Table of Contents
Advertisement
MPA_e_manual_D07-00-129P_RevA00
The Verification Experts
MPA USER MANUAL
Software Feature Set 8.2
Please direct all questions to your local VeEX Sales Office, Representative, Distributor or contact VeEX Technical
Support at
www.veexinc.com.
No part of this manual may be reproduced, translated into a foreign language, or be transmitted electronically without
prior agreement and written consent of VeEX Incorporated as governed by International copyright laws. Information
contained in this manual is provided "as is" and is subject to change without notice. Trademarks of VeEX
Incorporated have been identified where applicable, however the absence of such identification does not affect the
1
legal status of any trademark.
Copyright © 2018 VeEX Incorporated. All rights reserved.
MPA_e_manual_D07-00-129P_RevA00
Advertisement
Table of Contents

Subscribe to Our Youtube Channel
Related Manuals for VeEX MPA


Summary of Contents for VeEX MPA
- Page 1 VeEX Incorporated as governed by International copyright laws. Information contained in this manual is provided “as is” and is subject to change without notice. Trademarks of VeEX Incorporated have been identified where applicable, however the absence of such identification does not affect the legal status of any trademark.
- Page 2 MPA_e_manual_D07-00-129P_RevA00...
-
Page 3: Table Of Contents
MPA_e_manual_D07-00-129P_RevA00 Table of Contents Table of Contents Getting Started ......................11 Getting Started ......................11 General Information ....................11 General Information Overview................11 Safety Guidelines ....................12 Copyright ........................ 14 Customer Technical Support .................. 15 Warranty and Return Policies ................16 Return Shipping Instructions .................. - Page 4 Shutdown or Reboot the Processor from the GUI ..........63 Common Tasks......................65 Common Tasks Overview ..................65 Software Upgrade ....................66 Timed Licenses ...................... 68 MPA Shutdown Procedure ..................69 Fiber-Optic Cleaning Procedure ................72 Understanding Test Units ..................74...
- Page 5 Adding Notes to a Test Unit ................... 80 MPA Chassis ......................... 83 MPA Chassis Overview ..................... 83 MPA 1st Generation Chassis (5-Slots): ..............83 MPA 2nd Generation Chassis (5-Slots): ..............83 MPA 3rd Generation Chassis (6-Slots): ..............84 MPA Rackmount Installation ..................85 MPA Chassis Dimensions ..................
- Page 6 MPA_e_manual_D07-00-129P_RevA00 Table of Contents Test Module Insertion ..................... 92 SCM-210 (System Controller Module) ............... 94 MCH (MicroTCA Carrier Hub) ..................95 AM4022 Processor ....................97 MPM-10G Test Module Overview ................98 MPM-100G Test Module Overview ................101 MPM-100AR Test Module Overview ................ 103 MPM-400G Test Module Overview ................
- Page 7 MPA_e_manual_D07-00-129P_RevA00 Table of Contents SDH Tab Overview ....................391 Screens and Function Descriptions ..............392 SDH Specific Tasks ..................... 501 Packet Tab ......................519 Packet Tab Overview ................... 519 Ethernet (LAN and WAN) - Screens and Function Descriptions ......520 Ethernet (LAN and WAN) - Specific Tasks ............
- Page 8 MPA_e_manual_D07-00-129P_RevA00 Table of Contents External Clock In Status ..................767 IO Settings Screen ....................768 I/O Settings ......................768 Ethernet Port Settings ..................769 Rebooting the Test Set ..................771 File Services Screen ....................771 File Services......................771 Deleting Files ....................... 772 Deleting Directories ....................
- Page 9 MPA_e_manual_D07-00-129P_RevA00 Table of Contents Restoring Default Tab Names for the Go To Label ..........780 Setting the Alarm Beeper Status ................781 Sending Email Alerts .................... 782 Displaying All Test Status ..................787 Expanded Alarm and Status Indicators ..............788 Conditional LED Option ..................
- Page 10 MPA_e_manual_D07-00-129P_RevA00...
-
Page 11: Getting Started
General Information General Information Overview This section contains a broad range of information about the VeEX, MPA Safety Guidelines, Customer Support, RMA Policies and Warranty information. For tasks that are protocol processor specific, refer to the appropriate protocol processor section. -
Page 12: Safety Guidelines
Safety precautions should be observed during all phases of operation of this instrument. VeEX Inc. assumes no liability for the customer's failure to comply with safety precautions and requirements. - Page 13 • Field Service: This equipment is not intended to be serviced in the field. With the exception of card swapping, all service is intended to be completed by VeEX. For 110v/220v AC power supply module: Turn off the unit’s power switch when making power input connections. Refer to Chapter 4 for the proper shutdown method before connecting or disconnecting the DC power cord or swapping the DC power supply.
-
Page 14: Copyright
Copyright © VeEX Inc. - All rights reserved. VeEX reserves the right to revise and improve this document, as well as the contents of this document as it sees fit. This publication describes the state of this product at the time of its publication and may not represent the product at all times in the future. -
Page 15: Customer Technical Support
MPA_e_manual_D07-00-129P_RevA00 Getting Started Patent Information The rack mounted Multi-Protocol Analyzer (MPA) system and the various Protocol Processors described in this publication may be protected by one or more patents on file with the United States Patent Office. Trademarks VeEX; Verification Experts; MPA; Multi-Protocol Analyzer; Digital Lightwave; and the rectangular “jewel”... -
Page 16: Warranty And Return Policies
• Replace hardware which proves to be defective provided that the products that the customer elects to replace is returned to VeEX Inc. by the customer along with proof of purchase within thirty (30) days of the request by the customer, freight prepaid. -
Page 17: Return Shipping Instructions
MPA_e_manual_D07-00-129P_RevA00 Getting Started • Unauthorized alteration or misuse • Damage occurred from operating the unit Return Policy Approval must be obtained from Seller, prior to return of any merchandise. All material returned without a Seller Return Material Authorization (RMA) number may be refused automatically. - Page 18 Shipping Without the Original Container If you do not have the original shipping container: • You may purchase a shipping container from VeEX, custom designed for the size and shape of your test unit, or • You can use the following general instructions to repack the unit using commercially available materials: 1.
-
Page 19: Configuring The Ip Address
IP Address. The MPA’s IP Address is configured on the SCM-210 controller card and is used for all Ethernet communication to the MPA system, such as Remote GUI, VNC and SCPI, via the RJ-45 LAN Port. - Page 20 For MPA system containing an SCM-210 controller card, please refer to the section above for configuring the IP Address. The MPA’s IP Address is configured on the AM4022 processor card and is used for all Ethernet communication to the MPA system, such as Remote GUI, VNC and SCPI, via the MCH’s GbE port (as illustrated below).
-
Page 21: Changing The Ip Address With A Usb Flash Drive
Changing the IP Address with a USB Flash Drive The ability to change the MPA's IP Address with a USB flash drive (e.g., pen drive) is a very simple and easy method of changing the IP Address, especially if you do not know... - Page 22 SCM-210 card (3x USB ports to choose from) Software Requirements • mpa_ipconfig (Editable text file) This file is included in the USB drive that was shipped with the MPA system, also it can be provided by contacting Customer Technical Support.
- Page 23 USB 2.0 Mini-A cable (only required for systems containing an AM4022 Processor) (Two USB cables are shipped with the MPA systems containing the MCH card and AM4022 Processor; a USB 2.0 Mini-A connector type for use with the AM4022 Processor, and a USB 2.0 Micro-B connector type for use with the MCH card) Changing the Processor’s IP Address with USB Flash...
- Page 24 4. Copy the reconfigured mpa_ipconfig file to the USB flash drive, if it is not already on one. 5. Ensure the MPA system has been turned on for at least 4 to 5 minutes, and that either the SCM-210's Ready LED is solid green or that the AM4022 Processor’s status LED in the top left corner of the processor is solid green.
- Page 25 9. After the MPA begins the reboot process, disconnect the USB flash drive. 10. Wait for 4 to 5 minutes for the MPA system to finish booting up and verify that you can now Ping and remotely connect to the processor’s new IP Address.
-
Page 26: Changing The Ip Address With The Remote Gui Client
MPA via the Remote GUI client software, then you can change the processor’s IP Address from the Remote GUI client. You can also change the MPA’s IP Address from the remote desktop GUI via a connection, or from the local GUI via DisplayPort video monitor and USB mouse. - Page 27 MPA_e_manual_D07-00-129P_RevA00 Getting Started 4. Enter the new IP Address, Subnet Address, and Router/Gateway Address to the appropriate settings for your network. IP addresses 192.168.138.0 through 192.168.138.255 are reserved and should not be used. A serious system conflict can occur if an IP address in this range is assigned to the processor.
-
Page 28: Changing The Mch Module's Ip Address
For USB, the nat_mch.inf driver file (included in USB flash drive, and available upon request), and any Serial port terminal software, such as PuTTY (PuTTY is included on the USB flash drive shipped with the MPA system, or can be downloaded free from http://www.putty.org/... - Page 29 MPA_e_manual_D07-00-129P_RevA00 Getting Started • For Ethernet, a standard 10/100/1000BaseT RJ-45 Ethernet cable, connected to a network or directly to a PC • For USB, a USB 2.0 Micro-B cable (provided with system) (Two USB cables are shipped with the new systems; a USB 2.0 Mini-A connector type for use with the AMC Processor, and a USB 2.0 Micro-B connector type for use with the MCH) Option 1: Establish a connection to the MCH via Ethernet (Telnet):...
- Page 30 1. To communicate with the MCH via Serial, you will need a USB 2.0 Micro-B cable, and the nat_mch.inf driver file (accessible from the Utilities folder in the USB flash drive shipped with the MPA system or saved to a known location on your PC).
- Page 31 MPA_e_manual_D07-00-129P_RevA00 Getting Started 3. Select Serial from the Connection branch listed under Category, to configure the Serial port settings. 4. Enter the COM Port number that was automatically assigned for this USB connection in Device Manage. 5. Configure the rest of the Serial Port settings as the following: •...
- Page 32 MPA_e_manual_D07-00-129P_RevA00 Configuring the IP Address 1. In order to view the MCH’s GbE port’s IP Address, first establish either a Telnet or Serial connection to the MCH as described above, and verify the cursor appears next to the nat> command prompt. 2.
- Page 33 AMC cards. 9. Close the PuTTy connection as well as all remote software connections to the MPA system such as the Remote Client GUI, VNC, SCPI or other software connections to either the MCH or AMC Processor. 10. Follow the steps outlined in the Shutdown Procedure for turning the system’s power Off.
-
Page 34: Remote Client Application
Remote Client Application Remote Client Application Overview The Remote Client is a remote GUI (Graphical User Interface) application that allows you to remotely connect to and control MPA products from a Windows based PC. Before using the Remote Client: •... -
Page 35: Dli Remote Client Requirements
MPA_e_manual_D07-00-129P_RevA00 Getting Started To automate the log on process, select Automating the Remote Control Icon for more information. 5. If any problems are experience when installing or using the Remote Client, see Troubleshooting Remote Client Application for solutions. Important: Files that are created when using the Remote Control Application are saved on your PC in the Remote Control’s compatibility directory. -
Page 36: Remote Client Installation
Remote Client version when upgrading your MPA to a major Feature Set change. For example, from Feature Set 7.0 to 8.0. You must be logged into your Windows based PC/Laptop with Local Admin Permissions, in order to install the Remote Client software application. -
Page 37: Dli Remote Client Removal
MPA_e_manual_D07-00-129P_RevA00 Getting Started 4. Select Next and follow the on-screen instructions to install the software into a directory and create a program folder. The default directory is C:\Program Files\DLI\RemoteClient. 5. When prompted for "How do you want to maintain the Remote GUI files on your PC?", the default option is (A) Create Multiple Directories. -
Page 38: Automating The Dli Remote Client Icon
MPA_e_manual_D07-00-129P_RevA00 Remote Client Application proceeding with the uninstall process. • Any file with the .pdf, .set, .stat, .health, .evt, .aps, .perf, .rep, or .bmp extension. To remove the Remote Control Application 1. Close the DLI Remote Client application. 2. Click the Windows Start button and choose Settings. 3. - Page 39 MPA_e_manual_D07-00-129P_RevA00 Getting Started • z is the password (case sensitive) The default password is Admin1 • do not include any spaces between fields Example: "C:\Program Files\DLI\RemoteClient\Galaxy.exe" ip=10.1.8.21,uid=Admin,pw=Admin1 5. Click OK. 6. Now when you double click the DLI Remote Client application's icon, a connection is automatically made, and the remote system's GUI appears.
-
Page 40: Troubleshooting The Remote Client Application
Reboot your PC/Laptop, and install the Remote Client before opening any other software programs • "Transient" error Verify that you can Ping the MPA, and no other device message when on your network has the same IP Address as the MPA attempting to connect •... -
Page 41: Vnc Connection
VNC Connection Virtual Network Computing (VNC) Connection As of Feature Set version 8.1.45 (and later), a VNC Server has been added to MPA systems as another method of remotely controlling the system’s Graphical User Interface (GUI) client software. In addition to the standard multi-user Windows based... -
Page 42: Vnc Viewer Configuration
Internet for free. VNC connection to MPA: When the MPA is connected to the same network as your VNC equipped PC, or directly connected to your PC’s Ethernet port, you can log into the MPA using the VNC viewer to remotely control the user interface. - Page 43 Enable (check): Preserve Aspect Ratio • Disable (uncheck): Enable Toolbar 3. Enter the MPA’s IP Address in the VNC Server field, followed by colon (:) and the VNC Port #. • Verify the VNC Port # (from 1 to 10) being entered is not being used by another user.
- Page 44 From the Expert tab, scroll down and highlight the Enable Toolbar parameter. • Set the Value to False. 4. Enter the MPA’s IP Address in to the VNC Server field on the General tab, followed by colon (:) and the VNC Port #.
- Page 45 5. Leave the Name section empty for shortcut icon to be labeled as the IP Address and Port #, or enter a “Friendly Identifier” name, associated with this MPA and Port #. 6. Click OK to add the newly created VNC shortcut icon to the VNC viewer’s desktop section.
-
Page 46: Multiple Remote Vnc Desktops
Disable (uncheck): Show Toolbars by Default, in the User Interface section. • Leave the remaining options as set by default. 3. From the Main Menu, enter the MPA’s IP Address in the Remote Host field, followed by colon (:) and the VNC Port #. •... - Page 47 MPA_e_manual_D07-00-129P_RevA00 Getting Started When connecting to the MPA with VNC, each VNC Port # (1 to 10) has its own dedicated desktop. Example: 192.168.0.10:1 to 192.168.0.10:10 Each of the ten VNC remote desktops include a shortcut icon for the Remote Client software, which can be launched and run independently of the other VNC desktops, as well as a copy of this MPA User's Manual.
- Page 48 MPA_e_manual_D07-00-129P_RevA00 VNC Connection Resizing the Remote GUI Notice that the initial size of the VNC window may have reset to a default size upon launching the Remote GUI application. Since the Remote GUI runs in full-screen mode within the VNC viewer window, users can now resize the GUI to any desired viewing size by grabbing and dragging any of the four corners, stretching the size of the VNC window and making the GUI appear proportionately larger or smaller.
- Page 49 Remote GUI application by logging out of the application, and then close the VNC viewer. To Logout of the MPA, select the Shut Down button from the bottom right corner of the GUI, then choose Logout from the shutdown menu.
- Page 50 Screen Captures and reports that are automatically generated from Action After Duration timed-tests are saved to the [etc] sub folder. Users can then easily transfer their saved files from the MPA to their local PC, using any FTP client program.
- Page 51 • The default FTP Username is Admin and the default Password is Admin1. • However, any User Name created on that MPA can also be used to login with FTP. Add a New User for details on creating new login user accounts.
-
Page 52: Common Function Buttons
Issue: Resolution: • Unable to connect to Verify the MPA's IP Address is valid, and that there are no IP VNC server Address conflicts on the network. • Verify the software version on the MPA is Feature Set 8.1.45, or later •... -
Page 53: Error Insert
MPA_e_manual_D07-00-129P_RevA00 Getting Started • Stop • Restart • Presets • Report • Test Setup • Clear History • Lock Screen • Shut Down Error Insert The Error Insert common function button is used to injects single errors into the transmitted protocol processor signal: If no error types are specified for the Error to Insert setting in the Transmit >... -
Page 54: Restarting A Test
MPA_e_manual_D07-00-129P_RevA00 Common Function Buttons • Select the Stop common function button located at the bottom of the touch screen. To restart test activity and statistic reporting, select the Restart button. Restarting a Test The Restart common function button is used to initiate the following test activities: •... -
Page 55: Saving And Printing Statistics And Settings Reports
A protocol processor will now expect to receive a signal using its line interface. Saving and Printing Statistics and Settings Reports The MPA test set provides the option to Print or Save several Report types. To save or print test reports: Select from the Common Function Buttons row at the bottom of the screen. - Page 56 MPA_e_manual_D07-00-129P_RevA00 Common Function Buttons Choose the Report type(s) to be printed or saved. The most common report is the Statistics report, which contains a complete list of error and alarm statistic information as well as other counts that pertain to the test performed.
- Page 57 MPA_e_manual_D07-00-129P_RevA00 Getting Started Latency, Avg-RX%, Status). Y1564 Perf Reports the Y.1564 Performance test summary for each Service Stream tested (Avg-RX%, , Loss%, Min/Max/Avg/Curr Jitter, Min/Max/Avg/Curr Latency, Sequence Error Stats, Loss Error Stats, Status). Y1564 Combines the Y.1564 Settings, Ramp, and Performance reports into Combined one report.
-
Page 58: Test Setup Button
MPA_e_manual_D07-00-129P_RevA00 Common Function Buttons Supported image files formats include: .JPG, .PNG, .GIF and .BMP file extensions. Click the User Image File button to open a File Browser window. When printing/saving the report using the DLI Remote Client GUI, then the image file must be copied to the C:\Program Files\DLI\RemoteClient\Compat<feature set>... -
Page 59: Saving A Customized Settings Configuration
MPA_e_manual_D07-00-129P_RevA00 Getting Started • Save This Test Set to File: Saves the current Test Set configuration and settings. • Restore this Test Set from File: Restores the Test Set's settings from a previously saved settings configuration file. • Set the Protocol Mode: Changes the unit's Protocol settings. -
Page 60: Restoring A Settings Configuration Or Factory Defaults
MPA_e_manual_D07-00-129P_RevA00 Common Function Buttons Restoring a Settings Configuration or Factory Defaults This function allows you to perform the following actions: • Change the Protocol Mode: Changes the unit's Protocol settings. If this option is selected, the processor's protocol mode is changed (for example, from SONET to SDH). -
Page 61: Clearing Led History And Resetting Results
MPA_e_manual_D07-00-129P_RevA00 Getting Started Restore To Factory These options appear if your unit contains one or more Default SONET SONET/SDH board, but no PDH board Restore To Factory Default SDH 4. Select the desired protocol mode. The protocol tabs and settings will be updated to reflect the selected mode, and all of the protocol settings will revert back to their factory assigned default values. -
Page 62: Locking/Unlocking Screen Access
MPA_e_manual_D07-00-129P_RevA00 Common Function Buttons • Select the Clear History common function button that appears at the bottom of the touch screen • The LEDs' recorded history clears (Status Indicator) • Refer to Using LEDs for LED color descriptions The Clear History button does not reset error counts, alarm counts, or data that appear in graphs. -
Page 63: Shutdown Or Reboot The Processor From The Gui
MPA_e_manual_D07-00-129P_RevA00 Getting Started 3. Enter the Password required to unlock the screen. Press to open an on-screen keyboard, or use a mouse and keyboard to enter the Password. The Password is masked with asterisks, so it will not be displayed on the screen. 4. - Page 64 LED to turn solid blue. 6. If your MPA unit has an SCM-210 card, then at this point the OLED display screen will go blank and the green READY LED will turn off as the SCM-210 card's processor shuts down.
-
Page 65: Common Tasks
2. Selecting OK will begin the Reboot process, which may take several minutes to complete. 3. The Remote GUI will automatically disconnect from the MPA unit, and close. 4. After waiting about 5 minutes or so, the Remote Client software should be able to reconnect with the rebooted MPA system. -
Page 66: Software Upgrade
Fiber Optic Cleaning Procedure Software Upgrade The following procedure is for upgrading an MPA system which already contains Feature Set 7.5.35 or later, to a newer Feature Set version. Note: If the current software version on your system is less than Feature Set 7.5.35,... - Page 67 MPA system, which can take several seconds, followed by a System Software Update screen stating “The software update process has started”. Warning! Do not turn the MPA’s Power Off, or connect to the MPA system during this time period.
-
Page 68: Timed Licenses
MPA_e_manual_D07-00-129P_RevA00 Common Tasks • When attempting to connect to an MPA with the Remote Client application for the first time after a software update, the application tends to become unresponsive after the file transfer process. • If this happens, click Cancel or End Task on the Remote Client application, then reconnect to the MPA a second time. -
Page 69: Mpa Shutdown Procedure
This procedure describes the step by step process for shutting down a rack-mounted MPA system. When an MPA system needs to be powered down, follow the instructions below in the specified order. Warning! Do not turn the chassis Power off or unplug the power cable without first deactivating the SCM-210 card (or AM4022 Processor and MCH card) and Power Supply. - Page 70 3. Next, pull out the Unlock/Extraction handle (to the first stop position) on the MCH, and wait for its hot-swap LED to turn solid blue. 4. If your MPA unit has an SCM-210 card, then pull out the Unlock/Extraction handle (to the first stop position) on the SCM-210 card.
- Page 71 MPA_e_manual_D07-00-129P_RevA00 Getting Started AC P/S in the Unlocked position DC P/S in the Unlocked position 6. For the AC Power Supply, toggle the On/Off switch to the Off position before unplugging the power cable. a. The AC Power Supply supports a standard IEC 320-C14 connector, as well as a Self-Locking connector to prevent the power cord from accidentally being unplugged.
-
Page 72: Fiber-Optic Cleaning Procedure
MPA_e_manual_D07-00-129P_RevA00 Common Tasks Fiber-Optic Cleaning Procedure With fiber optics, the tolerance to dirt is near zero. Oils, greases, airborne particles of dust, lint, and other debris are all very harmful to fiber-optic cables. They can scratch and damage fiber-optic connectors if not removed. Not only can scratches and debris harm the connectors, but they also can jeopardize the integrity and accuracy of the optical signal. - Page 73 MPA_e_manual_D07-00-129P_RevA00 Getting Started 2. Next, using an Optic Prep (or any lens-grade lint-free tissue moistened with isopropyl alcohol), gently and slowly slide the tissue across the tip of the ferrule end face in one sweeping move. 3. Repeat the last step again using a clean section of the tissue. WARNING: Only isopropyl alcohol should be used because some solvents might attack epoxy.
-
Page 74: Understanding Test Units
Do not use cotton swabs, as cotton can leave particles and threads behind. Understanding Test Units Understanding Test-Units The MPA's Remote Client GUI will show a series of Protocol Processors tabs, used for testing the various interfaces supported by the test modules inserted into the MPA chassis. -
Page 75: Mpm Test Module Cards And Slot Locations
MPA chassis design, each with unique MPM test module slot locations. Gen 1 and Gen 2 MPA systems include an MCH and an AMC Processor (AM4022 ), and support a maximum of five (5) single-slot MPM test modules. Gen 3 MPA systems include an SCM-210 card, and support a maximum of... - Page 76 Notice the slot locations, in relation to the tab names in the GUI (S1-P1, S2-P1, etc.) In the examples above, the 1st and 2nd generation MPA chassis units have an AMC Processor located either below or above the Slot 1, depending on the chassis, leaving five additional slots for the MPM test modules.
-
Page 77: Lock Icon Overview
S6-P1 and S6-P2, in the 3rd generation MPA chassis example above. The MPM card types in each slot may vary from one MPA unit to another, but the dedicated Slot numbers for each of the three generation chassis designs will always be the same, regardless of what card type in each slot. - Page 78 MPA_e_manual_D07-00-129P_RevA00 Understanding Test Units To prevent users from interfering with each other, an individual user can "lock" and take control of a Test Set. This is done using the Lock icon that appears on the GUI. Permission levels determine the user's ability to lock and unlock a test set. When you lock the test set, you can configure protocol processors, start tests, and perform general product functions without the worry of contending for resources with another user.
-
Page 79: Locking And Unlocking A Test Unit
MPA_e_manual_D07-00-129P_RevA00 Getting Started 1. From the System tab, select User Preference. 2. Select Startup Locking State. • Select Lock to automatically lock the unit when it is started. • Select Unlock to make the unit available to anyone when it is started. Locking and Unlocking a Test Unit To prevent users from interfering with each other, an individual user can "lock"... -
Page 80: Adding Notes To A Test Unit
MPA_e_manual_D07-00-129P_RevA00 Understanding Test Units 6. Select Exit to close the Lock/Unlock dialog box. When you have the test set locked, the icon is displayed. To unlock a test set that you have locked: 1. Select the icon. The Lock/Unlock dialog box appears. 2. - Page 81 MPA_e_manual_D07-00-129P_RevA00 Getting Started 1. Choose the desired protocol processor and select the Lock icon. The Lock/Unlock dialog box appears. If the test unit is locked by someone else, select Force Unlock and choose Lock and Exit or Lock. 2. Select Circuit Info: and/or Contact Info:. The Enter User String keyboard opens.
- Page 82 MPA_e_manual_D07-00-129P_RevA00...
-
Page 83: Mpa Chassis
MPA_e_manual_D07-00-129P_RevA00 MPA Chassis MPA Chassis MPA Chassis Overview There are currently three generation chassis designs to the MPA system. The information below describes the features and test module slot locations for each chassis generation. MPA Rackmount Installation for chassis dimensions and installation instruction. -
Page 84: Mpa 3Rd Generation Chassis (6-Slots)
An interchangeable AC or DC Power Supply is located on the front of the chassis MPA 3rd Generation Chassis (6-Slots): The third generation MPA chassis is the same and similar layout as the second MPA generation and supports the following high-level chassis features: •... -
Page 85: Mpa Rackmount Installation
• MPM-100AR Module Overview • MPM-400G Module Overview MPA Rackmount Installation All three generations of the MPA chassis can be rack-mounted into a 19-in (48cm) telecommunication equipment rack, requiring only rack-space (1U). MPA Chassis Dimensions 1st Generation MPA Chassis Dimensions... -
Page 86: Chassis Mounting Brackets
2nd Generation MPA Chassis Dimensions 3rd Generation MPA Chassis Dimensions Chassis Mounting Brackets The MPA unit is designed so it can be rack-mounted to a 19-in (48cm) telecommunication equipment rack, using the mounting brackets attached to either side of the chassis. -
Page 87: How To Install The Chassis Into A Rack
MPA chassis. MPA Power Connections The 2nd Generation MPA chassis includes a pluggable Power Module slot that allows users to switch between AC and DC power supplies. -
Page 88: For The 110V/220V Ac Power Supply
MPA_e_manual_D07-00-129P_RevA00 MPA Power Connections For the 110v/220v AC Power Supply: 1. Turn AC Power Supply’s stand-by switch to the Off position prior to inserting or unplugging the AC power cord. a. Refer to MPA Shutdown Procedure for the proper shutdown method before switching off the power supply or unplugging the AC power cord. -
Page 89: For The -48V Dc Power Chassis
The 420W -48v DC power chassis supports dual power inputs for redundancy and load sharing. a. Refer to MPA Shutdown Procedure for the proper shutdown method before connecting or disconnecting the DC power cord or swapping the DC power supply. -
Page 90: Emi Shielding, Airflow, Air Filter And Fan Trays
U- shaped connector or Ring type connector. EMI Shielding, Airflow, Air Filter and Fan Trays Warning! Never turn the MPA chassis Power on with any of the bays/slots unpopulated or uncovered! EMI Shielding and Airflow Warning... -
Page 91: Dual Cooling Units (Fan Trays)
Units (CU), each equipped with 4 push-pull fans per CU with each fan rated at 20 CFM, for more than 100 CFM of total airflow though the chassis. Air Filter Swap The MPA chassis provides a front replaceable air filter, next to the right fan tray, to reduce the level of dust intake. -
Page 92: Test Module Removal
Test Module Removal With the MPA chassis powered off, use the module’s Unlock/Extraction handle to pull the module or blank filler plate out of the chassis. Test modules should be placed into anti-static bags when removed from the MPA unit, to keep them safe from static electricity. - Page 93 MPA_e_manual_D07-00-129P_RevA00 MPA Chassis When inserting a new module into the MPA chassis, verify the module is oriented correctly and the printed circuit board is properly aligned with the guide rails. Notice the orientation of the module's printed circuit board in the image above.
-
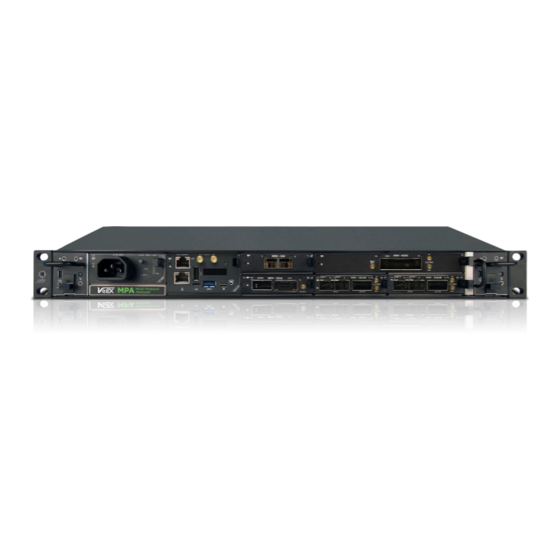
Page 94: System Controller Module)
SCM-210 (System Controller Module) The MPA chassis requires either an MCH and AM4022 processor combination, or just one SCM-210 (System Controller Module) card. In systems with an SCM-210 controller card, the SCM-210 combines the functionality of... -
Page 95: Mch (Microtca Carrier Hub)
MPA's system central management and data switching device for internal and external user communication. MPA units sold prior to October 2015 were shipped with an earlier version of the MCH controller card, that did not support External Clock In/Out timing. - Page 96 MPA_e_manual_D07-00-129P_RevA00 MCH (MicroTCA Carrier Hub) 8 Module Extraction Handle MPA units shipped since October of 2015 include a revised MCH controller card, which can support External timing via the Clock port. The Revised MCH controller card supports the following features:...
-
Page 97: Am4022 Processor
MCH’s IP Address AM4022 Processor The MPA chassis requires either an MCH and AM4022 Processor combination, or just one SCM-210 (System Controller Module). In systems with an MCH/AM4022 Processor combination, the AM4022 Processor supports a Mini-USB Type-A connector for USB flash drive and USB mouse... -
Page 98: Mpm-10G Test Module Overview
The MPM-10G card (10G Multi-Protocol Module) supports interface rates ranging from 10Mbps up to 12Gbps. The MPM-10G card has been designed to fit into any one of MPA's chassis test module slots. The MPM-10G card support two (2) fully independent test ports that can be equipped with SFP/SFP+ optical modules and/or RJ-45 electrical SFP modules, for simultaneous and independent testing or for loop-back testing from Port to Port. - Page 99 MPA_e_manual_D07-00-129P_RevA00 MPA Chassis When inserting the SFP or SFP+ laser module, the laser modules are inserted upside down where the handles for the release mechanism is oriented underneath the laser. Port 1's Activity Indicator LED (#2) above Port 1’s SFP/SFP+ module glows green when Port 1’s TX Laser is turned on...
- Page 100 MPA_e_manual_D07-00-129P_RevA00 MPM-10G Test Module Overview The MPM-10G card supports the following Protocol Processor tabs:...
-
Page 101: Mpm-100G Test Module Overview
The selected Interface determines which laser port to enable. An MPA unit fully loaded with a maximum of five (5) MPM-100G cards is capable of supporting a total of five (5) independently configurable test ports (called Test Units in... - Page 102 MPA_e_manual_D07-00-129P_RevA00 MPM-100G Test Module Overview The MPM-100G card can be controlled by the GUI or SCPI, and supports protocol processor tabs for MLD, OTN, SONET/SDH, and a PACKET tab (for Ethernet testing). Pluggable laser modules are hot-swappable, which allows for testing different Interfaces and wavelengths as needed.
-
Page 103: Mpm-100Ar Test Module Overview
MPA_e_manual_D07-00-129P_RevA00 MPA Chassis • Ethernet: 100G LAN (103.125G), 100G RS FEC LAN (103.125G), 40G LAN (41.25G) The following table lists all of the Packet and Transport Interface Rates available on each MPM-100G port, as supported by pluggable CFP4, QSFP28 or QSFP+ laser modules. - Page 104 When Port 1's Interface rate is changed to a setting that uses the QSFP+/QSFP28 laser, then Port 2's Interface rate defaults to "Not Assigned". The MPM-100AR card has been designed to fit into any one of MPA's chassis test module slots.
- Page 105 MPA_e_manual_D07-00-129P_RevA00 MPA Chassis Port 1's QSFP28's Port Activity Indicator LED (#4) glows green when Port 1’s QSFP28 TX Laser is turned on Port 1's SFP28's Port Activity Indicator LED (#3) glows green when Port 1’s SFP28 TX Laser is turned on Port 2's SFP28's Port Activity Indicator LED (#2) glows green when Port 2’s...
-
Page 106: Mpm-400G Test Module Overview
MPM-400G Test Module Overview The MPM-400G card (400G Multi-Protocol Module) is a double-wide dual-slot card, designed to fit into two side-by-side MPA chassis test-module slots, and supports 400Gbps Ethernet, 425G Unframed BERT, and 412.5G Unframed BERT rates. - Page 107 MPA_e_manual_D07-00-129P_RevA00 MPA Chassis IMPORTANT: The MPA chassis must be configured at the factory in order to accommodate a dual-slot MPM-400G card. The MPA can support up to two MPM-400G cards per chassis. The MPM-400G card supports a CFP8 pluggable laser module for testing 400G interface rates.
- Page 108 MPA_e_manual_D07-00-129P_RevA00 MPM-400G Test Module Overview CFP8's Port TX Indicator LED (#5) glows green when the CFP8 TX Laser is turned on Each MPM-400G port (Test Unit) provides the following testing capabilities: • Ethernet: 400G RS-FEC LAN (425G) • Unframed BERT: 425G The following table lists the supported CFP8 laser modules.
- Page 109 MPA_e_manual_D07-00-129P_RevA00 MPA Chassis The MPM-400G card supports the following Protocol Processor tabs: • MLD Tab Overview • Packet Tab Overview You may also navigate through the topics by using the Contents tab and window that appear on the left side of the screen.
- Page 110 MPA_e_manual_D07-00-129P_RevA00...
-
Page 111: Protocol Tabs
Protocol Tabs Protocol Processor Tabs The MPA's Remote Client Graphical User Interface (GUI) will show a series of Protocol Processor tabs, such as MLD, OTN, SONET/SDH and Packet, used for testing the various interfaces supported by the test modules inserted into the MPA chassis. - Page 112 MPA_e_manual_D07-00-129P_RevA00 MLD Tab Depending on the processor card, the following options can be configured from the MLD tab: • All supported Interface rates can be selected, including the Unframed BERT mapping options. • The PCS or Logical, unframed BERT, and PCS BERT virtual lane based settings can be modified.
- Page 113 MPA_e_manual_D07-00-129P_RevA00 Protocol Tabs 40G Ethernet (41.25G) Port 1 only QSFP+ 25G Ethernet (25.781G) Port 1 & SFP28 Port 2 25G RS-FEC Ethernet Port 1 & SFP28 (25.781G) Port 2 10G Ethernet (10.312G) Port 1 & SFP+ Port 2 Fibre 32G Fibre Channel (28.05G) Port 1 &...
- Page 114 MPA_e_manual_D07-00-129P_RevA00 MLD Tab Unframed Unframed BERT (112.304G) Port 1 only QSFP28 Unframed BERT (112.2G) Port 1 only QSFP28 Unframed BERT (111.809G) Port 1 only QSFP28 Unframed BERT (103.125G) Port 1 only QSFP28 Unframed BERT (44.583G) Port 1 only QSFP+ Unframed BERT (44.571G) Port 1 only QSFP+ Unframed BERT (43.018G)
- Page 115 MPA_e_manual_D07-00-129P_RevA00 Protocol Tabs Port 2 Port 1 & Unframed BERT (10.312G) SFP+ Port 2 MPM- Interface (Rate) Laser Type 100G Ethernet 100G Ethernet (103.125G) CFP4 / QSFP28 CFP4 / 100G RS-FEC Ethernet (103.125G) QSFP28 40G Ethernet (41.25G) QSFP+ OTU4 (111.809G) OTL-4.4 CFP4 / QSFP28 OTU3e2 (44.583G) OTL-3.4...
-
Page 116: Screens And Function Descriptions
MPA_e_manual_D07-00-129P_RevA00 MLD Tab Unframed BERT (44.571G) QSFP+ Unframed BERT (43.018G) QSFP+ Unframed BERT (41.25G) QSFP+ Unframed BERT (39.813G) QSFP+ The following MLD tab related topics are discussed in this section of the online help system: • MLD Screen and Function Descriptions •... - Page 117 MPA_e_manual_D07-00-129P_RevA00 Protocol Tabs Transmit MLD Transmit Screens and Functions The Transmit section allows you to configure the transmit signal parameters used in Multi-Lane Distribution (MLD) operations. The following transmit functionalities are available through the MLD Transmit screens: • • Multi Lanes •...
- Page 118 MPA_e_manual_D07-00-129P_RevA00 MLD Tab Interface Selects the transmit Interface Rate for the MPM-400G, MPM- 100G or MPM-100AR card. Verify that the inserted laser module supports the desired Interface rate prior to selecting it. • 400G Interface rates require a CFP8 pluggable laser module.
- Page 119 MPA_e_manual_D07-00-129P_RevA00 Protocol Tabs Recovered clocking. Note: The Recovered clock option is not available in Asynchronous mappings. Line Frequency Adjusts the offset of the signal frequency of the transmitted Offset signal, in parts per million (ppm). The Line Frequency Offset can be set as a Static value, with a frequency offset value ranging from -300.0 to 300.0, in increments of 0.1 PPM.
- Page 120 MPA_e_manual_D07-00-129P_RevA00 MLD Tab Configures the user-definable threshold for the TX Clock TX Clock Loss Loss alarm, in PPM. Threshold When the Measured TX Line Frequency Offset exceeds the TX Clock Loss Threshold, then the TX Clock Loss alarm begins to accumulate. Valid range is from 0 to 300ppm, where 0 is disabled.
- Page 121 MPA_e_manual_D07-00-129P_RevA00 Protocol Tabs Option Description Error to Selecting the Error to Insert button opens the Select Error to Generate Insert list (400GE only). The following Error types may be available, depending on the select Interface: Error Type Description None No errors are generated. Turns errors off. FEC Uncorrectable Generates a FEC Uncorrectable Error FEC Correctable Generates a FEC Uncorrectable Error...
- Page 122 MPA_e_manual_D07-00-129P_RevA00 MLD Tab Sets the insertion rate for the selected error type. This setting is not Error Insert available if Error to Insert is set to None. Rate The following options are available for this command. • Off: No errors are inserted for transmission. This command effectively disables the Error Insert Action button.
- Page 123 MPA_e_manual_D07-00-129P_RevA00 Protocol Tabs High SER Generates a High Symbol Error Ratio alarm Loss of Alignment alarm This screen also allows you to generate LOS alarms on the Optical Lanes. An LOS alarm can be generated on each Optical Lane separately, by selecting the check box next to the LOS (Optical Lane #) OFF.
- Page 124 MPA_e_manual_D07-00-129P_RevA00 MLD Tab 100G Ethernet • For 100G/400G RS-FEC Ethernet Interface, the virtual lanes are referred to as "FEC lanes". 100G RS-FEC Ethernet...
- Page 125 MPA_e_manual_D07-00-129P_RevA00 Protocol Tabs 400G RS-FEC Ethernet • For SONET, SDH and OTN Interface types, the virtual lanes are referred to as "Logical lanes". OTU-4...
- Page 126 MPA_e_manual_D07-00-129P_RevA00 MLD Tab • Unframed BERT Interface types use Physical lanes, but do not use virtual lanes. Unframed BERT 103G Unframed BERT 425G...
- Page 127 MPA_e_manual_D07-00-129P_RevA00 Protocol Tabs In the Multi-Lane table the following columns may or may not be displayed, depending on the errors/alarms supported by the configure Interface: Global Buttons • Payload - The selected Payload pattern will be applied to all of the lanes. The Payload pattern selection only applies to Unframed BERT interfaces.
- Page 128 MPA_e_manual_D07-00-129P_RevA00 MLD Tab • Sync Hdr - Inserts invalid Synchronization Headers. • Al Mark - Inserts Alignment Mark errors. • BIP-8 - Inserts Bit Interleaved Parity 8 errors 400G RS-FEC Ethernet Errors: • FEC Correctable Symbol Chan A: Selected the FEC Correctable Symbol Channel A error to be inserted on the specified FEC lane, essentially causing an Uncorrectable FEC error on Channel A to be inserted.
- Page 129 MPA_e_manual_D07-00-129P_RevA00 Protocol Tabs 400G RS-FEC Ethernet Alarms: • FEC Alignment Marker Loss: Causes the specified FEC lane to lose its FEC Alignment Marker Lock. This is reported as an LOAMPS alarm in the Results screen. • Bit Delay- Adds a known value of time delay to the selected specified virtual lane.
- Page 130 MPA_e_manual_D07-00-129P_RevA00 MLD Tab Function Description Settings Controls If Coupled is selected, settings changed on the Receive screen will automatically change on the Transmit screen as well. If Independent is selected, settings established on the Receive screen will only affect Receive mode. Interface Selects the receive Interface Rate for the MPM-400G, MPM- 100G or MPM-100AR card.
- Page 131 MPA_e_manual_D07-00-129P_RevA00 Protocol Tabs Power Low Sets the received optical power level (in dBm) threshold. If Threshold the power drops below the threshold, the Power Low alarm triggered. This applies to all optical channels supported by the CFP. The threshold range is from 0 to -100 dBm ppm, in increments of 0.1.
- Page 132 MPA_e_manual_D07-00-129P_RevA00 MLD Tab SER Activate Sets the number of Symbols for the SER Activate Threshold, from 0 to 15 times the SER Degrade Interval’s value, with a Threshold maximum limit of 65535. (MPM-400G card only) This value must be greater than the SER Deactivate Threshold value, but cannot exceed 15 times the SER Degrade Interval’s value.
- Page 133 MPA_e_manual_D07-00-129P_RevA00 Protocol Tabs Logical/FEC/PCS Displays the virtual Lane number(s) assigned to each Lane (w/ lane Physical Lane. position) Skew (bit) Shows the measured Skew delay in Bits. Skew (ps) Shows the measured Skew delay in picoseconds. • For 40G/100G Ethernet Interface types, the virtual lanes are referred to as "PCS lanes".
- Page 134 MPA_e_manual_D07-00-129P_RevA00 MLD Tab 100G RS-FEC Ethernet 400G RS-FEC Ethernet...
- Page 135 MPA_e_manual_D07-00-129P_RevA00 Protocol Tabs • For SONET, SDH and OTN Interface types, the virtual lanes are referred to as "Logical lanes". OTU-4 • Unframed BERT Interface types use Physical lanes, but do not use virtual lanes. Unframed BERT 112G...
- Page 136 MPA_e_manual_D07-00-129P_RevA00 MLD Tab MLD Receive - SIG (Signal Status) Displays the following signal measurements of the incoming Physical and Optical Lanes, supported by the inserted laser module: • Frequency in Hz, for each Physical Lane • Line Frequency Offset Received in Hz and ppm, for each Physical Lane •...
- Page 137 MPA_e_manual_D07-00-129P_RevA00 Protocol Tabs MLD Results - Error / Alarm The Results Error / Alarm screen contains the following options: • Scan - Select Scan to access a quick summary of incoming errors and alarms on all MLD optical, physical and virtual lanes. It is effective in identifying a general area to investigate when error or alarm activity is detected.
- Page 138 MPA_e_manual_D07-00-129P_RevA00 MLD Tab Frequency Wide (for all Physical Lanes) LOS (Loss of Signal) (for all Optical Lanes) Power Hot (for all Optical Lanes) Power Warm (for all Optical Lanes) Power Low (for all Optical Lanes) * This alarm is only available when testing an RS-FEC Ethernet rate •...
- Page 139 MPA_e_manual_D07-00-129P_RevA00 Protocol Tabs Ones Channels A & B FEC Chan AB Corr FEC Correctable Zeros errors on Zeros Channels A & B FEC Chan A Uncorr FEC Uncorrectable errors on Channel A FEC Chan A Corr FEC Correctable Code Word errors on Channel A FEC Chan A Corr FEC Correctable Symbol errors on...
- Page 140 MPA_e_manual_D07-00-129P_RevA00 MLD Tab * The Error section is only available when testing an RS-FEC Ethernet rate • FEC Analysis - The FEC Analysis function displays the FEC Correctable Symbol Error Counts for all Symbol #'s with the following parameters; Error count using an 11-digit format, Percentage using an integer format.
- Page 141 MPA_e_manual_D07-00-129P_RevA00 Protocol Tabs The top section will show the selected Error/Alarm statistics for the selected virtual lane. When monitoring Error statistics, the following information is display: • Lane # selected • Name of Error type selected • Error count using an 11-digit format •...
- Page 142 MPA_e_manual_D07-00-129P_RevA00 MLD Tab alarms are being received on any of the lanes. (see button description below) AlignMark Indicates if any Alignment Mark errors are being received on any of the lanes. (see button description below) BIP8 Indicates if any BIP 8 errors are being received on any of the lanes.
- Page 143 MPA_e_manual_D07-00-129P_RevA00 Protocol Tabs being received on any of the Physical lanes. This only applies to an Unframed BERT rate. (see button description below) Physical Lane Displays the Physical Lane number. Skew (bit) Shows the lane's measured Skew delay in Bits. Skew (ps) Shows the lane's measured Skew delay in picoseconds.
- Page 144 MPA_e_manual_D07-00-129P_RevA00 MLD Tab Select the Descending/Ascending button to toggle between the order you wish to view the results. Select Pause to temporarily halt the display of results, and press Resume to continue displaying results in real-time. For more information, see the Use the Event Log section.
- Page 145 MPA_e_manual_D07-00-129P_RevA00 Protocol Tabs 2. From Results, select Graph. The Graph screen appears. It contains two graphs which allow you to display incoming alarms and errors. 3. Use the following buttons to control graphing parameters: • Sample Rate - Sets the timing for graph results at increments of 1 Second, 1 Minute, or 15 Minutes.
- Page 146 MPA_e_manual_D07-00-129P_RevA00 MLD Tab Print a Graph Report 1. Select the protocol processor running the test for which you want to print the graph. 2. From the Results tab, select Graph. 3. Select the Graph screen's Print Report command button. The Report Setup menu appears.
- Page 147 MPA_e_manual_D07-00-129P_RevA00 Protocol Tabs Select the Save Graphs button to save the graphed results to a file for replay at a later time. The graph is saved with a .grp extension. To view the graph select the Replay Graphs button and choose the desired .grp file from the Browser dialog box.
- Page 148 MPA_e_manual_D07-00-129P_RevA00 MLD Tab • Module Check MLD Test - Set 1 The SET 1 functions determine how long a protocol processor's test runs and what activities occur at the end of the test. The following appears on the SET 1 screen. Function Description Duration...
- Page 149 MPA_e_manual_D07-00-129P_RevA00 Protocol Tabs Action after Duration Description Options None No action occurs at the end of the test duration. Print Current Statistics At the end of a timed test a statistics report of the received Errors, Alarms, Pointer Analysis, and Signal Status are printed to the configured printer.
- Page 150 MPA_e_manual_D07-00-129P_RevA00 MLD Tab Repeat Actions is selected. configured printer, and the timed test restarts. This test cycle continues until the test is stopped by selecting Stop from the Common Function Buttons, or by changing the Action After Duration value. Record Statistics and Repeat At the end of a timed test a Test statistics report of the...
- Page 151 MPA_e_manual_D07-00-129P_RevA00 Protocol Tabs This test cycle continues until the test is stopped by selecting Stop from the Common Function Buttons, or by changing the Action After Duration value. Print Statistics/Events and At the end of a timed test Repeat Test both test Statistics and Events are automatically printed to the configured...
- Page 152 MPA_e_manual_D07-00-129P_RevA00 MLD Tab Record Options When a Record option is chosen, the results are saved to a file with one of the following extensions: • .stat - Results Report. A statistics report of the received Errors, Alarms, Pointer Analysis, and Signal Status functions.
- Page 153 MPA_e_manual_D07-00-129P_RevA00 Protocol Tabs indicating that the test was paused earlier. Events occurring while in Pause mode will not be recorded in the Results Errors/Alarms screens, Event Log nor Performance Monitoring screens, however the corresponding event's LED will still turn red. Pressing Clear History or Restarting a new test will clear all LED history.
- Page 154 MPA_e_manual_D07-00-129P_RevA00 MLD Tab dB value available. PostEmph Sets the post-cursor transmit emphasis (Post- Emphasis) value in dB, for the Physical Lanes. Select "ALL" to adjust the Post-Emphasis values for all of the lanes, or adjust each physical lane individually. Valid dB settings range from 0.00 dB to 6.02 dB, with a Default value of 0.00 dB.
- Page 155 MPA_e_manual_D07-00-129P_RevA00 Protocol Tabs Example: CFP4, CFP8 Displays the CFP module’s Power Power Class: Power Class < 4: CFP NVR Class. 1, Hex Addr: 8001 Power Class ≥ 4: CFP NVR 1, Hex Addr: 807E Displays the CFP module’s WDM Type. WDM Type: CFP NVR 1, Hex Addr: 8001 Responses include:...
- Page 156 MPA_e_manual_D07-00-129P_RevA00 MLD Tab Undefined Displays the CFP module’s Media Type: CFP NVR 1, Hex Addr: 800A transmission Media Type. Responses include: SMF, MMF (OM3) or Copper. Displays the CFP module’s Signal Signal Modulation: CFP NVR 1, Hex Addr: 801A Modulation. Displays the CFP module’s Signal Signal Coding: CFP NVR 1, Hex Addr: 801A...
- Page 157 MPA_e_manual_D07-00-129P_RevA00 Protocol Tabs OTL4.4, STL256.4, CPPI, CAUI-4, CAUI-4f, CEI-28G VSR, MLG1.0, MLG1.1, MLG2.0, or Unspecified Network Lanes: Displays the number of Network CFP NVR 1, Hex Addr: 8009 (Optical) Lanes supported by the CFP module. • The values of 1 through 15 represent the actual number of network lanes supported.
- Page 158 MPA_e_manual_D07-00-129P_RevA00 MLD Tab Version number. Note: A value of 0.0 indicates that the vendor’s Hardware Version number is unspecified. Displays the CFP module’s Firmware Firmware Version: CFP NVR 1, Hex Addr: Version number. 806C-806D Note: A value of 0.0 indicates that the vendor’s Firmware Version number is unspecified.
- Page 159 MPA_e_manual_D07-00-129P_RevA00 Protocol Tabs Select the Write button to send the user-defined Data value to the specified reference address. The user-defined hexadecimal numbers can range from 0 to FFFF (leading 0's do not need to be entered). MLD Test - QSFP Info The QSFP Info screen displays common information from the pluggable QSFP28 or QSFP+ module’s 2-wire (I2C) interface, as programmed by the module's manufacturer.
- Page 160 MPA_e_manual_D07-00-129P_RevA00 MLD Tab 01: Class 5 (<= 4.0W max) 10: Class 6 (<= 4.5W max) 11: Class 7 (<= 5.0W max) Displays the module’s Connector Type. Connector Type: Page 00h Byte: 130 Example: LC, MPO 1x12 Size: 1 Byte Ref. SFF-8024 Table 4-3 Ethernet Code: Displays what (if any) Ethernet Page 00h Byte: 131...
- Page 161 MPA_e_manual_D07-00-129P_RevA00 Protocol Tabs Displays the module’s CLEI (Common CLEI Code: Page 00h Byte: 129 Language Equipment Identifier) code. Size: 1 bits If bit 4 is set to 1, the first 10 bytes of Page 02h Bytes 128-137 will be used Bit: 4 to store the CLEI code.
- Page 162 MPA_e_manual_D07-00-129P_RevA00 MLD Tab MOD_RST_L Toggles the logical state of the Module Reset state. Displays the logical state of the Module Interrupt MOD_PRESENT Reports the presence of an inserted module to the Host. I2C Access This section allows users to Read and/or Write to specific 2-wire (I2C) reference addresses.
- Page 163 MPA_e_manual_D07-00-129P_RevA00 Protocol Tabs Select the Supply Voltage button to change the CFP8's supply voltage from the Circuit Pack’s voltage-regulator, and choose between Voltage or Percent Offset. • When Voltage is selected, then the user can enter a voltage level from 3.135 to 3.465, which is the range of 3.30v +/- 5%.
- Page 164 MPA_e_manual_D07-00-129P_RevA00 MLD Tab I2C Function Description Address Location Displays the module’s form-factor Module ID Page 00h Byte: 128 Identifier code. Size: 1 Byte Example: SFP28, SFP/SFP+ Ref. SFF-8024 Table 4-1 Displays the module’s Connector Type. Connector Type: Page 00h Byte: 130 Example: LC, MPO 1x12 Size: 1 Byte Ref.
- Page 165 MPA_e_manual_D07-00-129P_RevA00 Protocol Tabs Size: 16 Bytes Displays the module’s vendor Date Code: Page 00h Byte: 212-219 (manufacturer) date, in the format Size: 8 Bytes YYMMDD. e.g., 180310 = March 10, 2018 Tx Power (dBm): Displays the TX optical power between Page 00h Byte: 50-57 (Table (~-40 to +8.2 dBm).
- Page 166 MPA_e_manual_D07-00-129P_RevA00 MLD Tab Module Control Pins QSFP28 Module Control Pins can be changed when the Interface is set to None. SFP+ and SFP8 Module Control Pins are read only. Control Pin Description TX_DISABLE Toggles the logical state of the TX_DIS pin state. Toggles the logical state of the Rate Select 0 bit.
- Page 167 MPA_e_manual_D07-00-129P_RevA00 Protocol Tabs This section allows users to Read and/or Write to specific 2-wire (I2C) reference addresses. Select the Address button to open a keypad that can used to enter the decimal reference address. Select the + or – buttons to increment or decrement the hexadecimal reference address.
- Page 168 MPA_e_manual_D07-00-129P_RevA00 MLD Tab Pre-defined and user-defined test durations Optical power high threshold (-20dBm/lane to +100dBm/lane) Optical power low threshold (+30dBm/lane to -100dBm/lane) Frequency wide threshold (+/- 0ppm to 120ppm) TX frequency offset (-120ppm to +120ppm) Excessive skew threshold (0 bits to 4158 bits) TX skew offset (0 bits to 4158 bits) Bit error threshold (fail on Any Error or above a user specified error-rate) Pre-defined PRBS payload patterns...
- Page 169 MPA_e_manual_D07-00-129P_RevA00 Protocol Tabs This is an aggregate broadband power value, based on the combined power levels from all of the laser module's received Optical Lanes. See the Receive - screen for individual Optical Lane power levels. • E/A: Indicates the current Error / Alarm configured for transmission in the MLD signal.
- Page 170 MPA_e_manual_D07-00-129P_RevA00 MLD Tab MLD LEDs When the MLD protocol processor tab is selected, the following status indicators and LEDs are displayed in the LED Quick Status Area and the Large LED Results screen. Description Loss of Signal. A Red LED indicates an LOS alarm condition exists on one or more Optical Lanes.
- Page 171 MPA_e_manual_D07-00-129P_RevA00 Protocol Tabs Loss of Frame. Indicates that one or more virtual lanes has received an OOF condition for at least 3ms. Out Of Frame. Indicates that one or more virtual lanes has not found a consistent start of frame for 5 or more consecutive frames.
-
Page 172: Specific Tasks
MPA_e_manual_D07-00-129P_RevA00 MLD Tab BLKLOC Block Lock Loss. Indicates that one or more virtual lanes is receiving a Loss of Block Lock alarm. ALMARK Alignment Mark. Indicates that one or more virtual lanes is receiving any Alignment Mark errors. SYNCHDR Synchronization Header. Indicates that one or more virtual lanes is receiving any Synchronization Header errors. - Page 173 MPA_e_manual_D07-00-129P_RevA00 Protocol Tabs • MLD Miscellaneous Information • Saving and Printing Statistics and Settings Reports MLD Miscellaneous Information Block Lock • Each block lock process looks for 64 valid sync headers in a row to declare lock. A valid sync header is either a 01 or a 10. •...
- Page 174 PCS can align and deskew the PCS lanes Saving and Printing Statistics and Settings Reports (Specifically for MLD tab) The MPA test set provides the option to Print or Save several Report types. To save or print test reports:...
- Page 175 MPA_e_manual_D07-00-129P_RevA00 Protocol Tabs Select from the Common Function Buttons row at the bottom of the screen. The Report Setup dialog box appears. Choose the Report type(s) to be printed or saved. The most common report is the Statistics report, which contains a complete list of error and alarm statistic information as well as other counts that pertain to the test performed.
- Page 176 MPA_e_manual_D07-00-129P_RevA00 MLD Tab Module Reports a combined summary of the Module Check Settings and Check/Module Results, and CFP, QSFP, or Module Information - one for each Info laser module supported by the selected MPM card. ** Module Not Present ** is shown when laser module is not inserted.
-
Page 177: Otn Tab
MPA_e_manual_D07-00-129P_RevA00 Protocol Tabs Click the User Image File button to open a File Browser window. When printing/saving the report using the DLI Remote Client GUI, then the image file must be copied to the C:\Program Files\DLI\RemoteClient\Compat<feature set> folder before selecting Print Report. For the best appearance quality the image file should have a width to height ratio of 5:1, with a maximum dimension size of 750px by 150px. - Page 178 MPA_e_manual_D07-00-129P_RevA00 OTN Tab This section of the help file will list all Interface rates and test options currently available for each card type. • The OTN tabs on the MPM-10G card provides Forward Error Correction (FEC) testing functionality for G.709 networks, including OTU-1 (2.666 GHz), OTU-2 (10.709 GHz), OTU-1e (11.049 GHz), OTU-2e (11.095 GHz), OTU-1f (11.270 GHz) and OTU-2f (11.270 GHz);...
-
Page 179: Screens And Function Descriptions
MPA_e_manual_D07-00-129P_RevA00 Protocol Tabs Screens and Function Descriptions OTN Tab - Screen Functions and Descriptions Overview The following function screens are available through the OTN protocol processor tab. • Transmit • Receive • Results • Test • OTUCn Config • LED Quick Status Area •... - Page 180 MPA_e_manual_D07-00-129P_RevA00 OTN Tab Use the Set 1 and Set 2 screens to configure the OTN Transmit parameters. The following describes the functions that appear on the Set 1 screen. Functions Description Settings Control If Coupled is selected, settings changed on the Transmit screen will automatically change on the Receive screen as well.
- Page 181 MPA_e_manual_D07-00-129P_RevA00 Protocol Tabs LAN testing over OTU-2 via SFP+ • OTU1e (11.049G) - Provides 11.049 Gigabit Ethernet LAN testing over OTU-2 via SFP+ • OTU2 (10.709 GHz) - Provides OTU-2 testing via SFP+ For the MPM-100G card, the following OTN interface rates may be available, depending on the licensed-based test options currently enabled: •...
- Page 182 MPA_e_manual_D07-00-129P_RevA00 OTN Tab • 802.3 LAN (10.3125G) elec - Provides 10000Base-T electrical Ethernet testing via RJ-45 SFP • 802.3 LAN (3.125G) - Provides 2500Base-FX optical Ethernet testing (2.5G LAN) via SFP • 802.3 LAN (1.25G) - Provides 1000Base-FX optical Ethernet testing (1 GigE) via SFP •...
- Page 183 MPA_e_manual_D07-00-129P_RevA00 Protocol Tabs The OTN processor supports hot-swappable laser modules. The wavelength of the selected interface is determined by the specifications of the pluggable laser module being used. All currently licensed interface rates are displayed in the Interface menu, regardless if the rates are actually supported by the currently inserted laser modules or not.
- Page 184 MPA_e_manual_D07-00-129P_RevA00 OTN Tab • shows Not SDH Synchronous: The Optical Channel Payload Assigned Unit (OPU) of the OTN frame is synchronized with the rest of the OTN frame, and the payload data is defined by the configuration settings on the SDH tab. •...
- Page 185 MPA_e_manual_D07-00-129P_RevA00 Protocol Tabs a single-channel mapping structure comprised of multiple ODU-j levels. ODTU Add/Drop mappings differ from ODTU Multi- Channel mappings in that multi-level ODTU-A/D Mappings only supports a single-channel ODU-j container, whose foreground ODU-j channel may be configured for ODU-Flex, GFP, PRBS Patterns, ITU-T G.Sup43 7.3, NULL Client, 40G LAN, 10G LAN, Transcoded 1000 Base-X, SDH/SONET mappings, STM-4/STS-12 and STM-1/STS-3 mapping options;...
- Page 186 MPA_e_manual_D07-00-129P_RevA00 OTN Tab The Line Frequency Offset can also be configured for Ramp mode. Select the Ramp Frequency Offset Mode checkbox to enable Ramp mode, and deselect the checkbox to disable Ramp mode. • In Ramp mode, the line frequency offset will continuously increment and decrement from one user- defined Offset Peak to second user-defined Offset Peak, each ranging from -300.0 to 300.0 PPM's.
- Page 187 MPA_e_manual_D07-00-129P_RevA00 Protocol Tabs on the SDH tab. • SDH Asynchronous: The Optical Channel Payload Unit (OPU) of the foreground ODU-j Mapping is Asynchronous with the rest of the OTN frame, and the payload data is defined by the configuration settings on the SDH tab.
- Page 188 MPA_e_manual_D07-00-129P_RevA00 OTN Tab • PRBS: The foreground ODU-0 Mapping is configured with a PRBS pattern. • Null Client: The foreground ODU-0 Mapping is configured with an All Zeros pattern. • Transcoded 1000Base-X: The foreground ODU-0 Mapping is configured with a modified GFP-T payload, which supports the Stuff Byte Algorithm per ITU-T G.709/Y.1331.
- Page 189 MPA_e_manual_D07-00-129P_RevA00 Protocol Tabs ODU-j or ODU-j Selected button (located in the LED Quick Status area) to select the A/D ODU-j level. The ODU-j Added setting is only available for ODTU Multi- Channel and multi-level ODTU Add/Drop mappings. ODU-j OPU Sets the ODU-j OPU frequency offset, for the selected ODTU Frequency Offset mapping.
- Page 190 MPA_e_manual_D07-00-129P_RevA00 OTN Tab TX Clock Loss Threshold, then the TX Clock Loss alarm begins to accumulate. Valid range is from 0 to +/- 300 ppm, in increments of 0.1 ppm, where 0 ppm is disabled. The default value is +/- 50 ppm.
- Page 191 MPA_e_manual_D07-00-129P_RevA00 Protocol Tabs The OTN OH screen allows you to configure the following overhead signals: ODU-A ODU-B OH INTRUDE OTN Transmit - OTN OH / OTU The following overhead options are available from the OTU screen. Option Description Edits the first three bytes of the Frame Alignment Signal (FAS) OH.
- Page 192 MPA_e_manual_D07-00-129P_RevA00 OTN Tab BIP-8 Edits the OTU SM error detection code signal. It is a single byte that uses a Bit Interleaved Parity-8 code. BEI/BDI/IAE/RES The Backward Error Indication (BEI) and Backward Incoming Alignment Error (BIAE) subfield is a four-bit signal sent in the upstream direction to indicate that an error has been detected.
- Page 193 MPA_e_manual_D07-00-129P_RevA00 Protocol Tabs Use screen A of the Optical Channel Data Unit (ODU) Overhead to edit the Path Monitoring overhead and the Fault Type and Fault Location (FTFL) overhead bytes and messages. The FTFL is a 256-byte message that is divided into two parts: the Forward FTFL and the Backward FTFL.
- Page 194 MPA_e_manual_D07-00-129P_RevA00 OTN Tab Option Description PM TTI The ODU Trail Trace Identifier (TTI) is a single byte used for Path Monitoring to identify the 64-byte TTI signal message. BIP-8 A single byte used to define the Error Detection Code signal, which is a Bit Interleaved Parity-8 (BIP-8) code. BEI/BDI/STAT The Backward Error Indication (BEI) and Backward Incoming Alignment Error (BIAE) subfield is a four-bit signal...
- Page 195 MPA_e_manual_D07-00-129P_RevA00 Protocol Tabs RES-1 through Nine bytes of the ODU overhead are reserved for future use. RES-9 These bytes are set to all zeros. The RES-3 byte was replaced with the "PM and TCM" byte for testing Round-Trip Delay measurements. EXP-1 and EXP-2 Two bytes of the ODU overhead are reserved for experimental use.
- Page 196 MPA_e_manual_D07-00-129P_RevA00 OTN Tab status has been detected. This bit is set to 1 to indicate a BDI. The Status (STAT) bits are three bits used to indicate the use of a maintenance signal. SAPI Source Access Point Identifier. The SAPI is the first part of the multi-frame Trail Trace Identifier (TTI) structure.
- Page 197 MPA_e_manual_D07-00-129P_RevA00 Protocol Tabs When the unit is in Passthru Mode, the Intrude option allows you intrude on selected byte data in a return signal. To intrude upon a byte: 1. Select the OTN tab. 2. Select Transmit and Set 1. 3.
- Page 198 MPA_e_manual_D07-00-129P_RevA00 OTN Tab For information on inserting errors and alarms see Inserting Errors Inserting Alarms in the OTN Specific Tasks section of this chapter. The following options are available on the OTN Errors and Alarms screen. Option Description Error to Insert Allows the user to select an error that is transmitted by the OTN signal.
- Page 199 MPA_e_manual_D07-00-129P_RevA00 Protocol Tabs • OTU:IAE, OTU:BIAE, OTU:BDI, ODU:BDI, TCM1:BDI - TCM6:BDI, TCM1:BIAE - TCM6:BIAE Error Insert Rate Sets the insertion rate for the selected error type. This setting is not available if Error to Insert is set to None. The following options are available for this command. •...
- Page 200 MPA_e_manual_D07-00-129P_RevA00 OTN Tab are available: • LOS, LOF, OOF, LOM, OOM, OTU:IAE, OTU:BIAE, OTU:BDI, ODU:AIS, ODU:LCK, ODU:OCI, ODU:BDI, OPU:LOOMFI, OPU:OOOMFI, OPU:C8 SYNC, OPU:C640 SYNC, TCM1:BDI – TCM6:BDI, and TCM1:BIAE – TCM6:BIAE When testing Add/Drop mappings, then the following A/D ODU- j alarm types are available: •...
- Page 201 MPA_e_manual_D07-00-129P_RevA00 Protocol Tabs OTN Receive - Set / Set 1 Use the Set 1, Set 2 and Set 3 screens to configure the OTN Receive parameters. The following describes the functions that appear on the Set 1 screen. Functions Description Settings Control If Coupled is selected, settings changed on the Receive screen will automatically change on the Transmit screen as...
- Page 202 MPA_e_manual_D07-00-129P_RevA00 OTN Tab LAN testing over OTU-2 via SFP+ • OTU2 (10.709 GHz) - Provides OTU-2 testing via SFP+ For the MPM-100G card, the following OTN interface rates may be available, depending on the licensed-based test options currently enabled: • OTUCn (112.304G) MLD - Configures the size and members of an OTUCn...
- Page 203 MPA_e_manual_D07-00-129P_RevA00 Protocol Tabs • 802.3 LAN (1.25G) elec - Provides 1000Base-T electrical Ethernet testing via RJ-45 SFP • 802.3 LAN (125.0M) - Provides 100Base-FX optical Ethernet testing via SFP • 802.3 LAN (125.0M) elec - Provides 100Base-T electrical Ethernet testing via RJ-45 SFP •...
- Page 204 MPA_e_manual_D07-00-129P_RevA00 OTN Tab All currently licensed interface rates are displayed in the Interface menu, regardless if the rates are actually supported by the currently inserted laser modules or not. Verify that the inserted laser module supports the desired Interface rate prior to selecting it. Constant LOS or LOF alarms may be present when an unsupported Interface rate is selected or if the required laser module is unplugged.
- Page 205 MPA_e_manual_D07-00-129P_RevA00 Protocol Tabs • GFP: The OTN frame is configured with a GFP Payload. • ITU-T G.709 Sup43 7.3: The OTN processor is configured for a 10Gbps LAN mapping over OTU-2, with a GFP-F structure, per ITU-T G.709 Supplement 43 Section 7.3. •...
- Page 206 MPA_e_manual_D07-00-129P_RevA00 OTN Tab currently enabled. Selects an expected test pattern in the payload of an OTN Payload Pattern signal, when the Mapping is set to PRBS or Unframed BERT. Select one of the following patterns: PRBS PRBS 9 Inv, PRBS PRBS 11 Inv, PRBS...
- Page 207 MPA_e_manual_D07-00-129P_RevA00 Protocol Tabs Correction (FEC), as defined by G.709. The default value is Enable. Trigger Out Trigger Out is currently not supported. Configures the lowest ODU-j Add/Drop mapping structure ODU-j Mapping expected to be received from the ODTU-jk Add/Drop multi- level mapping.
- Page 208 MPA_e_manual_D07-00-129P_RevA00 OTN Tab available when the lowest Add/Drop Mapping is ODU- • 41G PRBS: The foreground ODU-3 Mapping is configured for a 41Gbps PRBS payload mapping. (Only available when the lowest Add/Drop Mapping is ODU-3) • 41G NULL: The foreground ODU-3 Mapping is configured for a 41Gbps Null Client (All Zeros) payload mapping.
- Page 209 MPA_e_manual_D07-00-129P_RevA00 Protocol Tabs tab, you can further multiplex the STM-1 Mapping option from an AU-4 C-4 Bulk Filled Mapping down to the lowest Mapping option available ODUflex Mapping The ODUflex Mapping menu supports 8G Fibre Channel (7 ODU-0 containers) and 4G Fibre Channel (4 ODU-0 containers), as well as PRBS, Null Client and GFP over 1 to 8 ODU-0 containers.
- Page 210 MPA_e_manual_D07-00-129P_RevA00 OTN Tab • TCM #1 Alarm Reporting (Tandem Connection Monitoring #1) - Enabled with or without TIM Alarm Reporting • TCM #2 Alarm Reporting (Tandem Connection Monitoring #2) - Enabled with or without TIM Alarm Reporting • TCM #3 Alarm Reporting (Tandem Connection Monitoring #3) - Enabled with or without TIM Alarm Reporting •...
- Page 211 MPA_e_manual_D07-00-129P_RevA00 Protocol Tabs • A/D TCM #1 Alarm Reporting (Tandem Connection Monitoring #1) - Enabled with or without TIM Alarm Reporting • A/D TCM #2 Alarm Reporting (Tandem Connection Monitoring #2) - Enabled with or without TIM Alarm Reporting • A/D TCM #3 Alarm Reporting (Tandem Connection Monitoring #3) - Enabled with or without TIM Alarm Reporting •...
- Page 212 MPA_e_manual_D07-00-129P_RevA00 OTN Tab is set to "Enabled". ODU-A Overhead Displays the first screen of the Optical Channel Data Unit (ODU) Overhead bytes on the incoming signal. This is a read-only function. Use the SAPI Expected and DAPI Expected buttons to configure expected ODU SAPI and DAPI trace values.
- Page 213 MPA_e_manual_D07-00-129P_RevA00 Protocol Tabs MSI bytes are only available when the OTN Interface is configured for an ODTU Add/Drop mapping. Testing overhead Traces: Received SAPI Displays the Source Access Point Identifier (SAPI) trace Trace received on the incoming signal for OTU, ODU and TCM1- TCM6 OH bytes.
- Page 214 MPA_e_manual_D07-00-129P_RevA00 OTN Tab OTN Receive - Capture Use the Capture screen to capture 256 bytes of received overhead bytes, before/after a triggered event occurs. Description Function Byte Select Select the overhead byte to be captured. OTU:FAS OA1 1 ODU:TCM3 BIP ODU:PM BIP OTU:FAS OA1 2 ODU:TCM4 BIP...
- Page 215 MPA_e_manual_D07-00-129P_RevA00 Protocol Tabs ODU:TCM6 TTI ODU:TCM ACT OPU:RES 3 ODU:TCM1 BIP ODU:FTFL ODU:TCM2 BIP ODU:PM TTI Capture Trigger Select the Capture Trigger event. FRAME ERROR OTU:IAE ALARM BIT ERROR OTU:BDI ALARM FEC:CORR ERROR OTU:AIS ALARM FEC:UNCORR ERROR ODU:OCI ALARM MFAS ERROR ODU:LCK ALARM OTU:BIP8 ERROR ODU:BDI ALARM...
- Page 216 MPA_e_manual_D07-00-129P_RevA00 OTN Tab following 254 byte values will be captured. If 100 is entered, then the 155 bytes immediately preceding the trigger, as well as the triggered byte value, and the following 100 byte values will be captured. If 0 is entered, then the 255 bytes immediately preceding the trigger, as well as the triggered byte value will be captured, but 0 bytes after the trigger will be captured.
- Page 217 MPA_e_manual_D07-00-129P_RevA00 Protocol Tabs in ASCII format. (A hex value o 0, will be displayed as blank) OTN Receive - SIG (Signal Status) Displays the following measurements of the incoming OTN signal: • Line Frequency in Hz • Line Frequency Offset Received in Hz and PPM •...
- Page 218 MPA_e_manual_D07-00-129P_RevA00 OTN Tab The following options are available from the Results screen: • Error / Alarm • Event Log • Large LED • Graphs • Multi Chan OTN Results - Error / Alarm The reported Errors and Alarm are a result of incoming errors/alarms that are generated by the OTN network, or errors/alarms that are intentionally generated by the system when it is used in a loopback environment.
- Page 219 MPA_e_manual_D07-00-129P_RevA00 Protocol Tabs OTU:BEI ODU:BIP8 The following parameters are measured for the incoming errors: Error count using an 11-digit format Average error rate using an N.NNe-N format Current error rate using an N.NNe-N format • Add/Drop Errors - When configured for a Multi-Channel or Multi-Level Add/Drop mapping, the system can monitor and report errors on the incoming Add/Drop ODU Mapping.
- Page 220 MPA_e_manual_D07-00-129P_RevA00 OTN Tab Power Warm - See Power Warm ODU:BDI Alarm for details. Power Low - See Power Low Alarm ODU:SAPI for details. Frequency Wide ODU:DAPI OPU:PLM OPU:LOOMFI OPU:OOOMFI OPU:Cm Sync TCM1:BDI – TCM6:BDI OTU:AIS TCM1:BIAE – TCM6:BIAE OTU:IAE TCM1:SAPI – TCM6:SAPI OTU:BIAE TCM1:DAPI –...
- Page 221 MPA_e_manual_D07-00-129P_RevA00 Protocol Tabs A/D ODU:AIS A/D OPU:Cm Sync A/D ODU:LCK A/D OPU:PLM A/D ODU:OCI A/D OPU:CSF A/D ODU:BDI A/D OPU:Frequency Wide A/D ODU:SAPI • Counts - The Count screen displays the following statistics: Positive Justification - Reports the total number of Positive OPU Justification counts.
- Page 222 MPA_e_manual_D07-00-129P_RevA00 OTN Tab A/D ODU-j/k RX GMP Cm Lt 2 A/D ODU-j/k RX GMP Cm Gtr ltu A/D ODU-j/k RX GMP Cm Lt ltu A/D ODU-j/k Positive Justification - Reports the total number of Positive Add/Drop OPU Justification counts. A/D ODU-j/k Negative Justification - Reports the total number of Negative Add/Drop OPU Justification counts.
- Page 223 MPA_e_manual_D07-00-129P_RevA00 Protocol Tabs The following describes the LED colors: If the LED color is Then this indicates ... Green with black The specific function is active and OK. text with black text An error or alarm event is in progress. White with text This function experienced an error or alarm event.
- Page 224 MPA_e_manual_D07-00-129P_RevA00 OTN Tab • Print Report - Prints a graph report to printer or file. • Save Graphs - Saves a graph to file as a .grp file that can be replayed at a later time. Important: This is not a text file; when replayed, it appears as the original graph plot.
- Page 225 MPA_e_manual_D07-00-129P_RevA00 Protocol Tabs Print a Graph Report 1. Select the protocol processor running the test for which you want to print the graph. 2. From the Results tab, select Graph. 3. Select the Graph screen's Print Report command button. The Report Setup menu appears.
- Page 226 MPA_e_manual_D07-00-129P_RevA00 OTN Tab Select the Save Graphs button to save the graphed results to a file for replay at a later time. The graph is saved with a .grp extension. To view the graph select the Replay Graphs button and choose the desired .grp file from the Browser dialog box.
- Page 227 MPA_e_manual_D07-00-129P_RevA00 Protocol Tabs • Use the horizontal scroll bar on the bottom side of the screen to scroll left and right to see all of the errors and alarms that are being simultaneously monitored on all of the ODU-j channels. The Multi-Chan summary LED displayed in the LED Quick Status Area will also turn...
- Page 228 MPA_e_manual_D07-00-129P_RevA00 OTN Tab • TX: Displays the transmit interface configuration, such as rate, wavelength, framing, and/or duplex depending on the specific protocol processor If a non-OTN interface is selected from one of the other protocol tabs, then "Not Assigned" will be displayed. If a laser module is not inserted then "No Laser"...
- Page 229 MPA_e_manual_D07-00-129P_RevA00 Protocol Tabs • If an LED if White Green and the LED's Text is White, then that Error or Alarm condition has not occurred at any time during the current test. • If an LED if White Green but the LED's Text is Red, then that Error or Alarm condition was active at some point during the current test's history.
- Page 230 MPA_e_manual_D07-00-129P_RevA00 OTN Tab Loss of Frame. Indicates that a frame alignment problem with the incoming signal has been detected. This is an alarm LED. Out of Frame. Indicates that four consecutive frames have been received with invalid or errored framing patterns. This is an alarm LED.
- Page 231 MPA_e_manual_D07-00-129P_RevA00 Protocol Tabs BIP8 Bit Interleaved Parity 8 (ODU). This is an error LED. Backward Error Indication (ODU). This is an error LED. Alarm Indication Signal (ODU). This is an alarm LED. Lock Indication (ODU). This is an alarm LED. Open Connection Indication (ODU).
- Page 232 MPA_e_manual_D07-00-129P_RevA00 OTN Tab ODU-n Selected ODU-n Selected. This button toggles the Add/Drop ODU LEDs, A/D OH bytes, and Settings between the ODU-n levels. This button is only displayed when configured for a multi- level ODTU Add/Drop mapping. Add/Drop OTU Add/Drop Optical Transport Unit. Indicates if the Add/Drop mapping is detecting any OTU Section Monitoring alarms such as LOF, OOF, LOM, or OOM.
- Page 233 MPA_e_manual_D07-00-129P_RevA00 Protocol Tabs Alarm Indication Signal (A/D ODU). This is an alarm LED. ODU Lock Indication (A/D ODU). This is an alarm LED. Open Connection Indication (A/D ODU). This is an alarm LED. Backward Defect Indication (A/D ODU). This is an alarm LED.
- Page 234 MPA_e_manual_D07-00-129P_RevA00 OTN Tab For OTN, each ODU layer has its own TCM (Tandem Connection Monitoring) overhead section consisting of six TCM fields (TCM:1-TCM:6), including multi-level and multi-channel ODTU Add/Drop mappings. Quick Status Area LED's that are underlined are "Summary Status" LEDs and can be selected to display a summary pop-up window to show the individual LEDs, and sometimes error/alarm statistics, related to that status LED.
- Page 235 MPA_e_manual_D07-00-129P_RevA00 Protocol Tabs The Test screen configures test parameters associated with an OTN protocol processor. The Test screen contains the following functions: • SET 1 • Service Disruption • • SFP Info (MPM-10G only) OTN Test - Set 1 The SET 1 functions determine how long a protocol processor's test runs and what activities occur at the end of the test.
- Page 236 MPA_e_manual_D07-00-129P_RevA00 OTN Tab After configuring the Duration, you must select Restart in order for the Timed Test to begin. Action After Action after Duration defines what activities occur at the Duration conclusion of a timed test. It allows several different options, including printing results to a printer or recording them to a file;...
- Page 237 MPA_e_manual_D07-00-129P_RevA00 Protocol Tabs quote/comma-report format, meaning that error and/or alarm values are enclosed in quotes (") and separated by commas (,). The test does not repeat. Print Statistics and Repeat At the end of a timed test a Test statistics report of the received Errors, Alarms, Pointer Analysis, and Signal This option appears when...
- Page 238 MPA_e_manual_D07-00-129P_RevA00 OTN Tab the test is stopped by selecting Stop from the Common Function Buttons, or by changing the Action After Duration value. Record Events and Repeat At the end of a timed test a Test detailed summary of Errors, Alarms and Pointer event activities saved to a text file This option appears when...
- Page 239 MPA_e_manual_D07-00-129P_RevA00 Protocol Tabs After Duration value. value. Print Options When a print option is chosen from the Remote Client, the report is sent to the Current Printer as configured on the System tab's User Preference screen. If the Current Printer is configured for Prompt Each Time, then a Windows Print dialog box appears for you to choose between your PC's default printer or another printer listed in the drop-down...
- Page 240 LED history. OTN Test - Service Disruption The MPA can measure Service Disruption switching intervals in your network and can be configured to monitor for a specific event that will cause a service disruption switch. When this event occurs, the duration in both seconds and frames is logged. These statistics can be used to determine how long it takes for your network equipment to react to a service disruption event and switch to a backup path.
- Page 241 MPA_e_manual_D07-00-129P_RevA00 Protocol Tabs begins monitoring the incoming signal for a service disruption measurement event as soon as one of the following State options is selected: Single APS - Monitors for a single service disruption event. Seconds and frames are reported and the State returns to Inactive. Continuous APS - Constantly monitors for service disruption events, and updates the seconds and frames reported.
- Page 242 MPA_e_manual_D07-00-129P_RevA00 OTN Tab Interface Granular accuracy per Max number of Good Frames (Good Rate frame Time) allowed OTU4 0.001 ms (1.168 µs) 16383 frames (19.130 ms) OTU3 0.003 ms (3.035 µs) 16383 frames (49.722 ms) OTU3e1 0.003 ms (2.929 µs) 16383 frames (47.990 ms) OTU3e2 0.003 ms (2.928 µs)
- Page 243 MPA_e_manual_D07-00-129P_RevA00 Protocol Tabs Test RTD functions include: • ODTU Level: When configured for a Multi-Channel or Multi-Level Add/Drop mapping, then this setting selects which ODU overhead level to be used for Round-Trip Delay measurements. This is only available for ODTU Multi- Channel and Multi-Level Add/Drop mappings.
- Page 244 MPA_e_manual_D07-00-129P_RevA00 OTN Tab The SFP Info screen displays common information from the pluggable SFP or SFP+ module’s 2-wire (I2C) interface, as programmed by the module's manufacturer. The SFP Info screen can also be used to write to the SFP’s serial addresses as per the SFF-8636 Specification.
- Page 245 MPA_e_manual_D07-00-129P_RevA00 Protocol Tabs (Organizationally Unique Identifier, Size: 3 Bytes IEEE company ID). Displays the module’s Part Number Part Number: Page 00h Byte: 168-183 (model number). Size: 16 Bytes Displays the module’s revision level. Vendor Rev: Page 00h Byte: 184-185 Size: 2 Bytes Displays the module’s Serial Number.
- Page 246 MPA_e_manual_D07-00-129P_RevA00 OTN Tab Compliance Codes Displays which of the Transceiver Compliance Codes (per SFF-8472, Table 5-3) for the inserted SFP module supports. Module Control Pins QSFP28 Module Control Pins can be changed when the Interface is set to None. SFP+ and SFP8 Module Control Pins are read only. Control Pin Description TX_DISABLE...
- Page 247 Each OTUCn interface requires a QSFP28 port, which are supported by MPM-100G MPM-100AR cards. * One OTUCn port/slice per card. Third generation MPA units with an SCM-210 controller card supports OTUC1 to OTCU6, with up to 6 synchronized MPM-100AR and/or MPM-100G modules, operated...
- Page 248 5x 100G OTUC6 6x MPM-100 modules (6x 100G Ports) 6x 100G Flexible OTUCn Configuration Examples: MPA units with an SCM-210 and two or more MPM-100G and/or MPM-100AR cards support multiple OTUCn test combinations. OTUCn Configuration Examples MPM- 1x OTUC4 &...
- Page 249 OTN tab that is licensed for the OTUCn test option, and choose the OTUCn QSFP28 (112.304G x n) MLD test option. The OTUCn Instances menu appears. This menu lists all OTN ports in the MPA chassis that are licensed for the OTUCn test option, allowing you to configure one or more OTUCn groups.
- Page 250 MPA_e_manual_D07-00-129P_RevA00 OTN Tab The following describes the functions that appear on the OTUCn Instances menu. Functions Description Lock Icon Only locked OTN ports can be added to the OTUCn group. • OTN ports that you have locked will have a padlock •...
- Page 251 MPA_e_manual_D07-00-129P_RevA00 Protocol Tabs group. Available indicates that an OTN specific interface rate is not currently selected on the port's OTN tab. Notice: If an available port's SONET/SDH or Ethernet interfaces are currently under test on another protocol tab, then the Current Interface will still show that port's OTN interface is Available, and selecting that port to be added to the OTUCn group will interrupt any tests currently active it the other protocol tab.
- Page 252 MPA_e_manual_D07-00-129P_RevA00 OTN Tab being received • The LED turns Red when an error or alarm is currently being received, and reverts to Green when there is no current error or alarm activity • The word Summary remains Green until an error or alarm is received •...
- Page 253 MPA_e_manual_D07-00-129P_RevA00 Protocol Tabs The Restart button may need to be selected immediately after setting up a new OTUCn group, to clear any artificial error or alarm bursts recorded during the setup's stabilization period. Only the OTUCn group's controlling Slice (Slice #1) displays the Restart button.
- Page 254 (6) OTUC1's, three (3) OTUC2's, two (2) OTUC3's, one (1) synchronized OTUC6, one (1) OTUC2 and one (1) OTUC4, as well as multiple other OTUCn combinations. Below are just a few examples of various OTUCn configurations, based on an MPA unit with six (6) MPM-100AR...
- Page 255 MPA_e_manual_D07-00-129P_RevA00 Protocol Tabs...
- Page 256 MPA_e_manual_D07-00-129P_RevA00 OTN Tab...
-
Page 257: Otn Specific Tasks
MPA_e_manual_D07-00-129P_RevA00 Protocol Tabs * This MPA system only has two MPM-100AR cards. For more information about OTUCn groups, see OTUCn Overview For OTUCn configuration settings, see OTUCn Config - Screen and Functions OTN Specific Tasks OTN - Specific Tasks Overview (Specifically for LAN/WAN Ethernet testing on the Packet tab) This section includes tasks that are specific to the OTN protocol processor (G.709... - Page 258 MPA_e_manual_D07-00-129P_RevA00 OTN Tab • OTN TX Wavelengths and RX OPM • Enabling/Disabling OTN FEC Mode • Enabling/Disabling OTN Scramble Mode • Monitoring OTN SAPI and DAPI Traces • Measuring Service Disruption Activity • GFP Mappings for OTN • 10G Ethernet LAN over OTU-2 (11.049G and 11.095G) •...
- Page 259 MPA_e_manual_D07-00-129P_RevA00 Protocol Tabs • ODTU-23 - Allows OTU-3 to be filled with 4 ODU-2's, and the foreground ODU-2 is filled with 4 ODU-0's For OTU-2, various ODTU-jk mappings are supported allowing up to 8 ODU-0 mappings: • ODTU-02 - Allows OTU-2 to be filled with 8 ODU-0's •...
- Page 260 MPA_e_manual_D07-00-129P_RevA00 OTN Tab • Select ODU-0 Added from Transmit > SET 1 screen, to configure which one of the ODU-0 payloads will be configured for the specified ODU-0 mapping. • Select ODU-0 Dropped from Receive > SET 1 screen, to configure which one of the ODU-0 payloads to test.
- Page 261 MPA_e_manual_D07-00-129P_RevA00 Protocol Tabs Enabling/Disabling OTN Scramble Mode 1. Select the OTN tab. 2. Select Transmit and Set. 3. Select the SET 2 button from the Transmit/Set window. 4. Select Scramble and then Enable or Disable. If the Transmit and Receive Settings Control is set to Couple, Scramble is automatically changed under the Receive settings.
- Page 262 OTN Overhead, and appear in ASCII format at the bottom of the screen. 5. Expected SAPI or DAPI trace values can also be defined, and the MPA can be setup to display Trace Identifier Mismatch (TIM) alarms if the incoming SAPI or DAPI traces do not match what is expected.
- Page 263 MPA_e_manual_D07-00-129P_RevA00 Protocol Tabs 4. From Protection Switch Criteria, select the alarms, errors, and patterns to use for triggering a service disruption. 5. The measurement parameters that appear on the Service Disruption screen are dependant upon the protocol. A description of the possible parameters is provided below.
- Page 264 MPA_e_manual_D07-00-129P_RevA00 OTN Tab 2. Select the Service Disruption button. The Service Disruption Summary screen appears. GFP Mappings for OTN The OTN Protocol Processor can be configured for GFP mappings (Complying with ITU-T G.7041) Both OTU-1 and OTU-2 interface rates can be mapped for GFP. •...
- Page 265 MPA_e_manual_D07-00-129P_RevA00 Protocol Tabs After establishing an OTU-2 interface rate mapped with 10G LAN, you will notice that all of the common OTN features remain enabled with the exception of Mapping and Payload Pattern. Since the mapping defaults to 802.3 10GLAN SYNC, the Ethernet Payload and Streams are intended to be configured and tested from the Packet tab.
- Page 266 MPA_e_manual_D07-00-129P_RevA00 OTN Tab Inserting Multiple Errors Various errors can be transmitted by the system. One reason for transmitting errors is to determine if the receiving equipment can detect an error in the incoming signal. Inserting multiple errors at a specified error rate allows you to monitor the network and receiving equipment for any undesirable behavior as the error rate is increased.
- Page 267 MPA_e_manual_D07-00-129P_RevA00 Protocol Tabs When Power Hot alarms are occurring, the RX: <power level> text, located below the Laser On/Off button, will turn and the background will repeatedly between Black and White, until the power level is reduced to a safe level. Warning: Continued operation while the Power Hot alarm is incrementing will cause permanent damage to the laser module.
- Page 268 Print or Save (.evt extension) the Event Log report. Saving and Printing Statistics and Settings Reports (Specifically for OTN tab) The MPA test set provides the option to Print or Save several Report types. To save or print test reports: Select from the Common Function Buttons row at the bottom of the screen.
- Page 269 MPA_e_manual_D07-00-129P_RevA00 Protocol Tabs Choose the Report type(s) to be printed or saved. The most common report is the Statistics report, which contains a complete list of error and alarm statistic information as well as other counts that pertain to the test performed.
- Page 270 MPA_e_manual_D07-00-129P_RevA00 OTN Tab Module Info Reports the Module Information. Only supported on the MPM-10G card, see the MLD tab for other card types. ** Module Not Present ** is shown when laser module is not inserted. Select the Destination Printer or File type. The following report Destinations are available: Printer The selected report is sent to your PC's default printer.
-
Page 271: Sonet Tab
MPA_e_manual_D07-00-129P_RevA00 Protocol Tabs Supported image files formats include: .JPG, .PNG, .GIF and .BMP file extensions. Click the User Image File button to open a File Browser window. When printing/saving the report using the DLI Remote Client GUI, then the image file must be copied to the C:\Program Files\DLI\RemoteClient\Compat<feature set>... -
Page 272: Screens And Function Descriptions
MPA_e_manual_D07-00-129P_RevA00 SONET Tab This section of the help file will list all Interface rates and test options currently available for each card type. • The SONET tab on MPM-100G and MPM-100AR modules support OC-768 (39.81G) via pluggable QSFP+ laser modules. •... - Page 273 MPA_e_manual_D07-00-129P_RevA00 Protocol Tabs • Common Function Buttons • Lock/Unlock Icon Transmit SONET Transmit Screens and Functions The transmit section allows you to configure the transmit signal parameters used in SONET operations. The following transmit functionalities are available through the SONET Transmit screen: •...
- Page 274 MPA_e_manual_D07-00-129P_RevA00 SONET Tab Passthru Mode Activates or deactivates passthru mode, allowing an incoming STS signal to pass-through the unit without altering the data in the signal. The following options are available: On and Off. When Passthru Mode is turned On, the TX Clock Reference automatically changes to Recovered.
- Page 275 MPA_e_manual_D07-00-129P_RevA00 Protocol Tabs Interface Selects the transmit Interface Rate. For the MPM-100G and Port 1 on the MPM-100AR cards, the only SONET interface rate is: • OC-768 (39.813G) MLD Port 2 on the MPM-100AR card does not support SONET For the MPM-10G card, the following SONET interface rates are available on both ports: •...
- Page 276 MPA_e_manual_D07-00-129P_RevA00 SONET Tab • Fibre Chan (2.125G) - 2G Fibre Channel testing • Fibre Chan (4.25G) - 4G Fibre Channel testing • Fibre Chan (8.50G) - 8G Fibre Channel testing • Fibre Chan (10.52G) - 10G Fibre Channel testing The MPM-10G card supports hot-swappable SFP, SFP+ and Electrical SFP (RJ-45) laser modules.
- Page 277 MPA_e_manual_D07-00-129P_RevA00 Protocol Tabs Mapping Selects the transmit Mapping signal structure. Mapping options are dependent on the card type and the selected Interface. The following options may be available: Mapping Card Type STS-768c Bulk MPM-100G, MPM- Fill 100AR STS-192c Bulk MPM-100G, MPM- Fill 100AR, MPM10G STS-192c...
- Page 278 MPA_e_manual_D07-00-129P_RevA00 SONET Tab STS-<#> Added Selects foreground STS# of the mapped signal. When available, select the STS-<#> Added button to enter the number of the specific STS channel to set as the foreground (source) channel. The default setting is 1. The source channel can be used to transmit alarms, errors, or patterns.
- Page 279 MPA_e_manual_D07-00-129P_RevA00 Protocol Tabs Payload Pattern Allows the user to select a test pattern to transmit over the SONET signal. Select one of the following patterns: PRBS PRBS 9 Inv, PRBS PRBS 11 Inv, PRBS PRBS 15 Inv, PRBS PRBS 20 Inv, PRBS PRBS...
- Page 280 MPA_e_manual_D07-00-129P_RevA00 SONET Tab Line Frequency Adjusts the offset of the signal frequency of the transmitted Offset signal, in parts per million (ppm). The Line Frequency Offset can be set as a Static value, with a frequency offset value ranging from -300.0 to 300.0, in increments of 0.1 PPM.
- Page 281 MPA_e_manual_D07-00-129P_RevA00 Protocol Tabs SS Bits in the H1 This function allows bits 5 and 6, which are the SS bits, of the Label H1 Pointer byte to be set to support a SONET or SDH Transport OH. Changes to the Transport OH are another way to stress a SONET network by simulating errors, alarms, and other stress conditions.
- Page 282 MPA_e_manual_D07-00-129P_RevA00 SONET Tab Path Signal Label The Path Signal Label is part of the POH and identifies the type of traffic contained in the SPE. The C2 byte is used to indicate the content of the SPE, including the status of the mapped payload.
- Page 283 MPA_e_manual_D07-00-129P_RevA00 Protocol Tabs VT Signal Label Bits 5 through 7 of the V5 byte are allocated for a VT Signal Label to indicate the content of the VT SPE, including the status of the VT mapped payload. The following options are available: •...
- Page 284 MPA_e_manual_D07-00-129P_RevA00 SONET Tab TC Overhead Enables or Disables Tandem Connection Monitoring (TCM) Processing transmit mode. The following options are available for STS mappings. • Enable: For SONET, the unit uses its TCM circuitry and the Z5 byte to generate errors and alarms between TCM equipment.
- Page 285 MPA_e_manual_D07-00-129P_RevA00 Protocol Tabs Measured TX Line The measured TX line frequency for the currently configured Frequency interface (based on the selected reference clock) is displayed. When the TX Clock Reference is configured for Recovered, this measurement is derived from the external recovered clock.
- Page 286 MPA_e_manual_D07-00-129P_RevA00 SONET Tab J0 Trace The J0 Trace is a repeating 64-byte, 16-byte or 1-byte pattern that can be configured to send the system's default ASCII pattern, a customized user-defined ASCII pattern, or a 1-byte hexadecimal pattern. The following options are available: •...
- Page 287 MPA_e_manual_D07-00-129P_RevA00 Protocol Tabs SONET Transmit - POH The Transmit POH screen contains the following options: Function Description Allows the user to enter the number of the specific STS STS-<#> Added channel to set as the foreground (source) channel. The default setting is 1. Path and VT Allows the user to select any of the Path or VT Overhead Overhead Bytes...
- Page 288 MPA_e_manual_D07-00-129P_RevA00 SONET Tab J1 Trace The J1 Trace is a repeating 64-byte, 16-byte or 1-byte pattern that can be configured to send the system's default ASCII pattern, a customized user-defined ASCII pattern, or a 1-byte hexadecimal pattern. The following options are available: •...
- Page 289 MPA_e_manual_D07-00-129P_RevA00 Protocol Tabs J2 Trace The J2 Trace is a repeating 64-byte, 16-byte or 1-byte pattern that can be configured to send the system's default ASCII pattern, a customized user-defined ASCII pattern, or a 1-byte hexadecimal pattern. The following options are available: •...
- Page 290 MPA_e_manual_D07-00-129P_RevA00 SONET Tab TC Trace The TC Trace is a repeating 16-byte or 1-byte pattern that can be configured to send the system's default ASCII pattern, a customized user-defined ASCII pattern, or a 1-byte hexadecimal pattern. The following options are available: •...
- Page 291 MPA_e_manual_D07-00-129P_RevA00 Protocol Tabs The Transmit PTR (Pointer) screen contains the following STS Pointer and VT Pointer options: VT Pointers are only available when a VT mapping is selected. Function Description NDF Flag The NDF Flag allows you to specify whether the NDF bits are set when a new Pointer value is present in the generated signal.
- Page 292 MPA_e_manual_D07-00-129P_RevA00 SONET Tab Freq Offset The Pointer Frequency Offset function adjusts the rate at which Pointer adjustments are needed in the payload. This type of adjustment simulates network clocks that either run fast or slow. By adjusting the frequency offset rate, this forces the network equipment to compensate by decrementing or incrementing the Pointer bytes.
- Page 293 MPA_e_manual_D07-00-129P_RevA00 Protocol Tabs from 1 to 8. Ms between Bursts Allows the user to set the number of Milliseconds between bursts. Valid values are 5.5 to 35000 milliseconds. INC Pointer / DEC When a Single pointer action is selected, these will performs Pointer (action a single pointer Increment or Decrement.
- Page 294 MPA_e_manual_D07-00-129P_RevA00 SONET Tab • K1 Full Byte (Linear Mode) • K1 Bits 1-4 (Linear Mode) • K1 Bits 5-8 (Linear Mode) • K2 Full Byte (Linear Mode) • K2 Bits 1-4 (Linear Mode) • K2 Bit 5 (Provisioned) (Linear Mode) •...
- Page 295 MPA_e_manual_D07-00-129P_RevA00 Protocol Tabs This function configures the bit pattern of the K1 byte using either predefined or user defined settings by individually setting the eight bits of the K1 byte using the touch screen keypad. The following options are available: Options Description Set to 00000000 Configures the K1 byte to 00000000 bit pattern.
- Page 296 MPA_e_manual_D07-00-129P_RevA00 SONET Tab (0110) WTR Wait to restore, Bit pattern (0110) (0111) Unused Not used, Bit pattern (0111) (1000) MS Manual switch, Bit Pattern 1000 (1001) Unused Not used, Bit pattern (1001) (1010) SD-LP Signal degrade low priority, Bit pattern (1010) (1011) SD-HP Signal degrade high priority, Bit pattern (1011) (1100) SF-LP...
- Page 297 MPA_e_manual_D07-00-129P_RevA00 Protocol Tabs Channel 3 requests switch action, Bit pattern 0011 Channel 4 requests switch action, Bit pattern 0100 Channel 5 requests switch action, Bit pattern 0101 Channel 6 requests switch action, Bit pattern 0110 Channel 7 requests switch action, Bit pattern 0111 Channel 8 requests switch action, Bit pattern 1000...
- Page 298 MPA_e_manual_D07-00-129P_RevA00 SONET Tab K2 Full Byte (Linear Mode) This function configures the bit pattern of the K2 byte using either predefined or user defined settings by individually setting the eight bits of the K2 byte using the touch screen keypad. The following options are available: Options Description...
- Page 299 MPA_e_manual_D07-00-129P_RevA00 Protocol Tabs 0001 Channel 2 requests switch action, Bit pattern 0010 Channel 3 requests switch action, Bit pattern 0011 Channel 4 requests switch action, Bit pattern 0100 Channel 5 requests switch action, Bit pattern 0101 Channel 6 requests switch action, Bit pattern 0110 Channel 7 requests switch action, Bit pattern 0111...
- Page 300 MPA_e_manual_D07-00-129P_RevA00 SONET Tab K2 Bit 5 (Provisioned) (Linear Mode) This function edits the 5th bit of the K2 byte. In Linear mode. This bit controls the type of protection switching architecture used. The following options are available: Options Description Provisioned for 1+1 mode; Bit 5 = 0 1 : n Provisioned for 1:n mode;...
- Page 301 MPA_e_manual_D07-00-129P_RevA00 Protocol Tabs RDI-L pattern 110 (111) MS-AIS / Multiplex Section Alarm Indication Signal, Bit AIS-L pattern 111. This is the Transmit Illegal button setting. K1 Full Byte (Ring Mode) This function configures the bit pattern of the K1 byte using either predefined or user defined settings by individually setting the eight bits of the K1 byte using the touch screen keypad.
- Page 302 MPA_e_manual_D07-00-129P_RevA00 SONET Tab (0000) NR No request, Bit pattern 0000 (0001) RR-R Reverse request (Ring), Bit pattern 0001 (0010) RR-S Reverse request (Span), Bit pattern 0010 (0011) EXER-R Exerciser (Ring), Bit pattern 0011 (0100) EXER-S Exerciser (Span), Bit pattern 0100 (0101) WTR Wait to restore, Bit pattern (0101) (0110) MS-R...
- Page 303 MPA_e_manual_D07-00-129P_RevA00 Protocol Tabs Null (#0) Protection channel requesting switch action. The protection channel is supplied with a signal containing valid Transport Overhead for carriage of the APS bytes and BIP-8, Bit pattern 0000. Channel 1 requests switch action, Bit pattern 0001 Channel 2 requests switch action, Bit pattern 0010...
- Page 304 MPA_e_manual_D07-00-129P_RevA00 SONET Tab Channel 14 requests switch action, Bit pattern 1110 #15 (EXTRA) Extra traffic channel requesting switch, bit pattern 1111. This is the Transmit Illegal button setting. K2 Full Byte (Ring Mode) This function configures the bit pattern of the K2 byte using either predefined or user defined settings by individually setting the eight bits of the K2 byte using the touch screen keypad.
- Page 305 MPA_e_manual_D07-00-129P_RevA00 Protocol Tabs Protection channel requesting switch action. The protection channel is supplied with a signal containing valid Transport Overhead for carriage of the APS bytes and BIP-8, Bit pattern 0000. Channel 1 requests switch action, Bit pattern 0001 Channel 2 requests switch action, Bit pattern 0010 Channel 3 requests switch action, Bit pattern 0011...
- Page 306 MPA_e_manual_D07-00-129P_RevA00 SONET Tab Channel 14 requests switch action, Bit pattern 1110 Extra traffic channel requesting switch, bit pattern 1111. This is the Transmit Illegal button setting. K2 Bit 5 (Provisioned) (Ring Mode) This function edits the 5th bit of the K2 byte. In Ring mode, this bit controls the type of path code used.
- Page 307 MPA_e_manual_D07-00-129P_RevA00 Protocol Tabs the Transmit Default button setting. (100) Ex Tr Extra traffic on protection channel, Bit pattern (100) Unused Not used, Bit pattern 10 (101) Unused Not used, Bit pattern 101 (110) MS-RDI / Multiplex Section Remote Defect Indicator, Bit RDI-L pattern 110 (111) MS-AIS /...
- Page 308 MPA_e_manual_D07-00-129P_RevA00 SONET Tab The purpose of generating an error or alarm is to stress the network element that is receiving the error or alarm by testing if it can detect the incoming error/alarm and then report error/alarm statistics or if it can perform the appropriate actions required. Depending on the selected mapping, the following error types are available: Option Description...
- Page 309 MPA_e_manual_D07-00-129P_RevA00 Protocol Tabs B3 byte are toggled to create an error. This type of simulation allows an NE (in this case, the downstream equipment) to be tested to verify if (1) it can detect incoming errors, and (2) then conduct performance monitoring such as error counts and rates.
- Page 310 MPA_e_manual_D07-00-129P_RevA00 SONET Tab monitoring such as error counts and error rates. TC-IEC-P Generates a Tandem Connection Incoming Error Count over the Path layer. A TC-IEC is a count of B3 errors received by TCM equipment at the far end. Bits 1-4 of the Z5 byte are the IEC bits.
- Page 311 MPA_e_manual_D07-00-129P_RevA00 Protocol Tabs SONET Error/Alarm - Error Insert Rate This Error Insert Rate function sets the error rate for the selected error to insert. The system starts transmitting errors after the insertion rate is selected. For more information about inserting errors, see Inserting Errors in the SONET Specific Tasks section of this chapter.
- Page 312 MPA_e_manual_D07-00-129P_RevA00 SONET Tab Loss of Signal. An all-zeros pattern is transmitted to simulate a loss of signal or loss of optical power. This forces the downstream SONET equipment to (1) generate an AIS alarm to its downstream network elements (NE), and (2) generate an RDI alarm to its upstream NEs.
- Page 313 MPA_e_manual_D07-00-129P_RevA00 Protocol Tabs equipment (PTE). RDI-P Path Remote Defect Indicator. This generates an RDI-P condition using the G1 byte of the Path OH. This simulates a downstream NE (in this case, the test unit), at the Path layer, reporting a failure to an upstream NE. To do this, the system changes the pattern of the G1 byte in the Path OH.
- Page 314 MPA_e_manual_D07-00-129P_RevA00 SONET Tab Only available when a VT mapping is selected. AIS-V Virtual Tributary Alarm Indication Signal. The transmission of an AIS-V to a downstream NE forcing that NE to send a AIS- V alarm to the next downstream NE. The NE will also send an RDI-V alarm to its upstream equipment.
- Page 315 MPA_e_manual_D07-00-129P_RevA00 Protocol Tabs TC-AIS-P Tandem Connection-Alarm Indication Signal. Generates an AIS alarm to downstream TCM equipment by setting Bits 1-4 of the Z5 byte to 1110. Only appears when the TC Overhead Processing configured for "Path Enable". TC-UNEQ-P Tandem Connection-Unequipped. An all-zeros pattern is inserted into the Z5 byte of the Path OH.
- Page 316 MPA_e_manual_D07-00-129P_RevA00 SONET Tab TC-UNEQ-V Tandem Connection-Unequipped. An all-zeros pattern is inserted into the Z6 byte of the VT OH. Only appears when the TC Overhead Processing configured for "VT Enable". TC-LOF-V Tandem Connection-Loss of Frame. Generates a loss of a valid multiframe pattern to downstream equipment.
- Page 317 MPA_e_manual_D07-00-129P_RevA00 Protocol Tabs The following describes the functions that appear on the Set 1 screen, depending on the card type and configuration. Function Description Settings Control If Coupled is selected, settings changed on the Receive screen will automatically change on the Transmit screen as well.
- Page 318 MPA_e_manual_D07-00-129P_RevA00 SONET Tab Interface Selects the receive Interface Rate. For the MPM-100G and Port 1 on the MPM-100AR cards, the only SONET interface rate is: • OC-768 (39.813G) MLD Port 2 on the MPM-100AR card does not support SONET For the MPM-10G card, the following SONET interface rates are available on both ports: •...
- Page 319 MPA_e_manual_D07-00-129P_RevA00 Protocol Tabs • Fibre Chan (2.125G) - 2G Fibre Channel testing • Fibre Chan (4.25G) - 4G Fibre Channel testing • Fibre Chan (8.50G) - 8G Fibre Channel testing • Fibre Chan (10.52G) - 10G Fibre Channel testing The MPM-10G card supports hot-swappable SFP, SFP+ and Electrical SFP (RJ-45) laser modules.
- Page 320 MPA_e_manual_D07-00-129P_RevA00 SONET Tab Mapping Selects the receive Mapping signal structure. Mapping options are dependent on the card type and the selected Interface. The following options may be available: Mapping Card Type STS-768c Bulk Fill MPM-100G, MPM-100AR MPM-100G, MPM-100AR, STS-192c Bulk Fill MPM10G STS-192c Ethernet MPM10G...
- Page 321 MPA_e_manual_D07-00-129P_RevA00 Protocol Tabs STS-<#> Dropped Selects a specific STS-# to monitor in the received SONET signal, where # is the size of the Mapping. When available, select the STS-<#> Dropped button to enter the number of the specific STS channel number to be demuxed and then processed.
- Page 322 MPA_e_manual_D07-00-129P_RevA00 SONET Tab Out of Frequency Sets the threshold for which the Frequency Wide alarm Threshold occurs. When the received Line Frequency Offset (in ppm) exceeds the set threshold setting, the Frequency Wide alarm will occur. The threshold value is entered using an on-screen keypad, and can range from 0 ppm to +/- 300.0 ppm in increments of 0.1 ppm.
- Page 323 MPA_e_manual_D07-00-129P_RevA00 Protocol Tabs Expected Path Enter any eight bits for the Path Signal Label for byte C2 Signal Label expected. Configure to receive a specific value for the C2 byte. The following options are available: • 00 (Unequipped) • 01 (Equipped) •...
- Page 324 MPA_e_manual_D07-00-129P_RevA00 SONET Tab Expected VT Select one of the following values for the expected VT Signal Signal Label Label: The following options are available: • 00 (Unequipped) • 01 (Equipped) • 02 (Asynchronous) • 03 (Bit Synchronous) • 04 (Byte Synchronous) •...
- Page 325 MPA_e_manual_D07-00-129P_RevA00 Protocol Tabs Expected J0 Defines the Expected J0 Trace to be received on the incoming SONET signal. The J0 Trace is part of the Section Overhead (also known as the Section trace), where the J0 byte is configured as a repeating 64-byte, 16-byte or 1-byte pattern that can be configured as the system's default ASCII pattern, a customized user-defined ASCII pattern, or a 1-byte...
- Page 326 MPA_e_manual_D07-00-129P_RevA00 SONET Tab repeats indefinitely and does not contain CRC-7. The J0 trace is part of the Section Overhead and is known as the Section trace or J0 byte. When TIM Alarm Reporting is Enabled, a TIM-S alarm occurs if the incoming J0 trace does not match the Expected J0 Trace.
- Page 327 MPA_e_manual_D07-00-129P_RevA00 Protocol Tabs Expected J1 Defines the Expected J1 Trace to be received on the incoming SONET signal. The J1 Trace is part of the Path Overhead (also known as the Path trace), where the J1 byte is configured as a repeating 64-byte, 16-byte or 1-byte pattern that can be configured as the system's default ASCII pattern, a customized user-defined ASCII pattern, or a 1-byte...
- Page 328 MPA_e_manual_D07-00-129P_RevA00 SONET Tab repeats indefinitely and does not contain CRC-7. When TIM Alarm Reporting is Enabled, a TIM-P alarm occurs if the incoming J1 trace does not match the Expected J1 Trace.
- Page 329 MPA_e_manual_D07-00-129P_RevA00 Protocol Tabs Expected J2 Defines the Expected J2 Trace to be received on the incoming SONET signal. The J2 Trace is part of the VT Overhead (also known as the VT trace), where the J2 byte is configured as a repeating 64-byte, 16-byte or 1-byte pattern that can be configured as the system's default ASCII pattern, a customized user- defined ASCII pattern, or a 1-byte hexadecimal pattern.
- Page 330 MPA_e_manual_D07-00-129P_RevA00 SONET Tab repeats indefinitely and does not contain CRC-7. This option appears when a VT mapping is selected. When TIM Alarm Reporting is Enabled, a TIM-V alarm occurs if the incoming J2 trace does not match the Expected J2 Trace. SS Bits Alarm Enables or Disables SS bits reporting.
- Page 331 MPA_e_manual_D07-00-129P_RevA00 Protocol Tabs Expected SS Bits Selects one of the following as the expected SS Bits (bits 5 and 6 of the H1 Pointer byte) value: • 00 (SONET) • 01 (Undefined) • 10 (SDH) • 11 (Undefined) TC Error/Alarm Enables or Disables Tandem Connection Monitoring (TCM) Processing alarm reporting mode.
- Page 332 MPA_e_manual_D07-00-129P_RevA00 SONET Tab Expected TC Trace Defines the Expected TCM Trace to be received on the incoming SONET signal. The TC Trace is part of the TCM Overhead (also known as the TCM Trace), where the either the Z5 (Path) or Z6 (VT) byte, depending on the TC Error/Alarm Processing setting, is configured as a repeating 16-byte or 1-byte pattern that can be configured as the system's default ASCII pattern, a...
- Page 333 MPA_e_manual_D07-00-129P_RevA00 Protocol Tabs The following describes the functions that may appear on the Set 3 screen, depending on the card type and configuration. Function Description Monitor Mode Monitor Mode is currently not supported. Signal Auto- This is used as an attempt to recover the signal in the event Recovery Method the SONET's client processor signal (Packet tab, etc) is in an alarm state such as Loss of Frame or Loss of Link.
- Page 334 MPA_e_manual_D07-00-129P_RevA00 SONET Tab Showing Selects a specific SOH slot to monitor on the incoming SONET signal. The following bytes appear for the selected SOH slot: • Section Overhead bytes (A1, A2, J0/Z0, B1, E1, F1, D1, D2, and D3) • Pointer bytes (H1, H2, and H3) •...
- Page 335 MPA_e_manual_D07-00-129P_RevA00 Protocol Tabs Signal Label. J1 Trace Displays the J1 trace received on the incoming SONET signal. This is a read-only function. J2 Trace Displays the J2 trace received on the incoming SONET signal. This is a read-only function. The J2 trace only appears when VT mapping is selected. TC Trace Displays the TCM trace received on the incoming SONET signal.
- Page 336 MPA_e_manual_D07-00-129P_RevA00 SONET Tab Byte Select Select the Section Overhead byte to be captured. J0/Z0 S1/Z1 Z2/M1 MORE... When MORE... is selected, then the following Path Overhead bytes can be selected. F3/Z3 K3/Z4 N1/Z5...
- Page 337 MPA_e_manual_D07-00-129P_RevA00 Protocol Tabs Capture Trigger Select the Capture Trigger event. FRAME ERROR RDI-P ALARM B1 ERROR LOP-P ALARM B2 ERROR PTR INCREMENT B3 ERROR PTR DECREMENT REI-L ERROR NO NDF ALARM REI-P ERROR BIT ERROR BYTE EQUAL AIS-L ALARM BYTE NOT EQUAL RDI-L ALARM MANUAL AIS-P ALARM...
- Page 338 MPA_e_manual_D07-00-129P_RevA00 SONET Tab If 0 is entered, then the 255 bytes immediately preceding the trigger, as well as the triggered byte value will be captured, but 0 bytes after the trigger will be captured. Action buttons Capture - Activates the capture feature, and changes the State to "Waiting for Trigger".
- Page 339 MPA_e_manual_D07-00-129P_RevA00 Protocol Tabs OH CAPTURE When a capture event is triggered, the 256 captured bytes are RESULTS displayed in both Hexadecimal and ASCII. The Frame column displays the frame number for each of the captures bytes. Frame numbers can range from -255 to 255, depending on the Bytes After Trigger setting.
- Page 340 MPA_e_manual_D07-00-129P_RevA00 SONET Tab Results SONET Results Screens and Functions All monitored activity that the system receives is reported to the Results screen for viewing and analyzing. The Results screen provides information used for analyzing the incoming signal, pattern, errors, and alarms. The following options are available from the Results screen: •...
- Page 341 MPA_e_manual_D07-00-129P_RevA00 Protocol Tabs Frame (Section A1/A2 Framing REI-V (Remote Error Indication - Bytes) Virtual Tributary) B1 (Section BIP-8, also known as a TC-IEC-P/V (Tandem Connection- Section Coding Violation - CV-S) Incoming Error Count) B2 (Line BIP-8, also known as a TC-REI-P/V (Tandem Connection- Line Coding Violation - CV-L) Remote Error Indicator)
- Page 342 MPA_e_manual_D07-00-129P_RevA00 SONET Tab Frequency Wide LOP-V (Loss of Pointer - VT) OPU Generic AIS (Unframed - LOM-V (Loss of Multiframe PRBS 11) Alignment - VT) LOF (Loss of Frame) UNEQ-V (Unequipped - Virtual Transport) AIS-L (Alarm Indication Signal - RDI-V (Remote Defect Indicator - Line) Virtual Transport) APS-L (Automatic Protection...
- Page 343 MPA_e_manual_D07-00-129P_RevA00 Protocol Tabs SONET Results - PTR This PTR function monitors and reports received Pointer statistics. A count of the following Pointer statistics appear: The following STS/VT Pointer results appear: • Pointer Justification - Indicates the Positive Pointer Justification count. •...
- Page 344 MPA_e_manual_D07-00-129P_RevA00 SONET Tab The APS function monitors incoming APS activity. It logs and displays the K1 and K2 byte sequences received by the unit. A maximum of 15 byte sequences can appear on the screen. The Results APS screen contains the following options: Option Description APS Summary...
- Page 345 MPA_e_manual_D07-00-129P_RevA00 Protocol Tabs bits stabilize on a new value for a minimum of three consecutive frames. SONET Results - Large LEDs This screen displays the LED Error and Alarm Indicators in a large, easy to read format that covers the entire screen area. This is especially useful for viewing any errors or alarms from a long distance, such as across the room from a test bay.
- Page 346 MPA_e_manual_D07-00-129P_RevA00 SONET Tab 1. Select a protocol processor that has been configured for Error Alarm testing. 2. From Results, select Graph. The Graph screen appears. It contains two graphs which allow you to display incoming alarms and errors. 3. Use the following buttons to control graphing parameters: •...
- Page 347 MPA_e_manual_D07-00-129P_RevA00 Protocol Tabs Print a Graph Report 1. Select the protocol processor running the test for which you want to print the graph. 2. From the Results tab, select Graph. 3. Select the Graph screen's Print Report command button. The Report Setup menu appears.
- Page 348 MPA_e_manual_D07-00-129P_RevA00 SONET Tab Saving Graphs for Replay Select the Save Graphs button to save the graphed results to a file for replay at a later time. The graph is saved with a .grp extension. To view the graph select the Replay Graphs button and choose the desired .grp file from the Browser dialog box.
- Page 349 MPA_e_manual_D07-00-129P_RevA00 Protocol Tabs SONET Test - Set 1 The SET 1 functions determine how long a protocol processor's test runs and what activities occur at the end of the test. The following appears on the SET 1 screen. Function Description Duration This function configures how long a timed test runs.
- Page 350 MPA_e_manual_D07-00-129P_RevA00 SONET Tab Action after Duration Description Options None No action occurs at the end of the test duration. Print Current Statistics At the end of a timed test a statistics report of the received Errors, Alarms, Pointer Analysis, and Signal Status are printed to the configured printer.
- Page 351 MPA_e_manual_D07-00-129P_RevA00 Protocol Tabs Repeat Actions is selected. configured printer, and the timed test restarts. This test cycle continues until the test is stopped by selecting Stop from the Common Function Buttons, or by changing the Action After Duration value. Record Statistics and Repeat At the end of a timed test a Test statistics report of the...
- Page 352 MPA_e_manual_D07-00-129P_RevA00 SONET Tab This test cycle continues until the test is stopped by selecting Stop from the Common Function Buttons, or by changing the Action After Duration value. Print Statistics/Events and At the end of a timed test Repeat Test both test Statistics and Events are automatically printed to the configured...
- Page 353 MPA_e_manual_D07-00-129P_RevA00 Protocol Tabs Record Options When a Record option is chosen, the results are saved to a file with one of the following extensions: • .stat - Results Report. A statistics report of the received Errors, Alarms, Pointer Analysis, and Signal Status functions.
- Page 354 LED history. SONET Test - Service Disruption The MPA can measure Service Disruption switching intervals in your network and can be configured to monitor for a specific event that will cause a service disruption switch. When this event occurs, the duration in both seconds and frames is logged. These statistics can be used to determine how long it takes for your network equipment to react to an service disruption event and switch to a backup path.
- Page 355 MPA_e_manual_D07-00-129P_RevA00 Protocol Tabs • Protection Switch Criteria - Determines the type of alarm, error, or pattern event that is used as a trigger to generate service disruption activity in your network. The unit monitors the incoming signal for the specified event. If it occurs, its duration in both seconds and frames is measured and logged.
- Page 356 MPA_e_manual_D07-00-129P_RevA00 SONET Tab Test RTD functions include: • Action (State): Starts and stops round-trip delay mode. Single Round-Trip Delay - If selected, a burst of payload BIT errors are inserted into a frame and transmitted through your network. The frame's transmission through the network is measured in frame counts and milliseconds.
- Page 357 MPA_e_manual_D07-00-129P_RevA00 Protocol Tabs SONET Test - SFP Info The SONET, SDH and OTN protocol tabs on the MPM-10G module includes the following SFP Info screen under the Test section. The SFP Info screen displays common information from the pluggable SFP or SFP+ module’s 2-wire (I2C) interface, as programmed by the module's manufacturer.
- Page 358 MPA_e_manual_D07-00-129P_RevA00 SONET Tab Displays the module’s optical Wavelength: Page 00h Byte: 186-189 Wavelength and Wavelength Tolerance, or Copper Cable Size: 4 Bytes Attenuation Displays the module’s Power Class Power: Page 00h Byte: 129 Level. Size: 4 bits Displays the module’s Vendor Vendor Name: Page 00h Byte: 148-163 (manufacturer) Name.
- Page 359 MPA_e_manual_D07-00-129P_RevA00 Protocol Tabs Length (62.5um): Displays the link length supported for Page 00h Byte: 145 OM4 50/125 um fiber, units of 1 m Size: 1 Byte Length (OM4): Displays the link length supported for Page 00h Byte: 146 OM4 50/125 um fiber, units of 2 m Size: 1 Byte Length (OM3): Displays the link length supported for...
- Page 360 MPA_e_manual_D07-00-129P_RevA00 SONET Tab TX_DISABLE Toggles the logical state of the TX_DIS pin state. Toggles the logical state of the Rate Select 0 bit. Toggles the logical state of the Rate Select 1 bit. TX_FAULT Reports the state of the TX_FAULT signal. MOD_ABS Reports the presence of an inserted CFP module to the Host.
- Page 361 MPA_e_manual_D07-00-129P_RevA00 Protocol Tabs (Specifically for SONET testing) Performance Monitoring provides greater detail about incoming Section, Line, Path, VT and BIT errors. The following options are available: • Sect • Line • Path • VT Path (only available when in a VT mapping) •...
- Page 362 MPA_e_manual_D07-00-129P_RevA00 SONET Tab OC-768 22,778 errors per second OC-192 8,554 errors per second OC-48 2,392 errors per second OC-12 616 errors per second OC-3 115 errors per second OC-1 52 errors per second Perf Monitor - Line (Specifically for SONET testing) The Line screen displays a detailed breakdown of incoming B2 (Line BIP-8, also known as Coding Violations) and Line Remote Error Indicator (REI-L) errors.
- Page 363 MPA_e_manual_D07-00-129P_RevA00 Protocol Tabs Line - Far End REI Errors • CV - Coding Violations. Reports an error count of the number of B2 errors detected by the far-end Line Terminating Equipment (LTE). These errors are reported back to the unit using the M1 byte of the Line overhead. The M1 byte is also known as the Line Remote Error Indicator - REI-L.
- Page 364 MPA_e_manual_D07-00-129P_RevA00 SONET Tab The Path screen displays a detailed breakdown of incoming B3 (Path BIP-8, also known as Path Coding Violations) and STS Path Remote Error Indicator (REI-P) errors. The following statistics are reported: Path - Near End B3 Errors •...
- Page 365 MPA_e_manual_D07-00-129P_RevA00 Protocol Tabs (Specifically for SONET testing) The VT Path screen displays a detailed breakdown of incoming Virtual Tributary path BIP (Virtual Tributary BIP-2, also known as Coding Violations) errors and Virtual Tributary Remote Error Indicator (REI-V) errors. The following statistics are reported: VT BIP Errors •...
- Page 366 MPA_e_manual_D07-00-129P_RevA00 SONET Tab • UAS - Unavailable Seconds. Reports the number of seconds that the Path layer was considered unavailable. A Path is considered unavailable when at least 10 consecutive Severely Errored Seconds occur. Perf Monitor - BIT (Specifically for SONET testing) Bit analysis provides a detailed breakdown for detected Payload Bit errors.
- Page 367 MPA_e_manual_D07-00-129P_RevA00 Protocol Tabs LED Quick Status Area SONET - LED Quick Status Area The left side of the screen provides an at-a-glance view of the current protocol processor's LEDs and Laser ON/Off button. The LEDs report incoming error and alarm activity, current status, and event history to help narrow the focus if problems are detected on the incoming signal and provide a starting point when trying to diagnose problems.
- Page 368 MPA_e_manual_D07-00-129P_RevA00 SONET Tab • CLK:REC displays when configured for Recovered clocking. • All Tests: Provides a shortcut to the All Test Status screen (located under the System tab) which shows a general status summary of all circuit packs installed in the unit. •...
- Page 369 MPA_e_manual_D07-00-129P_RevA00 Protocol Tabs Section Section Status LED. Indicates if any of the errors or alarms within this portion of the overhead are being received, including a Frame error. This is a status LED. Loss of Signal. Indicates that a valid SONET signal is not being received.
- Page 370 MPA_e_manual_D07-00-129P_RevA00 SONET Tab Line Overhead BIP-8 Code Violation. Indicates that parity errors were detected at the Line layer of the incoming SONET signal. This is calculated over the Line OH, Path OH, and payload of each STS-1. This is an error LED Path STS Path Status LED.
- Page 371 MPA_e_manual_D07-00-129P_RevA00 Protocol Tabs AIS-V VT Alarm Indication Signal. Indicates an all-ones characteristic or adapted information signal was detected on the VT. It is generated to replace the normal traffic signal when it contains a defect condition in order to prevent consequential downstream failures being declared or alarms being raised.
- Page 372 MPA_e_manual_D07-00-129P_RevA00 SONET Tab This is an error LED. Tandem Connection Status LED. Indicates if a TCM error or alarm has been detected. If the TCM Summary LED is red, select the "TCM" text to display the TCM Summary LEDs. The TCM Summary LED only appears when Error/Alarm Processing is enabled in the Receive settings.
- Page 373 MPA_e_manual_D07-00-129P_RevA00 Protocol Tabs The following describes the TCM LEDs that appear when the TC Overhead Processing is configured for either "Enable" or "Path Enable". Description TC-IEC-P Tandem Connection-Incoming Error Count. Indicates a B3 error count is being received from downstream TCM equipment.
-
Page 374: Sonet Specific Tasks
MPA_e_manual_D07-00-129P_RevA00 SONET Tab Description TC-BIP-V Tandem Connection-Bit Interleaved Parity error. Indicates a BIP error count is being received from downstream TCM equipment. Bits 1-2 of the Z6 byte are used for this indicator. This is an error LED. TC-REI-V Tandem Connection-Remote Error Indication. Indicates that an error has occurred at the downstream TCM equipment. - Page 375 MPA_e_manual_D07-00-129P_RevA00 Protocol Tabs This section includes tasks that are specific to the SONET protocol processor. For a description of specific screens and their functionality, refer to SONET - Screen Functions and Descriptions Overview. The following Specific Tasks for this protocol processor are discussed: •...
- Page 376 MPA_e_manual_D07-00-129P_RevA00 SONET Tab Unit Reports Loss of Signal A Loss of Signal (LOS) occurs when the unit detects an all-zeros pattern for 100 milliseconds or greater on the incoming SONET signal. If an LOS is present, verify the receive signal strength as indicated by RX in the LEDs/Quick Status area of the touch screen.
- Page 377 MPA_e_manual_D07-00-129P_RevA00 Protocol Tabs Related Topics: Unit reports Loss of Signal (LOS) What causes a B1 error? What causes a B2 error? What causes a B3 error? What causes an AIS alarm? What causes an RDI alarm? How to Insert Errors How to Insert Alarms What Causes a B2 Error? A B2 error occurs when a parity error is detected at the Line layer of the incoming...
- Page 378 MPA_e_manual_D07-00-129P_RevA00 SONET Tab What causes an AIS alarm? What causes an RDI alarm? How to Insert Errors How to Insert Alarms What Causes a B3 Error? The B3 byte of the Path Overhead is used to detect parity errors at the Path layer of the incoming SONET signal.
- Page 379 SONET Line signal. An LTE declares an AIS-P downstream within 125 milliseconds of detecting an LOP alarm on the incoming SONET signal. If the MPA receives an AIS-L or AIS-P alarm, it is reported by the MPA's LEDs and logged to the Results screen.
- Page 380 Line Far-End Remote Failure (Line FERF) -- and STS Path RDI (RDI-P) alarms. If the MPA receives an RDI-L or RDI-P alarm, it is reported by the MPA's LEDs and logged to the Results screen. The MPA can be used to simulate RDI alarms to verify if upstream NEs react accordingly to an incoming RDI alarm.
- Page 381 MPA_e_manual_D07-00-129P_RevA00 Protocol Tabs 2. Select Transmit and choose Set > Set 1. 3. Verify that the Settings Control setting is set to Coupled. 4. Select Interface. The Select Type of Interface menu box appears. 5. Select OC-192 (9953.28 Mbps). 6. Select the Mapping. The Select Mapping menu box appears. 7.
- Page 382 MPA_e_manual_D07-00-129P_RevA00 SONET Tab 3. Select the APS button. The initial APS screen appears containing a table of the K1 and K2 byte sequences that can be transmitted. A total of 16 K1 and K2 byte sequences can appear in the table. 4.
- Page 383 MPA_e_manual_D07-00-129P_RevA00 Protocol Tabs To stop transmitting K1 and K2 bytes: 1. Select a protocol processor mode. 2. Select the Transmit button. 3. Select the APS button. The initial APS screen appears. 4. Select Stop. Related Topic: Decoding APS (K1 and K2) Values Decoding APS (K1 and K2) Values The following only applies to SONET and SDH protocol processors.
- Page 384 MPA_e_manual_D07-00-129P_RevA00 SONET Tab a. Select the desired Item row. The APS Decode dialog box appears with the K1 and K2 byte values decoded. b. You can scroll through the Items by selecting the Prev and Next buttons at the bottom of the APS Decode dialog box. Choose Cancel when finished.
- Page 385 MPA_e_manual_D07-00-129P_RevA00 Protocol Tabs Warning: Continued operation while the Power Hot alarm is incrementing will cause permanent damage to the laser module. The Power Low alarm is a user definable setting, that is typically set to -100 dBm (disable) by default. The user can adjust the Power Low Threshold setting from the Receive settings page.
- Page 386 MPA_e_manual_D07-00-129P_RevA00 SONET Tab Inserting Multiple Errors Various errors can be transmitted by the system. One reason for transmitting errors is to determine if the receiving equipment can detect an error in the incoming signal. Inserting multiple errors at a specified error rate allows you to monitor the network and receiving equipment for any undesirable behavior as the error rate is increased.
- Page 387 MPA_e_manual_D07-00-129P_RevA00 Protocol Tabs 1. Select a protocol processor mode. 2. Select Transmit and choose PTR. 3. Configure the Pointer Value parameters. For example, • Select NDF Flag to allow a New Data Flag to be set when a new Pointer value has been transmitted.
- Page 388 Print or Save (.evt extension) the Event Log report. Saving and Printing Statistics and Settings Reports (Specifically for SONET tab) The MPA test set provides the option to Print or Save several Report types. To save or print test reports: Select from the Common Function Buttons row at the bottom of the screen.
- Page 389 MPA_e_manual_D07-00-129P_RevA00 Protocol Tabs Choose the Report type(s) to be printed or saved. The most common report is the Statistics report, which contains a complete list of error and alarm statistic information as well as other counts that pertain to the test performed.
- Page 390 MPA_e_manual_D07-00-129P_RevA00 SONET Tab Serv Disrupt Reports Service Disruption statistics. Reports the Round Trip Delay measurements. Module Info Reports the Module Information. Only supported on the MPM-10G card, see the MLD tab for other card types. ** Module Not Present ** is shown when laser module is not inserted.
-
Page 391: Sdh Tab
MPA_e_manual_D07-00-129P_RevA00 Protocol Tabs When printing a report to PDF Printer or PDF File, you can include a User Image file (such as your company’s logo image) to be printed/saved to the top of the report file. Supported image files formats include: .JPG, .PNG, .GIF and .BMP file extensions. -
Page 392: Screens And Function Descriptions
MPA_e_manual_D07-00-129P_RevA00 SDH Tab The test options available under the SDH (Synchronous Digital Hierarchy) protocol processor tabs can vary from one card type to another, depending on the test options supported and actively licensed. This section of the help file will list all Interface rates and test options currently available for each card type. - Page 393 MPA_e_manual_D07-00-129P_RevA00 Protocol Tabs • LED Quick Status Area • Common Function Buttons • Lock/Unlock Icon Transmit SDH Transmit Screens and Functions The transmit section allows you to configure the transmit signal parameters used in SDH operations. The following transmit functionalities are available through the SDH Transmit screen: •...
- Page 394 MPA_e_manual_D07-00-129P_RevA00 SDH Tab Some settings such as Interface are always coupled, regardless of the Settings Control mode. Pass Thru Mode Activates or deactivates passthru mode, allowing an incoming STM signal to pass through the unit without altering the data in the signal. The following options are available: On and Off.
- Page 395 MPA_e_manual_D07-00-129P_RevA00 Protocol Tabs Interface Selects the transmit Interface Rate. For the MPM-100G and Port 1 on the MPM-100AR cards, the only SDH interface rate is: • STM-256 (39.813) MLD Port 2 on the MPM-100AR card does not support SDH For the MPM-10G card, the following SDH interface rates are available on both ports: •...
- Page 396 MPA_e_manual_D07-00-129P_RevA00 SDH Tab Ethernet testing • Fibre Chan (1.0625G) - 1G Fibre Channel testing • Fibre Chan (2.125G) - 2G Fibre Channel testing • Fibre Chan (4.25G) - 4G Fibre Channel testing • Fibre Chan (8.50G) - 8G Fibre Channel testing •...
- Page 397 MPA_e_manual_D07-00-129P_RevA00 Protocol Tabs Selects the transmit Mapping signal structure. Mapping Mapping options are dependent on the card type and the selected Interface. The following options may be available: Mapping Card Type AU-4-256c Bulk Fill MPM-100G, MPM-100AR MPM-100G, MPM-100AR, AU-4-64c Bulk Fill MPM10G AU-4-64c Ethernet MPM10G...
- Page 398 MPA_e_manual_D07-00-129P_RevA00 SDH Tab AU-<#> Added Selects foreground AU# of the mapped signal. When available, select the AU-<#> Added button to enter the number of the specific AU channel to set as the foreground (source) channel. The default setting is 1. The source channel can be used to transmit alarms, errors, or patterns.
- Page 399 MPA_e_manual_D07-00-129P_RevA00 Protocol Tabs value). Payload Pattern Allows the user to select a test pattern to transmit over the SDH signal. This command is automatically coupled to its equivalent Receive command. Select one of the following: PRBS PRBS 9 Inv, PRBS PRBS 11 Inv, PRBS...
- Page 400 MPA_e_manual_D07-00-129P_RevA00 SDH Tab Use the Set 1 and Set 2 screens to configure the SDH Transmit parameters. The following describes the functions that appear on the Set 2 screen. Function Description Adjusts the offset of the signal frequency of the transmitted Line Frequency signal, in parts per million (ppm).
- Page 401 MPA_e_manual_D07-00-129P_RevA00 Protocol Tabs SS Bits in the H1 This function allows bits 5 and 6, which are the SS bits, of the Label H1 Pointer byte to be set to support a SONET or SDH Transport OH. Changes to the Transport OH are another way to stress an SDH network by simulating errors, alarms, and other stress conditions.
- Page 402 MPA_e_manual_D07-00-129P_RevA00 SDH Tab The HP (Higher-Order Path) Signal Label is part of the POH HP Signal Label and identifies the type of traffic contained in the SPE. The C2 byte is used to indicate the content of the SPE, including the status of the mapped payload.
- Page 403 MPA_e_manual_D07-00-129P_RevA00 Protocol Tabs LP Signal Label Bits 5 through 7 of the V5 byte are allocated for a LP Signal Label to indicate the content of the LP SPE, including the status of the LP mapped payload. The following options are available: •...
- Page 404 MPA_e_manual_D07-00-129P_RevA00 SDH Tab Enables or Disables Tandem Connection Monitoring (TCM) TC Overhead transmit mode. Processing The following options are available for HP mappings. • Enable: For SDH, the unit uses its TCM circuitry and the N1 byte to generate errors and alarms between TCM equipment.
- Page 405 MPA_e_manual_D07-00-129P_RevA00 Protocol Tabs When the TX Clock Reference is configured for Recovered, this measurement is derived from the external recovered clock. For the MPM-100G and MPM-100AR cards, this setting is supported on the MLD tab. Measured TX Line Measures the Transmission Line Frequency Offset value in Frequency Offset Hz and PPM.
- Page 406 MPA_e_manual_D07-00-129P_RevA00 SDH Tab 1-byte hexadecimal pattern. The following options are available: • Default (64 byte) - Selects the default 64-byte ASCII message as the transmitted trace pattern. The message consists of 62 ASCII characters appended with CR and LF characters at the end of the message. •...
- Page 407 MPA_e_manual_D07-00-129P_RevA00 Protocol Tabs The Transmit POH screen contains the following options: Function Description AU-<#> Added Allows the user to enter the number of the specific AU channel to set as the foreground (source) channel. The default setting is 1. Allows the user to select any of the Higher-order Path (HP) or HP Overhead Lower-order Path (LP) Overhead bytes to edit their Bytes...
- Page 408 MPA_e_manual_D07-00-129P_RevA00 SDH Tab with a CRC-7 at the end of the message. • User Defined (16 byte): Selects a 16-byte user- defined ASCII message as the transmitted trace pattern. The message is entered and saved using a touch screen keyboard. The user-defined message can be up to 15 ASCII characters, appended with a CRC-7 at the end of the message.
- Page 409 MPA_e_manual_D07-00-129P_RevA00 Protocol Tabs defined ASCII message as the transmitted trace pattern. The message is entered and saved using a touch screen keyboard. The user-defined message can be up to 15 ASCII characters, appended with a CRC-7 at the end of the message. •...
- Page 410 MPA_e_manual_D07-00-129P_RevA00 SDH Tab value repeats indefinitely and does not contain CRC-7. • User Defined (1 byte): Selects a user-defined Hexadecimal byte value as the transmitted trace pattern. The byte value is entered and saved using a touch screen keypad (from 0x00 to 0xFF). The byte value repeats indefinitely and does not contain CRC-7.
- Page 411 MPA_e_manual_D07-00-129P_RevA00 Protocol Tabs An NDF error is registered when the received point value changes and the NDF flag bits are not toggled. Pointer Value The Pointer Value indicates the offset between the H1/H2 bytes and the first byte of the Virtual Container (VC) or Synchronous Payload Envelope (SPE) .
- Page 412 MPA_e_manual_D07-00-129P_RevA00 SDH Tab increases the frequency justification rate. This function is disabled by entering 0 for the frequency offset. Pointer Action Determines the type of Pointer activity that occurs when the INC Pointer and DEC Pointer buttons are selected. Single options - Inserts a single Pointer movement with each selection of the INC Pointer or DEC Pointer button.
- Page 413 MPA_e_manual_D07-00-129P_RevA00 Protocol Tabs or Ring-based networks and are transmitted using bytes K1 and K2 of the Line overhead. You can test the network’s APS response by generating a condition that is likely to cause APS switching. You also have the capability to generate specific APS messages and monitor the response.
- Page 414 MPA_e_manual_D07-00-129P_RevA00 SDH Tab • K1 Bits 5-8 (Ring Mode) • K2 Full Byte (Ring Mode) • K2 Bits 1-4 (Ring Mode) • K2 Bit 5 (Provisioned) (Ring Mode) • K2 Bits 6-8 (Ring Mode) Duration in Frames The Duration in Frames function determines the number of frames transmitted that contain specific K1 and K2 bytes.
- Page 415 MPA_e_manual_D07-00-129P_RevA00 Protocol Tabs K1 Bits 1-4 (Linear Mode) This function edits the first four bits of the K1 byte. The options for this function are predefined and use mnemonics to identify bit patterns. The following options are available: Options Description (0000) NR No Request, Bit pattern 0000 (0001) Non Rev Do not revert, Bit pattern 0001...
- Page 416 MPA_e_manual_D07-00-129P_RevA00 SDH Tab K1 Bits 5-8 (Linear Mode) This function edits the last four bits of the K1 byte. When APS commands are configured for Linear mode, these bits indicate the channel number. For example, Code 0 is the Null Channel, Codes 1-14 are the working channels, and Code 15 is an extra traffic channel.
- Page 417 MPA_e_manual_D07-00-129P_RevA00 Protocol Tabs 1010. This is the Transmit Default button setting. Channel 11 requests switch action, Bit pattern 1011 Channel 12 requests switch action, Bit pattern 1100 Channel 13 requests switch action, Bit pattern 1101 Channel 14 requests switch action, Bit pattern 1110 #15 (EXTRA) Extra traffic channel requesting switch, bit...
- Page 418 MPA_e_manual_D07-00-129P_RevA00 SDH Tab at a time using the touch screen keypad. K2 Bits 1-4 (Linear Mode - SDH) This function edits the first four bits of the K2 byte. In Linear mode, the first four bits indicate which working channel is bridged onto the protection channel during a traffic switching event.
- Page 419 MPA_e_manual_D07-00-129P_RevA00 Protocol Tabs 1000 Channel 9 requests switch action, Bit pattern 1001 Channel 10 requests switch action, Bit pattern 1010. This is the Transmit Default button setting. Channel 11 requests switch action, Bit pattern 1011 Channel 12 requests switch action, Bit pattern 1100 Channel 13 requests switch action, Bit pattern 1101...
- Page 420 MPA_e_manual_D07-00-129P_RevA00 SDH Tab K2 Bits 6-8 (Linear Mode) This function edits the 6th, 7th, and 8th bits of the K2 byte. These bits indicate if a FERF or FEBE occurs at the line level. The current value displays in the User Setup column of the APS Commands function.
- Page 421 MPA_e_manual_D07-00-129P_RevA00 Protocol Tabs (10101010) Illegal Configures the K1 byte to 11111111 bit pattern. (11111111) User Defined Allows you to configure the bit pattern one bit at a time using the touch screen keypad. K1 Bits 1-4 (Ring Mode) This function edits the first four bits of the K1 byte. The options for this function are predefined and use mnemonics to identify bit patterns.
- Page 422 MPA_e_manual_D07-00-129P_RevA00 SDH Tab is the Transmit Default button setting. (1011) SD-R Signal degrade (Ring), Bit pattern (1011) (1100) SF-S Signal fail (Span), Bit pattern (1100) (1101) FS-R Forced switch (Ring), Bit pattern (1101) (1110) FS-S Forced switch (Span), Bit pattern (1110) (1111) LP-S Lockout of protection (Span), Bit pattern (1111).
- Page 423 MPA_e_manual_D07-00-129P_RevA00 Protocol Tabs Channel 5 requests switch action, Bit pattern 0101 Channel 6 requests switch action, Bit pattern 0110 Channel 7 requests switch action, Bit pattern 0111 Channel 8 requests switch action, Bit pattern 1000 Channel 9 requests switch action, Bit pattern 1001 Channel 10 requests switch action, Bit pattern 1010.
- Page 424 MPA_e_manual_D07-00-129P_RevA00 SDH Tab Options Description Set to 00000000 Configures the K2 byte to 00000000 bit pattern. Default Configures the K2 byte to 10101010 bit (10101010) pattern. Illegal Configures the K2 byte to 11111111 bit (11111111) pattern. User Defined Allows you to configure the bit pattern one bit at a time using the touch screen keypad.
- Page 425 MPA_e_manual_D07-00-129P_RevA00 Protocol Tabs Channel 5 requests switch action, Bit pattern 0101 Channel 6 requests switch action, Bit pattern 0110 Channel 7 requests switch action, Bit pattern 0111 Channel 8 requests switch action, Bit pattern 1000 Channel 9 requests switch action, Bit pattern 1001 Channel 10 requests switch action, Bit pattern 1010.
- Page 426 MPA_e_manual_D07-00-129P_RevA00 SDH Tab Options Description SHT / OTO Short Path Code; Bit 5 = 0 LNG / OTN Long Path Code; Bit 5 = 1. When selected, both the Transmit Default and Transmit Illegal button settings are configured for LNG/OTN. K2 Bits 6-8 (Ring Mode) This function edits the 6th, 7th, and 8th bits of the K2 byte.
- Page 427 MPA_e_manual_D07-00-129P_RevA00 Protocol Tabs Error Alarm SDH Transmit - Error Alarm Use this screen to configure and transmit SDH errors and alarms. For information on inserting errors and alarms see the online help topics, Inserting Errors Inserting Alarms in the Common Tasks section. The following options are available on the SDH Errors and Alarms screen.
- Page 428 MPA_e_manual_D07-00-129P_RevA00 SDH Tab downstream equipment) to be tested to verify if (1) it can detect incoming errors, and (2) then conduct performance monitoring such as error counts and rates. B2 Error Generates a BIP-8 error over the Multiplex Section layer. Bits in the B2 byte are toggled to create an error.
- Page 429 MPA_e_manual_D07-00-129P_RevA00 Protocol Tabs error rates. LP-BIP Generates a BIP-2 error over the Lower-Order Path layer. Bits in the V5 byte are toggled to create an error. Only available when a LP mapping is selected. LP-REI Generates a Remote Error Indicator over the Lower-Order Path layer.
- Page 430 MPA_e_manual_D07-00-129P_RevA00 SDH Tab Bit 6 of the N1 byte is used for this error. Only appears when the TC Overhead Processing configured for "HP Enable". LP-TC-BIP Generates a Tandem Connection Bit Interleaved Parity error over the Lower-Order Path layer. Bits 1-2 of the N2 byte are the BIP bits.
- Page 431 MPA_e_manual_D07-00-129P_RevA00 Protocol Tabs Maximum Generates errors at the maximum rate listed below. 1e - X X is a negative integer exponent, for example 1e-3. The X may vary based on the type of error selected. User Defined Allows the user to enter a custom error rate anywhere between the Minimum and Maximum allowed rates.
- Page 432 MPA_e_manual_D07-00-129P_RevA00 SDH Tab An MS-AIS simulates an alarm generated by Line terminating equipment (LTE). MS-RDI Multiplex Section Remote Defect Indicator. This generates an MS-RDI condition using the K2 byte of the Line OH. This simulates a downstream NE at the Line layer, reporting a failure to an upstream NE.
- Page 433 MPA_e_manual_D07-00-129P_RevA00 Protocol Tabs HP-UNEQ Higher-Order Path Unequipped Alarm. An all-zeros pattern is inserted into the C2 byte of the HPOH. The C2 byte is the HP Signal Label. (This type of error is used between Higher- Order Path terminating equipment-PTE) When a PTE receives this alarm, it will generate an AIS to downstream NEs.
- Page 434 MPA_e_manual_D07-00-129P_RevA00 SDH Tab Only available when a LP mapping is selected. TU-LOM Tributary Unit Loss of Multiframe Alignment. Generates a loss of a valid TU multiframe pattern to downstream equipment. The NE will also send an TU-RDI alarm to its upstream equipment.
- Page 435 MPA_e_manual_D07-00-129P_RevA00 Protocol Tabs LP-TC-RDI Tandem Connection-Remote Defect Indicator. Generates an alarm to upstream equipment indicating that defects have been detected within the Tandem Connection. The TCM equipment receiving this alarm should detect a change to Bit 8 in multiframe 73 of the N2 byte. Only appears when the TC Overhead Processing configured for "LP Enable".
- Page 436 MPA_e_manual_D07-00-129P_RevA00 SDH Tab The Receive function allows you to define the parameters used in SDH receiving operations. The following parameter setting options are available from the Receive screen: • Set > Set 1 • Set > Set 2 • Set > Set 3 •...
- Page 437 MPA_e_manual_D07-00-129P_RevA00 Protocol Tabs Interface Selects the receive Interface Rate. For the MPM-100G and Port 1 on the MPM-100AR cards, the only SDH interface rate is: • STM-256 (39.813) MLD Port 2 on the MPM-100AR card does not support SDH For the MPM-10G card, the following SONET interface rates are available on both ports: •...
- Page 438 MPA_e_manual_D07-00-129P_RevA00 SDH Tab • Fibre Chan (2.125G) - 2G Fibre Channel testing • Fibre Chan (4.25G) - 4G Fibre Channel testing • Fibre Chan (8.50G) - 8G Fibre Channel testing • Fibre Chan (10.52G) - 10G Fibre Channel testing The MPM-10G card supports hot-swappable SFP, SFP+ and Electrical SFP (RJ-45) laser modules.
- Page 439 MPA_e_manual_D07-00-129P_RevA00 Protocol Tabs Mapping Selects the receive Mapping signal structure. Mapping options are dependent on the card type and the selected Interface. The following options may be available: Mapping Card Type AU-4-256c Bulk Fill MPM-100G, MPM-100AR MPM-100G, MPM-100AR, AU-4-64c Bulk Fill MPM10G AU-4-64c Ethernet MPM10G...
- Page 440 MPA_e_manual_D07-00-129P_RevA00 SDH Tab AU-<#> Dropped Selects a specific AU# signal to monitor in the SDH signal. The test set receives the SDH signal that is demuxed into dropped signals and then processed. The options that appear will depend on your current configuration.
- Page 441 MPA_e_manual_D07-00-129P_RevA00 Protocol Tabs Selects the type of pattern that the unit expects to receive on Payload Pattern the incoming SDH signal. Select one of the following patterns: PRBS PRBS 9 Inv, PRBS PRBS 11 Inv, PRBS PRBS 15 Inv, PRBS PRBS 20 Inv, PRBS...
- Page 442 MPA_e_manual_D07-00-129P_RevA00 SDH Tab SDH Receive - Set / Set 2 Use the Set 1, Set 2 and Set 3 screens to configure the SDH Receive parameters. The following describes the functions that may appear on the Set 2 screen, depending on the card type and configuration.
- Page 443 MPA_e_manual_D07-00-129P_RevA00 Protocol Tabs Expected HP Enter any eight bits for the Higher-Order Path Signal Label Signal Label for byte C2 expected. Configure to receive a specific value for the C2 byte. The following options are available: • 00 (Unequipped) • 01 (Equipped) •...
- Page 444 MPA_e_manual_D07-00-129P_RevA00 SDH Tab Expected LP Select one of the following values for the expected Lower Signal Label Order Path Signal: The following options are available: • 00 (Unequipped) • 01 (Equipped) • 02 (Asynchronous) • 03 (Bit Synchronous) • 04 (Byte Synchronous) •...
- Page 445 MPA_e_manual_D07-00-129P_RevA00 Protocol Tabs Defines the Expected J0 Trace to be received on the Expected J0 incoming SDH signal. The J0 Trace is part of the Regenerator Section Overhead (also known as the RS Trace), where the J0 byte is configured as a repeating 64-byte, 16-byte or 1-byte pattern that can be configured as the system's default ASCII pattern, a customized user-defined ASCII pattern, or a 1-byte hexadecimal pattern.
- Page 446 MPA_e_manual_D07-00-129P_RevA00 SDH Tab repeats indefinitely and does not contain CRC-7. When TIM Alarm Reporting is Enabled, an RS-TIM alarm occurs if the incoming J0 trace does not match the Expected J0 Trace.
- Page 447 MPA_e_manual_D07-00-129P_RevA00 Protocol Tabs Defines the Expected J1 Trace to be received on the Expected J1 incoming SDH signal. The J1 Trace is part of the Higher-Order Path Overhead (also known as the HP Trace), where the J1 byte is configured as a repeating 64-byte, 16-byte or 1-byte pattern that can be configured as the system's default ASCII pattern, a customized user-defined ASCII pattern, or a 1-byte hexadecimal pattern.
- Page 448 MPA_e_manual_D07-00-129P_RevA00 SDH Tab repeats indefinitely and does not contain CRC-7. When TIM Alarm Reporting is Enabled, an HP-TIM alarm occurs if the incoming J1 trace does not match the Expected J1 Trace.
- Page 449 MPA_e_manual_D07-00-129P_RevA00 Protocol Tabs Defines the Expected J2 Trace to be received on the Expected J2 incoming SDH signal. The J2 Trace is part of the Lower-Order Path Overhead (also known as the LP Trace), where the J2 byte is configured as a repeating 64-byte, 16-byte or 1-byte pattern that can be configured as the system's default ASCII pattern, a customized user-defined ASCII pattern, or a 1-byte hexadecimal pattern.
- Page 450 MPA_e_manual_D07-00-129P_RevA00 SDH Tab repeats indefinitely and does not contain CRC-7. This option appears when a LP mapping is selected. When TIM Alarm Reporting is Enabled, an LP-TIM alarm occurs if the incoming J2 trace does not match the Expected J2 Trace. SS Bits Alarm Enables or Disables SS bits reporting.
- Page 451 MPA_e_manual_D07-00-129P_RevA00 Protocol Tabs Enables or Disables Tandem Connection Monitoring (TCM) TC Error/Alarm alarm reporting mode. Processing The following options are available for Higher Order mappings. • Enable: The N1 byte is monitored for TCM error and alarm reporting mode. • Disable: TCM mode is disabled, and the N1 byte follows normal operation.
- Page 452 MPA_e_manual_D07-00-129P_RevA00 SDH Tab Defines the Expected TCM Trace to be received on the Expected TC Trace incoming SDH signal. The TC Trace is part of the TCM Overhead (also known as the TCM Trace), where the either the N1 (HP) or N2 (LP) byte, depending on the TC Error/Alarm Processing setting, is configured as a repeating 16-byte or 1-byte pattern that can be configured as the system's default ASCII pattern, a...
- Page 453 MPA_e_manual_D07-00-129P_RevA00 Protocol Tabs Use the Set 1, Set 2 and Set 3 screens to configure the SDH Receive parameters. The following describes the functions that may appear on the Set 3 screen, depending on the card type and configuration. Function Description Monitor Mode Monitor Mode is currently not supported.
- Page 454 MPA_e_manual_D07-00-129P_RevA00 SDH Tab Showing Selects a specific SOH slot to monitor on the incoming SDH signal. The following bytes appear for the selected SOH slot: • Section Overhead bytes (A1, A2, J0/Z0, B1, E1, F1, D1, D2, and D3) • Pointer bytes (H1, H2, and H3) •...
- Page 455 MPA_e_manual_D07-00-129P_RevA00 Protocol Tabs of the received HP Signal Label, and the V5 byte can be selected to show the decoded value of the received LP Signal Label. HP J1 Trace Displays the HP J1 trace received on the incoming SDH signal.
- Page 456 MPA_e_manual_D07-00-129P_RevA00 SDH Tab Byte Select Select the Multiplex Section (MS) Overhead byte to be captured. J0/Z0 S1/Z1 Z2/M1 MORE... When MORE... is selected, then the following Higher-order Path (HP) Overhead bytes can be selected. F3/Z3 K3/Z4 N1/Z5...
- Page 457 MPA_e_manual_D07-00-129P_RevA00 Protocol Tabs Capture Trigger Select the Capture Trigger event. FRAME ERROR HP-RDI ALARM B1 ERROR AU-LOP ALARM B2 ERROR PTR INCREMENT B3 ERROR PTR DECREMENT MS-REI ERROR NO NDF ALARM HP-REI ERROR BIT ERROR BYTE EQUAL MS-AIS ALARM BYTE NOT EQUAL MS-RDI ALARM MANUAL AU-AIS ALARM...
- Page 458 MPA_e_manual_D07-00-129P_RevA00 SDH Tab If 0 is entered, then the 255 bytes immediately preceding the trigger, as well as the triggered byte value will be captured, but 0 bytes after the trigger will be captured. Action buttons Capture - Activates the capture feature, and changes the State to "Waiting for Trigger".
- Page 459 MPA_e_manual_D07-00-129P_RevA00 Protocol Tabs Hexadecimal format. The ASCII column displays each captured frame's byte value in ASCII format. (A hex value o 0, will be displayed as blank) SDH Receive - SIG Displays the following measurements of the incoming SDH signal: •...
- Page 460 MPA_e_manual_D07-00-129P_RevA00 SDH Tab The following options are available from the Results screen: • Error / Alarm • • Event • • Large LEDs • Graph SDH Results - Error / Alarm The Results Error / Alarm screen contains the following options: •...
- Page 461 MPA_e_manual_D07-00-129P_RevA00 Protocol Tabs B2 (Line BIP-8, also known as a HP/LP-TC-REI (Tandem Line Coding Violation - CV-L) Connection-Remote Error Indicator) B3 (Path BIP-8, also known as an HP/LP-TC-OEI (Tandem STS Path Coding Violation - CV-P) Connection-Outgoing Error Indicator) MS-REI (Multiplex Section - Remote AU-NDF (Administrative Unit - New Error Indication) Data Flag)
- Page 462 MPA_e_manual_D07-00-129P_RevA00 SDH Tab Indication Signal) Defect Indicator) APS-L (Automatic Protection LP-RFI (Lower-Order Path Remote Switching) Failure Indicator) OOF (Out of Frame) LP-TIM (Lower-Order Path Trace Identifier Mismatch for J2 byte) MS-RDI (Multiplex Section Remote LP-PLM (Lower-Order Path Payload Defect Indicator) Label Mismatch) RS-TIM (Regenerator Section Trace HP/LP-TC-RDI (Tandem...
- Page 463 MPA_e_manual_D07-00-129P_RevA00 Protocol Tabs This PTR function monitors and reports received Pointer statistics. A count of the following Pointer statistics appear: The following AU/TU Pointer results appear: • Pointer Justification - Indicates the Positive Pointer Justification count. • Negative Justification - Indicates the Negative Pointer Justification count. •...
- Page 464 MPA_e_manual_D07-00-129P_RevA00 SDH Tab The Results APS screen contains the following options: Option Description APS Summary When selected, the following information appears in the results table last 15 K1 and K2 byte sequences received: • The HEX value of the K1 byte. •...
- Page 465 MPA_e_manual_D07-00-129P_RevA00 Protocol Tabs SDH Results - Large LEDs This screen displays the LED Error and Alarm Indicators in a large, easy to read format that covers the entire screen area. This is especially useful for viewing any errors or alarms from a long distance, such as across the room from a test bay. The following describes the LED colors: If the LED color is ...
- Page 466 MPA_e_manual_D07-00-129P_RevA00 SDH Tab • Change Scale - Compresses or expands the displayed time scale for the graphed errors and alarms at time intervals of 30 minutes, 90 minutes, 3 hours, 6 hours, 12 hours, 24 hours, or 72 hours. • Change Upper - Sets the type of errors or alarms that appear in the upper graph.
- Page 467 MPA_e_manual_D07-00-129P_RevA00 Protocol Tabs Print a Graph Report 1. Select the protocol processor running the test for which you want to print the graph. 2. From the Results tab, select Graph. 3. Select the Graph screen's Print Report command button. The Report Setup menu appears.
- Page 468 MPA_e_manual_D07-00-129P_RevA00 SDH Tab Select the Save Graphs button to save the graphed results to a file for replay at a later time. The graph is saved with a .grp extension. To view the graph select the Replay Graphs button and choose the desired .grp file from the Browser dialog box.
- Page 469 MPA_e_manual_D07-00-129P_RevA00 Protocol Tabs • M.2120 / M.2110 Perf Monitor - RS (Specifically for SDH testing) The RS screen provides a detailed breakdown for Regenerator Section errors detected and logged by the SDH protocol processor. The following statistics are reported: G.826 Near B1 Errors •...
- Page 470 MPA_e_manual_D07-00-129P_RevA00 SDH Tab For the ITU Standards option, you can select the G.826/G.829 toggle button in the lower-right corner of the ITU Standards error window to toggle the statistics between G.826 and G.829 results. Important: Select the G.826/G.829 button in the lower-right corner of the ITU Standards window to toggle between G.826 and G.829 statistics.
- Page 471 MPA_e_manual_D07-00-129P_RevA00 Protocol Tabs • ES - Errored Seconds. Reports the duration of the incoming MS-REI errored blocks per seconds, the percentage of errored seconds compared to the duration of error free seconds, and the objective percentage. • EFS - Error Free Seconds. Reports the duration of the incoming MS-REI error free seconds and the percentage of error free seconds compared to the duration of errored seconds.
- Page 472 MPA_e_manual_D07-00-129P_RevA00 SDH Tab blocks per second equals or exceeds 2,400 errors per second, or when an MS- RDI alarm is present. • M.2101.1 Allocation. Select an allocation percentage from 0 to 100. • Duration. Set to 2 Hours, 1 Day, or 7 Days. •...
- Page 473 MPA_e_manual_D07-00-129P_RevA00 Protocol Tabs This section is broken down into the following areas: G.826 and G.828 Near B3 Errors • EB - Errored Block count. Reports an error count of incoming B3 errors. • BBE - Background Block Errors. Reports the number of the incoming B3 background block errors by count, rate percentage, and objective percentage.
- Page 474 MPA_e_manual_D07-00-129P_RevA00 SDH Tab • SES - Severely Errored Seconds. Reports the duration of Severely Errored Seconds (SES), rate percentage, and objective percentage on the incoming SDH signal. An SES is reported when the number of HP-REI errored blocks per second equals or exceeds 2,400 errors per second, or when an HP-RDI alarm is present.
- Page 475 MPA_e_manual_D07-00-129P_RevA00 Protocol Tabs • Status - Pass, Uncertain, or failure Perf Monitor - LP (Specifically for SDH testing) The LP screen provides a detailed breakdown for Lower-Order Path errors detected and logged by the SDH protocol processor. In addition to monitoring the errors, you can set allocation percentages and durations by selecting their respective buttons.
- Page 476 MPA_e_manual_D07-00-129P_RevA00 SDH Tab alarm, AU-LOP alarm, HP-AIS alarm, HP-UNEQ alarm, TU-AIS alarm, TU-LOP alarm, or TU-LOM alarm is present. • SEP - Severely Errored Period. A period of time during which at least 3 but not more than 9 consecutive severely errored seconds (SES) occur. (G.828 only) •...
- Page 477 MPA_e_manual_D07-00-129P_RevA00 Protocol Tabs • SES - Severely Errored Seconds. Reports the duration of Severely Errored Seconds (SES), rate percentage, and the S1 and S2 percentage on the incoming SDH signal. An SES is reported when the number of LP- BIP errored blocks per second equals or exceeds 600 errors per second, or when an Out Of Frame (OOF) alarm, Loss of Frame (LOF) alarm, Loss of Signal (LOS) alarm, MS-AIS alarm, AU-LOP alarm, HP-AIS alarm, HP- UNEQ alarm, TU-AIS alarm, TU-LOP alarm, or TU-LOM alarm is present.
- Page 478 MPA_e_manual_D07-00-129P_RevA00 SDH Tab • ES - Errored Seconds. Reports the duration of the incoming BIT errors in seconds and the percentage of errored seconds compared to the duration of error free seconds. • EFS - Error Free Seconds. Reports the duration of the incoming BIT error free seconds and the percentage of error free seconds compared to the duration of errored seconds.
- Page 479 MPA_e_manual_D07-00-129P_RevA00 Protocol Tabs • ES - Errored Seconds. Reports the duration of the incoming BIT errored blocks per seconds, the percentage of errored seconds compared to the duration of error free seconds, and the S1 and S2 percentage. • SES - Severely Errored Seconds. Reports the duration of Severely Errored Seconds (SES), rate percentage, and the S1 and S2 percentage on the incoming SDH signal.
- Page 480 MPA_e_manual_D07-00-129P_RevA00 SDH Tab number of errors for an event cross the threshold during the 15- minute period the test records "fail"; if the errors do not exceed the threshold the test records "pass." The performance events continue to be counted to the end of the 15-minute period, at which time the current performance event counts are stored in the historical registers and the current performance event registers are reset to zero.
- Page 481 MPA_e_manual_D07-00-129P_RevA00 Protocol Tabs LED Quick Status Area SDH - LED Quick Status Area The left side of the screen provides an at-a-glance view of the current protocol processor's LEDs and Laser ON/Off button. The LEDs report incoming error and alarm activity, current status, and event history to help narrow the focus if problems are detected on the incoming signal and provide a starting point when trying to diagnose problems..
- Page 482 MPA_e_manual_D07-00-129P_RevA00 SDH Tab • CLK:INT displays when configured for Internal clocking. • CLK:REC displays when configured for Recovered clocking. • All Tests: Provides a shortcut to the All Test Status screen (located under the System tab) which shows a general status summary of all circuit packs installed in the unit.
- Page 483 MPA_e_manual_D07-00-129P_RevA00 Protocol Tabs = Administrative Unit = Tributary Unit SDH LEDs When the SDH protocol processor tab is selected, the following status indicators and LEDs are displayed in the LED Quick Status Area and the Large LED screen. Description RSOH Status LED. Indicates if any of the errors or alarms within this portion of the overhead are being received, including a Frame error.
- Page 484 MPA_e_manual_D07-00-129P_RevA00 SDH Tab MS-AIS MSOH Alarm Indication Signal. Indicates if an alarm is being received from upstream MS terminating equipment. This is an alarm LED. Automatic Protection Switching. Indicates that the K1 and K2 bytes on the incoming SDH signal have changed. MS-RDI MSOH Remote Defect Indication.
- Page 485 MPA_e_manual_D07-00-129P_RevA00 Protocol Tabs HP-UNEQ HPOH Unequipped Payload. Indicates that a 00h pattern has been detected in the C2 byte. This byte is being received from HP terminating equipment. This is an alarm LED. LPOH Status LED. Indicates if any of the errors or alarms within this portion of the overhead are being received.
- Page 486 MPA_e_manual_D07-00-129P_RevA00 SDH Tab byte. This is an alarm LED. LP-BIP LPOH BIP-2 Code Violations. Indicates an error occurred during a parity check, which involves grouping all the bits in a block into units and then performing a parity check of each bit position in the group.
- Page 487 MPA_e_manual_D07-00-129P_RevA00 Protocol Tabs Quick Status Area LED's that are underlined are "Summary Status" LEDs and can be selected to display a summary pop-up window to show the individual LEDs, and sometimes error/alarm statistics, related to that status LED. • If the TCM LED is red, select the "TCM" text to display to display a detailed LED window with all of the SDH TCM errors and alarms.
- Page 488 MPA_e_manual_D07-00-129P_RevA00 SDH Tab HP-TC-AIS Tandem Connection-Alarm Indication Signal. Indicates if IEC bits 1110 are being received from upstream TCM equipment. (Bits 1-4 of the N1 byte are the IEC bits.) This is an alarm LED. HP-TC-UNEQ Tandem Connection-Unequipped. Indicates that a 00h pattern has been detected in the N1 byte of a Tandem Connection.
- Page 489 MPA_e_manual_D07-00-129P_RevA00 Protocol Tabs LP-TC-UNEQ Tandem Connection-Unequipped. Indicates that a 00h pattern has been detected in the N2 byte of a Tandem Connection. This is an alarm LED. LP-TC-LOF Tandem Connection-Loss of Frame. Indicates the loss of a valid multiframe frame alignment signal (FAS) pattern from upstream TCM equipment.
- Page 490 MPA_e_manual_D07-00-129P_RevA00 SDH Tab • 1 Hour - Test runs for 1 hour. • 2 Hours - Test runs for 2 hours. • 24 Hours - Test runs for 24 hours. • 72 Hours - Test runs for 72 hours. • 1 Week - Test runs for 1 week.
- Page 491 MPA_e_manual_D07-00-129P_RevA00 Protocol Tabs with a .stat file extension. The test does not repeat. Record Current Statistics At the end of a timed test a using a delimiter statistics report of the received Errors, Alarms, Pointer Analysis, and Signal Status are saved to a comma separated value file with a .stat file extension.
- Page 492 MPA_e_manual_D07-00-129P_RevA00 SDH Tab selecting Stop from the Common Function Buttons, or by changing the Action After Duration value. Print Events and Repeat Test At the end of a timed test a detailed summary of Errors, Alarms and Pointer event This option appears when activities are printed to the Repeat Actions is selected.
- Page 493 MPA_e_manual_D07-00-129P_RevA00 Protocol Tabs Record Statistics/Events and At the end of a timed test Repeat Test both test Statistics and Events are saved to individual text files with the This option appears when .stat and .evt file extensions, Repeat Actions is selected. and the timed test restarts.
- Page 494 LED history. SDH Test - Service Disruption The MPA can measure Service Disruption switching intervals in your network and can be configured to monitor for a specific event that will cause a service disruption switch. When this event occurs, the duration in both seconds and frames is logged. These statistics can be used to determine how long it takes for your network equipment to react to an service disruption event and switch to a backup path.
- Page 495 MPA_e_manual_D07-00-129P_RevA00 Protocol Tabs The service disruption measurements show a granular accuracy of 1 frame duration. For all SDH rates one frame is roughly .125 ms (125 µs) Test Service Disruption functions include: • Action (State) - Starts and stops Service Disruption mode. If an event occurs, the protection switch time will appear in both seconds and frames present.
- Page 496 MPA_e_manual_D07-00-129P_RevA00 SDH Tab • History Recent Milliseconds: The 10 most recent measurements (in ms) are displayed from left to right (5 on the top line and 5 on the bottom line). • History Recent Frames: The 10 most recent measurements (in frames) are displayed from left to right (5 on the top line and 5 on the bottom line).
- Page 497 MPA_e_manual_D07-00-129P_RevA00 Protocol Tabs The Current column displays the most recent round trip measurement. The Minimum column displays the fastest round trip measurement. The Maximum column displays the slowest round trip measurement • Consecutive Good Time Required: This function allows you to enter the duration (in milliseconds) of valid frames to occur before the round-trip delay function is confirmed to be activated.
- Page 498 MPA_e_manual_D07-00-129P_RevA00 SDH Tab Displays the module’s Connector Type. Connector Type: Page 00h Byte: 130 Example: LC, MPO 1x12 Size: 1 Byte Ref. SFF-8024 Table 4-3 Displays the module’s Signal Encoding: Page 00h Byte: 139 Encoding. Size: 1 Byte Ref. SFF-8024 Table 4-2 Nominal Rate: Nominal bit rate per channel, units of Page 00h Byte: 222...
- Page 499 MPA_e_manual_D07-00-129P_RevA00 Protocol Tabs YYMMDD. Size: 8 Bytes e.g., 180310 = March 10, 2018 Tx Power (dBm): Displays the TX optical power between Page 00h Byte: 50-57 (Table (~-40 to +8.2 dBm). 6-8) Size: 16-bits Rx Power (dBm): Displays the measured RX optical Page 00h Byte: 34-41 (Table power between (~-40 to +8.2 dBm).
- Page 500 MPA_e_manual_D07-00-129P_RevA00 SDH Tab Module Control Pins QSFP28 Module Control Pins can be changed when the Interface is set to None. SFP+ and SFP8 Module Control Pins are read only. Control Pin Description TX_DISABLE Toggles the logical state of the TX_DIS pin state. Toggles the logical state of the Rate Select 0 bit.
-
Page 501: Sdh Specific Tasks
MPA_e_manual_D07-00-129P_RevA00 Protocol Tabs This section allows users to Read and/or Write to specific 2-wire (I2C) reference addresses. Select the Address button to open a keypad that can used to enter the decimal reference address. Select the + or – buttons to increment or decrement the hexadecimal reference address. - Page 502 MPA_e_manual_D07-00-129P_RevA00 SDH Tab • Power Hot, Power Warm and Power Low Alarms • Using M.2120 / M.2110 PM • Insert Alarms • Insert Errors • Make Pointer Adjustments • Use the Event Log • Saving and Printing Statistics and Settings Reports SDH Troubleshooting SDH Troubleshooting Overview This section provides a brief summary of conditions that can cause SDH errors and...
- Page 503 MPA_e_manual_D07-00-129P_RevA00 Protocol Tabs Related Topics: Unit reports Loss of Signal (LOS) What causes a B1 error? What causes a B2 error? What causes a B3 error? What causes an AIS alarm? What causes an RDI alarm? How to Insert Errors How to Insert Alarms What Causes a B1 Error? SDH uses the B1 byte of the Regenerator Section Overhead to detect parity errors on...
- Page 504 MPA_e_manual_D07-00-129P_RevA00 SDH Tab What causes an RDI alarm? How to Insert Errors How to Insert Alarms What Causes a B2 Error? A B2 error occurs when a parity error is detected at the Multiplex Section of the incoming SDH signal. A B2 error is also known as a Multiplex Section BIP-8. In general, the transmitting SDH equipment calculates the number of ones transmitted in the data.
- Page 505 Loss of Signal (LOS), Loss of Frame (LOF), or Loss of Pointer (LOP), it generates an AIS to alert downstream NEs of an upstream failure. The MPA supports the detection and transmission of Multiplex Section AIS (MS-AIS) and STS Administrative Unit AIS (AU-AIS) alarms.
- Page 506 SDH Multiplex Section signal. An LTE declares an AU-AIS downstream within 125 milliseconds of detecting an LOP alarm on the incoming SDH signal. If the MPA receives an MS-AIS or AU-AIS alarm, it is reported by the MPA's LEDs and logged to the Results screen.
- Page 507 MPA_e_manual_D07-00-129P_RevA00 Protocol Tabs If the MPA receives an MS-RDI or HP-RDI alarm, it is reported by the MPA's LEDs and logged to the Results screen. The MPA can be used to simulate RDI alarms to verify if upstream NEs react accordingly to an incoming RDI alarm.
- Page 508 MPA_e_manual_D07-00-129P_RevA00 SDH Tab 8. Turn the laser On. 9. Select Receive and choose SIG. Ensure that a valid signal is being received. 10. If any errors or alarms are being received, then resolve the errors or alarms being detected before continuing. 11.
- Page 509 MPA_e_manual_D07-00-129P_RevA00 Protocol Tabs 6. Edit the K1 byte. The K1 byte is a request for switch action. There are three functions that allow you to edit the K1 byte: • Use the K1 Full Byte function to set all eight bits of the K1 byte at once. •...
- Page 510 MPA_e_manual_D07-00-129P_RevA00 SDH Tab Decoding APS (K1 and K2) Values Decoding APS (K1 and K2) Values The following only applies to SONET and SDH protocol processors. The Automatic Protection Switching (APS) function monitors incoming APS activity. It logs and displays the K1 and K2 byte sequences received by the unit. A maximum of 15 byte sequences can appear on the screen.
- Page 511 MPA_e_manual_D07-00-129P_RevA00 Protocol Tabs The K1 table decodes the values for bits 1-4 and bits 5-8. The K2 table decodes the values for bits 1-4, bit 5, and bits 6-8. Also displayed in the tables are the number of frames received that contain the K1 and K2 bytes, and the elapsed time of the frames that contain the K1 and K2 bytes, for the last 15 byte sequences received.
- Page 512 MPA_e_manual_D07-00-129P_RevA00 SDH Tab Since the Maximum and Minimum receive power levels can vary from one laser module to another, you should reference the data sheet for information pertaining to a specific laser module's limits. Setting Thresholds for M.2120 Performance Events M.2120 screen provides a detailed breakdown for errors meeting the ITU-T M.2120 standard.
- Page 513 MPA_e_manual_D07-00-129P_RevA00 Protocol Tabs 1. From the SDH tab, select Perf Monitor. 2. Select M.2120 from the tabs along the left side of the Perf Monitor screen. 3. Select the desired performance event for an error type (for example, from the B2 error type, select the SES row).
- Page 514 MPA_e_manual_D07-00-129P_RevA00 SDH Tab Inserting Multiple Errors Various errors can be transmitted by the system. One reason for transmitting errors is to determine if the receiving equipment can detect an error in the incoming signal. Inserting multiple errors at a specified error rate allows you to monitor the network and receiving equipment for any undesirable behavior as the error rate is increased.
- Page 515 MPA_e_manual_D07-00-129P_RevA00 Protocol Tabs 3. Configure the Pointer Value parameters. For example, • Select NDF Flag to allow a New Data Flag to be set when a new Pointer value has been transmitted. • Select Pointer Value to change the Pointer value from 0 to 782. •...
- Page 516 Print or Save (.evt extension) the Event Log report. Saving and Printing Statistics and Settings Reports (Specifically for SDH tab) The MPA test set provides the option to Print or Save several Report types. To save or print test reports: Select from the Common Function Buttons row at the bottom of the screen.
- Page 517 MPA_e_manual_D07-00-129P_RevA00 Protocol Tabs Choose the Report type(s) to be printed or saved. The most common report is the Statistics report, which contains a complete list of error and alarm statistic information as well as other counts that pertain to the test performed.
- Page 518 MPA_e_manual_D07-00-129P_RevA00 SDH Tab Comma Delimited (CSV) file format, with a .csv file extension. PDF Printer The selected report is sent to your PC's default printer. The format of the report is similar to the PDF file which allows a User Image file (such as your company’s logo) to be printed at the top of the report.
-
Page 519: Packet Tab
Packet Tab Overview The Packet tab provides high speed packet-level testing over a wide-range of datacom rates supported by a variety of MPA test modules, including the MPM-10G, MPM-100G, MPM-100AR and MPM-400G card types. Depending on the test modules in your MPA system, LAN/WAN Ethernet Interface... -
Page 520: Ethernet (Lan And Wan) - Screens And Function Descriptions
MPA_e_manual_D07-00-129P_RevA00 Packet Tab (formerly known as Y.1564sam) Ethernet service testing, and Service Disruption testing. The following Packet tab related topics are discussed in this section: • LAN/WAN Ethernet - Screens Functions and Descriptions • LAN/WAN Ethernet - Specific Tasks Overview •... - Page 521 MPA_e_manual_D07-00-129P_RevA00 Protocol Tabs Config - Set screen (Specifically for LAN/WAN Ethernet testing on the Packet tab) The Config > Set (Configuration Settings) screen allows you to define the Packet tab's Ethernet parameters that will be used to generate a traffic flow into the network. The following functions appear on the Settings screen: Function Description...
- Page 522 MPA_e_manual_D07-00-129P_RevA00 Packet Tab Mode Sets which Ethernet rate to test, and displays the configured Ethernet mapping rate to test from the MLD, OTN or SONET/SDH tab's Interface menu. For the MPM-400G card, the following Ethernet rate is available: • 425 Gbps CFP8 RS-FEC opt LAN For the MPM-100AR card, the following Ethernet rates may be available, depending on the selected Port: •...
- Page 523 MPA_e_manual_D07-00-129P_RevA00 Protocol Tabs • 2.5 Gbps opt @ FDX • 1 Gbps opt @ FDX • 1 Gbps elec @ FDX • 100 Mbps opt @ FDX • 100 Mbps elec @ FDX • 10 Mbps elec @ FDX The MPM-100AR and MPM-10G cards also support 10 Gbps opt LAN in OTN by selecting OTU1e (11.049G) or OTU2e (11.095G) from the OTN tab's Interface menu.
- Page 524 MPA_e_manual_D07-00-129P_RevA00 Packet Tab Framed, GFP Transparent GFP Bulk options. For Fibre Channel testing see the Fibre Channel section.
- Page 525 MPA_e_manual_D07-00-129P_RevA00 Protocol Tabs Seed A/B Pattern Sets the pattern type for Ethernet rates that support Seed A/B Type Pattern testing. • Selectable Seed A/B Pattern types include: All zeros or Local Fault (as defined by the 802.3 standard publications) • Seed A Local Fault Pattern: 0x3C8B44DCAB6804F •...
- Page 526 MPA_e_manual_D07-00-129P_RevA00 Packet Tab Line Control Configures the electrical interface Line Control mode. Auto - Set line control mode to Auto-negotiate Master - Set line control mode to Master only Slave - Set line control mode to Slave only The Line Control setting is only available for 1 Gbps elect @ FDX interface.
- Page 527 MPA_e_manual_D07-00-129P_RevA00 Protocol Tabs packet that is received. Turns Reflection mode Off Enables or Disables Deficit Idle Count. Dfct Idle In order to achieve the maximum 100% bandwidth, test tools and devices under test require Deficit Idle Count (DIC) to be enabled (default).
- Page 528 MPA_e_manual_D07-00-129P_RevA00 Packet Tab Pause Allows the user to generate Pause frames for a specific Pause Quanta value. Valid values are: 1 to 65535 Important: Flow Control must be enabled in order to count Pause Packets. Important: Pause is not available when IP Reflection is enabled.
- Page 529 MPA_e_manual_D07-00-129P_RevA00 Protocol Tabs EMIX Mode Enables or Disables EMIX packet generation. Valid options are: ID337 or Off EMIX (Ethernet Mixture) packet generation is based on Broadband Forum’s G.fast certification test plan ID-337, and is used to emulate up to 16 simultaneous DPU/CPE traffic flows of varying frame sizes.
- Page 530 MPA_e_manual_D07-00-129P_RevA00 Packet Tab 0x9200), or enter a user defined value. The Count Statistics Table displays the following information Count Statistics for both transmitted (TX) and received (RX) packets: Table • TX/RX - Defines which row of statistics is designated for Transmit counts (TX) and which row is designated for Receive counts (RX) •...
- Page 531 MPA_e_manual_D07-00-129P_RevA00 Protocol Tabs The Strms Pg 1 side tab is used to control Streams 1 through 16, and Strms Pg 2 controls Streams 17 through 32. When the processor is licensed for the Advanced Ethernet test option, then up to 32 independent test streams can be configured and simultaneously generated and tested per port.
- Page 532 MPA_e_manual_D07-00-129P_RevA00 Packet Tab Column Description TX Status Indicates whether streams 1-32 are being transmitted (On) or not being transmitted (Off) Traffic Displays the configured transmit Rates (in %BW) for each stream. MAC Dest Destination MAC address Length Frame Length IP Mode IPv4 or IPv6 Payload Payload Pattern selected...
- Page 533 MPA_e_manual_D07-00-129P_RevA00 Protocol Tabs Send Burst The Send Burst button will generate a single burst of packets on the selected stream id, for the number of packets specified by the Burst Size setting, when the selected stream is turned off. The default Burst size is 1 frame, however you can edit the stream's Burst Size setting from the stream's Profile window.
- Page 534 MPA_e_manual_D07-00-129P_RevA00 Packet Tab column display order: (1) Selecting the Apply button retains the column display order settings until the next time the unit's power is cycled; (2) Selecting the Save button retains the column display order settings indefinitely. The Columns settings entered locally on the touch screen panel and those entered via a remote connection are completely independent of each other.
- Page 535 MPA_e_manual_D07-00-129P_RevA00 Protocol Tabs A packet stream's profile defines the type, size, content, destination address, and source addresses for the frame. The stream protocol supported is UDP/IP. The Traffic Stream Profile dialog box is used to set the stream profile parameters. To access this dialog box, select any of the streams in the Stream Profile Table.
- Page 536 MPA_e_manual_D07-00-129P_RevA00 Packet Tab MAC Dest address Sets a Destination MAC address for generated traffic. The address is a 12-digit (6-octets) HEX value that is entered using a keypad. The address is entered into 6 separate fields, 2 characters each. There are no restrictions on values entered, except that all a value must be entered into all fields.
- Page 537 MPA_e_manual_D07-00-129P_RevA00 Protocol Tabs IP Dest address Sets the IP address of the destination. For IPv4, the address is entered in decimal notation using a keypad. There are no restrictions on values entered but the format must be correct, i.e: ( 0-255 0-255 0-255...
- Page 538 MPA_e_manual_D07-00-129P_RevA00 Packet Tab Frame Size Sets the frame size (packet length) in bytes as a fixed value, or as a minimum and maximum range based on the Frame Size Type selected. The following Frame Size Types are available: Sets the frame length in bytes. The frame size is entered as a decimal value, entered using a keypad, ranging from 60 to 16000.
- Page 539 MPA_e_manual_D07-00-129P_RevA00 Protocol Tabs Payload Allows the user to select a test pattern to be transmitted in the stream's payload. Select one of the following patterns: PRBS PRBS 9 Inv, PRBS PRBS 11 Inv, PRBS PRBS Inv, PRBS PRBS 20 Inv, PRBS PRBS 23 Inv,...
- Page 540 MPA_e_manual_D07-00-129P_RevA00 Packet Tab Flag (IPv4) Flow Label (IPv6) Sets IPv6's IP Flow Label. This is a decimal value from 0 to 1048575. Rate Sets the traffic generation rate for the selected Stream. Rates can be configured as: • Constant %Bandwidth (0.01 to 100%) •...
- Page 541 MPA_e_manual_D07-00-129P_RevA00 Protocol Tabs packets within the burst, and longer than normal IPG's between the bursts. How to use the Burst Mode for Ethernet Traffic Generation for information on Burst mode testing. The following settings become enabled when a Ramp rate is Ramp Mode Settings selected: •...
- Page 542 MPA_e_manual_D07-00-129P_RevA00 Packet Tab MPLS Tagging must be enabled to use this parameter. MPLS S(Bottom) Configures the MPLS Bottom of Stack value. This is a 1-bit setting that should remain set to the default value of 0, for Ethernet networks. MPLS Tagging must be enabled to use this parameter. MPLS TTL Assigns a MPLS TTL (Time To Live) value.
- Page 543 MPA_e_manual_D07-00-129P_RevA00 Protocol Tabs Prev Moves to the stream with the next lower number. If currently looking at stream #1, selecting “Prev” will bring up stream #32. Note that changes made will not be saved until “Save All” is selected. Next Moves to the stream with the next higher number.
- Page 544 MPA_e_manual_D07-00-129P_RevA00 Packet Tab Error Type Selects the type of error to transmit into a stream. The following types may available, depending on the Interface selected: • Bit Error (Stream #n) - Generates bit errors in the payload for the specified stream number. •...
- Page 545 MPA_e_manual_D07-00-129P_RevA00 Protocol Tabs Runt Size Specify the frame size of the Runt errors to be inserted, from 60 to 63 bytes. This setting is only available when the Runt error type is selected. Runt error frame sizes on the MPM-10G card can be configured from 12 to 63 bytes.
- Page 546 Description Test Allows the user to switch between RFC-2544 Y.1564 Performance Standard Tests. If this button is disabled, then only the selected Performance Standard Test is currently available. Dest Port The destination Port setting is not supported on the MPA.
- Page 547 MPA_e_manual_D07-00-129P_RevA00 Protocol Tabs Trial Duration Determines how long the test runs for each packet size. This duration is used each time the test fails. Valid duration values are 1-86400 seconds. The default value is 60 seconds. Stream ID Allows the user to select one of the four streams for the RFC test.
- Page 548 MPA_e_manual_D07-00-129P_RevA00 Packet Tab Automated Test The following parameters allow the user to configure and test Sequence each of the RFC tests, so that one will run after the previous test completes. • Thruput/Latency checkbox and status field • Frame Loss checkbox and status field •...
- Page 549 Stream ID from the Traffic Stream Profile on the Conf screen. Dest Port Displays the destination port that will receive the test signal. The destination port configuration setting is not supported on the MPA. Displays the setting for the low-end of the bandwidth test BW Floor range.
- Page 550 MPA_e_manual_D07-00-129P_RevA00 Packet Tab Latency Min/Max/Avg - Reports how long it takes for the test frames to traverse the network and return to the unit. The values that appear are in milliseconds. If the test set is looped to itself with a short patch cable, the latency may appear as 0 ms.
- Page 551 Stream ID from the Traffic Stream Profile on the Conf screen. Dest Port Displays the destination port that will receive the test signal. The destination port configuration setting is not supported on the MPA. Displays the setting for the low-end of the bandwidth test BW Floor range.
- Page 552 MPA_e_manual_D07-00-129P_RevA00 Packet Tab by transmitted frames. First, Prev, Next, Allows the user to scroll through packet sizes to view their Last test results. Start/Stop Test Starts and stops the Frame Loss test. The button toggles between Start (when a test is not running) and Stop (when a test is running).
- Page 553 Stream ID from the Traffic Stream Profile on the Conf screen. Dest Port Displays the destination port that will receive the test signal. The destination port configuration setting is not supported on the MPA. Resolution (in Sets the level of precision for the B2B test, by frames. The frame:) value is the number of frames in the longest burst that the DUT will handle without the loss of any frames.
- Page 554 MPA_e_manual_D07-00-129P_RevA00 Packet Tab (when a test is running). Important: The BW Ceiling and BW Floor settings do not apply to the Back-to-Back Burst test. The following list of tasks demonstrate how to configure and test each of the RFC- 2544 benchmark tests. •...
- Page 555 MPA_e_manual_D07-00-129P_RevA00 Protocol Tabs 4. Select Goto Frame Loss Graph to view Frame Loss Rate Results, to see the Frame Loss Rate % for the tested frame sizes.
- Page 556 MPA_e_manual_D07-00-129P_RevA00 Packet Tab 5. To display the Packet Distribution Graphs: Under the Results tab select the Count tab, then the Packet Sizes tab.
- Page 557 MPA_e_manual_D07-00-129P_RevA00 Protocol Tabs 6. To Save a screen shot of any of the above graphs to a Screen(#).bmp file, select the button from the common functions row, and then press the button Y 1564 Y.1564 Performance Testing Overview ITU-T Y.1564 defines a test methodology that may be used in assessing the proper configuration and performance of an Ethernet network to deliver Ethernet-based services.
- Page 558 If this button is disabled, then only the selected Performance Standard Test is currently available. Dest Port The destination Port setting is not supported on the MPA. Trial Duration Determines how long the Configuration Ramp test runs for each selected Ramp/Burst Step.
- Page 559 MPA_e_manual_D07-00-129P_RevA00 Protocol Tabs Restore to Returns the Ramp/Burst Step settings to their default %CIR Default rates when user-defined rates have been set, and unselects all selected checkboxes, and resets the Trial and Performance Durations back to their default values. Any user-define Service Names which were edited from the Test side tab are also restored back to their default names.
- Page 560 MPA_e_manual_D07-00-129P_RevA00 Packet Tab Service 09 User Defined (Optional) Service 10 User Defined (Optional) Table 1 – Recommended Frame Sizes/Lengths for each Service Number...
- Page 561 MPA_e_manual_D07-00-129P_RevA00 Protocol Tabs Ramp/Burst The Ramp/Burst Steps section is used to do the following: Steps • Selects which Steps to test during the Ramp and Burst Configuration tests. • Allows the user to configure Steps 1 through 5 with a user-defined value for each of the %CIR Steps selected to be tested.
- Page 562 MPA_e_manual_D07-00-129P_RevA00 Packet Tab configuration test Per the Y.1564 test standard, as the performance limits are only used for service acceptance when Ethernet traffic is below or equal to the CIR (green traffic in Figure 1), the performance parameters will not be judged against the limits above the CIR. The next step of the service configuration test is to validate the total information rate of the service (CIR+EIR).
- Page 563 MPA_e_manual_D07-00-129P_RevA00 Protocol Tabs Automated Test The following parameters allow the user to configure and test Sequence each of the RFC tests, so that one will run after the previous test completes. • Config Ramp checkbox and status field • Perf checkbox and status field •...
- Page 564 MPA_e_manual_D07-00-129P_RevA00 Packet Tab Frame Lengths, as shown in Table 1. When editing the Frame Size for each Service #, use the Prev/Next buttons at the bottom of the Traffic Stream Profile window to change to the previous or next Service # (Stream ID #), then select Save All to save all of the edited Services at one time.
- Page 565 MPA_e_manual_D07-00-129P_RevA00 Protocol Tabs Allows the user to configure the selected Service's Maximum Max Latency Delay Latency Pass/Fail threshold, in µsec. The Max Latency can be set from 0 to 100000, per Service. If the measured Latency exceeds this value while testing the selected Service, then Configuration Test Results Status will show "FAIL"...
- Page 566 MPA_e_manual_D07-00-129P_RevA00 Packet Tab Y.1564 Summary Results How to view Y.1564 per service detailed results: 1. When a specific service is selected (clicked on) from the Configuration Test Results table a detailed result view is displayed for that service. Detailed Y.1564 Configuration Test Results 2.
- Page 567 MPA_e_manual_D07-00-129P_RevA00 Protocol Tabs Detailed Y.1564 Performance Test Results Y.1564 Service Configuration and Testing How to enable Y.1564 test mode: 1. Select the desired test interface rate. 2. Verify appropriate network connections such as power levels, valid link state, etc. 3. Select the Perf Test > Conf tab 4.
- Page 568 MPA_e_manual_D07-00-129P_RevA00 Packet Tab How to configure Y.1564 test options: 1. From the Conf side tab, select the desired settings 2. From the Test side tab, select the desired settings Y.1564 Conf Tab Configuration...
- Page 569 MPA_e_manual_D07-00-129P_RevA00 Protocol Tabs Y.1564 Test Tab Configuration How to start the Y.1564 test: 1. From the Conf tab, select the test options under the Automated Test Sequence section. At least one test must be selected 2. The Config Ramp and Config Burst selections are Y.1564 Configuration tests 3.
- Page 570 MPA_e_manual_D07-00-129P_RevA00 Packet Tab Starting Y.1564 Tests How to view Y.1564 summary results: 1. Select the Perf Test > Results tab 2. A summary overview of the Configuration and Performance test results for all services are displayed.
- Page 571 MPA_e_manual_D07-00-129P_RevA00 Protocol Tabs Y.1564 Summary Results How to view Y.1564 per service detailed results: 1. When a specific service is selected from the Configuration Test Results table a detailed result view is displayed for that service. 2. When a specific service is selected from the Performance Test Results table a detailed result view is displayed for that service.
- Page 572 MPA_e_manual_D07-00-129P_RevA00 Packet Tab Detailed Y.1564 Performance Test Results How to save or print Y.1564 test results: 1. Select the Report button at the bottom of the screen. 2. The individual or combined Y.1564 test results can be saved or printed. Y.1564 Report Result Options Results...
- Page 573 MPA_e_manual_D07-00-129P_RevA00 Protocol Tabs Results Screens and Functions (Specifically for LAN/WAN Ethernet testing on the Packet tab) Test activity and event history can be viewed using the various functions of the Results screen. The Results screen contains the following functions: • Scan - Displays a list of errors and alarms along with their count and duration.
- Page 574 MPA_e_manual_D07-00-129P_RevA00 Packet Tab The following error types can be monitored: Error Type Description Code A Code error or Symbol error is detected in the line encoding Undersized A frame whose length is < 64 bytes, with good FCS/CRC checksum Invalid FCS An error in the Frame Check Sequence (CRC checksum), and whose Frame length is ≥...
- Page 575 MPA_e_manual_D07-00-129P_RevA00 Protocol Tabs Current Displays the current error rate using an N.NNe-N format. Results - Alarm Screen (Specifically for LAN/WAN Ethernet testing on the Packet tab) The Alarm screen reports the various alarms detected by the receiving equipment. The following alarm types can be monitored: Alarm Type Description CP Power Loss...
- Page 576 MPA_e_manual_D07-00-129P_RevA00 Packet Tab Jabber Condition A Jabber alarm has occurred, which could be caused by a device that is handling the electrical signals improperly. 10/100/1000BaseT ports only The following alarm statistics are displayed: Statistic Description Alarm Description Displays the alarm type recognized and recorded by the unit. Seconds Displays the number of seconds the alarm spent in the alarm condition.
- Page 577 MPA_e_manual_D07-00-129P_RevA00 Protocol Tabs Second rate transmitted Total - RX BW Displays the Current, Min, Max and Avg. Total %BW received Total - RX Mbps Displays the Current, Min, Max and Avg. Total Mbps rate received Total - RX PPS Displays the Current, Min, Max and Avg. Total Packet Per Second rate received TX IPv4 BW Displays the Current, Min, Max and Avg.
- Page 578 MPA_e_manual_D07-00-129P_RevA00 Packet Tab Second rate transmitted RX IPv6 BW Displays the Current, Min, Max and Avg. IPv6 %BW received RX IPv6 Mbps Displays the Current, Min, Max and Avg. IPv6 Mbps rate received RX IPv6 PPS Displays the Current, Min, Max and Avg. IPv6 Packet Per Second rate received TX VLAN BW Displays the Current, Min, Max and Avg.
- Page 579 MPA_e_manual_D07-00-129P_RevA00 Protocol Tabs TX MPLS PPS Displays the Current, Min, Max and Avg. MPLS Packet Per Second rate transmitted RX MPLS BW Displays the Current, Min, Max and Avg. MPLS %BW received RX MPLS Mbps Displays the Current, Min, Max and Avg. MPLS Mbps rate received RX MPLS PPS Displays the Current, Min, Max and Avg.
- Page 580 MPA_e_manual_D07-00-129P_RevA00 Packet Tab Received IPv4 Reports the total number of IPv4 packets received. Packets Transmit IPv6 Reports the total number of IPv6 packets sent. Packets Received IPv6 Reports the total number of IPv6 packets received. Packets Received ICMP Internet Control Message Protocol. Reports the total number Packets of ICMP packets received.
- Page 581 MPA_e_manual_D07-00-129P_RevA00 Protocol Tabs Pause Quantas Reports the total number of quantas received. Taken A quanta is a 512-bit timing increment used by a Pause frame. The number of quanta (N x 512-bits) indicate the duration of the pause. Important: Flow Control must be enabled in order to count Pause Packets.
- Page 582 MPA_e_manual_D07-00-129P_RevA00 Packet Tab Address field and the Length/Type field. Traffic Class Entry For each stacked MPLS label level (1-4), separate data rows for TC Entries 0-7 are displayed. These reports the number of frames received for each user priority level value. A total of 8 different counters appear for each Stacked MPLS level.
- Page 583 MPA_e_manual_D07-00-129P_RevA00 Protocol Tabs packets. Results - Strm Rslt (Stream Results) Screen (Specifically for LAN/WAN Ethernet testing on the Packet tab) The Stream Results screen displays statistics for a specified incoming packet stream. The screen allows you to scroll through the different packet streams and view their individual results.
- Page 584 MPA_e_manual_D07-00-129P_RevA00 Packet Tab Statistics Table for the selected Stream ID. Transmit Statistics (per stream): • TX PORT # - Show the selected transmit Port #, for Protocol Processors that support more that 1 interface port. • Packets - Total number of Packets transmitted. •...
- Page 585 MPA_e_manual_D07-00-129P_RevA00 Protocol Tabs and displayed as "PASS" or "FAIL" when the test ends, depending on whether or not specified failure criteria was attained. Displays Error statistic as Counts, Errored Seconds, Errors Average error rate and Current error rate, for the following Error Types: •...
- Page 586 MPA_e_manual_D07-00-129P_RevA00 Packet Tab moves the stream statistics to Stream 1; selecting Last immediately moves the last stream's statistics; selecting Prev or Next moves the stream statistics to/from one stream immediately before or after the currently selected stream. Results - Event Screen (Specifically for LAN/WAN Ethernet testing on the Packet tab) The Results - Event function provides a detailed summary of when and how many errors, alarms, and other specific activity that has occurred and has been recorded by...
- Page 587 MPA_e_manual_D07-00-129P_RevA00 Protocol Tabs White with black text No activity from this specific function. For a list of available LEDs for LAN/WAN, see LAN/WAN LEDs. Results - Graph Screen (Specifically for LAN/WAN Ethernet testing on the Packet tab) The Graph function allows incoming errors and alarms to be graphed. The graphs can be saved, recalled, and printed from a history file.
- Page 588 MPA_e_manual_D07-00-129P_RevA00 Packet Tab information that can be printed out.) • Replay Graphs/Stop Replay - Replays or stops saved graph (.grp) files. Shift Left and Shift Right Use these buttons to adjust the graph's time scale to an earlier or later time. •...
- Page 589 MPA_e_manual_D07-00-129P_RevA00 Protocol Tabs Print a Graph Report 1. Select the protocol processor running the test for which you want to print the graph. 2. From the Results tab, select Graph. 3. Select the Graph screen's Print Report command button. The Report Setup menu appears.
- Page 590 MPA_e_manual_D07-00-129P_RevA00 Packet Tab Test Test Screens and Functions (Specifically for LAN/WAN Ethernet testing on the Packet tab) The Test screen configures test parameters associated with a LAN/WAN protocol processor. The Test screen contains the following functions: • SET 1 • Service Disruption Test - Set 1 (Specifically for LAN/WAN Ethernet testing on the Packet tab)
- Page 591 MPA_e_manual_D07-00-129P_RevA00 Protocol Tabs • 2 Weeks - Test runs for 2 weeks. • User Defined - Allows a specific test duration to be entered using a touch screen keypad. The minimum duration is 1 minute. The maximum duration is 99 days, 23 hours, and 59 minutes.
- Page 592 MPA_e_manual_D07-00-129P_RevA00 Packet Tab Status are saved to a comma separated value file with a .stat file extension. The results appear in a quote/comma-report format, meaning that error and/or alarm values are enclosed in quotes (") and separated by commas (,). The test does not repeat.
- Page 593 MPA_e_manual_D07-00-129P_RevA00 Protocol Tabs Repeat Actions is selected. activities are printed to the configured printer, and the timed test restarts. This test cycle continues until the test is stopped by selecting Stop from the Common Function Buttons, or by changing the Action After Duration value.
- Page 594 MPA_e_manual_D07-00-129P_RevA00 Packet Tab This test cycle continues until the test is stopped by selecting Stop from the Common Function Buttons, or by changing the Action After Duration value. value. Print Options When a print option is chosen from the Remote Client, the report is sent to the Current Printer as configured on the...
- Page 595 MPA_e_manual_D07-00-129P_RevA00 Protocol Tabs To learn how to print or view saved files, see the topic Print or View Saved Files. Pause To pause a test: Test/Resume Test Select Pause Test. When Pause is selected, the system stops collecting data, but the Elapsed Time counter continues. Additionally, when Pause is selected, a red Test Paused LED appears in the LEDs Quick Status area.
- Page 596 MPA_e_manual_D07-00-129P_RevA00 Packet Tab measurement times are logged, as well as an Average duration based on all measurements taken since the test began. Test Service Disruption functions include: • Resolution: When testing Service Disruption measurements on lower rate Ethernet bandwidths (≤ 1Gbps), this setting is used to ensure that at least one Ethernet packet is received within the configured period of time (measurement window).
- Page 597 MPA_e_manual_D07-00-129P_RevA00 Protocol Tabs Stop APS: Stops service disruption monitoring. The State returns to Inactive. • Protection Switch Time (MilliSecs): Indicates the Current (most recent), Average, Minimum and Maximum durations (in milliseconds) that it took for the service disruption events (errored frames) to occur. •...
- Page 598 MPA_e_manual_D07-00-129P_RevA00 Packet Tab • RX: Displays the received optical power in dBm. This status indicator will flash when one or more received Optical Lanes' power level exceeds the laser module's Power Warm or Power Hot thresholds. For MPM cards that have an MLD tab this is an aggregate broadband power value, based on the combined power levels from all of the laser module's received Optical Lanes.
-
Page 599: Ethernet (Lan And Wan) - Specific Tasks
MPA_e_manual_D07-00-129P_RevA00 Protocol Tabs valid signal is not being received. If an all zeros pattern exists for 100 milliseconds or longer on the incoming signal, then an LOS is reported. Link State Indicates the port's connection status. If green, the port is receiving a valid signal. - Page 600 MPA_e_manual_D07-00-129P_RevA00 Packet Tab • Multi-Stream Configuration • Initiating Auto Negotiation • Ramp Mode Traffic Generation • Burst Mode Traffic Generation • Enabling Stacked VLAN Tagging • Enabling MPLS Label Stacking • Transmitting Packet Streams • Inserting a Pause (Flow Control) into a Stream •...
- Page 601 MPA_e_manual_D07-00-129P_RevA00 Protocol Tabs 5. Select a desired stream to test in the Stream Profile table. The Traffic Stream Profile dialog box appears. 6. From the Traffic Stream Profile dialog box, set the parameters for the packet stream. If routing the packets through a network switch, the stream's Source and Destination MAC Addresses should be configured.
- Page 602 MPA_e_manual_D07-00-129P_RevA00 Packet Tab Important: Multi-Stream Configuration is only available when the processor is licensed for the Advanced Ethernet test option, enabling up to 32 independent test streams per port. Otherwise, this feature is unavailable when only 1 test stream is enabled.
- Page 603 MPA_e_manual_D07-00-129P_RevA00 Protocol Tabs beside the applicable address buttons. These checkboxes are initially unchecked when the window is opened. Select the appropriate checkboxes and enter the initial Address required for each of the selected addresses. If an address Incr checkbox is not selected then the specified address will be applied to all of the affected Streams 5.
- Page 604 MPA_e_manual_D07-00-129P_RevA00 Packet Tab Negotiation is an Ethernet handshaking mechanism that looks at the incoming signal and determines the link speed and duplex mode (full-duplex or half-duplex). The Negotiate button enables or disables negotiation mode. When auto negotiation is first enabled, it attempts to negotiate the link with a remote device.
- Page 605 MPA_e_manual_D07-00-129P_RevA00 Protocol Tabs Ramp mode is a feature that is commonly used to simulate a dynamic increasing and decreasing traffic load on a network device. This is normally performed to monitor a network device’s performance, under these varying loads. This mode can also be used as a stress test, when the traffic increase is set to a very steep rate change.
- Page 606 MPA_e_manual_D07-00-129P_RevA00 Packet Tab How to use the Burst Mode for Ethernet Traffic Generation What is Burst Mode? Burst mode is a feature that is commonly used to simulate "bursty" traffic loads on a network device. This mode is used as a more realistic method of testing network loads than a constant bandwidth, because Ethernet traffic is typically "bursty"...
- Page 607 MPA_e_manual_D07-00-129P_RevA00 Protocol Tabs • The maximum Burst Size allowed dynamically changes based on the last Frame Size setting to be saved. Example: • A 1GigE stream configured for a Frame Size of 128 bytes has a maximum Burst Size of 844594 PPS. •...
- Page 608 MPA_e_manual_D07-00-129P_RevA00 Packet Tab 1. The user also has the ability to transmit a Single Burst using the Send Burst button to the right of the Stream Profile Table. 2. This will generate the exact one burst of the number of packets that the selected stream’s Burst Size setting is configured for.
- Page 609 MPA_e_manual_D07-00-129P_RevA00 Protocol Tabs 8. Select Save All to apply the setting and close the Traffic Stream Profile dialog box. Each VLAN tag adds an addition 4-bytes to the Ethernet Stream, consisting of the following settings: • TPID (Tag Protocol Identifier): The default value is 0x8100, but the menu lets you select 0x88A8, 0x9100, 0x9200 or enter a 2-byte User Defined HEX value.
- Page 610 MPA_e_manual_D07-00-129P_RevA00 Packet Tab 4. To enable a second MPLS label, click the checkbox next to MPLS Level 2. 5. To enable a third MPLS label, click the checkbox next to MPLS Level 3. And to enable all four MPLS labels click the checkbox next to MPLS Level 4. 6.
- Page 611 MPA_e_manual_D07-00-129P_RevA00 Protocol Tabs 4. Choose a Strms Pg # side tab. (Where # is either 1 or 2 depending on which stream(s) you want to set. 5. Enable the desired stream(s) to begin generating traffic on the configured test stream(s). Important: Streams cannot be enabled when IP Reflection is enabled.
- Page 612 MPA_e_manual_D07-00-129P_RevA00 Packet Tab 4. Press the stream's Number Button under in Send Burst column to inject a single burst of packets, for the configured burst size. When done inserting bursts configuring the stream for transmitting at a Constant %BW rate, set the Burst Size back to 1 to avoid "bursty" transmissions. Inserting a Pause (Flow Control) into a Stream Pausing frames is a means of flow control that specifies how long the transmitting device should remain quite.
- Page 613 MPA_e_manual_D07-00-129P_RevA00 Protocol Tabs (Specifically for LAN/WAN Ethernet testing) To determine if receiving equipment can detect an error on an incoming signal, you can configure the system to insert specific errors and alarms into an Ethernet stream. Note: Error insertion is disabled when IP Reflection Mode is enabled.
- Page 614 MPA_e_manual_D07-00-129P_RevA00 Packet Tab Note: If no Error Type has been previously selected, then the Select Error Type menu will appear the first time the Error Insert button is selected. 5. View various result statistics by selecting the Results function. To insert an Alarm: 1.
- Page 615 Throughput Testing determines the maximum data rate which can be transported at each of a series of packet sizes, defined by the standard, i.e. 64, 128, 256, 512, 1024, 1280, 1518 bytes. NOTE: The MPA offers the ability to send non- standard packet sizes.
- Page 616 MPA – Network with Routers – MPA in IP Reflection mode • In networks with routers, a second MPA in IP Reflection mode can be used as a loopback device. • Configure the far-end MPA unit's Reflect setting for Digital Lightwave Packets Only.
- Page 617 MPA_e_manual_D07-00-129P_RevA00 Protocol Tabs 3. Stream settings are made in the Traffic Stream Profile pop-up window. 4. Make any applicable Stream settings such as Source and Destination MAC and IP Addresses, UDP port configuration and/or VLAN/MPLS configuration before continuing. It is not necessary to set Frame Length, Rate or Burst Size. These will be set by the RFC 2544 function.
- Page 618 MPA_e_manual_D07-00-129P_RevA00 Packet Tab The above Stream test is necessary to determine that packets are being successfully transmitted and received without any errors, to confirm basic connectivity before beginning lengthy RFC 2544 tests below. If any packets were lost or if any errors occurred during this loopback test, then those issues should be resolved before continuing.
- Page 619 MPA_e_manual_D07-00-129P_RevA00 Protocol Tabs To assign a user-defined frame size: a. Select a Packet Size button (for example, 64). A keypad appears. b. Enter a new value and select OK. Value ranges are 64 - 16000. c. By default, packet sizes 64 - 1518 are already selected, but packet size 9000 is not selected.
- Page 620 MPA_e_manual_D07-00-129P_RevA00 Packet Tab – Sets the level of precision for the test. The finer the resolution, • Resolution Rate the longer it takes to complete the test. A Throughput test cannot be performed if another RFC Test is running. Do not activate a BERT or Packet streams while an RFC 2544 test is active. Turning on or off a test Stream, while an RFC test is in progress, will disrupt test results.
- Page 621 MPA_e_manual_D07-00-129P_RevA00 Protocol Tabs 1. Select Start Test. Once the test begins, this button toggles to Stop Test. 2. The unit immediately starts transmitting a test stream using the configured parameters, starting with the smallest packet size. The packets are looped through the network and returned to the unit.
- Page 622 MPA_e_manual_D07-00-129P_RevA00 Packet Tab IMPORTANT: The minimum delta between the ceiling and floor setting is 1. For example, if the BW Floor is set to 9, then the BW Ceiling must be set to 10, or greater. 6. Select BW Floor to set the low-end of the bandwidth test range. The RFC test will not exceed the setting.
- Page 623 MPA_e_manual_D07-00-129P_RevA00 Protocol Tabs Choose the Packet Size button (for example, 256). The Frame Loss table displays the transmit and receive statistics for the selected packet size. Select the First, Prev, Next, or Last button to move through the frame sizes. Important: The status message that appears at the bottom of the screen always indicates which frame size and stream rate is currently being transmitted and not the report statistics selected.
- Page 624 MPA_e_manual_D07-00-129P_RevA00 Packet Tab 1. Select RFC Tests and choose Conf. The BW Ceiling and BW Floor settings do not apply to the Back-to-Back Burst test. 2. Select Stream ID and choose the packet stream (1 - 32) for the Frame Loss test. 3.
- Page 625 MPA_e_manual_D07-00-129P_RevA00 Protocol Tabs 1. The test set provides the option to save RFC Throughput, RFC Frame Loss, RFC B2B Burst, and stream test Statistics, Settings, Event and Service Disruption measurements to a file for access later or for immediate printing. Y.1564 Performance Testing Overview ITU-T Y.1564 defines a test methodology that may be used in assessing the proper configuration and performance of an Ethernet network to deliver Ethernet-based...
- Page 626 MPA_e_manual_D07-00-129P_RevA00 Packet Tab • Saving and Printing Statistics and Port Settings The MPM-400G card does not support Y.1564 performance testing. Y.1564 Service Configuration and Testing How to enable Y.1564 test mode: 1. Select the desired test interface rate. 2. Verify appropriate network connections such as power levels, valid link state, etc. 3.
- Page 627 MPA_e_manual_D07-00-129P_RevA00 Protocol Tabs Y.1564 Conf Tab Configuration Y.1564 Test Tab Configuration...
- Page 628 MPA_e_manual_D07-00-129P_RevA00 Packet Tab How to start the Y.1564 test: 1. From the Conf tab, select the test options under the Automated Test Sequence section. At least one test must be selected 2. The Config Ramp and Config Burst selections are Y.1564 Configuration tests 3.
- Page 629 MPA_e_manual_D07-00-129P_RevA00 Protocol Tabs Y.1564 Summary Results How to view Y.1564 per service detailed results: 1. When a specific service is selected from the Configuration Test Results table a detailed result view is displayed for that service. 2. When a specific service is selected from the Performance Test Results table a detailed result view is displayed for that service.
- Page 630 MPA_e_manual_D07-00-129P_RevA00 Packet Tab Detailed Y.1564 Performance Test Results How to save or print Y.1564 test results: 1. Select the Report button at the bottom of the screen. 2. The individual or combined Y.1564 test results can be saved or printed. Y.1564 Report Result Options Timed Test - Using Acceptance Criteria...
- Page 631 MPA_e_manual_D07-00-129P_RevA00 Protocol Tabs (Specifically for LAN/WAN Ethernet testing) The MPA unit has the capability to run a timed test (a test with Ethernet streams enabled for a certain time period) specifying user-defined acceptance criteria for Pass/Fail results. To Set Up the Test 1.
- Page 632 MPA_e_manual_D07-00-129P_RevA00 Packet Tab User-Defined Acceptance Criteria: • Accept Seq Errors - A user-specified threshold value for determining the acceptable Out of Sequence packet rate for a timed test. • Accept Bit Errors - A user-specified threshold value for determining the acceptable bit error rate for a timed test.
- Page 633 MPA_e_manual_D07-00-129P_RevA00 Protocol Tabs 2. When testing low speed Ethernet bandwidths (≤ 1Gbps), you may need to configure the Resolution setting in conjunction with the Consecutive Bad Time Required setting, to ensure that at least one Ethernet packet is received within the configured period of time (measurement window).
- Page 634 MPA_e_manual_D07-00-129P_RevA00 Packet Tab To Stop monitoring Service Disruption measurement activity: 1. Select the Test tab and choose Service Disrptn from the tabs along the left-side of the screen. 2. From the Action box, select State and choose Stop APS. Saving and Printing Statistics and Settings Reports (Specifically for LAN/WAN Ethernet testing) The Packet tab provides the option to Print or Save the following test reports to a file for access later or for immediate printing;...
- Page 635 MPA_e_manual_D07-00-129P_RevA00 Protocol Tabs Y1564 Settings Reports the Y.1564 Settings including the Ramp Steps and enabled Service Stream settings. Y1564 Ramp Reports the Y.1564 Configuration Ramp test summary for each Service Stream tested (Step, CIR%, Frame Loss%, Max Jitter, Max Latency, Avg-RX%, Status). Y1564 Perf Reports the Y.1564 Performance test summary for each Service Stream tested (Avg-RX%, Loss%, Min/Max/Avg/Curr Jitter,...
- Page 636 MPA_e_manual_D07-00-129P_RevA00 Packet Tab 3. Select the Destination Printer or File type. The following report Destinations are available: Printer The selected report is sent to your PC's default printer. Text File The selected report is saved as an ASCII text file, with a .txt file extension.
- Page 637 MPA_e_manual_D07-00-129P_RevA00 Protocol Tabs PDF File The selected report is saved as a PDF file, and this format allows a User Image file (such as your company’s logo) to be saved at the top of the report file, with a .pdf file extension. 4.
-
Page 638: Fibre Channel - Screen Functions And Description
MPA_e_manual_D07-00-129P_RevA00 Packet Tab Most Reports will automatically be assigned a file name consisting of (<type of report>_<mmddyyyy>_<hhmmss>.<file extension>) Ex. set_03092017_155039.pdf 8. For instructions on viewing saved report files see Printing or Viewing Saved Files. Fibre Channel - Screen Functions and Description Fibre Channel - Screen Functions and Descriptions Overview (Specifically for Fibre Channel SAN testing on the Packet tab) This section describes the various screens and functions that control Fibre Channel... - Page 639 MPA_e_manual_D07-00-129P_RevA00 Protocol Tabs The Config screen contains the following functions: • (Configuration Settings) • Traffic Stream Profile • Error Alarm Config - Set screen (Specifically for Fibre Channel SAN testing on the Packet tab) The Config > Set (Configuration Settings) screen allows you to define the Fibre Channel frame parameters that will be used to generate a traffic flow or stream into the network.
- Page 640 MPA_e_manual_D07-00-129P_RevA00 Packet Tab • 10 Gbps Fibre Channel • 8 Gbps Fibre Channel • 4 Gbps Fibre Channel • 2 Gbps Fibre Channel • 1 Gbps Fibre Channel The MPM-10G card also supports 10 Gbps Fibre Channel in OTN by selecting OTU1f (11.270G) or OTU2f (11.317G) from the OTN tab's Interface menu.
- Page 641 MPA_e_manual_D07-00-129P_RevA00 Protocol Tabs Name Server Login Attempts a name server Login This is disabled when the test stream is On. Link: – displays the current Link status Status Fabric: - displays the current Fabric status Name Server: - displays the current status Rearrange order of columns displayed in the Stream Profile Col (Columns) Table.
- Page 642 MPA_e_manual_D07-00-129P_RevA00 Packet Tab received since the test was started. • Mbit/sec - Displays the current rate of frames sent or received in Megabits per second. • %BW - Displays the total percent of bandwidth used by each active stream. Initial Laser Setting Controls whether the laser is on or off when the unit is turned The following options are available: •...
- Page 643 MPA_e_manual_D07-00-129P_RevA00 Protocol Tabs Percentage of bandwidth selected on that stream WWN Dest Destination World Wide Name address Payload Payload Pattern selected Length Frame Length SEQ_ID Sequence Identifier selected Frame Control address F_CTL D_ID Destination Identifier address OX_ID Originator Exchange ID address WWN Src Source World Wide Name address Source Identifier address...
- Page 644 MPA_e_manual_D07-00-129P_RevA00 Packet Tab WWN DEST Sets the World Wide Name Destination Address. ADDRESS Important: This value must be set before a Fabric & Name Server login is attempted Class of Service Supports Class of Service 3 Frame Length Sets the frame size (bytes). The frame size is entered as a decimal value, entered using a keypad.
- Page 645 MPA_e_manual_D07-00-129P_RevA00 Protocol Tabs Selects the End of Frame Delimiter Used. EOF Delimiter Functions are: EOFt – EOF Terminate • EOFdt – EOF Disconnect-Terminate • EOFa – EOF Abort • EOFn – EOF Normal • EOFni – EOF Normal-Invalid • EOFdti – EOF Disconnect-Terminate-Invalid •...
- Page 646 MPA_e_manual_D07-00-129P_RevA00 Packet Tab Data Structure Type – 1 byte, categorization of the Frame’s data. TYPE Indicates the next protocol (what's in the Payload), unless R_CTL indicates a control frame. supports raw edit of field values only Frame Control – 3 bytes, contains control information relating to F_CTL the frames content's various FC options, such as sequencing information.
- Page 647 MPA_e_manual_D07-00-129P_RevA00 Protocol Tabs PARM For Link Control frames, indicates the specific type of Link control frame. 4 bytes, used mostly as a "relative offset" in sequences. For ACK frames, used to indicate how many frames are being acknowledged and whether all frames with lower SEQ_CNT values have been acknowledged.
- Page 648 MPA_e_manual_D07-00-129P_RevA00 Packet Tab • Bit Error (Stream #1) - Generates bit errors in the payload • CRC - Generates an invalid CRC error Error Rate Selects the error rate to be transmitted for the selected error type. Once the error rate is selected, the system begins transmitting errors.
- Page 649 If this button is disabled, then only the selected Performance Standard Test is currently available. Dest Port The destination Port setting is not supported on the MPA. Trial Duration Determines how long the test runs for each packet size. This duration is used each time the test fails.
- Page 650 MPA_e_manual_D07-00-129P_RevA00 Packet Tab Enable/Disable Allows the user to select the packet sizes that will be used for check boxes the RFC tests. Packet Sizes Displays the packet sizes. Selecting a Packet Size button allows the user to assign a user-defined frame size to the packet.
- Page 651 Stream ID from the Traffic Stream Profile on the Conf screen. Dest Port Displays the destination port that will receive the test signal. The destination port configuration setting is not supported on the MPA. BW Floor Displays the setting for the low-end of the bandwidth test range.
- Page 652 MPA_e_manual_D07-00-129P_RevA00 Packet Tab 0%, which means that even one lost packet is a failure. Resolution Rate Sets a level of precision for the test. The default resolution is 1%. The finer the resolution (for example, 1%), the longer it takes to complete the test; the less precise the test (for example, 10%), the faster the test completes but with less accuracy.
- Page 653 Stream ID from the Traffic Stream Profile on the Conf screen. Dest Port Displays the destination port that will receive the test signal. The destination port configuration setting is not supported on the MPA. BW Floor Displays the setting for the low-end of the bandwidth test range.
- Page 654 MPA_e_manual_D07-00-129P_RevA00 Packet Tab Statistics Table Displays the frame loss test results for a specified packet size. The results display the nine rates determined by the BW Ceiling and BW Floor settings. The following statistics are displayed: Rate % - Indicates the percentage of bandwidth transmitted using the bandwidth ceiling and floor settings.
- Page 655 MPA_e_manual_D07-00-129P_RevA00 Protocol Tabs 4. Select Goto Frame Loss Graph to view Frame Loss Rate Results, to see the Frame Loss Rate % for the tested frame sizes.
- Page 656 MPA_e_manual_D07-00-129P_RevA00 Packet Tab 5. To display the Packet Distribution Graphs: Under the Results tab select the Count tab, then the Packet Sizes tab.
- Page 657 MPA_e_manual_D07-00-129P_RevA00 Protocol Tabs 6. To Save a screen shot of any of the above graphs to a Screen(#).bmp file, select the button from the common functions row, and then press the button Results Results - Screens and Functions (Specifically for Fibre Channel SAN testing on the Packet tab) Test activity and event history can be viewed using the various functions of the Results screen.
- Page 658 MPA_e_manual_D07-00-129P_RevA00 Packet Tab The message No Errors or Alarms appears if no events are received by the system. This function provides a quick summary of incoming errors and alarms. It is effective in identifying a general area to investigate when error or alarm activity is detected. Results - ERR (Errors) Screen (Specifically for Fibre Channel SAN testing on the Packet tab) The Err screen reports error statistics on the incoming signal.
- Page 659 MPA_e_manual_D07-00-129P_RevA00 Protocol Tabs The following error statistics are displayed: Statistic Description Error Displays the error type recognized and recorded by the unit. Count Displays the number of errors using an 11-digit format. Errored Seconds Displays the number of errored seconds. Average Displays the average error rate using an N.NNe-N format.
- Page 660 MPA_e_manual_D07-00-129P_RevA00 Packet Tab Power Hot The received optical power level exceeded the laser's maximum input limit Power Warm The received optical power level is within 3 dBm of laser's maximum input limit A Loss Of Signal alarm has occurred Link Down A Loss of Link State alarm occurred The following statistics appear: Statistic...
- Page 661 MPA_e_manual_D07-00-129P_RevA00 Protocol Tabs Total - TX Mbps Displays the Current, Min, Max and Avg. Total Mbps rate transmitted Total - TX FPS Displays the Current, Min, Max and Avg. Total Frames Per Second rate transmitted Total - RX BW Displays the Current, Min, Max and Avg. Total %BW received Total - RX Mbps Displays the Current, Min, Max and Avg.
- Page 662 MPA_e_manual_D07-00-129P_RevA00 Packet Tab primitives need to be transmitted based on how many frames were received. Credit is returned for frames that have a valid SOF and at least one word of data following the SOF, independent of the validity of the CRC. Results - Strm Rslt (Stream Results) Screen (Specifically for Fibre Channel SAN testing on the Packet tab) The Stream Results screen displays the following statistics for the incoming stream:...
- Page 663 MPA_e_manual_D07-00-129P_RevA00 Protocol Tabs • Accept Bit Errors - A user-specified threshold value for determining the acceptable bit error rate for a timed test. • Accept Loss Rate - A user-specified threshold value for determining the acceptable Packet Loss rate for a timed test.
- Page 664 MPA_e_manual_D07-00-129P_RevA00 Packet Tab The events appear in a table that lists events, the number of events logged, the start and stop time of the event, and the duration of the event. Select the Descending/Ascending button to toggle between the order you wish to view the results.
- Page 665 MPA_e_manual_D07-00-129P_RevA00 Protocol Tabs Use the Graph button to view error and alarm results for the selected protocol processor. Graphs show the test history for either the current test or a previously saved test. To use the graphs function: 1. Select a protocol processor that has been configured for Error Alarm testing. 2.
- Page 666 MPA_e_manual_D07-00-129P_RevA00 Packet Tab Print a Graph Report 1. Select the protocol processor running the test for which you want to print the graph. 2. From the Results tab, select Graph. 3. Select the Graph screen's Print Report command button. The Report Setup menu appears.
- Page 667 MPA_e_manual_D07-00-129P_RevA00 Protocol Tabs Select the Save Graphs button to save the graphed results to a file for replay at a later time. The graph is saved with a .grp extension. To view the graph select the Replay Graphs button and choose the desired .grp file from the Browser dialog box.
- Page 668 MPA_e_manual_D07-00-129P_RevA00 Packet Tab (Specifically for Fibre Channel SAN testing on the Packet tab) The SET 1 functions determine how long a protocol processor's test runs and what activities occur at the end of the test. The following appears on the SET 1 screen. Function Description Duration...
- Page 669 MPA_e_manual_D07-00-129P_RevA00 Protocol Tabs None No action occurs at the end of the test duration. Print Current Statistics At the end of a timed test a statistics report of the received Errors, Alarms, Pointer Analysis, and Signal Status are printed to the configured printer.
- Page 670 MPA_e_manual_D07-00-129P_RevA00 Packet Tab timed test restarts. This test cycle continues until the test is stopped by selecting Stop from the Common Function Buttons, or by changing the Action After Duration value. Record Statistics and Repeat At the end of a timed test a Test statistics report of the received Errors, Alarms,...
- Page 671 MPA_e_manual_D07-00-129P_RevA00 Protocol Tabs the test is stopped by selecting Stop from the Common Function Buttons, or by changing the Action After Duration value. Print Statistics/Events and At the end of a timed test Repeat Test both test Statistics and Events are automatically printed to the configured This option appears when printer, and the timed test...
- Page 672 MPA_e_manual_D07-00-129P_RevA00 Packet Tab When a Record option is chosen, the results are saved to a file with one of the following extensions: • .stat - Results Report. A statistics report of the received Errors, Alarms, Pointer Analysis, and Signal Status functions. •...
- Page 673 MPA_e_manual_D07-00-129P_RevA00 Protocol Tabs recorded in the Results Errors/Alarms screens, Event Log nor Performance Monitoring screens, however the corresponding event's LED will still turn red. Pressing Clear History or Restarting a new test will clear all LED history. LED Quick Status Area (Specifically for Fibre Channel SAN testing on the Packet tab) The left side of the screen provides an at-a-glance view of the current protocol processor's LEDs and Laser ON/Off button.
- Page 674 MPA_e_manual_D07-00-129P_RevA00 Packet Tab • Test Paused: This LED will turn Red if the Pause Test button has been selected. Any errors or alarms received while the test is paused will not be recorded in any of the Results statistics. • All Tests: Provides a shortcut to the All Test Status screen (located under the...
-
Page 675: Fibre Channel - Specific Tasks
For a description of specific screens and their functionality, refer to Fibre Channel - Screen Functions and Descriptions Overview. The following procedure demonstrates how to interconnect the MPA with a Fibre Channel SAN switch, and establish test-stream data connections. • Select... - Page 676 Connect (without Server login) procedure (Specifically for Fibre Channel SAN testing on the Packet tab) This procedure demonstrates how to interconnect the MPA with a Fibre Channel SAN switch. This procedure will establish a connection that does not require a Fabric and Name Server login.
- Page 677 MPA_e_manual_D07-00-129P_RevA00 Protocol Tabs 6. Configure the desired Data Rate, Frame Length, and Payload test pattern. 7. Select the Save All button to save the entered test stream parameters, then select the Exit button. 8. The Status menu field will display the following The Fabric Login status will display “Fabric: Not Logged in”...
- Page 678 MPA_e_manual_D07-00-129P_RevA00 Packet Tab This procedure demonstrates how to interconnect the MPA with a Fibre Channel SAN switch. This procedure will establish a connection that requires a Fabric and Name Server login. 1. Verify the optical laser module being used supports the selected Fibre Channel data rate, and the wavelength is compatible SAN equipment being tested.
- Page 679 6. Enter the correct WWN Source and Destination addresses, Destination ID (D_ID), and Source ID (S_ID) addresses. These will be network dependent. Important: The MPA’s WWN Source/Destination Addresses must not be configured as All Zeros. The Destination WWN address and ID number must match the Source WWN address and ID number from the Fibre Channel SAN Switch.
- Page 680 Timed Test - Using Acceptance Criteria (Specifically for Fibre Channel SAN testing on the Packet tab) This MPA unit has the capability to run a timed test (a test with Fibre Channel enabled for a certain time period) specifying user-defined acceptance criteria for Pass/Fail results.
- Page 681 MPA_e_manual_D07-00-129P_RevA00 Protocol Tabs If the "Continuous" duration is used, the test will continue to operate until the Stop button is pressed. Restart the port that will be used for the timed test using the Restart button at the bottom of the screen. When the time duration of the test is reached, the streams will automatically stop counting received packets and the Pass/Fail acceptance results are displayed under the Results >...
- Page 682 MPA_e_manual_D07-00-129P_RevA00 Packet Tab The Packet tab provides the option to Print or Save the following test reports to a file for access later or for immediate printing; Stream Settings, Stream Test Statistics, the Events Log, RFC Throughput, RFC Frame Loss, and RFC Combined reports. Multiple reports can be combined into one file by selecting more than one report type.
- Page 683 MPA_e_manual_D07-00-129P_RevA00 Protocol Tabs Printer The selected report is sent to your PC's default printer. Text File The selected report is saved as an ASCII text file, with a .txt file extension. Delimited The selected Settings or Statistics report is save as a text file, using Comma Delimited (CSV) file format, with a .csv file extension.
-
Page 684: Gfp - Screens And Function Descriptions
MPA_e_manual_D07-00-129P_RevA00 Packet Tab 4. You can add a User Comment, that will appear at the beginning of the report. This is useful if you want to include specific note about the test in the report. Click the Input button to enter any User Comments that you wish to appear in the printed or saved report file, using the Key board screen that appears. - Page 685 MPA_e_manual_D07-00-129P_RevA00 Protocol Tabs (Specifically for GFP testing on the Packet tab) This section describes the various screens and functions that control GFP-Bulk, GFP- Framed and GFP-Transparent configurations and operations: • Config • Perf Tests (RFC-2544) • Results • Test • LED Quick Status Area •...
- Page 686 MPA_e_manual_D07-00-129P_RevA00 Packet Tab Selects which GFP Mode to test. Mode • GFP Bulk Fill • GFP Framed Ethernet • GFP Transparent Important: GFP-T is only available when the mapping or VCG data rate for SONET, SDH or OTN is equal to or greater than 1Gbps.
- Page 687 MPA_e_manual_D07-00-129P_RevA00 Protocol Tabs TX PTI Allows the user to configure the Payload Type Identifier value. The TX PTI can be set to: • 000 - Client Data Frame • 100 - Client Mgmt Frame • User Defined (range from 1 to 7, entered using a touch screen keypad) inserting LOCS and LOCCS alarms for their affect on the...
- Page 688 MPA_e_manual_D07-00-129P_RevA00 Packet Tab Reflect Allows the user to start IP Packet Reflection Mode for DLI Packets or All Non-Routing Packets. Important: This setting is only supported in GFP-Transparent VLAN RX Filters the Stream Results RX packet count by the Streams VLAN TPID TPID values.
- Page 689 MPA_e_manual_D07-00-129P_RevA00 Protocol Tabs The Config > Set (Stream Control) screen allows you to define the GFP parameters that will be used to generate a traffic flow or stream into the network. Up to four different streams can be generated simultaneous. The following functions appear on the Config >...
- Page 690 MPA_e_manual_D07-00-129P_RevA00 Packet Tab TX PTI Allows the user to configure the Payload Type Identifier value. The TX PTI can be set to: • 000 - Client Data Frame • 100 - Client Mgmt Frame • User Defined (range from 1 to 7, entered using a touch screen keypad) inserting LOCS and LOCCS alarms for their affect on the...
- Page 691 MPA_e_manual_D07-00-129P_RevA00 Protocol Tabs Sets the type of data used for the transmit GFP payload. The TX Pattern payload can be set to: • PRBS 31 • User Defined (range from 1 bit to 32 bits and is entered using a touch screen keypad) Length Sets the frame size (bytes).
- Page 692 MPA_e_manual_D07-00-129P_RevA00 Packet Tab packets sent and received Config - Strms Pg 1 and Strms Pg 2 (Specifically for GFP-F or GFP-T testing on the Packet tab) The Strms Pg 1 (Streams Page 1) and Strms Pg 2 (Streams Page 2) screens are used for configuring and testing packet streams.
- Page 693 MPA_e_manual_D07-00-129P_RevA00 Protocol Tabs Selecting All with Enable/Disable all 32 test streams simultaneously. If one or more streams are currently enabled, then All disables all enabled streams. If no streams are currently enabled, then All enables all test streams on both Pg1 and Pg2.
- Page 694 MPA_e_manual_D07-00-129P_RevA00 Packet Tab IP Dest Destination IP address UDP Dest UDP Destination Port MAC Src Source MAC address IP Src Source IP address UDP Src UDP Source Port IP TOS IPv4 - IP Type of Service IP TTL IPv4 - IP Time to Live IP FRAG IPv4 - Select whether to allow or disallow IP fragments IP TC...
- Page 695 MPA_e_manual_D07-00-129P_RevA00 Protocol Tabs Columns dialog box. 2. In the Rearrange Columns dialog box, select the Columns button to display the Select Next Column dialog box. 3. In the Select Next Column dialog box, select the button for the associated description to appear as the first column (from left to right) in table.
- Page 696 MPA_e_manual_D07-00-129P_RevA00 Packet Tab columns display order. The Count Statistics Table displays the following information Count Statistics for both transmitted (TX) and received (RX) packets: Table • TX/RX - Defines which row of statistics is designated for Transmit counts (TX) and which row is designated for Receive counts (RX) •...
- Page 697 MPA_e_manual_D07-00-129P_RevA00 Protocol Tabs Stream ID # Displays the Stream ID # that the settings are being modified for. The title bar of this Traffic Stream Profile window also shows which Stream ID # is currently selected. Multi Stream Config Automatically increments the Source and Destination IP and MAC address values on up to all 32 Streams, and applies other global changes to each selected Stream, all in one step.
- Page 698 MPA_e_manual_D07-00-129P_RevA00 Packet Tab IP Src address Sets the IP address of the source (origination). For IPv4, the address is entered in decimal notation using a keypad. There are no restrictions on values entered but the format must be correct, i.e: ( 0-255 0-255 0-255...
- Page 699 MPA_e_manual_D07-00-129P_RevA00 Protocol Tabs configuration. Ether Type A two-octet field in an Ethernet frame, used to indicate which protocol is encapsulated in the payload. The following menu items are available: • Internet Protocol, Version 4 (IPv4) 0x0800 (* default value) • Internet Protocol, Version 6 (IPv6) 0x086DD •...
- Page 700 MPA_e_manual_D07-00-129P_RevA00 Packet Tab IP TOS (IPv4) / Sets the Type Of Service/Traffic Class as defined in RFC 791. This can be entered as a 2-character HEX value, or the dialog Traffic Class (IPv6) box lets you configure the TOS based on the individual bit fields. •...
- Page 701 MPA_e_manual_D07-00-129P_RevA00 Protocol Tabs Rate Sets the traffic generation rate for the selected Stream. Rates can be configured as: • Constant %Bandwidth (0.01 to 100%) • Constant Mbit/sec (0.1 to max Mb/s, for the selected Interface) • Constant IPG-Byte • Constant IPG-MS •...
- Page 702 MPA_e_manual_D07-00-129P_RevA00 Packet Tab The following settings become enabled when a Ramp rate is Ramp Mode Settings selected: • Ramp Step: This is the size of the % Bandwidth or Mbps rate that each step (up and down) should change by. •...
- Page 703 MPA_e_manual_D07-00-129P_RevA00 Protocol Tabs MPLS Tagging must be enabled to use this parameter. VLAN TPID Configures the VLAN Tag Protocol Identifier. The default value is 0x8100, but the menu lets you select 0x88A8, 0x9100, 0x9200 or enter a 2-byte User Defined HEX value. VLAN Tagging must be enabled to use this parameter VLAN PCP/QOS Configures the VLAN Priority Code Point/Quality Of Service.
- Page 704 MPA_e_manual_D07-00-129P_RevA00 Packet Tab Save All Saves all changes made and closes the Traffic Stream Profile window. Exit Closes the Traffic Stream Profile window without saving changes. Config - Errors and Alarms (Specifically for GFP Mappings) The Error and Alarm screen allows the user to configure errors and alarms for insertion into a stream to simulate various defects and anomalies.
- Page 705 MPA_e_manual_D07-00-129P_RevA00 Protocol Tabs Error Type Selects the type of error to transmit into a stream. Selecting one of the following will not send an error immediately but will only select the type of error to send when the “Send Error” button is pressed or when a rate is selected.
- Page 706 MPA_e_manual_D07-00-129P_RevA00 Packet Tab Error Rate Selects the error rate to be transmitted for the selected error type. Once the error rate is selected, the system begins transmitting errors. Select one of the following: • 1E-<x> - X is an exponential value from 2 to 10. Selecting one of these sets the error rate to 1 x 10 (The smaller the exponential the higher the error rate.)
- Page 707 MPA_e_manual_D07-00-129P_RevA00 Protocol Tabs Displays the received Extension Header Identifier value. Displays the User Payload Identifier value. Spare Displays the Spare Field value. Displays the received Channel ID value. Perf Test RFC 2544 Tests - Screen Functions and Descriptions Overview (Specifically for GFP Mappings on the Packet tab) For GFP, the only Performance Test option supported is RFC-2544.
- Page 708 If this button is disabled, then only the selected Performance Standard Test is currently available. Dest Port The destination Port setting is not supported on the MPA. Trial Duration Determines how long the test runs for each packet size. This duration is used each time the test fails.
- Page 709 MPA_e_manual_D07-00-129P_RevA00 Protocol Tabs BW Ceiling Sets the high-end of the bandwidth test range. The RFC test will not exceed the setting. Valid values are 0.10 – 100. IMPORTANT: The minimum delta between the ceiling and floor setting is 1. For example, if the BW Floor is set to 9, then the BW Ceiling must be set to 10, or greater.
- Page 710 MPA_e_manual_D07-00-129P_RevA00 Packet Tab 1. Select RFC Tests 2. Select GRAPH side tab 3. Select Goto Throughput Graph to view the Throughput Results, for your selected frame sizes measured against the RFC standardizations table for frame length and frames per second criteria. 4.
- Page 711 MPA_e_manual_D07-00-129P_RevA00 Protocol Tabs 5. To display the Packet Distribution Graphs: Under the Results tab select the Count tab, then the Packet Sizes tab.
- Page 712 Dest MAC Address is configured for the selected Stream ID from the Traffic Stream Profile on the Conf screen. Dest Port Displays the destination port that will receive the test signal. The destination port configuration setting is not supported on the MPA.
- Page 713 MPA_e_manual_D07-00-129P_RevA00 Protocol Tabs BW Floor Displays the setting for the low-end of the bandwidth test range. BW Floor is configured from the RFC Tests - Conf screen. Accept Lost Rate Sets a packet loss rate threshold. The test fails if packet loss exceeds this value.
- Page 714 Dest MAC Address is configured for the selected Stream ID from the Traffic Stream Profile on the Conf screen. Dest Port Displays the destination port that will receive the test signal. The destination port configuration setting is not supported on the MPA.
- Page 715 MPA_e_manual_D07-00-129P_RevA00 Protocol Tabs BW Floor Displays the setting for the low-end of the bandwidth test range. BW Floor is configured from the RFC Tests - Conf screen. Packet Size Determines which packet size results appear in the statistics buttons table. Selecting a packet size button displays its results. Statistics Table Displays the frame loss test results for a specified packet size.
- Page 716 Stream ID from the Traffic Stream Profile on the Conf screen. Dest Port Displays the destination port that will receive the test signal. The destination port configuration setting is not supported on the MPA. Resolution (in Sets the level of precision for the B2B test, by frames. The frame:) value is the number of frames in the longest burst that the DUT will handle without the loss of any frames.
- Page 717 MPA_e_manual_D07-00-129P_RevA00 Protocol Tabs are 1-812. # Of Repetitions Enter the number of times the trial length should be repeated. The RFC recommended repetition is 50, however valid values are 1-100. Statistics Table Reports the test results. The system recovery results are displayed by Frame Size (bytes) tested as follows: •...
- Page 718 MPA_e_manual_D07-00-129P_RevA00 Packet Tab • Scan - Displays a list of errors and alarms along with their count and duration. • - Displays a list of errors along with their count, errored seconds, average and current rates. • ALARM - Displays a list of alarms along with the number of seconds spent in the alarm condition.
- Page 719 MPA_e_manual_D07-00-129P_RevA00 Protocol Tabs Count Displays the number of errors. Errored Seconds Displays the number of errored seconds. Average Displays the average error rate using an N.NNe-N format. Current Displays the current error rate using an N.NNe-N format. The following error types can be monitored: Error Type Description Undersized...
- Page 720 MPA_e_manual_D07-00-129P_RevA00 Packet Tab Corr tHEC An Correctable Type Header Error Control error occurred, which is a CRC-16 Uncorr tHEC An Uncorrectable Type Header Error Control error occurred, which is a CRC-16 Corr eHEC An Correctable Extension Header Error Control error occurred, which is a CRC-16 (EXI must be On) Uncorr eHEC An Uncorrectable Extension Header Error Control error...
- Page 721 MPA_e_manual_D07-00-129P_RevA00 Protocol Tabs The Alarm screen reports the various alarms detected by the receiving equipment. The following statistics appear: Statistic Description Alarm Description Displays the alarm type recognized and recorded by the unit. Seconds Displays the number of seconds the alarm spent in the alarm condition.
- Page 722 MPA_e_manual_D07-00-129P_RevA00 Packet Tab Results - Count Screen (Specifically for GFP Mappings) The Count screen displays Utilization, Packets, VLAN, and MPLS statistics by type and count. To view total transmit and receive utilization statistics, select the Utilization button. The following statistics appear: Desc column Current / Min / Max / Avg columns Total - TX BW...
- Page 723 MPA_e_manual_D07-00-129P_RevA00 Protocol Tabs TX IPv4 PPS Displays the Current, Min, Max and Avg. IPv4 Packet Per Second rate transmitted RX IPv4 BW Displays the Current, Min, Max and Avg. IPv4 %BW received RX IPv4 Mbps Displays the Current, Min, Max and Avg. IPv4 Mbps rate received RX IPv4 PPS Displays the Current, Min, Max and Avg.
- Page 724 MPA_e_manual_D07-00-129P_RevA00 Packet Tab TX VLAN PPS Displays the Current, Min, Max and Avg. VLAN Packet Per Second rate transmitted RX VLAN BW Displays the Current, Min, Max and Avg. VLAN %BW received RX VLAN Mbps Displays the Current, Min, Max and Avg. VLAN Mbps rate received RX VLAN PPS Displays the Current, Min, Max and Avg.
- Page 725 MPA_e_manual_D07-00-129P_RevA00 Protocol Tabs Transmit Packets Reports the total number of packets sent. Received Packets Reports the total number of packets received. Transmit Bytes Reports the total number of bytes sent. Received Bytes Reports the total number of bytes received. Transmit VLAN Reports the total number of VLAN packets sent.
- Page 726 MPA_e_manual_D07-00-129P_RevA00 Packet Tab Received Multicast Reports the total number of Multicast packets received. Packets Received Unicast Reports the total number of Unicast packets received. Packets Received Jumbo Reports the total number of Jumbo packets received. Jumbo packets are those from 1519 – 9000 bytes in size. Packets Received Super Reports the total number of Super Jumbo packets received.
- Page 727 MPA_e_manual_D07-00-129P_RevA00 Protocol Tabs Quality of Service For each stacked VLAN tag level (1-4), separate data rows Entry for QOS Entries 0-7 are displayed. These reports the number of frames received for each user priority level value. A total of 8 different counters appear for each Stacked VLAN level. To view MPLS results, select the MPLS button.
- Page 728 MPA_e_manual_D07-00-129P_RevA00 Packet Tab • TX PORT # - Show the selected transmit Port #, for Protocol Processors that support more that 1 interface port. • Packets - Total number of Packets transmitted. • Bytes - Total number of Bytes transmitted. •...
- Page 729 MPA_e_manual_D07-00-129P_RevA00 Protocol Tabs Displays Error statistic as Counts, Errored Seconds, Errors Average error rate and Current error rate, for the following Error Types: • Sequence Errors - Each sent packet is marked with a sequence number. This count is incremented when a packet arrives that has a sequence number different than one plus the sequence number of the previous packet.
- Page 730 MPA_e_manual_D07-00-129P_RevA00 Packet Tab (Specifically for GFP Mappings) The Results - Event function provides a detailed summary of when and how many errors, alarms, and other specific activity that has occurred and has been recorded by the unit since the time the test was started The events appear in a table that lists events, the number of events logged, the start and stop time of the event, and the duration of the event.
- Page 731 MPA_e_manual_D07-00-129P_RevA00 Protocol Tabs The Test screen configures test parameters associated with a Fibre Channel protocol processor. The Test screen contains the following functions: • SET 1 Test - Set 1 (Specifically for GFP testing on the Packet tab) The SET 1 functions determine how long a protocol processor's test runs and what activities occur at the end of the test.
- Page 732 MPA_e_manual_D07-00-129P_RevA00 Packet Tab including printing results to a printer or recording them to a file; repeating a test or just processing one test. Test results appear in a columned report format; however, there is one option available to record the statistics using a delimiter. The table below describes the Action after Duration options.
- Page 733 MPA_e_manual_D07-00-129P_RevA00 Protocol Tabs commas (,). The test does not repeat. Print Statistics and Repeat At the end of a timed test a Test statistics report of the received Errors, Alarms, Pointer Analysis, and Signal This option appears when Status are printed to the Repeat Actions is selected.
- Page 734 MPA_e_manual_D07-00-129P_RevA00 Packet Tab After Duration value. Record Events and Repeat At the end of a timed test a Test detailed summary of Errors, Alarms and Pointer event activities saved to a text file This option appears when with a .evt file extension, and Repeat Actions is selected.
- Page 735 MPA_e_manual_D07-00-129P_RevA00 Protocol Tabs When a print option is chosen from the Remote Client, the report is sent to the Current Printer as configured on the System tab's User Preference screen. If the Current Printer is configured for Prompt Each Time, then a Windows Print dialog box appears for you to choose between your PC's default printer or another printer listed in the drop-down menu.
- Page 736 MPA_e_manual_D07-00-129P_RevA00 Packet Tab Paused LED appears in the LEDs Quick Status area. To resume a test: Select Resume Test. The Test Paused LED turns white with red text, indicating that the test was paused earlier. Events occurring while in Pause mode will not be recorded in the Results Errors/Alarms screens, Event Log nor Performance Monitoring screens, however the corresponding event's LED will still turn red.
- Page 737 MPA_e_manual_D07-00-129P_RevA00 Protocol Tabs • All Tests: Provides a shortcut to the All Test Status screen (located under the System tab) which shows a general status summary of all circuit packs installed in the unit. Quick Status LEDs Color Description Typically a LED indicates a problem, whereas a Green White...
-
Page 738: Gfp - Specific Tasks
MPA_e_manual_D07-00-129P_RevA00 Packet Tab eHEC Extension-Header Error Check error status LED Indicates that one or more Correctable or Uncorrectable eHEC errors were detected. Type-Header Error Check error status LED tHEC Indicates that one or more Correctable or Uncorrectable tHEC errors were detected. Payload-Frame Check Sequence error status LED pFCS sFCS... - Page 739 MPA_e_manual_D07-00-129P_RevA00 Protocol Tabs The following Specific Tasks for this protocol processor are discussed: • Configuring GFP Packet Streams • Inserting GFP Errors and Alarms • Viewing GFP Error and Alarm Results • Using the Event Log • Saving and Printing Statistics and Port Settings •...
- Page 740 MPA_e_manual_D07-00-129P_RevA00 Packet Tab If routing the packets through a network switch, the stream's Source and Destination MAC Addresses should be configured. If routing the packets through a network router, the stream's Source and Destination MAC and IP Addresses should be configured. 6.
- Page 741 MPA_e_manual_D07-00-129P_RevA00 Protocol Tabs dialog box disappears and your selection appears in the top row of Rearrange Columns dialog box display window. 4. Again, in the Rearrange Columns dialog box, select the Columns button to redisplay the Select Next Column dialog box. 5.
- Page 742 MPA_e_manual_D07-00-129P_RevA00 Packet Tab 4. Select Error Rate and choose an error rate from the Select Error Rate to Insert dialog box. 5. Errors immediately start injecting into the packet stream when the error rate is selected. 6. View various result statistics by selecting the Results function.
- Page 743 MPA_e_manual_D07-00-129P_RevA00 Protocol Tabs Important: Once an alarm is selected, then alarm will continuously insert until turned off. 4. If you want to clear any previously collected data, select Restart from the common function button at the bottom of the screen before inserting the error. 5.
- Page 744 MPA_e_manual_D07-00-129P_RevA00 Packet Tab 1. Select a protocol processor tab. 2. Select the Results button. 3. Select Event. As events occur (such as alarms, errors, or Pointer activity) they appear and continuously scroll in the table. Events display in a ascending order from the most recent event to the oldest event.
- Page 745 MPA_e_manual_D07-00-129P_RevA00 Protocol Tabs Settings Reports the Stream Settings for the selected Port. Statistics Reports all Steam Tx/Rx Packet counts, Errors, and Alarms. Events Reports a summary of Events, such as alarm and error activity. Serv Disrupt Reports Service Disruption statistics. RFC Thru Put Reports the Throughput test settings and a summary of the test results for each packet size (passing rate, transmitted and...
- Page 746 MPA_e_manual_D07-00-129P_RevA00 Packet Tab Printer The selected report is sent to your PC's default printer. Text File The selected report is saved as an ASCII text file, with a .txt file extension. Delimited The selected Settings or Statistics report is save as a text file, using Comma Delimited (CSV) file format, with a .csv file extension.
- Page 747 MPA_e_manual_D07-00-129P_RevA00 Protocol Tabs 4. You can add a User Comment, that will appear at the beginning of the report. This is useful if you want to include specific note about the test in the report. Click the Input button to enter any User Comments that you wish to appear in the printed or saved report file, using the Key board screen that appears.
- Page 748 MPA_e_manual_D07-00-129P_RevA00...
-
Page 749: Gui System Tab
MPA_e_manual_D07-00-129P_RevA00 GUI System Tab GUI System Tab System Tab The System tab contains functions used to establish unit preferences, set up tests, and configure input and output port configuration settings in order to perform software upgrades, file transfers, and many other functions. The System tab contains the following function screens: •... -
Page 750: Update License Keys
MPA_e_manual_D07-00-129P_RevA00 Misc Screen • Change Protocol Mode • Restore To Factory Defaults • Save Settings To File • Restore Settings From File • Chassis Clock • External Clock In Status Update License Keys The Update License Key function allows you to enable functionality that you may not have initially purchased. -
Page 751: Set The Unit's Date, Time, Time Zone, And Daylight Saving Time Option
The Date's format is displayed as MM/DD/YYYY. To Manually set the Time: If the MPA system is not be connected to an NTP timeserver and not configured for Automatically set the Time and Date, the system Date and Time can be configured manually. - Page 752 5. Select Set. The time change appears next to the Unit Time, Date setting. To Manually set the Date: If the MPA system is not be connected to an NTP timeserver and not configured for Automatically set the Time and Date, the system Date and Time can be configured manually.
- Page 753 MPA_e_manual_D07-00-129P_RevA00 GUI System Tab To set your current Time Zone: 1. From the System tab, select Unit Time, Date. The Date/Time and Time Zone menu appears. 2. The Date/Time and Time Zone menu displays the following items: 3. Select Adjust Time Zone. The Time Zone Properties window appear. 4.
- Page 754 To Automatically set the Time and Date: When an MPA system is connected via Ethernet to a network with Internet access, the system’s Date and Time can automatically update with the date and time obtained from a network time server or an Internet time server such...
-
Page 755: About This Product
MPA_e_manual_D07-00-129P_RevA00 GUI System Tab 1. From the System tab, select Unit Time, Date. The Date/Time and Time Zone menu appears. 2. The Date/Time and Time Zone menu displays the following items: • After configuring the unit to automatically adjust the Date and Time, the word (Enabled) will appear to the right of Automatically Adjust Date/Time. - Page 756 - Product Name: VeEX – MPA (TM) - Product Serial Number (11-Digits) - Usage Time (This is the total number of hours that the MPA unit has been operating.) - Card Type, Software Version, Licensing and additional information for each installed...
-
Page 757: Check For Upgrade
MPA_e_manual_D07-00-129P_RevA00 GUI System Tab - Copyright and Patent Information Saving Information NOTE: The above information may be needed when calling for Technical Support. The information contained in the window can be saved to a text file by pressing the SAVE bottom in the lower left corner of the window; so that it can easily be copied from the unit, and attached to an email. -
Page 758: Changing The Protocol Mode
MPA_e_manual_D07-00-129P_RevA00 Misc Screen • If a newer released software version is available, then the currently installed software version will be displayed as well as the latest available version 2. If an updated software version is available, then select the More Information button for details about the latest Feature Set release. -
Page 759: Restoring Factory Defaults
MPA_e_manual_D07-00-129P_RevA00 GUI System Tab Restoring Factory Defaults This function will reconfigure all of the protocol processor's settings back to the original Factory Defaults, for the selected Protocol Mode. The options that appear on this screen are determined by your hardware configuration. -
Page 760: Setting The Chassis Clock
This function allows you to set the chassis clock to Internal or External BITS, SETS, 1.544 MHz Clock, or 2.048 MHz Clock. AM4022 Processor and a MCH card If your MPA unit has an SCM-210 card then refer to the SCM-210 section below. - Page 761 MPA_e_manual_D07-00-129P_RevA00 GUI System Tab MPA units that have the revised MCH module can be configured for a variety of Internal and External clock in/out references, via the Clock in/out port. The second revision MCH cards have been available since October 2015, and have an RJ-48 connector labeled Clock, as well as a CLK status LED.
- Page 762 MPA_e_manual_D07-00-129P_RevA00 Misc Screen c. An error will appear stating "Connected to MCH without BITS/SETS hardware" will appear if you enter the IP Address of an older MCH card that does not support the External Clock. 5. Select Chassis Clock. The Chassis Clock dialog box appears. 6.
- Page 763 External Clock In/Out references, to support the RJ-48 CLK-A In/Out port or the SMA CLK-B In/Out port. If your MPA unit has an AM4022 Processor and a MCH card then refer to the AM4022 Processor and a MCH card section above.
- Page 764 1. Connect an External clock reference to either the SCM-210’s RJ-48 or SMA Clock In/Out Ports. 2. Remotely log into to the MPA’s IP Address with the Remote Client software. 3. Select the System tab and choose Misc. 4. Select Chassis Clock. The Chassis Clock dialog box appears.
- Page 765 Options Internal (No Output) The transmit signals derive their data's timing source from the MPA system's Internal Stratum 3 clock source. Chassis (Internal) option appears in the Transmit Clock Reference menus, and CLK:INT displays in the Quick LED Status area when selected.
- Page 766 MPA_e_manual_D07-00-129P_RevA00 Misc Screen LED Status area when selected. There is no timing signal on the RJ-48 CLK-A Out port. The SMA CLB-B Out port is a 10 MHz 75 ohm TTL clock. RJ48 CLK A (BITS The transmit signals derive their data's timing source from 1.544 Mbps In/Out) an external 1.544 Mbps BITS (Building Integrated Timing Supply) clock input from the RJ-48 CLK-A port.
-
Page 767: External Clock In Status
The SMA CLB-B Out port is a 10 MHz 75 ohm TTL clock. External Clock In Status MPA units that have the new MCH module support both Internal or External chassis clock references. The External Clock In Status will show Locked when the processor is synchronized to Chassis Clock setting. -
Page 768: Io Settings Screen
External Clock was disconnected from the RJ-48 Clock port. The MCH will then revert back to Internal Reference. IO Settings Screen I/O Settings The MPA unit can be remotely controller by a Graphical User Interface (GUI) and SCPI script commands, via a wired Ethernet connection. -
Page 769: Ethernet Port Settings
MPA_e_manual_D07-00-129P_RevA00 GUI System Tab AM4022 Processor SCM-210 Controller The I/O Settings screen contains the following functions used to change the processor's existing IP Address. • Ethernet Port Settings • Changing the IP Address with the Remote GUI Client • Reboot: A reboot is required for the new IP Address settings to take effect. Ethernet Port Settings If Ethernet port parameters are changed, the test set must be rebooted... - Page 770 When specifying an IP Address, the Host Name and Domain Name parameters are preset to "localhost". TCP Ports required In order to fully utilize the MPA system, the MPA system needs access to the following TCP Ports through your personal or corporate firewall. Application...
-
Page 771: Rebooting The Test Set
MPA_e_manual_D07-00-129P_RevA00 GUI System Tab FTP / Remote GUI 8080 HTTP (Software Upgrade) HTTP (Web Browser GUI) 5901- VNC viewer client <IP 5910 Address>:1-10 8090 SCPI 11000 Remote GUI Port1 11001 Remote GUI Port2 Rebooting the Test Set This function allows the system to write unsaved data to the disk before you reboot the unit. -
Page 772: Deleting Files
MPA_e_manual_D07-00-129P_RevA00 File Services Screen • Delete Files • Delete Directories • Rename Files • Print Saved Files • View Save Files • Create a New directory for file storage Deleting Files 1. From the System tab, select File Services. 2. Select a file or multiple files from the File List box. Note: Selecting multiple files does not cause previous files to be unselected. -
Page 773: Printing Saved Files
MPA_e_manual_D07-00-129P_RevA00 GUI System Tab 2. Select a file from the File List box. 3. Select Rename. A keyboard appears. Enter the new file name with extension. Do not use spaces in file names 4. Select Enter from the keyboard. The file is renamed. Printing Saved Files While running tests, you have the option to save the information to a file. -
Page 774: Viewing Saved Report Files
MPA_e_manual_D07-00-129P_RevA00 File Services Screen Viewing Saved Report Files While running tests, you have the option to save the information to a file. The instructions below tell you where and how to view a saved file. Important: Image files such as saved Screen Captures that have a .BMP file extension cannot be viewed by the GUI. -
Page 775: Creating A New Directory
MPA_e_manual_D07-00-129P_RevA00 GUI System Tab • Folder name • File name • File size and date • File attributes 4. Select View. The View File window appears. 5. Use the Display Hex / Display ASCII toggle button to display the file in Hex or ASCII format. -
Page 776: Adding A New User
MPA_e_manual_D07-00-129P_RevA00 Security Screen • User Name • Permissions: Admin, Calibrate, Read/Write,or Read Only Active: Displays “Yes” for user’s currently logged in to the test set. • • Current: Displays permissions of active users. The Account Information section enables a user with administrator privileges to perform the following tasks: •... -
Page 777: Deleting A User
MPA_e_manual_D07-00-129P_RevA00 GUI System Tab 6. Enter a password. Important: Password must between 4 and 8 characters long, and can not contain and spaces. 7. Select , next to the Permission field. The Select User Permissions window appears. 8. Select one of the following user permissions: •... -
Page 778: Enabling/Disabling Security System Lock
MPA_e_manual_D07-00-129P_RevA00 Security Screen Enabling/Disabling Security System Lock This function allows an administrator to enable a Security System Lock, that only allows one user with Read and Write permissions (this includes Calibration and Admin users) to be logged in at a time. This setting effects other Remote Client connections as well as SCPI connections If a user with Read and Write permissions is already logged in, a window will appears stating "System locked by another user". -
Page 779: User Preference Screen
MPA_e_manual_D07-00-129P_RevA00 GUI System Tab 2. Select Reset System. 3. A message asking to confirm that you want to reset the system appears. Select Yes. 4. A message stating that the system must be restarted for changes to take affect appears. Select OK. Reboot the system. -
Page 780: Changing The Tab Name For Protocol Processors
MPA_e_manual_D07-00-129P_RevA00 User Preference Screen • EMail Alert Notification: Allows the unit to be configured for sending automatic Email Alerts based on user specified Error/Alarm occurrences. Changing the Tab Name for Protocol Processors 1. From the System tab, select User Preference. 2. -
Page 781: Setting The Alarm Beeper Status
MPA_e_manual_D07-00-129P_RevA00 GUI System Tab To change tab names, select Changing a Tab Name for the Go To Label. Setting the Alarm Beeper Status This function associates a WAV file sound with an alarm event. When using the unit's touch screen, a total of 10 sounds are available. When using the remote GUI, up to a total of 16 sounds can be used. -
Page 782: Sending Email Alerts
MPA_e_manual_D07-00-129P_RevA00 User Preference Screen There can be more than one Compat folder in the RemoteClient directory. To determine the correct folder, check the Feature Set version operating on the test set that you want to add the WAV file to by selecting its System tab, choosing Misc, and pointing to About this product. - Page 783 MPA_e_manual_D07-00-129P_RevA00 GUI System Tab 3. Select the Mail From, and enter the "From" name as it should appear in the email, and press Enter. The default setting is the last four digits of the unit’s serial number • • Important: Some email servers may require the “@yourdomainname.com”...
- Page 784 MPA_e_manual_D07-00-129P_RevA00 User Preference Screen • If more than one processor receives their specified errors/alarms at different times, then they will each independently generate an email when their respective event occurs, and they will each independently wait for the specified Mail Interval time to elapse before checking their errors/alarms again •...
- Page 785 MPA_e_manual_D07-00-129P_RevA00 GUI System Tab • Important: The Processor / Mail Notify settings DO NOT persist after the unit has been rebooted 9. After you have finished configuring the Email Alerts, the GUI must actively be monitoring the specified protocol processor(s) for which the Email Alerts have been configured, at all times.
- Page 786 MPA_e_manual_D07-00-129P_RevA00 User Preference Screen Testing/Troubleshooting Email Alerts (optional): It is strongly suggested to test Email Alerts configurations prior to leaving the unit unattended or an important long-term test. 1. From the User Preference window, configure all of the Email Alert settings as describe in the sections above, customized for your specific test needs with two exceptions.
-
Page 787: Displaying All Test Status
GUI System Tab Displaying All Test Status The MPA can operate multiple tests simultaneously. Each Protocol Processor has a panel of Error, Alarm and Status LED Indicators to display the status and history of the current test. The All Test Status screen allows the user to observe, at a glance, the status of all simultaneous tests. -
Page 788: Expanded Alarm And Status Indicators
MPA_e_manual_D07-00-129P_RevA00 Displaying All Test Status The color of the word “Summary” indicates history. White text indicates that no • alarm or error has been detected during the current test. Red text indicates that at least one "conditional" LED is or was Red during the test in progress Below is an example of the All Test Status screen: Expanded Alarm and Status Indicators In order to display all Error, Alarm and Status Indicator LEDs for any one Protocol... -
Page 789: Multi-Page Display
Select the All Test Status button again to advance to the next group. All Ether Ports MPA units configured for Packet testing on more than one port or tab can operate multiple Ethernet tests simultaneously. The All Ether (Ethernet) Ports screen allows the user to observe, at a glance, results and statistics of all simultaneous tests. - Page 790 MPA_e_manual_D07-00-129P_RevA00 All Ether Ports The All Ether Ports display operates similar to a spreadsheet. The user can re-size and re-order the rows and columns easily. There are over 30 columns of information so not all can be shown simultaneously. Use the scroll bar at the bottom to scroll to the additional rows.
-
Page 791: Service Disruption
MPA_e_manual_D07-00-129P_RevA00 GUI System Tab Global Restart (All Tests) Selecting the Restart button will reset the counters and restart all of the listed ports, that are locked by the GUI. Essentially, this is the equivalent of selecting the "Restart " button on each of the ports at the same time. IMPORTANT: The Stop and Restart buttons only control those ports that the user locked on all Ethernet processors. -
Page 792: To Stop Monitoring Service Disruption Measurement Activity
MPA_e_manual_D07-00-129P_RevA00 Monitoring SCPI Commands 4. From Protection Switch Criteria, select the alarms, errors, and patterns to use for triggering a service disruption. 5. The measurement parameters that appear on the Service Disruption screen are dependant upon the protocol. A description of the possible parameters is provided below. -
Page 793: To Open The Monitor
MPA_e_manual_D07-00-129P_RevA00 GUI System Tab To open the monitor: 1. From the System tab, select Monitor. 2. Choose Reverse if you wish reverse the order in which commands appear. • By default, commands are listed such that the latest command will always be display at the top of the window, whereas the previous commands are pushed down. - Page 794 MPA_e_manual_D07-00-129P_RevA00 Chatting • Select to display an virtual keyboard. A keyboard appears allowing you to enter the message. Select Enter when done. The message appears in the Input Message window. • Remote GUI users can place their mouse cursor in the Input Message box and type the message using they computer's keyboard.
-
Page 795: Faults
MPA_e_manual_D07-00-129P_RevA00 GUI System Tab 6. The Received Messages box shows all chat messages sent to and received by other GUI connections. The sender's [user name] will appear to the left of the sent/received chat messages. If all users are logged in to their respective GUI applications with the same user name (such as Admin), then all chat messages sent and received will show the same [user name]. - Page 796 MPA_e_manual_D07-00-129P_RevA00...
-
Page 797: Term Definitions
MPA_e_manual_D07-00-129P_RevA00 Term Definitions Term Definitions A1 and A2 bytes Framing bytes. These two bytes indicate the beginning of the STM-N frame. The A1 and A2 bytes are unscrambled. A1 has the binary value 11110110, and A2 has the binary value 00101000. The frame alignment work of an STM-N frame is composed of (3 x N) A1 bytes followed by (3 x N) A2 bytes. - Page 798 Transmits a continuous test pattern of all zeros (000000. . .). AM4022 AM4022 Processor card contains the MPA's CPU and memory and Operating System used to govern the software applications needed for testing the MPM test modules. In systems with an MCH/AM4022 Processor combination, the AM4022...
- Page 799 MPA_e_manual_D07-00-129P_RevA00 Term Definitions Administrative Unit - Loss of Pointer (SDH only). In the Quick Status LEDs area, an alarm LED indicating a consecutive number of invalid pointers or NDFs were received on the AU. B1 byte RS Bit interleaved parity code (BIP-8) byte. This is a parity code (even parity) used to check for transmission errors over a Regenerator Section.
- Page 800 MPA_e_manual_D07-00-129P_RevA00 B3 Error. A B3 error is also known as a Path BIP-8. Indicates that parity errors were detected at the Path layer of the incoming SONET signal. This is calculated over the Path OH and payload of each STS-1. Background Block Errors.
- Page 801 MPA_e_manual_D07-00-129P_RevA00 Term Definitions C2 byte Path Signal Label byte. This byte specifies the mapping type in the VC-N. Committed Burst Size. In Y.1564, CBS is the number of allocated bytes available for bursts of ingress service frames transmitted at temporary rates above the while meeting the guarantees provided at the CIR.
- Page 802 MPA_e_manual_D07-00-129P_RevA00 Clock Alarm Indicates an anomaly with the selected timing source for the transmit signal. CPRI Common Public Radio Interface. The following Unframed CPRI rates are currently supported on the MPM-10G card: 614.4M, 1.2288G, 2.4576G, 3.072G, 4.9152G, 6.144G, 9.8304G, 10.1376G, 12.16512G. Cyclic Redundancy Check.
- Page 803 MPA_e_manual_D07-00-129P_RevA00 Term Definitions CV-S Section Coding Violation. This is a B1 error, which is also known as a Section BIP-8. Power level expressed in relation to 1 milliwatt. For example: 0dBm = 1 milliwatt; +3 dBm = 2 milliwatt; -3 dBm = 0.5 milliwatt. D1-D3 bytes Regenerator Section Data Communications Channel (DCC) bytes.
- Page 804 MPA_e_manual_D07-00-129P_RevA00 Dense Wavelength Division Multiplexing. The higher-capacity version of WDM, which is a means of increasing the capacity of fiber-optic data transmission systems through the multiplexing of multiple wavelengths of light. Excess Burst Size. In Y.1564, EBS is the number of allocated bytes available for bursts of ingress service frames sent at temporary rates above the CIR+EIR while remaining EIR-conformant.
- Page 805 MPA_e_manual_D07-00-129P_RevA00 Term Definitions and aligning of Ethernet frames into SONET frames, while preserving the Ethernet frame structure. See also Ethernet. Error Checking A procedure performed by computer-based communications programs, hardware, software, or firmware in a network monitoring device, instrument or equipment to ensure complete and accurate data transfer.
- Page 806 MPA_e_manual_D07-00-129P_RevA00 ES-LFE Errored Seconds - Line Far End. This is a counter that indicates the number of seconds that an REI-L alarm is reported. ES-P Near End Coding Violations - Path. Reports the duration of Severely Errored Seconds (SES) on the incoming SONET signal. ES-PFE Far End Errored Seconds.
- Page 807 MPA_e_manual_D07-00-129P_RevA00 Term Definitions F1 byte Regenerator Section user channel byte. This byte is set aside for the user's purposes. It can be read and/or written to at each section terminating equipment in that line. F2 byte Path user channel byte. This byte is used for user communication between path elements.
- Page 808 MPA_e_manual_D07-00-129P_RevA00 Far End Block Errors. Count of E-Bit errors, which are SMFs in error at the far end, as determined by a CRC-4 error. Forward Error Correction. FERF Far End Receive Failure. A signal generated and sent upstream that informs the transmitting line terminating equipment that the receiving equipment has detected an incoming failure.
- Page 809 MPA_e_manual_D07-00-129P_RevA00 Term Definitions Generic Framing Procedure provides for mapping various clients signals over a SONET/SDH/OTN transport network. Frame-Mapped GFP (GFP-F) maps individual client frames to individual GFP frames (such as Ethernet frames mapped directly to GFP frames). See also GFP. Frame Transfer Delay FTFL Fault Type and Fault Location...
- Page 810 MPA_e_manual_D07-00-129P_RevA00 H3 byte STM Pointer Action. H4 byte Position and Sequence Indicator byte. This byte provides a multiframe and sequence indicator for virtual VC-3/4 concatenation and a generalized position indicator for payloads. See also VC. HDB3 High Density Bipolar 3. Bipolar coding method that does not allow more than three zeros.
- Page 811 MPA_e_manual_D07-00-129P_RevA00 Term Definitions ICMP Internet Control Message Protocol. A TCP/IP protocol used to send error and control messages. The ICMP reports errors that occur during transmission of IP datagram packets. For example, a router uses ICMP to notify the sender that its destination node is not available.
- Page 812 MPA_e_manual_D07-00-129P_RevA00 J0 Byte The J0 byte is part of the Section OH and is known as the Section trace or J0 trace. J0 Trace A 64-byte pattern that can be created for repeated transmission. The pattern is a string of ASCII characters. The J0 trace can be configured to send the unit's default pattern or a customized pattern.
- Page 813 MPA_e_manual_D07-00-129P_RevA00 Term Definitions The K1 byte is used to indicate a request by a channel for a switch action. K1 is used by APS (Automatic Protection Switching). K1 Full Byte The K1 Full byte configures the bit pattern of the K1 byte using either predefined settings (00000000;...
- Page 814 MPA_e_manual_D07-00-129P_RevA00 Suffix indicating line level. Local Area Network. A LAN typically connects workstations, peripherals, terminals, and other devices in a single building, campus, or other geographically limited areas. LAN technologies usually employed include Ethernet, FDDI, and Token Ring. LANs are usually not subject to public telecommunications regulations.
- Page 815 MPA_e_manual_D07-00-129P_RevA00 Term Definitions between two consecutive network elements. One of the network elements originates the Line Overhead and the other terminates the Line Overhead. A Line span in the SONET network has special significance as it is protected in case of equipment failure or deterioration in performance.
- Page 816 MPA_e_manual_D07-00-129P_RevA00 Line Overhead In a Synchronous Transport Frame, 18 bytes are delegated in the Transport Overhead section of the frame for monitoring and maintenance of the frame signal across a line span. The Line Overhead data is updated each time the frame passes through a Line Terminating Equipment.
- Page 817 MPA_e_manual_D07-00-129P_RevA00 Term Definitions Loss of Multiframe alignment (H4). LOM-V Loss of Multiframe alignment - Virtual Tributary. Looped (Signal Timing) A method of synchronizing a circuit by taking a synchronizing clock signal from incoming digital pulses. LOP-P Loss of STS pointer. LOP-V Loss of VT pointer.
- Page 818 The hardware address of a device connected to a shared network medium. MicroTCA Carrier Hub. A central management and data switching device in a MicroTCA system, to provide needed support for the AMC cards used by the MPA system. The MPA chassis requires either an MCH and...
- Page 819 MPA_e_manual_D07-00-129P_RevA00 Term Definitions The physical chassis used by a rackmount MPA system to house and govern the application of the AMC cards, and the Fan Tray directly, through a backplane. Multiframe. Consists of 16 E1 frames, and broken into two SMFs. The E1 multiframe is used for all types of framing (except unframed).
- Page 820 MPA_e_manual_D07-00-129P_RevA00 For SDH, Multiplex Section. Contains the information required between the multiplex section termination equipment at each end of the MS (that is, between consecutive network elements excluding the regenerators). MSOH For SDH, Multiplex Path Overhead. 18 bytes of overhead accessed, generated, and processed by MS terminating equipment.
- Page 821 MPA_e_manual_D07-00-129P_RevA00 Term Definitions To transmit two or more signals over a single channel. N2 byte Allocated for Tandem Connection Monitoring for the VC2, VC-12, and VC-11 level. New Data Flag. The first four bits of the Payload Pointer in the Transport Overhead portion of the Synchronous Transport Frame.
- Page 822 MPA_e_manual_D07-00-129P_RevA00 Optical Carrier level 1. OC-1 is 51.840 million bits per second. Its electrical equivalent is an STS-1. OC-3 Optical Carrier level 3. A SONET channel equal to three DS3s, which is equal to 155.52 million bits per second. OC-12 Optical Carrier level 12.
- Page 823 MPA_e_manual_D07-00-129P_RevA00 Term Definitions Conceptually similar to SONET, since both share the goal of providing end-to-end networking. Out of Frame A condition entered when four consecutive frames are received with invalid (errored) framing patterns. Out of Frame Event Indicates the actual event of going from correct framing condition to an Out of Frame condition.
- Page 824 MPA_e_manual_D07-00-129P_RevA00 Pattern Synchronization. Indicates a loss of pattern synchronization. This is an alarm LED. Paused Alarm The total duration that the test has been Paused for. Payload Portion of the SDH signal available to carry service signals such as E1 and E3. The contents of a Virtual Container (VC).
- Page 825 MPA_e_manual_D07-00-129P_RevA00 Term Definitions Payload Label Mismatch alarm. Path Monitoring Pointer The Payload pointer indicates the offset between the VC payload and the STM-N frame by identifying the location of the first byte of the VC in the payload. In other words, the VC is allowed to "float"...
- Page 826 MPA_e_manual_D07-00-129P_RevA00 PPJC Positive Pointer Adjustment Count. Parts per million. PP Name A section of the touch screen that displays which common function tab, protocol processor/slot, and chassis is selected. See also To; SLOT. Point-to-Point Protocol. A protocol allowing computers to use TCP/IP to connect to other computers over standard phone lines using high-speed modems.
- Page 827 MPA_e_manual_D07-00-129P_RevA00 Term Definitions PRBS 2 -1 generates a maximum of 10 consecutive zeros and 11 consecutive ones. PRBS 11 Inv PRBS 2 -1 Inverted generates a maximum of 11 consecutive zeros and 10 consecutive ones. PRBS 15 PRBS 2 -1 is a 32,767-bit pseudorandom pattern, which generates a maximum of 14 consecutive zeros and 15 consecutive ones.
- Page 828 MPA_e_manual_D07-00-129P_RevA00 Protocol A specific set of rules, procedures, standards or agreements as to exactly how data is to be formatted and transmitted between two computers, devices or facilities in a network. Protocol Control Information Information exchanged between corresponding entities, using a lower layer connection, to coordinate their joint operation.
- Page 829 MPA_e_manual_D07-00-129P_RevA00 Term Definitions Quality of Service. When referring to VLAN, this is a 3-bit user Priority Code Point (PCP) that sets a priority value between 0 and 7, which can be used for Quality of Service (QoS) priority traffic delivery. QRSS Quasi-Random Signal Source.
- Page 830 MPA_e_manual_D07-00-129P_RevA00 RDI-P For SONET, Remote Defect Indication - Path (G1). RDI-V For SONET, Remote Defect Indication - Virtual Tributary (V5). Remote Error Indication (REI) An indication returned to a transmitting node (source) that an errored block has been detected at the receiving node (sink). This indication was formerly known as Far End Block Error (FEBE).
- Page 831 MPA_e_manual_D07-00-129P_RevA00 Term Definitions • A Ring network refers to the design of a Local Area Network in which the wiring loops from one workstation to another form a circle. Reverse Request (0010) in APS Linear mode. See also K1 Bits 1-4.
- Page 832 Trouble Scan. A scan function that lists received errors and alarms. SCM-210 System Controller Module contains the MPA's CPU and memory and Operating System used to govern the software applications needed for testing the MPM test modules, and replaces the...
- Page 833 MPA_e_manual_D07-00-129P_RevA00 Term Definitions higher-rate signal, a parity check byte, a local orderwire channel for voice communications between section terminating equipment, a data communications channel for message-based network management and maintenance information, and a user channel for network operator communications. See also Section Terminating Equipment.
- Page 834 Service Level Agreement SLOT Slot Number. The Slot number indicates which MPA chassis slot the test module is physically located. Slots are numbered from left to right beginning with slot number 1. The protocol processor tab names in the GUI include the Slot # as "S#", where # is the...
- Page 835 MPA_e_manual_D07-00-129P_RevA00 Term Definitions Section Monitoring SN Error Sequence Number error. SNP Error Sequence Number Protection error. SONET Synchronous Optical Network. A family of fiber-optic transmission rates from 51.84 million bits per second to 13.27 gigabits (thousand million) per second (with time, this will go higher), which was created to provide the flexibility needed to transport many digital signals with different capabilities and to provide a design standard for manufacturers.
- Page 836 MPA_e_manual_D07-00-129P_RevA00 Synchronous Transport Module level 16. An SDH channel of 2.488 gigabits per second (Gbps). STM-64 Synchronous Transport Module level 64. An SDH channel of 9.953 gigabits per second (Gbps). STM-256 Synchronous Transport Module level 256. An SDH channel of 39.813 gigabits per second (Gbps).
- Page 837 MPA_e_manual_D07-00-129P_RevA00 Term Definitions Tandem Connection-Incoming Error Count. Indicates a B3 error count is being received from downstream TCM equipment. Bits 1-4 of the N1 byte are used for this indicator. This is an error. TC-LOF Tandem Connection-Loss of Frame. Indicates the loss of a valid multiframe pattern from upstream TCM equipment.
- Page 838 MPA_e_manual_D07-00-129P_RevA00 Tandem Connection-Unequipped. Indicates that a 00h pattern has been detected in the N1 byte of a Tandem Connection. This is an alarm. Time Division Multiplexing. Digital multiplexing in which two or more apparently simultaneous channels are derived from a given frequency spectrum (bit stream), by interleaving pulses representing bits from different channels.
- Page 839 MPA_e_manual_D07-00-129P_RevA00 Term Definitions For SDH, a Tributary Unit is an information structure which provides adaption between the Lower-Order path layer and the Higher-Order path layer. It contains the VC, plus a tributary unit pointer. For SDH, a Tributary Unit Group contains several Tributary Units (TU) Unavailable Seconds.
- Page 840 MPA_e_manual_D07-00-129P_RevA00 Unequipped STS Payload. Indicates that an all-zeros pattern is being received from Path terminating equipment. The C2 byte is used for this indicator. This is an alarm LED. The user payload identifier (UPI) is an 8-b field such that when PTI = 0, it identifies the type of payload and mapping in the data frame, e.g., frame-mapped Ethernet (UPI=1), frame-mapped PPP (UPI=2), transparent fibre channel (UPI=3), transparent FICON (UPI=4), transparent ESCON (UPI=5), transparent Gigabit Ethernet (UPI=6), and frame-...
- Page 841 Payloads that exceed the standard payload container capacity (a VC-3) may be transported using a concatenation method. VeEX The Verification EXperts. The parent company of Digital Lightwave. www.veexinc.com Virtual Container Sometimes abbreviated VC.
- Page 842 MPA_e_manual_D07-00-129P_RevA00 networks (WANs) that span large geographic areas. Allows, for example, mobile users to dial up their company LANs. Wide Area Network. A WAN typically serves users across a broad geographic area and generally makes use of transmission devices provided by common carriers. Technologies involved with WANs can include Integrated Services Digital Networks (ISDNs), T1 networks, X.25, Frame Relay, and SMDS.
Need help?
Do you have a question about the MPA and is the answer not in the manual?
Questions and answers