Weinmann OXYWAY Fix I Service Manual
Pressure reducer
Hide thumbs
Also See for OXYWAY Fix I:
- Description and instructions for use (188 pages) ,
- Description of the equipment and instructions for use (114 pages) ,
- Instructions for use manual (72 pages)

Subscribe to Our Youtube Channel
Related Manuals for Weinmann OXYWAY Fix I


Summary of Contents for Weinmann OXYWAY Fix I
- Page 1 OXYWAY Pressure reducer from serial number 1810000 Fix I, Fix III (fixed) Fast I, Fast I+, Fast II, Fast III (multistep) Fine I (variable) Click (multistep) Service Manual...
- Page 2 5.2 Intervals ............... 18 5.3 Performing maintenance ..........19 5.4 Sending in parts ............20 6 Hygienic reprocessing ........ 21 7 Final inspection OXYWAY Fix I, OXYWAY Fix III ..........22 7.1 Safety during final inspection ........22 7.2 General instructions ............22 7.3 Required test and auxiliary equipment ......
- Page 3 11.5 Checking the constant output (flow) at the inhalation outlet ..........57 11.6 Checking the accessories ..........58 12 Faults ............59 13 Repairs to OXYWAY Fix I, OXYWAY Fix III ........... 62 13.1 General instructions ............62 13.2 Repair steps ..............62 13.3 Replacing a label ............
- Page 4 Table of Contents 14 Repairs to OXYWAY Fast I, OXYWAY Fast I+, OXYWAY Fast III .... 82 14.1 General instructions ............82 14.2 Sequence of repair steps ..........82 14.3 Assemblies ..............88 14.4 Replacing a label ............88 14.5 Replacing the pressure screw in the inhalation outlet ..89 14.6 Replacing the sieve and nozzle plate in the inhalation outlet ..........
- Page 5 Table of Contents 15.9 Replacing the disposable filter ........135 15.10Replacing the connecting bolt ........135 15.11Replacing the hand-screwed connection ..... 137 15.12Replacing the rib filter ..........137 15.13Replacing the inhalation outlet ........139 15.14Replacing the pressure outlet ........141 15.15Replacing the O coupling ..........
- Page 6 Table of Contents 16.16Replacing the multistep flow selector ......188 16.17Replacing the driving plate ......... 188 16.18Replacing the assembly housing cover ......189 16.19Replacing the spring for the piston ......191 16.20Replacing the piston ..........192 16.21Replacing the spring for the lifting pin ......193 16.22Replacing the lifting pin with shoulder .......
- Page 7 Table of Contents 19 Storage and disposal ....... 249 20 Accessories ..........250 20.1 Accessories and other parts ........250 21 Required auxiliary equipment ....251 21.1 Tools ................251 21.2 Test equipment and auxiliary equipment ..... 253 22 Technical data .......... 255 23 Technical changes ........
- Page 8 However, please observe the following: • You are responsible for all repairs carried out by yourself and for the warranty thereof! • Only use original spare parts from WEINMANN Emergency. • Please observe the accompanying documentation (instructions for use). Read this service manual carefully before any use, care or maintenance of the device.
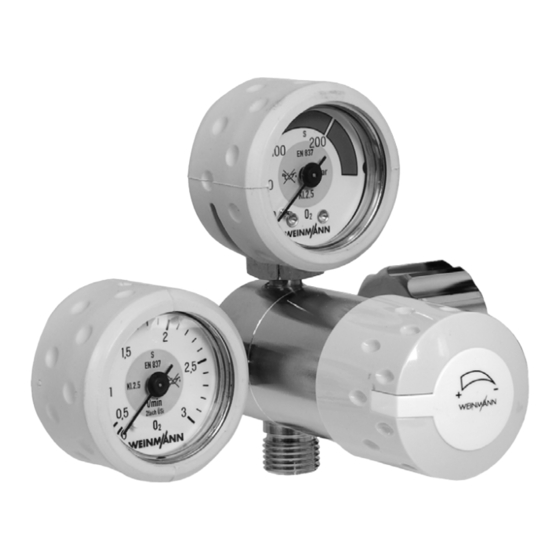
- Page 9 • Click the Contents button to go to the Table of Contents. • Click the Previous Page button to go to the previous page. • Click the Next Page button to go to the next page. 1.3 Function 1.3.1 OXYWAY Fix I, Fix III setup OXYWAY Fix I, Fix III Contents...
- Page 10 Introduction 1.3.2 OXYWAY Fast I, Fast I+, Fast III, Fast II setup OXYWAY Fast I, Fast I+, Fast III Contents indicator Housing Housing cover Multistep flow selector Connecting bolt Disposable Piston with spring with Rib filter filter hand-screwed connection Multistep flow selector Orifice...
- Page 11 Introduction The oxygen from the oxygen cylinder enters the pressure reducer through the connecting bolt with hand-screwed connection and 2 filters in series. When the cylinder valve is open, the cylinder pressure in the pressure reducer is reduced by a piston with spring to 6 bar. With multistep pressure reducers OXYWAY Fast I and OXYWAY Fast II, there is an orifice plate with various orifice diameters in the multistep flow selector.
- Page 12 Introduction The piston is acted on by a second spring which is adjustable by means of a spindle system and which therefore generates different rated outlet pressures. This means that the flow can be variably adjusted in connection with the nozzle plate in the inhalation outlet. The adjusted flow is read off at the flow indicator.
- Page 13 Shows the set inhalation flow. (OXYWAY Fine only) Pressure outlet Connects the pressure reducer with a connected device. (only OXYWAY Fix I, OXYWAY Fast II) Connects the pressure reducer with connected accessories (e.g., nasal cannulas, masks, Inhalation outlet intermediate humidifiers).
- Page 14 Safety 2 Safety 2.1 Safety information in this service manual Danger! DANGER indicates a hazardous situation that, if not avoided, will result in death or serious injury. Warning! WARNING indicates a hazardous situation that, if not avoided, could result in death or serious injury. Caution! CAUTION indicates a hazardous situation that, if not avoided, could result in minor or moderate injury.
- Page 15 Safety 2.2.3 Avoiding uncontrolled oxygen administration Not all outlets have a check valve which closes the outlets automatically when a connection hose (pressure outlet) or inhalation accessories (inhalation outlet) are removed. As a result, oxygen can escape unchecked and raise the oxygen content of the immediate surroundings.
- Page 16 Description 3 Description The contents of this chapter can be found in the instructions for use for this medical device at www.weinmann-emergency.com. Please observe the information given in the instructions for use, especially the safety information. OXYWAY Back Forward Contents...
- Page 17 Labeling 4 Labeling Symbol Description Article number Serial number (see engraving on housing) Maximum permissible inlet pressure Working pressure of pressure reducer Maximum output at inhalation outlet Observe the instructions for use CE mark (confirms that the device complies with the applicable European directives) xxl/min Maximum output at pressure outlet The pressure reducer must not come into contact with flammable substances (oil, alcohol, grease, etc.)
- Page 18 • A final inspection must be performed after every maintenance procedure or technical safety check. • Maintenance, technical safety checks, inspections and repairs must only be carried out by WEINMANN Emergency or a technician specifically authorized by WEINMANN Emergency. 5.2 Intervals...
- Page 19 (see "18.5.7 Contents of maintenance set", page 246). 2. Carry out a final inspection: • OXYWAY Fix I, OXYWAY Fix III: (see "7 Final inspection OXYWAY Fix I, OXYWAY Fix III", page 22). • OXYWAY Fast I, OXYWAY Fast I+, OXYWAY Fast III: (see "8 Final inspection OXYWAY Fast I, OXYWAY Fast I+,...
- Page 20 Clean and disinfect the parts required for maintenance measures. Do not send in parts which are potentially contaminated. 1. Disassemble parts. 2. Clean and disinfect parts. 3. Send in the parts to WEINMANN Emergency or to a technician specifically authorized by WEINMANN Emergency. OXYWAY Back...
- Page 21 Hygienic reprocessing 6 Hygienic reprocessing The contents of this chapter can be found in the instructions for use for this medical device at www.weinmann-emergency.com. Please observe the information given in the instructions for use, especially the safety information. OXYWAY Back...
- Page 22 Final inspection OXYWAY Fix I, OXYWAY Fix III 7 Final inspection OXYWAY Fix I, OXYWAY Fix III 7.1 Safety during final inspection Risk of fire and explosion due to highly compressed oxygen combined with hydrocarbon compounds! Hydrocarbon compounds (e.g., oil, grease, cleaning alcohol, hand cream or adhesive plasters) can cause explosive reactions if they come into contact with highly compressed oxygen.
- Page 23 Final inspection OXYWAY Fix I, OXYWAY Fix III 7.3 Required test and auxiliary equipment • Leak detection spray 502 • LPA cap, G 3/8" 503 • Brush • Cloth • LPA shut-off valve, G 3/8" internal thread - G 3/8" external thread 508 •...
- Page 24 Final inspection OXYWAY Fix I, OXYWAY Fix III • Screw the hand-screwed connection 115 onto the valve of the oxygen cylinder. Requirement: The connection threads show no sign of external damage and turn smoothly. 7.5 Checking the system for leaks 1.
- Page 25 Final inspection OXYWAY Fix I, OXYWAY Fix III Requirement: No bubbles form between the pressure outlet 105/inhalation outlet 106 and the housing. 9. Use a brush to lightly moisten the small opening between the housing and the pressure reducer housing cover 112 with leak detection spray 502.
- Page 26 Final inspection OXYWAY Fix I, OXYWAY Fix III 8. Close the valve on the oxygen cylinder. 9. Slightly open the shut-off valve 508. Requirement: The needle of the contents indicator 100 moves towards "0" without catching. 10.Close the shut-off valve 508.
- Page 27 Final inspection OXYWAY Fix I, OXYWAY Fix III 5. Open the valve of the oxygen cylinder slowly. 6. Wait 1 min until the static outlet pressure at the test equipment has adjusted itself and remains constant. 7. Read off the cylinder pressure p1 at the contents indicator 100 and enter the value in the test report.
- Page 28 Final inspection OXYWAY Fix I, OXYWAY Fix III 7.8 Checking the constant output (flow) 1. Screw the hand-screwed connection 115 onto the valve of the oxygen cylinder. 2. Screw the hand-screwed connection 115 tight by hand. 3. Screw the special kit 500 onto the pressure outlet 105.
- Page 29 Final inspection OXYWAY Fix I, OXYWAY Fix III 7.9 Checking the accessories 1. Also check the accessories according to the following table: Accessory Requirement • The oxygen cylinder shows no signs of external damage. • The valve of the oxygen cylinder is fully functional.
- Page 30 Final inspection OXYWAY Fast I, OXYWAY Fast I+, OXYWAY Fast III 8 Final inspection OXYWAY Fast I, OXYWAY Fast I+, OXYWAY Fast III Risk of fire and explosion due to highly compressed oxygen combined with hydrocarbon compounds! Hydrocarbon compounds (e.g., oil, grease, cleaning alcohol, hand cream or adhesive plasters) can cause explosive reactions if they come into contact with highly compressed oxygen.
- Page 31 Final inspection OXYWAY Fast I, OXYWAY Fast I+, OXYWAY Fast III 8.2 Required test and auxiliary equipment • Leak detection spray 502 • LPA adapter, G 3/8" internal thread - CGA V-5 external thread (UNF 9/16") 507 • Brush • Cloth •...
- Page 32 Final inspection OXYWAY Fast I, OXYWAY Fast I+, OXYWAY Fast III 8.4 Checking the system for leaks 1. Screw the hand-screwed connection 177 onto the valve of the oxygen cylinder. 2. Screw the hand-screwed connection 177 tight by hand. 3. Set the multistep flow selector 159 to "0". 4.
- Page 33 Final inspection OXYWAY Fast I, OXYWAY Fast I+, OXYWAY Fast III 15.Remove the hand-screwed connection 177 from the valve of the oxygen cylinder. 16.Wipe the pressure reducer with a clean, dry cloth. 8.5 Checking the contents indicator 1. Screw the hand-screwed connection 177 onto the valve of the oxygen cylinder.
- Page 34 Final inspection OXYWAY Fast I, OXYWAY Fast I+, OXYWAY Fast III 4. Screw the adapter 507 onto the inhalation outlet 155. 5. Screw the union nut of the supply test set 501 onto the adapter 507. 6. Connect the thin hose of the supply test set 501 to the testing device 513.
- Page 35 Final inspection OXYWAY Fast I, OXYWAY Fast I+, OXYWAY Fast III 8.7 Checking the constant output (flow) at the inhalation outlet 1. Screw the hand-screwed connection 177 onto the valve of the oxygen cylinder. 2. Screw the hand-screwed connection 177 tight by hand. 3.
- Page 36 Final inspection OXYWAY Fast I, OXYWAY Fast I+, OXYWAY Fast III OXYWAY Fast I Cylinder pressure p1 Flow values (in l/min) (100 bar) 1 l/min ± 0.26 l/min 2 l/min ± 0.36 l/min 3 l/min ± 0.5475 l/min 4 l/min ± 0.73 l/min 5 l/min ±...
- Page 37 Final inspection OXYWAY Fast I, OXYWAY Fast I+, OXYWAY Fast III 8.8 Checking the accessories 1. Also check the accessories according to the following table: Accessory Requirement • The oxygen cylinder shows no signs of external damage. • The valve of the oxygen cylinder is fully functional. Oxygen cylinder •...
- Page 38 Final inspection OXYWAY Fast II 9 Final inspection OXYWAY Fast II Risk of fire and explosion due to highly compressed oxygen combined with hydrocarbon compounds! Hydrocarbon compounds (e.g., oil, grease, cleaning alcohol, hand cream or adhesive plasters) can cause explosive reactions if they come into contact with highly compressed oxygen.
- Page 39 Final inspection OXYWAY Fast II 9.2 Required test and auxiliary equipment • Leak detection spray 502 • LPA cap, G 3/8" 503 • LPA adapter, G 3/8" internal thread - CGA V-5 external thread (UNF 9/16") 507 • Brush • Cloth •...
- Page 40 Final inspection OXYWAY Fast II Requirement: The connection threads show no sign of external damage and turn smoothly. 9.4 Checking the system for leaks 1. Screw the hand-screwed connection 230 onto the valve of the oxygen cylinder. 2. Screw the hand-screwed connection 230 tight by hand. 3.
- Page 41 Final inspection OXYWAY Fast II 13.Use a brush to lightly moisten the connection between the multistep flow selector 213 and the inhalation outlet 205 with leak detection spray 502. Requirement: No bubbles form between the multistep flow selector 213 and the inhalation outlet 205.
- Page 42 Final inspection OXYWAY Fast II 9.6 Checking the static outlet pressure p4 1. Screw the hand-screwed connection 230 onto the valve of the oxygen cylinder. 2. Screw the hand-screwed connection 230 tight by hand. 3. Set the multistep flow selector 211 to "0". 4.
- Page 43 Final inspection OXYWAY Fast II 12.Remove the union nut of the supply test set 501 from the pressure outlet 209. 13.Remove the hand-screwed connection 230 from the valve of the oxygen cylinder. 9.7 Checking the constant output (flow) at the pressure outlet 1.
- Page 44 Final inspection OXYWAY Fast II 9.8 Checking the constant output (flow) at the inhalation outlet 1. Screw the hand-screwed connection 230 onto the valve of the oxygen cylinder. 2. Screw the hand-screwed connection 230 tight by hand. 3. Set the multistep flow selector 211 to "0". 4.
- Page 45 Final inspection OXYWAY Fast II 14.Read off the flow values at the testing device 512 and enter in the test report. Requirement: The flow value is 0 l/min ± 0.15 l/min. 15.Remove the special kit 500 from the testing device 512. 16.Close the valve on the oxygen cylinder.
- Page 46 Final inspection OXYWAY Fine I 10 Final inspection OXYWAY Fine I Risk of fire and explosion due to highly compressed oxygen combined with hydrocarbon compounds! Hydrocarbon compounds (e.g., oil, grease, cleaning alcohol, hand cream or adhesive plasters) can cause explosive reactions if they come into contact with highly compressed oxygen.
- Page 47 Final inspection OXYWAY Fine I 10.2 Required test and auxiliary equipment • Leak detection spray 502 • Brush • Cloth • LPA cap, UNF 9/16" 504 • LPA adapter, G 3/8" internal thread - CGA V-5 external thread (UNF 9/16") 507 •...
- Page 48 Final inspection OXYWAY Fine I 10.4 Checking the system for leaks 1. Screw the hand-screwed connection 273 onto the valve of the oxygen cylinder. 2. Screw the hand-screwed connection 273 tight by hand. 3. Close the multistep flow selector 267. 4.
- Page 49 Final inspection OXYWAY Fine I 12.Use a brush to lightly moisten the connection between the housing and the inhalation outlet 257 with leak detection spray 502. Requirement: No bubbles form between the inhalation outlet and the housing. 13.Close the multistep flow selector 267. 14.Remove the cap 504 from the inhalation outlet 257.
- Page 50 Final inspection OXYWAY Fine I 10.6 Checking the flow indicator 1. Screw the hand-screwed connection 273 onto the valve of the oxygen cylinder. 2. Screw the hand-screwed connection 273 tight by hand. 3. Close the multistep flow selector 267. 4. Check the needle on the flow indicator 251. Requirement: The needle on the flow indicator 251 is at "0".
- Page 51 Final inspection OXYWAY Fine I 6. Connect the thin hose of the supply test set 501 to the testing device 513. When doing so, note: The T-distributor with check valve is not connected. 7. Open the valve of the oxygen cylinder slowly. 8.
- Page 52 Final inspection OXYWAY Fine I 10.8 Checking the constant output (flow) at the inhalation outlet 1. Screw the hand-screwed connection 273 onto the valve of the oxygen cylinder. 2. Screw the hand-screwed connection 273 tight by hand. 3. Close the multistep flow selector 267. 4.
- Page 53 Final inspection OXYWAY Fine I 14.Read off the flow value at the testing device 510 and enter in the test report. Requirement: The flow value is 3 l/min 0.5 l/min. ± 15.Close the multistep flow selector 267 until the flow indicator 251 displays 0 l/min.
- Page 54 Final inspection OXYWAY Click 11 Final inspection OXYWAY Click Risk of fire and explosion due to highly compressed oxygen combined with hydrocarbon compounds! Hydrocarbon compounds (e.g., oil, grease, cleaning alcohol, hand cream or adhesive plasters) can cause explosive reactions if they come into contact with highly compressed oxygen.
- Page 55 Final inspection OXYWAY Click 11.2 Required test and auxiliary equipment • Leak detection spray 502 • Brush • Cloth • LPA cap, UNF 9/16" 504 • LPH adapter, G 3/8" internal thread - DIN coupling 13260 505 • LPA adapter, NF S 90-116 (AFNOR) coupling - G 3/8" internal thread 506 •...
- Page 56 3. Set the OXYWAY Click multistep flow selector 305 to "0". 4. Connect the adapter 505 or 506 to the OXYWAY Fix I pressure outlet 105. 5. Connect the other end of the adapter 505 or 506 to the O sampling point on the OXYWAY Click.
- Page 57 3. Set the OXYWAY Click multistep flow selector 305 to "0". 4. Connect the adapter 505 or 506 to the OXYWAY Fix I pressure outlet 105. 5. Connect the other end of the adapter 505 or 506 to the O sampling point on the OXYWAY Click.
- Page 58 18.Remove the special kit 510 from the adapter 507. 19.Remove the adapter 507 from the inhalation outlet 301. 20.Remove the adapter 505 or 506 from the OXYWAY Fix I pressure outlet 105. 21.Remove the adapter 505 or 506 from the O sampling point on the OXYWAY Click.
- Page 59 Faults 12 Faults If you are not able to rectify a fault with the aid of the table below, please contact the manufacturer WEINMANN Emergency. To avoid serious damage, do not allow your customer to continue using the device. Fault...
- Page 60 Fault Cause Remedy Tighten the pressure outlet/inhalation outlet • OXYWAY Fix I, OXYWAY Fix III: (see "13.11.2 Fitting the pressure outlet/inhalation outlet", page 74) • OXYWAY Fast I, OXYWAY Fast I+, OXYWAY Fast III: (see "14.12.2 Fitting the inhalation outlet", page 96) Pressure outlet/inhalation outlet •...
- Page 61 Nozzle plate defective inhalation outlet", page 67) • OXYWAY Fine I: (only OXYWAY Fix I and OXYWAY Fine I) (see "16.6 Replacing the sealing disks and nozzle plate in the inhalation outlet", page 178) Disassemble the orifice plate assembly •...
- Page 62 • Only carry out the repairs described in this service manual. • Always carry out a final inspection after each repair job (see "7 Final inspection OXYWAY Fix I, OXYWAY Fix III", page 22). • Only use original spare parts from WEINMANN Emergency.
- Page 63 Repairs to OXYWAY Fix I, OXYWAY Fix III OXYWAY Back Forward Contents Previous page Next page...
- Page 64 Repairs to OXYWAY Fix I, OXYWAY Fix III OXYWAY Back Forward Contents Previous page Next page...
- Page 65 Repairs to OXYWAY Fix I, OXYWAY Fix III OXYWAY Back Forward Contents Previous page Next page...
- Page 66 Repairs to OXYWAY Fix I, OXYWAY Fix III 13.3 Replacing a label Required tools • Knife • Spirit or Label remover 13.3.1 Removing a label 1. Remove the label 116 from the pressure reducer. 2. Use spirit or label remover to remove any residue from the pressure reducer.
- Page 67 Repairs to OXYWAY Fix I, OXYWAY Fix III 13.4.2 Fitting the pressure screw in the pressure outlet/inhalation outlet 1. Insert the pressure screw 108 into the pressure outlet 105/ inhalation outlet 106. 105/106 When doing so, note: The slot on the pressure screw 108 must be facing upwards when the screw is fitted.
- Page 68 Repairs to OXYWAY Fix I, OXYWAY Fix III 13.6 Replacing the O-ring in the connecting bolt Required tools • Watchmaker's screwdriver 409 • Cloth 13.6.1 Removing the O-ring from the connecting bolt 1. Use the watchmaker's screwdriver 409 to carefully lift up the O-ring 114 and remove it from the groove in the connecting bolt 113.
- Page 69 Repairs to OXYWAY Fix I, OXYWAY Fix III 13.7.2 Fitting the disposable filter 1. Insert the disposable filter 103 into the connecting bolt 113. 2. Use the Allen key to tightly screw the disposable filter 103 in the connecting bolt 113.
- Page 70 Repairs to OXYWAY Fix I, OXYWAY Fix III 11.Unscrew the hand-screwed connection 115 from the bottom part of the counter tool 400 by hand. 12.Remove the hand-screwed connection 115 from the counter tool 400. 13.Remove the connecting bolt 113 from the hand-screwed connection 115.
- Page 71 Repairs to OXYWAY Fix I, OXYWAY Fix III 13.9 Replacing the hand-screwed connection 13.9.1 Removing the hand-screwed connection Requirement • The O-ring 114 has been removed from the connecting bolt 113 (see "13.6.1 Removing the O-ring from the connecting bolt", page 68).
- Page 72 Repairs to OXYWAY Fix I, OXYWAY Fix III 6. Place the torque wrench onto the square of the counter cap 404. 7. Use the torque wrench to loosen the housing from the connecting bolt 113. 8. Remove the torque wrench and counter cap 404.
- Page 73 Repairs to OXYWAY Fix I, OXYWAY Fix III 10.Remove the top part of the counter tool 400 from the bottom part of the counter tool 400. 11.Loosen the bottom part of the counter tool 400 from the vise and remove.
- Page 74 Repairs to OXYWAY Fix I, OXYWAY Fix III 6. Remove the pressure outlet 105/inhalation outlet 106 from the housing. 105/106 7. Remove any adhesive residue from the threads on the pressure reducer housing. When doing so, note: • No dirt must get into the housing during cleaning.
- Page 75 Repairs to OXYWAY Fix I, OXYWAY Fix III 10.If an inhalation outlet 106 is present: Fit the sealing disk 109 and nozzle plate 107 in the inhalation outlet 106 (see "13.5.2 Fitting the sealing disks and nozzle plate in the inhalation outlet", page...
- Page 76 Repairs to OXYWAY Fix I, OXYWAY Fix III 13.12.2 Fitting the O coupling 1. Pick up the O coupling. Risk due to adhesive in the gas flow! If the first two threads of the O coupling are moistened with adhesive, this adhesive can get into the gas flow to the patient and lead to airway irritation.
- Page 77 Repairs to OXYWAY Fix I, OXYWAY Fix III 13.13.1 Removing the spring for the piston 1. Lightly tension the cover clamping device 401 in the vise. 2. Insert the pressure reducer into the cover clamping device 401. When doing so, note: The cover clamping device 401 clamps onto the housing cover 112.
- Page 78 Repairs to OXYWAY Fix I, OXYWAY Fix III 3. Insert the pressure reducer housing into the cover screw-in device 402. 4. Insert the housing cover 112 with piston 110 and spring 111 into the housing. 5. Press down the lever on the cover screw-in device 402 until the housing cover 112 is resting gently on the housing.
- Page 79 Repairs to OXYWAY Fix I, OXYWAY Fix III 13.15 Replacing the threaded locking pin Required tools Allen key size 1.5 13.15.1 Removing the threaded locking pin Requirement The spring for the piston 111 has been removed (see "13.13.1 Removing the spring for the piston", page 77) 1.
- Page 80 Repairs to OXYWAY Fix I, OXYWAY Fix III 1. Remove the contents indicator 100 from the housing. 2. Remove the O-ring 102 from the contents indicator 100. 13.16.2 Fitting the contents indicator 1. Use the brush to wet the groove in the contents indicator 100 with oxygen-compatible lubricant 414.
- Page 81 Repairs to OXYWAY Fix I, OXYWAY Fix III 13.17.2 Fitting the O-ring in the contents indicator 1. Position the O-ring 102 on the connecting screw on the contents indicator 100. 2. Fit the contents indicator 100 (see "13.16.2 Fitting the contents indicator", page 80).
- Page 82 (see "8 Final inspection OXYWAY Fast I, OXYWAY Fast I+, OXYWAY Fast III", page 30). • Only use original spare parts from WEINMANN Emergency. • You will find the necessary auxiliary equipment in the "Required auxiliary equipment" chapter (see "21 Required auxiliary equipment", page 251).
- Page 83 Repairs to OXYWAY Fast I, OXYWAY Fast I+, OXYWAY Fast III OXYWAY Back Forward Contents Previous page Next page...
- Page 84 Repairs to OXYWAY Fast I, OXYWAY Fast I+, OXYWAY Fast III OXYWAY Back Forward Contents Previous page Next page...
- Page 85 Repairs to OXYWAY Fast I, OXYWAY Fast I+, OXYWAY Fast III OXYWAY Back Forward Contents Previous page Next page...
- Page 86 Repairs to OXYWAY Fast I, OXYWAY Fast I+, OXYWAY Fast III OXYWAY Back Forward Contents Previous page Next page...
- Page 87 Repairs to OXYWAY Fast I, OXYWAY Fast I+, OXYWAY Fast III OXYWAY Back Forward Contents Previous page Next page...
-
Page 88: Multistep Flow Selector Assembly 179
Repairs to OXYWAY Fast I, OXYWAY Fast I+, OXYWAY Fast III 14.3 Assemblies This chapter contains references to the assemblies defined in the following table. Assembly Parts • Multistep flow selector • Threaded pin • 2 balls • 2 springs Multistep flow selector assembly 179 •... - Page 89 Repairs to OXYWAY Fast I, OXYWAY Fast I+, OXYWAY Fast III 14.4.2 Attaching a label 1. Pull the protective film off the back of the label 178. When doing so, note: Do not touch the adhesive surface of the label 116. 2.
- Page 90 Repairs to OXYWAY Fast I, OXYWAY Fast I+, OXYWAY Fast III 14.6 Replacing the sieve and nozzle plate in the inhalation outlet Required tools • Watchmaker's screwdriver 409 • Tweezers 14.6.1 Removing the sieve and nozzle plate from the inhalation outlet Requirement The pressure screw 156 has been removed from the inhalation outlet 155...
- Page 91 Repairs to OXYWAY Fast I, OXYWAY Fast I+, OXYWAY Fast III 14.7.2 Fitting the O-ring in the connecting bolt 1. If the groove in the connecting bolt 175 is soiled: Clean the groove in the connecting bolt 175 with a dry cloth. 2.
- Page 92 Repairs to OXYWAY Fast I, OXYWAY Fast I+, OXYWAY Fast III 14.9 Replacing the connecting bolt Required tools • Counter tool with fastening handle 400 • Counter cap 404 • Vise • Torque wrench 60 Nm ± 1 Nm 14.9.1 Removing the connecting bolt Requirement The O-ring 176 has been removed from the connecting bolt 175 (see "14.7.1 Removing the O-ring from the connecting bolt",...
- Page 93 Repairs to OXYWAY Fast I, OXYWAY Fast I+, OXYWAY Fast III 14.9.2 Fitting the connecting bolt 1. Insert the connecting bolt 175 into the hand-screwed connection 177. 2. Screw the hand-screwed connection 177 onto the bottom part of the counter tool 400 by hand. 3.
- Page 94 Repairs to OXYWAY Fast I, OXYWAY Fast I+, OXYWAY Fast III 14.10.2 Fitting the hand-screwed connection 1. Pick up the hand-screwed connection 177. 2. Fit the connecting bolt 175 (see "14.9.2 Fitting the connecting bolt", page 93). 3. Fit the O-ring 176 in the connecting bolt 175 (see "14.7.2 Fitting the O-ring in the connecting bolt", page 91).
- Page 95 Repairs to OXYWAY Fast I, OXYWAY Fast I+, OXYWAY Fast III 14.11.2 Fitting the rib filter 1. Insert the rib filter 154 into the connecting bolt 175. 2. Screw the housing onto the connecting bolt 175 by hand. 3. Push the counter cap 404 over the safety valve and the housing. 4.
- Page 96 Repairs to OXYWAY Fast I, OXYWAY Fast I+, OXYWAY Fast III 14.12.1 Removing the inhalation outlet Requirement • The O-ring 176 has been removed from the connecting bolt 175 (see "14.7.1 Removing the O-ring from the connecting bolt", page 90). •...
- Page 97 Repairs to OXYWAY Fast I, OXYWAY Fast I+, OXYWAY Fast III 3. Insert the inhalation outlet 155 into the multistep flow selector 161. 4. Use the torque wrench to tightly screw in the inhalation outlet 155 in the multistep flow selector 161. When doing so, note: Loctite 413 must harden according to the manufacturer's specifications.
- Page 98 Repairs to OXYWAY Fast I, OXYWAY Fast I+, OXYWAY Fast III 14.13.1 Removing the multistep flow selector assembly 1. Lightly tension the cover clamping device 401 in the vise. 2. Insert the pressure reducer into the cover clamping device 401. When doing so, note: The cover clamping device 401 must clamp onto the housing cover 162.
- Page 99 Repairs to OXYWAY Fast I, OXYWAY Fast I+, OXYWAY Fast III 8. Remove the pressure reducer from the cover screw-in device 402. 9. Insert the pressure reducer into the cover clamping device 401. When doing so, note: The cover clamping device 401 must clamp onto the housing cover 162.
- Page 100 Repairs to OXYWAY Fast I, OXYWAY Fast I+, OXYWAY Fast III 14.15 Replacing the threaded locking pin Required tools Allen key size 1.5 14.15.1 Removing the threaded locking pin Requirement The multistep flow selector assembly 179 has been removed (see "14.13.1 Removing the multistep flow selector assembly", page 98).
- Page 101 Repairs to OXYWAY Fast I, OXYWAY Fast I+, OXYWAY Fast III 14.16.2 Fitting the piston Prevent the risk of fire and explosion as a result of oxygen! Compressed oxygen can quickly enrich the atmosphere with oxygen and lead to fire or explosion of combustible substances. ...
- Page 102 Repairs to OXYWAY Fast I, OXYWAY Fast I+, OXYWAY Fast III The balls and sliding ring on the bottom of the multistep flow selector may stick. 3. Remove the balls 163. 4. Remove the springs 165. 5. Remove the sliding ring 164. 6.
- Page 103 Repairs to OXYWAY Fast I, OXYWAY Fast I+, OXYWAY Fast III 4. Place the cover assembly 180 onto the orifice plate assembly 181. 5. Remove the cover assembly 180 from the clamping device for cover assembly 417 together with the orifice plate assembly 181. 6.
- Page 104 Repairs to OXYWAY Fast I, OXYWAY Fast I+, OXYWAY Fast III 13.Fix the multistep flow selector 159 in place using the clamping device for cover assembly 417. 14.Use the Allen key to tightly screw in the threaded pin 160 on the multistep flow selector 159.
- Page 105 Repairs to OXYWAY Fast I, OXYWAY Fast I+, OXYWAY Fast III 14.18.2 Fitting the O-ring in the contents indicator 1. Position the O-ring 152 on the contents indicator 150. 2. Fit the contents indicator 150 (see "14.19.2 Fitting the contents indicator", page 105).
- Page 106 Repairs to OXYWAY Fast I, OXYWAY Fast I+, OXYWAY Fast III 4. Fit the threaded locking pin 151 (see "14.15.2 Fitting the threaded locking pin", page 100). 5. Fit the multistep flow selector assembly 179 (see "14.13.2 Fitting the multistep flow selector assembly", page 98).
- Page 107 Repairs to OXYWAY Fast I, OXYWAY Fast I+, OXYWAY Fast III 14.20.2 Assembling the orifice plate assembly 1. Align the orifice plate 168 in your hand. When doing so, note: The largest bore on the orifice plate 168 must be on the left-hand side. 2.
-
Page 108: Multistep Flow Selector
Repairs to OXYWAY Fast I, OXYWAY Fast I+, OXYWAY Fast III 14.21 Replacing the threaded pin in the multistep flow selector Required tools Allen key size 2 14.21.1 Removing the threaded pin from the multistep flow selector Requirement • The multistep flow selector assembly 179 has been removed (see "14.13.1 Removing the multistep flow selector assembly", page 98). - Page 109 Repairs to OXYWAY Fast I, OXYWAY Fast I+, OXYWAY Fast III 14.22 Replacing the multistep flow selector 14.22.1 Removing the multistep flow selector Requirement • The multistep flow selector assembly 179 has been removed (see "14.13.1 Removing the multistep flow selector assembly", page 98).
- Page 110 Repairs to OXYWAY Fast I, OXYWAY Fast I+, OXYWAY Fast III 14.23.2 Fitting the balls 1. Pick up the balls 163. 2. Assemble the multistep flow selector assembly 179 (see "14.17.2 Assembling the multistep flow selector assembly", page 102). 3. Fit the piston 173 (see "14.16.2 Fitting the piston", page 101).
- Page 111 Repairs to OXYWAY Fast I, OXYWAY Fast I+, OXYWAY Fast III 14.25 Replacing the needle 14.25.1 Removing the needle • The multistep flow selector assembly 179 has been removed (see "14.13.1 Removing the multistep flow selector assembly", page 98). • The spring for the piston 174 has been removed (see "14.14.1 Removing the spring for the piston", page 99).
- Page 112 Repairs to OXYWAY Fast I, OXYWAY Fast I+, OXYWAY Fast III • The multistep flow selector assembly 179 has been disassembled (see "14.17.1 Disassembling the multistep flow selector assembly", page 101). 1. Dispose of the sliding ring 164. 14.26.2 Fitting the sliding ring 1.
- Page 113 Repairs to OXYWAY Fast I, OXYWAY Fast I+, OXYWAY Fast III 14.27.1 Disassembling the cover assembly Requirement • The multistep flow selector assembly 179 has been removed (see "14.13.1 Removing the multistep flow selector assembly", page 98). • The spring for the piston 174 has been removed (see "14.14.1 Removing the spring for the piston", page 99).
- Page 114 Repairs to OXYWAY Fast I, OXYWAY Fast I+, OXYWAY Fast III 14.Use the watchmaker's screwdriver 409 to carefully lift the O-ring 152 out of the housing cover 162. 15.Use the watchmaker's screwdriver 409 to carefully lift the small O-ring 171 out of the multistep flow selector 161. 16.Use the watchmaker's screwdriver 409 to carefully lift the large O-ring 172 out of the multistep flow selector 161.
- Page 115 Repairs to OXYWAY Fast I, OXYWAY Fast I+, OXYWAY Fast III 3. Use the Allen key to place the O-ring 152 in the groove in the housing cover 162. 4. Use the brush to apply a thin coat of oxygen-compatible lubricant 414 to the O-ring 152 in the housing cover 162.
- Page 116 Repairs to OXYWAY Fast I, OXYWAY Fast I+, OXYWAY Fast III 14.Remove the cover assembly 180 from the cover clamping device 401. 15.Screw the cover assembly 180 onto the housing by hand. 16.Place the housing with the cover assembly 180 into the cover clamping device 401.
- Page 117 Repairs to OXYWAY Fast I, OXYWAY Fast I+, OXYWAY Fast III 36.Remove the top part of the counter tool 400 from the bottom part of the counter tool 400. 37.Loosen the bottom part of the counter tool 400 from the vise and remove.
- Page 118 Repairs to OXYWAY Fast I, OXYWAY Fast I+, OXYWAY Fast III 14.28.1 Removing the O-ring from the housing cover Requirement • The multistep flow selector assembly 179 has been removed (see "14.13.1 Removing the multistep flow selector assembly", page 98). •...
- Page 119 Repairs to OXYWAY Fast I, OXYWAY Fast I+, OXYWAY Fast III 14.29 Replacing the O-rings in the multistep flow selector 14.29.1 Removing the O-rings from the multistep flow selector Requirement • The multistep flow selector assembly 179 has been removed (see "14.13.1 Removing the multistep flow selector assembly", page 98).
- Page 120 Repairs to OXYWAY Fast I, OXYWAY Fast I+, OXYWAY Fast III 14.30 Replacing the housing cover Required tools Cloth 14.30.1 Removing the housing cover Requirement • The multistep flow selector assembly 179 has been removed (see "14.13.1 Removing the multistep flow selector assembly", page 98).
- Page 121 Repairs to OXYWAY Fast I, OXYWAY Fast I+, OXYWAY Fast III • The multistep flow selector assembly 179 has been disassembled (see "14.17.1 Disassembling the multistep flow selector assembly", page 101). • The cover assembly 180 has been disassembled (see "14.27.1 Disassembling the cover assembly", page 113).
- Page 122 Repairs to OXYWAY Fast I, OXYWAY Fast I+, OXYWAY Fast III 4. Fit the piston 173 (see "14.16.2 Fitting the piston", page 101). 5. Fit the spring for the piston 174 (see "14.14.2 Fitting the spring for the piston", page 99).
- Page 123 Repairs to OXYWAY Fast I, OXYWAY Fast I+, OXYWAY Fast III 14.34 Replacing the orifice plate 14.34.1 Removing the orifice plate Requirement • The multistep flow selector assembly 179 has been removed (see "14.13.1 Removing the multistep flow selector assembly", page 98).
-
Page 124: Dispose Of The Slide Disk
Repairs to OXYWAY Fast I, OXYWAY Fast I+, OXYWAY Fast III • The orifice plate assembly 181 has been disassembled (see "14.20.1 Disassembling the orifice plate assembly", page 106). 1. Dispose of the slide disk 166. 14.35.2 Fitting the slide disk 1. - Page 125 • Always carry out a final inspection after each repair job (see "9 Final inspection OXYWAY Fast II", page 38). • Only use original spare parts from WEINMANN Emergency. • You will find the necessary auxiliary equipment in the "Required auxiliary equipment" chapter (see "21 Required auxiliary equipment", page...
- Page 126 Repairs to OXYWAY Fast II OXYWAY Back Forward Contents Previous page Next page...
- Page 127 Repairs to OXYWAY Fast II OXYWAY Back Forward Contents Previous page Next page...
- Page 128 Repairs to OXYWAY Fast II OXYWAY Back Forward Contents Previous page Next page...
- Page 129 Repairs to OXYWAY Fast II OXYWAY Back Forward Contents Previous page Next page...
- Page 130 Repairs to OXYWAY Fast II OXYWAY Back Forward Contents Previous page Next page...
-
Page 131: Required Tools
Repairs to OXYWAY Fast II 15.3 Assemblies This chapter contains references to the assemblies defined in the following table. Assembly Parts • Multistep flow selector • Threaded pin • 2 balls Multistep flow selector • 2 springs assembly 233 • Sliding ring •... - Page 132 Repairs to OXYWAY Fast II 15.4.2 Attaching a label 1. Pull the protective film off the back of the label 231. When doing so, note: Do not touch the adhesive surface of the label 231. 2. Stick the label 231 on the pressure reducer at the previously used position.
- Page 133 Repairs to OXYWAY Fast II 15.6 Replacing the sieve and nozzle plate in the inhalation outlet Required tools • Watchmaker's screwdriver 409 • Tweezers 15.6.1 Removing the sieve and nozzle plate from the inhalation outlet Requirement The pressure screw 206 has been removed from the inhalation outlet 205 (see "15.5.1 Removing the pressure screw from the inhalation outlet", page...
- Page 134 Repairs to OXYWAY Fast II 15.7.2 Fitting the pressure screw in the pressure outlet 1. Insert the pressure screw 210 into the pressure outlet 209. 2. Use the slot-head screwdriver to tighten the pressure screw 210 in the pressure outlet 209. 15.8 Replacing the O-ring in the connecting bolt Required tools...
-
Page 135: Vise
Repairs to OXYWAY Fast II 15.9 Replacing the disposable filter Required tools Allen key size 5 15.9.1 Removing the disposable filter 1. Use the Allen key to loosen the disposable filter 203 in the connecting bolt 228. 2. Remove the disposable filter 203 from the connecting bolt 228. 15.9.2 Fitting the disposable filter 1. -
Page 136: Connection G
Repairs to OXYWAY Fast II 4. Tightly screw the hand-screwed connection 230 onto the top part of the counter tool 400. 5. Push the counter cap 404 over the safety valve and the housing. 6. Place the torque wrench onto the square of the counter cap 404. 7. - Page 137 Repairs to OXYWAY Fast II 13.Remove the top part of the counter tool 400 from the bottom part of the counter tool 400. 14.Loosen the bottom part of the counter tool 400 from the vise and remove. 15.Fit the O-ring 229 in the connecting bolt 228 (see "15.8.2 Fitting the O-ring in the connecting bolt", page 134).
- Page 138 Repairs to OXYWAY Fast II 5. Push the counter cap 404 over the safety valve and the housing. 6. Place the torque wrench onto the square of the counter cap 404. 7. Use the torque wrench to loosen the housing from the connecting bolt 228.
-
Page 139: Open-End Wrench A/F
Repairs to OXYWAY Fast II 11.Loosen the bottom part of the counter tool 400 from the vise and remove. 12.Fit the O-ring 229 in the connecting bolt 228 (see "15.8.2 Fitting the O-ring in the connecting bolt", page 134). 15.13 Replacing the inhalation outlet Required tools •... - Page 140 Repairs to OXYWAY Fast II 7. Remove the adhesive residue from the threads on the multistep flow selector 213. When doing so, note: • No dirt must get into the housing during cleaning. • A brass brush must be used for the external thread. •...
- Page 141 Repairs to OXYWAY Fast II 15.14 Replacing the pressure outlet Required tools • Counter tool with fastening handle 400 • Vise • Loctite 413 • Torque wrench 25 Nm ± 1 Nm • Open-end wrench A/F 15 • Brass brush •...
- Page 142 Repairs to OXYWAY Fast II 15.14.2 Fitting the pressure outlet 1. Pick up the pressure outlet 209. Risk due to adhesive in the gas flow! If the first two threads of the pressure outlet are moistened with adhesive, this adhesive can get into the gas flow to the patient and lead to airway irritation.
- Page 143 Repairs to OXYWAY Fast II 15.15.1 Removing the O coupling Requirement The O-ring 229 has been removed from the connecting bolt 228 (see "15.8.1 Removing the O-ring from the connecting bolt", page 134). 1. Clamp the bottom part of the counter tool 400 in the vise. 2.
- Page 144 Repairs to OXYWAY Fast II 5. Insert the O coupling 232 and reducer into the housing. 6. Use the torque wrench to tightly screw in the O coupling 232 and reducer in the housing. When doing so, note: Loctite 413 must harden according to the manufacturer's specifications.
- Page 145 Repairs to OXYWAY Fast II 4. Push the counter cap 404 over the safety valve and the housing. 5. Place the torque wrench onto the square of the counter cap 404. 6. Use the torque wrench to slightly loosen the housing from the multistep flow selector assembly 233.
- Page 146 Repairs to OXYWAY Fast II 11.Push the counter cap 404 over the safety valve and the housing. 12.Place the torque wrench onto the square of the counter cap 404. 13.Screw the housing on tightly using the torque wrench. 14.Remove the torque wrench and counter cap 404. 15.Loosen the vise.
- Page 147 Repairs to OXYWAY Fast II 15.18 Replacing the threaded locking pin Required tools Allen key size 1.5 15.18.1 Removing the threaded locking pin Requirement The multistep flow selector assembly 233 has been removed (see "15.16.1 Removing the multistep flow selector assembly", page 144).
- Page 148 Repairs to OXYWAY Fast II 15.19.2 Fitting the piston Prevent the risk of fire and explosion as a result of oxygen! Compressed oxygen can quickly enrich the atmosphere with oxygen and lead to fire or explosion of combustible substances. Make sure that oxygen is flowing away from the body when blowing out device components.
- Page 149 Repairs to OXYWAY Fast II The balls and sliding ring on the bottom of the multistep flow selector may stick. 3. Remove the balls 215. 4. Remove the springs 217. 5. Remove the sliding ring 216. 6. Remove the needle 221. 7.
- Page 150 Repairs to OXYWAY Fast II 4. Place the cover assembly 234 onto the orifice plate assembly 235. 5. Remove the cover assembly 234 from the clamping device for cover assembly 417 together with the orifice plate assembly 235. 6. Align the orifice plate assembly 235 in the cover assembly 234. When doing so, note: The bores in the multistep flow selector 213, the bore in the orifice plate 220, and the grooved pin in the holder for the orifice plate 219 must be in a straight line.
- Page 151 Repairs to OXYWAY Fast II 13.Fix the multistep flow selector 211 in place using the clamping device for cover assembly 417. 14.Use the Allen key to tightly screw in the threaded pin 212 on the multistep flow selector 211. 15.Loosen the fastening on the clamping device for cover assembly 417.
- Page 152 Repairs to OXYWAY Fast II 15.21.2 Fitting the O-ring in the contents indicator 1. Position the O-ring 202 on the contents indicator 200. 2. Fit the contents indicator 200 (see "15.22.2 Fitting the contents indicator", page 152). 3. Fit the threaded locking pin 201 (see "15.18.2 Fitting the threaded locking pin", page 147).
- Page 153 Repairs to OXYWAY Fast II 4. Fit the threaded locking pin 201 (see "15.18.2 Fitting the threaded locking pin", page 147). 5. Fit the multistep flow selector assembly 233 (see "15.16.2 Fitting the multistep flow selector assembly", page 145). 15.23 Disassembling/assembling the orifice plate assembly Required tools •...
- Page 154 Repairs to OXYWAY Fast II 2. Use a brush to apply a thin coat of oxygen-compatible lubricant 414 to the side of the orifice plate 220 that is facing upwards. 3. Place the orifice plate 220 on the holder for the orifice plate 219. When doing so, note: The grooved pin in the holder for the orifice plate 219 must be inside the hole in the orifice plate 220.
- Page 155 Repairs to OXYWAY Fast II • The multistep flow selector assembly 233 has been disassembled (see "15.20.1 Disassembling the multistep flow selector assembly", page 148). 1. Use the Allen key to remove the threaded pin 212 from the multistep flow selector 211. 15.24.2 Fitting the threaded pin in the multistep flow selector 1.
- Page 156 Repairs to OXYWAY Fast II • The threaded pin 212 has been removed from the multistep flow selector 211 (see "15.24.1 Removing the threaded pin from the multistep flow selector", page 154). 1. Dispose of the multistep flow selector 211. 15.25.2 Fitting the multistep flow selector 1.
- Page 157 Repairs to OXYWAY Fast II 15.27 Replacing the springs 15.27.1 Removing the springs • The multistep flow selector assembly 233 has been removed (see "15.16.1 Removing the multistep flow selector assembly", page 144). • The spring for the piston 227 has been removed (see "15.17.1 Removing the spring for the piston", page 146).
- Page 158 Repairs to OXYWAY Fast II 1. Dispose of the needle 221. 15.28.2 Fitting the needle 1. Pick up the needle 221. 2. Assemble the multistep flow selector assembly 233 (see "15.20.2 Assembling the multistep flow selector assembly", page 149). 3. Fit the piston 226 (see "15.19.2 Fitting the piston", page 148).
- Page 159 Repairs to OXYWAY Fast II 15.30 Disassembling/assembling the cover assembly Required tools • Cover clamping device 401 • Vise • Special counter tool, DISS 416 • Special gripping pliers 415 • Counter tool with fastening handle 400 • Counter cap 404 •...
-
Page 160: O-Ring
Repairs to OXYWAY Fast II 4. Tighten the cover clamping device 401 in the vise. 5. Screw the special counter tool DISS 416 onto the inhalation outlet 205. 6. Position the special gripping pliers 415 on the union nut 222. 7. - Page 161 Repairs to OXYWAY Fast II 15.30.2 Assembling the cover assembly 1. Place the large O-ring 224 in the groove in the multistep flow selector 213. 2. Place the small O-ring 223 in the groove in the multistep flow selector 213. 3.
- Page 162 Repairs to OXYWAY Fast II Risk due to adhesive in the gas flow! If the first two threads of the inhalation outlet are moistened with adhesive, this adhesive can get into the gas flow to the patient and lead to airway irritation. ...
- Page 163 Repairs to OXYWAY Fast II 29.Turn the multistep flow selector 213 with inhalation outlet 205 around 30° counter-clockwise in order to reach the desired position after tightly screwing on. 30.Place the special gripping pliers 415 on the union nut 222 and hold in place.
- Page 164 Repairs to OXYWAY Fast II 51.Fit the multistep flow selector assembly 233 (see "15.16.2 Fitting the multistep flow selector assembly", page 145). 15.31 Replacing the O-ring in the housing cover Required tools • Brush • Oxygen-compatible lubricant 414 • Watchmaker's screwdriver 409 •...
- Page 165 Repairs to OXYWAY Fast II 4. Assemble the multistep flow selector assembly 233 (see "15.20.2 Assembling the multistep flow selector assembly", page 149). 5. Fit the piston 226 (see "15.19.2 Fitting the piston", page 148). 6. Fit the spring for the piston 227 (see "15.17.2 Fitting the spring for the piston", page 146).
- Page 166 Repairs to OXYWAY Fast II 15.33 Replacing the housing cover 15.33.1 Removing the housing cover Requirement • The multistep flow selector assembly 233 has been removed (see "15.16.1 Removing the multistep flow selector assembly", page 144). • The spring for the piston 227 has been removed (see "15.17.1 Removing the spring for the piston", page 146).
- Page 167 Repairs to OXYWAY Fast II • The cover assembly 234 has been disassembled (see "15.30.1 Disassembling the cover assembly", page 159). 1. Dispose of the multistep flow selector 213. 15.34.2 Fitting the multistep flow selector 1. Pick up the multistep flow selector 213. 2.
- Page 168 Repairs to OXYWAY Fast II 6. Fit the multistep flow selector assembly 233 (see "15.16.2 Fitting the multistep flow selector assembly", page 145). 15.36 Replacing the holder for the orifice plate 15.36.1 Removing the holder for the orifice plate Requirement •...
- Page 169 Repairs to OXYWAY Fast II • The piston 226 has been removed (see "15.19.1 Removing the piston", page 147). • The multistep flow selector assembly 233 has been disassembled (see "15.20.1 Disassembling the multistep flow selector assembly", page 148). • The orifice plate assembly 235 has been disassembled (see "15.23.1 Disassembling the orifice plate assembly", page 153).
- Page 170 Repairs to OXYWAY Fast II 15.38.2 Fitting the slide disk 1. Pick up the slide disk 218. 2. Assemble the orifice plate assembly (see "15.23.2 Assembling the orifice plate assembly", page 153). 3. Assemble the multistep flow selector assembly 233 (see "15.20.2 Assembling the multistep flow selector assembly", page 149).
- Page 171 • Always carry out a final inspection after each repair job (see "10 Final inspection OXYWAY Fine I", page 46). • Only use original spare parts from WEINMANN Emergency. • You will find the necessary auxiliary equipment in the "Required auxiliary equipment" chapter (see "21 Required auxiliary...
- Page 172 Repairs to OXYWAY Fine I OXYWAY Back Forward Contents Previous page Next page...
- Page 173 Repairs to OXYWAY Fine I OXYWAY Back Forward Contents Previous page Next page...
- Page 174 Repairs to OXYWAY Fine I OXYWAY Back Forward Contents Previous page Next page...
- Page 175 Repairs to OXYWAY Fine I OXYWAY Back Forward Contents Previous page Next page...
- Page 176 Repairs to OXYWAY Fine I OXYWAY Back Forward Contents Previous page Next page...
- Page 177 Repairs to OXYWAY Fine I 16.3 Assemblies This chapter contains references to the assemblies defined in the following table. Assembly Parts • Housing cover • Piston • Spring for piston Assembly housing cover 275 • Spring for lifting pin • Lifting pin with shoulder •...
- Page 178 Repairs to OXYWAY Fine I 16.5 Replacing the pressure screw in the inhalation outlet Required tools Slot-head screwdriver 16.5.1 Removing the pressure screw from the inhalation outlet 1. Use the slot-head screwdriver to loosen the pressure screw 258 in the inhalation outlet 257. 2.
- Page 179 Repairs to OXYWAY Fine I 16.6.2 Fitting the sealing disks and nozzle plate in the inhalation outlet 1. Use tweezers to insert the sealing disk 260 in the inhalation outlet 257. 2. Align the nozzle plate 259 so that the domed part is facing upwards.
- Page 180 Repairs to OXYWAY Fine I 16.8.2 Fitting the O-ring in the connecting bolt 1. If the groove in the connecting bolt 271 is soiled: Clean the groove in the connecting bolt 271 with a dry cloth. 2. Insert the O-ring 272 into the groove in the connecting bolt 271 by hand.
- Page 181 Repairs to OXYWAY Fine I 16.10 Replacing the connecting bolt Required tools • Counter tool with fastening handle 400 • Counter cap 404 • Vise • Torque wrench 60 Nm ± 1 Nm 16.10.1 Removing the connecting bolt Requirement The O-ring 272 has been removed from the connecting bolt 271 (see "16.8.1 Removing the O-ring from the connecting bolt", page 179).
- Page 182 Repairs to OXYWAY Fine I 16.10.2 Fitting the connecting bolt 1. Pick up the connecting bolt 271. 2. Insert the connecting bolt 271 into the hand-screwed connection 273. 3. Screw the hand-screwed connection 273 onto the bottom part of the counter tool 400 by hand. 4.
- Page 183 Repairs to OXYWAY Fine I 16.11 Replacing the hand-screwed connection 16.11.1 Removing the hand-screwed connection Requirement • The O-ring 272 has been removed from the connecting bolt 271 (see "16.8.1 Removing the O-ring from the connecting bolt", page 179). • The connecting bolt 271 has been removed (see "16.10.1 Removing the connecting bolt", page 181).
- Page 184 Repairs to OXYWAY Fine I 5. Push the counter cap 404 over the safety valve and the housing. 6. Place the torque wrench onto the square of the counter cap 404. 7. Use the torque wrench to loosen the housing from the connecting bolt 271.
- Page 185 Repairs to OXYWAY Fine I 11.Loosen the bottom part of the counter tool 400 from the vise and remove. 12.Fit the O-ring 272 in the connecting bolt 271 (see "16.8.2 Fitting the O-ring in the connecting bolt", page 180). 16.13 Replacing the inhalation outlet Required tools •...
- Page 186 Repairs to OXYWAY Fine I 7. Remove any adhesive residue from the threads on the housing. When doing so, note: • No dirt must get into the housing during cleaning. • A brass brush must be used for the external thread. •...
- Page 187 Repairs to OXYWAY Fine I 16.14 Replacing the cover for the multistep flow selector Required tools Knife 16.14.1 Removing the cover for the multistep flow selector 1. Slide the blade of the knife under the cover 269. 2. Use the blade of the knife to detach the cover 269 from the multistep flow selector 267 and then remove it.
- Page 188 Repairs to OXYWAY Fine I 16.15.2 Fitting the hexagon nut 1. Tightly screw in the hexagon nut 268 using the socket wrench. When doing so, note: Hold the multistep flow selector 267 with your hand during this step. 2. Fit the cover for the multistep flow selector 269 (see "16.14.2 Fitting the cover for the multistep flow selector", page 187).
- Page 189 Repairs to OXYWAY Fine I 1. Remove the driving plate 266 from the square in the spindle 270 by hand. 16.17.2 Fitting the driving plate 1. Place the driving plate 266 on the square in the spindle 270 by hand. 2.
- Page 190 Repairs to OXYWAY Fine I 1. Lightly tension the cover clamping device 401 in the vise. 2. Insert the pressure reducer into the cover clamping device 401. When doing so, note: The cover clamping device 401 clamps onto the housing cover 264. 3.
- Page 191 Repairs to OXYWAY Fine I 12.Loosen the vise. 13.Remove the pressure reducer from the cover clamping device 401. 14.Remove the cover clamping device 401 from the vise. 15.Fit the driving plate 266 (see "16.17.2 Fitting the driving plate", page 189). 16.Fit the multistep flow selector 267 (see "16.16.2 Fitting the multistep flow selector", page 188).
- Page 192 Repairs to OXYWAY Fine I 16.19.2 Fitting the spring for the piston 1. Position the spring 262 on the piston 261. 2. Insert the piston 261 into the assembly housing cover 275. 3. Fit the assembly housing cover 275 (see "16.18.2 Fitting the assembly housing cover", page 190).
- Page 193 Repairs to OXYWAY Fine I 16.20.2 Fitting the piston 1. Clean the inside of the assembly housing cover 275 with a clean, dry cloth. 2. Insert the spring for the lifting pin 263 into the piston 261. 3. Insert the piston 261 with spring for the lifting pin 263 into the housing cover.
- Page 194 Repairs to OXYWAY Fine I 1. Dispose of the spring for the lifting pin 263. 16.21.2 Fitting the spring for the lifting pin 1. Pick up the spring for the lifting pin 263. 2. Fit the piston 261 (see "16.20.2 Fitting the piston", page 193).
- Page 195 Repairs to OXYWAY Fine I • The driving plate 266 has been removed (see "16.17.1 Removing the driving plate", page 188). • The assembly housing cover 275 has been removed (see "16.18.1 Removing the assembly housing cover", page 189). • The spring for the piston 262 has been removed (see "16.19.1 Removing the spring for the piston", page 191).
- Page 196 Repairs to OXYWAY Fine I 16.23 Replacing the spindle 16.23.1 Removing the spindle Requirements • The cover for the multistep flow selector 269 has been removed (see "16.14.1 Removing the cover for the multistep flow selector", page 187). • The hexagon nut 268 has been removed (see "16.15.1 Removing the hexagon nut", page 187).
- Page 197 Repairs to OXYWAY Fine I 5. Fit the spring for the piston 262 (see "16.19.2 Fitting the spring for the piston", page 192). 6. Fit the assembly housing cover 275 (see "16.18.2 Fitting the assembly housing cover", page 190). 7. Fit the driving plate 266 (see "16.17.2 Fitting the driving plate", page 189).
- Page 198 Repairs to OXYWAY Fine I 16.24.2 Fitting the housing cover 1. Pick up the housing cover 264. 2. Fit the spindle 270 (see "16.23.2 Fitting the spindle", page 196). 3. Fit the lifting pin with shoulder 265 (see "16.22.2 Fitting the lifting pin with shoulder", page 195).
- Page 199 Repairs to OXYWAY Fine I 3. Screw the hand-screwed connection 273 of the pressure reducer onto the bottom part of the counter tool 400 by hand. 4. Tightly screw the hand-screwed connection 273 onto the top part of the counter tool 400. 5.
- Page 200 Repairs to OXYWAY Fine I 11.Fit the pressure gauge cap as protection against impact and falling 254 (see "16.7.2 Fitting the pressure gauge cap as protection against impact and falling", page 179). 12.Fit the O-ring 272 in the connecting bolt 271 (see "16.8.2 Fitting the O-ring in the connecting bolt", page 180).
- Page 201 Repairs to OXYWAY Fine I 16.26.2 Fitting the flow indicator 1. If there is dirt inside the housing: Remove the dirt with a dry, lint-free cloth. 2. Place the sealing disk 253 into the threaded hole in the flow indicator by hand. 3.
- Page 202 • Always carry out a final inspection after each repair job (see "11 Final inspection OXYWAY Click", page 54). • Only use original spare parts from WEINMANN Emergency. • You will find the necessary auxiliary equipment in the "Required auxiliary equipment" chapter (see "21 Required auxiliary equipment", page...
- Page 203 Repairs to OXYWAY Click OXYWAY Back Forward Contents Previous page Next page...
- Page 204 Repairs to OXYWAY Click OXYWAY Back Forward Contents Previous page Next page...
- Page 205 Repairs to OXYWAY Click OXYWAY Back Forward Contents Previous page Next page...
- Page 206 Repairs to OXYWAY Click OXYWAY Back Forward Contents Previous page Next page...
- Page 207 Repairs to OXYWAY Click 17.3 Assemblies This chapter contains references to the assemblies defined in the following table. Assembly Parts • Multistep flow selector • Threaded pin • 2 balls Multistep flow selector • 2 springs assembly 323 • Sliding ring •...
- Page 208 Repairs to OXYWAY Click 17.4.2 Attaching a label 1. Pull the protective film off the back of the label 321. When doing so, note: Do not touch the adhesive surface of the label 321. 2. Stick the label 321 on the pressure reducer at the previously used position.
- Page 209 Repairs to OXYWAY Click 17.6 Replacing the sieve and nozzle plate in the inhalation outlet Required tools • Watchmaker's screwdriver 409 • Tweezers 17.6.1 Removing the sieve and nozzle plate from the inhalation outlet Requirement The pressure screw 302 has been removed from the inhalation outlet 301 (see "17.5.1 Removing the pressure screw from the inhalation outlet", page...
- Page 210 Repairs to OXYWAY Click 1. Lightly tension the cover clamping device 401 in the vise. 2. Insert the pressure reducer with O sampling point 322 into the cover clamping device 401. When doing so, note: • The O sampling point 322 must be facing downwards. •...
- Page 211 Repairs to OXYWAY Click 6. Remove the pressure reducer from the cover clamping device 401. 7. Remove the cover clamping device 401 from the vise. 8. Fit the sieve 303 and the sealing disks 304 in the inhalation outlet 301 (see "17.6.2 Fitting the sieve and sealing disks in the inhalation outlet", page 209).
- Page 212 Repairs to OXYWAY Click 5. Use the torque wrench to tighten the housing 320 with O sampling point 322 on the multistep flow selector assembly 323. 6. Loosen the vise. 7. Remove the pressure reducer from the cover clamping device 401. 8.
- Page 213 Repairs to OXYWAY Click 7. Use the Allen key to push the orifice plate assembly 325 into the inside of the housing cover 308. 8. Remove the orifice plate assembly 325. 9. If necessary: Disassemble the orifice plate assembly 325 (see "17.10.1 Disassembling the orifice plate assembly", page 215).
- Page 214 Repairs to OXYWAY Click 6. Align the orifice plate assembly 325 in the cover assembly 324. When doing so, note: The bores in the multistep flow selector 307, the bore in the orifice plate 314, and the grooved pin in the holder for the orifice plate 313 must be in a straight line.
- Page 215 Repairs to OXYWAY Click 18.If necessary: Re-align the orifice plate assembly 325. To do so, disassemble the multistep flow selector assembly 323 again and then re-assemble. 19.Fit the multistep flow selector assembly 323 (see "17.8.2 Fitting the multistep flow selector assembly", page 211).
- Page 216 Repairs to OXYWAY Click 4. Align the slide disk 312 in your hand. When doing so, note: The side of the slide disk 312 that has markings indicating another hole in addition to the hole for the grooved pin must be facing upwards. 5.
- Page 217 Repairs to OXYWAY Click 17.11.2 Fitting the threaded pin in the multistep flow selector 1. Insert the threaded pin 306 into the multistep flow selector 305 and screw in using the Allen key. When doing so, note: The threaded pin 306 must not be screwed into the hole for the orifice plate assembly 325.
- Page 218 Repairs to OXYWAY Click 17.13 Replacing the balls 17.13.1 Removing the balls • The multistep flow selector assembly 323 has been removed (see "17.8.1 Removing the multistep flow selector assembly", page 211). • The multistep flow selector assembly 323 has been disassembled (see "17.9.1 Disassembling the multistep flow selector assembly", page 212).
- Page 219 Repairs to OXYWAY Click 17.15 Replacing the needle 17.15.1 Removing the needle • The multistep flow selector assembly 323 has been removed (see "17.8.1 Removing the multistep flow selector assembly", page 211). • The multistep flow selector assembly 323 has been disassembled (see "17.9.1 Disassembling the multistep flow selector assembly", page 212).
- Page 220 Repairs to OXYWAY Click 17.17 Disassembling/assembling the cover assembly Required tools • Cover clamping device 401 • Vise • Special counter tool, DISS 416 • Special gripping pliers 415 • Open-end wrench A/F 15 • Watchmaker's screwdriver 409 • Brush •...
- Page 221 Repairs to OXYWAY Click 5. Screw the special counter tool DISS 416 onto the inhalation outlet 301. 6. Position the special gripping pliers 415 on the union nut 316. 7. Use the special gripping pliers 415 and the special counter tool DISS 416 to slightly loosen the union nut 316 from the housing cover 308.
- Page 222 Repairs to OXYWAY Click 17.17.2 Assembling the cover assembly 1. Insert the large O-ring 318 into the groove in the multistep flow selector 307 by hand. 2. Insert the small O-ring 317 into the groove in the multistep flow selector 307 by hand. 3.
- Page 223 Repairs to OXYWAY Click Risk due to adhesive in the gas flow! If the first two threads of the inhalation outlet are moistened with adhesive, this adhesive can get into the gas flow to the patient and lead to airway irritation. ...
- Page 224 Repairs to OXYWAY Click 22.Turn the multistep flow selector 307 with inhalation outlet 301 around 30° counter-clockwise by hand in order to reach the desired position after tightly screwing on. 23.Place the special gripping pliers 415 on the union nut 316 and hold in place.
- Page 225 Repairs to OXYWAY Click 17.18 Replacing the O-ring in the housing cover Required tools • Brush • Oxygen-compatible lubricant 414 • Watchmaker's screwdriver 409 • Allen key size 5 17.18.1 Removing the O-ring from the housing cover Requirement • The multistep flow selector assembly 323 has been removed (see "17.8.1 Removing the multistep flow selector assembly", page 211).
- Page 226 Repairs to OXYWAY Click 17.19 Replacing the O-rings in the multistep flow selector 17.19.1 Removing the O-rings from the multistep flow selector Requirement • The multistep flow selector assembly 323 has been removed (see "17.8.1 Removing the multistep flow selector assembly", page 211).
- Page 227 Repairs to OXYWAY Click 17.20.2 Fitting the housing cover 1. Pick up the housing cover 308. 2. Fit the O-ring 319 in the housing cover 308 (see "17.18.2 Fitting the O-ring in the housing cover", page 225). 3. Assemble the cover assembly 324 (see "17.17.2 Assembling the cover assembly", page 222).
- Page 228 Repairs to OXYWAY Click 17.22 Replacing the union nut 17.22.1 Removing the union nut Requirement • The multistep flow selector assembly 323 has been removed (see "17.8.1 Removing the multistep flow selector assembly", page 211). • The multistep flow selector assembly 323 has been disassembled (see "17.9.1 Disassembling the multistep flow selector assembly", page 212).
- Page 229 Repairs to OXYWAY Click 17.23.2 Fitting the holder for the orifice plate 1. Pick up the holder for the orifice plate 313. 2. Assemble the orifice plate assembly 325 (see "17.10.2 Assembling the orifice plate assembly", page 215). 3. Assemble the multistep flow selector assembly 323 (see "17.9.2 Assembling the multistep flow selector assembly", page 213).
-
Page 230: Table Of Contents
Repairs to OXYWAY Click 17.25 Replacing the slide disk 17.25.1 Removing the slide disk Requirement • The multistep flow selector assembly 323 has been removed (see "17.8.1 Removing the multistep flow selector assembly", page 211). • The multistep flow selector assembly 323 has been disassembled (see "17.9.1 Disassembling the multistep flow selector assembly", page 212). - Page 231 Repairs to OXYWAY Click 4. Use the open-end wrench to loosen the O sampling point 322 and then remove it. 5. Completely remove the adhesive residue from the threads on the housing 320. 6. Loosen the cover clamping device 401 and remove the pressure reducer from the cover clamping device 401.
- Page 232 Repairs to OXYWAY Click 4. Use the special gripping pliers 415 to loosen the housing 320 from the multistep flow selector assembly 323 and then remove it. 5. Use the Allen key to loosen the disposable filter 300 from the housing 320 and then remove it.
- Page 233 Repairs to OXYWAY Click 10.Clamp the cover clamping device 401 onto the housing 320. 11.Tighten the cover clamping device 401 in the vise. 12.Use the open-end wrench to loosen the O sampling point 322 from the housing 320 and then remove it. 13.Fit the O sampling point 322 (see "17.26.2 Fitting the O...
- Page 234 The item numbers in this chapter are identical to the item numbers in the "Repairs" chapters: • (see "13 Repairs to OXYWAY Fix I, OXYWAY Fix III", page 62). • (see "14 Repairs to OXYWAY Fast I, OXYWAY Fast I+, OXYWAY Fast III", page...
- Page 235 Replacement parts Item Designation Number Article number Inhalation outlet, from SN 1350001 WM 31010 Nozzle plate 0.3 WM 30925 Pressure screw WM 1158 Sealing disk WM 145/32 Other Piston WM 17823 Spring for piston WM 30924 Housing cover WM 30922 Connecting bolt (see 18.2, p.
-
Page 236: Cover Assembly Comprising
Replacement parts Item Designation Number Article number Housing cover WM 30972 Ball Ø 6 mm WM 4677 Sliding ring WM 30984 Spring WM 30928 Slide disk WM 30974 Holder for the orifice plate WM 30012 Orifice plate 1-15 l/min WM 30976 Orifice plate 0.5-6 l/min WM 30909 Orifice plate 0.5-15 l/min... - Page 237 Replacement parts 18.1.3 Replacement parts OXYWAY Fast II Item Designation Number Article number Pressure gauge Contents indicator 0 - 315 bar, upright standing, rotating, from SN 1810000 WM 31000 Contents indicator 0 - 315 bar, flat, rotating, from SN 1810000 WM 31214 Threaded locking pin WM 30055...
- Page 238 Replacement parts Item Designation Number Article number Other Piston WM 17823 Spring for piston WM 30924 Connecting bolt (see 18.2, p. 241) O-ring for connecting bolt (see 20.1, p. 250) Hand-screwed connection (see 18.2, p. 241) (see 18.5.4, Label p. 244) coupling (see 18.3, p.
- Page 239 Replacement parts Item Designation Number Article number Inhalation outlet Inhalation outlet, OXYWAY Fine comprising: Inhalation outlet WM 31018 Pressure screw Nozzle plate 0.51 Sealing disk Inhalation outlet, from SN 1350001 WM 31010 Pressure screw WM 1158 Nozzle plate 0.51 WM 30955 Sealing disk WM 1145/32 Other...
- Page 240 Replacement parts 18.1.5 Replacement parts OXYWAY Click Item Designation Number Article number Filter Disposable filter WM 31124 Inhalation outlet Inhalation outlet, from SN 1350001 comprising: Inhalation outlet WM 31125 Pressure screw Sieve Sealing disk Inhalation outlet, from SN 1350001 WM 31010 Pressure screw WM 1158 Sieve...
-
Page 241: Not Available As An Assembly: Order Parts Individually
Replacement parts Item Designation Number Article number Assembly Multistep flow selector assembly comprising: Multistep flow selector Threaded pin Not available as an Balls assembly: order Springs parts individually Sliding ring Needle Orifice plate assembly Cover assembly Cover assembly comprising: Housing cover Not available as an O-ring in the housing cover assembly: order... - Page 242 Label, safety check (STK, only applies to Germany) in 1 year WM 75001 Label, safety check (STK, only applies to Germany) in 2 years WM 75009 Other Label, manufacturer,WEINMANN Emergency WM 77052 Label, filter screw replacement WM 0495 OXYWAY Back...
- Page 243 Replacement parts 18.5.2 Labels for OXYWAY Fix I, OXYWAY Fix III Designation Article number Device information label, OXYWAY Fix I, for WM 30101 WM 75107 Device information label, OXYWAY Fix I, for WM 30102 WM 75108 Device information label, OXYWAY Fix I, for WM 30103...
- Page 244 Replacement parts 18.5.3 Device information labels for OXYWAY Fast I, OXYWAY Fast I+, OXYWAY Fast III Designation Article number Device information label, OXYWAY Fast I for WM 30801 WM 75224 Device information label, OXYWAY Fast I for WM 30802 WM 75225 Device information label, OXYWAY Fast I for WM 30803 WM 75226 Device information label, OXYWAY Fast I for WM 30804...
- Page 245 Replacement parts Designation Article number Device information label, OXYWAY Fast II for WM 30873 WM 75245 Device information label, OXYWAY Fast II for WM 30875 WM 77252 Device information label, OXYWAY Fast II for WM 30877 WM 75374 Device information label, OXYWAY Fast II for WM 30881 WM 76863 Device information label, OXYWAY Fast II for WM 30883 WM 75246...
- Page 246 The "chapter" column refers to the relevant sub-chapter in the "Repairs" chapters: • OXYWAY Fix I, OXYWAY Fix III: (see "13 Repairs to OXYWAY Fix I, OXYWAY Fix III", page 62). • OXYWAY Fast I, OXYWAY Fast I+, OXYWAY Fast III: (see "14 Repairs to OXYWAY Fast I, OXYWAY Fast I+,...
- Page 247 Maintenance kit, 6 years, pressure reducer OXYWAY WM 17824 (exception: OXYWAY Click) comprising: OXYWAY Fix I, OXYWAY Fix III: (see "13.14 Replacing the piston", page 78) OXYWAY Fast I, OXYWAY Fast I+, OXYWAY Fast III: (see "14.16 Replacing the piston", page 100)
- Page 248 Replacement parts Item Designation Number Article number Chapter OXYWAY Fix I, OXYWAY Fix III: (see "13.3 Replacing a label", page 66) OXYWAY Fast I, OXYWAY Fast I+, OXYWAY Fast III: (see "14.4 Replacing a label", page 88) Label, maintenance in 6 years...
- Page 249 Storage and disposal 19 Storage and disposal The contents of this chapter can be found in the instructions for use for this medical device at www.weinmann-emergency.com. Please observe the information given in the instructions for use, especially the safety information.
- Page 250 Accessories 20 Accessories 20.1 Accessories and other parts Parts can be ordered separately, if required. An up-to-date list of parts is available at www.weinmann-emergency.com or in the instructions for use. Part Article number O-ring, 12.3 x 2.4 WM 1145 Kit, O-rings for G 3/4"...
- Page 251 Required auxiliary equipment 21 Required auxiliary equipment 21.1 Tools 21.1.1 General tools Tools Image Slot-head screwdriver Tweezers Allen key size 1.5 Allen key size 2 Allen key size 5 Allen key size 9 Vise Torque wrench 60 Nm ± 1 Nm Recommendation: Hazet no.
- Page 252 Required auxiliary equipment Tools Image Open-end wrench A/F 14 Open-end wrench A/F 15 Open-end wrench A/F 17 Open-end wrench A/F 19 Socket wrench size 8 Socket wrench size 15 Pliers Knife Brush Brass brush Thread tap G 1/8 Spirit Label remover Cloth OXYWAY Back...
- Page 253 Required auxiliary equipment 21.1.2 Special tools You can obtain special tools from WEINMANN Emergency. Item Tools Number Article number Kit, counter tools for OXYWAY for multistep flow selector G 3/4" WM 15366-0000 Kit, counter tool for OXYWAY for multistep flow selector NGO...
- Page 254 Required auxiliary equipment Item Test equipment Number Article number Test equipment available externally Oxygen cylinder Flow measuring tube 0 to 20 l/min, class 1.0 in oxygen version Flow measuring tube 0 to 220 l/min, class 1.0 in oxygen version Flow measuring tube 0 to 50 ml/min, class 1.0 in oxygen version Pressure gauge 0 to 10 bar, class 1.0 in oxygen version No item number Ventilator tester...
- Page 255 Technical data 22 Technical data The contents of this chapter can be found in the instructions for use for this medical device at www.weinmann-emergency.com. Please observe the information given in the instructions for use, especially the safety information. OXYWAY Back...
- Page 256 The headings in the test reports correspond to the headings in the "Final inspection" chapter. • OXYWAY Fix I, OXYWAY Fix III: (see "7 Final inspection OXYWAY Fix I, OXYWAY Fix III", page 22). • OXYWAY Fast I, OXYWAY Fast I+, OXYWAY Fast III: (see "8 Final inspection OXYWAY Fast I, OXYWAY Fast I+,...
- Page 257 The device meets the requirements of Section 11 of the Medizinprodukte- Betreiberverordnung (German regulations governing owners/operators of medical devices) Date Signature WEINMANN Emergency Medical Technology GmbH + Co. KG, Frohbösestraße 12, 22525 Hamburg, GERMANY Tel: +49 40 88 18 96-120, Fax: +49 40 88 18 96-481...
- Page 258 The flow value is within the tolerance range (from the table in Chapter 7.8). WEINMANN Emergency Medical Technology GmbH + Co. KG, Frohbösestraße 12, 22525 Hamburg, GERMANY Tel: +49 40 88 18 96-120, Fax: +49 40 88 18 96-481...
- Page 259 The instructions for use are present. The final inspection was performed and passed. Date Signature WEINMANN Emergency Medical Technology GmbH + Co. KG, Frohbösestraße 12, 22525 Hamburg, GERMANY Tel: +49 40 88 18 96-120, Fax: +49 40 88 18 96-481...
- Page 260 The device meets the requirements of Section 11 of the Medizinprodukte- Betreiberverordnung (German regulations governing owners/operators of medical devices) Date Signature WEINMANN Emergency Medical Technology GmbH + Co. KG, Frohbösestraße 12, 22525 Hamburg, GERMANY Tel: +49 40 88 18 96-120, Fax: +49 40 88 18 96-481...
- Page 261 Turn from 6 l/min to 3 l/min: 3 l/min ± 0.5475 l/min l/min Turn from 3 l/min to 0 l/min: 0 l/min ± 0.04 l/min WEINMANN Emergency Medical Technology GmbH + Co. KG, Frohbösestraße 12, 22525 Hamburg, GERMANY Tel: +49 40 88 18 96-120, Fax: +49 40 88 18 96-481...
- Page 262 The instructions for use are present. The final inspection was performed and passed. Date Signature WEINMANN Emergency Medical Technology GmbH + Co. KG, Frohbösestraße 12, 22525 Hamburg, GERMANY Tel: +49 40 88 18 96-120, Fax: +49 40 88 18 96-481...
- Page 263 The device meets the requirements of Section 11 of the Medizinprodukte- Betreiberverordnung (German regulations governing owners/operators of medical devices) Date Signature WEINMANN Emergency Medical Technology GmbH + Co. KG, Frohbösestraße 12, 22525 Hamburg, GERMANY Tel: +49 40 88 18 96-120, Fax: +49 40 88 18 96-481...
- Page 264 Turn from 15 l/min to 6 l/min: 6 l/min ± 1.095 l/min l/min Turn from 6 l/min to 0 l/min: 0 l/min ± 0.04 l/min WEINMANN Emergency Medical Technology GmbH + Co. KG, Frohbösestraße 12, 22525 Hamburg, GERMANY Tel: +49 40 88 18 96-120, Fax: +49 40 88 18 96-481...
- Page 265 The instructions for use are present. The final inspection was performed and passed. Date Signature WEINMANN Emergency Medical Technology GmbH + Co. KG, Frohbösestraße 12, 22525 Hamburg, GERMANY Tel: +49 40 88 18 96-120, Fax: +49 40 88 18 96-481...
- Page 266 The device meets the requirements of Section 11 of the Medizinprodukte- Betreiberverordnung (German regulations governing owners/operators of medical devices) Date Signature WEINMANN Emergency Medical Technology GmbH + Co. KG, Frohbösestraße 12, 22525 Hamburg, GERMANY Tel: +49 40 88 18 96-120, Fax: +49 40 88 18 96-481...
- Page 267 Turn from 15 l/min to 3 l/min: 3 l/min ± 0.5 l l/min Turn from 3 l/min to 0 l/min: 0 l/min ± 0.04 l/min WEINMANN Emergency Medical Technology GmbH + Co. KG, Frohbösestraße 12, 22525 Hamburg, GERMANY Tel: +49 40 88 18 96-120, Fax: +49 40 88 18 96-481...
- Page 268 The instructions for use are present. The final inspection was performed and passed. Date Signature WEINMANN Emergency Medical Technology GmbH + Co. KG, Frohbösestraße 12, 22525 Hamburg, GERMANY Tel: +49 40 88 18 96-120, Fax: +49 40 88 18 96-481...
- Page 269 The device meets the requirements of Section 11 of the Medizinprodukte- Betreiberverordnung (German regulations governing owners/operators of medical devices) Date Signature WEINMANN Emergency Medical Technology GmbH + Co. KG, Frohbösestraße 12, 22525 Hamburg, GERMANY Tel: +49 40 88 18 96-120, Fax: +49 40 88 18 96-481...
- Page 270 The instructions for use are present. The final inspection was performed and passed. Date Signature WEINMANN Emergency Medical Technology GmbH + Co. KG, Frohbösestraße 12, 22525 Hamburg, GERMANY Tel: +49 40 88 18 96-120, Fax: +49 40 88 18 96-481...
- Page 272 Manufacturer Center for Production, Logistics, Service WEINMANN Emergency WEINMANN Emergency Medical Technology GmbH + Co. KG Medical Technology GmbH + Co. KG Frohbösestraße 12 Siebenstücken 14 22525 Hamburg 24558 Henstedt-Ulzburg GERMANY GERMANY T: +49 40 88 18 96-120 E: customerservice@weinmann-emt.de...
Need help?
Do you have a question about the OXYWAY Fix I and is the answer not in the manual?
Questions and answers