ZyXEL Communications MSC1000G User Manual
Management switch card
Hide thumbs
Also See for MSC1000G:
- Specifications (6 pages) ,
- User manual (1092 pages) ,
- User manual (553 pages)
Table of Contents
Advertisement
Management Switch Card
MSC1000G, MSC1024G, MSC1224G, MSC1024GB, MSC1024GC,
MSC1224GB
Default Login Details
IP Address
https://192.168.1.1
User Name
Password
Version 4.06
Edition 3, 4/2017
www.zyxel.com
www.zyxel.com
admin
1234
IMPORTANT!
READ CAREFULLY
BEFORE USE.
Copyright © 2017
ZyXEL Communications Corporation
Advertisement
Table of Contents
Troubleshooting

Subscribe to Our Youtube Channel
Related Manuals for ZyXEL Communications MSC1000G


Summary of Contents for ZyXEL Communications MSC1000G
- Page 1 Management Switch Card MSC1000G, MSC1024G, MSC1224G, MSC1024GB, MSC1024GC, MSC1224GB Default Login Details IP Address https://192.168.1.1 User Name admin IMPORTANT! Password 1234 READ CAREFULLY BEFORE USE. Version 4.06 Edition 3, 4/2017 www.zyxel.com www.zyxel.com Copyright © 2017 ZyXEL Communications Corporation...
- Page 2 KEEP THIS GUIDE FOR FUTURE REFERENCE. IMPORTANT! READ CAREFULLY BEFORE USE. KEEP THIS GUIDE FOR FUTURE REFERENCE. Note: This guide is a reference for a series of products. Therefore some features or options in this guide may not be available in your product. Graphics in this book may differ slightly from the product due to differences in operating systems, operating system versions, or if you installed updated firmware/software for your device.
-
Page 3: Table Of Contents
Contents Overview Contents Overview Introduction ............................39 Getting to Know Your MSC ........................41 Hardware Connections ..........................55 Web Configurator ..........................61 The Web Configurator ..........................63 Access Control List Screens ........................81 Alarm Screens ............................147 Diagnostic Screens ..........................163 Maintenance Screens ...........................179 Multicast Screens ..........................185 Subscriber Port Setup Screens ......................205 IMA Screens ............................315 Profile Screens ............................331 Statistics Screens ..........................413... - Page 4 Contents Overview sys Commands ...........................1031 vlan Commands ..........................1059 voip Commands ..........................1063 Firmware and Configuration File Maintenance ...................1097 Troubleshooting, Specifications, Appendices, and Index ............1103 Troubleshooting ..........................1105 Product Specifications ......................... 1115 Management Switch Card User’s Guide...
-
Page 5: Table Of Contents
Table of Contents Table of Contents Contents Overview ..........................3 Table of Contents ..........................5 Part I: Introduction ..................39 Chapter 1 Getting to Know Your MSC ........................41 1.1 Introduction ............................41 1.1.1 Applications ..........................42 1.2 Ways to Manage the MSC ........................46 1.3 Features ............................46 Chapter 2 Hardware Connections........................55 2.1 Front Panels ............................55... - Page 6 Table of Contents 4.1 DHCP Relay Overview ........................81 4.1.1 DHCP Relay Agent Information Option (Option 82) ..............81 4.1.2 Private Format .........................81 4.1.3 TR-101 Format ........................82 4.1.4 PPPoE Intermediate Agent ......................82 4.2 DHCP Relay Screen .........................84 4.2.1 Example: DHCP Relay for Two VLANs ...................86 4.3 DHCP Snooping ..........................87 4.3.1 Anti-IP Address Spoofing ......................87 4.4 DHCP Snooping Configuration ......................87...
- Page 7 Table of Contents 4.24.1 Upstream Storm Slot Screen ....................132 4.25 ARP Inspection ..........................133 4.25.1 ARP Inspection Slot Screen ....................136 4.26 DHCPv6 Relay ..........................137 4.27 MAC Forced Forwarding .......................139 4.28 MAC Forced Forwarding Examples ....................140 4.29 MACFF Vlan Screen ........................142 4.30 MACFF Entry Screen ........................143 4.31 MACFF ARP Proxy Screen ......................145 Chapter 5 Alarm Screens...........................147...
- Page 8 Table of Contents 7.5 Firmware Upgrade Screen ......................181 7.6 Reboot Screen ..........................182 7.7 AlmHis Backup Screen ........................183 Chapter 8 Multicast Screens ..........................185 8.1 IGMP Introduction ...........................185 8.1.1 IP Multicast Addresses ......................185 8.1.2 IGMP Snooping ........................185 8.1.3 IGMP Proxy ...........................185 8.1.4 IGMP Snooping and Proxy Note ...................186 8.1.5 IGMP Fast Leave ........................187 8.1.6 Multicast Listener Discovery ....................187 8.2 IGMP Setup Screen ........................187...
- Page 9 Table of Contents 9.2.13 TLS Network Example ......................209 9.2.14 DT VLAN ..........................211 9.3 Downstream and Upstream ......................211 9.4 DSL Profiles ............................ 211 9.5 Alarm Profiles ..........................211 9.6 Default Settings ..........................212 9.7 ADSL Port Setup ..........................212 9.7.1 ADSL Port Setup Line Card Screen ..................214 9.7.2 ADSL Port Setup Advanced ....................216 9.7.3 ADSL Option Mask Screen ....................219 9.8 VDSL Port Setup ..........................221...
- Page 10 Table of Contents 9.19 IPBPVC Screen ..........................273 9.19.1 IPBPVC VLAN Setup Screen ....................275 9.19.2 IPBPVC by Slot Screen .......................276 9.20 IPB Route Screen .........................277 9.21 G.bond Screen ..........................279 9.22 The VoIP SIP Port Setup Screen ....................283 9.23 The SIP Port Setup Line Card Screen ..................286 9.24 Advanced SIP Port Setup Screen ....................288 9.25 The H248 Port Setup Screen ......................290 9.26 The H.248 Port Setup Line Card Screen ..................293...
- Page 11 Table of Contents 11.2.1 Fast Mode ..........................332 11.3 Configured Versus Actual ADSL Rates ..................332 11.4 ADSL Profile Screen ........................332 11.5 VDSL Profile Setup ........................335 11.6 VDSL2 Profiles ..........................338 11.6.1 VDSL2 Profiles ........................338 11.6.2 VDSL2 Profile Example .......................339 11.7 VDSL2 Template Setup .........................339 11.7.1 VDSL2 Line Profile Setup ....................341 11.7.2 VDSL2 Line Profile Setup >...
- Page 12 Table of Contents 11.24.2 ACL Profile Actions ......................403 11.25 ACL Profile Setup Screen ......................403 11.26 Rate Limit Profile Setup Screen ....................406 11.27 Queue Rate Limit Profile Setup Screen ..................407 11.28 VoIP Dial Plan Profile Screen ......................408 11.29 Alarm E1 Profile Screen ......................409 Chapter 12 Statistics Screens ..........................413 12.1 ARP Table .............................413...
- Page 13 Table of Contents 12.16.2 IPv6 Prefix List ........................478 12.16.3 IPv6 Destination Cache .....................479 12.16.4 IPv6 Route List ........................479 12.16.5 IPv6 Default Router List .....................480 12.17 G.bond Statistics ..........................481 12.18 CFM Endpoint Statistics ......................482 12.19 H.248 Interface Statistics ......................482 12.19.1 H.248 Media Interface Statistics ..................483 12.19.2 H.248 Media Card Statistics ....................484 12.20 Proxy Server Statistics ........................485 12.21 Termination Statistics ........................486...
- Page 14 Table of Contents 13.8 Switch Setup Isolation Screen ......................518 13.9 Switch Setup DSCP Screen ......................520 13.10 Switch Setup VlanPri Screen ......................521 13.11 Spanning Tree Protocols ......................522 13.11.1 STP and RSTP ........................522 13.11.2 Multiple STP ........................524 13.12 MSTP Setup ..........................527 13.12.1 MSTP Bridge Settings .......................527 13.12.2 MSTP Port Settings ......................529 13.12.3 MSTP Configuration Example ...................530 13.13 Switch Port ..........................532...
- Page 15 Table of Contents 14.3.1 Secured Client Screen ......................565 14.3.2 Secured Client6 Screen .......................567 14.4 General Setup ..........................568 14.5 IPv4 Setup .............................570 14.6 IPv6 Setup .............................571 14.7 Syslog Screen ..........................572 14.8 User Account Screen ........................572 14.9 Monitor Screen ..........................574 14.10 Authentication, Authorization and Accounting ................576 14.10.1 Local User Accounts ......................577 14.10.2 RADIUS and TACACS+ ....................577 14.10.3 Authentication and Accounting Setup...
- Page 16 Table of Contents 16.1.6 Voice Coding ........................610 16.1.7 PSTN Call Setup Signaling ....................611 16.2 European Type Call Services ......................612 16.2.1 Do Not Disturb ........................612 16.2.2 Call Waiting ..........................613 16.2.3 CLIR ............................613 16.2.4 Call Transfer ........................614 16.3 USA Type Supplementary Services ....................615 16.3.1 USA Call Hold ........................615 16.3.2 USA Call Waiting .........................615 16.3.3 USA Call Transfer ........................616...
- Page 17 Table of Contents 18.5 Command Privilege Levels ......................644 18.5.1 Command Privilege Levels with TACACS+ .................644 18.6 Saving Your Configuration ......................644 18.7 Commands Summary ........................645 Chapter 19 acl Commands ..........................647 19.1 acl Commands Summary ......................647 19.2 acl antimacspoof Commands ......................655 19.2.1 acl antimacspoof Command ....................655 19.3 acl arpinspection Commands ......................655 19.3.1 acl arpinspection disable Command ..................656 19.3.2 acl arpinspection enable Command ..................656...
- Page 18 Table of Contents 19.8.1 acl dot1x disable Command ....................665 19.8.2 acl dot1x enable Command ....................665 19.8.3 acl dot1x port control Command ..................665 19.8.4 acl dot1x port disable Command ..................665 19.8.5 acl dot1x port enable Command ..................665 19.8.6 acl dot1x port period Command ..................666 19.8.7 acl dot1x port reauth Command ..................666 19.8.8 acl dot1x port show Command ....................666 19.8.9 acl dot1x radius ip Command ....................666...
- Page 19 Table of Contents 19.15.6 acl pppoeagent optionmode Command ................678 19.15.7 acl pppoeagent set Command ...................678 19.15.8 acl pppoeagent show Command ..................678 19.16 acl rule Commands ........................679 19.16.1 acl rule delete Command ....................679 19.16.2 acl rule nomatch Command ....................679 19.16.3 acl rule set Command .......................679 19.16.4 acl rule show Command ....................680 19.17 acl usbcastctrl Commands ......................680 19.17.1 acl usbcastctrl set ......................680...
- Page 20 Table of Contents 23.2 General diagnostic Command Parameters ...................698 23.3 diagnostic Commands Summary ....................698 23.4 diagnostic Commands ........................701 23.4.1 diagnostic cfm loopback Command ..................701 23.4.2 diagnostic cfm linktrace show Command ................702 23.4.3 diagnostic cfm linktrace set Command ................702 23.4.4 diagnostic ldm show Command ..................703 23.4.5 diagnostic ldm test Command .....................704 23.4.6 diagnostic loopback f5 Command ..................704 23.4.7 diagnostic loopback internal Command ................705...
- Page 21 Table of Contents 25.2.5 ip route delete Command ....................723 25.2.6 ip route set Command ......................724 25.2.7 ip route show Command ......................724 25.2.8 ip show Command .......................725 25.2.9 ip set Command ........................725 25.2.10 ip tracert Command ......................726 Chapter 26 ip6 Commands ..........................727 26.1 ip6 Commands Summary ......................727 26.2 ip6 Commands ..........................728 26.2.1 ip6 gateway Command ......................728...
- Page 22 Table of Contents 28.5.1 multicast igmp fastleave enable Command ................743 28.5.2 multicast igmp fastleave disable Command ...............743 28.5.3 multicast igmp fastleave timer Command ................743 28.6 multicast igmp Commands ......................743 28.6.1 multicast igmp disable Command ..................743 28.6.2 multicast igmp enable Command ..................743 28.6.3 multicast igmp qryvid delete Command ................744 28.6.4 multicast igmp qryvid set Command ...................744 28.6.5 multicast igmp qryvid show Command ................744...
- Page 23 Table of Contents 29.3 port Commands ..........................775 29.4 port adsl Commands ........................775 29.4.1 port adsl alarmprof Command .....................776 29.4.2 port adsl annexl disable Command ..................776 29.4.3 port adsl annexl enable Command ..................776 29.4.4 port adsl annexm disable Command ...................777 29.4.5 port adsl annexm enable Command ..................777 29.4.6 port adsl annexi disable Command ..................777 29.4.7 port adsl annexi enable Command ..................777 29.4.8 port adsl dscarrier0 Command ....................778...
- Page 24 Table of Contents 29.10.14 port enet show Command ....................791 29.10.15 port enet tls Commands ....................791 29.10.16 port enet vlan Commands ....................792 29.11 G.bond Commands ........................792 29.11.1 port gbond set Command ....................793 29.11.2 port gbond show Command ....................793 29.11.3 port gbond delete Command .....................793 29.12 Port h248 Commands .........................794 29.13 port h248 set Command ......................794 29.14 port h248 termination Command ....................794...
- Page 25 Table of Contents 29.24.2 port paepvc set Command ....................808 29.24.3 port paepvc show Command ....................809 29.25 port pots cid set Command ......................809 29.26 port pots gain Command ......................810 29.27 port pots impedance Command ....................810 29.28 port ppvc Commands ........................810 29.28.1 port ppvc delete Command ....................810 29.28.2 port ppvc member delete Command .................
- Page 26 Table of Contents 29.40.2 port tlspvc set Command ....................824 29.40.3 port tlspvc show Command ....................825 29.41 port vdsl Commands ........................825 29.41.1 port vdsl alarmprof Command ...................825 29.41.2 port vdsl compatible Command ..................825 29.41.3 port vdsl dt Commands ......................826 29.41.4 port vdsl frametype Command ..................826 29.41.5 port vdsl frequencyplan Command ..................827 29.41.6 port vdsl ginp Command ....................827 29.41.7 port vdsl inm Command .....................828...
- Page 27 Table of Contents 30.6.1 profile alarmadsl show Command ..................868 30.6.2 profile alarmadsl set Command ...................869 30.6.3 profile alarmadsl delete Command ..................870 30.6.4 profile alarmadsl map Command ..................871 30.7 profile alarme1 Commands ......................871 30.7.1 profile alarme1 show Command ..................871 30.7.2 profile alarme1 set Command .....................872 30.7.3 profile alarme1 delete Command ..................872 30.7.4 profile alarme1 map Command ...................873 30.8 profile alarmshdsl Commands .......................873...
- Page 28 Table of Contents 30.14.5 profile profsvr clientlist show Command ................886 30.14.6 profile profsvr serverset Command ...................886 30.14.7 profile profsvr sync Command ...................886 30.15 profile ratelimit Commands ......................886 30.15.1 profile ratelimit delete Command ..................887 30.15.2 profile ratelimit map Command ..................887 30.15.3 profile ratelimit set Command ...................887 30.15.4 profile ratelimit show Command ..................888 30.16 profile shdsl Commands ......................888 30.16.1 profile shdsl set Command ....................888...
- Page 29 Table of Contents 30.23 profile voip sip Command ......................919 30.23.1 profile voip sip delete Command ..................920 30.23.2 profile voip sip map Command ..................920 30.23.3 profile voip sip set Command ....................920 30.23.4 profile voip sip show Command ..................921 30.24 profile voip sip dialplan Commands ....................922 30.24.1 profile voip sip dialplan delete Command ................922 30.24.2 profile voip sip dialplan map Command ................922 30.24.3 profile voip sip dialplan set Command ................923...
- Page 30 Table of Contents 32.3.23 show lineinfo Command ....................958 32.3.24 show linerate Command ....................959 32.3.25 show linestat Command ....................959 32.3.26 Tshow mac Command .......................959 32.3.27 show macff arp counter port Command ................960 32.3.28 show macff arp counter uplink Command .................960 32.3.29 show macff status Command ....................960 32.3.30 show monitor Command ....................961 32.3.31 show mstp Command .......................963 32.3.32 show oam Command ......................964...
- Page 31 Table of Contents 33.5.1 switch bcastctrl threshold Command ...................993 33.5.2 switch bcastctrl show Command ..................993 33.5.3 switch cfm Commands ......................994 33.6 switch dot3ad Commands ......................1000 33.6.1 switch dot3ad lacp priority Command ................1000 33.6.2 switch dot3ad lacp timeout Command ................1001 33.6.3 switch dot3ad lacp show Command ..................1001 33.6.4 switch dot3ad enable Command ..................1001 33.6.5 switch dot3ad disable Command ..................1002 33.6.6 switch dot3ad show Command ..................1002...
- Page 32 Table of Contents 33.12.2 switch mstp disable Command ..................1015 33.12.3 switch mstp enable Command ..................1015 33.12.4 switch mstp fwdelay Command ..................1015 33.12.5 switch mstp hellotime Command ..................1015 33.12.6 switch mstp maxage Command ..................1016 33.12.7 switch mstp maxhops Command ..................1016 33.12.8 switch mstp priority Command ..................1016 33.12.9 switch mstp revision Command ..................1017 33.12.10 switch mstp show Command ..................1017 33.12.11 switch mstp version Command ..................1018...
- Page 33 Table of Contents 34.1 sys Commands Overview ......................1031 34.2 sys Commands Summary ......................1031 34.3 sys Commands ...........................1038 34.3.1 sys version Command .......................1038 34.3.2 sys baud set Command .....................1039 34.3.3 sys baud show Command ....................1039 34.3.4 sys client set Command ....................1039 34.3.5 sys client enable Command ....................1040 34.3.6 sys client disable Command ....................1040 34.3.7 sys client show Command ....................1040...
- Page 34 Table of Contents 34.5.1 sys syslog server Command .....................1055 34.5.2 sys syslog enable Command .....................1056 34.5.3 sys syslog disable Command ....................1056 34.5.4 sys syslog show Command ....................1056 34.6 sys user Commands ........................1056 34.6.1 sys user set Command ......................1057 34.6.2 sys user delete Command ....................1057 34.6.3 sys user enable Command ....................1057 34.6.4 sys user disable Command ....................1058 34.6.5 sys user show Command ....................1058...
- Page 35 Table of Contents 36.4.10 voip h248 opmode command ..................1076 36.4.11 voip h248 priority command .....................1076 36.4.12 voip h248 show command ....................1077 36.5 voip h248 Command Examples ....................1077 36.6 Single VOP Card voip h248 Command Example ................1077 36.7 Adding Another VOP Card voip h248 Command Example ............1079 36.8 voip ip Commands ........................1079 36.8.1 voip ip set Command ......................1080 36.8.2 voip ip dns Command ......................1080...
- Page 36 Table of Contents 36.16.1 voip sip localcall show Command ..................1092 36.16.2 voip sip localcall time Command ..................1092 36.17 voip sip prack Command ......................1093 36.17.1 voip sip prack disable Command ..................1093 36.17.2 voip sip prack enable Command ..................1093 36.17.3 voip sip prack show Command ..................1093 36.18 voip sip regcount Command .....................1093 36.18.1 voip sip regcount set Command ..................1093 36.18.2 voip sip regcount show Command ..................1093...
- Page 37 39.2 Specifications ..........................1119 39.3 Features ............................1125 39.4 Firmware Naming Conventions ....................1131 39.5 Console Port Pin Assignments ....................1131 39.6 MSC1000G ALARM Connector Pin Assignments ............... 1132 Appendix A Customer Support ...................... 1135 Appendix B Legal Information......................1141 Index ..............................1147...
- Page 38 Table of Contents Management Switch Card User’s Guide...
-
Page 39: Introduction
Introduction... -
Page 41: Getting To Know Your Msc
H A PT ER Getting to Know Your MSC This chapter introduces the main applications of the MSC. It also introduces the ways you can manage the MSC. 1.1 Introduction The IES-5000, IES-5112, and IES-6000 series are perfect for ISPs or large building applications seeking to provide high bandwidth broadband services to subscribers while minimizing costs. -
Page 42: Applications
Chapter 1 Getting to Know Your MSC • The VLC1224G VDSL Line Card may be referred to as the “VLC1224G”, the “VLC” or the “line card” in this User’s Guide. • The VLC1324G-51 for VDSL2 over POTS (Annex A) Line Card may be referred to as the “VLC1324G”, the “VLC”... - Page 43 Chapter 1 Getting to Know Your MSC Figure 1 MTU Application • The IES provides DSL service over telephone wires to subscribers in a Central Office (CO) application. The following figure shows the IES-5000 set up in a telephone company’s central office.
- Page 44 Chapter 1 Getting to Know Your MSC • Other applications include telemedicine, surveillance systems, remote servers systems, cellular base stations and high-quality videoconferencing. IMA Application Although IP network is common today, there are still some countries using TDM (Time-Division Multiplex) as their backbone network. TDM is a technology to transmit data, voice and video signals using different channels and clocks on the same media.
- Page 45 Chapter 1 Getting to Know Your MSC Figure 4 IMA Application in Remote Sites Normally, traffic coming from subscribers is untagged or has one VLAN tag. The receiving xDSL line card adds an inner VLAN tag (C-tag) or add both inner (C-tag) and outer VLAN tag (S-tag) into untagged frames.
-
Page 46: Ways To Manage The Msc
Chapter 1 Getting to Know Your MSC In the central office, your IES should have an Ethernet connection to a backbone network. The IMA converts ATM cells coming from remote sites to Ethernet frames. Depending on your configuration, the IMA also converts traffic from double-tagged PVCs to either single-tagged or double-tagged VLAN frames. - Page 47 Chapter 1 Getting to Know Your MSC The first management switch card installed is active. If both management switch cards are installed at the same time, the management switch card in the lower numbered slot is active. Whenever the active management switch card cannot operate (whether it is removed, restarts or crashes), the standby management switch card becomes active.
- Page 48 Chapter 1 Getting to Know Your MSC LAN 2 LAN LAN 2 LAN allows you to control whether or not a DHCP server connected to a subscriber port is permitted to receive and send traffic through the IES. Anti-IP Address Spoofing With DHCP snooping, a line card records which IP address is assigned to each DHCP client MAC address and the VLAN to which each IP and MAC address pair belongs.
- Page 49 Chapter 1 Getting to Know Your MSC example, it is cheaper to use multiple lower-speed links than to under-utilize a high-speed, but more costly, single-port link. IEEE 802.1Q Tagged VLAN Your MSC uses the IEEE 802.1Q Tagged VLAN (Virtual Local Area Network), which allows your device to deliver tagged/untagged frames to and from its ports.
- Page 50 Chapter 1 Getting to Know Your MSC (customer tag) and an outer s-tag (service provider tag). The line card drops any tagged frames received on the DTPVC. DTPVCs support DHCP relay, IGMP, IEEE 802.1x and PPPoE agent. PPPoA-to-PPPoE (PAE) PVC This feature allows the system to translate PPPoA packets to PPPoE packets (and vice versa) to allow communication between CPE clients and an access concentrator (such as a BRAS) through the switch.
- Page 51 Chapter 1 Getting to Know Your MSC MAC (Media Access Control) Count Limit You can limit the number of MAC addresses that may be dynamically learned on a port. You may enable/disable the MAC count limit on individual ports. IGMP Count Limit You can limit the number of IGMP groups a subscriber on a port can join.
- Page 52 Chapter 1 Getting to Know Your MSC Multiple Management Logins The management switch card can support multiple concurrent management sessions. Remote Firmware Upgrade You can use FTP or SFTP to perform configuration backup/restore and firmware upgrade from a remote location. Security •...
- Page 53 Chapter 1 Getting to Know Your MSC You can configure DSCP-to-IEEE 802.1p mappings to allow the MSC to prioritize all incoming traffic based on the DSCP value according to the mapping table. System Monitoring • System status (link status, rates, statistics counters) •...
- Page 54 Chapter 1 Getting to Know Your MSC Management Switch Card User’s Guide...
-
Page 55: Hardware Connections
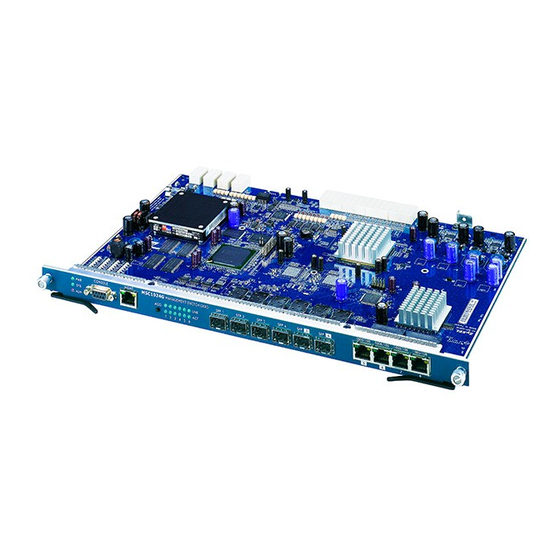
6000M User’s Guide for directions and safety warnings on installing the management switch card. Use this chapter’s port and slot descriptions to connect the management switch card. 2.1 Front Panels Figure 7 MSC1000G Front Panel Figure 8 MSC1024G Front Panel Figure 9 MSC1224G Front Panel Figure 10 MSC1024GB Front Panel... -
Page 56: Leds
An alarm has been detected on the MSC, the Integrated Ethernet Switch fan, the MSC1000G’s INPUT ALARM terminals, or the input alarm terminals of the IES-6000M’s alarm module. Examples of an alarm on the MSC are when the MSC’s voltage or temperature is outside of the normal range. -
Page 57: Alarm Connections
(a separate channel for management that is not part of the channels that are usually used for data transfer). CONSOLE This DB-9 (MSC1000G, MSC1024G or MSC1224G) or mini RJ-11 (MSC1024GB, MSC1024GC or MSC1224GB) RS-232 port is for connecting to a computer for local management. 2.3.1 Alarm Connections Figure 13 ALARM Connector Pin Layout A closed circuit on the ALARM input pins indicates an alarm. -
Page 58: Gigabit And 10 Gigabit Ethernet Interfaces
Examples of an alarm on the MSC are when the MSC’s voltage or temperature is outside of the normal range. 2.3.2 Gigabit and 10 Gigabit Ethernet Interfaces MSC1000G • Interfaces 1 and 2 are Gigabit Ethernet SFP slots. • Interfaces 3 and 4 are Gigabit Ethernet port/SFP slot pairs. - Page 59 Chapter 2 Hardware Connections 2.3.2.1 Uplink and Subtending The Gigabit Ethernet SFP slots and ports can function in either subtending or uplink mode. Connect a port in uplink mode to an backbone Ethernet switch or router. The management switch card allows traffic between the ports in uplink mode and the DSL ports on the line cards.
- Page 60 Chapter 2 Hardware Connections Insert the fiber-optic cables into the transceiver (you may need to remove cable dust covers). Insert the transceiver into the slot with the exposed section of PCB board facing down. Press the transceiver firmly until it clicks into place. Figure 14 Transceiver Installation Figure 15 Installed Transceiver 2.3.2.5 Transceiver Removal...
-
Page 61: Web Configurator
Web Configurator... -
Page 63: The Web Configurator
H A PT ER The Web Configurator This section introduces the configuration and functions of the Web Configurator. 3.1 Web Configurator Introduction The Web Configurator is an HTML-based management interface that allows easy system setup and management via Internet browser. Use Internet Explorer 6.0 or later. The recommended screen resolution is 1024 by 768 pixels. - Page 64 Chapter 3 The Web Configurator Figure 18 Web Configurator: Login Click OK to view the first Web Configurator screen. Figure 19 Web Configurator: First Screen Management Switch Card User’s Guide...
-
Page 65: Navigation Panel
Chapter 3 The Web Configurator 3.3 Navigation Panel In the navigation panel (the column on the left), click a main link to reveal a list of submenu links. The following table describes the links in the navigation panel. Table 3 Navigation Panel Links LINK DESCRIPTION DHCP Relay... - Page 66 Chapter 3 The Web Configurator Table 3 Navigation Panel Links (continued) LINK DESCRIPTION Current Alarm This link takes you to a screen where you can display current detailed alarms by severity or time period. History Alarm This link takes you to a screen where you can display historical alarms by severity or time period.
- Page 67 Chapter 3 The Web Configurator Table 3 Navigation Panel Links (continued) LINK DESCRIPTION Static MAC This link takes you to a screen where you can configure MAC address-based static Multicast multicast group entries. MVLAN This link takes you to a screen where you can configure multicast VLAN. Misc This link takes you to a screen where you can configure how the system handles unknown multicast, IPv4 reserved multicast group, and IPv6 multicast traffic.
- Page 68 Chapter 3 The Web Configurator Table 3 Navigation Panel Links (continued) LINK DESCRIPTION SHDSL This link takes you to a screen where you can configure SHDSL profiles. This link takes you to a screen where you can configure ATM traffic profiles. Alarm ADSL This link takes you to a screen where you can configure ADSL alarm profiles.
- Page 69 Chapter 3 The Web Configurator Table 3 Navigation Panel Links (continued) LINK DESCRIPTION IPv6 This link takes you to a screen where you can view the port IPv6 statistics. G.bond This link takes you to a screen where you can view G.bond statistics. This link takes you to a screen where you can view the connectivity fault management statistics.
- Page 70 Chapter 3 The Web Configurator Table 3 Navigation Panel Links (continued) LINK DESCRIPTION This link takes you to screens where you can configure settings for using an AAA (Authentication, Authorization, Accounting) server to control access to your network. VLAN VLAN This link takes you to screens where you can configure static VLANs.
- Page 71 Chapter 3 The Web Configurator The following table lists the various Web Configurator screens within the sub-links. Table 4 Web Configurator Screen Sub-links Details Alarm Diagnostic Maintenance DHCP Relay Current Alarm Config Backup Critical Loopback Config Restore DHCP Snoop Setup Major Minor DHCP Snoop Setup Slot...
- Page 72 Chapter 3 The Web Configurator Table 4 Web Configurator Screen Sub-links Details (continued) Multicast Port IGMP ADSL GROUP IGMP Setup ADSL Port Setup E1 Slot Port Setup ADSL Port Setup Slot VDSL2 PVC IGMP Port Setup Slot ADSL Port Setup PVC Slot Bandwidth Advanced...
- Page 73 Chapter 3 The Web Configurator Table 4 Web Configurator Screen Sub-links Details (continued) Profile Statistics Switch Switch Setup Access Control ADSL ARP Table VDSL DHCP General SNMP Dot3ad Access Ctrl QSchedule Secured Client VDSL2 MAC Table Isolation Secured Client6 VDSL2 Line Profile IGMP Status MSTP General Setup...
-
Page 74: Saving Your Configuration
Chapter 3 The Web Configurator Table 4 Web Configurator Screen Sub-links Details (continued) VLAN VoIP Config Save VLAN Config Save Port Setting Countrycode VLAN Slot VLAN Detail Route Number Plan VoIP H248 Local Help Key Pattern Dialplan Localcall Interface Pots 3.4 Saving Your Configuration Click Apply in a configuration screen when you are done modifying the settings in that screen to save your changes back to the run time memory and to make your changes take effect. -
Page 75: System Info
Chapter 3 The Web Configurator Figure 21 Web Configurator: Logout Screen 3.6 System Info The System Info screen is the first screen that displays when you access the Web Configurator. Figure 22 Web Configurator: Home Screen (System Info) The following table describes the labels in this screen. Table 5 System Info (Home) LABEL DESCRIPTION... -
Page 76: Card Status Details
Chapter 3 The Web Configurator Table 5 System Info (Home) (continued) LABEL DESCRIPTION State This field displays the line card’s current operational status. active means the line card is operating normally. init means the MSC is initializing the line card. disable means a manager has disabled the line card. -
Page 77: Enable Privilege Screen
Chapter 3 The Web Configurator Table 6 System Info: Slot (continued) LABEL DESCRIPTION Firmware Version This field displays the version number of the device’s current firmware including the date created. DSL Driver This field displays the version number of the line card’s driver. Version DSL Modem This field displays the version number of the line card’s modem code. -
Page 78: Enable Password Screen
Chapter 3 The Web Configurator The following table describes the labels in this screen. Table 7 Enable Privilege LABEL DESCRIPTION Privilege Select the access level you want to attain. Password Enter the password for the access level you selected. Apply Click Apply to have the system authenticate the password you entered. - Page 79 Chapter 3 The Web Configurator Table 8 Enable Password LABEL DESCRIPTION Apply Click Apply to save the changes in this screen to the system’s volatile memory. The system loses these changes if it is turned off or loses power, so use the Config Save link on the navigation panel and then the Save button to save your changes to the non- volatile memory when you are done configuring.
- Page 80 Chapter 3 The Web Configurator Management Switch Card User’s Guide...
-
Page 81: Access Control List Screens
H A PT ER Access Control List Screens This chapter describes the ACL (Access Control List) screens. 4.1 DHCP Relay Overview DHCP (Dynamic Host Configuration Protocol, RFC 2131 and RFC 2132) allows individual clients to obtain TCP/IP configuration at start-up from a DHCP server. You can configure the system to relay client TCP/IP configuration requests to a DHCP server and the server's responses back to the clients. -
Page 82: Format
Chapter 4 Access Control List Screens The Agent Information field that the MSC adds also contains an “Agent Remote-ID sub-option” of information that you specify. The following table shows the format of the private Agent Remote ID sub-option. The “2” in the first field identifies this as an Agent Remote ID sub-option. - Page 83 Chapter 4 Access Control List Screens This section describes how the MSC gives a PPPoE termination server additional information that the server can use to identify and authenticate a PPPoE client. If the PPPoE Intermediate Agent is enabled, the MSC adds a vendor-specific tag to PADI (PPPoE Active Discovery Initialization) and PADR (PPPoE Active Discovery Request) packets from PPPoE clients.
-
Page 84: Dhcp Relay Screen
Chapter 4 Access Control List Screens 4.2 DHCP Relay Screen Figure 26 DHCP Relay The following table describes the labels in this screen. Table 16 DHCP Relay LABEL DESCRIPTION Enter a VLAN ID (between 1 and 4094) to be served with DHCP relay. Enable DHCP Select disable to deactivate the DHCP relay service in this VLAN. - Page 85 Chapter 4 Access Control List Screens Table 16 DHCP Relay (continued) LABEL DESCRIPTION Suboption2 Select this option to have the MSC add the sub-option 2 (Remote ID) to the client DHCP Enable requests for this VLAN. Suboption2 Info Use this field to specify up to 23 English keyboard characters of additional information for the MSC to add to the DHCP requests that it relays to a DHCP server.
-
Page 86: Example: Dhcp Relay For Two Vlans
Chapter 4 Access Control List Screens 4.2.1 Example: DHCP Relay for Two VLANs The following example displays two VLANs (VIDs10 and 12) for the campus network. Two DHCP servers are installed to serve each VLAN. The system is set up to forward DHCP requests from the dormitory rooms (VLAN 10) to the DHCP server with an IP address of 192.168.1.100. -
Page 87: Dhcp Snooping
Chapter 4 Access Control List Screens 4.3 DHCP Snooping With DHCP snooping, the system obtains a client’s MAC-IP address information (in the reply messages from a DHCP server) and stores it in the DHCP snooping table. Frames with known source IP addresses are allowed to go through the subscriber ports. Frames from unknown IP addresses are dropped. - Page 88 Chapter 4 Access Control List Screens Figure 30 DHCP Snooping The following table describes the labels in this screen. Table 17 DHCP Snooping LABEL DESCRIPTION Slot Use the drop-down list boxes to select a DSL port or Gigabit Ethernet port on a line card for which you want to configure DHCP snooping.
-
Page 89: Dhcp Snooping Slot Screen
Chapter 4 Access Control List Screens Table 17 DHCP Snooping (continued) LABEL DESCRIPTION Copy Do the following to copy the settings you configure above to another port or ports. 1. Click Copy. 2. Select to which line card you want to copy the settings. 3. - Page 90 Chapter 4 Access Control List Screens Figure 31 DHCP Snooping: Slot The following table describes the labels in this screen. Table 18 DHCP Snooping: Slot LABEL DESCRIPTION Click UP to go back to the previous screen. Copy Do the following to copy settings from one port to another port or ports. 1.
-
Page 91: Example: Dhcp Snooping
Chapter 4 Access Control List Screens 4.4.2 Example: DHCP Snooping The following figures show the DHCP snooping configuration for computers A and B in the example network shown in Figure 29 on page 87. In this example, the line card in slot 3 has computer A connected to DSL port 1 and computer B connected to DSL port 10. - Page 92 Chapter 4 Access Control List Screens Figure 34 LAN 2 LAN Example DHCP Request DHCP Reply Click ACL > DHCP Snoop > Lan2Lan to display the screen shown next. Note: LAN 2 LAN is disabled on all of the subscriber ports by default so line cards will not forward DHCP Discover or Request packets to subscriber ports and will drop DHCP Offer or Reply packets received from subscriber ports.
- Page 93 Chapter 4 Access Control List Screens Table 19 LAN 2 LAN (continued) LABEL DESCRIPTION Enable Select this option to allow the subscriber to allow a DHCP server connected to the specified DSL port to receive and send DHCP packets through the IES. Note: Configure this port as a member of a VLAN specific to the LAN-to-LAN connection before you enable this feature.
-
Page 94: Lan 2 Lan Slot Screen
Chapter 4 Access Control List Screens 4.5.1 LAN 2 LAN Slot Screen Click the slot number of an active line card in the Lan2Lan screen to display the screen shown next. Figure 36 Lan2Lan: Slot The following table describes the labels in this screen. Table 20 DHCP Snooping: Slot LABEL DESCRIPTION... -
Page 95: Downstream Broadcast Screen
Chapter 4 Access Control List Screens 4.6 Downstream Broadcast Screen Downstream broadcast allows you to block downstream broadcast packets from being sent to specified VLANs on specified ports. This helps to reduce downstream bandwidth requirements on a subscriber line. Click ACL > Downstream Broadcast to display the screen shown next. Figure 37 Downstream Broadcast The following table describes the labels in this screen. - Page 96 Chapter 4 Access Control List Screens Table 21 Downstream Broadcast (continued) LABEL DESCRIPTION Delete Select one or more entries’ check boxes and then use the Apply button to remove it (or them). Use the Select All check box to select all of the entries for the specified line card’s port.
-
Page 97: Downstream Broadcast Slot Screen
Chapter 4 Access Control List Screens 4.6.1 Downstream Broadcast Slot Screen Click the slot number of an active line card in the Downstream Broadcast screen to display the screen shown next. Figure 38 Downstream Broadcast: Slot The following table describes the labels in this screen. Table 22 Downstream Broadcast: Slot LABEL DESCRIPTION... -
Page 98: Mac Count Screen
Chapter 4 Access Control List Screens 4.7 MAC Count Screen This screen allows you to limit how many MAC addresses may be dynamically learned on a DSL port or Gigabit Ethernet port. Note: You cannot enable both MAC count and MAC filtering on the same port at the same time. - Page 99 Chapter 4 Access Control List Screens Table 23 MAC Count (continued) LABEL DESCRIPTION Limited Number Specify how many MAC addresses the system can dynamically learn on this port. The of Learned MAC range is 1~128. Address For example, if you are configuring port 2 and you set this field to "5", then only five devices with dynamically learned MAC addresses may access port 2 at any one time.
-
Page 100: Mac Count Slot Screen
Chapter 4 Access Control List Screens 4.7.1 MAC Count Slot Screen Click the slot number of an active line card in the MAC Count screen to display the screen shown next. Figure 40 MAC Count: Slot The following table describes the labels in this screen. Table 24 MAC Count: Slot LABEL DESCRIPTION... -
Page 101: Mac Filter Screen
Chapter 4 Access Control List Screens 4.8 MAC Filter Screen Use MAC filter to allow or block frames from MAC (Media Access Control) address(es) that you specify to come in through a port or a PVC if the line card supports it. You may specify up to ten MAC addresses per port. -
Page 102: Mac Filter Slot Screen
Chapter 4 Access Control List Screens Table 25 MAC Filter (continued) LABEL DESCRIPTION Mode Select accept to only allow frames from MAC addresses that you specify and block frames from other MAC addresses. Select deny to block frames from MAC addresses that you specify and allow frames from other MAC addresses. -
Page 103: Oui Filter
Chapter 4 Access Control List Screens Table 26 MAC Filter: Slot (continued) LABEL DESCRIPTION Mode This field displays the filter action. Enable This field displays whether MAC filtering is activated on the specified DSL port or not (V for enabled, - for disabled). This fields displays the MAC address(es) you set for the port. - Page 104 Chapter 4 Access Control List Screens The following table describes the labels in this screen. Table 27 OUI Filter LABEL DESCRIPTION Slot Use the drop-down list boxes to select a DSL port or Gigabit Ethernet port on a line card for which you wish to configure packet type filtering.
-
Page 105: Oui Filter Slot Screen
Chapter 4 Access Control List Screens Table 27 OUI Filter (continued) LABEL DESCRIPTION State This field displays the line card’s current operational status. active means the line card is operating normally. init means the MSC is initializing the line card. disable means a manager has disabled the line card. -
Page 106: Packet Filter Screen
Chapter 4 Access Control List Screens The following table describes the labels in this screen. Table 28 OUI Filter: Slot LABEL DESCRIPTION Click UP to go back to the previous screen. Copy Do the following to copy settings from one port to another port or ports. 1. - Page 107 Chapter 4 Access Control List Screens Figure 45 Packet Filter The following table describes the labels in this screen. Table 29 Packet Filter LABEL DESCRIPTION Slot Use the drop-down list boxes to select a DSL port or Gigabit Ethernet port on a line card for which you wish to configure packet type filtering.
- Page 108 Chapter 4 Access Control List Screens Table 29 Packet Filter (continued) LABEL DESCRIPTION EAPOL Filter EAP (Extensible Authentication Protocol, RFC 2486) over LAN. EAP is used with IEEE 802.1x to allow additional authentication methods (besides RADIUS) to be deployed with no changes to the access point or the wireless clients.
-
Page 109: Packet Filter Slot Screen
Chapter 4 Access Control List Screens 4.11 Packet Filter Slot Screen Click the slot number of an active line card in the Packet Filter screen to display the screen shown next. Figure 46 Packet Filter: Slot The following table describes the labels in this screen. Table 30 Packet Filter: Slot LABEL DESCRIPTION... -
Page 110: Ieee 802.1X
Chapter 4 Access Control List Screens Table 30 Packet Filter: Slot (continued) LABEL DESCRIPTION Accept All, PPPoE These are the packet filter settings for each port. Only, PPPoE, IP, Accept All and PPPoE Only: “V” displays for the packet types that the system is to ARP, NetBIOS, accept on the port. -
Page 111: Pnac Port Setup Screen
Chapter 4 Access Control List Screens 4.13 802.1X PNAC Port Setup Screen Click ACL > 802.1X PNAC to display the screen shown next. PNAC stands for Port-based Network Access Control. Use this screen to configure IEEE 802.1x settings. Figure 48 802.1X PNAC: Port Setup The following table describes the labels in this screen. -
Page 112: Pnac Slot Screen
Chapter 4 Access Control List Screens Table 31 802.1X PNAC: Port Setup (continued) LABEL DESCRIPTION Cancel Click Cancel to begin configuring the screen again. Copy Do the following to copy the settings you configure above to another port or ports. 1. - Page 113 Chapter 4 Access Control List Screens Figure 49 802.1X PNAC: Port Setup: Slot The following table describes the labels in this screen. Table 32 802.1X PNAC: Port Setup: Slot label description Click UP to go back to the previous screen. Copy Do the following to copy settings from one port to another port or ports.
-
Page 114: Radius Screen
Chapter 4 Access Control List Screens Table 32 802.1X PNAC: Port Setup: Slot (continued) label description Reauthentication This field displays the IEEE 802.1x re-authentication period. Period (Sec) Select Select the radio button of the port from which you want to copy settings. 4.14 RADIUS Screen Click ACL >... -
Page 115: Upstream Broadcast Control Screen
Chapter 4 Access Control List Screens 4.15 Upstream Broadcast Control Screen Upstream broadcast allows you to define the maximum bandwidth for upstream broadcast traffic allowed in each VDSL or Ethernet subscriber line. This is useful to reduce the incoming broadcast packets and system load. -
Page 116: Anti-Mac Spoofing Screen
Chapter 4 Access Control List Screens Figure 52 ACL > Rule The following table describes the labels in this screen. Table 35 ACL > Rule LABEL DESCRIPTION Slot Use the drop-down list boxes to select a DSL line card and port for which to apply ACL profiles to a PVC. -
Page 117: Dscp Screens
Chapter 4 Access Control List Screens Click ACL > AntiMacspoof to display the screen shown next. Use this screen to enable or disable protection against MAC address spoofing. Note: A line card can detect MAC spoofing only when the spoofed MAC address is already in use by a device connected to another subscriber port. -
Page 118: Dscp Port Screen
Chapter 4 Access Control List Screens Figure 54 ACL > DSCP > Setup The following table describes the labels in this screen. Table 37 ACL > DSCP > Setup LABEL DESCRIPTION DSCP mapping Use the drop-down list boxes to select an IEEE 802.1p priority to which the Device should (priority) change the DSCP service level. - Page 119 Chapter 4 Access Control List Screens Figure 55 ACL > DSCP > Port The following table describes the labels in this screen. Table 38 ACL > DSCP > Port LABEL DESCRIPTION Slot Use the drop-down list boxes to select a line card and port. Port Load Click Load to display the port’s current settings.
-
Page 120: Dscp Port Slot Screen
Chapter 4 Access Control List Screens Table 38 ACL > DSCP > Port (continued) LABEL DESCRIPTION Copy Do the following to copy the settings you configure above to another port or ports. 1. Click Copy. 2. Select the line card to which you want to copy the settings. 3. - Page 121 Chapter 4 Access Control List Screens Figure 56 DSCP > Port: Slot The following table describes the labels in this screen. Table 39 DSCP > Port: Slot LABEL DESCRIPTION Click UP to go back to the previous screen. Copy Do the following to copy settings from one port to another port or ports. 1.
-
Page 122: Pppoe Screen
Chapter 4 Access Control List Screens 4.19 PPPoE Screen Use the ACL > PPPoE screen to configure PPPoE line information setting by VLAN. The switch adds the line information to PPPoE packets for identification and security. Figure 57 ACL > PPPoE The following table describes the labels in this screen. -
Page 123: Loop Guard
Chapter 4 Access Control List Screens Table 40 ACL > PPPoE (continued) LABEL DESCRIPTION Modify Select an entry’s Select radio button and click Modify to display the entry in the table above so you can edit it. Delete Select an entry’s Select radio button and click Delete to remove the entry. 4.20 Loop Guard Configure loop guard to protect against loops on the edge of your network. - Page 124 Chapter 4 Access Control List Screens Figure 59 Switch in Loop State The loop guard feature checks to see if a loop guard enabled port is connected to a switch in loop state. This is accomplished by periodically sending a probe packet and seeing if the packet returns on the same port.
-
Page 125: Loop Guard Setup
Chapter 4 Access Control List Screens Figure 61 Loop Guard - Network Loop Note: After resolving the loop problem on your network you can re-activate the disabled port via the Web Configurator or via commands. 4.21 Loop Guard Setup Click ACL > Loop Guard in the navigation panel to display the screen as shown. Note: The loop guard feature cannot be enabled on ports that have Spanning Tree Protocol (RSTP or MSTP) enabled. - Page 126 Chapter 4 Access Control List Screens The following table describes the labels in this screen. Table 41 ACL > Loop Guard LABEL DESCRIPTION Port This column lists the management switch card’s Gigabit Ethernet interfaces. Status Enable or disable loop guard for this individual port. Mode Select the port mode for loop guard.
-
Page 127: Loop Guard Slot Screen
Chapter 4 Access Control List Screens Table 41 ACL > Loop Guard (continued) LABEL DESCRIPTION Copy Do the following to copy the settings you configure above to another port or ports. 1. Click Copy. 2. Select the line card to which you want to copy the settings. 3. -
Page 128: Subnet Based Vlans
Chapter 4 Access Control List Screens The following table describes the labels in this screen. Table 42 ACL > Loop Guard: Slot LABEL DESCRIPTION Click UP to go back to the previous screen. Copy Do the following to copy settings from one port to another port or ports. 1. -
Page 129: Configuring Subnet Based Vlan
Chapter 4 Access Control List Screens You configure a subnet based VLAN with priority 6 and VID of 100 for traffic received from IP subnet 172.16.1.0/24 (voice services). You also have a subnet based VLAN with priority 5 and VID of 200 for traffic received from IP subnet 192.168.1.0/24 (video services). -
Page 130: Upstream Broadcast Storm Control
Chapter 4 Access Control List Screens The following table describes the labels in this screen. Table 43 ACL > Subnet VLAN LABEL DESCRIPTION Enable Check this box to activate this subnet based VLAN. Apply Click Apply to save the changes in this part of the screen to the system’s volatile memory. The system loses these changes if it is turned off or loses power, so use the Config Save link on the navigation panel and then the Save button to save your changes to the non-volatile memory when you are done configuring. - Page 131 Chapter 4 Access Control List Screens Figure 66 ACL > Upstream Storm The following table describes the labels in this screen. Table 44 ACL > Upstream Storm LABEL DESCRIPTION Slot Use the drop-down list boxes to select a line card and port. Port Load Click Load to display the port’s current settings.
-
Page 132: Upstream Storm Slot Screen
Chapter 4 Access Control List Screens Table 44 ACL > Upstream Storm (continued) LABEL DESCRIPTION Copy Do the following to copy the settings you configure above to another port or ports. 1. Click Copy. 2. Select the line card to which you want to copy the settings. 3. -
Page 133: Arp Inspection
Chapter 4 Access Control List Screens Figure 67 ACL > Upstream Storm: Slot The following table describes the labels in this screen. Table 45 ACL > Upstream Storm: Slot LABEL DESCRIPTION Click UP to go back to the previous screen. Copy Do the following to copy settings from one port to another port or ports. - Page 134 Chapter 4 Access Control List Screens Figure 68 Man-in-the-middle Attack Computer B tries to establish a connection with computer A. Computer X is in the same broadcast domain as computer A. Computer X can intercept ARP packets so that: • X pretends to be computer A and responds to computer B •...
- Page 135 Chapter 4 Access Control List Screens Figure 69 ACL > Arp Inspection The following table describes the labels in this screen. Table 46 ACL > Arp Inspection LABEL DESCRIPTION Slot Use the drop-down list boxes to select a line card and port. Port Load Click Load to display the port’s current settings.
-
Page 136: Arp Inspection Slot Screen
Chapter 4 Access Control List Screens Table 46 ACL > Arp Inspection (continued) LABEL DESCRIPTION Apply Click Apply to save the changes in this screen to the system’s volatile memory. The system loses these changes if it is turned off or loses power, so use the Config Save link on the navigation panel and then the Save button to save your changes to the non- volatile memory when you are done configuring. -
Page 137: Dhcpv6 Relay
Chapter 4 Access Control List Screens The following table describes the labels in this screen. Table 47 ACL > Arp Inspection: Slot LABEL DESCRIPTION Click UP to go back to the previous screen. Copy Do the following to copy settings from one port to another port or ports. 1. - Page 138 Chapter 4 Access Control List Screens Figure 71 DHCPv6 Relay The following table describes the labels in this screen. Table 48 DHCPv6 Relay LABEL DESCRIPTION Enter a VLAN ID (between 1 and 4094) to be served with DHCPv6 relay. LDRA Lightweight DHCPv6 Relay Agent (LDRA) adds information to client DHCPv6 requests before forwarding them to the DHCPv6 server.
-
Page 139: Mac Forced Forwarding
Chapter 4 Access Control List Screens Table 48 DHCPv6 Relay (continued) LABEL DESCRIPTION Apply Click Apply to save the changes in this screen to the system’s volatile memory. The system loses these changes if it is turned off or loses power, so use the Config Save link on the navigation panel and then the Save button to save your changes to the non- volatile memory when you are done configuring. -
Page 140: Mac Forced Forwarding Examples
Chapter 4 Access Control List Screens Figure 72 MAC Force Forwarding Without MAC Force Forwarding With MAC Force Forwarding 4.28 MAC Forced Forwarding Examples In your network, you have the following IP assignments. Table 49 MAC Forced Forwarding Example: IP Address Settings HOSTS VLAN IP ADDRESS... - Page 141 Chapter 4 Access Control List Screens Figure 73 MAC Forced Forwarding Configuration Example 1 Example 2: Source is a Range of IPs or a Subnet If you want to force all traffic between subscribers 1~8 and the server (S) to go through AR, you can have the following settings.
-
Page 142: Macff Vlan Screen
Chapter 4 Access Control List Screens Figure 75 MAC Forced Forwarding Configuration Example 3 4.29 MACFF Vlan Screen Click ACL > MACFF in the navigation panel to open the screen. Use this screen to enable MAC forced forwarding for specific VLAN(s) on individual line cards. The MSC forwards an enabled VLAN’s traffic to the access router or server according to the configuration in the other ACL >... -
Page 143: Macff Entry Screen
Chapter 4 Access Control List Screens Table 50 MACFF Vlan (continued) LABEL DESCRIPTION Apply Click Apply to save the changes in this screen to the system’s volatile memory. The system loses these changes if it is turned off or loses power, so use the Config Save link on the navigation panel and then the Save button to save your changes to the non- volatile memory when you are done configuring. - Page 144 Chapter 4 Access Control List Screens Table 51 MACFF Entry (continued) LABEL DESCRIPTION Enter the VLAN ID of the subscribers for which you are configuring this rule. Make sure you have enabled the VLAN in the ACL > MACFF > MACFF Vlan screen before you set it here.
-
Page 145: Macff Arp Proxy Screen
Chapter 4 Access Control List Screens An IP address with host IDs of all zeros is the IP address of the network (192.168.1.0 with a 24-bit subnet mask, for example). An IP address with host IDs of all ones is the broadcast address for that network (192.168.1.255 with a 24-bit subnet mask, for example). - Page 146 Chapter 4 Access Control List Screens Figure 78 MAC ARP Proxy The following table describes the labels in this screen. Table 54 MAC ARP Proxy LABEL DESCRIPTION Load Select a line card and click Load to display its Address Resolution Protocol (ARP) entries of Access Routers (ARs) and Application Servers (ASes) for which the MSC acts as a proxy to respond to ARP queries from subscribers Total...
-
Page 147: Alarm Screens
H A PT ER Alarm Screens This chapter describes alarm management. 5.1 Current Alarm Screen Click Alarm > Current Alarm to display the screen where you can view all current alarms. You can also click a tab to view the alarms only specific to one severity level. Figure 79 Current Alarm: All The following table describes the labels in this screen. -
Page 148: History Alarm Screen
Chapter 5 Alarm Screens Table 55 Current Alarm: All (continued) LABEL DESCRIPTION Condition This is the alarm condition. Severity This is the severity level (critical, major, minor, info or all) of alarms. Timestamp This is the time when the alarm occurred. Source This is the location where the alarm occurred. -
Page 149: Alarm Port Setup Screen
Chapter 5 Alarm Screens Table 56 History Alarm: All (continued) LABEL DESCRIPTION This is the index number of the alarm. Alarm This is the alarm category. eqpt represents equipment alarms. dsl represents Digital Subscriber Line (DSL) alarms. enet represents Ethernet alarms. sys represents system alarms. - Page 150 Chapter 5 Alarm Screens The following table describes the labels in this screen. Table 57 Alarm Port Setup LABEL DESCRIPTION sub1 Select the severity level from info, minor, major and critical for the alarms to record on the specified port of the MSC. sub2 Management Apply...
-
Page 151: Alarm Port Setup Slot Screen
Chapter 5 Alarm Screens Table 57 Alarm Port Setup (continued) LABEL DESCRIPTION State This field displays the line card’s current operational status. active means the line card is operating normally. init means the MSC is initializing the line card. disable means a manager has disabled the line card. inactive means the line card is starting up or is not operating normally. -
Page 152: Alarm Edit Severity Assignment Screen
Chapter 5 Alarm Screens The following table describes the labels in this screen. Table 58 Alarm Port Setup: Slot LABEL DESCRIPTION Click UP to go back to the previous screen. Copy Do the following to copy settings from one port to another port or ports. 1. - Page 153 Chapter 5 Alarm Screens Figure 83 Alarm Edit Severity Assignment: DSL The following table describes the labels in this screen. Table 59 Alarm EditSeverity Assignment LABEL DESCRIPTION Condition This identifies an individual alarm. See Section 5.5 on page 154 for all individual alarm information.
-
Page 154: Alarm Descriptions
Chapter 5 Alarm Screens 5.5 Alarm Descriptions This table describes the alarms on the system. You can view the settings using the “alarm tablelist” CLI command. • “ALC” is the ADSL Line Card. • “SLC” is the SHDSL Line Card. •... - Page 155 Chapter 5 Alarm Screens Table 60 Alarm Descriptions (continued) ALARM SEVERITY MSC ALC SLC VLC VOP IMA DESCRIPTION ADSL_TCA_SES INFO The Severely Errored Seconds (<value>) within 15 minutes for the atu(c or r) has reached the threshold (<value>). ADSL_TCA_UAS INFO The UnAvailable Seconds (<value>) within 15 minutes for the atu(c or r) has reached the threshold (<value>).
- Page 156 Chapter 5 Alarm Screens Table 60 Alarm Descriptions (continued) ALARM SEVERITY MSC ALC SLC VLC VOP IMA DESCRIPTION VDSL_TCA_UAS INFO The UnAvailable Seconds (<value>) within 15 minutes for the vtu(c or r) has reached the threshold (<value>). MAC_SPOOF Minor A duplicated MAC address is detected in two DSL subscriber lines.
- Page 157 Chapter 5 Alarm Screens Table 60 Alarm Descriptions (continued) ALARM SEVERITY MSC ALC SLC VLC VOP IMA DESCRIPTION LT_ACTIVE INFO A line card became active. LT_INACTIVE MAJOR A line card became inactive. LT_FW_UPLOAD_OK INFO Firmware was successfully uploaded to a card.
- Page 158 Chapter 5 Alarm Screens Table 60 Alarm Descriptions (continued) ALARM SEVERITY MSC ALC SLC VLC VOP IMA DESCRIPTION CLI_SYNC_PROF_OK INFO Client-initiated profile synchronization is successful. CLI_SYNC_PROF_FAIL INFO Client-initiated profile synchronization failed. ANTI_SPOOFING Minor A system connected to the MSC detected a MAC address connected to more than one port.
- Page 159 Chapter 5 Alarm Screens Table 60 Alarm Descriptions (continued) ALARM SEVERITY MSC ALC SLC VLC VOP IMA DESCRIPTION VOP_SC_MISSING CRITICAL The media VOP card cannot detect the signaling VOP card. VOP_TERMNAME_DUP INFO The VOP detected a duplicate terminal name. VOP_NO_PROTECTION INFO The active SC cannot detect the standby VOP_PROTECTION_SWITC...
-
Page 160: Alarm Clear Screen
Chapter 5 Alarm Screens Table 60 Alarm Descriptions (continued) ALARM SEVERITY MSC ALC SLC VLC VOP IMA DESCRIPTION LINK_TX_UNSUABLE_FE minor The remote IMA reports the transmit link is unusable. LINK_RX_UNSUABLE_FE minor The remote IMA reports the receiving link is unusable. DS1_LOS critical The Loss Of Signal seconds were... -
Page 161: Alarm Input Screen
Chapter 5 Alarm Screens Figure 84 Alarm Clear The following table describes the labels in this screen. Table 61 Alarm Clear LABEL DESCRIPTION Current Alarm Click Clear to manually remove the records of all the current alarms that are clearable. History Alarm Click Clear to manually remove the records of all the historical (past) alarms that are clearable. - Page 162 Chapter 5 Alarm Screens Management Switch Card User’s Guide...
-
Page 163: Diagnostic Screens
H A PT ER Diagnostic Screens This chapter explains the Diagnostic screens. 6.1 CFM Overview The route between a CO network and one of a CPE user may go through aggregated switches, routers and/or DSLAMs owned by independent organizations. A connectivity fault point generally takes time to discover and impacts on subscribers’... -
Page 164: Ldm Test Screen (Delt)
Chapter 6 Diagnostic Screens CFM provides two tests to discover connectivity faults. • Loopback test - similar to “pinging” a computer. A loopback test checks if the MEP port receives its LBR (Loop Back Response) from its target after it sends the LBM (Loop Back Message). If no response is received, there might be a connectivity fault between them. - Page 165 Chapter 6 Diagnostic Screens Figure 88 LDM Test The following table describes the labels in this screen. Table 63 LDM Test LABEL DESCRIPTION LDM Test Select slot and port numbers from the Slot and Port drop-down list boxes and click Set LDM Port to perform loop diagnostics on the specified port.
-
Page 166: Loop Diagnostics Test Parameters
Chapter 6 Diagnostic Screens 6.2.1 Loop Diagnostics Test Parameters Figure 89 LDM Test Result The following table lists the loop diagnostics test parameters that display, see the ITU-T’s G.992.3 for more information. Table 64 Loop Diagnostics Test Parameters LABEL DESCRIPTION near end (NE) This column of diagnostics results is for the upstream traffic (coming from the subscriber to the IES). -
Page 167: Ip Ping Screen
Chapter 6 Diagnostic Screens Figure 90 Loopback The following table describes the labels in this screen. Table 65 Loopback LABEL DESCRIPTION Loopback Select slot and port numbers from the Slot and Port drop-down list boxes. In the Item drop-down list box, select the type of loopback test. Currently oam f5 loopback test is supported. -
Page 168: Trace Route Screen
Chapter 6 Diagnostic Screens Figure 91 IP Ping The following table describes the labels in this screen. Table 66 IP Ping LABEL DESCRIPTION IP Ping Type the IP address of a device that you want to ping in order to test a connection. In the field to the right specify the number of times that you want to ping the IP address. -
Page 169: The Mlt Screen
Chapter 6 Diagnostic Screens The following table describes the labels in this screen. Table 67 Trace Route LABEL DESCRIPTION Trace Route Type the IP address of a device. Click Start to perform a trace route in order to check the path that packets take to get to the IP address that you specified. - Page 170 Chapter 6 Diagnostic Screens Figure 94 MLT (relay mode) The following table describes the labels in this screen. Table 68 MLT LABEL DESCRIPTION Use the Slot and Port drop-down list boxes to select the port on an active VoIP line card you want to configure.
-
Page 171: Cfm Loopback Screen
Chapter 6 Diagnostic Screens Table 68 MLT LABEL DESCRIPTION Type This field applies when you select the Ring Voltage, Pulse and DTMF Digit, or All MLT tests. If you selected All tests, use 0 to perform all tests or 1 to test AC voltage, DC voltage, isolation resistance, and capacitance. - Page 172 Chapter 6 Diagnostic Screens Figure 95 CFM Loopback The following table describes the labels in this screen. Table 69 CFM Loopback LABEL DESCRIPTION Select an MD name. If the drop-down list is empty, create an MD in the Switch > CFM screen. Select an MA name under the selected MD.
-
Page 173: Cfm Linktrace Screen
Chapter 6 Diagnostic Screens 6.8 CFM Linktrace Screen Click Diagnostic > CFM Linktrace in the navigation panel to display this screen. Use this screen to perform a link trace connectivity test on a link. Figure 96 Diagnostic > CFM Linktrace The following table describes the labels in this screen. -
Page 174: Selt Test Screen
Chapter 6 Diagnostic Screens Table 70 Diagnostic > CFM Linktrace (continued) LABEL DESCRIPTION LTM Index Enter the index number of a Link Trace Message (LTM) packet and click the Get Linktrace Data button to see the detailed test result. LTR Index Enter the index number of a Link Trace Response (LTR) packet and click the Get Linktrace Data button to see the detailed test result. -
Page 175: Oam Loopback Screen
Chapter 6 Diagnostic Screens 6.10 OAM Loopback Screen Click Diagnostic > OAM Loopback in the navigation panel to display this screen. Use this screen to perform an Ethernet OAM (Operational, Administration and Maintenance) loopback test to check an Ethernet line card port’s connection to a subscriber Ethernet device. Figure 98 OAM Loopback The following table describes the labels in this screen. - Page 176 Chapter 6 Diagnostic Screens Figure 99 IMA Loopback The following table describes the labels in this screen. Table 73 IMA Loopback LABEL DESCRIPTION Select the slot of an IMA line card from the Slot drop-down list box and a test item (E1, IMA, Loopback F5 end2end or F5 segment).
- Page 177 Chapter 6 Diagnostic Screens Table 73 IMA Loopback (continued) LABEL DESCRIPTION F5 end2end Select this to perform an ATM F5 end to end loopback test. Group: Select the number of an IMA group. VPI/VCI: Enter the Virtual Path Identifier (VPI) and Virtual Circuit Identifier (VCI) of a channel in this group.
- Page 178 Chapter 6 Diagnostic Screens Management Switch Card User’s Guide...
-
Page 179: Maintenance Screens
H A PT ER Maintenance Screens This chapter explains how to use the maintenance screens. 7.1 Configuration Backup Screen Click Maintenance > Config Backup in the navigation panel to open the following screen. Use this screen to back up your system configuration. This allows you to create various “snap shots” of your device from which you may restore at a later date. -
Page 180: Configuration Reset Screen
Chapter 7 Maintenance Screens Figure 101 Configuration Restore Type the path and file name of the configuration file you wish to restore in the File Path text box or click Browse to display a Choose File screen from which you can locate it. After you have specified the file, click Restore. -
Page 181: Config Server Screen
Chapter 7 Maintenance Screens Figure 104 Restart After Load Factory Defaults 7.4 Config Server Screen Click Maintenance > Config Server in the navigation panel to open the following screen. Use this screen to configure an FTP or TFTP server used to download the system’s configuration file or upload a specified configuration file to the system. -
Page 182: Reboot Screen
Chapter 7 Maintenance Screens Be sure to upload the correct model firmware as uploading the wrong model firmware may damage a card. Figure 106 FW Upgrade The MSC supports dual firmware images, ras-0 and ras-1. You can switch them from one to the other by selecting the Boot Image and clicking Apply. -
Page 183: Almhis Backup Screen
Chapter 7 Maintenance Screens Figure 107 Reboot Use the Config Save screen first if you want to save the system’s current configuration. Otherwise, using the Reboot button will return the system to the configuration that was last saved to nonvolatile memory. Click the Reboot button to display the following screen. - Page 184 Chapter 7 Maintenance Screens Management Switch Card User’s Guide...
-
Page 185: Multicast Screens
H A PT ER Multicast Screens This chapter describes the Multicast screens. 8.1 IGMP Introduction Traditionally, IP packets are transmitted in one of either two ways - Unicast (1 sender to 1 recipient) or Broadcast (1 sender to everybody on the network). Multicast delivers IP packets to just a group of hosts on the network. -
Page 186: Igmp Snooping And Proxy Note
Chapter 8 Multicast Screens In IGMP proxy, an upstream interface is the port that is closer to the source (or the root of the multicast tree) and is able to receive multicast traffic. There should only be one upstream interface (also known as the query port) on the system to limit bandwidth use. -
Page 187: Igmp Fast Leave
Chapter 8 Multicast Screens 8.1.5 IGMP Fast Leave When a host leaves a multicast group (224.1.1.1), it sends an IGMP leave message to inform all routers (224.0.0.2) in the multicast group. When a router receives the leave message, it sends a specific query message to all multicast group (224.1.1.1) members to check if any other hosts are still in the group. - Page 188 Chapter 8 Multicast Screens Figure 112 IGMP Setup The following table describes the labels in this screen. Table 75 IGMP Setup LABEL DESCRIPTION IGMP Mode Select Enable_IGMP_Snooping to have the system passively learn multicast groups. Select Enable_IGMP_Proxy to have the system proxy multicast traffic. Select Disable to have the system not use either IGMP proxy or snooping.
-
Page 189: Igmp Filtering
Chapter 8 Multicast Screens Table 75 IGMP Setup (continued) LABEL DESCRIPTION Static Query This table lists the manually added VLANs on which the system sends IGMP query messages. VID Table These are multicast service subscriber VLANs. Click Delete to remove the selected entry. Dynamic This table lists the IGMP query VLANs that the system has dynamically learned via IGMP Query VID... - Page 190 Chapter 8 Multicast Screens The following table describes the labels in this screen. Table 76 IGMP Port Setup LABEL DESCRIPTION Slot Select the number of a line card’s slot. Port Select the number of a DSL port on the line card. Load Click Load to retrieve the port’s IGMP filter profile setting and display it in the Profile drop- down list box.
-
Page 191: Igmp Bandwidth Screen
Chapter 8 Multicast Screens Table 76 IGMP Port Setup (continued) LABEL DESCRIPTION State This field displays the line card’s current operational status. active means the line card is operating normally. init means the MSC is initializing the line card. disable means a manager has disabled the line card. inactive means the line card is starting up or is not operating normally. -
Page 192: Igmp History Screen
Chapter 8 Multicast Screens Table 77 Multicast > IGMP > Bandwidth (continued) LABEL DESCRIPTION Start Mcast Ip Enter the starting IP address in the range of multicast IP addresses to which the bandwidth setting applies. Use an IPv4 address in dotted decimal notation or an IPv6 address and prefix in colon hexadecimal notation. - Page 193 Chapter 8 Multicast Screens Figure 116 IGMP History The following table describes the related labels in this screen. Table 78 IGMP History LABEL DESCRIPTION check box Select this and the action (Disable, Enable or Flush), then click Apply to perform the action.
-
Page 194: Static Multicast Screen
Chapter 8 Multicast Screens 8.5 Static Multicast Screen Click Multicast > Static Multicast in the navigation panel to display the screen shown next. Use static multicast to allow incoming frames based on the VID and multicast MAC address(es). This feature can be used in conjunction with IGMP snooping to allow multicast MAC address(es) that are not learned by IGMP snooping or IGMP proxy and would otherwise be dropped. -
Page 195: Static Multicast Slot Screen
Chapter 8 Multicast Screens Table 79 Static Multicast (continued) LABEL DESCRIPTION Apply Click Apply to save the changes in this screen to the system’s volatile memory. The system loses these changes if it is turned off or loses power, so use the Config Save link on the navigation panel and then the Save button to save your changes to the non-volatile memory when you are done configuring. -
Page 196: Static Mac Multicast Screen
Chapter 8 Multicast Screens The following table describes the related labels in this screen. Table 80 Static Multicast Slot LABEL DESCRIPTION The numbers represent the individual ports on the card. Use the F, -, and X radio buttons to set each port’s membership in the static multicast group. Select F to make the port a permanent member of the static multicast group. - Page 197 Chapter 8 Multicast Screens Figure 119 Static MAC Multicast The following table describes the related labels in this screen. Table 81 Static MAC Multicast LABEL DESCRIPTION Type the number of the VLAN that incoming packets for this static multicast group must be tagged with.
-
Page 198: Static Mac Multicast Slot Screen
Chapter 8 Multicast Screens Table 81 Static MAC Multicast (continued) LABEL DESCRIPTION Delete Select a static multicast group’s radio button and click Delete to remove the static multicast group. This is the number of the VLAN that this static multicast group uses. Group MAC This is the static multicast MAC address. -
Page 199: Mvlan Setup Screen
Chapter 8 Multicast Screens The following table describes the related labels in this screen. Table 82 Static MAC Multicast Slot LABEL DESCRIPTION The numbers represent the individual ports on the card. Use the F and X radio buttons to set each port’s membership in the static MAC multicast group. Select F to make the port a permanent member of the static MAC multicast group. -
Page 200: Mvlan Port Setting Screen
Chapter 8 Multicast Screens The following table describes the labels in this screen. Table 83 MVLAN Setup LABEL DESCRIPTION Set whether to process IGMP/MLD packets if the destined multicast group belongs to an MVLAN Member but the port which received the IGMP/MLD packets is not a member of the MVLAN. Port pass: Forward the IGMP/MLD packets in the original VLAN. -
Page 201: Mvlan Group Setup Screen
Chapter 8 Multicast Screens Figure 122 MVLAN Port Setting The following table describes the labels in this screen. Table 84 MVLAN Port Setting LABEL DESCRIPTION The numbers represent the individual ports on the card. Use the F, -, and X radio buttons to set each port’s membership in the MVLAN. Select F to make the port a permanent member of the MVLAN. -
Page 202: Misc Screen
Chapter 8 Multicast Screens Figure 123 MVLAN Group Setup The following table describes the labels in this screen. Table 85 MVLAN Group Setup LABEL DESCRIPTION This is the ID number of the MVLAN. Index Select the multicast group number (1 -16). Start IP Enter a multicast IP address as the beginning of the multicast IP address range. - Page 203 Chapter 8 Multicast Screens Figure 124 Misc Setup The following table describes the labels in this screen. Table 86 Misc Setup LABEL DESCRIPTION Unknown, Select flood and click Apply to have the MSC forward all IPv4 and IPv6 unknown multicast packets to all ports.
- Page 204 Chapter 8 Multicast Screens Management Switch Card User’s Guide...
-
Page 205: Subscriber Port Setup Screens
H A PT ER Subscriber Port Setup Screens This chapter explains how to configure settings for individual subscriber ports. It also covers how to configure permanent virtual circuits. 9.1 ADSL Standards Overview These are the ADSL standards and rates that the ADSL line card supports at the time of writing. The actual transfer rates will vary depending on what the subscriber’s device supports, the line conditions and the connection distance. -
Page 206: Frequency Band Plan
Chapter 9 Subscriber Port Setup Screens 9.2.3 Frequency Band Plan Each VDSL mode operates in a different frequency band allocation, resulting in different upstream and downstream speeds. Your system automatically changes the band plan based on the loop condition and loop length. A band plan example is shown next. -
Page 207: Configured Versus Actual Rate
Chapter 9 Subscriber Port Setup Screens 9.2.5 Configured Versus Actual Rate You configure the maximum rate of an individual VDSL port by modifying its profile (see the VDSL Profile Setup screen) or assigning the port to a different profile (see the Port Setup screen). However, the actual rate varies depending on factors such as transmission range and interference. -
Page 208: Upbo/Dpbo Electrical Length
Chapter 9 Subscriber Port Setup Screens ISDN in Europe uses a frequency range of up to 80 kHz, while ISDN in Japan uses a frequency range of up to 640 kHz. ADSL utilizes the 1.1 MHz band. Both ADSL2 and ADSL 2+ utilize the 2.2 MHz band. -
Page 209: Rfi (Radio Frequency Interference)
Chapter 9 Subscriber Port Setup Screens 9.2.11 RFI (Radio Frequency Interference) RFI is induced noise on the lines by surrounding radio frequency electromagnetic radiation from sources such as AM and HAM radio stations. Since VDSL uses a much larger frequency range that overlaps with other radio frequency systems, signals from VDSL lines and other radio systems interfere with each other. - Page 210 Chapter 9 Subscriber Port Setup Screens Figure 128 VLAN Stacking Example 9.2.13.1 VLAN Tag Format A VLAN tag (service provider VLAN stacking or customer IEEE 802.1Q) consists of the following three fields. Table 91 VLAN Tag Format Type Priority Type is a standard Ethernet type code identifying the frame and indicates that whether the frame carries IEEE 802.1Q tag information.
-
Page 211: Downstream And Upstream
Chapter 9 Subscriber Port Setup Screens Table 93 802.1Q Frame Destination Address Priority 802.1p Priority Source Address Len/Etype Length and type of Ethernet frame (SP)TPID (Service Provider) Tag Protocol IDentifier Data Frame data VLAN ID Frame Check Sequence 9.2.14 DT VLAN DT VLAN (Double-Tag VLAN) adds two VLAN tags to untagged frames received on a VDSL port. -
Page 212: Default Settings
Chapter 9 Subscriber Port Setup Screens 9.6 Default Settings The default profiles always exists and all of the DSL ports use the default profile settings when the line card is shipped. The default profiles are named DEFVAL. Refer to the chapter on initial configuration for the settings of the default profile and DSL port default settings. - Page 213 Chapter 9 Subscriber Port Setup Screens Table 94 ADSL Port Setup (continued) LABEL DESCRIPTION Mode Select the port’s ADSL operational mode. Select the mode that the subscriber’s device uses or auto to have the system automatically determine the mode to use. See Table 87 on page 205 for information on the individual ADSL modes.
-
Page 214: Adsl Port Setup Line Card Screen
Chapter 9 Subscriber Port Setup Screens Table 94 ADSL Port Setup (continued) LABEL DESCRIPTION This column lists the slot numbers of the line cards. Click the ID number of an active ADSL line card to go to a screen where you can copy an ADSL port’s settings to another ADSL port. - Page 215 Chapter 9 Subscriber Port Setup Screens The following table describes the fields in this screen. Table 95 ADSL Port Setup: Line Card LABEL DESCRIPTION Click this to return to the previous screen. Copy Do the following to copy settings from one DSL port to another DSL port or ports. 1.
-
Page 216: Adsl Port Setup Advanced
Chapter 9 Subscriber Port Setup Screens 9.7.2 ADSL Port Setup Advanced Click Port > ADSL in the navigation panel to open the ADSL Port Setup screen. Click the slot number of an active ADSL line card and click a port number to display the configuration screen. Use this screen to configure an ADSL port’s detailed settings. - Page 217 Chapter 9 Subscriber Port Setup Screens Table 96 ADSL Port Setup: Advanced (continued) LABEL DESCRIPTION Enable Select this check box to turn on this port. Customer Info Enter information to identify the subscriber connected to this ADSL port. You can use up to 31 printable English keyboard characters (including spaces and hyphens).
- Page 218 Chapter 9 Subscriber Port Setup Screens Table 96 ADSL Port Setup: Advanced (continued) LABEL DESCRIPTION Power Mode The power mode controls the connection’s power adaptivity. Select fix to set the maximum downstream transmit power to the number you specify in the Max DS TxPower field.
-
Page 219: Adsl Option Mask Screen
Chapter 9 Subscriber Port Setup Screens Table 96 ADSL Port Setup: Advanced (continued) LABEL DESCRIPTION DS Carrier Use these fields to disable downstream carrier tones (from 32~255). (32~255) Mask1 = tones 32~63 Mask2 = tones 64~95 Mask3 = tones 96~127 Mask4 = tones 128~159 Mask5 = tones 160~191 Mask6 = tones 192~223... - Page 220 Chapter 9 Subscriber Port Setup Screens Figure 134 ADSL Port Setup: Advanced: Option Mask The following table describes the fields in this screen. Table 97 ADSL Port Setup: Advanced: Option Mask LABEL DESCRIPTION Use the check boxes to disable individual features. Use the All check box to select every feature check box.
-
Page 221: Vdsl Port Setup
Chapter 9 Subscriber Port Setup Screens 9.8 VDSL Port Setup Click Port > VDSL in the navigation panel to open the following screen. Use this screen to configure settings for individual VDSL ports on VLCs that follow the VDSL1 MIB as defined in ADSL Extension Line MIB (RFC 3440). - Page 222 Chapter 9 Subscriber Port Setup Screens Table 98 VDSL Port Setup (continued) LABEL DESCRIPTION PMask Select this and click the 32 option bits link to apply standard mask(s) to the VDSL port. The following screen displays. Figure 136 PMask Select one or more standard mask to use on this port and click Apply. The displayed PMask value changes according to your setting.
-
Page 223: Vdsl Port Setup Line Card Screen
Chapter 9 Subscriber Port Setup Screens Table 98 VDSL Port Setup (continued) LABEL DESCRIPTION Copy Do the following to copy DSL settings from one DSL port to another DSL port or ports. 1. Use the Slot and Port drop-down list boxes and the Load button to select the number of the DSL port from which you want to copy settings. - Page 224 Chapter 9 Subscriber Port Setup Screens Figure 138 VDSL Port Setup: Line Card The following table describes the fields in this screen. Table 99 VDSL Port Setup: Line Card LABEL DESCRIPTION Click this to return to the previous screen. Copy Do the following to copy settings from one DSL port to another DSL port or ports.
-
Page 225: Vdsl Port Setup Advanced
Chapter 9 Subscriber Port Setup Screens Table 99 VDSL Port Setup: Line Card (continued) LABEL DESCRIPTION VDSL Profile Select a profile of VDSL settings (such as the transfer rate, interleave delay and signal to noise ratio settings) to assign to this port. Use the VDSL Profile screen to configure VDSL port profiles. - Page 226 Chapter 9 Subscriber Port Setup Screens Management Switch Card User’s Guide...
- Page 227 Chapter 9 Subscriber Port Setup Screens Management Switch Card User’s Guide...
- Page 228 Chapter 9 Subscriber Port Setup Screens The following table describes the fields in this screen. Table 100 VDSL Port Setup: Advanced LABEL DESCRIPTION Click this to return to the previous screen. General Enable Select this to turn on the VDSL port. Customer Info Enter information to identify the subscriber connected to this VDSL port.
- Page 229 Chapter 9 Subscriber Port Setup Screens Table 100 VDSL Port Setup: Advanced LABEL DESCRIPTION RFI Band RFI is induced noise on the lines by surrounding radio sources such as AM and HAM radio stations. To avoid performance degradation due to RFI, set the switch to not transmit VDSL signals in the RFI band plans defined by the regulatory bodies.
- Page 230 Chapter 9 Subscriber Port Setup Screens Table 100 VDSL Port Setup: Advanced LABEL DESCRIPTION DPBO DPBO (Downstream Power Back Off) allows the switch to provide better service in a network environment with telephone wiring of varying lengths. Select Enable to avoid interference with other services (such as ISDN, ADSL or ADSL2 provided by other devices) on the same bundle of lines.
- Page 231 Chapter 9 Subscriber Port Setup Screens Table 100 VDSL Port Setup: Advanced LABEL DESCRIPTION Result Mask Click Show to display the upstream and downstream result mask. Use this screen to check PSD mask settings. Figure 142 Result Mask Click Close Window to close this window. ADSL spectrum The VDSL2 frequency band overlaps with the ADSL2 and ADSL2+ frequency bands.
-
Page 232: Vdsl Port Setup Advanced: Custom Rfi
Chapter 9 Subscriber Port Setup Screens Table 100 VDSL Port Setup: Advanced LABEL DESCRIPTION Section 11.7.8 on page 355 for how to configure Impulse Noise Monitoring. GINP Section 11.7.7 on page 352 for how to configure ITU-T G.988.4’s improved impulse noise protection. - Page 233 Chapter 9 Subscriber Port Setup Screens Table 101 VDSL Port Setup: Advanced (Custom RFI) (continued) LABEL DESCRIPTION Apply Click Apply to save the changes in this screen to the system’s volatile memory. The system loses these changes if it is turned off or loses power, so use the Config Save link on the navigation panel and then the Save button to save your changes to the non-volatile memory when you are done configuring.
-
Page 234: Vdsl Port Setup Advanced: Limit Mask Profiles
Chapter 9 Subscriber Port Setup Screens 9.8.4 VDSL Port Setup Advanced: Limit Mask Profiles The following section describes the limit mask profiles supported by your Device. Select a limit mask profile for use on your DSL line or line bundle. To minimize interference between PSDs assign a single limit mask profile to a DSL line or line bundle. -
Page 235: Vdsl Port Setup Advanced: Vdsl Optionmask Screen
Chapter 9 Subscriber Port Setup Screens 9.8.5 VDSL Port Setup Advanced: VDSL Optionmask Screen Click the Optionmask link in the advanced VDSL Port Setup screen to display a pop-up screen as shown. Use this screen to enable features on a port for advanced troubleshooting. ADSL features are included because the VDSL line card supports ADSL fallback. -
Page 236: Vdsl Port Setup Advanced: The Psd Chart Parameters
Chapter 9 Subscriber Port Setup Screens Table 103 VDSL Port Setup: Advanced: Optionmask (continued) LABEL DESCRIPTION Enable ADSL2 Annex L allows transmission at a greater distance. However, it may increase interference Annex L at lower frequencies, due to the higher power used in this range. Enable ADSL2+ Annex M allows faster upload rates. - Page 237 Chapter 9 Subscriber Port Setup Screens Figure 145 VDSL PSD Chart Parameter The following table describes the labels in this screen. Table 104 VDSL PSD Chart Parameter LABEL DESCRIPTION Break Point This index number identifies each incremental break point. You can configure 32 break points in total.
-
Page 238: Vdsl Port Setup Advanced: Handshake Tx Psd
Chapter 9 Subscriber Port Setup Screens 9.8.7 VDSL Port Setup Advanced: Handshake Tx PSD Use this section of the screen to adjust the PSD level of each specific ITU-T G.994.1 (G.hs) carrier tone (such as A43, B43 and so on), that is used during handshaking. Note: A higher PSD level increases both the distance signals can be transmitted and the crosstalk impact. - Page 239 Chapter 9 Subscriber Port Setup Screens The following table describes the fields in this screen. Table 105 VDSL Port Setup: VLAN Setup LABEL DESCRIPTION Click this to return to the previous screen. PVID / Priority PVID refers to the customer’s VLAN ID. In the first field, enter the VLAN ID (from 1 to 4094) to use for untagged frames received on this port.
-
Page 240: Vdsl Pvlan Setup
Chapter 9 Subscriber Port Setup Screens Table 105 VDSL Port Setup: VLAN Setup (continued) LABEL DESCRIPTION Apply Click Apply to save the changes in this screen to the system’s volatile memory. The system loses these changes if it is turned off or loses power, so use the Config Save link on the navigation panel and then the Save button to save your changes to the non- volatile memory when you are done configuring. -
Page 241: Xvlan
Chapter 9 Subscriber Port Setup Screens The following table describes the fields in this screen. Table 106 VDSL Port Setup: PVLAN Setup LABEL DESCRIPTION Click this to return to the previous screen. Enter the VLAN ID (from 1 to 4094) of the VLAN to add to untagged frames of the protocol specified in this PVLAN configuration. - Page 242 Chapter 9 Subscriber Port Setup Screens Figure 149 XVLAN Example 9.8.10.1 VDSL XVLAN Setup Click Port > VDSL in the navigation panel and then click the Setup button next to XVLAN to open the Xvlan Setup screen. Use this screen to configure XVLAN settings for individual ports. Figure 150 VDSL Port Setup: Xvlan Setup The following table describes the fields in this screen.
- Page 243 Chapter 9 Subscriber Port Setup Screens Table 107 VDSL Port Setup: Xvlan Setup (continued) LABEL DESCRIPTION Svid This is the service provider VLAN ID used on the service provider’s network. Cvid-s This applies to the VLC13XXG cards. This is the translated customer VLAN ID used on the service provider’s network.
-
Page 244: Vdsl2 Port Setup
Chapter 9 Subscriber Port Setup Screens The following table describes the fields in this screen. Table 108 VDSL Port Setup: Xvlan Setup: Slot LABEL DESCRIPTION Click this to return to the previous screen. Delete Select one or more entries’ Select radio buttons and then click Delete to remove them. Index This is the number of an XVLAN entry on this port. - Page 245 Chapter 9 Subscriber Port Setup Screens Figure 152 Port > VDSL2 The following table describes the fields in this screen. Table 109 Port > VDSL2 LABEL DESCRIPTION Slot Select the number of a line card’s slot. The corresponding subscriber port setup screen for the type of line card you selected automatically displays.
- Page 246 Chapter 9 Subscriber Port Setup Screens Table 109 Port > VDSL2 (continued) LABEL DESCRIPTION Queue Schedule Set the port’s Class of Service (CoS) scheduling method. Select SPQ to use Strict Priority Queuing to service queues based on the traffic’s IEEE 802.1p priority only.
-
Page 247: Vdsl2 Port Setup Line Card Screen
Chapter 9 Subscriber Port Setup Screens Table 109 Port > VDSL2 (continued) LABEL DESCRIPTION Copy Do the following to copy DSL settings from one DSL port to another DSL port or ports. 1. Use the Slot and Port drop-down list boxes and the Load button to select the number of the DSL port from which you want to copy settings. - Page 248 Chapter 9 Subscriber Port Setup Screens Figure 154 Port > VDSL2: Line Card The following table describes the fields in this screen. Table 110 Port > VDSL2: Line Card LABEL DESCRIPTION Click this to return to the previous screen. Copy Do the following to copy settings from one DSL port to another DSL port or ports.
-
Page 249: Shdsl Port Setup
Chapter 9 Subscriber Port Setup Screens Table 110 Port > VDSL2: Line Card (continued) LABEL DESCRIPTION VDSL2 Select a VDSL2 template profile of VDSL2 settings to assign to this port. Use the Profile > Template Profile VDSL2 screen to configure VDSL port profiles. Select Use the Select column to choose a DSL port from which you want to copy settings. - Page 250 Chapter 9 Subscriber Port Setup Screens Table 111 SHDSL Port Setup (continued) LABEL DESCRIPTION SHDSL Profile Select a profile of SHDSL settings (such as the transfer rate, wire pair and signal to noise ratio settings) to assign to this port. Use the SHDSL Profile screen to configure SHDSL port profiles.
-
Page 251: Shdsl Port Setup Line Card Screen
Chapter 9 Subscriber Port Setup Screens Table 111 SHDSL Port Setup (continued) LABEL DESCRIPTION Copy Do the following to copy DSL settings from one DSL port to another DSL port or ports. 1. Use the Slot and Port drop-down list boxes and the Load button to select the number of the DSL port from which you want to copy settings. - Page 252 Chapter 9 Subscriber Port Setup Screens Figure 158 SHDSL Port Setup: Line Card The following table describes the fields in this screen. Table 112 SHDSL Port Setup: Line Card LABEL DESCRIPTION Click this to return to the previous screen. Copy Do the following to copy settings from one DSL port to another DSL port or ports.
-
Page 253: Shdsl Port Setup Advanced Features
Chapter 9 Subscriber Port Setup Screens Table 112 SHDSL Port Setup: Line Card (continued) LABEL DESCRIPTION SHDSL Profile Select a profile of SHDSL settings (such as the transfer rate, wire pair and signal to noise ratio settings) to assign to this port. Use the SHDSL Profile screen to configure SHDSL port profiles. - Page 254 Chapter 9 Subscriber Port Setup Screens Table 113 SHDSL Port Setup: Advanced Features (continued) LABEL DESCRIPTION Stuc Alarm Profile Select an alarm profile to define the thresholds that trigger an alarm on the port when exceeded. This alarm profile is for the STU-C (SHDSL Termination Unit - Central) end point.
-
Page 255: Permanent Virtual Circuits
Chapter 9 Subscriber Port Setup Screens Table 113 SHDSL Port Setup: Advanced Features (continued) LABEL DESCRIPTION The Negotiated Specify how the target noise margin value is acquired. Noise Margin Select normal to have each end of the connection determine the target noise margin to Mode be used by the other end. -
Page 256: Atm Profiles
Chapter 9 Subscriber Port Setup Screens 9.11.3 ATM Profiles Asynchronous Transfer Mode (ATM) is a networking technology that provides high-speed data transfer. ATM uses fixed-size packets of information called cells. With ATM, a high QoS (Quality of Service) can be guaranteed. ATM profiles allow you to configure the virtual channels efficiently. You can configure all of the virtual channels with the same profile, thus removing the need to configure the virtual channels one-by-one. - Page 257 Chapter 9 Subscriber Port Setup Screens The following table describes the fields in this screen. Table 114 PVC Setup LABEL DESCRIPTION PVC Table This table displays the PVCs that are configured for the selected port. Slot Select the number of a line card’s slot. The corresponding subscriber port setup screen for the type of line card you selected automatically displays.
- Page 258 Chapter 9 Subscriber Port Setup Screens Table 114 PVC Setup (continued) LABEL DESCRIPTION Copy Do the following to copy VLAN and PVC settings from one DSL port to another DSL port or ports. 1. Use the Select column to choose a PVC which you want to copy to another port. 2.
-
Page 259: Pvc Setup Slot Screen
Chapter 9 Subscriber Port Setup Screens Table 114 PVC Setup (continued) LABEL DESCRIPTION This column lists the slot numbers of the line cards. Click the ID number of an active DSL line card to go to a screen where you can view and delete PVCs from the line card’s DSL ports. State This field displays the line card’s current operational status. -
Page 260: Pvc Setup Vlan Screen
Chapter 9 Subscriber Port Setup Screens Table 115 PVC Setup: Slot (continued) LABEL DESCRIPTION Priority This field displays the priority value (0 to 7) that the line card adds to frames that come in on this PVC without a (IEEE 802.1p) priority tag. Select Select one or more PVCs’... -
Page 261: Pvc Setup Pvlan Screen
Chapter 9 Subscriber Port Setup Screens Table 116 PVC Setup: VLAN (continued) LABEL DESCRIPTION The table in the bottom half of the screen lists the VLANs that the PVC is a member of. Modify Click Modify to display the selected VLAN membership entry’s settings in the fields above so you can edit them. -
Page 262: Port Copy Screen
Chapter 9 Subscriber Port Setup Screens Table 117 PVC Setup: PVLAN (continued) LABEL DESCRIPTION Type a VID (VLAN ID) to add this channel as a member. This must be the VLAN ID of a VLAN that is already configured. The port that you are configuring must also be set to the fixed status in the VLAN. -
Page 263: Ip Bridge Overview
Chapter 9 Subscriber Port Setup Screens The following table describes the fields in this screen. Table 118 Port Copy LABEL DESCRIPTION Slot Select the number of a line card’s slot. Port Select the number of a DSL port on the line card. PVC Only Select this to only copy the PVC settings from one port to another or to multiple ports. - Page 264 Chapter 9 Subscriber Port Setup Screens Figure 168 IP Bridge: Traditional vs. IP-aware DSLAM Traditional Forward by destination MAC IP Aware Forward by destination IP The IP-aware MSC does not modify the IP packet header, but it uses the destination IP address to modify the layer-2 header, in particular the source MAC address, destination MAC address, and VLAN tag.
-
Page 265: Upstream And Downstream Traffic
Chapter 9 Subscriber Port Setup Screens 9.14.1 Upstream and Downstream Traffic When the MSC forwards upstream traffic, it makes the following changes in the layer-2 header. Table 119 IP Bridge: Layer-2 Header for Upstream Traffic ORIGINAL UPDATED Source MAC address Subscriber’s MAC address MSC’s MAC address Destination MAC address... -
Page 266: Ip Bridge Settings
Chapter 9 Subscriber Port Setup Screens 9.14.2 IP Bridge Settings The IP bridge function consists of the following settings. • Domains and VLANs • Edge routers • Downlink interfaces • Routing tables • PVCs • ARP proxy settings Each set of settings is discussed in more detail in the following sections. 9.14.2.1 Domains and VLAN A domain represents an ISP. -
Page 267: Ipb Arp Proxy Screen
Chapter 9 Subscriber Port Setup Screens addresses. The MSC uses the VLAN ID to identify the domain the downlink interface is in. Downlink interfaces in the same domain cannot have overlapping IP addresses. 9.14.2.4 Routing Tables Each domain has its own routing table. Each routing table contains entries that, based on the destination IP address, control where the MSC forwards packets (for upstream and downstream traffic). -
Page 268: Ipb Domain Screen
Chapter 9 Subscriber Port Setup Screens Figure 170 IPB ARP Proxy The following table describes the labels in this screen. Table 120 IPB ARP Proxy LABEL DESCRIPTION Aging Time Enter a number of seconds (10~10000) to set how long the MSC keeps ARP table entries for IP bridge domains. - Page 269 Chapter 9 Subscriber Port Setup Screens Figure 171 IPB Domain The following table describes the labels in this screen. Table 121 IPB Domain LABEL DESCRIPTION Name Enter the name of the domain you want to create. You can use 1-31 printable English keyboard characters, except for right angle brackets (>).
-
Page 270: Ipb Edgerouter Screen
Chapter 9 Subscriber Port Setup Screens Table 121 IPB Domain (continued) LABEL DESCRIPTION Select Select the check box in the Select column for an entry and click Delete to remove the entry. Note: You have to delete every IP bridge setting (including DHCP VLAN) that uses the selected VLAN before you can remove it from the domain. -
Page 271: Ipb Interface Screen
Chapter 9 Subscriber Port Setup Screens The following table describes the labels in this screen. Table 122 IPB Edgerouter LABEL DESCRIPTION Edgerouter IP Enter the IP address of the edge router. NetMask Enter the number of bits in the subnet mask of the edge router. Enter the ID of the VLAN of which the edge router is a member. - Page 272 Chapter 9 Subscriber Port Setup Screens Figure 173 IPB Interface The following table describes the labels in this screen. Table 123 IPB Interface LABEL DESCRIPTION Use the top section to create downlink interfaces manually. Interface IP Enter the IP address and the number of bits in the subnet mask that define the range of IP addresses to which this downlink interface applies.
-
Page 273: Ipbpvc Screen
Chapter 9 Subscriber Port Setup Screens Table 123 IPB Interface (continued) LABEL DESCRIPTION Slot This field displays the number of the slot where the line card is located. It displays “-” if the MSC looks for the subscriber in the whole VLAN and not a specific PVC. Port This field displays the number of the ADSL port on the line card to which the MSC forwards frames. - Page 274 Chapter 9 Subscriber Port Setup Screens The following table describes the labels in this screen. Table 124 IPBPVC LABEL DESCRIPTION Slot Use this drop-down list box to select the slot that contains a line card with a port for which you wish to set up an IP bridge PVC.
-
Page 275: Ipbpvc Vlan Setup Screen
Chapter 9 Subscriber Port Setup Screens Table 124 IPBPVC (continued) LABEL DESCRIPTION PVID Type the VLAN ID to assign to frames received on this channel. This VLAN ID must be in an IP bridge domain. Profile Use the drop-down list box to select an ATM profile to use for this channel’s traffic shaping. IPBPVC Type Use the drop-down list box to specify the encapsulation type for the PVC. -
Page 276: Ipbpvc By Slot Screen
Chapter 9 Subscriber Port Setup Screens Figure 175 IPBPVC: VLAN Setup The following table describes the labels in this screen. Table 125 IPBPVC: VLAN Setup LABEL DESCRIPTION Click UP to go back to the previous screen. VPI/VCI This field displays the Virtual Path Identifier (VPI) and Virtual Circuit Identifier (VCI). The VPI and VCI identify a IPB PVC (a channel). -
Page 277: Ipb Route Screen
Chapter 9 Subscriber Port Setup Screens To open this screen, click Port > IP Bridge > IPBPVC and then the index number of an active line card that supports PVC. Figure 176 IPBPVC: Slot The following table describes the labels in this screen. Table 126 IPBPVC: Slot LABEL DESCRIPTION... - Page 278 Chapter 9 Subscriber Port Setup Screens Figure 177 IPB Route The following table describes the labels in this screen. Table 127 IPB Route LABEL DESCRIPTION Use the top section to create routing table entries manually. Domain Select the domain to whose routing table you want to add this entry. Route IP Enter the IP address and the number of bits in the subnet mask that define the range of IP addresses to which this entry applies.
-
Page 279: G.bond Screen
Chapter 9 Subscriber Port Setup Screens Table 127 IPB Route (continued) LABEL DESCRIPTION Cancel Click Cancel to start configuring this section of the screen again. The bottom section displays routing table entries created manually. It does not show entries added automatically by the MSC. See Section 12.9 on page 422 to look at the full routing table(s) for selected domain(s). - Page 280 Chapter 9 Subscriber Port Setup Screens Figure 178 ADSL Pair Bonding Example Internet The next figure shows a large organization using port bonding on multiple DSL lines between an IES-708-22A (A) and an SHDSL line card in the IES (B) to connect to the Internet. Figure 179 SHDSL Pair Bonding Example Internet The following shows how to use the G.bond Setup screen to configure port bonding settings.
- Page 281 Chapter 9 Subscriber Port Setup Screens Select the ports to be used by the DSL line group and click Apply. Ports may not be shared between line groups. For example, if port 1 belongs to “Group1”, it may not belong to “Group2”. •...
- Page 282 Chapter 9 Subscriber Port Setup Screens Figure 180 Port > G.bond The following table describes the labels in this screen. Table 128 Port > G.bond LABEL DESCRIPTION Slot Select the number of a line card’s slot to apply G.bond settings on traffic through this card. Group The group represents a bundle of DSL lines connecting the line card and CPE DSL device.
-
Page 283: The Voip Sip Port Setup Screen
Chapter 9 Subscriber Port Setup Screens Table 128 Port > G.bond LABEL DESCRIPTION Member Port This link displays the ports configured to a group. If no ports have been configured to a group, the link will show “None”. Click this link to display a popup screen. Select the port(s) in this screen to allocate them to the DSL line group. - Page 284 Chapter 9 Subscriber Port Setup Screens Figure 181 Port > VoIP SIP Screen The following table describes the labels in this screen. Table 129 Port > VoIP SIP Setup Screen LABEL DESCRIPTION Slot Use the drop-down list boxes to select the port on an active VoIP line card you want to configure.
- Page 285 Chapter 9 Subscriber Port Setup Screens Table 129 Port > VoIP SIP Setup Screen LABEL DESCRIPTION DSP Profile Select the digital signal processing profile the port uses for voice traffic. A DSP profile contains information about the codecs (coders/decoders) If you have not configured any profiles, only the default profile DEFVAL can be selected.
-
Page 286: The Sip Port Setup Line Card Screen
Chapter 9 Subscriber Port Setup Screens Table 129 Port > VoIP SIP Setup Screen LABEL DESCRIPTION Copy Use this to assign a port’s settings to other ports. 1. Click Copy. The following pop-up screen displays. Figure 182 Copy Port Settings 2. - Page 287 Chapter 9 Subscriber Port Setup Screens Figure 183 The Port > VoIP SIP Setup > SIP Port Setup Line Card Screen The following table describes the labels in this screen. Table 130 The Port > VoIP SIP Setup > SIP Port Setup Line Card Screen LABEL DESCRIPTION Click this to return to the Port >...
-
Page 288: Advanced Sip Port Setup Screen
Chapter 9 Subscriber Port Setup Screens Table 130 The Port > VoIP SIP Setup > SIP Port Setup Line Card Screen LABEL DESCRIPTION Enable Select a check box in this column to activate a port. Select the check box at the top of the column to activate all of the line card’s ports. - Page 289 Chapter 9 Subscriber Port Setup Screens The following table describes the labels in this screen. Table 131 The Advanced Port SIP Setup Screen LABEL DESCRIPTION Click this to return to the Port SIP Setup Line Card screen. Enable Select the check box to activate SIP-based VoIP on this port. Account Enter the user name for registering the SIP account this port uses.
-
Page 290: The H248 Port Setup Screen
Chapter 9 Subscriber Port Setup Screens Table 131 The Advanced Port SIP Setup Screen LABEL DESCRIPTION Apply Click this to save your changes to the MSC’s volatile memory. The MSC loses these changes if it is turned off or loses power, so use the Config Save link on the navigation panel to save your changes to the non-volatile memory when you are done configuring. - Page 291 Chapter 9 Subscriber Port Setup Screens Table 132 Port > VoIP H248 Screen LABEL DESCRIPTION DSP Profile Select the digital sound processing profile the port uses for voice traffic. If you have not configured any profiles, you can only select the default profile DEFVAL. Configure DSP profiles in the Profile >...
- Page 292 Chapter 9 Subscriber Port Setup Screens Table 132 Port > VoIP H248 Screen LABEL DESCRIPTION Copy Use this to assign a port’s settings to other ports. 1. Click Copy. The following pop-up screen displays. Figure 187 Copy Port Settings 2. Select the required slot from the drop-down list. 3.
-
Page 293: The H.248 Port Setup Line Card Screen
Chapter 9 Subscriber Port Setup Screens 9.26 The H.248 Port Setup Line Card Screen Use this screen to see and edit the current VoIP configuration of each port on a H.248 VoIP line card. Click a line card’s ID number in the Port > VoIP H248 screen. The following screen displays. Figure 188 The Port >... -
Page 294: The Advanced H248 Port Setup Screen
Chapter 9 Subscriber Port Setup Screens Table 133 Port > VoIP H248 Setup > H248 Port Setup Line Card Screen LABEL DESCRIPTION Port These are the numbers of the line card’s ports. Click a port number to display the Advanced H248 Port Setup screen (see Section 9.27 on page 294). -
Page 295: Enet Port Setup
Chapter 9 Subscriber Port Setup Screens Table 134 The Advanced H248 Port Setup Screen LABEL DESCRIPTION Termination Enter the name for this port’s H.248 Termination. By default, the port’s Termination name is “termX”, where X is the port number. Enter up to 31 alphanumeric characters. - Page 296 Chapter 9 Subscriber Port Setup Screens The following table describes the fields in this screen. Table 135 ENET Port Setup LABEL DESCRIPTION Slot Select the number of a line card’s slot. The corresponding subscriber port setup screen for the type of line card you selected automatically displays. Port Select the number of a port on the line card.
-
Page 297: Enet Port Setup Line Card Screen
Chapter 9 Subscriber Port Setup Screens Table 135 ENET Port Setup (continued) LABEL DESCRIPTION Cancel Click Cancel to begin configuring the screen again. Copy Do the following to copy settings from one subscriber port to another subscriber port or ports. 1. - Page 298 Chapter 9 Subscriber Port Setup Screens Figure 193 ENET Port Setup: Line Card The following table describes the fields in this screen. Table 136 ENET Port Setup: Line Card LABEL DESCRIPTION Click this to return to the previous screen. Copy Do the following to copy settings from one Ethernet port to another Ethernet port or ports.
-
Page 299: Enet Vlan Setup
Chapter 9 Subscriber Port Setup Screens Table 136 ENET Port Setup: Line Card (continued) LABEL DESCRIPTION Customer Enter information to identify the subscriber connected to this port. You can use up to 31 Information printable English keyboard characters (including spaces and hyphens). Rate Limit Profile Select a profile of maximum egress and ingress rate settings. -
Page 300: Enet Dot3Ad Setup
Chapter 9 Subscriber Port Setup Screens Table 137 ENET Port Setup: VLAN Setup (continued) LABEL DESCRIPTION TLS SVID / This is the service provider’s VLAN ID (the outer VLAN tag). In the first field, enter the service SPriority provider ID (from 1 to 4094) for frames received on this port. In the second field, enter the priority level for the service provider’s VLAN ID. - Page 301 Chapter 9 Subscriber Port Setup Screens Figure 196 ENET Dot3ad Setup The following table describes the labels in this screen. Table 138 ENET Dot3ad Setup LABEL DESCRIPTION Group ID This column displays the names of the trunk groups for the Ethernet line card’s Ethernet ports.
-
Page 302: Dtpvc Setup Screen
Chapter 9 Subscriber Port Setup Screens Table 138 ENET Dot3ad Setup (continued) LABEL DESCRIPTION Group This column displays the names of the trunk groups for the Ethernet line card’s Ethernet ports. Port This column displays the numbers of each trunk group’s member ports. 9.29 DTPVC Setup Screen DTPVCs (Double-Tag Permanent Virtual Circuits) add double VLAN tags to untagged frames received from an ADSL, SHDSL, or VDSL2 (operating in ADSL2+ connection mode) port on the specified... - Page 303 Chapter 9 Subscriber Port Setup Screens The following table describes the fields in this screen. Table 139 DTPVC Setup LABEL DESCRIPTION DTPVC Table This table displays the DTPVCs that are configured for the selected port. Slot Select the number of a line card’s slot. The corresponding subscriber port setup screen for the type of line card you selected automatically displays.
-
Page 304: Dtpvc Setup Slot Screen
Chapter 9 Subscriber Port Setup Screens Table 139 DTPVC Setup (continued) LABEL DESCRIPTION Cancel Click Cancel to begin configuring the screen again. This column lists the slot numbers of the line cards. Click the ID number of an active DSL line card to go to a screen where you can view and delete PVCs from the line card’s DSL ports. -
Page 305: E1 Port Setup Screen
Chapter 9 Subscriber Port Setup Screens Table 140 DTPVC Setup: Slot (continued) LABEL DESCRIPTION SPri This field displays the IEEE 802.1p priority level for the service provider tag that the line card adds to untagged frames that come in on this DTPVC. "0" is the lowest priority level and "7" is the highest. - Page 306 Chapter 9 Subscriber Port Setup Screens Table 141 E1 Port Setup (continued) LABEL DESCRIPTION Frame Select the circuit framing for the E1 line. Both peers must use the same framing setting. cas: Channel associated signaling. crc: Clear channel signaling (CRC4 multiframe format). cascrc: Channel associated signaling (CRC4 multiframe format).
-
Page 307: E1 Port Setup Line Card Screen
Chapter 9 Subscriber Port Setup Screens Table 141 E1 Port Setup (continued) LABEL DESCRIPTION Up Time This field displays how long the line card has been running since the last time it was started. Firmware This field displays the current firmware version installed on the line card. 9.30.1 E1 Port Setup Line Card Screen Click Port >... -
Page 308: E1 Port Setup Advanced
Chapter 9 Subscriber Port Setup Screens Table 142 E1 Port Setup: Line Card (continued) LABEL DESCRIPTION Apply Click Apply to save the changes in this screen to the system’s volatile memory. The system loses these changes if it is turned off or loses power, so use the Config Save link on the navigation panel and then the Save button to save your changes to the non-volatile memory when you are done configuring. -
Page 309: Vdsl2 Pvc
Chapter 9 Subscriber Port Setup Screens Table 143 E1 Port Setup: Advanced (continued) LABEL DESCRIPTION Apply Click Apply to save the changes in this screen to the system’s volatile memory. The system loses these changes if it is turned off or loses power, so use the Config Save link on the navigation panel and then the Save button to save your changes to the non-volatile memory when you are done configuring. - Page 310 Chapter 9 Subscriber Port Setup Screens Table 144 Port > VDSL2 PVC (continued) LABEL DESCRIPTION Load Click Load to display the port’s settings in the fields below. Index This is the number of a PVC entry on this port. VPI/VCI This field displays the Virtual Path Identifier (VPI) and Virtual Circuit Identifier (VCI), if any.
-
Page 311: Default
Chapter 9 Subscriber Port Setup Screens 9.32 Default Click Port > Default in the navigation panel to open the screen shown next. Use this screen to reset a subscriber port’s settings to the defaults. Figure 203 Port > Default The following table describes the fields in this screen. Table 145 Port >... - Page 312 Chapter 9 Subscriber Port Setup Screens The following table describes the fields in this screen. Table 146 Port > PAEPVC LABEL DESCRIPTION Slot Select the number of a line card’s slot. The corresponding subscriber port setup screen for the type of line card you selected automatically displays. Port Select the number of a DSL port on the line card.
-
Page 313: Vdsl2 Paepvc
Chapter 9 Subscriber Port Setup Screens 9.34 VDSL2 PAEPVC Click Port > VDSL2 PAEPVC in the navigation panel to open the screen shown next. Use this screen to configure PAEVLAN settings for individual VDSL ports. Figure 205 Port > VDSL2 PAEPVC The following table describes the fields in this screen. - Page 314 Chapter 9 Subscriber Port Setup Screens Table 147 Port > VDSL2 PAEPVC (continued) LABEL DESCRIPTION Select the encapsulation type (llc or vc) for this channel. Priority Select the priority level for the service provider’s VLAN ID. "0" is the lowest priority level and "7" is the highest.
-
Page 315: Ima Screens
HAPTER IMA Screens This chapter describes how to configure settings related to the E1 ports on an IMA line card. 10.1 IMA Overview Inverse Multiplexing for ATM (IMA) is a technology used to transmit ATM traffic over a bundle of T1 or E1 lines. - Page 316 Chapter 10 IMA Screens Figure 206 Untagged DTPVCs IMA1 IMA2 DTPVC1 Network (S1,C1) (S1,C1) DTPVC2 (S1,C2) (S1,C2) DTPVC3 (S1,C3) (S1,C3) In order to reduce management hassle, you can use one tagged PVC to preserve the S-tags and C- tags in the ATM cells. To use the tagged PVC settings, you must make sure the remote IMA device also supports tagged PVC.
-
Page 317: Before You Begin
Chapter 10 IMA Screens 10.3 Before You Begin • Make sure all frames have either one or two VLAN tag(s) for multiple service providers to differentiate their own traffic. You have to configure the VLAN settings for xDSL and the MSC management line cards. - Page 318 Chapter 10 IMA Screens Table 148 IMA Group Setup (continued) LABEL DESCRIPTION Link This field displays the number of a single or multiple IMA links that are members of this group. none displays if this group does not have any members yet. Click none or the IMA link(s) to display the following screen where you can configure the link members.
-
Page 319: The Pvc Setup Screen
Chapter 10 IMA Screens Table 148 IMA Group Setup (continued) LABEL DESCRIPTION Apply Click Apply to save the changes in this screen to the system’s volatile memory. The system loses these changes if it is turned off or loses power, so use the Config Save link on the navigation panel and then the Save button to save your changes to the non-volatile memory when you are done configuring. - Page 320 Chapter 10 IMA Screens The following table describes the fields in this screen. Table 149 PVC Setup LABEL DESCRIPTION PVC Table This table displays the PVC settings that are configured for the selected IMA group. Slot Select the number of an IMA line card’s slot. The corresponding subscriber port setup screen for the type of line card you selected automatically displays.
-
Page 321: The Pvc Setup Slot Screen
Chapter 10 IMA Screens Table 149 PVC Setup (continued) LABEL DESCRIPTION This column lists the slot numbers of the line cards. Click the ID number of an active DSL line card to go to a screen where you can view and delete PVCs from the line card. State This field displays the line card’s current operational status. -
Page 322: The Dtpvc Setup Screen
Chapter 10 IMA Screens Table 150 IMA > PVC Setup: Slot (continued) LABEL DESCRIPTION Profile This field displays the ATM profile that this channel uses. PVID / Priority This field displays the service provider’s VLAN ID and priority settings that this channel uses. •... - Page 323 Chapter 10 IMA Screens Table 151 DTPVC Setup (continued) LABEL DESCRIPTION VPI/VCI This field displays the Virtual Path Identifier (VPI) and Virtual Circuit Identifier (VCI), if any. The VPI and VCI identify a channel on this group. Profile This field displays the ATM profile that this channel uses. This field displays the encapsulation type (llc or vc) for this channel.
-
Page 324: The Dtpvc Setup Slot Screen
Chapter 10 IMA Screens Table 151 DTPVC Setup (continued) LABEL DESCRIPTION State This field displays the line card’s current operational status. active means the line card is operating normally. init means the MSC is initializing the line card. disable means a manager has disabled the line card. inactive means the line card is starting up or is not operating normally. -
Page 325: Mgtpvc Overview
Chapter 10 IMA Screens Table 152 IMA > DTPVC Setup: Slot (continued) LABEL DESCRIPTION Svid / Spri This field displays the Svid and Spri settings that this channel uses. • Svid is the service provider’s VLAN ID (the outer VLAN tag) that the line card assigns to untagged frames received on this DTPVC. -
Page 326: The Mgtpvc Setup Screen
Chapter 10 IMA Screens To configure the settings on the IES for IMA-1, make sure that you configure the Ip and Gateway fields while configuring the other fields in the IMG > MGTPVC screen as shown next. Bridged MGTPVC If the remote IMA device uses bridge encapsulated (RFC 1483) PVCs for management traffic, you should leave the Ip and Gateway fields both 0.0.0.0 in the IMG >... - Page 327 Chapter 10 IMA Screens Figure 215 MGTPVC Setup The following table describes the fields in this screen. Table 153 MGTPVC Setup LABEL DESCRIPTION MGTPVC Table This table displays the management PVC settings that are configured for the selected IMA group. Slot Select the number of an IMA line card’s slot.
-
Page 328: The Mgtpvc Setup Slot Screen
Chapter 10 IMA Screens Table 153 MGTPVC Setup (continued) LABEL DESCRIPTION Page X of X This identifies which page of information is displayed and the total number of pages of information. Next Click Next to show the following screen if the information cannot be displayed in one screen. VPI/VCI Type the Virtual Path Identifier and Virtual Circuit Identifier for a channel on the IMA group. - Page 329 Chapter 10 IMA Screens Figure 216 IMA > MGTPVC Setup: Slot The following table describes the fields in this screen. Table 154 IMA > MGTPVC Setup: Slot LABEL DESCRIPTION Click this to return to the previous screen. Delete Click Delete to remove the selected management PVC(s). Previous 10 Click Previous 10 to show the preceding 10 pages of information.
- Page 330 Chapter 10 IMA Screens Management Switch Card User’s Guide...
-
Page 331: Profile Screens
HAPTER Profile Screens This chapter describes how to configure profiles to use in assigning settings to the DSL ports. 11.1 Profiles Overview A profile is a list of settings that you define. Then you can use them to configure one or more individual ports or PVCs. -
Page 332: Fast Mode
Chapter 11 Profile Screens 11.2.1 Fast Mode Fast mode means no interleaving takes place and transmission is faster (a "fast channel"). This would be suitable if you have a good line where little error correction is necessary. 11.3 Configured Versus Actual ADSL Rates You configure the maximum rate of an individual ADSL port by modifying its profile (see the set profile command) or assigning the port to a different profile (see the set port command). - Page 333 Chapter 11 Profile Screens Figure 217 ADSL Profile The following table describes the fields in this screen. Table 155 ADSL Profile LABEL DESCRIPTION The top part of the screen is for profile configuration. Name When editing a profile, this is the name of this profile. When adding a profile, type a name (up to 31 characters) for the profile.
- Page 334 Chapter 11 Profile Screens Table 155 ADSL Profile (continued) LABEL DESCRIPTION Min SNR (0.1 Type the minimum upstream signal to noise margin (measured in tenths of a decibel). Configure the minimum upstream signal to noise margin to be less than or equal to the maximum upstream signal to noise margin.
-
Page 335: Vdsl Profile Setup
Chapter 11 Profile Screens Table 155 ADSL Profile (continued) LABEL DESCRIPTION Down-shift The downstream down shift signal to noise margin (measured in tenths of a decibel). Noise Margin When the channel’s signal to noise margin goes below this number, the device shifts to a (0.1 dB) lower transfer rate. - Page 336 Chapter 11 Profile Screens Figure 218 VDSL Profile The following table describes the fields in this screen. Table 156 VDSL Profile LABEL DESCRIPTION The top part of the screen is for profile configuration. Name When editing a profile, this is the name of this profile. When adding a profile, type a name (up to 31 characters) for the profile.
- Page 337 Chapter 11 Profile Screens Table 156 VDSL Profile (continued) LABEL DESCRIPTION Interleave Configure this field when you set the Latency Mode field to Interleave. Type the Delay (ms) number of milliseconds of interleave delay to use for upstream transfers. It is recommended that you configure the same latency delay for both upstream and downstream.
-
Page 338: Vdsl2 Profiles
Chapter 11 Profile Screens Table 156 VDSL Profile (continued) LABEL DESCRIPTION Up-shift Noise The downstream up shift signal to noise margin (measured in tenths of a decibel). When Margin the channel’s signal to noise margin goes above this number, the device can attempt to use a higher transfer rate. -
Page 339: Vdsl2 Profile Example
Chapter 11 Profile Screens 11.6.2 VDSL2 Profile Example This example shows you the configuration relationships between VDSL2 templates, VDSL2 line profiles, VDSL2 line channel profiles, and subscriber ports. Since each VDSL2 line may have different loop conditions, you need to configure several VDSL2 line profiles and channel profiles in the Profile >... - Page 340 Chapter 11 Profile Screens Figure 219 Profile > VDSL2 The following table describes the labels in this screen. Table 159 Profile > VDSL2 LABEL DESCRIPTION Name Enter a descriptive name to identify this template. VDSL2 Line Profile Select a line profile for this VDSL2 template. You can configure line profiles by clicking the LineProfile link in the right-top corner of the screen.
-
Page 341: Vdsl2 Line Profile Setup
Chapter 11 Profile Screens 11.7.1 VDSL2 Line Profile Setup Click Profile > VDSL2 and click the LineProfile link to open the screen as shown next. Use the screen to add, edit or delete a VDSL2 line profile. Figure 220 Profile > VDSL2 > LineProfile The following table describes the labels in this screen. - Page 342 Chapter 11 Profile Screens Table 160 Profile > VDSL2 > LineProfile (continued) LABEL DESCRIPTION Bitswap Select On to allow on-line bits and power (for example, margin) reallocation among the allowed sub-carriers without service interruption or errors. This helps to keep transmission data rates on a high SNR VDSL2 line.
- Page 343 Chapter 11 Profile Screens Table 160 Profile > VDSL2 > LineProfile (continued) LABEL DESCRIPTION Rate Adaptive This field displays downstream (DS) and upstream (US) rate adaptive settings. Manual displays if the system fixes the transmission rate as the minimum net data rate and disables transmission rate adjustment.
-
Page 344: Vdsl2 Line Profile Setup > Rate Adaptive
Chapter 11 Profile Screens Table 160 Profile > VDSL2 > LineProfile (continued) LABEL DESCRIPTION Modify Select a profile’s Select radio button and click Modify to edit the profile. Delete Select a profile’s Select radio button and click Delete to remove the profile. 11.7.2 VDSL2 Line Profile Setup >... -
Page 345: Vdsl2 Line Profile Setup > Mib Psd Mask
Chapter 11 Profile Screens Table 161 Profile > VDSL2 > LineProfile > Rate Adaptive (continued) LABEL DESCRIPTION Up-Shift SNR Enter the number of decibels (in 0.1 dB) for the line’s up-shift SNR margin threshold. When the line’s signal-to-noise margin goes above this number, the system attempts to use a higher transmission rate. - Page 346 Chapter 11 Profile Screens Figure 222 Profile > VDSL2 > LineProfile > MIB PSD Mask Management Switch Card User’s Guide...
-
Page 347: Vdsl2 Line Profile Setup > Dpbo
Chapter 11 Profile Screens The following table describes the labels in this screen. Table 162 Profile > VDSL2 > LineProfile > MIB PSD Mask LABEL DESCRIPTION MIB PSD Mask This displays the PSD mask result in a graph. The MIB PSD mask is defined only within the operating bands and lies at or below the limit PSD mask. - Page 348 Chapter 11 Profile Screens Figure 223 Profile > VDSL2 > LineProfile > DPBO The following table describes the labels in this screen. Table 163 Profile > VDSL2 > LineProfile > DPBO LABEL DESCRIPTION Profile Name This is the name of the VDSL2 profile. DPBO Type Select which standard format (g.997.1 or t-com) to use.
-
Page 349: Vdsl2 Line Profile Setup > Rfi Band
Chapter 11 Profile Screens Table 163 Profile > VDSL2 > LineProfile > DPBO (continued) (continued) LABEL DESCRIPTION DPBOESELMIN This is the minimal electrical length of the cable between the CO and Cabinet. Type the electrical length in multiples between 0~511 of 0.5 dBm. DPBOESCMA, These parameters define a cable model that is used to describe the frequency dependent DPBOESCMB,... -
Page 350: Vdsl2 Line Profile Setup > Virtual Noise
Chapter 11 Profile Screens Figure 224 Profile > VDSL2 > LineProfile > RFI The following table describes the labels in this screen. Table 164 Profile > VDSL2 > LineProfile > RFI LABEL DESCRIPTION Start Use these columns below this field to specify the starting frequencies for each RFI band. Stop Use these columns below this field to specify the ending frequencies for each RFI band. - Page 351 Chapter 11 Profile Screens Figure 225 Profile > VDSL2 > LineProfile > Virtual Noise Management Switch Card User’s Guide...
-
Page 352: Vdsl2 Channel Profile Setup
Chapter 11 Profile Screens The following table describes the labels in this screen. Table 165 Profile > VDSL2 > LineProfile > Virtual Noise LABEL DESCRIPTION Virtual Noise This displays the virtual noise setting result in a graph. If there is too much noise on a line, the allowed line speed may be reduced or the line may not initialized. - Page 353 Chapter 11 Profile Screens Figure 226 Profile > VDSL2 > ChanProfile The following table describes the labels in this screen. Table 166 Profile > VDSL2 > ChanProfile LABEL DESCRIPTION Name Enter a descriptive name for identification purposes. DownStream The parameters in this column relate to downstream transmissions. Upstream The parameters in this column relate to upstream transmissions.
- Page 354 Chapter 11 Profile Screens Table 166 Profile > VDSL2 > ChanProfile LABEL DESCRIPTION PhyR Select enable to use the VDSL physical layer for data re-transmission when impulse noise occurs. This helps to get better link connection quality. Select disable to turn this feature off. Select auto to have the system enable this feature when there is no impact to the data rate.
-
Page 355: Vdsl2 Impulse Noise Monitoring Profile Setup
Chapter 11 Profile Screens Table 166 Profile > VDSL2 > ChanProfile LABEL DESCRIPTION Name This field displays the descriptive name of a profile. Down / Up Data This field displays the configured maximum upstream and downstream data transmission Rate (kbps) rates in megabits per second in a profile. - Page 356 Chapter 11 Profile Screens Figure 228 Profile > VDSL2 > Inm Profile The following table describes the labels in this screen. Table 167 Profile > VDSL2 > InmProfile LABEL DESCRIPTION Name Enter a descriptive name for identification purposes. DownStream The parameters in this column relate to downstream transmissions. Upstream The parameters in this column relate to upstream transmissions.
-
Page 357: Configured Versus Actual Shdsl Rates
Chapter 11 Profile Screens Table 167 Profile > VDSL2 > InmProfile LABEL DESCRIPTION ISDD Sensitivity The Indication of Severely Degraded Data (ISDD) sensitivity is a Broadcom proprietary [-128~127] parameter that provides an extension to the standard to allow you to adjust the Impulse Noise Sensor sensitivity. -
Page 358: Shdsl Profile Screen
Chapter 11 Profile Screens N-wire mode can increase the reach of a particular data rate without having to regenerate the signal. It can also give increased bandwidth for LAN-to-LAN applications. You can n-wire bundle multiple groups of ports on a single SHDSL line card. 11.10 SHDSL Profile Screen Click Profile >... -
Page 359: Atm Qos
Chapter 11 Profile Screens Table 168 SHDSL Profile (continued) LABEL DESCRIPTION Wire Pair Select a wire pair number. Select 2wire for a normal connection using a single SHDSL port’s two wires, this is the default. Select 4wire for a 4-wire n-wire group (two SHDSL ports grouped together). Select mpair4 for an 8-wire n-wire group (four SHDSL ports grouped together). -
Page 360: Traffic Shaping
Chapter 11 Profile Screens 11.12 Traffic Shaping Traffic shaping is an agreement between the carrier and the subscriber to regulate the average rate and fluctuations of data transmission over an ATM network. This agreement helps eliminate congestion, which is important for transmission of real time data such as audio and video connections. - Page 361 Chapter 11 Profile Screens maximum speed of 832Kbps gives a maximum PCR of 1962 cells/sec. This rate is not guaranteed because it is dependent on the line speed. 11.12.2.2 Sustained Cell Rate (SCR) Sustained Cell Rate (SCR) is the mean cell rate of each bursty traffic source. It specifies the maximum average rate at which cells can be sent over the virtual connection.
-
Page 362: Atm Profile Screen
Chapter 11 Profile Screens Figure 231 TAT, CDVT and BT in Traffic Shaping 11.13 ATM Profile Screen Click Profile > ATM in the navigation panel to open the following screen. Use this screen to configure ATM profiles. Later you can use the ATM profiles to configure PVCs in the PVC Setup screens. -
Page 363: Alarm Adsl Profile Screen
Chapter 11 Profile Screens Table 169 ATM Profile (continued) LABEL DESCRIPTION Cell Delay Cell Delay Variation Tolerance is the accepted tolerance of the difference between a cell’s Variation transfer delay and the expected transfer delay. Cell Delay Variation Tolerance applies with all Tolerance of the ATM traffic classes. - Page 364 Chapter 11 Profile Screens Figure 233 Alarm ADSL Profile The following table describes the fields in this screen. Table 170 Alarm ADSL Profile LABEL DESCRIPTION The top part of the screen is for profile configuration. Name Type a name to identify the alarm profile (you cannot change the name of the DEFVAL profile).
-
Page 365: Alarm Vdsl Profile Screen
Chapter 11 Profile Screens Table 170 Alarm ADSL Profile (continued) LABEL DESCRIPTION 15 Min SESL This field sets the limit for the number of Severely Errored Seconds that are permitted to [0~900] occur within 15 minutes. 15 Min UASL This field sets the limit for the number of UnAvailable Seconds that are permitted to occur [0~900] within 15 minutes. - Page 366 Chapter 11 Profile Screens Figure 234 Alarm VDSL Profile The following table describes the fields in this screen. Table 171 Alarm VDSL Profile LABEL DESCRIPTION The top part of the screen is for profile configuration. Name Type a name to identify the alarm profile (you cannot change the name of the DEFVAL profile).
-
Page 367: Alarm Vdsl2 Profile Setup
Chapter 11 Profile Screens Table 171 Alarm VDSL Profile (continued) LABEL DESCRIPTION While you are modifying a profile, you can click New to start configuring a fresh profile without saving your changes. Cancel Click Cancel to start configuring the screen again. The bottom part of the screen lists the configured profiles. -
Page 368: Alarm Vdsl2 Line Profile Setup
Chapter 11 Profile Screens Table 172 Profile > Alarm VDSL2 (continued) LABEL DESCRIPTION While you are modifying a profile, you can click New to start configuring a fresh profile without saving your changes. Cancel Click Cancel to start configuring the screen again. Index This is the index number of the alarm profile. -
Page 369: Alarm Vdsl2 Channel Profile Setup
Chapter 11 Profile Screens Table 173 Profile > Alarm VDSL2 > LineProfile (continued) LABEL DESCRIPTION XTUC Configure the thresholds in this column for the system (XTUC). XTUR Configure the thresholds in this column for CPE devices (XTUR). 15 Minute FECS Enter the number of Forward Error Correction Seconds (FECS) that are permitted to occur Threshold within 15 minutes. -
Page 370: Alarm Shdsl Profile Screen
Chapter 11 Profile Screens Figure 237 Profile > Alarm VDSL2 > ChanProfile The following table describes the labels in this screen. Table 174 Profile > Alarm VDSL2 > ChanProfile LABEL DESCRIPTION Name Enter a descriptive name for identification purposes. XTUC Configure the thresholds in this column for the system (XTUC). - Page 371 Chapter 11 Profile Screens Figure 238 Alarm SHDSL Profile The following table describes the fields in this screen. Table 175 Alarm SHDSL Profile LABEL DESCRIPTION The top part of the screen is for profile configuration. Name Type a name to identify the alarm profile (you cannot change the name of the DEFVAL profile).
-
Page 372: Igmp Filter Profile Screen
Chapter 11 Profile Screens Table 175 Alarm SHDSL Profile (continued) LABEL DESCRIPTION The bottom part of the screen lists the configured profiles. Index This is the index number of the alarm profile. Name This is the name of the alarm profile. Modify Select a profile’s Select radio button and click Modify to edit the profile. - Page 373 Chapter 11 Profile Screens Figure 239 IGMP Filter Profile The following table describes the fields in this screen. Table 176 IGMP Filter Profile LABEL DESCRIPTION Name Type a name to identify the IGMP filter profile (you cannot change the name of the DEFVAL profile).
-
Page 374: The Profile Voip Sip Screen
Chapter 11 Profile Screens Table 176 IGMP Filter Profile (continued) LABEL DESCRIPTION Modify Select a profile’s Select radio button and click Modify to edit the profile. Delete Select a profile’s Select radio button and click Delete to remove the profile. 11.19 The Profile VoIP SIP Screen Use this screen to configure basic information about the SIP accounts used by the VoIP line cards. - Page 375 Chapter 11 Profile Screens Table 177 Profile > VoIP SIP LABEL DESCRIPTION Port Enter the SIP server’s listening port number, if the VoIP service provider gave you one. Otherwise, keep the default value. Registration Server IP / Enter the IP address or domain name of the SIP registrar server, if the VoIP Domain Name service provider gave you one.
-
Page 376: Profile Voip Sip Call Service Screen
Chapter 11 Profile Screens Table 177 Profile > VoIP SIP LABEL DESCRIPTION RTP Port H.323 or SIP VoIP calls use RTP (Real time Transport Protocol) for the voice data transfer. Use these fields to specify a range of ports to use for the VoIP voice data transfer. - Page 377 Chapter 11 Profile Screens Figure 241 Profile > VoIP SIP CALLSVC Screen The following table describes the labels in this screen. Table 178 Profile > VoIP SIP CALLSVC Screen LABEL DESCRIPTION Name Enter the name for this call service profile (use up to 31 ASCII characters; spaces are not allowed).
- Page 378 Chapter 11 Profile Screens Table 178 Profile > VoIP SIP CALLSVC Screen LABEL DESCRIPTION Number Plan Select ON to use the number plan table specified in the Number Plan Table field. Select OFF to use no number plan table. Call Service Mode Select the mode for supplementary phone services (call hold, call waiting, call transfer and three-way conference calls).
- Page 379 Chapter 11 Profile Screens Table 178 Profile > VoIP SIP CALLSVC Screen LABEL DESCRIPTION Key Pattern Enter the name of a key pattern table for supplementary services. The default key pattern table “DEFVAL” has the following settings: *99#: enable DND (Do Not Disturb). #99#: disable DND.
-
Page 380: The Profile Voip Dsp Screen
Chapter 11 Profile Screens Table 178 Profile > VoIP SIP CALLSVC Screen LABEL DESCRIPTION Conference Transfer Select this to allow a subscriber to make a conference call and then transfer the call. Apply Click Apply to save the changes in this screen to the system’s volatile memory. The system loses these changes if it is turned off or loses power, so use the Config Save link on the navigation panel and then the Save button to save your changes to the non-volatile memory when you are done configuring. - Page 381 Chapter 11 Profile Screens Figure 242 The Profile > VoIP DSP Screen The following table describes the labels in this screen. Table 179 The Profile > VoIP DSP Screen LABEL DESCRIPTION Name Enter a name for this DSP profile (up to 31 ASCII characters; spaces are not allowed). Codecs Allowed This is the list of codecs to use in negotiation for this DSP profile.
-
Page 382: The Profile Voip H248 Screen
Chapter 11 Profile Screens Table 179 The Profile > VoIP DSP Screen LABEL DESCRIPTION Min Play Buffer Delay This is the minimum time delay of the play buffer (10 ~ 500 milliseconds, must be (10~500) less than or equal to the Max Play Buffer Delay). Max Play Buffer Delay This is the maximum time delay of the play buffer (10 ~ 500 milliseconds, must be (10~500) - Page 383 Chapter 11 Profile Screens Figure 243 Profile VoIP H248 Screen The following table describes the labels in this screen. Table 180 Profile VoIP H248 Screen LABEL DESCRIPTION Name Enter a name for this H.248 profile. MGC IP / Domain Enter the IP address or domain name of the H.248 media gateway controller. Name Port Enter the listening port number of the H.248 media gateway controller, if supplied by...
- Page 384 Chapter 11 Profile Screens Table 180 Profile VoIP H248 Screen LABEL DESCRIPTION MGC2 If your VoIP service provider gave you details of a backup H.248 media gateway controller (MGC)H.248, select On and enter the details in the MGC2 IP / Domain Name and Port fields.
-
Page 385: Ipqos Overview
Chapter 11 Profile Screens Table 180 Profile VoIP H248 Screen LABEL DESCRIPTION Min Retrantime Set the minimum duration between any two packets after registration. Max Retrantime Set the maximum duration between any two packets after registration. Retran Window Set the total retransmit timer. RFC2833 Select on to enable RFC 2833 for transmitting digits. -
Page 386: Ipqos Parameters
Chapter 11 Profile Screens • IPQoS limits the data rate of traffic flowing through the Device’s physical queues. • You can use 1, 2, 4, or 8 queues. • A VLC13XXG port connection that uses or falls back to ADSL2+ mode uses IPQoS instead of ATM QoS. -
Page 387: Ipqos For Vdsl 2 And Adsl2+ To Vdsl2 Migration Examples
Chapter 11 Profile Screens • Switch Queues: This column represents the mapping between IEEE 802.1p priorities and the MSC’s physical queues. You can configure this mapping, although it is highly recommended to use the default mapping. • IPQoS Profile with 1 Queue ~ IPQoS Profile with 8 Queues: The IPQoS profile configuration determines how many of the VDSL port’s queues to use and how to use them. - Page 388 Chapter 11 Profile Screens Figure 244 1 PVC with 8 Queues Here’s how to configure port 1 to use these settings. Configure the IPQoS Profile In the navigation panel, click Profile > IPQoS to open the IPQoS Profile screen. Figure 245 IPQoS Profile Screen 1 PVC 8 Queues Example In the Name field, type “1PVC_8Queues”.
- Page 389 Chapter 11 Profile Screens In the Number of Queues field, select 8. Click Apply. Apply the IPQoS Profile to Port 1 In the navigation panel, click Port > VDSL to open the VDSL Port Setup screen. Figure 246 VDSL Port Setup Screen 1 PVC 8 Queues Example Select the slot where the line card is installed and port 1.
- Page 390 Chapter 11 Profile Screens Figure 248 ADSL Mode: 3 PVCs for Triple Play Using SPQ Example Table 182 PVC and IPQoS Profile Settings IPQOS PROFILE LEVEL 0/33 Voice 4.096 Mbps 2 Mbps 0/34 Video 10.24 Mbps 5.12 Mbps 0/35 Data 5.12 Mbps 2.56 Mbps Here’s how to configure port 2 to use these settings.
- Page 391 Chapter 11 Profile Screens Figure 249 VDSL Profile Screen 3 PVCs SPQ Example In the Name field, type “20M_1M”. Type “1000” in the Up Stream Max Rate field and “20000” in the Down Stream Max Rate field. Click Apply. Configure the Voice IPQoS Profile In the navigation panel, click Profile >...
- Page 392 Chapter 11 Profile Screens Figure 251 Video IPQoS Profile In the Name field, type “Video”. In the Number of Queues field, select 1. In the PIR field, type 10240. In the CIR fields, type 5120. Type “6” in the Level field. Click Apply.
- Page 393 Chapter 11 Profile Screens Figure 253 VDSL Port Setup Screen 3 PVCs SPQ Example Select the slot where the line card is installed and port 2. Click Load. In the IPQoS Profile field, select “20M_1M”. In the field to the right, select adsl2+. Click Apply.
- Page 394 Chapter 11 Profile Screens Figure 255 Video PVC Setup Screen PVC 0/34 In the VPI/VCI fields, enter “0” and “34”. Enter 2 in the PVID field. In the Profile field, select “Video”. In the Priority field, select 6. Click Apply. Management Switch Card User’s Guide...
- Page 395 Chapter 11 Profile Screens Create PVC 0/35 and Apply the Data IPQoS Profile In the navigation panel, click Port > PVC to open the PVC Setup screen. Select the slot where the line card is installed and port 2. Click Load. Figure 256 Data PVC Setup Screen PVC 0/35 In the VPI/VCI fields, enter “0”...
- Page 396 Chapter 11 Profile Screens 11.23.3.3 ADSL Mode: 2 PVCs in WRR Example In this example the subscriber is located farther away so there will often be less bandwidth actually available. 2 PVCs and WRR help ensure that both video and data traffic get through. The backbone network and the system use IEEE 802.1Q VID 2 for video and VID 3 for data.
- Page 397 Chapter 11 Profile Screens VDSL Profile Setup In the navigation panel, click Profile > VDSL to open the VDSL Profile screen. Figure 259 VDSL Profile Screen 2 PVCs WRR Example In the Name field, type “20M_1M”. Type “1000” in the Up Stream Max Rate field and “20000” in the Down Stream Max Rate field.
- Page 398 Chapter 11 Profile Screens Configure the Data_WRR IPQoS Profile In the navigation panel, click Profile > IPQoS to open the IPQoS Profile screen. Figure 261 Data_WRR IPQos Profile In the Name field, type “Data_WRR”. In the Number of Queues field, select 1. In the PIR field, type 5120.
- Page 399 Chapter 11 Profile Screens Create PVC 0/34 and Apply the Video_WRR IPQoS Profile In the navigation panel, click Port > PVC to open the PVC Setup screen. Select the slot where the line card is installed and port 3. Click Load. Click Delete.
-
Page 400: Ipqos Profile Screen
Chapter 11 Profile Screens Click Apply. Save the Settings In the navigation panel, click Config Save > Config Save to open the VDSL Port Setup screen. Figure 265 Config Save Screen 11.23.4 IPQoS Profile Screen Click Profile > IPQoS in the navigation panel to open the following screen. Use this screen to configure QoS (Quality of Service) profile setting for each traffic queue. -
Page 401: Reference: Ipqos And Modified Ieee 802.1P To Switch Queue Mapping
Chapter 11 Profile Screens Table 184 IPQoS Profile (continued) LABEL DESCRIPTION Queue Id This is the index number of queues listed in the following table according to what you selected in the Number of Queues field. PIR is Peak Information Rate. Enter the maximum data rate (128~32768 kbps) allowed to flow through this device at peak hour. -
Page 402: Access Control List (Acl) Overview
Chapter 11 Profile Screens This example maps the IEEE 802.1p priorities to only 4 switch queues. Since switch queue 3 is always mapped to IPQoS Q0, if you map IEEE 802.1p priority 7 to switch queue 3, and set 2 IPQoS queues, the system maps all of the IEEE 802.1p priorities to Q0 and does not use Q1. -
Page 403: Acl Profile Rules
Chapter 11 Profile Screens 11.24.1 ACL Profile Rules If you apply multiple profiles to a PVC, the system checks the profiles by rule number. The lower the rule number, the higher the priority the rule (and profile) has. For example, there are two ACL profiles assigned to a PVC. - Page 404 Chapter 11 Profile Screens Figure 267 ACL Profile Setup Management Switch Card User’s Guide...
- Page 405 Chapter 11 Profile Screens The following table describes the labels in this screen. Table 187 ACL Profile Setup LABEL DESCRIPTION Name Enter a descriptive name for the ACL profile. The name can be 1-31 printable ASCII characters long. Spaces are not allowed. Rule Select which type of rule to use.
-
Page 406: Rate Limit Profile Setup Screen
Chapter 11 Profile Screens 11.26 Rate Limit Profile Setup Screen Use this screen to set up Ethernet subscriber line transmission rate profiles. You apply the rate limit profiles to individual Ethernet line card ports (see Section 9.28 on page 295). To open this screen, click Profile >... -
Page 407: Queue Rate Limit Profile Setup Screen
Chapter 11 Profile Screens 11.27 Queue Rate Limit Profile Setup Screen Click Profile > Queue Rate Limit to open this screen. Use this screen to configure VDSL2 and Ethernet subscriber line per-queue rate limit profiles. Apply the rate limit profiles to individual VDSL2 and Ethernet line card ports (see Section 9.9 on page 244 Section 9.28 on page... -
Page 408: Voip Dial Plan Profile Screen
Chapter 11 Profile Screens Table 189 Profile > Queue Rate Limit (continued) LABEL DESCRIPTION Name This is the name of the profile. Select Select the profile you wish to load or delete. Modify Select a profile and click this in order to edit its configuration. Delete Select a profile and click this to delete the profile. -
Page 409: Alarm E1 Profile Screen
Chapter 11 Profile Screens The following table describes the labels in this screen. Table 190 Profile > Dialplan LABEL DESCRIPTION Name Specify a name for the profile of dial plans. Default SIP Specify the default SIP profile for the dial plan profile. The system uses the default SIP profile Profile instead when a dialed number does not match any entries in this dial plan profile. - Page 410 Chapter 11 Profile Screens Figure 271 Alarm E1 Profile The following table describes the fields in this screen. Table 191 Alarm E1 Profile LABEL DESCRIPTION The top part of the screen is for profile configuration. Name Type a name to identify the alarm profile (you cannot change the name of the DEFVAL profile).
- Page 411 Chapter 11 Profile Screens Table 191 Alarm E1 Profile (continued) LABEL DESCRIPTION The bottom part of the screen lists the configured profiles. Index This is the index number of the alarm profile. Name This is the name of the alarm profile. Modify Select a profile’s Select radio button and click Modify to edit the profile.
- Page 412 Chapter 11 Profile Screens Management Switch Card User’s Guide...
-
Page 413: Statistics Screens
HAPTER Statistics Screens This chapter describes the run-time statistics. 12.1 ARP Table Address Resolution Protocol (ARP) is a protocol for mapping an Internet Protocol address (IP address) to a physical machine address, also known as a Media Access Control or MAC address, on the local area network. -
Page 414: Dhcp
Chapter 12 Statistics Screens Figure 272 ARP Table The following table describes the labels in this screen. Table 192 ARP Table LABEL DESCRIPTION Total X ARP This displays the number of entries in the ARP table. Entries Flush Click Flush to remove all of the entries from the ARP table. Index This is the ARP table entry number. -
Page 415: Mac Table
Chapter 12 Statistics Screens The following table describes the labels in this screen. Table 193 DHCP Statistics LABEL DESCRIPTION Slot Select the number of a line card’s slot. Port Select the number of a DSL port on the line card. Load Click Load to retrieve the port’s IGMP filter profile setting and display it in the Profile drop- down list box. -
Page 416: Mac Table Screen
Chapter 12 Statistics Screens Figure 274 MAC Table Filtering Flowchart 12.5 MAC Table Screen Click Statistics > MAC Table in the navigation panel to display the following screen. This screen lists device MAC addresses that the system dynamically learned. Figure 275 MAC Table The following table describes the labels in this screen. -
Page 417: Igmp Status Screen
Chapter 12 Statistics Screens Table 194 MAC Table (continued) LABEL DESCRIPTION Total Mac This is the total number of connected MAC addresses that the system has learned are connected. Index This is the number of the MAC table entry. This is the VLAN group to which the device belongs. MAC Address This is the MAC address of the device that the system has learned is connected to the port. - Page 418 Chapter 12 Statistics Screens The following table describes the labels in this screen. Table 195 IGMP Status LABEL DESCRIPTION IGMP Mode This displays whether the system is snooping multicast traffic, proxying multicast traffic, or ignoring multicast traffic. This number identifies the VLAN that the IGMP query port is on. Query Port This is the port through which the system receives IGMP queries.
-
Page 419: Igmp Port Statistics
Chapter 12 Statistics Screens 12.6.1 IGMP Port Statistics Click Statistics > IGMP Status > Port Status to display the following screen. Use this screen to view information collected by IGMP snooping and/or IGMP proxy on a selected port. Figure 277 IGMP Status: Port Status The following table describes the labels in this screen. -
Page 420: Ip Bridge Arp Proxy Screen
Chapter 12 Statistics Screens Table 196 IGMP Status: Port (continued)Status LABEL DESCRIPTION Join Count This is the total number of Join packets received. Leave Count This is the total number of Leave packets received. V2 JoinCount This is the total number of IGMP version 2 Join attempts. This is the total number of unsuccessful IGMP version 2 Join attempts. -
Page 421: Ip Bridge Interfaces Screen
Chapter 12 Statistics Screens To open this screen, click Statistics > IP Bridge > ARP Proxy. Figure 278 IP Bridge ARP Proxy The following table describes the labels in this screen. Table 197 IP Bridge ARP Proxy LABEL DESCRIPTION Domain, Load Select the domain at whose ARP table you want to look. -
Page 422: Ip Bridge Routes Screen
Chapter 12 Statistics Screens Figure 279 IP Bridge Interfaces The following table describes the labels in this screen. Table 198 IP Bridge Interfaces LABEL DESCRIPTION Index This field displays the index number of the downlink interface. Domain This field displays the name of the domain to which this entry applies. Interface IP, These fields display the IP address and the number of bits in the subnet mask that define the range of IP addresses to which this downlink interface applies. -
Page 423: Online Users Screen
Chapter 12 Statistics Screens The following table describes the labels in this screen. Table 199 IP Bridge Routes LABEL DESCRIPTION Domain Select a domain for which you wish to view information and click Load to display it. Index This field displays the number of the entry. Domain Name This field displays the name of the domain to which this entry applies. -
Page 424: Port Statistics
Chapter 12 Statistics Screens 12.11 Port Statistics Click Statistics > Port Statistics in the navigation panel to display the following screen. Use this screen to view port information (such as packet counts, uptime etc.). Note: You can only view port information on an active card. Figure 282 Port Statistics The following table describes the labels in this screen. -
Page 425: Detailed Msc Ethernet Port Statistics
Chapter 12 Statistics Screens Figure 283 MSC Port Statistics: ENET The following table describes the labels in this screen. Table 202 MSC Port Statistics: ENET LABEL DESCRIPTION Flush Select a port or slot and click Flush to reset its counters. Slot/Port This field displays the port name or slot number. - Page 426 Chapter 12 Statistics Screens Figure 284 MSC Port Statistics: ENET Details The following table describes labels in this example. Table 203 MSC Port Statistics: ENET Details LABEL DESCRIPTION Status This shows whether or not the port has an active connection. Rate This shows the connection speed for an active connection.
-
Page 427: Msc Rmon Statistics
Chapter 12 Statistics Screens Table 203 MSC Port Statistics: ENET Details (continued) LABEL DESCRIPTION BCastPkts This is the number of good broadcast frames received/transmitted of 64 to 1518 octets in length (for non VLAN) or 1522 octets (for VLAN), not including multicast frames. Frames with range or length errors are also not taken into account. - Page 428 Chapter 12 Statistics Screens Figure 285 MSC Port Statistics: ENET: RMON The following table describes the labels in this screen. Table 204 MSC Port Statistics: ENET: RMON LABEL DESCRIPTION sub1~up2 These are the Ethernet ports on the front panel of the MSC card. Click one to view RMON history information for that port.
- Page 429 Chapter 12 Statistics Screens Table 204 MSC Port Statistics: ENET: RMON (continued) LABEL DESCRIPTION 128to255Octets This is the number of frames received and transmitted (including bad frames) that were 128 to 255 octets in length (this includes FCS octets but excludes framing bits). 256to511Octets This is the number of frames received/transmitted (including bad frames) that were 256 to 511 octets in length (this includes FCS octets but excludes framing bits).
-
Page 430: Dsl Line Card Statistics
Chapter 12 Statistics Screens Table 205 Port Statistics: ENET: RMON History (continued) LABEL DESCRIPTION MulticastPkts This field displays the number of multicast packets received/transmitted since the last sample time. Utilization This field displays the port utilization status. 12.11.3.2 MSC RMON History Details To view detail RMON history information, click on a sample index in the RMON History screen. - Page 431 Chapter 12 Statistics Screens Figure 288 Port Statistics: DSL Line Card The following table describes the labels in this screen. Table 206 Port Statistics: DSL Line Card LABEL DESCRIPTION Port This field displays the port number. Link This field displays the port link status (link_down, link_up, or training). On an SHDSL port, this field displays the wire pair setting when the port is up.
- Page 432 Chapter 12 Statistics Screens Figure 289 Port Statistics: DSL Line Card: Packet Counter The following table describes the labels in this screen. Table 207 Port Statistics: DSL Line Card: Packet Counter LABEL DESCRIPTION Flush Click Flush to clear the counters. Link This field displays the port link status.
- Page 433 Chapter 12 Statistics Screens Note: The Cell Counter screen is not available for the VLC. Figure 290 Port Statistics: DSL Line Card: Cell Counter The following table describes the labels in this screen. Table 208 Port Statistics: DSL Line Card: Cell Counter LABEL DESCRIPTION Flush...
- Page 434 Chapter 12 Statistics Screens Figure 291 Port Statistics: DSL Line Card: Line Detail (VLC13XX) The following table describes the labels in this screen. Table 209 Port Statistics: DSL Line Card: Line Detail (VLC13XX) LABEL DESCRIPTION Flush Click Flush to clear the counters. Line Information Link This displays the connection status of the DSL link.
- Page 435 Chapter 12 Statistics Screens Table 209 Port Statistics: DSL Line Card: Line Detail (VLC13XX) (continued) LABEL DESCRIPTION Us Coding Mode This displays the upstream coding mode. Trellis coding helps to reduce the noise in ADSL transmissions. Trellis may reduce throughput but it makes the connection more stable. “RS”...
- Page 436 Chapter 12 Statistics Screens Table 209 Port Statistics: DSL Line Card: Line Detail (VLC13XX) (continued) LABEL DESCRIPTION Ses (seconds) This is the number of Severely Errored Seconds. This is how many seconds contained 30% or more errored blocks or at least one defect. This is a subset of Es. Uas (seconds) This is the number of Unavailable seconds (Uas).
- Page 437 Chapter 12 Statistics Screens Figure 292 Port Statistics: DSL Line Card: Line Detail (VLC14XX) Management Switch Card User’s Guide...
- Page 438 Chapter 12 Statistics Screens The following table describes the labels in this screen. Table 210 Port Statistics: DSL Line Card: Line Detail (VLC14XX) LABEL DESCRIPTION Line Info Active Template This field displays the VDSL2 template profile applied to this line. Transmission This is the transmission standard this line uses.
- Page 439 Chapter 12 Statistics Screens Table 210 Port Statistics: DSL Line Card: Line Detail (VLC14XX) (continued) LABEL DESCRIPTION Ds/Us This field displays the downstream/upstream loss of power (in dB) for traveling along the Attenuation(0.1dB line. Ds/Us Line This field displays the upstream/downstream line attenuation the system detects Attenuation(0.1dB according to the line length, frequency and the line wire diameter.
- Page 440 Chapter 12 Statistics Screens Table 210 Port Statistics: DSL Line Card: Line Detail (VLC14XX) (continued) LABEL DESCRIPTION Interleaving Depth This field displays the actual downstream/upstream interleaving depth. The value ranges from 1 to 4096 with an increment of 1. The value 1 indicates no interleaving. The value 0 indicates a fast path.
- Page 441 Chapter 12 Statistics Screens Table 210 Port Statistics: DSL Line Card: Line Detail (VLC14XX) (continued) LABEL DESCRIPTION G.inp Framing This field displays the DTU (Data Transfer Unit) framing type used in G.INP. Type 0: G.INP is not active. 1: G.INP is active using framing type 1, as specified in ITU-T G.998.4. 2: G.INP is active using framing type 2, as specified in ITU-T G.998.4.
- Page 442 Chapter 12 Statistics Screens The following table describes the labels in this screen. Table 211 Port Statistics: VDSL Line Card: Line Performance: Since Link Up LABEL DESCRIPTION PerfDataEntry This section displays current VDSL performance measured for the downstream (Vtuc) and upstream (Vtur) directions.
- Page 443 Chapter 12 Statistics Screens Table 211 Port Statistics: VDSL Line Card: Line Performance: Since Link Up (continued) LABEL DESCRIPTION ErrFreeBits This field displays the number of bits that passed through the alpha1/beta1 interface (bits that are available to carry user payload). Poll Interval(s) The text box displays how often (in seconds) this screen refreshes.
- Page 444 Chapter 12 Statistics Screens Figure 294 Port Statistics: DSL Line Card: Line Performance: Current Management Switch Card User’s Guide...
- Page 445 Chapter 12 Statistics Screens The following table describes the labels in this screen. Table 212 Port Statistics: DSL Line Card: Line Performance: Current LABEL DESCRIPTION Flush Click Flush to clear the counters. PhysEntry CurrSnrMgn (dB) These are the DSL line’s current downstream and upstream signal to noise margins in decibels.
- Page 446 Chapter 12 Statistics Screens Table 212 Port Statistics: DSL Line Card: Line Performance: Current (continued) LABEL DESCRIPTION These are the DSL line’s downstream and upstream numbers of 1-second intervals containing one or more PoweR (LPR) failures that have occurred since the system last started up.
- Page 447 Chapter 12 Statistics Screens 12.11.4.6 15Min DSL Line Performance To display line performance counters for the past 15 minutes, click the port number in the line card’s statistics screen (see Figure 288 on page 431) and click the 15Min tab. Figure 295 Port Statistics: DSL Line Card: Line Performance: 15Min Management Switch Card User’s Guide...
- Page 448 Chapter 12 Statistics Screens The following table describes the labels in this screen. Table 213 Port Statistics: DSL Line Card: Line Performance: 15Min LABEL DESCRIPTION Flush Current Click Flush Current to clear the counters. Refresh Click Refresh to update this screen. PerfCurr15Min This section displays current VDSL performance measured for the downstream (Vtuc) and upstream (Vtur) directions.
- Page 449 Chapter 12 Statistics Screens Table 213 Port Statistics: DSL Line Card: Line Performance: 15Min (continued) LABEL DESCRIPTION FailFulInit These are the DSL line’s downstream and upstream numbers of initialization failure traps that have occurred within the current 15 minute period. ChanCorrectedBlks These are the numbers of corrected blocks for downstream and upstream transmissions.
- Page 450 Chapter 12 Statistics Screens Refer to Table 213 on page 448 for similar descriptions of the rest of the fields in this screen. Figure 296 Port Statistics: DSL Line Card: Line Performance: 1day 12.11.4.8 DSL Line Status To display line information for an active DSL line, click the port number in the line card’s statistics screen (see Figure 288 on page 431) and click the Status tab.
- Page 451 Chapter 12 Statistics Screens Figure 297 Port Statistics: DSL Line Card: Status Management Switch Card User’s Guide...
- Page 452 Chapter 12 Statistics Screens The following table describes the labels in this screen. Table 214 Port Statistics: DSL Line Card: Status LABEL DESCRIPTION Items Select an item from the drop-down list box to display the status. The available options vary depending on the line card type. For the VLC14xx line cards: •...
-
Page 453: Elc Port Statistics
Chapter 12 Statistics Screens 12.11.5 ELC Port Statistics Click the slot ID for an Ethernet line card in the Port Statistics screen to view Ethernet port status and statistics. Figure 298 ELC Port Statistics The following table describes the labels in this screen. Table 215 ELC Port Statistics LABEL DESCRIPTION... -
Page 454: Glc Port Statistics
Chapter 12 Statistics Screens Figure 299 ELC Port Statistics Details The following table describes labels in this example. Table 216 ELC Port Statistics Details LABEL DESCRIPTION Flush Click Flush to clear the counters. Packet Counter Rate (kbps) This field displays the number of kilobits received/transmitted on this port per second. IfOctets This field displays the number of octets received/transmitted on this port. - Page 455 Chapter 12 Statistics Screens Figure 300 GLC Port Statistics The following table describes the labels in this screen. Table 217 GLC Port Statistics LABEL DESCRIPTION Port This field displays the slot number. Click one of these links to see detailed Gigabit Ethernet port statistics.
-
Page 456: Detailed Glc Port Statistics
Chapter 12 Statistics Screens Table 217 GLC Port Statistics (continued) LABEL DESCRIPTION Poll Interval(s) The text box displays how often (in seconds) this screen refreshes. You may change the refresh interval by typing a new number in the text box and then clicking Set Interval. Stop Click Stop to stop port statistic polling. -
Page 457: Vop Port Statistics
Chapter 12 Statistics Screens Table 218 GLC Port Statistics Details (continued) LABEL DESCRIPTION IfMCastPkts This field displays the number of multicast packets received/transmitted on this port. IfBCastPkts This field displays the number of broadcast packets received/transmitted on this port. IfNUCastPkts This field displays the number of non-unicast packets received/transmitted on this port. -
Page 458: Detailed Vop Port Statistics
Chapter 12 Statistics Screens The following table describes the labels in this screen. Table 219 VOP Port Statistics LABEL DESCRIPTION Port This field displays the port number. Click one of these links to see detailed Ethernet port statistics. Service Status This field displays the current state of the analog phone port. - Page 459 Chapter 12 Statistics Screens Figure 303 VOP Port Statistics Details The following table describes labels in this example. Table 220 VOP Port Statistics Details LABEL DESCRIPTION Refresh Click Refresh to update this screen. Line Status Management Switch Card User’s Guide...
- Page 460 Chapter 12 Statistics Screens Table 220 VOP Port Statistics Details (continued) LABEL DESCRIPTION Service Status This field displays the current state of the analog phone port. Possible values are: Disabled Out-of-service Idle Waiting-for-dialing Dialing-out Ringing Conversation-caller Conversation-callee Fax/Modem-caller Fax/Modem-callee Waiting-for-on-hook Alerting-off-hook Power-cut-down Dialing-timeout...
- Page 461 Chapter 12 Statistics Screens Table 220 VOP Port Statistics Details (continued) LABEL DESCRIPTION RTP Tx Payload This shows the voice codec currently used for transmitting voice on this port. The Type supported codecs can be configured in each DSP profile (in the VoIP > DSP Profile screen).
-
Page 462: Ima Line Card Statistics
Chapter 12 Statistics Screens Table 220 VOP Port Statistics Details (continued) LABEL DESCRIPTION RTP Tx Packet This shows the average interval time between two RTP packets received. interval RTP Rx Average This shows the average latency delay for received traffic. Delay Poll Interval(s) The text box displays how often (in seconds) this screen refreshes. - Page 463 Chapter 12 Statistics Screens Figure 304 Port Statistics: IMA Line Card The following table describes the labels in this screen. Table 221 Port Statistics: IMA Line Card LABEL DESCRIPTION Port This field displays the port number. Admin State This field displays whether the port is activated (In of Service) or not (notInService). Line Code This field displays the type of E1 line codes that help prevent signal loss during transmission.
- Page 464 Chapter 12 Statistics Screens Table 221 Port Statistics: IMA Line Card (continued) LABEL DESCRIPTION Alarm Status This field displays the name(s) of alarm(s) that have occurred on the port. Poll Interval(s) The text box displays how often (in seconds) this screen refreshes. You may change the refresh interval by typing a new number in the text box and then clicking Set Interval.
- Page 465 Chapter 12 Statistics Screens 12.11.11.2 E1 Link Performance - Current Day To display the link performance of a port on the IMA line card for the current day, click the port number in the line card’s statistics screen (see Figure 304 on page 463) and click the Currday tab.
- Page 466 Chapter 12 Statistics Screens The following table describes the labels in this screen. Table 224 Port Statistics: IMA Line Card: E1 Performance - Last24hr LABEL DESCRIPTION Refresh Click this to update this screen. PerfLast24HR The following parameters are used to evaluate this port’s performance in the last 24 hours. Refer to ITU-T G.826 for more information.
- Page 467 Chapter 12 Statistics Screens Table 225 Port Statistics: IMA Line Card: E1 Performance - 96Quarter LABEL DESCRIPTION SES(secs) The field displays the number of Severely Errored Seconds detected within the specified period. UAS(secs) The field displays the number of UnAvailable Seconds detected within the specified period.
-
Page 468: Vlan Statistics
Slot Select a slot containing and MSC or ELC. Trunk Sub refers to the subtending ports while up refers to the uplink ports. In the MSC1000G, tsub is for the subtending ports and tup is for the uplink ports. State This field displays whether link aggregation is activated on the ports. -
Page 469: Vlan Port Statistics
Chapter 12 Statistics Screens Figure 311 VLAN Statistics The following table describes the labels in this screen. Table 228 VLAN Statistics LABEL DESCRIPTION This field displays the VLAN ID. ENET ports 1~8 This column displays the VLAN’s settings for the MSC’s Ethernet ports. ENET port 1 and 2 are subtending ports 1 and 2. -
Page 470: Mstp Statistics
Chapter 12 Statistics Screens Figure 312 VLAN: Port Status The following table describes the labels in this screen. Table 229 VLAN: Port Status LABEL DESCRIPTION VID X This field displays the VLAN ID. Index This field displays the index number. Card Name This field displays the name of the line card in this VLAN. - Page 471 Chapter 12 Statistics Screens Figure 313 MSTP Statistics: CIST The following table describes the labels in this screen. Table 230 MSTP Statistics: CIST LABEL DESCRIPTION Enable This field displays whether MSTP is activated on the device. BridgeID This is the unique identifier for this bridge, consisting of bridge priority plus MAC address.
-
Page 472: Mstp Cist Statistics: Port Details
Chapter 12 Statistics Screens Table 230 MSTP Statistics: CIST (continued) LABEL DESCRIPTION BridegMaxAge This is the maximum time (in seconds) the root bridge can wait without receiving a configuration message before attempting to reconfigure. BridegHelloTime This is the time interval (in seconds) at which the root switch transmits a configuration message. -
Page 473: Mstp Msti Statistics
Chapter 12 Statistics Screens The following table describes the labels in this screen. Table 231 MSTP Statistics: CIST: Port Details LABEL DESCRIPTION Enable This field displays whether MSTP is activated on the device. Uptime This field displays the time the port is running. State This field displays the STP status on this port. - Page 474 Chapter 12 Statistics Screens Figure 315 MSTP Statistics: MSTI The following table describes the labels in this screen. Table 232 MSTP Statistics: MSTI LABEL DESCRIPTION MSTID Select an MSTI number and click Apply to display the port status for that spanning tree instance.
-
Page 475: Ip Statistics
Chapter 12 Statistics Screens 12.15 IP Statistics To view management IPv4 settings and statistics, click Statistics > IP in the navigation panel. Figure 316 IP Statistics The following table describes the labels in this screen. Table 233 IP Statistics LABEL DESCRIPTION Flush Click Flush to reset the counters for the selected port. -
Page 476: Ipv6 Neighbor Cache
Chapter 12 Statistics Screens 12.16 IPv6 Neighbor Cache The MSC uses the Neighbor Discovery Protocol (NDP) to discover other IPv6 devices and track their reachability in a network. The MSC uses the following ICMPv6 messages types: • Neighbor solicitation: A request from a host to determine a neighbor’s link-layer address (MAC address) and detect if the neighbor is still reachable. - Page 477 Chapter 12 Statistics Screens Figure 317 IPv6 Neighbor Cache The following table describes the labels in this screen. Table 234 IPv6 Neighbor Cache LABEL DESCRIPTION In-band/Out-of- This is the MSC’s interface on which the IPv6 address is created or through which a band neighbor can be reached.
-
Page 478: Ipv6 Prefix List
Chapter 12 Statistics Screens 12.16.2 IPv6 Prefix List Click Statistics > IPv6 > Prefix in the navigation panel to open this screen. Use this screen to view the list of on-link prefixes. The prefixes are used to determine whether an IP address is on the same link as the MSC or should be reached through a router. -
Page 479: Ipv6 Destination Cache
Chapter 12 Statistics Screens 12.16.3 IPv6 Destination Cache Click Statistics > IPv6 > Destination in the navigation panel to open this screen. Use this screen to view the mapping list of the next-hop address to an IPv6 destination address. The destination cache only shows these entries about destinations to which traffic has been sent recently. -
Page 480: Ipv6 Default Router List
Chapter 12 Statistics Screens Figure 320 IPv6 Route List The following table describes the labels in this screen. Table 237 IPv6 Route List LABEL DESCRIPTION In-band/Out-of- This is the MSC’s interface on which the IPv6 address is created or through which a band neighbor can be reached. -
Page 481: G.bond Statistics
Chapter 12 Statistics Screens The following table describes the labels in this screen. Table 238 IPv6 Default Router List LABEL DESCRIPTION In-band/Out-of- This is the MSC’s interface through which a router can be reached. band Index This is the index number of the entry. Address This is the IPv6 address of the router. -
Page 482: Cfm Endpoint Statistics
Chapter 12 Statistics Screens Table 239 IP Statistics (continued) LABEL DESCRIPTION PayloadRate(Us/ This field displays the actual upstream/downstream payload rates for this bonding group. Ds kbps) Rx/Tx(kbps) This field displays the current receiving and transmitting data rates for this bonding group. 12.18 CFM Endpoint Statistics To view CFM Endpoint settings and statistics, click Statistics >... -
Page 483: H.248 Media Interface Statistics
Chapter 12 Statistics Screens Figure 324 H.248 Interface Statistics The following table describes the labels in this screen. Table 241 H.248 Interface Statistics LABEL DESCRIPTION Click the number of an H.248 interface to view information about its media gateway cards. MG State This is the H.248 interface’s current media gateway status (registering, registered, disconnected, or disable). -
Page 484: H.248 Media Card Statistics
Chapter 12 Statistics Screens Figure 325 H.248 Media Interface Statistics The following table describes the labels in this screen. Table 242 H.248 Media Interface Statistics LABEL DESCRIPTION Media Click the number of a media card to view its status details. Slot This is the slot where the media card is located. -
Page 485: Proxy Server Statistics
Chapter 12 Statistics Screens Figure 326 H.248 Media Card Statistics The following table describes the labels in this screen. Table 243 H.248 Media Card Statistics LABEL DESCRIPTION Media IP This is the IP address of the media card. Media Click the number of a media card to view its status details. Management This is the media card’s inband IP address. -
Page 486: Termination Statistics
Chapter 12 Statistics Screens The following table describes the labels in this screen. Table 244 Proxy Server Statistics LABEL DESCRIPTION Slot Select the slot number of a SIP VoIP card. Click Load to show the card’s list of SIP proxy servers and their status. -
Page 487: Sfp Statistics
Chapter 12 Statistics Screens Table 245 Termination Statistics (continued) LABEL DESCRIPTION Phone State This shows whether or the phone connected to the subscriber port is on-hook or off- hook. Line State This shows the current condition of the connection to the subscriber’s phone. 12.22 SFP Statistics To view statistics about the transceiver installed in an SFP slot on an MSC or Ethernet line card, click Statistics >... -
Page 488: Oam Statistics
Chapter 12 Statistics Screens Table 246 SFP Statistics (continued) LABEL DESCRIPTION DDMI Info If the SFP module provides a Digital Diagnostics Monitoring Interface (DDMI), this section displays current status details you can use for troubleshooting. Temperature This field displays the current temperature inside the SFP module. Supply Voltage This field displays the level of voltage currently being supplied to the SFP module. - Page 489 Chapter 12 Statistics Screens Figure 330 OAM Statistics The following table describes the labels in this screen. Table 247 OAM Statistics LABEL DESCRIPTION Slot/Port Select an Ethernet line card and slot number and click Load to show details. Local Client Mode This shows whether or not the port has OAM (Operational, Administration and Maintenance) functionality enabled.
-
Page 490: Ima Statistics
Chapter 12 Statistics Screens Table 247 OAM Statistics (continued) LABEL DESCRIPTION Discovery State This field indicates the state in the OAM discovery process. OAM-enabled devices use this process to detect each other and to exchange information about their OAM configuration and capabilities. OAM discovery is a handshake protocol. Fault: One of the devices is transmitting OAM PDUs with link fault information, or the interface is not operational. -
Page 491: Ima Group Statistics
Chapter 12 Statistics Screens The following table describes the labels in this screen. Table 248 IMA Statistics LABEL DESCRIPTION This is the slot number of an IMA line card. Click the index number of an active line card to display a screen that lists the current status for each port on the line card. State This field displays the line card’s current operational status. -
Page 492: Ima Group Details
Chapter 12 Statistics Screens 12.24.2 IMA Group Details To display detailed information of an IMA group, click the slot number in the Statistics > IMA screen and then click the index number of the IMA group (see Figure 332 on page 491). - Page 493 Chapter 12 Statistics Screens The following table describes the labels in this screen. Table 250 IMA Statistics: IMA Line Card: Group Detail LABEL DESCRIPTION Link This displays the connection status of the E1 link. Click the number of a link to view its details.
-
Page 494: Link Details
Chapter 12 Statistics Screens Table 250 IMA Statistics: IMA Line Card: Group Detail (continued) LABEL DESCRIPTION Unavailable This field displays the number of the unavailable seconds for this IMA group. Seconds (secs) Ne Num Failures This field displays the number of times a failure on this IMA group has been reported by the IMA line card since it was booted up. - Page 495 Chapter 12 Statistics Screens Figure 334 IMA Statistics: IMA Line Card: Group Detail: Link Detail The following table describes the labels in this screen. Table 251 IMA Statistics: IMA Line Card: Group Detail: Link Detail LABEL DESCRIPTION RelDelay(ms) This field displays the least delay in milliseconds measured most recently on this link compared to the other links in the same IMA group.
-
Page 496: Link 15Min
Chapter 12 Statistics Screens Table 251 IMA Statistics: IMA Line Card: Group Detail: Link Detail (continued) LABEL DESCRIPTION Test Processing The field displays the current state of the Test Pattern Procedure. Status disabled: The test is stopped. operating: The test is running and no error has been detected on the link. linkFail: An error has been detected on this link during the test. - Page 497 Chapter 12 Statistics Screens Figure 335 IMA Statistics: IMA Line Card: Group Detail: Link 15Min The following table describes the labels in this screen. Table 252 IMA Statistics: IMA Line Card: Group Detail: Link 15Min LABEL DESCRIPTION Refresh Click this to update this screen. Flush Click this to clear the counters in this screen.
-
Page 498: Link 1Day
Chapter 12 Statistics Screens 12.24.5 Link 1Day To display the performance of an E1 link on the selected IMA group for the current day, click the slot number in the Statistics > IMA screen, the index number of the IMA group (see Figure 332 on page 491) and then the number of a link and the Link 1Day tab. -
Page 499: Link Last24Hr
Chapter 12 Statistics Screens Table 253 IMA Statistics: IMA Line Card: Group Detail: Link 1Day (continued) LABEL DESCRIPTION UUSFE(secs) This is the number of unusable seconds in the transmission (Tx) or receiving (Rx) direction detected by the remote IMA device. Stuff This is the number of stuff events the IMA line card has inserted on the link in the transmission (Tx) or receiving (Rx) direction. -
Page 500: Link 96Q
Chapter 12 Statistics Screens Table 254 IMA Statistics: IMA Line Card: Group Detail: Link Last24hr (continued) LABEL DESCRIPTION UASFE(secs) This is unavailable seconds detected by the remote IMA device. This is the number of link-layer transmission (Tx) or receiving (Rx) failures detected by the IMA line card. -
Page 501: Link 7Day
Chapter 12 Statistics Screens Table 255 IMA Statistics: IMA Line Card: Group Detail: Link 96Q (continued) LABEL DESCRIPTION Load Click this to display the IMA group statistics collected during the specified period. Refresh Click this to update this screen. collected interval This field displays the queried interval (in week day, date, time and year format) during which the following statistics were collected. - Page 502 Chapter 12 Statistics Screens Figure 339 IMA Statistics: IMA Line Card: Group Detail: Link 7Day The following table describes the labels in this screen. Table 256 IMA Statistics: IMA Line Card: Group Detail: Link 7Day LABEL DESCRIPTION Start day Enter the starting day within the past 7 days between 1 to 7. End day Enter the ending day within the past 7 days between 1 to 7.
-
Page 503: Ima Group Performance - Current 15 Minutes
Chapter 12 Statistics Screens Table 256 IMA Statistics: IMA Line Card: Group Detail: Link 7Day (continued) LABEL DESCRIPTION UUS(secs) This is the number of unusable seconds in the transmission (Tx) or receiving (Rx) direction detected by the IMA line card. UUSFE(secs) This is the number of unusable seconds in the transmission (Tx) or receiving (Rx) direction detected by the remote IMA device. -
Page 504: Ima Group Performance - Last 24 Hours
Chapter 12 Statistics Screens Figure 341 IMA Statistics: IMA Line Card: Group 1Day The following table describes the labels in this screen. Table 258 IMA Statistics: IMA Line Card: Group 1Day LABEL DESCRIPTION Refresh Click this to update this screen. Flush Click this to clear the counters. -
Page 505: Ima Group Performance - Last 96 Quarter Hours
Chapter 12 Statistics Screens Table 259 IMA Statistics: IMA Line Card: Group Last24hr (continued) LABEL DESCRIPTION NE-Failures This field displays the number of upstream failures detected in this IMA group within the last 24 hours. FE-Failures This field displays the number of downstream failures detected in this IMA group within the last 24 hours. -
Page 506: Ima Group Performance - Last 7 Days
Chapter 12 Statistics Screens Table 260 IMA Statistics: IMA Line Card: Group 96Q (continued) LABEL DESCRIPTION Page X of X This identifies which page of information is displayed and the total number of pages of information. Next Click Next to show the following screen if the information cannot be displayed in one screen. -
Page 507: Ima Line Card Cell Counters
Chapter 12 Statistics Screens Table 261 IMA Statistics: IMA Line Card: Group 7Day (continued) LABEL DESCRIPTION Page X of X This identifies which page of information is displayed and the total number of pages of information. Next Click Next to show the following screen if the information cannot be displayed in one screen. -
Page 508: Loop Guard Statistics
Chapter 12 Statistics Screens Figure 346 IMA Statistics: IMA Line Card: Pkt Counter The following table describes the labels in this screen. Table 263 IMA Statistics: IMA Line Card: Pkt Counter LABEL DESCRIPTION vpi, vci Enter the VPI and VCI of a channel on the IMA group and then click Load to display the packet counters. -
Page 509: Mac Forced Forwarding Statistics
Chapter 12 Statistics Screens Figure 347 Statistics > Loop Guard The following table describes the labels in this screen. Table 264 Statistics > Loop Guard LABEL DESCRIPTION Slot Select a card’s slot number and click Load to display the cards loop guard. Port No. -
Page 510: Pvc Statistics
Chapter 12 Statistics Screens Figure 348 Statistics > MACFF The following table describes the labels in this screen. Table 265 Statistics > MACFF LABEL DESCRIPTION Slot Select a card’s slot number and click Load to display the cards MAC forced forwarding statistics. - Page 511 Chapter 12 Statistics Screens Figure 349 Statistics > PVC The following table describes the labels in this screen. Table 266 Statistics > PVC LABEL DESCRIPTION Slot Use the drop-down list boxes to select a DSL line card and port. Port Load Click Load to display the port’s current settings.
- Page 512 Chapter 12 Statistics Screens Management Switch Card User’s Guide...
-
Page 513: Switch Screens
HAPTER Switch Screens This chapter describes the screens you use to configure Ethernet ports, multicast VLAN and global switch parameters such as GARP, link aggregation, priority queues and queuing method. 13.1 Ethernet Port Trunking Ethernet port trunking lets you aggregate the Ethernet ports into one logical link. The switch uses MAC-based load balancing which analyzes a packet’s source and destination MAC addresses to distribute the load between the two Ethernet ports when uplinking to the remote switch. -
Page 514: Link Aggregation Id
Chapter 13 Switch Screens 13.3 Link Aggregation ID LACP aggregation ID consists of the following information Table 267 Link Aggregation ID: Local Switch SYSTEM PRIORITY MAC ADDRESS PORT PRIORITY PORT NUMBER 0000 00-00-00-00-00 0000 0000 Table 268 Link Aggregation ID: Peer Switch SYSTEM PRIORITY MAC ADDRESS PORT PRIORITY PORT NUMBER... -
Page 515: Switch Setup General Screen
Chapter 13 Switch Screens incoming traffic on that port. This queue then moves to the back of the list. The next queue is given an equal amount of bandwidth, and then moves to the end of the list; and so on, depending on the number of queues being used. -
Page 516: Switch Setup Dot3Ad Screen
Chapter 13 Switch Screens Table 270 Switch Setup General (continued) LABEL DESCRIPTION Leave All Timer Leave All Timer sets the duration of the Leave All Period timer for GVRP in milliseconds. Each port has a single Leave All Period timer. Leave All Timer must be larger than Leave Timer;... - Page 517 (30 seconds). Group ID This column displays the names of the trunk groups for the management switch card’s Ethernet ports. In the MSC1000G, tsub is for the subtending ports and tup is for the uplink ports. Active Select this check box to turn on a trunk group.
-
Page 518: Switch Setup Qschedule Screen
Chapter 13 Switch Screens 13.7 Switch Setup QSchedule Screen Click Switch > Switch Setup > QSchedule to display the screen as shown. Figure 352 Switch Setup QSchedule The following table describes the labels in this screen. Table 272 Switch Setup QSchedule LABEL DESCRIPTION Port... - Page 519 Chapter 13 Switch Screens Figure 353 Switch Setup Isolation The following table describes the labels in this screen. Table 273 Switch Setup Isolation LABEL DESCRIPTION Port Isolation Turn on port isolation to block communications between subscriber ports. When you enable Enable port isolation you do not need to configure the VLAN to isolate subscribers.
-
Page 520: Switch Setup Dscp Screen
Chapter 13 Switch Screens 13.9 Switch Setup DSCP Screen DSCP (Differentiated Services Code Point) is a field in the header of IP packets for packet classification purposes. The QoS (Quality-of-Service) in the MSC uses DSCP to provide different level of services and priorities for downstream data transmission. IEEE 802.1p enables the MSC transmit frames according to their 3-bit priority (0~7) in an 802.1q header. -
Page 521: Switch Setup Vlanpri Screen
Chapter 13 Switch Screens 13.10 Switch Setup VlanPri Screen Click Switch > Switch Setup > VlanPri to display the screen as shown. Use this screen to overwrite the IEEE 802.1p priority value of traffic received through the Gigabit Ethernet interfaces based on its VLAN ID. -
Page 522: Spanning Tree Protocols
Chapter 13 Switch Screens Table 275 Switch Setup VlanPri LABEL DESCRIPTION Select All Select this check box to select all of the column’s check boxes. Clear this check box to clear all of the column’s check boxes. Cancel Click Cancel to begin configuring this screen afresh. 13.11 Spanning Tree Protocols The switch supports Spanning Tree Protocol (STP), Rapid Spanning Tree Protocol (RSTP) and Multiple Spanning Tree Protocol (MSTP) as defined in the following standards. - Page 523 Chapter 13 Switch Screens Table 277 MSTP/RSTP Path Costs LINK SPEED RECOMMENDED VALUE RECOMMENDED RANGE ALLOWED RANGE 1000 Gbps 2 to 200 1 to 200 000 000 10 000 Gbps 1 to 20 1 to 200 000 000 On each bridge, the root port is the port through which this bridge communicates with the root. It is the port on this switch with the lowest path cost to the root (the root path cost).
-
Page 524: Multiple Stp
Chapter 13 Switch Screens RSTP assigns three port states to eliminate packet looping while STP assigns five (see following table). A device port is not allowed to go directly from blocking state to forwarding state so as to eliminate transient loops. Table 278 RSTP and STP Port States RSTP PORT STATE STP PORT STATE DESCRIPTION Discarding... - Page 525 Chapter 13 Switch Screens Figure 357 STP/RSTP Network Example With MSTP, VLANs 1 and 2 are mapped to different spanning trees in the network. Thus traffic from the two VLANs travel on different paths. The following figure shows the network example using MSTP.
- Page 526 Chapter 13 Switch Screens • VLAN-to-MST mapping 13.11.2.3 MST Instance An MST Instance (MSTI) is a set of VLANs that use the same spanning tree. Each created MSTI is identified by a unique number (known as an MST ID) known internally to a region. Thus an MSTI does not span across MST regions.
-
Page 527: Mstp Setup
Chapter 13 Switch Screens 13.12 MSTP Setup Use the MSTP screens to enable MSTP on the switch and configure MSTP bridge and port settings. 13.12.1 MSTP Bridge Settings Click Switch > MSTP in the navigation panel to display the screen shown next. Use this screen to configure MSTP and RSTP settings. - Page 528 Chapter 13 Switch Screens Table 279 MSTP: Bridge (continued) LABEL DESCRIPTION Enable Select this option to activate MSTP on the system. Priority Priority is used in determining the root switch. The switch with the highest priority (lowest numeric value) becomes the STP root switch. If all switches have the same priority, the switch with the lowest MAC address will then become the root switch.
-
Page 529: Mstp Port Settings
Chapter 13 Switch Screens Table 279 MSTP: Bridge (continued) LABEL DESCRIPTION This field displays the VID (or VID ranges) to which the MST instance is mapped. Config Digest A configuration digest is generated from the VLAN-MSTI mapping information. This field displays the 16-octet signature that is included in an MSTP BPDU. -
Page 530: Mstp Configuration Example
Chapter 13 Switch Screens Table 280 MSTP: Port (continued) LABEL DESCRIPTION Set a point-to-point link between ports to increase the speed of convergence by allowing the network to determine the designated port faster. The port must be connected directly to another switch port. - Page 531 Chapter 13 Switch Screens Figure 364 MSTP Configuration Example: Bridge To configure port MSTP settings, click the Port tab. Select the instance ID number in the MSTID field and click Apply. Select Enable to set the port to belong to this spanning tree and click Apply. For this network example, enable uplink ports 1 and 2 in the two spanning tree instances (MSTID 1 and 2).
-
Page 532: Switch Port
Chapter 13 Switch Screens Figure 365 MSTP Configuration Example: Port For switch B, configure the same general MSTP settings and VLAN-to-MST mappings as switch A for the subtending ports. Set the subtending port priorities on switch B to allow MSTP to forward traffic to the corresponding link. -
Page 533: Port Vlan Trunking
Chapter 13 Switch Screens IEEE 802.3x flow control is used in full duplex mode to send a pause signal to the sending port, causing it to temporarily stop sending signals when the receiving port memory buffers fill. Back pressure flow control is typically used in half duplex mode to send a "collision" signal to the sending port (mimicking a state of packet collision) causing the sending port to temporarily stop sending signals and resend later. -
Page 534: Switch Port Setup Port Screen
Chapter 13 Switch Screens 13.14 Switch Port Setup Port Screen Click Switch > Switch Port Setup in the navigation panel to display the screen shown next. Use this screen to configure basic settings for the Gigabit Ethernet interfaces. Figure 367 Switch Port Setup The following table describes the labels in this screen. -
Page 535: Switch Port Setup 802.1P/1Q Screen
Chapter 13 Switch Screens 13.15 Switch Port Setup 802.1P/1Q Screen Click Switch > Switch Port Setup > 802.1P/1Q in the navigation panel to display the screen shown next. Use this screen to configure IEEE 802.1p priority and IEEE 802.1Q VLAN settings for the Gigabit Ethernet interfaces. -
Page 536: Switch Port Setup Bandwidth Screen
Chapter 13 Switch Screens 13.16 Switch Port Setup Bandwidth Screen Click Switch > Switch Port Setup > Bandwidth in the navigation panel to display the screen shown next. Use this screen to configure bandwidth control settings for the Gigabit Ethernet interfaces. -
Page 537: Switch Port Setup Dscp
Chapter 13 Switch Screens Figure 370 Switch Port Setup: Broadcast The following table describes the labels in this screen. Table 284 Switch Port Setup: Broadcast LABEL DESCRIPTION Port This is the label of a Gigabit Ethernet interface. Broadcast Select Enable to limit the number of broadcast packets the interface will accept per second. -
Page 538: Switch Port Setup Dscp Screen
Chapter 13 Switch Screens 13.18.1 Switch Port Setup DSCP Screen Click Switch > Switch Port Setup > DSCP in the navigation panel to display the screen shown next. Use this screen to overwrite the IEEE 802.1p priority value of traffic received through an MSC front panel Gigabit Ethernet interface based on its DSCP value. -
Page 539: Switch Cfm Screens
Chapter 13 Switch Screens 13.19 Switch CFM Screens Click Switch > CFM in the navigation panel to display the screen shown next. Use this screen for initial configuration of a CFM (Connectivity Fault Management) domain, to globally switch this feature on or off and to create an MD. Refer to Section 6.1 on page 163 for more information. -
Page 540: Cfm Ma Screen
Chapter 13 Switch Screens 13.19.1 CFM MA Screen Click an MD index number in the Switch > CFM screen to display the screen shown next. Use this screen to configure MAs, EP ID. Figure 373 CFM Maintenance Association The following table describes the labels in this screen. Table 287 CFM Maintenance Association LABEL DESCRIPTION... -
Page 541: Cfm Endpoint Screen: Mep
Chapter 13 Switch Screens Table 287 CFM Maintenance Association (continued) LABEL DESCRIPTION CCI Interval Select a number to specify how often the device sends a CCI message. 4: 1 second 5: 10 seconds 6: 1 minute 7: 10 minutes Apply Click Apply to add the settings as a new entry in the summary table above. - Page 542 Chapter 13 Switch Screens Figure 374 CFM Endpoint: MEP The following table describes the labels in this screen. Table 288 CFM Endpoint: MEP LABEL DESCRIPTION MD Name This displays the name of the MD for which you want to configure end points. MA Name This displays the name of the MA for which you want to configure end points.
-
Page 543: Cfm Endpoint Screen: Mip
Chapter 13 Switch Screens Table 288 CFM Endpoint: MEP (continued) LABEL DESCRIPTION Port This field displays the end point’s physical port on the device. Direction This field displays whether to send CCMs (Connectivity Check Messages) from the end point you configured (down) or from (s) (up). Priority This field displays the priority of the end point. -
Page 544: Cfm Endpoint: Mip Slot Screen
Table 289 CFM Endpoint: MIP (continued) LABEL DESCRIPTION MSC1000G Select Enable and specify a MAC address to set a MIP on an MSC port. Apply Click Apply to save the changes in this section to the system’s volatile memory. The... -
Page 545: Switch Cfm Lbr Screen
Chapter 13 Switch Screens Figure 376 CFM Endpoint: MIP > Slot The following table describes the labels in this screen. Table 290 CFM Endpoint: MIP > Slot LABEL DESCRIPTION Port This field displays the number of the DSL port. Enable This field displays whether or not the port is set to be a MIP. - Page 546 The following table describes the labels in this screen. Table 291 Switch CFM > LBR LABEL DESCRIPTION MSC1000G Enable or disable loopback testing on the MSC’s ports. Apply Click Apply to save the changes in this section to the system’s volatile memory. The system...
-
Page 547: Switch Cfm Lbr Slot Screen
Chapter 13 Switch Screens Table 291 Switch CFM > LBR (continued) LABEL DESCRIPTION State This field displays the line card’s current operational status. active means the line card is operating normally. init means the MSC is initializing the line card. disable means a manager has disabled the line card. -
Page 548: Switch Oam Setup
Chapter 13 Switch Screens 13.20 Switch OAM Setup To configure Ethernet OAM (Operational, Administration and Maintenance) settings for the Ethernet line card ports, click Switch > OAM. Figure 379 Switch > OAM The following table describes the labels in this screen. Table 293 Switch >... -
Page 549: Switch Sfp Alarm Setup
Chapter 13 Switch Screens Table 293 Switch > OAM (continued) LABEL DESCRIPTION Copy Do the following to copy settings from one Ethernet port to another Ethernet port or ports. 1. Use the Select column to choose an Ethernet port from which you want to copy settings. 2. -
Page 550: Port Mirroring Setup
Chapter 13 Switch Screens Figure 381 Switch > SFP The following table describes the labels in this screen. Table 294 Switch > SFP LABEL DESCRIPTION Port Select an Ethernet SFP slot and click Load to edit its settings. High Limit Use these fields to set the related measurement’s high and low thresholds. -
Page 551: Lldp
Chapter 13 Switch Screens Figure 382 Switch > Mirror The following table describes the labels in this screen. Table 295 Switch > Mirror LABEL DESCRIPTION Active Select this check box to activate port mirroring on the MSC. Clear this check box to disable the feature. -
Page 552: Lldp General
Chapter 13 Switch Screens • System Name (optional) • System Description (optional) • System Capabilities (optional) • Management Address (optional) The MSC also supports the IEEE 802.1 and IEEE 802.3 organizationally-specific TLVs. Annex F of the LLDP specification defines the following set of IEEE 802.1 organizationally specific TLVs: •... - Page 553 Chapter 13 Switch Screens Figure 383 LLDP General The following table describes the labels in this screen. Table 296 LLDP General LABEL DESCRIPTION Enable Select this check box to activate LLDP to have the MSC use LLDP to send and get information about devices connected to its interfaces.
-
Page 554: Lldp Port
Chapter 13 Switch Screens Table 296 LLDP General (continued) LABEL DESCRIPTION Admin Select how the MSC uses LLDP on this port. Status disable has the MSC not send or receive LLDP information through this port. tx has the MSC only send local LLDP information through this port. rx has the MSC only receive remote LLDP information through this port. - Page 555 Chapter 13 Switch Screens Figure 384 LLDP Port The following table describes the labels in this screen. Table 297 LLDP Port LABEL DESCRIPTION Local Port Select an MSC port and click Load to display and be able to configure its settings. Admin Status Select how the MSC uses LLDP on this port.
- Page 556 Chapter 13 Switch Screens Table 297 LLDP Port (continued) LABEL DESCRIPTION Chassis ID This tells what type of identifier is listed in the Chassis ID field (for example, MAC address). Subtype Port ID This identifies the port on the MSC. Port ID This tells what type of identifier is listed in the Port ID field.
-
Page 557: Lldp Remote
Chapter 13 Switch Screens Table 297 LLDP Port (continued) LABEL DESCRIPTION Rx TLVs This is the total number of unrecognized TLVs in LLDP frames received on this port. Unrecognized Rx Ageouts This is the total number of LLDP frames received on this port that have aged out. Total Flush Click this to remove all the entries from the port’s table. - Page 558 Chapter 13 Switch Screens Table 298 LLDP Remote (continued) LABEL DESCRIPTION Chassis ID This is the identifier for the remote system. Chassis ID This tells what type of identifier is listed in the Chassis ID field (for example, MAC address). Subtype Port ID This identifies the port on the remote device.
- Page 559 Chapter 13 Switch Screens Table 298 LLDP Remote (continued) LABEL DESCRIPTION TLV Type This identifies the kind of Type Length Value (TLV) field in the LLDP frames received from the remote port. Unknown TLV This is the value extracted from the value field of the TLV in the LLDP frames received from the Info remote port.
- Page 560 Chapter 13 Switch Screens Management Switch Card User’s Guide...
-
Page 561: Sys Screens
HAPTER Sys Screens This chapter describes the Sys screens you use to configure general system, access control, syslog, administrator login accounts and management IP settings. 14.1 SNMP Simple Network Management Protocol is a protocol used for exchanging management information between network switches. SNMP is a member of TCP/IP protocol suite. A manager station can manage and monitor the system through the network via SNMP version one (SNMPv1) and/or SNMP version 2c. -
Page 562: Supported Mibs
Chapter 14 Sys Screens SNMP itself is a simple request/response protocol based on the manager/agent model. The manager issues a request and the agent returns responses using the following protocol operations: Table 299 SNMP Commands COMMAND DESCRIPTION Allows the manager to retrieve an object variable from the agent. GetNext Allows the manager to retrieve the next object variable from a table or list within an agent. - Page 563 Chapter 14 Sys Screens Figure 387 Access Control: SNMP The following table describes the labels in this screen. Table 300 Access Control: SNMP LABEL DESCRIPTION Get Community Enter the get community, which is the password for the incoming Get- and GetNext- requests from the management station.
-
Page 564: Service Access Control Screen
Chapter 14 Sys Screens Table 300 Access Control: SNMP (continued) LABEL DESCRIPTION Enter the IP address of the trap server. Use an IPv4 address in dotted decimal notation or an IPv6 address and prefix in colon hexadecimal notation. Port Enter the port number upon which the station listens for SNMP traps. Username This field is applicable when you select v3 in the Version field. -
Page 565: Secured Client Screen
Chapter 14 Sys Screens Figure 388 Access Control: Service Access Control The following table describes the labels in this screen. Table 301 Access Control: Service Access Control LABEL DESCRIPTION Services These are services you may use to access the system are listed here. Enable Select the Enable check boxes for the corresponding services that you want to allow to access the system. - Page 566 Chapter 14 Sys Screens Figure 389 Access Control: Secured Client The following table describes the labels in this screen. Table 302 Access Control: Secured Client LABEL DESCRIPTION Index This is the client set index number. A “client set” is a group of one or more “trusted computers”...
-
Page 567: Secured Client6 Screen
Chapter 14 Sys Screens 14.3.2 Secured Client6 Screen Click Sys > Access Control from the navigation panel and then the Secured Client6 tab to open the following screen. Use this screen to configure IPv6 address ranges of trusted computers that may manage the system. -
Page 568: General Setup
Chapter 14 Sys Screens Table 303 Access Control: Secured Client6 (continued) LABEL DESCRIPTION Apply Click Apply to save the changes in this screen to the system’s volatile memory. The system loses these changes if it is turned off or loses power, so use the Config Save link on the navigation panel and then the Save button to save your changes to the non- volatile memory when you are done configuring. - Page 569 Chapter 14 Sys Screens The following table describes the labels in this screen. Table 304 General Setup LABEL DESCRIPTION Host Name Choose a descriptive name for identification purposes. This name consists of up to 31 English keyboard characters; spaces are not allowed. Location Enter the geographic location of your system.
-
Page 570: Ipv4 Setup
Chapter 14 Sys Screens 14.5 IPv4 Setup Click Sys > IP Setup from the navigation panel to open the following screen. Use this screen to configure the system and management IP addresses and subnet masks. Figure 392 IPv4 Setup 192.168.1.3 The following table describes the labels in this screen. -
Page 571: Ipv6 Setup
Chapter 14 Sys Screens 14.6 IPv6 Setup Click Sys > IP Setup from the navigation panel and then IPv6 to open the following screen. Use this screen to configure the system and management IP addresses and subnet masks. Figure 393 IPv6 Setup The following table describes the labels in this screen. -
Page 572: Syslog Screen
Chapter 14 Sys Screens 14.7 Syslog Screen Click Sys > Unix SysLog from the navigation panel to open the following screen. The syslog feature sends logs to an external syslog server. Figure 394 Unix Syslog The following table describes the labels in this screen. Table 307 Unix Syslog LABEL DESCRIPTION... - Page 573 Chapter 14 Sys Screens Figure 395 User Account The following table describes the labels in this screen. Table 308 User Account LABEL DESCRIPTION Enable Select this check box to activate the administrator account. Name Type a user name for the account Password Type a password for the account.
-
Page 574: Monitor Screen
Chapter 14 Sys Screens 14.9 Monitor Screen Click Sys > Monitor from the navigation panel to open the following screen. Use this screen to view hardware status information and set the hardware monitor high and low thresholds for generating alarms. Figure 396 Sys >... - Page 575 Chapter 14 Sys Screens Table 309 Sys > Monitor (continued) LABEL DESCRIPTION Index This field displays the number of the power supply in the list. volt This field displays the voltage that the power supply provides. Measured in volts (V). current This field displays the current voltage reading.
-
Page 576: Authentication, Authorization And Accounting
Chapter 14 Sys Screens Table 309 Sys > Monitor (continued) LABEL DESCRIPTION Index This field displays the number of the fan in the list. This field displays the name of the fan. current This is the fan’s current RPM reading. high_lmt Use these fields to set the maximum RPM threshold for each sensor. -
Page 577: Local User Accounts
Chapter 14 Sys Screens TACACS+ (Terminal Access Controller Access-Control System Plus) as external authentication, authorization and accounting servers. Figure 397 AAA Server Auth Server Client 14.10.1 Local User Accounts By storing user profiles locally on the system, your system is able to authenticate and authorize users without interacting with a network authentication server. - Page 578 Chapter 14 Sys Screens Figure 398 Sys > AAA The following table describes the labels in this screen. Table 311 Sys > AAA LABEL DESCRIPTION Authentication Use this section to specify the methods used to authenticate users accessing the system or changing access privilege levels while logged in.
- Page 579 Chapter 14 Sys Screens Table 311 Sys > AAA (continued) LABEL DESCRIPTION Method1 ~ Specify the databases the system uses to authenticate privilege level changes and logins. Method3 Set up the corresponding database properly before you select a method. Configure the local passwords for changing the privilege level in the Enable >...
-
Page 580: Commands Authorization Screen
Chapter 14 Sys Screens Table 311 Sys > AAA (continued) LABEL DESCRIPTION Privilege This field is only configurable for Commands type of event. Select the threshold command privilege level for which the system should send accounting information. The system will send accounting information when commands at the level you specify and higher are executed on the system. -
Page 581: Radius Server Setup
Chapter 14 Sys Screens Figure 399 Commands Authorization The following table describes the labels in this screen. Table 312 Commands Authorization LABEL DESCRIPTION Privilege These are the command access levels. Method Specify the database the system uses to check whether a user is authorized to execute commands of the specific privilege level. - Page 582 Chapter 14 Sys Screens Figure 400 RADIUS Server Setup The following table describes the labels in this screen. Table 313 RADIUS Server Setup LABEL DESCRIPTION Authentication Use this section to configure your RADIUS authentication settings. Server Mode This field is only valid if you configure multiple RADIUS servers. Select index-priority and the system tries to authenticate with the first configured RADIUS server, if the RADIUS server does not respond then the system tries to authenticate with the second RADIUS server.
-
Page 583: Tacacs+ Server Setup
Chapter 14 Sys Screens Table 313 RADIUS Server Setup (continued) LABEL DESCRIPTION Mode This field is only valid if you configure multiple RADIUS servers. Select index-priority and the system tries to use the first configured RADIUS server for accounting, if the RADIUS server does not respond then the system tries to use the second RADIUS server. - Page 584 Chapter 14 Sys Screens Figure 401 TACACS+ Server Setup The following table describes the labels in this screen. Table 314 TACACS+ Server Setup LABEL DESCRIPTION Authentication Use this section to configure your TACACS+ authentication settings. Server Mode This field is only valid if you configure multiple TACACS+ servers. Select index-priority and the system tries to authenticate with the first configured TACACS+ server, if the TACACS+ server does not respond then the system tries to authenticate with the second TACACS+ server.
- Page 585 Chapter 14 Sys Screens Table 314 TACACS+ Server Setup (continued) LABEL DESCRIPTION Shared Secret Specify a password (up to 32 alphanumeric characters) as the key to be shared between the external TACACS+ server and the system. This key is not sent over the network. This key must be the same on the external TACACS+ server and the MSC.
-
Page 586: Vendor Specific Attribute
Chapter 14 Sys Screens Table 314 TACACS+ Server Setup (continued) LABEL DESCRIPTION Apply Click Apply to save the changes in this screen to the system’s volatile memory. The system loses these changes if it is turned off or loses power, so use the Config Save link on the navigation panel and then the Save button to save your changes to the non-volatile memory when you are done configuring. -
Page 587: Tunnel Protocol Attribute
Chapter 14 Sys Screens Table 315 Supported VSAs FUNCTION ATTRIBUTE Egress Bandwidth Vendor-Id = 890 Assignment Vendor-Type = 2 egress rate (Kbps in decimal format) Vendor-data = Privilege Assignment Vendor-ID = 890 Vendor-Type = 3 Vendor-Data = "shell:priv-lvl=N" (CISCO) Vendor-ID = 9 (CISCO-AVPAIR) Vendor-Type = 1 Vendor-Data = "shell:priv-lvl=N"... -
Page 588: Attributes Used For Authentication
Chapter 14 Sys Screens 14.11.1 Attributes Used for Authentication The following sections list the attributes sent from the system to the RADIUS server when performing authentication. 14.11.1.1 Attributes Used for Authenticating Privilege Access User-Name - The format of the User-Name attribute is $enab#$, where # is the privilege level (1-14). User-Password NAS-Identifier NAS-IP-Address... - Page 589 Chapter 14 Sys Screens 14.11.2.2 Attributes Used for Accounting Exec Events The attributes are listed in the following table along with the time that they are sent (the difference between Console and Telnet/SSH Exec events is that the Telnet/SSH events utilize the Calling- Station-Id attribute): Table 317 RADIUS Attributes - Exec Events via Console ATTRIBUTE...
- Page 590 Chapter 14 Sys Screens Table 319 RADIUS Attributes-Exec Events via 802.1x ATTRIBUTE START INTERIM-UPDATE STOP Acct-Status-Type Acct-Delay-Time Acct-Session-Id Acct-Authentic Acct-Input-Octets Acct-Output-Octets Acct-Session-Time Acct-Input-Packets Acct-Output-Packets Acct-Terminate-Cause Acct-Input-Gigawords Acct-Output-Gigawords Management Switch Card User’s Guide...
-
Page 591: Vlan Screens
HAPTER VLAN Screens 15.1 VLAN Introduction A VLAN (Virtual Local Area Network) allows a physical network to be partitioned into multiple logical networks. Devices on a logical network belong to one group. A device can belong to more than one group. -
Page 592: Forwarding Tagged And Untagged Frames
Chapter 15 VLAN Screens frame with VID (VLAN Identifier) of null (0) is called a priority frame, meaning that only the priority level is significant and the default VID of the ingress port is given as the VID of the frame. Of the 4096 possible VIDs, a VID of 0 is used to identify priority frames and value 4095 (FFF) is reserved, so the maximum possible VLAN configurations are 4,094. -
Page 593: Gvrp
Chapter 15 VLAN Screens 15.3.2 GVRP GVRP (GARP VLAN Registration Protocol) is a registration protocol that defines a way for switches to register necessary VLAN members on ports across the network. Enable this function to permit VLANs groups beyond the local switch. Please refer to the following table for common IEEE 802.1Q VLAN terminology. -
Page 594: Vlan Setup Screen
Chapter 15 VLAN Screens The MSC checks the PVID table and assigns a temporary VID. The MSC ignores the port from which the frame came, because the MSC does not send a frame to the port from which it came. The MSC also does not forward frames to “forbidden” ports. If after looking at the SVLAN, the MSC does not have any ports to which it will send the frame, it won’t check the port filter. -
Page 595: Vlan Port Setting Screen
Chapter 15 VLAN Screens Table 321 VLAN Setup (continued) LABEL DESCRIPTION Registration Select Normal for the port to dynamically join this VLAN group using GVRP. Select Fix for the port to be a permanent member of this VLAN group. Select Forbidden if you want to prohibit the port from joining this VLAN group. You cannot change a port from the fixed state to another state if the port’s PVID is set to this VLAN. -
Page 596: Vlan Port Setting Slot Screen
Chapter 15 VLAN Screens Figure 403 VLAN Port Setting The following table describes the labels in this screen. Table 322 VLAN Port Setting LABEL DESCRIPTION This is the slot number of a line card. Click the index number of an active line card to display which of the line card’s ports belong to which VLANs. -
Page 597: Vlan Port Setting Slot Detail Screen
Chapter 15 VLAN Screens Figure 404 VLAN Port Setting Slot The following table describes the labels in this screen. Table 323 VLAN Port Setting Slot LABEL DESCRIPTION Port This is the label of a DSL port. Click a port’s index number to open a details screen about that port. - Page 598 Chapter 15 VLAN Screens Management Switch Card User’s Guide...
-
Page 599: Voip
HAPTER VoIP This chapter shows how to configure the Voice over IP (VoIP) features on your system. 16.1 VoIP Overview This section introduces VoIP, and discusses SIP and H.248 VoIP networks. 16.1.1 Introduction to VoIP VoIP (Voice over IP) is the sending of voice signals over the Internet Protocol. This allows you to make phone calls and send faxes over the Internet at a fraction of the cost of using the traditional circuit-switched telephone network. - Page 600 Chapter 16 VoIP 16.1.3.1 SIP Registration Each SIP-enabled VoIP line card in the IES is an individual SIP User Agent (UA). To provide voice service, it has an IP address for SIP and RTP protocols to communicate with other servers. A SIP user agent has to register with the SIP registrar and must provide information about the users it represents, as well as its current IP address (for the routing of incoming SIP requests).
- Page 601 Chapter 16 VoIP 16.1.3.7 SIP User Agent A SIP user agent can make and receive VoIP telephone calls. A User Agent Client (UAC) is a logical entity that initiates a SIP request, and a User Agent Server (UAS) is a logical entity that creates a response to a SIP request.
- Page 602 Chapter 16 VoIP The response to the request goes to all the proxy servers through which the request passed, in reverse sequence. Once the session is set up, session traffic is sent between the UAs directly, bypassing all the proxy servers in between. The following figure shows the SIP and session traffic flow between the user agents (UA 1 and UA 2) and the proxy servers (this example shows two proxy servers, PROXY 1 and PROXY 2).
-
Page 603: Introduction To H.248
Chapter 16 VoIP Proxy 2 sends a SIP INVITE request to User Agent 2. User Agent 2 sends a response back to Proxy 2 indicating that the phone is ringing. The response is relayed back to User Agent 1 via Proxy 1. User Agent 2 sends an OK response to Proxy 2 after the call is answered. - Page 604 Chapter 16 VoIP Figure 408 SIP and H.248 Network Comparison IP NETWORK ANALOG ANALOG SIP ATA SIP ATA H.248 ANALOG IP NETWORK The IES uses H.248 interfaces that consist of a “Signaling Card” (SC) and at least one “Media Card” (MC).
- Page 605 Chapter 16 VoIP Figure 409 H.248 Media Gateway SC and MC MGC 1 MGC 2 IP NETWORK ANALOG H.248 signaling Other MG Line events Signal events ANALOG RTP payload An MC sends line events (like “onhook” and “offhook” to the SC. The SC sends signal events (like ring, metering pulse, and various tones) to the MCs.
- Page 606 Chapter 16 VoIP Figure 410 H.248 Interface, SCs and MCs Interface Standby SC Backup Media Gateway Active SC Media Gateway IP NETWORK H.248 signaling RTP payload • The active SC uses the IP address of the H.248 interface to communicate with the MGC. •...
- Page 607 Chapter 16 VoIP The following figure shows an example Context, C1. This Context possesses two Terminations, T1 and T2. T1 is a PSTN connection, and T2 is an IP connection. Because both Terminations belong to the same Context, they can communicate. Figure 411 H.248 Connection Example MEDIA GATEWAY PSTN...
- Page 608 Chapter 16 VoIP • Statistics are information related to a Termination’s activity in a Context, and are sent to the MGC on request, or when the Termination is removed from the Context. 16.1.4.2 H.248 Commands In an H.248 network, the MGC controls calls by issuing commands to the Media Gateways. In turn, the media gateways can issue reports to the MGC.
- Page 609 Chapter 16 VoIP Figure 413 H.248/MEGACO Call Procedure Example IP Network ANALOG ANALOG PHONE A PHONE B The user of phone A wants to call the user of phone B. The following table shows the series of actions necessary to set up the network and make the call (TransactionRequests and TransactionReplies are not shown).
-
Page 610: Voice Coding
Chapter 16 VoIP Table 327 H.248/MEGACO Call Procedure Example DIRECTION ACTION COMMAND MGC --> MG1 MGC modifies analog Termination on MG1 to stop playing ringing tone Modify to phone A. MGC --> MG2 MGC modifies analog Termination on MG2 to stop ringing phone B. Modify MGC -->... -
Page 611: Pstn Call Setup Signaling
Chapter 16 VoIP • G.711 is a Pulse Code Modulation (PCM) waveform codec. PCM measures analog signal amplitudes at regular time intervals (sampling) and converts them into digital bits (quantization). Quantization “reads” the analog signal and then “writes” it to the nearest digital value. For this reason, a digital sample is usually slightly different from its analog original (this difference is known as “quantization noise”). -
Page 612: Do Not Disturb
Chapter 16 VoIP The system can add IEEE 802.1Q VLAN ID tags to voice frames that it sends to the network. This allows the system to communicate with a SIP server that is a member of the same VLAN group. Some ISPs use the VLAN tag to identify voice traffic and give it priority over other traffic. -
Page 613: Call Waiting
Chapter 16 VoIP Enter the number of hours and minutes from the present time that DND should take effect in the format hhmm (so you would enter 0145 for one hour and forty-five minutes, for example). Allowed digits for hours are 0~9 and allowed digits for minutes are 0~5. Enter the number of hours and minutes that DND should remain in effect in the format hhmm. -
Page 614: Call Transfer
Chapter 16 VoIP Note: This activates CLIR on the current call only. 16.2.4 Call Transfer Call transfer allows a user to forward an incoming call to another phone number. The VOP supports three types of call transfer: blind transfer, attendant transfer and consultative transfer. 16.2.4.1 Making a Blind Transfer In a blind transfer the caller (A) is transferred by the callee (B) to the second callee (C). -
Page 615: Usa Type Supplementary Services
Chapter 16 VoIP When you are on the phone talking to someone, press the flash key to put the caller on hold and get a dial tone. Dial a phone number directly to make another call. When the second call is answered, press the flash key and press “3” to create a three-way conversation. -
Page 616: Usa Call Transfer
Chapter 16 VoIP 16.3.3 USA Call Transfer Do the following to transfer an incoming call (that you have answered) to another phone. Press the flash key to put the caller on hold. When you hear the dial tone, dial “*98#” followed by the number to which you want to transfer the call. -
Page 617: The Voip Countrycode Screen
Chapter 16 VoIP The following table describes the labels in this screen. Table 330 The VoIP > ARP Screen LABEL DESCRIPTION Slot Use the drop-down list box to select the active VoIP line card you want to manage. Flush Click this to remove all the entries from the ARP table. Refresh Click this to reload the information in the ARP table. - Page 618 Chapter 16 VoIP The following table describes the labels in this screen. Table 331 The VoIP > Countrycode Screen LABEL DESCRIPTION Country Select the country in which the system will be used. Apply Click this to save your changes and display the region-specific VoIP settings below.
-
Page 619: The Countrycode Detail Screen
Chapter 16 VoIP Table 331 The VoIP > Countrycode Screen LABEL DESCRIPTION Second TAS Type This is the secondary TAS signal type, which is used in a line reversal followed by DT-AS/RP-AS scenario. NULL: No TAS signal is sent. DT_AS: Dual Tone Alerting Signal. RP_AS: Ringing Pulse Alerting Signal. -
Page 620: The Voip Ip Screen
Chapter 16 VoIP The following table describes the labels in this screen. Table 332 The VoIP > Countrycode > Detail Screen LABEL DESCRIPTION Click this to return to the VoIP > Countrycode screen. Pulse Parameters This section displays region-specific information about pulse dialling. Flash Min / Max (ms) These display the minimum and maximum hook flash times. -
Page 621: The Voip Route Screen
Chapter 16 VoIP Figure 417 The VoIP > IP Screen The following table describes the labels in this screen. Table 333 The VoIP > IP Screen LABEL DESCRIPTION Slot Enter the slot number of the line card you want to configure. Enter the IP address the line card uses for VoIP communications. - Page 622 Chapter 16 VoIP Click VoIP > Route. The following screen displays. Figure 418 The VoIP > Route Screen The following table describes the labels in this screen. Table 334 The VoIP > Route Screen LABEL DESCRIPTION Slot Enter the slot number of the line card for which you wish to configure this rule. Enter the IP address and the number of bits in the subnet mask that define the range of IP addresses to which this entry applies.
-
Page 623: The Number Plan Screen
Chapter 16 VoIP 16.9 The Number Plan Screen Number plans are used by the system to identify specific types of phone numbers dialed by a user, and to process the number before transmission by deleting, replacing or adding digits according to the relevant rule. - Page 624 Chapter 16 VoIP Table 335 The VoIP > Number Plan Screen LABEL DESCRIPTION Pattern This is the dialed number for which this table entry applies. Allowed characters are: • Numerals “0” ~ “9” • “x” representing a digit 0 ~ 9, a “*”, or a “#”. •...
-
Page 625: The Voip H248 Screen
Chapter 16 VoIP 16.10 The VoIP H248 Screen Click VoIP > VoIP H248 to open the screen below. Use this screen to configure settings specific to the system’s individual H.248 VoIP cards. To configure other H.248 settings, assign H.248 profiles to a VoIP card’s individual ports in the Port >... -
Page 626: The Local Help Screen
Chapter 16 VoIP Table 336 The VoIP > H248 Screen LABEL DESCRIPTION Master IP 1 This is the IP address this VoIP uses for communicating with the media gateway controller (softswitch). Master IP 2 This is the IP address this VoIP uses for communicating with the media cards. 802.1P 802.1p This is the IEEE 802.1p priority (0~7) for this VoIP card’s traffic. - Page 627 Chapter 16 VoIP Figure 421 The VoIP > Local Help Screen The following table describes the labels in this screen. Table 337 The VoIP > Local Help Screen LABEL DESCRIPTION Name Enter a name for this local help profile (up to 31 ASCII characters; spaces are not allowed). Index 1~16 This is the local help phone number index.
-
Page 628: The Voip Key Pattern Screen
Chapter 16 VoIP Table 337 The VoIP > Local Help Screen LABEL DESCRIPTION Modify Select a local help table and click this in order to edit its configuration. Delete Select a local help table and click this to delete the profile. Once deleted, information cannot be retrieved. -
Page 629: Dialplan Screen
Chapter 16 VoIP The following table describes the labels in this screen. Table 338 The VoIP > Key Pattern Screen LABEL DESCRIPTION Name Enter a name for this key pattern profile (up to 31 ASCII characters; spaces are not allowed). Service Type These fields control the telephone keys a user presses to access a particular service. - Page 630 Chapter 16 VoIP Figure 423 VoIP > Dialplan Screen The following table describes the labels in this screen. Table 339 VoIP > Dialplan Screen LABEL DESCRIPTION Dialplan Name Enter the name of the dialplan. If you are configuring a new dialplan, you can enter the name.
-
Page 631: The Localcall Screen
Chapter 16 VoIP Table 339 VoIP > Dialplan Screen LABEL DESCRIPTION Cancel Click Cancel to start configuring the screen again. Index This is an incremental number indicating the order in which the dialplans were created. Dialplan Name These are the names of individual tables. The DEFVAL table always exists, and is assigned to all ports by default. -
Page 632: The Voip Interface Screen
Chapter 16 VoIP 16.15 The VoIP Interface Screen Click VoIP > Interface to open the following screen. Use this screen to configure the system’s H.248 interfaces. Figure 425 VoIP > Interface Management Switch Card User’s Guide... -
Page 633: The Pots Ring Screen
Chapter 16 VoIP The following table describes the labels in this screen. Table 341 VoIP > Interface LABEL DESCRIPTION Interface ID Select the number of the H.248 interface you want to configure and click Load. Interface IP/ Enter the H.248 interface’s IP address and subnet mask. This is the IP address the active Mask signaling card uses to communicate with the MGC. - Page 634 Chapter 16 VoIP Figure 426 VoIP > Pots The following table describes the labels in this screen. Table 342 VoIP > Pots LABEL DESCRIPTION Index This is the index number of an entry. DEFVAL Clear this check box to be able to configure a custom name for the ring cadence. Select this check box to use the default name according to the country code setting.
-
Page 635: The Pots Flash Screen
Chapter 16 VoIP 16.17 The POTS Flash Screen Click VoIP > Pots > Flash to open the following screen. Use this screen to set how long (in milliseconds) a user has to press the flash key for the IES to register its use. DEFVAL uses the period defined in the country code setting. - Page 636 Chapter 16 VoIP Management Switch Card User’s Guide...
-
Page 637: Config Save
HAPTER Config Save Use this section to save changes to your system’s configuration. 17.1 The Config Save Screen Use this screen to save all configuration changes on to your MSC’s flash memory. If you do not use this screen, any changes you have made to the system’s configuration will be lost once the MSC is shut down. - Page 638 Chapter 17 Config Save Management Switch Card User’s Guide...
-
Page 639: Commands
Commands... -
Page 641: Commands
The default user name is “admin” and the default password is “1234”. This is the login message. User name: admin Password: **** Copyright (c) 1994 - 2011 ZyXEL Communications Corp. 18.2 Command Conventions The rules of the commands are listed next. The command keywords are in font. -
Page 642: Getting Help
Chapter 18 Commands Using commands not documented in the user’s guide can damage the unit and possibly render it unusable. 18.3 Getting Help The system includes a help facility to provide you with the following information about the commands: • List of available commands under a command group. •... -
Page 643: Common Command Notation
Chapter 18 Commands 18.4 Common Command Notation The following table describes commonly used command parameter notation. Table 345 Common Command Notation NOTATION DESCRIPTION The optional fields in a command are enclosed in square brackets [], for instance, ip ping […] <ip-address>... -
Page 644: Command Privilege Levels
Chapter 18 Commands Table 345 Common Command Notation NOTATION DESCRIPTION This represents the number of an individual chassis slot where a line card is located and the slot-port number of a port(s). You can specify a single port <1>, all ports <*> or a list of ports <1,3,4>. -
Page 645: Commands Summary
Chapter 18 Commands Do not turn off your MSC while saving your configuration. This command saves all system configurations to nonvolatile memory. You must use this command to save any configuration changes that you make, otherwise the MSC returns to its last saved settings when it is restarted. - Page 646 Chapter 18 Commands Management Switch Card User’s Guide...
-
Page 647: Acl Commands
HAPTER acl Commands This chapter describes the Access Control List management commands. 19.1 acl Commands Summary The following table lists the commands. The P column on the right indicates the administrator privilege level needed to use the command. Table 347 acl Commands COMMAND DESCRIPTION Disables anti-MAC spoofing. - Page 648 Chapter 19 acl Commands Table 347 acl Commands (continued) COMMAND DESCRIPTION Sets information for the option 82 Circuit ID info <vid> <string> field. string: Add descriptive information to appear in the option 82 field (<23 characters). Sets which DHCP relay mode the system uses relaymode <vid>...
- Page 649 Chapter 19 acl Commands Table 347 acl Commands (continued) COMMAND DESCRIPTION Disables LAN 2 LAN on the specified subscriber lan2lan disable <slot- port(s). LAN 2 LAN allows you to set whether port> or not a DHCP server connected to a subscriber port is permitted to receive and send traffic through the IES.
- Page 650 Chapter 19 acl Commands Table 347 acl Commands (continued) COMMAND DESCRIPTION Sets the specified DHCPv6 relay option opt set <vid> <option- information for the specified VLAN. id> <format> option-id: Option ID number (18 for interface ID or 37 for remote ID). format: a text string with the ‘%’...
- Page 651 Chapter 19 acl Commands Table 347 acl Commands (continued) COMMAND DESCRIPTION Sets the IP address of the specified external radius ip <index> <ip- RADIUS server (1 or 2). address> index: The RADIUS server number. Sets the external RADIUS server port number of port <index>...
- Page 652 Chapter 19 acl Commands Table 347 acl Commands (continued) COMMAND DESCRIPTION Sets the port mode for loop guard. mode <giga- port>|<slot- fix: The system shuts down the port(s) if the port> system detects that packets sent out on the <fix|dynamic> port(s) loop back to the system.
- Page 653 Chapter 19 acl Commands Table 347 acl Commands (continued) COMMAND DESCRIPTION Displays MAC filter settings for the specified show <slot>|<slot- subscriber ports or PVC. port>|<slot- port-vpi/vci> Removes all of the entries from the specified macff arp flush <slot> card’s MAC ARP proxy table. Turns off MAC forced forwarding for the <slot>...
- Page 654 Chapter 19 acl Commands Table 347 acl Commands (continued) COMMAND DESCRIPTION Sets the packet type filter for the specified pktfilter <slot- subscriber ports or subscriber ports and PVC. port>|<slot- port-vpi/vci> Packet type filter allows or drops specified <type> packet types on the specified subscriber ports or PVCs.
-
Page 655: Acl Antimacspoof Commands
Chapter 19 acl Commands Table 347 acl Commands (continued) COMMAND DESCRIPTION Specifies an IP address subnet for which to set <ip>/<mask> configure a subnet-based VLAN. <vid> <priority> [<name>] Displays whether subnet-based VLAN is enabled show or disabled and list VLANs. Disables rate limit for broadcast traffic. -
Page 656: Acl Arpinspection Disable Command
Chapter 19 acl Commands 19.3.1 acl arpinspection disable Command Syntax: acl arpinspection disable <slot-port> This command turns off ARP inspection on the specified subscriber port(s). This helps conserve the system’s resources. 19.3.2 acl arpinspection enable Command Syntax: acl arpinspection enable <slot-port> This command turns on ARP inspection on the specified subscriber port(s). -
Page 657: Acl Dhcprelay82 Info Command
Chapter 19 acl Commands Sets the relay mode. <mode> Activates DHCP relay service and include option 82 information in the client DHCP requests for this VLAN. Disables DHCP relay service but include option 82 information in the client DHCP requests. Before broadcasting, the switch adds option82 information to DHCP requests. -
Page 658: Acl Dhcprelay82 Relaymode Command
Chapter 19 acl Commands 19.4.5 acl dhcprelay82 relaymode Command Syntax: acl dhcprelay82 relaymode <mode> where <mode> = The system sends the requests to the active DHCP server first. If the active auto DHCP server does not respond, the switch sends the DHCP request to the backup DHCP server. -
Page 659: Acl Dhcprelay82 Server Set Command
Chapter 19 acl Commands 19.4.8 acl dhcprelay82 server set Command Syntax: acl dhcprelay82 server set <vid> <primary-server> [secondary-server] where A VLAN ID to be served with DHCP relay. <vid> Note: The DHCP server(s) must be in the same VLAN. The IP address of the primary DHCP server. <primary-server>... -
Page 660: Dhcp Relay Option 82 (Agent Information) Sub-Option 2 (Remote Id)
Chapter 19 acl Commands The following figure shows an example. The asterisk (*) in front of a DHCP server address indicates that it is the active DHCP server in the VLAN. ras> acl dhcprelay82 show dhcp relay status: disable dhcp relay mode: both dhcp relay option82 info: [NULL]... -
Page 661: Option 82 Sub-Option 2 Set Command
Chapter 19 acl Commands 19.5.3 Option 82 Sub-option 2 Set Command Syntax: ras> acl dhcprelay82 suboption2 set <vid> <info> where The ID of the VLAN to which to apply the setting. <vid> Up to 23 English keyboard characters of additional information for the MSC to add to the <info>... -
Page 662: Acl Dhcpsnoop Flush Command
Chapter 19 acl Commands 19.6.3 acl dhcpsnoop flush Command Syntax: acl dhcpsnoop flush <slot-port> This command clears the DHCP snooping binding table. The system automatically clears the binding table when you disable DHCP snooping on a port. 19.6.4 acl dhcpsnoop lan2lan disable Command Syntax: acl dhcpsnoop lan2lan disable <slot-port>... -
Page 663: Acl Dhcpsnoop Pool Delete Command
Chapter 19 acl Commands The following example adds two static IP addresses ( ) to the 192.168.1.10 192.168.1.11 DHCP snooping table on port 10 of the line card in slot 2. ras> acl dhcpsnoop pool set 2-10 192.168.1.10 ras> acl dhcpsnoop pool set 2-10 192.168.1.11 ras>... -
Page 664: Acl Dhcpv6Relay Clearinfo Command
Chapter 19 acl Commands Here is an example that configures LDRA to do the following for DHCPv6 requests from VLAN 5: • Creates a DHCPv6 relay entry for VLAN 5. • Sets the option 18 info to add this system’s host name and the slot, subscriber port, and SVLAN ID from which the request was received. -
Page 665: Acl Dot1X Commands
Chapter 19 acl Commands 19.8 acl dot1x Commands Use these commands to configure the IEEE 802.1x authentication feature. 19.8.1 acl dot1x disable Command Syntax: acl dot1x disable This command turns off the IEEE 802.1x authentication feature. 19.8.2 acl dot1x enable Command Syntax: acl dot1x enable This command turns on the IEEE 802.1x authentication feature. -
Page 666: Acl Dot1X Port Period Command
Chapter 19 acl Commands 19.8.6 acl dot1x port period Command Syntax: acl dot1x port period <slot-port> <secs> where <secs> = Sets the IEEE 802.1x re-authentication period in seconds (60~65535). This command sets the IEEE 802.1x re-authentication period for the specified subscriber ports. 19.8.7 acl dot1x port reauth Command Syntax: acl dot1x port reauth <slot-port>... -
Page 667: Acl Dot1X Radius Port Command
Chapter 19 acl Commands where The index number of an external RADIUS server entry (1 or 2). <index> This IP address of the external RADIUS server. <ip-address> This command sets the IP address of the specified external RADIUS server. 19.8.10 acl dot1x radius port Command Syntax: acl dot1x radius port <index>... -
Page 668: Acl Dscp Command
Chapter 19 acl Commands 19.9 acl dscp Command DSCP (Differentiated Services Code Point) is a field in the header of IP packets for packet classification purposes. The QoS (Quality-of-Service) in the Device uses DSCP to provide different level of services and priorities for downstream data transmission. 802.1p enables the Device transmit frames according to their 3-bit priority (0~7) in an 802.1q header. -
Page 669: Acl Maccount Commands
Chapter 19 acl Commands The mapping table shows service levels (0~63) and their priority for data transmission. For example, to find the priority level for the service level 43, find 40 in the left hand column and 3 in the top row. The intersection of the 3 column and 40 row gives a priority setting of 5. ras>... -
Page 670: Acl Maccount Set Command
Chapter 19 acl Commands 19.10.3 acl maccount set Command Syntax: acl maccount set <slot-port> <count> where Set the limit for how many MAC addresses that a port may dynamically learn. For <count> example, if you are configuring port 2 and you set this field to "5", then only five devices with dynamically learned MAC addresses may access port 2 at any one time. -
Page 671: Acl Macfilter Commands
Chapter 19 acl Commands 19.11 acl macfilter Commands Use the MAC filter commands to allow only incoming frames from MAC (Media Access Control) address(es) that you specify. MAC filter commands are listed next. You may specify up to ten MAC addresses per port. -
Page 672: Acl Macfilter Mode Command
Chapter 19 acl Commands 19.11.4 acl macfilter mode Command Syntax: acl macfilter mode <slot-port>|<slot-port-vpi/vci> accept|deny where Allows frames from MAC addresses that you specify and block accept: accept|deny frames from other MAC addresses. Blocks frames from MAC addresses that you specify and allow frames deny: from other MAC addresses. -
Page 673: Acl Macff Command
Chapter 19 acl Commands The following example displays the MAC filtering status on all ports of the line card in slot 2. ras> acl macfilter show 2 port mode enable mac address ----- ------ ------ ----------------- 2- 1 accept 2- 2 accept 2- 3 accept 2- 4 accept ---------------------- Snip ---------------------... -
Page 674: Acl Ouifilter Enable Command
Chapter 19 acl Commands 19.13.2 acl ouifilter enable Command Syntax: acl ouifilter enable <slot-port> This command activates MAC OUI filtering on the port(s) of the specified line card. 19.13.3 acl ouifilter mode Command Syntax: acl ouifilter mode <slot-port> accept|deny where Allows frames from MAC addresses with the OUI(s) that you specify accept: accept|deny... -
Page 675: Acl Ouifilter Show Command
Chapter 19 acl Commands 19.13.5 acl ouifilter show Command Syntax: acl ouifilter show <slot>|<slot-port> This command displays the OUI filtering status (V for enabled, - for disabled) and the OUI value(s) of the MAC address on a line card’s specified DSL port(s) or on all of the line card’s DSL ports if no port is specified. -
Page 676: Acl Pktfilter Show Command
Chapter 19 acl Commands Reject NetBIOS packets. (Network Basic Input/Output System) are TCP netbios: or UDP broadcast packets that enable a computer to connect to and communicate with a LAN. Reject IGMP packets. Internet Group Management Protocol is used when igmp: sending packets to a specific group of hosts. -
Page 677: Acl Pppoeagent Enable Command
Chapter 19 acl Commands 19.15.2 acl pppoeagent enable Command Syntax: acl pppoeagent enable <vid> This command turns on PPPoE line information for subscribers in the specified VLAN. The switch adds line information to PPPoE discover packets for user authentication and identification. The following example activates the PPPoE agent setting for VLAN 10. -
Page 678: Acl Pppoeagent Optionmode Command
Chapter 19 acl Commands The following example sets the switch to add “testing” as the line information to PPPoE discover packets on VLAN 10. ras> acl pppoeagent set 10 ras> acl pppoeagent enable 10 ras> acl pppoeagent info 10 testing ras>... -
Page 679: Acl Rule Commands
Chapter 19 acl Commands This command displays PPPoE line information settings. The following figure shows the PPPoE agent setting for VLAN 10. ras> acl pppoeagent show info ---- ----- ------------------------ testing vlan set: 1 ras> 19.16 acl rule Commands Use the commands to apply ACL profiles (you created using the acl rule profile acl... -
Page 680: Acl Rule Show Command
Chapter 19 acl Commands where Name of an access control profile. <profile> This command allows you to apply an access control profile to the specified DSL link(s). You can apply up to eight profiles to a subscriber port. The following example applies the “example” rule to PVC. ras>... -
Page 681: Acl Usbcastctrl Show
Chapter 19 acl Commands 19.17.2 acl usbcastctrl show Syntax: acl usbcastctrl show This command shows the maximum bandwidth for all upstream broadcast traffic entering the MSC. The following figure shows an example. ras> acl usbcastctrl show usbcastctrl enable usbcastctrl rate = 96 Management Switch Card User’s Guide... - Page 682 Chapter 19 acl Commands Management Switch Card User’s Guide...
-
Page 683: Alarm Commands
HAPTER alarm Commands This chapter describes the alarm management commands. 20.1 General alarm Command Parameters The following table describes commonly used command parameter notation. alarm Table 348 General alarm Command Parameters NOTATION DESCRIPTION Specify a category of alarms. alarm represents equipment alarms. eqpt represents Digital Subscriber Line (DSL) alarms. - Page 684 Chapter 20 alarm Commands Table 349 alarm Commands (continued) COMMAND DESCRIPTION Edits an alarm report entry. edit <alarm>|all <fac> <target>[,<targ et>] Sets the severity level of an alarm(s) and xedit <alarm> <cond> where the system is to send the alarm(s). <severity>...
-
Page 685: Alarm Commands
Chapter 20 alarm Commands 20.3 alarm Commands Use these commands to view and clear alarms. You can also set the device to report alarms to an SNMP or syslog server that you specify. 20.3.1 alarm clear Command Syntax: alarm clear This command erases (clearable) historic alarm entries. -
Page 686: Alarm History Show Command
Chapter 20 alarm Commands The following example removes the historic minor level alarms for all alarm categories, and all conditions. ras> alarm history clear minor 20.3.5 alarm history show Command Syntax: alarm history show [<severity>|all] [<alarm>|all] [<condition>|all] [<sdate>|all] [<edate>|all] [for|rev] [detail] This command displays historic alarms by severity, alarm category or alarm condition. -
Page 687: Alarm Port Show Command
Chapter 20 alarm Commands 20.3.7 alarm port show Command Syntax: alarm port show <slot> where The log facility ( ) that has the device log the syslog messages to local1~local7 <fac> different files in the syslog server. See your syslog program’s documentation for details. -
Page 688: Alarm Tablelist Command
The following example displays the critical level alarms for all alarm categories and conditions. ras> alarm show critical all [current card alarm] state card type heat vol mon down out --- --------- --------------- --------------------- standby MSC1000G active MSC1000G ALC1248G-53 active ALC1248G-53 ALC1248G-51 ALC1248G-53... -
Page 689: Alarm Xedit Command
Chapter 20 alarm Commands The following example displays the supported alarms for all alarm levels, all alarm categories, all facilities, all types of alarm messages and all conditions. ras> alarm tablelist no alarm (code)condition facility snmp syslog severity clearable --- ------ ------------------------- --------- ---- ------ -------- ------- ( 5002)LINE_UP local1... - Page 690 Chapter 20 alarm Commands Management Switch Card User’s Guide...
-
Page 691: Clear Commands
HAPTER clear Commands This chapter describes the clear commands that you use to reset the various system counters. 21.1 clear Commands Summary The following table lists the clear commands you can use to reset the counters. Once you reset a counter, you can only display new counter information using the command. -
Page 692: Clear Command Example
Chapter 21 clear Commands Table 350 clear Commands (continued) COMMAND DESCRIPTION Resets the PAE PVC records. paepvc counter <slot- port>|<slot- port-vpi/ vci> Resets subscriber line performance performance <slot-port> records. curr|15min|1 21.2 clear Command Example The following example resets the IGMP counters on the system. This clears the IGMP counters and the number of IGMP groups learned. -
Page 693: Config Commands
HAPTER config Commands This chapter describes the configuration file management commands. 22.1 config Commands Summary The following table lists the commands. The P column on the right indicates the config administrator privilege level needed to use the command. Table 351 config Commands COMMAND DESCRIPTION Resets factory default configuration. -
Page 694: Config Show Command
Chapter 22 config Commands Table 351 config Commands (continued) COMMAND DESCRIPTION Uploads the specified configuration file to upload <ip> <filename> the MSC from a TFTP server. ip: a TFTP server’s IP address filename: the path and filename of the configuration file on the TFTP server Displays the current configuration. - Page 695 Chapter 22 config Commands An example is shown next. ras> config show ip nopause ================= ip ====================================== ================= ip/show ==================== interface interface ip netmask --------- --------------- --------------- ---- inband 123.23.15.86 255.255.255.0 outband 192.168.0.1 255.255.255.0 gateway: 123.23.15.254 ================= ip/arp ===================== ip address time ether address interface --------------- ----- ----------------- ----------...
- Page 696 Chapter 22 config Commands Management Switch Card User’s Guide...
-
Page 697: Diagnostic Commands
HAPTER diagnostic Commands This chapter describes the commands. diagnostic 23.1 Terms and Definitions This section lists the terms and definitions appearing in several commands in this section. Refer to your User’s Guide for more detailed information. Table 352 CFM Terms and Definitions TERM DESCRIPTION CFM (Connectivity Fault Management) is used to detect, analyze connectivity faults in... -
Page 698: General Diagnostic Command Parameters
Chapter 23 diagnostic Commands 23.2 General diagnostic Command Parameters The following table describes commonly used command parameter notation. diagnostic Table 353 General diagnostic Command Parameters NOTATION DESCRIPTION The maintenance domain name (length<32). md-name The maintenance association name (length<16). ma-name The endpoint identifier (1~8191). ep-id The remote end point identifier (1~8191). - Page 699 Chapter 23 diagnostic Commands Table 354 diagnostic Commands (continued) COMMAND DESCRIPTION Specifies the MD name, MA name, MEP ID, linktrace set <md-name> <ma- destination (MEP ID or MAC address) to perform name> <ep-id> a link trace test. <remote-ep- id>|<mac> <ttl> This enables the MEP port (with the specified MEP ID) in a specified CFM domain to send the LTMs (Link Trace Messages) to a specified...
- Page 700 Chapter 23 diagnostic Commands Table 354 diagnostic Commands (continued) COMMAND DESCRIPTION Performs an IMA loopback test for the specified enable <slot-gid> IMA group. <link-id> <pattern> link: the number of an E1 link in the same IMA group pattern: This is a 2-digit hexadecimal number the IMA line card will add into IMA Control Protocol (ICP) cells before sending them to the remote connected device.
-
Page 701: Diagnostic Commands
Chapter 23 diagnostic Commands Table 354 diagnostic Commands (continued) COMMAND DESCRIPTION Turns the test relay in/out function on/off. relay set <slot-port> in|out|both|off Displays the current MLT relay status of each relay VoIP line card’s ports. show Sends OAM loopback test Ethernet frames to a test <slot-port>... -
Page 702: Diagnostic Cfm Linktrace Show Command
Chapter 23 diagnostic Commands The following shows an example. ras> diagnostic cfm loopback set testmd testma 1 target 2 loopback repId 2 received response ras> diagnostic cfm loopback set testmd testma 1 target 00:13:49:00:00:02 loopback 00:13:49:00:00:02 received response 23.4.2 diagnostic cfm linktrace show Command Displays a link trace test report. -
Page 703: Diagnostic Ldm Show Command
Chapter 23 diagnostic Commands where The maintenance domain name (length<32). md-name The maintenance association name (length<16) ma-name The endpoint identifier (1~8191). ep-id remote-ep-id = The remote endpoint identifier used to resolve the remote MAC address in the CCM database. An arbitrary unicast MAC address. This is Time-To-Live value (1~63 seconds). -
Page 704: Diagnostic Ldm Test Command
Chapter 23 diagnostic Commands The command then displays the results of the ADSL port loop diagnostics. ras> diagnostic ldm show 5-4 result port 5-4: near end far end ------------ ------------ attainable bit rate(kpbs): 1420 26060 loop attenuation(dB) signal attenuation(dB) snr margin(dB) : out of range out of range actual tx power fe(dBm) -
Page 705: Diagnostic Loopback Internal Command
Chapter 23 diagnostic Commands 23.4.7 diagnostic loopback internal Command This command performs a loopback test on the specified DSL port. The following example performs loopback diagnostic on DSL port 5 of the line card in slot 2. The command then displays the results of the DSL port loop diagnostic. ras>... -
Page 706: Diagnostic Mlt Show Command
Chapter 23 diagnostic Commands Only all, ring and digit have <type> to select. <type> With all: <type>: use 0 to perform all tests or 1 to test AC voltage, DC voltage, isolation resistance, and capacitance. With ring: <type>: use 0 to have the system automatically start and stop ringing or use 1 to manually start the ringing and 2 to manually stop the ringing. -
Page 707: Diagnostic Mlt Relay Show Command
Chapter 23 diagnostic Commands The following example allows diagnostic testing (both directions) on port 8 of slot 4. ras> diagnostic mlt relay set 4-8 both 23.5.4 diagnostic mlt relay show Command Syntax: diagnostic mlt relay show This command shows the test relay conditions of all VoIP line card ports. Test relay functions are off by default. -
Page 708: Diagnostic Selt Commands
Chapter 23 diagnostic Commands The following example shows the result of the last test conducted on the line connected to port 13 of slot 7. ras> diagnostic oam show 7-13 4 of 4 test ok, time =1(ms), 4000.0 (pkt/sec) Test status: OK 23.7 diagnostic selt Commands Use these commands to perform Single End Loop Tests on subscriber ports. -
Page 709: Diagnostic Loopback Ima Commands
Chapter 23 diagnostic Commands 1 (Line LPBK) return all physical or electrical signals received from the remote connected device 2 (In-ward LPBK) force all transmitted data to return to this port 3 (Payload LPBK) return all data received from the remote connected device This command specifies the loopback testing mode on an E1 port. - Page 710 Chapter 23 diagnostic Commands Syntax: diagnostic loopback ima disable <slot-gid> This command stops the previous IMA loopback test for the specified IMA group. The following example performs an IMA loopback test using a testing pattern ff on IMA group 3 and link 1 of slot 2.
-
Page 711: Ima Commands
HAPTER ima Commands This chapter describes the commands. 24.1 General ima Command Parameters The following table describes commonly used command parameter notation. Table 355 General diagnostic Command Parameters NOTATION DESCRIPTION The number of a slot and a port on the slot. For example, 2-5 means port 5 on slot 2. slot-port The number of a slot and an IMA group on the slot. - Page 712 Chapter 24 ima Commands Table 356 ima Commands (continued) COMMAND DESCRIPTION Select the source of the clock which the IMA group set <slot-gid> [ctc should use for the E1 port(s) in the selected local]|[ctc loop]|[itc] IMA group. Enables the specified IMA group. enable <slot-gid>...
- Page 713 Chapter 24 ima Commands Table 356 ima Commands (continued) COMMAND DESCRIPTION Sets a bridged management PVC. When the mgtpvc set <slot-group-vpi/vci> IES (with an IMA line card installed) is used in <profile> <llc|vcmux> a remote site (see IMA Application page <pvid>...
-
Page 714: Ima Group Commands
Chapter 24 ima Commands Table 356 ima Commands (continued) COMMAND DESCRIPTION Removes the specified PVC setting on the delete <slot-group-vpi/vci> specified IMA group. Displays all IMA PVC settings for the specified show <slot>|<gid>|<slot-group- IMA slot, IMA group, or IMA group with a vpi/vci>... - Page 715 Chapter 24 ima Commands Syntax: ima group link <slot-gid> <linklist> where The number of one or multiple link(s) that you want to add into this IMA linklist group. For examples, 1,3 means links 1 and 3. 1~3 means links 1, 2 and This command sets link members for the specified IMA group.
- Page 716 Chapter 24 ima Commands Syntax: ima group minlink <slot-gid> <minlink> where This is the minimum number of E1 lines (1~8) the specified IMA group minlink should support. Once all of these E1 lines link up, the IMA group automatically activates. Disconnecting one of these E1 lines deactivates this IMA group.
-
Page 717: Ima Mgtpvc Commands
Chapter 24 ima Commands The following example shows the settings of IMA group 2 on slot 2. ras> ima group show 2-2 slot group state : enable frame size : 128 frame sync alpha frame sync beta frame sync gamma clock mode : ctc loop group symmetry... - Page 718 Chapter 24 ima Commands Figure 429 Routed MGTPVC Configuration Example IMA-1 IMA-2 192.168.1.3 192.168.1.2 192.168.1.1 The following shows how to map management frames with a PVC on IMA group 2 of slot 2 using the following settings: • Management frames: tagged with VLAN ID 100 and priority 7 •...
-
Page 719: Ima Pvc Commands
Chapter 24 ima Commands 24.5 ima pvc Commands Syntax: ima pvc set <slot-group-vpi/vci> <profile> <llc|vcmux> <pvid> <priority> This command sets a PVC on an IMA line card. The following example shows how to map specific single-tagged frames with a PVC on IMA group 1 of slot 2 using the following settings: •... - Page 720 Chapter 24 ima Commands The c-tag VLAN ID, 1~4094. cvid The priority for the c-tag VLAN, 0~7. cpri This command sets a double-tagged PVC (DTPVC) on an IMA line card. The following example shows how to set a DTPVC on IMA group 3 of slot 2 using the following settings: •...
-
Page 721: Ip Commands
HAPTER ip Commands Here is how to use the commands to configure the IP (Internet Protocol) version 4 parameters. Note: The ip commands are for management purposes, rather than for user traffic. 25.1 ip Commands Summary The following table lists the commands. -
Page 722: Ip Commands
Chapter 25 ip Commands Table 357 ip Commands (continued) COMMAND DESCRIPTION Sets the management IP address, subnet mask inband|outband and in-band management VLAN ID. <ip-address>[/ <netmask>] ip-address: ‘0.0.0.0’ disables a management [<inband-vid>] interface. inband-vid: The VLAN ID for this interface. Note: Misconfiguring the management IP address or VLAN ID may lock yourself out from managing the device. -
Page 723: Ip Gateway Command
Chapter 25 ip Commands An example is shown next. ras> ip arp show ip address time ether address interface --------------- ----- ----------------- ---------- 123.23.14.65 300 00:00:86:47:11:91 outband 123.23.15.172 300 02:0e:a6:89:41:60 outband 123.23.15.254 300 00:04:80:9b:78:00 outband arp entry: 3 25.2.3 ip gateway Command Syntax: ras>... -
Page 724: Ip Route Set Command
Chapter 25 ip Commands where The destination IP address of packets to which this static route applies. <dst ip> [/netmask] = The destination subnet mask of packets to which this static route applies. The IP address of the gateway that you want to send the packets through. <gateway>... -
Page 725: Ip Show Command
Chapter 25 ip Commands 25.2.8 ip show Command Syntax: ras> ip show Use the command to display the current management IP settings. An example is shown next. ras> ip show interface interface ip netmask --------- --------------- --------------- ---- inband 192.168.1.2 255.255.255.0 outband 123.23.15.86... -
Page 726: Ip Tracert Command
Chapter 25 ip Commands Note: Use the out-of-band management port or console port to configure the system if you misconfigure the management VLAN and lock yourself out from performing in- band management. Note: It is highly recommended that you use the sys reboot <seconds> command before using any command that may lock yourself out from performing device management. -
Page 727: Ip6 Commands
HAPTER ip6 Commands Here is how to use the commands to configure the IP (Internet Protocol) version 6 parameters. Note: The ip6 commands are for management purposes, rather than for user traffic. 26.1 ip6 Commands Summary The following table lists the commands. -
Page 728: Ip6 Commands
Chapter 26 ip6 Commands 26.2 ip6 Commands The following shows general IPv6 commands that help with the management of the IPv6 parameters. 26.2.1 ip6 gateway Command Syntax: ras> ip6 gateway <ip-address> This command sets the system’s default gateway IPv6 address. The following example sets the system to use 2001:db8:1a2b:15::1a2f:0 as the default gateway. -
Page 729: Ip6 Show Command
Chapter 26 ip6 Commands The following example has the system send 4 pings to IP address 2001:db8:1a2b:15::1a2f:1. ras> ip6 set inband 2001::10/64 ras> ip6 ping 2001::8 pinging 2001::8 with 32 bytes of data: sent rcvd rate mdev reply from 2001::8 2001::8 2001::8 26.2.4 ip6 show Command... - Page 730 Chapter 26 ip6 Commands where Sets the in-band management IP address. inband Sets the out-of-band management IP address (for the MGMT port). outband Sets the VLAN ID (Identifier) of the management (CPU) VLAN. You must [<inband- connect to the system through a port that is a member of the management vid>] (CPU) VLAN in order to perform in-band management.
-
Page 731: Lcman Commands
HAPTER lcman Commands This chapter shows you how to use the commands to manage the line cards. lcman 27.1 lcman Commands Summary The following table lists the commands. The P column on the right indicates the lcman administrator privilege level needed to use the command. Table 359 lcman Commands COMMAND DESCRIPTION... -
Page 732: Lcman Reset Command
The following example shows an overview of all of the cards that are installed in the system’s slots. ras> lcman show id state card type uptime f/w version heat vol mon down out -- -------- ----------- ------------- ------------------- --------------------- 1 standby MSC1000G 01:36:48 V3.70(LU.0) 2 active MSC1000G 23:45:55 V3.70(LU.0) ALC1248G-53 V3.70(ABE.0) 5 active ALC1248G-53 22:45:41 V3.53(ABE.0) - Page 733 Chapter 27 lcman Commands The following table describes labels in the example. Table 360 lcman show Command LABEL DESCRIPTION This is the slot number. state This displays whether or not the installed card is turned on. card type This identifies the model of card that is installed or was last installed in the slot. uptime This is how long the card has been active.
- Page 734 Chapter 27 lcman Commands The following table describes labels in the example. Table 361 lcman show Command: Detailed Information LABEL DESCRIPTION slot This is the slot number followed by the model of card that is installed or was last installed in the slot. uptime This is how long the card has been active.
-
Page 735: Multicast Commands
HAPTER multicast Commands This chapter shows you how to use the commands. multicast 28.1 multicast Commands Summary The following table lists the commands. The P column on the right indicates the multicast administrator privilege level needed to use the command. Table 362 multicast Commands COMMAND DESCRIPTION... - Page 736 Chapter 28 multicast Commands Table 362 multicast Commands (continued) COMMAND DESCRIPTION Turns on IGMP proxy or snooping using the enable proxy|snooping specified version. IGMP v2 and v3 are for [igmpv2|igmpv3|mld IPv4 and Multicast Listener Discovery v1|mldv2] (MLD)v1 and 2 are for IPv6. Enables IGMP fast leave to allow the fastleave enable...
- Page 737 Chapter 28 multicast Commands Table 362 multicast Commands (continued) COMMAND DESCRIPTION Sets the way how this Device handles IGMP mode <aggressive|normal join/leave reports sent from subscribers to > uplink devices when it cannot find a "query port". A query port is the port the Device uses for IGMP queries' receiving and IGMP reports' forwarding from/to its uplink router.
- Page 738 Chapter 28 multicast Commands Table 362 multicast Commands (continued) COMMAND DESCRIPTION Displays IGMP control message statistics show <slot>|<slot-port> for the specified slot or port. Sets how to handle IPv6 multicast packets. ipv6passthro flood|drop|disable flood: Forwards all IPv6 multicast packets to all ports. drop:Drops all IPv6 multicast packets.
-
Page 739: Multicast Bandwidth Commands
Chapter 28 multicast Commands Table 362 multicast Commands (continued) COMMAND DESCRIPTION The reserved group here means IPv4 reservedgrou <flood|drop> packets with the destination IP address from 224.0.0.1 to 224.0.0.254. flood: Forwards all the reserved group packets to all ports. drop: Drops all the reserved group packets. -
Page 740: Multicast Bandwidth Set Command
Chapter 28 multicast Commands 28.2.3 multicast bandwidth set Command Syntax: multicast bandwidth set <index> <start-mcast-ip> <end-mcast-ip> <bandwidth> where A unique number for this setting. <index> <start-mcast-ip> = The start of the multicast address range. The end of the multicast address range. For one multicast address, enter <end-mcast-ip>... -
Page 741: Multicast Bandwidth Port Show Command
Chapter 28 multicast Commands This command sets the bandwidth allowed for multicast traffic on the specified port(s). This following example sets the multicast bandwidth limit to 1000 kbps on port 1 on the line card in slot 3. ras> multicast bandwidth port set 3-1 1000 After using this command, if the device receives a join report and the total multicast traffic at that moment is over 1000 kbps, the device ignores the join report. -
Page 742: Multicast Groupmacaddr Set Command
Chapter 28 multicast Commands 28.4.2 multicast groupmacaddr set Command Syntax: multicast groupmacaddr set <vid> <group-mac-addr> <giga-port>|<slot-port> fix|forbid where <group-mac-addr> = The static multicast MAC address. This command configures static MAC multicast to allow incoming frames based on multicast MAC address(es) that you specify. Use this to pass allowed layer 2 multicast packets through the IES. The following example configures VID 2 to have the multicast MAC address 01:01:5E:00:00:05 on port 2 in slot 9 as a fixed member. -
Page 743: Multicast Igmp Fastleave Enable Command
Chapter 28 multicast Commands the fastleave timer expires. In IPTV applications, this feature allows users to quickly switch between video channels. 28.5.1 multicast igmp fastleave enable Command Syntax: multicast igmp fastleave enable This command activates multicast fastleave on the system. 28.5.2 multicast igmp fastleave disable Command Syntax: multicast igmp fastleave disable... -
Page 744: Multicast Igmp Qryvid Delete Command
Chapter 28 multicast Commands This command turns on IGMP proxy or snooping using the specified version. The Multicast Listener Discovery (MLD) protocol (defined in RFC 2710) is derived from IPv4's Internet Group Management Protocol version 2 (IGMPv2). MLD uses ICMPv6 message types, rather than IGMP message types. MLDv1 is equivalent to IGMPv2 and MLDv2 is equivalent to IGMPv3. -
Page 745: Multicast Igmp Show Command
Chapter 28 multicast Commands This command displays the IGMP query VLAN IDs. ras> multicast igmp qryvid show igmp proxy query vlan table static/dynamic ---- -------------- 6 static 28.6.6 multicast igmp show Command Syntax: ras> multicast igmp show This command displays the current IGMP settings. The following shows an example. ras>... -
Page 746: Multicast Igmpcount Enable Command
Chapter 28 multicast Commands The following command turns off the IGMP count limit for DSL port 4 on the line card in slot 3. ras> multicast igmpcount disable 3-4 28.8.2 multicast igmpcount enable Command Syntax: multicast igmpcount enable <slot-port> This command turns on the IGMP count limit for the specified DSL port(s). The following command turns on the IGMP count limit for DSL port 4 on the line card in slot 3. -
Page 747: Multicast Igmpfilter Commands
Chapter 28 multicast Commands This command displays the IGMP count limit setting status for the DSL ports on the line card in the specified slot. The following example displays the IGMP count limit settings for the ports on the line card in slot 3. -
Page 748: Multicast Igmpfilter Show Command
Chapter 28 multicast Commands 28.9.2 multicast igmpfilter show Command Syntax: multicast igmpfilter show <slot> This command displays which IGMP filter profile DSL ports are using. The following example displays which IGMP filter profiles the DSL ports in slot 3 are using. ras>... -
Page 749: Multicast Igmpmsgcount Set Command
Chapter 28 multicast Commands This command enables limiting the number of IGMP control messages allowed to flow through the specified slot and port. The following example enables limiting of the number of IGMP control messages on port number 2 on the line card in slot 5. ras>... -
Page 750: Multicast Mvlan Delete Command
Chapter 28 multicast Commands Multicast VLAN allows one single multicast VLAN to be shared among different subscriber VLANs on the network. This improves bandwidth utilization by reducing multicast traffic in the subscriber VLANs and simplifies multicast group management. 28.11.1 multicast mvlan delete Command Syntax: multicast mvlan delete <vid>... -
Page 751: Multicast Mvlan Group Delete Command
Chapter 28 multicast Commands This command creates a multicast VLAN group. The following example creates a multicast VLAN with VID 10 and group index 1. The multicast address range is 224.224.224.1 ~ 224.224.224.10. ras> multicast mvlan group set 10 1 224.224.224.1 224.224.224.10 28.11.6 multicast mvlan group delete Command Syntax: multicast mvlan group delete <vid>... -
Page 752: Multicast Smcast Commands
Chapter 28 multicast Commands This command displays the current multicast VLAN settings. In the state column, “-” indicates the multicast VLAN is not active while “V” indicates the multicast VLAN is active. ras> multicast mvlan show idx vid state name --- ---- ----- ------------------------------- example ras>... -
Page 753: Multicast Smcast Show Command
Chapter 28 multicast Commands This controls the static multicast group membership status of the port fix|forbid|normal (or ports). Sets the port to be a permanent member of the multicast group. fix: llows the port to join the multicast group when the device normal: A adds it through IGMP protocol. - Page 754 Chapter 28 multicast Commands Management Switch Card User’s Guide...
-
Page 755: Port Commands
HAPTER port Commands This chapter shows you how to use the commands. port 29.1 General port Command Parameters The following table describes commonly used command parameter notation. port Table 363 General port Command Parameters NOTATION DESCRIPTION The name of an alarm profile configured using the profile alarm commands. alarmprofile Specify whether a port joins join) or leaves (leave... - Page 756 Chapter 29 port Commands Table 364 port Commands COMMAND DESCRIPTION Applies an ADSL alarm profile to the subscriber port adsl alarmprof <slot-port> port. <alarmprofile> Turns off the Annex L reach extended feature. annexl disable <slot-port> Turns on the Annex L reach extended feature. If enable <slot-port>...
- Page 757 Chapter 29 port Commands Table 364 port Commands (continued) COMMAND DESCRIPTION Sets the L0 (full power) and L2 (low power) power param <slot-port> mode transition settings. [l0time <l0time>] [l2time <l2time>] : Time (10~ 65535 seconds) to stay in L0 l0time [l2pcb <l2atpr>...
- Page 758 Chapter 29 port Commands Table 364 port Commands (continued) COMMAND DESCRIPTION Resets the specified subscriber port’s settings to its defaul <slot-port> defaults. Turns off a subscriber port. disabl <slot-port> [data|pots] Displays port settings. show <slot>|<slot- [data|pots] port>[pvc|vla slot: Specifies the slot of a line card (not MSC’s slot).
- Page 759 Chapter 29 port Commands Table 364 port Commands (continued) COMMAND DESCRIPTION Sets the incoming or outgoing bandwidth control enet bandwidth <slot-port> <ingress- for the specified Ethernet (ELC) subscriber port(s) rate> <egress-rate> (0~99968 Kbps). ingress-rate: The incoming bandwidth rate on a port.
- Page 760 Chapter 29 port Commands Table 364 port Commands (continued) COMMAND DESCRIPTION Adds the VLAN ID and 802.1p priority to untagged set <slot-port> frames with the specified Ethernet type. <etype> <vid> <priority> Assigns a profile of per-queue rate limiting qratelimit <slot-port> <profile> parameters to the specified port.
- Page 761 Chapter 29 port Commands Table 364 port Commands (continued) COMMAND DESCRIPTION Removes the specified XVLAN entry (cvid) from the xvlan delete <slot-port> specified port. <cvid> Note: These port enet xvlan commands only support the GLC1320G-55 line cards. Creates an XVLAN entry for the specified port. set <slot-port>...
- Page 762 Chapter 29 port Commands Table 364 port Commands (continued) COMMAND DESCRIPTION Deletes the specified edge router settings. edgerouter delete <ip-address> <vid> Sets the edge router. set <ip-address>/ <mask> <vid> Displays the list of edge routers. show all Displays details for the edge router for the show <domain-name>...
- Page 763 Chapter 29 port Commands Table 364 port Commands (continued) COMMAND DESCRIPTION Configures a PVC for PAE translation. <slot-port-vpi/vci> <profile> <mux> acname: The host name of the access concentrator. <pvid> <priority> srvcname: A descriptive name for the service that [acname <acname>] uses this PVC.
- Page 764 Chapter 29 port Commands Table 364 port Commands (continued) COMMAND DESCRIPTION Sets the impedance level on the specified impedance <slot-port> subscriber port. <impedance> impedance: 200ohm_680ohm_100nf, 220ohm_680ohm_100nf, 220ohm_820ohm_115nf, 220ohm_820ohm_120nf, 270ohm_750ohm_150nf, 300ohm_1000ohm_220nf, 370ohm_620ohm_310nf, 600ohm, 600ohm_1000nf, 900ohm, 900ohm_2160nf and DEFVAL Note: DEFVAL impedance is set at the impedance of the country defined in the countrycode command.
- Page 765 Chapter 29 port Commands Table 364 port Commands (continued) COMMAND DESCRIPTION Creates or modifies a PVC setting. <slot-port-vpi/vci> <profile> <mux> profile: The asynchronous transfer mode (ATM) <pvid> <priority> profile. Specify the ATM profile using profile atm [acname <acname>] commands. [srvcname <srvcname>] acname: The hostname of a remote access concen- [hellotime trator.
- Page 766 Chapter 29 port Commands Table 364 port Commands (continued) COMMAND DESCRIPTION Sets the transmission convergence mode for mode <slot-port> atm|efm SHDSL port(s). efm: use Ethernet frames inside SHDSL framing. atm: use ATM cells inside SHDSL framing. Sets power backoff for SHDSL port(s). <slot-port>...
- Page 767 Chapter 29 port Commands Table 364 port Commands (continued) COMMAND DESCRIPTION Specifies the SIP password a port on a VoIP line password <slot-port> card uses. <password> Use this command to turn polarity reversal on or polarityrever <slot-port> <on|off> off. Turn on polarity reversal to reverse the tip and ring after a call is established and again after it terminates.
- Page 768 Chapter 29 port Commands Table 364 port Commands (continued) COMMAND DESCRIPTION Sets DPBO parameters for the specified port. param <slot-port> [type <type>] [escma type: DPBO type, 0=g.997.1 or 1=t-com <escma>] [escmb escma, escmb, escmc: DPBOESCMA, DPBOESCMB, <escmb>] [escmc and DPBOESCMC parameters. 0~640 represents - <escmc>] [esel 1 ~ 1.5 in steps of 1/256.
- Page 769 Chapter 29 port Commands Table 364 port Commands (continued) COMMAND DESCRIPTION Configures improved impulse noise protection ginp <slot-port> xtuc|xtur settings on a VDSL connection. See Section [etrmax <etrmax>] 29.41.6 on page 827 for details. [etrmin <etrmin>] [ndrmax <ndrmax>] [shineratio <shineratio>] [leftrthreshold <leftrthreshold>] [maxdelay <maxdelay>]...
- Page 770 Chapter 29 port Commands Table 364 port Commands (continued) COMMAND DESCRIPTION Configures the PSD (Power Spectrum Density) limitmask set <slot-port> mask. <limitmask limitmask: 1: VDSL2_A_NUS0 2~11: VDSL2_A_EU[32,36,40,44,48,52,56,60,64,128] 12: VDSL1_FTTEX_ANSI_M1 13: VDSL1_FTTEX_ANSI_M2 14: VDSL1_FTTCAB_ANSI_M1 15: VDSL1_FTTCAB_ANSI_M2 16: VDSL1_FTTEX_ANSI_M1_e 17: VDSL1_FTTEX_ANSI_M2_e 18: VDSL1_FTTCAB_ANSI_M1_e 19: VDSL1_FTTCAB_ANSI_M2_e 20: VDSL2_A_CT 21~36: VDSL2_B8_[1..16]...
- Page 771 Chapter 29 port Commands Table 364 port Commands (continued) COMMAND DESCRIPTION Sets the port VID on the VDSL port(s). pvid <slot-port> <vid> Deletes a protocol VLAN setting on a specified port. 8 pvlan delete <slot-port> <etype> Sets the protocol VLAN settings on a specified port. 8 set <slot-port>...
- Page 772 Chapter 29 port Commands Table 364 port Commands (continued) COMMAND DESCRIPTION Configures SOS emergency rate reduction on the <slot-port> xtuc|xtur VDSL port(s). [sosminrate < >] [sostime sosminrate sosminrate : minimum bearer rate that must be < >] [soscrc sostime gauranteed after an SOS request, 0~100032 kbps. <...
- Page 773 Chapter 29 port Commands Table 364 port Commands (continued) COMMAND DESCRIPTION Disables upstream carrier tones (from 0~63). uscarrier <slot-port> <m0> <m1> For example, setting m0 to “80” and m1 to “0” means to disable upstream carrier tone 8. m0, m1: carrier tones mask, 0~ffffffff. Set the value to 1 to disable the corresponding tone.
- Page 774 Chapter 29 port Commands Table 364 port Commands (continued) COMMAND DESCRIPTION Sets the double tagging settings on a port. set <slot-port> <svid> <spriority> svid: service provider VLAN ID, 0~4094 <cvid> <cpriority> spri: service provider VLAN priority, 0~7 cvid: customer VLAN ID, 0~4094 cpri: customer VLAN priority, 0~7 Sets the acceptable frame type on the port(s).
-
Page 775: Port Commands
Chapter 29 port Commands Table 364 port Commands (continued) COMMAND DESCRIPTION Sets the port’s Class of Service (CoS) scheduling qschedule <slot-port> [<spq> | method. SPQ (Strict Priority Queuing) services <wrr <wt0> <wt1> queues based on the traffic’s IEEE 802.1p priority. <wt2>... -
Page 776: Port Adsl Alarmprof Command
Chapter 29 port Commands 29.4.1 port adsl alarmprof Command Syntax: port adsl alarmprof <slot-port> <alarmprofile> where The name of an ADSL alarm profile. <alarmprofile> This command applies (maps) an ADSL alarm profile to the subscriber port(s). The following example sets ADSL port 5 on the line card in slot 7 to use the SESalarm alarm profile. ras>... -
Page 777: Port Adsl Annexm Disable Command
Chapter 29 port Commands 29.4.4 port adsl annexm disable Command Syntax: port adsl annexm disable <slot-port> This command turns off the Annex M double upstream feature on the specified ADSL2/2+ port(s). The following example turns off the Annex M feature for port 5 on the line card in slot 7. ras>... -
Page 778: Port Adsl Dscarrier0 Command
Chapter 29 port Commands 29.4.8 port adsl dscarrier0 Command Syntax: port adsl dscarrier0 <slot-port> <m1> <m2> <m3> <m4> <m5> <m6> <m7> where The downstream carrier tones to be disabled. Each <mx> can use up to 8 <m1> <m7> hexadecimal digits (0~ffffffff). Each <mx> represents 32 carrier tones (each hexadecimal digit represents 4 tones). -
Page 779: Port Adsl Inpmin Command
Chapter 29 port Commands tones 384~415 tones 416~447 tones 448~479 tones 480~511 The hexadecimal digit is converted to binary and a '1' disables the corresponding tone. Disabling a carrier tone turns it off so the system does not send data on it. This command disables downstream carrier tones from 256 to 511 on the specified ADSL2+ port(s). -
Page 780: Port Adsl Optionmask Command
Chapter 29 port Commands 29.4.11 port adsl optionmask Command Syntax: port adsl optionmask <slot-port> <option_mask> where <option_mask> : Disables Trellis 0x0001 Trellis encoding helps to reduce the noise in ADSL transmissions. Trellis may reduce throughput but it makes the connection more stable. : Disables Reed-Solomon 0x0002 Reed-Solomon performs transmission error correction. -
Page 781: Port Adsl Pmm Enable Command
Chapter 29 port Commands 29.4.13 port adsl pmm enable Command Syntax: port adsl pmm enable <slot-port> [L2|L3] where Power management mode L2. This is a power saving mode that scales back the power usage to where there is just enough to support the transmission rate that the subscriber is using. -
Page 782: Port Adsl Psd Maximum Command
Chapter 29 port Commands The following example sets ADSL port 5 on the line card in slot 7 to only use up to 10.0 dBm of power for upstream transmissions, 11.5 dBm of power for downstream transmissions and -7.0 dBm of aggregated receive power. -
Page 783: Port Adsl Uscarrier Command
Chapter 29 port Commands Note: When the mode is set to auto, the connection rates are governed by the negotiated ADSL mode regardless of the rates configured in the profile. For example, if the profile is set to use a rate of 18000 Kbps, that speed is only supported if the negotiated ADSL mode is ADSL 2+. -
Page 784: Port Disable Command
Chapter 29 port Commands The slot and port number(s) to which you want to copy settings. <destination> This command copies the port settings from a source port to destination ports on the same type of line card. The following example copies the settings from port 5 on the line card in slot 7 to all of the ports on the line card in slot 7. -
Page 785: Dtpvc Mvlan Enable Command
Chapter 29 port Commands 29.7.3 dtpvc mvlan enable command Syntax: port dtpvc mvlan enable <slot-port-vpi/vci> This command turns on MVLAN for the specified DTPVC. The following example turns on MVLAN on DTPVC 8/35 on port 1 on the line card in slot 3. ras>... -
Page 786: Port Enable Command
Chapter 29 port Commands 29.8 port enable Command Syntax: port enable <slot-port> This command turns on the specified subscriber port(s). The following example turns on port 5 on the line card in slot 7. ras> port enable 7-5 29.9 port e1 Commands Syntax: port e1 alarmprof <slot-port>... -
Page 787: Port Enet Bandwidth Command
Chapter 29 port Commands 29.10.1 port enet bandwidth Command Syntax: port enet bandwidth <slot-port> <ingress-rate> <egress-rate> where <ingress-rate> The maximum bandwidth allowed in kilobits per second (Kbps) for the incoming traffic flow on a port. Use a number from 0 to 99968 in increments of 64 kbps. -
Page 788: Port Enet Dot3Ad Enable Command
Chapter 29 port Commands 29.10.4 port enet dot3ad enable Command Syntax: port enet dot3ad enable <slot> t1|t2|…|t10 [lacp] This command turns on link aggregation on the specified subscriber port trunk group. Use lacp to turn on LACP protocol. This example turns on link aggregation on the t1 trunk group on an ELC in slot 4. ras>... -
Page 789: Port Enet Flowctrl Enable Command
Chapter 29 port Commands 29.10.7 port enet flowctrl enable Command Syntax: port enet flowctrl enable <slot-port> This command turns on flow control on an Ethernet (ELC) subscriber port. The following example turns on the flow control on port 5 on the ELC in slot 4. ras>... -
Page 790: Port Enet Qratelimit Command
Chapter 29 port Commands 29.10.10 port enet qratelimit Command Syntax: port enet qratelimit <slot-port> <profile> This command sets the specified Ethernet port(s) to use a profile of per-queue rate limiting parameters The following example sets port 13 on the ELC in slot 7 to use a per-queue rate limiting profile named test. -
Page 791: Port Enet Ratelimit Command
Chapter 29 port Commands 29.10.13 port enet ratelimit Command Syntax: port enet ratelimit <slot-port> <rate-limit_profile> This command sets the specified Ethernet port(s) to use a profile that limits egress and ingress rates. The following example sets port 13 on the ELC in slot 7 to use a rate limit profile named test. ras>... -
Page 792: Port Enet Vlan Commands
Chapter 29 port Commands SPriority) and forwarded toward Gigabit Ethernet interface(s). If you configure an ENET PVID setting and enable TLS, the system does not apply the PVID. The following shows an example. • Enables TLS on port 5 on the Ethernet line card in slot 4. •... -
Page 793: Port Gbond Set Command
Chapter 29 port Commands 29.11.1 port gbond set Command Syntax: port gbond set <slot> <bond_name> <portlist> where The line card ID. <slot> A descriptive name for the gbond group of DSL lines. <bond_name> The ports on a line card that connect the DSL lines on which gbond is configured. <portlist>... -
Page 794: Port H248 Commands
Chapter 29 port Commands This command deletes the specified gbond group. The following is an example. ras> port gbond delete 2 group2 ras> port gbond show 2 slot bond name port list ---- ---------------------------------------- 2 Group1 29.12 Port h248 Commands Use these commands to configure the H.248 ports. -
Page 795: Ip Bridge Commands
Chapter 29 port Commands 29.15 IP Bridge Commands These sections explain how to set up the IP bridge function in the system. The IP bridge function is designed for large-scale, flat, access networks, and it is ideal when the network is based on Ethernet. When the IP bridge is enabled, the system forwards frames based on the destination IP address, instead of the destination MAC address, and it replaces the source MAC address with its own MAC address. -
Page 796: Port Ipbpvc Arpproxy Flush Command
Chapter 29 port Commands 29.16.2 port ipbpvc arpproxy flush Command Syntax: port ipbpvc arpproxy flush <all | edgerouter [<ip-address> <vid>] | interface [<ip/ mask> <vid>]> where All ARP table entries. IP address, in dotted decimal notation. <ip-address> Number of bits <1..32> in the subnet mask. <mask>... -
Page 797: Ip Bridge Domain Commands
Chapter 29 port Commands where The VPI and VCI of an individual PVC. vpi/vci This command deletes the specified PVC channel in an IP bridge. The following example deletes the IP bridge PVC on ADSL port 10 with VPI 40, VCI 73. ras>... -
Page 798: Port Ipbpvc Domain Dhcpvlan Disable Command
Chapter 29 port Commands where The name of the domain. <domain name> The ID (<1..4094>) of the VLAN. <vid> This setting has no effect on DHCP packets that come from VLANs where the system’s DHCP relay settings are active. (See Chapter 19 on page 647. -
Page 799: Port Ipbpvc Domain Show Command
Chapter 29 port Commands An example is shown next. port ipbpvc domain set example 29.19.5 port ipbpvc domain show Command Syntax: port ipbpvc domain show [<domain name>] where The name of the domain. <domain name> This command displays the settings for the specified domain and the VLAN that are in the domain. An example is shown next. -
Page 800: Ip Bridge Edge Router Commands
Chapter 29 port Commands 29.20 IP Bridge Edge Router Commands Use these commands to set up and maintain edge routers in an IP bridge. Edge routers are usually the gateways that are provided to the subscribers. They can also be gateways that are specified in static routing table entries. -
Page 801: Port Ipbpvc Edgerouter Show Command
Chapter 29 port Commands 29.20.3 port ipbpvc edgerouter show Command Syntax: port ipbpvc edgerouter show <all | domain-name [<vid>]> where The name of the domain. <domain name> = The ID (<1..4094>) of the VLAN. <vid> This command displays the edge routers for the specified VLAN or for all VLAN. An example is shown next. -
Page 802: Port Ipbpvc Interface Set Command
Chapter 29 port Commands The following example removes the downlink interface for 192.168.1.200/24 in VLAN 402. ras> port ipbpvc interface show 402 ip/mask slot port vpi vci ------------------ ---- ---- ---- --- ---- 192.168.1.200/24 ras> port interface delete 192.168.1.200/24 402 ras>... -
Page 803: Ip Bridge Routing Table Commands
Chapter 29 port Commands This command displays downlink interfaces created manually. It does not show forwarding information learned by snooping DHCP packets. An example is shown next. ras> port ipbpvc interface show 402 ip/mask slot port vpi vci ------------------ ---- ---- ---- --- ---- 192.168.3.0/24 The output values correspond to the input values of other IP bridge downlink interface commands. -
Page 804: Port Ipbpvc Route Set Command
Chapter 29 port Commands The following example removes the entry for 123.32.37.0~123.32.37.255 for domain “example2”. ras> adsl ipbpvc route show example2 domain name ip/netmask gateway ip metric pri -------------------- ------------------- --------------- ------ --- example2 0.0.0.0/0 192.168.1.252 example2 123.23.37.0/24 192.168.1.250 example2 192.168.2.0/24 192.168.1.249 ras>... -
Page 805: Port Ipbpvc Route Show Command
Chapter 29 port Commands The following example creates an entry in the routing table for domain “example3”. This entry forwards traffic for IP addresses 192.168.4.0~192.168.4.255 to edge router 192.168.1.244. ras> port ipbpvc route set example3 192.168.4.0/24 192.168.1.244 1 29.22.3 port ipbpvc route show Command Syntax: port ipbpvc route show [all|<domain-name>|<ip/mask>|<domain-name><ip-address>/ <mask>]... -
Page 806: Port Ipbpvc Show Command
Chapter 29 port Commands Specify the encapsulation type for the PVC. <type> llc and vc are for a PVC running on Ethernet (IPoE). llc_r and vc_r are for a PVC running on ATM (IPoA). This command allows the configuration of a PVC (permanent virtual circuit) for one or a range of ADSL ports in an IP bridge. -
Page 807: Port Mdf Command
Chapter 29 port Commands The default VID (1 to 4094). Each PVC must have a unique VID since the system <vid> forwards traffic back to the subscribers based on the VLAN ID. You must assign a default VID (1 to 4094) and IEEE 802.1p default priority (0 to 7) to normal channels. -
Page 808: Pppoa To Pppoe (Pae) Translation
Chapter 29 port Commands 29.24 PPPoA to PPPoE (PAE) Translation Before migrating to an Ethernet infrastructure, a broadband network might consist of PPPoA connections between the CPE devices and the DSLAM and PPPoE connections from the DSLAM to the BRAS (Broadband Remote Access Server). The following figure shows a network example. Figure 430 Mixed PPPoA-to-PPPoE Broadband Network Example BRAS PPPoE... -
Page 809: Port Paepvc Show Command
Chapter 29 port Commands This command creates a PPPoA-to-PPPoE PVC to allow communication between the ATM (CPE) and Ethernet network (BRAS) segments. The PVC is mapped to a PPPoE session that connects to the specified BRAS. The following example creates a PPPoA-to-PPPoE PVC ( ) for port on the line card in slot 1/33... -
Page 810: Port Pots Gain Command
Chapter 29 port Commands 29.26 port pots gain Command Syntax: port pots gain <slot-port> <tx-gain> <rx-gain> where <tx-gain> This sets the amount of gain (increase in volume) you want to apply to the signal received from the subscriber and transmitted to the SIP server. <rx-gain>... -
Page 811: Port Ppvc Member Delete Command
Chapter 29 port Commands This command removes a PPVC. Removing a PPVC also deletes all of the member PVCs. The following example removes a PPVC with VPI 8 and VCI 35 for port 5 on the line card in slot 7. ras>... -
Page 812: Port Ppvc Set Command
Chapter 29 port Commands 29.28.4 port ppvc set Command Syntax: port ppvc set <slot-port-vpi/vci> <mux> <pvid> <priority> where The slot, port(s) and VPI/VCI of the PPVC. <slot-port- vpi/vci> The type of encapsulation: vcmux <mux> Set a default VID (1 to 4094) for the channel. The channel can only forward <pvid>... -
Page 813: Port Ppvc Vlan Command
Chapter 29 port Commands The following example displays the PPVCs configured on the port 5 on the line card in slot 7. It also displays VLAN information. ras> port ppvc show 7-5-8/35 detail type pvid profile -------------- ------ ----- ------ ---- -------------------------------- 7-5-8/35 prio member:... -
Page 814: Port Pvc Commands
Chapter 29 port Commands 29.29 port pvc Commands Use the following commands to configure PVCs (Permanent Virtual Circuits) on the DSL port pvc ports. 29.29.1 port pvc delete Command Syntax: port pvc delete <slot-port-vpi/vci> This command removes the specified PVC channel. The following example removes the PVC on DSL port 5 on the line card in slot 2 with VPI 8 and VCI ras>... -
Page 815: Port Pvc Show Command
Chapter 29 port Commands Set a default VID (1 to 4094) for the channel. The channel can only forward <pvid> frames with this VLAN ID. The system would drop any frames received from the subscriber that are tagged with another VLAN ID. Each PVC must have a unique VID since the system forwards traffic back to the subscribers based on the VLAN ID. -
Page 816: Port Pvc Usratelimit Disable Command
Chapter 29 port Commands 29.29.7 port pvc usratelimit disable Command Syntax: port pvc usratelimit disable <slot-port-vpi/vci> This command deactivates upstream rate limiting on the specified PVC. 29.29.8 port pvc usratelimit set Command Syntax: port pvc usratelimit set <slot-port-vpi/vci> <rate> This command sets the maximum upstream rate (in Kbps) the specified PVC is allowed to use. The following example sets the maximum PVC upstream rate to 1000 Kbps on port 1 of the line card in slot 5. -
Page 817: Port Pvc Xvlan Delete Command
Chapter 29 port Commands The VLAN membership setting. <registratio n> : Adds the PVC to the VLAN. join : Removes the PVC from the VLAN. leave The VLAN tagging setting. <tag> : The specified port(s) accept only incoming Ethernet frames that have a VLAN tag. -
Page 818: Port Pvc Xvlan Show Command
Chapter 29 port Commands 29.29.13 port pvc xvlan show Command Syntax: port pvc xvlan show <slot-port-vpi/vci> where The slot and port(s) and VPI/VCI of the PVC. <slot-port- vpi/vci> This command displays the XVLAN settings for the specified PVC channel. 29.30 port shdsl Commands Use the commands to configure the subscriber SHDSL ports. -
Page 819: Port Shdsl Pbo Command
Chapter 29 port Commands where efm: Use Ethernet frames inside SHDSL framing. atm|efm atm: Use ATM cells inside SHDSL framing. This command sets the transmission convergence mode for the specified SHDSL port(s). IEEE 802.3-2004’s EFM (Ethernet First Mile) lets you run Ethernet protocol over G.SHDSL. EFM framing has less overhead than ATM encapsulation, thus allowing better data transmission rates. -
Page 820: Port Shdsl Pmms Command
Chapter 29 port Commands This example sets SHDSL port 7 on the line card in slot 6 to use 13 dB of power backoff for both downstream and upstream. ras> port shdsl pbo 6-7 forced_no_epl 13 29.30.4 port shdsl pmms Command Syntax: port shdsl pmms <slot-port>... -
Page 821: Port Show Command (G And Gb Models)
Chapter 29 port Commands 29.31 port show Command (G and GB Models) Syntax: port show <slot>|<slot-port>[pvc|vlan] where Specifies the slot of a line card (not MSC’s slot). <slot> Displays a port’s PVC settings. Displays a port’s VLAN settings. vlan This command displays the settings of the specified ports. 29.32 port show Command (MSC1024GC) Syntax: port show <slot>|<slot-port>[pvc|vlan|data|pots]... -
Page 822: Port Sip Opmode Command
Chapter 29 port Commands The following example sets port 1 in card 4 to use “sip-example” SIP user account. ras> port sip account 4-1 sip-example 29.34 port sip opmode Command Syntax: port sip opmode <slot-port> <DEFVAL|v5sip> where Configures the port to use SIP to connect to a server. DEFVAL Configures the port to use V5.2 to connect to a traditional class 5 POTS switch. -
Page 823: Port Sip Polarityreverse Command
Chapter 29 port Commands where The password for registering the SIP account this port uses. <password> This command sets a port on the VoIP line card to use the specified password with its SIP user name. The following example sets port 1 in card 4 to use “sip-test” as its SIP password. ras>... -
Page 824: Port Tel Command
Chapter 29 port Commands 29.39 port tel Command Syntax: port tel <slot-port> <telephone-no> where The subscriber’s telephone number. <telephone-no> This command records a subscriber’s telephone number for the specified port(s). On the VOP line card, each port’s telephone number is a SIP URI identity (SIP phone number) and must be unique. The following example records a telephone number of 123456789 for port 5 on the line card in slot ras>... -
Page 825: Port Tlspvc Show Command
Chapter 29 port Commands <vid> The VLAN ID the switch adds to the traffic on the PVC. This is the VLAN ID known in the service provider’s network. Note: Make sure this VLAN ID is not already used for MVLAN or PAE. This command sets the second VLAN tag to add to the packets from the PVC. -
Page 826: Port Vdsl Dt Commands
Chapter 29 port Commands Has the VDSL2 services not use the ADSL2+ frequency bands to avoid possible adsl2+ interference with ADSL2+ services provided by another device on the same bundle of lines. This command configures ADSL spectrum compatibility for VDSL2 ports. The following example sets port 5 on the VDSL card in slot 6 to not use the ADSL2 frequency bands. -
Page 827: Port Vdsl Frequencyplan Command
Chapter 29 port Commands The following example sets port 5 on the VDSL card in slot 4 to accept both tagged and untagged VLAN frames. ras> port vdsl frametype 4-5 all 29.41.5 port vdsl frequencyplan Command Syntax: port vdsl frequencyplan <slot-port> <997|998> where Selects a band plan to use. -
Page 828: Port Vdsl Inm Command
Chapter 29 port Commands Specify the minimum number of milliseconds (0~63) of retransmission delays. It is mindelay recommended that you configure the same delays for both upstream and downstream. Specify the minimum impulse noise protection (INP) against SHINE, 0~31 in units inpmin of 0.5 DMT symbols. -
Page 829: Port Vdsl Inpmin Command
Chapter 29 port Commands Set how to compute the “equivalent INP” (Impulse Noise Protection). ITU-T G.993.2 <eim> Amendment 2 and G.997.1 call this parameter INM_INPEQ_MODE. 0: the equivalent INP equals the Impulse Noise Cluster Length (INCL) with the cluster continuation parameter set to 0. INCL is defined as the number of data symbols from the first to the last severely degraded data symbol in the cluster. -
Page 830: Port Vdsl Ipqos Command
Chapter 29 port Commands where us-inp, ds-inp: The upstream and downstream impulse noise protection setting. <us-inp> Input 0~160 to set the DMT level to 0.1 of the input value. For example, an input <ds-inp> value of 10 sets the actual DMT value to 1. Input values 1~4 (0.1~0.4 DMT) are not valid. -
Page 831: Port Vdsl Limitmask Show Command
Chapter 29 port Commands where The PSD (Power Spectrum Density) mask. <limitmask> limitmask: 1: VDSL2_A_NUS0 2~11: VDSL2_A_EU[32,36,40,44,48,52,56,60,64,128] 12: VDSL1_FTTEX_ANSI_M1 13: VDSL1_FTTEX_ANSI_M2 14: VDSL1_FTTCAB_ANSI_M1 15: VDSL1_FTTCAB_ANSI_M2 16: VDSL1_FTTEX_ANSI_M1_e 17: VDSL1_FTTEX_ANSI_M2_e 18: VDSL1_FTTCAB_ANSI_M1_e 19: VDSL1_FTTCAB_ANSI_M2_e 20: VDSL2_A_CT 21~36: VDSL2_B8_[1..16] 37~46: VDSL2_B7_[1..10] 47: VDSL2_BT_ANFP 48: VDSL2_C_138_b 49: VDSL2_C_276_b 50: VDSL2_C_138_co... - Page 832 Chapter 29 port Commands where The PSD (Power Spectrum Density) mask. <limtmask> limitmask: 1: VDSL2_A_NUS0 2~11: VDSL2_A_EU[32,36,40,44,48,52,56,60,64,128] 12: VDSL1_FTTEX_ANSI_M1 13: VDSL1_FTTEX_ANSI_M2 14: VDSL1_FTTCAB_ANSI_M1 15: VDSL1_FTTCAB_ANSI_M2 16: VDSL1_FTTEX_ANSI_M1_e 17: VDSL1_FTTEX_ANSI_M2_e 18: VDSL1_FTTCAB_ANSI_M1_e 19: VDSL1_FTTCAB_ANSI_M2_e 20: VDSL2_A_CT 21~36: VDSL2_B8_[1..16] 37~46: VDSL2_B7_[1..10] 47: VDSL2_BT_ANFP 48: VDSL2_C_138_b 49: VDSL2_C_276_b 50: VDSL2_C_138_co...
-
Page 833: Port Vdsl Optionmask Command
Chapter 29 port Commands The following example shows the PSD mask for “VDSL2_A_NUS0”. ras> port vdsl limitmask show 1 1 (vdsl2_a_nus0) Upstream Band Plan Index ----------- -------- -------- -------- -------- Start tone 1981 5343 Stop tone 1196 2773 6947 Downstream Band Plan Index ----------- -------- -------- -------- -------- Start tone... -
Page 834: Port Vdsl Priority Command
Chapter 29 port Commands where The PSD (Power Spectral Density) and power adaptivity mode. fix|power|rate : Fixed mode sets the maximum downstream transmit power to the number you specify ( <max_ds_txpwr>). Power mode gives the saving of transmission power priority over the power: transmission rate. -
Page 835: Port Vdsl Rfiband Command
Chapter 29 port Commands The priority setting from 0~7 <priority> This command sets a private VLAN setting on a specified DSL port. The following example sets up a private VLAN with an IPv6 Ethernet type, an ID of 1 and a priority of 1 on traffic on port 5 on the VDSL card in slot 4. -
Page 836: Port Vdsl Set Command
Chapter 29 port Commands • Show the settings. ras> port vdsl rficustom set 1 3500 3800 ras> port vdsl rficustom enable 1 ras> port vdsl rficustom show index state start_freq stop_freq ------- ------- ------------ ----------- 3500 3800 ras> 29.41.19 port vdsl set Command Syntax: port vdsl set <slot-port>... -
Page 837: Port Vdsl Sos Command
Chapter 29 port Commands The following example sets port 5 on the VDSL card in slot 4 to use the line profile and the DEFVAL 17a band plan profile. ras> port vdsl set 4-5 DEFVAL 17a 29.41.20 port vdsl sos Command Syntax: port vdsl sos <slot-port>... -
Page 838: Port Vdsl Upbo Commands
Chapter 29 port Commands where Sets the service provider ID (from 1 to 4094) to add on frames received. <svid> Sets the priority level (from 0 to 7) for the service provider’s VLAN ID. <spriority> Use these commands to configure Transparent LAN Service (TLS) settings on the VDSL port(s). The following shows an example. - Page 839 Chapter 29 port Commands The following example sets the VDSL port 5 on the line card in slot 4 to join VLAN 5. The port also adds a tag to frames. ras> port vdsl vlan 4-5 5 join tag Management Switch Card User’s Guide...
- Page 840 Chapter 29 port Commands Management Switch Card User’s Guide...
-
Page 841: Profile Commands
HAPTER profile Commands This chapter shows you how to use the commands. profile 30.1 Profiles Overview Profiles are groups of settings that you can assign to a port(s). This helps simplify and speed up port configuration. 30.2 General profile Command Parameters The following table describes commonly used command parameter notation. -
Page 842: Profile Commands Summary
Chapter 30 profile Commands 30.3 profile Commands Summary The following table lists the commands. The P column on the right indicates the profile administrator privilege level needed to use the command. Table 366 profile Commands COMMAND DESCRIPTION Adds or edits an ACL profile. See Section <name>... - Page 843 Chapter 30 profile Commands Table 366 profile Commands (continued) COMMAND DESCRIPTION Creates a profile of ADSL alarm settings. <profile> atuc [lofs <lofs>] [loss <loss>] [lols <lols>] [lprs <lprs>] [ess <ess>] [ffr <ffr>] [sesl <sesl>] [uasl <uasl>] [fru <fru>] [iru <iru>] [frd <frd>] [ird <ird>] [ift <ift>] <profile>...
- Page 844 Chapter 30 profile Commands Table 366 profile Commands (continued) COMMAND DESCRIPTION Creates a profile of ADSL alarm settings. See <profile> atuc [lofs Section 30.6.2 on page 869 for more <lofs>] [loss <loss>] [lols information. <lols>] [lprs <lprs>] [ess <ess>] [ffr <ffr>] [sesl <sesl>] [uasl <uasl>] [fru <fru>] [iru <iru>] [frd <frd>] [ird <ird>]...
- Page 845 Chapter 30 profile Commands Table 366 profile Commands (continued) COMMAND DESCRIPTION Removes an alarm VDSL2 channel profile. alarmvdsl chanprofi delete <profile> Creates an alarm VDSL2 channel profile. set <profile> [xtuccv <0~4294967295>] xtuccv: The number of Code Violations [xtuccorrected (incorrect cyclic redundancy check) allowed <0~4294967295>] [xturcv on the system within 15 minutes.
- Page 846 Chapter 30 profile Commands Table 366 profile Commands (continued) COMMAND DESCRIPTION Creates an alarm VDSL2 line profile of 15 usage: set <profile> minute period alarm thresholds. A 0 has the [xtucfecs <xtucfecs>] system ignore that threshold. [xtuces <xtuces>] [xtucses : profile name, up to 31 characters profile <xtucses>][xtucloss : the number of Forward Error...
- Page 847 Chapter 30 profile Commands Table 366 profile Commands (continued) COMMAND DESCRIPTION Displays an alarm VDSL2 line profile. show [<profile>] Removes an alarm VDSL2 template. template delete <profile> Displays an alarm VDSL2 template’s map <profile> mappings. Creates an alarm VDSL2 template. set <name>...
- Page 848 Chapter 30 profile Commands Table 366 profile Commands (continued) COMMAND DESCRIPTION Sets the PIR, CIR, PBS, CBS parameters for queue <profile> <queue-id> <pir> an IPQoS profile. <cir> <pbs> <cbs> [<level> weight [< >]] queue-id: The queue index beginning at 0. For example, if you have configured 4 queues for a profile, then you can enter a queue-id from 0 to 3.
- Page 849 Chapter 30 profile Commands Table 366 profile Commands (continued) COMMAND DESCRIPTION Sets the VC (Virtual Circuits) shaping level, <profile> vcshaping <level> maximum rate, and depth of a IPQoS2 <max-rate> <depth> profile. level: The associated PVC level. The maximum rate of the max-rate: queue.
- Page 850 Chapter 30 profile Commands Table 366 profile Commands (continued) COMMAND DESCRIPTION Configures an Ethernet subscriber line <profile> <ingress-rate> ingress and egress rate profile. <egress-rate> Displays the name(s) of the rate limit show [<profile>] profile(s) you have configured. Specify a profile to see it’s details. Removes an unreferenced SHDSL port shdsl delete...
- Page 851 Chapter 30 profile Commands Table 366 profile Commands (continued) COMMAND DESCRIPTION Creates a VDSL line profile. See Section <profile> <us-max-rate> 30.17.3 on page 892 for more information. <ds-max-rate> [fast|delay <us-delay> <ds-delay>] [minrate <us-min-rate> <ds- min-rate>] [usmgn <us-max- mgn> <us-min-mgn> <us-tgt- mgn>] [dsmgn <ds-max-mgn>...
- Page 852 Chapter 30 profile Commands Table 366 profile Commands (continued) COMMAND DESCRIPTION Creates a VDSL2 channel profile. set <profile> [minrateds <ds_min_rate>] [minrateus <us_min_rate>] [maxrateds <ds_max_rate>] [maxrateus <us_max_rate>] [maxdelayds <delay>] [maxdelayus <delay>] [mininpds <min_inp>] [mininpus <min_inp>] [mininp8ds <min_inp8>] [mininp8us <min_inp8>] [phyrds <enable|disable|auto>] [phyrus <enable|disable|auto>][ginp etrmaxds <etr_max>]...
- Page 853 Chapter 30 profile Commands Table 366 profile Commands (continued) COMMAND DESCRIPTION Creates a VDSL2 Impulse Noise Monitoring set <profile> [eimfe <eim>] profile. The parameters ending with “fe” [eimne <eim>] [ccpfe <ccp>] mean “far end” while those ending with “ne” [ccpne <ccp>] [iatofe mean “near end”.
- Page 854 Chapter 30 profile Commands Table 366 profile Commands (continued) COMMAND DESCRIPTION This command creates and configures a DSP <profile> (Digital Signal Processing) profile. [codec <codec> [,<codec>...] codec: Available codecs are: [playbuffer <min-delay> G.711a: g711a <max-delay>] G.711µ: g711mu [echotail <echotail>] G.723: g723 G.726 [echocancel off|on] 16 kbps: g726-16...
- Page 855 Chapter 30 profile Commands Table 366 profile Commands (continued) COMMAND DESCRIPTION Configures an H.248 profile. <profile> <mgc-ip>|<mgc-dn> [mgcport <mgc-port>][mgc2 Section 30.20.3 on page 903 for more off|{on <mgc2-ip>|<mgc2- information on this command. dn>}] [mgc2port <mgc2- The default H248 profile values are: port>][transport udp|tcp][encode H248 profile...
- Page 856 Chapter 30 profile Commands Table 366 profile Commands (continued) COMMAND DESCRIPTION For the G and GB models: callsvc <name> [keypattern <pattern- Configures a new call service profile. table>] keypattern: Enter the VoIP key pattern to [nopassword | {password use. <password>} [registration off|{on Once the password configuration is set, it [<re>]}]...
- Page 857 Chapter 30 profile Commands Table 366 profile Commands (continued) COMMAND DESCRIPTION For the G and GB models. Continued: {sipinfo6 [<si>]} [localcall on|off] callhold: Turn call holding on or off. [mwi on|off] callwait: Turn call waiting on or off. [reanswer <ra>] callreturn: Turn call return on or off.
- Page 858 Chapter 30 profile Commands Table 366 profile Commands (continued) COMMAND DESCRIPTION For the G and GB models. Continued: sipinfo6: relays flash in SIP INFO packets (where the content of the message is determined by the text you enter for <si>). localcall: Sets whether or not to allow subscribers to call other subscribers if the system’s connection to the SIP server is not...
- Page 859 Chapter 30 profile Commands Table 366 profile Commands (continued) COMMAND DESCRIPTION For the MSC1024GC. callsvc <profile> [keypattern <pattern-table>] Configures a new call service profile. [registration off|{on <re>} keypattern: Enter the VoIP key pattern to use. [dialplan off|on {<cc> pattern-table:The VoIP keypattern table <ndc>...
- Page 860 Chapter 30 profile Commands Table 366 profile Commands (continued) COMMAND DESCRIPTION For the MSC1024GC. Continued: {sipinfo6 [<si>]} [localcall on|off] callhold: Turn call holding on or off. [mwi on|off] callwait: Turn call waiting on or off. [reanswer <ra>] callreturn: Turn call return on or off. clip: Turn Caller ID presentation on or off.
- Page 861 Chapter 30 profile Commands Table 366 profile Commands (continued) COMMAND DESCRIPTION For the MSC1024GC. Continued: sipinfo6: relays flash in SIP INFO packets (where the content of the message is determined by the text you enter for <si>). localcall: Sets whether or not to allow subscribers to call other subscribers if the system’s connection to the SIP server is not available.
- Page 862 Chapter 30 profile Commands Table 366 profile Commands (continued) COMMAND DESCRIPTION Configures the specified SIP profile. The system <profile> <sip-dn> <regsvr- supports up to 128 SIP profiles. ip>|<regsvr-dn> <proxysvr- ip>|<proxysvr-dn> [sipport sip-dn: The SIP server’s domain name (maximum 63 characters). <sip-port>] [regsvrport <regsvr-port>] regsvr-ip: SIP registrar server’s IP address.
-
Page 863: Profile Acl Commands
Chapter 30 profile Commands Table 366 profile Commands (continued) COMMAND DESCRIPTION Sets the default SIP profile for a dial plan <profile> default <sip- profile. The system uses the default SIP profile> profile instead when a dialed number does not match any entries in the set dial plan profile. - Page 864 Chapter 30 profile Commands where: The rule that classifies traffic flows. Ordering of the criteria is important. The system first compares <rule> the layer 2 fields first, the layer 3 fields and then the protocol type. The following lists the set of criteria you can configure. Note that the device takes the order when matching rules.
-
Page 865: Configuration Guidelines
Chapter 30 profile Commands <action> = The action(s) to perform on the classified packets. The following lists the actions you can set. 64~40960>: Sets the rate limit (in kbps) for the matched traffic. Set this rate in multiples of rate < 64. -
Page 866: Profile Adsl Set Command
Chapter 30 profile Commands 30.5.1 profile adsl set Command Syntax: profile adsl set <profile> <us-max-rate> <ds-max-rate> [fast|delay <us-delay> <ds-delay>] [minrate <us-min-rate> <ds-min-rate>] [usmgn <us-max-mgn> <us-min-mgn> <us-tgt-mgn>] [dsmgn <ds-max-mgn> <ds-min-mgn> <ds-tgt-mgn>] [usra fixed|startup|runtime <us-us-mgn> <us-ds-mgn>] [dsra fixed|startup|runtime <ds-us-mgn> <ds-ds-mgn>] where The descriptive name for the profile. <profile>... -
Page 867: Profile Adsl Map Command
Chapter 30 profile Commands If the signal becomes bad and the SNR is lower then 3, rate adaptation is triggered and the line rate becomes lower. The following example creates a premium profile (named gold) for providing subscribers with very high connection speeds and no interleave delay. -
Page 868: Profile Adsl Show Command
Chapter 30 profile Commands where <profile> = A profile name. This command allows you to delete an individual ADSL profile by its name. You cannot delete a profile that is assigned to any of the ports in the system. Assign a different profile to any ports that are using the profile that you want to delete, and then you can delete the profile. -
Page 869: Profile Alarmadsl Set Command
Chapter 30 profile Commands where The name of an alarm profile. <profile> This command displays the details of the specified alarm ADSL profile or lists all of the alarm ADSL profiles if you do not specify one. The following example displays the default alarm ADSL profile (DEFVAL). ras>... -
Page 870: Profile Alarmadsl Delete Command
Chapter 30 profile Commands The number of Errored SecondS (0~900) that are permitted to occur within 15 <ess> minutes. The number of Failed Fast Retrain seconds (0~900) that are permitted to occur <ffr> within 15 minutes. The number of Severely Errored Seconds (0~900) that are permitted to occur within <sesl>... -
Page 871: Profile Alarmadsl Map Command
Chapter 30 profile Commands 30.6.4 profile alarmadsl map Command Syntax: profile alarmadsl map <profile> where The name of an alarm profile. <profile> This command displays which ADSL ports are set to use the specified alarmadsl profile. The following example displays which ADSL ports use the SESalarm alarmadsl profile. ras>... -
Page 872: Profile Alarme1 Set Command
Chapter 30 profile Commands 30.7.2 profile alarme1 set Command Syntax: profile alarmadsl set <profile> [qes <qes>] [qses <qses>] [quas <quas>] [dayes <dayes>] dayses <dayses>] [dayuas <dayuas>] where The name of an E1 alarm profile (up to 31 English keyboard characters). profile The number of Error Seconds (0~900) that are permitted to occur within 15 minutes. -
Page 873: Profile Alarme1 Map Command
Chapter 30 profile Commands 30.7.4 profile alarme1 map Command Syntax: profile alarme1 map <profile> where The name of an E1 alarm profile. <profile> This command displays which E1 ports are set to use the specified E1 alarm profile. The following example displays which E1 ports use the SESalarm E1 alarm profile. ras>... -
Page 874: Profile Alarmshdsl Set Command
Chapter 30 profile Commands This command displays the details of the specified alarm SHDSL profile or lists all of the alarm SHDSL profiles if you do not specify one. The following example displays the default alarm SHDSL profile (DEFVAL). ras> profile alarmshdsl show DEFVAL shdsl alarm profile : DEFVAL loop attenuation(atten) (dB):... -
Page 875: Profile Alarmshdsl Delete Command
Chapter 30 profile Commands 30.8.3 profile alarmshdsl delete Command Syntax: profile alarmshdsl delete <profile> where The name of an alarm profile. <profile> This command allows you to delete an individual SHDSL alarm profile by its name. You cannot delete the DEFVAL alarm profile. The following example deletes the SESalarm alarm profile. -
Page 876: Profile Alarmvdsl Set Command
Chapter 30 profile Commands This command displays the details of the specified alarm VDSL profile or lists all of the alarm VDSL profiles if you do not specify one. The following example displays the default alarm VDSL profile (DEFVAL). ras> profile alarmvdsl show DEFVAL vdsl alarm profile : DEFVAL initFailure(ift) 15MinLofs(lofs) -
Page 877: Profile Alarmvdsl Delete Command
Chapter 30 profile Commands The following example sets an alarm profile named SESalarm that has the system send an alarm trap and generate a syslog whenever the connection (from the IES to the subscriber) has more than 3 severely errored seconds within a 15-minute period. ras>... -
Page 878: Profile Atm Commands
Chapter 30 profile Commands 30.10 profile atm Commands Use these commands to configure ATM traffic settings. 30.10.1 profile atm show Command Syntax: profile atm show [<profile>] where A profile name. profile This command displays the details of the specified ATM profile or lists all of the ATM profiles if you do not specify one. -
Page 879: Profile Atm Delete Command
Chapter 30 profile Commands Burst Tolerance this is the maximum number of cells (0~255) that the port is <bt> guaranteed to handle without any discards. BT applies with the vbr traffic class. * sets the default value. This command creates a profile of ATM traffic settings. After you create an ATM profile, you can use it with the port ppvc set port pvc set... -
Page 880: Profile Atm Map Command
Chapter 30 profile Commands 30.10.4 profile atm map Command Syntax: profile atm map <profile> where The name of a profile. <profile> This command displays which PVCs or PPVCs are set to use the specified ATM profile. The following example displays which PVCs or PPVCs use the silver profile. ras>... -
Page 881: Profile Ipqos Queue Command
Chapter 30 profile Commands This command displays the EXAMPLE IPQoS profile settings. ras> profile ipqos show EXAMPLE ipqos profile : EXAMPLE queue number level weight --- ------ ------ ------ ------ ------ ------ 0 131072 65536 65536 65536 1088 1024 3072 3072 2 131072 65536... -
Page 882: Profile Ipqos Map Command
Chapter 30 profile Commands This command configures the IPQoS profile’s queues. The following example sets the EXAMPLE IPQoS profile’s queue 1 to use a PIR of 1088 kbps, CIR or 1024 kbps, PBS of 3072 bytes, and CBS or 3072 bytes; displays the profile’s settings; and sets the VDSL port 1 in slot 6 to use the profile. -
Page 883: Profile Ipqos2 Delete Command
Chapter 30 profile Commands 30.13.1 profile ipqos2 delete Command Syntax: profile ipqos2 delete <profile> This command removes the specified IPQoS2 profile. Here is how to delete the EXAMPLE IPQoS2 profile. ras> profile ipqos2 delete EXAMPLE 30.13.2 profile ipqos2 map Command Syntax: profile ipqos2 map <profile>... -
Page 884: Profile Ipqos2 Set Command
Chapter 30 profile Commands 30.13.4 profile ipqos2 set Command Syntax: profile ipqos2 set <profile> vcshaping <level> <max-rate> <depth> where An IPQoS2 profile name. profile The assoiciated PVC level. level The maximum rate of the queue. max-rate The maximum number of packets. depth This command sets the VC (Virtual Circuits) shaping level, maximum rate, and depth of a IPQoS2 profile. -
Page 885: Profile Profsvr Show Command
Chapter 30 profile Commands 30.14.1 profile profsvr show Command Syntax: profile profsvr show This command displays the current profile server setting. ras> profile profsvr show mode :server mode Client Ip type ---- --------------- ------ 1.2.3.4 30.14.2 profile profsvr mode Command Syntax: profile profsvr mode client|server This command sets the profile server operation mode. -
Page 886: Profile Profsvr Clientlist Show Command
Chapter 30 profile Commands This command removes an entry from the profile server client list. The following example removes a profile server client entry for an IES at IP address 1.2.3.4. ras> profile profsvr clientlist delete 1.2.3.4 30.14.5 profile profsvr clientlist show Command Syntax: profile profsvr clientlist show <ip-address>... -
Page 887: Profile Ratelimit Delete Command
Chapter 30 profile Commands 30.15.1 profile ratelimit delete Command Syntax: profile ratelimit delete <profile> This command removes the specified Ethernet subscriber port rate limit profile. Note: You cannot remove a rate limit profile that is currently in use. 30.15.2 profile ratelimit map Command Syntax: profile ratelimit map <profile>... -
Page 888: Profile Ratelimit Show Command
Chapter 30 profile Commands The following creates an Ethernet subscriber line profile named test that limits ingress and egress traffic to 12,800 Kbps. ras> profile ratelimit set test 12800 12800 30.15.4 profile ratelimit show Command Syntax: profile ratelimit show [<profile>] This command displays the name(s) of the rate limit profile(s) you have configured. -
Page 889: Profile Shdsl Map Command
Chapter 30 profile Commands The wire pair number. 2wire|4wire|mpair4 : A normal connection using a single SHDSL port’s two wires, this 2wire is the default. : A 4-wire n-wire group (two SHDSL ports grouped together). 4wire : An 8-wire n-wire group (four SHDSL ports grouped together). mpair4 Disable line probe. -
Page 890: Profile Shdsl Delete Command
Chapter 30 profile Commands where The name of the profile. <profile> This command displays which SHDSL ports reference a specific profile. The following example displays which SHDSL ports use the gold profile. ras> profile shdsl map gold 30.16.3 profile shdsl delete Command Syntax: profile shdsl delete <profile>... -
Page 891: Profile Vdsl Commands
Chapter 30 profile Commands The following example displays the SHDSL profile named gold. ras> profile shdsl show gold shdsl profile: gold max rate (Kbps): 4096 min rate (Kbps): 2112 annex mode : annexa wire pair : 4wire line probe : enable with current target SNR margin curr margin (dB): 5 ras>... -
Page 892: Profile Vdsl Set Command
Chapter 30 profile Commands 30.17.3 profile vdsl set command Syntax: profile vdsl set <profile> <us-max-rate> <ds-max-rate> [fast|delay <us-delay> <ds- delay>] [minrate <us-min-rate> <ds-min-rate>] [usmgn <us-max-mgn> <us-min-mgn> <us- tgt-mgn>] [dsmgn <ds-max-mgn> <ds-min-mgn> <ds-tgt-mgn>] where The descriptive name for the profile. Up to 31 characters. <profile>... -
Page 893: Profile Vdsl Show Command
Chapter 30 profile Commands 30.17.4 profile vdsl show Command Syntax: profile vdsl show [<profile>] where The descriptive name for the profile. <profile> This command displays the VDSL profile list of the settings of a VDSL profile configured on the system. The following example displays the profile list and the settings of the profile. -
Page 894: Profile Vdsl2 Lineprofile Set Command
Chapter 30 profile Commands 30.18.1 profile vdsl2 lineprofile set Command Syntax: profile vdsl2 lineprofile set <profile> [ramodeds manual|rainit|dynamicra|sos] [ramodeus manual|rainit|dynamicra|sos] [rausnrmds <up_shift_nrm_ds>] [rausnrmus <up_shift_nrm_us>] [raustimeds <up_shift_time>] [raustimeus <up_shift_time>] [radsnrmds <down_shift_nrm_ds>] [radsnrmus <down_shift_nrm_us>] [radstimeds <down_shift_time>] [radstimeus <down_shift_time>] [targetsnrmds <target_margin_ds>] [targetsnrmus <target_margin_us>] [maxsnrmds <max_margin_ds>] [maxsnrmus <max_margin_us>] [minsnrmds <min_margin_ds>]... - Page 895 Chapter 30 profile Commands [rocenableus disable|enable] [dynamicdds disable|enable] [dynamicdus disable|enable] [compatible none|adsl2|adsl2+] [transmissiontype <transmissiontype>] where = The descriptive name for the profile. Up to 31 <profile> characters. [ramodeds = The downstream (ds) and upstream (us) rate <manual|rainit|dynamicra|sos>] adaption settings. manual fixes the transmit rate as the minimum net data rate and disable transmission rate adjustment.
- Page 896 Chapter 30 profile Commands [maxsnrmds <max_margin_ds>] = The downstream (ds) and upstream (us) maximum SNR (Signal to Noise Ratio) margin allowed on the line. When the actual SNR margin is going to reach this specified value, this mechanism forces connected [maxsnrmus <max_margin_us>] CPE device(s) to lower its transmission power level and maintains the actual SNR margin equal to or less...
- Page 897 Chapter 30 profile Commands = Adds virtual noise levels on downstream (ds) or [refvnds <tone_index> <vn_psd> upstream (us) tones where actual noise may occur. [...]] If there is too much noise on a line, the allowed line [refvnus <tone_index> <vn_psd> speed may be reduced or the line may not initialized.
- Page 898 Chapter 30 profile Commands = DPBOEPSD (Assumed Exchange PSD Mask) defines [dpboepsd <tone> <epsd> the PSD mask that is assumed to be exchanged at [...]|<psdid>] CO. Use this graph to view PSD level to frequency relationship. The horizontal is frequency in MHz and vertical is power level in dBm/Hz.
- Page 899 Chapter 30 profile Commands = Adjusts the MIB PSD level on downstream tones. [psdmaskds <psd_index> <psd> [...]] psd-index: Enter a number from 1 to 4096, 0 means not used A tone is a sub-channel of VDSL band. DMT divides VDSL bands into many 4.3125 kHz tones. psd: Enter 0~190 to represent 0~-95 dBm/Hz in steps of 0.5dBm/Hz.
-
Page 900: Profile Voip Dsp Commands
Chapter 30 profile Commands 30.19 profile voip dsp Commands Use these commands to set up and manage Digital Signal Processing for the VoIP line cards. Each DSP profile specifies VoIP-related attributes, such as the voice codecs to use in a given session. 30.19.1 profile voip dsp delete Command Syntax: profile voip dsp delete <name>... -
Page 901: Profile Voip Dsp Set Command
Chapter 30 profile Commands 30.19.3 profile voip dsp set Command Syntax: profile voip dsp set <name> [codec <codec> [,<codec>...] [playbuffer <min-delay> <max-delay>] [echotail <echotail>] [echocancel off|on] [vad off|on] [g711vpi <g711-vpi>] [g723vpi <g723-vpi>] [g726vpi <g726-vpi>] [g729vpi <g729-vpi>] where Available codecs are: <codec>... -
Page 902: Profile Voip Dsp Show Command
Chapter 30 profile Commands • G.711 voice package interval: 20 • G.723 voice package interval: 30 • G.726 voice package interval: 20 • G.729 voice package interval: 20 The following example shows a command configuring a DSP profile named “digsig4” with the following settings: •... -
Page 903: Profile Voip H248 Delete Command
Chapter 30 profile Commands 30.20.1 profile voip h248 delete Command Syntax: profile voip h248 delete <profile> This command removes the specified H248 profile. An example is shown to delete the h248 profile named “h248_profile”. ras> profile voip h248 delete h248_profile 30.20.2 profile voip h248 map Command Syntax: profile voip h248 map [profile]... - Page 904 Chapter 30 profile Commands Set the inactivity-timer which is a keep-alive timer from the MG to the MGC (0 <it> ~65535 in units of 10 milliseconds). If there are no messages from the MGC to the MG, after each inactivity-time out, the MG sends a "notify"...
-
Page 905: Profile Voip H248 Show Command
Chapter 30 profile Commands You can set this to on if the MGC only supports H.248 version 2. forcever off|on Set it to off to use H.248 version 2. This command sets up an h248 profile. An example is shown to set up an h248 profile (h248_profile), an MGC IP address (123.3.3.3), MGC port (1025), no secondary MGC, protocol (udp), long encoding, a pbit of 1, a DHCP bit of 1, and T.38 fax relay support on. -
Page 906: Profile Voip Sip Set Command (G And Gb Models)
Chapter 30 profile Commands This command displays which subscribers use the specified SIP profile. An example is shown, displaying the ports that map to a SIP profile named “SIP12” (ports 1 to 48 on slot 4). ras> profile voip sip map SIP12 slot port ---- ------------------------------------------------... - Page 907 Chapter 30 profile Commands The profile uses TEL URI. uritype tel The IEEE 802.1p priority tag for SIP and RTP packets (0 ~ 7). <pbit> The DiffServ Code Point for SIP and RTP packets (0 ~ 63). <dscp> Turn SIP session keepalive off or on. When this is on, the SIP UA periodically keepalive sends SIP session refresh requests.
-
Page 908: Profile Voip Sip Set Command (Msc1024Gc)
Chapter 30 profile Commands The following example shows a command configuring a SIP profile named “sip10” with the following settings: • SIP server domain name: host1.domain1 • SIP registrar server domain name: host2.domain2 • SIP proxy server domain name: host3.domain3 •... - Page 909 Chapter 30 profile Commands where The SIP server IP address. <sip-ip> Up to 31 characters to identify the profile. <profile> The SIP server domain name (maximum 63 characters). <sip-dn> The SIP registrar server IP address. <regsvr-ip> The SIP registrar server domain name (maximum 63 characters). <regsvr-dn>...
-
Page 910: Profile Voip Sip Show Command
Chapter 30 profile Commands • SIP proxy server IP address: 0.0.0.0 • SIP proxy server port number: 5060 • IEEE 802.1p tag: 6 • DSCP tag: 48 • Keep alive: off • PRACK: off • Switch type: DEFVAL • Registration expire: on, 3600 seconds •... -
Page 911: Profile Voip Sip Callsvc Commands
Chapter 30 profile Commands This command displays the settings of the specified SIP profile, or displays the names of all SIP profiles if none is specified. An example is shown next. ras> profile voip sip show sip profile(s): --------------------- 1. DEFVAL 2. -
Page 912: Profile Voip Sip Callsvc Set Command (G And Gb Models)
Chapter 30 profile Commands This command displays which subscribers use the specified SIP call service profile. An example is shown, displaying the ports that use a SIP call service profile named “sip-cs001” (ports 1 to 38 on slot 4). ras> profile voip sip callsvc map sip-cs001 slot port ---- ------------------------------------------------... - Page 913 Chapter 30 profile Commands Specify the VoIP key pattern to use. <pattern- table> The call service profile does not require a password (default). nopassword The call service profile requires a password. password The call service profile’s password. <password> When this is off. the call service profile does not use the registration registration timeout feature.
- Page 914 Chapter 30 profile Commands Set supplementary phone services to European (europe) or American (usa) callsvcmode mode. europe|usa onhooktransfer = This setting controls what happens when the initiator of a conference call hangs up. Turn this on to have the conference call continue without the initiator.
-
Page 915: Profile Voip Sip Callsvc Show Command (G And Gb Models)
Chapter 30 profile Commands • CLIR: on • Call transferring: on • Conference: on • Call Service Mode: europe • On hook transfer: off • Conference transfer: off • CIDCW: on • fax: G.711 • Initial Digit Time: 8 seconds •... - Page 916 Chapter 30 profile Commands This command displays the settings of the specified SIP call service profile, or displays the names of all call service profiles if none is specified. An example is shown next. ras> profile voip sip callsvc show callservice profile(s): ---------------------- 1.
-
Page 917: Profile Voip Sip Callsvc Set Command (Msc1024Gc)
Chapter 30 profile Commands 30.22.5 profile voip sip callsvc set Command (MSC1024GC) Syntax: profile voip sip callsvc set <profile> [keypattern <pattern-table>] [registration off|{on [<re>]}] [dialplan off|on {<cc> <ndc> <dialplan-table>}] [localhelp off|on {<tel-number> <localhelp-table> [<tel-number> <localhelp-table>...]}] [dnd on|off] [dtmf bypass|rfc2833|sipinfo|rfc2833like|plaintext] [callhold on|off] [callwait on|off] [callreturn on|off] [clip on|off]... - Page 918 Chapter 30 profile Commands The name of the local help table name, up to 31 characters. <localhelp- table> Do not Disturb allowed/prohibited. The system does not relay DTMF signals. dtmf bypass The system relays DTMF signals according to RFC 2833. dtmf rfc2833 The system to relay DTMF signals via SIP INFO message.
-
Page 919: Profile Voip Sip Callsvc Show Command (Msc1024Gc)
Chapter 30 profile Commands • Registration timeout: on 3600 seconds • DND: on • Call holding: on • Call waiting: on • Call return: on • CLIP: on • CLIR: on • Call transferring: on • Conference: on • fax: G.711 •... -
Page 920: Profile Voip Sip Delete Command
Chapter 30 profile Commands 30.23.1 profile voip sip delete Command Syntax: profile voip sip delete <profile> This command removes the specified SIP profile. An example is shown to delete the SIP profile named “bar”. ras> profile voip sip delete bar 30.23.2 profile voip sip map Command Syntax: profile voip sip map <profile>... -
Page 921: Profile Voip Sip Show Command
Chapter 30 profile Commands Turn SIP session keepalive off or on. When this is on, the SIP UA periodically sends keepalive SIP session refresh requests. The minimum session expiration time in seconds (90 ~ 65535) <se> Select the switch type for the NGN server: switchtype 1: Call transfer 2: Inquiry call... -
Page 922: Profile Voip Sip Dialplan Commands
Chapter 30 profile Commands This command displays the settings of the specified SIP profile, or displays the names of all SIP profiles if none is specified. An example is shown next. ras> profile voip sip show sip profile(s): --------------------- 1. DEFVAL 2. -
Page 923: Profile Voip Sip Dialplan Set Command
Chapter 30 profile Commands This command displays subscribers referenced by the specified one. An example is shown to display the call service profile named “dialplan_profile”. ras> profile voip sip dialplan map dialplan_profile slot port ---- ---------------------------------------------------------------------- 123456789012345678901234567890123456789012345678901234567890123456789012 3 ------------------------------------------------ 4 ------------------------------------------------ 5 ------------------------------------------------ 6 ------------------------ 7 ------------------------------------------------... - Page 924 Chapter 30 profile Commands Management Switch Card User’s Guide...
-
Page 925: Redundant Commands
HAPTER redundant Commands This chapter shows you how to use the commands. redundant 31.1 redundant Commands Overview commands provide uplink redundancy. Once the uplink ports on the main MSC redundant have a physical link problem, the system can automatically switch to the standby MSC and let the standby uplink ports take over uplink traffic handling. - Page 926 Chapter 31 redundant Commands Management Switch Card User’s Guide...
-
Page 927: Show Commands
HAPTER show Commands This chapter shows you how to use the commands. show 32.1 show Commands Overview commands display runtime status information. show 32.2 Commands Summary show The following table lists the commands. The P column on the right indicates the administrator show privilege level needed to use the command. - Page 928 Chapter 32 show Commands Table 368 show Commands (continued) COMMAND DESCRIPTION Displays the status of an E1 port. status <slot-port> Displays an E1 port’s performance information performance <slot-port> collected during the specified time period. curr15|curr day|last24h curr15: Statistics are collected in the current r|[96q <sq>...
- Page 929 Chapter 32 show Commands Table 368 show Commands (continued) COMMAND DESCRIPTION Displays an IMA group’s settings. groupdetail <slot- group> slot: The number of the slot where the IMA line card is installed. group: An IMA group ID. Displays an E1 line’s packet statistics. link <slot- group>...
- Page 930 Chapter 32 show Commands Table 368 show Commands (continued) COMMAND DESCRIPTION Displays an E1 link’s performance information link <slot- collected during the specified time period. group> <link-id> curr15: Statistics are collected in the current curr15|curr quarter of an hour. For example, if you use this day|last24h command at 2:25, this section displays statistics collected since 2:15.
- Page 931 Chapter 32 show Commands Table 368 show Commands (continued) COMMAND DESCRIPTION Displays runtime interfaces. interface [<ip/ mask>|<vid| <ip/mask> <vid>] Display runtime routing table. route [<domain>]| [<ip/ mask>]|[<do main> <ip/ mask>]] Displays line information. lineinfo <slot-port> [data|pots] Displays line performance statistics. lineperf <slot-port>...
- Page 932 Chapter 32 show Commands Table 368 show Commands (continued) COMMAND DESCRIPTION Displays a DSL port’s performance counters. performance <slot-port> curr|15min|1day Displays the session’s current access privilege level. 1 privilege Displays all PVC’s statistics on a port or only a PVC’s state <slot- statistics.
-
Page 933: Show Commands
Chapter 32 show Commands Table 368 show Commands (continued) COMMAND DESCRIPTION Displays the VDSL2 port’s impulse noise monitoring <slot-port> statistics. curr|15min| 1day Displays the status of the VDSL2 line connected to line <slot-port> the specified port. Displays the final PSD the system proposes to the medleypsd <slot-port>... -
Page 934: Show Adsl Commands
Chapter 32 show Commands 32.3.1 show adsl Commands Use the commands to display the line information for an active ADSL line. show adsl 32.3.1.1 show adsl linedata Command Syntax: show adsl linedata <slot-port> This command displays a ADSL port's line bit allocation. Discrete Multi-Tone (DMT) modulation divides up a line’s bandwidth into tones. - Page 935 Chapter 32 show Commands ras> show adsl linedata 7-5 slot-port=7-5, DSL line data link = link_up savedData=true usBit Table 1:00 00 00 00 00 00 00 07 08 09 0a 0b 0b 0c 0c 0d 17:0d 0d 0d 0e 0d 0d 0d 0d 0d 0d 0d 0c 0b 0a 09 08 33:00 00 00 00 00 00 00 00 00 00 00 00 00 00 00 00 49:00 00 00 00 00 00 00 00 00 00 00 00 00 00 00 00 dsBit Table...
- Page 936 Chapter 32 show Commands This command displays the line gain of the active ADSL line. Line gain represents the signal input required to compensate for losses in signal strength at different frequencies. ras> show adsl linegain 3-1 port 3-1: near end: (dB) tone ------ ------ ------ ------ ------ ------ ------ ------ ------ ------ 0.00...
- Page 937 Chapter 32 show Commands The following table describes labels in this example. Table 370 show adsl tssi Command Display LABEL DESCRIPTION This shows the location of the line test. “near end” refers to upstream traffic, or traffic near end/far from the CPE device. “far end” refers to downstream traffic, or traffic from the CO device. This shows the frequency in increments of 4.3125 KHz.
- Page 938 Chapter 32 show Commands This command displays the TSSI (Transmitter Spectrum Shape Index) of transmission on the specified DSL line. This tests the variation of the actual PSD (Power Spectrum Density) from the specified PSD. ras> show adsl linetssi 3-1 port 3-1: near end: (No unit) tone...
-
Page 939: Show Arp Command
Chapter 32 show Commands The following table describes labels in this example. Table 372 show adsl tssi Command Display LABEL DESCRIPTION This shows the location of the line test. “near end” refers to upstream traffic, or traffic near end/far from the CPE device. “far end” refers to downstream traffic, or traffic from the CO device. This shows the frequency in increments of 4.3125 KHz. -
Page 940: Show Cfm Command
Chapter 32 show Commands The following table describes labels in this example. Table 373 show atm Command Display LABEL DESCRIPTION This field shows the number of ATM cells received on this port. rx cells This field shows the number of ATM cells transmitted on this port. tx cells This field shows the number of kilobytes per second received on this port. -
Page 941: Show Dhcp Counter Command
Chapter 32 show Commands The following is an example. ras> show dot3ad [aggregator info] tsub: state : disable members: sub1 sub2 links syncs tup: state : disable members: up1 up2 links syncs 32.3.6 show dhcp counter Command Syntax: show dhcp counter <slot>|<slot-port> This command displays the number of DHCP related packets received on the port. -
Page 942: Show Enet Command
Chapter 32 show Commands This command displays the E1 port settings on port 2 of the IMA line card installed on slot 2. ras> show e1 status 2-2 admin : In of Service frame : cascrc impedance : 120ohm alarm status: Out of CRC MF Syntax: show e1 performance <slot-port>... - Page 943 Chapter 32 show Commands The following example displays the Ethernet packet counters for the Ethernet connection to the line card in slot 1. ras> show enet up1 slot 1: link status: up rate: 1000Mbps up time: 6:08:07:50 data rate (Tx/Rx): 0/0 kbps utilization (Tx/Rx): 0/0 -------------------- -------------------- Bytes...
-
Page 944: Show Gbond Command
Chapter 32 show Commands Table 374 show enet Command Display (continued) LABEL DESCRIPTION This is the number of good non-unicast frames received/transmitted. NUcastPkts This is the number of good multicast frames received/transmitted of 64 to 1518 octets in MCastPkts length (for non VLAN) or 1522 octets (for VLAN), not including Broadcast frames. Frames with range or length errors are also not taken into account. -
Page 945: Show Https Commands
Chapter 32 show Commands The following example shows G.bond settings on the G.bond group named “gbondgroup1” configured on the line card in slot 5. The ports 1 and 2 have set in the G.bond group, receiving and transmitting rates, upstream (us) and downstream (ds) data rates for DSL lines on these ports are zero. - Page 946 Chapter 32 show Commands This command displays the current HTTPS sessions. Nothing displays if there are no current HTTPS sessions. 32.3.11.3 show https certificate Command Syntax: show https certificate This command displays details about the system’s certificate, including the public key. The following figure shows an example.
- Page 947 Chapter 32 show Commands This command displays the system certificate’s private key and the data used to generate it. The following figure shows an example. ras> show https key Private-Key: (1024 bit) modulus: 00:cd:15:93:2a:6d:99:7d:63:92:5c:56:ef:31:93: 6a:f1:c7:0d:6f:4a:e0:53:dc:90:68:95:d3:4e:94: c4:66:c5:62:20:4c:d6:bc:90:41:7d:1e:7d:4e:24: 8d:11:2a:6c:a5:10:29:be:bc:e7:70:4b:6a:59:1d: d4:6e:ae:1c:72:5c:9a:7c:c3:32:8f:8a:2f:83:8a: 13:36:1d:64:78:99:4f:3b:30:d6:fb:27:ea:cb:95: 88:58:b1:61:7f:c3:42:87:26:fb:10:12:90:1a:e4: 84:64:a9:73:1b:86:70:9d:56:52:f2:53:6b:75:8b: 72:63:4c:c6:f9:30:a8:bb:cb publicExponent: 65537 (0x10001)
-
Page 948: Show Igmp Commands
Chapter 32 show Commands 32.3.12 show igmp Commands Use the show igmp commands to display current IGMP settings and statistics. Use multicast to enable IGMP first. igmp enable 32.3.12.1 show igmp info Command Syntax: show igmp info This command displays the current IGMP settings and the number of IGMP-related packets received. -
Page 949: Show Ima Commands
Chapter 32 show Commands This command displays the current IGMP settings and the number of IGMP-related packets received. The following figure shows the IGMP packet counters for port 1 on the line card in slot 3. ras> show igmp port info 3-1 port group_cnt query_cnt join_cnt leave_cnt ----- --------- --------- --------- ---------... - Page 950 Chapter 32 show Commands This command displays the details of IMA group 2 on the line card installed in slot 2. ras> show ima groupdetail 2-2 Admin Status : notInService Failure state : insufficientLinksNe Symmetry : symop Near End Tx Clock Mode : itc Max Differential Delay(ms) : 25...
- Page 951 Chapter 32 show Commands This command displays the status and statistics of E1 link 6 on the IMA group 2 of the line card installed in slot 2. ras> show ima link 2-2 6 Row status code NE Tx State : usable NE Rx State : unusableNoGivenReason...
- Page 952 Chapter 32 show Commands This command displays the statistics of E1 link 6 in slot 2 and IMA group 2 collected during the 5th to 6th quarter hours of the past 96 quarter hours. ras> show ima performance link 2-2 6 96q 5 6 Group 2 Link 2,3 in 96 Qtr history : start from 5 to 6 idx-1 SESFE...
-
Page 953: Show Ip Command
Chapter 32 show Commands 32.3.14 show ip Command Syntax: show ip This command displays the management IP settings and statistics. An example is shown next. ras> show ip outband[enif0] inband[swif0] -------------- --------------- --------------- inet 192.168.0.1 123.23.19.206 netmask 255.255.255.0 255.255.255.0 broadcast 192.168.0.255 123.23.19.255 1500... -
Page 954: Show Ip6 Destination Command
Chapter 32 show Commands 32.3.16 show ip6 destination Command Syntax: show ip6 destination This command displays the mapping list of the next-hop address to an IPv6 destination address. Section 12.16.3 on page 479 for more details. ras> show ip6 destination Interface: In-band Destination Address Next Hop Address... -
Page 955: Show Ip6 Prefix Command
Chapter 32 show Commands The following table describes the labels in this screen. Table 376 show ipv6 neighbor LABEL DESCRIPTION This is the interface on which the IPv6 address is created or through which a Interface neighbor can be reached. This is the IPv6 address of the MSC’s interface or a neighboring device. -
Page 956: Show Ip6 Route Command
Chapter 32 show Commands An example is shown next. See Section 12.16.2 on page 478 for more details. ras> show ip6 prefix Interface: In-band Prefix vltime pltime expire onlink autonomous -------------------------- --------- --------- --------- ------ ---------- fe80::/64 infinity infinity Never TRUE TRUE Interface: Out-of-band... -
Page 957: Show Ipbpvc Interface Command
Chapter 32 show Commands where The domain name, up to 31 characters. <domain-name> The edgerouter IP address, in dotted decimal notation. <ip-address> The VLAN ID (<1..4094>). <vid> The interface IP and the subnet mask length. <ip/mask> This command displays the specified learned ARP table entries. An example is shown below. -
Page 958: Show Ipbpvc Route Command
Chapter 32 show Commands This command displays the (run-time) downlink interfaces for the selected range of IP addresses and/or VLAN. This table includes all the forwarding information for downstream traffic, whether learned by snooping DHCP packets or provided manually. An example is shown next. ras>... -
Page 959: Show Linerate Command
Chapter 32 show Commands 32.3.24 show linerate Command Syntax: show linerate <slot-port> This command displays an ADSL port's line rate information. The following example displays the line operating values for ADSL port 5 on the line card in slot 7. ras>... -
Page 960: Show Macff Arp Counter Port Command
Chapter 32 show Commands This command displays the IEEE 802.1d MAC address forwarding table. The following example displays the IEEE 802.1d MAC address forwarding table on Ethernet port 1. ras> show mac enet1 mac(total: port ---- ----------------- ----- 1 00:00:04:a0:00:31 enet1 1 00:00:1c:d4:1c:f6 enet1 1 00:00:e2:82:7d:90 enet1 1 00:02:3f:6c:6f:0a enet1... -
Page 961: Show Monitor Command
Chapter 32 show Commands This command displays the card’s static and dynamicly learned MAC forced forwarding entries. Here is an example for the line card in slot 12. ras> show macff status 12 No Static entry was set Dynamic Table: idx Gateway vid ip mask ip... - Page 962 Chapter 32 show Commands The following example displays the hardware monitor statistics for the card in slot 1. ras> show monitor 1 '*' indicates a current alarm voltage: volt current nominal high_lmt low_lmt ---------------- -------- -------- -------- -------- 2.5V 2.588 2.500 2.700 2.300...
-
Page 963: Show Mstp Command
Chapter 32 show Commands This table describes labels in the example. Table 379 show monitor Command Information LABEL DESCRIPTION The power supply for each voltage has a sensor that can detect and report the voltage. voltage This is the present voltage reading. current This field displays the average voltage measured at this sensor. -
Page 964: Show Oam Command
Chapter 32 show Commands The following example displays MST region information for MST IDs 1 and 2. ras> show mstp 1 2 [mstid 1] BridgeID : 0x8001-00a0c5da46eb TimeSinceTopoChange : 3:08:23:03 TopoChangeCount TopoIsChanging : false IntRootPortID : 0x0000 IntRootID : 0x8001-00a0c5da46eb IntRootPathCost [mstid 2] BridgeID... -
Page 965: Show Packet Command
Chapter 32 show Commands The following example displays Ethernet OAM details about port 13 on an Ethernet line card in slot ras> show oam 7-13 Local client ------------ OAM configurations: Mode : active Remote loopback : supported Max. OAMPDU size : 1518 Operational status: Link status... -
Page 966: Show Paepvc Counter Command
Chapter 32 show Commands The following example displays the hardware monitor statistics for VDSL port 5 on the line card in slot 2. ras> show packet 2-5 ifInOctets = 66240 ifInUcastPkts = 1029 ifInMcastPkts = 149 ifInBcastPkts = 202 ifInNUcastPkts = 351 ifInDiscards = 86... -
Page 967: Show Paepvc Session Command
Chapter 32 show Commands The following table describes the counters. Table 380 show paepvc counter Command Fields FIELD DESCRIPTION ppp lcp config-request This field displays the number of PPP config-request packets received. ppp lcp echo-request This field displays the number of PPP echo-request packets received. ppp lcp echo-reply This field displays the number of PPP echo-reply packets received. - Page 968 Chapter 32 show Commands The following example displays the current performance counters for ADSL port 5 on the line card in slot 7. ras> show perform 7-5 curr PhysEntry --------- vtuc/vtur CurrSnrMgn = 12.5/5.5 dB vtuc/vtur CurrAtn = 1.9/0.0 dB vtuc/vtur CurrOutputPwr = 13.3/12.3 dBm vtuc/vtur CurrAttainableRate = 24989/1013 kbps...
- Page 969 Chapter 32 show Commands Table 381 show performance curr (continued) LABEL DESCRIPTION These are the ADSL line’s downstream and upstream numbers of Loss of frame PerfLofs Seconds that have occurred within the current 15 minute period. These are the ADSL line’s downstream and upstream numbers of Loss of signal PerfLoss Seconds that have occurred within the current 15 minute period.
-
Page 970: Show Rmon Command
Chapter 32 show Commands The following example displays the one day performance counters for ADSL port 5 on the line card in slot 7. ras> show performance 7-5 1day PerfCurr1Day ------------- vtuc/vtur TimeElapsed = 57163/57163 seconds vtuc/vtur Lofs = 0/0 seconds vtuc/vtur Loss = 0/0 seconds vtuc... - Page 971 Chapter 32 show Commands This command displays subtending or uplink RMON MIB information. See RFC 1757 for information on the RMON MIBs. The following example displays RMON history information for the Gigabit Ethernet uplink 1 interface. ras> show rmon history up1 historyControlInterval = 30 seconds Index SampleIndex...
-
Page 972: Show Sfp Command
Chapter 32 show Commands 32.3.38 show sfp Command Syntax: show sfp <slot-port> This command displays details about the transceiver installed in an SFP slot on an Ethernet line card. The following example displays about the SFP transceiver installed in slot 13 on an Ethernet line card in slot 7. -
Page 973: Show User Command
Chapter 32 show Commands ras> show sys CPU usage status: baseline 1456794 ticks ticks util ticks util ticks util ticks util 0 1356594 6.87 1 1363056 6.43 2 1337785 8.16 3 1340022 8.01 4 1187472 18.48 5 1366325 6.21 6 1377483 5.44 7 1153896 20.79... - Page 974 Chapter 32 show Commands This command displays the VDSL port’s impulse noise monitoring statistics. The following example shows the current impulse noise monitoring statisitcs on the VDSL line connected to port 2 of the line card in slot 12 ras> show vdsl inm 12-2 curr InmCurr: vtuc vtur...
-
Page 975: Show Vdsl Linebandplan Command
Chapter 32 show Commands 32.3.42 show vdsl linebandplan Command Syntax: show vdsl linebandplan <slot-port> This command displays a VDSL line bandplan. The following example shows bandplan details on the VDSL line connected to port 22 of the line card in slot 2. ras>... -
Page 976: Show Vdsl Linehlog Command
Chapter 32 show Commands The following example shows the line gain on the VDSL line connected to port 22 on the device inserted into slot 2. ras> show vdsl linegain 2-22 slot-port=2-22, DSL line gain US0 gain measured (dB): tone ------ ------ ------ ------ ------ ------ ------ ------ 0.00 0.00... -
Page 977: Show Vdsl Lineqln Command
Chapter 32 show Commands 32.3.46 show vdsl lineqln Command Syntax: show vdsl lineqln <slot-port> This command displays the Quiet Line Noise level on a line. This is the rms (root mean square) level of the noise present on the line for a DMT tone when no ADSL or VDSL signals are present. It is measured in dBm/Hz. - Page 978 Chapter 32 show Commands This command displays the TSSi (Transmit Spectrum Shaping index) of transmission on the specified line. This shows the variation of the actual PSD (Power Spectrum Density) from the PSD. The following example shows TSSi levels on port 22 of the VDSL line card in slot 2. ras>...
-
Page 979: Show Vlan Command
Chapter 32 show Commands The following table describes labels in this example. Table 384 show vdsl tssi Command Display LABEL DESCRIPTION This shows the location of the line test. “near end” refers to upstream traffic, or traffic near end/far from the CPE device. “far end” refers to downstream traffic, or traffic from the CO device. This shows the frequency in increments of 4.3125 KHz. -
Page 980: Show Voip H248 Media Command
Chapter 32 show Commands 32.3.50 show voip h248 media Command Syntax: show voip h248 media <id> <media> where The number of the H.248 interface (1~16). media The number of the media card (1~27). This command displays the status of the specified H.248 media card. This example shows the status of the H.248 interface 1’s media card 1. -
Page 981: Show Voip H248 Termination State Command
Chapter 32 show Commands This example shows the H.248 termination status of the H.248 interface 1’s media card 1. ras> show voip h248 termination info 1-1-1 media id media ip : 192.168.3.174 management inband ip : 172.23.19.236 management outband ip: 192.168.0.1 slot id port count : 48... - Page 982 Chapter 32 show Commands The following example shows settings on the SIP proxy server assigned to the line card in slot 3. ras> show voip sip serverstate 3 SIP proxy server IP/domain name port state --------------------------------------------------------------- ----- ------- 192.168.2.20 5060 alive 192.168.2.2 5062 lost Management Switch Card User’s Guide...
-
Page 983: Switch Commands
HAPTER switch Commands This chapter shows you how to use the commands. switch 33.1 switch Commands Overview commands configure switching functions and manage the Ethernet interfaces. switch 33.2 General switch Command Parameters The following table describes commonly used command parameter notation. switch Table 385 General switch Command Parameters NOTATION... - Page 984 Chapter 33 switch Commands Table 386 switch Commands (continued) COMMAND DESCRIPTION Displays the bandwidth control settings. show Displays broadcast and multicast storm control bcastctrl show settings. Sets the limitations of broadcast, multicast and threshold <giga-port> <bc- unknown unicast packets, in packets per second limit>...
- Page 985 Chapter 33 switch Commands Table 386 switch Commands (continued) COMMAND DESCRIPTION Deletes a MEP. delete <md-name> <ma-name> <mep-id> Sets an endpoint in the association. set <md-name> <ma- name> <mep-id> direction: Choose up|down. This is the active <giga- SAP direction, up means CFM PDUs are sent port>|<slot-port>...
- Page 986 Chapter 33 switch Commands Table 386 switch Commands (continued) COMMAND DESCRIPTION Sets the time interval between exchanging LACP timeout short|long packets. Displays the link aggregation state. show Displays DSCP-IEEE 802.1p mappings on this dscp show device. Deactivates DSCP-IEEE 802.1p mappings on this disable device.
- Page 987 Chapter 33 switch Commands Table 386 switch Commands (continued) COMMAND DESCRIPTION Displays the LLDP settings. show Sets how the MSC uses LLDP on this port. port adminstatus <port> disable|tx|rx|tx- disable: has the MSC not send or receive LLDP information through this port. tx: only send local LLDP information through this port.
- Page 988 Chapter 33 switch Commands Table 386 switch Commands (continued) COMMAND DESCRIPTION Specifies the port and traffic direction port <port> <direction> (ingress|egress|both|none) to copy to the monitor port. Displays the port mirroring settings. show Sets a descriptive name for the MSTP mstp cfgname <config name>...
- Page 989 Chapter 33 switch Commands Table 386 switch Commands (continued) COMMAND DESCRIPTION Turns on data transmission on a port. enable <giga-port> Turns off flow control on a port. flowctrl disable <giga- port> Turns on flow control on a port. enable <giga-port> Sets the port(s) to accept VLAN tagged and frametype <giga-port>...
- Page 990 Chapter 33 switch Commands Table 386 switch Commands (continued) COMMAND DESCRIPTION Sets a port’s queuing method and/or priority qschedule <giga-port> spq weight. <giga-port> wrr spq: strict priority queuing algorithm <wt0> <wt1> <wt2> wrr: weighted round robin queue algorithm <wt3> <wt4> <wt5> <wt6>...
-
Page 991: Switch Bandwidth Commands
Chapter 33 switch Commands Table 386 switch Commands (continued) COMMAND DESCRIPTION Sets a transceiver’s voltage thresholds. When the <giga- value goes out of the thresholds, the system port>|<slot-port> sends an alarm. <high-limit> <low- limit> high-limit: high threshold, 0~6.5535 low-limit: low threshold, 0~6.5535. The value must be smaller than the high-limit value. -
Page 992: Switch Bandwidth Set Command
Chapter 33 switch Commands where This represents Gigabit Ethernet uplink ports, subtending ports or all ports. Use <giga-port> f trunking is not enabled. Use sub1|sub2|up1|up2|all i if trunking is enabled. sub|tup|all This command turns on bandwidth control on the specified port(s). This example turns on bandwidth control for the subtending 2 port. -
Page 993: Switch Bcasctrl Commands
Chapter 33 switch Commands “V” displays for ports that have bandwidth control enabled “-” displays for ports that do not. 33.5 switch bcasctrl Commands Use the commands to configure broadcast storm control. switch bcasctrl 33.5.1 switch bcastctrl threshold Command Syntax: switch bcasctrl threshold <giga-port>... -
Page 994: Switch Cfm Commands
Chapter 33 switch Commands 33.5.3 switch cfm Commands 33.5.3.1 switch cfm disable Syntax: switch cfm disable This command disables Connectivity Fault Management (CFM). 33.5.3.2 switch cfm enable Syntax: switch cfm enable This command enables CFM. 33.5.3.3 switch cfm lbr enable Syntax: switch cfm lbr enable <giga-port>|<slot-port>... - Page 995 Chapter 33 switch Commands This command displays loopback testing settings. The following shows an example. ras> switch cfm lbr show Giga port --------- sub1: disable sub2: disable up1: disable up2: disable DSL port -------- 6-1: enable 6-2: disable 6-3: enable 33.5.3.6 switch cfm ma delete Syntax: switch cfm ma delete <md-name>...
- Page 996 Chapter 33 switch Commands This command sets a list of maintenance association end points. The following example sets the end point identifier “2” in the list of end point identifiers for the maintenance association “ma1” in the maintenance domain “md1”. ras>...
- Page 997 Chapter 33 switch Commands 33.5.3.12 switch cfm md delete Syntax: switch cfm md delete <md-name> This command deletes a maintenance domain. 33.5.3.13 switch cfm md set Syntax: switch cfm md set <md-name> <level> This command sets a maintenance domain and it’s level. The following example configures the maintenance domain “md1”...
- Page 998 Chapter 33 switch Commands This is the number of seconds (2.5~10) the system waits to remove a local <reset-time> alarm after CFM_ERROR has been resolved and no other alarms occurred. The default is 10 seconds. This command configures a maintenance end point (MEP). The example identifies the port 22 in slot 2 using the MEP ID 22 and the port will send CCMs with priority 7.
- Page 999 Chapter 33 switch Commands incompatible with link state Ethernet protocol and will result in loops. The following shows an example. ras> switch cfm mip mlbm respond disable 33.5.3.19 switch cfm mip mlbm respond enable Syntax: switch cfm mip mlbm respond enable This command sets MIPs to respond to mLBM messages.
-
Page 1000: Switch Dot3Ad Commands
Chapter 33 switch Commands Three examples (show all MDs, a specified MD’s detail, a specified MA’s detail) are shown next. ras> switch cfm show status : enabled no. of maintenance domain : 2 md name level no. of ma -------------------------------- ----- --------- MD_0 MD_1 ras>... -
Page 1001: Switch Dot3Ad Lacp Timeout Command
Chapter 33 switch Commands This example sets the system’s priority to 1000. ras> switch dot3ad lacp priority 1000 33.6.2 switch dot3ad lacp timeout Command Syntax: switch dot3ad lacp priority timeout short|long where Timeout is the time interval between the individual port exchanges of LACP timeout packets in order to check that the peer port in the trunk group is still up. -
Page 1002: Switch Dot3Ad Disable Command
Chapter 33 switch Commands This example sets the MSC to use link aggregation on the subtending ports. This also copies the configuration of subtending port one to subtending port two. The system asks you to confirm if this is what you want to do. ras>... -
Page 1003: Dscp Overview
Chapter 33 switch Commands 33.6.7 DSCP Overview DiffServ Code Point (DSCP) is a field used for packet classification on DiffServ networks. The higher the value, the higher the priority. Lower-priority packets may be dropped if the total traffic exceeds the capacity of the network. 33.6.8 switch dscp Commands Use the commands to show and configure the DSCP mapping and DSCP to IEEE...
Need help?
Do you have a question about the MSC1000G and is the answer not in the manual?
Questions and answers