
Subscribe to Our Youtube Channel
Related Manuals for Conductix-Wampfler ProfiDAT compact


Summary of Contents for Conductix-Wampfler ProfiDAT compact
- Page 1 Mounting Instructions ProfiDAT compact ® Data Transmission System Program 0515 MAL0515-0001i-EN www.conductix.com Translated from MAL0515-0001k-DE Page 1 of 169...
- Page 2 Mounting Instructions ProfiDAT compact ® Data Transmission System Program 0515 Contents General Information ................................. 7 About this document ..............................7 Limitation of liability ..............................7 Copyright .................................. 8 Replacement parts ..............................8 Material defects ................................ 8 Technical support ..............................8 Safety Information ..................................
- Page 3 Mounting Instructions ProfiDAT compact ® Data Transmission System Program 0515 Technical Data ..................................24 General information ..............................24 Interfaces ................................24 3.2.1 Electrical / Electronic .............................. 24 3.2.2 Control signal cycle times ............................26 3.2.3 Data transfer limitations ............................26 3.2.4 Network integration ..............................
- Page 4 Mounting Instructions ProfiDAT compact ® Data Transmission System Program 0515 Safety ..................................48 Preparation ................................49 Grounding ................................50 6.3.1 TN grid ..................................51 6.3.2 Information on the implementation of the conductor rail grounding ................ 52 Mechanical installation ............................54 6.4.1 Mount universal hanger clamp ..........................
- Page 5 Mounting Instructions ProfiDAT compact ® Data Transmission System Program 0515 Operation ..................................... 119 WLAN channel usage ............................119 Safety ................................... 119 Maintenance and Service ..............................120 Safety ................................... 120 Maintenance schedule ............................121 8.2.1 Documentation ..............................122 8.2.2 Maximum wear of the sliding contacts ........................122 8.2.3 Replacement of the sliding contacts ........................
- Page 6 Mounting Instructions ProfiDAT compact ® Data Transmission System Program 0515 9.3.3 Accessing and interpreting the Event Log (device) ....................155 9.3.4 Accessing and interpreting the Authentication Log (WLAN) ................. 155 9.3.5 Display of fault states ............................156 9.3.6 Power supply state ............................... 157 9.3.7 Network connection state .............................
- Page 7 Mounting Instructions ProfiDAT compact ® Data Transmission System Program 0515 1 General Information 1.1 About this document This document facilitates the safe and efficient handling of the ProfiDAT compact Data Transmission System. ® This document is a component of the system and must be kept accessible to personnel at all times in its immediate vicinity. Personnel must read this document carefully and understand it before starting any work.
- Page 8 Mounting Instructions ProfiDAT compact ® Data Transmission System Program 0515 1.3 Copyright This document is protected by copyright and is exclusively intended for internal use by customers. Provision of these mounting instructions to third parties, reproduction in any form – even in part – as well as the reuse and/or disclosure of its content, except for the customer's internal use, are not permitted without the written approval of the manufacturer.
- Page 9 Mounting Instructions ProfiDAT compact ® Data Transmission System Program 0515 2 Safety Information 2.1 Explanation of symbols Safety information is identified in these mounting instructions using symbols. The safety information is introduced using signal words that indicate the degree of the hazard. Always observe safety information and work carefully to avoid accidents, bodily injury and material damage! ...
- Page 10 Mounting Instructions ProfiDAT compact ® Data Transmission System Program 0515 2.2 Personnel requirements 2.2.1 Qualifications Inadequately trained persons are at risk of injury! Improper use can result in serious injury to persons and property. → All activities must only be carried out by qualified personnel. WARNING! Only persons who can be expected to perform their work reliably are acceptable personnel.
- Page 11 Mounting Instructions ProfiDAT compact ® Data Transmission System Program 0515 2.3 Unauthorized persons Danger due to unauthorized persons! Unauthorized persons who do not meet the requirements described here are not acquainted with the dangers in the work area. WARNING! → Keep unauthorized persons away from the work area. →...
- Page 12 Mounting Instructions ProfiDAT compact ® Data Transmission System Program 0515 To be worn for Specific protective equipment is required when conducting special tasks. Separate reference special tasks to this is made in the individual sections. Protective eyewear For eye protection against harmful influences such as strong light, chemicals, dust, splinters or weather effects.
- Page 13 Operation in areas that require a higher protection class than IP23. Use of the system parallel to a conductor rail system from manufacturers and/or types not approved by Conductix-Wampfler. Use of the system with accessories that are not approved and not authorized by the manufacturer.
- Page 14 Mounting Instructions ProfiDAT compact ® Data Transmission System Program 0515 2.7 Protective measures by the operator /user The equipment is designed for use in an industrial setting. The operator of the equipment is therefore subject to compliance with the legal obligations concerning workplace safety. In addition to the safety information in this document, all safety, accident protection and environmental regulations valid in the place of operation of the system must also be observed.
- Page 15 Mounting Instructions ProfiDAT compact ® Data Transmission System Program 0515 Radio Equipment Directive Radio Equipment 2014/53/EC, including EN 301 489-1 V1.8.1 Protection requirements with regard to EMC EN 301 489-17 V2.2.1 EN 300 328 V1.8.1 Use of the radio frequency spectrum ...
- Page 16 Mounting Instructions ProfiDAT compact ® Data Transmission System Program 0515 2.9.1 Electrical hazards and sources of danger in combination with a conductor rail Risk of death due to Contact with energized components can lead to death or severe injury due to electrical shock! electrical shock.
- Page 17 Mounting Instructions ProfiDAT compact ® Data Transmission System Program 0515 Fire hazard due to overload Fire hazards occur due to overloaded cables, electrical arcs, short circuits or sparking. or sparking! Sparking can occur with poorly serviced, soiled conductor rails or if installation does not comply with the required tolerances.
- Page 18 Mounting Instructions ProfiDAT compact ® Data Transmission System Program 0515 Risk of injury due to The conductor rails, collectors or other components (e.g. antennas), can fall down falling objects! during operations or during any other works on the system. This can cause severe injuries or fatalities if they fall from great heights.
- Page 19 (e.g. aromatics, benzene) are stored or processed must be checked in advance through Conductix-Wampfler. → With an installation height of 3 m or more in areas with pedestrian traffic, secure conductor rails against falling down (safety gear).
- Page 20 Mounting Instructions ProfiDAT compact ® Data Transmission System Program 0515 These characteristics of the conductor rail can create a hazardous situation if the conductor rail is installed in an operational environment with: Electrical power Sparking Dust due to abrasion ...
- Page 21 Data Transmission System does not have its own emergency stop. Suitable safety components must be ® incorporated to ensure the emergency stop function. Conductix-Wampfler recommends the use of a PROFIsafe system. 2.9.7 Danger zones Risk of injury due to moving components! When the system is operating, severe injuries can result if persons or objects are within the movement range (danger zone!).
- Page 22 Mounting Instructions ProfiDAT compact ® Data Transmission System Program 0515 Risk of crushing due to stored energy! When working on the collector, there is the risk of crushing extremities due to uncontrolled movements as a result of the energy stored in the spring. CAUTION! →...
- Page 23 Remove the equipment and replace it with new equipment. Determine the cause of fault and repair the equipment. Conductix-Wampfler must be informed immediately if personal injury or material damage can occur during breakdowns. Conductix-Wampfler GmbH Phone: +49 ( 0) 7621 662-0 Rheinstraße 27 + 33...
- Page 24 Mounting Instructions ProfiDAT compact ® Data Transmission System Program 0515 3 Technical Data 3.1 General information Specification Value, Unit Maximum length of a rail segment 120 m (with line feed) Rail length 5000 mm Outer rail dimensions (width x height) 21 mm x 37 mm (21 mm x 52 mm) Pole spacing Depending on the respective parallel mounted...
- Page 25 Mounting Instructions ProfiDAT compact ® Data Transmission System Program 0515 Fig. 1: Overview of interfaces and scope of delivery ProfiDAT ® compact (simplified) Data interface: 100 Mbps, RJ45 Data is fed to the rail (slotted waveguide) via the line feed. A data cable (HF cable) is connected to the stationary antenna. The connection is made via plug connectors.
- Page 26 Mounting Instructions ProfiDAT compact ® Data Transmission System Program 0515 Risk of injury due to collectors! Failure to comply with the specified supply voltages for the controller can cause a controller failure and electrical components may be destroyed. As a result, the collector may run jerkily WARNING! and hit persons or objects.
- Page 27 Mounting Instructions ProfiDAT compact ® Data Transmission System Program 0515 3.2.5 Mechanical The interface between the data transmission system and the portable consumer of the machine is: Collector The collector on the ProfiDAT compact rail fulfills a double function. The collector is guided on theProfiDAT compact rail via sliding ®...
- Page 28 Mounting Instructions ProfiDAT compact ® Data Transmission System Program 0515 Specification Value, Unit Power supply PoE (RJ45), (according to IEEE802.3at for Type IEEE802.3af typical) 4-pole with clamping screws Operating frequency 5.2 – 5.8 GHz Operating voltage from terminal strip 19.2 to 28.8 V DC Operating voltage –...
- Page 29 ® Data Transmission System Program 0515 3.4 Transceiver housing technical data Conductix-Wampfler Automation – Housing (part of the transceiver assemblies) (Material number: 3272029) Fig. 3: Transceiver housing dimensions and illustration Material: Aluminum and plastic (ABS) • Fastening: Mounting bracket •...
- Page 30 Mounting Instructions ProfiDAT compact ® Data Transmission System Program 0515 Rear side grounding connection via ring terminal • Plate for equipotential bonding connection with blade receptacle for 1.5-2.5 mm² (only for access point) • Not in scope of delivery: Power supply •...
- Page 31 Mounting Instructions ProfiDAT compact ® Data Transmission System Program 0515 Protection class: IP66 • Transceiver connection (laid outward): • 1…2x N-Connect (antennas), provide unused opening with filler plug Prepared connections: • Power supply (prepared screw connection M20), connection directly to transceiver Protective conductor terminal 2.5 mm²...
- Page 32 Mounting Instructions ProfiDAT compact ® Data Transmission System Program 0515 Connector types: Fig. 5 R-SMA angle connector Fig. 6: QLS connector is unlocked Fig. 7: QLS connector is locked (green ring visible by pushing the blue sleeve forward) Fig. 9: N-socket as switching cabinet bushing on cable Fig.
- Page 33 Mounting Instructions ProfiDAT compact ® Data Transmission System Program 0515 Tightening torques: Connector type Tightening torque 4 to 6 Nm (R)-SMA 0.79 to 1.13 Nm QLS connectors are not screwed, but rather are locked by pushing the blue sleeve forward (green ring becomes visible). To remove the connector, the blue sleeve must be pulled back (unlocked) in the direction of the cable.
- Page 34 Mounting Instructions ProfiDAT compact ® Data Transmission System Program 0515 3.5.2 Further passive HF components Drill hole diameter: 16mm Fig. 10: N-socket (on both sides) as switching cabinet bushing Length: 54 mm Shaft diameter: 18mm Fig. 11: N-attenuator (example 3dB) Shaft diameter: 34 mm Outer dimensions: 72 x 132 mm Fig.
- Page 35 Mounting Instructions ProfiDAT compact ® Data Transmission System Program 0515 The HF cables must not be crimped (e.g. by pulling too tightly on the cable tie). → Observe the bending radii of the HF cables (see Section 3.5.1). → Maintain the recommended coupling torques (see Section HF cables 3.5.1). ATTENTION! 3.6 Operating conditions Specification...
- Page 36 MAC address Model Manufacturer Manufacturer address Additional marking by Conductix-Wampfler GmbH: Customer order number Access point or client name Please always include the information on the type plate when inquiring about the product! MAL0515-0001i-EN www.conductix.com...
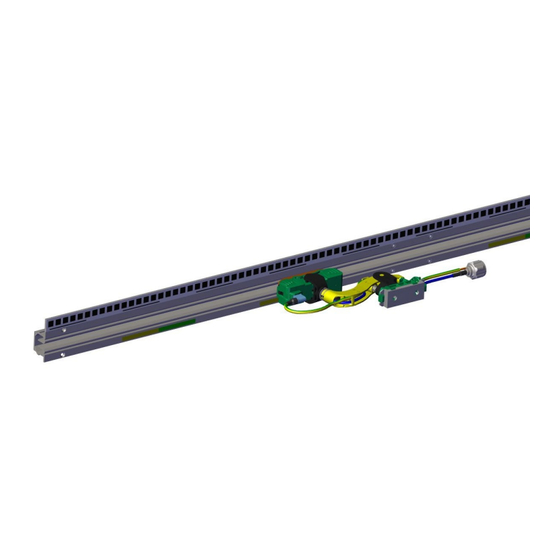
- Page 37 Mounting Instructions ProfiDAT compact ® Data Transmission System Program 0515 4 Product Description and Functional Principle 4.1 Overview Fig. 15: ProfiDAT compact components in detail ® Item Name Item Name Line feed Stationary antenna Universal hanger clamp PE connector/ PE connection Transceiver (access point) Connector Collector...
- Page 38 Mounting Instructions ProfiDAT compact ® Data Transmission System Program 0515 4.2 Brief description The ProfiDAT compact Data Transmission System is a system that facilitates the communication between a stationary network ® and one or more mobile consumers. The mobile consumers move along the guideway in a linear, track-guided manner. The collector follows the movement of the mobile consumer and compensates for guideway deviations between the mobile consumer and the data rail (horizontally and vertically).
- Page 39 (width: 21 mm, height: 52 mm) The standard length of a data rail is 5 m. The rails can also be purchased as rail bends from Conductix-Wampfler (for more information, see KAT0515-0001). Fig. 17: Rail with positioning strip Hanger clamp ...
- Page 40 Mounting Instructions ProfiDAT compact ® Data Transmission System Program 0515 Project-specific hanger clamps can be developed and produced for the various conductor rail systems combination with ProfiDAT compact rail (with and without a positioning strip). (see Fig. 20) ® Project-specific hanger clamps, such as for EMS applications, are typically clipped on or screwed into the EMS traverse beam.
- Page 41 Mounting Instructions ProfiDAT compact ® Data Transmission System Program 0515 Line feed (with stationary antenna) The line feed is mounted on the segment ends or on the rail line. It is used to couple and decouple the data signals. There are two types of line feeds: Line feed with or without positioning strip ...
- Page 42 Mounting Instructions ProfiDAT compact ® Data Transmission System Program 0515 4.4 ProfiDAT compact electrical components (example layout) ® Overview of electrical components with HF cables (schematic diagram) The green area shows the access point components and the client components are shown in the purple area. Fig.
- Page 43 Mounting Instructions ProfiDAT compact ® Data Transmission System Program 0515 Fig. 30: Overview and arrangement of the electrical components. Example: End feed, client with one antenna, without additional housing, equipotential bonding not shown Name HF Connection 1 HF Connection 2 Length Material Number Access point W774 R/SMA...
- Page 44 Mounting Instructions ProfiDAT compact ® Data Transmission System Program 0515 Name HF Connection 1 HF Connection 2 Length Material Number Installation 11 Installation socket 180° Installation socket 180° 3187977 socket 12 Ecoflex 10 cable Connector 90° Connector 180° 3.0 m 3259210 14 Client W734 R/SMA...
- Page 45 Mounting Instructions ProfiDAT compact ® Data Transmission System Program 0515 5 Transport, Packaging and Storage 5.1 Transport 5.1.1 Safety instructions for transport Risk of death due to suspended loads! When lifting loads, there is a risk of death due to parts falling or swinging out of control. →...
- Page 46 Mounting Instructions ProfiDAT compact ® Data Transmission System Program 0515 5.1.3 Transport inspection Immediately check the delivery for completeness and transport damage upon delivery. In the event of visible damage proceed as follows: Do not accept delivery or accept it only with reservations. ...
- Page 47 Mounting Instructions ProfiDAT compact ® Data Transmission System Program 0515 5.3 Storage of packaged parts Store packaged parts under the following conditions: Do not store outdoors Store in a dry, dust-free area Do not expose to aggressive media ...
- Page 48 Mounting Instructions ProfiDAT compact ® Data Transmission System Program 0515 6 Installation and Commissioning 6.1 Safety Personnel: Installation and commissioning may only be carried out by specially trained technicians! Wear the following personal protective equipment for all installation and commissioning work: Protective clothing ...
- Page 49 Mounting Instructions ProfiDAT compact ® Data Transmission System Program 0515 6.2 Preparation Required tools: Cross-cut saw Open-end wrench SW7 (M4) Open-end wrench SW8 (M5) Open-end wrench SW13 (M8) Hexagon screwdriver (Allen key) SW 2.5 Cordless drill driver ...
- Page 50 Mounting Instructions ProfiDAT compact ® Data Transmission System Program 0515 6.3 Grounding The system operator must ensure sufficient grounding of the support structures (substructures), particularly the coated components. Safety regulations and country-specific directives for the grounding of electrical equipment (e.g. VDE/UVV/VBG4) must be followed.
- Page 51 Mounting Instructions ProfiDAT compact ® Data Transmission System Program 0515 6.3.1 TN grid → In the TN grid, ProfiDAT compact rail (ground conductor rail) is directly connected to the grounded star point of the supply ® transformer through a cable. →...
- Page 52 Mounting Instructions ProfiDAT compact ® Data Transmission System Program 0515 6.3.2 Information on the implementation of the conductor rail grounding ® → The ProfiDAT compact rail (ground conductor rail) must be installed at the beginning and at the end as well as at every 5th connection point to the support structure (substructure).
- Page 53 Mounting Instructions ProfiDAT compact ® Data Transmission System Program 0515 Standard PE connector Item Name Hexagon nut, DIN 934 Locking edge washer Cable lug up to 95 mm² M8 Serrated washer PE connector PE cable Fig. 31: PE connector Optional lateral PE connection Item Name Countersunk screw M3 x 8...
- Page 54 Mounting Instructions ProfiDAT compact ® Data Transmission System Program 0515 6.4 Mechanical installation Personnel: Installation only by technical personnel Min. 2 persons The following describes the installation of the data transmission system in a step by step manner and one after the other in a practical order. Some steps may be carried out in parallel on site.
- Page 55 Mounting Instructions ProfiDAT compact ® Data Transmission System Program 0515 Fig. 34: Mount universal hanger clamp Fig. 35: Universal hanger clamp Work steps for the universal hanger clamp: → Drill the support structure (substructure) for the hanger clamps according to Fig. 36. The diameter "X" depends on the thickness of the support structure (substructure) and can be taken from the table below: Thickness "D"...
- Page 56 Mounting Instructions ProfiDAT compact ® Data Transmission System Program 0515 Optional mounting for the universal hanger clamp The universal hanger clamp can also be mounted with fastenings other than the expanding rivet. Other fastenings are: → Self-tapping screw (DIN 7500 CE) →...
- Page 57 Mounting Instructions ProfiDAT compact ® Data Transmission System Program 0515 Thread M4 Thread reach 3.65 3.65 3.70 3.70 3.70 3.70 3.70 3.70 3.70 3.70 3.70 Table 1: Hole diameter standard values according to DIN 7500-2 → Mount the hanger clamp (1) on the side of the support structure (substructure). →...
- Page 58 Mounting Instructions ProfiDAT compact ® Data Transmission System Program 0515 6.4.2 Combined and project-specific hanger clamps The mounting of combined hanger clamps can be found in the respective documentation of the conductor rail system or, on request, in the project-specific documentation. The following distances between the hanger clamps must be observed: Fig.
- Page 59 The line feed must be mounted with two hanger clamps. ATTENTION: The position of the stationary antenna (1) may differ depending on the system. This changes the drilling pattern of the stationary antenna (1). Please note the project-specific documentation and, if necessary, contact Conductix-Wampfler. Fig. 42: Stationary antenna (1) Fig.
- Page 60 Mounting Instructions ProfiDAT compact ® Data Transmission System Program 0515 Fig. 46: Support structure (substructure) (1) with line feed (plastic cap, right) Fig. 47: Support structure (substructure) (1) with line feed (plastic cap, left) Fig. 48: Support structure (substructure) (1) with line feed (aluminium cap, right) Fig.
- Page 61 Mounting Instructions ProfiDAT compact ® Data Transmission System Program 0515 Work steps: → Determine the position of the through hole for the line feed in the support structure (substructure) according to Fig. 44 to Fig. 49 centered on the slot of the data rail. ATTENTION: The stationary antenna is located outside (below or above) the center (see Fig.
- Page 62 Mounting Instructions ProfiDAT compact ® Data Transmission System Program 0515 6.4.4 Expansion unit 6.4.4.1 Expansion unit layout Number of expansion units per segment: The maximum segment length for a line feed (center) is 120 meters. The maximum segment length is linked to the data transmission and not to the ProfiDAT compact rail made of aluminium in particular.
- Page 63 Mounting Instructions ProfiDAT compact ® Data Transmission System Program 0515 Data rail material: Aluminium with a 0.0000234 1/K linear expansion coefficient ∆t tot = ∆tU + ∆tSW ∆tU = Temperature range of the ambient temperature [° C] ∆tSW = Temperature increase due to current heat [° C] Because the ProfiDAT compact may only be used as PE and not as PH rail, the value for ∆tSW always corresponds to 0°.
- Page 64 Mounting Instructions ProfiDAT compact ® Data Transmission System Program 0515 With line feed Example of segment length "S" (intermediate length "a " with 1 expansion unit and intermediate length "a " with 2 expansion units) Data transfer does not occur in the area of the expansion unit. If there are several expansion units in a row, the distance between the two antennas must be dimensioned accordingly! ATTENTION!
- Page 65 Mounting Instructions ProfiDAT compact ® Data Transmission System Program 0515 With end feed Fig. 52: Expansion unit layout at end Fig. 53: Expansion unit layout at end Item Name Item Name Outfeed Segment length Expansion unit Intermediate length a Anchor point Intermediate length a Area without data (1 expansion unit) Transfers and curves are anchor points, this area must therefore be taken into account when...
- Page 66 Mounting Instructions ProfiDAT compact ® Data Transmission System Program 0515 6.4.4.2 Setting up the expansion unit Fig. 54: Air gap in expansion unit Fig. 55: Determine air gap = the lowest temperature occurring in the given application = highest possible operating temperature in the given application * = Ambient temperature during installation Instructions for determining the air gap: Enter the connecting line from t...
- Page 67 Mounting Instructions ProfiDAT compact ® Data Transmission System Program 0515 Example: Temperature difference: from + 40° C to 0° C Ambient temperature during installation: + 20° C Expansion unit setting: Set expansion distance at 12.5 mm per expansion unit and 2 x 6.25 mm air gap The diagram in Section 11.3 can be used to help determine the air gap at the installation site! 6.4.4.3 Required materials...
- Page 68 (4), e.g. before transfers. However, this is not required in all applications. This should be determined by the customer together with Conductix-Wampfler during the design phase. → If the anchor point screw M4 x 20 (screw M4 x 20 in Fig.
- Page 69 Mounting Instructions ProfiDAT compact ® Data Transmission System Program 0515 → If the anchor point is in the expansion unit (4), then mount the anchor point screw (A) with nut in the expansion unit (4) accordingly with a tightening torque of 3.0 Nm (M4 DIN 7991, hexagon socket SW2.5 –...
- Page 70 Mounting Instructions ProfiDAT compact ® Data Transmission System Program 0515 System without positioning strip Fig. 65: Expansion unit – end feed (mounted on left) Fig. 66: Expansion unit – end feed (mounted on left), A = Anchor point Fig. 67: Expansion unit – end feed (mounted on right) Fig.
- Page 71 Mounting Instructions ProfiDAT compact ® Data Transmission System Program 0515 System with positioning strip (take dimensions from Fig. 65 to Fig. 68) Fig. 69: Expansion unit – end feed (mounted on right) MAL0515-0001i-EN www.conductix.com Translated from MAL0515-0001k-DE Page 71 of 169...
- Page 72 However, this is not required in all applications. This should be determined by the customer together with Conductix-Wampfler during the design phase. → The position in the expansion unit where the anchor point screws are to be placed must be determined (A or B) (see Fig.
- Page 73 Mounting Instructions ProfiDAT compact ® Data Transmission System Program 0515 System without positioning strip Fig. 72: Line feed without positioning strip Fig. 73: Line feed without positioning strip; A = anchor point System with positioning strip (take dimensions from Fig. 72 to Fig. 73) Fig.
- Page 74 Mounting Instructions ProfiDAT compact ® Data Transmission System Program 0515 6.4.5 Mount the ProfiDAT compact rail ® The first ProfiDAT compact rail is to be mounted at the beginning of the line feed. The system must also be completed with a line ®...
- Page 75 Mounting Instructions ProfiDAT compact ® Data Transmission System Program 0515 Fig. 79: Tighten 4 self-tapping screws (2 Nm) Fig. 80: Remove mounting aid → Slide the connector (1) onto ProfiDAT compact Rail (3) up to the center. Then slide the second ProfiDAT compact rail (3) into ®...
- Page 76 Mounting Instructions ProfiDAT compact ® Data Transmission System Program 0515 max. 0,5 mm Fig. 82: Maximum offset of connection point in X-direction (direction of travel) If both rails have an offset of more than 0.5 mm in the Y-direction, then at least one rail must be replaced! ATTENTION! Max.
- Page 77 Mounting Instructions ProfiDAT compact ® Data Transmission System Program 0515 6.4.7 Mount PE connectors Note the following for the PE connector: The PE connector must not act as an anchor point. Avoid needing too many cuts on the data rail for a connection point. ...
- Page 78 Mounting Instructions ProfiDAT compact ® Data Transmission System Program 0515 2.) Mount PE connector on segment (without connector point) → Drill an elongated hole (Ø 21 mm) for the PE bolt into the support structure (substructure), through which the spacer can be guided (see Fig.
- Page 79 Mounting Instructions ProfiDAT compact ® Data Transmission System Program 0515 Fig. 90: Align stop ring correctly Fig. 89: Slide stop ring (4) over step drill M3 90° → Drill the 4 holes (5) into the data rail. The drill holes are deburred during the drilling process (see Fig. 105). Fig.
- Page 80 Mounting Instructions ProfiDAT compact ® Data Transmission System Program 0515 3.) Mount the PE connection on the data rail → The PE connection is mounted on the data rail. The flexible drilling jig is used for the drill holes in the data rail (see Fig. 86 and Fig.
- Page 81 In order for the attenuation to be as low as possible, the rails must precisely machined connected connection points. We therefore recommend that the installation only be carried out by Conductix-Wampfler personnel. Fig. 97: Shorten ProfiDAT ® Fig. 98: Shorten ProfiDAT ® compact rail compact rail...
- Page 82 Mounting Instructions ProfiDAT compact ® Data Transmission System Program 0515 Area A Area B Fig. 99: Deburr ProfiDAT ® compact rail Sharp edges and/or burrs lead to increased wear of the sliding contacts in a very short period of time! Poorly made saw cuts can cause the connection points to be affected by a gap or offset, which can have an adverse effect on the data transmission quality.
- Page 83 Mounting Instructions ProfiDAT compact ® Data Transmission System Program 0515 The drill holes for the connector in the data rail must be redrilled if the data rail length must be adjusted. A special drilling jig is available for this (Order No.: 05-V015-0005). Work steps: Fig.
- Page 84 Mounting Instructions ProfiDAT compact ® Data Transmission System Program 0515 → To set the adjusting ring to the correct dimension, the step drill M3 90° (5) is first inserted into the drilling hole (1) up to the mechanical stop. Fig. 101: Step drill M3 90° →...
- Page 85 Mounting Instructions ProfiDAT compact ® Data Transmission System Program 0515 Fig. 104: Remove step drill (5) with tightened adjusting ring (7) from drilling hole. → Position the data rail (8) at the drilling jig. Fig. 105: Position data rail (8) →...
- Page 86 Mounting Instructions ProfiDAT compact ® Data Transmission System Program 0515 Fig. 107: Slide data rail (8) up to rail stop → Slide the data rail (8) up to the rail stop (C) (see Fig. 108). Fig. 108: Data rail (8) lays against rail stop (C) →...
- Page 87 Mounting Instructions ProfiDAT compact ® Data Transmission System Program 0515 → Drill with a cordless screwdriver (incl. countersink) until the adjusting ring Fig. 110: Data rail comes into contact with the drill bushing (2) (see Fig. 111). Fig. 111: Step drill (5) lays against drilling hole (10) MAL0515-0001i-EN www.conductix.com Translated from MAL0515-0001k-DE...
- Page 88 Mounting Instructions ProfiDAT compact ® Data Transmission System Program 0515 → Open/loosen the eccentric tappet (9) and the adjustment nut (10), to remove the data rail. Fig. 112: Remove data rail Fig. 113: Rail is drilled → Check the distance dimensions (see Fig.
- Page 89 Mounting Instructions ProfiDAT compact ® Data Transmission System Program 0515 6.4.9 Transfers In order to ensure a trouble-free transfer of the collector at transfer points, the following additional conditions must be observed: Distance of the opposing transfer guides is max. 10 mm in X-axis (travel direction) (see Fig. 115) ...
- Page 90 Mounting Instructions ProfiDAT compact ® Data Transmission System Program 0515 Transfer guide 0515 aluminium (generally used for EMS applications) (Mat. No.: 3260960) Fig. 118: Aluminium transfer guide MAL0515-0001i-EN www.conductix.com Translated from MAL0515-0001k-DE Page 90 of 169...
- Page 91 Common drilling patterns are shown below. However, there may be deviations from this within the scope of projects, which is why this should be discussed with Conductix-Wampfler in the design phase. Project-specific drawings can be requested from Conductix-Wampfler during the design phase. Drilling pattern for line feed with an expansion unit Fig.
- Page 92 Mounting Instructions ProfiDAT compact ® Data Transmission System Program 0515 Drilling pattern for end feed with an expansion unit and plastic overrun cap Fig. 121: Drill hole positions for end feed with expansion unit and plastic overrun cap ATTENTION: Not suitable for substructures (support structure) with angled cuts! * Options for anchor point screw Drilling pattern for end feed with an expansion unit and aluminium overrun cap (45°...
- Page 93 Mounting Instructions ProfiDAT compact ® Data Transmission System Program 0515 Drilling pattern for end feed with an expansion unit and aluminium overrun cap (45° cut on long side) Fig. 123: Drill hole positions for end feed with single expansion unit with aluminium overrun cap (45° cut on long side of substructure (support structure)) * Options for anchor point screw MAL0515-0001i-EN...
- Page 94 Mounting Instructions ProfiDAT compact ® Data Transmission System Program 0515 6.4.11 Mount the collector The collector is mounted on the vehicle or on a separate, customer-specific mobile consumer. Fig. 124: Mount collector on towing unit Fig. 125: Slide collector into rail Work steps: →...
- Page 95 Mounting Instructions ProfiDAT compact ® Data Transmission System Program 0515 Fig. 127: Collector mounting dimension from towing unit to bottom edge of rail 6.4.12 Mount the positioning system The positioning system consists of the code band (2), which is attached to the data rail with the positioning strip, and the read head (1), which is located on the vehicle.
- Page 96 Mounting Instructions ProfiDAT compact ® Data Transmission System Program 0515 6.4.13 Connect PE cable to the PE connector The ProfiDAT compact rail must be connected to the customer's PE cable at the line feed points! If the route is interrupted by one ®...
- Page 97 Mounting Instructions ProfiDAT compact ® Data Transmission System Program 0515 Optional lateral PE connection Item Name Countersunk screw M3 x 8 Fastening Serrated washer A6,4 DIN 6798 Cable lug up to 25 mm² M6 possible at max. width (w) of < 14 mm Locking edge washer D6.1 Cylinder head screw DIN 6912-M6x10 Data rail...
- Page 98 In order to check the quality of the mechanical installation, the attenuation of the rail can be measured with suitable measuring means. This measurement can be carried out by the “International Service” of Conductix-Wampfler GmbH. The expected values for this measurement for each ProfiDAT compact segment are part of the project-specific documentation.
- Page 99 Mounting Instructions ProfiDAT compact ® Data Transmission System Program 0515 6.5 Electrical installation Risk of death due to electrical shock! Contact with energized components can lead to death or severe injury due to electrical shock. There is also a risk of injury from shock reactions, falling or being thrown across the room as DANGER! a result of an electrical shock.
- Page 100 Mounting Instructions ProfiDAT compact ® Data Transmission System Program 0515 The HF cable must never be unwound spirally (e.g. pulled out of the center). Always unwind the HF cable correctly. ATTENTION! If the HF cable is too long, it must be laid in loops as described below to reduce the effective length: The HF cable must never be shortened with a cutting tool (pliers, scissors or similar).
- Page 101 Mounting Instructions ProfiDAT compact ® Data Transmission System Program 0515 Fig. 133: Loop formation is allowed; coil winding prohibited MAL0515-0001i-EN www.conductix.com Translated from MAL0515-0001k-DE Page 101 of 169...
- Page 102 Mounting Instructions ProfiDAT compact ® Data Transmission System Program 0515 6.5.3 Protection against electromagnetic interference and damage from potential differences To avoid damage to the HF components, the following components must be connected to the same protective ground potential: The Ethernet cable shielding and the Ethernet devices connected to it ...
- Page 103 Mounting Instructions ProfiDAT compact ® Data Transmission System Program 0515 Fig. 136: Fully mounted equipotential bonding cable Implementation of the equipotential bonding The equipotential bonding must be implemented using an equipotential bonding cable with the following characteristics: Laying the equipotential bonding cable The equipotential bonding cable must be laid parallel, directly and over the entire length, next to each HF cable that connects the points specified above.
- Page 104 Mounting Instructions ProfiDAT compact ® Data Transmission System Program 0515 Fig. 138: Principle diagram of equipotential bonding (red) and grounding (symbol) Item Name Grounding plate diameter M16 with connection for flat cable lug Equipotential bonding cable Equipotential bonding conductor node on splitter Connection for equipotential bonding cable to line feed segment MAL0515-0001i-EN www.conductix.com...
- Page 105 Mounting Instructions ProfiDAT compact ® Data Transmission System Program 0515 6.5.4 Connect the transceiver (access point) to the stationary antenna The connecting cable for the line feed to the ProfiDAT compact rail is mounted between the transceiver (access point) and the ®...
- Page 106 Mounting Instructions ProfiDAT compact ® Data Transmission System Program 0515 Connection with segment line feed Fig. 140: Segment line feed Name HF Connection 1 HF Connection 2 Length Material Number Access point W774 R/SMA Socket 180° R/SMA Socket 180° 3187868 Key plug W780 3187889 R-SMA terminating resistor...
- Page 107 Mounting Instructions ProfiDAT compact ® Data Transmission System Program 0515 Work steps: → Connect the R-SMA connector of the cable (4) to the R-SMA connector of the transceiver. The N-socket on the other end of the cable (4) must be installed as a switching cabinet bushing and electrically conductively connected to the housing (grounded).
- Page 108 Mounting Instructions ProfiDAT compact ® Data Transmission System Program 0515 Name HF Connection 1 HF Connection 2 Length Material Number Access point W774 R/SMA Socket 180° R/SMA Socket 180° 3187868 Key plug W780 3187889 R-SMA terminating resistor R/SMA Connector 180° 3170540 Aircell 5 cable Connector...
- Page 109 Mounting Instructions ProfiDAT compact ® Data Transmission System Program 0515 6.5.5 Connect the transceiver (client) to the mobile antenna The mobile antenna connection cables of the collector are connected to the transceiver (client) on the vehicle. Fig. 142: Connection to mobile antenna MAL0515-0001i-EN www.conductix.com Translated from MAL0515-0001k-DE...
- Page 110 Mounting Instructions ProfiDAT compact ® Data Transmission System Program 0515 Connection of client with two antennas Fig. 143: Client with two antennas Name HF Connection 1 HF Connection 2 Length Material Number Aircell 5 cable Connector 180° Installation socket 180° 1.0 m 3173091 10 Collector with 316D cable...
- Page 111 Mounting Instructions ProfiDAT compact ® Data Transmission System Program 0515 Work steps: → Connect the R-SMA connector of the cable (4) to the R-SMA connector of the transceiver. The N-socket on the other end of the cable (4) must be installed as a switching cabinet bushing and electrically conductively connected to the housing (grounded).
- Page 112 Mounting Instructions ProfiDAT compact ® Data Transmission System Program 0515 Name HF Connection 1 HF Connection 2 Length Material Number Aircell 5 cable Connector 180° Installation socket 180° 1.0 m 3173091 10 Collector with 316D cable Connector 180° 0.6 m 3247347 Installation 11 Installation socket...
- Page 113 Mounting Instructions ProfiDAT compact ® Data Transmission System Program 0515 6.5.6 Connect transceivers to the network → Insert the Ethernet connector (RJ45) into the socket P1 (option 1) on the transceiver. Observe the information and safety instructions in the manufacturer's documentation. Instructions regarding the network integration of ProfiDAT(R)compact are described in TI0514-0001! ATTENTION!
- Page 114 Mounting Instructions ProfiDAT compact ® Data Transmission System Program 0515 6.5.7 Supply power to the transceiver Fig. 145: Transceiver connection for Ethernet For power supply via 4-pole socket (Option 1): Direct supply via the 4-pole socket: Connection assignment: L1 +: DC 24V M1: Ground M2: Ground L2 +: DC 24V...
- Page 115 Mounting Instructions ProfiDAT compact ® Data Transmission System Program 0515 6.6 Checklist and initial Commissioning This checklist serves as a guideline to ensure the safe operation of the ProfiDAT compact system! ® This checklist is intended for qualified professionals who install and commission data transmission systems and are familiar with the regulations on safety at work and accident prevention.
- Page 116 Mounting Instructions ProfiDAT compact ® Data Transmission System Program 0515 Description Comment: OK/NOK Installation 1.1. Distance of the hanger clamps (suspension distance) is correct according to Section 6.4.1. Care has been taken to ensure that there are as few connection points as possible at the 1.2.
- Page 117 Mounting Instructions ProfiDAT compact ® Data Transmission System Program 0515 ® The ProfiDAT compact connection has been confirmed via device LEDs The stationary ProfiDAT compact transceiver is turned on and the LAN is connected. ® Switch on the 24 V power supply to the ProfiDAT compact transceiver and allow the Profi- ®...
- Page 118 Mounting Instructions ProfiDAT compact ® Data Transmission System Program 0515 If the configuration of the transceiver has been changed: These changes are also to be undertaken for all the same/ similar devices of the • system. • These are to be documented and additionally backed up by a ConfigPack – Backup. Commissioning Collector test –...
- Page 119 Mounting Instructions ProfiDAT compact ® Data Transmission System Program 0515 7 Operation 7.1 WLAN channel usage When using the "iPCF" function, it is imperative to ensure that the WLAN channels used for the ProfiDAT compact are exclusively ® available for ProfiDAT compact and are not used by any other device in the local area.
- Page 120 Mounting Instructions ProfiDAT compact ® Data Transmission System Program 0515 8 Maintenance and Service 8.1 Safety Risk of injury due to improperly conducted maintenance works! Improper maintenance can cause serious injuries to persons or material damage. → Before starting work, ensure sufficient space for installation. →...
- Page 121 Mounting Instructions ProfiDAT compact ® Data Transmission System Program 0515 8.2 Maintenance schedule The following sections describe the maintenance work required for optimal, trouble-free operation. The work carried out according to the maintenance plan must be logged. If signs of heavier wear are revealed during regular inspections, reduce the maintenance intervals according to the actual signs of wear.
- Page 122 Documentation → The results of inspections and the measures taken are to be documented in written reports. → Conductix-Wampfler must be immediately informed of any defects or malfunctions that occur during the test phase and within the warranty period. 8.2.2...
- Page 123 Mounting Instructions ProfiDAT compact ® Data Transmission System Program 0515 8.2.3 Replacement of the sliding contacts Work steps: → Pull off the angled blade receptacle (1) of the PE cable (see Fig. 147). Fig. 147: Pull off angled blade receptacle →...
- Page 124 Mounting Instructions ProfiDAT compact ® Data Transmission System Program 0515 Pull Fig. 149: Pull data cable (HF cable) (loop from below) → Using a flat-head screwdriver ≤ 3.0, carefully push a nose of the collector housing inward to disassemble the circuit board housing (see Fig.
- Page 125 Mounting Instructions ProfiDAT compact ® Data Transmission System Program 0515 → Disconnect the collector head (1) from the connector (2) of the data cable (HF cable) (3). The data cable (HF cable) must protrude approx. 80 mm from the joint (see Fig. 151). Fig.
- Page 126 Mounting Instructions ProfiDAT compact ® Data Transmission System Program 0515 → When removing the cover, check the sliding components for wear (see Fig. 154). With heavy wear (> 1.5 mm), order a new collector head (copper graphite: 051592-11 or graphite: 051592-12). Fig.
- Page 127 Mounting Instructions ProfiDAT compact ® Data Transmission System Program 0515 → In the event that the springs have loosened in the collector housing, they can be mounted as follows: → Apply the adhesive (LOCTITE 406) to the 1st turn of the spring (1) 2 times.
- Page 128 Mounting Instructions ProfiDAT compact ® Data Transmission System Program 0515 Remove worn sliding contact from the insulation: → Unscrew the STS-plus 1.4x4-T5 screw with a TX 5 Torx screwdriver (see Fig. 158) and remove the worn sliding contact (see Fig. 159). Fig.
- Page 129 Mounting Instructions ProfiDAT compact ® Data Transmission System Program 0515 → Tighten STS-plus 1.4x4 – T5 screw (5) to secure the sliding contact (1). Tightening torque: 0.2 Nm (see Fig. 162) Fig. 162: Tighten STS-plus 1.4x4 – T5 screw → Mount the balance incl. sliding contact (1) onto the balance on the collector arm (2) (see Fig. 163). Fig.
- Page 130 Mounting Instructions ProfiDAT compact ® Data Transmission System Program 0515 → The balance must audibly click twice over the lateral bolts (see Fig. 164). Fig. 164: Balance clicks audibly → The balance springs must rest correctly on the bearing (see Fig. 165) Fig.
- Page 131 Mounting Instructions ProfiDAT compact ® Data Transmission System Program 0515 → The data cable connector (2) must audibly click into the circuit board connector (3) (see Fig. 167). Fig. 167: Click in connector → Mount the collector housing (1) and balance (2). Carefully tighten the data cable (see Fig. 168). Fig.
- Page 132 Mounting Instructions ProfiDAT compact ® Data Transmission System Program 0515 → The collector housing must audibly click on both sides (see Fig. 170) Fig. 169: Collector housing audibly clicks into place → Carry out the steps as shown on page 123. MAL0515-0001i-EN www.conductix.com Translated from MAL0515-0001k-DE...
- Page 133 Mounting Instructions ProfiDAT compact ® Data Transmission System Program 0515 8.2.4 Replacement of the collector head Work steps: → Pull off the angled blade receptacle (1) of the PE cable (see Fig. 170). Fig. 170: Pull off angled blade receptacle →...
- Page 134 Mounting Instructions ProfiDAT compact ® Data Transmission System Program 0515 Pull Fig. 172: Pull data cable (HF cable) (loop from below) → Using a flat-head screwdriver ≤ 3.0, carefully push a nose of the collector housing inward to disassemble the circuit board housing (see Fig.
- Page 135 Mounting Instructions ProfiDAT compact ® Data Transmission System Program 0515 Fig. 174: Disconnect collector housing (1) from data cable (HF cable) (3) → Disassemble the balance (1) from the joint (2) (see Fig. 175 and Fig. 176). If necessary, use a flat-head screwdriver ≤ 3.0. Fig.
- Page 136 Mounting Instructions ProfiDAT compact ® Data Transmission System Program 0515 → Mount new balance incl. sliding contact (1) on the joint of the collector arm (2) (see Fig. 177) Fig. 177: Balance incl. sliding contact (1) is mounted → The balance must audibly click twice over the lateral bolts (see Fig. 178). Fig.
- Page 137 Mounting Instructions ProfiDAT compact ® Data Transmission System Program 0515 → The balance springs must rest correctly on the bearing (see Fig. 179) Fig. 179: Correct position of springs → Connect the collector housing, including the glued-in compression spring (1), to the data cable (2) (see Fig. 180). Fig.
- Page 138 Mounting Instructions ProfiDAT compact ® Data Transmission System Program 0515 → The data cable connector (2) must audibly click into the circuit board connector (3) (see Fig. 181). Fig. 181: Click in connector → Mount the collector housing (1) and balance (2). Carefully tighten the data cable (see Fig. 182). Fig.
- Page 139 Mounting Instructions ProfiDAT compact ® Data Transmission System Program 0515 → The collector housing must audibly click on both sides (see Fig. 183). Fig. 183: Audibly click in collector housing → Pull the data cable (HF cable) back through (see Fig. 184). Pull Inner radius Fig.
- Page 140 Mounting Instructions ProfiDAT compact ® Data Transmission System Program 0515 → Check the ease of movement of the collector housing (1) (see Fig. 185). Fig. 185: Check collector housing ease of movement The data cable (HF cable) must not apply any force on the cover from below! ATTENTION! →...
- Page 141 Mounting Instructions ProfiDAT compact ® Data Transmission System Program 0515 → Attach the angled blade receptacle (see Fig. 187). Fig. 187: Attach angled blade receptacle After mounting the angled blade receptacle, the collector head must not be pushed upward or pulled downward by the PE cable. ATTENTION! →...
- Page 142 Mounting Instructions ProfiDAT compact ® Data Transmission System Program 0515 The PE cable must not be bent or compressed! ATTENTION! → Simulate ease of movement of the antenna in the installed state. → Retract the balance (1) back to mechanical stop and hold (see Fig. 189). →...
- Page 143 Mounting Instructions ProfiDAT compact ® Data Transmission System Program 0515 8.3 Replacement of WLAN transceiver If a WLAN transceiver needs to be replaced due to a defect, the following options are available: Replace using the removable media (Key/C-plug) Replace using the web interface 8.3.1 Replacement using the removable media (Key/C-plug) Each WLAN transceiver is delivered with a removable media (Key or C-plug).
- Page 144 Mounting Instructions ProfiDAT compact ® Data Transmission System Program 0515 8.3.2 Replacement using the web interface If there is no removable media or if it is defective, the configuration can also be transmitted using the web interface. To do this, a backup ("Config" or "ConfigPack") and the firmware of the old transceiver must be available or these must be obtained by downloading from the old transceiver.
- Page 145 Mounting Instructions ProfiDAT compact ® Data Transmission System Program 0515 9 Data Transmission Troubleshooting Risk of injury due to improper fault correction! Improper fault correction can result in serious injury to persons or material damage. → Contact the manufacturer in case of failures. WARNING! →...
- Page 146 Mounting Instructions ProfiDAT compact ® Data Transmission System Program 0515 Procedure for communication disturbances If the fault is persistent: The fault only occurs in one vehicle (client) carry out a vehicle-related troubleshooting. If the vehicle-related troubleshooting was not successful, the following components must be checked: ProfiDAT compact transceiver (primary diagnostic tool and non-potential fault source): Check client, use the ®...
- Page 147 Mounting Instructions ProfiDAT compact ® Data Transmission System Program 0515 If the fault is temporary (temporal, localized, random): The fault occurs at a specific position or area Examine position or area. If the examination of a position or an area was unsuccessful, the following components must be checked: ProfiDAT compact transceiver (primary diagnostic tool and non-potential fault source): General check.
- Page 148 Mounting Instructions ProfiDAT compact ® Data Transmission System Program 0515 9.1 Fault sources With reference to the systematic procedure in the event of a system disturbance, a selection of possible fault sources for the different areas is listed below. 9.1.1 ProfiDAT transceiver ®...
- Page 149 Deviations from the project planning of the system layout can lead to malfunctions or completely prevent the successful commissioning: Section and segment lengths Access point positions HF cable lengths Installation sequence of HF components Use of unsuitable HF components (not supplied by Conductix-Wampfler) 9.1.5 Ethernet cabling Network connection faulty Connected network devices faulty 9.1.6...
- Page 150 Mounting Instructions ProfiDAT compact ® Data Transmission System Program 0515 9.2 Diagnosis via the transceiver LED state The first approach to diagnosing the transceivers without a computer is to evaluate the LED state on the transceiver itself. Essentially, the LEDs of all Siemens Scalance devices behave the same. As an example, an excerpt from the manual of the device family W774/W734 (source: Scalance W774-1 / W734-1 Operating Instructions) is listed.
- Page 151 Mounting Instructions ProfiDAT compact ® Data Transmission System Program 0515 Fig. 192: Transceiver LED state (Source: Scalance W774-1 / W734-1 Operating Instructions) The following basic functions can be checked based on the LEDs: Power supply • Network connection • Wi-Fi connection •...
- Page 152 Mounting Instructions ProfiDAT compact ® Data Transmission System Program 0515 9.2.1 Power supply If the LED "L1" does not light up green, the power supply is too low or not available. Corrective steps: Check the correct seating of the power supply connector on the transceiver. Measure the voltage on the power supply connector on the transceiver and compare it with the input range of the transceiver (see Section 3.3).
- Page 153 Mounting Instructions ProfiDAT compact ® Data Transmission System Program 0515 9.3 Diagnosis via the transceiver web interface Additional diagnostic tools are accessible via the web interface. To access the web interface, the following steps are necessary: Set the IP address of the laptop to the same subnetwork of the transceiver (see project-specific documentation). Connect the laptop to the transceiver (via Ethernet, directly or via the devices connected to the WLAN).
- Page 154 Mounting Instructions ProfiDAT compact ® Data Transmission System Program 0515 9.3.2 Uploading and downloading files Under "System" -> "Load&Save", files can be exchanged with the transceiver via the web interface. To do this, click on "Load" in the respective line to upload the file and "Save" to download it. The following files are relevant: File type Description...
- Page 155 Mounting Instructions ProfiDAT compact ® Data Transmission System Program 0515 9.3.3 Accessing and interpreting the Event Log (device) In addition to downloading the Event Log, it can also be viewed on the website. To do this, the menu "Information" -> "Log Table" -> "Event Log" must be accessed. The number of log entries is limited, entries of lower severity (Info, Warning) are overwritten by entries of higher severity (Warning, Critical) when the maximum number of log entries is reached.
- Page 156 Mounting Instructions ProfiDAT compact ® Data Transmission System Program 0515 Fig. 195: Accessing and interpreting Authentication Log (WLAN) 9.3.5 Display of fault states Faults are signaled by the red LED "F" and generate entries in the fault list. This is located in the menu "Information" -> "Faults". Faults are also entered in the "Event-Log".
- Page 157 Mounting Instructions ProfiDAT compact ® Data Transmission System Program 0515 9.3.6 Power supply state The power supply state is displayed in the menu "Information" -> "Start Page" in the lines "Power Line 1", "Power Line 2" and "Power over Ethernet". 9.3.7 Network connection state The general state of the network interface can be viewed via the menu "Interfaces ->...
- Page 158 Mounting Instructions ProfiDAT compact ® Data Transmission System Program 0515 This can be used to obtain information about the quality of the connection ("Signal Strength [dBm]"), the name of the AP ("System Name") and the WLAN channel ("Channel"). The range of the expected signal strength depends on the system layout, but should not drop below -70dBm and not rise above - 20dBm.
- Page 159 Mounting Instructions ProfiDAT compact ® Data Transmission System Program 0515 Fig. 200: Signal scan The following variables are of particular interest for signal scanning: RX-Signal [dBm]: reception power, upper diagram for the WLAN client, lower diagram for the WLAN access point. TX rate [Mbps]: WLAN data rate.
- Page 160 Mounting Instructions ProfiDAT compact ® Data Transmission System Program 0515 The attenuation values are calculated within the framework of technical feasibility in the so-called link budget. Deviations from these assumptions and the measurement inaccuracy of the WLAN devices can lead to a deviation of the measured values from this theoretical link budget.
- Page 161 Mounting Instructions ProfiDAT compact ® Data Transmission System Program 0515 Fig. 202: Multiple crossing of same segment transfer with incorrect roaming processes (multiple vertical black lines in transfer area) Retries and WLAN data rate: Reflections and overlays can destroy WLAN packets, creating retries – repetitions of WLAN packets. The figure in the diagram shows the percentage of retries in the measurement interval based on the (unknown) number of WLAN packets transmitted.
- Page 162 Mounting Instructions ProfiDAT compact ® Data Transmission System Program 0515 Fig. 203: Signal scan with low retry rate and constant WLAN data rate (150 Mbps) If the data rate is not fixed (application-specific), it can drop under a data load and depend on the retries. This is normal behavior and should only be checked if: it is accompanied by a malfunction or the retries are permanently in the red range (>10%)
- Page 163 Mounting Instructions ProfiDAT compact ® Data Transmission System Program 0515 Fig. 204: Signal scan with too low signal strength, resulting in many retries and data rate drop Settings parameters for recording: To carry out the signal scan, various parameters can be specified at the bottom of the Signal Recorder screen. These are listed below with recommendations.
- Page 164 Mounting Instructions ProfiDAT compact ® Data Transmission System Program 0515 Saving and naming the recording: Each generated signal scan should be documented with information on the route, time and, if necessary, configuration characteristics (see Section 9.3.2). Note: Up to Firmware v6.5.0, the scaling of the displayed attenuation values in the signal scan is incorrect. The measured values are only correct when the file is downloaded (PDF, CSV).
- Page 165 Mounting Instructions ProfiDAT compact ® Data Transmission System Program 0515 10 Disassembly and Disposal 10.1 Safety Risk of injury due to improper disassembly! Stored residual energy, sharp components, points and edges on and in the data transmission system or the tools needed can cause injuries. WARNING! →...
- Page 166 Mounting Instructions ProfiDAT compact ® Data Transmission System Program 0515 10.2.1 Disassembly of the assemblies Risk of fatal injury due to falling parts! Falling parts can cause serious injuries or even death. There is a risk of components falling down while disassembling the data transmission DANGER! system.
- Page 167 ProfiDAT compact ® Data Transmission System Program 0515 11 Additional Documents 11.1 Declaration of Conformity The Declaration of Conformity for this product can be obtained from Conductix-Wampfler upon request. 11.2 Applicable Documents Seq.No. Document No. Document Name Conductix-Wampfler GmbH WV0800-0001...
- Page 168 Mounting Instructions ProfiDAT compact ® Data Transmission System Program 0515 11.3 Air Gap Diagram The diagram can be used as an aid for determining the air gap at the installation site (see also Section 6.4.4.2) 11.4 Project-specific documentation The project-specific documentation can include the following points: Layout Plan HF layout (only based on data transmission: ProfiDAT compact conductor rail and HF cables, positions of access points,...
- Page 169 Material defects ..............8 Type plate ................36 Unauthorized persons ............11 Mechanical installation ............54 Modes of operation ............. 44 Conductix-Wampfler GmbH Phone: +49 ( 0) 7621 662-0 Rheinstraße 27 + 33 Fax: +49 ( 0) 7621 662-144 79576 Weil am Rhein – Märkt info.de@conductix.com...
Need help?
Do you have a question about the ProfiDAT compact and is the answer not in the manual?
Questions and answers