
Related Manuals for OSI Security Devices OMNILOCK OM100 Series

Summary of Contents for OSI Security Devices OMNILOCK OM100 Series
-
Page 1: User Guide
SECURITY D E V I C E S ® OMNILOCK ACCESS CONTROL SYSTEMS SERIES OM100, OM300 & OM500 (Firmware Version 2.xx) USER GUIDE... - Page 2 The information contained in this document is subject to change without notice. OSI Security Devices makes no warranty of any kind with regard to this material, including, but not limited to, the implied warranties of merchantability and fitness for a particular purpose.
- Page 3 OMNILOCK ACCESS CONTROL SYSTEMS SERIES OM100, OM300 & OM500 (Firmware Version 2.xx) Initial Setup Checklist Complete and mail the Product Registration Form. Read the User Guide! Verify operation. Enter the Default Master Code 5 01 12 3 4. The System will flash the Green Light and Unlock. Then after approximately 5 seconds the Red Light will flash and the System will Lock.
- Page 4 Assign group membership if needed (see Assigning Extended Group Membership, page 43). Assign Supervisor codes if needed (see Assigning Supervisor Codes, page 48). Assign Manager codes if needed (see Assigning Manager Codes, page 50). Program the Time Schedule and Holiday List if needed (see Adding a Schedule Event, page 80).
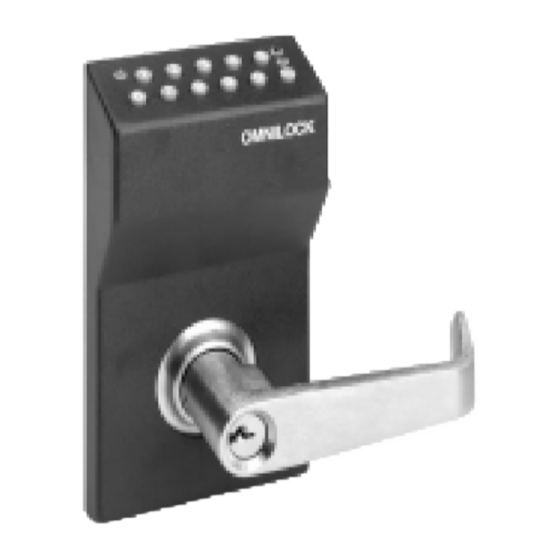
- Page 5 CYLINDRICAL MORTISE LOCK SYSTEM LOCK SYSTEM WALL MOUNT SYSTEM LOCK SYSTEM PRINTER...
- Page 6 (BLANK)
-
Page 7: Table Of Contents
Table of Contents Overview New Features in Firmware Version 2.xx ......... 1 General ..................1 Access Levels and Codes Access Levels ................3 Codes..................4 Master Code ................5 Submaster Codes ..............6 Manager Codes................ 6 Supervisor Codes..............6 General User Codes..............7 Service Code ................ - Page 8 Table of Contents Programming in Command Mode Indicator Lights ..............22 Adding/Changing User Codes ..........22 Placing Codes on Hold ............23 Restoring Codes..............24 Assigning Supervisor Privileges ..........24 Assigning Manager Privileges ..........25 Access Level................26 Enable Groups ............... 26 Disable Groups ..............
- Page 9 Table of Contents Restoring The Service Code ..........57 Setting the Service Code Time Limit....... 59 Audit Code ................60 Adding the Audit Code ............ 60 Removing the Audit Code ..........62 Verifying the Audit Code..........64 Placing the Audit Code on Hold ........65 Restoring the Audit Code ..........
- Page 10 Table of Contents Setting Group Boundaries..........99 Setting the Location Number ......... 101 Setting the Facility Autocodes ........102 Running Diagnostics............104 Batteries Low Battery Indicator............105 Battery Replacement Instructions ........106 Cylindrical Models (Non-Weatherized)......106 Mortise Models (Non-Weatherized) ......110 Wall Mount System (Non-Weatherized)......
-
Page 11: Overview
Overview Chapter 1 New Features in Firmware Version 2.xx A new User privilege, Manager, is available. A user with Manager privileges can change or set any access level of the lock except Shutdown. In addition the Manager may enable or disable specific groups. - Page 12 Overview The System has a programmable time schedule and holiday list that allows it to automatically change access levels at predetermined times of the day. It can even be programmed to automatically unlock and remain unlocked during times when access control is not required. The System is programmed at the door.
-
Page 13: Access Levels And Codes
Access Levels and Chapter 2 Codes Access Levels The System can be set to four levels of access: 1-Unlocked, 2-Code Required, 3-Lockout and 4-Shutdown. Unlocked - free passage. Code Required - a valid code is required for access. Lockout - The Master, Submaster or a Manager code is required for access. -
Page 14: Codes
Service Audit * 100 on OM100, 300 on OM300 or 500 on OM500 The PIN length is determined by the length of the Master code and may be 4, 5 or 6 digits long (only one PIN length can be in use at a time). -
Page 15: Master Code
Access Levels and Codes There are two modes of operation supported: PIN Only, where only the PIN is required for access, and ID+PIN, where the user must enter both the code ID and the PIN for access. Important! There are two modes of operation supported: PIN Only, where only the PIN is required for access, and ID+PIN, where the user must enter both the code ID and the PIN for access. -
Page 16: Submaster Codes
Access Levels and Codes all other code lengths are five digits). The more digits used, the greater the possible number of code combinations and the greater resulting security. For security, you should change the Master Code before installing the System . Write down your new Master code and store it somewhere safe and separate from your list of all other System codes. -
Page 17: General User Codes
Access Levels and Codes General User Codes General User codes are for the day-to-day user. A General User code has access at Code Required access level only. If the user code is within a group that has a supervisor, access can be enabled or denied by a Supervisor (or Master/Submaster if no supervisor is defined for the group). -
Page 18: Code Groups
2, etc. The following table shows the default group settings for the various Systems, as shipped from the factory. System Group 1 Group 2 Group 3 Group 4 OM100 001 - 025 026 - 050 051 - 075 076 - 100 OM300 001 - 075... - Page 19 Access Levels and Codes allowed access if any of the groups it belongs to is enabled and unsupervised. Supervisors can also be assigned group membership outside of their home group. However, a Supervisor’s authority to set a group’s supervision level does not extend beyond its home group. When a Supervisor code has multiple group membership, and the System’s access level is at Code Required, then that Supervisor code will allow access if any of the groups it belongs to are enabled.
- Page 20 Access Levels and Codes (BLANK)
-
Page 21: Time Schedule And Holiday List
Time Schedule and Chapter 3 Holiday List Time Schedule The Time Schedule enables the System to automatically switch between any of three access levels (Unlocked, Code Required and Lockout) as determined from nine daily schedules (Monday through Sunday and two additional schedules, DY8 and DY9, for use on holidays). -
Page 22: Holiday List
Time Schedule and Holiday List Holiday List The daily time schedule for any given date may be overridden by the Holiday List. A holiday description consists of a month and day, and the daily schedule to use on that date. A typical holiday might be 12/25-SUN. The System would then use Sunday’s schedule on December 25, regardless of what day of the week December 25 actually falls on. -
Page 23: Operation And Indicators
Operation and Chapter 4 Indicators Basic Operation The System control module has an 11 key pad on top, numbers 0 through 9 and CL (Figure 1). Operation is simple: press a code number in sequence. Two lights, one red and the other green, flash to indicate the status of the code that was entered. -
Page 24: Manager Operation
Operation and Indicators Important! Three rapid flashes of the red and green lights indicates that a jam condition has occurred in the motor drive system. Entering the Master code will cause the System to attempt to clear the jam. This condition may indicate an improperly installed System. -
Page 25: Supervisor Operation
Operation and Indicators b) Press and hold the CL key (approximately 2 seconds) until the green light flashes two times. To set the access level to Lockout: a) Press and hold the CL key (approximately 2 seconds)until the green light flashes three times. If the red light flashes while changing the access level, you have paused too long between key presses and the programming... -
Page 26: Anti-Tamper
Operation and Indicators Anti-Tamper The system has an anti-tamper feature that helps frustrate any attempts to “guess” a valid code. If an invalid code is entered, the red light will flash. After three invalid codes are entered consecutively, the System enters the anti-tamper shutdown mode and the red light will flash for each key press. -
Page 27: Programming Overview
Programming Chapter 5 Overview This section provides an overview of the programming process. We recommend that you read this section thoroughly at least once. Then read Chapters 6 and 7 and practice programming with the System. After you know what results to expect, you can program the System for use. There are two programming modes, the Command Mode and the Menu Mode. -
Page 28: Syntax Conventions
Programming Overview Code Level Access/Programming Privileges Programming Functions Master All times All functions Submaster All times except when the access All functions, if assigned, except: level is set to Shutdown; 1. Change Master code Programming privileges may be 2. Program Submaster codes limited by the Master code 3. - Page 29 Programming Overview line at a time and indicate the result of the command via the red and/or green lights. The WP4000 wireless printer is not required for programming in the Command mode, however, it may be used to see a printout of the results of the program entry if desired.
- Page 30 Programming Overview (BLANK)
-
Page 31: Programming In Command Mode
Programming in Chapter 6 Command Mode To begin programming, enter the Master or a Submaster code. (As shipped from the factory, the Master Code is set to 5 0 1 1 2 3 4 .) The lights will flash 3 times to indicate the battery level (see Batteries, page 105). If locked, the System will unlock for access. -
Page 32: Indicator Lights
Programming in Command Mode To program the System, follow these steps: Step 1 Enter the Master or a Submaster code and begin programming within the Open Delay Time (as shipped from the factory, the Open Delay Time is 2 seconds). Step 2 Enter the desired command sequence. -
Page 33: Placing Codes On Hold
Programming in Command Mode ID + PIN + CL where ID is the three digit code ID number to which you want to assign the new code (you must enter any leading zeros) and where PIN is the PIN you want to assign (it must be the same length as the current Master code PIN). -
Page 34: Restoring Codes
Programming in Command Mode Restoring Codes Programming Code Required: Master Code, or Submaster Code with menu privilege 2-CODES To restore a code from Hold status, enter the following command sequence while in the Command mode: 87 + ID + CL where ID is the three digit ID number of the code that you want to restore (you must enter any leading zeros). -
Page 35: Assigning Manager Privileges
Programming in Command Mode To indicate the results of the command, the lights will flash as follows: Green-Green Supervisor privileges assigned Invalid ID number Assigning Manager Privileges Programming Code Required: Master Code or Submaster Code with menu privilege 2 (codes) A user with Manager privileges can change or set any access level of the lock except Shutdown. -
Page 36: Access Level
Programming in Command Mode Access Level Programming Code Required: Master Code, or Submaster Code with menu privilege 3-ACCESS To set the access level of the System, enter the following command sequence while in the Command mode: 90 + Level + CL where Level is the Access level to set: 1-Unlocked, 2-Code Required, 3- Lockout or 4-Shutdown. - Page 37 Programming in Command Mode When you enable a group, the level of supervision for the group is determined by the type of group. If the group contains one or more Supervisor codes, the group's supervision will default to supervised. If there are no Supervisor codes within the group, the group's supervision will default to unsupervised.
-
Page 38: Disable Groups
Programming in Command Mode Disable Groups Programming Code Required: Master Code, or Submaster Code with menu privilege 3-ACCESS The Disable Groups command is used to restrict access to all codes, except codes with Manager privileges, within a group (or groups). To disable access for a user group or groups, enter the following command sequence while in the Command mode: 92 + [ 1... -
Page 39: Id Status Inquiry
Programming in Command Mode Note Setting the Service code time to 00:00 provides a 'One-time' use code. Setting the Service code time to 99:99 will allow the Service code to remain valid indefinitely. To indicate the status of the Service code time, the lights will flash as follows: Green Time set. -
Page 40: Enter Menu Mode
Programming in Command Mode To indicate the status of the User Code ID Number, the lights will flash as follows: Green User Code is in use Green-Green Active Supervisor Code Green-Green-Green Active Manager Code Green-Red User Code is on hold Green-Green-Red Supervisor Code is on hold Green-Green-Green-Red... -
Page 41: Programming In Menu Mode
Programming in Chapter 7 Menu Mode Programming in Menu mode requires the use of the WP4000 wireless printer. Before programming for the first time, familiarize yourself with the printer controls and its operation (see Chapter 9, The WP4000 Printer). Holding the Printer Because the printer couples to the System optically, you must take care to hold it as shown in Figure 2 below. -
Page 42: Entering The Menu Mode
The Printer will print COMMAND # ?. Press 99 within five seconds to begin programming. The “log on” header and the Main Menu similar to below will print. OMNILOCK 300 v2.05 (C) OSI SECURITY DEVICES LOCATION #123456 BAT:3 MON 03/01/99 07:54pm... -
Page 43: Operational Control Features
Programming in Menu Mode or UNLOCKED or LOCKOUT or SHUTDOWN All programming steps begin from the Main Menu. The Main Menu lists the following options. To select an option, press the key corresponding to the number of the option. 1-AUDIT (Select to print the Audit Log.) 2-CODES (Select to manage codes.) 3-ACCESS (Select to set the access level.) 4-SCHEDULE (Select to edit the Schedule or Holiday List.) -
Page 44: Printing An Audit Log
Programming in Menu Mode To Correct an Error While entering data, briefly press the CL key to clear erroneous numbers entered BEFORE the System has accepted the data. To Correct an Error After Entry Return to the previous menu and re-enter the data. Reprinting a Menu To return to the previous menu or prompt, press the CL key as the first key whenever data is requested. - Page 45 Programming in Menu Mode ------ AUDIT LOG ------- LOCATION #123456 BAT:3 MON 05/29/95 08:26pm 1-MORE 2-REPRINT CL-DONE MON 05/29/95 08:26pm 501-LOG ON 04:28pm 204-ENTRY FRI 05/28/95 05:00pm 000 C/R s - + + 08:00am 000 UNLOCKED ------------------------ In the sample Audit Log printout above, the dates are the dates of the events, the times are the times of the events, the 3 digit numbers following the times are the code ID numbers, and the words after the ID numbers (e.g., LOG ON) are the events themselves.
-
Page 46: User Codes
Programming in Menu Mode The following events only print in the Audit Log if they were entered from the Command Mode. Group level(s) set (where x can be (+) x x x x enabled, (–) disabled, (s) supervised) Code ID xxx added xxx ADD Code ID xxx placed on hold xxx HOLD... - Page 47 Programming in Menu Mode Note A Submaster can not change other Submaster codes or the Master code, therefore the Codes Menu appears as shown below when a Submaster code is used. ------ CODES MENU ------ 1-USER 2-SERVICE 3-AUDIT Next, select 1-ADD from the User Codes Menu: --- USER CODES MENU ---- 1-ADD 2-REMOVE 3-VERIFY 4-HOLD 5-RESTORE...
- Page 48 Programming in Menu Mode Enter the three digit code ID at which you want to begin adding (you must enter any leading zeros) or press the CL key if you are finished adding User codes. When you have entered a valid starting ID number, the following prompt will print: ENDING ID (###)? Enter the last three digit code ID that you want to add or, if you are only...
-
Page 49: Removing User Codes
Programming in Menu Mode Removing User Codes Programming Code Required: Master Code, or Submaster Code with menu privilege 2-CODES To remove User codes from the System, select 2-CODES from the Main Menu: ------ MAIN MENU ------ 1-AUDIT 2-CODES 3-ACCESS 4-SCHEDULE 5-SETUP 0-END Next, select 1-USER from the Codes Menu: ------ CODES MENU ----- 1-USER 2-SERVICE 3-AUDIT... -
Page 50: Verifying User Codes
Programming in Menu Mode Next, select 2-REMOVE from the User Codes Menu: --- USER CODES MENU ---- 1-ADD 2-REMOVE 3-VERIFY 4-HOLD 5-RESTORE 6-GROUPS 7-EXTEND The following prompt will print: STARTING ID (###)? Enter the three digit code ID at which you want to begin removing codes (you must enter any leading zeros) or press the CL key if you are finished removing User codes. - Page 51 Programming in Menu Mode ------ MAIN MENU ------ 1-AUDIT 2-CODES 3-ACCESS 4-SCHEDULE 5-SETUP 0-END Next, select 1-USER from the Codes Menu: ------ CODES MENU ----- 1-USER 2-SERVICE 3-AUDIT 4-SUBMASTERS 5-MASTER Note A Submaster can not change other Submaster codes or the Master code, therefore the Codes Menu appears as shown below when a Submaster code is used.
- Page 52 Programming in Menu Mode Select 1-YES if you want to print the group membership for the User ID codes, otherwise select 2-NO. Once you have made your selection, the following prompt will print: STARTING ID (###)? Enter the three digit code ID at which you want to begin the User Verify Report (you must enter any leading zeros) or press the CL key if you are finished verifying User codes.
-
Page 53: Assigning Extended Group Membership
Programming in Menu Mode -- VERIFY USER REPORT -- 1-MORE 2-REPRINT CL-DONE 001- GRP: 1,3,4 002- GRP: 1 003- GRP: 1,3,4 004- GRP: 1 005-s GRP: 1 ------------------------ Sample Verify User Report With Groups and No PINs -- VERIFY USER REPORT -- 1-MORE 2-REPRINT CL-DONE #001-#010 #022-#125 #135-#175 #200-#500... - Page 54 Programming in Menu Mode Next, select 1-USER from the Codes Menu: ------ CODES MENU ----- 1-USER 2-SERVICE 3-AUDIT 4-SUBMASTERS 5-MASTER Note A Submaster can not change other Submaster codes or the Master code, therefore the Codes Menu appears as shown below when a Submaster code is used.
- Page 55 Programming in Menu Mode Enter the last three digit code ID to which you want to assign extended group membership, or, if you are only assigning membership for a single code, press the CL key and the System will accept the starting ID number that you entered above as the ending ID number.
-
Page 56: Placing User Codes On Hold
Programming in Menu Mode Placing User Codes On Hold Programming Code Required: Master Code, or Submaster Code with menu privilege 2-CODES To place User codes on Hold, select 2-CODES from the Main Menu: ------ MAIN MENU ------ 1-AUDIT 2-CODES 3-ACCESS 4-SCHEDULE 5-SETUP 0-END Next, select 1-USER from the Codes Menu: ------ CODES MENU -----... -
Page 57: Restoring User Codes
Programming in Menu Mode The following prompt will print: HOLD ID (###)? Enter the three digit code ID that you want to place on Hold (you must enter any leading zeros) or press the CL key if you are finished placing User codes on Hold. -
Page 58: Assigning Supervisor Codes
Programming in Menu Mode Note A Submaster can not change other Submaster codes or the Master code, therefore the Codes Menu appears as shown below when a Submaster code is used. ------ CODES MENU ------ 1-USER 2-SERVICE 3-AUDIT Next, select 5-RESTORE from the User Codes Menu: --- USER CODES MENU ---- 1-ADD 2-REMOVE 3-VERIFY 4-HOLD 5-RESTORE... - Page 59 Programming in Menu Mode Note Before assigning Supervisor Codes, the System should have been through an unlock and lock cycle. Otherwise the Access Level will be incorrectly reported until the Access Level is Subsequently changed manually or by the Time Schedule.
-
Page 60: Assigning Manager Codes
Programming in Menu Mode Next, select 7-EXTEND from the User Codes Menu: --- USER CODES MENU ---- 1-ADD 2-REMOVE 3-VERIFY 4-HOLD 5-RESTORE 6-GROUPS 7-EXTEND The following prompt will print: EXTENDED USER TYPE? 1-SUPERVISOR 2-MANAGER Select 1-SUPERVISOR The following prompt will print: EXTEND USER ID (###)? Enter the three digit code ID to which you want to assign Supervisor privileges (you must enter any leading zeros) or press the CL key if you are... - Page 61 Programming in Menu Mode Note A Submaster can not change other Submaster codes or the Master code, therefore the Codes Menu appears as shown below when a Submaster code is used. ------ CODES MENU ------ 1-USER 2-SERVICE 3-AUDIT Next, select 7-EXTEND from the User Codes Menu: --- USER CODES MENU ---- 1-ADD 2-REMOVE 3-VERIFY 4-HOLD 5-RESTORE...
-
Page 62: Service Code
Programming in Menu Mode Service Code Adding the Service Code Programming Code Required: Master Code, or Submaster Code with menu privileges 2-CODES To add the Service code to the System, select 2-CODES from the Main Menu: ------ MAIN MENU ------ 1-AUDIT 2-CODES 3-ACCESS 4-SCHEDULE 5-SETUP 0-END Next, select 2-SERVICE from the Codes Menu:... -
Page 63: Removing The Service Code
Programming in Menu Mode Next, select 1-ADD from the Service Code Menu: -- SERVICE CODE MENU --- 1-ADD 2-REMOVE 3-VERIFY 4-HOLD 5-RESTORE 6-TIME LIMIT (01:00) The following prompt will print: 510: 4 DIGIT PIN? If you are using 5 or 6 digit PINs, the prompt will reflect it accordingly. Enter the PIN that you wish to assign for the Service code or press the CL key to abort without changing the Service code. - Page 64 Programming in Menu Mode Note A Submaster can not change other Submaster codes or the Master code, therefore the Codes Menu appears as shown below when a Submaster code is used. ------ CODES MENU ------ 1-USER 2-SERVICE 3-AUDIT Next, select 2-REMOVE from the Service Code Menu: -- SERVICE CODE MENU --- 1-ADD 2-REMOVE 3-VERIFY 4-HOLD 5-RESTORE...
-
Page 65: Verifying The Service Code
Programming in Menu Mode Verifying the Service Code Programming Code Required: Master Code, or Submaster Code with menu privilege 2-CODES To verify the Service code setting, select 2-CODES from the Main Menu: ------ MAIN MENU ------ 1-AUDIT 2-CODES 3-ACCESS 4-SCHEDULE 5-SETUP 0-END Next, select 2-SERVICE from the Codes Menu: ------ CODES MENU ----- 1-USER 2-SERVICE 3-AUDIT... -
Page 66: Placing The Service Code On Hold
Programming in Menu Mode If the Service code is assigned, the following will print: SERVICE CODE 510-1234 Where 1234 is the PIN assigned to the Service code. If the Service code is currently on hold, the following will print: SERVICE CODE ON HOLD If the Service code is not currently assigned, the following will print: SERVICE CODE UNASSIGNED Once the status of the Service code is printed, the Service Code Menu will... -
Page 67: Restoring The Service Code
Programming in Menu Mode Note A Submaster can not change other Submaster codes or the Master code, therefore the Codes Menu appears as shown below when a Submaster code is used ------ CODES MENU ------ 1-USER 2-SERVICE 3-AUDIT Next, select 4-HOLD from the Service Code Menu: -- SERVICE CODE MENU --- 1-ADD 2-REMOVE 3-VERIFY 4-HOLD 5-RESTORE... - Page 68 Programming in Menu Mode Next, select 2-SERVICE from the Codes Menu: ------ CODES MENU ----- 1-USER 2-SERVICE 3-AUDIT 4-SUBMASTERS 5-MASTER Note A Submaster can not change other Submaster codes or the Master code, therefore the Codes Menu appears as shown below when a Submaster code is used.
-
Page 69: Setting The Service Code Time Limit
Programming in Menu Mode Setting the Service Code Time Limit Programming Code Required: Master Code, or Submaster Code with menu privilege 2-CODES The Service code time limit defines the length of time that the Service code remains active after its first use. To set the Service code time, select 2- CODES from the Main Menu: ------ MAIN MENU ------ 1-AUDIT 2-CODES 3-ACCESS... -
Page 70: Audit Code
Programming in Menu Mode If you want to change the Time Limit, select 6-TIME LIMIT from the Service Code Menu: -- SERVICE CODE MENU --- 1-ADD 2-REMOVE 3-VERIFY 4-HOLD 5-RESTORE 6-TIME LIMIT (01:00) If you select 6-TIME LIMIT, the following prompt will print: SVC CODE TIME (hhmm)? Enter the new Service code time limit as hhmm, where hh is hours in the range 00 - 99 and mm is minutes in the range 01 - 59. - Page 71 Programming in Menu Mode To add the Audit code to the System, select 2-CODES from the Main Menu: ------ MAIN MENU ------ 1-AUDIT 2-CODES 3-ACCESS 4-SCHEDULE 5-SETUP 0-END Next, select 3-AUDIT from the Codes Menu: ------ CODES MENU ----- 1-USER 2-SERVICE 3-AUDIT 4-SUBMASTERS 5-MASTER Note A Submaster can not change other Submaster...
-
Page 72: Removing The Audit Code
Programming in Menu Mode The following prompt will print: 511: 4 DIGIT PIN? If you are using 5 or 6 digit PINs, the prompt will reflect it accordingly. Enter the PIN that you wish to assign for the Audit code or press the CL key to abort without changing the Audit code. - Page 73 Programming in Menu Mode Note A Submaster can not change other Submaster codes or the Master code, therefore the Codes Menu appears as shown below when a Submaster code is used. ------ CODES MENU ------ 1-USER 2-SERVICE 3-AUDIT Next, select 2-REMOVE from the Audit Code Menu: --- AUDIT CODE MENU --- 1-ADD 2-REMOVE 3-VERIFY 4-HOLD 5-RESTORE...
-
Page 74: Verifying The Audit Code
Programming in Menu Mode Verifying the Audit Code Programming Code Required: Master Code, or Submaster Code with 2-CODES menu privileges To verify the Audit code setting, select 2-CODES from the Main Menu: ------ MAIN MENU ------ 1-AUDIT 2-CODES 3-ACCESS 4-SCHEDULE 5-SETUP 0-END Next, select 3-AUDIT from the Codes Menu: ------ CODES MENU ----- 1-USER 2-SERVICE 3-AUDIT... -
Page 75: Placing The Audit Code On Hold
Programming in Menu Mode If the Audit code is assigned, the following will print: AUDIT CODE 511-1234 Where 1234 is the PIN assigned to the Audit code. Otherwise, if the Audit code is currently on hold, the following will print: AUDIT CODE ON HOLD Otherwise, if the Audit code is not currently assigned, the following will print:... -
Page 76: Restoring The Audit Code
Programming in Menu Mode The following confirmation will print: AUDIT CODE ON HOLD The Audit Code Menu will then reprint Restoring the Audit Code Programming Code Required: Master Code, or Submaster Code with 2-CODES menu privileges To Restore the Audit Code, select 2-CODES from the Main Menu: ------ MAIN MENU ------ 1-AUDIT 2-CODES 3-ACCESS 4-SCHEDULE 5-SETUP 0-END... -
Page 77: Submaster Codes
Programming in Menu Mode The following confirmation will print: AUDIT CODE RESTORED The Audit Code Menu will then reprint Submaster Codes Adding Submaster Codes Programming Code Required: Master Code To add a Submaster code to the System, select 2-CODES from the Main Menu: ------ MAIN MENU ------ 1-AUDIT 2-CODES 3-ACCESS... - Page 78 Programming in Menu Mode Next, select 1-ADD from the Submaster Codes Menu: - SUBMASTER CODES MENU - 1-ADD 2-REMOVE 3-VERIFY 4-HOLD 5-RESTORE The following prompt will print: SUBMASTER ID (###)? Enter the three digit ID number of the Submaster code you want to add or press CL if you are finished adding Submaster codes.
-
Page 79: Removing Submaster Codes
Programming in Menu Mode Otherwise, the selected menu rights will be assigned to the specified Submaster code and a confirmation of these changes will print. Once completed, the Submaster ID prompt will reprint. If Menu options 1, 2 and 3 were selected for Submaster ID 502 the confirmation would print as follows: SUB #502: 1,2,3 Note... -
Page 80: Verifying Submaster Codes
Programming in Menu Mode The following prompt will print: SUBMASTER ID (###)? Enter the three digit ID number of the Submaster code you want to remove or press CL if you are finished removing Submaster codes. When you have entered the ID of a valid Submaster code, the following prompt will print: REMOVE SUBMASTER #502? 1-YES 2-NO... -
Page 81: Placing Submaster Codes On Hold
Programming in Menu Mode ------ CODES MENU ----- 1-USER 2-SERVICE 3-AUDIT 4-SUBMASTERS 5-MASTER Next, select 3-VERIFY from the Submaster Codes Menu: - SUBMASTER CODES MENU - 1-ADD 2-REMOVE 3-VERIFY 4-HOLD 5-RESTORE A Submaster List report similar to the following will print: ---- SUBMASTER LIST ---- SUBMASTER #: MENU ACCESS #502: ALL... -
Page 82: Restoring The Submaster Codes
Programming in Menu Mode Next, select 4-HOLD from the User Codes Menu: --SUBMASTER CODES MENU - 1-ADD 2-REMOVE 3-VERIFY 4-HOLD 5-RESTORE The following prompt will print: SUBMASTER ID (###)? Enter the three digit ID number of the Submaster code that you want to place on hold or press the CL key if you are finished placing Submaster codes on Hold. -
Page 83: Changing The Master Code
Programming in Menu Mode Next, select 5-RESTORE from the Submaster Codes Menu: -- SUBMASTER CODES MENU 1-ADD 2-REMOVE 3-VERIFY 4-HOLD 5-RESTORE The following prompt will print: SUBMASTER ID (###)? Enter the three digit ID number of the Submaster code that you want to Restore or press the CL key if you are finished restoring Submaster codes . - Page 84 Programming in Menu Mode Important! If you change the length of your Master code, all other codes are erased! Also, if you lose your Master Code, you will have to reset the System. (See Resetting The System page 118.). Resetting the system will reset the Master Code to the factory default and erase all other programming.
- Page 85 Programming in Menu Mode Important! There are two modes of operation supported: PIN Only, where only the PIN is required for access, and ID+PIN, where the user must enter both the code ID and the PIN for access. When the length of the Master code is set to 4 through 6 digits, the System operates in PIN Only mode.
-
Page 86: Setting The Access Level
Programming in Menu Mode Reenter the new PIN for confirmation. Once the PIN has been reentered, a confirmation of the changes made will print. If the code length was changed, the following will print: ***ALL CODES ERASED*** MASTER CODE SET If the code length was NOT changed, the following will print: MASTER CODE SET The Codes Menu will then reprint. -
Page 87: Unlocked
Programming in Menu Mode Next, select the desired level from the Access Level Menu: -- ACCESS LEVEL MENU --- 1-UNLOCK 2-CODE 3-LOCK 4-SHUTDOWN Unlocked If you selected 1-UNLOCK, the following prompt will print: UNLOCK WITH FIRST CODE? 1-YES 2-NO Select 1-YES if you want the System to set Unlock with Code level, where it will wait for a valid entry code to be entered and then will remain unlocked Select 2-NO if you want the System to remain unlocked immediately after... -
Page 88: Code Required
Programming in Menu Mode When you have responded to all of the required prompts, a confirmation of the changes made will print. The confirmation will be similar to the following: ACCESS: U/C s + + - Where U/C represents Unlock with Code level and ‘s + + -’ represents the security level of code groups 1 through 4;... -
Page 89: Lockout
Programming in Menu Mode If you selected 1-YES, when you have responded to all of the required prompts, a confirmation of the changes made will print and the Main Menu will then reprint. The confirmation will be similar to the following: ACCESS: C/R s + + - Where C/R represents Code Required level and ‘s + + -’... -
Page 90: Schedule
Programming in Menu Mode Schedule Adding a Schedule Event Programming Code Required: Master Code, or Submaster Code with menu privilege 4-SCHEDULE Important! Changes made to the Time Schedule will not take effect until after you have ended the programming session at which time, the System will override the current access level with the appropriate level as determined by the schedule. - Page 91 Programming in Menu Mode ADD ddd TIME (24 HR)? Enter the time (in 24 hour format) of the event you wish to add to the daily schedule for ddd (where ddd represents the schedule that you selected above), or press the CL key if you are finished adding events to the Time Schedule.
- Page 92 Programming in Menu Mode confirmation made for groups that you have selected until after you have finished your selections. If you press the CL key before making any selections, the System will set access level Unlocked at the specified event time. Otherwise, for each of the selected groups that contain a Supervisor code, the following prompt will print in succession: GROUP # n SUPERVISED?
- Page 93 Programming in Menu Mode Press the number of each code group that you want enabled while at the Code Required access level. If you want to enable all groups, press 5-ALL. Press CL when you have finished selecting groups. Note: There is no confirmation made for groups that you have selected until after you have finished your selections.
-
Page 94: Removing A Schedule Event Time
Programming in Menu Mode Lockout If you selected 3-LOCK in response to the access level prompt, a confirmation of the change made will print as indicated below and the event time prompt will then reprint. ACCESS: LOCKOUT Removing a Schedule Event Time Programming Code Required: Master Code, or Submaster Code with menu privilege 4-SCHEDULE... - Page 95 Programming in Menu Mode The following prompt will print: SCHEDULE (MON-1..DAY-9)? Select the daily schedule number from which you want to remove an event or press the CL key if you are finished removing events from the Time Schedule. The following prompt will print: REMOVE ddd TIME (24 HR)? Enter the time (in 24 hour format) of the event you wish to remove from the daily schedule for ddd (where ddd represents the schedule that you selected...
-
Page 96: Verifying Schedules Time
Programming in Menu Mode Verifying Schedules Time Programming Code Required: Master Code, or Submaster Code with menu privilege 4-SCHEDULE To verify a daily schedule (print a listing of the scheduled events), select 4- SCHEDULE from the Main Menu: ------ MAIN MENU ------ 1-AUDIT 2-CODES 3-ACCESS 4-SCHEDULE 5-SETUP 0-END Next, select 3-VERIFY from the Schedule Menu:... -
Page 97: Copying A Schedule Time
Programming in Menu Mode Copying a Schedule Time Programming Code Required: Master Code, or Submaster Code with menu privilege 4-SCHEDULE Important! Changes made to the Time Schedule will not take effect until after you have quit the programming session at which time, the System will override the current access level with the appropriate level as determined by the schedule. -
Page 98: Clearing A Schedule Time
Programming in Menu Mode Select the daily schedule that you want to copy to, or press the CL key if you are finished copying schedules. When you have made your selection, a confirmation of any change will print and the ‘copy to’ prompt will then reprint. -
Page 99: Adding Holidays
Programming in Menu Mode The following prompt will print: SELECT SCHEDULE TO CLEAR (MON-1..DAY-9, 0-ALL)? Select the daily schedule that you want to clear or select 0 if you want to clear the entire Time Schedule. When you have made your selection, a prompt, similar to the following, will print: CLEAR TUE SCHEDULE? 1-YES 2-NO... - Page 100 Programming in Menu Mode Next, select 6-HOLIDAY from the Schedule Menu: ---- SCHEDULE MENU ----- 1-ADD 2-REMOVE 3-VERIFY 4-COPY 5-CLR 6-HOLIDAY Then, select 1-ADD from the Holiday Menu: ----- HOLIDAY MENU ----- 1-ADD 2-REMOVE 3-VERIFY 4-CLEAR HOLIDAY LIST The following prompt will print: MONTH (mm)? Enter the month that the holiday will occur in, or press the CL key if you are finished adding holidays to the Holiday List.
-
Page 101: Removing Holidays
Programming in Menu Mode When you have made your selection, a confirmation of the changes made to the Holiday List will print and the month prompt will then reprint. Removing Holidays Programming Code Required: Master Code, or Submaster Code with menu privilege 4-SCHEDULE To remove a holiday from the Holiday List, select 4-SCHEDULE from the Main Menu: ------ MAIN MENU ------... -
Page 102: Verifying Holidays
Programming in Menu Mode Enter the day of the month of the holiday to remove. You must enter any leading 0 in the day. Once you have entered a valid day, a prompt similar to the following will print: REMOVE HOLIDAY 05/29? 1-YES 2-NO Select 1-YES to remove the specified holiday from the Holiday List. -
Page 103: Clearing The Holiday List
Programming in Menu Mode A report similar to the following will print: ----- HOLIDAY LIST ----- 1-MORE 2-REPRINT CL-DONE 05/29-DY9 07/03-SUN 07/04-MON 09/04-DY8 11/26-DY9 12/25-SUN ------------------------ The printer will print up to eight lines at a time and then pause. At this time enter 1-MORE to continue, 2-REPRINT to reprint the previous eight lines, or CL-DONE to end the printout. -
Page 104: Setup
Programming in Menu Mode The following prompt will print: CLEAR ALL HOLIDAYS? 1-YES 2-NO Select 1-YES to clear the Holiday List. Select 2-NO to abort without changing the Holiday List. When you have made your selection, a confirmation of any changes made will print and the Holiday Menu will then reprint. -
Page 105: Setting The Clock
Programming in Menu Mode A report similar to below will print: ---- STATUS REPORT---- LOCATION #123456 BAT:3 MON 05/29/95 08:26pm ACCESS: C/R + + + + OPEN DELAY SECONDS: 02 DAYLIGHT: NORTHERN SERVICE CODE TIME: 01:00 BATTERY USAGE: 12,176 ------------------------ In addition to providing a hard copy printout of the settings of the System, the Status Report also reports the number of uses on the current set of batteries (BATTERY USAGE). -
Page 106: Setting The Open Delay Time
Programming in Menu Mode The following prompt will print: MONTH (mm)? Enter the current month. You must enter any leading zero. When you have entered a valid month, the following prompt will print: DAY (dd)? Enter the current day of the month. You must enter any leading zero. When you have entered a valid day, the following prompt will print: YEAR (yy)? Enter the last 2 digits of the current year. - Page 107 Programming in Menu Mode The Open Delay Time controls the length of time the System remains unlocked after a valid code is entered. As shipped from the factory and when the System is reset, this time is two seconds. (See Resetting The System page 118.) You can set a delay time from 1 to 30 seconds.
-
Page 108: Setting Daylight Savings
Programming in Menu Mode Enter the desired Open Delay Seconds from 01 to 30. You must enter any leading zeros. When you have entered a valid delay time, the Defaults Menu will reprint and you can then confirm that the new delay time is shown. -
Page 109: Setting Group Boundaries
Programming in Menu Mode Next, select 3-DEFAULTS from the Setup Menu: ------ SETUP MENU ------ 1-STATUS REPORT 2-CLOCK 3-DEFAULTS 4-AUTOCODES 5-RUN DIAGNOSTICS Then, select 2-DAYLIGHT from the Defaults Menu: ---- DEFAULTS MENU ----- 1-OPEN DELAY SECONDS: 02 2-DAYLIGHT: NORTHERN 3-GROUP BOUNDARIES 4-LOCATION: 123456 A prompt similar to the following will print: DAYLIGHT: NORTHERN... - Page 110 Programming in Menu Mode Next, select 3-DEFAULTS from the Setup Menu: ------ SETUP MENU ------ 1-STATUS REPORT 2-CLOCK 3-DEFAULTS 4-AUTOCODES 5-RUN DIAGNOSTICS Next, select 3-GROUP BOUNDARIES from the Defaults Menu: ---- DEFAULTS MENU ----- 1-OPEN DELAY SECONDS: 02 2-DAYLIGHT: NORTHERN 3-GROUP BOUNDARIES 4-LOCATION: 123456 Then, select the group number from the Group Boundaries Menu for which...
-
Page 111: Setting The Location Number
Programming in Menu Mode Setting the Location Number Programming Code Required: Master Code, or Submaster Code with menu privilege 5-SETUP The location is a 6 digit number that is printed in the log on header and on most reports. It is used for relating the printouts back to the System when multiple Systems are in use. -
Page 112: Setting The Facility Autocodes
Programming in Menu Mode Setting the Facility Autocodes Programming Code Required: Master Code, or Submaster Code with menu privilege 5-SETUP The four Facility Autocodes are used for adding User codes quickly and reliably on one System, or multiple Systems with common Users (Autocoding). - Page 113 Programming in Menu Mode Important! The Autocode feature is only available when operating in ID+PIN mode ( the code length in use is from 7 to 9 digits). If a Facility Code is subsequently changed, any User codes already assigned will remain unaffected.
-
Page 114: Running Diagnostics
1-STATUS REPORT 2-CLOCK 3-DEFAULTS 4-AUTOCODES 5-RUN DIAGNOSTICS A Diagnostic Report similar to the following will print: --DIAGNOSTICS REPORT-- OMNILOCK 300 v2.05 (C) OSI SECURITY DEVICES LOCATION #123456 BAT:3 MON 03/01/99 07:54pm DRIVE TYPE: MOTOR DRIVE: 5810 mV MOTOR: 1121 mV 0284 mA... -
Page 115: Batteries
Batteries Chapter 8 Four AA-size 1½-volt alkaline batteries power the System. You can expect them to last for approximately 5 years or: 100,000 operations for Cylindrical Locks, 100,000 operations for NT Falcon Mortise locks, 80,000 operations for Schlage mortise locks, or 150,000 operations for Wall Mount Systems. Each time you enter the Master or a Submaster code, the System flashes the lights according to the condition of the batteries as follows: Battery... -
Page 116: Battery Replacement Instructions
Batteries Battery Replacement Instructions CAUTION Use electrostatic discharge protection procedures when the printed circuit board is exposed. Note The battery voltage is measured under load conditions and the voltages from a number of operations are averaged to determine the Battery Status. - Page 117 Batteries Step 3 Press the Lever Catch with the Push Pin. Step 4 For ARROW Locks; slide the Inside Lever from the Spindle (Figure 3). For SCHLAGE Locks; remove the Inside Lever and the Driver from the Spindle (Figure 4). Wrench Plate (provided)
- Page 118 Batteries Step 5 Remove the Inside Rose by twisting it counter-clockwise slightly and pulling it off. Step 6 Using a Phillips screwdriver, remove the 2 screws that hold the System to the door. Step 7 For ARROW Q48 series Locks; remove the Rose Insert, depress the Lever Catch and remove the Flexible Adapter.
- Page 119 Batteries Very Important! Get your fresh replacement batteries positioned and ready to install before you begin the next step. Avoid touching the Battery Contacts or the Contacts in the Battery Holders because the oils and acids from your fingers can cause long term electrical contact problems. Batteries are to be removed and replaced one at a time.
-
Page 120: Mortise Models (Non-Weatherized)
Batteries Mortise Models (Non-Weatherized) CAUTION Use electrostatic discharge protection procedures when the printed circuit board is exposed. Step 1 Open the Lock and prop open the door so that you can work on it. Step 2 Remove the Faceplate and loosen the Cylinder Retaining Screw (Figure 6). - Page 121 Batteries Step 7 Remove and replace each of the old Batteries, one at a time, with the plus (+) end down (Figure 7) Step 8 Close the Battery Cover and press the Gasket in place. Step 9 Remount the System in the reverse order of Steps 1 through 5 and you are done! Wrench Collar...
-
Page 122: Wall Mount System (Non-Weatherized)
Batteries Wall Mount System (Non-Weatherized) CAUTION Use electrostatic discharge protection procedures when the printed circuit board is exposed. Step 1 Insert the key into the Cylinder Assembly and rotate it counterclockwise until the Cylinder Assembly can be removed from the Module (Figure 8) . Step 2 With your finger, reach into the hole in the Module and guide the wires out through the hole. - Page 123 Batteries Screw-On Wire Connector Mounting Screw (2) Cylinder Assembly Figure 8 OMNILOCK Wall Mount System Module AA Alkaline Battery Battery (4) Cover Positive Down Figure 9 Battery Replacement...
-
Page 124: Weatherized Models
Batteries Weatherized Models CAUTION Use electrostatic discharge protection procedures when the printed circuit board is exposed. Cylindrical and Mortise Step 1 Unscrew the Security Screws approximately 1/4 inch and remove the Electronic Housing (Figure 10). Important! Get your fresh replacement batteries positioned and ready to install before you begin the next step. - Page 125 Batteries Electronic Housing AA Alkaline Battery (4) Security Screws #8-32 x 1/2 long (2) (Torx Drive, Type T15) Security Screw Wrench Figure 10 Weatherized Cylindrical and Mortise Models...
-
Page 126: Wall Mount System (Weatherized)
Batteries Wall Mount System (Weatherized) CAUTION Use electrostatic discharge protection procedures when the printed circuit board is exposed. Step 1 Unscrew the four Security Screws and remove the Cover (Figure 11). Important! Get your fresh replacement batteries positioned and ready to install before you begin the next step. - Page 127 Batteries Cover AA Alkaline Battery (4) Security Screw Positive Torx T-15 Down #8-32 x 1/2 4 Reqd. Figure 11 Weatherized Wall Mount System...
-
Page 128: Resetting The System
Batteries Resetting The System CAUTION Use electrostatic discharge protection procedures when the printed circuit board is exposed. In some special cases you may want to reset the System to the way it was shipped from the factory. Important! All data and programming will be erased when the System is reset. - Page 129 Batteries Important! Avoid touching the Battery Contacts or the Contacts in the Battery Holders because the oils and acids from your fingers can cause long term electrical contact problems. To ensure a complete System reset, remove all of the Batteries and then short the negative (-) terminal of the Battery Holder, Figure 12 Point A, to the positive (+) terminal of the Battery Holder, Figure 12 Point B, for approximately 15 seconds.
- Page 130 Batteries (BLANK)
-
Page 131: The Wp4000 Printer
The WP4000 Printer Chapter 9 The WP4000 Wireless Printer is used for reading the various reports maintained by the System including the Audit Log. The System also sends prompts to the user via the Printer while the System is in the Menu programming mode. -
Page 132: Installing Batteries
The WP4000 Printer Installing Batteries Remove the Battery Compartment Door from the rear of the Printer. Install 4 fresh ‘AA’ alkaline batteries in alternating directions, as marked in the printer. Replace the Battery Compartment Door. Installing Paper Do not operate the Printer without paper. For best results, use Hewlett Packard 82175 Black-Printing Thermal Paper (OSI part # WP106). -
Page 133: Self Test/Battery Test
The WP4000 Printer Self Test/Battery Test If a Printer problem is suspected, or to check the Printer Batteries, perform the following Steps: Step 1 Turn the Printer Power Switch to OFF Step 2 Hold down the Paper Advance Button Step 3 Turn the Printer Power Switch to ON Step 4 Release the Paper Advance Button The Printer will perform a self test by printing the entire character set. - Page 134 The WP4000 Printer If you are not planning to use the Printer in the near future, you should remove the batteries before storing the Printer. You can use rechargeable batteries, but they cannot be recharged inside the Printer. Battery life for a single charge is less than for alkaline batteries. Self-Test and Battery Status.
-
Page 135: Help
*Every effort will be made to respond by the next business day. Warranty Service OSI Security Devices will service any product we sell when you return it to the factory complete, free and clear of all liens and encumbrances. You must prepay transportation and accompany the product by a Return Material Authorization Number (see below). -
Page 136: Return Material Authorization
Help!! Return Material Authorization Before you return any product to OSI Security Devices for any reason, you must first get a Return Material Authorization (RMA) number. To get an RMA number, call Technical Support and describe the problem. If we determine your System needs to be returned to us for repair, we will give you an RMA number. - Page 137 OMNILOCK Access Control System and educate the end user upon completion of the project. OSI Security Devices and its sales representatives are not responsible for programming after project completion. If required to do so, a fee will be incurred by the end user.
- Page 138 Help!! (BLANK)
-
Page 139: Menu Tree
Menu Tree Chapter 11 MAIN MENU 1-AUDIT 2-CODES 3-ACCESS 4-SCHEDULE 5-SETUP 0-END See Page 130 See Page 136 See Page 138 AUDIT LOG Programming Location #000000 Bat:3 session Mon 01/01/95 12:00am ended 1-More 2-Reprint CL-Done 1-UNLOCK 2-CODE 3-LOCK 4-SHUTDOWN (CODE REQ’D) (LOCKOUT) Access: Lockout Access: Shutdown... - Page 140 MenuTree 2-CODES 1-USERS 2-SERVICE 3-AUDIT 4-SUBMASTER 5-MASTER See Page 132 See Page 133 See Page 134 See Page 135 1-ADD 2-REMOVE 3-VERIFY 4-6 Digits 7-9 Digits Print PINs ? 1-Yes 2-No Starting (1-4) Autocode Starting ID (###) ? 5-Manual ID (###) ? Print Groups ? 1-Yes 2-No...
- Page 141 Menu Tree 4-HOLD 5-RESTORE 6-GROUPS 7-EXTEND Hold Restore Starting Extended User Type ID (###) ? ID (###) ? ID(###) ? 1-Supervisor 2-Manager Confirmation Confirmation of code on of code Ending hold prints restored ID (###) ? Extended User prints ID (###) ? Select Confirmation User Groups...
- Page 142 MenuTree 2-SERVICE 1-ADD 2-REMOVE 3-VERIFY 4-HOLD 5-RESTORE 6-TIME LIMIT (01:00) 510: Service Service Service Service Code 4 Digit Pin? Code 510- Code On Code On Time (hhmm) ? (####) Hold Hold Confirmation Service code prints, Service menu reprints. Above Above service code Code On Verify the time...
- Page 143 Menu Tree 3-AUDIT 1-ADD 2-REMOVE 3-VERIFY 4-HOLD 5-RESTORE 511: Audit Code Audit Code Audit Code 4 Digit Pin? 511-(####) On Hold Restored Confirmation Audit Code Above Above prints: On Hold confirmation confirmation audit code prints prints added Audit Code Unassigned One of the above confirmations...
- Page 144 MenuTree 4-SUBMASTER 1-ADD 2-REMOVE 3-VERIFY 4-HOLD 5-RESTORE A Submaster Submaster list prints ID (###) ? Submaster Submaster ID (###) ? ID (###) ? (###): Confirmation Confirmation 4 Digit Pin ? of the of the Submaster ID Submaster ID on hold prints restored prints Select Menu Rights 1-Audit 2-Codes...
- Page 145 Menu Tree 5-MASTER Code Length (4-9) (Enter Code Length) New Length Existing Length --Warning-- Enter New Master Pin New Code Length! All Codes Will Be Erased Continue ? Re-enter To Confirm 1-Yes 2-No Confirmation prints: master code set No change to Enter New Master Pin master code Re-enter To Confirm...
- Page 146 MenuTree 4-SCHEDULE 1-ADD 2-REMOVE 3-VERIFY Schedule Schedule In Use: 1,2,3,... (Mon-1... Day 9) ? (Mon-1... Day 9) ? Schedule (Mon-1... Day 9) ? Remove ddd Time (24 Hours) ? Add ddd Time A schedule (24 Hours) ? list prints Remove (Day) (Time) ? 1-Yes 2-No 1-Unlock 2-Code 3-Lock...
- Page 147 Menu Tree 4-COPY 5-CLR 6-HOLIDAY Select Schedule Copy From: To Clear Schedule (Mon-1... Day 9) ? (Mon-1... Day 9) ? Copy To: Clear (Day) Schedule ? Schedule 1-Yes 2-No (Mon-1... Day 9) ? Confirmation of the Confirmation of the No change change prints change prints made...
- Page 148 MenuTree 5-SETUP 1-STATUS 2-CLOCK REPORT Month (mm) ? A report prints Day (dd) ? Year (yy) ? (Mon-1...Sun-7) ? Confirmation of the date prints Time (24 Hr) ? Confirmation of the time prints...
- Page 149 Menu Tree 3-DEFAULTS 4-AUTOCODES 5-RUN DIAGNOSTICS A report Facility Autocodes prints 1-000000 2-000000 3-000000 4-000000 6 Digit Autocode ? Facility autocode menu prints with new autocode number 1-OPEN DELAY 2-DAYLIGHT: 3-GROUP 4-LOCATION: SECONDS: 02 NORTHERN BOUNDARIES 123456 6 DIGIT Group Boundaries Open Delay DAYLIGHT: LOCATION ?
- Page 150 INDEX Code Types • 4 Audit • 7 General User • 7 Access Level • 3, 26 Manager • 6 Code Required • 78 Master • 5 Lockout • 79 Service • 7 Setting • 76 Submaster • 6 Shutdown • 79 Supervisor •...
- Page 151 Index Facility Auto Codes • 102 Manager • 25 Features • 1 Code • 6 Operation • 14 Manager Codes Assigning • 50 Group • 8 Master Code • 5, 73 Boundaries • 99 Menu Mode • 31 Disable • 28 Access Level •...
- Page 152 Index Service Code Overview Adding • 52 General • 1 Holding • 56 Removing • 53 Restoring • 57 Printer Time Limit • 59 Battery Test • 123 Verifying • 55 General • 121 Setup Holding • 31 Daylight Savings Time • 98 Installing Batteries •...
- Page 153 Index Service Code Time • 28 Set Clock • 95 Status Report • 94 Time Schedule Submaster Codes • 6 Copying • 87 Adding • 67 Removing An Event • 84 Holding • 71 Verifying • 86 Removing • 69 Time Schedule •...
- Page 154 Index (BLANK)
- Page 155 QUICK REFERENCE PROGRAMMING GUIDE OMNILOCK ACCESS CONTROL SYSTEMS SERIES OM100, OM300 & OM500 (Firmware Version 2.xx) To program the System in the Command Mode: Enter Master or Submaster Code (Press and Release CL Key to Extend Time-out to 1 Minute)
- Page 156 OSI Security Devices Office: (619) 628-1000 1580 Jayken Way FAX: (619) 628-1001 Chula Vista, CA 91911 WEBSITE: http://www.osisecurity.com...
- Page 157 ACCESS CONTROL SYSTEMS OMNILOCK USER GUIDE ® SERIES OM100, OM300 & OM500...
Need help?
Do you have a question about the OMNILOCK OM100 Series and is the answer not in the manual?
Questions and answers