Omron K6CM User Manual
Motor condition
Hide thumbs
Also See for K6CM:
- User manual (268 pages) ,
- Usage manual (64 pages) ,
- Startup manual (36 pages)
Table of Contents
Advertisement
Quick Links
Motor Condition
Monitoring Device
User's Manual
K6CM
1
Overview
2
Device Components
3
Measuring and
Monitoring System
4
Introduction of
the Motor condition
monitoring Tool
5
Installation and Wiring
6
How to Use
the Motor condition
monitoring Tool
7
Monitoring with K6CM
and Motor condition
monitoring Tool
8
Monitoring and Setting
Using the EtherNet/IP
Devices
9
Monitoring and Setting
Using the Modbus TCP
Devices
10
Trouble shooting
A
Appendices
I
Index
N219-E1-12
Advertisement
Chapters
Table of Contents

Related Manuals for Omron K6CM


Summary of Contents for Omron K6CM
- Page 1 User's Manual the Motor condition monitoring Tool K6CM Installation and Wiring How to Use the Motor condition monitoring Tool Monitoring with K6CM and Motor condition monitoring Tool Monitoring and Setting Using the EtherNet/IP Devices Monitoring and Setting Using the Modbus TCP...
- Page 2 No patent liability is assumed with respect to the use of the information contained herein. Moreover, because OMRON is constantly striving to improve its high-quality products, the information contained in this manual is subject to change without notice. Every precaution has been taken in the preparation of this manual. Neverthe- less, OMRON assumes no responsibility for errors or omissions.
- Page 3 Thank you for purchasing K6CM Motor Condition Monitoring Devices. This manual describes how to use the K6CM. Read this manual thoroughly and be sure you under- stand it before attempting to use the K6CM correctly according to the information provided. Keep this manual in a safe place for easy reference.
- Page 4 Omron’s exclusive warranty is that the Products will be free from defects in materials and workman- ship for a period of twelve months from the date of sale by Omron (or such other period expressed in writing by Omron). Omron disclaims all other warranties, express or implied.
- Page 5 Disclaimers Performance Data Data presented in Omron Company websites, catalogs and other materials is provided as a guide for the user in determining suitability and does not constitute a warranty. It may represent the result of Omron’s test conditions, and the user must correlate it to actual application requirements. Actual perfor- mance is subject to the Omron’s Warranty and Limitations of Liability.
- Page 6 Explosions may cause minor injuries. Do not use the product in locations with inflammable or explo- sive gases. K6CM Motor Condition Monitoring Device User’s Manual (N219)
- Page 7 600 V and at least basic insulation. Keep the secondary terminal cover of the special CT and ZCT (IRT) securely closed. Touching any of electrode may result in electric shock. K6CM Motor Condition Monitoring Device User’s Manual (N219)
- Page 8 • Connect the wiring of the special ZCT (IRT) to the terminal block corresponding to the thickness of AWG 18 or more. • K6CM must be installed within a control panel as an embedded device, if using as a UL certified product.
- Page 9 The followings are common to the Motor Condition Monitoring Devices.: (1) Do not use or store the product in the following locations: • Locations subject to water or oil (for K6CM devices and K6CM-VBS1 sensor preamplifier) • Outdoor or locations subject to direct sunlight •...
- Page 10 (40) Open locking hook and clamp to each phase. After clamping, firmly engage until a sound is heard. (41) Use the special CTs and the CT cables that are specified by OMRON' s model number. Special CTs (The cable is included with the special CT.):...
- Page 11 Precautions for Safe Use The followings are for K6CM-VB, K6CM-VBS1 sensors, K6CM-IS and ZCT(IRT). (42) Do not connect or disconnect the cables between the sensor and the product while power is being supplied. Doing so may result in malfunction or failure of the product.
- Page 12 (7) Refer to the status information of the product on the data link communications and refer to the received data only in case of no errors occur with the product. The followings are for K6CM-VB and K6CM-VBS1 sensors. (8) Wipe off the dirt on the mounting surface and screw mounting with 17 mm nominal size of wrench.
- Page 13 (40) Associated leads of the special CT shall be maintained within the same overall enclosure. (41) The special CT are intended for installation within the same enclosure as the equipment. These may not be installed within switchgears and panel boards. K6CM Motor Condition Monitoring Device User’s Manual (N219)
- Page 14 Monitoring is performed on the [Monitoring by mo tor category] screen or [Monitoring by monitor- ing category] screen. Precautions for Correct Use In order to monitor the K6CM with the software tool, the communications service of the SYS- MAC Gateway communication driver between the computer and the K6CM must be in the start status.
- Page 15 Information on differences in specifications and functionality for CPU Units with different unit versions and for different versions of the Sysmac Studio is given. Note References are provided to more detailed or related information. K6CM Motor Condition Monitoring Device User’s Manual (N219)
- Page 16 Tool (version 1.0.0.2 to 1.1.0.0) • Added following functions according to the upgrade of the Eip cpu version (version 1.00 to 1.10) of the K6CM device • Selection function of the Transistor output method (Not that it can be selected only when using the software tool Motor condition monitoring Tool version 1.1.0.0 or higher.)
- Page 17 • Changed descriptions due to upgrading the comprehensive current diagnosis model from K6CM-CIM to K6CM-CI2M. • Upgrade version of the software tool Motor condition monitoring Tool. (version 1.2.0.0 to 1.3.0.0) • Corrected mistakes. K6CM Motor Condition Monitoring Device User’s Manual (N219)
- Page 18 Revision History K6CM Motor Condition Monitoring Device User’s Manual (N219)
- Page 19 How to Use the Motor condition monitoring Tool Monitoring with K6CM and Motor condition monitoring Tool Monitoring and Setting Using the EtherNet/IP Devices Monitoring and Setting Using the Modbus TCP Devices Trouble shooting K6CM Motor Condition Monitoring Device User’s Manual (N219)
- Page 20 Sections in this Manual ..................17 CONTENTS......................18 Section 1 Overview Overview..........................1-2 1-1-1 What is the K6CM Motor Condition Monitoring Devices For?............. 1-2 Features..........................1-3 1-2-1 Features Common for All Models....................1-3 1-2-2 Overview and Features of the Comprehensive Current Diagnosis Type ........1-4 1-2-3 Features of Vibration &...
- Page 21 4-2-2 Uninstallation Procedures......................4-23 IP Address Setting....................... 4-24 4-3-1 IP Address Setting of Your PC ....................4-24 4-3-2 IP Address Setting of the K6CM Devices ................4-26 Section 5 Installation and Wiring Dimensions ..........................5-2 5-1-1 K6CM device ..........................5-2 5-1-2 Special CT ..........................
- Page 22 8-1-2 EtherNet/IP Communications Specifications................8-4 Monitoring Using the Tag Data Link ................... 8-5 8-2-1 Connection setting ........................8-5 8-2-2 Data to be Tag Data Link Target in the K6CM Device ..............8-9 K6CM Motor Condition Monitoring Device User’s Manual (N219)
- Page 23 A-6 Internal Data of K6CM Devices...................A-14 A-7 Setting Values........................A-15 A-8 Present Values........................A-21 A-9 Tag Data Link Connection Setting Procedures ..............A-26 A-9-1 Using the CS/CJ-series ......................A-26 A-9-2 Using the NJ/NX-series ......................A-38 K6CM Motor Condition Monitoring Device User’s Manual (N219)
-
Page 24: Table Of Contents
A-11 Version Compatibility......................A-51 A-11-1 Version Upgrades of the K6CM Series ..................A-51 A-11-2 Support Correspondence between the K6CM Device and Motor Condition Monitoring Tool ...A-51 A-11-3 Motor Condition Monitoring Tool Version Compatibility ............A-52 A-11-4 BOOTP Server Connection Error State LED Lighting Differences..........A-52 Index K6CM Motor Condition Monitoring Device User’s Manual (N219) - Page 25 1-1-1 What is the K6CM Motor Condition Monitoring Devices For? ....1-2 1-2 Features ........... . . 1-3 1-2-1 Features Common for All Models .
- Page 26 *1. Two degradation levels, degradation level 1 and degradation level 2, are measured by using different algo- rithms. The K6CM-CIM measures only degradation level 1, so it is referred to as the degradation level in the software tool. By properly using these three types as necessary, you can catch the state of the induction motor and decide the appropriate maintenance time.
- Page 27 1-2-1 Features Common for All Models • Multiple K6CM devices can be connected to one PLC or one PC, and multiple motor statuses can be monitored at one time. • Status monitoring can be confirmed on site easily from the alarm bar display and numeric LCD dis- play on the front of the K6CM device.
- Page 28 It is suitable for monitoring of inverter drive (as degradation level 2). • Degradation levels 1 and 2 can be monitored simultaneously. (The K6CM-CIM can only monitor deg- radation level 1.) • The K6CM can also detect motor peripheral malfunctions affecting the rotating shaft of the motor.
- Page 29 1 Overview Mechanism of degradation level 1 For degradation level 1, the K6CM device compares the current waveform of the motor with the smooth sine wave of the ideal state, and represents the degree of deviation from the smooth sine wave in numerical values.
- Page 30 1-2-5 Features of Software Tool • Software tool "Motor condition monitoring Tool" that is provided with the K6CM device enables K6CM device setup and simple status monitoring. • It enables reading of measurement values at specified intervals and automatic data storage (with the CSV format).
- Page 31 1 Overview List of Models This section shows the model number legend of the K6CM devices, and models of the K6CM devices and the dedicated sensors. 1-3-1 Model Number Legend K6CM- -EIP (3) (4) Product Power Special Commu- Function Base...
- Page 32 24 V AC/DC Sensor (special ZCT (IRT)) *1 K6CM-ISZBI52 Rated voltage: 200 to 480 VAC, through hole diameter 52 mm *1. ZCT (IRT) stands for Zero Current Transformer (Insulation Resistance Transformer). 1 - 8 K6CM Motor Condition Monitoring Device User’s Manual (N219)
- Page 33 1 Overview System Configurations This section describes the overall system configurations of the K6CM and the I/O configuration for each monitor type of K6CM devices. 1-4-1 Overall System Configuration Software tool Industrial switching hub • Initial setting (*1) (e.g., W4S1) (*1) •...
- Page 34 Three-phase induction motor *1. The dedicated cable between the special CT and the K6CM device is 2.9 m long. It cannot be extended. Also, there is no designation in the phase to be installed. Be careful of the installation direction stated on the CT label and mount it to any one phase.
- Page 35 *1. The dedicated cable between the special CT and the K6CM device is 2.9 m long. It cannot be extended. Also, there is no designation in the phase to be installed. Be careful of the installation direction stated on the CT...
- Page 36 5-7. *2. The dedicated attached cable between the pre-amplifier and the K6CM device is 1 m. It can be extended up to a maximum length of 100 m. Refer to A-5 Individual Specifications of the Dedicated Sensor on page A-10 for recommended cables.
- Page 37 5-27 under 5-6 I/O wiring on page 5-25. Three-phase induction motor *1. The distance between the insulation resistance sensor (special ZCT (IRT)) and K6CM device is 1 m with the dedicated attached cable. *2. Motor capacity of 7.5 kW or less (Measurement error will increase if exceeding this value.) *3.
- Page 38 Wiring Section 5 Installation Wire. and Wiring ▼ Section 6 How to Use Connect the software tool to the K6CM device (s) via hub. 3. Setting with the Motor condition ↓ actual sys- monitoring Tool (When necessary) Change the parameters and download to tem configu- each K6CM device.
- Page 39 ↓ Change the setting of the alarm threshold values and make main monitoring and operation. ▼ Section 10 Trouble 5. Troubleshoot Troubleshoot shooting 1 - 15 K6CM Motor Condition Monitoring Device User’s Manual (N219)
- Page 40 1 Overview 1 - 16 K6CM Motor Condition Monitoring Device User’s Manual (N219)
- Page 41 2-1 Overview of K6CM Device ........
-
Page 42: Overview Of K6Cm Device
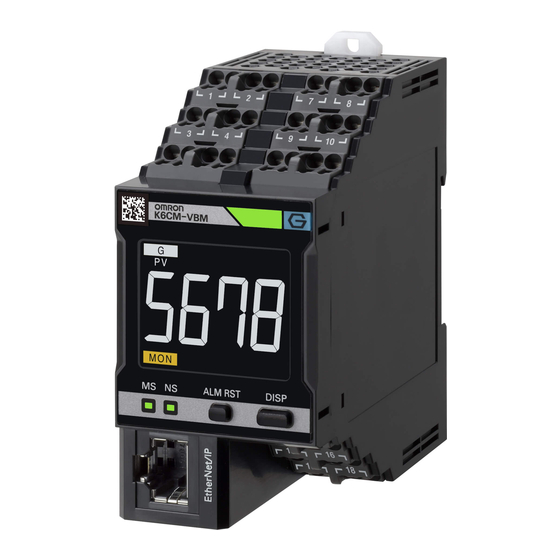
2 Device Components Overview of K6CM Device The appearances of the K6CM device and the nomenclature and functions are as follows. 2-1-1 K6CM Device Push-In Plus terminal IP address label (Used to write down the IP address) (When necessary) Sensor... -
Page 43: Nomenclature And Functions Of The K6Cm Device
When the power is OFF, when measuring is not started yet, when self-diagnosis error occurs Unit of mea- The unit of measurement value (monitoring type) is indicated by the LCD characters. surement value (moni- toring type) 2 - 3 K6CM Motor Condition Monitoring Device User’s Manual (N219) - Page 44 Indicators Indicates the product status or network status by LEDs. • "MS": Module Status. Displays the status of the K6CM device. It is green when it is normal. • "NS": Network Status. Displays the state of the communications. It lights or flashes green when it is normal.
- Page 45 If you press the [ALM RST] key during monitoring, it returns to the comprehensive alarm state at that point (both the alarm bar and transistor outputs 1 and 2). *5. Running Time is a function to inform you when to replace the K6CM device. It is calculated from the internal temperature and the operation time of the device.
- Page 46 Name Function External trig- Trigger input by external input that sets the K6CM device status during monitoring ger input (status display "MON"). Monitoring can be started during the rise from OFF → ON or the fall from ON → OFF, and monitoring up to the monitoring time, or monitoring in the ON state can be selected.
- Page 47 (Network Lit. IP address duplication status Status) Flashes at 1-s The connection has timed out intervals. Not lit. No power supply or IP address is not set 2 - 7 K6CM Motor Condition Monitoring Device User’s Manual (N219)
-
Page 48: Transition Of Numeric Lcd Display
"MON" goes on 7 segment blinking 10 seconds or less *1. It depends on the Device reset button operation from the software tool or software reset command from Eth- erNet/IP. 2 - 8 K6CM Motor Condition Monitoring Device User’s Manual (N219) -
Page 49: Status Of Alarm Bar, Status Indication, And Transistor Output For Each Status
When the power is OFF *1. This is the case when the transistor output type is set to Normally Close. In the case of Normally Open, ON/OFF is opposite to the above. 2 - 9 K6CM Motor Condition Monitoring Device User’s Manual (N219) -
Page 50: Special Ct
The special CT has the mounting direction. Cable length 2.9 m Mount a special CT to any one phase according to the mounting direction stated on the CT label when you mount it. 2 - 10 K6CM Motor Condition Monitoring Device User’s Manual (N219) -
Page 51: Vibration & Temperature Sensor
Vibration & VBS 1: Sensor input (-) temperature type VBS 2: Supply to sensor 10 V (+) Black device VBS 3: Supply to sensor 10 V (-) Black and white 2 - 11 K6CM Motor Condition Monitoring Device User’s Manual (N219) - Page 52 Screw the vibration sensor head into the fixed attachment. *1. K6CM will not conform to safety standards if attaching the vibration sensor with adhesive. In the case of dis- connection, take safety measures such as fixing the cables.
-
Page 53: Insulation Resistance Sensor (Special Zct (Irt))
IRT0: Sensor input (+) Red and white IRT1: Sensor input (-) IRT2: Supply to sensor 10 V (+) Black IRT3: Supply to sensor 10 V (-) Black and white 2 - 13 K6CM Motor Condition Monitoring Device User’s Manual (N219) - Page 54 2 Device Components 2 - 14 K6CM Motor Condition Monitoring Device User’s Manual (N219)
- Page 55 3-1 Internal mechanism of K6CM ........
-
Page 56: Internal Mechanism Of K6Cm
"individual alarm". Next, the OR logic is obtained for each "individual alarm" and Normal/Warning/Critical is judged for each monitor target as the "Comprehensive alarm". This is called monitoring. It displays the front LCD alarm bar of the K6CM device and performs transis- tor output. -
Page 57: Measurement System
Measurement System 3-2-1 Sampling of measurement values The input from the sensor is given to the K6CM device as a measurement value in every sampling period. The sampling period depends on the measured target as follows. Monitor type Measured target... -
Page 58: Moving Average
Trigger mode Trigger type Monitoring delay time Free run Disable Disable External trigger Rising Disable: 0.0 seconds Falling Enable: 0.1 to 600.0 seconds Level Internal trigger Rising Falling Level 3 - 4 K6CM Motor Condition Monitoring Device User’s Manual (N219) -
Page 59: Trigger Mode
• Insulation resistance type: Insulation resistance When you select the trigger mode from External trigger or Internal trigger, set the measurement start condi- tion and end condition by selecting the trigger type. 3 - 5 K6CM Motor Condition Monitoring Device User’s Manual (N219) - Page 60 3 Measuring and monitoring System Detailed information on trigger mode and behavior by status The operation of the K6CM device and operation results from the software tool or message communi- cations for each trigger mode and state are as follows.
- Page 61 *1. In the above figure, the power-ON state and the unmeasured state (i.e., the state until the measurement value is calculated) that exist immediately after turning ON the power as shown below are omitted. 3 - 7 K6CM Motor Condition Monitoring Device User’s Manual (N219)
- Page 62 *1. In the above figure, the power-ON state and the unmeasured state (i.e., the state until the measurement value is calculated) that exist immediately after turning ON the power as shown on page 3-7 are omitted. 3 - 8 K6CM Motor Condition Monitoring Device User’s Manual (N219)
- Page 63 *2 The sampling period differs for each measured target. For details, refer to 3-2-1 Sampling of measurement values on page 3-3. *3 Set this as 1 when the moving average times setting is OFF. 3 - 9 K6CM Motor Condition Monitoring Device User’s Manual (N219)
- Page 64 = time to wait for motor to stabilize + sampling period × (moving average times + 1) = 10 s + 0.5 s x (2+1) = 11.5 s Also, determine a monitoring time that will fit within the motor stable operation. 3 - 10 K6CM Motor Condition Monitoring Device User’s Manual (N219)
-
Page 65: Maximum Value And Minimum Value Of Measurement Value
Criticality of the motor. Also, changing the setting allows you to set the display value of the front LCD of the K6CM device to the maximum value or the minimum value. - Page 66 *1. In the above figure, the power-ON state and the unmeasured state (i.e., the state until the measurement value is calculated) that exist immediately after turning ON the power as shown on page 3-7 are omitted. 3 - 12 K6CM Motor Condition Monitoring Device User’s Manual (N219)
-
Page 67: Monitoring System
For individual alarms, it is possible to set the level of Warning and Critical, respectively. For the K6CM-VBM, the threshold values can be set automatically with the software tool by using the threshold automatic setting function. For details, refer to 6-1-4 Buttons on Device Setting on page 6-13. -
Page 68: Relationship Between Alarm And Display/Output
*2. The transistor output method of output 1 and output 2 can also be set to "Normally Open". In the case of Normally Open, ON/OFF is opposite to the above. 3 - 14 K6CM Motor Condition Monitoring Device User’s Manual (N219) - Page 69 *2. The transistor output method of output 1 and output 2 can also be set to "Normally Open". In the case of Normally Open, ON/OFF is opposite to the above. 3 - 15 K6CM Motor Condition Monitoring Device User’s Manual (N219)
- Page 70 *2. The transistor output type of output 1 and output 2 can also be set to "Normally Open". In the case of Normally Open, ON/OFF is opposite to the above. 3 - 16 K6CM Motor Condition Monitoring Device User’s Manual (N219)
- Page 71 (lower limit alarm), Hold (alarm latch) the state of comprehensive alarm (alarm bar and transistor outputs 1 and 2). The alarm latch is released for the first time by pressing the [ALM RST] key on the front of the K6CM device.
- Page 72 *2. The transistor output method of output 1 and output 2 can also be set to "Nor- mally Open". In the case of Normally Open, ON/OFF is opposite to the above. 3 - 18 K6CM Motor Condition Monitoring Device User’s Manual (N219)
-
Page 73: Guide For Setting Alarm
Refer to the K6CM Motor Condition Monitoring Device STARTUP GUIDE (N221-E1) for details. When driving the motor with an inverter With an inverter, the influence of the inverter control appears in the current waveform. The degrada- tion level 1 will be measured to be larger than the actual value. - Page 74 2. Degradation level 1 may vary when the motor is driven by the inverter. In that case, slightly shift the inverter drive frequency. Also always measure and monitor degradation level 1 at the same inverter drive frequency. 3 - 20 K6CM Motor Condition Monitoring Device User’s Manual (N219)
- Page 75 Refer to the K6CM Motor Condition Monitoring Device STARTUP GUIDE (N221-E1) for details. When driving the motor with an inverter Degradation level 2 clearly captures not only the noise caused by inverter driving but also other fac- tors such as the frequency components affecting the rotating shaft of the motor, and represents them as numerical values.
- Page 76 *1. The K6CM-CIM measures only degradation level 1, so it is referred to as the degradation level in the software tool. Choose whether to use degradation level 1 or degradation level 2 based on the trends of the measured data because the degradation level appears differently depending on the failure condition of the motor or load or depending on the installation conditions.
-
Page 77: Vibration & Temperature Type (K6Cm-Vb)
3 Measuring and monitoring System 3-4-2 Vibration & Temperature Type (K6CM-VB) For the Vibration & temperature type (K6CM-VB), the threshold setting method differs depending on the monitored object (i.e., acceleration, velocity) as follows. Monitoring by Acceleration In acceleration monitoring, you can generally monitor the bearing wears. - Page 78 (9999) so that the speed alarm is not output. Likewise, if you only want to monitor using speed, set the alarm threshold of acceleration to the maximum value. 3 - 24 K6CM Motor Condition Monitoring Device User’s Manual (N219)
-
Page 79: How The Self-Diagnosis Function Works
How to Notify Self-Diagnosis Error If the self-diagnosis function determines a hardware error or a communications error between the K6CM device and the sensor, it notifies the error using display, communications and output. Display When an error occurs, an error will be notified by displaying the following (1) to (4). - Page 80 Turn ON the power again. If it returns to normal, the influence of noise is possible. Then, check whether noise is being generated. If the condition does not restore, contact your OMRON representative. 3 - 26 K6CM Motor Condition Monitoring Device User’s Manual (N219)
-
Page 81: How The Replacement Timing Notification (I.e., Running Time Function)
Also, when reaching the guideline value, K6CM device front display and communications status will change. You can use this function as a guideline to know when to replace the K6CM device. Note The replacement timing announcement indicates a guideline that the K6CM device cannot achieve suffi- cient performance due to deterioration of the electrolytic capacitor. -
Page 82: Initialization Of Setting Value
3 Measuring and monitoring System Initialization of Setting Value This section describes how to initialize the setting values of the K6CM devices. To initialize the setting value, press the [ALM RST] key and the [DISP] key at the same time for 5 sec- onds or more. - Page 83 4-3-2 IP Address Setting of the K6CM Devices ......4-26 4 - 1...
-
Page 84: Overview
4 Introduction of the Motor condition monitoring Tool Overview The software tool can display the setting of K6CM devices and the present value (PV) display, and automatic logging and history display. 4-1-1 What is the Motor condition monitoring Tool (Software Tool) for? -
Page 85: Functions And Specifications Of The Software Tool
4 Introduction of the Motor condition monitoring Tool Present value (PV) Display and Automatic Logging and History Dis- play Present value (PV) display and automatic logging of the following data of the K6CM device are possi- ble. * The project is saved along with the log file. - Page 86 Days = 50 * Measurement interval [seconds] / Number of connected K6CMs For example, if the monitoring cycle setting = 5 seconds, and the number of connected K6CM = 10, Move the log file to another location every 25 days and reopen the project.
- Page 87 • Main body status, measurement status: Monitoring form Character string in hexadecimal representation of each of the 16 bits of the Main body status and measurement status of the K6CM device (Refer to the next page for details on the CSV file content and sta-...
- Page 88 During monitoring stopped Reserved area Reserved area Trigger input (ON/OFF state of the exter- nal trigger input) Tr1 (transistor 1output state) Tr2 (transistor 2output state) Tr3 (transistor 3output state) 4 - 6 K6CM Motor Condition Monitoring Device User’s Manual (N219)
- Page 89 "Alarm occurrence". Note When the above status is "0001" or "0110" for example, the value displayed in the CSV file is like "1" or "110" without the last "0". 4 - 7 K6CM Motor Condition Monitoring Device User’s Manual (N219)
- Page 90 CD-ROM drive: For installation LAN port: For network connection *1. The operation requires .NET Framework 3.5 SP1. Software tools can be installed on the CD-ROM included with the K6CM device. The following data is stored on the CD-ROM. Contents Description...
- Page 91 *2. It is added from the software tool version 1.1.0.0. For the version of the software tool, check the printing of CD-ROM. With the update program of our I-Web, you can update the software tool of the old version to the latest version. 4 - 9 K6CM Motor Condition Monitoring Device User’s Manual (N219)
-
Page 92: Installation And Uninstallation, Starting Up
OS version and cannot connect to the network, you cannot acquire the above. NET and you cannot install the software included with the software tool. 4 - 10 K6CM Motor Condition Monitoring Device User’s Manual (N219) - Page 93 Note If you do not know the Windows version of your computer, perform the following procedure. Hold down the Windows key and press the R key. Alternatively, click [Run] from the [Start] menu. Enter “winver”and click [OK].Button. The Windows version is displayed, so confirm. 4 - 11 K6CM Motor Condition Monitoring Device User’s Manual (N219)
- Page 94 Enter “cmd” and click OK. A command prompt is launched. Enter “echo %processor_architecture%”and press Enter key. 32 bits are displayed as x86, 64 bits are displayed as x64, and so on. 4 - 12 K6CM Motor Condition Monitoring Device User’s Manual (N219)
- Page 95 Note It is possible to check the media with other methods. Click the Explorer icon located at the bot- tom of the desktop screen.(If there is no icon, hold down the Windows key and press the E key to start the explorer screen) 4 - 13 K6CM Motor Condition Monitoring Device User’s Manual (N219)
- Page 96 OS media was recognized correctly. Hold down the Windows key while pressing the X key, the following screen will be dis- played, so select Windows PowerShell (Administrator). 4 - 14 K6CM Motor Condition Monitoring Device User’s Manual (N219)
- Page 97 Wait for a while until the completion screen as shown below. If this screen can be confirmed, the installation of .NET Framework 3.5 will be completed, continue installing the software tool. 4 - 15 K6CM Motor Condition Monitoring Device User’s Manual (N219)
- Page 98 4 Introduction of the Motor condition monitoring Tool Select "Program" from the Control Panel. Turn on or off Windows functions. Check the check box of "Microsoft .NET Framework 3.5.1" and click "OK". 4 - 16 K6CM Motor Condition Monitoring Device User’s Manual (N219)
- Page 99 Gateway is necessary. Please read "3.5. Upgrade installation" of "CX-Compolet_SGW_InstallationGuide_E.pdf" in the Manual folder on the CD and uninstall the CX-Compolet/SYSMAC Gateway after backing up the data. Then re-perform step 1. 4 - 17 K6CM Motor Condition Monitoring Device User’s Manual (N219)
- Page 100 [Modify] is used to change the function to be installed. Do not use it now for future expansion. [Repair] is used to reinstall the software tool. [Remove] is used to uninstall the software tool. 4 - 18 K6CM Motor Condition Monitoring Device User’s Manual (N219)
- Page 101 * After installation, you cannot change the language of the software tool. If you want to change the lan- guage, reinstall the software tool. Click the [Next] Button. The License Agreement Dialog Box appears. 4 - 19 K6CM Motor Condition Monitoring Device User’s Manual (N219)
- Page 102 If a new version of the Communications Middlware is already installed, go to step 15. While the installation wizard is running, the [Windows Security] Dialog Box will be displayed. Click the [Install] Button. "OMRON Corporation Modems" is installed and the following [Windows Security] Dialog Box will be displayed. Click the [Install] Button.
- Page 103 The Installation options Dialog Box appears. Check "Automatically start the WinPcap driver at boot time" and click the [Install] Button. Installation of WinPcap will start. Click the [Finish] Button. Installation of WinPcap is completed. 4 - 21 K6CM Motor Condition Monitoring Device User’s Manual (N219)
- Page 104 From the software tool, select the network card to be used for automatic connection to the K6CM device with the Ethernet cable from the pull-down list and click the [OK] Button. If Communications Middleware is already installed, go to step 15.
-
Page 105: Uninstallation Procedures
A Dialog Box will be displayed confirming complete deletion of "Motor condition monitoring Tool". Click the [Yes] Button. After completion, the Uninstall Complete Dialog Box will be displayed. Click the [Finish] Button. 4 - 23 K6CM Motor Condition Monitoring Device User’s Manual (N219) -
Page 106: Ip Address Setting
IP Address Setting of Your PC Before starting this tool and monitoring and logging the K6CM device, it is necessary to set the IP address of the computer to the IP address of the same segment as the K6CM device. It shows the pro- cedure. - Page 107 IP Address Settings Example When using Ethernet for the first time, if you set the IP address and subnet mask of the computer and K6CM device as below, it is possible to connect the software tool to the K6CM device. Device name...
-
Page 108: Ip Address Setting Of The K6Cm Devices
• Can be connected without specifying IP address of K6CM device. Either straight type or cross type Ethernet cable is available. Note If the IP address setting method of the K6CM device is set to BOOTP, auto connection can not be made until connecting to the BOOTP server. - Page 109 Connect the computer and each K6CM device with an Ethernet cable via the hub. In the case of fixed IP connection, there are the following merits. Fixed IP Connection is a method to connect by specifying the IP address of the K6CM device you want to connect.
- Page 110 Procedure for Setting IP Address (when necessary, further parame- ters) The IP address of each K6CM device is set by the following procedure. It is also possible to set further parameters when necessary. The initial value of the IP address of the K6CM device is "192.168.250.10" common to all models.
- Page 111 If there is only one wired LAN port of the computer and the Motor condition monitoring Tool communicates with the K6CM device with that wired LAN port, select the following. (If the name of the network connection has been changed, select the one with the changed name.)
- Page 112 Note 1. Directly connect the computer and devices cone-on-one, and then click it. 2. If the IP address setting method of the K6CM device is set to BOOTP, auto connection can not be made until connecting to the BOOTP server.
- Page 113 PC and registered devices are displayed. Click the [Connection] Button. "Connecting" will be displayed on the line between the computer and the device on the following [Connecting to device] wizard screen. 4 - 31 K6CM Motor Condition Monitoring Device User’s Manual (N219)
- Page 114 BOOTP server by the [Add device] Button. Precautions for Correct Use When setting the IP address of the K6CM to "Fixed setting", set the IP address of the computer to the IP address of the same segment as the K6CM.For details of the setting method, refer to4-3-1 IP Address Setting of Your PC on page 4-24.
- Page 115 Click the [Next] Button. The following [Parameter setting] wizard screen will be displayed. (Set the parameters as nec- essary.) For details, refer to “6-2-1 Settings for Each Monitor Type of K6CM devices on page 6-19”. Be sure to set the parameters in the table below before starting measurement.
- Page 116 Click the [OK] Button. The following [Downloading to device] wizard screen will be displayed. When the download is successful, the following [Motor name setting] wizard screen will be dis- played. 4 - 34 K6CM Motor Condition Monitoring Device User’s Manual (N219)
- Page 117 • Up to 3 devices can be registered in the same motor name. Click the [OK] Button.The following [Navigation complete] wizard screen is displayed. The IP address of the registered device is displayed. 4 - 35 K6CM Motor Condition Monitoring Device User’s Manual (N219)
- Page 118 [Connecting to device] wizard screen of the following [Start navigation] Dialog Box is displayed as in step 5. Connect the Motor condition monitoring Tool directly to the other form K6CM one to one. Perform the same operation as Step 8 and the following.
- Page 119 Save Destination dialog box will be displayed. Enter the directory and project name and click the [Save] Button. The following dialog box will be displayed. Click the [OK] Button. 4 - 37 K6CM Motor Condition Monitoring Device User’s Manual (N219)
- Page 120 Select the device you want to change and click the [Device setting] Button on the setting screen tool button. The following [K6CM Configuration setting] Dialog Box is displayed. Note The IP address displayed here is the value registered in the project. Version Information With software tool version 1.2.0.0 or later, the column for displaying the IP addresses of your...
- Page 121 Installing the K6CM Device ........
-
Page 122: Dimensions
5 Installation and Wiring Dimensions This section shows the external dimensions of the K6CM device and the sensors used. 5-1-1 K6CM device (1.9) 5-1-2 Special CT K6CM-CICB005 K6CM-CICB025 22.9 28.9 CT Through-hole CT Through-hole Dimensions Dimensions 25.5 25.3 R7.5 41.3 40.5... -
Page 123: Vibration & Temperature Sensor
2,400 (40.7) M12 (smart click connector) Sensor head Mounting hole dimensions M6 screw A´ Surface finish 20 mm dia. or more (44.7) 9 mm or more A-A´ cross section 5 - 3 K6CM Motor Condition Monitoring Device User’s Manual (N219) -
Page 124: Insulation Resistance Sensor (Special Zct (Irt))
Material: Stainless steel 24 dia. C0.5 C0.5 5-1-4 Insulation resistance sensor (special ZCT (IRT)) (159) 36.4 (150) 52 dia. (152.5) Four, M4 Two, M5 27.1 Mounting hole dimensions Four, M6 5 - 4 K6CM Motor Condition Monitoring Device User’s Manual (N219) -
Page 125: Installation
Refer to the Precautions for Safe Use on page 7. 5-2-2 Installing the K6CM Device For installation of the K6CM device, it is possible to install it on the DIN rail or install it with screws on the wall. When installing on DIN Track Screw the DIN Track in three or more places in a control cabinet. - Page 126 How to install the K6CM device To mount the K6CM device to a DIN Track, hook the device onto the DIN Track and press the device in the direction of the arrow until you hear it lock into place.
-
Page 127: Installation Of The Vibration & Temperature Sensor
5-2-3 Installation of the Vibration & Temperature sensor The pre-amplifier used for Vibration & temperature type (K6CM-VB) can be mounted on a DIN rail or mounted on a wall with an M3 screw. The mounting method is the same as K6CM device. - Page 128 Screw the vibration sensor head into the fixed attachment. *1. K6CM will not conform to safety standards if attaching the vibration sensor with adhesive. In the case of dis- connection, take safety measures such as fixing the cables.
- Page 129 Three-phase induction motor Mount the tip of the vibration sensor head to the screw hole. (Recommended tightening torque is 4.4 to 5.4 N•m) Mounting vertically Screw M6 thread (coarse) 5 - 9 K6CM Motor Condition Monitoring Device User’s Manual (N219)
- Page 130 Apply the adhesive thinly and evenly. Motor's flat surface Note The adhesive attachment is similar in shape to an easy-mounting magnet. Be careful not to handle it by mistake. 5 - 10 K6CM Motor Condition Monitoring Device User’s Manual (N219)
- Page 131 Motor's flat surface Procedures 2 to 4 are mounting methods when the recommended adhesive is used. Connect the sensor head to the pre-amplifier before mounting it to the motor. Mating mark 5 - 11 K6CM Motor Condition Monitoring Device User’s Manual (N219)
- Page 132 The number following (21) in the second line is the serial number. Make sure that this number on the sensor head's label matches the number on the pre-amplifier's label. 5 - 12 K6CM Motor Condition Monitoring Device User’s Manual (N219)
-
Page 133: Installation Of The Insulation Resistance Sensor (Special Zct (Irt))
5 Installation and Wiring 5-2-4 Installation of the insulation resistance sensor (special ZCT (IRT)) Insulation resistance sensor (special ZCT (IRT)) used for Insulation resistance type (K6CM-IS) is fixed on the wall etc and used. Precautions for Correct Use Insulation resistance sensor (special ZCT (IRT)) must be installed inside the cabinet. - Page 134 Special ZCT (IRT) Wiring Diagram R S T (3 phase 3 wire S-phase ground) White Black Red and White ZCT (IRT) K6CM-ISM Black Black and White Load side (L) 5 - 14 K6CM Motor Condition Monitoring Device User’s Manual (N219)
-
Page 135: Installation Of The Special Ct
5-2-5 Installation of the special CT Special CT for Comprehensive current diagnosis type (K6CM-CI2) must be used always with the spe- cial CT supplied cable. Note Do not extend the special CT supplied cable. An extended cable for it does not satisfy the safety standards. -
Page 136: How To Connect To The Vibration & Temperature Sensor
5 Installation and Wiring How to Connect to the Vibration & Temperature Sensor This section describes how to connect the K6CM-VBM to the K6CM-VBS1 vibration and temperature sensor. Appearance of K6CM-VBS1 Cable length: To the K6CM-VBM 2.6 m Vibration & temperature... -
Page 137: When Connecting By Extending The Cable
5-3-2 When Connecting by Extending the Cable The cable between the pre-amplifier and K6CM device can be extended using a commercially avail- able cable, connectors, and terminal block. You can use either a screw terminal block type or push-in plus terminal block for the terminal block. -
Page 138: Recommended Ferrules And Crimp Tool
Voltage rating 16 VDC or higher Current rating 200 mA DC or higher When using a push-in plus terminal block We recommend the OMRON XW5T-P DIN Track Terminal Block. Short Bar Nameplate or Labels End Cover End Brackets End Brackets... -
Page 139: How To Connect To The Push-In Plus Terminal Blocks
How to Connect to the Push-In Plus Terminal Blocks This section describes how to connect the K6CM devices to the Push-In Plus terminal blocks. The following wiring terminals of the K6CM device are all push-in Plus terminals. • Input wiring (sensor input, power supply input, external trigger input) •... -
Page 140: The Push-In Plus Terminal Block
Wire stripping length 10 mm, 12 mm Ferrule length 8 mm, 10 mm Recommended flat-blade XW4Z-00B (Omron) (Refer to the "Recommended Flat-blade Screwdriver" in 5-4-3 Recom- screwdriver mended Ferrules and Crimp Tools on page 5-22.) Current capacity 10 A (per pole) - Page 141 • For the stranded wires, make sure that some of the wires from adjacent terminals are not accidentally inserted. 5 - 21 K6CM Motor Condition Monitoring Device User’s Manual (N219)
-
Page 142: Recommended Ferrules And Crimp Tools
1/1.25 18/17 AI 1-8 H1.0/14 FE-1.0-8N-RD AI 1-10 H1.0/16 FE-1.0-10N-RD 1.25/1.5 17/16 AI 1,5-8 H1.5/14 FE-1.5-8N-BK AI 1,5-10 H1.5/16 FE-1.5-10N-BK Recommended crimp tool CRIMPFOX6 PZ6 roto Variocrimp4 CRIMPFOX6T-F CRIMPFOX10S 5 - 22 K6CM Motor Condition Monitoring Device User’s Manual (N219) - Page 143 0.4×2.5×75 302 Wiha AEF.2,5×75 Facom 210-719 Wago SDI 0.4×2.5×75 Weidmuller *1. OMRON's exclusive purchase model XW4Z-00B is available to order as SZF 0-0.4 x 2.5 (manufactured by Phoenix Contact). 5 - 23 K6CM Motor Condition Monitoring Device User’s Manual (N219)
-
Page 144: Diagram Of Terminal Description
This section describes the wiring of the K6CM devices. Connect to the push-in Plus terminal blocks as follows. Model Number Legend The "sensor input" and "power voltage" of the K6CM can be identified from the following parts of the model number. K6CM-... -
Page 145: I/O Wiring
Therefore, it is recommended to use the degradation level 2. Refer to 3-4-1 Com- prehensive Current Diagnosis Type (K6CM-CI2) on page 3-19 in 3-4 Guide for Setting Alarm on page 3-19 for details. - Page 146 5 Installation and Wiring Wiring Diagram of the Vibration & Temperature Type (K6CM-VB) Monitor target (motor etc.) fuse Single phase Connector power supply VBS0 Red and White VBS1 K6CM-VBS Black VBS2 (Pre-amplifier) PLC etc. Measurement trigger signal. Black and White...
- Page 147 It can not be measured correctly. Do not use the K6CM device. *1. For details on how to change the setting, refer to 6-2-1 Settings for Each Monitor Type of K6CM devices on page 6-19 and 6-2-2 Setting Parameters on page 6-23.
- Page 148 PLC etc. PLC etc. *1. With the above wiring, set 0 for the Circuit topology and 1 for the Using inverter of the K6CM-ISM, and start measurement. For details on how to change the setting, refer to 6-2-1 Settings for Each Monitor Type of K6CM devices on page 6-19 and 6-2-2 Setting Parameters on page 6-23.
-
Page 149: Network Wiring
Network Wiring This section describes the network wiring of the K6CM devices. Connect the K6CM devices with the software tool, PLC, or PC via the industrial switching hub with the Ethernet cables. Use an STP (shielded twisted-pair) cable of Ethernet category 5 or higher. Either cross cables or straight cables can be used, as the K6CM device has the Auto-MDI/MDIX function. - Page 150 • Do not exceed the communications distance that is given in the specifications and use the specified communications cable. • Set the switching hub connected to the K6CM devices as follows. If any setting other than the following is used, the link will be unstable, and normal communications are prevented.
- Page 151 6-2 Setting of K6CM Devices ........
- Page 152 Open the project that you created and saved in step 2) above. (3)Device setting Start SYSMAC Gateway Console. Configure communications service and network port. (For details, refer to 6-2 Setting of K6CM Devices on page 6-19.) 6 - 2 K6CM Motor Condition Monitoring Device User’s Manual (N219)
- Page 153 [Select the connecting method.] Dialog Box opens. Select the connecting method with K6CM device. For details, refer to "6-2 Setting of K6CM Devices on page 6-19" Perform IP address, parameter setting, motor name setting, etc. For details, refer to "6-2 Setting of K6CM Devices on page 6-19"...
- Page 154 Be sure to select [Device setting] before selecting [[K6CM] Create project]. If you select [[K6CM] Create project] before selecting [Device setting], click the [Cancel] Button and close the screen. Click the [Cancel] Button and do not save the project, please exit. Then start the software tool again.
-
Page 155: Monitoring Screen And Setting Screen
Communications error occurred Clicking one of the comprehensive alarm status indications for each motor will display the device group being used for monitoring the selected motor in the list. 6 - 5 K6CM Motor Condition Monitoring Device User’s Manual (N219) - Page 156 To display the detailed data of each device, click the "Current individual alarm status" on the left of each device. The detailed data screen by motor category or by monitoring category is displayed. 6 - 6 K6CM Motor Condition Monitoring Device User’s Manual (N219)
- Page 157 2. The time series period can be switched to 1 hour / 1 day / 1 month / 1 year. If a period of more than 1 day is selected and displayed, data may be thinned out and displayed. 6 - 7 K6CM Motor Condition Monitoring Device User’s Manual (N219)
- Page 158 (green: normal, yellow: warning, red: critical) Time series Clicking the current individual alarm status will display the detailed data screen by monitoring cate- gory. 6 - 8 K6CM Motor Condition Monitoring Device User’s Manual (N219)
- Page 159 You can display the following [Event log list] by pressing the [Event log display] Button. You can check the occurrence history of individual alarms of the currently displayed device. 6 - 9 K6CM Motor Condition Monitoring Device User’s Manual (N219)
- Page 160 Device setting screen Click the [Device setting] Button. The following device setting screen is displayed. For details on the displayed parameters, refer to 6-2-1 Settings for Each Monitor Type of K6CM devices on page 6-19. Device setting screen Motor name...
-
Page 161: Common Menu And Toolbar List
Open project Display "Open file" dialog. Selectable during monitoring execution (grayed out) Equivalent to "[K6CM] Open project file" button when the soft- ware tool is started. If the current project is not saved, a message will be displayed. Save the project Save over the current project file. - Page 162 Enable / disabled condition Start monitoring Indicates that monitoring is stopped. By pressing this button, monitoring will start. Monitoring OFF It is currently being monitored. By pushing this button, monitoring is stopped. 6 - 12 K6CM Motor Condition Monitoring Device User’s Manual (N219)
-
Page 163: Buttons On Device Setting
(grayed out) Set the motor name, device type, IP address with the same value as already set for the actual device. Note : The IP address of the K6CM device cannot be set from here. Delete device Delete the selected device. - Page 164 [Add device] Button (1) Add a device to the currently open project. Set the motor name, device type, and the IP address already set for the K6CM device, and click the [Add] Button. (2) To add more devices, repeat (1).
- Page 165 K6CM devices. The measurement values are collected by the software tool at that cycle, regardless of the K6CM device state such as the use of trigger or the determination of measurement value. Using this pull down list allows you to change the unit of monitoring cycle.
- Page 166 Specify the setting file and click the [Open] Button. • [Downloading (PC→device)] Button To write the setting value to the K6CM device, click the [OK] Button. If you do not want to write it, click the [Cancel] Button. • [Uploading (Device→PC)] Button To read the setting value from the K6CM device, click the [OK] Button.
- Page 167 6 How to Use the Motor condition monitoring Tool • [Guide for Setting Alarm (K6CM_VB)] Button When the specified values related to the acceleration and velocity alarm values of the K6CM-VB are entered, the alarm values (warning and critical) are calculated automatically. Additional Information When the [Shaft diameter] button is clicked, the motor shaft diameter list document is dis- played.
-
Page 168: Software Tool Version Display Screen
6 How to Use the Motor condition monitoring Tool 6-1-5 Software Tool Version Display Screen You can check the version of software tool by clicking (Version information) Button. 6 - 18 K6CM Motor Condition Monitoring Device User’s Manual (N219) -
Page 169: Setting Of K6Cm Devices
6 How to Use the Motor condition monitoring Tool Setting of K6CM Devices The setting of the K6CM device can be set by either of the following two methods: • How to set in the start navigation of project creation •... - Page 170 "Free run" or the trigger type is "Level". Alarm latch 0: Disable Set the latch function when an alarm is 1: Enable detected. 1: Enable 6 - 20 K6CM Motor Condition Monitoring Device User’s Manual (N219)
- Page 171 6 How to Use the Motor condition monitoring Tool Parameter name Setting range Description Default Use Running Time 0: OFF Set the function to detect the life of the K6CM 0: OFF device. 1: ON Moving average 0: OFF Every time the measurement value is sam-...
- Page 172 0: Normally Close Select transistor output method. method 1: Normally Open Monitoring delay 0.0 to 600.0 seconds Set the delay time from the trigger input to the time start of measurement. 6 - 22 K6CM Motor Condition Monitoring Device User’s Manual (N219)
-
Page 173: Setting Parameters
If the parameter setting during project creation is not completed, set the parameters of each K6CM device according to the actual system configuration via the hub. Because each K6CM device already has an IP address, you can access multiple forms K6CM via the hub from the software tool. -
Page 174: Add A Device To An Existing Project
6 How to Use the Motor condition monitoring Tool Precautions for Correct Use After downloading the parameters to the device, turn the power of the K6CM ON again, or click [Device reset] Button at the upper right of the parameter list on the device setting screen in order to validate the parameter setting. -
Page 175: Motor (Device Group) Rename
Select the added device, click the [Device setting] Button on the setting screen tool button. The following [K6CM Configuration setting] Dialog Box is displayed. Change the IP address from the factory default value. Change the subnet mask and default gateway as necessary. -
Page 176: Save Overwriting Project
Enter the directory and project name and click the [Save] Button. The following dialog box will be displayed. Click the [OK] Button. The following dialog box will be displayed. Click the [OK] Button. The software tool ends. 6 - 26 K6CM Motor Condition Monitoring Device User’s Manual (N219) - Page 177 7-1 Motor Monitoring and Operation Procedure ......7-2 7-2 Motor Monitoring Using the K6CM devices ......7-3 7-2-1 Start measurement .
-
Page 178: Motor Monitoring And Operation Procedure
PCs or PLCs with the EtherNet/IP com- munications. It is generally difficult to set the alarm setting (threshold) of the K6CM at the time of start of use. Therefore, the actual motor monitoring and operation method depends on the following procedure. -
Page 179: Motor Monitoring Using The K6Cm Devices
Start measurement Turn ON the power of the K6CM device. Depending on the "Trigger mode" and "Trigger type" set in advance in the parameter, the state of the K6CM device while power is ON will differ as follows. Status of the K6CM device... - Page 180 7 Monitoring with K6CM and Motor condition monitoring Tool When the trigger mode is "Free run (while power is ON)", measuring and monitoring will be started. Measurement value is displayed on the numeric display LCD on the front of the device. At the same time, "MON"...
-
Page 181: Monitoring Type Switching
7 Monitoring with K6CM and Motor condition monitoring Tool 7-2-2 Monitoring Type Switching Switch the monitoring category by pressing the [DISP] key on the front of the device. Each time you press the [DISP] key, the unit of the measurement value (monitoring category) changes. -
Page 182: Monitoring Method
7 Monitoring with K6CM and Motor condition monitoring Tool 7-2-3 Monitoring method When monitoring with the K6CM devices, it can be monitored by the following method. • Front alarm bar • Transistor output Monitor with the Front Alarm Bar When monitoring with front alarm bar, the following monitoring is available. - Page 183 7 Monitoring with K6CM and Motor condition monitoring Tool Monitor with the Transistor Outputs When monitoring with the transistor outputs, the following monitoring is available. Transistor Transistor Transistor Status Status Meaning Output 1 Output 2 Output 3 display Monitoring Not yet In the case of a trigger, monitoring is not started Not lit.
-
Page 184: Monitoring Completed
When the trigger mode is "external trigger" or "internal trigger", when the termination condition of moni- toring is satisfied, the measurement value of the numerical display LCD on the front of the K6CM is retained. Also, the status at the end of monitoring is retained for the alarm bar and transistor outputs 1 and 2. -
Page 185: Motor Monitoring Using Software Tools
Monitoring is performed on the [Monitoring by motor category] screen or [Monitoring by monitor- ing category] screen. Precautions for Correct Use In order to monitor the K6CM with the software tool, the communications service of the SYS- MAC Gateway communications driver between the computer and the K6CM must be in the start status. -
Page 186: Start Monitoring
Click the [Start monitoring] Button. Monitoring with the software tool is started. There are a method of monitoring by motor (K6CM device group) and a method of monitoring by moni- toring category. Monitoring by motor (K6CM device group) When monitoring by motor (K6CM device group), confirm the detailed information in the following order. -
Page 187: Saving Log Files
7 Monitoring with K6CM and Motor condition monitoring Tool Monitoring by monitoring category When monitoring by monitoring category, confirm the detailed information in the following order. Monitoring screen by monitoring category Example: What are the details of the "Acceleration"? Detailed status screen by monitoring category... -
Page 188: Graph Vertical Axis Scale Setting
7 Monitoring with K6CM and Motor condition monitoring Tool 7-3-5 Graph Vertical Axis Scale Setting Click the Button on each graph display screen. Make the settings on the following screen. The vertical axis scale can be set for each measurement value of each K6CM. -
Page 189: Graph Time Axis Movement
7 Monitoring with K6CM and Motor condition monitoring Tool 7-3-6 Graph Time Axis Movement You can move the graph to be displayed in the time axis direction in section the bottom of the graph display screen. The operation of each button and display column is as follows. - Page 190 7 Monitoring with K6CM and Motor condition monitoring Tool 7 - 14 K6CM Motor Condition Monitoring Device User’s Manual (N219)
- Page 191 Datatype List of Variables ........8-12 8-3-2 Services Supported by Objects in K6CM ......8-12 8-3-3 Monitor Object (Class ID: 370 hex) .
-
Page 192: Overview
LAN port (EtherNet/IP port) If the K6CM device was manufactured before April 30, 2019, a tag data link timeout may occur in the network system including the node configured for multicast communications. Use a switching hub with multicast filtering function to prevent multicast packets from reaching the K6CM devices. - Page 193 (the internal data size of the K6CM). • K6CM-side output tag set The K6CM device assigns the instance ID of the internal data to be tagged data link. The data size is fixed at 44 bytes. Configuration tool When configuring with OMRON controllers, the following setting tools for the tag data link should be used.
-
Page 194: Ethernet/Ip Communications Specifications
Connection resource 2 (Class 3 server) Number of clients that can communicate at one time with UCMM Communications Type Specifications Port number 44818 Conformance EtherNet/IP conformance test Conforms to CT17 8 - 4 K6CM Motor Condition Monitoring Device User’s Manual (N219) -
Page 195: Monitoring Using The Tag Data Link
If I/O memory addresses are specified for the communications areas, the information in the communications areas will be cleared when the operating mode of the PLC changes unless addresses in the Area, which are maintained, are specified. 8 - 5 K6CM Motor Condition Monitoring Device User’s Manual (N219) - Page 196 • Which memory area (I/O memory or variables) in the PLC should be used for the tag data link. • The size of the internal data (parameter) of the K6CM is 44 bytes for all models. 2)-1 Drag a K6CM to the PLC and register it.
- Page 197 Download the connections that were set to the PLC. Tag data link communications are automatically started. Confirm each LED of the PLC and the K6CM devices, and status information in the [Device Monitor] Dialog Box of the Network Configurator. 8 - 7...
- Page 198 Right-click on the target device list in the tool box on the displayed Tab page and select the [Display EDS Library] menu. Click the [Install] Button and import the EDS file of each K6CM device in the [EDS Library] Dialog Box.
-
Page 199: Data To Be Tag Data Link Target In The K6Cm Device
For detailed information on each data, refer to A-6 Internal Data of K6CM Devices on page A-14. In both cases, it is possible to read from the K6CM device to the originator such as PLC. All data is one word. - Page 200 If reading is performed when the "Measurement state" bit is 0 (OFF), there is a possibility that the value before monitoring (i.e., 0) or the value held after monitoring is being read. 8 - 10 K6CM Motor Condition Monitoring Device User’s Manual (N219)
- Page 201 If the trigger mode is "Free run (no trigger), read the data when "Present value not measured" bit (bit 00) of the measurement status is 0. There is a possibility that the value before monitoring (i.e., 0) is being read. 8 - 11 K6CM Motor Condition Monitoring Device User’s Manual (N219)
- Page 202 WORD 1 word hex DWORD 2 words hex 8-3-2 Services Supported by Objects in K6CM The services supported by the objects in K6CM device are as follows. Object name Class ID Contents Monitor object 370 hex Reading the measurement values and other present values (PV) of the K6CM.
-
Page 203: Monitor Object (Class Id: 370 Hex)
8 Monitoring and Setting Using the EtherNet/IP Devices 8-3-3 Monitor Object (Class ID: 370 hex) This object reads the measurement value of K6CM device and other present values (PV). Service Codes Supported services Service code Service name Description Classes Instances... - Page 204 Increase the number of triggers by +1 every 100 iterations of starting measuring and monitoring. 0 to 65535 69 hex or more: It depends on the K6CM model. Refer to the following and subsequent sections. *1. Main body status Bit contents Bit position...
- Page 205 If the trigger mode is "Free run (no trigger), read the data when "Present value not measured" bit (bit 00) of the measurement status is 0. There is a possibility that the value before monitoring (i.e., 0) is being read. 8 - 15 K6CM Motor Condition Monitoring Device User’s Manual (N219)
- Page 206 Standby Minimum value input error Not occurred Occurrence Reserved area Reserved area Individual alarm result (Warning) Individual alarm result (Critical) Reserved area Reserved area *2. Depends on measurement value. 8 - 16 K6CM Motor Condition Monitoring Device User’s Manual (N219)
- Page 207 Standby Minimum value input error Not occurred Occurrence Reserved area Reserved area Individual alarm result (Warning) Individual alarm result (Critical) Reserved area Reserved area *2. Depends on measurement value. 8 - 17 K6CM Motor Condition Monitoring Device User’s Manual (N219)
-
Page 208: Setting Object (Class Id: 371 Hex)
8 Monitoring and Setting Using the EtherNet/IP Devices 8-3-4 Setting Object (Class ID: 371 hex) This object sets up the K6CM device itself and sets up measurement and alarm. Service Code Supported services Service code Service name Description Classes Instances... - Page 209 *2. If this attribute is set when using K6CM-CI2M, the value is set for both attribute ID A2 hex (current moving average times) and attribute ID A3 hex (degradation level 1 moving average times) at the same time.
- Page 210 8 Monitoring and Setting Using the EtherNet/IP Devices *3. Transistor output method is a function implemented by version upgrade. Eip cpu version: Implemented in the K6CM device with version 1.10 or higher. The Eip cpu version can be confirmed by the following method.
- Page 211 Sets the degradation level 2 moving average Write UINT 0000 hex level 2 mov- times. ing average 0: OFF times 1: 2 times 2: 4 times 3: 8 times 4: 16 times 5: 32 times 8 - 21 K6CM Motor Condition Monitoring Device User’s Manual (N219)
- Page 212 (0000 to 270F hex) 78 hex Temperature Sets the temperature gap failure critical Write UINT 0050 hex (80) gap failure threshold. critical 0 to 9999 (Unit: °C) (0000 to 270F hex) 8 - 22 K6CM Motor Condition Monitoring Device User’s Manual (N219)
- Page 213 76 hex Reserved area Reserved area Write UINT 0000 hex 77 hex Reserved area Reserved area Write UINT 0000 hex 78 hex Reserved area Reserved area Write UINT 0000 hex 8 - 23 K6CM Motor Condition Monitoring Device User’s Manual (N219)
-
Page 214: Identity Object (Class Id: 01 Hex)
8 Monitoring and Setting Using the EtherNet/IP Devices 8-3-5 Identity Object (Class ID: 01 hex) This object reads the identification information of the K6CM, reads the state of the built-in EtherNet/IP port, and resets the K6CM. Service Codes Supported services... - Page 215 0E 4B 36 43 4D 2D 43 49 32 4D 78 2D 45 49 50 The number of characters (0D hex) is added to the beginning of K6CM-VBM and K6CM-ISM. The number of characters (0E hex) is added to the beginning of K6CM-CI2M.
-
Page 216: Tcp/Ip Interface Object (Class Id: F5 Hex)
The class attribute ID specifies the attribute of the object class. Parameter Data Attribute ID Description Attribute name Data type Default value 01 hex Revision Revision of the object Read UINT 0004 hex 8 - 26 K6CM Motor Condition Monitoring Device User’s Manual (N219) - Page 217 0001 to 0E10 hex: 1 to 3600 s (0: prohibited) Inactivity Timeout timeout time Default: 0078 hex (120 s) *1. It is unsupported. Therefore the fixed value is read only when reading with Get_Attributes_All. 8 - 27 K6CM Motor Condition Monitoring Device User’s Manual (N219)
-
Page 218: Examples Of Cip Message Communications Instruction
8-3-7 Examples of CIP Message Communications Instruction The following is an example of reading the measurement value of the K6CM using the CIP message communications instruction of the NJ/NX-series Controller. The CIPUCMMSend (Send Explicit Message UCMM) instruction is used a CIP message communica- tions instruction. - Page 219 Specify the following. Class ID, Instance ID, Attribute ID Example) Degradation level 1 pv: Specify the following. • ClassID: = 370 hex (meaning "K6CM monitor object") • InstanceID: = 01 hex (fixed) • IsAttributeID: = TRUE (meaning to use an attribute ID)
-
Page 220: Sample Program For The Nj/Nx-Series
The following processing can be executed using the sample program described here. • Obtains measurement data of up to 100 K6CM devices with one PLC (NJ/NX series) • Outputs the obtained measurement data as a CSV file to the SD Memory Card mounted on the PLC The output CSV file name is determined from the date of data obtainment according to the internal clock of the PLC. - Page 221 The specifications of the CSV file output to the SD Memory Card of the PLC are shown below. At the beginning of the CSV file, there is a K6CM device profile data, and collection time stamps and collected data are output following it.
- Page 222 Time Trig- resis- resis- resis- resis- resis- resis- gers tance tance tance tance tance tance status min. max. fail- fail- warn- critical 8 - 32 K6CM Motor Condition Monitoring Device User’s Manual (N219)
-
Page 223: Sample Program Processing Flow And Function Block Specifications
Initialize the effective device status (bEnable) according to the number of connected devices. Initialize the data collection target device (iSelectableUNIT). The operation after the initial setting is as shown in the flow chart. 8 - 33 K6CM Motor Condition Monitoring Device User’s Manual (N219) - Page 224 Normal end or retry over for all collection targets CSV file output Wait until the next collection cycle Initialization of internal parameters 8 - 34 K6CM Motor Condition Monitoring Device User’s Manual (N219)
- Page 225 4 : Retry over (missing measurement) Function Block Specifications This FB reads data from the K6CM device whose IP address is specified in the input data, using the CIPUCMMSend command by rising of the Execute. * Do not restart the FB by the Execute while FB is executing. Communications processing is initialized.
- Page 226 Eip cpu version wStatus WORD Main body status iRunningTime UINT Running Time iTriggerCnt UINT Number of Triggers MonVBM STRUCT Monitor object (VBM) wAccStatus WORD Acceleration status rAccValue REAL Acceleration pv 8 - 36 K6CM Motor Condition Monitoring Device User’s Manual (N219)
- Page 227 Trigger level rMonitoringTime REAL Monitoring time iAlarmLatch UINT Alarm latch iUseRunningTime UINT Use Running Time iMovingAveTimes UINT Moving average times iTrOutputMethod UINT Transistor output method rMonitoringDelayTime REAL Monitoring delay time 8 - 37 K6CM Motor Condition Monitoring Device User’s Manual (N219)
- Page 228 Degradation level 1 failure critical iDegradation2Alarm_Warning UINT Degradation level 2 failure warning iDegradation2Alarm_Critical UINT Degradation level 2 failure critical dummy STRUCT Dummy variable sDummy STRING[256] Dummy variable tTime TIME Dummy variable 8 - 38 K6CM Motor Condition Monitoring Device User’s Manual (N219)
-
Page 229: Sample Program Execution Procedures
K6CM: Set it with the start navigation of the software tool (Motor condition monitoring tool). Refer to 4-3-2 IP Address Setting of the K6CM Devices on page 4-26 PLC: If you have not imported the project file in the Sysmac Studio, set it with [Connect to Device] on the start page of the Sysmac Studio. -
Page 230: Sample Program Code Descriptions
With the above operation, the sample program will be executed and data collection will be started. The measured data of the K6CM devices will be output as a CSV file to the SD Memory Card mounted to the PLC. (Note: To prevent measured data corruption, change to Program mode before you remove the SD Memory Card.) - Page 231 := '192.168.250.140'; [Initial setting] sIPAddress sIPAddress[UINT#40] := '192.168.250.141'; Set the IP address of K6CM devices to be used in advance. Set in order from the top of the program for the sIPAddress[UINT#41] := '192.168.250.142'; number to use. sIPAddress[UINT#42] := '192.168.250.143';...
- Page 232 END_FOR; ELSE // K6CM FB execution setting 1 ( initialize index of execution target unit ) FOR iWk1 := UINT#0 TO iNumOfParallel - UINT#1 BY UINT#1 DO When data collection in progress bCollectiong is TRUE, set the FB execution command IF ( iSelectableUNIT[ iWk1 ] <...
- Page 233 END_IF; // K6CM data collection FB execution FOR iWk1 := UINT#0 TO iNumOfParallel - UINT#1 BY UINT#1 DO In accordance with the above status processing result, the K6CM-dedicated insK6CM_Read[ iWk1 ]( FB is called for each device. Execute := bExecute[ iWk1 ], The collected data is stored in stRespServiceDat.
- Page 234 8 Monitoring and Setting Using the EtherNet/IP Devices 8 - 44 K6CM Motor Condition Monitoring Device User’s Manual (N219)
- Page 235 Monitoring and Setting Using the Modbus TCP Devices K6CM can also be monitored or set using Modbus TCP compatible devices. This sec- tion describes how to monitor using the Modbus TCP. 9-1 Outline ............9-2 9-2 Function Codes .
-
Page 236: Outline
Note The socket is an interface for using TCP directly from the user program. The host device specifies the IP address of K6CM and TCP port number of 502 (01F6 hex) and opens the socket in Active. After that, it sends Modbus TCP request and reads and writes the internal data of the K6CM. -
Page 237: Function Codes
06 hex Operation command Used to instruct Software reset and Max./min. reset. 10 hex Writing of multiple Used to set the IP address, K6CM initial setting, etc. registers 9-2-2 03 hex: Reading of Multiple Registers This function can read the contents of multiple registers starting from the specified address. - Page 238 The Main body status is 2 bytes, so 02 hex is set. Note For the other elements (the elements shaded in the above figure), the value specified in the request is set. 9 - 4 K6CM Motor Condition Monitoring Device User’s Manual (N219)
-
Page 239: 06 Hex: Operation Command
Error information is set. Refer to 9-2-5 Exception Code List on page 9-7. Note For the other elements (the elements shaded in the above figure), the value specified in the request is set. 9 - 5 K6CM Motor Condition Monitoring Device User’s Manual (N219) -
Page 240: 10 Hex: Writing Of Multiple Registers
Note 1. The elements shaded in the above figures are set to the value specified in the request. 2. The function code of (5) at error response is 90 hex. 9 - 6 K6CM Motor Condition Monitoring Device User’s Manual (N219) -
Page 241: Exception Code List
• When K6CM is an error state. • When an operation command and writing of multiple registers cannot be performed. Refer to 9-3 Register Address Lists on page 9-8 for details. 9 - 7 K6CM Motor Condition Monitoring Device User’s Manual (N219) -
Page 242: Register Address Lists
Increase the number of triggers by +1 every 100 iterations of starting measuring and monitoring. 0 to 65535 *1. R: Read using Reading of multiple registers (03 hex). 9 - 8 K6CM Motor Condition Monitoring Device User’s Manual (N219) - Page 243 0011 hex Degradation level 2 max. Measurement value of degradation level 2 max. 0012 to 0015 Reserved area Reserved area *1. R: Read using Reading of multiple registers (03 hex). 9 - 9 K6CM Motor Condition Monitoring Device User’s Manual (N219)
- Page 244 Temperature gap min. Measurement value of temperature gap min. 0015 hex Temperature gap max. Measurement value of temperature gap max. *1. R: Read using Reading of multiple registers (03 hex). 9 - 10 K6CM Motor Condition Monitoring Device User’s Manual (N219)
- Page 245 8-13. 000F hex I0c pv Measurement value of I0c pv 0010 to 0015 Reserved area Reserved area *1. R: Read using Reading of multiple registers (03 hex). 9 - 11 K6CM Motor Condition Monitoring Device User’s Manual (N219)
-
Page 246: Setting Information
0: OFF 1: 2 times 2: 4 times 3: 8 times 4: 16 times 5: 32 times 9 - 12 K6CM Motor Condition Monitoring Device User’s Manual (N219) - Page 247 A014 hex Monitoring delay Set the delay time from the trigger input 0000 hex time to the start of measurement. 0.0 to 6000 (unit: 0.1 seconds) (0000 to 1770 hex) 9 - 13 K6CM Motor Condition Monitoring Device User’s Manual (N219)
- Page 248 A000 hex Display value Sets which measurement value is displayed in the 0000 hex type 7 segment display on the front of the K6CM device. 0: PV (Present value) 1: MIN 2: MAX A001 hex Trigger mode Selects the trigger mode.
- Page 249 Sets enable/disable of alarm latch function. 0001 hex 0: Disable (no latch) 1: Enable (with latch) A006 hex Use Running Sets the usage or nonuse of K6CM remaining 0000 hex Time capacity function. 0: OFF (not used) 1: ON (use)
- Page 250 A000 hex Display value Sets which measurement value is displayed in the 0000 hex type 7 segment display on the front of the K6CM device. 0: PV (Present value) 1: MIN 2: MAX A001 hex Trigger mode Selects the trigger mode.
- Page 251 Initial Address Description name of bytes value A006 hex Use Running Sets the usage or nonuse of K6CM remaining 0000 hex Time capacity function. 0: OFF (not used) 1: ON (use) A007 hex Moving aver- Every time the measurement value is sampled, the...
-
Page 252: Product Information
0 hex: Fixed 1 hex: BOOTP 2 hex: BOOTP one-shot *1. R: Read using Reading of multiple registers (03 hex). W: Write using Writing of multiple registers (10 hex). 9 - 18 K6CM Motor Condition Monitoring Device User’s Manual (N219) -
Page 253: Operation Command
0 to 3600, initial value = 10 (unit: second) tion timeout time (0: Timeout disabled) *1. R: Read using Reading of multiple registers (03 hex). W: Write using Writing of multiple registers (10 hex). 9 - 19 K6CM Motor Condition Monitoring Device User’s Manual (N219) - Page 254 9 Monitoring and Setting Using the Modbus TCP Devices 9 - 20 K6CM Motor Condition Monitoring Device User’s Manual (N219)
- Page 255 10-1 K6CM Devices ........
- Page 256 This section shows how to troubleshoot the K6CM devices. If the K6CM device does not operate properly, check the items below as required before repair is requested. If it still does not work properly, return it through our sales department.
- Page 257 Make the settings in a soft- A-7 Setting Values ting information. in a software tool version ear- ware tool version that is on page A-15 lier than 1.3.0.0. 1.3.0.0 or later. 10 - 3 K6CM Motor Condition Monitoring Device User’s Manual (N219)
- Page 258 If the time information of the PC is incorrect, the dedicated tool records the measurement value with an incorrect date and time, so it cannot display the correct graph. 10 - 4 K6CM Motor Condition Monitoring Device User’s Manual (N219)
- Page 259 Move the log file to a different location ---- available memory insufficient. and reopen the project file. capacity becomes insuf- ficient. The operation may be delayed." is dis- played. 10 - 5 K6CM Motor Condition Monitoring Device User’s Manual (N219)
- Page 260 If you do not have a BOOTP server, press the [ALM RST] key and the [DISP] key at the same time for five seconds or more to initialize all set- tings of the K6CM device. 10 - 6 K6CM Motor Condition Monitoring Device User’s Manual (N219)
- Page 261 A-3 K6CM Common Specifications ........A-4...
-
Page 262: A-1 Specifications
Appendices A-1 Specifications This section shows the common specifications and the individual specifications of the K6CM, and the specifications of the used sensors. List of Models Comprehensive Current Diagnosis Type Model Specifications such as power supply voltage k6CM device... -
Page 263: A-2 Measurement Values By Each Monitor Type
(I0r and insulation resistance are proportional. Therefore, alarm monitoring is based on insulation resistance.) There is no indication on the front of the K6CM device for I0c (leakage current due to capacitance). It can be read by the software tool or by message communications. -
Page 264: A-3 K6Cm Common Specifications
Alarm setting By measurement It depends on K6CM device type. Refer to 6-2-1 Settings for Each Monitor Type of K6CM value devices on page 6-19. Critical level and Warning level can be set for each upper limit or lower limit (different depending on measurement value) of measurement value. - Page 265 Specifications Power supply voltage K6CM-□□MA: 100 to 240 VAC, 50/60 Hz (Alternating current) K6CM-□□MD: 24 VAC, 50/60 Hz, 24 VDC (Both direct and alternating current) Allowable operating voltage range 85% to 110% of the rated power supply voltage Power supply frequency range...
- Page 266 ± 35% rdg, current: ± 10% F. S. Safety standards: UL 61010-2-030 (Listing), Korean Radio Law, RCM Mounting DIN Rail mounting, or screw mounting Weight Approx. 200 g A - 6 K6CM Motor Condition Monitoring Device User’s Manual (N219)
- Page 267 192 . 168 . 250 . 10 value Subnet mask 255 . 255 . 255 . 0 Default gateway 0 . 0 . 0 . 0 IP address set- Fixed IP address ting method A - 7 K6CM Motor Condition Monitoring Device User’s Manual (N219)
-
Page 268: K6Cm Device Individual Specifications
*1. The degradation tendency of the motor hardly appears when the inverter is used at frequencies higher than 80 Hz. *2. Current value can be calculated from the motor capacity. Refer to A-5 Individual Specifications of the Dedicat- ed Sensor on page A-10. A - 8 K6CM Motor Condition Monitoring Device User’s Manual (N219) - Page 269 Z direction (one axis) Acceleration Detection frequency 1 to 10 kHz Measurement range 0.05 to 9.99 G Absolute accuracy ±3 dBrdg ±2 digit (at 25 °C) when using K6CM-VBS1 Repeat accuracy ±0.2 dB Display numerical unit Display resolution 0.01 G Sampling Period...
-
Page 270: Individual Specifications Of The Dedicated Sensor
The frequency characteristics of the CT are as follows. K6CM-CICB005 K6CM-CICB025 1.00% 1.00% 0.50% 0.50% 10 A 0.00% 0.00% 15 A 20 A -0.50% -0.50% 25 A -1.00% -1.00% Frequency [Hz] Frequency [Hz] K6CM-CICB100 K6CM-CICB200 A - 10 K6CM Motor Condition Monitoring Device User’s Manual (N219) - Page 271 80 A 120 A 160 A 240 A 0.00% 0.00% 240 A 360 A 320 A 480 A -0.50% 400 A -0.50% 600 A -1.00% -1.00% Frequency [Hz] Frequency [Hz] A - 11 K6CM Motor Condition Monitoring Device User’s Manual (N219)
- Page 272 Screw diameter Connected K6CM device K6CM-VBS1 Vibration & temperature type (K6CM-VBM) Note Vibration and temperature sensor consists of sensor head and pre-amplifier.The K6CM-VBS1 is provided with a magnet for positioning of the vibration & temperature sensor. Rating/Performance Power supply voltage...
- Page 273 Voltage input: 1 m (can be extended up to 100 m) Cable length Between ZCT (IRT) and K6CM device: 1 m (can be extended to 100 m) Voltage input: STO/TC(CE) # 18×3C (manufactured by Chugoku Electric Wire & Cable Co., Ltd.)
-
Page 274: A-6 Internal Data Of K6Cm Devices
A-6 Internal Data of K6CM Devices This section describes the overview of the internal data of the K6CM devices. The K6CM device has setting values and present values (i.e., measurement value and alarm results) as internal data. You can write or read these setting values and present values (PV) in the following way. -
Page 275: A-7 Setting Values
Appendices A-7 Setting Values In this section, the setting values in the internal data of the K6CM devices are classified according to K6CM common and monitor type, and are shown in a list. Precautions for Correct Use In order to validate the setting value, it is necessary to turn the power supply ON again or per- form a software reset after changing the set value. - Page 276 Data name Description Software munications / Mod- data Remarks tool bus TCP message link communications Insulation resistance, 0 to 9999 Lower limit critical and (Unit: 0.001 MΩ) warning threshold A - 16 K6CM Motor Condition Monitoring Device User’s Manual (N219)
- Page 277 Sets the IP address of the K6CM. K6CM IP address The initial value is "192.168.250.10" (common to models) Restarts the K6CM device. It is used to Yes (Soft- validate the setting after changing the ware reset setting value. button)
- Page 278 "internal trigger". Set value: Set in each measurement range. Note : Unit and decimal point position follow measurement values. For each K6CM, set the trigger level for Trigger level the following monitoring category. • Comprehensive current diagnosis type: current •...
- Page 279 When you have changed the setting of the temperature unit, also change the alarm set- points of the motor temperature and temperature gap to the set value according to the temperature unit. A - 19 K6CM Motor Condition Monitoring Device User’s Manual (N219)
- Page 280 Wiring Diagram of the Insu- lation Resistance Type (K6CM-IS) on page 5-27 in 5-6 I/O wiring on page 5-25. Note : With or without inverter = "with inverter" only valid A - 20 K6CM Motor Condition Monitoring Device User’s Manual (N219)
-
Page 281: A-8 Present Values
Appendices A-8 Present Values In this section, the present values in the internal data of the K6CM devices are classified according to K6CM common and monitor type, and are shown in a list. Measurement Value Comprehensive Current Diagnosis Type 2 (K6CM-CI2M) - Page 282 Min., Max.) Velocity (PV, 0.00 to 45.00 mm/s (K6CM display) Min., Max.) Motor tempera- ture (PV, Min., 0 to 80°C (32 to 176°F) (K6CM display) Max.) Temperature gap (Difference from the room tem- 0 to 80°C (32 to 176°F) (K6CM display)
- Page 283 0000 to 0064 hex (0 to 100) Total number of integration times of exter- nal trigger or internal trigger. Make +1 Number of trig- every 100 iterations. gers 0 to 65535 A - 23 K6CM Motor Condition Monitoring Device User’s Manual (N219)
- Page 284 K6CM Software Modbus TCP data Remarks device tool message commu- link nications In K6CM, there is no "Critical" in the mea- Yes (Main body surement value, and even one of them (Alarm status) (Main Comprehensive has "Warning". bar, and body...
- Page 285 CIP message communications / Data name Description K6CM Software Modbus TCP data Remarks device tool message commu- link nications Insulation resis- tance, Low alarm ON, OFF (Critical and Warning) A - 25 K6CM Motor Condition Monitoring Device User’s Manual (N219)
-
Page 286: Tag Data Link Connection Setting Procedures
The setting method when the CS/CJ-series PLC is an originator is as follows. Starting the Network Configurator for EtherNet/IP To start the Network configurator, select [All Programs] | [OMRON] | [Sysmac Studio] | [Network Configurator for EtherNetIP] | [ Network Configurator] from the Windows Start Menu. - Page 287 If you are using an earlier version, install using the EDS file which is stored on the CD bundled with the K6CM device. EDS files can also be downloaded from our I-Web. Register the CIP revision corresponding to the EIP version on the side label of the K6CM device.
- Page 288 At this time, an icon confirmation message will be displayed. Click [Yes]. After selecting the following ICON file, click [Open] and install it. Model name of the K6CM ICON file name K6CM-CI2M 128x128.ico K6CM-VBM K6CM-ISM A - 28 K6CM Motor Condition Monitoring Device User’s Manual (N219)
- Page 289 Register the EtherNet/IP devices which participate in the tag data links in the Network Con- figuration Window. From the hardware list, you can register a PLC as an originator device and K6CM devices, by dragging and dropping each device at a time, or by selecting and double-clicking it.
- Page 290 (CJ2H-CPU6□-EIP21 and CJ2M-CPU3□ only). Additional Information The setting contents depend on the originator device connecting the K6CM series. For detailed settings, refer to the manual of the originator device. • "SYSMAC CS/CJ Series EtherNet/IP Units Operation Manual (Cat. No.W465)"...
- Page 291 Select the device (e.g., CJ1W-EIP21) for editing the tag set and the tag. Then right-click it and select [Parameter (P)] | [Edit (E) ...] or double-click it. Click the Tag Sets Tab at in the Edit Device Parameters Dialog Box. A - 31 K6CM Motor Condition Monitoring Device User’s Manual (N219)
- Page 292 To enter tags, there are tabs for Input (Consume) and Output (Produce), but set only the Input (Consume) tab when connecting the K6CM series. Select the [In - Consume] Tab and click [New (N) ...], the Edit Tags Dialog Box will be displayed.
- Page 293 If you register the tag name as it is as the tag set name, one tag is registered as one tag set. Here, when selecting [Yes (Y)], you can omit "(1) -2. Editing tag set" for the newly cre- ated tag. A - 33 K6CM Motor Condition Monitoring Device User’s Manual (N219)
- Page 294 To enter tags, there are tabs for Input (Consume) and Output (Produce), but set only the Input (Consume) tab when connecting the K6CM series. For editing tag set, click [New (N) ...] in the following Edit Tag Set Dialog Box.
- Page 295 Set communications parameters for tag data link communications. Select the [Connections] Tab in the Edit Device Parameters Dialog Box, The Connection Edit is displayed in the Edit Device Parameters Dialog Box. A - 35 K6CM Motor Condition Monitoring Device User’s Manual (N219)
- Page 296 Select the tag set name edited in "(1) -2. Editing tag set" from the drop down list and set it. • Packet Interval (RPI) From the setting range of K6CM (250 ms to 10000 ms), set the data send interval from K6CM according to the system.
- Page 297 Click [Close] and return from the Connection Allocation Dialog Box. When the setting is completed, it is displayed as follows. Setting is completed by clicking [OK] at the lower right. A - 37 K6CM Motor Condition Monitoring Device User’s Manual (N219)
-
Page 298: A-9-2 Using The Nj/Nx-Series
Appendices Downloading settings Connect online to the originator device and download the configuration settings. (The EtherNet/IP tag data link communications setting of the K6CM series is fixed, so you do not need to download it to the K6CM.) (1) Online Select the communications interface to use from [Option (O)] | [Select Interface (I)] on the menu bar. - Page 299 (PLC model) to use and its version, and then click the [Create] But- ton. (Only the project name is required.) When you finish setting [Project Properties], the following screen will be displayed. A - 39 K6CM Motor Condition Monitoring Device User’s Manual (N219)
- Page 300 Creating Network Variables (Input) Create network variables to be the input area in the PLC. The K6CM device sends 44 bytes as Input data, therefore the network variable must be created as a structure variable or an array variable. This section shows how to create structure variables. (For array variables, the following "(1) data type registration"...
- Page 301 (1)-3 Adding structure Members Right-click the structure data type you just crated and select [Create New Member(M)] from the menu. Register members and data types to match data received from the K6CM device. The registered Pane will be as follows. Data that are not defined as tag data link are regis- tered as reserved area.
- Page 302 To process the input data as an array variable instead of a structure variable, create a 44-byte network variable with an array of UINT as [Data Type] in the following example. A - 42 K6CM Motor Condition Monitoring Device User’s Manual (N219)
- Page 303 Make the following settings so that the K6CM device operates as a target. (3)-1 Installing EDS Files To configure K6CM as an EtherNet/IP tag data link communications target, install the EDS file containing the configuration information of the K6CM in the SysmacStudio. Once this installation is done, this operation is unnecessary from the next setting.
- Page 304 K6CM-ISM K6CM_ISM_EIP_R3.eds When installation is completed, the category "Motor Condition Monitoring Device" and the registered K6CM devices are displayed under the tree of the OMRON Corporation in the EDS Library Dialog Box. (3)-2 Adding K6CM Devices to the Network Click the (Add Target Device) Button in the [Toolbox] on the right of the EtherNet/IP Con- nection Setting Tab Page.
- Page 305 Appendices Click the [Add] Button at the bottom of the toolbox. The K6CM device will be added as a tar- get device. (4) Tag Set Editing Map the K6CM Input data to the memory area of the PLC using the EtherNet/IP tag data link by associating the network variable (input) of the PLC with the tag used in the network,.
- Page 306 For [Originator Variable], select the tag set created in "(4) Editing tag set" from the pull down list and set it. In [RPI (ms)], from the setting range of the K6CM device (250 ms to 10,000 ms), set the data send interval from the K6CM device according to the system. Select the [Timeout Value] from the pull-down list and set it.
- Page 307 EtherNet/IP tag data link settings to the PLC by clicking [Transfer to Controller] Button. (The EtherNet/IP tag data link communications setting of the K6CM series is fixed, so you do not need to download it to the K6CM.) A - 47 K6CM Motor Condition Monitoring Device User’s Manual (N219)
-
Page 308: Expansion Error Code Of The Cip Message Communications
The data to be transmitted in the response buffer is larger than the allo- cated response buffer. Fragmentation of a primitive The service specified an operation that is going to fragment a primitive value data value, i.e. half a REAL data type. A - 48 K6CM Motor Condition Monitoring Device User’s Manual (N219) - Page 309 Error Codes presented in this table accurately reflect the error that was encountered. The Additional Code field can be used to explain the Gen- eral Error Code in more detail. A - 49 K6CM Motor Condition Monitoring Device User’s Manual (N219)
- Page 310 031C Miscellaneous. 031D Redundant connection mismatch. 031E There are no more available reception resources in the sending module. 031F No connection resources exist for target path. 0320- 07FF unused. A - 50 K6CM Motor Condition Monitoring Device User’s Manual (N219)
-
Page 311: A-11 Version Compatibility
Appendices A-11 Version Compatibility This section describes version upgrades of the K6CM series and the support status of Motor condition monitoring Tool. A-11-1 Version Upgrades of the K6CM Series The following version upgrades have been performed up until now for the K6CM device. -
Page 312: A-11-3 Motor Condition Monitoring Tool Version Compatibility
Symbol Name Color Status Color Status Module status indication Green Lit. Green Flashes at 1-s intervals. (Module Status) Network status indication Flashes at 1-s intervals. Not lit. (Network Status) A - 52 K6CM Motor Condition Monitoring Device User’s Manual (N219) - Page 313 Index I - 1 K6CM Motor Condition Monitoring Device User’s Manual (N219)
- Page 314 K6CM-CICB ..............A-10 Vibration & Temperature Sensor ....5-3, 5-16, A-12 K6CM-ISM .............1-13, A-9 Vibration & Temperature Type .......1-6, 1-12, A-9 K6CM-ISZB ..............A-13 K6CM-VBM ............1-12, A-9 K6CM-VBS ..............A-12 Warning ................ 3-13 I - 2 K6CM Motor Condition Monitoring Device User’s Manual (N219)
- Page 315 OMRON AUTOMATION AMERICAS HEADQUARTERS • Chicago, IL USA • 847.843.7900 • 800.556.6766 • automation.omron.com OMRON CANADA, INC. • HEAD OFFICE OMRON ELETRÔNICA DO BRASIL LTDA • HEAD OFFICE Toronto, ON, Canada • 416.286.6465 • 866.986.6766 • automation.omron.com São Paulo, SP, Brasil • 55 11 5171-8920 • automation.omron.com OMRON ELECTRONICS DE MEXICO •...
Need help?
Do you have a question about the K6CM and is the answer not in the manual?
Questions and answers