Table of Contents
Advertisement
Advertisement
Table of Contents
Troubleshooting

Related Manuals for Delta SCARA DRS40L Series

Summary of Contents for Delta SCARA DRS40L Series
- Page 1 Delta SCARA Robot System User Manual SCARA CE Series...
- Page 2 Thank you for using this product. This manual provides users with contents that must be followed in order to safely operate the robot. It contains information related to the Delta SCARA industrial robot series. Before operating the robot, please read this manual carefully in order to ensure your safety and proper usage.
- Page 3 If you still have questions concerning the usage, please contact a dealer or our company’s customer service center. The copyright © of this manual belongs to Delta Electronics Inc., whole or partial contents of this manual cannot be copied or duplicated without a written approval from our company and its contents must not be passed on to a third-party, nor can it be used for any unauthorized use.
- Page 4 Delta SCARA Robot System User Manual SCARA CE Series Model name: Series Model Name Controller DRS40L3SSADF003 DTS-2FM DRS40L3SSADN003 DRS40L DRS40L3SOADF003 DTS-2FM DRS40L3SOADN003 DRS50L6SSADF003 DTS-2FM DRS50L6SSADN003 DRS50L6SOADF003 DTS-2FM DRS50L DRS50L6SOADN003 DRS50L6OSADF003 DTS-2FM DRS50L6OSADN003 DRS60L6SSADF003 DTS-2FM DRS60L6SSADN003 DRS60L6SOADF003 DTS-2FM DRS60L6SOADN003 DCS-1B00-CA DRS60L6OSADF003...
- Page 5 Delta SCARA Robot System User Manual SCARA CE Series Safety Notice This manual includes safety precautions on user safety and how to prevent the robot from getting damaged, warnings and notes are used in this manual to describe how important these safety precautions are.
- Page 6 Delta SCARA Robot System User Manual SCARA CE Series Definitions of stop, Danger and Warning For your safety, please read this manual before using the robot and have a clear understanding of all contents related to safety and warnings. Robot operators must receive training, read and understand how to use the safety measures, also to follow and execute all the rules described in this manual.
- Page 7 Delta SCARA Robot System User Manual SCARA CE Series Installation safety Please read this manual carefully before installing in order to make sure that the robot and controller are installed at suitable usage locations and environments, to avoid affecting the mechanisms and usage life of the electronic components or encountering other safety problems.
- Page 8 Delta SCARA Robot System User Manual SCARA CE Series Please do not turn the power on and off frequently as doing so may result in damage to the controller. The robot system should be installed under the specified conditions; in the...
- Page 9 Delta SCARA Robot System User Manual SCARA CE Series Usage and operating safety Please read this manual carefully before usage in order to ensure proper usage and the safety of the maintenance staff. Due to operational environment and operator safety considerations, our company will provide dedicated training for the operators of different robot applications in order to ensure usage safety.
- Page 10 Delta SCARA Robot System User Manual SCARA CE Series Please do not stand within the moving range of the robot when teaching the robot manually for the first time in order to prevent danger from occurring due to your being unfamiliar with the operations.
- Page 11 Delta SCARA Robot System User Manual SCARA CE Series Maintenance safety Please perform maintenance and inspection work properly according to the manual in order to prolong the usage life of the robot. Please add a safety lock on the power switch of the power box when performing maintenance or repair operations on the robot, and place a “Do...
-
Page 12: Table Of Contents
Delta SCARA Robot System User Manual SCARA CE Series Table of Contents 1. Warning label explanations ............. 22 1.1 DRS40L/50L/60L/70L/60H CE series sticker label location ........23 1.2 DCS controller sticker mark location ............... 27 1.3 DRS CE series Robot nameplate description ............28 2. - Page 13 Delta SCARA Robot System User Manual SCARA CE Series 4.8.5 DRS70L series robot arm dimension ............62 4.8.6 DRS60H series robot arm dimension ............65 4.8.7 DCS controller dimensions ..............66 5. Hardware point................67 5.1 DRS 3kg series limit hardware point ............... 68 5.2 DRS 6kg series limit hardware point ...............
- Page 14 Delta SCARA Robot System User Manual SCARA CE Series 7.2.10 Communication port (ETHERNET) ............136 7.2.11 Communication port (DMCNET) ............137 8. Installation and operation ............140 8.1 Robot and power control box installation .............. 143 8.1.1 Robot installation .................. 143 8.1.2 Controller installation ................
- Page 15 Delta SCARA Robot System User Manual SCARA CE Series List of Figures Figure1. 1 DRS40/50/60/70L CE series warning sticker locations ..........23 Figure1. 2 DRS60H CE series warning sticker locations ............... 24 Figure1. 3 DRS CE series robot head sticker location ..............26 Figure1.
- Page 16 Delta SCARA Robot System User Manual SCARA CE Series Figure5. 1 DRS 3kg series limit hardware point installation illustration .......... 68 Figure5. 2 DRS 6kg series first arm limit hardware point installation illustration ......69 Figure5. 3 The installation position of the first arm limit point of DRS 6kg series ......69 Figure5.
- Page 17 Delta SCARA Robot System User Manual SCARA CE Series Figure6. 20 Installation location of DRS 6kg series air hose connector ......... 97 Figure6. 21 Installation location of DRS60H series air hose connector ......... 98 Figure6. 22 Air hose burst pressure table ..................98 Figure6.
- Page 18 Delta SCARA Robot System User Manual SCARA CE Series Figure7. 33 Mode selection switch installation location ............... 121 Figure7. 34 Reset button installation location ................122 Figure7. 35 Safety connector seat ....................125 Figure7. 36 Wiring example of a single emergency stop button ..........126 Figure7.
- Page 19 Delta SCARA Robot System User Manual SCARA CE Series Figure8. 15 Locking the connector fixture seat ................152 Figure8. 16 Air pipe path inside the robot ..................153 Figure8. 17 Detailed locations of the robot air pipes ..............154 Figure8. 18 Signal path inside the robot ..................155 Figure8.
- Page 20 Delta SCARA Robot System User Manual SCARA CE Series List of Tables Table1. 1 DRS CE series Warning sticker content descriptions ............. 24 Table1. 2 Warning sticker content explanation ................27 Table1. 3 DRS CE series Robot nameplate description ..............28 Table2.
- Page 21 Delta SCARA Robot System User Manual SCARA CE Series Table7. 10 SYS.DO3 status descriptions ..................123 Table7. 11 SYS.DO4 status descriptions ..................123 Table7. 12 SYS.DO5 status descriptions ..................124 Table7. 13 SYS.DO7 status descriptions ..................124 Table7. 14 Safety connector pin definition table ................125 Table7.
-
Page 22: Warning Label Explanations
Delta SCARA Robot System User Manual SCARA CE Series 1. Warning label explanations The description to the location and explanation of the safety warning stickers are as follows; operators should get familiar with the locations of the safety warning labels before use and know the meanings of each safety warning in order to prevent accidents from occurring. -
Page 23: Drs40L/50L/60L/70L/60H Ce Series Sticker Label Location
Delta SCARA Robot System User Manual SCARA CE Series 1.1 DRS40L/50L/60L/70L/60H CE series sticker label location Figure 1.1 shows all warning sticker locations of DRS40L/50L/60L/70L CE series. Figure 1.2 shows all warning sticker locations of DRS60H CE series. Table 1.1 shows the contents of each warning sticker. -
Page 24: Figure1. 2 Drs60H Ce Series Warning Sticker Locations
Delta SCARA Robot System User Manual SCARA CE Series a、g i、j、m Figure1. 2 DRS60H CE series warning sticker locations Table1. 1 DRS CE series Warning sticker content descriptions Item Part No. Name Flag Note The first air hose provided inside the Air hose sticker 1 mechanical arm. - Page 25 Delta SCARA Robot System User Manual SCARA CE Series When the indicator lights up, the machine is in Stand by status; Servo ON workers should not get close because the machine might start operating at any time. Movable Z axis part; please be...
-
Page 26: Figure1. 3 Drs Ce Series Robot Head Sticker Location
Delta SCARA Robot System User Manual SCARA CE Series Figure 1.3 below is the DRS CE series robot head details sticker location Figure1. 3 DRS CE series robot head sticker location Figure 1.4 below is the DRS CE series robot rear and base details sticker location... -
Page 27: Dcs Controller Sticker Mark Location
Delta SCARA Robot System User Manual SCARA CE Series 1.2 DCS controller sticker mark location Figure 1.5 shows the DCS controller warning sticker location; Table 1.2 shows the contents of each warning sticker. Figure1. 5 DCS controller warning sticker location Table1. -
Page 28: Drs Ce Series Robot Nameplate Description
Delta SCARA Robot System User Manual SCARA CE Series 1.3 DRS CE series Robot nameplate description SCARA DRS CE series robot nameplate description contents are as shown in Figure 1.6 and Table 1.3 below. Figure1. 6 DRS CE series Robot nameplate figure Table1. -
Page 29: Transport And Installation
Delta SCARA Robot System User Manual SCARA CE Series 2. Transport and Installation Please execute the transportation and installation according to the instructions in the manual properly; otherwise it may result in the dropping and damaging of the robot. ... -
Page 30: Transportation
Delta SCARA Robot System User Manual SCARA CE Series 2.1 Transportation There are 3 methods to transport the robot: using fork lift, stacker or lift, as shown in Figure 2.1 below. Fork lift Stacker Lift Figure2. 1 Transportation device type... -
Page 31: Figure2. 3 Drs40L/50L/60L/70L Series Package Removal Figure
Delta SCARA Robot System User Manual SCARA CE Series robot, controller, cables and handheld teaching pendant (optional) carefully, as shown in Figure 2.3 and Figure 2.4 below. Teach Pendant (Option) Controller SCARA Cable Figure2. 3 DRS40L/50L/60L/70L series package removal figure... -
Page 32: Figure2. 5 Drs40L/50L/60L/70L Series Transportation Method
Delta SCARA Robot System User Manual SCARA CE Series connected to the heavy load connector of the arm and then bend the first and second arm manually until they touch the point position, and then place one hand under the robot base and use the other hand to hold under the front of the first arm, as shown in Figure 2.5 and Figure 2.6... -
Page 33: Installation
Delta SCARA Robot System User Manual SCARA CE Series 2.2 Installation Please read this manual carefully before installing in order to make sure that the robot is installed at a suitable usage location and environment, avoid affecting the mechanisms and usage life of the electronic components, or encounter other safety problems. - Page 34 Delta SCARA Robot System User Manual SCARA CE Series Please follow the manual to install the safety protection devices such as railings, gratings, regional laser or pressure pads, etc. in order to prevent injuries or other dangers caused to the staff arising from impact by the robot within the operating range of the robot.
-
Page 35: Scara Robot Main Body Installation
Delta SCARA Robot System User Manual SCARA CE Series 2.2.1 SCARA robot main body installation The installation of the SCARA robot should be as shown in Figure 2.7 below; the base should be locked on a flat surface and when locking it in place, M8 screws + flat gaskets should be used as shown in Table 2.1, then lock it in properly with the locking torque. -
Page 36: Table2. 2 Installation Conditions
Delta SCARA Robot System User Manual SCARA CE Series General structure carbon steel- rectangle Table2. 2 Installation conditions modulus moment radius of Area Specific of inertia gyration H x B mass section cm^4 mm x mm kg/m cm^3 100 x 100 8.85... -
Page 37: Controller Installation
Delta SCARA Robot System User Manual SCARA CE Series 2.2.2 Controller installation Controller installation notes: The power control box uses forced fan cooling; in order to keep the cooling cycle working well, when installing the robot power control box, sufficient room must be left with neighboring objects and the baffle (wall), or else it may cause malfunctioning. -
Page 38: Figure2. 10 Power Control Box Door Open Space
Delta SCARA Robot System User Manual SCARA CE Series Please note the space required to open the power control box door; the installation space is as shown in Figure 2.10 below, or else it will be very difficult to perform repairs. -
Page 39: Robot Safety Protection
Delta SCARA Robot System User Manual SCARA CE Series 3. Robot safety protection The final system integrator must follow this manual properly to construct a safe overall protection system for the robot, otherwise it may result in injuries or fatalities to workers. -
Page 40: Robot Safety Protection
Delta SCARA Robot System User Manual SCARA CE Series 3.1 Robot safety protection The robot safety protection refers to the protection equipment set up around the robot, they are used to prevent workers from getting close while the robot is operating and causing an accident of getting hit. -
Page 41: Robot Safety Protection Construction And Installation
Delta SCARA Robot System User Manual SCARA CE Series 3.2 Robot safety protection construction and installation 3.2.1 Emergency stop device installation Must be dual-channel NC contact mechanical type emergency stop device. When the emergency stop button is used: It must be a red type and has yellow background (the area of the yellow background must be greater than the red), as shown in Figure 3.1. -
Page 42: Emergency Pull-Rope Device Installation
Delta SCARA Robot System User Manual SCARA CE Series order to avoid not being able to press this button when emergency events occur. Make sure the height of the emergency stop button installation is not too high or low; install it at a height that is accessible to workers. -
Page 43: Railings Installation
Delta SCARA Robot System User Manual SCARA CE Series 3.2.3 Railings installation The power of the power control box must be disconnected when performing adjustments to surrounding devices and confirm that the mechanical arm has stopped operating completely before performing adjustments, according to EN ISO 13857 (EN294 &... -
Page 44: Safety Gratings Installation
Delta SCARA Robot System User Manual SCARA CE Series 3.2.4 Safety gratings installation The safety grating system shall comply with IEC 61496-1 and -2. Improper installation and usage will also cause the risk of workers getting hit by the robot arm. -
Page 45: Safety Mat Installation
Delta SCARA Robot System User Manual SCARA CE Series 3.2.5 Safety mat installation The safety mat shall comply with EN 1760-1 (ISO 13856-1), and shall be able to detect operators over 35kg. Installation mat is another type of protection system installed around the robot, and since safety mats are laid on the floor, it does not have height protection like railings;... -
Page 46: Figure3. 9 Drs60L/70L Series Safety Mat Laying Range
Delta SCARA Robot System User Manual SCARA CE Series DRS60L/70L series safety mat laying range Figure 3.9 below shows the safety mat installation area for DRS60L/70L series; in addition to calculating the maximum work plan of the robot, an average of 1m of worker arm length shall also be added in order to prevent the workers’... -
Page 47: Laser Scanner
Delta SCARA Robot System User Manual SCARA CE Series 3.2.6 Laser scanner The selected laser scanner shall comply with IEC 61496-1 & -3. Laser scanner safety protection area Not only shall the operating range of the robot be considered for the installation of the laser scanner, the distance that the worker’s arm reaches into the robot shall also be considered. -
Page 48: Specifications And Dimensions
Delta SCARA Robot System User Manual SCARA CE Series 4. Specifications and dimensions This chapter introduces the specifications and dimensions of the robots and controllers; please use according to the specifications properly. Please use the robot according to the specified methods, otherwise it may ... -
Page 49: Drs40L Series Robot Specifications
Delta SCARA Robot System User Manual SCARA CE Series 4.1 DRS40L series Robot Specifications Specifications of the DRS40L series robot are as shown in Table 4.1 below. Table4. 1 DRS40L series robot specification table Specifications of the SCARA Robot DRS40L3SSADF003、DRS40L3SOADF003 Number of Axes 4 400mm / 15.75inch... -
Page 50: Drs50L Series Robot Specifications
Delta SCARA Robot System User Manual SCARA CE Series 4.2 DRS50L series Robot Specifications Specifications of the DRS50L series robot are as shown in Table 4.2 below. Table4. 2 DRS50L series robot specification table Specifications of the SCARA Robot DRS50L6SSADF003、DRS50L6SOADF003、DRS50L6OSADF003 Number of Axes 4 500mm / 19.69inch... -
Page 51: Drs60L3 Series Robot Specifications
Delta SCARA Robot System User Manual SCARA CE Series 4.3 DRS60L3 series Robot Specifications Specifications of the DRS60L3 series robot are as shown in Table 4.3 below. Table4. 3 DRS60L3 series robot specification table Specifications of the SCARA Robot DRS60L3SSADF003、DRS60L3SOADF003 Number of Axes 4 600mm / 23.62inch... -
Page 52: Drs60L6 Series Robot Specifications
Delta SCARA Robot System User Manual SCARA CE Series 4.4 DRS60L6 series Robot Specifications Specifications of the DRS60L6 series robot are as shown in Table 4.4 below. Table4. 4 DRS60L6 series robot specification table Specifications of the SCARA Robot DRS60L6SSADF003、DRS60L6SOADF003、DRS60L6OSADF003 Number of Axes 4 600mm / 23.62inch... -
Page 53: Drs70L Series Robot Specifications
Delta SCARA Robot System User Manual SCARA CE Series 4.5 DRS70L series Robot Specifications Specifications of the DRS70L series robot are as shown in Table 4.5 below. Table4. 5 DRS70L series robot specification table Specifications of the SCARA Robot DRS70L6SSADF003、DRS70L6SOADF003、DRS70L6OSADF003 Number of Axes 4 700mm / 27.56inch... -
Page 54: Drs60H Series Robot Specifications
Delta SCARA Robot System User Manual SCARA CE Series 4.6 DRS60H series Robot Specifications Specifications of the DRS60H series robot are as shown in Table 4.6 below. Table4. 6 DRS60H series robot specification table Specifications of the SCARA Robot DRS60H6SSADF003 Number of Axes 4 600mm / 23.62inch... -
Page 55: Dcs Controller Specifications
Delta SCARA Robot System User Manual SCARA CE Series 4.7 DCS controller Specifications controller specifications are as shown in Table 4.7 below. Table4. 7 DCS controller specifications DCS-1B00-CA Phase / Voltage 220V ~ +PE, 10A, 50 / 60Hz Power Rated power... -
Page 56: Dimensions
Delta SCARA Robot System User Manual SCARA CE Series 4.8 Dimensions 4.8.1 DRS40L series robot arm dimensions Figure 4.1 below is the dimensions figure of DRS40L series; the unit is mm. -
Page 57: Drs50L Series Robot Arm Dimensions
Delta SCARA Robot System User Manual SCARA CE Series Figure4. 1 DRS40L series dimensions figure 4.8.2 DRS50L series robot arm dimensions Figure 4.2 below is the dimensions figure of DRS50L series; the unit is mm. -
Page 58: Figure4. 2 Drs50L Series Dimensions Figure
Delta SCARA Robot System User Manual SCARA CE Series Z axis range Type 323 mm 423 mm 200 mm 300 mm 61 mm 161 mm Figure4. 2 DRS50L series dimensions figure... - Page 59 Delta SCARA Robot System User Manual SCARA CE Series...
-
Page 60: Drs60L3 Series Robot Arm Dimensions
Delta SCARA Robot System User Manual SCARA CE Series 4.8.3 DRS60L3 series robot arm dimensions Figure 4.3 below is the dimensions figure of DRS60L3 series; the unit is mm. -
Page 61: Drs60L6 Series Robot Arm Dimensions
Delta SCARA Robot System User Manual SCARA CE Series Figure4. 3 DRS60L3 series dimensions figure 4.8.4 DRS60L6 series robot arm dimensions Figure 4.4 below is the dimensions figure of DRS60L6 series; the unit is mm. Z axis range Type 323 mm... -
Page 62: Drs70L Series Robot Arm Dimension
Delta SCARA Robot System User Manual SCARA CE Series Figure4. 4 DRS60L6 series dimensions figure 4.8.5 DRS70L series robot arm dimension Figure 4.5 below is the dimensions figure of DRS70L series; the unit is mm. - Page 63 Delta SCARA Robot System User Manual SCARA CE Series Z axis range Type 323 mm 423 mm 200 mm 300 mm 61 mm 161 mm...
-
Page 64: Figure4. 5 Drs70L Series Dimensions Figure
Delta SCARA Robot System User Manual SCARA CE Series Figure4. 5 DRS70L series dimensions figure... -
Page 65: Drs60H Series Robot Arm Dimension
Delta SCARA Robot System User Manual SCARA CE Series 4.8.6 DRS60H series robot arm dimension Figure 4.6 below is the dimensions figure of DRS60H series; the unit is mm. Figure4. 6 DRS60H series dimensions figure... -
Page 66: Dcs Controller Dimensions
Delta SCARA Robot System User Manual SCARA CE Series 4.8.7 DCS controller dimensions DCS controller dimensions are as shown in Figure 4.7 below. 381mm 453mm 268mm Figure4. 7 Controller dimensions figure Controller installation notes: Do not put your finger or foreign matter into heat-radiating fan of controller, or it may cause injury hazards. -
Page 67: Hardware Point
Delta SCARA Robot System User Manual SCARA CE Series 5. Hardware point This chapter will introduce the point position and working range of the robot. Since the robot is a semi-finished product system, please install and adjust the active point positions according to the actual system in order to prevent operational errors causing damages to the robot and surrounding devices due to impact. -
Page 68: Drs 3Kg Series Limit Hardware Point
Delta SCARA Robot System User Manual SCARA CE Series 5.1 DRS 3kg series limit hardware point The installation location of the DRS 3kg series limit point is as shown in Figure 5.2 below; Table 5.1 is the limit point screw and locking torque. -
Page 69: Drs 6Kg Series Limit Hardware Point
Delta SCARA Robot System User Manual SCARA CE Series 5.2 DRS 6kg series limit hardware point The installation location of the DRS 6kg series limit point is as shown in Figure 5.2、5.3 below. 2-M8x12 hex socket screws (limit point) Figure5. 2... -
Page 70: Figure5. 4 Drs 6 Kg Series Second Arm Limit Hardware Point Installation Illustration
Delta SCARA Robot System User Manual SCARA CE Series The screws used to locking torque for the installation of the first arm and base limit point of DRS 6kg series are as shown in Table 5.2. Table5. 2 DRS 6kg series hardware point locking torque... -
Page 71: Drs60H Series Limit Hardware Point
Delta SCARA Robot System User Manual SCARA CE Series 5.3 DRS60H series limit hardware point The installation location of the DRS60H6 series limit point is as shown in Figure 5.5 below. Figure5. 5 DRS60H first arm limit hardware point installation illustration Table5. -
Page 72: Drs40L3 Series Active Hardware Point
Delta SCARA Robot System User Manual SCARA CE Series 5.4 DRS40L3 series active hardware point When the working range of the SCARA arm needs to restricted, active hardware limit points can be added The installation position of the first arm active point of DRS40L3 series and the working angle are as shown in Figure 5.7 below. -
Page 73: Figure5. 8 Drs40L3 Second Arm Active Point Position And Working Ranges
Delta SCARA Robot System User Manual SCARA CE Series The installation position of the second arm active point (119°, 132°) of DRS40L3 series and the working angle are as shown in Figure 5.8 below. J2=146.6 (Limit point) J2=119 J2=132 J2=132 J2=119 Figure5. -
Page 74: Drs60L3 Series Active Hardware Point
Delta SCARA Robot System User Manual SCARA CE Series 5.4 DRS60L3 series active hardware point The installation position of the first arm active point of DRS60L3 series and the working angle are as shown in Figure 5.9 below. J1=108 (Active point) -
Page 75: Figure5. 10 Drs60L3 Second Arm Active Point Position And Working Ranges
Delta SCARA Robot System User Manual SCARA CE Series The installation position of the second arm active point (121°, 145°) of DRS60L3 series and the working angle are as shown in Figure 5.10 below. J2=145 (Limit point) J2=121 J2=145 (Limit point) J2=121 Figure5. -
Page 76: Drs 50L6/60L6/70L 6 Kg Series Active Hardware Point
Delta SCARA Robot System User Manual SCARA CE Series 5.5 DRS 50L6/60L6/70L 6 kg series active hardware point The installation position of the first arm limit point of DRS50L6 series is as shown in Figure 5.11 below. M5x20 hex socket screws (screws used to keep fixtures in place) J1=55.2°... -
Page 77: Figure5. 12 The Installation Position Of The First Arm Limit Point Of Drs60L6 Series
Delta SCARA Robot System User Manual SCARA CE Series The installation position of the first arm limit point of DRS60L6 series is as shown in Figure 5.12 below. M5x20 hex socket screws (screws used to keep fixtures in place) J1=46° (active point) J1=59.5°... -
Page 78: Figure5. 13 The Installation Position Of The First Arm Limit Point Of Drs70L6 Series
Delta SCARA Robot System User Manual SCARA CE Series The installation position of the first arm limit point of DRS70L6 series is as shown in Figure 5.13 below. M5x20 hex socket screws (screws used to keep fixtures in place) J1=49° (active point) J1=62.5°... -
Page 79: Drs 60H Series Active Hardware Point
Delta SCARA Robot System User Manual SCARA CE Series 5.6 DRS 60H series active hardware point The installation position of the first arm limit point of DRS 60H series is as shown in Figure 5.15 below. Figure5. 15 The installation active hardware position of the first arm limit point of DRS60H series Table 5.12 below is the first arm point screw and locking torque for DRS60H series installation. -
Page 80: Figure5. 16 Drs60H Series Installation Position Of The Second Arm Active Point And Angle
Delta SCARA Robot System User Manual SCARA CE Series The installation position of the second arm active point and angle (101°, 121°, 141°) of DRS60H series are as shown in Figure 5.16 below. Figure5. 16 DRS60H series installation position of the second arm active point and angle Table 5.13 below is the second arm point screw and locking torque for DRS60H series installation. -
Page 81: Drs Ce Series Active Hardware Point
Delta SCARA Robot System User Manual SCARA CE Series 5.7 DRS CE series active hardware point The installation adjustment position of the Z axis active hardware point of DRS CE 3kg series is as shown in Figure 5.17 below. Screw torque value 9.7 to 10.5 N-m.。... -
Page 82: Figure5. 19 Drs60H Series Z Axis Active Hardware Adjustment Position
Delta SCARA Robot System User Manual SCARA CE Series Z axis active hardware adjustment position Figure5. 19 DRS60H series Z axis active hardware adjustment position... -
Page 83: Robotparts Descriptions
Delta SCARA Robot System User Manual SCARA CE Series 6. Robotparts descriptions This chapter will introduce the names, functions and operating directions of the various parts of the robot. Please install safety protection devices around the working area of the robot, such as railings, safety gratings, pressure pads or laser scanners etc. -
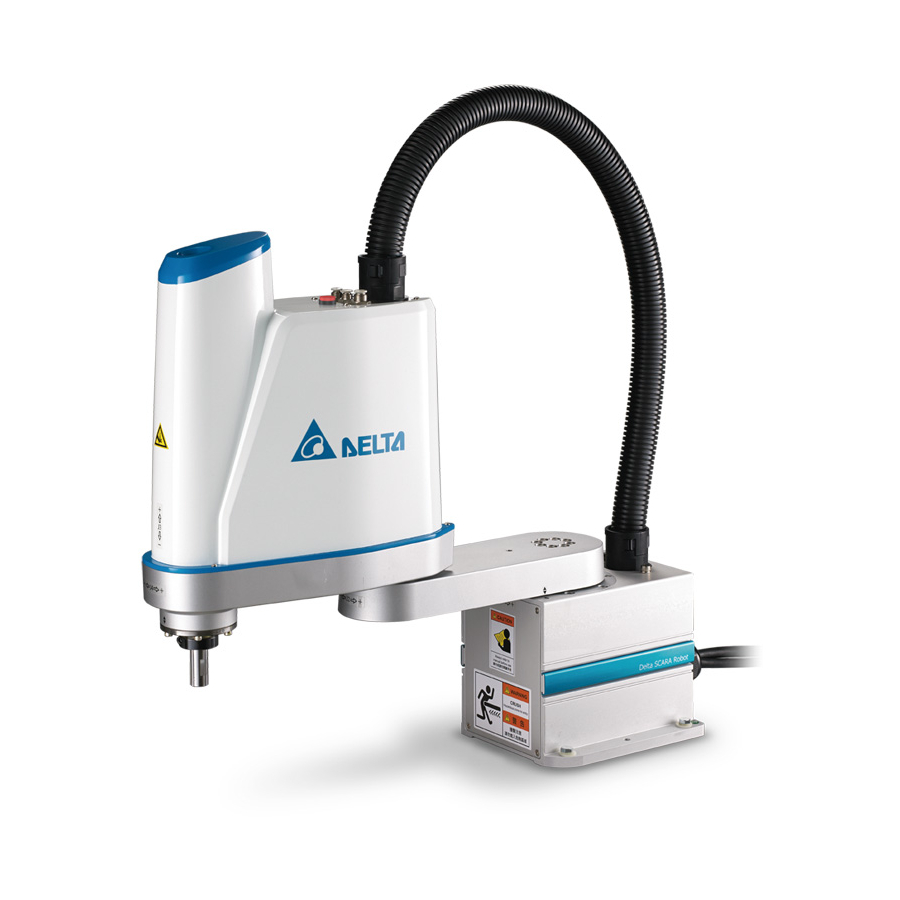
Page 84: Drs 3Kg Series Robot Parts Descriptions
Delta SCARA Robot System User Manual SCARA CE Series 6.1 DRS 3kg series robot parts descriptions The appearance and parts of DRS 3kg series are as shown in Figure 6.1 below. C-section cable Air hose Servo ON lamp J3 brake... -
Page 85: Figure6. 3 Internal Components Of The Drs 3Kg Series Second Arm
Delta SCARA Robot System User Manual SCARA CE Series The internal components of the DRS 3kg series second arm are as shown in Figure 6.3 below. J4 motor Screw J2 motor Spline R-axis gear J3 motor Central spindle Figure6. 3 Internal components of the DRS 3kg series second arm... -
Page 86: Drs 6Kg Series Robot Parts Descriptions
Delta SCARA Robot System User Manual SCARA CE Series 6.2 DRS 6kg series robot parts descriptions The appearance and parts of DRS 6kg series are as shown in Figure 6.4 below. Start lamp C-section cable Air hose J3 and J4... -
Page 87: Figure6. 6 Internal Mechanisms And Components Of The Drs 6Kg Series Second Arm
Delta SCARA Robot System User Manual SCARA CE Series The internal components of the DRS 6kg series second arm are as shown in Figure 6.6 below. J3 motor J4 motor J2 motor Spline screw R-axis gear Brake PCB J3 Brake DC to... -
Page 88: Drs 60H Series Robot Parts Descriptions
Delta SCARA Robot System User Manual SCARA CE Series 6.3 DRS 60H series robot parts descriptions The appearance and parts of DRS60H series are as shown in Figure 6.7 below. Figure6. 7 DRS60H series appearance figure The internal components of the DRS60H series base are as shown in Figure 6.8 below. -
Page 89: Figure6. 9 Internal Mechanisms And Components Of The Drs60H Series Second Arm
Delta SCARA Robot System User Manual SCARA CE Series The internal components of the DRS60H series second arm are as shown in Figure 6.9 below. Figure6. 9 Internal mechanisms and components of the DRS60H series second arm... -
Page 90: Drs Robot Operation Directions
Delta SCARA Robot System User Manual SCARA CE Series 6.4 DRS robot operation directions DRS series are four-axis robots composed of the first arm (J1), second arm (J2), Z-axis (J3) and RZ- axis (J4); its operation directions are divided into Joint coordinate and Cartesian coordinate according to the type. -
Page 91: Drs 3Kg Series Buttons And Lamps
Delta SCARA Robot System User Manual SCARA CE Series 6.5 DRS 3kg series buttons and lamps DRS 3kg series brake release button function description: This button is located on the head of the robot and its location is as shown in Figure 6.10 below;... -
Page 92: Drs 3Kg Series Lamp Descriptions
Delta SCARA Robot System User Manual SCARA CE Series 6.6 DRS 3kg series lamp descriptions The lamp is located on the head of the robot as shown in Figure 6.12 below. The lamp will turn on when the robot status is Servo ready and the lamp will go off when the robot is abnormal or when Servo is off. -
Page 93: Drs 6Kg Series Buttons And Lamps
Delta SCARA Robot System User Manual SCARA CE Series 6.7 DRS 6kg series buttons and lamps DRS 6kg series brake release button function description: This button is located on the head of the robot and its location is as shown in Figure 6.13 below;... -
Page 94: Figure6. 14 Drs 6Kg Series Break Release Attention
Delta SCARA Robot System User Manual SCARA CE Series Careful not to get pinched Careful not to get pinched and slide down Figure6. 14 DRS 6kg series break release attention DRS 6kg series lamp descriptions: The lamp is located on the head of the robot as shown in Figure 6.15 below. The lamp will turn on when the robot status is Servo ready and the lamp will go off when the robot is abnormal or when Servo is off. -
Page 95: Drs60H Series Air Hose And Signal Connector Configuration
Delta SCARA Robot System User Manual SCARA CE Series 6.8 DRS60H series air hose and signal connector configuration DRS60H series brake release button function description: This button is located on the head of the robot and its location is as shown in Figure 6.16 below;... -
Page 96: Figure6. 17 Drs60H Series Break Release Attention
Delta SCARA Robot System User Manual SCARA CE Series Figure6. 17 DRS60H series break release attention DRS60H series lamp descriptions: The lamp is located on the head of the robot as shown in Figure 6.18 below. The lamp will turn on when the robot status is Servo ready and the lamp will go off when the robot is abnormal or when Servo is off. -
Page 97: Drs Ce Series Air Hose And Signal Connector Configuration
Delta SCARA Robot System User Manual SCARA CE Series 6.9 DRS CE series air hose and signal connector configuration DRS CE series air hose configuration: Since customers need to install different clips and fixtures during actual applications, the robot provides a signal connector and three sets of air hoses for customers to install. -
Page 98: Figure6. 21 Installation Location Of Drs60H Series Air Hose Connector
Delta SCARA Robot System User Manual SCARA CE Series Item Specifications Remark Signal 15Pin(Female) Item Specifications Remark connector Signal 15Pin(Male) Air hose Φ6 Black connector connector Air hose Φ6 Black Air hose Φ6 Blue connector connector Air hose Φ6 Blue Air hose Φ4... -
Page 99: Figure6. 23 Signal Connector Wiring Table
Delta SCARA Robot System User Manual SCARA CE Series Standard D-Sub 15 pin is used for the connector; a female connector is used for the head and a male connector is used for the base. Please use with the D-Sub connector provided in the accessory pack;... -
Page 100: Drs Ce Series Battery Location
Delta SCARA Robot System User Manual SCARA CE Series 6.10 DRS CE series battery location Figure 6.24 below is the location of the DRS CE series battery. and Figure 6.25 below is the location of the DRS60H series battery. There are 2 batteries in the battery holder and the battery is responsible for memorizing the position of each axis of the robot. -
Page 101: Wiring
Delta SCARA Robot System User Manual SCARA CE Series 7. Wiring This chapter introduces the compositions of the peripheral systems of the controller and the wiring. Since the robot is a semi-finished product system, please construct safety protection systems, operation buttons and lamps etc., around the robot according to the instructions in the manual properly in order to ensure the integrity and safety of the entire system. -
Page 102: Controller Peripheral Interface
Delta SCARA Robot System User Manual SCARA CE Series 7.1 Controller peripheral interface The robot controller is integrated with the driver control; this controller can be used with visual systems and teach pendants, and be expanded with drivers or remote input/output modules to easily complete the integration with peripheral systems. -
Page 103: Introduction To The Controller Interface
Delta SCARA Robot System User Manual SCARA CE Series Figure7. 1 Power control box interface peripheral combination 7.2 Introduction to the controller interface Figure 7.2 below is the DCS power control box interface; the following are individual explanations of the controller interface, explaining the function of the interface and the wiring. -
Page 104: Main Circuit Power Connection
SCARA CE Series 7.2.1 Main circuit power connection The input power specification of the Delta robot controller is AC 200V to 230V single-phase 50/60 Hz. Customers need to connect the main power manually and please use cables that comply with VW-1 flame resistance and UL758 wire diameter specifications, as well as cables with the specifications in Table 7.1 below:... -
Page 105: Figure7. 4 Power Breaker Location
Delta SCARA Robot System User Manual SCARA CE Series Open the controller box hatch and the power circuit breaker is located at the top-left corner of the power control box, as shown in Figure 7.4. Figure7. 4 Power breaker location The primary and secondary power breakers both have shock-proof protection covers;... -
Page 106: Figure7. 6 Power Cable And Ground Cable Installation Location
Delta SCARA Robot System User Manual SCARA CE Series Connect L and N of the power cable to where L and N is marked on the primary power breaker, and connect the ground cable to the point marked PE on the grounding copper. Place the protection cover back on once installation is complete, as shown in Figure 7.6. -
Page 107: Robot Connectors
Delta SCARA Robot System User Manual SCARA CE Series 7.2.2 Robot connectors Detachable cables are used for the connection between the robot and the DCS robot control box; the two ends are connected with heavy load connectors. Please make sure the buckles are locked in properly before turning on the power. -
Page 108: External Encoder Connector
Delta SCARA Robot System User Manual SCARA CE Series 7.2.3 External encoder connector A set of external optical ruler or encoder is provided for external optical rulers or encoders (A, B, Z); the connection of the controller into a fully closed loop can be applied for CVT functions. The location of the external encoder connector and definitions of the pins are as shown in Figure 7.10 and Table 7.3 below. -
Page 109: User.di/O
Delta SCARA Robot System User Manual SCARA CE Series 7.2.4 User.DI/O Standard D-SUB50P/Female/3 row connector; this connector defines the user output input pins and provides 12 sets of output and 24 sets of input that can be planned freely. The location of the connector is as shown in Figure 7.11 and the definitions of the pins are as shown in Table 7.4 below. -
Page 110: Figure7. 12 Npn Wiring For When The Input Signal Di Uses Power Of The Controller Itself
Delta SCARA Robot System User Manual SCARA CE Series User digital input (User.DI) wiring example User input signal D1 includes a total of 24 points from Pin1~Pin24; users can freely select between NPN or PNP wiring. When the power of the controller itself is going to be used for the input signal DI: ... -
Page 111: Figure7. 14 Input Signal Di Connected To Upper Controller Using Npn Connection
Delta SCARA Robot System User Manual SCARA CE Series When the input signal DI is going to be connected directly with the upper controller and NPN wiring is used, the wiring method is as shown in Figure 7.14. Upper controller Figure7. -
Page 112: Figure7. 16 User Do Controller Voltage Output Npn Wiring
Delta SCARA Robot System User Manual SCARA CE Series The output signal DO includes a total of 24 points of output from Pin25~Pin48; the output method can be NPN or PNP. Customers can freely choose whether the output voltage signal will be controller voltage output or upper controller voltage output. - Page 113 Delta SCARA Robot System User Manual SCARA CE Series...
-
Page 114: Figure7. 19 User Do Upper Controller Voltage Output Npn Wiring
Delta SCARA Robot System User Manual SCARA CE Series When the selected output voltage signal is the upper controller voltage output The NPN wiring method is as shown in Figure 7.19 below: Figure7. 19 User DO upper controller voltage output NPN wiring The PNP wiring method is as shown in Figure 7.20 below:... - Page 115 Delta SCARA Robot System User Manual SCARA CE Series...
-
Page 116: System Digital Output Input Connectors
Delta SCARA Robot System User Manual SCARA CE Series 7.2.5 System digital output input connectors Standard D-Sub25P/Female connector; System DI/O provides 5 point input and 7 point output to communicate with the upper controller. Pin definitions are as shown in Table 7.5, and the connector interface locations are as shown in Figure 7.22. -
Page 117: Figure7. 23 Dc Output Connector Location
Delta SCARA Robot System User Manual SCARA CE Series Please connect Pin2 (N24G) of the DC output connector in the power control box interface with the input signal DI by using a button or selection switch during wiring. The DC Output location is as shown in Figure 7.23. -
Page 118: Figure7. 25 System Do Controller Voltage Output Npn Wiring
Delta SCARA Robot System User Manual SCARA CE Series The output signal DO includes a total of 8 points of output from Pin7~Pin22; the output method can be NPN or PNP. Customers can freely choose whether the output voltage signal will be controller voltage output or upper controller voltage output. -
Page 119: Figure7. 28 System Do Upper Controller Voltage Output Npn Wiring
Delta SCARA Robot System User Manual SCARA CE Series When the selected output voltage signal is the upper controller voltage output. The NPN wiring method is as shown in Figure 7.28 below: Figure7. 28 System DO upper controller voltage output NPN wiring The PNP wiring method is as shown in Figure 7.29 below:... -
Page 120: Table7. 6 Di4, Di5 Mode Selection Truth Table
Delta SCARA Robot System User Manual SCARA CE Series 7.2.5.1 System digital input (SYS.DI) usage DI3 reserved This function is temporarily reserved and does not have any meaning. DI4, DI5 mode selection switch Provides 2 point DI4 and DI5 signals. User then selects whether to perform manual teach or automatic operation mode. -
Page 121: Figure7. 31 Two-Stage Key Switch Figure
Delta SCARA Robot System User Manual SCARA CE Series Note: Please use the two-stage key switch (one for contact A and one for contact B) in order to ensure that the operation mode cannot be changed randomly and prevent danger from happening. The key switch is as shown in Figure 7.31 below. -
Page 122: Figure7. 34 Reset Button Installation Location
Delta SCARA Robot System User Manual SCARA CE Series DI6, DI7 program execution Provides the function for customers to perform program run; the program can be paused, stopped and run by executing the functions from the external switch; its description is as shown in Table 7.7 below. -
Page 123: Table7. 8 Sys.do1 Status Descriptions
Delta SCARA Robot System User Manual SCARA CE Series 7.2.5.2 Digital output (DO) usage DO1 robot abnormality alarm status display The status descriptions of the system digital output SYS.DO1 is as shown in Table 7.8 below. Table7. 8 SYS.DO1 status descriptions... -
Page 124: Table7. 12 Sys.do5 Status Descriptions
Delta SCARA Robot System User Manual SCARA CE Series DO5, DO6 program run status display The status descriptions of the system digital output SYS .DO5 and SYS.DO6 are as shown in Table 7.12 below. Table7. 12 SYS.DO5 status descriptions SYS.DO6 status SYS.DO5 status... -
Page 125: Safety Connector
Delta SCARA Robot System User Manual SCARA CE Series 7.2.6 Safety connector The controller provides 8 point safety signals for users to connect; these 8 point safety signals can be used by the user to construct comprehensive robot safety protection. The location of the safety connector is as shown in Figure 7.35. -
Page 126: Figure7. 36 Wiring Example Of A Single Emergency Stop Button
Delta SCARA Robot System User Manual SCARA CE Series Connects to external emergency stop notes: The emergency stop is a dry contact (voltage-free contact) signal. Do not connect AC or DC voltage signal, or it may cause the damage to the internal components of the controller. -
Page 127: Figure7. 37 Wrong Wiring Of A Single Nc Emergency Stop
Delta SCARA Robot System User Manual SCARA CE Series Figure 7.37 below shows the wiring method when only a single emergency stop button NC contact is used; this wiring method is wrong and such wiring will cause the system to become abnormal continuously. -
Page 128: Figure7. 39 Wiring Example Of Multiple Emergency Stop Buttons
Delta SCARA Robot System User Manual SCARA CE Series When multiple emergency stop buttons need to be connected, please perform wiring according to Figure 7.39 and distribute the locations of each emergency stop buttons appropriately so that when a dangerous situation occurs, the emergency stop button can be quickly pressed to stop the robot actions. - Page 129 Delta SCARA Robot System User Manual SCARA CE Series...
-
Page 130: Figure7. 41 Safety Door Switch Figure
Delta SCARA Robot System User Manual SCARA CE Series For safety protection needs, users can install safety lock switches on the railings in order to ensure that the safety door can close properly, as shown in Figure 7.41 below. Figure7. 41 Safety door switch figure... -
Page 131: Direct Current Output Connector
Delta SCARA Robot System User Manual SCARA CE Series 7.2.7 Direct current output connector There is a DC output connector on the power control box interface for customers to connect DI/O signals. The connector location is as shown in Figure 7.43 and the pin definitions are as shown in Table 7.15. -
Page 132: Handheld Teach Pendant Connector
Delta SCARA Robot System User Manual SCARA CE Series 7.2.8 Handheld teach pendant connector Users can use the handheld teach pendant to operate the robot, teach points, edit robot program and perform I/O surveillance easily. The connection method is as shown in Figure 7.44. -
Page 133: Figure7. 46 Tp Enable Switch Icon
Do not press the screen on the TP with a sharp object or a pen, or it may cause the damage to the screen. Please refer to the TP manual for detailed operations, or download it from the official Delta website. ... -
Page 134: Figure7. 47 Correct Way To Hold The Tp
Delta SCARA Robot System User Manual SCARA CE Series Figure7. 47 Correct way to hold the TP TP interface structure: it is mainly divided into touch screen, physical buttons, emergency stop button and select/adjust knob, as shown in Figure 7.48 below. -
Page 135: Serial Transmission (Rs-232, Rs-485)
Delta SCARA Robot System User Manual SCARA CE Series 7.2.9 Serial transmission (RS-232, RS-485) Standard D-Sub 9P/Female Connector. With controllers such as PC, PLC and HMI, etc. that are designed with RS-232/485 function, users may carry out the communication with the power control box controller through such connector to read the Robot data or control the Robot. -
Page 136: Communication Port (Ethernet)
7.2.10 Communication port (ETHERNET) By connecting the network cable to Ethernet connector, the PC can perform communication connection with the controller. In addition, the following can be performed through the Delta DROE software: Edit robot language and save the program into the controller to perform project management. -
Page 137: Communication Port (Dmcnet)
Diverse Delta products can be connected through the Delta high speed communication network DMCNET; for example, drivers or remote DI/O modules. Connect one side of a standard RJ45 to the power control box interface and connect the other end to the Delta DMCNET product as shown in Figure 7.52. -
Page 138: Figure7. 54 Power Control Box With External Driver System Architecture
Delta SCARA Robot System User Manual SCARA CE Series Driver models that can be connected through DMCNET are as follows: ASD-A2-0221-FN Product name: Input voltage and phase count: AC Servo Drive 21:220V~、1 Phase 23:220V~、3 Phase Product series name: Drive rated power: A2 Series 01:100W... -
Page 139: Figure7. 55 Asd-Dmc-Rm32Mn
Delta SCARA Robot System User Manual SCARA CE Series Listed below is the model number of DI/O module that can be connected: Input Module: ASD-DMC-RM32MN 32-point Input Module. Input signal: By connecting with COM point, the user may select input signal as PNP or NPN. -
Page 140: Installation And Operation
Delta SCARA Robot System User Manual SCARA CE Series 8. Installation and operation This chapter will introduce how to install, wire, connect the robot and the execution method for initial operation. Please read this manual carefully before usage in order to ensure proper usage and the safety of the maintenance staff. - Page 141 Delta SCARA Robot System User Manual SCARA CE Series to stop completely when the robot is no longer used before you leave. Please follow the manual to install the safety protection devices such as railings, gratings, regional laser or pressure pads in order to prevent workers for getting inside the working range of the robot and result in injuries or other dangers due to impact by the robot.
- Page 142 Delta SCARA Robot System User Manual SCARA CE Series pendant might get damaged. The location of the interlock switch between the structure of the safety protection device and the protection device should comply with EN ISO 14120 and EN ISO 14119 standards, and the safety distance should be designed according to EN ISO 13857 standards.
-
Page 143: Robot And Power Control Box Installation
Delta SCARA Robot System User Manual SCARA CE Series 8.1 Robot and power control box installation 8.1.1 Robot installation The installation of the robot should be as shown in Figure 8.1 below; lock the base on a flat surface using M8 screws + flat gaskets, and lock it tight by using the locking torque (20N-m) instructed. -
Page 144: Controller Installation
Delta SCARA Robot System User Manual SCARA CE Series 8.1.2 Controller installation Controller installation notes: The controller uses forced fan cooling, so sufficient space must be left in the front, back and left side of the controller or else it will cause malfunctions. Figure 8.2 shows the cooling illustration of the controller. -
Page 145: Figure8. 3 Controller Installation Cooling Distance
Delta SCARA Robot System User Manual SCARA CE Series Do not topple over the power control box as doing so will cause it to malfunction. >150mm >100mm >150mm Figure8. 3 Controller installation cooling distance When the controller is installed outside the equipment of the final system integrator, please make sure that the height of the power control box is at 0.6m to 1.7m between. -
Page 146: Figure8. 5 Controller Box Door Open Space
Delta SCARA Robot System User Manual SCARA CE Series When installing the controller, please check to leave space for opening the controller door, or else it will be difficult to perform repairs. Figure 8.5 showsthe space used when the power control box door is opened. -
Page 147: Safety Protection Device Construction
Delta SCARA Robot System User Manual SCARA CE Series 8.2 Safety protection device construction 8.2.1 Railing construction notes The final system integrator must construct safety protection devices around the robot properly, such as railings, pressure pads and gratings etc. Please refer to Chapter 3 for the construction of safety protection devices. -
Page 148: Figure8. 8 Safety Railing Signal Installation Example
Delta SCARA Robot System User Manual SCARA CE Series Danger area Robot working range Safety switch outside railing Safety switch inside railing Figure8. 8 Safety railing signal installation example The wiring method of the safety railing signal is as shown in Figure 8.9 below. The safety signal contact on the controller must be a voltage-free contact;... -
Page 149: Emergency Stop Installation Notes
Delta SCARA Robot System User Manual SCARA CE Series 8.2.2 Emergency stop installation notes Please refer to Chapter 3.2.1 for details on items related to the installation of the emergency stop button. The installation of the emergency stop button must be at an obvious place and cannot be blocked by other equipment or objects. -
Page 150: Figure8. 11 Example Of Installing Multiple Emergency Stop Buttons Inside The Railing
Delta SCARA Robot System User Manual SCARA CE Series Please also install one or more emergency stop buttons inside the railing so that if workers are trapped inside the railing, they can press the emergency stop button inside the railing and the controller will remove the power from the robot in order to ensure the safety of the workers trapped inside the railing. -
Page 151: Wiring
Delta SCARA Robot System User Manual SCARA CE Series 8.3 Wiring Please have workers with related wiring knowledge responsible for the wiring, otherwise, it can easily cause danger. Please implement the grounding properly in order to ensure the safety. Please refer to Chapter 7 for details on related wiring for the controller; please have the final system integrator to perform wiring according to your actual needs. -
Page 152: Figure8. 14 Robot Cable Connection Figure
Delta SCARA Robot System User Manual SCARA CE Series Please use the robot cables from our company to connect the robot and controller, as shown in Figure 8.14 below. Figure8. 14 Robot cable connection figure When installing the robot cable on the robot and controller, please lock the connector and fixture seat properly in place, otherwise it can easily cause poor signal contact and other dangers. -
Page 153: Figure8. 16 Air Pipe Path Inside The Robot
Delta SCARA Robot System User Manual SCARA CE Series The robot provides 2 Φ6 air hoses and 1 Φ4 air hose for users to use. Please use clean, oil-less, steam air source; otherwise, it can cause damages to the pneumatic piping or components inside the robot. -
Page 154: Figure8. 17 Detailed Locations Of The Robot Air Pipes
Delta SCARA Robot System User Manual SCARA CE Series Detailed locations of the robot air pipe are as shown in Figure 8.17 below. DRS40/50/60/70L series Air Output Air Input DRS60H series Air Output Air Input Figure8. 17 Detailed locations of the robot air pipes... -
Page 155: Figure8. 18 Signal Path Inside The Robot
Delta SCARA Robot System User Manual SCARA CE Series 2 D Sub-15Pin connectors are provided inside the robot, easy for customers to use when installing fixture sensors at the TCP terminal. The signal circuit enters from the base at the bottom of the robot and connects to the back of the head, as shown in Figure 8.18 below. -
Page 156: Figure8. 19 Wiring Example Connecting The Sensor Using The Robot Connector
Delta SCARA Robot System User Manual SCARA CE Series Figure 8.19 below is a wiring example using the D Sub-15Pin connector provided inside the robot when the customer is installing sensors at the TCP terminal. DRS40/50/60/70L series Sensor cable Air tube... -
Page 157: Inspection Before Power Transmission
Delta SCARA Robot System User Manual SCARA CE Series 8.4 Inspection before power transmission Please check whether the wiring of the entire system is properbefore connecting the power; the following sections are items to check for the robot and controller systems. -
Page 158: Figure8. 22 Press The Emergency Stop Signal And Measure Pin1 And 2
Delta SCARA Robot System User Manual SCARA CE Series Measure Pin1 and 2 of the safety connector; the reading on the multimeter must be ∞, as shown in Figure 8.22 below. Figure8. 22 Press the emergency stop signal and measure Pin1 and 2 Measure Pin3 and 4 of the safety connector;... -
Page 159: Railing Safety Signal Check
Delta SCARA Robot System User Manual SCARA CE Series 8.4.2 Railing safety signal check Unplug the safety connector, take a multimeter and set the Ω gear to the lowest gear. Turn off all railing safety signals. Measure Pin5 and 6 of the safety connector; the reading on the multimeter must be <0.5Ω, as shown in Figure 8.24 below. -
Page 160: Figure8. 26 Turn On Railing Safety Signal And Measure Pin5 And 6
Delta SCARA Robot System User Manual SCARA CE Series Measure Pin5 and 6 of the safety connector; the reading on the multimeter must be ∞, as shown in Figure 8.26 below. Figure8. 26 Turn on railing safety signal and measure Pin5 and 6 Measure Pin7 and 8 of the safety connector;... -
Page 161: Robot Cable Check
Delta SCARA Robot System User Manual SCARA CE Series 8.4.3 Robot cable check Connect the robot cable on the robot and controller; the connector must be locked tightly and the connector should not be loose. The location to check is as shown in Figure 8.28 below. -
Page 162: Controller Di/O Signal Check
Delta SCARA Robot System User Manual SCARA CE Series 8.4.4 Controller DI/O signal check Check whether the controller DI/O signal connections are correct. The controller DI/O signal is DC 24V signals using NPN or PNP connections; it cannot be connected to the AC power. -
Page 163: Air Hose Installation Check
Delta SCARA Robot System User Manual SCARA CE Series 8.4.5 Air hose installation check Check whether the air hose of the robot is loose; the air hose should not come off from the air hose connector, as shown in Figure 8.29. -
Page 164: Input Power Check
Delta SCARA Robot System User Manual SCARA CE Series 8.4.6 Input power check Check the primary L and N wiring of the power switch inside the controller; the L and N power cables cannot be loose. The location to check is as shown in Figure 8.30 below. -
Page 165: Safety Protection Device Check
Delta SCARA Robot System User Manual SCARA CE Series 8.4.7 Safety protection device check After power is connected to the controller, please check all safety protection devices properly before operating the robot in order to ensure that the system integration and wiring are correct. -
Page 166: Initial Operation
Delta SCARA Robot System User Manual SCARA CE Series 8.5 Initial operation 8.5.1 Initial operation risk notification Since users are unfamiliar with the operations when executing operations for the first time, it is possible that workers might get hit by the robot. -
Page 167: Figure8. 33 Location To Be Careful Of When The Z-Axis Slides Down
Delta SCARA Robot System User Manual SCARA CE Series objects were hung on the Z-axis. Please be careful not to place hands under the Z-axis in order to prevent hands from getting squeezed, as shown in Figure 8.33 below. Brake release push button... -
Page 168: Figure8. 34 Working Area And Safe Area Of The Robot Inside The Railing
Delta SCARA Robot System User Manual SCARA CE Series Please teach the points from outside of the railing when operating for the first time. If it has to be taught inside the railing, please stand at the safe area inside the railing in order to avoid getting hit by the robot during operation, as shown in Figure 8.34 below. -
Page 169: When Operating Tp For The First Time
Delta SCARA Robot System User Manual SCARA CE Series 8.5.2 When operating TP for the first time When teach pendant is used to operate the robot, please connect the teach pendant connector onto the controller. Please disconnect the power before connecting; the location for connection is as shown in Figure 8.35. -
Page 170: Figure8. 37 Location Of The Enable Switch Behind The Teach Pendant
Delta SCARA Robot System User Manual SCARA CE Series The enable switch at the back of the teach pendant is a 3-position button; the robot can only be operated when pressed at the middle position. When the enable switch is released or pressed all the way down, it will cut the power outputted to the robot from the controller. -
Page 171: Figure8. 39 Location Of Teach Pendant Physical Buttons
Delta SCARA Robot System User Manual SCARA CE Series To Servo off the robot, just press the button again to Servo off the robot. At this time the icon will change to ** . When Servo on the robot, pressing the physical + and - buttons to the right of the teach pendant can operate the robot. -
Page 172: Abnormal Condition Disposal
Delta SCARA Robot System User Manual SCARA CE Series 8.6 Abnormal condition disposal When faced with abnormal conditions, we recommend users to dispose of them using the following methods: Press the emergency stop button outside the railing. Switch the mode selection to manual (T1 mode) status. This action ensures that workers will not accidentally press start operation again and restart the robot before the abnormal condition was eliminated. -
Page 173: How To Save Injured Workers
Delta SCARA Robot System User Manual SCARA CE Series 8.7 How to save injured workers If workers were accidentally hit and injured, or got caught by the robot, please save them using the following steps. Press the emergency stop button to cut off the power sent to the robot from the controller, as shown in Figure 8.41. -
Page 174: Figure8. 43 Save Worker By Lifting Z-Axis
Delta SCARA Robot System User Manual SCARA CE Series If the worker was caught by the Z-axis, please use an auxiliary tool or elevation device to lift the Z- axis so that the worker can break away from the robot, as shown in Figure 8.43. -
Page 175: How To Turn Off The Power
Delta SCARA Robot System User Manual SCARA CE Series 8.8 How to turn off the power When the robot is not in use, please turn off the power of the controller properly and confirm that the robot has come to a complete stop before leaving. -
Page 176: Maintenance
Delta SCARA Robot System User Manual SCARA CE Series 9. Maintenance In order to prolong the usage life of the robot and to ensure accuracy for usage and reduce malfunctions, maintenance and inspections must be performed properly according to the maintenance table. -
Page 177: Drs Ce Series Inspection Table
Delta SCARA Robot System User Manual SCARA CE Series 9.1 DRS CE series inspection table Table 9.1 below is the inspection table of the DRS CE series robots. Please turn off the power switch properly during inspection and press the emergency stop button to ensure worker safety, otherwise dangers might occur. -
Page 178: Table9. 2 Oil Table Of The Maintenance Oil For Each Axis Parts
Delta SCARA Robot System User Manual SCARA CE Series Table 9.2 below is the oil table for each DRS axis part that requires oil change during maintenance. Please use the oils described in the table or similar quality oils to perform maintenance in order to ensure normal use of each component. -
Page 179: Robot Battery Maintenance And Replacement
When the absolute position data is lost, the origin reset process must be performed again. Please use batteries with specifications that comply with Delta specifications; otherwise, it might cause damages to the machine. Please refer to the battery specifications shown in Table 9.3. -
Page 180: Figure9. 1 Drs Ce Series Battery Location
Delta SCARA Robot System User Manual SCARA CE Series DRS40/50/60/70L series Battery holder DRS60H series Figure9. 1 DRS CE series battery location... -
Page 181: Bill Of Materials
Delta SCARA Robot System User Manual SCARA CE Series 10. Bill of materials This chapter lists some important components; please purchase components with same specifications if the component is damaged and needs to be replaced. Randomly replacing components with different specification is prohibited;... -
Page 182: Dcs Controller Bill Of Materials
Delta SCARA Robot System User Manual SCARA CE Series 10.1 DCS controller bill of materials Figure 10.1 below are the locations of the components inside the DCS-1B00-CA controller. Figure10. 1 Controller internal parts layout... - Page 183 Delta SCARA Robot System User Manual SCARA CE Series Table 10.1 below is the bill of materials for the DCS controller; please replace materials according to the specification table below when damaged. Please replace components with the same model number, otherwise it might cause more damages or danger, or reduce the performance of the controller and robot.
- Page 184 Delta SCARA Robot System User Manual SCARA CE Series M3, M4 Servo motor DELTA ECMR-CV0401PX 100W XT1-XT9 Terminal block DINKLE AK2.5-TR 800V/24A BT1-BT2 Battery ER14505 DC 3.6V HMN-012-F Modul1, 2 Connector TYCO 250VAC/10A HMN-012-M HMN-025-F Modul3 Connector TYCO 250VAC/10A HMN-025-M AC-12: 250VAC, 0.5A...
-
Page 185: Simple Troubleshooting
Delta SCARA Robot System User Manual SCARA CE Series 11. Simple troubleshooting This chapter introduces some simple troubleshooting methods and abnormality messages and contents of the controller. Please perform troubleshooting properly according to the descriptions in the manual. ... -
Page 186: Fuse Replacement
Delta SCARA Robot System User Manual SCARA CE Series 11.1 Fuse replacement In order to protect the various components inside the power control box, fuses are used for each power circuit to protect its electrical circuit. If the corresponding fuse is burnt, the corresponding circuit will not be able to operate normally. -
Page 187: Table11. 2 Fuse Replacement Steps
Delta SCARA Robot System User Manual SCARA CE Series Solution: If the malfunction status above occurred, it might be due to the corresponding fuse being burnt. Please open the power control box door to check the fuse circuit and perform replacement if necessary. Please... -
Page 188: Troubleshooting Temperature Of Power Control Box Being Too High
Delta SCARA Robot System User Manual SCARA CE Series 11.2 Troubleshooting temperature of power control box being too high If the cooling fan of the box body malfunctioned or the installation space was not installed according to the distance specified in the manual, the temperature inside the power control box will become too high, causing components inside the power control box to get damaged due to the temperature being too high. -
Page 189: Abnormality Warning List
Delta SCARA Robot System User Manual SCARA CE Series 11.3 Abnormality warning list When an abnormality occurs, the abnormality code number can be received through the handheld teach pendant. Table 11.4 below shows the abnormality alarms according to their group categories. -
Page 190: Table11. 5 Axis Category Abnormality Warning Code Number
Delta SCARA Robot System User Manual SCARA CE Series Table 11.5 below is the axis abnormality warning table according to each axis category Table11. 5 Axis category abnormality warning code number Abnormality Abnormality type Servo status warning Abnormality warning name... - Page 191 Delta SCARA Robot System User Manual SCARA CE Series Abnormality Abnormality type Servo status warning Abnormality warning name WARN display ○ ○ E?070 Encoder processing not complete warning ○ ○ E?072 Encoder over-speed ○ ○ E?099 EEPROM needs upgrading ○...
-
Page 192: Abnormality Warning Cause And Disposal Method
Delta SCARA Robot System User Manual SCARA CE Series 11.4 Abnormality warning cause and disposal method The following are the causes of each abnormality warning and their troubleshooting methods. Group category: E?801 origin not set for all axes Cause Origin not set for all axes... - Page 193 Delta SCARA Robot System User Manual SCARA CE Series E?843 arc mode error Cause Arc mode error. Inspection and disposal Please return it to the dealer or original manufacturer for repairs. method Solution Abnormality warning reset. E?851 conveyor belt tacking visual parameter transmission timeout 1.
- Page 194 Delta SCARA Robot System User Manual SCARA CE Series Axis category: E?001 over-current 1. Driver output short-circuited. Cause 2. Motor connection error. 3. IGBT abnormal. 1. Check whether the wiring between the motor and driver has short-circuited; if short-circuited, please eliminate the short-circuit status and prevent the wiring Inspection and from being exposed.
- Page 195 Delta SCARA Robot System User Manual SCARA CE Series E?005 regeneration error 1. Use of regenerative resistance error or no external regenerative resistance Cause connected. 2. Parameter setting error. Inspection and disposal Please return it to the dealer or original manufacturer for repairs.
- Page 196 Delta SCARA Robot System User Manual SCARA CE Series E?013 safety stop 1. Emergency stop switch is trsggered. Cause 2. Protective stop signal is triggered, Safety dooe is open (Fence is triggered). 3. In T1 mode, no press TP enable switch.
- Page 197 Delta SCARA Robot System User Manual SCARA CE Series E?018 detector output abnormal 1. Encoder error. Cause 2. Output pulse wave exceeded the allowable range by the hardware. Inspection and disposal Please return it to the dealer or original manufacturer for repairs.
- Page 198 Delta SCARA Robot System User Manual SCARA CE Series E?025 encoder internal error 1. Encoder internal error (internal memory abnormal and internal counter abnormal). Cause 2. When power is connected, the motor started due to mechanical inertia or other elements.
- Page 199 Delta SCARA Robot System User Manual SCARA CE Series E?031 motor power cable break detection Cause Motor power cable broke. Inspection and Check whether the power cable (U, V, W, GND) of the motor had broken and wire disposal method and ground it properly according to the manual.
- Page 200 Delta SCARA Robot System User Manual SCARA CE Series E?062 absolute position loop overflow Cause Stroke exceeded range. Inspection and disposal Please return it to the dealer or original manufacturer for repairs. method Solution Reconnect the power and clear. E?067 encoder temperature warning Cause Encoder temperature too high warning (85 ~ 100℃...
- Page 201 Delta SCARA Robot System User Manual SCARA CE Series E?072 encoder over-speed While power is supplied by the driver: rotation speed exceeded 8800rpm; while Cause power is supplied by the battery: rotation speed exceeded 10000rpm. 1. Is the motor ground terminal properly grounded.
- Page 202 Delta SCARA Robot System User Manual SCARA CE Series E?235 position command overflow 1. When the feedback position register overflows. 2. When return to origin was triggered but the return to origin process was not yet Cause completed. 3. When E?060 and E?062 occurs.
- Page 203 Delta SCARA Robot System User Manual SCARA CE Series 台達電子工業股份有限公司 33068 桃園 市桃園 區興隆 路 18 號 TEL:886-3-3626301 FAX:886-3-3716301 * 本 使 用 手冊內 容若有 變更,恕 不另行 通知...
Need help?
Do you have a question about the SCARA DRS40L Series and is the answer not in the manual?
Questions and answers