Eaton i-on series Engineering Manual
Hide thumbs
Also See for i-on series:
- Administration and user manual (63 pages) ,
- Engineering manual (156 pages) ,
- Administration and user manual (67 pages)
Table of Contents
Advertisement
Quick Links
Advertisement
Table of Contents

Subscribe to Our Youtube Channel
Related Manuals for Eaton i-on series


Summary of Contents for Eaton i-on series
-
Page 2: About This Guide
Range © Eaton’s Security Business. 2014 IN NO EVENT WILL EATON’S SECURITY BUSINESS BE LIABLE FOR ANY SPECIAL, CONSEQUENTIAL, OR INDIRECT LOSS OR DAMAGE, INCIDENTAL DAMAGES, STATUTORY DAMAGES, EXEMPLARY DAMAGES, LOSS OF PROFITS, LOSS OF REVENUE, LOSS OF ANTICIPATED SAVINGS, LOSS OF BUSINESS OR OPPORTUNTIY, LOSS OF GOODWILL OR INJURY TO REPUTATION, LIQUIDATED DAMAGES OR LOSS OF USE, EVEN IF INFORMED OF THE POSSIBILITY OF SUCH DAMAGES. - Page 3 i-on Range 2. A user can now make only four attempts (instead of 10) before code lockout. After four attempts the system generates a tamper condition. 3. A Duress Code user is blocked from all menus. A Duress code can only set/unset system.
-
Page 4: New In Issue 7 (S/W Version 4.03 With New Keypads)
3. Automatic Remote Diagnostics is now available the for i-on30EX/D, i-on40, i-on50EX/D and i-on160EX. (Please note that this must be activated within Downloader by a Eaton’s Security Business External Support Manager.) Changes to Defaults: 1. Unset Comms now defaults to Enabled. - Page 5 i-on Range Partitions/Setting Options Menu: 1. Exit mode for Partition 2 and higher now defaults to “As Partition 1.” Outputs Menu: 1. There is a new “pulsed” option available for outputs that previously did not have a pulsed option. 2. Some output types previously available on the i-onEX range are now also available for the i-on16.
- Page 6 i-on Range This page is intentionally blank. Page vi...
-
Page 7: Table Of Contents
i-on Range Contents About this Guide ....................... ii Other i-onEX Publications .......................... ii A Note about screen displays ........................ii Changes Since Release 4.00 ................... ii New in Issue 6 (S/W Version 4.03) ......................ii New In Issue 7 (S/W version 4.03 with new keypads) ................iv New In Issue 8 (S/W version 4.04) ...................... - Page 8 i-on Range Detectors/Devices ......................44 Detectors ..............................44 Expanders ..............................54 Wired Keypads ............................57 Radio Keypads ............................61 External Sirens ............................62 Info Modules............................. 63 WAMs ............................... 64 Outputs ........................... 64 Bell and Strobe ............................65 Wired Outputs ............................65 Control Unit Plug-By Outputs ........................
- Page 9 i-on Range IP Network (Own) ........................... 121 Downloading ............................123 Plug-by ..............................126 Test ..........................127 Sirens and Sounders ..........................127 Wired Keypad............................128 Radio Keypads ............................128 Expanders .............................. 128 Walk test ..............................129 Zone Resistances ..........................130 Signal Strengths ............................. 131 Outputs ..............................
- Page 10 i-on Range Introduction ........................149 Before You Begin ........................... 149 Set Up the 762 or 768/769 ................... 149 Enter Programming Mode ........................149 Set the Channels to Output Module Mode ..................... 149 Disable infrared learning ........................150 Set to manual learn ..........................150 Select channel ............................
-
Page 11: Introduction
i-on Range Introduction System Design The i-on range of control units for hybrid wired/wirefree alarm systems are intended for, domestic, commercial or industrial use. The range is designed to support a wide spread of alarm system sizes. To increase the size of the alarm system the i-onEX control units allow the Installer to connect expanders and keypads to a single “data bus”... -
Page 12: Printed Circuit Board
Introduction i-on Range Printed Circuit Board All of the control unit functions and connectors are provided by a single PCB. In the i- on30EX/i-on30EXD, i-on30EXL/i-on30EXDL, i-on50EX/i-on50EXD and i-on160EX a plastic PCB carrier holds the PCB within the case. Bus Connections 30 50 160. -
Page 13: Keypads
30 40 50 160. The mini-USB port allows an Installer to program the control unit through a USB cable from a PC to the control unit. The PC must be running Eaton Security Business’s Downloader. The USB port also allows an Installer to apply software updates to the control unit or, in European versions, install alternate language text files for the keypad display. - Page 14 Introduction i-on Range Provided that they are in separate partitions, the control unit can respond to several keypads in use at the same time. Within each partition, the control unit responds to just one keypad at a time. The number of simultaneous keypad sessions each control unit can handle at any one time is: i-on160EX five...
-
Page 15: Expanders
This label can be printed with installer details (for example logo or telephone number). Please contact the Eaton’s Security Business marketing department for more details. All the KEY- keypads allow the installer to program the behaviour of the backlight, the illuminated ABCD keys and the LEDs in the navigation key. -
Page 16: Communications
Introduction i-on Range Radio Expander The EXP-R10 radio expander provides 10 zones for radio detectors. The EXP-R30 provides 30 zones for radio detectors on an i-on160EX or i-on50EX. When fitted to an i-on30EX the EXP-R30 provides 20 zones. In addition each radio expander provides channels for: two radio keypads, two external radio sounders and two Wireless Accessory Modules (WAMs) (Note that the i-on30EX supports only one WAM.). -
Page 17: Part Setting Or Partitioned System
i-on Range Introduction 30 40 50 160 Using Downloader software on a PC or laptop connected to the control unit either over the PSTN, or via the USB port, or via the Ethernet port. (This option is not available on i-on16.) 40 50 160 From a PC or laptop connected to the control unit via Ethernet cable, and using a web browser (IE 8 recommended). - Page 18 Introduction i-on Range User Codes When using four digit access codes, the default Installer code is “7890” and the default User 001 (User 01) code is “1234”. When using six digit access codes the default Installer code is “567890”, and the default User 001 (User 01) code is “123456”.
-
Page 19: System Capacities
i-on Range Introduction System Capacities i-on16 i-on30EX i-on40 i-on50EX i-on160EX Main Software Differences Max No Zones Users: Part Sets (In part set mode) Partitions: (see Note 3) Bus devices: (see Note 1) None None Max No Wired Outputs (non plug-by) Max No Radio Outputs (see Note 5) Radio sounders: (see Note 2) - Page 20 Introduction i-on Range Notes: 1. Shared between expanders and keypads. The i-on16 can have two keypads and the i-on40 four keypads. Neither the i-on16 nor i-on40 can use expanders. 2. Two per expander for i-onEX control units. 3. In partition mode. Each partition has one part set within it. 4.
-
Page 21: Basic Programming Procedures
i-on Range Basic Programming Procedures Programming Before Installation If you prefer, you can program the control unit before installing the system in its final location. You will need to temporarily connect a keypad to the control unit. It is possible to operate the control unit from battery power (or a 12Vdc supply) without connecting the unit to a mains supply. -
Page 22: To Enter The Installer Menu By Keypad
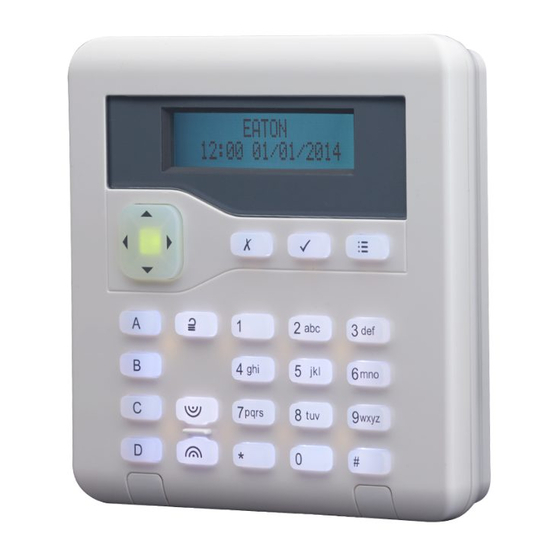
Basic Programming Procedures i-on Range To Enter the Installer Menu by Keypad: Make sure the system is fully unset and showing the standby screen (time and date). Note that although the example at the right shows “i- on160EX” on the top line, if you are using another control unit, the text will show the name of that control unit. -
Page 23: Transferring To Another Keypad
i-on Range Basic Programming Procedures Once the lock out time has expired then the user can try and key in their access code again. If they still key an incorrect code then the system will lock all keypads for another 90 seconds, but will not start another tamper alarm. -
Page 24: Important! Saving Changes
Basic Programming Procedures i-on Range Either: press to put the control unit back into Installer Menu (so that you can go and check that all the bus devices you have installed are connected, powered up and addressed correctly). Note: To check an expander address remove the lid and briefly press the addressing button. - Page 25 i-on Range Basic Programming Procedures Press until the bottom line shows: Press . The display shows (NOT i-on16 or i-on40): Press until the bottom line shows: Press . The display asks for confirmation. ...
- Page 26 Basic Programming Procedures i-on Range to default user codes then press to stay with the current security grade.) If you wish to use Security Grade 2 but with six-digit access codes you can make this change after defaulting the system. See page 96. 50 160 Press ...
-
Page 27: Defaulting Access Codes
i-on Range Basic Programming Procedures 18. Press . The control unit saves your changes and the display shows the time and date: Note: 1) If the control unit is an i-on30EXD, i-on50EXD, or has an i-sd02 or i-dig02 fitted, then the keypad will show an alert when you leave Installer Mode. -
Page 28: Editing Text
Basic Programming Procedures i-on Range Reconnect the batteries. Close the control unit lid (to restore the tamper switch). The display shows the time and date, for example: Key in the default User 01 code to silence the sounders. ... -
Page 29: Resetting A System After An Alarm
i-on Range Basic Programming Procedures Alternatively, if you press when you first select a name to edit, then the existing text shifts right one character and you can insert a new character in the empty space. To move the cursor left or right press or respectively. To delete characters press . - Page 30 Basic Programming Procedures i-on Range Press or to enable or disable the ABCD LEDs. The character at the right of the display shows “” when the LEDs are disabled and “” when the MENU LEDs are enabled. For example: ABCD LEDs ...
-
Page 31: Adding Bus Devices
i-on Range Basic Programming Procedures To Leave Local Programming Mode and Save Changes EITHER: Press Close the keypad tamper. The keypad saves the changes you have made in its local memory. You can now remove 12Vdc power, if required, or leave Installer Menu on the control unit. Adding Bus Devices To add bus devices to the system after you have connected them physically: Enter the Installer Menu. -
Page 32: The System Bus (I-On Ex Control Units Only)
i-on Range The System Bus (i-on EX Control Units Only) 30 50 160 The system bus carries all the data between the control unit and its expanders and keypads. Electrically the bus is a single set of four conductive paths. Two paths carry dc power and two carry data. -
Page 33: Bus Device Addresses
i-on Range The System Bus Delete the device information from within the control unit. Each type of device has its own “delete” command in the Installer menu. Reset the bus address on the device to zero. If a bus device is damaged and you suspect it is faulty then you can use the Installer menu to temporarily disable the device. -
Page 34: Detector Connection Point Addresses
The System Bus i-on Range Figure 4. Bus Device Addressing for EXP-R30. Note that you can connect an i-on30EX to an EXP-R30, but you will not be able to use all the zones available on the EXP-R30 (see “Zone Numbering” on page 27) Detector Connection Point Addresses Each connection point for a detector has an address. -
Page 35: Output Numbering
i-on Range The System Bus Figure 5. Detector Connection Point Addressing. Output Numbering Output numbering is an extension of the way that devices are addressed on the bus. Each output has a connection point address. The address contains three groups of digits: An>dd>oo The first two groups are the address of the bus device (see page 23). -
Page 36: Other Radio Device Addressing
The System Bus i-on Range Other Radio Device Addressing For radio keypads, radio sirens and WAMs, during the learning process the installer selects a specific radio expander to learn the identity of the radio device. This means that when programming these devices the control unit refers to them by a number containing three groups of characters (similar to the characters the system uses to refer to zones and outputs): Rn-dd-zz... -
Page 37: Zone Numbering
i-on Range The System Bus If you are confident that the control unit has already learned all the devices on the bus you do not have to carry out a bus scan (but it may be a useful check). If you have temporarily removed a bus device you can reconnect it to the bus, provided that you carry out a bus scan and do not change its bus address. - Page 38 The System Bus i-on Range Figure 7. Zone Numbering Example. In table form, the zone numbering for the example in Figure 3 would look like this: Control Unit EXPW-10 (device 1-01) EXPR10 (device 1-02) Zone No. Address Zone Address Zone Address Zone 000 PAN<Z00...
-
Page 39: Adding/Removing Expanders And Zone Numbering
Connection point PAN<Z00 (the first zone terminal on the control unit PCB) is available for use as a valid zone. However, please note that SIA cannot report any alarms on zone 000. Eaton’s Security Business suggests that you might find this zone useful as a Log Only zone. -
Page 40: Numbering Zones On Keypads
The System Bus i-on Range Numbering Zones on Keypads The key-kpz01 keypad provides terminals for up to two zones using FSL or 2-wire CC wiring. or one zone using 4-wire CC wiring. To use the zones on the keypad you must first enable them from the Detectors/Devices –... - Page 41 i-on Range The System Bus For each keypad, the Z2 terminals are the for the tamper contacts, and the Z1 terminals are for the alarm contacts. Allocating Zones Between Expander and Keypads It is possible that there may be no zones available to assign to a keypad. This can happen in two ways: When the control unit has expanders allocated to all the available zones on the bus.
-
Page 42: Processing Priority
The System Bus i-on Range Note that you cannot allocate zones to both an expander AND a KEY-KPZ01. This means, for example, that allocating zones on the i-on30EX to a KEY-KPZ01 will make eight zones unavailable to expanders at the top of the zone number range. Processing Priority When several detectors are activated at the same time, the control unit always processes HUA and Normal Alarm detectors first, followed by Fire, and then all other alarm types. -
Page 43: Installer Menu
i-on Range Installer Menu Important: Where noted below the defaults listed enable the control unit to comply with EN50131 requirements. If you change those settings then the installation may no longer comply. If the control unit does not comply with EN50131 you must remove any labelling that indicates compliance. - Page 44 The Installer Menu i-on Range MENU Option Factory Default Notes Deletes expander ID and all Delete Expander associated zones and outputs. Display shows expanders currently Expander W1-01...W1-50 addressed on bus. All expanders enabled. Enable Expander Expander W1-01...W1-50 Display shows expanders currently addressed on bus.
-
Page 45: External Sirens
i-on Range The Installer Menu MENU Option Factory Default Notes Yes (all keypads enabled) Enable Keypad 30 50 160 Display shows keypads currently Keypad K1-51...K1-95 addressed on bus. Replace Keypad 30 50 160 Display shows keypads currently Keypad K1-51...K1-95 addressed on bus. Radio Keypads Add/Del Radio Keypad Edit Keypads... -
Page 46: Menu Option
The Installer Menu i-on Range MENU Option Factory Default Notes partitions. Wired outputs Name Type Polarity Panel 16 40 Output 01 Siren Normal i-on16/i-on40 do not have separate Output 02 Strobe Normal Siren and Strobe outputs. Output 03 Siren Normal Output 04 Strobe Normal... -
Page 47: Full Set
i-on Range The Installer Menu MENU Option Factory Default Notes Appears when Pulsed set to “Yes”. 1 second On time Appears only in a Part Setting 3 SETTING OPTIONS system. Full Set “Full Set” Name Timed Set Exit mode Appears only if Exit Mode is “Final 15 seconds Settle time Door”, “Lock Set”... - Page 48 The Installer Menu i-on Range MENU Option Factory Default Notes systems. Applies to both full and part set partition. 0 minutes For full set only. Siren Delay 15 minutes For full set only. Siren Time To comply with EN50131-1 Clause 8.6 minimum is 90s, maximum is 15mins.
-
Page 49: Factory Defaults
i-on Range The Installer Menu MENU Option Factory Default Notes Grade 2: Yes For INCERT approval set to NO. Zone tampers Grade 3: No System tampers (-EUR Version) EUR versions always use Basic Confirmation Confirmation. Sounder on Unconfirmed Unconfirmed Siren on (-UK Version) Confirmation Confirmation Mode... -
Page 50: Account Number
The Installer Menu i-on Range MENU Option Factory Default Notes comply with EN50131. Appears in EUR versions, OR only when System Options – Confirmation Mode is “Basic”. Panel Loudspeaker (Two loudspeakers on i-on160EX.) Loudspeaker 1 (or 2) Volume **** Partitions 30 40 50 160 Appears 01...04 (i-on30) only in a Partitioned system. - Page 51 i-on Range The Installer Menu MENU Option Factory Default Notes Technical Alarm: No 2. This setting is required in order Masking: Yes to comply with EN50131. Tampers: Yes Downloading and masking events Set/Unset: Yes (see Note 2) not available on i-on16. Part Set: Yes(see Note 2) Reset: Yes...
- Page 52 IP Port 2 Blank Disabled Secure Callback Auto Modem Baud Rate (UK versions only. Must be Remote Servicing enabled by Eaton Security Business External Support Manager.) Plug-by Audible For plug-by modules only. Line Fail Response 9 seconds For plug-by modules only.
- Page 53 i-on Range The Installer Menu MENU Option Factory Default Notes only if fitted with a keypad with zones.) Signal Strengths Detectors Radio Keypads External Sirens WAMs 30 40 50 160 Outputs Radio Outputs Wired Outputs Plug-by outputs 30 40 50 160 Expander Outputs 30 50 160 Remotes...
-
Page 54: Installer Menu Options
i-on Range Installer Menu Options This section contains reference information for the options provided in the Installer Menu. Detectors/Devices Detectors Adding or Deleting Radio Detectors Add a Radio Detector To The System To use a radio zone the control unit must learn the identity of the radio detector. When learning detectors on an i-onEX range control unit you first select a radio expander to assign that detector to, and then learn the detector’s identity. - Page 55 i-on Range Installer Menu Options Default zone If you select this option then the control unit “forgets” the ID of the detector and sets all the zone programming back to default values: Type = Not Used, no attributes. Notes: 1. A “*” indicates that the control unit has learned a radio detector learned for that zone.
- Page 56 Installer Menu Options i-on Range Fire Alarm - FA (02). Smoke or heat detectors connected to Fire Alarm zones cause the internal sounders to give a pulsing fire signal. Fire alarms operate whether the system is set or unset, and will always trigger communications, if a communications module is fitted and enabled.
- Page 57 i-on Range Installer Menu Options In a Part Setting system the keyswitch can Full Set or unset. In a Partitioned system you can allocate the keyswitch to one or more partitions. Each time a user operates the keyswitch the control unit changes the current set state.
- Page 58 Installer Menu Options i-on Range This zone type is not available for radio zones. External PSU Fault – PF (14) 30 40 50 160 Use this zone type to monitor the fault output of an external PSU. (This zone type is available for power supplies that do not provide specific fault outputs that can be used by zone types 11, 12 and 13.) If a power supply triggers a zone with this type then the control unit activates any output programmed as “External PSU Fault”...
- Page 59 A Lock Set zone can take the Inverted attribute. Eaton’s Security Business recommends that you do not use Lock Set with a Part Set. The results may not function as described. Note: Zone types 22 and 23 are not used.
- Page 60 Installer Menu Options i-on Range One partition only Any partition 03 Normal Alarm Fire 05 Final Exit 24 Hr 06 Entry Route Technical 08 Key Switch Momentary Tamper 09 Key Switch Latched External PSU AC fail 17 Log Only External PSU Battery fault 18 Exit Terminate External PSU Low Volts 21 Lock Set...
- Page 61 i-on Range Installer Menu Options Chime When enabled by the user, the system gives a non-alarm warning tone when any zones programmed as ‘Chime’ are operated. This facility operates only while the system is unset. The following zone types can use this attribute: Normal Alarm, Final Exit, Entry Route, Technical, Log Only and Exit Terminate.
- Page 62 Installer Menu Options i-on Range Part Set (Only visible in a Partioned system.) When a partition is Part Set, zones in that partition with this attribute are set. Note that if a zone is in more than one partition, all partitions have to be set or part set before this zone will be set.
- Page 63 i-on Range Installer Menu Options Notes: 1. You cannot apply the Inverted and the Masking attributes at the same time. 2. The Inverted attribute does not apply to radio zones. 3. If an i-on16 is fitted with a keypad with zones then this attribute will be available. Shock (This attribute is available only on the i-on160EXEUR for wired zones connected directly to the control unit.)
-
Page 64: Expanders
Installer Menu Options i-on Range Expanders 30 50 160 Note: If you need to add or remove expanders or keypads from the bus then: a) Delete the device before removing it, see page 56. b) Make sure that you remove all power from the system before physically disconnecting the device. - Page 65 i-on Range Installer Menu Options Expander Loudspeaker Volume To change the volume of notification tones from loudspeakers attached to expanders use the Detectors/Devices – Wired Expander – Edit Expander – Loudspeaker volume menu. Press to lower the volume or to raise the volume. The display shows the current volume setting by a row of stars (for example “****”).
- Page 66 Note: Eaton’s Security Business recommends that you remove all power from the system (battery and mains) before disconnecting any device from the bus.
-
Page 67: Wired Keypads
i-on Range Installer Menu Options Note: If you replace a wireless expander then you must teach the identity of the new wireless expander to any receivers that had previously learned the old expander’s identity. This includes any 762s, 768s or WAMs. Wired Keypads Adding Wired Keypads 30 50 160... - Page 68 Installer Menu Options i-on Range A Partition User can use only keypads assigned to the same partition as the user’s code or prox tag. All other users can use any keypad. While they are using a keypad the display shows information from partitions assigned to the user, not to the keypad.
- Page 69 i-on Range Installer Menu Options Zones (This option applies to the KEY-KPZ01.) Use this option to enable or disable zones that connect directly to keypads. When enabled the zones appear at the top end of the zone numbering range (see page 30) and have a zone type of “Not Used”.
- Page 70 Installer Menu Options i-on Range Notes: If you are working on a system with only one keypad (for example when programming a new control unit before installation) then do not delete the keypad you are using by holding down D and .
-
Page 71: Radio Keypads
i-on Range Installer Menu Options programming from the old keypad. The new keypad will not need any further programming. 16 40 To replace a wired keypad on the bus of an i-on16 or i-on40, first remove all power from the control unit, both mains and battery. Disconnect the old keypad. Make sure the address link on the new keypad is fitted in the same position as that on the old keypad, and is not fitted in the same position as any of the address links on the other keypads already connected to the control unit. -
Page 72: External Sirens
Installer Menu Options i-on Range Partitions (Assigning Radio Keypads to) 30 40 50 160 To assign radio keypads to one or more of the partitions select Detectors/Devices – Radio Keypad – Edit Keypads - Partitions. Once you have entered the Edit Keypads - Partitions option, press or to scroll through the list of partitions followed by ... -
Page 73: Info Modules
i-on Range Installer Menu Options Radio Sirens and Partitions 30 40 50 160 In partitioned system you can assign a radio siren to any of the partitions. Any radio siren can belong to one or more partitions. Assigning a radio siren to partitions controls the response to tampers of those partitions. If any assigned partition is set then a tamper to the radio siren will cause an unconfirmed alarm. -
Page 74: Wams
Installer Menu Options i-on Range Disabled The control unit stops transmitting data to all the Info Modules Enabled The control unit carries on transmitting to the Info Module. The default setting for this menu option is Disabled. The control unit changes the setting to Enabled when you teach an Info Module the control unit’s identity. -
Page 75: Bell And Strobe
i-on Range Installer Menu Options The software in an i-onEX range control unit can only handle a maximum number of outputs in total. Table 1 on page 9 gives the totals for each type of control unit. If the number of physical hardwired outputs attached to the system exceeds this maximum then the installer menu will not let you program some of those outputs. -
Page 76: Control Unit Plug-By Outputs
Installer Menu Options i-on Range attribute is set to “Yes” for an output, the control unit provides two more options for that output: Delay The delay can take any value from 0 to 999 seconds. If set to 0 the output operates immediately. - Page 77 i-on Range Installer Menu Options Some output types can be assigned to zones or partitions. If you select those types then the keypad display will show a further menu allowing you to select the appropriate zones or partitions. The output types available are: Type: (nn=shortcut) Active when:...
- Page 78 Installer Menu Options i-on Range Type: (nn=shortcut) Active when: If the unconfirmed alarm is caused by the expiry of the entry timer, then for: DD243 a further two zones which are not on the entry route must be triggered to activate the output. BS8243 one zone not on the entry route must be triggered to activate the output.
- Page 79 i-on Range Installer Menu Options Type: (nn=shortcut) Active when: External PSU An external power supply fault signal triggers a Fault (15) Power output fault zone. The control unit deactivates the output when the 30 40 50 zone has been restored and a user has acknowledges the fault by entering a valid access code.
- Page 80 Installer Menu Options i-on Range Type: (nn=shortcut) Active when: Siren (21) The control unit starts a full alarm, a hold up alarm or a fire alarm (the siren has a distinctive tone during a fire alarm). The control unit deactivates this output at the end of the siren time.
- Page 81 i-on Range Installer Menu Options Type: (nn=shortcut) Active when: Smoke Sensor This output is active (0V) all the time except when a Reset (28) user acknowledges a fire alarm: after which the control unit deactivates the output for three seconds. 30 40 50 This output type is designed to be connected to low- voltage smoke detector reset terminals.
- Page 82 Installer Menu Options i-on Range Type: (nn=shortcut) Active when: Autoset Warning The control unit starts the Calendar Set Warning (42) period (see page 85). Deactivates when the system sets, or if a user defers or cancels the calendar set. 50 160 Assigned to all partitions by default.
-
Page 83: Programing Zone Follow Outputs
i-on Range Installer Menu Options Type: (nn=shortcut) Active when: (Not available on –EUR versions. Operates only Burg Confirm timer (50) when DD243 or BS8243 is enabled.) Burg confirmation timer is running. Inactive when the timer stops. HUA confirm timer (Not available on -EUR versions. Operates only (51) when BS8243 is enabled.) HUA confirmation timer is running. -
Page 84: Programming Zone Alarm Outputs
Installer Menu Options i-on Range active when the zone is active. When programmed as Inverted the output is active when the zone is inactive. Pulsed When Pulsed is set to “No” then the output changes state when the zone changes state. -
Page 85: Programming User Defined Outputs
i-on Range Installer Menu Options Zones This option allows you to select which zones the output will follow. Scroll down the list using or . To select a zone press or to change “Off” at the bottom right of the display to “On”. - Page 86 Installer Menu Options i-on Range When you first power-up a new control unit (see the relevant Installation Guide), or if you restore a control unit to factory defaults (see page 97 ), you must choose between having a Part Setting system or a Partitioned system. If you select a Part Setting system then the Installer Menu contains a “Setting Options”...
-
Page 87: Options
i-on Range Installer Menu Options Notes: 1. Appears only if Exit Mode is “Final Door”, “Lock Set” or “Exit Terminate”. 2. Appears only if Exit Mode is “Timed Set” or “Silent Set”. 3. Not available on i-on16, i-on40 or i-on30EX. 4. - Page 88 Final Exit zone (see page 46) connected to the final exit door. Eaton’s Security Business recommends that you do not use Lock Set within a Part Set. The results may not function as described below.
- Page 89 i-on Range Installer Menu Options Logs the opening of the Lock Set zone Converts any zone originally programmed as Final Exit back to Final Exit, so that the entry time will start when the user opens the entry door. Starts a warning tone (distinct from the entry tone). If the user activates the Lock Set zone again without starting the Entry Timer then the control unit will change all Final Exit zones back into Normal Alarm...
- Page 90 Installer Menu Options i-on Range Unsetting: To unset the partition the user can either: a) Present their prox tag to an external prox tag reader, or: b) Use the unset button on their remote control, or: c) Open a Final Exit zone allocated to the partition (to start an entry timer) and then key in their access code or present a prox tag to a keypad.
- Page 91 i-on Range Installer Menu Options Silent The control unit keeps the HUA alarm silent: there are no alarm tones from keypads or loudspeakers and any siren outputs or HUA outputs remain inactive. The control unit signals the HUA using the communications device(s).
-
Page 92: Full Set Link
Installer Menu Options i-on Range Final Exit In a Part Setting system, any Final Exit zones with the Part Set B, C or D attributes will continue to act as Final Exit zones during part set. In a Partitioned system, any Final Exit zones, belonging to the partition, with the Part Set attribute will continue to act as Final Exit zones during part set. -
Page 93: Calendar Set
i-on Range Installer Menu Options If you wish to link/unlink partition 1 to many partitions then you can use the “All Partitions” option (in between partition 2 and the last partition on the menu on the menu) to either link or unlink partition 1 to all the other partitions in one operation. - Page 94 Installer Menu Options i-on Range number of minutes held in the calendar set warning time) then the event will not take action until the following start day. Also, note that the time “00:00” is midnight, at the beginning of a new day. Event Days.
- Page 95 i-on Range Installer Menu Options Calendar Set Example As an example, a user wants their system to set every evening during the week at 19:00, and unset at 05:00 in the morning. During the weekend the system should unset on Saturday at 05:00 and set at 13:00.
-
Page 96: System Options
Installer Menu Options i-on Range time the control unit will not set the system. The control unit will log the failure as “set fail”. At the same time the control unit will activate any output programmed as type “Set Fail”. Note that if you assign zones the “Force Set Omit”... -
Page 97: User Access
i-on Range Installer Menu Options where “e” is the expander number. The i-on40 control unit provides eight wired zones. The KEY-KPZ01 provides one zone. There are several options of resistor values for FSL: the keypad display shows the end of line resistor/alarm contact resistor values for each option. -
Page 98: User Reset
Installer Menu Options i-on Range By pressing the user can set the system if there are zones with the Omit Allowed attribute active. The user must go to the Omit Menu to set the system if a zone is active. -
Page 99: Confirmation (Eur Variants)
i-on Range Installer Menu Options Zone Tampers The user can reset the system after an alarm caused by a zone’s tamper circuits being triggered. The installer must reset the system after an alarm caused by a zone’s tamper circuits being triggered. The alarm abort period does not apply. Note: This setting is required for INCERT approval. -
Page 100: Confirmation (Uk Variants)
Installer Menu Options i-on Range 3. The Master User can enable or disable HUD functions for the FOB-2W-4B and 727r by using the option “User Menu – System Config – Remotes – HUA Function”. There are two options available to control sounders and siren: Sounder on Unconfirm When the system is set the control unit activates the internal sounders... - Page 101 Entry Keypad Lock is intended for use when the system can summon a police response. 2) In a partitioned system Eaton’s Security Business advises that you use Entry Keypad Lock in conjunction with Partition Users. The Master User or Normal Users can unset a partition from a keypad that is not specifically allocated to that partition, and so bypass Entry Keypad Lock.
- Page 102 Installer Menu Options i-on Range Confirm When the system is set the control unit does not activate the siren(s) until a confirmed alarm occurs. Note: The control unit will not allow you to select “Siren on - Unconfirm” at the same time as “Sounder on - Confirm”.
-
Page 103: Profiles
When an unconfirmed Tamper occurs the control unit sends only “Tamper” Enabled to the ARC and activates any output programmed as “Tamper” (this follows Eaton’s Security Business’s understanding that BS8243, Annex H.7.1 applies to all Grades). When an unconfirmed Tamper occurs the control unit sends “Tamper”, Disabled “General Fault”... -
Page 104: Masking
Installer Menu Options i-on Range Masking 30 40 50 160 This option allows you to control whether the system responds to masking or trouble events from those detectors that are capable of reporting them, are connected correctly to the system, and are programmed with the “masking” attribute. Note: This menu item will appear for the i-on16 if it has a KEY-KPZ01 connected. - Page 105 i-on Range Installer Menu Options Alarm contacts 2K2 EOL Fault/Trouble Tamper contacts contacts Zone n Figure 11. Wiring a Fault/Masking Zone: 3 Resistor Method. The detector must signal masking by closing both the Alarm and Fault contacts together. (If the detector closes the Fault contact only, then the control unit reports this as a detector fault.) When masking is enabled the alarm response depends on whether the system is set or unset, and which resistance range the detector is signalling with.
-
Page 106: Mask Override
Installer Menu Options i-on Range Note that the user can also reset this alarm provided they do so within the abort time. Fault The control unit treats this condition as a fault and activates any Alarm closed, outputs programmed as General Fault. When a user unsets the Fault open, partition/system the control unit generates an Alert on the resistance = 4k4) -
Page 107: Installer Name
Note that the i-on16, i-on30EX and i-on30EXD do not provide a Web browser interface. Installer Code The default Installer access code is 7890 (567890 with six-digit access codes). Eaton’s Security Business recommends that you change this code to some other number. To change the Installer access code select System Options-Installer Code. -
Page 108: Keypad Text
Installer Menu Options i-on Range The Installer code allows you to enter the Installer Menu, and carry out an Installer reset. However, the Installer code does not allow you to set or unset the system. 40 50 160 When logging into the i-onEX Web browser interface you must key into the password field the same code as you have programmed into the Installer Code field. -
Page 109: Rkp Entry Part Set
i-on Range Installer Menu Options RKP Entry Part Set In a Part Set system or partition, instead of using an entry timer triggered by a Final Exit zone to allow the user to gain access to the control unit and unset the system, the user can employ a radio keypad. -
Page 110: Entry Alarm Delay
Installer Menu Options i-on Range Once you have entered the Partitions option, press or to scroll through the list of partitions followed by or to allocate/deallocate the loudspeaker to each partition as necessary. If you wish to allocate/deallocate the loudspeaker to many partitions you can use the “All Partitions”... -
Page 111: Jamming
i-on Range Installer Menu Options any plug-by output output programmed as “Jamming”, “Supervision” or programmed as “Supervision” or “Fault”. See “Fault”. See page 93. page 93. 2. If there is no Tamper channel 2. If there is no Tamper allocated in FSL the system sends an “Unconfirmed Alarm”. -
Page 112: Tamper Omit
Installer Menu Options i-on Range The remote control user cannot force set the system, even if you have applied the force set zone attribute to any zones. Confirm The remote control user can force set the system. They must operate as follows: 1) the user presses the appropriate button to set the system, 2) the control unit does not start setting, 3) the user presses the same remote control button to confirm that they wish to continue setting the system. -
Page 113: Mains Fail Delay
i-on Range Installer Menu Options 30, 60, 120 minutes The keypad gives the alert tone for the selected time. The status LEDs on the Navigation key stay on for the selected time. The alert tone stops if a user enters a valid access code. -
Page 114: Battery 2
Installer Menu Options i-on Range than the Mains Fail Delay period the control unit will activate any AC Fail outputs and report a mains fail to the ARC. If the mains failures do not overlap, and are both individually shorter than the Mains Fail Delay period then the control unit logs the events and activates any General Fault outputs, but will not send a report to the ARC. - Page 115 Note: Eaton’s Security Business do not recommend using the i-gsm02 for Fast Format communications. The GSM network introduces too great a variation in the delay between signal and response. Tests carried out by Eaton’s Security Business show that different cell towers from the same providers give different results.
-
Page 116: Arc Reporting
Installer Menu Options i-on Range ARC Reporting Note: The i-on30EXD and i-on50EXD both have a built-in digital communicator. Plugging in a communications module disables the built-in communicator. The ARC Reporting option then applies to the plug-in module (NOT the built-in module). To program how the control unit will communicate with an ARC select Communications - ARC Reporting. - Page 117 Fast Format Channels (See Appendix I for a brief description of Fast Format.) Note: Eaton’s Security Business does not recommend using the i-gsm02 for Fast Format communications. The GSM network introduces too great a variation in the delay between signal and response. Tests carried out by Eaton’s Security Business show that different cell towers from the same providers give different results.
- Page 118 Installer Menu Options i-on Range Channel 6 Tamper Channel 7 Confirmed Alarm Channel 8 General Fault Note: In EUR versions the default for Channel 5 is Zone Omit (setting). Table 4a and 4b shows the events available. You can key-in the two-digit numbers shown next to each event in order to display that event type on the keypad.
- Page 119 i-on Range Installer Menu Options The control unit delays reporting/logging either mains loss, or exiting Installer Menu with mains loss, by 15-18 min (chosen randomly). The control unit communicates Jamming, Supervision when the system is unset. The control unit communicates Mains Fail depending on the time programmed in System Options –...
- Page 120 Installer Menu Options i-on Range A/C power fail alarm (also called Mains fail) and restore Mains Fail Panel Battery low/fail and restore Panel Battery System or Partition reset Reset Panel Battery low/ missing and restore Panel Battery External battery fault and restore Faults Zone External Warning Device fault and restore Faults...
- Page 121 i-on Range Installer Menu Options Table 4. SIA Report Groups SIA Code Includes: SIA Report Group AT, AR Mains fail and restore Mains Fail AT, AR External PSU AC fail and restore Faults BA, BR Burg and Burg restore Burglar Alarm BB, BU User/system zone omit.
- Page 122 Installer Menu Options i-on Range PA, PR Zone HUA (PA) and restore Hold Up Alarm Keypad HUA (PA), Keypad HUA (PA) restore RF HUA (PA), RF HUA (PA) restore Radio keypad HUA (PA), radio keypad HUA (PA) restore PT, PJ Zone HUD fault and restore Faults Downloading successful...
- Page 123 i-on Range Installer Menu Options Burg Comms Rearm (This menu appears only if you select “Fast Format” in Communications - Report Type. AND if System Options – Confirmation – Confirmation Mode is set to “Basic”.) This menu option determines what the control unit does with the “Burg” Fast Format channel 3 at the end of the siren run time.
-
Page 124: Unset Comms
Installer Menu Options i-on Range To make test calls on the same day every week select Communications – ARC Reporting – Static Test Call – Weekly. From the display select the day of the week on which the call should take place. Next, key in the hour of the day (01 to 24) on which the test call should occur.. - Page 125 i-on Range Installer Menu Options Report Triggers Messages Destinations Phone Book Home message Dest 1 Y Message 1 Dest 2 N Dest 3 Y Dest 4 N None Fire Alarm Dest 1 N Message 2 Hold Up Alarm Dest 2 N Dest 3 N Burglar Alarm Dest 4 N...
- Page 126 Installer Menu Options i-on Range Press to start recording. The control unit starts recording from the Record Message i-sd02 or i-gms02’s built in microphone. The display shows a progress bar indicating how long you have left to record. Press ...
-
Page 127: Sms
i-on Range Installer Menu Options Triggers In the control unit you can link up to five different trigger events to each speech message. A trigger event is one item selected from a list of alarm types. To link specific trigger events to individual messages select Communications – Speech Dialler –... - Page 128 Installer Menu Options i-on Range The text of the log entry that corresponds to the event causing the alarm. The time and date of the alarm. The name of the zone causing the alarm. The control unit sends the text in the Home Message to every telephone number you have programmed for SMS messages.
- Page 129 i-on Range Installer Menu Options list of phone numbers. Press and to scroll to the required phone number followed by to select it. Key in the correct digits and then press . The display then allows you to give the telephone number a name. The control unit will display this name in the phone book to help you remember what destination you wanted the message to go to.
-
Page 130: Line Fail Response (For Plug-On Or Built-In Module)
The control unit cancels any programmed siren delay if the line is out of order when an alarm occurs. Note: Eaton’s Security Business recommends audible response for line fault. Silent If the system is unset then the keypad display indicates a telephone line fault, the LEDs around the navigation key glow red, and the control unit logs the event. -
Page 131: Line Fail Delay (For Plug-On Or Built-In Module)
i-on Range Installer Menu Options Line Fail Delay (For Plug-on or Built-in Module) This menu controls the length of time that the control unit waits until starting an alert if the communications line connected to either a plug-on or built-in communication module fails. The values available are 0 to 60 seconds. - Page 132 Installer Menu Options i-on Range From VKP Instant the user can control or program the system as long as they have a valid access code. If any other user is already logged into the system then the VKP Instant shows the message “User Menu in use” or Installer on Site” as appropriate.
-
Page 133: Downloading
This is the module’s own IP address. If you leave it blank the IP Address service provider will give the module an IP address using DHCP. (Eaton’s Security Business recommends that you leave this field blank.) Port Number If you wish to change the port number used by the module then key in the new port number here. - Page 134 Installer Menu Options i-on Range To use both the speech dialler and remote dial-in access from Downloader fit a SIM card that permits both voice and data traffic. Note that when setting up a remote connection of any kind it is advisable to test the connection before leaving the site.
- Page 135 i-on Range Installer Menu Options Once Downloader is connected to the control unit then it has access to all system programming. If you wish to provide secure access then use either Call Out Only or Secure Callback. Please note that you cannot use Secure Callback with Local connection. Call Out Only.
-
Page 136: Plug-By
The options available under the Downloading – Remote Servicing menu item are intended for use with Eaton’s Security Business’s Remote Servicing feature on Downloader. This feature must be set up by a Eaton’s Security Business External Support Manager. Please contact your Eaton’s Security Business Account Manager for more details. -
Page 137: Test
i-on Range Installer Menu Options cancels any programmed siren delay if the line is out of order when an alarm occurs. Disabled The control unit does not monitor the telephone line. Line Fail Delay This menu controls the length of time that the control unit waits until starting an alert if the plug-by communications line fails. -
Page 138: Wired Keypad
Installer Menu Options i-on Range the sounder(s) for that partition. (The display will only present those partitions that have zones allocated to them.) Press to turn the sounder on. Press to turn the sounder off again. The display shows the word "On"... -
Page 139: Walk Test
i-on Range Installer Menu Options System Voltage This option displays the dc voltage present on the expander PCB just after the mains transformer and principal voltage regulator. If it shows anything other than 13.6V then this indicates that there may be either a mains “brown out” or that the expander is running on its standby battery. -
Page 140: Zone Resistances
Installer Menu Options i-on Range Zones This option lets you select one or more individual zones, and test only those zones and no others. Use or to scroll up and down the list of zones. Press or ... -
Page 141: Signal Strengths
i-on Range Installer Menu Options The end of the bottom line shows the resistance of the zone. For 4-wire CC zones the display alternates between the Alarm resistance (“A”) and the Tamper resistance (“T”). “O/C” means Open Circuit. “0k00” means zero resistance or closed circuit. Signal Strengths This option allows you check the received signal strength from all the radio transmitters belonging to the system. -
Page 142: Remotes
Installer Menu Options i-on Range not need to deactivate the output (This test applies to the UK only, and is compliant with Form 175). When you complete testing the outputs check that they are in the state you wish to leave them in. -
Page 143: Arc Reporting
i-on Range Installer Menu Options The keypad display shows the user number and name of the prox tag owner. ARC Reporting (For the i-on40, i-on30EX, i-on50EX and i-on160EX this option appears only when the i- sd02, i-dig02 or i-gsm02 module is fitted. For the i-on30EXD and i-on50EXD this option is always available. -
Page 144: Battery(S)
Installer Menu Options i-on Range 30 50 160 If the alarm system has an EXP-PSU connected then this menu also lets you check the current used by the EXP-PSU itself. Battery(s) 50 160 This option allows you to carry out a load test on any standby batteries connected to the control unit, or of batteries in any EXP-PSU connected to the system. -
Page 145: Other Diagnostic Leds
i-on Range Installer Menu Options No communication over the bus in the last 10 seconds. Three No bus address allocated to expander Four No poll request received from control unit in the last minute. Other Diagnostic LEDs The Heartbeat LED on the control unit and the navigation key LEDs on the keypad pcb may also flash to indicate the status of those devices: Device Slow Flash... -
Page 146: Downloader And The Log
Installer Menu Options i-on Range Downloader and the Log When Downloader connects to a control unit, the control unit logs the event as “Rem Download”. This indicates that Downloader successfully connected and disconnected. The control unit logs a separate event “Unn Config Change” if Downloader changes the configuration of the control unit. -
Page 147: Psu
i-on Range Installer Menu Options 30 50 160 This option shows the first item in a list of the EXP-PSUs known to the control unit. If you have more than one EXP-PSU, select one by scrolling up or down and then press tick. The keypad display will then show the revision of software running on the EXP-PSU. -
Page 148: Appendix I: Arc Communication Formats
i-on Range Appendix I: ARC Communication Formats Note: To comply with EN50131 you must fit a communications module. Fast Format Fast Format is the format most widely used in the UK. When using the Fast Format, each message transmitted to the ARC consists of the following: A 4,5 or 6-digit account number. -
Page 149: Extended Sia3 V2
i-on Range Appendix I Where: AAAAAA 6-digit programmable account code (e.g. 123456). “N” New Event (always N). “ti”hh:mm/ time (e.g. ti10:23/). “id”nnn/ user number, if applicable; otherwise not sent (e.g. id123/ or id6/). “ri”nn/ partition no. (e.g. ri12/ or ri3). event code (e.g. -
Page 150: Appendix Ii: Programming A Common Area
i-on Range Appendix II: Programming a Common Area 30 40 50 160 Some commercial premises include two or more separate areas linked by a common area. You can program a control unit to allow users to set each area independently, and then set the common area automatically when the last occupant leaves the premises. -
Page 151: Zone Programming
i-on Range Appendix II area (P1) follow the status of other partitions use the Partitions - Full Set Link option (see below). To avoid false alarms make the alarm response of the common area (Partition 1) Siren + Comms and the other two Partitions Siren only. Zone Programming Location Zone... -
Page 152: User Programming
Appendix II i-on Range P3 = Yes System Options Wired Zone Type Select FSL if using all wired detectors Confirmation Mode DD243 or BS8243 Confirmation 30 mins Time After Entry 2 zones Entry keypad Lock Sounder on ... - Page 153 i-on Range Appendix II If either User 02 or 03 opens the Front Door this starts the entry time and tone. The user enters their code or presents a Prox tag to the keypad in their department. The system then unsets their partition and the common area. If the Master user opens the Front Door and enters their code or presents a Prox to a keypad then only P1, the common area, will unset.
-
Page 154: Appendix Iii: Using A Wam As A Repeater
Before You Begin 1. Carry Out a Radio Site Survey Eaton’s Security Business strongly recommend that you carry out a radio site survey to find the best position for the WAM. You must choose a position for the WAM so that a) the nearest radio expander can receive the signals from the WAM and b) the WAM can receive the signals from those distant transmitters that you wish to repeat. -
Page 155: Teach The Expander The Identity Of The Wam
i-on Range Appendix III Press SELECT. The blue LED 1 glows. The WAM is in menu 1. Use menu 7 to go into mode selection as follows: Press SELECT repeatedly until LED 7 glows. Press SET. The blue LEDs show the current mode. When delivered from the factory the WAM is in mode 1 (LED 1 glowing). -
Page 156: On The Wam
Appendix III i-on Range Press . 30 50 160 The display shows the first in a list of the available radio expanders, for example: 40 For i-on40 go to step 8. Press or to see other expanders (if ... -
Page 157: Deleting Devices
i-on Range Appendix III Press SELECT. The blue LED 1 glows. The WAM is in menu 1. Press SET. If any blue LEDs flash then those channels are already in use. Activate tampers on all transmitters that the WAM needs to learn. - Page 158 Appendix III i-on Range Press SELECT. The blue LED 2 glows. Press SET. The WAM is in menu 2 – Delete Detectors. If any blue LEDs flash then those channels are in use. If necessary, press SELECT to select the detector you wish to delete.
-
Page 159: Appendix Iv: Programming A 762 Or 768/769 As An Output Module
i-on Range Appendix IV: Programming a 762 or 768/769 as an Output Module Introduction Before You Begin Carry out a radio site survey. Set Up the 762 or 768/769 Enter Programming Mode To enter programming for the first time (while installing a new unit): Connect a suitable 12VDC power supply to the DC supply in connector. -
Page 160: Disable Infrared Learning
Appendix IV i-on Range C2 Press Select until the display shows the next channel that you want to set to output mode, for example: n1 10. Press Set. The display shows the channel’s current mode, for example: 11. Press Select until the display shows “n6”, the Output Module Mode: n6... -
Page 161: At The 762R (Or 768R/769R)
i-on Range Appendix IV Press until the display shows: Press . Press . Press . 30 50 160 The display shows the first in a list of the available radio expanders, for example: 16 40 For i-on16 and i-on40 go to step 7. -
Page 162: At The Keypad
Appendix IV i-on Range 1. Press Esc/Del to go back to the command menu. The display shows: Press Select until the display shows the command "GO". You should see: Press Set. The display shows: You should hear a single beep repeated slowly. Close the lid. -
Page 163: Appendix V: Changing I-Rk01 From Four To Six Digit Access Codes
i-on Range Appendix V: Changing i-rk01 From Four to Six Digit Access Codes 50 160 The i-rk01 can be programmed to give either four or six-digit access codes. Doing this requires you to remove the batteries and re-insert them. Make sure that the control unit is in Installer Mode first in order to avoid tamper alarms. -
Page 164: Appendix Vi: Using A 703 Transmitter
i-on Range Appendix VI: Using a 703 Transmitter For the i-on16, i-on40, and i-onEX systems fitted with radio expander, it is possible to program the control unit to learn the identity of a 703r transmitter. 703r will operate in the following modes: Mode 4 Two zones with normally closed contacts on both alarm and tamper. -
Page 165: Appendix Vii: Log Messages
i-on Range Appendix VII: Log Messages This Appendix gives short explanations of the messages that may be stored in the control unit’s log. Please note that many of the messages refer to specific equipment items by the bus and device number. Therefore, it is not possible to show in this list the exact log message that you may be seeing on any given installation. - Page 166 Appendix VII i-on Range Batt= Charger Rstr Control unit battery charger EXP-PSU Ex Keys Rstr' The system was restored after a working again. user keyed in the wrong code more than four times in a row at a Battery Load OK Control unit battery passed load keypad.
- Page 167 i-on Range AppendixVII HUA Confirm == Hold Up Alarm confirmed on Mask Z== Masking detected on zone while keypad HUA keys. partition set. HUA Confirm Aux # Hold Up Alarm confirmed by open Missing == Expander missing from bus. circuit on AUX Tamp terminals on Missing == Rstr Missing expander restored to bus.
- Page 168 Appendix VII i-on Range Sec Comms Path Rst Secondary communications path U--- Duress Restr User nn keyed in a Duress code to fault restored. unset the system (part setting system). Set Fail Z== Setting failed at zone. U-- Off-Site User nn left Installer mode. SMS Test Call SMS test call made.
- Page 169 i-on Range AppendixVII Z== Smoke Flt Rst Smoke detector at zone has been Z== Smoke PSU Rst Smoke detector at zone power restored. supply fault restored. Z== Smoke PSU Flt Smoke detector at zone has power supply fault. Page 159...
-
Page 170: Index
i-on Range Index 24 hour alarm Auto rearm ......... 99 output type ......71 Autoset warning zone type ....... 46 description ......85 770r..........64 output type ......72 771r..........63 Battery Abort delay ....... 100 fault output type ..... 68 AC Fail load test ....... - Page 171 i-on Range Index and expanders ....... 54 Entry code lockout ..... 91 and radio sirens ..... 63 Entry route ......... 46 and sounders ....90, 91 in part set (Part setting) ..82 fast format ......108 in part set (partitions) ..... 82 output type ......
- Page 172 Index i-on Range fault output type ..... 69 Heartbeat LED ......135 fault zone type ....... 48 low volts output type ....68 fast format ......108 Low volts zone type ....47 Function ......... 90 External warning device fault ..48 keys enable ......
- Page 173 i-on Range Index Status LED ......20 Lock Set ........78 KEY-KP01 ........ 4, 5 ABCD keys ......19 erasing ........16 backlight ........ 20 mandatory ......135 backlight from installer menu . 59 viewing......... 135 External prox ......59 Log only programming mode ....
- Page 174 Index i-on Range Omit Polling IP address ....107 allowed attribute..... 52 Port number SIA and CID ....110, 111 web browser interface..122 Open/Close ........ 67 web server ....121, 123 fast format ......108 Proximity tag Outputs for entry code lockout .... 91 Digi On Board output ...
- Page 175 i-on Range Index Restorals ........112 triggers ......... 119 RF fault ........68 Soak Test........51 RF jamming ....... 68 Sounder enabling/disabling detection of101 confirmed/unconfirmed ..90, 91 fast format ......108 Speech dialler ....105, 114 SIA and CID ....110, 112 testing ........
- Page 176 Index i-on Range Text editing ........ 18 Web browser interface ..11, 121 Text messages and alarms ......11 SMS ........117 gateway address ....122 Time and Date ......104 ip address ......122 Timed set port number ......122 Part setting ......
- Page 177 i-on Range Index This page is intentionally blank. Page 167...
- Page 178 Index i-on Range www.coopersecurity.co.uk Product Support (UK) Tel: +44 (0) 1594 541978 Available between: 08:30 17:00 Monday to Friday. Product Support Fax: (01594) 545401 email: techsupport@coopersecurity.co.uk Part Number 12343429 24/1/14 Page 168...
Need help?
Do you have a question about the i-on series and is the answer not in the manual?
Questions and answers