Table of Contents
Advertisement
Quick Links
Advertisement
Table of Contents
Troubleshooting

Subscribe to Our Youtube Channel
Related Manuals for Oracle Fujitsu SPARC M12-1


Summary of Contents for Oracle Fujitsu SPARC M12-1
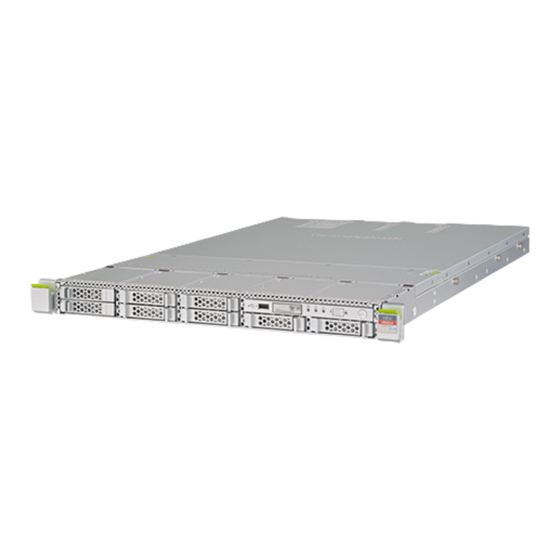
- Page 1 Fujitsu SPARC M12-1 Service Manual Manual Code: C120-0059-09EN January 2023...
- Page 2 Oracle and/or its affiliates and Fujitsu Limited, including software and font technology. Per the terms of the GPL or LGPL, a copy of the source code governed by the GPL or LGPL, as applicable, is available upon request by the End User. Please contact Oracle and/or its affiliates or Fujitsu Limited.
-
Page 3: Table Of Contents
Contents Preface xi Chapter 1 Before Starting Maintenance Work 1 1.1 Warning/Caution Indications 1 1.2 Labels/Tags 2 1.3 Safety Precautions 3 1.4 Precautions on Static Electricity 4 1.5 Other Precautions 5 1.6 Emergency Power Off 6 Chapter 2 Understanding the System Components 9 2.1 ... - Page 4 5.5.1 Stopping the System With the XSCF Command 56 5.5.2 Stopping the System From the Operation Panel 57 5.6 Saving Setting Information and Configuration Information 58 Fujitsu SPARC M12-1 Service Manual • January 2023...
- Page 5 5.6.1 Saving XSCF Setting Information 58 5.6.2 Saving Logical Domain Configuration Information and OpenBoot PROM Environment Variables 58 5.7 Releasing a FRU From the System With the replacefru Command 60 5.8 Accessing a FRU 62 5.8.1 ...
- Page 6 8.4.2 Installing a PCIe Riser 128 8.4.3 Restoring the Server 129 Chapter 9 Maintaining Internal Storage 131 9.1 Before Maintenance on an HDD/SSD 131 9.2 HDD/SSD Configuration 131 Fujitsu SPARC M12-1 Service Manual • January 2023...
- Page 7 9.3 Removing an HDD/SSD 133 9.4 Installing an HDD/SSD 135 Chapter 10 Maintaining the HDD Backplane 137 10.1 Before Maintenance on the HDDBP 137 10.2 Location of the HDDBP 137 10.3 Removing the HDDBP 138 10.3.1 ...
- Page 8 16.1 Before Maintenance on the MBU and Memory 181 16.2 Location of the MBU 181 16.3 Memory Locations 182 16.4 Precautions for MBU Replacement 184 viii Fujitsu SPARC M12-1 Service Manual • January 2023...
- Page 9 B.4 HDD/SSD 205 B.5 PCIe Card 205 B.6 Backplanes 206 B.7 OPNL 207 Appendix C Oracle Solaris Troubleshooting Commands 209 C.1 iostat Command 209 C.2 prtdiag Command 211 C.3 prtconf Command 213 C.4 ...
- Page 10 D.4 RESET Switch 223 Appendix E Removing the Lithium Battery 225 E.1 Location of the Lithium Battery 225 E.2 Removing the Lithium Battery 226 Index 227 Fujitsu SPARC M12-1 Service Manual • January 2023...
-
Page 11: Preface
Preface This document describes the maintenance procedures for the Oracle or Fujitsu SPARC M12-1. This document can also be used as a disassembly procedure for disposal or recycling. The maintenance work should be performed by service engineers and/or field engineers. - Page 12 *1 The listed manuals are subject to change without notice. *2 Printed manuals are provided with the product. *3 This document applies specifically to the SPARC M12/M10 and FUJITSU ETERNUS disk storage system. Fujitsu SPARC M12-1 Service Manual • January 2023...
- Page 13 Notes on Safety Read the following documents thoroughly before using or handling the SPARC M12. Fujitsu SPARC M12 and Fujitsu M10/SPARC M10 Important Legal and Safety ■ Information Fujitsu SPARC M12 and Fujitsu M10/SPARC M10 Safety and Compliance Guide ■ ...
- Page 14 Along with the manual code, manual title, and page number, state your points specifically at one of the following websites: Global site ■ https://www.fujitsu.com/global/contact/ Japanese site ■ https://www.fujitsu.com/jp/products/computing/servers/unix/sparc/contact/ Fujitsu SPARC M12-1 Service Manual • January 2023...
-
Page 15: Chapter 1 Before Starting Maintenance Work
Chapter 1 Before Starting Maintenance Work This chapter describes the safety precautions that must be observed before starting any maintenance work. Note the meanings of each of the following symbols and labels to ensure that the work is done correctly. Warning/Caution Indications ■... -
Page 16: Labels/Tags
- Safety: NRTL/C, BIS - Radio wave: VCCI, FCC, ICES, KCC - Safety and radio wave: CE, CCC, BSMI, RCM, EAC Figure 1-1 Locations of the System Name Plate Label and Standard Label Fujitsu SPARC M12-1 Service Manual • January 2023... -
Page 17: Safety Precautions
The RFID tag carries an Asset ID. The RFID tag is affixed to the operation panel. ■ Figure 1-2 RFID Tag Safety Precautions Caution - Observe the following precautions to protect yourself when performing maintenance. Observe all the precautions, warnings, and instructions described on the SPARC ■... -
Page 18: Precautions On Static Electricity
For details on the rack, see "Chapter 2 Planning and Preparing for System Installation" in the Fujitsu SPARC M12-1 Installation Guide. Precautions on Static Electricity Caution - Observe the precautions related to electrostatic discharge (ESD) as... -
Page 19: Other Precautions
How to use a wrist strap Wear a wrist strap in such a way that the inner metal surface (A in Figure 1-3) of the wrist strap band is in contact with your skin. Connect the clip (B in Figure 1-3) directly to the chassis. -
Page 20: Emergency Power Off
Regardless of the operation you are performing, give top priority to fire prevention. Remove all the power cords from the power supply units. For details, see "5.8.1 Removing the Power Cords." Fujitsu SPARC M12-1 Service Manual • January 2023... - Page 21 Figure 1-4 Removing the Power Cords Chapter 1 Before Starting Maintenance Work...
- Page 22 Fujitsu SPARC M12-1 Service Manual • January 2023...
-
Page 23: Chapter 2 Understanding The System Components
Chapter 2 Understanding the System Components This section describes the components mounted in the SPARC M12-1. Before starting any maintenance work, you need to confirm and fully understand the configurations of the components mounted in the SPARC M12-1 and also the indications by LEDs. - Page 24 Components that can be accessed from the rear Figure 2-2 Locations of Components That Can be Accessed From the Rear Location No. Component Power supply unit (PSU) Fujitsu SPARC M12-1 Service Manual • January 2023...
- Page 25 Letters in parentheses are an abbreviation for the component. Below, each component is represented by its abbreviation unless otherwise noted. Internal components To access the internal components, open the fan cover and remove the upper cover. For details on how to remove the covers, see "5.8.4 Opening the Fan Cover"...
-
Page 26: Checking The Memory Configuration Rules
For example, in the memory on the right side of CPU#0 in Figure 2-4, the four- module set of MEM#00B, MEM#00A, MEM#01B, and MEM#01A mirrors the four-module set of MEM#10B, MEM#10A, MEM#11B, and MEM#11A. Fujitsu SPARC M12-1 Service Manual • January 2023... -
Page 27: Checking Memory Information
Figure 2-4 Memory Installation Locations and Units Mirroring Mirroring CPU#0 Front Table 2-2 Memory Installation Configurations Memory Module Installed Memory Count a in Figure 2-4 a in Figure 2-4 b in Figure 2-4 a in Figure 2-4 b in Figure 2-4 c in... -
Page 28: Confirming The Functions Of The Operation Panel
The operation panel provides the system's display and control functions. The field engineer and system administrator can specify the operation mode or control start/stop of the system while checking the LEDs indicating the system operation status. Fujitsu SPARC M12-1 Service Manual • January 2023... -
Page 29: Display Function Of The Operation Panel
Figure 2-6 Location of the Operation Panel Figure 2-7 Appearance of the Operation Panel Location No. LED/Switch POWER LED XSCF STANDBY LED CHECK LED Mode switch Power switch 2.3.1 Display Function of the Operation Panel The operation panel has three LED indicators as a display function. The LED indicators show the following. -
Page 30: Control Function Of The Operation Panel
The operation panel has the following switches to implement its control function: Mode switch (slide switch) ■ Specifies the mode for either operation or maintenance. Power switch ■ Controls start/stop of the system. Figure 2-9 Operation Panel Switches Fujitsu SPARC M12-1 Service Manual • January 2023... - Page 31 Location No. Switch Mode switch Power switch The mode switch sets the operation mode for the system. The Locked and Service operation modes can be switched by sliding the mode switch. Table 2-3 describes the difference between the modes. Table 2-3 Functions of the Mode Switch Icon Name Description...
-
Page 32: Checking The Indications By Leds
For the locations of the LEDs, see Figure 2-8. Table 2-6 lists the system operation status indicated by the LEDs, while Table 2-7 lists the system status indicated by the combination of LEDs. Fujitsu SPARC M12-1 Service Manual • January 2023... - Page 33 Table 2-6 System Operation Status Indicated by LEDs Icon Name Color State Description POWER Green The system is running. Blinking The system is being stopped. The system is stopped. XSCF Green The XSCF is functioning normally. STANDBY Blinking The XSCF is being initialized.
-
Page 34: Leds On The Rear Panel (System Locator)
Each component incorporates LEDs. If a component experiences an error, check the LEDs to see which component requires maintenance. Check the LEDs before starting maintenance work. The LEDs on each component and the states that they indicate are as follows. Fujitsu SPARC M12-1 Service Manual • January 2023... - Page 35 Figure 2-11 LED Locations of the MBU (1) (2) Table 2-9 MBU LEDs and Their States Location Name Color State Description READY Green The XSCF is running. Blinking The XSCF is being started. The XSCF is stopped. CHECK Amber Indicates that an error has occurred.
- Page 36 Indicates that the communication speed is 10 Mbps. Green Blinking Indicates that communication is being performed. Indicates that communication is not being performed. Figure 2-13 LED Locations of the On-Board LAN Ports Fujitsu SPARC M12-1 Service Manual • January 2023...
- Page 37 Table 2-11 On-Board LAN Port LEDs and Their States Location Name Color State Description LINK SPEED Green Indicates that the communication speed is 10 Gbps. Amber Indicates that the communication speed is 1 Gbps. Indicates that the communication speed is 100 Mbps.
- Page 38 Blinking A hardware error has occurred, but this power supply unit (PSU) is operating. Indicates that power is not being supplied. Figure 2-16 LED Locations on the HDD/SSD READY CHECK Fujitsu SPARC M12-1 Service Manual • January 2023...
- Page 39 Table 2-14 HDD/SSD LEDs and Their States Name Color State Description READY Green Blinking Indicates that the disk is being accessed. This LED is normally on, but it blinks while the disk is being accessed. While the LED is blinking, maintenance such as removal of the disk cannot be performed.
- Page 40 Fujitsu SPARC M12-1 Service Manual • January 2023...
-
Page 41: Chapter 3 Types Of Maintenance
The supported maintenance is divided into two types: active maintenance and system-stopped (inactive) maintenance. Active maintenance ■ Type of maintenance performed while Oracle Solaris is operating System-stopped maintenance (inactive maintenance) ■ Type of maintenance performed with the physical partition stopped The SPARC M12-1 has only one physical partition. -
Page 42: Active Maintenance
Type of maintenance performed with the power cords removed from the SPARC M12-1 requiring maintenance Active Maintenance The type of maintenance performed with Oracle Solaris operating on the physical partition is referred to as active maintenance. Note that active/cold maintenance is not supported by the SPARC M12-1. -
Page 43: System-Stopped Maintenance (Inactive Maintenance)
System-Stopped Maintenance (Inactive Maintenance) The type of maintenance performed with the physical partition stopped is referred to as system-stopped maintenance (inactive maintenance). The SPARC M12-1 has only one physical partition. Thus, the state in which the physical partition requiring maintenance is stopped is the same as the state in which the entire system is stopped. Table 3-3 shows whether system-stopped maintenance (inactive maintenance) is enabled for each FRU. - Page 44 Fujitsu SPARC M12-1 Service Manual • January 2023...
-
Page 45: Chapter 4 Preparation And Precautions For Maintenance
Chapter 4 Preparation and Precautions for Maintenance This chapter describes the preparations that must be completed prior to performing any maintenance as well as the types of maintenance. Confirming the System Configuration ■ Troubleshooting ■ Maintenance Precautions ■ Confirming the System Configuration This section describes how to check the hardware and software configurations. -
Page 46: Confirming The Software And Firmware Configurations
Confirming the software configuration Use Oracle Solaris commands to check the software configuration. If you are logged in to the XSCF console, switch to the control domain console by executing the console command beforehand. - Page 47 Summary: entire incorporation including Support Repository Update (Oracle Solaris 11.1.12.5.0). For Oracle Solaris 10, execute the showrev command. # showrev -p To display the version of Oracle VM Server for SPARC, execute the ldm command. # ldm -V Logical Domains Manager (v 3.4.0.3.x) (*1) ...
- Page 48 BB#00-PCI#00 (*1) *1 Mounting locations of the PCI expansion unit and link card Execute the ioxadm command to check the firmware version information for the PCI expansion unit and link card. Fujitsu SPARC M12-1 Service Manual • January 2023...
-
Page 49: Confirming Fru Information
XSCF> ioxadm -v list Location Type FW Ver Serial Num Part Num State PCIBOX#6002 PCIBOX PZ21242007 PCIBOX#6002/PSU#0 FEJD1212000530 CA01022- 0750-D/ PCIBOX#6002/PSU#1 FEJD1212000529 CA01022- 0750-D/ PCIBOX#6002/IOB IOBOARD 1330 PP123300E5 CA20365- B66X 008AG (*1) PCIBOX#6002/LINKBD BOARD PP141900V0 CA20365- B60X 008AD/7061035 PCIBOX#6002/FANBP FANBP PP123203NT CA20365-... - Page 50 + Core:6; Strand:8; MEM#00A Status:Normal; + Code:ce8002M393A2K40BB1-CRC 00-31C056F2; + Type:83; Size:16 GB; ( Omitted ) XSCF> Table 4-2 lists combinations of the SPARC M12-1 (Fujitsu Product ID SPNAAAAxxx) and MBU types. Fujitsu SPARC M12-1 Service Manual • January 2023...
-
Page 51: Troubleshooting
Table 4-2 Combinations of Servers and MBU Types Server Fujitsu Product ID (Oracle Product ID) MBU Type Indicator SPARC M12-1 SPNAAAA1xx (7118228), SPNAAAA2xx (7602945) SPNAAAA3xx (7605161) SPNAAAA4xx (7605940) Table 4-3 shows the correspondence between memory mounted in the SPARC M12-1 and FRU types. -
Page 52: Identifying A Failure
Check the LEDs on the operation panel, rear panel, and each component to identify the FRU requiring maintenance. Check the status of a FRU from its LED before starting maintenance work on the FRU. Operation panel LEDs ■ Fujitsu SPARC M12-1 Service Manual • January 2023... - Page 53 For details, see "12.1 Checking a Log Saved by the XSCF" in the Fujitsu SPARC M12 and Fujitsu M10/SPARC M10 System Operation and Administration Guide. Checking messages on Oracle Solaris ■ For details, see "12.2 Checking Warning and Notification Messages" in the Fujitsu SPARC M12 and Fujitsu M10/SPARC M10 System Operation and Administration Guide.
- Page 54 Due to the failure or degradation of another unit, the target unit and components of its underlying layer has been degraded, though there is no problem in them. Maintenance Maintenance is being performed. The replacefru or addfru command is being executed. Fujitsu SPARC M12-1 Service Manual • January 2023...
- Page 55 Checking the status of a PCI expansion unit If a PCI expansion unit is connected, execute the ioxadm command to check the status of the PCI expansion unit. ioxadm command Execute the ioxadm command to determine the environmental conditions (temperature, voltage, etc.) or LED indications of the PCI expansion unit. Log in to the XSCF shell.
- Page 56 Lists the panic message log. Checking the messages output by the predictive self-repairing tool Check the messages output from the Oracle Solaris Fault Manager predictive self-repairing tool, running on Oracle Solaris. Oracle Solaris Fault Manager supports the following functions: Receives telemetry information about errors.
- Page 57 Use 'fmdump -eV' to view the unexpected telemetry. corrective action the system administrator Please refer to the associated reference document at http://support. should apply oracle.com/msg/SUNOS-8000-J0 for the latest service procedures and policies regarding this diagnosis. Identifying the location of the SPARC M12-1 requiring maintenance...
-
Page 58: Downloading Error Log Information
■ chassis: - the one currently mounted in the SPARC M12-1, or - one that was once used as a maintenance part This is because these SD cards store device identification information. Fujitsu SPARC M12-1 Service Manual • January 2023... - Page 59 The CPU and XSCF on the MBU cannot be replaced individually. Replace the ■ MBU. When replacing the MBU, you need to remove memory from the old unit and ■ reinstall it on the new unit. Always install the memory modules at the same locations as on the old motherboard unit.
-
Page 60: Precautions For Expansion
Observe the memory installation rules when you expand memory. For details, see ■ "2.2.1 Memory Installation Rules." To mount a 64 GB DIMM, see "Notes on Memory" in the latest version of the ■ Fujitsu SPARC M12 Product Notes. Fujitsu SPARC M12-1 Service Manual • January 2023... -
Page 61: Precautions For Reduction
Precautions for HDD/SSD expansion In HDD/SSD expansion, to install an HDD/SSD in a slot, remove the internal ■ storage filler unit from the slot. Keep the removed internal storage filler unit because it will be needed for any ■ subsequent HDD/SSD reduction. Precautions for PCIe card expansion In PCIe card expansion, remove the filler for a PCIe card from the PCIe riser. - Page 62 Fujitsu SPARC M12-1 Service Manual • January 2023...
-
Page 63: Chapter 5 Preparations Required For Maintenance
Caution - Do not operate the Field Replaceable Unit (FRU) requiring maintenance while OpenBoot PROM is running (the ok prompt is displayed). After turning off the physical partition (stopping the system) or starting Oracle Solaris, operate the FRU requiring maintenance. -
Page 64: Switching The Mode Switch To Service Mode
Execute the showpparstatus command to confirm the operating condition of the physical partition. In the following example, [PPAR Status] of PPAR-ID 00 displays "Running", which indicates that the physical partition is operating. Fujitsu SPARC M12-1 Service Manual • January 2023... -
Page 65: Checking The Assignment Status Of I/O Devices
In the following execution example, the operating condition of the logical domain, the resource usage status, and the assignment status of I/O devices are checked from Oracle Solaris on the logical domain. For details, see "3.2 Operations and Commands Related to Logical Domain Configurations" in the Fujitsu SPARC M12 and Fujitsu M10/SPARC M10 Domain Configuration Guide. -
Page 66: Checking The Usage Status Of The Hdd/Ssd
In the following execution example, the configurations and states of devices in pools and errors generated from the devices are checked. Log in to Oracle Solaris on the logical domain. Execute the zpool status command to check the configurations and operating conditions of devices. - Page 67 For details, see "Using the diskinfo command (Oracle Solaris 10)." Using the format command (Oracle Solaris 11) Execute the format command to check the HDD/SSD slots. (1) to (4) in the following example represent: (1): Logical path name of the disk...
- Page 68 3706 <-- (1) Physical path -------------------------------- 0: /pci@8100/pci@4/pci@0/pci@0/scsi@0/iport@f/disk@w50000393b81b3a36,0 HDD_1 c0t500000E01FB332A2d0 TOSHIBA MBF2600RC 3706 <-- (2) Physical path -------------------------------- 0: /pci@8100/pci@4/pci@0/pci@0/scsi@0/iport@f/disk@w500000e01fb332a2,0 HDD_2 c0t50000393B81B4D7Ad0 TOSHIBA MBF2600RC 3706 <-- (3) Physical path -------------------------------- 0: /pci@8100/pci@4/pci@0/pci@0/scsi@0/iport@f/disk@w50000393b81b4d7a,0 Fujitsu SPARC M12-1 Service Manual • January 2023...
-
Page 69: Releasing An Hdd/Ssd From The System
5.4.2 Releasing an HDD/SSD From the System To use the hot plug function, the hotplug service of Oracle Solaris needs to be enabled. Check the status of the service. If it is disabled, enable the hotplug service in the following procedure. The hot plug function is available only on the control domain and root domain. -
Page 70: Stopping The Entire System
Continue? [y|n] : y 00 : Powering off The following processes are performed. - Oracle Solaris is completely shut down. - The system stops and enters the POWERON READY state (The XSCF is running). Fujitsu SPARC M12-1 Service Manual • January 2023... -
Page 71: Stopping The System From The Operation Panel
Execute the showdomainstatus command to confirm the operating condition of the logical domain. In the following example, [Status] of the logical domain displays "Solaris powering down," indicating the power-off processing of Oracle Solaris. XSCF> showdomainstatus -p 0 Logical Domain Name... -
Page 72: Saving Setting Information And Configuration Information
Execute the ldm ls-spconfig command to confirm that the current logical domain configuration information has already been saved on the XSCF. In the following example, the current configuration information is set in test1. Fujitsu SPARC M12-1 Service Manual • January 2023... - Page 73 primary# ldm ls-spconfig factory-default test1 [current] test2 If the current configuration information has not been saved on the XSCF, save it with the ldm add-spconfig command. In the following example, the configuration information is saved in test3 by the ldm add-spconfig command, and the ldm ls-spconfig command is used to confirm that the information is set in test3.
-
Page 74: Releasing A Fru From The System With The Replacefru Command
Note - If the XSCF startup mode is high-speed mode, hardware cannot be replaced using the replacefru command. Replace hardware with the input power turned off. Log in to the XSCF shell. Execute the replacefru command to display the maintenance menu. XSCF> replacefru Fujitsu SPARC M12-1 Service Manual • January 2023... - Page 75 With a number key, select the FRU requiring maintenance. In the following example, since the FANU is selected, "1" is entered. ------------------------------------------------------------------------------ Maintenance/Replacement Menu Please select a type of model which has FRU to be replaced. 1. FAN (Fan Unit) 2.
-
Page 76: Accessing A Fru
Release the tab of the cable clamp (A in Figure 5-1). Pulling the cable clamp toward the rear facilitates the release of the latch. Figure 5-1 Latch of the Cable Clamp Fujitsu SPARC M12-1 Service Manual • January 2023... -
Page 77: Removing The Cables
Remove the power cords from the PSU. Figure 5-2 Removing the Power Cords 5.8.2 Removing the Cables When maintaining a PCIe card ■ Disconnect all the cables connected to the PCIe card requiring maintenance. When maintaining the MBU, memory, and PSUBP ■... -
Page 78: Pulling The Sparc M12-1 Out From The Rack
While pulling the levers outward, pull the SPARC M12-1 out as far as possible. Once the SPARC M12-1 has been completely pulled out, it is automatically locked into the prescribed position. Figure 5-4 Pulling Out the SPARC M12-1 Fujitsu SPARC M12-1 Service Manual • January 2023... -
Page 79: Opening The Fan Cover
5.8.4 Opening the Fan Cover To perform maintenance on an internal FRU in the SPARC M12-1, pull the SPARC M12-1 out of the rack, and then open the fan cover. Turn the locking screw to the Service position ( ) to release the lock. Figure 5-5 ... - Page 80 Note - The fan cover does not open through 180 degrees. Figure 5-6 Opening the Fan Cover Fujitsu SPARC M12-1 Service Manual • January 2023...
-
Page 81: Removing The Upper Cover
5.8.5 Removing the Upper Cover To perform maintenance on an internal FRU in the SPARC M12-1, pull the SPARC M12-1 out of the rack, open the fan cover, and then remove the upper cover. Slide the upper cover toward the rear to remove it. Figure 5-7 ... - Page 82 Lift the air duct up by both sides to remove it. Figure 5-8 Removing the Air Duct Fujitsu SPARC M12-1 Service Manual • January 2023...
-
Page 83: Releasing The Cable Guide Lock
Remove the PSUBP cover by sliding it to the front while pressing the latch of the PSUBP cover. Figure 5-9 Removing the PSUBP Cover 5.8.7 Releasing the Cable Guide Lock To perform maintenance with the connected cables removed from the motherboard unit, release the cable guide lock to remove the cables. - Page 84 Fujitsu SPARC M12-1 Service Manual • January 2023...
-
Page 85: Chapter 6 Understanding The Preparations For Restoring The System
Chapter 6 Understanding the Preparations for Restoring the System This chapter describes the procedures required to restore the system after FRU maintenance. See this chapter, as required, when performing maintenance on each FRU described in Chapter 8 onward. Restoring the Server ■... -
Page 86: Installing The Air Duct And Psubp Cover
Figure 6-1 Locking the Cable Guide 6.1.2 Installing the Air Duct and PSUBP Cover If maintenance was performed on the MBU, memory, or PSUBP, install the air duct and PSUBP cover. Fujitsu SPARC M12-1 Service Manual • January 2023... - Page 87 Install the PSUBP cover by tilting it, inserting the latch (A in Figure 6-2), and sliding the cover to the rear. Note - Confirm that the latch of the PSUBP cover is secured. Figure 6-2 Installing the PSUBP Cover Attach the air duct vertically.
-
Page 88: Installing The Upper Cover
Install the upper cover by sliding it toward the front. Note - Confirm that the pins on the rear of the SPARC M12-1 (four locations) are inserted into the upper cover. Figure 6-4 Installing the Upper Cover Fujitsu SPARC M12-1 Service Manual • January 2023... -
Page 89: Closing The Fan Cover
6.1.4 Closing the Fan Cover If the maintenance was performed on an internal FRU in the SPARC M12-1, install the upper cover, and then close the fan cover. Hold the edge of the fan cover, and close it while pressing the green slide button toward the inside. -
Page 90: Putting The Sparc M12-1 Into The Rack
SPARC M12-1 further until it goes in all the way. Then, take your hands off the levers to engage the locks. c. Shake the SPARC M12-1 a little to confirm that the SPARC M12-1 is secured to the rack. Fujitsu SPARC M12-1 Service Manual • January 2023... - Page 91 Figure 6-7 Putting the SPARC M12-1 in the Rack FRONT FRONT Note - Confirm that the SPARC M12-1 is securely mounted and that all the levers are locked. Figure 6-8 SPARC M12-1 Levers Chapter 6 Understanding the Preparations for Restoring the System...
-
Page 92: Installing The Power Cords
Install the power cord to the PSU. Insert the power cord all the way straight into the PSU. Figure 6-9 Installing the Power Cords Fujitsu SPARC M12-1 Service Manual • January 2023... - Page 93 Clip the power cords with the cable clamp, and secure the cable clamp. Lock the latch (A in Figure 6-10) and then push the cable clamp toward the front to firmly secure the cable clamp. Figure 6-10 Cable Clamp Lock Chapter 6 Understanding the Preparations for Restoring the System...
-
Page 94: Incorporating A Fru Into The System With The Replacefru Command
1) Confirm the Check LED is blinking. 2) Remove FAN#6. 3) Execute either the following: 3-1) After installing the exchanged device, please select 'finish'. 3-2) If you want to suspend the maintenance without exchanging device, Fujitsu SPARC M12-1 Service Manual • January 2023... -
Page 95: When Replacing The Mbu/Psubp
please select 'cancel'. [f:finish|c:cancel] : f The following screen is displayed. Wait until the processing has completed. Waiting for FAN#6 to enter install state. [This operation may take up to 1 minute(s)] (progress scale reported in seconds) 0.. done Diagnostic tests for FAN#6 have started. -
Page 96: Setting The Time
BB#00-XSCF#0 (Master) XCP0 (Reserve): 3025 XSCF : 03.02.0005 XCP1 (Current): 3025 XSCF : 03.02.0005 : 03.02.0005 POST : 5.15.0 OpenBoot PROM : 4.38.5+3.1.0 Hypervisor : 1.5.13 CMU BACKUP #0: 03.02.0005 #1: .. XSCF> Fujitsu SPARC M12-1 Service Manual • January 2023... -
Page 97: When The System Is Configured With A Hardware Raid
6.3.3 When the System is Configured With a Hardware RAID If you have replaced the MBU in a hardware RAID configuration, activate the RAID volume. Log in to the XSCF shell. Execute the setpparparam command to suppress auto-boot. XSCF> setpparparam -p 0 -s bootscript "setenv auto-boot false" Start the system. - Page 98 From the execution result of "show-devs", confirm that the mounted PCIe cards are recognized. From the execution result of the initial diagnosis, confirm that "Passed" and "Normal" are displayed for all the PSBs. Fujitsu SPARC M12-1 Service Manual • January 2023...
-
Page 99: Restoring Setting Information And Configuration Information
Restoring Setting Information and Configuration Information 6.5.1 Restoring XSCF Setting Information This section describes how to restore the XSCF setting information saved on the USB device in "5.6.1 Saving XSCF Setting Information." Log in to the XSCF shell. Execute the restoreconfig command to restore the XSCF setting information. XSCF>... - Page 100 Restore the OpenBoot PROM environment variables based on the record saved in "5.6.2 Saving Logical Domain Configuration Information and OpenBoot PROM Environment Variables." The following example restores the boot-device to "/pci@8100/pci@4/pci@0/ pci@0/scsi@0/disk@p0,0". Fujitsu SPARC M12-1 Service Manual • January 2023...
- Page 101 {0} ok printenv auto-boot? auto-boot? = true Boot Oracle Solaris. {0} ok boot On Oracle Solaris super user prompt, confirm that the system started with factory-default. primary# ldm ls-spconfig factory-default [current] Execute the ldm init-system command to reflect the setting in the saved XML file.
-
Page 102: Incorporating The Hdd/Ssd
This section describes the flow of the procedure to incorporate a HDD/SSD by using the hot plug function. To use the hot plug function, the hotplug service of Oracle Solaris needs to be enabled. Check the status of the service. If it is disabled, enable the hotplug service in the following procedure. - Page 103 # cfgadm -al Ap_Id Type Receptacle Occupant Condition <Omitted> scsi-sas connected configured unknown c2::dsk/c2t50000394281B50C6d0 disk connected configured unknown c2::es/ses0 connected configured unknown c2::smp/expd0 connected configured unknown scsi-sas connected unconfigured unknown scsi-sas connected unconfigured unknown connected unconfigured unknown connected unconfigured unknown scsi-sas connected unconfigured unknown...
-
Page 104: Checking The Fru Status After Maintenance
+ Freq:3.200 GHz; Type:0x30; + Core:6; Strand:8; MEM#00A Status:Normal; + Code:2c800f18ASF2G72PZ-2G3B1 31-1221E918; + Type:83; Size:16 GB; MEM#01A Status:Normal; + Code:2c800f18ASF2G72PZ-2G3B1 31-1221E8E3; + Type:83; Size:16 GB; MEM#02A Status:Normal; + Code:2c800f18ASF2G72PZ-2G3B1 31-1221E917; + Type:83; Size:16 GB; Fujitsu SPARC M12-1 Service Manual • January 2023... -
Page 105: Returning The Mode Switch To Locked Mode
Returning the Mode Switch to Locked Mode Return the mode switch of the operation panel to Locked mode. For details, see "2.3.2 Control Function of the Operation Panel." Starting the System This section describes the procedure for starting the system. The system can be started in either of the following two ways: Starting the System With an XSCF Command ■... -
Page 106: Starting The System From The Operation Panel
Execute the fmadm faulty command on the logical domains where an error is detected to confirm that no errors remain. # fmadm faulty If any error remains, execute the fmadm repaired command to clear the error. Fujitsu SPARC M12-1 Service Manual • January 2023... -
Page 107: Chapter 7 Maintenance Flow
Chapter 7 Maintenance Flow This chapter describes the maintenance workflow. Be sure to check the notes on FRUs requiring maintenance in the Fujitsu SPARC M12 Product Notes for the latest XCP version. Maintenance Workflow ■ FRU Replacement Workflow ■ FRU Addition Workflow ■... - Page 108 (RAID configuration), active/hot maintenance can be performed on the HDD/SSD that is the boot device. *3 If the XSCF startup mode is high-speed mode, hardware cannot be replaced using the replacefru command. Perform system-stopped (inactive)/cold maintenance. Fujitsu SPARC M12-1 Service Manual • January 2023...
-
Page 109: Fru Replacement Workflow
FRU Replacement Workflow This section describes the replacement workflow for the following FRUs of the SPARC M12-1: - PCIe card - MBU - Memory - HDD/SSD - FANU - PSU - PSUBP - HDDBP - OPNL - Cable kit 7.2.1 Active Replacement This section describes the workflows for active/hot FRU replacement. - Page 110 "6.2 Incorporating a FRU Into the System With the system replacefru Command" Confirming that there is no problem with "6.7 Checking the FRU Status After Maintenance" the replacement FRU Closing the rack door Fujitsu SPARC M12-1 Service Manual • January 2023...
- Page 111 Active/Hot replacement (for an HDD/SSD in a RAID configuration) Active/Hot replacement can be performed on an HDD/SSD. If the HDD/SSD is in a RAID configuration, perform the following procedure to replace it. Figure 7-2 Active/Hot Replacement Flow (for an HDD/SSD in a RAID Configuration) 1.
- Page 112 "Chapter 9 Maintaining Internal Storage" Incorporating the replacement HDD/SSD "6.6 Incorporating the HDD/SSD" Confirming that there is no problem with "6.7 Checking the FRU Status After Maintenance" the replacement FRU Closing the rack door Fujitsu SPARC M12-1 Service Manual • January 2023...
-
Page 113: System-Stopped Replacement
7.2.2 System-Stopped Replacement This section describes the workflows for system-stopped/hot and system-stopped/ cold FRU replacement. References to detailed descriptions are written in the workflow. See any of them as required. Note - If the XSCF startup mode is high-speed mode, hardware cannot be replaced using the replacefru command. - Page 114 8. Confirming that there is no problem with the replacement FRU 9. Returning the mode switch on the operation panel to Locked mode 10. Starting the system 11. Closing the rack door Maintenance complete Fujitsu SPARC M12-1 Service Manual • January 2023...
- Page 115 Table 7-6 System-Stopped/Hot Replacement Work Procedure (PSU and FANU) Item Work Procedure Reference Opening the rack door Switching the mode switch on the "5.2 Switching the Mode Switch to Service Mode" operation panel to Service mode Checking the operating condition of the "5.3.1 Checking the Operating Condition of a Physical system Partition or Logical...
- Page 116 7. Confirming that there is no problem with the replacement FRU 8. Returning the mode switch on the operation panel to Locked mode 9. Starting the system 10. Closing the rack door Maintenance complete Fujitsu SPARC M12-1 Service Manual • January 2023...
- Page 117 Table 7-7 System-Stopped/Hot Replacement Work Procedure (HDD/SSD) Item Work Procedure Reference Opening the rack door Switching the mode switch on the "5.2 Switching the Mode Switch to Service Mode" operation panel to Service mode Checking the operating condition of the "5.3 Checking the Operating Condition and Resource system and the I/O device usage status Usage...
- Page 118 10. Confirming that there is no problem with the replacement FRU 11. Returning the mode switch on the operation panel to Locked mode 12. Starting the system 13. Closing the rack door Maintenance complete Fujitsu SPARC M12-1 Service Manual • January 2023...
- Page 119 Table 7-8 System-Stopped/Cold Replacement Work Procedure Item Work Procedure Reference Opening the rack door Switching the mode switch on the "5.2 Switching the Mode Switch to Service Mode" operation panel to Service mode Checking the operating condition "5.3 Checking the Operating Condition and Resource Usage Status"...
-
Page 120: Fru Addition Workflow
3. Mounting an HDD/SSD 4. Incorporating the HDD/SSD by using the hot plug function 5. Confirming that there is no problem with the installed FRU 6. Closing the rack door Addition complete Fujitsu SPARC M12-1 Service Manual • January 2023... -
Page 121: System-Stopped Addition
Table 7-9 Active/Hot Addition Work Procedures (HDD/SSD) Item Work Procedure Reference Opening the rack door Checking the operating condition of "5.3 Checking the Operating Condition and Resource Usage Status" the system and the I/O device usage status Mounting the HDD/SSD "Chapter 9 Maintaining Internal Storage"... - Page 122 7. Confirming that there is no problem with the installed FRU 8. Returning the mode switch on the operation panel to Locked mode 9. Starting the system 10. Closing the rack door Addition complete Fujitsu SPARC M12-1 Service Manual • January 2023...
- Page 123 Table 7-10 System-Stopped/Hot Addition Work Procedure (HDD/SSD) Item Work Procedure Reference Opening the rack door Switching the mode switch on the "5.2 Switching the Mode Switch to Service Mode" operation panel to Service mode Checking the operating condition "5.3 Checking the Operating Condition and Resource Usage Status"...
- Page 124 9. Confirming that there is no problem with the installed memory 10. Returning the mode switch on the operation panel to Locked mode 11. Starting the system 12. Closing the rack door Addition complete Fujitsu SPARC M12-1 Service Manual • January 2023...
- Page 125 Table 7-11 System-Stopped/Cold Addition Work Procedure (Memory) Item Work Procedure Reference Opening the rack door Switching the mode switch on the "5.2 Switching the Mode Switch to Service Mode" operation panel to Service mode Checking the operating condition "5.3 Checking the Operating Condition and Resource Usage Status"...
- Page 126 9. Confirming that there is no problem with the installed FRU 10. Returning the mode switch on the operation panel to Locked mode 11. Starting the system 12. Closing the rack door Addition complete Fujitsu SPARC M12-1 Service Manual • January 2023...
-
Page 127: Fru Removal Workflow
Table 7-12 System-Stopped/Cold Addition Work Procedure Item Work Procedure Reference Opening the rack door Switching the mode switch on the "5.2 Switching the Mode Switch to Service Mode" operation panel to Service mode Checking the operating condition "5.3 Checking the Operating Condition and Resource Usage Status"... - Page 128 Removing the HDD/SSD for reduction "Chapter 9 Maintaining Internal Storage" Confirming that there is no problem "6.7 Checking the FRU Status After Maintenance" with the reduced SPARC M12-1 Closing the rack door Fujitsu SPARC M12-1 Service Manual • January 2023...
-
Page 129: System-Stopped Removal
7.4.2 System-Stopped Removal This section describes the workflows for system-stopped/hot and system-stopped/ cold FRU removal. References to detailed descriptions are written in the workflow. See any of them as required. System-stopped removal on the SPARC M12-1 has the following patterns: System-stopped/hot removal (HDD/SSD) ■... - Page 130 7. Confirming that there is no problem with the chassis after the removal 8. Returning the mode switch on the operation panel to Locked mode 9. Starting the system 10. Closing the rack door Removal complete Fujitsu SPARC M12-1 Service Manual • January 2023...
- Page 131 Table 7-14 System-Stopped/Hot Removal Work Procedure (HDD/SSD) Item Work Procedure Reference Opening the rack door Switching the mode switch on the "5.2 Switching the Mode Switch to Service Mode" operation panel to Service mode Checking the operating condition "5.3 Checking the Operating Condition and Resource Usage Status"...
- Page 132 11. Returning the mode switch on the operation panel to Locked mode 12. Starting the system 13. Restoring the OpenBoot PROM environment variables 14. Closing the rack door Removal complete Fujitsu SPARC M12-1 Service Manual • January 2023...
- Page 133 Table 7-15 System-Stopped/Cold Removal Work Procedure (Memory) Item Work Procedure Reference Opening the rack door Switching the mode switch on the "5.2 Switching the Mode Switch to Service Mode" operation panel to Service mode Checking the operating condition "5.3 Checking the Operating Condition and Resource Usage Status"...
- Page 134 9. Confirming that there is no problem with the chassis after the removal 10. Returning the mode switch on the operation panel to Locked mode 11. Starting the system 12. Closing the rack door Removal complete Fujitsu SPARC M12-1 Service Manual • January 2023...
- Page 135 Table 7-16 System-Stopped/Cold Removal Work Procedure Item Work Procedure Reference Opening the rack door Switching the mode switch on the "5.2 Switching the Mode Switch to Service Mode" operation panel to Service mode Checking the operating condition "5.3 Checking the Operating Condition and Resource Usage Status"...
- Page 136 Fujitsu SPARC M12-1 Service Manual • January 2023...
-
Page 137: Chapter 8 Maintaining The Pci Express Cards
Chapter 8 Maintaining the PCI Express Cards This chapter describes the maintenance procedures for PCI Express (PCIe) cards. PCIe cards can be replaced, expanded, and reduced. Before Maintenance on a PCIe Card ■ PCIe Card Configuration ■ Removing a PCIe Card ■... -
Page 138: Removing A Pcie Card
Caution - Before you handle any components, wear a wrist strap to ground any static electricity. If you perform this procedure without a wrist strap, individual components or the overall system may be damaged. For details, see "1.4 Precautions on Static Electricity." Fujitsu SPARC M12-1 Service Manual • January 2023... -
Page 139: Accessing A Pcie Card
8.3.1 Accessing a PCIe Card Disconnect all the cables connected to the PCIe card requiring maintenance. Note - Record the positions of the cables before removing them, to ensure that they are reinstalled correctly. Pull the server out of the rack. For details, see "5.8.3 Pulling the SPARC M12-1 Out From the Rack."... - Page 140 Figure 8-2 Removing a PCIe Riser Fujitsu SPARC M12-1 Service Manual • January 2023...
-
Page 141: Removing A Pcie Card
8.3.3 Removing a PCIe Card Remove the PCIe card from the PCIe riser connector. In PCIe card expansion, you do not have to perform this step. Remove the PCIe card filler from the PCIe riser. Caution - Do not forcibly remove a PCIe card from a PCIe riser. The use of excessive force may damage the PCIe card. -
Page 142: Installing A Pcie Card
Note - The PCIe card filler is easily removed. Be careful not to drop it. Figure 8-4 Installing a PCIe Card 8.4.2 Installing a PCIe Riser Hold the PCIe riser at two points and install it on the MBU. Fujitsu SPARC M12-1 Service Manual • January 2023... -
Page 143: Restoring The Server
8.4.3 Restoring the Server Install the upper cover. For details, see "6.1.3 Installing the Upper Cover." Close the fan cover. For details, see "6.1.4 Closing the Fan Cover." Put the SPARC M12-1 into the rack. For details, see "6.1.5 Putting the SPARC M12-1 Into the Rack."... - Page 144 Fujitsu SPARC M12-1 Service Manual • January 2023...
-
Page 145: Chapter 9 Maintaining Internal Storage
Chapter 9 Maintaining Internal Storage This chapter describes the maintenance procedures for internal storage (HDD/SSD). HDDs/SSDs can be replaced, expanded, and reduced. Before Maintenance on an HDD/SSD ■ HDD/SSD Configuration ■ Removing an HDD/SSD ■ Installing an HDD/SSD ■ Before Maintenance on an HDD/SSD This chapter only has descriptions of the HDD/SSD configuration and the work of removing and installing HDDs/SSDs. - Page 146 Figure 9-1 Locations of the HDDs/SSDs Location No. Component HDD/SSD (HDD#0) HDD/SSD (HDD#1) HDD/SSD (HDD#2) HDD/SSD (HDD#3) HDD/SSD (HDD#4) HDD/SSD (HDD#5) HDD/SSD (HDD#6) HDD/SSD (HDD#7) Fujitsu SPARC M12-1 Service Manual • January 2023...
-
Page 147: Removing An Hdd/Ssd
Removing an HDD/SSD This section describes the procedure for removing an HDD/SSD. Use the same procedure for reduction too. In HDD/SSD expansion, to install an HDD/SSD in a slot, first remove the internal storage filler unit from the slot. Enable removal of the HDD/SSD before attempting to remove it. For details, see "Chapter 7 Maintenance Flow."... - Page 148 Note - Place the removed HDD/SSD on a grounded ESD mat to ground any static electricity. Note - In HDD/SSD reduction, after removing an HDD/SSD from a slot, install an internal storage filler unit in the slot. Fujitsu SPARC M12-1 Service Manual • January 2023...
-
Page 149: Installing An Hdd/Ssd
Installing an HDD/SSD This section describes the procedure for installing an HDD/SSD. Use the same procedure for expansion too. Caution - Do not attempt to insert an HDD/SSD into a slot when the lever is closed. Otherwise, the internal disk could jam and prove difficult to remove. Note - In HDD/SSD expansion, to install an HDD/SSD in a slot, first remove the internal storage filler unit from the slot. - Page 150 Fujitsu SPARC M12-1 Service Manual • January 2023...
-
Page 151: Chapter 10 Maintaining The Hdd Backplane
Chapter 10 Maintaining the HDD Backplane This chapter describes the maintenance procedures for the HDD backplane (HDDBP). Before Maintenance on the HDDBP ■ Location of the HDDBP ■ Removing the HDDBP ■ Installing the HDDBP ■ 10.1 Before Maintenance on the HDDBP This chapter only has descriptions of the HDDBP location and the work of removing and installing the HDDBP. -
Page 152: Removing The Hddbp
For details, see "1.4 Precautions on Static Electricity." 10.3.1 Accessing the HDDBP Pull the SPARC M12-1 out of the rack. For details, see "5.8.3 Pulling the SPARC M12-1 Out From the Rack." Fujitsu SPARC M12-1 Service Manual • January 2023... -
Page 153: Removing The Hddbp
Remove all the HDDs/SSDs and internal storage filler units mounted in the chassis. For details, see "9.3 Removing an HDD/SSD." Note - Record the mounting locations of the HDDs/SSDs before removing them, to ensure that they are reinstalled correctly. Open the fan cover. For details, see "5.8.4 Opening the Fan Cover."... - Page 154 Note - Record the positions of the cables before removing them, to ensure that they are reinstalled correctly. Figure 10-3 OPNL Cables Loosen the two screws of the HDDBP. Figure 10-4 HDDBP Screws Fujitsu SPARC M12-1 Service Manual • January 2023...
- Page 155 Hold both ends of the HDDBP and lift to release it from the hooks (three places). Figure 10-5 Hooks on the Chassis Remove the HDDBP. Note - Place the removed HDDBP on a grounded ESD mat to ground any static electricity. Chapter 10 Maintaining the HDD Backplane...
-
Page 156: Installing The Hddbp
Install the HDDBP by aligning the notches on both sides. Figure 10-6 HDDBP Notches Align the HDDBP with hooks on the chassis (three places) and push the HDDBP into place. Figure 10-7 Hooks on the Chassis Fujitsu SPARC M12-1 Service Manual • January 2023... - Page 157 Tighten the two screws of the HDDBP. Connect the two cables from the OPNL to the MBU. Note - Connect the cables in their original positions by referring to the record that you made before the start of maintenance. Note - When connecting the cables, insert them firmly. If there is a loose connection, the MBU will be unable to access the OPNL, resulting in an XSCF startup error.
-
Page 158: Restoring The Server
Note - Reinstall the HDDs/SSDs at their original locations by referring to the record that you made before the start of maintenance. Put the SPARC M12-1 into the rack. For details, see "6.1.5 Putting the SPARC M12-1 Into the Rack." Fujitsu SPARC M12-1 Service Manual • January 2023... - Page 159 The FRU installation work is completed. See "Chapter 7 Maintenance Flow" to continue maintenance work. Chapter 10 Maintaining the HDD Backplane...
- Page 160 Fujitsu SPARC M12-1 Service Manual • January 2023...
-
Page 161: Chapter 11 Maintaining The Power Supply Units
Chapter 11 Maintaining the Power Supply Units This chapter describes the maintenance procedures for the power supply units (PSUs). Before Maintenance on a PSU ■ PSU Configuration ■ Removing a PSU ■ Installing a PSU ■ 11.1 Before Maintenance on a PSU This chapter only has descriptions of the PSU configuration and the work of removing and installing PSUs. -
Page 162: Removing A Psu
Caution - Before you handle any components, wear a wrist strap to ground any static electricity. If you perform this procedure without a wrist strap, individual components or the overall system may be damaged. For details, see "1.4 Precautions on Static Electricity." Fujitsu SPARC M12-1 Service Manual • January 2023... -
Page 163: Accessing A Psu
11.3.1 Accessing a PSU Release the cable management arm. Release the lock by pressing the cable management arm tab (A in Figure 11-2) toward the outside of the SPARC M12-1 to unlock the cable management arm. Figure 11-2 Releasing the Cable Management Arm Remove the power cords from the PSU requiring maintenance. -
Page 164: Removing A Psu
11.4 Installing a PSU 11.4.1 Installing a PSU This section describes the procedure for installing a PSU. Support the PSU from below with one hand, and insert it carefully into its slot. Fujitsu SPARC M12-1 Service Manual • January 2023... -
Page 165: Restoring The Server
Caution - Do not forcibly push the PSU into its slot. Using excessive force may damage the PSU and server. Push the PSU firmly into place at the mounting location. Note - Make sure that the PSU is firmly inserted and fixed. 11.4.2 Restoring the Server Connect the power cords to the PSU requiring maintenance. - Page 166 Fujitsu SPARC M12-1 Service Manual • January 2023...
-
Page 167: Chapter 12 Maintaining The Psu Backplane
Chapter 12 Maintaining the PSU Backplane This chapter describes the maintenance procedures for the PSU backplane (PSUBP). Before Maintenance on the PSUBP ■ Location of the PSUBP ■ Precautions for PSUBP Maintenance ■ Removing the PSUBP ■ Installing the PSUBP ■... -
Page 168: Precautions For Psubp Maintenance
- one that was once used as a maintenance part This is because the above PSUBP stores device identification information. Set the system time. ■ After replacing the PSUBP, you need to set the system time. For details, see "Notes Fujitsu SPARC M12-1 Service Manual • January 2023... -
Page 169: Removing The Psubp
on Maintenance of a CPU Memory Unit, Motherboard Unit, XSCF Unit, PSU Backplane, or Crossbar Backplane Unit" in the Fujitsu SPARC M12 Product Notes for the latest XCP version. 12.4 Removing the PSUBP This section describes the procedure for removing the PSUBP. Enable removal of the PSUBP before attempting to remove it. -
Page 170: Removing The Psubp
Figure 12-2 MBU Cables Release the cable guide lock. For details, see "5.8.7 Releasing the Cable Guide Lock." If the cable guide does not have a lock, proceed to step 3. Fujitsu SPARC M12-1 Service Manual • January 2023... - Page 171 One cable connects the PSUBP to the HDDBP. Remove this cable from the HDDBP connector. Figure 12-3 HDDBP Cable Loosen the one screw of the PSUBP. Figure 12-4 PSUBP Screw Chapter 12 Maintaining the PSU Backplane...
- Page 172 Note - Record the positions of the cables before removing them, to ensure that they are reinstalled correctly. Note - Place the removed PSUBP on a grounded ESD mat to ground any static electricity. Figure 12-6 PSUBP Cables Fujitsu SPARC M12-1 Service Manual • January 2023...
-
Page 173: Installing The Psubp
12.5 Installing the PSUBP 12.5.1 Installing the PSUBP This section describes the procedure for installing the PSUBP. Lift the PSUBP, and connect the four cables (A in Figure 12-7) to the PSUBP. Figure 12-7 PSUBP Cables Install the PSUBP. Confirm that the two fixing pins are inserted into the PSUBP, and then slide the PSUBP toward the front of the SPARC M12-1. - Page 174 Store the connected cables in the cable guide, and lock the guide. For details, see "6.1.1 Locking the Cable Guide." If the cable guide does not have a lock, proceed to step 8. Fujitsu SPARC M12-1 Service Manual • January 2023...
-
Page 175: Restoring The Server
Connect the three cables that connect the PSUBP to the MBU. Note - Connect the cables in their original positions by referring to the record that you made before the start of maintenance. Note - Make sure that each cable is firmly inserted. Figure 12-9 ... - Page 176 Fujitsu SPARC M12-1 Service Manual • January 2023...
-
Page 177: Chapter 13 Maintaining The Cable Kit
Chapter 13 Maintaining the Cable Kit This section describes the maintenance procedures for the cable kit. Before Maintaining the Cable Kit ■ Location of the Cable Kit ■ Removing the Cable Kit ■ Installing the Cable Kit ■ 13.1 Before Maintaining the Cable Kit This chapter only has descriptions of the cable kit location and the work of removing and installing the cable kit. -
Page 178: Removing The Cable Kit
For details, see "1.4 Precautions on Static Electricity." 13.3.1 Accessing the Cable Kit Remove all the PSUs. For details, see "11.3 Removing a PSU." Fujitsu SPARC M12-1 Service Manual • January 2023... -
Page 179: Removing The Cable Kit
Pull the SPARC M12-1 out of the rack. For details, see "5.8.3 Pulling the SPARC M12-1 Out From the Rack." Open the fan cover. For details, see "5.8.4 Opening the Fan Cover." Remove the upper cover. For details, see "5.8.5 Removing the Upper Cover."... - Page 180 One cable connects the PSUBP to the HDDBP. Remove this cable from the HDDBP connector. Figure 13-3 HDDBP Cable Loosen the one screw of the PSUBP. Figure 13-4 PSUBP Screw Fujitsu SPARC M12-1 Service Manual • January 2023...
- Page 181 Slide the PSUBP toward the rear of the SPARC M12-1 to release it from two fixing pins (A in Figure 13-5). Figure 13-5 Fixing Pins of the PSUBP Lift the PSUBP, and disconnect the four cables (A in Figure 13-6) connected to the PSUBP.
-
Page 182: Installing The Cable Kit
Install the PSUBP. Confirm that the two fixing pins are inserted into the PSUBP, and then slide the PSUBP toward the front of the SPARC M12-1. Tighten the one screw of the PSUBP. Fujitsu SPARC M12-1 Service Manual • January 2023... - Page 183 Connect the one cable that connects the PSUBP to the HDDBP. Figure 13-8 HDDBP Cable Store the connected cables in the cable guide, and lock the guide. For details, see "6.1.1 Locking the Cable Guide." Chapter 13 Maintaining the Cable Kit...
-
Page 184: Restoring The Server
For details, see "6.1.4 Closing the Fan Cover." Install all the PSUs. For details, see "11.4 Installing a PSU." The FRU installation work is completed. See "Chapter 7 Maintenance Flow" to continue maintenance work. Fujitsu SPARC M12-1 Service Manual • January 2023... -
Page 185: Chapter 14 Maintaining The Operation Panel
Chapter 14 Maintaining the Operation Panel This chapter describes the maintenance procedures for the operation panel (OPNL). Before Maintenance on the OPNL ■ Location of the OPNL ■ Removing the OPNL ■ Installing the OPNL ■ 14.1 Before Maintenance on the OPNL This chapter only has descriptions of the OPNL location and the work of removing and installing the OPNL. -
Page 186: Removing The Opnl
"5.8.3 Pulling the SPARC M12-1 Out From the Rack." Open the fan cover. For details, see "5.8.4 Opening the Fan Cover." Remove the upper cover. For details, see "5.8.5 Removing the Upper Cover." Fujitsu SPARC M12-1 Service Manual • January 2023... -
Page 187: Removing The Opnl
14.3.2 Removing the OPNL Two cables connect the OPNL to the MBU. Remove these cables from the MBU connectors. Note - Record the positions of the cables before removing them, to ensure that they are reinstalled correctly. Figure 14-2 OPNL Cables Chapter 14 Maintaining the Operation Panel... -
Page 188: Installing The Opnl
Connect the two cables from the OPNL to the MBU. Note - Connect the cables in their original positions by referring to the record that you made before the start of maintenance. Fujitsu SPARC M12-1 Service Manual • January 2023... -
Page 189: Restoring The Server
Note - When connecting the cables, insert them firmly. If there is a loose connection, the MBU will be unable to access the OPNL, resulting in an XSCF startup error. Figure 14-4 OPNL Cables 14.4.2 Restoring the Server Install the upper cover. - Page 190 Fujitsu SPARC M12-1 Service Manual • January 2023...
-
Page 191: Chapter 15 Maintaining The Fan Units
Chapter 15 Maintaining the Fan Units This chapter describes the maintenance procedures for the fan units (FANUs). Before Maintenance on the FANU ■ FANU Configuration ■ Removing a FANU ■ Installing a FANU ■ 15.1 Before Maintenance on the FANU This chapter only has descriptions of the FANU configuration and the work of removing and installing the FANU. -
Page 192: Removing A Fanu
Caution - Before you handle any components, wear a wrist strap to ground any static electricity. If you perform this procedure without a wrist strap, individual components or the overall system may be damaged. For details, see "1.4 Precautions Fujitsu SPARC M12-1 Service Manual • January 2023... -
Page 193: Accessing A Fanu
on Static Electricity." 15.3.1 Accessing a FANU Pull the SPARC M12-1 out of the rack. For details, see "5.8.3 Pulling the SPARC M12-1 Out From the Rack." Open the fan cover. For details, see "5.8.4 Opening the Fan Cover." 15.3.2 Removing a FANU With fingers on the front and rear, grip and pull up the FANU to remove it. -
Page 194: Installing A Fanu
"6.1.4 Closing the Fan Cover." Put the SPARC M12-1 into the rack. "6.1.5 Putting the SPARC M12-1 Into the Rack." The FRU installation work is completed. See "Chapter 7 Maintenance Flow" to continue maintenance work. Fujitsu SPARC M12-1 Service Manual • January 2023... -
Page 195: Chapter 16 Maintaining The Motherboard Unit/Memory
Chapter 16 Maintaining the Motherboard Unit/Memory This chapter describes the procedures for maintaining the motherboard unit (MBU) and memory. Before Maintenance on the MBU and Memory ■ Location of the MBU ■ Memory Locations ■ Precautions for MBU Replacement ■ Removing the MBU and Memory ■... -
Page 196: Memory Locations
Memory is installed on the MBU and divided into group A and group B. Up to eight memory modules can be installed for each group, up to a total of 16 memory modules. Fujitsu SPARC M12-1 Service Manual • January 2023... - Page 197 Figure 16-2 Locations of Memory CPU#0 (15) (16) (13) (14) (7) (8) (5) (6) (2) (1) (4) (3) (10) (9) (12) (11) Front Location No. Component Group Memory (MEM#00A) Memory (MEM#00B) Memory (MEM#01A) Memory (MEM#01B) Memory (MEM#02A) Memory (MEM#02B) Memory (MEM#03A) Memory (MEM#03B) Memory (MEM#10A)
-
Page 198: Precautions For Mbu Replacement
MBU by appropriate means such as cutting it with cutting pliers. The old SD card stores the user information, IP address, and other information set in the XSCF firmware. Fujitsu SPARC M12-1 Service Manual • January 2023... -
Page 199: Removing The Mbu And Memory
16.5 Removing the MBU and Memory This section describes the procedure for removing the MBU. Enable removal of the MBU before attempting to remove it. For details, see "Chapter 7 Maintenance Flow." Caution - Before you handle any components, wear a wrist strap to ground any static electricity. -
Page 200: Removing Memory
Note - Record the mounting locations of the memory before removing them, to ensure that they are reinstalled correctly. Note - Place the removed memory on a grounded antistatic ESD mat. Fujitsu SPARC M12-1 Service Manual • January 2023... - Page 201 Figure 16-3 Removing Memory Chapter 16 Maintaining the Motherboard Unit/Memory...
-
Page 202: Removing The Mbu
Two cables connecting the HDDBP to the MBU d. Two cables connecting the OPNL to the MBU Note - Record the positions of the cables before removing them, to ensure that they are reinstalled correctly. Fujitsu SPARC M12-1 Service Manual • January 2023... - Page 203 Figure 16-4 MBU Cables Loosen the five screws of the MBU. Figure 16-5 MBU Screws Chapter 16 Maintaining the Motherboard Unit/Memory...
- Page 204 16-6) of the MBU and slide it out toward the front of the SPARC M12-1. Confirm that the MBU disengages from 10 fixing pins. Figure 16-6 Fixing Pins of the MBU Fujitsu SPARC M12-1 Service Manual • January 2023...
- Page 205 Pull up the MBU to remove it. Note - Place the removed MBU on a grounded ESD mat to ground any static electricity. Figure 16-7 Removing the MBU Chapter 16 Maintaining the Motherboard Unit/Memory...
-
Page 206: Switching The Sd Card
16-8) securing the SD card protection cover fixed to the removed MBU, then slide the protection cover towards the memory, and lift up to remove the cover. Figure 16-8 Removing the SD Card Protection Cover Fujitsu SPARC M12-1 Service Manual • January 2023... - Page 207 Remove the SD card. Release the lock by pressing the SD card (1 in Figure 16-9), and then remove the card from the MBU (2 in Figure 16-9). Figure 16-9 Removing the SD Card Note - Be careful not to mix up the removed SD card with the SD card installed in the replacement part.
- Page 208 Install the protection cover on the MBU, and secure it with the screw (A in Figure 16-11). Figure 16-11 Installing the SD Card Protection Cover Note - Return the SD card supplied with the new MBU by installing it in the removed MBU. Fujitsu SPARC M12-1 Service Manual • January 2023...
-
Page 209: Installing The Mbu And Memory
16.6 Installing the MBU and Memory This section describes the procedure for installing the MBU. 16.6.1 Installing the MBU Caution - Be careful not to damage the connectors when installing the MBU in the SPARC M12-1. Hold the handles on the MBU, and install the MBU in the SPARC M12-1. Install it from the front of the SPARC M12-1, aligning it with the mounting location. - Page 210 Tighten the five screws of the MBU. Figure 16-13 MBU Screws Fujitsu SPARC M12-1 Service Manual • January 2023...
- Page 211 Connect the cables to the MBU. The following cables are to be installed: a. Three cables connecting the PSUBP to the MBU b. One cable connecting the PSUBP to the HDDBP Connect the cable to the PSUBP. c. Two cables connecting the HDDBP to the MBU d.
- Page 212 Note - Reinstall the PCIe risers at their original locations by referring to the record that you made before the start of maintenance. Install all the FANUs. For details, see "15.4.1 Installing a FANU." Fujitsu SPARC M12-1 Service Manual • January 2023...
-
Page 213: Installing Memory
Note - Reinstall the FANUs at their original locations by referring to the record that you made before the start of maintenance. 16.6.2 Installing Memory This section describes the procedure for installing memory. To expand memory, see "2.2 Checking the Memory Configuration Rules,"... - Page 214 11. Match the XCP firmware version with the pre-replacement version. For details on the procedure, see "6.3.2 Confirming the Firmware Version." The FRU installation work is completed. See "Chapter 7 Maintenance Flow" to continue maintenance work. Fujitsu SPARC M12-1 Service Manual • January 2023...
-
Page 215: Appendix A Component List
Appendix A Component List This appendix describes the components constituting the SPARC M12-1. Figure A-1 shows the locations of the components mounted in the SPARC M12-1. Figure A-1 Locations of Components (15) (14) (13) (12) (11) (10) - Page 216 Fan unit (FANU) HDD backplane (HDDBP) Internal storage (HDD/SSD) Operation panel (OPNL) PSU backplane (PSUBP) PSU backplane cover (PSUBP cover) Power supply unit (PSU) PCI Express riser (PCIe riser) PCI Express card (PCIe card) Fujitsu SPARC M12-1 Service Manual • January 2023...
-
Page 217: Appendix B Component Specifications
Appendix B Component Specifications This appendix provides the specifications of the components. ■ ■ FANU ■ HDD/SSD ■ PCIe Card ■ Backplanes ■ OPNL ■ The MBU consists of the following components: ■ Memory ■ XSCF ■ PCIe card ■ FANU ■... -
Page 218: Psu
Number of FANUs Redundancy 6+1 redundant configuration Location Rear of HDDs/SSDs Active/Hot maintenance Supported System-stopped (inactive)/Hot maintenance Supported System-stopped (inactive)/Cold maintenance Supported For the maintenance procedure, see "Chapter 15 Maintaining the Fan Units." Fujitsu SPARC M12-1 Service Manual • January 2023... -
Page 219: Hdd/Ssd
HDD/SSD The SPARC M12-1 supports the mounting of up to eight hard disk drives (HDDs) or solid state drives (SSDs). Table B-3 lists the specifications of the HDD/SSD. Table B-3 HDD/SSD Specifications Item Description Number of HDDs/SSDs Interface Location Front of SPARC M12-1 Active/Hot maintenance... -
Page 220: Backplanes
M12-1. The PSUBP houses memory that stores identification information and user setting information. Figure B-1 Locations of the Backplanes Table B-5 lists the specifications of the HDDBP. Table B-6 lists the specifications of the PSUBP. Fujitsu SPARC M12-1 Service Manual • January 2023... -
Page 221: Opnl
Table B-5 HDDBP Specifications Item Description Number of HDDBPs Location Inside SPARC M12-1 Active/Hot maintenance Unsupported System-stopped (inactive)/Hot maintenance Unsupported System-stopped (inactive)/Cold maintenance Supported Table B-6 PSUBP Specifications Item Description Number of PSUBPs Location Inside SPARC M12-1 Active/Hot maintenance Unsupported System-stopped (inactive)/Hot maintenance... - Page 222 Fujitsu SPARC M12-1 Service Manual • January 2023...
-
Page 223: Appendix C Oracle Solaris Troubleshooting Commands
Oracle Solaris Troubleshooting Commands This appendix describes how to use Oracle Solaris commands to display fault diagnosis information and to take countermeasures. The commands listed here are useful for determining whether there are problems in the system, the network, or some other system connected through the network. - Page 224 Vendor: TOSHIBA Product: MBF2300RC Revision: 3706 Serial No: EB25PC301AV6 Size: 300.00GB <300000000000 bytes> Media Error: 0 Device Not Ready: 0 No Device: 0 Recoverable: 0 Illegal Request: 0 Predictive Failure Analysis: 0 Fujitsu SPARC M12-1 Service Manual • January 2023...
-
Page 225: Prtdiag Command
SPARC64-XII on-line 3200 MHz SPARC64-XII on-line 3200 MHz SPARC64-XII on-line 3200 MHz SPARC64-XII on-line 3200 MHz SPARC64-XII on-line ------------------------Omitted------------------------ 3200 MHz SPARC64-XII on-line 3200 MHz SPARC64-XII on-line 3200 MHz SPARC64-XII on-line 3200 MHz SPARC64-XII on-line Appendix C Oracle Solaris Troubleshooting Commands... - Page 226 ============================ Environmental Status ============================ ============================ FRU Status ============================ Location Name Status ------------------------------------------------------ enabled ============================ FW Version ============================ Version ------------------------------------------------------------ 3026 ====================== System PROM revisions ======================= Version ------------------------------------------------------------ OBP 4.38.5 2017/01/04 14:38 Chassis Serial Number Fujitsu SPARC M12-1 Service Manual • January 2023...
-
Page 227: Prtconf Command
The prtconf command identifies hardware units recognized by Oracle Solaris. When a software application experiences a hardware-related issue even though there is no hardware error, this command allows you to check whether Oracle Solaris recognizes the hardware and whether the hardware drivers are loaded. - Page 228 #3 pci, instance #4 pci, instance #5 scsi, instance #0 iport, instance #1 smp, instance #0 (driver not attached) enclosure, instance #0 iport, instance #2 pci, instance #6 usb, instance #0 Fujitsu SPARC M12-1 Service Manual • January 2023...
-
Page 229: Netstat Command
-i option. piping the netstat output to a file. Displays the media table. Allows you to check the MAC addresses of the host on the subnetwork. Appendix C Oracle Solaris Troubleshooting Commands... -
Page 230: Ping Command
The destination host is specified by the variable: hostname. Table C-5 lists the operands/options of the ping command and how they are useful for troubleshooting. Fujitsu SPARC M12-1 Service Manual • January 2023... -
Page 231: Ps Command
ID as the user executing the command and the same control terminal. If you specify an option, output information is controlled by the option. Table C-6 lists the options of the ps command and how these options are useful for troubleshooting. Appendix C Oracle Solaris Troubleshooting Commands... - Page 232 487 /usr/lib/hal/hald-addon-cpufreq 472 /usr/lib/autofs/automountd 470 /usr/lib/autofs/automountd 468 /usr/lib/inet/inetd 458 hald-runner 453 /usr/lib/hal/hald 450 /usr/sbin/rpcbind 421 /usr/lib/inet/proftpd 413 /usr/sbin/cron 382 /lib/svc/method/iscsid 369 /usr/lib/efcode/sparcv9/efdaemon 332 /usr/sbin/nscd 297 /usr/lib/picl/picld 272 /lib/inet/nwamd 179 /usr/lib/devfsadm/devfsadmd 176 /usr/lib/zones/zonestatd Fujitsu SPARC M12-1 Service Manual • January 2023...
-
Page 233: Prstat Command
[Ctrl] + [C] keys. -n number Restricts the number of lines in the Limits the amount of displayed output. data, so that you can identify those processes that are consuming excessive amounts of resources. Appendix C Oracle Solaris Troubleshooting Commands... - Page 234 0:09:13 0.0% ldmd/13 11 root 33M sleep 0:00:17 0.0% svc.startd/12 468 root 12M sleep 0:00:00 0.0% inetd/4 13 root 19M sleep 0:00:37 0.0% svc.configd/24 Total: 49 processes, 669 lwps, load averages: 0.05, 0.05, 0.04 Fujitsu SPARC M12-1 Service Manual • January 2023...
-
Page 235: Appendix D External Interface Specifications
Appendix D External Interface Specifications This appendix provides the specifications of the external interface connectors and XSCF switch mounted on the server. The following external interface connectors are mounted on the server: Serial Port ■ USB Port ■ SAS Port ■... -
Page 236: Wire Connection Chart For Serial Cables
Ground Table D-3 USB 3.0 Port (Rear) Pin Arrangement Signal Input/Output Description Number Name VBUS Output Power supply -DATA Input/ Data Output 1 2 3 4 +DATA Input/ Data Output Fujitsu SPARC M12-1 Service Manual • January 2023... -
Page 237: Sas Port
Table D-3 USB 3.0 Port (Rear) (continued) Pin Arrangement Signal Input/Output Description Number Name Ground -SSRX Input SuperSpeed data +SSRX Input SuperSpeed data Ground -SSTX Output SuperSpeed data +SSTX Output SuperSpeed data Table D-4 USB Port for Maintenance (Rear) Pin Arrangement Signal Input/Output... - Page 238 Figure D-2 Location of the RESET Switch Fujitsu SPARC M12-1 Service Manual • January 2023...
- Page 239 Appendix E Removing the Lithium Battery This appendix describes the procedure for removing the lithium battery mounted in the motherboard unit. Note - Perform this work only when disassembling the product for disposal or recycling. Location of the Lithium Battery ■...
- Page 240 Gripping the lithium battery at the top (A in Figure E-2) with needle-nose pliers or another fine-tipped tool, pull up the lithium battery to remove it. Figure E-2 Removing the Lithium Battery Fujitsu SPARC M12-1 Service Manual • January 2023...
- Page 241 Index HDD backplane, 11, 46, 137, 206 HDDBP, 11, 46, 137, 206 active addition, 106 hot maintenance, 27 active maintenance, 27, 28 active removal, 113 active replacement, 95 inactive maintenance, 27, 29 indications by LEDs, 18 internal storage, 10, 47, 131, 205 cable kit, 163 iostat command, 209 cold maintenance, 27...
- Page 242 2 system name plate label, 2 system, starting, 91 system-stopped addition, 107 system-stopped maintenance, 27, 29 system-stopped removal, 115 system-stopped replacement, 99 time, setting, 82 XSCF setting information, 58, 85 Fujitsu SPARC M12-1 Service Manual • January 2023...
Need help?
Do you have a question about the Fujitsu SPARC M12-1 and is the answer not in the manual?
Questions and answers