Advertisement
Quick Links
- 1 Table of Contents
- 2 Cover Replacement Procedures
- 3 Control Console Components Replacement Procedures
- 4 Keyboard Assembly Replacement Procedures
- 5 Lower Section Components Replacement Procedures
- 6 Mechanical Components Replacement Procedures
- 7 Software Loading
- 8 Peripherals - Replacement Procedures
- Download this manual
P R E L I M I N A R Y
GE
Vivid™ S5 N and Vivid™ S6 N
Service Manual
Vivid S5 N and Vivid S6 N software v12.x
11.SEP.2015
FN091065_BSP-BT12-VS5N-
BASIC SERVICE DOCUMENTATION.
COPYRIGHT GENERAL ELECTRIC COMPANY.
© 2013 and 2015 General Electric Company.
All Rights Reserved.
Part Number: FN091065
Revision: 2
Advertisement

Related Manuals for GE Vivid S5 N


Summary of Contents for GE Vivid S5 N
- Page 1 P R E L I M I N A R Y 11.SEP.2015 FN091065_BSP-BT12-VS5N- Vivid™ S5 N and Vivid™ S6 N Service Manual Vivid S5 N and Vivid S6 N software v12.x BASIC SERVICE DOCUMENTATION. COPYRIGHT GENERAL ELECTRIC COMPANY. © 2013 and 2015 General Electric Company. All Rights Reserved.
- Page 3 P R E L I M I N A R Y FN091065, R VS5 N VS6 N UMBER EVISION ERVICE ANUAL Important Precautions TRANSLATION POLICY...
- Page 4 P R E L I M I N A R Y FN091065, R VS5 N VS6 N UMBER EVISION ERVICE ANUAL...
- Page 5 P R E L I M I N A R Y FN091065, R VS5 N VS6 N UMBER EVISION ERVICE ANUAL...
- Page 6 P R E L I M I N A R Y FN091065, R VS5 N VS6 N UMBER EVISION ERVICE ANUAL...
- Page 7 P R E L I M I N A R Y FN091065, R VS5 N VS6 N UMBER EVISION ERVICE ANUAL...
- Page 8 P R E L I M I N A R Y FN091065, R VS5 N VS6 N UMBER EVISION ERVICE ANUAL...
- Page 9 P R E L I M I N A R Y FN091065, R VS5 N VS6 N UMBER EVISION ERVICE ANUAL...
- Page 10 P R E L I M I N A R Y FN091065, R VS5 N VS6 N UMBER EVISION ERVICE ANUAL viii...
- Page 11 P R E L I M I N A R Y FN091065, R VS5 N VS6 N UMBER EVISION ERVICE ANUAL...
- Page 12 P R E L I M I N A R Y FN091065, R VS5 N VS6 N UMBER EVISION ERVICE ANUAL...
- Page 13 P R E L I M I N A R Y FN091065, R VS5 N VS6 N UMBER EVISION ERVICE ANUAL...
- Page 14 P R E L I M I N A R Y FN091065, R VS5 N VS6 N UMBER EVISION ERVICE ANUAL...
- Page 15 GE personnel. In performing all electrical work on these products, GE will use its own specially trained field engineers. All of GE’s electrical work on these products will comply with the requirements of the applicable electrical codes.
- Page 16 The contents of this publication may not be copied or duplicated in any form, in whole or in part, without prior written permission of GE. GE may revise this publication from time to time without written notice. TRADEMARKS All products and their name brands are trademarks of their respective holders.
- Page 17 P R E L I M I N A R Y FN091065, R VS5 N VS6 N UMBER EVISION ERVICE ANUAL Revision History Revision Date Reason for change 2013 APR 23 Initial release (per BT12). 2015 SEP 11 Updated content. List of Effected Pages (LOEP) Pages Revision...
- Page 18 P R E L I M I N A R Y FN091065, R VS5 N VS6 N UMBER EVISION ERVICE ANUAL This page was intentionally left blank.
- Page 19 Vivid S5 N / Vivid S6 N Battery Safety ......1 - 14...
- Page 20 P R E L I M I N A R Y FN091065R VS5 N VS6 N UMBER EVISION ERVICE ANUAL CHAPTER 2 Site Preparations Overview ............2 - 1 Purpose of Chapter 2 .
- Page 21 Configuration ........... . . 3 - 80 Vivid S5 N and Vivid S6 N Configuration ......3 - 80 Service Screen Set-up .
- Page 22 Storing and Transporting the Unit ........3 - 186 Safety Precautions for Moving the Vivid S5 N or Vivid S6 N Unit ..3 - 186 Cardboard Shipping Carton and Packaging Materials .
- Page 23 P R E L I M I N A R Y FN091065R VS5 N VS6 N UMBER EVISION ERVICE ANUAL CHAPTER 4 Functional Checks Overview............4 - 1 Purpose of Chapter 4 .
- Page 24 P R E L I M I N A R Y FN091065R VS5 N VS6 N UMBER EVISION ERVICE ANUAL CHAPTER 5 Components and Function (Theory) Overview ............5 - 1 Purpose of Chapter 5 .
- Page 25 P R E L I M I N A R Y FN091065R VS5 N VS6 N UMBER EVISION ERVICE ANUAL ECG Module ............5 - 50 Overview .
- Page 26 P R E L I M I N A R Y FN091065R VS5 N VS6 N UMBER EVISION ERVICE ANUAL CHAPTER 6 Service Adjustments Overview ............6 - 1 Purpose of Chapter 6 .
- Page 27 P R E L I M I N A R Y FN091065R VS5 N VS6 N UMBER EVISION ERVICE ANUAL CHAPTER 7 Diagnostics/Troubleshooting Overview............7 - 1 Purpose of Chapter .
- Page 28 P R E L I M I N A R Y FN091065R VS5 N VS6 N UMBER EVISION ERVICE ANUAL CHAPTER 8 Replacement Procedures Overview ............8 - 1 Purpose of Chapter 8 .
- Page 29 P R E L I M I N A R Y FN091065R VS5 N VS6 N UMBER EVISION ERVICE ANUAL Rotary Knob Replacement Procedure ......8 - 91 ATGC Keycap Replacement Procedure .
- Page 30 P R E L I M I N A R Y FN091065R VS5 N VS6 N UMBER EVISION ERVICE ANUAL How to Restore User-defined Presets ......8 - 233 Peripherals - Replacement Procedures .
- Page 31 P R E L I M I N A R Y FN091065R VS5 N VS6 N UMBER EVISION ERVICE ANUAL CHAPTER 9 Renewal Parts Overview............9 - 1 Purpose of Chapter 9 .
- Page 32 P R E L I M I N A R Y FN091065R VS5 N VS6 N UMBER EVISION ERVICE ANUAL CHAPTER 10 Care and Maintenance Overview ............10 - 1 Periodic Maintenance Inspections .
- Page 33 1-1-1 Purpose of Chapter 1 This chapter describes important issues related to safely servicing the Vivid S5 N and Vivid S6 N ultrasound scanner. The service provider must read and understand all the information presented here before installing or servicing a unit.
- Page 34 Provides disassembly and reassembly procedures for all Field Replaceable Units (FRUs). • Chapter 9 - Renewal Parts Contains a complete list of field replaceable parts for the Vivid S5 N and Vivid S6 N ultrasound scanner. • Chapter 10 - Care and Maintenance Provides periodic maintenance procedures for the Vivid S5 N and Vivid S6 N ultrasound scanner.
- Page 35 Vivid™ S5 N and Vivid™ S6 N Models Covered in this Manual The Vivid™ S5 N and Vivid™ S6 N models documented in this manual are shown in Table 1-2 below. Table 1-2 Vivid S5 N and Vivid S6 N Models and Hardware/Software Compatibility SYSTEM APPLICATION MODEL SOFTWARE SOFTWARE CAT NO.
- Page 36 No upgrade from Vivid S5 N to Vivid S6 N is possible. 1-1-6 Purpose of Operator Manual(s) The Operator Manual(s) should be fully read and understood before operating the Vivid S5 N or Vivid S6 N system, and also kept near the unit for quick reference.
- Page 37 Conventions Used in this Manual 1-2-1-1 Model Designations This manual covers the Vivid™ S5 N and Vivid™ S6 N ultrasound units listed in Table 1-2 "Vivid S5 N and Vivid S6 N Models and Hardware/Software Compatibility" on page 1-3. 1-2-1-2 Icons Pictures, or icons, are used wherever they will reinforce the printed message.
- Page 38 Some others icons make you aware of specific procedures that should be followed. NOTE: The Vivid Vivid S5 N / Vivid S6 N system has no unintended or motorized moving parts that could cause pinching; all moving parts are mechanically operated by the user. Pay attention to move such parts carefully (e.g.
- Page 39 • Servicing should be performed by authorized personnel only. • Only personnel who have participated in a Vivid S5 N and Vivid S6 N Training Seminar are authorized to service the equipment. • Local laws may restrict this device for sale or use by or on the order of a physician.
- Page 40 ANUAL DO NOT SUBSTITUTE PARTS OR MODIFY EQUIPMENT WARNING WARNING Because of the danger of introducing additional hazards, ONLY install GE approved parts. DO NOT perform any unauthorized modification of the equipment. DO NOT SUBSTITUTE PARTS OR MODIFY EQUIPMENT WARNING...
- Page 41 IMPACT. EVEN IF THE PROBE APPEARS TO BE UNBROKEN, IT MAY IN FACT BE DAMAGED. THE Vivid S5 N or Vivid S6 N portable ultrasound scanner WEIGHS 65KG (144 LBS.) OR MORE, CAUTION DEPENDING ON CARRY-ON PERIPHERALS WHEN READY FOR USE.
- Page 42 POSITION THE OPERATING PANEL IN ITS CENTERED AND LOCKED POSITION. LOWER THE OPERATING PANEL AS MUCH AS POSSIBLE BEFORE MOVING THE SYSTEM. Do not transport the Vivid S5 N or Vivid S6 N system in a vehicle without locking the WARNING WARNING casters (wheels) and securing it as described in Section 3-8 "Storing and Transporting...
- Page 43 NOTE: For detailed information on handling endocavity probes, refer to the appropriate supplementary instructions for each probe. In addition, refer to the Vivid S5 N or Vivid S6 N User Manual for detailed probe handling instructions. Chapter 1 - Introduction...
- Page 44 P R E L I M I N A R Y FN091065, R VS5 N VS6 N UMBER EVISION ERVICE ANUAL 1-3-4-2 Peripherals Safety and Environmental Guidelines Environmental Dangers WARNING WARNING All devices meeting IEC60950 must be kept outside the patient environment as defined in IEC60601-1-1, unless the devices, according to IEC60601-1-1, are equipped with the following: A) Additional Earth Protection...
- Page 45 1 - Patient environment Figure 1-1 Patient environment When connecting a peripheral directly to the Vivid S5 N or Vivid S6 N scanner, if a network cable CAUTION (RJ45 LAN) is used, the cable shielding should not be soldered to the LAN connector.
- Page 46 Do not apply solder to a battery. • Do not connect the battery to an electrical power outlet. In the event that the Vivid S5 N or Vivid S6 N ultrasound scanner will not be used for a WARNING WARNING long period, it is recommended to remove the battery from the system while not in use.
- Page 47 NOTE: When shipped, the Vivid S5 N or Vivid S6 N with the battery it is in a state of being approximately 30% charged. Before use, it is necessary to fully charge and discharge the battery pack up to 3 times, in order to utilize Li-lon smart packs.
- Page 48 DANGER THIS EQUIPMENT. USE EXTREME CAUTION WHEN HANDLING, TESTING AND ADJUSTING. If the covers are removed from an operating Vivid S5 N or Vivid S6 N system, some WARNING WARNING metal surfaces may be warm enough to pose a potential heat hazard if touched, even while in shut down mode.
- Page 49 5.) Control all stored and residual energy. 6.) Verify isolation. All potentially hazardous stored or residual energy is relieved. ENERGY CONTROL AND POWER LOCKOUT FOR Vivid S5 N and Vivid S6 N. WARNING WARNING WHEN SERVICING PARTS OF THE SYSTEM WHERE THERE IS EXPOSURE TO VOLTAGE GREATER THAN 30 VOLTS: 1.
- Page 50 1-5-1 Product Labels (Label, General info) The following tables show the Product Labels (Label, General info) found on the Vivid S5 N / Vivid S6 N ultrasound units. All the labels and icons are described in Table 1-7 "Product Icons" on page 1-20.
- Page 51 P R E L I M I N A R Y FN091065, R VS5 N VS6 N UMBER EVISION ERVICE ANUAL 1-5-1 Product Labels (Label, General info) (cont’d) Table 1-6 Product Labels, Vivid S5 N Description Label Label, General Info, BT12 Chapter 1 - Introduction 1-19...
- Page 52 1-5-2 Label Descriptions and Locations The following table shows the labels and symbols that may be found on the Vivid S5 N or Vivid S6 N ultrasound unit, and provides a description of each label’s purpose and location. Table 1-7...
- Page 53 Do not push Vivid S5 N and Vivid S6 N sideways when casters are in break position. Instability may occur.
- Page 54 P R E L I M I N A R Y FN091065, R VS5 N VS6 N UMBER EVISION ERVICE ANUAL Table 1-7 Product Icons (cont’d) Label Name Description Location Waste Electrical and Electronic Equipment (WEEE) Disposal This symbol indicates that waste electrical and electronic equipment must not be disposed of On the base of the unit.
- Page 55 Vivid™ S5 N and Vivid™ S6 N External Labels In addition to the labels described in the previous section, additional labels may be found on the Vivid S5 N or Vivid S6 N ultrasound unit, as described in the following sections: •...
- Page 56 Equipment being returned must be clean and free of blood and other infectious substances. GE Healtcare policy states that body fluids must be properly removed from any part or equipment prior to shipment. GE Healtcare employees, as well as customers, are responsible for ensuring that parts/ equipment have been properly decontaminated prior to shipment.
- Page 57 RF fields, magnetic fields and power line transient requirements. For applicable standards refer to the Safety Chapter in the Vivid S5 N or Vivid S6 N User Manual. NOTE: For CE Compliance, it is critical that all covers, screws, shielding, gaskets, mesh and clamps are in good condition and installed tightly without skew or stress.
- Page 58 Equipment being returned must be clean and free of blood and other infectious substances. GE Healtcare policy states that body fluids must be properly removed from any part or equipment prior to shipment. GE Healtcare employees, as well as customers, are responsible for ensuring that parts/ equipment have been properly decontaminated prior to shipment.
- Page 59 P R E L I M I N A R Y FN091065, R VS5 N VS6 N UMBER EVISION ERVICE ANUAL Section 1-8 Customer Assistance 1-8-1 Contact Information If this equipment does not work as indicated in this service manual or in the user manual, or if you require additional assistance, please contact the local distributor or appropriate support resource, as listed below.
- Page 60 P R E L I M I N A R Y FN091065, R VS5 N VS6 N UMBER EVISION ERVICE ANUAL Table 1-8 Phone numbers for Customer Assistance 1-28 Section 1-8 - Customer Assistance...
- Page 61 VS6 N UMBER EVISION ERVICE ANUAL 1-8-2 System manufacturer Table 1-9 System manufacturer MANUFACTURER PHONE NUMBER FAX NUMBER GE VINGMED ULTRASOUND A/S STRANDPROMENADEN 45 +47 3302 1100 +47 3302 1350 P.O. BOX 141 NO-3191 HORTEN NORWAY Chapter 1 - Introduction 1-29...
- Page 62 P R E L I M I N A R Y FN091065, R VS5 N VS6 N UMBER EVISION ERVICE ANUAL This page was intentionally left blank. 1-30 Section 1-8 - Customer Assistance...
- Page 63 2-1-1 Purpose of Chapter 2 This chapter provides the information required to plan and prepare for the installation of a Vivid S5 N or Vivid S6 N ultrasound unit. Included are descriptions of the electrical and facility requirements that must be met by the purchaser.
- Page 64 2-2-2 Cooling Requirements The cooling requirement for the Vivid S5 N or Vivid S6 N ultrasound unit environment is 3500 BTU/hr. This figure does not include the cooling required for lights, people, or other equipment in the room. NOTE: Each person in the room places an additional 300 BTU/hr demand on the environmental cooling.
- Page 65 If possible, begin these checks as many as six weeks before system delivery. Only one person is required to unpack the Vivid S5 N or Vivid S6 N ultrasound unit; at least two CAUTION people must be available to roll the system down the wheeling ramp. Attempts to move the system considerable distances (or on an incline) by one person alone, could result in personal injury, and/ or damage to the system.
- Page 66 The Vivid™ S5 N and Vivid™ S6 N portable ultrasound scanner is supplied with a mains power plug, as standard. In the event that the unit arrives without a power plug, or with the wrong plug, contact your GE dealer. When necessary, the installation engineer will supply the appropriate power plug to meet the applicable local regulations.
- Page 67 P R E L I M I N A R Y FN091065, R VS5 N VS6 N UMBER EVISION ERVICE ANUAL 2-2-5 Electrical Requirements (cont’d) 2-2-5-5 Power Stability Requirements • Voltage drop-out Max 10 ms. • Power Transients (All applications) Less than 25% of nominal peak voltage for less than 1 millisecond for any type of transient, including line frequency, synchronous, asynchronous, or aperiodic transients.
- Page 68 RF gaskets touch metal. a different, appropriate location. The interconnect cables are grounded and require ferrite beads and other shielding. Use GE-specified harnesses Cable length, material, and routing are all important; do not make any changes that do and peripherals.
- Page 69 (and the accompanying electrical installations) are highly sophisticated and special engineering competence is required. All electrical work on these products must comply with the requirements of applicable electrical codes. The purchaser of GE equipment must utilize only qualified personnel to perform electrical servicing of the equipment.
- Page 70 NOTE: All relevant preliminary network outlets installations at the prepared site must be performed by authorized contractors. The purchaser of GE equipment must utilize only qualified personnel to perform servicing of the equipment. 2-3-3 Site Recommendations The following are (optional) site recommendations.
- Page 71 Ultrasound Room and depicting the minimal room layout requirements. Dedicated Power Outlets VIVID 3 Hospital Network GE Cabinet for Software and Manuals (optional) 36 IN. (92 CM) Figure 2-1 Recommended Floor Plan 4.3m x 5.2m (14 ft x 17 ft)
- Page 72 2-3-4-4 DICOM Option Pre-Installation Requirements To configure the Vivid S5 N or Vivid S6 N ultrasound unit to work with other network connections, the network administrator must provide the required information, which should include the following: •...
- Page 73 ANUAL Section 2-4 Connectivity Installation Worksheet Site System Information Comments: Floor: Site: Dept: Room: Type: Vivid S5 N or REV: Vivid S6 N SN: CONTACT INFORMATION Name Title E-Mail Address Phone Remote Archive Setup TCP/IP Settings (Echo Server/GEMNet Server/EchoPac PC)
- Page 74 FN091065, R VS5 N VS6 N UMBER EVISION ERVICE ANUAL Section 2-4 Connectivity Installation Worksheet (cont’d) Vivid S5 N or Vivid S6 N IP Address Local Port Host Name AE Title Net Mask ROUTING INFORMATION GATEWAY IP Addresses Destination IP Addresses...
- Page 75 P R E L I M I N A R Y FN091065, R VS5 N VS6 N UMBER EVISION ERVICE ANUAL Section 2-4 Connectivity Installation Worksheet (cont’d) Table 2-7 Vivid™ S5 N and Vivid™ S6 N Pre-Installation Check List Action Schedule at least 3 hours for installation of the system.
- Page 76 P R E L I M I N A R Y FN091065, R VS5 N VS6 N UMBER EVISION ERVICE ANUAL This page was intentionally left blank. 2-14 Section 2-4 - Connectivity Installation Worksheet...
- Page 77 Overview 3-1-1 Purpose of Chapter 3 This chapter provides instructions for installing the Vivid S5 N and Vivid S6 N Ultrasound system. Before beginning the installation process, an appropriate site must be prepared, as described in Chapter Once the site has been prepared, installation can proceed as described in this chapter.
- Page 78 3-2-2-1 System Acclimation Time Following transport, the Vivid S5 N or Vivid S6 N system may be very cold, or hot. Allow time for the system to acclimate before being switched ON. Acclimation requires 1 hour for each 2.5 C increment,...
- Page 79 ULTRASOUND ENERGY CAN PRODUCE HEAT AND MECHANICAL DAMAGE Note: The Vivid S5 N or Vivid S6 N User Manual should be fully read and understood before operating the unit. Keep the manual near the unit for reference. Chapter 3 - System Setup...
- Page 80 Figure 3-2 on page 3-6. Where the specific customer requirements are for a Vivid S5 N or Vivid S6 N ultrasound unit with peripherals, this is shipped in a smaller-sized cardboard shipping carton mounted on a raised wooden base, or placed on top of the main cardboard carton that contains the scanner- see...
- Page 81 If the carton is damaged, or if either the Drop or Tilt indicators have turned red (indicating damage incident), please inform the GE HEALTHCARE sales representative immediately. In addition, mark on the shipping consignment note or packing slip/post-delivery checklist (in the “Package” column) that the Tilt and/or Drop indicators show damage incident.
- Page 82 157 cm (62 in) Plastic Straps Wooden Base FRONT Depth Width 87 cm (34 in) 73 cm (29 in) Note: Weight = 105 Kgs (231 lbs) Figure 3-2 Shipping Carton - Vivid S5 N and Vivid S6 N with Peripherals...
- Page 83 Depth Width 87 cm (34 in) 73 cm (29 in) Note: Weight = 95 Kgs (209 lbs) Figure 3-3 Shipping Carton - Vivid S5 N and Vivid S6 N Only Table 3-4 Shipping Cartons - Dimensions and Weights Weight Description...
- Page 84 3-3-1 Unpacking the Cardboard Shipping Carton As previously described, the Vivid S5 N or Vivid S6 N ultrasound unit is packed in a single cardboard shipping carton comprising a durable outer cardboard carton cover and a wooden platform base; these are firmly joined together with plastic straps.
- Page 85 UMBER EVISION ERVICE ANUAL 3-3-1-2 Unpacking the Vivid S5 N or Vivid S6 N 1.) Cut the two plastic straps securing the shipping carton to the wooden base - see Figure 3-3 on page 3-7. WHEN USING SHARP TOOLS TO OPEN PACKING MATERIALS, TAKE CARE TO AVOID CAUTION CUTTING OR DAMAGING ANY OF THE CONTENTS.
- Page 86 P R E L I M I N A R Y FN091065, R VS5 N VS6 N UMBER EVISION ERVICE ANUAL Wheeling Ramp (in upright position) Guide Rail Wooden Base Figure 3-6 Wheeling Ramp in Upright Position Note: The front side of the carton is reinforced with wooden guide rails and, when dropped down in the open position, these form a strong ramp used for wheeling the system out of the shipping carton.
- Page 87 P R E L I M I N A R Y FN091065, R VS5 N VS6 N UMBER EVISION ERVICE ANUAL 6.) Lower the wheeling ramp into the unloading position, as shown in Figure 3-7 on page 3-11. Foam Supports Adhesive tape Console Holder Unscrew to remove...
- Page 88 12.)Press down on the locking brake to unlock the wheel. Repeat for the three other wheels. 13.)Using two people, carefully roll the scanner forwards down the unloading ramp to remove it completely from the shipping carton. TWO PEOPLE ARE REQUIRED WHEN MOVING THE Vivid S5 N or Vivid S6 N CAUTION SCANNER.
- Page 89 100-120V AC - Americas, Japan and Taiwan. NOTE: Applicable to Vivid S5 N / Vivid S6 N systems with AC Distribution Box Type B or Type A. SETTING THE Vivid S5 N or Vivid S6 N ULTRASOUND COMPONENTS TO THE WRONG...
- Page 90 The shipping carton will contain the probes that have been ordered with the system. For a list of probes available for use with the Vivid S5 N or Vivid S6 N portable ultrasound scanner, refer Section 9-9 "Probes" on page 9-16.
- Page 91 P R E L I M I N A R Y FN091065, R VS5 N VS6 N UMBER EVISION ERVICE ANUAL 5.) From the Service screen, click Keyboard Setup. The Regional Language Option window opens - Figure 3-11. Figure 3-11 Regional Language Options window 6.) Select the Languages tab and in the next window click the Details...
- Page 92 P R E L I M I N A R Y FN091065, R VS5 N VS6 N UMBER EVISION ERVICE ANUAL 7.) The Text Services and Input Languages window opens - see Figure 3-13. Figure 3-13 Text Services and Input Languages window 8.) From the Text Services and Input Languages screen, click Add.
- Page 93 P R E L I M I N A R Y FN091065, R VS5 N VS6 N UMBER EVISION ERVICE ANUAL Verifying the Language Change Once the language is installed, it is necessary to verify that the language change was correctly implemented.
- Page 94 Visually inspect the contents of the shipping carton for damage. If any parts are damaged or missing, contact an authorized GE Service Representative. A Damage Inspection Checklist for the Vivid S5 N or Vivid S6 N portable ultrasound scanner is provided Table 3-5 below.
- Page 95 VS6 N UMBER EVISION ERVICE ANUAL Table 3-5 Damage Inspection Checklist - Vivid S5 N and Vivid S6 N Systems (cont’d) Step Item Recommended Procedure Check the power cord for cuts, loose hardware, tire marks, exposed insulation, or any deterioration. Verify continuity.
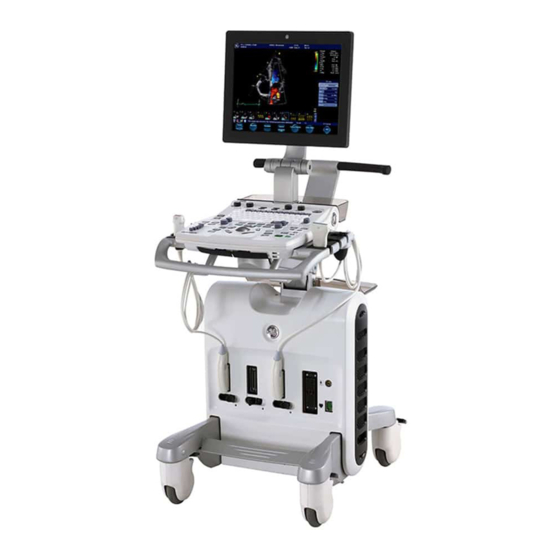
- Page 96 Front View of the Vivid S5 N or Vivid S6 N Ultrasound Unit Figure 3-15 below shows the Vivid S5 N or Vivid S6 N ultrasound unit components that are visible from the front and side of the ultrasound unit.
- Page 97 Provides External ECG input connection to an ECG monitor device outlet, or direct patient three-contact ECG lead connection. Important: Do not use the Vivid 7 ECG cable with the Vivid S5 N or Vivid S6 N system. 12 Speakers: Two loudspeakers provided for Doppler sound.
- Page 98 ERVICE ANUAL 3-4-3-3 Rear View of the Vivid S5 N or Vivid S6 N Ultrasound Unit Figure 3-17 Vivid S5 N or Vivid S6 N Rear View Rear Cable Hooks: Provides a cable management solution for probes and ECG leads.
- Page 99 Rear Panel of the Vivid S5 N or Vivid S6 N Ultrasound Unit Figure 3-18 shows a view of the Vivid S5 N or Vivid S6 N ultrasound unit rear panel and external peripheral/accessory connectors: Figure 3-18 View of the Vivid S5 N or Vivid S6 N Rear Panel Peripherals 230VA AC outlet, isolated - provides power to external peripherals connected to scanner.
- Page 100 System Voltage Confirmation 3-4-4-1 System Voltage Settings Verify that the Vivid S5 N or Vivid S6 N ultrasound scanner is set to the correct voltage. The voltage settings are found on the system rear cover. Systems with Type-B Power Supply:...
- Page 101 3-4-5 Ensuring Protection from EMI The Vivid S5 N or Vivid S6 N unit has been designed to minimize the effects of Electro-Magnetic Interference (EMI). Many of the covers, shields, and screws are provided primarily to protect the system from image artifacts caused by this interference. For this reason, it is imperative that all covers and hardware are installed and secured before the unit is put into operation.
- Page 102 NOTE: If required, it is possible to disable access to all Vivid S5 N / Vivid S6 N scanner USB ports (including the CD/DVD drive) in order to limit system vulnerability. This is implemented from the System Configuration window, via the Service tab.
- Page 103 Printers should be connected to the Vivid S5 N/ Vivid S6 N scanner using the USB Isolation Unit (P/N 5459394). This section provides information common to all printers approved for use with the Vivid S5 N/ Vivid S6 N ultrasound scanner, as follows: •...
- Page 104 EVISION ERVICE ANUAL P1 and P2 Hot Key Configuration via Vivid S5 N/ Vivid S6 N Connectivity Settings 1.) Press Config (or F2); select Connectivity (in the lower part of window). 2.) Select the Additional Outputs tab. Figure 3-21 Configuring Control Panel Hot Keys for Printing 3.) From the Button drop-down menu (see...
- Page 105 P R E L I M I N A R Y FN091065, R VS5 N VS6 N UMBER EVISION ERVICE ANUAL 6.) Select Configure. Figure 3-23 Printer Setup Screen 7.) From the drop-down menu, select the desired printer and press OK. 8.) In the Printer Properties window, select OK.
- Page 106 P R E L I M I N A R Y FN091065, R VS5 N VS6 N UMBER EVISION ERVICE ANUAL 3.) From the Connectivity screen click the Tcpip tab. Figure 3-24 Additional Outputs Screen 3-30 Section 3-4 - Preparing for Installation...
- Page 107 P R E L I M I N A R Y FN091065, R VS5 N VS6 N UMBER EVISION ERVICE ANUAL 4.) In the Tcpip window, click Advanced Settings. Click Advanced Settings Figure 3-25 Tcpip Tab Activated The Network Connection screen opens as seen in Figure 3-26.
- Page 108 P R E L I M I N A R Y FN091065, R VS5 N VS6 N UMBER EVISION ERVICE ANUAL 7.) From the menu, select Printer and select the Set As Default Printer option to select the printer as the default printer or verify that the printer is the set as the default.
- Page 109 P R E L I M I N A R Y FN091065, R VS5 N VS6 N UMBER EVISION ERVICE ANUAL 3-5-1-1-3 Setting Printing Orientation (Portrait or Landscape) and Paper Size To change the printing orientation and printing paper size, configure the printer as described below. To configure printers for portrait/landscape printing, the change must be performed at the Windows operating system level.
- Page 110 P R E L I M I N A R Y FN091065, R VS5 N VS6 N UMBER EVISION ERVICE ANUAL 4.) In the Orientation area, select Portrait or Landscape as needed. Figure 3-30 Printer Setup 5.) From the Paper Size drop-down list, select the required paper size. 6.) Click Properties.
- Page 111 Any unauthorized peripherals may cause system failure or damage! NOTE: After connecting the printer to the Vivid S5 N/ Vivid S6 N system, proceed to the following procedures, as required: • ‘Configuring Printing Buttons P1 and P2” on page 3-27 •...
- Page 112 ‘Setting the HP 5400K DeskJet Color Printer as the Default Report Printer” on page 3-40. NOTE: After connecting the printer to the Vivid S5 N/ Vivid S6 N system, proceed to the following procedures, as required: • ‘Configuring Printing Buttons P1 and P2” on page 3-27 •...
- Page 113 P R E L I M I N A R Y FN091065, R VS5 N VS6 N UMBER EVISION ERVICE ANUAL 3-5-1-3-1 Configuring the HP 5400K DeskJet Color Printer for Connection via USB Port 1.) Log in to Windows® with Administrator permission. 2.) On the console, press the Config button (or F2) and click the Service tab at the bottom of the screen.
- Page 114 P R E L I M I N A R Y FN091065, R VS5 N VS6 N UMBER EVISION ERVICE ANUAL 6.) Select the USB cable option for connecting the device to the computer, then click Next - see Figure 3-35 Figure 3-35 Connecting via USB Cable 7.) Follow the instructions on the Connect Your Device Now screen, (Figure...
- Page 115 P R E L I M I N A R Y FN091065, R VS5 N VS6 N UMBER EVISION ERVICE ANUAL 10.)Verify that the Report Printer, HP Office Pro K5400 is installed. This indicates that the printer has been successfully installed. Figure 3-37 Connectivity Screen 9.) If the HP Office Pro K5400 does not appear as the Report Printer, click Advanced...
- Page 116 P R E L I M I N A R Y FN091065, R VS5 N VS6 N UMBER EVISION ERVICE ANUAL 3-5-1-3-2 Setting the HP 5400K DeskJet Color Printer as the Default Report Printer 1.) Press Config (or F2). 2.) Select Connectivity (in the lower part of window). 3.) Select the Additional Outputs tab.
- Page 117 P R E L I M I N A R Y FN091065, R VS5 N VS6 N UMBER EVISION ERVICE ANUAL The Print Setup dialog opens (Figure 3-41). Figure 3-41 Printer Setup Screen 6.) From the drop-down menu, select HP DeskJet K5400. 7.) If necessary, select Properties to set the required printing parameters (e.g.
- Page 118 Figure 3-43 AC Power Cable (P/N 2300857) & USB Cable Connected to the Vivid S5 N/ Vivid S6 N System 1.) Connect the printer to the AC power outlet located at the rear of the Vivid S5 N/ Vivid S6 N system.
- Page 119 P R E L I M I N A R Y FN091065, R VS5 N VS6 N UMBER EVISION ERVICE ANUAL 2.) Using the USB communications cable, connect the printer to the Vivid S5/S6 system. The HP OfficeJet Pro 8000 printer power and communication ports are shown in Figure 3-44.
- Page 120 P R E L I M I N A R Y FN091065, R VS5 N VS6 N UMBER EVISION ERVICE ANUAL The Connectivity Screen opens - see Figure 3-45 below. Figure 3-45 Connectivity Screen 6.) Activate the Additional Outputs tab, then click Advanced. The Printer properties screen opens - see Figure 3-46.
- Page 121 P R E L I M I N A R Y FN091065, R VS5 N VS6 N UMBER EVISION ERVICE ANUAL Figure 3-47 Print Setup Screen 8.) In the Name field scroll down list (Figure 3-47), select HP OfficeJet Pro A809 Series. 9.) Under Paper, select the appropriate paper size.
- Page 122 P R E L I M I N A R Y FN091065, R VS5 N VS6 N UMBER EVISION ERVICE ANUAL 3.) Switch on the printer, insert a few sheets of appropriate printing paper and press the left-most button on the printer’s panel - see Figure 3-48.
- Page 123 P R E L I M I N A R Y FN091065, R VS5 N VS6 N UMBER EVISION ERVICE ANUAL Figure 3-50 Printers and Faxes Screen 3.) Click Add Printer. The Add Printer wizard opens. 4.) Click Next. The Local or Network Printer screen opens - see Figure 3-51.
- Page 124 P R E L I M I N A R Y FN091065, R VS5 N VS6 N UMBER EVISION ERVICE ANUAL The Select a Printer Port screen opens - Figure 3-52. Figure 3-52 Select a Printer Port Screen 6.) Select Create a new port and in the drop-down list select Standard TCP/IP Port. 7.) Click Next.
- Page 125 P R E L I M I N A R Y FN091065, R VS5 N VS6 N UMBER EVISION ERVICE ANUAL Figure 3-54 Additional Port Information Screen 9.) Under Device Type, select Standard and click Next. The Finish screen opens. 10.)Click Next.
- Page 126 P R E L I M I N A R Y FN091065, R VS5 N VS6 N UMBER EVISION ERVICE ANUAL Note: If the driver is already installed proceed as follows: a.) Click Next. The following screen appears - see Figure 3-56.
- Page 127 14.)Select Do not share this printer and click Next. 15.)Print a test page and click Finish. NOTE: After connecting the printer to the Vivid S5 N/ Vivid S6 N system, proceed to the following procedures, as required: • ‘Configuring Printing Buttons P1 and P2” on page 3-27 •...
- Page 128 Vivid S5 N/ Vivid S6 N SYSTEM NOTE: When connecting the printer’s network cable, ensure that it is connected to the network port at the rear of the Vivid S5 N/ Vivid S6 N system as shown in Figure 3-61.
- Page 129 ANUAL Installation of the HP LaserJet CP2025/M451 Color Printer requires configuring the IP addresses for both the Vivid S5 N/ Vivid S6 N system and for the printer. There are two types of installations, as described below: “Peer-to-Peer” using a cross communication cable between the system and the printer.
- Page 130 P R E L I M I N A R Y FN091065, R VS5 N VS6 N UMBER EVISION ERVICE ANUAL 5.) From “This connection uses the following items” scroll box, select Internet Protocol (TCP/IP) and click Properties. Figure 3-62 Local Area Connection 2 Properties The Internet Protocol (TCP/IP) Properties screen opens.
- Page 131 In the Subnet mask field type: 255.0.0.0 7.) Click OK and click Close. The Vivid S5 N/ Vivid S6 N system’s IP address is defined. Defining the Printer IP Address The settings for the HP LaserJet CP2025 / LaserJet M451 Color printer are controlled via the printer’s...
- Page 132 P R E L I M I N A R Y FN091065, R VS5 N VS6 N UMBER EVISION ERVICE ANUAL Table 3-8 Printer Control Panel - Legend to Figure 3-64 Description of Controls Control-panel display: The display provides information about the printer. Use the menus on the display to establish printer settings.
- Page 133 P R E L I M I N A R Y FN091065, R VS5 N VS6 N UMBER EVISION ERVICE ANUAL 6.) Press OK. “Yes” is displayed in the control panel. 7.) Press OK again. The Subnet mask displays: 255.0.0.0 8.) Press OK.
- Page 134 P R E L I M I N A R Y FN091065, R VS5 N VS6 N UMBER EVISION ERVICE ANUAL Figure 3-66 HP Color LaserJet CP2020 Series PCL 6 Network Properties Dialog Box 3.) Click Configure Port. The Configure Standard TCP/IP Port Monitor dialog box opens. Figure 3-67 Configure Standard TCP/IP Port Monitor 3-58 Section 3-4 - Preparing for Installation...
- Page 135 3.) Select the required settings and click OK. 4.) Print a test page to confirm that the printer is properly installed. NOTE: After connecting the printer to the Vivid S5 N/ Vivid S6 N system, proceed to the following procedures, as required: •...
- Page 136 P R E L I M I N A R Y FN091065, R VS5 N VS6 N UMBER EVISION ERVICE ANUAL The B&W Printer should connected to a designated USB port on the DIB board, as indicated in Figure 3-69. KB Data (J1) DVI DVR...
- Page 137 DO NOT ATTEMPT TO USE A DIFFERENT TYPE OF B/W PRINTER (BRAND OR MODEL) WARNING WARNING OTHER THAN THE B/W PRINTER PROVIDED BY GE. THE ULTRASOUND SYSTEM IS AN EXTREMELY SENSITIVE AND COMPLEX MEDICAL SYSTEM. ANY UNAUTHORIZED PERIPHERALS MAY CAUSE SYSTEM FAILURE OR DAMAGE!
- Page 138 P R E L I M I N A R Y FN091065, R VS5 N VS6 N UMBER EVISION ERVICE ANUAL 4.) Navigate to Printers and Faxes and double click Sony UP-D897 to open the Sony UP-D897 Printer Configuration dialog. 5.) From the menu, select Printer >...
- Page 139 Figure 3-75 Printing Preferences screen 8.) Click OK and return to the Connectivity screen. NOTE: After connecting the printer to the Vivid S5 N/ Vivid S6 N system, proceed to the following procedure, if required: • ‘Configuring Printing Buttons P1 and P2” on page 3-27...
- Page 140 ‘P1 and P2 Hot Key Configuration via Vivid S5 N/ Vivid S6 N Connectivity Settings” on page 3-28. The Digital Color Printer can be connected to either of the USB ports (upper or lower) on the rear connectors panel.
- Page 141 Connecting the Color Video Printer 1.) Place the Digital Color Printer on a stable surface close to the Vivid S5 N or Vivid S6 N scanner. 2.) Using the power cable (provided with the printer), connect one end of the power cable to the power IN socket at rear of the printer, and the other end to the printer peripherals outlet at the rear of the scanner.
- Page 142 1-12. NOTE: All peripherals mounted on the Vivid S5 N or Vivid S6 N system must be firmly secured in position using the securing straps supplied with the scanner. These straps are fastened through the dedicated holes located on each side of the rear tray and serve to hold the peripheral firmly in place.
- Page 143 The MOD Drive may be connected once the system is powered ON, or after shutdown. All software drivers for the MOD Drive are pre-configured and installed designated to be used with the specific MOD drive supplied by GE HEALTHCARE. DO NOT ATTEMPT TO USE A DIFFERENT TYPE OF MASS STORAGE DEVICE OTHER...
- Page 144 ANY UNAUTHORIZED PERIPHERALS MAY CAUSE SYSTEM FAILURE OR DAMAGE! Refer to the External USB Hard Disk Installation Procedure section, page 8-243 for instructions on initial configuration and connecting the External USB Hard Disk to the Vivid S5 N or Vivid S6 N scanner. 3-5-2-4...
- Page 145 P R E L I M I N A R Y FN091065, R VS5 N VS6 N UMBER EVISION ERVICE ANUAL 2.) Select Imaging, then activate the Application tab - see Figure 3-81. Figure 3-81 Application Tab Chapter 3 - System Setup 3-69...
- Page 146 P R E L I M I N A R Y FN091065, R VS5 N VS6 N UMBER EVISION ERVICE ANUAL 3.) Using the Footswitch Functionality drop-down menus, select the required functionality for the Left, Middle and/or Right Footswitch - see the example in Figure 3-82 Figure 3-82 Footswitch Functionality Settings 3-70...
- Page 147 3-5-3 Connecting Probes The Vivid S5 N or Vivid S6 N ultrasound unit operates with various types of probes that are used for scanning patients, including flat phased, convex and linear electronic array probes. Once connected, the probes can be selected for different applications.
- Page 148 Figure 3-84. LOGIQ TEE Pencil Figure 3-84 Connecting Probes to the Vivid S5 N or Vivid S6 N 6) Move the connector locking lever to the right to lock the probe in place, as shown in Figure 3-84. 7) Carefully position the probe cord so that it is free to move and is not resting on the floor, placing the cable and probe head into one of the cable hooks or probe holders.
- Page 149 NOTE: The ECG may be connected to the system at any time, whether the system is powered ON or OFF. Do not use the Vivid 7 ECG cable with the Vivid S5 N or Vivid S6 N system. NOTICE •...
- Page 150 P R E L I M I N A R Y FN091065, R VS5 N VS6 N UMBER EVISION ERVICE ANUAL AHA (Americas, Japan) IEC (Europe, Asia, ROW) Figure 3-86 ECG Cable and Electrode Placement Note: For optimal ECG operation, use only electrodes that meet universal standards - see Table 3-1.
- Page 151 The connection of the ultrasound unit to a power source should be performed by a qualified person who has completed basic Vivid S5 N or Vivid S6 N System User Training. Use only the power cords, cables and plugs provided by or designated by GE HEALTHCARE to connect the unit to the power source.
- Page 152 PERFORMANCE AND COOLING PURPOSES. NOTE: Connecting electrical power to the Vivid S5 N or Vivid S6 N ultrasound unit involves preliminary checks of the power cord, voltage level and compliance with electrical safety requirements. 1) Ensure that the wall outlet is of appropriate type, and that the power circuit breaker is turned OFF.
- Page 153 P R E L I M I N A R Y FN091065, R VS5 N VS6 N UMBER EVISION ERVICE ANUAL Screw hole for Securing Plastic Cable Clamp Plastic Cable Clamp and Screw Figure 3-88 Plastic Cable Clamp and Securing Screw 6.) Proceed as follows: a.) Loosen the screw to open the plastic cable clamp (see Figure...
- Page 154 ANUAL 3-5-5-3 Disconnecting the Ultrasound Unit from the Electrical Outlet WHENEVER DISCONNECTING THE Vivid S5 N or Vivid S6 N UNIT FROM THE ELECTRICAL CAUTION OUTLET, ALWAYS OBSERVE THE SAFETY PRECAUTIONS. FIRST UNPLUG THE MAINS POWER CABLE FROM THE WALL OUTLET SOCKET, THEN FROM THE UNIT ITSELF.
- Page 155 Detecting connected probes. 3) When prompted, log in to the system as appropriate. (Refer to the instructions for system login and user security setup as described in the Vivid S5 N or Vivid S6 N User Manual). The system first enters 2D-Mode with the probe and application that were last used before the system was shut down.
- Page 156 VS5 N VS6 N UMBER EVISION ERVICE ANUAL Section 3-6 Configuration 3-6-1 Vivid S5 N and Vivid S6 N Configuration 3-6-1-1 Enter Location Figure 3-91 Hospital and Department Name Table 3-2 Location Name Step Task Expected Result(s) Open the Configuration Window, see The System Settings Window is displayed.
- Page 157 P R E L I M I N A R Y FN091065, R VS5 N VS6 N UMBER EVISION ERVICE ANUAL 3-6-1-2 Date and Time Adjustments Figure 3-92 Date and Time Adjustments Table 3-3 Date and Time Adjustments Step Task Expected Result(s) Figure 3-91 on Open the System (Configuration) Window, see...
- Page 158 P R E L I M I N A R Y FN091065, R VS5 N VS6 N UMBER EVISION ERVICE ANUAL 3-6-1-3 Language Selection Language Figure 3-93 Settings - Language Selection Table 3-4 Language Adjustments STEP TASK EXPECTED RESULT(S) Open the Configuration Window, see ‘Log On to the System as ADM”...
- Page 159 P R E L I M I N A R Y FN091065, R VS5 N VS6 N UMBER EVISION ERVICE ANUAL Table 3-4 Language Adjustments STEP TASK EXPECTED RESULT(S) The Regional and Language Options dialog box opens: For Russian and Greek languages only: Reboot the system and, at the Windows level, navigate to the Control Panel.
- Page 160 P R E L I M I N A R Y FN091065, R VS5 N VS6 N UMBER EVISION ERVICE ANUAL 3-6-1-4 Units of Measure Units Figure 3-94 Select Units of Measure Table 3-5 Select Units of Measure STEP TASK EXPECTED RESULT(S) Open the Configuration Window, see ‘Log On to the System as...
- Page 161 P R E L I M I N A R Y FN091065, R VS5 N VS6 N UMBER EVISION ERVICE ANUAL 3-6-2 Service Screen Set-up 3-6-2-1 Overview The Service Screen gives you access to: • Keyboard Setups • Printer Setup •...
- Page 162 Figure 3-97 LCD Adjustments on Vivid S6 N Systems Figure 3-98 LCD Adjustments on Vivid S5 N Systems For instructions, see ‘LCD Display Adjustments and Calibration” on page 6-1.
- Page 163 P R E L I M I N A R Y FN091065, R VS5 N VS6 N UMBER EVISION ERVICE ANUAL 3-6-2-5 Keyboard Setup 1) Press <F2>, select Service Tab. Select Keyboard layout Select Keyboard setup Figure 3-99 Select Keyboard Setup 2) From the Keyboard layout pull-down menu, select the desired layout and click CHANGE.
- Page 164 P R E L I M I N A R Y FN091065, R VS5 N VS6 N UMBER EVISION ERVICE ANUAL 3-6-2-5-1 Regional Options • Select appropriate Format and Location, then click Apply. Figure 3-100 Regional Options 3-88 Section 3-4 - Preparing for Installation...
- Page 165 P R E L I M I N A R Y FN091065, R VS5 N VS6 N UMBER EVISION ERVICE ANUAL 3-6-2-5-2 Languages 1.) Under the Languages tab, click Details to select appropriate Language. 2.) If necessary, activate applicable Supplemental Language Support check box, then click Apply. Figure 3-101 Languages Chapter 3 - System Setup 3-89...
- Page 166 P R E L I M I N A R Y FN091065, R VS5 N VS6 N UMBER EVISION ERVICE ANUAL 3-6-2-5-3 Advanced 1.) Under the Advanced tab, select a language version of the non-unicode programs you want to use, then click Apply.
- Page 167 Windows Installation Wizard. Normally, all software drivers are pre-installed and there is no need to use this functionality. In special cases where there is a need, follow the instructions provided by GE HEALTHCARE or the instructions in the respective printer installation manual. Select Add Printer Figure 3-103 Select Add Printer 1.) Select ADD PRINTER to start the Add Printer (Installation) Wizard.
- Page 168 Configuring Peripherals 3-6-3-1 Approved Peripherals The following lists the internal peripherals available for use with the Vivid S5 N or Vivid S6 N scanner and details their method of connection: • Printer - Black & White, digital, Sony (via USB).
- Page 169 P R E L I M I N A R Y FN091065, R VS5 N VS6 N UMBER EVISION ERVICE ANUAL 3-6-3-3 Virtual Printing (Optional) Virtual printing is not configurable. The functionality of virtual printing provides the ability to print to a specific printer, even though it is not physically connected.
- Page 170 P R E L I M I N A R Y FN091065, R VS5 N VS6 N UMBER EVISION ERVICE ANUAL Figure 3-107 Resuming Spooled Print Job 4.) Right-click and select Restart to resume print job/s for printing, as required 3-94 Section 3-4 - Preparing for Installation...
- Page 171 3-6-4-1 Software Option Installation A Password (Software Option String) enables a software option or a combination of software options. This password is specific for each Vivid S5 N and Vivid S6 N. 3-6-4-2 On-site Configuration 1.) Press CONFIG (F2) and log on as Adm - see ‘Log On to the System as ADM”...
- Page 172 3-7-1 Connectivity Introduction The Vivid S5 N or Vivid S6 N ultrasound unit can be connected to various connectivity devices, such as DICOM devices and EchoPac servers. The following sections describe how to connect the system to a remote archive/work station or a DICOM service, using a TCP/IP connection.
- Page 173 P R E L I M I N A R Y FN091065, R VS5 N VS6 N UMBER EVISION ERVICE ANUAL • Automatically send images to DICOM PACS after End Exam? Y/N • DICOM SR? Y/N Note: If the answer to some of the above is Yes, perform the required steps in the procedure below to select the appropriate dataflow according to your needs.
- Page 174 P R E L I M I N A R Y FN091065, R VS5 N VS6 N UMBER EVISION ERVICE ANUAL 4.) Click on Properties. The Worklist Properties dialog box opens: Figure 3-112 Worklist Properties Dialog Box 5.) Select the appropriate settings to configure the Worklist (IP address, etc), as required. 6.) When done, click OK to close the dialog box.
- Page 175 P R E L I M I N A R Y FN091065, R VS5 N VS6 N UMBER EVISION ERVICE ANUAL 9.) Select the appropriate settings to configure Dicom Storage (e.g. Name: DICOM Storage 1, etc. as shown in Figure 3-113).
- Page 176 The name indicates that the local database is used for patient archiving and images are stored to internal hard drive. A list of all the predefined dataflows is included in the Vivid S5 N and Vivid S6 N User’s Manual. 3-100...
- Page 177 In this scenario, the EchoPAC PC (one or several) is used for review of studies acquired on one or more Vivid S5 N or Vivid S6 N scanners without being connected in a network. Images can be stored on the scanner’s internal hard drive (recommended) or on a dedicated MOD.
- Page 178 Vivid S5 N or Vivid S6 N and a DICOM Server in a Network In this configuration, the Vivid S5 N or Vivid S6 N is configured to work with a DICOM server in a network environment. Usually, this will be the hospital network. Images are first saved on the local image buffer on the scanner.
- Page 179 ANUAL 3-7-2 Physical Connection 3-7-2-1 Ethernet Switch Connections An Ethernet Switch (P/N: 066E0741), is used to connect the Vivid S5 N or Vivid S6 N system to an EchoPAC PC and a network printer. Ethernet Cable Informative LEDS connectors MDI Button...
- Page 180 P R E L I M I N A R Y FN091065, R VS5 N VS6 N UMBER EVISION ERVICE ANUAL 3-7-2-3 Hospital Network Connection to EchoPAC PC Workstation Using standard non-crossed cables and MDI switch set to position =HUB, connect like this. Wall connection Vivid S6 or Vivid7...
- Page 181 ANUAL 3-7-2-4 Wireless Network Configuration The following procedure is used to configure the Vivid S5 N or Vivid S6 N system for a wireless network environment. NOTE: A Wireless Network adaptor must be connected to the lower USB port located at the rear of the system.
- Page 182 P R E L I M I N A R Y FN091065, R VS5 N VS6 N UMBER EVISION ERVICE ANUAL The “Network Connections” dialog box is displayed: Figure 3-121 Network and Dial-up Connections 5.) Navigate to “Wireless Network Connection 8" and double-click to open the Wireless Network Connection 8 screen - see Figure 3-122.
- Page 183 At the end of a successful Network Detection process, a message displays indicating that the network is connected - see Figure 3-125. Figure 3-125 Confirmation of Successful Wireless Network Connection The Vivid S5 N or Vivid S6 N system is now configured for a wireless network environment. Chapter 3 - System Setup 3-107...
- Page 184 ‘Ethernet Switch Connections” on page 3-103. Connection via Hospital Network You will need one network cable to connect the Vivid S5 N or Vivid S6 N to a wall outlet on the hospital’s network. 3-7-2-8 Connection between a Vivid S5 N or Vivid S6 N and a DICOM Server on a Network You will need one network cable.
- Page 185 ANUAL 3-7-3 Connectivity Configuration NOTE: If connected to a stand-alone network (Peer-to-Peer network with a Vivid S5 N or Vivid S6 N scanner, an EchoPAC PC work station and eventually a network printer), you should use default delivery settings. 3-7-3-1...
- Page 186 Figure 3-128 TCP/IP Set-up for Vivid S5 N or Vivid S6 N 3-7-3-5 Vivid S5 N/ Vivid S6 N Remote Path Configuration The Vivid S5 N/ Vivid S6 N Remote Path feature enables the user to define a user name. 3-110 Section 3-4 - Preparing for Installation...
- Page 187 EVISION ERVICE ANUAL 3-7-3-6 Configuring the Vivid S5 N / Vivid S6 N Remote Path NOTE: Before starting this procedure, verify that the destination PC / Network has a Shared folder (remote path) with user permissions. Refer to section 3-7-9-1-1 on page 3-146 for creating a new user in the remote PC or network.
- Page 188 (This is the password usually assigned by the local IT person). 3-7-3-7 Configuring the Vivid S5 N or Vivid S6 N and Network PC for a Peer-to-Peer Connection NOTE: The following steps are performed on the Vivid S5 N or Vivid S6 N scanner.
- Page 189 The IP must be different from the IP address used for network computer. 12.)Type in the Subnet mask 255.255.255.0. Note: The Subnet mask should be the same for both the network computer and the Vivid S5 N or Vivid S6 N. 13.)Click OK 14.)Press the Config button on the control panel to close all windows and return to the regular scanning...
- Page 190 P R E L I M I N A R Y FN091065, R VS5 N VS6 N UMBER EVISION ERVICE ANUAL NOTE: The following steps are performed on the Network Computer. 1) On the network computer, access the Control Panel, as follows: a.) Double-click on My Computer icon on desktop.
- Page 191 6.) Activate the Use the following IP address check box. 7) Type in the network computer’s IP address 10.0.0.2. Note: The IP address must be different from the one used for the Vivid S5 N or Vivid S6 N system. 8) Type in the Subnet mask 255.255.255.0. Note: The Subnet mask should be the same for both the network computer and the Vivid S5 N or Vivid S6 N.
- Page 192 P R E L I M I N A R Y FN091065, R VS5 N VS6 N UMBER EVISION ERVICE ANUAL 4.) Trackball to the Advanced tab and press the Set button on the control panel. Figure 3-135 Connectivity Dialog Box - TCPIP Advanced Tab 5.) Select the Local Area Connection, as shown in Figure 3-130.
- Page 193 The Internet Protocol (TCP/IP) Properties dialog box opens. Figure 3-137 Internet Protocol (TCP/IP) Properties 10.)Activate the Use the following IP address check box. 11.)Type in the Vivid S5 N or Vivid S6 N IP address 10.0.0.1 or the one provided by the local network administrator. Note: The IP must be different from the IP address used for network computer.
- Page 194 8) Connect the Vivid S5 N or Vivid S6 N and network computer LAN connection using a regular Network cable. The Vivid S5 N or Vivid S6 N and the network computer are now ready for export, import of files. 3-118...
- Page 195 ERVICE ANUAL Note: One can check the connection by pinging to the Vivid S5 N or Vivid S6 N IP, as follows: a.) Select <Start>, <Run> b.) Type CMD, then press <Enter> c.) Type Ping and IP 10.0.0.1 for Vivid S5 N or Vivid S6 N then press <Enter>.
- Page 196 P R E L I M I N A R Y FN091065, R VS5 N VS6 N UMBER EVISION ERVICE ANUAL 3-7-4 Set Up Connection to a DICOM Server in a Network NOTE: Typically, DICOM server (PACS) is configured as part of another dataflow (for example, Local Archive - DICOM Server).
- Page 197 P R E L I M I N A R Y FN091065, R VS5 N VS6 N UMBER EVISION ERVICE ANUAL The selected flow is shown, as seen in the example in Figure 3-141 below (Worklist/Local Archive - DICOM Server/Int. HD). Figure 3-141 Worklist/Local Archive - DICOM Server/Int.
- Page 198 P R E L I M I N A R Y FN091065, R VS5 N VS6 N UMBER EVISION ERVICE ANUAL Figure 3-143 DICOM Server’s Properties Dialog Box 8.) Follow the steps below to change the IP-Address settings: a.) From the IP-Address pull-down menu, select <Modify> to display the IPs dialog box. Figure 3-144 Select <Modify>...
- Page 199 P R E L I M I N A R Y FN091065, R VS5 N VS6 N UMBER EVISION ERVICE ANUAL Name IP address Figure 3-146 Edit Name and/or IP address d.) Click OK to save the new settings and close the Edit Name dialog box. e.) Click OK to close the IPs dialog to return to the Properties dialog box.
- Page 200 P R E L I M I N A R Y FN091065, R VS5 N VS6 N UMBER EVISION ERVICE ANUAL 3-7-4-3 Verify the Connection to a Device 1.) Select (highlight) the device to which you want to verify the connection. Select device to be verified.
- Page 201 3-7-5-1 Introduction The procedures below describe how to set up the Vivid S5 N or Vivid S6 N workstation so it can connect to the Hospital Information System (HIS), via the Vivid HL7 Gateway. By connecting to the HIS, demographic information (i.e. Patient ID, Name, Gender, etc.) can be retrieved from the HIS, reducing “double-work”...
- Page 202 6.) Ensure that the service is displaying the value In for the Dir parameter and that its role is Primary. Test Connectivity with the Vivid HL7 Gateway The purpose of this test is to verify that the Vivid S5 N or Vivid S6 N has connectivity with the Vivid HL7 Gateway.
- Page 203 Modality Worklist service. Troubleshoot Connectivity with the Gateway If connection between the Vivid S5 N or Vivid S6 N and the HIS failed, the following are typical causes: 1.) No network connection. 2.) IP address and/or port number was incorrectly entered when configuring the Gateway Modality Worklist service.
- Page 204 1.) Path provided in Export to HL7 export path was incorrect. 2.) Mitra support personnel did not create the user account for the Vivid S5 N or Vivid S6 N. 3.) The POLL_DIR directory on the Vivid HL7 Gateway was not shared or the permissions are incorrect.
- Page 205 Overview The Query/Retrieve function makes it possible to search for and retrieve DICOM data from a DICOM server for further analysis on the Vivid S5 N or Vivid S6 N. 3-7-6-2 Query/Retrieve Setup on the Vivid S5 N or Vivid S6 N 1.) Press CONFIG (F2) and log on as Adm, as described in...
- Page 206 P R E L I M I N A R Y FN091065, R VS5 N VS6 N UMBER EVISION ERVICE ANUAL Figure 3-151 Query/Retrieve Workflow 5.) Select QueryRetrieve so it is highlighted and then select Properties to display the Properties dialog box.
- Page 207 P R E L I M I N A R Y FN091065, R VS5 N VS6 N UMBER EVISION ERVICE ANUAL IP-ADDRESS DOWN-ARROW AE TITLE PORT NO Figure 3-153 DICOM Query/Retrieve properties 6.) Select the IP-address down-arrow to choose the DICOM Query/Retrieve server from the pull-down menu.
- Page 208 P R E L I M I N A R Y FN091065, R VS5 N VS6 N UMBER EVISION ERVICE ANUAL SEARCH CRITERIAS SELECT TAG ADD TO LIST REMOVE Figure 3-154 Select Search Criterias 2.) Select the correct tag from the Select Tag pull-down menu. 3.) If needed, type in the value.
- Page 209 P R E L I M I N A R Y FN091065, R VS5 N VS6 N UMBER EVISION ERVICE ANUAL 3-7-6-3 Query/Retrieve Verification SMILEY VERIFICATION CHECK BOX Figure 3-155 DICOM Query/Retrieve Properties Follow the Steps Below to do a First Test (Ping) of the Connection 1.) Select the Smiley button to Ping the server.
- Page 210 P R E L I M I N A R Y FN091065, R VS5 N VS6 N UMBER EVISION ERVICE ANUAL QUERYRETRIEVE CHECK Figure 3-156 Check the DICOM Query/Retrieve Workflow 1.) Select QueryRetrieve from the Selected devices list. 2.) Select Check. If the test passes, a pop-up dialog is displayed, see left illustration in Figure 3-157.
- Page 211 P R E L I M I N A R Y FN091065, R VS5 N VS6 N UMBER EVISION ERVICE ANUAL Select OK to continue. A red “X” to the left of the Selected devices indicates that the test failed. Figure 3-158 Test (Check) Failed Chapter 3 - System Setup 3-135...
- Page 212 3-7-7-1 Introduction The procedures below describe how to set up the Vivid S5 N or Vivid S6 N ultrasound scanner for MPEGVue export. This provides the user with the ability to export an entire patient exam into standard supported media (such as, CD, DVD, or USB Memory Stick [disk-on-key]) in standard MPEG or JPG format.
- Page 213 P R E L I M I N A R Y FN091065, R VS5 N VS6 N UMBER EVISION ERVICE ANUAL 4) From the drop-down menu, select Misc Export - see Figure 3-159. Figure 3-159 Dataflow - Misc Export 5) From selected output devices, highlight evue and then click the Properties button - refer to Figure 3-160 on page 3-138.
- Page 214 P R E L I M I N A R Y FN091065, R VS5 N VS6 N UMBER EVISION ERVICE ANUAL Figure 3-160 eVue Properties The eVue Properties Dialog box opens: Figure 3-161 eVue Properties Dialog Box 6) In the Remote Path field, type in the path to which you want to export MPEGVue (when this feature is used).
- Page 215 P R E L I M I N A R Y FN091065, R VS5 N VS6 N UMBER EVISION ERVICE ANUAL Note: Step 7 is recommended for the first transfer of MPEGVue files. This step is not needed for Windows XP nor for Windows Vista. After initial transfer of MPEGVue, it is recommended to disable this check box.
- Page 216 9.) If required, click OK then select any additional Patient Files for export. 10.)When export complete, click OK then remove the media containing the exported MPEGVue data from the Vivid S5 N or Vivid S6 N system. Note: If any problems occurred with copying the Patient Files during the export process, an error message such as the one below will be displayed, showing the status of each of the transferred Patient Files.
- Page 217 Introduction It is possible to configure the Vivid S5 N or Vivid S6 N ultrasound scanner to allow the user to send images or loops to a remote PC, in almost real time. When pressing Store, the loop will save not only to the local archive (in raw-data format), but will also be transmitted to a designated PC (“e-Vue PC”)
- Page 218 P R E L I M I N A R Y FN091065, R VS5 N VS6 N UMBER EVISION ERVICE ANUAL Figure 3-163 Connectivity - Dataflow Tab Selected 6.) Click on the Name field to access the drop-down menu. 7.) From drop-down menu, select the Dataflow named Local Archive – Int. HD/eVue. 8.) Trackball to the Selected devices window and select (highlight) eVue (see Figure 3-163).
- Page 219 This step is not needed for Windows XP. After initial transfer of eVue, it is recommended to disable this check box. The Vivid S5 N or Vivid S6 N dataflow is set and ready for export/import of eVue files into a network computer.
- Page 220 P R E L I M I N A R Y FN091065, R VS5 N VS6 N UMBER EVISION ERVICE ANUAL The Search/Create Patient dialog box opens. Figure 3-165 Search/Create Patient Dialog Box 2.) Type the patient’s Last Name and ID in the appropriate fields (see Figure 3-165).
- Page 221 P R E L I M I N A R Y FN091065, R VS5 N VS6 N UMBER EVISION ERVICE ANUAL 3-7-9 Using MPEGVue/eVue on a Remote PC NOTE: MPEGVue Player is intended for secondary review and patient consultation. 3-7-9-1 Installing MPEGVue on a Remote PC NOTE: MPGEGVue player is not compatible with Windows 98.
- Page 222 P R E L I M I N A R Y FN091065, R VS5 N VS6 N UMBER EVISION ERVICE ANUAL Figure 3-167 Download/Installation Message Examples #2 3-7-9-1-1 Manually Setting the Network PC for eVue Import 1) On the network computer, create a New User by accessing the Control Panel, as follows: a.) Double-click on My Computer icon on desktop.
- Page 223 P R E L I M I N A R Y FN091065, R VS5 N VS6 N UMBER EVISION ERVICE ANUAL The User Accounts dialog box opens: Figure 3-168 User Accounts Dialog Box 3) Select the Advanced Tab. 4) Click on the Advanced button. The Local Users and Groups dialog box opens: Figure 3-169 Local Users and Groups Dialog Box 5.) Select the Users folder and right-click to select New User.
- Page 224 P R E L I M I N A R Y FN091065, R VS5 N VS6 N UMBER EVISION ERVICE ANUAL The New User dialog box opens: Figure 3-170 New User Dialog Box 6.) Configure a new user account, as follows (see Figure 3-170): a.) User name:...
- Page 225 P R E L I M I N A R Y FN091065, R VS5 N VS6 N UMBER EVISION ERVICE ANUAL b.) Now select New and Folder, to create a new folder: Important: When more than one scanner is used to export with eVue, it is recommended to configure each scanner with its own folder for exporting files.
- Page 226 P R E L I M I N A R Y FN091065, R VS5 N VS6 N UMBER EVISION ERVICE ANUAL Figure 3-171 eVue_Import Properties Dialog Box b.) Select the Sharing Tab. c.) Click on the Permissions button. The Permissions for eVue Import dialog box opens: Note: It is recommended to remove this user.
- Page 227 P R E L I M I N A R Y FN091065, R VS5 N VS6 N UMBER EVISION ERVICE ANUAL d.) Click the Add button. Note: It is recommended to remove the User Everyone from Share Permissions. The Select Users, Computers, or Groups dialog box opens: Figure 3-173 Select Users, Computers, or Groups Dialog Box e.) Click the Object Types button.
- Page 228 P R E L I M I N A R Y FN091065, R VS5 N VS6 N UMBER EVISION ERVICE ANUAL Figure 3-174 Select Users or Groups Dialog Box - Check Names j.) Click the Check Names button. The name and path will be detected by underlining, as shown below. k.) Now click OK.
- Page 229 Close all windows. Note: The network computer is now ready to receive files from the Vivid S5 N or Vivid S6 N system. At this stage, set the appropriate path for export of files into the network computer. For example, for eVue, Data Flow or MpegVue export into the network computer using the browsing option to select the appropriate path.
- Page 230 P R E L I M I N A R Y FN091065, R VS5 N VS6 N UMBER EVISION ERVICE ANUAL c.) Select Control Panel from the Menu. 2.) Double-click on Network Connections as shown above. 3.) Select your network connection and right-click. 4.) From the drop-down menu, select Properties.
- Page 231 P R E L I M I N A R Y FN091065, R VS5 N VS6 N UMBER EVISION ERVICE ANUAL The Local Area Connection Properties dialog box opens: Figure 3-176 Local Area Connection Properties Dialog Box 5.) Select the Advanced Tab. 6.) Uncheck the Internet Connection Firewall check box, as shown in Figure 3-176.
- Page 232 P R E L I M I N A R Y FN091065, R VS5 N VS6 N UMBER EVISION ERVICE ANUAL 2.) Double-click on Administrative Tools. The Administrative Tools dialog box opens: Figure 3-177 Administrative Tools Dialog Box 3.) Double-click on Services. 4.) From the Services dialog box, select your firewall program (for example, Black Ice).
- Page 233 ANUAL 6.) When finished, click Close. 7.) Now you can try to reconnect the network computer to the Vivid S5 N or Vivid S6 N system. Stopping the Firewall on Windows XP Service Pack 2 1.) On the network computer, access the Control Panel, as follows: a.) Press Start.
- Page 234 P R E L I M I N A R Y FN091065, R VS5 N VS6 N UMBER EVISION ERVICE ANUAL 3-7-9-2 Un-installing MPEGVue on a Remote PC 1.) Log in to Windows with Administrator permissions. Note: You may need to obtain these from the local IT person. 2.) Close all Internet Explorer windows, if open.
- Page 235 P R E L I M I N A R Y FN091065, R VS5 N VS6 N UMBER EVISION ERVICE ANUAL Figure 3-181 Uninstall Message 1 Figure 3-182 Uninstall Message 2 d.) From the C:\Program Files\GEULS\eStorePlayer\Version1_0\ folder, delete all files, as shown in Figure 3-183 on page 3-160.
- Page 236 P R E L I M I N A R Y FN091065, R VS5 N VS6 N UMBER EVISION ERVICE ANUAL Figure 3-183 Deleting All Files 5.) Restart Windows, then confirm that the MPEGVue application is no longer installed. 3-160 Section 3-4 - Preparing for Installation...
- Page 237 P R E L I M I N A R Y FN091065, R VS5 N VS6 N UMBER EVISION ERVICE ANUAL 3-7-9-3 Using MPEGVue Viewer on a Remote PC 3-7-9-3-1 Reading an MPEGVue Exam An MPEG exam can be read on any computer with Windows 2000/XP/Vista, provided that DirectX 8.1 (or later) and Windows Media Player 7.1 (or later) are installed.
- Page 238 P R E L I M I N A R Y FN091065, R VS5 N VS6 N UMBER EVISION ERVICE ANUAL 1) Click on the required examination Exam Date (labeled 1 in the example above) to select and display images of that exam. The MPEGVue screen is displayed as shown in the example in Figure 3-185 below.
- Page 239 2) Perform the measurement. Note: If the original image contains measurements that were taken and stored on the Vivid S5 N or Vivid S6 N scanner, those measurements will appear in the MPEGvue image. In this case, additional measurements cannot be performed on that image.
- Page 240 Saved Worksheets On the Vivid S5 N or Vivid S6 N scanner, it is possible to view the Worksheet and press Store. This will generate a still frame showing a snapshot of the Worksheet with the visible measurements on it. This same snapshot will also be visible in the MPEGvue Viewer.
- Page 241 P R E L I M I N A R Y FN091065, R VS5 N VS6 N UMBER EVISION ERVICE ANUAL Figure 3-186 E-mail Dialog Box - Sending Current Exam 3.) Click Next. The E-mail address window is displayed (Figure 3-187 below).
- Page 242 P R E L I M I N A R Y FN091065, R VS5 N VS6 N UMBER EVISION ERVICE ANUAL Note: The password should be given to the recipient of the e-mail verbally by phone or by other protected means. (It is recommended to keep a separate record of passwords used).
- Page 243 P R E L I M I N A R Y FN091065, R VS5 N VS6 N UMBER EVISION ERVICE ANUAL The E-mail Dialog box is displayed. Figure 3-191 E-mail Dialog Box 2) Activate the Send Current Image radio button, then click Next. Note: If it is necessary to send the MPEGVue Player software to the recipient, first complete this procedure, then proceed to...
- Page 244 P R E L I M I N A R Y FN091065, R VS5 N VS6 N UMBER EVISION ERVICE ANUAL When the operation is complete, a Confirmation window is displayed as shown below.. Figure 3-194 Operation Completed Message 5) Click OK to close the message window. 6) Check that the message has been sent from the Outlook Outbox.
- Page 245 P R E L I M I N A R Y FN091065, R VS5 N VS6 N UMBER EVISION ERVICE ANUAL Note: When the message has been sent from the Outbox and has arrived at the addressee, the recipient should follow the instructions (included in the body of the email) in order to install the MPEGVue Player.
- Page 246 P R E L I M I N A R Y FN091065, R VS5 N VS6 N UMBER EVISION ERVICE ANUAL 1) From the desktop, double-click on the MPEGVue Startup icon. The MPEGVue Startup Menu opens: Provides access to Outlook Inbox Opens Patient List (lists only studies received by email) Activates e-Vue - opens Patient List of studies received via export operation Enables user to manage patient exams received by email, export or removable...
- Page 247 P R E L I M I N A R Y FN091065, R VS5 N VS6 N UMBER EVISION ERVICE ANUAL 3-7-9-3-12 Get New Exams by E-mail 1) From the MPEGVue Startup Menu, click on the Get new exams by email button. The Start MPEGVue screen is displayed, as shown in Figure 3-198 below.
- Page 248 P R E L I M I N A R Y FN091065, R VS5 N VS6 N UMBER EVISION ERVICE ANUAL The following message is displayed while the e-mail Inbox is being scanned for studies: When complete, all studies found in the Inbox are listed in the Found Studies dialog box, as shown Figure 3-199 below.
- Page 249 P R E L I M I N A R Y FN091065, R VS5 N VS6 N UMBER EVISION ERVICE ANUAL The Password window is displayed:. Figure 3-200 Password Window 6) Enter the same password (for decryption of the study) as that used by the sender of the e-mails. Note: The Password is case-sensitive.
- Page 250 P R E L I M I N A R Y FN091065, R VS5 N VS6 N UMBER EVISION ERVICE ANUAL 8) Click OK to close the message. The exam is now listed in the MPEGVue Patient List (see Figure 3-202 below) and is ready for selection and viewing.
- Page 251 P R E L I M I N A R Y FN091065, R VS5 N VS6 N UMBER EVISION ERVICE ANUAL Activate e-Vue 1) From the MPEGVue Startup Menu, click on the Activate e-Vue button. The Patient List is displayed, listing all e-Vue exams received (refer to Figure 3-203, above).
- Page 252 P R E L I M I N A R Y FN091065, R VS5 N VS6 N UMBER EVISION ERVICE ANUAL c.) The current path information is displayed below the Patient List as well as number of studies, cumulative size and amount of space available on the drive. By default, the destination path Other Folder radio button is enabled.
- Page 253 P R E L I M I N A R Y FN091065, R VS5 N VS6 N UMBER EVISION ERVICE ANUAL Note: When the selected studies have been copied to the destination folder, they will remain listed in the MPEGVue Patient Manager Patient List. However, if they have been moved, they will no longer be listed.
- Page 254 P R E L I M I N A R Y FN091065, R VS5 N VS6 N UMBER EVISION ERVICE ANUAL 4.) Manage Other Exams, as follows: a.) Make sure the Manage Other Exams tab is activated as shown in Figure 3-207.
- Page 255 P R E L I M I N A R Y FN091065, R VS5 N VS6 N UMBER EVISION ERVICE ANUAL Figure 3-208 Exams Selected for Copying g.) Click the Copy Selected Patients button. h.) During the copy operation, the following message and progress bar is displayed: i.) When done, the currently-selected exam/s are available in the destination folder for review.
- Page 256 P R E L I M I N A R Y FN091065, R VS5 N VS6 N UMBER EVISION ERVICE ANUAL 5.) If required, access the System Configuration utility, as follows: a.) Make sure the System Configuration tab is activated as shown in Figure 3-209.
- Page 257 P R E L I M I N A R Y FN091065, R VS5 N VS6 N UMBER EVISION ERVICE ANUAL f.) Select the required eVue folder destination drive: g.) If applicable, enable the peer-to-peer connection check box then type the correct current IP address and Subnet mask details: h.) Click Save to save the new configuration.
- Page 258 Disable eVue operations. In cases of a peer-to-peer connection, before using Enable eVue always make sure the two computers (Vivid S5 N or Vivid S6 Nscanner and your PC) are properly configured and connected directly. Before using Disable eVue, your PC should be connected back to the local network.
- Page 259 P R E L I M I N A R Y FN091065, R VS5 N VS6 N UMBER EVISION ERVICE ANUAL 3.) Double-click on the START_MpegVue Player icon, as shown below: Note: On most computers, when inserting the CD media with MpegVue files, the MpegVue Player will start automatically (due to the autoplay option of CD-ROM).
- Page 260 P R E L I M I N A R Y FN091065, R VS5 N VS6 N UMBER EVISION ERVICE ANUAL Figure 3-211 Image Review Window 5.) From thumbnails mini-pictures (on the left of the screen), select one for review. The selected image is displayed in the Image Review window.
- Page 261 P R E L I M I N A R Y FN091065, R VS5 N VS6 N UMBER EVISION ERVICE ANUAL Note: The MpegVue Player can be used as a regular player, using the Play, Stop, Forward, and Rewind buttons. In addition, the user can forward images by e-mail, save images, and perform measurements, as previously described.
- Page 262 Section 3-8 Storing and Transporting the Unit The Vivid S5 N or Vivid S6 N ultrasound unit weighs up to 65 kg (99 labs), depending on the configuration. To avoid equipment damage and ensure maximum safety while transporting or moving the unit, the following precautions are recommended: •...
- Page 263 P R E L I M I N A R Y FN091065, R VS5 N VS6 N UMBER EVISION ERVICE ANUAL Figure 3-213 Examples of Cables Not Properly Secured - Diagram 1 Figure 3-214 Securing AC Power Cable Chapter 3 - System Setup 3-187...
- Page 264 P R E L I M I N A R Y FN091065, R VS5 N VS6 N UMBER EVISION ERVICE ANUAL Figure 3-215 Securing Ultrasound Gel Bottle ...
- Page 265 P R E L I M I N A R Y FN091065, R VS5 N VS6 N UMBER EVISION ERVICE ANUAL Figure 3-217 Moving the Ultrasound Unit Safely Chapter 3 - System Setup 3-189...
- Page 266 EVISION ERVICE ANUAL Document no. R2424026-100 Rev.3 GE Healthcare-Ultrasound Figure 3-218 Correct and Incorrect Positioning - Diagram 2 3-190 Section 3-8 - Storing and Transporting the Unit...
- Page 267 Verify that the required packing materials are available. All these materials are required to safely package and transport the Vivid S5 N or Vivid S6 N ultrasound unit in the cardboard shipping carton for shipment by vehicle, or any other means.
- Page 268 Section 3-9 Completing the Installation Paperwork NOTE: On completion of a Vivid S5 N or Vivid S6 N ultrasound scanner installation, it is important to record the relevant System Installation details (see Table 3-7 below) and Product Locator Installation details (see Figure 3-219 on page 3-193), for future reference.
- Page 269 3-9-4 User Manual(s) Check that the correct Vivid S5 N or Vivid S6 N User Manual(s) for the system (and relevant software revision), is included with the installation. Specific language versions of the Vivid S5 N or Vivid S6 N User Manual may also be available.
- Page 270 P R E L I M I N A R Y FN091065, R VS5 N VS6 N UMBER EVISION ERVICE ANUAL This page was intentionally left blank. 3-194 Section 3-9 - Completing the Installation Paperwork...
- Page 271 Purpose of Chapter 4 This chapter describes the functional checks that must be performed either as a part of the installation procedure, or as required during servicing and periodic maintenance of the Vivid S5 N or Vivid S6 N ultrasound scanner.
- Page 272 4-2-2 Power ON/Boot-up 4-2-2-1 Connecting Mains Power to the Vivid S5 N or Vivid S6 N Ultrasound Unit To avoid the risk of fire, power to the system must be supplied from a properly DANGER rated outlet. It is recommended to use a dedicated power outlet. The power plug should not, under any circumstances, be altered to a configuration rated less than that specified for the current.
- Page 273 Follow These Steps to Connect Mains Power to the Unit Connecting the Vivid S5 N or Vivid S6 N ultrasound unit involves preliminary checks of the power cord, voltage level and compliance with electrical safety requirements.
- Page 274 P R E L I M I N A R Y FN091065, R VS5 N VS6 N UMBER EVISION ERVICE ANUAL 4-2-2 Power ON/Boot-up (cont’d) NOTE: In the next step, it is necessary to screw the plastic cable clamp (into the hole provided in the support column - centrally located at the rear of the system, see Figure 4-2 "Plastic Cable Clamp and Securing Screw"...
- Page 275 P R E L I M I N A R Y FN091065, R VS5 N VS6 N UMBER EVISION ERVICE ANUAL 4-2-2 Power ON/Boot-up (cont’d) 4-2-2-2 Turning the System ON 1) Verify that the ultrasound unit has been connected to the mains power wall outlet via the AC connector on the rear of the system (as previously described) and that mains power is turned ON.
- Page 276 P R E L I M I N A R Y FN091065, R VS5 N VS6 N UMBER EVISION ERVICE ANUAL 4-2-2 Power ON/Boot-up (cont’d) c.) The Back-End Processor and the rest of the scanner commences the following sequence (in the listed order of steps): 1.) Back-End Processor is turned ON and starts to load the software.
- Page 277 P R E L I M I N A R Y FN091065, R VS5 N VS6 N UMBER EVISION ERVICE ANUAL 4-2-3 Power Shut Down When switching the unit OFF, the system performs an automatic shutdown sequence. NOTE: After turning OFF the system, wait at least 10 seconds before turning it on again. The system may not be able to boot-up if power is recycled too quickly.
- Page 278 P R E L I M I N A R Y FN091065, R VS5 N VS6 N UMBER EVISION ERVICE ANUAL 4-2-3 Power Shut Down (cont’d) 4-2-3-1 Standby Mode Follow the steps below to select Standby Mode This procedure describes the steps required to power down the unit to Standby mode: NOTE: Don’t press the On/Off button too long.
- Page 279 P R E L I M I N A R Y FN091065, R VS5 N VS6 N UMBER EVISION ERVICE ANUAL 4-2-3 Power Shut Down (cont’d) 4-2-3-2 Complete Power Down NOTE: This function is not available from Standby mode. Follow this procedure to perform a complete system power-down 1.) Hold down the On/Off button for 3-5 seconds to evoke the display of the System Exit dialog box (see Figure 4-7 "System Exit Dialog Box"...
- Page 280 P R E L I M I N A R Y FN091065, R VS5 N VS6 N UMBER EVISION ERVICE ANUAL 4-2-4 Log On to the System as ADM Table 4-2 Logging on to the System as ADM Step Task Expected Result(s) Press Config on the alphanumeric keyboard.
- Page 281 P R E L I M I N A R Y FN091065, R VS5 N VS6 N UMBER EVISION ERVICE ANUAL Table 4-2 Logging on to the System as ADM (cont’d) Step Task Expected Result(s) Select System to access the System Setup window. The System Settings window is displayed Proceed to select the required settings.
- Page 282 This connection must be via a USB-to-SCSI adaptor; one side of the adaptor being connected to the Vivid S5 N or Vivid S6 N USB port, and the other side to the rear of the MOD drive. When connecting the MOD drive directly to the system, it is necessary to use an additional power source.
- Page 283 P R E L I M I N A R Y FN091065, R VS5 N VS6 N UMBER EVISION ERVICE ANUAL 4-2-5 Using Removable Media (cont’d) Figure 4-8 Eject Device Menu 2.) Select 5 1/4 MO Disk in the Eject Device menu to eject the MO Disk. 3.) Remove the ejected MO Disk from the MO Drive and place it in its cover box for storage in a safe place.
- Page 284 P R E L I M I N A R Y FN091065, R VS5 N VS6 N UMBER EVISION ERVICE ANUAL 4-2-6 Labeling Removable Media Before you start to format any Removable Media, be sure about what naming convention you will use for labelling.
- Page 285 P R E L I M I N A R Y FN091065, R VS5 N VS6 N UMBER EVISION ERVICE ANUAL 4-2-8 DICOM Repair of Removable Media 1.) Insert the removable media to be verified. 2.) Select the pre-configured removable media from the Config > Connectivity > Tools pop-up menu. 3.) Press Repair DICOM Dir.
- Page 286 STEP TASK FUNCTION Insert an empty, formatted MO disk labelled “PRESETS” and marked with Vivid S5 N or Vivid S6 N serial number and the date, into the MO Drive. For more information about formatting, see ‘Formatting Removable Media” on page 4-14.
- Page 287 P R E L I M I N A R Y FN091065, R VS5 N VS6 N UMBER EVISION ERVICE ANUAL 4-2-9-2 Restoring System Configuration from an MO Disk Table 4-4 Restoring System Configuration STEP TASK FUNCTION Insert the MO disk with the archived presets into the MOD.
- Page 288 P R E L I M I N A R Y FN091065, R VS5 N VS6 N UMBER EVISION ERVICE ANUAL Section 4-3 Functional Checks 4-3-1 Basic Controls 4-3-1-1 Alphanumeric Keyboard Test Table 4-5 Alphanumeric Keyboard Test Step Task Expected Result(s) Power-up the System in Normal Scanning Mode Press Config and select Report Select the Comment Texts Tab and press New.
- Page 289 P R E L I M I N A R Y FN091065, R VS5 N VS6 N UMBER EVISION ERVICE ANUAL Table 4-6 Extended Keyboard and Trackball Test Step Task Expected Result(s) Power-up the System in Normal Scanning Mode Press <Alt> F2 to start the diagnostic package. Highlight the Extended Keyboard Test and press <Set>...
- Page 290 P R E L I M I N A R Y FN091065, R VS5 N VS6 N UMBER EVISION ERVICE ANUAL Table 4-6 Extended Keyboard and Trackball Test (cont’d) Step Task Expected Result(s) Check the On/Off button: The On/Off button displayed in the Test Screen will be a.) Press the button once;...
- Page 291 P R E L I M I N A R Y FN091065, R VS5 N VS6 N UMBER EVISION ERVICE ANUAL 4-3-1-3 System SN Test Table 4-7 System SN Test Step Task Expected Result(s) Boot-up the System in Regular Scanning Mode Press Config Under the Connectivity tab, select TCPIP then Computer Name...
- Page 292 P R E L I M I N A R Y FN091065, R VS5 N VS6 N UMBER EVISION ERVICE ANUAL 4-3-1-5 Light Detector Test for Vivid S6 N only Table 4-9 Light Detector Test Step Task Expected Result(s) Boot-up the System in Regular Scanning Mode. Press LCD (F4 Key) to start the LCD adjustment.
- Page 293 P R E L I M I N A R Y FN091065, R VS5 N VS6 N UMBER EVISION ERVICE ANUAL Table 4-10 Monitor Test (cont’d) Step Task Expected Result(s) Select Solid Test. Not more than 1 missing pixel in R/G/B tests Make sure there are no more than 1 missing pixel in the Full Select Red Screen Red or display in another color.
- Page 294 P R E L I M I N A R Y FN091065, R VS5 N VS6 N UMBER EVISION ERVICE ANUAL Table 4-11 ECG Test (cont’d) Step Task Expected Result(s) The ECG signal is displayed in the Data area, as shown in the example below: From the Test ECG device window, set the resolution to 1 second and press the Open Device button.
- Page 295 P R E L I M I N A R Y FN091065, R VS5 N VS6 N UMBER EVISION ERVICE ANUAL 4-3-1-8 Front End Tests Table 4-12 Front End Tests Step Task Expected Result(s) In order to access an individual board test, it is necessary to insert the service dongle from system boot-up and enter the Service Password.
- Page 296 P R E L I M I N A R Y FN091065, R VS5 N VS6 N UMBER EVISION ERVICE ANUAL Table 4-12 Front End Tests (cont’d) Step Task Expected Result(s) Disconnect any probes currently connected to the system and make sure that nothing is touching the probe connectors.
- Page 297 P R E L I M I N A R Y FN091065, R VS5 N VS6 N UMBER EVISION ERVICE ANUAL Table 4-12 Front End Tests (cont’d) Step Task Expected Result(s) Trackball to TR32 BF Digital Test and press Set. Disconnect any probes currently connected to the system and make sure that nothing is touching the probe connectors.
- Page 298 P R E L I M I N A R Y FN091065, R VS5 N VS6 N UMBER EVISION ERVICE ANUAL Table 4-12 Front End Tests (cont’d) Step Task Expected Result(s) Adjacent to On Fail, select either Stop or Continue, as required.
- Page 299 P R E L I M I N A R Y FN091065, R VS5 N VS6 N UMBER EVISION ERVICE ANUAL Table 4-12 Front End Tests (cont’d) Step Task Expected Result(s) The test commences. When the ACW IQ Symmetry Test sequence is complete, the View Test Log window opens Trackball to the Start button and press Set automatically, listing the test performed and showing...
- Page 300 P R E L I M I N A R Y FN091065, R VS5 N VS6 N UMBER EVISION ERVICE ANUAL Table 4-12 Front End Tests (cont’d) Step Task Expected Result(s) ACW Delay Range Test Trackball to ACW Delay Range Test and press Set. Disconnect any probes currently connected to the system and make sure that nothing is touching the probe connectors.
- Page 301 P R E L I M I N A R Y FN091065, R VS5 N VS6 N UMBER EVISION ERVICE ANUAL Table 4-12 Front End Tests (cont’d) Step Task Expected Result(s) Under the Special Instructions area, activate the Loops checkbox and select the required number of Loops from the combo box.
- Page 302 P R E L I M I N A R Y FN091065, R VS5 N VS6 N UMBER EVISION ERVICE ANUAL Table 4-12 Front End Tests (cont’d) Step Task Expected Result(s) The test commences. When the PENCIL RX Test sequence is complete, the Trackball to the Start button and press Set View Test Log window opens automatically, listing the test performed and showing whether it passed or failed...
- Page 303 P R E L I M I N A R Y FN091065, R VS5 N VS6 N UMBER EVISION ERVICE ANUAL 4-3-2 Peripherals 4-3-2-1 B/W and Color Printer Test NOTE: If the printer is not currently connected to the system, refer to ‘Sony UP-D897 B/W Video Printer”...
- Page 304 Figure 8-278 on page 8-244. indicators. Create a dummy patient file on the Vivid S5 N or Vivid S6 N scanner. Save several images in the patient file. Export the images to the External USB Hard Disk. Delete the dummy patient file (including images) from The deleted patient file and images are no longer listed.
- Page 305 P R E L I M I N A R Y FN091065, R VS5 N VS6 N UMBER EVISION ERVICE ANUAL 4-3-3 Mechanical Functional Tests 4-3-3-1 Arm Movement Test Table 4-17 Arm Movement Test Step Task Expected Result(s) Lift the up/down release handle upwards. (It is located The up and down movement locking mechanism is on the right side below the operator panel).
- Page 306 P R E L I M I N A R Y FN091065, R VS5 N VS6 N UMBER EVISION ERVICE ANUAL 4-3-3-3 Monitor Movement Test Table 4-19 Main Shelf Movement Test Step Task Expected Result(s) Ensure that you do apply some force to move the monitor.
- Page 307 The red LED on the service dongle illuminates. ports in turn, checking that the LED illuminates correctly. 4-3-4-2 Standby Test NOTE: This test only applicable for Vivid S5 N or Vivid S6 N systems with a battery. Table 4-23 Standby Test Task Expected Result(s) Press the On/Off button on the control console for no The system enters Standby mode.
- Page 308 P R E L I M I N A R Y FN091065, R VS5 N VS6 N UMBER EVISION ERVICE ANUAL Section 4-4 Image Testing This section provides guidelines for the following image testing checks: 2D Mode (B Mode) Checks - see below ‘M Mode Checks”...
- Page 309 P R E L I M I N A R Y FN091065, R VS5 N VS6 N UMBER EVISION ERVICE ANUAL 4-4-1-3 Adjust the 2D Mode Controls ALWAYS USE THE MINIMUM POWER REQUIRED TO OBTAIN ACCEPTABLE IMAGES WARNING WARNING IN ACCORDANCE WITH APPLICABLE GUIDELINES AND POLICIES. 1.) Press 2D on the Operator Panel to access 2D mode.
- Page 310 P R E L I M I N A R Y FN091065, R VS5 N VS6 N UMBER EVISION ERVICE ANUAL 4-4-2-1 Preparations 1.) Connect one of the probes. ‘Connecting Probes” on page 3-71 for information about connecting the probes. 2.) Turn ON the scanner.
- Page 311 P R E L I M I N A R Y FN091065, R VS5 N VS6 N UMBER EVISION ERVICE ANUAL NOTE: The scale value may affect FPS, Low Velocity Reject, and Sample Volume. • Adjust Low Velocity Reject to remove low velocity blood flow and tissue movement that reduces image quality.
- Page 312 P R E L I M I N A R Y FN091065, R VS5 N VS6 N UMBER EVISION ERVICE ANUAL • Adjust Power to obtain an acceptable image using the lowest setting possible. NOTE: The Power setting affects all other operating modes. Adjust the following settings to further optimize display of the image: •...
- Page 313 P R E L I M I N A R Y FN091065, R VS5 N VS6 N UMBER EVISION ERVICE ANUAL • Adjust Frame rate to a higher setting to improve motion detection, or to a lower setting to improve resolution.
- Page 314 P R E L I M I N A R Y FN091065, R VS5 N VS6 N UMBER EVISION ERVICE ANUAL 4-4-6 Probe/Connectors Check TAKE THE FOLLOWING PRECAUTIONS WITH THE PROBE CABLES: CAUTION - KEEP AWAY FROM THE WHEELS - DO NOT BEND - DO NOT CROSS CABLES BETWEEN PROBES Table 4-24 Probe and Connectors Checks...
- Page 315 Section 4-5 System Turnover Checklist Before returning the Vivid S5 N or Vivid S6 N ultrasound scanner to regular operational use, the System Configuration settings should be checked. In 2D-Mode, press Config on the keyboard and check the settings in accordance with those listed or referenced in Table 4-25 "Software Configuration Checklist"...
- Page 316 P R E L I M I N A R Y FN091065, R VS5 N VS6 N UMBER EVISION ERVICE ANUAL Section 4-6 Site Log Table 4-1: Vivid™ S5 N and Vivid™ S6 N Site Log Date Service Person Problem Comments 4-46 Section 4-6 - Site Log...
- Page 317 P R E L I M I N A R Y FN091065, R VS5 N VS6 N UMBER EVISION ERVICE ANUAL Table 4-1: Vivid™ S5 N and Vivid™ S6 N Site Log (cont’d) Date Service Person Problem Comments Chapter 4 - Functional Checks 4-47...
- Page 318 P R E L I M I N A R Y FN091065, R VS5 N VS6 N UMBER EVISION ERVICE ANUAL This page was intentionally left blank. 4-48 Section 4-6 - Site Log...
- Page 319 P R E L I M I N A R Y FN091065, R VS5 N VS6 N UMBER EVISION ERVICE ANUAL Chapter 5 Components and Function (Theory) Section 5-1 Overview 5-1-1 Purpose of Chapter 5 This chapter explains Vivid™ S5 N and Vivid™ S6 N system concepts, component arrangement, and sub-system functions.
- Page 320 Open connectivity using multiple USB ports • High-performance LCD monitor, with fully-adjustable contrast and viewing angle (Vivid S6 N systems: 17" display; Vivid S5 N systems: 15" display) • Low profile, backlit keyboard Vivid™ S5 N and Vivid™ S6 N have a digital beam forming system (incorporated in the Front End) that can handle up to 192 element linear probes using multiplexing.
- Page 321 P R E L I M I N A R Y FN091065, R VS5 N VS6 N UMBER EVISION ERVICE ANUAL 5-2-2 Signal Flow The two TR32 Boards in the Front-End Processor generate the strong bursts transmitted by the probes as ultrasound into the body.
- Page 322 P R E L I M I N A R Y FN091065, R VS5 N VS6 N UMBER EVISION ERVICE ANUAL 5-2-3 Vivid™ S5 N and Vivid™ S6 N Systems - Block Diagram Figure 5-2 System Block Diagram...
- Page 323 P R E L I M I N A R Y FN091065, R VS5 N VS6 N UMBER EVISION ERVICE ANUAL Section 5-3 Front End Unit 5-3-1 General Information The Vivid™ S5 N and Vivid™ S6 N Front End system (see diagram in Figure 5-4 "Front End - Block Diagram"...
- Page 324 P R E L I M I N A R Y FN091065, R VS5 N VS6 N UMBER EVISION ERVICE ANUAL Section 5-3 Front End Unit (cont’d) Figure 5-3 System Block Diagram showing Location of Front End Section 5-3 - Front End Unit...
- Page 325 P R E L I M I N A R Y FN091065, R VS5 N VS6 N UMBER EVISION ERVICE ANUAL Section 5-3 Front End Unit (cont’d) Figure 5-4 Front End - Block Diagram Chapter 5 - Components and Function (Theory)
- Page 326 P R E L I M I N A R Y FN091065, R VS5 N VS6 N UMBER EVISION ERVICE ANUAL 5-3-2 Front End Unit - Location in the System The Front End unit is located inside the cabinet cage assembly - see Figure 5-5 "Cabinet Cage Assembly"...
- Page 327 P R E L I M I N A R Y FN091065, R VS5 N VS6 N UMBER EVISION ERVICE ANUAL 5-3-2 Front End Unit - Location in the System (cont’d) ECG Cable PIB-PSB Flex RFI_AM Board TR32 Boards (located below the PIB) Figure 5-7 Cabinet Cage Assembly showing Position of Boards (PSB, PIB, RFI_AM and TR3) Chapter 5 - Components and Function (Theory)
- Page 328 P R E L I M I N A R Y FN091065, R VS5 N VS6 N UMBER EVISION ERVICE ANUAL 5-3-3 RFI_AM Board The RFI_AM Board combines the following functionalities: • Front End Control • Radio Frequency & Tissue Processing •...
- Page 329 P R E L I M I N A R Y FN091065, R VS5 N VS6 N UMBER EVISION ERVICE ANUAL 5-3-3 RFI_AM Board (cont’d) 5-3-3-4 FPGA Download The FPGAs contain no configuration upon power-ON; FGPA Download proceeds as follows: 1.) The actual FPGA contents (bit-streams) are written into DSP memory from the Host.
- Page 330 P R E L I M I N A R Y FN091065, R VS5 N VS6 N UMBER EVISION ERVICE ANUAL 5-3-3 RFI_AM Board (cont’d) 5-3-3-6 RFI_AM Board Connectors P5 to PIB P7 to PIB P14 to Power Supply PCI Flex to RFI J1 to TR32 Boards J2 to TR32 Boards Figure 5-9 RFI_AM Board Connector Locations...
- Page 331 P R E L I M I N A R Y FN091065, R VS5 N VS6 N UMBER EVISION ERVICE ANUAL 5-3-3 RFI_AM Board (cont’d) Table 5-3 RFI_AM Board - Input DC Voltages Input Description Connector - PIN# Connected From +3.3 V DC voltage from PS P14 1-4...
- Page 332 P R E L I M I N A R Y FN091065, R VS5 N VS6 N UMBER EVISION ERVICE ANUAL 5-3-4 TR32 Boards (Transmitter/Receiver) 5-3-4-1 General Description The TR32 has 64 receive channels and is made up of two identical TR32 Boards: TR32A and TR32B (see Figure 5-10).
- Page 333 P R E L I M I N A R Y FN091065, R VS5 N VS6 N UMBER EVISION ERVICE ANUAL 5-3-4 TR32 Boards (Transmitter/Receiver) (cont’d) Figure 5-12 Connectors on TR32 Board - Bottom View Table 5-4 TR32 Board Connectors Connector # Description To RFI Board...
- Page 334 P R E L I M I N A R Y FN091065, R VS5 N VS6 N UMBER EVISION ERVICE ANUAL 5-3-4 TR32 Boards (Transmitter/Receiver) (cont’d) Each TR32 Board has 32 channels and includes a 32-channel Digital Beam Former (consisting of one FOC32 ASIC).
- Page 335 P R E L I M I N A R Y FN091065, R VS5 N VS6 N UMBER EVISION ERVICE ANUAL 5-3-5 Probe Select Board (PSB) The Probe Select Board (PSB) enables acquisition and processing of signals from and to probes connected to the front panel.
- Page 336 P R E L I M I N A R Y FN091065, R VS5 N VS6 N UMBER EVISION ERVICE ANUAL 5-3-5 Probe Select Board (PSB) (cont’d) To PIB via Flex Connector Figure 5-16 Probe Select Board - Bottom View Table 5-6 PSB Connectors Connector # Description...
- Page 337 P R E L I M I N A R Y FN091065, R VS5 N VS6 N UMBER EVISION ERVICE ANUAL 5-3-6 Probe Interface Board (PIB) The Probe Interface Board (PIB) interconnects the following boards: • Interface between the RFI_AM and PSB •...
- Page 338 P R E L I M I N A R Y FN091065, R VS5 N VS6 N UMBER EVISION ERVICE ANUAL 5-3-6 Probe Interface Board (PIB) (cont’d) Figure 5-18 Probe Interface Board - Connectors Table 5-8 PIB Connectors Connector # Description To PSB via Flex Not used...
- Page 339 P R E L I M I N A R Y FN091065, R VS5 N VS6 N UMBER EVISION ERVICE ANUAL 5-3-6 Probe Interface Board (PIB) (cont’d) Table 5-9 PIB Input DC Voltages Input Description Connector - PIN# Connected From 12 V DC voltage, distributed via RFI Board J5 -16, 17, 18, 19, 20, 21...
- Page 340 Back End Processor 5-4-1 Introduction The Back End Processor (BEP) supports the operation of the Vivid S5 N or Vivid S6 N ultrasound unit and is the main controller for the system. A block diagram of the BEP is provided in Figure 5-20 "Vivid S5 N or Vivid S6 N Back End Processor -...
- Page 341 P R E L I M I N A R Y FN091065, R VS5 N VS6 N UMBER EVISION ERVICE ANUAL Section 5-4 Back End Processor (cont’d) Figure 5-20 Vivid S5 N or Vivid S6 N Back End Processor - Block Diagram Chapter 5 - Components and Function (Theory) 5-23...
- Page 342 P R E L I M I N A R Y FN091065, R VS5 N VS6 N UMBER EVISION ERVICE ANUAL Section 5-4 Back End Processor (cont’d) For reference, a list of abbreviations used in this section is provided in Table 5-10 "Abbreviations and Definitions"...
- Page 343 P R E L I M I N A R Y FN091065, R VS5 N VS6 N UMBER EVISION ERVICE ANUAL 5-4-3 ETX Base Board 5-4-3-1 Overview of ETX Base Board Functions The ETX Base Board connects all the peripheral modules to the ETX single board computer. The CPU (see 5-4-2 "ETX SBC Central Processing Unit (CPU)"...
- Page 344 Hard Disk The Hard Disk is the main storage device of the Vivid S5 N or Vivid S6 N ultrasound unit. The Hard Disk, which is controlled by the CPU via signals from the IDE Bus, is partitioned into four drives, each of which is designated for different operations, as follows: •...
- Page 345 P R E L I M I N A R Y FN091065, R VS5 N VS6 N UMBER EVISION ERVICE ANUAL 5-4-4 Hard Disk (cont’d) • E: Drive: Archiving of all images and reports. The partition size is normally 35 GB but this depends upon the size of the hard disk.
- Page 346 P R E L I M I N A R Y FN091065, R VS5 N VS6 N UMBER EVISION ERVICE ANUAL 5-4-8 Back End Processor - Location of Components From DC-DC Power Supply To Fan Board PCI Cable to RFI ETX SBC CPU Internal Battery Control, Status, and Power...
- Page 347 P R E L I M I N A R Y FN091065, R VS5 N VS6 N UMBER EVISION ERVICE ANUAL 5-4-8 Back End Processor - Location of Components (cont’d) 5-4-8-1 BEP Connectors Figure 5-24 Connectors on the BEP Table 5-11 BEP Connectors Connector # Description EXT DC INPUT...
- Page 348 P R E L I M I N A R Y FN091065, R VS5 N VS6 N UMBER EVISION ERVICE ANUAL 5-4-8 Back End Processor - Location of Components (cont’d) Table 5-12 BEP Input DC Voltages Input Description Connector - PIN# Connected From EXT_DC 20 V DC from PS...
- Page 349 P R E L I M I N A R Y FN091065, R VS5 N VS6 N UMBER EVISION ERVICE ANUAL Section 5-5 Internal and External Input/Output (I/O) The Distribution Interface Board (DIB) connects between the different system sections and also provides the following functionality: •...
- Page 350 P R E L I M I N A R Y FN091065, R VS5 N VS6 N UMBER EVISION ERVICE ANUAL Section 5-5 Internal and External Input/Output (I/O) (cont’d) 2 x Isolated AC Outlets LAN RJ45 2 x USB Circuit Breaker (for connection of peripherals prior to regular system use)
- Page 351 P R E L I M I N A R Y FN091065, R VS5 N VS6 N UMBER EVISION ERVICE ANUAL Section 5-5 Internal and External Input/Output (I/O) (cont’d) The DIB has the following internal interfaces: • Two PS/2 channels for A/N K/B and Trackball. •...
- Page 352 P R E L I M I N A R Y FN091065, R VS5 N VS6 N UMBER EVISION ERVICE ANUAL 5-5-1 DIB - Interconnections Controller Burning Connector J4 - Network RJ45 J16 2x USB USB Connectors (see below) J12 Audio J7 - Power from AC Box J17 - DVI + VGA to Extension Monitor...
- Page 353 P R E L I M I N A R Y FN091065, R VS5 N VS6 N UMBER EVISION ERVICE ANUAL 5-5-1 DIB - Interconnections (cont’d) J22 USB from BEP J2 - BEP - DIB Cable Connector J21 - LAN from BEP Figure 5-28 DIB - Bottom View Table 5-13 DIB Connectors Connector #...
- Page 354 P R E L I M I N A R Y FN091065, R VS5 N VS6 N UMBER EVISION ERVICE ANUAL 5-5-1 DIB - Interconnections (cont’d) Table 5-14 DIB- Input DC Voltages Input Description Connector - PIN# Connected To/ From 5 V_BE DC voltage distributed via BEP J2-1, 3, 26, 56...
- Page 355 P R E L I M I N A R Y FN091065, R VS5 N VS6 N UMBER EVISION ERVICE ANUAL Table 5-15 DIB Power Connector - J7 Pin Number Pinout 5V DC 5V DC 12V DC 20V DC Not in use Not in use Not in use PWR CONT...
- Page 356 • DC/DC Power Supply Unit - located inside the cabinet cage assembly, provides the Vivid S5 N or Vivid S6 N system with both Low Voltage and High Voltage power, and also enables recharging of the battery.
- Page 357 P R E L I M I N A R Y FN091065, R VS5 N VS6 N UMBER EVISION ERVICE ANUAL 5-6-3 AC Distribution Panel The distribution of isolated local AC power is allocated in the peripherals section, and divided as follows: •...
- Page 358 P R E L I M I N A R Y FN091065, R VS5 N VS6 N UMBER EVISION ERVICE ANUAL 5-6-3 AC Distribution Panel (cont’d) Table 5-18 AC Distribution Box - J6 Connector Pin Number Pinout 5V DC 5V DC 12V DC 12V DC 20V DC...
- Page 359 P R E L I M I N A R Y FN091065, R VS5 N VS6 N UMBER EVISION ERVICE ANUAL System Ground Equalization CB1 System Circuit Isolated AC Breakers Output AC Input to Isolated DC System Output Side View 110 V or 220 VAC Power Jumper...
- Page 360 ERVICE ANUAL 5-6-4 Power Supply Unit Components As shown in Figure 5-33 "Vivid S5 N or Vivid S6 N Power Supply Unit Components - Block Diagram" on page 5-42, the Power Supply Unit comprises the following components: • Rechargeable Battery •...
- Page 361 NOTE: The battery is designed to be replaced every 2 years. The battery is designed to work with Vivid S5 N or Vivid S6 N systems only. Only use the CAUTION batteries authorized by GE.
- Page 362 Do not use a damaged battery. Do not solder a battery. Do not connect the battery to an electrical outlet. If the Vivid S5 N or Vivid S6 N portable ultrasound system is not being used for periods of one CAUTION month or longer, the battery should be removed during lengthy non-use period.
- Page 363 P R E L I M I N A R Y FN091065, R VS5 N VS6 N UMBER EVISION ERVICE ANUAL Section 5-7 Top Console with Monitor and Operator Panel 5-7-1 Keyboard and Operator Panel Figure 5-35 "Keyboard and Operator Panel Layout" on page 5-45 illustrates the layout of the Vivid™...
- Page 364 The Vivid™ S5 N and Vivid™ S6 N alphanumeric keyboard, with a key arrangement similar to that of a laptop keyboard, is based on the global GE International standard keyboard requirements. The alphanumeric keyboard has a PS/2 interface and supports all standard alpha-numeric functionality, such as, auto-repeat, standard ASCII output codes, etc.
- Page 365 5-7-2-6 Trackball The Vivid S5 N or Vivid S6 N operator panel has a 1.5” trackball centrally located above the hand-rest area to provide easy operation. The trackball has a PS/2 interface and supports a variety of basic PC operations and specific ultrasound controls.
- Page 366 5-7-2-10 Keyboard ID The keyboard PCB contains an EEPROM which stores a variety of information about the keyboard such as, GE part number, manufacturing date, and revision # of the PCB hardware. The EEPROM size is 1KB. 5-7-2-11 Keyboard Connectors USB Input Control &...
- Page 367 5-7-2-13 Display Unit The display monitor is a 15" (Vivid S5 N) or 17" inch (Vivid S6 N) LCD. In order to optimize the display settings, a light-sensing device located on the keyboard is used for measuring the ambient light. This data is processed by the main CPU which adapts the display setting, accordingly.
- Page 368 P R E L I M I N A R Y FN091065, R VS5 N VS6 N UMBER EVISION ERVICE ANUAL Section 5-8 ECG Module 5-8-1 Overview The Vivid™ S5 N and Vivid™ S6 N ECG Patient I/O module is designed to enable acquisition of the following signals: ECG, and external ECG.
- Page 369 The ECG Bandwidth is 0.05 to 150Hz. 5-8-3 Isolation The ECG signals are isolated from the Vivid S5 N or Vivid S6 N system to comply with IEC601-1 type CF device classification. All leakage and auxiliary currents apply the values listed in Table 5-20 "Leakage and Auxiliary Current Values"...
- Page 370 Black & White Digital Printer The B&W Digital Printer receives image data and the print command via the USB port which is controlled by the keys Print or Alt+Print on the Vivid S5 N or Vivid S6 N operator panel. Digital...
- Page 371 P R E L I M I N A R Y FN091065, R VS5 N VS6 N UMBER EVISION ERVICE ANUAL 5-9-1 Introduction (cont’d) 5-9-1-4 Wireless Network Adapter The Vivid™ S5 N and Vivid™ S6 N supports a unique type of Wireless Network Adapter. For details regarding type and installation, refer to “Wireless Network Adaptor”...
- Page 372 P R E L I M I N A R Y FN091065, R VS5 N VS6 N UMBER EVISION ERVICE ANUAL Section 5-10 Cooling System 5-10-1 General Information The Vivid 5S N/6S N cooling system comprises two main parts: • A single, 80x80 mm freely-running FAN located on the left side of the AC Distribution Box.
- Page 373 5-11-1 Introduction The Service Platform contains a set of software modules that are common to many of GE’s ultrasound and cardiology systems. This Web-enabled technology provides linkage to e-Services, e-Commerce, and the iCenter, making GE’s scanners more e-enabled than ever.
- Page 374 Use the OnLine Center. External Service Access is protected with a password. GE Service Requires knowledge of a password. Every access request, whether successful or not, will be logged into a service access log that is viewable to authorized users.
- Page 375 Vivid S5 N or Vivid S6 N system monitor, then manually adjust the External Monitor (using its own controls), as required. Overall low image quality or “shades” visible on the Vivid S5 N or Vivid S6 N LCD Display may be the result of improper monitor calibration. Therefore, adjustments may be made to the Brightness, Contrast and/or Blue Tint, as required.
- Page 376 P R E L I M I N A R Y FN091065, R VS5 N VS6 N UMBER EVISION ERVICE ANUAL 6-1-2 LCD Display Adjustments and Calibration (cont’d) Figure 6-1 LCD Display Calibration Screen 6-1-2-1 Contrast Adjustment Procedure • To adjust the Contrast: Rotate the second rotary knob from left on the soft menus keys, as required.
- Page 377 P R E L I M I N A R Y FN091065, R VS5 N VS6 N UMBER EVISION ERVICE ANUAL 6-1-2-2 Brightness Adjustment Procedure • To adjust the Brightness: Rotate the left-most rotary knob on the soft menus keys, as required. Counter-clockwise rotation will decrease the brightness Clockwise rotation will increase the brightness.
- Page 378 P R E L I M I N A R Y FN091065, R VS5 N VS6 N UMBER EVISION ERVICE ANUAL 6-1-2-4 Blue Tint Adjustment Procedure • To adjust the Blue Tint: Rotate the second right rotary knob on the soft menus keys, as required. Counterclockwise rotation will decrease the blue tint level.
- Page 379 Systems with BT11 installed software have a Blue Tint “2” option that enables blue tint enhancement. This option can be switched off if preferred by the user. NOTE: This option applies to the following LCD monitor installations: System: Vivid S5 N Monitor: NEC 15-2 System: Vivid S6 N...
- Page 380 P R E L I M I N A R Y FN091065, R VS5 N VS6 N UMBER EVISION ERVICE ANUAL 6-1-2-5-1 Adjusting the Blue Tint 1.) On the console, press the LCD button and then point the cursor to the Test Pattern soft-key on the screen (Figure 6-7) and click to display the test pattern - see...
- Page 381 P R E L I M I N A R Y FN091065, R VS5 N VS6 N UMBER EVISION ERVICE ANUAL 6-1-2-5-2 Turning Off the Blue Tint “2” Option 1.) Press Config > Service. The Service Screen opens - see Figure 6-9.
- Page 382 P R E L I M I N A R Y FN091065, R VS5 N VS6 N UMBER EVISION ERVICE ANUAL 6-1-2-7 Display Type Setup The display type should be set each time one of the following procedures is performed: •...
- Page 383 P R E L I M I N A R Y FN091065, R VS5 N VS6 N UMBER EVISION ERVICE ANUAL 6-1-3 Keyboard Adjustments 6-1-3-1 Backlighting Intensity Adjustment Procedure To make adjustments to the Keyboard Backlighting intensity, follow the procedure described in 3-6-2-3 "Adjust Keyboard Backlight Intensity"...
- Page 384 P R E L I M I N A R Y FN091065, R VS5 N VS6 N UMBER EVISION ERVICE ANUAL This page was intentionally left blank. 6-10...
- Page 385 P R E L I M I N A R Y FN091065, R VS5 N VS6 N UMBER EVISION ERVICE ANUAL Chapter 7 Diagnostics/Troubleshooting Section 7-1 Overview 7-1-1 Purpose of Chapter This chapter describes how to set up and run diagnostic tools to locate system problems and failures. The Vivid™...
- Page 386 P R E L I M I N A R Y FN091065, R VS5 N VS6 N UMBER EVISION ERVICE ANUAL Section 7-2 Diagnostics 7-2-1 Diagnostic Tools The diagnostic tools are provided for checking the system which includes the power supply, temperature, fan operation, board functions, Back-end signal processing performance, keyboard operation, peripherals, and so on.
- Page 387 P R E L I M I N A R Y FN091065, R VS5 N VS6 N UMBER EVISION ERVICE ANUAL 7-2-3 Accessing the Diagnostic Test Window The diagnostic tools are accessed from 2D-Mode by simultaneously pressing <ALT+Config> on the alphanumeric keyboard.
- Page 388 You are able to select and perform the • Green: All recommended tests for these components Vivid S5 N or Vivid S6 N diagnostic tests by have been completed and no problems were trackballing to the required test (listed in identified.
- Page 389 P R E L I M I N A R Y FN091065, R VS5 N VS6 N UMBER EVISION ERVICE ANUAL 7-2-3-1 View Log From the Diagnostics Test Window (Figure 7-1) the View Log button provides access to the test result information described below.This is shown in the View Log dialog box (see example in Figure 7-2 below) which is displayed in the upper right portion of the screen (over the Data Flow Map...
- Page 390 P R E L I M I N A R Y FN091065, R VS5 N VS6 N UMBER EVISION ERVICE ANUAL Table 7-3 Vivid™ S5 N and Vivid™ S6 N Diagnostics Test Window - View Log (cont’d) 2 of 2 Option Description Comments...
- Page 391 P R E L I M I N A R Y FN091065, R VS5 N VS6 N UMBER EVISION ERVICE ANUAL Figure 7-2 View Log Dialog Box Figure 7-2 "View Log Dialog Box" on page 7-7 above, the selected report (Test signal amplitude, first harmonic) is displayed in the Report window.
- Page 392 P R E L I M I N A R Y FN091065, R VS5 N VS6 N UMBER EVISION ERVICE ANUAL Figure 7-3 ADC Test - Viewing Report (Test Signal Amplitude 2nd Harmonic) NOTE: Left and right arrows provided in the View Report window enable scrolling between the different channels.
- Page 393 P R E L I M I N A R Y FN091065, R VS5 N VS6 N UMBER EVISION ERVICE ANUAL corresponding results are shown in the Report window below, as shown in Figure 7-40. Figure 7-4 View Test Log - ACW Matrix Test - Signal RMS 3.) Use the tools provided to scroll through the channels and view the results, as previously described.
- Page 394 Perform calibration, as described in “DC Offset Calibration” on page 7-27 • If no problems were identified but the problem persists, contact your local GE HEALTHCARE field engineer for assistance. • If errors were identified and the results were not marginal, verify that all system cables and...
- Page 395 P R E L I M I N A R Y FN091065, R VS5 N VS6 N UMBER EVISION ERVICE ANUAL 7-2-4 Diagnostic Test Window Menu Options The Diagnostic Test menu includes the options described below. 7-2-4-1 Full System Test NOTE: The Full System Test requires approximately 10 minutes for completion.
- Page 396 P R E L I M I N A R Y FN091065, R VS5 N VS6 N UMBER EVISION ERVICE ANUAL 7-2-4-2 Front End Tests NOTE: The Front End Tests may be performed in any order. However, due to the functional dependencies between each of the Front End boards, it is recommended to perform the tests on the boards in the following order (as described in the Section 7-4 "Performing Front End (FE) Diagnostics"...
- Page 397 P R E L I M I N A R Y FN091065, R VS5 N VS6 N UMBER EVISION ERVICE ANUAL 7-2-4-2-3 TR32 Tests • Beamformer Tests TR32 BF Digital Test This is an internal test of the Beamformers. Each Beamformer generates an internal test pattern (first on the TR32A board and then on the TR32B board).
- Page 398 P R E L I M I N A R Y FN091065, R VS5 N VS6 N UMBER EVISION ERVICE ANUAL 7-2-4-2-4 PIB Tests • ACW Test ACW IQ Symmetry Test The ACW (analog CW test) is performed when CW problems are suspected. Checks the symmetry of I and Q signals.
- Page 399 P R E L I M I N A R Y FN091065, R VS5 N VS6 N UMBER EVISION ERVICE ANUAL • Pencil Test Pencil Rx Test When performing the Pencil Rx Test, no probes or jig are connected to the system. This test is performed to check the receive functions.
- Page 400 P R E L I M I N A R Y FN091065, R VS5 N VS6 N UMBER EVISION ERVICE ANUAL 7-2-4-3-6 Battery Parameters Test The Battery Parameters Test is used to check the battery status with regard to the following: •...
- Page 401 P R E L I M I N A R Y FN091065, R VS5 N VS6 N UMBER EVISION ERVICE ANUAL 7-2-4-4-1 PC Doctor The PC Doctor Tests are divided into two main groups: Automatic and Interactive. The automatic tests do not require user intervention.
- Page 402 P R E L I M I N A R Y FN091065, R VS5 N VS6 N UMBER EVISION ERVICE ANUAL • CPU MMX Shift: Tests the MXX commands PSLL and PSRL. If errors are detected, the failed commands are listed. •...
- Page 403 P R E L I M I N A R Y FN091065, R VS5 N VS6 N UMBER EVISION ERVICE ANUAL • Video Data Transfer: Tests the graphics acceleration part of the video controller. This test fills the screen with black and white concentric squares, and rectangles of various sizes and colors.
- Page 404 P R E L I M I N A R Y FN091065, R VS5 N VS6 N UMBER EVISION ERVICE ANUAL • Interactive Audio Test The Audio Test is performed to check for proper operation of the audio system; the following selections are available: Left Channel, Right Channel, Both Channels, and MIDI.
- Page 405 When performing the automatic Full System Diagnostic tests, it is strongly recommended to start with the Full System Test (FE and BEP) - especially if the Vivid S5 N or Vivid S6 N system shows signs of an intermittent problem. As described in this section, the testing sequence can be paused and restarted at any stage, providing a quick and easy method of reviewing any detected faults.
- Page 406 P R E L I M I N A R Y FN091065, R VS5 N VS6 N UMBER EVISION ERVICE ANUAL 7-3-1 Accessing the Full System Diagnostic Options • In 2D-Mode, press <ALT +Config> on the alphanumeric keyboard. The Diagnostic Test window is displayed, as shown in Figure 7-1 "Diagnostic Test Window"...
- Page 407 P R E L I M I N A R Y FN091065, R VS5 N VS6 N UMBER EVISION ERVICE ANUAL 7-3-1 Accessing the Full System Diagnostic Options (cont’d) 3.) Under the Special Instructions area, activate the Loops checkbox and select the required number of Loops from the combo box. 4.) Adjacent to On Fail, select either Stop or Continue, as required.
- Page 408 P R E L I M I N A R Y FN091065, R VS5 N VS6 N UMBER EVISION ERVICE ANUAL 7-3-1 Accessing the Full System Diagnostic Options (cont’d) Figure 7-7 View Test Log - Full System Test (BEP and FE) 7-24 Section 7-3 - Performing Full System Diagnostics...
- Page 409 P R E L I M I N A R Y FN091065, R VS5 N VS6 N UMBER EVISION ERVICE ANUAL 7-3-1 Accessing the Full System Diagnostic Options (cont’d) 8.) If necessary, use the scroll bars and/or arrows to scroll through the list of Test results. 9) After reviewing the test results, proceed as follows: If no problems were identified, it is recommended to re-boot the system (this is obligatory when prompted).
- Page 410 P R E L I M I N A R Y FN091065, R VS5 N VS6 N UMBER EVISION ERVICE ANUAL Section 7-4 Performing Front End (FE) Diagnostics NOTE: When performing Front End Diagnostic tests, it is strongly recommended to start with the Full System Test (FE and BEP) especially if the system shows signs of an intermittent problem.
- Page 411 P R E L I M I N A R Y FN091065, R VS5 N VS6 N UMBER EVISION ERVICE ANUAL 7-4-1 Accessing the Front End Diagnostic Options • In 2D-Mode, press <ALT +Config> on the alphanumeric keyboard. The Diagnostic Test window is displayed, as shown in Figure 7-1.
- Page 412 P R E L I M I N A R Y FN091065, R VS5 N VS6 N UMBER EVISION ERVICE ANUAL 7-4-2 Calibration Tests (cont’d) 2.) As indicated in the Special Instructions area, disconnect any probes currently connected to the system and make sure that nothing is touching the probe connectors.
- Page 413 If no problems were identified, it is recommended to re-boot the system (this is obligatory when prompted). • If no problems were identified but the problem persists, contact your local GE HEALTHCARE field engineer for assistance. • If errors were identified but the results were very close to the upper or lower limits, perform calibration, as described in “DC Offset Calibration”...
- Page 414 P R E L I M I N A R Y FN091065, R VS5 N VS6 N UMBER EVISION ERVICE ANUAL 11.)Trackball to the Exit button and press Set to close the View Test Log dialog box. 12.)Press the <Esc> button on the keyboard to close the Diagnostic Test Window. 7-4-2-2 DC Offset Verification NOTE:...
- Page 415 P R E L I M I N A R Y FN091065, R VS5 N VS6 N UMBER EVISION ERVICE ANUAL 7-4-2-2 DC Offset Verification (cont’d) 5.) Trackball to the Start button and press Set. The CD Offset Verification Test commences. While the test proceeds, the name of the test currently in progress (CD Offset Verification) is displayed in the Execute field and the current Loop # and specific test are shown below.
- Page 416 If no problems were identified, it is recommended to re-boot the system (this is obligatory when prompted). • If no problems were identified but the problem persists, contact your local GE HEALTHCARE field engineer for assistance. • If errors were identified but the results were marginal, perform calibration, as described in “DC Offset Calibration”...
- Page 417 P R E L I M I N A R Y FN091065, R VS5 N VS6 N UMBER EVISION ERVICE ANUAL 7-4-3 Radio Frequency Interface (RFI) Diagnostic Tests 7-4-3-1 Accessing the RFI Diagnostic Test Options • Access the Diagnostic Test window, as described in the 7-4-1 "Accessing the Front End Diagnostic Options"...
- Page 418 P R E L I M I N A R Y FN091065, R VS5 N VS6 N UMBER EVISION ERVICE ANUAL 7-4-3-2 Full RFI Test (cont’d) 4.) Adjacent to On Fail, select either Stop or Continue, as required. Stopping on failure enables you to review a failed test, the moment it fails.
- Page 419 If no problems were identified, it is recommended to re-boot the system (this is obligatory when prompted). • If no problems were identified but the problem persists, contact your local GE HEALTHCARE field engineer for assistance. • If errors were identified but the results were marginal, perform calibration, as described in “DC Offset Calibration”...
- Page 420 P R E L I M I N A R Y FN091065, R VS5 N VS6 N UMBER EVISION ERVICE ANUAL 7-4-3-3 RFI FE Cache Test (cont’d) Figure 7-14 RFI FE Cache Test 2.) As indicated in the Special Instructions area, disconnect any probes currently connected to the system and make sure that nothing is touching the probe connectors.
- Page 421 If no problems were identified, it is recommended to re-boot the system (this is obligatory when prompted). • If no problems were identified but the problem persists, contact your local GE HEALTHCARE field engineer for assistance. • If errors were identified but the results were marginal, perform calibration, as described in “DC Offset Calibration”...
- Page 422 If the problem persists, this indicates that either the specific board you tested is faulty or that another board that supports the operation of that board is faulty. Contact your local GE HEALTHCARE field engineer for assistance. 11.)Trackball to the Exit button and press Set to close the View Test Log dialog box.
- Page 423 P R E L I M I N A R Y FN091065, R VS5 N VS6 N UMBER EVISION ERVICE ANUAL 7-4-3-4 RFI Analog Circuits Test (cont’d) 3.) Under the Special Instructions area, activate the Loops checkbox and select the required number of Loops from the combo box. 4.) Adjacent to On Fail, select either Stop or Continue, as required.
- Page 424 If no problems were identified, it is recommended to re-boot the system (this is obligatory when prompted). • If no problems were identified but the problem persists, contact your local GE HEALTHCARE field engineer for assistance. • If errors were identified but the results were marginal, perform calibration, as described in “DC Offset Calibration”...
- Page 425 If the problem persists, this indicates that either the specific board you tested is faulty or that another board that supports the operation of that board is faulty. Contact your local GE HEALTHCARE field engineer for assistance. 11.)Trackball to the Exit button and press Set to close the View Test Log dialog box.
- Page 426 P R E L I M I N A R Y FN091065, R VS5 N VS6 N UMBER EVISION ERVICE ANUAL 7-4-3-5 RFI Demodulator Short Test (cont’d) 4.) Adjacent to On Fail, select either Stop or Continue, as required. Stopping on failure enables you to review a failed test, the moment it fails.
- Page 427 • If no problems were identified, it is recommended to re-boot the system (this is obligatory when prompted). If no problems were identified but the problem persists, contact your local GE HEALTHCARE field engineer for assistance. • If errors were identified but the results were marginal, perform calibration, as described in “DC Offset Calibration”...
- Page 428 P R E L I M I N A R Y FN091065, R VS5 N VS6 N UMBER EVISION ERVICE ANUAL 7-4-3-6 RFI Audio Test NOTE: For a description of this test, refer to the information provided in • "RFI Audio Test" on page 7-12.
- Page 429 P R E L I M I N A R Y FN091065, R VS5 N VS6 N UMBER EVISION ERVICE ANUAL 7-4-3-6 RFI Audio Test (cont’d) The RFI Audio Test commences. While the test proceeds, the name of the test currently in progress is displayed in the Execute field and the current Loop # and specific test are shown below.
- Page 430 If no problems were identified, it is recommended to re-boot the system (this is obligatory when prompted). • If no problems were identified but the problem persists, contact your local GE HEALTHCARE field engineer for assistance. • If errors were identified but the results were marginal, perform calibration, as described in “DC Offset Calibration”...
- Page 431 P R E L I M I N A R Y FN091065, R VS5 N VS6 N UMBER EVISION ERVICE ANUAL 7-4-4 TR 32 Diagnostic Tests NOTE: The TR32 Diagnostic Tests are used to perform functional testing of both the TR32A and TR32 boards. 7-4-4-1 Accessing the TR32 Diagnostic Test Options •...
- Page 432 P R E L I M I N A R Y FN091065, R VS5 N VS6 N UMBER EVISION ERVICE ANUAL 7-4-4 TR 32 Diagnostic Tests (cont’d) 3.) Under the Special Instructions area, activate the Loops checkbox and select the required number of Loops from the combo box. 4.) Adjacent to On Fail, select either Stop or Continue, as required.
- Page 433 If no problems were identified, it is recommended to re-boot the system (this is obligatory when prompted). • If no problems were identified but the problem persists, contact your local GE HEALTHCARE field engineer for assistance. • If errors were identified but the results were marginal, perform calibration, as described in “DC Offset Calibration”...
- Page 434 P R E L I M I N A R Y FN091065, R VS5 N VS6 N UMBER EVISION ERVICE ANUAL 7-4-4 TR 32 Diagnostic Tests (cont’d) 7-4-4-2-2 System BF Digital Test NOTE: For a description of this test, refer to the information in “System BF Digital Test”...
- Page 435 P R E L I M I N A R Y FN091065, R VS5 N VS6 N UMBER EVISION ERVICE ANUAL 7-4-4 TR 32 Diagnostic Tests (cont’d) The System BF Digital Test commences. While the test proceeds, the name of the test currently in progress (System BF Digital Test) is displayed in the Execute field and the current Loop # and specific test are shown below.
- Page 436 If no problems were identified, it is recommended to re-boot the system (this is obligatory when prompted). • If no problems were identified but the problem persists, contact your local GE HEALTHCARE field engineer for assistance. • If errors were identified but the results were marginal, perform calibration, as described in “DC Offset Calibration”...
- Page 437 P R E L I M I N A R Y FN091065, R VS5 N VS6 N UMBER EVISION ERVICE ANUAL 7-4-4 TR 32 Diagnostic Tests (cont’d) 7-4-4-2-3 ADC Test NOTE: For a description of this test, refer to the information in - "ADC Test"...
- Page 438 P R E L I M I N A R Y FN091065, R VS5 N VS6 N UMBER EVISION ERVICE ANUAL 7-4-4 TR 32 Diagnostic Tests (cont’d) The ADC Test commences. While the test proceeds, the name of the test currently in progress (ADC Test) is displayed in the Execute field and the current Loop # and specific test are shown below.
- Page 439 P R E L I M I N A R Y FN091065, R VS5 N VS6 N UMBER EVISION ERVICE ANUAL 7-4-4 TR 32 Diagnostic Tests (cont’d) NOTE: The ADC test has four test reports which are listed in Reports on the right. By default, the First Harmonic report is displayed in the Reports window below (Figure 7-29 "View Test Log - First Harmonic Report"...
- Page 440 P R E L I M I N A R Y FN091065, R VS5 N VS6 N UMBER EVISION ERVICE ANUAL 7-4-4 TR 32 Diagnostic Tests (cont’d) Figure 7-31 View Test Log - Third Harmonic 13.)Use the tools provided to scroll through the channels and view the results, as previously described. 14) When done, trackball to the Close button and press Set to close the View Report window.
- Page 441 If no problems were identified, it is recommended to re-boot the system (this is obligatory when prompted). • If no problems were identified but the problem persists, contact your local GE HEALTHCARE field engineer for assistance. • If errors were identified but the results were marginal, perform calibration, as described in “DC Offset Calibration”...
- Page 442 P R E L I M I N A R Y FN091065, R VS5 N VS6 N UMBER EVISION ERVICE ANUAL 7-4-4 TR 32 Diagnostic Tests (cont’d) 7-4-4-3 Receive (RX) Tests 7-4-4-3-1 RX Test NOTE: For a description of this test, refer to the information in “RX Test”...
- Page 443 P R E L I M I N A R Y FN091065, R VS5 N VS6 N UMBER EVISION ERVICE ANUAL 7-4-4 TR 32 Diagnostic Tests (cont’d) 5.) Trackball to the Start button and press Set. The Rx Test commences. While the test proceeds, the name of the test currently in progress (Rx Test) is displayed in the Execute field and the current Loop # and specific test are shown below.
- Page 444 If no problems were identified, it is recommended to re-boot the system (this is obligatory when prompted). • If no problems were identified but the problem persists, contact your local GE HEALTHCARE field engineer for assistance. 7-60 Section 7-4 - Performing Front End (FE) Diagnostics...
- Page 445 If the problem persists, this indicates that either the specific board you tested is faulty or that another board that supports the operation of that board is faulty. Contact your local GE HEALTHCARE field engineer for assistance. 13.)Trackball to the Exit button and press Set to close the View Test Log dialog box.
- Page 446 P R E L I M I N A R Y FN091065, R VS5 N VS6 N UMBER EVISION ERVICE ANUAL 7-4-5 Probe Interface Board Diagnostic Tests 7-4-5-1 Accessing the Probe Interface Board Diagnostic Test Options • Access the Diagnostic Test window, as described in the 7-4-1 "Accessing the Front End Diagnostic Options"...
- Page 447 P R E L I M I N A R Y FN091065, R VS5 N VS6 N UMBER EVISION ERVICE ANUAL 7-4-6 Probe Select Board Diagnostic Tests 7-4-6-1 Accessing the Probe Select Board Diagnostic Test Options • Access the Diagnostic Test window, as described in the 7-4-1 "Accessing the Front End Diagnostic Options"...
- Page 448 P R E L I M I N A R Y FN091065, R VS5 N VS6 N UMBER EVISION ERVICE ANUAL 7-4-6 Probe Select Board Diagnostic Tests (cont’d) 2.) As indicated in the Special Instructions area, disconnect any probes currently connected to the system and make sure that nothing is touching the probe connectors.
- Page 449 “DC Offset Calibration” on page 7-27. • If no problems were identified but the problem persists, contact your local GE HEALTHCARE field engineer for assistance. • If errors were identified and the results were not marginal, verify that all system cables and...
- Page 450 P R E L I M I N A R Y FN091065, R VS5 N VS6 N UMBER EVISION ERVICE ANUAL 7-4-6 Probe Select Board Diagnostic Tests (cont’d) 7-4-6-2-2 ACW Matrix Test NOTE: For a description of this test, refer to the information in - "ACW Matrix Test"...
- Page 451 P R E L I M I N A R Y FN091065, R VS5 N VS6 N UMBER EVISION ERVICE ANUAL 7-4-6 Probe Select Board Diagnostic Tests (cont’d) The ACW Matrix Test commences. While the test proceeds, the name of the test currently in progress (ACW IQ Symmetry Test) is displayed in the Execute field and the current Loop # and specific test are shown below.
- Page 452 P R E L I M I N A R Y FN091065, R VS5 N VS6 N UMBER EVISION ERVICE ANUAL 7-4-6 Probe Select Board Diagnostic Tests (cont’d) NOTE: The ACW Matrix Test test has three test reports (Signal Frequency, Signal RMS, and Signal SNR) which are listed in the Reports window on the right.
- Page 453 P R E L I M I N A R Y FN091065, R VS5 N VS6 N UMBER EVISION ERVICE ANUAL 7-4-6 Probe Select Board Diagnostic Tests (cont’d) 8) Select the second report (Signal RMS); the report is highlighted in the Reports list, and the corresponding results are shown in the Report window below, as shown in Figure 7-40 "View Test Log - ACW Matrix Test - Signal RMS"...
- Page 454 Perform calibration, as described in “DC Offset Calibration” on page 7-27 • If no problems were identified but the problem persists, contact your local GE HEALTHCARE field engineer for assistance. • If errors were identified and the results were not marginal, verify that all system cables and...
- Page 455 P R E L I M I N A R Y FN091065, R VS5 N VS6 N UMBER EVISION ERVICE ANUAL 7-4-6 Probe Select Board Diagnostic Tests (cont’d) 7-4-6-2-3 ACW Delay Range Test NOTE: For a description of this test, refer to the information in “ACW Delay Range Test”...
- Page 456 P R E L I M I N A R Y FN091065, R VS5 N VS6 N UMBER EVISION ERVICE ANUAL 7-4-6 Probe Select Board Diagnostic Tests (cont’d) 4.) Trackball to the Start button and press Set. The ACW Delay Range Test commences. While the test proceeds, the name of the test currently in progress (ACW IQ Delay Range Test) is displayed in the Execute field and the current Loop # and specific test are shown below.
- Page 457 P R E L I M I N A R Y FN091065, R VS5 N VS6 N UMBER EVISION ERVICE ANUAL 7-4-6 Probe Select Board Diagnostic Tests (cont’d) NOTE: The ACW Delay Range Test test has three test reports (Signal Frequency, Signal RMS, and Signal SNR) which are listed in the Reports window on the right.
- Page 458 7-4-2-1 "DC Offset Calibration" on page 7-27. • If no problems were identified but the problem persists, contact your local GE HEALTHCARE field engineer for assistance. • If errors were identified and the results were not marginal, verify that all system cables and...
- Page 459 P R E L I M I N A R Y FN091065, R VS5 N VS6 N UMBER EVISION ERVICE ANUAL 7-4-6 Probe Select Board Diagnostic Tests (cont’d) 7-4-6-2-4 ACW Pre-Mixer Gain Test NOTE: For a description of this test, refer to the information in - "ACW Pre-Mixer Gain Test"...
- Page 460 P R E L I M I N A R Y FN091065, R VS5 N VS6 N UMBER EVISION ERVICE ANUAL 7-4-6 Probe Select Board Diagnostic Tests (cont’d) 4.) Trackball to the Start button and press Set. The ACW Pre-Mixer Gain Test commences. While the test proceeds, the name of the test currently in progress (ACW Pre-Mixer Gain Test) is displayed in the Execute field and the current Loop # and specific test are shown below.
- Page 461 7-4-2-1 "DC Offset Calibration" on page 7-27. • If no problems were identified but the problem persists, contact your local GE HEALTHCARE field engineer for assistance. • If “Fail” appears in one of the Result columns, the test has failed, even if “Pass” appears in other columns.
- Page 462 P R E L I M I N A R Y FN091065, R VS5 N VS6 N UMBER EVISION ERVICE ANUAL 7-4-6-2-5 ACW BPF Test NOTE: For a description of this test, refer to the information in - "ACW BPF Test" on page 7-14.
- Page 463 P R E L I M I N A R Y FN091065, R VS5 N VS6 N UMBER EVISION ERVICE ANUAL 4.) Trackball to the Start button and press Set. The ACW BPF Test commences. While the test proceeds, the name of the test currently in progress (ACW BPF Test) is displayed in the Execute field and the current Loop # and specific test are shown below.
- Page 464 P R E L I M I N A R Y FN091065, R VS5 N VS6 N UMBER EVISION ERVICE ANUAL 7-4-6 Probe Select Board Diagnostic Tests (cont’d) Figure 7-49 View Test Log - ACW BPF Test - BPF0 NOTE: The ACW BPF Test has four test reports (BPF0, BPF1, BPF2, and BPF3) which are listed in the Reports window on the right.
- Page 465 P R E L I M I N A R Y FN091065, R VS5 N VS6 N UMBER EVISION ERVICE ANUAL 7-4-6 Probe Select Board Diagnostic Tests (cont’d) Figure 7-50 View Test Log - ACW BPF Test - BPF1 9.) Use the tools provided to scroll through the channels and view the results, as previously described. 10) When done, trackball to the Close button and press Set to close the View Report window.
- Page 466 P R E L I M I N A R Y FN091065, R VS5 N VS6 N UMBER EVISION ERVICE ANUAL 7-4-6 Probe Select Board Diagnostic Tests (cont’d) Figure 7-51 View Test Log - ACW BPF Test - BPF2 12.)Use the tools provided to scroll through the channels and view the results, as previously described. 13) When done, trackball to the Close button and press Set to close the View Report window.
- Page 467 “DC Offset Calibration” on page 7-27. • If no problems were identified but the problem persists, contact your local GE HEALTHCARE field engineer for assistance. • If errors were identified and the results were not marginal, verify that all system cables and...
- Page 468 P R E L I M I N A R Y FN091065, R VS5 N VS6 N UMBER EVISION ERVICE ANUAL 7-4-6 Probe Select Board Diagnostic Tests (cont’d) 7-4-6-2-6 ACW HPF Test NOTE: For a description of this test, refer to the information in “ACW HPF Test”...
- Page 469 P R E L I M I N A R Y FN091065, R VS5 N VS6 N UMBER EVISION ERVICE ANUAL 7-4-6 Probe Select Board Diagnostic Tests (cont’d) 4.) Trackball to the Start button and press Set. The ACW HPF Test commences. While the test proceeds, the name of the test currently in progress (ACW HPF Test) is displayed in the Execute field and the current Loop # and specific test are shown below.
- Page 470 “DC Offset Calibration” on page 7-27. • If no problems were identified but the problem persists, contact your local GE HEALTHCARE field engineer for assistance. • If errors were identified and the results were not marginal, verify that all system cables and...
- Page 471 P R E L I M I N A R Y FN091065, R VS5 N VS6 N UMBER EVISION ERVICE ANUAL 7-4-6 Probe Select Board Diagnostic Tests (cont’d) 7-4-6-2-7 Pencil Rx Test NOTE: For a description of this test, refer to the information in - "Pencil Rx Test"...
- Page 472 If no problems were identified, it is recommended to re-boot the system (this is obligatory when prompted). • If no problems were identified but the problem persists, contact your local GE HEALTHCARE 7-88 Section 7-4 - Performing Front End (FE) Diagnostics...
- Page 473 If the problem persists, this indicates that either the specific board you tested is faulty or that another board that supports the operation of that board is faulty. Contact your local GE HEALTHCARE field engineer for assistance. 10.)Trackball to the Exit button and press Set to close the View Test Log dialog box.
- Page 474 P R E L I M I N A R Y FN091065, R VS5 N VS6 N UMBER EVISION ERVICE ANUAL Section 7-5 Monitoring Tests 7-5-1 Accessing the Monitoring Diagnostic Test Options • Access the Diagnostic Test window, as described in the 7-4-1 "Accessing the Front End Diagnostic Options"...
- Page 475 P R E L I M I N A R Y FN091065, R VS5 N VS6 N UMBER EVISION ERVICE ANUAL 7-4-6 Probe Select Board Diagnostic Tests (cont’d) The Full System Monitoring Test commences. While the test proceeds, the name of the test currently in progress (ADC Test) is displayed in the Execute field and the current Loop # and specific test are shown below.
- Page 476 P R E L I M I N A R Y FN091065, R VS5 N VS6 N UMBER EVISION ERVICE ANUAL 7-5-1 Accessing the Monitoring Diagnostic Test Options (cont’d) Figure 7-60 View Test Log - Full System Monitoring Test - Fixed Voltages 9.) Check that the sub-test passed and that result values are within the pre-defined Max and Min limits, as shown in Figure 7-60 "View Test Log - Full System Monitoring Test - Fixed Voltages"...
- Page 477 P R E L I M I N A R Y FN091065, R VS5 N VS6 N UMBER EVISION ERVICE ANUAL 7-5-1 Accessing the Monitoring Diagnostic Test Options (cont’d) Figure 7-61 View Test Log - Full System Monitoring Test - Temperatures 11.)Check that the sub-test passed and that result values are within the pre-defined Max and Min limits, as shown in Figure 7-61 "View Test Log - Full System Monitoring Test - Temperatures"...
- Page 478 P R E L I M I N A R Y FN091065, R VS5 N VS6 N UMBER EVISION ERVICE ANUAL 7-5-1 Accessing the Monitoring Diagnostic Test Options (cont’d) Figure 7-62 View Test Log - Full System Monitoring Test - Fans Speed 13.)Check that the sub-test passed and that result values are within the pre-defined Max and Min limits, as shown in Figure 7-60 "View Test Log - Full System Monitoring Test - Fixed Voltages"...
- Page 479 P R E L I M I N A R Y FN091065, R VS5 N VS6 N UMBER EVISION ERVICE ANUAL 7-5-1 Accessing the Monitoring Diagnostic Test Options (cont’d) Figure 7-63 View Test Log - Full System Monitoring Test - Battery Parameters 15.)Check that the sub-test passed and that result values are within the pre-defined Upper and Lower limits, as shown in Figure 7-63 "View Test Log - Full System Monitoring Test - Battery Parameters"...
- Page 480 If no problems were identified, it is recommended to re-boot the system (this is obligatory when prompted). • If no problems were identified but the problem persists, contact your local GE HEALTHCARE field engineer for assistance. • If errors were identified but the results were marginal, perform calibration, as described in “DC Offset Calibration”...
- Page 481 P R E L I M I N A R Y FN091065, R VS5 N VS6 N UMBER EVISION ERVICE ANUAL 7-5-1 Accessing the Monitoring Diagnostic Test Options (cont’d) 7-5-1-2 Fixed Voltages Test NOTE: For a description of this test, refer to the information in 7-2-4-3-2 "Fixed Voltages Test"...
- Page 482 P R E L I M I N A R Y FN091065, R VS5 N VS6 N UMBER EVISION ERVICE ANUAL 7-5-1 Accessing the Monitoring Diagnostic Test Options (cont’d) • Green: All recommended tests for these components have been completed and no problems were identified.
- Page 483 Accessing the Monitoring Diagnostic Test Options (cont’d) • If no problems were identified but the problem persists, contact your local GE HEALTHCARE field engineer for assistance. • If errors were identified but the results were marginal, perform calibration, as described in “DC Offset Calibration”...
- Page 484 P R E L I M I N A R Y FN091065, R VS5 N VS6 N UMBER EVISION ERVICE ANUAL 7-5-1-3 Temperatures Test NOTE: For a description of this test, refer to the information in 7-2-4-3-3 "Temperatures Test" on page 7-15.
- Page 485 P R E L I M I N A R Y FN091065, R VS5 N VS6 N UMBER EVISION ERVICE ANUAL • Red: Problems were identified in these components during the performance of the test. • Yellow: The tests executed so far on these components have passed, but not all recommended tests have been performed.
- Page 486 If no problems were identified, it is recommended to re-boot the system (this is obligatory when prompted). • If no problems were identified but the problem persists, contact your local GE HEALTHCARE field engineer for assistance. • If errors were identified but the results were marginal, perform calibration, as described in “DC Offset Calibration”...
- Page 487 P R E L I M I N A R Y FN091065, R VS5 N VS6 N UMBER EVISION ERVICE ANUAL 7-5-1 Accessing the Monitoring Diagnostic Test Options (cont’d) 7-5-1-4 Fans Speed Test NOTE: For a description of this test, refer to the information in 7-2-4-3-4 "Fans Speed Test"...
- Page 488 If no problems were identified, it is recommended to re-boot the system (this is obligatory when prompted). • If no problems were identified but the problem persists, contact your local GE HEALTHCARE field engineer for assistance. 7-104 Section 7-5 - Monitoring Tests...
- Page 489 If the problem persists, this indicates that either the specific board you tested is faulty or that another board that supports the operation of this board is faulty. Contact your local GE HEALTHCARE field engineer for assistance. 10.)Trackball to the Exit button and press Set to close the View Test Log dialog box.
- Page 490 P R E L I M I N A R Y FN091065, R VS5 N VS6 N UMBER EVISION ERVICE ANUAL 7-5-1 Accessing the Monitoring Diagnostic Test Options (cont’d) 2.) Under the Special Instructions area, activate the Loops checkbox and select the required number of Loops from the combo box. 3.) Adjacent to On Fail, select either Stop or Continue, as required.
- Page 491 If no problems were identified, it is recommended to re-boot the system (this is obligatory when prompted). • If no problems were identified but the problem persists, contact your local GE HEALTHCARE field engineer for assistance. • If the test fails, repeat the Fan Speed Test.
- Page 492 P R E L I M I N A R Y FN091065, R VS5 N VS6 N UMBER EVISION ERVICE ANUAL 7-5-1 Accessing the Monitoring Diagnostic Test Options (cont’d) 7-5-1-6 Battery Parameters Test NOTE: For a description of this test, refer to the information in “Battery Parameters Test”...
- Page 493 If no problems were identified, it is recommended to re-boot the system (this is obligatory when prompted). • If no problems were identified but the problem persists, contact your local GE HEALTHCARE field engineer for assistance. Chapter 7 - Diagnostics/Troubleshooting...
- Page 494 If the problem persists, this indicates that either the specific board you tested is faulty or that another board that supports the operation of this board is faulty. Contact your local GE HEALTHCARE field engineer for assistance. 10.)Trackball to the Exit button and press Set to close the View Test Log dialog box.
- Page 495 P R E L I M I N A R Y FN091065, R VS5 N VS6 N UMBER EVISION ERVICE ANUAL 7-5-1 Accessing the Monitoring Diagnostic Test Options (cont’d) 3.) Adjacent to On Fail, select either Stop or Continue, as required. Stopping on failure enables you to review a failed test, the moment it fails.
- Page 496 If no problems were identified, it is recommended to re-boot the system (this is obligatory when prompted). • If no problems were identified but the problem persists, contact your local GE HEALTHCARE field engineer for assistance. • If errors were identified but the results were marginal, perform calibration, as described in “DC Offset Calibration”...
- Page 497 P R E L I M I N A R Y FN091065, R VS5 N VS6 N UMBER EVISION ERVICE ANUAL Section 7-6 Performing Back End Diagnostics on the System The Back End Diagnostics Tests enable you to test the functionality of various Back End hardware components.
- Page 498 P R E L I M I N A R Y FN091065, R VS5 N VS6 N UMBER EVISION ERVICE ANUAL 7-6-1 Accessing the Back End Diagnostic Test Options (cont’d) 7-6-1-1 PC Doctor NOTE: For a complete description of all PC Doctor tests, refer to the information in 7-2-4-4-1 "PC Doctor"...
- Page 499 P R E L I M I N A R Y FN091065, R VS5 N VS6 N UMBER EVISION ERVICE ANUAL 7-6-1 Accessing the Back End Diagnostic Test Options (cont’d) Figure 7-77 Full Back End Test w/o Hard Disk Scan 2.) Under the Special Instructions area, activate the Loops checkbox and select the required number of Loops from the combo box.
- Page 500 If no problems were identified, it is recommended to re-boot the system (this is obligatory when prompted). • If no problems were identified but the problem persists, contact your local GE HEALTHCARE field engineer for assistance. • If errors were identified and the results were not marginal, verify that all system cables and...
- Page 501 P R E L I M I N A R Y FN091065, R VS5 N VS6 N UMBER EVISION ERVICE ANUAL 7-6-1 Accessing the Back End Diagnostic Test Options (cont’d) 7-6-1-1-2 Full PC Doctor Test (50 min) NOTE: For a description of this test, refer to the information in - "Full PC Doctor Test (50 min)"...
- Page 502 If no problems were identified, it is recommended to re-boot the system (this is obligatory when prompted). • If no problems were identified but the problem persists, contact your local GE HEALTHCARE field engineer for assistance. • If errors were identified and the results were not marginal, verify that all system cables and...
- Page 503 P R E L I M I N A R Y FN091065, R VS5 N VS6 N UMBER EVISION ERVICE ANUAL 7-6-1 Accessing the Back End Diagnostic Test Options (cont’d) 7-6-1-1-3 CPU Tests NOTE: For a description of these tests, refer to the information in - "CPU Tests"...
- Page 504 If no problems were identified, it is recommended to re-boot the system (this is obligatory when prompted). • If no problems were identified but the problem persists, contact your local GE HEALTHCARE field engineer for assistance. • If errors were identified and the results were not marginal, verify that all system cables and...
- Page 505 If the problem persists, this indicates that either the specific board you tested is faulty or that another board that supports the operation of this board is faulty. Contact your local GE HEALTHCARE field engineer for assistance. 10.)Trackball to the Exit button and press Set to close the View Test Log dialog box.
- Page 506 P R E L I M I N A R Y FN091065, R VS5 N VS6 N UMBER EVISION ERVICE ANUAL 7-6-1 Accessing the Back End Diagnostic Test Options (cont’d) 7-6-1-1-4 HD Test NOTE: For a description of these tests, refer to the information in - "HD Test"...
- Page 507 If no problems were identified, it is recommended to re-boot the system (this is obligatory when prompted). • If no problems were identified but the problem persists, contact your local GE HEALTHCARE field engineer for assistance. • If errors were identified and the results were not marginal, verify that all system cables and...
- Page 508 P R E L I M I N A R Y FN091065, R VS5 N VS6 N UMBER EVISION ERVICE ANUAL 7-6-1 Accessing the Back End Diagnostic Test Options (cont’d) 7-6-1-1-5 Memory Test NOTE: For a description of these tests, refer to the information in - "Memory Test"...
- Page 509 If no problems were identified, it is recommended to re-boot the system (this is obligatory when prompted). • If no problems were identified but the problem persists, contact your local GE HEALTHCARE field engineer for assistance. • If errors were identified and the results were not marginal, verify that all system cables and...
- Page 510 P R E L I M I N A R Y FN091065, R VS5 N VS6 N UMBER EVISION ERVICE ANUAL 7-6-1 Accessing the Back End Diagnostic Test Options (cont’d) 7-6-1-1-6 Video Test NOTE: For a description of these tests, refer to the information in - "Video Test"...
- Page 511 If no problems were identified, it is recommended to re-boot the system (this is obligatory when prompted). • If no problems were identified but the problem persists, contact your local GE HEALTHCARE field engineer for assistance. • If errors were identified and the results were not marginal, verify that all system cables and...
- Page 512 P R E L I M I N A R Y FN091065, R VS5 N VS6 N UMBER EVISION ERVICE ANUAL 7-6-1 Accessing the Back End Diagnostic Test Options (cont’d) 7-6-1-1-7 PCI Test NOTE: For a description of this test, refer to the information in “PCI Test”...
- Page 513 If no problems were identified, it is recommended to re-boot the system (this is obligatory when prompted). • If no problems were identified but the problem persists, contact your local GE HEALTHCARE field engineer for assistance. • If errors were identified and the results were not marginal, verify that all system cables and...
- Page 514 P R E L I M I N A R Y FN091065, R VS5 N VS6 N UMBER EVISION ERVICE ANUAL 7-6-1 Accessing the Back End Diagnostic Test Options (cont’d) 7-6-1-1-8 Network Test NOTE: For a description of this test, refer to the information in - "Network Test"...
- Page 515 If no problems were identified, it is recommended to re-boot the system (this is obligatory when prompted). • If no problems were identified but the problem persists, contact your local GE HEALTHCARE field engineer for assistance. • If errors were identified and the results were not marginal, verify that all system cables and...
- Page 516 Section 7-7 Automatic Error Log The Vivid S5 N or Vivid S6 N automatically logs the software activity, sequences and error messages that occur during normal operation. Each day’s activity is compressed into a single daily logger report, with a time stamp appearing in each line of the report. Additional user comments and screen captures, can also be included in the report.
- Page 517 P R E L I M I N A R Y FN091065, R VS5 N VS6 N UMBER EVISION ERVICE ANUAL 7-7-2 Extracting Logs (cont’d) Figure 7-94 System Problem Reporting Dialog 3.) If use of the Advanced features is required, proceed to the following instructions, as applicable: •...
- Page 518 To Format a CD: 1.) Insert the blank CD media into the DVD/CD-RW drive tray. 2.) On the Vivid S5 N or Vivid S6 N system, press the <Config> key. 3.) Select the Connectivity Tab and activate the Tools Tab.
- Page 519 P R E L I M I N A R Y FN091065, R VS5 N VS6 N UMBER EVISION ERVICE ANUAL 7-7-2 Extracting Logs (cont’d) 7-7-2-2 Enabling Extensive Logging NOTE: In some cases, the user may need to activate the Extensive Logging feature. This will allow the system to record logs in a more detailed format, specifically addressing an issue of suspected failure.
- Page 520 P R E L I M I N A R Y FN091065, R VS5 N VS6 N UMBER EVISION ERVICE ANUAL 7-7-2 Extracting Logs (cont’d) 1.) Perform step 1 step 2 on page 7-132. 2.) Click the Extensive Log button (refer to step 7-94 on page 7-133).
- Page 521 P R E L I M I N A R Y FN091065, R VS5 N VS6 N UMBER EVISION ERVICE ANUAL 7-7-2 Extracting Logs (cont’d) 7-7-2-3 Advanced Options 1.) From the System Problem Reporting dialog (Figure 7-94 "System Problem Reporting Dialog" on page 7-133), click the Options button.
- Page 522 Provides details on the connectivity configuration. Recommended to include this whenever any type of connectivity problem arises. “Upload to GE” Tool Enables the user to export the log directly to GE HEALTHCARE for analysis. For details, see “Sending Log Files to GE” on page 7-139.
- Page 523 5.) When export completed, press <Ctrl>+E to eject the media. 7-7-2-3-3 Sending Log Files to GE After exporting logs (with the Upload To GE Tool attachment) to the selected media (i.e. CD or Memory Stick), the media contains the zipped log file along with the binary (UploadLog.exe and other attachments) files that perform the upload of all exported files to the GE ftp site.
- Page 524 Figure 7-100 Upload Complete 5.) Click Close to terminate and exit the Upload utility. 6.) Inform the local GE personnel that you have uploaded files to the GE ftp site. NOTE: In the event that the upload process fails, check your local network security settings to make sure that they did not prevent the upload.
- Page 525 P R E L I M I N A R Y FN091065, R VS5 N VS6 N UMBER EVISION ERVICE ANUAL 7-7-2 Extracting Logs (cont’d) The System Problem Reporting dialog opens:. Figure 7-101 System Problem Reporting - Advanced 2.) Under Advanced, click on the DBScan button. Chapter 7 - Diagnostics/Troubleshooting 7-141...
- Page 526 P R E L I M I N A R Y FN091065, R VS5 N VS6 N UMBER EVISION ERVICE ANUAL 7-7-2 Extracting Logs (cont’d) The Database Scanning procedure commences, and a progress bar is displayed together with the message: The action may take a long time. Please wait..Figure 7-102 Database Scanning Procedure in Progress During this procedure, a log file which contains information about the integrity of the database will automatically be created and stored in the Logs directory (in the folder name Log).
-
Page 527: Table Of Contents
P R E L I M I N A R Y FN091065, R VS5 N VS6 N UMBER EVISION ERVICE ANUAL Chapter 8 Replacement Procedures Section 8-1 Overview 8-1-1 Purpose of Chapter 8 This chapter provides replacement procedures for Vivid™ S5 N and Vivid™ S6 N system parts, as outlined below. - Page 528 P R E L I M I N A R Y FN091065, R VS5 N VS6 N UMBER EVISION ERVICE ANUAL Section 8-2 Cover Replacement Procedures 8-2-1 Overview of Covers Front View Rear View Figure 8-1 Vivid™ S5 N and Vivid™ S6 N Ultrasound Units Table 8-1 Vivid™...
- Page 529 UMBER EVISION ERVICE ANUAL 8-2-1-1 Preparations Shut down the Vivid S5 N or Vivid S6 N ultrasound unit, as described in 4-2-3 "Power Shut Down" on page 4-7. ELECTRICAL HAZARDS EXIST AT SEVERAL POINTS IN THE SYSTEM. DANGER FAMILIARIZE YOURSELF WITH ALL HAZARDOUS VOLTAGES AND HIGH CURRENT LEVELS BEFORE REMOVING ANY OF THE COVERS.
- Page 530 Figure 8-2 Right Side Cover (Longer Type) - Front and Inside Views 8-2-2-1 Tools None. 8-2-2-2 Preparations Shut down the Vivid S5 N or Vivid S6 N ultrasound unit, as described in 4-2-3 "Power Shut Down" on page 4-7. Section 8-2 - Cover Replacement Procedures...
- Page 531 P R E L I M I N A R Y FN091065, R VS5 N VS6 N UMBER EVISION ERVICE ANUAL 8-2-2 Right Side Cover Replacement Procedure (cont’d) 8-2-2-3 Right Side Cover Removal Procedure 1) Gripping the recess located near the bottom of the cover (as shown on the left in Figure 8-3), pull the bottom of the cover out towards you to release it from the lower securing clip.
-
Page 532: Cover Replacement Procedures
8-7. 8-2-3-1 Tools None. 8-2-3-2 Preparations Shut down the Vivid S5 N or Vivid S6 N ultrasound unit, as described in 4-2-3 "Power Shut Down" on page 4-7. 8-2-3-3 Left Side Cover Removal Procedure 1) Gripping the recess located near the bottom of the cover (as shown in... - Page 533 Air Filter Replacement Procedure NOTE: Commencing with Vivid S5 N and Vivid S6 N ultrasound scanners version BT12, systems are supplied without an air filter. Therefore, for all BT versions, it is no longer necessary to perform the procedure described below.
- Page 534 P R E L I M I N A R Y FN091065, R VS5 N VS6 N UMBER EVISION ERVICE ANUAL 8-2-3 Left Side Cover Replacement Procedure (cont’d) 4.) Lifting up the free end of the Air Filter, release the other end from the two securing notches on the right cover, as shown in Figure 8-7.
- Page 535 P R E L I M I N A R Y FN091065, R VS5 N VS6 N UMBER EVISION ERVICE ANUAL 8-2-3 Left Side Cover Replacement Procedure (cont’d) 7.) Make sure the air filter is seated in the correct position then fasten the other end of the air filter onto the cover, by closing the securing clip - refer to Figure 8-6 on page 8-7 Figure 8-9...
- Page 536 Tools Use the appropriate Phillips-type screwdrivers, as indicated in the right rear cover replacement procedures. 8-2-4-2 Preparations Shut down the Vivid S5 N or Vivid S6 N ultrasound unit, as described in 4-2-3 "Power Shut Down" on page 4-7. 8-2-4-3 Right Rear Cover Removal Procedure 1) Disconnect any peripherals currently connected to the system.
- Page 537 P R E L I M I N A R Y FN091065, R VS5 N VS6 N UMBER EVISION ERVICE ANUAL 8-2-4 Right Rear Cover Replacement Procedures (cont’d) Remove screw here Remove screw here Figure 8-11 Loosening the Securing Screws 7) Carefully lift the cover upwards sufficiently to clear the portion of the cover that overlaps the system chassis (shown in Figure...
- Page 538 P R E L I M I N A R Y FN091065, R VS5 N VS6 N UMBER EVISION ERVICE ANUAL 8-2-4 Right Rear Cover Replacement Procedures (cont’d) 8.) Pull the cover towards you and remove from the system. Figure 8-13 Removing the Right Rear Cover 8-2-4-4 Right Rear Cover Installation Procedure NOTE:...
- Page 539 Tools Use the appropriate Phillips-type screwdrivers, as indicated in the left rear cover replacement procedures. 8-2-5-2 Preparations Shut down the Vivid S5 N or Vivid S6 N ultrasound unit, as described in 4-2-3 "Power Shut Down" on page 4-7. 8-2-5-3...
- Page 540 P R E L I M I N A R Y FN091065, R VS5 N VS6 N UMBER EVISION ERVICE ANUAL 8-2-5 Left Rear Cover Replacement Procedures (cont’d) Figure 8-15 Loosening the Securing Screw 4) Pull the cover upwards to release the two securing hooks (located on the inner right side of the cover) from the main assembly frame - see Figure 8-16.
- Page 541 P R E L I M I N A R Y FN091065, R VS5 N VS6 N UMBER EVISION ERVICE ANUAL 8-2-5 Left Rear Cover Replacement Procedures (cont’d) Figure 8-17 Removing the Left Rear Cover 6.) Pull the cover towards you and remove from the system. Chapter 8 - Replacement Procedures 8-15...
- Page 542 P R E L I M I N A R Y FN091065, R VS5 N VS6 N UMBER EVISION ERVICE ANUAL 8-2-5-4 Left Rear Cover Installation Procedure NOTE: When performing the following installation procedure steps, it may be helpful to review the movie clip previously referenced in the Left Rear Cover Removal Procedure.
- Page 543 8-2-6-1 Tools Use the appropriate Phillips-type screwdriver, as indicated in the front cover replacement procedures. 8-2-6-2 Preparations Shut down the Vivid S5 N or Vivid S6 N ultrasound unit, as described in 4-2-3 "Power Shut Down" on page 4-7. 8-2-6-3...
- Page 544 P R E L I M I N A R Y FN091065, R VS5 N VS6 N UMBER EVISION ERVICE ANUAL 8-2-6 Front Cover Replacement Procedures (cont’d) Front Cover - from Right Side Front Cover - from Left Side Figure 8-19 Removing Screws from Front Cover Securing Tabs 5) Pull the lower portion of the cover away from the system main assembly frame to release it from the ball and snap-lock securing clips (see [1] in Figure...
- Page 545 P R E L I M I N A R Y FN091065, R VS5 N VS6 N UMBER EVISION ERVICE ANUAL 8-2-6 Front Cover Replacement Procedures (cont’d) 8.) Tilting the cover away from the main assembly frame (to clear the keyboard), continue pulling it towards you until it is completely removed from the system.
- Page 546 Basket Replacement Procedure 8-2-7-1 Tools None 8-2-7-2 Preparations Shut down the Vivid S5 N or Vivid S6 N ultrasound unit, as described in 4-2-3 "Power Shut Down" on page 4-7. 8-2-7-3 Basket Removal Procedure 1) Remove all contents from the basket.
- Page 547 Rear Folder Box Replacement Procedure 8-2-8-1 Tools None 8-2-8-2 Preparations Shut down the Vivid S5 N or Vivid S6 N ultrasound unit, as described in 4-2-3 "Power Shut Down" on page 4-7. 8-2-8-3 Rear Folder Box Removal Procedure 1) Remove all contents from the folder box.
- Page 548 Tray Replacement Procedure 8-2-9-1 Tools None 8-2-9-2 Preparations Shut down the Vivid S5 N or Vivid S6 N ultrasound unit, as described in 4-2-3 "Power Shut Down" on page 4-7. 8-2-9-3 Tray Removal Procedure 1) Remove all contents from the tray.
- Page 549 8-2-10 Bottom Rear Cover Replacement Procedures 8-2-10-1 Tools None. 8-2-10-2 Preparations Shut down the Vivid S5 N or Vivid S6 N ultrasound unit, as described in 4-2-3 "Power Shut Down" on page 4-7. 8-2-10-3 Bottom Rear Cover Removal Procedure NOTE:...
- Page 550 8-2-11-1 Tools Use the appropriate Phillips screwdriver, as indicated in the DVD cover replacement procedure. 8-2-11-2 Preparations Shut down the Vivid S5 N or Vivid S6 N ultrasound unit, as described in 4-2-3 "Power Shut Down" on page 4-7. 8-2-11-3 DVD Cover Removal Procedure 1) Raise the control console to its maximum height.
- Page 551 P R E L I M I N A R Y FN091065, R VS5 N VS6 N UMBER EVISION ERVICE ANUAL 8-2-11 DVD Cover Replacement Procedure (cont’d) 6.) Pull out and remove the DVD cover. Figure 8-26 DVD Cover Removed 8-2-11-4 DVD Cover Installation Procedure NOTE:...
-
Page 552: Control Console Components Replacement Procedures
8-3-1-1 Tools Use the appropriate Phillips screwdriver, as indicated in the monitor replacement procedures. 8-3-1-2 Preparation Shut down the Vivid S5 N ultrasound unit, as described in 4-2-3 "Power Shut Down" on page 4-7. 8-3-1-3 Monitor Removal Procedure 1) Working from the front of the system, lower the console to the maximum down position. - Page 553 P R E L I M I N A R Y FN091065, R VS5 N VS6 N UMBER EVISION ERVICE ANUAL 8-3-1 Monitor Replacement Procedure (cont’d) 4.) Carefully fold the monitor forwards until it is in the fully-folded position (i.e., face down), as shown Figure 8-28 below.
- Page 554 P R E L I M I N A R Y FN091065, R VS5 N VS6 N UMBER EVISION ERVICE ANUAL 8-3-1 Monitor Replacement Procedure (cont’d) 7.) Using a screwdriver, release the DVI cable and the power cable connectors from the monitor (loosening the two screws on each side of the cables to disconnect them) - see Figure 8-31 below.
- Page 555 - refer to Figure 8-27 on page 8-26. 8.) Adhere the appropriate Vivid S5 N or Vivid S6 N system label to the rear of the monitor. 9.) Set the appropriate LCD type, as described in 6-1-2-7 "Display Type Setup" on page 6-8.
- Page 556 8-3-2-1 Tools Use the appropriate flat and Phillips type screwdrivers and the appropriate Allen keys. 8-3-2-2 Preparation Shut down the Vivid S5 N or Vivid S6 N ultrasound unit, as described in 4-2-3 "Power Shut Down" on page 4-7. 8-3-2-3...
- Page 557 P R E L I M I N A R Y FN091065, R VS5 N VS6 N UMBER EVISION ERVICE ANUAL 3.) Remove the roller-screw from the Alignment Block - Figure 8-34. Alignment Block Remove Roller-Screw Figure 8-34 Roller-screw Located on the Alignment Block 4.) To remove the alignment block, first loosen the Monitor Arm locking bolt a few turns to create some freedom of movement for the Monitor Arm assembly so that it can be raised and lowered on the upper arm securing pin -...
- Page 558 P R E L I M I N A R Y FN091065, R VS5 N VS6 N UMBER EVISION ERVICE ANUAL 9.) Remove the lower cable bracket - Figure 8-36. Lower Roller-Screw Lower Cable Bracket Figure 8-36 Lower Cable Bracket and Lower Roller-Screw 10.)Remove the lower roller-screw - Figure 8-36.
- Page 559 P R E L I M I N A R Y FN091065, R VS5 N VS6 N UMBER EVISION ERVICE ANUAL 8-3-2-4 Monitor Arm Installation Procedure 1.) Return the lower washer to its position on the securing pin - Figure 8-38.
- Page 560 P R E L I M I N A R Y FN091065, R VS5 N VS6 N UMBER EVISION ERVICE ANUAL 4.) Return the Locking Bolt to its location on the securing pin and turn it a few turns only - Figure 8-41.
- Page 561 P R E L I M I N A R Y FN091065, R VS5 N VS6 N UMBER EVISION ERVICE ANUAL 9.) To return the alignment block to its position on the support pin, raise the support arm and insert the alignment block to its position above the securing bolt, see Figure 8-35.
- Page 562 P R E L I M I N A R Y FN091065, R VS5 N VS6 N UMBER EVISION ERVICE ANUAL 16.)Install the Monitor as described in the “Monitor Installation Procedure” on page 8-29. 17) Lower the console to the maximum down position. 18.)Turn ON power to the system.
- Page 563 8-3-3-1 Tools Use the appropriate flat and Phillips type screwdrivers and the appropriate Allen keys. 8-3-3-2 Preparation Shut down the Vivid S5 N or Vivid S6 N ultrasound unit, as described in 4-2-3 "Power Shut Down" on page 4-7. 8-3-3-3...
- Page 564 “Monitor Installation Procedure” on page 8-29. 4.) Adhere the appropriate Vivid S5 N or Vivid S6 N system label to the rear of the monitor. 5.) Proceed to perform the following functionality tests: “Grounding Continuity” on page 10-23 “Chassis Current Leakage Test” on page 10-24 “Monitor Movement Test”...
- Page 565 Use the appropriate flat and Phillips-type screwdrivers and the appropriate Hex wrench keys, as indicated in the keyboard assembly replacement procedure. 8-3-4-2 Preparation Shut down the Vivid S5 N or Vivid S6 N ultrasound unit, as described in 4-2-3 "Power Shut Down" on page 4-7.
- Page 566 P R E L I M I N A R Y FN091065, R VS5 N VS6 N UMBER EVISION ERVICE ANUAL 8-3-4 Keyboard Assembly Replacement Procedure (cont’d) 4) Loosen the two captive Allen screws on the left side, as shown in Figure 8-47 below (arrows marked in the figure indicate the screw locations).
- Page 567 P R E L I M I N A R Y FN091065, R VS5 N VS6 N UMBER EVISION ERVICE ANUAL 8-3-4 Keyboard Assembly Replacement Procedure (cont’d) Release here Release here Figure 8-50 Releasing the Data Cable Securing Tags 9.) Unplug the Data cable, as shown in Figure 8-51.
- Page 568 P R E L I M I N A R Y FN091065, R VS5 N VS6 N UMBER EVISION ERVICE ANUAL 8-3-4-4 Keyboard Assembly Installation Procedure NOTE: When performing the following installation procedure steps, it may be helpful to review the appropriate movie clips previously referenced in the Keyboard Assembly Removal Procedure.
- Page 569 P R E L I M I N A R Y FN091065, R VS5 N VS6 N UMBER EVISION ERVICE ANUAL 8-3-4 Keyboard Assembly Replacement Procedure (cont’d) When the installation process is complete, the following screen is displayed: 14.)Press Set on the keyboard, eject the CD, and reboot the system. 15.)With the system up and running, press Alt + L.
- Page 570 8-3-5-1 Tools Use the appropriate flat and Phillips type screwdrivers and the appropriate Allen keys. 8-3-5-2 Preparation Shut down the Vivid S5 N or Vivid S6 N ultrasound unit, as described in 4-2-3 "Power Shut Down" on page 4-7. 8-3-5-3...
- Page 571 P R E L I M I N A R Y FN091065, R VS5 N VS6 N UMBER EVISION ERVICE ANUAL 3.) Remove the DVI cable clip - be careful to hold the clip screw to prevent it from falling through the shaft - Figure 8-55.
- Page 572 P R E L I M I N A R Y FN091065, R VS5 N VS6 N UMBER EVISION ERVICE ANUAL 5.) Remove two brake lever retaining screws - Figure 8-57 and remove the Gas Spring lever. Up-Down Lever Separated from Gas Spring Cable Lever Two Brake Lever Retaining Screws Figure 8-57 Up-Down Lever Separated from Gas Spring Cable Lever 6.) To release the Keyboard Interface Assembly from the lower support arm, unscrew the retaining bolt...
- Page 573 P R E L I M I N A R Y FN091065, R VS5 N VS6 N UMBER EVISION ERVICE ANUAL inwards, gently turn the base from side to side while pulling upwards and away from the support arm. 8.) Carefully unthread the cables from the Key Board Interface Assembly as shown in the movie clip. 8-3-5-4 Keyboard Interface Assembly Installation Procedure NOTE:...
- Page 574 P R E L I M I N A R Y FN091065, R VS5 N VS6 N UMBER EVISION ERVICE ANUAL 2.) Position the Keyboard Interface Assembly on the Joint Assembly and thread the gas spring cable through the black Keyboard Interface Assembly cone and lower the assembly onto the joint. Interface Assembly Cone Gas Spring Cable Figure 8-60 Keyboard Interface Assembly on the Joint Assembly...
- Page 575 P R E L I M I N A R Y FN091065, R VS5 N VS6 N UMBER EVISION ERVICE ANUAL 6.) Return the gas spring cable lever to its position, hooking the gas spring cable lever onto the second notch on the gas spring cable - Figure 8-62.
- Page 576 P R E L I M I N A R Y FN091065, R VS5 N VS6 N UMBER EVISION ERVICE ANUAL 8.) Attach the Up-Down Lever to the cable holder lever and fasten it with the retaining screw (see Figure 8-64).
- Page 577 P R E L I M I N A R Y FN091065, R VS5 N VS6 N UMBER EVISION ERVICE ANUAL 8-3-5-4-1 Adjusting the Tension of the Up-Down Cables NOTE: The following procedure describes how to adjust the tension in the Up-Down Cable to enable raising and lowering of the Keyboard Interface base, using the system chassis height adjustment lever.
- Page 578 8-3-6-1 Tools Use the appropriate screwdriver as indicated in the Probe Shelf Replacement procedure. 8-3-6-2 Preparation Shut down the Vivid S5 N or Vivid S6 N ultrasound unit, as described in 4-2-3 "Power Shut Down" on page 4-7. 8-3-6-3 Probe Shelf Removal Procedure 1) Remove the Keyboard Assembly as described in the “Keyboard Assembly Removal Procedure”...
- Page 579 Swivel and Up-Down Handle Replacement Procedure 8-3-7-1 Tools Flat and Phillips screwdrivers as needed. 8-3-7-2 Preparation Shut down the Vivid S5 N or Vivid S6 N ultrasound unit, as described in 4-2-3 "Power Shut Down" on page 4-7. 8-3-7-3 Swivel and Up-Down Handle Replacement Procedure 1) Remove the Operator Panel as described in the “Keyboard Assembly Removal Procedure”...
- Page 580 P R E L I M I N A R Y FN091065, R VS5 N VS6 N UMBER EVISION ERVICE ANUAL 4.) Remove the spring clips securing the particular handle to be removed - Figure 8-67. Up-down Handle Swivel Handle Spring Clip Figure 8-67 Removing Spring Clip that Secures the Swivel Handle 5.) Release the small spring that presses on the handle to be replaced -...
- Page 581 P R E L I M I N A R Y FN091065, R VS5 N VS6 N UMBER EVISION ERVICE ANUAL 7.) Disconnect the up-down/swivel cable from the handle to be replaced and slide the handle sideways to remove it from the supporting shaft - Figure 8-69.
- Page 582 There are two types of rear handle removal procedure, as follows: • On older-type Vivid S5 N or Vivid S6 N systems, the rear handles are glued to the aluminium bars and have to be cut and peeled off the aluminium bars to remove them.
- Page 583 P R E L I M I N A R Y FN091065, R VS5 N VS6 N UMBER EVISION ERVICE ANUAL 8-3-8-3-1 Removing Handles Glued in Position When removing the rear handles, do not use aggressive cleaning materials and do not use tools CAUTION that impact or that might damage the aluminium handle bars.
- Page 584 P R E L I M I N A R Y FN091065, R VS5 N VS6 N UMBER EVISION ERVICE ANUAL 8-3-8-4 Rear Handle Installation Procedure 8-3-8-4-1 Installing Handles Glued in Position NOTE: Identify the left and right rear handle before starting this procedure. 1.) Apply the RTV 102 silicone sealant to a few points along the aluminium bar.
-
Page 585: Keyboard Assembly Replacement Procedures
8-4-1-1 Tools Use the appropriate screwdriver, as indicated in the Keyboard Bottom Cover replacement procedure. 8-4-1-2 Preparation Shut down the Vivid S5 N or Vivid S6 N ultrasound unit, as described in 4-2-3 "Power Shut Down" on page 4-7. 8-4-1-3 Keyboard Bottom Cover Removal Procedure 1.) Remove the Keyboard Assembly, as described in the... - Page 586 P R E L I M I N A R Y FN091065, R VS5 N VS6 N UMBER EVISION ERVICE ANUAL 8-4-1 Keyboard Bottom Cover Replacement Procedure (cont’d) 4.) Disconnect the two USB cables from the side of the trackball (Figure 8-74).
- Page 587 8-4-2-1 Tools Use the appropriate flat and Phillips type screwdrivers and the appropriate Allen keys. 8-4-2-2 Preparation Shut down the Vivid S5 N or Vivid S6 N ultrasound unit, as described in 4-2-3 "Power Shut Down" on page 4-7. 8-4-2-3 Upper Arm Removal Procedure 1) If the rear tray is attached to the system, remove it before starting the procedure.
- Page 588 P R E L I M I N A R Y FN091065, R VS5 N VS6 N UMBER EVISION ERVICE ANUAL 9.) Using a screwdriver, tap out the support pin - Figure 8-76 on page 8-62. Figure 8-76 Tapping Out the Upper Arm Support Pin 10.)Remove the Upper Arm.
- Page 589 The cables must protrude on either side of the Upper Arm in a specified manner as described below. Also, the cable length on either side of the Upper Arm is specific for the Vivid S5 N and Vivid S6 N system, respectively.
- Page 590 (Figure 8-77); the USB Keyboard-to-Distribution cable protrudes 21 cm (not shown). Installation Procedure - Vivid S5 N and Vivid S6 N Systems 1.) Prepare the required cable lengths for installation in the Upper Arm, as described above. 2.) Install the cables in the Upper arm securing them with the appropriate cable holders and clips - see Figure 8-78.
- Page 591 8-4-3-1 Tools Use the appropriate flat and Phillips type screwdrivers and the appropriate Allen keys. 8-4-3-2 Preparation Shut down the Vivid S5 N or Vivid S6 N ultrasound unit, as described in 4-2-3 "Power Shut Down" on page 4-7. 8-4-3-3...
- Page 592 P R E L I M I N A R Y FN091065, R VS5 N VS6 N UMBER EVISION ERVICE ANUAL 9.) Release the two locking screws that secure the two Joint Assembly supporting pins - Figure 8-81. Two Joint Assembly Supporting Pins (one on either side) Locking screws that secure Joint Assembly Pin...
- Page 593 P R E L I M I N A R Y FN091065, R VS5 N VS6 N UMBER EVISION ERVICE ANUAL 11.)Using a screwdriver, tap out the supporting pins to release the Joint Assembly - Figure 8-83. Tap out Supporting Figure 8-83 Removing the Joint Assembly 12.)Release the communication cables from the arm.
- Page 594 P R E L I M I N A R Y FN091065, R VS5 N VS6 N UMBER EVISION ERVICE ANUAL 12) Lower the console to the maximum down position. 13.)Turn ON power to the system. 14.)Check for proper up/down and side-to-side movement of the operator panel and monitor, as described in “Mechanical Functional Tests”...
- Page 595 Use the appropriate flat screwdriver and T10 Torx screwdriver (T8 may also be used), as indicated in the Alphanumeric Keyboard replacement procedure. 8-4-4-2 Preparation Shut down the Vivid S5 N or Vivid S6 N ultrasound unit, as described in 4-2-3 "Power Shut Down" on page 4-7.
- Page 596 P R E L I M I N A R Y FN091065, R VS5 N VS6 N UMBER EVISION ERVICE ANUAL 8-4-4 Alphanumeric Keyboard Replacement Procedure (cont’d) NOTE: When performing the next step, for ribbon cable connectors place a flat screwdriver into the gap beneath the connector, as shown in the example in Figure 8-86.
- Page 597 Use the appropriate screwdriver and 5.5 mm nut driver/box spanner, as indicated in the Mechanical Trackball and Housing replacement procedure. 8-4-5-2 Preparation Shut down the Vivid S5 N or Vivid S6 N ultrasound unit, as described in 4-2-3 "Power Shut Down" on page 4-7.
- Page 598 P R E L I M I N A R Y FN091065, R VS5 N VS6 N UMBER EVISION ERVICE ANUAL 6.) Remove each of the three nuts from the Trackball Board and housing, as indicated in Figure 8-88 Trackball Board and Housing Cable Connector...
- Page 599 P R E L I M I N A R Y FN091065, R VS5 N VS6 N UMBER EVISION ERVICE ANUAL 3.) Secure the Trackball Housing using the three new nuts supplied with the kit (see Figure 8-87). 4.) Carefully re-connect the two cables (previously disconnected), as indicated in Figure 8-89.
- Page 600 ERVICE ANUAL 8-4-6 TGC Board Replacement Procedure (New-type Operator Panel) NOTE: The procedures described in this section are applicable to all Vivid S5 N / Vivid S6 N systems supplied with the new-type Operator Panel (Figure 8-93). NOTE: For Vivid S5 N / Vivid S6 N systems with the older-type Operator Panel, refer to the instructions provided in “TGC Board Replacement Procedure (Old-type Operator Panel)”...
- Page 601 P R E L I M I N A R Y FN091065, R VS5 N VS6 N UMBER EVISION ERVICE ANUAL 6.) Disconnect the black cable - encircled in Figure 8-91. Figure 8-91 TGC Board 7.) Remove the TGC Board. Chapter 8 - Replacement Procedures 8-75...
- Page 602 P R E L I M I N A R Y FN091065, R VS5 N VS6 N UMBER EVISION ERVICE ANUAL 8-4-6-4 TGC Board Installation Procedure (New-type Operator Panel) 1.) Carefully place the new TGC Board in the keyboard assembly. Make sure it is correctly positioned. 2.) Return and fasten the four retaining screws (previously loosened) to secure the TGC Board firmly in position, as indicated in Figure...
- Page 603 Use the appropriate flat screwdriver and T10 Torx screwdriver (T8 may also be used), as indicated in the TGC Board replacement procedure. 8-4-7-2 Preparation Shut down the Vivid S5 N or Vivid S6 N ultrasound unit, as described in 4-2-3 "Power Shut Down" on page 4-7.
- Page 604 P R E L I M I N A R Y FN091065, R VS5 N VS6 N UMBER EVISION ERVICE ANUAL 8-4-7-4 TGC Board Installation Procedure 1.) Carefully place the new TGC Board in the keyboard assembly (refer to Figure 8-92).
- Page 605 Extended Keyboard Replacement Procedure (New-type Operator Panel) NOTE: The procedures described in this section are applicable to all Vivid S5 N / Vivid S6 N systems supplied with the new-type Operator Panel. Figure 8-93 Vivid S5 N / Vivid S6 N - New-type Operator Panel...
- Page 606 Use the appropriate flat and Phillips-type screwdrivers, Hex wrench keys, and a No. 10 Torx screwdriver. 8-4-8-2 Preparation Shut down the Vivid S5 N or Vivid S6 N ultrasound unit, as described in 4-2-3 "Power Shut Down" on page 4-7.
- Page 607 P R E L I M I N A R Y FN091065, R VS5 N VS6 N UMBER EVISION ERVICE ANUAL 6.) Loosen and remove all Extended Keyboard retaining screws - refer to the illustration in Figure 8-97 on page 8-83.
- Page 608 8-4-9 Extended Keyboard Replacement Procedure (Old-type Operator Panel) The procedures described in this section are applicable to any Vivid S5 N / Vivid S6 N system with the old-type Operator Panel. When performing these procedures, take precautions to avoid damage of CAUTION electrostatic-sensitive components.
- Page 609 P R E L I M I N A R Y FN091065, R VS5 N VS6 N UMBER EVISION ERVICE ANUAL 8-4-9 Extended Keyboard Replacement Procedure (Old-type Operator Panel) (cont’d) 7.) Disconnect the seven cable connectors, as indicated in Figure 8-97.
- Page 610 P R E L I M I N A R Y FN091065, R VS5 N VS6 N UMBER EVISION ERVICE ANUAL 8-4-9-5 Releasing an Extended Keyboard Key 1.) Using a sticky strip (e.g. masking tape or scotch tape), remove the key as follows: b) Pull the key up a) Adhere the sticky strip to the key c) Key removed...
- Page 611 P R E L I M I N A R Y FN091065, R VS5 N VS6 N UMBER EVISION ERVICE ANUAL b.) Remove any surplus plastic tape gently with sharp tool (e.g. scalpel or similar) - Figure 8-100. Figure 8-100 Removing Surplus Plastic Tape Note: Pay attention not to damage the key surface or the painted lettering.
- Page 612 ERVICE ANUAL 8-4-10 LEDs and Soft Menu Board Replacement (New-type OP) NOTE: The procedures described in this section are applicable to all Vivid S5 N / Vivid S6 N systems supplied with the new-type Operator Panel (Figure 8-93). NOTE: For systems with the older-type Operator Panel, refer to the instructions provided in “LEDs and Soft...
- Page 613 P R E L I M I N A R Y FN091065, R VS5 N VS6 N UMBER EVISION ERVICE ANUAL 4.) Unscrew the 10 Torx retaining screws and remove them from the LED and Soft Menu Board - those visible in Figure 8-101 are encircled.
- Page 614 8-4-11 LEDs and Soft Menu Board Replacement (Old-type OP) The procedures described in this section are applicable to any Vivid S5 N / Vivid S6 N system with the old-type Operator Panel When performing these procedures, take precautions to avoid damage of NOTICE electrostatic-sensitive components.
- Page 615 P R E L I M I N A R Y FN091065, R VS5 N VS6 N UMBER EVISION ERVICE ANUAL 7.) Loosen and remove the seven star-shape screws that fasten the Soft Menu board in position, as shown in Figure 8-102.
- Page 616 P R E L I M I N A R Y FN091065, R VS5 N VS6 N UMBER EVISION ERVICE ANUAL 8-4-12 Alphanumeric Keycap Replacement Procedure 8-4-12-1 Tools Use the appropriate flat screwdriver, as indicated in the keycap replacement procedure. 8-4-12-2 Preparation None...
- Page 617 P R E L I M I N A R Y FN091065, R VS5 N VS6 N UMBER EVISION ERVICE ANUAL 8-4-13 Rotary Knob Replacement Procedure 8-4-13-1 Tools Use the appropriate flat screwdriver, as indicated in the rotary knob replacement procedure. 8-4-13-2 Preparation None...
- Page 618 P R E L I M I N A R Y FN091065, R VS5 N VS6 N UMBER EVISION ERVICE ANUAL 8-4-14 ATGC Keycap Replacement Procedure 8-4-14-1 Tools Use the appropriate flat screwdriver, as indicated in the ATGC Keycap replacement procedure. 8-4-14-2 Preparation None...
- Page 619 Use the appropriate flat screwdriver and T10 Torx screwdriver (T8 may also be used), as indicated in the Speaker replacement procedure. 8-4-15-2 Preparation Shut down the Vivid S5 N or Vivid S6 N ultrasound unit, as described in 4-2-3 "Power Shut Down" on page 4-7.
- Page 620 P R E L I M I N A R Y FN091065, R VS5 N VS6 N UMBER EVISION ERVICE ANUAL 8-4-15 Speaker Replacement Procedure (cont’d) 5.) Loosen and remove the four star-shape screws that fasten each of the Speakers in position, as shown in Figure 8-102.
-
Page 621: Cable Replacement Procedures
Use the appropriate flat and Phillips screwdrivers, Allen Key, appropriate flat spanner, and diagonal side cutter as indicated in the Keyboard or Monitor Cable replacement procedure. 8-5-1-2 Preparation Shut down the Vivid S5 N or Vivid S6 N ultrasound unit, as described in 4-2-3 "Power Shut Down" on page 4-7. - Page 622 P R E L I M I N A R Y FN091065, R VS5 N VS6 N UMBER EVISION ERVICE ANUAL 1.) Remove the LCD arm upper cover from the Monitor Arm Assembly (as shown in Figure 8-109) to expose the LCD cable. Upper Cover Figure 8-109 Removing the LCD Arm Upper Cover 2.) Remove the lower cover from the Monitor Arm Assembly, as shown in...
- Page 623 P R E L I M I N A R Y FN091065, R VS5 N VS6 N UMBER EVISION ERVICE ANUAL 5.) Slide the Power cable (the thinner, black cable) through the opening and slide it down (Figure 8-111). Cables in New Position Slide Cables Down Here Figure 8-111 Sliding the Cables through the Opening...
- Page 624 P R E L I M I N A R Y FN091065, R VS5 N VS6 N UMBER EVISION ERVICE ANUAL 3.) Using an Allen key, remove the Alignment Block as shown in Figure 8-113. If necessary, use a flat screwdriver for leverage when loosening the block, taking care not to damage the cables.
- Page 625 P R E L I M I N A R Y FN091065, R VS5 N VS6 N UMBER EVISION ERVICE ANUAL 7.) Cut the two tie wraps, as indicated in Figure 8-115. Figure 8-115 Location of Tie Wraps 8.) Using an Allen key, release the screw and nut that secure the arm for the up/down mechanism and move the arm to one side, as shown in Figure 8-116.
- Page 626 P R E L I M I N A R Y FN091065, R VS5 N VS6 N UMBER EVISION ERVICE ANUAL 8-5-1-3-3 Removing Cables from the Upper Arm Assembly Note: After removing cables from the Keyboard Interface Assembly, it is recommended to lean the keyboard interface platform backwards and to place protective material between the lower arm and the handle, as indicated in Figure...
- Page 627 P R E L I M I N A R Y FN091065, R VS5 N VS6 N UMBER EVISION ERVICE ANUAL 2.) Loosen (but do not remove) the two lower cable securing brackets, as indicated in Figure 8-119. Bracket Bracket Figure 8-119 Lower Cable Securing Brackets 3.) Proceed to remove the four cables from the Keyboard Interface Assembly by passing them through the aperture in the centre of the platform in the following order:...
- Page 628 P R E L I M I N A R Y FN091065, R VS5 N VS6 N UMBER EVISION ERVICE ANUAL b.) Push the 90° Data cable down through the aperture, as shown in Figure 8-121. Figure 8-121 Data Cable c.) Push the DVI cable down through the aperture, as shown in Figure 8-122.
- Page 629 P R E L I M I N A R Y FN091065, R VS5 N VS6 N UMBER EVISION ERVICE ANUAL d.) Push the LCD power cable down through the aperture, as shown in Figure 8-123. Figure 8-123 LCD Power Cable 8-5-1-3-4 Removing Cables from the Distributions Interface Board (DIB) 1.) Remove the system covers, as described in the following procedures (see also):...
- Page 630 P R E L I M I N A R Y FN091065, R VS5 N VS6 N UMBER EVISION ERVICE ANUAL Figure 8-124 System with Covers Removed 2.) Remove the central metal bracket, as indicated in Figure 8-125. Bracket Removed Bracket Figure 8-125 Bracket Removal 8-104...
- Page 631 P R E L I M I N A R Y FN091065, R VS5 N VS6 N UMBER EVISION ERVICE ANUAL 3.) To complete the procedure, disconnect the relevant cables from the Distribution Interface Board (DIB); see Figure 8-126 Figure 8-126 Cables Connected to Distribution Interface Board 8-5-1-4 Keyboard and Monitor Cable Installation Procedure 1.) Re-connect all the relevant cables (including the new Keyboard power cable and Monitor cable) to...
- Page 632 P R E L I M I N A R Y FN091065, R VS5 N VS6 N UMBER EVISION ERVICE ANUAL 8-5-1-4-1 Installing the Cables in the Monitor Arm Assembly The cables are threaded from the Keyboard Interface Assembly to the Monitor Arm Assembly and upwards to the LCD monitor;...
- Page 633 P R E L I M I N A R Y FN091065, R VS5 N VS6 N UMBER EVISION ERVICE ANUAL 8.) Place the Power cable (the thinner, black cable) and the DVI cable (the thicker, grey cable) together with the attached ferrite into their positions on the Monitor Arm assembly and secure them with the white bracket, using the two Phillips screws previously removed, as shown in Figure...
- Page 634 P R E L I M I N A R Y FN091065, R VS5 N VS6 N UMBER EVISION ERVICE ANUAL opening and slide it upwards, as indicated in Figure 8-129. 12.)Re-connect the GND cable to the centre of the upper arm - see Figure 8-110.
-
Page 635: Lower Section Components Replacement Procedures
4-7. 8-6-1-3 Cabinet Cage Assembly Opening and Removal Procedure 1) Remove the Vivid S5 N or Vivid S6 N left and right side covers, as described in the “Left Side Cover Removal Procedure” on page 8-6 “Right Side Cover Removal Procedure” on page 8-5. - Page 636 P R E L I M I N A R Y FN091065, R VS5 N VS6 N UMBER EVISION ERVICE ANUAL 8-6-1 Opening and Removing the Cabinet Cage Assembly (cont’d) Fastening Hook Figure 8-131 Fastening the Cage Door Open 5.) Release the end of the USB cable from the cable clip, as shown below. Cable Clip Figure 8-132 Releasing USB Cable from the Cable Clip 6.) Release the LAN connector from the Back End.
- Page 637 P R E L I M I N A R Y FN091065, R VS5 N VS6 N UMBER EVISION ERVICE ANUAL 8-6-1 Opening and Removing the Cabinet Cage Assembly (cont’d) 7.) Unfasten the two knurled (ridged) screws on the Docking Connector and release the Docking Connector from the Back End (Figure 8-134 Docking Connector...
- Page 638 P R E L I M I N A R Y FN091065, R VS5 N VS6 N UMBER EVISION ERVICE ANUAL 10.)Disconnect the VGA cable from the Back End (use a flat screwdriver to release the two screws on the connector). Figure 8-137 Releasing Connectors on the VGA Cable 11.)Pull down the spring latch to release the cage door from its securing hinge - see Figure...
- Page 639 P R E L I M I N A R Y FN091065, R VS5 N VS6 N UMBER EVISION ERVICE ANUAL 13.)Unfasten each of the two thumbscrews on either side of the cabinet cage, as shown in Figure 8-140. Figure 8-140 Cabinet Cage Thumbscrews 14.)Unfold the cage to the fully-open position, as shown in Figure 8-141.
- Page 640 P R E L I M I N A R Y FN091065, R VS5 N VS6 N UMBER EVISION ERVICE ANUAL 8-6-1-4 Cabinet Cage Assembly Closing and Installation Procedure NOTE: When performing the following installation procedure steps, it may be helpful to review the movie clips previously referenced in the Cabinet Cage Assembly Opening and Removal Procedure.
- Page 641 P R E L I M I N A R Y FN091065, R VS5 N VS6 N UMBER EVISION ERVICE ANUAL Note: When closing the cage door, take care to ensure that the protective gasket (kapton strip) surrounding the PSB (Probe Selection Board) - shown in Figure 8-143 - is properly seated and does not become pinched or damaged.
- Page 642 P R E L I M I N A R Y FN091065, R VS5 N VS6 N UMBER EVISION ERVICE ANUAL 8-6-2 Battery Replacement Procedure NOTE: This procedure is applicable to Vivid S6 N systems only. 8-6-2-1 Tools Use the appropriate Phillips-type screwdrivers as indicated in the Battery replacement procedure. 8-6-2-2 Time Required 1 minute...
- Page 643 Figure 8-146 Sliding the Vivid S6 N Battery out of the Battery Compartment WHEN REMOVING A DEFECTIVE BATTERY, ENSURE THAT IT IS DISPOSED OF NOTE: IN ACCORDANCE WITH LOCAL REGULATIONS. ALTERNATIVELY, FORWARD IT FOR PROPER DISPOSAL. GE HEALTHCARE Chapter 8 - Replacement Procedures 8-117...
- Page 644 DO NOT ATTEMPT TO DIS-ASSEMBLE OR ALTER THE BATTERY! Always observe the precautions listed in 1-3-5 "Vivid S5 N / Vivid S6 N Battery Safety" on page 1- use only batteries approved by GE HEALTHCARE as suitable for use with the Vivid S6 N CAUTION ultrasound scanner 1) Holding the cabinet cage assembly steady with one hand, carefully slide the replacement battery sideways into the battery compartment.
- Page 645 P R E L I M I N A R Y FN091065, R VS5 N VS6 N UMBER EVISION ERVICE ANUAL 8-6-3 Battery Bracket Replacement Procedure NOTE: This procedure is applicable to Vivid S6 N systems only. 8-6-3-1 Tools Use the appropriate Phillips-type screwdrivers and a side cutter as indicated in the Battery Bracket replacement procedure.
- Page 646 P R E L I M I N A R Y FN091065, R VS5 N VS6 N UMBER EVISION ERVICE ANUAL NOTE: The bracket cannot be removed completely at this stage as it still connected to the system via the battery cable, as explained in the next step. Figure 8-148 Removing the Battery Bracket 8.) Tilt the battery bracket sideways (swing it around), then disconnect the battery cable connector from the BEP...
- Page 647 P R E L I M I N A R Y FN091065, R VS5 N VS6 N UMBER EVISION ERVICE ANUAL 8-6-3-5 Battery Bracket Installation Procedure NOTE: When performing the following installation procedure steps, it may be helpful to review the appropriate movie clips previously referenced in the 8-6-3-4 "Battery Bracket Removal Procedure"...
- Page 648 Use the appropriate flat and Phillips-type screwdrivers as indicated in the Hard Disk replacement procedure. 8-6-4-2 Time Required 10 minutes 8-6-4-3 Preparation Shut down the Vivid S5 N or Vivid S6 N ultrasound unit, as described in 4-2-3 "Power Shut Down" on page 4-7. 8-6-4-4 Hard Disk Removal Procedure 1) Remove the left and right side covers, as described in the 8-2-3-3 "Left Side Cover Removal...
- Page 649 P R E L I M I N A R Y FN091065, R VS5 N VS6 N UMBER EVISION ERVICE ANUAL 8-6-4 Hard Disk Replacement Procedure (cont’d) 4) Working from the side of the cage, use a small Phillips screwdriver to loosen and remove the screw from the metal securing plate that holds the Hard Disk in position (as shown in Figure 8-152 below).
- Page 650 Figure 8-152 on page 8-123. NOTE: When inserting the hard disk and bracket into it’s slot in the Vivid S5 N / Vivid S6 N cabinet cage assembly, check that the plastic buffer strip is properly in position as shown in Figure 8-154.
- Page 651 P R E L I M I N A R Y FN091065, R VS5 N VS6 N UMBER EVISION ERVICE ANUAL To identify which hard disk is installed on your system, boot up the system and enter the BIOS configuration as described in “Setting the BIOS”...
- Page 652 P R E L I M I N A R Y FN091065, R VS5 N VS6 N UMBER EVISION ERVICE ANUAL 5.) Insert the appropriate software installation CD into the CD drive. The following options are displayed: NOTE: If you need to abort the process at this stage, prior to formatting, do so by pressing the On/Off switch and holding down for a few seconds until the system shuts down.
- Page 653 P R E L I M I N A R Y FN091065, R VS5 N VS6 N UMBER EVISION ERVICE ANUAL 8-6-4-6 Hard Disk Duplication NOTE: In some instances, it may be necessary to duplicate a customer’s existing hard disk. The duplication procedure is performed using a USB to SATA / PATA adaptor.
- Page 654 “Hard Disk Removal Procedure” on page 8-122. 5.) Reconnect the AC cable and battery and power ON the Vivid S5 N / Vivid S6 N ultrasound unit. 6.) Perform a full software installation procedure, as described in “Software Loading” on page 8-207.
- Page 655 P R E L I M I N A R Y FN091065, R VS5 N VS6 N UMBER EVISION ERVICE ANUAL 13.)Plug the adaptor into the AC power outlet and verify that the power indicator light is ON. 14.)Plug the adaptor’s USB cable into the system and wait a few seconds. 15.)Open the Explorer window (eight partitions will now be shown, as shown in Figure 8-159 below).
- Page 656 P R E L I M I N A R Y FN091065, R VS5 N VS6 N UMBER EVISION ERVICE ANUAL Figure 8-160 Disabling SQL Service The Sybase Central sub-directory displays in the left pane - see Figure 8-161 below. Figure 8-161 Sybase Central Dialog Box 8-130 Section 8-6 - Lower Section Components Replacement Procedures...
- Page 657 P R E L I M I N A R Y FN091065, R VS5 N VS6 N UMBER EVISION ERVICE ANUAL 19.)In the left pane under “Services”, select LocalArchive. 20.)On the system console press the Update/Menu button and then on the screen click Stop. The Local Archive status changes from Running to Stopped.
- Page 658 P R E L I M I N A R Y FN091065, R VS5 N VS6 N UMBER EVISION ERVICE ANUAL Figure 8-163 Desktop Screen 28.)Double-click the ReplaceCompName utility. The IBUtil screen will be displayed, as shown in Figure 8-164 below.
- Page 659 P R E L I M I N A R Y FN091065, R VS5 N VS6 N UMBER EVISION ERVICE ANUAL 29.)Click OK. The following message is displayed: 30.)Click OK to close the message box. NOTE: The DB links change according to the new system serial number to enable proper link functionality.
- Page 660 Use the appropriate Phillips and flat screwdrivers, as indicated in the BEP replacement procedure. 8-6-5-2 Time Required 15 minutes 8-6-5-3 Preparations Shut down the Vivid S5 N or Vivid S6 N ultrasound unit, as described in 4-2-3 "Power Shut Down" on page 4-7. 8-134 Section 8-6 - Lower Section Components Replacement Procedures...
- Page 661 P R E L I M I N A R Y FN091065, R VS5 N VS6 N UMBER EVISION ERVICE ANUAL 8-6-5-4 BEP Removal Procedure 1) Remove the left and right side covers, as described in the 8-2-3-3 "Left Side Cover Removal Procedure"...
- Page 662 P R E L I M I N A R Y FN091065, R VS5 N VS6 N UMBER EVISION ERVICE ANUAL 8-6-5 BEP Replacement Procedure (cont’d) 8) Proceed to disconnect the following cables from their connectors on the BEP (refer to Figure 8-167): a.) Disconnect the Fan-to-BEP power cable...
- Page 663 P R E L I M I N A R Y FN091065, R VS5 N VS6 N UMBER EVISION ERVICE ANUAL 8-6-5 BEP Replacement Procedure (cont’d) 10) Carefully lift the BEP out of the cage assembly and remove it from the system, as shown in Figure 8-169 below.
- Page 664 P R E L I M I N A R Y FN091065, R VS5 N VS6 N UMBER EVISION ERVICE ANUAL 8-6-5 BEP Replacement Procedure (cont’d) 8-6-5-5 BEP Installation Procedure NOTE: When performing the following installation procedure steps, it may be helpful to review the appropriate movie clips previously referenced in the 8-6-5-4 "BEP Removal Procedure"...
- Page 665 P R E L I M I N A R Y FN091065, R VS5 N VS6 N UMBER EVISION ERVICE ANUAL 8-6-5 BEP Replacement Procedure (cont’d) 11.)Proceed to perform the following functionality tests: 10-6-4 "Grounding Continuity" on page 10-23 10-6-5 "Chassis Current Leakage Test" on page 10-24 7-2-4-2-1 "Calibration"...
- Page 666 Use the appropriate flat screwdriver, as indicated in the ECG Module Assembly replacement procedure. 8-6-6-2 Time Required 10 minutes 8-6-6-3 Preparation Shut down the Vivid S5 N or Vivid S6 N ultrasound unit, as described in 4-2-3 "Power Shut Down" on page 4-7. 8-6-6-4 ECG Module Assembly Removal Procedure 1) Remove the system left and right side covers, as described in the 8-2-3-3 "Left Side Cover Removal...
- Page 667 P R E L I M I N A R Y FN091065, R VS5 N VS6 N UMBER EVISION ERVICE ANUAL 8-6-6 ECG Module Assembly Replacement Procedure (cont’d) 4) Loosen the three screws on the fastening bracket, as indicated in Figure 8-171.
- Page 668 P R E L I M I N A R Y FN091065, R VS5 N VS6 N UMBER EVISION ERVICE ANUAL 8-6-6 ECG Module Assembly Replacement Procedure (cont’d) When disconnecting the cable, it is necessary to press the cable connector latch down (Figure 8-173): ECG Cable...
- Page 669 P R E L I M I N A R Y FN091065, R VS5 N VS6 N UMBER EVISION ERVICE ANUAL 8-6-6 ECG Module Assembly Replacement Procedure (cont’d) 4) Turn the ECG Module assembly (with bracket attached) over, ready to place it in the correct location as shown in Figure 8-176.
- Page 670 P R E L I M I N A R Y FN091065, R VS5 N VS6 N UMBER EVISION ERVICE ANUAL 8-6-6 ECG Module Assembly Replacement Procedure (cont’d) 11.)Proceed to perform the following functionality tests: 10-6-6 "Isolated Patient Lead (Source) Leakage – Lead-to-Ground" on page 10-26 10-6-7 "Isolated Patient Lead (Source) Leakage –...
- Page 671 8-6-7-2 Time Required 15 minutes 8-6-7-3 Preparation Shut down the Vivid S5 N or Vivid S6 N ultrasound unit, as described in 4-2-3 "Power Shut Down" on page 4-7. 8-6-7-4 DC-to-DC Power Supply Removal Procedure 1) Remove the left and right side covers, as described in the 8-2-3-3 "Left Side Cover Removal...
- Page 672 P R E L I M I N A R Y FN091065, R VS5 N VS6 N UMBER EVISION ERVICE ANUAL 8-6-7 DC-to-DC Power Supply Replacement Procedure (cont’d) 6.) Loosen and remove the 5 screws that secure the DC-to-DC Power Supply to the cage assembly (see Figure 8-178 below).
- Page 673 P R E L I M I N A R Y FN091065, R VS5 N VS6 N UMBER EVISION ERVICE ANUAL 8-6-7-5 DC-to-DC Power Supply Installation Procedure NOTE: When performing the following installation procedure steps, it may be helpful to review the movie clip previously referenced in the 8-6-7-4 "DC-to-DC Power Supply Removal Procedure"...
- Page 674 8-6-8-2 Time Required 15 minutes 8-6-8-3 Preparation Shut down the Vivid S5 N or Vivid S6 N ultrasound unit, as described in 4-2-3 "Power Shut Down" on page 4-7. 8-6-8-4 PSB Board Removal Procedure 1) Remove the system left and right side covers, as described in the 8-2-3-3 "Left Side Cover Removal...
- Page 675 P R E L I M I N A R Y FN091065, R VS5 N VS6 N UMBER EVISION ERVICE ANUAL 8-6-8 PSB (Probe Select Board) Board Replacement Procedure (cont’d) 5) Proceed as follows: a.) Lift the ECG Connector up to expose the bracket, as shown in Figure 8-182.
- Page 676 P R E L I M I N A R Y FN091065, R VS5 N VS6 N UMBER EVISION ERVICE ANUAL 8-6-8 PSB (Probe Select Board) Board Replacement Procedure (cont’d) c.) Push the ECG Connector all the way down through the rectangular hole in the PSB Board (see Figure 8-184).
- Page 677 P R E L I M I N A R Y FN091065, R VS5 N VS6 N UMBER EVISION ERVICE ANUAL 8-6-8 PSB (Probe Select Board) Board Replacement Procedure (cont’d) 7.) Loosen and remove the screw that secures the PIB-to-PSB flex cable in position and disconnect the flex cable (see Figure 8-186).
- Page 678 P R E L I M I N A R Y FN091065, R VS5 N VS6 N UMBER EVISION ERVICE ANUAL 8-6-8 PSB (Probe Select Board) Board Replacement Procedure (cont’d) 8-6-8-5 PSB Board Installation Procedure NOTE: When performing the following installation procedure steps, it may be helpful to review the movie clips previously referenced in the 8-6-8-4 "PSB Board Removal Procedure"...
- Page 679 Use the appropriate flat and Phillips-type screwdrivers as indicated in the PIB replacement procedure. 8-6-9-2 Time Required 10 minutes 8-6-9-3 Preparation Shut down the Vivid S5 N or Vivid S6 N ultrasound unit, as described in 4-2-3 "Power Shut Down" on page 4-7. 8-6-9-4 PIB Board Removal Procedure 1) Remove the system left and right side covers, as described in the “Left Side Cover Removal...
- Page 680 P R E L I M I N A R Y FN091065, R VS5 N VS6 N UMBER EVISION ERVICE ANUAL 8-6-9 PIB (Probe Interface Board) Board Replacement Procedure (cont’d) 6.) Disconnect the flex cable from the PIB Board. 7.) Loosen and remove the five screws holding the PIB Board in position (see Figure 8-189).
- Page 681 P R E L I M I N A R Y FN091065, R VS5 N VS6 N UMBER EVISION ERVICE ANUAL 8-6-9 PIB (Probe Interface Board) Board Replacement Procedure (cont’d) 8-6-9-5 PIB Board Installation Procedure NOTE: When performing the following installation procedure steps, it may be helpful to review the movie clips previously referenced in the 8-6-9-4 "PIB Board Removal Procedure"...
- Page 682 Use the appropriate Phillips and flat screwdrivers, as indicated in the board replacement procedures. 8-6-10-2 Time Required 15 minutes 8-6-10-3 Preparations Shut down the Vivid S5 N or Vivid S6 N ultrasound unit, as described in 4-2-3 "Power Shut Down" on page 4-7. 8-6-10-4 TR32 and RFI Boards Removal Procedure 1) Remove the system left and right side covers, as described in the 8-2-3-3 "Left Side Cover Removal...
- Page 683 P R E L I M I N A R Y FN091065, R VS5 N VS6 N UMBER EVISION ERVICE ANUAL 8-6-10 TR32 and RFI Boards Replacement Procedure (cont’d) 7) Loosen and remove the 10 Phillips screws that fasten the RFI board in position - Figure 8-192.
- Page 684 P R E L I M I N A R Y FN091065, R VS5 N VS6 N UMBER EVISION ERVICE ANUAL NOTE: Although the securing screws have been removed from the RFI Board (step 7), it is still secured on the cabinet cage assembly by way of a metal spline. It is necessary to perform the next step in order to release the RFI Board and so facilitate its removal from the cage assembly.
- Page 685 P R E L I M I N A R Y FN091065, R VS5 N VS6 N UMBER EVISION ERVICE ANUAL 12.)Detach the RFI Board from the TR32 Boards (separate by gently pulling them apart), as shown in Figure 8-196 below.
- Page 686 P R E L I M I N A R Y FN091065, R VS5 N VS6 N UMBER EVISION ERVICE ANUAL 8-6-10-5 TR32 and RFI Boards Installation Procedure NOTE: This procedure applies to replacement of one or more of the defective boards (TR32A and/or TR32B and/or RFI).
- Page 687 P R E L I M I N A R Y FN091065, R VS5 N VS6 N UMBER EVISION ERVICE ANUAL 2) Re-connect the two TR32 Boards to each other (gently press together as shown in Figure 8-201). Figure 8-201 Reattaching the Two TR32 Boards to Each Other 3.) Prepare the RFI Board by applying a strip of Kapton tape to each of the two areas illustrated in Figure 8-202 Kapton Tape...
- Page 688 P R E L I M I N A R Y FN091065, R VS5 N VS6 N UMBER EVISION ERVICE ANUAL 4.) Attach the TR32 Boards to the RFI Board by gently pressing the two parts together as shown in Figure 8-203.
- Page 689 P R E L I M I N A R Y FN091065, R VS5 N VS6 N UMBER EVISION ERVICE ANUAL 8) Return and fasten the 10 screws (previously removed) to secure the RFI board in position - refer to Figure 8-192.
- Page 690 Use the appropriate flat and Phillips-type screwdrivers, as indicated in the fan replacement procedure. 8-6-11-2 Time Required 15 minutes 8-6-11-3 Preparation Shut down the Vivid S5 N or Vivid S6 N ultrasound unit, as described in 4-2-3 "Power Shut Down" on page 4-7. 8-6-11-4 Fan and Fan Board Removal Procedure 1) Remove the system left and right side covers, as described in the 8-2-3-3 "Left Side Cover Removal...
- Page 691 P R E L I M I N A R Y FN091065, R VS5 N VS6 N UMBER EVISION ERVICE ANUAL 8-6-11 Fans and Fan Board Replacement Procedure (cont’d) 5) Carefully remove the fan by pulling it towards you. Leave each of the blue-colored shock absorbers in position on the mounting pin at each of the four corners (see Figure 8-206 on page 8-165).
- Page 692 P R E L I M I N A R Y FN091065, R VS5 N VS6 N UMBER EVISION ERVICE ANUAL 8-6-11 Fans and Fan Board Replacement Procedure (cont’d) 8-6-11-5 Fan and Fan Board Installation Procedure NOTE: When performing the following installation procedure steps, it may be helpful to review the movie clip previously referenced in the Fan and Fan Board Removal Procedure.
- Page 693 Use the appropriate flat and Phillips-type screwdrivers, and a suitably-sized T-Handle Hex Wrench, as indicated in the Peripherals AC Outlet Connectors Panel replacement procedure. 8-6-12-2 Preparation Shut down the Vivid S5 N or Vivid S6 N ultrasound unit, as described in 4-2-3 "Power Shut Down" on page 4-7.
- Page 694 P R E L I M I N A R Y FN091065, R VS5 N VS6 N UMBER EVISION ERVICE ANUAL 6.) Release the cable clamps using a T-Handle Hex Wrench (or socket with extension piece) - see Figure 8-209. Figure 8-209 Releasing the Cable Clamps NOTE: Keep the cable clamps for the installation procedure and note the order of removal of the various spring...
- Page 695 P R E L I M I N A R Y FN091065, R VS5 N VS6 N UMBER EVISION ERVICE ANUAL 8.) Disconnect the AC cable from the AC box - Figure 8-211 AC Cable Figure 8-211 Disconnecting the AC Cable from the AC Box 9.) Gently ease out the AC cable from behind the DIB (Figure 8-212) and remove the AC peripheral...
- Page 696 P R E L I M I N A R Y FN091065, R VS5 N VS6 N UMBER EVISION ERVICE ANUAL 10.)Disconnect the power cable from the default printer - Figure 8-213. Printer Power Cable Figure 8-213 Disconnecting the Printer Power Cable 11.)Remove the AC Outlet Peripheral Connectors Panel.
- Page 697 P R E L I M I N A R Y FN091065, R VS5 N VS6 N UMBER EVISION ERVICE ANUAL 6.) Reconnect the ground cables and replace the tie-wraps previously removed. 7.) Replace the cable clamps. 8.) Reconnect any peripherals previously connected to the system. 9.) Return the system bottom rear cover, as described in the “Bottom Rear Cover Installation Procedure”...
- Page 698 Use the appropriate flat and Phillips-type screwdrivers and a wire cutter as indicated in the Sub-woofer replacement procedure. 8-6-13-2 Preparation Shut down the Vivid S5 N or Vivid S6 N ultrasound unit, as described in 4-2-3 "Power Shut Down" on page 4-7.
- Page 699 P R E L I M I N A R Y FN091065, R VS5 N VS6 N UMBER EVISION ERVICE ANUAL 6.) Remove the Sub-woofer from the top of the AC Distribution box (together with the cable attached) - see Figure 8-217.
- Page 700 Use the appropriate flat and Phillips-type screwdrivers and a wire cutter as indicated in the DIB replacement procedure. 8-6-14-2 Preparation Shut down the Vivid S5 N or Vivid S6 N ultrasound unit, as described in 4-2-3 "Power Shut Down" on page 4-7.
- Page 701 P R E L I M I N A R Y FN091065, R VS5 N VS6 N UMBER EVISION ERVICE ANUAL 8-6-14 DIB (Distribution Interface Board) Replacement Procedure (cont’d) NOTE: Refer also to the schematic diagram in Figure 8-219. R2419175-2 R2419151 DVR PWR R2419174...
- Page 702 P R E L I M I N A R Y FN091065, R VS5 N VS6 N UMBER EVISION ERVICE ANUAL 8-6-14 DIB (Distribution Interface Board) Replacement Procedure (cont’d) 8) While carefully lifting the DIB Box upwards, disconnect the LAN cable connection from underneath then remove the DIB Box from the system - see Figure 8-221 below.
- Page 703 Use the appropriate flat and Phillips-type screwdrivers as indicated in the AC Distribution Box replacement procedure. 8-6-15-2 Preparation Shut down the Vivid S5 N or Vivid S6 N ultrasound unit, as described in 4-2-3 "Power Shut Down" on page 4-7.
- Page 704 P R E L I M I N A R Y FN091065, R VS5 N VS6 N UMBER EVISION ERVICE ANUAL AC Box Supporting Screws Ground Leads Disconnect Power Cables Figure 8-223 AC Distribution Box Secured with Two Supporting Screws 3.) Disconnect the two power cables (seen in Figure 8-223) from the AC Box by squeezing the plastic...
- Page 705 P R E L I M I N A R Y FN091065, R VS5 N VS6 N UMBER EVISION ERVICE ANUAL 8-6-15-4 AC Distribution Box (Type B) Installation Procedure 1.) Fasten the ground lead (previously disconnected from the AC Distribution Box that has been removed) to the new AC Distribution Box - as illustrated (on left) in Figure 8-225.
- Page 706 It is necessary to blank the two AC Outlet ports (previously used for connection of peripherals) on the Vivid S5 N / Vivid S6 N Left Rear Cover, using the plastic AC Outlet Cover (P/N 5446701) which is supplied in the AC Distribution Box Kit. In addition, a plain white label is used to cover the power details (Max.
- Page 707 Use the appropriate flat and Phillips-type screwdrivers as indicated in the AC Distribution Box replacement procedure. 8-6-16-2 Preparation Shut down the Vivid S5 N or Vivid S6 N ultrasound unit, as described in 4-2-3 "Power Shut Down" on page 4-7.
- Page 708 P R E L I M I N A R Y FN091065, R VS5 N VS6 N UMBER EVISION ERVICE ANUAL AC Box Supporting Screws Ground Leads Disconnect Power Cables Figure 8-229 AC Distribution Box Secured with Two Supporting Screws 2.) Disconnect the two power cables (seen in Figure 8-233) from the AC Box by squeezing the plastic...
- Page 709 P R E L I M I N A R Y FN091065, R VS5 N VS6 N UMBER EVISION ERVICE ANUAL 3.) Return the two supporting screws (previously removed) to their positions and fasten them securely (shown in Figure 8-229). 4.) Connect the Printer power cable (PN5448872) to the printer and attach it to the system chassis using the retaining clips previously installed.
- Page 710 Use the appropriate flat and Phillips-type screwdrivers as indicated in the AC Distribution Box replacement procedure. 8-6-17-2 Preparation Shut down the Vivid S5 N or Vivid S6 N ultrasound unit, as described in 4-2-3 "Power Shut Down" on page 4-7.
- Page 711 P R E L I M I N A R Y FN091065, R VS5 N VS6 N UMBER EVISION ERVICE ANUAL AC Box Supporting Screws Ground Leads Disconnect Power Cables Figure 8-233 AC Box Secured with Two Supporting Screws 2.) Disconnect the two power cables (seen in Figure 8-233) from the AC Box by squeezing the plastic retainer clips inwards...
- Page 712 P R E L I M I N A R Y FN091065, R VS5 N VS6 N UMBER EVISION ERVICE ANUAL 5.) Remove the Fan Assembly as follows: a.) Unscrew the four retaining screws indicated in Figure 8-235. b.) Remove the fan protecting grid and carefully pull the Fan Assembly away from the AC Box chassis.
- Page 713 P R E L I M I N A R Y FN091065, R VS5 N VS6 N UMBER EVISION ERVICE ANUAL 8-6-17-4 AC Distribution Box (Type A) Installation Procedure 1.) Inspect the rubber bumpers on the AC Box housing (see Figure 8-235) and if necessary, replace.
- Page 714 P R E L I M I N A R Y FN091065, R VS5 N VS6 N UMBER EVISION ERVICE ANUAL Note: When reconnecting the ground leads, there are two spring washers that should be installed in the order shown in Figure 8-237.
-
Page 715: Mechanical Components Replacement Procedures
P R E L I M I N A R Y FN091065, R VS5 N VS6 N UMBER EVISION ERVICE ANUAL Section 8-7 Mechanical Components Replacement Procedures 8-7-1 Foot Rest Replacement Procedure 8-7-1-1 Tools None 8-7-1-2 Preparations None 8-7-1-3 Foot Rest Removal Procedure NOTE: The Foot Rest is secured in position on the front of the system, between the wheelbase: Foot Rest... - Page 716 P R E L I M I N A R Y FN091065, R VS5 N VS6 N UMBER EVISION ERVICE ANUAL 8-7-1 Foot Rest Replacement Procedure (cont’d) Bolt Hinge Securing Pin Slide hinge in this direction Figure 8-239 Bolt Hinge Securing Foot Rest to Wheelbase 2.) Release the other side of the foot rest from the securing pin on the left side - see Figure 8-239.
- Page 717 P R E L I M I N A R Y FN091065, R VS5 N VS6 N UMBER EVISION ERVICE ANUAL 8-7-2 Brake and Swivel Locking Wheels Replacement Procedure NOTE: The procedure below is the same whether replacing a Brake Locking Wheel (Front Wheel: P/N S2420671) or a Swivel Locking Wheel (Rear Wheel: P/N S2420672).
- Page 718 P R E L I M I N A R Y FN091065, R VS5 N VS6 N UMBER EVISION ERVICE ANUAL 8-7-2-4 Brake and Swivel Locking Wheels Installation Procedure 1) Carefully lift the chassis sufficiently to allow insertion of the replacement wheel shaft into the wheel securing socket.
- Page 719 Use the appropriate flat and Phillips-type screwdrivers as indicated in the Lower Arm replacement procedure. 8-7-3-2 Preparations Shut down the Vivid S5 N or Vivid S6 N ultrasound unit, as described in 4-2-3 "Power Shut Down" on page 4-7. 8-7-3-3 Lower Arm Removal Procedure 1) Working from the front of the system, raise the console to the maximum up position.
- Page 720 P R E L I M I N A R Y FN091065, R VS5 N VS6 N UMBER EVISION ERVICE ANUAL 8-7-3 Lower Arm Replacement Procedure (cont’d) 4.) While moving the keyboard slightly up and down with one hand, use the screwdriver to push the securing pin all the way out of the base of the operator panel, as shown in Figure 8-243 below.,...
- Page 721 P R E L I M I N A R Y FN091065, R VS5 N VS6 N UMBER EVISION ERVICE ANUAL 6) Lower the arm to access the lower securing pins as shown in Figure 8-245 and remove the securing clips on either side of the lower arm.
- Page 722 P R E L I M I N A R Y FN091065, R VS5 N VS6 N UMBER EVISION ERVICE ANUAL 10) Remove the Lower Arm from the system, as shown in Figure 8-247. Figure 8-247 Removing the Lower Arm 8-7-3-4 Lower Arm Installation Procedure NOTE:...
- Page 723 P R E L I M I N A R Y FN091065, R VS5 N VS6 N UMBER EVISION ERVICE ANUAL 5) Lower the console and raise the Lower Arm to insert the upper support pin previously removed Figure 8-248. Figure 8-248 Raising Lower Arm to Reconnect with Upper Arm (Console not shown) 6.) While moving the console slightly up and down with one hand, insert the securing pin (previously removed) - refer to...
- Page 724 8-7-4-1 Tools Use the appropriate flat and Phillips type screwdrivers and the appropriate Allen keys. 8-7-4-2 Preparation Shut down the Vivid S5 N or Vivid S6 N ultrasound unit, as described in 4-2-3 "Power Shut Down" on page 4-7. 8-7-4-3...
- Page 725 P R E L I M I N A R Y FN091065, R VS5 N VS6 N UMBER EVISION ERVICE ANUAL 6.) Using an Allen key, unscrew each locking screw on either side of the support arm - Figure 8-250. Figure 8-250 Releasing the Securing Screws on Either Side of the Support Arm 7.) Tap out the internal supporting pin using a screwdriver - Figure...
- Page 726 P R E L I M I N A R Y FN091065, R VS5 N VS6 N UMBER EVISION ERVICE ANUAL 8.) Similarly, remove the upper gas spring securing pin and use a screwdriver to support the joint - Figure 8-252.
- Page 727 P R E L I M I N A R Y FN091065, R VS5 N VS6 N UMBER EVISION ERVICE ANUAL 8-7-4-4 Gas Spring Installation Procedure NOTE: The gas spring is supplied without the top connecting bracket - see Figure 8-253.
- Page 728 P R E L I M I N A R Y FN091065, R VS5 N VS6 N UMBER EVISION ERVICE ANUAL shown in Figure 8-254. 7.) Applying Loctite, insert the first locking screw previously removed and screw it in until it just touches the supporting pin.
- Page 729 Tools Use the appropriate Allen key as indicated in the Probe Cable Holder replacement procedure. 8-7-5-2 Preparations Shut down the Vivid S5 N or Vivid S6 N ultrasound unit, as described in 4-2-3 "Power Shut Down" on page 4-7. 8-7-5-3 Probe Cable Holder Removal Procedure 1) Raise the console to the maximum up position.
- Page 730 P R E L I M I N A R Y FN091065, R VS5 N VS6 N UMBER EVISION ERVICE ANUAL 8-7-5-4-1 Routing the Probe Cables When routing the probe cables, it is important to lead the cables upwards from the system’s connecting ports as shown in Figure 8-256.
- Page 731 Figure 8-259. Figure 8-259 AC Power Cable Connected and Routed NOTE: Whenever moving the Vivid S5 N / Vivid S6 N scanner, make sure the system is prepared correctly, as shown in Figure 8-260 on page 8-206. Chapter 8 - Replacement Procedures...
- Page 732 Figure 8-260, with the monitor screen folded downwards. Figure 8-260 Vivid S5 N / Vivid S6 N Scanner and Cables - Ready for Moving 7.) Turn ON power to the system. 8.) Check for proper up/down and side-to-side movement of the operator panel and monitor, as described in “Mechanical Functional Tests”...
-
Page 733: Software Loading
The PMC software is automatically updated with the system upgrade. NOTE: It is essential to back-up the archive and the settings as described in the Vivid S5 N or Vivid S6 N User Manual, before commencing software installation (or whenever upgrading the software). - Page 734 Software Upgrade Procedure Overview (cont’d) IMPORTANT Before performing a Vivid S5 N / Vivid S6 N Software Upgrade from Version BT11 to NOTICE BT12, it is mandatory to backup the Archive, then format and partition the Hard Disk (due to partitioning changes).
- Page 735 At the site, perform the following steps before you start the upgrade procedure: 1.) Perform Disk Management for all database records and select the “Copy” option (for instructions, refer to the Vivid S5 N / Vivid S6 N User Manual on your document media). NOTE: It is recommended that Disk Management be executed using the “move”...
- Page 736 P R E L I M I N A R Y FN091065, R VS5 N VS6 N UMBER EVISION ERVICE ANUAL 8-8-2 Preparation (cont’d) Modifying BIOS Settings prior to Software Installation NOTE: This preparation procedure is required to enable system reboot from the USB Flash Drive containing the system software.
- Page 737 P R E L I M I N A R Y FN091065, R VS5 N VS6 N UMBER EVISION ERVICE ANUAL 8-8-2 Preparation (cont’d) 4.) Under Advanced, select Display Control, then press <Enter>. Figure 8-262 Changing Display Control Mode 5.) From the available options, change the Display Mode to CRT+LCD. Figure 8-263 Display Mode - CRT+LCD 6.) Check that Flat Panel Type is set to SVGA.
- Page 738 P R E L I M I N A R Y FN091065, R VS5 N VS6 N UMBER EVISION ERVICE ANUAL 8-8-2 Preparation (cont’d) 7.) Click the Exit menu and select Exit Saving Changes. 8.) When prompted, click Yes to confirm and exit. Figure 8-265 Exiting BIOS Settings and Saving Changes 9.) Return to step 5...
- Page 739 NOTE: The following upgrade procedure is based on the Vivid S6 N system. The procedure is the same for the Vivid S5 N system (displayed screens will of course reflect Vivid S5 N information). NOTE: During the software installation procedure, it is important to observe the USB Flash Drive connected to the front of the Operator Panel and make sure the LED is blinking.
- Page 740 P R E L I M I N A R Y FN091065, R VS5 N VS6 N UMBER EVISION ERVICE ANUAL Table 8-2 Step-by-Step Software Upgrade/Installation/Reinstallation Procedure (cont’d) 2 of 9 Step Instruction Expected Result Proceed with the Software Installation process by File loading starts.
- Page 741 P R E L I M I N A R Y FN091065, R VS5 N VS6 N UMBER EVISION ERVICE ANUAL Table 8-2 Step-by-Step Software Upgrade/Installation/Reinstallation Procedure (cont’d) 3 of 9 Step Instruction Expected Result Press [Yes] or [No], as applicable. The message window closes;...
- Page 742 P R E L I M I N A R Y FN091065, R VS5 N VS6 N UMBER EVISION ERVICE ANUAL Table 8-2 Step-by-Step Software Upgrade/Installation/Reinstallation Procedure (cont’d) 4 of 9 Step Instruction Expected Result When all files have been copied, the following options are displayed: Select the following option: The following Warning message is displayed: Reboot Machine...
- Page 743 P R E L I M I N A R Y FN091065, R VS5 N VS6 N UMBER EVISION ERVICE ANUAL Table 8-2 Step-by-Step Software Upgrade/Installation/Reinstallation Procedure (cont’d) 5 of 9 Step Instruction Expected Result IMPORTANT. The system reboots and then begins the software installation process. Perform these steps before proceeding! This stage of the process takes approximately 20 minutes, during which time a progress indicator is displayed, as shown in the example below:...
- Page 744 P R E L I M I N A R Y FN091065, R VS5 N VS6 N UMBER EVISION ERVICE ANUAL Table 8-2 Step-by-Step Software Upgrade/Installation/Reinstallation Procedure (cont’d) 6 of 9 Step Instruction Expected Result The system automatically reboots, then displays the following screens 8-218 Section 8-8 - Software Loading...
- Page 745 P R E L I M I N A R Y FN091065, R VS5 N VS6 N UMBER EVISION ERVICE ANUAL Table 8-2 Step-by-Step Software Upgrade/Installation/Reinstallation Procedure (cont’d) 7 of 9 Step Instruction Expected Result Note: The last screen shown on the right is displayed for a long time.
- Page 746 P R E L I M I N A R Y FN091065, R VS5 N VS6 N UMBER EVISION ERVICE ANUAL Table 8-2 Step-by-Step Software Upgrade/Installation/Reinstallation Procedure (cont’d) 8 of 9 Step Instruction Expected Result At the end of the software installation, the Software License dialog box appears. Type in the option key that you received from the OTR The system will boot-up into Normal scanning mode.
- Page 747 P R E L I M I N A R Y FN091065, R VS5 N VS6 N UMBER EVISION ERVICE ANUAL Table 8-2 Step-by-Step Software Upgrade/Installation/Reinstallation Procedure (cont’d) 9 of 9 Step Instruction Expected Result Verify the Application Software version corresponds with the System Software version you have installed (check against the label on the USB Flash Drive) and that it was correctly installed.
- Page 748 P R E L I M I N A R Y FN091065, R VS5 N VS6 N UMBER EVISION ERVICE ANUAL 8-8-4 Vivid™ S5 N and Vivid™ S6 N Software Re-Installation Procedure Table 8-3 Vivid™ S5 N and Vivid™ S6 N Software Re-Installation Step Instruction Expected Result...
- Page 749 P R E L I M I N A R Y FN091065, R VS5 N VS6 N UMBER EVISION ERVICE ANUAL Table 8-3 Vivid™ S5 N and Vivid™ S6 N Software Re-Installation (cont’d) Step Instruction Expected Result When prompted, type the following password: A message is displayed showing the current system ID;...
- Page 750 P R E L I M I N A R Y FN091065, R VS5 N VS6 N UMBER EVISION ERVICE ANUAL Table 8-3 Vivid™ S5 N and Vivid™ S6 N Software Re-Installation (cont’d) Step Instruction Expected Result Press any key to begin the PMC upgrade. The PMC upgrade commences and the following screen with current PMC version and colored progress bar is displayed: When done (after several minutes), the screen will turn blank and the fans will...
- Page 751 P R E L I M I N A R Y FN091065, R VS5 N VS6 N UMBER EVISION ERVICE ANUAL Table 8-3 Vivid™ S5 N and Vivid™ S6 N Software Re-Installation (cont’d) Step Instruction Expected Result Navigate to the TCPIP tab and press the Set button on Connectivity dialog box - TCPIP tab activated: the control panel.
- Page 752 NOTE: This procedure is valid for Vivid S5 N / Vivid S6 N systems running BT12 software later than Build 31. As described in the procedure below, it is not necessary to reinstall the software since the option is provided to load only the latest version of the User Manuals (in all languages).
- Page 753 FN091065, R VS5 N VS6 N UMBER EVISION ERVICE ANUAL Table 8-4 Loading Latest Version Vivid S5 N / Vivid S6 N User Manuals(cont’d) Step Instruction Expected Result Select the following option: The following message is displayed: Update User Manual) then press <Enter>.
- Page 754 P R E L I M I N A R Y FN091065, R VS5 N VS6 N UMBER EVISION ERVICE ANUAL 8-8-6 Setting the BIOS NOTE: This procedure is applicable to MODBR964 version. NOTE: To reset the BIOS password, one can remove the real time battery for a period longer than 10 secs, then reconnect it.
- Page 755 P R E L I M I N A R Y FN091065, R VS5 N VS6 N UMBER EVISION ERVICE ANUAL 12) Perform the following changes in the <Boot>: Option Value Comments \Boot\ATX AC Power Boot Mode Desktop \Boot\Boot Device Priority \Boot\ Boot Device Priority 1 - st Boot device Highlight CDROM Drive, Hold CDROM Drive...
- Page 756 8-8-7 Formatting and Partitioning the Hard Disk - Automatic Procedure NOTE: This procedure is applicable to Vivid S5 N / Vivid S6 N systems running software version BT12. Table 8-5 Formatting and Partitioning the Hard Disk - Automatic Procedure Step...
- Page 757 P R E L I M I N A R Y FN091065, R VS5 N VS6 N UMBER EVISION ERVICE ANUAL Table 8-5 Formatting and Partitioning the Hard Disk - Automatic Procedure Step Instruction Expected Result Press [Y] to confirm the Hard Disk formatting command. Hard Disk formatting commences. During this process, a visual indication of progress is displayed on the screen: When Hard Disk formatting is complete, the system automatically reboots.
- Page 758 1.) Boot up the system into Maintenance mode and exit to the Windows desktop. 2.) Insert the Vivid S5 N / Vivid S6 N KB Firmware software disk (P/N 5402933) into the DVD drive. 3.) Navigate to My Computer, drive I:\ .
- Page 759 IMPORTANT: Contact the customer and request that a full incremental back-up be performed prior to NOTICE upgrade. If necessary, refer them to the Vivid S5 N or Vivid S6 N User Manual. Ask for removal (delete) of un-necessary patient information, so that the back-up process will require minimal time.
-
Page 760: Peripherals - Replacement Procedures
P R E L I M I N A R Y FN091065, R VS5 N VS6 N UMBER EVISION ERVICE ANUAL Section 8-9 Peripherals - Replacement Procedures 8-9-1 Wireless USB Network Adaptor Replacement Procedure NOTE: This section describes removal and replacement procedures only. For initial installation and configuration instructions, refer to the information provided in Chapter 3 - System Setup. - Page 761 P R E L I M I N A R Y FN091065, R VS5 N VS6 N UMBER EVISION ERVICE ANUAL 8-9-1 Wireless USB Network Adaptor Replacement Procedure (cont’d) USB Connector Wireless Network Adaptor Figure 8-268 Wireless USB Network Adaptor Connected to Rear of Scanner 8-9-1-5 Wireless USB Network Adaptor Installation Procedure 1.) Place the Wireless USB Network Adaptor against the rear of the system with the velcro facing...
- Page 762 4-7. 8-9-2-4 DVD/CD-RW Drive Removal Procedure 1) Remove the Vivid S5 N or Vivid S6 N left and right side covers, as described in the “Left Side Cover Removal Procedure” on page 8-6 “Right Side Cover Removal Procedure” on page 8-5.
- Page 763 P R E L I M I N A R Y FN091065, R VS5 N VS6 N UMBER EVISION ERVICE ANUAL 8-9-2 DVD/CD-RW Drive Replacement Procedure (cont’d) 6.) Disconnect the DVD USB cable and the DVD power cable from the rear of the DVD /CD-RW Drive, as indicated in Figure 8-270.
- Page 764 USB port on the chassis i.e. the port that was previously occupied by the old DVD/ CD cable. 2.) Connect the new DVD cable as follows: 3.) Plug the D-type connector into its connector on the Vivid S5 N/Vivid S6 Nchassis - see Figure 8-272.
- Page 765 “Front Cover Installation Procedure” on page 8-19. 9.) Return the Vivid S5 N or Vivid S6 N left and right side covers, as described in the “Left Side Cover Installation Procedure” on page 8-7 “Right Side Cover Installation Procedure” on page 8-5.
- Page 766 8-9-3-5 MOD Drive Installation Procedure 1.) Place the MOD Drive either on the tray at the rear of the Vivid S5 N or Vivid S6 N scanner, or on a flat, stable surface close to the scanner. 2.) Using the power cable (provided with the MOD Drive), connect one end to the power IN socket at rear of the MOD Drive and the other to one of the peripheral power outlets at the rear of the scanner.
- Page 767 P R E L I M I N A R Y FN091065, R VS5 N VS6 N UMBER EVISION ERVICE ANUAL 3.) Connect the USB cable between the USB port at the rear of the MOD Drive and either of the USB ports (upper or lower) on the scanner rear connectors panel.
- Page 768 Figure 8-277 on page 8-243. 2) Disconnect the power cable from the mains power outlet. 3) Disconnect the External USB Hard Disk from the USB port on the Vivid S5 N / Vivid S6 N system. 4) Remove the unit. NOTE: If the External USB Hard Disk is filled with data, store it in a safe place and label it with the date, and a note that the drive is full.
- Page 769 P R E L I M I N A R Y FN091065, R VS5 N VS6 N UMBER EVISION ERVICE ANUAL External USB Hard Disk - Rear View Power IN Cable Power OUT Cable AC/DC Power Converter and Cables Figure 8-277 External USB Hard Disk - Rear View and Cables IN THE EVENT THAT THE AC/DC POWER CONVERTER AND CABLES HAVE BEEN WARNING WARNING...
- Page 770 NOTE: Only connect one USB storage device (like this External USB Hard Disk) to the Vivid S5 N / Vivid S6 N scanner at a time. Follow these steps to set the Volume Name: 1) Connect the USB cable from the External USB Hard Disk to a laptop or PC.
- Page 771 P R E L I M I N A R Y FN091065, R VS5 N VS6 N UMBER EVISION ERVICE ANUAL Figure 8-279 Removable Disk Shown under My Computer 4) Right-click the drive name (Removable Disk) and select Rename from the menu. Figure 8-280 Select Rename from the Drop-down Menu 5) Enter the name you have decided to use for the drive.
- Page 772 Connecting the External USB Hard Disk to the Vivid S5 N or Vivid S6 N Scanner 1) Connect the USB cable to a USB port on the Vivid S5 N or Vivid S6 N scanner. 2.) Turn ON power to the Vivid S5 N or Vivid S6 N ultrasound scanner.
- Page 773 4-7. 8-9-5-4 Black and White Printer Removal Procedure 1) Remove the Vivid S5 N or Vivid S6 N left and right side covers, as described in the “Left Side Cover Removal Procedure” on page 8-6 “Right Side Cover Removal Procedure” on page 8-5.
- Page 774 P R E L I M I N A R Y FN091065, R VS5 N VS6 N UMBER EVISION ERVICE ANUAL 8-9-5 Black and White Printer Replacement Procedure (cont’d) Screws this side not visible in illustration Black and White Printer Figure 8-283 Screws Securing Black and White Printer in Compartment 5.) Using a small screwdriver, release the metal securing plate and slide it out of the compartment, as shown in...
- Page 775 “Front Cover Installation Procedure” on page 8-19. 7) Return the Vivid S5 N or Vivid S6 N left and right side covers, as described in the “Left Side Cover Installation Procedure” on page 8-7 “Right Side Cover Installation Procedure” on page 8-5.
- Page 776 4-7. 8-9-6-4 Peripherals Console Removal Procedure 1) Remove the Vivid S5 N or Vivid S6 N left and right side covers, as described in the “Left Side Cover Removal Procedure” on page 8-6 “Right Side Cover Removal Procedure” on page 8-5.
- Page 777 P R E L I M I N A R Y FN091065, R VS5 N VS6 N UMBER EVISION ERVICE ANUAL 8-9-6-5 Peripherals Console Installation Procedure 1. Remove the DVD/CD-RW drive securing bracket from the new peripherals console as shown in Figure 8-287.
- Page 778 “DVD/CD-RW Installation Procedure” on page 8-238. 6) Return the Vivid S5 N or Vivid S6 N left and right rear covers, as described in the “Left Rear Cover Installation Procedure” on page 8-16 “Right Rear Cover Installation Procedure” on page 8-12 7) Return the Vivid S5 N or Vivid S6 N front cover, as described in the “Front Cover Installation...
- Page 779 None 8-9-7-2 Time Required 20 minutes 8-9-7-3 Preparations Shut down the Vivid S5 N or Vivid S6 N ultrasound unit, as described in 4-2-3 "Power Shut Down" on page 4-7. 8-9-7-4 Digital Color Printer Removal Procedure 1.) Disconnect the USB cable from the scanner rear connectors panel, and from the USB port at the rear of the printer.
- Page 780 Digital Color Printer Installation Procedure 1.) Place the Digital Color Printer on a stable surface close to the Vivid S5 N or Vivid S6 N scanner. 2.) Using the power cable (provided with the printer), connect one end of the power cable to the power IN socket at rear of the printer, and the other end to the printer peripherals outlet at the rear of the scanner.
- Page 781 1.) Place the DeskJet Color Printer on a stable surface close to the Vivid S5 N or Vivid S6 N scanner. 2.) Using the AC adaptor and power cable (provided with the printer), connect one end of the power...
- Page 782 P R E L I M I N A R Y FN091065, R VS5 N VS6 N UMBER EVISION ERVICE ANUAL Figure 8-291 DeskJet Color Printer - Rear View 3.) Connect the USB cable between the USB port at the rear of the printer (Figure 8-291) and either of the USB ports (upper or lower) on the scanner rear connectors panel.
- Page 783 Chapter 9 Renewal Parts Section 9-1 Overview 9-1-1 Purpose of Chapter 9 This chapter gives you an overview of replacement parts for the Vivid S5 N and Vivid S6 N ultrasound scanner. Table 9-1 Contents in Chapter 9 Section Description...
- Page 784 P R E L I M I N A R Y FN091065, R VS5 N VS6 N UMBER EVISION ERVICE ANUAL Section 9-2 List of Abbreviations • Assy - Assembly • - Back End Processor • - Customer Replaceable Unit •...
- Page 785 P R E L I M I N A R Y FN091065, R VS5 N VS6 N UMBER EVISION ERVICE ANUAL Section 9-3 Covers Figure 9-1 Covers - Diagram 1 Table 9-2 Covers - Diagram 1 Item Part Name Part Number Description Cover: Bottom rear.
- Page 786 P R E L I M I N A R Y FN091065, R VS5 N VS6 N UMBER EVISION ERVICE ANUAL Section 9-3 Covers (cont’d) 114 115 Not shown 118 119 here Not shown here Figure 9-2 Covers - Diagram 2 Table 9-3 Covers - Diagram 2 Item Part Name...
- Page 787 P R E L I M I N A R Y FN091065, R VS5 N VS6 N UMBER EVISION ERVICE ANUAL Section 9-4 Mechanical Hardware Parts Figure 9-3 Mechanical Hardware Parts - Diagram 1 Table 9-4 Mechanical Hardware Parts - Diagram 1 Item Part Name Part Number...
- Page 788 P R E L I M I N A R Y FN091065, R VS5 N VS6 N UMBER EVISION ERVICE ANUAL Section 9-4 Mechanical Hardware Parts (cont’d) NOT USED Rear Wheel Front Wheel Figure 9-4 Mechanical Hardware Parts - Diagram 2 Table 9-5 Mechanical Hardware Parts - Diagram 2 Item Part Name...
- Page 789 P R E L I M I N A R Y FN091065, R VS5 N VS6 N UMBER EVISION ERVICE ANUAL Section 9-5 Electro Mechanical Parts Not shown here. Figure 9-5 Electro Mechanical Parts - Diagram 1 Table 9-6 Electronic Parts - Diagram 1 Item Part Name Part Number...
- Page 790 P R E L I M I N A R Y FN091065, R VS5 N VS6 N UMBER EVISION ERVICE ANUAL Section 9-6 Electronic Parts Figure 9-6 Electronic Parts - Diagram 1 Table 9-7 Electronic Parts - Diagram 1 Item Part Name Part Number Description...
- Page 791 P R E L I M I N A R Y FN091065, R VS5 N VS6 N UMBER EVISION ERVICE ANUAL Section 9-6 Electronic Parts (cont’d) TR32 Board Heat Sink Pad Figure 9-7 Electronic Parts - Diagram 2 Table 9-8 Electronic Parts - Diagram 2 Item Part Name Part Number...
- Page 792 P R E L I M I N A R Y FN091065, R VS5 N VS6 N UMBER EVISION ERVICE ANUAL Section 9-6 Electronic Parts (cont’d) 701 702 Not shown here Figure 9-8 Electronic Parts - Diagram 3 Table 9-9 Electronic Parts - Diagram 3 Item Part Name Part Number...
- Page 793 P R E L I M I N A R Y FN091065, R VS5 N VS6 N UMBER EVISION ERVICE ANUAL Section 9-7 Cables Table 9-10 Cables Item Part Name Part Number Description 1001 Cable: RFI to BEP flex S2418578 1002 Cable: BEP to Bridge S2420879...
- Page 794 P R E L I M I N A R Y FN091065, R VS5 N VS6 N UMBER EVISION ERVICE ANUAL Table 9-10 Cables (cont’d) Item Part Name Part Number Description Cable: B&W Printer USB to 1006 S2419132 Distribution 1007 Cable: BEP LAN to DIB S2419055 1008...
- Page 795 P R E L I M I N A R Y FN091065, R VS5 N VS6 N UMBER EVISION ERVICE ANUAL Table 9-10 Cables (cont’d) Item Part Name Part Number Description 1011 Cable: Internal ECG S2419034-2 1012 Cable: KB Data to Distribution S2419653 1013 Cable: Monitor DVI to Distribution...
- Page 796 P R E L I M I N A R Y FN091065, R VS5 N VS6 N UMBER EVISION ERVICE ANUAL Table 9-10 Cables (cont’d) Item Part Name Part Number Description Cable: Yellow Lead Europe & 1119 S2269983 Cable: Black Lead Europe & 1120 S2269983-2 1121...
- Page 797 P R E L I M I N A R Y FN091065, R VS5 N VS6 N UMBER EVISION ERVICE ANUAL Section 9-8 Software Table 9-11 Software Item Part Name Part Number Description Vivid S5N and Vivid S6 N Software and 1301 N5444462 SW and Doc disk on key (BT12)
- Page 798 P R E L I M I N A R Y FN091065, R VS5 N VS6 N UMBER EVISION ERVICE ANUAL Section 9-9 Probes Table 9-12 Probes 1 of 2 Item Part Name Part Number Description 2355686 1471 Probe: 3S - RS H4000PD 47237516 1472...
- Page 799 Probe: e8C - RS H40402LN 5116678 1490 Probe: i12L RS H40402LW 1491 PROBE RELEASE ARM CAP KIT S2422766 GE M4S/3S Probe Sterile Multi- 1492 E8385MZ Angle Biopsy Starter Kit 1493 3Sc-RS Biopsy Kit H45041FX 1494 4C - RS Biopsy Kit...
- Page 800 P R E L I M I N A R Y FN091065, R VS5 N VS6 N UMBER EVISION ERVICE ANUAL Section 9-10 Peripherals Table 9-13 Approved Peripherals Item Part Name Part Number Description 1501 DVD/CD-RW S2423870 Sony UP-D898MD Digital A6 BW 1502 5555265 Printer...
- Page 801 This chapter describes the Care and Maintenance (PM) procedures for the Vivid™ S5 N and Vivid™ S6 N Ultrasound system and its peripherals. These procedures are designed to protect your investment in the Vivid S5 N or Vivid S6 N system, and are intended to maintain the quality of system performance.
- Page 802 P R E L I M I N A R Y FN091065, R VS5 N VS6 N UMBER EVISION ERVICE ANUAL 10-1-3 Warnings THERE ARE SEVERAL PLACES INSIDE THE CAGE, THE BATTERY, DANGER THE AC DISTRIBUTION BOX, AND THE DISTRIBUTION INTERFACE BOARD (DIB) THAT COULD BE DANGEROUS.
- Page 803 Your GE HEALTHCARE Service Representative can help you with establishing, performing and maintaining records for a Quality Assurance program. Please contact us for details of your nearest GE HEALTHCARE Service Representative, who will provide a quotation for this service, as required.
- Page 804 It is the customer’s responsibility to ensure the Care and Maintenance procedures are performed on the Vivid S5 N or Vivid S6 N ultrasound scanner as scheduled in order to retain the high levels of safety, dependability, and system performance.
- Page 805 P R E L I M I N A R Y FN091065, R VS5 N VS6 N UMBER EVISION ERVICE ANUAL Table 10-2 Customer Care & Maintenance Task Schedule Service at Indicated Time Daily Weekly Monthly Annually Notes • Clean Probes •...
- Page 806 ERVICE ANUAL Section 10-4 System Maintenance 10-4-1 Preliminary Checks The preliminary checks take approximately 15 minutes to perform. Refer to the Vivid S5 N or Vivid S6 N User Manual whenever necessary. Table 10-3 System Preliminary Checks Item Description Ask & Listen Ask the customer if they have any problems or questions about the equipment.
- Page 807 EVISION ERVICE ANUAL 10-4-2 Functional Checks The functional checks take approximately 60 minutes to perform. Refer to the Vivid S5 N / Vivid S6 N User Manual whenever necessary. NOTE: Refer also to Chapter 4 - Functional Checks, for additional details about the functional checks described in this section.
- Page 808 Peripheral/Option Checks If any peripherals or options are not part of the system configuration, the check can be omitted. Refer to the Vivid S5 N or Vivid S6 N User Manual for a list of approved peripherals/options. Table 10-5 GE Approved Peripheral/Hardware Option Functional Checks...
- Page 809 Table 10-7 on page 10-10. • Do not use any solutions or products not listed in the Vivid S5 N or Vivid S6 N User Manual. • Do not spray any liquid directly onto the system covers, LCD Display or keyboard! •...
- Page 810 P R E L I M I N A R Y FN091065, R VS5 N VS6 N UMBER EVISION ERVICE ANUAL Table 10-7 Vivid™ S5 N and Vivid™ S6 N Systems - General Cleaning Step Item Description Covers On a weekly basis, moisten a soft, non-abrasive folded cloth or sponge with a mild, general purpose, non-abrasive soap and water solution.
- Page 811 10-4-4-2 Air Filter Cleaning Regular cleaning of the Vivid S5 N or Vivid S6 N scanner’s air filter will ensure that the filter does not become clogged - this would otherwise cause the system to overheat and reduce system performance and reliability.
- Page 812 P R E L I M I N A R Y FN091065, R VS5 N VS6 N UMBER EVISION ERVICE ANUAL 10-4-4-3 Mechanical Trackball Cleaning NOTE: The Trackball ring serves as a dust cover. 1.) Turn the trackball ring to loosen and remove it. Trackball ring 2.) Lift out the trackball.
- Page 813 P R E L I M I N A R Y FN091065, R VS5 N VS6 N UMBER EVISION ERVICE ANUAL 10-4-5 Physical Inspection Table 10-9 Physical Checks Step Item Description Labeling Verify that all system labeling is present and in readable condition. Scratches and Dents Inspect the system for dents, scratches or cracks.
- Page 814 7-108. (Vivid S6 N systems) Observe all warnings and cautions for battery handling, recharging, storing, and/or disposal, as listed in “Vivid S5 N / Vivid S6 N Battery Safety” on page 1-14. 10-4-6 Optional Diagnostic Checks To complete the periodic maintenance checks, perform the diagnostic tests as described in Chapter 7 - Diagnostics/Troubleshooting.
- Page 815 WARNING IMPROPER HANDLING MAY EASILY DAMAGE ULTRASOUND PROBES. SEE THE Vivid S5 N / Vivid S6 N USER MANUAL AND ALSO REFER TO THE PROBE MANUFACTURER’S HANDLING INSTRUCTIONS, FOR MORE DETAILS. FAILURE TO FOLLOW THESE PRECAUTIONS CAN RESULT IN SERIOUS INJURY AND EQUIPMENT DAMAGE.
- Page 816 10-5-4-1 Basic Probe Cleaning NOTE: For details on general probe cleaning, refer to the information provided in the Vivid S5 N or Vivid S6 N User Manual. NOTE: For specific probe cleaning instructions, refer to the individual probe Users Manual (or care card supplied with the probe).
- Page 817 P R E L I M I N A R Y FN091065, R VS5 N VS6 N UMBER EVISION ERVICE ANUAL 10-5-4-2 General Probe Cleaning Instructions Do not clean or immerse probes using any of the following products: WARNING WARNING •...
- Page 818 P R E L I M I N A R Y FN091065, R VS5 N VS6 N UMBER EVISION ERVICE ANUAL 10-5-4-2 General Probe Cleaning Instructions (cont’d) 10-5-4-2-1 Cleaning and Sterilizing Probes Used Externally Table 10-11 Cleaning & Sterilizing Procedure for Probes Used Externally Step Description To protect yourself from blood-borne diseases, wear approved, non-allergic disposable gloves.
- Page 819 Equipment being returned must be properly clean and free of blood and other potentially infectious contaminants. GE policy states that body fluids must be properly removed from any part or equipment prior to shipment. GE employees, as well as customers, are responsible for ensuring that parts/equipment have been properly decontaminated prior to shipment.
- Page 820 PERFORMED SAFETY TESTS E.G. LAST YEAR ETC. IN EVENT OF UNEXPLAINABLE ABRUPT CHANGES OF SAFETY-TEST RESULTS, CONSULT EXPERIENCED AUTHORIZED SERVICE PERSONNEL OR GE FOR FURTHER ANALYSIS. To avoid the risk of electrical shock, the unit under test must not be connected to other electrical CAUTION equipment.
- Page 821 The following limits are summarized for NFPA 99 (for USA) and IEC 60601-1 Medical Equipment Safety Standards. These limits are GE standards and in some cases are lower than the above standards listed. Table 10-13 Chassis Current Leakage Limits - Accessible Metal Surfaces...
- Page 822 P R E L I M I N A R Y FN091065, R VS5 N VS6 N UMBER EVISION ERVICE ANUAL 10-6-3 Outlet Test Wiring Arrangement - USA & Canada Test all outlets in the area for proper grounding and wiring arrangement by plugging in the neon outlet tester and noting the combination of lights that are illuminated.
- Page 823 2.) Connect one of the Ohmmeter probes to the tested AC wall outlet (Ground pin). 3.) Using the other Ohmmeter probe, touch the exposed metal part of the Vivid S5 N or Vivid S6 N unit. 4) Set the meter Function switch to the Resistance position.
- Page 824 P R E L I M I N A R Y FN091065, R VS5 N VS6 N UMBER EVISION ERVICE ANUAL 10-6-5 Chassis Current Leakage Test 10-6-5-1 Definition This test measures the current that would flow in a grounded person who touched accessible metal parts of the bedside station, if the Ground wire should break.
- Page 825 P R E L I M I N A R Y FN091065, R VS5 N VS6 N UMBER EVISION ERVICE ANUAL 10-6-5-3 Data Sheet for Chassis Source Current Leakage The Chassis Source Current Leakage Test passes when all readings measure less than the values shown Table 10-13.
- Page 826 Measurements should be made with the Ground Open and Closed, with power line polarity Normal and Reversed, and with the Vivid S5 N or Vivid S6 N unit ON and OFF. For each combination, the operating controls (such as, the lead switch) should be operated to find the worst case condition.
- Page 827 P R E L I M I N A R Y FN091065, R VS5 N VS6 N UMBER EVISION ERVICE ANUAL 10-6-7 Isolated Patient Lead (Source) Leakage – Lead-to-Lead NOTE: Refer to the procedure in the IEC 60601-1. 10-6-8 Isolated Patient Lead (Sink) Leakage - Isolation Test NOTE: Refer to the procedure in the IEC 60601-1.
- Page 828 P R E L I M I N A R Y FN091065, R VS5 N VS6 N UMBER EVISION ERVICE ANUAL 10-6-8-1 Data Sheet for ECG Current Leakage The test passes when all readings measure less than the values shown in the tables below. Table 10-17 Maximum Allowance Limit for ECG Lead Leakage Test to Ground Maximum Allowance Limit...
- Page 829 P R E L I M I N A R Y FN091065, R VS5 N VS6 N UMBER EVISION ERVICE ANUAL 10-6-9 Probe Current Leakage Test 10-6-9-1 Definition This test measures the current that would flow to Ground (from any of the probes) through a patient who is being scanned, and who becomes grounded by touching some other grounded surface.
- Page 830 Figure 10-6 Check Without Probe Adapter Follow these steps to test each transducer for current leakage. 1.) Turn the Vivid S5 N or Vivid S6 N unit OFF. 2.) Plug the unit into the test meter, and the meter into the tested AC wall outlet.
- Page 831 P R E L I M I N A R Y FN091065, R VS5 N VS6 N UMBER EVISION ERVICE ANUAL 10-6-9-4 Data Sheet for Transducer Source Current Leakage The test passes when all readings measure less than the values shown in Table 10-14 Table 10-15.
- Page 832 P R E L I M I N A R Y FN091065, R VS5 N VS6 N UMBER EVISION ERVICE ANUAL Section 10-7 Excessive Current Leakage 10-7-1 Possible Causes of Excessive Current Leakage 10-7-1-1 Chassis Fails Check the Ground on the power cord and plug for continuity. Ensure the Ground is not broken, frayed, or intermittent.
- Page 834 2013 and 2015, General Electric Company. © GE Vingmed Ultrasound AS P.O.Box: 141 NO 3191 HORTEN NORWAY www.gehealthcare.com...
Need help?
Do you have a question about the Vivid S5 N and is the answer not in the manual?
Questions and answers