Table of Contents
Advertisement
Quick Links
Advertisement
Table of Contents

Subscribe to Our Youtube Channel
Related Manuals for Inficon Micro GC Fusion 2-Module


Summary of Contents for Inficon Micro GC Fusion 2-Module
- Page 1 Operating Manual ® Micro GC Fusion Gas Analyzer 074-594-P1H...
- Page 2 INFICON Two Technology Place East Syracuse, NY 13057-9714...
-
Page 3: Table Of Contents
INFICON Table of Contents Table of Contents 1 Disclaimer and Copyright .......................... 11 2 Declaration of Conformity .......................... 12 3 Two Year Warranty............................ 14 4 Introduction.............................. 16 Overview.............................. 16 About Micro GC Fusion ........................ 17 Definition of Notes, Cautions and Warnings .................. 17 Cautions and Warnings When Using Micro GC Fusion............... 18 Theory of Operation.......................... - Page 4 Table of Contents INFICON 5.7.4.2 GC Module Interface Board .................... 41 JP-100 .............................. 42 Integrated Sample Conditioner ...................... 43 5.10 Specifications............................ 44 5.10.1 Physical Operating Requirements .................... 44 5.10.2 Sample Inlet .......................... 45 5.10.3 Integrated Sample Conditioner .................... 45 5.10.4 Gas Liquid Separator ........................ 45 5.10.5 Pressure Reducer and Gas Liquid Separator ................
- Page 5 INFICON Table of Contents 6.1.2 Carrier Gas Requirement...................... 57 6.1.3 Calibration Gas Requirement...................... 58 6.1.4 Sample Gas Pressure Range ..................... 59 6.1.5 Installation Space and Venting .................... 59 6.1.6 Power Requirement ........................ 60 6.1.7 Computer Hardware Requirement .................... 61 6.1.8 EZ IQ Computer Requirement .................... 61 6.1.9 Network Preparation ........................
- Page 6 Table of Contents INFICON Connecting the Power Supply ...................... 90 6.9.1 2-Module Micro GC Fusion ...................... 90 6.9.2 4-Module Micro GC Fusion ...................... 90 6.10 Carrier Gas Configuration........................ 91 6.11 Set Instrument Time .......................... 93 6.12 The AUX I/O Connector........................ 95 6.13 Valco Stream Selector .........................
- Page 7 INFICON Table of Contents Launch Software.......................... 149 Select and Load a Method or Sequence ................... 151 Run a Loaded Method or Sequence.................... 152 Stop a Sequence .......................... 153 View Results ............................ 154 View System Status........................... 156 Front Panel Language ........................ 157 9 Software Operation............................ 158...
- Page 8 Table of Contents INFICON 9.10.1.3 Toggle Chromatogram Information .................. 190 9.10.2 View Run Information and Acquisition Parameters.............. 191 9.10.3 Overlay Multiple Runs....................... 192 9.10.3.1 Toggle Chromatogram Information .................. 193 9.10.4 Filter ............................ 194 9.10.5 Search............................ 195 9.10.6 Export Runs .......................... 195 9.10.6.1 Export as JSON ....................... 196 9.10.6.2 Export as CSV........................ 197...
- Page 9 INFICON Table of Contents 9.13.3 Customize the CSV Script ...................... 244 9.13.4 Run the CSV Script........................ 245 9.13.4.1 Run the Script by Double-Clicking the csv-log.py File ............. 245 9.13.4.2 Run the Script Through the IDLE Editor................ 246 9.13.5 Viewing the CSV File ........................ 247 9.14 EZ IQ or OpenLab EZChrom Instrument Control ................
- Page 10 11.2.2.2 Correcting Instrument Parameter Settings - Recalibrating.......... 298 12 Service and Technical Support........................ 299 12.1 How to Contact Customer Support .................... 299 12.2 Returning Micro GC Fusion to INFICON ................... 299 12.3 Warranty Extension ........................... 299 12.4 Service Contract .......................... 300 13 Checkout Gases and Replacement Parts .................... 301 13.1 Checkout Gases ..........................
-
Page 11: Disclaimer And Copyright
The information contained in this manual is believed to be accurate and reliable. However, INFICON assumes no responsibility for its use and shall not be liable for any special, incidental, or consequential damages related to the use of this product. Due to our continuing program of product improvements, specifications are subject to change without notice. -
Page 12: Declaration Of Conformity
2 | Declaration of Conformity INFICON 2 Declaration of Conformity 12 / 319 074-594-P1H Micro GC Fusion Operating Man-... - Page 13 INFICON Declaration of Conformity | 2 074-594-P1H Micro GC Fusion Operating Manual 13 / 319...
-
Page 14: Two Year Warranty
Seller product was not designed nor against any defects due to plans or instructions supplied to the Seller by or for Buyer. This manual is intended for private use by INFICON Inc. and its customers. Contact INFICON before reproducing its contents. - Page 15 Two Year Warranty | 3 These instructions do not provide for every contingency that may arise in connection with the installation, operation or maintenance of this equipment. Should you require further assistance, please contact INFICON 074-594-P1H Micro GC Fusion Operating Manual 15 / 319...
-
Page 16: Introduction
4 | Introduction INFICON 4 Introduction 4.1 Overview Micro GC Fusion provides concentration measurement for: Fixed Gases: • nitrogen • oxygen • carbon monoxide • carbon dioxide • hydrogen • helium • neon • krypton Light Hydrocarbons: • methane • ethane, ethylene, acetylene •... -
Page 17: About Micro Gc Fusion
INFICON Introduction | 4 4.2 About Micro GC Fusion Micro GC Fusion is an analytical instrument that can accommodate multiple gas chromatograph (GC) modules, each performing GC analysis with individually optimized chromatographic conditions. The sample is introduced through the front sample inlet to optimize detection and separation on the GC modules using appropriate carrier gases. -
Page 18: Cautions And Warnings When Using Micro Gc Fusion
4 | Introduction INFICON WARNING High temperatures are present, which could result in personal injury. CAUTION Failure to head these messages could result in instrument damage or the loss of data. 4.4 Cautions and Warnings When Using Micro GC Fusion Misuse of Micro GC Fusion can damage the instrument and may cause bodily harm. - Page 19 INFICON Introduction | 4 CAUTION Ensure the Micro GC Fusion fan exhaust at the back of the instrument is not blocked and the air flow through the bottom of Micro GC Fusion is unobstructed. CAUTION Carrier gas inlet (rear of instrument) pressure must be between 400-427 kPa (58-62 psi).
- Page 20 Micro GC Fusion is not intrinsically safe and is not recommended for use in explosive environments. WARNING For rack mount installation, use only the INFICON supplied mounting kit. Using unspecified mounting hardware may result in personal injury caused by unstable instrument mounting.
- Page 21 INFICON Introduction | 4 WARNING Never interrupt the protective earth circuit on a 4-module Micro GC Fusion. Any interruption of the protective earth circuit inside or outside of the 4-module Micro GC Fusion, or disconnection of the protective earth terminal is likely to make the instrument dangerous.
-
Page 22: Theory Of Operation
4 | Introduction INFICON 4.5 Theory of Operation Gas chromatography is used to separate and analyze compounds in mixed gas samples. A typical GC module consists of four main subsystems: injection, separation, detection, and data system. 4.5.1 Injection A sample is introduced into a GC system through its injector. Micro GC Fusion accepts gas phase samples only at pressures ranging 0-172 kPa (0-25 psi). -
Page 23: Separation
INFICON Introduction | 4 4.5.2 Separation Component separation of a sample injected onto a column is achieved through the interaction between the sample and the column coating, also known as the stationary phase. The less retentive the column coating is to a specific compound, the faster that compound travels, or elutes, through the column. -
Page 24: Detection
4 | Introduction INFICON The capillary column installed in Micro GC Fusion is resistively heated to achieve temperature ramping, which quickly increases the column temperature to reduce analysis time and improve compound separation. Separation may be optimized by: • selecting the appropriate column coating type and thickness •... - Page 25 Ethernet or Wi-Fi on commerically available web browsers. Micro GC Fusion can also be controlled using INFICON EZ IQ or Agilent CDS OpenLab EZChrom software. See EZ IQ or OpenLab EZChrom Instrument Control [} 248] for details.
-
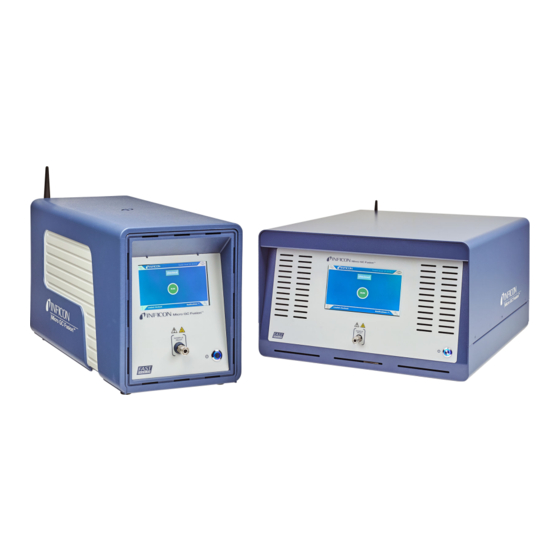
Page 26: Product Overview
5 | Product Overview INFICON 5 Product Overview Micro GC Fusion is available in two chassis configurations: • 2-module chassis, which can house one or two GC modules • 4-module chassis, which can house three or four GC modules The two chassis configurations share most of the hardware components. The following overview is applicable to both chassis configurations unless otherwise specified. - Page 27 INFICON Product Overview | 5 Number Label Description ANALYTICAL Vents for the analytical column(s) with 1/8 in. Swagelok connectors REFERENCE Vents for the reference columns(s) with 1/8 in. Swagelok connectors Wi-Fi Antenna Boosts wireless signal strength and improves connectivity HIGH PRESSURE...
-
Page 28: 4-Module Chassis
5 | Product Overview INFICON 5.2 4-Module Chassis The 4-module Micro GC Fusion chassis houses up to four analytical GC modules, electrical components and internal plumbing. The front panel display provides access to basic operating interfaces and controls. • Heated sample inlet ®... - Page 29 INFICON Product Overview | 5 Number Label Description SAMPLE INLET Optional 1/8 in. unheated rear sample inlet CARRIER C1, C2, C3 and C4 Carrier gas connections with 1/8 in. Swagelok connectors ANALYTICAL Vents for the analytical column(s) with 1/8 in. Swagelok connectors REFERENCE Vents for the reference column(s) with 1/8 in.
-
Page 30: Sample Inlets
5 | Product Overview INFICON 5.3 Sample Inlets Sample gas is introduced to Micro GC Fusion through a front sample inlet. Sample input pressure may range 0-172 kPa (0-25 psi), or up to 6,895 kPa (1,000 psi) when an optional Integrated Sample Conditioner is used. -
Page 31: Carrier Gas Connections
INFICON Product Overview | 5 5.4 Carrier Gas Connections Micro GC Fusion supports up to two external carrier gas connections from pressurized tanks for the 2-module chassis, and up to four external carrier gas connections for the 4-module chassis. Common carrier gases include: helium, hydrogen, argon, and nitrogen. - Page 32 5 | Product Overview INFICON CAUTION Carrier gas inlet (rear of instrument) pressure must be between 400-427 kPa (58-62 psi). Use a dual-stage regulator on the carrier gas cylinder to ensure the pressure range is maintained. Exceeding 565 kPa (82 psi) may damage Micro GC Fusion and require factory repair.
-
Page 33: Venting Connections
INFICON Product Overview | 5 5.5 Venting Connections Four types of venting connections are located on the back panel: • ANALYTICAL • REFERENCE • PUMP • HIGH PRESSURE PURGE VENT ANALYTICAL, REFERENCE, and PUMP vents require 1/8 in. Swagelok connectors. -
Page 34: Analytical Vent
5 | Product Overview INFICON 5.5.1 ANALYTICAL Vent The ANALYTICAL vents are used to vent the exhaust from the GC module analytical columns. 5.5.2 REFERENCE Vent The REFERENCE vents are used to vent the exhaust from the GC module reference columns. -
Page 35: Front Panel Display
INFICON Product Overview | 5 5.6 Front Panel Display The front panel display is used to load a stored method/sequence, run the loaded method/sequence, view run data, and view system status. For more details, see Front Panel Operation [} 149]. Complex operations such as method or sequence development require a separate computer with a larger display screen. -
Page 36: Gc Module
5 | Product Overview INFICON 5.7 GC Module A GC module is a self-contained gas chromatograph that can perform sample injection, separation, and detection. Up to two GC modules can be installed in a 2- module chassis or up to four GC modules can be installed in a 4-module chassis, each optimized to analyze different compounds from the same sample source. -
Page 37: Variable Volume Injector
INFICON Product Overview | 5 5.7.1.1 Variable Volume Injector Valid Inject (ms) time set points for the Variable Volume injector range from 10 to 100 ms. A typical set point is 25 ms. An Inject (ms) time of 0 ms results in no injection. -
Page 38: Backflush Injector
5 | Product Overview INFICON 5.7.1.4 Backflush Injector The backflush assembly consists of: • a backflush injector • a pre-column • an analytical column The pre-column is a short section of column connected in series to the analytical column. The pre-column prevents contaminants from entering the analytical column. -
Page 39: Detection
INFICON Product Overview | 5 Separation is influenced by: • coating type • thickness • length • diameter • carrier gas Separation may be further optimized by adjusting: • column temperature • column head pressure Temperature ramping provides additional control of component separation, compared to isothermal operation. - Page 40 5 | Product Overview INFICON 99% Nitrogen 50 ppm Ethylene 25 ppm 25 ppm Ethane A detection limit of 1 ppm can be achieved for some compounds when the analyses method is optimized. The µTCD detects the difference in thermal conductivity of the gas traveling through the reference column (pure carrier gas) versus the gas traveling through the analytical column (carrier gas plus the sample gas).
-
Page 41: Module Circuit Boards
INFICON Product Overview | 5 5.7.4 Module Circuit Boards Micro GC Fusion modules are controlled by two circuit boards: the GC module controller board and the GC module interface board. 5.7.4.1 GC Module Controller Board The GC module controller board receives commands from the Micro GC Fusion software, performs hardware control of the GC module, and sends the data signal back to the software. - Page 42 5 | Product Overview INFICON 5.8 JP-100 The Micro GC Fusion JP-100 is a 3D printed device that is installed at the back of the Micro GC Fusion modules. For a 1- or 2-module chassis, a single JP-100 controls both modules. For a 3- or 4-module chassis, two JP-100 devices are installed.
-
Page 43: Integrated Sample Conditioner
INFICON Product Overview | 5 5.9 Integrated Sample Conditioner The optional Integrated Sample Conditioner is factory installed. It maintains the incoming sample at 100°C (212°F) and reduces sample pressure from up to 6,895 kPa (1,000 psi) down to approximately 83 kPa (12 psi) prior to the sample being injected into the GC module. -
Page 44: Specifications
5 | Product Overview INFICON 5.10 Specifications 5.10.1 Physical Operating Requirements 2-module chassis Specification Maximum weight 6.2 kg (13.6 lb.) Dimensions (L x W x H) 46.2 x 19.6 x 25.4 cm (18.2 x 7.7 x 10 in.) Installation (Overvoltage) -
Page 45: Sample Inlet
INFICON Product Overview | 5 5.10.2 Sample Inlet Sample Inlet Specification Front inlet Heated, 30-140°C (86-284°F), 1/16 in. Swagelok Maximum sample pressure 172 kPa (25 psi) Recommended sample pressure Ambient to 69 kPa (10 psi) 5.10.3 Integrated Sample Conditioner Integrated Sample Conditioner... -
Page 46: Column Heater
5 | Product Overview INFICON 5.10.7 Column Heater Column Heater Specification Max (temp. programmed) 250°C of column phase maximum, whichever is lower with temperature programming Max (isothermal) 225°C or column phase maximum, whichever is lower with isothermal operation Resolution 0.1°C Maximum heating rate 5°C per second (column dependent) -
Page 47: 13Control Software
INFICON Product Overview | 5 5.10.12 Communication Communication Specification Wired ethernet RJ-45 connection Wireless Ethernet IEEE 802.11a/g/n Signal range 30 m (100 ft.), line of sight 5.10.13 Control Software Embedded, web-based software compatible with common web browsers. See Computer Web Browser Requirement [} 48]. -
Page 48: Minimum Hardware Requirement
5 | Product Overview INFICON 5.11.1 Minimum Hardware Requirement The following is the minimum tablet and computer hardware configuration necessary to run the Micro GC Fusion web-based user interface. 5.11.1.1 Tablet 1 GB minimum Memory 16 GB minimum 1 GHz minimum Screen Size 9.7 in. -
Page 49: Wireless Regulatory Compliance Information
Micro GC Fusion, ONLY use the antenna that was originally supplied with the instrument. If the original antenna is damaged, please contact the INFICON service department for a replacement antenna. 5.12.1 Regulatory Compliance Information for UNITED STATES Users 5.12.1.1 FCC Statement... -
Page 50: Fcc Rf Exposure Statement
5 | Product Overview INFICON • Increase the separation between the equipment and receiver • Connect the equipment into an outlet on a circuit different from that to which the receiver is connected • Consult the dealer or an experienced radio/TV technician for assistance 5.12.1.2 FCC RF Exposure Statement... -
Page 51: Regulatory Compliance For European Users
INFICON Product Overview | 5 5.12.3 Regulatory Compliance for EUROPEAN Users This section of the Operating Manual lists CE and R&TTE compliance information for Micro GC Fusion. Micro GC Fusion is marked with the following symbol: This symbol indicates compliance with the essential requirements of Directive 2014/53/EU (RED Directive). -
Page 52: European Emc Compliance Statement
Hierbij verklaart INFICON Inc. dat het toestel Micro GC Fusion in overeenstemming is met de essentiële eisen en de andere relevante bepalingen van richtlijn 1999/5/EG. Bij deze verklaart INFICON Inc. dat deze Micro GC Fusion voldoet aan de essentiële eisen en aan de overige relevante bepalingen van Richtlijn 1999/5/EC. -
Page 53: European Safety Compliance Statement
1999/5/CE. Spanish Por medio de la presente INFICON Inc. declara que el Micro GC Fusion cumple con los requisitos esenciales y cualesquiera otras disposiciones aplicables o exigibles de la Directiva 1999/5/CE. -
Page 54: Micro Gc Fusion And Gc Module Part Numbers
5 | Product Overview INFICON 5.13 Micro GC Fusion and GC Module Part Numbers 5.13.1 2-Module Micro GC Fusion Part Number A 2-module Micro GC Fusion can be configured with one or two GC modules. The figure below shows how a Micro GC part number is constructed. -
Page 55: Gc Module Part Number
INFICON Product Overview | 5 • Chassis Option: a five digit number that identifies sample inlet, carrier gas connection, number of GC modules, Integrated Sample Conditioner, AUX I/O, power cord and factory checkout gas type • Number for Module A: a three digit number that specifies injector type, column type and length, detector type, and venting connector type •... -
Page 56: Installation
INFICON 6 Installation 6.1 Site Preparation Proper site preparation prior to installing Micro GC Fusion is critical. Contact INFICON (www.inficon.com) with any questions regarding site preparation. Bullet points (.) identify hardware that must be available and actions that must be addressed when installing Micro GC Fusion. -
Page 57: Carrier Gas Requirement
INFICON Installation | 6 6.1.2 Carrier Gas Requirement • Carrier gas (e.g., helium, argon) with purity of 99.999% (or minimum 99.995% when the appropriate carrier gas trap is installed) A pressurized >16,547 kPa (>2400 psi) 50 liter tank of carrier gas will last approximately one year or more. -
Page 58: Calibration Gas Requirement
Checkout gas mixtures are only used for instrument installation and startup. Checkout gas mixtures supplied by INFICON are not calibration gases. When the instrument is configured with a 1/16 in. Swagelok front sample inlet, the ship kit includes a 61 cm (24 in.) 1/16 in. OD piece of stainless steel sample tubing and nuts and ferrules for both ends. -
Page 59: Sample Gas Pressure Range
INFICON Installation | 6 6.1.4 Sample Gas Pressure Range CAUTION Sample inlet gas pressure must be less than 172 kPa (25 psi). Exceeding 172 kPa (25 psi) will damage Micro GC Fusion and require factory repair. • The maximum pressure for direct sample injection into either the front or rear sample inlet is 172 kPa (25 psi). -
Page 60: Power Requirement
• Maximum power for a 2-module Micro GC Fusion system: 300W • Uninterruptible AC power source with surge protection is recommended Every Micro GC Fusion 2-module system is shipped with a 24 VDC power supply (PN: 952-435-P1S). Always use this power supply to power the instrument. -
Page 61: Computer Hardware Requirement
INFICON Installation | 6 6.1.7 Computer Hardware Requirement Minimum hardware configuration required to run Micro GC Fusion web-based software user interface: Tablet 1 GB Memory 16 GB 1 GHz Screen size 9.7 in. Resolution 1024 x 768 pixels Network connectivity... -
Page 62: Network Preparation
6 | Installation INFICON 6.1.9 Network Preparation • If Micro GC Fusion will be connected to a local area network (LAN) using a static IP address, the Micro GC Fusion hostname and static IP address must be assigned by the LAN administrator •... -
Page 63: Instrument Hardware Setup
INFICON Installation | 6 6.2 Instrument Hardware Setup 6.2.1 Unpacking the Instrument Verify the contents of the order, including accessories, consumables and checkout gases using the included packing list. The contents of the ship kit should also be verified. 6.2.2 Ship Kit Contents A Micro GC Fusion ship kit is included with each instrument. -
Page 64: Making Swagelok Connections
6 | Installation INFICON Country dependent Description Quantity power cords 068-0433 Power cord, USA, 10A/125V, 6 ft. 0 or 1 pc 068-0434 Power cord, Euro 10A/250V, 2.5 m 0 or 1 pc 068-0590 Power cord, UK, 10A, BLK PVC, 220V, RoHS... - Page 65 INFICON Installation | 6 Ensure that the front ferrule makes contact with the female fitting, slide the Swagelok nut over the ferrule, then finger tighten. Female fitting Front ferrule, back ferrule, and nut in vise Push the tube fully into the female fitting.
-
Page 66: Connecting The Carrier Gas
6 | Installation INFICON 6.3 Connecting the Carrier Gas 6.3.1 Carrier Gas Safety WARNING Gas cylinders present a hazard when not secured properly. Securely fasten all compressed gas cylinders to an immovable structure or permanent wall. Store and handle compressed gases in accordance with safety procedures. -
Page 67: Connecting The Carrier Gas Particulate Filter
INFICON Installation | 6 6.3.2 Connecting the Carrier Gas Particulate Filter Remove the shipping caps from the Micro GC Fusion carrier gas inlet. Install one carrier gas particulate filter (PN 059-0701) on the carrier gas supply tubing for each carrier gas used. Do not connect the tubing directly to Micro GC Fusion. -
Page 68: Purging And Connecting Carrier Gas Line
6 | Installation INFICON CAUTION Carrier gas inlet (rear of instrument) pressure must be between 400-427 kPa (58-62 psi). Use a dual-stage regulator on the carrier gas cylinder to ensure the pressure range is maintained. Exceeding 565 kPa (82 psi) may damage Micro GC Fusion and require factory repair. -
Page 69: Installing The Sample Inlet Filter
INFICON Installation | 6 6.4 Installing the Sample Inlet Filter Micro GC Fusion is shipped with an external 10 micron sample inlet filter assembly, one dual-ended ferrule per sample inlet, and extra replacement filter disks. The sample inlet filter cannot be installed if the Integrated Sample Conditioner is installed. - Page 70 6 | Installation INFICON Inspect the sample inlet filter assembly and verify that the filter disk is in place. If not, place a filter disk between parts A and B of the filter body, thread the parts together until finger tight and then use two 7/16 in. wrenches to tighten an additional 1/4 turn.
-
Page 71: Installing The Rack Mount Kit
INFICON Installation | 6 6.5 Installing the Rack Mount Kit 6.5.1 Rack Mount Kit (PN 952-4100-G1) Parts Description Quantity 952-4005-P2 Bracket-rack mount right (with handle) 952-4006-P2 Bracket-rack mount left (with handle) 070-2026* Handle 6.375 LG 2-leg 10-32 THD SS RoHS 070-2028 Washer countersink #10 hole 0.593 OD SS... - Page 72 6 | Installation INFICON Install brackets (PN 952-4005-P2 and 952-4006-P2) onto the 19 in. rack prior to attaching Micro GC Fusion when access is available from below. Install the rack mount brackets onto the unit prior to rack installation if access to the underside is not available.
- Page 73 INFICON Installation | 6 ð Repeat the previous step to finish securing the remaining nuts on the left bracket. ð To attach the right bracket (PN 952-4005-P2), repeat step 3. Once both brackets are secure, gently place Micro GC Fusion onto rack mount brackets.
-
Page 74: Installing The Gas Liquid Separator
6 | Installation INFICON 6.6 Installing the Gas Liquid Separator 6.6.1 Introduction The gas-liquid separator (PN 952-029-G1) provides gas-liquid separation through a ® Genie membrane separator. CAUTION The gas-liquid separator filters out liquid droplets in a gas sample. It is not intended for liquid injections. -
Page 75: Gas-Liquid Separator Accessory Kit (Pn 952-029-G1)
INFICON Installation | 6 6.6.2 Gas-Liquid Separator Accessory Kit (PN 952-029-G1) Specifications Sample inlet 1/16 in. Swagelok Maximum sample pressure 172 kPa (25 psi) Gas-liquid separator Description Quantity accessory kit contents Gas-liquid separator with genie membrane filter assembly 952-4029-P4 1/16 in. SS sample output tubing for the 2-module Micro GC Fusion 952-4029-P1 1/16 in. -
Page 76: List Of Required Tools
6 | Installation INFICON 6.6.3 List of Required Tools The following tools are user supplied: • 2 mm hex driver • 5/16 in. wrenches • 1/4 in. wrench 6.6.4 Installing the Gas Liquid Separator The gas-liquid separator can be installed on the 2-module or the 4-module Micro GC Fusion. - Page 77 INFICON Installation | 6 Remove the two M3 x 8 screws on the chassis bottom using a 2 mm hex driver. Retain screws for future use. Mount the gas-liquid separator for the 2-module chassis as shown. Hold the gas- liquid separator so that the slots on the gas-liquid separator align with the holes on Micro GC Fusion.
- Page 78 6 | Installation INFICON Adjust the front bumpers so that the gas-liquid separator lays flat on the surface. Insert the sample output tubing for the 2-module chassis (952-4029-P4) into the Valco fitting on the gas-liquid separator. Do not tighten. The tubing should be loose.
- Page 79 INFICON Installation | 6 Connect the sample output tubing from the gas-liquid separator to the Micro GC Fusion sample inlet and tighten using a 5/16 in. wrench. Tighten the Valco fitting on the gas-liquid separator using a 1/4 in. wrench.
-
Page 80: 4-Module Chassis
6 | Installation INFICON CAUTION Ensure the vent tubing is not inclined upward to prevent potential liquid accumulation in the tubing. CAUTION Blocking the vent port during operation significantly increases the output pressure from the device. When this happens, the instrument may be damaged if the incoming sample pressure is greater than 172 kPa (25 psi). - Page 81 INFICON Installation | 6 Turn Micro GC Fusion upside down. There are two holes for the M3 x 8 screws. Mount the gas-liquid separator for the 4-module chassis as shown. Hold the gas- liquid separator so that the slots on the gas-liquid separator align with the holes on Micro GC Fusion.
- Page 82 6 | Installation INFICON Adjust the front bumpers so that the gas-liquid separator lays flat on the surface. Insert the sample output tubing for the 4-module chassis (952-4029-P1) into the Valco fitting on the gas-liquid separator. Do not tighten. The tubing should be loose.
- Page 83 INFICON Installation | 6 Tighten the Valco fitting on the gas-liquid separator using a 1/4 in. wrench. Use additional tubing to connect the gas-liquid separator sample vent to a fume hood or other safe location. Reconnect all electrical cables, including the power cable and Ethernet cable.
-
Page 84: Wired Ethernet Connection
6 | Installation INFICON 6.7 Wired Ethernet Connection Connect an Ethernet (LAN) cable to the RJ45 connector on the rear of Micro GC Fusion. The other end of this connection can be connected to a computer or Ethernet switching device. - Page 85 INFICON Installation | 6 Click System Configuration. Uncheck the Static IP Address checkbox to achieve dynamic IP addressing. Micro GC Fusion is now setup to use DHCP. 074-594-P1H Micro GC Fusion Operating Manual 85 / 319...
-
Page 86: Set Up The Static Ip Address
IP address. Three blocks of IP address spaces are reserved by the Internet Assigned Numbers Authority (IANA) for private internets. INFICON recommends using these IP addresses for setting up a static IP address on Micro GC Fusion. - Page 87 INFICON Installation | 6 Click System Configuration. In the System Configuration window: ð Check the Static IP Address ð Enter the static IP address, Subnet Mask, and Default Gateway (if applicable) ð Click the icon. 074-594-P1H Micro GC Fusion Operating Manual...
-
Page 88: Wireless Connection
6 | Installation INFICON 6.8 Wireless Connection Micro GC Fusion enables wireless networking by default. The default wireless signal name <serial number>.local and the wireless password is inficongc. Wireless password protection is provided to prevent accidental or unauthorized access. To connect a computer or a device to Micro GC Fusion through the wireless connection: Locate the wireless connection (<serialnumber>.local) on the web-enabled... -
Page 89: Disable The Wireless
INFICON Installation | 6 6.8.1 Disable the Wireless Click the icon. Click System Administration. Click System Configuration. In the System Configuration window, clear the Wireless check box. 6.8.2 Changing the Wireless Password Click the icon. Click System Administration. Click System Configuration. -
Page 90: Connecting The Power Supply
6 | Installation INFICON 6.9 Connecting the Power Supply 6.9.1 2-Module Micro GC Fusion The 2-module Micro GC Fusion system uses a power supply that accepts 100-240 V (ac) input and provides 24 V (dc) to the instrument. 24 V (dc) Power Supply... -
Page 91: Carrier Gas Configuration
INFICON Installation | 6 6.10 Carrier Gas Configuration By default, Micro GC Fusion is set to use helium carrier gas for all GC modules. Click the icon to change the carrier gas type. Click System Administration. Click System Configuration. 074-594-P1H Micro GC Fusion Operating Manual... - Page 92 6 | Installation INFICON In the System Configuration window, select the desired carrier gas from the shortcut menu for each GC module. Click Pressure Units to switch from psi to kPa. 92 / 319 074-594-P1H Micro GC Fusion Operating Man-...
-
Page 93: Set Instrument Time
INFICON Installation | 6 6.11 Set Instrument Time To set Micro GC Fusion to the same time as the connected device: Click the icon to change the instrument time. Click System Administration. Click System Configuration. 074-594-P1H Micro GC Fusion Operating Manual... - Page 94 6 | Installation INFICON In the System Configuration window, click the icon to set the instrument time. 94 / 319 074-594-P1H Micro GC Fusion Operating Man-...
-
Page 95: The Aux I/O Connector
INFICON Installation | 6 6.12 The AUX I/O Connector For some applications, an external triggering device may be required for sampling. This can be accomplished by connecting an external triggering device to the Micro GC Fusion AUX I/O port via a Remote Start Cable (PN G2801-60618). This cable has a 15 pin connector at one end. - Page 96 6 | Installation INFICON Function Color Variable GND Black/white Red/white Contact closure output FAULT_OUT* Green/white Contact closure output READY_OUT Blue/white *Not implemented Remote start cable: Remote start/cancel circuitry: Purpose Pin Connection Action Remote Start Pin 1 and pin 2 Connect together to activate circuit...
-
Page 97: Valco Stream Selector
INFICON Installation | 6 6.13 Valco Stream Selector Micro GC Fusion can be paired with a Valco stream selector from VICI® (Valco® Instruments Co. Inc.) to perform analysis on multiple gas streams. Valco stream selector models EUH, EUD and EUT with USB option are supported. -
Page 98: Installing The Valco Stream Selector Accessories
• 1/16 in. OD stainless steel sample line(s) 6.13.1.2 Valco Stream Selector Accessories INFICON offers a 10-port SD and a 10-port SF Valco stream selector as an accessory. When sample or calibration gas is in short supply and sample composition does not change drastically over time, the dead-ended (SD) Valco stream selector is the desired choice. -
Page 99: 10-Port Sd Valco Stream Selector Accessory
INFICON Installation | 6 When sample or calibration gas is abundant and sample composition changes quickly over time, the flow-through (SF) Valco stream selector is the desired choice. The pre-assembled accessories have 1/16 in. sample line filters installed at each inlet port. - Page 100 6 | Installation INFICON Description Quantity Photo Power cord Manual remote USB cable Nut and ferrules 11 each 100 / 319 074-594-P1H Micro GC Fusion Operating Man-...
-
Page 101: 10-Port Sf Valco Stream Selector Accessory
INFICON Installation | 6 6.13.1.4 10-Port SF Valco Stream Selector Accessory Description Quantity Photo 10-Port SF Valco stream selector Power supply Power cord Manual remote 074-594-P1H Micro GC Fusion Operating Manual 101 / 319... -
Page 102: Installing The 10-Port Sd Valco Stream Selector Accessory
6 | Installation INFICON Description Quantity Photo USB cable Nuts and ferrules 21 of each 6.13.1.5 Installing the 10-Port SD Valco Stream Selector Accessory Identify sample line 1 IN and remove the black filter caps from the desired sample line ports. - Page 103 INFICON Installation | 6 Connect the 1/16 in. sample line to the 1 IN filter on the Valco stream selector. While holding the filter with a 7/16 in. wrench, use a 1/4 in. wrench to turn the union fitting. Over-tighten by 1/2 turn to swage the union fitting and ferrule onto the 1/16 in.
- Page 104 6 | Installation INFICON Swage the 1/16 in. OD stainless steel tubing to the Micro GC Fusion 1/16 in. front inlet using a 5/16 in. wrench. Plug the DC power connector on the power supply into the back of the Valco stream selector.
- Page 105 INFICON Installation | 6 Connect the Manual Controller to the back of the Valco stream selector to manually control the internal actuator. To validate that the Valco stream selector was installed successfully, open the Micro GC Fusion Main Page on any supported web browser or wireless device.
-
Page 106: Installing The 10-Port Sf Valco Stream Selector Accessory
6 | Installation INFICON 6.13.1.6 Installing the 10-Port SF Valco Stream Selector Accessory Identify sample line 1 IN and remove the black filter caps from the desired sample line ports. Place a union fitting and ferrule onto a 1/16 in. OD stainless steel sample line. - Page 107 INFICON Installation | 6 Repeat steps 1-5 for sample lines to 2 IN filter, 3 IN filter, etc. until the desired number of sample lines are connected. Place a union fitting and ferrule onto a 1/16 in. OD stainless steel sample line.
- Page 108 6 | Installation INFICON While holding the union with a 1/4 in. wrench, use a 1/4 in. wrench to turn the union fitting. Over-tighten by 1/2 turn to swage the union fitting and ferrule onto the 1/16 in. sample line.
- Page 109 INFICON Installation | 6 Connect the USB Type B connector of the USB cable to the back of the Valco stream selector. Connect the USB Type A connector of the USB slot in the back of Micro GC Fusion. Connect the Manual Controller to the back of the Valco stream selector to manually control the internal actuator.
- Page 110 6 | Installation INFICON To validate that the Valco stream selector was installed successfully, open the Micro GC Fusion Main Page on any supported web browser or wireless device. The Valve Position quick select menu will appear, enabling the user to select a valve position.
-
Page 111: Front Panel Language Selection
INFICON Installation | 6 6.14 Front Panel Language Selection Micro GC Fusion provides the option of using the English or Chinese language on the front panel display. To change the front panel display language: Click the icon to change the instrument language. - Page 112 6 | Installation INFICON In the System Configuration window, click the drop-down box under Front Panel Language and select the desired language. Refresh the front panel display to allow the new setting to take effect. 112 / 319 074-594-P1H Micro GC Fusion Operating Man-...
-
Page 113: Pressure Reducer Genie Filter And Gas-Liquid Separator
INFICON Installation | 6 6.15 Pressure Reducer Genie Filter and Gas-Liquid Separator The pressure reducer and gas-liquid separator (PN 952-033-G1) reduces sample pressure and filters out liquid particulates in the sample. The maximum sample input pressure is 3,450 kPa (500 psi). With a flow rate at or less than 100 mL/min, as indicated on the flow gauge on the device, the output pressure from the device is about ambient pressure. - Page 114 6 | Installation INFICON CAUTION Ensure the vent tubing is not inclined upward to prevent potential liquid accumulation in the tubing. 6.15.1 2-Module Micro GC Fusion Chassis Installation - Side Install The pressure reducer and gas-liquid separator includes the following items. These items are needed to install the device on the side of a 2-module Micro GC Fusion chassis.
- Page 115 INFICON Installation | 6 User supplied parts: • vent tubing and fittings, if used • 1/8 in. Swagelok type sample input tubing and female fittings The cap plugs on the sample inlet and the sample vent of the pressure reducer and gas-liquid separator are not shown in the figure. They must be removed when performing this installation.
- Page 116 6 | Installation INFICON Set the five nuts on the mounting bracket to the positions shown. If the nut positions need adjustment, relax the nuts, adjusting the mounting bracket and re- tighten the nuts using a 3/8 in. wrench. Clamp the mounting bracket onto the left side of the instrument.
- Page 117 INFICON Installation | 6 Adjust the nut position to remove the gap between the mounting bracket and the chassis top. Tighten all nuts with a 3/8 in. wrench to fix the bracket on the instrument chassis. Put the Valco ferrule (PN 059-0335) and the nut (PN 059-0336) on the inlet tube.
- Page 118 6 | Installation INFICON Insert the sample tubing with the Valco fittings into the fitting detail on the Genie filter. Push the tubing all the way forward into the detail, so that it seats firmly. Manually turn the nut into the detail until it is finger tight. Using the 1/4 in. open- ended wrench, turn the nut 1/4 turn (90°) past the point where the ferrule first...
- Page 119 INFICON Installation | 6 Insert the 1/16 in. sample tubing with the Swagelok fittings onto the instrument sample inlet. Tighten 1/2 turn past finger-tight using the 5/16 in. wrench. The pressure reducer and gas-liquid separator installation is complete. Reconnect the power cable, the Ethernet cable and the carrier gas lines.
- Page 120 6 | Installation INFICON Before connecting a pressurized sample to the device, close the metering valve by turning the dial fully clockwise to ensure no sample flow through the device when the pressurized sample is connected. Install a user-provided 1/8 in. sample line with the female Swagelok fittings preinstalled.
- Page 121 INFICON Installation | 6 Turn on Micro GC Fusion. The instrument is ready to perform analysis. CAUTION If the flow rate through the device exceeds 100 mL/min, the output pressure from the device to Micro GC Fusion may exceed the acceptable pressure range, causing instrument damage.
- Page 122 6 | Installation INFICON User supplied parts: • vent tubing and fittings, if used • 1/8 in. Swagelok type sample input tubing and female fittings The cap plugs on the sample inlet and the sample vent of the pressure reducer and gas-liquid separator are not shown in the figure. They must be removed when performing this installation.
- Page 123 INFICON Installation | 6 Set the five nuts on the mounting bracket to the positions shown. If the nut positions need adjustment, relax the nuts, adjusting the mounting bracket and re- tighten the nuts using a 3/8 in. wrench. Clamp the mounting bracket onto the left side of the instrument, with the large hole on the bottom of the mounting bracket fitting into the left front foot of the instrument.
- Page 124 6 | Installation INFICON Push the top of the mounting bracket towards the instrument until it fits tightly. Adjust and tighten all the nuts using a 3/8 in. wrench to fix the mounting bracket on the instrument chassis. Put the Valco ferrule (PN 059-0335) and the nut (PN 059-0336) on the inlet tube.
- Page 125 INFICON Installation | 6 Insert the sample tubing with the Valco fittings into the fitting detail on the Genie filter. Push the tubing all the way into the detail, so that it seats firmly. Manually turn the nut into the detail until it is finger tight. Using the 1/4 in. open-ended wrench, turn the nut 1/4 turn (90°) past the point where the ferrule first starts to...
- Page 126 6 | Installation INFICON Insert the 1/16 in. sample tubing with the Swagelok fittings onto the instrument sample inlet. Tighten 1/2 turn past finger-tight using the 5/16 in. wrench. The pressure reducer and gas-liquid separator installation is complete. Reconnect the power cable, the Ethernet cable and the carrier gas lines.
- Page 127 INFICON Installation | 6 Before connecting the pressurized sample to the device, close the metering valve by turning the dial fully clockwise to ensure no sample flow through the device when the pressurized sample is connected. Install a user-provided 1/8 in. sample line with the female Swagelok fittings preinstalled.
- Page 128 6 | Installation INFICON Turn on Micro GC Fusion. The instrument is ready to perform an analysis. CAUTION If the flow rate through the device exceeds 100 mL/min, the output pressure from the device to Micro GC Fusion may exceed the acceptable pressure range, causing instrument damage.
- Page 129 INFICON Installation | 6 • 2.0 hex driver User supplied parts: • vent tubing and fittings, if used • 1/8 in. Swagelok type sample input tubing and female fittings The cap plugs on the sample inlet and the sample vent of the pressure reducer and gas-liquid separator are not shown in the figure.
- Page 130 6 | Installation INFICON Set the five nuts on the mounting bracket to the positions shown. If the nut positions need adjustment, relax the nuts, adjust the mounting bracket and re- tighten the nuts using a 3/8 in. wrench. Clamp the mounting bracket on the instrument front, with the mounting bracket bottom to the right side of the instrument left front foot.
- Page 131 INFICON Installation | 6 Put the two M3 screws (PN B3079191X) through the two small holes in the mounting bracket bottom and into the instrument chassis bottom with a 2.0 hex driver. Loosen the top two nuts on the mounting bracket.
- Page 132 6 | Installation INFICON Slide in bracket E. Bracket E Fit the two inserts of bracket E into the air vent. Push or pull the front cover as required to align it into the air vent opening. Tighten the two nuts using a 3/8 in. wrench to ensure that bracket E does not fall off.
- Page 133 INFICON Installation | 6 Adjust and tighten all the nuts using a 3/8 in. wrench to fix the mounting bracket on the instrument chassis. Put the Valco ferrule (PN 059-0335) and the nut (PN 059-0336) on the inlet tube. Insert the sample tubing with the Valco fittings into the fitting detail on the Genie filter.
- Page 134 6 | Installation INFICON Using the 1/4 in. open-ended wrench, turn the nut 1/4 turn (90°) past the point where the ferrule first starts to grab the tubing. The amount of force required can vary considerably due to the friction between the nut and the treads and the composition and wall thickness of the tubing used.
- Page 135 INFICON Installation | 6 Tighten 1/2 turn past finger-tight using the 5/16 in. wrench. The pressure reducer and gas-liquid separator installation is complete. Reconnect the power cable, the Ethernet cable and the carrier gas lines. Before connecting the pressurized sample to the device, close the metering valve by turning the dial fully clockwise to ensure no sample flow through the device when the pressurized sample is connected.
- Page 136 6 | Installation INFICON Install a user-provided 1/8 in. sample line with the female Swagelok fittings preinstalled. Connect a vent line to the vent fittings using 1/8 in. Swagelok fittings. Run the exhaust to a fume hood or other designated area for hazardous waste disposal.
-
Page 137: Change Mounting Bracket Orientation
INFICON Installation | 6 6.15.4 Change Mounting Bracket Orientation Loosen the lower three nuts inside the mounting bracket using a 3/8 in. wrench. Turn the mounting bracket upside down. Install the top two nuts in the back of the mounting bracket. - Page 138 6 | Installation INFICON Remove the two bottom nuts. Align the three holes and screws and then press the mounting bracket and the device together. Reattach the three nuts using a 3/8 in. wrench. 138 / 319 074-594-P1H Micro GC Fusion Operating Man-...
-
Page 139: Connecting To A Sample
INFICON Connecting to a Sample | 7 7 Connecting to a Sample 7.1 Introduction Micro GC Fusion allows for a variety of sampling techniques including the use of syringes, sample bags, or pressurized cylinders. 7.2 Purging the Sample Path To obtain an accurate analysis of the sample, always purge the sample line with the sample before connecting it to the sample inlet to remove residual gas in the sample line. -
Page 140: Front Sample Inlet
7 | Connecting to a Sample INFICON 7.3.1 Front Sample Inlet The front sample inlet is a 1/16 in. Swagelok male connector. It connects the sample to one or more GC modules, allowing for parallel analyses on multiple GC modules. -
Page 141: Sampling Using Gas Cylinders And Canisters
INFICON Connecting to a Sample | 7 7.4 Sampling Using Gas Cylinders and Canisters Gas cylinders and canisters can be connected directly to the 1/16 in. Swagelok or 1/8 in. Quick Connect sample inlet. Sample pressures must not exceed 172 kPa (25 psi), or 6,895 kPa (1,000 psi) when the optional Integrated Sample Conditioner is installed. -
Page 142: Sampling Using Syringes
7 | Connecting to a Sample INFICON 7.5 Sampling Using Syringes Use syringes that are gas tight, accurate and have a low dead volume. The syringe must also be compatible with the Micro GC Fusion 1/16 in. Swagelok front inlet. The following are the general steps to sample using a syringe. -
Page 143: Installing A Syringe Luer Lock Adapter Onto A Gas Tight Syringe
INFICON Connecting to a Sample | 7 7.5.2 Installing a Syringe Luer Lock Adapter onto a Gas Tight Syringe Attach the luer fitting of the Syringe Luer Adapter (PN 952-024-G1) to the PTFE luer lock termination of the gas tight syringe. -
Page 144: Sample Bag Sampling Kits
7 | Connecting to a Sample INFICON 7.6.1 Sample Bag Sampling Kits The Ship Kit - SS Adapter for Sample Bag (PN 952-026-G1) includes a 3/16 in. to 1/16 in. stainless steel reducing union (PN 059-0298), a Teflon front ferrule (PN 059-0263) and a Teflon back ferrule (PN 059-0264) to adapt the polypropylene tube fitting on a sample bag to a 1/16 in. - Page 145 INFICON Connecting to a Sample | 7 Place the Teflon front ferrule and the Teflon back ferrule into the 3/16 in. stainless steel nut. ð Place the Teflon back ferrule into the nut with the narrow end facing outwards. ð Place the Teflon front ferrule into the nut with the narrow end facing outwards.
-
Page 146: Sampling Using The Gas-Liquid Separator
7 | Connecting to a Sample INFICON 7.7 Sampling Using the Gas-Liquid Separator The gas-liquid separator provides gas-liquid separation through a Genie filter. Refer to Installing the Gas Liquid Separator [} 74] for the device installation procedure. CAUTION Sample inlet gas pressure must be less than 172 kPa (25 psi). Exceeding 172 kPa (25 psi) will damage Micro GC Fusion and require factory repair. -
Page 147: Sampling Using The Pressure Reducer And Gas-Liquid Separator
INFICON Connecting to a Sample | 7 7.8 Sampling Using the Pressure Reducer and Gas-Liquid Separator The pressure reducer and gas-liquid separator (PN 952-033-G1) reduces sample pressure and filters out liquid particulates in the sample. The maximum sample input pressure is 3450 kPa (500 psi). Refer to Pressure Reducer Genie Filter and Gas- Liquid Separator [} 113] for the device installation procedure. -
Page 148: Sampling Using The Integrated Sample Conditioner
7 | Connecting to a Sample INFICON 7.9 Sampling Using the Integrated Sample Conditioner The optional Integrated Sample Conditioner is factory installed. It maintains the incoming sample at 100°C (212°F) and reduces the sample pressure from up to 6,895 kPa (1,000 psi) down to 83 kPa (12 psi) prior to the sample being injected into the GC module. -
Page 149: Front Panel Operation
INFICON Front Panel Operation | 8 8 Front Panel Operation 8.1 Introduction The front panel display on Micro GC Fusion can be used to: • load a method or a sequence • run a method or a sequence • view reports and chromatograms •... - Page 150 8 | Front Panel Operation INFICON The following table illustrates the icons on each corner of the front panel display. Icon Name Enabled on Front Function Panel Display (Y/N) Home Return to the main operation screen Gear Access stored report and...
-
Page 151: Select And Load A Method Or Sequence
INFICON Front Panel Operation | 8 8.3 Select and Load a Method or Sequence A method or sequence can be loaded on Micro GC Fusion by selecting the corresponding method or sequence preset button in the Run tab on the front panel display. -
Page 152: Run A Loaded Method Or Sequence
8 | Front Panel Operation INFICON 8.4 Run a Loaded Method or Sequence Perform the following steps to run a loaded method or sequence from the Micro GC Fusion front panel display: Ensure the desired method or sequence is loaded. If not, load the desired method or sequence by following the steps in Select and Load a Method or Sequence [} 151]. -
Page 153: Stop A Sequence
INFICON Front Panel Operation | 8 8.5 Stop a Sequence Multiple runs may be programmed into a sequence. Once a sequence is started, the green RUN button on the Micro GC Fusion front panel display changes to a red STOP button, which can be used to stop a running sequence. -
Page 154: View Results
8 | Front Panel Operation INFICON 8.6 View Results When a run is completed, a notification is displayed. Tap the notification message to enter the report window. Alternately, tap the icon, followed by View Result to view the report. The chromatogram displays on the top half of the screen. A table of the compound names, RT(s) (retention time in seconds), Area (µV) (peak area in... - Page 155 INFICON Front Panel Operation | 8 To optimize screen resolution, the table only displays analysis results for one module at a time. The user can select which module to display using a drop down control. Tap the module name to select the analysis result on a different module.
-
Page 156: View System Status
8 | Front Panel Operation INFICON 8.7 View System Status Tap the icon to display the System Status screen. Tap the desired module. The following information is displayed: • module serial number and part number • installed module information • temperature and pressure set points and real time readings... -
Page 157: Front Panel Language
INFICON Front Panel Operation | 8 Once a method starts loading, the actual temperature and pressure readings equilibrate to the set points defined in the method. The System Status window displays both the set points and the actual readings of the temperatures and pressures for the Micro GC Fusion analytical components. -
Page 158: Software Operation
9 | Software Operation INFICON 9 Software Operation 9.1 Connecting to a Computing Device Micro GC Fusion connects to a computer via a standard Ethernet cable or via a wireless connection. Refer to User Interface [} 47] for a list of the minimum hardware display and browser requirements. - Page 159 INFICON Software Operation | 9 The table below illustrates the icons on each corner of the page. Icon Name Enabled (Y/N) Function Home Returns to the main operation screen Gear Access stored report and chromatogram via the Data Browser Access to method editor and system...
-
Page 160: Micro Gc Fusion Workflow
9 | Software Operation INFICON Item Name Function Tag Run Allows the user to enter desired analysis tags RUN button Initiates a sample run based on the loaded method or sequence Method Loaded Label Displays the currently loaded method or... -
Page 161: Method Development
INFICON Software Operation | 9 9.4 Method Development Methods can be created, copied, and edited from the Methods/Sequences window. Click the icon. Click Methods/Sequences. A list of methods is displayed. Item Name Function Name column Displays the user defined methods and sequences... -
Page 162: Add Method
9 | Software Operation INFICON 9.4.1 Add Method Click the icon. In the window, enter a method name in the Name field. Select the Method option. Click the icon. The Method Editor window is displayed. 162 / 319 074-594-P1H Micro GC Fusion Operating Man-... -
Page 163: Edit Method
INFICON Software Operation | 9 9.4.2 Edit Method In the Method/Sequences window, select the desired method. Click the icon to edit the highlighted method. The Method Editor window is displayed. In the Method Editor window, edit method parameters of each GC module. - Page 164 9 | Software Operation INFICON The number of module tabs is dependent on the instrument configuration. In a 2-module Micro GC Fusion system, either one or two module tabs (corresponding to Module A and Module B, if configured) will be present. In a...
- Page 165 INFICON Software Operation | 9 Method Parameter Unit Description Temperature profile Click on the icon to display the column temperature profile. Sample pump time Duration that the sample pump pulls sample into the instrument Continuous Disables sample pump and allows sample to...
-
Page 166: Copy Method Or Sequence
9 | Software Operation INFICON 9.4.3 Copy Method or Sequence In the Methods/Sequences window, select the desired method or sequence. Click the icon. In the Enter new name field, type a new method or sequence name and click Refresh the screen using the browser's refresh function to display the copied method in the methods list. -
Page 167: Import Method
INFICON Software Operation | 9 9.4.6 Import Method In the Methods/Sequences window, click the icon. In the Method window, click Choose File. Navigate to locate the desired method file. Type the method name in the Name field. Click the icon to complete the method upload action. -
Page 168: Load Method Or Sequence
9 | Software Operation INFICON 9.4.8 Load Method or Sequence In the Methods/Sequences window, select the desired method. Click Load. Micro GC Fusion is ready to run the loaded method or sequence. 168 / 319 074-594-P1H Micro GC Fusion Operating Man-... -
Page 169: Preset Methods And Sequences
INFICON Software Operation | 9 9.4.9 Preset Methods and Sequences Methods and sequences can be set to display on the Micro GC Fusion main page and/or the front panel display. Present methods and sequences can be loaded by selecting the desired method from the Micro GC Fusion main page. -
Page 170: Add Sequence
9 | Software Operation INFICON 9.4.10 Add Sequence When multiple runs of the same sample or different methods are desired, a sequence can be defined to automate the runs. Intervals between each run can be defined. Click the icon. In the window, type a sequence name in the Name: field. -
Page 171: Edit Sequence
INFICON Software Operation | 9 9.4.11 Edit Sequence In the Methods/Sequences window, select the desired sequence. Click the icon to edit the highlighted sequence. The Sequence Editor is displayed. Click the step shortcut menu to select an action. Available actions include: ð... - Page 172 9 | Software Operation INFICON ð Type the number of step repetitions. If desired, add a delay to the repetitions. When the step repetition is changed, a delay between each repetition in minutes is displayed. There is an option to add a delay to the step by clicking the icon followed by icon.
- Page 173 INFICON Software Operation | 9 To add a step to the sequence, click the icon followed by the icon. ð Click the step shortcut menu to select an action. ð To select a method, click the method shortcut menu. Type the number of step repetitions.
-
Page 174: View System Status
9 | Software Operation INFICON 9.5 View System Status Click the icon to display the System Status screen. The System Status screen displays: • module part number and serial number • installed module information • temperature and pressure set points and real time readings Once a method starts loading, the actual temperature and pressure readings equilibrate to the set points defined in the method. - Page 175 INFICON Software Operation | 9 In the 4-module version of the software, click on the module name to display the readings. In the System Status window, Module A is displayed above Module B, Module B above Module C, and Module C above Module D. Physically in the 4-module Micro GC Fusion instrument, Module A is the bottom module and Module B is the top module of the left side of the instrument.
-
Page 176: Run Method Or Sequence
9 | Software Operation INFICON 9.6 Run Method or Sequence 9.6.1 Run Method Ensure the desired method is loaded. The Preparing button displays until the method has reached the programmed set points. Micro GC Fusion is ready to run when the green RUN button displays. -
Page 177: Run Sequence
INFICON Software Operation | 9 9.6.2 Run Sequence If a sequence is set as preset, it displays on the Micro GC Fusion main page. Click on the sequence to load it. Alternately: In the Method/Sequences window, click on the sequence to highlight it. -
Page 178: View Chromatogram
9 | Software Operation INFICON 9.7 View Chromatogram As soon as a run is started, the Chromatogram tab displays automatically. A real-time chromatogram is displayed for each configured GC module. Once the run is completed, the Report tab is displayed. Chromatograms of previous runs can be viewed in the Data Browser. -
Page 179: Zoom
INFICON Software Operation | 9 9.7.1 Zoom To zoom in on a particular region of the chromatogram, hold down the left mouse button and drag the cursor to create a rectangular area over the region. Release the left mouse button to zoom in. -
Page 180: Expand Chromatogram
9 | Software Operation INFICON 9.7.3 Expand Chromatogram To expand individual chromatograms, click the icon. Use the shortcut menu on the right-hand side to select the desired chromatogram. To return to the original view, select All. 180 / 319 074-594-P1H Micro GC Fusion Operating Man-... -
Page 181: Viewing Coordinates
INFICON Software Operation | 9 9.7.4 Viewing Coordinates Hover the mouse over a region of the chromatogram to display a rolling black ball and a legend displaying x and y coordinates points on the chromatogram. The x axis is the retention time in seconds. -
Page 182: View Report
9 | Software Operation INFICON 9.8 View Report When a run is completed, calibrated compound names, retention times, area counts, height counts, compound concentrations (if calibrated), and normalized amounts are displayed in the Report tab. Click mol% to change the view to ppm, and vice versa. -
Page 183: Scheduler
INFICON Software Operation | 9 9.9 Scheduler Methods and sequences can be scheduled to run on a specific day and time, repeatedly, or several times per week. To schedule a method or sequence: Click the icon. Click Schedule. Click the icon to add a scheduled event. - Page 184 9 | Software Operation INFICON Select a data and time from the shortcut menus. Alternately, click Repeat and select a day and time to repeat the event. Click the icon to save the event. A confirmation method is displayed. If an event is scheduled to start while another method or sequence is running, the event will fail to start and be removed from the list.
-
Page 185: Data Browser
INFICON Software Operation | 9 9.10 Data Browser The Data Browser allows the user to access analysis data stored on Micro GC Fusion. The following actions can be accomplished through the interactive user interface. • View Chromatogram and Report • View Run Information an Acquisition Parameters •... - Page 186 9 | Software Operation INFICON To access the Data Browser: Click the icon. Click Data Browser. The Data Browser window is displayed. Icon Name Function View Selected Run(s) View chromatograms or reports Filter Filter or search the run list Calibrate...
-
Page 187: View Chromatogram And Report
INFICON Software Operation | 9 9.10.1 View Chromatogram and Report By default, the right chromatogram window in the data browser will be blank until a run is selected. Double-click a run to view the chromatogram or report. A icon appears to the left of the selected run(s) and the corresponding chromatogram is displayed to the right. -
Page 188: View Vs. Select
9 | Software Operation INFICON 9.10.1.1 View vs. Select When viewing a chromatogram, a icon will appear on the left of the highlighted run. Highlighted runs that are not viewed and do not show a icon are considered selected runs. The following functions can only be accomplished by selecting the desired runs: •... -
Page 189: Hide Or Show Run List
INFICON Software Operation | 9 9.10.1.2 Hide or Show Run List The run list can be hidden to maximize the chromatogram or report display area. To hide the data run list, click the icon. To show the data run list, click the icon. -
Page 190: Toggle Chromatogram Information
9 | Software Operation INFICON 9.10.1.3 Toggle Chromatogram Information Information such as integration lines, peak names, area shading and the temperature profile can be displayed on the chromatogram. Select the desired icon to display the chromatogram information. Icon Description Toggle integration events... -
Page 191: View Run Information And Acquisition Parameters
INFICON Software Operation | 9 9.10.2 View Run Information and Acquisition Parameters Click the icon to the right of the selected run to view information such as Acquisition Source, Updated On, Tags, System, and the module serial number(s). Click the icon to view the run acquisition parameters such as column temperatures and pressures. -
Page 192: Overlay Multiple Runs
9 | Software Operation INFICON 9.10.3 Overlay Multiple Runs To overlay multiple chromatograms or view multiple reports, double-click the runs. The icon appears to the left. Alternately, highlight the run(s) and click the icon. To remove a single chromatogram from view, double-click the run to remove the icon next to it. -
Page 193: Toggle Chromatogram Information
INFICON Software Operation | 9 9.10.3.1 Toggle Chromatogram Information To display integration lines, peak names, areas, or the temperature profile for a specific run within the overlaid chromatogram, click on the run in the legend. 074-594-P1H Micro GC Fusion Operating Manual... -
Page 194: Filter
9 | Software Operation INFICON 9.10.4 Filter The run list can be filtered to display only runs within a user-specified time period. Click the icon. Select the Start Date option and click on the date and time shortcut menus. Click on a date and time to add it to the field. -
Page 195: Search
INFICON Software Operation | 9 9.10.5 Search Runs can be searched by analysis name (name run on the main page), method name, compound name (defined in calibration) or by tags. Click the icon. Select Search. Type the parameter to search. -
Page 196: Export As Json
9 | Software Operation INFICON 9.10.6.1 Export as JSON Select the run(s). Click the icon. The export dialog box allows the user to export all of the runs stored on the instrument by clicking Select remaining link in the top right corner. -
Page 197: Export As Csv
INFICON Software Operation | 9 9.10.6.2 Export as CSV Select the run(s). Click the icon. Type the file name in the Name: field. This name is saved onto the computer. From the Format: shortcut menu, select CSV. From the Data: shortcut menu, select All or Compound Trend. -
Page 198: Import Runs
9 | Software Operation INFICON 9.10.7 Import Runs Exported run files with a .fusion-data extension can be imported onto any Micro GC Fusion via the Data Browser. Multiple runs can be compressed into a .zip file and imported onto any Micro GC Fusion. -
Page 199: Print Chromatogram Or Report
INFICON Software Operation | 9 9.10.9 Print Chromatogram or Report Double-click the desired run(s) to view the chromatogram(s) or report(s). Click the icon to select the chromatogram(s) or the icon to select the report(s). The chromatogram and the report cannot be printed on the same page. -
Page 200: Access The Calibration Window Through The Data Browser
9 | Software Operation INFICON 9.10.10 Calibration An external standard calibration must be performed to quantify a peak (i.e., determine the concentration). To calibrate Micro GC Fusion, a calibration gas with components and concentrations that closely resemble the sample composition must be available. -
Page 201: Integration Parameters
INFICON Software Operation | 9 9.10.10.2 Integration Parameters Micro GC Fusion uses a default set of integration parameters to calculate the area under each peak. The method must be recalibrated after integration parameters have been saved to the method, as area counts may have changed. Once the method is saved, all future runs will have the integration events applied. - Page 202 9 | Software Operation INFICON Click on any of the Parameter shortcut menus to select an integration parameter. For additional information on integration events, please see the relevant section: ð Baseline Window ...See Baseline Window [} 203] ð...
- Page 203 INFICON Software Operation | 9 9.10.10.2.1 Baseline Window The Baseline Window parameter changes the size of the search window used at each point along the peak. Valid Value set points are between 0 and 20. Changing this parameter changes the way the peak integrates to the baseline.
- Page 204 9 | Software Operation INFICON 9.10.10.2.2 Group Peaks The Group Peaks parameter sums the area underneath all peaks within a specified retention time range. A black bar is displayed above the grouped peaks. Once a retention time range is specified, the group can be calibrated in the Compound tab.
- Page 205 INFICON Software Operation | 9 9.10.10.2.3 Manual Integration The Manual Integration parameter allows the user to enter a start and stop time to manually integrate a peak. Manual integration provides finer control of the baseline integration for a specified retention time range.
- Page 206 9 | Software Operation INFICON 9.10.10.2.4 Min Height Threshold The Min Height Threshold parameter allows the user to specify the minimum peak height the integrator detects. 206 / 319 074-594-P1H Micro GC Fusion Operating Man-...
- Page 207 INFICON Software Operation | 9 9.10.10.2.5 No Peaks The No Peaks parameter stops integration within a specified retention time range. 074-594-P1H Micro GC Fusion Operating Manual 207 / 319...
- Page 208 9 | Software Operation INFICON 9.10.10.2.6 Start Sensitivity The Start Sensitivity parameter influences the start point of peaks within a specified retention time range. Valid Value set points are 0 to 100, with 50 being the default. Values closer to 0 will start the peak sooner, values closer to 100 will start the peak later.
- Page 209 INFICON Software Operation | 9 9.10.10.2.7 Stop Sensitivity The Stop Sensitivity parameter influences the stopping point of peaks within a specified retention time range. Valid Value set points are 0 to 100, with 50 being the default. Values closer to 0 will stop the peak sooner, values closer to 100 will stop the peak later.
- Page 210 9 | Software Operation INFICON 9.10.10.2.8 Peak Sensitivity The Peak Sensitivity parameter allows the increase or decrease of the sensitivity of the auto-integration software. Decreasing the value provides more sensitive results. Increasing the value can reduce noise or undesired peaks.
- Page 211 INFICON Software Operation | 9 9.10.10.2.9 Forced Baseline The Forced Baseline parameter allows the user to specify a retention time where the baseline starts for succeeding peaks. For peaks eluting before the specified retention time, the baseline end changes when appropriate.
- Page 212 9 | Software Operation INFICON 9.10.10.2.10 Negative Peaks The Negative Peaks parameter allows the user to enter a start and stop time to manually integrate a negative peak. 212 / 319 074-594-P1H Micro GC Fusion Operating Man-...
-
Page 213: Single Level Calibration
INFICON recommends conducting multiple runs of the calibration gas and using the last run to perform the calibration. This thoroughly purges the sample path with the calibration gas and ensures the best calibration accuracy. - Page 214 9 | Software Operation INFICON Type in the Compound Name for the peak. The left RT(s) and right RT (s) columns define the retention time window. Edit the retention time start and end points. The retention time window displays as a yellow shaded bar surrounding the peak.
- Page 215 INFICON Software Operation | 9 Click the icon to select another module, if configured. If there isn’t another module, skip to step 13. Repeat steps 4 to 11 for each additional module. Click the icon to save the calibration to the method. A window will prompt the user to save the calibration.
- Page 216 9 | Software Operation INFICON To reprocess the calibrated run with the new information, click the icon. A confirmation message will display Are you sure you want to reprocess the X selected run(s)? Click the icon to reprocess the run.
-
Page 217: Recalibration
This procedure will replace all area counts for all compounds. To recalibrate a method using a new run: Conduct an analysis of the calibration gas standard. INFICON recommends conducting multiple runs of each calibration gas and using the last run to perform the calibration. - Page 218 9 | Software Operation INFICON ð Average Replicates - Select multiple runs from the calibration gas and click to display a window. Click to confirm you want to average the areas of the individual compounds in the calibrated method. The runs used in average replicates appear with a icon next to each run.
- Page 219 INFICON Software Operation | 9 A message will prompt the user to reload the method and apply the calibration. To reprocess the calibrated run with the new information, click the icon. A confirmation message will display Are you sure you want to reprocess the X selected run(s)? Click the icon to reprocess the run.
-
Page 220: Recalibrate The Area Of A Single Peak
When recalibrating, a user may want to only change integration on a single peak. Conduct an analysis of the calibration gas standard. INFICON recommends conducting multiple runs of each calibration gas and using the last run to perform the calibration. - Page 221 INFICON Software Operation | 9 Click the Compounds tab. Click the icon next to the edited compound to populate a new area count. If the selected run is not the calibration reference data file, the calibration reference data file will open to acquire the new data to update the area. This insures consistency in respect to which data file was used to perform the calibration.
- Page 222 9 | Software Operation INFICON 353921.34 uV Click the icon to save the new calibration to the method. A window will prompt the user to save the calibration. To override the current method, use the original method name. An icon will indicate that there are unsaved changes.
-
Page 223: Second Level Calibration
Calibrate a single level by following Single Level Calibration [} 213]. Introduce a second level calibration gas. Conduct an analysis of the second level calibration gas. INFICON recommends conducting multiple runs of each calibration gas and using the last run to perform the calibration. - Page 224 9 | Software Operation INFICON To view a different calibration level, select the level from the shortcut menu. Click on the icon to display the calibration curve. A second level calibration point will display on the curve. Click the Fit Type shortcut menu to change the fit type, if desired.
- Page 225 INFICON Software Operation | 9 Click the icon to save the calibration to the method. A window will prompt the user to save the calibration. To override the current method, use the original method name. An icon will indicate that there are unsaved changes.
-
Page 226: Manual Response Factors
9 | Software Operation INFICON 9.10.10.7 Manual Response Factors Often, certain compounds are not available in a calibration gas mix. If the response factor is known or if the response factor can be determined from another compound, a Manual Response Factor can be used in lieu of calibration gas. - Page 227 INFICON Software Operation | 9 9.10.10.7.2 Using the Response Factor of a Known Calibrated Compound If the response factor of the desired compound is close to a previously calibrated compound, a multiplication factor can be used to calibrate the desired compound.
-
Page 228: Auto-Calibration
9 | Software Operation INFICON 9.10.10.8 Auto-Calibration Micro GC Fusion has the ability to automatically recalibrate a previously calibrated method. Depending on the setup of Micro GC Fusion, the auto-calibration can be set up in different ways. • Single level calibration •... - Page 229 INFICON Software Operation | 9 9.10.10.8.2 Multi-Level Calibration Create several sequences corresponding to the calibration level using the method described in Single Level Calibration [} 228]. Example - An auto-calibration sequence for level 3 would be named Level 3 Calibration and have a 3 typed in the Calibration Runs Level field.
- Page 230 9 | Software Operation INFICON Type 2 for a level 2 calibration. Repeat steps 7 through 10 until you have reached the desired number of levels. Click to save the sequence. Run the Auto-Calibration sequence after all the calibration gases are connected.
- Page 231 INFICON Software Operation | 9 9.10.11 Reprocess Runs Often it is desirable to edit integration parameters and adjust retention time windows after a run is completed, without adjusting the calibration information. After a run is performed: In the data browser, click on the run.
- Page 232 9 | Software Operation INFICON Click the icon to save the changes to the method. Select additional runs to reprocess, if desired, by holding down the CTRL key and clicking on the desired runs. Click the icon to reprocess the runs. A window appears, Are you sure you want to reprocess the X selected run(s)?.
-
Page 233: Micro Gc Fusion Offline Analysis
INFICON Software Operation | 9 9.11 Micro GC Fusion Offline Analysis Micro GC Fusion Offline Analysis allows the user to view and reprocess data on a standalone computer. It offers a similar work flow and capability as the Micro GC Fusion Data Browser, but without the need to connect to an instrument. The operation of Micro GC Fusion Offline Analysis, unless otherwise specified, is the same as the Data Browser operation document in Data Browser [} 185]. -
Page 234: Tray Icon
9 | Software Operation INFICON 9.11.2 Tray Icon A system tray icon appears after the software is started, indicating the Micro GC Fusion Offline Analysis service is running in the background. The tray icon is identical to the desktop icon. The tray icon can be used to launch the browser, restart service and exit service. -
Page 235: Restart Service
INFICON Software Operation | 9 9.11.2.2 Restart Service Right-click on the tray icon and select Restart Service. The background service will restart, resolving any connection issues with the user interface. The background service restart can also be accomplished by double-clicking on the Micro GC Fusion Offline Analysis icon. -
Page 236: Saving A Method
9 | Software Operation INFICON 9.11.3 Saving a Method There are two ways to save a method from Micro GC Fusion Offline Analysis. Acquisition parameters: ð Click the icon to view the acquisition parameters such as column temperatures and pressures. -
Page 237: Valco Stream Selector Operation
INFICON Software Operation | 9 9.12 Valco Stream Selector Operation Micro GC Fusion can be paired with a Valco stream selector from VICI (Valco Instruments Co. Inc.) to perform analyses on multiple gas streams. Refer to Valco Stream Selector [} 97] for an introduction to the connection between a Valco stream selector and a Micro GC Fusion, and supported valve types. -
Page 238: Position Assignments
9 | Software Operation INFICON The valve Settings window will display. Ensure that the Enabled option is selected if the Valco stream selector is connected with the Micro GC Fusion. 9.12.1.1 Position Assignments Individual valve positions can be assigned with unique names. -
Page 239: Running A Method Using A Valco Stream Selector
INFICON Software Operation | 9 9.12.2 Running a Method Using a Valco Stream Selector The Micro GC Fusion main page will display a valve position shortcut menu when the valve is enabled. To start a single method run: Select the desired Valve Position from the shortcut menu. - Page 240 9 | Software Operation INFICON Click the icon to add a valve position. Select the desired valve position from the shortcut menu. Click the icon, followed by the icon to add an event. 240 / 319 074-594-P1H Micro GC Fusion Operating Man-...
- Page 241 INFICON Software Operation | 9 Select the desired event from the shortcut menu. Click the icon to add addition events, delays, or port positions. Click the icon to select the number of Repetitions for the defined sequence, or select Continuous to run the sequence indefinitely.
-
Page 242: Automatic Appending Csv File
9 | Software Operation INFICON 9.13 Automatic Appending CSV File The procedure below demonstrates how to use Micro GC Fusion to create continuously updated comma separated value (CSV) files from calibrated methods using Python software. Running this CSV script appends a new row of analysis results to the end of a .CSV logfile after each new run has completed. -
Page 243: Install Python Packages
INFICON Software Operation | 9 Click Close to complete the installation. 9.13.1.1 Install Python Packages In order to create an appending CSV file, Python requires certain packages to be installed. Click the Windows Start button and type cmd into the search bar. Click the cmd program to open the Windows command prompt. -
Page 244: Copy The Csv Script To The Computer
The CSV script must be saved on the computer in order to generate the file. Open a supported browser. Type http://products.inficon.com/GetAttachment.axd?attaName=47f0f3f3-ffcf- 4fef-bad2-2ecf34b579eb in the web browser address bar. Press the Enter and the csv-log.py file will be saved in the designated download location. -
Page 245: Run The Csv Script
INFICON Software Operation | 9 9.13.4 Run the CSV Script The CSV script can be run using one of two procedures. 9.13.4.1 Run the Script by Double-Clicking the csv-log.py File Double-click on the csv-log.py file. A window and confirmation message will display. -
Page 246: Run The Script Through The Idle Editor
9 | Software Operation INFICON 9.13.4.2 Run the Script Through the IDLE Editor Right-click on the csv-log.py file and select Edit with IDLE. In the IDLE editor, press the F5 key. A Python window will display. A confirmation message will display Logging analysis from instrument X.X.X.X. -
Page 247: Viewing The Csv File
INFICON Software Operation | 9 9.13.5 Viewing the CSV File A CSV file will generate with the name of the method. Any run using that method will append to the method specific file. Each method will have its own CSV file. -
Page 248: Ez Iq Or Openlab Ezchrom Instrument Control
INFICON 9.14 EZ IQ or OpenLab EZChrom Instrument Control Micro GC Fusion is compatible with INFICON EZ IQ and Agilent OpenLAB CDS EZChrom Edition software (OpenLAB EZChrom). To connect the Micro GC Fusion to either software, the Micro GC Fusion driver for EZ IQ or OpenLAB EZChrom must be installed on the computer and a License Certificate for EZ IQ or OpenLAB Access (PN 952-389-G1) must be purchased from INFICON and installed on the Micro GC Fusion. -
Page 249: Externally Triggering Runs
INFICON Software Operation | 9 9.15 Externally Triggering Runs Sample runs can be automatically triggered externally by electrical contact closure via the Micro GC Fusion AUX I/O port. Refer to The AUX I/O Connector [} 95] for the AUX I/O port configuration information. -
Page 250: Purge Integrated Sample Conditioner
9 | Software Operation INFICON 9.16 Purge Integrated Sample Conditioner The Micro GC Fusion main page provides two ways to purge the internal volume of the Integrated Sample Conditioner and the sample line connecting to it. 9.16.1 Automatic Purging The user can select the purge time and the flow rate when setting up a method. -
Page 251: Routine Operation
INFICON Routine Operation | 10 10 Routine Operation 10.1 Shutdown Procedure Press the On/Standby button once to shutdown Micro GC Fusion. This shutdown procedure will cool down the analytical columns before powering down. If the analytical column temperature is high upon shutdown, this procedure may take up to 1 to 2 minutes. -
Page 252: Column Conditioning
10 | Routine Operation INFICON 10.2 Column Conditioning Over time, small amounts of contaminants may accumulate in the analytical column causing ghost peaks, peak tailing, and/or retention time shifts. Column temperature programmed methods can be optimized to flush contaminants and high boiling point compounds with each run, however, a column bakeout may occasionally still be needed. -
Page 253: Create A Custom Bakeout Method
INFICON Routine Operation | 10 10.2.2 Create a Custom Bakeout Method Alternately, a bakeout method can be created and customized. A bakeout method can be created by modifying the final temperature and/or hold time of an existing temperature programmed or isothermal analytical method. - Page 254 10 | Routine Operation INFICON Click OK. Edit Temperature Profile to set the column temperature to the recommended bakeout temperature described in the table for each configured module. ð Set the Inject (ms) time and Sample Pump Time(s) to 0.
-
Page 255: Updating Micro Gc Fusion Software
These instruments have an older style motherboard that is incompatible with current versions of the software. To update the Micro GC Fusion software to the latest version: Download the latest software from the software download area on the INFICON website. ð Go to www.INFICON.com. - Page 256 10 | Routine Operation INFICON Click the Update Software button. Micro GC Fusion will display the currently loaded software version. Click the Choose File button and choose the software update file. Click the Apply Software Update and Reboot button to complete the software update.
-
Page 257: Gc Module Replacement
INFICON Routine Operation | 10 10.4 GC Module Replacement Each Micro GC Fusion GC module contains the analytical components required to perform a GC analysis. This includes an injector, column and detector. GC modules can be easily replaced for maintenance or to configure Micro GC Fusion for different applications. - Page 258 10 | Routine Operation INFICON WARNING The Micro GC Fusion power cable must be disconnected before JP-100 removal operation to prevent potential electrical damage to the instrument. Disconnect sample gas connection(s), carrier gas connections and venting connections. CAUTION Sample gas and carrier gas must be properly disconnected before the JP-100 to prevent instrument damage from pressurized gases.
- Page 259 INFICON Routine Operation | 10 Disconnect the fan cable from the cable extension. Remove the retaining screw holding the JP-100 in place with the 2.5 mm ball point hex driver. Slide the JP-100 up and out of the instrument. See GC Module Removal Procedure for 2-Module System [} 265] to continue the module removal process.
-
Page 260: 4-Module Jp-100 Removal
10 | Routine Operation INFICON 10.4.2.2 4-Module JP-100 Removal Shutdown the system by following the system shutdown procedure in Shutdown Procedure [} 251]. Remove all external electrical cables, including power cable and Ethernet cable. WARNING The Micro GC Fusion power cable must be disconnected before JP-100 removal operation to prevent potential electrical damage to the instrument. - Page 261 INFICON Routine Operation | 10 Remove the two small air filters on the top at the front of the unit. Remove the top foam by grasping one front corner and the opposite back corner, and pulling straight up. Remove the foam by the right side of each module by pulling it straight up out of the unit.
- Page 262 10 | Routine Operation INFICON Remove the retaining screws: ð For modules C/D, remove the retaining screw holding the JP-100 in place with the 2.5 mm ball point hex driver. ð For modules A/B, remove the retaining screw holding the JP-100 in place with the 2.5 mm ball point hex wrench.
- Page 263 INFICON Routine Operation | 10 10.4.3 Replacing the JP-100 After modules have been replaced, replace the JP-100: Ensure that the fan is properly seated inside the JP-100. Slide the JP-100 into position. ð The fan cable should sit between the two fan ports on the JP-100.
- Page 264 10 | Routine Operation INFICON Tighten the retaining screw into the bracket of the bottom module. Repeat for additional JP-100, if configured. 264 / 319 074-594-P1H Micro GC Fusion Operating Man-...
-
Page 265: Gc Module Removal Procedure For 2-Module System
INFICON Routine Operation | 10 10.4.4 GC Module Removal Procedure for 2-Module System This procedure is for Micro GC Fusion models built before October 2019 and will not contain a JP-100. If the lower module needs to be removed, the upper module must be removed first. - Page 266 10 | Routine Operation INFICON Turn Micro GC Fusion back to its upright position. With finger tips, grasp the bottom lips of the housing on both sides, carefully pull them apart and lift the housing off Micro GC Fusion. Remove the side foam by pulling it sideways to free it from the dovetail joint at the bottom.
- Page 267 INFICON Routine Operation | 10 ð Each GC module is secured by two captive screws (or four for newer models). If only removing the upper module, use a Phillips head screwdriver loosen the uppermost two screws. The figure indicates screw positions for both the upper and lower GC modules.
- Page 268 10 | Routine Operation INFICON CAUTION The Micro GC Fusion power cable must be disconnected before module removal operation to prevent potential electrical damage to the instrument. CAUTION When removing the module, do not lift from the bottom. Pull the module straight out and away from the standoffs and the electrical connector.
- Page 269 INFICON Routine Operation | 10 10.4.5 GC Module Replacement Procedure for 2-Module System This section illustrates the replacement of the upper module. If the lower GC module needs to be replaced, remove both upper and lower GC modules, and then replace the lower GC module, followed by the upper GC module.
- Page 270 10 | Routine Operation INFICON CAUTION Make sure that the column module is inserted using the guiding pins and that the connector is not damaged during installation. Ensure the 100 pin connectors on the GC module controller board and the GC module interface board are securely connected.
- Page 271 INFICON Routine Operation | 10 CAUTION Over-tightening the sample line nut may damage the thread on the GC module. Repeat steps 2 to 8 if replacing both modules. When all the GC modules are replaced, replace the rear foam. Replace the side foam. Ensure the dovetail joint is oriented as shown.
- Page 272 10 | Routine Operation INFICON With finger tips, grasp the bottom of the housing cover and gently pull it apart. Position the cover over Micro GC Fusion and lower it down over the housing to replace the housing cover back on Micro GC Fusion.
-
Page 273: Gc Module Removal Procedure For 4-Module System
INFICON Routine Operation | 10 10.4.6 GC Module Removal Procedure for 4-Module System This procedure is for Micro GC Fusion models built before October 2019. If the lower module on for either side needs to be removed, the upper module on the respective side must be removed first. - Page 274 10 | Routine Operation INFICON Remove the two small air filters on the top at the front of the unit. Remove the top foam by grasping one front corner and the opposite back corner, and pulling straight up. Remove the foam by the right side of each module by pulling it straight up out of the unit.
- Page 275 INFICON Routine Operation | 10 ð Each GC module is secured by two captive screws (or four for newer models). If only removing the upper module, use a Phillips head screwdriver to loosen the uppermost two screws. The figure indicates screw positions for both the upper and lower GC modules.
- Page 276 10 | Routine Operation INFICON CAUTION When removing the module, do not lift from the bottom. Pull the module straight out and away from the standoffs and the electrical connector. Lifting from the bottom may cause damage to both connectors and cause failures when the module is reinstalled or replaced.
- Page 277 INFICON Routine Operation | 10 10.4.7 GC Module Replacement Procedure for 4-Module Systems This section illustrates the replacement of the upper module. If the lower GC module needs to be replaced, remove both upper and lower GC modules, and then replace the lower GC module, followed by the upper GC module.
- Page 278 10 | Routine Operation INFICON CAUTION Make sure that the column module is inserted using the guiding pins and that the connector is not damaged during installation. Ensure the 100 pin connectors on the GC module controller board and the GC module interface board are securely connected.
- Page 279 INFICON Routine Operation | 10 CAUTION Overtightening the sample line nut may damage the thread on the GC module. Repeat steps 2 to 8 if replacing both modules. When all the GC modules are replaced, replace the rear foam. Replace the side foam. Ensure the dovetail joint is oriented as shown.
- Page 280 10 | Routine Operation INFICON With finger tips, grasp the bottom of the housing cover and gently pull apart. Position the cover over Micro GC Fusion and lower to replace the housing cover back on Micro GC Fusion. Use a 2.5 mm ball-point hex driver replace the screws, three on each side.
-
Page 281: Filter Replacement
INFICON Routine Operation | 10 10.5 Filter Replacement 10.5.1 Replacing the External 10 Micron Sample Inlet Filter Disk WARNING Micro GC Fusion has a heated inlet which is hot to the touch. Shut off sample flow to Micro GC Fusion. -
Page 282: Replacing The Integrated Sample Conditioner Filter
10 | Routine Operation INFICON 10.5.2 Replacing the Integrated Sample Conditioner Filter Shutdown the system by following the system shutdown procedure in Shutdown Procedure [} 251]. Remove all the external electrical cables, including the power cable and Ethernet cable. Disconnect the sample gas connection(s), carrier gas connections and venting connections. - Page 283 INFICON Routine Operation | 10 Use forceps to remove the used filter from the unit. Use forceps to place a new filter into the unit. Ensure the flat side of the filter faces the forceps. Replace the hex plug. Reconnect the external electrical cables, including the power cable and Ethernet cable, sample gas connection(s), carrier gas connection(s) and venting connections.
-
Page 284: Troubleshooting
11 | Troubleshooting INFICON 11 Troubleshooting 11.1 Symptom, Possible Cause, and Remedy Tables The following tables identify common symptoms, possible causes, and remedies when operating the instrument. For repair service and technical support contact information, see Service and Technical Support [} 299]. - Page 285 Troubleshooting | 11 Symptom Possible sources of error Remedy There is an internal leak. • Contact INFICON. See Service and Technical Support [} 299]. There is a malfunction in the • Check the flow rate of the columns by column or injector.
- Page 286 11 | Troubleshooting INFICON Symptom Possible sources of error Remedy The web browser requires a • Clear the web browser's cache, then refresh cache clear. the web browser. Micro GC Fusion requires a • Restart Micro GC Fusion. Refer to Shutdown restart.
- Page 287 • Check the flow coming out of the reference negative baseline, but damaged. vents. peaks still appear • If there is no flow, contact INFICON. See Service and Technical Support [} 299]. There is poor separation There is contamination in the • Conduct a bakeout to clean the columns.
-
Page 288: Common User Interface Problems
Micro GC Fusion requires a • Restart Micro GC Fusion. Refer to Shutdown restart. Procedure [} 251]. There is an instrument • Contact INFICON. See Service and Technical communication failure. Support [} 299]. The method button is not The device's screen size is •... - Page 289 There is a malfunction in the • Listen for the noise from the pump when taking sample pump. a sample. If there is no noise, contact INFICON. See Service and Technical Support [} 299]. The front panel display will The internal cable is •...
-
Page 290: Common Chromatographic And Method Problems
It is divided into two topics: Chromatographic Problems Method Problems If the issue is not resolved after taking the suggested measure(s), contact INFICON. 11.2.1 Chromatographic Problems Unexpected chromatographic behavior may be the result of: • Electronic or mechanical failure •... -
Page 291: Baseline Symptoms
• If there is a leak at the inlet end of the column, there will be reduced flow through the column, an increase in retention time, and reduced sensitivity. If a leak is suspected, contact INFICON. Baseline moves steadily (drift) upscale or downscale during a run. This problem can be minimized by: •... - Page 292 11 | Troubleshooting INFICON • Recent changes made to the system • Loose connections in the detector or its signal path • Detector contamination • Contaminated carrier gas If the carrier gas tank was recently replaced, re-connect the previous tank to see if the noise decreases.
-
Page 293: Retention Time Symptoms
If the actual pressures and temperatures do not match the set points, power Micro GC Fusion off, restart, and download the method again. If this does not solve the problem, contact INFICON. 11.2.1.2.2 Retention Time Wander (Reproducibility) Reproducibility is erratic for successive runs of similar composition. -
Page 294: Peak Symptoms
Verify if there is flow present by connecting a flow meter to the reference and analytical vents on the back of each module. No flow could indicate a broken column. The presence of flow could indicate an injector or TCD malfunction. Contact INFICON. 11.2.1.3.2 Inverted Peaks Inverted peaks are usually caused by poor quality carrier gas. - Page 295 INFICON Troubleshooting | 11 • The run time is not adequate for all the sample compounds to elute. Compounds carry over and appear as traveling broad peaks during subsequent runs. This can be eliminated by increasing Column Temperature or increasing the sample Hold Time.
- Page 296 11 | Troubleshooting INFICON 11.2.1.3.4.2 Peak Tailing The peak rises sharply, then falls normally to baseline. Tailing is usually caused by column overload. Reduce the sample Inject (ms) time. If using a variable volume or fixed volume injector, do not reduce the Inject (ms) time to less than 15 ms to avoid repeatability issues.
-
Page 297: Method Problems
INFICON Troubleshooting | 11 11.2.1.3.4.4 Split Peak Apex Ensure that this is not a merged peak by conducting a run at a lower column temperature. If the peaks separate at the lower column temperature, the split peak is due to unresolved compounds. -
Page 298: Correcting Instrument Parameter Settings - Recalibrating
11 | Troubleshooting INFICON Adjust column head pressure so that all peaks elute within method defined peak windows. Save the method. 11.2.2.2 Correcting Instrument Parameter Settings - Recalibrating Changes to Column Pressure, Column Temperature, Inject (ms) time, and Backflush Time (if applicable) may cause peak retention times to shift and peak areas to change. -
Page 299: Service And Technical Support
North America, fill out a Service Request Form at http://service.inficon.com. 12.2 Returning Micro GC Fusion to INFICON Do not return a Micro GC Fusion or a GC module to INFICON without first speaking with a Customer Support Representative. A Return Material Authorization (RMA) number must be obtained from the Customer Support Representative. -
Page 300: Service Contract
INFICON offers service contracts for an out-of-warranty Micro GC Fusion. INFICON will conduct an evaluation to verify the condition of an out-of-warranty Micro GC Fusion before agreeing to offer a service contract. Contact INFICON for details. 300 / 319 074-594-P1H Micro GC Fusion Operating Man-... -
Page 301: Checkout Gases And Replacement Parts
GC applications. At the factory, the Universal checkout gas is used by default unless otherwise specified. The checkout gas selection is made when configuring a Micro GC Fusion instrument part number. INFICON PN Description 952-607-P1 Universal Checkout Gas Cylinder 952-607-P3... -
Page 302: Universal Checkout Gas
See the table below for the component concentrations. Universal checkout gas is not intended to be a substitute for a calibration standard for any specific applications. INFICON recommends acquiring a calibration standard gas that meets composition requirements appropriate for the specific application. -
Page 303: Natural Gas Checkout Gas
Natural gas checkout gas is not intended to be a substitute for a calibration standard for any specific applications. INFICON recommends acquiring a calibration standard gas that meets composition requirements appropriate for the specific application. -
Page 304: Refinery Gas Checkout Gas
C2-C5 olefins in a nitrogen balance. See the table below for the component concentrations. Refinery gas checkout gas is not intended to be a substitute for a calibration standard for any specific applications. INFICON recommends acquiring a calibration standard gas that meets composition requirements appropriate for the specific application. -
Page 305: Replacement Parts
Refer to GC Module Replacement [} 257] for instructions on how to remove and replace a GC module. The following table provides a list of INFICON part numbers (PN) and descriptions for GC module replacements. - Page 306 13 | Checkout Gases and Replacement Parts INFICON INFICON PN Injector Analytical Column Analytical Col- Pre-Column Pre-Column Detector Status umn Length, ID Length, ID GCMR-VC4 Rt-Alumina 10 m, 0.32 mm Rt-Alumina 1 m, 0.32 mm TCD2 Obsolete GCMR-W02 Rt-Msieve 5A 10 m, 0.25 mm Rt-Q-Bond...
- Page 307 INFICON Checkout Gases and Replacement Parts | 13 INFICON PN Injector Analytical Column Analytical Col- Pre-Column Pre-Column Detector Status umn Length, ID Length, ID GCMR-T83 Rt-Alumina 10 m, 0.25 mm N/A TCD2 Active GCMR-U83 Rt-Alumina 10 m, 0.25 mm N/A...
-
Page 308: Micro Gc Fusion Accessories
13 | Checkout Gases and Replacement Parts INFICON 13.2.2 Micro GC Fusion Accessories Accessories are available to optimize instrument performance and facilitate effective use of the instrument. INFICON PN Description G2801-60618 Remote start cable (AUX I/O) 075-541 Transit case for 2-module chassis... -
Page 309: Spare And Consumable Parts
Checkout Gases and Replacement Parts | 13 13.2.3 Spare and Consumable Parts Stocking the following spare and consumable parts is recommended to facilitate instrument maintenance and minimize downtime. INFICON PN Description FRL-1269 Dual end ferrule for 1/16 in. inlet G2870A-01... -
Page 310: Software And Computers
Micro GC Fusion - TwoDays Install, Familiarization and Advance Operation MGCTRAVEL3-6K Addition MGC Travel Cost - total mileage between 3000-6000 miles from nearest INFICON office MGCTRAVEL6K+ Addition MGC Travel Cost - total mileage exceeds 6000 miles from nearest INFICON office... -
Page 311: Checkout Gas Chromatograms
INFICON Checkout Gas Chromatograms | 14 14 Checkout Gas Chromatograms 14.1 Introduction Standard checkout gases are used in the factory to validate the chromatography performance of Micro GC Fusion. Chromatograms created with these checkout gases on Micro GC Fusion columns are provided in this chapter to demonstrate typical peak elution order, when these checkout gases are used at the customer site during product acceptance. -
Page 312: 10 M Rt-Msieve 5A
14 | Checkout Gas Chromatograms INFICON 14.2 10 m Rt-Msieve 5A 14.2.1 Universal Checkout Gas Using Helium Carrier Gas Peak Number Compound Concentration (mole %) oxygen 1.00 nitrogen 81.24 methane 5.00 carbon monoxide 1.00 Helium is not an acceptable carrier gas for hydrogen analysis. -
Page 313: Universal Checkout Gas Using Argon Carrier Gas
INFICON Checkout Gas Chromatograms | 14 14.2.2 Universal Checkout Gas Using Argon Carrier Gas Argon carrier gas is used for the analysis of hydrogen in a sample. Analysis of other fixed gases is possible using argon carrier gas but with reduced sensitivity when compared with helium carrier gas. -
Page 314: 12 M Rt-Q-Bond
14 | Checkout Gas Chromatograms INFICON 14.3 12 m Rt-Q-Bond 14.3.1 Universal Checkout Gas Using Helium Carrier Gas Peak Number Compound Concentration (mole %) composite air 93.24 methane 5.00 carbon dioxide 1.01 combined ethylene/ 0.25 acetylene ethane 0.10 propylene 0.05 propane 0.10... -
Page 315: Natural Gas Checkout Gas Using Helium Carrier Gas
INFICON Checkout Gas Chromatograms | 14 14.3.2 Natural Gas Checkout Gas Using Helium Carrier Gas Peak Number Compound Concentration (mole %) nitrogen 1.50 methane 75.32 carbon dioxide 1.50 ethane 8.99 propane 6.00 isobutane 3.01 n-butane 2.00 isopentane 1.02 n-pentane 0.50 n-hexane 0.10... -
Page 316: 10 M Rxi-1Ms
14 | Checkout Gas Chromatograms INFICON 14.4 10 m Rxi-1ms 14.4.1 Universal Checkout Gas Using Helium Carrier Gas Peak Number Compound Concentration (mole %) propane 0.10 n-butane 0.05 n-pentane 0.05 n-hexane 0.05 • Column Temperature Profile: 60°C (20 s hold) -> 110°C (20 s hold), 0.8°C/s •... -
Page 317: Natural Gas Checkout Gas Using Helium Carrier Gas
INFICON Checkout Gas Chromatograms | 14 14.4.2 Natural Gas Checkout Gas Using Helium Carrier Gas Peak Number Compound Concentration (mole %) propane 6.00 isobutane 3.01 n-butane 2.00 isopentane 1.02 n-pentane 0.50 n-hexane 0.10 • Column Temperature Profile: 50°C (10 s hold) -> 150°C (20 s hold), 2°C/s •... - Page 319 074-594-P1H ©2019...
Need help?
Do you have a question about the Micro GC Fusion 2-Module and is the answer not in the manual?
Questions and answers