ABB IRC5 Product Manual
Robot controller
Hide thumbs
Also See for IRC5:
- Operating manual (590 pages) ,
- Product manual (550 pages) ,
- Applications manual (110 pages)
Table of Contents
Advertisement
Quick Links
Advertisement
Table of Contents

Related Manuals for ABB IRC5


Summary of Contents for ABB IRC5
- Page 1 Product manual Robot controller IRC5 RobotWare 5.13...
- Page 3 Product manual Robot Controller IRC5 M2004 Document ID: 3HAC021313-001 Revision: P...
- Page 4 Except as may be expressly stated anywhere in this manual, nothing herein shall be construed as any kind of guarantee or warranty by ABB for losses, damages to persons or property, fitness for a specific purpose or the like.
-
Page 5: Table Of Contents
2.5.9 Connecting the manipulator to the IRC5 controller ....... . . - Page 6 2.9.4 Installation of Drive system parts (Drive System 09) ....... . . 116 2.9.5 Installation of I/O, Gateways and encoder interface units, IRC5 ......118 2.9.6 Installation of PMC-card for Force Control Function (Drive System 04) .
- Page 7 4.29.3 Replacement of customer I/O power supply, IRC5 ....... . .
- Page 8 Table of Contents 3HAC021313-001 Revision: P...
-
Page 9: Overview Of This Manual
• repair personnel. Prerequisites A maintenance/repair/installation craftsman working with an ABB Robot must: • be trained by ABB and have the required knowledge of mechanical and electrical installation/repair/maintenance work. References Reference Document ID Product manual - IRC5 3HAC021313-001... - Page 10 • Memory functions • Connecting a USB memory to the computer unit • Installation of external operator’s panel, IRC5 New sections added for the new computer unit DSQC 639: • Replacement of computer unit DSQC 639 • Replacement of motherboard in computer unit DSQC •...
- Page 11 SafeMove board DSQC 647. Changes made in section Maintenance schedule, controller IRC5. Replacement of fans every third year is withdrawn and inspection interval is changed from once a year to twice a year. Changes made in section Installation of Euromap.
- Page 12 Manipulator cables on page 308. Removed unnecessary information about manipulator variants. Removed information about Drive unit connection from section Configuration of Drive System 04, IRC5 on page 91. This information is available in Application manual - Additional axes and stand alone controller.
-
Page 13: Product Documentation, M2004
The manipulator documentation is divided into a number of categories. This listing is based on the type of information in the documents, regardless of whether the products are standard or optional. All documents listed can be ordered from ABB on a DVD. The documents listed are valid for M2004 manipulator systems. Product manuals... - Page 14 The group of manuals includes: • Emergency safety information • General safety information • Getting started, IRC5 and RobotStudio • IRC5 with FlexPendant • RobotStudio • Introduction to RAPID •...
-
Page 15: Safety
1 Safety 1.1. Introduction to safety information 1 Safety 1.1. Introduction to safety information Overview The safety information in this manual is divided in two categories: • General safety aspects, important to attend to before performing any service or installation work on the controller. These are applicable for all service work and are found in section General safety information. -
Page 16: General Safety Information
1 Safety 1.2.1. Introduction to general safety information 1.2 General safety information 1.2.1. Introduction to general safety information Definitions This section details general safety information for personnel performing installation, repair and maintenance work. Sections The general safety information is divided into the following sections. Contents Containing General information... -
Page 17: General Information
Limitation of liability Any information given in this manual regarding safety must not be construed as a warranty by ABB that the industrial manipulator will not cause injury or damage even if all safety instructions are complied with. Related information... -
Page 18: Safety Risks
The mains supply to the robot must be connected in such a way that it can be turned off from outside the robot’s working space. Voltage related risks, IRC5 controller A danger of high voltage is associated with, for example, the following parts: •... -
Page 19: Safety Actions
1 Safety 1.2.4.1. Fire extinguishing 1.2.4. Safety actions 1.2.4.1. Fire extinguishing NOTE! Use a CARBON DIOXIDE (CO ) extinguisher in the event of a fire in the manipulator system (manipulator or controller)! 3HAC021313-001 Revision: P... -
Page 20: Safety Stops
1 Safety 1.2.5.1. Overview of manipulator stopping functions 1.2.5. Safety stops 1.2.5.1. Overview of manipulator stopping functions Overview Stops are categorized/classified by standards IEC 60204-1:2005 and ISO 10218-1:2006. There are several different manipulator stopping functions in the manipulator system. • Hardware stops connected to the run chain. - Page 21 1 Safety 1.2.5.1. Overview of manipulator stopping functions Continued Stop connections: Description: General stop Disconnects drive power in all operating modes. To be used as Protective stop in all operating modes. Also called Safety stop. Superior stop Disconnects drive power in all operating modes. To be used as Protective stop in all operating modes.
- Page 22 1 Safety 1.2.5.1. Overview of manipulator stopping functions Continued Stop with system input signals In addition to the hardware stops as described above, it is also possible to define system input signals, which will give an immediate or delayed stop of different modes for all tasks and manipulators, when activated.
- Page 23 1 Safety 1.2.5.1. Overview of manipulator stopping functions Continued Stop with RAPID instructions There are several RAPID instructions available that stops the manipulator. Instruction: Description: Arguments: SystemStopAction Stops all manipulators in all tasks \Stop - similar to a normal program immediately.
- Page 24 1 Safety 1.2.5.1. Overview of manipulator stopping functions Continued Instruction: Description: Arguments: SearchX Search instructions can be \Stop - the manipulator will stop as programmed with arguments to fast as possible. This stop is stop the manipulator movement performed by ramping down close to the point where a search motion in each motor separate hit was noticed.
-
Page 25: What Is An Emergency Stop
Emergency stop should not be used for normal program stops as this causes extra, unnecessary wear on the manipulator. For how to perform normal program stops, see the section Stopping programs inOperating manual - IRC5 with FlexPendant. Classification of stops... - Page 26 1 Safety 1.2.5.2. What is an emergency stop? Continued Emergency stop devices In a manipulator system there are several emergency stop devices that can be operated in order to achieve an emergency stop. There are emergency stop buttons available on the FlexPendant and on the controller cabinet (on the Control Module on a Dual Cabinet Controller).
-
Page 27: What Is A Safety Stop
1 Type of safety stops Safety stops are activated through special signal inputs to the controller, see Product manual - IRC5. The inputs are intended for safety devices such as cell doors, light curtains, or light beams. Safety stop: Description: Automatic mode stop (AS) Disconnects drive power in automatic mode. - Page 28 1 Safety 1.2.5.3. What is a safety stop? Continued NOTE! Use normal program stop for all other types of stop. 3HAC021313-001 Revision: P...
-
Page 29: What Is Safeguarding
The safeguarding function should not be used for normal program stops as this causes extra, unnecessary wear on the manipulator. For how to perform normal program stops, see section Stopping programsin Operating manual - IRC5 with FlexPendant. Safeguarded space The safeguarded space is the space guarded by the guards. For example, a manipulator cell is safeguarded by the cell door and its interlocking device. -
Page 30: Safety Related Instructions
1 Safety 1.3.1. Safety signals in the manual 1.3 Safety related instructions 1.3.1. Safety signals in the manual Introduction to safety signals This section specifies all dangers that can arise when doing the work described in this manual. Each danger consists of: •... - Page 31 1 Safety 1.3.1. Safety signals in the manual Continued Symbol Designation Significance ELECTROSTATIC Warns for electrostatic hazards which could result in DISCHARGE (ESD) severe damage to the product. Electrostatic discharge (ESD) NOTE Describes important facts and conditions. Note Describes where to find additional information or how to do an operation in an easier way.
-
Page 32: Danger - Make Sure That The Main Power Has Been Switched Off
1 Safety 1.3.2. DANGER - Make sure that the main power has been switched off! 1.3.2. DANGER - Make sure that the main power has been switched off! Description Working with high voltage is potentially lethal. Persons subjected to high voltage may suffer cardiac arrest, burn injuries, or other severe injuries. -
Page 33: Warning - The Unit Is Sensitive To Esd
Location of wrist strap button The location of the wrist strap button is shown in the following illustration. IRC5 The wrist strap button is located in the top right corner. xx0500002171 Wrist strap button... -
Page 34: Caution - Never Stand On Or Use The Cabinet As A Ladder
1 Safety 1.3.4. CAUTION - Never stand on or use the cabinet as a ladder 1.3.4. CAUTION - Never stand on or use the cabinet as a ladder Description To avoid personal injury or damaging the product, it is never allowed to stand on the single cabinet or the modules of the dual cabinet. -
Page 35: Caution - Make Sure That There Are No Loose Screws Or Turnings Inside The Computer Unit
1 Safety 1.3.5. CAUTION - Make sure that there are no loose screws or turnings inside the computer unit DSQC639 1.3.5. CAUTION - Make sure that there are no loose screws or turnings inside the computer unit DSQC639 Description To avoid damaging the product, do not proceed working before checking that there are no loose screws, turnings or other parts inside the computer unit after work has been performed inside the controller cabinet. -
Page 36: Caution - Close The Cabinet Door
1 Safety 1.3.6. CAUTION - Close the cabinet door 1.3.6. CAUTION - Close the cabinet door Description The cabinet door must be closed properly when the manipulator system is in production. If a door is not properly closed, the cabinet does not comply with the protection class IP54. The shield for Electro Magnetic Compatibility is also affected if the door is not properly closed. -
Page 37: Caution - Hot Components In Controller
1 Safety 1.3.7. CAUTION - Hot components in controller 1.3.7. CAUTION - Hot components in controller Description Units and heat sinks are HOT after running the manipulator! Touching the units and heat sinks may result in burns! With higher environment temperature more surfaces on the controller get HOT and may result in burns. - Page 38 1 Safety 1.3.7. CAUTION - Hot components in controller 3HAC021313-001 Revision: P...
-
Page 39: Installation And Commissioning, Irc5
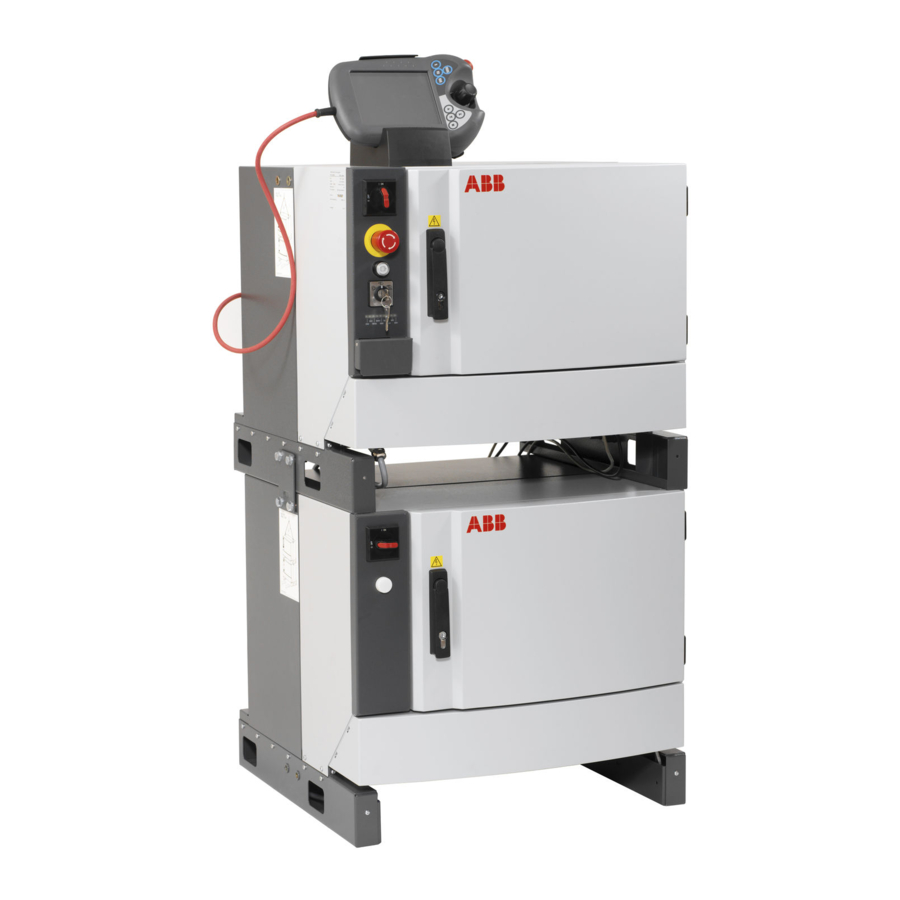
2 Installation and Commissioning, IRC5 2.1. Overview 2 Installation and Commissioning, IRC5 2.1. Overview General The ABB IRC5 controller is available in two basic configurations: Single Cabinet Controller and Dual Cabinet Controller. xx0600002929 Dual Cabinet (Control Module) Dual Cabinet (Drive Module) -
Page 40: Installation Activities
How to connect buses e.g DeviceNet, is detailed in the Application manual for the bus respectively. How to connect I/O units to the IRC5 controller is detailed in the Application manual for the I/O unit respectively. How to connect to a network is detailed in... -
Page 41: Transporting And Handling
2.3.1. Lifting the controller modules Lifting device Use the two lifting eyes or a fork lift when lifting the IRC5 controller, as shown below. The figure below shows the maximum angle between the lifting straps when lifting the controller. The weight of the controller modules are detailed in section... -
Page 42: Unpacking The Controller
When unpacking the controller, check that it was not damaged during transport. NOTE! If the IRC5 Controller is going to be stored before unpacking and installation, read the following information regarding storage conditions. Storage conditions The table below shows the recommended storage conditions for the IRC5 Controller:... - Page 43 2 Installation and Commissioning, IRC5 2.3.2. Unpacking the controller Continued Protection class The table below shows the protection classes for the IRC5 Controller and FlexPendant: Equipment Protection class IRC5 Single or Dual Cabinet Controller IP54 electronics IRC5 Single or Dual Cabinet Controller air...
-
Page 44: On-Site Installation
2.4 On-site Installation 2.4.1. Required installation space, IRC5 Controller Dimensions The figure below shows the required installation space for the IRC5 controller, the illustration shows a Single Cabinet Controller. The measures are the same for the Dual Cabinet Controller. xx0500001848 NOTE! The free space on the right hand side of the controller is required to allow opening the door a full 180°... -
Page 45: Bolting Down The Controller
2 Installation and Commissioning, IRC5 2.4.2. Bolting down the controller 2.4.2. Bolting down the controller Bolt pattern, Single Cabinet Controller and Dual Cabinet Controller Design 2006 The figure below shows the bolt pattern for the Single Cabinet Controller: xx0500001853 Bolt pattern, Dual Cabinet Controller Design 2004 The figures below shows the bolt pattern for the Control Module and the Drive Module. -
Page 46: Transportation Screws
2 Installation and Commissioning, IRC5 2.4.3. Transportation screws 2.4.3. Transportation screws General During transportation the kick cover is secured with two screws. The two screws must be removed before removal of the plate and connection of cables. The screws are located as shown in the illustration below. -
Page 47: Mounting The Flexpendant Holder
2 Installation and Commissioning, IRC5 2.4.4. Mounting the FlexPendant holder 2.4.4. Mounting the FlexPendant holder Location The placement of the FlexPendant holder is shown in the illustration below. xx0500002542 FlexPendant holder mounted on top of the control cabinet. FlexPendant holder mounted on the control cabinet door. - Page 48 2 Installation and Commissioning, IRC5 2.4.4. Mounting the FlexPendant holder Continued Procedure - On top of the control cabinet The following procedure details how to mount the FlexPendant holder on top of the control cabinet. Action Note/illustration 1. Remove the protective liner from the tape.
- Page 49 2 Installation and Commissioning, IRC5 2.4.4. Mounting the FlexPendant holder Continued Procedure - On the control cabinet door The following procedure details how to mount the FlexPendant holder on the control cabinet door. Action Note/Illustration 1. At assembly of FlexPendant holder on the...
- Page 50 2 Installation and Commissioning, IRC5 2.4.4. Mounting the FlexPendant holder Continued Action Note/Illustration 5. Press the mounting plate against the control cabinet door. NOTE! The surface must be clean and dry. xx0700000243 3HAC021313-001 Revision: P...
-
Page 51: Connections
2.5 Connections 2.5.1. Connectors on controller, IRC5 General The following section describes the connectors on respective front panels on the IRC5 controller. These are described below. Single Cabinet Controller The following details the connection interface on the Single Cabinet Controller. - Page 52 2 Installation and Commissioning, IRC5 2.5.1. Connectors on controller, IRC5 Continued Dual Cabinet Controller The following details the connectors on the frontpanel of the Dual Cabinet Controller, that is the Control Module and the Drive Module. Control Module The following details the connectors on the frontpanel of the Control Module.
- Page 53 2 Installation and Commissioning, IRC5 2.5.1. Connectors on controller, IRC5 Continued Drive Module The following details the connectors on the frontpanel of the Drive Module. Small robots: xx0600002931 Large robots: xx0700000424 Description A4.X0: Mains connection to transformer A4.XS25: Power to Control Module A4.X1: Robot power connection...
-
Page 54: Connecting A Flexpendant
Hot plug, then you can also disconnect in auto mode. See section Using the hot plug optioninOperat- ing manual - IRC5 with FlexPendant. 2. Plug in the FlexPendant cable connector. 3. Screw the connector lock ring firmly by turning it clockwise. -
Page 55: Connecting A Pc To The Service Port
2 Installation and Commissioning, IRC5 2.5.3. Connecting a PC to the service port 2.5.3. Connecting a PC to the service port NOTE! The service port shall only be used for direct connection to a PC as described in this procedure. It must not be connected to a LAN (local area network), since it has a DHCP server that automatically distributes IP addresses to all units connected to the LAN. - Page 56 2 Installation and Commissioning, IRC5 2.5.3. Connecting a PC to the service port Continued Connections to ports may be done as detailed below. Connection to/from: Detailed in section: Connecting the Single Cabinet/Control Module to the factory LAN. Connecting a PC to the Single Cabinet/ Proceed as detailed below.
-
Page 57: Connection To Serial Channel Connector
2 Installation and Commissioning, IRC5 2.5.4. Connection to serial channel connector 2.5.4. Connection to serial channel connector Overview The controller has one serial channel RS232 for permanent use which can be used for communication point to point with printers, terminals, computers or other equipment. - Page 58 2 Installation and Commissioning, IRC5 2.5.4. Connection to serial channel connector Continued Conversion of the RS232 channel The RS232 channel can be converted to RS422 full duplex with an optional adapter (Option 714-1). The RS422 enables a more reliable point to point communication (differential) over longer distances, from RS232 = 15m to RS422 = 120m.
-
Page 59: Connecting Power Supply To The Single Cabinet Controller
2 Installation and Commissioning, IRC5 2.5.5. Connecting power supply to the Single Cabinet Controller 2.5.5. Connecting power supply to the Single Cabinet Controller General The following sections details how to connect power supply to the Single Cabinet Controller. Location xx0500001869... - Page 60 2 Installation and Commissioning, IRC5 2.5.5. Connecting power supply to the Single Cabinet Controller Continued Line fusing Recommended line fusing, slow-blowing diazed or circuit breaker with trip characteristic K. Max. fuse 35 A, with options 80 A. Robot Voltage Description...
- Page 61 2 Installation and Commissioning, IRC5 2.5.5. Connecting power supply to the Single Cabinet Controller Continued Connection through a cable gland The following procedures detail how to connect the mains power to the controller through a cable gland. Action Note/Illustration 1. Connect power supply from an external Described in section, Prerequisites earth fault protection.
- Page 62 2 Installation and Commissioning, IRC5 2.5.5. Connecting power supply to the Single Cabinet Controller Continued Action Note/Illustration 3. Strip the insulation on the power supply cable long enough to reach the rotary switch. 4. Connect the ground cable at the See illustration above.
-
Page 63: Connecting Power Supply To The Dual Cabinet Controller
2 Installation and Commissioning, IRC5 2.5.6. Connecting power supply to the Dual Cabinet Controller 2.5.6. Connecting power supply to the Dual Cabinet Controller General The following sections details how to connect power supply to the Dual Cabinet Controller for both the Control Module and the Drive Module. - Page 64 1. Lead the harness through the Connectors on the Control Module are described in cable gland, into the Control section, Connectors on controller, IRC5 on page 49 Cabinet. 2. Loosen the contact behind the main switch of the Control Cabinet.
-
Page 65: Connecting The Communication Cabling For The Dual Cabinet Controller
2 Installation and Commissioning, IRC5 2.5.7. Connecting the communication cabling for the Dual Cabinet Controller 2.5.7. Connecting the communication cabling for the Dual Cabinet Controller General Normally the communication cabling between the Control Module and Drive Module are installed at delivery. - Page 66 2 Installation and Commissioning, IRC5 2.5.7. Connecting the communication cabling for the Dual Cabinet Controller Continued Procedure The procedures below details how to install the communication cabling. The placement of Computer unit, Axis computer, Panel unit and Contactor board are described in the repairs section respectively.
-
Page 67: Fitting The Connector
2 Installation and Commissioning, IRC5 2.5.8. Fitting the connector 2.5.8. Fitting the connector General This section describes how to manufacture a cable for connecting the mains power to the Drive Module. Specifications The following describes the cable and fuse requirements for the mains power connection to the Drive Module. - Page 68 2 Installation and Commissioning, IRC5 2.5.8. Fitting the connector Continued Action Note/Illustration 3. Fit the cable through the housing and the brass cable clamp, and connect the wires to the female connector. xx0400001044 • A: housing • B: Brass cable clamp •...
-
Page 69: Connecting The Manipulator To The Irc5 Controller
2.5.9. Connecting the manipulator to the IRC5 controller General Connect the manipulator and IRC5 controller to each other after installing them. The lists below specify which cables to be used in each application. All connectors on the IRC5 controller are shown in section... -
Page 70: Connecting Safety Signals
2 Installation and Commissioning, IRC5 2.5.10. Connecting safety signals 2.5.10. Connecting safety signals External customer connection If the cabinet is equipped with the option External customer connection, connect the connector as shown in the following illustration. xx1000000143 Internal customer connection If the cabinet is not equipped with the option External customer connection, the signal cables must go though a cable gland and be connected to the Panel board inside the cabinet. -
Page 71: The Motors On/Motors Off Circuit
2 Installation and Commissioning, IRC5 2.5.11. The MOTORS ON/MOTORS OFF circuit 2.5.11. The MOTORS ON/MOTORS OFF circuit Outline diagram The MOTORS ON/MOTORS OFF circuit is made up of two identical chains of switches. The diagram shows the available customer connections, AS, GS, SS and ES. - Page 72 2 Installation and Commissioning, IRC5 2.5.11. The MOTORS ON/MOTORS OFF circuit Continued Function of the MOTORS ON/MOTORS OFF circuit The circuit monitors all safety related equipment and switches. If any of the switches is opened, the MOTORS ON/MOTORS OFF circuit switches the power to the motors off.
- Page 73 2 Installation and Commissioning, IRC5 2.5.11. The MOTORS ON/MOTORS OFF circuit Continued Technical data per chain GS/AS/SS open "0" < 5 V External supply of GS/AS/SS Max. + 35 VDC Min. - 35 VDC GS/AS/SS Filter time 2,0 ms Max. potential in relation to the...
- Page 74 2 Installation and Commissioning, IRC5 2.5.11. The MOTORS ON/MOTORS OFF circuit Continued Connection of ES1/ES2 on panel unit The diagram below shows the terminals for the emergency circuits. The supply from internal 24V (X1/X2:10) and 0V (X1/X2:10) is displayed. For an ext.
- Page 75 2 Installation and Commissioning, IRC5 2.5.11. The MOTORS ON/MOTORS OFF circuit Continued Technical data ES1 and ES2 max output voltage 120 VAC or 48 VDC ES1 and ES2 max output current 120 VAC: 4 A 48 VDC L/R: 50 mA...
-
Page 76: Connection Of External Safety Relay
2 Installation and Commissioning, IRC5 2.5.12. Connection of external safety relay 2.5.12. Connection of external safety relay Description The motor contactors K42 and K43 in the Drive Module can operate with external equipment if external relays are used. The following figure shows an example of how to connect an external safety relay. -
Page 77: Connection To Motors On/Motors Off Contactor
2 Installation and Commissioning, IRC5 2.5.13. Connection to MOTORS ON/MOTORS OFF contactor 2.5.13. Connection to MOTORS ON/MOTORS OFF contactor General This section details connection to the MOTORS ON/MOTORS OFF contactor. To be used when the customer wants external equipment to follow the robot control. - Page 78 2 Installation and Commissioning, IRC5 2.5.13. Connection to MOTORS ON/MOTORS OFF contactor Continued Procedure Following procedure describes connection to the MOTORS ON/MOTORS OFF contactor. Action Info/Illustration DANGER! Before commencing any work inside the cabinet, please observe the safety information in section...
-
Page 79: Connection Of Drive Module Disconnect, By Limit Switch
2 Installation and Commissioning, IRC5 2.5.14. Connection of Drive Module Disconnect, by limit switch 2.5.14. Connection of Drive Module Disconnect, by limit switch General This function enables you to temporarily disconnect a Drive Module and deactivate any robot or additional mechanical units connected to this module. The procedures are detailed below. - Page 80 The following procedures details how to enabeling the system for a Drive Module Disconnect. Action 1. On the FlexPendant, Tap ABB and then Tap Control Panel. 2. In the Control panel menu, Tap Configuration. 3. In the Configuration menu, Tap Topics, and select Motion.
- Page 81 2 Installation and Commissioning, IRC5 2.5.14. Connection of Drive Module Disconnect, by limit switch Continued Disconnect the Drive Module The following procedure details how to disconnect a Drive Module. Action Note/illustration 1. Make sure that the system is in the MOTORS_OFF state.
- Page 82 2 Installation and Commissioning, IRC5 2.5.14. Connection of Drive Module Disconnect, by limit switch Continued Action Note/illustration 3. Connect the wires to the connector X22 according to the diagram on the right. xx0500002091 3HAC021313-001 Revision: P...
-
Page 83: Connection Of Servo Disconnect, By Servo Power Switch
2.5.15. Connection of servo disconnect, by servo power switch 2.5.15. Connection of servo disconnect, by servo power switch General The IRC5 controller is pre-wired to accept a customer servo disconnect. NOTE! Due to risk of voltage drop, the switch to the servo disconnect circuit should not be mounted more than 50 meters from the Drive Module. - Page 84 2 Installation and Commissioning, IRC5 2.5.15. Connection of servo disconnect, by servo power switch Continued Procedure Following procedure details how to connect a servo disconnect. Action Note/Illustration DANGER! Before commencing any work inside the cabinet, please observe the safety information in section...
-
Page 85: Connecting A Limit Switch Override Push Button
The following procedure details how to connect a Limit switch override circuit in a Single Cabinet Controller. Action Note/illustration Danger DANGER! Before any work inside the IRC5 controller modules, please observe the safety information in section DANGER - Make sure that the main power has been switched off! on page... - Page 86 2 Installation and Commissioning, IRC5 2.5.16. Connecting a Limit switch override push button Continued Action Note/illustration 2. Attach two additional contact blocks on the existing push button (Motors on). note Note! There is only room for one additional contact block beside the two existing.
- Page 87 2 Installation and Commissioning, IRC5 2.5.16. Connecting a Limit switch override push button Continued Action Note/illustration 4. Route the wires together with the existing harness on the left wall. xx0500002557 • A: Contact blocks • B: Wires • C: Connector X23 5.
- Page 88 The following procedure details how to connect a Limit switch override circuit in a Dual Cabinet Controller. Action Note/illustration Danger DANGER! Before any work inside the IRC5 controller modules, please observe the safety information in section DANGER - Make sure that the main power has been switched off! on page 2.
- Page 89 2 Installation and Commissioning, IRC5 2.5.16. Connecting a Limit switch override push button Continued Action Note/illustration 6. Connect wires from the contact blocks to the connector according to the diagram to the right. xx050000 7. Route the wires together with the existing harness on the left wall.
-
Page 90: Drive System
2.6 Drive system 2.6.1. Drive functions, general General The robot is powered by power electronics found in the IRC5 controller, (for the Dual Cabinet Controller it’s found in the Drive Module). This also includes power electronics for driving additional axes. -
Page 91: Drive System 04 Or 09
2.6.2. Drive System 04 or 09? Overview The IRC5 Controller is delivered with either Drive System 04 or Drive System 09. Their function is the same, but for maintenance and when connecting additional axes it is necessary to know which drive system the controller has. - Page 92 2 Installation and Commissioning, IRC5 2.6.2. Drive System 04 or 09? Continued Drive System 09 In Drive system 09 there is only one unit including rectifier, capacitors and drive units for all robot axes, the Main Drive Unit. The axis computer used with Drive System 09 is slightly smaller than the one for Drive System 04.
-
Page 93: Configuration Of Drive System 04, Irc5
2.6.3. Configuration of Drive System 04, IRC5 General The IRC5 Single Cabinet Controller contains a number of drive units, rectifiers and filters. Any allowed combination of these, depending on the robot type, is specified below. The robot system may also be equipped with up to three additional drive modules, which are... - Page 94 2 Installation and Commissioning, IRC5 2.6.3. Configuration of Drive System 04, IRC5 Continued IRB 140 The figures show the drive unit with and without additional axes respectively. The table specifies which units may be fitted in which positions. xx0200000121 xx0200000120 Pos.
- Page 95 2 Installation and Commissioning, IRC5 2.6.3. Configuration of Drive System 04, IRC5 Continued IRB 340, 360 The figures show the drive unit with and without additional axes respectively. The table specifies which units may be fitted in which positions. xx0200000121 xx0200000120 Pos.
- Page 96 2 Installation and Commissioning, IRC5 2.6.3. Configuration of Drive System 04, IRC5 Continued IRB 1400 The figures show the drive unit with and without additional axes respectively. The table specifies which units may be fitted in which positions. xx0200000121 xx0200000120 Pos.
- Page 97 2 Installation and Commissioning, IRC5 2.6.3. Configuration of Drive System 04, IRC5 Continued IRB 1600, 2400 The figures show the drive unit with and without additional axes respectively. The table specifies which units may be fitted in which positions. xx0200000121 xx0200000120 Pos.
- Page 98 2 Installation and Commissioning, IRC5 2.6.3. Configuration of Drive System 04, IRC5 Continued IRB 4400 The figures show the drive unit with and without additional axes respectively. The table specifies which units may be fitted in which positions. Rectifier: Z2...
- Page 99 2 Installation and Commissioning, IRC5 2.6.3. Configuration of Drive System 04, IRC5 Continued Pos. Identification Description Art. no. Note DSQC 620_C4 Capacitor unit 3HAC14551-3 DSQC 618_R2 Rectifier 3HAC14549-2 Y2, X2 DSQC 619 Optional drive units 3HAC14550-4 Size: 1W for external axes...
-
Page 100: Configuration Of Drive System 09, Irc5
2.6.4. Configuration of Drive System 09, IRC5 General The IRC5 Controller contains one Main Drive Unit and up to three Additional Drive Units, and in some cases an Additional Rectifier Unit. The allowed combinations of these, depending on the robot type, is specified below. - Page 101 2 Installation and Commissioning, IRC5 2.6.4. Configuration of Drive System 09, IRC5 Continued IRB 120, 140, 1410, 260, 340, 360, 1600 The following illustration shows the drive units. The table specifies which units may be fitted in which positions. en0800000293 Pos.
- Page 102 2 Installation and Commissioning, IRC5 2.6.4. Configuration of Drive System 09, IRC5 Continued Pos. Identification Description Art. no. Note DSQC 664 Additional drive 3HAC030923-001 For first unit additional axis ADU-790A DSQC 664 Additional drive 3HAC030923-001 For second unit additional axis...
-
Page 103: Memory Functions
Compact flash memory 1 GB containing ABB boot image software. • 256 MB DDR SDRAM memory (Synchronous Dynamic Random Access Memory). Note NOTE! Only use Compact flash memory and DDR SDRAM memory supplied by ABB. Further information The table gives references to additional information. Information: Found in:... -
Page 104: Connecting A Usb Memory To The Computer Unit
2 Installation and Commissioning, IRC5 2.7.2. Connecting a USB memory to the computer unit 2.7.2. Connecting a USB memory to the computer unit Location DSQC639 A USB memory may be connected to either one of the USB portson the computer unit. The... - Page 105 2 Installation and Commissioning, IRC5 2.7.2. Connecting a USB memory to the computer unit Continued Action Info/illustration CAUTION! CAUTION! Handling of USB memory is described in Operating manual - IRC5 with Flex- Pendant, section File Managing. 3HAC021313-001 Revision: P...
-
Page 106: I/O System
The IRC5 controller may be fitted with I/O, Gateway or Encoder units. These are configured in an identical way. The IRC5 Single Cabinet Controller is prepared for up to two I/O units, Gateways or Encoder interfaces units, and the Dual Cabinet Controller (Control Module) is prepared for up to four I/O units, Gateways or Encoder interface units. - Page 107 2 Installation and Commissioning, IRC5 2.8.1. Definition of I/O units, IRC5 Continued I/O units The table below specifies the I/O units: Description Note AD Combi I/O DSQC 651 I/O System parts on page 304 for the spare part number Digital I/O...
-
Page 108: Installation Of Add-Ons
2.9.1. Installation of additional Drive Module General To be able to use a Multi Move system or to control more than 3 additional axes, an additional Drive Module is needed. The IRC5 controller is prepared for up to three additional Drive Modules. xx0400001042... - Page 109 2 Installation and Commissioning, IRC5 2.9.1. Installation of additional Drive Module Continued Action Info/Illustration WARNING! The unit is sensitive to ESD. Before handling the unit please read the safety information in the section WARNING - The unit is sensitive to ESD! on page 31 3.
- Page 110 2 Installation and Commissioning, IRC5 2.9.1. Installation of additional Drive Module Continued Action Info/Illustration 6. Loosen the attachment screws, and remove the cover to a empty slot in the back of the controller. xx0500001888 • A: cover • B: attachment screw (2pcs) 7.
- Page 111 2 Installation and Commissioning, IRC5 2.9.1. Installation of additional Drive Module Continued Action Info/Illustration 8. Connect the ethernet cable (A32.X9) to the DSQC 612 Ethernet board. Connector: • A32.X9 to Ethernet board connector, AXC1 9. Connect the safety signal cable (A21.X7) to the Panel board.
-
Page 112: Installation Of External Operator's Panel, Irc5
2 Installation and Commissioning, IRC5 2.9.2. Installation of external operator's panel, IRC5 2.9.2. Installation of external operator's panel, IRC5 Location An external operator's panel may be fitted in a separate wall cabinet as shown in the illustration below. xx0400000956 Wall cabinet IRC5... - Page 113 2 Installation and Commissioning, IRC5 2.9.2. Installation of external operator's panel, IRC5 Continued Procedure The procedure below details how to install the external control panel. Action Info/Illustration DANGER! Before commencing any work inside the cabinet, please observe the safety information in section...
- Page 114 2 Installation and Commissioning, IRC5 2.9.2. Installation of external operator's panel, IRC5 Continued Action Info/Illustration 4. Remove the cover to a free customer The illustration below shows the connector slot on the connection panel. connection panel for the Dual Cabinet Controller.
- Page 115 2 Installation and Commissioning, IRC5 2.9.2. Installation of external operator's panel, IRC5 Continued Action Info/Illustration 8. Connect the signal connectors A21.X9 and A21.X10 to the connector X9 and X10 on the panel board unit. xx0500001890 xx0600003257 9. Strap the cabling to the existing cable strapping inside the module.
-
Page 116: Installation Of Drive System Parts (Drive System 04)
Art. no. Note A number of choices are Specified in section Configuration available of Drive System 04, IRC5 on page Standard toolkit The contents are defined in section Standard toolkit. Other tools and procedures may These procedures include be required. See references to references to the tools required. - Page 117 • C: attachment screw 3. Fit the drive unit in position. Allowed positions are specified in section Configuration of Drive System 04, IRC5 Secure it with its attachment screws. on page 91 4. Connect any additional connectors to the unit.
-
Page 118: Installation Of Drive System Parts (Drive System 09)
Additional Rectifier Unit (only used for additional axes in combination with small robots) Configuration The drive module exists in a number of versions, these are described in section Configuration of Drive System 09, IRC5 on page Required equipment Equipment Note Drive units... - Page 119 2 Installation and Commissioning, IRC5 2.9.4. Installation of Drive system parts (Drive System 09) Continued Installing an Additional Drive Unit The procedure below details how to install an Additional Drive Unit. NOTE! When using Main Drive Unit MDU-430A an Additional Rectifier Unit, ARU-430A, is required to use an Additional Drive Unit.
-
Page 120: Installation Of I/O, Gateways And Encoder Interface Units, Irc5
2 Installation and Commissioning, IRC5 2.9.5. Installation of I/O, Gateways and encoder interface units, IRC5 2.9.5. Installation of I/O, Gateways and encoder interface units, IRC5 Location in Single Cabinet Controller The location for the I/O units, Gateway or encoder interface units to be installed are shown in the illustration below. - Page 121 2 Installation and Commissioning, IRC5 2.9.5. Installation of I/O, Gateways and encoder interface units, IRC5 Continued Required equipment Equipment Art. no. Note I/O units, Gateways or encoder Specified in Definition of interface units I/O units, IRC5 on page 104. Application manual - DeviceNet...
-
Page 122: Installation Of Pmc-Card For Force Control Function (Drive System 04)
2 Installation and Commissioning, IRC5 2.9.6. Installation of PMC-card for Force Control Function (Drive System 04) 2.9.6. Installation of PMC-card for Force Control Function (Drive System 04) Limitations This section describes how to install a PCM-card on a Controller with Drive System 04. This solution is not possible for Drive System 09. - Page 123 2 Installation and Commissioning, IRC5 2.9.6. Installation of PMC-card for Force Control Function (Drive System 04) Continued Equipment Art. no. Note Application manual - Force Control 3HAC025057-001 Assembly Operating manual - RobotStudio 3HAC032104-001 Standard tool kit. Circuit diagram Circuit Diagram on...
- Page 124 2 Installation and Commissioning, IRC5 2.9.6. Installation of PMC-card for Force Control Function (Drive System 04) Continued Action Note/illustration 4. Remove the six attachments screws on the sides of the axis computer, and remove the back cover. xx0500002134 • A: back cover •...
- Page 125 2 Installation and Commissioning, IRC5 2.9.6. Installation of PMC-card for Force Control Function (Drive System 04) Continued Action Note/illustration 7. Refit the axis computer in controller. xx0500001885 • A: axis computer • B: attachment screws 8. Install the Force Control software.
-
Page 126: Installation Of Force Control For Drive System 09
2.9.7. Installation of Force Control for Drive System 09 About Force Control hardware An IRC5 controller with Drive System 09 does not require any specific hardware inside the cabinet for Force Control. Instead an external voltage measurement box is connected to Serial Measurement Link 2. -
Page 127: Upgrading And Installation Of 2X Euromap Interface (Option 671-4)
2.9.8. Upgrading and installation of 2X Euromap interface (Option 671-4) General This section describes installation of 2X Euromap interface (Option 671-4) in an IRC5 Single Cabinet Controller and in an IRC5 Dual Cabinet Controller. The customer option 2X Euromap interface is not a pre mounted delivery option, it must be complimented with a safety relay, not included in the option kit from ABB. - Page 128 2 Installation and Commissioning, IRC5 2.9.8. Upgrading and installation of 2X Euromap interface (Option 671-4) Continued Cable protection Euromap adapter X13x and X14z connector Placement of customer safety relay Location of Euromap 2X interfaces in the Dual Cabinet xx0800000215 Connector A21.X5, on panel board Connector A21.X1, on panel board...
- Page 129 2 Installation and Commissioning, IRC5 2.9.8. Upgrading and installation of 2X Euromap interface (Option 671-4) Continued Required equipment for 2X Euromap interfaces in the Single Cabinet Controller Equipment Art. number Description Note Cable harness 3HAC026692-001 Harness-Euromap 67 Single Cab. Gasket...
- Page 130 2 Installation and Commissioning, IRC5 2.9.8. Upgrading and installation of 2X Euromap interface (Option 671-4) Continued Action Note/Illustration WARNING! The unit is sensitive to ESD. Before handling the unit please read the safety information in the section WARNING - The unit is sensitive to ESD! on page 31 3.
- Page 131 2 Installation and Commissioning, IRC5 2.9.8. Upgrading and installation of 2X Euromap interface (Option 671-4) Continued Action Note/Illustration 6. Use the adapter Described in section Adapter Euromap 67 on page 132. 3HAC032370-001 to connect (harness 1 with harness 2) and the (panel board...
- Page 132 2 Installation and Commissioning, IRC5 2.9.8. Upgrading and installation of 2X Euromap interface (Option 671-4) Continued Requirements safety relay The safety loop demands a safety relay, it is not included in the upgrade kit and has to be supplied by the customer.
- Page 133 WARNING - The unit is sensitive to ESD! on page 3. Assemble the relay (customer supplied) on the recommended location in the IRC5 Controller. 4. Connect all wires from the adapter. Described in Wiring relay on page 133.
- Page 134 2 Installation and Commissioning, IRC5 2.9.8. Upgrading and installation of 2X Euromap interface (Option 671-4) Continued Adapter Euromap 67 The figure below shoes the connections for the Euromap 67 adapter 3HAC032370-001. xx0800000216 Wiring adapter Harness Connection From-To Connection XS13.1 X13-Adapter XP13.1...
- Page 135 2 Installation and Commissioning, IRC5 2.9.8. Upgrading and installation of 2X Euromap interface (Option 671-4) Continued Wiring relay The figure below shoes the connections for the Euromap safety loop. xx0800000219 Connection point A Connection point B Wire No. Term Term...
-
Page 136: Installation Of Cooling Fan Harness Axis 1 And 2
2 Installation and Commissioning, IRC5 2.9.9. Installation of cooling fan harness axis 1 and 2 2.9.9. Installation of cooling fan harness axis 1 and 2 General If the robot is going to be supplemented with cooling fans on axis 1 and 2 the controller has to be supplemented with a internal harness. - Page 137 2 Installation and Commissioning, IRC5 2.9.9. Installation of cooling fan harness axis 1 and 2 Continued Locations in Single Cabinet Controller xx0600002686 Harness, cooling - Axis 1 and 2 Cable protection Contactor interface board Connector A43.X10 Connector A43.X11 Position switch terminals...
- Page 138 2 Installation and Commissioning, IRC5 2.9.9. Installation of cooling fan harness axis 1 and 2 Continued Procedures for Dual Cabinet Controller Following procedure details how to install the harness, cooling - Axis 1 and 2 kit in the Dual Cabinet Controller.
- Page 139 2 Installation and Commissioning, IRC5 2.9.9. Installation of cooling fan harness axis 1 and 2 Continued Action Note/Illustration 7. Connect the harness connectors to the contactor interface board. • A43.X11 to X11 • A43.X10 to X10 xx0500002690 Locations in Dual Cabinet Controller on page 134.
- Page 140 2 Installation and Commissioning, IRC5 2.9.9. Installation of cooling fan harness axis 1 and 2 Continued Action Note/Illustration 5. Route the cable to the left and connect the harness connectors to the contactor interface board. • A43.X11 to X11 •...
-
Page 141: Installation Of Hot Plug
2 Installation and Commissioning, IRC5 2.9.10. Installation of Hot plug 2.9.10. Installation of Hot plug Location To be able to use the Hot plug function an additional hot plug button is needed. The figure below shows the location of the hot plug button on the Single Cabinet Controller and Dual Cabinet Controller. - Page 142 2 Installation and Commissioning, IRC5 2.9.10. Installation of Hot plug Continued Procedure Single Cabinet Controller The procedure below details how to install the hot plug button in the Single Cabinet Controller. Action Note/Illustration DANGER! Before commencing any work inside the...
- Page 143 2 Installation and Commissioning, IRC5 2.9.10. Installation of Hot plug Continued Action Note/Illustration 5. Remove the FlexPendant connector with harness from the Operator panel. xx0600002948 • A: FlexPendant connector 6. Remove the plug that covers the hot plug hole. xx0600002949 •...
- Page 144 2 Installation and Commissioning, IRC5 2.9.10. Installation of Hot plug Continued Action Note/Illustration 10. Connect the cables to the hot plug button connector. xx0600002953 11. Place the warning label above the hot plug button. xx0600002957 • A: Warning label 12. Test the hot plug button function.
- Page 145 2 Installation and Commissioning, IRC5 2.9.10. Installation of Hot plug Continued Procedure Dual Cabinet Controller The procedure below details how to install the hot plug button in the Dual Cabinet Controller. Action Note/Illustration DANGER! Before commencing any work inside the...
- Page 146 2 Installation and Commissioning, IRC5 2.9.10. Installation of Hot plug Continued Action Note/Illustration 5. Remove the cover plate with the FlexPendant connector and harness. xx0600002954 • A: Cover plate 6. Fit the new cover plate with FlexPendant connector and hot plug button with harness into the empty slot.
- Page 147 2 Installation and Commissioning, IRC5 2.9.10. Installation of Hot plug Continued Action Note/Illustration 10. Place the warning label below the hot plug button. xx0600002955 • A: Warning label 11. Test the hot plug button function. See section Test of hot plug button function on page 145.
-
Page 148: Installing The Eps Board Dsqc 646 For Electronic Position Switches
2 Installation and Commissioning, IRC5 2.9.11. Installing the EPS board DSQC 646 for Electronic Position Switches 2.9.11. Installing the EPS board DSQC 646 for Electronic Position Switches General To use the option Electronic Position Switches you need to install an EPS board in the robot controller. - Page 149 2 Installation and Commissioning, IRC5 2.9.11. Installing the EPS board DSQC 646 for Electronic Position Switches Continued Procedure The procedure below details how to install an EPS board. Action Note/illustration DANGER! Before commencing any work inside the cabinet, please observe the safety...
- Page 150 2 Installation and Commissioning, IRC5 2.9.11. Installing the EPS board DSQC 646 for Electronic Position Switches Continued Action Note/illustration 5. If the EPS board is used together with axis computer DSQC 668 (used with Drive System 09) two mounting brackets must be mounted on the EPS board.
- Page 151 2 Installation and Commissioning, IRC5 2.9.11. Installing the EPS board DSQC 646 for Electronic Position Switches Continued Action Note/illustration 7. If the EPS board is used together with axis computer DSQC 668 (used with Drive System 09), the upper mounting rail must be moved: 1.
- Page 152 2 Installation and Commissioning, IRC5 2.9.11. Installing the EPS board DSQC 646 for Electronic Position Switches Continued Action Note/illustration 9. Fit the axis computer on the EPS board. Axis computer DSQC 601 (Drive System 04): xx0600003206 • A: axis computer •...
- Page 153 2 Installation and Commissioning, IRC5 2.9.11. Installing the EPS board DSQC 646 for Electronic Position Switches Continued Action Note/illustration 10. For a Single Cabinet Controller: Remove the Ethernet cable between the main computer and the axis computer. Replace it with the long Ethernet cable from the EPS board to the main computer.
- Page 154 2 Installation and Commissioning, IRC5 2.9.11. Installing the EPS board DSQC 646 for Electronic Position Switches Continued Action Note/illustration 12. Remove the power cable from the axis computer and connect it to the split cable. Connect the split cable to the EPS board and the axis computer.
-
Page 155: Installing The Safemove Board Dsqc 647
2 Installation and Commissioning, IRC5 2.9.12. Installing the SafeMove board DSQC 647 2.9.12. Installing the SafeMove board DSQC 647 General To use the option SafeMove you need to install an SafeMove board DSQC 647 in the robot controller. The procedure below will show how to install this board. - Page 156 2 Installation and Commissioning, IRC5 2.9.12. Installing the SafeMove board DSQC 647 Continued Procedure The procedure below details how to install the SafeMove board. Action Note/illustration DANGER! Before commencing any work inside the cabinet, please observe the safety information in section...
- Page 157 2 Installation and Commissioning, IRC5 2.9.12. Installing the SafeMove board DSQC 647 Continued Action Note/illustration 4. Connect both SMB cables and both Ethernet cables to the SafeMove board before mounting the board. These connections may be difficult to reach once the board is mounted.
- Page 158 2 Installation and Commissioning, IRC5 2.9.12. Installing the SafeMove board DSQC 647 Continued Action Note/illustration 6. Remove the attachment screws of the axis computer. Lift out the axis computer so that the SafeMove board can be fitted behind the axis computer.
- Page 159 2 Installation and Commissioning, IRC5 2.9.12. Installing the SafeMove board DSQC 647 Continued Action Note/illustration 8. Fit the SafeMove board in the same place as the axis computer was before. xx0800000104 • A: SafeMove board • B: attachments screws (4 pcs)
- Page 160 2 Installation and Commissioning, IRC5 2.9.12. Installing the SafeMove board DSQC 647 Continued Action Note/illustration 9. Fit the axis computer on the SafeMove Axis computer DSQC 601 (Drive System 04): board. xx0800000017 • A: Axis computer • B: SafeMove board •...
- Page 161 2 Installation and Commissioning, IRC5 2.9.12. Installing the SafeMove board DSQC 647 Continued Action Note/illustration 10. For a Single Cabinet Controller: Remove the Ethernet cable between the main computer and the axis computer. Replace it with the long Ethernet cable from the SafeMove board to the main computer.
- Page 162 2 Installation and Commissioning, IRC5 2.9.12. Installing the SafeMove board DSQC 647 Continued Action Note/illustration 12. Connect the SMB cables from the SafeMove board to the axis computer xx0800000032 • A: SMB1 cable • B: SMB2 cable 13. Disconnect the power cable from the axis computer and connect it to the split cable.
- Page 163 2 Installation and Commissioning, IRC5 2.9.12. Installing the SafeMove board DSQC 647 Continued Action Note/illustration 14. Connect the limit switch cable between SafeMove board: the SafeMove board (X13) and the contactor interface board (X21) xx0800000033 Contactor interface board: xx0800000105 •...
- Page 164 2 Installation and Commissioning, IRC5 2.9.12. Installing the SafeMove board DSQC 647 Continued Action Note/illustration 16. Connect signal cables to the plug contacts, which is then connected to the I/O connector of the SafeMove board. xx0700000640 • A: Power supply •...
-
Page 165: Installation Of Remote Service
2 Installation and Commissioning, IRC5 2.9.13. Installation of Remote Service 2.9.13. Installation of Remote Service General To use the option Remote Service you need a Remote Service box mounted in the robot controller. The procedure below will show how to connect the Remote Service antenna. - Page 166 2 Installation and Commissioning, IRC5 2.9.13. Installation of Remote Service Continued Procedure The following procedure details how to connect the Remote Service antenna. Action Note/illustration 1. Connect the antenna cable to the adapter cover plate on the controller. Use tightening torque 0.8 - 1.1 Nm.
-
Page 167: Installation Of Dispensepac Support
2 Installation and Commissioning, IRC5 2.9.14. Installation of DispensePac support 2.9.14. Installation of DispensePac support About DispensePac To use the DispensePac option you need to connect externally placed Process I/O board(s). The procedure below shows how to connect the DeviceNet cable from the Process I/O board to the DeviceNet signal cable from the Process Interface Board. - Page 168 2 Installation and Commissioning, IRC5 2.9.14. Installation of DispensePac support 3HAC021313-001 Revision: P...
-
Page 169: Maintenance Activities, Controller Irc5
3.1. Maintenance schedule, controller IRC5 3 Maintenance activities, controller IRC5 3.1. Maintenance schedule, controller IRC5 General The IRC5 robot controller must be maintained at regular intervals to ensure its function. The maintenance activities and their respective intervals are specified below: Intervals Maintenance... -
Page 170: Inspection Activities
Inspection The procedure below describes how to inspect the IRC5 controller. WARNING! Please observe the following before commencing any repair work on the IRC5 Controller modules or units connected to the controller: • Switch off all electric power supplies with the power switches on the Control and Drive modules! •... - Page 171 3 Maintenance activities, controller IRC5 3.2.1. Inspection of the controller Continued Action Note/Illustration 4. Inspect the drive system fans and air channels in the controller to make sure they are clean. xx0500002172 • A: drive system fans (4 pcs) 5. After cleaning:...
-
Page 172: Changing/Replacing Activities
3 Maintenance activities, controller IRC5 3.3.1. Activities 3.3 Changing/replacing activities 3.3.1. Activities References Certain activities to be performed as specified in the Maintenance Schedule are not all detailed in this chapter, but in the Repair chapter. Please refer to the Repair chapter of the equipment in question. -
Page 173: Replacement Of Moist Dust Filter
3 Maintenance activities, controller IRC5 3.3.2. Replacement of moist dust filter 3.3.2. Replacement of moist dust filter Location The moist dust filters are located as shown in the illustration below. xx0700000128 Moist dust filter magazine Single Cabinet Controller Dual Cabinet Controller, Control Module... - Page 174 3 Maintenance activities, controller IRC5 3.3.2. Replacement of moist dust filter Continued Removal The procedure below details how to replace the moist dust filter. Action Note/Illustration 1. Pull the moist dust filter magazine upwards. xx0700000131 2. Pull the moist dust filter magazine in the arrow direction and remove it.
- Page 175 3 Maintenance activities, controller IRC5 3.3.2. Replacement of moist dust filter Continued Refitting The procedure below details how to refit the moist dust filter. Action Note/Illustration 1. Fit the new moist dust filter in the magazine and lock it with the lock shackle.
-
Page 176: Cleaning Activities
255. compressed air to clean the channels. 4. If the IRC5 controller is installed in a very harsh envi- How to remove the drive units is ronment, the drive units cooling fans must be cleaned detailed in section, at regular intervals. -
Page 177: Cleaning Moist Dust Filter
3 Maintenance activities, controller IRC5 3.4.2. Cleaning moist dust filter 3.4.2. Cleaning moist dust filter Location The moist dust filters are located as shown in the illustration below. xx0700000128 Moist dust filter magazine Single Cabinet Controller Dual Cabinet Controller, Control Module... -
Page 178: Cleaning The Flexpendant
3 Maintenance activities, controller IRC5 3.4.3. Cleaning the FlexPendant 3.4.3. Cleaning the FlexPendant Location The surfaces to clean are shown in the illustration below. xx0400000973 Touch screen Hard buttons Required equipment Equipment, etc. Note Soft cloth ESD Protected Warm water/Mild cleaning agent Clean the touch screen This section details how to clean the touch screen. - Page 179 3 Maintenance activities, controller IRC5 3.4.3. Cleaning the FlexPendant Continued Action Info/Illustration 2. Tap the Lock button in the following window. en0400000657 3. When the next window appears, it is safe to clean the screen. en0400000658 4. Clean the touch screen and...
- Page 180 3 Maintenance activities, controller IRC5 3.4.3. Cleaning the FlexPendant Continued Do's and don'ts! The section below specifies some special considerations when cleaning the FlexPendant. Always: • use ESD Protection • use cleaning equipment as specified above! Any other cleaning equipment may shorten the life time of the touch screen.
-
Page 181: Repair Activities, Controller Irc5
4 Repair activities, controller IRC5 4.1. Overview 4 Repair activities, controller IRC5 4.1. Overview General The ABB IRC5 controller is available in two basic configurations: Single Cabinet Controller and Dual Cabinet Controller. xx0600002929 Dual Cabinet (Control Module) Dual Cabinet (Drive Module) -
Page 182: Replacement Of Panel Board
4 Repair activities, controller IRC5 4.2. Replacement of panel board 4.2. Replacement of panel board Location The panel board unit is located as shown in the illustration below. In the Dual Cabinet Controller the panel board unit is located in the Control Module. - Page 183 4 Repair activities, controller IRC5 4.2. Replacement of panel board Continued Removal The procedure below details how to remove the panel board unit. Action Note/Illustration DANGER! Before commencing any work inside the cabinet, please observe the safety information in section...
- Page 184 4 Repair activities, controller IRC5 4.2. Replacement of panel board Continued Refitting The procedure below details how to refit the panel board unit. Action Note/Illustration DANGER! Before commencing any work inside the cabinet, please observe the safety information in section...
-
Page 185: Replacement Of Flange Disconnect
4 Repair activities, controller IRC5 4.3. Replacement of Flange disconnect 4.3. Replacement of Flange disconnect Location The Flange disconnect unit is located as shown in the illustration below. xx0600003133 Flange disconnect Required equipment Equipment Art. no. Note Flange disconnect 3HAC027113-001... - Page 186 4 Repair activities, controller IRC5 4.3. Replacement of Flange disconnect Continued Removal The procedure below details how to remove the Flange disconnect unit. Action Note/Illustration DANGER! Before commencing any work inside the cabinet, please observe the safety information in section...
- Page 187 4 Repair activities, controller IRC5 4.3. Replacement of Flange disconnect Continued Action Note/Illustration 4. Loosen the two upper attachment screws and remove the unit. xx0600003140 • A: attachment screws 5. Disconnect the cables. Refitting The procedure below details how to refit the Flange disconnect unit.
-
Page 188: Replacement Of I/O Units And Gateways
4.4. Replacement of I/O units and Gateways 4.4. Replacement of I/O units and Gateways General A number of I/O units and Gateways may be installed in the IRC5 controller. These are specified in Definition of I/O units, IRC5 on page 104. - Page 189 4 Repair activities, controller IRC5 4.4. Replacement of I/O units and Gateways Continued Required equipment Equipment Note A number of choices are available! Specified in section Definition of I/O units, IRC5 on page 104. Standard toolkit The contents are defined in section Standard toolkit! Other tools and procedures may be required.
- Page 190 4 Repair activities, controller IRC5 4.4. Replacement of I/O units and Gateways Continued Refitting The procedure below details how to refit the I/O units or Gateways. Action Note/Illustration DANGER! Before commencing any work inside the cabinet, please observe the safety information in section...
-
Page 191: Replacement Of Backup Energy Bank
4 Repair activities, controller IRC5 4.5. Replacement of backup energy bank 4.5. Replacement of backup energy bank Location The illustration below shows the location of the backup energy bank in a Single Cabinet Controller. In the Dual Cabinet Controller the backup energy bank is located in the Drive Module. - Page 192 4 Repair activities, controller IRC5 4.5. Replacement of backup energy bank Continued Removal The procedure below details how to remove the backup energy bank. Action Note/Illustration DANGER! Before commencing any work inside the cabinet, please observe the safety information in section...
- Page 193 4 Repair activities, controller IRC5 4.5. Replacement of backup energy bank Continued Refitting The procedure below details how to refit the backup energy bank. Action Note/Illustration DANGER! Before commencing any work inside the cabinet, please observe the safety information in section...
-
Page 194: Replacement Of Control System Fan
4 Repair activities, controller IRC5 4.6. Replacement of control system fan 4.6. Replacement of control system fan Location The control system fan is located in the back of the Single Cabinet Controller as shown below. On the Dual Cabinet Controller the control system fan is located on the Control Module. - Page 195 4 Repair activities, controller IRC5 4.6. Replacement of control system fan Continued Removal of control system fan The procedure below details how to remove the control system fan. Action Note/Illustration DANGER! Before commencing any work inside the cabinet, please observe the safety information...
- Page 196 4 Repair activities, controller IRC5 4.6. Replacement of control system fan Continued Action Note/Illustration 6. Push the fan upwards, and pull it out. xx0700000417 • A: fan • B: screw Refitting of control system fan The procedure below details how to refit the control system fan.
- Page 197 4 Repair activities, controller IRC5 4.6. Replacement of control system fan Continued Action Note/Illustration 4. Refit the top cover. xx0700000416 • A: fan • B: top cover • C: attachment screws (4 pcs) 5. Refit the attachment screws. 3HAC021313-001 Revision: P...
-
Page 198: Replacement Of Heat Exchange Unit And Fan
4 Repair activities, controller IRC5 4.7. Replacement of heat exchange unit and fan 4.7. Replacement of heat exchange unit and fan Location The heat exchanger unit is located in the back of the Control Module as shown below. On the Dual Cabinet Controller the heat exchange unit is located on the Control Module. - Page 199 4 Repair activities, controller IRC5 4.7. Replacement of heat exchange unit and fan Continued Removal of heat exchanger fan The procedure below details how to remove the heat exchange unit fan. Action Note/Illustration DANGER! Before commencing any work inside the...
- Page 200 4 Repair activities, controller IRC5 4.7. Replacement of heat exchange unit and fan Continued Refitting of heat exchanger fan The procedure below details how to refit the heat exchange unit fan. Action Note/Illustration 1. Put the new fan in place, and push down.
- Page 201 4 Repair activities, controller IRC5 4.7. Replacement of heat exchange unit and fan Continued Replacement of heat exchange unit The procedure below details how to remove the heat exchange unit. Action Note/Illustration DANGER! Before commencing any work inside the cabinet, please observe the safety information...
-
Page 202: Replacement Of Computer Unit Dsqc639
4 Repair activities, controller IRC5 4.8. Replacement of computer unit DSQC639 4.8. Replacement of computer unit DSQC639 Location The computer unit is located in the top of the module as shown below. In the Dual Cabinet Controller the computer unit is located in the Control Module. - Page 203 4 Repair activities, controller IRC5 4.8. Replacement of computer unit DSQC639 Continued Removal The procedure below details how to remove the computer unit. NOTE! The computer unit can have different design. The procedure how to remove the computer unit is the same.
- Page 204 4 Repair activities, controller IRC5 4.8. Replacement of computer unit DSQC639 Continued Action Note/Illustration 6. Let the front end of the computer unit down and pull the unit out. xx0600002966 Refitting The procedure below details how to refit the computer unit.
- Page 205 4 Repair activities, controller IRC5 4.8. Replacement of computer unit DSQC639 Continued Action Note/Illustration 4. Push the computer unit up until the spring lock snaps into position. xx0600002968 5. Refit the transportation screw. 6. Reconnect all connectors to the computer unit.
-
Page 206: Replacement Of Motherboard In Computer Unit Dsqc639
4 Repair activities, controller IRC5 4.9. Replacement of motherboard in computer unit DSQC639 4.9. Replacement of motherboard in computer unit DSQC639 Location The motherboard is located as shown in the figure below. xx0600002912 Motherboard Required equipment Equipment Note Computer unit... - Page 207 4 Repair activities, controller IRC5 4.9. Replacement of motherboard in computer unit DSQC639 Continued Action Note/Illustration WARNING! The unit is sensitive to ESD. Before handling the unit please read the safety information in the section WARNING - The unit is sensitive to ESD! on page 31 3.
- Page 208 4 Repair activities, controller IRC5 4.9. Replacement of motherboard in computer unit DSQC639 Continued Refitting The procedure below details how to refit the motherboard in the computer unit. Action Note/Illustration DANGER! Before commencing any work inside the cabinet, please observe the safety information...
-
Page 209: Replacement Of Ddr Sdram Memory On Motherboardin Computer Unit Dsqc639
4 Repair activities, controller IRC5 4.10. Replacement of DDR SDRAM memory on motherboardin computer unit DSQC639 4.10. Replacement of DDR SDRAM memory on motherboardin computer unit DSQC639 Location The following illustration shows the location of the DDR SDRAM memory. xx0600003031... - Page 210 4 Repair activities, controller IRC5 4.10. Replacement of DDR SDRAM memory on motherboardin computer unit DSQC639 Continued Removal Use this procedure to remove the DDR SDRAM memory on the motherboardin the computer unit. Action Note/Illustration DANGER! Before commencing any work inside the...
- Page 211 4 Repair activities, controller IRC5 4.10. Replacement of DDR SDRAM memory on motherboardin computer unit DSQC639 Continued Action Note/Illustration 6. Gently lift the DDR SDRAM memory straight xx0600003033 • A: DDR SDRAM memory NOTE! Always grip the memory around the edges to avoid damage to the...
- Page 212 4 Repair activities, controller IRC5 4.10. Replacement of DDR SDRAM memory on motherboardin computer unit DSQC639 Continued Action Note/illustration 3. Gently lift the DDR SDRAM memory out of the ESD safe bag and fit it into position on the motherboard.
-
Page 213: Replacement Of Pci Boardsin The Computer Unit Dsqc639
4 Repair activities, controller IRC5 4.11. Replacement of PCI boardsin the computer unit DSQC639 4.11. Replacement of PCI boardsin the computer unit DSQC639 Location A number of boards may be fitted in the slots in the computer unit as shown in the figure below: •... - Page 214 4 Repair activities, controller IRC5 4.11. Replacement of PCI boardsin the computer unit DSQC639 Continued Required equipment Equipment Art. no. Note Ethernet card 3HAC15639-1 DSQC 612. Used with MultiMove and EtherNet/IP Master/Slave. See Application manual - MultiMove or Application manual - EtherNet/IP...
- Page 215 4 Repair activities, controller IRC5 4.11. Replacement of PCI boardsin the computer unit DSQC639 Continued Removal The procedure below details how to remove the PCI cardsfrom the computer unit. Action Note/Illustration DANGER! Before commencing any work inside the cabinet, please observe the safety information in section...
- Page 216 4 Repair activities, controller IRC5 4.11. Replacement of PCI boardsin the computer unit DSQC639 Continued Refitting The procedure below details how to refit the PCI cardsin the computer unit. Action Note/Illustration DANGER! Before commencing any work inside the cabinet, please observe the safety information in section...
-
Page 217: Replacement Of Fieldbus Adapter In The Computer Unit Dsqc639
4 Repair activities, controller IRC5 4.12. Replacement of fieldbus adapter in the computer unit DSQC639 4.12. Replacement of fieldbus adapter in the computer unit DSQC639 Location The following fieldbus adapter may be fitted in the slot as shown in the figure below: •... - Page 218 4 Repair activities, controller IRC5 4.12. Replacement of fieldbus adapter in the computer unit DSQC639 Continued Equipment Art. no. Note Application manual - PROFINET 3HAC031974-001 Contains information on how to Fieldbus Adapter configure the system for PROFINET Fieldbus Adapter DSQC 688.
- Page 219 4 Repair activities, controller IRC5 4.12. Replacement of fieldbus adapter in the computer unit DSQC639 Continued Action Note/Illustration 7. Loosen the attachment screws (2 psc) on front of the fieldbus adapter to release the fastening mechanism. NOTE! Only loosen the attachment screws. Do not remove them.
- Page 220 4 Repair activities, controller IRC5 4.12. Replacement of fieldbus adapter in the computer unit DSQC639 Continued Refitting The following procedure details how to refit the fieldbus adapter in the computer unit. Action Note/Illustrator DANGER! Before commencing any work inside the...
- Page 221 4 Repair activities, controller IRC5 4.12. Replacement of fieldbus adapter in the computer unit DSQC639 Continued Action Note/Illustrator 4. Secure it with its attachment screws (2 pcs) on front of the fieldbus adapter. xx0700000201 • A: Attachment screws • B: Fastening mechanism 5.
-
Page 222: Replacement Of Fan In Computer Unit Dsqc639
4 Repair activities, controller IRC5 4.13. Replacement of fan in computer unit DSQC639 4.13. Replacement of fan in computer unit DSQC639 Location The computer fan is located as shown in the figure below. xx0600002917 Required equipment Equipment Note Computer unit DSQC 639 parts on page 305. - Page 223 4 Repair activities, controller IRC5 4.13. Replacement of fan in computer unit DSQC639 Continued Removal The procedure below details how to remove the fan in the computer unit. Action Note/Illustration DANGER! Before commencing any work inside the cabinet, please observe the safety information...
- Page 224 4 Repair activities, controller IRC5 4.13. Replacement of fan in computer unit DSQC639 Continued Action Note/Illustration 7. Remove the fan from the cover plate in arrow direction. xx0600002920 Refitting The procedure below details how to refit the fan in the computer unit.
-
Page 225: Replacement Of Compact Flash Memoryin Computer Unit Dsqc639
Location The Compact Flash memory is located in the computer unit as shown in the figure below. xx0600002922 Slot for Compact Flash memory NOTE! Only use Compact flash memory supplied by ABB. Required equipment Equipment Note Compact Flash 1GB DSQC 656 1GB NOTE! Only use Compact flash memory supplied by ABB. - Page 226 4 Repair activities, controller IRC5 4.14. Replacement of Compact Flash memoryin computer unit DSQC639 Continued Removal Use the following procedure to remove the Compact Flash memoryfrom the computer unit. Action Note/illustration DANGER! Before commencing any work inside the cabinet, please observe the safety information...
- Page 227 4 Repair activities, controller IRC5 4.14. Replacement of Compact Flash memoryin computer unit DSQC639 Continued Refitting Use the following procedure to refit the Compact Flash memoryin the computer unit. Action Note/Illustration DANGER! Before commencing any work inside the cabinet, please observe the safety...
-
Page 228: Replacement Of Servo Drive Units, Rectifier And Capacitor Unit (Drive System 04)
Axis computer Drive system ( drive units and rectifier) Configuration The drive module exists in a number of versions, these are described in section Configuration of Drive System 04, IRC5 on page 91 Continues on next page 3HAC021313-001 Revision: P... - Page 229 Equipment Note Drive units, rectifiers and capacitor units Specified in section Configuration of Drive System 04, IRC5 on page 91 Standard toolkit The contents are defined in section Standard toolkit, IRC5 on page 299. Other tools and procedures may be required.
- Page 230 4 Repair activities, controller IRC5 4.15. Replacement of servo drive units, rectifier and capacitor unit (Drive System 04) Continued Action Note/Illustration 5. Remove the drive unit after unscrewing its attachment screws . xx0500002001 Parts: • A: drive unit • B: attachment screw Refitting The procedure below details how to refit the servo drive units, rectifiers and capacitor units.
-
Page 231: Replacement Of Drive Units (Drive System 09)
Additional Rectifier Unit (only used for additional axes in combination with small robots) Configuration The drive module exists in a number of versions, these are described in section Configuration of Drive System 09, IRC5 on page Required equipment Equipment Note Drive units... - Page 232 4 Repair activities, controller IRC5 4.16. Replacement of drive units (Drive System 09) Continued Removal The procedure below details how to remove the Main Drive Unit and the Additional Drive Units. If your drive system contains an Additional Rectifier Unit, it is replaced in a similar way.
- Page 233 4 Repair activities, controller IRC5 4.16. Replacement of drive units (Drive System 09) Continued Refitting The procedure below details how to refit the drive units. Action Note/Illustration DANGER! Before commencing any work inside the cabinet, please observe the safety information in section...
-
Page 234: Replacement Of Axis Computer Dsqc 601 (Drive System 04)
4 Repair activities, controller IRC5 4.17. Replacement of Axis computer DSQC 601 (Drive System 04) 4.17. Replacement of Axis computer DSQC 601 (Drive System 04) Location The illustration below shows the location of the axis computer in the Single Cabinet Controller. - Page 235 4 Repair activities, controller IRC5 4.17. Replacement of Axis computer DSQC 601 (Drive System 04) Continued Removal The procedure below details how to remove the axis computer. Action Note/Illustration DANGER! Before commencing any work inside the cabinet, please observe the safety information in section...
- Page 236 4 Repair activities, controller IRC5 4.17. Replacement of Axis computer DSQC 601 (Drive System 04) Continued Refitting The procedure below details how to refit the axis computer. Action Note/Illustration DANGER! Before commencing any work inside the cabinet, please observe the safety information in section...
-
Page 237: Replacement Of Axis Computer Dsqc 668 (Drive System 09)
4 Repair activities, controller IRC5 4.18. Replacement of Axis computer DSQC 668 (Drive System 09) 4.18. Replacement of Axis computer DSQC 668 (Drive System 09) Location The illustration below shows the location of the axis computer in the Single Cabinet Controller. - Page 238 4 Repair activities, controller IRC5 4.18. Replacement of Axis computer DSQC 668 (Drive System 09) Continued Removal The procedure below details how to remove the axis computer. Action Note/Illustration DANGER! Before commencing any work inside the cabinet, please observe the safety information in section...
- Page 239 4 Repair activities, controller IRC5 4.18. Replacement of Axis computer DSQC 668 (Drive System 09) Continued Refitting The procedure below details how to refit the axis computer. Action Note/Illustration DANGER! Before commencing any work inside the cabinet, please observe the safety information in section...
-
Page 240: Replacement Of Eps Board Dsqc 646
4 Repair activities, controller IRC5 4.19. Replacement of EPS board DSQC 646 4.19. Replacement of EPS board DSQC 646 General An EPS board is mounted in the Single Cabinet Controller or Drive Module if the option Electronic Position Switches is used. - Page 241 4 Repair activities, controller IRC5 4.19. Replacement of EPS board DSQC 646 Continued Action Note/illustration 3. Disconnect the following cables connected to the EPS board and axis computer: • Plug contact in I/O connector • Power cables • SMB cables •...
- Page 242 4 Repair activities, controller IRC5 4.19. Replacement of EPS board DSQC 646 Continued Action Note/illustration 5. If the EPS board is used together with axis computer DSQC 668 (used with Drive System 09) two mounting brackets are mounted on the EPS board. Remove these and save them so the can be used on the new EPS board.
- Page 243 4 Repair activities, controller IRC5 4.19. Replacement of EPS board DSQC 646 Continued Refitting Action Note/illustration DANGER! Before commencing any work inside the cabinet, please observe the safety information in section DANGER - Make sure that the main power has been switched off!
-
Page 244: Replacement Of Safemove Board Dsqc 647
4 Repair activities, controller IRC5 4.20. Replacement of SafeMove board DSQC 647 4.20. Replacement of SafeMove board DSQC 647 General A SafeMove board is mounted in the Single Cabinet Controller or Drive Module if the option SafeMove is used. NOTE! After replacement of the safety controller, the SafeMove configuration must be downloaded to the new safety controller and then validated. - Page 245 4 Repair activities, controller IRC5 4.20. Replacement of SafeMove board DSQC 647 Continued Removal The procedure below details how to remove the SafeMove board. Action Note/illustration DANGER! Before commencing any work inside the cabinet, please observe the safety information in section...
- Page 246 4 Repair activities, controller IRC5 4.20. Replacement of SafeMove board DSQC 647 Continued Action Note/illustration 5. If the SafeMove board is used together with axis computer DSQC 668 (used with Drive System 09) two mounting brackets are mounted on the SafeMove board.
- Page 247 4 Repair activities, controller IRC5 4.20. Replacement of SafeMove board DSQC 647 Continued Refitting The procedure below details how to refit the SafeMove board. Action Note/illustration DANGER! Before commencing any work inside the cabinet, please observe the safety information in section...
- Page 248 4 Repair activities, controller IRC5 4.20. Replacement of SafeMove board DSQC 647 Continued Action Note/illustration 4. Connect both SMB cables and both Ethernet cables to the SafeMove board before mounting the board. These connections may be difficult to reach once the board is mounted.
-
Page 249: Replacement Of Remote Service Box
4 Repair activities, controller IRC5 4.21. Replacement of Remote Service box 4.21. Replacement of Remote Service box General A Remote Service box is mounted in the Single Cabinet Controller or in the Control Module of the Dual Cabinet Controller if option Remote Service is used. - Page 250 4 Repair activities, controller IRC5 4.21. Replacement of Remote Service box Continued Removal Use this procedure to remove the Remote Service box. Action Note/illustration DANGER! Before commencing any work inside the cabinet, please observe the safety information in section DANGER - Make sure that the main...
- Page 251 4 Repair activities, controller IRC5 4.21. Replacement of Remote Service box Continued Action Note/illustration WARNING! The unit is sensitive to ESD, before handling the unit please observe the safety information in section The unit is sensitive to ESD! on page 3.
-
Page 252: Replacement Of Integrated Plc
4.22. Replacement of integrated PLC General As an option, the PLC AC500 can be integrated in the IRC5 controller. AC500 is built up by modules. Each module can easily be removed from its terminal base and be replaced. Removing the terminal base must be done from right to left. - Page 253 4 Repair activities, controller IRC5 4.22. Replacement of integrated PLC Continued Remove terminal base Only the right most terminal base can be removed. To remove one in the middle, all terminal bases to the right of it must be removed first.
-
Page 254: Replacement Of Contactor Interface Board
4 Repair activities, controller IRC5 4.23. Replacement of Contactor Interface Board 4.23. Replacement of Contactor Interface Board Location The contactor interface board is located on the left wall in the Single Cabinet Controller. In the Dual Cabinet Controller the contactor interface board is located on the left wall in the Drive Module. - Page 255 4 Repair activities, controller IRC5 4.23. Replacement of Contactor Interface Board Continued Removal The procedure below details how to remove the contactor board. Action Note/Illustration DANGER! Before commencing any work inside the cabinet, please observe the safety information in section...
- Page 256 4 Repair activities, controller IRC5 4.23. Replacement of Contactor Interface Board Continued Refitting The procedure below details how to refit the contactor board. Action Note/Illustration DANGER! Before commencing any work inside the cabinet, please observe the safety information in section...
-
Page 257: Replacement Of Drive System Fans
4 Repair activities, controller IRC5 4.24. Replacement of drive system fans 4.24. Replacement of drive system fans Location The illustration below shows the drive system fans in the Single Cabinet Controller. In the Dual Cabinet Controller the drive system fans are located in the back of the Drive Module. - Page 258 4 Repair activities, controller IRC5 4.24. Replacement of drive system fans Continued Removal The following procedures details how to remove the drive system fan. Action Note /illustration DANGER! Before commencing any work inside the cabinet, please observe the safety information in section...
- Page 259 4 Repair activities, controller IRC5 4.24. Replacement of drive system fans Continued Refitting The following procedures details how to refit the drive system fan. Action Note/illustration DANGER! Before commencing any work inside the cabinet, please observe the safety information in section...
-
Page 260: Replacement Of Transformer Unit
4 Repair activities, controller IRC5 4.25. Replacement of transformer unit 4.25. Replacement of transformer unit Location The illustration below shows the location of the transformer unit in the Single Cabinet Controller. In the Dual Cabinet Controller the transformer is located in the back of the Drive Module. - Page 261 4 Repair activities, controller IRC5 4.25. Replacement of transformer unit Continued Removal The following procedures details how to remove the transformer unit. Action Note/illustration DANGER! Before commencing any work inside the cabinet, please observe the safety information in section DANGER - Make sure that the main...
- Page 262 4 Repair activities, controller IRC5 4.25. Replacement of transformer unit Continued Action Note/illustration 8. Remove the two transformer attachment screws. xx0500002032 • A: attachment screw (2pcs) 9. Push the transformer unit side ways and lift it out with lifting slings and a hoist.
- Page 263 4 Repair activities, controller IRC5 4.25. Replacement of transformer unit Continued Action Note/illustration 6. Refit the cover. 7. Refit the moist dust filter magazine. (Option) How to refit the moist dust filter magazine is detailed in section Replacement of moist dust filter on page 171.
-
Page 264: Replacement Of Brake Resistor Bleeder
4 Repair activities, controller IRC5 4.26. Replacement of brake resistor bleeder 4.26. Replacement of brake resistor bleeder Location The illustration below shows the location of the brake resistor bleeder (behind the cover) in the Single Cabinet Controller. In the Dual Cabinet Controller the brake resistor bleeder is located in the Drive Module. - Page 265 4 Repair activities, controller IRC5 4.26. Replacement of brake resistor bleeder Continued Removal, Single Cabinet Controller The following procedure details how remove the brake resistor bleeder in the Single Cabinet Controller. Action Note/illustration DANGER! Before commencing any work inside the...
- Page 266 6. Lift the bleeder slightly and push it in to release the attachments. 7. Lift the bleeder straight up. 8. If the IRC5 controller uses an Additional Rectifier Unit, an extra ARU bleeder is mounted on the MDU bleeder. Remove the attachment screws and remove the ARU bleeder from the MDU bleeder.
- Page 267 9. Lift the bleeder slightly and push it in to release the attachments. 10. Lift the bleeder straight up. 11. If the IRC5 controller uses an Additional Rectifier Unit, an extra ARU bleeder is mounted on the MDU bleeder. Remove the ARU bleeder from the MDU bleeder and remove the mounting brackets for the ARU bleeder.
- Page 268 DANGER - Make sure that the main power has been switched off! on page 2. If the IRC5 controller uses an Additional Rectifier Unit, an extra ARU bleeder is required. Attach the mounting brackets for ARU bleeder on the MDU bleeder.
- Page 269 DANGER - Make sure that the main power has been switched off! on page 2. If the IRC5 controller uses an Additional Rectifier Unit, an extra ARU bleeder is required. Attach the mounting brackets for ARU bleeder on the MDU bleeder and then attach the ARU bleeder.
-
Page 270: Replacement Of Process Interface Board
4 Repair activities, controller IRC5 4.27. Replacement of Process Interface Board 4.27. Replacement of Process Interface Board About the Process Interface Board A Process Interface Board is mounted in the controller cabinet if option DispensePac support is used. Location The illustration below shows the location of the Process Interface Board. - Page 271 4 Repair activities, controller IRC5 4.27. Replacement of Process Interface Board Continued Removing the Process Interface Board Action DANGER! Before commencing any work inside the cabinet, please observe the safety information in section DANGER - Make sure that the main power has been switched off! on page WARNING! The unit is sensitive to ESD.
-
Page 272: Replacement Of Ethernet Switch
4 Repair activities, controller IRC5 4.28. Replacement of Ethernet switch 4.28. Replacement of Ethernet switch About the Ethernet switch An Ethernet switch is mounted in the controller cabinet if option DispensePac support is used. Location The illustration below shows the location of the Ethernet switch. - Page 273 4 Repair activities, controller IRC5 4.28. Replacement of Ethernet switch Continued Refitting the switch Action DANGER! Before commencing any work inside the cabinet, please observe the safety information in section DANGER - Make sure that the main power has been switched off! on page WARNING! The unit is sensitive to ESD.
-
Page 274: Replacement Of Power Supply
4 Repair activities, controller IRC5 4.29.1. Replacement of control power supply 4.29 Replacement of power supply 4.29.1. Replacement of control power supply Location The control power supply is located on the left hand side as shown in the illustration below. - Page 275 4 Repair activities, controller IRC5 4.29.1. Replacement of control power supply Continued Removal The procedures below details how to remove the control power supply. Action Note/Illustration DANGER! Before commencing any work inside the cabinet, please observe the safety information in section...
- Page 276 4 Repair activities, controller IRC5 4.29.1. Replacement of control power supply Continued Refitting The procedures below details how to refit the control power supply. Action Note/Illustration DANGER! Before commencing any work inside the cabinet, please observe the safety information in section...
-
Page 277: Replacement Of Power Distribution Board
4 Repair activities, controller IRC5 4.29.2. Replacement of power distribution board 4.29.2. Replacement of power distribution board Location The power distribution board is located on the left side as shown in the illustration below. xx0700000139 Customer I/O power supply Power distribution board... - Page 278 4 Repair activities, controller IRC5 4.29.2. Replacement of power distribution board Continued Removal The procedure below details how to remove the power distribution board. Action Note/Illustration DANGER! Before commencing any work inside the cabinet, please observe the safety information in section...
- Page 279 4 Repair activities, controller IRC5 4.29.2. Replacement of power distribution board Continued Refitting The procedure below details how to refit the power distribution board. Action Note/Illustration DANGER! Before commencing any work inside the cabinet, please observe the safety information in section...
-
Page 280: Replacement Of Customer I/O Power Supply, Irc5
4 Repair activities, controller IRC5 4.29.3. Replacement of customer I/O power supply, IRC5 4.29.3. Replacement of customer I/O power supply, IRC5 Location The customer I/O power supply is located as shown in the illustration below. For the Dual Cabinet Controller the customer I/O power supply is located in the Control Module with the same placement. - Page 281 4 Repair activities, controller IRC5 4.29.3. Replacement of customer I/O power supply, IRC5 Continued Removal The procedure below details how to remove the customer I/O power supply. Action Note/Illustration DANGER! Before commencing any work inside the cabinet, please observe the safety information in section...
- Page 282 4 Repair activities, controller IRC5 4.29.3. Replacement of customer I/O power supply, IRC5 Continued Refitting The procedure below details how to refit the customer I/O power supply. Action Note/Illustration DANGER! Before commencing any work inside the cabinet, please observe the safety information in section...
-
Page 283: Replacement Of Customer I/O Power Supply
4 Repair activities, controller IRC5 4.29.4. Replacement of customer I/O power supply 4.29.4. Replacement of customer I/O power supply Location The customer I/O power supply is located as shown in the figure below. For the Dual Cabinet Controller the customer I/O power supply is located in the Control Module with the same placement. - Page 284 4 Repair activities, controller IRC5 4.29.4. Replacement of customer I/O power supply Continued Removal The procedure below details how to remove the customer I/O power supply. Action Note/Illustration DANGER! Before commencing any work inside the cabinet, please observe the safety information in section...
- Page 285 4 Repair activities, controller IRC5 4.29.4. Replacement of customer I/O power supply Continued Refitting The procedure below details how to refit the customer I/O power supply. Action Note/Illustration DANGER! Before commencing any work inside the cabinet, please observe the safety information in section...
-
Page 286: Replacement Of Drive System Power Supply
4 Repair activities, controller IRC5 4.29.5. Replacement of drive system power supply 4.29.5. Replacement of drive system power supply Location The illustration below shows the location of the drive system power supply in a Single Cabinet Controller. In the Dual Cabinet Controller the drive system power supply is located in the Drive Module. - Page 287 4 Repair activities, controller IRC5 4.29.5. Replacement of drive system power supply Continued Removal The procedure below details how to remove the drive system power supply. Action Note/Illustration DANGER! Before commencing any work inside the cabinet, please observe the safety...
- Page 288 4 Repair activities, controller IRC5 4.29.5. Replacement of drive system power supply Continued Refitting The procedure below details how to refit the drive system power supply. Action Note/Illustration Danger DANGER! Before any repair work, please observe the safety information in section...
-
Page 289: Replacement Of System Power Supply
4 Repair activities, controller IRC5 4.29.6. Replacement of system power supply 4.29.6. Replacement of system power supply Location The illustration below shows the location of the system power supply in the Single Cabinet Controller. xx0700000139 Customer I/O power supply Power distribution board... - Page 290 4 Repair activities, controller IRC5 4.29.6. Replacement of system power supply Continued Removal The procedure below details how to remove the system power supply. Action Note/Illustration DANGER! Before commencing any work inside the cabinet, please observe the safety information in section...
- Page 291 4 Repair activities, controller IRC5 4.29.6. Replacement of system power supply Continued Refitting The procedure below details how to refit the system power supply. Action Note/Illustration DANGER! Before commencing any work inside the cabinet, please observe the safety information in section...
- Page 292 4 Repair activities, controller IRC5 4.29.6. Replacement of system power supply 3HAC021313-001 Revision: P...
-
Page 293: Decommissioning
5 Decommissioning 5.1. Introduction 5 Decommissioning 5.1. Introduction Introduction This section contains information to consider when taking a product, robot or controller, out of operation. It deals with how to handle potentially dangerous components and potentially hazardous materials. General All used grease/oils and dead batteries must be disposed of in accordance with the current legislation of the country in which the robot and the control unit are installed. -
Page 294: Environmental Information
5 Decommissioning 5.2. Environmental information 5.2. Environmental information Hazardous material The table specifies some of the materials in the controller cabinet and their respective use throughout the product. Dispose of the components properly to prevent health or environmental hazards. Material Example application Batteries, Lithium Main computer... -
Page 295: Reference Information, Irc5
6 Reference information, IRC5 6.1. Introduction 6 Reference information, IRC5 6.1. Introduction General This chapter includes general information, complementing the more specific information in the different procedures in the manual. 3HAC021313-001 Revision: P... -
Page 296: Applicable Safety Standards
6 Reference information, IRC5 6.2. Applicable safety standards 6.2. Applicable safety standards Standards, EN ISO The manipulator system is designed in accordance with the requirements of: Standard Description EN ISO 12100 -1 Safety of machinery - Basic concepts, general principles for... - Page 297 6 Reference information, IRC5 6.2. Applicable safety standards Continued Other standards Standard Description ANSI/RIA R15.06 Safety Requirements for Industrial Robots and Robot Systems ANSI/UL 1740 Safety Standard for Robots and Robotic Equipment (option 429-1) CAN/CSA Z 434-03 Industrial Robots and Robot Systems - General Safety Require-...
-
Page 298: Unit Conversion
6 Reference information, IRC5 6.3. Unit conversion 6.3. Unit conversion Converter table Use the table below to convert units used in this manual. Quantity Units Length 3.28 ft 39.37 in Weight 1 kg 2.21 lb Pressure 1 bar 100 kPa 14.5 psi... -
Page 299: Screw Joints
6 Reference information, IRC5 6.4. Screw joints 6.4. Screw joints General This section details how to tighten the various types of screw joints on the controller. The instructions and torque values are valid for screw joints comprised of metallic materials and do not apply to soft or brittle materials. -
Page 300: Weight Specifications
In all repair and maintenance instructions, weights of the components handled are sometimes specified. All components exceeding 22 kg (50 lbs) are high-lighted in this way. To avoid injury, ABB recommends the use of lifting equipment when handling components with a weight exceeding 22 kg. -
Page 301: Standard Toolkit, Irc5
6 Reference information, IRC5 6.6. Standard toolkit, IRC5 6.6. Standard toolkit, IRC5 General All service (repair, maintenance and installation) instructions contain lists of tools required to perform the specified activity. All special tools, i.e. all tools that are not considered standard as defined below, are listed in their instructions respectively. -
Page 302: Lifting Equipment And Lifting Instructions
6 Reference information, IRC5 6.7. Lifting equipment and lifting instructions 6.7. Lifting equipment and lifting instructions General Many repair and maintenance activities require different pieces of lifting equipment, which are specified in each procedure. The use of each piece of lifting equipment is not detailed in the activity procedure, but in the instruction delivered with each piece of lifting equipment. -
Page 303: Spare Parts
7.1 Controller parts 7.1.1. Single Cabinet Controller General The illustrations in this section show the locations of the parts in the IRC5 Single Cabinet Controller. The spare parts for the Single and Dual Cabinet Controller are in general identical but the location of parts in the Dual Cabinet Controller are divided between the Control Module and the Drive Module. - Page 304 7 Spare Parts 7.1.1. Single Cabinet Controller Continued Spare part no. Description Note 3HAC025338-003 Main Servo Drive Unit, D4 3E 1C DSQC 617 3HAC025338-004 Main Servo Drive Unit, D6 3T 3G DSQC 617 3HAC025338-006 Main Servo Drive Unit, D6 3W 3V DSQC 617 3HAC14550-1 Single servo drive unit...
- Page 305 7 Spare Parts 7.1.1. Single Cabinet Controller Continued Controller system parts (Drive System 09) The illustration below shows the placement of the controller system parts in the recommended spare part list. xx0900000046 Spare part no. Description Note 3HAC029818-001 Main Drive Unit, MDU-790A DSQC 663 3HAC035301-001 Main Drive Unit, MDU-430A...
- Page 306 7 Spare Parts 7.1.1. Single Cabinet Controller Continued I/O System parts The illustration below shows the placement of the I/O system parts in the recommended spare part list. xx0600002681 Spare part no. Description Note 3HAC025784-001 ADCombi I/O DSQC 651 3HAC025917-001 Digital I/O DSQC 652 3HAC025918-001...
- Page 307 7 Spare Parts 7.1.1. Single Cabinet Controller Continued Computer unit DSQC 639 parts The illustration below shows the placement of the computer unit parts in the recommended spare part list. xx0600003029 Spare part no. Description Note 3HAC025527-004 Computer unit DSQC 639 3HAC025465-010 Compact flash 1GB DSQC 656 1GB...
- Page 308 7 Spare Parts 7.1.1. Single Cabinet Controller Continued Miscellaneous parts The illustration below shows the placement of the Miscellaneous parts in the recommended spare part list. xx0600002683 Spare part no Description Note 3HAC037015-001 Transformer unit 400-480V 1.2kVA 3HAC024174-001 Transformer unit 400-480V 2,5kVA drive 3HAC037016-001 Transformer unit 200-220V...
- Page 309 7 Spare Parts 7.1.1. Single Cabinet Controller Continued Spare part no Description Note 3HAC2349-1 Cam switch 2-pos Extended 3HAC028357-001 GTPU3 with 10m cable 3HAC027697-001 Moist dust filter Option 3HAC027641-001 Moist dust filter Option 3HAC021313-001 Revision: P...
-
Page 310: Manipulator Cables
7 Spare Parts 7.2.1. Manipulator cables 7.2 Manipulator cables 7.2.1. Manipulator cables Signal cables, IRB1400, 1600 and 4600 Art. no. Description Option no. 3HAC2493-1 Control cable signal L=7m 210-2 3HAC2530-1 Control cable signal L=15m 210-3 3HAC2540-1 Control cable signal L=22m 210-4 3HAC2566-1 Control cable signal L=30m... - Page 311 7 Spare Parts 7.2.1. Manipulator cables Continued Power cables, IRB 260 Art. no. Description Option no. 3HAC9038-1 Control cable power L=7m Foundry: 210-2 and 287-3 Wash: 210-5 and 287-5 3HAC9038-2 Control cable power L=15m Foundry: 210-3 and 287-3 Wash: 210-5 and 287-5 3HAC9038-3 Control cable power L=22m Foundry: 210-4 and 287-3...
- Page 312 7 Spare Parts 7.2.1. Manipulator cables Continued Art. no. Description Option no. 3HAC2572-1 Control cable power L=30m Standard: 210-5 and 287-4 Clean room: 210-5 and 287-1 3HAC8182-1 Control cable power L=7m Foundry: 210-2 and 287-3 Wash: 210-2 and 287-5 3HAC8182-2 Control cable power L=15m Foundry: 210-3 and 287-3 Wash: 210-3 and 287-5...
-
Page 313: Position Switch Cables
7 Spare Parts 7.2.2. Position switch cables 7.2.2. Position switch cables IRB 1400 Axis 1 Art. no. Description Option no. 3HAC3363-1 Pos. switch cable L=7m 273-1 3HAC3364-1 Pos. switch cable L=15m 273-2 3HAC3365-1 Pos. switch cable L=22m 273-3 3HAC3366-1 Pos. switch cable L=30m 273-4 IRB 1600, 2400, 260, 4400, 6400RF and 340 Axis 1... -
Page 314: Fan Cables
7 Spare Parts 7.2.3. Fan cables 7.2.3. Fan cables IRB6600 and 7600 Art. no. Description Option no. 3HAC022723-001 Harness - Axis 1&2 cooling (87-1 or 88-1 or 89-1) and 210-2 3HAC022723-004 Harness - Axis 1&2 cooling (87-1 or 88-1 or 89-1) and 210-3 3HAC022723-005 Harness - Axis 1&2 cooling... -
Page 315: Cp/Cs Harness Irb 6400Rf
7 Spare Parts 7.2.4. CP/CS Harness IRB 6400RF 7.2.4. CP/CS Harness IRB 6400RF CP/CS Canbus Art. no. Description Option no. 3HAC9288-1 Harness CP/CS, CAN L=7m 16-1 and 90-2 3HAC9288-2 Harness CP/CS, CAN L=15m 16-1 and 90-3 3HAC9288-3 Harness CP/CS, CAN L=22m 16-1 and 90-4 3HAC9288-4 Harness CP/CS, CAN L=30m... -
Page 316: Cp/Cs Harness Irb 4600, 6600, 7600, 660, 6620 And 6640
7 Spare Parts 7.2.5. CP/CS Harness IRB 4600, 6600, 7600, 660, 6620 and 6640 7.2.5. CP/CS Harness IRB 4600, 6600, 7600, 660, 6620 and 6640 CP/CS Art. no. Description Option no. 3HAC022957-001 Harness CP/CS L=7m 16-1 and 94-1 3HAC022957-002 Harness CP/CS L=15m 16-1 and 94-2 3HAC022957-006 Harness CP/CS L=22m... -
Page 317: Customer Signal, Cs/Cp And Cs
7 Spare Parts 7.2.6. Customer signal, CS/CP and CS 7.2.6. Customer signal, CS/CP and CS IRB 1400 Art. no. Description Option no. 3HAC3346-1 Customer cable sign. L=7m 16-1 and 17-5 and 94-1 3HAC3347-1 Customer cable sign. L=15m 16-1 and 17-5 and 94-2 3HAC3348-1 Customer cable sign. -
Page 318: Customer Power-Signal
7 Spare Parts 7.2.7. Customer power-signal 7.2.7. Customer power-signal IRB 1600, 260, 2400 and 4400 Art. no. Description Option no. 3HAC8183-1 Customer pow.-sign. L=7m 94-1 and 16-1 and 17-5 and (287-3 or 243-5) 3HAC8183-2 Customer pow.-sign. L=15m 94-2 and 16-1 and 17-5 and (287-3 or 243-5) 3HAC8183-3 Customer pow.-sign. -
Page 319: Additional Axis Cables
7 Spare Parts 7.2.8. Additional axis cables 7.2.8. Additional axis cables Power cable (stationary gun) Art. no. Description Option no. 3HEA800736-001 Power cable (floor) L=7m 809-1 3HEA800736-002 Power cable (floor) L=15m 809-2 3HEA800736-003 Power cable (floor) L=22m 809-3 3HEA800736-004 Power cable (floor) L=30m 809-4 Power cable (robot gun) Art. - Page 320 7 Spare Parts 7.2.8. Additional axis cables 3HAC021313-001 Revision: P...
-
Page 321: Circuit Diagram
The circuit diagrams are not included in this manual but delivered as separate documents on the documentation DVD. See below for correct article numbers. Controllers Product Article numbers for circuit diagrams IRC5 with Drive System 04 3HAC024480-004 IRC5 with Drive System 09 3HAC024480-005 IRC5 Panel Mounted Controller... - Page 322 8 Circuit Diagram 8.1. About circuit diagrams 3HAC021313-001 Revision: P...
- Page 323 42 Compact Flash memory, replace 223 integrated PLC 250 Configuration of the drive system 91 IP class 41 connecting a USB memory 102 IRC5 controller modules 38 connection external safety devices 15 lifting device 39 FlexPendant 52 manipulator cables 67...
- Page 324 Index replacing Compact Flash memory 223 uncontrolled stop 18 DDR SDRAM memory 207 USB ports 102 fieldbus adapter 215 PCI boards 211 responsibility and validity 15 validity and responsibility 15 safety weight 40 emergency stop 23 ESD 31 fire extinguishing 17 introduction 13 manipulator system 15 service 15...
- Page 326 ABB AB Robotics Products S-721 68 VÄSTERÅS SWEDEN Telephone: +46 (0) 21 344000...
Need help?
Do you have a question about the IRC5 and is the answer not in the manual?
Questions and answers