FujiFilm VisualSonics Vevo MD User Manual
Hide thumbs
Also See for VisualSonics Vevo MD:
- Cleaning and disinfection manual (134 pages) ,
- Getting started manual (19 pages)
Table of Contents
Advertisement
Quick Links
Advertisement
Table of Contents

Subscribe to Our Youtube Channel
Related Manuals for FujiFilm VisualSonics Vevo MD


Summary of Contents for FujiFilm VisualSonics Vevo MD
- Page 3 SonoSite, VisualSonics, Vevo, Vevo MD and the VisualSonics logo are registered and unregistered trademarks of FUJIFILM SonoSite, Inc. in various jurisdictions. All other trademarks are the property of their respective owners. Patents: CA 2501647; CA 2525220; CN 201430080125.0; CN ZL200380101220.3; CN ZL200380105066.7; CN ZL20040013162.3;...
-
Page 4: Table Of Contents
Contents About the Vevo MD Imaging System User Manual Getting started Quick start tutorial Vevo MD Imaging System Overview Moving and setting up the system Starting up and shutting down the system System components Transducers Exam types Using the control panel Indications for use Contraindications System settings... - Page 5 Archiving To associate a routing selection during an exam To associate a routing selection after an exam has ended DICOM log files Display information Exam types and presets Exam types Customizing exam types Exporting exam types and presets Importing exam types and presets Presets Export USB devices...
- Page 6 User management Logging on for the first time User login Managing user accounts Patient Patient image data Patient form fields Entering patient information manually Entering patient information from the worklist Updating and querying the worklist Ending the exam To end an exam Editing patient information Completed exams Exporting patient exams...
- Page 7 Protecting patient information HIPAA standard Scanning Customizing controls 2D acquisition and analysis 2D image acquisition 2D clinical display 2D control panel Controls in 2D Adding 2D measurements M-Mode acquisition and analysis M-Mode image acquisition M-Mode clinical display M-Mode control panel Controls in M-Mode Adding M-Mode measurements Color Doppler Mode acquisition and analysis...
- Page 8 Controls in Color Doppler Mode Adding Color Doppler Mode measurements Freeze Saving images Annotations Measurements Using the measurement panel To change measurement properties To delete a measurement Adding a depth measurement Adding a linear measurement To add a linear measurement Adding a time measurement To add a time measurement Adding a traced area measurement...
- Page 9 Adding an IMT measurement To add an IMT measurement on a 2D image To add an IMT measurement to an M-Mode image To add an I/M measurement to a 2D image Report To create a report To interact with your report To export a report Cleaning and disinfecting Determining the required cleaning and disinfecting level...
- Page 10 Safety Product safety Clinical safety Electrical safety Electromagnetic compatibility Environmental limits Ergonomic safety Minimize eye and neck strain Support your back during an exam Minimize reaching and twisting Promote comfortable shoulder and arm postures Promote comfortable hand, wrist, and finger postures Equipment safety Hazardous materials Manufacturer's declaration...
- Page 11 Transducer surface temperature rise Acoustic output measurement Acoustic output tables Acoustic measurement precision and uncertainty Specifications and standards Electromechanical safety standards EMC standards classification DICOM standard HIPAA standard Measurement accuracy Troubleshooting Contact information Related guidance documents Glossary Index...
-
Page 13: About The Vevo Md Imaging System User Manual
About the Vevo MD Imaging System User Manual The Vevo MD Imaging System User Manual is intended for a user familiar with ultrasound; it does not provide training in sonography, ultrasound or clinical practices. Before using the Vevo MD Imaging System, training should be completed. This manual provides detailed descriptions and procedures for configuring and using the system. - Page 14 Getting More Information Vevo MD Getting Started Guide printable PDF version provided with Vevo MD Imaging System Technical Support: See "Contact information" on page 415 About the Vevo MD Imaging System User Manual...
-
Page 15: Getting Started
"Exporting patient exams" on page 190. WARNING: Use only the power cord provided by FUJIFILM SonoSite with the system. Caution: If the equipment is used in a manner not specified by the manufacturer, you void the terms of the product warranty, and the protection provided by the equipment may be impaired. -
Page 16: Quick Start Tutorial
Quick start tutorial This tutorial provides a high-level overview for acquiring and analyzing an image and then exporting your data. WARNING: Before using the Vevo MD Imaging System users must read and observe the Safety Warning and Precautions listed in . To acquire and export a 2D image and analysis 1 Turn the system on. -
Page 17: Vevo Md Imaging System Overview
Vevo MD Imaging System Overview The Vevo MD Imaging System houses the electronics, software, and monitors, that control the transducer functions, and processes the image data. The Vevo MD Imaging System provides two imaging modes: Frame-based imaging mode and Time-Based imaging mode. Frame-based imaging mode captures images in frames, based on two-dimensional 2D data. -
Page 18: Moving And Setting Up The System
WARNING: When transporting your system, push forward on the grab bars instead of pushing or leaning on the clinical monitor. FUJIFILM SonoSite recommends having two people to move a system—one positioned at the front of the system and one positioned at the back of the system, both using the available grab bars. - Page 19 WARNING: Lock the wheels whenever the system is unattended or stationary. Caution: Care should also be taken when handling heavy items, as it is easy to crush limbs when lifting or moving them. Caution: Use extra care when moving the system over thresholds, inclines and on or off elevators.
- Page 20 Clinical display collapsed for system transport 8 When the system is at its desired location, lock the wheels by pressing down on the lever on the wheels. 9 Grasp the clinical display monitor on both sides and fold it upward. 10 Grasp the clinical display monitor on both sides and tilt or rotate it to adjust its angle.
- Page 21 WARNING: To avoid the risk of injury, do not operate the system in the presence of flammable gasses or anesthetics. Explosion can result. WARNING: The power frequency magnetic field should be measured in the intended installation location to assure that it is sufficiently low. If image distortion occurs, it may be necessary to position the Vevo MD Imaging System further from sources of power frequency magnetic fields.
-
Page 22: Starting Up And Shutting Down The System
Starting up and shutting down the system Before you power up the Vevo MD Imaging System, ensure that the AC power cord is plugged into the wall outlet using the proper plug, and that the main power switch on the back of the bottom of the system base is turned ON. Description Symbol Location of power cord connection and... - Page 23 Location of the Power button To log in for a typical imaging session 1 Once powered on, the system software starts and displays the Login page. 2 The user ID defaults to the Administrator. If you are not the Administrator tap the Guest button, or select your user ID.
- Page 24 Note: Your user account must be created and configured by the administrator before it can be used for login. See "Logging on for the first time" on page 147. 3 Enter your password and tap Log in. The Log in control appears once you enter your password.
- Page 25 To log out and leave the system in standby ♦ When you want to log out and leave the system running in standby, tap the Log Out button located at the top of the control panel. If the button is not displayed, tap the More button to see the other available options. or ...
-
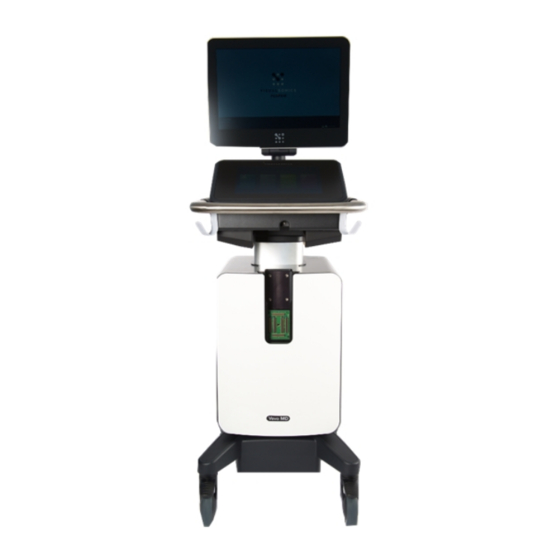
Page 26: System Components
System components Vevo MD Imaging System views Safety warning label The composite safety warning label is located on the top of the system enclosure. Getting started... - Page 27 System enclosure with composite safety warning label location highlighted System components...
- Page 28 The following table describes the symbols on the composite safety warning label. Composite safety warning symbols Symbol Description Catalog number Serial number Electrostatic sensitive device. Proof of product compliance (electrical, gas and other safety standards) to North American safety standards. Conformité...
- Page 29 Composite safety warning symbols Symbol Description European Union WEEE (Waste Electrical and Electronic Equipment) Directive 96/86/EEC. Identifies the directive on waste electrical and electronic equipment. Refer to local regulations for disposal. System connections System connectors on bottom of back of stand base.
- Page 30 Symbol Description Plug the AC power cord in here. Fuse label. Displays the type of fuses required for the system voltage; this example displays fuse requirements for a 125V system. System connectors on back of the clinical display. Includes: HDMI and headphone jack connectors.
- Page 31 System connectors on back of the computer enclosure. Includes: Ethernet and USB connectors. System connectors on side of system. Includes: USB connectors. System components...
- Page 32 System connector on front of system. Includes: Transducer interface. System connectors Connector Description Connect a second monitor via an HDMI video cable here. Located on the back of the clinical display. HDMI video output resolution is 1920 x 1080 at 60 Hz. HDMI WARNING: Do not use a monitor connected...
- Page 33 AC In socket, on the bottom of the back of the Fuse box system enclosure. The fuse box contains replaceable fuses that must be replaced by a FUJIFILM SonoSite service technician. Connect the power cable here. Located on the bottom of AC In the back of the system enclosure.
- Page 34 Transducer and gel holders Use the transducer or gel holders located on the left and right sides of the system to store gel bottles and transducers. Store both items facing up. Caution: Only use gels with properties similar to Aquasonic® 100 Ultrasound Transmission Gel for use with the Vevo MD Imaging System.
- Page 35 Internal data storage devices The following table describes the range of storage device technology: Hard drive 1 (Windows® operating system, Vevo software) Hard drive 2 (exam storage) USB connectors (4) for exporting image data to an external device Note: You do not need to eject a connected USB device before removing. Network connection The computer unit includes a 100 MB/s Ethernet network connection.
- Page 36 Control panel The LED monitor can be adjusted at any angle from flat to vertical. The Control Panel provides a touch screen user interface. See "Using the control panel" on page 57. To adjust the control panel angle ♦ Grasp the sides of the Control Panel, and then pull forward or push backward to the desired angle.
- Page 37 To protect the AC mains (the power switch on the system) from over current damage, the Vevo MD Imaging System fuses can be replaced. If the fuse blows, it must be replaced by a FUJIFILM SonoSite service technician. WARNING: If you cannot power on the system, unplug the machine immediately and contact a Technical Support Representative.
- Page 38 Do not modify the attachment plug or use an adapter. This could cause an electrical hazard. If you need to use a different plug, contact a Technical Support Representative. See "Technical support" on page 415. WARNING: Do not move the system when the plug is connected to the power outlet.
-
Page 39: Transducers
0.0 mm, but includes an offset. Please be aware of this when placing measurements. WARNING: Use ONLY FUJIFILM SonoSite UHF transducers with the Vevo MD Imaging System. The use of other transducers may affect safety and system performance. - Page 40 The following transducers can be used with the Vevo MD Imaging System: Vevo MD Imaging System Ultra High-Frequency clinical transducers Transducer Description UHF22 10-22 MHz Center transmit: 15 MHz UHF48 20-46 MHz Center transmit: 30 MHz UHF70 29-71 MHz Center transmit: 50 MHz Only use gels with properties similar to Aquasonic ®...
- Page 41 Safety warning label The composite safety warning label is located on the top surface of the transducer connector. Here is an example of a UHF22 transducer label: The following table describes the symbols on the composite safety warning label: Composite safety warning symbols Symbol Description Catalog number...
- Page 42 Composite safety warning symbols Symbol Description Hot surface hazard. The International Protection Marking (IP Code), IEC 60529 rates the degrees of protection provided by enclosures of electrical equipment. UHF transducers are protected against water immersion—immersion for 30 minutes at a depth of 1 meter. Conformité...
- Page 43 The Vevo MD Imaging System software allows for users to switch transducers without any negative affect to the current exam or imaging session. Caution: If damage is evident, do not use the transducer, and contact FUJIFILM SonoSite or your local representative. Transducer interface...
- Page 44 2 Slide the transducer connector into the transducer bay underneath the control panel. 3 Push the transducer connector into the transducer interface. 4 Rotate the handle on the transducer counterclockwise to the horizontal (locked)position and push down on the handle to lock the transducer. To disconnect the transducer from the system 1 Flip the handle up and rotate clockwise to the vertical (unlocked) position.
- Page 45 Storing Transducers Store the nose of the transducer in the transducer and gel holder on either side of the Vevo MD Imaging System. Position the transducer nose upward. You can also store the transducer cables on the cable hooks; there are four hooks available.
- Page 46 To avoid damage to the transducer, use only gels with properties similar to Aquasonic® 100 Ultrasound Transmission Gel for use with the Vevo MD Imaging System. Using other gels can damage the transducer and void the warranty. If you have questions about gel compatibility, contact FUJIFILM SonoSite or your local representative. Sheaths...
- Page 47 To apply a transducer sheath 1 Place gel inside the sheath. Make sure the gel is at the end of the sheath. 2 Insert the transducer into the sheath. 3 Pull the sheath over the transducer and cable until the sheath is fully extended. 4 Secure the sheath using the bands supplied with the sheath.
- Page 48 Transducer exam types by mode Exam types by mode Imaging mode Transducer Exam type Color Doppler M-Mode Mode Abdominal Arterial UHF22 Small Parts Superficial Venous Abdominal Arterial Small Parts UHF48 Superficial Venous Getting started...
- Page 49 Exam types by mode (continued) Imaging mode Transducer Exam type Color Doppler M-Mode Mode Abdominal Arterial Small Parts UHF70 Superficial Venous Transducers...
- Page 50 Clinical applications Important: The clinical applications and procedures are only possible as they relate to the individual transducers and their depth limitations. Clinical Applications Clinical Description Exam types application You can assess the liver, kidneys, pancreas, spleen, gallbladder, bile ducts, transplanted organs, abdominal vessels and surrounding anatomical Abdominal structures for the presence or absence...
- Page 51 Clinical Applications Clinical Description Exam types application evaluate and perform interventional abdominal procedures and evaluate blood flow in abdominal organs. You can assess the carotid arteries, deep veins, and arteries in the arms and legs, superficial veins in the arms and Peripheral vessel Arterial, Venous legs, great vessels in the abdomen, and...
- Page 52 After use, remove and discard the single-use sheath, and clean and disinfect the transducer using a FUJIFILM SonoSite recommended high-level disinfectant. See "Cleaning and disinfecting"...
- Page 53 WARNING: To avoid injury to the patient, never perform an Ophthalmic exam with the Vevo MD Imaging System. The FDA has established lower acoustic energy limits for ophthalmic use, and the Vevo MD Imaging System may exceed these limits. Transducers...
- Page 54 Transducer cable lengths Transducer cable lengths Description Cable length (in) Cable length (m) UHF22 transducer 78 ± 2 1.98 m ± 5 UHF48 transducer 78 ± 2 1.98 m ± 5 UHF70 transducer 78 ± 2 1.98 m ± 5 Note: Cable length is measured between the strain reliefs and includes the length under the strain relief.
-
Page 55: Exam Types
Exam types Exam types are predefined groups of image acquisition settings. This way you can quickly get an optimal image to work with. The system includes various default system exam types depending on the transducer you are working with. When you start the system, select the exam type for the work you are doing. UHF70 transducer with the Arterial exam type selected Exam types... - Page 56 To switch the exam type for the attached transducer ♦ Tap the EXAM TYPE navigation button and select the desired exam type for the attached transducer. Important: Please be aware that you switch a transducer at any time. You can switch transducers during a live scan, after acquiring an image and during review of an image.
-
Page 57: Using The Control Panel
Using the control panel The control panel is where you adjust settings. You can select the patient and exam type, transducer, imaging mode, and more. As you adjust the image settings or controls, the results appear on the clinical display. When an image is frozen, the control panel displays an outline of the image. - Page 58 Control panel gestures and actions Gesture Action Pan image in zoom area Scroll through tables and pages in forms Swipe Scroll through M-Mode data Scan Unfreeze Freeze Select calipers Select an imaging control or setting Save an image Select a thumbnail in the review images screen to open it for review Change keyboard to uppercase via the shift key Change numbers and symbols to international...
- Page 59 Control panel gestures and actions Gesture Action Zoom in or out Control panel elements Control panel elements: "Patient" on page 165. 2. Review Images, see "Patient image data" on page 166. "Exam types" on page 106. 4. More Controls, see "Customizing controls" on page 207. 5.
- Page 60 "General controls" on page 208. "Freeze" on page 268. "2D acquisition and analysis" on page 215. "M-Mode acquisition and analysis" on page 229. "Color Doppler Mode acquisition and analysis" on page 247. Onscreen Keyboard You can enter text into text boxes using the onscreen keyboard. To enter text using the onscreen keyboard 1 Tap a text box (for example, the patient name), to display the onscreen keyboard.
- Page 61 2. Shift key: Changes alphabet keys to uppercase—single tap will enable uppercase for a single use, double tap will enable uppercase permanently. You can also change to international characters when the numbers and symbols keyboard is displayed with a double tap. 3.
-
Page 62: Indications For Use
Indications for use The Vevo MD Imaging System is a general purpose imaging system intended for use by a qualified physician for evaluation by ultrasound imaging or fluid flow analysis of the human body. Specific clinical applications and exam types include: Abdominal Pediatric Small Organ (breast, thyroid, testicles, prostate) - Page 63 UHF22 Intended Uses System: FUJIFILM SonoSite Vevo MD Ultrasound System Transducer: UHF22 Diagnostic ultrasound imaging or fluid flow analysis of the human body Intended Use: as follows: Mode of Operation Clinical Application Color Combined Other (2D) Doppler (Spec.) (Spec.) Ophthalmic...
- Page 64 UHF48 Intended Uses System: FUJIFILM SonoSite Vevo MD Ultrasound System Transducer: UHF48 Diagnostic ultrasound imaging or fluid flow analysis of the human body Intended Use: as follows: Mode of Operation Clinical Application Color Combined Other (2D) Doppler (Spec.) (Spec.) Ophthalmic...
- Page 65 UHF70 Intended Uses System: FUJIFILM SonoSite Vevo MD Ultrasound System Transducer: UHF70 Diagnostic ultrasound imaging or fluid flow analysis of the human body Intended Use: as follows: Mode of Operation Clinical Application Color Combined Other (2D) Doppler (Spec.) (Spec.) Ophthalmic...
- Page 66 After use, remove and discard the single-use sheath, and clean and disinfect the transducer using a FUJIFILM SonoSite recommended high-level disinfectant. See "Cleaning and disinfecting"...
-
Page 67: Contraindications
Contraindications The Vevo MD Imaging System system has no known contraindications. Contraindications... -
Page 68: System Settings
System settings You can customize your system and set your user preferences through the system settings panel. Note: Some system settings are only available to system users with Administrator status. Additionally, not all system settings are available if you log in to the system as a Guest. - Page 69 System settings...
- Page 70 System settings...
-
Page 71: Backup And Restore
Backup and restore The backup and restore settings provide the tools to create and manage the backup System users The state of User Login Custom exam types and presets The state of configurable preferences When backing up and restoring data, be aware of the following user access permissions and conditions: Standard users and administrators can perform a system backup Only administrators can restore, import, export or delete a backup... - Page 72 To create a backup file 1 On the backup and restore page, tap System Backup. The system creates a backup and lists the backup as a time-stamped item. 2 Tap Done to close the settings page. To restore from a backup file 1 On the Backup &...
- Page 73 The system completes an automatic backup of the current settings first, then completes the restore. 3 When the system settings have been restored successfully, you will be presented with another confirmation screen. Tap OK. Importing, Exporting and Deleting Backup Files To export a backup file 1 Select the time-stamped backup you want to export and then tap Export.
- Page 74 To import a backup file 1 On the backup and restore page, tap Import. 2 In the import page, browse to the folder that contains the file and then select it. Backup files appear with a logo. 3 Tap Import. Tap Yes to confirm the import operation. Note: The imported files will overwrite the files in your current file location.
-
Page 75: Connectivity
Connectivity On the connectivity page, you can select the network location, define network settings and setup DICOM transfer. Note: A guest user will not be able to change connectivity settings. Connecting to the network Before configuring the system for DICOM transfer, you must connect to the network; you can connect by using a standard Ethernet 10/100/1000 network. - Page 76 Network Status The location you specify represents the active location of the system. ♦ Choose a network location from the Location list. Note: Once a location is selected, the IP address, Subnet mask, Default gateway and MAC address fields are populated automatically. DICOM setup Use this page to configure your system to archive images and exams to different locations depending on what type of procedure is being performed and if it is billable.
- Page 77 3 Tap DICOM Setup. Connectivity...
-
Page 78: Dicom
Export exam data in PACS format to a USB storage device DICOM is a licensed feature. The system conforms to the DICOM standard as specified in the Vevo MD DICOM Conformance Statement, contact FUJIFILM SonoSite for a copy of this statement. The Vevo MD DICOM Conformance Statement provides information about the purpose, characteristics, configuration, and specifications of the network connections supported by the system. -
Page 79: Configuring The System For Dicom Transfer
Configuring the system for DICOM transfer To configure the system for DICOM transfer, perform the following tasks (typically completed by a network administrator or PACS manager): To configure the system for DICOM transfer 1 Connect to the network. See "Connectivity" on page 75. 2 Complete the configuration pages for locations and devices. - Page 80 i. Select the check box of the MPPS server that you want ii. Select the check box of the archiver iii. Select the check box in the archiver's MPPS column 3 (Optional) If you want to use the storage commitment service, associate the storage commitment server with the archiver: Note: Only one storage commitment server can be selected for a location.
- Page 81 5 Tap Done. 4. Tap OK. The system will shutdown to complete the configuration. After the system is fully shutdown, restart the system by using the power button. Configuring the system for DICOM transfer...
-
Page 82: Dicom Configuration Pages
DICOM configuration pages In order to archive exams, patient data and images, you must first configure the DICOM settings. You must also configure the Vevo MD Imaging System for DICOM transfer. Have your Network Administrator or PACS Manager perform the configuration task. See "Configuring the system for DICOM transfer"... - Page 83 To add DICOM configuration pages 1 Tap MORE, and then tap SYSTEM SETTINGS. 2 Tap Connectivity in the list on the left. 3 Tap DICOM Setup. 4 Tap Config. 5 Select a configuration page: Location, Archive, Storage Commit, Worklist or MPPS. 6 Tap New.
- Page 84 7 Enter information into the available fields. Tap Save. DICOM configuration page fields To configure DICOM, you will need to define fields in each of the configuration pages: Location, Archive, Storage Commit, Worklist and MPPS. Note: Required fields are marked with asterisks. 1 Location Configuration for network settings.
- Page 85 Name: Unique network name for the Vevo MD Imaging System. The default is VisualSonics Alias: Name that identifies the network location of the Vevo MD Imaging System AE Title: DICOM Application Entity Title DHCP: If desired, select to enable Dynamic Host Configuration Protocol. The IP Address, Subnet mask and Default Gateway fields become unavailable IP Address: Unique identifier of the Vevo MD Imaging System location.
- Page 86 Name: Network host name for an archiver Alias: Personalized name for an archiver AE Title: Archiver DICOM Application Entity Title Images: Defines how images are sent to the archiver: RGB (uncompressed) or JPEG IP Address: Unique identifier for the archiver Port: Device port number Exclude Video Clips: If the check box is selected, only images (no videos) are transferred.
- Page 87 Name: Unique network name for the storage Commit serve. The default is Name Alias: Name that identifies the network location of the Storage Commit server AE Title: DICOM Application Entity Title IP Address: Unique identifier of the storage commitment server Port: Device port number. Ping: Tap to determine whether the IP address is accessible.
- Page 88 AE Title: Application Entity Title Worklist: Today; Yesterday, today, tomorrow; All This Device Only: Restricts the query to patient procedures that are scheduled for the Vevo MD Imaging System based on its AE Title IP Address: Unique identifier for the worklist server Port: Device port number Automatic Query: Turns automatic query on/off Occurs Every: In an automatic query, length of time between automatic updates...
- Page 89 Name: Network host name for the MPPS server Alias: Name that identifies the network location of the MPPS system AE Title: DICOM Application Entity Title IP Address: Unique identifier for the MPPS server Port: Device port number Ping: Tap to determine whether the IP address is accessible. The system displays OK or Failed To delete a location or device 1 On the proper configuration page, select the name from the list of locations or...
-
Page 90: Associating Devices With Locations
Associating devices with locations For each location, select which archivers you want to receive the data that you transfer, which archiver you want to associate with MPPS or storage commitment server, and which worklist server you want to receive data from. After you select a location, choose which devices you want associated with that location. - Page 91 4 In the Location list, select the location of the system. 5 In the list of devices, select the check box next to one or more archivers, or worklist servers. You can select a maximum of four archivers, and one worklist server for each location.
- Page 92 To disassociate devices with a location 1 Tap MORE, and then tap SYSTEM SETTINGS. 2 Tap Connectivity in the list on the left. 3 On the Connectivity setup page, tap DICOM Setup. 4 In the Location list, select the location. 5 Do any of the following: To disassociate an archiver or worklist server, deselect its check box System settings...
- Page 93 To disassociate an MPPS server from an archiver, deselect the check box for the MPPS server To disassociate a storage commitment server from an archiver, deselect the check box for the storage commitment server 6 Tap Done. To verify the connection status of devices 1 On the Connectivity setup page, tap DICOM Setup.
- Page 94 Success: DICOM can communicate with the device Unknown: The device does not support the C-ECHO (for example, verify query command) Note: Unknown is also displayed for locations that have not be checked; in this case, the meaning of Unknown is to tell you that the device verification has not been done.
-
Page 95: Archiving
Archiving The completed exams list organizes saved images and video clips. You can archive completed exams to a DICOM archive server. Archiving exams If you have configured the system for DICOM transfer, the system automatically archives saved images and video clips to DICOM devices. The system archives images and video clips at the end of the exam. - Page 96 Note: If there is no icon displayed in the archive status column, your exam is pending archive or the system is not connected to DICOM services. Archive status icons Icon Description Patient exam has been exported to USB. Patient exam is transferring. Patient exam is archived.
- Page 97 Storage commitment—N/A (Not Available), Suspended, Pending or Completed MPPS—N/A (Not Available), In Progress, Discontinued or Completed Patient edit allowed—no or yes To manually archive exams 1 Verify the following: The correct location is selected. See "Connectivity" on page 75 The system is connected to a network via an Ethernet connection 2 From the REVIEW IMAGES or PATIENT page, tap Completed Exams.
- Page 98 Specifying educational DICOM archivers When you associate the Educational/Accreditation routing selection with a DICOM archiver, the system archives exams associated with the Educational/Accreditation routing selection to that archiver. Archivers that are not specified as educational are procedural (billing) archivers. The system archives exams associated with the Diagnostic and Procedural routing selections to these archivers.
- Page 99 3 Tap Connectivity. 4 On the Connectivity system setup page, tap a location. 5 Tap DICOM Setup. 6 Tap Config. 7 From the DICOM list, select the Archive configuration page for the archiver. 8 Select Educational. 9 Tap Done. Archiving...
-
Page 100: To Associate A Routing Selection During An Exam
Routing selections Routing selections let you control where patient exams are archived. You can associate one or more routing selection with an exam. The system supports three routing selections: Diagnostics (Documentation) Procedural (Documentation) Accreditation (Educational) You can associate the accreditation routing selection with a DICOM archive device. "Specifying educational DICOM archivers"... -
Page 101: To Associate A Routing Selection After An Exam Has Ended
To associate a routing selection after an exam has ended 1 From the Completed Exams page, select the check box next to an exam. 2 Tap More Options. 3 Tap Route Exam. 4 Select one or more options in the Routing Selection section. Note: Procedural and Diagnostics routing selections are billable, Accreditation is not. -
Page 102: Dicom Log Files
DICOM log files The Vevo MD Imaging System logs transfer failures due to incorrect settings or an archive location that cannot be reached. Note: DICOM log files will be displayed in English only. To view DICOM logs 1 Tap MORE, and then tap SYSTEM SETTINGS. 2 Tap System Logs in the list on the left. - Page 103 2 Tap System Logs in the list on the left. 3 Select ALL from the Show log type drop down menu. Note: The DICOM log files are embedded within the system log files. 4 Tap Export. 5 Locate and select your USB device. 6 (Optional) Add an additional folder by tapping New Folder.
-
Page 104: Display Information
Display information On the display information page, you can select what information will be displayed in the patient header and what thermal index to display. To display the display information page 1 Tap MORE, and then tap SYSTEM SETTINGS. 2 Tap Display Information from the list on the left. Patient Header The patient header contains information about the patient and the person who performed the exam. - Page 105 Patient name Patient ID User Date and time Department ID Institution Thermal Index The thermal index (TI) is the ratio of power used, to that required to produce a temperature increase of 1°C. The setting is used for the current session only, so when the exam is ended or another transducer or exam type is selected, the exam type default setting is used.
-
Page 106: Exam Types And Presets
Exam types and presets The exam types and presets page contains the settings for viewing and configuring imaging presets and transducer exam types. Exam types The system displays both system-defined and user-defined exam types, organized by transducer. Use the options to change a default transducer exam type or to change a default preset. - Page 107 To manage exam types A transducer exam type contains the imaging presets you can use to instantly optimize your image during an acquisition session. Select the transducer you are planning to use to acquire image data, then select an available exam type from the list. All of the available transducers that the Vevo MD Imaging System supports will be displayed.
- Page 108 Note: You cannot disable the default exam types. To create a new exam type, tap New To import an exam type, tap Import To export an exam type, tap Export To edit an exam type, tap Edit To delete the exam type, tap Delete System settings...
- Page 109 Note: You can only delete user-defined exam types. 3 Tap Done. Creating a custom exam type Factory default exam types are defined for each transducer which contain the imaging presets you can use to instantly optimize your image during an acquisition session. You cannot modify factory default exam types, except to add custom presets.
- Page 110 2 Click New. 3 In the Copy From drop down menu, select an existing exam type that contains presets that are similar to what you want to create. 4 Type a name for your custom exam type in the Name field. 5 Click Done.
- Page 111 Importing, exporting, disabling, and deleting exam types To export exam types and presets see "Exporting exam types and presets" page 115. To import exam types and presets see "Importing exam types and presets" page 117. To disable an exam type 1 Tap to select the transducer that contains the exam type that you want to disable. 2 Tap to highlight the exam type.
- Page 112 3 Tap Delete and confirm you want to delete the exam type. 4 Tap Done to close the settings page. System settings...
-
Page 113: Customizing Exam Types
Customizing exam types You can customize, or define, any exam type to use your favorite settings. When you select the new exam type (that is, the user-defined exam type) the system automatically uses the settings you specified. The system displays user-defined exam types along with the original exam types in the transducer-selection lists and also in the exam drop down menu in the patient form. - Page 114 4 Type a name for the exam type. Note: The exam type must have a unique name. 5 Tap Done. System settings...
-
Page 115: Exporting Exam Types And Presets
Exporting exam types and presets When you export from the exam types and presets page, you export the exam type, presets and groupings. Note: You must be an administrator to export exam types. To export Note: When exporting an exam type, only the custom presets are exported, not the factory default presets. - Page 116 6 Select the folder containing the file, then tap Export. The exam type, presets and groupings are added to the selected folder. 7 Tap Done to close the settings page. System settings...
-
Page 117: Importing Exam Types And Presets
Importing exam types and presets When you import from the exam types and presets page, you import the exam type, presets and groupings. Note: You must be an administrator to import exam types. To import 1 Insert a USB memory stick. 2 On the Exam Types &... -
Page 118: Presets
Presets Presets preferences A preset is a way to capture a set of acquisition parameters that you have customized to save and then apply as required. You can create presets with new settings while scanning. The presets preferences page allows you to manage how you work with the existing presets. - Page 119 3 In the mode list, select the mode for which you want to set the default preset. The system populates the presets list for that mode. 4 Tap Make Default. 5 Repeat this selection process for the modes that are available for the selected transducer exam type.
- Page 120 Enabling and disabling existing presets When a preset is enabled, it will appear in the list of available presets when you tap the Presets control while scanning. To disable an existing preset 1 On the Exam Types and Presets page, tap the exam type on the transducer for which you want to modify the preset.
- Page 121 Creating a Preset Every transducer exam type includes factory presets for each imaging mode. You can create custom presets that store your own settings from within system settings and while scanning. See "To create a custom preset during scanning" on the next page below.
- Page 122 7 Tap Done to save the preset. To create a custom preset during scanning A typical workflow would be to create your 2D presets first. 2D includes the largest number of controls that can be saved; Color Doppler Mode and M-Mode are based on The new preset appears in the presets list for the specific mode, exam type and transducer.
- Page 123 Deleting a preset Users are only allowed to delete custom presets. Note: You cannot delete a default preset or if it is the last remaining preset in a mode. To delete a preset 1 On the Exam Types & Presets page, tap the exam type on the transducer for which you want to delete a preset.
- Page 124 7 Tap Done. Creating preset groups for multi-mode acquisition sessions A preset group is a way to set your system to automatically apply a selected preset in multiple-mode image acquisition sessions. You create a preset group in the Exam Types & Presets page. When creating the group preset, observe the following: Name and apply the group to each mode you work with in a particular multiple mode session sequence such as you would follow in a protocol SOP...
- Page 125 4 In the presets list select the preset to add to the group. Tap the down arrow The system populates the corresponding mode, within your group, with the selected preset. The name of the group is displayed in the presets list. Note: A preset can be used in only one group.
-
Page 126: Export
Export Use the export settings to define the content of your exported image files. You can select between Multimedia or DICOM export options. You are able to export: Images that are acquired or in review from within the mode Images from the thumbnails page Exams from the completed exams list;... - Page 127 To define multimedia export options 1 Select Hide measurements and annotations on exported images if you do not want measurements and annotations to appear on the exported image. 2 Select the clip format. Option Description Largest file size, provides the original image Uncompressed AVI (*.avi) quality.
- Page 128 Option Description Uncompressed, low compression, choose for RGB (Uncompressed) optimal DICOM image quality. Uses lossy compression and may have less absolute detail than BMP format that don't render identically to the original images. WARNING: In some circumstances, lossy- JPEG compressed image quality may be reduced and therefore inappropriate for clinical use.
-
Page 129: Usb Devices
USB devices You can use the USB ports on the system for connecting devices such as a USB foot switch, USB memory stick or USB hard drive. Important: Only a user with Administrator privileges can choose to enable or disable exports to a USB device—this option is off by default. See "To enable USB export"... - Page 130 To disconnect a USB memory stick Disconnecting the USB memory stick while the system is exporting to it may cause the exported files to be corrupted or incomplete. 1 When exporting, a message is displayed on the clinical display. Wait until the export report is displayed before removing the USB.
-
Page 131: Dicomdir
DICOMDIR When exporting DICOM to a USB, a DICOMDIR file is created. DICOMDIR files are readable by a DICOM reader. To export DICOMDIR files 1 Within the Export page in System Settings, DICOM export options, select either JPEG or RGB image format. 2 Go to Completed Exams and select an exam to export. -
Page 132: Measurements And Annotations
Measurements and annotations On the measurements and annotations page, you can set the default font size for measurements and annotations and enable or disable the IMT measurement tools. The IMT measurement tools allow you to perform manual measurements of the Intima-Media thickness Measurement and annotations font size This font size will be displayed when placing measurements or annotations. - Page 133 In an exam, once an annotation is placed on a saved image, subsequent scans will display the same annotation label—turn off this feature by enabling the Clear Annotations on Scan selection box. To display the annotations page 1 Tap MORE, and then tap SYSTEM SETTINGS. 2 Tap the Measurements &...
- Page 134 2 Add the text of the new annotation label. Note: You can also select predefined labels and add more text or edit the existing labels, then save as a custom annotation. Custom annotation labels are limited to 40 characters in length. 3 If you want to create more than one, tap Add New again.
- Page 135 To delete an annotation label 1 To delete an annotation label, tap to select the annotation label, and tap Delete Label. Note: You cannot delete the default annotations. 2 Tap Done to close the page and return to your imaging session. Annotations...
-
Page 136: General
General Use general preferences to set basic system settings. All users can set their Startup, Display Brightness, Default Save Type, System Sounds, and Foot Switch Configuration. An Administrator System Settings section has additional settings that only a user with administrative privileges can change. These settings include date and time, preferred language and patient ID generation. - Page 137 Startup: Specify the system state you want to see when you start and log into the system: home screen, patient entry, completed exams or scanning. Display Brightness: You can adjust the brightness of the clinical display or the control panel to compensate for the level of light in the room in which the system is located.
- Page 138 Start/Stop Date and Time: Enter the date, time and time zone values as required. By default, the system updates the internal clock automatically for daylight savings time. You can disable this option, if required. You can also choose to display the time using the 24 hour time format. Date and time settings can only be changed by an administrator.
-
Page 139: System Information
System information The system information page displays system hardware, software and transducer versions, licensed features and Contact Information. On this page you can upgrade the system and update your license. Note: These tasks can only be completed by a user with administrator privileges. To display the system information page 1 Tap MORE, and then tap SYSTEM SETTINGS. - Page 140 Your system license and the enabled features are mapped to your specific machine, as identified by the machine ID. In order to update your license and enable new features, you may need to provide the machine ID to FUJIFILM SonoSite. 1 Insert a USB stick.
- Page 141 3 Select the location for the export and tap Export. The ID is saved to a text file that can be sent to FUJIFILM SonoSite. Once you have the license file on a USB stick you can perform the update 1 Insert the USB stick with the license file.
-
Page 142: System Logs
System logs On the system logs page, you can choose to display the following log types: All: Displays all types of log files, including DICOM DICOM: Displays current DICOM session log entries Error: Collects errors and events typically to support diagnostics Exit: Collects processor exceptions and software-generated assertions to support diagnostics Terminate: Collects errors and events that cause the system to shut down to... - Page 143 To export log files Caution: To avoid losing data from or damaging the USB memory stick, do not remove the USB memory stick or turn off the ultrasound system while exporting. In addition, do not bump or apply pressure to the USB memory stick while it is connected to the system.
- Page 144 3 Tap Delete to delete the selected files. 4 Tap Yes to confirm the deletion. 5 Tap Done to close the page and return to your imaging session. System settings...
-
Page 145: User Management
WARNING: When User Login is OFF, there are no restrictions for unauthorized users. FUJIFILM SonoSite recommends leaving the default setting of User Login in the ON state at all times. Note: When user login is off, the guest account is not available. - Page 146 2 Tap User Management in the list on the left. System settings...
-
Page 147: Logging On For The First Time
Logging on for the first time The first time you turn on the system, you will see the login screen with two buttons. The Administrator button allows you to log on as an administrator with all of the associated administrative privileges. The Guest button allows you to begin imaging immediately;... - Page 148 Note: This password is for future use. You will need it to log in for subsequent sessions. 4 Tap Done to create the account. 5 The system updates the name of the logged in administrator user, if the name was changed.
-
Page 149: User Login
User login The Vevo MD Imaging System default setting for user login is set to on. When the system is first turned on, you are presented with the user login screen and two options. Your first option is to sign in as a guest that requires no password. Your second option is to sign in as an administrator where you will be required to define a password. - Page 150 User Login on Only an administrator can turn user login off When user login is set to on, the login screen will provide a list of available users Users will only be able to try their password 10 times. If the user exceeds their 10 attempts, the user becomes disabled;...
- Page 151 Perform system backups Save and delete exam type presets Configure settings for export Configure display information View list of users in user management Select only themselves in the list of users Export system logs Use Help View system information Change their own password (if the administrator has allowed this) Restore their own user settings (and button configuration) Configure DICOM archives and export Set the default font size...
- Page 152 Restore the user settings for anyone Upgrade the system software Get the machine ID to update the software license Restore the system configuration from backups Import and export backups Delete backups Set the localization language With user login on, a guest user will be able to: Configure button layout Adjust the monitor brightness and contrast, and keyboard sound level Choose the foot switch configuration...
- Page 153 User Login off When user login is turned off in system settings and an exam is open, it will remain open and the software will return to the last screen displayed before accessing system settings User name will be removed from the status bar Only an administrator can access the user management panel in system settings, and only an administrator can delete other users With user login off, an non-administrator user will be able to:...
- Page 154 With user login off, an administrator can define the above, but will also be able to define these additional settings: Access the user management page (administrator password required) Enable and disable USB export Enable and disable patient header on the mode window Generate patient ID Add and delete users, except themselves Delete system logs...
- Page 155 Choose the startup screen used Configure button layout Edit, create new and delete custom annotations Adjust the monitor brightness and contrast , and keyboard sound level Choose the foot switch configuration Save and delete custom exam types Export system logs Use Help View system information Perform system backup...
-
Page 156: Managing User Accounts
Managing user accounts There are three types of user accounts available on the system: Guest: The guest account does not require a password and has access to all of the imaging and review functionality within the current exam. Any user can access the guest account using the Guest button on the log in screen. - Page 157 Important: When user login is off, only an administrator has access to the user management panel in system settings; a password must be provided to proceed. To create a new user account Only a user with administrative privileges can add a new user to the system. 1 Open the User Management page from the system settings.
- Page 158 2 In the user list, select the user you want to delete. 3 Tap User Options. 4 Tap Delete User. 5 Enter your administrator password to confirm deletion of the user account. The user account is deleted and you are returned to the User List. To modify a user’s settings Only a user with administrative privileges can modify a user's settings.
- Page 159 5 From this page you can: Change the administrator status of a user Disable a user so they cannot log in 6 After making the desired changes, tap Done to update the user account. Note: A user with administrative privileges cannot remove their own administrator status while they are using the account.
- Page 160 2 In the user list, select the user account for which you want to restore the settings. 3 Tap User Options. 4 Tap Restore User. A confirmation dialog box is displayed. 5 Tap Restore. A message is displayed confirming the settings have been restored, and you are returned to the log in page.
- Page 161 4 Tap Restore More Controls. A confirmation dialog box is displayed. 5 Tap Restore. A message is displayed confirming the settings have been restored, and you are returned to the log in page. To change a user account's password Only a user with administrative privileges can change another user account's password.
- Page 162 5 Enter your administrative password in the Your Password field. 6 Enter a password for the standard user in the New Password field and also in the Confirm New Password field. 7 Tap Done to change the password. To enable password changes for standard users Only a user with administrator privileges can enable the Enable password changes option to allow a standard user to change their own passwords.
- Page 163 4 When a standard user is in user management, a Change Password button is displayed. To enable USB export Only a user with administrative privileges can enable or disable USB export. If the USB export option is disabled, no user can export data to a USB. 1 Open the User Management page from the system settings.
- Page 164 2 Check the Enable Patient Header check box below the user list. 3 Tap Done. System settings...
-
Page 165: Patient
Patient The Patient page displays a patient entry form that lets you enter current patient demographic data, exam type, facility information and clinical details for the patient exam. After you begin a new patient form, all images, video clips, and other information you save during the exam are linked to that patient. -
Page 166: Patient Image Data
For more information, see "DICOM" page 78. If you do not use DICOM networking, then FUJIFILM SonoSite recommends that you export patient image data to a USB memory stick after every exam. For more information, see "DICOM"... - Page 167 active image in mode window 3 You can name the image, export or delete any image. You can also request a Report, see "Report" on page 312. 4 Double tap the image you want to load into review. Reviewing image data from an ended exam 1 Go to the Completed Exams and tap the patient exam that you would like to review.
- Page 168 Review images screen 1. Next and previous image 2. Scan 3. Export 4. Delete Patient...
- Page 169 The review image screen provides the following: Next and previous image controls There are two sets of the Next/Previous image controls on the control panel; use the directional arrows on either side of the image area or use the next and previous buttons on either side of the Scan button.
-
Page 170: Patient Form Fields
Patient form fields Field descriptions The patient form fields available depend on exam type. In some fields, you can enter symbols and special characters, select from drop down menus or calendar pickers. Fields that require entered text will display a keyboard when tapped; to dismiss the keyboard tap outside of the patient form. - Page 171 User: The User field is prepopulated by the logged in user. If User Login is OFF, the User field will be blank Reading Doctor Referring Doctor Routing Selection When you associate one or more routing selections with an exam, the system reflects the routing selection in the patient report.
- Page 172 Meaning Additional Worklist Query Parameters Modality: Procedure types. The modality for the Vevo MD Imaging System is Ultrasound (US) and cannot be edited. Requested Procedure ID: The procedure ID Patient...
-
Page 173: Entering Patient Information Manually
Entering patient information manually To enter patient information manually 1 End the previous exam. See "Ending the exam" on page 181. 2 Tap PATIENT from either: a. the top menu b. the home screen The patient form is displayed. Entering patient information manually... - Page 174 3 Tap a text box, and fill in the field. See "Patient form fields" on page 170. 4 Tap Done. Patient...
-
Page 175: Entering Patient Information From The Worklist
Entering patient information from the worklist Using the worklist, you can import patient information from the Hospital Information System or Radiology Information System. (DICOM worklist is a licensed feature.) The worklist is available after you do the following: Connect the system to the network Configure the system for DICOM transfer Select a worklist server for the active location "DICOM"... - Page 176 5 Tap Select. The system populates the patient form. (Patient information from the worklist is not editable.) 6 To return to the patient form without selecting a procedure, tap Back. To view scheduled procedures The patient information that you import from the worklist includes scheduled procedures.
- Page 177 To change the procedure You can select a procedure different from the performed procedure. 1 Under Performed Procedure on the patient form, select the desired procedure from the Code list. The definition of the procedure appears in the Meaning field. 2 If you want to modify the Code list, tap Edit, and do one of the following: Note: Required fields are marked with asterisks.
-
Page 178: Updating And Querying The Worklist
Updating and querying the worklist The worklist automatically updates if set up for an automatic worklist query, see "Worklist" on page 87. You can also manually update the worklist, and you can query the worklist server for a matching patient procedure. The following table shows the parameters used for worklist queries. - Page 179 2 Tap Update. To perform a manual query 1 On a new patient form, do any of the following: a. Fill in any of the following fields for the query: Last, First, Middle, Accession, or ID Note: The query is on the characters you enter. For example, Smith returns Smith, Smithson, Smithy.
- Page 180 The system will notify you when the worklist is complete, if the query returns more entries than the system can display or if the query has failed. When the worklist is complete, the query results, quantity and time of the Last Query are displayed below the worklist.
-
Page 181: Ending The Exam
Ending the exam Note: Although you cannot add images and video clips to a patient exam that is ended, you can automatically start a new patient exam that has the same patient information. See "To append images and video clips to a patient exam" page 188. -
Page 182: Editing Patient Information
Editing patient information You can edit patient information if an exam has ended. You cannot edit patient name, patient ID, accession number, birth date and gender for any exam in the following situations: If the exam is transferring or is already archived If the MPPS transfer is configured and enabled for the current location If the exam is coming from a worklist If the exam is appended and without MPPS configuration... - Page 183 2 Make changes as desired. 3 Tap Done. 4 A pop up window will be displayed. Do one of the following: a. Tap New to start a new patient exam using the current data b. Tap Modify to change the current patient data c.
- Page 184 Note: The Edit Information button is not available for a patient exam that is transferring or is already archived. 4 Make changes as desired. 5 Tap Done. Patient...
-
Page 185: Completed Exams
Completed exams The completed exams list organizes saved images and video clips from patients. You can review, manage, and export completed patient exams. You can also append images and video clips to an existing exam. From the completed exams list, you can also export exams to a USB memory stick, associate a routing selection with an exam, or archive exams to a DICOM server. - Page 186 To display the completed exams Do one of the following: a. Tap REVIEW IMAGES then Completed Exams b. Tap PATIENT then Completed Exams c. From the home screen, tap Completed Exams To sort the completed exams By default, completed exams are sorted by date and time, with the most recent patient listed first.
- Page 187 To delete an exam You can delete an exam that hasn't been archived, that is pending archive or that has already been archived. You cannot delete an exam while transferring to a DICOM server. When an exam is transferring, the transfer icon is displayed on the clinical display and in the completed exams list for that exam.
- Page 188 Note: Images will be listed in numerical order from top-left to bottom-right. 3 Double tap a thumbnail to load into review. To append images and video clips to a patient exam Although you cannot add images and video clips to a patient exam that is ended, you can automatically start a new patient exam that has the same patient information.
- Page 189 To view a report of an exam A report will display patient information, thumbnails of the images or videos within the exam and any measurements. 1 Tap the exam in the completed exams list. 2 Tap Report. 3 Tap a thumbnail if you wish to load it into review. 4 Tap a measurement, and the corresponding thumbnail image will be highlighted.
-
Page 190: Exporting Patient Exams
Exporting patient exams Caution: To avoid losing data from or damaging the USB memory stick, do not remove the USB memory stick or turn off the ultrasound system while exporting. In addition, do not bump or apply pressure to the USB memory stick while it is connected to the system. - Page 191 a. Ended exam(s): Displayed with black text and all export options will be available b. Active exam: Displayed with blue text— PACS will not be an available option for export 3 Tap Export USB. 4 In the export page, choose the export type. PACS: Exports completed Patient Exams in DICOM format to be read on a PACS station or other DICOM viewer Multimedia: Allows export of individual images and reports.
-
Page 192: To Export From The Review Images Page
To export from the review images page You can export images from an ended exam or your current exam from the REVIEW IMAGES page. 1 Select REVIEW IMAGES. 2 In the completed exams page, tap either: a. Ended exam(s): Displayed with black text and all export options will be available b. -
Page 193: Export Folder Structure
Note: PACS will not be available for an active exam. 4 Tap Export. During export, a report will be displayed; when export is complete, a message confirming a successful export will be shown. Export folder structure A unique folder structure for each patient will be used when exporting. The folder name will include the patient name, ID and a unique internal identifier, ex. -
Page 194: Protecting Patient Information
Protecting patient information To require user login You can set the system to require a user name and password at startup. If you require user login, you also need to set up user accounts. See "Managing user accounts" page 156. 1 On the Administration Login settings page, log in as a user with administrative privileges. - Page 195 To hide patient information when exporting You can choose to hide the patient name and ID number when you export images and video clips. 1 From Review Images or Completed Exams, select your image or exam and tap Export USB. If you are viewing your image in the mode window, tap Export. 2 On the export page, select and check the Hide patient information on exported images option.
-
Page 196: Hipaa Standard
HIPAA standard The system includes security settings that help you to meet the applicable security requirements listed in the HIPAA standard. Users are ultimately responsible for ensuring the security and protection of all electronic protected health information collected, stored, reviewed, and transmitted on the system. The Health Insurance and Portability and Accountability Act, Pub.L. -
Page 197: Scanning
Important: The Vevo MD Imaging System is designed to stop acquisition after one hour of uninterrupted scan time. Therefore, FUJIFILM SonoSite recommends freezing scanning if the system is not in use, and to save images if you need to leave the system for a long period of time. - Page 198 Clinical display elements 1. Image status area 2. Mode settings panel 3. Display map 4. Image area 5. Transducer orientation indicator 6. Image scale 7. Focal zone indicator 8. Status bar Scanning...
- Page 199 The clinical display provides the following: Image status area The following information is shown on the image status area: The transducer in use The institution and department ID The patient name, patient ID and user Image acquisition mode and status; acquired, stored or recalled System status, date and time Note: Some of the information displayed is dependent on the patient header options...
- Page 200 Indicates the chosen display map for the image. The display map can be changed using the display map control. Image area This is the area where the image data acquired by the transducer appears. This is the area of the window that the system exports—along with header information—when you export a stored image and configure your export to send only the image area.
- Page 201 Focal zone indicator When you acquire data, use the focal zone control on the control panel to adjust the configuration of the focal zone in order to optimize the image based on its depth; drag the control up to decrease depth, and down to increase depth or tap on the scale where you would like the focal zone to be.
- Page 202 Using the control panel during scanning You can control image acquisition and management through the control panel. A general overview of the interface is provided here and specific details are provided with each scanning mode. Control panel elements: 1. Patient 2.
- Page 203 7. Save Frame 8. Freeze 9. General controls bar 10. Scanning modes While scanning, the control panel provides the following controls: Patient Tap this control to open the patient entry form. See "Patient" on page 165. Review images Tap this control to open the review page. See "Patient image data"...
- Page 204 controls" on page 207. Also refer to each scanning mode to see information on mode- specific controls. See "Color Doppler Mode image acquisition" on page 248, "M-Mode image acquisition" on page 230, "2D image acquisition" on page 216. Save frame Tap this control to save the current frame. See "Saving images"...
- Page 205 Using the control panel during review When you stop scanning, the control panel provides the following options: Control panel elements: 1. Play speed 2. Clip slider 3. Play and pause 4. Unfreeze Play speed Allows control of the playback speed of a clip. Tap Play Speed and use the Up and Down buttons to cycle through the available options.
- Page 206 This control is not available when reviewing a single frame or when reviewing non- frame based clips. Clip slider The slider shows the current position within the clip. The slider can be dragged to view a different frame or time in the clip. The arrows at each end of the slider can be used to move in small increments.
-
Page 207: Customizing Controls
Customizing controls There are three categories of controls on the control panel during scanning and reviewing images that can be customized. These include: Mode controls General controls Imaging controls Customizing the control panel For each of the three categories of customizable controls, there is a tab located in the more controls panel accessed through the More Controls button. - Page 208 Note: You do not have to place a control on a bar to use it. Controls can be used directly from the more controls panel. 4 Close the more controls panel by tapping the More Controls button or anywhere else on the control panel. General controls General controls are located along the bottom of the control panel (on either side of the Freeze/Unfreeze button) and stay on the control panel regardless of the mode during...
- Page 209 The options available for the general controls include: Clip Mode Tap this control to specify how the system saves a clip. This control toggles between Retrospective save and Prospective save. See "Saving images" on page 269. This is a shortcut from setting this option in the General tab of the Clip Settings panel. Changing the setting in one location will update the other location.
- Page 210 Save Clip Tap this control to save a clip. This control toggles between retrospective save and prospective save. See "Saving images" on page 269. This is a shortcut from setting this option in the general tab of the clip settings panel. Clip Settings Tapping the Clip Settings control opens the clip settings panel.
- Page 211 End Exam Tap this button to close the current exam. Report Tap this button to see a report of the measurements for the current exam. Scanning stops when you open the report. Tap the Scan control to restart scanning. Reset Preset If you have selected a preset while scanning and have changed some of the scanning parameters, tapping this control will reset the controls to the currently selected preset values.
- Page 212 Save Exam Type Tap this control to save the current configuration in all modes into a new exam type for the current transducer. See "Exam types and presets" on page 106. Save Frame Tap this control to save a single frame in 2D and Color Doppler Mode. You can also use save frame in M-Mode;...
- Page 213 A flyout button menu will be displayed when you tap split screen. Configure the view using the following buttons: Off: Turn split screen view off L: Toggles to the left image panel on the clinical display R: Toggles to the right image panel on the clinical display Start and stop This button is available while acquiring data in M-Mode.
- Page 214 Imaging controls You can adjust parameters that are available during live scanning and review using the imaging controls. For each imaging mode, you can drag your commonly used controls onto the controls bar located on the right side of the control panel. Different controls are available when you are scanning or reviewing an image.
-
Page 215: 2D Acquisition And Analysis
2D acquisition and analysis 2D is the system's default imaging mode. The system displays echoes in a two- dimensional view by assigning a brightness level based on the echo signal amplitude. If you have seen a conventional ultrasound image, then you are already familiar with You will also: Use 2D in other imaging modes as the background image over which the active mode data is applied... -
Page 216: 2D Image Acquisition
2D image acquisition To acquire an image in 2D 1 Tap 2D. 2 Adjust the controls as needed. See "Controls in 2D" on page 222. 3 Save the image for later review using Save Frame. See "Saving images" page 269. 4 Tap Freeze to stop scanning. Scanning... -
Page 217: 2D Clinical Display
2D clinical display 2D clinical display 1. Image status area 2. Mode settings panel 3. Display map 4. Transducer orientation indicator 5. Image area 6. Image scale 7. Focal zone indicator 8. Status bar When working in 2D, the clinical display is exactly as shown in "Scanning"... -
Page 218: 2D Control Panel
2D control panel When imaging in 2D, there are a number of controls on the control panel that you can use to manipulate in order to optimize your image. Image controls: 1. Transducer orientation indicator 2. Focal zone 3. Image depth 4. - Page 219 Transducer orientation indicator The blue dot corresponds to the orientation ridge on the transducer nose and indicates the orientation relative to the anatomy. Tap either of the Orientation buttons to flip the image between the following options: Right and Left or Up and Down. Focal zone When you acquire data, this blue arrow indicates the current focus depth.
- Page 220 control b. Tap any location along the depth scale and the depth control will automatically move to the new position—once the depth is moved, the value will update 2 As you adjust the depth, the depth value also appears in the lower left corner of the clinical display.
- Page 221 To adjust gain and TGC 1 Drag the slider left or right, to decrease or increase the master gain respectively: 2 When the master gain control is touched, the two TGC sliders will appear on the control panel. Drag each slider left or right. The upper slider adjusts the near gain of the 2D image, controlling the display intensity in the near field (nearer to the transducer).
-
Page 222: Controls In 2D
Controls in 2D The following table provides an overview of the 2D controls and when they are available. If the listed control is not on the controls bar, it will be in more controls. You can customize which controls appear in the controls bar, see "Customizing controls"... - Page 223 Control Live Review Dynamic Range Magnify Scale Presets Orientation Presets Zoom Allows you to add annotations to your acquired or stored image. Select the desired text from the annotation page or enter custom text. See "Annotations" on page 276. Indicates the image brightness level. Tap the Brightness control and adjust the slider up or down to obtain the required setting.
- Page 224 Tap the Clip Settings button to open the clip settings panel. You can set various options for saving a clip, including the clip length for each mode. See "Configuring clip settings" on page 272. Indicates the image contrast level. Tap the Contrast button to adjust the slider up or down to obtain the required setting.
- Page 225 This control adjusts the input signal strength that is mapped to the spectral display. Tap Dynamic Range to display the flyout. Adjust the slider up or down to obtain the required setting. You can increase or decrease the range in 5 dB increments. The setting is displayed on the control for easy reference and the value is stored with the image.
- Page 226 Sets the image orientation, allowing you to align the image with the transducer. The blue dot in the corner of the control panel image area and clinical display image corresponds to this setting. Tap either of the orientation controls to toggle the orientation between the following options: Left/Right and Up/Down.
- Page 227 Use this control to zoom in on an image during scanning or in review. Tap the Zoom button to activate the adjustable zoom control. Tap the In or Out button, or drag the slider. The zoom factor is displayed within a range from 1.0x to 8.0x on the Zoom button.
-
Page 228: Adding 2D Measurements
Adding 2D measurements 2D provides several measurement tools. Use these tools when you want to add measurements to an image. To access measurements for 2D ♦ Do one of the following: a. If you are acquiring image data, tap Freeze, then Measurements and select a measurement b. -
Page 229: M-Mode Acquisition And Analysis
M-Mode acquisition and analysis Motion mode (M-Mode) provides the trace of a line from the 2D image displayed over time. A single beam of ultrasound is transmitted, and reflected signals are displayed as dots of varying intensities, creating lines across the screen. M-Mode works fundamentally differently than 2D. -
Page 230: M-Mode Image Acquisition
M-Mode image acquisition To acquire an image in M-Mode To begin acquisition in M-Mode, tap the M-Mode button, then tap the Start button flyout; once acquisition begins, the button flyout will change to Stop. To end an M-Mode acquisition, you can tap Freeze or tap the M-Mode Stop button flyout. - Page 231 A dual-window image area appears. The M-Mode window is on the bottom, the 2D scout window is on the top. The system begins storing data in the acquisition buffer, and live acquisition data appears in both windows. 4 Adjust the controls as needed. See "Controls in M-Mode"...
-
Page 232: M-Mode Clinical Display
M-Mode clinical display The M-Mode clinical display is similar to the 2D clinical display but with some differences. M-Mode clinical display 1. Image status area 2. Mode settings panel 3. Display map 4. Transducer orientation indicator 5. Sample gate 6. 2D scout window 7. - Page 233 9. Image scale 10. Status bar Sample gate Displays the cross-section image data acquired along the sample gate line in the 2D scout window. 2D scout window The region of interest is located between the sample gate line brackets. In this window, position your transducer and set the line brackets so you can acquire useful data.
-
Page 234: M-Mode Control Panel
M-Mode control panel When imaging in M-Mode there are a number of controls on the control panel that you can manipulate to optimize your image. These controls adjust the image in the M-Mode data window. Image controls: 1. Sample gate 2. - Page 235 To set the M-Mode sample gate In M-Mode, the region of interest is the image data that the transducer acquires along the vertical line between the brackets of the green overlay in the 2D scout image. This line is called the sample gate. 1 Begin acquiring data in M-Mode.
- Page 236 The current value is displayed above the control as you adjust it. Adjustments to the master gain control and the TGC controls will apply to both the 2D image window and M-Mode image. A TGC button is also available in More Controls. Once the TGC button is tapped, the More Controls page will close and the TGC sliders will be displayed on the image.
- Page 237 To change the sweep speed of the M-Mode data Note: You can only change the sweep speed of M-Mode data that has been saved using Save Clip. M-Mode data that was saved using Save Frame will not have adjustable sweep speed. ♦...
-
Page 238: Controls In M-Mode
Controls in M-Mode In M-Mode imaging, you can adjust the following controls in addition to most of the 2D controls. If the listed control is not on the controls bar, it will be in more controls. You can customize which controls appear in the controls bar, see "Customizing controls"... - Page 239 M-Mode controls Control Live Review Annotation Brightness Clip Settings Contrast Display Layout Display Map Gate Size Magnify Scale Presets Orientation Save Preset Sweep Speed Zoom Controls in M-Mode...
- Page 240 Allows you to add annotations to your acquired or stored image. Select the desired text from the annotation page or enter custom text. See "Annotations" on page 276. Indicates the image brightness level. Tap the Brightness control and adjust the slider up or down to obtain the required setting.
- Page 241 Use this control to change the size of the 2D scout window relative to the other imaging data window. Tap the control and select one of the available options: Predefined sets of overlays and image maps that you can apply at any time during live scanning or review.
- Page 242 This control adjusts the size of the sample gate in millimeters (mm). The control adjusts the distance of the vertical line between the two calipers. Tap the Gate Size button, then tap Up to increase the size, or tap Down to decrease the size.
- Page 243 Sets the image orientation, allowing you to align the image with the transducer. The blue dot in the corner of the control panel image area and clinical display image corresponds to this setting. Tap either of the orientation controls to toggle the orientation between the following options: Left/Right and Up/Down.
- Page 244 Adjusts the scale of the data in the M-Mode window. A faster sweep speed will increase the speed and decompress or "stretch out" the clip image. To set the sweep speed, tap the Sweep Speed button and select Fast, Medium, or Slow.
- Page 245 You can resave an image with the zoom state activated and if you load the image in review, you can zoom again using the same control. If you wish to return to the image in its original state with no zoom activated, tap Default from the zoom controls. Please note the following: The maximum zoom factor may be less depending on the image size and the minimum physical size of the image that can be displayed.
-
Page 246: Adding M-Mode Measurements
Adding M-Mode measurements M-Mode provides several measurement tools. Use these tools when you want to add measurements to an image. Important: M-Mode frames will only display measurements that were in full view at the time of saving. To access measurements for M-Mode ♦... -
Page 247: Color Doppler Mode Acquisition And Analysis
Color Doppler Mode acquisition and analysis Color Doppler Mode is used to measure blood flow through vessels. The system converts the doppler sounds into colors. These colors are then overlaid on the image of the blood vessel, which represents the relative velocity and direction of blood flow through the vessel. -
Page 248: Color Doppler Mode Image Acquisition
Color Doppler Mode image acquisition To acquire an image in Color Doppler Mode 1 Tap Color. The color box with two handles appears. 2 Position the color box as needed by dragging the color box on the control panel either left, right, up or down. 3 Resize the color box by tapping and dragging one of the handles. - Page 249 5 Adjust the Color Doppler gain using the gain slider. 6 Adjust other controls as needed. See "Controls in Color Doppler Mode" page 255. Also see "Controls in 2D" on page 222. Note: While scanning, toggle between 2D and Color by tapping the image area border or the color box overlay—controls displayed will correspond to the current mode.
-
Page 250: Color Doppler Mode Clinical Display
Color Doppler Mode clinical display The Color Doppler Mode clinical display is similar to the 2D clinical display with some differences. Color Doppler Mode clinical display 1. Image status area 2. Mode settings panel 3. Priority indicator 4. Display maps and velocity scale 5. - Page 251 9. Focal zone indicator 10. Status bar Color box overlay In Color Doppler Mode, the region of interest is located within the green color box overlay. Data is displayed in blue to display vascular flow moving away from the transducer and red to display vascular flow moving toward the transducer.
-
Page 252: Color Doppler Mode Control Panel
Color Doppler Mode control panel When imaging in Color Doppler Mode there are a number of controls on the control panel that you can manipulate to optimize your image. Image controls: 1. Color box 2. Focal zone 3. Image depth 4. - Page 253 To position and resize the color box overlay In Color Doppler Mode, the region of interest is located within the green color box overlay. The system applies colors only to the image data within this color box. Adjust the box as follows: 1 Begin acquiring data in Color Doppler Mode.
- Page 254 gain. Color Doppler gain is indicated with a "C" on the Gain control. You can switch to adjusting the 2D gain by tapping on the 2D image. The color box will become gray and the gain control bar will switch to 2D gain. ♦...
-
Page 255: Controls In Color Doppler Mode
Controls in Color Doppler Mode In Color Doppler Mode imaging, you can adjust the following controls in addition to most of the 2D controls. You can specify which controls appear in the controls bar, see "Customizing controls" on page 207. Some controls appear only when the image is live, others only when the image is in review and some appear in both cases. - Page 256 Color Doppler Mode controls Control Live Review Annotation Beam Steering Clip Settings Display Layout Display Map Line Density Magnify Scale Orientation Persistence Presets Priority Save Preset Scale Scanning...
- Page 257 Control Live Review Sensitivity Wall Filter Zoom Allows you to add annotations to your acquired or stored image. Select the desired text from the annotation page or enter custom text. See "Annotations" on page 276. Controls in Color Doppler Mode...
- Page 258 Use this control to generate flow direction information when the orientation of the target vessel is perpendicular or almost perpendicular to the ultrasound beam. This control applies a graduated series of transmission and reception delays to the ultrasound sound signals of each element in the transducer. These carefully calibrated sequences can effectively steer the ultrasound beam in order to detect very small frequency shifts.
- Page 259 Use this control to change which data is being displayed. This does not affect the actual data collection and can be changed at any time during live scanning or review. Tap the button and select one of the available options: Predefined sets of overlays and image maps that you can apply at any time during live scanning or review.
- Page 260 Use this control to adjust the resolution of your image by adjusting how many lines of image data the transducer acquires over your image area. The higher you set the line density, the lower the acquisition frame rate. Because of this trade off, you might find that higher line density is most useful for examining features in tissue that do not move very much.
- Page 261 Persistence applies a pixel averaging algorithm to the most recently acquired frames to produce a more uniform view of the faster moving tissue in the image data. Persistence reduces distracting artifacts such as shimmering. Tap the Persistence button and use the Up and Down buttons to cycle through the available options: Off, Low, Med, High, and Max.
- Page 262 Tap Presets to see the available presets and then select an appropriate set of optimized image acquisition settings. This button is active during image acquisition in every mode. The list of presets includes the factory default presets as well as any custom presets you have added to the system.
- Page 263 The Save Preset button is used to save all of the parameters being used in the current mode. This allows you to apply these exact parameters again later using the Presets button. 1 Begin scanning in the desired mode. Adjust the controls to optimize your image. 2 Tap Save Preset to save the current settings as a preset.
- Page 264 Adjusts the signal-to-noise ratio so that you can better: Identify weak-signal targets in the near field that are difficult to distinguish because they are very small Identify large targets in the far field that are difficult to distinguish due to attenuation The higher you set the sensitivity level, the lower the system sets the frame rate.
- Page 265 Use this control to zoom in on an image during scanning or in review. Tap the Zoom button to activate the adjustable zoom control. Tap the In or Out button, or drag the slider. The zoom factor is displayed within a range from 1.0x to 8.0x on the Zoom button.
- Page 266 Note: When you enable zoom from inside the color box the whole image is zoomed, not just the color box area. Scanning...
-
Page 267: Adding Color Doppler Mode Measurements
Adding Color Doppler Mode measurements Color Doppler Mode provides several measurement tools. Use these tools when you want to add measurements to an image. To access measurements for Color Doppler Mode ♦ Do one of the following: a. If you are acquiring image data, tap Freeze, then Measurements and select a measurement b. -
Page 268: Freeze
Freeze Before performing certain tasks, such as viewing a clip or adding measurements, you need to stop live imaging by freezing the image. To freeze the image ♦ Tap FREEZE. The buttons on the controls bar will change. See "Customizing controls" on page 207. -
Page 269: Saving Images
Saving images You can save images as a frame or a clip. You can also save a frame from a clip. When you save a frame or clip during live imaging, saving will happen in the background while the scanning will continue uninterrupted. In review, when saving a clip using Save Clip, the system will always resave the existing clip, however when saving a frame using Save Frame, the system will always save a new frame. - Page 270 This icon will also be displayed on the bottom right of the clinical display when the software is actively saving data. The frame or clip that you selected to save will be added to the saved images for the current exam. WARNING: To avoid mixing images saved from multiple patients, make sure that the patient ID is displayed before you save an image.
- Page 271 a. To save only a frame, tap Save Frame Save Frame can also be used to save a frame from an acquired or saved clip, as well as saving a frame during imaging. Note: Using Save Frame in M-Mode will save a short clip that will only include the M-Mode data that was visible on the clinical display at the time of saving.
- Page 272 Note: Regardless of the save clip setting defined in the clip settings, when you freeze acquisition, only retrospective saving will be available; prospective saving can only be performed while live imaging. 3 Tap Save Frame. An audio tone will confirm the save; Saving Tones are on by default, to turn sounds off, see "General"...
- Page 273 2 Tap the General tab and set the following as required: Control Description Prospective: Captures data after you tap Save Clip. The system captures data for the number of frames or seconds you specify in each mode tab. Once the prospective save begins, the save clip button changes to Stop Save;...
- Page 274 Control Description continue to be acquired if you select to save a clip during scanning. A tone will be heard when saving has completed. Save Clip/Frame: Gives you the option to save either a clip or a frame when performing an autosave. There are two choices to trigger an autosave of a clip or frame for most imaging modes.
- Page 275 Managing internal storage space The percentage of space available on the data drive and is located in the system status area at the bottom of the clinical display. When storage space is at 25%, the text turns orange and at 10% the text turns alert you;...
-
Page 276: Annotations
Annotations Annotations are text labels that you can add to an acquired or saved image. When you store an annotated frame or clip, the system stores the annotations along with the image. This topic describes how to work with annotations when you are analyzing an image. - Page 277 To add a predefined annotation 1 Acquire an image, or load an image to review. 2 In the imaging controls, tap the Annotation button. The annotation panel is displayed. Note: When placing annotations on M-Mode images, you can place annotations on either the M-Mode window, or the 2D scout.
- Page 278 The annotation is placed on the image. You can then interact with the annotation using the control panel. While you are placing the annotation, a magnified view of the placement area is displayed on the Clinical Display. 8 Drag the annotation to the desired location on the image. 9 Annotations on the image will be shown in the annotation panel on the left of the control panel.
- Page 279 Edit the properties for your selected annotation as follows: Label: Tap the text box and modify the existing label as required. Font Size: Tap the font size drop down menu and select the preferred size – range is from 6 to 24. The default font size is set in the system settings. See "Measurements and annotations"...
- Page 280 3 Save your image. To modify an annotation Once an annotation is placed, you can edit the text. 1 Tap the annotation on the image or on the annotation panel. 2 Tap the Edit button or tap the Annotation button and edit the text or select another predefined annotation.
- Page 281 3 When the move is complete, lift your finger to commit the change. 4 Save your image. Annotations...
-
Page 282: Measurements
Measurements The Vevo MD Imaging System offers several types of measurements you can apply to any image acquired in a specific imaging mode. The following table shows which measurements are available for each frame-based imaging mode: Measurement Color Traced Area Linear Traced Distance The following table shows which measurements are available for M-Mode—a time-... - Page 283 Measurement M-Mode When adding measurements, observe the following: Measurements will be displayed on both the clinical display and the control panel Measurements can be placed on a saved image loaded into review or any image that has been acquired during an acquisition session Measurements cannot be placed on an image that is part of an exam that has been archived or transferring—the measurements button will not be displayed Measurements will not be displayed during playback of a clip or if the clip was...
- Page 284 b. If you are in completed exams, select an exam and tap Review Images, then double tap a thumbnail image to open in review—If the image is a clip, pause the clip c. If you are acquiring image data, tap Freeze on the control panel 2 View the available measurements by tapping the Measurements button.
- Page 285 2 Tap a measurement from the list. 3 The measurement will be placed on the image. You can interact with the measurement using the control panel. You perform most measurements by using calipers that you drag into position. An active caliper has a round highlighted handle. Tap the caliper to activate it. 4 While you are placing the measurement, a magnified view of the placement area is displayed on the clinical display. The default magnification factor is 4x;...
- Page 286 To modify a measurement Once a measurement is placed, you can edit individual calipers along the measurement. Note: You cannot edit a traced distance or traced area measurement after being placed. In this case, delete the measurement and add it again. 1 Tap the measurement on the image or on the measurement panel. ...
-
Page 287: Using The Measurement Panel
Using the measurement panel The measurement panel provides tools for editing measurements on an image and the ability to change what measurement properties are displayed. The measurement panel is only displayed once the first measurement is placed on an acquired or saved image. The panel is not available in acquisition. When playing back a clip with measurements, you cannot interact with the panel until the clip is paused. - Page 288 Note: Identical labels are not allowed in the same image. However, identical labels are allowed in different images in the same patient exam. Label: Tap the text box and modify the existing label as required Font Size: Tap the font size drop down menu and select the preferred size – range is from 6 to 24 Parameters: Select the measurement parameters to be displayed on both the measurement label and in the measurement panel...
-
Page 289: To Delete A Measurement
To delete a measurement 1 On the measurement panel, tap the measurement you want to delete. 2 Tap the Delete button displayed below the selected measurement. The measurement will be deleted immediately. 3 Tap Save Clip to save the entire clip or tap Save Frame to save a new single frame. -
Page 290: Adding A Depth Measurement
Adding a depth measurement A depth measurement is available in M-Mode. 1 Tap Measurements. 2 Tap Depth. The depth measurement is placed on the image. 3 Tap and drag either caliper to a desired location on the image. As you move the calipers, the measurement parameters are updated on the measurement panel. - Page 291 4 (Optional) When a caliper is enabled, drag the entire measurement line to a new location on the image. 5 Tap Save Clip to save the entire clip or tap Save Frame to save a new single frame. Adding a depth measurement...
-
Page 292: Adding A Linear Measurement
Adding a linear measurement Linear measurements are available in B-Mode and Color Doppler Mode. To add a linear measurement 1 Tap Measurements. 2 Tap Linear. The linear measurement is placed on the image. 3 Tap and drag either caliper to a desired location on the image. As you move the caliper, the measurement parameters are updated on the measurement panel. - Page 293 4 Tap Save Clip to save the entire clip or tap Save Frame to save a new single frame. To add a linear measurement...
-
Page 294: Adding A Time Measurement
Adding a time measurement Time measurements are available in M-Mode. To add a time measurement 1 Tap Measurements. 2 Tap Time. The time measurement is placed on the image. 3 Tap and drag either caliper to a desired location on the image. As you move the caliper, the measurement parameters are updated on the measurement panel. -
Page 295: Adding A Traced Area Measurement
Adding a traced area measurement Traced area measurements are available in 2D and Color Doppler Mode. Note: You cannot edit a traced area measurement after being placed. In this case, delete the measurement and add it again. To add a traced area measurement 1 Tap Measurements. - Page 296 5 Drag the caliper to trace the area. 6 Tap Done to complete the measurement. The measurement parameters are updated on the measurement panel. See "Using the measurement panel" on page 287. Measurements...
- Page 297 7 Tap Save Clip to save the entire clip or tap Save Frame to save a new single frame. To add a traced area measurement...
-
Page 298: Adding A Traced Distance Measurement
Adding a traced distance measurement Traced distance measurements are available in 2D and Color Doppler Mode. Note: You cannot edit a traced distance measurement after being placed. In this case, delete the measurement and add it again. To add a traced distance measurement 1 Tap Measurements. - Page 299 5 Drag the caliper to trace the distance. 6 Tap Done to complete the measurement. The measurement parameters are updated on the measurement panel. See "Using the measurement panel" on page 287. 7 Tap Save Clip to save the entire clip or tap Save Frame to save a new single frame.
-
Page 300: Adding A Velocity Measurement
Adding a velocity measurement Use the velocity measurement to determine the velocity of vascular flow. A velocity measurement is available in M-Mode. To add a velocity measurement in M-Mode 1 Tap Measurements. 2 Tap Velocity. The velocity measurement is placed on the image. Measurements... - Page 301 3 Tap and drag either caliper to a desired location on the image. 4 As you move the caliper, the velocity parameters are updated on the measurement panel. You may also want to display time as an additional parameter, see "Using the measurement panel"...
-
Page 302: Adding An Imt Measurement
Adding an IMT measurement Use the IMT (Intima-Media Thickness) measurement tools to generate the following measurements across an artery: Intima-Media Thickness (IMT) Intima Thickness plus Media (I/M) You can measure the IMT of the near or far walls of the artery or vein. WARNING: To ensure high-quality images, all patient images should be obtained by qualified and trained individuals in ultrasound. -
Page 303: To Add An Imt Measurement On A 2D Image
IMT measurements availability per mode Color Doppler Measurements M-Mode Mode To add an IMT measurement on a 2D image Note: If the IMT measurement is not available, ask an Administrator to enable the IMT Measurement Tools, see "Measurements and annotations" on page 132. 1 Tap Measurements. - Page 304 3 Tap and drag the first active caliper to a beginning point on the lumen/intima interface. 4 Tap Set to place the first caliper. 5 Tap and drag the second active caliper to another point on the lumen/intima interface. 6 Tap Set to place the second caliper. 7 Tap Set to place another caliper on the lumen/intima interface or tap Done if the trace is complete.
-
Page 305: To Add An Imt Measurement To An M-Mode Image
The measurement parameters are updated on the measurement panel. See "Using the measurement panel" on page 287. Your IMT measurement should look like the following measurement on your image on the clinical display: = lumen/intima interface trace = media/adventitia interface trace 10 You can edit either trace by tapping on a caliper and dragging it to your desired location. - Page 306 Before adjustments After adjustments Note: When placing an IMT measurement in M-Mode, the software will restrict repositioning of both calipers to a vertical direction only. 1 Tap Measurements. 2 Tap IMT. An active caliper is placed on the image. Measurements...
- Page 307 3 Tap and drag the caliper to a point along the lumen/intima interface. 4 Tap and drag the other caliper to a point along the intima/adventitia interface. 5 When you are finished drawing your measurement, tap anywhere on the control panel to commit the measurement.
-
Page 308: To Add An I/M Measurement To A 2D Image
6 You can edit the measurement line by tapping on a caliper and dragging it to your desired location. 7 Tap Save Clip to save the entire clip or tap Save Frame to save a new single frame. To add an I/M measurement to a 2D image Note: If the IMT measurement is not available, ask an Administrator to enable the IMT Measurement Tools, see... - Page 309 An active caliper is placed on the image. 3 Tap and drag the active caliper to a beginning point on the lumen/intima interface. 4 Tap Set to place the first caliper. 5 Tap and drag the second active caliper to another point on the lumen/intima interface.
- Page 310 8 Repeat this process, drag and Set, for the intima thickness. 9 Tap and drag the third active caliper to a beginning point on the media/adventitia interface. 10 Tap Set if you want to drop another caliper on the media/adventitia line or tap Done if the trace is complete.
- Page 311 Your IMT measurement should look like the following measurement on your image on the clinical display: = lumen/intima interface trace = intima thickness trace = media/adventitia interface trace 12 You can edit either of the traces by tapping on a caliper and dragging it to your desired location.
-
Page 312: Report
Report You can create, view and export a patient report from an exam. The report includes patient information, date and time, user, image thumbnails, comments and measurements. You can create a report from Completed Exams, Review Images, and while reviewing an image in the mode window. When you are creating a report consider the following: When you select an exam for a report, the report includes all measurements and images for that exam... -
Page 313: To Interact With Your Report
4 (Optional) Tap Scan to begin scanning. To interact with your report Once your report is created, it will show the patient information, facility, procedure and measurements for the exam selected. The report will also display thumbnails of all the images in the exam; including images without measurements. - Page 314 a. From the report page tap Export b. From completed exams, tap Export USB and select Report under multimedia in the export window c. From the mode window, tap Export and select Report under multimedia in the export window 2 The export window appears. Browse to, and then select the destination folder. 3 (Optional) Tap New Folder to add a sub-folder.
- Page 315 5 Tap Export. 6 The report is exported in CSV format and the status is displayed when the export operation completes. Tap Done to close the export page. To export a report...
-
Page 316: Cleaning And Disinfecting
Cleaning and disinfecting The system and transducer must be cleaned and disinfected after each exam. It is important to follow these cleaning and disinfecting instructions without skipping any steps. System Transducer Determining the required cleaning and disinfecting level Note: Please be aware that you must perform both a cleaning as well as a disinfection for each component. - Page 317 Inspect the system and transducer to determine that it is free of any unacceptable deterioration, such as corrosion, discoloration, pitting, or cracked seals. If damage is evident, discontinue use, and contact FUJIFILM SonoSite or your local representative. Confirm that cleaning and disinfecting materials are appropriate for your facility’s use.
- Page 318 Do not allow cleaning solution or disinfectant into the system or transducer connectors. Do not use strong solvents such as thinner or benzene, or abrasive cleansers, since these will damage the exterior surfaces. Use only FUJIFILM SonoSite recommended cleaners or disinfectants. Cleaning and disinfecting...
-
Page 319: Step A: Semi-Critical Contact Cleaning And Disinfecting Of System And Transducer
Step A: Semi-critical contact cleaning and disinfecting of system and transducer Part 1 of 2: Cleaning of system and transducer, disinfecting of system for semi-critical contact Follow the manufacturer's instructions when using cleaners and disinfectants. The materials listed in the table below are chemically compatible with the system and transducer. - Page 320 Do not attempt to disinfect a transducer using a method or chemical that is not included here. This can damage the transducer and void the warranty. Use only FUJIFILM SonoSite recommended disinfectants. Using a non- recommended disinfecting solution or incorrect solution strength can damage the system and void the warranty.
- Page 321 START Semi-critical cleaning and disinfection 1 Put on gloves, for protection from cleaning and disinfecting materials. Change gloves as needed throughout the procedure. 2 Turn off the system by pressing the Power button. 3 Turn off the main power switch located on the bottom of the system near the back, where the power cord connects.
- Page 322 10 Clean the system to remove any visible gel, debris or bodily fluids. ♦ Wipe from clean areas to the soiled areas to avoid cross-contamination. 11 Verify that all gel, debris, and bodily fluids have been removed from the transducer and system.
- Page 323 Do not soak the transducer longer than recommended by the chemical manufacturer. Do not immerse the transducer connector in any disinfectant solution. Use only FUJIFILM SonoSite recommended disinfectants. Using a non- recommended disinfecting solution or incorrect solution strength can damage or discolor the transducer and void the transducer warranty.
- Page 324 Caution: Ensure that you select the proper disinfectant according to your transducer. Cidex OPA is not compatible with any FUJIFILM SonoSite UHF transducer. Use only FUJIFILM SonoSite recommended disinfectants listed in the table "Compatible high-level disinfectants for semi-critical contact" on the previous pageto avoid damage to the transducer.
- Page 325 7 Examine the transducer and cable for damage, such as cracks or splitting where fluid can enter. If damage is evident, discontinue use of the transducer, and contact FUJIFILM SonoSite or your local representative. DONE Step A: Semi-critical contact cleaning and disinfecting of system and...
-
Page 326: Step B: Non-Critical Contact Cleaning And Disinfecting Of The System And Transducer
Step B: Non-critical contact cleaning and disinfecting of the system and transducer Follow the manufacturer's instructions when using cleaners and disinfectants. The materials listed in the table below are chemically compatible with the system and transducer. Confirm that cleaning and disinfecting materials are appropriate for your facility’s use. - Page 327 Do not attempt to disinfect a transducer using a method or chemical that is not included here. This can damage the transducer and void the warranty. Use only FUJIFILM SonoSite recommended disinfectants. Using a non- recommended disinfecting solution or incorrect solution strength can damage the system and void the warranty.
- Page 328 START Non-critical cleaning and disinfecting 1 Put on gloves, for protection from cleaning and disinfecting materials. Change gloves as needed throughout the procedure. 2 Turn off the system by pressing the Power button. 3 Turn off the main power switch located on the bottom of the system near the back, where the power cord connects.
- Page 329 10 Clean the system to remove any visible gel, debris or bodily fluids. ♦ Wipe from clean areas to the soiled areas to avoid cross-contamination. 11 Verify that all gel, debris, and bodily fluids have been removed from the transducer and system.
- Page 330 19 Allow the transducer to air dry in a clean, well ventilated space. 20 Examine the transducer and cable for damage, such as cracks or splitting where fluid can enter. If damage is evident, do not use the transducer, and contact FUJIFILM SonoSite or your local representative. DONE Cleaning and disinfecting...
-
Page 331: Cleaning And Disinfecting The Foot Switch
Cleaning and disinfecting the foot switch The foot switch must be cleaned and disinfected after each exam. It is important to follow these cleaning and disinfecting instructions without skipping any steps. WARNING: The foot switch is not intended for use in a sterile environment. Caution: To avoid damaging the foot switch, do not sterilize. -
Page 332: Before Getting Started
Inspect the foot switch to determine that it is free of any unacceptable deterioration, such as corrosion, discoloration, pitting, or cracked seals. If damage is evident, discontinue use, and contact FUJIFILM SonoSite or your local representative. Confirm that cleaning and disinfecting materials are appropriate for your facility’s use. -
Page 333: Non-Critical Contact Cleaning And Disinfecting Of The Foot Switch
Non-critical contact cleaning and disinfecting of the foot switch Follow the manufacturer's instructions when using cleaners and disinfectants. The materials listed in the table below are chemically compatible with the foot switch. Confirm that cleaning and disinfecting materials are appropriate for your facility's use. Compatible cleaners and disinfectants Transducers Product... - Page 334 Do not attempt to disinfect the foot switch using a method or chemical that is not included here. This can damage the foot switch and void the warranty. Use only FUJIFILM SonoSite recommended disinfectants. Using a non- recommended disinfecting solution or incorrect solution strength can damage the foot switch and void the warranty.
-
Page 335: Non-Critical Cleaning And Disinfecting
START Non-critical cleaning and disinfecting 1 Put on gloves, for protection from cleaning and disinfecting materials. Change gloves as needed throughout the procedure. 2 Unplug the foot switch from the system. 3 Obtain a compatible cleaner. Compatible cleaning materials are listed in the table "Compatible cleaners and disinfectants"... - Page 336 10 Examine the foot switch and USB cable for damage, such as cracks or splitting where fluid can enter. If damage is evident, do not use the foot switch and contact FUJIFILM SonoSite or your local representative. DONE Cleaning and disinfecting...
-
Page 337: Appendices
Appendices This section contains product safety information, acoustic output information, specifications and standards that are specific details required by regulatory agencies. Additionally some basic troubleshooting information, related guidance documents, and technical and customer support information is provided in these appendices. Appendices... -
Page 338: Safety
Safety This section contains general safety information that applies to the ultrasound system, transducers, accessories and peripherals. Appendices... -
Page 339: Product Safety
Never tamper with or alter the Vevo MD Imaging System in any way such that the acoustic power level is increased. WARNING: Use ONLY FUJIFILM SonoSite UHF transducers with the Vevo MD Imaging System. The use of other transducers may affect safety and system performance. - Page 340 Disconnect the system from the power source before cleaning the system or performing any maintenance operations. WARNING: Connection of equipment not authorized by FUJIFILM SonoSite to the Vevo MD Imaging System isolation transformer could result in an electrical hazard. WARNING: DO NOT spray or drip any liquid into the system or onto the control panel, as this could affect reliable operation and electrical safety.
- Page 341 To avoid the risk of increased electromagnetic emissions or decreased immunity, use only accessories and peripherals recommended by FUJIFILM SonoSite. Connection of accessories and peripherals not recommended by FUJIFILM SonoSite could cause your ultrasound system to malfunction or cause other medical electrical devices in the area to malfunction. Caution: The use of accessories, transducers and cables other than those specified (with the exception of UHF transducers and Vevo MD Imaging System...
- Page 342 HDMI video output WARNING: The external HDMI video output is intended for non-diagnostic use. FUJIFILM SonoSite has not approved any monitors that can connect to the external HDMI video output. WARNING: Connection of accessories and peripherals is not recommended by FUJIFILM SonoSite and could result in electrical shock.
- Page 343 WARNING: Using a medical-grade device to connect to the external HDMI video out port does not protect against shock. To avoid applying unsafe voltage levels to the patient while a device is connected to the external HDMI video out port, do not touch the ultrasound system and the patient simultaneously.
- Page 344 Composite safety warning symbols Symbol Description Serial number Electrostatic sensitive device. Proof of product compliance (electrical, gas and other safety standards) to North American safety standards. Conformité Européenne. Product meets the safety requirements of the European Union. Read usage instructions. This symbol instructs the user to consult the instructions of the device for information on how to properly use it.
- Page 345 Stand base labels Symbol Description Read usage instructions. This symbol instructs the user to consult the instructions of the device for information on how to properly use it. See the Vevo MD Getting Started Guide, Vevo MD User Manual or the Vevo MD system's HELP. Plug the AC power cord in here.
- Page 346 Composite safety warning symbols Symbol Description immersion—immersion for 30 minutes at a depth of 1 meter. Conformité Européenne. Product meets the safety requirements of the European Union. IEC 60601-1 uses this term to refer to the part of the medical device which comes into physical contact with the patient.
- Page 347 Caution: FUJIFILM SonoSite recommends that the Vevo MD Imaging System be pushed by one person from behind and guided by another person in front, using the grab bars. Please use caution when going up or down ramps. Keep the system upright during transport.
- Page 348 Operation of this equipment in a residential area is likely to cause harmful interference in which case the user will be required to correct the interference at their own expense. WARNING: Changes or modifications not expressly approved by FUJIFILM SonoSite could void the user’s authority to operate the equipment. Appendices...
-
Page 349: Clinical Safety
WARNING: Some transducer sheaths contain natural rubber latex and talc, which can cause allergic reactions in some individuals. FUJIFILM SonoSite recommends identifying your latex and talc-sensitive patients and being prepared to treat allergic reactions promptly. - Page 350 Direct, indirect, and receive controls Direct Controls The system does not have a direct user control for output. Rather, the system has been designed to automatically adjust output to ensure that acoustic and thermal limits are not exceeded for all imaging modes. Since there is no direct user control for output, the sonographer should rely on controlling exposure time and scanning technique to implement the ALARA principle.
-
Page 351: Electrical Safety
Electrical safety This system meets EN60601-1, Class I, mobile equipment requirements and Type BF (transducers) isolated patient-applied parts safety requirements. This system complies with the applicable medical equipment requirements published in the Canadian Standards Association (CSA), European Norm Harmonized Standards, and Underwriters Laboratories safety standards. See "Specifications and standards"... - Page 352 FUJIFILM SonoSite, including the power supply. Connection of accessories and peripherals not recommended by FUJIFILM SonoSite could result in shock. Contact FUJIFILM SonoSite for a list of accessories and peripherals available from or recommended by FUJIFILM SonoSite. WARNING: Inspect the AC power cords, cables, and plugs on a regular basis.
- Page 353 Do not use the system if an error message appears on the clinical display. Note the error code and call FUJIFILM SonoSite or your local representative, turn off the system by pressing the power button until the system powers down.
- Page 354 Caution: To avoid increasing the system and transducer connector temperature, do not block the airflow to the ventilation holes on the front and back of the system. Appendices...
- Page 355 Electrical testing FUJIFILM SonoSite products tested The following equipment has been tested: Vevo MD Imaging System Vevo MD Imaging System transducers: UHF22, UHF48, UHF70 Foot switch Electrical safety testing The system complies with the following medical equipment standards related to electrical safety as follows: CAN/CSA-C22.2 No.
- Page 356 CSA Group 178 Rexdale Blvd. Toronto, Ontario, Canada M9W 1R3 Tel: +1 (416) 747-4000 Toll-Free: +1 (800) 463-6727 Inquiries Send any questions to: FUJIFILM SonoSite, Inc. 21919 30th Drive SE Bothell, WA 98021 USA T: 1-888-482-9449 or 1-425-951-1200 F: 1-425-951-1201 support@sonosite.com...
- Page 357 Australia Sponsor FUJIFILM SonoSite Australasia Pty Ltd 114 Old Pittwater Road BROOKVALE, NSW, 2100 Australia Compliance The Vevo MD Imaging System complies with Part 15 of the FCC Rules. Operation is subject to the following two conditions: (1) this device may not cause harmful interference, and (2) this device must accept any interference received, including interference that may cause undesired operation.
- Page 358 Electrical safety classification Safety classification Classification Description Class I equipment The ultrasound system is classified as Class I equipment. Type BF applied parts Ultrasound transducers IPX-7 Ultrasound transducers (except connector) IPX-8 Foot switch Ultrasound system power supply, system transducer Non AP/APG connector, and peripherals.
- Page 359 Electrical power supply FUJIFILM SonoSite manufactures the Vevo MD Imaging System to operate with AC line voltages of 100V, 120V, and 240V. The electrical configuration of the system is noted on the safety label. 100V~, 50/60Hz, 6A 120V~, 50/60Hz, 5A 240V~, 50/60Hz, 2.5A...
- Page 360 Isolating the Vevo MD Imaging System from power The Vevo MD Imaging System does not become completely isolated from power by pressing the power off button. The only way to completely remove power is to perform the following procedure. To isolate the system from power 1 Press the power button.
- Page 361 Compatible accessories and peripherals FUJIFILM SonoSite has tested the Vevo MD Imaging System with the following accessories and peripherals and has demonstrated compliance to the requirements of IEC 60601-1-2:2007. WARNING: Use of the accessories with medical systems other than the Vevo MD Imaging System ultrasound system may result in increased emissions or decreased immunity of the medical system.
-
Page 362: Electromagnetic Compatibility
FUJIFILM SonoSite could result in malfunctioning of your ultrasound system or other medical electrical devices in the area. Contact FUJIFILM SonoSite for a list of accessories and peripherals available from or recommended by FUJIFILM SonoSite See "Compatible accessories and peripherals"... - Page 363 Caution: Medical electrical equipment requires special precautions regarding EMC and must be installed and operated according to these instructions. It is possible that high levels of radiated or conducted radio-frequency (RF) electromagnetic interference (EMI) from portable and mobile RF communications equipment or other strong or nearby radio-frequency sources, could result in performance disruption of the ultrasound system.
- Page 364 Electrostatic discharge Caution: Electrostatic discharge (ESD), or static shock, is a naturally occurring phenomenon. ESD is common in conditions of low humidity, which can be caused by heating or air conditioning. ESD is a discharge of the electrical energy from a charged body to a lesser or non-charged body.
- Page 365 Separation distance (continued) Separation distance according to frequency of Rated maximum transmitter (m) output power 150 kHz to 80 80 MHz to 800 800 MHz to 2.5 of transmitter (Watts) d=1.2 √P d=1.2 √P d=2.3 √P For transmitters rated at a maximum output power not listed above, the recommended separation distance (d) in meters (m) can be estimated using the equation applicable to the frequency of the transmitter, where P is the maximum output power rating of the transmitter in watts (W) according to the transmitter...
-
Page 366: Environmental Limits
Environmental limits The Vevo MD Imaging System operating environment should be free of fumes, dirt, and electrical interference. Note: The temperature, pressure, and humidity limits apply only to the ultrasound system and transducers. Vevo MD Imaging System and transducer operating limits Specifications Value Temperature... -
Page 367: Ergonomic Safety
Ergonomic safety These scanning guidelines are intended to assist you in the comfortable and effective use of your ultrasound system. WARNING: To prevent musculoskeletal disorders, follow the guidelines in this section. Use of an ultrasound system may be linked to musculoskeletal disorders (MSDs). -
Page 368: Minimize Reaching And Twisting
Minimize reaching and twisting Use a bed that is height adjustable Position the patient as close to you as possible Face forward and avoid twisting your head or body Move your entire body front to back, and position your scanning arm next to or slightly in front of you Stand for difficult exams to minimize reaching Position the monitor directly in front of you... - Page 369 Keep moving and avoid sustaining the same posture by varying your head, neck, body, arm, and leg positions Do targeted exercises to strengthen muscle groups, which may help you avoid MSDs—contact a qualified health professional to determine stretches and exercises that are right for you Promote comfortable hand, wrist, and finger postures...
-
Page 370: Equipment Safety
Equipment safety To protect your ultrasound system, transducer, and accessories, follow these precautions. WARNING: When transporting your system, to avoid possible injury from the system tipping, always collapse the clinical monitor and push forward on the bar on the platform instead of pushing downward on the bar or pushing the clinical monitor. -
Page 371: Hazardous Materials
Hazardous materials WARNING: Products and accessories may contain hazardous materials. When disposing of products and accessories, be environmentally responsible and meet federal and local regulations for disposing hazardous materials. Manufacturer's declaration The following tables document the intended use environment and EMC compliance levels of the system. - Page 372 Manufacturer's declaration - Electromagnetic immunity Immunity IEC 60601 test Electromagnetic Compliance level test level Environment Floors should be wood, ± 2.0KV, ± 4.0KV, ± 2.0KV, ± 4.0KV, Electrostatic concrete or ceramic tile. ±6.0KV contact ±6.0KV contact Discharge If floors are covered (ESD) IEC with synthetic material, ±2.0KV, ±4.0KV,...
- Page 373 Immunity IEC 60601 test Electromagnetic Compliance level test level Environment If image distortion occurs, it may be necessary to position the Vevo MD Imaging System further from Power sources of power Frequency frequency magnetic Magnetic 3 A/m 3 A/m fields or to install Field IEC- magnetic shielding.
- Page 374 Immunity IEC 60601 test Electromagnetic Compliance level test level Environment 80 MHz to 800 MHz d=2.3√P 800 MHz to 2.5 GHz Where √P is the maximum output power rating of the transmitter in watts (W) according to the transmitter manufacturer and d is the recommended separation distance in IEC 61000-...
- Page 375 Immunity IEC 60601 test Electromagnetic Compliance level test level Environment the following symbol: (IEC 60417 No. 417- IEC-5140: "Source of non-ionizing radiation") Note: is the AC mains voltage prior to application of the test level. At 80 MHz and 800 MHz, the higher frequency range applies. These guidelines may not apply in all situations.
- Page 376 1 23 Noise on a waveform or artifacts or distortion in an image or error of a displayed numerical value that cannot be attributed to a physiological effect and that may alter the diagnosis Display of incorrect numerical values associated with the diagnosis to be performed Display of incorrect MI/TI indications Display of incorrect safety related indications...
-
Page 377: Acoustic Output
Acoustic output This section contains information about the ALARA (as low as reasonably achievable) principle, the output display standard, and acoustic power and intensity tables. The information applies to the ultrasound system, transducer, accessories, and peripherals. Acoustic output... -
Page 378: Alara Principle
ALARA principle ALARA is the guiding principle for the use of diagnostic ultrasound. Sonographers and other qualified ultrasound users, using good judgment and insight, determine the exposure that is “as low as reasonably achievable.” There are no set rules to determine the correct exposure for every situation. -
Page 379: Acoustic Artifacts
varying depth. Decisions that support prudent use are based on the type of patient, exam type, patient history, ease or difficulty of obtaining diagnostically useful information, and potential localized heating of the patient due to transducer surface temperature. See "Transducer surface temperature rise" on page 383. - Page 380 Guidelines for reducing MI Transducer Control UHF22 Focal zone* UHF48 Focal zone* UHF70 Focal zone* * Adjusting the focal zone depth will affect the MI value. Tap and drag the focal zone indicator along the image scale of the control panel. As you adjust the focal zone, note the MI value on the clinical display;...
-
Page 381: Output Display
The TI consists of three user-selectable indices, and only one of these is displayed at any one time. In order to display TI properly and meet the ALARA principle, the user selects an appropriate TI based on the specific exam being performed. FUJIFILM SonoSite provides a copy of AIUM Medical Ultrasound Safety, which contains guidance on determining which TI is appropriate. - Page 382 MI and TI output display accuracy The accuracy result for the MI is stated statistically. With 95% confidence, 95% of the measured MI values will be within +61.0% to -73.1% of the displayed MI value, or +0.2 of the displayed value, whichever value is larger. The accuracy result for the TI is stated statistically.
-
Page 383: Transducer Surface Temperature Rise
48.6 48.6 48.6 Simulated use FUJIFILM SonoSite UHF series transducers pass surface temperature limits, however, in certain situations, temperatures may rise to 41°C (105.8°F). WARNING: When the transducer scanhead is in contact with the patient, special precautions should be considered when using the transducer on children or on other patients who are sensitive to higher temperatures. -
Page 384: Acoustic Output Measurement
Acoustic output measurement Since the initial use of diagnostic ultrasound, the possible human biological effects (bio effects) from ultrasound exposure have been studied by various scientific and medical institutions. In October 1987, AIUM ratified a report from its Bio effects Committee (Bio effects Considerations for the Safety of Diagnostic Ultrasound, J Ultrasound Med., Sept. - Page 385 Attenuation factor (a) for various tissue types are given below: brain = 0.53 heart = 0.66 kidney = 0.79 liver = 0.43 muscle = 0.55 l = skinline to measurement depth in cm f = center frequency of the transducer/system/mode combination in MHz Since the ultrasonic path during the exam is likely to pass through varying lengths and types of tissue, it is difficult to estimate the true In Situ intensity.
- Page 386 diagnostic ultrasound exposures and uncertainties in the acoustic properties of soft tissues. No single tissue model is adequate for predicting exposures in all situations from measurements made in water, and continued improvement and verification of these models is necessary for making exposure assessments for specific exam types.
- Page 387 second-trimester fetal bone. Estimated maximum temperature elevations given here are for a “fixed path” tissue model and are for devices having ISPTA values greater than 500 mW/cm2. The temperature elevations for fetal bone and tissue were computed based on calculation procedures given in Sections 4.3.2.1- 4.3.2.6 in “Bioeffects and Safety of Diagnostic Ultrasound”...
-
Page 388: Acoustic Output Tables
Acoustic output tables The tables in this section indicate the acoustic output for the system and transducer combinations with a TI or MI equal to or greater than one. These tables are organized by transducer model and imaging mode. For a definition of terms used in the tables, see the "Glossary"... - Page 389 Transducer Model: UHF22 - Operating Mode: 2D Mode Index Label M.I. Non- Scan ≤1 >1 aprt aprt scan Global Maximum Index Value 1.26 1.02 Associated Acoustic Parameter (MPa) 3.86 (mW) (mW) 24.4 min of W ), I (mW) TA.3 (cm) (cm) (cm) Z@PII (cm)
- Page 390 Transducer Model: UHF22 - Operating Mode: Color Doppler Mode Index Label M.I. Non- Scan ≤1 >1 aprt aprt scan Global Maximum Index Value 1.26 3.29 1.86 Associated Acoustic Parameter (MPa) 3.86 (mW) (mW) 55.4 51.5 min of W ), I (mW) TA.3 (cm) (cm)
- Page 391 # : No data is reported as the global maximum index value is not reported for the reason listed. - : Data are not applicable for this transducer/mode. Acoustic output tables...
- Page 392 Transducer Model: UHF22 - Operating Mode: M-Mode Index Label M.I. Non- Scan ≤1 >1 aprt aprt scan Global Maximum Index Value 1.26 Associated Acoustic Parameter (MPa) 3.86 (mW) (mW) min of W ), I (mW) TA.3 (cm) (cm) (cm) Z@PII (cm) 1.22 .3max (cm)
- Page 393 Transducer Model: UHF48 - Operating Mode: 2D Mode Index Label M.I. Non- Scan ≤1 >1 aprt aprt scan Global Maximum Index Value Associated Acoustic Parameter (MPa) (mW) (mW) min of W ), I (mW) TA.3 (cm) (cm) (cm) Z@PII (cm) .3max (cm) (MHz) Dim of A...
- Page 394 Transducer Model: UHF48 - Operating Mode: Color Doppler Mode Index Label M.I. Non- Scan ≤1 >1 aprt aprt scan Global Maximum Index Value 0.98 Associated Acoustic Parameter (MPa) 3.95 (mW) (mW) min of W ), I (mW) TA.3 (cm) (cm) (cm) Z@PII (cm) 0.76...
- Page 395 Transducer Model: UHF48 - Operating Mode: M- Mode Index Label M.I. Non- Scan ≤1 >1 aprt aprt scan Global Maximum Index Value Associated Acoustic Parameter (MPa) (mW) (mW) min of W ), I (mW) TA.3 (cm) (cm) (cm) Z@PII (cm) .3max (cm) (MHz) Dim of A...
- Page 396 Transducer Model: UHF70 - Operating Mode: 2D Mode Index Label M.I. Non- Scan ≤1 >1 aprt aprt scan Global Maximum Index Value Associated Acoustic Parameter (MPa) (mW) (mW) min of W ), I (mW) TA.3 (cm) (cm) (cm) Z@PII (cm) .3max (cm) (MHz) Dim of A...
- Page 397 Transducer Model: UHF70 - Operating Mode: Color Doppler Mode Index Label M.I. Non- Scan ≤1 >1 aprt aprt scan Global Maximum Index Value 1.37 Associated Acoustic Parameter (MPa) (mW) (mW) 7.32 min of W ), I (mW) TA.3 (cm) (cm) (cm) Z@PII (cm) .3max...
- Page 398 # : No data is reported as the global maximum index value is not reported for the reason listed. - : Data are not applicable for this transducer/mode. Appendices...
- Page 399 Transducer Model: UHF70 - Operating Mode: M-Mode Index Label M.I. Non- Scan ≤1 >1 aprt aprt scan Global Maximum Index Value Associated Acoustic Parameter (MPa) (mW) (mW) min of W ), I (mW) TA.3 (cm) (cm) (cm) Z@PII (cm) .3max (cm) (MHz) Dim of A X (cm)
-
Page 400: Acoustic Measurement Precision And Uncertainty
Acoustic measurement precision and uncertainty All table entries have been obtained at the same operating conditions that give rise to the maximum index value in the first column of the table. Measurement precision and uncertainty for power, pressure, intensity, and other quantities that are used to derive the values in the acoustic output table are shown in the table below. - Page 401 Precision Uncertainty (%) Quantity (% of standard deviation) (95% confidence) ±3.0 14.9 +107.8 to -112.7 15.5 +109.6 to -114.0 Acoustic measurement precision and uncertainty for UHF70 Precision Uncertainty (%) Quantity (% of standard deviation) (95% confidence) 26.5 +60.5 to -72.8 27.5 +60.9 to -73.1 18.2...
- Page 402 The displayed MI and TI values are based on calculations that use a set of acoustic output measurements that were made using a single reference ultrasound system with a single reference transducer that is representative of the population of transducers of that type. The reference system and transducer are chosen from a sample population of systems and transducers taken from early production units, and they are selected based on having an acoustic output that is representative of the nominal expected acoustic output for all transducer-system combinations that might...
-
Page 403: Specifications And Standards
Specifications and standards For information on accessories and peripherals, see "Compatible accessories and peripherals" on page 361. Important: Ensure that sufficient clearance is available around the system for adequate airflow and cooling. Important: Do not block the air vents or air filters. System Caution: The Vevo MD Imaging System is for indoor use only. - Page 404 Diagonal (viewable area) = 17 in (43 cm) Control panel Length (exterior dimension) = 16.1 in (40.8 cm) Height (exterior dimension) = 10.2 in (25.8 cm) Diagonal (viewable area) = 12.1 in (30.7 cm) Imaging modes 2D (256 gray shades) Color Doppler Mode (256 colors) M-Mode Additionally, the system includes advanced imaging technologies:...
-
Page 405: Electromechanical Safety Standards
Transducers Transducer specifications Maximum Center Bandwidth image Transducer frequency Cable length (ft)* (MHz) depth (MHz) (mm) UHF22 10-22 38.4 6.5 ± 2" (1.98 m ± 5 cm) UHF48 20-46 23.5 6.5 ± 2" (1.98 m ± 5 cm) UHF70 29-71 6.5 ±... -
Page 406: Emc Standards Classification
The system complies with the electromagnetic compatibility (EMC) limits as per the following standards: IEC 60601-1-2:2007 / EN 60601-1-2:2007/AC:2010 / CSA C22.2 No. 60601-1- 2:08, Medical electrical equipment - part 1-2: general requirements for basic safety and essential performance - collateral standard: electromagnetic disturbances - requirements and tests EN 55011:2009/A1:2010, CISPR 11:2003/A1:2004, Class A Group 1 - Industrial, scientific and medical equipment - radio-frequency disturbance... -
Page 407: Hipaa Standard
Statement. This statement provides information about the purpose, characteristics, configuration, and specifications of the network connections supported by the system. For more information contact FUJIFILM SonoSite. HIPAA standard The system includes security settings that help you to meet the applicable security requirements listed in the HIPAA standard. - Page 408 Measurement System Accuracy By Test Method Range Accuracy and Tolerance Range (vertical) of full scale Linear distance ˂± 2% plus 1% Acquisition Phantom 0-32 mm (horizontal) of full scale ˂± 3% plus 1% Traced area Acquisition Phantom 0-1206.2 mm of full scale Traced ˂±...
- Page 409 1. Acquisition Error Includes errors introduced by the ultrasound system electronics relating to signal acquisition, signal conversion, and signal processing for display. Additionally, computational and display errors are introduced by the generation of the pixel scale factor, application of that factor to the caliper positions on the screen, and the measurement display.
-
Page 410: Troubleshooting
Troubleshooting If a problem is encountered when using the Vevo MD Imaging System, try the solutions described in this appendix. If none of the solutions solve the problem, contact a FUJIFILM SonoSite Technical Support Representative. See "Contact information" on page 415. - Page 411 Problem Solution Follow the steps; write down the error information, call FUJIFILM SonoSite customer support, and power off the system. Disconnect the transducer, then reconnect the transducer. Clean the transducer interface on the system using a compressed air duster—never use a cloth or wipes...
- Page 412 Patient management troubleshooting Problem Solution Ensure that a transducer is connected to the front Unable to create new panel of the Vevo MD Imaging System, and ensure exams that it has been initialized. Unable to archive an Ensure that the Ethernet cable is attached and that exam the connection is active.
- Page 413 Problem Solution Ensure the anatomy being studied is in the focal Lack of sensitivity zone for the transducer. Ensure that there is adequate coupling medium (for example, ultrasound gel) between the transducer and the patient. Lack of penetration or sensitivity Adjust the position of the TGC sliders.
- Page 414 Problem Solution If it succeeds, the port number and/or AE Title is correct. Measurement troubleshooting Problem Solution Placement of the media wall trace is out of order. An I/M parameters are all I/M trace needs to be placed in order from either top- zero down or bottom-up as follows;...
-
Page 415: Contact Information
The technical support representative can help you troubleshoot the situation by phone or by e-mail. For more complex problems, FUJIFILM SonoSite may: Send a technical support representative to the location to evaluate the problem Request that the equipment be transported to the FUJIFILM SonoSite service department Phone... - Page 416 +1-888-482-9449 Toll-free +800 0751 2020 (Europe) Email www.visualonics.com/support/customer-support Website www.visualsonics.com FUJIFILM SonoSite - Amsterdam Joop Geesinkweg 140 1114 AB Amsterdam Europe service center The Netherlands Tel (Main): +31 20 751 2020 Tel (Toll free): +800 0751 2020 Maintaining the Vevo MD Imaging System The Vevo MD Imaging System requires proper care and cleaning.
- Page 417 Vevo MD Imaging System, please contact FUJIFILM SonoSite. See "Technical support" on page 415. Cleaning the air filters FUJIFILM SonoSite requires that service technicians clean the Vevo MD Imaging System air filters once every three months. See "Technical support" on page 415. Contact information...
-
Page 418: Related Guidance Documents
Related guidance documents Information for Manufacturers Seeking Marketing Clearance of Diagnostic Ultrasound Systems and Transducers, issued September 9, 2008. Medical Ultrasound Safety, American Institute of Ultrasound in Medicine (AIUM), 1994. Acoustic Output Measurement Standard for Diagnostic Ultrasound Equipment, NEMA UD2-2004. Acoustic Output Measurement and Labeling Standard for Diagnostic Ultrasound Equipment, American Institute of Ultrasound in Medicine, 1993. -
Page 419: Glossary
Glossary General terms For ultrasound terms not included in this glossary, refer to Recommended Ultrasound Terminology Available, third edition, published in 2011 by AIUM. AIUM American Institute of Ultrasound in Medicine As low as reasonably achievable. The guiding principle of ultrasound use, which states that you should keep patient ALARA exposure to ultrasound energy as low as reasonably... - Page 420 Terminology in acoustic output tables Area of the active aperture measured in cm aprt Equivalent beam diameter as a function of axial distance z, and is equal to , where I (z) is the temporal-average intensity as a function of z in centimeters.
- Page 421 Derated peak rarefactional pressure associated with the transmit pattern giving rise to the value reported under MI (Megapascals). Peak rarefactional pressure at the point where the free- @PII field, spatial-peak pulse intensity integral is a maximum in Megapascals. Pulse repetition frequency associated with the transmit pattern giving rise to the reported value of MI in Hertz.
- Page 422 window in units of milliwatts. Axial distance corresponding to the location of maximum min(W (z), I (z) x 1 cm )], where z ≥ zbp in TA.3 centimeters. 1.69 in centimeters. For MI, the axial distance at which p is measured. For TIB, the axial distance at which TIB is a global maximum (for example, z ) in centimeters.
-
Page 423: Index
Index adding measurements annotations control brightness control clinical display clip settings control contrast control control panel controls display map control dynamic range control image acquisition imaging magnify scale control orientation presets control save preset troubleshooting Index... - Page 424 zoom in review while scanning about Vevo MD help system AC plug accessories accuracy measurement acoustic artifacts measurement precision and uncertainty output output measurement output tables acquisition Color Doppler Mode 247-248 M-Mode Index...
- Page 425 adding annotations mode settings depth measurements IMT measurements linear measurements time measurements traced area measurements traced distance measurements velocity measurements administrator user account ALARA applying principle angle Color Doppler Mode beam steering annotations 2D control Index...
- Page 426 Color Doppler Mode control M-Mode control mode adding deleting modifying moving 279-280 properties system settings adding deleting editing appendices archive exam status archivers educational procedural archiving Index...
- Page 427 audio troubleshooting backup system settings beam steering Color Doppler Mode control brightness 2D control control panel display M-Mode control castors caution magnetic field sensitivity physical hazards radiation safety labels cleaning and disinfecting 316, 331 compatible cleaners compatible disinfectants guide Index...
- Page 428 high-level disinfectants non-critical semi-critical spaulding classifications clinical applications clinical display Color Doppler Mode display map focal zone indicator image area image scale image status area M-Mode 232-233 B-Mode scout window window mode settings panel status bar system component Index...
- Page 429 clip saving clip settings 2D control Color Doppler Mode control configuring M-Mode control more controls collapsing clinical display Color Doppler Mode adding measurements annotations beam steering control clip settings control color and velocity scale color box overlay 250, 252 control panel controls display layout control Index...
- Page 430 display map control gain image acquisition imaging line density control magnify scale orientation control persistence control presets control priority control priority indicator save preset control scale control sensitivity control troubleshooting wall filter control zoom review scanning completed exams Index...
- Page 431 connecting transducers connections clinical display rear panel 31, 33 system connectivity DICOM setup network status setup connector transducer contact information customer support technical support contraindications contrast 2D control M-mode control Index...
- Page 432 control panel accessing patient data changing exam type Color Doppler Mode display brightness during scanning freeze general controls bar imaging controls bar M-Mode more control more controls control overview review images save frame scanning modes using keyboard controls Index...
- Page 433 Color Doppler Mode customizing M-Mode save clip mode conventions document creating presets reports customizing controls date and time setup delete annotations settings custom exam type presets depth measurements Index...
- Page 434 DICOM archiver configuration configuration page fields configure location configuring the system connecting to the network delete location or device DICOM setup educational archivers exporting DICOMDIR log files MPPS storage commit troubleshooting worklist DICOMDIR disabling exam type Index...
- Page 435 presets discontinue display information measurement and annotations patient header thermal index display layout Color Doppler Mode control M-Mode control display map 2D control Color Doppler Mode control M-Mode control disposal dynamic range 2D control edit annotations mode Index...
- Page 436 editing annotations mode settings electrical power supply safety safety testing shock warnings electromagnetic emissions electromagnetic interference warning 341, 355 enabling IMT measurement tools presets equipment safety Ethernet connection exam append archive Index...
- Page 437 completed delete display of information export manually archive reports review images routing routing selections select all exam types changing custom, from system settings customizing delete disable export importing managing Index...
- Page 438 settings to display export DICOMDIR exam exam types folder structure patient header presets reports settings supported file formats system log files USB export focal zone indicator font size annotations mode system settings Index...
- Page 439 foot switch configuration freeze control fuse box description location 29, 36 gain Color Doppler Mode M-Mode TGC sliders gate size M-Mode control general controls clip setttings control more controls name image control new series control reset preset control save application control save clip control Index...
- Page 440 save frame control split screen control start/stop control general preferences general settings getting started about the system quick start tutorial grab bars guide using this document hard drive storage HDMI HIPAA 196, 407 image area clinical display image scale image status area Index...
- Page 441 images and video clips export to USB saving imaging Color Doppler Mode controls 207, 214 freeze control M-Mode modes overview overview immunity testing requirements import exam types presets indications for use initial log in internal storage managing isolation transformer Index...
- Page 442 keyboard entering text onscreen sound settings label safety warning system transducer legal license updating line density Color Doppler Mode control linear measurements log files clearing DICOM system Index...
- Page 443 logging into system first time M-line M-Mode 2D scout window adding measurements annotations control brightness control clinical display clip settings control contrast control control panel controls display layout control display map control gate size control image acquisition magnify scale control orientation control presets Index...
- Page 444 save preset control sweep speed control troubleshooting window zoom control magnify scale B-Mode control Color Doppler Mode control M-Mode Control manage exam types manufacturer's declaration measurements about accuracy adding to 2D adding to Color Doppler Mode adding to M-Mode availability depth Index...
- Page 445 font size mode enabling linear measurement panel modifying placing time traced area traced distance troubleshooting using measurement panel velocity mode settings panel more controls general tab imaging tab Index...
- Page 446 moving annotations mode 279-280 moving the system MPPS discontinue name image control network connecting connection connectivity location verify connection orientation 2D control Color Doppler Mode control M-Mode control transducer Index...
- Page 447 overlay Color Doppler Mode M-Mode overview control panel exam types imaging modes scanning transducers panel clip settings measurements patient 165-166 archive status edit 182-183 form fields information edit enter from worklist enter manually Index...
- Page 448 protecting information peripherals persistence Color Doppler Mode control plug power module isolation power surges presets 2D control Color Doppler Mode control creating deleting disabling enabling groups M-Mode control setting default settings Index...
- Page 449 priority Color Doppler Mode control product safety testing safety warnings prospective save option quick start tutorial rear panel connections system view related guidance documents reports creating export reset preset control restore system settings retrospective save option Index...
- Page 450 safety acoustic artifacts acoustic measurement and uncertainty acoustic output acoustic output measurement acoustic output tables ALARA principle applying the ALARA principle clinical compatible accessories peripherals DICOM standard direct controls display uncertainty electrical electrical classification electrical power supply electromagnetic compatibility electromechanical standards Index...
- Page 451 electrostatic discharge EMC standards classification environmental limits equipment ergonomic general purpose classification hazardous materials HIPAA standard 196, 407 indirect controls isolating system from power labeling and verification product warnings receiver controls separation distance testing warning label system transducer sample gate overlay, M-Mode save application control Index...
- Page 452 save clip control 210, 269 save frame control 212, 269 save preset 2D control Color Doppler Mode control M-Mode control saving clip images prospective option retrospective option scale Color Doppler Mode control scanning available imaging modes Color Doppler Mode control panel M-Mode overview Index...
- Page 453 patient header scheduled procedures sensitivity Color Doppler Mode control sheaths spaulding classifications speakers stand connections front/rear views standards DICOM electromechanical EMC classification HIPAA 196, 407 starting system status bar stopping system Index...
- Page 454 storage internal managing internal storing transducers sweep speed M-Mode control system AC plug air filters castors clinical display exporting log files front/rear view grab bars logging on 22-23 maintaining moving setup 18, 68 shutting down Index...
- Page 455 specifications and standards starting transducer holder upgrading system information update license upgrade system system settings annotations backup and restore DICOM configuration display information exam types & presets export general measurements and annotations overview system information user management Index...
- Page 456 technical support air filters disposal maintaining traced area measurements traced distance measurements transducer cable lengths clinical applications connecting disconnecting exam type by mode features holder orientation output display overview Index...
- Page 457 reducing MI and TI sheaths specifications and standards storing surface temperature rise switching exam types transducer interface troubleshooting types and uses transformer, isolation troubleshooting audio Color Doppler Mode DICOM M-Mode measurements patient management system transducer interface Index...
- Page 458 tutorial quick start unfreeze image update your license upgrade your system connection devices memory stick connect disconnect export to ports user accounts administrator change password creating deleting enable password changes managing Index...
- Page 459 modifying restore more controls restore settings user login administrator guest non-administrator administrator guest non-administrator options user management settings velocity measurements wall filter Color Doppler Mode control Index...
- Page 460 warning cart movement chemicals electric shock electromagnetic interference labeling and verification product safety safety label system transducer worklist manual query manual update patient information query update zoom in review 2D control Color Doppler Mode control M-Mode Index...
- Page 461 zoom while scanning 2D control Color Doppler Mode control Index...
- Page 462 Index...
- Page 463 *51370-01* 51370-01 1.0...
Need help?
Do you have a question about the VisualSonics Vevo MD and is the answer not in the manual?
Questions and answers