Table of Contents
Advertisement
Quick Links
Advertisement
Table of Contents

Subscribe to Our Youtube Channel
Related Manuals for Planmeca Compact I


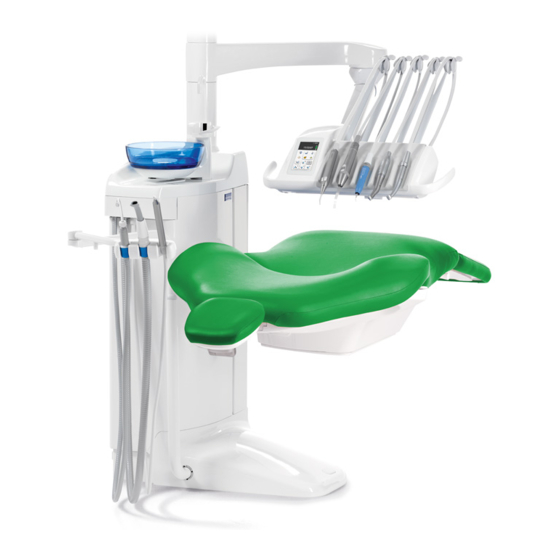
Summary of Contents for Planmeca Compact I
- Page 1 technical manual...
-
Page 3: Table Of Contents
SERVICE MODE DETAILED DESCRIPTION ......C-17 MAIN control system related service modes..........C-17 Instrument MUX related service modes............C-22 Instrument related service modes.............C-26 Control panel related service modes ............C-27 Suction holder related service modes............C-28 Technical Manual Planmeca Compact i Dental Unit TOC - 1... - Page 4 Chapter E PREVENTIVE MAINTENANCE DELIVERY ARMS ................E-1 SUCTION ARMS................E-1 INSTRUMENT CONSOLE ............. E-2 INSTRUMENTS................E-2 FOOT CONTROL................E-3 CUSPIDOR..................E-3 CHAIR .................... E-4 SUCTION SYSTEM................ E-4 OPERATING LIGHT ..............E-5 TOC - 2 Planmeca Compact i Dental Unit Technical Manual...
- Page 5 Adjusting the upper sensor ............... F-30 BLEEDING OF THE SPRAY WATER SYSTEM ......F-31 WMS OPERATION ............... F-32 List of abbreviations .................. F-32 WMS operation, normal use ..............F-32 WMS operation, WCS use ................ F-35 Technical Manual Planmeca Compact i Dental Unit TOC - 3...
- Page 6 Replacing water or air main valve assembly..........G-40 CABLES & TUBES REPLACEMENT.......... G-41 Replacing OP delivery arm cable............. G-41 OTHER PARTS REPLACEMENT ..........G-42 Detaching the instrument console from the OP delivery arm....G-42 TOC - 4 Planmeca Compact i Dental Unit Technical Manual...
- Page 7 Calibrating the sector plate and adjusting the angle of the foot control pedal (new foot control model, from serial number 826740).....H-11 Calibrating foot control ................H-15 Adjustments and functional check-ups after parts replacements....H-17 Chapter I DIAGRAMS Technical Manual Planmeca Compact i Dental Unit TOC - 5...
- Page 8 TABLE OF CONTENTS COPYRIGHT PLANMECA 2008-01 Publication number 10007462 revision 23 TOC - 6 Planmeca Compact i Dental Unit Technical Manual...
-
Page 9: Chapter A General & Technical Data
See page A-7 for handling details. NOTE GENERAL SAFETY The unit must be serviced by qualified personnel only, trained by PLANMECA or approved dealers. Repairs and parts replaced by unqualified personnel carry no warranty. Periodic maintenance as described in this manual must be performed on a reg- ular basis. -
Page 10: Manual Versions
MANUAL VERSIONS 2 MANUAL VERSIONS Planmeca pursues a policy of continual product development. Although every effort is made to produce up-to-date product documentation this publication should not be regarded as an infallible guide to current specifications. We reserve the right to make changes without prior notice. -
Page 11: Technical Specifications
TECHNICAL SPECIFICATIONS Chapter A - GENERAL & TECHNICAL DATA 3 TECHNICAL SPECIFICATIONS Original manufacturer PLANMECA Oy, Asentajankatu 6, 00880 Helsinki, FINLAND phone: +358 20 7795 500, fax: +358 20 7795 555, www.planmeca.com Colours Painted parts: RAL-9016 Upholstery colours: please consult your dealer for availability... - Page 12 Air quality: medical grade, dry and oil-free Connection: 1/4” Suction connection ≥ 150 mbar Vacuum: ≥ 550 l/ min Flow rate: Connection: 25 mm (3/4”) Drain connection Capacity: min. 10 l/min Connection: 25 mm (3/4”) A-4 Planmeca Compact i Technical Manual...
- Page 13 850mm (33.5") (swing of service door) Side delivery arm 645mm (25.4") 30˚ 510mm (20.1") (swing of cuspidor) 110˚ 375mm (14.8") max. 390mm (15.4") 1620mm (63.8") (fixed seat 610) 1520mm (60") (automatic seat 510) 1470mm (57.9") (automatic seat 460) Technical Manual Planmeca Compact i A-5...
-
Page 14: List Of Terms And Abbreviations In This Manual
Random Access Memory. Suction Tube Holder. to be announced. Printed Circuit Board. Pressure Sensor Board. Pounds per Square Inch. Quick Connector. The connector at the hose end that connects to the instrument console IMUX. A-6 Planmeca Compact i Technical Manual... -
Page 15: Handling Precautions For Pcb's And Software Chips
(see the spare part manual for details). Using any other tool for removal can seriously damage the socket on the MCB. Please refer to 5.1 “How to replace/upgrade the software” on page G-20 for details how to replace the software. Technical Manual Planmeca Compact i A-7... -
Page 16: Emc Information
Guidance and manufacturer’s declaration - electromagnetic emissions Planmeca Compact i dental unit is intended for use in the electromagnetic environment specified below. The customer or the user of the Planmeca Compact i dental unit should assure that it is used in such an environment. - Page 17 Guidance and manufacturer’s declaration - electromagnetic immunity Planmeca Compact i dental unit is intended for use in the electromagnetic environment specified below. The customer or the user of Planmeca Compact i dental unit should assure that it is used in such an envi- ronment.
- Page 18 Guidance and manufacturer’s declaration - electromagnetic immunity Planmeca Compact i dental unit is intended for use in the electromagnetic environment specified below. The customer or the user of Planmeca Compact i dental unit should assure that it is used in such an environment.
- Page 19 Planmeca Compact i dental unit is intended for use in an electromagnetic environment in which radiated RF disturbances are controlled. The customer or the user of Planmeca Compact i dental unit can help prevent electromagnetic interference by maintaining a minimum distance between portable and mobile RF communications equipment (transmitters) and the Planmeca Compact i dental unit as recommended below, according to the maximum output power of the communications equipment.
- Page 20 Chapter A - GENERAL & TECHNICAL DATA EMC INFORMATION A-12 Planmeca Compact i Technical Manual...
-
Page 21: Chapter B Control Panel Functions
CONTROL PANEL FUNCTIONS 1 CONTROL PANEL OVERVIEW NOTE For units equipped with the Plus package refer to the Planmeca Compact i User’s Manual. This chapter describes the control panel functions in normal and service modes. There are some special control and display modes that are not normally available but which can be entered by certain key sequences. -
Page 22: Normal User Functions
The control panel is always in the normal operating mode when the unit is switched on. Please refer to the Planmeca Compact i User’s Manual for descriptions for the normal control panel operation and instructions for normal everyday use of the unit. - Page 23 4.7 “Intensity of the ing light intensity operating light” on page B-8 Alternative method: press and hold Adjusting extra 4.8 “Duration of the function (door/ extra function relay nurse) signal dura- activation” on page tion Technical Manual Planmeca Compact i B-3...
-
Page 24: Programming Mode Function Details
Please note that the instrument will run normally during this operation. Turbines will start immediately to full speed. Press the program key to exit and store the new spray settings. B-4 Planmeca Compact i Technical Manual... -
Page 25: Chip Blow Flow Rates
Chapter B - CONTROL PANEL FUNCTIONS NOTE If the dental unit is equipped with the Planmeca Sterile Water System, the ster- ile water function is selected in this mode. Letters ‘St’ indicate that sterilized water is fed to the selected instrument. The indicator light of the instrument spray key flashes when the spray is on. -
Page 26: Fibre Optic Light Intensity
NOTE The recommended exposure times (factory settings) for various lights are as follows, and should not be set shorter than indicated to guarantee a good cur- ing effect; Demetron 30 seconds Lysta 40 seconds. B-6 Planmeca Compact i Technical Manual... -
Page 27: Duration Of The Bowl Rinsing And Duration Of The Glass Filling
2 seconds. The pedal can be released and then pushed again, and the time continues to increase. Press the program key to exit and store the new setting. Technical Manual Planmeca Compact i B-7... -
Page 28: Intensity Of The Operating Light
Press the extra function key. The text ‘d.nnn’ will appear on the display. Change the door open/nurse call time with the foot control. The minimum value is 0 sec. and the maximum 25 sec., and the adjustment step is 0.5 seconds. Press the program key. B-8 Planmeca Compact i Technical Manual... -
Page 29: Chapter C Service Mode
NOTE Even if listed in this documentation, some service modes are reserved for future use and might not yet be implemented in the current software version. Planmeca Compact i C-1 Technical Manual... -
Page 30: How To Enter Service Mode
4 seconds (without additionally pressing any other keys) will automatically start the suction system flushing function. 1.2 How to exit service mode and store settings Briefly press the program key. C-2 Planmeca Compact i Technical Manual... -
Page 31: Navigating Among The Various Service Modes
This behaviour can, however, be used as a “master undo”, if you for some rea- son want to return to the previous settings. The factory presets (mode 16) are stored immediately and cannot be un-done. Technical Manual Planmeca Compact i C-3... -
Page 32: Service Mode Functions Short-Form
3 = fill cup, flush bowl (default) n.15 Disable error messages 0 = no error messages are dis- C-20 played 1 = error messages will show (default) 2 = error messages relating con- sole arm are not displayed C-4 Planmeca Compact i Technical Manual... - Page 33 0 = disabled n 38 Show internal water or air pressure A (A) = show internal air pressure C-25 H (B) = show internal water pres- sure X n.nn bar; X nnn kPa; X nn.n Technical Manual Planmeca Compact i C-5...
- Page 34 Show control panel key code for branch 1 n.- = row, -.n = column C-27 n 48 Show control panel key code for branch 2 n.- = row, -.n = column C-27 n 49 Display test All LEDs turn on C-27 C-6 Planmeca Compact i Technical Manual...
- Page 35 0 = no extra functions n.68 Disable automatic chair positions (A, B, C, D) from foot 0 = manual control on, automatic C-31 control positions off 1 = normal (all features, default) 2 = both chair controls off Technical Manual Planmeca Compact i C-7...
- Page 36 Disable OP-light dimming function from its button 0 = dimmer function disabled C-32 from OP-light push-button 1 = dimmer function enabled (default) 2 = dimmer function disabled from control panel button 3 = dimmer function disabled C-8 Planmeca Compact i Technical Manual...
- Page 37 DISPLAY/RANGE page n 81 Show type of installed suction system 0 = Wet (or no) suction system C-34 1 = Microvac II (Planmeca) 2 = Dürr Combisep 3 = Metasys 4 = Dürr VSA 5 - 7 = reserved n.82 Set suction motor turn-off delay mm.ss = minutes.seconds...
- Page 38 2 = RPM enabled / low speed function disabled 3 = RPM enabled / low speed function enabled n.97 Set suction system cleaning time 0 sec. - 20 min, default = 2 min C-37 C-10 Planmeca Compact i Technical Manual...
- Page 39 1 = Prostyle Compact unit 2 = Prostyle Compact WE’S unit 3 = reserved for future use 4 = Planmeca Compact e 5 = Planmeca Compact i without chair 6 = Planmeca Compact i 7 = Planmeca Compact e with...
- Page 40 2 = Prostyle chair with legrest down 3 = WE’S lifter 4 = Planmeca Compact e chair 5 = Planmeca Compact i chair with fixed legrest; or automatic legrest up 6 = Planmeca Compact i chair with 510 automatic legrest; in...
- Page 41 0 = armrests deselected C-42 1 = armrests selected (default) n.123 Factory test C-42 n.124 Set the type of Planmeca Compact i 0, 1 C-42 n 125 Show Water management system status C-42 n 126 Show Water management system inputs and outputs ¦¦¦¦¦¦¦¦...
- Page 42 C-45 n 202 Main software checksum For factory use C-45 n.203 Processor watchdog test. Restarts the dental unit with C-45 error E 75.1. n.204 Processor reset test. Restarts the dental unit without C-45 errors. C-14 Planmeca Compact i Technical Manual...
- Page 43 315 Headrest length calibration C-48 n 316 Headrest joystick directions and buttons C-48 n 317 Potentiometer select line test C-48 n.318 As service mode n.18 but only headrest endurance test For factory use. C-48 Technical Manual Planmeca Compact i C-15...
- Page 44 Headrest right joystick vertical ADC-value C-49 n.322 Headrest left (cabinet side) joystick horizontal ADC-value C-49 n.323 Headrest left (cabinet side) joystick vertical ADC-value C-49 n.999 Main program loop speed For factory use. C-49 C-16 Planmeca Compact i Technical Manual...
-
Page 45: Service Mode Detailed Description
50% of the maximum speed. The following settings are possible. The factory default is 0 (zero). instrument unit settings chair settings micromotor settings disabled disabled speed limited disabled Technical Manual Planmeca Compact i C-17... - Page 46 MCB, therefore the voltage shown is normally somewhat higher than the instru- ment receives. However, the voltage drop in the cabling is compensated for so that instru- ments always receive a proper voltage. C-18 Planmeca Compact i Technical Manual...
- Page 47 (that attach the heatsink to the aluminum box) are missing. To protect against overheating the CPU turns off those loads that contribute to the power dissipation (OP-light and IPS) if the temperature rises above 60°C, The error E15 is then also displayed. Technical Manual Planmeca Compact i C-19...
- Page 48 Set the mode to 0 to disable the error messages, or to 1 to enable the error messages (factory default), or to 2 to disable the error messages related to the console arm. The unit shows shortly HE12 when turning the power on (remainder of that the error messages are disabled). C-20 Planmeca Compact i Technical Manual...
- Page 49 PSI (pounds per square inch). If mode 3 is selected additionally tem- perature displays (ex. service mode 10) are shown in °Fahrenheit instead of °Celsius. Select mode 4 to show the pressure in PSI and temperature in °Celsius. n.18 Factory test Reserved for factory use. Technical Manual Planmeca Compact i C-21...
-
Page 50: Instrument Mux Related Service Modes
Show console syringe location hose ID-code (nn ID-code) This service mode shows the hose ID-code for the hose connected to the syringe location. The display shows zero (0) if no hose is attached, otherwise the hose ID-code is displayed continuously. C-22 Planmeca Compact i Technical Manual... - Page 51 IMUX just after the proportional valve controlling this line. Therefore this pressure display is (under normal flow conditions) always higher than the pres- sure measured at the instrument end of the hose. Technical Manual Planmeca Compact i C-23...
- Page 52 Jan. -96. In this mode all instrument select membranes stays whenever possible open (not pressurized). Then prevention of water dropping from instruments (when idle) is fully dependent of the operation of the integral back pressure valves. C-24 Planmeca Compact i Technical Manual...
- Page 53 (a few drops) flowing out from the IMUX. This behaviour is fully normal and is due to the way the measurement is performed (using the spray water line sensor). Technical Manual Planmeca Compact i C-25...
-
Page 54: Instrument Related Service Modes
(instrument) type. The display shows four dashes ( ) if no valid hose is selected. Valid hoses are all turbine- and air-motor hoses. The factory default is 0 (zero). Positive values increase, negative decrease the factory default. C-26 Planmeca Compact i Technical Manual... -
Page 55: Control Panel Related Service Modes
2. See explanation above. n 49 Display test This service mode turns on all individual LEDs and display segments on the control panel(s). Can be used to check that all displays work properly. Technical Manual Planmeca Compact i C-27... -
Page 56: Suction Holder Related Service Modes
This is AUX input signal on the suction hose sensor PCB connected to MCB branch 1 (nor- mally the dentist's console suction hose holder). This signal is reserved for future use and shows always 255. C-28 Planmeca Compact i Technical Manual... -
Page 57: Foot Control Related Service Modes
(signal / jumper). Jumpers A and B are optional (not needed) in the Prostyle Com- pact unit. The AUX in-put is reserved for future use. Chair A,B,C,D signals are convenient for checking the proper operation of the chair control knob, its magnet and HALL-sensors. Technical Manual Planmeca Compact i C-29... - Page 58 (in a clockwise direction) push the pedal to the left. To reverse the direction of rotation push the pedal to the right. Note, that the reverse rotation of micromotor key does not function in this mode. C-30 Planmeca Compact i Technical Manual...
- Page 59 3 = momentary spray water on, instrument spray with foot control disabled 4 = momentary spray disabled, instrument spray with foot control on 5 = factory use 6 = momentary spray disabled, instrument spray with foot control disabled 7 = factory use Technical Manual Planmeca Compact i C-31...
-
Page 60: Operating Light Related Service Modes
This service mode adjusts the maximum allowed voltage (Vrms) to the operating light bulb. The factory default is 18.5 (volts) that is valid for a Planmeca manufactured Delight operating light, when directly installed in the unit. Using this service mode it is easy to adapt the unit to any type of light as long as the maximum load ratings (24V, 150W bulb) are not exceeded. -
Page 61: Patient Chair Related Service Modes
Note that during the calibration of the lift motor position sensor all software limits are ignored. Special care must be taken for not to damage the unit by driving the lifting adapter to its mechanical limits. Technical Manual Planmeca Compact i C-33... -
Page 62: Separator/Suction System Related Service Modes
MCB (jumper wires). 0 = wet suction system or no separator system installed 1 = Microvac II dry suction system separator (manufactured by Planmeca, no amalgam sepa- ration) 2 = Dürr Combisep amalgam separator (manufactured by Dürr, centrifugal amalgam separa-... -
Page 63: Mcb Cpu Direct I/O Related Service Modes (For Factory Use
2nd: Beeper control 3rd: Boiler control 4th: Assistant call / door open / Intracam control relay 5th: Suction motor relay 6th: Bacrest movement reversion relay 7th: Lift motor movement reversion relay 8th: Instrument reverse rotation Technical Manual Planmeca Compact i C-35... - Page 64 2nd: Not in use 3rd: Backrest motor control 4th: Lift motor control 5th: Chair control n 92 Show port A inputs (IC4) 1st vertical segment (counting from right): Factory use 2nd: Emergency switch 3rd: Factory use C-36 Planmeca Compact i Technical Manual...
-
Page 65: Other Service Modes
3 = pedal movement activates both the door open/nurse call relay and the Dimaxis serial communication (1 + 2). The factory default is 2. 4 - 7 are the same as 0 - 3 but the pedal operation is vertical. Technical Manual Planmeca Compact i C-37... - Page 66 5 = Planmeca Compact i without chair 6 = Planmeca Compact i 7 = Planmeca Compact e with swivel position recognition 8 = Planmeca Compact i unit without chair, connected to Planmeca Chair 9 = Planmeca Simulation Unit ---- = unit type not selected The factory default is 6.
- Page 67 3 = WE’S lifter 4 = Planmeca Compact e chair 5 = Planmeca Compact i chair with fixed legrest; or automatic legrest up 6 = Planmeca Compact i chair with 510 automatic legrest; in automatic state 7 = Planmeca Compact i chair with 460 automatic legrest; in automatic state...
- Page 68 Factory default is either 0 or 3 depending on the unit type selection in service mode 100. 0 = Compact i (nor) 3 = Compact e (Co.E). Door switch ignored. 28 = Cart (CArt). No error messages but text "CArt" displayed if IMUX disconnected.
- Page 69 117 Show active time of drive air pulse width modulation For factory use. n 118 Show active time of spray water pulse width modulation For factory use. n 119 Show active time of spray air pulse width modulation For factory use. Technical Manual Planmeca Compact i C-41...
- Page 70 Factory test Reserved for factory use. n.124 Set the type of Planmeca Compact i This service mode is used to select the G Compact i dental unit: 0 = Normal Planmeca Compact i 1 = G Compact i Factory default is 0.
- Page 71 In this mode the Waterline cleaning system (WCS) operation can be disabled: 0 = WCS in use (factory default) 1 = Starting of WCS disabled, safety features still active 2 = WCS totally disabled, i.e. also safety features are disabled. Technical Manual Planmeca Compact i C-43...
- Page 72 Default is 3. n. 136 Disable motorized headrest automatic positions In this mode the automatic positions of the motorized headrest can be disabled. 0 = Automatic positions enabled (default) 1 = Automatic positions disabled C-44 Planmeca Compact i Technical Manual...
- Page 73 Measure from floor to the center of the backrest joint and set that value to this service mode. n.206 Backrest angle calibration in degrees (deg) Measure angle (or drive to 0 with spirit level) and set that angle here. Technical Manual Planmeca Compact i C-45...
- Page 74 5: Headrest input normal mode but unknown type 6: Headrest input in burn mode but unknown type 7: Headrest input in burn mode 8: Headrest input normal 1028 is typical idle value. 1248 is typical manual drive value. C-46 Planmeca Compact i Technical Manual...
- Page 75 This service mode is used when the headrest upholstery is replaced. n.311 Headrest joint 1 (near backrest) ADC-value Value is typically from 85 to 477. After pressing the S key, the joint can be driven. Technical Manual Planmeca Compact i C-47...
- Page 76 If the value is 0 (or +-1) and will not change when the joystick(s) are moved, the select wire is broken. n.318 As service mode SM n.18 but only headrest endurance test Reserved for factory use. n.319 As service mode SM n.18 but chair and headrest endurance tests. Reserved for factory use. C-48 Planmeca Compact i Technical Manual...
- Page 77 Value is typically ±10 when joystick is centered and from ±40 to ±100 when in use. Positive direction is up. n.999 Main program loop speed. Reserved for factory use. In Set-mode displays speed with filtering. Technical Manual Planmeca Compact i C-49...
- Page 78 Chapter C - SERVICE MODE SERVICE MODE DETAILED DESCRIPTION C-50 Planmeca Compact i Technical Manual...
-
Page 79: Chapter D Help & Error Messages
Amalgam container is 100% full (only Metasys Replace or empty the container immediately. or Dürr). The suction system cannot be used before the container is emptied or replaced. See the User’s manual for details. Planmeca Compact i D-1 Technical Manual... - Page 80 Instruments: Please pick up a dental instru- ment before attempting to alter its settings; or if the instrument is selected, this function is not allowed with this instrument. Other keys: the unit does not have this func- tion. D-2 Planmeca Compact i Technical Manual...
- Page 81 HE 26 Compact WE’S help message, should not Drive the seat upwards before lowering the appear in Compact i: The chair backrest can- backrest. If this help message is shown while not be driven down, the seat is too low.
- Page 82 HE 27 Compact WE’S help message, should not Drive the backrest upwards before lowering appear in Compact i: The chair seat cannot be the seat. If this help message is shown while driven down, the backrest is too low. the patient chair is attached to the unit, it means that you have forgotten to switch on the chair’s automatic positions.
- Page 83 If the syringe is already removed, return it back to the flushing holder. This ensures that no water will flow from the syringes after flushing. Door Cuspidor door is open. Close the door. Technical Manual Planmeca Compact i D-5...
-
Page 84: Error Messages
The unit briefly flashes an “HE 12” message on the display at power-on, to remind that the error message system is disabled. Please refer to service mode “n.15 Disable error mes- sages (n mode = 0, 1, 2)” on page C-20 for details how to enable/disable the error message system. D-6 Planmeca Compact i Technical Manual... -
Page 85: Error Message Short-Form Table
INSTRUMENT RELATED Polymerization (light curing) light bulb is overheated, blown, or not in the page D-13 socket. reserved Satelec mini L.E.D. polymerization light requires IMUX PCB version F or later. page D-13 reserved Technical Manual Planmeca Compact i D-7... - Page 86 Cable from the foot control is loose page D-18 Foot control is of a new type. Update software on MCB. page D-18 Foot control serial communication (data) failure. page D-18 E54.n Foot control is not properly calibrated. page D-18 reserved D-8 Planmeca Compact i Technical Manual...
- Page 87 RAM error. page D-21 E75.n Program structure error. page D-21 reserved Error in communicating with external serial device. page D-21 HEADREST RELATED ERROR MESSAGES E80.n Headrest error. page D-22 E81.n Headrest communication error. page D-22 Technical Manual Planmeca Compact i D-9...
-
Page 88: Detailed Description Of Error Messages
50-300Ω. Disconnect the valve connector P16 on the MCB and check the condition on the indicated valve cable wires. Check that both the disconnected wires are OK all the way to P16. D-10 Planmeca Compact i Technical Manual... -
Page 89: Power Supply Related Error Messages
If the MCB is OK; check the condition of the IMUX (8-wire) cable by disconnecting it both at the IMUX and MCB. Measure all wires for shorts between each others as well as the chassis. Replace the cable or the IMUX. reserved Technical Manual Planmeca Compact i D-11... - Page 90 (Ý60 °C) this error is generated. The CPU on the MCB first turns off the OP-light and secondly the output power to the dental instruments, if the temperature still rises a few degrees. This safety feature makes it impossible to overheat the MCB heatsink. D-12 Planmeca Compact i Technical Manual...
-
Page 91: Control Panel Related Error Messages
E 25 Satelec mini L.E.D. polymerization light requires IMUX PCB version F or later The usage of the Satelec mini L.E.D. requires the IMUX PCB version F or later. E 24, 26, 27 reserved Technical Manual Planmeca Compact i D-13... -
Page 92: Instrument Multiplexer Related Error Messages
The communication between the MCB and IMUX seems to work most of the time, but there can be an intermittent contact problem in the IMUX cable. Check the connectors and the pins. E 32.5 Wrong IMUX type or wrong unit type, see service mode 100 and 103. D-14 Planmeca Compact i Technical Manual... - Page 93 IMUX. E 35.1 Drive/Cooling air pressure sensor output <0.2V E 35.2 Air coolant pressure sensor output <0.2V E 35.3 Water coolant pressure sensor output <0.2V E 35.4 Differential pressure sensor output <0.2V Technical Manual Planmeca Compact i D-15...
- Page 94 Check that the incoming air pressure is within recom- mendations. The control valve in the IMUX could also cause this problem. Replace the valve as a last remedy. E 43, 44 reserved D-16 Planmeca Compact i Technical Manual...
-
Page 95: Suction Tube Holder (Sth) Related Error Messages
Either the holder is missing, faulty or the cable to the holder is loose or faulty. The problem can be intermittent. E 49.1 Suction holder PCB or its cable is faulty in branch 1 E 49.2 Suction holder PCB or its cable is faulty in branch 2 E 50 reserved Technical Manual Planmeca Compact i D-17... -
Page 96: Foot Control Related Error Messages
PCB, or is not too close to the PCB. It is also possible, however very unlikely, that the foot control PCB is defect. E 55 reserved D-18 Planmeca Compact i Technical Manual... -
Page 97: Operating Light Related Error Messages
WMS error WMS error: E 63.1 There is WMS installed but there should not be (according to service mode) E 63.2 There is no WMS installed but there should be according to service mode Technical Manual Planmeca Compact i D-19... -
Page 98: Patient Chair Related
Please refer to the explanation for the lift motor (ER64), since both motor drives are equal. E 68 Backrest motor does not run or no signal from the position sensing potentiometer Please refer to the explanation for the lift motor (ER65), since both motor systems are equal. D-20 Planmeca Compact i Technical Manual... -
Page 99: Main Cpu Related Error Messages
CPU error, Watchdog reset E 75.2 Illegal OP-code E 75.3 Illegal vector E 75.6 Mains voltage failure E 75.7 Clock monitor reset E 76 reserved E 77 Error in communicating with external device reserved for future use Technical Manual Planmeca Compact i D-21... -
Page 100: Headrest Related Error Messages
Headrest should not be installed but is found (according to service mode) E 81.n Headrest communication error Headrest communication error (may be too old software or wrong software or loose cables or short circuit). D-22 Planmeca Compact i Technical Manual... -
Page 101: Chapter E Preventive Maintenance
Arm friction. Adjust if needed, refer to section 1.10 “Adjusting friction of the ergo suction arm” on page F-15. Adjustable suction arm • Arm friction. Adjust if needed, refer to section 1.11 “Adjusting friction of the adjustable suc- tion arm” on page F-15. Planmeca Compact i E-1 Technical Manual... -
Page 102: Instrument Console
O-rings. Change automatically twice a year. • Lubricate. Micromotor • Bulb voltage. • O-rings. Change automatically twice a year. • Lubricate. Polymerization light • Bulb voltage. Recommended voltages are 8.90 Vdc (Lysta), 15.4 Vdc (Satelec), 10.0 Vdc (Demetron, PowerLysta). E-2 Planmeca Compact i Technical Manual... -
Page 103: Foot Control
Clean and grease the worm screw. If there is any rust on the worm screw or nut, or if they are worn, replace them. Additionally, if you find any rust or damage, check for signs of leaks and eliminate the cause of the leaks. Technical Manual Planmeca Compact i E-3... -
Page 104: Chair
Microvac II suction system • Change the middle bottom membrane. • Change the bottom drain membrane. • Change the pressure balancing membrane. • Check the rubber sealing. Other suction systems • Refer to the manufacturer’s instructions. E-4 Planmeca Compact i Technical Manual... -
Page 105: Operating Light
Chapter E - PREVENTIVE MAINTENANCE 9 OPERATING LIGHT • Clean the protective fascia. • Operating light is in focus. • Light is not turning with the arm. • Check the voltage. 10 CLEAN WATER SYSTEM • Operation check. Technical Manual Planmeca Compact i E-5... -
Page 106: Water Management System (Wms
330 ml, 120 mm = 400 ml and 140 mm = 500 ml. • The water flow must be: Metasys typ1 and Compact, Microvac, no suction: 330 - 400 ml / min. Dürr and Dürr VSA systems: 400 - 500 ml /min. E-6 Planmeca Compact i Technical Manual... - Page 107 When the water flow is correct, lock the adjustment knob with the locking screw: hold the knob in position and turn the lock ring. Attach the pump water tube to the container quick connector. Technical Manual Planmeca Compact i E-7...
-
Page 108: Changing The Water Filter (00271003
Switch off the dental unit. • Open the cuspidor door. • Unscrew clockwise the cup of the filter regulator with a 17 mm fork spanner. filter regulator • Unscrew clockwise the filter from its position. filter E-8 Planmeca Compact i Technical Manual... - Page 109 Remove the spring from the old filter and place it inside the new filter. • Attach the new filter to its position. • Attach the cup back to its position. • Close the cuspidor door. Technical Manual Planmeca Compact i E-9...
- Page 110 Chapter E - PREVENTIVE MAINTENANCE WATER MANAGEMENT SYSTEM (WMS) E-10 Planmeca Compact i Technical Manual...
-
Page 111: Chapter F Adjustments
M8x12 DIN 913 adjustment screws sup- plied with the mounting accessories. Refer to the fig- ures for the location of the three holes. 4. Reassemble in reverse order. Console arm adapter Adjustment screws Planmeca Compact i F-1 Technical Manual... -
Page 112: Adjusting Friction Of The Op Delivery Arm Joints
Adjust the rotational friction of the instrument console with the 4 mm allen key. Adjust the two screws equally to avoid wearing. Tight- ening the screws increases the friction. F-2 Planmeca Compact i Technical Manual... -
Page 113: Adjusting Balance Of The Op Delivery Arm
This is done with the aid of the adjust- ing hook, which is pushed by a screwdriver (use a robust, round-shaped (not six-edged) screwdriver with a diameter of 4.5…5.5 mm). Gas spring Adjustment plate Adjusting hook Spring support y-spring Technical Manual Planmeca Compact i F-3... - Page 114 Do not let the screwdriver go through the groove on the adjustment plate to avoid damaging the tubes above the adjustment plate. Adjusting hook Adjusting plate Hole in the y-spring Adjusting hook goes into a groove of the adjustment plate. F-4 Planmeca Compact i Technical Manual...
- Page 115 The tension of the gas spring is now increased by one step. I-6) Repeat the procedure if necessary. There are totally seven steps to increase the tension of the gas spring (from the fully decreased spring). Technical Manual Planmeca Compact i F-5...
- Page 116 D-3) Hold the screwdriver inside the arm in the same position compared to the arm and lift the arm to its highest position. Both the adjusting hook and the spring support stay in the grooves of the adjustment plate. F-6 Planmeca Compact i Technical Manual...
- Page 117 The spring support is released from the groove. D-5) Lower the arm to horizontal position while holding the screwdriver at the same position compared to the arm. D-6) Remove the screwdriver from the arm. Technical Manual Planmeca Compact i F-7...
- Page 118 After step I-3 or D-5 do not remove the screwdriver from the arm, but turn the handle of the screwdriver carefully away from the instrument console (see figure below) while lowering the arm. This will help the hook of the spring support to go into the groove. F-8 Planmeca Compact i Technical Manual...
-
Page 119: Adjusting Angle Of The Op Delivery Arm Instrument Console
Assemble the lower joint in reverse order. The angle is preset at the factory to level with the rotating arm. Locking ring ø8 DIN 471 Lower joint adjustment screw Lower joint pin (short) Lifting arm cover Technical Manual Planmeca Compact i F-9... -
Page 120: Adjusting The Side Delivery Arm Base Joint Friction
Tightening the screw increases the friction. Horizontal arm 1.6 Adjusting the friction of the side delivery arm joint Adjust the rotational friction of the lower joint by turning the adjustment bolt with 10 mm fork spanner. F-10 Planmeca Compact i Technical Manual... -
Page 121: Adjusting The Side Delivery Arm Instrument Console Friction
Remove the level arm cover by first pulling it from its upper end with both hands as shown on the figure below. After detaching the upper end the cover can be lifted away from its position. Technical Manual Planmeca Compact i F-11... - Page 122 Adjust the lifting friction of the delivery arm with the 5 mm allen key. Adjust the two screws of the level arm friction block equally. Tightening the screws increases the friction. Attach the level arm cover back to its position. F-12 Planmeca Compact i Technical Manual...
-
Page 123: Adjusting The Tension Of The Side Delivery Arm Gas Spring
Before adjusting the tension of the gas spring decrease the lifting friction of the side delivery arm with the 5 mm allen key. Adjust the two screws of the level arm friction block equally. Loosening the screws decreases the friction. Technical Manual Planmeca Compact i F-13... - Page 124 6mm Allen key as shown on the figure below. Turning the screw clockwise will increase the tension, i.e, the weight-carrying capacity. Adjust the lifting friction of the delivery arm with the 5 mm allen key. Attach the level arm cover back to its position. F-14 Planmeca Compact i Technical Manual...
-
Page 125: Adjusting Friction Of The Ergo Suction Arm
Adjust the rotational friction of the joint with the 4 mm allen key. Tightening the screw increases the friction. Lock the screw into position with the holding screw. Loosen the screw with 2 mm allen key. Adjust with 4 mm allen key. Technical Manual Planmeca Compact i F-15... -
Page 126: Removing Play Of The Lifting Adapter
Screw the M8x12 ULS screw and the washers back into position. Use some locking agent to secure the screw into position. Repeat the above for the other sliding support. M8 DIN 934 nut M8x12 ULS screw F-16 Planmeca Compact i Technical Manual... -
Page 127: Adjusting The Instrument Arms
Vertical axis the axis of the instrument arm. Horizontal axis Spreading M3x6 DIN 916 Roller rubber Switching pivot, movable when the holding screw is loosened. 20°…30° Technical Manual Planmeca Compact i F-17... -
Page 128: Electrical Adjustments
Using the A and B keys from the control panel, drive the backrest into position where the calibration mark on the chair casting and the lug of the spindle nut assembly are aligned. Spindle nut assembly F-18 Planmeca Compact i Technical Manual... - Page 129 Check that the spindle nut does not touch the cog wheel or potentiometer. Drive the guiding nut past the calibration mark a couple of times to ensure that the sensor is now calibrated correctly (the horizontal lines are aligned). Exit service mode. Technical Manual Planmeca Compact i F-19...
-
Page 130: Calibrating Lift Motor Position Sensor
The upper edge of the lifting adapter and the calibration mark at the side of the lifting column are aligned. F-20 Planmeca Compact i Technical Manual... - Page 131 Tighten the two M3x6 DIN 916 screws to secure the cog wheel into position. Drive the lifting adapter past the calibration mark a couple of times to ensure that the sensor is now calibrated correctly. Exit service mode. Technical Manual Planmeca Compact i F-21...
-
Page 132: Calibrating Motorized Headrest Motor Position Sensor
Using the A and B keys from the control panel, drive the headrest to position where the lower edge of the headrest slide (1) and lower edge of the lower attachment plate (2) are aligned. F-22 Planmeca Compact i Technical Manual... - Page 133 Tighten the two M4x4 DIN 916 screws to secure the cog wheel into position. Drive the headrest past the calibration point a couple of times to ensure that the sensor is now calibrated correctly. Exit service mode. Technical Manual Planmeca Compact i F-23...
- Page 134 Chapter F - ADJUSTMENTS ELECTRICAL ADJUSTMENTS Drive the headrest to its lowest position and make sure that the stopper screw does not hit the backrest casting. The screw length can be slightly adjusted, if needed. F-24 Planmeca Compact i Technical Manual...
-
Page 135: Rewiring Mains Voltage Selection Jumper
Bypass the neutral line fuse by connecting the pins 1 and 2 together. SELECTED MAINS CONNECTED PINS VOLTAGE 3 & 6 100V~ 3 & 5 115V~ 3 & 4 220-240V~ Technical Manual Planmeca Compact i F-25... -
Page 136: Pneumatical Adjustments
The factory preset value for the internal water pressure is 2.8 bar. Lock the filter/regulator to the adjusted position by pushing down the regulator cap. Lift to adjust, push down to lock. Factory preset values: * water pressure 2.8 bar * air pressure 5.5 bar F-26 Planmeca Compact i Technical Manual... -
Page 137: Adjusting Syringe Water And Air Flow Rates
The water and air flow rates for each instrument are adjusted in the instrument settings pro- gram mode. Please refer to the User’s manual (publication part number 288037) for program- ming the instrument settings. Technical Manual Planmeca Compact i F-27... -
Page 138: Water Management System: Adjusting The Sensors
4.1 Preparations before adjustment • Open the cuspidor door. • Add some Planosil solution or coloured water (with e.g. caramel) to the container. • Switch on the Clean water mode and switch on the container (bottle) switch. F-28 Planmeca Compact i Technical Manual... - Page 139 Pass the door switch by pushing e.g a fork spanner into the electronics control box as shown on the figure below. • The fork spanner is pressing the door switch and the WMS operates also with door open. Technical Manual Planmeca Compact i F-29...
-
Page 140: Adjusting The Lower Sensor
The sensor adjustment screw is located on the side of the sensor. Adjust the sensor so that it just recognizes the water level: the sensor light first goes on and then goes off and remains off. F-30 Planmeca Compact i Technical Manual... -
Page 141: Bleeding Of The Spray Water System
The control system identifies the instrument hose, not the instrument. The control system does not recognize the instrument change. NOTE Make sure that the hoses are properly connected to the console to avoid leak- age. Technical Manual Planmeca Compact i F-31... -
Page 142: Wms Operation
(from software version 3.07) 3.07) Bowl rinse is used, water comes directly from incoming water line. City Water Bottled Water Bowl rinse Bowl rinse Pump not running Pump not running Display Display F-32 Planmeca Compact i Technical Manual... - Page 143 Cup fill (water level below lower sensor) Automatic cup fill Manual cup fill Automatic cup fill Manual cup fill Pump running running Pump not running not running Display He 60 He 60 Display He 61 He 61 Technical Manual Planmeca Compact i F-33...
- Page 144 Instruments are used and at same time bottle is filled. City Water Bottled Water Instrument in use (water level below lower Instrument in use (water level below lower sensor) sensor) Pump running Pump not running Display He 60 Display He 61 F-34 Planmeca Compact i Technical Manual...
-
Page 145: Wms Operation, Wcs Use
City Water Bottled Water Special situation: bottle removed Special situation: bottle removed Pump not running Pump not running Display He 62 Display He 62 6.3 WMS operation, WCS use Continuously City Water Bottled Water Technical Manual Planmeca Compact i F-35... - Page 146 3 s each Cleaning agent is fed to cup fill line City Water Bottled Water Feeding cycle: Similar to City water mode Cup fill Pump not running Display countdown timer 4 s Duration F-36 Planmeca Compact i Technical Manual...
- Page 147 L2 reached + 15 s When feeding cycle is completed, Display: He 66 Flushing cycle is started City Water Bottled Water After 8 hours if unit let on or when unit restarted When unit turned on Technical Manual Planmeca Compact i F-37...
- Page 148 L2 reached + 15 s Duration until L2 reached + 15 s Bottle is filled City Water Bottled Water Filling bottle Bottle is filled manually Pump running Display wait He 65 Duration until L1 reached F-38 Planmeca Compact i Technical Manual...
- Page 149 Pump running Display timer Duration 50 s Flushing cycle: Bottle has to be filled manually Bottle filling Pump running Display wait He 65 Duration Until L1 reached When cycle is completed Display: He 36 Technical Manual Planmeca Compact i F-39...
- Page 150 Chapter F - ADJUSTMENTS WMS OPERATION F-40 Planmeca Compact i Technical Manual...
-
Page 151: Chapter G Parts Replacement & Repair
Then pull the cover outwards at the other side of the cuspidor (see picture on the next page). Assemble the cuspidor cover into position in reverse order. Planmeca Compact i G-1 Technical Manual... - Page 152 Remove the lifting adapter by pulling it upwards. Assemble the lifting column adapter into position in reverse order. M4x8 DIN 912 Lifting column cover Door opening limiter Door joint sleeve Cuspidor top cover Side cover plate Cuspidor door Cuspidor cover G-2 Planmeca Compact i Technical Manual...
-
Page 153: Upholsteries Replacement
Loosen the screws at the back of the headrest assembly using the T25 key. Detach the headrest upholstery from the headrest assembly. Attach the new headrest upholstery in reverse order. Headrest upholstery: Loosen the screws and remove the cushion. Technical Manual Planmeca Compact i G-3... - Page 154 Attach the new backrest upholstery by bending it carefully from its sides and aligning it properly during the attaching. Press first the center of the upholstery into position and then the edges to attach all the tapes to their counterparts. Backrest upholstery: Detach tapes and pull. G-4 Planmeca Compact i Technical Manual...
- Page 155 Loosen the attachment screw by turning it clockwise (figure below, 1). Unscrew the other six screws as shown on the figure below (2-4). Slide the seat upholstery towards the footrest so that the attachment screw comes out from the groove of the upholstery’s backplate. Remove the seat upholstery. Technical Manual Planmeca Compact i G-5...
- Page 156 UPHOLSTERIES REPLACEMENT Slide the attachment plates to their positions at the new seat upholstery backplate as shown on the figure below. Attachment plate Attachment plate positions Attach the new seat upholstery in reverse order. G-6 Planmeca Compact i Technical Manual...
-
Page 157: Instrument Multiplexer Related
M4x8 DIN 912 screw. Unscrew the M4x50 DIN 912 and M4x20 DIN 912 screws from sides of the multiplexer assembly. Lift the multiplexer assembly from the console casting. Remove the instruments and balanced arms. Technical Manual Planmeca Compact i G-7... - Page 158 Chapter G - PARTS REPLACEMENT & REPAIR INSTRUMENT MULTIPLEXER RELATED Attach the new multiplexer to the instrument console. Attach the grounding cable to the instrument console. Connect the return air tube. Return air tube G-8 Planmeca Compact i Technical Manual...
- Page 159 Connect the instrument multiplexer cable to the connector P11 on the Instrument multiplexer PCB. Connect the water tube coming from the console arm to the T-nipple of the valve assembly. Water tube from the console arm T-nipple Technical Manual Planmeca Compact i G-9...
- Page 160 Close the instrument console cover. Attach the balanced arms and the instruments to their places. Bleed the multiplexer according to the instruction described in Chapter 4 “BLEEDING OF THE SPRAY WATER SYSTEM” on page F-14. G-10 Planmeca Compact i Technical Manual...
-
Page 161: Replacing One Multiplexer Block (Other Than Syringe
Bleed the multiplexer according to the instruction described in chapter F, section 5 “BLEEDING OF THE SPRAY WATER SYSTEM” on page F-31 TORX WN1451 3X6 PT Multiplexer plate Detached multiplexer block Spindle screw Blocking flange M4x6 DIN 912 M4 DIN 980 Technical Manual Planmeca Compact i G-11... -
Page 162: Replacing Multiplexer Control Membrane
Remove the spring and membrane press. Install the new control membrane in reverse order. TORX WN1451 3x12 PT TORX WN1451 3x22 PT Block cover Spring Membrane press Multiplexer control membrane G-12 Planmeca Compact i Technical Manual... -
Page 163: Replacing Instrument Control Valve
Unscrew the two of the four screws and remove the valve. Install the new proportional valve in reverse order. Unscrew these screws Proportional valve to remove the valve. Technical Manual Planmeca Compact i G-13... -
Page 164: Suction System Related
The pressure balancing membrane over the intermediate membrane moves upwards and blocks the opening Pressure balancing between the upper chamber and the lower chamber. membrane Saliva and water begins to gather into the upper chamber. Intermediate membrane G-14 Planmeca Compact i Technical Manual... - Page 165 After about 0.5 seconds the pressure difference between the chambers is balanced by the pressure balancing tube. The pressure balancing membrane moves downwards due to gravity allowing saliva and water to flow to the lower chamber. Pressure balancing tube Technical Manual Planmeca Compact i G-15...
- Page 166 Since the main valve is closed, the vacuum is not led to the tank nor the suction tubes. The suction will start again after five seconds delay, supposing that the liq- uid level has fallen below the critical level. G-16 Planmeca Compact i Technical Manual...
-
Page 167: Replacing The Whole Pm Microvac Ii Separating Tank
Disconnect the pulse valve tube from the front of the separating tank. Lift the separating tank from the socket. Install the new separating tank in reverse order. Microvac cable Pulse valve tube Suction filter tube Suction line tube Overfill switch cables Microvac II socket Technical Manual Planmeca Compact i G-17... -
Page 168: Replacing Pressure Balancing Membrane
Unscrew the intermediate membrane while holding the drain membrane in position. The drain membrane and the 10x3.5 O-ring will now detach. Lift off the intermediate membrane from inside the lower chamber. Install the new intermediate membrane and/or the new drain membrane in reverse order. G-18 Planmeca Compact i Technical Manual... -
Page 169: Replacing Suction Closing Membrane
Install the new suction closing membrane in reverse order. NOTE Care must be taken when positioning the suction closing membrane. NOTE Tighten the lid assembly screws crosswise. Screw M3x16 Note the positions of the grooves! Lid assembly Suction closing membrane Technical Manual Planmeca Compact i G-19... -
Page 170: Electrical Parts Replacement
The orientation of the software chip is critical. Never try to force the chip into the socket. Carefully place the new software chip into the socket. Assemble the cover of the electronics control box back to its position. G-20 Planmeca Compact i Technical Manual... -
Page 171: Replacing Fuses
NOTE The mains fuse ratings depend on the selected voltage setting. Mains Voltage Fuse Rating & Type Setting 100V~ Schurter T12.5A, slow blow, 0034.3128 115V~ Schurter T12.5A, slow blow, 0034.3128 220-240V~ T6.3A, slow blow Technical Manual Planmeca Compact i G-21... -
Page 172: Replacing Main Control Pcb
“n.100 Select dental unit type (n mode = 0, 1, 2, 3, 4, 5, 6, 7)” on page C-38 when the unit is switched on. The unit type must be selected before you can use the dental unit. G-22 Planmeca Compact i Technical Manual... -
Page 173: Replacing Instrument Multiplexer Pcb
“BLEEDING OF THE SPRAY WATER SYSTEM” on page F-31 TORX WN1451 3x6 PT Multiplexer plate Multiplexer blocks Protective membrane Quick connector housing Instrument multiplexer PCB Instrument control valve M4x6 DIN 912 M3x35 DIN 912 M3x8 DIN 912 Technical Manual Planmeca Compact i G-23... -
Page 174: Replacing Control Panel Pcb
Replace the suction sensor PCB with a new one and assemble the suction arm in reverse order. Console frame Suction sensor Suction holder cable Screw M4x8 R IN E JE A LI ¬S A LI ¬S Screws M4x10 Suction arm G-24 Planmeca Compact i Technical Manual... -
Page 175: Replacing Transformer
Transformer Transformer cover M4x6 DIN 912 TRANSFORMER CONNECTIONS PRIMARY LEADS SECONDARY LEADS YEL/GRN (CHASSIS GND) YELLOW (230 V~) RED (115 V~) BLUE (24 V~~) ORANGE (GND) GREEN (24 V~) BLUE (NEUTRAL) BROWN (100 V~) Technical Manual Planmeca Compact i G-25... -
Page 176: Replacing Position Sensors
The eccentricity of the axle causes damages the position sensor. the cog wheel to slip and loose position. Cog wheel Threaded axle of the motor C O R R E C T G-26 Planmeca Compact i Technical Manual... -
Page 177: Motors Replacement
(4). Remove the backrest. Open the cable clamp located on the upholstery support plate (1). Remove the upholstery support plate by unscrewing the three M6x10 DIN 912 screws (2). Technical Manual Planmeca Compact i G-27... - Page 178 Detach the legrest support bar from the spindle fork assembly by unscrewing the attachment screw using the 6mm Allen key (1). Legrest support bar Spindle fork assembly Detach the spindle fork assembly from the seat casting by unscrewing the attachment screw using the 6mm Allen key (1). G-28 Planmeca Compact i Technical Manual...
- Page 179 3mm Allen key and detach the attachment plate from the backrest motor assembly (2). Disconnect the Backrest motor cable from the seat cable adapter (1). Technical Manual Planmeca Compact i G-29...
- Page 180 Chapter G - PARTS REPLACEMENT & REPAIR MOTORS REPLACEMENT Detach the position sensor plate by unscrewing the two Ejot Torx DG 50x10 A2 attachment screws (1). Detach the backrest motor grounding cable (1). G-30 Planmeca Compact i Technical Manual...
- Page 181 Unscrew the two M6x14 ISO 7380 screws at the backrest motor attachment plate using the 4mm Allen key. Detach the backrest motor mechanical limit from the seat casting by unscrewing the M6x16 DIN 7984 attachment screw using 4mm Allen key. Technical Manual Planmeca Compact i G-31...
- Page 182 Chapter G - PARTS REPLACEMENT & REPAIR MOTORS REPLACEMENT Lift the backrest motor from the seat casting. Detach the mechanical limit and bearing from the threaded motor axle. G-32 Planmeca Compact i Technical Manual...
- Page 183 MOTORS REPLACEMENT Chapter G - PARTS REPLACEMENT & REPAIR Install the new backrest motor assembly in reverse order. Assemble new cable ties in the place of the ones cut previously. Backrest motor assembly Technical Manual Planmeca Compact i G-33...
-
Page 184: Replacing Chair Lift Motor
Disconnect the Lift motor potentiometer cable from the connector P24 (Lift pot) on the Main control PCB. Disconnect the Lift motor cable from the connector P23 (Lift motor). G-34 Planmeca Compact i Technical Manual... - Page 185 Electronics Unscrew the eight screws control box lifted aside Remove the nut attachment plate and the lifting frames Detach the grounding cable Remove the locking ring Technical Manual Planmeca Compact i G-35...
-
Page 186: Valves & Filters Replacement
Detach all the water and air tubes that are connected to the valves. Install the new magnetic valve/pressure regulator assembly in reverse order. Apply pressure to test that there are no air or water leaks. G-36 Planmeca Compact i Technical Manual... -
Page 187: Replacing Water And Air Filter/Regulator Assemblies
Valve attachment block Water inlet tube Air inlet tube Air filter/regulator Bolts Water filter N108-DS01 Air filter In P. max. 16 bar NOTE! Out P. 0,5-10 bar Made in Italy Max. Torque 7 Nm Technical Manual Planmeca Compact i G-37... -
Page 188: Replacing Water And Air Filters And The Water Regulator Plug
Lubricate the new plug with non-toxic vaseline and place it to the regulator. Plug Attach the new filter to its position and attach the filter cup. Be careful not to overtighten the filter cup, you should be able to open it manually. G-38 Planmeca Compact i Technical Manual... -
Page 189: Replacing The Water / Air Regulator Membrane
Unscrew the four attachment screws of the regulator cap and remove the cap. Replace the membrane. Note, that the air regulator membrane has a small opening in the middle of the membrane. Lock ring Regulator cap Membrane Technical Manual Planmeca Compact i G-39... -
Page 190: Replacing Water Or Air Main Valve Assembly
Check that the valve functions correctly. Air main valve assembly Locking nut Air main valve Valve cable (green leads) Valve cable Valve bottom plate (blue leads) Screws Water main valve Support attachment plate Valve support Core G-40 Planmeca Compact i Technical Manual... -
Page 191: Cables & Tubes Replacement
Console arm cable Lifting arm Cables approx. 55 cm (22 in.) Tubes approx. 30 cm (12 in.) Arm joint cover Console arm adapter Cables approx. 70 cm (28 in.) Tubes approx. 140 cm (55 in.) Technical Manual Planmeca Compact i G-41... -
Page 192: Other Parts Replacement
Instrument console M6x16 DIN 916 Bearing assembly Lower joint axle Console arm cable Lower joint cover Cover plug Locking ring ø8 DIN 471 Lower joint pin (long) Lifting arm cover Lower joint pin (short) G-42 Planmeca Compact i Technical Manual... -
Page 193: Replacing Op Delivery Arm Gas Spring
Upper joint axle Arm joint cover Console arm cable Lifting arm Upper joint pin ø10 DIN 6799 M5x8 DIN 7991 Adjustment plate Gas spring pin Gas spring ø10 DIN 6799 Lifting arm assembly Upper joint pin Technical Manual Planmeca Compact i G-43... -
Page 194: Replacing The Whole Op Delivery Arm
Be careful not to break the bowl collar when you replace the console arm. In the case that the dental light / Planmeca Intra / monitor is (are) installed to the console arm, disconnect the cables from the main control PCB and remove the equipment with posts from the delivery arm. -
Page 195: Removing Foot Control Cover
Unscrew the M4x8 DIN 7984 screw from under the foot control and the two M4x10 DIN 7991 screws from the top. Knob holder Knob support M4x10 DIN 7991 Spacer M4x10 DIN 7991 M4x8 DIN 7984 Planmeca Compact i H-1 Technical Manual... -
Page 196: Replacing Chair Control Springs
(one bends upwards, the other bends downwards). Reassemble in reverse order. M4x10 DIN 7991 Chair control assembly Spring support Spacer Chair control NOTE THE ORIENTATION springs OF THE SPRINGS: THEY MUST EASILY OVERLAP EACH OTHER. Spring support plate M4x8 ULS H-2 Planmeca Compact i Technical Manual... -
Page 197: Replacing Foot Control Pcb
Detach the foot control cable from the connector P1 on the foot control PCB. Lift the strain reliefer upwards and pull the foot control cable out. Install the new foot control cable in reverse order. Strain reliefer Foot control cable Technical Manual Planmeca Compact i H-3... -
Page 198: Replacing The Pedal Assembly (New Foot Control Model, From Serial Number 826740
Put the foot control PCB back in position and secure it with the four M4x10 DIN 7991 screws. Connect the foot control cable to the connector P1. Secure the chair control assembly with the M4x10 DIN 7991 screws and remount the foot control cover. H-4 Planmeca Compact i Technical Manual... -
Page 199: Replacing Pedal Centering Spring
Adjust the pedal tension and angle as described in section “Adjusting tension and angle of the foot control pedal” on page H-9. Secure the chair control assembly with the M4x10 DIN 7991 screws and remount the foot control cover. Technical Manual Planmeca Compact i H-5... - Page 200 Calibrate the foot control as described in section “Calibrating foot control” on page H-15. M4x16 DIN 7991 M4x10 DIN 7991 Upper adjustment screw Bearing bar Foot control PCB Spring washer Pedal centering plate (with side wings) Pedal centering spring Pedal assembly Spring support Pedal height adjustment screw H-6 Planmeca Compact i Technical Manual...
-
Page 201: Adjustments
Tighten the two pedal centering plate screws. Reassemble the foot control in reverse order. Calibrate the foot control as described in section “Calibrating foot control” on page H-15. Sector plate Axis of the foot control pedal Pedal centering plate Screws Technical Manual Planmeca Compact i H-7... -
Page 202: Eliminating Sideways Play Of The Foot Control Pedal
Tighten the M3x4 DIN 916 locking screw on the underside of the foot control. Reassemble the foot control in reverse order. Calibrate the foot control as described in section “Calibrating foot control” on page H-15. H-8 Planmeca Compact i Technical Manual... -
Page 203: Adjusting Tension And Angle Of The Foot Control Pedal
Foot control pedal PCB supports Sector plate 0.5mm Adjusting rod Angle adjusting screw Reassemble the foot control in reverse order. Calibrate the foot control as described in section “Calibrating foot control” on page H-15. Technical Manual Planmeca Compact i H-9... -
Page 204: Adjusting Height Of The Foot Control Pedal (Old Foot Control Model, Serial Number Smaller Than 826740
Check also that the pedal does not touch the switch on the underside of the PCB. Foot control PCB Sector plate 0.5-1mm Pedal height adjuster Reassemble the foot control in reverse order. Calibrate the foot control as described in section “Calibrating foot control” on page H-15. H-10 Planmeca Compact i Technical Manual... -
Page 205: Calibrating The Sector Plate And Adjusting The Angle Of The Foot Control Pedal (New Foot Control Model, From Serial Number 826740
PCB and that the sector plate is visually estimated straight (±0.1mm). NOTE You will need a foot control calibration tool (Planmeca order code 10007445) to perform the adjustments described in this section. The sector plate calibration cannot be performed without the calibration tool. - Page 206 Apply a drop of Loctite 243 sealer (or corresponding) to the upper adjustment screw. Do not allow Locktite to get to the pedal axle. Tighten the upper adjustment screw completely (the foot control pedal does not move freely). Upper adjustment screw H-12 Planmeca Compact i Technical Manual...
- Page 207 Release the pedal from the lower position by loosening the angle adjusting screw. Remove the play. Push the pedal downwards and tighten the angle adjusting screw. Technical Manual Planmeca Compact i H-13...
- Page 208 Tighten the pedal centering plate screws (4). Adjust the angle of the pedal by tightening/loosening the angle adjusting screw (1). The front end of the pedal should move approx. 4 mm vertically (up/down) for convenient use of the H-14 Planmeca Compact i Technical Manual...
-
Page 209: Calibrating Foot Control
Press and hold down the calibration switch with the screwdriver for 4 seconds. The blinking sequence of the indicator light inside the foot control cover alters and the first pedal position to determine is suggested on the display. Technical Manual Planmeca Compact i H-15... - Page 210 Release the foot control pedal. Move the foot control pedal to the rightmost position and hold. While holding, move the chair control briefly to the ‘chair up’ direction. Release the foot control pedal. Exit foot control calibration mode. H-16 Planmeca Compact i Technical Manual...
-
Page 211: Adjustments And Functional Check-Ups After Parts Replacements
+-600 if not, air gap too big or pedal’s sector plate is tilted Technical Manual Planmeca Compact i H-17... - Page 212 Chapter H - FOOT CONTROL ADJUSTMENTS H-18 Planmeca Compact i Technical Manual...
- Page 213 Chapter DIAGRAMS Planmeca Compact i I-1 Technical Manual...
-
Page 214: Chapter I Diagrams
Chapter I - DIAGRAMS I-2 Planmeca Compact i Technical Manual... - Page 215 02375039 P anoramic X-R ay V iewer S atelec S teripump C able US E D ONLY WIT H C AR T PM Compact-i (EU) 02375030 for C art 02375075 US E D ONLY WIT H S IDE S caler cable: S atelec S teripump C able DE LIV E R Y AR M Wiring Diagram...
- Page 217 02375039 PM Compact-i (USA-Canada) P anoramic X-R ay V iewer S atelec S teripump C able US E D ONLY WIT H C AR T 02375030 for C art 02375075 US E D ONLY WIT H S IDE S caler cable: Wiring Diagram S atelec S teripump C able DE LIV E R Y AR M...
- Page 219 Instr.4 control valve air exhaust Date PLANMECA OY PNEUMATICAL DIAGRAM 05.02.2003 Asentajankatu 6, Designed PLANMECA COMPACT instrument console 00880 Helsinki Finland P.Peräsaari / M.Jarva Tel +358 9 759 05500 Drawn Fax +358 9 759 05555 S.Jänkävaara www.planmeca.com Checked Rev.D P.Peräsaari / M.Jarva...
- Page 221 Date PLANMECA OY PNEUMATICAL DIAGRAM 05.02.2003 Asentajankatu 6, Designed PLANMECA COMPACT instrument console 00880 Helsinki Finland P.Peräsaari / M.Jarva with Sterile Water System Tel +358 9 759 05500 Drawn Fax +358 9 759 05555 S.Jänkävaara www.planmeca.com Checked Rev.D...
- Page 223 WATER 450 - 700 KPA Date Head Office Planmeca Oy 02.01.2008 PNEUMATICAL DIAGRAM Asentajankatu 6 Designed 00880 Helsinki J.Fröjdman PLANMECA COMPACT with Dürr CAS1 amalgam Finland separating system Drawn tel.+358 20 7795 500 S.Jänkävaara fax.+358 20 7795 555 Checked www.planmeca.com J.Fröjdman...
- Page 225 WATER 450 - 700 KPA Date Head Office Planmeca Oy 02.01.2008 PNEUMATICAL DIAGRAM Asentajankatu 6 Designed 00880 Helsinki J.Fröjdman PLANMECA COMPACT with Dürr amalgam Finland separating system Drawn tel.+358 20 7795 500 S.Jänkävaara fax.+358 20 7795 555 Checked www.planmeca.com J.Fröjdman Rev.D...
- Page 227 WATER 450 - 700 KPA Date Head Office Planmeca Oy 02.01.2008 PNEUMATICAL DIAGRAM Asentajankatu 6 Designed 00880 Helsinki J.Fröjdman PLANMECA COMPACT with Dürr VSA system Finland Drawn tel.+358 20 7795 500 S.Jänkävaara fax.+358 20 7795 555 Checked www.planmeca.com J.Fröjdman Rev.E...
- Page 229 OPTIONAL EJECTOR Note: Separate connection to drainage system required for optional Ejector P16 Yellow AIR 500 - 700 KPA WATER 450 - 700 KPA Date Head Office Planmeca Oy 02.01.2008 PNEUMATICAL DIAGRAM Asentajankatu 6 Designed 00880 Helsinki J.Fröjdman PLANMECA COMPACT...
- Page 231 WATER 450 - 700 KPA Date Head Office Planmeca Oy 02.01.2008 PNEUMATICAL DIAGRAM Asentajankatu 6 Designed 00880 Helsinki J.Fröjdman PLANMECA COMPACT with Metasys Typ1 amalgam Finland separating system Drawn tel.+358 20 7795 500 S.Jänkävaara fax.+358 20 7795 555 Checked www.planmeca.com J.Fröjdman...
- Page 233 WATER 450 - 700 KPA Date Head Office Planmeca Oy 02.01.2008 PNEUMATICAL DIAGRAM Asentajankatu 6 Designed 00880 Helsinki J.Fröjdman PLANMECA COMPACT with Microvac amalgam Finland separating system Drawn tel.+358 20 7795 500 S.Jänkävaara fax.+358 20 7795 555 Checked www.planmeca.com J.Fröjdman Rev.E...
- Page 235 QUICK CONNECTOR OPTIONAL WATER QUICK CONNECTOR WATER OPTIONAL EJECTOR P16 Yellow AIR 500 - 700 KPA WATER 450 - 700 KPA Date Head Office Planmeca Oy 02.01.2008 PNEUMATICAL DIAGRAM Asentajankatu 6 Designed 00880 Helsinki J.Fröjdman PLANMECA COMPACT Finland No suction system Drawn tel.+358 20 7795 500...
- Page 237 AIR 500 - 700 KPA WATER 450 - 700 KPA Date Head Office Planmeca Oy 02.01.2008 PNEUMATICAL DIAGRAM Asentajankatu 6 Designed 00880 Helsinki J.Fröjdman PLANMECA COMPACT Wet suction system Finland Drawn tel.+358 20 7795 500 S.Jänkävaara fax.+358 20 7795 555 Checked www.planmeca.com J.Fröjdman Rev.F...
- Page 239 OPTIONAL WATER QUICK CONNECTOR WATER OPTIONAL EJECTOR P16 Yellow AIR 500 - 700 KPA WATER 450 - 700 KPA Date Head Office Planmeca Oy 02.01.2008 PNEUMATICAL DIAGRAM Asentajankatu 6 Designed 00880 Helsinki J.Fröjdman PLANMECA COMPACT Finland Selective suction system Wet Drawn tel.+358 20 7795 500...
- Page 241 WATER 450 - 700 KPA Date Head Office Planmeca Oy 21.09.2005 PNEUMATICAL DIAGRAM Asentajankatu 6 Designed 00880 Helsinki A.Huotari PLANMECA COMPACT i with water line Finland cleaning system (WCS) Drawn tel.+358 9 759 05500 S.Jänkävaara fax.+358 9 759 05555 Checked www.planmeca.com Rev.A...
- Page 244 PLANMECA OY Asentajankatu 6, 00880 Helsinki, Finland tel. +358 20 7795 500, fax +358 20 7795 555, sales@planmeca.com...
Need help?
Do you have a question about the Compact I and is the answer not in the manual?
Questions and answers