Planmeca Intra User Manual
Intraoral dental x-ray system
Hide thumbs
Also See for Intra:
- Installation manual (68 pages) ,
- Technical manual (58 pages) ,
- Quick reference manual (20 pages)
Table of Contents
Advertisement
Advertisement
Table of Contents

Related Manuals for Planmeca Intra


Summary of Contents for Planmeca Intra
- Page 1 user's manual...
-
Page 3: Table Of Contents
INTRODUCTION ....................1 Symbols ......................... 2 WARNINGS AND PRECAUTIONS ..............3 CHECKLIST - BEFORE USING THE UNIT .............4 PLANMECA INTRA X-RAY UNIT - MAIN PARTS ..........5 General view of the X-ray ....................5 Control panel ........................6 PREPARATIONS FOR THE EXPOSURE ............7 Switching the unit on ...................... - Page 4 IEC364 - equipment is used according to the operating instructions Planmeca pursues a policy of continual product development. Although every effort is made to produce up-to-date product documentation this publication should not be regarded as an infallible guide to current specifications. We reserve the right to make changes without prior notice.
-
Page 5: Introduction
X-ray system. Please read these instructions thoroughly before using the unit. Note that if you use the Dixi digital Intra X-ray system, you need a PC with a Planmeca Dimaxis imaging software to save, view and modify the radiographs. The Dimaxis software has a separate manual, which should be used in conjunction with this manual. -
Page 6: Symbols
Type B equipment (Standard IEC 601-1). Alternating current (Standard IEC-417). Attention, consult accompanying documents (Standard IEC 601-1). Intermediate focal spot (Standard IEC-417). Separate collection for electrical and electronic equipment according to Directive 2002/96/EC (WEEE). Planmeca Intra X-ray Unit User’s Manual... -
Page 7: Warnings And Precautions
Do not use the equipment in close conjunction with sensitive devices, or devices creating high electromagnetic disturbances. CAUTION The SIP/SOP shall not be used in Intra, but only for connection of Dixi equipment. User’s Manual Planmeca Intra X-ray Unit 3... -
Page 8: Checklist - Before Using The Unit
• Make sure that the film you are going to use is fresh. Do not use old film. Store and handle the film according to the manufacturer’s instructions. Planmeca Intra X-ray Unit User’s Manual... -
Page 9: Planmeca Intra X-Ray Unit - Main Parts
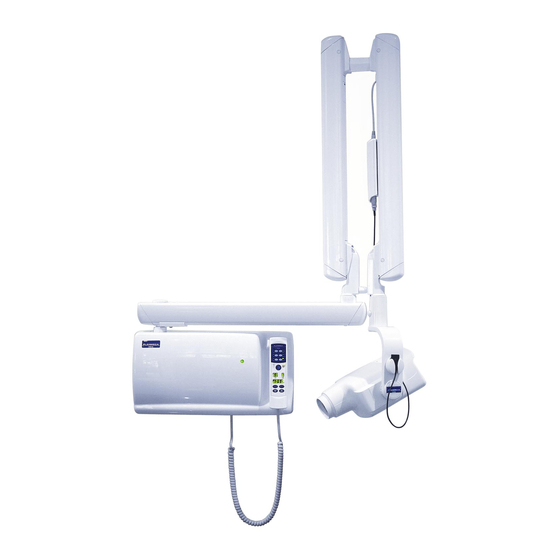
PLANMECA INTRA X-RAY UNIT - MAIN PARTS PLANMECA INTRA X-RAY UNIT - MAIN PARTS General view of the X-ray Support arm Scale for cone angle READY PRET MODE SELECT Tube head Control panel Generator box Horizontal tube head stiffness adjustment screw... -
Page 10: Control Panel
PLANMECA INTRA X-RAY UNIT - MAIN PARTS Horizontal tube head stiffness adjustment screw Control panel One end of the control panel cable is connected to the terminal at the underside of the generator box, and the other end to the control panel. -
Page 11: Preparations For The Exposure
NOTE There are two sets of default exposure values: one for the adult mode and one for the child mode. The unit is always in the adult mode when it is switched on. User’s Manual Planmeca Intra X-ray Unit 7... -
Page 12: Selecting The Cone
Rectangular collimator cone either before the film holder or after it. When the collimator is attached before the film holder, the film holder rotates when the collimator is rotated. Film holder Film holder Rectangular collimator Planmeca Intra X-ray Unit User’s Manual... - Page 13 “EXPOSURE VALUES” on page 36. RINN film holder Attach the RINN compatible rectangular collimator to the long cone. The film holder can be attached to the collimator. RINN compatible rectangular collimator RINN film holder User’s Manual Planmeca Intra X-ray Unit 9...
- Page 14 (2). The cone can be now rotated in its position ±90°. 180˚ Red points The rectangular cone can be removed when the red dots on the short cone and on the rectangular cone are in line. Planmeca Intra X-ray Unit User’s Manual...
-
Page 15: Control Panel
The selected mA value is shown on the mA display. There are seven different values that can be selected: 2 - 8 mA. NOTE The minimum available mA value depends on the local requirements. User’s Manual Planmeca Intra X-ray Unit 11... -
Page 16: Keys And Indicator Lights
The indicator light of the selected projection will come on. Pressing the key a third time will recall the default exposure values. The preprogrammed settings can be changed by the user, see section 14 “PROGRAMMING THE EXPOSURE VALUES” on page 39. Planmeca Intra X-ray Unit User’s Manual... - Page 17 All the keys function as in the film-based imaging mode. Phosphoric mode All the exposure parameters remain selected after the exposure until the user changes the parameters or until the unit is switched off. User’s Manual Planmeca Intra X-ray Unit 13...
- Page 18 Dimaxis program is ready for the exposure, i.e. “Waiting for exposure” message appears on the computer screen. To change the settings of the unit contact your Planmeca technical support. Exposure key When you take an exposure you must press and hold down the exposure key for the duration of the exposure.
-
Page 19: Molar Exposure
The preprogrammed time, kV and mA values appear on the respective displays. The preprogrammed time, kV and mA values can be temporarily changed with the parameter adjustment keys. This will not affect the preprogrammed values. User’s Manual Planmeca Intra X-ray Unit 15... -
Page 20: Patient Positioning
The film or sensor is placed to a film holder which is used to align the film parallel to the long axis of the tooth. Use a long cone for the paralleling technique. Film or Long axis sensor of the tooth Planmeca Intra X-ray Unit User’s Manual... - Page 21 Refer to chapter 5.2 “Selecting the cone” on page 8. Select the cone angle from the table below. ANGLE OF TEETH INCLINATION Molars Maxilla +35° Molars Mandible -5° Position the cone according to the figures below. Maxillary molar Mandibular molar User’s Manual Planmeca Intra X-ray Unit 17...
-
Page 22: Taking An Exposure
Press and hold the exposure key on the control panel for the duration of the exposure. READY PRET MODE SELECT The exposure warning light will come on. You will also hear the radiation warning tone during the exposure. Planmeca Intra X-ray Unit User’s Manual... -
Page 23: Premolar And Canine Exposure
The preprogrammed time, kV and mA values appear on the respective displays. The preprogrammed time, kV and mA values can be temporarily changed with the parameter adjustment keys. This will not affect the preprogrammed values. User’s Manual Planmeca Intra X-ray Unit 19... -
Page 24: Patient Positioning
The film or sensor is placed to a film holder which is used to align the film parallel to the long axis of the tooth. Use a long cone for the paralleling technique. Film or Long axis sensor of the tooth Planmeca Intra X-ray Unit User’s Manual... - Page 25 Select the cone angle from the table below. ANGLE OF TEETH INCLINATION Premolars and Maxilla +45° canine teeth Premolars and Mandible -10° canine teeth Position the cone according to the figure below. Maxillary premolar and canine Mandibular premolar and canine User’s Manual Planmeca Intra X-ray Unit 21...
-
Page 26: Taking An Exposure
Press and hold the exposure key on the control panel for the duration of the exposure. READY PRET MODE SELECT The exposure warning light will come on. You will also hear the radiation warning tone during the exposure. Planmeca Intra X-ray Unit User’s Manual... -
Page 27: Incisor Exposure
The preprogrammed time, kV and mA values appear on the respective displays. The preprogrammed time, kV and mA values can be temporarily changed with the parameter adjustment keys. This will not affect the preprogrammed values. User’s Manual Planmeca Intra X-ray Unit 23... -
Page 28: Patient Positioning
The film or sensor is placed to a film holder which is used to align the film parallel to the long axis of the tooth. Use a long cone for the paralleling technique. Film or Long axis sensor of the tooth Planmeca Intra X-ray Unit User’s Manual... - Page 29 Refer to chapter 5.2 “Selecting the cone” on page 8. Select the cone angle from the table below. ANGLE OF TEETH INCLINATION Incisors Maxilla +55° Incisors Mandible -20° Position the cone according to the figures below. Maxillary anterior Mandibular anterior User’s Manual Planmeca Intra X-ray Unit 25...
-
Page 30: Taking An Exposure
Press and hold the exposure key on the control panel for the duration of the exposure. READY PRET MODE SELECT The exposure warning light will come on. You will also hear the radiation warning tone during the exposure. Planmeca Intra X-ray Unit User’s Manual... -
Page 31: Occlusal Exposure
The preprogrammed time, kV and mA values appear on the respective displays. The preprogrammed time, kV and mA values can be temporarily changed with the parameter adjustment keys. This will not affect the preprogrammed values. User’s Manual Planmeca Intra X-ray Unit 27... -
Page 32: Patient Positioning
Patient positioning Ask the patient to sit down. Place a protective lead apron over the patient’s chest. In the intraoral occlusal exposures the film or sensor is positioned between patient’s upper and lower teeth. Planmeca Intra X-ray Unit User’s Manual... - Page 33 Select the cone angle from the table below. ANGLE OF TEETH INCLINATION Occlusal Maxilla +75° exposure Occlusal Mandible -60° exposure Position the cone according to the figures below. Film Film Maxillary occlusal Mandibular occlusal User’s Manual Planmeca Intra X-ray Unit 29...
-
Page 34: Taking An Exposure
Press and hold the exposure key on the control panel for the duration of the exposure. READY PRET MODE SELECT The exposure warning light will come on. You will also hear the radiation warning tone during the exposure. Planmeca Intra X-ray Unit User’s Manual... -
Page 35: Endodontic Exposure
15, 8 “PREMOLAR AND CANINE EXPOSURE” on page 19 and 9 “INCISOR EXPOSURE” on page 23 for more information. It is possible to program two sets of exposure parameters with the endodontic exposure; adult and child. User’s Manual Planmeca Intra X-ray Unit 31... -
Page 36: Bite-Wing Exposure
The preprogrammed time, kV and mA values appear on the respective displays. The preprogrammed time, kV and mA values can be temporarily changed with the parameter adjustment keys. This will not affect the preprogrammed values. Planmeca Intra X-ray Unit User’s Manual... -
Page 37: Patient Positioning
Ask the patient to sit down. Place a protective lead apron over the patient’s chest. In the bite-wing exposures the patient closes the teeth during the exposure on the film’s tab or on the film/sensor holder. User’s Manual Planmeca Intra X-ray Unit 33... - Page 38 Refer to chapter 5.2 “Selecting the cone” on page 8. Select the cone angle from the table below. ANGLE OF TEETH INCLINATION Bite-wing exposure 5° Position the cone according to the figure below. Bite-wing Planmeca Intra X-ray Unit User’s Manual...
-
Page 39: Taking An Exposure
Press and hold down the exposure key on the control panel for the duration of the exposure. READY PRET MODE SELECT The exposure warning light will come on. You will also hear the radiation warning tone during the exposure. User’s Manual Planmeca Intra X-ray Unit 35... -
Page 40: Exposure Values
PATIENT time Adult 0.160 Child 0.120 NOTE When using the digital sensor change the exposure values by pressing the MODE key. PATIENT time Adult 0.050 Child 0.040 PATIENT time Adult 0.160 Child 0.125 Planmeca Intra X-ray Unit User’s Manual... -
Page 41: Preprogrammed Settings Values
Adult Maxilla 0.050 0.050 0.064 70 0.050 0.050 63 0.050 Mandible 60 0.040 0.040 0.050 70 0.050 Child Maxilla 0.032 0.040 0.050 66 0.040 0.040 60 0.040 Mandible 60 0.020 0.032 0.040 66 0.040 User’s Manual Planmeca Intra X-ray Unit 37... - Page 42 Adult Maxilla 0.125 0.125 0.160 70 0.160 0.160 63 0.160 Mandible 60 0.100 0.100 0.125 70 0.160 Child Maxilla 0.064 0.080 0.100 66 0.125 0.125 60 0.125 Mandible 60 0.040 0.064 0.080 66 0.125 Planmeca Intra X-ray Unit User’s Manual...
-
Page 43: Programming The Exposure Values
Press the SELECT key briefly, the kV display will start to flash and the exposure time value is stored in the memory. The kV value can now be changed with the parameter adjustment keys. User’s Manual Planmeca Intra X-ray Unit 39... - Page 44 (dark exposures). Select the child/adult mode and program its settings as described above or exit the programming mode by pressing and holding down the SELECT key. The density value is stored in the memory. Planmeca Intra X-ray Unit User’s Manual...
-
Page 45: Programming The Preprogrammed Settings
The time display and the ready light will start to flash. The imaging mode can be changed by pressing the MODE key briefly. User’s Manual Planmeca Intra X-ray Unit 41... - Page 46 SELECT key (about 4 seconds). You will hear a signal tone. NOTE If you interrupt programming for over 45 seconds, the unit automatically exits the programming mode, and the current values will be stored in the memory. Planmeca Intra X-ray Unit User’s Manual...
-
Page 47: 15 Cleaning
PLANMECA service technician once a year or after every 10 000 exposures if this is sooner. Please refer to the Planmeca Intra Technical Manual for complete servicing information. User’s Manual... -
Page 48: Exposure Value Tables
P M O MAXILLA adult MANDIBLE 57 kV/ MAXILLA adult MANDIBLE 55 kV/ MAXILLA adult MANDIBLE 52 kV/ MAXILLA adult MANDIBLE 50 kV/ MAXILLA adult MANDIBLE mA TIME 70 kV/ P M O MAXILLA child MANDIBLE Planmeca Intra X-ray Unit User’s Manual... - Page 49 P M O MAXILLA adult MANDIBLE 57 kV/ MAXILLA adult MANDIBLE 55 kV/ MAXILLA adult MANDIBLE 52 kV/ MAXILLA adult MANDIBLE 50 kV/ MAXILLA adult MANDIBLE INCISORS MOLARS PREMOLARS AND CANINES OCCLUSAL EXPOSURE User’s Manual Planmeca Intra X-ray Unit 45...
-
Page 50: Exposure Values For Dixi2 V1 Sensors (High Sensitivity)
MANDIBLE 8 mA 57 kV/ MAXILLA adult MANDIBLE 8 mA 55 kV/ MAXILLA adult MANDIBLE 8 mA 52 kV/ MAXILLA adult MANDIBLE 8 mA 50 kV/ MAXILLA adult MANDIBLE INCISORS PREMOLARS AND CANINES MOLARS Planmeca Intra X-ray Unit User’s Manual... - Page 51 8 mA 57 kV/ MAXILLA adult MANDIBLE 8 mA 55 kV/ MAXILLA adult MANDIBLE 8 mA 52 kV/ MAXILLA adult MANDIBLE MAXILLA 8 mA 50 kV/ adult MANDIBLE INCISORS PREMOLARS AND CANINES MOLARS User’s Manual Planmeca Intra X-ray Unit 47...
-
Page 52: Exposure Values For Dixi2 V3 Sensors
MANDIBLE 8 mA 57 kV/ MAXILLA adult MANDIBLE 8 mA 55 kV/ MAXILLA adult MANDIBLE 8 mA 52 kV/ MAXILLA adult MANDIBLE 8 mA 50 kV/ MAXILLA adult MANDIBLE INCISORS PREMOLARS AND CANINES MOLARS Planmeca Intra X-ray Unit User’s Manual... - Page 53 8 mA 57 kV/ MAXILLA adult MANDIBLE 8 mA 55 kV/ MAXILLA adult MANDIBLE 8 mA 52 kV/ MAXILLA adult MANDIBLE MAXILLA 8 mA 50 kV/ adult MANDIBLE INCISORS PREMOLARS AND CANINES MOLARS User’s Manual Planmeca Intra X-ray Unit 49...
-
Page 54: Error Codes
Communication error between control panel and tube head CPU. E r. 7 1 FLASH memory check-sum error (tube head CPU). E r. 8 1 EEPROM memory defective (tube head CPU). E r. 8 3 Config register error (tube head CPU). Planmeca Intra X-ray Unit User’s Manual... -
Page 55: Disposal Of The Unit
DISPOSAL OF THE UNIT DISPOSAL OF THE UNIT In order to reduce the environmental load over the product’s entire lifecycle, PLANMECA’s products are designed to be as safe as possible to manufacture, use and dispose of. Parts which can be recycled should always be taken to the appropriate processing centres, after hazardous waste has been removed. -
Page 56: Technical Specifications
100V~ or 110-115V~ voltage setting: 15AT, 250V, slow blow (6.3x32mm) (special fuse, manufacturer Bussmann, type MDA) units with 220-240V~ voltage setting: 8AT, 250V, slow blow (6.3x32mm) (special fuse, manufacturer Bussmann, type MDA) Planmeca Intra X-ray Unit User’s Manual... - Page 57 -10°C - +50°C transport -10°C - +50°C Humidity 25% - 75% Atmospheric pressure range 700 hPa - 1060 hPa Original manufacturer PLANMECA Oy, Asentajankatu 6, FIN-00880, Helsinki, FINLAND phone: +358-20-7795 500, fax: +358-20-7795 555 User’s Manual Planmeca Intra X-ray Unit 53...
-
Page 58: Dimensions (In Mm)
Dimensions (in mm) (18") 320º 450º 385 (opt) (15.2") 535 (opt) (21.1") 75,5 760 (std) (29.9") 1230,8 (48,4") 835 (opt) (32.9") (3") 305º 123,8 1525(opt) (60") (4,9") 1675(opt) (66") 165,9 1900(std) (74,8") 1975(opt) (77,8") (6,5") Planmeca Intra X-ray Unit User’s Manual... -
Page 59: User's Statement For Planmeca Intra
TECHNICAL SPECIFICATIONS 20.3 User’s statement for Planmeca Intra Radiation leakage technique factors The maximum rated peak tube potential is 70 kV and the maximum rated continuous tube current is 0.53 mA for the maximum rated peak tube potential. Minimum filtration The radiation port contains an added 1.0 mm aluminium filtration. - Page 60 70 kV, 8 mA The nominal electric power for a load time of 0.1 sec and at the nominal x-ray tube voltage 1.4 kW at 70 kV, 8 mA Anode heating/cooling curve of the X-ray tube Planmeca Intra X-ray Unit User’s Manual...
- Page 61 X-ray tube assem bly heating/cooling curve 18 W 13 W Cooling Tim e (m in) Reference axis to which the target angle and the focal spot characteristics of the tube head assembly refer 16° User’s Manual Planmeca Intra X-ray Unit 57...
- Page 62 Values of loading factors concerning leakage radiation 70 kV, 8 mA Tolerances of the focal spot on the reference axis X= ±0.5 mm (sideways) Y= ±0.5 mm (in depth) Z= ±0.5 mm (in height) Planmeca Intra X-ray Unit User’s Manual...
- Page 64 Planmeca Oy | Asentajankatu 6 | 00880 Helsinki | Finland tel. +358 20 7795 500 | fax +358 20 7795 555 | sales@planmeca.com | www.planmeca.com...
Need help?
Do you have a question about the Intra and is the answer not in the manual?
Questions and answers
Why does our pro style intra change exposure time setting after every exposure?
The Planmeca Intra X-ray unit retains the selected exposure parameters after an exposure until the user changes them or the unit is switched off. However, the unit automatically returns to the time adjustment mode after 5 seconds if kV, mA, or exposure time is adjusted. Additionally, the waiting time between exposures is 15 times the exposure time, with a minimum of 6 seconds. This ensures proper operation and safety by preventing rapid consecutive exposures.
This answer is automatically generated