Advertisement
Quick Links
Home
About this Site
Section 508 Compliance
Copyright Declarations
Typographic Conventions
Symbol Usage
Navigation
Supported Browsers
Recommended Screen Display
Interactive Content
Third Party Licenses
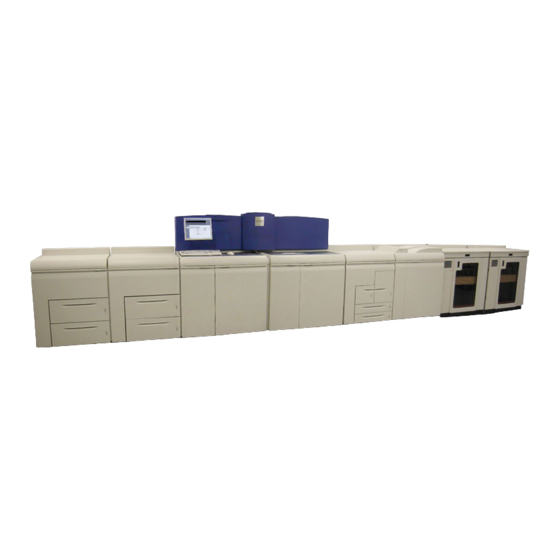
System Tour
Sheet Feed Modules
Sheet Enhancement Module
Print Engine - EA
Print Engine - 288
Control Console
Multifunction Finisher Interface
Multifunction Finisher (MFF)
Automatic Document Feeder
How Do I?
Contacting Xerox
Copying Overview
Setting up a Copy Job
Copying 2-Sided Pages
Adjusting Output Size
Managing Copy Jobs
Making a Stapled Copy
Using the Document Feeder
Finishing
Delivering Document Sets To the Stacker
Making a Booklet
Booklet Size Limitations
Using Offset to Separate Documents in a Stack
Creating Folded Documents
Printing Pads
Using the Basic Finishing Module (BFM)
Using the Finishing Transport Module (FTM)
Changing DFA Configurations for 3rd Party Finishers
Using the Multifunction Finisher (MFF)
Adjusting Image Quality
About Image Processing
Choosing the Best Original Type
About Contrast
Adjusting Contrast
About Lightness
About Sharpness
Adjusting Sharpness
Choosing the Best Halftone Setting
Printing Overview
Printing From the Media Drive
Setting up a Print Job
Printing with the Parallel RIP Feature
Printing 2-Sided Pages
Printing a Job From Your PC
Available Client / Print Drivers
Nuvera 9.0 User Guide and Training Aid
Advertisement

Related Manuals for Xerox Nuvera EA


Summary of Contents for Xerox Nuvera EA
- Page 1 Print Engine - 288 Control Console Multifunction Finisher Interface Multifunction Finisher (MFF) Automatic Document Feeder How Do I? Contacting Xerox Copying Overview Setting up a Copy Job Copying 2-Sided Pages Adjusting Output Size Managing Copy Jobs Making a Stapled Copy...
- Page 2 Managing Print Jobs Reprinting a Saved Job Printing Directly From a Mainframe Computer with LCDS VIPP Support Working with IPDS Working with Queues Scanning Your Document Setting up a Scan Job Choosing a Scan File Format Setting Image Resolution Scanning a 2-sided Document Using the System with FreeFlow Editing Images Erasing Unwanted Edge Markings...
- Page 3 Maintenance Machine Specifications Supported Papers Recommendations for Paper Usage Supported Paper Sizes: Trays 1 and 2 Supported Paper Sizes: Trays 3 and 4 Document Feeder & Scanner Specifications Printer Capabilities Finisher Specifications Basic Finishing Module (BFM) Specifications FTM Specifications Stapler Specifications Keyboard, Mouse &...
- Page 4 Poor or Slow System Performance Solving Image Quality Problems Removing Moiré from Images About Halftones and Gray Levels Removing Lines, Streaks, or Shadows Correcting Posterization About Posterization and Gray Levels Correcting Halo Removing Background Artifacts Removing Image Show Through Removing Spots & Specks Recovering Missing Parts of the Image Removing Drill Holes From Output 4 of 256...
- Page 5 Production System System This User Guide and Training Aid contains information The Xerox Nuvera EA Production System is a digital black The Xerox Nuvera 288 Perfecting System is a digital in an easy to use, point of need format. It contains...
- Page 6 Maintenance Problem Solving About this Site There are several features in this online user guide that you should be familiar with in order to quickly gain knowledge about the Xerox Nuvera. Most important is that you be aware of the...
- Page 7 Problem Solving Section 508 Compliance / Keyboard Accessibility The Xerox Nuvera User Interface is fully compliant with Section 508 of the Rehabilitation Act Amendments of 1998. All controls on the user interface can be accessed using either keyboard or mouse.
- Page 8 Problem Solving Copyright and Trademark Declarations © 1998-2008 Xerox Corporation. All rights reserved. Xerox® and the sphere of connectivity design, Xerox Nuvera®, FreeFlow®, DocuTech®, DocuSP®, DigiPath®, and CentreWare®, VIPP® (Variable-data Intelligent PostScript Printware) and "Keep the Conversation Going. Share the Knowledge." are registered trademarks of Xerox Corporation in the US and/or other countries.
- Page 9 Home Resources Search Index About this Site How Do I? System Tour Maintenance Problem Solving Typographic Conventions Bold type is used for technical terms, including application specific concepts and the names of click-able interface elements such as commands, dialog boxes, windows, menus, buttons and fields. Italic type is used for emphasis.
- Page 10 Home Resources Search Index About this Site How Do I? System Tour Maintenance Problem Solving Symbol Usage Throughout this web site and on the machine itself, symbols are used to draw your attention to important safety notices and useful information. Observe all cautions, hazards and warnings closely. When performing maintenance or clearing jams on the machine, be sure to pay attention to these symbols wherever they appear.
- Page 11 Home Resources Search Index About this Site How Do I? System Tour Maintenance Problem Solving Navigation This web site is designed in such a way as to make it easy for you to find the exact information you need, without having to click through extraneous topics.
- Page 12 Home Resources Search Index About this Site How Do I? System Tour Problem Solving Maintenance Supported Browsers This web site has been tested with the most popular Web browsers, including Opera 7, Internet Explorer 6, and Netscape 7.0. Internet Explorer versions 5.0+ should work also, but have not been tested. Netscape 6.0 has not been tested.
- Page 13 Home Resources Search Index About this Site How Do I? System Tour Maintenance Problem Solving Recommended Screen Display The UGTA pages were designed to be viewed at a screen resolution setting of 96 dpi. If your screen setting on your PC is set to a larger screen setting such as 120 dpi, you may see this larger text font exceeding the allotted page space and overwriting other text.
- Page 14 Interactive Content User interface simulation This system is designed to let you learn about the capabilities of the Xerox Nuvera from the comfort of your own desk. The "System Tour" section allows you to become familiar with the system and its controls at your own pace. It also serves as a quick visual reference, in the event you forget what a particular control is for or you need to see the panel while reading a procedure.
- Page 15 As a requirement of the GNU GPL terms and conditions, a list of the source code for the above programs can be found in the www. xerox.com web site for the product or can be ordered from Xerox. 15 of 256 file:///C|/Documents%20and%20Settings/Miz%20B/My%20D...0UGTA/Nuvera%209.0%20UGTA_FINAL/English/about_80.htm8/13/2008 1:33:26 PM...
- Page 16 Full, Basic, CPW (XPP) or ISO Diagnostics License Speed License - 100, 120 or 144 ppm are available on Your Xerox Nuvera EA Production System can be configured systems with a BFM/BFM Plus and/or FTM. The with a variety of modules. Select the links below for information 100/120 license is on systems with MFF.
- Page 17 2-Tray Feed Module - two high capacity large stock feed trays. Jam Clearance Contacting Xerox Basic Finisher Module - stacker/stapler with top tray. 3-Tray Feed Module - The 3-Tray Feed Module is a modification of the 4-Tray Feed Module. It can be combined with a 4-Tray or a 2-Tray module.
- Page 18 Xerox DB120-D Document Binder Xerox Manual and Book Factory Control Console - houses the computer components that drive your Xerox Nuvera system. The mouse driven Xerox Tape Binder UI provides access to the tools to manage jobs and the system.
- Page 19 Special features Licensed Features System The Xerox Nuvera 288 Perfecting System is a high speed, The software options available to you depend on the duplex, black and white Production printing system with the licenses that were installed and enabled on your system...
- Page 20 Tray or 3-Tray SFM must be used with the Roll Feeder Engine option. Control Console - houses the computer components that drive your Xerox Nuvera system. The mouse driven UI provides access to the tools to manage jobs and the system. Finishing Transport Module - enables inline finishing by providing document transport capability and full DFA support to DFA-compliant finishing devices.
- Page 21 Sheet Feed Modules (SFM) The Sheet Feed Modules hold your paper and feed the appropriate stock for the current job settings. The Xerox Nuvera System can be configured with a 4-Tray Feed Module, a 2-Tray Feed Module or a 3-Tray Feed Module. Your system can include up to two SFMs in any combination of 4-Tray, 2-Tray or 3-Tray.
- Page 22 Problem Solving Sheet Enhancement Module(SEM) The Sheet Enhancement Module on the Xerox Nuvera EA Production System and the Xerox Nuvera 288 Perfecting System is a standard component on all configurations except for those with a Multifunction Finisher. Located to the right of the print engine, it is used to remove upcurl or downcurl in paper as it passes through the module from the print engine. This feature is performed automatically by the system when the Decurl Automatic Mode is selected.
- Page 23 The Print Engine houses the xerographic components that transfer the digital image to the paper at the photoreceptor. The toner from the dry ink container is then fused to the paper in the Fuser. The Xerox Nuvera EA Production System and Xerox Nuvera 288 Perfecting System print engines do not support MICR printing and uses EA dry ink only. For details, features and functions of the various components, browse the links below.
- Page 24 Image Output Terminal (Printer and Fuser) Module 24 of 256 file:///C|/Documents%20and%20Settings/Miz%20B/My%...TA/Nuvera%209.0%20UGTA_FINAL/English/wdtbd_20.htm (2 of 2)8/13/2008 5:57:24 PM...
- Page 25 The unique paper path on the Xerox Nuvera 288 Perfecting System On the Xerox Nuvera 288 Perfecting System, the first print engine is referred to as A1 and the second is A2. Print Engine A1 prints side one on its simplex paper path, inverts the sheet and then passes it to A2.
- Page 26 Image Output Terminal (Printer and Fuser) Module 26 of 256 file:///C|/Documents%20and%20Settings/Miz%20B/My%...TA/Nuvera%209.0%20UGTA_FINAL/English/wdtbd_25.htm (2 of 2)8/13/2008 5:57:22 PM...
- Page 27 Problem Solving Control Console Jobs are programmed using the keyboard or mouse to click the buttons on the control screen. The Xerox Nuvera can also print jobs stored on CD. Browse the links below for more details about features and functions.
- Page 28 Multifunction Finisher (MFF) Interface The Interface Module on the Multifunction Finisher Professional is part of the paper path that allows the Xerox Nuvera to connect to the Multifunction Finisher. For the Multifunction Finisher Pro Plus, it is also an Insertion Module that includes an Insertion Tray on top and a Hole Punch unit and waste bin inside.
- Page 29 The Interface Module on the Multifunction Finisher Professional is part of the paper path that allows the Xerox Nuvera to connect to the Multifunction Finisher. For the Multifunction Finisher Pro Plus, it is also an Insertion Module that includes an Insertion Tray on top and a Hole Punch unit and waste bin inside.
- Page 30 Multifunction Finisher (MFF) MFF Professional MFF Pro Plus: Insertion Module To learn about the MFF models and their features, refer to Finisher specifications. To learn about clearing jams in this area, refer to Clearing paper jams. 30 of 256 file:///C|/Documents%20and%20Settings/Miz%20B/My%...TA/Nuvera%209.0%20UGTA_FINAL/English/wdtbd_40.htm (2 of 2)8/13/2008 5:58:59 PM...
- Page 31 Home Resources Search Index About this Site How Do I? System Tour Maintenance Problem Solving Automatic Document Feeder Use the Automatic Document Feeder for rapid scanning of stacks of documents. Browse the links below for more information. 1. Document Glass (not shown) Scanning from the Document Glass Cleaning the Document Glass 2.
- Page 32 How Do I... Your Xerox Nuvera is a fast, high-volume, networked Production publishing and printing system. It is comprised of multiple modules and configurations, and can accommodate various finishing devices. Depending on the Nuvera configuration available to you, you can become a one-person publishing shop, creating booklets, scanning images and documents for Optical Character Recognition (OCR), and storing documents on the system to be printed as needed.
- Page 33 Provide real-time recommendations to help optimize overall performance Use MeterAssistant to automatically generate accurate meter reads and submit them to Xerox To read more about Xerox prInteract Remote Service Offerings , go to the Remote Services link on the Home Page. To submit system data: 1.
- Page 34 Contacting Xerox Xerox Canada Supplies: 1-800-668-0199 Internet: Xerox Parts Ordering Contact your Xerox representative for Support and Supplies in all other countries. CRU/Maintenance/Consumables part names and numbers Part Name Part Number 6R1261 - North America EA (Emulsion Aggregation) Dry Ink...
- Page 35 1. Place your document face up in the Document Feeder or face down on the Document Glass. 2. Click the Copy Services button. Adjust the job settings under each tab. 3. Select the <Start> button. The Xerox Nuvera also offers many powerful features for reproducing documents: Copy jobs with mixed size originals Make booklets...
- Page 36 Setting up a Copy Job This topic explains how to copy documents. For more detailed information and specialized procedures, explore the links in this topic and the column at the left. NOTE: This feature is only available if your system includes the integrated Document Scanner module for copying and scanning jobs.
- Page 37 The Xerox Nuvera makes it easy to copy 2-sided (duplex) originals, either from the document glass or from the high-speed Document Feeder. To copy 2-sided pages from the Document Feeder The Xerox Nuvera is equipped with a high-speed Document Feeder. For details about what kind of papers can be fed through the document feeder, see Document Feeder Specifications.
- Page 38 Trays button, select a tray, and right-click to enable one of the tray selections. NOTE: The APS feature is active by default. APS applies to copy jobs only. See also: Supported Paper for details on paper sizes and types you can use with the Xerox Nuvera. 38 of 256 file:///C|/Documents%20and%20Settings/Miz%20B/My%20D...UGTA/Nuvera%209.0%20UGTA_FINAL/English/hdi_c_030.htm8/13/2008 2:08:44 PM...
- Page 39 Not all job programming choices can be modified. Sample workflow to edit a held Copy job 1. In the Xerox Nuvera user interface, click the <Copy> button. 2. Make sure "Proof 1 Copy and Hold" is selected for Job Type.
- Page 40 To generate a stapled copy job 1. Orient your original documents according to the instructions shown on the Document Feeder. 2. In the Xerox Nuvera user interface, select the appropriate paper/staple orientation icon. 3. When satisfied with your settings, click <Copy>.
- Page 41 NOTE: This feature is only available if your system Feeder includes the integrated Document Scanner module for copying and scanning jobs. The Xerox Nuvera is equipped with a Document Feeder, allowing you to quickly scan large document sets into the system for processing. Scanning from the Document Glass...
- Page 42 Using the Multifunction Finisher (MFF) The Xerox Nuvera can include a Multifunction Finisher (MFF). There are two MFF models: the Professional and the Pro Plus. Explore the links at the left to learn all of the ways to utilize the MFF.
- Page 43 NOTE: The MFF is the basic or standard finisher on Xerox Nuvera. It is not available with any other finishers and the Sheet Enhancement Module is not part of the configuration. Basic Finishing Module (BFM) The BFM includes a top tray, which serves as a purge tray and as a destination for stocks ineligible for delivery to the stacker (refer to the CED for stock compatible with the system).
- Page 44 Delivering Document Sets To the Stacker 4. Remove stack from stacker tray. 5. Push tray back into the BFM. 6. Close the access door. What the LED means LED is On = BFM is in use LED is Off = BFM is not in use or is initializing after an unload (Do not open BFM front door) LED is Steady = Stacker tray is lowering (Do not open BFM front door) LED is Blinking Slow = Stacker tray is lowering for an unload and the request to open the BFM front door is recognized LED is Blinking Fast = OK to open the BFM front door...
- Page 45 Capabilities. To make a booklet Multiple-page documents can be arranged in a folded and bound output, most commonly called a booklet. The Xerox Nuvera allows you to set up a booklet output job in a few different ways. Two conditions must be in place in order to process a booklet job: 1.
- Page 46 Program the Booklet Layout in the job properties and release it. For more information on printing from a client application, see Printing from your For detailed information about the controls used in these workflows, see the Xerox Nuvera online Help system. 46 of 256 file:///C|/Documents%20and%20Settings/Miz%20B/My%2...TA/Nuvera%209.0%20UGTA_FINAL/English/hdi_f_040.htm (2 of 2)8/13/2008 2:14:08 PM...
- Page 47 Problem Solving Booklet Size Limitations To avoid sheet misfeeds or jams, you should understand how booklet sizes, stapled and unstapled, are expected to be handled by the Xerox Nuvera. Maximum Booklet Sizes (in sheets) For stapled sets: For best results, the maximum booklet size (number of sheets that make up the booklet) is 15 sheets of 80gsm paper (or 14 sheets of 80gsm, and 1 sheet of 200gsm cover stock).
- Page 48 Using Offset to Separate Documents in a Stack Printing large volumes of documents is not a problem for the Xerox Nuvera. However, sorting and delivering those documents to people is difficult and time consuming if the output is all in one stack. You can program your jobs to include offset for finishers that have stacking capabilities.
- Page 49 Making Folded Documents For those Xerox Nuvera systems that include a Multifunction Finisher (MFF), you will have C and Z-Folding capabilities for 8.5 X11 inch and A4 stock. All that is required is either an original document or print-ready file that is formatted for this type of output.
- Page 50 Printing Pads You have the ability to produce printed pads on all Xerox Nuvera systems. Pads are typically single sheet forms, often with a card stock back cover and a glued binding on the top edge. Each sheet can be torn off the pad as needed.
- Page 51 Enable/Disable Automatic Image Permanence for All Stock Weights The Xerox Nuvera is designed to optimize fusing performance across the supported range of paper types and weights. The BFM uses the paper weight programmed when loading paper to optimize registration and compiling. Enable the AIP selection from [System: User Diagnostics] to achieve the best fuse temperature and minimize curl in the stacked output.
- Page 52 Using the Basic Finishing Module (BFM) NOTE: When running smaller stapled sets (15 sheets or less), limit the quantity to 100 maximum. Unload the stacker after each quantity is completed. Set BFM Registration Values Paper registration at the BFM is impacted by curl. Follow the steps below to improve paper registration quality at the BFM for each BFM on the system.
- Page 53 Using the Basic Finishing Module (BFM) 5. Close the Elevator Tray. Related Hints and Tips Tab behaviors for non-MFF systems only On non-MFF systems, tab jobs are delivered to the finisher face down in 1 to N order. As such, the following must be noted: Tabs must be loaded in the feeder tray in 1 to N order (commonly referred to as forward-ordered tabs) There are no special loading instructions required for drilled or pre-printed stock.
- Page 54 If you have a 3rd party finisher attached to your system, you will also have a Finishing Transport Module (FTM). The FTM is an interface between the main printing area of the Xerox Nuvera EA Production System or Xerox Nuvera 288 Perfecting System and a DFA-compliant finishing device of some type, such as a stapler, binder, booklet maker or folder.
- Page 55 For information about FTM specifications, see Finishing Transport Module (FTM) Specifications. For details on the specifications of the DFA-compliant 3rd Party Finishers, contact your Xerox representative for the Solutions Planning Guide for that finisher. 55 of 256 file:///C|/Documents%20and%20Settings/Miz%20B/My%...uvera%209.0%20UGTA_FINAL/English/hdi_f_XIM_00.htm (2 of 2)8/13/2008 2:17:05 PM...
- Page 56 Using the Multifunction Finisher (MFF) Pro Plus Using the MFF Pro Plus allows you to finish your jobs using the same features available on the MFF Professional but also includes an insertion module that offers these additional finishing features: An Insertion Tray for inserting preprinted tabs, covers and colored sheets into your job A 2/3 or 2/4 Hole Punch capability To Insert Preprinted Sheets on the MFF Pro Plus To insert covers, preprinted tabs or colored paper into your job, follow these steps:...
- Page 57 Finishing NOTE: If you have a MFF with hole punch and both the 2/3 and 2/4 hole punch dies, any job programmed for 2 hole punch will punch with either die loaded. Be sure the appropriate hole punch die is loaded before submitting the job. On a 2/4 hole punch, the two center holes are 80 mm apart.
- Page 58 Adjusting Image Quality The Xerox Nuvera user interface contains a set of Image Quality adjustment tools for Copy, Scan to File and Print jobs. Using these controls, you can make adjustments to images containing text, photographic images, halftoned images, as well as documents with mixed image types.
- Page 59 Adjusting Image Quality About Toner Saver The Toner Saver Print Quality selection is intended to save toner costs, similar to draft mode. NOTE: Toner Saver is designed to save toner, and can produce poor image quality and undesirable, light, or washed-out prints. 59 of 256 file:///C|/Documents%20and%20Settings/Miz%20B/My%2...GTA/Nuvera%209.0%20UGTA_FINAL/English/iq_adj00.htm (2 of 2)8/13/2008 2:22:36 PM...
- Page 60 Also, the halftones available to you depends on whether the Enhanced Line Screen license is enabled or not. The Xerox Nuvera is a digital imaging system. The scanner converts full color optical (analog) images to a gray digital image (0-255 gray scales).
- Page 61 Home Resources Search Index About this Site System Tour Maintenance Problem Solving Choosing the Best Original Type (when scanning or copying) Original Type is the most important image quality setting for copying images. When selecting an original type use a default setting for sharpness, contrast, darkness and background suppression.
- Page 62 Choosing The Best Original Type TIP: One of the advantages of build job is the ability to set Original Type for each section or page of the build job. For information on Build Job see Using Build Job. TIP: It is best practices to proof a job when you make image quality adjustments. 62 of 256 file:///C|/Documents%20and%20Settings/Miz%20B/My%2...GTA/Nuvera%209.0%20UGTA_FINAL/English/hdi_iq80.htm (2 of 2)8/13/2008 2:17:06 PM...
- Page 63 Limits of Contrast controls The Contrast control on the Xerox Nuvera applies to all of the pixels in an image at once. In other words, changing the contrast in the midtones of your image will also affect highlights and shadows.
- Page 64 About the Contrast control. To adjust contrast 1. In the Xerox Nuvera user interface, click the Copy button. 2. Click the Image Quality tab. 3. Click the Image Adjustments button. 4. Move the slider right or left to increase or decrease (respectively) the amount of contrast.
- Page 65 Home Resources Search Index About this Site How Do I? System Tour Problem Solving Maintenance About Lightness/Darkness Figure 1: The Lighten/Darken control makes all tones lighter or darker. Increasing Lightness/Darkness moves all tones in the image toward white. Decreasing Lightness/Darkness moves all tones toward black.
- Page 66 TIP: It is best to proof a job when you make image quality adjustments. Adjust Lightness/Darkness for Printing 1. In the Xerox Nuvera user interface, select Image Quality on the Printer menu. 2. To select a printer darkness value, select the [Setup] button and choose one of the following Print Quality modes: Best mode -the default and recommended for most jobs, especially those on uncoated stocks.
- Page 67 Home Resources Search Index About this Site System Tour Problem Solving Maintenance About Sharpness Figure 1 A sharp image has clean, crisp edges. Sharpness effects local areas which transition quickly from light to dark tones such as the edge of a building against the sky or the edge of a line against a white background.
- Page 68 About the Sharpness control. To adjust sharpness 1. In the Xerox Nuvera user interface, click the Copy button. 2. Click the Image Quality tab. 3. Click the Image Adjustments button. 4. Move the Sharpness slider right or left to increase or decrease (respectively) the amount of sharpness.
- Page 69 Choosing the Best Halftone Setting If the Enhanced Line Screen license is enabled on your system, the Xerox Nuvera supports a variety of halftones when printing. If this license is not installed and enabled, the system offers a 125 lpi line screen. Also, the available selections depend on the Page Description Language (PDL) being submitted.
- Page 70 You can print with the Xerox Nuvera in several ways: If you have a network you can submit a job to the Xerox Nuvera printer directly from your desktop through your Internet browser. You can download drivers and print directly from your desktop applications.
- Page 71 Printing Overview Tab job with drilled For MFF configurations only: When running a tab job with pre-drilled paper for the main body pages, the pre- paper (MFF drilled paper must be loaded with the holes leading, which is opposite of what the label on the tray indicates. configs.
- Page 72 Printing from the Media Drive One way to submit a print job is to load the file into the system from a data CD or DVD. Once the file to be printed is loaded in the Xerox Nuvera, it can be programmed for output and printed immediately, or it can be saved for printing at a later time.
- Page 73 Setting up a Print Job The Xerox Nuvera offers a wide array of features to support your workflow needs. You can make a print using the default settings in either a client-based printer driver, or on the tabbed user interface. Or, you can use either of those methods to make changes to your document.
- Page 74 Setting up a Print Job NOTE: All DFA finishing profiles available on the system will display. If you send the job to a finisher that is not enabled, the job faults to the inactive job queue in Job Manager. Contact your System Administrator to enable or disable DFA finishing profiles.
- Page 75 5, then pages 1 through 4 will be finished as a unit and pages 5 through the end of the job will be finished as a separate unit. This is the same behavior as other Xerox production printers, such as the DocuTech 6180.
- Page 76 Problem Solving Printing with the Parallel RIP feature The Xerox Nuvera 288 Perfecting System includes page independent Parallel RIP (PPR) as a standard feature used to improve image processing performance and print speed, especially for complex documents. How the Parallel RIP process works Parallel RIP works with page independent jobs that are compliant with Adobe Document Structuring Conventions (DSC) 3.0, such as...
- Page 77 Setting up a Print Job Explore the links at the left to learn more about ways to submit print jobs. 77 of 256 file:///C|/Documents%20and%20Settings/Miz%20B/My%2...TA/Nuvera%209.0%20UGTA_FINAL/English/hdi_p_015.htm (2 of 2)8/13/2008 2:19:36 PM...
- Page 78 When submitting a print job from a client driver or the web-based interface, single or two-sided printing can be specified at that time. However, there may be instances when you'll need to override that programming from the actual Xerox Nuvera user interface.
- Page 79 The Hot Folders feature on the FreeFlow Print Server user interface allows you to drag and drop your print-ready jobs from your networked PC into a Hot Folder. The Hot Folder places the job in a queue on the Xerox Nuvera System. Once the job is submitted to the queue, it will automatically print at a specified time and then be deleted from the Hot Folder.
- Page 80 Print Client Support The Xerox Nuvera is accessible over the network by entering the IP address of the Xerox Nuvera System in the address line on a web browser. On the Xerox Nuvera's homepage, there are two selections available. There is the lightweight Job Submission selection and the fully featured Job Submissions Applet selection.
- Page 81 Available Client / Print Drivers PDF Booklets Follow the steps below to properly program booklets created using Adobe Acrobat PDF files. To create an 11x17 folded booklet out of 8.5x11 size originals from PDF files, program the job for 8.5x11 paper, use Fit to new Paper Size, and choose 11x17 as follows: 1.
- Page 82 In a Xerox Nuvera system this workflow is usually handled by a queue, or a location on the machine where jobs line up and wait for further processing by an operator. Systems with the Productivity Pack license enabled, have more than one queue to set for different job statuses.
- Page 83 Managing Print Jobs Hold Prevents any further processing of that job until it is To reclaim system resources that had released from a held state. been processing the job, allowing the next scheduled job to proceed. NOTE: When a job is released from Hold, it will continue processing, but do so starting at the beginning of the job.
- Page 84 Home Resources Search Index About this Site System Tour Maintenance Problem Solving Reprinting a Saved Job A job submitted to a save queue is transformed to a PDF, Single-Page TIFF or a Multi-Page Tiff. To reprint a saved job NOTE: If Retain PDL File is active, a completed copy job will be listed under the Job Manager: Completed tab. This allows you to resubmit the job for printing, changing job properties if needed.
- Page 85 The Xerox LCDS approach to printing dramatically reduces bandwidth requirements by locating the final assembly of document elements on the printer where resources are stored. This eliminates the need for repeatedly sending complex elements like forms from the host as part of a fully formed data stream.
- Page 86 For further information about LCDS printing with the system, and for queue setup information, refer to the LCDS Print documentation that is provided along with the LCDS license software CD. See your System Administrator or Xerox Customer Representative to obtain this documentation.
- Page 87 How it Works VIPP uses the same "Dynamic Document Construction" concepts as the Xerox LCDS printers. Fonts, forms, and images reside on the printer, and formatting is controlled by a template (JDT) called by the job. The bit-heavy resources stored at the printer are merged with the variable data at run-time.
- Page 88 Home Resources Search Index About this Site System Tour Maintenance Problem Solving Working With IPDS IPDS is a printer device data stream (specific to IBM) that contains the information necessary to identify, monitor, and control the functions of the printer. This information includes the characteristics of the printer, its resolution, what resources it has, whether it has sufficient memory, and whether it receives and prints a job.
- Page 89 Working With IPDS N-1 job hangs N-1 job hangs if greater than IPDS throttling 160-page limit. User Action: Restart IPDS Gateway from the IPS Manager GUI. Avoidance: Select Print Job Unfinished (vs. Fault Job) for Overlimit Finishing or print 1-N when feasible. If N-1 printing and faulting over limit jobs is required, set the maximum set size for the finishing device to at least the size of the largest jobs or sets that will be handled.
- Page 90 HostName_Hold - default setting release=No. Jobs submitted to this queue are held until manually set to release. In the Xerox Nuvera user interface, Queue Manager is used to create numerous internal printer queues that can be used to control the flow or handling of documents in different ways.
- Page 91 Using Parallel RIP (on the Xerox Nuvera 288 Perfecting System) The FreeFlow Print Server Parallel RIP feature, previously available only on color products, is provided on the Xerox Nuvera 288 Perfecting System. Access this feature from the Queue Manager to improve print speeds especially on complex jobs. For more...
- Page 92 Working With Queues Job Definition Format Print Submission via Hot Folders Job Definition Format (JDF) is a job ticket and workflow specification language used by production printers. JDF tickets with PDF data files add flexibility for job submissions when you need specific settings for jobs instead of default queue settings. When a job is added to a Hot Folder, the FreeFlow Print Server determines if the file has a JDF job ticket.
- Page 93 Home Resources Search Index About this Site How Do I? System Tour Maintenance Problem Solving Scanning your Document NOTE: This feature is only available if your system includes the integrated Document Scanner module for copying and scanning jobs. Scan To File allows you to turn your original documents into: Single Page TIFFs Multi-Page Tiffs to be stored on removable media, the local drive, or network destination.
- Page 94 Document Glass or Document Feeder. 2. In the Xerox Nuvera user interface, select the Scan To File button. 3. In the Job Name entry box, type in a name for the scan job. 4. In the Save Location entry box, type in the location (if known) in which to save the scanned file, or click the Save Location...
- Page 95 Save your document as PDF if it will be distributed through the internet; either by email or through a web server. Choose PDF if you are certain there will be no further need to adjust the image. If saved as a PDF, it is immediately available for printing through the Xerox Nuvera.
- Page 96 Remote copy is the use of Scan to File for the purpose of reprinting on another Xerox Nuvera system. A local copy is created using the Copy function on the Xerox Nuvera. The local copy is equivalent to 1200 x 600 dpi scan (chosen for very high productivity with competitive image quality).
- Page 97 NOTE: This feature is only available if your system includes the integrated Document Scanner module for copying and scanning jobs. Some Xerox Nuvera systems include a document scanner with a full-featured document handling system. This allows the user to rapidly scan large documents and two-sided documents without requiring the user to re-load the original document tray.
- Page 98 NOTE: The following information is subject to change as new versions of the Makeready application are developed. If you have a Xerox FreeFlow solution, you can incorporate the FreeFlow Makeready application with the Xerox Nuvera. For best results, follow these guidelines: To print to the Xerox Nuvera from FreeFlow Makeready 1.
- Page 99 There may be instances where you may want to alter placement of the image on your output. The Copy Service, Scan to File Service and Print from File Service Image Edit tab on the Xerox Nuvera user interface offers controls to change image placement, orientation, etc.
- Page 100 Home Resources Search Index About this Site System Tour Maintenance Problem Solving Erasing Unwanted Marks On Originals Sometimes the original document you are copying or scanning contains markings near the edges that you wish to remove. Examples of unwanted edge markings could be: Wrinkled, torn, or other damage near the original document's edges Hole punches Handwriting or other errant marks near the document's edges...
- Page 101 1. Determine the amount of space needed to shift the content away from the binding edge. 2. Place the original document on the Document Glass. 3. In the Xerox Nuvera user interface, click the Copy button. 4. Click the Image Edit tab.
- Page 102 Automatic Image Rotation The Xerox Nuvera automatically rotates the full page image, if necessary, to match the orientation of the paper loaded in the paper trays. Thus, you do not have to manually rotate originals or paper stock to get the correct orientation.
- Page 103 Advanced Publishing Features You can print with the Xerox Nuvera in several ways: With a networked-configured system, you can submit a job to the Xerox Nuvera printer directly from your desktop through the internet browser. You can download drivers and print directly from your desktop applications.
- Page 104 Programming. To use Build Job 1. In the Xerox Nuvera user interface, click Copy, then click the <Build Job> button at the bottom left corner of the user interface. The system is now in Build Job mode. 2. Place the first part of the document set (Job Segment 1) to be scanned in the Document Feeder or Document Glass.
- Page 105 Home Resources Search Index About this Site How Do I? System Tour Maintenance Problem Solving Understanding Job and Segment Level Programming NOTE: This feature is only available if your system includes the integrated Document Scanner module for copying and scanning jobs. Job and Segment Level programming are used in conjunction with Build Job.
- Page 106 To work with job tickets Open a job ticket: Once a job has been submitted to the Xerox Nuvera and saved, it can be retrieved and opened at a later time. 1. Select the Job Manager button, then choose Saved tab. See Finding a Saved Job To Print.
- Page 107 Working with Job Tickets 3. If you select New, select a size of Custom (.in) from the New Stock menu. 4. Enter the appropriate dimensions for width and height: Spanish (XE) - 8.46 x 12.4 in. Foolscap (XE) - 8.5 x 13.0 inches. NOTE: Note that programming of any job attributes other than Size, Type, Color and Weight will be ignored by the printer.
- Page 108 Home Resources Search Index About this Site How Do I? System Tour Maintenance Problem Solving Using Front-Back Registration This feature enables customized, independent, Side-1 and Side-2 registration fine-tuning for a specific stock saved and stored within the stock library. Due to the high levels of differences among stock characteristics that affect image to substrate performance, the system allows custom registration settings to be stored as custom media properties.
- Page 109 1. Place the document set in the Document Feeder. The set must be arranged so that the leading edges of all sheets are the same width. 2. In the Xerox Nuvera User Interface, click Copy, then click the Image Edit tab. 3. On the Image Edit tab, click the Original Size button.
- Page 110 Problem Solving Maintenance Saving and Storing Jobs Jobs (copy, scan, and print) can be submitted and programmed to be placed in a Saved Jobs directory on the Xerox Nuvera user interface (FreeFlow Print Server). Once saved, they can be reprinted at any time.
- Page 111 Saving and Storing Jobs NOTE: The Job Manager Saved tab displays a list of all jobs in the user-defined Save location as specified in System Preferences. Related Hints and Tips Subtopic Hint/Tip Description Auto Proof – With Productivity Pack only: While copy jobs can be sent to any queue, sending a copy job to a queue that does Productivity Pack not have Auto Proof selected will produce unexpected results.
- Page 112 Saving and Storing Jobs Build Job with When using Build Job with Imposition (ex. booklet), with all Landscape images, and scanning from the platen, image orientation rotate the paper 180 degrees on the platen to get the proper output. Copies in When making copies, ensure the documents are in the document handler for at least 1 second before pressing the document handler start button.
- Page 113 Problem Solving Finding a Saved Job to Print Finding jobs (copy, print, or scanned) saved on the Xerox Nuvera user interface can be done in two ways: Through the user interface under the Job Manager Services Through the user interface under the Print From File Services...
- Page 114 The default settings of the Xerox Nuvera are fully customizable by a System Administrator, making job programming much quicker and easier. Some of the system defaults that can be customized for your particular workflow include:...
- Page 115 Using Xerox FreeFlow® Remote Print Server Software FreeFlow Remote Print Server software allows access to the Xerox Nuvera user interface from a remote client (i.e., the computer at your own desk). Remote print server software provides the functionality of the Xerox Nuvera at a remote desktop, enabling the user, from anywhere on the network, to use the full range of Xerox Nuvera functions.
- Page 116 Date Stamps Annotation can be a queue setting. Any job being sent to that queue will be annotated. The Xerox Nuvera systems that have the Productivity Pack license allowing for multiple queues have a Queue manager to create new queues.
- Page 117 This feature enables you to periodically check image quality and job programming selections used on the job as it is printing. Since jobs sent to certain finishers (such as, the Xerox Basic Finisher Module) cannot be accessed while the main stacker tray is in use, the Sample Current Job feature allows sample prints to be sent to the stacker top tray.
- Page 118 Problem Solving Video About Pitch The Xerox Nuvera is equipped with a variable pitch Xerographic How Page Image Size Effects Pitch belt. Pitch refers to the number of page images that can be placed on the belt, which are then transferred to the paper.
- Page 119 8.5 in ( 216mm)- 9.0 in (229mm) 9.0 in (229mm) - 11 in (297mm) 11 in (297mm) - 17 in (432mm) 17 in (432mm) - 18.5 in (470mm) Xerox Nuvera 288 Perfecting System Pitch Maximum Paper/Image Size (Images Throughput (Feed Direction) per PR...
- Page 120 To learn about book printing productivity when setting up your job to print stock greater than 9.0 inches wide up to 9.5 inches wide, refer to Running User Diagnostics. To learn more about the more complex tasks the Xerox Nuvera is capable of processing, explore the links at the left. 120 of 256 file:///C|/Documents%20and%20Settings/Miz%20B/My%...TA/Nuvera%209.0%20UGTA_FINAL/English/comp_000.htm (1 of 2)8/13/2008 1:38:15 PM...
- Page 121 Imposition options include the ability to create 2-up to multiple- ups documents including custom multiple-up For a custom multiple-up, the Xerox Nuvera automatically calculates how many images will fit on the sheet size selected for the job. Imposition settings are provided for setting gutter margins and Repeated, Sequential, and Alternating image on sheet outputs.
- Page 122 Figure z: (Top) Example of a signature layout for a perfect bound book. (Bottom) Example of a signature layout for a saddle stitched book. TIP: To become familiar with both print and copy impositions, refer to the Xerox Nuvera online help. 122 of 256 file:///C|/Documents%20and%20Settings/Miz%20B/My%20Documents/A_Xerox...P/Nuvera%209.0%20UGTA/Nuvera%209.0%20UGTA_FINAL/English/comp_010.htm (2 of 2)8/13/2008 1:38:22 PM...
- Page 123 The Imposition features in the print drivers offer slightly different options and produce different output than the driver Imposition features available in the Print from File pathway on the machine. TIP: To become familiar with both print and copy impositions, refer to the Xerox Nuvera online help. 123 of 256 file:///C|/Documents%20and%20Settings/Miz%20B/My%20D...0UGTA/Nuvera%209.0%20UGTA_FINAL/English/comp_020.htm8/13/2008 1:38:17 PM...
- Page 124 Printing this type of image is called a "bleed". The ability to print full bleed (edge-to-edge) used to be only available through the use of offset printers. The Xerox Nuvera platform is not a print to edge system due to potential image quality defects on the edge of the page.
- Page 125 Home Resources Search Index About this Site How Do I? System Tour Maintenance Problem Solving Reducing or Enlarging Images When in Copy mode, use the Reduce/Enlarge controls located on the Basic tab. Using these controls, you could for example, copy an original image on an 11 by 17 inch sheet, and shrink it to fit on a standard 8.5 by 11 inch sheet.
- Page 126 See Setting Up Paper Trays. 1. Set the properties for a job on the Xerox Nuvera user interface. See Copy My Document Print My Document for details.
- Page 127 Printing/Copying on Tabbed and Ordered Stock Because of the special procedures required to use tabs, take time to review this section before attempting to use tabs with the Xerox Nuvera. NOTE: For information on loading tabbed stock in the Sheet Feed Module, see Using the Feed Module Tab Guides.
- Page 128 Multifunction Finisher Specifications. For the Xerox Nuvera® 288 Perfecting System - Using Media Optimization mode for tabs You can print jobs that contain a mix of sizes and media, including full-cut and pre-cut tabbed stock. If you need to print a job containing 8.5 x 11 inch paper, for example, containing 9 x 11 inch or A4 pre-cut tabs to be imaged, you must first enable the Pre-Cut Tabs selection from the Media Optimization mode in the user interface.
- Page 129 Using Tabbed Stock To set up and use ordered stock Ordered stock is paper with multiple pieces, such as a carbonless form, multi-part colored stocks, etc., which need to be kept in a certain sequence. Load tray with ordered stock 1.
- Page 130 3. Use the Editor feature to remove the excess blank pages prior to printing the job. Supported Tab Media The 288 Perfecting System supports the Xerox tab media (9 x 11 inches) listed in the following tables. If you use tabs other than those listed below, you may experience questionable results.
- Page 131 Using Tabbed Stock Blue 3R5693 Rainbow 3R5650 Ring-Tuff Tabs White Xpressions+ Tabs White 3R12368 3R12366 FX Tab Stock – All 223 x 297 millimeters (A4 based) Weight Bank Color Single Straight Single Reverse Double Reverse Type Standard Tabs White 3R90871 White 3R90872 White...
- Page 132 Home Resources Search Index About this Site System Tour Maintenance Problem Solving Using the Feed Module Tab Guides Use the Feed Module Tab Guides to improve the feeding of tab stock from any tray in the Feed Module. NOTE: Do not use tab stock unless you install the appropriate Tab Guide in the paper tray where the tab stock is loaded.
- Page 133 Home Resources Search Index About this Site How Do I? System Tour Maintenance Problem Solving Using Media Optimization Mode on the Nuvera 288 You can use the Media Optimization Mode for maximizing productivity in the following job situations: Pre-cut tabs Small stock mixed with mostly large stock Wide Stocks measuring 9”...
- Page 134 Using Media Optimization Mode CAUTION! The throughput rate when Media Optimization Switches is set to Large Stock will be consistent with the rate of the largest stocks encountered. Therefore, for jobs containing a low percentage of larger stocks make sure Media Optimization Switches is set to Normal.
- Page 135 Home Resources Search Index About this Site System Tour Maintenance Problem Solving Adding Pages to your Document with the SFM Insertion Module The SFM Insertion Module is either a 2-Tray or 4-Tray Sheet Feed Module used as a post-process inserter (pages do not go through the print engine).
- Page 136 8. In the Document Properties window, click <OK>. You are returned to the Print window. Click <OK>. 9. Select [Saved Background Form] to create a form on the Xerox system that will be the preprinted form. 10. Make sure to also save the original background form document you created to an archive outside of the printer system for future jobs should the printer system lose the data.
- Page 137 9. Click <OK> to submit your variable data job to the printer where it will be merged with the background form and the resulting output document printed. If you are using Copy to create the final output document, (the copying feature is not available on the Xerox Nuvera 288 Perfecting System): 1.
- Page 138 Do not mix copy background forms with print variable data if the background form contains imposition. Every other page will have the form and the data 180 degrees off from each other. To learn more about the advanced tasks the Xerox Nuvera is capable of processing, explore the links at the left. 138 of 256...
- Page 139 Home Resources Search Index About this Site How Do I? System Tour Maintenance Problem Solving Managing System Resources This section provides an overview of system management and some of the key configuration tools, such as Queue Manager, that operators may need to use. For detailed information, see the System Administrator's Guide. Managing the Printer Getting Billing Information Reading the Billing Meters...
- Page 140 You can use the Printer menu to globally manage all aspects of the printer, including print quality, what types of papers are loaded, and tray enabling/disabling. Review the sections below to familiarize yourself with this part of the Xerox Nuvera user interface.
- Page 141 Managing the Printer NOTE: See your System Administrator to change any settings on the Stacking window. Managing Image Quality The Image Quality selection allows you to globally set the darkness and resolution levels for system supported file types. If you are having Image Quality problems on a consistent basis (for example, your entire job is either too light or too dark), check image quality settings using the Image Quality selection on the Printer menu.
- Page 142 Index About this Site Getting Billing Information The Billing capability enables the user to view and print Xerox billing data. Why would I need to access billing information? A few examples of why you need to access billing data: You can gain system usage information to more accurately plan your supplies re-ordering.
- Page 143 Home Resources Search Index About this Site How Do I? System Tour Maintenance Problem Solving Reading the Billing Meters Following are descriptions of what each Billing Meter is tracking. Make sure you have correctly identified your region. Billing Regions Region 1 Region 2 Region 3 Region 4...
- Page 144 Problem Solving Managing System Software and Hardware In the event you need to install a software patch or upgrade, or attach new hardware, this can be done with the Xerox System Install Service Utility. To access the Xerox System Install Service Utility 1.
- Page 145 Home Resources Search Index About this Site How Do I? System Tour Maintenance Problem Solving Managing the Stock Library NOTE: The Stock Library selection, located on the Printer menu, is only available on systems that have the Productivity Pack license installed and enabled. The Stock Library selection enables you to add to the group of stocks that are eligible to print.
- Page 146 Managing the Stocks Library NOTE: When loading stock, it is recommended that you either enter a specified name for all stocks, or use "unspecified" as a name value for all stocks. You should never mix named stocks with "unspecified" stocks since Required Stock Not Loaded issues may arise.
- Page 147 Changing DFA Configurations for 3rd Party Finishers When your system is installed, a Xerox CSE uses the FreeFlow Print Server to create a configuration and profile of the finishing devices on your system. A configuration represents the finishing module or combination of finishing modules installed. Within a configuration are profiles that represent specific destinations, device settings and attributes for that configuration.
- Page 148 Changing DFA Configurations for 3rd Party Finishers If Device Type is set to Stacker, the resultant behavior is: Pause - immediate Banner sheet delivery - to the same destination as the job body If Device Type is set to Finisher, the resultant behavior is: Pause - next set boundary Banner sheet delivery - to the FTM top tray DFA sheet rotation and letter-size banner sheets...
- Page 149 Problem Solving Setup Paper Trays You can print and copy with many types of papers with the Xerox Nuvera: You can load many types of cover and tabbed stocks, giving you the ability to create professional-quality documents. You can load trays with special stocks, such as envelopes, transparencies, and labels.
- Page 150 Home Resources Search Index About this Site How Do I? System Tour Maintenance Problem Solving Paper Tray Programming When you load paper in a paper tray, you must program the tray for the paper it contains. To avoid loading a paper stock unsupported by the machine, see Recommendations for Paper Usage.
- Page 151 Configuring Paper Stocks and Tray Settings 7. For Tray 2, refer to the section below on using the Rear Stop Guide. 8. Push the tray closed. The system automatically confirms the size and attributes programmed. For fully-adjustable trays, a "Confirm Tray Contents" alert window may appear. Either Confirm the tray contents, or click Change to enter the correct stock size/type.
- Page 152 About Auto Tray Switching and setting tray priorities The Xerox Nuvera is designed to allow a job to be submitted using only job attributes, and the system will then, based upon tray priorities, pull stock from the tray(s) containing the programmed stock.
- Page 153 Avoiding Multi-Sheet Feeds When Using Special Stocks There may be times when the paper loaded in the paper trays do not feed correctly. The Xerox Nuvera will notify you of the problem with a message on the user interface screen.
- Page 154 Decurler. Trailing edge is the edge opposite the leading edge. It is on NOTE: It may be possible to configure your Xerox the right side and is the last edge of the paper to go into the Nuvera with two or more SFMs, effectively doubling the print engine.
- Page 155 Loading Paper the guides, making sure the feed direction is correct. 6. Move the paper guides inward until they touch the paper stack. Make sure the side and trail edge guides are snug against the stack after loading the first ream. 7.
- Page 156 Home Resources Search Index About this Site How Do I? System Tour Maintenance Problem Solving Loading Special Stock for Proper Finishing Output Depending on the finishing devices that are present on your system, special paper stock must be loaded in certain ways to achieve correct output.
- Page 157 Loading Special Stock For Proper Finishing Output Face up, right edge leading, 1- Trays 3 and 4 N order **Special Case: Jobs with drilled paper AND drilled tabs when using the MFF: When processing jobs which use drilled paper and drilled tabs together, load the tabbed stock with tabs trailing as usual, but load the drilled paper stock with the holes leading.
- Page 158 Load the paper in paper trays 1 - 4 "seam side" of the ream up. "Seam side" refers to the side of the unwrapped ream containing the seam. For more information about proper handling of Xerox supplies, see Xerox Supplies Library.
- Page 159 System Tour Maintenance Problem Solving Using Special Paper Stocks The Xerox Nuvera is capable of printing on much more than normal white paper. The figures below provide a few examples of the special stocks you can use with the system.
- Page 160 14. Select None from the pull-down menu. Select the cover stock from the tray you loaded. Select Add Cover. 15. When satisfied with your settings, click <Copy, Scan or Print>. System Level (Administrative) Added Pages The Xerox Nuvera can be configured to include Administrative information in each Job output. Banner pages 160 of 256...
- Page 161 Adding Special Pages to a Document Error pages Job attribute report For more information about these types of pages, see Adding System Level Pages. 161 of 256 file:///C|/Documents%20and%20Settings/Miz%20B/My%...TA/Nuvera%209.0%20UGTA_FINAL/English/specpg10.htm (2 of 2)8/13/2008 5:25:54 PM...
- Page 162 System Tour Maintenance Problem Solving Adding System Level Pages The Xerox Nuvera can be configured to add "system level" or "administrative" pages: Banner pages Error pages Job Attributes report These administrative pages not only provide a useful way to separate jobs in a Finisher tray, but also provide information about each job processed by the system.
- Page 163 Problem Solving Maintaining Your Xerox Nuvera The Xerox Nuvera is designed to maximize machine uptime. The machine is equipped with a short paper path in order to minimize jams, and Replaceable Units in order to avoid extended periods of downtime.
- Page 164 Machine Specifications The Xerox Nuvera machine is available in several configurations. The configuration you have may include an insertion module, a Sheet Enhancement Module and any number of feeding modules and finishing options. Click the subtopics at the left to learn about each machine subsystem, as well as machine capabilities.
- Page 165 System Tour Maintenance Problem Solving Supported Paper The Xerox Nuvera will accept a wide variety of paper types and sizes. For best results, use only the papers mentioned in this topic. For more information, see Recommendations for Paper Usage. For details on expected performance of papers through the system, see Paper Performance Tables.
- Page 166 Problem Solving Recommendations for Paper Usage Tip: To help anybody needing to load paper, and to avoid using unsupported papers, print this topic and post near the Xerox Nuvera. Paper Type Usage Recommendation Not supported on systems with a Multifunction Finisher.
- Page 167 Select papers printed with laser-compatible, lithographic inks to minimize offsetting. UV-cured inks are recommended, especially on coated stocks, to insure complete drying before printing on a Xerox Nuvera. Laser inks can be oxidative, or heat set types. Preprinted materials Do not use papers preprinted with xerographic processes.
- Page 168 Recommendations for Paper Usage Paper backed transparencies Loaded with side to be imaged facing up, and glued end to the left. Mixed size sheet handling in Document Feeder and Requires the same IB/OB dimension for all sheets. Multifunction Finisher Related Information Supported Paper Expected Paper Performance Tables Configuring Paper Stocks and Trays...
- Page 169 System Tour Maintenance Problem Solving Supported Paper Sizes: Trays 1 and 2 Tip: To help anybody needing to load paper, and to avoid using unsupported papers, print this topic and post near the Xerox Nuvera. Size Feed Orientation Paper Type...
- Page 170 System Tour Maintenance Problem Solving Supported Paper Sizes: Trays 3 and 4 Tip: To help anybody needing to load paper, and to avoid using unsupported papers, print this topic and post near the Xerox Nuvera. Size Feed Orientation Paper Type...
- Page 171 Home Resources Search Index About this Site How Do I? System Tour Maintenance Problem Solving Document Feeder & Scanner Specifications NOTE: This feature is only available if your system includes the integrated Document Scanner module for copying and scanning jobs. The scanner includes the Simultaneous Duplex Document Feeder ("Document Feeder") and the Document Glass (or "Platen").
- Page 172 (A1 and A2). Printer Speed The Xerox Nuvera EA Production System can be licensed to support either a 100, 120 or 144 ppm print speed. For systems with a Multifunction Finisher, only 100 and 120 are available. The Xerox Nuvera 288 Perfecting System prints up to 288 impressions per minute at duplex mode with 2 - 3 Parallel RIP running on the dual core CPU.
- Page 173 Variable Pitch Xerographics for maximum throughput The Xerox Nuvera is equipped with a variable pitch Xerographic belt. Pitch refers to the number of page images that can be placed on the belt, which are then transferred to the paper. For details on how page image size impacts belt pitch, which in turn impacts overall...
- Page 174 Multifunction Finisher (MFF) Specifications The Multifunction Finisher offers the basic publishing option on the Xerox Nuvera EA Production System. It is the only finisher in the configuration and can not be followed by any other finishing devices. It provides stacking and stapling capabilities as well as the ability to make booklets and trifold documents.
- Page 175 MFF Capacities The Xerox Nuvera Multifunction Finisher (MFF) adds the finishing touches to your job by collating and stapling your output. The MFF Professional can be used to make folded and stapled booklets and various folding options; Folded-Only Booklets, Tri-Fold C- Configuration and Z-Configuration folded documents.
- Page 176 Finisher Specifications When using the MFF for folded output, the Banner Sheets that separate your print jobs from one another will come out folded on the long axis of 8.5 x 11 inch or A4 paper, allowing the customer to see separation easier. Booklet Making Folded Only Booklets 1-5 sheets Folded and Stapled Booklets 2-15 sheets...
- Page 177 Configurations The MFF is the basic configuration on the Xerox Nuvera EA Production System and is the only configuration that does not include the Sheet Enhancement Module (SEM). The Sheet Enhancement Module is a standard component on systems with a BFM or FTM.
- Page 178 The BFM is a finisher that provides high capacity collecting, stacking and stapling. It also includes a top tray for collecting or purging sheets. The Xerox Nuvera System offers two BFM models: The BFM is a finisher that provides high capacity collating, stacking and stapling. It also includes a top tray for collecting or purging sheets.
- Page 179 There are a number of possible 'Finishing' combinations for installing the BFM, Insertion Module, Finishing Transport Module (FTM) and other external finishers on a Xerox Nuvera system. The BFM and BFM Plus or BFM Plus and BFM Plus can be installed together to double the stacker capacity.
- Page 180 Basic Finishing Module (BFM) Specifications Print Engine / SEM/ BFM Plus/ BFM Print Engine / SEM/ Insertion Module / BFM Plus/ BFM Print Engine / SEM / FTM -->connects to DFA compliant 3rd party Finisher Print Engine / SEM/ Insertion Module/ FTM -->connects to DFA compliant 3rd party Finisher Print Engine / SEM/ Insertion Module/ BFM Plus/ FTM -->connects to DFA compliant 3rd party Finisher 180 of 256 file:///C|/Documents%20and%20Settings/Miz%20B/My%...GTA/Nuvera%209.0%20UGTA_FINAL/English/spec_41.htm (3 of 4)8/13/2008 4:44:25 PM...
- Page 181 Basic Finishing Module (BFM) Specifications Print Engine / SEM/ Insertion Module / BFM Plus / BFM Plus/ FTM -->connects to DFA compliant 3rd party Finisher 181 of 256 file:///C|/Documents%20and%20Settings/Miz%20B/My%...GTA/Nuvera%209.0%20UGTA_FINAL/English/spec_41.htm (4 of 4)8/13/2008 4:44:25 PM...
- Page 182 If the Xerox Nuvera is equipped with a Multifunction Finisher, this finisher includes two stapling systems: Main Stapler Booklet Stapler Before using any of the staplers on the Xerox Nuvera, take the time to learn about their capabilities and capacities. Document Size Requirements Short Edge size range: 8 inches to 12 inches Long Edge size range: 6.7 inches to 18 inches...
- Page 183 Keyboard Specifications Navigating the user interface using only the keyboard The Xerox Nuvera user interface, in addition to being navigable with the USB mouse, can also be navigated through the keyboard. Some examples of why the user interface is keyboard-accessible: Blind people cannot use a mouse because they cannot see where to click.
- Page 184 Home Resources Search Index About this Site How Do I? System Tour Maintenance Problem Solving Common Keyboard Shortcuts You can use the keyboard to navigate the UI and program jobs. For a complete set of documentation on keyboard navigation, see Keyboard Operations on the Sun/Java website.
- Page 185 Special Navigation/Activation Keyboard Shortcuts In addition to the common keyboard shortcuts, the Xerox Nuvera provides special navigation and activation keys. These keys allow the user to navigate around the user interface and interact with the components and features of the system.
- Page 186 Special Navigation/Activation Keyboard Shortcuts Control-A Select all rows in a table. Shift-End Selects whole row. Shift-Up Arrow/ Extend selection up/down one row in table. Shift-Down Arrow Extend Selection up/down one "table page" at a time. When no vertical scrollbar is visible, moves focus and row selection to last/ first row in table.
- Page 187 Special Navigation/Activation Keyboard Shortcuts Assuming focus is at a cascading menu element, close the Left Arrow cascading menu. Exit pop up menus. Space/Down Pull Down Box Menu Post (activate) menu. Arrow Up/Down Arrow Move focus and select previous/next menu item. Exit pull-down menus.
- Page 188 Home Resources Search Index About this Site System Tour Maintenance Problem Solving Keyboard Shortcuts and Mnemonics Keyboard Shortcut Result Notes Pause dialog (pauses both printing and/or Ctrl-P Pause button scanning) PS only Ctrl-N Pause Scanning When available on the UI (as applicable Ctrl-U Unload button to the configuration)
- Page 189 Keyboard Shortcuts and Mnemonics Reset button (Copy, Alt-R Scan to File, Print When pathway with button is open. Service) Build Job button (Copy, Alt-B When pathway with button is open. Scan to File) Continue Build Job button for Build Job Alt-O When pathway with button is open.
- Page 190 Problem Solving Media Drive Specifications All Xerox Nuvera systems are equipped with a CD-RW/DVD drive, located just to the right of the monitor in the Control Console. File Submission Systems equipped with the CD drive support reading from and writing to CD-R and CD-RW formats.
- Page 191 Home Resources Search Index About this Site System Tour Maintenance Problem Solving Electrical and Environmental Specifications The print engine, which includes the FreeFlow Print Server, requires: Frequency 50/60 hz Voltage US/Canada Line Voltage: Protection 115-127/200-220V 2 phase, 3 wire+ PE Line Current 24A or 40A, Frequency 60 and Branch Cir 30A or 50A EU Line Voltage: Protection 200-240 V...
- Page 192 Electrical Specifications As an ENERGY STAR® partner, Xerox Corporation has determined that the Xerox Nuvera EA Production System (except for the 100 EA printer/BFM configuration) meets the ENERGY STAR® guidelines for energy efficiency. The Xerox Nuvera 288 Perfecting System is not ENERGY STAR compliant.
- Page 193 Integrated Scanner, and an optional large format, high capacity 2-Tray Feed Module. The Xerox Nuvera can have any combination of the 4-Tray or 2-Tray Feed Modules installed up to a total of two modules. If the 4-Tray Feed Module has a scanner, it should be installed closest to the Print Engine.
- Page 194 Feed Module (FM) Specifications For more information on supported papers, see Recommendations for Paper Usage. CAUTION! Paper trays do not lock and can be opened while paper is being fed from the tray, resulting in misfeeds and/or paper jams. Wait for the LED light on the tray to turn OFF before opening the tray. 194 of 256 file:///C|/Documents%20and%20Settings/Miz%20B/My%...GTA/Nuvera%209.0%20UGTA_FINAL/English/spec_90.htm (2 of 2)8/13/2008 4:44:20 PM...
- Page 195 Expected Paper Handling The Xerox Nuvera can process a wide array of stock types. Use the following topics to learn how each stock type can be expected to perform in the system; either through the paper feed trays or the Document Feeder.
- Page 196 Problem Solving Paper and Tray Performance Matrix -- 20 lb standard paper The Xerox Nuvera can process a wide array of stock types. Use the following topics to learn how each stock type can be expected to perform in the system.
- Page 197 Problem Solving Paper and Tray Performance Matrix -- 80 gsm standard paper The Xerox Nuvera can process a wide array of stock types. Use the following topics to learn how each stock type can be expected to perform in the system.
- Page 198 Problem Solving Stock Types Performance Matrix The Xerox Nuvera can process a wide array of stock types. Use the following topics to learn how each stock type can be expected to perform in the system. NOTE: Performance of the following stock types may not be equivalent to papers in the same weight range.
- Page 199 Non-standard Paper Performance Performance Matrix LEF: Long Edge Feed Best: Best system performance Good: Good system performance Fair: Significant performance degradation is likely, particularly paper handling. NR: Not Recommended. Exceeds system design. Unacceptable performance likely. **: Same performance as shown in 20 lb.
- Page 200 Problem Solving Plain Paper Performance Matrix The Xerox Nuvera can process a wide array of stock types. Use the following topics to learn how each stock type can be expected to perform in the system Throughput Material (8.5 x 11 inch or A4)
- Page 201 Problem Solving Paper and Tray Performance Matrix -- Loading Special Stock The Xerox Nuvera can process a wide array of stock types. Use the following topics to learn how each stock type can be expected to perform in the system...
- Page 202 Maintenance Paper Through Document Feeder Performance Matrix The Xerox Nuvera can process a wide array of stock types. Use the following topics to learn how each stock type can be expected to perform in the system. TIP: If you're having feeding problems through the Document Feeder, all problems can be avoided by scanning directly from the Document Glass.
- Page 203 Paper Through Document Feeder Performance Matrix Good: Good system performance Fair: Significant performance degradation is likely, particularly paper handling. NR: Not Recommended. Exceeds system design. Unacceptable performance likely. **: Same performance as shown in 20 lb. Standard Paper Table for the corresponding paper sizes. 203 of 256 file:///C|/Documents%20and%20Settings/Miz%20B/My%2...uvera%209.0%20UGTA_FINAL/English/spec_paper_60.htm (2 of 2)8/13/2008 5:01:07 PM...
- Page 204 Home Resources Search Index About this Site How Do I? System Tour Maintenance Problem Solving Paper Weight Conversion Chart The following "Equivalent weights" chart shows you which weights of the different paper types are equal to the same number of grams per square meter.
- Page 205 Paper Weight Conversion Chart Bristol Index 205 of 256 file:///C|/Documents%20and%20Settings/Miz%20B/My%2...uvera%209.0%20UGTA_FINAL/English/spec_paper_70.htm (2 of 2)8/13/2008 5:25:53 PM...
- Page 206 Home Resources Search Index About this Site How Do I? System Tour Maintenance Problem Solving Power Procedures In order to ensure correct operation of the system, it is imperative that the system be powered on and off in the way that it was designed to do so.
- Page 207 The power switch is the white switch located on the right side of the machine. Press the (|) symbol embossed into the button toward the back of the machine to turn the power on. (For the Xerox Nuvera 288 Perfecting System, the Power On switch is located on Print Engine A1).
- Page 208 If the preferred power off method is not successful 1. Press the (O) symbol embossed into the button toward the back of the machine to turn the power off. For the Xerox Nuvera 288 Perfecting System, access the power switch on Print Engine A1.
- Page 209 Energy Star® Xerox Nuvera As an ENERGY STAR partner, Xerox Corporation has determined that the Xerox Nuvera EA Production System (except for the 100 EA printer/BFM configuration) meets the ENERGY STAR guidelines for energy efficiency. The Xerox Nuvera 288 Perfecting System is not ENERGY STAR compliant.
- Page 210 MOM. NOTE: You cannot set the total of LPM and SM timers to more than 240 minutes. Refer to Xerox Nuvera online Help for details on configuring Power Saver Mode. 210 of 256...
- Page 211 If your machine performance becomes degraded, or it ceases to function correctly for any reason, executing a Restart will usually restore correct function. If the problem continues, contact your Xerox representative. NOTE: If the system is restarted during the printing of a very long job, the system may take a long time to recover the job - approximately 1 minute for each 10,000 pages in the job.
- Page 212 Problem Solving Using the Pass Through Mode Feature The Pass Through Mode (PTM) is only available on the Xerox Nuvera 288 Perfecting System, which is uniquely configured with two print engines instead of one. The PTM feature is used to maximize print productivity in the event that only one of the print engines is up and running. If a print engine is shut down due to a fault, image quality mismatching, or pending maintenance, the PTM feature allows you to identify the print engine to use for continued printing of simplex or duplex jobs.
- Page 213 Problem Solving Cleaning Procedures In order to keep the Xerox Nuvera in good working condition, it is important to carefully clean it at regular intervals. Depending on your work environment, your cleaning schedule may be frequent or occasional. Click the links at the left to learn how to clean the system.
- Page 214 To clean the document glass CAUTION! To avoid damage to the machine, do not pour or spray water or cleaner directly on the document glass of the Xerox Nuvera. Do not use any abrasive cleaners to clean the document glass of the Xerox Nuvera.
- Page 215 Depending on your work environment, you may need to perform these steps frequently. To clean the document feeder CAUTION! To avoid damage to the machine, do not pour or spray water or cleaner directly into the Xerox Nuvera. Do not use any abrasive cleaners to clean the Xerox Nuvera. Recommended cleaning materials: Soft, lint-free cleaning towels (part # 600S4372).
- Page 216 If Dry Ink is spilled or inadvertently gets into the paper path or anywhere else in the machine, the best course of action is to contact a Xerox Service Representative. They have equipment specifically suited for dealing with Dry Ink spills.
- Page 217 Depending on your work environment, you may need to perform these steps frequently. To clean the display CAUTION! To avoid damage to the machine, do not pour or spray water or cleaner directly into the Xerox Nuvera. Do not use any abrasive cleaners to clean the Xerox Nuvera. Recommended cleaning materials: Soft, lint-free cleaning towels.
- Page 218 Problem Solving Cleaning the 'Optical' Mouse Dirt and dust settling on the Xerox Nuvera machine can work its way into the mouse, causing the user difficulty in efficiently navigating the controls on the machine display. Depending on your work environment, you may need to perform these steps frequently.
- Page 219 To clean the keyboard CAUTION! To avoid damage to the machine, do not pour or spray water or cleaner directly into the Xerox Nuvera. Do not use any abrasive cleaners to clean the Xerox Nuvera. Cleaning the keyboard can be performed fairly quickly. It is recommended that you perform the following actions before the machine is started, or after the machine is completely shut down for the day.
- Page 220 System Tour Maintenance Problem Solving Replacing Consumables This section covers procedures for maintaining your Xerox Nuvera. Consumables can be defined as any parts or supplies that need replacing periodically in order for the machine to perform all of its functions.
- Page 221 3. Remove the used container. 4. Insert the new container, making sure it is completely seated. 5. Package the used container for return. Use the box and prepaid return label to return the old unit to Xerox. 221 of 256 file:///C|/Documents%20and%20Settings/Miz%20B/My%20D...%20UGTA/Nuvera%209.0%20UGTA_FINAL/English/cru_10.htm8/13/2008 1:45:43 PM...
- Page 222 As soon as the job is printed, replace the waste container. To replace the Dry Ink Waste Container Contacting Xerox to get the correct part number for this container. Make sure there are no jobs running.
- Page 223 Problem Solving Videos Dry Ink (Toner) The Xerox Nuvera System uses EA dry ink only. The EA Replacing the Dry Ink Container (Emulsion Aggregation) dry ink is a latex-based material that flows easier than conventional dry ink, resulting in less toner being used to provide the same density print.
- Page 224 7. Package the used container for return. Use the box and prepaid return label to return the old unit to Xerox. 224 of 256 file:///C|/Documents%20and%20Settings/Miz%20B/My%...UGTA/Nuvera%209.0%20UGTA_FINAL/English/cru_25.htm (2 of 2)8/13/2008 2:12:58 PM...
- Page 225 Home Resources Search Index About this Site How Do I? System Tour Maintenance Problem Solving Replacing the Hole Punch Waste Container When the Hole Punch Waste container in the Interface Module of the Multifunction Finisher Pro Plus reaches its limit, an alert will appear in the system messages portion of the user interface screen.
- Page 226 The Hole Punch module is first installed and set up on the system by a Xerox CSE. If you would like to switch to using the other type of hole punch at any time, you must contact your Xerox representative who can order the 2/3 or 2/4 Hole Punch module.
- Page 227 (MFF): 1. Main Tray Stapler 2. Booklet Tray Stapler When the Xerox Nuvera has used all of the staples in either of the staplers, an alert will appear in the system messages portion of the UI. NOTE: The Main Stapler cartridge must be completely empty before you can remove the old container.
- Page 228 4. Grasp one of the staple head assemblies, and with a slight pinching action, pull out the empty staple cartridge. 5. Replace with a new cartridge. Contact Xerox to order this consumable part. NOTE: Before inserting new cartridge, remove the small orange clip. It is there to ensure the staples remain in the housing during shipment/ handling.
- Page 229 Home Resources Search Index About this Site How Do I? System Tour Maintenance Problem Solving Video Replacing Staples in the BFM Replacing the BFM Stapler There are two stapler cartridge sizes available for the Basic Cartridges Finishing Module (BFM), a 30 or 100 page staple cartridge. Refer to the following procedures for either type of staple size cartridges.
- Page 230 Adjustments The Xerox Nuvera is designed to work in Production publishing environments and perform a high volume of printing. Because of this, the machine may require slight adjustments to keep it working effectively. Click the links at the left for details about adjusting the machine.
- Page 231 2. From the menu bar, select [Printer: Adjust Decurler]. The Adjust Decurler window displays. How to Manage Paper Curl for Simplex Jobs 1. Open the right door of the Xerox Nuvera print engine module. 2. Locate the Decurler Knob near Area 4 of the print engine paper path.
- Page 232 Adjusting the Decurler 3. Adjust the Decurler Knob to a higher setting to reduce upcurl and adjust to a lower setting to reduce downcurl. The decurler introduces curl in the opposite direction of the curl created in the paper path. Most simplex jobs work best with the Decurler Knob set at 4.
- Page 233 Adjusting the Decurler 2. Select the Manual Decurl Mode radio button. The system defaults to +3 to compensate for slight upcurl. 3. Move the slide bar from -1 to -5 to decrease and remove downcurl. Move the slide bar from 0 to +5 to decrease and remove upcurl.
- Page 234 Image Quality Setup - use if experiencing image quality problems after running the Corotron Cleaning routine. Print Engine A1 For the Xerox Nuvera 288 Perfecting System, select one of the following routines when running Print Engine A1 only. Note that Print Engine A1 is the print engine on the left, directly following the feeder modules.
- Page 235 These deletions are typically only seen on side 2 of 2-sided jobs. Do not use with heavyweight stock and use only when directed to do so by a Xerox representative.
- Page 236 System: Advanced User Diagnostics If the Xerox Productivity Plus (XPP) service option is enabled, this diagnostic mode is intended for and accessed by a trained customer operator only. The trained operator logs onto and accesses these advanced diagnostics to perform certain repair and maintenance procedures without the need to contact Service.
- Page 237 Product Recycling and Equipment End of Life Disposal: USA & Canada If you are managing the disposal of your Xerox product, please note that the product contains lamp(s) with mercury and may contain lead, perchlorate, and other materials whose disposal may be regulated due to environmental considerations. The presence of these materials is fully consistent with global regulations applicable at the time that the product was placed on the market.
- Page 238 Problem Solving The Xerox Nuvera is designed to allow the user to easily correct any problem that may arise. Click the links at the left for details on correcting system problems. Contact your System Administrator if these topics do not help you solve the problem.
- Page 239 Too much paper curl can cause jams, poor set registration and poor stacking quality. The Xerox Nuvera offers a Sheet Enhancement Module that can be adjusted to ensure sheet flatness in the paper sent to the stacker. To learn more go to Manage Paper Curl.
- Page 240 Paper jam notification When paper becomes jammed anywhere in the paper path, the Xerox Nuvera notifies you by one or more of the following: Clearing jams in area 4 of the MFF a text notification in the status area of the User Interface, describing the location of the jam.
- Page 241 Clearing Paper Jams Clearing jams in the Xerox Nuvera® 288 Clearing jams in the BFM Plus Perfecting System Print Engines During paper jam recovery, the two print engines coordinate automatically so that after both paper paths are cleared, the job can start printing at the correct position.
- Page 242 Clearing staple jams from the BFM Stapler jam notification staplers When any of the staplers become jammed, the Xerox Nuvera will provide notification by: alpha-numeric messages a machine "mimic", or pictorial representation of the machine on the UI screen, depicting the location of the a steady or blinking Attention Light.
- Page 243 Poor or Slow System Performance If your machine performance becomes degraded, or it ceases to function correctly for any reason, executing a Restart will usually restore correct functionality. If the problem continues, contact your Xerox representative. Related Hints and Tips There are several things that affect the performance of the system and RIP speed when processing print jobs.
- Page 244 Enable the Wide Stock feature when printing 9.25 " or 9.5" wide stock If you have the Xerox Nuvera 288 Perfecting System and are printing stock greater than 9.0 inches wide up to 9.5 inches wide, you can optimize the print speed of the job by selecting the Wide Stock feature from the customer diagnostics screen.
- Page 245 NOTE: See your System Administrator to change the darkness and/or resolution settings on the Image Quality window. If you are using the Xerox Nuvera 288 Perfecting System and side 1 of your job is either lighter or darker than side 2, refer to the image quality diagnostic routine, dC965, for more information.
- Page 246 Home Resources Search Index About this Site System Tour Problem Solving Maintenance Removing Moiré Patterns from Examples Images (when scanning or copying) Figure 1: The following excerpt is taken from Real World Scanning and Halftones by Glenn Fleishman, David Blatner, and Steve Roth: "Moiré...
- Page 247 Home Resources Search Index About this Site System Tour Problem Solving Maintenance About Halftones and Gray Levels Figures A halftoned image is a series of dots arranged in a patterned grid of halftone cells, which yields the appearance of a complete image.
- Page 248 <Clear All> or <Reset> in the user interface. Then proceed to do job programming pertinent to your job. If the problem continues, you may want to run the Corotron Cleaning Routine under User Diagnostics. See your Xerox Representative for advice.
- Page 249 Home Resources Search Index About this Site How Do I? System Tour Problem Solving Maintenance Correcting Posterization Figures (when scanning or copying) Obvious "stair-stepping," or sudden shifts in tones, rather than smooth transitions in areas of tonal gradation (see left half of figure), is called Posterization.
- Page 250 Home Resources Search Index About this Site System Tour Maintenance Problem Solving About Posterization and Gray Levels The number of dots in a halftone spot determine the number of available gray levels. For example, a four by four dot halftone cell will yield 17 gray levels (multiply 4 x 4 = 16, + 1 for either all dots on [black] or all dots off [white]).
- Page 251 Home Resources Search Index About this Site System Tour Problem Solving Maintenance Correcting Halo Figures (when scanning or copying) Halo appears as objects in an image looking artificial, or not quite matching their surroundings. A faint glow or "halo" surrounds objects in the scanned image (see the numbers on the sail in the figure).
- Page 252 Background is only detected on the first few mm of the lead edge. Ensure the lead edge is not solid black and the document is registered against the registration edge indicated on the platen. To remove background artifacts 1. In the Xerox Nuvera user interface, click the Copy Service button. 2. Click the Image Quality tab. 3. Click the Image Adjustments button.
- Page 253 (see figure). To correct image show through: 1. In the Xerox Nuvera user interface, click the Copy Services button. 2. Click the Image Quality tab.
- Page 254 Home Resources Search Index About this Site System Tour Maintenance Problem Solving Removing Spots & Specks (when scanning or copying) If you notice spots or specks on your image, try the following: Clean the Document Glass Dirt and dust in the work environment, finger prints, and paste-up residue from documents will gradually build up on the Document Glass.
- Page 255 Home Resources Search Index About this Site How Do I? System Tour Maintenance Problem Solving Recovering Missing Parts of the Image If the image you are printing is comprised of very fine lines and/or you are printing at high resolution (for example, 1200 x 1200 dpi), there may be instances when those parts of the image may not appear on the final output.
- Page 256 Home Resources Search Index About this Site How Do I? System Tour Maintenance Problem Solving Removing Drill Holes From Output (when scanning or copying) If you are scanning or copying originals that have been drilled for insertion in a multi-ring binder, or the paper is otherwise damaged at the edge, you may notice black holes or other unacceptable marks on one edge of your output image.
Need help?
Do you have a question about the Nuvera EA and is the answer not in the manual?
Questions and answers