Table of Contents
Advertisement
Quick Links
Braille Sense U2
User Manual
ENGLISH MANUAL
For Software Version 6.2
(December, 2011)
When there are any manual updates,
the readme files or appendices
will be added to the manual CD
and website.
HIMS Inc.
4616 W. Howard Lane, Ste 960 Austin, TX 78728
Phone: 888-520-4467
Fax: 512-837-2011
Email: support@hims-inc.com
Advertisement
Table of Contents

Summary of Contents for HIMS Braille Sense U2
-
Page 1: User Manual
Braille Sense U2 User Manual ENGLISH MANUAL For Software Version 6.2 (December, 2011) When there are any manual updates, the readme files or appendices will be added to the manual CD and website. HIMS Inc. 4616 W. Howard Lane, Ste 960 Austin, TX 78728... -
Page 2: Safety Precautions
Before you use the Braille Sense U2, you should make sure the battery is fully charged. When you use the Braille Sense U2 for the first time, you may need to open the package, take the battery, and insert it into the battery slot at the rear panel of the unit. - Page 3 10. If you let your Braille Sense U2 remain for a long time at the closed or high temperature places like inside of car, the battery...
- Page 4 Braille Sense U2 may be defected or fired. So please don’t keep your Braille Sense U2 at those places. 11. If you have any complaints or suggestions, please provide us with your comments on our website. We will improve our product based on your comments and suggestions.
- Page 5 FCC RF Radiation Exposure Statement: This equipment complies with FCC RF radiation exposure limits set forth for an uncontrolled environment. This equipment should be installed and operated with a minimum distance of 20 cm between the radiator and your body. This transmitter must not be co-located or operating in conjunction with any other antenna or transmitter.
- Page 6 Before using the Braille Sense U2, you should read the entire manual to familiarize yourself with the functions of the Braille Sense U2. Reading the entire manual will allow you to operate the Braille Sense U2 to its fullest potential. The Braille Sense U2 has many functions. Many of these functions operate in a similar manner, so it is important to become familiar with all of the functions of the Braille Sense U2.
- Page 7 1 and 2 simultaneously. This is a very important concept to understand when using this manual. In order to use the Braille Sense U2, you will need to understand what a menu is, and how it works. You will also need to understand what a text box is, and how to type in information in a text box.
-
Page 8: Table Of Contents
1.2.3 Left Side Panel .................39 1.2.4 Rear Panel ................39 1.2.5 Front Panel ................40 1.3 Hardware Specifications of the Braille Sense U2 .......41 1.4 Memory on the Braille Sense U2 ..........41 2. BASIC FUNCTIONS OF THE BRAILLE SENSE U2......43 2.1 How to Use the Commands............43 2.1.1 Messages..................43... - Page 9 2.8.1 The ASCII table for a computer Braille input......53 2.8.2 Input/search for Control character .........56 2.9 Multi Tasking ..................57 2.10 Switching Audio mode ..............58 2.11 Switching Key lock ..............59 2.12 Print Spool ..................59 2.13 One-Handed Mode ...............60 2.14 Using Typing Mode ..............61 2.15 Common Combination Keys ............61 3.
- Page 10 3.2.12 Numbers .................72 3.2.13 Abbreviations .................73 3.2.14 Voice Volume ................73 3.2.15 Voice Rate ................74 3.2.16 Voice Pitch ................74 3.2.17 Scroll Voice................75 3.2.18 LCD..................75 3.2.19 Flip LCD display..............76 3.2.20 LCD Font Size.................76 3.2.21 Video Display................77 3.2.22 Printer Port ................77 3.2.23 Print Paper Size..............77 3.2.24 Audio alerts ................78 3.2.25 Play Power On/Off Sound............78 3.2.26 Left Scroll Buttons ..............79...
- Page 11 3.2.35 Check Today’s Schedule ............85 3.2.36 One-Handed Mode ..............85 3.2.37 Automatic spell-check ............86 3.2.38 Default Document ..............86 3.2.39 Automatically synchronize with time server .......87 3.2.40 Progress indicator ..............87 3.2.41 Bluetooth ................88 3.2.42 Wireless LAN ................88 3.2.43 Ethernet port ................89 3.2.44 Mass-storage device mode ...........90 4.
- Page 12 4.2.8 New Document .................98 4.2.9 New Folder................99 4.2.10 File Conversion ..............99 4.2.11 Select All ................100 4.2.12 Search for File ..............100 4.2.13 Sort Files By .................101 4.2.14 Set File Info................102 4.2.15 Display Only Files of Type...........103 4.2.16 Zip..................103 4.2.17 Unzip ..................104 4.2.18 Information ................104 4.3 Using the Address Window............105 4.3.1 Editing..................106...
- Page 13 5.1.3 Save..................115 5.1.4 Save As ...................116 5.1.5 Close Current Document............117 5.1.6 Print..................118 5.1.7 Settings...................120 5.1.8 Exit ..................122 5.2 Edit Menu ..................122 5.2.1 Start Selection................122 5.2.2 Copy ..................123 5.2.3 Cut ...................123 5.2.4 Paste ..................124 5.2.5 Delete ..................124 5.2.6 Delete Blank Lines ..............124 5.2.7 Add to Clipboard ..............125 5.2.8 Clear Clipboard ..............125 5.2.9 Select All.................125...
- Page 14 5.3.2 Find Again ................133 5.3.3 Replace ...................134 5.3.4 Go to Location................135 5.3.5 Go to Previous Page ..............137 5.3.6 Go to Next Page ..............137 5.3.7 Set Mark ..................137 5.3.8 Go to Mark ................138 5.3.9 Go to Previous Document .............138 5.3.10 Go to Next Document ............139 5.4 Read Menu ..................139 5.4.1 Read Selected Text ..............139 5.4.2 Read Beginning of Selected Text .........140...
- Page 15 5.5.3 Braille Paragraph Layout ............147 5.5.4 Print Paragraph Layout ............148 5.6 Keys for Text Scrolling and Deleting .........150 5.7 Cursor Location ................151 5.8 Hot keys in the word processor: ..........151 6. ADDRESS MANAGER ..............154 6.1 What is the “Address Manager”? ..........154 6.2 Starting the Address Manager ............155 6.3 Using “Add Address”...
- Page 16 6.7 Commands in the Found Records..........168 6.7.1 Find again ................168 6.7.2 Opening a home page ............168 6.7.3 Editing Addresses ..............169 6.7.4 Deleting Addresses ...............169 6.7.5 Printing addresses..............170 6.7.6 Saving Addresses to a File ...........171 6.8 Synchronizing With Microsoft Outlook ........171 6.9 Hot Keys in the Address Manager..........172 7.
- Page 17 7.4.10 Confirm .................183 7.4.11 Cancel ...................183 7.5 Search Schedule ................184 7.5.1 Searching with date ...............184 7.5.2 Searching with subject ............185 7.6 Modify Schedule................186 7.7 Deleting a Schedule ..............186 7.8 Printing a Schedule..............187 7.9 Saving Appointments as a File ...........187 7.10 Backing Up and Restoring Your Appointments ......188 7.10.1 Backup Schedule ..............188 7.10.2 Restore Schedule..............188 7.10.3 Setting Backup Option ............189...
- Page 18 8.1.1 Executing e-mail ..............196 8.1.2 Management e-mail service information......197 8.2 Receiving and Sending E-mail............204 8.2.1 Receiving E-mail ..............204 8.2.2 Reading the Received E-mail Messages......205 8.2.3 Writing e-mail .................211 8.3 Major features of E-mail ..............220 8.3.1 Deleting E-mail ...............220 8.3.2 Reply And Reply All to a Received E-Mail......223 8.3.3 Forwarding a Received E-Mail Message ......224 8.3.4 Saving a Received E-mail as Document.
- Page 19 8.6.2 Hot Keys for Sending E-Mail Including Reply, Forward, and Save in the Mail Outbox ..............247 8.6.3 Hot Keys for Reading E-Mail Messages or Writing an E-mail Message...................247 9. MEDIA PLAYER ................249 9.1 Using the Audio Buttons .............249 9.1.1 Play/Pause Button ..............249 9.1.2 Next button and previous button..........250 9.1.3 Record Button ................250 9.1.4 Stop Button ................251...
- Page 20 9.4.1 Moving features using the cursor keys .......278 9.5 Hot Keys in the Media Player ............278 10. FM RADIO ..................281 10.1 Listening to FM Radio via internal speakers ......281 10.2 Frequency control..............282 10.3 Add of the channel and move among channels......283 10.4 Recording FM Radio sound ............285 10.4.1 Recording Setting Dialog Box ..........286 10.5 Additional features..............288...
- Page 21 11.3.2 Copy ..................296 11.3.3 Add to clipboard ..............296 11.3.4 Copy URL................296 11.3.5 Copy Link................297 11.4 Go To...................297 11.4.1 Go to Home Page ..............297 11.4.2 Go to Previous Page ............298 11.4.3 Go to Next Page ..............298 11.4.4 Go to Previous Heading ............299 11.4.5 Go to Next Heading..............299 11.4.6 Go to Previous/Next Text ............299 11.4.7 Refresh..................300...
- Page 22 11.6.3 Show visited links ..............307 11.6.4 Changing the Default Download Folder......307 11.6.5 Clear cookies................308 11.7 Read Page...................309 11.7.1 Moving Between Controls ...........309 11.7.2 Moving to a Form ..............311 11.7.3 Table..................311 11.7.4 Move to the Frame ...............314 11.7.5 Playback of Streaming Audio Files ........314 11.8 Hot keys in the Web Browser............315 11.9 What the Web browser Does Not Support .......317 12.
- Page 23 12.3.5 Move by Time Index .............327 12.3.6 Move by Text Index..............328 12.4 Mark.....................329 12.4.1 Previous Mark ..............329 12.4.2 Next Mark................330 12.4.3 Set Mark ................330 12.4.4 Move to Mark ................330 12.4.5 Deleting a Mark ..............331 12.5 Heading ..................331 12.5.1 Move by Heading ..............331 12.5.2 Move to Specific Heading............332 12.5.2 Find Heading ................332 12.5.3 Scan Heading and Read Heading ........333...
- Page 24 13.2.6 Bluetooth keyboard service ..........354 13.2.7 Bluetooth Printer service ............355 13.2.8 Using Multiple Services Simultaneously ......355 13.3 Hot keys in Bluetooth Manager ..........355 14. DATABASE MANAGER..............357 14.1 Table Manager ................358 14.1.1 Add Table................359 14.1.2 Modify Table .................361 14.1.3 Delete table................362 14.1.4 Set Default Table ..............363 14.2 Add Record.................363 14.3 Search Records................365...
- Page 25 16.1 The component of the Social networking service ....375 16.2 Twitter ..................375 16.2.1 Main Terms ................376 16.2.2 Launch “Twitter” ..............377 16.2.3 Twitter window ..............378 16.2.4 Timeline ................380 16.2.5. Manage "Tweet" ..............382 16.2.6. Manage Follow ..............387 16.2.7. Use Direct Message ............389 16.2.8.
- Page 26 16.4.2 Using a Contact List ............428 16.4.3 Instant Message Dialog Box ..........435 16.5 Hot Keys in Social Networking ..........438 16.5.1 Twitter ...................438 16.5.2 Google talk ................439 16.5.3 MSN messenger ..............441 17. UTILITIES ..................443 17.1 Calculator..................444 17.1.1 General Functions ...............444 17.1.2 Memory Functions ...............446 17.1.3 Sine Functions ..............448 17.1.4 Cosine Functions ..............449 17.1.5 Tangent Functions ...............449...
- Page 27 17.5.1 Set Time ................459 17.5.2 Alarm Sound.................459 17.5.3 Term ..................459 17.5.4 Ringing Duration ..............460 17.5.5 Repeat Interval ..............460 17.5.6 Wakeup Call Times ..............460 17.5.7 Confirm/Cancel ..............460 17.6 Calendar..................461 17.6.1 Using the Calendar ..............461 17.7 Pronunciation Dictionary ............462 17.8 Stopwatch ...................464 17.9 Terminal for Screen reader ............465 17.10 Setup Internet ................466 17.10.1 LAN Setup................467...
- Page 28 19.1 What is ActiveSync?..............488 19.2 Connecting the Braille Sense U2 to a PC ........488 19.3 Setting up the Braille Sense U2 in the ActiveSync Program .488 19.4 Transferring Files to the Braille Sense U2 Via ActiveSync ..489 20. COMMAND SUMMARY ..............491 20.1 Common Combination Keys .............491...
- Page 29 20.4.1 Move keys for adding an address or in the menu.....496 20.4.2 Move Keys in the Search Result List .........496 20.4.3 Hot keys for the Commands ..........497 20.4.4 Miscellaneous Hot Keys ............497 20.5 Schedule Manager ..............497 20.5.1 Hot keys for the commands ..........497 20.5.2 Move Keys in the Search Result List .........498 20.6 E-mail ..................498 20.6.1 Hot keys that are used in the inbox........498...
- Page 30 20.15.7 Display Network Status .............515 20.15.8 Display power status ............515 20.15.9 Backup/Restore personalized settings ......515 20.15.10 Format................515 20.15.11 Sleep Timer...............516 20.15.12 Upgrading the Braille Sense U2 Firmware.....516 21. COMMAND SUMMARY FOR USB KEYBOARDS .......517 21.1 Common Combination Keys .............517 21.2 File Manager ................518...
- Page 31 21.2.1 Navigation keys on the file list and menu list ....518 21.2.2 Navigation Keys in the File List ..........518 21.2.3 Item (Folder or File) Selection Keys ........518 21.2.4 Hot Keys for the Commands..........519 21.3 Word Processor .................519 21.3.1 Hot keys for the command ..........519 21.3.2 Miscellaneous Hot Keys ............521 21.4 Address Manager ...............521 21.4.1 Move keys for moving from field to field in the record or in...
- Page 32 21.15.2 Setting the Date and Time ..........539 21.15.3 Checking the Date and Time ..........539 21.15.4 Calendar................539 21.15.5 Pronunciation dictionary...........540 21.15.6 Stopwatch................540 21.15.7 Display Network Status .............540 21.15.8 Display power status ............540 21.15.9 Backup/Restore personalized settings ......540 21.15.10 Upgrading Braille Sense U2 Firmware ......541...
- Page 33 22. TROUBLESHOOTING GUIDE ............542 22.1 The Braille Sense U2 Will Not Turn On ........542 22.2 The Voice Cannot Be Heard ............542 22.3 The Voice is Too Fast to Understand........542 22.4 The Voice Pitch Is Too Low or Too High to Understand ..542 22.5 Lost Your Place ................543...
-
Page 34: Introduction
Braille. 6. Using the Schedule Manager, you can enter your appointments on the Braille Sense U2. The Braille Sense U2 will then alert you at the time of your appointments. -
Page 35: Hardware
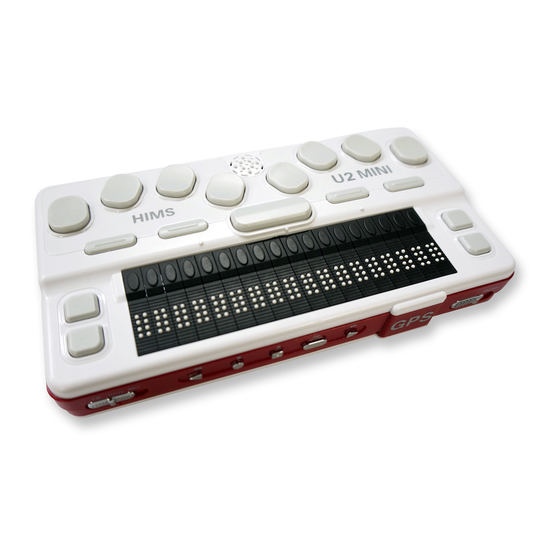
Braille Sense U2. 1.2 Hardware In order to get the most out of your Braille Sense U2, you will want to become familiar with the Braille Sense U2 by learning where the buttons and ports are located, as well as the function of each of these buttons and ports. -
Page 36: Top Panel
The side that is now facing up is referred to as the top of the Braille Sense U2. The side that is facing to your right is called the right side panel. The side facing to your left is called the left side panel. - Page 37 Above the cursor routing keys, are four rectangular shaped buttons. The spacebar is located between these four rectangular shaped buttons. Two of the rectangular shaped buttons are located on the left side of the spacebar and the other two are located on the right of the spacebar. These four rectangular shaped buttons are function keys.
-
Page 38: Right Side Panel
Toward the top of the Braille Sense U2 on the top panel, is a liquid crystal display (LCD) in the center. The LCD displays the printed text, so that someone who has sight can see what you are typing. On both sides of the LCD, there are two speakers, which enable the Braille Sense U2 to emit sound. -
Page 39: Left Side Panel
Now, let's take a look at the left side panel of the unit. If you move your finger to the left side of the Braille Sense U2, you will find USB port. You can connect USB cable to this USB port. -
Page 40: Front Panel
1.2.5 Front Panel Finally, let’s take a look at the front panel of the Braille Sense U2. On the far left of the front panel, there is microphone jack. You can plug in microphone. -
Page 41: Hardware Specifications Of The Braille Sense U2
The data in the RAM area will disappear if your battery goes dead, and the AC adapter is not connected. Also, when the Braille Sense U2 reboots for any reason, the data in the RAM will disappear. However, the data in flash memory will not disappear, even if... - Page 42 Now that you know what the Braille Sense U2 is, move on to the next section to learn more about the basic functions of the Braille Sense U2.
-
Page 43: Basic Functions Of The Braille Sense U2
If you turn off the Braille Sense U2 while another program is opened, and then you turn it on again, the Braille Sense U2 will tell you the name of the program that was running on the Braille Sense U2 when you... -
Page 44: Concept Of The Menu
“AC adaptor disconnected.” 2.2 Concept of the Menu The menu on the Braille Sense U2 is similar to the concept of a restaurant menu. For instance, a menu that is used at a restaurant will help you select your choice of food that will be served, while the menu on the Braille Sense U2 provides you with choices that you can select. - Page 45 Now, bring up the “program” menu. You can bring up the “program” menu by pressing “F1.” The “program” menu is the top menu in the Braille Sense U2. That is, the “program” menu is the parent directory for everything, as there are no directories or...
-
Page 46: Control Symbols On The Braille Sense U2
“program” menu, will be displayed. 2.2.1 Control Symbols on the Braille Sense U2 The Braille Sense U2 has many control symbols. Those symbols appear when you set “Before” and “After” the “Control information” in the “Global options”. - Page 47 Name Symbol Comments Menu It means the menu that has submenus. Menu item It means the menu that does not have a submenu. List item The item name after this symbol represents the name of the item in any list. (Ex: “LI database”...
- Page 48 which you can choose an item by pressing the up scroll button or the down scroll button. (Ex: “CB Type: *.*” in the “Open dialog box” of the word processor program) Edit combo box You can choose the desired item by pressing the up or down scroll button, or by directly typing in the item name.
-
Page 49: Using The Function Keys
“Enter” to “push the button.” 2.3 Using the Function Keys There are four function keys on the Braille Sense U2. When using the Braille Sense U2, you can open the menus, cancel tasks, and move to other items by using these function keys. -
Page 50: The Ac Power Supply And The Battery Pack For The Braille Sense U2
Braille Sense U2 It is very useful to know what the remaining battery power when the Braille Sense U2 is being operated only on battery power. If the remaining battery power is not sufficient, the Braille Sense U2 will indicate that the battery power is low. -
Page 51: Basic Explanation Of Disks, Folders, And Files
Braille Sense U2. This is done to prevent damage during shipping. When you insert this battery pack in to the Braille Sense U2 for the first time, the unit may display an inaccurate battery power level. Before using the Braille Sense U2 for the first time, please charge the battery for five hours. -
Page 52: Controlling The Volume, Speed, And The Pitch Of Speech
When the Braille Sense U2 is shipped from the factory, the name of the flash memory in the Braille Sense U2 is called “flashdisk.” You can create folders on this “flashdisk” in any way that you prefer. You can also expand your memory space by adding additional memory devices, such as a floppy disk drive through a USB port, USB stick memory (also known as a USB flash drive), or SD card. -
Page 53: How To Type The Character
2.8 How to type the character In the document, “edit box” and “multi edit box” on Braille Sense U2, you can enter the grade 1 or grade 2 Braille. But in the “computer edit box” such as “To” in email program, you have to enter the computer Braille. If you want to enter the capital letter, you can use the “capital sign (Space-... - Page 54 dash: dots 3-6 period: dots 4-6 slash: dots 3-4 0: dots 3-5-6 1: dot 2 2: dots 2-3 3: dots 2-5 4: dots 2-5-6 5: dots 2-6 6: dots 2-3-5 7: dots 2-3-5-6 8: dots 2-3-6 9: dots 3-5 colon: dots 1-5-6 semi colon: dots 5-6 less than: dots 1-2-6 equal: dots 1-2-3-4-5-6...
- Page 55 R: Space-u (dots 1-3-6), dots 1-2-3-5 S: Space-u (dots 1-3-6), dots 2-3-4 T: Space-u (dots 1-3-6), dots 2-3-4-5 U: Space-u (dots 1-3-6), dots 1-3-6 V: Space-u (dots 1-3-6), dots 1-2-3-6 W: Space-u (dots 1-3-6), dots 2-4-5-6 X: Space-u (dots 1-3-6), dots 1-3-4-6 Y: Space-u (dots 1-3-6), dots 1-3-4-5-6 Z: Space-u (dots 1-3-6), dots 1-3-5-6 left bracket: Space-u (dots 1-3-6), dots 2-4-6...
-
Page 56: Input/Search For Control Character
For example, all entries in the ASCII table below code 32 such as Form Feed (FF), TAB, and Carriage Return (CR). In the Braille Sense U2, you can input or search the control character in the Braille documents. -
Page 57: Multi Tasking
(5) Pressing “Enter” will search for the control character. 2.9 Multi Tasking The Braille Sense U2 can do more than one task at the same time, which is called multi-tasking. For example, you can work with the word processor while you are listening to music, and you can put calculations into a document at the same time. -
Page 58: Switching Audio Mode
The audio buttons on the front panel will work for different function according to the location of Audio mode switch. If you push the audio mode switch to the left side, the Braille Sense U2 will say “radio mode” and the audio buttons will work for the FM Radio program. -
Page 59: Switching Key Lock
You can disable or enable any specified keys on the Braille Sense U2 by using Key Lock switch on the right side panel. If the key lock switch put on front, Braille Sense U2 will say “all keys locked.” In this case, you can’t use the all keys including the on/off switch. -
Page 60: One-Handed Mode
“Space-z (dots 1-3-5-6)” will also close the print spool. 2.13 One-Handed Mode Braille Sense U2 provides a one-handed mode for users restricted to the use of one hand for Braille input. To turn on one-handed mode, hold down F3, while turn on the power switch. And to turn off this mode (i.e. -
Page 61: Using Typing Mode
The operation of the scroll buttons, function keys, audio buttons remains the same as in two-handed mode. If one-handed mode is on, the Braille Sense U2 will advise this each time it is turned on, and will also advise what to do to return to the two- handed mode. - Page 62 1. Call up the program menu: F1 2. Execute the individual program in the program menu F1-”shortcut key” (varies for each program) 3. Call up the Task Name list: F1-F4 4. Switch to previous program: Space-F2-F3 5. Switch to next program: F2-F3 6.
- Page 63 29. Checking your version: Space-v (dots 1-2-3-6) only in the Braille Sense U2 “program” menu.” 30. Display Network Status: Space-n (dots 1-3-4-5) in the Braille Sense U2 “program” menu 31. Increase the voice volume: Backspace-F4 32. Decrease the voice volume: Backspace-F1 33.
-
Page 64: Global Options
3. Global options The “Global options” in the Braille Sense U2 has information on all of your settings. You can change your preferences regarding each option. You can access the “Global options” by pressing “F1.” Then, use “Space- 4” or “Space-1” until you find “Global options.” Then, press “Enter” on “Global options.”... -
Page 65: Global Options Overview
3.1 Global options Overview The “Global options” contains different settings that can be changed in the Braille Sense U2. By pressing “Space-o (dots 1-3-5),” you can open the “Global options” while you are anywhere in the Braille Sense U2. The “Global options” has five groups. -
Page 66: Braille Display
If there are no more settings that have the same shortcut key, the Braille Sense U2 will wrap around and move to the first match. Pressing “Space-1” or “Space-4” moves the focus to the previous setting or the next setting. -
Page 67: Eight Dot Mode
Braille mode by pressing “Space” key. You can toggle this option on or off by pressing “F1-down scroll button” while you are using another program in the Braille Sense U2, without having to pull up the “Global options”. If you have changed the setting, press “Enter” key to save the setting. -
Page 68: Braille Code
The Braille code setting defines the rules by which Braille is translated to text and vice versa. The Braille Sense U2 offers 2 English Braille codes as well as entry of Spanish Braille. Thus the Braille code can be set to use “US”, “UEBC”, (Unified English Braille Code) or “Spanish”. -
Page 69: Message Display Time
“Enter.” You can also cancel saving the setting by pressing “Space-z (dots 1-3-5-6)” or “Space-e (dots 1-5).” 3.2.7 Language The Braille Sense U2 can output speech in both US English and Mexican Spanish. You can change the Text-to-Speech (TTS) engine using the “Language” setting in the “Global Options”. -
Page 70: Voice
“Backspace-Enter-v (dots1-2-3-6)”. 3.2.8 Voice This menu will allow you to turn the Braille Sense U2 voice on or off. The shortcut key is “v (dots 1-2-3-6).” By default the voice is set to on, so you will hear the Braille Sense U2 speak. You can turn off the voice with the ‘“Space”... -
Page 71: Punctuation Level
3.2.9 Punctuation Level You can choose how you want the Braille Sense U2 to read punctuation marks. The shortcut key is “p (dots 1-2-3-4).” The setting options are “All,” “Off,” “Punctuation,” and “Symbol.” The default setting is set to “All”... -
Page 72: Capitalization Alert
“Space-z (dots 1-3-5-6)” or “Space-e (dots 1-5).” 3.2.12 Numbers You can choose how you want the Braille Sense U2 to read number. The shortcut key is “n (dots 1-3-4-5)” with the default set to “On.” For example, if you set “On,” the “2007” will read “two thousand seven.” And you set “Off,”... -
Page 73: Abbreviations
(4) Pressing “Enter” key allows you to change and save the setting. 3.2.14 Voice Volume You can set the volume level of the voice on the Braille Sense U2. The shortcut key is “l (dots 1-2-3).” The setting value is 1 through 10 with the default set on 6. -
Page 74: Voice Rate
“Space-z (dots 1-3-5-6)” or “Space-e (dots 1-5).” 3.2.16 Voice Pitch You can control the voice pitch of the Braille Sense U2. The shortcut key is “t (dots 1-2-3-4-5).” The available options are 1 through 10 with the default set to 6. At level 10, the voice pitch will be the highest; and, at level 1, the voice pitch will be the lowest. -
Page 75: Scroll Voice
“Off.” The default setting (Off) does not allow the Braille Sense U2 to speak while scrolling. The “Space” key toggles off/on. If you set the option to “On,” you can hear the Braille Sense U2 while scrolling. -
Page 76: Flip Lcd Display
then press “Enter.” You can also cancel saving the setting by pressing “Space-z (dots 1-3-5-6)” or “Space-e (dots 1-5).” 3.2.19 Flip LCD display You can decide if the text on the LCD screen is shown in the right or reverse direction. By default, it is set to “Off,” You can switch the value to “On”... -
Page 77: Video Display
3.2.21 Video Display You can choose to have the Braille Sense U2 show your tasks on a VGA monitor. That is, a monitor that would normally hook up to a personal computer. The shortcut key is “d (dots 1-4-5)” with the default set to “Off.”... -
Page 78: Audio Alerts
“a (dot 1).” This option is useful if the speech setting on the Braille Sense U2 is turned off. The default for this option is set to “On.” If you turn off the speech, you will hear a beeping sound when you type in keys that the Braille Sense U2 does not accept. -
Page 79: Left Scroll Buttons
will hear a starting sound signal when you turn on or off the Braille Sense U2. If you don’t want to hear the on/off sound signal, you can press “Space” key once to turn “Off” the sound signal. If you have changed the setting, press “Enter” key to save the setting. You can also “tab (“Space-4-5”)”... -
Page 80: Right Scroll Buttons
If you set the value to “Move by sentence,” left-scroll buttons are used to move to previous or next sentence and it works as if you press “Space- 2-3-5” or “Space-2-5-6.” If you have changed the setting, press “Enter” to save the setting. You can also “tab (“Space-4-5”)”... -
Page 81: Skip Empty Lines
“Space-z (dots 1-3-5-6)” or “Space-e (dots 1-5).” 3.2.28 Skip Empty Lines You can choose to have the Braille Sense U2 read a blank line, or to skip empty lines. The shortcut key is “e (dots 1-5),” and the default is set to “Off.”... -
Page 82: Hide Passwords
“list item” or “menu item” after a menu or list item. If you have control information shut off, you will not hear “list item” or “menu item.” Note that if the Web browser is activated, the control symbols will appear even if you turn off the “Control information”... -
Page 83: Announce Shortcut Keys
(dots 2-3-4)” and the default is set to “On.” For example, if you hear, “File (f) pull down,” the shortcut key is the letter “f.” If you prefer the Braille Sense U2 only says, “File pull down,” you will want to turn the “Announce shortcut keys” setting off. To toggle “Announce shortcut keys”... -
Page 84: Power Saving Kick In
3)” with the default set at “After 10 minutes.” If you set this option to the default, the Braille Sense U2 will enter into power saving mode when you have not used the Braille Sense U2 for 10 minutes. The “Space” key changes the option setting to 10 minutes, 20 minutes, or 30 minutes. -
Page 85: Check Today's Schedule
Braille Sense U2. The Braille Sense U2 is able to check today’s schedule when you turn it on. You can decide if you want the Braille Sense U2 to show today’s schedule when it powers on. -
Page 86: Automatic Spell-Check
3.2.37 Automatic spell-check You can choose whether the Braille Sense U2 will check spelling or not. This option is available in “multi edit boxes” in programs such as the schedule manager, address manager, e-mail messages, the word processor, etc. The short cut key for this option is “c (dots1-4).”... -
Page 87: Automatically Synchronize With Time Server
Braille Sense U2 through accurate internet time server. Once the Braille Sense U2 is being connected to internet, you will hear the sound. From this point, the date and time of Braille Sense U2 synchronize the internet server automatically. The default is "ON", you can check or change this option following steps. -
Page 88: Bluetooth
10% or 20%. If it is set to “Beep,” the Braille Sense U2 outputs beep sound during copying or opening any documents or webpage. If it is set to “Silent”, the Braille Sense U2 will not hear the any sound in progress of copying or opening. -
Page 89: Ethernet Port
You can decide whether the Braille Sense U2 will turn Wireless LAN on. The shortcut key for this option is “w (dots 2-4-5-6).” You can choose between “On” and “Off” by pressing “Space.” By default, it is set to “Off.”... -
Page 90: Mass-Storage Device Mode
If you select “Off,” PC doesn’t recognizes the Braille Sense U2. In this case, if you want to connect the PC to the Braille Sense U2, you need to install and execute the Active Sync program in the PC. You can download the Active Sync program from the Microsoft website for free. -
Page 91: File Manager
“flashdisk.” You can use the up and down arrows (“Space-1” or “Space-4”) or the scroll buttons to explore additional disks. Press “Enter” on the disk you want to open. The Braille Sense U2 will show you the list of the files or folders on the disk you have opened. -
Page 92: Item (Folder Or File) Selection Key
“Space-4.” However, when you reach the end of a “file list,” the Braille Sense U2 will remain at the end of the “file list,” even if you press “Space-4.” The following is a list of the navigation keys;... -
Page 93: Cancel / Exit Key
You can choose a disk from the list, and then press “Enter” to get into the selected disk. The Braille Sense U2 will show you the list of folders and files on that disk. The items within the quotation marks are the folders, and the items without quotation marks are the files. -
Page 94: Opening A File
(dots 1-3-4)” or “F2” to call up the menu. Then, press the letter “o (dots 1-3-5),” or you can press “Enter” on the item named “Open.” The file formats that are supported by the Braille Sense U2 are as follows: Hbl, brl, txt, pwd, brf, rtf, doc,docx, pdf and epub files are supported by the word processor on the Braille Sense U2. - Page 95 Sense U2. If you press “Enter” on a file type other than those mentioned above, the “Open With” dialog box appears, because the file type is not associated with a program. Also, you can bring up the “Open With” dialog box through the menu.
-
Page 96: Send To
“Space-m (dots 1-3-4)” to choose the “Send To” option. Then, when you press “Enter” on “Send To,” the Braille Sense U2 will display the list of disks that you can use to send your files or folders to. You can choose a destination disk by using the up and down arrow keys (“Space-1”... -
Page 97: Delete Files Or Folders
Braille Sense U2 will attach “Copy1-” to your original file names for copied files. If the same files are copied into the same folder once again, the Braille Sense U2 will attach “Copy2-” to the original file names for the second copied files. -
Page 98: Rename
Otherwise, you can use the down arrow (“Space-4”) until you reach “Rename” on the list. Press “Enter” on this menu. Then, the Braille Sense U2 will ask for a new name. On the Braille display, “New file (or folder) name: (current file name or folder name)”... -
Page 99: New Folder
The Braille Sense U2 file conversion feature will support the following file formats: “Sense Word (hbl),” “Text (txt),” and “Braille (brl).” The Braille Sense U2 can convert one or more files at the same time to the file format you prefer. Select files using the file selection method. -
Page 100: Select All
4”) to select the desired file format. When you press “Enter” on the file format you want, the Braille Sense U2 will start converting files to the file format you have chosen. The Braille Sense U2 will keep the original file names for the files you have converted, except for the file name extension. -
Page 101: Sort Files By
For File,” and press “Enter” or “b.” Or, you can press “Space-f (dot 1-2- 4)” without calling the menu. Then, you can see dialog box for file search. The dialog box for file search consists of “edit window for file name to search”, “combo box to select a disk”, “check box to searching sub- folder”, “search button”, “cancel button”... -
Page 102: Set File Info
This option is used to specify the order of how files and folders will be displayed within the file list. Press “Space-m (dots 1-3-4)” to bring up the menu. Then, press “Space-4” repeatedly until you reach “Sort Files By,” and then press “Enter.” Also, you can access this feature by pressing “Enter-g (dots 1-2-4-5)”... -
Page 103: Display Only Files Of Type
4.2.15 Display Only Files of Type This is used to specify what type of files will be displayed in the file list. Press “Space-m (dots 1-3-4)” to bring up the menu. Then, press “Space- 4” repeatedly until you reach “Display Only Files Of Type,” and press “Enter.”... -
Page 104: Unzip
4.2.17 Unzip The “Unzip” function will allow you to unzip (or decompress) a zip file, regardless of whether it was made in Braille Sense U2 or a PC. To activate the “Unzip” function, use the following steps: After selecting a zip file, open the menu with “Space-m (dots 1- 3-4)”... -
Page 105: Using The Address Window
“tab (“Space-4-5”).” You can also press “Space-i (dots 2-4),” while you are in the file manager or “program” menu in the Braille Sense U2, to hear how much space is available on the flashdisk. 1. File type: This will give you the file type information, such as “brl file,”... -
Page 106: Editing
When you relocate the cursor by pressing the cursor routing key to the place that you want to edit, the Braille Sense U2 will insert the text from the location where the cursor is. If you know the exact path and file name, you can type in the path and file name to open the file with the appropriate application. -
Page 107: Network Share Function
Simply open or visit the file and path by pressing “Enter” on the item, which is displayed in Braille. The files that are supported by the Braille Sense U2 will open with the appropriate applications (see section 4.2.3). During the navigation of the history list, you can still type in new path names or file names that you want to access. -
Page 108: Search For Shared Computers And Add The Network List
If you want detailed LAN/wireless LAN setting, refer to Setup Internet of Utilities in this user manual. 4.4.1 Search for shared computers and add the network list. When you execute File Manager, you will see network list on disk list. Network list consists of the shared folder list of computer registered. - Page 109 “\\” signal and press “Enter”. For example, if the computer name which you want to search for is “hims”, type “\\hims” or just “hims” and press “Enter”. If the shared computer is searched, login box will be displayed according to the shared computer setting.
-
Page 110: Remove Remote Folder Registered
If remote folder name exceed 11 characters, Braille Sense U2 can’t recognize the folder. If file list does not appear, cancel the sharing of folder or file. And check the item that is displayed as “use simple file sharing”, execute... -
Page 111: Hot Keys In The "File Manager
already registered or not, next control is changeable to “Add” or “Remove” button. 4.5 Hot Keys in the “File Manager” Hot Keys for the File Manager Open: Enter-o (dots 1-3-5) Open with: Enter-e (dots 1-5) Zip: Enter-z (dots 1-3-5-6) Unzip: Enter-u (dots 1-3-6) Send: Enter-s (dots 2-3-4) Copy: Enter-c (dots 1-4) Cut: Enter-x (dots 1-3-4-6) -
Page 112: Word Processor
When you launch the word processor on the Braille Sense U2, the Braille Sense U2 will place you in a new document that is ready for you to write in. The menu can be opened by pressing “Space-m (dots 1-3-4)”... -
Page 113: New
“noname.brl.” The extension, “.brl” is the extension given to documents that are created in Braille on the Braille Sense U2. It is the same file name that is named automatically when the word processor opens. In order to create a new document, select “New”... - Page 114 “Enter.” The file name should be typed in ASCII Braille. The Braille Sense U2 will look for that file in the “/flashdisk/My Documents” folder. If there are files that you used recently, you can scroll through them by pressing “Space-4.”...
-
Page 115: Save
“Global options”. After the file opens, you can switch the Braille mode. In the word processor of the Braille Sense U2, it is possible to open and work simultaneously with up to 10 files at one time. If you already have... -
Page 116: Save As
If you execute “Save” after you edit a document that was opened using the “Open” function, the Braille Sense U2 will save the document with the same file name without using a dialog box. After saving a document, it will return to document edit status. -
Page 117: Close Current Document
and “Epub”, the formatting will not be kept and will be saved as “TXT” format. However, if you created a new document by executing the word processor or by executing “New,” and you execute “Save” or “Save As,” the displayed default file name is “noname.brl” and the file path is “flashdisk/My Documents/.”... -
Page 118: Print
5.1.6 Print The “Print” command is used to print the current document in ink or emboss it in Braille. If you want to execute this command, press “Space- m (dots 1-3-4)” or “F2,” and press “Enter” on the “File” menu. Then, move to “Print”... - Page 119 Braille Sense U2 will be used when embossing. If you set this to “Yes,” the document will be embossed using the Braille document layout setting in Braille Sense U2. If you set it to “No,” the document will be embossed in the format specified in the original document.
-
Page 120: Settings
“Space” to move to “No,” and press “Enter,” printing will be canceled, and the Braille Sense U2 will return you to the open document. Note that the Braille Sense U2 will work with all HP printers (level 3 PCL or higher), and with HP-compatible printers. - Page 121 Reading mode “Original”, will show the document in its original format. If the Reading mode is set to “Compressed”, The Braille Sense U2 will continue displaying contents even if there exists a carriage return ($p). In order to toggle between “Original” and “Compressed,” press “Space.”...
-
Page 122: Exit
“Enter” to exit the word processor. 5.2 Edit Menu In the Braille Sense U2, you can edit all files regardless of what the view mode is set to. In the “Edit” menu, you will find the following items: “Start Selection,”... -
Page 123: Copy
to use this function, press “Space-m (dots 1-3-4)” or “F2” to open the “Edit” menu, and then press “Enter” on “Start Selection,” or you can press “b (“dots1-2”)” in the “Edit” menu to get to this option. While editing a document, pressing “Enter-b (dots 1-2)” will activate this command. The end point of the selected text is where you want to place the cursor after setting the starting point. -
Page 124: Paste
The difference between “Cut” and “Copy” is that if you execute the “Cut” command, the text that has been selected will be moved to the clipboard and the selection in the document will be cut. However, the “Copy” command will copy the selection to the clipboard, and the text that has been selected will not be erased from the document. -
Page 125: Add To Clipboard
5.2.7 Add to Clipboard When you have selected the text you want to select in your document, you should press “Space-m (dots 1-3-4)” or “F2,” and then press “Enter” on “Edit” to enter into the “Edit” menu. Move to “Add To Clipboard” by pressing “Space-4,”... -
Page 126: Insert From File
5.2.10 Insert from File This command will insert another file in the current document that is being edited. If you want to run this command, press “Space-m (dots 1- 3-4)” or “F2,” and press “Enter” on the “Edit” menu. Move to “Insert From File”... -
Page 127: Insert Time
5.2.13 Changing Between Insert and Overwrite Mode There are two ways of editing documents in the Braille Sense U2. The first is to insert your text, which will push back the words behind the cursor. This is called the “Insert mode” because you are simply inserting text. -
Page 128: Check Spelling
5.2.14 Check Spelling This option is used to check spelling while you are editing a document. In order to bring up check spelling option, do the following; Call up the menu by pressing “Space-m (dots 1-3-4)” or “F2.” Move to the “Edit” menu by pressing “Space-4.” Press “Enter”... - Page 129 1. Always suggest recommended word: if this option is set to “On,” the Braille Sense U2 will suggest a word if the word that is encountered is not in the dictionary. The default is set to “On.” If the option is set to “Off,”...
- Page 130 “Off,” and you can change it by pressing “Space.” 6. Confirm: if you press “Enter” on “Confirm,” the changes that you made above will be saved, and the Braille Sense U2 will exit from the “Options” dialog.
-
Page 131: Go To Menu
encountered that is not in the dictionary, the word will not be modified. You can also press the “down scroll button” in order to skip the word. 5. Skip all (i): if you press “Enter” on this button, the word that is the same word as the currently focused word will not be modified and skipped throughout the spell check range. -
Page 132: Find
submenus: “Find,” “Find Again,” “Replace,” “Go To Location,” “Go to Previous Page,” “Go To Next Page,” “Set Mark,” “Go to Mark,” “Go To Previous Document,” and “Go To Next Document.” 5.3.1 Find The find function allows you to search for text in a document. Once the text is found you will be taken to that position in your document. -
Page 133: Find Again
Braille display. If there was no text that matched what you typed in, the cursor does not move and the Braille Sense U2 announce the “not found.” by the voice. This function saves the text that was typed in last, as well as the direction, so you can use it again to search for the next occurrence of text. -
Page 134: Replace
You can type in new text that will replace the text that is found. After you type in “Text to find” and “Replace with,” the Braille Sense U2 will find the text and replace it in the direction that you have specified. If you want to change the direction, press “tab (“Space-4-5”)”... -
Page 135: Go To Location
“Enter-l (dots 1-2-3)” to activate this function. If “Go to Location” is executed, the word processor says, “Move to page number.” If you type in a number here, the Braille Sense U2 will take you to the page number that corresponds with the number you have just typed in. - Page 136 “+f.” If the page number you type in is not valid, the Braille Sense U2 will say, “Move range error.” You can also use this function to move to a specific paragraph. First, select “Go To Location”...
-
Page 137: Go To Previous Page
“Go To” menu. Then, when the Braille Sense U2 says, “Move to page number:” you can type in the page number followed by the line number. For example, to move to the 3 line on the 20 page, you would type “20 3,”... -
Page 138: Go To Mark
For example, if you put down the letter “a (dot 1),” the Braille Sense U2 will move you to that point in the document immediately. If you are in the document, the Braille Sense U2 will not show the mark sign. -
Page 139: Go To Next Document
currently editing. To execute this command, press “Space-m (dots 1-3- 4)” or “F2,” and move to “Go To” by pressing “Space-4.” Then, press “Enter” on “Go To.” Move to “Go To Previous Document” by pressing “Space-4,” and then press “Enter.” Or, you can press “shift-tab (space - 1-2)”... -
Page 140: Read Beginning Of Selected Text
This command will read a document from where the cursor is located to the end of the document. While the Braille Sense U2 is reading the text, the cursor will stay in the same location that you were, before you... -
Page 141: Auto Scroll
been completed. Once the text has been read, the cursor will move to the end of the document. To execute this command, press “Space-m (dots 1-3-4),” and move to the “Read” menu by pressing “Space-4.” Then, press “Enter.” You can move to “Read From Cursor To End” by pressing “Space-4”... -
Page 142: Read Current Line
This function will let you know the information of the current sentence. To execute this command, press “Space-m (dots 1-3-4),” and move to the “Read” menu by pressing “Space-4.” Press “Enter” to move to “Read Current Sentence” by pressing “Space-4” and press “Enter.” Or you can press “e (dots 2-5),”... -
Page 143: Read Status
5.4.10 Read Status This function will tell you information about your current file. If you activate this function, the Braille Sense U2 will tell you the “file name,” “edit mode (insert or overwrite),” and “file protection(write or read only).” To execute this command, press “Space-m (dots 1-3-4)” or “F2,” and move to the “Read”... - Page 144 are editing a document, the setting will be valid on the rest of the document. You can navigate the menu items with “Space-1” or “Space-4,” and you can move to “Confirm” or “Cancel” by pressing “tab” (“Space-4-5” or “F3”). You can skip an item by pressing “Space-4” if you don’t want to change the default setting.
-
Page 145: Print Document Layout
press “Space.” Pressing “Backspace” will allow you to move in reverse order. When you have selected your preference, you need to press “Space-4” in order to move to the next setting. 5. Set page numbering This sets the position of the page number when embossing. The selections are “Upper right”... - Page 146 by pressing “tab” (“Space-4-5” or “F3”). You can skip an item by pressing “Space-4” if you do not want to change the default setting. The following is a detailed explanation of each setting: 1. Set top margin This sets the top margin for ink printing. The top margin is the distance from the top of the paper to the first line of the printed paragraph.
-
Page 147: Braille Paragraph Layout
150%. The distance can be anywhere from 100% to 300%. If you type in a value that exceeds this range, the Braille Sense U2 will say “Out of range. Value too large,” and wait for you to type in another value. -
Page 148: Print Paragraph Layout
1. Indent first line This indents the first line of the paragraph as designated by the number of characters. The default value is set to 0. In order to change this setting, type in the number of characters to be indented on the “Indent first line”... - Page 149 The following is a detailed explanation of the settings for “Print Paragraph Layout:” 1. Set left margin This sets the left margin for ink printing. The default value is set to 0mm. In order to change the setting, you will need to type in the value. Move to the next setting by pressing the down scroll button or press “Space-4.”...
-
Page 150: Keys For Text Scrolling And Deleting
Abstract2: Times New Roman, Font size 14, Boldface Sub title: Courier New, Font size 16, Italic, Boldface, CEnter- aligned Title: Times New Roman, Font size 20, Boldface, CEnter-aligned 7. Confirm / cancel In order to apply a setting, press “Enter” on “Confirm.” In order to cancel a setting, and move to “edit mode,”... -
Page 151: Cursor Location
the current paragraph function, you will hear the entire paragraph where the cursor is located. Read the current paragraph: “Space-2-3-5-6” Read the current sentence: Space-1-4-5-6 Read the current line: “Space-1-4” Read the current word: “Space-2-5” Read the current character: “Space-3-6” If you want to delete a part where the cursor is, you can use the following keys. - Page 152 2. Edit menu Start selection: Enter-b (dots 1-2) Copy: Enter-c (dots 1-4) Cut: Enter-x (dots 1-3-4-6) Paste: Enter-v (dots 1-2-3-6) Delete: Space-d (dots 1-4-5) Delete blank lines: Backspace-e (dots 1-5) Add to clipboard: Enter-p (dots 1-2-3-4) Clear clipboard: Enter-d (dots 1-4-5) Select All: Enter-a (dot 1) Insert from file: Enter-i (dots 2-4) Insert date: Enter-w (dots 2-4-5-6)
- Page 153 5. Layout menu Braille document layout: Backspace-p (dots 1-2-3-4) Print document layout: Backspace-t (dots 2-3-4-5) Braille paragraph layout: Backspace-1-2-4-6 Print paragraph layout: Backspace-2-3-4-6 6. Miscellaneous hot keys Move to previous character: Space-3 Move to next character: Space-6 Move to previous word: Space-2 Move to next word: Space-5 Move to the beginning of the line: Home (Space-1-3) Move to the end of the line: End (Space-4-6)
-
Page 154: Address Manager
6. Address Manager 6.1 What is the “Address Manager”? The “Address manager” is a program that you can use to keep track of your contact information and schedule information, such as names, company addresses, home addresses, as well as other information. “Address manager”... -
Page 155: Starting The Address Manager
6.2 Starting the Address Manager When you press “Enter” on “Address manager” in the “program” menu, the Braille Sense U2 will say “Search Address,” and display the prompt, “Last name:.” In other words, when you start the “Address manager,” the “Search Address”... - Page 156 press the down arrow (“Space-4”), and the field will be left blank. You will then be prompted for the next field. When you have entered information in the desired fields, you can save the information by pressing “tab (“Space-4-5”)” or “shift-tab (“Space-1- 2”)”...
-
Page 157: Setting Add Address Fields
case, you should press “dot 6” to enter the comma in computer Braille or “dot 2” in grade 1 Braille. When you enter a home page address or an e-mail address, you should enter the information using computer Braille. For the @ (at sign), you should press “Space-u (dots 1-3-6)”... -
Page 158: Using "Search Address" In "Add Address
After setting all the fields you want to change, move to the “Confirm” button or the “Cancel” button by pressing “tab (“Space-4-5”)” or “shift-tab (“Space-1-2”)”, and then press “Enter” to save or cancel the changes. Another way you can cancel the changes is by pressing “Space-e (dots 1-5)”... -
Page 159: Setting Searching Address Fields
For moving each field and record in the search result list, you can use the following keys. Following are the move keys in the search result list Move to a previous field in a record: Space-2 Move to the next field in a record: Space-5 Move to the first field in a record: Space-1-3 Move to the last field in a record: Space-4-6 Move to the previous record: Space-1... -
Page 160: Using "Add Address" In "Search Address
want to search by pressing “Space-4” or “Space-1,” and then press “Space” to change the value of that field to “unused.” By pressing “Space,” you can toggle the value of a field between “used” and “unused.” 6.4.3 Using “Add Address” In “Search Address” You can use the “Add Address”... -
Page 161: Restore Address List
6.5.2 Restore Address List If you want to restore the address list after a cold reset, press “Space-m (dots 1-3-4)” or “F2” to call up the menu, and use the up and down scroll buttons to find “Restore Address List.” Then, press “Enter” on “Restore Address List.”... -
Page 162: Importing And Exporting Csv
If you activate the function, you will see a dialog box. The dialog box has three controls: “Backup mode” radio button, a “Confirm” button, and a “Cancel” button. You can switch between controls by pressing “tab (Space-4-5)” or “shift-tab (Space-1-2).” To switch between radio buttons, you can press “Space-1,”... -
Page 163: Import From Csv
It will import CSV file from contacts of MS outlook or contacts of some cell phones. In “Address Manager” of Braille Sense U2, 1. “Import from CSV” allows you to import the data of CSV file in “Address Manager”. - Page 164 6.6.1.3 Importing the CSV file In order to import the CSV file, follow these steps: 1) Press “Enter” on “Address Manager”. Or press “a (dot 1) in program list. 2) Press “Space-m (dots 1-3-4)” or “F2” to call up the menu. 3) Press “Space-1”...
- Page 165 6.6.1.4 Adding the CSV file in data of “Address Manager” Once you import the CSV file, “Last name: unused 1/xx” will be displayed. Structure is like below. 1. 23 filed list of Search address/ Add address 1) unused 2) Field name list of CSV file 2.
-
Page 166: Exporting Csv
2) Follow steps the above by pressing “Tab (Space-4-5)” to move to different field such as “Group”, “Company”, and “Title” etc. 3) Press “Tab (Space-4-5)”, move to “Allow fields in first record”. You can change setting, by pressing “Space”. When you import the fields of first record in CSV file, you select it. - Page 167 3) Press “Space-1” or “Space 4” and move to “Export to CSV”. 4) Press “Enter”. Or press “x (dots 1-3-4-6)”. Without calling menu, you can directly execute this function by pressing “Backspace-x (Dots 1-3-4-6)”. 6.6.2.2 Structure and Move of “Export to CSV” menu 1.
-
Page 168: Commands In The Found Records
1) Execute “Address manager”. 2) Press “Space-m (dots 1-3-4)” or “F2” to call up the menu. 3) Press “Space-1” or “Space-4”, move to “Export to CSV”. 4) Press “Enter”. Or press “x (dots 1-3-4-5)”. 5) It shows “File name”. 6) Press “Tab (Space-4-5)”, move to “File storage” list. It shows list of work folder in “Flashdisk”. -
Page 169: Editing Addresses
“Company e-mail” by pressing “Space-1” or “Space-4.” Then, press “Enter” on “Home page,” “Home e-mail” or “Company e-mail.” If you press “Enter” on a “Home page,” the Braille Sense U2 will automatically connect to the Web browser program. If you press “Enter”... -
Page 170: Printing Addresses
“last name:,” which is the first field of a record. The Braille Sense U2 will say “selected.” If you cancel a selection by pressing “Space” on a selected record, the “*” will disappear, and the Braille Sense U2 will say “Canceled selection.”... -
Page 171: Saving Addresses To A File
1-3-4)” to bring up the “menu,” and then select “Print Address.” Then, press “Enter,” or press “Space-p (dots 1-2-3-4),” which is the hot key. The Braille Sense U2 will now prompt you to select a printer. The default selection is “Printer.” If you press “Space” once, the selection will be changed to “Embosser.”... -
Page 172: Hot Keys In The Address Manager
USB cable. If the “Partnership” dialog box opens on your PC after you connect the Braille Sense U2 to your PC, select “Yes,” and press the “Next” button on your PC. Then, you will be asked for a device name. Type in “BrailleSensePLUS”... - Page 173 Move to the previous record: Space-1 Move to the next record: Space-4 Move to the first record: Space-1-2-3 Move to the last record: Space-4-5-6 Move to previous same field different record: Space-3 Move to next same field different record: Space-6 3.
- Page 174 Cancel: Space-e (dots 1-5) or F4 Exit: Space-z (dots 1-3-5-6)
-
Page 175: Schedule Manager
When you use “Add Schedule,” “Search Schedule,” or “Wake up alarm” (which are located in the “Utilities” menu), you are asked to set the date and time. The Braille Sense U2 provides you with a consistent interface to enter time and date information in these dialog boxes. So before we... -
Page 176: Adding A Schedule
start talking about using the “Schedule manager” in this section, we should explain how to enter the date and time. When you are asked to enter a date and time, you can either type in the date and time, or select it using shortcut keys, which are outlined at the end of this section. -
Page 177: Start Date
To add a new appointment, press “Space-m (dots 1-3-4)” or “F2” to bring up the menu. Select “Add Schedule,” and press “Enter,” or press “Enter-i (dots 2-4)” in the “Search Schedule” dialog box. The “Add Schedule” dialog box has a set of input fields, a “Confirm” button, and a “Cancel” button. -
Page 178: Start Time
7.4.2 Start time “Start time” is the second field in the “Add Schedule” dialog box. Here you can set the time when your appointment starts. By default, this field shows the current time, which can be changed in the “Set Time and Date”... -
Page 179: Subject
7.4.5 Subject “Subject” is the fifth field where you can type in the subject of an appointment. If you do not enter anything in this field, you will not be able to save the record. If you press “Enter” after typing in the subject, the record will be saved, leaving the “Location”... -
Page 180: Setting A Recurring Schedule
Move to 1 minute after: Space-6 Move to 1 minute before: Space-3 If you attempt to set the time to 0, the Braille Sense U2 will display the message, “Time of appointment.” If you do not want to set an alarm, press “Space-1”... - Page 181 7.4.9.1 Daily If you select “Daily,” and press “tab (Space-4-5),” the focus will move to “Recurring interval of day” edit box. Here, you can enter the number of days after which the appointment recurs. You can type a number between 1 and 999. If you enter 1, the appointment recurs every day, and if you enter 2, it recurs every other day.
- Page 182 (Space-4-5)” after entering the recurring interval, the focus will move to a list box where you can select the day of the week on which the appointment recurs. You can move between the items in the list box, by pressing “Space-1” or “Space-4.” To select or unselect the current item, press “Space”.
-
Page 183: Confirm
appointment recurs. Since you can select only one of the 7 days, the one shown currently is the selected day. If you press “tab (Space-4-5)” here, the focus will move to the “Set recurrence end date” check box, and you can set it. 7.4.9.4 Yearly If you set the “Recurrence”... -
Page 184: Search Schedule
“Enter.” Or you can execute it by pressing “Enter-f (dots 1-2-4)” without calling up the menu. Every time you press “Enter-f (dots 1-2-4),” the Braille Sense U2 will say “Search mode: Date” or “Search mode: Subject,” and the searching mode will be toggled. -
Page 185: Searching With Subject
7.5.2 Searching with subject If it is executed, the Braille Sense U2 will say “Search subject:” Type in the keywords which you are searching. After you type in the keywords and press “Enter,” then all schedules with the keywords will be displayed. -
Page 186: Modify Schedule
If you want to read the schedule in detail, you can press “Enter” at the schedule that you want to read in detail. After you read the schedule in detail and return to the schedule list, press “Space-e (dots 1-5).” And if you want to search with the other keywords, press “tab (Space-4-5)”... -
Page 187: Printing A Schedule
3-4),” or call up the menu by pressing “Space-m (dots 1-3-4)” or “F2,” and press “p (dots 1-2-3-4),” or select “Print Schedule.” Then, press “Enter.” The Braille Sense U2 will ask you to specify the beginning date of the appointments to be printed. By default, the current date is displayed. -
Page 188: Backing Up And Restoring Your Appointments
“Save Schedule As File,” and press “Enter,” or press “t (dots 2-3- 4-5)” in the menu. Then, the Braille Sense U2 will ask you to specify the beginning and end date of the appointments to be saved just like it did in “Print Schedule.”... -
Page 189: Setting Backup Option
If you want to restore your schedule after a cold reset, press “Space-m (dots 1-3-4)” or “F2” to call up the menu, and use the up and down scroll buttons to find “Restore Schedule.” Then, press “Enter” on “Restore Schedule.” Or, you can press “r (dots 1-2-3-5)” while you are in the menu to find “Restore Schedule.”... -
Page 190: Setting Alarm Option
“Cancel” button. You can switch between controls by pressing “tab (Space-4-5)” or “shift-tab (Space-1-2).” To move between the radio buttons, you can press “Space-1,” “Backspace,” “Space-4,” or “Space.” The “Backup mode” has three radio buttons: “Always backup changes when exiting,” “Manual backup,” and “Prompt backup changes when exiting.”... -
Page 191: Alarm Duration
7.11.2 Alarm Repeat Interval Time When the alarm goes off, if you do not stop it by pressing “Backspace- Enter,” the Braille Sense U2 will keep giving you a notice about the appointment after a specified time interval. The “Alarm repeat interval”... -
Page 192: Confirm
An alarm will repeat according to the number of times that you set for this option and will then stop automatically. The Braille display on the Braille Sense U2 will also display the “date” and “subject” for the alarm. 7.11.4 Confirm By pressing “Enter”... -
Page 193: Hot Keys For The Schedule Manager
If the “Partnership” dialog box opens on your PC after you connect the Braille Sense U2 to your PC, select “Yes,” and press the “Next” button on your PC. Then, you will be asked for a device name. Type in “BrailleSensePLUS”... - Page 194 Toggle search mode: Enter-f (dots 1-2-4) Exit: Space-z (dots 1-3-5-6) 4. Move keys in the search result list 1) Move from a appointment to another in the schedule list: Move to the previous a in the same day: up arrow (Space-1) Move to the next appointment in the same day: down arrow (Space- Move to the first appointment in the same day: Space-1-3 Move to the last appointment in the same day: Space-4-6...
-
Page 195: E-Mail
When checking the “inbox” in the email program, the menus are different from the menus that are used when you are writing an email. You should read this chapter carefully, before you use the e-mail program on the Braille Sense U2. 8.1 Executing E-mail and E-mail service management To use the e-mail program, you have to add your e-mail service information. -
Page 196: Executing E-Mail
By pressing “Space-1” and “Space-4”, you can move between mailbox lists. If there are any e-mail messages that the Braille Sense U2 has already received, “Opening inbox...” will be announced in voice and on the LCD display; however, “xx% processed” will be displayed on the Braille display. -
Page 197: Management E-Mail Service Information
8.1.2 Management e-mail service information In “Accounts manager”, you can manage e-mail service information. To execute e-mail service, follow these steps: 1) Press “Space-M (dots 1-3-4) to call up the menu in “Inbox” mail list. 2) Pressing “Space-4”, move to “Tools”. Press “Enter” on “Tools”. Or press “T (dots 2-3-4-5)”. - Page 198 15) Press “Tab (Space-4-5)”, move to “Confirm” button. 16) Press “Enter” on the “Confirm” button. 17) Then, the Braille Sense U2 will exit to “Account name list” and show the added account name (Ex: Account name: Braille Sense U2 1/1).
- Page 199 “Backspace.” 3) In order to delete the current line, press “Backspace-c (dots 1-4)”. Then, the Braille Sense U2 will ask “Delete line: Yes.” If you press “enter,” the selected line will be deleted. If you do not want to delete the current line, press “Space” to change from “Yes” to “No”...
- Page 200 18) Press “Space-4” to move to “Keep mail copies in server”. When you download e-mail from your e-mail server, you can set the Braille Sense U2 to keep e-mail messages on the server or not. Press “Space” to change “Yes” to “No,” and press “enter” if you do...
- Page 201 19) Press “Space-4” to move to “Save mail copies in sent mailbox”. When you send e-mail, you can set the Braille Sense U2 to keep e-mail message in sent mailbox or not. Press “Space” to change “Yes” to “No”, and press “Enter”.
- Page 202 8) The “Information” dialog box will be opened, and “Account name: (Added account name)” will be displayed (Ex: account name: Braille Sense U2). 9) Press “Space-4” or “tab (“Space-4-5”)” and check the added information for each item. Pressing “enter” on the “Close” will return you to the service list.
- Page 203 9) The “Modify” dialog box will be opened, and “Account name: (Added account name)” will be displayed (Ex: Account name: Braille Sense U2). You can type in here that you want to modify. 10) Press “Space-4”, move to “Display name”. You can type in here that you want to modify.
-
Page 204: Receiving And Sending E-Mail
Yes” will be displayed. 9) Press “enter” in order to delete it. 10) The Braille Sense U2 will delete it, show “Successfully deleted,” and return to the “service list.” If you want to cancel the deletion, press “Space” when “Are you sure you want to delete the (Added account name) account? Yes”... -
Page 205: Reading The Received E-Mail Messages
“inbox” (Ex: Subject: (subject of the email received) xx/xx). If the e-mail size is more than the Braille Sense U2 can handle, it announces “This message is too large to download. Skipping.” and then the Braille Sense U2 will begin downloading the next e-mail message. - Page 206 “1 attachment,” which indicates the number of the attached files in voice. The Braille Sense U2 also indicates which e-mail messages have been read, and which e-mail messages have been unread. E-mail messages that have not yet been read have the “-” sign placed in front of the subject.
- Page 207 Move to the first e-mail in the Inbox: Space-1-2-3 or Space-1-3 Move to the last e-mail in the Inbox: Space-4-5-6 or Space-4-6 The Braille Sense U2 also indicates which e-mail messages have been read, and which e-mail messages have been unread. E-mail messages that have not yet been read will have the “-”...
- Page 208 Braille Sense U2 will show you the “From” item again. By saving the e-mail ID using the above method, the name and its e-mail id will be saved in the Braille Sense U2. The saved e-mail ID can be used to send your message.
- Page 209 When you type in the name, you can type it in “Name” edit box directly. If the address that was typed in is saved, and the dialog box is closed, the Braille Sense U2 will show you the “CC” item again. 8.2.2.5 Message Control “Message”...
- Page 210 But, if the folder has a lower level folder, “(folder name) 1/yy” will be displayed. When “Save attachment path” is executed, the Braille Sense U2 will only show the folder. So, if there is no folder in the “download” folder, it will show “no items.”...
-
Page 211: Writing E-Mail
If you have links on the html type of e-mail, you can visit linked site by pressing “enter” on it only when your Braille Sense U2 is already connected to internet. - Page 212 If this occurs, the e-mail will be saved in the “Outbox.” If the Braille Sense U2 completed or failed to send the e-mail, it will return to the “Inbox.” While you execute the above steps, if you want to cancel, press “Space- e (dots 1-5) or “Space-z (dots 1-3-5-6)”.
- Page 213 5) The default folder for the “file list” is the “upload” folder, which is a sub folder of “flashdisk.” If there are no folders in the “upload” folder of the Braille Sense U2 due to any reason, “no items” will be displayed. In this case, you have to make a folder in the “File manager,”...
- Page 214 Braille dots. Semi-colon (;): Dots 5-6 Comma (,): Dot 6 For example, sense@hims-inc.com;hims@hims-inc.com. 8.2.3.3 Searching the Address List You can type in the recipient at “To,” “CC,” and “BCC” from the address list without typing in the e-mail address directly.
- Page 215 Here, “xx” is the number of the found addresses that have the same name in the address list (Ex: HIMS hims@hims-inc.com 1/xx). 7) Press “Space-1” or “Space-4” to move to the desired address, and press “enter”...
- Page 216 “Save As” in the Word processor. You can also change the path for saving it. 10) After the Braille Sense U2 saves the e-mail message, it will return to the status it was at before calling the menu.
- Page 217 If you press “Space-z (dots 1-3-5-6)” instead of “Space-e (dots 1-5)” while you are writing an e-mail message, the Braille Sense U2 will return to the “inbox” without asking whether it will save the message or not. 8.2.3.5 Saving E-Mail as New Name in the “Outbox”...
- Page 218 “Message body” control. While you are typing in “message body” if you press “Space-z (dots 1-3- 5-6)” to cancel writing an e-mail, the Braille Sense U2 will display “Currently writing mail. Save? Yes”. Pressing “Enter”, it will save the e- mail.
- Page 219 “Outbox”. After sending the mail of the “Outbox”, there is no the mail in “Outbox”. The mail will move to “Sent item”. Then, the Braille Sense U2 will return to “inbox.”...
-
Page 220: Major Features Of E-Mail
4) Press “Enter” on the “Tools menu” or press “T (dots 2-3-4-5)”. 5) It shows the “Accounts manager”. 6) Press “Enter” on the “Accounts manager”. 7) It shows “Account name” lists. 8) Press “Space-1” or “Space-4”, move to the e-mail account that you want to set the default account. - Page 221 2) Press “Space-d (dots 1-4-5)”. 3) Then it shows “Delete (subject of the selected e-mail) mail? Yes”. 4) Press “Enter” if you want to delete the e-mail. If you want to cancel it, press “Space” to change “Yes” to “No” on the “Delete (subject to the selected e-mail) mail?”.
- Page 222 8.3.1.3 Deleting E-Mail by Making a Selection If you want to delete multiple e-mail by designating a selection, you can delete them as follows: 1) Press “Enter-a (dot 1)” on the “Subject” or “Date” control. 2) Then, all of the e-mail will be selected. 3) It shows “*”...
-
Page 223: Reply And Reply All To A Received E-Mail
You can get to this stage by pressing “Enter-r (dots 1-2-3-5)”. 9) Press “Shift-Tab (Space-1-2)” to move to “Subject,” “BCC”,” “CC,” and “To.” 10) At “Subject,” it shows “Subject: Re: Welcome to HIMS”. And, at “To,” it shows “To: hims@hims-inc.com ”. 11) Press “Tab (Space-4-5)” to move to “Message body.”... -
Page 224: Forwarding A Received E-Mail Message
If you want to add another e-mail recipient, press the “cursor routing key” that is located at the position where you want to add the recipient, and type in the new e-mail address. Use computer Braille when typing in this information. -
Page 225: Saving A Received E-Mail As Document
Braille. 9) Press “Tab (Space-4-5)”, move to “CC,” “BCC,” and “Subject.” 10) At “Subject,” It shows “Subject: Fw: Welcome to HIMS.” 11) Press “Tab (“Space-4-5”)”, move to “Message body.” 12) You can find the original e-mail message with the following message;... -
Page 226: Printing E-Mail Messages
In order to print to an ink printer, do the following: 1) Connect the Braille Sense U2 to an ink printer with the printer cable that was provided by the manufacturer of the printer. The... -
Page 227: Additional Features Of E-Mail
printing port must be the same port that was set in the “Print port” in the “Global options”. 2) Press “Space-m (dots 1-3-4)” or “F2” to call up the menu. 3) It shows “File”. 4) Press “Enter” on the “File”. 5) Press “Space-4”, move to “Print E-mail.”... -
Page 228: Find Again
In the “Find” dialog box, you can move between the five controls by pressing “Tab (“Space-4-5”)” or “Shift-Tab (“Space-1-2”)”. The shortcut key is “f (dots 1-2-4).” You can move to this function without calling up the menu by pressing “Space-f (dots 1-2-4).” To activate the “Find”... -
Page 229: Move To Next Unread Message
The “Find Again” command finds the next text according to what you found using “Find” dialog box, and it will go to the previous text if you set the direction to “Backward” when you used the “Find” function before. The “Find Again” function only works in the “Subject,” “Date,” or “From” control. -
Page 230: Copy Or Move To Mailbox
To use this function without calling up the menu, press “Enter-u (dots 1- 3-6).” 8.4.4 Copy or Move to Mailbox There are two methods how to copy or move an e-mail to folder. 1. You can copy and move e-mails directly in “Mailbox” lists except “Outbox”. - Page 231 19) Press “Enter” on the “Edit”. 20) It shows the “Select All”. 21) Press “Space-4”, move to the “Paste” and press “Enter”. Or without calling up the menu, press “Enter-v (dots 1-2-3-6). 22) It will be copied or moved the e-mail to mailbox. 2.
- Page 232 8) Press “Enter” on the “Copy to Mailbox” or “Move To Mailbox”. 9) It shows “Folder list”. Or without calling up the menu, press “Backspace-c (dots 1-4)” or “Backspace-x (dots 1-3-4-6). 10) Press “Space-4”, move to the folder that you want to copy or move.
- Page 233 You can’t delete “Inbox”, “Sent”, “Outbox”. But you can delete the added folders. In order to delete the folder, follow these steps: 1) Execute “E-mail” program. 2) Press “Space-m (dots 1-3-4) to call up the menu in mail lists of “Inbox”.
-
Page 234: Use The Tools Menu
In order to change the folder mailbox, follow these steps: 1) Execute “E-mail” program. 2) Press “Space-m (dots 1-3-4) to call up the menu in mail lists of “Inbox”. 3) It shows “File”. 4) Press “Space-4”, move to “Edit” and Press “Enter”. Or Press “e (dots 1-5). -
Page 235: Set Path
8.5.1 Set Path “Set Path” sets the default download path where file attachments and email are stored. You can set the download path using the following method: “Set Path” sets the default download path where file attachments and email are stored. You can set the download path using the following method: 1) Press “Space-m (dots 1-3-4)”... - Page 236 “Enter.” If a folder is selected, “*” will be displayed in front of the selected folder. If you press “Enter” to set the path, the Braille Sense U2 shows the changed path. If you changed the path to the “My Documents” folder that is one of the lower level folders located in “flashdisk,”...
- Page 237 11) Press “Space” to select the desired folder, and press “Enter.” 12) It shows “*” in front of the selected folder. If you finish setting the path by pressing “Enter,” the Braille Sense U2 will show the changed path. If you changed path from “upload” folder to “music”...
-
Page 238: Set Options
“flashdisk,” you can change to a different disk using the following method: 1) Connect the external storage disc to the Braille Sense U2. 2) Press “Space-m (dots 1-3-4)” or “F2” to call up the “E-mail” menu in the “Inbox.”... -
Page 239: Spam Settings
The spam e-mail messages that are set at “Spam Settings” will not be downloaded into the Braille Sense U2, and will remain on the e-mail server. Use the following steps to set up spam e-mail: Press “Space-m (dots 1-3-4)”... - Page 240 It shows “Accounts manager”. Press “Space-4”, move to ““Spam Settings”. Press “Enter.” It shows “Type: Subject 1/3”. Without calling the menu, you can also execute to this stage directly by pressing “Enter-e (dots 1-5)”. Now, you are in the “Spam Settings” menu. “Spam Settings”...
- Page 241 By adding the word as explained above, if there are any e-mail messages that include the words you entered in the subject of the message, the Braille Sense U2 will download those e-mails from the e- mail server, but will delete them automatically. So those e-mails will not be in the inbox.
- Page 242 If you set it once, the e-mails with the e-mail ids will be downloaded from the e-mail server, but the Braille Sense U2 will delete those e-mails automatically. So those e-mails will not be found in the inbox. You can add an additional e-mail address by modifying the e-mail address that you have typed in.
- Page 243 “Host: (registered host address) 1/1.” If you add the host address as above, the e-mails from the registered host will be downloaded from the e-mail server, but the Braille Sense U2 will delete them automatically. So those e-mails will not be found in the inbox.
- Page 244 address at “Host add: (host address),” the displayed host address will be erased, and the new host address will be displayed. But, if you press the “cursor routing key” at the position where you want to modify the displayed address, that address will be modified where you modify it. When “Host: (registered host address) 1/1”...
- Page 245 It shows “Accounts manager”. Press “Space-4”, move to ““Spam Settings”. Press “Enter.” It shows “Type: Subject 1/3”. Without calling the menu, you can also execute to this stage directly by pressing “Enter-e (dots 1-5)”. Move to “list” by pressing “tab (Space-4-5).” Then, “Subject: (Registered word) 1/xx”...
-
Page 246: Hot Keys For E-Mail
Let’s start our explanation from “Subject.” Press “Space-m (dots 1-3-4)” or “F2” to call up the menu while you are in the “inbox.” Press “Space-4”, move to the “Tools”. Press “Enter.” It shows “Accounts manager”. Press “Space-4”, move to ““Spam Settings”. Press “Enter.”... -
Page 247: Hot Keys For Sending E-Mail Including Reply, Forward, And Save In The Mail Outbox
Call up “set option”: Enter-o (dots 1-3-5) Call up “set spam”: Enter-e (dots 1-5) Find: Space-f (dots 1-2-4) Find again: Backspace-f (dots 1-2-4) Move to unread message: Enter-u (dots 1-3-4) Move to mailbox: Backspace-x (dots 1-3-4-6) Copy to Mailbox: Backspace-c (dots 1-4) Add a sender to the address list: Enter-i (dots 2-4) (This is valid only at the “from”... - Page 248 Delete: Space-d (dots 1-4-5) (It is not valid when you are reading e-mail in the “inbox”) Cancel block: Space-e (dots 1-5)
-
Page 249: Media Player
Media Player, the Braille Sense U2 will play the files in the play list. If there are no files in the play list, the Braille Sense U2 says, “There are no items to display.” The other buttons, “previous,” “stop,” and “next”... -
Page 250: Next Button And Previous Button
If there are no files that have been registered in the play list, the Braille Sense U2 will display the message, “There are no items to display.” You have to add a file to the play list before it can be played. -
Page 251: Stop Button
“stop” button while an audio file is being played, the Braille Sense U2 will stop playing. The next time the Braille Sense U2 starts playing, it will start from the first file in the play list. If you press this button while recording, the Braille Sense U2 will stop recording. -
Page 252: Playback Information Tab
(play, pause, or stop). If there are no files in the play list, the Braille Sense U2 will display “Title: There are no items to display.” If you press “Space-4,” the Braille Sense U2 will display playback time information. -
Page 253: Hot Keys In The Play Information Tab And The Play List Tab
file name. “1/10” means the file is the first of ten files in the play list. Whenever you register an audio file using the “File”, the file is added to the play list. 9.2.3 Hot Keys in the Play Information Tab and the Play List Tab The hot keys that can be used in the “playback information”... - Page 254 Space-up scroll button Volume up Space-down scroll button Volume down Space-1-3-4 Open menu Space-1-2-5 Open help Space-4-5/Space-1-2 Move to “play list” tab Space-1-3-5-6 Exit “Media player”...
- Page 255 2) Hot Keys in the Play List Tab Hot key Function Space-4 Move to the next file Space-1 Move to the previous file Space-4-6 Move to the last file Space-1-3 Move to the first file Space Select/resume current file (while playing, it is used as play/pause) Enter-1-2 Start selecting files...
-
Page 256: How To Use The Media Player Menu
Space-1-3-5-6 Exit “Media player” 9.3 How to Use the Media Player Menu When you want to open the “Media player” menu, you can press “Space- m (dots 1-3-4).” You can also “F2” while in the “Media player” dialog box. This menu contains five items: “File,” “Play,” “Record,” “Position,” “Mark” and “Settings.”... - Page 257 “Enter,” the Braille Sense U2 will register the files in the play list, and start playing the first file. You can select more than one file in the “Open File” dialog box by pressing “Space” on the file you want to play, and then move to another file to be played, and press “Space.”...
- Page 258 “play/pause” button on the front panel of the Braille Sense U2. Or, you can press “Enter” on “play” in the “play” menu. A detailed explanation of the “play” menu can be found in section 9.3.2.
- Page 259 9.3.1.6 Save as play list The “Save As Playlist” menu item is used to save the play list as a different file or on another disk drive. If you want to use this function, you can press “Space-m (dots 1-3-4)” to open the “File” menu and execute the “Save As Playlist”...
-
Page 260: Play
You can exit from the “Media player” by selecting “Exit” in the “File” menu, or by pressing “Space-z (dots 1-3-5-6)” in the “Media player” dialog box. Then, the Braille Sense U2 will stop playing (if it is playing a file), and exit from “Media player” to the “program menu.”... - Page 261 9.3.2.1 Play If you press “Enter” on “Play,” the Braille Sense U2 will start playing the files in the play list. Also, if you press “Enter” in the “Media player” dialog box, the Braille Sense U2 will start playing. 9.3.2.2 Previous Track “Previous Track”...
- Page 262 This item is for pausing playback while you are playing a file. If you use this command again, the Braille Sense U2 will start playing again from the position where it stopped playing. You can also do this by pressing “Space”...
-
Page 263: Record
“Media player” menu. Press “Space-4” twice to move to “record (r),” and then press “Enter,” or you can press “r (dots 1-2-3-5).” Then, the Braille Sense U2 will display the “Record” dialog box. You can also open this dialog box by pressing “Enter-r (dots 1-2-3-5)” in the “Media player”... - Page 264 This button is used to play the file that has just been recorded. You can also start playing the recorded sound by pressing the “play” button on the front panel of the Braille Sense U2. If you have not yet recorded a file after opening the “Record” dialog box, pressing “Enter” on the “Play”...
-
Page 265: Position Menu
Braille Sense U2 will stop playing and show the “playback information” tab. You can also stop recording or playing by pressing the “stop” button on the front panel of the Braille Sense U2. 9.3.3.5 Pause This item is used to pause the recording or playing a file while in the Media Player. - Page 266 If you exit the “Media player” after setting a bookmark, the Braille Sense U2 asks if you want to save the bookmark. If you select “Yes,” the Braille Sense U2 will save the bookmark, at your current position, and play from the bookmark position the next time that...
- Page 267 If you select “No,” the Braille Sense U2 will save the bookmark that is already set. If you select “erase,” the Braille Sense U2 will delete the bookmark that is already set. 9.3.4.2 Delete Marked Position If you execute this function when you are playing a file, or when a file is paused, it will delete the bookmark that was created before.
- Page 268 If you execute this function in a file that does not have a bookmark, the Braille Sense U2 will display “There is no bookmark in selected file.” 9.3.4.4 Go to Time If you execute this function when you are playing a file, or when a file is paused, it will move to a time that you specify, and begin playing the file.
- Page 269 4) By pressing “Space-1” or “Space-4”, move to “Go to percent” menu. 5) Press “Enter”. Or without calling up the menu, press “Backspace-p (dots 1-2-3-4)” while playing or in a pause status of file. 6) Then it will find the edit box asking “Go to percent: XX”. 7) Enter the percent that you want to move to.
-
Page 270: Mark
After “Set end point” message, A B repeat mode allows you to play a specific part of an audio file as many times as you wish. To set how many times a specified region, go to "playback settings" under the "settings"... - Page 271 Call up the menu and press “Enter” on “Mark”. And then move to “Move To Mark.” Press “Enter” on “Move To Mark.” Or press “Backspace-j (dots 2-4-5)” without calling the menu. Input the mark number in the edit box of “Move to mark:” and press “Enter.”...
-
Page 272: Settings
There are all marks of the current file in the “mark list” with information of “name of mark: setting time of mark”. You can go to the other information in the list by pressing “Space-1” or “Space-4.” You can delete a mark in the list by pressing “Enter” or “Space-d (dots 1- 4-5)”... - Page 273 track automatically. If this is set to “On,” you can hear the track title. The default value is set to “Off,” namely you can’t hear the track title when move to previous/next track. You can change the on or off by pressing “Space.”...
- Page 274 If it this option is set to “Yes,” all files in the play list will be played repeatedly, and if it is set to “No,” the Braille Sense U2 will stop playing after playing the last file in the play list. Again, you can change the value of this option by pressing “Space”...
- Page 275 The “Set speed” option allows you to set the audio playback speed. The speed level ranges from 1 to 10. The default setting is the 5. If you change the value, press “Space” or “Backspace.” The higher the number, audio playback speed is fast. The “Time index”...
- Page 276 Braille Sense U2 can record will be shortened. On the other hand, if you set the lower values of these options, the Braille Sense U2 can record sound longer, although the sound quality may not be as good as when these options are set to higher values.
- Page 277 “Effect settings”. Press “Enter” on “Effect settings” or press “E”. Or press “Enter-e (dots 1-5)” in “Play list tab” or “Playback information tab”. “Effect settings” dialog box will be displayed, which contains the following: the “Equalizer” option, “BassBoost” option, “Surround” option, “3D effect”...
-
Page 278: Additional Features
“Confirm” button by pressing “Tab(Space-4-5)” or “Shift-Tab(Space-1-2)” repeatedly, and then press “Enter.” If you want to cancel the changes, and exit from this dialog box, press enter on the “Cancel” button, or press “Space-e (dots 1-5)” or “Space-z (dots 1-3-5-6).” 9.4 Additional features 9.4.1 Moving features using the cursor keys While playing an audio file, pressing cursor key in ‘Playback information... - Page 279 Volume up: Space-up scroll button Volume down: Space-down scroll button Speed up: Dots 3-4-5 Slow down: Dots 1-2-6 Pause/continue: Space, Play button Stop: Backspace, Stop button Change time index: dot 2 or dot 5 Move to next position by time index and play: dot 4 Move to previous position by time index and play: dot 1 Delete play list during stop: Space-d (dots 1-4-5) 3) Hot Keys for the Commands in the Record Dialog Box...
- Page 280 Effect settings dialog box: Enter-e (dots 1-5) 7) Hot keys for toggling options. Toggle “display time” between “elapsed time” and “remaining time”: t (dots 2-3-4-5) Toggle “repeat” between “Yes” and “No”: r (dots 1-2-3-5) Toggle “shuffle” between “On” and “Off”: s (dots 2-3-4)
-
Page 281: Fm Radio
10. FM Radio In order to use “FM Radio” program in the Braille Sense U2, please connect the headphone to the headphone jack of the Braille Sense U2. The headphone connected to the Braille Sense U2 will work as a radio antenna. -
Page 282: Frequency Control
To navigate between these items, press “Space-1” or “Space-4”. Pressing “Enter” will execute. Without calling the menu, if you press “dot 2,” your Braille Sense U2 will search the next frequency. If you press “dot 5,” your Braille Sense U2 will search the previous frequency. -
Page 283: Add Of The Channel And Move Among Channels
You can input the frequency directly by pressing “Space-f (dots 1-2-4).” If you press “Space-f (dots 1-2-4),” then the dialog box will be opened. You can input the frequency in numbers and press “Enter” to move to that frequency. Besides using the Braille keys on the top panel, you can use audio buttons on the front panel. - Page 284 In order to delete any channel, move to the channel to be deleted and press “Space-d (dots 1-4-5).” If “Space-d (dots 1-2-4)” is pressed, the selected channel will be deleted without any warning message. You can add and delete channels in the presets manager dialog box. Press “Space-m (dots 1-3-4)”...
-
Page 285: Recording Fm Radio Sound
“Record (r)” and press “Enter.” Or just press “Enter-r (dots 1-2-3-5)” without calling menu. Then the record dialog box will be opened and the Braille Sense U2 starts recording. The record dialog box consists of as follows. -
Page 286: Recording Setting Dialog Box
10.4.1 Recording Setting Dialog Box If you press enter on “Record Settings” in the “File” menu, or press “Backspace-s (dots 2-3-4)” , the Braille Sense U2 will display the “Record Settings” dialog box, which contains “Recording type,” “Sample rate” option, “Bitrate” option(only when recording type is mp3), “Bits per channel”... - Page 287 Braille Sense U2 can record will be shortened. On the other hand, if you set the lower values of these options, the Braille Sense U2 can record sound longer, although the sound quality may not be as good as when these options are set to higher values.
-
Page 288: Additional Features
10.5 Additional features 1. Sensitivity adjustment When you activate the FM Radio program, if the Braille Sense U2 cannot tune to the broadcasting frequency, please adjust the sensitivity. In order to adjust the sensitivity, call “Settings dialog box” as explained in the Section 9.1. - Page 289 Call up the record dialog box: Enter-r (dots 1-2-3-5) Record start/pause: short press record button Record stop: short press stop button Mute on: short press stop button or Space Mute off: short press play button or Space Volume up: Space-up scroll button Volume down: Space-down scroll button...
-
Page 290: Web Browser
11. Web Browser You can use the Web browser on the Braille Sense U2 to read pages on the Internet, as well as reading html books that you have saved to disk. In addition, you can download and read books from places such as Web Braille, and BookShare. -
Page 291: Open
You can go to a specific web page either by typing in a new address, or by selecting one of the previously entered addresses. If the Braille Sense U2 cannot connect to the desired web page, and it only shows progress on the Braille display, press “BackSpace-enter” to stop connecting, and call up “Open URL”... -
Page 292: Save As
The default folder is “/flashdisk/download,” and it can be changed by the same method as explained in the “File manager.” There are three types of files in “Type”; “*.*,” “htm,” “html.” Default is “*.*” and it means that all types of files will be shown in the file list. At the “Type,”... -
Page 293: Page Information
“Backspace” and if you want to enter the selected folder or select a file, press “Enter” on the folder or file that you want to select. And press “Space-4” or “Space-1” in order to move next or previous folder or file. There is a “Type”... -
Page 294: Read
11.2 Read The “Read” menu can read the page generally. In order to call up the “Read” menu, press “Space-m (dots 1-3-4),” and press “Enter” on “Read” or press “r.” The “Read” menu has three submenus: 1. Read From Beginning To Cursor 2. -
Page 295: Auto Scroll
If you want to quit this function before the end of the current page, press “BackSpace-enter.” If you execute this function, the Braille display and LCD change to correspond with the voice output. 11.2.3 Auto Scroll This function will scroll the current page from the cursor to the end of the current page. -
Page 296: Copy
In order to use this command, press “Space-m (dots 1-3-4)”, move to “Edit” menu by pressing “Space-4” and press “Enter” at the starting point of selection. And press “Enter” on the “Start Selection.” Then move to the end of selection that you want to select. You can also set the starting point of the block by pressing “Enter-b (dots 1-2)”... -
Page 297: Copy Link
The link will then be placed on the clipboard, so that you can paste it to a document, or wherever you can paste text in the Braille Sense U2. 11.4 Go To In order to enter into the “Go To” menu, press “Space-m (dots 1-3-4)” or “F2,”... -
Page 298: Go To Previous Page
“Space-4,” and then press “Enter.” Or, you can press “Backspace-p (dots 1-2-3-4)” or “Backspace” with “Space-3”. This command does not work on the first page in the Braille Sense U2 because there is no previous page when you first open the Web Browser. -
Page 299: Go To Previous Heading
11.4.4 Go to Previous Heading If you activate the “Go To Previous Heading” function, you can go to a heading that is located before your current location. To execute the “Go To Previous Heading” function, open the menu by pressing “Space-m (dots 1-3-4)”... -
Page 300: Refresh
When “History” is executed, the Braille Sense U2 will display the titles of the web pages in the history list. If you have visited a web page such as www.google.com previously, the history list on the Braille Sense U2 will show you the title of the page as, “Google.”... -
Page 301: Find
“Enter-h (dots 1-2-5)” while the Web browser is running. The Braille Sense U2 will show the history list. Move to the title of the web site that you want to select by pressing “Space-4” or “Space-1.” If you want the “History”... -
Page 302: Find Again
U2 will then find the text, and move the cursor position to the text. The default search direction is set to “Forward.” This means that the Braille Sense U2 will search for the specified text from the current cursor position to the end of the page. If you want to change the search direction, select “Backward,”... -
Page 303: Favorites
Home Page” will be displayed on the Braille display and press “Enter.” Then, the current web site will be registered as your home page automatically, and the Braille Sense U2 will say “Saved as home page,” and it displays the current web page. Or, you can press “Enter-s (dots 2-... -
Page 304: Add To Favorites
11.5.2 Add to Favorites You can add the web page that you are reading now to the “Favorites” list. In order to add the web page to the “Favorites” list, press “Space-m (dots 1-3-4)” or “F2,” and move to “Favorites” by pressing “Space-4.” Then, press “Enter.”... - Page 305 If there is a title in the “Favorites list,” the Braille Sense U2 will connect to the web page. If you do not remember the exact title, you can find it from the “Favorites” list, using the method that is outlined below.
-
Page 306: Options
these two file formats. If you select “*.*” then all types of files will be shown. 11.6 Options Using the “Options” menu, you can set the type that is gets the web page and change default download folder. Also you can clear cookie in the “Options”... -
Page 307: Show Visited Links
2) Press “Space-m (dots 1-3-4)” or “F2” to call up the menu. 3) Move to “Options”, by pressing “Space-4”. 4) Press “Enter.” Or you can press “Backspace-o (dots 1-3-5)” while the “Web browser” is executing. 5) It will find “User agent: Windows CE” on the LCD and Braille display. -
Page 308: Clear Cookies
11.6.5 Clear cookies Cookie contains information which can be read in web application whenever user visits the web site. You can clear cookie in “Options” menu in Braille Sense U2. To clear cookie, follow these steps: 1) Press “Enter” on “Web browser”. -
Page 309: Read Page
In a combo box and list box, the user should select one of the items listed in the combo box or list box. The Braille Sense U2 Web browser uses symbols to identify what type of control is being used. In order to move from one control to another without reading the text in between controls, the Braille Sense U2 provides the following “move to... - Page 310 When you find controls in web pages, the Braille Sense U2 will show control symbols ahead of the contents of the control. The followings are a list of control symbols.
-
Page 311: Moving To A Form
You can move to the next form by pressing this key. If there are no more forms. The Braille Sense U2 will play the warning sound. If there are no forms on a web page, the Braille Sense U2 will say, “no control.”... - Page 312 Braille Sense U2. The Braille Sense U2 provides a way to move table by table, and cell by cell, in order for the user to comprehend the structure of the table. In order to move cell by cell, the cell position and contents of the cell will be displayed.
- Page 313 4. Move to next cell: Space-5-6 It moves to the next cell. If the current cell is the last cell, it moves to the end line of the table. If it is pressed on the end line of the table, the warning sound will be played.
-
Page 314: Move To The Frame
11.7.4 Move to the Frame 1. Move to the previous frame: Space-3-4-6 It moves to the starting position of the previous frame. If there are no previous frames, the warning sound will be played. 2. Move to the next frame: Space-1-4-6 It moves to the starting position of the next frame. -
Page 315: Hot Keys In The Web Browser
4. Turn down the volume: Space-down scroll button Playback of a streaming audio file does not stop if you switch to another program, until you press the “stop” button on the front panel after you come back to “Web browser.” You can download real audio files but not play them in the Web Browser. - Page 316 Go to next text: Space-1-2-4-5-6 Refresh: Enter-r (dots 1-2-3-5) Open the history list: Enter-h (dots 1-2-5) Check the address of the selected title in the history list: Space-i (dots 2- Find: Space-f (dots 1-2-4) Find again: Enter-f (dots 1-2-4) Links list: Backspace-i (dots 2-4) Favorites Set current as your home page: Enter-s (dots 2-3-4) Add to favorites: Backspace-a (dot 1)
-
Page 317: What The Web Browser Does Not Support
1. Images are not supported. 2. Any executable files on web sites cannot be executed. It is because the operating system on the Braille Sense U2 is different from the operating system on a personal computer. 3. A web page using flash can be opened, but the flash content may not be read. -
Page 318: Daisy Player
12. DAISY Player Using the Daisy player, on the Braille Sense U2, you can listen to files and read books that use the DAISY format. DAISY is an acronym for (DIGITAL ACCESSIBLE INFORMATION SYSTEM). One advantage to DAISY books is that you can listen to the audio as well as read the associated text with the audio in books where both text and audio are present. - Page 319 BARD account, please contact your regional NLS lending library or visit: https://nlsbard.loc.gov/ApplicationInstructions.html To register your Braille Sense U2 with NLS BARD, follow these steps: 1. Log in to your account on the BARD main page. 2. Choose the “Update Account Settings” link.
- Page 320 When you want to execute the player, follow these steps: (1) Press “Enter” on “Daisy player” in the “program” menu. (2) Or press the shortcut key “d (dots 1-4-5)” in the Braille Sense U2 “program” menu. (3) When you execute the Daisy player, you will see all of the disks available on the Braille Sense U2 (regardless of whether each disk has DAISY-formatted files or not).
-
Page 321: Components Of The Daisy Player
which will move you to the prompt box. Once in the prompt box, you can select “Yes” or “No” with “Space” or “Backspace.” You can open the Daisy player menu by pressing “Space-m (dots 1-3-4)” or “F2” when you are in the Daisy player. In the menu, you will find “File,” “Document,”... -
Page 322: File
you are anywhere in the four control components, you can play or pause by pressing “Space.” 12.2 File When in the “File” menu, you can open a new DAISY file, check file information on the file that is currently open, and set voice parameters. You can open the “File”... -
Page 323: Voice Settings
“open DAISY” dialog box. Namely, you can move to up and down by pressing “previous” and “next” button in list of “Open DAISY” dialog box. And you can select and unselect by pressing “record” button. If you press “stop” button, you can move to upper folder. - Page 324 12.2.2.1 DAISY play type It will show while playing text+audio DAISY. You can use this function when you play the text+audio DAISY. Without calling the menu, you can directly this function by pressing “Enter-t (dots 2-3-4-5)”. The default setting is “Audio”. It will play with audio in text+audio Daisy. If you set the “Text”, it will play with text in text+audio Daisy.
-
Page 325: Book-Info
NIMAS Daisy control includes “image”, “description”, “caption”, “prodnote, “table”. “image” is displayed on the braille display as “img”. “desc” is for “description” and “prodnote”. “cap” is for “caption”. “tdt is for “table”. 12.2.3 Book-Info Using “Book-Info,” you can check the information on the file that is currently playing. -
Page 326: Document
12.3 Document When in the “Document” menu, you can move by phrase or level while playing. If you want to activate the “Document” menu, press “Space-m (dots1-3-4)” and then press “d (dots 1-4-5).” In this menu, you will find items such as, 1) “Play/Pause”... -
Page 327: Move By Page
“Enter.” You can move to the next, previous, next fifth, or previous fifth phrase without calling up the menu by pressing “dot 6,” “dot 3,” “dot 4,” or “dot 1,” respectively. Also you can move to the previous or next phrase without calling up the menu by a short pressing “previous”... -
Page 328: Move By Text Index
The setting values are “5 seconds”, “10 seconds”, “30 seconds”, “1minute”, “3 minutes”, “5 minutes”, “10 minutes”, “15 minutes”, “20 minutes”, “30 minutes” and “1 hour”. To set previous time index, follow these steps: 1) Press “dots 1-2”. Every time you press the dots 1-2, Braille Sense U2 toggles between 30, 10, or 5 seconds;... -
Page 329: Mark
1) Press “dots 4-5”. Every time you press “dots 4-5”, Braille Sense U2 toggles between “Phonetic”, “Character”, “Word” and “Sentence”. 2) Choose the setting value you want. When you set the value, to move by the setting value, follow these steps: 1. -
Page 330: Next Mark
move to the previous mark by pressing “Space-3” during reading DAISY contents. 12.4.2 Next Mark The “Next Mark” function will allow you to move to a location where you have placed a mark. If you have placed a mark in a DAISY Player file, and you have not yet passed it, you can move to that mark by using the “Next Mark”... -
Page 331: Deleting A Mark
mark name that you want to go to. Make sure that you have already set a mark. Otherwise, you will not be able to move to a mark. 12.4.5 Deleting a Mark Without using the menu, you can activate the “Delete Mark” function by pressing “Space-d (dots 1-4-5).”... -
Page 332: Move To Specific Heading
While playing a DAISY file, you can move heading by heading without using the “Heading” menu. You can move to the next, previous, first, and last heading by pressing “Space-5,” “Space-2,” “Space-2-3,” and “Space-5-6,” respectively. Also you can move to the previous or next heading without calling up the menu using audio buttons on the front panel. -
Page 333: Scan Heading And Read Heading
At the “Heading to find:” edit box, you can input the mark name that you want to find. And select the searching direction to “Previous” or “Next” at “Search direction” prompt by pressing “Space.” 12.5.3 Scan Heading and Read Heading While playing a DAISY Player file, you can check your current heading (or heading list) from your current location to the last heading. -
Page 334: Hot Keys In The Daisy Player
7) Press “Enter” on the “Find Phrase”. Or press “s (dots 2-3-4)”. Without calling the menu, you can execute directly it by pressing “Space- s (dots 2-3-4)”. While executing the “Find Phrase”, it will open “Find Phrase dialog box”. The “Find Phrase dialog box” consists of as follows. 1) Phrase to find 2) Search direction 3) Confirm... - Page 335 Play Play/Pause: Space Move to the beginning of document: Space-1-3 or Space-1-2-3 Move to the last phrase: Space-4-6 or Space-4-5-6 Increase the speed: dots 3-4-5 Decrease the speed: dots 1-2-6 Increase the volume: Space-up scroll button Decrease the volume: Space-down scroll button Move by Phrase Move to the next phrase: dot 6 or short press “next”...
- Page 336 Find heading: Space-f (dots 1-2-4) Find again: Enter-f (dots 1-2-4) Scan heading: Enter-n (dots 1-3-4-5) Read heading: Enter-w (dots 2-4-5-6) Set mark Set mark at current position: Enter-m (dots 1-3-4) Move to the next mark: Space-6 Move to the previous mark: Space-3 Delete mark: Space-d (dots 1-4-5) Miscellaneous Hot Keys Move to the title list: Space-1-2-5-6...
-
Page 337: Bluetooth Manager
30 feet or less. Bluetooth enables users to exchange various types of information. In order to use Bluetooth with the Braille Sense U2, you must change the Bluetooth option to “On” in the option menu. - Page 338 Braille Sense U2 will not work, and you cannot stop scanning the device. You have to wait until the completion of the scanning devices. If Bluetooth option in Option menu set to “Off,” or if the Braille Sense U2 does not recognize it, the Braille Sense U2 will say the message, “Bluetooth not activated.”...
- Page 339 “Enter.” You can also press “n (dots 1-3-4-5)” while you are in the Bluetooth Device List menu to activate “Device Name.” This item allows you to give the Braille Sense U2 a specific name. The default name for the Bluetooth device name is “BrailleSensePLUS.” You can activate this item by pressing “Enter”...
-
Page 340: Bluetooth Service List
ActiveSync and Serial Port disabled. If this is the case, then the Braille Sense U2 will only display LAN and FTP. Once the Braille Sense U2 has found all of the available services, it will display the services in a list in the following format: “service name xx/yy”... -
Page 341: Connecting Service
Bluetooth device without having to select the device and then the service. However, you must have connected the service first before the Braille Sense U2 will allow you to transfer files. If you have not connected the FTP service already, and you activate this function, you will hear, “FTP service disconnected.”... - Page 342 If the remote Bluetooth device pin code matches the pin code that was typed in the Braille Sense U2, then the service will authenticate. If this occurs, you will hear, “PIN code authentication accepted.”...
-
Page 343: Lan Service
Bluetooth device. When referring to the FTP service, we will refer to the file/folder list in the remote Bluetooth device as “remote folder list” and the file/folder list of the Braille Sense U2 as the “local folder list.”... - Page 344 Please note that while sending data to and from the remote Bluetooth device, the remote Bluetooth device may still need to give access permission to the Braille Sense U2. Please consult the documentation for the remote Bluetooth device for details.
- Page 345 You can only select files. If you try to select a folder, the Braille Sense U2 will say “Deactivated.” Once you have selected files by pressing the “Space,” you can copy them by pressing “Space-m (dots 1-3-4)” or “F2,” and then navigate to “Copy”...
- Page 346 function without calling up the menu by pressing “Enter-c (dots 1- 4).” Note that you cannot copy folders to send to the local folder. After you have activated this function, you will see the Disk list, just like when you open the file manager. You will be taken to “flashdisk”...
- Page 347 “Send To” function without having to call up the menu. Just like copying and pasting, you will hear a sound that indicates that the Braille Sense U2 is working. If the file is larger than 300 KB, you will also hear the progress meter each time an additional 10% has been completed.
- Page 348 5).” Just like copying and pasting, you will hear a sound that indicates that the Braille Sense U2 is working. If the file is larger than 300 KB, you will also hear the progress meter each time an additional 10% has been completed. If the file is less than 300 KB, then you will only hear the sound, and not the progress meter.
- Page 349 then be automatically returned to the list that you were in, whether it was the remote or local folder list. To cancel any changes that you made, press “Space-z (dots 1- 3-5-6),” and you will be returned to the previous list. 13.2.3.5 Delete File/Folder This function will allow you to delete files or folders in the remote or local folder list.
-
Page 350: Activesync Service
You will then be returned to the Bluetooth Service list. Just like using ActiveSync via USB, you can copy and paste files from the Braille Sense U2 from the remote Bluetooth device to the Braille Sense U2 and visa versa. -
Page 351: Serial Port
13.2.5 Serial Port If you connect this service, you should not connect the other services. The Serial Port service will allow you to use your Braille Sense U2 as a wireless Braille display via Bluetooth. In order to use the Braille Sense U2 as a wireless Bluetooth display, please reference the following sections. - Page 352 “Windows CE.” Remember that the Braille Sense U2 must be turned on in order to be found as mentioned above. If you forgot to turn the Braille Sense U2 on, leave it turned on, exit the Bluetooth settings, and start at step number 1 above.
- Page 353 WindowsCE.” 20) Tab to the OK button, and press Enter. You have now setup the Braille Sense U2 and the computer. However, you must properly setup Window-Eyes in order to use the Braille Sense U2 as a Bluetooth Braille display.
-
Page 354: Bluetooth Keyboard Service
To exit this mode from the Braille Sense U2, press “Backspace-Space- z.” Please note that “F1” on the Braille Sense U2 will still take you to the Program menu. This is to allow you to use the applications on the Braille Sense U2 at the same time, and be able to switch back to using the Braille Sense U2 as a Bluetooth Braille display. -
Page 355: Bluetooth Printer Service
Input PIN code on the Braille Sense U2 and press “Enter.” And then you need to input PIN code on the Bluetooth Keyboard. (The PIN code of Bluetooth keyboard may be referred to the Bluetooth keyboard manual.) 13.2.7 Bluetooth Printer service You can print the documents connecting the printer to Braille Sense U2 through the “Bluetooth”. - Page 356 Connecting service: Enter on the service name Disconnect service in Bluetooth service list: Enter-d (dots 1-4-5) Move to Bluetooth device list in service list: Backspace Remove device setting in Bluetooth device list: Space-d (dots 1-4-5) 1) FTP service Open local folder/move remote folder: Enter-o (dots 1-3-5) Copy: Enter-c (dots 1-4) Paste: Enter-v (dots 1-2-3-6) Send to: Enter-s (dots 2-3-4)
-
Page 357: Database Manager
14. Database Manager The Database manager is a program that can be used to create a database in the form that you specify. You can use the Database manager to add records and search for data in your records. A table contains at least one record, and a record consists of at least one field. -
Page 358: Table Manager
1. Table manager: Here you can create, delete, and modify tables, records, and their fields. When you run the database manager for the first time, the “table manager” dialog box will appear. 2. Add record: You can add records to the current table. 3. -
Page 359: Add Table
5. Set default table button: Using this option, you can set the table that opens by default when you run the program. 6. Close button: After closing the “Table Manager” dialog box, it will take you back to where you were before you started the “Table Manager” dialog box. - Page 360 Type “name” here, and then press “tab (Space-4-5).” Then, the “Field type” combo box will be focused. Press “Space- 4” or “Space-1” to move to “edit box,” and press “tab (Space-4-5).” The “Set primary key” check box will be focused. If you want to set the current field as the primary key, press “Space”...
-
Page 361: Modify Table
(Space-4-5)” repeatedly to move to the “Delete field” button and press “Enter.” To change the order of a field, which is in your table, you can move to the field that you want to change. This can be done when you are in the “registered fields”... -
Page 362: Delete Table
press “Enter.” If you want to delete an already registered field, press “Space-1” or “Space-4” repeatedly in the “registered fields” list to move to the name of the field you want to delete. And then press “tab (Space- 4-5)” repeatedly move to “Delete field” button and press enter or press “d (dots 1-4-5),”... -
Page 363: Set Default Table
14.1.4 Set Default Table When you set a table as the default table, whenever the database manager is started, the table will be activated and you will be placed in the search dialog. You can search and add fields on this table. If you have registered more than one table and there is a table you use more frequently than the others, it may be convenient for you to set this table as the default table. - Page 364 Press “Space-m (dots 1-3-4)” or F2 to open the menu, and press “Enter” on “Insert a New Record.” Or instead of using the menu, just press “Enter-i (dots 2-4).” Then the “name” field, the first field in the “addressbook” table, will be shown.
-
Page 365: Search Records
14.3 Search Records After you have added your records, if you want to search for information that is in your records, you can use the “Search Records” dialog box. To open the “Search Records” dialog box, press “Space-m (dots 1-3-4)” and press “Enter”... -
Page 366: List Of Records Found
In the “List of Records Found,” if you want to search for different text, you can press “Enter-s (dots 2-3-4)” again to open the “Search Records” dialog box. Then, type the new text that you want to search for. If you want to delete a record found, press “Space-1” or “Space-4” to move to the record, and press “Space-d (dots 1-4-5)”... -
Page 367: Setting Backup Option
14.5 Setting Backup Option To backup your database file, you can do it manually using the “Backup Database” function. You can also backup your database file automatically by using the “Set Backup Option.” To activate the “Set Backup Option” function, press “Space-m (dots 1-3-4)” or “F2” to open up the menu. -
Page 368: Backup Database
You can change the backup mode if you press “Enter” after focusing on one of the three radio buttons. Or, you can press “Enter” on “Confirm” by moving to it by pressing “tab (Space-4-5).” The default backup mode is set to “Prompt to backup changes when exiting.” 14.6 Backup Database If a cold reset occurs, or if your battery goes dead, all of the data in the Database manager will be lost. -
Page 369: Hot Keys For Database Manager
Restore? Yes.” If you press “Enter,” the backup database file will be restored to the current database file. If you want to cancel, you press “Space” and press “Enter.” 14.8 Hot Keys for Database Manager Add record: Enter-i (dots 2-4) Search records: Enter-s (dots 2-3-4) Table manager: Enter-t (dots 2-3-4-5) List of records found: Enter-r (dots 1-2-3-5) -
Page 370: Extras
15. EXTRAS 15.1 Games 15.1.1 Sense Dice game You don’t need to bring dice anymore. Use Braille Sense U2! Anyone can play Dice game anywhere, anytime. 15.1.1.1 Execute 1) Dice game is in “Extras” from the main menu. Press “Enter” on “Extras”... -
Page 371: Sense Brain Game
1) Press “space-e (dot s 1-5) or F4” when the message “Press space to go on” announces. 2) And select the number of dices that you want to play when the list displays. Press “Enter” on the list that you want to change playing. 15.1.1.4 Exit Press space-z to exit the game. - Page 372 15.1.2.4 Memory game When the game is started, you can hear numbers or alphabets one by one. Take stage 1 For instance, it will say 3 numbers one by one. Memorize these numbers. When it says “Type the answer”, write the numbers in the order and press “Enter”.
- Page 373 When the game is started, you can hear a sound of footsteps. A thief hid in a 10-story building. A police will say on which floor the thief hided. After a while, the thief will run away to the up and down stairs. It will say “Up”...
-
Page 374: Hot Keys In Extras
You can see your record in this menu. Press “Enter” on “View ranking” menu. Press dot-1 with space or dot-4 with space and press “Enter” on the game name you want to check. The ranking list will show up. It shows rank, name and score. Press space to see next record. -
Page 375: Social Networking
To execute the Social networking service, follow these steps: (1) The Braille Sense U2 needs to be connected to the internet using “Setup internet” of the “Utilities”. (2) Press the short cut key, “c (dots 1-4)” form the program menu. Or using the navigation key to move to the “social networking”... -
Page 376: Main Terms
The following is how to launch “Twitter”. 1) Within the main menu, press "c (dots 1-4)" or move to the “Social Networking" using “Space-4" and press "Enter". And then you can enter sub menu of “Social Networking". 2) Press "t (dots 2-3-4-5)" or move to the "Twitter" and then press "Enter". -
Page 377: Launch "Twitter
In order to use "Twitter" program, you need a "Twitter" account. Visit "Twitter" web site and create "Twitter" account. If you have a "Twitter" account, you can use "Twitter" program after login. If you want to use "Twitter", the Braille Sense U2 needs to be connected to Internet. 16.2.2.1 Sign In If you launch "Twitter", ‘Sign In’... -
Page 378: Twitter Window
5) Press "Enter". Or after moving to the "Sign In" button using "Tab (Space-4-5)" and then press "Enter" 6) With a "Connecting" message, Braille Sense U2 will try to sign in “Twitter”. If sign-in is successful, a "Refreshing Home Timeline"... - Page 379 1) Timeline: This represents tweet or retweet of your follows in the newest registration order. Timeline appears “A writer Id: Tweet” as follows. himsintl: Hello. This is HIMS International. In case of Mention, it appears “Sender ID: @ receiver Id, Tweet” as follows.
-
Page 380: Timeline
5) Tweet button: Using this button, you can write tweet. You can launch the function by pressing "Enter-t (dots 2-3-4-5)" or "Enter" key on the button. 6) Reply button: you can write reply on the focused tweets. You can launch the function pressing "Enter-y (dots 1-3-4-5-6)" or "Enter" key on the button. - Page 381 3) Friend Timeline: This will display all tweets, except for ‘Retweet’. 4) The hot key for ‘Friend Timeline’ is "Enter-f (dots 1-2-4)". No matter what Timeline is displayed, if you press "Enter-f (dots 1-2-4)", refreshing ‘Friend Timeline’ will represent. 5) User Time line: It displays only the tweets which specified user posted.
-
Page 382: Manage "Tweet
16.2.4.2. Refresh Refresh is a function to renew tweet list indicated in Timeline. Once executing the function, Braille Sense U2 will access to the twitter server and load new posted tweets. And then new posted tweets are rearranged in chronological order. - Page 383 4) Cancel: you can cancel posting of tweet using this button. To post tweet, follow these steps. (1) Once "Tweet" dialog box is launched, "Tweet?" edit box appears. (2) If you have typed tweet, press "Enter" (3) If posting of tweet is successful, "Tweet completed" message represents.
- Page 384 Mention is tweets which would be sent to more than one specified user. You can use "Mention" function when you want to communicate with specific users intensively. How to send mentions is similar to way to post tweet. Just, enter at sign (@) in front of User Id and type mention you want to send.
- Page 385 2"). 1) Tweet? : This is edit box. You can write answer on this box. 2) Characters: This is status bar. It displays current characters and maximum characters like ‘Characters: 0/140T’. 3) Tweet: As a button, if you press "Enter", reply will be posted. 4) Cancel: As a button, you can cancel posting reply.
- Page 386 Favorite" menu located on the sub menu of "Tweets", after calling up the menu. (3) If addition is successful, "Completed" message will be displayed and then Braille Sense U2 will return to "Timeline". 16.2.5.8 Favorite List You can check your favorites calling up the ‘Favorite list’ dialog box. In order to call up ‘Favorite List’...
-
Page 387: Manage Follow
(2) On this box, you can input the desired User Id and then press "Enter". (3) "Adding Follow" message is displayed and Braille Sense U2 tries to follow. (4) If following is successful, "Follow complete" message will be displayed and you will go to the status right before calling up the menu. - Page 388 3)". Or launch "Following" on the sub menu of "Follow", after calling up the menu. "Following" consists of 5 controls. You can move to the next control by pressing "Tab"(F3 or “Space-4-5") or to the previous control by pressing “Shift-Tab"(“Space-F3" or “Space-1-2"). 1) Following: As a list, it lists your follows.
-
Page 389: Use Direct Message
16.2.6.4 Followers “Followers” indicates Users who follow you. In order to call up “Followers”, press hot key, "Backspace-e (dots 1-5)". Or by calling up menu and moving to sub menu of "Follow", you can launch "Followers". “Followers” dialog box consists of 5 controls. You can move to the next control pressing "Tab"(F3 or “Space-4-5") or to the previous control pressing “Shift-Tab"(“Space-F3"... - Page 390 control pressing "Tab"(F3 or “Space-4-5") or to the previous control pressing “Shift-Tab"(“Space-F3" or “Space-1-2"). 1) Followers: Your followers appear. And then select follower who you want to send Direct Message. 2) Next list: Whenever you launch this function, it can load lists by 32 followers.
- Page 391 "Received Direct Message" dialog box consists of 4 controls. You can move to the next control pressing "Tab"(F3 or “Space-4-5") or to the previous control pressing “Shift-Tab"(“Space-F3" or “Space-1-2"). 1) Received Direct Message: This is a list. ‘Direct Message’ represents in the newest registration order.
-
Page 392: Use Search Function
16.2.8. Use Search function "Twitter" program allows you to search registered users and words contained in tweets with “Search” function. Also, it provides “Save Search” function in order to save words used frequently. 16.2.8.1 Global Search "Global Search" launches search for entered word among all "Twitter" Timelines and shows the result. - Page 393 (1) If "Global search" dialog box is launched, “Search word" edit box appears. You can type the desired word on this edit box. (2) If you press "Enter", searching tweet starts with “Searching" message. (3) If search is successful, immediately search results appear. When there is no search result, "No search results"...
- Page 394 5) Confirm: As a button, you can execute search. 6) Cancel: As a button, you can close “User Search” dialog box and return to the status right before calling up the Menu. Or you can use "F4" or “Space-e (1-5)". The followings are way to follow User, using "User Search"...
-
Page 395: Additional Function
6) Close: Using this button, you can close “Search word list" dialog box and go back to the status right before calling up the function. Or you can use "F4 or space-e (dots 1-5)". You can save words in the “Search word list” as follows. (1) If you have launched “Search word list"... - Page 396 Tab"(“Space-F3" or “Space-1-2"). 1) Name 2) ID 3) Homepage 4) About me 5) Follow count 6) Follower count 7) Edit 8) Close "Personal Information" dialog box can edit name, homepage, a self- introduction. The followings are way to modify personal information. (1) After executing ‘Personal Information’...
-
Page 397: Hot Keys For Twitter
desire. The default is ‘Timeline name current date’ like ‘Home Timeline 20110310’. 2) Confirm: As a button, you can execute “Save Current Timeline” 3) Cancel: As a button, you can exit “Save Current Timeline” dialog box and return to the “Tweet Window”, the previous status right before calling up the menu. - Page 398 Retweet Of Me: Backspace-o (dots 1-3-5) Tweet: Enter-t (dots 2-3-4-5) Remove Tweet: Space-d (dots 1-4-5) Retweet: Enter-e (dots 1-5)" Reply: Enter-y (dots 1-3-4-5-6) Add To Favorite: Enter-v (dots 1-2-3-6) Favorite List: Enter-l (dots 1-2-3) Send Direct Message: Enter-s (dots 2-3-4) Sent Direct Message: Backspace-m (dots 1-3-4) Received Direct Message: Backspace-r (dots 1-2-3-5) Follow User: Backspace-a (dot 1)
-
Page 399: Google Talk
"Enter." 16.3.1 Launch the Google Talk In order to launch Google Talk on the Braille Sense U2, you need a Gmail account. Visit Gmail website (http://gmail.google.com) and create a Gmail account. If you have a Gmail account registered, you can use Google Talk. - Page 400 "Password" computer edit box. You can input the password using the computer Braille. 3) In order to log in Google Talk, pressing "Enter" or "Tab" to move to the "Login" button and press "Enter" on the button. 4) With a "Signing in, please wait" message, Braille Sense U2...
- Page 401 If login is successful, "Building contact list..." message will appear and after a little moment contact list will be displayed. If the Braille Sense U2 isn’t connected to Internet, "Connection failed. Check network status." Message will appear and you will return to the "Sign In”...
-
Page 402: Manage Contact
16.3.2 Manage Contact If you log in Google Talk, contact list will appear. If you use Google Talk for the first time, there will be no contact list. You will get a detailed explanation about "Manage Contact" for example, adding, deleting and manage block list from this chapter. - Page 403 Edit Box to enter E-mail is displayed. 2) After typing user ID which you want to add using computer Braille, press "Enter". 3) With the user ID typed, adding contact is executed. If you add a contact, the contact will remain "off-line" until the contact accepting your request adding contact After the contact accepting your request, the status will be turn "on-line".
- Page 404 The way to block contact is as follows. 1) Move to the contact which you want to block in the contact list. 2) Press "back space-b (dots 1-2)" or press "Enter" on the "Block Contact" after entering sub-menu of "Contact", by calling up the menu.
- Page 405 the status right before calling up the menu. The way to unblock contact, using "Manage Block list" is as follows. 1) Press "Backspace-m (dots 1-3-4)" on the contact list. The Blocked E-mails are displayed. 2) Move to the E-mail which you want to unblock using "Space-4" or "Space-1"...
- Page 406 3) E-mail: It displays E-mail account. 4) Chat: It displays whether chat is possible or not as "Enable" or "Disable". 5) File sharing: It displays whether it is able to send/receive file or not as "Enable" or "Disable". 6) Voice Chat: It displays whether voice chatting is possible or not, as "Enable"...
-
Page 407: Start Chat
or to the previous control pressing "Shift-Tab"("Space-F3" or "Space-1- 2"). 1) E-mail: As a list, this displays user ID requesting you to add as contact. 2) Accept: As a button, you can accept focused user ID as contact. 3) Reject: As a button, you can reject focused user ID as contact. 4) Close: As a button, once you execute a function, you will go to the "Contact list", the previous status right before calling up the menu. - Page 408 1) Input: Edit control 2) History: Edit control You will get detailed explanation about each control of "Chat." You can move to the next control pressing "Tab"(F3 or "Space-4-5") or to the previous control pressing "Shift-Tab"("Space-F3" or "Space-1-2"). 1) Input: As a edit box, you can type message to send. 2) History: As a read only edit box, you can see messages sent and received in chronological order.
-
Page 409: Start Voice Chat
"Enter" on "Move to Recently Chat" menu, after entering sub-menu of "Action", calling up the menu. If you want to exit "Chat" windows, press "Space-z(dots 1-3-5-6-)" or "Space-e(dots 1-5)." Or you can exit "Chat" windows, if you press "Enter" on "Exit" menu after entering sub-menu of "File" 16.3.4 Start Voice Chat Start voice chat is a function to send and receive voice message with registered contact in real time like using phone. -
Page 410: Send/Receive A File
"Chat" window. 16.3.5 Send/Receive a file Google Talk program of Braille Sense U2 supports a function to receive and send file. With this function, you can send your files to other person and save files from other person in Braille Sense U2 16.3.5.1 Send file... - Page 411 Enter into selected folder or open the selected file: Enter Move to the upper level folder: Backspace (3) Select file and press "Enter" using hot key for Start selection. When you send one file, focus on file which you want and press "Enter."...
-
Page 412: Other Functions
The following is how to receive files. (1) If contact requests to send file, "XXX send to file" message will be displayed, "Chat" window will be activated and "Receiving File Information list" is focused on. (2) "Receiving File Information list" shows "Receiving: Pending acceptance XX file name". - Page 413 In order to execute this function, press "Space-s (dots 2-3-4)" within the "Chat" window or press "Enter" on the "Save Conversation" menu located on sub menu of "File" by calling up the menu. "Save Conversation" dialog box consists of 4 controls. 1) File Name: Edit combo box Control 2) Confirm: Button Control 3) Cancel: Button Control...
- Page 414 disk/My Documents" folder. This folder is the default folder. 16.3.6.2 Manage Chat "Manage Chat" supports a function to view information of chat window opened and to move directly to the selected case of opening 2 chat- windows you can switch to other chat-window using this function and check status sending/receiving of file.
- Page 415 window on the chat list. 5) Cancel: Using this button, you can exit "Manage Chat Window" dialog box and return to the "Contact list". 16.3.6.3 Find “Find” supports a function to search for input word in “History” edit box of chat window. It is useful in the situation that a lot of messages are exchanged.
- Page 416 “Find”. 4) Cancel: This is a button, using this button you can exit “Find” dialog box, and the chat window that right before calling “Find” menu will be displayed. The Following is how to find the message in chat window. 1) Press "Space-f (dots 1-2-4)".
- Page 417 "Tab"(F3 or "Space-4-5") or to the previous control pressing "Shift- Tab"("Space-F3" or "Space-1-2"). 1) File name: It is a combo edit box. You can type in the file name to be saved in this edit box. 2) Confirm: It is a button. You can execute "Export Contact list". 3) Cancel: It is a button.
- Page 418 "Import Contact List" consists of 4 controls. 1) File name: Combo Edit control. 2) Confirm: Button control 3) Cancel: Button control 4) File list: List control The following is a detailed explanation about each control of "Import Contact list" dialog box. You can move to the next control pressing "Tab"(F3 or "Space-4-5") or to the previous control pressing "Shift- Tab"("Space-F3"...
-
Page 419: Setup Options
16.3.7 Setup Options Braille Sense U2 Google Talk Program supports options setting such as "My status options", "on-line ID", "auto-reply" “notification and sound". You will get detailed information of each option setting from this chapter. 16.3.7.1 My status Options This menu will allow you to setup your status and on-line ID to be shown to other contact. - Page 420 Contact List and so on. In order to call up "Action Options" dialog box, press "Backspace-a (dot 1)" on the contact list or press "Enter" on the "Action Options" menu after entering sub-menu of "Setup" by calling up the menu. "Action Options"...
- Page 421 contact will be rejected automatically. You are able to change the setting by using "Space" or "Backspace". Incoming chat request: You can setup you move to chat- window immediately or to be still at contact list, when someone wants to talk with you. You can choose one between "Move to the chat"...
- Page 422 message, when you are requested chat. You are able to change the setting by using "Space" or "Backspace." 2) Auto-reply message: It is edit box. You can type message when using auto reply function. 3) Show me as "Away" when I'm inactive for: When there is no input during the setting time, your status will be displayed as "Idle".
- Page 423 your message to a person in chat-window. You can choose between "Yes" and "No." If you choose "Yes", what you are typing will be announced in voice. If you choose "No", what you are typing will not be announced in voice. If you set to "No", when you are typing message, you can view received message immediately.
- Page 424 1) Set download path: Button Control 2) Set temporary path: Button Control 3) Set save conversation path: Button Control 4) Confirm: Buttons Control 5) Cancel: Button Control The following is a detailed explanation of each control on "Path options" dialog box. You can move to the next control pressing "Tab"(F3 or "Space-4-5") or to the previous control pressing "Shift-Tab"("Space-F3"...
-
Page 425: Hot Keys In The Google Talk
16.3.8 Hot keys in the Google Talk File (F) Menu Commands Sign out (L): ENTER-l (dots 1-2-3) Export Contact Lists(X): BACKSPACE-x (dots 1-3-4-6) Import Contact Lists (I): BACKSPACE-I (dots 2-4) Exit (Z): SPACE-z (dots 1-3-5-6) Action (A) Menu Commands Start Chat (S): ENTER-s (dots 2-3-4) Start Voice Chat: ENTER-h (dots 1-2-5) Send File (F): ENTER-f (dots 1-2-4) Move to Recently Chat (R): ENTER-t (dots 2-3-4-5) -
Page 426: Msn Messenger
Move to the last item of the Contents: Space-4-5-6 16.4 MSN messenger The MSN messenger program on the Braille Sense U2 is very similar in its operation to that which runs on a Personal computer. This is because we have made every attempt to keep the structure and features the same as those that are found in the MSN messenger program that runs on a PC. -
Page 427: Getting Started With Msn Messenger
registered users of MSN messenger. Note that you will need to setup your MSN messenger account with Microsoft before using this service. To start MSN messenger, executing the “social networking” and press the short cut key, “n (dots 1-3-4-5)”. Or pressing ‘Space-1’ or ‘Space-4’ to move to the “MSN messenger”... -
Page 428: Using A Contact List
“email” edit box the next time you want to log in. When the Braille Sense U2 is not connected to the Internet, if you execute the MSN messenger and try to log in, the Braille Sense U2 will announce “Connection failed. Display Network Status.” and return to the log-in dialog box. - Page 429 3. Move between online and offline groups : Space-5-6 You can have the received message stay on the Braille display until you are done reading it. When in the Contacts list box you can press “Enter-l (dots 1-2-3).” When you are asked to “Confirm the received message: No,”...
- Page 430 adding the contact information, press “tab (Space-4-5)” to move to the “Cancel” button, and press “Enter.” The added contact will be displayed as offline until the person accepts your request for adding him or her to your contact list. As soon as the request is accepted, their status will be changed to online.
- Page 431 Then, you will be placed the “Contact Information” dialog box. First, “Nickname” is focused. Press “tab (Space-4-5)” to move to the email address of the contact. Press “tab (Space-4-5)” again to move to his/her status. After you have read all the information about the contact, press “tab (Space-4-5)”...
- Page 432 When you have read through all of the information, you can press “tab (Space-4-5)” to move to the “Close” button, and then press “Enter.” Or you can just press “Space-e (dots 1-5).” Then, the information dialog box will be closed and you will be placed in the contact list box.
- Page 433 account information once you are logged in. You can use the “Save Account” option for this. It is exactly the same as checking the two check boxes in the login dialog box. To use “Save Account,” you should press “Space-m (dots 1-3-4)” to open the menu. Press “Space-4”...
- Page 434 continuously when a person send you a message. You need to take the following steps for this function. 1) Press “Space-m (dots 1-3-4)” to call up the menu. 2) Press “Space-4” to move to the “Tools” and press “Enter.” 3) Press “Space-4” to move to the “Play Keyboard Sound” and press “Enter.”...
-
Page 435: Instant Message Dialog Box
You can select whether you use beep sound for receipt of the messages or not to use “message sound notification while messenger is in the background” when you are using another program like as word processor. You need to take the following steps for this function. 1) Press “Space-m (dots 1-3-4)”... - Page 436 considered as a paragraph. When you are in the instant message dialog box, if the other person sends a message, the message will be displayed in Braille and announced in speech immediately. If you receive a message while the focus is at the “input” edit box, the focus will not be changed.
- Page 437 16.4.2 Saving and Printing Your Messages You can save or print the messages that are shown in the “history” window. If you want to save the messages, press “Space-m (dots 1-3-4)” to open the menu. Press “Enter” on “File.” Move to “Save As” and press “Enter.”...
-
Page 438: Hot Keys In Social Networking
“Find” dialog box is used for this, and it works the same as the one in the “Word processor.” Press “Space-m (dots 1-3-4)” to open the menu. Press “Space-4” to move to “Edit,” and press “Enter.” Press “Space-4” repeatedly to move to “Find,” and press “Enter.” Or instead of using the menu, just press “Space-f (dots 1-2-4).”... -
Page 439: Google Talk
Follow User: Backspace-a (dot 1) Following: Backspace-l (dots 1-2-3) Followers: Backspace-e (dots 1-5) Global Search: Space-f (dots 1-2-4) User Search: Backspace-f (dots 1-2-4) Search Word List: Backspace-w(dots 2-4-5-6) Next List: Enter-n (dots 1-3-4-5) Refresh: Enter-r (dots 1-2-3-5) Exit: Space-z (dots 1-3-5-6) Move to the next tweet: Space-4 Move to the previous tweet: Space-1 Move to the first tweet on the refreshing list: Space-1-2-3... - Page 440 Contact (b) Menu Commands Add Contact (q): Backspace-q (dots 1-2-3-4-5) Delete Contact (d): Space-d (dots 1-4-5) Block Contact (b): Backspace-b (dots 1-2) Manage Block List (m): Backspace-m (dots 1-3-4) Contact Information (i): Enter-i (dots 2-4) Manage Contact List (p): Enter-p (dots 1-2-3-4) Option (s) Menu Commands My Status Options (u): Backspace-u (dots 1-3-6) Action Options (a): Backspace-a (dot 1)
-
Page 441: Msn Messenger
Move to the previous Contents: Space-1 Move to the next Contents: Space-4 Move to the previous 32-items of the Contents: Space-1-2-6 Move to the next 32-item of the Contents: Space-3-4-5 Move to the first item of the Contents: Space-1-2-3 Move to the last item of the Contents: Space-4-5-6 16.5.3 MSN messenger 1) Log-in dialog box Move to the next control: Tab (Space-4-5 or F3) - Page 442 3) Instant message dialog box Move to the next control: Tab (Space-4-5 or F3) Move to the previous control: Shift-Tab (Space-1-2 or Space- F3) Move between the instant message dialog box and the contact list box: Space-1-2-6 or Space-3-4-5, F1-F2, or F3-F4 Save as: Space-s (dots 2-3-4) Print: Space-p (dots 1-2-3-4) Close: Space-e (dots 1-5)
-
Page 443: Utilities
1) Calculator (where you can do simple math equations as well as scientific calculations) 2) Set Time and Date (where you can set the Braille Sense U2 internal clock) 3) Display Time and Date (where you can check the date and time) -
Page 444: Calculator
17.1 Calculator Using the calculator on the Braille Sense U2 you can do simple math equations as well as complex scientific calculations. The results and formulas will be displayed in Braille, and spoken by the Braille Sense U2. - Page 445 press “Enter” on “General Functions.” Or, you can press “g (dots 1-2-4- 5)” in the menu to access “General Functions.” After starting the calculation, 0 will be displayed in computer Braille. On the calculation line, you can access the “General Functions” by pressing “Enter-g (dots 1-2-4-5).”...
-
Page 446: Memory Functions
17.1.2 Memory Functions The “Memory Functions” will keep your resulting answers and calculations in the memory. The “Memory Functions” menu has four submenu items: “Recall Item,” “Delete All Saved Items,” “Save Item,” and “Statistics Functions.” You can move between these items by pressing “Space-4”... - Page 447 want to delete some of them, you can select the items by pressing “Space,” and press “Space-d (dots 1-4-5)” on the selected items. 17.1.2.2 Delete All Saved Items When you use this function, you can delete all of the saved items that are stored in the “Recall Items.”...
-
Page 448: Sine Functions
If you select this menu item, a dialog box opens, which consists of a list box containing all the stored variables, a list box displaying the results of several functions, and a “Close” button. You can move between these elements by pressing “tab (Space-4-5),” or “shift-tab (Space-1-2).” You can bring up this dialog box by pressing “Backspace-t (dots 2-3-4-5)”... -
Page 449: Cosine Functions
moving with “Space-1” or “Space-4,” or if you press “Enter” on “Confirm” on one of the functions while moving with tab (“Space-4-5”), you can insert it into your calculation line after selecting one of the sine functions. Or, you can insert one of the three sine functions by pressing the first letter of each in the list. -
Page 450: Copy To Clipboard
After copying, you can paste it in your document of the word processor. When you activate “Copy To Clipboard,” you will hear “Copy completed,” and the Braille Sense U2 will return to your calculation line. -
Page 451: Option Settings
“Space-z (dots 1-3-5-6)”. 17.1.10 Sample Math Calculations The following are examples for each of the math functions that you can perform when using the calculator on the Braille Sense U2. General functions: 1. Addition PLUS... - Page 452 For PLUS press “dots 3-4-6.” For example, to add the numbers 10 and 20, you would enter: 10+20. The result is displayed as 30. 2. Subtraction Minus For Minus, press “dots 3-6.” For example, to add the numbers 10 and 20, and then subtract 5, you would enter: 10+20-5.
- Page 453 For example, to calculate 2 to the power of 10, you would press: 2^10. The answer will be given as 1024. 7. Calculating Square Root To perform the Square root function, you can press “Enter” with “dots 1-2-3-4-5.” For example, to calculate the square root of 16, you press: Enter with dots 1-2-3-4-5, 16 “)”.
- Page 454 For Arc cosine, press “Enter,” with “dots 2-4,” then, “a.” This is displayed as acos(. For Hyperbolic cosine, press “Enter” with “dots 2-4,” then, “h.” This is displayed as cosh(. For example, to calculate the cosine of the 30 degree angles, you press: Enter with dots 2-4, C, 30 and then “)”.
-
Page 455: Display Compass Heading
17.2 Display Compass Heading You can display compass in Braille Sense OnHand. You can execute this function regardless of location. In order to display compass, follow these steps: (1) Press “Enter-5-6”, regardless of location. (2) It will show current status of compass. Also you can execute this function in the “Utilities”... -
Page 456: Set Time And Date
“Space”, you can change setting value. 17.3 Set Time and Date If you want to set the Braille Sense U2 internal clock, you can set it by pressing “Enter” on “Set Time and Date” in the “Utilities” menu. In the “Utilities”... - Page 457 The next item is “Synchronize with time server”, where you can synchronize time and date. This function is extremely useful when the date and time of Braille Sense U2 is faster or slower than current time. First of all, to execute this function, you have to connect the internet to your Braille Sense U2.
-
Page 458: Display Time And Date
If you have set up the “Wake up alarm” function, an alarm will sound on the Braille Sense U2 at the specified time every day. If you want to open “Wake up alarm,” go to the “program” menu, move to “Utilities,” and then press “Enter.”... -
Page 459: Set Time
“Backspace-enter.” After you press “Backspace-enter,” the Braille Sense U2 will remain on.” In order to turn the Braille Sense U2 off, you have to move power switch to “Right” and hit “Backspace-enter” and then move power switch to “Right” again. Then the Braille Sense U2 will be turned off, and the alarm will not sound again until you set it again. -
Page 460: Ringing Duration
to “Week day,” the alarm will go off at the same time every weekday, Monday through Friday. If “Term” is set to “Everyday,” the alarm will go off at the specified time 7 days a week, even on weekends. When you have selected the option you like, press “tab (“Space-4-5”)”... -
Page 461: Calendar
“l (dots 1-2-3).” The calendar works according to a date unit. The default is the date that the Braille Sense U2 was set to the last time the date was set. You can check the date in two ways. -
Page 462: Pronunciation Dictionary
After putting in a date, you can check the “Solar calendar,” “Lunar calendar,” and “Day of week” by pressing “tab (Space-4-5)” or “shift- tab (Space-1-2).” Move to the next day: Space-6 Move to the previous day: Space-3 Move to the next week: Space-5 Move to the previous week: Space-2 Move to the next month: Space-4 Move to the previous month: Space-1... - Page 463 will meet “Add entry:” Here you can type in the word you want to change its pronunciation and press “tab (Space-4-5)” then you will meet “Replacement:” Here you can type in the word you want to hear the pronunciation and then press “Enter” or press “tab (Space-4-5)” to move to “Confirm”...
-
Page 464: Stopwatch
When you press “Enter” on the “Stopwatch,” you will show “00:00:00.” If you press “Enter,” the stopwatch will start. If you press “Enter” again, it will pause, and the Braille Sense U2 will say the elapsed time, and display it in Braille. Pressing “Enter” again will restart the stopwatch from where it paused. -
Page 465: Terminal For Screen Reader
“Enter” and you will hear “terminal mode.” The Braille Sense U2 will no longer say anything, as it is now simply acting as a Braille display for your computer. If you fail to connect, you will be returned to the list of connection methods. -
Page 466: Setup Internet
6) Enter any 4 number code of your choosing. 7) Double tap the "Pair" button. The Braille Sense U2 will ask for a pin code. Enter the same pin code and press Enter. If all goes to plan, you should be paired. -
Page 467: Lan Setup
“Utilities” menu, or press “I (dots 2-4)” in the “Utilities” menu. You can move through the “Utilities” menu items with “Space-1” or “Space-4.” If you want to access to Internet with the Braille Sense U2, you must set the Internet settings at “Setup internet” that is one of the submenus of “Utilities”... - Page 468 If you want to connect to a wireless network, you should use the “setup wireless LAN” function. In order to use the “setup wireless LAN” function, you must change the wireless option to “On” in the option menu. Go to the “Utilities” menu that is located in the “program” menu by pressing “F1,”...
- Page 469 navigate among these controls by pressing “tab (“Space-4-5”)” or “shift- tab (“Space-1-2”)”. The “Advanced” common dialog box contains “profile list,” “Connect” button, “Add” common dialog button, “Remove” button, “Properties” common dialog button and “Close” button controls. 1. “profile list”: Here you will see the profile lists that you have added. You can move through the list by pressing “Space-4”...
-
Page 470: Modem & Bluetooth Dun Setup
6) “The key is provided automatically” check box: If the “access point” does not provide a key for users automatically, uncheck this check box by pressing “Space.” The default is that the check box is checked. 7) “Network key” computer edit box: This is a computer edit box to type the network key if the key is not provided automatically. - Page 471 If you are going to set up the Braille Sense U2 to connect to the Internet via a modem, you should first put in a USB 3G modem card into the USB port, and connect a phone line to the modem on the USB 3G mode.
-
Page 472: Adsl Setup
“tab (“Space-4-5”)”. 17.10.4 ADSL Setup If you want to connect the Braille Sense U2 to the Internet via a DSL connection, you should use the ADSL setup. First, you should plug in a LAN cable to the Braille Sense U2’s LAN port. If you press “Enter” on “Setup internet,”... -
Page 473: Display Network Status
“Enter” on “Close.” 17.11 Display Network Status Using this program, you can check if the Braille Sense U2 is currently connected to the Internet. This program provides you with the information about the current connection type, the current IP of the unit, subnet mask, gateway, and MAC address. -
Page 474: Display Power Status
4-5),” the Braille Sense U2 will display a “Renew” button. If you press “tab (Space-4-5) again, “exit” will be displayed. If you press “shift-tab (Space-1-2),” the Braille Sense U2 will move between these elements in the opposite direction. The first item in the information list (status) shows... - Page 475 U2 all at once. This program can be found in the “Utilities” menu. You can run this program by pressing “k (dots 1-3)” in the “Utilities” menu. If you run this program, a dialog box will be opened. This dialog box contains: “program option check box list”, Select all”...
-
Page 476: Menu Manager
If you cold reset your Braille Sense U2, or its battery is fully discharged, the main option settings and settings for each program will be lost, and initialized to the default values. -
Page 477: Format
17.15 Format To use the Braille Sense U2, you may need to format. This program can be found in the “Utilities” menu. You can execute this program by pressing “f” in the “Utilities” menu. When you format Braille Sense U2, all information is erased. -
Page 478: Set Sleep Timer
After you have completed the format, return to the “File manager” program. 17.16 Set Sleep Timer You can set “Sleep Timer” in Braille Sense U2. The sleep timer will turn the unit off at a specified time regardless of what you are doing. Please follow these steps;... -
Page 479: Upgrade Braille Sense U2 Firmware
“3” minutes. 17.17 Upgrade Braille Sense U2 Firmware If you activate this function, you can update the Braille Sense U2 either through an Internet connection or from a disk that contains the upgrade file. If you decide to upgrade using an Internet connection, you must first complete the “Setup internet”... -
Page 480: Upgrading The Braille Sense U2 Firmware From A Disk
After downloading the upgrade file, Braille Sense U2 will automatically start the upgrading process. Please remember that you must not do anything to the Braille Sense U2 until the upgrade is complete. When the upgrade is complete, you will be returned to the “program”... -
Page 481: Hot Keys For Utilities
Connect a disk (such as a compact flash card, SD card or USB memory stick) to the Braille Sense U2. The disk must have the upgrade file stored on it. Then, press “Enter” on “Upgrade Braille Sense U2 Firmware.” Then, “Upgrade: Online” will appear. Press “Space-4” to go to the “Upgrade: Offline.”... - Page 482 Decimal Point: dots 4-6 Left Parenthesis: dots 1-2-3-5-6 Right Parenthesis: dots 2-3-4-5-6 PI: Enter-p (dots 1-2-3-4) Exp: Enter-e (dots 1-5) Memory Function: Recall Items: Backspace-r (dots 1-2-3-5) Delete all saved items: Enter-d (dots 1-4-5) Save Items: Backspace-s (dots 2-3-4) Trigonometric Function: Enter-s (dots 2-3-4) Sine: Enter-s (dots 2-3-4), s (dots 2-3-4) Arc Sine: Enter-s (dots 2-3-4), a (dot 1) Hyperbolic Sine: Enter-s (dots 2-3-4), h (dots 1-2-5)
- Page 483 Move to the next year: Space-5-6 Move to the previous year: Space-2-3 Move to 1 hour after: Space-4 Move to 1 hour before: Space-1 Move to 10 minutes after: Space-5 Move to 10 minutes before: Space-2 Move to 1 minute after: Space-6 Move to 1 minute before: Space-3 Switch Between a.m.
- Page 484 Move to previous control: Shift-tab (Space-1-2 or Space-F3) Move to next control: Tab (Space-4-5 or F3) Format: Space-1-2-3 Set Sleep Timer: Space-j (dots 2-4-5) Upgrade Braille Sense U2 Firmware: u (dots 1-3-6) Check download information: Space-i (dots 2-4) Cancel download and exit: Space-z (dots 1-3-5-6)
-
Page 485: Using The Help Menu
18. Using the help menu The help section consists of various text files that will allow you to read about the many functions of the Braille Sense U2. You will find the following help sections: 1. Help overview 2. Basic functions help 3. - Page 486 For a list of the navigation keys, please see section 19.3.2. Remember that when you are reading the manual on the Braille Sense U2, you can search for text in the various sections by pressing “Space-f (dots 1-2-4),” type the text you wish to find, and then press “Enter.”...
- Page 487 (dots 1-2-4).” The “Information about the Braille Sense U2” section gives the copyright and version of the Braille Sense U2, as well as the version of Windows CE that the Braille Sense U2 is using. To access “Information about the Braille Sense U2”...
-
Page 488: Using Activesync
ActiveSync installed, you will need to plug a USB cable in to the USB OTG port on the right panel of the Braille Sense U2. Then, plug the other end of the USB cable in to a USB port on your personal computer. -
Page 489: Transferring Files To The Braille Sense U2 Via Activesync
After you have opened “mobile device,” you will enter in to the file list on the Braille Sense U2. One of the items in the list is “my computer.” Press the letter “m” until you hear “my computer,” and press “Enter.” Then, another file list will open. - Page 490 “ctrl-v” to paste the file(s). If you want to copy folders from the Braille Sense U2 to your PC via ActiveSync, follow the same steps; except, you will need to copy files from the Braille Sense U2, and paste the file(s) to your PC in the directory where you want to store the file(s).
-
Page 491: Command Summary
20. Command Summary 20.1 Common Combination Keys Call up the program menu: F1 Run the individual program in the program menu F1-”shortcut key” (varies for each program) Call up the Task Name list: F1-F4 Switch to previous program: Space-F2-F3 Switch to next program: F2-F3 Call up the menu in the individual program: Space-m (dots 1-3-4) or F2 Exit: Space-z (dots 1-3-5-6) Escape: Space-e (Space-1-5) or F4... -
Page 492: File Manager
Online help: Space-h (dots 1-2-5) Check software version: Space-v (dots 1-2-3-6) only in the Braille Sense U2 “program” menu. Display network status: Space-n (dots 1-3-4-5) in the Braille Sense U2 “program” menu Increase the voice volume: Backspace-F4 Decrease the voice volume: Backspace-F1... -
Page 493: Navigation Keys For The File List
Move to the beginning of the list: Ctrl-home (Space-1-2-3) Move to the end of the list: Ctrl-end (Space-4-5-6) 20.2.2 Navigation Keys for the File List Fast move to folder list or move to file list: Space-5-6 Move between file list and address window: Tab (Space-4-5 or F3) / shift-tab (Space-1-2 or F3-F4) Enter into selected folder or open the selected file: Enter Move to the upper level folder: Backspace... -
Page 494: Word Processor
Display only files of type: Enter-w (dots 2-4-5-6) Search file: Space-f (dots 1-2-4) Information: Enter-i (dots 2-4) Setup Network connection: Backspace-e (dots 1-5) Cancel setting of Network connection: Space-z (dots 1-3-5-6) Sharing a folder with other computer: Backspace-s (dots 2-3-4) Remove remote folder on network: Backspace-u (dots 1-3-6) Setup sharing security: Backspace-p (dots 1-2-3-4) 20.3 Word Processor... -
Page 495: Miscellaneous Hot Keys
Find: Space-f (dots 1-2-4) Find again: Enter-f (dots 1-2-4) Replace: Enter-r (dots 1-2-3-5) Go to location: Enter-l (dots 1-2-3) Go to previous page: Space-1-2-6 or F1-F2 Go to next page: Space-3-4-5 or F3-F4 Set Mark: Enter-m (dots 1-3-4) Go to the mark: Enter-j (dots 2-4-5) Go to previous document: Tab (Space-1-2 or Space-F3) Go to next document: Shift-tab (Space-4-5 or F3) Read selected text: Backspace-b (dots 1-2) -
Page 496: Address Manager
Move to the beginning of the document: Ctrl-home (Space-1-2-3) Move to the end of the document: Ctrl-end (Space-4-5-6) Read current paragraph: Space-2-3-5-6 Read current line: Space-1-4 Read current word: Space-2-5 Read current character: Space-3-6 Delete current paragraph: Backspace-1-3-4-6 Delete current line: BackSpace-1-4 Delete current word: BackSpace-2-5 Delete current character: Space-d (dots 1-4-5) Confirm current cursor position: Space-1-5-6... -
Page 497: Hot Keys For The Commands
Move to next same field different record: Space-6 20.4.3 Hot keys for the Commands Add address: Enter-i (dots 2-4) Find address: Enter-s (dots 2-3-4) Edit address: Enter-m (dots1-3-4) Delete address: Space-d (dots 1-4-5) Select all: Enter-a (dot 1) Save as a file: Enter-t (dots 2-3-4-5) Print address: Space-p (dots 1-2-3-4) Backup address list: Enter-u (dots 1-3-6) Restore address list: Enter-r (dots 1-2-3-5) -
Page 498: Move Keys In The Search Result List
Restore schedule: Enter-r (dots 1-2-3-5) Set backup option: Enter-e (dots 1-5) Alarm option: Enter-o (dots 1-3-5) Save schedule as file: Enter-t (dots 2-3-4-5) Print schedule: Space-p (dots 1-2-3-4) 20.5.2 Move Keys in the Search Result List 1) Move from an appointment to another in the schedule list Move to the previous appointment in the same day: Space-1 or up scroll button Move to the next appointment in the same day: Space-4 or down scroll... -
Page 499: Hot Keys For Sending E-Mail Including Reply, Forward, And Save In The Mail Outbox
Find again: Backspace-f (dots 1-2-4) Move to unread message: Enter-u (dots 1-3-4) Move to mailbox: Backspace-x (dots 1-3-4-6) Copy to Mailbox: Backspace-c (dots 1-4) Add a sender to the address list: Enter-i (dots 2-4) (This is valid only at the “from” item of the “inbox”) Delete received e-mail: Space-d (dots 1-4-5) (It is valid only at the “Subject”... -
Page 500: Media Player
20.7 Media Player 20.7.1 Hot keys for commands Open file: Enter-o (dots 1-3-5) Open folder: Enter-f (dots 1-2-4) Add file: Backspace-o (dots 1-3-5) Add folder: Backspace-f (dots 1-2-4) Save play list: Enter-i (dots 2-4) Save as play list: Space-s (dots 2-3-4) Delete item: Space-d (dots 1-4-5) Open URL: Enter-u (dots 1-3-6) Play: Enter, Play button... -
Page 501: Hot Keys In The Play Information Tab
Delete play list during stop: Space-d (dots 1-4-5) Set bookmark: Enter-m (dots 1-3-4) Delete bookmark: Enter-d (dots 1-4-5) Jump to bookmark: Enter-j (dots 2-4-5) Go to position: Enter-g (dots 1-2-4-5) Set mark: Backspace-m (dots 1-3-4) Move to mark: Backspace-j (dots 2-4-5) Move to previous mark: Backspace-dot 3 Move to next mark: Backspace-dot 6 Delete mark: Backspace-d (dots 1-4-5) -
Page 502: Hot Keys In The Play List Tab
Move to previous position by time index and play: dot 1 Open menu: Space-m (dots 1-3-4) Open help: Space-h (dots 1-2-5) Move to “play list” tab: Space-4-5/Space-1-2 Exit “media player”: Space-z (dots 1-3-5-6) 20.7.3 Hot Keys in the Play List Tab Move to the next file: Space-4 Move to the previous file: Space-1 Move to the last file: Space-4-6... -
Page 503: Fm Radio
20.8 FM Radio Call up the sets dialog box: Enter-e (dots 1-5) Call up the menu: Space-m (dots 1-3-4) or F2 Internal speakers on/off: Space-x (dots 1-3-4-6) or X (dots 1-3-4-6) Move to next frequency: dot 6 Move to previous frequency: dot 3 Auto previous frequency: dot 2, short press previous button Auto next frequency: dot 5, short press next button Go to frequency: Space-f (dots 1-2-4) -
Page 504: Hot Keys When Playing Audio Files In Web Browser
Start selection: Enter-b (dots 1-2) Copy: Enter-c (dots 1-4) Add to clipboard: Enter-p (dots 1-2-3-4) Copy URL: Backspace-d (dots 1-4-5) Copy link: Backspace-l (dots 1-2-3) Go to the home page: Backspace-h (dots 1-2-5) Go to the previous page: BackSpace-Space-3 or Backspace-p (dots 1-2- 3-4) Go to the next page: BackSpace-Space-6 or Backspace-n (dots 1-3-4-5) Go to previous heading: Backspace-b (dots 1-2) -
Page 505: Hot Keys For Reading Web
20.9.3 Hot Keys for Reading Web Pages Move to the previous control: Shift-tab (Space-1-2) Move to the next control: Tab (Space-4-5) Select the next item in the combo box (list box): Backspace-Space-4 Select the previous item in the combo box (list box): Backspace-Space-1 Move to the previous form: Space-1-2-3-4-6 Move to the next form: Space-1-3-4-5-6 Move to the previous table: Space-3-4-5-6... -
Page 506: Bluetooth Manager
Increase the volume: Space-up scroll button Decrease the volume: Space-down scroll button Move to the next phrase: dot 6 or short press “next” button Move to the previous phrase: dot 3 or short press “previous” button Move to the next fifty phrase: dot 4 Move to the previous fifty phrase: dot 1 Move to the next page: Space-3-4-5 Move to the previous page: Space-1-2-6... -
Page 507: Database Manager
1. FTP service Open local folder: Enter-o (dots 1-3-5) Copy: Enter-c (dots 1-4) Paste: Enter-v (dots 1-2-3-6) Send to: Enter-s (dots 2-3-4) Retrieve file: Enter-r (dots 1-2-3-5) New folder: Enter-f (dots 1-2-4) Delete file/folder: Space-d (dots 1-4-5) Information: Enter-i (dots 2-4) 20.12 Database Manager Add record: Enter-i (dots 2-4) Search records: Enter-s (dots 2-3-4) -
Page 508: Extras
Move to previous same field different record: Space-3 Move to next same field different record: Space-6 Move to the last field: Space-4-6 Move to the first field: Space-1-3 20.13 Extras 20.13.1 Games Skip record: space-e/space-z 20.14 Social Networking 20.14.1 Twitter Sign Out: Enter-g(dots 1-2-4-5) Personal Information: Enter-I (dots 2-4) Save Current Timeline: Space-s(dots 2-3-4) -
Page 509: Google Talk
Followers: Backspace-e (dots 1-5) Global Search: Space-f (dots 1-2-4) User Search: Backspace-f (dots 1-2-4) Search Word List: Backspace-w(dots 2-4-5-6) Next List: Enter-n (dots 1-3-4-5) Refresh: Enter-r (dots 1-2-3-5) Exit: Space-z (dots 1-3-5-6) Move to the next tweet: Space-4 Move to the previous tweet: Space-1 Move to the first tweet on the refreshing list: Space-1-2-3 Move to the last tweet on the refreshing list: Space-4-5-6 Move to the previous 32 list: Space-1-2-6... - Page 510 Contact (b) Menu Commands Add Contact (q): Backspace-q (dots 1-2-3-4-5) Delete Contact (d): Space-d (dots 1-4-5) Block Contact (b): Backspace-b (dots 1-2) Manage Block List (m): Backspace-m (dots 1-3-4) Contact Information (i): Enter-i (dots 2-4) Manage Contact List (p): Enter-p (dots 1-2-3-4) Option (s) Menu Commands My Status Options (u): Backspace-u (dots 1-3-6) Action Options (a): Backspace-a (dot 1)
-
Page 511: Msn Messenger
Move to Previous Chat (p): Space-2-3 Move to Next Chat (n): Space-5-6 The move keys in Google Talk. Move to the previous Contents: Space-1 Move to the next Contents: Space-4 Move to the previous 32-items of the Contents: Space-1-2-6 Move to the next 32-item of the Contents: Space-3-4-5 Move to the first item of the Contents: Space-1-2-3 Move to the last item of the Contents: Space-4-5-6 20.14.3 MSN messenger... -
Page 512: Utilities
Message sound notification while messenger is in the background: Backspace-m (dots 1-3-4) Nickname: Enter-p (dots 1-3-4) Save account: Enter-o (dots 1-3-5) Confirm the Received Message, “Enter-l (dots-1-2-3) 3. Instant message dialog box Move to the next control: Tab (Space-4-5 or F3) Move to the previous control: Shift-Tab (Space-1-2) or Space-F3 Move between the instant message dialog box and the contact list box: Space-1-2-6 or Space-3-4-5, F1-F2, or F3-F4... -
Page 513: Setting Time And Date
Percent: Dots 1-4-6 Power: Backspace-4-5 Square Root: Enter-q (dots 1-2-3-4-5) Decimal Point: Dots 4-6 Left Parenthesis: Dots 1-2-3-5-6 Right Parenthesis: Dots 2-3-4-5-6 PI: Enter-p (dots 1-2-3-4) Exp: Enter-e (dots 1-5) Recall Items: Backspace-r (dots 1-2-3-5) Delete all save items: Enter-d (dots 1-4-5) Save Items: Backspace-s (dots 2-3-4) Trigonometric Function: Enter-s (dots 2-3-4) Sine: Enter-s (dots 2-3-4), s (dots 2-3-4) -
Page 514: Checking Date And Time
Move to the previous week: Space-2 Move to the next month: Space-4 Move to the previous month: Space-1 Move to the next year: Space-5-6 Move to the previous year: Space-2-3 Move to 1 hour after: Space-4 Move to 1 hour before: Space-1 Move to 10 minutes after: Space-5 Move to 10 minutes before: Space-2 Move to 1 minute after: Space-6... -
Page 515: Stopwatch
Move to the next item in entry: Space-4 Add word: Space-i (dots 2-4) Modify word: Space-m (dots 1-3-4) Delete word: Space-d (dots 1-4-5) 20.15.6 Stopwatch Stopwatch start, pause, restart: Enter Check the elapsed time: Backspace Stop and restart Braille display: Space-F2 Switch between stopwatch and count down timer: Tab (Space-4- 5) or shift-tab (Space-1-2) Count down timer pause or restart: Enter... -
Page 516: Sleep Timer
20.15.11 Sleep Timer Set Sleep Timer: Space-j (dots 2-4-5) 20.15.12 Upgrading the Braille Sense U2 Firmware Check download information: Space-i (dots 2-4) Cancel download and exit: Space-z (dots 1-3-5-6) -
Page 517: Command Summary For Usb Keyboards
Move to the next page or to the first item of the next 18-item group: Page down Read the current item again: Ctrl-shift-r Say current time: Ctrl-shift-t Display power status: Ctrl-shift-b Print spool: Alt-shift-p Call up the “Global options”: F10 Online help: F1 Check your version: Ctrl-shift-v only in the Braille Sense U2 “program” menu. -
Page 518: File Manager
Display network status: Ctrl-shift-n in the Braille Sense U2 “program” menu Voice volume up: F6 Voice volume down: Shift-F6 Voice rate up: F7 Voice rate down: Shift-F7 Voice pitch up: F8 Voice pitch down: Shift-F8 Voice on/off: F5 Braille display on/off: F4... -
Page 519: Hot Keys For The Commands
21.2.4 Hot Keys for the Commands Open: Ctrl-o Open with: Ctrl-h Zip: Ctrl-z Unzip: Ctrl-u Send: Ctrl-s Copy: Ctrl-c Cut: Ctrl-x Paste: Ctrl-v Delete: DEL Rename: F2 New document: Ctrl-n New folder: Alt-f File conversion: Ctrl-t Select all: Ctrl-a Sort files by: Ctrl-g Set file info: Ctrl-i Display only files of type: Ctrl-w Search file: Ctrl-f... - Page 520 Print: Ctrl-p Settings: Ctrl-e Exit: Alt-f4 Start selection: Ctrl-b Copy: Ctrl-c Add to the clipboard: Ctrl-Ins Clear clipboard: Ctrl-Del Delete: Del Cut: Ctrl-x Paste: Ctrl-v Delete blank lines: Alt-e Select All: Ctrl-a Insert from file: Ctrl-i Insert date: Ctrl-w Change insert/overwrite mode: Insert Check spelling: Ctrl-k Check spelling of the current word: Alt-k Find: Ctrl -f...
-
Page 521: Miscellaneous Hot Keys
Braille paragraph layout: Alt-F6 Print paragraph layout: Alt-F8 21.3.2 Miscellaneous Hot Keys Move to previous character: Left arrow key Move to next character: Right arrow key Move to previous word: Ctrl-Left arrow Move to next word: Ctrl-Right arrow Move to the beginning of the line: Home key Move to the end of the line: End key Move to previous line: Up arrow key Move to next line: Down arrow key... -
Page 522: Move Keys For Moving From Field To Field In The Record Or In The Menu
21.4.1 Move keys for moving from field to field in the record or in the menu Move to the previous field or menu item: Up arrow key Move to the next field or menu item: Down arrow key Move to the first field or menu item: Ctrl-Home Move to the last field or menu item: Ctrl-End 21.4.2 Move Keys for Moving from Record to Record Move to the previous record: Up arrow key... -
Page 523: Miscellaneous Hot Keys
21.4.4 Miscellaneous Hot Keys Tab: Tab Shift-tab: Shift-Tab Cancel: ESC Exit: Alt-f4 21.5 Schedule Manager 21.5.1 Hot keys for the commands Move to the next field: Tab Move to the previous field: Shift-Tab Add schedule: Ctrl-n Search schedule: Ctrl-s Modify schedule: Ctrl-m Delete schedule: Del Alarm option: Ctrl-o Save schedule as file: Alt-s... -
Page 524: E-Mail
Move to the first schedule: Ctrl-Home Move to the last schedule: Ctrl-End 21.6 E-mail Sign Out: Enter-g(dots 1-2-3) Personal Information: Enter-I (dots 2-4) Save Current Timeline: Space-s(dots 2-3-4) Home Timeline: Enter-h (dots 1-2-5) Friend Timeline: Enter-f (dots 1-2-4) User Timeline: Enter-u (dots 1-3-6) Current User Timeline: Backspace-u (dots1-3-6) Mention Timeline: Enter-m (dots 1-3-4) Retweet By Me: Backspace-b (dots 1-2) -
Page 525: Media Player
Move to the previous tweet: Space-1 Move to the first tweet on the refreshing list: Space-1-2-3 Move to the last tweet on the refreshing list: Space-4-5-6 Move to the previous 32 list: Space-1-2-6 Move to the next 32 list: Space-3-4-5 Move to the previous list: up scroll button (Space-1) Move to the next list: down scroll button (Space-4) Move to the top of the list: Ctrl-home (Space-1-2-3)/ Home (Space-1-3) -
Page 526: Hot Keys In The Play Information Tab
Volume down: Shift-Down arrow key Speed up: Shift-Left arrow key Slow down: Shift-Right arrow key Pause/Continue: Space Stop: c or Backspace Delete play list during stop: DEL Record: Ctrl-r Play: Enter Stop: Backspace Pause/Continue recording: Space Configuration dialog box: Alt-c Set bookmark: Ctrl-m Delete bookmark: Ctrl-d Jump to bookmark: Ctrl-j... -
Page 527: Hot Keys In The Play List Tab
Change time index: Ctrl-Up arrow key or Ctrl-Down arrow key Volume up: Shift-Up arrow key Volume down: Shift-Down arrow key Speed up: Shift-Left arrow key Slow down: Shift-Right arrow key Open menu: Alt Open help: F1 Move to “play list” tab: Tab/Shift-Tab Exit “media player”: Alt-F4 21.7.3 Hot Keys in the Play List Tab Move to the next file: Down arrow key... -
Page 528: Fm Radio
Open help: F1 Move to “playback information” tab: Tab/Shift-Tab Exit “media player”: Alt-F4 21.8 FM Radio Call up the sets dialog box: Ctrl-e Call up the “menu”: Alt Internal speakers on/off: x or Ctrl-shift-x Move to next frequency: Right arrow key Move to previous frequency: Left arrow key Auto previous frequency: Ctrl-Left arrow key Auto next frequency: Ctrl-Right arrow key... -
Page 529: Hot Keys When Playing Audio Files In Web Browser
Read from cursor to end: Ctrl-Shift-Enter Copy selection: Ctrl-b Copy: Ctrl-c Add clipboard: Ctrl-Ins Copy URL: Alt-d Copy link address: Alt-l Go to the home page: Alt-h Go to the previous page: Alt-Left arrow key Go to the next page: Alt-Right arrow key Go to previous text: Ctrl-F5Go to next text: Ctrl-F6 Go to previous heading: Alt-b or Ctrl-F3 Go to next heading: Alt-f or Ctrl-F4... -
Page 530: Daisy Player
Move to the previous form: Ctrl-F1 Move to the next form: Ctrl-F2 Move to the previous table: Ctrl-F7 Move to the next table: Ctrl-F8 Move to the previous cell: Ctrl-Shift-Left arrow key Move to the next cell: Ctrl-Shift-Right arrow key Move to the upper cell: Ctrl-Shift-Up arrow key Move to the lower cell: Ctrl-Shift-Down arrow Read current cell: Ctrl-Shift-F... -
Page 531: Bluetooth Manager
Move to the next page: Page down Move to the previous page: Page up Go to the page: Ctrl-g Move to the upper-level: Alt-Left arrow key Move to the down-level: Alt-Right arrow key Move to the next level at the preset level: Alt-Up arrow key Move to the previous level at the preset level: Alt-Down arrow key Move to the next heading: Ctrl-F6 Move to the previous heading: Ctrl-F5... -
Page 532: Database Manager
1. FTP service Open local/remote folder: Ctrl-o Copy: Ctrl-c Paste: Ctrl-v Send to: Ctrl-s Retrieve file: Ctrl-r New folder: Ctrl-f Delete file/folder: DEL Information: Ctrl-i 21.12 Database Manager Add record: Ctrl-n Search records: Ctrl-f Modify record: Ctrl-m Table manager: Ctrl-t List of records found: Ctrl-r Setting backup option: Ctrl-e Backup database: Ctrl-u... -
Page 533: Extras
Move to the first record: Ctrl-home Move to the next field: Ctrl-Right arrow key Move to the previous field: Ctrl-Left arrow key Move to previous same field different record: Left arrow key Move to next same field different record: Right arrow key Move to the last field: End Move to the first field: Home 21.13 Extras... -
Page 534: Google Talk
Received Direct Message: Alt-r Follow User: Alt-a Following: Alt-l Followers: Alt-e Global Search: Ctrl-f User Search: Alt-f Search Word List: Alt-w Next List: Ctrl-n Refresh: Ctrl-r Exit: Alt-F4 Escape: Esc key Move to the next tweet: Down arrow key Move to the previous tweet: Up arrow key Move to the first tweet on the refreshing list: Ctrl-Fn-Left arrow key Move to the last tweet on the refreshing list: Ctrl-Fn-Right arrow key Move to the previous 32 list: Fn-Un arrow key... - Page 535 Start Voice Chat: Ctrl-h Send File: Alt-f Move to Recently Chat: Ctrl-t Manage Chat: Ctrl-m Contact Menu Commands Add Contact: Alt-q Delete Contact: Delete Block Contact: Alt-b Manage Block List: Alt-m Contact Information: Ctrl-i Manage Contact List: Ctrl-p Option Menu Commands My Status Options: Alt-u Action Options: Alt-a Alert Options: Alt-o...
-
Page 536: Msn Messenger
Start Voice Chat: Ctrl-h Stop Voice Chat: Esc key Send File: Alt-f View Contact List: Ctrl-t Manage Chat: Ctrl-m Move to Previous Chat: Ctrl-Shift-Tab Move to Next Chat: Ctrl-Tab The move keys in Google Talk. Move to the previous Contents: Up arrow key Move to the next Contents: Down arrow key Move to the previous 32-items of the Contents: Fn-Up arrow key button Move to the next 32-item of the Contents: Fn-Down arrow key button... -
Page 537: Utilities
Last message: Alt-r Play keyboard sound: Ctrl-k Message sound notification while in current window: Ctrl-Shift-s Message sound notification while messenger is in the background: Alt-m Nickname: Ctrl-p Save account: Ctrl-o Confirm the Received Message: Ctrl-l 3. Instant message dialog box Move to the next control: Tab Move to the previous control: Shift-Tab Move between the instant message dialog box and the contact listbox:... - Page 538 Plus: + Minus: - Division: / Multiplication: * Percent: % Power: ^ Square Root: Ctrl-q Decimal Point: . Left Parenthesis: ( Right Parenthesis: ) PI: Ctrl-p Exp: Ctrl-e Recall Items: Alt-r Delete all saved items: Ctrl-d Save Items: Alt-s Trigonometric Function: Ctrl-s Sine: Ctrl-s, s Arc Sine: Ctrl-s, a Hyperbolic Sine: Ctrl-s, h...
-
Page 539: Setting The Date And Time
21.15.2 Setting the Date and Time Move to the next day: Right arrow key Move to the previous day: Left arrow key Move to the next week: Ctrl-Right arrow key Move to the previous week: Ctrl-Left arrow key Move to the next month: Down arrow key Move to the previous month: Up arrow key Move to the next year: Ctrl-Down arrow key Move to the previous year: Ctrl-Up arrow key... -
Page 540: Pronunciation Dictionary
21.15.5 Pronunciation dictionary Move to the previous control: Tab Move to the next control: Shift-Tab Move to the previous item in entry: Up arrow key Move to the next item in entry: Down arrow key Add word: Alt-i Modify word: Alt-m Delete word: Del 21.15.6 Stopwatch Stopwatch start, pause, restart: Enter... -
Page 541: Upgrading Braille Sense U2 Firmware
Select/unselect check box: Space 21.15.10 Upgrading Braille Sense U2 Firmware Check download information: Space Cancel download and exit: Alt-F4... -
Page 542: Troubleshooting Guide
22. Troubleshooting Guide If you are having trouble with the Braille Sense U2, please try the following suggestions according to your problem: 22.1 The Braille Sense U2 Will Not Turn On 1. Check to make sure that the battery is inserted in to its compartment properly. -
Page 543: Lost Your Place
22.5 Lost Your Place 1. If you have lost your place in the Braille Sense U2, and cannot remember where you are press “F1” to access the “program” menu. Then, press “F2-F3” to switch between programs that are open. If you are in the word processor, pressing “space1-5-6”... -
Page 544: The Lcd Does Not Come On
press the reset button, or press “1-2-3-4-5-6-F2-F3.” Do NOT hold the reset button for more than 5 seconds. 22.10 The LCD Does Not Come On If the LCD screen does not come on, make sure that it is turned on. Press “space-o (dots 1-3-5).”... -
Page 545: Accessories
For information on available accessories for the Braille Sense U2, please contact HIMS Inc. You can contact HIMS at sales@hims-inc.com. Or, you can contact HIMS by phone at at 888-520-4467. You can also visit HIMS on the web at www.hims-inc.com. -
Page 546: Obtaining Support
24. Obtaining Support If you are having any problems with your Braille Sense U2, please contact the Hims-inc. If you require further assistance, please contact us at support@hims-inc.com. Or, you can contact HIMS by phone at 512- 837-2000.
Need help?
Do you have a question about the Braille Sense U2 and is the answer not in the manual?
Questions and answers