Avaya G700 Installation And Upgrades
Hide thumbs
Also See for G700:
- Installing and upgrading (808 pages) ,
- Installing manual (768 pages) ,
- Installation and upgrades (734 pages)

Subscribe to Our Youtube Channel
Related Manuals for Avaya G700


Summary of Contents for Avaya G700
- Page 1 Installation and Upgrades Avaya G700 Media Gateway Avaya S8300 Media Server 555-234-100 Issue 4.1 December 2003...
- Page 2 The final responsibility for securing both this system and its networked equipment rests with you - Avaya’s customer system Avaya Inc. provides a limited warranty on this product. Refer to your administrator, your telecommunications peers, and your managers. sales agreement to establish the terms of the limited warranty. In Base the fulfillment of your responsibility on acquired knowledge and addition, Avaya’s standard warranty language as well as information...
- Page 3 The LASER devices operate within the following parameters: Avaya attests that this registered equipment is capable of providing users access to interstate providers of operator services through the use • Maximum power output: -5 dBm to -8 dBm of access codes. Modification of this equipment by call aggregators to •...
- Page 4 FIC Code SOC/REN/ Network (SDoC) Identifier A.S. Code Jacks Avaya Inc. in the United States of America hereby certifies that the Ground Start CO trunk 02GS2 1.0A RJ11C equipment described in this document and bearing a TIA TSB-168 DID trunk 02RV2-T AS.0...
-
Page 5: Table Of Contents
You cannot use the Upgrade Tool to do the following: The Avaya Gateway Installation Wizard • Installation Roadmap and Task Lists Checklist 1: Install a New G700 with an S8300 (Primary or LSP) Installation and Upgrades for G700 and S8300 December 2003... - Page 6 S8300 • Connection and Login Methods Connection Overview Summary of S8300 and G700 Access Methods and Tasks Laptop Configuration for a Direct Connection to the Services Port Settings for a Direct Connection to S8300, S8500, or S8700 Services Port...
- Page 7 Contents • Navigational Aid for CLI Commands • Terminal Emulation Function Keys for Communication Manager Installing Hardware for the G700 Media Gateway and S8300 Media Server • Getting Started G700 Media Gateway G700 Media Gateway Chassis and Processors Media Modules...
- Page 8 Connect AC Power Power Requirements Test the AC Outlet Plug in AC Power Check and Connect DC Power Installing a New G700 with an S8300 • Installation Overview G700 components Software and firmware files System Access Initial Access to the G700 Access to the S8300 and G700 •...
- Page 9 Updating System Files Screen Provide the keys.install File (If Necessary) • Configure the G700 Media Gateway Assign the IP Addresses of the G700 Media Gateway Components Check for IP Connections Set up the Controller List for the G700 Media Gateway...
- Page 10 For a Bundled Firmware File For Individual Firmware Files • Configure the G700 Assign the IP Addresses of the G700 Media Gateway Components Check for IP Connections Assign the IP Addresses of the G700 Media Gateway Components Check for IP Connections...
-
Page 11: Upgrading An Existing G700 With An S8300 — R1.X To R
Access the P330 Stack Processor Verify the Contents of the tftpboot Directory Determine Which Firmware to Install on the G700 • Install New Firmware on the G700 Media Gateway Firmware Installation Procedures Install New Firmware on the P330 Stack Processor... - Page 12 Collect Upgrade Information If Upgrading from Release 1.1, Fill in the EPW Get Planning Forms from the Project Manager Get the Serial Number of the G700, if Necessary Check Number of Allocated Ports Check FTP Server for Backing up Data...
- Page 13 Using the Installation Wizard Using the Upgrade Tool Manual Upgrade Procedures Verify the Contents of the tftpboot Directory Determine Which Firmware to Install on the G700 Install New Firmware on the P330 Stack Processor Installation and Upgrades for G700 and S8300 December 2003...
- Page 14 Contents Install New Firmware on the G700 Media Gateway Processor Install New Firmware on the Media Modules Install New Firmware on Other G700 Media Gateways • If the S8300 is Using IA770 Install and Restart IA770 Save Translations Install IA770 update (patch) files, if any •...
- Page 15 Load License File (from Your Laptop) If Necessary, Install License and Authentication Files Run Save Translations (Only If New License and/or Authentication Files Installed) Transfer Files from a CD or Laptop Download Files Screen Installation and Upgrades for G700 and S8300 December 2003...
- Page 16 Determine Which Firmware to Install on the G700 Install New Firmware on the P330 Stack Processor Install New Firmware on the G700 Media Gateway Processor Install New Firmware on the Media Modules Install New Firmware on Other G700 Media Gateways •...
- Page 17 Access the P330 Stack Processor Verify the Contents of the tftpboot Directory Determine Which Firmware to Install on the G700 • Install New Firmware on the G700 Media Gateway Firmware Installation Procedures Install New Firmware on the P330 Stack Processor...
- Page 18 Avaya Terminal Emulator Avaya Voice Announcement Over LAN Manager Avaya VoIP Monitoring Manager • Uninterruptible Power Supply (UPS) Technical Information • Avaya G700 Media Gateway Technical Specifications • Cabling Equipment Information Checklists • Installer's Checklist • Serial Number and Login Information...
- Page 19 Contents • Set-Up for P330 Stack Processor • Set Up for G700 Media Gateway Processor (MGP) • Set Up for VoiP Resources • Set Up for S8300 Media Server • Installation Site Information • Stack Layout Equipment List Replacing the G700 Media Gateway...
- Page 20 Contents Installation and Upgrades for G700 and S8300 December 2003...
-
Page 21: About This Book
About This Book Overview This document provides procedures to install, upgrade, or add to an Avaya G700 Media Gateway controlled by an Avaya S8300, S8500, or S8700 Media Server. It also includes information on connecting telephones and adjuncts to the G700. -
Page 22: Conventions
Avaya Communication Manager is the application that provides call control and the Avaya telephony feature set. This application was referred to as MultiVantage Software or as Avaya Call Processing (ACP) in previous releases. The term Multivantage is still used in some CLI commands and in the Web interface. -
Page 23: Keys
System output and field names on the screen are in monospaced type Example: — The system displays the following message: The installation is in progress. — Type in the field. Message Transfer? Installation and Upgrades for G700 and S8300 December 2003... -
Page 24: Downloading This Book
Downloading this book Downloading this book You can view or download the latest version of the Installation and Upgrades for Avaya G700 Media Gateway and Avaya S8300 Media Server, 555-234-100, from the Avaya Web site at: http://support.avaya.com. You must have access to the Internet, and a copy of Acrobat Reader must be installed on your personal computer. -
Page 25: Related Resources
Related resources For a summary of what is new in the December 2003 release of Avaya Communication Manager, see Highlights of Avaya Communication Manager, 555-245-704. For more information on the Avaya G700 Media Gateway and related features, see the following books:... -
Page 26: International
• Fax, send your comments to: 1-303-538-1741 Ensure that you mention the name and number of this book, Installation and Upgrades for Avaya G700 Media Gateway and Avaya S8300, 555-234-100. Installation and Upgrades for G700 and S8300 December 2003... -
Page 27: Roadmap And Reference
• Wizards for Installations and Upgrades • Installation Roadmap and Task Lists • Connection and Login Methods • Navigational Aid for CLI Commands • Terminal Emulation Function Keys for Communication Manager Installation and Upgrades for G700 and S8300 December 2003... -
Page 28: Wizards For Installations And Upgrades
Roadmap and Reference Wizards for Installations and Upgrades Wizards for Installations and Upgrades To save time on installations and upgrades, three distinct tools are available for your use — the Avaya Installation Wizard, the Gateway Installation Wizard, and the Upgrade Tool. NOTE: These tools do not replace all normal installation or upgrade procedures described in this document. - Page 29 This wizard configures the IP addresses for the gateway, including the gateway processors, the controller list, and the VoIP engine. The GIW does not install firmware on the G350 or G700 or their media modules. You can install firmware manually, or use the UT.
-
Page 30: The Avaya Installation Wizard (Iw)
Wizards for Installations and Upgrades The Avaya Installation Wizard (IW) You can use the Avaya Installation Wizard (IW) as a tool to assist you in the installation and upgrade processes for S8300, S8500, and S8700 Media Servers and G350 and G700 Media Gateways. The Installation Wizard is designed to get you up and running in a basic installation as quickly as possible. -
Page 31: Electronic Worksheets And Templates
For greatest efficiency, obtain the Electronic Pre-Installation Worksheet (EPW), which is filled in by the customer and Avaya project manager. This worksheet is an Excel spreadsheet from which IW automatically pulls data to configure and install the S8300/S8500/S8700 Media Servers, G350/G700 Media Gateways, P330 Stack Processor, and VoiP Engines. -
Page 32: The Upgrade Tool
• Install a new LSP or G350 or G700 Media Gateway. For each new installation, you must be on site and use the Avaya Installation Wizard (for an LSP), the Avaya Gateway Installation Wizard (for a media gateway), or perform a manual installation. -
Page 33: The Avaya Gateway Installation Wizard
P330 and MG CLI commands to configure the media gateway. Use the GIW to configure a new G700 Media Gateway that is controlled by a remote S8300, S8500, or S8700 Media Server and does not have an S8300 LSP. -
Page 34: Installation Roadmap And Task Lists
Installation Roadmap and Task Lists From your planning sheets, you can determine what type of installation or upgrade is involved with the G700 Media Gateway. Use the following table to determine which task list is most appropriate for your upgrade or installation. -
Page 35: Checklist 1: Install A New G700
The G700 has an S8300 Media Server configured as the primary controller, or, • The G700 has an S8300 Media Server configured as an LSP and is controlled by an S8300, S8500, or an S8700 Media Server. You will use Chapters 2 and 3 with this checklist. - Page 36 Roadmap and Reference Installation Roadmap and Task Lists Table 1: Install New G700 with an S8300 (Primary or LSP) Continued Major Tasks Subtasks Configure the S8300 on page 123 - Backup data - Set server indentities - Configure Ethernet interfaces...
- Page 37 Roadmap and Reference Installation Roadmap and Task Lists Table 1: Install New G700 with an S8300 (Primary or LSP) Continued Major Tasks Subtasks Complete the Installation of S8300 (if - Register the system the Primary Controller) on page 168 - Back up the system...
-
Page 38: Install A New G700 Without An S8300
Use the following checklist to install a G700 Media Gateway with the following characteristics: • The G700 does not have an S8300 and is controlled by an external S8300, S8500, or S8700 Media Server. You will use Chapters 2 and 4 with this checklist. - Page 39 Roadmap and Reference Installation Roadmap and Task Lists Table 2: Install a New G700 without an S8300 Continued Major Task Subtasks Administer Communication Manager - Reboot the system on page 198 - Assign node names, if necessary - Administer network regions...
-
Page 40: Upgrade An Existing G700 With An S8300 (R1.X To R2.0)
The G700 has an S8300 Media Server configured as an LSP and is controlled by either an S8300, S8500, or S8700 Media Server. You will use Chapter 5 with this checklist. For help with connecting to and logging in to the G700 or S8300, see Connection Methods in this chapter. - Page 41 Roadmap and Reference Installation Roadmap and Task Lists Table 3: Task List to Upgrade an Existing G700 with an S8300 (R1.x to R2.0) Continued Major Tasks Subtasks Upgrade the S8300 on page 227 Install the Upgrade Software: - Copy RP files to hard drive...
-
Page 42: Upgrade An Existing G700 With An S8300 (R2.0 To R2.X)
The G700 has an S8300 Media Server configured as an LSP and is controlled by either an S8300, S8500, or S8700 Media Server. You will use Chapter 6 with this checklist. For help with connecting to and logging in to the G700 or S8300, see Connection Methods in this chapter. - Page 43 Roadmap and Reference Installation Roadmap and Task Lists Table 4: Task List to Upgrade an Existing G700 with an S8300 (R2.0 to R2.x) Continued Major Tasks Subtasks Upgrade the Firmware on the G700 - Decide whether to use the Installation Wizard...
-
Page 44: Checklist 5
The G700 does not have an S8300 and is controlled by an external S8300, S8500, or S8700 Media Server. You will use Chapter 7 with this checklist. For help with connecting to and logging in to the G700, see Connection Methods in this chapter. -
Page 45: Connection And Login Methods
Server and the Avaya™ G700 Media Gateway. Use this chapter as a reference for the other chapters in this book. The procedures in this book assume that you are connecting to the S8300 and/or the G700 with an Avaya Services laptop. However, the methods apply for any type of PC. -
Page 46: Connection Overview
If you are installing or upgrading a G700 that does not have an internal S8300, check for the location of the ethernet ports (EXT 1 / EXT 2). You will need to connect the G700 to the customer’s LAN via one of these ports for loading the latest software. -
Page 47: Laptop Configuration For A Direct Connection To The Services Port
The S8300 Media Server uses the same access configuration as an Avaya S8100 Media Server with a CMC1 or G600 Media Gateway. If you already have a NetSwitcher profile for the S8100 Media Server (formerly called DEFINITY One), try using that profile first before configuring a new one. - Page 48 Access your computer's network information. On your desktop: — Windows 95, 98, and NT: Right-click Network Neighborhood — Windows ME: Right-click My Network Places Select to display the Network dialog box. Properties Installation and Upgrades for G700 and S8300 December 2003...
- Page 49 Clear the checkbox for Enable DNS for WINS Resolution Click OK twice to accept the address information and close the Network dialog box. Reboot the system if directed to do so. Installation and Upgrades for G700 and S8300 December 2003...
- Page 50 No Proxy for: versions of Netscape). If there are other entries in this box, add to the list of entries and separate entries with a ";". • Click OK to exit. Installation and Upgrades for G700 and S8300 December 2003...
-
Page 51: Connection Methods
192.11.13.6 Connect Laptop to the G700 Serial Port To configure a G700 that does not have an S8300, you may need to set up a direct connection from your laptop’s serial port to the G700 Console (serial) port. To connect a laptop directly to the serial port on the G700 Media Gateway: For a stacked configuration, locate the device that contains the master controller for the stack. -
Page 52: Connect Laptop To Customer Lan
G700: — Attach one end of the RS-232 cable to the RJ-45 jack on the front of the G700 that is the stack master. The serial port is on the lower right side of the chassis, labeled Console. -
Page 53: Set Up Windows For Modem Connection To The Media Server (Windows 2000 Or Xp)
The modem is now ready to receive calls. Set up Windows for Modem Connection to the Media Server (Windows 2000 or XP) NOTE: The remote dial-up PC must be configured for PPP access. Also, Avaya Terminal Emulator does not support Windows XP. Right-click and click... -
Page 54: Use Windows For Ppp Modem Connection (Windows 2000 Or Xp)
Use Avaya Terminal Emulator for LAN Connection to Communication Manager You can download the Avaya Terminal Emulator from the Integrated Management main menu. Simply click Download next to the Administration menu item and follow the instructions. Once the Terminal Emulator is installed on your PC, use the following steps to establish a LAN connection to your Media Server. -
Page 55: Use Avaya Terminal Emulator For Modem Connection To Communication Manager
Use Avaya Terminal Emulator for Modem Connection to Communication Manager You can download the Avaya Terminal Emulator from the main menu for Integrated Management. Simply click Download next to the Administration menu item and follow the instructions. Once the Terminal Emulator is installed on your PC, use the following steps to establish a LAN connection to your Media Server. -
Page 56: Log In Methods
LAN and you would use the LAN IP address of the S8300 instead of 192.11.13.6. The last procedure in this section describes logging in to the P330 stack processor when you have a direct serial connection to the G700 Console port. Installation and Upgrades for G700 and S8300... -
Page 57: Log In To The Media Server From Your Laptop Using Telnet
IP address of the media server on the customer LAN) and press Enter If your browser does not have a valid security certificate, you will see a warning screen and instructions to load the security certificate. Installation and Upgrades for G700 and S8300 December 2003... - Page 58 Roadmap and Reference Connection and Login Methods The system displays the Welcome screen. Installation and Upgrades for G700 and S8300 December 2003...
- Page 59 Click the Continue button. Accept the Client Authentication and Security Certificate to access the Login screen. The system displays the Login screen. Log in as craft Select for Suppress Alarm Origination. Installation and Upgrades for G700 and S8300 December 2003...
- Page 60 The system displays the main menu for the Integrated Management Suite. Click on the link for Launch Maintenance Web Interface The system displays the S8300 main menu in the left panel and a usage-agreement notice in the right window. Installation and Upgrades for G700 and S8300 December 2003...
- Page 61 S8300 Main Menu Check the top of the left panel. — The Avaya media server you are logged into is identified by name and server number. — The S8300 media server number is always 1. Installation and Upgrades for G700 and S8300...
-
Page 62: Open The Replace Variable W/ Productname Sat Screens
Direct Connection to the Services Port NOTE: If you are upgrading an S8300/G700 remotely, connect to the customer LAN and telnet to the IP address of the P330 stack master (that is, the P330 stack processor running as the stack master). The IP address is the address assigned on the customer LAN, not 192.11.13.6. -
Page 63: Log In To The P330 Stack Processor With A Lan Connection
For a complete list of command line interface commands, type help or refer to the "Avaya P330 User’s Guide" (available at www.avaya.com/support). -
Page 64: Log In To The P330 Stack Processor With Device Manager
Configure Avaya Site Administration When Avaya Site Administration is initially installed on a client machine, it needs to be configured to communicate with Communication Manager on the S8300 Media Server. When it runs initially, after downloading, you need to create a new entry for the switch connection. To... -
Page 65: Installation And Upgrades For G700 And S8300 December
Data Import. For more information refer to the Online Help, Guided Tour, and Show Me accessed from the Avaya Site Administration Help menu. To use Avaya Site Administration, open the application and select the switch (media server) you want to access. When prompted, log in. -
Page 66: Navigational Aid For Cli Commands
P330-y(super)# <MG-xxx>-y(super)# is the media gateway number where xxx assigned on the "add media-gateway" form, is the "module number" of the G700 in the stack. configure change to configuration P330-1(configure)# mode <MG-001>-1(configure)# open a CLI session on the session <module #>... -
Page 67: Terminal Emulation Function Keys For Communication Manager
(alpha O) V Next Page (alpha O) W Previous Page The following table lists key presses for terminal emulation. w2ktt Function Key Sequence Function Cancel Execute Help Next Page Previous Page Installation and Upgrades for G700 and S8300 December 2003... - Page 68 Roadmap and Reference Terminal Emulation Function Keys for Communication Manager Installation and Upgrades for G700 and S8300 December 2003...
-
Page 69: Installing Hardware For The G700 Media Gateway And S8300 Media Server
G700 Media Gateway and S8300 Media Server The Avaya G700 Media Gateway is part of a family of components that provides data, voice, fax, and messaging services over an IP network. Its standards-based IP communications infrastructure allows high reliability of critical applications and multi-service networking with feature transparency. The G700 can be controlled by an Avaya S8300, S8500, S8700 Media Server running Avaya Communication Manager. -
Page 70: Getting Started
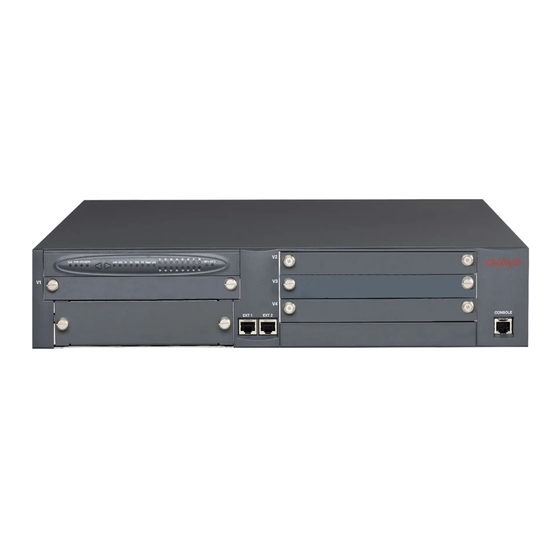
Server. G700 Media Gateway The main elements of a G700 Media Gateway are: (1) the G700 chassis and processors, (2) the media modules, and (3) the Avaya Data Expansion Modules. Figure 1: G700 Media Gateway with an S8300 Media Server: Front View... -
Page 71: Media Modules
10/100 base T port, power (+5V, -48 V phantom) and ground. Each media module can be accessed and reset from the G700 Media Gateway Processor (MGP) or from the primary controller, and its status is indicated by an LED display. -
Page 72: Data Expansion Modules
Data Expansion Modules The G700 Media Gateway can accommodate any of the Avaya ™ Data Expansion Modules. With expansion modules, customers can add additional LAN and WAN access modules directly to the G700. Figure 3: Expansion Module (example) X330W-4DS1 CONSOLE... -
Page 73: S8300 Led Indicators
Each G700 is associated with a primary call controller. The primary controller may be an S8300, S8500, or S87 00 Media Server. The S8300 is on a circuit pack that is always installed in slot V1 of a G700. The S8500 or S8700 is housed in a separate box that connects to the G700 over a network through a C-LAN circuit pack. -
Page 74: S8300 Media Server
Communication Manager). S8500 Media Server The G700 Media Gateway can be controlled by an external S8500 Media Server. The S8500 is connected to the G700 over the network through a C-LAN circuit pack in the G600, SCC1, or MCC1. Installation and Upgrades for G700 and S8300... -
Page 75: S8700 Media Server
G700 over the network through a C-LAN circuit pack in the G600, SCC1, or MCC1. Information on installing the G700 using the S8500 or S8700 as the primary controller can be found in Chapters 4 and 6 in this book. -
Page 76: Use The Planning Documentation
RFA (or go directly to: http://rfa.avaya.com). • Associates should point their browsers to the Avaya Associate portal (or go directly to: http://rfa.avaya.com). • Contractors should point their browsers to Avaya.com (or go directly to: http://rfa.avaya.com). -
Page 77: Network Integration
Installing Hardware for the G700 Media Gateway and S8300 Media Server Getting Started Network Integration Integration into the customer’s network will require coordination with the network manager and the planning and implementation personnel. They will ascertain the customer’s need for DHCP service and the intended network configuration and applications. -
Page 78: Installation And Cabling
Media Gateways and Avaya P330 family devices. Up to ten G700 Media Gateways and/or Avaya P330s devices can be combined in a single stack. The G700s can be controlled by an Avaya S8300, S8500, or S8700 Media Server. -
Page 79: Power Verification
In these cases, access to the G700 Media Gateway is gained by the use of a tool (such as a lock and key) or other means of security. -
Page 80: Install The G700 Media Gateway
Installing Hardware for the G700 Media Gateway and S8300 Media Server Installation and Cabling Install the G700 Media Gateway After you have verified the site conditions and the shipment, you will proceed with the installation of the hardware. Figure 5: Avaya G700 Media Gateways... -
Page 81: Prepare The G700 Media Gateway
Tighten with the screwdriver. Repeat on the other side. If the G700 is to be a table-top unit, four feet must be attached to the bottom of the unit. The procedure to do this is the following: Affix Feet on the Table-Top G700 Use this procedure only if the G700 will be installed as a table-top unit (not in a data rack). - Page 82 If the G700 is being mounted in a rack with other equipment already installed, the G700 must be positioned to avoid imbalance. • The G700 is shipped with 3 sets of four mounting screws. Choose the set of screws that match the screw holes in the rack being used. •...
-
Page 83: Insert The Avaya S8300 Media Server (If Necessary For Standalone Service Or Lsp)
90); these may be G700s or Avaya P330 family switches. At this point, you have mounted the G700 chassis in the rack and are ready to insert S8300 Media Servers and media modules as required in the planning documentation. - Page 84 Installing Hardware for the G700 Media Gateway and S8300 Media Server Installation and Cabling Figure 8: Insert S8300 Align the LED module in its guides and gently push it into place, keeping the LED module safely within its guides and maintaining an even pressure to assure that the module does not become twisted or disengage from the guides.
-
Page 85: Insert The Media Modules
Following the planning documentation, you can insert the required media modules into their designated bays. The G700 Media Gateway can accommodate up to four media modules, or plug-in circuit packs. The choice of media modules is dictated by the offer selected by the customer and the configuration of the system. - Page 86 Complete the Telephone Installation Process page 331). At this point, you have readied the G700 inserted the S8300 if required, and inserted the media modules, as described in the planning documentation. Next, if required, the Expansion Module should be inserted into its bay.
-
Page 87: Insert An Expansion Module
The Expansion Modules provide increased networking and connectivity capabilities. These modules may be mounted on the G700 Media Gateway in the slot on the lower left side of the unit below slot V1 (see G700 Media Gateway with an S8300 Media Server: Front View on page 70). -
Page 88: Insert An Avaya X330Stk Stacking Module
G700 Media Gateways can be mounted in equipment stacks with routers, switches, or other G700s. The stack is limited to ten elements. To link multiple units, each G700 must be equipped with an Avaya X330STK Stacking Module, which is mounted through the rear panel (back view) of the G700. -
Page 89: Cable Multiple Units
Guide for installation and cabling information. To link multiple units, each G700 Media Gateway must be equipped with an Avaya X330STK Stacking Module on the rear panel. Then, each unit in the stack is linked to the one above it. Finally, the bottom unit is linked to the top unit. Stacks should always be built from the bottom, and new units should be added at the top. - Page 90 “to upper unit” on the top element of the stack. If you have elements of a stack in two racks, you must use the Avaya X330LC cable to connect them. You may not link more than 10 units to form a stack, but those units can be mounted in more than one rack.
- Page 91 Connect the Avaya X330LC cable (dark grey connector) to the port on first unit of the stack marked “to the lower unit.” Connect the Avaya X330LC cable (light grey connector) to the port on the last unit in the stack marked “to the upper unit.”...
-
Page 92: Attach Ground Conductors
The customer must select a location for the G700 Media Gateway installation that is no more than 50 feet (15 m) from an approved ground. If this location requirement is not met, the customer must contact a licensed electrician to install a Supplementary Ground Conductor per Article 250 of the National Electrical Code (NEC). -
Page 93: Approved Grounds
Service Personnel or Customers who have been instructed about the reasons for the restricted access and any safety precautions that must be taken. In these cases, access to the G700 Media Gateway is gained by the use of a tool (such as a lock and key) or other means of security. -
Page 94: Connect The Safety Ground
If the ground block has been purchased: The ground block is provided for use with more than one G700 (or other Cajun devices) in the rack. It is usually mounted by the customer electrician. Installation and Upgrades for G700 and S8300... -
Page 95: Connect Ac Power
Power Requirements The G700 Media Gateway uses an auto-ranging 100-240 Vac power supply, 50 to 60 Hz, 5 A maximum at 100-120 Vac and 2 A maximum at 200-240 Vac. The AC power source is to be single phase, 3- conductor (Line, Neutral and Ground) with a 15 A circuit breaker for 100-120 Vac or a 10 A circuit breaker for 200-240 Vac. - Page 96 Installing Hardware for the G700 Media Gateway and S8300 Media Server Installation and Cabling Fault Conditions If the AC outlet tests that follow reveal any of the following conditions, they must be corrected BEFORE the system is to be installed.
-
Page 97: Plug In Ac Power
Server, and the G700 Media Gateway will flash at power-up. Each element will conduct a series of self-tests. The LEDs on the G700 LED panel will flash, and the red ALM LED will light up until the self- tests on the G700 Media Gateway have completed. -
Page 98: Check And Connect Dc Power
Perform this check procedure only if you are installing a G700 that is using the DC input-power option rather than AC input-power. Before you connect the G700 media gateway DC feed cable to the DC power source, check the DC power source using a KS-20599 digital voltmeter (or equivalent). To check DC power: Verify that the meter reads between -41Vdc and -56 Vdc across the -48Vdc and -48V Return distribution leads from the DC source. - Page 99 Main AC Green/Yellow 10 AWG supply 10 AWG Green/Yellow (AC mains) Green/Yellow 10 AWG 6 AWG cydf_dc2 LAO 072403 You have now completed the initial installation of the G700 Media Gateway. Installation and Upgrades for G700 and S8300 December 2003...
- Page 100 Installing Hardware for the G700 Media Gateway and S8300 Media Server Installation and Cabling Installation and Upgrades for G700 and S8300 December 2003...
-
Page 101: Installing A New G700 With An S8300
Installing a New G700 with an S8300 This chapter covers the procedures to install a new Avaya G700 Media Gateway with an Avaya S8300 Media Server. The S8300 can be configured as either the primary controller or as a local survivable processor (LSP). -
Page 102: Installation Overview
Installation Overview G700 components A P330 stack processor is built into the G700 Media Gateway. (This processor is also known as the Layer 2 switching processor). The G700 also contains an MGP processor, a VoIP processor, and media modules. Updating the firmware for one or more of these processors and/or media modules is a required part of most S8300 software upgrades. - Page 103 For LAN connections the TFTP server can be your laptop or a customer computer on the LAN. See "Connection and Login Methods" in Chapter 1 for details on how to connect and log into the G700. Installation and Upgrades for G700 and S8300...
-
Page 104: Before Going To The Customer Site
(for example, adding BRI trunks), or if the upgrade is between major releases (for example, 1.3 to 2.0), you will need the serial number of the G700. To get this number, ask the customer’s administrator to log in to the S8300 web page and select... -
Page 105: License File And Communication Manager Versions For A Local Survivable Processor
Communication Manager from any login is blocked unless a valid authentication file is present on the S8300 media server. A new license file and the Avaya authentication file may be installed independently of each other or any other server upgrades. -
Page 106: Run The Automatic Registration Tool (Art)
If one or more updates are required for this installation or upgrade procedure, and the update file is not on your software CD, download the update file from the Avaya Support web site to your laptop: On your laptop, create a directory to store the file (for example, c:\S8300download). - Page 107 Installing a New G700 with an S8300 Before Going to the Customer Site At the Avaya support site, select the following sequence of links: — Software & Firmware Downloads — G700 Media Gateway & S8300 Media Server — Software Downloads —...
-
Page 108: On-Site Preparation For The Installation
For new installations, you typically need to load a licences file. NOTE: If the S8300 is already set up for remote access, Avaya services personnel can copy new license and authentication files directly into the FTP directory on the server. Avaya personnel will notify you when the new files are in place as agreed (for example, by telephone or E-mail). - Page 109 Installing a New G700 with an S8300 On-Site Preparation for the Installation Download Files Screen Select "Files to download from the machine I’m using to connect to the server" and click Browse for the first field. The S8300 displays the Choose File screen, which allows you to select files from your laptop.
-
Page 110: If Necessary, Install License And Authentication Files
Installing a New G700 with an S8300 On-Site Preparation for the Installation When you have selected the .pwd file, click Open in the dialog box. When you have finished entering the files to be uploaded, click Load File When the files are successfully transferred, the system displays the status screen. -
Page 111: Run Save Translations
Installing a New G700 with an S8300 On-Site Preparation for the Installation Install Authentication Screen Select "Install the Authentication file I previously downloades" and click Install The system tells you the authentication is installed successfully Run Save Translations (Only If New License and/or Authentication... -
Page 112: Download Files Screen
Manager has a .tar.gz extension and a file name that reflects the most recent load of software (for example, 03.0.110.4-4925.tar.gz). This .tar file will also contain the most recent firmware for the G700 Media Gateway, the various media modules, and the P330 stack processor. - Page 113 Installing a New G700 with an S8300 On-Site Preparation for the Installation When the files are successfully transferred, the system displays the Download Files Results screen with the following message: "The following files have been successfully uploaded to the server."...
-
Page 114: Install New Software On The S8300
Installing a New G700 with an S8300 Install New Software on the S8300 Install New Software on the S8300 Although this is a new installation and a version of Communication Manager already exists on the S8300, there may be new software loads available that you need to install. If necessary, follow the steps in this section to install the most recent version of Communication Manager. - Page 115 Installing a New G700 with an S8300 Install New Software on the S8300 Choose Software Screen On the Choose Software screen, select the software release number that you want to install (for example, the release listed in your planning documentation). Click Continue The S8300 displays the Choose License Source screen.
- Page 116 Installing a New G700 with an S8300 Install New Software on the S8300 Choose License Source Screen If you have installed the license and authentication files, select the following: — I want to reuse the license files from the currently active partition on this server.
- Page 117 Installing a New G700 with an S8300 Install New Software on the S8300 Review Notices Screen For a new installation, or if you previously ran a backup, you do not need to run a backup at this time. If your planning documents instruct you to enable Tripwire, follow the instructions to reset the signature database.
- Page 118 Installing a New G700 with an S8300 Install New Software on the S8300 Begin Installation Screen At the Begin Installation screen, click Continue The S8300 displays the Install in Progress screen. Install in Progress Screen Installation and Upgrades for G700 and S8300...
- Page 119 Installing a New G700 with an S8300 Install New Software on the S8300 The installation will take approximately 10 to 20 minutes. The Install in Progress screen refreshes every 10 seconds or on demand by clicking the button. When complete, the S8300 Refresh displays the Reboot Server screen.
- Page 120 Installing a New G700 with an S8300 Install New Software on the S8300 Wait 5 minutes (or about 20 minutes if running IA770) and then click Continue. If you click Continue before the reboot is finished, the screen will display "Expired Page." If you see the Expired Page message, refresh the browser.
- Page 121 Installing a New G700 with an S8300 Install New Software on the S8300 Installation Complete Screen Click . You are returned to the main menu. Close Under Server, click Software Version to verify the new software version. Make the Upgrade Permanent...
- Page 122 If IA770 is being used, a post-upgrade update (patch) for IA770 may be required. See the IA770 documentation for procedures to install an update. The documentation can be found on the Avaya Support Web Site at http://support.avaya.com. Then click on Product Documentation and then Messaging and scroll down to the INTUITY document links.
-
Page 123: Configure The S8300
Installing a New G700 with an S8300 Install New Software on the S8300 Configure the S8300 CAUTION: For a new installation, be sure you have set the time and timezone before proceeding. Failure to do so may cause network problems later. -
Page 124: Select Method Screen
Configure all services using the wizard through the screens to configure all of the IP services. NOTE: This option is for the built-in configuration wizard, not the Avaya Installation Wizard (IW). If you are upgrading an existing system, you may also click Configure individual services . -
Page 125: Set Server Identities Screen
The host name uniquely identifies this server. CAUTION: If the S8300 on the G700 is hosting an IA 770 INTUITY AUDIX Messaging Application with Digital Networking, the name must be 10 characters or less. The screen also lists the current physical cabling to the server. For example, the Services laptop is connected to Ethernet interface 0. -
Page 126: Configure Ethernet Interfaces Screen
Installing a New G700 with an S8300 Install New Software on the S8300 Configure Ethernet Interfaces Screen Use your planning forms to complete the fields for the: — assigned to the S8300 Media Server. Check your planning forms. IP Address —... -
Page 127: Configure Local Survivable Processor Screen
Installing a New G700 with an S8300 Install New Software on the S8300 Configure Local Survivable Processor Screen Select one of the following options: — This is NOT a local survivable processor. — This is a local survivable processor (LSP) with an S8700 media server as the primary controller. -
Page 128: Ethernet Adjuncts Screen
S8500 or S8700. For information on how to upgrade the firmware on the S8500 or S8700, please see the section "Upgrade Firmware in Selected Port Cabinet Packs" in Upgrading the Avaya Media Server Configuration in the S8700 documentation portion of this documentation CD (‘‘ Avaya S8300, S8500, and S8700 Media Server Library CD, 555-233-825 ’’) . -
Page 129: External Dns Server Configuration Screen
Installing a New G700 with an S8300 Install New Software on the S8300 Most corporate networks have one or more domain name service (DNS) servers that associate an IP address with a device’s name. When the DNS is administered with the S8300 Media Server name, you will be able to access the S8300 server by name as well as IP address over the corporate network. -
Page 130: Set Network Routes Screen
Installing a New G700 with an S8300 Install New Software on the S8300 Static Network Routes screen appears. Static Network Routes are used only if the customer has defined additional routes for IP packets other than through the default gateway. -
Page 131: Network Time Server Screen
Installing a New G700 with an S8300 Install New Software on the S8300 Network Time Server Screen You will be able to make the following choices, according to the planning documentation: — Choose Disable NTP if the user does not want the Network Time Protocol to run on the S8300 Media Server. - Page 132 Installing a New G700 with an S8300 Install New Software on the S8300 — Choose Use these Network Time Servers to enter up to three time servers. Select this option to enable NTP and be synchronized with an external time source on the corporate network.
-
Page 133: Set Modem Interface Screen
Install New Software on the S8300 Set Modem Interface Screen The Modem IP Address for the Avaya INADS alarming is assigned by the ART tool. You should have obtained this address when you performed Run the Automatic Registration Tool (ART) for the INADS IP Address, if Necessary on page 106. -
Page 134: Updating System Files Screen
Updating System Files Screen When the process is complete, you will receive a notification. Click Close Window and continue the configuration of the G700 Media Gateway on the command line interface. Installation and Upgrades for G700 and S8300 December 2003... -
Page 135: Provide The Keys.install File (If Necessary)
Installing a New G700 with an S8300 Install New Software on the S8300 Provide the keys.install File (If Necessary) Use this procedure only if you selected one of the customer-provided keys options in the previous procedure. If encryption between the NTS and S8300 Media Server is to be used for additional security, you must provide a keys.install file that specifies for each key:... - Page 136 Installing a New G700 with an S8300 Install New Software on the S8300 When finished, click on the Configure Server wizard window to continue. After NTP is enabled, time changes greater than 15 minutes will disrupt the synchronization with the NTS and NTP will shut down. You need to set the server’s clock now so that synchronization can take place.
-
Page 137: Configure The G700 Media Gateway
The Gateway Installation Wizard (GIW) performs this task automatically. This section describes how to assign the IP addresses and IP routes to the G700 Media Gateway and its components. The IP addresses should be available to you on the IP Addressing Planning Form. The... - Page 138 Select at the dialog box that asks if you want to continue. All LEDs will flash. As the unit powers up, self-tests will be run. When the G700 mpg or P330 stack processor has reset, login again to continue. Login at the Welcome to P330 menu.
- Page 139 Write the serial number on your planning document. Make sure it matches the serial number sticker on the back of the G700 Media Gateway chassis. If there is a difference, the serial number in the displayed list is correct.You will need this later.
-
Page 140: Check For Ip Connections
The prompt will change to P330-1(configure)# The G700 Media Gateway processor will reset. The LEDs on the G700 Media Gateway and the Media Modules will flash. These elements will each conduct a series of self-tests. When the LEDs on the Media Modules are extinguished and the active status LEDs on the G700 Media Gateway are on, the reset is complete. -
Page 141: Set Up The Controller List For The G700 Media Gateway
The Avaya Gateway Installation Wizard (GIW) performs this task automatically. To complete the configuration of the G700 Media Gateway, you need to administer a list of primary and alternate controllers. This list begins with the IP address of the primary controller. In the event that the G700 Media Gateway loses contact with its primary controller, it will seek to re-register with the primary controller first, then with the other controllers on this list. - Page 142 <ip_address> [,<ip_address> [,<ip_address> [,<ip_address>]]] where, the first <ip_address> is the IP address of the primary controller for this G700. If the primary controller is an S8700, this is the IP address of a C-LAN board that is connected to a pair of duplicated S8700s.
-
Page 143: Set The Lsp Transition Points
(for example, additional CLAN connections) with which to register. After this search time has elapsed, the G700 will search for an LSP with which to register. You must also set the total time the G700 searches for either a primary controller and an LSP, after which the G700 resets. And finally, you must define how many primary controllers, from 1 to 4, are in the controller list you just defined. -
Page 144: Configure An X330 Expansion Module (If Necessary)
NOTE: You cannot use the IW to perform this task. See the Avaya X330W-2DS1 Access Router Module Quick Start Guide. This document is available at the Avaya Support website: Support > Technical Database > LAN, Backbone, and Edge Access Switches > P330 Stackable Switching System >... -
Page 145: Install New Firmware On The G700
Installing a New G700 with an S8300 Install New Firmware on the G700 Install New Firmware on the G700 This section describes the procedures to install firmware on the G700 Media Gateway processors and media modules. Verify the Contents of the tftpboot Directory Before proceeding with the G700 firmware installation, you should check the tftpboot directory on the TFTP server to make sure the firmware versions match those listed in the planning documentation. -
Page 146: Install New Firmware On The P330 Stack Processor
MM711 MM710 Refer to the list to check the FW vintage number of the G700. In the TYPE column, find G700, then check the matching field in the FW VINTAGE column to see if it matches the vintage number in your planning forms. If not, you must install new firmware on the G700 Media Gateway. -
Page 147: Install New Firmware On The G700 Media Gateway Processor
At the MG-???-1(configure)# prompt, type copy tftp mgp-image <bank> <filename> <tftp_server_ip_address> to transfer the mgp image from the tftp server to the G700, where <bank> is the bank that is not Active Now (Bank A in the example). Installation and Upgrades for G700 and S8300... -
Page 148: Install New Firmware On The Media Modules
The G700 Media Gateway processor will reset. The LEDs on the G700 Media Gateway and the Media Modules will flash. These elements will each conduct a series of self-tests. When the LEDs on the Media Modules are extinguished and the active status LEDs on the G700 Media Gateway are on, the reset is complete. - Page 149 Check the VOIP FW column and row for slot v0 to see if the number matches the VoIP firmware identified in the planning documentation. Type where <module #> is the number of the G700 in the stack. reset <module #> When the reset is finished, type show mm to verify the upgrade.
- Page 150 Installing a New G700 with an S8300 Install New Firmware on the G700 NOTE: If you see the response, Board Not Inserted, this means that the media module is still rebooting. Wait one minute and repeat the release board command.
-
Page 151: Administer Communication Manager
This administration applies only to an S8300 that serves as the primary controller for the target G700. The S8300 primary controller can be in the target G700 or in another, possibly remote, G700. If the S8300 is an LSP, do not administer Communication Manager on it. -
Page 152: Administer Network Regions
E NT ER Administer Network Regions Before assigning an IP network region to a G700, you must define network region on the IP Network Region form. After a network region is defined, you can assign it to the various network elements (servers, gateways, IP phones). -
Page 153: Associate Lsps With Network Regions
Installing a New G700 with an S8300 Administer Communication Manager IP Network Region Screen change ip-network-region 1 Page 1 of IP NETWORK REGION Region: 1 Location: Home Domain: Name: Intra-region IP-IP Direct Audio: yes AUDIO PARAMETERS Inter-region IP-IP Direct Audio: yes... -
Page 154: Administer Ip Interfaces
Installing a New G700 with an S8300 Administer Communication Manager Enter the names of up to six LSPs to be associated with region 1. The LSP names must be the same as administered on the Node Names form. Submit the form. -
Page 155: The Primary Controller Is An S8500 Or S8700 (The S8300 Is An Lsp)
Some of the procedures in this section should have been completed previously as part of a normal S8500 or S8700 installation. This document covers only the administration of Communication Manager required for the G700 Media Gateway to communicate with the primary controller over a customer’s network. For the majority of required administration, see ‘‘Administrator’s Guide to Avaya Communication Manager, 555-233-506,’’... -
Page 156: Assign Node Names And Ip Addresses For The C-Lans And Lsps
For a G700 with an S8300 LSP and an S8500 or S8700 as the primary controller, there may be more than one network region, since there can be up to 250 G700 Media Gateways connected to the S8500 or S8700 with thousands of telephones in the network. - Page 157 It is strongly recommended to use the defaults in the screen. If the network region of the G700 (1 in this example) is different from that of the S8500 or S8700 CLAN board(s), you must interconnect the two regions. Press...
-
Page 158: Assign Lsps To The Network Regions
Type the number for the type of codec set (1–7) that the S8500 or S8700 will use to interconnect the G700 and the C-LAN board(s) in the row corresponding to the region of the C-LAN. In this example, the C-LAN is in region 9 and codec-set type 3 is to be used for the interconnection between region 1 and region 9. -
Page 159: Administer Ip Interfaces
Installing a New G700 with an S8300 Administer Communication Manager Enter the names of up to six LSPs to be assigned to region 1. The LSP names must be the same as administered on the Node Names form. Submit the form. -
Page 160: Administer The Lsp Form
Installing a New G700 with an S8300 Administer Communication Manager Field Conditions/Comments Enable Ethernet The Ethernet port must be enabled (y) before it can be used. The port Port? must be disabled (n) before changes can be made to its attributes on this screen. -
Page 161: Administer The Media Gateway
Module Type Name Complete the Name field with the hostname assigned to the G700 Media Gateway. Complete the Identifier field with the serial number of the G700 Media Gateway. You can obtain the serial number by typing the show system command at the MGP command line. - Page 162 If the G700 fails to register, two common causes might be: — The serial number added as the identifier for the G700 is wrong. To check, log back into the G700 gateway and type show system. Check the serial number that appears.
- Page 163 Only if specifically requested by the customer or your planning documents, at the SAT prompt, type enable announcement-board <gateway_number> V9, where <gateway_number> is the number of the G700 Media Gateway you just added and is the virtual slot (for example, means Media Gateway number 2, slot V9. Press to enable announcements.
-
Page 164: Considerations For Ip Phones Supported By A Local Survivable Processor
(sson) 176. Different DHCP servers allow for this administration in different ways, but the sson option must be mapped to 176. Then the option can be set up to send the information desired to the Avaya phones for the intended activity. -
Page 165: Transition Of Control From Primary Controller To Lsp
S8500 or S8700 and G700 has problems. If control passes to the LSP, the LSP’s license allows it to support the G700 endpoints for up to 10 days, within which the network problems should be resolved. -
Page 166: Set Up Snmp Alarming On The G700
Configuring the primary server to report alarms to a services support agency • Configuring the G700 Media Gateway to send its traps to a network management system (NMS), which can be the primary server (S8300, S8500, or S8700). The primary server may be an S8300, S8500, or S8700 Media Server. The media server supports two methods for reporting alarms. - Page 167 Configure the Destination for G700 SNMP Traps Events occurring on the G700 cause SNMP traps to be generated. The G700 MGP can be configured to send SNMP traps to any network management system (NMS) in the network, including the primary server (S8300, S8500, or S8700).
-
Page 168: Complete The Installation Of S8300 (If The Primary Controller)
Installing a New G700 with an S8300 Complete the Installation of S8300 (if the Primary Controller) Complete the Installation of S8300 (if the Primary Controller) Consult the planning documentation to obtain the necessary information to complete the installation. Part of the final process will be to: •... -
Page 169: Complete The Installation Process
Connect and administer test endpoints. • Test the endpoints. • Complete the electrical installation • Enable adjunct systems This completes the installation of the G700 Media Gateway with and S8300 Media Server. Installation and Upgrades for G700 and S8300 December 2003... - Page 170 Installing a New G700 with an S8300 Complete the Installation Process Installation and Upgrades for G700 and S8300 December 2003...
-
Page 171: Installing A New G700 Without An S8300
TFTP Server To install firmware on a G700 without an S8300 or LSP, you must first copy the firmware files to an external TFTP server on the customer LAN. The TFTP server can be a customer computer or it can be set up on your services laptop. -
Page 172: Initial Access To The G700
Before the P330 stack processor is configured with an IP address, the only way to access it is with a direct connection from your laptop to the Console port on the G700. With this connection, you can assign the IP addresses to the G700 processors, which can then be accessed over the customer LAN. - Page 173 For LAN connections the TFTP server can be your laptop or a customer computer on the LAN. See "Connection and Login Methods" in Chapter 1 for details on how to connect and log into the G700. Installation and Upgrades for G700 and S8300...
-
Page 174: Before Going To The Customer Site
(for example, adding BRI trunks), or if the upgrade is between major releases (for example, 1.3 to 2.0), you will need the serial number of the G700. To get this number, ask the customer’s administrator to log in to the S8300 web page and select... - Page 175 On the hard drive of your laptop or the customer’s PC, create a directory into which you will load the G700 software. It is recommended that you create a directory called C:\tftp. Connect to the LAN using a browser on your laptop or the customer’s PC and access http:// www.avaya.com/support on the Internet.
-
Page 176: Download G700 Firmware Files To Your Tftp Directory
Download G700 Firmware Files to Your TFTP Directory To install new firmware for the G700 processors and the media modules, you first need to move the new firmware files to a directory on the TFTP server. The installation program reads the new firmware files from this directory on the TFTP server. - Page 177 Installing a New G700 without an S8300 Before Going to the Customer Site Firmware File Formats Component Firmware Version Example Format P330 Stack Processor viisa<version id> viisa3_12_1.exe P330 Stack Processor p330<version id> p330Tweb.3.8.6.exe G700 Media Gateway mgp<version id> mgp_8_0.bin VoIP Media Module and mm760<version id>...
-
Page 178: Configure The G700
The Gateway Installation Wizard (GIW) performs this task automatically. This section describes how to assign the IP addresses and IP routes to the G700 Media Gateway and its components. The IP addresses should be available to you on the IP Addressing Planning Form. The... - Page 179 Select at the dialog box that asks if you want to continue. All LEDs will flash. As the unit powers up, self-tests will be run. When the G700 mpg or P330 stack processor has reset, login again to continue. Login at the Welcome to P330 menu.
- Page 180 Write the serial number on your planning document. Make sure it matches the serial number sticker on the back of the G700 Media Gateway chassis. If there is a difference, the serial number in the displayed list is correct.You will need this later.
-
Page 181: Check For Ip Connections
The prompt will change to P330-1(configure)# The G700 Media Gateway processor will reset. The LEDs on the G700 Media Gateway and the Media Modules will flash. These elements will each conduct a series of self-tests. When the LEDs on the Media Modules are extinguished and the active status LEDs on the G700 Media Gateway are on, the reset is complete. - Page 182 Check that the same number of packets transmitted were also received. Type ping voip v0 <IP_address>, where <IP_address> is the address of the G700, or any other functioning endpoint on the customer’s LAN. Ping results appear on the screen, similar to the following example.
-
Page 183: Assign The Ip Addresses Of The G700 Media Gateway Components
The Avaya Gateway Installation Wizard (GIW) performs this task automatically. This section describes how to assign the IP addresses and IP routes to the G700 Media Gateway and its components. The IP addresses should be available to you on the IP Addressing Planning Form. The... - Page 184 Write the serial number on your planning document. Make sure it matches the serial number sticker on the back of the G700 Media Gateway chassis. If there is a difference, the serial number in the displayed list is correct.You will need this later.
- Page 185 Assign the IP Address to the G700 Media Gateway Processor If, after you have assigned an IP address to the G700 processor, you telnet directly to the G700 Media Gateway processor, you will need to login, and the login name and password will be provided in the planning documentation.
-
Page 186: Check For Ip Connections
Assign IP Addresses to the VoIP Resources From the G700 Media Gateway Processor command line interface, you will assign IP addresses to the VoIP resource resident on the G700 Media Gateway and to any installed MM760 VoIP Media Modules. At the prompt, type set interface voip <number>... -
Page 187: Set Up The Controller List For The G700 Media Gateway
The Avaya Gateway Installation Wizard (GIW) performs this task automatically. To complete the configuration of the G700 Media Gateway, you need to administer a list of primary and alternate controllers. This list begins with the IP address of the primary controller. In the event that the G700 Media Gateway loses contact with its primary controller, it will seek to re-register with the primary controller first, then with the other controllers on this list. - Page 188 The G700 Media Gateway processor will reset. The LEDs on the G700 Media Gateway and the Media Modules will flash. These elements will each conduct a series of self-tests. When the LEDs on the Media Modules are extinguished and the active status LEDs on the G700 Media Gateway are on, the reset is complete.
-
Page 189: Set The Lsp Transition Points
(for example, additional CLAN connections) with which to register. After this search time has elapsed, the G700 will search for an LSP with which to register. You must also set the total time the G700 searches for either a primary controller and an LSP, after which the G700 resets. And finally, you must define how many primary controllers, from 1 to 4, are in the controller list you just defined. -
Page 190: Configure An X330 Expansion Module (If Necessary)
NOTE: You cannot use the IW to perform this task. See the Avaya X330W-2DS1 Access Router Module Quick Start Guide. This document is available at the Avaya Support website: Support > Technical Database > LAN, Backbone, and Edge Access Switches > P330 Stackable Switching System >... -
Page 191: Prepare To Install Firmware On The G700
P330-1(super)# Verify the Contents of the tftpboot Directory Before proceeding with the G700 firmware installation, you should check the tftpboot directory on the TFTP server to make sure the firmware versions match those listed in the planning documentation. Determine Which Firmware to Install on the... - Page 192 MM711 MM710 Refer to the list to check the FW vintage number of the G700. In the TYPE column, find G700, then check the matching field in the FW VINTAGE column to see if it matches the vintage number in your planning forms. If not, you must install new firmware on the G700 Media...
- Page 193 If the list shows B, you will upgrade A. If the list shows A, you will upgrade B. Refer to the VOIP FW column and row for slot V0 (same row occupied by the G700 information) to see if the number matches the VoIP firmware identified in your planning forms. If not, you must also upgrade the G700 Media Gateway motherboard VoIP module.
-
Page 194: Install New Firmware On The G700 Media Gateway
Install New Firmware on the G700 Media Gateway Install New Firmware on the G700 Media Gateway Follow the procedures in this section to install firmware on the G700 processors and media modules. Firmware Installation Procedures Install New Firmware on the P330 Stack... - Page 195 The G700 Media Gateway processor will reset. The LEDs on the G700 Media Gateway and the Media Modules will flash. These elements will each conduct a series of self-tests. When the LEDs on the Media Modules are extinguished and the active status LEDs on the G700 Media Gateway are on, the reset is complete.
-
Page 196: Install New Firmware On The Media Modules
Installing a New G700 without an S8300 Install New Firmware on the G700 Media Gateway Example: Show mg list_config SLOT TYPE CODE SUFFIX HW VINTAGE FW VINTAGE VOIP FW ---- ------ ----- ------ ---------- ---------- ------- G700 DAF1 230(A) S8300... - Page 197 Check the VOIP FW column and row for slot v0 to see if the number matches the VoIP firmware identified in the planning documentation. Type where <module #> is the number of the G700 in the stack. reset <module #> When the reset is finished, type show mm to verify the upgrade.
-
Page 198: Administer Communication Manager
The Primary Controller is an S8500 or S8700 The Primary Controller is an S8300 This document covers only the administration of Communication Manager required for the G700 Media Gateway to communicate with the primary controller over a customer’s network. For the majority of administration required, see ‘‘Administrator’s Guide to Avaya Communication Manager, 555-233-506,’’... -
Page 199: Administer Network Regions
E NT ER Administer Network Regions Before assigning an IP network region to a G700, you must define network region on the IP Network Region form. After a network region is defined, you can assign it to the various network elements (servers, gateways, IP phones). -
Page 200: Associate Lsps With Network Regions
Installing a New G700 without an S8300 Administer Communication Manager Press ) to submit the screen. E NT ER Associate LSPs with Network Regions If the primary controller has LSPs, you can associate each LSP with one or more network regions. In the event of a network failure, IP telephones assigned to a network region will register with an LSP associated with that region. -
Page 201: Administer The Lsp Form
The Primary Controller is an S8500 or S8700 If the primary controller is an S8500 or S8700. This document covers only the administration of Communication Manager required for the G700 Media Gateway to communicate with the primary controller over a customer’s network. For the majority of required administration, see ‘‘Administrator’s Guide to Avaya Communication Manager, 555-233-506,’’... -
Page 202: Assign Node Names And Ip Addresses For The C-Lans And Lsps
For a G700 with an S8300 LSP and an S8500 or S8700 as the primary controller, there may be more than one network region, since there can be up to 250 G700 Media Gateways connected to the S8500 or S8700 with thousands of telephones in the network. - Page 203 It is strongly recommended to use the defaults in the screen. If the network region of the G700 (1 in this example) is different from that of the S8500 or S8700 CLAN board(s), you must interconnect the two regions. Press...
-
Page 204: Assign Lsps To The Network Regions
Type the number for the type of codec set (1–7) that the S8500 or S8700 will use to interconnect the G700 and the C-LAN board(s) in the row corresponding to the region of the C-LAN. In this example, the C-LAN is in region 9 and codec-set type 3 is to be used for the interconnection between region 1 and region 9. -
Page 205: Administer Ip Interfaces
Installing a New G700 without an S8300 Administer Communication Manager Enter the names of up to six LSPs to be assigned to region 1. The LSP names must be the same as administered on the Node Names form. Submit the form. -
Page 206: Administer The Lsp Form
Installing a New G700 without an S8300 Administer Communication Manager Field Conditions/Comments Enable Ethernet The Ethernet port must be enabled (y) before it can be used. The port Port? must be disabled (n) before changes can be made to its attributes on this screen. - Page 207 Module Type Name Complete the Name field with the hostname assigned to the G700 Media Gateway. Complete the Identifier field with the serial number of the G700 Media Gateway. You can obtain the serial number by typing the show system command at the MGP command line.
- Page 208 If the G700 fails to register, two common causes might be: — The serial number added as the identifier for the G700 is wrong. To check, log back into the G700 gateway and type show system. Check the serial number that appears.
-
Page 209: Complete The Installation Process
Only if specifically requested by the customer or your planning documents, at the SAT prompt, type enable announcement-board <gateway_number> V9, where <gateway_number> is the number of the G700 Media Gateway you just added and is the virtual slot (for example, means Media Gateway number 2, slot V9. Press to enable announcements. - Page 210 Installing a New G700 without an S8300 Complete the Installation Process Installation and Upgrades for G700 and S8300 December 2003...
-
Page 211: Upgrading An Existing G700 With An S8300
This chapter covers the procedures to upgrade the software on an installed Avaya S8300 Media Server from release 1.x to 2.0. It also covers the procedures to upgrade the firmware on an installed Avaya G700 Media Gateway. The S8300 can be configured as either the primary controller or as a local survivable processor (LSP). -
Page 212: Task Summary
Upgrading an Existing G700 with an S8300 — R1.x to R2.0 Task Summary Task Summary Before Going to the Site • Get USB CD-ROM Drive on page 214 • If Upgrading from Release 1.1, Fill in the EPW on page 214 •... -
Page 213: G700 Upgrade Using The Wizards
Upgrading an Existing G700 with an S8300 — R1.x to R2.0 Task Summary • Install Post-Upgrade Communication Manager Update File from Your Laptop, if any on page 244 • Verify Media Server Configuration on page 245 • Install the New License File on page 246 •... -
Page 214: Before Going To The Customer Site
(for example, adding BRI trunks), or if the upgrade is between major releases (for example, 1.3 to 2.0), you will need the serial number of the G700. To get this number, ask the customer’s administrator to log in to the S8300 web page and select... -
Page 215: Check Number Of Allocated Ports
The file containing the software for the S8300 has a *.tar extension and contains both the S8300 software and the G700 firmware. The *.tar file is on a CD-ROM that you take to the site. Additional files that may be needed are license and authentication files and the most recent versions of the software update (patch) files and G700 firmware files. -
Page 216: Download Software Update (Patch) File To Your Laptop, If Necessary
To upgrade just the G700 processor and media module firmware, you can obtain the individual firmware image files from the Avaya Support Web site. In this case, you cannot use the S8300 as the TFTP server. Download Software Update (patch) file... -
Page 217: Complete The Rfa Process (Obtain License And Password File)
Communication Manager from any login is blocked unless a valid authentication file is present on the S8300 media server. A new license file and the Avaya authentication file may be installed independently of each other or any other server upgrades. -
Page 218: Run The Automatic Registration Tool (Art) For The Inads Ip Address, If Necessary
You must generate a license and authentication file before you use the ART tool. Also, the ART process is available only to Avaya personnel. You need an ART login ID and password, which you can set up at the ART web site. Non-Avaya personnel must contact their service support or customer care center for INADS addresses, if required. -
Page 219: On-Site Preparation For The Upgrade
Upgrading an Existing G700 with an S8300 — R1.x to R2.0 On-site Preparation for the Upgrade On-site Preparation for the Upgrade Perform the tasks in this section before starting the software upgrade on the S8300. Access to the S8300 To perform the installation and upgrade procedures you will need to connect your laptop to the S8300 Services port using a crossover cable. -
Page 220: Check Current Software Release
Upgrading an Existing G700 with an S8300 — R1.x to R2.0 On-site Preparation for the Upgrade Check Current Software Release Tip: The Upgrade Tool performs this task automatically. Check the release of Communication Manager currently running on the S8300 to determine whether a pre-upgrade update is required. -
Page 221: Pre-Upgrade Tasks - If The S8300 Is The Primary Controller
Upgrading an Existing G700 with an S8300 — R1.x to R2.0 On-site Preparation for the Upgrade The following table maps the release number to the Reports as: field and specifies whether or not a pre-upgrade update is required. Software Release Numbers... -
Page 222: Record All Busyouts
Before you upgrade the primary controller, you need to shut down Communication Manager on the LSPs. This prevents the phones and other endpoints attached to the G700 from trying to register with the LSPs while you are upgrading the primary controller. -
Page 223: Disable Alarm Origination
Controller. When you complete the primary controller upgrade, run save translation on the primary controller before restarting Communication Manager on the LSP. The save translations process will automatically cause the G700’s endpoints to reregister with the primary controller. After the primary controller has been upgraded, you need to restart the LSPs. -
Page 224: Get Ia770 (Audix) Data And Stop Ia770
Enter to verify that AUDIX is shut down. When AUDIX is shut down, you will see "voice system is down." NOTE: After the S8300 upgrade, you must upgrade the G700 and media module firmware before restarting IA770. Back up recovery system files CAUTION: If the current release is 1.1.x, you must backup the Communication Manager translations... - Page 225 Upgrading an Existing G700 with an S8300 — R1.x to R2.0 On-site Preparation for the Upgrade Tip: Depending on the Communication Manager software version, the following screen may look slightly different. Select all data sets: • Avaya Call Processing (ACP) Translations •...
-
Page 226: Record Configuration Information
Upgrading an Existing G700 with an S8300 — R1.x to R2.0 On-site Preparation for the Upgrade Select the FTP backup method and fill in the User Name, Password, Host Name, and Directory fields with information provided by the customer. Click Start Backup to back up the files. -
Page 227: Upgrade The S8300
Upgrading an Existing G700 with an S8300 — R1.x to R2.0 Upgrade the S8300 Upgrade the S8300 This section describes the procedures for upgrading the S8300 Media Server from a pre-2.0 release of Communication manager to release 2.0. Upgrading S8300 from a pre-2.0 release to release 2.0 requires an upgrade to the Linux operating system. - Page 228 Upgrading an Existing G700 with an S8300 — R1.x to R2.0 Upgrade the S8300 Install the pre-upgrade update (patch) Use Telnet to access the media server. Click Start > Run to open the Run dialog box. Type and press telnet 192.11.13.6 Enter Log in as craft.
-
Page 229: Back Up The System Files (Linux Migration Web Procedure)
Upgrading an Existing G700 with an S8300 — R1.x to R2.0 Upgrade the S8300 Back Up the System Files (Linux Migration Web Procedure) If the current software release is between 1.2.0 and 1.3.9, you must back up the system files using the Linux Migration backup procedure. - Page 230 Upgrading an Existing G700 with an S8300 — R1.x to R2.0 Upgrade the S8300 Click Submit. Click Status to see the backup progress. NOTE: The Linux Migration backup status function is not enabled for release 1.3.1. To check the backup status when upgrading from 1.3.1, select Backup Status under Data Backup/Restore on the Maintenance Web Interface menu.
- Page 231 Upgrading an Existing G700 with an S8300 — R1.x to R2.0 Upgrade the S8300 Select the backup set and click Check Status to see the backup results. If the backup is in progress, click on Refresh until the "Backup is finished" message appears.
-
Page 232: Upgrade The S8300
The reboot takes 3–10 minutes. After the system reboots, the RP software redirects the system to boot from the CD-ROM drive. Note that no telephony support is provided by this software. Its only purpose is to reformat the hard drive and install a clean copy of the Avaya Communication Manager server software. -
Page 233: Set Telnet Parameters
Upgrading an Existing G700 with an S8300 — R1.x to R2.0 Upgrade the S8300 Set Telnet Parameters The Microsoft Telnet application may be set to send a carriage return (CR) and line feed (LF) each time you press . The installation program sees this as 2 key presses. You need to correct this before you Enter Telnet to the server. - Page 234 Upgrading an Existing G700 with an S8300 — R1.x to R2.0 Upgrade the S8300 Select Install, make sure OK is highlighted, and press Enter. Select <Yes> and press Enter. NOTE: After this step, the previous disk image cannot be recovered by rebooting.
- Page 235 Upgrading an Existing G700 with an S8300 — R1.x to R2.0 Upgrade the S8300 • Once the drive is properly configured, the program begins installing Communication Manager software and reports the progress. • These processes take 15–20 minutes. When the media server is ready to reboot, the CD drive door opens and the following screen flashes for about 5 seconds.
-
Page 236: Verify Software Version
/var/home/ftp directory that was used in previous releases. You must upload the remaining required files to the pub directory on the S8300 hard drive. This includes, but is not limited to, the post-upgrade software update, license file, Avaya authentication file (if needed), and new firmware files. - Page 237 Upgrading an Existing G700 with an S8300 — R1.x to R2.0 Upgrade the S8300 Under Miscellaneous click Download Files. Select "Files to download from the machine I’m using to connect to the server" and browse to each file you want to move to the S8300.
-
Page 238: Configure The Network Parameters
Upgrading an Existing G700 with an S8300 — R1.x to R2.0 Upgrade the S8300 Configure the Network Parameters If you have upgraded from a pre-1.2 release, skip to If Upgrading from a Pre-1.2 Release on page 239. NOTE: For this procedure, you must have the host name, subnet mask, and IP address of the S8300 and the IP address of the default gateway. -
Page 239: If Upgrading From A Pre-1.2 Release
If you have upgraded from a pre-1.2 release, you must enter all server configuration information. If you have filled in the Electronic Pre-installation Worksheet (EPW), you should use the Avaya Installation Wizard at this point. The Installation Wizard will do the server configuration and install the license and password files. -
Page 240: Verify Connectivity
Upgrading an Existing G700 with an S8300 — R1.x to R2.0 Upgrade the S8300 Log on to a Telnet session. Type to capture the configuration data. You should see the response, /opt/ws/drestart 1 4 "Killed". Skip to If IA770 Is Being Used, Ensure that Messaging Is Disabled on page 243. - Page 241 Upgrading an Existing G700 with an S8300 — R1.x to R2.0 Upgrade the S8300 Under Restore Method, select . Fill in the User Name Password Host Name ( enter host IP Address , and fields for the location of the backup file on the customer’s server. If the...
- Page 242 Upgrading an Existing G700 with an S8300 — R1.x to R2.0 Upgrade the S8300 Select the backup set to restore and both Force options and click Restore. Click Status to view the restore progress Select the backup set and click Check Status to view the restore progress.
-
Page 243: If Ia770 Is Being Used, Ensure That Messaging Is Disabled
Upgrading an Existing G700 with an S8300 — R1.x to R2.0 Upgrade the S8300 If IA770 Is Being Used, Ensure that Messaging Is Disabled If the system is using IA770: Click Messaging Software under Miscellaneous. If the Enable button shows at the bottom of the screen, messaging is currently disabled — go to... -
Page 244: Install Post-Upgrade Communication Manager Update File From Your Laptop, If Any
Upgrading an Existing G700 with an S8300 — R1.x to R2.0 Upgrade the S8300 Server Date/Time Window Verify or set the media server’s time close enough to the NTS’s time, date, and time zone that synchronization can occur (within about 5 minutes). -
Page 245: Verify Media Server Configuration
Upgrading an Existing G700 with an S8300 — R1.x to R2.0 Upgrade the S8300 Type sudo update_activate <update> , where <update> is the release or issue number of the latest software file. (For example, . Do not use the .tar.gz extension at the end of 03.0.219.0-4925... -
Page 246: Install The New License File
NOTE: If the S8300 is already set up for remote access, Avaya services personnel can copy new license and authentication files directly into the /pub directory on the server. Avaya personnel will notify you when the new files are in place as agreed (for example, by telephone or E-mail). -
Page 247: Install The New Authentication File
Upgrading an Existing G700 with an S8300 — R1.x to R2.0 Upgrade the S8300 Install the New Authentication File Click Authentication File Select "Install the Authentication file I previously downloaded" and Click Install The system tells you the authentication is installed successfully Verify that the restoration of the backup files was successful by testing the craft login. - Page 248 Upgrading an Existing G700 with an S8300 — R1.x to R2.0 Upgrade the S8300 When the save is finished, the system displays the message, "Command successfully completed." Installation and Upgrades for G700 and S8300 December 2003...
-
Page 249: Verify Operation
Next Steps This completes the S8300 upgrade process for upgrading from a 1.x software release to release 2.0. You now must upgrade the G700 and media module firmware and then install and restart IA770, if installed on the S8300. Installation and Upgrades for G700 and S8300... -
Page 250: Upgrade The Firmware On The G700
Upgrade the Firmware on the G700 The tasks in this section can be completed most efficiently by using the Avaya Installation Wizard or the Upgrade Tool. If the S8300 is a primary controller, use the Installation Wizard. If the S8300 is one of several LSPs controlled by the same primary controller, use the Upgrade Tool. -
Page 251: Determine Which Firmware To Install On The G700
Determine Which Firmware to Install on the G700 Conduct the following procedure to compare software versions running on the G700 processors and media modules with the versions in you planning documents. If the versions do not match, new firmware for those components is necessary. -
Page 252: Install New Firmware On The P330 Stack Processor
MM711 MM710 Refer to the list to check the FW vintage number of the G700. In the TYPE column, find G700, then check the matching field in the FW VINTAGE column to see if it matches the vintage number in your planning forms. If not, you must install new firmware on the G700 Media Gateway. -
Page 253: Install New Firmware On The G700 Media Gateway Processor
At the MG-???-1(configure)# prompt, type copy tftp mgp-image <bank> <filename> <tftp_server_ip_address> to transfer the mgp image from the tftp server to the G700, where <bank> is the bank that is not Active Now (Bank A in the example). <filename> is the full path name of the mgp firmware image file, which begins with mgp and will be similar to the name mgp_8_0.bin. -
Page 254: Install New Firmware On The Media Modules
The G700 Media Gateway processor will reset. The LEDs on the G700 Media Gateway and the Media Modules will flash. These elements will each conduct a series of self-tests. When the LEDs on the Media Modules are extinguished and the active status LEDs on the G700 Media Gateway are on, the reset is complete. - Page 255 Check the VOIP FW column and row for slot v0 to see if the number matches the VoIP firmware identified in the planning documentation. Type reset <module #> where <module #> is the number of the G700 in the stack. When the reset is finished, type to verify the upgrade. show mm...
-
Page 256: Install New Firmware On Other G700 Media Gateways
If you are dialed in remotely, you should have automatically dialed in to the stack master. For a local installation, you should have plugged your laptop into the stack master P330, which you can identify by the LED panel on the upper left of each G700 or P330 device in the stack. The LEDs signal as follows: •... -
Page 257: If The S8300 Is Using Ia770
Upgrading an Existing G700 with an S8300 — R1.x to R2.0 If the S8300 is Using IA770 If the S8300 is Using IA770 Install and Restart IA770 Telnet to 192.11.13.6 Log in as craft or dadmin Type cd /usr/CHIA Install IA770: Type sudo ./autoinstall... - Page 258 Upgrading an Existing G700 with an S8300 — R1.x to R2.0 If the S8300 is Using IA770 Select FTP and enter the information for the location of the backed up AUDIX Translations, Names, and Messages and click View. Select the AUDIX Translations, Names, and Messages backup set, select both Force options, and click Restore.
-
Page 259: Save Translations
If IA770 is being used, a post-upgrade update (patch) for IA770 may be required. See the IA770 documentation for procedures to install an update. The documentation can be found on the Avaya Support Web Site at http://support.avaya.com. Then click on Product Documentation and then Messaging and scroll down to the INTUITY document links. -
Page 260: Complete The Upgrade Process (S8300 Is The Primary Controller)
Upgrading an Existing G700 with an S8300 — R1.x to R2.0 Complete the Upgrade Process (S8300 is the Primary Controller) Complete the Upgrade Process (S8300 is the Primary Controller) Telnet to the S8300 (primary controller) and open a SAT session to complete the following procedures. -
Page 261: Re-Enable Alarm Origination
Upgrading an Existing G700 with an S8300 — R1.x to R2.0 Complete the Upgrade Process (S8300 is the Primary Controller) Re-enable Alarm Origination Telnet to the S8300 and log on. At the command prompt, type , where almenable -d b -s y... -
Page 262: Upgrading An Existing G700 With An S8300
Upgrading an Existing G700 with an S8300 — R1.x to R2.0 Complete the Upgrade Process (S8300 is the Primary Controller) Installation and Upgrades for G700 and S8300 December 2003... -
Page 263: R2.0 To R2.X
2.0 to a later (2.x) release. It also covers the procedures to upgrade the firmware on an installed Avaya G700 Media Gateway. The S8300 can be configured as either the primary controller or as a local survivable processor (LSP). When the S8300 is an LSP, the primary controller, running Avaya Communication Manager, can be either another S8300 or an Avaya S8500 or S8700 Media Server. -
Page 264: Task Summary
Upgrading an Existing G700 with an S8300 — R2.0 to R2.x Task Summary Task Summary Before Going to the Site • Get Planning Forms from the Project Manager on page 266 • Get the Serial Number of the G700, if Necessary on page 266 •... -
Page 265: G700 Manual Upgrade Tasks
Upgrading an Existing G700 with an S8300 — R2.0 to R2.x Task Summary G700 Manual Upgrade Tasks G700 Pre-Upgrade Tasks • Verify the Contents of the tftpboot Directory on page 291 • Determine Which Firmware to Install on the G700... -
Page 266: Before Going To The Customer Site
(for example, adding BRI trunks), or if the upgrade is between major releases (for example, 1.3 to 2.0), you will need the serial number of the G700. To get this number, ask the customer’s administrator to log in to the S8300 web page and select... -
Page 267: Check Ftp Server For Backing Up Data
Get Software/Firmware Files The file containing the S8300 software and G700 firmware has a *.tar extension. The *.tar file is on a CD-ROM that you take to the site. Additional files that may be needed are the most recent versions of the software update (patch) files and G700 firmware files. -
Page 268: License File And Communication Manager Versions For A Local Survivable Processor
You must generate a license and authentication file before you use the ART tool. Also, the ART process is available only to Avaya personnel. You need an ART login ID and password, which you can set up at the ART web site. Non-Avaya personnel must contact their service support or customer care center for INADS addresses, if required. -
Page 269: Obtain The Static Craft Password
If one or more updates are required for this installation or upgrade procedure, and the update file is not on your software CD, download the update file from the Avaya Support web site to your laptop: On your laptop, create a directory to store the file (for example, c:\S8300download). -
Page 270: On-Site Preparation For The Upgrade
Upgrading an Existing G700 with an S8300 — R2.0 to R2.x On-site Preparation for the Upgrade On-site Preparation for the Upgrade Perform these tasks before starting the software upgrade on the S8300. Access to the S8300 To perform the installation and upgrade procedures you will need to connect your laptop to the S8300 Services port using a crossover cable. -
Page 271: Pre-Upgrade Tasks - If The Target S8300 Is The Primary Controller
Upgrading an Existing G700 with an S8300 — R2.0 to R2.x On-site Preparation for the Upgrade Pre-Upgrade Tasks — If the Target S8300 is the Primary Controller If the S8300 is configured as an LSP, skip to Upgrade the S8300 on page 282. -
Page 272: Disable Scheduled Maintenance
Before you upgrade the primary controller, you need to shut down Communication Manager on the LSPs. This prevents the phones and other endpoints attached to the G700 from trying to register with the LSPs while you are upgrading the primary controller. -
Page 273: Disable Alarm Origination
Upgrading an Existing G700 with an S8300 — R2.0 to R2.x On-site Preparation for the Upgrade Disable Alarm Origination If alarm origination is enabled during the upgrade, unnecessary alarms will be sent to the Operations Support System (OSS) destination number(s). Even if you selected "Suppress Alarm Origination" when you logged in, alarm origination will be automatically re-enabled when the system reboots after the software upgrade. -
Page 274: Back Up Recovery System Files
Enter to verify that AUDIX is shut down. When AUDIX is shut down, you will see "voice system is down." NOTE: After the S8300 upgrade, you must upgrade the G700 and media module firmware before restarting IA770. Back up recovery system files Before installing the S8300 software, you should back up the system data in case there’s a need to back... -
Page 275: Back Up Data
Upgrading an Existing G700 with an S8300 — R2.0 to R2.x On-site Preparation for the Upgrade Back up data Under Data Backup/Restore, click Backup Now. Select all data sets: • Avaya Call Processing (ACP) Translations • Save ACP translations prior (do not save ACP translations if this is an LSP). -
Page 276: Install New License And Authentication Files, If Necessary
Communication Manager (for example, R2.x to R3.x) or when the feature set has changed. NOTE: If the S8300 is already set up for remote access, Avaya services personnel can copy new license and authentication files directly into the FTP directory on the server. Avaya personnel will notify you when the new files are in place as agreed (for example, by telephone or E-mail). - Page 277 Upgrading an Existing G700 with an S8300 — R2.0 to R2.x On-site Preparation for the Upgrade Log on to the S8300 Web Interface In the main menu under Miscellaneous, click Download Files Download Files Screen Select "Files to download from the machine I’m using to connect to the server" and click Browse for the first field.
-
Page 278: If Necessary, Install License And Authentication Files
Upgrading an Existing G700 with an S8300 — R2.0 to R2.x On-site Preparation for the Upgrade Click Browse for the second field. Locate the customer’s .pwd file on your laptop. When you have selected the .pwd file, click Open in the dialog box. -
Page 279: Run Save Translations
Manager has a .tar.gz extension and a file name that reflects the most recent load of software (for example, 03.0.110.4-4925.tar.gz). This .tar file will also contain the most recent firmware for the G700 Media Gateway, the various media modules, and the P330 stack processor. -
Page 280: Download Files Screen
Upgrading an Existing G700 with an S8300 — R2.0 to R2.x On-site Preparation for the Upgrade Tip: The Avaya Installation Wizard performs tasks automatically starting with this section. Log in to the S8300 Web interface. Choose under Miscellaneous on the left pane of the main menu. - Page 281 Upgrading an Existing G700 with an S8300 — R2.0 to R2.x On-site Preparation for the Upgrade CAUTION: At this point you are finished with the software CD-ROM. Remove the CD from your laptop now to avoid possible problems the next time your laptop is rebooted.
-
Page 282: Install The Upgrade Software
Installation Wizard. To use the Upgrade Tool, go to the Integrated Management main menu and click Launch Avaya Upgrade Tool. Manual Installation If you are not using the Avaya Installation Wizard or Upgrade Tool, follow the steps in this section to upgrade the S8300 to the most recent load of software. CAUTION: For a new installation, be sure to set the time and time zone before installing the S8300 software. - Page 283 Upgrading an Existing G700 with an S8300 — R2.0 to R2.x Upgrade the S8300 Choose Software Screen On the Choose Software screen, select the software release number that you want to install (for example, the release listed in your planning documentation). Click Continue The S8300 displays the Choose License Source screen.
- Page 284 Upgrading an Existing G700 with an S8300 — R2.0 to R2.x Upgrade the S8300 Choose License Source Screen If you have installed the license and authentication files, select the following: — I want to reuse the license files from the currently active partition on this server.
- Page 285 Upgrading an Existing G700 with an S8300 — R2.0 to R2.x Upgrade the S8300 Review Notices Screen For a new installation, or if you previously ran a backup, you do not need to run a backup at this time. If your planning documents instruct you to enable Tripwire, follow the instructions to reset the signature database.
- Page 286 Upgrading an Existing G700 with an S8300 — R2.0 to R2.x Upgrade the S8300 Begin Installation Screen At the Begin Installation screen, click Continue The S8300 displays the Install in Progress screen. Install in Progress Screen Installation and Upgrades for G700 and S8300...
- Page 287 Upgrading an Existing G700 with an S8300 — R2.0 to R2.x Upgrade the S8300 The installation will take approximately 10 to 20 minutes. The Install in Progress screen refreshes every 10 seconds or on demand by clicking the button. When complete, the S8300 Refresh displays the Reboot Server screen.
- Page 288 Upgrading an Existing G700 with an S8300 — R2.0 to R2.x Upgrade the S8300 Wait 5 minutes (or about 20 minutes if running IA770) and then click Continue. If you click Continue before the reboot is finished, the screen will display "Expired Page." If you see the Expired Page message, refresh the browser.
-
Page 289: Make The Upgrade Permanent
Upgrading an Existing G700 with an S8300 — R2.0 to R2.x Upgrade the S8300 Installation Complete Screen Click . You are returned to the main menu. Close Under Server, click Software Version to verify the new software version. Make the Upgrade Permanent... -
Page 290: Install Post-Upgrade Communication Manager Update File From Your Laptop, If Any
If IA770 is being used, a post-upgrade update (patch) for IA770 may be required. See the IA770 documentation for procedures to install an update. The documentation can be found on the Avaya Support Web Site at http://support.avaya.com. Then click on Product Documentation and then Messaging and scroll down to the INTUITY document links. -
Page 291: Upgrade The Firmware On The G700
Upgrade the Firmware on the G700 The tasks in this section can be completed most efficiently by using the Avaya Installation Wizard or the Upgrade Tool. If the S8300 is a primary controller, use the Installation Wizard. If the S8300 is one of several LSPs controlled by the same primary controller, use the Upgrade Tool. -
Page 292: Determine Which Firmware To Install On The G700
Determine Which Firmware to Install on the G700 Conduct the following procedure to compare software versions running on the G700 processors and media modules with the versions in you planning documents. If the versions do not match, new firmware for those components is necessary. -
Page 293: Install New Firmware On The P330 Stack Processor
MM711 MM710 Refer to the list to check the FW vintage number of the G700. In the TYPE column, find G700, then check the matching field in the FW VINTAGE column to see if it matches the vintage number in your planning forms. If not, you must install new firmware on the G700 Media Gateway. -
Page 294: Install New Firmware On The G700 Media Gateway Processor
At the MG-???-1(configure)# prompt, type copy tftp mgp-image <bank> <filename> <tftp_server_ip_address> to transfer the mgp image from the tftp server to the G700, where <bank> is the bank that is not Active Now (Bank A in the example). <filename> is the full path name of the mgp firmware image file, which begins with mgp and will be similar to the name mgp_8_0.bin. -
Page 295: Install New Firmware On The Media Modules
The G700 Media Gateway processor will reset. The LEDs on the G700 Media Gateway and the Media Modules will flash. These elements will each conduct a series of self-tests. When the LEDs on the Media Modules are extinguished and the active status LEDs on the G700 Media Gateway are on, the reset is complete. - Page 296 Check the VOIP FW column and row for slot v0 to see if the number matches the VoIP firmware identified in the planning documentation. Type reset <module #> where <module #> is the number of the G700 in the stack. When the reset is finished, type to verify the upgrade. show mm...
-
Page 297: Install New Firmware On Other G700 Media Gateways
If you are dialed in remotely, you should have automatically dialed in to the stack master. For a local installation, you should have plugged your laptop into the stack master P330, which you can identify by the LED panel on the upper left of each G700 or P330 device in the stack. The LEDs signal as follows: •... -
Page 298: Check Media Modules
Upgrading an Existing G700 with an S8300 — R2.0 to R2.x Complete the Upgrade Process (S8300 is the Primary Controller) Complete the Upgrade Process (S8300 is the Primary Controller) Telnet to the S8300 (primary controller) and open a SAT session to complete the following procedures. -
Page 299: Back Up The System
Upgrading an Existing G700 with an S8300 — R2.0 to R2.x Complete the Upgrade Process (S8300 is the Primary Controller) -d b sets the dialout option to both (numbers) enables SNMP alarm origination -s y Type almenable (without any options) to verify that alarm origination status. - Page 300 Upgrading an Existing G700 with an S8300 — R2.0 to R2.x Complete the Upgrade Process (S8300 is the Primary Controller) Installation and Upgrades for G700 and S8300 December 2003...
-
Page 301: Upgrade Overview
TFTP Server To install firmware on a G700 without an S8300 or LSP, you must first copy the firmware files to an external TFTP server on the customer LAN. The TFTP server can be a customer computer or it can be set up on your services laptop. -
Page 302: System Access
— Or, telnet to the server and then telnet to the P330 stack processor If you are at the location of the G700, you can connect directly to the G700 Console port and open a Hyperterm session to access the P330 stack processor. -
Page 303: Before Going To The Customer Site
(for example, adding BRI trunks), or if the upgrade is between major releases (for example, 1.3 to 2.0), you will need the serial number of the G700. To get this number, ask the customer’s administrator to log in to the S8300 web page and select... - Page 304 On the hard drive of your laptop or the customer’s PC, create a directory into which you will load the G700 software. It is recommended that you create a directory called C:\tftp. Connect to the LAN using a browser on your laptop or the customer’s PC and access http:// www.avaya.com/support on the Internet.
-
Page 305: Download G700 Firmware Files To Your Tftp Directory
Download G700 Firmware Files to Your TFTP Directory To install new firmware for the G700 processors and the media modules, you first need to move the new firmware files to a directory on the TFTP server. The installation program reads the new firmware files from this directory on the TFTP server. - Page 306 Upgrading an Existing G700 without an S8300 Before Going to the Customer Site Firmware File Formats Component Firmware Version Example Format P330 Stack Processor viisa<version id> viisa3_12_1.exe P330 Stack Processor p330<version id> p330Tweb.3.8.6.exe G700 Media Gateway mgp<version id> mgp_8_0.bin VoIP Media Module and mm760<version id>...
-
Page 307: On-Site Preparation For The Upgrade
P330-1(super)# Verify the Contents of the tftpboot Directory Before proceeding with the G700 firmware installation, you should check the tftpboot directory on the TFTP server to make sure the firmware versions match those listed in the planning documentation. Determine Which Firmware to Install on the... - Page 308 MM711 MM710 Refer to the list to check the FW vintage number of the G700. In the TYPE column, find G700, then check the matching field in the FW VINTAGE column to see if it matches the vintage number in your planning forms. If not, you must install new firmware on the G700 Media...
- Page 309 If the list shows B, you will upgrade A. If the list shows A, you will upgrade B. Refer to the VOIP FW column and row for slot V0 (same row occupied by the G700 information) to see if the number matches the VoIP firmware identified in your planning forms. If not, you must also upgrade the G700 Media Gateway motherboard VoIP module.
-
Page 310: Install New Firmware On The G700 Media Gateway
Install New Firmware on the G700 Media Gateway NOTE: The Upgrade Tool performs this task automatically. Follow the procedures in this section to install firmware on the G700 processors and media modules Firmware Installation Procedures Install New Firmware on the P330 Stack... - Page 311 The G700 Media Gateway processor will reset. The LEDs on the G700 Media Gateway and the Media Modules will flash. These elements will each conduct a series of self-tests. When the LEDs on the Media Modules are extinguished and the active status LEDs on the G700 Media Gateway are on, the reset is complete.
-
Page 312: Install New Firmware On The Media Modules
Upgrading an Existing G700 without an S8300 Install New Firmware on the G700 Media Gateway Example: Show mg list_config SLOT TYPE CODE SUFFIX HW VINTAGE FW VINTAGE VOIP FW ---- ------ ----- ------ ---------- ---------- ------- G700 DAF1 230(A) S8300... - Page 313 Check the VOIP FW column and row for slot v0 to see if the number matches the VoIP firmware identified in the planning documentation. Type where <module #> is the number of the G700 in the stack. reset <module #> When the reset is finished, type show mm to verify the upgrade.
- Page 314 Upgrading an Existing G700 without an S8300 Install New Firmware on the G700 Media Gateway Installation and Upgrades for G700 and S8300 December 2003...
-
Page 315: Connecting Telephones And Adjunct Systems
Connecting Telephones and Adjunct Systems To administer dial plans and trunks and other features, you will use Avaya Communication Manager, as usual. Consult the Administrator’s Guide for Avaya Communication Manager, 555-233-506. In addition, you may need to install one or more of the following adjunct systems or devices: •... -
Page 316: Installation And Wiring Telephones And Power Supplies
For a complete description of wiring procedures, refer to "Installing and Wiring Telephones" in Installing the Avaya S8700 Media Server with the Avaya MCC1 or the Avaya SCC1 Media Gateway. After installing the hardware, the data for the telephone features must be administered. -
Page 317: Connect Telephones
Each port network can provide power for up to three attendant consoles. This source of power is preferred for the attendant consoles because it has the same battery backup as the G700 Media Gateway. Adjunct power can be provided locally at the telephone or console by either the 1151A1 or 1151A2 power supply. -
Page 318: Adjunct Power Connections End-To-End
To Individual Power Unit Destination Service Access Point (DSAP) Power Cord Adjunct Power Connections End-to-End Figure 17, Example Adjunct Power Connections, on page 319 shows typical connection locations for adjunct power. Installation and Upgrades for G700 and S8300 December 2003... -
Page 319: Auxiliary Power For An Attendant Console
350 feet (107 m) for a 301B1 and 302D An attendant console can also derive auxiliary power from: • Individual 1151B or 1151B2 power supply • MSP-1 power supply • 258A-type adapters • Bulk power supplies Installation and Upgrades for G700 and S8300 December 2003... -
Page 320: A1 Mid-Span Power Distribution Unit
When using this switch, the following safety precautions should always be followed to reduce the risk of fire, electric shock, and injury to persons. — Read and understand all instructions. — Follow all warnings and instructions marked on this switch. Installation and Upgrades for G700 and S8300 December 2003... - Page 321 The 1152A1 PDU is used to power the 46xx series of IP telephones in addition to providing 10/100 megabits per second Ethernet connection. Generation 1 Avaya IP telephones can receive power from the 1152A1 via an in-line adapter. This adapter provides the resistive signature so that the 1152A1 allows power to flow to the telephone. The generation 2 telephones do not need an adapter.
- Page 322 To safeguard devices that are not enabled, the 1152A1 PDU detects devices that are not enabled so does not send power. Note that data continues to flow via the Ethernet cable regardless of the status of the end device. Installation and Upgrades for G700 and S8300 December 2003...
- Page 323 On the front panel of the 1152A1 PDU, monitor the response of the corresponding port LED. If it lights up GREEN, the unit has identified your telephone as a Power over LAN Installation and Upgrades for G700 and S8300 December 2003...
-
Page 324: P333T-Pwr Power Over Ethernet Stackable Switch
This product can be hazardous if immersed in water. To avoid the possibility of electrical shock, do not use it near water. • The Avaya P333T-PWR switch and modules contain components sensitive to electrostatic discharge. Do not touch the circuit boards unless instructed to do so. •... - Page 325 The P333T-PWR Power over Ethernet Stackable Switch can be used to power 46xx series IP telephones in addition to providing a 10/100 megabits per second Ethernet connection. The switch can form part of a stack with the G700 Media Gateway or members of the P330 stackable switching system. CAUTION: The Avaya P333T-PWR switch does not contain any user-serviceable components inside.
-
Page 326: B1 And 1151B2 Power Supplies
Connect the other end of the cable to the Ethernet port of the PC, server, router, workstation, IP telephone, switch, or hub. NOTE: Use a crossover cable when connecting the Avaya P333T-PWR switch to a switch or hub. Check that the appropriate link (LNK) LEDs light up. 1151B1 and 1151B2 Power Supplies The 1151B1 and 1151B2 power supplies are a local power supply. - Page 327 120 volts AC 60 hertz power source (105 to 129 volts AC) or a 220/230/240 volts AC 50 hertz power source (198 to 264 volts AC). Input voltage selection is automatic. The output capacity is 19.2 watts. Installation and Upgrades for G700 and S8300 December 2003...
-
Page 328: Install Emergency Transfer Unit And Associated Telephones
Use analog telephones for emergency transfer. The 2500-type telephones can also be used as normal extensions. Emergency transfer capability may be provided on analog CO and Wide Area Telecommunications Service (WATS) trunks. Installation and Upgrades for G700 and S8300 December 2003... -
Page 329: Connect An Analog Station Or 2-Wire Digital Station
Choose the Media Module to use and its Media Gateway and slot number; for example, MM711 Analog Media Module, Media Gateway 002, Slot V2. Choose a port circuit on the MM711 Media Module; for example, port 03. Installation and Upgrades for G700 and S8300 December 2003... - Page 330 (QUEST) DSS (ISDN) BRI-A BRI-U ANALOG RING HANDSET Administer using Administrator’s Guide for Avaya Communication Manager. Figure 23: 2500-Type Analog Telephone Wiring 2500wire RBP 071996 Figure notes 2500-Type Analog Station MM711 Analog Media Module, Position 1V301 Installation and Upgrades for G700 and S8300...
-
Page 331: Complete The Telephone Installation Process
Position the non-exposed telephone cables at least 12 inches (30.5 cm) away from exposed telephone cables whenever possible. Install Circuit Protection Over-voltage and sneak fuse protection measures are necessary for the safe operation of the G700 Media Gateway system. Over-Voltage and Sneak-Current Protection... - Page 332 Complete the Telephone Installation Process • Avaya MM711 Analog: analog trunks use the 507B or 110-SCP-9 sneak current protectors. Over- voltage protection is normally provided by the local telephone company. Analog voice terminals use one of the following types of combined over-voltage and sneak current protection: —...
-
Page 333: Ia 770 Intuity Audix Messaging Application
AUDIX Messaging Application Installation Checklist and Instructions, 585-313-159. Both of these documents are included in the IA 770 INTUITY AUDIX Messaging Application Technician Kit. The IA 770 INTUITY AUDIX Messaging Application runs only on a G700 Media Gateway controlled by an S8300 Media Server. Shared Resources of Coresidency Because it is coresident on the S8300, the INTUITY AUDIX system uses many of the S8300 resources for call processing, data storage, and access and use of administrative tools. -
Page 334: No Data Link And No Voice Ports To Connect
For complete information on IA 770 INTUITY AUDIX Installations, including the S8300 hard drive replacement, see the IA INTUITY AUDIX documentation on the Avaya S8300, S8500, and S8700 Media Server Library CD, 555-233-825, or the IA 770 INTUITY AUDIX Messaging Application Installation Checklist and Instructions, 585-313-159. -
Page 335: Intuity Audix Lx Messaging System
INTUITY AUDIX LX Messaging System INTUITY AUDIX LX Messaging System The process of integrating an INTUITY AUDIX LX system with an Avaya S8300 Media Server involves a series of tasks to prepare the switch to work with the INTUITY AUDIX LX system. -
Page 336: Administration Task Summary (For The S8300 Media Server)
Administration Task Summary (for the S8300 Media Server) On the SAT interface of the S8300 Media Server with G700 Media Gateway, follow these steps: Type display system-parameters customer-options. Go to page 4 and make sure that Processor Ethernet is enabled. -
Page 337: Call Center
Voice announcements are used in a call center environment to announce delays, direct customers to different departments, and entertain and inform calling parties. The announcement capability is standard and comes co-resident on the G700. The G700 announcement software has many of the functions of the TN2501AP VAL circuit pack. - Page 338 Connecting Telephones and Adjunct Systems Call Center Table 14: Comparison between the G700 Announcement software and the VAL circuit pack Continued TN2501AP (VAL) circuit Avaya G700 announcement Area description pack software File portability to multiple DEFINITY or Communication Manager servers...
-
Page 339: Avaya Integrated Management
Avaya ATM WAN Survivable Processor Manager is a Windows (98/NT/2000) client/server software tool with which administrators can upload translations from a main Media Server to the Avaya ATM WAN Survivable Processor Manager workstation. Once translations are uploaded, administrators can then download them from the workstation to a maximum of 15 separate ATM WSP Media Servers via LAN connectivity. -
Page 340: Avaya Multiservice Network Manager
Avaya MultiService Network Manager supports converged network environments composed of multi- vendor equipment from key vendors and will be enhanced to support all Avaya IP voice systems and data devices to create a full convergence solution. -
Page 341: Avaya Proxy Agent
FTP Manipulator — lets you transfer files to and from your computer to a remote system. Icon Manager — lets you assign functionality to icons that come as part of Avaya Terminal Emulator or to your own icons. -
Page 342: Avaya Voice Announcement Over Lan Manager
VoIP QoS sent to any NMS, and can receive RTCP packets from IP telephones, IP soft phones, VoIP engines (on G700 Media Gateways), and Prowler boards. Avaya VoIP Monitoring Manager can operate as a standalone application, or it can be integrated with Avaya MultiService Network Manager. -
Page 343: Uninterruptible Power Supply (Ups)
Uninterruptible Power Supply (UPS) Uninterruptible Power Supply (UPS) Several varieties of the Avaya Uninterruptible Power Supply (UPS) are available. A typical example, the 700 VA 120 V Online UPS provides 700 VA/490 Watts/5.8 amps at 120 Volts AC and battery holdover of 9 minutes at full load. - Page 344 Connecting Telephones and Adjunct Systems Uninterruptible Power Supply (UPS) Installation and Upgrades for G700 and S8300 December 2003...
-
Page 345: A Technical Information
Avaya G700 Media Gateway Technical Specifications Technical Information This appendix collects some of the detailed technical information you will need to install the Avaya G700 Media Gateway with an Avaya S8300 Media Serve. More complete information can be found in Hardware Guide for Avaya Communication Manager. -
Page 346: Cabling Equipment
Technical Information Cabling Equipment Cabling Equipment The G700 Media Gateway Cables and Peripherals chart lists the types and specifications of the cables used to connect the Media Gateway. See also “Avaya P333T User’s Guide”. Table 16: Media Gateway Cables and Peripherals... -
Page 347: B Information Checklists
Installer’s Checklist Information Checklists This appendix is can be used as an aid for collecting the necessary information for the installation of a G700 Media Gateway and an S8300 Media Server. The following lists are provided Installer’s Checklist: Tools, software, laptop settings, customer network information. - Page 348 You will not be able to obtain the license file or to perform remote feature activation without the SSO login. dial plan IP addressing plan List of customer-provided IP services Installation and Upgrades for G700 and S8300 December 2003...
-
Page 349: Serial Number And Login Information
Serial Number and Login Information Serial Number and Login Information G700 Serial Numbers Logins Name & Password S8300 Media Server P330 Stack G700 Media Gateway SSO Authentication Login anonymous email address Communication Manager SAT Installation and Upgrades for G700 and S8300 December 2003... -
Page 350: Set-Up For P330 Stack Processor
IP address gateway IP address set time protocol sntp-protocol | time-protocol set time server IP address of time server set timezone zone name - <hours> (offset from GMT) Installation and Upgrades for G700 and S8300 December 2003... -
Page 351: Set Up For G700 Media Gateway Processor (Mgp)
Information Checklists Set Up for G700 Media Gateway Processor (MGP) Set Up for G700 Media Gateway Processor (MGP) G700 Media Gateway # Prompt: MG-???-n (super)# type configure to change prompt to MG-???-n (configure)# Command Requested Field Information to be Entered... -
Page 352: Set Up For Voip Resources
G700 Media Gateway # Command Requested Field Information to be Entered set interface voip number V0 for resident VoIP resource of the G700 ip address number (v + slot #) ip address number (v + slot #) ip address number (v + slot #) -
Page 353: Set Up For S8300 Media Server
Network Time Server Enable/Disable NTP IP addresses of designated Network Time Servers Trusted Key, Requested Key, leave blank Control Key Do Not Install a New Keys File Default Set Modem Interface IP address Installation and Upgrades for G700 and S8300 December 2003... -
Page 354: Installation Site Information
Sales/AE phone: Other Contact Info: Salesperson/ Account Exec Notes to installer: access procedures, safety/security procedures Name Title Phone: FAX: Mobile: Pager: email: Access Contact Off-hours contact: Installer Name Date of Installation Installation and Upgrades for G700 and S8300 December 2003... -
Page 355: Stack Layout
Expansion Module Media Gateway (module) # or P330 switch # Expansion Module Media Gateway (module) # or P330 switch # Expansion Module Media Gateway (module) # or P330 switch # Expansion Module Installation and Upgrades for G700 and S8300 December 2003... - Page 356 Information Checklists Stack Layout Installation and Upgrades for G700 and S8300 December 2003...
-
Page 357: C Equipment List
Avaya Expansion Module interface slot. The Avaya G700 Media Gateway is designed to offer options and scalability. A customer will be able to mix and match Media Modules, as well as stack and/or add additional Avaya G700 Media Gateways as they grow in size. Material Code: 170896... - Page 358 Table 18: Equipment List: G700 Media Gateway Power Cords G700 Media Gateway Power Cords Supplies Power to the G700 Media Gateway. One cord per gateway is required, and there are various cords depending on the power required for the country in which the unit will be installed.
- Page 359 *CCMS messages tunneled over H.248 Signaling Protocol *TFTP server The S8300 Media Server can act as the primary server of the G700 Media Gateway, or it can serve as a local survivable processor for remote/branch customer locations. Material Code: 170902...
- Page 360 Signal timing specifications for the MM712 support TDM Bus Timing in receive and transmit modes. The G700 Media Gateway supplies only +5 VDC and –48 VDC to the MM712 Media Module. Any other required voltages must be derived on the module.
- Page 361 Media Modules are used in a single chassis. This will provide for an additional 64 channels. This VoIP conversion resource in the G700 Media Gateway is an improved version of the Prowler board resource and from a configuration perspective, the two are the same. The capacity is 64 G.711 TDM/IP simultaneous calls, or 32 compression codec (G.729 or G.723) TDM/IP...
- Page 362 10/100Base-T ports. It allows up to 64 ports in a single switch and an impressive 640 per stack. Two LAGs can be created, with up to eight ports per group. 1 of 2 Installation and Upgrades for G700 and S8300 December 2003...
- Page 363 V.35 DTE Cable Used with the X330 WAN- 2USP. Material code: 108659194 Avaya MOD DUAL SPEED OC12/0C3 SMF 15KM Material code: 108659186 Avaya MOD DUAL SPEED OC12 OC3 MMF 500M 2 of 2 Installation and Upgrades for G700 and S8300 December 2003...
- Page 364 Equipment List Installation and Upgrades for G700 and S8300 December 2003...
-
Page 365: D Replacing The G700 Media Gateway
Module, Avaya Octaplane Module, or various Media Modules) may be reused in the replacement G700. To replace the G700, follow these steps: If the original G700 is still in operation, power down the system. This should be done at a time when there will be the minimum interruption in service. - Page 366 Replacing the G700 Media Gateway Installation and Upgrades for G700 and S8300 December 2003...
-
Page 367: Index
AC power Call Center adding G700 announcements switch configuration adjunct power connections Checklist 1, Install new G700 with S8300 Adjuncts Checklist 2, Install new G700 without S8300 connecting Checklist 3, Upgrade G700 with S8300 alarm wiring Checklist 4, Upgrade G700 without S8300... - Page 368 G700 Media Gateway IP phones rack mounting transition of control replace LSP/G700 Upgrade Tool SNMP alarming setup Gateway Installation Wizard grounding approved conductors connections requirements Media Modules safety Messaging IA770 multiple units Installation and Upgrades for G700 and S8300 December 2003...
- Page 369 S8700 Media Server safety instructions wiring telephone power supplies 1151A1 and 1151A2 power supply procedures Single Sign-On SSO RFA Single Sign-On site verification site-specific-option-number (sson) SNMP alarming on G700 Installation and Upgrades for G700 and S8300 December 2003...
- Page 370 Index Installation and Upgrades for G700 and S8300 December 2003...
Need help?
Do you have a question about the G700 and is the answer not in the manual?
Questions and answers