Avaya g700 Installation And Upgrades
Media gateway and media server
Hide thumbs
Also See for g700:
- Installing and upgrading (808 pages) ,
- Installing manual (768 pages) ,
- Installation manual (494 pages)

Related Manuals for Avaya g700


Summary of Contents for Avaya g700
-
Page 1: Installation And Upgrades
Installation and Upgrades for Avaya G700 Media Gateway and Avaya S8300 Media Server 555-234-100 Issue 8.1 June 2005... - Page 2 • System administration documents Warranty • Security documents Avaya Inc. provides a limited warranty on this product. Refer to your • Hardware-/software-based security tools sales agreement to establish the terms of the limited warranty. In • Shared information between you and your peers addition, Avaya’s standard warranty language as well as information...
-
Page 3: Checklist
• A reorder tone is received. 04DU9-IKN 6.0Y RJ48C Avaya attests that this registered equipment is capable of providing users access to interstate providers of operator services through the use of 04DU9-ISN 6.0Y RJ48C access codes. Modification of this equipment by call aggregators to block... -
Page 4: Checklist
Contact the state public utility commission, public service E-mail: totalware@gwsmail.com commission or corporation commission for information. For the most current versions of documentation, go to the Avaya support This equipment, if it uses a telephone receiver, is hearing aid compatible. Web site: http://www.avaya.com/support. -
Page 5: Table Of Contents
When to use each wizard ......About the Avaya Installation Wizard (IW) .... - Page 6 Logging in to the P330 Stack Processor with Device Manager..About Avaya Site Administration ......
- Page 7 Unpacking and checking the order ......Installing the G700 media gateway ......
- Page 8 Installation Overview ....... . . About G700 components ......
- Page 9 Configure the G700 Media Gateway ..... . . Install new firmware on the G700 ......
- Page 10 Downloading individual firmware files ....Configure the G700 ........
- Page 11 Identifying the FTP server for backing up data ....Obtaining S8300 software and G700 firmware ....
- Page 12 About upgrading the S8300B to release 3.0 and upgrading G700 firmware ......Major tasks to upgrade the S8300B to release 3.0 and upgrade the G700 firmware .
- Page 13 (only if new license and/or authentication files installed) ..Upgrade the G700 Firmware ......
- Page 14 About system access ....... Accessing the G700 ......
- Page 15 Avaya Fault and Performance Manager ..... Avaya Proxy Agent ....... .
- Page 16 Contents Avaya Site Administration ......Avaya Terminal Configuration ......
- Page 17 ASAI and DEFINITY LAN Gateway ......Avaya Interactive Response ......
- Page 18 Installation Overview ....... . . About G700 components ......
- Page 19 Configuring an X330 Expansion Module (If Necessary) ... . Install New Firmware on the G700 ......
- Page 20 Downloading individual firmware files ....Configure the G700 ........
- Page 21 Contents Prepare to install firmware on the G700 ..... . . Accessing the P330 Stack Processor ..... .
- Page 22 Identifying the FTP server for backing up data ....Obtaining S8300 software and G700 firmware ....
- Page 23 About upgrading the S8300B to release 3.0 and upgrading G700 firmware ......Major tasks to upgrade the S8300B to release 3.0 and upgrade the G700 firmware .
- Page 24 (only if new license and/or authentication files installed) ..Upgrade the G700 Firmware ......
- Page 25 Serial Number and Login Information ......G700 Serial Numbers .......
- Page 26 Appendix C: Equipment list......715 Appendix D: Install the Avaya TFTP server ....725 Index .
-
Page 27: About This Book
About this book Overview This document provides procedures to install, upgrade, or add to an Avaya G700 Media Gateway controlled by an Avaya S8300, S8500, or S8700/S8710 Media Server. It also includes information on connecting telephones and adjuncts to the G700. - Page 28 ● Chapter 10: Manual installation of a new G700 without an S8300 ● Chapter 11: Upgrade of an existing S8300A to R3.0 with manual upgrade of G700 ● firmware Chapter 12: Upgrade of an existing S8300B to R3.0 with manual upgrade of G700 ●...
-
Page 29: Conventions
Appendix A: Technical information contains specifications and other technical information ● that you need to install an S8300 Media Server with a G700 Media Gateway. Appendix B: Information checklists contains the pre-installation worksheets that you will ●... -
Page 30: Terminology
CLI commands and in the Web interface. In most of these cases, they are synonymous with service pack. Typography This section describes the typographical conventions for commands, keys, user input, system output, and field names. 30 Installation and Upgrades for Avaya G700 Media Gateway and Avaya S8300 Media Server... -
Page 31: Commands
Conventions Commands Commands are in constant-width bold type. ● Example: Type change-switch-time-zone and press Enter. Command variables are in bold italic type when they are part of what you must type, ● and in plain italic type when they are not part of what you must type. Example: Type ch ma machine_name, where machine_name is the name of the call delivery machine. -
Page 32: User Input
- The system displays the following message: The installation is in progress (Web output) The installation is in progress (CLI output) - Type y in the Message Transfer? field. 32 Installation and Upgrades for Avaya G700 Media Gateway and Avaya S8300 Media Server... -
Page 33: Downloading This Book
Downloading this book Downloading this book You can view or download the latest version of the Installation and Upgrades for Avaya G700 Media Gateway and Avaya S8300 Media Server, 555-234-100, from the Avaya Web site at: http://support.avaya.com. You must have access to the Internet, and a copy of Acrobat Reader must be installed on your personal computer. -
Page 34: Safety Labels And Security Alert Labels
The CD, Documentation for Avaya Communication Manager, Media Gateways and Servers, 03-300151, contains a comprehensive library of documents. For a summary of what is new in the June 2004 release of Avaya Communication Manager, see Highlights of Avaya Communication Manager, 555-245-704. -
Page 35: Technical Assistance
Technical assistance For more information on the Avaya G700 Media Gateway and related features, see the following books: Title Number Overview for Avaya G700 Media Gateway and Avaya S8300 Media 555-234-200 Server Maintenance Commands Reference 555-245-101 Maintenance Alarms Reference 555-245-102... -
Page 36: Trademarks
Fax, send your comments to: ● 1-303-538-1741 Ensure that you mention the name and number of this book, Installation and Upgrades for Avaya G700 Media Gateway and Avaya S8300, 555-234-100. 36 Installation and Upgrades for Avaya G700 Media Gateway and Avaya S8300 Media Server... -
Page 37: Section 1: Reference Information And Hardware Installation
This section contains chapters explaining the types of wizards that you can use for installations and upgrades, connection methods, and login methods. These chapters cover: Chapter 1: Roadmaps and reference information ● Chapter 2: Hardware installation for the G700 Media Gateway and S8300 Media Server ● Issue 8.1 June 2005... - Page 38 38 Installation and Upgrades for Avaya G700 Media Gateway and Avaya S8300 Media Server...
-
Page 39: Chapter 1: Roadmaps And Reference Information
Avaya Installation Wizard ● See Job Aid: Avaya Installation Wizard, 555-245-754. Gateway Installation Wizard ● See Job Aid: Avaya Gateway Installation Wizard, 555-245-756. Upgrade Tool ● See Job Aid: Upgrade Tool and Worksheets, 555-245-757. Note: These tools replace many normal installation or upgrade procedures described in Note: this document. -
Page 40: Where Are The Most Recent Versions Of The Wizards
LSP. †. Use UT to schedule upgrades of multiple gateways. Use the IW on site for an immediate upgrade of a single gateway or G700 stack. 40 Installation and Upgrades for Avaya G700 Media Gateway and Avaya S8300 Media Server... - Page 41 You will also use the Electronic Pre-installation Worksheet, which you get from your project manager. For the S8300/G700, you may also use the Name and Number List and the Custom Template with the wizard for more comprehensive custom installations.
-
Page 42: About The Avaya Installation Wizard (Iw)
2 of 2 About the Avaya Installation Wizard (IW) You can use the Avaya Installation Wizard (IW) as a tool to assist you in the installation and upgrade processes for S8300, S8500, and S8700/S8710 Media Servers, and G350 and G700 Media Gateways. -
Page 43: What The Iw Does And Does Not Do
The IW automates many but not all tasks in an S8300 Media Server installation. Tasks IW automates Of the tasks in Chapter 3, Installing a New G700 with an S8300, the IW automates the following: Installing Communication Manager service pack files, if any ●... -
Page 44: Electronic Worksheets And Templates
IW automatically pulls data to configure and install the S8300/S8500/S8700/S8710 Media Servers, G350/G700 Media Gateways, P330 Stack Processor, and VoiP Engines. The EPW also can be used to supply basic translations for the S8300/G700 configuration.The default values used by the wizard can be viewed at http://support.avaya.com/avayaiw under the "View Default Parameters"... -
Page 45: About The Upgrade Tool
Install a new LSP or G350 or G700 Media Gateway. ● For each new installation, you must be on site and use the Avaya Installation Wizard (for an LSP), the Avaya Gateway Installation Wizard (for a media gateway), or perform a manual installation. -
Page 46: About The Avaya Gateway Installation Wizard
V1. The GIW enables you to configure the gateway IP addresses without having to enter CLI commands. You can also use the GIW to install firmware on the G700 and its components. Use the GIW to configure a new G700 Media Gateway that is controlled by a remote S8300, S8500, or S8700/S8710 Media Server and that does not have an S8300 LSP. -
Page 47: About Connection And Login Methods
Media Server and the Avaya™ G700 Media Gateway. Use this chapter as a reference for the other chapters in this book. The procedures in this book assume that you are connecting to the S8300 and/or the G700 with an Avaya Services laptop. However, the methods apply for any type of PC. -
Page 48: Laptop Configuration For Direct Connection To The Services Port
NetSwitcher configures a profile for each type of system for easy future access without requiring you to reset TCP/IP properties or browser settings manually. NetSwitcher is available from an Avaya Services CTSA. 48 Installation and Upgrades for Avaya G700 Media Gateway and Avaya S8300 Media Server... -
Page 49: What Network Settings Are Required On The Laptop
About connection and login methods What network settings are required on the laptop A laptop connected directly to the Services Ethernet interface on the S8300, S8500, or S8700/ S8710 Media Server requires a specific configuration as described in this section. On any operating system, the network settings need to reflect the following: TCP/IP properties. - Page 50 - Enabled appears when the laptop's Ethernet cable is connected to the server. - Disabled or unplugged appears if the NIC is not connected to anything. 50 Installation and Upgrades for Avaya G700 Media Gateway and Avaya S8300 Media Server...
- Page 51 About connection and login methods To change TCP/IP properties (Windows 95, 98, NT 4.0, and Millennium Edition [ME]) 1. Access your computer's network information. On your desktop: - Windows 95, 98, and NT: Right-click Network Neighborhood. - Windows ME: Right-click My Network Places. 2.
- Page 52 Type 192.11.13.6 in the Exceptions box. If there are other entries in this box, add to the list of entries and separate entries with a “;”. - iii. Click OK to exit. 52 Installation and Upgrades for Avaya G700 Media Gateway and Avaya S8300 Media Server...
- Page 53 About connection and login methods - For Netscape: a. Select Edit > Preferences. b. Under Category, click Advanced. c. Click Proxies. d. If Direct connection to the Internet is selected, no change is necessary; click Cancel to exit. e. If Direct connection to the Internet is not selected, you can: - select it and click OK to exit - Leave it unselected and configure your browser to bypass the proxy server whenever you are connected to the S8300 services port:...
-
Page 54: About Connection Methods
Location field to access the server: 192.11.13.6 Connecting a laptop to the G700 serial port To configure a G700 that does not have an S8300, you may need to set up a direct connection from your laptop’s serial port to the G700 Console (serial) port. -
Page 55: Connecting A Laptop To The Customer Lan
G700. a. Attach one end of the RS-232 cable to the RJ-45 jack on the front of the G700 that is the stack master. The serial port is on the lower right side of the chassis, labeled Console. -
Page 56: Setting Up Windows For Modem Connection To The Media Server (Windows 2000 Or Xp)
4. In the Phone number field, enter the appropriate telephone number inserting special digits such as 9 and 1 or *70, if necessary. 5. On the Connection Availability screen, click For all users or Only for myself, as appropriate. 56 Installation and Upgrades for Avaya G700 Media Gateway and Avaya S8300 Media Server... -
Page 57: Configuring The Remote Pc For Ppp Modem Connection (Windows 2000 Or Xp, Terminal Emulator, Or Asa)
About connection and login methods 6. On the Completing the Network Connection Wizard screen, type the name you want to use for this connection. This name will appear in the Network and Dial-up Connections list. 7. Check the Add a shortcut to my desktop, if desired, and click Finish. 8. -
Page 58: Using Windows For Ppp Modem Connection (Windows 2000 Or Xp)
Type telnet <ip-address>, where <ip-address> is the Server IP address, as noted in the Dialup Status box from Step 9. 11. Access SAT or use the CLI commands as needed. 58 Installation and Upgrades for Avaya G700 Media Gateway and Avaya S8300 Media Server... -
Page 59: Using Avaya Terminal Emulator For Lan Connection To Communication Manager
To use Avaya Terminal Emulator for LAN connection to Communication Manager 1. Double-click the Terminal Emulator icon on your desktop. Alternatively, go to the Start menu, select Programs, then select Avaya, and finally select Terminal Emulator. The system displays the Terminal Emulator. -
Page 60: Using Avaya Terminal Emulator For Modem Connection To Communication Manager
12. Log in to Communication Manager to access the SAT command prompt screen. If you are logging in as craft, you log in to the S8300 Linux software. Then, see Open the Communication Manager SAT Screens on page 66. 60 Installation and Upgrades for Avaya G700 Media Gateway and Avaya S8300 Media Server... -
Page 61: About Log In Methods
Telnet or the built-in Web Interface and how to start a SAT session. The last procedure in this section describes logging in to the P330 Stack Processor when you have a direct serial connection to the G700 Console port. These procedures assume: You have a crossover cable directly connected from your laptop to the Services port on the ●... -
Page 62: Logging In To The S8300 Web Interface From Your Laptop
Welcome Screen 4. Click the Continue button. 5. Accept the Client Authentication and Security Certificate to access the Login screen. The system displays the Login screen. 62 Installation and Upgrades for Avaya G700 Media Gateway and Avaya S8300 Media Server... - Page 63 About connection and login methods Login Screen 6. Log in as craft. 7. Select yes for Suppress Alarm Origination. The system displays the main menu for the Integrated Management Suite. Issue 8.1 June 2005...
- Page 64 8. Click on the link for Launch Maintenance Web Interface The system displays the S8300 main menu in the left panel and a usage-agreement notice in the right window. 64 Installation and Upgrades for Avaya G700 Media Gateway and Avaya S8300 Media Server...
- Page 65 S8300 Main Menu/Usage Agreement Notice 9. Check the top of the left panel. Note that: - The Avaya media server you are logged into is identified by name and server number. - The S8300 media server number is always 1.
-
Page 66: Open The Communication Manager Sat Screens
3. Telnet to the P330 stack master stack processor. Type telnet <xxx.xxx.xxx.xxx>, where <xxx.xxx.xxx.xxx> is the IP address of the P330 stack master processor on the customer’s LAN. 66 Installation and Upgrades for Avaya G700 Media Gateway and Avaya S8300 Media Server... -
Page 67: Logging In To The P330 Stack Processor With A Lan Connection
For a complete list of command line interface commands, type help or refer to the Avaya P330T User’s Guide (available at http://www.avaya.com/support). -
Page 68: Logging In To The P330 Stack Processor With A Direct Serial Connection
Roadmaps and reference information Logging in to the P330 Stack Processor with a Direct Serial Connection Use this procedure to access the G700 processors when your laptop is directly connected to the Console port using a serial cable. To access the G700 using the Console (serial) port 1. -
Page 69: About Avaya Site Administration
Management package. Configuring Avaya Site Administration When Avaya Site Administration is initially installed on a client machine, it needs to be configured to communicate with Communication Manager on the S8300 Media Server. When it runs initially, after downloading, you need to create a new entry for the switch connection. - Page 70 1. Click Start > Programs > Avaya > Site Administration. 2. Select the switch (media server) you want to access. 3. When prompted, log in. 4. When you are logged in, click Start GEDI. 70 Installation and Upgrades for Avaya G700 Media Gateway and Avaya S8300 Media Server...
-
Page 71: About Navigation For G700 Cli Commands
Note: This navigational aid assumes that you are logged in to the P330 Stack Note: Processor. Default mode is Supervisor with a P330-1(super)# command-line prompt. Table 4: Navigational aid for G700 CLI commands Command Purpose Prompt change to supervisor P330-y(super)#... - Page 72 The command-line prompts in an MGP session use the media gateway name that is assigned when the gateway is configured. You can telnet to another processor from a current telnet session. Differences between CLI commands for the G700 and G350 are described in an Application Note available at the Avaya Resource Library.
-
Page 73: About Terminal Emulation Function Keys For Communication Manager
About terminal emulation function keys for Communication Manager About terminal emulation function keys for Communication Manager When you log in to the Communication Manager SAT screens, your terminal emulation may not display function keys on the screen to help you determine which function keys to press. Use Table 5 as a guide for ntt terminal emulation. - Page 74 Roadmaps and reference information 74 Installation and Upgrades for Avaya G700 Media Gateway and Avaya S8300 Media Server...
-
Page 75: Chapter 2: Hardware Installation For The G700 Media Gateway And S8300 Media Server
555-233-150, for an overview of the G700 hardware and cabling. About hardware components This section describes the components of an Avaya G700 Media Gateway and an Avaya S8300 Media Server. What are the main elements of the G700 media gateway... -
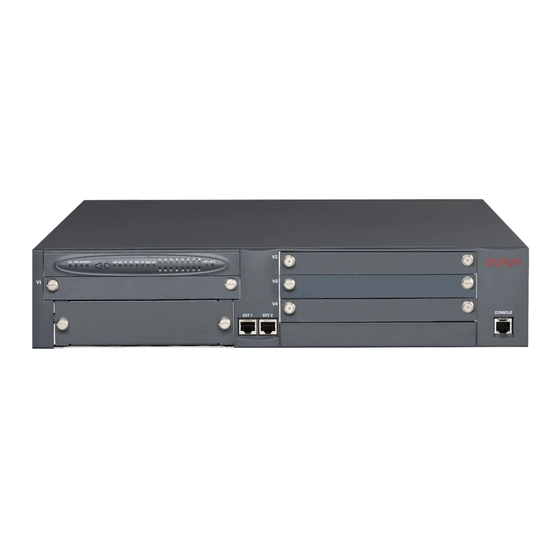
Page 76: What Comprises The G700 Media Gateway Chassis And Processors
4. Expansion module slot 9. Console interface What comprises the G700 media gateway chassis and processors The G700 Media Gateway chassis is a 19-inch, 2u rack-mountable unit. A partial list of technical specifications of the G700 appears in Appendix A: Technical information. - Page 77 1. Avaya MM710 T1/E1 Media Module 2. Avaya MM760 VoIP Media Module for additional VoIP resources 3. Avaya MM711 Analog Media Module for connection to 8 analog stations or CO trunks 4. Avaya MM714 Analog Media Module for connection to 4 analog stations and 4 CO trunks.
-
Page 78: What Are Data Expansion Modules
European Union countries. The use of a shielded cable for the MM710 is preferred for installations worldwide. The media modules enable the G700, with its primary controller, to host a variety of functions ranging from IP phones to traditional analog telephony ports. The media modules contain trunk or line interfaces and their associated circuitry. -
Page 79: What Are Stackable Ethernet Switches
What are stackable ethernet switches The G700 Media Gateway can accommodate any of the Avaya stackable ethernet switches. With stackable ethernet switches, customers can add additional IP ports to the G700 in an octaplane stack of up to 10 units cabled together. - Page 80 Ethernet ports. Maximum power consumption is 55 Watts. Its power output per PoE port is 15 Watts. A C360 switch can co-reside in a stack with G700 Media Gateways. As a result, a C360 switch can be used as an expansion module for a G700 Media Gateway. An Avaya C360 stack can contain up to 10 switches and up to three backup power supply units.
-
Page 81: What Are The Functions Of The S8300 Led Indicators
What are the functions of the S8300 LED Indicators A set of LED indicators the faceplate of the S8300 are separate from those of the G700. A shutdown button is also on the faceplate, which when depressed for about three seconds, will shut down the system, including the operating software on the S8300. -
Page 82: Media Servers Supporting The G700 Media Gateway
S8500, or S8700/S8710 Media Server. The S8300 is on a circuit pack that is always installed in slot V1 of a G700. The S8500 or S8700/S8710 is housed in a separate box that connects to the G700 over a network through a C-LAN circuit pack. Both media servers can support multiple G700s. -
Page 83: What Is The S8500 Media Server
What is the S8500 media server The G700 Media Gateway can be controlled by an external S8500 Media Server. The S8500 is connected to the G700 over the network through a C-LAN circuit pack in the G600, SCC1, or MCC1. -
Page 84: About Installation Planning
Planning and implementation personnel have conducted preliminary inspections of the site ● and of the other equipment to assure that the S8300/G700 solution will operate at its full potential. A data network readiness assessment has been completed to assure that the solution will ●... -
Page 85: Who Needs A Single Sign-On (Sso) Authentication Login
● sales_market, services-voice, training tools and procedures to select RFA (or go directly http://rfa.avaya.com). Associates should point their browsers to the Avaya Associate portal (or go directly to: ● http://rfa.avaya.com). Contractors should point their browsers to Avaya.com (or go directly to: http:// ●... -
Page 86: About Installation And Cabling
In combinations of Media Gateways and Avaya C360 family devices. ● Up to ten G700 Media Gateways and/or Avaya C360 devices can be combined in a single stack. The G700s can be controlled by an Avaya S8300, S8500, or S8700/S8710 Media Server. -
Page 87: Verifying Environmental Conditions
In these cases, access to the G700 Media Gateway is gained by the use of a tool (such as a lock and key) or other means of security. -
Page 88: Unpacking And Checking The Order
89 shows a stack of four G700 Media Gateways installed in a rack-mounted configuration. Of the four G700s, only one contains an S8300 Media Server in slot V1 (second up from the bottom). 88 Installation and Upgrades for Avaya G700 Media Gateway and Avaya S8300 Media Server... -
Page 89: Preparing The G700 Media Gateway
Gateway after you have mounted the empty chassis in the rack. It is possible to equip an empty G700 chassis before positioning it in the rack. If you are working where space is limited, you may wish to prepare the G700 before rack insertion. -
Page 90: Mounting The G700 Media Gateway In The Rack
4. Tighten with the screwdriver. 5. Repeat on the other side. If the G700 is to be a table-top unit, four feet must be attached to the bottom of the unit. Use the following procedure to do this: To affix feet on the table-top G700... - Page 91 About installation and cabling The G700 is shipped with 3 sets of four mounting screws. Choose the set of screws that ● match the screw holes in the rack being used. The G700 weighs 22.5 pounds (10 kg) empty and between 27 and 34 pounds (between 12 ●...
-
Page 92: Inserting The Avaya S8300 Media Server (If Necessary For Standalone Service Or Lsp)
Local Survivable Processor (LSP). The S8300 can only be inserted in the slot (v1) on the left side of the G700 Media Gateway. The LED module must be pulled from the G700 chassis to provide clearance for the S8300 Media Server. - Page 93 About installation and cabling 3. Engage both sides of the S8300 Media Server module in the interior guides and guide the module halfway into the chassis. Figure 9: Insert S8300 4. Align the LED module in its guides and gently push it into place, keeping the LED module safely within its guides and maintaining an even pressure to assure that the module does not become twisted or disengage from the guides.
-
Page 94: Inserting Media Modules
"Trunk". Avaya MM712 8-port DCP Media Module ● Avaya MM717 24-port DCP Media Module (Install no more than 3 in a single G700. The ● ports must be used in-building only) Avaya MM720 8-port BRI Media Module (for trunks or stations) ●... - Page 95 To insert media modules 1. Remove the blank plate from the empty bay. 2. Position the media module squarely before the selected bay on the front of the G700 Media Gateway chassis and engage both sides of the module in the interior guides.
- Page 96 360). At this point, you have readied the G700, inserted the S8300, if required, and inserted the media modules, as described in the planning documentation. Next, if required, the Expansion Module should be inserted into its bay.
-
Page 97: Inserting An Expansion Module
Inserting an Expansion Module The Expansion Modules provide increased networking and connectivity capabilities. These modules may be mounted on the G700 Media Gateway in the slot on the lower left side of the unit below slot V1 (see G700 media gateway with an S8300 media server: front view page 76). -
Page 98: Inserting An Avaya X330Stk Stacking Module
G700 Media Gateways can be mounted in equipment stacks with routers, switches, or other G700s. The stack is limited to ten elements. To link multiple units, each G700 must be equipped with an Avaya X330STK Stacking Module, which is mounted through the rear panel (back view) of the G700. -
Page 99: Cabling Multiple Units
Avaya P333T User Guide for installation and cabling information. To link multiple units, each G700 Media Gateway must be equipped with an Avaya X330STK Stacking Module on the rear panel. Then, each unit in the stack is linked to the one above it. Finally, the bottom unit is linked to the top unit. - Page 100 Hardware installation for the G700 Media Gateway and S8300 Media Server Figure 14: Cabling Multiple Units in a Single Rack Figure notes: 1. Short Octaplane cable (X330SC) 2. Redundancy cable (X330RC) 100 Installation and Upgrades for Avaya G700 Media Gateway and Avaya S8300 Media Server...
- Page 101 About installation and cabling To connect units within a single stack 1. Connect the light grey connector of the short Avaya X330SC cable (12 in, 30 cm) to the port marked “to upper unit” in the bottom-most stack element. 2. Connect the dark grey connector of the same short X330SC cable to the port marked “to the lower unit”...
- Page 102 2. Redundancy cable (X330RC) 3. Long cable (X330LC) You have now mounted the fully equipped Avaya G700 Media Gateway in the rack, and cabled units together as described in the planning documents. When all the units are mounted, and cabled, you are ready to connect to electrical ground conductors.
-
Page 103: Attaching Ground Conductors
Agency (NFPA) 70, or the applicable electrical code in the country of installation. What are general grounding requirements For AC Input: - Two safety grounds are required to ensure safe operation of the G700 Media Gateway: Ground conductor — part of the AC power cord ●... -
Page 104: What Are Approved Grounds
In these cases, access to the G700 Media Gateway is gained by the use of a tool (such as a lock and key) or other means of security. - Page 105 About installation and cabling Acceptable water pipe ● A metal underground water pipe, at least 1/2-in. (1.3 cm) in diameter, in direct contact with the earth for at least 10 ft. (3m). The pipe must be electrically continuous (or made electrically continuous by bonding around insulated joints, plastic pipe, or plastic water meters) to the point where the protector ground wire connects.
-
Page 106: Connecting The Safety Ground
3. Replace the ground screw to the chassis and securely tighten the screw such that it cannot be loosened without the use of a tool. The ground block is provided for use with more than one G700 (or other Cajun devices) in the rack. It is usually mounted by the customer electrician. -
Page 107: Connecting Ac Power
What are the G700 AC power requirements The G700 Media Gateway uses an auto-ranging 100-240 Vac power supply, 50 to 60 Hz, 5 A maximum at 100-120 Vac and 2 A maximum at 200-240 Vac. The AC power source must be single phase, 3-conductor (Line, Neutral and Ground) with a 15 A circuit breaker for 100-120 Vac or a 10 A circuit breaker for 200-240 Vac. - Page 108 The following example is for North American voltages (110 to 125 Vac). Use the Note: appropriate voltages for local power. 2. Set the VOM to the lowest scale on which you can read 130 Vac. 108 Installation and Upgrades for Avaya G700 Media Gateway and Avaya S8300 Media Server...
-
Page 109: Plugging In Ac Power
Server, and the G700 Media Gateway flash at power-up. Each element conducts a series of self-tests. 3. The LEDs on the G700 LED panel flash, and the red ALM LED lights up until the self-tests on the G700 Media Gateway have completed. -
Page 110: Checking And Connecting Dc Power
Perform this check procedure only if you are installing a G700 that is using the Note: DC input-power option rather than AC input-power. Before you connect the G700 media gateway DC feed cable to the DC power source, check the DC power source using a KS-20599 digital voltmeter (or equivalent). To check DC power 1. - Page 111 4. Connect the DC feed cable for each G700 to the G700 chassis. 5. Connect the DC feed cable for each G700 to the DC power source. a. Connect the red insulated 10 AWG lead to the -48Vdc Return (positive) source.
- Page 112 Hardware installation for the G700 Media Gateway and S8300 Media Server 112 Installation and Upgrades for Avaya G700 Media Gateway and Avaya S8300 Media Server...
-
Page 113: Section 2: G700 Installation And Upgrades - Wizards
This section contains procedures to install or upgrade an Avaya G700 Media Gateway controlled by an Avaya S8300, S8500, or S8700-series Media Server, using one of the available Avaya wizard tools. Information on connecting telephones and adjuncts to the G700 is... -
Page 114: About The Installation Roadmap And Task Lists
Use Checklist 1 to install a G700 Media Gateway with the following characteristics: The G700 has an S8300 Media Server configured as the primary controller ● The G700 has an S8300 Media Server configured as an LSP and is controlled by an ● S8300, S8500, or an S8700-series Media Server. - Page 115 About the Installation Roadmap and Task Lists For help with connecting to and logging in to the G700 or S8300, see About connection methods on page 54. Checklist 1: Install New G700 with an S8300 (Primary or LSP) Major Tasks...
- Page 116 - Back up the system Controller) on page 179 - Check planning documentation - Connect and administer test endpoints - Complete electrical installation - Enable adjunct systems 2 of 3 116 Installation and Upgrades for Avaya G700 Media Gateway and Avaya S8300 Media Server...
-
Page 117: Install A New G700 Without An S8300
Install a New G700 without an S8300 Use Checklist 2 to install a G700 Media Gateway with the following characteristics: The G700 does not have an S8300 and is controlled by an external S8300, S8500, or ● S8700-series Media Server. - Page 118 Complete the Installation - Check planning documentation Process on page 209 - Connect and administer test endpoints - Complete electrical installation - Enable adjunct systems 2 of 2 118 Installation and Upgrades for Avaya G700 Media Gateway and Avaya S8300 Media Server...
-
Page 119: Upgrade An Existing G700 With An S8300A To R3.0
The G700 has an S8300A Media Server configured as an LSP and is controlled by either ● an S8300, S8500, or S8700-series Media Server. You will use Chapter 5 with this checklist. For help with connecting to and logging in to the G700 or S8300, see About connection methods on page 54. - Page 120 Checklist 3: Task List to Upgrade an Existing G700 with an S8300A (R1.x or R2.0.x to R3.0) (continued) Major Tasks Subtasks Upgrading the S8300A - Install the pre-upgrade service pack page 237 - Linux Migration Backup - Replace the S8300A...
-
Page 121: Upgrade An Existing G700 With An S8300B To R3.0
The G700 has an S8300B Media Server configured as an LSP and is controlled by either ● an S8300, S8500, or S8700-series Media Server. You will use Chapter 6 with this checklist. For help with connecting to and logging in to the G700 or S8300, see About connection methods on page 54. - Page 122 - Busy out trunks - Check for translation corruption - Resolve alarms - Re-enable alarm origination - Back up system - Restart LSPs, if any 2 of 2 122 Installation and Upgrades for Avaya G700 Media Gateway and Avaya S8300 Media Server...
-
Page 123: Checklist 5
Upgrade an Existing G700 without an S8300 Use Checklist 5 to upgrade a G700 Media Gateway with the following characteristics: The G700 does not have an S8300 and is controlled by an external S8300, S8500, or ● S8700-series Media Server. - Page 124 124 Installation and Upgrades for Avaya G700 Media Gateway and Avaya S8300 Media Server...
-
Page 125: Chapter 3: Installing A New G700 With An S8300
Chapter 3: Installing a new G700 with an S8300 This chapter covers the procedures to install a new Avaya G700 Media Gateway with an Avaya S8300B Media Server. The S8300 can be configured as either the primary controller or as a local survivable processor (LSP). -
Page 126: Installation Overview
Installation Overview About G700 components A P330 Stack Processor is built into the G700 Media Gateway. (This processor is also known as the Layer 2 switching processor). The G700 also contains an MGP processor, a VoIP processor, and media modules. Updating the firmware for one or more of these processors and/ or media modules is a required part of most S8300 software upgrades. -
Page 127: About Access To The Server Cd
Recommended: Place the CD in the CD-ROM drive on the technician’s laptop. This ● method requires that the Avaya TFTP Server software (available at support.avaya.com) is installed on the technician’s laptop. This method requires that the S8300B does not have Communication Manager software installed on its hard drive. -
Page 128: System Access
Before the P330 stack processor is configured with an IP address, the only way to access it is with a direct connection from your laptop to the Console port on the G700. With this connection, you can assign the IP addresses to the G700 processors, which can then be accessed over the customer LAN. -
Page 129: Connecting Directly To The Remote Primary Server (S8300, S8500, Or S8700)
- Opening the Web interface on the S8300 and using the main menu 2. Upgrade the G700 firmware by: - Opening the Web interface on the primary server and using the Avaya Installation Wizard or Upgrade Tool - Opening a telnet session to the P330 stack processor and perform the installation... -
Page 130: Before Going To The Customer Site
You must have the Avaya TFTP server software installed on your laptop or take a USB CD-ROM drive to the site. If you do not already have the Avaya TFTP server installed on your laptop, you can obtain the software from the Avaya Support website and install it as described in Appendix D: Install the Avaya TFTP server. -
Page 131: Collecting Installation Information
Getting the Serial Number of the G700, if Necessary For a new installation of a G700 with an S8300, you need the serial number of the G700 Media Gateway in order to complete the creation of the customer’s license file on the rfa.avaya.com web site. -
Page 132: Obtaining Service Pack Files, If Needed
Obtaining service pack files, if needed If one or more service packs are required for this installation or upgrade procedure, and the service pack files are not on your software CD, download the service pack files from the Avaya Support web site to your laptop. -
Page 133: If Using Ia770, Obtaining Service Pack And Language Files
If an IA770 service pack is required after the upgrade, obtain the service pack file from the Avaya Support web site. To obtain an IA770 service pack file 1. On the Avaya Support website, double click on Find Documentation and Downloads by Product Name. 2. Select: >... -
Page 134: Obtaining Optional Language Files
The Avaya authentication file contains the logins and passwords to access the S8300 media server. This file is updated regularly by Avaya services personnel, if the customer has a maintenance contract. All access to Communication Manager from any login is blocked unless a valid authentication file is present on the S8300 media server. - Page 135 Also, the ART process is available only to Avaya personnel. You need an ART login ID and password, which you can set up at the ART web site. Non-Avaya personnel must contact their service support or customer care center for INADS addresses, if required.
- Page 136 In addition to your credentials, you will need to enter the customer’s Product ID or the FL or IL number. Business Partners must use the dadmin password. Call 877-295-0099 for more information. 136 Installation and Upgrades for Avaya G700 Media Gateway and Avaya S8300 Media Server...
-
Page 137: Install The S8300
3. Secure the S8300 faceplate with the thumb screws. Tighten the thumb screws with a screw driver. 4. Power up the G700 by plugging in the power cord. 5. Connect the laptop to the Services port on the faceplate of the S8300. -
Page 138: Installing Communication Manager Software
3. Avaya recommends using a UPS backup for media servers. If a UPS is present, make sure the G700 is plugged into the UPS. 4. Verify that all Ethernet connections are secure, to ensure the file transfer process is not interrupted. - Page 139 Install the S8300 Note: Shut down all applications on the laptop except for the TFTP server and the Note: telnet client. Other background applications can overly use laptop resources. Note: Ensure that the Outbound file path is set to the root of your laptop’s CD-ROM Note: drive.
- Page 140 Alternatively, you can obtain a USB CD-ROM drive or an S8300B with only the RP software and proceed from Remastering the hard drive and installing the software on page 138. 140 Installation and Upgrades for Avaya G700 Media Gateway and Avaya S8300 Media Server...
- Page 141 Install the S8300 The first RP screen Tip: To navigate on these screens, use the arrow keys to move to an option, then Tip: press the space bar to select the option. Press Enter to submit the screen. 4. Select Install and press Enter. If a Warning screen appears, RP Warning screen select Yes and press Enter.
- Page 142 5. Select the appropriate release version (if more than one) then select OK and press Enter. 6. The Run AUDIX Installation screen appears. Run AUDIX Installation screen 142 Installation and Upgrades for Avaya G700 Media Gateway and Avaya S8300 Media Server...
- Page 143 Install the S8300 7. Select Yes if you want to install IA770 concurrently with Communication Manager. Select No if you do not. Then press Enter. At this point, the following processes are initiated: a. The S8300 hard drive is reformatted. b.
-
Page 144: About The Avaya Installation Wizard
Arrange access to another hard drive (comcode 700307028) should it be necessary to ● perform the TFTP remaster procedure on it. About the Avaya Installation Wizard You can use the Avaya Installation Wizard (IW) to perform all of the following tasks: Configure the S8300 Media Server ● Configure the G700 Media Gateway ●... -
Page 145: Enabling Network Time Servers
Internet. To use a network time server, the NTP service must be enabled. The Avaya Installation Wizard prompts for enabling the NTP service. -
Page 146: Configure The G700 Media Gateway
Configuring an X330 Expansion Module (if necessary) ● Install new firmware on the G700 The IW performs the procedures to install firmware on the G700 Media Gateway processors and media modules. These procedures include: Verifying the Contents of the tftpboot directory ●... -
Page 147: Electronic Worksheets And Templates
To allow the IW to automatically configure and install the system, obtain the following files from the project manager and load them onto your laptop: Electronic Pre-Installation Worksheet ● Name and Number List (S8300 with a G700 or G350 only) ● Custom Template (S8300 with a G700 or G350 only) ●... -
Page 148: Custom Template (S8300 With G700 Or G350 Only)
Installation Wizard screen displays. You can use the currently installed version of the IW, or you can choose to install a new version of the IW from your laptop. 148 Installation and Upgrades for Avaya G700 Media Gateway and Avaya S8300 Media Server... - Page 149 Using the Avaya Installation Wizard (IW) Upgrade Installation Wizard screen When you are finished with the Upgrade Installation Wizard screen, click Continue. Following brief Overview and Auto Discovery screens that display system data for the installation, such Server Type ●...
- Page 150 IW at this time. When you are finished with this screen, click the Continue button. The Usage Options screen displays. Usage Options screen 150 Installation and Upgrades for Avaya G700 Media Gateway and Avaya S8300 Media Server...
- Page 151 Using the Avaya Installation Wizard (IW) You can choose any of several Wizard Usage options. For a new installation, you could select the Install a Primary Controller radio button if the S8300 were going to be operated in primary controller mode; or you could select one of the LSP options, depending on the type of primary controller the system has.
- Page 152 Optional Services - you can identify any or all of these optional services for this installation: ● - Uninterruptible Power Supply (UPS) - identify the UPS system on the network for this solution 152 Installation and Upgrades for Avaya G700 Media Gateway and Avaya S8300 Media Server...
- Page 153 Using the Avaya Installation Wizard (IW) - Domain Name Service (DNS) - identify the DNS servers on the customer network - Network Time Protocol (NTP) - select the NTP option for time-of-day (TOD) synchronization for this solution. Depending on the solution, additional screens allow you to define NTP server IP addresses, trusted keys (if necessary), multicast client support, and other support.
- Page 154 Firmware screen To check the firmware versions, click the Action Icon. The Firmware - Media Gateway <serial number> screen displays. Firmware - Media Gateway <serial number> screen 154 Installation and Upgrades for Avaya G700 Media Gateway and Avaya S8300 Media Server...
- Page 155 Using the Avaya Installation Wizard (IW) This screen shows for both the Media Gateway and its media modules the firmware resident on the component and the available versions of firmware present on your laptop. Note: New firmware can be uploaded from the previous screen. Click Back to return to Note: that page.
- Page 156 Template radio button, then browse to the location on your laptop where you have stored the Custom Template, and click Continue. After the Call Routing and Extension Ranges screens, the Name/Number List screen displays. 156 Installation and Upgrades for Avaya G700 Media Gateway and Avaya S8300 Media Server...
-
Page 157: Installing Ia770 Service Pack Files, If Any
Avaya Support Web Site at http://support.avaya.com. To obtain the post-upgrade service pack file and documentation 1. On the Avaya Support Web site, click on Find Documentation and Downloads by Product Name. 2. Under the letter "I", select IA 770 INTUITY AUDIX Messaging Application. -
Page 158: Configuring An X330 Expansion Module (If Necessary)
This opens the window that contains the document for installing IA770 software. Configuring an X330 Expansion Module (if necessary) User Guides and Quick Start Guides for the expansion modules are available on the Avaya Support web site: To obtain the appropriate Avaya Support Web site document 1. -
Page 159: Setting Rapid Spanning Tree On The Network
To set an edge-port, type set port edge admin state module/port edgeport. For more information on the Spanning Tree CLI commands, see the Avaya P330T User’s Guide (available at http://www.avaya.com/support). Issue 8.1 June 2005... -
Page 160: Administer Communication Manager
A separate, possibly remote, S8300. ● In the first case, the G700/S8300 you installed is a standalone (or “ICC”) configuration. In the second case, the S8300 you installed is configured as an LSP. Perform one of the following two administration procedures in this section: Administering an S8300 primary controller ●... -
Page 161: Assigning Node Names And Ip Addresses For The Lsps
Administer Communication Manager In this section, you will use the SAT interface to: Assigning Node Names and IP Addresses for the LSPs ● Administering Network Regions ● Associating LSPs with Network Regions ● Administering IP Interfaces ● Administering the LSP Form ●... -
Page 162: Administering Network Regions
Installing a new G700 with an S8300 Administering Network Regions Before assigning an IP network region to a G700, you must define network region on the IP Network Region form. After a network region is defined, you can assign it to the various network elements (servers, gateways, IP phones). -
Page 163: Associating Lsps With Network Regions
Administer Communication Manager 2. If necessary, complete the fields as described in ‘‘Administration for Network Connectivity for Avaya Communication Manager, 555-233-504.’’ Note: It is strongly recommended to use the defaults in the screen. However, for the Note: RTCP Enabled and RSVP Enabled fields, the entry should be n (no). -
Page 164: Administering Ip Interfaces
LSP screen. To add LSP names to the LSP screen 1. At the S8300 SAT prompt, type change lsp to open the LSP screen. 164 Installation and Upgrades for Avaya G700 Media Gateway and Avaya S8300 Media Server... - Page 165 Administer Communication Manager LSP Screen change lsp Page 1 of LOCAL SURVIVABLE PROCESSOR Number NAME IP Address Service Translations State? Updated node-10-LSP_ 192.168.1.50 in-service 14:21 5/4/2003 ____________ out-of-service ____________ out-of-service ____________ out-of-service ____________ out-of-service ____________ out-of-service ____________ out-of-service ____________ out-of-service ____________ out-of-service ____________...
-
Page 166: Administering An S8500 Or S8700 Primary Controller
S8700 media server, see the Installation documentation on the Documentation for Avaya Communication Manager, Media Gateways and Servers CD, 03-300151. 166 Installation and Upgrades for Avaya G700 Media Gateway and Avaya S8300 Media Server... -
Page 167: Assigning Node Names And Ip Addresses For The C-Lans And Lsps
For a G700 with an S8300 LSP and an S8500 or S8700 as the primary controller, there may be more than one network region, since there can be up to 250 G700 media gateways connected to the S8500 or S8700 with thousands of telephones in the network. - Page 168 Installing a new G700 with an S8300 The G700, in this case, may also share the same network region as the CLAN board(s). However, it may have a different network region because of the geographic distances of the connections between the G700 and the S8500 or S8700. The G700 network region may also differ because of the nature of the endpoints connected to it.
- Page 169 RTCP Enabled and RSVP Enabled fields, the entry should be n (no). 3. If the network region of the G700 (1 in this example) is different from that of the S8500 or S8700 CLAN board(s), you must interconnect the two regions.
-
Page 170: Assigning Lsps To The Network Regions
This should have already been established as a part of normal S8500 or S8700 Note: installation. 1. Type change ip-interfaces to open the IP Interfaces screen. 170 Installation and Upgrades for Avaya G700 Media Gateway and Avaya S8300 Media Server... - Page 171 The subnet mask associated with the IP address for this IP interface. For more information on IP addresses and subnetting, see “Administration for Network Connectivity for Avaya Communication Manager, 555-233-504”. Gateway The address of a network node that serves as the default Address gateway for the IP interface.
-
Page 172: Administering The Lsp Form
____________ out-of-service ____________ out-of-service ____________ out-of-service ____________ out-of-service ____________ out-of-service ____________ out-of-service ____________ out-of-service ____________ out-of-service ____________ out-of-service ____________ out-of-service ____________ out-of-service ____________ out-of-service ____________ out-of-service 172 Installation and Upgrades for Avaya G700 Media Gateway and Avaya S8300 Media Server... -
Page 173: Administering The Media Gateway
Administer Communication Manager 2. Enter the node name for each LSP supported by the primary controller. 3. Submit the form. Administering the Media Gateway To perform the procedures in this section, telnet to the primary controller, log in, and open a SAT session. - Page 174 5. If specifically requested by the customer or your planning documents, type gateway-announcements in the V9 field. This field allows you to enable announcements on the G700 media gateway. V9 is a virtual slot. There is no announcement board associated with it. The announcements for the G700 are available in the G700 firmware and are administered in the same way as announcements on the TN2301 circuit pack used on S8500 or S8700 port networks.
- Page 175 ANA MM MM710 T1/E1 MM The media modules installed in the G700 are listed next to their slot numbers. Verify that a G700 media gateway has been successfully added. To verify changes 1. At the SAT prompt, type list media-gateway.
- Page 176 If the G700 fails to register, two common causes are: - The serial number added as the Identifier for the G700 is wrong. To check, log back into the G700 gateway and type show system. Check the serial number that appears.
-
Page 177: Considerations For Ip Phones Supported By A Local Survivable Processor
TFTP server, as well as the directory on the TFTP server from which the phone receives its upgrades. When preparing a DHCP server to work with Avaya IP phones, there is an option that must be administered to allow the Avaya phone to receive the DHCP offer. This option is “site-specific-option-number”... -
Page 178: Transition Of Control From Primary Controller To Lsp
When the network connection between the G700 and the S8500 or S8700 goes down, control of endpoints connected to the G700 goes to the next point in the primary controller list, which will be either a second CLAN board or the LSP. At this point, the S8500 or S8700 alarms to notify the customer and services personnel that the network connection between the S8500 or S8700 and G700 has problems. -
Page 179: Complete The Installation Of The S8300 (If The Primary Controller)
Complete the Installation of the S8300 (if the Primary Controller) Complete the Installation of the S8300 (if the Primary Controller) Consult the planning documentation to obtain the necessary information to complete the installation. Part of the final process will be to: Connect and administer test endpoints ●... -
Page 180: If Using Ia770, Administer Communication Manager For Integrated Messaging
6. Click Start Backup. The system displays the results of your backup procedure on the Backup Now results screen. This completes the installation of the G700 Media Gateway with an S8300 Media Server as primary controller. If using IA770, administer Communication Manager for... -
Page 181: Complete The Installation Process (For An S8300 Lsp)
Part of the final process will be to: Connect and administer test endpoints ● Test endpoints ● Complete the electrical installation ● Enable adjunct systems ● This completes the installation of the G700 Media Gateway with an S8300 LSP. Issue 8.1 June 2005... - Page 182 Installing a new G700 with an S8300 182 Installation and Upgrades for Avaya G700 Media Gateway and Avaya S8300 Media Server...
-
Page 183: Chapter 4: Installing A New G700 Without An S8300
Chapter 4: Installing a new G700 without an S8300 This chapter covers the procedures to install the firmware on an new Avaya G700 Media Gateway without an Avaya S8300 Media Server. The G700 is controlled by an external primary server running Avaya Communication Manger. The primary server can be an Avaya S8500 or S8700-series Media Server or an S8300 residing in another G700. -
Page 184: Installation Overview
About the TFTP server To install firmware on a G700 without an S8300 or LSP, you must first copy the firmware files to an external TFTP server on the customer LAN. The TFTP server can be a customer computer or it can be set up on your services laptop. -
Page 185: How Is Normal Access To The S8300 And G700 Provided
Installation overview How is normal access to the S8300 and G700 provided You can access the S8300 and G700 in several ways with either a direct connection or LAN connection. Note: Before the Upgrade Tool can be used to upgrade software on an LSP or firmware... -
Page 186: Connecting Using The Customer's Lan
- Opening the Web interface on the S8300 and using the main menu 2. Upgrade the G700 firmware by: - Opening the Web interface on the primary server and using the Avaya Installation Wizard or Upgrade Tool - Opening a telnet session to the P330 stack processor and perform the installation... -
Page 187: Before Going To The Customer Site
(for example, 1.3 to 2.0), you will need the serial number of the G700. To get this number, ask the customer’s administrator to log in to the S8300 web page and select View License Status from the main menu to display the serial number. -
Page 188: Installing The Gateway Installation Wizard
To get this number, look for the serial number sticker on the back of the G700 chassis. If the unit is delivered directly to the customer and you will not have phone or LAN line access from the customer site to access the rfa.avaya.com web site, this task will require a preliminary trip to the... -
Page 189: Downloading G700 Firmware Files To Your Tftp Directory
Downloading G700 firmware files to your TFTP directory To install new firmware for the G700 processors and the media modules, you first need to move the new firmware files to a directory on the TFTP server. The installation program reads the new firmware files from this directory on the TFTP server. -
Page 190: Configure The G700
6. Save the file to the C:\tftp directory (or your alternate tftp location). 7. Use WinZip or another zip file tool to unzip the file, if necessary. Configure the G700 For a new installation of a G700 Media Gateway, you must complete the following configuration tasks: Note:... -
Page 191: Install Firmware On The G700 And Media Modules
Installing new firmware on the media modules ● Configure an X330 Expansion Module (If Necessary) User Guides and Quick Start Guides for the expansion modules are available on the Avaya Support web site: To configure an X330 Expansion Module 1. Go to the Avaya Support web site: http://avaya.com/support. -
Page 192: Set Rapid Spanning Tree On The Network
To set an edge-port, type set port edge admin state module/port edgeport. For more information on the Spanning Tree CLI commands, see the Avaya P330T User’s Guide (available at http://www.avaya.com/support). 192 Installation and Upgrades for Avaya G700 Media Gateway and Avaya S8300 Media Server... -
Page 193: Administer Communication Manager
G700 you previously installed. This primary controller may or may not be the S8300 you installed in the G700. The primary controller for the G700 you are installing must be administered to enable communication between the primary controller and the G700. The administration differs somewhat depending on whether the primary controller is an S8300 or the primary controller is an S8500 or S8700-series. -
Page 194: Assigning Node Names And Ip Addresses For The Lsps
3. Press F3 (Enter) when complete. Administering Network Regions Before assigning an IP network region to a G700, you must define network region on the IP Network Region form. After a network region is defined, you can assign it to the various network elements (servers, gateways, IP phones). - Page 195 Defining IP network regions can be quite complex. For detailed information on CAUTION: the use and administration of IP network regions, see ‘‘Administration for Network Connectivity for Avaya Communication Manager, 555-233-504.’’ 1. At the SAT prompt, type change ip-network-region 1. The S8300 displays the IP Network Region screen.
-
Page 196: Associating Lsps With Network Regions
To assign the network region to the S8300 1. At the SAT prompt, type change ip-interfaces procr. The S8300 displays the IP Interfaces screen for the media server. 196 Installation and Upgrades for Avaya G700 Media Gateway and Avaya S8300 Media Server... -
Page 197: Administering The Lsp Form
Administer Communication Manager IP Interfaces Screen change ip-interfaces procr Page 1 of 1 IP INTERFACES Type: PROCR Node Name: procr IP Address: 135.9.41.146 Subnet Mask: 255.255.255.0 Enable Ehternet Port? Nework Region: 1 2. The field Enable Ethernet Port? should indicate y (yes). The Node Name should be the IP address of the S8300 media server. -
Page 198: Administering An S8500 Or S8700-Series Primary Controller
Administering an S8500 or S8700-series primary controller Complete the procedures in this section if the primary controller for the G700 you are installing is an S8500, S8700 or S8710. If the primary controller is an S8300, you should have completed... -
Page 199: Assigning Node Names And Ip Addresses For The C-Lans And Lsps
S8700. For information on how to upgrade the firmware on the S8700, please see the section "Upgrade Firmware in Selected Port Cabinet Packs" in Upgrading the Avaya media server Configuration in the S8700 documentation portion of this documentation CD, ‘‘Avaya S8300, S8500, and S8700 media server Library CD,"... -
Page 200: Administering Network Regions
For a G700 with an S8300 LSP and an S8500 or S8700 as the primary controller, there may be more than one network region, since there can be up to 250 G700 media gateways connected to the S8500 or S8700 with thousands of telephones in the network. - Page 201 RTCP Enabled and RSVP Enabled fields, the entry should be n (no). 3. If the network region of the G700 (1 in this example) is different from that of the S8500 or S8700 CLAN board(s), you must interconnect the two regions.
-
Page 202: Assigning Lsps To The Network Regions
IGAR 4. Type the number for the type of codec set (1–7) that the S8500 or S8700 will use to interconnect the G700 and the C-LAN board(s) in the row corresponding to the region of the C-LAN. In this example, the C-LAN is in region 9 and codec-set type 3 is to be used for the interconnection between region 1 and region 9. -
Page 203: Administering Ip Interfaces
Administer Communication Manager IP Network Region Screen, page 2 change ip-network-region 1 Page 2 of 19 IP Network Region LSP NAMES IN PRIORITY ORDER node-10-LSP______ ________________ ________________ ________________ ________________ ________________ 2. Enter the names of up to six LSPs to be assigned to region 1. The LSP names must be the same as administered on the Node Names form. -
Page 204: Administering The Lsp Form
LSPs to get translations updates from the primary controller. Once the LSPs are successfully entered on the LSP form, their status can be viewed with the display lsp command. 204 Installation and Upgrades for Avaya G700 Media Gateway and Avaya S8300 Media Server... -
Page 205: Administering The Media Gateway
Administer Communication Manager Note: The LSP node names must be administered on the node-names-ip form before Note: they can be entered on the LSP form. To add LSP names to the LSP screen 1. At the SAT prompt, type change lsp to open the LSP screen. LSP Screen change lsp Page... - Page 206 Module Type Name 2. Complete the Name field with the hostname assigned to the G700 media gateway. 3. Complete the Identifier field with the serial number of the G700 media gateway. You can obtain the serial number by typing the show system command at the MGP command line interface.
- Page 207 ANA MM MM710 T1/E1 MM The media modules installed in the G700 are listed next to their slot numbers. Verify that a G700 media gateway has been successfully added. To verify changes 1. At the SAT prompt, type list media-gateway.
- Page 208 If the G700 fails to register, two common causes are: - The serial number added as the Identifier for the G700 is wrong. To check, log back into the G700 gateway and type show system. Check the serial number that appears.
-
Page 209: Complete The Installation Process
Complete the Installation Process Complete the Installation Process Consult the planning documentation to obtain the necessary information to complete the installation. Part of the final process will be to: Connect and administer test endpoints ● Test the endpoints ● Complete the electrical installation ●... - Page 210 Installing a new G700 without an S8300 210 Installation and Upgrades for Avaya G700 Media Gateway and Avaya S8300 Media Server...
-
Page 211: Chapter 5: Upgrading An Existing S8300A To R3.0 Using The Wizards
This chapter covers the procedures to upgrade Communication Manager software to release 3.0 on an installed Avaya S8300 Media Server, version A. The current Communication Manager release can be any pre-2.1 release. These procedures require replacing version A of the S8300 with version B. -
Page 212: Release 3.0 Upgrade Scenarios
View/Restore Data View/Restore Data Backup Now Backup Now R 2.x Remaster and upgrade Upgrade View/Restore Data View/Restore Data Move hard drive from A to B Upgrade 212 Installation and Upgrades for Avaya G700 Media Gateway and Avaya S8300 Media Server... -
Page 213: Accessing The Server Cd
Recommended: Place the CD in the CD-ROM drive on the technician’s laptop. This ● method requires that the Avaya TFTP Server software (available at support.avaya.com) is installed on the technician’s laptop. In addition, this method requires that the S8300B does not have Communication Manager software installed on its hard drive. -
Page 214: Accessing The S8300
If using IA770, checking stored messages size, obtaining service pack (or RFU) and ● language files on page 219 Completing the RFA process (obtaining license and authentication files) on page 221 ● 214 Installation and Upgrades for Avaya G700 Media Gateway and Avaya S8300 Media Server... -
Page 215: Installing Tftp Server Or Obtaining Usb Cd-Rom Drive
You must have either the Avaya TFTP server software installed on your laptop or take a USB CD-ROM drive to the site. If you do not already have the Avaya TFTP server installed on your laptop, you can obtain the software from the Avaya Support website and install it as described in Appendix D: Install the Avaya TFTP server. -
Page 216: Getting The Serial Number Of The G700, If Necessary
G700, ask the customer’s administrator to log into the S8300 web page and select View License Status from the main menu to display the serial number. The serial number should also be on a sticker on the back of the G700 chassis but this number is occasionally incorrect. -
Page 217: Obtaining S8300 Software And G700 Firmware
The file containing the software for the S8300 has a *.tar extension and contains both the S8300 software and the G700 and media module firmware. The *.tar file is on a CD-ROM that you take to the site. This CD is called the “Server CD” because it contains software for all of the Linux servers. -
Page 218: Obtaining Service Pack Files
Obtaining service pack files If one or more service packs are required for this installation or upgrade procedure, and the service pack files are not on your software CD, download the service pack files from the Avaya Support web site to your laptop. -
Page 219: If Using Ia770, Checking Stored Messages Size, Obtaining Service Pack (Or Rfu) And Language Files
Before going to the customer site File download window 7. Click the Save button and browse to the directory on your laptop in which you want the file saved. To upgrade from release 1.2.x or 1.3.0 1. If you are upgrading from release 1.2.x or 1.3.0, on the Document Preview/Software Updates page, locate the file name that matches the load currently installed on the system you are upgrading. -
Page 220: Checking The Size Of Stored Messages
7. Under IA 770 INTUITY AUDIX Messaging Application, click on Installation, Migrations, Upgrades & Configurations. 8. Click on IA770 INTUITY AUDIX Release 3.0 Installation. This opens the window that contains the document for installing IA770 software. 220 Installation and Upgrades for Avaya G700 Media Gateway and Avaya S8300 Media Server... -
Page 221: Obtaining Optional Language Files
The Avaya authentication file contains the logins and passwords to access the S8300 media server. This file is updated regularly by Avaya services personnel, if the customer has a maintenance contract. All access to Communication Manager from any login is blocked unless a valid authentication file is present on the S8300 media server. - Page 222 Also, the ART process is available only to Avaya personnel. You need an ART login ID and password, which you can set up at the ART web site. Non-Avaya personnel must contact their service support or customer care center for INADS addresses, if required.
- Page 223 Obtaining the static craft password (Avaya technicians only) After installing new software and new Authentication file, you will need to use a static craft password to access the customer’s system. This static password will enable you to log in to the S8300 with a direct connection to the Services port without the ASG challenge/response.
-
Page 224: Preparing For The Upgrade On-Site
2. Type 192.11.13.6 in the Address field to open the logon page. 3. Log on as craft or dadmin, when prompted. 4. Click Launch Maintenance Web Interface to get to the Main Menu. 224 Installation and Upgrades for Avaya G700 Media Gateway and Avaya S8300 Media Server... -
Page 225: Checking Current Software Release
Preparing for the upgrade on-site To access the SAT 1. From the bash CLI, type SAT and press Enter. Or, to open SAT directly from your laptop, a. Click Start > Run. b. Type telnet 192.11.13.6 5023 and press Enter. 2. -
Page 226: Pre-Upgrade Tasks - If The S8300 Is The Primary Controller
Perform the following procedures if you are upgrading an S8300 that is configured as a primary controller: To clear alarms ● To check link status ● To record all busyouts ● 226 Installation and Upgrades for Avaya G700 Media Gateway and Avaya S8300 Media Server... - Page 227 Preparing for the upgrade on-site To disable scheduled maintenance ● To check for translation corruption ● To save translations ● To stop Communication Manager on an LSP ● To disable alarm origination ● Note: It is no longer necessary to disable Terminal Translation Initialization (TTI) before Note: an upgrade or to enable it after an upgrade.
- Page 228 Therefore, an upgrade to an LSP is usually accompanied by an upgrade of the primary controller. Note: You should upgrade the LSP before you upgrade the primary controller. Note: 228 Installation and Upgrades for Avaya G700 Media Gateway and Avaya S8300 Media Server...
- Page 229 Before you upgrade the primary controller, you need to shut down Communication Manager on the LSPs. This prevents the phones and other endpoints attached to the G700 from trying to register with the LSPs while you are upgrading the primary controller.
-
Page 230: Getting Ia770 Data And Stopping Ia770
2. Select Global Administration then Messaging Administration. 3. Enter the craft password. 4. At the command prompt, enter display system-parameters features. The System-Parameters Features screen displays. 5. Go to page 3. 230 Installation and Upgrades for Avaya G700 Media Gateway and Avaya S8300 Media Server... - Page 231 Preparing for the upgrade on-site System-Parameters Features screen 6. Under Announcement Sets, note the main system language listed after System: In this example, the main system language is English (us-eng). If the system language is anything other than us-eng or us-tdd, you will need to download the appropriate language files from a language CD after the upgrade.
- Page 232 French (french-c) are listed, ask if these will be used with the release 3.0 system. If any other language files are listed, you will need to download the additional language files from a language CD after the upgrade. 232 Installation and Upgrades for Avaya G700 Media Gateway and Avaya S8300 Media Server...
-
Page 233: Stopping Ia770
Preparing for the upgrade on-site Stopping IA770 Note: If you are using the Avaya Installation Wizard (IW) to upgrade the server, skip this Note: procedure. The IW will execute the stop command automatically. To stop IA770: 1. Type telnet 192.11.13.6 and press Enter. - Page 234 To back up data 1. On the Maintenance Web Interface under Data Backup/Restore, click Backup Now. The Backup Now screen displays. Backup Now screen (Part One) 234 Installation and Upgrades for Avaya G700 Media Gateway and Avaya S8300 Media Server...
- Page 235 Preparing for the upgrade on-site 2. Select all data sets: Avaya Call Processing (ACP) Translations ● Save ACP translations prior to backup ● Note: Select this option only if the S8300 is a primary controller. Do not select it if the Note: S8300 is an LSP.
-
Page 236: Recording Configuration Information
5. View and record the configuration information on each screen, and click Continue to move to the next screen. 6. When you get to the Update System screen, click Cancel. 236 Installation and Upgrades for Avaya G700 Media Gateway and Avaya S8300 Media Server... -
Page 237: Upgrading The S8300A
Upgrading the S8300A The best way to record the configuration data is to fill in the Electronic Pre-installation Worksheet (EPW). You then have the option to use the Installation Wizard to do the server configuration task. If you do not have the EPW, you can record the current configuration data and enter it manually after the upgrade. -
Page 238: Installing The Pre-Upgrade Software Service Pack, If Necessary
1. Use Telnet to access the media server. a. Click Start > Run to open the Run dialog box. b. Type telnet 192.11.13.6 and press Enter. c. Log in as craft. 238 Installation and Upgrades for Avaya G700 Media Gateway and Avaya S8300 Media Server... - Page 239 Upgrading the S8300A 2. Type cd /var/home/ftp and press Enter to access the ftp directory. 3. At the prompt, type ls -ltr and press Enter to list files in the ftp directory. The S8300 displays a list of files in the ftp directory. 4.
-
Page 240: Linux Migration Backup (If Current Release Is 1.2.0 Through 1.3.X)
To perform the Linux migration backup 1. Launch the Maintenance Web Interface. Under Server Configuration click Linux Migration (Backup/Restore). The Linux Migration - Backup screen displays. 240 Installation and Upgrades for Avaya G700 Media Gateway and Avaya S8300 Media Server... - Page 241 Upgrading the S8300A Linux Migration - Backup screen 2. Select "Initiate new backup or restore" and click Submit. The Linux Migration - Backup Initiate screen displays. Linux Migration - Backup Initiate screen 3. Under Backup Method, select FTP Fill in the User Name, Password, Host Name (or host IP address) and Directory fields for the back up location.
- Page 242 5. Select the backup set and click Check Status to see the backup results. If the backup is in progress, click on Refresh until the Backup is finished message appears. 242 Installation and Upgrades for Avaya G700 Media Gateway and Avaya S8300 Media Server...
-
Page 243: Replacing The S8300A With The S8300B Media Server
Upgrading the S8300A Linux Migration - Backup Status screen CAUTION: The screen will show Backup is finished when the backup is completed. CAUTION: However, also verify that the message, Backup Successful also appears in the last line. If any error messages appear stating that the backup failed, follow the normal escalation procedures. -
Page 244: Upgrading Communication Manager Software
258 ● Verifying the time, date, and time zone on page 262 ● Installing post-upgrade Communication Manager service pack file from your laptop ● page 256 244 Installation and Upgrades for Avaya G700 Media Gateway and Avaya S8300 Media Server... -
Page 245: Setting Telnet Parameters
3. Avaya recommends using a UPS backup for media servers. If a UPS is present, make sure the G700 is plugged into the UPS. 4. Verify that all Ethernet connections are secure, to ensure the file transfer process is not interrupted. - Page 246 CD-ROM drive to one of the USB ports on the S8300B and insert the Server CD in the drive. To begin the upgrade 1. Click Start > Run to open the Run dialog box. 246 Installation and Upgrades for Avaya G700 Media Gateway and Avaya S8300 Media Server...
- Page 247 However, you can upgrade the Communication Manger software using the procedure described in Chapter 12: Upgrade of an existing S8300B to R3.0 with manual upgrade of G700 firmware and then return to this chapter. To upgrade using the procedure in Chapter 12: Upgrade of an existing S8300B to R3.0 with manual upgrade of G700 firmware...
- Page 248 CD drive connected to the USB port. If you do not have the TFTP server running on the laptop, and a CD drive is not attached to a USB port, you will see the Select Installation Media screen: 248 Installation and Upgrades for Avaya G700 Media Gateway and Avaya S8300 Media Server...
- Page 249 Upgrading the S8300A The Select Installation Media screen If you see the Select Installation Media screen: a. Start up the TFTP server on your laptop, or connect a USB CD-ROM drive to one of the USB ports. b. Insert the Server CD in the laptop or USB drive. c.
- Page 250 If IA770 installation has been selected, it is then installed now and enabled. When the media server is ready to reboot, the following screen flashes for about 5 seconds. 250 Installation and Upgrades for Avaya G700 Media Gateway and Avaya S8300 Media Server...
-
Page 251: Verifying Software Version
Upgrading the S8300A Software and firmware update reminder When the installation is complete, the CD drive door opens and the system reboots automatically. The reboot takes 1–3 minutes. In the event you used the laptop TFTP server and you have a problem with power and the S8300 does not reboot, there are two methods of recovery: Use the USB CD-ROM to plug into the S8300 and repeat the remastering process using ●... -
Page 252: Copying Files To The S8300
Since the system is now running a new software release, you must login with the Note: initial craft ID and password. (You cannot use dadmin at this point.) 2. Under Miscellaneous click Download Files. The Download Files screen displays. 252 Installation and Upgrades for Avaya G700 Media Gateway and Avaya S8300 Media Server... - Page 253 Upgrading the S8300A Download Files screen 3. Select Files to download from the machine I’m using to connect to the server and browse to each file you want to copy to the S8300. Leave the “Install this file on the local server” checkbox unchecked. If you are downloading an IP Telephone software file, download this file last with the Install this file on the local server checkbox checked.
-
Page 254: Configuring Network Parameters
3. Select Configure individual services and click Continue. 4. Click Configure Interfaces from the “Configure Individual IP Services” list on the left. The Configure Ethernet Interfaces screen displays. 254 Installation and Upgrades for Avaya G700 Media Gateway and Avaya S8300 Media Server... -
Page 255: Verifying Connectivity
Upgrading the S8300A Configure Ethernet Interfaces screen 5. Fill in the correct server IP address, Gateway, and Subnet mask. If these fields are already filled in, overwrite them with the correct information. Leave the Integrated Messaging fields blank. Click Change to update the system files. Note: If an Action Cancelled message appears before the success message, refresh Note:... -
Page 256: Installing Post-Upgrade Communication Manager Service Pack File From Your Laptop
The media server displays a message that the software update (patch) was applied. 9. Type update_show again and press Enter to list Communication Manager files to verify the new software update file was activated. 256 Installation and Upgrades for Avaya G700 Media Gateway and Avaya S8300 Media Server... -
Page 257: Restoring Data
Upgrading the S8300A Restoring data In this section you will restore the system data that you backed up. Do only one of the following two procedures, depending on how you backed up the data: Procedure One: Restoring data backup (if upgrading from a Pre-1.2 release) on page 257 ●... -
Page 258: Procedure Two: Restoring Data Backup (If Upgrading From R1.2.X Through 2.X)
EPW. Otherwise, you will need to enter the configuration data into the IW. In addition, the IW will perform the tasks of upgrading firmware on the G700 Media Gateway and the media modules. When you are finished with the IW, return to... - Page 259 Upgrading the S8300A To restore backup data: 1. On the Maintenance Web Interface, under Data Backup/Restore select View/Restore Data. The system displays the View/Restore Data screen. View/Restore Data screen 2. Select FTP. Fill in the User Name, Password, Host Name (enter host IP Address), and Directory fields for the location of the backup file on the customer’s server.
- Page 260 5. Select both Force options, and click Restore. 6. To monitor the restore progress: a. Select Restore History The Restore History screen displays. 260 Installation and Upgrades for Avaya G700 Media Gateway and Avaya S8300 Media Server...
- Page 261 Upgrading the S8300A Restore History screen b. Select the backup set being restored and click Check Status. The Restore History Results screen displays. c. Click Refresh periodically until the message, The final status for your restore is shown below appears. Restore History Results screen If restoring files from a 2.0.x release, repeat the restore procedure for each backup set, except the AUDIX data (msg and annc files), if any:...
-
Page 262: Verifying The Time, Date, And Time Zone
To configure the server using the Avaya Installation Wizard on page 258. In this case, skip to Setting rapid spanning tree on the network on page 269. 262 Installation and Upgrades for Avaya G700 Media Gateway and Avaya S8300 Media Server... - Page 263 Upgrading the S8300A For the other upgrade scenarios, at this point, you should not have to enter any configuration information. In the following procedure, click Continue to open each configuration screen and verify that the configuration information is correct. To verify media server configuration 1.
-
Page 264: Installing The Updated License File
/pub directory on the server. Avaya personnel will notify you when the new files are in place as agreed (for example, by telephone or E-mail). After they are loaded into the /pub directory, install them using the License File and Authentication File screens under Security on the Maintenance Web Interface. -
Page 265: Installing The New Authentication File, If Any
Upgrading the S8300A 2. Select Install the license file I previously downloaded. Browse to the license file on the services laptop, and click Submit. The system tells you when the license is installed successfully. Installing the new authentication file, if any To install the new authentication file 1. -
Page 266: Saving Translations (If Not Using Ia770 And S8300 Is Not An Lsp)
1. On the Maintenance Web Interface under Server, click Process Status. 2. Select Summary and Display once and click View. The View Process Status Results screen displays. 266 Installation and Upgrades for Avaya G700 Media Gateway and Avaya S8300 Media Server... -
Page 267: Next Steps
4. Using a telephone, make test calls to verify that call processing is working. Next steps This completes the S8300 upgrade process for upgrading to release 3.0. You now must upgrade the G700 and media module firmware and then restart IA770, if it has been installed on the S8300. Issue 8.1 June 2005... -
Page 268: Upgrade The Firmware On The G700 Media Gateway
Upgrading an existing S8300A to R3.0 using the Wizards Upgrade the firmware on the G700 Media Gateway The tasks in this section can be completed most efficiently by using the Avaya Installation Wizard or the Upgrade Tool. If the S8300 is a primary controller, use the Installation Wizard. -
Page 269: Upgrading The G700 Using The Upgrade Tool
Upgrade the firmware on the G700 Media Gateway 3. When you get to the G700 Firmware Upgrade screen, click the Action button to view the versions of the currently installed firmware, and the firmware available in the tftp directory. 4. Select each component for which there is a firmware version that is later than the installed version. -
Page 270: Post-Upgrade Tasks
To set an edge-port, type set port edge admin state module/port edgeport. For more information on the Spanning Tree CLI commands, see the Avaya P330T User’s Guide (available at http://www.avaya.com/support). Post-upgrade tasks Complete the following tasks after you have finished the upgrade:... -
Page 271: If Using Ia770
Post-upgrade tasks If using IA770: Restore AUDIX data To restore AUDIX data: 1. Under Data Backup/Restore, click View/Restore Data. The View/Restore Data screen displays. View/Restore Data screen 2. Select FTP and enter the information for the location of the backed up AUDIX Translations, Names, and Messages and click View. - Page 272 4. Select both Force options, and click Restore. To monitor the restore progress: 1. Select Restore History. The Restore History screen displays. 272 Installation and Upgrades for Avaya G700 Media Gateway and Avaya S8300 Media Server...
- Page 273 Post-upgrade tasks Restore History screen 2. Select the backup set being restored, and click Check Status. The Restore History Results screen displays. Restore History Results screen 3. Click Refresh periodically until the Completed Successfully message appears. This restore process could take 30 minutes or longer. Note: Warning messages similar to the message shown on this screen are expected Note:...
- Page 274 1. In the Maintenance Web Interface, under Server, click Process Status. 2. Select Summary and Display once and click View. the View Process Status Results screen displays. 274 Installation and Upgrades for Avaya G700 Media Gateway and Avaya S8300 Media Server...
- Page 275 Post-upgrade tasks View Process Status screen 3. Make sure everything except ENV, arbiter, and dupmgr shows UP. Communication Manger should show 65/65 UP or, if IA770 is installed, 67/67 UP. The number of processes (67/67) may vary depending on the configuration. For a normal state, the second number should not be greater than the first number.
-
Page 276: Saving Translations
7. To install the language files, under Miscellaneous click Messaging Administration, then Utilities, then Software Management, then Software Installation. Follow the instructions to install the language software. 276 Installation and Upgrades for Avaya G700 Media Gateway and Avaya S8300 Media Server... -
Page 277: Complete The Upgrade Process (S8300 Is The Primary Controller)
Post-upgrade tasks Complete the upgrade process (S8300 is the primary controller) Telnet to the S8300 (primary controller) and open a SAT session to complete the following procedures. To check media modules 1. Type list configuration all and press Enter. 2. Verify that the software is communicating with all media modules and that all media modules are listed in the reports. - Page 278 1. Open a Telnet session on the S8300 (LSP). 2. At the command prompt, type start -ac and press Enter. This completes the upgrade process for a G700 with an S8300. 278 Installation and Upgrades for Avaya G700 Media Gateway and Avaya S8300 Media Server...
-
Page 279: Chapter 6: Upgrading An Existing S8300B To R3.0 Using The Wizards
(LSP). When the S8300 is an LSP, the primary controller, running Avaya Communication Manager, can be either another S8300 or an Avaya S8500 or S8700 series Media Server. The steps to upgrade an S8300 configured as an LSP are the same as the steps to upgrade an... -
Page 280: Major Tasks To Upgrade The S8300B To Release 3.0
Major tasks to upgrade the S8300B to release 3.0 and upgrade the G700 firmware The major tasks to upgrade the S8300B to release 3.0, and upgrade the G700 firmware are: Before going to the customer site ●... -
Page 281: Planning Forms Provided By The Project Manager
(for example, 2.2 to 3.0), you will need the serial number of the G700. To get this number, ask the customer’s administrator to log in to the S8300 web page and select View License Status from the main menu to display the serial number. The serial number should also be on a sticker on the back of the G700 chassis but this number is occasionally incorrect. -
Page 282: Obtaining S8300 Software And G700 Firmware
Obtaining S8300 software and G700 firmware The files containing the software for the S8300 and the G700 and media module firmware are on a CD-ROM that you take to the site. This CD is called the “Server CD” because it contains software for all of the Linux servers. - Page 283 Manager release (for example, Avaya Communication Manager Software Updates for 3.0). 5. Scroll down the page to find a link called Latest Avaya Communication Manager x.x.x Software Update (where x.x.x is the release number). After this link, there should be a link starting with “PCN“ Click on this link to read about the release and software load to which this service pack applies.
-
Page 284: Obtaining Service Pack And Language Files, If Using Ia770
CELP to G.711. Before the going to the site, have the customer check the size of messages stored in IA770 and, if greater than 72 hours, contact your service support center. 284 Installation and Upgrades for Avaya G700 Media Gateway and Avaya S8300 Media Server... -
Page 285: Obtaining An Ia770 Service Pack File
Avaya Support web site. To obtain an IA770 service pack file 1. On the Avaya Support website, double click on Messaging in the list on the left. 2. Scroll down to the INTUITY links and double click on IA 770 INTUITY AUDIX Messaging Application. - Page 286 The Avaya authentication file contains the logins and passwords to access the S8300 media server. This file is updated regularly by Avaya services personnel, if the customer has a maintenance contract. All access to Communication Manager from any login is blocked unless a valid authentication file is present on the S8300 media server.
- Page 287 Also, the ART process is available only to Avaya personnel. You need an ART login ID and password, which you can set up at the ART web site. Non-Avaya personnel must contact their service support or customer care center for INADS addresses, if required.
-
Page 288: On-Site Preparation For The Upgrade
2. Type 192.11.13.6 in the Address field to open the Logon page. 3. Log on as craft or dadmin when prompted. 4. Click Launch Maintenance Web Interface to get to the Main Menu. 288 Installation and Upgrades for Avaya G700 Media Gateway and Avaya S8300 Media Server... -
Page 289: Completing Pre-Upgrade Tasks - If The Target S8300 Is The Primary Controller
On-site Preparation for the Upgrade To access SAT 1. From the bash CLI, type SAT and press Enter. Or, to open SAT directly from your laptop, Click Start > Run, type telnet 192.11.13.6 5023, and press Enter. 2. Log in as craft or dadmin. 3. - Page 290 2. Enter your terminal type and press Enter. If you see the message, Warning: Translation corruption found follow the normal escalation procedure for translation corruption before continuing the upgrade. 290 Installation and Upgrades for Avaya G700 Media Gateway and Avaya S8300 Media Server...
- Page 291 Before you upgrade the primary controller, you need to shut down Communication Manager on the LSPs. This prevents the phones and other endpoints attached to the G700 from trying to register with the LSPs while you are upgrading the primary controller.
-
Page 292: Getting Ia770 (Audix) Data And Stopping Ia770
2. Select Global Administration; then Messaging Administration. 3. Enter the craft password. 4. At the command prompt, enter display system-parameters features. The SYSTEM PARAMETERS FEATURES screen displays. 5. Go to page 3. 292 Installation and Upgrades for Avaya G700 Media Gateway and Avaya S8300 Media Server... - Page 293 On-site Preparation for the Upgrade System Parameters Features screen 6. Under Announcement Sets, note the main system language listed after System: In this example, the main system language is English (us-eng). If the system language is anything other than us-eng or us-tdd, you will need to download the appropriate language files from a language CD after the upgrade.
-
Page 294: Downloading Optional Language Files, If Needed
To download optional language files 1. Insert the optional language CD in your laptop’s CD-ROM drive. 2. On the Maintenance Web Interface, under Miscellaneous, select Download Files. 294 Installation and Upgrades for Avaya G700 Media Gateway and Avaya S8300 Media Server... -
Page 295: Creating An Ia770 Test Message For The Upgrade
Shutting down IA770 To shut down IA770 Note: If you are using the Avaya Installation Wizard (IW) to upgrade the server, skip this Note: procedure. The IW will execute the stop command automatically. 1. Type telnet 192.11.13.6 and press Enter. -
Page 296: Backing Up S8300 Recovery System Files
S8300 hard drive. To back up S8300 recovery system data 1. Under Data Backup/Restore, click Backup Now. The Backup Now screen displays. Backup Now screen (Part One) 296 Installation and Upgrades for Avaya G700 Media Gateway and Avaya S8300 Media Server... - Page 297 On-site Preparation for the Upgrade 2. Select all data sets: Avaya Call Processing (ACP) Translations ● Save ACP translations prior to backup ● Note: Select this option only if the S8300 is a primary controller. Do not select it if the Note: S8300 is an LSP.
-
Page 298: Copying The Service Pack Files To The Media Server
3. Browse to the directory on the laptop that contains the pre-upgrade and post-upgrade service pack files. 4. Select the service pack files and click Download. 298 Installation and Upgrades for Avaya G700 Media Gateway and Avaya S8300 Media Server... -
Page 299: Installing The Pre-Upgrade Software Service Pack
On-site Preparation for the Upgrade Installing the pre-upgrade software service pack A pre-upgrade service pack is required to modify the server upgrade tools, including the web Interface and upgrade scripts, which will enable the upgrade to Communication Manager 3.0 to complete successfully. -
Page 300: Copying License And Authentication Files To The S8300 Hard Drive (From Your Laptop)
FTP directory on the server. Avaya personnel will notify you when the new files are in place as agreed (for example, by telephone or E-mail). After they are loaded into the FTP directory, install them using the License File and Authentication File screens from the S8300 main menu web-page. - Page 301 On-site Preparation for the Upgrade Download Files screen 3. Select Files to download from the machine I’m using to connect to the server and click Browse for the first field. The S8300 displays the Choose File screen, which allows you to select files from your laptop.
-
Page 302: Copying The Software And Firmware Files From The Server Cd
Communication Manager also reflects the most recent load of software (for example only, 01.0.411.1-6592). These files also contain the most recent firmware for the G700 Media Gateway, the various media modules, and the P330 Stack Processor. To transfer files from the Server CD 1. - Page 303 On-site Preparation for the Upgrade Manage Software screen 4. Select the radio button Copy a release to the local hard drive, but do not install it. Note: The S8300 hard drive can hold up to three releases without having to delete a Note: release before copying a new release from the Server CD.
- Page 304 The first drive found with a valid release is used, in the event multiple CD drives are actually present. The Choose Release screen displays. 304 Installation and Upgrades for Avaya G700 Media Gateway and Avaya S8300 Media Server...
- Page 305 On-site Preparation for the Upgrade Choose Release screen The screen is presented with no radio button selected. The user must select the release to be copied and click Continue. The Copy in Progress screen displays. Copy in Progress screen The screen lists each file as it is being copied to the S8300 hard drive. When the copy completes successfully, the Copy Complete screen displays.
- Page 306 At this point you are finished with the software CD-ROM. Remove the CD from CAUTION: your laptop now to avoid possible problems the next time your laptop is rebooted. 306 Installation and Upgrades for Avaya G700 Media Gateway and Avaya S8300 Media Server...
-
Page 307: Upgrade The S8300
Upgrade the S8300 Upgrade the S8300 This section describes the procedures to upgrade the S8300 Media Server to Communication Manager release 3.0. Upgrading the S8300B using the Web Interface Perform the following tasks to upgrade the S8300 to the most recent load of software: Installing new software on page 307 Making the upgrade permanent... - Page 308 To install the 3.0 release, click the radio button next to the 3.0 release and click Continue. The next screen displays in order to support installation of IA770 software. IA770 Installation Support screen 308 Installation and Upgrades for Avaya G700 Media Gateway and Avaya S8300 Media Server...
- Page 309 Upgrade the S8300 This screen displays, if and only if: IA770 is/is not supported, and ● The server is not an LSP. ● The radio buttons default as follows: If IA770 is not supported, the "no" button will be selected; if IA770 is supported, the "yes"...
- Page 310 The system displays the Installation Complete screen. 11. Click Close. You are returned to the main menu. 12. Under Server, click Software Version to verify the new software version. 310 Installation and Upgrades for Avaya G700 Media Gateway and Avaya S8300 Media Server...
-
Page 311: Making The Upgrade Permanent
Upgrade the S8300 Making the upgrade permanent CAUTION: You must make the upgrade of the software permanent so that the software is CAUTION: recognized and kept on the S8300. If you fail to make software permanent, then the next time you reboot, old software will become active. To make the upgrade permanent 1. -
Page 312: Install Updated License And Authentication Files
The system displays the License File screen. License File Screen 2. Select Install the license file I previously downloaded and click Submit. The system tells you the license is installed successfully. 312 Installation and Upgrades for Avaya G700 Media Gateway and Avaya S8300 Media Server... -
Page 313: Saving Translations
Upgrade the S8300 3. Under Security, select Authentication File. 4. The Authentication File screen displays. Authentication File screen 5. Select Install the Authentication file I previously downloaded and click Install. The system tells you the authentication file is installed successfully Saving translations (only if new license and/or authentication files installed) Skip this procedure if the S8300 is an LSP. -
Page 314: Upgrade The G700 Firmware
Upgrading an existing S8300B to R3.0 using the Wizards Upgrade the G700 Firmware This section describes upgrading firmware on the components of the G700, including the Media Gateway Processor (MGP), the P330 Stack Processor, and any installed media modules. The tasks in this section can be completed most efficiently by using the Avaya Installation Wizard (IW) or the Upgrade Tool. - Page 315 IW, you will be asked if you want to install the latest version of the IW from your laptop or from the Avaya Support website. Be sure not to install a version of the IW later than the version of Communications Manager from which you are upgrading.
- Page 316 When you are finished with this screen, click Continue. Click Continue to move through the Media Server tasks. The first Media Gateway screen to display is the Firmware screen. 316 Installation and Upgrades for Avaya G700 Media Gateway and Avaya S8300 Media Server...
- Page 317 Upgrade the G700 Firmware Firmware screen This screen displays the Media Gateway and its associated media modules. To check the installed compared to available versions of firmware, click on the icon in the Action column. The Firmware - Media Gateway <identifier> screen displays.
-
Page 318: Upgrading G700 Firmware Using The Upgrade Tool From The Primary Controller
S8300 configured as an LSP. On the Integrated Management main menu, click Launch Upgrade Tool. Follow the instruction to upgrade the G700 and media module firmware. For more information on the Upgrade Tool, see Job Aid: Upgrade Tool and Worksheets, 555-245-757. -
Page 319: Post-Upgrade Tasks
To set an edge-port, type set port edge admin state module/port edgeport. For more information on the Spanning Tree CLI commands, see the Avaya P330T User’s Guide (available at http://www.avaya.com/support). Post-upgrade tasks After the upgrade is complete, perform the following post-upgrade tasks:... -
Page 320: Completing The Upgrade Process (S8300 Is The Primary Controller)
1. Type change system-parameters maintenance and press Enter. 2. Ensure that the Start Time and Stop Time fields' administration is the same as before the upgrade. 320 Installation and Upgrades for Avaya G700 Media Gateway and Avaya S8300 Media Server... - Page 321 To restart Communication Manager on an LSP after the upgrade: 1. Open a Telnet session on the S8300 (LSP). 2. At the command line, type start -ac and press Enter. This completes the upgrade process for a G700 with an S8300. Issue 8.1 June 2005...
- Page 322 Upgrading an existing S8300B to R3.0 using the Wizards 322 Installation and Upgrades for Avaya G700 Media Gateway and Avaya S8300 Media Server...
-
Page 323: Chapter 7: Upgrading An Existing G700 Without An S8300
Installing new firmware on the G700 Media Gateway What are the G700 system components A P330 Stack Processor is built into the G700 Media Gateway. (This processor is also known as the Layer 2 switching processor). In addition, the G700 contains: Media Gateway Processor (MGP) ●... -
Page 324: About Firmware Files
About the TFTP server To install firmware on a G700 without an S8300 or LSP, you must first copy the firmware files to an external TFTP server on the customer LAN. The TFTP server can be a customer computer or it can be set up on your services laptop. -
Page 325: Before Going To The Customer Site
Getting the serial number of the G700, if necessary For an upgrade of an existing G700, the existing license file can usually be reused. However, if the customer is adding feature functionality (for example, adding BRI trunks), or if the upgrade is between major releases (for example, 1.3 to 2.1), you will need the serial number of the... -
Page 326: Setting Up The Tftp Server On Your Laptop Or On A Customer Pc, If Necessary
1. Ask the customer’s administrator to log in to the S8300 Web page. 2. Select View License Status from the main menu to display the serial number. The serial number should also be on a sticker on the back of the G700 chassis, but this number is occasionally incorrect. - Page 327 Before going to the customer site 2. Navigate to Firmware Downloads for The G700 Media Gateway. The system displays a list of firmware files. 3. Locate the file names that match the files listed in your planning documentation. The file names will approximate those listed in...
-
Page 328: On-Site Preparation For The Upgrade
Upgrading an existing G700 without an S8300 On-site preparation for the upgrade Before installing new firmware on the G700 processors and medial modules you need to prepare on-site by: Accessing the P330 Stack Processor on page 328 ● Verifying the contents of the tftpboot directory on page 329 ●... -
Page 329: Verifying The Contents Of The Tftpboot Directory
Media Server command line interface. To copy firmware files to the /tftpboot directory of an S8300 Media Server, do the following: a. Use telnet, Avaya Site Administration, or another tool to access the S8300 Media Server command line. b. Log in as craft. - Page 330 To determine if new firmware is required for the MGP, VoIP module, and installed media modules 1. Type session mgp 2. At the MG-001-1(super)# prompt, type show mg list_config The system displays the list of software. 330 Installation and Upgrades for Avaya G700 Media Gateway and Avaya S8300 Media Server...
-
Page 331: Installing New Firmware On The G700 Media Gateway
A. If the list shows A, you will upgrade B. 4. Refer to the VOIP FW column and row for slot V0 (same row occupied by the G700 information) to see if the number matches the VoIP firmware identified in your planning forms. -
Page 332: Setting Rapid Spanning Tree On The Network
To set an edge-port, type set port edge admin state module/port edgeport. For more information on the Spanning Tree CLI commands, see the Avaya P330T User’s Guide (available at http://www.avaya.com/support). This completes the G700 firmware upgrade procedures. -
Page 333: Chapter 8: Telephones And Adjunct Systems
364 ● ASAI co-resident DEFINITY LAN gateway (DLG) on page 364 ● Call center on page 366 ● Avaya Integrated Management on page 369 ● Uninterruptible power supply (UPS) on page 374 ● Terminal server installation on page 376 ●... -
Page 334: Installation And Wiring Of Telephones And Power Supplies
607A Avaya Callmaster V ACD Console Digital 606A Avaya CallMaster VI ACD Console Digital Enhanced Attendant Consoles: Digital 302D 62xx series: Analog 6211, 6219 1 of 2 334 Installation and Upgrades for Avaya G700 Media Gateway and Avaya S8300 Media Server... -
Page 335: Connecting Telephones
*. For information on administering 46xx series IP Telephones, see 4600 Series IP Telephone LAN Administrator’s Guide, 555-233-507. Connecting telephones Various analog, digital, and IP telephones can be connected to the G700 Media Gateway. In addition, you may need to install an 808A Emergency Transfer Panel. Examples of these procedures follow: Connecting an analog station or 2-wire digital station ●... - Page 336 5. Administer using Administrator Guide for Avaya Communication Manager, 03-300509. Figure 18: 2500-Type Analog Telephone Wiring 2500wire RBP 071996 Figure notes: 1. 2500-Type Analog Station 2. MM711 Analog Media Module, Position 1V301 336 Installation and Upgrades for Avaya G700 Media Gateway and Avaya S8300 Media Server...
-
Page 337: Connecting An Isdn Bri Station To An Mm720 Media Module
Installation and wiring of telephones and power supplies Connecting an ISDN BRI station to an MM720 Media Module Each ISDN port on the MM720 Media Module (see Media modules on page 77) supports up to two ISDN BRI stations. Note: The MM720 BRI Media Module cannot be administered to support both BRI Note: trunks and BRI stations at the same time. -
Page 338: Installing An 808A Emergency Transfer Panel And Associated Telephones
(REN) is 1.0A. For information on installing the 808A Emergency Transfer Panel, see 808A Emergency Transfer Panel Installation Instructions, which ships with the Emergency Transfer Panel. 338 Installation and Upgrades for Avaya G700 Media Gateway and Avaya S8300 Media Server... -
Page 339: Installing And Wiring Telephone Power Supplies
These are examples only and actual wiring procedures may vary at each site. Note: Refer to the Installation for Adjuncts and Peripherals for Avaya Communication Note: Manager, 555-233-116, to install the necessary peripheral equipment. The power is provided to telephones or consoles either centrally or locally. - Page 340 341. Each port network can provide power for up to three attendant consoles. This source of power is preferred for the attendant consoles because it has the same battery backup as the G700 Media Gateway. Adjunct power can be provided locally at the telephone or console by either the 1151A1 or 1151A2 power supply.
- Page 341 Installation and wiring of telephones and power supplies Figure 21: 400B2 Adapter Connecting to a Modular Plug r749428 KLC 060396 Figure notes: 1. Flush-Mounted Information Outlet 4. 400B2 Adapter 2. Surface-Mounted Information 5. To Telephone Outlet 6. Destination Service Access Point 3.
- Page 342 An attendant console can also derive auxiliary power from: Individual 1151B or 1151B2 power supply ● MSP-1 power supply ● 258A-type adapters ● Bulk power supplies ● 342 Installation and Upgrades for Avaya G700 Media Gateway and Avaya S8300 Media Server...
-
Page 343: 1152A1 Mid-Span Power Distribution Unit
Installation and wiring of telephones and power supplies Local and Phantom Power An attendant console’s maximum distance from the system is limited. Table 18: Attendant Console Cabling Distances on page 343. Table 18: Attendant Console Cabling Distances Enhanced Attendant 24 AWG Wire (0.26 26 AWG Wire (0.14 Console (302D) Feet... - Page 344 The 1152A1 PDU is used to power the 46xx series of IP telephones in addition to providing 10/ 100 megabits per second Ethernet connection. Generation 1 Avaya IP telephones can receive power from the 1152A1 using an in-line adapter. This adapter provides the resistive signature so that the 1152A1 allows power to flow to the telephone.
-
Page 345: Connecting The 1152A1 Pdu Cables
Installation and wiring of telephones and power supplies To connect the 1152A1 PDU CAUTION: The 1152A1 PDU has no ON/OFF switch. To connect or disconnect power to the CAUTION: 1152A1 PDU, simply insert or remove the power cable from the AC power receptacle on the rear of the 1152A1 PDU. - Page 346 Requires an external splitter or whether it requires only a single RJ45 connection. ● If an external splitter is needed, be certain to use a splitter with the correct connector and polarity. 346 Installation and Upgrades for Avaya G700 Media Gateway and Avaya S8300 Media Server...
-
Page 347: 1151B1 And 1151B2 Power Supplies
Installation and wiring of telephones and power supplies Power requirements are consistent with the 1152A1 PDU voltage and power ratings. ● Refer to Appendix B in the user’s guide that comes with the unit for voltage and power ratings. To connect telephones and other end devices to the 1152A1 PDU 1. -
Page 348: Using The 1151B1 And 1151B2 Power Supplies
The power supply can be placed on a flat surface such as a desk. For wall-mounting, keyhole slots are provided on the bottom of the chassis. CAUTION: Do not locate the unit within 6 inches (15 centimeters) of the floor. CAUTION: 348 Installation and Upgrades for Avaya G700 Media Gateway and Avaya S8300 Media Server... -
Page 349: Connecting The 1151B1 Or 1151B2 Power Supplies
349. Figure 25: 1151B2 Power Supply — Front pwr_sup1 CJL 051496 Avaya Power over Ethernet (PoE) switches Available PoE Switch Options Data and power are combined in a (PoE) switch and sent over a single cable, thus simplifying power management and cabling infrastructure and saving rack space. -
Page 350: Power Priority Mechanism
The limit is 18 Watts below the maximum PoE capacity. The remaining 18W are reserve power for a change in the power draw of PDs. 350 Installation and Upgrades for Avaya G700 Media Gateway and Avaya S8300 Media Server... -
Page 351: C360 Converged Stackable Switches
Installation and wiring of telephones and power supplies C360 converged stackable switches The Avaya C360 converged stackable switch series is a line of stackable, multilayer switches that provide high availability, quality of service (QoS), and Power over Ethernet (PoE) to enhance converged network infrastructure operations. -
Page 352: Features Of The C360 Converged Stackable Switches
Figure 29: C364T-PWR Converged Stackable switch A C360 switch can co-reside in a stack with G700 media gateways and with selected P330 switches. A C360 stack can contain up to 10 switches and up to three backup power supply units. - Page 353 Installation and wiring of telephones and power supplies The Octaplane stacking system provides 8 Gbps stacking bandwidth to all switches in the ● stack. C360 stacks continue to function even if one switch or link fails. ● Switches in the stack can be added, removed, and replaced without disrupting operation. ●...
- Page 354 You can use all appropriate tools of the Avaya Integrated Management suite for ● administration. System logging can occur by terminal, internal file, or Syslog server. ● Switch access can be restricted to specified protocols or services. ● 354 Installation and Upgrades for Avaya G700 Media Gateway and Avaya S8300 Media Server...
-
Page 355: C460 Converged Multi-Layer Switch
C460 converged multi-layer switch For enterprises looking to deploy Avaya Communication Manager Communications Applications, the Avaya C460 converged multi-layer switch is a highly resilient network platform designed to provide high-availability support for mixed data and IP Telephony deployments. The Avaya C460 features a compact modular six-slot chassis with the following main... -
Page 356: P333T-Pwr Power Over Ethernet Stackable Switch
C22.2 No.950 Std. Approved For safety instructions, see Important 1152A1 PDU Safety Instructions on page 344. For installation instructions, see Connecting the P333T-PWR switch on page 358. 356 Installation and Upgrades for Avaya G700 Media Gateway and Avaya S8300 Media Server... -
Page 357: Important P333T-Pwr Switch Safety Instructions
The P333T-PWR Power over Ethernet Stackable Switch can be used to power 46xx series IP telephones in addition to providing a 10/100 megabits per second Ethernet connection. The switch can form part of a stack with the G700 Media Gateway or members of the P330 stackable switching system. -
Page 358: Connecting The P333T-Pwr Switch
2. Insert the other end of the power cord into a non-switched electrical outlet or the connector on the BUPS. The unit powers up and performs a self-test procedure. The LEDs flash at regular intervals after the self-test procedure is completed successfully. 358 Installation and Upgrades for Avaya G700 Media Gateway and Avaya S8300 Media Server... -
Page 359: Connecting The Cables
2. Connect the other end of the cable to the Ethernet port of the PC, server, router, workstation, IP telephone, switch, or hub. Note: Use a crossover cable when connecting the Avaya P333T-PWR switch to a Note: switch or hub. -
Page 360: Complete The Telephone Installation Process
3. Terminate the other end to the single-point ground block provided for the telephone system. Note: Position the non-exposed telephone cables at least 12 inches (30.5 cm) away Note: from exposed telephone cables whenever possible. 360 Installation and Upgrades for Avaya G700 Media Gateway and Avaya S8300 Media Server... -
Page 361: Installing Over-Voltage And Sneak-Current Circuit Protection
Over-voltage and sneak fuse protection measures are necessary for the safe operation of the G700 Media Gateway system. Out-of-building installations of telephones or other standard (tip/ ring) devices/terminals that connect to the Avaya G700 Media Gateway Media Modules require over-voltage and sneak current protection at both building entry points. Sneak current protectors must have a maximum of 350 mA and a minimum voltage rating of 600V. -
Page 362: Ia 770 Intuity Audix Messaging Application
IA770 INTUITY AUDIX Messaging, Release 3.0, Installation, Upgrades, and Troubleshooting, 11-300532. The IA 770 INTUITY AUDIX Messaging Application runs on a G700 Media Gateway controlled by an S8300 Media Server. Without the need for additional hardware, IA770 INTUITY AUDIX software processes touchtones, converts messages to the G.711 format, and converts text to speech. -
Page 363: Where Is The Ia770 Location And Software
Manager and IA770 software. The INTUITY AUDIX system software is loaded directly onto the S8300 hard drive. Note: For upgrades only, a G700 Media Gateway that previously used a CWY1 board Note: can continue to use the CWY1 board with IA770 INTUITY AUDIX software. -
Page 364: Intuity Audix Lx Messaging System
Telephones and adjunct systems INTUITY AUDIX LX messaging system The process of integrating an INTUITY AUDIX LX system with an Avaya S8300 Media Server involves a series of tasks to prepare the switch to work with the INTUITY AUDIX LX system. -
Page 365: Procr Administration Task Summary (For The S8300 Media Server)
PROCR administration task summary (for the S8300 Media Server) To administer PROCR on the S8300 Media Server with G700 Media Gateway: 1. On the SAT interface, type display system-parameters customer-options. Go to page 4 and make sure that Processor Ethernet is enabled. -
Page 366: Supported Ethernet Interfaces
- Avaya Call Center Deluxe - Avaya Call Center Elite Up to 450 agents ● A maximum of 16 ASAI links ● Avaya G700 announcement software ● 366 Installation and Upgrades for Avaya G700 Media Gateway and Avaya S8300 Media Server... -
Page 367: About Avaya G700 Announcement Software
Voice announcements are used in a call center environment to announce delays, direct customers to different departments, and entertain and inform calling parties. The announcement capability is standard and comes co-resident on the G700. The G700 announcement software has many of the functions of the TN2501AP VAL circuit pack. - Page 368 S8710 Media Server Format CCITT A-law or u-law CCITT A-law or u-law Sample bits Sample rate 8,000 KHz 8,000 KHz Channels Mono Mono 2 of 2 368 Installation and Upgrades for Avaya G700 Media Gateway and Avaya S8300 Media Server...
-
Page 369: Avaya Integrated Management
Avaya Integrated Management Avaya Integrated Management Avaya Integrated Management provides a comprehensive set of network and system management solutions for the converged voice and data environment. Avaya Integrated Management is available in several different offers. Each offer includes an appropriate set of applications to meet different business needs. -
Page 370: Avaya Directory Enabled Management
VLAN numbering and naming, tracks additions and changes to the network, validates VLAN name and tag values, and monitors the number of VLANs in order to assist in maintenance tasks. 370 Installation and Upgrades for Avaya G700 Media Gateway and Avaya S8300 Media Server... -
Page 371: Avaya Multiservice Smon Manager
Avaya Integrated Management Avaya MultiService Network Manager supports converged network environments composed of multi-vendor equipment from key vendors and will be enhanced to support all Avaya IP voice systems and data devices to create a full convergence solution. Avaya MultiService SMON Manager Avaya MultiService SMON Manager monitors the Ethernet and provides complete visibility of all switched traffic in the network. -
Page 372: Avaya Site Administration
Avaya Terminal Emulator Avaya Terminal Emulator is a Windows (98/NT/2000) application that provides direct connectivity capabilities. It can be run either as a standalone application or run from Avaya Site Administration. Avaya Terminal Emulator includes the following features: Connection List — lets you store and organize information about the systems to which you regularly connect and allows you to connect to them by double-clicking. -
Page 373: Avaya Voice Announcement Over Lan Manager
Quality of Service (QoS) measurements for VoIP systems. Avaya VoIP Monitoring Manager offers a client GUI accessible from your LAN or using remote access. Avaya VoIP Monitoring Manager can generate traps associated with VoIP QoS sent to any NMS, and can receive RTCP packets from IP telephones, IP soft phones, VoIP engines (on G700 Media Gateways), and Prowler boards. -
Page 374: Uninterruptible Power Supply (Ups)
2. Unit fits into standard 19-inch equipment racks. For tower configurations, the unit stands 17 inches high. 3. Also user-selectable for 100, 110 and 127 V. 374 Installation and Upgrades for Avaya G700 Media Gateway and Avaya S8300 Media Server... - Page 375 1. This table provides typical information. Runtimes are approximate and may vary with equipment, configuration, battery age, temperature, etc. Full Details on these units can be found in Hardware Guide for Avaya Communication Manager, 555-245-207. You can also go online to find out the latest details about UPS technology at http:/ /www.avayaups.com/avaya/default.asp.
-
Page 376: Terminal Server Installation
Telephones and adjunct systems Terminal server installation This section provides information on connecting adjunct equipment to a G700 or G350 Media Gateway with an S8300 Media Server using a terminal server (Figure 31: Switch-to-adjunct LAN connectivity through a terminal server). Avaya supports the IOLAN+ 104 terminal server. -
Page 377: What Are The Distance Limits For The Terminal Server
Terminal server installation Table 24: Required equipment (continued) Comcode Description Supplier DB25-to-DB9 connector for PC COM Avaya port RS232 Null modem (if needed for PC 1 or Avaya or printer connectivity) more 405369042 Male/female adapter (if necessary) 1 or Avaya... -
Page 378: How Is The Terminal Server Cabling Connected
Connecting the IOLAN+ to the adjunct and the LAN Connect the adjunct to the IOLAN+, using the RJ45-to-DB25 cable and the null modem. You can use a male/female adapter. See Figure 378 Installation and Upgrades for Avaya G700 Media Gateway and Avaya S8300 Media Server... -
Page 379: Administering The Iolan
Figure 33: Connecting an adjunct to the IOLAN+ DATA CONNECTIONS ONLY - NOT FOR TELECOM USE 10BASE-T 5VDC Figure notes: 1. IP connection on an S8300/G700 or G350 5. Null modem 2. Local area network (LAN) 6. PC or laptop (for initial 3. IOLAN+ 104 terminal server administration) 4. - Page 380 5. Press ENTER to get the login prompt. To administer the IOLAN+ the first time 1. At the login prompt type any text and press ENTER. 380 Installation and Upgrades for Avaya G700 Media Gateway and Avaya S8300 Media Server...
- Page 381 Terminal server installation 2. At the second prompt type set term ansi and press ENTER to view the Connections Menu. Name: port 2 CONNECTIONS MENU Terminal: 2 Connection Host *** FREE ** === Commands === *** FREE ** | Telnet *** FREE ** | Rlogin *** FREE ** | Port | Admin mode ^A|...
-
Page 382: Subnet Mask
8. Press ENTER and select Save & Exit to effect the changes. You must reboot the server any time you change an IP address or Local Port value. 382 Installation and Upgrades for Avaya G700 Media Gateway and Avaya S8300 Media Server... -
Page 383: Navigating The Iolan+ Terminal Server
Terminal server installation To reboot the IOLAN+ 1. Press ENTER to view the Administration Menu. ** Administrator ** ADMINISTRATION MENU Terminal: 2 access Remote System Access (PPP). change Change login and/or admin password. gateway Examine/modify gateway table. host Examine/modify host table. kill Kill TCP connections on serial line. -
Page 384: Administering The Gateway
To administer an IOLAN+ port 1. Select Admin mode > Password and press ENTER. 2. Type iolan and press ENTER. 3. Select port and press ENTER. 384 Installation and Upgrades for Avaya G700 Media Gateway and Avaya S8300 Media Server... - Page 385 Terminal server installation 4. Type port number and press ENTER to view the Port Setup Menu where port number is the port that the adjunct connects to, ** Administrator ** PORT SETUP MENU Terminal: 2 Hardware Flow ctrl Keys Speed [9600 Flow ctrl [xon/xoff]...
-
Page 386: Testing Connectivity Through The Iolan
2. If no login prompt appears, log back into the IOLAN+ through HyperTerminal. 3. Select Admin mode > stats and press ENTER twice. 4. Select users and press ENTER. 386 Installation and Upgrades for Avaya G700 Media Gateway and Avaya S8300 Media Server... - Page 387 Terminal server installation 5. Look at the port that the adjunct is connected to and see if there is any traffic. If not, check all your connections and administration fields. ** Administrator ** SERVER STATISTICS Terminal: 2 1. port1 Talking to host 172.22.22.67.5111<DSR+CTS+DCD >DTR+RTS 2.
-
Page 388: Potential Failure Scenarios And Repair Actions
In this example, we are administering the primary call detail recording (CDR) connection as end-to-end TCP/IP. To administer IP services 1. Type change ip-services and press RETURN to assign the CDR endpoint. 388 Installation and Upgrades for Avaya G700 Media Gateway and Avaya S8300 Media Server... - Page 389 Terminal server installation 2. In the Service Type field, enter CDR1 for the call accounting link. change ip-services Page 1 of IP SERVICES Service Enabled Local Local Remote Remote Type Node Port Node Port CDR1 procr callacctg 5101 3. In the Local Node field, enter the node name for the switch. In this example, enter procr.
-
Page 390: Call Detail Recording (Cdr)
CDR equipment connects to one of the two IP connections (EXT 1 or EXT 2) on the front of the G700 or G350 Media Gateway. As with C-LAN connections, the CDR adjunct may be a terminal server or a CDR application using RSP. -
Page 391: Administering Cdr Parameters
You must administer CDR parameters to let the system know that the adjunct is connected through TCP/IP. For details on all fields on the CDR System Parameters screen, see Administrator Guide for Avaya Communication Manager, 03-300509. Issue 8.1 June 2005... - Page 392 4. If you use a secondary output device, and that device is also connected through TCP/IP, complete the Secondary Output Format field. Also, type CDR2 in the Secondary Output Endpoint field. 5. Press ENTER to save your changes. 392 Installation and Upgrades for Avaya G700 Media Gateway and Avaya S8300 Media Server...
-
Page 393: Testing The Switch-To-Adjunct Link
You can use the test, status, busyout and release commands to find and correct problems with CDR links. For more information about these commands, see Maintenance Commands for Avaya Communication Manager 3.0, Media Gateways and Servers, 03-300191. status cdr-link CDR LINK STATUS... -
Page 394: Reliable Data Transport Tool (Rdtt) Package
Avaya provides this free software application to help vendors and customers develop CDR applications that use the reliable session protocol to collect CDR data from an Avaya Media Server. The Reliable Data Transport Tool (RDTT) is a testing tool and thus is not supported by Avaya. -
Page 395: Installing The Rdtt Package
“Call Detail Recording” in Chapter 21, “Features and Technical Reference” in Administrator ● Guide for Avaya Communication Manager, 03-300509. Printers For connecting a printer to a G700 or G350 Media Gateway, see Terminal server installation page 376 for more information. Issue 8.1 June 2005... -
Page 396: Ds1/T1 Cpe Loopback Jack
This position provides maximum coverage of CPE wiring when remote loopback tests are run. If the smart jack is not accessible, install the loopback jack at the extended demarcation ● point. 396 Installation and Upgrades for Avaya G700 Media Gateway and Avaya S8300 Media Server... -
Page 397: Installing A Loopback Jack Without A Smart Jack
DS1/T1 CPE loopback jack If there is no extended demarcation point, install the loopback jack directly at the network ● interface point as shown in Figure If there is an extended demarcation point and the smart jack is not accessible, install the ●... -
Page 398: Administering A Loopback Jack
DS1 board. A bit-error rate counter displays the results on the management terminal until you terminate the test. Always perform both parts of the test. Proceed as follows. 398 Installation and Upgrades for Avaya G700 Media Gateway and Avaya S8300 Media Server... -
Page 399: Checking The Integrity Of Local Equipment
XXX is the administered number of the G700 or G350 (for example, 002), and VS is the slot number on the G700 or G350 of the Media Module (for example, V3). The V is not a variable and needs to be included in the command exactly where shown. A sample address for a DS1 circuit pack on a G700 or G350 Media Gateway might look like this: 002V3. -
Page 400: Testing The Integrity Of Data Sent Over The Loop
1. At the SAT, type clear meas ds1 loop XXXVS to zero out the bit-error counter. where XXX is the administered number of the G700 or G350 (for example, 002), and VS is the slot number on the G700 or G350 of the Media Module (for example, V3). - Page 401 3-in-24 pattern error detector is operating. 6. Type test ds1-loop XXXVS inject-single-bit-error where XXX is the administered number of the G700 or G350 (for example, 002), and VS is the slot number on the G700 or G350 of the Media Module (for example, V3).
- Page 402 4. Press ENTER to save the changes. To release the DS1 circuit pack 1. At the SAT, type release board XXXVS. 2. Leave the loopback jack in place. 402 Installation and Upgrades for Avaya G700 Media Gateway and Avaya S8300 Media Server...
-
Page 403: Testing The Ds1 Span From The Smart Jack To The Network Interface Termination Or Fiber Multiplexer (Mux)
3. Run a far-end MM710 line loopback, using the following procedure: a. From the SAT, type test ds1-loop XXXVS far-csu-loopback-test-begin , where XXX is the administered number of the G700 (for example, 002), and VS is the slot number on the G700 of the Media Module (for example, V3). - Page 404 4. G700 or G350 Media Gateway 8. Network interface smart jack 5. E1/T1 port on an MM710 9. Interface termination or fiber multiplexer (MUX) multi-media module 10. Central office 404 Installation and Upgrades for Avaya G700 Media Gateway and Avaya S8300 Media Server...
- Page 405 2. Span section 2 7. Loopback jack 3. Span section 3 8. Dumb block (extended demarcation) 4. G700 or G350 Media Gateway 9. Network interface smart jack 5. E1/T1 port on an MM710 10. Interface termination or fiber multiplexer (MUX) multi-media module 11.
- Page 406 9. Network interface smart jack 5. E1/T1 port on an MM710 10. Interface termination or fiber multiplexer (MUX) multi-media module 11. Central office 12. Dumb block to smart jack RJ-48 406 Installation and Upgrades for Avaya G700 Media Gateway and Avaya S8300 Media Server...
-
Page 407: Testing A Loopback Jack Without A Smart Jack
5. RJ-48 to network interface (up to 1000 ft. [305 m]) 2. Span section 2 6. Loopback jack 3. G700 or G350 Media Gateway 7. Dumb block (demarcation point) 4. E1/T1 port on an MM710 8. Interface termination or fiber multiplexer (MUX) multi-media module 9. - Page 408 You are responsible for finding and correcting problems in the customer wiring (section 1 and the loopback cable portion of section 2). The DS1 service provider is responsible for finding and correcting problems in the majority of section 2. 408 Installation and Upgrades for Avaya G700 Media Gateway and Avaya S8300 Media Server...
- Page 409 DS1/T1 CPE loopback jack To test a loopback jack without a smart jack 1. Test customer premises wiring from the MM710 to the loopback jack, as described in Testing the DS1 span from the loopback jack to the smart jack on page 403.
-
Page 410: Configurations Using Fiber Multiplexers
From receive tip (T1, Pin 2) to receive ring (R1, Pin 1) All measurements should read 0 (zero) volts DC. For pin numbers and pin designations, refer to Integrated Channel Service Unit (ICSU) Installation and Operation. 410 Installation and Upgrades for Avaya G700 Media Gateway and Avaya S8300 Media Server... -
Page 411: External Modems
3. If you are using a PC, start your terminal emulation software. Multi-Tech MT5634ZBA-USB-V92 Avaya recommends using a Multi-Tech USB modem, model MT5634ZBA-USB-V92, with an S8300/700, S8500, or S8700/S8710 configuration. This modem is used for sending alarms, as well as for remote dial up to the server for maintenance and administration. -
Page 412: Configuring The Mt5634Zba-Usb-V92 Modem
The Multi-Tech modems do not require administration if used in the United States. In non-US countries, these modems may require administration. For the full range of modem options, see the Administrator Guide for Avaya Communication Manager, 03-300509. 412 Installation and Upgrades for Avaya G700 Media Gateway and Avaya S8300 Media Server... -
Page 413: Busy Tone Disconnect Equipment For Non-U.s. Installations
The customer-provided busy tone disconnect adjunct detects busy tone disconnects of incoming calls on loop-start, 2-wire, analog trunks. In some non-U.S. countries where a G700 or G350 Media Gateway is used, the PSTN sends busy tone as the disconnect signal. Therefore, the S8300 Media Server, G700 Media Gateway, or G350 Media Gateway requires a busy tone disconnect adjunct. -
Page 414: Music-On-Hold
(LINE 1 or LINE 2) to a customer-supplied music source on a G350 Media Gateway On a G700 or G350 Media Gateway, the music-on-hold feature is connected through a port on an MM711 Analog Media Module or, for a G350 Media Gateway only, an MM714 Analog Media Module, or the analog LINE ports of the integrated analog media module. - Page 415 3. RJ-45 connection 6. Music source To connect an unregistered music-on-hold source to a G700 or G350 Media Gateway using a KS-23395-L3 coupler: 1. Connect one end of an RJ-45 cable to a port in the MM711 Analog Media Module.
- Page 416 5. Administer the switch for the new equipment. Note: For additional installation information, refer to 909A/909B Universal Coupler Note: Installation Instructions, which is normally shipped with the 909A/909B Universal Coupler. 416 Installation and Upgrades for Avaya G700 Media Gateway and Avaya S8300 Media Server...
-
Page 417: Installing A Registered Music Source On A G700 Or G350 Media Gateway
Installing a registered music source on a G700 or G350 Media Gateway Figure 42 show the connections for the music-on-hold feature on a G700 Media Gateway for a registered source. Note: The G350 Media Gateway’s physical connection with the MM711 Analog Media... -
Page 418: Paging And Announcement Equipment
Loudspeaker Paging screen. The G700 or G350 Media Gateway does not support an auxiliary trunk circuit pack. Therefore, the loudspeaker feature through an auxiliary trunk is not supported on a G700 or G350 Media Gateway. Users on a G700 or G350 Media Gateway controlled by an S8700/S8710 or S8500 can also access the loudspeaker paging feature if equipment is physically connected to a TN763 auxiliary trunk circuit pack in an PN carrier of an the S8700/S8710 or S8500 system. -
Page 419: Adjunct Information Sources
Avaya Call Management System (CMS) Sun Enterprise 3500 Computer Hardware ● Installation, Maintenance, and Troubleshooting (585-215-873) Avaya CMS R12 Sun Blade 100/150 Workstation Hardware Installation, Maintenance, and ● Troubleshooting (585-215-783) Avaya CMS Sun Fire V880 Computer Hardware Installation, Maintenance, and ●... -
Page 420: Intuity Audix Messaging Systems
Release 2.0 ASAI Technical Reference, 555-230-220 on the Avaya Communication Manager Release 2.0 ASAI Documents CD-ROM, 585-246-801. Another document related to ASAI is Avaya CVLAN Server 9.0 for Linux Installation and Basic Administration, which is available at http://avaya.com/support. Click the following links: Support>Technical Database>Contact Centers/CRM>CTI>CVLAN Server for... -
Page 421: Avaya Ec500 Extension To Cellular And Off-Pbx Stations
Adjunct Information Sources Avaya EC500 Extension to Cellular and Off-PBX Stations For information on installing Avaya EC500 Extension to Cellular and Off-PBX Station systems, see the Avaya EC500 Extension to Cellular and Off-PBX Station (OPS) Installation and Administration Guide, 210-100-500. - Page 422 Telephones and adjunct systems 422 Installation and Upgrades for Avaya G700 Media Gateway and Avaya S8300 Media Server...
-
Page 423: Section 3: G700 Installation And Upgrades - Manual Procedures
- manual procedures This section contains manual procedures to install or upgrade an Avaya G700 Media Gateway controlled by an Avaya S8300, S8500, or S8700-series Media Server. Information on connecting telephones and adjuncts to the G700 is presented in... -
Page 424: About The Installation Roadmap And Task Lists
Use Checklist 1 to install a G700 Media Gateway with the following characteristics: The G700 has an S8300 Media Server configured as the primary controller ● The G700 has an S8300 Media Server configured as an LSP and is controlled by an ● S8300, S8500, or an S8700-series Media Server. - Page 425 About the Installation Roadmap and Task Lists For help with connecting to and logging in to the G700 or S8300, see About connection methods on page 54. Checklist 1: Manually install new G700 with an S8300 (Primary or LSP) Major Tasks...
- Page 426 - Back up the system Controller) on page 515 - Check planning documentation - Connect and administer test endpoints - Complete electrical installation - Enable adjunct systems 2 of 3 426 Installation and Upgrades for Avaya G700 Media Gateway and Avaya S8300 Media Server...
-
Page 427: Install A New G700 Without An S8300
Install a new G700 without an S8300 Use Checklist 2 to install a G700 Media Gateway with the following characteristics: The G700 does not have an S8300 and is controlled by an external S8300, S8500, or ● S8700-series Media Server. - Page 428 Complete the Installation - Check planning documentation Process on page 561 - Connect and administer test endpoints - Complete electrical installation - Enable adjunct systems 2 of 2 428 Installation and Upgrades for Avaya G700 Media Gateway and Avaya S8300 Media Server...
-
Page 429: Upgrade An Existing G700 With An
Use Checklist 3 to upgrade a G700 Media Gateway with the following characteristics: The G700 has an S8300A Media Server configured as the primary controller. ● The G700 has an S8300A Media Server configured as an LSP and is controlled by either ● an S8300, S8500, or S8700-series Media Server. - Page 430 Checklist 3: Task list to manually upgrade an existing G700 with an S8300A (R1.x or R2.x to R3.0) (continued) Major Tasks Subtasks Upgrading the S8300A - Install the pre-upgrade service pack page 589 - Linux Migration Backup - Replace the S8300A...
-
Page 431: Upgrade An Existing G700 With An S8300B To R3.0
Use Checklist 4 to upgrade a G700 Media Gateway with the following characteristics: The G700 has an S8300B Media Server configured as the primary controller. ● The G700 has an S8300B Media Server configured as an LSP and is controlled by either ● an S8300, S8500, or S8700-series Media Server. - Page 432 Checklist 4: Task list to manually upgrade an existing G700 with an S8300B (R2.0.x to R2.2.x) (continued) Major Tasks Subtasks Upgrade the G700 - Verify contents of the tftp directory Firmware on page 674 - Determine which firmware to install...
-
Page 433: An S8300
Upgrade an existing G700 without an S8300 Use Checklist 5 to upgrade a G700 Media Gateway with the following characteristics: The G700 does not have an S8300 and is controlled by an external S8300, S8500, or ● S8700-series Media Server. - Page 434 434 Installation and Upgrades for Avaya G700 Media Gateway and Avaya S8300 Media Server...
-
Page 435: Chapter 9: Manual Installation Of A New G700 With An S8300
The hard drive contains only the remastering program (RP) software, which remasters the hard drive and installs the Communication Manager Software from the Server CD. To install the software, you need to have the Avaya TFTP Server installed on your laptop or use an external USB CD-ROM drive. -
Page 436: Installation Overview
Installation Overview About G700 components A P330 stack processor is built into the G700 Media Gateway. (This processor is also known as the Layer 2 switching processor). The G700 also contains an MGP processor, a VoIP processor, and media modules. Updating the firmware for one or more of these processors and/ or media modules is a required part of most S8300 software upgrades. -
Page 437: System Access
Before the P330 stack processor is configured with an IP address, the only way to access it is with a direct connection from your laptop to the Console port on the G700. With this connection, you can assign the IP addresses to the G700 processors, which can then be accessed over the customer LAN. -
Page 438: Connecting Directly To A Target S8300
- Opening the Web interface and using the main menu 2. Upgrade the G700 firmware by: - Opening the Web interface and using the Avaya Installation Wizard or the Upgrade Tool - Opening a telnet session to the S8300, and then telnet to the P330 stack processor... -
Page 439: Connecting Using The Customer's Lan
- Opening the Web interface on the S8300 and using the main menu 2. Upgrade the G700 firmware by: - Opening the Web interface on the primary server and using the Avaya Installation Wizard or Upgrade Tool - Opening a telnet session to the P330 stack processor and perform the installation... -
Page 440: Upgrading To Release 3.0 (Install Tftp Server Or Obtain Usb Cd-Rom Drive)
You must have the Avaya TFTP server software installed on your laptop or take a USB CD-ROM drive to the site. If you do not already have the Avaya TFTP server installed on your laptop, you can obtain the software from the Avaya Support website and install it as described in Appendix D: Install the Avaya TFTP server. -
Page 441: Getting The Serial Number Of The G700, If Necessary
Getting the Serial Number of the G700, if Necessary For a new installation of a G700 with an S8300, you need the serial number of the G700 Media Gateway in order to complete the creation of the customer’s license file on the rfa.avaya.com web site. -
Page 442: If Using Ia770, Obtaining Service Pack And Language Files
Manager release (for example, Avaya Communication Manager Software Updates for 3.0). 5. Scroll down the page to find a link called Latest Avaya Communication Manager x.x.x Software Update (where x.x.x is the release number). After this link, there should be a link starting with “PCN: “Click on this link to read about the release and software load to which this service pack applies. -
Page 443: Obtaining An Ia770 Service Pack File
Avaya Support web site. To obtain an IA770 service pack file 1. On the Avaya Support website, double click on Messaging in the list on the left. 2. Scroll down to the INTUITY links and double click on IA 770 INTUITY AUDIX Messaging Application. - Page 444 The Avaya authentication file contains the logins and passwords to access the S8300 media server. This file is updated regularly by Avaya services personnel, if the customer has a maintenance contract. All access to Communication Manager from any login is blocked unless a valid authentication file is present on the S8300 media server.
- Page 445 Also, the ART process is available only to Avaya personnel. You need an ART login ID and password, which you can set up at the ART web site. Non-Avaya personnel must contact their service support or customer care center for INADS addresses, if required.
-
Page 446: Install The S8300
Enter. The installation program interprets this as two key presses. You need to correct this before you telnet to the server. Note: This procedure is done entirely on your laptop, not on the S8300. Note: 446 Installation and Upgrades for Avaya G700 Media Gateway and Avaya S8300 Media Server... -
Page 447: Remastering The Hard Drive And Installing The Software
3. Avaya recommends using a UPS backup for media servers. If a UPS is present, make sure the G700 is plugged into the UPS. 4. Verify that all Ethernet connections are secure, to ensure the file transfer process is not interrupted. - Page 448 CD-ROM drive to one of the USB ports on the S8300B and insert the Unity CD in the drive. To begin the upgrade 1. Click Start > Run to open the Run dialog box. 448 Installation and Upgrades for Avaya G700 Media Gateway and Avaya S8300 Media Server...
- Page 449 However, you can upgrade the Communication Manger software using the procedure described in Chapter 12: Upgrade of an existing S8300B to R3.0 with manual upgrade of G700 firmware and then return to this chapter. To upgrade using the procedure in Chapter 12: Upgrade of an existing S8300B to R3.0 with manual upgrade of G700 firmware...
- Page 450 CD drive connected to the USB port. If you do not have the TFTP server running on the laptop, and a CD drive is not attached to a USB port, you will see the Select Installation Media screen: 450 Installation and Upgrades for Avaya G700 Media Gateway and Avaya S8300 Media Server...
- Page 451 Install the S8300 The Select Installation Media screen If you see the Select Installation Media screen: a. Start up the TFTP server on your laptop, or connect a USB CD-ROM drive to one of the USB ports. b. Insert the unity CD in the laptop or USB drive. c.
- Page 452 Manager software and reports the progress. Communication Manager installation progress These processes take 15–30 minutes. When the media server is ready to reboot, the following screen flashes for about 5 seconds. 452 Installation and Upgrades for Avaya G700 Media Gateway and Avaya S8300 Media Server...
-
Page 453: Verifying Software Version
Install the S8300 Software and firmware update reminder When the installation is complete, the CD drive door opens and the system reboots automatically. The reboot takes 1–3 minutes. In the event you used the laptop TFTP server and you have a problem with power and the S8300 does not reboot, there are two methods of recovery: Use the USB CD-ROM to plug into the S8300 and repeat the remastering process using ●... -
Page 454: Copying Files To The S8300 Hard Drive
Since the system is now running a new software release, you must login with the Note: initial craft ID and password. (You cannot use dadmin at this point.) 2. Under Miscellaneous click Download Files. 454 Installation and Upgrades for Avaya G700 Media Gateway and Avaya S8300 Media Server... - Page 455 Install the S8300 Download Files screen 3. Select "Files to download from the machine I’m using to connect to the server" and browse to each file you want to copy to the S8300. Leave the “Install this file on the local server” checkbox unchecked.
-
Page 456: Verifying The Time, Date, And Time Zone
(within about 5 minutes). Installing License and Authentication Files To install license and authentication files 1. Under Security, select License File. The License File screen displays. 456 Installation and Upgrades for Avaya G700 Media Gateway and Avaya S8300 Media Server... - Page 457 Install the S8300 License File Screen 2. Select "Install the license file I previously downloaded" and click Submit. The system tells you the license is installed successfully. 3. Under Security, select Authentication File. The Authentication File screen displays. Install Authentication Screen 4.
-
Page 458: Saving Translations
If this warning screen appears, close the telnet session, wait about 5 minutes, CAUTION: and try again. 2. At the telnet prompt, type cd /var/home/ftp/pub and press Enter to access the FTP directory. 458 Installation and Upgrades for Avaya G700 Media Gateway and Avaya S8300 Media Server... -
Page 459: Configuring The S8300
Install the S8300 3. At the prompt, type ls -ltr and press Enter to list files in the FTP directory. The S8300 displays a list of files in the FTP directory. 4. Verify that the directory contains the update .tar.gz file you have uploaded, if any. 5. - Page 460 - For an upgrade, perform the backup, as described in To back up the system page 515. 3. Click Continue. The Select Method screen appears. 460 Installation and Upgrades for Avaya G700 Media Gateway and Avaya S8300 Media Server...
- Page 461 With this option, the wizard guides you through the screens to configure all of the IP services. Note: This option is for the built-in Web Interface configuration wizard, not the Avaya Note: Installation Wizard (IW). If you are upgrading an existing system, you may also click Configure individual services.
- Page 462 6. Enter the host name for this server in the Host Name field (see your planning forms). The host name uniquely identifies this server. CAUTION: If the S8300 on the G700 is hosting an IA 770 INTUITY AUDIX Messaging CAUTION: Application with Digital Networking, the name must be 10 characters or less.
- Page 463 Install the S8300 Configure Ethernet Interfaces Screen 8. Use your planning forms to complete the fields for the: Ethernet 1: Control Network ● - IP Address server1 (hostname) assigned to the S8300 Media Server. Check your planning forms. - Gateway with the IP address of the default gateway of the subnet. - Subnet mask with the value of the subnet mask of the hosting subnet.
- Page 464 - This is a local survivable processor (LSP) with an S8500 media server as the primary controller. - This is a local survivable processor with a S8300 media server as the primary controller. 464 Installation and Upgrades for Avaya G700 Media Gateway and Avaya S8300 Media Server...
- Page 465 S8700-series. For information on how to upgrade the firmware on the S8500 or S8700-series, please see the section "Upgrade Firmware in Selected Port Cabinet Packs" in Upgrading the Avaya Media Server Configuration in the S8700-series documentation portion of the Documentation for Avaya Communication Manager, Media Gateways and Servers CD, 03-300151.
- Page 466 If you configure an external DNS server, the DNS will be an extra device that, if CAUTION: not working properly, can cause delays in S8300 access. External DNS Server Configuration Screen 466 Installation and Upgrades for Avaya G700 Media Gateway and Avaya S8300 Media Server...
- Page 467 Install the S8300 18. Enter the appropriate IP addresses from your planning documentation. Complete the following fields: - In the Name Servers fields, enter the IP addresses for up to 3 DNS servers on the corporate network. The S8300 Media Server checks the DNS servers in the order in which their addresses are entered for name-to-IP address resolution.
- Page 468 20. Click Continue. The system displays the Network Time Server screen. The Network Time Server screen allows you to set up the Network Time Protocol (NTP) Service. 468 Installation and Upgrades for Avaya G700 Media Gateway and Avaya S8300 Media Server...
- Page 469 Install the S8300 Network Time Server Screen Make the following choices, according to the planning documentation: - Choose Disable NTP if the user does not want the Network Time Protocol to run on the S8300 Media Server. Select this option to disable Network Time Protocol (NTP) and use the media server's own clock as a time source.
- Page 470 Only 1 key is allowed in this field. - Control key — Enter a key to query and request changes to an NTS. Only 1 key is allowed in this field. 470 Installation and Upgrades for Avaya G700 Media Gateway and Avaya S8300 Media Server...
- Page 471 23. At the next screen, Set Modem Interface, you can set up the Modem Interface IP Address for Avaya-provided service. Set Modem Interface Screen Note: The Modem IP Address for the Avaya INADS alarming is assigned by the ART Note: tool. You should have obtained this address when you performed Running the Automatic Registration Tool (ART) for the INADS IP address, if necessary page 445.
- Page 472 In this case, the configuration process will continue and you can log back on and pick up where left off. 472 Installation and Upgrades for Avaya G700 Media Gateway and Avaya S8300 Media Server...
-
Page 473: Providing The Keys.install File (If Necessary)
Install the S8300 Updating System Files Screen When the process is complete, you will receive a notification. 28. Click Close Window and continue the configuration of the G700 Media Gateway on the command line interface. Providing the keys.install File (If Necessary) Use this procedure only if you selected one of the customer-provided keys options in the previous procedure. - Page 474 4. If a keys file is not used, or if the correct keys.install file is already installed, select the option not to install a new keys file. 474 Installation and Upgrades for Avaya G700 Media Gateway and Avaya S8300 Media Server...
-
Page 475: Setting The Media Server's Time
3. Auto-install the IA770 messaging software. 4. Restart the system. 5. Enable messaging on the S8300 Media Server Web interface. For detailed information on performing these tasks, refer to Avaya IA770 INTUITY AUDIX Messaging, Release 3.0, Installation, Upgrades, and Troubleshooting, 11-300532. Issue 8.1 June 2005... -
Page 476: Configure The G700 Media Gateway
Assigning IP Addresses of the G700 Media Gateway Components This section describes how to assign the IP addresses and IP routes to the G700 Media Gateway and its components. The IP addresses should be available to you on the IP Addressing Planning Form. - Page 477 Checking for IP connections ● To access the P330 stack processor 1. Set up a direct connection to the G700 Console (serial) port and access the P330 stack processor using Hyperterminal (or similar terminal emulation application). 2. Login as root.
- Page 478 The route net and route host tables appear. Verify that the information is correct. After you have configured the P330 stack processor, you assign an IP address to the G700 Media Gateway Processor (MGP). Your first task is to check the serial number of the MGP.
- Page 479 Configure the G700 Media Gateway After you have assigned an IP address to the G700 processor, telnet directly to the G700 media gateway processor and login (the login name and password are provided in the planning documentation). To assign the IP address to the G700 media gateway processor 1.
- Page 480 11. At the MG-???-1(super)# prompt, type configure to reach the configuration level of the command line interface. 12. Type show interface mgp to verify that the G700 media gateway has the correct IP address. To assign the default IP route to the G700 media gateway 1.
-
Page 481: Checking For Ip Connections
2. Check that the same number of packets transmitted were also received. 3. Type ping voip v0 <IP_address> <IP_address> is the address of the G700, or any other functioning endpoint on the customer’s LAN. Ping results appear on the screen, similar to the following example. -
Page 482: Setting Up The Controller List For The G700
This list begins with the IP address of the primary controller. In the event that the G700 media gateway loses contact with its primary controller, it will seek to re-register with the primary controller first, then with the other controllers on this list. The other controllers are S8500 or S8700/S8710 media servers that can act as the primary controller, or S8300 media servers configured as Local Survivable Processors (LSPs). - Page 483 3. Select Yes at the dialog box that asks if you want to continue. The G700 media gateway processor resets. The LEDs on the G700 media gateway and the media modules flash. These elements each conduct a series of self-tests. When the LEDs on the media modules are extinguished and the active status LEDs on the G700 media gateway are on, the reset is complete.
-
Page 484: Setting The Lsp Transition Points
NO and the H248 Link Status says DOWN. Setting the LSP Transition Points You must set the length of time that the G700 searches, in the event of a network problem, for primary controllers (for example, additional CLAN connections) with which to register. After this search time has elapsed, the G700 will search for an LSP with which to register. -
Page 485: Install New Firmware On The G700
5. Select the appropriate document for the expansion module you are installing. Install New Firmware on the G700 This section describes the manual procedures to install firmware on the G700 Media Gateway processors and media modules. Manual upgrade procedures — G700 firmware... -
Page 486: Determining Which Firmware To Install On The G700
2. Check the version number (ver num) of the EW_Archive file to see if it matches the Release Letter. If not, you must upgrade the P330 stack processor. 3. Type show image version The system displays the list of software. 486 Installation and Upgrades for Avaya G700 Media Gateway and Avaya S8300 Media Server... - Page 487 A. If the list shows A, you will upgrade B. 4. Refer to the VOIP FW column and row for slot V0 (same row occupied by the G700 information) to see if the number matches the VoIP firmware identified in your planning forms.
-
Page 488: Installing New Firmware On The P330 Stack Processor
Installing new firmware on the G700 Media Gateway Processor To install MGP firmware 1. At the P330-1(configure)# prompt, type session mgp to reach the G700 media gateway processor. 2. Type configure at the MG-???-1(super)# prompt to enter configuration mode, which will change the prompt to MG-???-1(configure)#. - Page 489 7. Select Yes at the dialog box that asks if you want to continue. The G700 media gateway processor resets. The LEDs on the G700 media gateway and the media modules flash. These elements each conduct a series of self-tests. When the LEDs on the media modules are extinguished and the active status LEDs on the G700 media gateway are on, the reset is complete.
-
Page 490: Installing New Firmware On The Media Modules
This VoIP module does not occupy a physical position like other media modules. 2. At the P330-1(configure)# prompt, type session mgp. 3. At the MG-001-1(super)# prompt, type configure to change to the configuration mode. 490 Installation and Upgrades for Avaya G700 Media Gateway and Avaya S8300 Media Server... - Page 491 8. Type reset <module #> where <module #> is the number of the G700 in the stack. 9. When the reset is finished, type show mm to verify the upgrade. To release board (if media module was busied out) 1.
-
Page 492: Setting Rapid Spanning Tree On The Network
802.1w standard defined it. An edge port is a port that goes to a device that cannot form a network loop. To set an edge-port, type set port edge admin state module/port edgeport. 492 Installation and Upgrades for Avaya G700 Media Gateway and Avaya S8300 Media Server... -
Page 493: Installing Ia770 Service Pack Files, If Any
Install New Firmware on the G700 For more information on the Spanning Tree CLI commands, see the Avaya P330 User’s Guide (available at http://www.avaya.com/support). Installing IA770 service pack files, if any If IA770 is being used, a post-upgrade service pack for IA770 may be required. See the IA770 documentation for procedures to install a service pack. -
Page 494: Administer Communication Manager
A separate, possibly remote, S8300. ● In the first case, the G700/S8300 you installed is a standalone (or “ICC”) configuration. In the second case, the S8300 you installed is configured as an LSP. Perform one of the following two administration procedures in this section: Administering an S8300 primary controller ●... -
Page 495: Assigning Node Names And Ip Addresses For The Lsps
Administer Communication Manager In this section, you will use the SAT interface to: Assigning Node Names and IP Addresses for the LSPs ● Administering Network Regions ● Associating LSPs with Network Regions ● Administering IP Interfaces ● Administering the LSP Form ●... -
Page 496: Administering Network Regions
Manual installation of a new G700 with an S8300 Administering Network Regions Before assigning an IP network region to a G700, you must define network region on the IP Network Region form. After a network region is defined, you can assign it to the various network elements (servers, gateways, IP phones). -
Page 497: Associating Lsps With Network Regions
Administer Communication Manager 2. If necessary, complete the fields as described in ‘‘Administration for Network Connectivity for Avaya Communication Manager, 555-233-504.’’ Note: It is strongly recommended to use the defaults in the screen. However, for the Note: RTCP Enabled and RSVP Enabled fields, the entry should be n (no). -
Page 498: Administering Ip Interfaces
LSP screen. To add LSP names to the LSP screen 1. At the S8300 SAT prompt, type change lsp to open the LSP screen. 498 Installation and Upgrades for Avaya G700 Media Gateway and Avaya S8300 Media Server... -
Page 499: Administering An S8500 Or S8700 Primary Controller
Administer Communication Manager LSP Screen change lsp Page 1 of LOCAL SURVIVABLE PROCESSOR Number NAME IP Address Service Translations State? Updated node-10-LSP_ 192.168.1.50 in-service 14:21 5/4/2003 ____________ out-of-service ____________ out-of-service ____________ out-of-service ____________ out-of-service ____________ out-of-service ____________ out-of-service ____________ out-of-service ____________ out-of-service ____________... -
Page 500: Assigning Node Names And Ip Addresses For The C-Lans And Lsps
CD, ‘‘Avaya S8300, S8500, and S8700 media server Library CD," 555-233-325.’’ To assign node names and IP addresses 1. At the SAT prompt, type change node-names ip to open the Node Names screen. 500 Installation and Upgrades for Avaya G700 Media Gateway and Avaya S8300 Media Server... -
Page 501: Administering Network Regions
For a G700 with an S8300 LSP and an S8500 or S8700 as the primary controller, there may be more than one network region, since there can be up to 250 G700 media gateways connected to the S8500 or S8700 with thousands of telephones in the network. - Page 502 RTCP Enabled and RSVP Enabled fields, the entry should be n (no). 3. If the network region of the G700 (1 in this example) is different from that of the S8500 or S8700 CLAN board(s), you must interconnect the two regions.
-
Page 503: Assigning Lsps To The Network Regions
IGAR 4. Type the number for the type of codec set (1–7) that the S8500 or S8700 will use to interconnect the G700 and the C-LAN board(s) in the row corresponding to the region of the C-LAN. In this example, the C-LAN is in region 9 and codec-set type 3 is to be used for the interconnection between region 1 and region 9. -
Page 504: Administering Ip Interfaces
Node Name: procr IP Address: 135.9.41.146 Subnet Mask: 255.255.255.0 Gateway Address: 135.9.41.254 Enable Ehternet Port? y Nework Region: 1 VLAN: 0 Number of CLAN Sockets Before Warning: 400 504 Installation and Upgrades for Avaya G700 Media Gateway and Avaya S8300 Media Server... -
Page 505: Administering The Lsp Form
The subnet mask associated with the IP address for this IP interface. For more information on IP addresses and subnetting, see “Administration for Network Connectivity for Avaya Communication Manager, 555-233-504”. Gateway The address of a network node that serves as the default Address gateway for the IP interface. -
Page 506: Administering The Media Gateway
To perform the procedures in this section, telnet to the primary controller, log in, and open a SAT session. CAUTION: Before administering a media gateway, make sure that the gateway has been CAUTION: fully configured. 506 Installation and Upgrades for Avaya G700 Media Gateway and Avaya S8300 Media Server... - Page 507 Module Type Name 2. Complete the Name field with the hostname assigned to the G700 media gateway. 3. Complete the Identifier field with the serial number of the G700 media gateway. You can obtain the serial number by typing the show system command at the MGP command line interface.
- Page 508 MM710 T1/E1 MM The media modules installed in the G700 are listed next to their slot numbers. Verify that a G700 media gateway has been successfully added. 508 Installation and Upgrades for Avaya G700 Media Gateway and Avaya S8300 Media Server...
- Page 509 If the G700 fails to register, two common causes are: - The serial number added as the Identifier for the G700 is wrong. To check, log back into the G700 gateway and type show system. Check the serial number that appears.
-
Page 510: Considerations For Ip Phones Supported By A Local Survivable Processor
TFTP server, as well as the directory on the TFTP server from which the phone receives its upgrades. When preparing a DHCP server to work with Avaya IP phones, there is an option that must be administered to allow the Avaya phone to receive the DHCP offer. This option is “site-specific-option-number”... -
Page 511: Transition Of Control From Primary Controller To Lsp
When the network connection between the G700 and the S8500 or S8700 goes down, control of endpoints connected to the G700 goes to the next point in the primary controller list, which will be either a second CLAN board or the LSP. At this point, the S8500 or S8700 alarms to notify the customer and services personnel that the network connection between the S8500 or S8700 and G700 has problems. -
Page 512: Configuring The Primary Server To Report Alarms To A Services Support Agency
OSS method. In this example, the primary server is an S8300, and the services support agency is Avaya’s Initialization and Administration System (INADS). Perform this task after all Communication Manager administration is complete. 512 Installation and Upgrades for Avaya G700 Media Gateway and Avaya S8300 Media Server... -
Page 513: Configuring The G700 Media Gateway To Send Its Traps To A Network Management System (Nms)
Configuring the G700 Media Gateway to send its traps to a network management system (NMS) Configuring the G700 Media Gateway to send SNMP traps to the primary server can be accomplished by two commands: P330 stack processor CLI command set snmp community trap [community ●... -
Page 514: Configuring The Destination For G700 Snmp Traps
Manual installation of a new G700 with an S8300 Configuring the destination for G700 SNMP traps Events occurring on the G700 cause SNMP traps to be generated. The G700 MGP can be configured to send SNMP traps to any network management system (NMS) in the network, including the primary server (S8300, S8500, or S8700). -
Page 515: Complete The Installation Of The S8300 (If The Primary Controller)
Complete the Installation of the S8300 (if the Primary Controller) Complete the Installation of the S8300 (if the Primary Controller) Consult the planning documentation to obtain the necessary information to complete the installation. Part of the final process will be to: Connect and administer test endpoints ●... -
Page 516: If Using Ia770, Administer Communication Manager For Integrated Messaging
6. Click Start Backup. The system displays the results of your backup procedure on the Backup Now results screen. This completes the installation of the G700 Media Gateway with an S8300 Media Server as primary controller. If using IA770, administer Communication Manager for... -
Page 517: Complete The Installation Process (For An S8300 Lsp)
Part of the final process will be to: Connect and administer test endpoints ● Test endpoints ● Complete the electrical installation ● Enable adjunct systems ● This completes the installation of the G700 Media Gateway with an S8300 LSP. Issue 8.1 June 2005... - Page 518 Manual installation of a new G700 with an S8300 518 Installation and Upgrades for Avaya G700 Media Gateway and Avaya S8300 Media Server...
-
Page 519: Chapter 10: Manual Installation Of A New G700 Without An S8300
Chapter 10: Manual installation of a new G700 without an S8300 This chapter covers the manual procedures to install the firmware on an new Avaya G700 Media Gateway without an Avaya S8300 Media Server. The G700 is controlled by an external primary server running Avaya Communication Manger. -
Page 520: Installation Overview
About the TFTP server To install firmware on a G700 without an S8300 or LSP, you must first copy the firmware files to an external TFTP server on the customer LAN. The TFTP server can be a customer computer or it can be set up on your services laptop. -
Page 521: How Is Normal Access To The S8300 And G700 Provided
Installation overview How is normal access to the S8300 and G700 provided You can access the S8300 and G700 in several ways with either a direct connection or LAN connection. Note: Before the Upgrade Tool can be used to upgrade software on an LSP or firmware... -
Page 522: Connecting Directly To The Remote Primary Server (S8300, S8500, Or S8700)
- Opening the Web interface on the S8300 and using the main menu 2. Upgrade the G700 firmware by: - Opening the Web interface on the primary server and using the Avaya Installation Wizard or Upgrade Tool - Opening a telnet session to the P330 stack processor and perform the installation... -
Page 523: Before Going To The Customer Site
This section covers: Collecting Installation Information ● Getting the Serial Number of the G700, if Necessary Setting Up the TFTP Server on Your Laptop or on a Customer PC, if Necessary ● Collecting Installation Information Planning forms that the Project Manager provides The project manager should provide you with forms that contain all the information needed to prepare for this installation. -
Page 524: Getting The Serial Number Of The G700, If Necessary
(for example, 1.3 to 2.0), you will need the serial number of the G700. To get this number, ask the customer’s administrator to log in to the S8300 web page and select View License Status from the main menu to display the serial number. -
Page 525: Downloading Individual Firmware Files
1. Access the http://www.avaya.com/support website. 2. Navigate to Firmware Downloads for The G700 Media Gateway. The system displays a list of firmware files. 3. Locate the file names that match the files listed in your planning documentation. The file names will approximate those listed in... -
Page 526: Configure The G700
Assigning the IP addresses of the G700 media gateway components This section describes how to assign the IP addresses and IP routes to the G700 Media Gateway and its components. The IP addresses should be available to you on the IP Addressing Planning Form. - Page 527 Checking for IP connections ● To access the P330 stack processor 1. Set up a direct connection to the G700 Console (serial) port and access the P330 stack processor using Hyperterminal (or similar terminal emulation application). 2. Login as root.
- Page 528 The route net and route host tables appear. Verify that the information is correct. After you have configured the P330 stack processor, you assign an IP address to the G700 Media Gateway Processor (MGP). Your first task is to check the serial number of the MGP.
- Page 529 If there is a difference, the serial number in the displayed list is correct.You will need this later. After you have assigned an IP address to the G700 processor, telnet directly to the G700 media gateway processor and login (the login name and password are provided in the planning documentation).
- Page 530 11. At the MG-???-1(super)# prompt, type configure to reach the configuration level of the command line interface. 12. Type show interface mgp to verify that the G700 media gateway has the correct IP address. To assign the default IP route to the G700 media gateway 1.
-
Page 531: Checking For Ip Connections
Usually, only a default route is needed. Refer to your planning document. From the G700 media gateway processor command line interface, you assign IP addresses to the VoIP resource resident on the G700 media gateway and to any installed MM760 VoIP media modules. -
Page 532: Setting Up The Controller List For The G700
This list begins with the IP address of the primary controller. In the event that the G700 media gateway loses contact with its primary controller, it will seek to re-register with the primary controller first, then with the other controllers on this list. The other controllers are S8500 or S8700/S8710 media servers that can act as the primary controller, or S8300 media servers configured as Local Survivable Processors (LSPs). - Page 533 <ip_address> [,<ip_address> [,<ip_address> [,<ip_address>]]] where, the first <ip_address> is the IP address of the primary controller for this G700. If the primary controller is an S8700, this is the IP address of a C-LAN board that is connected to a pair of duplicated S8700/S8710s.
-
Page 534: Setting The Lsp Transition Points
NO and the H248 Link Status says DOWN. Setting the LSP Transition Points You must set the length of time that the G700 searches, in the event of a network problem, for primary controllers (for example, additional CLAN connections) with which to register. After this search time has elapsed, the G700 will search for an LSP with which to register. -
Page 535: Configuring An X330 Expansion Module (If Necessary)
2. At the MG-001-1(configure)# prompt, type set mgp reset-times total-search <search-time> where <search-time> is the total time in minutes that the G700 searches for both primary controllers or LSPs. The range is from 1 to 60. 3. At the MG-001-1(configure)# prompt, type set mgp reset-times transition-point <#_of_primary>... -
Page 536: Prepare To Install Firmware On The G700
Manual installation of a new G700 without an S8300 Prepare to install firmware on the G700 Before installing new firmware on the G700 processors and media modules, you must be: Accessing the P330 Stack Processor ● Verifying the contents of the tftpboot directory ●... -
Page 537: Determining Which Firmware To Install On The G700
Check the directory to make sure the firmware files you want to install are listed. Determining which firmware to install on the G700 Conduct the following procedure to compare software versions running on the G700 processors and media modules with the versions in you planning documents. If the versions do not match, you need to install the new firmware for those components. - Page 538 A. If the list shows A, you will upgrade B. 4. Refer to the VOIP FW column and row for slot V0 (same row occupied by the G700 information) to see if the number matches the VoIP firmware identified in your planning forms.
-
Page 539: Install New Firmware On The G700 Media Gateway
If not, you must upgrade them, as well. Install New Firmware on the G700 Media Gateway The procedures in this section install firmware on the G700 processors and media modules. This section covers: Installing New Firmware on the P330 Stack Processor... -
Page 540: Installing New Firmware On The G700 Media Gateway Processor
Installing new firmware on the G700 Media Gateway Processor To install MGP firmware 1. At the P330-1(configure)# prompt, type session mgp to reach the G700 media gateway processor. 2. Type configure at the MG-???-1(super)# prompt to enter configuration mode, which will change the prompt to MG-???-1(configure)#. -
Page 541: Installing New Firmware On The Media Modules
7. Select Yes at the dialog box that asks if you want to continue. The G700 media gateway processor resets. The LEDs on the G700 media gateway and the media modules flash. These elements each conduct a series of self-tests. When the LEDs on the media modules are extinguished and the active status LEDs on the G700 media gateway are on, the reset is complete. - Page 542 Show MG list_config SLOT TYPE CODE SUFFIX HW VINTAGE FW VINTAGE VOIP FW ---- ------ ----- ------ ---------- ---------- ------- G700 DAF1 21.25.0(A) S8300 MM712 MM711 MM710 542 Installation and Upgrades for Avaya G700 Media Gateway and Avaya S8300 Media Server...
-
Page 543: Setting Rapid Spanning Tree On The Network
8. Type reset <module #> where <module #> is the number of the G700 in the stack. 9. When the reset is finished, type show mm to verify the upgrade. To release board (if media module was busied out) 1. -
Page 544: Administer Communication Manager
802.1w standard defined it. An edge port is a port that goes to a device that cannot form a network loop. To set an edge-port, type set port edge admin state module/port edgeport. For more information on the Spanning Tree CLI commands, see the Avaya P330 User’s Guide (available at http://www.avaya.com/support). Administer Communication Manager Important:... -
Page 545: Administering An S8300 Primary Controller
Administering an S8300 primary controller This document covers only the administration of Communication Manager required for the G700 media gateway to communicate with the primary controller over a customer’s network. For the majority of administration required, see Administrator Guide to Avaya Communication Manager, 03-300509, or Administration for Network Connectivity for Avaya Communication Manager, 555-233-504. -
Page 546: Administering Network Regions
3. Press F3 (Enter) when complete. Administering Network Regions Before assigning an IP network region to a G700, you must define network region on the IP Network Region form. After a network region is defined, you can assign it to the various network elements (servers, gateways, IP phones). -
Page 547: Associating Lsps With Network Regions
Keep-Alive Interval (sec): 5 Keep-Alive Count: 5 2. If necessary, complete the fields as described in ‘‘Administration for Network Connectivity for Avaya Communication Manager, 555-233-504.’’ Note: It is strongly recommended to use the defaults in the screen. However, for the Note: RTCP Enabled and RSVP Enabled fields, the entry should be n (no). -
Page 548: Administering Ip Interfaces
To assign the network region to the S8300 1. At the SAT prompt, type change ip-interfaces procr. The S8300 displays the IP Interfaces screen for the media server. 548 Installation and Upgrades for Avaya G700 Media Gateway and Avaya S8300 Media Server... -
Page 549: Administering The Lsp Form
Administer Communication Manager IP Interfaces Screen change ip-interfaces procr Page 1 of 1 IP INTERFACES Type: PROCR Node Name: procr IP Address: 135.9.41.146 Subnet Mask: 255.255.255.0 Enable Ehternet Port? Nework Region: 1 2. The field Enable Ethernet Port? should indicate y (yes). The Node Name should be the IP address of the S8300 media server. -
Page 550: Administering An S8500 Or S8700/S8710 Primary Controller
Administering an S8500 or S8700/S8710 primary controller Complete the procedures in this section if the primary controller for the G700 you are installing is an S8500, S8700 or S8710. If the primary controller is an S8300, you should have completed... -
Page 551: Assigning Node Names And Ip Addresses For The C-Lans And Lsps
S8700. For information on how to upgrade the firmware on the S8700, please see the section "Upgrade Firmware in Selected Port Cabinet Packs" in Upgrading the Avaya media server Configuration in the S8700 documentation portion of this documentation CD, Documentation for Avaya Communication Manager, Media Gateways and Servers CD, 03-300151. -
Page 552: Administering Network Regions
For a G700 with an S8300 LSP and an S8500 or S8700 as the primary controller, there may be more than one network region, since there can be up to 250 G700 media gateways connected to the S8500 or S8700 with thousands of telephones in the network. - Page 553 RTCP Enabled and RSVP Enabled fields, the entry should be n (no). 3. If the network region of the G700 (1 in this example) is different from that of the S8500 or S8700 CLAN board(s), you must interconnect the two regions.
-
Page 554: Assigning Lsps To The Network Regions
IGAR 4. Type the number for the type of codec set (1–7) that the S8500 or S8700 will use to interconnect the G700 and the C-LAN board(s) in the row corresponding to the region of the C-LAN. In this example, the C-LAN is in region 9 and codec-set type 3 is to be used for the interconnection between region 1 and region 9. -
Page 555: Administering Ip Interfaces
Administer Communication Manager IP Network Region Screen, page 2 change ip-network-region 1 Page 2 of 19 IP Network Region LSP NAMES IN PRIORITY ORDER node-10-LSP______ ________________ ________________ ________________ ________________ ________________ 2. Enter the names of up to six LSPs to be assigned to region 1. The LSP names must be the same as administered on the Node Names form. -
Page 556: Administering The Lsp Form
LSPs to get translations updates from the primary controller. Once the LSPs are successfully entered on the LSP form, their status can be viewed with the display lsp command. 556 Installation and Upgrades for Avaya G700 Media Gateway and Avaya S8300 Media Server... -
Page 557: Administering The Media Gateway
Administer Communication Manager Note: The LSP node names must be administered on the node-names-ip form before Note: they can be entered on the LSP form. To add LSP names to the LSP screen 1. At the SAT prompt, type change lsp to open the LSP screen. LSP Screen change lsp Page... - Page 558 Module Type Name 2. Complete the Name field with the hostname assigned to the G700 media gateway. 3. Complete the Identifier field with the serial number of the G700 media gateway. You can obtain the serial number by typing the show system command at the MGP command line interface.
- Page 559 ANA MM MM710 T1/E1 MM The media modules installed in the G700 are listed next to their slot numbers. Verify that a G700 media gateway has been successfully added. To verify changes 1. At the SAT prompt, type list media-gateway.
- Page 560 If the G700 fails to register, two common causes are: - The serial number added as the Identifier for the G700 is wrong. To check, log back into the G700 gateway and type show system. Check the serial number that appears.
-
Page 561: Complete The Installation Process
Complete the Installation Process Complete the Installation Process Consult the planning documentation to obtain the necessary information to complete the installation. Part of the final process will be to: Connect and administer test endpoints ● Test the endpoints ● Complete the electrical installation ●... - Page 562 Manual installation of a new G700 without an S8300 562 Installation and Upgrades for Avaya G700 Media Gateway and Avaya S8300 Media Server...
-
Page 563: Chapter 11: Upgrade Of An Existing S8300A To R3.0
This chapter covers the procedures to upgrade the Communication Manager software to release 3.0 on an installed Avaya S8300 Media Server, version A. The procedures to upgrade the G700 firmware use CLI commands instead of the Upgrade Tool. The current Communication Manager release can be any pre-2.1 release. -
Page 564: Release 3.0 Upgrade Scenarios
Upgrade The unshaded cells in this table are the most common and recommended upgrade scenarios. The shaded cells are scenarios that are unlikely or not recommended. 564 Installation and Upgrades for Avaya G700 Media Gateway and Avaya S8300 Media Server... -
Page 565: Accessing The Server Cd
Recommended: Place the CD in the CD-ROM drive on the technician’s laptop. This ● method requires that the Avaya TFTP Server software (available at support.avaya.com) is installed on the technician’s laptop. In addition, this method requires that the S8300B does not have Communication Manager software installed on its hard drive. -
Page 566: Accessing The S8300
If using IA770, checking stored messages size, obtaining service pack (or RFU) and ● language files on page 571 Completing the RFA process (obtaining license and authentication files) on page 573 ● 566 Installation and Upgrades for Avaya G700 Media Gateway and Avaya S8300 Media Server... -
Page 567: Installing Tftp Server Or Obtaining Usb Cd-Rom Drive
You must have either the Avaya TFTP server software installed on your laptop or take a USB CD-ROM drive to the site. If you do not already have the Avaya TFTP server installed on your laptop, you can obtain the software from the Avaya Support website and install it as described in Appendix D: Install the Avaya TFTP server. -
Page 568: Getting The Serial Number Of The G700, If Necessary
G700, ask the customer’s administrator to log into the S8300 web page and select View License Status from the main menu to display the serial number. The serial number should also be on a sticker on the back of the G700 chassis but this number is occasionally incorrect. -
Page 569: Obtaining S8300 Software And G700 Firmware
The file containing the software for the S8300 has a *.tar extension and contains both the S8300 software and the G700 and media module firmware. The *.tar file is on a CD-ROM that you take to the site. This CD is called the “Server CD” because it contains software for all of the Linux servers. -
Page 570: Obtaining Service Pack Files, If Needed
Obtaining service pack files, if needed If one or more service packs are required for this installation or upgrade procedure, and the service pack files are not on your software CD, download the service pack files from the Avaya Support web site to your laptop. -
Page 571: If Using Ia770, Checking Stored Messages Size, Obtaining Service Pack (Or Rfu) And Language Files
Before going to the customer site File download window 7. Click the Save button and browse to the directory on your laptop in which you want the file saved. To upgrade from release 1.2.x or 1.3.0 1. If you are upgrading from release 1.2.x or 1.3.0, on the Document Preview/Software Updates page, locate the service pack file name that matches the load currently installed on the system you are upgrading. -
Page 572: Checking The Size Of Stored Messages
To obtain the post-upgrade service pack file and documentation 1. On the Avaya Support website, double click on Messaging in the list on the left. 2. Scroll down to the INTUITY links and double click on IA 770 INTUITY AUDIX Messaging Application. -
Page 573: Obtaining Optional Language Files
The Avaya authentication file contains the logins and passwords to access the S8300 media server. This file is updated regularly by Avaya services personnel, if the customer has a maintenance contract. All access to Communication Manager from any login is blocked unless a valid authentication file is present on the S8300 media server. - Page 574 Also, the ART process is available only to Avaya personnel. You need an ART login ID and password, which you can set up at the ART web site. Non-Avaya personnel must contact their service support or customer care center for INADS addresses, if required.
- Page 575 Obtaining the static craft password (Avaya technicians only) After installing new software and new Authentication file, you will need to use a static craft password to access the customer’s system. This static password will enable you to log in to the S8300 with a direct connection to the Services port without the ASG challenge/response.
-
Page 576: Preparing For The Upgrade To R3.0 On-Site
2. Type 192.11.13.6 in the Address field to open the logon page. 3. Log on as craft or dadmin, when prompted. 4. Click Launch Maintenance Web Interface to get to the Main Menu. 576 Installation and Upgrades for Avaya G700 Media Gateway and Avaya S8300 Media Server... -
Page 577: Checking Current Software Release
Preparing for the upgrade to R3.0 on-site To access the SAT 1. From the bash CLI, type SAT and press Enter. Or, to open SAT directly from your laptop, a. Click Start > Run. b. Type telnet 192.11.13.6 5023 and press Enter. 2. -
Page 578: Pre-Upgrade Tasks - If The S8300 Is The Primary Controller
LSPs must be upgraded before the primary controller. (You can use the SAT command, list media-gateway, to see if there are LSPs registered to the S8300.) 578 Installation and Upgrades for Avaya G700 Media Gateway and Avaya S8300 Media Server... - Page 579 Preparing for the upgrade to R3.0 on-site Perform the following procedures if you are upgrading an S8300 that is configured as a primary controller: To clear alarms ● To check link status ● To record all busyouts ● To disable scheduled maintenance ●...
- Page 580 Therefore, an upgrade to an LSP is usually accompanied by an upgrade of the primary controller. Note: You should upgrade the LSP before you upgrade the primary controller. Note: 580 Installation and Upgrades for Avaya G700 Media Gateway and Avaya S8300 Media Server...
- Page 581 Before you upgrade the primary controller, you need to shut down Communication Manager on the LSPs. This prevents the phones and other endpoints attached to the G700 from trying to register with the LSPs while you are upgrading the primary controller.
-
Page 582: Getting Ia770 Data And Stopping Ia770
2. Select Global Administration then Messaging Administration. 3. Enter the craft password. 4. At the command prompt, enter display system-parameters features. The System-Parameters Features screen displays. 5. Go to page 3. 582 Installation and Upgrades for Avaya G700 Media Gateway and Avaya S8300 Media Server... - Page 583 Preparing for the upgrade to R3.0 on-site System-Parameters Features screen 6. Under Announcement Sets, note the main system language listed after System: In this example, the main system language is English (us-eng). If the system language is anything other than us-eng or us-tdd, you will need to download the appropriate language files from a language CD after the upgrade.
-
Page 584: Stopping Ia770
Note: If you use the Avaya Installation Wizard (IW) to upgrade the server, you would Note: skip this procedure. The IW executes the stop command automatically. 584 Installation and Upgrades for Avaya G700 Media Gateway and Avaya S8300 Media Server... -
Page 585: Backing Up System Files
When AUDIX is shut down, you see the message Voice System is Down. Important: After upgrading an S8300 media server, you must upgrade the G700 or G350 Important: media gateway firmware and media module firmware before restarting IA770. Backing up system files For releases 1.2.0 through 1.3.9, this backup is optional but recommended in case there is a... - Page 586 Select this option only if the S8300 is a primary controller. Do not select it if the Note: S8300 is an LSP. Server and System Files ● Security Files ● 586 Installation and Upgrades for Avaya G700 Media Gateway and Avaya S8300 Media Server...
- Page 587 Preparing for the upgrade to R3.0 on-site 3. If the AUDIX options are available, select AUDIX and select AUDIX Translations, Names, and Messages. CAUTION: Selecting the Full Backup radio button does NOT include AUDIX files. CAUTION: Backup Now screen (Part Two) 4.
-
Page 588: Recording Configuration Information
- Gateway IP address, - Subnet mask You can skip the remaining configuration screens. 8. If upgrading from pre-1.2 release, record the data from all configuration screens. 588 Installation and Upgrades for Avaya G700 Media Gateway and Avaya S8300 Media Server... -
Page 589: Upgrading The S8300A
Upgrading the S8300A Upgrading the S8300A CAUTION: This upgrade procedure, including remastering the hard drive on the S8300, CAUTION: requires a service interruption of approximately 4 hours, or up to 6 hours if IA770 is being used. This section describes the procedures for upgrading the S8300A Media Server from a pre-2.2 release of Communication manager to release 3.0. -
Page 590: Installing The Pre-Upgrade Service Pack
1–2 minutes (or longer if messaging is enabled). 8. Type patch_show again and press Enter to list Communication Manager files to verify the new software file was applied. 590 Installation and Upgrades for Avaya G700 Media Gateway and Avaya S8300 Media Server... - Page 591 Upgrading the S8300A 9. Before proceeding, type statapp -c to view the status of the processes. Make sure everything except dupmgr shows UP. Communication Manger should show 65/65 UP or, if IA770 is installed, 67/67 UP. To stop the continual refresh of the statapp command, type Ctrl-C.
-
Page 592: Linux Migration Backup (If Current Release Is 1.2.0 Through 1.3.X)
The Linux Migration - Backup screen displays. Linux Migration - Backup screen 2. Select "Initiate new backup or restore" and click Submit. The Linux Migration - Backup Initiate screen displays. 592 Installation and Upgrades for Avaya G700 Media Gateway and Avaya S8300 Media Server... - Page 593 Upgrading the S8300A Linux Migration - Backup Initiate screen 3. Under Backup Method, select FTP Fill in the User Name, Password, Host Name (or host IP address) and Directory fields for the back up location. The backup location should be a server on the customer’s LAN. Click Submit.
- Page 594 However, also verify that the message, Backup Successful also appears in the last line. If any error messages appear stating that the backup failed, follow the normal escalation procedures. 594 Installation and Upgrades for Avaya G700 Media Gateway and Avaya S8300 Media Server...
-
Page 595: Replacing The S8300A With The S8300B Media Server
The guides are in slot V1 for the S8300 and above slot V1 for the LED panel. b. Push both circuit packs (together) back into the guides, gently and firmly, until the front of each circuit pack aligns with the front of the G700. 9. Secure the S8300 faceplate with the thumb screws. -
Page 596: Upgrading The S8300B Media Server
5. Type quit and press Enter to save the setting and close the window. This procedure resets your Microsoft Telnet defaults and does not need to be done each time you use Telnet. 596 Installation and Upgrades for Avaya G700 Media Gateway and Avaya S8300 Media Server... -
Page 597: Remastering The Hard Drive And Installing The Upgrade Software
3. Avaya recommends using a UPS backup for media servers. If a UPS is present, make sure the G700 is plugged into the UPS. 4. Verify that all Ethernet connections are secure, to ensure the file transfer process is not interrupted. - Page 598 Alternatively, you can obtain a USB CD-ROM drive or an S8300B with only the RP software and proceed from Remastering the hard drive and installing the upgrade software on page 245. 598 Installation and Upgrades for Avaya G700 Media Gateway and Avaya S8300 Media Server...
- Page 599 Upgrading the S8300A The first RP screen Tip: To navigate on these screens, use the arrow keys to move to an option, then Tip: press the space bar to select the option. Press Enter to submit the screen. 4. Select Install and press Enter. If a Warning screen appears, RP Warning screen select Yes and press Enter.
- Page 600 5. Select the appropriate release version (if more than one) then select OK and press Enter. 6. The Run AUDIX Installation screen appears. Run AUDIX Installation screen 600 Installation and Upgrades for Avaya G700 Media Gateway and Avaya S8300 Media Server...
- Page 601 Upgrading the S8300A 7. Select Yes if you want to install AUDIX concurrently with Communication Manager. Select No if you do not. Then press Enter. At this point, the following processes are initiated: a. The S8300 hard drive is reformatted. b.
-
Page 602: Verifying Software Version
Normally, you would need to use the Make Upgrade Permanent function on the Tip: Web Interface at this point. However, this is not necessary for this upgrade because there is no previous software version in the alternate partition. 602 Installation and Upgrades for Avaya G700 Media Gateway and Avaya S8300 Media Server... -
Page 603: Copying Files To The S8300
● License file ● Avaya authentication file (if needed) ● New firmware files ● Note: If you are copying a license file or authentication file, be sure the /var/home/ftp/ Note: pub directory contains no files with a *.pwd or *.lic extension. - Page 604 The transfer is complete when you see the message, Files have been successfully uploaded to the server. Important: Remove the Server CD from the CD drive. Important: 604 Installation and Upgrades for Avaya G700 Media Gateway and Avaya S8300 Media Server...
-
Page 605: Configuring Network Parameters
Upgrading the S8300A Configuring network parameters Note: For this procedure, you must have the host name, subnet mask, and IP address Note: of the S8300, and the IP address of the default gateway. Because the software upgrade resets the configuration data, you must reconfigure the network parameters on the S8300 before restoring the backup files. -
Page 606: Verifying Connectivity
To verify connectivity 1. On the Maintenance Web Interface, under Diagnostics click Ping. 2. Enter the IP address where the Linux-Migration backup file is stored. 606 Installation and Upgrades for Avaya G700 Media Gateway and Avaya S8300 Media Server... -
Page 607: Installing Post-Upgrade Communication Manager Service Pack File From Your Laptop
Upgrading the S8300A 3. Click Execute Ping. If the ping is successful, continue with restoring the system files. Otherwise, check the IP address and connectivity to the server. Installing post-upgrade Communication Manager service pack file from your laptop CAUTION: The software service pack may or may not be call-preserving. CAUTION: Note: Skip this procedure if there is no Communication Manager service pack file to... -
Page 608: Restoring Data
AUDIX backup sets as separate steps. The AUDIX translations, names, and messages backup set filename begins with "audix-tr-name-msg". The AUDIX announcement backup set filename begins with "audix-ann". 608 Installation and Upgrades for Avaya G700 Media Gateway and Avaya S8300 Media Server... -
Page 609: Procedure Two: Restoring Data Backup (If Upgrading From R1.2.X Through 2.X)
If you have upgraded from a pre-1.2 release (Procedure One), you must enter all server configuration information. You can do this most easily using the Avaya Installation Wizard (IW), which will do the server configuration and install the license and password files. If you have filled in the Electronic Pre-installation Worksheet (EPW), the IW will read the configuration data from the EPW. - Page 610 Fill in the User Name, Password, Host Name (enter host IP Address), and Directory fields for the location of the backup file on the customer’s server. 3. Click View. The system displays the View/Restore Data Results screen. 610 Installation and Upgrades for Avaya G700 Media Gateway and Avaya S8300 Media Server...
- Page 611 Upgrading the S8300A View/Restore Data Results screen 4. Select the backup file to restore. If you started with a software release between 1.2.0 and 1.3.x and you used the Linux-Migration Backup procedure, the backup file name will start with "upgrade-2.0." If you started with a 2.0.x software release and you used the Backup Now procedure, there are three backup files with names starting with "os,"...
- Page 612 If restoring files from a 2.0.x release, repeat the restore procedure for each backup set, except the AUDIX data (msg and annc files), if any: Translations: xln files ● System: os files ● Security: security files ● 612 Installation and Upgrades for Avaya G700 Media Gateway and Avaya S8300 Media Server...
-
Page 613: Verifying The Time, Date, And Time Zone
Upgrading the S8300A Verifying the time, date, and time zone To verify the time, date, and time zone 1. Under Server click Server Date/Time. The Server Date/Time screen displays. Server Date/Time screen 2. Verify or set the media server's time close enough to the NTS's time, date, and time zone that synchronization can occur (within about 5 minutes). - Page 614 5. Click Close Window. 6. Log on to a Telnet session. 7. Type /opt/ws/drestart 1 4 to capture the configuration data. You should see the response, Killed. 614 Installation and Upgrades for Avaya G700 Media Gateway and Avaya S8300 Media Server...
-
Page 615: Installing The New License File
/pub directory on the server. Avaya personnel will notify you when the new files are in place as agreed (for example, by telephone or E-mail). After they are loaded into the /pub directory, install them using the License File and Authentication File screens under Security on the Maintenance Web Interface. -
Page 616: Installing The New Authentication File, If Any
Telnet to 192.11.13.6 and login as craft, using the normal craft password. Note: If you log into SAT and see the Translation corruption message, ignore it Note: for now. 616 Installation and Upgrades for Avaya G700 Media Gateway and Avaya S8300 Media Server... -
Page 617: Saving Translations (If Not Using Ia770 And S8300 Is Not An Lsp)
Upgrading the S8300A Note: Avaya Services personnel only: You may need to use the static craft password Note: at this point. The static password will enable you to log in to the S8300 with a direct connection to the Services port without the ASG challenge/response. To obtain the static password, call the ASG Conversant number, 800-248-1234 or 720-444-5557, and follow the prompts to get the password. -
Page 618: Next Steps
Next steps This completes the S8300 upgrade process for upgrading to release 3.0. You now must upgrade the G700 and media module firmware and then install and restart IA770, if installed on the S8300. 618 Installation and Upgrades for Avaya G700 Media Gateway and Avaya S8300 Media Server... -
Page 619: Upgrade The Firmware On The G700 Media Gateway
Upgrade the firmware on the G700 Media Gateway Upgrade the firmware on the G700 Media Gateway Conduct the following manual procedures to update the firmware running on the G700 Media Gateway processors and media modules. This section covers: Verifying the contents of the tftpboot directory on page 619 ●... -
Page 620: Determining Which Firmware To Install On The G700
2. Check the version number (ver num) of the EW_Archive file to see if it matches the Release Letter. If not, you must upgrade the P330 stack processor. 3. Type show image version The system displays the list of software. 620 Installation and Upgrades for Avaya G700 Media Gateway and Avaya S8300 Media Server... - Page 621 A. If the list shows A, you will upgrade B. 4. Refer to the VOIP FW column and row for slot V0 (same row occupied by the G700 information) to see if the number matches the VoIP firmware identified in your planning forms.
-
Page 622: Installing New Firmware On The P330 Stack Processor
Installing new firmware on the G700 Media Gateway Processor To install MGP firmware 1. At the P330-1(configure)# prompt, type session mgp to reach the G700 media gateway processor. 2. Type configure at the MG-???-1(super)# prompt to enter configuration mode, which will change the prompt to MG-???-1(configure)#. - Page 623 7. Select Yes at the dialog box that asks if you want to continue. The G700 media gateway processor resets. The LEDs on the G700 media gateway and the media modules flash. These elements each conduct a series of self-tests. When the LEDs on the media modules are extinguished and the active status LEDs on the G700 media gateway are on, the reset is complete.
-
Page 624: Installing New Firmware On The Media Modules
This VoIP module does not occupy a physical position like other media modules. 2. At the P330-1(configure)# prompt, type session mgp. 3. At the MG-001-1(super)# prompt, type configure to change to the configuration mode. 624 Installation and Upgrades for Avaya G700 Media Gateway and Avaya S8300 Media Server... - Page 625 8. Type reset <module #> where <module #> is the number of the G700 in the stack. 9. When the reset is finished, type show mm to verify the upgrade. To release board (if media module was busied out) 1.
-
Page 626: Setting Rapid Spanning Tree On The Network
To set an edge-port, type set port edge admin state module/port edgeport. For more information on the Spanning Tree CLI commands, see the Avaya P330 User’s Guide (available at http://www.avaya.com/support). 626 Installation and Upgrades for Avaya G700 Media Gateway and Avaya S8300 Media Server... -
Page 627: Installing New Firmware On Other G700 Media Gateways
For a local installation, you should have plugged your laptop into the stack master P330, which you can identify by the LED panel on the upper left of each G700 or P330 device in the stack. -
Page 628: Post-Upgrade Tasks
637 To re-enable alarm origination on page 637 To back up the system on page 637 To restart LSPs (if any) on page 637 628 Installation and Upgrades for Avaya G700 Media Gateway and Avaya S8300 Media Server... -
Page 629: If Using Ia770
Post-upgrade tasks If using IA770: Install and restart IA770 To install and restart IA770 1. Telnet to 192.11.13.6 2. Log in as craft or dadmin. 3. Type cd /usr/CHIA 4. Install IA770: a. Type sudo ./autoinstall b. When prompted to stop call processing, select y. The installation should take about 10 minutes from this point. - Page 630 On the Maintenance Web Interface, under Security select Firewall. In the Service column, find ping. The checkboxes for both Input to Server and Output from Server should be checked. 630 Installation and Upgrades for Avaya G700 Media Gateway and Avaya S8300 Media Server...
- Page 631 Post-upgrade tasks View/Restore Data Results screen c. Select the AUDIX Translations, Names, and Messages backup set (that is, the file with audix-tr-name-msg in the filename) d. Select both Force options, and click Restore. To monitor the restore progress 1. Select Restore History. The Restore History screen displays.
- Page 632 To restart Communication Manager 1. Open a Telnet session to the S8300 and type start -a 2. Ensure that all Communication Manager processes come up. 632 Installation and Upgrades for Avaya G700 Media Gateway and Avaya S8300 Media Server...
- Page 633 Post-upgrade tasks To monitor the startup of IA770 1. Type watch /VM/bin/ss The display will periodically refresh automatically. When you see the following display, the IA770 startup is complete. IA770 startup complete screen 2. Press Ctrl+C to break out of the watch command. To verify operation 1.
- Page 634 5. Run an IA770 sanity test: a. Type /vs/bin/display b. All states should be Inserv with an associated phone number. c. Retrieve the test message saved before the upgrade. 634 Installation and Upgrades for Avaya G700 Media Gateway and Avaya S8300 Media Server...
-
Page 635: Saving Translations
Avaya Support Web Site at http://support.avaya.com. To obtain the post-upgrade service pack file and documentation 1. On the Avaya Support Web site, click on Find Documentation and Downloads by Product Name. 2. Under the letter "I", select IA 770 INTUITY AUDIX Messaging Application. -
Page 636: Complete The Upgrade Process (S8300 Is The Primary Controller)
To busy out trunks 1. Busy out trunks that were busied out before the upgrade (see Pre-Upgrade Tasks — If the S8300 is the primary controller on page 578). 636 Installation and Upgrades for Avaya G700 Media Gateway and Avaya S8300 Media Server... - Page 637 To restart Communication Manager on LSPs (if any) after the upgrade: 1. Open a Telnet session on the S8300 (LSP). 2. At the command prompt, type start -ac and press Enter. This completes the upgrade process for a G700 with an S8300. Issue 8.1 June 2005...
- Page 638 Upgrade of an existing S8300A to R3.0 with manual upgrade of G700 firmware 638 Installation and Upgrades for Avaya G700 Media Gateway and Avaya S8300 Media Server...
-
Page 639: Chapter 12: Upgrade Of An Existing S8300B To R3.0
This chapter covers the procedures to upgrade the software on an installed Avaya S8300B Media Server from a 2.x release to 3.0. The procedures to upgrade the G700 firmware use CLI commands instead of the Upgrade Tool. This chapter also covers the procedures to upgrade the firmware on an installed Avaya G700 Media Gateway. -
Page 640: Major Tasks To Upgrade The S8300B To Release 3.0
Major tasks to upgrade the S8300B to release 3.0 and upgrade the G700 firmware The major tasks to upgrade the S8300B to release 3.0 and upgrade the G700 firmware are: Before going to the customer site ●... -
Page 641: Planning Forms That The Project Manager Provides
(for example, 1.3 to 2.0), you will need the serial number of the G700. To get this number, ask the customer’s administrator to log in to the S8300 web page and select View License Status from the main menu to display the serial number. The serial number should also be on a sticker on the back of the G700 chassis but this number is occasionally incorrect. -
Page 642: Obtaining S8300 Software And G700 Firmware
The file containing the software for the S8300 has a *.tar extension and contains both the S8300 software and the G700 firmware. The *.tar file is on a CD-ROM that you take to the site. This CD is called the “Server CD” because in contains software for all of the Linux servers. - Page 643 Manager release (for example, Avaya Communication Manager Software Updates for 3.0). 5. Scroll down the page to find a link called Latest Avaya Communication Manager x.x.x Software Update (where x.x.x is the release number). After this link, there should be a link starting with “PCN:“ Click on this link to read about the release and software load to which this service pack applies.
-
Page 644: Obtaining Service Pack And Language Files, If Using Ia770
IA770 and, if greater than 72 hours, contact your service support center. To check the IA770 stored messages size 1. On the Maintenance Web Interface, under Miscellaneous select Messaging Administration. 644 Installation and Upgrades for Avaya G700 Media Gateway and Avaya S8300 Media Server... -
Page 645: Obtaining An Ia770 Service Pack File
Avaya Support web site. To obtain an IA770 service pack file 1. On the Avaya Support website, double click on Messaging in the list on the left. 2. Scroll down to the INTUITY links and double click on IA 770 INTUITY AUDIX Messaging Application. - Page 646 The Avaya authentication file contains the logins and passwords to access the S8300 media server. This file is updated regularly by Avaya services personnel, if the customer has a maintenance contract. All access to Communication Manager from any login is blocked unless a valid authentication file is present on the S8300 media server.
- Page 647 Also, the ART process is available only to Avaya personnel. You need an ART login ID and password, which you can set up at the ART web site. Non-Avaya personnel must contact their service support or customer care center for INADS addresses, if required.
-
Page 648: On-Site Preparation For The Upgrade
Or, to open SAT directly from your laptop, Click Start > Run, type telnet 192.11.13.6 5023, and press Enter. 2. Log in as craft or dadmin. 648 Installation and Upgrades for Avaya G700 Media Gateway and Avaya S8300 Media Server... -
Page 649: Completing Pre-Upgrade Tasks - If The Target S8300 Is The Primary Controller
On-site Preparation for the Upgrade 3. Enter w2ktt for the Terminal Type (if you are running Windows 2000 on your laptop). 4. Accept the default (y) for Suppress Alarm Origination. Completing pre-upgrade tasks — If the target S8300 is the primary controller If the S8300 is configured as an LSP, skip to Upgrade the S8300... - Page 650 2. Enter your terminal type and press Enter. If you see the message, Warning: Translation corruption found follow the normal escalation procedure for translation corruption before continuing the upgrade. 650 Installation and Upgrades for Avaya G700 Media Gateway and Avaya S8300 Media Server...
- Page 651 Before you upgrade the primary controller, you need to shut down Communication Manager on the LSPs. This prevents the phones and other endpoints attached to the G700 from trying to register with the LSPs while you are upgrading the primary controller.
-
Page 652: Getting Ia770 (Audix) Data And Stopping Ia770
2. Select Global Administration; then Messaging Administration. 3. Enter the craft password. 4. At the command prompt, enter display system-parameters features. The SYSTEM PARAMETERS FEATURES screen displays. 5. Go to page 3. 652 Installation and Upgrades for Avaya G700 Media Gateway and Avaya S8300 Media Server... - Page 653 On-site Preparation for the Upgrade System Parameters Features screen 6. Under Announcement Sets, note the main system language listed after System: In this example, the main system language is English (us-eng). If the system language is anything other than us-eng or us-tdd, you will need to download the appropriate language files from a language CD after the upgrade.
-
Page 654: Downloading Optional Language Files, If Needed
To download optional language files 1. Insert the optional language CD in your laptop’s CD-ROM drive. 2. On the Maintenance Web Interface, under Miscellaneous, select Download Files. 654 Installation and Upgrades for Avaya G700 Media Gateway and Avaya S8300 Media Server... -
Page 655: Creating An Ia770 Test Message For The Upgrade
Shutting down IA770 To shut down IA770 Note: If you use the Avaya Installation Wizard (IW) to upgrade the server, you would Note: skip this procedure. The IW executes the stop command automatically. 1. Type telnet 192.11.13.6 and press Enter. -
Page 656: Backing Up S8300 Recovery System Files
S8300 hard drive. To back up S8300 recovery system data 1. Under Data Backup/Restore, click Backup Now. The Backup Now screen displays. Backup Now screen (Part One) 656 Installation and Upgrades for Avaya G700 Media Gateway and Avaya S8300 Media Server... - Page 657 On-site Preparation for the Upgrade 2. Select all data sets: Avaya Call Processing (ACP) Translations ● Save ACP translations prior to backup ● Note: Select this option only if the S8300 is a primary controller. Do not select it if the Note: S8300 is an LSP.
-
Page 658: Installing The Pre-Upgrade Software Service Pack
4. Browse to the directory on the software CD (or laptop) that contains the pre-upgrade service pack file. 5. Select the pre-upgrade service pack file and click Download. 658 Installation and Upgrades for Avaya G700 Media Gateway and Avaya S8300 Media Server... -
Page 659: Copying License And Authentication Files To The S8300 Hard Drive (From Your Laptop)
On-site Preparation for the Upgrade To install the pre-upgrade service pack Note: Use a telnet session to install and activate the service pack file. Note: The following steps activate the service pack. 1. Click Start > Run to open the Run dialog box. 2. - Page 660 FTP directory on the server. Avaya personnel will notify you when the new files are in place as agreed (for example, by telephone or E-mail). After they are loaded into the FTP directory, install them using the License File and Authentication File screens from the S8300 main menu web-page.
-
Page 661: Copying The Software And Firmware Files From The Server Cd
Communication Manager also reflects the most recent load of software (for example only, 01.0.411.1-6592). These files also contain the most recent firmware for the G700 Media Gateway, the various media modules, and the P330 Stack Processor. Issue 8.1 June 2005... - Page 662 Server CD. The S8300 displays the Choose Source screen, which allows you to copy files from one of several possible sources to the S8300 hard drive. 662 Installation and Upgrades for Avaya G700 Media Gateway and Avaya S8300 Media Server...
- Page 663 On-site Preparation for the Upgrade Choose Source screen Possible sources include: This server’s CD-ROM drive ● TFTP server at IP address shown (default is local laptop at 192.11.13.5) ● URL specified in Copy from URL: field ● If you select the Copy from this server’s CD-ROM drive: radio button, all available CD drives are checked.
- Page 664 Copy in Progress screen The screen lists each file as it is being copied to the S8300 hard drive. When the copy completes successfully, the Copy Complete screen displays. 664 Installation and Upgrades for Avaya G700 Media Gateway and Avaya S8300 Media Server...
- Page 665 On-site Preparation for the Upgrade Copy Complete screen This screen indicates the release just copied, shows the release running on the S8300, and shows the releases resident on the server’s hard drive. CAUTION: At this point you are finished with the software CD-ROM. Remove the CD from CAUTION: your laptop now to avoid possible problems the next time your laptop is rebooted.
-
Page 666: Upgrade The S8300
This section describes the procedures to upgrade the S8300B Media Server from a 2.x release of Communication Manager to release 3.0. To upgrade from a pre-2.0, use the procedures in Chapter 11: Upgrade of an existing S8300A to R3.0 with manual upgrade of G700 firmware. - Page 667 Upgrade the S8300 Choose Software screen This screen will show the release currently running on the S8300B, and the releases resident on the hard drive. To install the 3.0 release, click the radio button next to the 3.0 release and click Continue.
- Page 668 If these files have not been installed, select the following: - I will supply the license/authentication files myself when prompted later in this process. - Update authentication information as well as license information. 668 Installation and Upgrades for Avaya G700 Media Gateway and Avaya S8300 Media Server...
- Page 669 Upgrade the S8300 3. Click Continue. The system displays the Review Notices screen. 4. For a new installation, or if you previously ran a backup, you do not need to run a backup at this time. If your planning documents instruct you to enable Tripwire, follow the instructions to reset the signature database.
-
Page 670: Making The Upgrade Permanent
The S8300 displays the Make Upgrade Permanent window. 2. Click Submit. When the new S8300 upgrade software is permanent, the S8300 displays the message: The commit operation completed successfully 670 Installation and Upgrades for Avaya G700 Media Gateway and Avaya S8300 Media Server... -
Page 671: Installing Post-Upgrade Communication Manager Service Pack File From Your Laptop, If Any
Upgrade the S8300 Installing post-upgrade Communication Manager service pack file from your laptop, if any Skip to Upgrade the G700 Firmware on page 674 if there is no Communication Manager service pack file to install. CAUTION: The service pack may or may not be call-preserving. -
Page 672: Install Updated License And Authentication Files
2. Select Install the license file I previously downloaded and click Submit. The system tells you the license is installed successfully. 3. Under Security, select Authentication File. 4. The Authentication File screen displays. 672 Installation and Upgrades for Avaya G700 Media Gateway and Avaya S8300 Media Server... -
Page 673: Saving Translations
Upgrade the S8300 Authentication File screen 5. Select Install the Authentication file I previously downloaded and click Install. The system tells you the authentication file is installed successfully Saving translations (only if new license and/or authentication files installed) Skip this procedure if the S8300 is an LSP. To save translations 1. -
Page 674: Upgrade The G700 Firmware
Upgrade of an existing S8300B to R3.0 with manual upgrade of G700 firmware Upgrade the G700 Firmware This section describes how to upgrade firmware on the components of the G700, including the Media Gateway Processor (MGP), the P330 Stack Processor, and any installed media modules. -
Page 675: Determining Which Firmware To Install On The G700
Check the directory to make sure the firmware files you want to install are listed. Determining which firmware to install on the G700 Conduct the following procedure to compare software versions running on the G700 processors and media modules with the versions in you planning documents. If the versions do not match, you need to install the new firmware for those components. - Page 676 A. If the list shows A, you will upgrade B. 4. Refer to the VOIP FW column and row for slot V0 (same row occupied by the G700 information) to see if the number matches the VoIP firmware identified in your planning forms.
-
Page 677: Installing New Firmware On The P330 Stack Processor
Installing new firmware on the G700 Media Gateway Processor To install MGP firmware 1. At the P330-1(configure)# prompt, type session mgp to reach the G700 media gateway processor. 2. Type configure at the MG-???-1(super)# prompt to enter configuration mode, which will change the prompt to MG-???-1(configure)#. - Page 678 7. Select Yes at the dialog box that asks if you want to continue. The G700 media gateway processor resets. The LEDs on the G700 media gateway and the media modules flash. These elements each conduct a series of self-tests. When the LEDs on the media modules are extinguished and the active status LEDs on the G700 media gateway are on, the reset is complete.
-
Page 679: Installing New Firmware On The Media Modules
Upgrade the G700 Firmware 10. Verify that the download was successful when the prompt returns. Type show mg list_config. The system displays the list of software. Example: Show mg list_config SLOT TYPE CODE SUFFIX HW VINTAGE FW VINTAGE VOIP FW... - Page 680 1. When the upgrade procedure is complete, go to the SAT session and release the board Type release board vx where x is the slot number of the upgraded media module. 680 Installation and Upgrades for Avaya G700 Media Gateway and Avaya S8300 Media Server...
-
Page 681: Setting Rapid Spanning Tree On The Network
802.1w standard defined it. An edge port is a port that goes to a device that cannot form a network loop. To set an edge-port, type set port edge admin state module/port edgeport. For more information on the Spanning Tree CLI commands, see the Avaya P330 User’s Guide (available at http://www.avaya.com/support). Issue 8.1 June 2005... -
Page 682: Installing New Firmware On Other G700 Media Gateways
For a local installation, you should have plugged your laptop into the stack master P330, which you can identify by the LED panel on the upper left of each G700 or P330 device in the stack. -
Page 683: Post-Upgrade Tasks
Avaya Support Web Site at http://support.avaya.com. To obtain the post-upgrade service pack file and documentation 1. On the Avaya Support Web site, click on Find Documentation and Downloads by Product Name. 2. Under the letter "I", select IA 770 INTUITY AUDIX Messaging Application. -
Page 684: Completing The Upgrade Process (S8300 Is The Primary Controller)
If you do not get a login prompt and see the following message: Warning: Translation corruption detected follow the normal escalation procedure for translation corruption before continuing the upgrade. 684 Installation and Upgrades for Avaya G700 Media Gateway and Avaya S8300 Media Server... - Page 685 To restart Communication Manager on an LSP after the upgrade: 1. Open a Telnet session on the S8300 (LSP). 2. At the command line, type start -ac and press Enter. This completes the upgrade process for a G700 with an S8300. Issue 8.1 June 2005...
- Page 686 Upgrade of an existing S8300B to R3.0 with manual upgrade of G700 firmware 686 Installation and Upgrades for Avaya G700 Media Gateway and Avaya S8300 Media Server...
-
Page 687: Chapter 13: Manual Upgrade Of An Existing G700 Without An S8300
Install new firmware on the G700 Media Gateway What are the G700 system components A P330 Stack Processor is built into the G700 Media Gateway. (This processor is also known as the Layer 2 switching processor). In addition, the G700 contains: Media Gateway Processor (MGP) ●... -
Page 688: About Firmware Files
About the TFTP server To install firmware on a G700 without an S8300 or LSP, you must first copy the firmware files to an external TFTP server on the customer LAN. The TFTP server can be a customer computer or it can be set up on your services laptop. -
Page 689: Before Going To The Customer Site
Getting the serial number of the G700, if necessary For an upgrade of an existing G700, the existing license file can usually be reused. However, if the customer is adding feature functionality (for example, adding BRI trunks), or if the upgrade is between major releases (for example, 1.3 to 2.1), you will need the serial number of the... -
Page 690: Setting Up The Tftp Server On Your Laptop Or On A Customer Pc, If Necessary
1. Ask the customer’s administrator to log in to the S8300 Web page. 2. Select View License Status from the main menu to display the serial number. The serial number should also be on a sticker on the back of the G700 chassis, but this number is occasionally incorrect. - Page 691 Before going to the customer site 2. Navigate to Firmware Downloads for The G700 Media Gateway. The system displays a list of firmware files. 3. Locate the file names that match the files listed in your planning documentation. The file names will approximate those listed in...
-
Page 692: On-Site Preparation For The Upgrade
Manual upgrade of an existing G700 without an S8300 On-site preparation for the upgrade Before installing new firmware on the G700 processors and medial modules you need to prepare on-site by: Accessing the P330 stack processor on page 692 ●... -
Page 693: Determining Which Firmware To Install On The G700
On-site preparation for the upgrade To copy firmware files to the /tftpboot directory of an S8300 Media Server, do the following: a. Use telnet, Avaya Site Administration, or another tool to access the S8300 Media Server command line. b. Log in as craft. - Page 694 3. Refer to the list to check the FW vintage number of the G700. In the TYPE column, find G700, then check the matching field in the FW VINTAGE column to see if it matches the vintage number in your planning forms. If not, you must install new firmware on the G700 media gateway.
-
Page 695: Install New Firmware On The G700 Media Gateway
Install new firmware on the G700 Media Gateway 4. Refer to the VOIP FW column and row for slot V0 (same row occupied by the G700 information) to see if the number matches the VoIP firmware identified in your planning forms. -
Page 696: Installing New Firmware On The P330 Stack Processor
Installing new firmware on the G700 Media Gateway Processor To install MGP firmware 1. At the P330-1(configure)# prompt, type session mgp to reach the G700 media gateway processor. 2. Type configure at the MG-???-1(super)# prompt to enter configuration mode, which will change the prompt to MG-???-1(configure)#. - Page 697 7. Select Yes at the dialog box that asks if you want to continue. The G700 media gateway processor resets. The LEDs on the G700 media gateway and the media modules flash. These elements each conduct a series of self-tests. When the LEDs on the media modules are extinguished and the active status LEDs on the G700 media gateway are on, the reset is complete.
-
Page 698: Installing New Firmware On The Media Modules
<slot #> is the slot of the specific media module, <filename mm> the full-path name of the media module firmware file in a format such as 698 Installation and Upgrades for Avaya G700 Media Gateway and Avaya S8300 Media Server... - Page 699 8. Type reset <module #> where <module #> is the number of the G700 in the stack. 9. When the reset is finished, type show mm to verify the upgrade. To release board (if media module was busied out) 1.
-
Page 700: Setting Rapid Spanning Tree On The Network
To set an edge-port, type set port edge admin state module/port edgeport. For more information on the Spanning Tree CLI commands, see the Avaya P330 User’s Guide (available at http://www.avaya.com/support). This completes the G700 firmware upgrade procedures. -
Page 701: Appendix A: Technical Information
Appendix A: Technical information This appendix collects some of the detailed technical information you will need to install the Avaya G700 Media Gateway with an Avaya S8300 Media Serve. More complete information can be found in Hardware Guide for Avaya Communication Manager, 555-245-207. -
Page 702: Cabling Equipment
X330LC Long Octaplane Long Octaplane cable - 6 ft Cable (2 m) (Catalog No. light-colored, used to CB0225) connect switches from two different physical stacks 1 of 2 702 Installation and Upgrades for Avaya G700 Media Gateway and Avaya S8300 Media Server... - Page 703 Cabling Equipment Table 40: Media Gateway Cables and Peripherals (continued) Cable Description Length Length (metric) X330RC Redundant Redundant cable - black, Octaplane Cable (2 m) used to connect the top and (Catalog No. CB0222) bottom switches of a stack. X330L-LC Extra Long Extra-Long Octaplane cable 24 ft Octaplane Cable (8 m)
- Page 704 Technical information 704 Installation and Upgrades for Avaya G700 Media Gateway and Avaya S8300 Media Server...
-
Page 705: Appendix B: Information Checklists
Appendix B: Information checklists This appendix is can be used as an aid for collecting necessary information for the installation of a G700 Media Gateway and an S8300 Media Server. The following lists are provided: Installer's Checklist: Tools, software, laptop settings, customer network information. -
Page 706: Installer's Checklist
SSO login authentication process. You will not be able to obtain the license file or to perform remote feature activation without the SSO login. dial plan IP addressing plan List of customer-provided IP services 706 Installation and Upgrades for Avaya G700 Media Gateway and Avaya S8300 Media Server... -
Page 707: Serial Number And Login Information
Serial Number and Login Information Serial Number and Login Information G700 Serial Numbers Logins Name & Password S8300 Media Server P330 Stack G700 Media Gateway SSO Authentication Login anonymous email address Communication Manager Issue 8.1 June 2005... -
Page 708: Set-Up For P330 Stack Processor
IP address set time protocol sntp-protocol | time-protocol set time server IP address of time server set timezone zone name - <hours> (offset from GMT) 708 Installation and Upgrades for Avaya G700 Media Gateway and Avaya S8300 Media Server... -
Page 709: Set Up For G700 Media Gateway Processor (Mgp)
Set Up for G700 Media Gateway Processor (MGP) Set Up for G700 Media Gateway Processor (MGP) G700 Media Gateway # Prompt: MG-???-n (super)# type configure to change prompt to MG-???-n (configure)# Command Requested Field Information to be Entered set interface... -
Page 710: Set Up For Voip Resources
(v + slot #) ip address number (v + slot #) ip address number (v + slot #) ip address number (v + slot #) ip address 710 Installation and Upgrades for Avaya G700 Media Gateway and Avaya S8300 Media Server... -
Page 711: Set Up For S8300 Media Server
Set Up for S8300 Media Server Set Up for S8300 Media Server Location: slot #1 of G700 survivable processor? _______________________ Web Interface: 192.11.13.6 (default) Screen Title Field Information to be Entered Login Name Password Set Time and Date Time & Date... - Page 712 IP addresses of designated Network Time Servers Trusted Key, Requested leave blank Key, Control Key Do Not Install a New Keys Default File Set Modem Interface IP address 712 Installation and Upgrades for Avaya G700 Media Gateway and Avaya S8300 Media Server...
-
Page 713: Installation Site Information
Installation Site Information Installation Site Information Site Name Main Phone Installation Address Shipping Address Customer Contact Name Title Phone: FAX: Mobile: Pager: email: Off-hours contact: Salesperson/ Account Exec Sales/AE phone: Other Contact Info: Notes to installer: access procedures, safety/security procedures Access Contact Name Title... -
Page 714: Stack Layout
P330 switch # Expansion Module Media Gateway (module) # or P330 switch # Expansion Module Media Gateway (module) # or P330 switch # Expansion Module 714 Installation and Upgrades for Avaya G700 Media Gateway and Avaya S8300 Media Server... -
Page 715: Appendix C: Equipment List
Media Module Bays as well as a single, standard Avaya Expansion Module interface slot. The Avaya G700 Media Gateway is designed to offer options and scalability. A customer will be able to mix and match Media Modules, as well as stack and/or add additional Avaya G700 Media Gateways as they grow in size. - Page 716 Table 42: Equipment List: G700 Media Gateway Power Cords G700 Media Gateway Power Cords Supplies Power to the G700 Media Gateway. One cord per gateway is required, and there are various cords depending on the power required for the country in which the unit will be installed.
- Page 717 CCMS messages tunneled over H.248 Signaling Protocol ● TFTP server ● The S8300 Media Server can act as the primary server of the G700 Media Gateway, or it can serve as a local survivable processor for remote/branch customer locations. Comcode (for Services Ordering Only): 700335144...
- Page 718 Required for any 107988867 customer with a maintenance contract and an MM710 T1/E1 Media Module, highly recommend for other customers to avoid expensive technician visits. 1 of 4 718 Installation and Upgrades for Avaya G700 Media Gateway and Avaya S8300 Media Server...
- Page 719 MM712 will not support 4-Wire DCP telephones. Signal timing specifications for the MM712 support TDM Bus Timing in receive and transmit modes. The G700 Media Gateway supplies only +5 VDC and –48 VDC to the MM712 Media Module. Any other required voltages must be derived on the module.
- Page 720 -40 volt phantom power to the BRI endpoints. MM722 2-port BRI Media Comcode (for Services Ordering Only): 700277361 Module The MM722 BRI Media Module supports two BRI ports. 3 of 4 720 Installation and Upgrades for Avaya G700 Media Gateway and Avaya S8300 Media Server...
- Page 721 Module needs to be added if more than two MM710 T1/E1 Media Modules are used in a single chassis. This will provide for an additional 64 channels. This VoIP conversion resource in the G700 Media Gateway is an improved version of the Prowler board resource and from a configuration perspective, the two are the same.
- Page 722 100FX UPLINK 2PT 100Base-FX ports which can be aggregated using LAG to provide a 200 Mbps link for backbone or high-speed server applications. 2 of 3 722 Installation and Upgrades for Avaya G700 Media Gateway and Avaya S8300 Media Server...
- Page 723 Table 45: Avaya P330 Equipment (continued) Avaya P330 Equipment Material code: 108659178 Avaya P330 MOD EXP The X330-G2 provides GBIC 2PT GBIC connectivity with an adapter for standard GBIC transceivers. Material code: 700214612 Avaya X330 WAN-2DS1 The X330 WAN-2DS1 provides two T1/E1 ports and a 10/ 100BaseT port.
- Page 724 Equipment list 724 Installation and Upgrades for Avaya G700 Media Gateway and Avaya S8300 Media Server...
-
Page 725: Appendix D: Install The Avaya Tftp Server
This appendix describes the procedure to install and configure the Avaya TFTP server on a technician’s laptop or other computer. You can use the capabilities of the TFTP server as the "source" to install software on the S8300 and install firmware on the G700 or G350 Media Gateways and the gateway media modules. - Page 726 In the Server Options window, select the Outbound tab, and browse to your CD-ROM drive location and double-click to enter in the outbound file path. 726 Installation and Upgrades for Avaya G700 Media Gateway and Avaya S8300 Media Server...
- Page 727 c. Select the Inbound tab and ensure that the Inbound file path is blank d. Select the Options tab. Enter 69 in the Use Port field and 30 in the Timeout field. e. Select No Incoming. However, if you wish to copy files as a backup prior to performing an upgrade of software, leave this field unchecked.
- Page 728 Select the Deny tab and ensure that all fields are blank. i. Select the MultiThreading & Logging tab and select High for Thread Priority Settings. j. Leave the default filename in the Log to file field. 728 Installation and Upgrades for Avaya G700 Media Gateway and Avaya S8300 Media Server...
- Page 729 k. Select the Client Limits tab and move the slide button all the way to the right for Maximum simultaneous Clients (~) and Maximum Clients in display (100). l. Select the ICMP Messages tab and ensure that all fields are blank. m.
- Page 730 Install the Avaya TFTP server 730 Installation and Upgrades for Avaya G700 Media Gateway and Avaya S8300 Media Server...
-
Page 731: Index
CD, Unity . . . Checklist 1, Install new G700 with S8300 Checklist 2, Install new G700 without S8300 ..... - Page 732 ..installation and administration ....installation 732 Installation and Upgrades for Avaya G700 Media Gateway and Avaya S8300 Media Server...
- Page 733 ... MultiService Network Manager connecting to a G700 or G350 Media Gateway ... . MultiService SMON Manager ....
- Page 734 ....installation ..... . w2ktt 734 Installation and Upgrades for Avaya G700 Media Gateway and Avaya S8300 Media Server...
Need help?
Do you have a question about the g700 and is the answer not in the manual?
Questions and answers