Table of Contents
Advertisement
Quick Links
Advertisement
Table of Contents
Troubleshooting

Related Manuals for Matrix Sparsh VP110


Summary of Contents for Matrix Sparsh VP110
- Page 1 SPARSH VP110 User Guide...
-
Page 3: User Guide
SPARSH VP110 The Business IP Phone User Guide... - Page 4 Documentation Disclaimer Information in this documentation may change from time to time. Matrix ComSec reserves the right to revise information in this publication for any reason without prior notice. Matrix ComSec makes no warranties with respect to this documentation and disclaims any implied warranties. While every precaution has been taken in the preparation of this document, Matrix ComSec assumes no responsibility for errors or omissions.
-
Page 5: Table Of Contents
Introduction..............................1 Welcome! ................................1 About this User Guide ............................1 How to Read this User Guide ..........................3 Know Your SPARSH VP110..........................7 Hardware Component Instructions ........................8 Icon Instructions ..............................9 LED Instructions ..............................10 Information for Your Safety and Comfort ....................13 General Requirements ............................ - Page 6 Accessing Basic Features ......................... 135 Placing Calls ..............................135 Answering Calls .............................. 137 Ending Calls ..............................138 Redialing Numbers ............................139 Recent Call In Dialing ............................140 Auto Answer ..............................142 Auto Redial ..............................145 Call Completion ............................... 148 Call Return ..............................151 Call Mute .................................
- Page 7 Acoustic Clarity Technology ..........................290 Configuring Security Features ........................295 TLS .................................. 295 SRTP ................................302 Encrypting Configuration Files ........................305 Maintenance ..............................309 Upgrading Firmware ............................309 SNMP ................................313 TR-069 Device Management .......................... 316 Advanced Maintenance ........................... 319 Resource Files ............................
- Page 8 Table of Contents...
-
Page 9: Introduction
CHAPTER 1 Welcome! Thank you for choosing the Matrix SPARSH VP110! You have now entered the exciting world of Internet Telephony. We hope you will make optimum use of this intelligent, feature-packed SIP-based IP phone. Please read this document carefully before installing and using the SPARSH VP110. -
Page 10: Intended Audience
It is assumed that they have some experience in installing SIP phones, they are familiar with the VoIP technology and its functions, and they have basic knowledge of the various technical terms associated with it. They must be capable of configuring all the parameters of SPARSH VP110 and troubleshoot the phone, in case it is malfunctioning. -
Page 11: How To Read This User Guide
Cross references are provided in blue font, with hyperlinks to the headings. For example, you can refer to the relevant topic easily by clicking the text in blue font on the electronic copy of this document. Symbols Used Matrix SPARSH VP110 User Guide... - Page 12 “Appendix F - Acronyms”. The words IP phone, phone, VoIP phone or SIP phone are used interchangeably and synonymously to mean Matrix SPARSH VP110. Some of the terms specific to this document that you will encounter frequently are defined below: •...
- Page 13 Phone/IP Phone: Both of these terms have been used synonymously in this document to refer to Matrix SPARSH VP110. Using this document, we hope, you will be able to install, operate and make optimum use of SPARSH VP110. If you encounter any technical problems, contact your dealer/reseller or you can mail Matrix Technical Support in the following id: Support@MatrixComSec.com.
- Page 14 Matrix SPARSH VP110 User Guide...
-
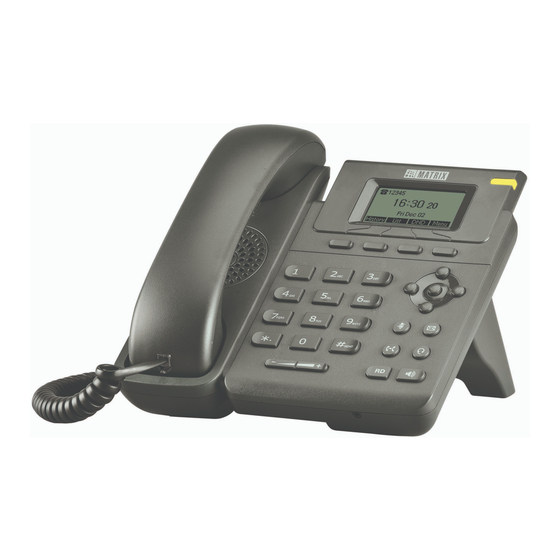
Page 15: Know Your Sparsh Vp110
Know Your SPARSH VP110 CHAPTER 2 SPARSH VP110 is a new breed of entry-level SIP phone that redefines the desktop telephony experience and quality of business communications. It provides features and functions normally available in high-end phones such as large graphical LCD, 5-line display, context sensitive keys, full-duplex speakerphone, integrated PoE, auto provisioning and broad array of call management features. -
Page 16: Hardware Component Instructions
Hardware Component Instructions The main hardware components of the SPARSH VP110 IP phone are the LCD screen and the keypad. Hardware component instructions of the IP phone are: Key Label Item Description Shows information about calls, messages, soft keys, time, date and other relevant data: • Call information — caller ID, call duration • Icons (for example,) • Missed call text or second incoming caller LCD Screen information •... -
Page 17: Icon Instructions
RD Key Redials a previously dialed number. Adjusts the volume of the handset, headset, speaker, and Volume Key ringer. Provides the digits, letters and special characters in Keypad context‐sensitive applications. Label automatically to identity their context‐sensitive Soft Keys features. Icon Instructions Icons appearing on the LCD screen are described in the following table: Icon Description Network is unavailable Registered successfully Register failed Registering Hands‐free speakerphone mode Handset mode Headset mode Multi‐lingual lowercase letters input mode Matrix SPARSH VP110 User Guide... -
Page 18: Led Instructions
Multi‐lingual uppercase letters input mode Alphanumeric Numeric input mode Multi‐lingual uppercase and lowercase letters input mode Voice Mail Text Message Auto Answer Do Not Disturb Call Forwarded/Forwarded Calls Call Hold Call Mute Ringer volume is 0 Keypad Lock Received Calls Placed Calls Missed Calls LED Instructions Power Indicator LED LED Status Description The phone is initializing. The phone is busy. Solid green The phone is idle. The call is placed on hold or is held. The phone receives a text message or voice mail. Matrix SPARSH VP110 User Guide... - Page 19 The phone is ringing. Fast flashing green (300ms) The call is mute. The phone is powered off. The above table displays the default LED status. The status of the power indicator LED is configurable via web user interface. Refer “Power Indicator LED” for details. Matrix SPARSH VP110 User Guide...
- Page 20 Matrix SPARSH VP110 User Guide...
-
Page 21: Information For Your Safety And Comfort
• Without prior written consent, no organization or individual is permitted to make any change to the structure or the safety design of the device. Matrix is under no circumstance liable to consequences or legal issues caused by such changes. -
Page 22: Operating Requirements
During a thunderstorm, stop using the device and disconnect it from the power supply. Unplug the power plug and the Asymmetric Digital Subscriber Line (ADSL) twisted pair (the radio frequency cable) to avoid lightning strike. Matrix SPARSH VP110 User Guide... -
Page 23: Cleaning Requirements
Use a piece of soft, dry and anti-static cloth to clean the device. • Keep the power plug clean and dry. Using a dirty or wet power plug may lead to electric shock or other perils. Matrix SPARSH VP110 User Guide... - Page 24 Matrix SPARSH VP110 User Guide...
-
Page 25: Getting Started
This chapter provides basic installation instructions and information for obtaining the best performance with the IP phone. If you require additional information or assistance with your new phone, contact your re-seller/vendor. Packaging Contents The following components are included in your IP phone package: Matrix SPARSH VP110 IP Phone Matrix SPARSH VP110 User Guide... - Page 26 Phone Stand Power Adapter (Optional) Handset & Handset Cord Ethernet Cable Matrix SPARSH VP110 User Guide...
-
Page 27: Quick Installation Guide & User Card
Quick Installation Guide & User Card Check the list before installation. If you find anything missing, contact your reseller/vendor. Matrix SPARSH VP110 User Guide... -
Page 28: Phone Installation
Connect the handset and optional headset. Connect the network and power. Refer following details for instructions. Attach the stand and detach the stand. • Attach the stand Desk Mount Method Wall Mount Method • Detach the stand Matrix SPARSH VP110 User Guide... - Page 29 Power Adapter (DC 5V) Power over Ethernet (PoE) With the included or a regular Ethernet cable, the IP phone can be powered from a PoE-compliant switch or hub. To connect the PoE for the IP phone: Matrix SPARSH VP110 User Guide...
- Page 30 The phone can also share the network with another network device such as a PC (personal computer). It is an optional connection. Do not unplug or remove power while the phone is updating firmware and configurations. Matrix SPARSH VP110 User Guide...
-
Page 31: Phone Initialization
The IP phone will be able to resolve and update configurations written in the configuration file(s). If the IP phone does not obtain configurations from the provisioning server, the IP phone will use configurations stored in the flash memory. Matrix SPARSH VP110 User Guide... -
Page 32: Reading Icons
If the IP phone has successfully passed through these steps, it starts up properly and is ready for use. Reading Icons Icons associated with different features may appear on the LCD screen. Refer “Icon Instructions” for details. Matrix SPARSH VP110 User Guide... -
Page 33: Configuration Methods
The recommended method for configuring IP phones is automatically through a central provisioning server. If a central provisioning server is not available, the manual method will allow changes to most features. The following section describes how to configure SPARSH VP110 using each of the mentioned methods: •... -
Page 34: Admin Mode
‐‐Ring Tones √ √ ‐‐Contact Management --Directory √ --Local Directory √ √ ‐‐Blacklist √ √ ‐‐Remote Phone Book √ --Call History Management √ √ --Logo Customization √ ‐‐Headset Prior √ --Programmable Keys √ ‐‐Account Registration √ √ --Dial Plan √ ‐‐Emergency Number √ ‐‐Live Dialpad √ ‐‐Hotline √ √ Matrix SPARSH VP110 User Guide... - Page 35 Interface are termed as “Local” configurations since such methods will configure individual IP Phone parameters. For mass configuration of IP Phones, the best method is using the “Auto-Provisioning” as described below. • To change the default administrator password, refer “Administrator Password”. Matrix SPARSH VP110 User Guide...
-
Page 36: Encrypting Configuration Files
(<MAC>.cfg). SPARSH VP110 IP phones support FTP, TFTP, HTTP, and HTTPS protocols for auto- provisioning and are configured by default to use the TFTP protocol. Auto provisioning Methods enable SPARSH VP110 IP phones to update themselves automatically via downloading MAC-Oriented CFG files. -
Page 37: Obtaining The Address Of Provisioning Server
The MAC-Oriented Configuration files needs to be kept in the FTP/TFTP/HTTP/HTTPS Servers' root directory in the network. Obtaining the Address of Provisioning Server SPARSH VP110 IP phones support obtaining the Provisioning Server Address in the following ways: • Zero Touch •... - Page 38 Configure the wait time in the Wait Time (0~100s) field. • Click Confirm to accept the change. When Zero Touch is enabled, configuration wizard as shown below will appear on the phone user interface during start up: • Press the OK soft key. Matrix SPARSH VP110 User Guide...
- Page 39 (optional) in the Auto Provision screen. Plug and Play (PnP) Server SPARSH VP110 IP phones support obtaining the Provisioning Server details from the PnP server. The phone broadcasts the PnP SUBSCRIBE message to obtain the Provisioning Server details during startup. To use Plug and Play, make sure this feature is enabled.
-
Page 40: Dhcp Options
Option 66 and Option 43. The Option 66 is used to identify the TFTP server. To obtain the Provisioning Server Address by a custom DHCP option, make sure the DHCP option is set properly. SPARSH VP110 identifies the protocol of Provisioning Server as per the details configured in the DHCP option. - Page 41 Click Confirm to accept the change. Phone Flash – Manual Entry SPARSH VP110 IP phones support obtaining the provisioning server address from the phone flash. To obtain the provisioning server address by reading the phone flash, make sure the configuration is set properly. These...
- Page 42 Click Confirm to accept the change. To configure the Phone Flash via phone user interface: • Go to the Phone User Interface ->Menu ->Settings ->Advanced Settings ->Enter the Phone UI password ->Auto Provision ->URL/Username (Optional) /Password (Optional). Matrix SPARSH VP110 User Guide...
-
Page 43: Update Mode
• SIP NOTIFY Message Power On The phone performs the auto provisioning process when the phone is powered on. To activate the Power On mode via a web user interface: • Click on Settings->Auto Provision. Matrix SPARSH VP110 User Guide... - Page 44 The phone performs the auto provisioning process at regular intervals. You can configure the interval for the Repeatedly mode. The default interval is 1440 minutes. To activate the Repeatedly mode via web user interface: • Click on Settings->Auto Provision. • Select the On check box in the Repeatedly field. Matrix SPARSH VP110 User Guide...
- Page 45 2 to 3 o’clock every Friday and Sunday. To activate the Weekly mode via web user interface: • Click on Settings->Auto Provision. • Select the On check box in the Weekly field. • Enter the desired time in the Time field. Matrix SPARSH VP110 User Guide...
-
Page 46: Auto Provision Now
Click Confirm to accept the change. Auto Provision Now You can use Auto Provision Now mode to manually trigger the phone to perform the auto provisioning process immediately. To use the Auto Provision Now mode via web user interface: Matrix SPARSH VP110 User Guide... -
Page 47: Sip Notify Message
The phone will perform the auto provisioning process when receiving a SIP NOTIFY message which contains the header “Event: check-sync”. If the header of the SIP NOTIFY message contains an additional string “reboot=true”, the phone will reboot immediately and then perform the auto provisioning process. This update mode requires server support. Matrix SPARSH VP110 User Guide... - Page 48 The following figure shows the message flow: Matrix SPARSH VP110 User Guide...
-
Page 49: Viewing The Phone Status
• Open the web browser of your computer. • Enter the IP address in the browser’s address bar, and then press Enter. • Enter the Username (admin) and Password (default: 1234) in the login page. Matrix SPARSH VP110 User Guide... - Page 50 • Click Confirm to login. The phone status is displayed on the first page of the web user interface. Matrix SPARSH VP110 User Guide...
-
Page 51: Registration
“SIP Account Configuration”. Idle Screen If the phone has successfully started up, the idle screen will be shown as below: The idle screen shows the label of current account, time and date, and four soft keys. Matrix SPARSH VP110 User Guide... -
Page 52: Basic Network Settings
Specify a list of domain name servers available to the client. Log Server Specify a list of MIT‐LCS UDP servers available to the client. Host Name Specify the name of the client. Specify the domain name that client should use when resolving Domain Server host names via DNS. Broadcast Address Specify the broadcast address in use on the client's subnet. Network Time Protocol Specify a list of NTP servers available to the client by IP address. Servers Vendor‐Specific Identify the vendor‐specific information. Information Vendor Class Identifier Identify the vendor type. Identify a TFTP server when the 'sname' field in the DHCP header TFTP Server Name has been used for DHCP options. Identify a boot file when the 'file' field in the DHCP header has Boot file Name been used for DHCP options. For more information on DHCP options, refer to, http://www.ietf.org/rfc/rfc2131.txt?number=2131 http:// www.ietf.org/rfc/rfc2132.txt?number=2132. Matrix SPARSH VP110 User Guide... - Page 53 For more information, refer to http://www.ietf.org/rfc/rfc3925.txt?number=3925. Procedure DHCP can be configured using the configuration files or locally. Configure DHCP on the IP phone. Configure static DNS address when Configuration File <MAC>.cfg DHCP is used. For more information, refer “Appendix D ‐ Configuration Parameters”. Configure DHCP on the IP phone. Configure static DNS address when DHCP is used. Web User Interface Navigate to: Local http://<phoneIPAddress>/ servlet?p=network&q=load Phone User Interface Configure DHCP on the IP phone. Matrix SPARSH VP110 User Guide...
- Page 54 Click OK to reboot the IP phone. To configure static DNS address when DHCP is used via web user interface: • Click on Network->Basic. • In the IPv4 Config block, click DHCP. • Click Static DNS. Matrix SPARSH VP110 User Guide...
-
Page 55: Configuring Network Parameters Manually
If DHCP is disabled or IP phones cannot obtain network parameters from the DHCP server, you need to configure them manually. The following parameters should be configured for IP phones to establish network connectivity: • IP Address • Subnet Mask • Default Gateway • Primary DNS Matrix SPARSH VP110 User Guide... - Page 56 Select desired value from the Mode (IPv4/IPv6) list. • Click Confirm to save the change. A dialog box pops up to prompt that settings will take effect after a reboot. • Click OK to reboot the IP phone. Matrix SPARSH VP110 User Guide...
- Page 57 • Press to select IPv4, IPv6 or IPv4 & IPv6 from the IP Mode field. or • Press the Save soft key to save the change. • Reboot the IP phone to apply the changes. Matrix SPARSH VP110 User Guide...
- Page 58 DSL connection to the Internet. PPPoE connection is supported by the IP phone Internet port. Contact your ISP for the PPPoE user name and password. Procedure PPPoE can be configured using the configuration files or locally. Configure PPPoE on the IP phone. Configuration File <MAC>.cfg For more information, refer “Appendix D ‐ Configuration Parameters”. Configure PPPoE on the IP phone. Navigate to: Web User Interface http://<phoneIPAddress>/ Local servlet?p=network&q=load Phone User Interface Configure PPPoE on the IP phone. Matrix SPARSH VP110 User Guide...
- Page 59 PPPoE IP Client and press the Enter soft key. • Enter the user name and password in corresponding fields. • Press the Save soft key to save the change. • Reboot the IP phone to apply the changes. Matrix SPARSH VP110 User Guide...
- Page 60 Using the wrong network parameters may result in inaccessibility of your phone and may also have an impact on your network performance. For more information on these parameters, contact your network administrator. Matrix SPARSH VP110 User Guide...
-
Page 61: Configuring Transmission Methods Of The Internet Port And The Pc Port
You can configure the full-duplex transmission on both Internet port and PC port for the IP phone to transmit in 10Mbps or 100Mbps. Procedure The transmission methods of Ethernet ports can be configured using the configuration files or locally. Matrix SPARSH VP110 User Guide... - Page 62 To configure the transmission methods of Ethernet ports via web user interface: • Click on Network->Advanced. • Select the desired value from the WAN Port Link list. • Select the desired value from the PC Port Link list. Matrix SPARSH VP110 User Guide...
-
Page 63: Configuring Pc Port Mode
Phone User Interface Configure the PC port mode. To configure the PC port mode via web user interface: • Click on Network->PC Port. • Select the desired value from the PC Port Active list. • Click Confirm to save the change. Matrix SPARSH VP110 User Guide... - Page 64 Select Disabled from the PC Port Active list. • Click Confirm to save the change. A dialog box pops up to prompt that settings will take effect after a reboot. • Click OK to reboot the IP phone. Matrix SPARSH VP110 User Guide...
-
Page 65: Customizing Your Phone
When configured properly, contrast allows users to read the LCD’s display with minimal eyestrain. Procedure Contrast can be configured using the configuration files or locally. Configure the contrast of the LCD screen. Configuration File <MAC>.cfg For more information, refer “Appendix D ‐ Configuration Parameters”. Configure the contrast of the LCD screen. Navigate to: http://<phoneIPAddress>/ Web User Interface servlet?p=settings‐preference&q=load Local Configure the contrast of the LCD screen. Phone User Interface Matrix SPARSH VP110 User Guide... - Page 66 If the language of your web browser is not supported by the phone, the web user interface will use English. You can change the language for the phone user interface and the web user interface respectively. Matrix SPARSH VP110 User Guide...
-
Page 67: Specifying The Language To Use
Specify the language for the phone user interface or the web user interface using the configuration files or locally. Specify the languages for the phone user interface and the web user interface. Configuration File <MAC>.cfg For more information, refer “Appendix D ‐ Configuration Parameters”. Specify the language for the web user interface. Web User Interface Navigate to: http://<phoneIPAddress>/ servlet?p=settings‐preference&q=load Local Specify the language for the phone user Phone User Interface interface. Matrix SPARSH VP110 User Guide... -
Page 68: Time & Date
NTP server by default. The NTP server can be obtained by DHCP or configured manually. If IP phones cannot obtain the time and date from the NTP server, you need to manually configure them. Matrix SPARSH VP110 User Guide... - Page 69 Option Configuration Methods Configuration Files Time Zone Web User Interface Phone User Interface Web User Interface Time Phone User Interface Configuration Files Time Format Web User Interface Phone User Interface Web User Interface Date Phone User Interface Configuration Files Date Format Web User Interface Phone User Interface Configuration Files Daylight Saving Time Web User Interface Procedure Configuration changes can be performed using the configuration files or locally. Matrix SPARSH VP110 User Guide...
- Page 70 To configure NTP by DHCP priority feature via web user interface: • Click on Settings->Time & Date. • Select the desired value from the NTP By DHCP Priority list. • Click Confirm to save the change. Matrix SPARSH VP110 User Guide...
- Page 71 Select the desired values from the lists of DST Start Month, DST Start Day of Week, DST Start Day of Week Last in Month, DST Stop Month, DST Stop Day of Week and DST Stop Day of Week Last in Month. Enter the desired time in the Start Hour of Day field. Matrix SPARSH VP110 User Guide...
- Page 72 Enter the desired offset time in the Offset (minutes) field. • Click Confirm to save the change. To configure the time and date manually via web user interface: • Click on Settings->Time & Date. • Select Enabled from the Manual Time list. Matrix SPARSH VP110 User Guide...
- Page 73 Enter the time and date in the corresponding fields. • Click Confirm to save the change. To configure the time and date format via web user interface: • Click on Settings->Time & Date. • Select the desired value from the Time Format list. Matrix SPARSH VP110 User Guide...
- Page 74 Enter the domain names or IP addresses in the NTP Server1 and NTP Server2 fields respectively. • Press the Save soft key to save the change. Please refer to “Appendix A - Time Zone” for the list of available time zones on the IP phone. Matrix SPARSH VP110 User Guide...
-
Page 75: Power Indicator Led
Talk/Dial Power Light On allows the power indicator LED to be turned on when the IP phone is busy. If this option is disabled, the status of the power indicator LED is determined by the option "Common Power Light On". Matrix SPARSH VP110 User Guide... - Page 76 Select the desired value from the Mute Power Light Flash list. • Select the desired value from the Hold/Held Power Light Flash list. • Select the desired value from the Talk/Dial Power Light On list. Matrix SPARSH VP110 User Guide...
-
Page 77: Administrator Password
Enter the current administrator password in the Old Password field. • Enter new password in the New Password and Confirm Password fields. Valid characters are ASCII characters 32-126(0x20-0x7E) except 58(3A). • Click Confirm to save the change. Matrix SPARSH VP110 User Guide... -
Page 78: User Password
User password can be changed using the configuration files or locally. Change the user password of the IP phone. Configuration File <MAC>.cfg For more information, refer “Appendix D ‐ Configuration Parameters”. Change the user password of the IP phone. Local Web User Interface Navigate to: http://<phoneIPAddress>/ servlet?p=security&q=load To change the user password via web user interface: • Click on Security->Password. • Select user from the User Type list. Matrix SPARSH VP110 User Guide... -
Page 79: Key As Send
Send sound works only if Key tone is enabled. Procedure Key as send can be configured using the configuration files or locally. Configure a send key. Configure a send sound. Configuration File <MAC>.cfg Configure a key tone. For more information, refer “Appendix D ‐ Configuration Parameters”. Configure a send key. Navigate to: http://<phoneIPAddress>/ servlet?p=features‐general&q=load Web User Interface Local Configure a send sound and key tone. Navigate to: http://<phoneIPAddress>/ servlet?p=features‐audio&q=load Configure the send key. Phone User Interface Matrix SPARSH VP110 User Guide... - Page 80 To configure a send sound and key tone via web user interface: • Click on Features->Audio. • Select the desired value from the Key Tone list. • Select the desired value from the Send Sound list. • Click Confirm to save the change. Matrix SPARSH VP110 User Guide...
-
Page 81: Keypad Lock
Press the keypad lock key (if configured) when the IP phone is idle. In addition to the above steps, you can configure the IP phone to automatically lock the keypad after a period of time. Matrix SPARSH VP110 User Guide... - Page 82 To configure phone lock via web user interface: • Click on Features->Phone Lock. • Select the desired type from the Keypad Lock Type list. • Enter the unlock PIN in the Phone Unlock PIN (0~15 Digit) field. Matrix SPARSH VP110 User Guide...
- Page 83 Click Confirm to save the change. To configure a keypad lock key via web user interface: • Click on DSS Key-> Programmable Key. • In the desired DSS key field, select Keypad Lock from the Type list. Matrix SPARSH VP110 User Guide...
- Page 84 Enter the current unlock PIN in the Current PIN field. • Enter the new unlock PIN in the New PIN field. • Enter the new unlock PIN again in the Confirm PIN field. • Press the Save soft key to save the change. Matrix SPARSH VP110 User Guide...
-
Page 85: Audio Settings
(handset, speakerphone or headset). Ring Tones Ring tones are used to indicate incoming calls. You can select different ring tones to distinguish your phone from your neighbor’s. Matrix SPARSH VP110 User Guide... - Page 86 To upload a custom ring tone for your phone via web user interface: • Click on Settings->Preference. • Click Browse to locate a ring tone (file format must be *.wav) file from your local system. Matrix SPARSH VP110 User Guide...
- Page 87 If no ring tone is assigned to the account, the phone will play the ring tone assigned for the phone. All custom ring tone files must be within 100KB. Uploading custom ring tones for your phone is configurable via web user interface only. Matrix SPARSH VP110 User Guide...
-
Page 88: Contact Management
The selected list appears in the Enabled column. • Repeat above step to add more lists to the Enabled column. • To remove a list from the Enabled column, select the desired list and then click Matrix SPARSH VP110 User Guide... -
Page 89: Local Directory
Contacts and groups can be added either one by one or in batch using a local contact file. For more information on how to customize a contact file, refer “Local Contact File”. Matrix SPARSH VP110 User Guide... -
Page 90: Adding Groups
Click on Directory->Local Directory. • In the Group Setting block, enter the desired group name in the Group field. • Select the desired ring tone from the Ring list. • Click Add to add the group. Matrix SPARSH VP110 User Guide... -
Page 91: Editing Groups
If Local Directory is removed from the directory, press Menu->Dir->Local Directory to enter the local directory. • Select the desired group. • Press the Option soft key, and then select Detail from the prompt list. Matrix SPARSH VP110 User Guide... -
Page 92: Adding Contacts
• Click on Directory->Local Directory. • In the Directory block, enter the name and the office, mobile or other numbers in the corresponding fields. • Select the desired ring tone from the Ring Tone list. Matrix SPARSH VP110 User Guide... - Page 93 You can add contacts to the local directory in the following ways via phone user interface: • Manually • From call history • From remote phone book Adding Contacts Manually To add a contact to the local directory manually: • Press the Dir soft key. Matrix SPARSH VP110 User Guide...
- Page 94 If the contact has existed in the directory, the LCD screen will prompt “Contact name existed!”. Adding Contacts from Call History To add a contact to the local directory from the call history: • Press the History soft key. • Press to select the desired entry. Matrix SPARSH VP110 User Guide...
-
Page 95: Editing Contacts
Editing Contacts To edit a contact in the local directory: • Press the Dir soft key. The IP phone enters the local directory directly as there is only Local Directory in the directory by default. Matrix SPARSH VP110 User Guide... -
Page 96: Deleting Contacts
Press the OK soft key to confirm the deletion or the Cancel soft key to cancel. Placing Calls to Contacts To place a call to a contact from the local directory: • Press the Dir soft key. Matrix SPARSH VP110 User Guide... -
Page 97: Searching For Contacts
The IP phone enters the local directory directly as there is only Local Directory in the directory by default. If Local Directory is removed from the directory, press Menu->Dir->Local Directory to enter the local directory. • Press to scroll to the All Contacts field. • Press the Search soft key. Matrix SPARSH VP110 User Guide... -
Page 98: Search Source List In Dialing
The selected list appears in the Enabled column. • Repeat above step to add more lists to the Enabled column. • To remove a list from the Enabled column, select the desired list and then click Matrix SPARSH VP110 User Guide... - Page 99 The contacts in the enabled search source lists whose name or number matches the characters entered will appear on the LCD screen. You can press to select the desired contact and then place a call to the contact. Matrix SPARSH VP110 User Guide...
-
Page 100: Importing/Exporting Contact Lists
Click Browse to locate a contact list file (file format must be *.csv) from your local system. • (Optional) Check the Show Title check box. It will prevent importing the title of the contact information which is located in the first line of the CSV file. Matrix SPARSH VP110 User Guide... - Page 101 To add a contact to the blacklist manually: Matrix SPARSH VP110 User Guide...
- Page 102 • Press the OK soft key to confirm the setting. For more operating instructions on editing, deleting, placing calls to and/or searching for contacts in the blacklist, refer to the operating instructions of “Local Directory”. Matrix SPARSH VP110 User Guide...
-
Page 103: Remote Phone Book
Search Flash Time specifies how often IP phones refresh the local cache of the remote phone book. Procedure Remote phone book can be configured using the configuration files or locally. Specify the access URL of the remote phonebook. Specify whether to query the entry name from the remote phone book for outgoing/incoming calls. Specify how often the IP phone refreshes the local cache of the Configuration File <MAC>.cfg remote phonebook. Specify whether to refresh the local cache of the remote phone book at a time when accessing the remote phone book. For more information, refer “Appendix D ‐ Configuration Parameters”. Matrix SPARSH VP110 User Guide... - Page 104 Enter the access URL in the Remote URL field. • Enter the name in the Display Name field. • Click Confirm to save the change. An access URL for remote phone book is configurable via web user interface only. Matrix SPARSH VP110 User Guide...
- Page 105 Enter a few continuous characters of the contact name or number using the keypad. The contacts whose name or number matches the characters entered will appear on the LCD screen. You can dial from the result list. Matrix SPARSH VP110 User Guide...
- Page 106 Select Enabled from the Search Remote Phone book Name list. • Enter the refresh period of corporate directory in the Search Flash Time (Seconds) field. The default value is 21600 seconds. • Click Confirm to save the change. Matrix SPARSH VP110 User Guide...
-
Page 107: Call History Management
Call log can be configured using the configuration files or locally. Configure call log feature. Configuration File <MAC>.cfg For more information, refer “Appendix D ‐ Configuration Parameters”. Configure call log feature. Web User Interface Navigate to: http://<phoneIPAddress>/ Local servlet?p=features‐general&q=load Configure the call log. Phone User Interface To configure call log feature via web user interface: • Click on Features->General Information. Matrix SPARSH VP110 User Guide... - Page 108 Press Menu->Features->History Setting. • Press , or the Switch soft key to select Enable from the History Record field. or • Press the Save soft key to save the change or the Back soft key to cancel. Matrix SPARSH VP110 User Guide...
- Page 109 Enabling this parameter will display numbers instead of the configured names (if available) in the call history list when accessed from the IP phone. To view the call history: • Press the History soft key. Matrix SPARSH VP110 User Guide...
- Page 110 All Calls, Placed Calls, Received Calls, Missed Calls and or Forwarded Calls. • Press to scroll to the desired entry. • Press the Delete soft key. To delete all entries from the call history list: • Press the History soft key. Matrix SPARSH VP110 User Guide...
-
Page 111: Missed Call Log
Missed call log can be configured using the configuration files or locally. Configure missed call log feature. Configuration File <MAC>.cfg For more information, refer “Appendix D ‐ Configuration Parameters”. Configure missed call log feature. Local Web User Interface Navigate to: http://<phoneIPAddress>/ servlet?p=account‐ basic&q=load&acc=0 To configure missed call log via web user interface: • Click on Account-> Basic. Matrix SPARSH VP110 User Guide... - Page 112 • Select the desired value from the Missed Call Log list. • Click Confirm to save the change. Matrix SPARSH VP110 User Guide...
-
Page 113: System Customizations
The logo shown on the idle screen can be configured using the configuration files or locally. Configure the logo shown on the idle screen. Configuration File <MAC>.cfg For more information, refer “Appendix D ‐ Configuration Parameters”. Configure the logo shown on the idle screen. Local Web User Interface Navigate to: http://<phoneIPAddress>/ servlet?p=features‐general&q=load To upload a custom logo via web user interface: • Click on Features->General Information. Matrix SPARSH VP110 User Guide... -
Page 114: Programmable Keys
Logo customization is configurable via web user interface only. Programmable Keys You can customize the soft keys, navigation keys and function keys on the keypad. The SPARSH VP110 IP phone supports 11 programmable keys. To customize the programmable keys via web user interface: •... - Page 115 Directed Pickup • Group Pickup • Prefix • Local Directory • Local Group • XML Directory • XML Group 1. Programmable Keys are subject to change depending on various reasons. For more information, contact your vendor/re-seller. Matrix SPARSH VP110 User Guide...
-
Page 116: Speed Dial
Usage: Press the programmable key when the phone is idle, then the phone will enter into the dialing screen and display the prefix number which you specified in the Value field. You can enter other digits and then dial out. Matrix SPARSH VP110 User Guide... -
Page 117: Local Group
You can customize practical applications, such as weather report, stock information, Google search, etc. Dependencies: Type (XML Browser) Value (the access URL for xml browser) Usage: Press the programmable key to access the XML browser specified in the Value field. Matrix SPARSH VP110 User Guide... - Page 118 “Keypad Lock”. Dependencies: Type (Keypad Lock) Usage: Press the programmable key to immediately lock the keypad of your phone instead of long pressing Intercom You can use this key to make outgoing intercom calls. Matrix SPARSH VP110 User Guide...
-
Page 119: Multicast Paging
IP phones to process the inputs received from the IP phone’s keypads. IP phones support the following dial plan features: • Replace Rule • Dial-now • Area Code • Block Out The basic expression syntax you need to know: The dot “.” can be used as a placeholder or multiple placeholders for any string. Example: “12.” would match “123”,“1234”,“12345”,“12abc”, etc. The “x” can be used as a placeholder for any character. Example: “12x” would match “121”,“122”,“123”,“12a”, etc. Matrix SPARSH VP110 User Guide... -
Page 120: Replace Rule
You can also configure replace rules in batch using a replace rule template. For more information on how to customize a replace rule template, refer “Replace Rule Template”. Procedure Replace rule can be created using the configuration files or locally. Create the replace rule for the IP phone. Configuration File <MAC>.cfg For more information, refer “Appendix D ‐ Configuration Parameters”. Matrix SPARSH VP110 User Guide... - Page 121 When you enter the number “1” using the keypad and then press the Send soft key, the phone will dial out “1234” instead. To edit a replace rule via web user interface: • Click on Settings->Dial Plan->Replace Rule. Matrix SPARSH VP110 User Guide...
- Page 122 • Click on Settings->Dial Plan->Replace Rule. • Select one or more replace rules by checking the check box(es). • Click Del to delete the replace rule(s). Replace rule is configurable via web user interface only. Matrix SPARSH VP110 User Guide...
-
Page 123: Delay Time For Dial-Now Rule
Dial-now rule can be created using the configuration files or locally. Create the dial‐now rule for the IP phone. Configure the delay time for the dial‐ now rule. Configuration File <MAC>.cfg For more information, refer “Appendix D ‐ Configuration Parameters”. Create the dial‐now rule for the IP phone. Navigate to: http://<phoneIPAddress>/ servlet?p=settings‐dialnow&q=load Local Web User Interface Configure the delay time for the dial‐ now rule. Navigate to: http://<phoneIPAddress>/ servlet?p=features‐general&q=load To add a dial-now rule via web user interface: • Click on Settings->Dial Plan->Dial-now. Matrix SPARSH VP110 User Guide... - Page 124 When you enter the number “1234” using the keypad, the phone will dial out “1234” automatically without pressing any key. Dial-now rule is configurable via web user interface only. To configure the delay time for dial-now rule via web user interface: • Click on Features->General Information. Matrix SPARSH VP110 User Guide...
- Page 125 • Enter the time within 0-14 (in seconds) in the Time-Out for Dial-Now Rule field. • Click Confirm to save the change. Delay time for dial-now rule is configurable via web user interface only. Matrix SPARSH VP110 User Guide...
-
Page 126: Area Code
To configure the area code via web user interface: • Click on Settings->Dial Plan->Area Code. • Enter the desired values in the Code, Min Length(1-15) and Max Length(1-15) fields. • Click Confirm to save the change. Matrix SPARSH VP110 User Guide... -
Page 127: Block Out
To add a block out number via web user interface: • Click on Settings->Dial Plan->Block Out. • Enter the desired values in the BlockOut Number fields. • Click Confirm to add the block out number. Matrix SPARSH VP110 User Guide... -
Page 128: Emergency Number
Enter the emergency number in the Emergency field. For multiple numbers, enter a comma between every two emergency numbers. There may be default emergency numbers configured in the IP phone. • Click Confirm to save the change. Matrix SPARSH VP110 User Guide... -
Page 129: Live Dialpad
To configure live dialpad via web user interface: • Click on Settings->Preference. • Select Enabled from the Live Dialpad list. • Enter the desired delay time in the Inter Digit Time (1~14s) field. • Click Confirm to save the change. Matrix SPARSH VP110 User Guide... - Page 130 Configure the hotline number. Specify the time (in seconds) the IP phone waits before automatically dial Web User Interface out the hotline number. Navigate to: http://<phoneIPAddress>/ Local servlet?p=features‐general&q=load Configure the hotline number. Specify the time (in seconds) the IP Phone User Interface phone waits before automatically dialing out the hotline number. To configure hotline via web user interface: • Click on Features->General Information. • Enter the hotline number in the Hotline Number field. Matrix SPARSH VP110 User Guide...
- Page 131 Enter the delay time (in seconds) in the Hotline Time-out field. The valid values range from 0 to 10. • Press the Save soft key to save the change or the Back soft key to cancel. Matrix SPARSH VP110 User Guide...
- Page 132 Matrix SPARSH VP110 User Guide...
-
Page 133: Sip Account Configuration
Peer-to-Peer (P2P) calling using the SPARSH VP110 IP phones. Configuration for Proxy Calling Matrix SPARSH VP110 supports one SIP Account; thus allowing you to register one SIP account with the added advantage of server redundancy. For more information about how server redundancy works, refer “Server... - Page 134 Account‐>Register ‐ authentication for the account. account.1.auth_name >Register Name characters The default value is blank. It configures the register user name for the String within 32 Account‐>Register ‐ account. account.1.user_name characters >User Name The default value is blank. It configures the password for register String within 99 Account‐>Register ‐ authentication for the account. account.1.password characters >Password The default value is blank. It configures the IP address or domain name of account.1.sip_server. the SIP server Y for the account. Account‐>Register ‐ Y.address = IP address or Example: >SIP Server Y‐> domain name Server Host account.1.sip_server.1.address = 10.2.1.128 (Y ranges from 1 to 2.) The default value is blank. Matrix SPARSH VP110 User Guide...
- Page 135 3‐DNS‐NAPTR The default value is 0. It configures the way of SRV query when there is no result from the NAPTR query for the account. account.1.naptr_build 0 or 1 0‐SRV query using UDP only 1‐SRV query using UDP, TCP or TLS. The default value is 0. Fallback Mode Parameter Valid Values Descriptions Web Interface Path It configures the registration mode for the account in fallback mode. account.1.fallback.red 0‐Concurrent registration 0 or 1 undancy_type 1‐Successive registration The default value is 0. It configures the time interval (in seconds) for the phone to detect whether the working server is available by sending the registration account.1.fallback.tim Integer from 10 request for the account. eout to 2147483647 It is only applicable to successive registration mode. The default value is 120. Matrix SPARSH VP110 User Guide...
- Page 136 The following shows an example of SIP account and server redundancy configurations for account 1 (since the IP phone supports single SIP account) in the configuration files: ##Account Configuration and Registration account.1.enable = 1 account.1.register.enable = 1 account.1.label = 1234 account.1.display_name = 1234 account.1.auth_name = 1234 account.1.user_name = 1234 account.1.password = 1234 Matrix SPARSH VP110 User Guide...
- Page 137 • Select Enabled from the Enable Outbound Proxy Server list and configure the Outbound Proxy Server address and Port if your ITSP uses an outbound server. • Select the desired value from the Transport list. Matrix SPARSH VP110 User Guide...
- Page 138 to select Enable for Activation. or • Press to configure the Label, Display Name, Register Name, User Name, Password, SIP Server 1, SIP Server 2, Outbound Sts, Outbound Proxy, STUN Status, STUN Server and press the Save soft key. Matrix SPARSH VP110 User Guide...
-
Page 139: Configuration For Peer-To-Peer (P2P) Calling
Configuration for Peer-to-Peer (P2P) Calling Matrix SPARSH VP110 supports Peer-to-Peer (P2P) calling and Direct IP calling using the phone dial pad without registering to the SIP server. Procedure Parameters for Peer-to-Peer (P2P) calling and Direct IP calling can be configured using the configuration files or locally. - Page 140 Select Enabled from the Line Active list. • Select Disabled from the Register list. • Configure the User Name. You may configure other parameters if required. • Select the desired value from the Transport list. Matrix SPARSH VP110 User Guide...
- Page 141 If you dial out an IP address using the phone dial pad, the IP address will be dialed out along with the destination port as 5060 (irrespective of the Port Programmed for the SIP Server 1 parameter). Matrix SPARSH VP110 User Guide...
- Page 142 To configure auto answer for incoming Peer-to-Peer (P2P) calls via web user interface: • Click on Features->General Information. • Select Enable from the IP Direct Auto Answer list. • Click Confirm to save the change. Matrix SPARSH VP110 User Guide...
-
Page 143: Accessing Basic Features
CHAPTER 7 The SPARSH VP110 IP phone is designed to be easily used like a regular phone on a public switched telephone network (PSTN). You can place calls, answer calls, transfer a call to someone else, or conduct a conference call. - Page 144 Enter the desired number using the keypad. Press OK , or the Send soft key. • With the handset on-hook, enter the desired number using the keypad. Press , OK , or the Send soft key. Matrix SPARSH VP110 User Guide...
-
Page 145: Answering Calls
“Call Forward”. Answering When Not in Another Call Call duration and destination will always appear on the LCD screen for the active call. To answer a call using the handset: • Pick up the handset. Matrix SPARSH VP110 User Guide... -
Page 146: Ending Calls
Cancel soft key. To end a call placed on hold, you can press the Cancel soft key to end the call directly, or press the Resume soft key to resume the call before ending it. Matrix SPARSH VP110 User Guide... -
Page 147: Redialing Numbers
A call to your last dialed number is attempted. To redial a previously dialed number from your phone: • Press when the phone is idle. • Press to select the desired entry, and then press or the Send soft key. Matrix SPARSH VP110 User Guide... -
Page 148: Recent Call In Dialing
Click Confirm to save the change. This parameter is configurable via web user interface only. To view placed calls list when the phone is in the pre-dialing screen: • Pickup the handset or press the speakerphone. Matrix SPARSH VP110 User Guide... - Page 149 The LCD screen displays the placed calls list.You can press to select the desired entry and then place a call to the contact. Matrix SPARSH VP110 User Guide...
-
Page 150: Auto Answer
<MAC>.cfg D ‐ Configuration Parameters”. Specify a period of delay time for auto Configuration File answer. <MAC>.cfg For more information, refer “Appendix D ‐ Configuration Parameters”. Configure auto answer. Navigate to: http://<phoneIPAddress>/ servlet?p=account‐ basic&q=load&acc=0 Specify a period of delay time for auto Web User Interface answer. Local Navigate to: http:// <phoneIPAddress>servlet?p=features‐ general&q=load Configure auto answer. Phone User Interface To configure auto answer via web user interface: • Click on Account-> Basic. Matrix SPARSH VP110 User Guide... - Page 151 To configure auto answer via phone user interface: • Press Menu->Settings->Advanced Settings (password: 1234) ->Account. • Press the Enter soft key. • Press , or the Switch soft key to select Enable from the Auto Answer field. or Matrix SPARSH VP110 User Guide...
- Page 152 Press the Save soft key to save the change or the Back soft key to cancel. icon appears on the LCD screen. Auto answer is only applicable when there is no other call in progress on the phone. Matrix SPARSH VP110 User Guide...
-
Page 153: Auto Redial
Select the desired value from the Auto Redial list. • Enter the waiting time in the Auto Redial Interval (1~300s) field. The default waiting time is 10s. • Enter the desired times in the Auto Redial Times (1~300) field. Matrix SPARSH VP110 User Guide... - Page 154 The default time interval is 10s. • Enter the desired times in the Times field. The default times are 10. • Press the Save soft key to save the change or the Back soft key to cancel. Matrix SPARSH VP110 User Guide...
- Page 155 The following prompt will appear on the LCD screen of the phone: • Wait for a period of time or press the OK soft key to redial the phone number. The phone will retry as many times as configured until the called party is idle. Matrix SPARSH VP110 User Guide...
-
Page 156: Call Completion
Configure call completion. Configuration File <MAC>.cfg For more information, refer “Appendix D ‐ Configuration Parameters”. Configure call completion. Web User Interface Navigate to: http://<phoneIPAddress>/ Local servlet?p=features‐general&q=load Configure call completion. Phone User Interface To configure call completion via web user interface: • Click on Features->General Information. • Select the desired value from the Call Completion list. Matrix SPARSH VP110 User Guide... - Page 157 Press Menu->Features->Call Completion. • Press , or the Switch soft key to select Enable from the Call Completion field. or • Press the Save soft key to save the change or the Back soft key to cancel. Matrix SPARSH VP110 User Guide...
- Page 158 Call completion is not available on all servers. IP phones support call completion using the SUBSCRIBE/ NOTIFY method, which is specified in draft-poetzl-sipping-call-completion-00, to subscribe to the busy party and receive notifications of their status changes. Matrix SPARSH VP110 User Guide...
-
Page 159: Call Return
To configure a call return key via web user interface: • Click on DSSKey->Programmable Key. • Select the desired programmable key. • Select Call Return from the Type list. • Click Confirm to save the change. Matrix SPARSH VP110 User Guide... - Page 160 A call return key is configurable via web user interface only. Matrix SPARSH VP110 User Guide...
-
Page 161: Call Mute
Press again to un-mute the call. To mute an active call, you must set the Allow Mute parameter as Enabled. This parameter is accessible from the web user interface by clicking Features -> General Information. Matrix SPARSH VP110 User Guide... -
Page 162: Call Hold And Resume
Call hold can be configured using the configuration files or locally. Configure the call hold tone and call hold tone delay. Configuration File <MAC>.cfg Specify whether RFC 2543 (c=0.0.0.0) outgoing hold signaling is used. For more information, refer “Appendix D ‐ Configuration Parameters”. Configure the call hold tone and call hold tone delay. Specify whether RFC 2543 (c=0.0.0.0) outgoing hold signaling is used. Local Web User Interface Navigate to: http://<phoneIPAddress>/ servlet?p=features‐general&q=load To configure call hold method via web user interface: • Click on Features->General Information. Matrix SPARSH VP110 User Guide... - Page 163 Click Confirm to save the change. To configure call hold tone and call hold tone delay via web user interface: • Click on Features->General Information. • Select the desired value from the Play Hold Tone list. Matrix SPARSH VP110 User Guide...
- Page 164 Press the Hold soft key during a call. The LCD screen indicates that the call is on hold. By default, the phone will beep softly every 30 seconds to remind you that you still have a call on hold. Matrix SPARSH VP110 User Guide...
- Page 165 Resume soft key to retrieve the desired call. A numbered prompt appears on the LCD screen, for example “1/2”, indicating that this is the first call out of two calls. Matrix SPARSH VP110 User Guide...
-
Page 166: Do Not Disturb
DND is enabled on the IP phone. The caller’s phone LCD screen displays the received return code. Procedure DND can be configured using the configuration files or locally. Assign a DND key. For more information, refer “Appendix D ‐ Configuration Parameters”. Configure DND in the phone mode. Configuration File <MAC>.cfg Specify the return code and the reason of the SIP response message when DND is enabled. For more information, refer “Appendix D ‐ Configuration Parameters”. Matrix SPARSH VP110 User Guide... - Page 167 To configure a DND key via web user interface: • Click on DSS Key ->Programmable Key. • In the desired DSS key field, select DND from the Type list. • Click Confirm to save the change. Matrix SPARSH VP110 User Guide...
- Page 168 (Optional.) Enter the DND off code in the DND Off Code field. • Click Confirm to save the change. To specify the return code and the reason when DND is enabled via web user interface: • Click on Features->General Information. Matrix SPARSH VP110 User Guide...
- Page 169 DND is enabled. Incoming calls will be rejected automatically and "n New Missed Call(s)" ("n" indicates the number of the missed calls) will appear on the LCD screen. Matrix SPARSH VP110 User Guide...
- Page 170 Click Confirm to save the change. When DND is enabled on the phone, the phone can still receive incoming calls from the numbers specified in the DND Authorized Numbers field. DND authorized number is configurable via web user interface only. Matrix SPARSH VP110 User Guide...
-
Page 171: Call Forward
Forward International Forward international allows users to forward an incoming call to an international telephone number. This feature is enabled by default. Procedure Call forward can be configured using the configuration files or locally. Matrix SPARSH VP110 User Guide... - Page 172 To configure call forward via web user interface: • Click on Features->Forward& DND. • In the Forward block, click the desired option in Always Forward/Busy Forward/No Answer Forward. • Enter the destination number you want to forward in the Target field. Matrix SPARSH VP110 User Guide...
- Page 173 Select the ring time to wait before forwarding from the After Ring Time(0~120s) list (only for the No answer forward). • Click Confirm to save the change. To configure Diversion/History-Info feature via web user interface: • Click on Features->General Information. • Select the desired value from the Diversion/History-Info list. Matrix SPARSH VP110 User Guide...
- Page 174 (Optional.) Enter the always forward on code or off code respectively in the On Code or Off Code field. • If you select Busy Forward: • Press , or the Switch soft key to select Enable from the Busy field. or Matrix SPARSH VP110 User Guide...
-
Page 175: Dynamic Forwarding
, or the Switch soft key to select Disable to disable the call forward. or • Press the Save soft key to save the change. Dynamic Forwarding To forward an incoming call to another party: • When the phone is ringing, press the Fwd soft key. Matrix SPARSH VP110 User Guide... - Page 176 • Enter the number you want to forward the incoming call to. • Press OK , or the Send soft key. The incoming call is forwarded. The LCD screen prompts a call forward message. Matrix SPARSH VP110 User Guide...
-
Page 177: Call Transfer
Call transfer can be configured using the configuration files or locally. Specify whether to complete the transfer through on‐hook. Configure semi‐attended transfer Configuration File <MAC>.cfg feature. For more information, refer “Appendix D ‐ Configuration Parameters”. Specify whether to complete the transfer through on‐hook. Configure semi‐attended transfer feature. Local Web User Interface Navigate to: http://<phoneIPAddress>/ servlet?p=features‐transfer&q=load To configure call transfer via web user interface: • Click on Features->Transfer. Matrix SPARSH VP110 User Guide... - Page 178 “Directory” for more information.). • Press the Dir soft key, and then select History. Select the desired list and use to select the entry (Directory should be configured in advance. Refer “Directory” for more information.). Matrix SPARSH VP110 User Guide...
- Page 179 Tran soft key to complete call transfer. If you are using a handset, call transfer can be completed by hanging up the handset. You can cancel call transfer before the call is connected by pressing the Cancel soft key. Matrix SPARSH VP110 User Guide...
-
Page 180: Call Waiting
To configure call waiting via web user interface: • Click on Features->General Information. • Select the desired value from the Call Waiting list. • (Optional.) Enter the call waiting on code in the Call Waiting On Code field. Matrix SPARSH VP110 User Guide... - Page 181 Click Confirm to save the change. To configure call waiting tone via web user interface: • Click on Features->Audio. • Select the desired value from the Call Waiting Tone list. • Click Confirm to save the change. Matrix SPARSH VP110 User Guide...
- Page 182 (Optional.)Enter the call waiting on code or off code respectively in the CW On Code or CW Off Code field. • Press the Save soft key to save the change or the Back soft key to cancel. Matrix SPARSH VP110 User Guide...
-
Page 183: Conference
To use this feature, you must configure the network conference URI in advance. • Network conference is not available on all servers. For more information, contact your ITSP. • IP phones implement network conference using the REFER method specified in RFC 4579. Matrix SPARSH VP110 User Guide... - Page 184 To configure network conference via web user interface: • Click on Account->Advanced. • Select Network Conference from the Conference Type list. • Enter the conference URI (e.g., conference@example.com) in the Conference URI field. • Click Confirm to save the change. Matrix SPARSH VP110 User Guide...
-
Page 185: Transfer On Conference Hang Up
Transfer on conference hang up can be configured using the configuration files or locally. Configure the transfer on conference hang up. Configuration File <MAC>.cfg For more information, refer “Appendix D ‐ Configuration Parameters”. Configure the transfer on conference hang up. Local Web User Interface Navigate to: http://<phoneIPAddress>/ servlet?p=features‐transfer&q=load To configure Transfer on Conference Hang up via web user interface: • Click on Features->Transfer. Matrix SPARSH VP110 User Guide... - Page 186 • Select the desired value from the Transfer on Conference Hang up list. • Click Confirm to save the change. Matrix SPARSH VP110 User Guide...
-
Page 187: Call Pickup
Procedure Directed call pickup can be configured using the configuration files or locally. Configure directed call pickup feature on a phone basis. <MAC>.cfg For more information, refer “Appendix D ‐ Configuration Parameters”. Configuration File Assign a directed call pickup key. For more information, refer <MAC>.cfg “Appendix D ‐ Configuration Parameters”. Matrix SPARSH VP110 User Guide... - Page 188 Enter the directed call pickup code followed by the specific extension in the Value field. • Click Confirm to save the change. To enable the directed call pickup via web user interface: • Click on Features->Call Pickup. Matrix SPARSH VP110 User Guide...
- Page 189 Press the DPickup soft key on your phone when a phone receives an incoming call. • Enter the phone number which receives an incoming call. • Press the DPickup soft key again. The call is answered on your phone. Matrix SPARSH VP110 User Guide...
-
Page 190: Group Call Pickup
Click on DSS Key-> Programmable Key. • In the desired DSS key field, select Group Pickup from the Type list. • Enter the group call pickup code in the Value field. • Click Confirm to save the change. Matrix SPARSH VP110 User Guide... - Page 191 The GPickup soft key appears on the LCD screen. • Press the GPickup soft key on your phone when a phone in the group receives an incoming call. The call is answered on your phone. Matrix SPARSH VP110 User Guide...
- Page 192 You can pick up a call by pressing the group pickup key directly. • The directed call pickup code and group call pickup code are predefined on the system server. Contact your ITSP for more information. Matrix SPARSH VP110 User Guide...
-
Page 193: Anonymous Call
They may vary on different servers. Send Anonymous Code feature allows IP phones to send anonymous on/off code to the server. Procedure Anonymous call can be configured using the configuration files or locally. Matrix SPARSH VP110 User Guide... - Page 194 (Optional.) Enter the anonymous call on code in the On Code field. • (Optional.) Enter the anonymous call off code in the Off Code field. • Click Confirm to save the change. To configure anonymous call via phone user interface: • Press Menu->Features->Anonymous Call. Matrix SPARSH VP110 User Guide...
- Page 195 Press the Save soft key to save the change or the Back soft key to cancel. To place an anonymous call: • Using the specific line on the phone to place a call to phone B. The LCD screen of phone B prompts an incoming call from anonymity. Matrix SPARSH VP110 User Guide...
-
Page 196: Anonymous Call Rejection
Anonymous call rejection can be configured using the configuration files or locally. Configure anonymous call rejection. Configuration File <MAC>.cfg For more information, refer “Appendix D ‐ Configuration Parameters”. Configure anonymous call rejection. Web User Interface Navigate to: http://<phoneIPAddress>/ servlet?p=account‐ Local basic&q=load&acc=0 Phone User Interface Configure anonymous call rejection. To configure anonymous call rejection via web user interface: • Click on Account-> Basic. Matrix SPARSH VP110 User Guide... - Page 197 (Optional.) Enter the anonymous call rejection on code in the Reject On Code field. • (Optional.) Enter the anonymous call rejection off code in the Reject Off Code field. • Press the Save soft key to save the change or the Back soft key to cancel. Matrix SPARSH VP110 User Guide...
- Page 198 Matrix SPARSH VP110 User Guide...
-
Page 199: Accessing Advanced Features
• Return Code When Refuse • Early Media • 180 Ring Workaround • Use Outbound Proxy in Dialog • SIP Session Timer • Session Timer • Distinctive Ring Tones • Tones • Remote Phone Book Matrix SPARSH VP110 User Guide... -
Page 200: Hot Desking
Hot desking key can be configured using the configuration files or locally. Assign a hot desking key. Configuration File <MAC>.cfg For more information, refer “Appendix D ‐ Configuration Parameters”. Assign a hot desking key. Navigate to: Local Web User Interface http://<phoneIPAddress>/ servlet?p=dsskey&q=load&model=0 To configure a hot desking key via web user interface: • Click on DSSKey->Programmable Key. • Select the desired programmable key. Matrix SPARSH VP110 User Guide... - Page 201 Press the hot desking key when the phone is idle. The LCD screen prompts “Clear all account config?”. • Press the OK soft key, registration configurations (e.g., display name, register name, user name and password) of the account will be cleared immediately. Matrix SPARSH VP110 User Guide...
- Page 202 To use the logon wizard, the SIP account configuration must be kept blank. This feature is similar to Hot Desking but pops-up automatically on the phone user interface by default when the phone reboots. Matrix SPARSH VP110 User Guide...
-
Page 203: Calling Line Identification Presentation (Clip)
Navigate to: Local Web User Interface http://<phoneIPAddress>/ servlet?p=account‐ adv&q=load&acc=0 To configure the presentation of the caller identity via web user interface: • Click on Account-> Advanced. • Select the desired value from the Caller ID Source list. Matrix SPARSH VP110 User Guide... - Page 204 • Click Confirm to save the change. Matrix SPARSH VP110 User Guide...
-
Page 205: Connected Line Identification Presentation (Colp)
If the Callee is present in the local directory, the local contact name assigned to the Callee should be preferentially displayed. Procedure COLP can be configured only using the configuration files. Configure the presentation of the callee’s identity. Configuration File <MAC>.cfg For more information, refer “Appendix D ‐ Configuration Parameters”. Matrix SPARSH VP110 User Guide... -
Page 206: Dtmf
The DTMF keypad is laid out in a 4 × 4 matrix, with each row representing a low frequency, and each column representing a high frequency. Pressing a digit key (such as '1') will generate a sinusoidal tone for each of two frequencies (697 and 1209 hertz (Hz)). - Page 207 Click on Account-> Advanced. • Select the desired value from the DTMF Type list. • If SIP INFO or AUTO or SIP INFO is selected, select the desired value from the DTMF Info Type list. Matrix SPARSH VP110 User Guide...
- Page 208 Enter the desired value in the DTMF Payload Type (96~127) field. • Click Confirm to save the change. To configure the number of times to send the end RTP Event packet via web user interface: • Click on Features->General Information. Matrix SPARSH VP110 User Guide...
- Page 209 • Select the desired value (1-3) from the DTMF Repetition list. • Click Confirm to save the change. Matrix SPARSH VP110 User Guide...
-
Page 210: Suppress Dtmf Display
Navigate to: Local Web User Interface http://<phoneIPAddress>/ servlet?p=features‐general&q=load To configure suppress DTMF display and suppress DTMF display delay via web user interface: • Click on Features->General Information. • Select the desired value from the Suppress DTMF Display list. Matrix SPARSH VP110 User Guide... - Page 211 • Select the desired value from the Suppress DTMF Display Delay list. • Click Confirm to save the change. Matrix SPARSH VP110 User Guide...
-
Page 212: Transfer Via Dtmf
<MAC>.cfg For more information, refer “Appendix D ‐ Configuration Parameters”. Configure transfer via DTMF. Navigate to: Local Web User Interface http://<phoneIPAddress>/ servlet?p=features‐general&q=load To configure transfer via DTMF via web user interface: • Click on Features->General Information. • Select the desired value from the DTMF Replace Tran list. Matrix SPARSH VP110 User Guide... - Page 213 • Enter the specified DTMF digits in the Tran Send DTMF field. • Click Confirm to save the change. Matrix SPARSH VP110 User Guide...
-
Page 214: Intercom
D ‐ Configuration Parameters”. Assign an intercom key. Local Web User Interface Navigate to: http://<phoneIPAddress>/ servlet?p=dsskey&q=load&model=0 To configure an intercom key via web user interface: • Click on DSS Key-> Programmable Key. • In the desired DSS key field, select Intercom from the Type list. Matrix SPARSH VP110 User Guide... -
Page 215: Incoming Intercom Calls
The IP phone can process incoming calls differently depending on settings. There are four configuration options for incoming intercom calls: Intercom Feature Description Enable or disable the IP phone to automatically answer an Accept Intercom incoming intercom call. Enable or disable the microphone on the IP phone for intercom Intercom Mute calls. Enable or disable the IP phone to play a warning tone when it Intercom Tone/ receives an incoming intercom call. Warning Tone Enable or disable the IP phone to automatically answer an incoming intercom call while there is already an active call on Intercom Barge the phone. Matrix SPARSH VP110 User Guide... - Page 216 • Select the desired values from the Accept Intercom, Intercom Mute, Warning Tone and Intercom Barge lists. • Click Confirm to save the change. To configure intercom features via phone user interface: • Press Menu->Features->Intercom. Matrix SPARSH VP110 User Guide...
- Page 217 If Intercom Barge is enabled, the phone automatically answers the intercom call and places the active call on hold. If Intercom Barge is disabled, the phone handles an incoming intercom call like a waiting call. Matrix SPARSH VP110 User Guide...
-
Page 218: Multicast Paging
To configure a multicast paging key via web user interface: • Click on DSS Key-> Programmable Key. • In the desired DSS key field, select Multicast Paging from the Type list. • Enter the multicast IP address and port number in the Value field. Matrix SPARSH VP110 User Guide... -
Page 219: Receiving Rtp Stream
If enabled, the phone will ignore incoming multicast paging calls with lower priorities, otherwise, the phone will answer incoming multicast paging calls automatically and place the previous multicast paging call on hold. If disabled, the phone will automatically ignore all incoming multicast paging calls. Matrix SPARSH VP110 User Guide... - Page 220 Enter the multicast IP address(es) and port number (for example, 224.5.6.20:10008) which the phone listens for incoming RTP multicast in the Listening Address field. The valid multicast IP addresses range from 224.0.0.0 to 239.255.255.255. • Enter the label in the Label field. Matrix SPARSH VP110 User Guide...
- Page 221 The phone plays a warning tone when receiving incoming multicast paging calls. • The phone will not receive a new incoming multicast paging call when there are two calls on the phone. • Multicast listening addresses is configurable via web user interface only. Matrix SPARSH VP110 User Guide...
-
Page 222: Music On Hold
Music on hold (MoH) can be configured using the configuration files or locally. Configure MoH. Configuration File <MAC>.cfg For more information, refer “Appendix D ‐ Configuration Parameters”. Configure MoH. Navigate to: Local Web User Interface http://<phoneIPAddress>/ servlet?p=account‐adv&q=load&acc=0 To configure MoH server via web user interface: • Click on Account->Advanced. Matrix SPARSH VP110 User Guide... - Page 223 Click Confirm to save the change. When you have placed a call on hold, the held party can hear the music. • All involved parties cannot use encrypted RTP (SRTP). • MoH server is configurable via web user interface only. Matrix SPARSH VP110 User Guide...
-
Page 224: Messages
If the phone prompts receiving new text messages, you can also press the View soft key to read the new messages directly. To send a text message via phone user interface: • Press Menu->Messages->Text Message->New Message. • Compose the new text message. You can press the abc soft key to change the input mode. Matrix SPARSH VP110 User Guide... - Page 225 • Enter the number you want to send the message to in the SMS target number field. • Compose the new text message in the SMS message field. • Click Confirm to send the message. Matrix SPARSH VP110 User Guide...
- Page 226 You can also delete all text messages by pressing the Delete soft key and then select Del All. For more information, refer to the above steps. You can also delete a specific message after retrieving by pressing the Delete soft key. Matrix SPARSH VP110 User Guide...
-
Page 227: Voice Mail
Conn soft key to dial out the voicemail access code. • Follow the voice prompt to listen to voice mails. Before listening to voice mails, make sure the voice mail access code has been configured. Matrix SPARSH VP110 User Guide... -
Page 228: Message Waiting Indicator (Mwi)
IP phones do not need to subscribe for message-summary updates. The server automatically sends a message- summary NOTIFY in a new dialog each time the MWI status changes. MWI service is not available on all servers. The MWI Subscription parameters you need to know: Option Description Subscribe for MWI Enable or disable a subscription for MWI service. Matrix SPARSH VP110 User Guide... - Page 229 Configure subscribe for MWI. Configure subscribe MWI to voice mail. Configuration File <MAC>.cfg For more information, refer “Appendix D ‐ Configuration Parameters”. Configure subscribe for MWI. Configure subscribe MWI to voice mail. Local Web User Interface Navigate to: http://<phoneIPAddress>/ servlet?p=account‐adv&q=load&acc=0 To configure subscribe for MWI via web user interface: • Click on Account->Advanced. • Select Enabled from the Subscribe for MWI list. Matrix SPARSH VP110 User Guide...
- Page 230 The IP phone will subscribe to the account number for MWI service by default. To enable Subscribe MWI to Voice Mail via web user interface: • Click on Account->Advanced. • Select Enabled from the Subscribe MWI To Voice Mail list. Matrix SPARSH VP110 User Guide...
- Page 231 The IP phone will subscribe to the voice mail number for MWI service using Subscribe MWI to Voice Mail. • For proper functioning of the Voice Mail & MWI with the Matrix PBX server, Subscribe for MWI parameter must be Enabled and Subscribe MWI To Voice Mail parameter must be Disabled.
-
Page 232: Web Server Type
For more information, refer “Appendix D ‐ Configuration Parameters”. Configure the web access type, HTTP port and HTTPS port. Navigate to: Web User Interface http://<phoneIPAddress>/ Local servlet?p=network‐adv&q=load Configure the web access type, HTTP Phone User Interface port and HTTPS port. To configure web server type via web user interface: • Click on Network->Advanced. • Select the desired value from the HTTP list. Matrix SPARSH VP110 User Guide... - Page 233 • Enter the HTTPS port number in the HTTPS Port field. • Press the Save soft key to save the change. The IP phone reboots automatically to make settings effective after a period of time. Matrix SPARSH VP110 User Guide...
-
Page 234: Softkey Layout
Connecting Empty Cancel Connecting Transfer Empty Empty Switch SemiAttendTrans Empty Cancel Send Empty History Delete Switch Dialing Cancel GPickup DPickup Empty Empty Empty Switch RingBack Empty Cancel RingBack Transfer Empty Empty Switch SemiAttendTransBack Empty Cancel Matrix SPARSH VP110 User Guide... - Page 235 Softkey layout can be configured using the configuration files or locally. Specify the access URL of the softkey layout template. Configuration File <MAC>.cfg For more information, refer “Appendix D ‐ Configuration Parameters”. Configure the softkey layout. Local Web User Interface Navigate to: http://<phoneIPAddress>/ servlet?p=settings‐softkey&q=load To configure softkey layout via web user interface: • Click on Settings->Softkey Layout. • Select the desired value from the Custom Softkey list. Matrix SPARSH VP110 User Guide...
- Page 236 • To adjust the display order of soft keys, select the desired soft key and then click The LCD screen displays the soft keys in the adjusted order. • Click Confirm to save the change. Matrix SPARSH VP110 User Guide...
-
Page 237: Busy Tone Delay
Web User Interface servlet?p=features‐general&q=load To configure busy tone delay via web user interface: • Click on Features->General Information. • Select the desired value from the Busy Tone Delay (Seconds) list. • Click Confirm to save the change. Matrix SPARSH VP110 User Guide... -
Page 238: Return Code When Refuse
Specify the return code and the reason of the SIP response message when refusing a call. Configuration File <MAC>.cfg For more information, refer “Appendix D ‐ Configuration Parameters”. Specify the return code and the reason of the SIP response message when refusing a call. Local Web User Interface Navigate to: http://<phoneIPAddress>/ servlet?p=features‐general&q=load To specify the return code and the reason when refusing a call via web user interface: • Click on Features->General Information. Matrix SPARSH VP110 User Guide... - Page 239 • Select the desired value from the Return Code When Refuse list. • Click Confirm to save the change. Matrix SPARSH VP110 User Guide...
-
Page 240: Early Media
Current implementation supports early media through the 183 message. When the caller receives a 183 message with SDP before the call is established, a media channel is established. This channel is used to provide the early media stream for the caller. Matrix SPARSH VP110 User Guide... -
Page 241: 180 Ring Workaround
180 ring workaround can be configured using the configuration files or locally. Configure 180 ring work around. Configuration File <MAC>.cfg For more information, refer “Appendix D ‐ Configuration Parameters”. Configure 180 ring work around. Local Web User Interface Navigate to: http://<phoneIPAddress>/ servlet?p=features‐general&q=load To configure 180 ring workaround via web user interface: • Click on Features->General Information. Matrix SPARSH VP110 User Guide... - Page 242 • Select the desired value from the 180 Ring Workaround list. • Click Confirm to save the change. Matrix SPARSH VP110 User Guide...
-
Page 243: Use Outbound Proxy In Dialog
Use outbound proxy in dialog can be configured using the configuration files or locally. Specify whether to use outbound proxy in a dialog. Configuration File <MAC>.cfg For more information, refer “Appendix D ‐ Configuration Parameters”. Specify whether to use outbound proxy in a dialog. Local Web User Interface Navigate to: http://<phoneIPAddress>/ servlet?p=features‐general&q=load To specify whether to use outbound proxy server in a dialog via web user interface: • Click on Features->General Information. Matrix SPARSH VP110 User Guide... - Page 244 • Select the desired value from the Use Outbound Proxy In Dialog list. • Click Confirm to save the change. Matrix SPARSH VP110 User Guide...
-
Page 245: Sip Session Timer
The default value is 0.5s. • Enter the desired value in the SIP Session Timer T2 (2~40s) field. The default value is 4s. • Enter the desired value in the SIP Session Timer T4 (2.5~60s) field. Matrix SPARSH VP110 User Guide... - Page 246 The default value is 5s. • Click Confirm to save the change. Matrix SPARSH VP110 User Guide...
-
Page 247: Session Timer
To configure session timer via web user interface: • Click on Account-> Advanced. • Select the desired value from the Session Timer list. • Enter the desired time interval in the Session Expires (30~7200s) field. Matrix SPARSH VP110 User Guide... - Page 248 • Select the desired refresher from the Session Refresher list. • Click Confirm to save the change. Matrix SPARSH VP110 User Guide...
-
Page 249: Distinctive Ring Tones
Maximum Bellcore Tone Pattern ID Pattern Cadence Duration Duration Duration (ms) (ms) (ms) Ringing 2s On 1800 2000 2200 Bellcore‐dr1 (standard) Silent 4s Off 3600 4000 4400 Ringing Long 1025 Silent Bellcore‐dr2 Ringing Long 1025 Silent 3475 4000 4400 Matrix SPARSH VP110 User Guide... - Page 250 (RingN.wav). Otherwise, the IP phone will play the pre-configured local ring tone in about ten seconds. Example: Alert-Info: ringtone-2 Alert-Info: MyMelody2 The following table identifies different ring tones. Value of N Ring Tone Ring1.wav Ring2.wav Ring3.wav Ring4.wav Ring5.wav N<1 or N>5 Ring1.wav Matrix SPARSH VP110 User Guide...
- Page 251 Example: Alert-Info: info=family;x-line-id=0 Procedure Distinctive ring tones can be configured using the configuration files or locally. Configure distinctive ring tones. <MAC>.cfg For more information, refer “Appendix D ‐ Configuration Parameters”. Configuration File Configure the internal ringer text and internal ringer file. <MAC>.cfg For more information, refer “Appendix D ‐ Configuration Parameters”. Matrix SPARSH VP110 User Guide...
- Page 252 Configure distinctive ring tones. Navigate to: http://<phoneIPAddress>/ servlet?p=account‐ adv&q=load&acc=0 Local Web User Interface Configure the internal ringer text and internal ringer file. Navigate to: http://<phoneIPAddress>/ servlet?p=settings‐ring&q=load To configure distinctive ring tones via web user interface: • Click on Account-> Advanced. Matrix SPARSH VP110 User Guide...
- Page 253 Click on Settings->Ring. • Enter the keywords in the Internal Ringer Text fields. • Select the desired ring tones for each text from the Internal Ringer File lists. • Click Confirm to save the change. Matrix SPARSH VP110 User Guide...
-
Page 254: Tones
Norway • Portugal • Spain • Switzerland • Sweden • Russia • United States • Chile • Czech ETSI Configured tones can be heard on IP phones for the following conditions. Condition Description Dial When in the pre‐dialing interface Matrix SPARSH VP110 User Guide... - Page 255 Tones can be configured using the configuration files or locally. Configure the tones for the IP phone. Configuration File <MAC>.cfg For more information, refer “Appendix D ‐ Configuration Parameters”. Configure the tones for the IP phone. Navigate to: Local Web User Interface http://<phoneIPAddress>/ servlet?p=settings‐tones&q=load To configure tones via web user interface: • Click on Settings->Tones. • Select the desired type from the Select Country list. Matrix SPARSH VP110 User Guide...
- Page 256 If you select Custom, you can customize a tone for each condition of the IP phone. • Click Confirm to save the change. Matrix SPARSH VP110 User Guide...
-
Page 257: Action Url
Outgoing Call When the IP phone places a call. Established When the IP phone establishes a call. Terminated When the IP phone terminates a call. Open DND When the IP phone enables the DND mode. Close DND When the IP phone disables the DND mode. Open Always Forward When the IP phone enables the always forward. Close Always Forward When the IP phone disables the always forward. Open Busy Forward When the IP phone enables the busy forward. Close Busy Forward When the IP phone disables the busy forward. Open No Answer Forward When the IP phone enables the no answer forward. Close No Answer Forward When the IP phone disables the no answer forward Transfer Call When the IP phone transfers a call. Blind Transfer When the IP phone blind transfers a call. When the IP phone performs the semi‐attended/attended Attended Transfer transfer. Hold When the IP phone places a call on hold. UnHold When the IP phone retrieves a hold call. Mute When the IP phone mutes a call. Matrix SPARSH VP110 User Guide... - Page 258 MAC address of the IP phone when the IP phone mutes a call. The following table lists pre-defined variable values. Variable Value Description $mac The MAC address of the IP phone The IP address of the IP phone $model The IP phone model $firmware The firmware version of the IP phone The SIP URI of the current account when the IP phone places a call, $active_url receives an incoming call or establishes a call. The user part of the SIP URI for the current account when the IP phone $active_user places a call, receives an incoming call or establishes a call. The host part of the SIP URI for the current account when the IP phone $active_host places a call, receives an incoming call or establishes a call. The SIP URI of the caller when the IP phone places a call. $local The SIP URI of the callee when the IP phone receives an incoming call. Matrix SPARSH VP110 User Guide...
- Page 259 The SIP URI of the caller when the IP phone receives an incoming call. The display name of the caller when the IP phone places a call. $display_local The display name of the callee when the IP phone receives an incoming call. The display name of the callee when the IP phone places a call. $display_remote The display name of the caller when the IP phone receives an incoming call. $call_id The call‐id of the active call. Procedure Action URL can be configured using the configuration files or locally. Configure action URL. Configuration File <MAC>.cfg For more information, refer “Appendix D ‐ Configuration Parameters”. Configure action URL. Navigate to: Local Web User Interface http://<phoneIPAddress>/ servlet?p=features‐actionurl&q=load Matrix SPARSH VP110 User Guide...
- Page 260 To configure action URL via web user interface: • Click on Features->Action URL. • Enter the action URLs in the corresponding fields. • Click Confirm to save the change. Matrix SPARSH VP110 User Guide...
-
Page 261: Action Uri
VOLUME_DOWN Decrease the volume. MUTE Mute the call. F_HOLD Place an active call on hold. Cancel actions or reject incoming calls. 0‐9/*/POUND Press the keypad (0‐9, * or #). F_CONFERENCE Press the Conference soft key. F1‐F4 Press the soft keys. Press the MESSAGE key. HEADSET Press the HEADSET key. Press the RD key. UP/DOWN/LEFT/RIGHT Press the navigation keys. Reboot Reboot the IP phone. AutoP Perform auto provisioning. DNDOn Activate the DND feature. DNDOff Deactivate the DND feature. number=xxx&outgoing_uri=y Place a call to xxx from SIP URI y. OFFHOOK Pick up the handset. ONHOOK Hang up the handset. ANSWER Answer a call. Matrix SPARSH VP110 User Guide... - Page 262 IP addresses on the IP phone, or configure the IP phone to receive and handle the URI from any IP address. Procedure Specify the trusted IP address for action URI using the configuration files or locally. Specify the trusted IP address(es) for sending the action URI to the IP phone. Configuration File <MAC>.cfg For more information, refer “Appendix D ‐ Configuration Parameters”. Matrix SPARSH VP110 User Guide...
- Page 263 Multiple IP addresses are separated by commas. If you enter “any” in this field, the IP phone can receive and handle GET requests from any IP address. If you leave the field blank, the IP phone cannot receive or handle any HTTP GET request. • Click Confirm to save the change. Matrix SPARSH VP110 User Guide...
-
Page 264: Server Redundancy
‘matrix_ippbx.com’. DNS mechanism is used such that the working server is resolved to multiple SIP servers for failover purpose. The working server is deployed in redundant pairs, designated as primary and secondary servers. The primary server has the highest priority server in a cluster of servers resolved by Matrix SPARSH VP110 User Guide... - Page 265 IP address respectively for account 1. The parameter "account.1.fallback.redundancy_type" is configured as 0 (Concurrent Registration). INVITE Fallback The phone has ability to fail over to a fallback server when the working server has no response to an INVITE request. Matrix SPARSH VP110 User Guide...
- Page 266 Phone A sends an INVITE request to the primary server. • Phone A retries INVITE requests to the primary server (three times by default). • After no response from the primary server, the phone sends an INVITE request to the secondary server. Matrix SPARSH VP110 User Guide...
- Page 267 Procedure Server redundancy can be configured using the configuration files or locally. Configure the server redundancy on the IP phone. Configuration File <MAC>.cfg For more information, refer “Appendix D ‐ Configuration Parameters”. Configure the server redundancy on the IP phone. Navigate to: Local Web User Interface http://<phoneIPAddress>/ servlet?p=account‐ register&q=load&acc=0 Matrix SPARSH VP110 User Guide...
- Page 268 Configure parameters of the SIP Server 1 or SIP Server 2 in the corresponding fields. You must set the port of SIP server to 0 for NAPTR, SRV and A queries. • Click Confirm to save the change. Matrix SPARSH VP110 User Guide...
-
Page 269: Sip Server Domain Name Resolution
"s" "SIP+D2T" "" _sip._tcp.matrix_ippbx.com IN NAPTR "s" "SIP+D2U" "" _sip._udp.matrix_ippbx.com Parameters are explained in the following table: Parameter Description Specify preferential treatment for the specific record. The order is from order lowest to highest, lower order is more preferred. Specify the preference for processing multiple NAPTR records with the same pref order value. Lower value is more preferred. flags The flag “s” means to perform an SRV lookup. Specify the transport protocols: SIP+D2U: SIP over UDP service SIP+D2T: SIP over TCP SIP+D2S: SIP over SCTP SIPS+D2T: SIPS over TCP regexp Always empty for SIP services. Matrix SPARSH VP110 User Guide... - Page 270 Outgoing Call When the Working Server Connection Fails When a user initiates a call, the phone will go through the following steps to connect the call: • Sends the INVITE request to the primary server. Matrix SPARSH VP110 User Guide...
- Page 271 UDP time-out defined in RFC 3261. If it is not the last server in the list, the maximum number of retries depends on the configured retry count. Procedure Server redundancy can be configured using the configuration files or locally. Configure the transport type on the IP phone. Configuration File <MAC>.cfg For more information, refer “Appendix D ‐ Configuration Parameters”. Configure the transport type on the IP phone. Navigate to: Local Web User Interface http://<phoneIPAddress>/ servlet?p=account‐ register&q=load&acc=0 Matrix SPARSH VP110 User Guide...
-
Page 272: Lldp
Inventory Management -- provides a means to effectively manage IP phones and their attributes such as model number, serial number and software revision. TLVs supported by IP phones are summarized in the following table: TLV Type TLV Name Description Chassis ID The network address of the IP phone. Port ID The MAC address of the IP phone. Mandatory TLVs Time To Live Seconds until data unit expires. End of LLDPDU Marks end of LLDPDU. Matrix SPARSH VP110 User Guide... - Page 273 System Name Name assigned to the IP phone. System Description Description of the IP phone. The supported and enabled capabilities of the IP phone. Optional TLVs The supported capabilities are Bridge and Telephone. System Capabilities The enabled capabilities are Bridge and Telephone by default. Description of port that sends data unit. Port Description The default value is “WAN PORT”. Duplex and bit rate settings of the IP phone. The Auto Negotiation is supported and enabled by default. IEEE Std 802.3 MAC/PHY Configuration/ Organizationally The advertised capabilities of PMD. Status Specific TLV Auto‐Negotiation is: 100BASE‐TX (full duplex mode), 100BASE‐TX (half duplex mode), 10BASE‐T (full duplex mode), or 10BASE‐T (half duplex mode). Matrix SPARSH VP110 User Guide...
- Page 274 TIA Organizationally Inventory – Firmware Firmware revision of the IP phone. Specific TLVs Revision Inventory – Software Software revision of the IP phone. Revision Inventory – Serial Number Serial number of the IP phone. Inventory – Manufacturer Manufacturer name of the IP phone. Name Inventory – Model Name Model name of the IP phone. Assertion identifier of the IP phone. Asset ID The default value is “asset”. Procedure LLDP can be configured using the configuration files or locally. Configure LLDP. Configuration File <MAC>.cfg For more information, refer “Appendix D ‐ Configuration Parameters”. Matrix SPARSH VP110 User Guide...
- Page 275 Enter the desired time interval in the Packet Interval (1~3600s) field. • Click Confirm to save the change. A dialog box pops up to prompt that settings will take effect after a reboot. • Click OK to reboot the IP phone. Matrix SPARSH VP110 User Guide...
-
Page 276: Vlan
You can customize the DHCP option used to request the VLAN ID. Procedure VLAN can be configured using the configuration files or locally. Configure VLAN for the Internet port and PC port manually. Configure DHCP VLAN discovery feature. Configuration File <MAC>.cfg For more information, refer “Appendix D ‐ Configuration Parameters”. Configure VLAN for the Internet port and PC port. Configure DHCP VLAN discovery feature. Web User Interface Navigate to: Local http://<phoneIPAddress>/ servlet?p=network‐adv&q=load Configure VLAN for the Internet port Phone User Interface and PC port. Matrix SPARSH VP110 User Guide... - Page 277 Enter the VLAN ID in the VID (1-4094) field. • Select the desired value (0-7) from the Priority list. • Click Confirm to save the change. A dialog box pops up to prompt that the settings will take effect after a reboot. Matrix SPARSH VP110 User Guide...
- Page 278 • Enter the priority value (0-7) in the Priority field. • Press the Save soft key to save the change • The IP phone reboots automatically to make settings effective after a period of time. Matrix SPARSH VP110 User Guide...
-
Page 279: Quality Of Service (Qos)
In order to make VoIP transmissions intelligible to receivers, voice packets should not be dropped, excessively delayed, or made to suffer varying delay. DiffServ model can guarantee high-quality voice transmission when the voice packets are configured to a higher DSCP value. Matrix SPARSH VP110 User Guide... - Page 280 Parameters”. Configure the DSCPs for voice packets and SIP packets. Local Web User Interface Navigate to: http://<phoneIPAddress>/ servlet?p=network‐adv&q=load To configure DSCPs for voice packets and SIP packets via web user interface: • Click on Network->Advanced. • Enter the desired value in the Voice QoS(0~63) field. Matrix SPARSH VP110 User Guide...
- Page 281 Enter the desired value in the SIP QoS(0~63) field. • Click Confirm to save the change. A dialog box pops up to prompt that settings will take effect after a reboot. • Click OK to reboot the IP phone. Matrix SPARSH VP110 User Guide...
-
Page 282: Network Address Translation (Nat)
Configuration File <MAC>.cfg For more information, refer “Appendix D ‐ Configuration Parameters”. Configure NAT traversal and STUN server on the IP phone. Navigate to: Local Web User Interface http://<phoneIPAddress>/ servlet?p=account‐ register&q=load&acc=0 To configure NAT traversal and STUN server via web user interface: • Click on Account->Register. • Select STUN from the NAT list. Matrix SPARSH VP110 User Guide... - Page 283 • Enter the IP address or the domain name of the STUN server in the STUN Server field. • Click Confirm to save the change. Matrix SPARSH VP110 User Guide...
-
Page 284: 802.1X Authentication
IP phones support protocols EAP-MD5, EAP-TLS, PEAP-MSCHAPv2 and EAP-TTLS/EAP-MSCHAPv2 for 802.1X authentication. Procedure 802.1X authentication can be configured using the configuration files or locally. Configure the 802.1Xauthentication. Configuration File <MAC>.cfg For more information, refer “Appendix D ‐ Configuration Parameters”. Configure the 802.1X authentication. Navigate to: Web User Interface http://<phoneIPAddress>/ Local servlet?p=network‐adv&q=load Configure the 802.1X authentication. Phone User Interface Matrix SPARSH VP110 User Guide... - Page 285 In the 802.1x block, select the desired protocol from the 802.1x Mode list. • If you select EAP-MD5: • Enter the username for authentication in the Identity field. • Enter the password for authentication in the MD5 Password field. • If you select EAP-TLS: Matrix SPARSH VP110 User Guide...
- Page 286 , or the Switch soft key to select the desired value from the 802.1x Mode field. or • If you select EAP-MD5: • Enter the username for authentication in the Identity field. • Enter the password for authentication in the MD5 Password field. • If you select EAP-TLS: Matrix SPARSH VP110 User Guide...
- Page 287 Enter the username for authentication in the Identity field. • Enter the password for authentication in the MD5 Password field. • Click Save to save the change. The IP phone reboots automatically to make the settings effective after a period of time. Matrix SPARSH VP110 User Guide...
-
Page 288: Ipv6 Support
IP phone to configure itself with IPv6 address, as specified in RFC 4862. Procedure IPv6 can be configured using the configuration files or locally. Configure the IPv6 address assignment method. Configuration File <MAC>.cfg For more information, refer “Appendix D ‐ Configuration Parameters”. Configure the IPv6 address assignment method. Navigate to: Local Web User Interface http://<phoneIPAddress>/ servlet?p=network&q=load Matrix SPARSH VP110 User Guide... - Page 289 Select the desired address mode (IPv6 or IPv4&IPv6) from the Mode (IPv4/IPv6) list. • In the IPv6 Config block, do one of the following: • If you click Static IP Address, configure the IPv6 address and other configuration parameters in the corresponding fields. Matrix SPARSH VP110 User Guide...
- Page 290 If you select the Static IPv6 Client, configure the IPv6 address and other network parameters in the corresponding fields. • Press the Save soft key to save the change. The IP phone reboots automatically to make settings effective after a period of time. Matrix SPARSH VP110 User Guide...
-
Page 291: Configuring Audio Features
“Placing Calls”. To deactivate the headset mode: • Press again on the phone. The headset icon disappears from the idle screen indicates the headset mode is deactivated. Matrix SPARSH VP110 User Guide... -
Page 292: Headset Prior
Procedure Headset prior can be configured using the configuration files or locally. Configure headset prior. Configuration File <MAC>.cfg For more information, refer “Appendix D ‐ Configuration Parameters”. Configure headset prior. Local Web User Interface Navigate to: http://<phoneIPAddress>/ servlet?p=features‐general&q=load To enable headset prior via web user interface: • Click on Features->General Information. Matrix SPARSH VP110 User Guide... - Page 293 • If headset prior is enabled, the headset mode will not be deactivated until you press the Headset key again. • Headset prior is configurable via web user interface only. Matrix SPARSH VP110 User Guide...
-
Page 294: Audio Codecs
The corresponding attributes of the codec are listed as follows: Codec Configuration Methods Priority RTPmap Configuration Files PCMU Web User Interface Configuration Files PCMA Web User Interface Configuration Files G729 Web User Interface Configuration Files G722 Web User Interface Configuration Files G723_53 Web User Interface Configuration Files G723_63 Web User Interface Matrix SPARSH VP110 User Guide... - Page 295 “Appendix D ‐ Configuration Parameters”. Configure the codecs to use and adjust the priority of the enabled codecs. Local Web User Interface Configure the ptime. Navigate to: http://<phoneIPAddress>/ servlet?p=account‐ codec&q=load&acc=0 To configure the codecs to use and adjust the priority of the enabled codecs via web user interface: • Click on Account ->Codec. Matrix SPARSH VP110 User Guide...
- Page 296 To remove the codec from the Enable Codecs column, select the desired codec and then click • To adjust the priority of codecs, select the desired codec and then click • Click Confirm to save the change. To configure the ptime via web user interface: • Click on Account ->Advanced. Matrix SPARSH VP110 User Guide...
- Page 297 • Select the desired value from the PTime (ms) list. • Click Confirm to save the change. Matrix SPARSH VP110 User Guide...
-
Page 298: Acoustic Clarity Technology
Utilizing acoustic echo cancellation will introduce a small delay increase into audio path which might cause a lower voice quality. Procedure AEC can be configured using the configuration files or locally. Configure AEC. Configuration File <MAC>.cfg For more information, refer “Appendix D ‐ Configuration Parameters”. Configure AEC. Navigate to: Local Web User Interface http://<phoneIPAddress>/ servlet?p=settings‐voice&q=load Matrix SPARSH VP110 User Guide... -
Page 299: Voice Activity Detection
VAD can avoid unnecessary coding or transmission of silence packets in VoIP applications, saving on computation and network bandwidth. Procedure VAD can be configured using the configuration files or locally. Configure VAD. For more information, refer Configuration File <MAC>.cfg “Appendix D ‐ Configuration Parameters”. Configure VAD. Navigate to: Local Web User Interface http://<phoneIPAddress>/ servlet?p=settings‐voice&q=load Matrix SPARSH VP110 User Guide... -
Page 300: Comfort Noise Generation
IP phones support two types of jitter buffers: fixed and adaptive. A fixed jitter buffer adds the fixed delay to voice packets. You can configure the delay time for the static jitter buffer on IP phones. A adaptive jitter buffer is Matrix SPARSH VP110 User Guide... - Page 301 Enter the maximum delay time for adaptive jitter buffer in the Max Delay field. Valid values range from 0 to 300. • Enter the fixed delay time for fixed jitter buffer in the Normal field. Matrix SPARSH VP110 User Guide...
- Page 302 Valid values range from 0 to 300. • Click Confirm to save the change. Matrix SPARSH VP110 User Guide...
-
Page 303: Configuring Security Features
IP phones support TLS version 1.0. A cipher suite is a named combination of authentication, encryption, and message authentication code (MAC) algorithms used to negotiate the security settings for a network connection using the TLS/SSL network protocol. IP phones support the following cipher suites: • DHE-RSA-AES256-SHA • DHE-DSS-AES256-SHA • AES256-SHA Matrix SPARSH VP110 User Guide... - Page 304 Step3: IP phone sends session key information (encrypted by server’s public key) in the “Client Key Exchange” message. Step4: Server sends “Change Cipher Spec” message to activate the negotiated options for all future messages it will send. Matrix SPARSH VP110 User Guide...
- Page 305 Resetting the IP phone to factory defaults will delete custom certificates by default. But this feature is configurable using the configuration files. For more information on the configuration parameter, refer “Appendix D - Configuration Parameters”. Procedure Configuration changes can be performed using the configuration files or locally. Matrix SPARSH VP110 User Guide...
- Page 306 Parameters”. <MAC>.cfg Upload the trusted certificates. Upload the server certificates. For more information, refer “Appendix D ‐ Configuration Parameters”. Configure TLS. Navigate to: http://<phoneIPAddress>/ servlet?p=account‐ register&q=load&acc=0 Configure trusted certificates feature. Upload the trusted certificates. Navigate to: Local Web User Interface http://<phoneIPAddress>/ servlet?p=trusted‐cert&q=load Configure server certificates feature. Upload the server certificates. Navigate to: http://<phoneIPAddress>/ servlet?p=server‐cert&q=load To configure TLS via web user interface: • Click on Account->Register. Matrix SPARSH VP110 User Guide...
- Page 307 • Select TLS from the Transport list. • Click Confirm to save the change. To configure the trusted certificates via web user interface: • Click on Security->Trusted Certificates. Matrix SPARSH VP110 User Guide...
- Page 308 Click Browse to select the certificate (*.pem, *.crt, *.cer or *.der) from your local system. • Click Upload to upload the certificate. To configure the server certificates via web user interface: • Click on Security->Server Certificates. Matrix SPARSH VP110 User Guide...
- Page 309 Click Browse to select the certificate (*.pem and *.cer) from your local system. • Click Upload to upload the certificate. A dialog box pops up to prompt “Success: The Server Certificate has been loaded! Rebooting, please wait…”. Matrix SPARSH VP110 User Guide...
-
Page 310: Srtp
The callee receives the INVITE message with the RTP encryption algorithm, and then answers the call by responding with a 200 OK message which carries the negotiated RTP encryption algorithm. Example of the RTP encryption algorithm carried in the SDP of the 200 OK message: Matrix SPARSH VP110 User Guide... - Page 311 If you enable SRTP, then you should also enable TLS. This ensures the security of SRTP encryption. For more information on TLS, refer “TLS”. Procedure SRTP can be configured using the configuration files or locally. Configure SRTP feature. Configuration File <MAC>.cfg For more information, refer “Appendix D ‐ Configuration Parameters”. Configure SRTP feature. Navigate to: Local Web User Interface http://<phoneIPAddress>/ servlet?p=account‐ adv&q=load&acc=0 Matrix SPARSH VP110 User Guide...
- Page 312 To configure SRTP feature via web user interface: • Click on Account ->Advanced. • Select the desired value from the RTP Encryption(SRTP) list. • Click Confirm to save the change. Matrix SPARSH VP110 User Guide...
-
Page 313: Encrypting Configuration Files
However, file names should be the same regardless of whether the file is encrypted or not. A simple command line AES-encryption tool can be downloaded from the Public FTP server of Matrix. For details, contact Matrix Technical Support. Procedure to Encrypt/Decrypt the Configuration Files (<MAC>.cfg) •... - Page 314 To configure AES keys via web user interface: • Click on Settings->Auto Provision. • Enter the values in the MAC-Oriented AES Key fields. AES keys must be 16 characters and the supported characters contain: 0-9, A-Z, a-z. Matrix SPARSH VP110 User Guide...
- Page 315 MAC-Oriented AES Key must be same as the <AES Key> that you used to encrypt/decrypt the <MAC>.cfg file. For details, refer “Procedure to Encrypt/Decrypt the Configuration Files (<MAC>.cfg)” described above. • Click Confirm to save the change. Matrix SPARSH VP110 User Guide...
- Page 316 Matrix SPARSH VP110 User Guide...
-
Page 317: Maintenance
Upgrade via Web User Interface To manually upgrade firmware via web user interface, you need to store firmware to your local system in advance. To upgrade firmware manually via web user interface: • Click on Settings->Upgrade. • Click Browse. Matrix SPARSH VP110 User Guide... - Page 318 Automatically check for configuration files and then download firmware at a fixed interval or specific time. Method of checking for configuration files is configurable. Procedure Configuration changes can be performed using the configuration files or locally. Matrix SPARSH VP110 User Guide...
- Page 319 Click Confirm to save the change. When the “Power On” is set to On, the IP phone will check configuration files stored on the provisioning server during start-up and then it will download firmware from the server. Matrix SPARSH VP110 User Guide...
- Page 320 Matrix SPARSH VP110 User Guide...
-
Page 321: Snmp
1.3.6.1.2.1.37459.2.1.2.0 the value is a zero‐length string. For example, IPPHONE The physical location of the IP phone. 1.3.6.1.2.1.37459.2.1.3.0 For example, Server Room The time (in milliseconds) since the network management portion of the 1.3.6.1.2.1.37459.2.1.4.0 system was last re‐initialized. 1.3.6.1.2.1.37459.2.1.5.0 The firmware version of the IP phone. 1.3.6.1.2.1.37459.2.1.6.0 The hardware version of the IP phone. 1.3.6.1.2.1.37459.2.1.7.0 The IP phone’s model. 1.3.6.1.2.1.37459.2.1.8.0 The MAC address of the IP phone. 1.3.6.1.2.1.37459.2.1.9.0 The IP address of the IP phone. The target version to which the current version is automatically updated. Format: 1.3.6.1.2.1.37459.2.1.10.0 MacVersion[*]ComVersion[*] For example, MacVersion[0.0.0.1]ComVersion[0.0.0.1] Procedure SNMP can be configured using the configuration files or locally. Matrix SPARSH VP110 User Guide... - Page 322 In the SNMP block, select Enabled from the Active list. • Enter the SNMP port in the Port (1~65535) field. • Enter the IP address or domain name of the SNMP server in the Trusted Address field. Matrix SPARSH VP110 User Guide...
- Page 323 Multiple IP addresses should be separated by space. • Click Confirm to save the change. A dialog box pops up to prompt that settings will take effect after reboot. • Click OK to reboot the IP phone. Matrix SPARSH VP110 User Guide...
-
Page 324: Tr-069 Device Management
SetParameterAttributes more CPE parameters. Reboot This method causes the CPE to reboot. This method is used to cause the CPE to download a specified file from the designated location. File types supported by IP phones are: Download • Firmware Image • Configuration File This method is used to cause the CPE to upload a specified file to the designated location. File types supported by IP phones are: Upload • Configuration File • Log File This method is used to request the CPE to schedule a one‐time ScheduleInform Inform method call (separate from its periodic Inform method calls) sometime in the future. FactoryReset This method resets the CPE to its factory default state. This method informs the ACS of the completion (either successful or TransferComplete unsuccessful) of a file transfer initiated by an earlier Download or Upload method call. This method is used to add a new instance of an object defined on AddObject the CPE. DeleteObject This method is used to remove a particular instance of an object. Matrix SPARSH VP110 User Guide... - Page 325 To configure TR-069 via web user interface: • Click on Settings->TR069. • Select Enabled from the Enable TR069 list. • Enter the username and password authenticated by the ACS in the ACS Username and ACS Password fields. Matrix SPARSH VP110 User Guide...
- Page 326 Enter the desired time in the Periodic Inform Interval(seconds) field. • Enter the username and password authenticated by the IP phone in the Connection Request Username and Connection Request Password fields. • Click Confirm to save the change. Matrix SPARSH VP110 User Guide...
-
Page 327: Advanced Maintenance
5: normal but significant condition 6: informational For more information on the system log setting parameters, refer “Appendix D - Configuration Parameters”. To configure the level of the system log via web user interface: • Click on Settings->Configuration. Matrix SPARSH VP110 User Guide... - Page 328 3 after having the syslog file provided. To configure the phone to export the system log to a syslog server via web user interface: • Click on Settings->Configuration. • Click Server in the Export System Log. Matrix SPARSH VP110 User Guide...
- Page 329 The system log will be exported successfully to the desired syslog server after a reboot. • Reproduce the issue. To export a log file to the local system via web user interface: • Click on Settings->Configuration. • Click Local in Export System Log. • Reproduce the issue. Matrix SPARSH VP110 User Guide...
- Page 330 On Pcap Feature, click Start to start capturing signal traffic. • Reproduce the issue to get stack traces. • Click Stop to stop capturing. • Click Export to open the file download window, and then save the file to your local system. Matrix SPARSH VP110 User Guide...
-
Page 331: Enabling Watchdog Feature
This feature is helpful when there is a system failure on the phone. To use Zero Touch, make sure this feature is enabled. To configure the Zero Touch via web user interface: • Click on Settings->Auto Provision. Matrix SPARSH VP110 User Guide... - Page 332 Configure the wait time in the Wait Time (0~100s) field. • Click Confirm to save the change. When Zero Touch is enabled, there will be a configuration wizard during startup as shown below: • Press the OK soft key. Matrix SPARSH VP110 User Guide...
-
Page 333: Getting Information From Status Indicators
Wrong configurations may have an impact on your phone use. You can export configuration file to check the current configuration of the IP phone and troubleshoot if necessary. To export configuration file via web user interface: • Click on Settings->Configuration. Matrix SPARSH VP110 User Guide... - Page 334 • In the Export or Import Configuration block, click Export to open the file download window, and then save the file to your local system. Matrix SPARSH VP110 User Guide...
-
Page 335: Resource Files
IP phones. The resources files can be local contact directory, remote phone book and so on. Ask Matrix field application engineer for resource file templates. To enable the desired phone to use the resource file(s), the resource file access URL should be programmed in the <MAC>.cfg file. -
Page 336: Dial-Now Template
At most 100 rules can be added to the IP phone. • The expression syntax in the dial-now rule template is the same as that introduced in the section “Dial Plan”. Procedure Use the following procedures to customize a dial-now template. Matrix SPARSH VP110 User Guide... -
Page 337: Softkey Layout Template
Create enabled soft keys between <Enable> and </Enable>. • <Default> indicates the start of the default soft key list and </Default> indicates the end of the default soft key list. The default soft keys are displayed on the LCD screen by default. Matrix SPARSH VP110 User Guide... - Page 338 The following shows an example of the CallFailed template: <CallFailed> <Disable> <Key Type="Empty"/> <Key Type="Switch"/> <Key Type="Cancel"/> </Disable> <Enable> <Key Type="NewCall"/> <Key Type="Empty"/> <Key Type="Empty"/> <Key Type="Empty"/> </Enable> <Default> <Key Type="NewCall"/> <Key Type="Empty"/> <Key Type="Empty"/> <Key Type="Empty"/> </Default> </CallFailed> Matrix SPARSH VP110 User Guide...
-
Page 339: Directory Template
Specify the values within double quotes. • Place this file to the provisioning server. The following shows an example of a directory template: <root_favorite_set> <item id_name="localdirectory" display_name="Local Directory" priority="1" enable="1" /> <item id_name="history" display_name="History" priority="2" enable="0" /> Matrix SPARSH VP110 User Guide... -
Page 340: Super Search Template
We do not recommend editing this field. priority="" specifies the priority of search results. enable="" enables or disables the directory list. • Specify the values within double quotes. • Place this file to the provisioning server. Matrix SPARSH VP110 User Guide... -
Page 341: Local Contact File
• For each contact that you want to add, add the following string to the file. Each starts on a separate line: Matrix SPARSH VP110 User Guide... -
Page 342: Remote Xml Phone Book
When creating an XML phone book, learn the following: • <xxxIPPhoneDirectory> indicates the start of a phone book and </xxxIPPhoneDirectory> indicates the end of a phone book. • <DirectoryEntry> indicates the start of a contact and </DirectoryEntry> indicates the end of a contact. Matrix SPARSH VP110 User Guide... - Page 343 Place this file to the provisioning server. The following shows an example of an XML phone book: <xxxIPPhoneDirectory clearlight="true"> <Title>Phonelist</Title> <Prompt>Prompt</Prompt> <DirectoryEntry> <Name>Support</Name> <Telephone>8881234567</Telephone> </DirectoryEntry> <DirectoryEntry> <Name>Sales</Name> <Telephone>8887654321</Telephone> <Telephone>8887654322</Telephone> </DirectoryEntry> <DirectoryEntry> <Name>Billing</Name> <Telephone>8881231231</Telephone> </DirectoryEntry> <SoftKeyItem> <Name>#</Name> </SoftKeyItem> <SoftKeyItem> <Name>*</Name> </SoftKeyItem> Matrix SPARSH VP110 User Guide...
-
Page 344: Specifying The Access Url Of Resource Files
Configure the access URL of the replace rule template. Configuration File <MAC>.cfg For more information, refer “Appendix D ‐ Configuration Parameters”. Configure the access URL of the dial‐ now rule template. Configuration File <MAC>.cfg For more information, refer “Appendix D ‐ Configuration Parameters”. Configure the access URL of the softkey layout template. Configuration File <MAC>.cfg For more information, refer “Appendix D ‐ Configuration Parameters”. Configure the access URL of the local contact file. Configuration File <MAC>.cfg For more information, refer “Appendix D ‐ Configuration Parameters”. Configure the access URL of the remote XML phonebook. Configuration File <MAC>.cfg For more information, refer “Appendix D ‐ Configuration Parameters”. Matrix SPARSH VP110 User Guide... - Page 345 Configure the access URL of the directory template. Configuration File <MAC>.cfg For more information, refer “Appendix D ‐ Configuration Parameters”. Configure the access URL of the super search template. Configuration File <MAC>.cfg For more information, refer “Appendix D ‐ Configuration Parameters”. Matrix SPARSH VP110 User Guide...
- Page 346 Matrix SPARSH VP110 User Guide...
-
Page 347: Troubleshooting
CHAPTER 13 This section describes solutions to common issues that may occur while using the IP phone. Upon encountering a scenario not listed in this section, contact your Matrix SPARSH VP110 reseller for further support. Why is the LCD screen blank? •... - Page 348 When there is a call on hold, the phone will play a hold tone every 30 seconds. Play hold tone is enabled by default. Play hold tone and play hold tone delay are configurable via web user interface only. Matrix SPARSH VP110 User Guide...
- Page 349 We may need you to provide debug log information to help analyze problem. By default, you can export the debug system log information to local PC. To export the system log to local PC via web user interface, refer “Viewing Log Files”. Matrix SPARSH VP110 User Guide...
- Page 350 We recommend asking your vendor for advice before resetting the phone. To reset the phone via phone user interface: • Press Menu->Settings->Advanced Settings (password: 1234). • Press to scroll to Reset to Factory, and then press the Enter soft key. Matrix SPARSH VP110 User Guide...
- Page 351 If you have poor sound quality/acoustics like intermittent voice, low volume, echo or other noises, the possible reasons could be: • Users are seated too far out of recommended microphone range and sound faint, or are seated too close to sensitive microphones and cause echo. Matrix SPARSH VP110 User Guide...
- Page 352 SIP server recognizing the message will respond with the pre-configured provisioning server address, so the IP phone will be able to download the CFG files from the provisioning server. PnP depends on support from a SIP server. Why doesn’t the IP phone update the configuration? Do one of the following: Matrix SPARSH VP110 User Guide...
- Page 353 IP phone will reboot only after the call ends (that is, after it becomes idle). If the IP phone is idle and SIP NOTIFY message with reboot event is received, then the IP phone will reboot immediately irrespective of this parameter whether enabled or disabled. Matrix SPARSH VP110 User Guide...
- Page 354 Matrix SPARSH VP110 User Guide...
-
Page 355: Appendix
Appendix Physical Features of IP Phones This section lists the available physical features of SPARSH VP110 IP phones. • 132 x 64 Graphic LCD • Single VoIP account • 29 keys including 4 soft keys • 1 x RJ9 (4P4C) Handset port •... -
Page 356: Phone Features
SIP v1 (RFC2543), v2 (RFC3261) • IPv6 • NAT Transverse: STUN Mode • Proxy Mode and Peer-to-Peer SIP Link Mode • IP Assignment: Static/DHCP/PPPoE • HTTP/HTTPS Web Server • Time and Date Synchronization using SNTP Matrix SPARSH VP110 User Guide... -
Page 357: Physical Features
Power Consumption: 5W (Typical) • Connector: DC Power Jack Mechanical • Packaging: 10 Qty/CTN • Net Weight: 9.8 Kg • Gross Weight: 10.8 Kg • Gift Box: 215 x 200 x 121 mm • Installation: Wall Mount, Table-top Matrix SPARSH VP110 User Guide... - Page 358 • Color: Gray Environmental • Operating Temperature: -10° C to 50°C (14° F to 122° F) • Operating Humidity: 10 - 95% (Non-Condensing) Certifications • CE, FCC-15 (Class-B), RCM, RoHS Matrix SPARSH VP110 User Guide...
-
Page 359: Appendix A - Time Zone
−03:00 Brazil(DST) −02:00 Brazil(no DST) −01:00 Portugal(Azores) Greenland Denmark‐Faroe Islands(Torshavn) Ireland(Dublin) Portugal(Lisboa, Porto, Funchal) Spain‐Canary Islands(Las Palmas) United Kingdom(London) Morocco +01:00 Albania(Tirane) +01:00 Austria(Vienna) +01:00 Belgium(Brussels) +01:00 Caicos +01:00 Chad +01:00 Spain(Madrid) +01:00 Croatia(Zagreb) +01:00 Czech Republic(Prague) +01:00 Denmark(Copenhagen) +01:00 France(Paris) +01:00 Germany(Berlin) Matrix SPARSH VP110 User Guide... - Page 360 Russia(Krasnoyarsk) +07:00 Thailand(Bangkok) +08:00 China(Beijing) +08:00 Singapore(Singapore) +08:00 Australia(Perth) +09:00 Korea(Seoul) +09:00 Japan(Tokyo) +09:30 Australia(Adelaide) +09:30 Australia(Darwin) +10:00 Australia(Sydney, Melbourne, Canberra) +10:00 Australia(Brisbane) +10:00 Australia(Hobart) +10:00 Russia(Vladivostok) +10:30 Australia(Lord Howe Islands) +11:00 New Caledonia(Noumea) +12:00 New Zealand(Wellington, Auckland) +12:45 New Zealand(Chatham Islands) +13:00 Tonga(Nukualofa) Matrix SPARSH VP110 User Guide...
-
Page 361: Appendix B - Glossary
• ROM (Read-only Memory): It is a class of storage medium used in computers and other electronic devices. Matrix SPARSH VP110 User Guide... - Page 362 WLAN (Wireless Local Area Network): It is a type of local area network that uses high-frequency radio waves rather than wires to communicate between nodes. • XML-RPC (Remote Procedure Call Protocol): It uses XML to encode its calls and HTTP as a transport mechanism. Matrix SPARSH VP110 User Guide...
-
Page 363: Appendix C - Trusted Certificates
• VeriSign Universal Root Certification Authority Matrix endeavors to maintain a built-in list of most common used CA Certificates. Due to memory constraints, we cannot ensure a complete set of certificates. If you are using a certificate from a commercial Certificate Authority not in the list above, you can send a request to your local distributor. At this point, you can upload your particular CA certificate into your phone. -
Page 364: Appendix D - Configuration Parameters
<MAC>.cfg Configures the Internet port type. Description Note: If you change this parameter, the IP phone will reboot to make the change take effect. Format Integer Default Value Valid values are: 0‐DHCP Range 1‐PPPoE 2‐Static IP Address network.internet_port.type= 0 Example Parameter- Configuration File network.static_dns_enable <MAC>.cfg Enables or disables the phone to use manually configured static IPv4 DNS when the parameter “network.internet_port.type” is set to 0 (DHCP). Description Note: If you change this parameter, the IP phone will reboot to make the change take effect. Format Boolean Default Value Valid values are: Range 0-Disabled 1-Enabled Example network.static_dns_enable= 0 Matrix SPARSH VP110 User Guide... - Page 365 <MAC>.cfg Configures the IP address mode. IP phones support using the IPv4 address only, the IPv6 Description address only or both IPv4 and IPv6 addresses. Note: If you change this parameter, the IP phone will reboot to make the change take effect. Format Integer Default Value Valid values are: 0‐IPv4 Range 1‐IPv6 2‐IPv4&IPv6 network.ip_address_mode = 0 Example Parameter- Configuration File network.internet_port.ip <MAC>.cfg Configures the IP address when the Internet port type is configured as Static IP Address and the IP address mode is configured as IPv4 or IPv4&IPv6. Description Note: If you change this parameter, the IP phone will reboot to make the change take effect. Format IPv4Address Default Value Blank Range Not Applicable network.internet_port.ip = 192.168.1.20 Example Matrix SPARSH VP110 User Guide...
- Page 366 Configuration File network.internet_port.gateway <MAC>.cfg Configures the default gateway when the Internet port type is configured as Static IP Address and the IP address mode is configured as IPv4 or IPv4&IPv6. Description Note: If you change this parameter, the IP phone will reboot to make the change take effect. Format IPv4 Address Default Value Blank Range Not Applicable Example network.internet_port.gateway = 192.168.1.254 Parameter- Configuration File network.primary_dns <MAC>.cfg Configures the primary DNS server when the Internet port type is configured as Static IP Address and the IP address mode is configured as IPv4 or IPv4&IPv6. Description Note: If you change this parameter, the IP phone will reboot to make the change take effect. Format IPv4 Address Default Value Blank Range Not Applicable Example network.primary_dns = 202.101.103.55 Matrix SPARSH VP110 User Guide...
- Page 367 Configuration File network.internet_port.type <MAC>.cfg Configures the Internet port type. Description Note: If you change this parameter, the IP phone will reboot to make the change take effect. Format Integer Default Value Valid values are: 0‐DHCP Range 1‐PPPoE 2‐Static IP Address network.internet_port.type= 1 Example Parameter- Configuration File network.pppoe.user <MAC>.cfg Configures the PPPoE username when the Internet port type is configured as PPPoE and the IP address mode is configured as IPv4 or IPv4&IPv6. Description Note: If you change this parameter, the IP phone will reboot to make the change take effect. Format String Default Value Blank Range String within 32 characters Example network.pppoe.user = test.matrix Matrix SPARSH VP110 User Guide...
- Page 368 Configuration File network.internet_port.speed_duplex <MAC>.cfg Configures the transmission method of Internet port. Note: We recommend that you do not change this Description parameter. If you change this parameter, the IP phone will reboot to make the change take effect. Format Integer Default Value Valid values are: 0‐Auto negotiate 1‐Full duplex, 10Mbps Range 2‐Full duplex, 100Mbps 3‐Half duplex, 10Mbps 4‐Half duplex, 100Mbps network.internet_port.speed_duplex = 0 Example PC Port Transmission Method Parameter- Configuration File network.pc_port.speed_duplex <MAC>.cfg Configures the transmission method of PC port. Note: We recommend that you do not change this Description parameter. If you change this parameter, the IP phone will reboot to make the change take effect. Format Integer Matrix SPARSH VP110 User Guide...
-
Page 369: Upgrading Firmware
PC Port Mode Parameter- Configuration File network.PC_port.enable <MAC>.cfg Enables or disables the PC port. Description Note: If you change this parameter, the IP phone will reboot to make the change take effect. Format Boolean Default Value Valid values are: Range 0‐Disabled 1‐Auto Negotiation Example network.PC_port.enable = 1 Upgrading Firmware Parameter- Configuration File firmware.url <MAC>.cfg Configures the access URL of firmware. Description Note: If you change this parameter, the IP phone will reboot to make the change take effect. Format Default Value Blank Range String within 511 characters Example firmware.url = http://192.168.1.20/2.72.0.1.rom Matrix SPARSH VP110 User Guide... - Page 370 Description configuration repeatedly. Format Boolean Default Value Valid values are: Range 0‐Disabled 1‐Enabled auto_provision.repeat.enable = 0 Example Parameter- Configuration File auto_provision.repeat.minutes <MAC>.cfg Configures the interval (in minutes) for the IP phone to check new configuration. Description Note: It works only if the parameter “auto_provision.repeat.enable” is set to 1 (Enabled). Format Integer Default Value 1440 Range 1 to 43200 Example auto_provision.repeat.minutes = 1000 Parameter- Configuration File auto_provision.weekly.enable <MAC>.cfg Enables or disables the IP phone to check new Description configuration weekly. Matrix SPARSH VP110 User Guide...
- Page 371 Time Default Value 00:00 Range 00:00 to 23:59 Example auto_provision.weekly.begin_time = 01:30 Parameter- Configuration File auto_provision.weekly.end_time <MAC>.cfg Configures the end time of the day for the IP phone to check new configuration weekly. Description Note: It works only if the parameter “auto_provision.weekly.enable” is set to 1 (Enabled). Format Time Default Value 00:00 Range 00:00 to 23:59 auto_provision.weekly.end_time = 21:30 Example Parameter- Configuration File auto_provision.weekly.dayofweek <MAC>.cfg Configures the days of the week for the IP phone to Description check new configuration weekly. Format Integer Default Value 0123456 Matrix SPARSH VP110 User Guide...
- Page 372 <MAC>.cfg nable Enables or disables the power indicator LED to be Description turned on. Format Boolean Default Value Valid values are: 0‐Disabled (power indicator LED is off) Range 1‐Enabled (power indicator LED is solid green) phone_setting.common_power_led_enable = 1 Example Parameter- Configuration File phone_setting.ring_power_led_flash_e <MAC>.cfg nable Enables or disables the power indicator LED to flash when the phone receives an incoming call. Description If it is set to 0, the status of the power indicator LED is determined by the value of the parameter “phone_setting.common_power_led_enable”. Format Boolean Default Value Valid values are: 0‐Disabled (power indicator LED does not flash) Range 1‐Enabled (power indicator LED fast flashes (300ms) green) Example phone_setting.ring_power_led_flash_enable = 1 Matrix SPARSH VP110 User Guide...
- Page 373 Example Parameter- Configuration File phone_setting.mute_power_led_flash <MAC>.cfg _enable Enables or disables the power indicator LED to flash when a call is mute. Description If it is set to 0, the status of the power indicator LED is determined by the value of the parameter “phone_setting.common_power_led_enable”. Format Boolean Default Value Valid values are: 0‐Disabled (power indicator LED does not flash) Range 1‐Enabled (power indicator LED fast flashes (300ms) green) Example phone_setting.mute_power_led_flash_enable = 1 Parameter- Configuration File phone_setting.hold_and_held_power_ <MAC>.cfg led_flash_enable Enables or disables the power indicator LED to flash when a call is placed on hold or is held. If it is set to 0, the status of the power indicator LED is Description determined by the value of the parameter “phone_setting.common_power_led_enable”. Format Boolean Matrix SPARSH VP110 User Guide...
- Page 374 <MAC>.cfg d_enable Enables or disables the power indicator LED to be turned on when the phone is busy. Description If it is set to 0, the status of the power indicator LED is determined by the value of the parameter “phone_setting.common_power_led_enable”. Format Boolean Default Value Valid values are: 0‐Disabled (power indicator LED is off) Range 1‐Enabled (power indicator LED is solid green) Example phone_setting.talk_and_dial_power_led_enable = 1 Contrast Parameter- Configuration File phone_setting.contrast <MAC>.cfg Configures the contrast of the LCD screen. It configures the LCD’s contrast of the IP phone only. Description Note: We recommend that you set the contrast of the LCD screen to 6 as a more comfortable level. Format Integer Default Value Range 1 to 10 phone_setting.contrast = 6 Example Matrix SPARSH VP110 User Guide...
- Page 375 Valid values are: Range 0‐Disabled 1‐Enabled wui.http_enable = 1 Example Parameter- Configuration File network.port.http <MAC>.cfg Configures the HTTP port used to access the web user interface of the IP phone. The default HTTP port is 80. Description Note: If you change this parameter, the IP phone will reboot to make the change take effect. Format Integer Default Value Range 1 to 65535 network.port.http = 80 Example Parameter- Configuration File wui.https_enable <MAC>.cfg Enables or disables the IP phone to access its web user interface using HTTPS protocol. Description Note: If you change this parameter, the IP phone will reboot to make the change take effect. Format Boolean Default Value Matrix SPARSH VP110 User Guide...
- Page 376 <MAC>.cfg Configures the HTTPS port used to access the web user interface of the IP phone. Description The default HTTPS port is 443. Note: If you change this parameter, the IP phone will reboot to make the change take effect. Format Integer Default Value Range 1 to 65535 Example network.port.https = 443 User Password Parameter- Configuration File security.user_password <MAC>.cfg Configures the password of the user for web server access. The IP phone uses “1111” as the default user password. Description Note: IP phones support ASCII characters 32‐126(0x20‐ 0x7E) in passwords. Format username:new password Default Value 1111 Range String within 32 characters security.user_password = user:1111 Example Matrix SPARSH VP110 User Guide...
-
Page 377: Phone Lock
Example security.user_password = admin:1234 Phone Lock Parameter- Configuration File phone_setting.lock <MAC>.cfg Configures the type of phone lock. Menu Key: The Menu soft key and MESSAGE key are locked. Function Keys: MESSAGE, RD, MUTE, TRAN, OK, navigation keys, soft keys are locked. All Keys: All keys are locked except the volume key. You are only allowed to dial emergency numbers, answer Description incoming calls by lifting the handset, pressing the Speakerphone key, the HEADSET key or the OK key, place an active call on hold by pressing the Hold soft key, resume the held call by pressing the Resume soft key, and end the call by hanging up the handset, pressing the Speakerphone key. If it is set to 0 (Disabled), IP phone lock feature is disabled. Format Integer Default Value Valid values are: 0‐Disabled Range 1‐Menu Key 2‐Function Keys 3‐All Keys Example phone_setting.lock = 1 Matrix SPARSH VP110 User Guide... -
Page 378: Time And Date
_out Configures the IP phone to automatically lock the keypad after a delay time (in seconds). If it is set to 0 (0s), the keypad will not be locked Description automatically. In this case, you need to long press the pound key to lock the keypad. Note: This parameter works only if the IP phone lock type is preset. Format Integer Default Value 0 to 3600 Range Example phone_setting.phone_lock.lock_time_out = 8 Time and Date Parameter- Configuration File local_time.manual_time_enable <MAC>.cfg Configures the phone to obtain time from NTP server or Description manual settings. Format Integer Default Value Valid values are: 0‐Manual Range 1‐NTP Example local_time.manual_time_enable = 1 Matrix SPARSH VP110 User Guide... - Page 379 Example Parameter- Configuration File local_time.ntp_server1 <MAC>.cfg Configures the IP address or the domain name of the Description primary NTP server. IP Address or Domain Name Format Default Value cn.pool.ntp.org Range String within 99 characters Example local_time.ntp_server1 = cn.pool.ntp.org Parameter- Configuration File local_time.ntp_server2. <MAC>.cfg Configures the IP address or the domain name of the secondary NTP server. If the primary NTP server is not Description configured or cannot be accessed, the IP phone will request the time and date from the secondary NTP server. Format IP Address or Domain Name Default Value cn.pool.ntp.org Range String within 99 characters Example local_time.ntp_server2 = cn.pool.ntp.org Matrix SPARSH VP110 User Guide...
- Page 380 Example Time Zone Parameter- Configuration File local_time.time_zone <MAC>.cfg Configures the time zone. Description For more available time zones, refer “Appendix A ‐ Time Zone”. Format String Default Value +5:30 Range ‐11 to +13 Example local_time.time_zone = +8 Parameter- Configuration File local_time.time_zone_name <MAC>.cfg Configures the desired time zone name. Description For more available time zones, refer “Appendix A ‐ Time Zone”. Format String Default Value India (Calcutta) Range String within 32 characters Example local_time.time_zone_name = India (Calcutta) Matrix SPARSH VP110 User Guide...
- Page 381 Parameter- Configuration File local_time.summer_time <MAC>.cfg Enables or disables Daylight Saving Time (DST) feature. Description Format Integer Default Value Valid values are: 0‐Disabled Range 1‐Enabled 2‐Automatic local_time.summer_time = 2 Example Parameter- Configuration File local_time.dst_time_type <MAC>.cfg Configures the DST type. Description Note: It works only if the parameter “local_time.summer_time” is set to 1 (Enabled). Format Integer Default Value Valid values are: Range 0‐By Date 1‐By Week local_time.dst_time_type = 0 Example Matrix SPARSH VP110 User Guide...
- Page 382 Parameter- Configuration File local_time.start_time <MAC>.cfg Configures the time to start DST. If “local_time.dst_time_type” is set to 0 (By Date), use the mapping: MM: 1=Jan, 2=Feb,…, 12=Dec DD:1=the first day in a month,…, 31= the last day in a month HH:0=1am, 1=2am,…, 23=12pm If “local_time.dst_time_type” is set to 1 (By Week), use the mapping: Description Month: 1=Jan, 2=Feb,…, 12=Dec Week of Month: 1=the first week in a month,…, 5=the last week in a month Day of Week: 1=Mon, 2=Tues,…, 7=Sun Hour of Day: 0=1am, 1=2am,…, 23=12pm Note: It works only if the parameter “local_time.summer_time” is set to 1 (Enabled). The value formats are: • MM/DD/HH (For By Date) Format • Month/Day of week last in Month/Day of Week/Hour of Day (for By Week) Default Value 1/1/0 1to 12/1 to 31/0 to 23 (for By Date) Range 1 to 12/1 to 5/1 to 7/0 to 23 (for By Week) Example local_time.start_time = 1/1/0 Matrix SPARSH VP110 User Guide...
- Page 383 Week of Month: 1=the first week in a month,…, 5=the last week in a month Day of Week: 1=Mon, 2=Tues,…, 7=Sun Hour of Day: 0=1am, 1=2am,…, 23=12pm Note: It works only if the parameter “local_time.summer_time” is set to 1 (Enabled). The value formats are: • MM/DD/HH (For By Date) • Month/Day of week last in Month/Day of Format Week/Hour of Day (for By Week) Default Value 12/31/23 1to 12/1 to 31/0 to 23 (For By Date) Range 1 to 12/1 to 5/1 to 7/0 to 23 (For By Week) Example local_time.end_time = 12/31/23 Parameter- Configuration File local_time.dhcp_time <MAC>.cfg Enables or disables the phone to update time with the offset time obtained from the DHCP server. Description Note: It is only available to offset from GMT 0. Format Boolean Default Value Valid values are: Range 0‐Disabled 1‐Enabled Matrix SPARSH VP110 User Guide...
- Page 384 Time Format Parameter- Configuration File local_time.time_format <MAC>.cfg Configures the time format. If it is set to 0 (12 Hour), the time display will use 12 hour format. Description If it is set to 1 (24 Hour), the time display will use 24 hour format. Format Integer Default Value Valid values are: Range 0‐12 Hour 1‐24 Hour local_time.time_format = 1 Example Date Format Parameter- Configuration File local_time.date_format <MAC>.cfg Configures the date format. IP phones support various date formats. You can Description change the desired format according to your requirement. Format Integer Default Value Matrix SPARSH VP110 User Guide...
- Page 385 Example Language Parameter- Configuration File gui_lang.url <MAC>.cfg Configures the access URL of the language pack. Note: The language packs you load are dependent on available language packs from the provisioning server. Description You can download the language pack to the phone user interface only. Format Default Value Blank Range String within 511 characters The following example uses HTTP to download the language pack “lang+English.txt” from the provisioning server 192.168.10.25. Example gui_lang.url = http://192.168.10.25/lang+English.txt Note: This is not supported in this version. So keep the url blank for now. Parameter- Configuration File lang.gui <MAC>.cfg Configures the language used on the phone user Description interface. Format String Default Value English Matrix SPARSH VP110 User Guide...
- Page 386 Range Portuguese Italian Polish Turkish Chinese_S Chinese_T lang.gui = English Example Parameter- Configuration File lang.wui <MAC>.cfg Configures the language used on the web user interface. Note: The default language used on the web user Description interface depends on the language preferences of your browser. If the language of your browser is not supported by the IP phone, the web user interface will use English by default. Format String Default Value Blank Valid values are: Chinese_S English Range German Italian Polish Turkish lang.wui = English Example Matrix SPARSH VP110 User Guide...
-
Page 387: Logo Customization
1‐System logo 2‐Custom logo Example phone_setting.lcd_logo.mode = 1 Parameter- Configuration File lcd_logo.url <MAC>.cfg Description Configures the access URL of custom logo file. Format Default Value Blank Range String within 511 characters The following example uses HTTP to download the custom logo file (logo.dob) from the provisioning server Example 192.168.10.25. lcd_logo.url = http://192.168.10.25/logo.dob Key as Send Parameter- Configuration File features.key_as_send <MAC>.cfg Configures the "#" or "*" key as the send key. If it is set to 0 (Disabled), neither “#” nor “*” can be used as a send key. Description If it is set to 1(# key), the pound key is used as the send key. If it is set to 2(* key), the asterisk key is used as the send key. Matrix SPARSH VP110 User Guide... - Page 388 <MAC>.cfg Enables or disables the IP phone to play a tone when a user presses a key. Description If it is set to 1 (Enabled), the IP phone will play a tone when a user presses a key. Format Boolean Default Value 0‐Disabled Range 1‐Enabled Example features.key_tone= 1 Parameter- Configuration File features.send_key_tone <MAC>.cfg Enables or disables the IP phone to play a tone when a user presses a send key. If it is set to 1 (Enabled), the IP phone will play a tone when a user presses a send key. Description Note: It works only if the parameter “features.key_tone” is set to 1 (Enabled). Format Boolean Default Value Valid values are: Range 0‐Disabled 1‐Enabled Example features.send_key_tone = 1 Matrix SPARSH VP110 User Guide...
- Page 389 Configuration File dialplan.replace.replace.X <MAC>.cfg Configures the alternate string instead of what the user enters. Description X ranges from 1 to 100. Format String Default Value Blank Range String within 32 characters dialplan.replace.replace.1 = 1 Example Dial-now Parameter- Configuration File dialplan.dialnow.rule.X <MAC>.cfg Configures the string used to match the numbers entered by the user. When entered numbers match the predefined dial‐now rule, the IP phone will automatically dial out the Description numbers without pressing the send key. X ranges from 1 to 100. Format String Default Value Blank Range String within 511 characters dialplan.dialnow.rule.1 = 123 Example Matrix SPARSH VP110 User Guide...
- Page 390 Range 1 to 14 phone_setting.dialnow_delay = 1 Example Area Code Parameter- Configuration File dialplan.area_code.code <MAC>.cfg Configures the area code to add before the entered Description numbers. Format String Default Value Blank Range String within 16 characters dialplan.area_code.code = 010 Example Parameter- Configuration File dialplan.area_code.min_len <MAC>.cfg Configures the minimum length of the entered Description numbers. Format Integer Default Value Range 1 to 15 dialplan.area_code.min_len = 1 Example Matrix SPARSH VP110 User Guide...
- Page 391 Example Block Out Parameter- Configuration File dialplan.block_out.number.X <MAC>.cfg Configures the block out numbers. Description X ranges from 1 to 10. Format String Default Value Blank Range String within 32 characters Example dialplan.block_out.number.1 = 1234 Hotline Parameter- Configuration File features.hotline_number <MAC>.cfg Configures the hotline number. It configures a number that the IP phone automatically Description dials out when lifting the handset, pressing the speakerphone key. Leaving it blank disables hotline feature. Format String Default Value Blank Range String within 32 characters Matrix SPARSH VP110 User Guide...
-
Page 392: Call Log
If it is set to 0 (0s), the IP phone will immediately dial out the pre‐configured hotline number when you lift the handset or press the speakerphone key. Description If it is set to a value greater than 0, the IP phone will wait the specified seconds before dialing out the predefined hotline number when you lift the handset or press the speakerphone key. Format Integer Default Value 0 to 10 Range features.hotline_delay = 4 Example Call Log Parameter- Configuration File features.save_call_history <MAC>.cfg Enables or disables the IP phone to save call log. If it is set to 0 (Disabled), the IP phone cannot log the Description placed calls, received calls, missed calls and the forwarded calls in the call log lists. Format Boolean Default Value Valid values are: Range 0‐Disabled 1‐Enabled features.save_call_history = 1 Example Matrix SPARSH VP110 User Guide... - Page 393 Description If it is set to 1 (Enabled), a prompt message "<number> New Missed Call(s)" along with an indicator icon is displayed on the IP phone idle screen when the IP phone misses calls. X is 1. Format Boolean Default Value Valid values are: Range 0‐Disabled 1‐Enabled account.1.missed_calllog = 1 Example Live Dialpad Parameter- Configuration File phone_setting.predial_autodial <MAC>.cfg Enables or disables live dialpad feature. If it is set to 1 (Enabled), the IP phone will automatically Description dial out the entered phone number without having to press any key. Format Boolean Default Value Valid values are: Range 0‐Disabled 1‐Enabled Example phone_setting.predial_autodial = 1 Matrix SPARSH VP110 User Guide...
- Page 394 Call Waiting Parameter- Configuration File call_waiting.enable <MAC>.cfg Enables or disables call waiting feature. If it is set to 0 (Disabled), a new incoming call is automatically rejected by the IP phone with a busy Description message while during a call. If it is set to 1 (Enabled), the LCD screen will present a new incoming call while during a call. Format Boolean Default Value Valid values are: Range 0‐Disabled 1‐Enabled Example call_waiting.enable = 1 Parameter- Configuration File call_waiting.tone <MAC>.cfg Enables or disables the playing of a call waiting tone when the IP phone receives an incoming call during a call. If it is set to 1 (Enabled), the IP phone will perform an Description audible indicator when receiving a new incoming call during acall. Note: It works only if the parameter “call_waiting.enable” is set to 1 (Enabled). Matrix SPARSH VP110 User Guide...
- Page 395 Parameter- Configuration File call_waiting.off_code <MAC>.cfg Configures the call waiting off code to deactivate the Description server‐side call waiting feature. Format String Default Value Blank Range String within 32 characters Example call_waiting.off_code = *73 Auto Redial Parameter- Configuration File auto_redial.enable <MAC>.cfg Enables or disables the IP phone to automatically redial the called number when it is busy. Description If it is set to 1 (Enabled), the IP phone will dial the previous dialed out number automatically when the dialed number is busy. Format Boolean Default Value Valid values are: Range 0‐Disabled 1‐Enabled Matrix SPARSH VP110 User Guide...
- Page 396 Integer Default Value Range 1 to 300 auto_redial.interval = 10 Example Parameter- Configuration File auto_redial.times <MAC>.cfg Configures the redial times for the IP phone. Description The IP phone tries to redial the dialed number as many times as configured till the callee answers the call. Format Integer Default Value Range 1 to 300 Example auto_redial.times = 10 Auto Answer Parameter‐ Configuration File account.X.auto_answer <MAC>.cfg Enables or disables auto answer feature for account X. If it is set to 1 (Enabled), the IP phone can automatically answer an incoming call. Description X is 1. Note: The IP phone cannot automatically answer the incoming call during a call even if auto answer is enabled. Matrix SPARSH VP110 User Guide...
- Page 397 <MAC>.cfg Configures the delay time (in seconds) before the Description phone automatically answers an incoming call. Format Integer Default Value Range 1 to 4 Example features.auto_answer_delay = 1 Call Completion Parameter‐ Configuration File features.call_completion_enable <MAC>.cfg Enables or disables call completion feature. If a user places a call and the callee is temporarily not available to answer the call, call completion feature Description allows notifying the user when the callee becomes available to receive a call. If it is set to 1 (Enabled), the caller is notified when the callee becomes available to receive a call. Format Boolean Default Value Valid values are: Range 0‐Disabled 1‐Enabled Example features.call_completion_enable = 1 Matrix SPARSH VP110 User Guide...
- Page 398 X is 1. Format Boolean Default Value Valid values are: Range 0‐Disabled 1‐Enabled Example account.1.anonymous_call = 1 Parameter‐ Configuration File account.X.send_anonymous_code <MAC>.cfg Configures the phone to send anonymous on/off code to activate/deactivate the server‐side anonymous call feature for account X. If it is set to 0 (Off Code), the IP phone will send anonymous off code to deactivate the server‐side Description anonymous call feature. If it is set to 1 (On Code), the IP phone will send anonymous on code to activate the server‐side anonymous call feature. X is 1. Format Boolean Default Value Valid values are: Range 0‐Off Code 1‐On Code Example account.1.send_anonymous_code = 0 Matrix SPARSH VP110 User Guide...
- Page 399 Configuration File account.X.anonymous_call_offcode <MAC>.cfg Configures the anonymous call off code to deactivate the server‐side anonymous call feature for account X. Description X is 1. Note: It works only if the parameter “account.X.send_anonymous_code” is set to 1 (Enabled). Format String Default Value Blank Range String within 32 characters account.1.anonymous_call_offcode = *73 Example Anonymous Call Rejection Parameter‐ Configuration File account.X.reject_anonymous_call <MAC>.cfg Enables or disables anonymous call rejection feature for account X. If it is set to 1 (Enabled), the IP phone will automatically Description reject incoming calls from users enabled anonymous call feature. The anonymous user’s phone LCD screen presents “Anonymity Disallowed”. X is 1. Format Boolean Default Value Matrix SPARSH VP110 User Guide...
- Page 400 Configuration File account.X.anonymous_reject_offcod <MAC>.cfg Configures the anonymous call rejection off code to deactivate the server‐side anonymous call rejection Description feature for account X. X is 1. Format String Default Value Blank Range String within 32 characters account.1.anonymous_reject_offcode = *75 Example Do Not Disturb Return Message When DND Parameter- Configuration File features.dnd_refuse_code <MAC>.cfg Configures a return code and reason of SIP response messages when the phone rejects an incoming call by DND. A specific reason is displayed on the caller’s phone LCD screen. Description If it is set to 486 (Busy here), the caller’s phone LCD screen will display the reason “Busy here” when the callee enables DND feature. Matrix SPARSH VP110 User Guide...
- Page 401 Format Integer Default Value 0-Phone Range Example features.dnd_mode = 0 Parameter- Configuration File features.dnd.enable <MAC>.cfg Enables or disables DND feature. Description If it is set to 1 (Enabled), the IP phone will reject incoming calls on all accounts. Format Boolean Default Value Valid values are: Range 0‐Disabled 1‐Enabled features.dnd.enable = 1 Example Parameter- Configuration File features.dnd.on_code <MAC>.cfg Configures the DND on code to activate the server‐side Description DND feature. Format String Default Value Blank Matrix SPARSH VP110 User Guide...
- Page 402 Description side DND feature. Format String Default Value Blank Range String within 32 characters Example features.dnd.off_code = *72 Busy Tone Delay Parameter- Configuration File features.busy_tone_delay <MAC>.cfg Configures a period of time (in seconds) for which the busy tone is audible on the IP phone. When one party releases the call, a busy tone is audible to the other party indicating that the call connection Description breaks. If it is set to 3 (3s), a busy tone is audible for 3 seconds on the IP phone. Format Integer Default Value Valid values are: 0‐0s Range 3‐3s 5‐5s Example features.busy_tone_delay = 0 Matrix SPARSH VP110 User Guide...
- Page 403 If it is set to 486 (Busy here), the caller’s phone LCD screen will display the message “Busy here” when the callee rejects the incoming call. Format Integer Default Value Valid values are: 404‐No Found Range 480‐Temporarily not available 486‐Busy here features.normal_refuse_code = 486 Example 180 Ring Workaround Parameter- Configuration File phone_setting.is_deal180 <MAC>.cfg Enables or disables the IP phone to deal with the 180 SIP message received after the 183 SIP message. Description If it is set to 1 (Enabled), the IP phone will resume and play the local ring‐back tone upon a subsequent 180 message received. Format Boolean Default Value Valid values are: Range 0‐Disabled 1‐Enabled Example phone_setting.is_deal180 = 1 Matrix SPARSH VP110 User Guide...
- Page 404 Example sip.use_out_bound_in_dialog = 1 SIP Session Timer Parameter‐ Configuration File account.X.advanced.timer_t1 <MAC>.cfg Configures the SIP session timer T1 (in seconds) for account X. T1 is an estimate of the Round Trip Time (RTT) of Description transactions between a SIP client and SIP server. X is 1. Format Float Default Value Range 0.5 to 10 Example account.1.advanced.timer_t1 =0.5 Parameter‐ Configuration File account.X.advanced.timer_t2 <MAC>.cfg Configures the session timer T2 (in seconds) for account X. Description T2 represents the maximum retransmit interval for non‐INVITE requests and INVITE responses. X is 1. Format Float Default Value Matrix SPARSH VP110 User Guide...
- Page 405 Session Timer Parameter‐ Configuration File account.X.session_timer.enable <MAC>.cfg Enables or disables the session timer for account X. If it is set to 1 (Enabled), IP phone will send periodic Description re‐INVITE requests to refresh the session during a call. X is 1. Format Boolean Default Value Valid values are: Range 0‐Disabled 1‐Enabled Example account.1.session_timer.enable = 1 Parameter‐ Configuration File account.X.session_timer.expires <MAC>.cfg Configures the IP phone to refresh the session during a call at regular intervals (in seconds) for account X. Description If it is set to 1800 (1800s), the IP phone will refresh the session during a call before 1800 seconds. X is 1. Format Integer Default Value 1800 Range 30 to 7200 Matrix SPARSH VP110 User Guide...
- Page 406 0‐UAC 1‐UAS Example account.1.session_timer.refresher = 0 Call Hold Parameter- Configuration File features.play_hold_tone.enable <MAC>.cfg Enables or disables the IP phone to play a tone when Description there is a hold call on the IP phone. Format Boolean Default Value Valid values are: Range 0‐Disabled 1‐Enabled Example features.play_hold_tone.enable = 1 Parameter- Configuration File features.play_hold_tone.delay <MAC>.cfg Configures the interval (in seconds) at which the IP phone plays a hold tone. If it is set to 30 (30s), the IP phone will play a hold tone every 30 seconds when there is a hold call on Description the IP phone. Note: It works only if the parameter “features.play_hold_tone.enable” is set to 1 (Enabled). Matrix SPARSH VP110 User Guide...
- Page 407 If it is set to 0 (Disabled), SDP media direction attributes (such as a=sendonly) per RFC 3264 is used Description when placing a call on hold. If it is set to 1 (Enabled), SDP media connection address c=0.0.0.0 per RFC 2543 is used when placing a call on hold. Format Boolean Default Value Valid values are: Range 0‐Disabled 1‐Enabled sip.rfc2543_hold = 0 Example Parameter- Configuration File account.X.music_server_uri <MAC>.cfg Configures the Music on Hold server address. Examples for valid values: <10.1.3.165>, 10.1.3.165, sip:moh@sip.com etc. Description X is 1. Note: The DNS query in this parameter only supports A query. Format String Default Value Blank Range String within 256 characters Example account.1.music_server_uri =<10.1.3.165> Matrix SPARSH VP110 User Guide...
-
Page 408: Always Forward
Always Forward Parameter- Configuration File forward.always.enable <MAC>.cfg Enables or disables always forward feature. Description If it is set to 1 (Enabled), incoming calls are forwarded to the destination number immediately. Format Boolean Default Value Valid values are: Range 0‐Disabled 1‐Enabled forward.always.enable = 1 Example Parameter- Configuration File forward.always.target <MAC>.cfg Configures the destination number of the always Description forward. Format String Default Value Blank Range String within 32 characters Example forward.always.target = 3601 Matrix SPARSH VP110 User Guide... -
Page 409: Busy Forward
Parameter- Configuration File forward.always.off_code <MAC>.cfg Configures the always forward off code to deactivate Description the server‐side always forward feature. Format String Default Value Blank Range String within 32 characters Example forward.always.off_code = *73 Busy Forward Parameter- Configuration File forward.busy.enable <MAC>.cfg Enables or disables busy forward feature. Description If it is set to 1 (Enabled), incoming calls are forwarded to the destination number when the callee is busy. Format Boolean Default Value Valid values are: Range 0‐Disabled 1‐Enabled Example forward.busy.enable = 1 Matrix SPARSH VP110 User Guide... - Page 410 Example Configuration File Parameter- <MAC>.cfg forward.busy.off_code Configures the busy forward off code to deactivate Description the server‐side busy forward feature. Format String Default Value Blank Range String within 32 characters Example forward.busy.off_code = *75 No Answer Forward Parameter- Configuration File forward.no_answer.enable <MAC>.cfg Enables or disables no answer forward feature. Description If it is set to 1 (Enabled), incoming calls are forwarded to the destination number after a period of ring time. Format Boolean Default Value Valid values are: Range 0‐Disabled 1‐Enabled Matrix SPARSH VP110 User Guide...
- Page 411 Format Integer Default Value Range 0 to 20 Example forward.no_answer.timeout = 2 Parameter- Configuration File forward.no_answer.on_code <MAC>.cfg Configures the no answer forward on code to activate Description the server‐side no answer forward feature. Format String Default Value Blank Range String within 32 characters Example forward.no_answer.on_code = *76 Parameter- Configuration File forward.no_answer.off_code <MAC>.cfg Configures the no answer forward off code to Description deactivate the server‐side no answer forward feature. Format String Default Value Blank Range String within 32 characters Matrix SPARSH VP110 User Guide...
- Page 412 Example Fwd International Parameter‐ Configuration File forward.international.enable <MAC>.cfg Enables or disables the IP phone to forward an Description incoming call to an international phone number. Format Boolean Default Value Valid values are: Range 0‐Disabled 1‐Enabled Example forward.international.enable = 1 Call Transfer Parameter- Configuration File transfer.blind_tran_on_hook_enable <MAC>.cfg Enables or disables the IP phone to complete the blind Description transfer through on‐hook. Format Boolean Default Value Valid values are: Range 0‐Disabled 1‐Enabled Matrix SPARSH VP110 User Guide...
-
Page 413: Network Conference
Range 0‐Disabled 1‐Enabled Example transfer.on_hook_trans_enable = 1 Parameter- Configuration File transfer.semi_attend_tran_enable <MAC>.cfg Configures whether to display the missed call prompt on the destination party’s phone when performing a Description semi‐attended transfer. Format Boolean Default Value Valid values are: Range 0‐Enabled 1‐Disabled Example transfer.semi_attend_tran_enable = 1 Network Conference Parameter- Configuration File account.X.conf_type <MAC>.cfg Configures the conference type for account X. If it is set to 0 (Local Conference), conferences are set up on the IP phone locally. Description If it is set to 2 (Network Conference), conferences are set up by the server. X is 1. Matrix SPARSH VP110 User Guide... - Page 414 “account.X.conf_type” is set to 2 (Network Conference). Format SIP URI Default Value Blank Range SIP URI within 511 characters Example account.1.conf_uri = conference@example.com Transfer on Conference Hang Up Parameter- Configuration File transfer.tran_others_after_conf_enable <MAC>.cfg Enables or disables Transfer on Conference Hang Up feature. If it is set to 1 (Enabled), the other two parties remain Description connected when the conference initiator drops the conference call. Note: It is only applicable to the local conference. Format Boolean Default Value Valid values are: Range 0‐Disabled 1‐Enabled Example transfer.tran_others_after_conf_enable=1 Matrix SPARSH VP110 User Guide...
-
Page 415: Directed Call Pickup
Configuration File features.pickup.direct_pickup_code <MAC>.cfg Configures the directed call pickup code on a phone Description basis. Format String Default Value Blank Range String within 32 characters features.pickup.direct_pickup_code = *97 Example Group Call Pickup Phone Basis Parameter- Configuration File features.pickup.group_pickup_enable <MAC>.cfg Enables or disables the IP phone to display the Description GPickup soft key when the IP phone is off‐hook. Format Boolean Default Value Valid values are: Range 0‐Disabled 1‐Enabled Example features.pickup.group_pickup_enable = 1 Matrix SPARSH VP110 User Guide... -
Page 416: Calling Line Identification Presentation
String within 32 characters Example features.pickup.group_pickup_code = *98 Calling Line Identification Presentation Parameter- Configuration File account.X.cid_source <MAC>.cfg Configures the presentation of the caller identity for account X. 0-FROM (Derives the name and number of the caller from the “From” header). 1-PAI (Derives the name and number of the caller from the “PAI” header. If the server does not send the “PAI” header, displays “anonymity” on the callee’s phone). Description 2-PAI‐FROM (Derives the name and number of the caller from the “PAI” header preferentially. If the server does not send the “PAI” header, derives from the “From” header). 3-RPID‐PAI‐FROM 4-PAI‐RPID‐FROM 5-RPID‐FROM X is 1. Format Integer Default Value Range 0 to 5 account.1.cid_source = 0 Example Matrix SPARSH VP110 User Guide... -
Page 417: Connected Line Identification Presentation
Connected Line Identification Presentation Parameter- Configuration File account.X.cp_source <MAC>.cfg Configures the presentation of the callee’s identity for account X. 0‐PAI‐RPID (Derives the name and number of the callee from the “PAI” header preferentially. If the server does not send the “PAI” header, derives from the “RPID” header). 1-Dialed Digits (Preferentially displays the dialed digits on the caller’s phone). Description 2-RFC4916 (Derives the name and number of the callee from “From” header in the Update message). When the RFC 4916 is enabled on the IP phone, the caller sends the SIP request message which contains the from‐change tag in the Supported header. The caller then receives an UPDATE message from the callee, and displays the identity in the From header. X is 1. Format Integer Default Value Range 0 to 2 account.1.cp_source = 0 Example Matrix SPARSH VP110 User Guide... - Page 418 If it is set to 1 (RFC 2833), DTMF digits are transmitted by RTP Events compliant to RFC 2833. Description If it is set to 2 (SIP INFO), DTMF digits are transmitted by the SIP INFO messages. If it is set to 3 (AUTO or SIP INFO), the IP phone negotiates with the other end to use INBAND or RFC 2833, if there is no negotiation, using SIP INFO by default. X is 1. Format Integer Default Value Valid values are: 0‐INBAND Range 1‐RFC 2833 2‐SIP INFO 3‐AUTO or SIP INFO Example account.1.dtmf.type = 1 Parameter- Configuration File account.X.dtmf.dtmf_payload <MAC>.cfg Configures the RFC 2833 payload type. Description X is 1. Format Integer Default Value Range 96 to 127 Example account.1.dtmf.dtmf_payload = 101 Matrix SPARSH VP110 User Guide...
- Page 419 Example Parameter- Configuration File features.dtmf.repetition <MAC>.cfg Configures the number of times for the IP phone to Description send the end RTP EVENT packet. Format Integer Default Value Range 1 to 3 Example features.dtmf.repetition = 3 Suppress DTMF Display Parameter- Configuration File features.dtmf.hide <MAC>.cfg Enables or disables the IP phone to suppress the display of DTMF digits. Description If it is set to 1 (Enabled), the DTMF digits are displayed as asterisks. Format Boolean Default Value Valid values are: 0‐Disabled Range 1‐Enabled Matrix SPARSH VP110 User Guide...
- Page 420 Note: It works only if the parameter “features.dtmf.hide” is set to 1 (Enabled). Format Boolean Default Value Valid values are: Range 0‐Disabled 1‐Enabled Example features.dtmf.hide_delay = 1 Transfer via DTMF Parameter- Configuration File features.dtmf.replace_tran <MAC>.cfg Enables or disables transfer via DTMF feature. If it is set to 0 (Disabled), the IP phone will perform the transfer as normal when pressing the transfer key Description during a call. If it is set to 1 (Enabled), the IP phone will transmit the specified DTMF digits to the server for completing call transfer when pressing the transfer key during a call. Format Boolean Default Value Valid values are: Range 0‐Disabled 1‐Enabled features.dtmf.replace_tran = 1 Example Matrix SPARSH VP110 User Guide...
- Page 421 Incoming Intercom calls Parameter‐ Configuration File features.intercom.allow <MAC>.cfg Enables or disables the IP phone to automatically answer an incoming intercom call. If it is set to 0 (Disabled), the IP phone will reject incoming intercom calls and sends a busy signal to Description the caller. If it is set to 1 (Enabled), the IP phone will automatically answer an incoming intercom call. Format Boolean Default Value Valid values are: Range 0‐Disabled 1‐Enabled Example features.intercom.allow = 1 Parameter‐ Configuration File features.intercom.mute <MAC>.cfg Enables or disables the IP phone to mute the microphone when answering an intercom call. If it is set to 0 (Disabled), the microphone is un‐muted Description for incoming calls. If it is set to 1 (Enabled), the microphone is muted for intercom calls. Matrix SPARSH VP110 User Guide...
- Page 422 Format Boolean Default Value Valid values are: Range 0‐Disabled 1‐Enabled features.intercom.tone = 1 Example Parameter‐ Configuration File features.intercom.barge <MAC>.cfg Enables or disables the IP phone to automatically answer an incoming intercom call while there is already an active call on the IP phone. If it is set to 0 (Disabled), the IP phone will handle an incoming intercom call like a waiting call while there is Description already an active call on the IP phone. If it is set to 1 (Enabled), the IP phone will automatically answer the intercom call while there is already an active call on the IP phone and place the active call on hold. Format Boolean Default Value Valid values are: Range 0‐Disabled 1‐Enabled features.intercom.barge = 1 Example Matrix SPARSH VP110 User Guide...
- Page 423 Configuration File Parameter- <MAC>.cfg account.X.alert_info_url_enable Enables or disables the IP phone to download the ring tone from the URL contained in the Alert‐Info header Description for account X. X is 1. Format Boolean Default Value Valid values are: Range 0‐Disabled 1‐Enabled Example account.1.alert_info_url_enable= 1 Parameter- Configuration File distinctive_ring_tones.alert_info.X.text <MAC>.cfg Configures the texts to map the keywords contained in the SIP header. Description X ranges from 1 to 10. Format String Default Value Blank Range String within 32 characters Example distinctive_ring_tones.alert_info.1.text = family Matrix SPARSH VP110 User Guide...
- Page 424 Parameter- Configuration File distinctive_ring_tones.alert_info.X.ring <MAC>.cfg Configures the desired ring tones for each text. The value ranges from 1 to 5, the digit stands for the Description appropriate ring tone. X ranges from 1 to 10. Format Integer Default Value Valid values are: 1‐Ring1.wav 2‐Ring2.wav Range 3‐Ring3.wav 4‐Ring4.wav 5‐Ring5.wav Example distinctive_ring_tones.alert_info.1.ringer = 1 Tones Parameter- Configuration File voice.tone.country <MAC>.cfg Description Configures the country tone for the IP phone. Format String Default Value Custom Matrix SPARSH VP110 User Guide...
- Page 425 • Lithuania Range • India • Italy • Japan • Mexico • New Zealand • Netherlands • Norway • Portugal • Spain • Switzerland • Sweden • Russia • United States • Chile • Czech ETSI Example voice.tone.country = Custom Matrix SPARSH VP110 User Guide...
- Page 426 Duration: the time duration (in milliseconds, ranges from 0 to 30000ms) of the ring tone. You can configure at most eight different tones for one condition, and separate tones by commas (e.g., 250/200, !0/1000, 200+300/500, 600+700+800+1000/ 2000). The exclamation point (!) can be added optionally, which means these tones are only played once. Note: It works only if the parameter “voice.tone.country” is set to Custom. Format Refer to the introduction above Default Value Blank Range Not Applicable voice.tone.dial = 800+200/1000, 0/100, 500/1200, Example 500+600+950+1500/5000 Remote Phone Book Parameter- Configuration File remote_phonebook.data.X.url <MAC>.cfg Configures the access URL of the remote XML phonebook. Description X ranges from 1 to 5. Format Default Value Blank Range String within 511 characters Matrix SPARSH VP110 User Guide...
- Page 427 Configuration File remote_phonebook.display_name <MAC>.cfg Configures the display name of the remote phone book. Description If you leave it blank, Remote Phone Book is displayed on the LCD screen at the path Menu‐ >Directory. Format String Default Value Blank Range String within 99 characters remote_phonebook.display_name = Remote Example Phone Book Parameter- Configuration File features.remote_phonebook.enable <MAC>.cfg Enables or disables the IP phone to perform a Description remote phone book search for outgoing/incoming calls. Format Boolean Default Value Valid values are: Range 0‐Disabled 1‐Enabled features.remote_phonebook.enable = 1 Example Matrix SPARSH VP110 User Guide...
-
Page 428: Message Waiting Indicator
Description If it is set to 3600, the IP phone will refresh the local cache of the remote phone book every 3600 seconds. Format Integer Default Value 21600 Range 120 to 2592000 Example features.remote_phonebook.flash_time = 21600 Message Waiting Indicator Parameter- Configuration File account.X.subscribe_mwi <MAC>.cfg Enables or disables the IP phone to subscribe the message waiting indicator to the account for account X. Description If it is set to 1 (Enabled), the IP phone will send a SUBSCRIBE message to the server for message‐ summary updates. X is 1. Format Boolean Default Value Valid values are: Value 0‐Disabled 1‐Enabled account.1.subscribe_mwi =0 Example Matrix SPARSH VP110 User Guide... - Page 429 Example Parameter- Configuration File voice_mail.number.X <MAC>.cfg Configures the voice mail number for account X. Description X is 1. String Format Default Value Blank Value String within 99 characters voice_mail.number.1 = 1234 Example Parameter- Configuration File account.X.subscribe_mwi_to_vm <MAC>.cfg Enables or disables the IP phone to subscribe the message waiting indicator to the voice mail number for account X. X is 1. Description Note: It works only if the parameters “account.X.subscribe_mwi” is set to 1 (Enabled) and “voice_mail.number.X” is configured. Format Boolean Default Value Valid values are: Value 0‐Disabled 1‐Enabled Matrix SPARSH VP110 User Guide...
-
Page 430: Sending Rtp Stream
G722 Range • G723_53 • G723_63 • iLBC • G726‐32 Example multicast.codec = G722 Receiving RTP Stream Parameter- Configuration File multicast.receive_priority.enable <MAC>.cfg Enables or disables the IP phone to handle the incoming multicast paging calls when there is an active multicast paging call on the IP phone. Description If it is set to 1 (Enabled), the IP phone will answer the incoming multicast paging call with a higher priority and ignore that with a lower priority. Format Boolean Default Value Valid values are: Range 0‐Disabled 1‐Enabled multicast.receive_priority.enable =1 Example Matrix SPARSH VP110 User Guide... - Page 431 Parameter- Configuration File multicast.listen_address.X.label <MAC>.cfg Configures the label to be displayed on the LCD screen when receiving the RTP multicast. Description X ranges from 1 to 10. Format String Default Value Blank Range String within 99 characters Example multicast.listen_address.1.label = Paging1 Parameter- Configuration File multicast.listen_address.X.ip_address <MAC>.cfg Configures the multicast address and port number that the IP phone listens to. X ranges from 1 to 10. Description Note: The valid multicast IP addresses range from 224.0.0.0 to 239.255.255.255. Format String Blank Default Value Range Not Applicable multicast.listen_address.1.ip_address = Example 224.5.6.20:10008 Matrix SPARSH VP110 User Guide...
- Page 432 <MAC>.cfg action_url.registered action_url.unregistered action_url.register_failed action_url.off_hook action_url.on_hook action_url.incoming_call action_url.outgoing_call action_url.call_established action_url.dnd_on action_url.dnd_off action_url.always_fwd_on action_url.always_fwd_off action_url.busy_fwd_on action_url.busy_fwd_off action_url.no_answer_fwd_on action_url.no_answer_fwd_off action_url.transfer_call action_url.blind_transfer_call action_url.attended_transfer_call action_url.hold action_url.unhold action_url.mute action_url.unmute action_url.missed_call action_url.call_terminated action_url.busy_to_idle action_url.idle_to_busy action_url.ip_change action_url.forward_incoming_call action_url.reject_incoming_call action_url.answer_new_incoming_call action_url.transfer_finished action_url.transfer_failed Matrix SPARSH VP110 User Guide...
- Page 433 Format Default Value Blank Range String within 511 characters action_url.mute = http://192.168.0.20/ Example help.xml?model=$model Action URI Parameter- Configuration File features.action_uri_limit_ip <MAC>.cfg Configures the address(es) from which Action URI will be accepted. For discontinuous IP addresses, multiple IP addresses are separated by commas. For continuous IP addresses, the format likes *.*.*.* and the “*” stands for the values 0~255. Description For example: 10.10.*.* stands for the IP addresses that range from 10.10.0.0 to 10.10.255.255. If left blank, the IP phone cannot receive or handle any HTTP GET request. If it is set to “any”, the IP phone will accept and handle HTTP GET requests from any IP address. Format IP Address or any Default Value Blank Range String within 511 characters Example features.action_uri_limit_ip = any Matrix SPARSH VP110 User Guide...
- Page 434 String within 256 characters account.1.sip_server.1.address = Example matrix.ip_pbx.com Parameter- Configuration File account.X.sip_server.Y.port <MAC>.cfg Configures the port of the SIP server Y for account Description X is 1. Y ranges from 1 to 2. Format Integer Default Value 5060 Range 0 to 65535 Example account.1.sip_server.1.port = 5060 Parameter- Configuration File account.X.sip_server.Y.expires <MAC>.cfg Configures the registration expires (in seconds) of the SIP server Y for account X. Description X is 1. Y ranges from 1 to 2. Format Integer Default Value 3600 Range 30 to 2147483647 Matrix SPARSH VP110 User Guide...
- Page 435 Example account.1.sip_server.1.retry_counts = 3 Fallback Mode Parameter- Configuration File account.X.fallback.redundancy_type <MAC>.cfg Configures the registration mode for the IP phone in fallback mode. Description X is 1. Format Integer Default Value Valid values are: 0-Concurrent registration Range 1-Successive registration account.1.fallback.redundancy_type = 0 Example Parameter- Configuration File account.X.fallback.timeout <MAC>.cfg Configures the time interval (in seconds) for the IP phone to detect whether the working server is available by sending the registration request after Description the fallback server takes over call control. It is only applicable to successive registration mode. X is 1. Format Integer Default Value Matrix SPARSH VP110 User Guide...
-
Page 436: Failover Mode
1‐DNSTTL: the IP phone retries to send requests to the primary server after the time‐out equal to the DNSTTL configured for the server that the IP phone is registered to. Range 2‐registration: the IP phone retries to send REGISTER requests to the primary server when registration renewal. 3‐duration: the IP phone retries to send requests to the primary server after the time‐out defined by the account.X.sip_server.Y.failback_timeout parameter. Example account.1.sip_server.1.failback_mode = 0 Parameter- Configuration File account.X.sip_server.Y.failback_timeout <MAC>.cfg Configures the time‐out (in seconds) for the IP phone to retry to send requests to the primary server after failing over to the current working server when the parameter “account.X.sip_server.Y.failback_mode” is set to 3 (duration). Description If you set the parameter to 0, the IP phone will not send requests to the primary server until a failover event occurs with the current working server. X is 1. Y ranges from 1 to 2. Format Integer Default Value 3600 Range 0, 60 to 65535 Matrix SPARSH VP110 User Guide... - Page 437 0‐Disabled 1‐Enabled Example account.1.sip_server.1.register_on_enable = 0 SIP Server Domain Name Resolution Parameter- Configuration File account.X.transport <MAC>.cfg Configures the transport type for account X. If the parameter is set to 3 (DNS‐NAPTR) and no server port is given, the IP phone performs the DNS NAPTR and SRV queries for the service type and port. Description Note: If the outbound proxy server is required and the transport is set to DNS‐NAPTR, you must set the port of outbound proxy server to 0 for NAPTR, SRV and A queries. X is 1. Format Integer Default Value Valid values are: 0‐UDP Range 1‐TCP 2‐TLS 3‐DNS‐NAPTR Example account.1.transport = 3 Matrix SPARSH VP110 User Guide...
- Page 438 Description returned from NAPTR query. X is 1. Format Integer Default Value Valid values are: Range 0‐UDP 1‐TCP or TLS. Example account.1.naptr_build = 0 Allow IP call for Peer-to-Peer (P2P) calling Parameter- Configuration File <MAC>.cfg features.direct_ip_call_enable Description It enables or disables the phone to make an IP call directly. Format Boolean Default Value Valid values are: Range 0‐Disabled 1‐Enabled Example features.direct_ip_call_enable= 1 LLDP Matrix SPARSH VP110 User Guide...
- Page 439 Configuration File network.lldp.enable <MAC>.cfg Enables or disables LLDP feature on the IP phone. Description Note: If you change this parameter, the IP phone will reboot to make the change take effect. Format Boolean Default Value Valid values are: Range 0‐Disabled 1‐Enabled Example network.lldp.enable = 1 Parameter- Configuration File network.lldp.packet_interval <MAC>.cfg Configures the amount of time (in seconds) between the transmissions of LLDP packet. Note: If you change this parameter, the IP phone Description will reboot to make the change take effect. It works only if the parameter “network.lldp.enable” is set to 1 (Enabled). Format Integer Default Value Range 1 to 3600 Example network.lldp.packet_interval = 60 VLAN Matrix SPARSH VP110 User Guide...
- Page 440 0‐Disabled 1‐Enabled Example network.vlan.internet_port_enable = 1 Parameter- Configuration File network.vlan.internet_port_vid <MAC>.cfg Configures the VLAN ID that is associated with the particular VLAN. Description Note: If you change this parameter, the IP phone will reboot to make the change take effect. Format Integer Default Value Range 1 to 4094 Example network.vlan.internet_port_vid = 1 Parameter- Configuration File network.vlan.internet_port_priority <MAC>.cfg Configures the priority value used for passing VLAN packets. Description 7 is the highest priority, 0 is the lowest priority. Note: If you change this parameter, the IP phone will reboot to make the change take effect. Format Integer Default Value Range 0 to 7 Matrix SPARSH VP110 User Guide...
- Page 441 Default Value Valid values are: Range 0‐Disabled 1‐Enabled Example network.vlan.pc_port_enable = 1 Parameter- Configuration File network.vlan.pc_port_vid <MAC>.cfg Configures the VLAN ID that is associated with the particular VLAN. Description Note: If you change this parameter, the IP phone will reboot to make the change take effect. Format Integer Default Value Range 1 to 4094 Example network.vlan.pc_port_vid = 1 Parameter- Configuration File network.vlan.pc_port_priority <MAC>.cfg Configures the priority value used for passing VLAN packets. Description Note: If you change this parameter, the IP phone will reboot to make the change take effect. Format Integer Default Value Matrix SPARSH VP110 User Guide...
- Page 442 DHCP VLAN Discovery Parameter- Configuration File network.vlan.dhcp_enable <MAC>.cfg Enables or disables DHCP VLAN discovery feature on the IP phone. Description Note: If you change this parameter, the IP phone will reboot to make the change take effect. Format Boolean Default Value Valid values are: Range 0‐Disabled 1‐Enabled Example network.vlan.dhcp_enable = 1 Parameter- Configuration File network.vlan.dhcp_option <MAC>.cfg Configures the DHCP option used to request the VLAN ID. Description Note: If you change this parameter, the IP phone will reboot to make the change take effect. Format Integer Default Value Range 128 to 254 Example network.vlan.dhcp_option = 132 Matrix SPARSH VP110 User Guide...
- Page 443 Parameter- Configuration File network.qos.rtptos <MAC>.cfg Configures the DSCP for voice packets. The default DSCP value for RTP packets is 46 Description (Expedited Forwarding). Note: If you change this parameter, the IP phone will reboot to make the change take effect. Format Integer Default Value Range 0 to 63 network.qos.rtptos = 46 Example Parameter- Configuration File network.qos.signaltos <MAC>.cfg Configures the DSCP for SIP packets. The default DSCP value for SIP packets is 26 (Assured Forwarding). Description Note: If you change this parameter, the IP phone will reboot to make the change take effect. Format Integer Default Value Range 0 to 63 Example network.qos.signaltos = 26 Matrix SPARSH VP110 User Guide...
-
Page 444: Network Address Translation
0‐Disabled 1‐Enabled Example account.1.nat.nat_traversal = 0 Parameter- Configuration File account.X.nat.stun_server <MAC>.cfg Configures the IP address or the domain name of the STUN server for account X. Description X is 1. Format IP Address or Domain Name Default Value Blank Range String within 99 characters Example account.1.nat.stun_server = 218.107.220.201 Parameter- Configuration File account.X.nat.stun_port <MAC>.cfg Configures the port of the STUN server. Description X is 1. Format Integer Default Value 3478 Range 1024 to 65000 Example account.1.nat.stun_port = 3478 Matrix SPARSH VP110 User Guide... - Page 445 2‐EAP‐TLS 3‐PEAP‐MSCHAPv2 4‐EAP‐TTLS/EAP‐MSCHAPv2 Example network.802_1x.mode = 1 Parameter- Configuration File network.802_1x.identity <MAC>.cfg Configures the identity used for authenticating the IP phone. Description Note: If you change this parameter, the IP phone will reboot to make the change take effect. Format String Default Value Blank Range String within 32 characters Example network.802_1x.identity = admin Parameter- Configuration File network.802_1x.md5_password <MAC>.cfg Configures the password used for authenticating the IP phone. Note: If you change this parameter, the IP phone Description will reboot to make the change take effect. It is only applicable to EAP‐MD5, PEAP‐MSCHAPv2and EAP‐ TTLS/EAP‐MSCHAPv2 protocols. Format String Matrix SPARSH VP110 User Guide...
- Page 446 Configures the access URL of the CA certificate used for authentication. Note: If you change this parameter, the IP phone Description will reboot to make the change take effect. It is only applicable to EAP‐TLS, PEAP‐MSCHAPv2 and EAP‐ TTLS/EAP‐MSCHAPv2 protocols. The format of the certificate must be *.pem, *.crt, *.cer or *.der. Format Default Value Blank Range String within 511 characters network.802_1x.root_cert_url = http:// Example 192.168.1.10/ca.pem Parameter- Configuration File network.802_1x.client_cert_url <MAC>.cfg Configures the access URL of the device certificate used for authentication. Note: If you change this parameter, the IP phone Description will reboot to make the change take effect. It is only applicable to the EAP‐TLS protocol. The format of the certificate must be *.pem or *.cer. Format Default Value Blank Range String within 511 characters network.802_1x.client_cert_url = http:// Example 192.168.1.10/ client.pem Matrix SPARSH VP110 User Guide...
- Page 447 Blank Range String within 128 characters Example managementserver.username = user1 Parameter- Configuration File managementserver.password <MAC>.cfg Configures the password to authenticate with the Description ACS. This string is set to the empty string if no authentication is required. Format String Default Value Blank Range String within 64 characters Example managementserver.password = pwd123 Parameter- Configuration File managementserver.url <MAC>.cfg Description Configures the URL of the ACS. Format Default Value Blank Range String within 511 characters managementserver.url = http://192.168.1.20/ Example acs/ Matrix SPARSH VP110 User Guide...
- Page 448 Blank Range String within 64 characters managementserver.connection_request_passwor Example d = acspwd Parameter- Configuration File managementserver.periodic_inform_ena <MAC>.cfg Enables or disables the IP phone to periodically Description report its configuration information to the ACS. Format Boolean Default Value Valid values are: Range 0‐Disabled 1‐Enabled Example managementserver.periodic_inform_enable = 1 Parameter- Configuration File managementserver.periodic_inform_inte <MAC>.cfg rval Configures the interval (in seconds) to report its Description configuration information to the ACS. Format Integer Default Value Range 5 to 4294967295 Matrix SPARSH VP110 User Guide...
- Page 449 1‐IPv6 2‐IPv4&IPv6 Example network.ip_address_mode = 1 Parameter- Configuration File network.ipv6_internet_port.type <MAC>.cfg Configures the IPv6 address assignment method. Description Note: If you change this parameter, the IP phone will reboot to make the change take effect. Format Integer Default Value Valid values are: Range 0‐DHCP 1‐Static IP Address Example network.ipv6_internet_port.type = 0 Parameter- Configuration File network.ipv6_static_dns_enable <MAC>.cfg Enables or disables the phone to use manually configured static IPv6 DNS when the parameter “network.ipv6_internet_port.type” is set to 0 Description (DHCP). Note: If you change this parameter, the IP phone will reboot to make the change take effect. Format Boolean Default Value Matrix SPARSH VP110 User Guide...
- Page 450 Parameter- Configuration File network.ipv6_prefix <MAC>.cfg Configures the prefix of the IPv6 address when the IPv6 address assignment method is configured as Static IP Address and the IP address Description mode is configured as IPv6 or IPv4&IPv6. Note: If you change this parameter, the IP phone will reboot to make the change take effect. Format Integer Default Value Range 0 to 128 Example network.ipv6_prefix = 64 Parameter- Configuration File network.ipv6_internet_port.gateway <MAC>.cfg Configures the gateway when the IPv6 address assignment method is configured as Static IP Address and the IP address mode is configured as Description IPv6 or IPv4&IPv6. Note: If you change this parameter, the IP phone will reboot to make the change take effect. Format IPv6 Address Default Value Blank Range Not Applicable Matrix SPARSH VP110 User Guide...
- Page 451 IP Address and the IP address mode is configured Description as IPv6 or IPv4&IPv6. Note: If you change this parameter, the IP phone will reboot to make the change take effect. Format IPv6 Address Blank Default Value Range Not Applicable network.ipv6_primary_dns = Example 3036:1:1:c3c7:c11c:5447:23a6:256 Parameter- Configuration File network.ipv6_secondary_dns <MAC>.cfg Configures the secondary DNS server when the IPv6 address assignment method is configured as Static IP Address and the IP address mode is Description configured as IPv6 or IPv4&IPv6. Note: If you change this parameter, the IP phone will reboot to make the change take effect. Format IPv6 Address Default Value Blank Range Not Applicable network.ipv6_secondary_dns = Example 2026:1234:1:1:c3c7:c11c:5447:23a6 Matrix SPARSH VP110 User Guide...
-
Page 452: Audio Feature Parameters
Default Value Valid values are: Range 0‐Disabled 1‐Enabled Example features.headset_prior = 1 Audio Codecs Parameter- Configuration File account.X.codec.Y.enable <MAC>.cfg Enables or disables the IP phone to use the specific codec for account X. Description X is 1. Y ranges from 1 to 8. Format Boolean When Y=1, the default value is 1; When Y=2, the default value is 1; When Y=3, the default value is 0; When Y=4, the default value is 0; Default Value When Y=5, the default value is 1; When Y=6, the default value is 1; When Y=7, the default value is 0; When Y=8, the default value is 0. Valid values are: Range 0‐Disabled 1‐Enabled account.1.codec.1.enable = 1 Example Matrix SPARSH VP110 User Guide... - Page 453 Valid values are: PCMU PCMA G729 Range G722 G723_53 G723_63 G726-32 iLBC account.1.codec.1.payload_type = PCMU Example Parameter- Configuration File account.X.codec.Y.priority <MAC>.cfg Configures the priority for the codec. Description X is 1. Y ranges from 1 to 8. Format Integer When Y=1, the default value is 1; When Y=2, the default value is 2; When Y=3, the default value is 0; When Y=4, the default value is 0; Default Value When Y=5, the default value is 3; When Y=6, the default value is 4; When Y=7, the default value is 0; When Y=8, the default value is 0. Range 0 to 7 Example account.1.codec.1.priority = 1 Matrix SPARSH VP110 User Guide...
-
Page 454: Acoustic Echo Cancellation
Example Ptime Parameter- Configuration File account.X.ptime <MAC>.cfg Configures the ptime (in milliseconds) for the codec. Description X is 1. Format Integer Default Value Valid values are: Range 0 (Disabled) 10, 20, 30, 40, 50, 60 Example account.1.ptime = 20 Acoustic Echo Cancellation Parameter- Configuration File voice.echo_cancellation <MAC>.cfg Description Enables or disables AEC feature on the IP phone. Format Boolean Default Value Valid values are: Range 0‐Disabled 1‐Enabled Matrix SPARSH VP110 User Guide... - Page 455 Example voice.vad = 1 Comfort Noise Generation Parameter- Configuration File voice.cng <MAC>.cfg Description Enables or disables CNG feature on the IP phone. Format Boolean Default Value Valid values are: Range 0‐Disabled 1‐Enabled Example voice.cng = 1 Jitter Buffer Parameter- Configuration File voice.jib.adaptive <MAC>.cfg Description Configures the type of jitter buffer. Format Integer Default Value Valid values are: Range 0‐Fixed 1‐Adaptive Matrix SPARSH VP110 User Guide...
- Page 456 Default Value Range 0 to 400 Example voice.jib.min = 60 Parameter- Configuration File voice.jib.max <MAC>.cfg Configures the maximum delay time for jitter buffer. Description Note: It works only if the parameter “voice.jib.adaptive” is set to 1 (Adaptive). Format Integer Default Value Range 0 to 400 Example voice.jib.max = 300 Parameter- Configuration File voice.jib.normal <MAC>.cfg Configures the fixed delay time for jitter buffer. Description Note: It works only if the parameter “voice.jib.adaptive” is set to 0 (Fixed). Format Integer Default Value Range 0 to 400 Example voice.jib.mormal = 120 Matrix SPARSH VP110 User Guide...
-
Page 457: Security Feature Parameters
Description will be encrypted after the successful TLS negotiation. X is 1. Format Integer Default Value 0 (UDP) Valid values are: 0‐UDP Range 1‐TCP 2‐TLS 3‐DNS‐NAPTR Example account.1.transport = 2 Parameter- Configuration File security.trust_certificates <MAC>.cfg Enables or disables the IP phone to authenticate the connecting server based on the trusted certificates list. Description Note: If you change this parameter, the IP phone will reboot to make the change take effect. Format Boolean Default Value Valid values are: Range 0‐Disabled 1‐Enabled security.trust_certificates = 1 Example Matrix SPARSH VP110 User Guide... - Page 458 1‐Custom certificates 2‐All certificates Example security.ca_cert = 2 Parameter- Configuration File security.cn_validation <MAC>.cfg Enables or disables the IP phone to mandatorily validate the CommonName or SubjectAltName of the certificate sent by the connecting server. Description Note: If you change this parameter, the IP phone will reboot to make the change take effect. Format Boolean Default Value Valid values are: Range 0‐Disabled 1‐Enabled Example security.cn_validation = 0 Parameter- Configuration File security.dev_cert <MAC>.cfg Configures the type of certificates the IP phone sends for authentication. Description Note: If you change this parameter, the IP phone will reboot to make the change take effect. Format Integer Default Value Matrix SPARSH VP110 User Guide...
- Page 459 Uploading Certificates Parameter- Configuration File trusted_certificates.url <MAC>.cfg Configures the access URL of the certificate used to authenticate the connecting server. Description Note: The certificate you want to upload must be in *.pem, *.crt, *.cer or *.der format. Format Default Value Blank Range String within 511 characters trusted_certificates.url = http://192.168.1.20/ Example tc.crt Parameter- Configuration File server_certificates.url <MAC>.cfg Configures the access URL of the certificate the IP phone sends for authentication. Description Note: The certificate you want to upload must be in *.pem or *.cer format. Format Default Value Blank Range String within 511 characters server_certificates.url = http://192.168.1.20/ Example ca.pem Matrix SPARSH VP110 User Guide...
- Page 460 Description If it is set to 2 (Compulsory), the IP phone is forced to use SRTP during a call. X is 1. Format Integer Default Value Valid values are: 0‐Disabled Value 1‐Optional 2‐Compulsory Example account.1.srtp_encryption = 0 Configuring Decryption Method Parameter- Configuration File auto_provision.aes_key_in_file <MAC>.cfg Enables or disables the IP phone to decrypt Description configuration files using the encrypted AES keys. Format Boolean Default Value Valid values are: Value 0‐Disabled 1‐Enabled Example auto_provision.aes_key_in_file = 0 Matrix SPARSH VP110 User Guide...
- Page 461 <MAC>.cfg Configures the plaintext AES key which is used to decrypt the <MAC>.cfg file. Description Note: It works only if the parameter “auto_provision.aes_key_in_file” is set to 0 (Disabled). Format String Default Value Blank 16 characters and the supported characters Range contain: 0 ~ 9, A ~ Z, a ~ z auto_provision.aes_key_16.mac = Example 0123456789abmins Parameter- Configuration File auto_provision.update_file_mode <MAC>.cfg Enables or disables the IP phone to update encrypted configuration settings only during auto Description provisioning. Format Boolean Default Value Valid values are: Range 0‐Disabled 1‐Enabled Example auto_provision.update_file_mode =0 Matrix SPARSH VP110 User Guide...
-
Page 462: Resource Files
Access URL of Dial-now Template Parameter- Configuration File dialplan_dialnow.url <MAC>.cfg Configures the access URL of the dial‐now Description template. Format Default Value Blank Range String within 511 characters dialplan_dialnow.url = http://192.168.10.25/ Example dialnow.xml Access URL of Softkey Layout Template Parameter‐ Configuration File custom_softkey_call_failed.url <MAC>.cfg Configures the access URL of the custom file for the Description softkey presented on the LCD screen when in the Call Failed state. Format Default Value Blank Matrix SPARSH VP110 User Guide... - Page 463 Configures the access URL of the custom file for the Description softkey presented on the LCD screen when in the CallIn state. Format Default Value Blank Range String within 511 characters The following example uses HTTP to download the CallIn state file from the “XMLfiles” directory on provisioning server 10.2.8.16 using 8080 port. Example custom_softkey_call_in.url = http:// 10.2.8.16:8080/XMLfiles/CallIn.xml Parameter‐ Configuration File custom_softkey_connecting.url <MAC>.cfg Configures the access URL of the custom file for the Description softkey presented on the LCD screen when in the Connecting state. Format Default Value Blank Range String within 511 characters The following example uses HTTP to download the Connecting state file from the “XMLfiles” directory on provisioning server 10.2.8.16 using Example 8080 port. custom_softkey_connecting.url = http:// 10.2.8.16:8080/XMLfiles/Connecting.xml Matrix SPARSH VP110 User Guide...
- Page 464 10.2.8.16:8080/XMLfiles/Dialing.xml Parameter‐ Configuration File custom_softkey_ring_back.url <MAC>.cfg Configures the access URL of the custom file for the Description softkey presented on the LCD screen when in the RingBack state. Format Default Value Blank Range String within 511 characters The following example uses HTTP to download the RingBack state file from the “XMLfiles” directory on provisioning server 10.2.8.16 using Example 8080 port. custom_softkey_ring_back.url = http:// 10.2.8.16:8080/XMLfiles/RingBack.xml Parameter‐ Configuration File custom_softkey_talking.url <MAC>.cfg Configures the access URL of the custom file for the Description softkey presented on the LCD screen when in the Talking state. Format Default Value Blank Range String within 511 characters Matrix SPARSH VP110 User Guide...
- Page 465 Parameter- Configuration File directory_setting.url <MAC>.cfg Description Configures the access URL of the directory template. Format Default Value Blank Range String within 511 characters directory_setting.url = http://192.168.1.20/ Example favorite_setting.xml Access URL of Super Search Template Parameter- Configuration File super_search.url <MAC>.cfg Configures the access URL of the super search Description template. Format Default Value Blank Range String within 511 characters super_search.url = http://192.168.1.20/ Example super_search.xml Matrix SPARSH VP110 User Guide...
- Page 466 <MAC>.cfg Description Configures the access URL of the local contact file. Format Default Value Blank Range String within 511 characters local_contact.data.url = http://192.168.10.25/ Example contact.xml Access URL of Remote XML Phone Book Parameter- Configuration File remote_phonebook.data.X.url <MAC>.cfg Configures the access URL of the remote XML phonebook. Description X ranges from 1 to 5. Format Default Value Blank Range String within 511 characters remote_phonebook.data.1.url = http:// Example 192.168.1.20/phonebook.xml Matrix SPARSH VP110 User Guide...
-
Page 467: Troubleshooting
Example syslog.mode = 1 Parameter- Configuration File syslog.server <MAC>.cfg Configures the IP address or domain name of the syslog server where to export the log files. Note: It works only if the parameter “syslog.mode” Description is set to 1 (Server). If you change this parameter, the IP phone will reboot to make the change take effect. Format IP Address or Domain Name Default Value Blank Range String within 99 characters Example syslog.server = 192.168.1.50 Parameter- Configuration File syslog.log_level <MAC>.cfg Configures the severity level of the logs to be reported to a log file. Description Note: If you change this parameter, the IP phone will reboot to make the change take effect. Format Integer Default Value Range 0 to 6 Matrix SPARSH VP110 User Guide... - Page 468 Example syslog.log_level = 3 WatchDog Parameter- Configuration File watch_dog.enable <MAC>.cfg Description Enables or disables WatchDog feature. Format Boolean Default Value Valid values are: Range 0‐Disabled 1‐Enabled Example watch_dog.enable = 1 Matrix SPARSH VP110 User Guide...
-
Page 469: Configuring Dss Key
This section provides the DSS key parameters you can configure on IP phones. DSS key consists of the programmable keys. There are 11 programmable keys available for SPARSH VP110. The programmable key takes effect only if the IP phone is idle. - Page 470 Valid values are: 0‐N/A 2‐Forward 5‐DND 7‐Call Return 8‐SMS 9‐ Directed Pickup 13‐Speed Dial 14‐Intercom 22‐XML Group 23‐Group Pickup 24‐Multicast Paging Range 27‐XML Browser 28‐History 30‐Menu 32‐New SMS 33‐Status 34‐Hot Desking 40‐Prefix 41‐Zero Touch 43‐Local Directory 45‐Local Group 47‐XML Directory 50‐Keypad Lock 61‐Directory Example programablekey.7.type = 32 Matrix SPARSH VP110 User Guide...
-
Page 471: Intercom Key
3 – Family 4 ‐ Friends Example programablekey.X.line = 2 Parameter- Configuration File programablekey.X.value <MAC>.cfg Configures the value for some key features. Description For the programmable key, x ranges from 1 to 14 (For IP phones, x = 1‐9, 13, 14). Format String Default Value Blank Range String within 99 characters When you assign the Speed Dial to the memory key, this parameter is used to specify the number you want Example to dial out. programablekey.7.value= 565 Intercom Key Parameter‐ Configuration File programablekey.X.type <MAC>.cfg Configures a DSS key as an intercom key. Description The digit 14 stands for the key type Intercom. Format Integer Value Matrix SPARSH VP110 User Guide... - Page 472 String Range String within 99 characters Example programablekey.1.value = 1008 Multicast Paging Key Parameter‐ Configuration File programablekey.X.type <MAC>.cfg Configures a DSS key as a multicast paging key on the IP phone. Description The digit 24 stands for the key type Multicast Paging. Format Integer Value Example programablekey.1.type = 24 Parameter‐ Configuration File programablekey.X.value <MAC>.cfg Configures the multicast IP address and port number. Description Note: The valid multicast IP addresses range from 224.0.0.0 to 239.255.255.255. Format IP Address Range 224.0.0.0 to 239.255.255.255 programablekey.1.value = 224.5.5.6:10008 Example Matrix SPARSH VP110 User Guide...
-
Page 473: Appendix E - Sample Configuration File
Notepad which is available by default with Windows OS or third party tools like Notepad++) and edit the contents as per your requirements. You must copy the contents of the Sample Configuration file which is available in the Matrix’s public FTP server instead of the following file. The following Sample Configuration File is provided just for your reference and copying contents from it may result in erroneous formatting due to limitations of PDF files and thus the configuration file may not work properly. - Page 474 #auto_provision.repeat.enable =1 #auto_provision.weekly.enable =1 #Enable or disable the Plug and Play feature; 0-Disabled, 1-Enabled (default);##This parameter needs to be 0 when the Phone is used with matrix PBX.## auto_provision.pnp_enable =0 #Configure the interval (in minutes) for the phone to check new configuration files.
- Page 475 #Default DHCP option=66(For TFTP server) auto_provision.dhcp_option.enable = 1 #Configure the value (manufacturer of the device) of DHCP option 60. auto_provision.dhcp_option.option60_value = Matrix SPARSH VP110 #Configure the custom DHCP option number. It ranges from 128 to 254. Matrix SPARSH VP110 User Guide...
- Page 476 =10 ################################################################################ ####### Configure the access URL of firmware ################################################################################ ####### #Before using this parameter, you should store the desired firmware (.70.x.x.rom) to the provisioning server. firmware.url = http://192.168.153.27:8081/Matrix SPARSH VP110/31.72.196.1.rom ################################################################################ ####### Network Settings Matrix SPARSH VP110 User Guide...
- Page 477 Static IP Address and the IP address mode is configured as IPv4 or IPv4&IPv6. network.primary_dns= 8.8.8.8 #Configures the secondary DNS server when the Internet port type is configured as Static IP Address and the IP address mode is configured as IPv4 or IPv4&IPv6. network.secondary_dns = 4.2.2.2 Matrix SPARSH VP110 User Guide...
- Page 478 IPv4&IPv6.Default 64.Range 0 to 128 #network.ipv6_primary_dns =3036:1:1:c3c7: c11c:5447:23a6:256 #Configures the Secondary DNS server when the IPv6 address assignment method is configured as Static IP Address and the IP address mode is configured as IPv6 or Matrix SPARSH VP110 User Guide...
- Page 479 #Enables or disables the IP phone to insert VLAN tag on packet from the Internet port. network.vlan.internet_port_enable = 0 #Configures the VLAN ID that is associated with the particular VLAN.Range 1 to 4094. network.vlan.internet_port_vid = 15 Matrix SPARSH VP110 User Guide...
- Page 480 #Configure the maximum local RTP port. It ranges from 0 to 65535, the default value is 11800. #Require reboot; network.port.max_rtpport = 11800 #Configure the minimum local RTP port. It ranges from 0 to 65535, the default value is 11780. Matrix SPARSH VP110 User Guide...
- Page 481 = 0 #Configures the identity used for authenticating the IP phone.String within 32 characters. network.802_1x.identity = admin #Configures the password used for authenticating the IP phone.The default value is blank.String within 32 characters. network.802_1x.md5_password =admin123 Matrix SPARSH VP110 User Guide...
- Page 482 #Enable the Account registration to the Programmed server.0-Disabled,1- Enabled(Default). account.1.register.enable=0 #configures the label displayed on the LCD screen for account.The default value is blank.String within 99 characters. account.1.label =Ranger #configures the display name for account.The default value is blank.String within Matrix SPARSH VP110 User Guide...
- Page 483 #configures the IP address or domain name of the STUN server for account.Default Blank.String within 99 characters account.1.nat.stun_server =stun.voipbuster.com #configures the port of the STUN server for account.The default value is 3478.Range 1024 to 65000 account.1.nat.stun_port = 3478 Matrix SPARSH VP110 User Guide...
- Page 484 “account.1.failback_timeout”. #The default value is 0. account.1.sip_server.1.failback_mode =0 #configures the timeout (in seconds) for the phone to retry to use the primary server after failing over to the current working server for account when the Matrix SPARSH VP110 User Guide...
- Page 485 ##configures the code for deactivating the server-side anonymous call feature for account when the parameter “account.1.send_anonymous_code” is set to 0 (Off Code). #The default value is blank.String within 32 characters. account.1.anonymous_call_offcode =185 #enables or disables anonymous call rejection feature for account.0- Disabled(Default),1-Enabled. Matrix SPARSH VP110 User Guide...
- Page 486 = 1 account.1.codec.7.enable = 1 account.1.codec.8.enable = 0 #Configures the priority for the codec.Range 0 to 7.0-Highest and 7-Lowest local priority. account.1.codec.5.priority = 0 account.1.codec.2.priority = 1 account.1.codec.1.priority = 2 account.1.codec.4.priority = 3 account.1.codec.3.priority = 4 Matrix SPARSH VP110 User Guide...
- Page 487 #configures the session timer T4 (in seconds) for account.The default value is 5.Float from 2.5-60s. account.1.advanced.timer_t2 =5 #configures the DTMF type for account.0-INBAND,1-RFC2833(Default),2-SIP INFO,3- AUTO or SIP INFO. account.1.dtmf.type =1 #configures the RFC2833 payload for account.The default value is 101.From 96 to 127. account.1.dtmf.dtmf_payload =101 Matrix SPARSH VP110 User Guide...
- Page 488 =3600 #enables or disables the phone to subscribe to the voice mail number for the message waiting indicator for account. #This method is not supported by Matrix PBX.Here the SUBSCRIBE for VM sent to Voice mail retrieval number.0-Disabled(Default),1-Enabled. account.1.subscribe_mwi_to_vm =0 #configures the voice mail number for account.(Voice Mail Retrieval Number).The...
- Page 489 #enables or disables the phone to carry the MAC address of Phone in the REGISTER message for account.0-Disabled(Default),1-Enabled. account.1.register_mac =0 #enables or disables the phone to carry the line number in the REGISTER message for account.However SPARSH VP110 has only one Line.0-Disabled(Default),1- Enabled. account.1.register_line =0 #configures the conference type for account.0-Local Conference(Default),2- Network Conference.
- Page 490 = 3318 forward.no_answer.timeout = 4 forward.no_answer.on_code = *15 forward.no_answer.off_code = *16 #Enable or disable the phone to forward the call to the international number (the prefix is 00); 0-Disabled , 1-Enabled(default); forward.international.enable = 1 ################################################################################ Matrix SPARSH VP110 User Guide...
- Page 491 #enables or disables the phone to play key tone when pressing the send key.0- Disabled , 1-Enabled(default) features.send_key_tone =1 #configures the phone to continue to play the dial tone after inputting the preset numbers in the dialing screen.Integer within 6 digits.The default value is Matrix SPARSH VP110 User Guide...
- Page 492 =1 #enables or disables the phone to barge in an intercom call.0-Disabled(default), 1-Enabled. features.intercom.barge =0 ################################################################################ ####### Transfer ################################################################################ ####### #enables or disables the transferee party’s phone to prompt a missed call on the Matrix SPARSH VP110 User Guide...
- Page 493 #enables or disables the phone to display the GPickup soft key when the phone is in the pre-dialing screen.0-Disabled(default), 1-Enabled. features.pickup.group_pickup_enable =0 #configures the group call pickup code.The default value is blank.String within 32 characters. features.pickup.group_pickup_code =*4 ################################################################################ ####### Remote Control ################################################################################ ####### Matrix SPARSH VP110 User Guide...
- Page 494 #The default value is 0 (the keypad is locked only by long pressing the pound key or pressing the keypad lockkey).Integer from 0 to 3600. phone_setting.phone_lock.lock_time_out =0 #configures emergency numbers.Multiple emergency numbers are separated by commas.The default value is 112,911,110.String within 99 characters phone_setting.emergency.number =100,101,102,108 Matrix SPARSH VP110 User Guide...
- Page 495 =http://192.168.153.27:8081/localcontact.xml remote_phonebook.data.1.url =http://192.168.153.27:8081/remotephonebook.xml directory_setting.url =http://192.168.153.27:8081/favorite_setting.xml super_search.url =http://192.168.153.27:8081/super_search.xml ################################################################################ ####### Features -General Information ################################################################################ ####### #enables or disables call waiting call_waiting.enable =0-Disabled , 1-Enabled(default). #configures the call waiting on code.The default value is blank.String within 32 Matrix SPARSH VP110 User Guide...
- Page 496 #configures a return code and reason of SIP response messages when rejecting an incoming call.404-No Found,480-Temporarily not available,486-Busy here(Default). features.normal_refuse_code =486 #configures a return code and reason of SIP response messages when rejecting an incoming call by DND.404-No Found,480-Temporarily not available (Default),486- Busy here. Matrix SPARSH VP110 User Guide...
- Page 497 #Web UI Path--->Features-->General Information-->PswLength. features.password_dial.length =6 #enables or disables password dial feature for the phone.0-Disabled(default), 1- Enabled. #Web UI Path--->Features-->General Information-->PswDial. features.password_dial.enable =0 #enables or disables the phone to save the call history.0-Disabled, 1- Enabled(default). features.save_call_history =1 Matrix SPARSH VP110 User Guide...
- Page 498 0-9, A-D, * and #. The default value is blank.String within 32 characters. features.dtmf.transfer =123 #configures whether to send one pound key by pressing the pound key twice when the pound key is configured as a send key.0-Send one pound key(Default),1-Do not send any pound key Matrix SPARSH VP110 User Guide...
- Page 499 #enables or disables the phone to play the warning tone when receiving a voice mail.0-Disabled, 1-Enabled(default). features.voice_mail_tone_enable =1 #configures the client host name for DHCP option 12.The default value is Matrix SPARSH VP110. #Web UI Path--->Features-->General Information-->DHCP Hostname. network.dhcp_host_name =Matrix SPARSH VP110...
- Page 500 5.Integer from 1 to 14. phone_setting.inter_digit_time =5 ################################################################################ ####### LCD parameter ################################################################################ ####### #configures the contrast of the LCD screen.Integer from 1 to 10.The default value is 6. phone_setting.contrast =6 ################################################################################ Matrix SPARSH VP110 User Guide...
- Page 501 #Configure the time zone and time zone name. The time zone ranges from -11 to +12, the default value is +8. #The default time zone name is India(Calcutta). #Refer to User Guide for more available time zones and time zone names. local_time.time_zone = +5:30 Matrix SPARSH VP110 User Guide...
- Page 502 #Configure the end time of DST. The default value is 12/31/23. The value format is the same to the start time. local_time.end_time = !NULL! #Configure the offset time (in seconds). It ranges from -300 to 300, the default value is 60. local_time.offset_time = !NULL! Matrix SPARSH VP110 User Guide...
- Page 503 #configures the detail level of syslog information to be exported.0 means nothing and 6 means all.The default value is 3.It takes effect after a reboot. syslog.log_level =6 ################################################################################ ####### Matrix SPARSH VP110 User Guide...
- Page 504 #configures the block out string.The default value is blank.String within 32 characters. dialplan.block_out.number.1 = 5532 dialplan.block_out.number.2 = 5858 dialplan.block_out.number.3 = dialplan.block_out.number.4 = dialplan.block_out.number.5 = dialplan.block_out.number.6 = dialplan.block_out.number.7 = dialplan.block_out.number.8 = dialplan.block_out.number.9 = dialplan.block_out.number.10 = Matrix SPARSH VP110 User Guide...
- Page 505 1 to 5. distinctive_ring_tones.alert_info.1.text = Friends distinctive_ring_tones.alert_info.1.ringer = 1 distinctive_ring_tones.alert_info.2.text = distinctive_ring_tones.alert_info.2.ringer = distinctive_ring_tones.alert_info.3.text = distinctive_ring_tones.alert_info.3.ringer = distinctive_ring_tones.alert_info.4.text = distinctive_ring_tones.alert_info.4.ringer = distinctive_ring_tones.alert_info.5.text = distinctive_ring_tones.alert_info.5.ringer = distinctive_ring_tones.alert_info.6.text = distinctive_ring_tones.alert_info.6.ringer = distinctive_ring_tones.alert_info.7.text = distinctive_ring_tones.alert_info.7.ringer = Matrix SPARSH VP110 User Guide...
- Page 506 #At most eight tones can be configured for dial, ring, busy and so on, each tone is separated by a comma. #For example, voice.tone.dial = 100/200,200/150,300+400+500+1200/1000,0/ 1200,500+900/800,5000+2000+3000/6000,0/1500,3600/1800 voice.tone.dial = 1 voice.tone.ring = 1 voice.tone.busy = 1 voice.tone.congestion = 1 Matrix SPARSH VP110 User Guide...
- Page 507 3600 to 2592000.The default value is 21600. features.remote_phonebook.flash_time =21610 #The following parameter required to name the remote Phonebook.String within 99 characters. remote_phonebook.data.1.name=Remote Contacts ################################################################################ ####### Matrix SPARSH VP110 User Guide...
- Page 508 ################################################################################ ####### #enables or disables recent call in dialing feature. If it is enabled, you can see the placed calls list when the phone is in the pre-dialing screen.0- Disabled(default),1-Enabled super_search.recent_call =0 ################################################################################ ####### Security Matrix SPARSH VP110 User Guide...
- Page 509 #configures the access URL of the custom server certificate file.The default value is blank.URL within 511 characters. server_certificates.url =http://192.168.153.27:8081/matrixservercertificate.pem #deletes the uploaded server certificate file.Here the parameter is intentionally kept commented with "#" below.URL within 511 characters. #server_certificates.delete =http://localhost/all Matrix SPARSH VP110 User Guide...
- Page 510 Matrix SPARSH VP110 User Guide...
-
Page 511: Appendix F - Acronyms
Local Area Network Liquid Crystal Display Light Emitting Diode Media Access Control Mili seconds Network Address Traversal Network Time Protocol Peer to Peer Private Branch Exchange Power Over Ethernet PPPoE Point to Point Protocol over Ethernet Matrix SPARSH VP110 User Guide... - Page 512 Simple Traversal of UDP over NAT Transmission Control Protocol TFTP Trivial File Transfer Protocol User Datagram Protocol Uniform Resource Identifier Universal Reference/Resource Locator VLAN Virtual Local Area Network Voice Mail VoIP Voice Over Internet Protocol Matrix SPARSH VP110 User Guide...
-
Page 513: Declaration Of Conformity
Declaration of Conformity Matrix SPARSH VP110 is manufactured by YEALINK NETWORK TECHNOLOGY CO. LTD., China and this phone is in conformity with the essential requirements and other relevant provisions of the CE, FCC-15 (Class-B), RCM and RoHS. CE Mark Warning This device is marked with the CE mark in compliance with EC Directives 2006/95/EC and 2004/108/EC. -
Page 514: Gnu Gpl Information
GNU GPL Information Matrix SPARSH VP110 is manufactured by YEALINK NETWORK TECHNOLOGY CO. LTD., China. The firmware of this phone contains third-party software under the GNU General Public License (GPL). Yealink uses software under the specific terms of the GPL. Please refer to the GPL for the exact terms and conditions of the license. -
Page 515: Warranty Statement
Matrix has been advised of the possibility of such damages or losses or for any claim by any other party. - Page 516 Matrix SPARSH VP110 User Guide...
- Page 517 Index Numerics Phone Book 347 Phone Features 348 180 Ring Workaround 233 Physical Features 349 802.1X Authentication 276 Physical Features of IP Phones 347 Power Supply 349 Technical Specifications 347 About this User Guide 1 Appendix A - Time Zone 351 Accessing Advanced Features 191 Appendix B - Glossary 353 Accessing Basic Features 135...
- Page 518 DHCP 44 Introduction 1 Dial Plan 111 IPv6 Support 280 Dial-now 115 Delay Time for Dial-now Rule 115 Directory 80 Key as Send 71 Distinctive Ring Tones 241 Keypad Lock 73 Do Not Disturb 158 Know Your SPARSH VP110 7...
- Page 519 Packaging Contents 17 Configuration for Peer-to-Peer (P2P) Calling Ethernet Cable 18 Handset & Handset Cord 18 Configuration for Proxy Calling 125 Matrix SPARSH VP110 IP Phone 17 SIP Session Timer 237 Phone Stand 18 SNMP 313 Power Adapter (Optional) 18 Softkey Layout 226 Quick Installation Guide &...
- Page 520 TR-069 Device Management 316 Transfer via DTMF 204 Troubleshooting 339 Upgrading Firmware 309 Upgrade Firmware from the Provisioning Server 310 Upgrade via Web User Interface 309 Use Outbound Proxy in Dialog 235 User 5 User Password 70 Verifying Start-up 24 Viewing Log Files 319 Viewing the Phone Status 41 VLAN 268...
- Page 522 MATRIX COMSEC Head Office 394-GIDC, Makarpura, Vadodara - 390010, India. Ph:+91 265 2630555 E-mail: Support@MatrixComSec.com www.MatrixTeleSol.com...
Need help?
Do you have a question about the Sparsh VP110 and is the answer not in the manual?
Questions and answers