Advertisement
Advertisement

Related Manuals for Matrix SPARSH VP210


Summary of Contents for Matrix SPARSH VP210
- Page 2 Disclaimer Matrix Comsec reserves the right to change, at any time, without prior notice, the product design, specifications, components, as engineering and manufacturing may warrant. This is a general documentation for all models/configurations of the product. The product may not support some of the features/facilities described in this document.
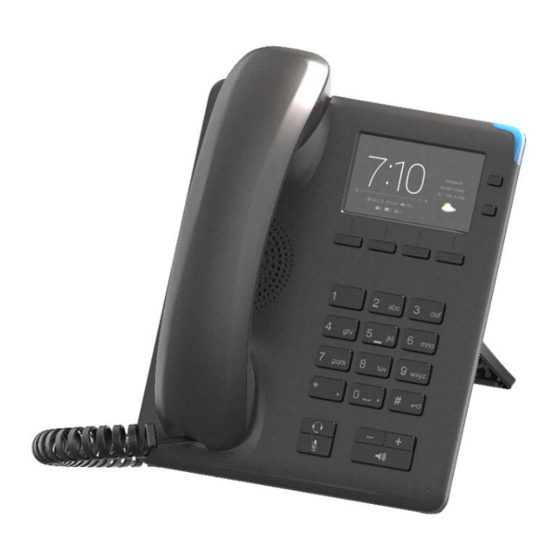
- Page 3 SPARSH VP210 Entry Level IP Phone Quick Start Package Contents • SPARSH VP210 Phone Handset with Handset Cord • • Ethernet Cable • A Foot Stand...
-
Page 4: Table Of Contents
Installing SPARSH VP210 ................. 8 Connecting SPARSH VP210 ................10 Configuring SPARSH VP210 ................13 Converting SPARSH VP210 Extended SIP Phone to SPARSH VP210 Standard SIP Phone ............17 Converting SPARSH VP210 Standard SIP Phone to SPARSH VP210 Extended SIP Phone ............18... -
Page 5: Know Your Sparsh Vp210
Thank you for choosing SPARSH VP210! Please read this guide first for correct installation and retain it for future reference. The information in this guide was current at the time of publication. All specifications are subject to change without notice. - Page 6 Number Description LCD Screen Ringer LED Navigation Key / SIP Line Key Context Sensitive Key Dail Pad Volume Increase Key Volume Decrease Key Speaker Key Mute Headset Key Handset Volume Keys While talking, Press to increase and press to decrease Speech volume. When the phone rings, Press to increase and press to decrease Ringer volume.
- Page 7 Bottom View...
-
Page 8: Installing Sparsh Vp210
Installing SPARSH VP210 Mounting SPARSH VP210 on the Desk Attaching the Stand You can attach the Stand in the following ways - • at an angle of 45 degrees • at an angle of 55 degrees... - Page 9 Foot Stand attached at 45 Degree Angle Foot Stand attached at 55 Degree Angle...
-
Page 10: Connecting Sparsh Vp210
“Package Contents”. Get your Internet Connection ready To install SPARSH VP210 you must have: • Broadband Internet Connection to make/receive calls through Public Internet. If you want to make calls within your network, you do not need an Internet connection. - Page 11 Foot Stand. Connect the Handset to the Phone body • Connect the handset of the SPARSH VP210 to the phone body using the Spring Cord (supplied with the phone). • Connect the long straightened end of the Spring Cord into the RJ9 connector at the bottom of...
- Page 12 • Plug in the Power Adapter into a power outlet. If you are going to use SPARSH VP210 in LAN environment and your LAN Switch supports Power over Ethernet (PoE as per IEEE 802.3af)), do not connect the Adapter! •...
-
Page 13: Configuring Sparsh Vp210
• Scroll using the Up/Down Navigation Key to select Phone Info and press Select Key. • IP Address assigned to the phone is displayed. Take a note of the same. • Make sure your PC is in the same Subnet as SPARSH VP210. Change the Subnet Mask of the PC, if necessary. - Page 14 The links Basic Settings, Advanced Settings, Certificate Management, Maintenance, Supplementary Services, and Status appear in the left pane. Basic Settings are sufficient to get your SPARSH VP210 into operation. To set up and operate your system, quickly, • Click Basic Settings link.
- Page 15 The links to the different basic parameters appear on the left pane. You may either use the Wizard to guide you through the configuration or selectively configure the Basic Settings pages. When you use selective configuration, • Click Basic Settings link to expand. •...
- Page 16 You may use the Wizard or selectively configure the Basic Settings pages, whichever works best for you. Read the User Guide for detailed instructions. If required, you can convert the SPARSH VP210 Standard SIP Phone to SPARSH VP210 Extended SIP Phone. Refer to “Converting SPARSH VP210 Standard SIP Phone to SPARSH VP210...
-
Page 17: Converting Sparsh Vp210 Extended Sip Phone To Sparsh Vp210 Standard Sip Phone
Converting SPARSH VP210 Extended SIP Phone to SPARSH VP210 Standard SIP Phone By default the phone will boot in the Extended mode, follow the steps given below to convert the same to Standard mode: • When the Phone is powered on and the Loading/Starting screen appears press #2. The following message appears. -
Page 18: Converting Sparsh Vp210 Standard Sip Phone To Sparsh Vp210 Extended Sip Phone
Converting SPARSH VP210 Standard SIP Phone to SPARSH VP210 Extended SIP Phone To convert the SPARSH VP210 Standard SIP Phone to SPARSH VP210 Extended SIP Phone, follow the steps given below: SPARSH VP210 with Serial Number: 10009001 and onwards only can be converted to Extended SIP Phones. - Page 19 MATRIX COMSEC Head Office: 394-GIDC, Makarpura, Vadodara - 390010, India. Tel.:+91 85111 73344 E-mail: Customer.Care@MatrixComSec.com www.MatrixTeleSol.com...
Need help?
Do you have a question about the SPARSH VP210 and is the answer not in the manual?
Questions and answers