
Related Manuals for adept technology 550


Summary of Contents for adept technology 550
- Page 1 (217) 352-9330 | Click HERE Find the OMRON / Adept Technology 550 at our website:...
- Page 2 Adept 550 Robot Instruction Handbook Including Adept 550 CleanRoom Robot ® Artisan Technology Group - Quality Instrumentation ... Guaranteed | (888) 88-SOURCE | www.artisantg.com...
- Page 3 Artisan Technology Group - Quality Instrumentation ... Guaranteed | (888) 88-SOURCE | www.artisantg.com...
- Page 4 Adept 550 Robot Instruction Handbook Including Adept 550 CleanRoom Robot ® 00556-00100, Rev A February, 1996 ® 150 Rose Orchard Way • San Jose, CA 95134 • USA • Phone (408) 432-0888 • Fax (408) 432-8707 Otto-Hahn-Strasse 23 • 44227 Dortmund • Germany • Phone 0231/75 89 40 • Fax 0231/75 89 450 adept 11, Voie la Cardon •...
- Page 5 The information contained herein is the property of Adept Technology, Inc., and shall not be reproduced in whole or in part without prior written approval of Adept Technology, Inc. The information herein is subject to change without notice and should not be construed as a commitment by Adept Technology, Inc.
- Page 6 MANUFACTURER’S DECLARATION We, Adept Technology, with Corporate Headquarters at 150 Rose Orchard Way, San Jose, CA., USA, and European Technical Center at Otto-Hahn-Str. 23, 44227 Dortmund, Germany, herewith declare that the Robot comprised of: 1. Controller: MV-8 (P/N 30330-15000), MV-19 (P/N 30330-25000) MV-5 (P/N 30340-10000), or MV 10 (P/N 30340-20000) 2.
- Page 7 English Manufacturer’s Declaration as defined in Machinery Directive 89/392EEC, Appendix IIB We herewith declare that the machine as delivered by us complies with the relevant and fundamental safety and health requirements defined in the EC Directive, Appendix 1. The machine must not be put into operation until all of the machinery into which it is incorporated has been declared in compliance with the provisions of the effective versions of the directives.
- Page 8 Table 1 VME Plug-in Modules that meet all applicable Directives and that may be installed, without additional EMC conformance testing, in MV-8 and MV-19 Controllers Minimum Acceptable Part Number Description Revision 10332-11150 PCA, VME 030 Processor 10332-00710 PCA, VME 040 Processor 30332-12350 SYSIO 2 Module Assy FD/HD (SIO2) 30332-12351...
- Page 9 Artisan Technology Group - Quality Instrumentation ... Guaranteed | (888) 88-SOURCE | www.artisantg.com...
-
Page 10: Table Of Contents
Outside Continental United States or Europe......14 Adept 550 Robot Instruction Handbook, Rev A Artisan Technology Group - Quality Instrumentation ... Guaranteed | (888) 88-SOURCE | www.artisantg.com... - Page 11 Connecting AC Power to the MV Controller......37 viii Adept 550 Robot Instruction Handbook, Rev A Artisan Technology Group - Quality Instrumentation ... Guaranteed | (888) 88-SOURCE | www.artisantg.com...
- Page 12 Installing Amplifier Modules ........46 2.18 Installing End-Effectors on an Adept 550 Robot ......46 2.19 Removing and Installing the User Flange .
- Page 13 Dimensions for Adept 550 Robot........82...
- Page 14 6.4 Adept PA-4 Power Chassis Specifications ......96 Adept 550 CleanRoom Robot ....... . . 97 A.1 Introduction.
- Page 15 Figure 1-1 Adept 550 Robot with Joint Locations....... . . 2 Figure 1-2 Adept MV-8 Controller and PA-4 Power Chassis .
- Page 16 Figure 6-13 Adept 550 Robot Working Envelope ....... . . 95 Figure A-1 Adept 550 CleanRoom Robot Top and Side Dimensions .
- Page 17 Adept 550 Robot Specifications........
-
Page 18: Safety
Outside Continental United States or Europe......14 Adept 550 Robot Instruction Handbook, Rev A Artisan Technology Group - Quality Instrumentation ... Guaranteed | (888) 88-SOURCE | www.artisantg.com... -
Page 19: Introduction
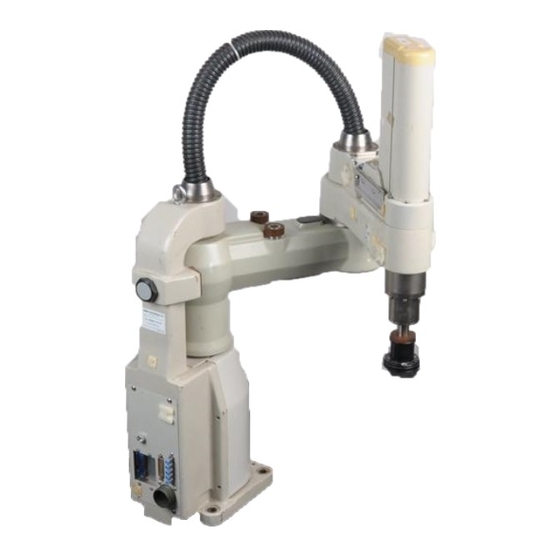
Joints 1, 2, and 4 are rotational and Joint 3 is translational. See Figure 1-1 for a description of the robot joint locations. The Adept 550 robot is designed to interface with the Adept MV controller and PA-4 power chassis (see Figure 1-2). The control and operation of the robot is programmed and performed through the controller. -
Page 20: Adept Equipment Compatibility
Introduction Adept Equipment Compatibility The Adept 550 Category 1 robot system must consist of the hardware and software listed in the following table. All new systems shipped from the factory will include the correct equipment as shown. If you have existing Adept equipment, this table can help distinguish new equipment from older equipment, especially since some of it is visibly similar. -
Page 21: Notes, Cautions, And Warnings
Provided that instructed personnel who enter Adept 550 robot work envelope are wearing protective headgear, eyeglasses, and safety shoes, it is highly unlikely that the Adept 550 Robot could cause permanent injury. Further, due to its small size, light payload capacity, and limited reach, it is highly likely that such personnel could avoid being hit by the robot even in a high-acceleration, runaway, failure condition. -
Page 22: Precautions And Required Safeguards
It is critical that safeguards be in place to prevent personnel from entering the workcell whenever equipment power is present. The Adept 550 robot is not safe on its own. The Robot System Integrator (or end-user) must ensure that adequate safeguards, safety barriers, light curtains, safety gates, safety floor mats, etc. -
Page 23: Impact And Trapping Points
Hazards from Expelling a Part or Attached Tooling The maximum joint and user flange tip speeds that can be obtained on the Adept 550 robot in a runaway situation are listed in Table 1-3. Any tooling, fixtures, end-effectors, etc., mounted to the user flange, outer link, or inner link of the robot must be attached by sufficient means to resist being expelled from the robot. -
Page 24: Additional Safety Information
Installation and usage must also comply with all applicable European, international or local requirements and safety standards. The Adept 550 robot is intended for use in small parts assembly and material handling for payloads typically less than 5.5 kg (12.1 lb). -
Page 25: Robot Modifications
WARNING: The given instructions about operation, installation, and maintenance in this Instruction Handbook must be strictly observed. Non-intended use of an Adept 550 Robot can: • cause injury to the personnel. • damage the robot or other equipment. • reduce the system reliability and the performance of the system. -
Page 26: Unacceptable Modifications
See section 1.9 on page 10 for the specifications of the personnel. Adept 550 Robot Instruction Handbook, Rev A Artisan Technology Group - Quality Instrumentation ... Guaranteed | (888) 88-SOURCE | www.artisantg.com... -
Page 27: Qualification Of Personnel
Always use adequate equipment to transport and lift Adept devices. See Chapter 2 for more information on transporting, lifting, and installing. WARNING: Do not stay under the robot while it is transported. Adept 550 Robot Instruction Handbook, Rev A Artisan Technology Group - Quality Instrumentation ... Guaranteed | (888) 88-SOURCE | www.artisantg.com... -
Page 28: 1.11 Safety Equipment For Operators
Manual Control Pendant by locking them in a cabinet or use another adequate method to prevent access to them. 1.13 Operating Modes of Adept Robots The Adept 550 robot has two different operating modes. Automatic Mode Adept Robot systems are computer-controlled, and the program that is currently running the robot may cause it to move at times or along paths you may not anticipate. -
Page 29: 1.14 Safety Aspects While Performing Maintenance
1.15 Risks That Cannot Be Avoided The Adept 550 Robot Control system implementation has devices that disable High Power if a system failure occurs. The following situations may result in risks that cannot be avoided: •... -
Page 30: 1.17 How To Get Help
(49) 231 / 75 89 40 (Monday to Friday, 8:00 to 17:00,CET) (49) 231/75 89 450 FAX France For customers in France, Adept Technology maintains a Customer Service Center in Paris, France. The phone numbers are: (33) 1 69 19 16 16 (Monday to Friday, 8:30 to 17:30, CET) -
Page 31: Outside Continental United States Or Europe
Service Center in San Jose, California USA: 1 (408) 434-5000 1 (408) 433-9462 FAX (service requests) 1 (408) 434-6248 FAX (application questions) Adept 550 Robot Instruction Handbook, Rev A Artisan Technology Group - Quality Instrumentation ... Guaranteed | (888) 88-SOURCE | www.artisantg.com... -
Page 32: Installation
2.15 Grounding Information ..........36 Adept 550 Robot Instruction Handbook, Rev A... - Page 33 Removing and Installing Amplifier Modules......45 2.18 Installing End-Effectors on an Adept 550 Robot ......46 2.19 Removing and Installing the User Flange .
-
Page 34: Environmental And Facility Requirements For Robot
The IP rating also applies to the motors inside the robot. Robot Workcell Free Space The workcell design should allow the Adept 550 freedom of movement within the area specified in Figure 6-13 on page 95. Additional allowances maybe required to accommo- date any installed end-of-arm tooling. -
Page 35: Environmental And Facility Requirements Power Chassis
WARNING: Heavy load! Do not attempt to transport the robot boxes by hand. Always use a pallet jack, fork lift, etc. Adept 550 Robot Instruction Handbook, Rev A Artisan Technology Group - Quality Instrumentation ... Guaranteed | (888) 88-SOURCE | www.artisantg.com... -
Page 36: Unpacking And Inspecting The Adept Equipment
Place forklift or pallet-jack here. Figure 2-1. Adept 550 Robot on a Transportation Pallet Unpacking and Inspecting the Adept Equipment Compare the actual items received (not just the packing slip) with your equipment purchase order and verify that all items are present and that the shipment is correct. -
Page 37: Robot Installation
Robot Installation Mounting Surface The Adept 550 robot is designed to be mounted on a smooth, flat, level tabletop. The mounting structure must be rigid enough to prevent vibration and flexing during robot operation. Excessive vibration or mounting flexure will degrade robot performance. -
Page 38: Table 2-4 Mounting Bolt Specifications
Size Specification Torque Metric M12 x P1.75 ISO Property Class 8.8 85 Nm 7/16-14 UNC SAE Grade 5 50 ft-lb Adept 550 Robot Instruction Handbook, Rev A Artisan Technology Group - Quality Instrumentation ... Guaranteed | (888) 88-SOURCE | www.artisantg.com... -
Page 39: Installation Of The Adept Mv Controller And The Adept Pa-4 Power Chassis
Install four M4 x 8 flat-head Phillips screws to secure bracket. Figure 2-3. Joining the Power Chassis and Controller at the Top Adept 550 Robot Instruction Handbook, Rev A Artisan Technology Group - Quality Instrumentation ... Guaranteed | (888) 88-SOURCE | www.artisantg.com... -
Page 40: Joining At The Top
Cutout Bracket Adept PA-4 Adept MV-8 Power Chassis Controller Figure 2-4. Joining the Power Chassis and Controller at the Bottom Adept 550 Robot Instruction Handbook, Rev A Artisan Technology Group - Quality Instrumentation ... Guaranteed | (888) 88-SOURCE | www.artisantg.com... -
Page 41: Space Around The Chassis
Adept 550 Robot Instruction Handbook, Rev A Artisan Technology Group - Quality Instrumentation ... Guaranteed | (888) 88-SOURCE | www.artisantg.com... -
Page 42: Figure 2-5 Installing Mounting Brackets On An Adept Mv Controller
M4 x 10mm pan-head screw Rack Mount – Flush Rack Mount – Set-Back Figure 2-5. Installing Mounting Brackets on an Adept MV Controller Adept 550 Robot Instruction Handbook, Rev A Artisan Technology Group - Quality Instrumentation ... Guaranteed | (888) 88-SOURCE | www.artisantg.com... -
Page 43: Figure 2-6 Installing Mounting Brackets On An Adept Pa-4 Power Chassis
M4 x 10mm pan-head screw Rack Mount – Flush Rack Mount – Set-Back Figure 2-6. Installing Mounting Brackets on an Adept PA-4 Power Chassis Adept 550 Robot Instruction Handbook, Rev A Artisan Technology Group - Quality Instrumentation ... Guaranteed | (888) 88-SOURCE | www.artisantg.com... -
Page 44: 2.11 Installing The A-Series Monitor And Keyboard
MONITOR module. 3. Connect the double-ended keyboard cable to the connector and the KEYBOARD connector on the VGB module. POINTER Adept 550 Robot Instruction Handbook, Rev A Artisan Technology Group - Quality Instrumentation ... Guaranteed | (888) 88-SOURCE | www.artisantg.com... -
Page 45: 2.12 Installing A Terminal In An S-Series System
5. Set the terminal baud rate to 9600, that is the default rate for the Adept system. To change the baud rate, refer to the information on in the Instructions for CONFIG_C Adept Utility Programs. Adept 550 Robot Instruction Handbook, Rev A Artisan Technology Group - Quality Instrumentation ... Guaranteed | (888) 88-SOURCE | www.artisantg.com... -
Page 46: 2.13 Installing The External Front Panel
• LAMP TEST switch: When the button is pressed, all the indicator lamps should light. If an indicator does not light, check it before continuing operation. Adept 550 Robot Instruction Handbook, Rev A Artisan Technology Group - Quality Instrumentation ... Guaranteed | (888) 88-SOURCE | www.artisantg.com... -
Page 47: Installing The External Front Panel (Vfp)
POWER ON/OFF TEST EMERGENCY STOP ® PROGRAM PROGRAM PENDANT LOCAL NETWORK START RUNNING Figure 2-9. External VME Front Panel Installation Adept 550 Robot Instruction Handbook, Rev A Artisan Technology Group - Quality Instrumentation ... Guaranteed | (888) 88-SOURCE | www.artisantg.com... -
Page 48: 2.14 Signal Interconnection Installation
RUNNING Arm Signal Cable (8-meter) Motor Power Cable (8-meter) Adept 550 Robot Figure 2-10. Adept 550 Robot System Cable Installation Adept 550 Robot Instruction Handbook, Rev A Artisan Technology Group - Quality Instrumentation ... Guaranteed | (888) 88-SOURCE | www.artisantg.com... -
Page 49: Connecting The Robot To The Power Chassis
Cable Robot Ground Point Figure 2-11. Adept 550 Robot Rear Panel Connecting the Robot to the Power Chassis The 8-meter cable between the robot and power chassis is called the Motor Power cable. It is permanently attached at the robot, and has two square connectors on the power chassis end. -
Page 50: Installing Signal Cables: Robot To Mv Controller
Adept MV Controller Install VJI-to-Amp cable here AMPLIFIER SIGNAL BELT ENCODER Install Arm Signal cable here SIGNAL Figure 2-12. Robot-to-VJI Cable Installation Adept 550 Robot Instruction Handbook, Rev A Artisan Technology Group - Quality Instrumentation ... Guaranteed | (888) 88-SOURCE | www.artisantg.com... -
Page 51: Installing Signal Cables: Mv Controller To Power Chassis
(to VJI Module Amplifier in MV Controller) Ctrl 3 adept technology, inc. Figure 2-13. Power Chassis to VJI Cable Installation Adept 550 Robot Instruction Handbook, Rev A Artisan Technology Group - Quality Instrumentation ... Guaranteed | (888) 88-SOURCE | www.artisantg.com... -
Page 52: Connecting The Mcp To The Vfp
Hold-to-Run switch closed. The MCP cradle must be installed outside of the robot workcell. See Figure 6-9 on page 90 for the dimensions of the cradle. Adept 550 Robot Instruction Handbook, Rev A Artisan Technology Group - Quality Instrumentation ... Guaranteed | (888) 88-SOURCE | www.artisantg.com... -
Page 53: 2.15 Grounding Information
Robot-Mounted Equipment Grounding The following parts of an Adept 550 robot are not grounded to protective earth: the Joint 3 quill, the user flange, and all access covers. If hazardous voltages are present at any user-supplied robot-mounted equipment or tooling, you must install a ground connection from that equipment/tooling to the ground point on the robot base (see Figure 2-11). -
Page 54: 2.16 Connecting To Ac Power
= Off) • the On/Off power switch ( • the AC power cord socket • the two incoming AC line fuses Adept 550 Robot Instruction Handbook, Rev A Artisan Technology Group - Quality Instrumentation ... Guaranteed | (888) 88-SOURCE | www.artisantg.com... -
Page 55: Connecting Ac Power Cord
Cord rating 10 amps Number and size of 3 x 1.00 mm conductors Color code line brown neutral blue ground green/yellow Adept 550 Robot Instruction Handbook, Rev A Artisan Technology Group - Quality Instrumentation ... Guaranteed | (888) 88-SOURCE | www.artisantg.com... -
Page 56: Connecting Ac Power To The Adept Pa-4 Power Chassis
245 VAC 20 amps 3-phase Power to the Adept MV controller and PA-4 power chassis must come from a single source. Adept 550 Robot Instruction Handbook, Rev A Artisan Technology Group - Quality Instrumentation ... Guaranteed | (888) 88-SOURCE | www.artisantg.com... -
Page 57: Connecting The Power Chassis Ac Power Cord
Adept 550 Robot Instruction Handbook, Rev A Artisan Technology Group - Quality Instrumentation ... Guaranteed | (888) 88-SOURCE | www.artisantg.com... -
Page 58: Typical Ac Power Installation Diagrams
1Ø 200-240V~ Note: F4 and F5 are user-supplied. Figure 2-17. Typical 3-Phase 200-240 V AC Connection for Category 1 System Adept 550 Robot Instruction Handbook, Rev A Artisan Technology Group - Quality Instrumentation ... Guaranteed | (888) 88-SOURCE | www.artisantg.com... -
Page 59: Changing Voltage Setting For Power Chassis
7 mm (1/4 inch) diameter shrink tubing Figure 2-18. Insulating Blue Wire in Power Cord Adept 550 Robot Instruction Handbook, Rev A Artisan Technology Group - Quality Instrumentation ... Guaranteed | (888) 88-SOURCE | www.artisantg.com... -
Page 60: Figure 2-19 Changing Voltage In Power Chassis
200–240 V~ Voltage Selector Plug Voltage Selector (in 380 – 415 V~ position) Socket Figure 2-19. Changing Voltage in Power Chassis Adept 550 Robot Instruction Handbook, Rev A Artisan Technology Group - Quality Instrumentation ... Guaranteed | (888) 88-SOURCE | www.artisantg.com... -
Page 61: 2.17 Additional Power Chassis Information
Adept 550 robot. In a typical Adept 550 robot system, there are two identical B+ Amplifier modules in the Adept PA-4 power chassis. The amplifier module on the left-hand side, called Module 1, drives motors 1 and 3. -
Page 62: Circuit Breaker And Fuse Information
4. Using both the top handle and bottom handle, pull the module straight out of the chassis. Remove the module from the chassis and store it in a safe place. Adept 550 Robot Instruction Handbook, Rev A Artisan Technology Group - Quality Instrumentation ... Guaranteed | (888) 88-SOURCE | www.artisantg.com... -
Page 63: Installing Amplifier Modules
2.18 Installing End-Effectors on an Adept 550 Robot The user is responsible for providing and installing any end-effector or other end-of-arm tooling. End-effectors can be attached to the user flange using either four M6 screws or a ring clamp;... -
Page 64: 2.19 Removing And Installing The User Flange
The torque specification for each screw is 8 Nm (70 in-lb). Adept 550 Robot Instruction Handbook, Rev A Artisan Technology Group - Quality Instrumentation ... Guaranteed | (888) 88-SOURCE | www.artisantg.com... -
Page 65: 2.20 User Connections On Robot
These connectors can be used to run user electrical signals from the back panel, through the robot, and up to the outer link. Wire size: 0.1 mm Maximum current per line: 1 Amp Adept 550 Robot Instruction Handbook, Rev A Artisan Technology Group - Quality Instrumentation ... Guaranteed | (888) 88-SOURCE | www.artisantg.com... -
Page 66: Preparation For Safe And Effective Use Of The Robot
Typical Emergency Stop Circuitry ........57 Adept 550 Robot Instruction Handbook, Rev A... -
Page 67: Overview Of Safety System
Overview of Safety System Introduction Adept Technology highly recommends the use of workcell safety features such as light curtains, safety gates, or safety floor mats to prevent access to the workcell while power is present. These devices would open the E-Stop circuit and shut down High Power when activated. -
Page 68: Terminal Block On External Front Panel
Emergency Stop switch on the Manual Control Pendant (N/C) Hold-to-Run switch on the Manual Control Pendant (N/O) not used not used Adept 550 Robot Instruction Handbook, Rev A Artisan Technology Group - Quality Instrumentation ... Guaranteed | (888) 88-SOURCE | www.artisantg.com... -
Page 69: External E-Stop Input
• maximum switching current = 0.5 Amps DC, 0.3 Amps AC rms CAUTION: The power through the relay must not exceed 10 VA. Adept 550 Robot Instruction Handbook, Rev A Artisan Technology Group - Quality Instrumentation ... Guaranteed | (888) 88-SOURCE | www.artisantg.com... -
Page 70: Digital Inputs And Outputs Of The System Input/Output (Sio) Module
2 ms response time (minimum) for fast inputs 1001 to 1003, depending on program task configuration, when used with V INT.EVENT instruction. Adept 550 Robot Instruction Handbook, Rev A Artisan Technology Group - Quality Instrumentation ... Guaranteed | (888) 88-SOURCE | www.artisantg.com... -
Page 71: Output Signals
Specifically, the SIO output current is limited to 100 mA per channel, whereas the DIO output is rated at 400 mA. Adept 550 Robot Instruction Handbook, Rev A Artisan Technology Group - Quality Instrumentation ... Guaranteed | (888) 88-SOURCE | www.artisantg.com... -
Page 72: Digital I/O Connector Pinouts
Not used Output 0001+ Output 0001– Pins 41, 42, 43, and 44, see Figure 3-2 and Figure 3-3 for more information. Adept 550 Robot Instruction Handbook, Rev A Artisan Technology Group - Quality Instrumentation ... Guaranteed | (888) 88-SOURCE | www.artisantg.com... -
Page 73: Figure 3-1 Digital I/O Connector Pin Locations On Sio Module
Pin 33 Pin 50 Pin 34 Pin 18 Pin 1 Figure 3-1. Digital I/O Connector Pin Locations on SIO Module Adept 550 Robot Instruction Handbook, Rev A Artisan Technology Group - Quality Instrumentation ... Guaranteed | (888) 88-SOURCE | www.artisantg.com... -
Page 74: Typical Emergency Stop Circuitry
(0.8 A at 12 VDC, 0.4 A at 24 VDC, see text) Figure 3-2. E-Stop Diagram with VFP and MCP Adept 550 Robot Instruction Handbook, Rev A Artisan Technology Group - Quality Instrumentation ... Guaranteed | (888) 88-SOURCE | www.artisantg.com... -
Page 75: Figure 3-3 E-Stop Circuitry With Additional Safety Equipment
Note: This drawing is ONLY an example for the implementation of additional safeguards. Figure 3-3. E-Stop Circuitry with Additional Safety Equipment Adept 550 Robot Instruction Handbook, Rev A Artisan Technology Group - Quality Instrumentation ... Guaranteed | (888) 88-SOURCE | www.artisantg.com... -
Page 76: Commissioning The System
Hardstops ............71 Adept 550 Robot Instruction Handbook, Rev A... -
Page 77: Introduction
In Manual mode the maximum speed of the Tool Center Point and the joints of the robot is reduced to 250 mm per second (10 ips). Also, the motors run at reduced torque. Adept 550 Robot Instruction Handbook, Rev A Artisan Technology Group - Quality Instrumentation ... Guaranteed | (888) 88-SOURCE | www.artisantg.com... -
Page 78: Automatic Operating Mode
For example, it is possible to calibrate the robot, or to enable High Power with the MCP in Automatic mode. Adept 550 Robot Instruction Handbook, Rev A Artisan Technology Group - Quality Instrumentation ... Guaranteed | (888) 88-SOURCE | www.artisantg.com... -
Page 79: Using The Brake Release Button
Joint 3 is supported while releasing the brake and verify that the end effector or other installed tooling is clear of all obstructions. Adept 550 Robot Instruction Handbook, Rev A Artisan Technology Group - Quality Instrumentation ... Guaranteed | (888) 88-SOURCE | www.artisantg.com... -
Page 80: Description Of The Manual Control Pendant (Mcp)
NOTE: The MCP must be stored in the MCP cradle to close the Hold-to-Run switch when it is not being held. Adept 550 Robot Instruction Handbook, Rev A Artisan Technology Group - Quality Instrumentation ... Guaranteed | (888) 88-SOURCE | www.artisantg.com... -
Page 81: Description Of Buttons On The Mcp
NOTE: The Step button on the lower right corner of the MCP is used to step through motions in a V program. See the V 11.3 Release Notes for details. Adept 550 Robot Instruction Handbook, Rev A Artisan Technology Group - Quality Instrumentation ... Guaranteed | (888) 88-SOURCE | www.artisantg.com... -
Page 82: How To Stop A Robot In Manual Mode
The robot can move at high speeds and exert considerable force. 4. Set operating keyswitch to and the other keyswitch to AUTO LOCAL Adept 550 Robot Instruction Handbook, Rev A Artisan Technology Group - Quality Instrumentation ... Guaranteed | (888) 88-SOURCE | www.artisantg.com... -
Page 83: In Manual Mode
The robot can move at high speeds and exert considerable forces. Calibration involves limited robot motion. Observe all safety precautions. Adept 550 Robot Instruction Handbook, Rev A Artisan Technology Group - Quality Instrumentation ... Guaranteed | (888) 88-SOURCE | www.artisantg.com... -
Page 84: Moving The Robot With The Mcp
Only a skilled or instructed robot operator (see Section 1.9 on page 10) wearing the safety equipment given in Section 1.11 on page 11 is allowed to work with the robot. Adept 550 Robot Instruction Handbook, Rev A Artisan Technology Group - Quality Instrumentation ... Guaranteed | (888) 88-SOURCE | www.artisantg.com... -
Page 85: Man/Halt Button For Selecting Joint State
The maximum speed of the robot in Manual mode is 250 mm per second (10 ips). Fast Slow WORLD TOOL JOINT FREE USER PANIC HALT COMP HOLD Fast Figure 4-5. Speed Bars Adept 550 Robot Instruction Handbook, Rev A Artisan Technology Group - Quality Instrumentation ... Guaranteed | (888) 88-SOURCE | www.artisantg.com... -
Page 86: Selecting Joint State And Moving The Robot
LED are lit, Joint state is selected MAN/HALT JOINT and movement of a specified joint must be selected. Adept 550 Robot Instruction Handbook, Rev A Artisan Technology Group - Quality Instrumentation ... Guaranteed | (888) 88-SOURCE | www.artisantg.com... -
Page 87: Selecting And Moving Joint 1
If every joint the robot moved correctly in both directions the installation of the hardware is correct. Then press the button on the MCP to disable High Power. DIS/PWR Adept 550 Robot Instruction Handbook, Rev A Artisan Technology Group - Quality Instrumentation ... Guaranteed | (888) 88-SOURCE | www.artisantg.com... -
Page 88: Limiting Joint Travel
–13 to 213 mm CleanRoom 0 to 180 mm –13 to 195 mm Joint 3 Joint 4 ±360° max None Adept 550 Robot Instruction Handbook, Rev A Artisan Technology Group - Quality Instrumentation ... Guaranteed | (888) 88-SOURCE | www.artisantg.com... - Page 89 Artisan Technology Group - Quality Instrumentation ... Guaranteed | (888) 88-SOURCE | www.artisantg.com...
-
Page 90: Maintenance
5.6 Check Lamps on VFP ..........79 Adept 550 Robot Instruction Handbook, Rev A... -
Page 91: Introduction
(50 ft-lb). Also check the tightness of all cover plate screws and all the captive screws of the cables. Check the leveling of the base every 6 months. Adept 550 Robot Instruction Handbook, Rev A Artisan Technology Group - Quality Instrumentation ... Guaranteed | (888) 88-SOURCE | www.artisantg.com... -
Page 92: Lubricate Joint 3 Ball Screw
Adept 550 Robot with Joint 3 cover Joint 3 Ball Screw removed. ® Figure 5-1. Lubrication of Joint 3 Ball Screw Adept 550 Robot Instruction Handbook, Rev A Artisan Technology Group - Quality Instrumentation ... Guaranteed | (888) 88-SOURCE | www.artisantg.com... -
Page 93: Check Tension And Wear On J3 And J4 Drive Belts
Any larger particles that may indicate worn or broken teeth on the drive belts could be a problem. Call Adept Customer Service if you discover anything that looks unusual. View of Underside of Adept 550 Outer LInk Access Cover Joint 3 Brake Assembly Figure 5-2. -
Page 94: Figure 5-3 Location Of Joint 3 And Joint 4 Drive Belts
7. Install the access cover using the 4 screws you removed earlier. Make sure the cable running along the inside of the opening is not pinched when you install the access cover. Adept 550 Robot Instruction Handbook, Rev A Artisan Technology Group - Quality Instrumentation ... Guaranteed | (888) 88-SOURCE | www.artisantg.com... -
Page 95: Figure 5-4 Close-Up View Of Joint 3 Brake Assembly
Spacer M3x8 screw Joint 3 Drive Belt Joint 3 Brake Assembly Figure 5-4. Close-up View of Joint 3 Brake Assembly Adept 550 Robot Instruction Handbook, Rev A Artisan Technology Group - Quality Instrumentation ... Guaranteed | (888) 88-SOURCE | www.artisantg.com... -
Page 96: Maintenance And Inspection Of Air Filters
Use the Lamp Test button on the external Front Panel to test the lamps once per month. Replace any lamps that are not working. Contact Adept Customer Service for replacement information. Adept 550 Robot Instruction Handbook, Rev A Artisan Technology Group - Quality Instrumentation ... Guaranteed | (888) 88-SOURCE | www.artisantg.com... - Page 97 Artisan Technology Group - Quality Instrumentation ... Guaranteed | (888) 88-SOURCE | www.artisantg.com...
-
Page 98: Technical Specification
Dimensions for Adept 550 Robot ........82... -
Page 99: Dimensions
411.5 136* *These dimensions may vary slightly due to manufacturing tolerances. Figure 6-1. Adept 550 Robot Top and Side Dimensions Adept 550 Robot Instruction Handbook, Rev A Artisan Technology Group - Quality Instrumentation ... Guaranteed | (888) 88-SOURCE | www.artisantg.com... -
Page 100: User Flange Dimensions For Adept 550 Robot
ON ∅50.000 BC ∅.10 17.68 All dimensions in mm 4 x 90° Figure 6-2. User Flange Dimensions for Adept 550 Robot Adept 550 Robot Instruction Handbook, Rev A Artisan Technology Group - Quality Instrumentation ... Guaranteed | (888) 88-SOURCE | www.artisantg.com... - Page 101 4.14 8.89 1.47 +.14 1.15 -.00 All dimensions in mm .50 X 45° CHAMFER Figure 6-3. User Flange Close-up Dimensions Adept 550 Robot Instruction Handbook, Rev A Artisan Technology Group - Quality Instrumentation ... Guaranteed | (888) 88-SOURCE | www.artisantg.com...
-
Page 102: Dimensions For Adept Mv-8 Controller
216 mm 290 mm 52 mm 479 mm ® 136 mm Front View Side View Figure 6-4. Adept MV-8 Dimensions Adept 550 Robot Instruction Handbook, Rev A Artisan Technology Group - Quality Instrumentation ... Guaranteed | (888) 88-SOURCE | www.artisantg.com... -
Page 103: Dimensions For Adept Mv-19 Controller
Top View 431 mm 290 mm 479 mm ® 136 mm Front View Side View Figure 6-5. Adept MV-19 Dimensions Adept 550 Robot Instruction Handbook, Rev A Artisan Technology Group - Quality Instrumentation ... Guaranteed | (888) 88-SOURCE | www.artisantg.com... -
Page 104: Dimensions For Adept Pa-4 Power Chassis
290 mm 479 mm adept technology, inc. 136 mm Side View Front View Figure 6-6. Adept PA-4 Power Chassis Dimensions Adept 550 Robot Instruction Handbook, Rev A Artisan Technology Group - Quality Instrumentation ... Guaranteed | (888) 88-SOURCE | www.artisantg.com... -
Page 105: Dimensions Of The External Front Panel
14.3 mm (0.56 in.) 90 mm (3.5 in.) 81.3 mm (3.2 in.) 48.3 mm (1.9 in.) Figure 6-7. Adept External Front Panel Dimensions Adept 550 Robot Instruction Handbook, Rev A Artisan Technology Group - Quality Instrumentation ... Guaranteed | (888) 88-SOURCE | www.artisantg.com... -
Page 106: Dimensions Of The Mounting Brackets
10.3 mm Controller and Power Chassis with mounting (4x) brackets installed Figure 6-8. Adept MV-8 and PA-4 With Mounting Brackets Installed Adept 550 Robot Instruction Handbook, Rev A Artisan Technology Group - Quality Instrumentation ... Guaranteed | (888) 88-SOURCE | www.artisantg.com... -
Page 107: Mcp Cradle Dimensions
4 X 9.7 mm (0.38") 4 X ø9.7 mm (ø0.38") 201 mm (7.9") 221 mm (8.70") Figure 6-9. MCP Cradle Dimensions Adept 550 Robot Instruction Handbook, Rev A Artisan Technology Group - Quality Instrumentation ... Guaranteed | (888) 88-SOURCE | www.artisantg.com... -
Page 108: Joint Motions
“precision point” or the LEFTY or RIGHTY program instruction is used. Righty Lefty Back of Robot Figure 6-11. Joint-2 Motion and LEFTY/RIGHTY Configurations Adept 550 Robot Instruction Handbook, Rev A Artisan Technology Group - Quality Instrumentation ... Guaranteed | (888) 88-SOURCE | www.artisantg.com... -
Page 109: Joint 3
Joint 3 provides vertical translation of the quill. Joint 3 drives the quill to up and down with a maximum stroke of 200 mm (7.9”). See Figure 6-12. The Adept 550 Cleanroom robot has a maximum Joint 3 stroke of 180 mm; see Appendix A. -
Page 110: Adept 550 Robot Specifications
Repeatability (at constant temperature) X,Y plane ± 0.025 mm (±0.001") Joint 3 (vertical Z) ±0.03 mm (±0.001") Joint 4 (rotational) ±0.05° Adept 550 Robot Instruction Handbook, Rev A Artisan Technology Group - Quality Instrumentation ... Guaranteed | (888) 88-SOURCE | www.artisantg.com... - Page 111 Chapter 6 - Technical Specification Table 6-1. Adept 550 Robot Specifications (Continued) Adept 550 Robot Specifications Maximum Joint Speed (with 2 kg [4.4 lb] payload) Joint 1 270°/sec Joint 2 430°/sec Joint 3 1000 mm/sec (40"/sec) Joint 4 480°/sec Weight...
-
Page 112: Adept 550 Robot Working Envelope
100° 100° Minimum Radial Reach 194 mm (7.6") 140° 140° Back of Robot Figure 6-13. Adept 550 Robot Working Envelope Adept 550 Robot Instruction Handbook, Rev A Artisan Technology Group - Quality Instrumentation ... Guaranteed | (888) 88-SOURCE | www.artisantg.com... -
Page 113: Adept Pa-4 Power Chassis Specifications
(short duration) demands of the Adept PA-4 power chassis. The typical values are for calculating air conditioning requirements. Table 6-2. Power Consumption for PA-4 Power Chassis with an Adept 550 System Line Voltage Typical... -
Page 114: Adept 550 Cleanroom Robot
A.2 Installation ............98 A.3 Adept 550 CleanRoom Robot Dimensions ......99 Adept 550 Robot Instruction Handbook, Rev A Artisan Technology Group - Quality Instrumentation ... -
Page 115: Introduction
The Adept 550 CleanRoom robot product specifications are the same as the standard Adept 550 robot (listed in Table 6-1), except the Vertical Stroke (Joint 3 - Z direction) is 180 mm (7.1"). The working envelope dimensions for the Adept 550 CleanRoom robot are the same as those shown in Figure 6-13. -
Page 116: A.3 Adept 550 Cleanroom Robot Dimensions
137* *These dimensions may vary slightly due to manufacturing tolerances. Figure A-1. Adept 550 CleanRoom Robot Top and Side Dimensions Adept 550 Robot Instruction Handbook, Rev A Artisan Technology Group - Quality Instrumentation ... Guaranteed | (888) 88-SOURCE | www.artisantg.com... - Page 117 Artisan Technology Group - Quality Instrumentation ... Guaranteed | (888) 88-SOURCE | www.artisantg.com...
-
Page 118: Dual Adept 550 Robots
B.1 Introduction ........... . 102 Dual Adept 550 Robot System Description ......102 B.2 Installation . -
Page 119: Introduction
VMEbus Address for VJI Module If you purchased both Adept 550 robots at the same time as part of a Dual Adept 550 robot system, then the two VJI modules will be configured at the factory for the correct VMEbus address. -
Page 120: Cable Installation
Operation with the Manual Control Pendant (MCP) The optional MCP can be used to control either robot in a Dual Adept 550 robot system. By default, the MCP controls robot 1. To switch to robot 2, press the DEV/F3 button on the MCP. -
Page 121: Emergency Stop Circuit Shuts Off Both Robots
Appendix B - Dual Adept 550 Robots The CALIBRATE monitor command will calibrate both robots. Robot 1 will be calibrated first, then robot 2. If you want to temporarily disable either robot and continue to use the other, you can use the DISABLE ROBOT[] command. -
Page 122: Emc Test Information
EMC Test Information C.1 Electromagnetic Compatibility Testing Results The Adept 550 robot meets all applicable requirements as mandated by the EMC Directive. Table C-1 summarizes the test results of some of the most critical tests. Table C-1. EMC Test Results... - Page 123 Artisan Technology Group - Quality Instrumentation ... Guaranteed | (888) 88-SOURCE | www.artisantg.com...
- Page 124 J3 for manual movement dimensions Adept 550 robot Adept MV-19 controller Adept 550 Robot Instruction Handbook, Rev A Artisan Technology Group - Quality Instrumentation ... Guaranteed | (888) 88-SOURCE | www.artisantg.com...
- Page 125 Lamp Test button, on External Front Panel Lefty configuration Adept 550 Robot Instruction Handbook, Rev A Artisan Technology Group - Quality Instrumentation ... Guaranteed | (888) 88-SOURCE | www.artisantg.com...
- Page 126 Operating keyswitch, on External Front Panel operating modes Automatic 11, 61 11, 60 Manual Adept 550 Robot Instruction Handbook, Rev A Artisan Technology Group - Quality Instrumentation ... Guaranteed | (888) 88-SOURCE | www.artisantg.com...
- Page 127 System Power switch, on External Front Panel technical support, contact information temperature, required range power chassis robot Adept 550 Robot Instruction Handbook, Rev A Artisan Technology Group - Quality Instrumentation ... Guaranteed | (888) 88-SOURCE | www.artisantg.com...
- Page 128 COMPANY _________________________________________________________________________ ADDRESS___________________________________________________________________________ PHONE_____________________________________________________________________________ MANUAL TITLE: ____________________________________________________________________ PART NUMBER and REV level:________________________________________________________ COMMENTS: ______________________________________________________________________________________ ______________________________________________________________________________________ ______________________________________________________________________________________ ______________________________________________________________________________________ ______________________________________________________________________________________ ______________________________________________________________________________________ ______________________________________________________________________________________ ______________________________________________________________________________________ Adept 550 Robot Instruction Handbook, Rev A Artisan Technology Group - Quality Instrumentation ... Guaranteed | (888) 88-SOURCE | www.artisantg.com...
- Page 129 Artisan Technology Group - Quality Instrumentation ... Guaranteed | (888) 88-SOURCE | www.artisantg.com...
- Page 130 Artisan Technology Group - Quality Instrumentation ... Guaranteed | (888) 88-SOURCE | www.artisantg.com...
- Page 131 ® 150 Rose Orchard Way San Jose, CA 95134 408•432•0888 00556-00100, Rev A Artisan Technology Group - Quality Instrumentation ... Guaranteed | (888) 88-SOURCE | www.artisantg.com...
Need help?
Do you have a question about the 550 and is the answer not in the manual?
Questions and answers