Sign In
Upload
Manuals
Brands
Otto Bock Manuals
Medical Equipment
AxonArm Ergo 12K501
Otto Bock AxonArm Ergo 12K501 Manuals
Manuals and User Guides for Otto Bock AxonArm Ergo 12K501. We have
4
Otto Bock AxonArm Ergo 12K501 manuals available for free PDF download: Instructions For Use Manual
Otto Bock AxonArm Ergo 12K501 Instructions For Use Manual (244 pages)
Brand:
Otto Bock
| Category:
Medical Equipment
| Size: 3.36 MB
Table of Contents
Deutsch
3
Table of Contents
3
Produktbeschreibung
5
Konstruktion und Funktion
5
Begriffsbestimmung
5
Vorwort
5
Qualifikation
6
Bedeutung der Warnsymbolik
6
Sicherheit
6
Kontraindikationen
6
Einsatzbedingungen
6
Verwendungszweck
6
Bestimmungsgemäße Verwendung
6
Aufbau der Sicherheitshinweise
7
Allgemeine Sicherheitshinweise
7
Lieferumfang und Zubehör
8
Lieferumfang
8
Zubehör
9
Gebrauchsfähigkeit Herstellen
9
Axonrotation Adapter Einbauen
9
Axonmaster
9
Abdichten der Prothese
10
Axonmaster IM Oberarmschaft Montieren
10
Elektroden Anschließen
10
Steuerung der Elektronischen Sperre
10
Axonmaster an Easyplug Anstecken
11
Easyplug Montieren
11
Ellbogengelenk mit Oberarm Verbinden
11
Vorflexion Einstellen
12
Sichelgelenk Einstellen
14
Seilzug Montieren
14
Sicherheitsabschaltung
15
Ausschalten des Axon-Bus Prothesensystem
15
Einschalten des Axon-Bus Prothesensystems
15
Ladebuchse
15
Abfragen des Ladezustands
15
Laden des Akkus
15
Handhabung
15
Symmetrie Kontrollieren
15
Notöffnen der Axon-Bus Greifkomponente
16
Bluetooth Funktion
16
Beep-Ton Funktion
16
Technische Daten
17
Lokale Rechtliche Hinweise
17
CE-Konformität
17
Haftung
17
Markenzeichen
17
Datentransfer zwischen dem Produkt und dem PC
17
Rechtliche Hinweise
17
Wartung
17
Angewandte Symbole
18
Fehleranzeigen und Beseitigung
18
LED Blinkt Rot und der Beeper Ertönt 3 Sekunden
18
Anhänge
18
LED Blinkt nach dem Tastendruck Drei Mal in der Farbe des Aktuellen Ladezustands
19
English
21
Construction and Function
23
Definition of Terms
23
Foreword
23
Product Description
23
Conditions of Use
24
Contraindications
24
Explanation of Warning Symbols
24
Indications for Use
24
Intended Use
24
Qualification
24
Safety
24
General Safety Instructions
25
Structure of the Safety Instructions
25
Accessories
26
Scope of Delivery
26
Scope of Delivery and Accessories
26
Axonmaster
27
Controlling the Electronic Lock
27
Installing the Axonrotation Adapter
27
Preparing the Product for Use
27
Connecting the Axonmaster to the Easyplug
28
Connecting the Electrodes
28
Installing the Axonmaster in the Upper Arm Socket
28
Installing the Easyplug
28
Sealing the Prosthesis
28
Connecting the Elbow Joint to the Upper Arm
29
Setting the Preflexion
30
Adjusting the Humeral Rotation Feature
32
Charging Receptacle
32
Charging the Battery
32
Checking the Symmetry
32
Handling
32
Installing the Pull Cable
32
Beep Function
33
Bluetooth Function
33
Determining the Battery Charge Level
33
Open the Axon-Bus Gripping Component in an Emergency
33
Safety Shutoff
33
Switching off the Axon-Bus Prosthetic System
33
Switching on the Axon-Bus Prosthetic System
33
Data Transfer between the Product and the PC
34
Legal Information
34
Liability
34
Maintenance
34
CE Conformity
35
Local Legal Information
35
Trademarks
35
Technical Data
36
Appendices
37
Fault Display and Fault Elimination
37
LED Flashes Red and Beeper Sounds for 3 Seconds
37
Symbols Used
37
The LED Flashes Three Times after Pressing the Button in the Colour of the Current Battery Capacity
37
Français
39
Avant-Propos
41
Conception Et Fonctionnement
41
Description du Produit
41
Définition des Termes Utilisés
41
Conditions D'utilisation
42
Contre-Indications
42
Qualification
42
Signification des Symboles de Mise en Garde
42
Sécurité
42
Usage Prévu
42
Utilisation Conforme
42
Consignes Générales de Sécurité
43
Structure des Consignes de Sécurité
43
Contenu de la Livraison
44
Fournitures Et Accessoires
44
Accessoires
45
Axonmaster
45
Installation de L'axonrotation Adapter
45
Mise en Service du Produit
45
Commande du Mécanisme de Verrouillage Électronique
46
Montage de L'axonmaster Sur L'emboîture du Bras
46
Raccordement des Électrodes
46
Étanchéification de la Prothèse
46
Branchement de L'axonmaster À L'easyplug
47
Liaison de L'articulation du Coude Avec Le Bras
47
Montage de L'easyplug
47
Réglage de la Préflexion
48
Montage du Câble Bowden
50
Réglage de L'articulation en Forme de Demi-Lune
50
Allumer Le Système Prothétique Axon-Bus
51
Charge de la Batterie
51
Contrôle de la Symétrie
51
Interrogation de L'état de Charge
51
Manipulation
51
Prise Femelle du Chargeur
51
Éteindre Le Système Prothétique Axon-Bus
51
Déconnexion de Sécurité
52
Fonction Bluetooth
52
Ouverture D'urgence du Composant de Préhension Axon-Bus
52
Signification des Bips
52
Conformité CE
53
Informations Légales
53
Maintenance
53
Marque
53
Responsabilité
53
Transfert de Données entre Le Produit Et Le PC
53
Informations Légales Locales
54
Annexes
55
Caractéristiques Techniques
55
Symboles Utilisés
55
Indicateurs D'erreurs Et Élimination
56
La LED Rouge Clignote, Puis Le Bipeur Retentit Pendant 3 Secondes
56
Italiano
57
Costruzione E Funzionamento
59
Descrizione del Prodotto
59
Introduzione
59
Spiegazione Dei Termini
59
Condizioni D'impiego
60
Controindicazioni
60
Qualifica
60
Sicurezza
60
Significato Dei Simboli Utilizzati
60
Uso Conforme
60
Uso Previsto
60
Indicazioni Generali Per la Sicurezza
61
Struttura Delle Indicazioni Per la Sicurezza
61
Fornitura
62
Fornitura E Accessori
62
Accessori
63
Axonmaster
63
Montaggio Dell'attacco Axonrotation
63
Preparazione All'uso
63
Collegamento Degli Elettrodi
64
Comando del Dispositivo DI Bloccaggio Elettronico
64
Isolamento Della Protesi
64
Montaggio Dell'axonmaster Nell'invasatura del Braccio
64
Collegamento Dell'articolazione DI Gomito al Braccio
65
Collegamento Dell'axonmaster con L'easyplug
65
Montaggio Dell'easyplug
65
Regolazione Della Preflessione
66
Montaggio del Cavo DI Trazione
68
Regolazione Dell'articolazione Falciforme
68
Accensione del Sistema Protesico Axon Bus
69
Boccola DI Carica
69
Carica Della Batteria
69
Controllo Della Simmetria
69
Spegnimento del Sistema Protesico Axon Bus
69
Spegnimento DI Sicurezza
69
Utilizzo
69
Verifica Dello Stato DI Carica
69
Apertura D'emergenza del Componente DI Presa Axon Bus
70
Funzionamento del Segnalatore Acustico
70
Funzione Bluetooth
70
Conformità CE
71
Manutenzione
71
Marchi
71
Note Legali
71
Note Legali Locali
71
Responsabilità
71
Trasferimento Dei Dati Tra Il Prodotto E Il PC
71
Allegati
72
Dati Tecnici
72
Simboli Utilizzati
72
Dopo Aver Premuto Il Tasto, Il LED Lampeggia Tre Volte del Colore Dello Stato DI Carica Attuale
73
Il LED Lampeggia in Rosso E si Sente un Segnale Acustico Per 3 Secondi
73
Segnalazione Ed Eliminazione Guasti
73
Español
75
Construcción y Función
77
Descripción del Producto
77
Explicación de Los Términos Utilizados
77
Introducción
77
Condiciones de Aplicación
78
Contraindicaciones
78
Cualificación
78
Seguridad
78
Significado de Los Símbolos de Advertencia
78
Uso Previsto
78
Estructura de las Indicaciones de Seguridad
79
Indicaciones Generales de Seguridad
79
Componentes Incluidos en el Suministro
80
Componentes Incluidos en el Suministro y Accesorios
80
Accesorios
81
Axonmaster
81
Montar el Adaptador Axonrotation
81
Preparación para el Uso
81
Conectar Los Electrodos
82
Control del Bloqueo Electrónico
82
Impermeabilización de la Prótesis
82
Montar el Axonmaster en el Encaje de Brazo
82
Conectar el Axonmaster al Easyplug
83
Montar el Easyplug
83
Unir la Articulación de Codo con el Brazo
83
Ajustar la Preflexión
84
Ajustar la Articulación de Hoz
86
Montar el Cable de Accionamiento
86
Apagado del Sistema Protésico Axon-Bus
87
Carga de la Batería
87
Comprobar la Simetría
87
Consultar el Nivel de Carga
87
Desconexión de Seguridad
87
Encendido del Sistema Protésico Axon-Bus
87
Manejo
87
Toma de Alimentación
87
Apertura del Componente de Agarre Axon-Bus en Caso de Emergencia
88
Función de Bluetooth
88
Función de las Señales Acústicas
88
Aviso Legal
89
Avisos Legales Locales
89
Conformidad CE
89
Mantenimiento
89
Marcas
89
Responsabilidad
89
Transferencia de Datos entre el Producto y el PC
89
Anexos
90
Datos Técnicos
90
Símbolos Utilizados
90
Avisos de Fallos y Soluciones
91
Después de Pulsar el Botón, el LED Parpadea Tres Veces con el Color del Nivel de Carga Actual
91
El LED Parpadea en Rojo y el Dispositivo Acústico Emite una Señal Durante 3 Segundos
91
Português
93
Construção E Funcionamento
95
Definição de Termos
95
Descrição Do Produto
95
Prefácio
95
Condições de Uso
96
Contraindicações
96
Finalidade
96
Qualificação
96
Segurança
96
Significado Dos Símbolos de Advertência
96
Uso Previsto
96
Estrutura das Indicações de Segurança
97
Indicações Gerais de Segurança
97
Material Fornecido
98
Material Fornecido E Acessórios
98
Acessórios
99
Axonmaster
99
Estabelecer a Operacionalidade
99
Montar O Adaptador Axonrotation
99
Conectar os Eletrodos
100
Controle Do Travamento Eletrônico
100
Montar O Axonmaster no Encaixe Do Braço
100
Vedação da Prótese
100
Conectar a Articulação Do Cotovelo Com O Braço
101
Inserir O Axonmaster no Easyplug
101
Montar O Easyplug
101
Ajustar a Pré-Flexão
102
Ajustar a Articulação Do Foice
104
Montar a Tração por Sarilho
104
Carga da Bateria
105
Conduta Do Estado de Carga
105
Desligamento de Segurança
105
Desligar O Sistema de Prótese Axon-Bus
105
Ligar O Sistema de Prótese Axon-Bus
105
Manuseio
105
Tomada de Carga
105
Verificar a Simetria
105
Abertura de Emergência Do Componente de Preensão Axon-Bus
106
Função Bluetooth
106
Função Sinal Sonoro
106
Conformidade CE
107
Dados Técnicos
107
Manutenção
107
Marcas Registradas
107
Notas Legais
107
Notas Legais Locais
107
Responsabilidade
107
Transferência de Dados entre O Produto E O PC
107
Anexos
108
Símbolos Utilizados
108
Indicações de Falhas E Eliminação
109
LED Pisca a Vermelho E O Sinal Sonoro Soa Durante 3 Segundos
109
O LED Pisca Três Vezes Na Cor Do Estado de Carga Atual Após a Tecla Ter Sido Pressionada
109
Dutch
111
Begrippen
113
Constructie en Functie
113
Productbeschrijving
113
Voorwoord
113
Betekenis Van de Gebruikte Waarschuwingssymbolen
114
Contra-Indicaties
114
Gebruiksdoel
114
Gebruiksvoorwaarden
114
Kwalificatie
114
Veiligheid
114
Algemene Veiligheidsvoorschriften
115
Opbouw Van de Veiligheidsvoorschriften
115
Inhoud Van de Levering
116
Inhoud Van de Levering en Toebehoren
116
Accessoires
117
Axonmaster
117
Axonrotation Adapter Inbouwen
117
Gebruiksklaar Maken
117
Axonmaster in de Bovenarmkoker Monteren
118
Besturing Van de Elektronische Blokkering
118
Elektroden Aansluiten
118
Prothese Afdichten
118
Axonmaster Aansluiten Op de Easyplug
119
Easyplug Monteren
119
Elleboogscharnier Met de Bovenarm Verbinden
119
Voorflexie Instellen
120
Sikkelscharnier Instellen
122
Trekkabel Monteren
122
Gebruik
123
Inschakelen Van Het Axon-Bus-Prothesesysteem
123
Laadbus
123
Laadtoestand Opvragen
123
Laden Van de Accu
123
Symmetrie Controleren
123
Uitschakelen Van Het Axon-Bus-Prothesesysteem
123
Veiligheidsuitschakeling
123
Axon-Bus-Grijpcomponent Openen in Geval Van Nood
124
Bluetoothfunctie
124
Piepsignaalfunctie
124
Aansprakelijkheid
125
CE-Conformiteit
125
Gegevensoverdracht Tussen Het Product en de Pc
125
Handelsmerken
125
Juridische Informatie
125
Lokale Juridische Informatie
125
Onderhoud
125
Bijlagen
126
Gebruikte Symbolen
126
Technische Gegevens
126
Led Knippert Na Een Druk Op de Toets Drie Maal in de Kleur Van de Actuele Laadtoestand
127
Led Knippert Rood en de Pieper Geeft 3 Seconden Lang Een Geluidssignaal
127
Storingsmeldingen en Het Verhelpen Ervan
127
Svenska
129
Definitioner
131
Förord
131
Konstruktion Och Funktion
131
Produktbeskrivning
131
Avsedd Användning
132
Förutsättningar För Användning
132
Kontraindikation
132
Kvalifikation
132
Säkerhet
132
Uppbyggnad Och Säkerhetsanvisningar
132
Varningssymbolernas Betydelse
132
Ändamålsenlig Användning
132
Allmänna Säkerhetsanvisningar
133
I Leveransen
134
Leveransomfång Och Tillbehör
134
Tillbehör
134
Axonmaster
135
Göra Klart För Användning
135
Montera Axonrotation-Adapter
135
Styrning Av Det Elektroniska Låset
135
Ansluta Elektroder
136
Montera Axonmaster I Överarmshylsan
136
Montera Easyplug
136
Sticka in Axonmaster I Easyplug
136
Täta Protesen
136
Förbinda Armbågsleden Med Överarmen
137
Ställa in Förflexion
138
Hantering
140
Kontrollera Symmetrin
140
Laddning Av Batteriet
140
Laddningsdosa
140
Montera Vajerdraget
140
Ställa in Rotationsleden
140
Bluetooth-Funktion
141
Information Om Laddningsnivån
141
Nödavstängning
141
NöDöppning Av Axon-Bus-Gripkomponenten
141
Piptonsfunktion
141
Slå På Axon-Bus-Protessystemet
141
Stänga Av Axon-Bus-Protessystemet
141
Ansvar
142
Dataöverföring Mellan Produkten Och Datorn
142
Juridisk Information
142
Underhåll
142
Varumärken
142
Bilagor
143
CE-Överensstämmelse
143
Lokal Lagstiftning
143
Symboler Som Används
143
Tekniska Uppgifter
143
Felindikationer Och Felavhjälpning
144
LED Blinkar Rött Och Summern Ljuder under 3 Sekunder
144
Led:n Blinkar Tre Gånger I den Aktuella Laddningsnivåns Färg När Knappen Tryckts in
144
Advertisement
Otto Bock AxonArm Ergo 12K501 Instructions For Use Manual (220 pages)
Brand:
Otto Bock
| Category:
Medical Equipment
| Size: 4.23 MB
Table of Contents
Deutsch
3
Table of Contents
3
Vorwort
5
Beugehilfe (AFB - Automatic Forearm Balance)
5
Konstruktion und Funktion
5
Produktbeschreibung
5
Axonmaster
6
Easyplug
6
Elektronische Entriegelung (Axonarm Ergo 12K501)
6
Energieversorgung
6
Mechanische Entriegelung
6
Sperre
6
Steuerung der Elektronischen Sperre
6
Unterarmkabel
6
Akku
7
Verwendung
7
Bedeutung der Warnsymbolik
7
Einsatzbedingungen
7
Einsatzgebiet
7
Sicherheit
7
Ladebuchse
7
Qualifikation des Orthopädie-Technikers
7
Verwendungszweck
7
Allgemeine Sicherheitshinweise
8
Lieferumfang
9
Aufbau der Sicherheitshinweise
8
Axonmaster
10
Axonrotation Adapter Einbauen
10
Herstellung der Gebrauchsfähigkeit
10
Steuerung der Elektronischen Sperre
10
Abdichten der Prothese
11
Axonmaster an Easyplug Anstecken
11
Axonmaster IM Oberarmschaft Montieren
11
Easyplug Montieren
11
Elektroden Anschließen
11
Ellbogengelenk mit Oberarm Verbinden
12
Vorflexion Einstellen
13
Abfragen des Ladezustands
15
Ausschalten des Axon-Bus Prothesensystem
15
Einschalten des Axon-Bus Prothesensystems
15
Laden des Akkus
15
Seilzug Montieren
15
Sichelgelenk Einstellen
15
Symmetrie Kontrollieren
15
Handhabung
15
Beep-Ton Funktion
16
Rechtliche Hinweise
17
Servicehinweis
17
Einstellungen
17
Bluetooth Funktion
16
Notöffnen der Axon-Bus Greifkomponente
16
Sicherheitsabschaltung
16
CE-Konformität
17
Haftung
17
Wartung
17
Angewandte Symbole
18
Entsorgung
17
Warenzeichen
17
Anhänge
18
Die Bewegungen der Axon-Bus Greifkomponente werden Zunehmend Langsamer
18
Fehleranzeigen und Beseitigung
18
LED Blinkt Abwechselnd Gelb/Rot und der Beeper Ertönt für 3 Sekunden
18
LED Blinkt nach dem Tastendruck Drei Mal in der Farbe des Aktuellen Ladezustands
18
LED Blinkt Rot und der Beeper Ertönt 3 Sekunden
18
Technische Daten
18
Axon
19
English
21
Foreword
23
Zubehör
19
AFB (Automatic Forearm Balance) Flexion Aid
23
Construction and Function
23
Product Description
23
Axonmaster
24
Controlling the Electronic Lock
24
Easyplug
24
Electronic Unlocking (Axonarm Ergo 12K501)
24
Forearm Connection Cables
24
Lock
24
Mechanical Release
24
Power Supply
24
Application Area
25
Safety
25
Charging Receptacle
25
Conditions of Use
25
Explanation of Warning Symbols
25
Indications for Use
25
Orthotist / Prosthetist Qualifications
25
Rechargeable Battery
25
Application
25
General Safety Instructions
26
Scope of Delivery
27
Structure of the Safety Instructions
26
Preparation for Use
27
Axonmaster
28
Controlling the Electronic Lock
28
Installing the Axonrotation Adapter
28
Connecting the Axonmaster to the Easyplug
29
Connecting the Electrodes
29
Installing the Axonmaster in the Upper Arm Socket
29
Installing the Easyplug
29
Sealing the Prosthesis
29
Connecting the Elbow Joint to the Upper Arm
30
Setting the Preflexion
31
Adjusting the Humeral Rotation Feature
33
Charging the Battery
33
Checking the Symmetry
33
Handling
33
Determining the Battery Charge Level
33
Installing the Pull Cable
33
Switching off the Axon-Bus Prosthetic System
33
Switching on the Axon-Bus Prosthetic System
33
Beep Function
34
Settings
35
Bluetooth Function
34
Open the Axon-Bus Gripping Component in an Emergency
34
Safety Shutoff
34
CE Conformity
35
Maintenance
35
Service Information
35
Disposal
35
Trademarks
35
Legal Information
35
Liability
35
Appendices
36
Fault Display and Fault Elimination
36
LED Alternately Flashes Yellow/Red and Beeper Sounds for 3 Seconds
36
LED Flashes Red and Beeper Sounds for 3 Seconds
36
Symbols Used
36
Technical Data
36
The LED Flashes Three Times after Pressing the Button in the Colour of the Current Battery Capacity
36
The Movements of the Axon-Bus Gripping Component Are Becoming Increasingly Slower
36
Accessories
37
Axon
37
Français
39
Aide À la Flexion (AFB - Automatic Forearm Balance)
41
Avant-Propos
41
Conception Et Fonction
41
Description du Produit
41
Axonmaster
42
Commande du Mécanisme de Verrouillage Électronique
42
Déblocage Électronique (Axonarm Ergo 12K501)
42
Déverrouillage Mécanique
42
Easyplug
42
Câbles de L'avant-Bras
42
Mécanisme de Verrouillage
42
Alimentation
43
Batterie
43
Application
43
Champ D'application Médical
43
Qualification de L'orthoprothésiste
43
Conditions D'utilisation
43
Domaine D'application
43
Sécurité
44
Prise Femelle du Chargeur
43
Consignes Générales de Sécurité
44
Contenu de la Livraison
45
Préparation À L'utilisation
46
Signification des Symboles de Mise en Garde
44
Structure des Consignes de Sécurité
44
Installation de L'axonrotation Adapter
46
Axonmaster
47
Commande du Mécanisme de Verrouillage Électronique
47
Raccordement des Électrodes
47
Montage de L'axonmaster Sur L'emboîture du Bras
47
Étanchéification de la Prothèse
47
Branchement de L'axonmaster À L'easyplug
48
Montage de L'easyplug
48
Liaison de L'articulation du Coude Avec Le Bras
48
Réglage de la Préflexion
49
Réglage de L'articulation en Forme de Demi-Lune
51
Montage du Câble Bowden
51
Allumer Le Système Prothétique Axon-Bus
52
Charge de la Batterie
52
Contrôle de la Symétrie
52
Manipulation
52
Déconnexion de Sécurité
52
Ouverture D'urgence du Composant de Préhension Axon-Bus
52
Éteindre Le Système Prothétique Axon-Bus
52
Interrogation de L'état de Charge
52
Fonction Bluetooth
53
Remarque Relative À la Révision
53
Mise Au Rebut
54
Signification des Bips
53
Réglages
53
Maintenance
53
Annexes
54
Indicateurs D'erreurs Et Élimination
54
Conformité CE
54
La LED Rouge Clignote, Puis Le Bipeur Retentit Pendant 3 Secondes
54
Marque de Fabrique
54
Notices Légales
54
Responsabilité
54
Une Fois que Le Bouton a Été Pressé, la LED Clignote Trois Fois Dans la Couleur Indiquant Le Niveau de Charge Actuel
54
Caractéristiques Techniques
55
Les Mouvements du Composant de Préhension Axon-Bus Sont de Plus en Plus Lents
55
Symboles Utilisés
55
Accessoires
56
Axon
56
Italiano
57
Ausilio Alla Flessione (AFB - Automatic Forearm Balance)
59
Costruzione E Funzionamento
59
Descrizione del Prodotto
59
Introduzione
59
Alimentazione Elettrica
60
Axonmaster
60
Comando del Dispositivo DI Bloccaggio Elettronico
60
Dispositivo DI Bloccaggio
60
Easyplug
60
Cavi Dell'avambraccio
60
Sbloccaggio Elettronico (Axonarm Ergo 12K501)
60
Sbloccaggio Meccanico
60
Batteria
61
Utilizzo
61
Boccola DI Carica
61
Campo D'impiego
61
Sicurezza
61
Condizioni D'impiego
61
Qualificazione del Tecnico Ortopedico
61
Scopo Medico
61
Significato Dei Simboli Utilizzati
61
Indicazioni Generali Per la Sicurezza
62
Fornitura
63
Preparazione All'uso
64
Montaggio Dell'attacco Axonrotation
64
Struttura Delle Indicazioni Per la Sicurezza
62
Axonmaster
64
Comando del Dispositivo DI Bloccaggio Elettronico
64
Collegamento Degli Elettrodi
65
Montaggio Dell'axonmaster Nell'invasatura del Braccio
65
Isolamento Della Protesi
65
Collegamento Dell'axonmaster con L'easyplug
65
Montaggio Dell'easyplug
66
Collegamento Dell'articolazione DI Gomito al Braccio
66
Regolazione Della Preflessione
67
Regolazione Dell'articolazione Falciforme
69
Carica Della Batteria
69
Controllo Della Simmetria
69
Utilizzo
69
Montaggio del Cavo DI Trazione
69
Accensione del Sistema Protesico Axon Bus
70
Funzionamento del Segnalatore Acustico
70
Regolazioni
71
Manutenzione
71
Funzione Bluetooth
70
Spegnimento del Sistema Protesico Axon Bus
70
Spegnimento DI Sicurezza
70
Apertura D'emergenza del Componente DI Presa Axon Bus
70
Verifica Dello Stato DI Carica
70
Servizio Assistenza
71
Smaltimento
71
Español
75
Descripción del Producto
77
Servoflexión (AFB - Automatic Forearm Balance)
77
Axonmaster
78
Bloqueo
78
Cables del Antebrazo
78
Control del Bloqueo Electrónico
78
Desbloqueo Electrónico (Axonarm Ergo 12K501)
78
Desbloqueo Mecánico
78
Easyplug
78
Suministro de Energía
78
Batería
79
Introducción
77
Construcción y Funcionamiento
77
Uso
79
Condiciones de Aplicación
79
Cualificación del Técnico Ortopédico
79
Finalidad Médica
79
Significado de Los Símbolos de Advertencia
79
Toma de Alimentación
79
Ámbito de Aplicación
79
Seguridad
79
Estructura de las Indicaciones de Seguridad
80
Indicaciones Generales de Seguridad
80
Componentes Incluidos en el Suministro
81
Axonmaster
82
Control del Bloqueo Electrónico
82
Montar el Adaptador Axonrotation
82
Preparación para el Uso
82
Conectar el Axonmaster al Easyplug
83
Conectar Los Electrodos
83
Impermeabilización de la Prótesis
83
Montar el Axonmaster en el Encaje de Brazo
83
Montar el Easyplug
84
Unir la Articulación de Codo con el Brazo
84
Ajustar la Preflexión
85
Ajustar la Articulación de Hoz
87
Carga de la Batería
87
Comprobar la Simetría
87
Manejo
87
Montar el Cable de Accionamiento
87
Apagado del Sistema Protésico Axon-Bus
88
Apertura del Componente de Agarre Axon-Bus en Caso de Emergencia
88
Consultar el Nivel de Carga
88
Desconexión de Seguridad
88
Encendido del Sistema Protésico Axon-Bus
88
Función de Bluetooth
88
Función de las Señales Acústicas
88
Eliminación
89
Mantenimiento
89
Ajustes
89
Indicación de Servicio Técnico
89
Português
93
Prefácio
95
Ajuda de Flexão (AFB - Automatic Forearm Balance)
95
Construção E Funcionamento
95
Alimentação
96
Axonmaster
96
Cabos Do Antebraço
96
Controle Do Travamento Eletrônico
96
Destravar Eletronicamente (Axonarm Ergo 12K501)
96
Destravar Mecanicamente
96
Easyplug
96
Travamento
96
Bateria
97
Descrição Do Produto
95
Uso
97
Condições de Aplicação
97
Finalidade Médica
97
Qualificação Do Técnico Ortopédico
97
Significado Dos Símbolos de Advertência
97
Tomada de Carga
97
Área de Aplicação
97
Segurança
97
Estrutura das Indicações de Segurança
98
Indicações Gerais de Segurança
98
Material Fornecido
99
Axonmaster
100
Controle Do Travamento Eletrônico
100
Estabelecimento da Operacionalidade
100
Montar O Adaptador Axonrotation
100
Conectar os Eletrodos
101
Inserir O Axonmaster no Easyplug
101
Montar O Axonmaster no Encaixe Do Braço
101
Vedação da Prótese
101
Conectar a Articulação Do Cotovelo Com O Braço
102
Montar O Easyplug
102
Ajustar a Pré-Flexão
103
Ajustar a Articulação Do Foice
105
Carga da Bateria
105
Montar a Tração por Sarilho
105
Verificar a Simetria
105
Uso
105
Abertura de Emergência Do Componente de Preensão Axon-Bus
106
Conduta Do Estado de Carga
106
Desligamento de Segurança
106
Desligar O Sistema de Prótese Axon-Bus
106
Função Bluetooth
106
Função Sinal Sonoro
106
Configurações
107
Ligar O Sistema de Prótese Axon-Bus
106
Indicação sobre a Manutenção
107
Manutenção
107
Eliminação
107
Dutch
111
Productbeschrijving
113
Buighulp (AFB - Automatic Forearm Balance)
113
Constructie en Functie
113
Voorwoord
113
Axonmaster
114
Besturing Van de Elektronische Blokkering
114
Blokkering
114
Easyplug
114
Elektronische Ontgrendeling (Axonarm Ergo 12K501)
114
Mechanische Ontgrendeling
114
Onderarmkabels
114
Accu
115
Gebruik
115
Betekenis Van de Gebruikte Waarschuwingssymbolen
115
Energievoorziening
115
Gebruiksvoorwaarden
115
Kwalificatie Van de Orthopedisch Instrumentmaker
115
Laadbus
115
Medisch Doel
115
Toepassingsgebied
115
Veiligheid
115
Algemene Veiligheidsvoorschriften
116
Inhoud Van de Levering
117
Opbouw Van de Veiligheidsvoorschriften
116
Axonmaster
118
Axonrotation Adapter Inbouwen
118
Besturing Van de Elektronische Blokkering
118
Gebruiksklaar Maken
118
Axonmaster Aansluiten Op de Easyplug
119
Axonmaster in de Bovenarmkoker Monteren
119
Elektroden Aansluiten
119
Prothese Afdichten
119
Easyplug Monteren
120
Elleboogscharnier Met de Bovenarm Verbinden
120
Voorflexie Instellen
121
Laden Van de Accu
123
Sikkelscharnier Instellen
123
Symmetrie Controleren
123
Werkwijze
123
Trekkabel Monteren
123
Axon-Bus-Grijpcomponent Openen in Geval Van Nood
124
Bluetoothfunctie
124
Inschakelen Van Het Axon-Bus-Prothesesysteem
124
Laadtoestand Opvragen
124
Piepsignaalfunctie
124
Onderhoud
125
Service
125
Afvoer Aan Het Einde Van de Levensduur
125
Instellingen
125
Uitschakelen Van Het Axon-Bus-Prothesesysteem
124
Veiligheidsuitschakeling
124
Otto Bock AxonArm Ergo 12K501 Instructions For Use Manual (284 pages)
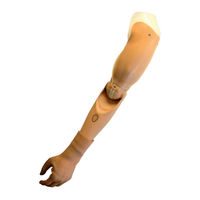
Prosthetic System
Brand:
Otto Bock
| Category:
Medical Equipment
| Size: 4.15 MB
Table of Contents
Table of Contents
1
Instructions D'utilisation (Utilisateur)
55
Istruzioni Per L'uso (Utilizzatore)
74
Manual de Utilização (Usuário)
121
Gebruiksaanwijzing (Gebruiker)
143
Bruksanvisning (Bruker)
205
取扱説明書(ユーザー用)
269
Advertisement
Otto Bock AxonArm Ergo 12K501 Instructions For Use Manual (20 pages)
Brand:
Otto Bock
| Category:
Medical Equipment
| Size: 0.47 MB
Table of Contents
Table of Contents
3
Foreword
5
Product Description
5
Construction and Function
5
Definition of Terms
5
Intended Use
6
Indications for Use
6
Conditions of Use
6
Contraindications
6
Qualification
6
Safety
6
Explanation of Warning Symbols
6
Structure of the Safety Instructions
6
General Safety Instructions
7
Scope of Delivery and Accessories
8
Scope of Delivery
8
Accessories
9
Preparing the Product for Use
9
Installing the Axonrotation Adapter
9
Axonmaster
10
Controlling the Electronic Lock
10
Connecting the Electrodes
10
Installing the Axonmaster in the Upper Arm Socket
10
Sealing the Prosthesis
10
Connecting the Axonmaster to the Easyplug
11
Installing the Easyplug
11
Connecting the Elbow Joint to the Upper Arm
11
Setting the Preflexion
12
Adjusting the Humeral Rotation Feature
14
Installing the Pull Cable
14
Checking the Symmetry
14
Handling
15
Charging the Battery
15
Charging Receptacle
15
Determining the Battery Charge Level
15
Switching on the Axon-Bus Prosthetic System
15
Switching off the Axon-Bus Prosthetic System
15
Safety Shutoff
15
Open the Axon-Bus Gripping Component in an Emergency
16
Bluetooth Function
16
Beep Function
16
Data Transfer between the Product and the PC
16
Legal Information
17
Liability
17
Trademarks
17
CE Conformity
17
Local Legal Information
17
Technical Data
18
Appendices
18
Symbols Used
18
Fault Display and Fault Elimination
19
LED Flashes Red and Beeper Sounds for 3 Seconds
19
The LED Flashes Three Times after Pressing the Button in the Colour of the Current Battery Capacity
19
LED Alternately Flashes Yellow/Red and Beeper Sounds for 3 Seconds
19
Advertisement
Related Products
Otto Bock 12K50
Otto Bock AxonArm Hybrid 12K500
Otto Bock 12K5
Otto Bock 12K50 ErgoArm Electronic plus
Otto Bock 12K41
Otto Bock 12K42
Otto Bock 12K110N
Otto Bock 12K110N-50-S
Otto Bock 12K19
Otto Bock 12K20
Otto Bock Categories
Medical Equipment
Wheelchair
Personal Care Products
Mobility Aid
Adapter
More Otto Bock Manuals
Login
Sign In
OR
Sign in with Facebook
Sign in with Google
Upload manual
Upload from disk
Upload from URL