Table of Contents
Advertisement
Quick Links
Advertisement
Chapters
Table of Contents
Troubleshooting

Related Manuals for Tandberg Data Magnum 224


Summary of Contents for Tandberg Data Magnum 224
- Page 2 Copyright 2007 by Tandberg Data Corporation. All rights reserved. This item and the OPYRIGHT information contained herein are the property of Tandberg Data Corporation. No part of this document may be reproduced, transmitted, transcribed, stored in a retrieval system, or translated into any language or computer language in any form or by any means,...
- Page 3 The library (Magnum 224, StorageLibrary T24, or StorageLoader 2U LTO) by Tandberg RODUCT Data Corporation is warranted to be free from defects in materials, parts, and ARRANTY workmanship and will conform to the current product specification upon delivery. For AUTION the specific details of your warranty, refer to your sales contract or contact the company from which the library was purchased.
- Page 4 OTES 1017472 RODUCT ANUAL...
-
Page 5: Table Of Contents
Contents About This Manual ......xv 1 1 1 1 Product Overview ......1 Library Features . - Page 6 Viewing Information on the Statistics Page ....100 Using the Utility’s Tools ....... . . 103 5 5 5 5 Operating the Library.
- Page 7 8 8 8 8 Troubleshooting ......193 Library Troubleshooting ....... . . 193 Tape Drive Troubleshooting .
- Page 8 Index ......... 251 1017472 RODUCT ANUAL...
- Page 9 Figures 1 1 1 1 Product Overview Figure 1-1 Library front panel components ......3 Figure 1-2 Library back panel components (SCSI configuration) .
- Page 10 5 5 5 5 Operating the Library Figure 5-1 Location of status LED ......114 Figure 5-2 Bar code label placement and write-protect switch location .
- Page 11 Figure D-8 Bottom foam packing pieces ......235 Figure D-9 Top foam packing piece (shown with accessories)..235 Figure D-10 Accessory item placement in shipping box .
- Page 12 OTES 1017472 RODUCT ANUAL...
- Page 13 Tables 2 2 2 2 Installing the Library Table 2-1 Obtaining accessories and equipment ....10 3 3 3 3 Configuring the Library Table 3-1 Tape drive status messages .
- Page 14 C C C C Write Once, Read Many (WORM) Capability Table C-1 WORM tape cartridge specifications ....224 Table C-2 TapeAlert flags associated with the WORM media ..225 Table C-3 ASC/ASCQ error codes for a Medium Error (SK 3) with WORM media .
-
Page 15: About This Manual
BOUT ANUAL This manual describes how to install, configure, operate, maintain, and troubleshoot the Magnum 224, StorageLibrary T24, or StorageLoader 2U LTO (library) by Tandberg Data Corporation. It also provides specifications for the library. NOTICE–This manual may contain some preliminary information that may change without notice. - Page 16 Magnum 224, StorageLibrary T24, or StorageLoader 2U LTO Quick Start Guide, 1017473 FI: Installing the Library in a Rack or Replacing a Magazine (Magnum 224, Magnum 448, StorageLibrary T24, or StorageLoader 2U LTO), 1017475 FI: Installing or Replacing a Tape Drive in the Library (Magnum 224,...
- Page 17 Standards Small Computer System Interface - 2 (SCSI-2), INCITS 131-1994[R2004] Information Technology - SCSI-3 Primary Commands (SPC), ANSI INCITS 301-1997 Information Technology - SCSI Primary Commands-2 (SPC-2), ANSI INCITS 351-2001 SCSI-3 Primary Commands (SPC), INCITS 301-1997 [R2002] Information Technology - SCSI-3 Medium Changer Commands (SMC), ANSI INCITS 314-1998 Information Technology –...
- Page 18 OTES 1017472 RODUCT ANUAL XVIII...
- Page 19 EATURES The library includes the following features: Storage for up to 24 data cartridges. The Magnum 224 and StorageLibrary T24 hold up to 24 data cartridges; the StorageLoader 2U LTO holds up to 20 data cartridges. The magazines hold 10 or 12 cartridges each.
- Page 20 1—P HAPTER RODUCT VERVIEW Tape drives. The library contains high-performance, high-capacity LTO tape drives in one of these options: One or two half height LTO Ultrium 2 tape drive(s) One or two half height LTO Ultrium 3 tape drive(s) One full height LTO Ultrium 3 tape drive One full height LTO Ultrium 4 tape drive Import/Export (I/E Port).
-
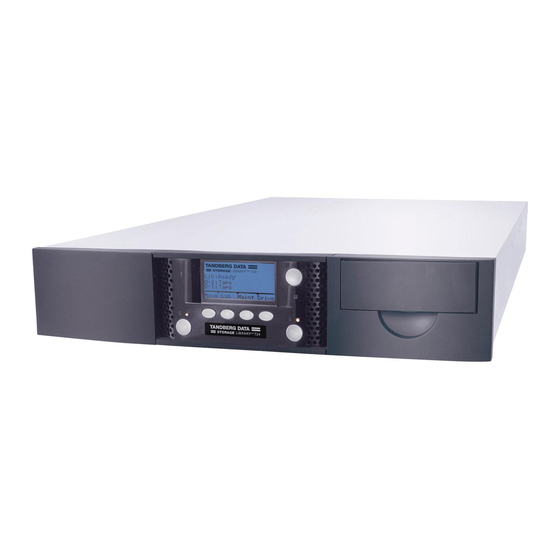
Page 21: Figure 1-1 Library Front Panel Components
(2x) status LEDs (2x) Figure 1-1 Library front panel components Operator Panel (LCD and Keypad) The operator panel includes a 4-button keypad and an 8-line, 21-character liquid crystal display (LCD). TANDBERG DATA Idle No Tape No Tape Move Maint... -
Page 22: Product Overview
1—P HAPTER RODUCT VERVIEW You can use the operator panel to: Set or change library configuration options Issue commands to the library View library status and information Run demonstration programs and test library functions Reset the library Set tape drive configuration options View tape drive status and information Import/Export Port (I/E Port) The I/E port allows you to insert or remove cartridges from the library. -
Page 23: Library Components
IBRARY OMPONENTS I/E Port Full LED The LED for the I/E port (full/empty) indicates activity as shown in the following table. See Figure 1-1 for the location of the LED. Color Status Off (no color) I/E Port is empty Green I/E Port is full Green blinking I/E Port door is open... -
Page 24: Product Overview
1—P HAPTER RODUCT VERVIEW See the tape drive Product Manual for tape drive information. IBM — www.storage.ibm.com/tape/lto/oem/index.html Hewlett Packard — www1.hp.com/storage/tapestorage.html See Automation/Drive Interface - Command (ADC) for ADI information. T 10 — www.t10.org SCSI Connectors—If the tape drive(s) installed in the library have SCSI connectors, they can accommodate one of the following. -
Page 25: Figure 1-4 Library Internal Components
Magazines The library’s two magazines hold up to 24 data cartridges; the Magnum 224 and StorageLibrary T24 both hold 24 cartridges, while the StorageLoader 2U LTO library holds 20 cartridges. The I/E port is located in the magazine on the right of the library. - Page 26 1—P HAPTER RODUCT VERVIEW OTES 1017472 RODUCT ANUAL...
- Page 27 NSTALLING THE IBRARY This chapter describes how to install the library. Depending on your requirements, installation will involve most or all of the following steps: To view this information... go to... Obtaining accessories and equipment page 10 Preparing for installation page 12 Installing the library in a rack page 13...
-
Page 28: Installing The Library
QUIPMENT Make sure that you have all the accessories and equipment for library installation and operation, as indicated in the following table. If necessary, you can purchase these items from Tandberg Data (see “Contacting Tandberg Data Corporation” on page iii). - Page 29 Bar code Sample bar code labels for the cartridges are included with the library. If you want to labels prepare your own labels—refer to the Tandberg Data Bar Code Label Specification for LTO Ultrium Cartridges at www.tandbergdata.com. Cartridges Use only data cartridges and cleaning cartridges designed specifically for LTO Ultrium tape drives.
-
Page 30: Preparing For Installation
For optimum performance, use an Ultra160 SCSI host bus adapter. Compatibility information is available at www.tandbergdata.com. If your software has not yet been certified for the Magnum 224, StorageLibrary T24, or StorageLoader 2U LTO, you can use one of the library’s emulation modes (see... -
Page 31: Installing The Library In A Rack
NSTALLING THE IBRARY IN A Ensure that the work area is free from conditions that could cause electrostatic discharge (ESD). Discharge static electricity from your body by touching a known grounded surface, such as a computer’s metal chassis. Before performing any installation or maintenance procedures, be sure that the Warning library power switch is in the off position and that the power cord is disconnected from the library and the outlet. -
Page 32: Figure 2-1 Assembling The Left-Side Rail
2—I HAPTER NSTALLING THE IBRARY 3. 3. 3. 3. Assemble the left rail using four M5 screws. Keep the screws loose so that you can adjust the length of the assembled rail, if necessary. Left-side rails (viewed from front) Back flange Back section Small back flange... -
Page 33: Attaching The Rails To The Rack
TTACHING THE AILS TO THE TTACHING THE AILS TO THE 1. 1. 1. 1. Left side rail assembly—Position the left-side rail assembly in the rack so that the front flange is behind the front screw holes in the rack. Back of Rack Rack rail (back) Depth of rack (E) -
Page 34: Attaching The Library To The Rails
2—I HAPTER NSTALLING THE IBRARY 6. 6. 6. 6. Using a #2 Phillips screwdriver, tighten the four screws holding the rail assembly together. 7. 7. 7. 7. Right side rail assembly—Repeat steps 1 through 6 for the right-side rail assembly. Make sure that the right rail assembly is at the same level as the left rail assembly. -
Page 35: Connecting To Scsi
SCSI ONNECTING TO 3. 3. 3. 3. From the back of the rack, attach the library to the rails by inserting an M3 (the two smaller screws) screw into each of the small flanges. Tighten the screws using a #2 Phillips screwdriver. Back of rack M5 x 12 (black) screws (total qty installed = 16) - Page 36 Ultra 160 non-RAID SCSI host bus adapter card. Do not connect single-ended SCSI devices. Although single-ended SCSI is compatible with the tape drive’s LVD SCSI interface, Tandberg Data does not support connecting single-ended devices to the SCSI bus attached to the tape drives.
-
Page 37: Figure 2-6 Scsi Connectors
SCSI ONNECTING TO 2. 2. 2. 2. Power off the host. Power switch Terminate (off = 0) (if needed) SCSI connector Figure 2-6 SCSI connectors 3. 3. 3. 3. Connect a SCSI cable to the host computer and to one of the tape drive SCSI connectors. -
Page 38: Connecting The Library To Fibre Channel
2—I HAPTER NSTALLING THE IBRARY ONNECTING THE IBRARY TO IBRE HANNEL This section provides instructions for connecting the tape drive(s) in the library to a Fibre Channel network. Figure 2-7 shows the back panel of the FC Library. Each tape drive includes one integrated dual LC optical fiber connector, Port A, for connecting the tape drive to a Fibre Channel network. -
Page 39: Connecting The Library To Ethernet
ONNECTING THE IBRARY TO THERNET ONNECTING THE IBRARY TO THERNET The library’s Remote Management utility (described in Chapter 4) allows you to remotely monitor operations when the library is connected to an Ethernet network. You can also create diagnostic listings and upgrade library firmware. For information about upgrading firmware and creating diagnostic listings, page 183. -
Page 40: Figure 2-10 Shipping Locks
2—I HAPTER NSTALLING THE IBRARY 2. 2. 2. 2. Connect the other end of the cable to the network or directly to the server you plan to use to run the library’s Remote Management utility or to upload firmware. Chapter 7, “Maintenance for information about downloading firmware and performing diagnostics. -
Page 41: Powering On The Library
“Completing the Power-on Sequence” on page EMOVING THE HIPPING The library automatically ejects both magazines and displays the following message when you power it on with the shipping lock installed. TANDBERG DATA : Hardware Error Picker ship-lock Remove Picker Lock Reset Library Move... -
Page 42: Figure 2-12 Shipping Lock Replacement Preparation
2—I HAPTER NSTALLING THE IBRARY No up and down or No up and down or side to side movement side to side movement Figure 2-12 Shipping lock replacement preparation 3. 3. 3. 3. Remove the screws and the locks. Remove the screw securing the left shipping lock. -
Page 43: Verifying The Hardware Installation
3. 3. 3. 3. Ensure that both magazines are fully seated. Once they are fully seated, the library updates its inventory. While updating inventory, the library displays the inventory status (XX%). TANDBERG DATA Update Inventory (Current action) No Tape Move... - Page 44 181 for instructions. These exercises help determine if the library’s hardware components are operating properly. 3. 3. 3. 3. Download the Tandberg Data diagnostic tools LibTool and LTOTool from www.tandbergdata.com. Use the Remote Management Utility (see Chapter 4) to verify that the host computer can communicate with the library and the tape drive(s).
- Page 45 ERIFYING THE ARDWARE NSTALLATION Use LibTool to view the cartridge inventory and to move tapes into and out of the tape drive(s). Use LTOTool to run a Write/Read test to verify that the tape drive(s) can perform write and read operations. If the library and tape drive(s) are not operating as expected, see: Chapter 8 for troubleshooting tips...
- Page 46 2—I HAPTER NSTALLING THE IBRARY OTES 1017472 RODUCT ANUAL...
-
Page 47: Figure 3-1 Library Lcd And Keypad
ONFIGURING THE IBRARY After installing the library hardware, you are ready to set configuration options. This chapter provides the following information for the library: To view this information... go to... Accessing Configuration Options below Home Screen Menu page 35 Setting Configuration Options page 35 Checking the Setup page 79... -
Page 48: Table 3-1 Tape Drive Status Messages
Viewing the Home Screen During normal operation, the Home screen appears on the LCD (see below). By default, the Home screen displays the operating status of the library and tape drive or tape drives. TANDBERG DATA Idle No Tape No Tape... -
Page 49: Table 3-2 Library Command Status Messages
D-n: Rewinding The tape drive is rewinding the tape. Library status messages Some examples of library status messages are shown Table 3-2 Table 3-3. The display for the library will be: TANDBERG DATA <command> <command-state> Move Maint Drive Table 3-2 shows the <command>... -
Page 50: Table 3-3 Library Command-State Status Messages
3—C HAPTER ONFIGURING THE IBRARY Table 3-3 shows the current state <command-states> of the commands. Table 3-3 Library command–state status messages Message Meaning Calibrate The library is calibrating a mechanism. Positioning The library is positioning the robot to the desired location. Loading The library is loading a cartridge into a tape drive. - Page 51 ONFIGURATION PTIONS VERVIEW OF IBRARY ENUS When the Home screen is displayed on the LCD, press Move, Lib, Maint, or Drive to access the library’s main menus. TANDBERG DATA Idle No Tape No Tape Move Maint Drive Once you are within a menu, press Select, Back,...
-
Page 52: Configuring The Library
3—C HAPTER ONFIGURING THE IBRARY Table 3-2 provides an overview of the library’s main menus. Figure 3-2 shows the organization of the menus. Table 3-4 Operator button descriptions Button Description (press this button to:) ƒ Load a cartridge into the tape drive ƒ... -
Page 53: Setting Configuration Options
ETTING ONFIGURATION PTIONS Home Screen Menu Maint Drive Move (Maintenance/ (Tape Drive (Move Cartridges) (Library Properties) Diagnostics) Properties) Load Drive(s) Library ID Library Maintenance Drive ID [Library type, serial number, (Drive type, code level, code level, and SCSI ID and serial number) Library Status (and LUN) or WWNN] Unload Drive(s) -
Page 54: Table 3-5 Library Configuration Options
3—C HAPTER ONFIGURING THE IBRARY Table 3-5 provides an overview of each configuration option. Read through the table to determine which options you need to set, and then follow the steps on the referenced pages. Table 3-5 Library configuration options Configuration Description See... - Page 55 Emulation Mode Changing the emulation mode is required if your “Changing the Emulation backup application does not support the Magnum 224, Mode” on page 53 StorageLibrary T24, or StorageLoader 2U LTO, but does support one of these products: ƒ Exabyte 221L library ƒ...
- Page 56 3—C HAPTER ONFIGURING THE IBRARY LCD L HANGING THE ANGUAGE You can choose from the following languages for the LCD display: English (default) French German Italian Spanish To change the LCD language: 1. 1. 1. 1. At the Home screen, press Lib. If necessary, enter the operator panel password (see page 75).
- Page 57 ETTING ONFIGURATION PTIONS HANGING THE SETTINGS If desired, you can change the LCD’s contrast from its default setting to a level that is appropriate for your lighting conditions. To change the LCD settings: 1. 1. 1. 1. At the Home screen, press Lib. If necessary, enter the operator panel password (see page 75).
- Page 58 3—C HAPTER ONFIGURING THE IBRARY 2. 2. 2. 2. Press Select. – 3. 3. 3. 3. Press Modify. Press until the selection changes to the desired value. As you change the value, the display will update to show the result of the current value.
- Page 59 ETTING ONFIGURATION PTIONS 4. 4. 4. 4. Press until the selection arrow ( ) points to Display Settings. Library Settings Emulation Mode Ethernet Display Settings Storage Settings Restore Defaults Select Back 5. 5. 5. 5. Press Select. 6. 6. 6. 6. Press until the selection arrow ( ) points to Display Contrast.
- Page 60 3—C HAPTER ONFIGURING THE IBRARY 2. 2. 2. 2. Press until the selection arrow ( ) points to Library Settings. Library Library ID Inventory Password Select Language Library Settings Select Back 3. 3. 3. 3. Press Select. 4. 4. 4. 4. Press until the selection arrow ( ) points to Display Settings.
- Page 61 You can limit the number of slots visible to the SCSI interface for compatibility with backup software. Note: The Magnum 224 and StorageLibrary T24 each have 24 available slots with two magazines installed. The StorageLoader 2U LTO library has 20 available slots with two magazines installed.
- Page 62 3—C HAPTER ONFIGURING THE IBRARY 2. 2. 2. 2. Press until the selection arrow ( ) points to Library Settings. Library Library ID Inventory Password Select Language Library Settings Select Back 3. 3. 3. 3. Press Select. 4. 4. 4. 4. Press until the selection arrow ( ) points to Storage Settings.
- Page 63 ETTING ONFIGURATION PTIONS 9. 9. 9. 9. Press OK to continue. Press Back (as needed) to return to the Home screen. ! ! ! ! You may need to reconfigure your backup application to Important recognize the new slot count. Refer to your application’s documentation for instructions.
- Page 64 3—C HAPTER ONFIGURING THE IBRARY 4. 4. 4. 4. Press until the selection arrow ( ) points to Storage Settings. Library Settings Operation Mode Ethernet Display Settings Storage Settings Restore Defaults Select Back 5. 5. 5. 5. Press Select. 6. 6. 6. 6. Press until the selection arrow ( ) points to I/E Port.
- Page 65 ETTING ONFIGURATION PTIONS NABLING THE EDIA DENTIFIER You can enable the library to identify the ‘type’ of media installed in the library when it scans barcodes. With this option enabled, the bar code scan includes two extra digits: L2 for an LTO-2 data cartridge, L3 for an LTO-3 data cartridge, or L4 for an LTO-4 data cartridge.
- Page 66 3—C HAPTER ONFIGURING THE IBRARY 3. 3. 3. 3. Press until the selection arrow ( ) points to Storage Settings. Library Settings Operation Mode Ethernet Display Settings Storage Settings Restore Defaults Select Back 4. 4. 4. 4. Press Select, and then press until the selection arrow ( ) points to Label Media Type, and then press Select.
- Page 67 ETTING ONFIGURATION PTIONS SCSI ID HANGING THE Each device on a SCSI bus must have a unique SCSI ID so that it can be identified by the host computer. You can use the default IDs for the tape drive(s) or change them if they conflict with other devices on the SCSI bus. Notes: The library communicates with the host through the SCSI interface of the tape drive(s) via the ADI serial interface.
- Page 68 3—C HAPTER ONFIGURING THE IBRARY – 4. 4. 4. 4. Press to select the tape drive (if your library has more than one tape drive installed). Press Select to see the following screen. Drive SCSI ID Drive 01 SCSI ID: n Modify –...
- Page 69 ETTING ONFIGURATION PTIONS 3. 3. 3. 3. Press Select. Library SCSI Bridge Drive: nn Modify – 4. 4. 4. 4. Press Modify. Press to select the desired tape drive. Press Select. Library SCSI Bridge Drive ID Address: 0051 (element address) Drive 1: (empty) –...
- Page 70 3—C HAPTER ONFIGURING THE IBRARY If necessary, enter the operator panel password (see page 75). 2. 2. 2. 2. Press until the selection arrow ( ) points to Drive Configuration. Drive Drive ID Interface Drive Configuration Library SCSI Bridge Select Back 3.
-
Page 71: Table 3-6 Emulation Modes For The Library
“EXABYTE “, “MAGNUM 224 “ in response to a SCSI INQUIRY command from an application. If your library software has not yet been certified for the Magnum 224, StorageLibrary T24, or StorageLoader 2U LTO, you can select an option in Table 3-6, which lists the available emulation modes for the library. - Page 72 3—C HAPTER ONFIGURING THE IBRARY 2. 2. 2. 2. Press until the selection arrow ( ) points to Library Settings. Library Library ID Inventory Password Select Language Library Settings Select Back 3. 3. 3. 3. Press Select, and then press until the selection arrow ( ) points to Operation Mode.
- Page 73 ETTING ONFIGURATION PTIONS 5. 5. 5. 5. Press Select, and then press Modify. Emulation Mode Native Modify 6. 6. 6. 6. Press until the selection arrow ( ) points to the desired mode, and then press Select. Emulation Mode Native Exabyte 221L Exabyte 210 Exabyte EZ17...
- Page 74 3—C HAPTER ONFIGURING THE IBRARY Sequential–The library processes cartridges sequentially without direction from an application. In Sequential mode, magazines are automatically associated with tape drives so that each tape drive and its associated magazine (or magazines) becomes an independent autoloader. ! ! ! ! If you are using a backup application which is capable of Important...
- Page 75 ETTING ONFIGURATION PTIONS 5. 5. 5. 5. Press Select. Press until the selection arrow ( ) points to Sequential Mode, and press Select. Operation Mode Emulation Mode Sequential Mode Select Back Enabling Sequential Mode ! ! ! ! If you are using a backup application which is capable of Important controlling the library, do not configure the library to operate in Sequential mode.
- Page 76 3—C HAPTER ONFIGURING THE IBRARY Setting the Restart Option The Restart option determines what the library does after it is reset, power cycled, or when a magazine has been re-inserted. Setting The library... Enabled restarts at the beginning of the cartridge sequence Disabled resume where it left off when the interruption occurred –...
- Page 77 Press OK. 7. 7. 7. 7. Press Back (as needed) to return to the Home screen. The Home screen now indicates that the library is operating in Sequential Mode by the following changes. TANDBERG DATA Idle No Tape No Tape Move...
- Page 78 3—C HAPTER ONFIGURING THE IBRARY Activating the Cleaning Cartridge Cell Activating the cleaning cartridge cell designates the storage location for a cleaning cartridge. Use one of the following options: Slot/Cell 2—if the I/E Port is enabled Slot/Cell 1—if the bottom I/E Port is disabled Note: The library ships from the factory with the I/E Port enabled.
- Page 79 ETTING ONFIGURATION PTIONS 5. 5. 5. 5. Press Select. Fixed Cleaning Slot Fixed Cleaning Slot Slot 2: Disabled Modify 6. 6. 6. 6. Press Modify. Fixed Cleaning Slot > Enable Disabled – Select Back – 7. 7. 7. 7. Press until the selection arrow ( ) points to Enable, and then press Select.
- Page 80 3—C HAPTER ONFIGURING THE IBRARY 2. 2. 2. 2. Press until the selection arrow ( ) points to Cleaning Options. Maintenance Library Maintenance Drive Maintenance Cleaning Options System Reset USB Options Select Back 3. 3. 3. 3. Press Select, and then press until the selection arrow ( ) points to Auto Cleaning.
-
Page 81: Table 3-7 Ethernet Configuration Options
ETTING ONFIGURATION PTIONS – 5. 5. 5. 5. Press until the selection arrow ( ) points to Enable, and then press Select. Auto Cleaning Enable Disable – Select Back 6. 6. 6. 6. Press OK. 7. 7. 7. 7. Press Back (as needed) to return to the Home screen. ETTING THERNET ONFIGURATION... - Page 82 3—C HAPTER ONFIGURING THE IBRARY Table 3-7 Ethernet configuration options (continued) SNMP If you are using a network-based monitor/management application other than the library’s Remote Management utility, you may need to identify the library’s Simple Network Management Protocol (SNMP) settings to the application. These settings include: ƒ...
- Page 83 ETTING ONFIGURATION PTIONS 3. 3. 3. 3. Press Select. 4. 4. 4. 4. Press until the selection arrow ( ) points to Ethernet. Library Settings Operation Mode Ethernet Display Settings Storage Settings Restore Defaults Select Back 5. 5. 5. 5. Press Select.
- Page 84 3—C HAPTER ONFIGURING THE IBRARY – 3. 3. 3. 3. Press Modify. Press to toggle between Enable and Disable. Disabling DHCP addressing (assigned by the server) enables Static addressing (a fixed IP address). ! ! ! ! Dynamic assignment of the library’s IP address may require Important periodic reinstallation or reconfiguration of some monitoring software applications.
- Page 85 ETTING ONFIGURATION PTIONS 5. 5. 5. 5. Press Done. 6. 6. 6. 6. Press OK. Changing the Subnet Mask 1. 1. 1. 1. To change the Subnet Mask address, press until the selection arrow ( points to Subnet Mask. Ethernet DHCP IP Address Subnet Mask...
- Page 86 3—C HAPTER ONFIGURING THE IBRARY Changing the Gateway Address 1. 1. 1. 1. To change the Gateway address, press until the selection arrow ( points to Gateway. Ethernet DHCP IP Address Subnet Mask Gateway MAC Address Select Back 2. 2. 2. 2. Press Select.
- Page 87 ETTING ONFIGURATION PTIONS Viewing the MAC Address 1. 1. 1. 1. To view the MAC address, press until the selection arrow ( ) points to MAC Address. Ethernet DHCP IP Address Subnet Mask Gateway MAC Address Select Back 2. 2. 2. 2. Press Select.
- Page 88 3—C HAPTER ONFIGURING THE IBRARY Get configuration from USB —Use this option to “clone” the user selectable configurations from a different library. Use this in conjunction with the “Save configuration from USB” option. The library reads data from the file shown (CAL3CLON.BIN) that contains the user selectable configuration values (SCSI IDs, I/E Port Enable, Cleaning Cartridge Information, SCSI element addresses, emulation mode, language, password, saved Mode Select data, drive...
- Page 89 ETTING ONFIGURATION PTIONS 4. 4. 4. 4. Press until the selection arrow ( ) points to Save Configuration. USB Options New Library Code New Drive Code Save Configuration Get Configuration Save Library Logs Select Back 5. 5. 5. 5. Press Select. Pending Action: Save Configuration CAL3CLON.BIN...
- Page 90 3—C HAPTER ONFIGURING THE IBRARY 2. 2. 2. 2. Press until the selection arrow ( ) points to USB Options. Maintenance Library Maintenance Drive Maintenance Cleaning Options System Reset USB Options Select Back 3. 3. 3. 3. Press Select. 4. 4. 4. 4. Press until the selection arrow ( ) points to Get Configuration.
- Page 91 ETTING ONFIGURATION PTIONS 7. 7. 7. 7. Press Back (as needed) to return to the Home screen. ETTING IBRARY ASSWORD ROTECTION To prevent unauthorized users from disrupting library operation, you can set up a password for accessing operator panel menus. When you enable the password, all operator panel functions are prevented.
- Page 92 3—C HAPTER ONFIGURING THE IBRARY – 4. 4. 4. 4. Press Modify. Press to switch between Enable and Disable. Password > Enable Disable – Select Back 5. 5. 5. 5. With the arrow pointed to Enable, press Select. Note: The password can be between 3 and 11 characters long and consists of upper case alphabet letters (“A”...
- Page 93 Press Done to accept the change, or press Back to reject the change. Once you enable the password, a padlock icon appears in the upper right screen to show that the operator panel is password protected. TANDBERG DATA Idle No Tape...
- Page 94 3—C HAPTER ONFIGURING THE IBRARY If you forget your password, see “Getting your password hint” on page 3. 3. 3. 3. Press Done. If you entered the correct password, the library displays the screen you requested. Disabling the operator panel password To turn off password protection for the operator panel: 1.
- Page 95 ETTING ONFIGURATION PTIONS – 5. 5. 5. 5. Press Modify. Press to switch between Enable and Disable. Password Enable > Disable – Select Back 6. 6. 6. 6. With the arrow pointed to Disable, press Select. 7. 7. 7. 7. Press OK.
- Page 96 3—C HAPTER ONFIGURING THE IBRARY 3. 3. 3. 3. Press Select. Password Password Hint 0*021*00*0 (example) 4. 4. 4. 4. Copy down the password hint and contact Technical Support (see www.tandbergdata.com). They will provide you with your password. ESTORING THE EFAULT ONFIGURATION If necessary you can return all of the library configuration settings to their...
-
Page 97: Checking The Setup
HECKING THE ETUP 4. 4. 4. 4. Press until the selection arrow ( ) points to Restore Defaults. Library Settings Operation Mode Ethernet Display Settings Storage Settings Restore Defaults Select Back 5. 5. 5. 5. Press Select. The following screen appears. Pending Action: Restore Defaults Reset Will Occur! - Page 98 3—C HAPTER ONFIGURING THE IBRARY Back up several megabytes of data with the tape drive(s) and perform a comparison check on the backed-up data. This determines whether the software and tape drive are communicating properly. If the library and tape drive are not operating as expected: Chapter 8 for troubleshooting tips Appendix E...
- Page 99 SING THE EMOTE ANAGEMENT TILITY The library’s Remote Management utility allows you to set configuration options, view library and tape drive information, and monitor operation across an Ethernet network. You can access the Remote Management utility using a standard web browser. NOTICE–The functions described in this chapter are subject to change.
-
Page 100: Figure 4-1 Remote Management Utility-Home Page
Home, Configure, Library and tape drive options and information Statistics, and Tools Tandberg Data Logo Tandberg Data’s web site at www.tandbergdata.com Product Image The utility’s Home screen page Magazine configuration – The left magazine is optional in some configurations. - Page 101 IEWING THE IEWING THE This is the “home page” for the utility. The Home page provides information in four sections. See Figure 4-1 to view the Home page. Library Information (Home/Info) – shown in Figure 4-1 Library Status (Home/Status) – shown in Figure 4-2 Tape Drive Status (Home/Status) –...
- Page 102 4—U HAPTER SING THE EMOTE ANAGEMENT TILITY –F IBRARY NFORMATION IBRE HANNEL ONFIGURATION WWNN World-Wide Node Name. This shows the number for the WWNN, which is the unique identifier of the device in a Fibre Channel network environment. Notes: The library communicates with the host through the SCSI interface of the tape drive(s) via the ADI serial interface.
-
Page 103: Figure 4-2 Remote Management Utility-Library And Tape Drive Status
IEWING THE The information available on the Status page is shown in the following figure and described below. Status window button Refresh update buttons (manual and automatic) Figure 4-2 Remote Management Utility–Library and Tape Drive Status 2007 224, S T24, UGUST AGNUM TORAGE... -
Page 104: Using The Remote Management Utility
4—U HAPTER SING THE EMOTE ANAGEMENT TILITY If desired, you can click the Status Window button to open a separate Status window. Figure 4-3 shows an example of a stand-alone Status window. Move the cursor over an element to view its status Figure 4-3 Remote Management Utility–Status window Note:... -
Page 105: Viewing The Home Page
IEWING THE “Loading Cartridges into a Magazine” on page 120 for instructions on how to lock and unlock the magazines. Left Magazine This indicates if the left magazine (if present) is locked or unlocked. You can operate the library with one or two magazines (the second magazine is optional). - Page 106 4—U HAPTER SING THE EMOTE ANAGEMENT TILITY Element ID Indicates the element address of the tape drive. Element addresses (indexes) identify locations within the library that can accept a cartridge. The library has three tape drive configuration options. Tape drive style Location Element Address Single full height...
-
Page 107: Figure 4-4 Remote Management Utility-Inventory Page
You can move the cursor over any inventory location to view that location’s status. The Magnum 224 and StorageLibrary T24 each have 24 available slots with two magazines installed. The StorageLoader 2U LTO library has 20 available slots with two magazines installed. - Page 108 SING THE EMOTE ANAGEMENT TILITY Slots–Addresses 1 through 24 represent magazine slots for the Magnum 224 and StorageLibrary T24. Addresses 1 through 20 for the StorageLoader 2U LTO. The slot numbers begin with the right magazine and continue with the left magazine.
-
Page 109: Figure 4-5 Remote Management Utility-Configuration Home Page
ETTING ONFIGURATION PTIONS ETTING ONFIGURATION PTIONS Click on Configure at the top of the page to view the Configuration page. Figure 4-5 shows an example of the Configuration page. From the Configuration page, you can change settings in the following sections: Change library configurations and operation mode Change Web access password and front panel password... - Page 110 4—U HAPTER SING THE EMOTE ANAGEMENT TILITY Notes: The library communicates with the host through the SCSI interface of the tape drive(s) via the ADI serial interface. The SCSI interface as seen by the host is the SCSI interface of the tape drive. The library is shown as LUN 1 of the tape drive’s SCSI ID.
- Page 111 ETTING ONFIGURATION PTIONS Once you click the Update button and you receive the following confirmation message, you need to reset the library. “Advanced” on page 111 for instructions on how to reset the library. “Tape Drive SCSI Interface (Library Bridge)” on page 50 to set the SCSI bridge from the front panel.
- Page 112 Mode You can configure two library modes: Emulation and Control. Emulation—If your backup software has not yet been certified for the Magnum 224, StorageLibrary T24, or StorageLoader 2U LTO, you can set the library to emulate one of these Tandberg Data products:...
-
Page 113: Setting Configuration Options
ETTING ONFIGURATION PTIONS Control (operation mode)—You can operate your library in either Random mode or Sequential mode. Mode Description Random Use this mode with an application that controls the library. (the default) Sequential Only use this mode if you plan to operate the library without a backup application. - Page 114 4—U HAPTER SING THE EMOTE ANAGEMENT TILITY Skin This option allows you to change the background color of the utility. Cleaning The Autoclean option enables the library to automatically perform tape drive cleaning without operator intervention. Cleaning the tape drive(s): Via the Remote Management Utility—To set automatic cleaning with the Remote Management Utility: a.
- Page 115 ETTING ONFIGURATION PTIONS d. d. d. d. Click the Update button. Via the front panel—See page 59 for information about using the front panel to set the Autoclean option. “Check the Cleaning Cartridge Status” on page 129 for information about the cleaning cartridge “count”...
- Page 116 4—U HAPTER SING THE EMOTE ANAGEMENT TILITY Both the SNMP System Name and SNMP System Location are displayed on the Home page. FTP If you plan to use the library’s FTP interface to upgrade firmware or obtain diagnostic listings, you can view the default FTP User Name and change it, if desired.
- Page 117 ETTING ONFIGURATION PTIONS E-mail If desired, you can receive e-mail alerts from the library in the event of error conditions or exceptions. If you want to receive these e-mail alerts, enter the IP address of your e-mail server, your e-mail user name, and your e-mail address.
-
Page 118: Figure 4-6 Remote Management Utility-Statistics Home Page
4—U HAPTER SING THE EMOTE ANAGEMENT TILITY To cancel the password, enter the current password in the Current Web Access Password, and leave the New Web Access Password and Confirm New Web Access Password fields blank. Then, click the Update button. Get Web Password Hint By clicking the Get Web Password Hint button, you will receive an encrypted version of a password. -
Page 119: Viewing Information On The Statistics Page
IEWING NFORMATION ON THE TATISTICS IBRARY TATISTICS The Statistics/Library (Home) page provides the following information: Move Count This indicates the total number of moves that have taken place in the library. A move is when the robot removes a cartridge: from a slot (or the I/E port) to a tape drive from a tape drive to a slot (or the I/E port) Pick Retry Count This indicates the total number of the robot has retried... - Page 120 4—U HAPTER SING THE EMOTE ANAGEMENT TILITY Put Retries This indicates the total number of times the robot has retried putting a cartridge into this cell. Pick Retries This indicates the total number of times the robot has retried picking a cartridge from this cell. ETWORK TATISTICS The Statistics Network page provides the following information:...
-
Page 121: Figure 4-7 Remote Management Utility-Tools Home Page
’ SING THE TILITY OOLS Drive Reload Count This indicates the number of the library has reloaded a cartridge into the tape drive. Drive 1 indicates either the lower half height tape drive or the full height tape drive. Drive 2 indicates the upper half height tape drive (if installed). ’... - Page 122 ! ! ! ! Make sure that you select and download the correct firmware Important files. Firmware for other Tandberg Data products is not compatible with the Magnum 224, StorageLibrary T24, or StorageLoader 2U LTO. Do not attempt to perform library operations or power down the library until after Caution it automatically resets.
- Page 123 ’ SING THE TILITY OOLS Choose the option, press Select, and then follow the instructions as shown below. When you press the Select button, the following screen appears. Once you determine that it is acceptable to continue, press the OK button. 2007 224, S T24,...
- Page 124 4—U HAPTER SING THE EMOTE ANAGEMENT TILITY Update automatically from the WEB Update from the WEB but let me choose 1017472 RODUCT ANUAL...
-
Page 125: Using The Utility's Tools
! ! ! ! Make sure that you select and download the correct firmware Important files. Firmware for other Tandberg Data products is not compatible with the tape drives. Do not attempt to perform library operations or power down the library until after Caution it automatically resets. - Page 126 4—U HAPTER SING THE EMOTE ANAGEMENT TILITY Choose the options, press Select, and then follow the instructions as shown below. When you press the Select button, the following screen appears. Once you determine that it is acceptable to continue, press the OK button. 1017472 RODUCT ANUAL...
- Page 127 ’ SING THE TILITY OOLS Update from the WEB but let me choose Update from a file of my choice 2007 224, S T24, UGUST AGNUM TORAGE IBRARY TORAGE OADER...
- Page 128 4—U HAPTER SING THE EMOTE ANAGEMENT TILITY Update from the USB port Lib Test Library Test – Use this option to run test’s on the library. None of these tests will write data to tape, but some of them will load cartridges into and out of the tape drive(s).
- Page 129 ’ SING THE TILITY OOLS Logs Occasionally, you may be asked by Technical Support to provide diagnostic logs (sometimes called dumps). Use this option to create these logs. You can select the device that you want logs for and how to handle them. Advanced Use the advanced tools with caution as some of the features may alter the configuration in such a way that you may lose Network connectivity.
- Page 130 4—U HAPTER SING THE EMOTE ANAGEMENT TILITY Update Library Ring This option allows you to link multiple libraries in your system. 1017472 RODUCT ANUAL...
- Page 131 PERATING THE IBRARY After you have configured your library, you can add cartridges and put it into operation. You can operate the library in either Random or Sequential mode. Random mode (the default)—The library processes cartridges according to commands issued from an application. Sequential mode—The library automatically processes the cartridges in sequential order.
-
Page 132: Operating The Library
You can monitor library operations by viewing the operator panel or by using the library’s Remote Management Utility (see Chapter 4). The Home screen (shown here) provides continuous updates on the activities of the library and tape drive(s). TANDBERG DATA Idle No Tape No Tape Move Maint... -
Page 133: Preparing Cartridges
Figure 5-2. To prepare your own labels, refer to the Tandberg Data Bar Code Label Specification for LTO Ultrium Cartridges available at www.tandbergdata.com. Note: The bar code labels provided with the library include labels for both data cartridges and cleaning cartridges. -
Page 134: Inserting And Moving Cartridges
5—O HAPTER PERATING THE IBRARY 2. 2. 2. 2. Make sure the write-protect switch on each cartridge is set for the desired operation. If the switch... the tape is... does not cover the opening write-enabled covers the opening write-protected NSERTING AND OVING ARTRIDGES I/E P... -
Page 135: Figure 5-4 Inserting A Cartridge Into The I/E Port
NSERTING AND OVING ARTRIDGES 4. 4. 4. 4. Load the cartridge into the slot with the bar code label facing to the left and the arrow facing to the right. Note the cartridge Note illustration orientation (bar code inside I/E port Arrow label to the left) Figure 5-4 Inserting a cartridge into the I/E port... - Page 136 5—O HAPTER PERATING THE IBRARY 2. 2. 2. 2. Press until the selection arrow ( ) points to Import, and then press Select. Move Load Unload Import Export Move Select Back 3. 3. 3. 3. When the following screen appears, press Select. Import Source I/E Port Address: 0071...
- Page 137 NSERTING AND OVING ARTRIDGES 6. 6. 6. 6. Press Back (as needed) to return to the Home screen. OVING ARTRIDGES The front panel Move command allows you to move cartridges between any of the elements inside the library (slots, a tape drive, or the I/E Port). Note: The following steps describe how to move cartridges between slots.
- Page 138 5—O HAPTER PERATING THE IBRARY – 4. 4. 4. 4. Press Select, and then press to move through the slot choices. When the screen shows your “source” (moving from) choice, press Select. Slot: Source Slot: n: (bar code number) – Select Back Repeat steps 4 and 5 above to select your “destination”...
-
Page 139: Figure 5-5 Magazine Lock Buttons
Not inserting it straight into / pulling it straight out of the opening can damage components inside the library. 4. 4. 4. 4. Load the cartridges as shown here. Each Magnum 224 or Each StorageLoader 2U LTO StorageLibrary T24 magazine holds 10 cartridges. -
Page 140: Loading Cartridges Into A Magazine
5—O HAPTER PERATING THE IBRARY 5. 5. 5. 5. Securely grasp the magazine and slide it straight into the library (use care not to twist the magazine or move it side to side—it must be inserted “straight” into the opening). When you encounter resistance, press the magazine firmly, and you will hear it “snap”... -
Page 141: Removing Cartridges From The Library
EMOVING ARTRIDGES FROM THE IBRARY – 3. 3. 3. 3. Press Select, and then press to move through the choices. When the screen shows your “source” (moving from) choice, press Select. Export: Source Slot: n: (bar code number) – Select Back 4. -
Page 142: Issuing A Re-Inventory Command To The Library
5—O HAPTER PERATING THE IBRARY SSUING A INVENTORY OMMAND TO THE IBRARY Under normal circumstances, you should never have to issue a Re-inventory command to the library. The library automatically updates the inventory each time you power the unit on, reset the library from the front panel, and open and close an I/E Port or a magazine. - Page 143 OADING AND NLOADING ARTRIDGES IN THE RIVE 6. 6. 6. 6. Press OK to continue or Back to cancel the action. During the inventory, the front panel displays a Re-Inventory Active message, a status (XX%), and the current action: positioning, scanning, and so forth.
- Page 144 5—O HAPTER PERATING THE IBRARY 2. 2. 2. 2. Press until the selection arrow ( ) points to Load. Move Load Unload Import Export Move Select Back – 3. 3. 3. 3. Press Select, and then press to move through the slot choices. When the screen shows your “source”...
-
Page 145: Loading And Unloading Cartridges In The Tape Drive
OADING AND NLOADING ARTRIDGES IN THE RIVE After a successful Load, the library displays this confirmation message: Load Good. Once the message appears, press OK to continue. 6. 6. 6. 6. Press Back (as needed) to return to the Home screen. NLOADING A ARTRIDGE FROM A RIVE... -
Page 146: Cleaning The Tape Drive
Auto cleaning disabled—Clean the tape drive(s) whenever the library displays the “Needs Cleaning” message on the Home screen, or your application software notifies you. Not all backup applications display cleaning requirements. TANDBERG DATA : Needs Cleaning Move Maint Drive... - Page 147 LEANING THE RIVE Auto cleaning enabled—The library does not display this message if Auto Cleaning is enabled and a cleaning cartridge is in the fixed cleaning cell. In this case, the cleaning is done automatically (see “Setting Up Automatic Tape Drive Cleaning”...
- Page 148 5—O HAPTER PERATING THE IBRARY 2. 2. 2. 2. Press until the selection arrow ( ) points to Cleaning Options. Maintenance Library Maintenance Drive Maintenance Cleaning Options System Reset USB Options Select Back 3. 3. 3. 3. Press Select. 4. 4. 4. 4. Press until the selection arrow ( ) points to Cleaning Tape, and then...
- Page 149 LEANING THE RIVE ’ SE THE IBRARY UTOCLEAN UNCTION Set up automatic tape drive cleaning during library configuration, and store a cleaning cartridge in the library. See page 59 for information about setting up automatic tape drive cleaning. If the fixed The library...
- Page 150 5—O HAPTER PERATING THE IBRARY The Clean Drive option allows you to select any slot/cell as the source for a cleaning cartridge, including an I/E Port. Determine the location of your cleaning cartridge, and then proceed. Cleaning Condition Description Cartridge Cells all occupied Use the Export command to remove a cartridge from the library, as described...
- Page 151 LEANING THE RIVE 3. 3. 3. 3. Press until the selection arrow ( ) points to Clean Drive, and then press Select. Clean Drive: Source Slot: n: CLNA02 – Select Back – 4. 4. 4. 4. Press to select the “source” slot where the cleaning cartridge is located (either a slot or the I/E Port), and then press Select.
-
Page 152: Resetting The Library
5—O HAPTER PERATING THE IBRARY The tape drive automatically performs the cleaning in less than a minute and ejects the cartridge when finished. During the cleaning, the front panel displays an Clean Drive Active message. After a successful cleaning, the library displays this confirmation message: Cleaning Good. - Page 153 ESETTING THE IBRARY Resetting the library from the operator panel or powering the library off and back on causes it to perform its power-on self-test and a cartridge inventory. Powering the library off and back on to reset the tape drive(s) cause the tape drive to perform a power-on self-test and to rewind a loaded tape to the beginning.
-
Page 154: Storing Cartridges
5—O HAPTER PERATING THE IBRARY 3. 3. 3. 3. Press Select. Pending Action: System Reset Continue? Back 4. 4. 4. 4. Press OK to reset the library, or Back to cancel the action. The time it takes the library to reset is based on the number of cartridges in the library and the number of cartridges without bar code labels. - Page 155 This information is available through the front panel. During day-to-day operation, you typically do not need to access this information. However, if you need to contact Tandberg Data Technical Support about your library, you may be asked to check and report back on various settings and event results.
- Page 156 6—V HAPTER IEWING IBRARY NFORMATION All instructions begin at the library’s Home screen. TANDBERG DATA Idle No Tape Move Maint Drive To check the library’s basic information: 1. 1. 1. 1. At the Home screen, press Lib. If necessary, enter the operator panel password (see page 75).
- Page 157 IEWING IBRARY TATUS ! ! ! ! Because the library uses the ADI serial interface, the SCSI ID Important indicates the ID of the tape drive. The library appears to the host as LUN1 of the SCSI ID of the tape drive.
- Page 158 The library history (sometimes called the event log) lists any events that prevented a library operation from completing (up to four events). If you contact Tandberg Data Technical support, you may be asked to check this history buffer to help troubleshoot a problem. The most recent event appears first.
- Page 159 IEWING IBRARY ISTORY The library displays the event logs in this format: Example history screen Definition Library History Page Title History entry number Move Medium Command that failed Servo Failure Type of error Slot: 1 Primary slot involved Power time: 1234567890 Cumulative power-on time (minutes) To view the library’s history: 1.
-
Page 160: Viewing Library Information
6—V HAPTER IEWING IBRARY NFORMATION 4. 4. 4. 4. Press until the selection arrow ( ) points to Library History. Library Maintenance Library Status Library History Library Diagnostics Library Statistics Shipping Select Back 5. 5. 5. 5. Press Select. A screen similar to the following one appears (Library History #0). - Page 161 IEWING IBRARY TATISTICS IEWING IBRARY TATISTICS The library’s statistics menu provides you with information on the slots, the tape drive(s), and the I/E port. IEWING LOTS 1. 1. 1. 1. At the Home screen, press Maint. If necessary, enter the operator panel password (see page 75).
- Page 162 6—V HAPTER IEWING IBRARY NFORMATION 5. 5. 5. 5. Press Select, and then press until the selection arrow ( ) points to View Slots. Library Statistics View Slots View Drives Select Back 6. 6. 6. 6. Press Select. A screen similar to this one appears. In this example, slot 1 (the –...
-
Page 163: Viewing Library Status
IEWING IBRARY TATISTICS 2. 2. 2. 2. Press until the selection arrow ( ) points to Library Maintenance. Maintenance Library Maintenance Drive Maintenance Cleaning Options System Reset USB Options Select Back 3. 3. 3. 3. Press Select. 4. 4. 4. 4. Press until the selection arrow ( ) points to Library Statistics. - Page 164 6—V HAPTER IEWING IBRARY NFORMATION – Press to advance through the tape drives (if more than one tape drive is installed in the library). View Drives: Address: 0051 Drive 1: (status) – Select Back Note: The screen above shows the library with only one tape drive installed. 7.
- Page 165 IEWING IBRARY ETTINGS 2. 2. 2. 2. Press until the selection arrow ( ) points to Library Settings. Library Library ID Inventory Password Select Language Library Settings Select Back 3. 3. 3. 3. Press Select. 4. 4. 4. 4. Press until the selection arrow ( ) points to the setting that you wish to view.
-
Page 166: Viewing Basic Tape Drive Information
6—V HAPTER IEWING IBRARY NFORMATION 7. 7. 7. 7. Press Back (as needed) to return to the Home screen. IEWING ASIC RIVE NFORMATION LVD SCSI T —B RIVE RAND AND ERIAL UMBER To check a tape drive’s type and serial number: 1. - Page 167 IEWING ASIC RIVE NFORMATION – 4. 4. 4. 4. Press to toggle between tape drives (if more than one tape drive is installed), and then press Select. Drive ID BRAND ULTRIUM–TD4 (code level) Serial Number: nnnnnnnnnn 5. 5. 5. 5. Press OK.
- Page 168 6—V HAPTER IEWING IBRARY NFORMATION 3. 3. 3. 3. Press Select. Interface Source Drive Address: 0051 Drive n: (empty) – Select Back – 4. 4. 4. 4. Press to toggle between tape drives (if more than one tape drive is installed), and then press Select.
- Page 169 IEWING ASIC RIVE NFORMATION 6. 6. 6. 6. Press Back (as needed) to return to the Home screen. RIVE ONFIGURATION TYPE To check a tape drive’s serial number: 1. 1. 1. 1. At the Home screen, press Drive. If necessary, enter the operator panel password (see page 75).
- Page 170 6—V HAPTER IEWING IBRARY NFORMATION For instructions on how to assign one of the tape drives to act as the SCSI interface (bridge), see “Tape Drive SCSI Interface (Library Bridge)” on page Note: The library communicates with the host through the SCSI interface of the tape drive(s) via the ADI serial interface.
- Page 171 The library uses this information to process commands from an application. Note: Both the Magnum 224 and the StorageLibrary T24 are 24-slot libraries; the StorageLoader 2U LTO library is a 20-slot library. IEWING...
- Page 172 LTO-3 bar code label to an LTO-4 data cartridge, it displays as an LTO-3 cartridge. The above screen shows either a Magnum 224 or a StorageLibrary T24. The last two slots in StorageLoader 2U LTO library are not shown.
- Page 173 IEWING AND PDATING THE ARTRIDGE NVENTORY Tape drive inventory To view a tape drive’s inventory: 1. 1. 1. 1. At the Home screen, press Lib. If necessary, enter the operator panel password (see page 75). 2. 2. 2. 2. Press until the selection arrow ( ) points to Inventory, then press Select.
- Page 174 6—V HAPTER IEWING IBRARY NFORMATION Notes: If there is no cartridge in the tape drive that you are viewing, the library indicates an (empty) status. If the tape drive contains a cartridge, the library lists the bar code information. – 5.
- Page 175 IEWING AND PDATING THE ARTRIDGE NVENTORY 5. 5. 5. 5. Press Select. View I/E Ports Address: 0071 I/E Port: (empty) – Back Notes: If there is no cartridge in the I/E Port, the library indicates an (empty) status. If the I/E Port contains a cartridge, the library lists the bar code. If the I/E Port is not enabled, the following screen appears: View I/E Ports No Enabled I/E Port...
- Page 176 6—V HAPTER IEWING IBRARY NFORMATION OTES 1017472 RODUCT ANUAL...
-
Page 177: Maintenance
AINTENANCE This chapter describes basic library maintenance tasks that you can perform on-site without the aid of a service technician. . To view this information... go to... Installing or replacing a tape drive below Removing cartridges without power – from the library or tape drive page 175 Cleaning the library page 176... - Page 178 ! ! ! ! The tape drives must be specially configured (at the factory) for Important use in a Tandberg Data library. Purchase tape drive kits only from Tandberg Data or Tandberg Data-approved suppliers. To view this information... go to...
- Page 179 NSTALLING OR EPLACING A RIVE EFERENCE LLUSTRATIONS Upper SCSI cover plate Half Height Tape Drive Cover Plate Lower SCSI cover plate Full Height Tape Drive Cover Plate Full Height Fibre Channel Tape Drive Cover Plate Serial cable (C) Connect to Connect tape drive (white) to library...
-
Page 180: Figure 7-1 Serial Cable Routing-Full Height Tape Drive
7—M HAPTER AINTENANCE Serial cable Library Drive 2 Top serial connector (not used) Full Height Bottom serial Tape Drive connector Drive 1 Figure 7-1 Serial cable routing—full height tape drive Serial cable Library Drive 2 HH Tape Drive Second serial connector HH Tape Drive Bottom serial... -
Page 181: Figure 7-5 Tape Drive Cover Plate (Half Height Scsi Library)
NSTALLING A ECOND EIGHT RIVE NSTALLING A ECOND EIGHT RIVE To install an additional tape drive, follow these steps: 1. 1. 1. 1. Preparing for replacement— a. a. a. a. Power off the host. b. b. b. b. Power off the library (press the 0 on the back of the unit). c. -
Page 182: Figure 7-6 Tape Drive Cooling Plate
7—M HAPTER AINTENANCE a. a. a. a. Remove the two screws ( ) holding the tape drive cooling plate ( Remove the plate, and discard it and the screws. Screws (A) Cooling plate Looking inside Looking inside back of library back of library Retaining Single half height... -
Page 183: Replacing A Tape Drive (Same Configuration)
EPLACING A RIVE SAME CONFIGURATION c. c. c. c. Connect the supplied serial cable ( ) and the power cable ( ) to the tape drives. Press the serial cable (C) down into the Power cable carrier to prevent catching it between (route under carrier the tape drive and the library. -
Page 184: Figure 7-8 Tape Drive Cover Plate (Fibre Channel Library)
7—M HAPTER AINTENANCE c. c. c. c. Disconnect the power cord, the SCSI or Fibre Channel cable(s), and the terminator (if present). d. d. d. d. Remove the tape drive cover plate. Set the plate and the screws aside. Tape drive Back of library Power OFF cover plate... -
Page 185: Figure 7-9 Full Height Tape Drive's Serial And Power Connectors
EPLACING A RIVE SAME CONFIGURATION b. b. b. b. While holding the cables out of the way, slide the new tape drive into the library, leaving it a short distance out to access the cables. Use care not to damage the cables. Install in this Serial Internal... -
Page 186: Figure 7-10 Upper Half Height Tape Drive Cable Routing
7—M HAPTER AINTENANCE Second Half height tape drive: Install the tape drive in the upper opening. Serial—Route the serial cable ( ) over the tape drive carrier and under the power cable; connect as shown in Figure 7-2 (HH serial cable routing). Power—Route the power cable under the tape drive carrier as shown here;... -
Page 187: Replacing A Tape Drive (Half Height To Full Height)
EPLACING A RIVE ALF HEIGHT TO ULL HEIGHT 4. 4. 4. 4. Completing the installation— a. a. a. a. Attach the SCSI cover plate and the tape drive cover plate that came with your replacement kit. See “Reference Illustrations” on page 161. -
Page 188: Figure 7-12 Tape Drive Cover Plate (Half Height Scsi Library)
7—M HAPTER AINTENANCE d. d. d. d. Remove the tape drive cover plate. Set the plate and the screws aside. Tape drive Back of library Power OFF cover plate (press the 0) Screws Screws Disconnect power cord Figure 7-12 Tape drive cover plate (half height SCSI library) 2. -
Page 189: Figure 7-14 Full Height Tape Drive's Serial And Power Connectors
EPLACING A RIVE ALF HEIGHT TO ULL HEIGHT Repeat steps as necessary to remove the second tape drive, if one is installed. e. e. e. e. Disconnect the serial cable ( ) from the library. Do not reuse this cable. If you are replacing multiple tape drives, remove and discard the serial cables from all the tape drives you are replacing. -
Page 190: Reconfiguring The Library And Resuming Operation
7—M HAPTER AINTENANCE ! ! ! ! The library requires both the SCSI cover plates and the tape Important drive cover plates for ESD protection. Do not leave any openings uncovered. Do not connect the SCSI cables until after you reconfigure the library. - Page 191 ECONFIGURING THE IBRARY AND ESUMING PERATION Note: The library lists “no drive” only if there is no room for more tape drives. For example, in the above screen, the library has one half height tape drives. The two tape drive number is for two half height tape drives.
- Page 192 7—M HAPTER AINTENANCE Notes: You must install a terminator on the device at the physical end of the SCSI bus. If one of the tape drives in the library terminates the SCSI bus, you must install the required terminator on one of the tape drive’s SCSI connectors.
-
Page 193: Removing Cartridges Without Power
If so, the magazine will not manually eject, and you should not use force. Contact Tandberg Data Technical Support if you encounter this situation (see “Contacting Tandberg Data... -
Page 194: Cleaning The Library
If the library’s power supply failed, you can attach the tape drive to another power source, such as an available power connector in a server and use the tape drive’s unload button to remove the cartridge. If a general power failure occurred, contact Tandberg Data Technical Support (see page iii) for information about removing the cartridge from the tape drive manually. - Page 195 UNNING RIVE IAGNOSTICS 2. 2. 2. 2. Press until the selection arrow ( ) points to Drive Maintenance. Maintenance Library Maintenance Drive Maintenance Cleaning Options System Reset USB Options Select Back 3. 3. 3. 3. Press Select. 4. 4. 4. 4. Press until the selection arrow ( ) points to Drive Diagnostics.
-
Page 196: Running Library Diagnostics
To check basic library functions, you can run a set of diagnostic tests from the operator panel. These tests check the library’s electronics and SCSI functions. If you report a problem to Tandberg Data Technical Support, you may be asked to run these tests and provide the results. - Page 197 UNNING IBRARY IAGNOSTICS 3. 3. 3. 3. Press Select, and then press until the selection arrow ( ) points to Library Diagnostics. Library Maintenance Library Status Library History Library Diagnostics Library Statistics Shipping Select Back 4. 4. 4. 4. Press Select, and then press until the selection arrow ( ) points to Digital Self Test.
- Page 198 7—M HAPTER AINTENANCE 1. 1. 1. 1. At the Home screen, press Maint. If necessary, enter the operator panel password (see page 75). 2. 2. 2. 2. Press until the selection arrow ( ) points to Library Maintenance. Maintenance Library Maintenance Drive Maintenance Cleaning Options System Reset...
- Page 199 UNNING IBRARY IAGNOSTICS 5. 5. 5. 5. Press Select. Pending Action: Motions Test Continue? Back 6. 6. 6. 6. Press OK to perform the test. Test: 0001 <Command> 05 Lib: Position <Command> Positioning <Command State> D-2: No Tape D-1: No Tape STOP Press STOP at any time to cancel the test.
- Page 200 7—M HAPTER AINTENANCE To run a system demo on the library: 1. 1. 1. 1. At the Home screen, press Maint. If necessary, enter the operator panel password (see page 75). 2. 2. 2. 2. Press until the selection arrow ( ) points to Library Maintenance.
- Page 201 IBRARY IRMWARE PGRADE AND IAGNOSTICS Occasionally, Tandberg Data may make revisions to the library’s internal code (firmware). The library’s Remote Management utility contains additional firmware for the Ethernet module. The Ethernet firmware may also be revised periodically. You can download new firmware from www.tandbergdata.com. To upload new firmware to the library, you can use the library’s optional Ethernet...
- Page 202 HAPTER AINTENANCE If you report a problem to Tandberg Data Technical Support, you may be asked to create a diagnostic listing (also called a dump) via FTP . A diagnostic listing is created when you use an FTP utility to send a copy of the library’s diagnostic buffer to a host computer.
-
Page 203: Ftp-Library Firmware Upgrade And Diagnostics
! ! ! ! Make sure that you select and download the correct firmware Important files. Firmware for other Tandberg Data products is also on this web site and is not compatible with the Magnum 224, StorageLibrary T24, or StorageLoader 2U LTO. - Page 204 —L IBRARY IRMWARE PGRADE You can also use the Tandberg Data LibTool to upgrade firmware over the SCSI interface. LibTool is available as a free download at www.tandbergdata.com. Refer to the readme file provided with the program for installation instructions.
-
Page 205: Usb Port-Library Firmware Upgrade And Diagnostics
USB P —L IBRARY IRMWARE PGRADE AND IAGNOSTICS 3. 3. 3. 3. Press Select. 4. 4. 4. 4. Press until the selection arrow ( ) points to New Library Code. USB Options New Library Code New Drive Code Save Configuration Get Configuration Save Library Logs Select... - Page 206 Continue? Back 6. 6. 6. 6. Press OK to continue with the action, or Back to cancel the action. Tandberg Data Technical Support can examine the log to determine the nature of the reported error (see www.tandbergdata.com). 1017472 RODUCT ANUAL...
-
Page 207: Ltotool-Tape Drive Firmware Upgrade
Refer to the program’s online help for instructions on performing upgrades and diagnostics. You can download new firmware at www.tandbergdata.com. Do not upgrade firmware unless Tandberg Data Technical Support has advised you Caution to do so. If performed improperly, the upgrade procedure can render your tape drive inoperable. - Page 208 7—M HAPTER AINTENANCE USB P —T RIVE IRMWARE PGRADE You can use the USB port to upgrade tape drive firmware. See “Connecting the Library to the USB Port” on page Go to www.tandbergdata.com for the latest level of firmware. This table lists the firmware options for the available tape drives.
-
Page 209: Usb Port-Tape Drive Firmware Upgrade
USB P —T RIVE IRMWARE PGRADE 4. 4. 4. 4. Press until the selection arrow ( ) points to New Drive Code. USB Options New Library Code New Drive Code Save Configuration Get Configuration Save Library Logs Select Back 5. 5. 5. 5. Press Select. - Page 210 7—M HAPTER AINTENANCE Press Browse to view subdirectories. Browse \ (current directory) VD104 IBFHL3SC_69M0.fmr * IBFHL3SC_5BG2.fmr IBFHL3SC_6BA0.fmr Select Back The folder icon ( ) indicates a directory. Selecting the directory allows you to view items in that directory. Once in a subdirectory, press the “..” to move to the directory above the current directory.
-
Page 211: Troubleshooting
SCSI controller type. Make sure that the SCSI controller is an LVD, non-RAID controller. Tandberg Data does not support the use of libraries or tape drives on RAID controllers. SCSI IDs. Make sure that the SCSI IDs you selected for the tape drive or tape drives are not the same as the IDs used by any other devices on the SCSI bus, including the SCSI adapter card. - Page 212 Note: Although Ultra-2 and Ultra-3 LVD SCSI are compatible with single-ended SCSI, Tandberg Data does not support using the LVD library on a single-ended SCSI bus. SCSI cable lengths. Make sure that the cabling for the SCSI bus attached to...
- Page 213 FTP (via the Ethernet port) to obtain a diagnostic log from the library (see page 183). Tandberg Data Technical Support can examine the log to determine the nature of the reported error. Hardware Servo Error. If your library is reporting a hardware servo error,...
-
Page 214: Tape Drive Troubleshooting
“Reconfiguring the Library and Resuming Operation” on page 172. Slot Configuration. Both the Magnum 224 and StorageLibrary T24 are 24-slot libraries; the StorageLoader 2U LTO is a 20-slot library. The StorageLoader 2U LTO library will not allow you to move cartridges to or from the last two slots of each magazine. - Page 215 RIVE ROUBLESHOOTING Write-protect switch. If you are writing data, make sure that the cartridge is write-enabled. If the switch... the tape is... does not cover the opening write-enabled covers the opening write-protected Cartridge type. Use the appropriate cartridges for your tape drive(s). See Table 5-1 on page 115 for information about selecting cartridges.
-
Page 216: Backup Software Reports An Error
8—T HAPTER ROUBLESHOOTING ACKUP OFTWARE EPORTS AN RROR Your backup software may report an error as a result of a failure to communicate with the tape drive(s) or library, a failure by a tape drive to write or read data, or because of a software configuration issue. AILURE TO OMMUNICATE WITH A RIVE... - Page 217 ACKUP OFTWARE EPORTS AN RROR The backup software has attempted to append data to a cartridge that previously failed. If a write media error previously occurred on the tape, the tape drive cannot append data at the point where the write media error occurred.
-
Page 218: Before Contacting Technical Support
Make certain that the SCSI adapter is Ultra 160 SCSI and that any necessary drivers for the controller are installed. Note: Tandberg Data does not support using the library on a RAID controller or on a single-ended controller. SCSI bus configuration. What is the configuration of the SCSI bus used by... - Page 219 EFORE ONTACTING ECHNICAL UPPORT What are the SCSI IDs of all devices attached to the same bus (both internal and external devices)? Is the SCSI bus terminated at the physical end of the bus? ! ! ! ! LTO-2, LTO-3, and LTO-4 SCSI tape drives require an Ultra 3 Important or LVD 160 terminator to function properly on the SCSI bus.
-
Page 220: Advanced Troubleshooting
“Logs” on page 111). DVANCED ROUBLESHOOTING If you report a problem to Tandberg Data Technical Support, you may be asked to create a diagnostic listing. Use one of the following options for creating a diagnostic listing. To create diagnostic listings for: The Library—using the Remote Management Utility... -
Page 221: Specifications
Assuming a 2:1compression ratio. Actual compressed capacity varies depending on the type of data being recorded and the system configuration Both the Magnum 224 and StorageLibrary T24 accommodate 24 data cartridges. The StorageLoader 2U LTO library accommodates 20 data cartridges. -
Page 222: Size And Weight
A—S PPENDIX PECIFICATIONS IZE AND EIGHT Table A-2 lists the library’s dimensions and weight. Table A-2 Library dimensions and weight Dimensions (L x W x D) 77.54 cm x 44.63 cm x 8.75 cm (29.0 x 17.57 x 3.45 inches) Weight 20.9 kg (46.1 lb) with no cartridges installed Dimension from front rail mount to rear of chassis. -
Page 223: Power Specifications
The average cartridge inventory time is approximately: Library Seconds Number of Bar code labels on cartridges? Cartridges Magnum 224 StorageLibrary T24 1440 StorageLoader 2U 1200 ARTRIDGE Move complete time is the time it takes the library to remove a cartridge from a tape drive, return it to its cell, and load the new cartridge into the tape drive. -
Page 224: Environmental Specifications
A—S PPENDIX PECIFICATIONS US, Canada, and European Power Cord Specifications Table A-4 US, Canada, European power cord specifications Power Cord Description Connectors and Cordage Certifications ƒ One molded NEMA 5-15P male US/Canada 2.3-meter (7.5-foot), 120-volt UL Listed connector three-conductor CSA Certified ƒ... -
Page 225: Table A-7 Acoustic Noise Limits
NVIRONMENTAL PECIFICATIONS Table A-6 Environmental specifications Storage Specification Operating Transportation Non-Operating Relative Humidity 20% to 80% 10% to 90% 10% to 90% Non-condensing Non-condensing Non-condensing Wet Bulb 26° C (79° F) max 29° C (84° F) max 29° C (84° F) max Altitude –306 m to +3,048 m –306 m to +3,048 m... -
Page 226: Shipping Specifications
A—S PPENDIX PECIFICATIONS HOCK AND IBRATION IMITS The library will operate normally after experiencing shock loads as specified in Table A-8. The operating shock levels indicate how much shock the library can withstand while the enclosed tape drive (or tape drives) is reading and writing data. -
Page 227: Safety And Regulatory Agency Compliance
OMPLIANCE AFETY AND EGULATORY GENCY OMPLIANCE The Magnum 224, StorageLibrary T24, or StorageLoader 2U LTO complies with the safety and regulatory agency standards listed below when installed in accordance with this manual. NDERWRITERS ABORATORY The Magnum 224, StorageLibrary T24, or StorageLoader 2U LTO is listed by Underwriters Laboratories, Inc. - Page 228 TATES ECLARATION OF ONFORMITY We declare under our sole responsibility that: Product Name: Magnum 224, StorageLibrary T24, or StorageLoader 2U LTO To which this declaration relates, is in conformity with the following standard(s) or other normative documents: ANSI C63.4-1992 Methods of Measurement Federal Communications Commission 47 CFR Part 15, Subpart B 15.107 (b) Class A Conducted Limits...
- Page 229 LECTRICAL AND LECTRONIC QUIPMENT The RoHS marking indicates that the Magnum 224, StorageLibrary T24, or StorageLoader 2U LTO is in compliance with European Council Directive 2002/95/EC, on the restriction of the use of certain hazardous substances in electrical and electronic equipment.
- Page 230 A—S PPENDIX PECIFICATIONS OTES 1017472 RODUCT ANUAL...
-
Page 231: Interface Specification
NTERFACE PECIFICATION This appendix provides information about the interface options of the library and the tape drives. To view this information... go to... SCSI Interface Specifications—SCSI tape drive only below Fibre Channel Interface Specifications—FC tape drive only page 221 Ethernet Specifications—Library page 222 The library has a standard SCSI interface through the tape drives, via the Automation/Drive Interface - Command (ADC), which support the commands... -
Page 232: Interface Specification
Although the tape drive’s wide LVD SCSI interface is compatible with single-ended Caution SCSI, Tandberg Data does not support the use of the tape drives in this library on a single-ended bus or on a bus with single-ended devices attached. -
Page 233: Table B-1 Scsi Command Set Supported By The Library
Perform diagnostics and receive results Upload diagnostic data Upgrade the library firmware For more information about SCSI communications, refer to: The Magnum 224, Magnum 448, StorageLibrary T24, or StorageLoader 2U LTO SCSI Reference The tape drive’s Product Manual The Automation/Drive Interface - Command (ADC) - Page 234 B—I PPENDIX NTERFACE PECIFICATION Table B-1 SCSI command set supported by the library (continued) When you issue this The library does this … command … Code LOG SELECT Manages statistical information maintained by the library. (10 bytes) LOG SENSE Returns statistical and condition information to the initiator. (10 bytes) MODE SELECT Accepts specific element addresses, LCD information, and operating...
-
Page 235: Table B-2 Status Byte Descriptions
LERT LAGS Table B-1 SCSI command set supported by the library (continued) When you issue this The library does this … command … Code SEND VOLUME TAG Compares the template it receives from the initiator to the cartridge (12 bytes) inventory information in memory, and determines which bar code labels match the template. -
Page 236: Table B-3 Supported Sense Keys
B—I PPENDIX NTERFACE PECIFICATION For more information about these sense keys and sense data returned by the library, refer to the Magnum 224, StorageLibrary T24, or StorageLoader 2U LTO SCSI Reference. Table B-3 Supported sense keys Sense Key Description Value No Sense Indicates that there is no specific sense key information to be reported. -
Page 237: Figure B-1 Mag 224/T24 Element Addresses
LAGS Use the MODE SELECT command to change the address of each element in the library, as described in the Magnum 224, Magnum 448, StorageLibrary T24, or StorageLoader 2U LTO SCSI Reference. I/E Port enabled/No fixed cleaning slot (Magnum 224 or StorageLibrary T24)—This figure shows the element addresses for this configuration. -
Page 238: Figure B-3 Storageloader 2U Lto Element Addresses
B—I PPENDIX NTERFACE PECIFICATION I/E Port enabled/No fixed cleaning slot (StorageLoader 2U LTO)—This figure shows the element addresses for this configuration. Half height tape Full height tape drive configuration drive configuration Second HH tape drive Full height tape drive Bottom HH tape drive Top left I/E Port... -
Page 239: Table B-4 Multi-Mode Optical Cable Characteristics
LERT LAGS (FC T IBRE HANNEL NTERFACE PECIFICATIONS RIVE Fibre Channel cables are not included with the library. The number of optical fiber cables required for attaching the library to a Fibre Channel network depends on how many tape drives are installed. Each of the tape drive optical fiber ports contains a transmitter and receiver optical subassembly. -
Page 240: Ethernet Specifications
B—I PPENDIX NTERFACE PECIFICATION THERNET PECIFICATIONS This section provides specifications for the library’s Ethernet interface, including information about the following: General Ethernet information Cable requirements Ethernet port pin assignments ENERAL THERNET NFORMATION The Ethernet port allows connection to a 10/100Base T Ethernet network. You can use the Ethernet connection to perform the following activities: Monitor library operations using the built-in Remote Management utility (see... -
Page 241: Overview
RITE (WORM) C APABILITY VERVIEW Certain records retention and data security applications require a Write Once, Read Many (WORM) method for storing data on tape. To meet this data storage requirement, a new WORM feature is now available on the Magnum 224, StorageLibrary T24, or StorageLoader 2U LTO when you have an LTO-3 or LTO-4 tape drive installed. -
Page 242: Table C-1 Worm Tape Cartridge Specifications
C—W (WORM) C PPENDIX RITE APABILITY Table C-1 lists WORM media specifications. Table C-1 WORM tape cartridge specifications Tape Cartridge Case Color Native Data Capacity Ultrium 3 WORM Two-toned colored cartridge 400 GB (800 GB at 2:1 compression) Ultrium 4 WORM Two-toned colored cartridge 800 GB (1600 GB at 2:1 compression) The two-toned coloring allows you to easily distinguish WORM cartridges from Write/Read cartridges. -
Page 243: Requirements
Refer to the program’s online help for instructions on determining the tape drive(s) firmware level. If your LTO-3 tape drive has an earlier version of firmware, you can download the updated firmware by visiting the download page on the Tandberg Data web site at www.tandbergdata.com. Note: Refer to “FTP—Library Firmware Upgrade and Diagnostics”... -
Page 244: Error Codes
C—W (WORM) C PPENDIX RITE APABILITY RROR ODES Tape drive errors associated with the new WORM capability result in either a Medium Error (Sense Key 3h) or a Data Protect error (Sense Key 7h). The tape drive returns this error information in response to a SCSI REQUEST SENSE command. - Page 245 This chapter describes the process of returning the library for service. If you need to return the library for service, first contact your service provider. If your service provider instructs you to return the library directly to Tandberg Data, contact Tandberg Data Technical Support (see page iii) to obtain a Return Materials Authorization (RMA) number and the shipping address.
-
Page 246: Shipping The Library
D—S PPENDIX HIPPING THE IBRARY 2. 2. 2. 2. Press until the selection arrow ( ) points to Library Maintenance, and then press Select. Maintenance Library Maintenance Drive Maintenance Cleaning Options System Reset USB Options Select Back 3. 3. 3. 3. Press until the selection arrow ( ) points to Shipping. - Page 247 LERT LAGS a. a. a. a. Press until the selection arrow ( ) points to Ship Lock Type, then press Select. Shipping Park for Shipping Ship Lock Type Select Back b. b. b. b. Press Modify Ship Lock Type Red Ship Lock Modify c.
-
Page 248: Replacing The Shipping Locks
D—S PPENDIX HIPPING THE IBRARY The following screen appears. Press OK to complete the process. Pending Action: Park For Shipping Continue? Back When the robot is parked, the following screen appears Park For Shipping Good EPLACING THE HIPPING OCKS Follow these steps to replace the shipping locks. “V”... -
Page 249: Figure D-2 Shipping Lock Replacement-Step 1
LERT LAGS 1. 1. 1. 1. Remove the magazines. Press the left magazine eject button. While supporting it, gently slide the magazine straight out of the library. Repeat the process for the right magazine. Use care not to twist the magazine or move it side to side as you insert or Caution remove it from the library. -
Page 250: Figure D-4 Shipping Lock Replacement-Step 3B
D—S PPENDIX HIPPING THE IBRARY b. b. b. b. Secure the locks with the screws, as shown here. Align as shown (both right and left locks) Screw Screw Figure D-4 Shipping lock replacement–step 3b 4. 4. 4. 4. Replace the magazines. While supporting it, gently slide the left magazine straight into the library. -
Page 251: Removing The Library From The Rack
LERT LAGS EMOVING THE IBRARY FROM THE The library weighs 46.1 pounds (20.9 kg). Two people are needed to move or Warning lift the library. Most of the weight is toward the back of the library. Die Library wiegt 20.9 kg. Es sind mindestens 2 Personen erforderlich, um die Warnung Library zu bewegen oder zu heben. -
Page 252: Packing The Library
D—S PPENDIX HIPPING THE IBRARY 2. 2. 2. 2. From the front of the rack, slide the library forward and out of the rack (see Figure D-6). Figure D-6 Removing the library from the rack ACKING THE IBRARY Use the original packing materials (shipping box, foam cushions, foam spacers, and antistatic bag) to pack the library. - Page 253 LERT LAGS 2. 2. 2. 2. Put the foam cushions in the bottom of the box, as shown in Figure D-8. Flat foam piece Curved foam piece (for back of library) (for front of library) Figure D-8 Bottom foam packing pieces 3.
- Page 254 D—S PPENDIX HIPPING THE IBRARY Terminator SCSI cable Paperwork (bar code labels) Rack rails Ethernet (long, this side– cable short, other side) Power cords Figure D-10 Accessory item placement in shipping box 5. 5. 5. 5. Place any necessary paperwork on top of the die-cut piece. 6.
- Page 255 This appendix defines error messages that may appear on the library’s front panel and provides corrective actions. Most library components can be replaced only by Tandberg Data-approved service Caution providers. If you cannot find an obvious cause for the problem, contact your service provider.
-
Page 256: Error Messages
E—E PPENDIX RROR ESSAGES Table E-1 Library error messages Error Message Description Corrective Action Auto Cleaning The tape drive is performing No action necessary. an automatic cleaning of the tape drive using the cleaning cartridge in the fixed cleaning cell. Bad Cleaning Tape The tape drive has Replace the cleaning cartridge with one that is... - Page 257 LERT LAGS Table E-1 Library error messages (continued) Error Message Description Corrective Action Power cycle the library. Circuit Failure The library has detected a problem within its electronic If the error persists, contact Technical Support circuitry. or your service provider. Verify that the options for the command are Command Error The options for the...
-
Page 258: Error Messages
E—E PPENDIX RROR ESSAGES Table E-1 Library error messages (continued) Error Message Description Corrective Action Drive Empty The command cannot be Do one of the following: completed because the tape ƒ Load a cartridge in the tape drive and retry the drive does not contain a operation. - Page 259 LERT LAGS Table E-1 Library error messages (continued) Error Message Description Corrective Action Enable Sequential mode. See “Setting the Failed Sequential mode action Library to Operate in Sequential Mode” on failed. page Retry the operation. If the error persists, contact Technical Support (see page iii) or your service provider.
- Page 260 E—E PPENDIX RROR ESSAGES Table E-1 Library error messages (continued) Error Message Description Corrective Action Ensure that the selected file is present on the File Open Fail The library could not find USB device. the file on the USB device, or it could find the file, but Ensure that the USB device is securely not open it.
- Page 261 LERT LAGS Table E-1 Library error messages (continued) Error Message Description Corrective Action I/E Port Unlocked Import/Export element is Close I/E Port and retry the operation. unlocked. “Loading Cartridges into the I/E Port” on page 116. ƒ Remove the cartridge from the library and Invalid Cartridge An attempt was made to replace it with one that is compatible with the...
- Page 262 E—E PPENDIX RROR ESSAGES Table E-1 Library error messages (continued) Error Message Description Corrective Action ƒ Use either SCSI or front panel commands to No Empty Drive The requested move cannot empty a tape drive and retry the command. be completed because there ƒ...
- Page 263 LERT LAGS Table E-1 Library error messages (continued) Error Message Description Corrective Action Owned by E-Net The library is executing a Wait until the library has finished its current command issued from the operation, and then retry the operation. Remote Management utility (see Chapter 4) when a...
- Page 264 E—E PPENDIX RROR ESSAGES Table E-1 Library error messages (continued) Error Message Description Corrective Action Reset the library and retry the operation. See Robot Full The robot is unexpectedly page 134 for reset instructions. full If the error persists, contact Technical Support (see page iii) or your service provider.
- Page 265 LERT LAGS Table E-1 Library error messages (continued) Error Message Description Corrective Action Ensure that the USB device is securely Set Time Fail The library could not set the inserted and retry the operation. time on a USB file or directory.
-
Page 266: Library "Fatal" Error Messages
E—E PPENDIX RROR ESSAGES “F ” E IBRARY ATAL RROR ESSAGES This section describes the “fatal” error messages that can appear on the library’s operator panel. If one of these errors occurs, the library goes into a halted state where only serial diagnostics communication is possible. The only recovery is to power-cycle the library: press the 0 on the back of the library (power off), and then press the I I I I (power on). - Page 267 LERT LAGS Table E-2 Library “fatal” error messages (continued) Error Message Description Corrective Action FIQ ints can’t be Illegal use of certain enabled interrupts FIQ ints can’t be Illegal use of certain disabled interrupts FIQ ints can’t be Illegal use of certain registered interrupts FIQ ints can’t be...
- Page 268 E—E PPENDIX RROR ESSAGES Table E-2 Library “fatal” error messages (continued) Error Message Description Corrective Action Power-cycle the library: press the 0 on the WatchDog timer Firmware failed report to back of the library (power off), and then press expired hardware the I (power on).
- Page 269 NDEX Automation/Drive Interface See ADI Command 210 emulation mode 221L emulation mode back panel components backup application accessories See software acoustic noise limits bar code labels ADI Command identifying the media about 213, preparing library LUN re-scanning LVD SCSI interface viewing contents 89, SCSI IDs bar code scanner 2,...
- Page 270 NDEX cartridges (information) configuration (changing) continued purchasing Ethernet selecting LCD language supported by tape drive password SCSI IDs cartridges (inventory) Sequential mode after power-on using operator panel after reset using Remote Management utility time required updating configuration (restoring default values) viewing via RMU via power reset viewing via the front panel...
- Page 271 NDEX element addresses firmware changing updating tape drive via remote description management updating via remote management emulation mode upgrading for library via FTP changing from operator panel viewing library code level changing using Remote Management viewing tape drive code level utility WORM requirements description...
- Page 272 NDEX interface specifications library (maintenance) continued Ethernet troubleshooting Fibre Channel library (updating) SCSI updating code via remote management internal components upgrading firmware inventory LibTool See viewing cartridge inventory advanced troubleshooting download URL IP address upgrading library firmware viewing current inventory loader, cartridge handling mechanism keypad (front panel buttons) LTOTool...
- Page 273 NDEX power cord connecting operating environment specifications international requirements operation (general) specifications preparing cartridges power switch resetting library and tape drive powering on the library See also operation (library) preparing cartridges See also operation (tape drive) product warranty caution using Remote Management utility viewing library and tape drive information operation (library)
- Page 274 Remote Management utility subnet mask password Sequential mode serial number library Tandberg Data LibTool tape drive download URL upgrading firmware service viewing current inventory returning the library Tandberg Data LTOTool shipping lock, removing...
- Page 275 NDEX Technical Support Write Once, Read Many (WORM) capability gather required information before firmware requirements contacting overview 223, temperature, operating Write Once, Read Many (WORM) media characteristics termination, SCSI data security installing terminator errors terminator requirements specifications transfer rate troubleshooting Universal Serial Bus (USB) connecting library to interface support...
- Page 276 NDEX Notes 1017472 RODUCT ANUAL...
- Page 277 Specification, from the date of shipment to Tandberg Data's authorized dealer. In order to receive warranty services, contact the appropriate In no event shall Tandberg Data be liable for loss of profits or any Tandberg Data location shown at the following web address, indirect, special, incidental, or consequential damages arising out of any www.tandbergdata.com.
- Page 278 ARRANTY For more information about Tandberg Data Service Support, see www.tandbergdata.com. ANDBERG ORPORATION 2108 55 TREET 80301 USA OULDER OLORADO 1017472 RODUCT ANUAL...
Need help?
Do you have a question about the Magnum 224 and is the answer not in the manual?
Questions and answers