Table of Contents
Advertisement
Chapter 1 - Introduction
Chapter Overview
ScreenWriter 3 Printer..................................................................... 1-3
About this Manual ........................................................................... 1-4
Manual Conventions ................................................................. 1-5
Printer Features ............................................................................... 1-6
Printer Configuration ...................................................................... 1-7
Warranty and Product Registration ................................................. 1-8
Other Helpful Documentation ......................................................... 1-8
_________________________________________
Introduction 1-1
Advertisement
Chapters
Table of Contents

Related Manuals for Xante ScreenWriter 3


Summary of Contents for Xante ScreenWriter 3
-
Page 1: Table Of Contents
Chapter 1 - Introduction Chapter Overview ScreenWriter 3 Printer..............1-3 About this Manual ................1-4 Manual Conventions ..............1-5 Printer Features ................1-6 Printer Configuration ..............1-7 Warranty and Product Registration ..........1-8 Other Helpful Documentation ............1-8 _________________________________________ Introduction 1-1... - Page 2 Notes Introductionbb ________________________________________...
-
Page 3: Screenwriter 3 Printer
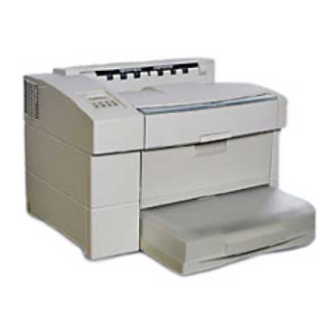
ScreenWriter 3 Printer Fig. 1.1 ScreenWriter 3 Printer The ScreenWriter 3 is designed for high-end silk-screen and graphics applications. Standard density and advanced graphics features allow you to print images directly to XANTÉ Myriad film, process the output through XANTÉ’s FilmStar 2, and then use the film to burn silk-screen emulsions. -
Page 4: About This Manual
About this Manual The user’s guide covers printer installation, setup, and operation. Chapter 1—Introduction summarizes this manual, printer features and configuration, and the warranty. Chapter 2—Installation covers printer setup and connection to its Macintosh, PC, and Ethernet interfaces. Chapter 3—Macintosh Setup describes the contents and use of the XANTÉ... -
Page 5: Manual Conventions
Index—alphabetically lists major manual topics with their corresponding page numbers and some cross references. The ScreenWriter 3 Menu quick reference sheet illustrates the printer’s front panel menu structure and lists XANTÉ support. Manual Conventions The following conventions are used in this manual:... -
Page 6: Printer Features
PostScript typefaces work with leading operating systems including Windows (95, 98, and NT) and Macintosh OS. The ScreenWriter 3 features a standard input capacity of 650 sheets— 500 sheets in the standard paper cassette and 150 sheets in the multipurpose feeder. -
Page 7: Printer Configuration
• XANTÉ’s patented Accurate Calibration Technology (X-ACT) allows you to calibrate the printer’s line lengths and to correct inaccuracies in printing width, height, skew, and angle. • Dot Gain Calibration provides gamma control to adjust image grayscale values to help compensate for dot gain. •... -
Page 8: Warranty And Product Registration
This publication features articles on printing, new options, and tips for using your printer effectively. Other Helpful Documentation Please visit our Web site at www.xante.com for the latest information about XANTÉ products and services. You may find the following publications on Adobe PostScript printing helpful. - Page 9 Chapter 2 - Installation Chapter Overview Introduction ..................2-3 Printer Location ................2-3 Printer Package ................2-4 Printer Overview ................2-5 Toner Cartridge ................2-7 Handling the Toner Cartridge ........... 2-7 Removing and Installing the Toner Cartridge ......2-8 Paper Cassette ................2-13 Multipurpose Feeder ..............
- Page 10 Notes Installationbb _________________________________________...
-
Page 11: Introduction
Introduction This chapter describes selecting a printer location; installing toner and paper; connecting the printer to Macintosh, PC, and network hardware; and connecting to the power supply. Printer Location Set up your printer in a location that can support its weight and that provides sufficient operation and maintenance clearance. -
Page 12: Printer Package
Remove the plastic wrap, tape, and shipping stabilizers from all of the items. Your printer package contains the following items: • Your XANTÉ printer • 500 sheet cassette • Power cord • ScreenWriter 3 user’s guide (this manual) Installationbb _________________________________________... -
Page 13: Printer Overview
• XANTÉ Utilities CD-ROM • Toner cartridge The following optional items are packaged separately. • Additional paper cassettes • Additional paper feeders RAM, internal hard disk, resolution, and 10/100BaseT Ethernet upgrades ordered with your printer are installed at the factory before shipping. - Page 14 Fig. 2.4 Printer Rear View Fig. 2.5 Printer Inside Front View Installationbb _________________________________________...
-
Page 15: Toner Cartridge
Toner Cartridge The printer’s toner cartridge combines the toner and drum. The cartridge can print approximately 14,000 letter/A4 size pages at 5% coverage. Quality and reliability of refilled toner cartridges vary, so XANTÉ recommends not using them. Printer damage caused by these products is not covered by your printer warranty. -
Page 16: Removing And Installing The Toner Cartridge
Removing and Installing the Toner Cartridge Remove all media from the output tray. Squeeze the top cover latch to release the lock (fig. 2.6). Fig. 2.6 Release the Top Cover Latch Lift the top cover. The multipurpose feeder opens automatically (fig. 2.7). Caution: Do not touch any parts inside the printer. - Page 17 Remove the toner cartridge if it is in the printer by grasping its handles and pulling it slowly out of the printer (fig. 2.8). Caution: Once you begin pulling the cartridge out of the printer, remove it completely. The cartridge’s shutter may not open properly or may be damaged if the cartridge is pulled partially out and then pushed back in the printer.
- Page 18 Gently shake the cartridge several times to distribute toner throughout the cartridge (fig. 2.9). Caution: Shake the cartridge enough to free any compacted toner. Turning on the printer with toner still compacted may damage the cartridge. Fig. 2.9 Shake the Toner Cartridge Place the toner cartridge on a flat surface, holding it in place with one hand.
- Page 19 Insert the pins on both sides of the cartridge into the guide channels in the printer (fig. 2.11). Fig. 2.11 Insert the Pins into the Guide Channels Slide the cartridge into the printer until it stops (fig. 2.12). Fig. 2.12 Insert the Toner Cartridge __________________________________________ Installation 2-11...
- Page 20 Close the top cover by pressing down on the center section until the latch engages (fig. 2.13). Fig. 2.13 Close the Top Cover Close the multipurpose feeder (fig. 2.14). Fig. 2.14 Close the Multipurpose Feeder 2-12 Installationbb _________________________________________...
-
Page 21: Paper Cassette
Paper Cassette The universal paper cassette feeds up to 500 sheets of 20 lb bond/60 lb text weight (65 g/m ) paper or other paper to a stack height of 2.13" (54 mm). This cassette can handle media weights from 16 - 28 lb (60 to 105 g/m Note: An envelope cassette designed to feed up to 75 envelopes can be purchased as an option for your printer. - Page 22 Lift up slightly on the cassette; then pull it from the printer (fig. 2.16). Fig. 2.16 Remove the Cassette from the Printer Place the cassette on a flat surface and remove the cassette cover (fig. 2.17). Fig. 2.17 Remove the Cassette Cover 2-14 Installationbb _________________________________________...
- Page 23 Lift the paper length guide to release it. Slide it forward (fig. 2.18). Fig. 2.18 Move the Length Guide Squeeze the sides of the paper width guide to release it. Slide it to the outside of the cassette (fig. 2.19). Fig.
- Page 24 Align the media stack and load it into the cassette print side up, leading edge to the back (fig. 2.20). See “Media Source” in chapter 7 to determine whether to load media short or long edge first. Fig. 2.20 Load the Media Adjust media guides to the size of the media stack.
-
Page 25: Multipurpose Feeder
Pull out the output tray extension and turn up the paper stop for paper sizes larger than letter/A4 (fig. 2.21). Fig. 2.21 Adjust the Output Tray Extension Multipurpose Feeder The printer’s multipurpose feeder feeds up to 150 sheets of 20 lb bond/ 60 lb text weight (65 g/m ) paper or media such as Myriad Film, label stock, and transparencies to a stack height of approximately .70"... - Page 26 Open the multipurpose feeder by grasping the cover’s top center handle and pulling down (fig. 2.22). Caution: The multipurpose feeder does not open to a 90 angle. To prevent damage, do not exert strong pressure or place heavy objects on the feeder. Fig.
- Page 27 Align the media stack and load it into the cassette print side up, leading edge toward the back (fig. 2.24). See “Media Source” in chapter 7 to determine whether to load media short or long edge first. Caution: To prevent jams, make sure the media stack fits under the media guide’s retaining clips (fig.
-
Page 28: Multipurpose Feeder Tip
Close the multipurpose feeder if the media fits completely inside the printer (fig. 2.14). Multipurpose Feeder Tip Occasionally, in a Macintosh environment if media is in the multipurpose feeder, the system’s Print Monitor sends a prompt message to put paper into the manual feed tray and click OK. To disable this prompt Note: This prompt can only be turned off in Print Monitor. -
Page 29: Printer Ports
Printer Ports Your printer has standard LocalTalk, serial, and parallel ports and an optional Ethernet port. These simultaneously active interfaces can receive jobs from different operating environments without hardware switching. (UTP) (Coaxial) Fig. 2.27 Printer Ports Selecting the Printer Interface Connect to the appropriate printer interface for your host computer or network environment: Macintosh without Ethernet... - Page 30 • Two terminating resistors DIN-8 Connector RJ-11 Cable Connector Connector Terminating Resistor Fig. 2.28 LocalTalk Connector Boxes, Resistors, and Cable Turn off your computer. Plug the DIN-8 connector on one LocalTalk connector box into the printer’s 8-pin LocalTalk port. Plug the DIN-8 connector on the second LocalTalk connector box into the Macintosh’s printer port (refer to your Apple Macintosh manual).
-
Page 31: Connecting To The Parallel Port
Verify that the printer’s LocalTalk interface is enabled and configured properly. See “Interface Control” in chapter 6 and “XANTÉ Command Center” in chapter 3. Before using your printer, install and configure the Adobe PostScript printer driver and your printer’s PPD. See “Xinstaller” and “Adobe PostScript Printer Drivers”... -
Page 32: Connecting To The Serial Port
Connecting to the Serial Port Use a straight-through serial cable (fig. 2.30) with either a 9-pin or 25-pin female connector to attach to the computer and a 9-pin male connector to attach to the printer. 25-pin Connector to Printer: 9-pin Connector to PC: 9-pin Fig. -
Page 33: Connecting To The Ethernet Ports
Before using your printer, install and configure the Adobe PostScript printer driver and your printer’s PPD. See “XANTÉ Utilities Installer” and “Adobe PostScript Printer Drivers” in chapter 4. Connecting to the Ethernet Ports With the Ethernet option on your printer, you can connect to a network using unshielded twisted pair or coaxial cable. -
Page 34: Connecting The Power Cord
Connect the printer to the appropriate port for the cable used on your network. Fig. 2.31 Connect to the Coaxial Port Fig. 2.32 Connect to the UTP Port Before using your printer, set it up for your network environment and configure the Ethernet interface. See chapter 5 for details. Connecting the Power Cord Make sure the printer’s power switch is off (the O is pressed in). -
Page 35: Turning The Printer On
Fig. 2.33 Connect the Power Cord to the Printer Warning: Never use a power cord that is damaged. Check the cord and plug monthly and replace immediately if you find any damage. Turning the Printer On Press the | on the power switch to turn on the printer (fig. 2.34). Fig. -
Page 36: Turning The Printer Off
Printer initialization takes about 60 seconds. When READY/IDLE displays, the printer is ready to accept print jobs. Note: Due to movement during shipping, XANTÉ recommends that you calibrate your printer after setup. For procedures, see “Accurate Calibration Technology (X-ACT)” in chapter 3 (Macintosh) or 4 (PC). - Page 37 Chapter 3 - Macintosh Setup Chapter Overview Introduction ..................3-3 XANTÉ Utilities CD-ROM ............3-3 Adobe Acrobat Reader 3.0 .............. 3-5 XInstaller ..................3-5 Adobe PostScript Printer Drivers ............ 3-7 Selecting the Adobe PostScript Printer Driver ......3-7 AdobePS 8.6 ................3-10 AdobePS 8.5.1 ................
- Page 38 Notes 3-2 Macintosh Setupbb ____________________________________...
-
Page 39: Introduction
Introduction This chapter describes Macintosh setup procedures for your ScreenWriter 3 printer, including installation and configuration of the Adobe PostScript printer driver, your printer’s PPD (PostScript Printer Description) file, XANTÉ Command Center, and the Adobe Downloader. The last part describes procedures using XANTÉ... - Page 40 The PostScript 3 Fonts folder contains an installation program and screen fonts used on XANTÉ’s PostScript 3 printers for display on Macintosh systems. Note: Do not overload the Macintosh OS Fonts folder. On Macintosh operating systems prior to 8.0, you have to remove some of these fonts;...
-
Page 41: Adobe Acrobat Reader 3.0
Adobe Acrobat Reader 3.0 XANTÉ Utilities CD-ROM documentation is in Adobe Acrobat Portable Document Format (PDF). To install Acrobat Reader 3.0 Insert the XANTÉ Utilities CD-ROM into your Macintosh. Double-click the XANTÉ Utilities 4.0 icon; then, double-click the Acrobat icon. Check the ReadMe-Reader file. - Page 42 Select either XANTÉ Utilities to install only the utilities or select the appropriate PPD(s) for your printer(s) and the utilities will be included during installation; then, click Install (or stop installation by clicking Quit). • XANTÉ Utilities installs Adobe Downloader, XANTÉ Command Center, and the XD-1 software for Accel-a-Writer, PlateMaker, and ScreenWriter printers.
-
Page 43: Adobe Postscript Printer Drivers
Fig. 3.2 AdobePS Installer Window Change the destination disk (if necessary) for the driver in the Install Location box; then, click Install and follow instructions. A message window appears when installation is complete. Click Restart. After the restart, finish setup by following procedures in “Configuring the PPD”... - Page 44 AdobePS 8.6 The AdobePS 8.6 driver requires the following system setup: • Macintosh running System 7.6.1 or later (AdobePS 8.6 does not run on Macintosh 128K, 512K, or 512Ke computers) • At least 4 MB of memory • At least 2.1 MB of hard disk space plus the space required for the PPDs (each PPD is approximately 75 K) •...
- Page 45 • At least 4 MB of memory • At least 2 MB of hard disk space plus the space required for the PPDs • Chooser version 7.3 or later (supplied with the PSPrinter installation) AdobePS 8.5.1 provides • Adobe PostScript 3 and Adobe PostScript Level 2 support •...
-
Page 46: Adobeps 8.6
AdobePS 8.6 Following installation of the XANTÉ Utilities and your printer’s PPD, AdobePS launches automatically. AdobePS also can be launched manually from the Printer Drivers: AdobePS 8.6 folder. The AdobePS installation program loads AdobePS, and AdobePS Readme file, an AdobePS driver Custom Page extension into the Printer Descriptions folder, and other files required for the Adobe PostScript printer diver. -
Page 47: Adobeps 8.5.1
AdobePS 8.5.1 Following the installation of XANTÉ Utilities and your printer’s PPD, AdobePS 8.5.1 needs to be launched manually from the Printer Drivers folder. The AdobePS installation program loads AdobePS, an AdobePS Readme file, an AdobePS driver Custom Page extension into the Printer Descriptions folder, and other files required for the Adobe PostScript printer driver. -
Page 48: Psprinter 8.3.1
Drag the PPD to the System Folder: Extensions: Printer Descriptions folder on your Macintosh. The AdobePS printer driver and your printer’s PPD are installed. Skip to “Configuring the PPD” later in this chapter to complete the driver setup. PSPrinter 8.3.1 The PSPrinter installation program loads PSPrinter 8.3.1, Chooser version 7.3 (if necessary), the PSPrinter Read Me, and the latest PPDs. - Page 49 Click Install to load the files listed in the Easy Install box. To load only specific components, click Customize. Select the files to load; then, click Install. Read the license agreement; then, select Accept to bring up the installation screen (or select Decline to terminate installation). Follow instructions on screen to complete installation.
-
Page 50: Configuring The Ppd
The plug-in’s user guide (less than 10 page SimpleText file) describes system requirements and plug-in installation. To print this guide, double-click WM UserGuide; then, select File: Print. Configuring the PPD Select Chooser from the Apple menu. The Chooser window appears (fig. 3.4). Select AdobePS or PSPrinter from the box on the left (top left in a network environment);... - Page 51 Highlight your printer and double-click. If the setup reminder dialog box appears, click OK. The Adobe PostScript printer driver automatically selects and configures the correct PPD for your printer. Note: If multiple PPDs are installed for your printer, select the correct PPD when prompted. If you are using PSPrinter, select Off for Background printing (to maximize processing performance) when the Chooser window reappears.
-
Page 52: Configuring The Printer
Note: If your printer has two cassette trays, select Upper Optional Tray: Installed. If it has three cassettes, select Upper Optional Tray: Installed and Lower Optional Tray: Installed. Select True for Spooler Enabled to activate the Save Spooled Job menu in your application Print dialog box if your system has an optional internal hard disk. -
Page 53: App Drivers Folder
Verify the setup. Make sure your Macintosh is connected to the printer with a LocalTalk or Ethernet cable. Double-click the XANTÉ Command Center icon in the XANTÉ Utilities folder. Choose General: Printer Status. A dialog box displays the current printer status. Note: If the status dialog box does not appear, check all cable connections and be sure the printer interface you are using is enabled on the printer. -
Page 54: Quarkxpress Pdf Folder
Load and configure the Adobe PostScript printer driver and your printer’s PPD following instructions in “Adobe PostScript Printer Drivers” earlier in this chapter. Copy your printer’s PPD from the CD-ROM’s App Drivers: PageMaker PPD folder to the System: Aldus PPD folder on your Macintosh. -
Page 55: Scenicsoft Preps
ScenicSoft Preps The App Drivers: ScenicSoft Preps folder contains PPD and PDX files for XANTÉ Accel-a-Writer 3 series, PlateMaker 3, and ScreenWriter 3 printers. XInstaller installs these files automatically if you have the ScenicSoft Preps application on your system. Downloads Folder The Downloads folder contains Adobe PostScript files and Overview.pdf, which describes these files. - Page 56 INITDSKX.PS files are used to initialize hard disks attached to or installed in your printer. • Numbered files initialize the SCSI disk with the same device number (INITDSK1.PS initializes SCSI disk #1, INITDSK2.PS initializes SCSI disk #2, etc.) on the printer. •...
-
Page 57: Xanté Command Center
XANTÉ Command Center XANTÉ Command Center allows you to check and control many printer functions from your Macintosh. Use XInstaller to install Command Center or copy the program from the CD-ROM’s XANTÉ Utilities folder to a folder on your Macintosh. File and Edit menus are similar to other Macintosh applications and are not described in this section. -
Page 58: Printer Information
Printer Information This option allows you to send current printer settings to the screen or printer. These include printer configuration, storage devices on the printer, and network configuration details. Spooling This option allows you to enable and control printer hard drive spooling. -
Page 59: Startup Page
Startup Page This option allows you to enable or disable automatic start-up page printing after your printer goes through initialization. The Print One option allows you to print a start-up page regardless of whether the feature is enabled. The factory default is to print the start-up page after initialization. -
Page 60: Graphics Menu
• Set Print Server Password—allows you to specify the password required for your printer to login to the Novell file server(s). • Network Protocol—allows you to configure the Novell Print Server emulation for your network protocol. The printer’s front panel Novell Print Server menu is another way to set network protocol. -
Page 61: Crd Directories
CRD Directories This menu is not for use with monochrome laser printers. Linearization This menu allows you to create and download custom curves to your printer. These curves can be selected for a specific job from the Print dialog box or set as the default from the printer’s front panel. See “Calibration with a Densitometer (Gamma)”... -
Page 62: Download Fonts
Download Fonts This menu allows you to download fonts to an optional hard disk on your printer or to printer memory. Fonts downloaded to your printer are considered resident, which means applications do not have to bundle these fonts with print jobs. Fonts downloaded to printer memory only remain during the current power cycle. -
Page 63: Procedures
Procedures This section covers special procedures using XANTÉ Command Center and Adobe Downloader. Spooler If your printer has an optional hard drive, you can use the spooler to place print jobs into a queue on that drive. This reduces return to application time by freeing the communications channel between the computer and printer. - Page 64 Open XANTÉ Command Center; then, choose General: Spooling. The Spooling window appears (fig. 3.11). Fig. 3.11 Spooling Window Select Devices from the Configure box. The Select Spool Device window appears (fig. 3.12). Fig. 3.12 Select Spool Device Window 3-28 Macintosh Setupbb ____________________________________...
- Page 65 Select the disk to use to store the spooled jobs or select NONE to disable spooling (fig. 3.12); then, click Ok. The Spooling window reappears (fig. 3.11). Select Interfaces from the Configure box. The Select I/O Interfaces to Spool window appears (fig. 3.13). Fig.
- Page 66 Open XANTÉ Command Center; then, choose General: Spooling. The Spooling window appears (fig. 3.14). Fig. 3.14 Job Queue in the Spooling Window The Job queue lists the ID, status, title, spool device, and file size of all jobs in the spooling queue. Job status can be W (waiting to be processed), P (currently processing), or H (already processed and held using the Save Spooled Job feature).
-
Page 67: Calibration With A Densitometer (Gamma)
Calibration with a Densitometer (Gamma) Your printer’s Custom Dot Gain Calibration feature provides densitometer support which allows you to adjust your printer’s performance to eliminate inconsistencies due to equipment age, different toners, press inks, media, and environmental conditions. Dot Gain Calibration provides gamma control to adjust image grayscale values to help compensate for dot gain. - Page 68 Open XANTÉ Command Center and choose Graphics: Linearization. The Linearization window appears (fig. 3.15). Fig. 3.15 Linearization Window Change the Linearization window LPI setting in the Print box (fig. 3.15) to achieve 256 levels of gray for the resolution at which you are printing.
- Page 69 Note: Always print the calibration page using the same media and toner or press ink as used for the final copy. When calibrating film media, you must select Man Feed using the Tray Select key and select the media size through the front panel MISC: MAN FEED menu.
-
Page 70: Using The Densitometer
Click Print Calibration Page (fig. 3.15). The calibration page shows the printer’s performance using no gamma curve correction (fig. 3.16). Note: Print only one calibration page (using the Print Calibration Page button) at the beginning of the calibration process. Printing this page again later in the process resets the calibration, cancelling any linearization you have already done. -
Page 71: Linearizing The Densitometer Data
After calibrating the densitometer, use it to get density measurements for the calibration page you printed. Linearizing the Densitometer Data Enter the densitometer measurements to calculate the adjustments necessary to correct printer performance to a linear standard. Click Enter Curve/Linearize in the Linearization window (fig. 3.15). - Page 72 For example, when you are reading for 2%, if the box labeled 7 measures 2%, enter the number 7 in the corresponding box. Note: The calibration page blocks are numbered from 0 to 255. You may have to check several blocks to find the one that most closely matches the percentage in the Densitometer Data Entry window.
- Page 73 Select the gamma curve to update from Update Gamma Curve in the Linearization window. Click Advanced. Then, use the appropriate scroll bars to make the adjustment and click Ok. The Linearization window reappears. Click Enter Curve/Linearize to create a new curve and download it to your printer.
-
Page 74: Accurate Calibration Technology (X-Act)
Resetting Custom Curve Defaults To reset a custom gamma curve to the factory default (a copy of the standard Gamma 0 curve) or to reset all gamma curves to the factory defaults Highlight the curve to change in Update Gamma Curve list in the Linearization window and click Reset (fig. - Page 75 Front Panel X-ACT Your printer’s front panel MISC: XACT menu allows you to make 1/2 mm line length adjustments using the following procedure. Note: To use the front panel XACT, you need a metric ruler with 1/2 millimeter rule markings. Also, you must use the paper cassette, not the multipurpose feeder, when making X-ACT adjustments.
- Page 76 Measure Line B. Use the following procedures to adjust the printer for the correct line length. Note the amount Line B is over or under 388.61 mms. Press the Menu key until LINE B appears. Then, press the Enter key. Press the Menu key until the amount which would most closely adjust the line to the desired length appears.
- Page 77 Fig. 3.19 More X-ACT Calibration Window Make sure that the same type of media you will use for final printing is loaded in the printer. Select a setting for the media type you are using from the Media Type drop-down menu (fig. 20). Fig.
- Page 78 Note: Each media type can have only one set of options. For example, if you calibrate for 8 1/2 x 11 (letter) paper, you can choose Paper as the media type. If you need to calibrate for 11 x 17 (tabloid) paper, you need to select another media type such as User-defined 1 so that the first calibration for letter size paper is not overwritten.
- Page 79 Under Print Settings, select the resolution from the drop-down menu. Click the Negative Film box if you are printing negative output. Click OK. The More X-ACT window reappears. Click Print Calibration Page. Measure dashed line from left edge of paper to top arrow tip; enter results in millimeters in box A.
- Page 80 Make the measurements indicated on the calibration page next to boxes A through F, I, and J, recording each measurement in its corresponding box on the calibration page. The values in boxes G and H are fixed values and do not require you to make any measurements.
-
Page 81: Printer Margin Adjustment
Printer Margin Adjustment Use Margin Adjustment to adjust the position of the imageable area on the media. Note: Use the standard paper size (letter or A4) for your paper cassette with the Margin Adjustment function. Open XANTÉ Command Center. Select General: Margin Adjustment. - Page 82 Turn the test page so that -x is to the left and -y is at the top of the crossed lines. Check the current settings that printed near the crossed lines. The factory default is x = 0, y = 0, which should cause each line to print 1"...
-
Page 83: Downloaded Fonts
Measure the -x and -y lines on the new test page. If the lines are not each 1" (25.4 mm) from the edge of the paper, go back to step 5 and repeat the process. When the -x and -y lines are set correctly, click Close. Choose File: Quit to close Command Center. -
Page 84: Reviewing And Removing Downloaded Fonts
Select the folder on your Macintosh that contains the font files from the drop down menu on the top left of the screen (fig. 3.25). The large box on the left displays the fonts in the selected folder. Select Memory or Disk from the Device menu as the destination for the downloaded fonts. - Page 85 Note: To print a list of resident fonts in ROM, use Adobe Downloader’s File: Download PostScript File option to download the FONT.PS3 file (or download the Fontsamp.ps3 file to see a sample of these fonts). Fig. 3.27 Font Directory Window Select the font storage area from the Device menu to view the fonts present in that area.
- Page 86 3-50 Macintosh Setupbb ____________________________________...
- Page 87 Chapter 4 - PC Setup Chapter Overview Introduction ..................4-3 XANTÉ Utilities CD-ROM (PC) ............ 4-3 Adobe Acrobat Reader 3.0 .............. 4-5 XANTÉ Utilities Installer ............... 4-5 XANTÉ Utilities and Application Drivers ....... 4-6 Adobe PostScript Printer Drivers ..........4-10 Deleting Previous Driver Versions .........
- Page 88 Notes 4-2 PC Setupbb __________________________________________...
-
Page 89: Introduction
Introduction This chapter describes the PC XANTÉ Utilities as well as installing and configuring the Adobe PostScript printer driver and your printer’s PPD (PostScript Printer Description) file. The procedures section covers your printer’s features and options. Note: Before beginning this setup, you should be familiar with all standard PC and Windows procedures. - Page 90 The Pdfs folder contains printer drivers required by QuarkXPress. See “XANTÉ Utilities Installer” and “PDFs Folder” later in this chapter. The Ppds folder contains XANTÉ PPDs for Roman font printers. See the CD-ROM’s Readme.PDF file and “Adobe PostScript Printer Drivers” later in this chapter. The Ps_files folder contains PostScript files that can be downloaded to your printer using XANTÉ...
-
Page 91: Adobe Acrobat Reader 3.0
Adobe Acrobat Reader 3.0 XANTÉ Utilities CD-ROM documentation is in Adobe Acrobat Portable Document Format (PDF). You can install Adobe Acrobat Reader 3.0 from the CD-ROM. Windows NT 3.5X users should install the Windows 3.1 version; Windows 98 and NT 4.0 users should install the Windows 95 version. -
Page 92: Xanté Utilities And Application Drivers
XANTÉ Utilities and Application Drivers Note: To do NT 4.X setup, you must be logged on as the System Administrator. Insert the XANTÉ Utilities CD-ROM into your PC. XANTÉ Utilities Installer launches automatically on systems running Windows 95, 98, and NT 4.0. To start the Installer manually, use the following steps. - Page 93 Note: If you are not using a listed application for Windows 95 and 98, select Next and go to step 3.d. For NT 4.X, select None and Next and go to step 3.e. Fig. 4.2 Select Your Printer Application(s) Select the destination directory for the application, if you specified an application and click Next.
- Page 94 Fig. 4.3 Select the AdobePS Printer Driver Windows 95 or Windows 98: • AdobePS 4.1 (Adobe PostScript Level 2 only) • AdobePS 4.2 (Adobe PostScript Level 2 and Adobe PostScript 3) • AdobePS 4.3 (Adobe PostScript Level 2 and Adobe PostScript 3—Some systems have problems using this new Adobe 4.3.
- Page 95 Click Next to install XANTÉ Utilities and any application- specific PPD that you selected. Then use the following appropriate procedure depending on which AdobePS driver version you selected: For AdobePS 4.1: Skip to “Installing AdobePS 4.1, 4.2, or 5.X and the Printer PPD.” For AdobePS 4.2: Skip to step 3 in “Installing the AdobePS Printer Driver and Printer PPD.”...
-
Page 96: Adobe Postscript Printer Drivers
Go to the appropriate section for your operating system in “Adobe PostScript Printer Drivers” to continue the installation. Adobe PostScript Printer Drivers Before using your printer, you must install the Adobe PostScript driver and your printer’s PPD. XANTÉ Utilities Installer launches the installation program for the most recent Adobe PostScript printer driver on systems running Windows NT 4.0. - Page 97 Select Tools: Find: Files or Folders. The following screen appears. Fig. 4.7 Find: All Files Window Delete each of the following four files on your C drive using the following procedure. Adobeps4.drv Defprtr2.ppd Adobeps4.hlp Adfonts.mfm Enter the name of the file to be deleted in the Name field (Fig.
- Page 98 Close the Find: File All window. You return to Windows Explorer. Go to the C:\ root drive in the Windows Explorer window. Locate and highlight AdobePS4 directory if it is listed; then, press the Delete key and go to step 8. If the directory is not listed, go to step 6.
-
Page 99: Windows 95, 98, And Nt 4.0 Drivers
PSINSTDV.EXE WINDOWN.EXE PS_ENUM.* DOWN.DLL DWN.HLP Restart Windows. Use Notepad or another ASCII text editor to delete the following entries from the Win.ini file in the Windows directory. Only delete the lines indicated by notes in the right column; the other lines are to help you locate the entries <<<Delete this line [<printer_name>,<port>] <<<Delete this line... -
Page 100: Installing The Adobeps Printer Driver And Printer Ppd
Installing the AdobePS Printer Driver and Printer PPD Go to step 2 (AdobePS 4.3) or step 3 (AdobePS 5.X) if the XANTÉ Utilities Installer automatically launches the AdobePS printer driver installation program. If not, use the following procedure to launch it. Insert the XANTÉ... - Page 101 Fig. 4.8 PostScript Printer Driver Setup Window Select Yes or No in the Install Setup Program window; then click Next. If you select Yes, go to step 3. If you select No, skip to step 4 after the driver files load. Click Next to copy the AdobePS printer driver files and setup program to the default directory on your PC.
- Page 102 Fig. 4.9 Printer Type Window Use Browse or type the network path or queue name in the Network Path window. Click Next to bring up the Install PostScript Printer from PPD window (fig. 4.10). With a networked printer for AdobePS 4.1, go to step 7 or for AdobePS 4.2, skip to step 9.
- Page 103 Select the drive containing the CD-ROM (fig. 4.10); then, select the PPDs: Level3: win95_98 folder (for a printer that supports Adobe PostScript 3) or select the PPDs: Level2: Win95_98 folder (for a printer that supports Adobe PostScript Level 2). Note: Windows NT 4.X uses the Windows 95 and 98 PPD. Select your printer from the list of printers and click Next (fig.
- Page 104 Set the following options in the Add Printer window (Windows 95 or 98) or Get Setup Information (Windows NT 4.0). Fig. 4.12 Add Printer Window Use the default printer name or type in a name you prefer. Check Yes to set the printer as the default. Select either Yes or No to print a test page for Windows 95 or 98.
- Page 105 Select the type of printer installation (either to install a new PostScript printer or to upgrade the existing PostScript printers to AdobePS version 4.3) in the Printer Installation Type window. Then, click Next. Fig. 4.13 Printer Installation Type Window Select the type of printer connection you are using (local, network, or WebReady) in the Printer Connection Type window.
- Page 106 Select the model of your printer in the Select Printer Model window. If your printer is not listed, use Browse to locate your printer or a compatible printer. If you cannot find one of those, select Generic PostScript Printer. Then, click Next. Note: If you use Browse, go to the drive containing the XANTÉ...
- Page 107 Click the Device Options tab (Windows 95 or 98) or the Device Settings tab (Windows NT 4.X). Then, make the following changes for options installed on your printer (fig. 4.13) using the appropriate following procedure. Windows 95 and 98—highlight the option in the Installable Options section;...
- Page 108 Note: This does not enable the Spooler on your printer. The Spooler must be enabled using either the front panel Interface menus or XANTÉ Command Center. See “Spooler” in chapter 6 and “Spooler” later in this chapter for details. Select the amount of RAM installed on your printer. For Windows 95 and 98, use the VMOption and then go to step 4.
- Page 109 Fig. 4.16 PostScript Tab In the PostScript output format box, select PostScript (optimized for speed) if you have a Pentium processor. If not, select PostScript (optimized for portability-ADSC). Under PostScript header, select Download header with each print job. Under PostScript timeout values, make sure the setting are Job timeout: 0 Wait timeout: 240 Click the General tab if you want to print a test page;...
-
Page 110: Configuring The Printer
Select File: Close. The Printers window closes. After the AdobePS printer driver and PPD are installed and configured, you need to do one of the following: Windows 95 or 98—to verify that printer interfaces are properly configured, see “Configuring the Printer” later in this chapter. Windows NT 4.X—to set up your printer for TCP/IP or AppleTalk, continue to either “LPR Port Setup for TCP/IP”... -
Page 111: Ps_Files Folder
The XANTÉ Utilities Installer loads the QuarkXPress PDF. To load these PDFs manually Load and configure the Adobe PostScript printer driver and your printer’s PPD following instructions in “Adobe PostScript Printer Drivers” earlier in this chapter. Copy the XANTE_3S.PDF for the series 3 printers from the PDFs folder to the Xpress\PDF directory on your PC by typing the following command, substituting the drive letter containing the XANTÉ... - Page 112 Ftp.ps prints instructions for uploading and downloading files to XANTÉ’s FTP (File Transfer Protocol) site. InitdskX.ps files are used to initialize hard disks attached to or installed in your printer. • Numbered files initialize the SCSI disk with the same device number (Initdsk1.ps initializes SCSI disk #1, Initdsk2.ps initializes SCSI disk #2, etc.) on the printer.
-
Page 113: Xanté Command Center
Startpg.on enables the start-up page feature, causing it to print automatically each time the printer is restarted. See “Start-up Page” in chapter 6 for details. Sysparm.ps prints a list of current system parameters. XANTÉ Command Center XANTÉ Command Center allows you to check and control many printer functions from your PC. - Page 114 Fig. 4.17 Controller Menu General General menu options (fig. 4.18) allow you to access printer status information, perform diagnostics and troubleshooting, and set some network parameters. Fig. 4.18 General Menu • Chat is a diagnostic communication tool, to be used only as directed by XANTÉ...
- Page 115 – The Product Information screen lists the product name. • I/O Timeout allows you to select the number of seconds the printer waits for additional incoming data before cancelling a job and returning to the idle state, ready to accept another job. •...
-
Page 116: Align Paper
Note: In some cases, turning the I/O Buffer Clear feature off may increase communication speed. Align Paper This option allows you to adjust the printer margin. Printer margin refers to the page’s imageable area, not to margin settings in an application. -
Page 117: Test Directory
Fig. 4.19 Novell Menu Add File Server—allows you to specify up to four Novell file servers for your printer to poll for print jobs. XANTÉ printers can log onto as many as four file servers. Delete File Server—allows you to delete specific Novell file servers from the list that your printer polls for print jobs. -
Page 118: Ports Menu
More X-ACT This option allows you to calibrate printer line length to a standard and to correct inaccuracies in printing width, height, skew, and angle. See “Accurate Calibration Technology (X-ACT)” later in this chapter for details. Ports Menu The Ports menu allows you to select the PC port through which you are connected to the printer for XANTÉ... - Page 119 Spooling can be enabled for each interface independently through XANTÉ Command Center or printer front panel Interface menus. Command Center also allows you to manage jobs in the spooler print queue. Using the Front Panel The Spooler can be enabled using the Spooler menu for the interface. See “Interface Control”...
- Page 120 Choose Configure: Spool Device. The Select Spool Device window appears (fig. 4.22). Fig. 4.22 Select Spool Device Window Select the disk to store the spooled jobs (or select NONE to disable spooling); then click OK. The Spooler window reappears (fig. 4.19). Choose Configure: I/O Interfaces to Spool;...
- Page 121 Managing Jobs in the Spooler’s Job Queue The spooler’s job queue can store up to 250 jobs. Jobs sent with the Save Spooled Job option set to True in the Print dialog box are retained indefinitely in the queue. A saved job can be reprinted quickly from the Spooling menu without reprocessing.
-
Page 122: Calibration With A Densitometer (Gamma)
Calibration with a Densitometer (Gamma) Densitometer support allows you to use gamma curves to adjust your printer’s performance to eliminate inconsistencies due to equipment age, to different toners, press inks, and media, and to environmental conditions. The XD-1 (XANTÉ densitometer), combined with XANTÉ Command Center software, measures grayscale output for calibration and proofing. - Page 123 Fig. 4.25 Linearization Window Change the Linearization window LPI setting in the Print box (fig. 4.25) to achieve 256 levels of gray for the resolution at which you are printing. Note: For 600 dpi, select 85 lpi; for 1200 dpi, select 106 lpi. Any lpi may be used;...
- Page 124 Also, when possible, calibrate from the final output. For example when calibrating for plates, take the plate to press and print. Then, measure the output from the press. Select Negative Film to calibrate the printer if you are calibrating for negative output from your printer. Select Emulsion side down if you want to print a mirror image.
- Page 125 Fig. 4.26 Sample Calibration Page Using the Densitometer A densitometer uses a standard light source to measure the amount of light reflected from printer output. This measurement is compared to a standard and expressed as a percentage of gray. Like any other precision instrument, the densitometer must be calibrated before each use.
- Page 126 Click Enter Curve/Linearize (fig. 4.25). The Densitometer Data Entry window appears (fig. 4.27). Fig. 4.27 Densitometer Data Entry Window Measure individual patches on the calibration page by placing the page on a white background; then, center the densitometer's lens over the patch and either click the black button on top of the XD-1 or click the measure button on the Densitometer Data Entry window (fig.
- Page 127 Note: Calibration page blocks are numbered from 0 to 255. You may have to check several blocks to find the one that most closely matches the percentage in the Densitometer Data Entry window. Also, it is not necessary to measure for each coverage value listed in the Densitometer Data Entry window, but it is recommended to do so to achieve more accurate results.
- Page 128 Select the gamma curve to update from Update Transfer Curve in the Linearization window (fig. 4.25). Click Advanced. The Advanced Settings window appears (fig. 4.28). Use the appropriate scroll bars to make the adjustment and click OK to return to the Linearization window (fig. 4.25). Fig.
- Page 129 • To retrieve a custom gamma curve from the printer, click Load from printer. • To retrieve a custom gamma curve saved to your PC, click Load and select the file. • To save a custom gamma curve to your PC, retrieve it from the printer using Load from printer;...
-
Page 130: Accurate Calibration Technology (X-Act)
Click Close; the Linearization window closes. Then, select File: Exit to close Command Center. Accurate Calibration Technology (X-ACT) Use XANTÉ’s patented X-ACT feature to calibrate your printer in two ways, through the front panel MISC:XACT menu or through XANTÉ Command Center’s X-ACT menu. Front Panel X-ACT Your printer’s front panel MISC:XACT menu allows you to make 1/2 mm line length adjustments using the following procedure. - Page 131 Press the Menu key until LINE A appears. Then, press the Enter key. Press the Menu key until the amount which would most closely adjust the line to the desired length appears. Then, press the Enter key. For example, if Line A is 250.46 mm instead of 251.46 mm, select 1.00 mm to add one mm to make the line the correct length.
- Page 132 Note: You must have Command Center and your printer’s current PPD installed before you can use Command Center’s X- ACT. You also will need a 1/2 millimeter ruler. Open XANTÉ Command Center and select Controller: More X-ACT. The More X-ACT window appears (fig. 4.30). Fig.
- Page 133 Select the media type you are using from the Media Type drop-down menu. Note: Each media type can have only one set of options. For example, if you calibrate for 8 1/2 x 11 (letter) paper, choose Paper as your media type. If you also calibrate for 11 x 17 (tabloid) paper, choose User-defined 1 as your media type.
- Page 134 Under Manual Feed Options, if you are using standard size media, click Standard Paper Size and select the size from the drop-down menu. If you are using a custom size, click Custom Paper Size and enter the size and select the unit of measure (inch, millimeter, or centimeter).
-
Page 135: Printer Margin Adjustment
Copy the recorded measurements in boxes A through F, I, and J and the fixed values in boxes G and H from the calibration page to the corresponding boxes in the Enter Calibration Values section of the More X-ACT window. Click Update Printer. - Page 136 Fig. 4.33 Align Printer Margins Click Update/Print to print an alignment test page. Click OK in the Alignment message box. Turn the test page so that -x is to the left and -y is at the top of the crossed lines (fig. 4.33). Check the current settings printed near the crossed lines.
-
Page 137: Managing Fonts On An Optional Hard Disk
• To move the -x line toward the edge of the page, move the slide on the vertical slide bar down (toward the +y). Measure the distance from the edge of the page to the -y line. This distance is dependent on the x coordinate. •... - Page 138 To remove specific fonts downloaded to a hard disk, see the documentation for your font downloader program. To remove all fonts downloaded to a hard disk, reinitialize the disk by downloading the Initdsk.ps file. 4-52 PC Setupbb __________________________________________...
- Page 139 Chapter 5 - Ethernet Setup Chapter Overview Introduction ..................5-3 EtherTalk Network Configuration ..........5-3 Select the EtherTalk Phase 2 Driver ......... 5-3 Change the EtherTalk Zone Name ........... 5-4 Novell NetWare Configuration ............5-5 Configure the Novell Server ............. 5-5 Configure the Print Server Emulation ........
- Page 140 Notes 5-2 Ethernet Setupbb ______________________________________...
-
Page 141: Introduction
Introduction This chapter covers configuration for the EtherTalk, Novell Print Server, and Line Printer protocols on the printer’s optional Ethernet interface using printer front panel menus, XANTÉ Command Center, and specific network software. It also covers NetBEUI configuration in a PC environment. EtherTalk Network Configuration Ethernet, a multiple protocol medium, allows you to run several network protocols concurrently. -
Page 142: Change The Ethertalk Zone Name
• Select the Phase 2 driver through the Network Control Panel under Apple menu: Control Panels on a Macintosh with an older operating system (System 6.X and earlier). • Select Ethernet from the drop down menu in the AppleTalk Control Panel under Apple Menu: Control Panels on a Macintosh with an operating system that supports Open Transport (System 7.5 and later and some versions between 6.X and 7.5). -
Page 143: Novell Netware Configuration
Choose File: Quit. Command Center closes. Restart the Printer to make the new zone name effective. Novell NetWare Configuration Your printer’s Ethernet upgrade supports EtherTalk, Novell NetWare print server, NetBEUI, and TCP/IP protocols concurrently. In a Novell network, users send print jobs to a queue on a server. The print server monitors these queues and submits the jobs to the appropriate network printer. -
Page 144: Selecting The Novell Names
Ethernet board is installed. The default print server name is formed by adding a _PS extension to your printer’s PostScript name. The printer PostScript name ScreenWriter 3 becomes the default print server name SCREENWRITER_3_PS. The Novell System Administrator may assign a print server name other than the default and may assign a password to control access to the server. - Page 145 To configure the Novell server for NetWare versions 3.X or 4.X see the next section; for version 5.X, skip to “Configure the Novell Server (NetWare 5.X)” later in this chapter. Configure the Novell Server (NetWare 3.X and 4.X) This section covers setup for Novell NetWare Version 3.X and 4.X using PConsole.
- Page 146 Press Escape until you return to the Available Options menu. Set up the Print Queue name. Select Available Options: Print Queue Information (version 3.X) or Available Options: Print Queues (version 4.X) and press Enter. Press Insert and type in a queue name. XANTÉ recommends that the name be twelve characters or less.
- Page 147 Now that the Novell server is configured for NetWare 3.X and 4.X, skip to “Configure the Print Server Emulation” later in this chapter. Configure the Novell Server (NetWare 5.X) Use XANTÉ Command Center to setup the Novell print server name, the file server name of the Novell server and the Printer AppleTalk name if it is different.
- Page 148 Highlight the main organization where the printer will be installed (fig. 5.3). Then, select Object: Create (fig. 5.3). The New Object Window appears (fig. 5.4). Fig. 5.4 New Object Window Select Print Queue and then click OK (fig. 5.4). The Create Print Queue window appears (fig.
- Page 149 Select Directory Service Queue and under Print Queue Name enter the desired queue name (such as XANTE_Q). Click the Browse button to the right of the Print Queue Volume field (fig. 5.5). The Select Object window appears (fig. 5.6). Fig. 5.6 Select Object Window Highlight the print server volume in the left side of the Select Object window.
- Page 150 OK. The Create Printer window appears (fig. 5.7). Fig. 5.7 Create Printer Window Enter the printer name as it appears on the printer’s start-up page (for example, ScreenWriter 3). Note: In a Macintosh environment, the printer can be renamed using XANTÉ Command Center. See “Networking Menu”...
- Page 151 Click Assignments; then, click Add (fig. 5.8). The following Select Object window appears. Fig. 5.9 Select Object Window Highlight the print queue name in the left of the Select Object window. Then, click OK. The Network Administrator window reappears (fig. 5. 3). Highlight the main organization where the printer will be installed.
- Page 152 Enter the printer server name. This name must match the Novell Printer Serve Name from the printer start-up page. Then, click Create. The following Print Server window appears (fig. 5.11). Fig. 5.11 Print Server Window Click Assignments and then click Add. The Select Object window reappears (fig.
-
Page 153: Configure The Print Server Emulation
Press the Online key once to take the printer offline. Press the Menu key until SETUP:I/F appears; then, press the Enter key. Press the Menu key until I/F:NVL PSRV appears; then press the Enter key. NVL PSRV:ENABLE appears. Press the Enter key. Then, press the Menu key until ENABLE:yes appears. - Page 154 Type in the name of the Novell file server that your printer will poll for print jobs exactly as it appears in PConsole; then click OK to return to the main menu. Note: The printer enters a waiting state while it saves the file server name.
- Page 155 Note: If no password is required to access the Novell server, this step is not required. Choose Controller: Novell: Set Print Server Password. Type in the password exactly as it was entered on the file server. The password must follow Novell NetWare naming conventions, and lower-case letters will be converted to upper-case.
- Page 156 Type in the name of the Novell file server that your printer will poll for print jobs exactly as it appears in PConsole; then click OK to return to the main menu. Note: The printer enters a waiting state while it saves the file server name.
-
Page 157: Configure The Novell Print Server Interface
If a password is required to access the file server, change the print server password to agree with the password set up on the file server. Note: If no password is required to access the Novell server, this step is not required. Choose Networking: Novell Print Server: Set Print Server Password. - Page 158 • To configure the frame type used on your network, use either Command Center’s Macintosh version or printer front panel menus. • To configure the Novell timeout, which specifies the number of minutes that the printer waits before disabling the Novell print server emulation when an assigned file server cannot be found, use printer front panel menus.
-
Page 159: Install The Adobe Postscript Driver
Click the option buttons for Enable Login and Enable Printing. Click Ok to save the changes and return to the main menu. This directs the printer to login to the assigned file servers and begin servicing the assigned print queues. Choose Networking: Novell Print Server: Network Protocol. -
Page 160: Configure The Line Printer Interface
The following steps are required to set up your printer to communicate using the Line Printer interface on the Ethernet board. Chapter 2 covers step 1; this section covers steps 2 through 4. Connect your XANTÉ printer to the network through the Ethernet port. -
Page 161: Ethernet Setup
Class Net ID Host ID 1 Bit 7 Bits 24 Bits Network Address Class Net ID Host ID 2 Bits 14 Bits 16 Bits Network Address 1 1 0 Class Net ID Host ID 3 Bits 21 Bits 8 Bits Network Address XANTÉ... -
Page 162: Reserved Ip Addresses
Reserved IP Addresses Addresses in the following table are reserved, by convention, and should not be used as a device address. Reserved IP Addresses Net ID Host ID Meaning all 0’s all 0’s This host all 0’s host ID A host on this network all 1’s all 1’s Limited broadcast (local network) -
Page 163: Subnet Addresses
XANTÉ printer default addresses On a class C network, the broadcast address is 192.9.200.255 On a class B network, the broadcast address is 192.9.255.255 On a class A network, the broadcast address is 192.255.255.255 Subnet Addresses Subnetting is frequently used to manage the traffic between ports on a router more efficiently. - Page 164 Open XANTÉ Command Center by double-clicking its icon. Choose Controller: General: TCP/IP Address. Fig. 5.20 PC TCP/IP Address Window If necessary (check with your System Supervisor), change the network class by clicking the appropriate option button. Change the printer’s default TCP/IP address to the address assigned by your System Supervisor using the scroll bars under each octet.
-
Page 165: Configure The Printer Setup On The Network
Change the printer’s default TCP/IP address to the address assigned by your System Supervisor, using the tab key to move to the next octet. Click Ok. Command Center’s main menu reappears. If necessary, enable the printer’s Line Printer interface. The Line Printer interface is enabled as the factory default. -
Page 166: Windows Nt 4.X Configuration
Windows NT 4.X Configuration Windows NT is a cross platform networking system. This section describes configuring the printer’s Ethernet interface for TCP/IP or EtherTalk protocols on a system running Windows NT 4.X. LPR Port Setup for TCP/IP After completing the driver installation, use the following procedure to configure your printer for Windows NT 4.X network printing. -
Page 167: Appletalk Setup For Ethertalk
Select LPR Port; then, click New Port to bring up the Add LPR Compatible Printer window (fig. 5.24). Note: If LPR is not an option, you must log in as the Administrator and select Control Panel: Network: Services and make sure that Microsoft TCP/IP Printing is installed. - Page 168 Click Start: Settings: Printers. Then, right click on the new XANTÉ icon and select Properties. Click the Ports Tab; then, click Add Port. The Printer Ports window appears (fig. 5.23). Select AppleTalk Printing Devices; then, click New Port. A window appears listing zone names if you have several AppleTalk zones on your network.
-
Page 169: Netbeui Configuration
NetBEUI Configuration NetBEUI (NetBIOS Extended User Interface) is the Microsoft Windows networking interface standard for Windows 95 and 98, Workgroups, Microsoft LAN Manager and MS-DOS’s Workgroup add-on). On a Windows 95 or 98 system, NetBEUI installs using the procedure later in this section. Configuration consists of simply setting the computer name and a workgroup or domain name. -
Page 170: Host Setup
You can minimize some of the NetBEUI constraints just listed by installing an internal disk drive and setting the NetBEUI’s Spool setting to True. This provides free disk space for print job storage before sending the job to be processed, and allows the fully compiled job to be sent from this drive to the printer as a complete unit. -
Page 171: Print Queue Setup
Make sure your PC is connected to the network properly. You will need to restart your computer for the new network changes to take effect. Note: MS Networks can delay updating the network for a few minutes. Print Queue Setup Once your PC is restarted with the new network changes, you can establish a print queue to your XANTÉ... - Page 172 Your XANTÉ printer is set as the default printer. Note: Make sure NetBEUI is enabled on the printer’s front panel in the SETUP :IF: NETBEUI menu. 5-34 Ethernet Setupbb ______________________________________...
- Page 173 Chapter 6 - Configuration Chapter Overview Introduction ..................6-3 Front Panel ..................6-3 Window ..................6-3 Status Lights ................6-4 Control Keys ................6-4 Configuration Menus ..............6-5 Selecting Menu Options ............6-6 Resetting to Factory Defaults ........... 6-6 Menu Structure ................. 6-7 The PPD ..................
- Page 174 RAM Disk ................6-26 Resolution Options ..............6-26 Smooth Shading ..............6-26 Soft Error ................6-27 Spooler ..................6-27 Start-up Page ................6-28 Toner Cartridge Control ............6-29 Toner Page ................6-30 Tray Selection Options ............6-31 Notes Configurationbb ______________________________________...
-
Page 175: Introduction
Introduction This chapter describes configuring printer features. Included are manual settings available through the front panel and advanced features available through the PPD options and XANTÉ Command Center. Note: PPD options override printer default settings for a specific job or for all jobs sent to the printer from your host. Front Panel The printer’s front panel provides printer status information and allows you to configure some printer features (fig. -
Page 176: Status Lights
Manual LED is on when the multipurpose feeder is selected. MANUAL Duplex LED is not functional on the ScreenWriter 3. DUPLEX Control Keys Printer front panel control keys allow you to configure some printer features and to access the configuration menus. -
Page 177: Configuration Menus
Note: Tray options do not appear in all capital letters in the window. Duplex key is not functional on the ScreenWriter 3 printer. DUPLEX Reset key allows you to return to the previous menu level when using configuration menus. To cancel a job that... -
Page 178: Selecting Menu Options
Note: PPD options override printer default settings for a specific job or for all jobs sent to the printer from your host. Selecting Menu Options The following example explains changing the printer’s default resolution from the standard 600 x 600 dpi to optional 1200 x 1200 dpi using control keys and configuration menus. -
Page 179: Level 2 Reset
Level 2 Reset Level 2 resets printer options to factory default settings except for printer margins, gamma settings, Novell network print server parameters, IP network parameters, and More X-ACT settings. To do a level 2 reset, turn off the printer, hold down the Online and Tray Select keys. -
Page 180: The Ppd
The PPD The PostScript Printer Description (PPD) allows you to select many printer feature settings from your application’s Print dialog box. These settings override printer default settings and other software settings. You can customize printer features for each job or for all jobs sent to the printer from your host without resetting printer front panel menus. -
Page 181: Selecting Ppd Options (Windows 95 And 98)
Choose Printer Specific Options. The printer option menus appear (fig. 6.4). Fig. 6.4 Printer Specific Options Menu Use the right scroll bar to locate the option; then, use the option’s drop down menu to select its setting. Repeat to configure other printer options. Click Save Settings to save the Print dialog box settings as the defaults for all jobs sent to the selected printer. - Page 182 Choose File: Print. The Print dialog box appears. Fig. 6.5 Windows 95 and 98 Print Dialog Box Make sure your printer is selected in the Name box (fig. 6.5); then click Properties. Click the Graphics tab to set the Resolution option. Click the Device Options tab to set other printer options.
-
Page 183: Selecting Ppd Options (Windows Nt 4.0)
Use the right scroll bar to locate the feature in the Printer features box. Highlight the feature to display the options in the Change Setting for box (fig. 6.6). Select the setting from the drop down menu in the Change Setting for box. Click Apply after you have made the desired changes. -
Page 184: Ppd Menus
Make sure your printer is selected in the Name box in the Print dialog box (fig. 6.7); then click Properties. Click the Advanced tab to set printer options (fig. 6.8). Fig. 6.8 Windows NT 4.0 Advanced Tab Highlight the feature in the top box; then select the setting from the options in the bottom box (fig. -
Page 185: Configuring Printer Features
On a Macintosh, use the Chooser’s Auto Setup feature to set installable options to agree with the printer’s configuration. To change PPD menu defaults, use the Print dialog box Save Settings button. See “Selecting PPD Options (Macintosh),” earlier in this chapter. On a PC, PPD menu defaults and installable options are set during PPD configuration. -
Page 186: Accurate Screens
Because of manufacturing variations and usage, a printer may not print lines with the exact dimensions specified by the application. X-ACT allows you to calibrate your printer to compensate for these differences. See “Procedures” in chapter 3 (Macintosh) or 4 (PC) for instructions. -
Page 187: Dot Gain Calibration (Gamma)
Dot Gain Calibration (Gamma) XANTÉ’s Dot Gain Calibration allows you to adjust printer output for ink, media, file, and environmental conditions. For example, if a scanned image is too dark, you can select a new gamma setting to lighten and enhance the details. Gamma corrections bring out details that can be lost when printing at higher line screens or when dark photos are scanned. -
Page 188: Fast Imaging
See “Calibration with a Densitometer (Gamma)” in chapter 3 (Macintosh) or 4 (PC) about creating custom gamma curves. Gamma 0 Input Levels Black White Gamma 1 Gamma 2 Input Levels Input Levels Black White Black White Gamma 3 Gamma 4 Input Levels Input Levels Black... -
Page 189: Font Accelerator
• Optimized for Speed implements a greater degree of data compression to provide the fastest print time but with the possibility of a noticeable loss of data quality. Note: Optimize selections do not function if the print job contains an image that is masked or rotated to anything other than 0 , 90 , 180 , or 270 . -
Page 190: Initial Job
Set Idiom Recognition using the MISC:IDIOMREC configuration menu. Yes, the factory default, enables this feature; No disables it. Initial Job Initial Job allows you to direct the printer to execute a Sys/Start file from an optional hard disk each time the printer is turned on. Set Initial Job from the MISC:INITIAL JOB configuration menu. -
Page 191: Enable Menus
Enable Menus Use Enable menus to enable (Yes) or disable (No) each interface. The LocalTalk, RS232, and Parallel interfaces are enabled as factory defaults. If the Ethernet upgrade is factory installed, the EtherTalk and LPR interfaces are enabled as the factory defaults. The Novell Print Server interface is disabled as the factory default. -
Page 192: Parallel Configuration
Flow control is the mechanism the printer uses to signal the computer that it is ready to accept data. The Flow Control menu allows you to select XON/XOFF (software) or DTR (hardware) flow control. The factory default is XON/XOFF. The Data Bits menu allows you to select either 7 or 8 (the factory default) data bits. -
Page 193: Jam Recover
• Reset key increases the current number flashing by one. • Menu key moves to the next number to the right of the current number flashing. • Test key moves to the next number to the left of the current number flashing. -
Page 194: Media
Usually you set lines per inch through your application or you can use the LPI option in Command Center’s Linearization program. However, when LPI is not a software option, you can use the front panel MISC:LPI configuration menu. Line screen options range from 5 to 210 lines per inch with a factory default of 85 lpi. -
Page 195: Fuser Temperature Control
Electrophotography (EP2, Humidity Control) The PAPER:EP2 menu allows you to make adjustments for changes in humidity during printing, thereby reducing ghosting. Humidity can affect toning on plates and the density on negatives. Options are 0 to 10. The default depends on the selected media; the defaults are 5 for paper and heavy paper, and 3 for film and heavy film. -
Page 196: Multipurpose Feeder Media Sizes
Set Mirror Print from your application Print dialog box. To ensure the highest quality when producing mirror images, use this menu in the Print dialog box rather than an application setting. True enables this feature and False (the factory default) disables it. Fig. -
Page 197: Paper Mode
Paper Mode The paper cassette media guides activate cams which notify the printer of the paper size. Because some international and North American paper sizes are very similar in size, the MISC:PAPER MODE configuration menu specifies whether the cassette setting is for North American paper sizes (US) or for International paper sizes (Euro). -
Page 198: Ram Disk
RAM Disk RAM Disk allows you to set aside a section of printer RAM to be used as a read/write device for implementing XANTÉ’s Font Accelerator. Set RAM Disk from the MISC:RAM DISK configuration menu. 0, the factory default, disables RAM disk. Options are in 1 MB increments to the maximum available RAM, which is the installed RAM minus 32 MB (the base amount of RAM required by the system). -
Page 199: Soft Error
Set Smooth Shading from your application Print dialog box. Off, the factory default, disables this feature. Options of Maximum, High, Medium, Low control the degree to which Smooth Shading is implemented. Soft Error Soft Error alerts you that the printer requires attention. Examples are low toner and low paper messages. -
Page 200: Start-Up Page
After the job is processed, it is deleted from the spooler’s job queue. If Save Spooled Job is enabled, the job is saved to the printer’s hard disk for future use. To use Save Spooled Job, the spooler must be enabled on the printer port you are using, the spooler option must be configured in the PPD, and the printer must have a hard disk attached. -
Page 201: Toner Cartridge Control
Toner Cartridge Control If your printer does not produce the rich, black images that you expect, try redistributing the toner in the cartridge and adjusting the print density before replacing the toner cartridge. Redistributing Toner If you have not used the toner cartridge in several days, toner may have settled. -
Page 202: Toner Page
Turn the print density dial toward the H (Higher density) to darken the print or toward the L (Lower density) to lighten the print (fig. 6.13). Fig. 6.13 Adjust the Print Density Dial Close the Multipurpose Feeder. Note: Check the print density dial when you replace a toner cartridge. -
Page 203: Tray Selection Options
Tray Selection Options You can select a specific tray as the default media source or you can use tray chaining to automatically switch to another source for media when the current source is empty. Selecting a Specific Tray Use the Tray Select control key or your application’s options to select a specific tray as the media source. - Page 204 • All selected media sources must contain the same size media. If the printer detects a different size media when it switches to a new tray, a PAPER OUT message appears. • All trays must be inserted properly. When tray chaining is enabled, an incorrectly positioned tray prevents the printer from printing.
- Page 205 Chapter 7 - Media Options Chapter Overview Introduction ..................7-3 Media Specifications ............... 7-3 Guidelines for Selecting and Storing Media ......7-3 Media Sizes ................7-4 Media Types ................7-6 Media Handling ................7-6 Media Path ................7-7 Media Sources ................7-8 Printing Double-Sided Copy ............
- Page 206 Notes 7-2 Media Optionsbb ______________________________________...
-
Page 207: Introduction
Introduction This chapter describes media guidelines, sizes, types, and handling as well as creating double-sided output. Media Specifications Always use appropriate media, storing and handling it carefully to prevent damage to it or the printer. This section covers selecting media and describes its types and sizes. Guidelines for Selecting and Storing Media To prevent jams and print quality problems, use media that •... -
Page 208: Media Sizes
Physical page size is different from the imageable area. The portion of a physical page on which the printer can lay down toner is the imageable area. The following chart lists imageable areas produced by the ScreenWriter 3 for many standard media sizes. 7-4 Media Optionsbb... -
Page 209: Media Options
Media Sizes Imageable Areas Letter 8.50" x 11.00" 8.34" x 10.82" (215 mm x 279 mm) (212 mm x 275 mm) Legal 8.50" x 14.00" 8.30" x 13.89" (215 mm x 355 mm) (211 mm x 353 mm) 8.26" x 11.69" 8.14"... -
Page 210: Printing On Custom Sized Media
Printing on Custom Sized Media Always use the appropriate feed source for the size and type media you are using, following the procedure in chapter 2 or in “Media Sources” later in this chapter. Set the custom page size through your application. Make sure that paper size selections in the page or document setup agree with those in the Print dialog box to ensure that the page prints correctly. -
Page 211: Media Path
Media Path Figure 7.1 illustrates the media path in your printer. Fuser Output Tray Toner Cartridge Drum Multipurpose Feeder Standard Tray Optional Trays Paper path when Trays 2 and 3 are installed Fig. 7.1 Printer Media Path Media is pulled from the multipurpose feeder or a paper cassette. -
Page 212: Media Sources
Media Sources The ScreenWriter 3 features a standard input capacity of 650 sheets—500 sheets in the standard paper cassette and 150 sheets in the multipurpose feeder. You can add up to two optional paper feeders with cassettes, expanding maximum capacity to 1650 sheets. -
Page 213: Loading Media
Multipurpose Feeder Your printer’s multipurpose feeders handle media sizes from 3.94" x 5.83" (100 mm x 148 mm) up to 13.00" x 35.50" (330 mm x 902 mm) and media weights from 16 - 36 lb bond (60 - 135 g/m ). -
Page 214: Tray Chaining
Media Universal Multipurpose Size Cassette* Feeder* Short Short Long Long Long Long Short Short Long Long Legal Short Short Ledger Short Short Letter Long Long Executive Long Long Statement Long Long Envelopes Short Oversize** Short Short * Short = Short Edge First, Long = Long Edge First ** Oversize paper = 12.00"... -
Page 215: Printing Double-Sided Copy
Printing Double-Sided Copy You can print double-sided copy manually by feeding paper through the printer twice. Print the first side of the paper. Remove the paper from the output tray, straighten any curling edges, and allow it to cool thoroughly. Load the paper using the following guidelines: Note: For best results when printing on the second side, feed sheets individually or slip-feed (feed a blank sheet... - Page 216 7-12 Media Optionsbb ______________________________________...
- Page 217 Chapter 8 - Printing with Various Media Types Chapter Overview Introduction ..................8-3 Printing Computer-to-Film ............. 8-3 Printing Envelopes ................8-5 Printing Labels ................8-5 Printing Transparencies ..............8-6 _______________________ Printing with Various Media Types 8-1...
- Page 218 Notes 8-2 Printing with Various Media Typesbb ______________________...
-
Page 219: Introduction
Introduction This chapter covers printing computer-to-film, envelopes, labels, and transparencies. For additional information and troubleshooting procedures, see chapters 2 and 11. Printing Computer-to-Film With the Positive Film Technology, you can print directly to XANTÉ’s Myriad film to create an image that can be used to burn silk-screen emulsions, bypassing the camera and darkroom steps. - Page 220 • Use the Cool fuser temperature setting for regular weight film and Warm for heavy film. Myriad film is regular weight film. The following chart lists Myriad film sizes. To order Myriad film, call your preferred XANTÉ dealer or XANTÉ Consumables Sales at 800-540-7091 (US and Canada).
-
Page 221: Printing Envelopes
Printing Envelopes Use the multipurpose feeder or envelope cassette, following the procedures in chapter 2, the media specifications in chapter 7, and these guidelines when printing envelopes. • Do not use gummed envelopes or envelopes with adhesive tape. • Before loading the envelope, place it on a flat surface and press it smooth to make the corners and folds as flat as possible. -
Page 222: Printing Transparencies
Printing Transparencies Always use the multipurpose feeder, following the procedure in chapter 2, the media specifications in chapter 7, and these guidelines when printing transparencies. • Avoid handling transparencies excessively to prevent fingerprints and scratches. • Keep the paper path clean (see chapter 9); dust or dirt can scratch transparencies and reduce the print quality. - Page 223 Chapter 9 - Maintenance and Specifications Chapter Overview Introduction ..................9-3 Maintenance ..................9-3 Handling the Printer ..............9-3 Storing the Printer ..............9-4 Moving the Printer ..............9-4 Cleaning the Printer ..............9-5 Technical Specifications ............... 9-10 Printer Memory Requirements ..........9-11 Warranty and Service Options ............
- Page 224 Notes 9-2 Maintenance and Specificationsbb ________________________...
-
Page 225: Introduction
Introduction Your ScreenWriter 3 printer requires minimal maintenance. This chapter describes how to handle, store, move, and clean your printer and contains technical specifications and warranty information. Maintenance Proper care will extend the printer’s life. Use the guidelines in this section to maintain your printer in optimum working condition and to ensure the highest quality output. -
Page 226: Storing The Printer
• Allow the printer side vent at least 8.0" (200 mm) clearance to prevent overheating. Never insert anything into the vent. • Make sure the output tray does not overfill. Overfilling can block media as it comes out and cause a printer jam. •... -
Page 227: Cleaning The Printer
Turn off the printer; then, unplug the power cord from the power source. Remove all media from the multipurpose feeder, close it and, if necessary, the top cover. See chapter 2 for instructions. Remove any installed optional paper feeder (see chapter 10, “Options,”... - Page 228 Warning! Allow fuser assembly to cool before removing. Open the fuser cover assembly (fig. 9.1). Fig. 9.1 Fuser Assembly Loosen but do not remove the two thumb screws located on the right side of the printer. Lift up on the right side of the fuser assembly, using the orange tab.
-
Page 229: Transfer Roller Cleaning
Warning! Wear protective safety glasses when using compressed air. Caution: Do not pull out any wires while performing this step. Slide the left side of the fuser assembly under the metal bracket and lower into place. Tighten the two screws. Close the fuser cover assembly. -
Page 230: Toner And Manual Feed Area Cleaning
Warning! Wear protective safety glasses when using compressed air. Caution: Do not pull out wires while performing this step. Lower the roller back into place with the gear end to the left. Make sure the lever protruding below the transfer roller fits inside the small opening on the door. -
Page 231: Exterior Cleaning
Reassemble the printer and reconnect it to the power source. Exterior Cleaning Turn off your printer and disconnect it from the power source. Caution: Use only water or mild detergent for cleaning. To prevent discoloration, cracking, and deformation of the case, do not use alcohol, ammonia-based cleaners, or other volatile cleaners on or around the printer. -
Page 232: Technical Specifications
Technical Specifications Type: Laser printer; NEC V4310 166 MHz processor Engine Speed: 10 ppm Power Supply: 100/120 V Version- 100/120 VAC (90-132 V) 50/60 Hz (47-63 Hz); 6.5 Amps 220/240 V Version- 220/240 VAC (198-264 V) 50/60 Hz (47-63 Hz); 3.2 Amps Power Consumption 100/120 V Version- 100 VAC: Maximum 580 W (Running) Maximum 5 W (Pause Mode);... -
Page 233: Printer Memory Requirements
Resolutions: 600 x 600 dpi standard; 1200 x 1200 optional Memory: 16 MB RAM standard, upgradeable to 256 MB Media size: 3.94" x 5.83" (100 mm x 148 mm) up to 13.00" x 35.50" (330 mm x 902 mm) XANTÉ Features: Dot Gain Calibration (Gamma Control) Custom Dot Gain Calibration (Densitometer support) -
Page 234: Warranty And Service Options
Minimum Memory Requirements Media Resolutions 600 dpi 1200 dpi COM10 Env. 16 MB 32 MB C5 Env. 16 MB 32 MB DL Env. 16 MB 32 MB Monarch Env. 16 MB 32 MB 16 MB 32 MB Letter/A4 16 MB 32 MB 16 MB 32 MB... -
Page 235: Limited Warranty
XANTÉ CORPORATION warrants this product against defects in material and workmanship for a period of ONE (1) YEAR from the date of original purchase of the ScreenWriter 3 printer. In case of defect, XANTÉ CORPORATION will, at its option, repair, or replace this product at no charge to you provided you return the product, freight prepaid, to us during the warranty period. -
Page 236: Effect Of Consumables On Warranty
ALL IMPLIED WARRANTIES, INCLUDING IMPLIED WARRANTIES OF MERCHANTABILITY AND FITNESS FOR A PARTICULAR PURPOSE ARE LIMITED IN DURATION TO ONE (1) YEAR FROM THE DATE OF ORIGINAL PURCHASE OF THE SCREENWRITER 3 PRINTER. THE WARRANTY SET FORTH ABOVE IS EXCLUSIVE AND IN LIEU OF ALL OTHERS, ORAL OR WRITTEN, EXPRESS OR IMPLIED. - Page 237 Chapter 10 - Options Chapter Overview Introduction ................... 10-3 Printer Options ................10-3 Paper Cassette Feeder ..............10-3 Installing the Paper Cassette Feeder ........10-4 Removing the Paper Cassette Feeder ........10-7 Controller Board Upgrades ............10-7 Removing the Controller Board Panel ........10-8 Installing SIMM and Firmware Upgrades ......
- Page 238 Notes 10-2 Optionsbb __________________________________________...
-
Page 239: Introduction
Introduction This chapter describes available printer options and covers installation for those that are user installable. Printer Options You can order paper handling and controller board upgrade options to enhance your printer’s performance. The following chart lists options and their types of installation. Option Type of Installation 10/100BaseT... -
Page 240: Installing The Paper Cassette Feeder
This section describes installing and removing an optional paper cassette feeder. Optional feeders support the same paper cassettes as the printer’s built-in paper feeder. See “Paper Cassette” in chapter 2 and “Media Sources” in chapter 7. Installing the Paper Cassette Feeder Unpack the paper cassette feeder from the shipping carton. - Page 241 Remove all media from the multipurpose feeder and the output tray. Close the multipurpose feeder. Pull the cassette out until it stops; then lift up slightly and remove it from the printer (figs. 2.16 and 2.17). Warning! The printer weighs approximately 58.5 lbs (26.5 kg) without the toner, cassettes, and media installed.
- Page 242 Insert the screws supplied with the feeder into the holes on the bottom of the printer (fig. 10.3). Tighten the screws to secure the feeder to the printer. Fig. 10.3 Secure the Printer to the Feeder Unpack the cassette, load it with paper, and install the first and second cassettes according to procedures in chapter 2 (fig.
-
Page 243: Removing The Paper Cassette Feeder
Removing the Paper Cassette Feeder Make sure the printer displays a READY/IDLE message. Then, turn off the printer and disconnect the power cord from the power supply (fig. 2.6). Remove media from the multipurpose feeder and the output tray. Close the multipurpose feeder. Remove all paper cassettes from the printer. -
Page 244: Removing The Controller Board Panel
To install a controller board upgrade Remove the controller board panel. Install the upgrade(s). Replace the controller board panel. Caution: Static electricity can destroy electronic components, such as your controller board, SODIMMs, firmware, the hard disk, and Ethernet board. Use approved anti-static procedures when working with the controller board and upgrades. - Page 245 Slide the panel toward the printer’s back until it stops. Pull the panel down and out to remove it from the printer (fig. 10.6). Fig. 10.6 Remove the Panel Figure 10.7 illustrates upgrade installation locations. Fig 10.7 Controller Board ___________________________________________ Options 10-9...
-
Page 246: Installing Simm And Firmware Upgrades
SODIMMs are used for RAM upgrades. Resolution upgrades are firmware (flash ROM) changes. RAM Upgrades (SODIMMs) Standard RAM configuration is 16 MB for the ScreenWriter 3. Your printer features interleaved DRAM for faster processing and better buffering capabilities. RAM can be upgraded with 16 and 64 MB SODIMMs installed in the DRAM banks (fig. - Page 247 Common Specification for all Densities Module type: 72-pin SODIMM Organization: x32 Parity: none Power voltage: 3.3V I/O voltage: 3.3V tolerant Speed: 60 ns or better Mode: Refresh: CAS before RAS Contact: gold Dimension: 2.3" (length) x 1.5" (max height) Supported Densities and Organizations Density Config RAS/CAS...
- Page 248 Flash ROM SIMM Bank SODIMMS Fig. 10.8 Flash SIMM and SODDIM Banks Remove the controller board panel following the instructions earlier in this section. Unpack the SIMM or SODIMM. Remove the existing SIMM(s) or SODIMM(s) if necessary using the following procedure (fig. 10.8). Note: Remove the DRAM SIMM closest to the front of the printer first.
- Page 249 Fig. 10.9 Open the Latches and Remove the SIMM Fig. 10.10 Remove the SODIMM ___________________________________________ Options 10-13...
- Page 250 Install the new SIMM or SODIMM using the following steps (fig. 10.11). Note: Install the DRAM SIMM closest to the back of the printer first. Align the SIMM or SODIMM over its bank using the following appropriate step. Flash ROM SIMM—tilt the SIMM 45 toward the back of the board (toward the interfaces) with the notched corner toward the top of its bank.
-
Page 251: Installing The Ethernet Board
Fig. 10.11 Installing a SIMM Installing the Ethernet Board The Ethernet upgrade for the ScreenWriter 3 allows you to run EtherTalk, Novell Print Server, NetBEUI, and Line Printer protocols on your printer. After installing the Ethernet upgrade, see chapter 6 for information about configuring and using the Ethernet options. - Page 252 Remove the interface bracket from the printer using the following procedure (fig. 10.12). Fig. 10.12 Remove the Interface Bracket Remove the two bracket screws with the Phillips screwdriver. Remove the hex nuts on each side of the serial port. Carefully pull the bracket off the printer. You may have to squeeze the parallel connector locks together as you pull the bracket off.
-
Page 253: Replacing The Controller Board Panel
Fig. 10.13 Align the Ethernet Board Replace the interface bracket on the printer using the following procedure (fig. 10.12). Carefully slide the interface bracket on the printer. You may have to squeeze the parallel connector locks together as you put the bracket on. Replace the hex nuts on each side of the serial port. -
Page 254: Internal Ide Hard Disk Upgrade
Insert the tab on the top of the controller board panel into the slot above the opening (fig. 10.6). Align tabs on the front of the controller board panel with the slots in the front of the opening; then slide the panel forward into place (fig. - Page 255 Chapter 11 - Troubleshooting Chapter Overview Introduction ................... 11-3 Status Messages ................11-3 Power and Setup Issues ..............11-6 Print Quality Issues ..............11-10 Mechanical Issues ............... 11-16 Media Jams ................. 11-17 Preventing Jams ..............11-17 Locating Jams ............... 11-18 Clearing Jams ...............
- Page 256 Notes 11-2 Troubleshootingbb ____________________________________...
-
Page 257: Introduction
Introduction This chapter describes status messages that can direct you to a problem’s source, suggests solutions for some typical printer setup and print quality problems, and provides information about preventing and clearing media jams. Status Messages Printer front panel messages provide printer status information and can help you determine the source of a problem or media jam. - Page 258 A media jam has occurred caused by the FRONT PAPER JAM media not being pulled from the tray properly. The output tray is full. FULL STACK The fuser cover is not closed properly. FUSER COVER OPEN The printer is offline and data is coming HOLDING across one (or more) of the interfaces.
- Page 259 RESETTING JOB key has been pressed and an active job has been cancelled. Appears when the printer is first turned ScreenWriter 3 on, before initialization begins. The printer is printing a test page. TEST PRINT The printer is processing a job and...
-
Page 260: Power And Setup Issues
Power and Setup Issues This section provides tips for resolving problems concerning power to the printer and host or concerning printer setup. My printer has no power. • Make sure the power cord is plugged into the printer and the power source. See “Connecting the Power Cord” in chapter 2. - Page 261 • Make sure the Macintosh is setup to communicate using LocalTalk. See “Connecting to the LocalTalk Port” in chapter 2. • Make sure the correct Adobe PostScript printer driver and your printer’s PPD are installed and configured properly. See “Adobe PostScript Printer Drivers” in chapter 3. •...
- Page 262 • Set the data format to ASCII in your application. My printer does not respond properly to my PC using a serial connection. • Make sure all cables are connected and seated properly. See “Connecting to the Serial Port” in chapter 2. •...
- Page 263 Note: If your printer is configured as a Novell Print Server and the Novell network becomes unavailable, the printer may disable the Novell Print Server interface. When the Novell network is available, re-enable the interface using the front panel configuration menus or XANTÉ Command Center.
-
Page 264: Print Quality Issues
For example, for a line screen of 95, set the scanner resolution 190 dpi (95 x 2). To print the same image at 75% of original size, set the scanner resolution to 142 dpi (95 x 2 x .75). Scanning the image at a lower than optimum resolution results in less detail. - Page 265 Random black dots appear on the printed media. • Media may not meet the requirements in “Media Specifications” in chapter 7. If necessary, replace the media. See “Paper Cassette” and “Multipurpose Feeder” in chapter 2. • The toner cartridge may need replacing. See “Toner Cartridge ”...
- Page 266 Some characters are missing or only partially printed. • Media may not meet the requirements in “Media Specifications” in chapter 7. If necessary, replace the media. See “Paper Cassette” and “Multipurpose Feeder” in chapter 2. • The toner cartridge may need replacing. See “Toner Cartridge”...
- Page 267 Instead of my image (or text), the output is a solid black page. • The density setting may need adjusting. See “Adjusting Print Density” in chapter 6. • The toner cartridge may need replacing. See “Toner Cartridge” in chapter 2. Blank areas appear in my image (or text).
- Page 268 Print is smudged or small spaces are plugged. • Media may be damp or otherwise damaged. Make sure it meets the requirements in “Media Specifications” in chapter 7. If necessary, replace the media. See “Paper Cassette” and “Multipurpose Feeder” in chapter 2.
- Page 269 Bold print appears shaded on the output. • The density setting may need adjusting. See “Adjusting Print Density” in chapter 6. • The toner cartridge may need replacing. See “Toner Cartridge” in chapter 2. Horizontal banding appears on the printed image. •...
-
Page 270: Mechanical Issues
• Printer or application settings may need to be adjusted for the image. The line screen may need to be adjusted in your application. Lowering the line screen (at a set resolution) produces larger dots and more levels of gray, which result in a more accurate representation of the image. -
Page 271: Media Jams
• There may be a foreign object in the printer. Turn off the printer and remove the object. See chapter 2 for the basic printer setup; chapter 10 for the optional paper feeder setup. I can’t remove the paper cassette. •... -
Page 272: Locating Jams
Follow the guidelines for the type of media you are using. See “Media Types” in chapter 7. Make sure the media is loaded according to procedures and guidelines in “Paper Cassettes” and “Multipurpose Feeder” in chapter 2 and “Media Sources” in chapter 7. •... -
Page 273: Clearing Jams
• In the media source (either a paper cassette or the multipurpose feeder) and the toner cartridge (A) • In the back of the paper feeder (B) • Around the toner cartridge (C) • In the paper exit area under the fuser cover (D) Use the following procedure to locate a media jam;... -
Page 274: Clearing A Paper Cassette Or Multipurpose Feeder Jam
Clearing a Paper Cassette or Multipurpose Feeder Jam Squeeze the top cover latch to release the lock (fig. 11.2). Note: If media is in the output tray, remove it before lifting the top cover. Fig. 11.2 Release the Top Cover Latch Lift the top cover. - Page 275 Fig. 11.3 Open the Top Cover and Multipurpose Feeder Remove all media from the multipurpose feeder (fig. 11.4). Fig. 11.4 Remove Media from the Multipurpose Feeder _____________________________________ Troubleshooting 11-21...
- Page 276 Remove any jammed media from the multipurpose feeder (fig. 11.5). Fig. 11.5 Remove the Jam from the Multipurpose Feeder Remove the cassette from the printer. Pull the cassette straight out until it stops (fig. 11.6). Fig. 11.6 Pull out the Cassette 11-22 Troubleshootingbb ____________________________________...
- Page 277 Lift up slightly; then pull the cassette from the printer (fig. 11.7). Fig. 11.7 Lift up and Pull out the Cassette Remove any crumpled media from the cassette (fig. 11.8). Fig. 11.8 Remove the Jam from the Cassette _____________________________________ Troubleshooting 11-23...
-
Page 278: Clearing A Back Of Paper Feeder Jam
Remove any jammed media from inside the paper feeder (fig. 11.9). Fig. 11.9 Remove the Jam from the Paper Feeder Clearing a Back of Paper Feeder Jam Open the feeder’s back cover by grasping the notch on the top side of the cover and pulling down (fig. 11.10). Caution: The cover may be held in place by two strong springs or by magnets. - Page 279 Remove any jammed media in the back of the paper feeder (fig. 11.11). Fig. 11.11 Remove the Jam from the Back of the Paper Feeder Close the paper feeder’s back cover (fig. 11.12). Fig. 11.12 Close the Back Cover _____________________________________ Troubleshooting 11-25...
-
Page 280: Clearing A Toner Cartridge Area Jam
Clearing a Toner Cartridge Area Jam Warning: The inside of the printer becomes very hot during operation. Do not touch any area with a high-temperature warning label (fig. 11.13) without first turning off the printer and allowing it to cool for at least 40 minutes. Note: When the printer is turned off, all print job information still in memory is lost;... - Page 281 Fig. 11.14 Remove the Toner Cartridge Note: Place the toner cartridge flat on a level surface. To prevent stains, protect the surface with old newspapers or cloth. Follow all procedures in “Handling the Toner Cartridge” in chapter 2. Remove any jammed media from the back of the multipurpose feeder and from the toner cartridge area (fig.
-
Page 282: Clearing A Paper Exit Area Jam
Clearing a Paper Exit Area Jam Warning: The fuser becomes very hot during operation. Do not touch any area with a high-temperature warning label (fig. 11.16) without first turning off the printer and allowing it to cool for at least 40 minutes. Note: When the printer is turned off, all print job information still in memory is lost;... - Page 283 Open the fuser drum cover using the colored tabs on each side of the cover (fig. 11.18). Fig. 11.18 Use the Tabs to Open the Fuser Drum Cover 3. Remove any jammed media from the fuser area (fig. 11.19). Fig. 11.19 Remove the Jam from the Fuser _____________________________________ Troubleshooting 11-29...
- Page 284 Close the fuser drum cover using the colored tabs on each side of the cover (fig. 11.20). Fig. 11.20 Close the Fuser Drum Cover Close the fuser cover (fig. 11.21). Note: Make sure the fuser cover is closed properly to prevent print quality problems.
-
Page 285: Reassembling The Printer
Reassembling the Printer Insert the toner cartridge’s pins into the printer’s guide channels. Slide the cartridge into the printer until it stops, making sure it seats properly (fig. 11.22). See “Toner Cartridge” in chapter 2. Fig. 11.22 Reinstall the Toner Cartridge Reload the paper cassette(s), if necessary, and reinsert into the paper feeder(s) (fig. - Page 286 Close and latch the top cover (fig. 11.24). Fig. 11.24 Close the Top Cover Reload the multipurpose feeder, if necessary. Close the multipurpose feeder cover if the media fits completely inside the tray. See “Multipurpose Feeder” in chapter 2. Note: If the printer was turned off to clear the jam, turn on the printer before loading the multipurpose feeder.
-
Page 287: Calling For Technical Support
Calling for Technical Support If you encounter problems that cannot be resolved by following the procedures in this chapter, you may call XANTÉ’s Technical Support at 800-926-8393 (US and Canada) from 7 a.m. until 7 p.m. Central Standard Time (CST) Monday through Thursday and 7 a.m. until 6 p.m. - Page 288 If you have internet access, XANTÉ’s web page address is www.xante.com. From this site, you can download printer drivers, software, PPDs, manuals, and access other technical information. 11-34...