Olympus USPM-RU-W Series Operation Manual
Optical measuring instrument
Hide thumbs
Also See for USPM-RU-W Series:
- Operation manual (29 pages) ,
- Instruction manual (29 pages)
Table of Contents
Advertisement
Optical Measuring Instrument
Operation Manual
USPM-RU-W series
USPM-W-B
Before use
Thank you for your purchasing our NIR Micro Spectrophotometer.
To use this product safely and satisfactorily benefit from doing so, please take the time to
carefully read this Operation Manual before using the product.
Keep this manual handy when using the product, and store it close to the unit for future
reference. Page 9 of this manual contains the warranty. Fill in the necessary items, and
store it in a safe place.
PV8344F4E013
I
Advertisement
Chapters
Table of Contents

Related Manuals for Olympus USPM-RU-W Series


Summary of Contents for Olympus USPM-RU-W Series
- Page 1 Optical Measuring Instrument Operation Manual USPM-RU-W series USPM-W-B Before use Thank you for your purchasing our NIR Micro Spectrophotometer. To use this product safely and satisfactorily benefit from doing so, please take the time to carefully read this Operation Manual before using the product.
-
Page 2: Table Of Contents
Contents Preface ···································································· 1 Cautions, Ratings and Graphic Symbols ··························· 2 For Safe Use ····························································· 4 Product Features ····················································· 11 Confirming the Package Contents ························· 12 Names and Functions of Parts and their Specifications ······························· 14 Installation and Connection ·································· 19 How to Use ·······················································... -
Page 3: Preface
About the personal computer (hereinafter "computer") We (Olympus) will take no responsibility for any and all damage arising out of the use or malfunction of the unit, including, but not limited to, any damage to the data stored in your personal computer(s). -
Page 4: Cautions, Ratings And Graphic Symbols
Cautions, Ratings and Graphic Symbols [Safety symbols] An NIR micro spectrophotometer has labels with the following marks. Handle it carefully, keeping the meanings of the marks in mind. Symbols Description Don not touch with your hand. There is a risk of burns. Indicates any unspecified danger. - Page 5 [Symbols on the box] The box has the following symbols: Indicates this side up. Indicates the box should be protected from rain. Indicates the items inside are fragile and the box should be handled with care. Indicates the compatibility with China RoHS. PV8344F4E013...
-
Page 6: For Safe Use
Take measures according to section "6. Troubleshooting" if a repair is considered necessary. When you cannot fix a problem, send the unit for repair to the supplier where you purchased it or to the Olympus sales department. Warnings in this document This document uses the following symbols and terms in the manner as described below. - Page 7 Doing so may cause a fire or electrical shock hazard. When water or any foreign object gets inside the unit, turn off the power and unplug the power cord immediately, and then contact to supplier where you purchased it or the Olympus sales department. PV8344F4E013...
- Page 8 Do not disassemble or modify the unit! Disassembly or modifying the unit for a reason other than replacement of consumables may cause fire, electric shock hazard or injury. If an abnormality occurs, such as unusual odor or noise, immediately turn off the power, remove the power plug from the wall outlet, and contact our sales representatives or our sales department for repair.
- Page 9 Use the prescribed power supply Use the prescribed power supply in this operation manual. If any power supply other than that prescribed in this manual is used, the safety performance of the product cannot be guaranteed, and fire may result. Use the supplied power cord and cable.
- Page 10 Failure to follow these precautions may result in injury or material damage to this Product or peripheral devices. Do not place the unit in an unstable location! If the unit is placed on an unstable stand, on an incline, or on a rigid floor, it may be knocked over or fall down, resulting in injury.
- Page 11 This warranty guarantees free repair for the following conditions. [Free Repair] Olympus Corporation will repair, free of charge, any problem caused by a manufacturing defect, provided that the problem occurred while correctly using the product in compliance with the provisions of the manual during the warranty period.
- Page 12 * The warranty card guarantees any free-of-charge repair under the terms and conditions specified in this document. The warranty is not intended to restrict the right of the customer. Even after the warranty period, the service department at Olympus will gladly welcome any questions. Contact the support division given in the attachment.
-
Page 13: Product Features
Product Features The Product has the following features: This device is intended to measure spectroscopic characteristics, such as reflectance and transmittance. Do not use it for anything other than the intended purpose. Wideband measurement The unit is able to measure the spectroscopic characteristics within the wide wavelength range of 380 nm to 1,050 nm. -
Page 14: Confirming The Package Contents
1. Confirming the Package Contents Check the package to confirm the main unit and all accessories are included in accord with the table shown below. Also, check that no part has been damaged in transit. If you find anything missing or discover a component has been damaged, or have any questions, please contact your sales representative or our sales department before attempting to use anything in the package. - Page 15 18. Fuses 19. Caps for the revolver 17. Halogen lamps 20. Hexagon wrench 21. Rotation stage 22. High-reflectivity reference sample It is a reference sample for the high reflectivity sample. Reference data CD is attached. The reference data once a year is recommended to be updated because the high reflectivity reference sample give the mirror court.
-
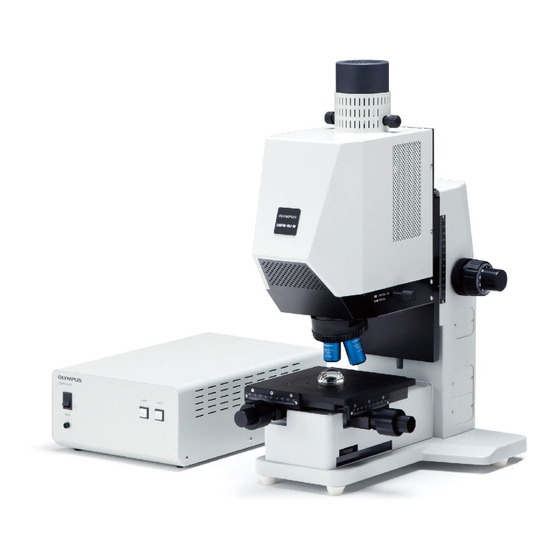
Page 16: Names And Functions Of
2. Names and Functions of Parts and their Specifications 2.1. The names and functions of each part in the unit 1. Lamp connector 2. Lamp house 3. Photometric head 4. IO connector 5. USB connector 6. Revolver 7. Objective lens 8. - Page 17 (Two) USB connectors Transmit video signals and control signals. Each of them is connected to the computer via a USB cable. Revolver An objective lens is placed on it. For detail, refer to “3. Installation and Connection”. All the object lenses are for use in the unit only. Do not use any of them in other devices.
- Page 18 2.2. The names and functions of the items on the controller supply unit 3. Lamp 1 switch 1. Power switch Lamp 2 switch 2. Power indicator Front view of the controller supply unit 4. Lamp 1 connector 6. Power inlet Lamp 2 connector 5.
- Page 19 2.3. Product specification Item Specification Name NIR Micro Spectrophotometer Model USPM-W-B Wavelength range 380 nm - 1,050 nm Display resolution About 1 nm (Wavelength resolution About 5 nm ) of wavelength Repeatability ±0.02[%] or less (430 nm - 1,010 nm), With 10x/20x objective lens ±0.2[%] or less (in other ranges) ±0.05[%] or less (430 nm - 950 nm),...
- Page 20 Temperature: 15ºC - 30ºC Humidity: 15% - 60% RH (non-condensing) Voltage fluctuation: ±10% Contamination: 2 (IEC60664-1) Installation Category (Overvoltage Category): II (IEC60664-1) PV8344F4E013...
-
Page 21: Installation And Connection
3. Installation and Connection 3.1. To transfer and install the main unit When installing or transferring the main unit, take care of the following points: Hold the base when installing or transferring the main unit. Otherwise some failure may be caused. Base Always have two or more persons install or transfer the main unit, which weighs approx. - Page 22 If the temperature of the unit is greatly different from the room temperature, dew is likely to form on the inside of the unit after installation or transport. Wait until the dew evaporates before using the unit, instead of trying to wipe it off. The unit is equipped with fans.
- Page 23 3.3. Installation and replacement of halogen lamp For your safety, you should always remove and install a halogen lamp by first turning off the power switch, unplugging the cord, and when the halogen lamp and the socket are cool to the touch, remove and install the lamp.
- Page 24 3.4. Installation and replacement of fuses Always turn off the power and unplug the power cord before installing or removing any fuses. Fuse: Rated voltage/current: 250V AC, 3.15 A; Size: φ5.2 mm 20 mm time delay fuses high breaking capacity type Compatible parts permitted (1) Pull out the fuse holder stored in the slot below the power cord inlet.
- Page 25 Pull out the gas spring from the hole. Insert a new gas spring into the hole. (10) Push the replacement jig into the gas spring access hole to compress the gas spring. (11) Insert and fix hinge pin 1 into the upper edge of the new gas spring with a slotted screwdriver.
- Page 26 3.6. Installation of the optional rotation stage If the optional tilt stage is attached, remove the work plate on the upper surface of the tilt stage. Tool: hexagon wrench Install the rotation stage on the topside of the shift stage, and fix it by screwing two bolts into the fixing hole.
- Page 27 3.7. Connection Take care not to apply excessive force in handling the cables, since they can be damaged by bending or twisting. For cable setting, keep cables away from something sharp. Connect the cables only when all power switches are turned off and the power cord is unplugged.
-
Page 28: How To Use
4. How to Use This chapter describes the general operations of the unit. For details on the usage, all personnel operating the unit should be sufficiently trained from the viewpoint of each specialized area. When the computer is misbehaving or any failure is found in the measurement data, plug off and reinsert USB cable and then reboot the software. - Page 29 (12) Conduct a measurement. When conducting a spectrometry: Refer to 4.11 Spectroscopy. When measuring a film thickness (after conducting 4.11 Spectroscopy): Refer to 4.12 Analysis of film thickness. When measuring color difference (after conducting 4.11 Spectroscopy): Refer to 4.13 Calculation of color difference. (13) Check the result.
- Page 30 [In a measurement with a rotation stage] Turn on the controller supply unit, the computer, and then launch the software. Refer to 4.2 Launch. Set up the work configuration file. Refer to 4.5 Setup of the work configuration file. Put the BK7 reference sample. Refer to 4.14 Setting the BK7 reference sample when using the rotation stage.
- Page 31 4.2. Launch Use the computer properly in accordance with its manuals. It takes about 15 minutes from turning on the lamp switch for the lamp to reach the stable state. Allow the lamp to warm up, if necessary. Turn on the power switch of the controller supply unit. Turn on the Lamp 1 switch (for the transmittance measurement option: Lamp 2 switch) on the controller supply unit.
- Page 32 4.5. Setup of the work configuration file For detail, refer to 6.2 Work configuration in the USPM-SA Software Operation Manual. Choose [Setup]-[Work] on the File menu. The work setup window opens. File menu Configure the reference. [When using BK7 reference sample] Click , and select SELLMEIER.
- Page 33 4.6. Setting the BK7 reference sample /Setting the sample to be measured Place the BK7 reference sample the sample to be measured on the top surface of the shift stage. To avoid unnecessary reflected light, it is recommended to put the BK7 reference sample the sample to be measured on the center of the stage, where there is a hole for letting light pass.
- Page 34 Adjust the shift of the BK7 reference sample the sample to be measured . [For a flat sample] Looking at a circle of light injected from the objective lens that is visible on the top surface of the BK7 reference sample the sample to be measured , use the shift adjuster of the shift stage to set the shift of the sample.
- Page 35 4.8. Adjusting the sampling interval Adjust the sampling interval so that the quantity of spectroscopic light received by the BK7 reference sample does not exceed the maximum quantity of light of the photodetector. Go through the following steps to adjust the sampling interval. Hint: If the quantity of the sample to be measure is considered to be larger than that of the reference sample, use the former sample to adjust the sampling interval.
- Page 36 The Information window opens that displays the sampling interval. After that, Click OK to end the operation.Then, the shutter operates again. 4.9. Obtaining the background value Click BACKGROUND1 on the operation panel. A clicky sound is generated, and then a warning alarm sounds as the process finishes.
- Page 37 Configure the layer. The film thickness measurement can be selected from "Peak valley method (PV)", "Fourier transform method (FFT)", and "Curve fitting method (FIT)" according to the usage. The unit of the film thickness can select the optical film thickness and the physical film thickness.
- Page 38 Item Description AUTO If enabled, analysis of film thickness is automatically done after the easurement. UNIT Unit of the film thickness displayed in the analysis. USE REFLECTANCE Any spectroscopy data file (*.csv/*.dat) is available as reflectance of substance. The first OF SUBSTANCE data in the data file will be used as the reflectance of substance.
- Page 39 4.14. Setting the BK7 reference sample when using the rotation stage Set the BK7 reference sample on the rotation stage. Adjust the holding chuck with the chuck knob to set the sample. Focus adjuster Chuck knob Holding chuck Strength knob Angle knob Shift adjuster 4.15.
- Page 40 4.16. Setting the sample to be measured when using the rotation stage Set the sample to be measured on the rotation stage. Follow the same procedure as described in 4.14 Setting the BK7 reference sample when using the rotation stage. Adjust the angle of the sample to the desired for the measurement.
- Page 41 4.18. Checking the results For details on the main window of the software, refer to Chapter 4 Main Window in the USPM-SA Software Operation Manual. (1) GRAPH window (2) TEXT window (3) DIAGRAM window File menu (4) Operation panel (6) LUMINANCE TEXT window (5) LUMINANCE window (detailed values) (7) THICKNESS INFO window...
- Page 42 DIAGRAM window A chromaticity diagram of the result is displayed. An XY chromaticity diagram and a Lab chromaticity diagram are available. Double-clicking the window switches the display between XY and Lab diagrams. Graph setting also allows you to change between the two chromaticity diagrams. For the diagram settings, refer to 6.4 Graph setting in the USPM-SA Software Operation Manual.
-
Page 43: Precautions For Storage
5. Precautions for Storage 5.1. Storage When the product is not to be used for a long time, turn off power to the unit and the computer, unplug the power cords, and cover the unit to protect it from dust. [Storage condition] (1) Temperature : 10ºC - 60ºC, no sudden changes (2) Humidity... - Page 44 5.3. Wavelength offset Outline of wavelength offset Wavelength offset is performed to modify the measurement by this unit of the display position of spectral reflectance data in the direction of the wave by comparing it with the position of a certain reference sample for which the peak positions of its spectral reflectance is known (measured by another standard device).
- Page 45 As the focus is set, click the REFERENCE button to measure the reference. If the data is saturated, adjust the sampling interval and conduct the background measurement again. Measurement of the blue sample plate Bring the reflecting mirror under the blue glass into focus as in the measurement of the reference, and then click the MEASURE button to conduct a measurement.
-
Page 46: Troubleshooting
6. Troubleshooting Incidents Causes and countermeasures Check for deterioration of the lamp. Check the connection of the lamp. Check the lamp switch. CT window displays no image Check the adjustment of ring slits. Check the gain adjustment. Restart the software if the camera is not recognized. Check for deterioration of the lamp. - Page 47 Check the correctness of reference setting. (11) Check whether sampling interval is appropriate. (12) Check for injection of ambient light from fluorescent lamps or (13) the sun. Failure in the measurement of Refer to 5.3 Wavelength offset to conduct a offset. wavelength direction Display of wavelength in LUMINANCE...
-
Page 48: Compliance With Regulations
7. Compliance with Regulations IEC61326-1 defines two categories according to the location for use. Class A: Equipment suitable for use in establishments other than domestic, and those directly connected to a low voltage power supply network which supplies buildings used for domestic purposes. Class B: Equipment for use in domestic establishments, and in establishments directly connected to a low voltage power supply network which supplies buildings used for domestic purposes. -
Page 49: Appendix
Appendix Principles of measurement How to calculate spectral reflectance (spectral transmittance) with the product is described below. The product measures the strength of spectral reflectance of the reference, whose reflectance (transmittance) is known (Ireference (λ)) and that of the sample to be measured, whose reflectance is unknown (Isample (λ)). -
Page 50: Checklist For Inspection Of The Lighting Device (Lamp House)
Checklist for inspection of the lighting device (lamp house) Read the manuals carefully before conducting an inspection. Inspections on a regular basis (at least once every half year and when replacing a lamp) is recommended in order to ensure safe use. Inspect the items in the list, and put a checkmark next to each passed item and a circle next to each item having some problem. -
Page 51: Precautions For Proper Use Of The Power Cord
Precautions for proper use of the power cord When no power cord is attached to the product, refer to the “Specification” and “Certification cord” below to choose a proper power cord for the unit. We do not guarantee the electrical safety of the product, if an incorrect power cord is connected to the product. - Page 52 HAR flexible cord Table 2. Certification organizations and cord labels Labels Replacement symbol with (Probably marked on the black-red-yellow line Certification organization cover or insulating part in Length (mm) the internal wiring) Black Yellow Comite Electrotechnique Belge CEVEC <HAR> (CEBEC) Verband Deutscher Elektrotechniker <VDE>...
- Page 53 ******************************************************************************************************** Printed in Japan © 2011 Olympus Corporation. All rights reserved. No part of this document in whole or in part may be copied or distributed without the permission of Olympus Corporation. The company names and product names referred to in this document may be trademarks or registered trademarks of their respective companies.
- Page 54 Instruction Manual Spectral Analysis Software USPM-SA v1.01 Before use Thank you for purchasing our spectral analysis software. In order to use this software safely and to maximize the benefit from doing so, be sure to read this instruction manual completely before use. Please also keep this manual close at hand when using the product and store it carefully for future reference.
- Page 55 Contents Introduction ···························································· 3 Safety Precautions ·················································· 3 1. Confirmation of Packaged Products ······················· 6 2. Installation and Wiring ········································· 7 3. Usage ······························································ 8 4. Main Window ·················································· 13 5. File Menu ······················································· 17 6. Settings ························································· 23 7. Windows ························································ 44 8.
-
Page 56: Introduction
Introduction This spectral analysis software (USPM-SA) is the dedicated software of the near-infrared (NIR) micro-spectrophotometer (USPM-RU-W). Since it is always possible that computer data may become damaged due to unexpected trouble, please backup data periodically. About the computer We assume no responsibility for all incidental damages, including compensation for computer data, resulting from the use or unserviceability of this product. - Page 57 Warning indications in this manual In this manual, the symbol marks and terms below are used in accordance with the descriptive contents. The symbol marks and terms are described for each safety level. To use this product safely and properly, thoroughly understand the contents of symbol marks and terms.
- Page 58 Failure to follow the precaution below may result in injury or material damage to peripheral products. Do not turn off hardware power during software start. Doing so may result in improper operation. PV8959-F4E005...
-
Page 59: Confirmation Of Packaged Products
1. Confirmation of Packaged Products Make sure that all software and supplied accessories are completely received and check whether products are missing or damaged. Contact the retailer or our branch office immediately if products are missing or if you have any questions regarding products. CD-ROM Protection key Software Instruction Manual (this document) -
Page 60: Installation And Wiring
2. Installation and Wiring 2.1.Installation Perform installation according to the "Installation procedure" in the attached sheet. Contact our business personnel if you have any questions. 2.2.Wiring Insert a protection key into any USB port of your computer. Wire the hardware according to the instruction manual of the hardware in question. PV8959-F4E005... -
Page 61: Usage
3. Usage This chapter describes the outline of software according to the general procedure. For details on use, conduct full training from the standpoint of a specialist. 3.1.Program start and termination Start Double-click the USPM-SA shortcut icon on the desktop and start the software. Turn on the power to all the hardware used and then start the software. - Page 62 Sets the theoretical spectral reflection factor (transmission factor) of the reference used; for more details, see the [6.2.1 [Reference] setting] . Sets the specification value for deciding the acceptability of the measured spectral measured values; for this setting, see the [6.2.2 [Standard] setting].
- Page 63 Executing measurement Arrange the sample to be measured to enter the measurement state. Press the MEASURE button to execute measurement for acquiring the spectral light intensity of the sample. Confirming the spectral measured values (reflection and transmission factors) Confirm the spectral measured values on each window. Each data and wavelength piece of information can be acquired by performing an operation on the operation panel.
- Page 64 Printing spectral measured value data Select [Custom print] from the file menu. A print setting dialog box appears. Set each item and press the OK button for printing. 3.3.Analysis of film thickness After the measurement of the spectral measured values (reflection and transmission factors) is completed, film thickness can be analyzed by setting a layer setting file and then executing the analysis of film thickness.
- Page 65 Confirming the result of film thickness analysis Confirm the result on the THICKNESS and THICKNESS INFO windows. For details of the windows, see the [7.8 [THICKNESS] window] and [7.9 [THICKNESS INFO] window]. A film thickness analysis method and its result are displayed. For the contents of the display, see the [7.8 [THICKNESS] window].
-
Page 66: Main Window
4. Main Window As shown below, the main window consists of a file menu, status display, an operation panel, and several windows. File menu Windows Operation panel Status display 4.1.File menu Each file menu has submenus, respectively. For the details of each submenu, please read each file menu item. - Page 67 4.2.Operation panel The operation panel displays various operation buttons and spectral measured value data. Menu Description MEASURE Measures a sample; this operation is the same as that when pressing the [F1] key of the computer used. BACKGROUND2 Measures the background for measurement; this operation is the same as that when pressing the [F2] key of the computer used.
- Page 68 [Del]: Deletes the spectral measured value data of a data number. [No.]: Displays the data number. [Name]: Displays the data name. [Detail]: Displays the contents of data. [Date]: Displays the measurement date and time. [Average (reflection/transmission)]: Displays the average reflection and transmission factors. [Luminous (reflection/transmission)]: Displays the luminous reflection and transmission factors.
- Page 69 4.4.Various windows Various windows display the measurement result or the status of the spectral measured values. They can be arranged in the proper position on a main window, respectively. Each window can also be changed in size. For details on the windows, see the [7. Windows]. Menu Description DIAGRAM...
-
Page 70: File Menu
5. File Menu 5.1.[File] menu The [File] menu is constituted by the submenus below. Menu Description Open datafile Opens spectral measured value data; this submenu can be used in CSV and DAT formats. SaveAs.. datafile Saves spectral measured value data; the spectral measured value data can be saved in CSV and DAT formats. - Page 71 Open graph Opens the existing graph setting file SaveAs.. graph Assigns a name to a graph setting file and saves it Open layout Opens the existing layout setting file SaveAs.. layout Assigns a name to a layout setting file and saves it Custom print Prints spectral measured value data;...
- Page 72 5.2.[Measure] Menu The [Measure] menu is constituted by the submenus below. Menu Description MEASURE Performs measurement; this function is the same as that for [MEASURE] on the operation panel. BACKGROUND2 Performs the background measurement for measurement; this function is the same as that for [BACKGROUND2] on the operation panel.
- Page 73 (4) A START INTERVAL window appears. Enter the expected sampling time and press the OK button. (5) It takes about several tens of seconds to perform adjustment. (6) Adjustment is completed when the window below appears. The sampling time of the work setting file is changed to the displayed numeric value when you press the OK button.
- Page 74 Select the data numbers, used as the color-difference calculation, for data 1 and data 2 using the buttons. Color difference is automatically displayed during selection. An expression for obtaining color difference is given below. (Expression 5-1) Difference in the chromatici diagram Difference in the...
- Page 75 5.6.[Help] menu The [Help] menu is constituted by the submenus below. Menu Description (Instruction manual name) Opens the instruction manual About Displays an information window About Firm Displays a firm information window PV8959-F4E005...
-
Page 76: Settings
6. Settings 6.1.System settings A SYSTEM setting window appears when you select [Setup] - [System] from the file menu. A system setting file can be changed on the SYSTEM setting window. All spectral measured value data items are deleted when you open the SYSTEM setting window. Therefore, open the SYSTEM setting window after saving the required spectral measured value data. - Page 77 micro-spectrophotometer (USPM-RU-W), set this to 380. MAX WAVE Sets the upper-limit value of the wavelength to be displayed and analyzed; data files may not be readable when you change this value. The setting value varies depending on the equipment to be connected. For a near-infrared micro-spectrophotometer (USPM-RU-W), set this to 1050.
- Page 78 LUMINANCE BY Sets how to display a [LUMINANCE] window; the window PIXELS is displayed for each pixel of a photosensor when this item is set to "Enable." It is displayed for each wavelength when this item is set to "Disable." Usually, set this to "Disable."...
- Page 79 6.2.Work setting Select [Setup] - [Work] from the file menu. A WORK setting window appears. Menu Description Name Enters the name of a work setting file Detail Enters the details of a work setting file Reference Sets the theoretical value of a reference; for details of the setting, see the [6.2.1 [Reference] setting].
- Page 80 Standard Sets the standard light and light source that are of the source/illuminant illuminant prescribed in the CIE; this item influences the result related to a chromaticity diagram. Field of view Sets the XYZ display color system based on a two-degree field of view and the X display color system based on a 10-degree field of view;...
- Page 81 FIXED [%] Enter the theoretical reflection factor (transmission factor) of a reference. You must set this item when selecting [FIXED] in a dispersion setting tab. FILE Enter the reference wavelength dispersion data filename used for the theoretical spectral reflection factor (transmission factor) of a reference.
- Page 82 A refractive index is calculated from spectral measured value data using the expression below when it is displayed according to the setting state on a GRAPH setting window....(6-2) Spectral measured value data Spectral refractive index data Setting the theoretical reflection factor of a reference As known by the calculation expression (6-1) of the spectral measured value data described above, the theoretical reflection factor (transmission factor) of a reference must be set in advance to calculate the spectral measured value data.
- Page 83 Dispersion formula Expression Sellmeier dispersion formula Schott dispersion formula Cauchy dispersion formula Wavelength dispersion of the refractive index Coefficient of the dispersion formula (2) Setting the refractive index using a user calculation expression The refractive index of a reference is set using the set user calculation expression. The theoretical spectral reflection factor (transmission factor) calculated from the set refractive index is treated as the theoretical spectral reflection factor (transmission factor) of a reference.
- Page 84 6.2.2. [Standard] setting Reflection factor standard Menu Description Reflection factor Sets the upper- and lower-limit standard reflection(/transmission) factor standards of a reflection factor to each wavelength; click the check box when enabling the set standard value. Enter the wavelength in [Wavelength], a lower-limit reflection factor value in [Lower], and an upper-limit reflection factor value in [Upper].
- Page 85 (reflection/transmission factor standards of the luminous reflection and ) [%] transmission factors; click the check box when enabling the set standard value. Chroma Sets the upper- and lower-limit standards of the chroma; click the check box when enabling the set standard value.
- Page 86 6.3.Layer setting Select [Setup] - [Layer] from the file menu. A LAYER setting window appears. Menu Description Auto When this item is enabled, film thickness is automatically analyzed after measurement. Unit Sets the display unit of the film thickness analysis; you can select the physical film thickness and the optical film thickness obtained when the physical film thickness is multiplied by a refractive index.
- Page 87 method Sets the analysis method of the film thickness; [PV] is a peak-valley method, and [FFT] is a frequency analysis method. [FIT] is a curve fit method. For details of each method, see the section below. Layer Enter the design parameters of a layer to be analyzed. Setting is not required when the analysis method is [PV] and when the unit is [Optical].
- Page 88 loaded spectral reflection factor value data and the spectral reflection factor value data R measured with the materials coated..(6-4) : Refractive index of coat materials : Refractive index of substrate (2) Fourier transform method: [FFT] This method is used to calculate film thickness from the periodicity of the measured spectral reflection factor value data.
- Page 89 6.3.1. Layer setting Layer display section Menu Description Layer display Displays, selects, and sets the layer count and layer section structure of the sample to be analyzed for film thickness; press the [Add] or [Del] button when increasing or decreasing the number of layers. The detail of the layer selected here can be changed by confirming [Thickness], [Extinctive index], and [Refractive index].
- Page 90 Refractive index Sets the refractive index of the selected layer; this item must be set irrespective of an analysis method. First, select the type of dispersion setting value [TYPE]. The four types of ([Sellmeier], [Schott], [Fixed], and [File]) can be selected as standard. The type can be increased by creating a user dispersion setting file on a DISPERSION editing window.
- Page 91 6.4.Graph setting Select [Setup] - [Graph] from the file menu. A GRAPH setting window appears. A graph setting file can be changed on the GRAPH setting window. Menu Description Graph type Select the type of a graph on a [GRAPH] window. The type of the graph set here is displayed just after a value is measured.
- Page 92 refers to the display format of the wavelength, [Value] represents the other data formats, and [Date] represents the date display format. Graph Y-axis Sets the vertical axis values on a [GRAPH] window; the vertical axis is automatically adjusted when enabling [AUTO] and the vertical gridline is automatically adjusted when enabling [AUTO] of gridline.
- Page 93 appears. A dispersion setting file (*.cf) can be created and changed on the DISPERSION setting window. PV8959-F4E005...
- Page 94 Menu Description List Displays the list of dispersion setting files to select from; two types ([Sellmeier] and [Schott]) can be selected as standard. The list is increased by creating a dispersion setting file. The standard dispersion setting files are as follows: [Sellmeier] is a Sellmeier dispersion formula and [Schott] is a Schott dispersion formula.
- Page 95 Cauchy coefficient calculated from the refractive index when the refractive from file index for several wavelengths of coat materials is known. Each coefficient that approximates to the Cauchy dispersion formula is calculated when you set a filename in which the wavelength and refractive index are described and when you press the Run button.
- Page 96 Export Outputs the numeric value of the current dispersion setting file. A refractive index (*.ind format) or reflection factor (*.rf format) can be selected as an output format. Assign the name to be displayed and select it from the file type on a SAVE window. Change file format Close Closes the setting window...
-
Page 97: Windows
7. Windows The main screen of this software is constituted by multiple windows. Various windows can be freely arranged on the main window. The arranged state can be kept with the layout setting file saved and loaded. On each window, the operation below can be performed by clicking the right button of the mouse. - Page 98 Menu Description Measurement result Displays the measurement result SOURCE Displays the state of the standard light source set using a work setting file VIEW Displays the field-of-view state set using a work setting file Displays the selected data number NAME Displays the data name of the selected data number Displays the measurement result of the selected data number's hue angle...
- Page 99 7.2.[GRAPH] window Spectral measured value data is displayed using a graph. Graph type Data graph Cursor Data name Menu Description Graph type Displays the type of a graph; the type displayed during the completion of measurement is determined by setting the graph type (GRAPH) of a graph setting file.
- Page 100 7.3.[LIVE] window FOCUS and CT images are displayed on the [LIVE] window. They can be switched by selecting [FOCUS] or [CT] from [Image] from the file menu or double-clicking on the screen. The current image can be saved when you click the right button of the mouse to select [SAVE]. JPEG or BMP can be selected as the saving format.
- Page 101 7.4.[LUMINANCE] window Each spectral light intensity of a background, reference, and measurement is displayed in black (gray), light blue, and blue, respectively. The pink graph indicates the lower-limit value of the spectral light intensity set on a SYSTEM setting window. The red graph indicates the maximum value of the spectral light intensity.
- Page 102 7.6.[OK/NG] window Result are displayed on the [OK/NG] window. 7.7.[TEXT] window The reflection and transmission factor values of the spectral measured values are displayed using numeric values. Data name Data value Menu Description Data name Displays the name of each color in a data graph; a NAME input window appears when you click the mouse.
- Page 103 7.8.[THICKNESS] Window The result of film thickness analysis is displayed on the [THICKNESS] window. The progress information of film thickness analysis displayed on this window varies depending on the setting state of [Analysis method] on a LAYER setting window. It is separately described below.
- Page 104 7.8.3. Curve fit method: FIT The film thickness analysis method and analysis result for each layer are displayed on this window when [FIT] (curve fit method) is selected for [Analysis method] on a LAYER setting window. The [Method] field displays a film thickness analysis method and the optical film thickness (physical film thickness) analyzed for each layer.
- Page 105 7.9.2. Fourier transform method: FFT Detection points Analysis data Analysis data and a detection point are displayed on this window when [FFT] (Fourier transform method) is selected for [method] on a LAYER setting window. The analysis data is the data obtained when the spectral measured value data to be analyzed for film thickness is frequency-analyzed.
-
Page 106: Others
8. Others 8.1.Loading the setting files using a shortcut By setting the property of a shortcut, the specified setting file can be loaded when software is started using a shortcut. The way in which you can specify a setting file is described below. (1) Create a shortcut for this software on the desktop and open the property of the created shortcut. -
Page 107: File Configuration And Format
9. File Configuration and Format The configuration of file formats used in this software is shown below. Format name Extension Description Data file *.dat/*.csv Data file in which spectral measured value data is saved System setting file *.conf System-related setting file Work setting file *.ref Setting file for work setting... - Page 108 CSV format USPM-SA v1.00 DATAFILE 380-1050: Data file identification tag wavelength, DATA1, Data2, , Data10 : Data name 380, measurement value of Data1 wavelength 380, measurement value of Data2 wavelength 380, measurement value of Data10 wavelength 380 381, measurement value of Data1 wavelength 381, measurement value of Data2 wavelength 381, , measurement value of Data10 wavelength 381 382, measurement value of Data1 wavelength 382, measurement value of Data2 wavelength 382, measurement value of Data10 wavelength 382...
- Page 109 9.2.Additional data files (*.csv) An additional file is created when the measured spectral measured values are saved in CSV format. USPM-SA v1.01 ADDFILE : Data file identification tag Source” ”,(0:A,1:B,2:C,3:D65),View” ”,(True:2(CIE1931),False:10(CIE1964) Number of standard light source state of field-of-view L*, Data1 L*, Data2 L*, Data3 L*, a*, Data1 a*, Data2 a*, Data3 a*, b*, Data1 b*, Data2 b*, Data3 b*, x, Data1 x, Data2 x, Data3 x,...
- Page 110 executed on a DISPERSION editing window. The extension is "*.ind". Data is based on a text format. The refractive index between the shortest and longest wavelengths is arranged after an identification tag in steps of 1 [nm]. USPM-SA v1.00 INDEXFILE :Identification tag of reference file 1.00000000000000 :Refractive index data [%] (380[nm])
-
Page 111: Error Display
10. Error Display Item Description License error: USPM-SA A hardware key cannot be confirmed. Restart after confirming that a hardware key is connected to a computer. Focus not open device Cannot communicate with a FOCUS camera; restart after confirming that hardware cables are connected and that the power is turned on. - Page 112 Data range is less than The number of variables is too many to perform the variables curve fit method (FIT) of film thickness analysis. Increase the quantity for enabling [FIX]. Too dark. Set manually Sampling adjustment cannot be used because the sampling time is long.
-
Page 113: Index
11. Index Item Description Changing the theoretical Open the WORK setting window and set the reflection (transmission) [Reference] field. For details, see the [Reference] factor of a reference setting item. Setting the standard Open the WORK setting window and set the value [Standard] field. - Page 114 Changing the password The character string described in password.txt in of a SYSTEM setting C:¥Program Files¥USPM-SA¥conf folder is a window password. Open password.txt and change the character string in the first line. Recovering lost A data file is saved in C:¥Program measured data Files¥USPM-SA¥conf folder for each measurement.
-
Page 115: Contact Information
Although we took substantial measures to confirm the accuracy of the contents of this document, if you discover any unclear point or any mistakes/omissions, please contact the Service Department of Olympus Corporation as shown in the attached sheet. For the sake of improvement, the contents of this document may be subject to change without prior notice. -
Page 116: Software License Agreement
Article 1: Intellectual property rights The right of this software belongs to Olympus. This software is protected by the laws and treaties regarding other intellectual property rights as well as copyright laws and international copyright treaties. This software is licensed for use and is not for sale. - Page 117 Olympus does not guarantee that all defects are corrected. The only warranty of Olympus is to replace the media when media that do not satisfy the guarantee above are sent back to Olympus together with the copied receipt.
- Page 118 Olympus provides third-party software for you as is without any explicit or implicit warranty, including the warranty of product characteristics and conformity to a specific purpose. In any case, Olympus assumes no liability for direct or indirect damages (that include the loss of lost profits, business interruption, the loss of business information, or other pecuniary losses, but not restricted to such) resulting from use or the lack of serviceability of third-party software.
- Page 119 ******************************************************************************************************** The company and product names described in this manual may be trademarks or registered trademarks of their respective proprietors. ******************************************************************************************************** PV8959-F4E005...
- Page 120 Installation Instructions Spectroscopic Analysis Software USPM-SA Before use We thank you for purchasing our spectroscopic analysis software. In order to use this software safely and to maximize the benefit from doing so, be sure to read this instruction manual completely before use. Please also keep this manual close at hand when using this product and store it carefully for future reference.
- Page 121 Table of Contents 1. Introduction ······················································· 3 2. Installing the Communication Port Driver ·············· 5 3. Installing the FOCUS Camera Driver ····················· 6 4. Installing the CT Camera Driver ·························· 13 5. Installing the Protection Key Driver ····················· 21 6. Verifying the Driver Installation Result ················ 24 7.
-
Page 122: Introduction
1. Introduction 1.1. Cautions If a necessary file is deleted by mistake during installation or uninstallation operations, the PC may not operate properly. Alternatively, if operations are aborted midway, installation or uninstallation may not be correctly executed. Installation and uninstallation operations must be performed by personnel who have adequate knowledge and experience regarding the operation of a personal computer and who have carefully read this manual. - Page 123 1.4. Installation and uninstallation flow "6. Verifying the driver installation result" must be performed after the installation of each driver is completed. Thus, follow the procedures below for a new installation. For other installation and uninstallation cases, perform them by referring to the relevant chapter as necessary. When you install the software application, execute a wavelength calibration by following the instruction manual of the relevant product after the installation is completed.
-
Page 124: Installing The Communication Port Driver
2. Installing the Communication Port Driver The operations in this chapter do not include any wiring of the computer or the product used. (1) Place the CD-ROM into the CD-ROM drive. (2) Double-click CP210x\CP210xVCPInstaller_x64.exe ( [Windows7] WIN7\CP210x\CP210xVCPInstaller_x86.exe) in the CD-ROM to execute it. (3) If a warning screen is displayed at this time, click the Continue button. -
Page 125: Installing The Focus Camera Driver
3. Installing the FOCUS Camera Driver The operations in this chapter do not include any wiring of the computer and or the product used. [Windows10] < SN.6L40431-- / > REVISON A1- (1) Place the CD-ROM into the CD-ROM drive. (2) Double-click MCM320\Setup_x64_win10.exe in the CD-ROM to execute it. A warning related to the user account control may be displayed depending on the settings of the computer used. - Page 126 (5) In the following screen, click the Next button to start the installation. (6) When the following screen is displayed, click the Finish button to proceed. < -SN.6K45356 / > REVISON A0 (1) Place the CD-ROM into the CD-ROM drive. (2) Double-click MCM4303\Setup.exe in the CD-ROM to execute it.
- Page 127 (4) In the following screen, click the Next button to proceed. (5) In the following screen, click the Next button to proceed. [Windows7] < SN.6L40431-- / > REVISON A1- (1) Place the CD-ROM into the CD-ROM drive. (2) Double-click WIN7\MCM320\Setup.exe in the CD-ROM to execute it. A warning related to the user account control may be displayed depending on the settings of the computer used.
- Page 128 (4) In the following screen, click the Next button to proceed. (5) In the following screen, click the Next button to proceed. PV9576-F4E006...
- Page 129 (6) In the following screen, click the Next button to start the installation. (7) When the following screen is displayed, click the Finish button to proceed. (8) Finally, when the following screen is displayed, click the OK button to restart the computer.
- Page 130 < -SN.6K45356 / > REVISON A0 (1) Place the CD-ROM into the CD-ROM drive. (2) Double-click WIN7\MCM4303\Setup.exe in the CD-ROM to execute it. A warning related to the user account control may be displayed depending on the settings of the computer used.
- Page 131 (6) In the following screen, click the Next button to start the installation. (7) When the following screen is displayed, click the Finish button to proceed. (8) Finally, when the following screen is displayed, click the OK button to restart the computer.
-
Page 132: Installing The Ct Camera Driver
4. Installing the CT Camera Driver The operations in this chapter do not include any wiring of the computer or the product used. [Windows10] < REVISON A0,A1,A2,A3 > (1) Place the CD-ROM into the CD-ROM drive. (2) Double-click Micron\dpinst.exe in the CD-ROM to execute it. A warning related to the user account control may be displayed depending on the settings of the computer used. - Page 133 [Windows10] < REVISON A4- > (1) Place the CD-ROM into the CD-ROM drive. (2) Double-click IDS\uEye64_*_WHQL.exe in the CD-ROM to execute it. A warning related to the user account control may be displayed depending on the settings of the computer used. Click the Yes button to proceed with the installation. (3) n the following screen, click the Next button to proceed.
- Page 134 (5) In the following screen, select the 3.USB and click the Next button to proceed. (6) In the following screen, click the Next button to proceed. (7) In the following screen, click the Next button to proceed. PV9576-F4E006...
- Page 135 (8) In the following screen, click the Install button to proceed. (9) In the following screen, remove the Install a desktop shortcut to... , Install a quick launch shortcut to… and Show quickstart HTML checkbox and click the Next button to proceed.
- Page 136 [Windows7] < REVISON A0,A1,A2,A3 > (1) Place the CD-ROM into the CD-ROM drive. (2) Copy both WIN7\Micron\Mv46Cap_I.inf and WIN7\Micron\Mv46Raw_I.inf to the C:\Windows\inf folder. File extensions may not be displayed depending on the settings of the computer used. In addition, a warning screen related to the user account control such as that below may be displayed depending on the settings of the computer used.
- Page 137 (4) In the following screen, click the Next button to proceed. (5) In the following screen, select the 3.USB and click the Next button to proceed. (6) In the following screen, click the Next button to proceed. PV9576-F4E006...
- Page 138 (7) In the following screen, click the Next button to proceed. (8) In the following screen, click the Install button to proceed. (9) In the following screen, remove the Install a desktop shortcut to... , Install a quick launch shortcut to… and Show quickstart HTML checkbox and click the Next button to proceed..
- Page 139 (10) In the last screen, click the Finish button to complete the installation. PV9576-F4E006...
-
Page 140: Installing The Protection Key Driver
5. Installing the Protection Key Driver The operations in this chapter do not include any wiring of the computer or the product used. [Windows10] (1) Place the CD-ROM into the CD-ROM drive. (2) Double-click Sentinel\HASPUserSetup.exe in the CD-ROM to execute it. (3) If a warning screen is displayed, click the Continue button. - Page 141 (7) In the last screen, click the Finish button to complete the installation. [Windows7] (1) Place the CD-ROM into the CD-ROM drive. (2) Double-click WIN7\Hasp\HASPUserSetup.exe in the CD-ROM to execute it. (3) If a warning screen is displayed, click the Continue button. A warning related to the user account control may be displayed depending on the settings of the computer used.
- Page 142 (6) In the following screen, click the button to proceed. Next (7) In the last screen, click the Finish button to complete the installation. PV9576-F4E006...
-
Page 143: Verifying The Driver Installation Result
6. Verifying the Driver Installation Result With this chapter, verify the installation results executed in Chapter 2 through to Chapter 5. First, refer to the instruction manual of the product used, then wire the computer and the product, and then turn on the power. (1) Open the Control Panel from the Start menu. - Page 144 (3) Select Device Manager from Hardware and Sound. (4) First, verify the communication port installation status. Select Ports (COM & LPT) and check that Silicon Labs CP210x USB to UART Bridge (COM*) is displayed. Note that the number at the position marked with * differs depending on the configuration of the computer used.
- Page 145 (5) Next, verify the FOCUS camera installation status. < SN.6L40431-- / > REVISON A1- Select Imaging devices and check that MCM320 Video Stream Device is displayed. Then, select Universal Serial Bus controllers and check that MCM320 Image Acquisition Controller is displayed. <...
- Page 146 (6) Next, verify the CT camera installation status. < REVISON A0,A1,A2,A3 > Select Imaging devices and check that USB Video Stream Device Type.I is displayed. Then, select Universal Serial Bus controllers and check that USB Image Acquisition Controller Type.I is displayed. <...
-
Page 147: Installing Software
7. Installing Software Immediately after the installation (or re-installation) of the software application, all settings are set to their respective default values. After you have installed the software application, be sure to execute wavelength calibration by following the instruction manual of the relevant product that you are using. -
Page 148: Uninstalling The Communication Port Driver
8. Uninstalling the Communication Port Driver (1) Open the Control Panel from the Start menu. (2) Select Uninstall a program from the Control Panel. (3) First select Windows Driver Package – Silicon Laboratories Inc. (silabser) Ports and then start the uninstallation using the Uninstall/Change button. PV9576-F4E006... -
Page 149: Uninstalling The Focus Camera Driver
9. Uninstalling the FOCUS Camera Driver [Windows10] < SN.6L40431-- / > REVISON A1- (1) Open the Control Panel from the Start menu. (2) Select Uninstall a program from the Control Panel. (3) First select MvUsbCam Sdk x.xx (64bit) and then start the uninstallation and change using the Uninstall/Change button. - Page 150 < -SN.6K45356 / > REVISON A0 (1) Open the Control Panel from the Start menu. (2) Select Uninstall a program from the Control Panel. (3) First select M25U870 Driver for MCM4303 verx.xx and then start the uninstallation and change using the Uninstall/Change button. PV9576-F4E006...
- Page 151 (4) In the first screen, select Automatic and click the Next button. (5) In the following screen, click the Finish button to start the uninstallation. (6) When the uninstallation progress status window disappears, the uninstallation is complete. [Windows7] < SN.6L40431-- / >...
- Page 152 (2) Select Uninstall a program from the Control Panel. (3) First select MvUsbCam Sdk verx.xx and then start the uninstallation and change using the Uninstall/Change button. PV9576-F4E006...
- Page 153 (4) In the first screen, select Automatic and click the Next button. (5) In the following screen, click the Finish button to start the uninstallation. (6) When the uninstallation progress status window disappears, the uninstallation is complete. < -SN.6K45356 / >...
- Page 154 (2) Select Uninstall a program from the Control Panel. (3) First select M25U870 Driver for MCM4303 verx.xx and then start the uninstallation and change using the Uninstall/Change button. PV9576-F4E006...
-
Page 155: Uninstalling The Ct Camera Driver
(4) In the first screen, select Automatic and click the Next button. (5) In the following screen, click the Finish button to start the uninstallation. (6) When the uninstallation progress status window disappears, the uninstallation is complete. 10. Uninstalling the CT Camera Driver [Windows10] <... - Page 156 (2) Select Uninstall a program from the Control Panel. (3) First select Windows Driver Package – OLYMPUS Corporation M25uCap_Ivxxx and then start the uninstallation using the Uninstall/Change button. (4) First select Windows Driver Package – OLYMPUS Corporation M25uRaw_Ivxxx and then start the uninstallation using the Uninstall/Change button.
- Page 157 [Windows10] < REVISON A4- > (1) Open the Control Panel from the Start menu. (2) Select Uninstall a program from the Control Panel. (3) First select IDS uEye and then start the uninstallation using the Uninstall button. PV9576-F4E006...
- Page 158 (4) In the following screen, select Remove and click the Next button. (5) In the following screen, click the Yes button. (6) In the following screen, click the Yes button. (7) In the last screen, click the Finish button to complete the installation PV9576-F4E006...
- Page 159 [Windows7] < REVISON A0,A1,A2,A3 > (1) Open the C:\Windows\System32 folder. (2) Select the Mv46Prp_I.ax file and delete it. (3) Open the C:\Windows\System32\drivers folder. (4) Select the Mv46Cap_I.sys and Mv46Raw_I.sys files and delete them. (5) Open the C:\Windows\inf folder. (6) Select the Mv46Cap_I.inf and Mv46Raw_I.inf files and delete them. [Windows7] <...
- Page 160 (3) First select IDS uEye and then start the uninstallation using the Uninstall button. (4) In the following screen, select Remove and click the Next button. (5) In the following screen, click the Yes button. (6) In the following screen, click the Yes button. PV9576-F4E006...
- Page 161 (7) In the last screen, click the Finish button to complete the installation PV9576-F4E006...
-
Page 162: Uninstalling The Protection Key Driver
11. Uninstalling the Protection Key Driver (1) Open the Control Panel from the Start menu. (2) Select Uninstall a program from the Control Panel. (3) Select Sentinel Run-time ([Windows7] Sentinel HASP Run-time) and then click the Uninstall button to start the uninstallation. (4) When the uninstallation progress status window disappears, the uninstallation is complete. -
Page 163: Uninstalling Software
12. Uninstalling Software (1) Open the Control Panel from the Start menu. (2) Select Uninstall a program from the Control Panel. (3) Select USPM-SA and then click the Uninstall button to start the uninstallation. (4) When the uninstallation progress status window disappears, the uninstallation is complete. - Page 164 ************************************************************************************************************* The company names and product names referred to in this document may be trademarks or registered trademarks of their respective companies. ************************************************************************************************************* PV9576-F4E006...
- Page 165 Precautions Regarding the Change of the focus Camera in the USPM-RU-W As the focus camera in the USPM-RU-W Near-IR Micro Spectrophotometer (hereinafter referred to as the “previous camera”) is no longer available, we have replaced it with an alternative camera (hereinafter referred to as the “new camera”) since November 2016.
- Page 166 Shinjuku Monolith , 3-1,Nishi Shinjuku 2-chome ,Shinjuku-ku ,Tokyo ,163-0914, Japan TEL.0120-58-0414 FAX.03-6901-4251 +81-3-6901-4251 OLYMPUS KOREA CO., LTD. 8F Olympus Tower , 446 Bongeunsa-ro , Gangnam-gu, Seoul , Korea , 135-509 Tel: +82-2-6255-3458 OLYMPUS (THAILAND) CO., LTD. 159 Serm-mit Tower, 9 floor, unit# 906-910, Sukhumvit21 road, North Klongtoey,...
Need help?
Do you have a question about the USPM-RU-W Series and is the answer not in the manual?
Questions and answers