Dräger Babylog 8000 plus Instructions For Use Manual
Intensive care ventilator for neonates
Hide thumbs
Also See for Babylog 8000 plus:
- Technical & service manual (155 pages) ,
- Instructions for use manual (138 pages) ,
- Operating instructions manual (148 pages)

Related Manuals for Dräger Babylog 8000 plus


Summary of Contents for Dräger Babylog 8000 plus
- Page 1 Instructions for use Babylog 8000 plus Intensive care ventilator for neonates WARNING Software 5.n To properly use this medical device, read and comply with these instructions for use.
- Page 2 (A) Letters in parentheses refer to elements in the related illustration. In these instructions for use, the designation Letters in illustrations denote elements Babylog 8000 is used for "Babylog 8000 plus". referred to in the text. Any text shown on the screen and any labeling on Screen reproductions...
- Page 3 Users Experts must have the necessary knowledge and experience with complex maintenance work on the Users are persons who use the product in product. accordance with its intended use. Instructions for use Babylog 8000 plus SW 5.n...
- Page 4 Abbreviations and symbols Explanations can be found in the sections ''Abbreviations'' and ''Symbols'' in chapter ''Overview''. Instructions for use Babylog 8000 plus SW 5.n...
- Page 5 Setting ventilation ..........63 Repairs ............125 Endotracheal suction ........68 Replacing the cooling air filter ......126 Manual inspiration ........... 69 Medication nebulization ........70 Analog and digital interface ......76 Instructions for use Babylog 8000 plus SW 5.n...
- Page 6 EMC Declaration ..........146 Connection to IT networks....... 151 Principles of operation ......... 152 Pneumatic function description ....... 153 Description of ventilation modes ..... 156 Additional settings for ventilation..... 161 Measurements..........165 Instructions for use Babylog 8000 plus SW 5.n...
- Page 7 Disposable product.......... 11 Sterile accessories .......... 11 Installing accessories ........11 Storing the instructions for use ......11 Training............11 Product-specific safety information .... 12 Ensuring ventilation using an independent manual ventilator ..........14 Instructions for use Babylog 8000 plus SW 5.n...
- Page 8 Dräger. If other, incompatible accessories are used, there is a risk of patient injury due to medical device failure. Dräger recommends using the medical device only with accessories from the current list of accessories. Instructions for use Babylog 8000 plus SW 5.n...
- Page 9 – IEC 60601-1-1 (device combinations) – IEC 60601-1-2 (electromagnetic compatibility) – IEC 60601-1-4 (software-controlled functions) – IEC 60601-1-8 (alarm systems) Instructions for use Babylog 8000 plus SW 5.n...
- Page 10 – Mobile phones medical device. – Radio frequency electrosurgical equipment – Defibrillators – Shortwave therapy equipment Maintain sufficient safety distances, see EMC declaration in chapter ''Technical data''. Instructions for use Babylog 8000 plus SW 5.n...
- Page 11 Install the accessory on the basic device in accordance with the instructions of the basic device. Check for secure connection to the basic device. Strictly observe the instructions for use and assembly instructions. Instructions for use Babylog 8000 plus SW 5.n...
- Page 12 NO monitoring is used, impaired. patient monitoring is not guaranteed. Do not use the medical device in hyperbaric Monitor the NO concentration separately. chambers. Instructions for use Babylog 8000 plus SW 5.n...
- Page 13 – Slowly open the pressure reducer – Do not place any containers with liquid on manually. Do not use tools. or above the device. – Make sure that no liquid penetrates into the device when disinfecting surfaces. Instructions for use Babylog 8000 plus SW 5.n...
- Page 14 If the ventilation slots on the medical device are covered or sealed, the medical device may overheat. – Air must be able to enter freely. – An alarm is triggered if the medical device overheats during operation. Instructions for use Babylog 8000 plus SW 5.n...
- Page 15 Application Application Intended use ..........16 Environment of use ........16 Instructions for use Babylog 8000 plus SW 5.n...
- Page 16 Application Intended use Babylog 8000 plus 5.n is a long-term ventilator for premature babies, newborns, and children with a body weight of up to approx. 20 kg (44 lbs). The device must only be operated by doctors or, on a doctor's order, by clinical personnel.
- Page 17 Ventilation functions ........23 Monitoring functions ........23 Power supply ........... 23 Gas supply............23 Data transfer (optional)........23 Medication nebulization ........23 Non-invasive ventilation........23 Abbreviations..........24 Symbols............26 Product labels..........27 Instructions for use Babylog 8000 plus SW 5.n...
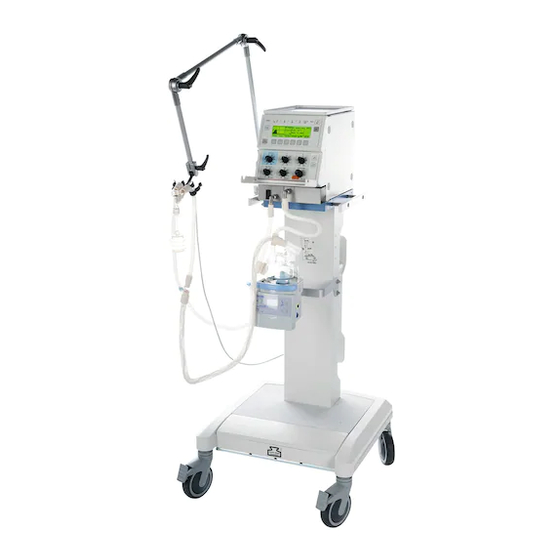
- Page 18 Overview Babylog 8000 Ventilator on trolley A Control and display unit, display panel B Control and display unit, control panel C Control panel cover D Trolley E Patient connection panel Instructions for use Babylog 8000 plus SW 5.n...
- Page 19 E Key to suppress alarm tone for 2 minutes P Cal. Config. key F OK key Q man. Insp. key G Key to select dialog windows H Vent. Mode key for ventilation modes Vent. Option key for additional settings Instructions for use Babylog 8000 plus SW 5.n...
- Page 20 Overview Patient connection panel A "Exhaust" muffler B Rocker lever for expiratory valve C Expiratory port "GAS RETURN" D Inspiratory port "GAS OUTPUT" Instructions for use Babylog 8000 plus SW 5.n...
- Page 21 "INFLATING GAS INPUT" G Air connection "INFLATING GAS INPUT" H Connection for pneumatic medication nebulizer Connection for flow sensor cable: Applied part of protection class BF or B J Cooling air filter Instructions for use Babylog 8000 plus SW 5.n...
- Page 22 A Babylog 8000 B Device holder C Trolley column D Hose holder E Castor with locking brake, 2 pieces F Castor with locking brake, 2 pieces G Base plate H Holder Lateral standard rail Instructions for use Babylog 8000 plus SW 5.n...
- Page 23 Non-invasive ventilation is possible if BabyFlow – Leakage rate Leak accessories are used. Additional information can – Respiratory rate for panting breathing Panting be found in the BabyFlow instructions for use. – Apnea alarm time Apnoea time Instructions for use Babylog 8000 plus SW 5.n...
- Page 24 Intermittent Mandatory Ventila- tion Time constant Insp. Flow Expiratory time Setting knob for inspiratory flow Inspiratory time IPPV Intermittent Positive-Pressure Ventilation TIspo Inspiratory time during sponta- neous breathing Inverse-Ratio Ventilation Kilogram Liter Instructions for use Babylog 8000 plus SW 5.n...
- Page 25 Vtset Set tidal volume Inspiratory flow and expiratory flow Expiratory flow in the dialog win- dow VIVE Expiratory flow Inspiratory flow in the dialog win- VIVE Inspiratory flow insp Instructions for use Babylog 8000 plus SW 5.n...
- Page 26 Set the volume of the alarm tone Reduce Batch designation Increase Use by Selecting the parameter Switch device on, Keep away from sunlight switch device off Protect from moisture Storage temperature Relative humidity Instructions for use Babylog 8000 plus SW 5.n...
- Page 27 Overview Product labels Product label Explanation Maximum loads and conditions for maintaining the stability of the device on the trolley Nominal weight and maximum weight (for further information, see chapter ''Technical data'') Instructions for use Babylog 8000 plus SW 5.n...
- Page 28 Keys with fixed and variable functions .... 30 Displays............32 Dialog windows ..........33 Dialog window layout........33 Opening dialog windows ......... 33 Main screen............. 33 Overview of dialog windows ......34 Instructions for use Babylog 8000 plus SW 5.n...
- Page 29 The set value is adopted immediately. Turn the setting knobs for Pinsp and PEEP/CPAP slowly. Otherwise, the set value will be displayed incorrectly. After the next parameter has been set, the display will be correct. Instructions for use Babylog 8000 plus SW 5.n...
- Page 30 Setting the ventilation mode 1 Press the Vent. Mode key (C). 2 Press the key (E) for the desired ventilation mode, e.g., SIMV. 3 Press the On key (E). The ventilation mode is active. Instructions for use Babylog 8000 plus SW 5.n...
- Page 31 If the key is pressed briefly and repeatedly, the value of the parameter is increased or decreased by individual steps. If the key is pressed longer, the value of the parameter changes quickly. Instructions for use Babylog 8000 plus SW 5.n...
- Page 32 Alarms are indicated visually using the LED (C). The alarm message is displayed on the screen (E). Pressing the OK key acknowledges the alarm message and closes the display. For additional information on alarms, see page 82. Instructions for use Babylog 8000 plus SW 5.n...
- Page 33 TE (B) is displayed in the pressure and flow waveforms. – Keys with fixed functions – Vent. Mode – Vent. Option – Cal. Config. – 6 keys with variable functions Press a key to open the associated dialog window. Instructions for use Babylog 8000 plus SW 5.n...
- Page 34 Operating concept Overview of dialog windows Dialog windows for ventilation Instructions for use Babylog 8000 plus SW 5.n...
- Page 35 Operating concept Dialog windows for displays, alarms, and logbook Instructions for use Babylog 8000 plus SW 5.n...
- Page 36 Operating concept Dialog windows for calibration and configuration Instructions for use Babylog 8000 plus SW 5.n...
- Page 37 Connecting the external device for MEDIBUS. 51 Configuring the interface ......... 51 Establishing potential equalization ..... 52 Connecting the potential equalization cable ..52 Transport within the hospital ....... 53 Increasing stability ........... 53 Instructions for use Babylog 8000 plus SW 5.n...
- Page 38 >5°. Observe the permitted maximum load and weight distribution, see ''Operating Do not use the device on a trolley on characteristics'' on page 139. inclinations >5°. Instructions for use Babylog 8000 plus SW 5.n...
- Page 39 B Holder 10 kg (22 lbs) Breathing gas device with knurled screws at the rear. humidifier or medication nebulizer C Base plate 50 kg (110 lbs) Ambient air compressor Instructions for use Babylog 8000 plus SW 5.n...
- Page 40 If a monitor is mounted on the ventilator, there is a risk of the device tipping over. Combining devices is only approved on the trolley. The counterweight must be mounted under the base plate of the trolley. Instructions for use Babylog 8000 plus SW 5.n...
- Page 41 Assembly and preparation Mounting the Graphic Screen on Babylog 8000 For information on mounting and connection, see the "Graphic Screen option" instructions for use. Instructions for use Babylog 8000 plus SW 5.n...
- Page 42 3 Tilt the rocker lever down. The expiratory valve the calibration of the O sensor, see page 94. is locked in place. 4 Connect the muffler (B) to the exhaust port of the expiratory valve. Instructions for use Babylog 8000 plus SW 5.n...
- Page 43 Babylog 8000 must not impair the safety and function of either device. Prepare the breathing gas humidifier in accordance with the corresponding instructions for use. Instructions for use Babylog 8000 plus SW 5.n...
- Page 44 2 Insert the adapter Ø15/Ø22 (B) into the breathing hose. 3 Attach the bacterial filter (C) onto the adapter. 4 Insert the catheter connector size II (D) into the bacterial filter. 5 Attach the breathing hoses. Instructions for use Babylog 8000 plus SW 5.n...
- Page 45 2 Rotate the inspiratory and expiratory ports down or in the direction of the patient. 4 Press the rubber connection sleeves on the breathing hoses into the clamp on the holder. Instructions for use Babylog 8000 plus SW 5.n...
- Page 46 The following flow sensors are available: – ISO 15 flow sensor (8411130) – Y-piece flow sensor (8410185) 3 Insert the plug of the flow sensor cable into the connector at the rear and tighten the screws. Instructions for use Babylog 8000 plus SW 5.n...
- Page 47 Insert the test lung in the patient connection 4 Connect the plug (A) of the flow sensor cable to port of the breathing circuit. the flow sensor. 5 Calibrate the flow sensor, see page 95. Instructions for use Babylog 8000 plus SW 5.n...
- Page 48 (8412448) must be in use. Connecting the sample line Connect the sample line to the adapter with safety valve. In order to prevent condensate from accumulating, the Luer Lock connector must face upwards. Instructions for use Babylog 8000 plus SW 5.n...
- Page 49 1 Screw on the compressed gas hoses for Air and O at the rear of the device. 2 Plug the probes into the wall terminal units of the central gas supply system. Instructions for use Babylog 8000 plus SW 5.n...
- Page 50 The mains voltage must be within the voltage range indicated on the rating plate: Either: 100 V to 127 V Or: 220 V to 240 V Insert the mains plug into the mains power socket. Instructions for use Babylog 8000 plus SW 5.n...
- Page 51 MEDIBUS for Dräger Pediatric 9029205 (A). Devices Dräger RS 232 MEDIBUS, Protocol 9028258 Definition Configuring the interface For a description of the process, see chapter ''Configuring the RS232 interface'' on page 104. Instructions for use Babylog 8000 plus SW 5.n...
- Page 52 1 Connect the potential equalization cable to the potential equalization pin on the device. 2 Connect the potential equalization cable to a hospital potential equalization connection (e.g., wall, ceiling supply unit, operating table). Instructions for use Babylog 8000 plus SW 5.n...
- Page 53 3 Do not attach any additional parts to the lateral standard rails. 4 Remove the monitor if there is one. 5 Grasp the device firmly by the lateral standard rails and push the device in longitudinal direction. Instructions for use Babylog 8000 plus SW 5.n...
- Page 54 ........... 57 Checking readiness for operation ....58 Device check after reprocessing ..... 58 Device check immediately before using the device on a patient .......... 60 Checking the speaker and LEDs..... 61 Instructions for use Babylog 8000 plus SW 5.n...
- Page 55 2 Press the mains switch (B) on the rear of the Move the protective flap over the switch. device until it locks in place. 3 Move the protective flap over the mains switch. Instructions for use Babylog 8000 plus SW 5.n...
- Page 56 The symbol for alarm limits (C) flashes. Set the alarm limits, see page 84. The Calibrate flow sensor! alarm message is displayed. Calibrate the flow sensor, see page 95. Instructions for use Babylog 8000 plus SW 5.n...
- Page 57 Setting -Vol.% 0.4 s 0.6 s Insp. Flow 5 L/min Pinsp 20 mbar (20 cmH PEEP/CPAP 3 mbar (3 cmH 2 Switch the ventilator on. 3 Allow the charging time to expire. Instructions for use Babylog 8000 plus SW 5.n...
- Page 58 2 Set the IPPV/IMV ventilation mode. – Check the alarm for airway pressure 3 Set the following alarm limits: 0 L/min 15 L/min Checking the O alarm: 1 Set the O -Vol.% setting knob to 60 %. Instructions for use Babylog 8000 plus SW 5.n...
- Page 59 Pinsp – MV low PEEP/CPAP Checking the alarm limits for airway pressure: 2 On the main screen, press the Meas key. 1 Set the IPPV/IMV ventilation mode. 3 Press the Paw key. Instructions for use Babylog 8000 plus SW 5.n...
- Page 60 Calibrate the flow sensor, see page 95. If calibration is successful, a confirmation is displayed on the screen. Checking the ventilation functions 1 Set the following alarm limits: 0 L/min 15 L/min Instructions for use Babylog 8000 plus SW 5.n...
- Page 61 Press and hold the OK key for approx. 2 seconds. All LEDs light up and a continuous tone sounds as long as the key is pressed. Instructions for use Babylog 8000 plus SW 5.n...
- Page 62 Analog and digital interface ......76 Data output............76 Transferring data to the patient monitor ..79 Terminating operation ........80 Switching the ventilator off ......80 Removing the compressed gas hoses .... 80 Instructions for use Babylog 8000 plus SW 5.n...
- Page 63 Options > VG dialog Vtset window Options > HFV dialog Frequ. window Ampl. SIMV, SIPPV, and PSV ventilation modes If the patients becomes apneic, ventilation begins with the respiratory rate specified by T and T Instructions for use Babylog 8000 plus SW 5.n...
- Page 64 5 Set the alarm limits, see page 84. The trigger threshold currently set (Trigger) is displayed. 2 Reduce the trigger threshold by pressing the key. 3 Increase the trigger threshold by pressing the key. Instructions for use Babylog 8000 plus SW 5.n...
- Page 65 Apnoea time alarm limits. For information on deactivating flow monitoring, see chapter ''Deactivating flow monitoring'' on page 97. For information on deactivating alarm limits, see chapter ''Deactivating alarm limits'' on page 85. Instructions for use Babylog 8000 plus SW 5.n...
- Page 66 Pinsp and PEEP is automatically regulated so that the set tidal volume Vtset is applied. 1 Set the pressure plateau, see page 64. 2 Press the Vent. Option key. Instructions for use Babylog 8000 plus SW 5.n...
- Page 67 10 On the main screen, press the Values key. 11 Press the Meas2 key. 12 Monitor the tidal volume VThf and the diffusion coefficient DCO and adjust the amplitude and frequency if necessary. Instructions for use Babylog 8000 plus SW 5.n...
- Page 68 Select an appropriate suction catheter for suction. Closed suction Closed suction is possible in all ventilation modes. An appropriate flow must be set for suction. Insp. Flow Set the appropriate flow with the setting knob. Instructions for use Babylog 8000 plus SW 5.n...
- Page 69 2 Press the man. Insp. key (A) and hold it for the desired inspiratory time. Display (example): The device ends the inspiration after a maximum of 5 seconds. The next manual inspiration can only be started after an additional 5 seconds. Instructions for use Babylog 8000 plus SW 5.n...
- Page 70 If a bacterial filter is placed between the nebulizer and tube during medication nebulization, flow resistance may increase and impair ventilation. Place the bacterial filter between the inspiratory valve and the nebulizer. Instructions for use Babylog 8000 plus SW 5.n...
- Page 71 Switching on flow monitoring 1 Connect the plug of the flow sensor cable to the flow sensor. 2 Check if flow monitoring is active. 2 Acknowledge the alarm message by pressing the OK key. Instructions for use Babylog 8000 plus SW 5.n...
- Page 72 With an inspiratory flow of 10 L/min and a desired reach the lungs, however. concentration of 80 Vol.%, the O -Vol.% setting knob must be set to 90 Vol.% during medication nebulization. Instructions for use Babylog 8000 plus SW 5.n...
- Page 73 Push the inlet port or the outlet port of the mounting screw. medication nebulizer into the upper hose guide 3 Insert the plug (B) into the socket on the rear of of the incubator. the device until it locks in place. Instructions for use Babylog 8000 plus SW 5.n...
- Page 74 8 If no bacterial filter is used, attach a socket (E) until it locks in place. reprocessed expiratory valve, see page 42. Babylog 8000 starts nebulization. 2 Check whether aerosol is generated. Instructions for use Babylog 8000 plus SW 5.n...
- Page 75 3 If a bacterial filter is used to protect the expiratory valve, replace or remove the bacterial filter. 4 If no bacterial filter is used, attach a reprocessed expiratory valve, see page 42. Instructions for use Babylog 8000 plus SW 5.n...
- Page 76 1 Connect the printer (internal resistance ≥ – Measurement waveforms 1 MΩ) using the cable 8306487. 2 Select the measuring signal and scale range, – Data is transmitted to a patient monitor or see page 101. personal computer Instructions for use Babylog 8000 plus SW 5.n...
- Page 77 – Alarm: L during an alarm condition, otherwise H. Analog 1 Analog 2 1 Connect the printer (input resistance ≥ 1 MΩ) using the cable 8306487. 2 Select the signal, see page 103. Instructions for use Babylog 8000 plus SW 5.n...
- Page 78 Automatically printing a report every 30 minutes: 1 Press the Select key repeatedly until 30 min. report is highlighted. 2 Start the print process by pressing the Start key. The key function changes to Stop. Instructions for use Babylog 8000 plus SW 5.n...
- Page 79 2 Press the Select key repeatedly until All is highlighted. 3 Start the print process by pressing the Start key. The key function changes to Stop. Canceling the print process: Press the Stop key. Instructions for use Babylog 8000 plus SW 5.n...
- Page 80 4 Switch off the breathing gas humidifier and Disconnect the probes of the Air and O remove the mains plug. compressed gas hoses from the wall terminal units of the central gas supply system. Instructions for use Babylog 8000 plus SW 5.n...
- Page 81 Acknowledging alarm messages ....83 Alarm limits ............ 84 Automatic alarm limits ........84 Manual alarm limits.......... 84 Setting the alarm limits ........84 Deactivating alarm limits........85 Response to power failure....... 85 Instructions for use Babylog 8000 plus SW 5.n...
- Page 82 Quick action required to avert dan- medium priority flashes Note Alarm with low One tone Attention and action required priority For a list of causes and remedies, see chapter ''Alarm – Cause – Remedy'' on page 106. Instructions for use Babylog 8000 plus SW 5.n...
- Page 83 Acknowledging alarm messages After the fault triggering the alarm has been resolved, the alarm tone is silenced. High-priority alarm messages continue to be displayed and need to be acknowledged. Press the OK key. Instructions for use Babylog 8000 plus SW 5.n...
- Page 84 Apnea alarm time Apnoea 5 to 20 seconds 2 Select the parameter by pressing the time key. Respiratory rate for panting 20 to 200 bpm 3 Set the alarm limit using the key. breathing Panting Instructions for use Babylog 8000 plus SW 5.n...
- Page 85 1 Select the alarm limit Panting. 2 Set the value to <20 bpm. The alarm limit is deactivated. Response to power failure Alarm limits are saved in the event of a power failure. Instructions for use Babylog 8000 plus SW 5.n...
- Page 86 Displaying waveforms and measured values ............. 87 Displaying waveforms ........87 Displaying measured values ......87 Displaying all set values and measured values ................ 89 Displaying trends .......... 90 Displaying the logbook......... 91 Instructions for use Babylog 8000 plus SW 5.n...
- Page 87 PEEP End-expiratory pressure E Flow axis scale (e.g., 10 L/min) F Zero line G End of the set expiratory time TE (dotted verti- cal line) H Time axis scale (e.g., 2 s) Instructions for use Babylog 8000 plus SW 5.n...
- Page 88 Expiratory minute volume values may be distorted, e.g., due to a Measured inspiratory O concentration leakage. Mean Mean airway pressure of previous respiratory cycle Instructions for use Babylog 8000 plus SW 5.n...
- Page 89 1 On the main screen, press the Values key. VThf Inspiratory measured tidal volume of 2 Press the Meas1 key. high-frequency ventilation [mL] Displaying additional measured values: Press the Meas2 key. Instructions for use Babylog 8000 plus SW 5.n...
- Page 90 (max. 24 hours, min. 2 hours). The times displayed indicate the beginning and end of the segment. 4 Use the keys to shift the segment: Instructions for use Babylog 8000 plus SW 5.n...
- Page 91 1 On the main screen, press the key. The Logbook dialog window is displayed. 2 Scroll forward in the logbook by pressing the key. 3 Scroll back in the logbook by pressing the key. Instructions for use Babylog 8000 plus SW 5.n...
- Page 92 Sensors and calibration intervals ....93 monitoring ..........94 Calibrating the O sensor ........ 94 Flow monitoring ..........95 Calibrating the flow sensor ......95 Deactivating and activating flow monitoring ..96 Instructions for use Babylog 8000 plus SW 5.n...
- Page 93 Device function impaired If the sensors are not calibrated, device function may be impaired. Calibrate the sensors at the indicated intervals. Recalibration is not necessary if the flow sensor has been unplugged only briefly. Instructions for use Babylog 8000 plus SW 5.n...
- Page 94 -Cal (B) is displayed in the status field. The calibration is completed after approx. 5 minutes. O -Cal (B) is no longer displayed in the status field. Hiding the message (A): Press the OK key. Instructions for use Babylog 8000 plus SW 5.n...
- Page 95 Body temperature 37 °C (98.6 °F), air pressure 1013 mbar (or hPa or cmH plus mean airway pressure 10 mbar (or 8 Press the key (B). -Cal hPa or cmH O), water-vapor-saturated Instructions for use Babylog 8000 plus SW 5.n...
- Page 96 1 second. A message is displayed on the screen. After calibration Connect the tube connector. If calibration was not successful Replace the flow sensor insert, see page 42. Replace the flow sensor cable. Instructions for use Babylog 8000 plus SW 5.n...
- Page 97 1 Connect the plug (A) of the flow sensor cable to the flow sensor. 2 Check whether flow monitoring is active. The information (D) is no longer displayed in the status field. Instructions for use Babylog 8000 plus SW 5.n...
- Page 98 Configuring the data interfaces ....101 Selecting the measuring signals and scale range for the analog output ports ....101 Configuring the impulse output......103 Configuring the RS232 interface ..... 104 Configuring the printer........104 Instructions for use Babylog 8000 plus SW 5.n...
- Page 99 1 Open the dialog window by pressing the Cal. Config. > Config > Clock keys. 2 Use the keys to select the appropriate parameter. The selected parameter is highlighted. 3 Use the keys to set the value. Instructions for use Babylog 8000 plus SW 5.n...
- Page 100 1 Open the dialog window by pressing the Cal. Config. > Config > Contr keys. A test pattern is displayed. 2 Reduce the contrast by pressing the key. 3 Increase the contrast by pressing the key. Instructions for use Babylog 8000 plus SW 5.n...
- Page 101 1 Open the dialog window by pressing the Cal. Config. > Config > Com keys. 2 Press the Param key repeatedly until Analog1 is highlighted. 3 Use the keys to select the measuring signal. Instructions for use Babylog 8000 plus SW 5.n...
- Page 102 → 0 ... 10 V 0 ... 25 mL → 0 ... 10 V VThf 0 ... 25 mL → 0 ... 10 V 0 ... 5 mL → 0 ... 10 V Instructions for use Babylog 8000 plus SW 5.n...
- Page 103 If a measured value exceeds the limits of the 2 Press the Param key repeatedly until scale, the voltage is limited to the maximum value highlighted. on the scale. 3 Use the key to select the signal. Instructions for use Babylog 8000 plus SW 5.n...
- Page 104 4 Press the Param key repeatedly until Parity is highlighted. 5 Use the key to select one of the following values: – NONE – EVEN – ODD When using the printer, select NONE. Instructions for use Babylog 8000 plus SW 5.n...
- Page 105 Troubleshooting Troubleshooting Failure of the power supply......106 Alarm – Cause – Remedy......106 Instructions for use Babylog 8000 plus SW 5.n...
- Page 106 Airway pressure low Leakage or disconnection Check the breathing circuit for leakages in the connections. Inspiratory or expiratory flow set Increase flow. too low. Apnoea The patient's spontaneous Apply controlled ventilation. breathing is interrupted. Instructions for use Babylog 8000 plus SW 5.n...
- Page 107 Increase trigger threshold. Hose kinked? Breathing hose kinked, blocked, Check breathing hoses, establish or condensate in breathing hose. clear passage. Inner diameter of breathing Use a suitable breathing circuit. hoses too small. Instructions for use Babylog 8000 plus SW 5.n...
- Page 108 Change sensor! page 42. measurement disturbed? measurement impaired. Replace the O sensor, see page 42. Contact DrägerService. pressure low supply pressure too low. Ensure pressure greater than 2.7 bar (39.2 psi). Instructions for use Babylog 8000 plus SW 5.n...
- Page 109 Tube kinked or blocked. Establish free passage. Flow sensor blocked. Replace flow sensor. VT low Set tidal volume is not reached. Increase flow . Extend insp Check settings! inspiratory time, increase Pinsp if necessary. Instructions for use Babylog 8000 plus SW 5.n...
- Page 110 Reprocessing list .......... 117 Non-critical medical devices......117 Semi-critical medical devices ......117 Manual reprocessing of the Y-piece....118 After reprocessing ........119 Assembling the components ......119 Preparation for next use ........119 Instructions for use Babylog 8000 plus SW 5.n...
- Page 111 1 Switch off the device and breathing gas humidifier and unplug their mains plugs. 2 Empty the water traps and breathing hoses. 3 Empty the water container of the breathing gas humidifier. Instructions for use Babylog 8000 plus SW 5.n...
- Page 112 Reprocess the individual parts of the medication nebulizer in accordance with the corresponding instructions for use. Reprocess the parts for adaptation in accordance with the reprocessing list, see page 117. Instructions for use Babylog 8000 plus SW 5.n...
- Page 113 Dismantle and reprocess the breathing gas humidifier and the Aeroneb Pro nebulizer in accordance with the corresponding instructions for use. Dismantle and dispose of the bacterial filter in accordance with the corresponding instructions for use. Instructions for use Babylog 8000 plus SW 5.n...
- Page 114 – Korsolex extra by Bode Chemie 3 Remove disinfectant residues after the contact – Concentration: 3 %, contact time: 15 min time has elapsed. Machine cleaning: – Neodisher MediClean by Dr. Weigert Instructions for use Babylog 8000 plus SW 5.n...
- Page 115 3 Inspect components for visible soiling and damage. Repeat manual disinfection if necessary. 4 Shake off all excess water. Allow components to dry thoroughly. Instructions for use Babylog 8000 plus SW 5.n...
- Page 116 Sterilize only components that have been cleaned and disinfected. For sterilization, use a vacuum steam sterilizer (in accordance with DIN EN 285), preferably with fractional vacuum. Instructions for use Babylog 8000 plus SW 5.n...
- Page 117 Housing of the Daily Possible Possible ISO 15 flow sensor Y-piece flow sen- Daily According to the corresponding Instructions for use and section ''Manual reprocessing of the Y-piece'' on page 118 Instructions for use Babylog 8000 plus SW 5.n...
- Page 118 (C). Fit a syringe (D) containing 20 mL of the solution to each opening of the Y-piece. Inject the solution three times. Instructions for use Babylog 8000 plus SW 5.n...
- Page 119 1 Assemble and prepare the device for operation, see chapter ''Assembly and preparation'' on page 37. 2 Calibrate the flow sensor, see page 95. 3 Check readiness for operation, see chapter ''Getting started'' on page 54. Instructions for use Babylog 8000 plus SW 5.n...
- Page 120 Maintenance Maintenance Overview ............121 Inspection ............122 Safety checks ..........122 Preventive maintenance ....... 124 Table of preventive maintenance intervals..124 Repairs ............125 Replacing the cooling air filter ..... 126 Instructions for use Babylog 8000 plus SW 5.n...
- Page 121 Preventive mainte- Recurrent specified measures intended to maintain the functional condition of a nance medical device Repair Measures intended to restore the functional condition of a medical device after a device malfunction Instructions for use Babylog 8000 plus SW 5.n...
- Page 122 – Country-specific labeling of gas types 3 Using the instructions for use, check that all components and accessories needed to use the product are available. Instructions for use Babylog 8000 plus SW 5.n...
- Page 123 6 Perform a functional test of the following features according to the instructions for use: – All functions described in the test steps of the device check. – Functioning of the power supply failure alarm Instructions for use Babylog 8000 plus SW 5.n...
- Page 124 Filter on entry block of Every 2 years Replace Experts gas connection Time keeper RAM Every 4 years Replace Experts Pressure reducers Every 6 years Basic overhaul of pres- Experts sure reducers Instructions for use Babylog 8000 plus SW 5.n...
- Page 125 Experts valve Integrated diaphragm for Every 6 years Replace Experts equalization valve Repairs Dräger recommends that all repairs are carried out by DrägerService and that only authentic Dräger repair parts are used. Instructions for use Babylog 8000 plus SW 5.n...
- Page 126 2 Replace the cooling air filter or clean it in warm soapy water and dry thoroughly. 3 Insert the cooling air filter in the holder in the rear panel. Instructions for use Babylog 8000 plus SW 5.n...
- Page 127 Disposal Disposal Disposal of the medical device ....128 For countries subject to the EU Directive 2002/96/EC............128 Disposal of batteries ........128 Disposal of O sensors ......... 129 Instructions for use Babylog 8000 plus SW 5.n...
- Page 128 The battery installed in the device must therefore be removed by experts before disposal of the device. Observe the applicable laws and regulations for battery disposal. Instructions for use Babylog 8000 plus SW 5.n...
- Page 129 Improper handling of O sensors can result in explosions and chemical burns. – Do not throw O sensors into fire. – Do not force O sensors open. sensors can be sent back to Dräger. Instructions for use Babylog 8000 plus SW 5.n...
- Page 130 150 Reduced separation distances to portable and mobile radio frequency communication devices ............150 Connection to IT networks ......151 Information for connection to an IT network ..151 Instructions for use Babylog 8000 plus SW 5.n...
- Page 131 Ventilation modes IPPV/IMV, IPPV, IMV SIMV, SIPPV PSV, CPAP Inspiratory time Range 0.1 to 2 s Resolution 0.1 to 1 s: 0.01 s 1 to 2 s: 0.1 s Accuracy ±10 ms Instructions for use Babylog 8000 plus SW 5.n...
- Page 132 Inspiratory pressure Pinsp Range 5 to 80 mbar (5 to 80 cmH Resolution 1 mbar (1 cmH Accuracy ±1 mbar (±1 cmH O) or 3 % of the measured value, whichever is greater Instructions for use Babylog 8000 plus SW 5.n...
- Page 133 Only use other breathing circuits if their resistance values do not exceed the above-mentioned values and the inspiratory fraction is approx. 70 %. Other- wise the measurement of the airway pressure may be impaired. Instructions for use Babylog 8000 plus SW 5.n...
- Page 134 10 to 99 mbar (10 to 99 cmH O): 1 mbar (1 cmH Airway pressure Bar display (on device) Range –10 to 80 mbar (–10 to 80 cmH Resolution 2 mbar (2 cmH Instructions for use Babylog 8000 plus SW 5.n...
- Page 135 >2 to 30 L/min: ±10 % (NTPD) endotracheal tube >3 mm (0.12 in)) Leakage Leak Range 0 to 100 % Resolution Spontaneous portion of minute volume spont Range 0 to 100 % Resolution Instructions for use Babylog 8000 plus SW 5.n...
- Page 136 Inspiratory O Range 18 to 100 Vol.% Resolution 1 Vol.% Accuracy ±3 Vol.% based on the compressed gases O <65 s at 1 L/min 0...90 <10 s at 30 L/min Instructions for use Babylog 8000 plus SW 5.n...
- Page 137 ±30 % Overinflation index Range 0 to 5 Resolution 0.01 Ratio of f : VT Range 0 to 1000 bpm/mL Resolution 0.1 bpm/mL Transport coefficient Range 0 to 999 mL Resolution 1 mL Instructions for use Babylog 8000 plus SW 5.n...
- Page 138 Range 20 to 200 bpm <20 bpm: monitoring is deactivated Alarm delay time Alarm delay Delays the following alarms: – MV high – VT low Check settings! Range 0 to 30 s Instructions for use Babylog 8000 plus SW 5.n...
- Page 139 2.7 to 6 bar (270 to 600 kPa) (39 to 87 psi) input flow Up to 52 L/min connection NIST Air positive operating pressure 2.7 to 6 bar (270 to 600 kPa) (39 to 87 psi) Instructions for use Babylog 8000 plus SW 5.n...
- Page 140 14-361 ture System Materials used Breathing hose Silicone rubber, Hytrel (milky, transparent, white) Water trap Polysulphone (gray, transparent) Y-piece Polysulphone (yellow, transparent) Expiratory valve (housing, muffler) Aluminum (gray) Inspiratory valve Aluminum (gray) Instructions for use Babylog 8000 plus SW 5.n...
- Page 141 Output resistance <5 kΩ Plug connection SMB-Subclic RS232 interface Level in accordance with DIN 66020 Printer connection With 8306489 printer cable only Pin configuration Monitor connection With 8306488 monitor cable only Pin configuration Instructions for use Babylog 8000 plus SW 5.n...
- Page 142 – Failure of the external power supply – Failure of the gas supply (O and compressed air) An additional performance characteristic is the prevention of backflow of gas into the central gas supply system. Instructions for use Babylog 8000 plus SW 5.n...
- Page 143 CPAP pressure low If airway pressure falls below PEEP/CPAP – 2 mbar (2 cmH and the pressure-time integral exceeds 6 mbar x s (6 cmH O x s), an alarm is triggered. Instructions for use Babylog 8000 plus SW 5.n...
- Page 144 The apnea alarm time can be set to between 5 and 20 seconds. Panting breathing If the measured respiratory rate f is greater than the adjustable panting breathing limit Panting, an alarm is triggered. Instructions for use Babylog 8000 plus SW 5.n...
- Page 145 Babylog 8000 is a software-driven device. The safety concept is based on 2 microprocessor systems that function independently of one another and monitor each other's functions. The measurement and alarm functions required to do this are thus doubled. Instructions for use Babylog 8000 plus SW 5.n...
- Page 146 Even if the equipment meets the test requirements described below, smooth operation cannot be guaranteed – the ‘quieter‘ the electrical environment the better. In general, increasing the distance between electrical devices decreases the likelihood of interference. Instructions for use Babylog 8000 plus SW 5.n...
- Page 147 (without transformer) to the public low-voltage power supply net- work that supplies buildings used for domestic purposes. Harmonic emissions (IEC 61000- Not applicable 3-2) Voltage fluctuations/flicker emis- Not applicable sions (IEC 61000-3-3) Instructions for use Babylog 8000 plus SW 5.n...
- Page 148 25 periods power supply interruptions, it is recommended that the Voltage dip >95 %, >95 %, medical device is powered 5 seconds 5 seconds from an uninterruptible power supply or a battery. Instructions for use Babylog 8000 plus SW 5.n...
- Page 149 150 kHz to 2.5 GHz and less than 1 V/m above 2.5 GHz. 2) ISM bands in this frequency range are: 6.765 MHz to 6.795 MHz; 13.553 MHz to 13.567 MHz; 26.957 MHz to 27.283 MHz; 40.66 MHz to 40.70 MHz. Instructions for use Babylog 8000 plus SW 5.n...
- Page 150 GSM 1800, GSM 1900 (limited to 1 W ERP) 0.38 m (1.25 ft) UMTS, DECT (limited to 0.25 W ERP) 0.19 m (0.62 ft) Bluetooth, WLAN 2450, RFID 2450 (limited to 0.1 W ERP) 0.07 m (0.23 ft) Instructions for use Babylog 8000 plus SW 5.n...
- Page 151 IT networks with medical devices). Serial interfaces The following interfaces are possible: – RS232 interfaces according to EIA RS-232 (CCITT V.24/V.28) for the following applications: – MEDIBUS – Connections with third-party medical devices Instructions for use Babylog 8000 plus SW 5.n...
- Page 152 Additional settings for ventilation ....161 Volume Guarantee (VG)........161 Separate expiratory flow........162 High-frequency ventilation (HFV) ....162 Measurements ..........165 Airway pressure measurement......165 Flow and volume measurement ...... 165 Instructions for use Babylog 8000 plus SW 5.n...
- Page 153 H Magnetic valve T Expiratory valve Magnetic valve U Bactericide section of pressure measurements J Non-return valve V Relative pressure absorber K Filter W Magnetic valve L Pneumatic control valve X Ejector Instructions for use Babylog 8000 plus SW 5.n...
- Page 154 The inspiratory oxygen concentration is measured at the O sensor (N) by the open pneumatic control valve (L). The safety valve (P) is opened if a detected stenosis impedes depressurization in the expiratory branch. Instructions for use Babylog 8000 plus SW 5.n...
- Page 155 Y-piece by means of the pressure drop caused by the continuous flow in the breathing circuit. The bactericide section of pressure measurements (U) prevents contamination of the pressure absorber (V) with expiration gas. Instructions for use Babylog 8000 plus SW 5.n...
- Page 156 The patient can always breathe spontaneously. The following settings determine the parameters of the mechanical breath: – Flow determines the ramp insp – Inspiratory time T determines the duration – Inspiratory pressure Pinsp limits the pressure Instructions for use Babylog 8000 plus SW 5.n...
- Page 157 This effect of ventilating the breathing circuit occurs with any ventilator. The flow sensor in Babylog 8000 is located at the Y-piece in order to measure the tidal volume that is actually inhaled and exhaled. Instructions for use Babylog 8000 plus SW 5.n...
- Page 158 – The volume Vtrig (A) inhaled in the course of the spontaneous inspiration must correspond to a volume of at least the selected trigger sensitivity. – The inhaled volume Vtrig (A) must be inhaled until the end of T Instructions for use Babylog 8000 plus SW 5.n...
- Page 159 IPPV/IMV ventilation mode. Triggered mandatory breaths alternate with spontaneous breathing phases without support in which the patient must exert the entire work of breathing alone. By increasing T Instructions for use Babylog 8000 plus SW 5.n...
- Page 160 The effective inspiratory time is optimized for the patient. Breaths are triggered in the same way as in the SIPPV ventilation mode. Instructions for use Babylog 8000 plus SW 5.n...
- Page 161 Conversely, the pressure increases as compliance decreases, but only until the selected pressure limitation Pinsp. Fluctuations in spontaneous breathing are also compensated. The stronger the patient breathes, Instructions for use Babylog 8000 plus SW 5.n...
- Page 162 – In the CPAP ventilation mode, the pattern of manually triggered mechanical breaths can be set separately. A reduced expiratory flow can be used to save oxygen. Instructions for use Babylog 8000 plus SW 5.n...
- Page 163 IMV breaths. Mean airway pressure is somewhat higher than with high-frequency ventilation with CPAP due to the IMV breaths. However, during high-frequency phases, the pressure oscillates at the PEEP/CPAP level again. Instructions for use Babylog 8000 plus SW 5.n...
- Page 164 Tidal volume of the high-frequency pulses, averaged over multiple cycles MVim Minute volume applied by IMV breaths, measured on the inspiratory side VTim Tidal volume applied by IMV breaths, measured on the inspiratory side Instructions for use Babylog 8000 plus SW 5.n...
- Page 165 30 % to 70 %, there is a measurement error for the airway pressure. In the breathing circuits typically used, this error is less than 1 mbar (1 cmH O). In systems with very high Instructions for use Babylog 8000 plus SW 5.n...
- Page 166 1 represents high sensitivity and plus mean airway pressure 10 mbar (or 10 represents low sensitivity. hPa or cmH O), water-vapor-saturated The desired reference condition is set in the dialog window Calibration/Configuration > Sensor. Instructions for use Babylog 8000 plus SW 5.n...
- Page 167 One measure of conformity is the correlation coefficient r, a number between 0 and 1. The closer the correlation coefficient r is to 1, the better the conformity. Instructions for use Babylog 8000 plus SW 5.n...
- Page 168 Dennis R. Bing, Stephen J. Boros. Pediatric Karl L. Yang, Martin J. Tobin. The New England Journal Pulmonology, 5:10-14 (1988) of Medicine, Vol. 324, 21, 1991 Instructions for use Babylog 8000 plus SW 5.n...
- Page 169 Display unit ......29 Disconnecting ..... . . 113 Instructions for use Babylog 8000 plus SW 5.n...
- Page 170 Reprocessing..... . . 114 Non-invasive ventilation ....23 Instructions for use Babylog 8000 plus SW 5.n...
- Page 171 Ventilation functions ..... 23 Checking ......60 Instructions for use Babylog 8000 plus SW 5.n...
- Page 172 Printing ......79 Y-piece Attaching......46 Instructions for use Babylog 8000 plus SW 5.n...
- Page 173 This page intentionally left blank. Instructions for use Babylog 8000 plus SW 5.n...
- Page 174 These instructions for use only apply to Babylog 8000 plus SW 5.n with the Serial No.: If no serial number has been filled in by Dräger, these instructions for use are provided for general information only and are not intended for use with any specific medical device.