
Related Manuals for Fuji Xerox DocuCentre SC2020


Summary of Contents for Fuji Xerox DocuCentre SC2020
- Page 1 DocuCentre SC2020 User Guide...
- Page 2 As the copying machine contains a feature designed to prevent forging of certain documents, there may be rare instances where copies do not achieve the desired results. Fuji Xerox is not responsible for any breakdown of machines due to infection of computer virus or computer hacking.
-
Page 3: Table Of Contents
Table of Contents Table of Contents Before Using the Machine ........................9 Preface ................................... 10 Types of Manuals .............................. 11 Using This Guide..............................12 Organization of This Guide ........................12 Conventions..............................13 Safety Notes................................ 15 Electrical Safety ............................16 Machine Installation..........................17 Operational Safety ............................. - Page 4 Installing the Print Driver/Scan Driver.......................42 Installing the Print Driver .........................42 Installing the Scan Driver .........................42 Uninstalling ..............................42 Product Overview ............................45 Machine Components ............................46 Front, Left Side..............................46 Right Side, Rear.............................47 Inside ................................48 Duplex Automatic Document Feeder....................49 Power Source................................50 Switching the Power On ..........................50 Switching the Power Off ...........................50 Power Saver Modes ............................51 Entering Power Saver Modes ........................51...
- Page 5 Table of Contents Canceling the Current Copy Job......................77 Checking Job Status........................... 77 ID Card Copy............................... 78 Advanced Copy Settings..........................80 Output Color..............................81 Select Tray ..............................81 Reduce / Enlarge............................82 2 Sided Copying............................84 Lighten / Darken ............................84 Original Type..............................
- Page 6 Receiving a Fax Manually Using an External Telephone............112 Receiving Faxes Using the DRPD Mode................... 112 Receiving Faxes in the Memory ......................113 Other Ways to Fax ............................114 Using the Secure Receiving Mode...................... 114 Using an Answering Machine ......................116 Using a Computer Modem........................
- Page 7 Table of Contents Enabling the Panel Lock..........................200 Disabling the Panel Lock ........................202 Limiting Access to Copy, Fax, and Scan ....................204 Setting the Power Saver Option ........................207 About the Concurrent Jobs Feature......................209 Resetting to Factory Defaults ........................210 10 Machine Status .............................213 Checking Consumables ..........................214 Selecting Language ............................215 Checking the Machine’s IP Address ......................216...
- Page 8 Scan Problems ..............................262 Scan Driver/Printer Utility Problems......................264 Error Code................................265 Paper Jams................................. 272 Paper Jam in Left Side Cover [A] ......................272 Paper Jam in Left Side Cover [B] ......................273 Paper Jams in Trays 1 and 2 ........................ 274 Paper Jams in Tray 5 (bypass)......................
-
Page 9: Before Using The Machine
1 Before Using the Machine This chapter describes how to use this guide, as well as safety notes and legal notice you should read before using the machine. Preface .............................. 10 Types of Manuals.......................... 11 Using This Guide ........................... 12 Safety Notes ........................... -
Page 10: Preface
1 Before Using the Machine Preface Thank you for selecting the DocuCentre SC2020 (hereafter referred to as "the machine"). This guide describes how to operate the machine and the precautions you should follow during operation. To get the most out of the machine and to use it effectively, be sure to read this guide before use. -
Page 11: Types Of Manuals
Types of Manuals Types of Manuals The following guides are provided with the machine. Accompanying Manuals User Guide (this guide) (Driver CD Kit) The guide describes how to use the copy, print, fax and scan features as well as how to set the paper, perform everyday maintenance, make machine status settings, perform troubleshooting, and set up a network. -
Page 12: Using This Guide
1 Before Using the Machine Using This Guide This guide is intended for first time users of the machine. It describes the basic operations for the copy, fax, scan, and print features. Organization of This Guide This guide consists of the following chapters: 1 Before Using the Machine Describes how to use this guide and provides license information. -
Page 13: Conventions
Using This Guide 14 Appendix Describes the specifications of the machine, optional accessories, and cautions/restrictions. Conventions The screen shots and illustrations used in this guide vary depending on the machine configuration and optional components installed. Some of the items in the screen shots may not be displayed or available depending on your machine configuration. - Page 14 1 Before Using the Machine Portrait Orientation Landscape Orientation feed direction feed direction...
-
Page 15: Safety Notes
Any unauthorized alteration including an addition of new functions or connection to external devices may not be covered by the product warranty. Contact your local Fuji Xerox representative for more information. Follow all warning instructions marked on this product. The warning marks stand for the... -
Page 16: Electrical Safety
Plug the power cord directly into a grounded electrical outlet. To prevent overheat and a fire accident, do not use an extension cord, a multi-plug adaptor or a multiple connector. Consult your local Fuji Xerox representative to check if an outlet is grounded. -
Page 17: Machine Installation
Once you notice any unusual condition, switch off and unplug this product first and contact your local Fuji Xerox representative. Machine Installation Do not locate this product where people might step on or trip over the power cord. - Page 18 1 Before Using the Machine With Duplex Automatic Document Feeder With Duplex Automatic Document Feeder and One Tray Module 1101 1101 Unit; mm Unit; mm Do not incline the product at more than 10 degree angle. Otherwise, it may fall over and cause injuries.
-
Page 19: Operational Safety
To avoid the risk of electric shock and a fire accident, switch off and unplug the product promptly in the following conditions, then contact your local Fuji Xerox representative. The product emits smoke or its surface is unusually hot. -
Page 20: Consumable
1 Before Using the Machine If you need to pull out a tray to remove paper jam, contact your local Fuji Xerox representative. Do not pull out a tray, otherwise it may cause injuries. Never play the CD-ROM supplied with the product on an audio player. Always use a CD-ROM player. - Page 21 Safety Notes Never throw a waste toner bottle into an open flame. Toner may catch fire and cause burn injuries or explosion. If you have a used waste toner bottle no longer needed, contact your local Fuji Xerox representative for its disposal. Keep drum cartridges (or drum if not a cartridge type) and toner cartridges out of the reach of children.
-
Page 22: Location Of Warning And Caution Labels
1 Before Using the Machine Location of Warning and Caution Labels Always follow all warning instructions marked on or supplied with this product. To avoid the risk of burn injuries and electric shock, never touch the area with the "High Temperature" or "High Voltage" marks on. -
Page 23: Regulation
Changes and modifications to this product not specifically approved by Fuji Xerox may void the user's authority to operate this equipment. -
Page 24: About License
1 Before Using the Machine About License This section describes information about licenses. Be sure to read through it. JPEG Code Our printer software uses some of the codes defined by the Independent JPEG Group. Libcurl COPYRIGHT AND PERMISSION NOTICE Copyright (c) 1996 - 2006, Daniel Stenberg, <daniel@haxx.se>. -
Page 25: Wide Dhcp Client
About License THIS SOFTWARE IS PROVIDED BY THE FREEBSD PROJECT "AS IS" AND ANY EXPRESS OR IMPLIED WARRANTIES, INCLUDING, BUT NOT LIMITED TO, THE IMPLIED WARRANTIES OF MERCHANTABILITY AND FITNESS FOR A PARTICULAR PURPOSE ARE DISCLAIMED. IN NO EVENT SHALL THE FREEBSD PROJECT OR CONTRIBUTORS BE LIABLE FOR ANY DIRECT, INDIRECT, INCIDENTAL, SPECIAL, EXEMPLARY, OR CONSEQUENTIAL DAMAGES (INCLUDING, BUT NOT LIMITED TO, PROCUREMENT OF SUBSTITUTE GOODS OR SERVICES;... -
Page 26: Md5
1 Before Using the Machine Copyright (C) 1991-2, RSA Data Security, Inc. Created 1991. All rights reserved. License to copy and use this software is granted provided that it is identified as the "RSA Data Security, Inc. MD5 Message-Digest Algorithm" in all material mentioning or referencing this software or this function. -
Page 27: Math Library
About License package is highly portable C code; we have tested it on many machines ranging from PCs to Crays. We are releasing this software for both noncommercial and commercial use. Companies are welcome to use it as the basis for JPEG-related products. We do not ask a royalty, although we do ask for an acknowledgement in product literature (see the README file in the distribution for details). -
Page 28: Legal Notice
1 Before Using the Machine Legal Notice Copying or printing certain documents may be illegal in your country. Penalties of fines or imprisonment may be imposed on those found guilty. The following are examples of items that may be illegal to copy or print in your country. Currency Banknotes and checks Bank and government bonds and securities... -
Page 29: Environment Settings
2 Environment Settings This chapter describes the machine's operating environment. Note • For information on optional components required to make some settings in this chapter, contact our Customer Support Center. Supported Environment ......................30 Interface Cables ..........................32 Setting the Network Environment ..................34 Activating the Communication Port To Use .............. -
Page 30: Supported Environment
2 Environment Settings Supported Environment This section describes the environment settings needed to use the machine's print, scan and fax features. Print Feature The machine can be connected directly to a computer for use as a local printer, or can be connected to a network for use as a network printer. -
Page 31: Fax Feature
Supported Environment Using the Network connection Scan to E-mail Uses the SMTP protocol to send the document scanned by the machine as an e-mail attachment. For information on how to use this feature, refer to "Sending an E-mail With the Scanned File" (P.140). Scan to PC (Network) Uses the FTP or SMB protocol to save the document scanned by the machine in a common folder created on a network PC. -
Page 32: Interface Cables
2 Environment Settings Interface Cables When connecting the machine directly to a computer, use a USB interface. When connecting the machine to a network, use an Ethernet interface. Using the USB Interface The machine supports the USB 2.0 interface. To connect the USB interface: Press the power switch to the [ ] position to turn the power OFF. - Page 33 Interface Cables Press the power switch to the [ ] position to turn the power OFF. Note • Make sure that the display is turned off. Connect a network cable to the Ethernet port. Note • Prepare a network cable suitable for your network connection.
-
Page 34: Setting The Network Environment
2 Environment Settings Setting the Network Environment This section describes how to make the settings needed to use the TCP/IP protocol. Note • The machine supports IPv6 addresses in an IPv6 network environment. For more information, refer to "Setting the Machine's IP Address (IPv6)" (P.35). Setting the Machine's IP Address (IPv4) To use the TCP/IP protocol, you must set the machine's IP address. -
Page 35: Setting The Machine's Ip Address (Ipv6)
Setting the Network Environment If the machine's IP address has not been set, set the IP address by using the Printer Setup Utility for Setting IP Address included in the Driver CD Kit, using the control panel to change the [Get IP Address] setting to [Panel], or using CentreWare Internet Services. Printer Setup Utility for Setting IP Address Control Panel CentreWare Internet Services... -
Page 36: When Using The Printer Setup Utility For Setting The Ip Address
2 Environment Settings For information on how to check on the [About This MFP] screen, refer to "Checking the Machine’s IP Address" (P.216). For information on how to check using CentreWare Internet Services, refer to the online Help of CentreWare Internet Services. - Page 37 Setting the Network Environment Make sure that the network cable is connected to the machine, and then click [Next]. As a list of available IP addresses and Mac addresses appears, select the machine and click [Next]. If you already have the IP address of the machine, click [Enter IP Address] and directly enter the IP address on the displayed window.
- Page 38 2 Environment Settings After confirming information displayed, click [Apply]. The specified settings are applied. Click [Finish] to exit the Printer Setup Utility for Setting IP Address. When the settings are properly configured, the machine reboots automatically. Confirm the assigned IP address after completing the setting process by one of the following methods.
-
Page 39: Activating The Communication Port To Use
Activating the Communication Port To Use Activating the Communication Port To Use Use CentreWare Internet Services to activate the communication port you want to use. You can activate the following ports: Port Description Select [Enabled] to use the LPD port. Port9100 Select [Enabled] to use the Port9100 port. -
Page 40: Using Centreware Internet Services
2 Environment Settings Using CentreWare Internet Services CentreWare Internet Services CentreWare Internet Services provides services such as changing settings using a web browser on a computer connected to a TCP/IP network environment. For more information on how to use CentreWare Internet Services, refer to the online HELP of CentreWare Internet Services. -
Page 41: Starting Centreware Internet Services
Using CentreWare Internet Services The following procedure is based on the Internet Explorer 6.0. From the [Tools] menu, select [Internet Options]. In the [General] tab, click [Settings] under [Temporary Internet Files]. In the [Settings] dialog box, select [Check for newer versions of stored pages:]. Select [Every visit to the page] or [Every time you start Internet Explorer]. -
Page 42: Installing The Print Driver/Scan Driver
The CD-ROM contains the following print driver. Print Driver Name Description FX DocuCentre SC2020 Click [Print/Fax Driver] in the [Main] menu of the Driver CD Kit to start installation. The standard print driver converts the data created by the application software to images before sending them to the printer. - Page 43 Installing the Print Driver/Scan Driver Uninstalling Other Software To uninstall other software installed from the Driver CD Kit CD-ROM, see the application's Readme file. Readme files can be displayed from the "Product Information (HTML)" on the CD-ROM.
- Page 44 2 Environment Settings...
-
Page 45: Product Overview
3 Product Overview This chapter lists the name of each machine component, and describes basic operations such as how to turn the power ON/OFF and use the control panel. Machine Components......................... 46 Power Source ..........................50 Power Saver Modes ........................51 Control Panel .......................... -
Page 46: Machine Components
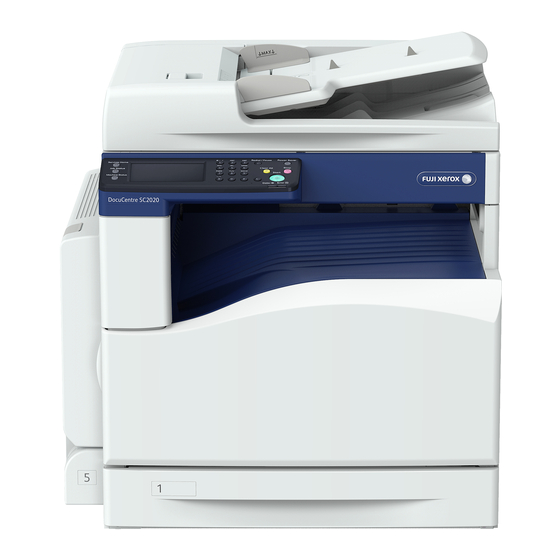
3 Product Overview Machine Components This section describes the machine components and their functions. Front, Left Side Component Description Document glass cover Holds document in place. Document glass Place document here. Control panel Contains the buttons, the LED indicators, and the touch screen used for operations. -
Page 47: Right Side, Rear
Machine Components Right Side, Rear Component Description Ethernet Port Connect a network cable. USB Port Connect a USB 2.0 cable. Power switch Switches the power of the machine on and off. For more information, refer to "Power Source" (P.50). Power cord connector Connects the power cord. -
Page 48: Inside
3 Product Overview Inside Component Description Yellow toner [Y] cartridge Contains yellow toner (the powder used to form the image). Magenta toner [M] cartridge Contains magenta toner (the powder used to form the image). Cyan toner [C] cartridge Contains cyan toner (the powder used to form the image). Black toner [K] cartridge Contains black toner (the powder used to form the image). -
Page 49: Duplex Automatic Document Feeder
Machine Components Duplex Automatic Document Feeder Component Description Document feeder top cover Open this cover to remove any jammed paper. Inner cover Open this cover to remove any jammed paper. Document guides Aligns the edges of documents. Document feeder tray Load documents here. -
Page 50: Power Source
3 Product Overview Power Source Switching the Power On The following describes how to switch the power on. The machine takes approximately 26 seconds or less to warm up and to be ready to copy, print, or fax after the power is turned on. It may take slightly longer than normal depending on the device configuration. -
Page 51: Power Saver Modes
Power Saver Modes Power Saver Modes The machine is installed with the Power Saver function that will automatically cut off the electricity to the machine if no copy or print data is received for a certain duration. There are two Power Saver modes: Low Power mode and Sleep mode. Low Power Mode The machine's power is not turned OFF completely in Low Power mode. -
Page 52: Control Panel
3 Product Overview Control Panel The names and functions of the control panel's components are described below. Redial/Pause Power Saver Services Home Job Status Clear All Stop Start Machine Status Error Data Component Function Touch Screen Displays the operation menu items and the machine status messages. Numeric keypad Press these buttons to enter numbers (such as number of copies) or text. -
Page 53: Touch Screen - Services Home Screen
Control Panel Touch Screen - Services Home Screen This section describes the fields and buttons on the Services Home screen which is displayed by pressing the <Services Home> button. Message Field Toner Status Icon Function Buttons Message Field Displays the printer status, error message, and IP address assigned to the printer. Toner Status Icon Displays the condition of toner in six levels. -
Page 54: Auditron
3 Product Overview Auditron Auditron contains an authentication function that can set limits on what processes can be used, as well as an account management that can be used to control usage based on authentication. The following illustration shows how the machine works with Print Auditron. You can also limit the copy function by using Copy Auditron. -
Page 55: Entering Characters
Entering Characters Entering Characters This section describes how to use the keyboard displayed on the control panel and the number pad. Using the Keyboard Displayed on the Control Panel During operations, a screen for entering text sometimes appears. The following describes how to enter text. -
Page 56: Setting The Options Configuration
The following procedure uses Windows 7 and PCL 6 driver as an example. The procedure differs depending on the OS and the print driver. Select [Start] > [Devices and Printers]. Right-click the printer icon of the DocuCentre SC2020 and select [Printer properties]. Click the [Configuration] tab. Click [Bi-Directional Setup]. - Page 57 Setting the Options Configuration Click [Get Information from Printer]. If [Printer Searching Method] is displayed The machine's information is not loaded onto the print driver. Complete the following operations. 1) Select [Specify Address], and click [Next]. 2) Enter the printer name or IP Address in the [Printer Name or IP Address] field.
-
Page 58: Cooling Mode
3 Product Overview Cooling Mode The machine enters the Cooling mode if its internal temperature rises too high. During this mode, either of the following screen is displayed on the touch screen. Screen A Screen B This screen disappears when the internal temperature has cooled down. Wait until the screen disappears. -
Page 59: Loading Paper
4 Loading Paper This chapter describes the paper that can be used with the machine, precautions when handling paper, and how to load paper in trays. Paper Types............................. 60 Loading Paper ..........................64 Changing Paper Size........................67 Changing the Paper Settings ....................69... -
Page 60: Paper Types
Use of non-recommended paper types may result in paper jams, lower print quality, malfunctions, or damage to the machine. To achieve optimum machine performance, use only paper types recommended by Fuji Xerox. If you desire to use paper other than the paper recommended by Fuji Xerox, contact our Customer Support Center. WARNING Do not use conductive paper such as origami paper, carbonic paper or conductively-coated paper. -
Page 61: Supported Paper Type
Paper Types Duplexing (two-sided printing) The following paper types support automatic duplexing: Paper Type (Quality) Plain (60 - 89 gsm) Bond (90-105 gsm) Heavyweight (106-169 gsm) Supported Paper Type Standard Paper When printing or copying on commonly used paper (plain paper), use paper meeting the standards described below. -
Page 62: Usable Paper
4 Loading Paper Basis Weight Paper Name Paper Type Notes / Countermeasure (gsm) Professional Plain Do not keep the paper unsealed in a high-humidity condition. Plain Before copying or printing, fan the stack of paper well and reload it in the tray. Usable Paper In addition to the standard/semi-standard paper, the following paper also can be used. -
Page 63: Unusable Paper
Paper Types Unusable Paper Using paper not recommended by Fuji Xerox may cause a paper jam or machine malfunction. Use paper recommended by Fuji Xerox. Damp or wet paper Paper pre-printed with other printer or copying machine Wrinkled, creased, or ripped paper... -
Page 64: Loading Paper
4 Loading Paper Loading Paper This section describes how to load paper in a paper tray. Types of paper loaded in trays The machine automatically detects the size and orientation of paper loaded in a tray, but the paper type must be set manually. Each tray's default paper type setting is Plain paper. Change the paper type setting when loading a different type of paper. -
Page 65: Loading Paper In Tray 5 (Bypass)
Loading Paper Important • While the machine is copying or printing, do not pull out the tray that the job uses. • To prevent paper jams or loading errors, do not load different sizes or types of paper on top of any remaining paper in a tray. - Page 66 4 Loading Paper Load paper with the side to be copied or printed on facing down, inserting paper until its edge lightly touches against the paper feed entrance. Important • Do not load mixed paper types in a tray. • Do not load paper above the maximum fill line. It may cause paper jams or machine malfunctions.
-
Page 67: Changing Paper Size
Changing Paper Size Changing Paper Size This section describes how to change paper size in Trays 1 and 2. Important • Do not load mixed paper sizes into a tray. Note • A paper type is preset for Trays 1 and 2. Normally, [Plain] is set for the trays. When changing it to a different paper type, change the paper quality settings to match the type of paper to be loaded so that you can maintain high quality printing. - Page 68 4 Loading Paper Load paper with the side to copy or print on facing up. Align the leading edge of paper with the left side of the tray. Important • Do not load paper above the maximum fill line. It may cause paper jams or machine malfunctions.
-
Page 69: Changing The Paper Settings
Changing the Paper Settings Changing the Paper Settings This section describes how to change the paper type setting for a tray. A paper type is preset for Trays 1 and 2. Normally, [Plain] is set for the trays. To maintain the same print quality after changing paper in a different quality in the same tray, you need to change the paper quality setting for the tray that matches new paper loaded. - Page 70 4 Loading Paper Select [Type], and then select the desired paper type. Note • If you select Tray 5 (bypass), [Size] and [Type] are displayed. To change the paper size, select [Size]. To use a non-standard document size, set [Size] to [Custom Size], and then specify the paper size.
-
Page 71: Copy
5 Copy This chapter describes the Copy functions and operations. Overview of Copy Operations ....................72 Operations Performed While Copying.................. 77 ID Card Copy ..........................78 Advanced Copy Settings ......................80... -
Page 72: Overview Of Copy Operations
5 Copy Overview of Copy Operations This section describes the basic flow of copy operations including placing document in the machine and making advanced settings. Placing Document The following two methods are available to place document: Document feeder Single sheet Multiple sheets Document glass Single sheet... -
Page 73: Document Glass
Overview of Copy Operations Place the document in the center of the document feeder, with the side to be scanned (or the front surface of a 2 sided document) facing Align the document guides to each side of document. Open the document stopper. Document Glass Document sizes supporting automatic detection The document size is detected automatically when [Original Size] is set to [Auto]. -
Page 74: Making Advanced Settings
5 Copy Follow the steps below to place document on the document glass. You can place a single sheet document or bound document such as book on the document glass. Open the document glass cover. Important • When using the document glass, make sure to close the document glass cover after finishing your copy job. -
Page 75: Entering The Number Of Copies
Overview of Copy Operations Select [Copy]. Make advanced settings as needed. Refer to "Advanced Copy Settings" (P.80). Entering the Number of Copies You can enter a value between 1 and 999 for the number of copies. Use the numeric keypad to enter the desired Numeric keypad number of copies. -
Page 76: Starting The Copy Job
5 Copy Starting the Copy Job Press the <Start> button. <Start> button Important • If document is placed in the document feeder, do not press down on the document while it is Redial/Pause Power Saver being fed through the machine. Clear All Stop Note... -
Page 77: Operations Performed While Copying
Operations Performed While Copying Operations Performed While Copying While the machine is copying, you can cancel the currently executing job, and check or cancel pending jobs. Canceling the Current Copy Job To cancel the currently executing copy job: Press the <Stop> button. <Stop>... -
Page 78: Id Card Copy
5 Copy ID Card Copy You can copy both sides of an ID card (name card, employee card, etc.) on one side of paper. Select [ID Card Copy] to use this feature. Original document Original orientation Copied output Front side Front side Back side Back side... - Page 79 ID Card Copy Press the <Start> button. <Start> button Redial/Pause Power Saver Clear All Stop Start Error Data To continue scanning the other side of the ID card, place the other side of the ID card face down slightly away from the top left corner of the document glass, and then close the document glass cover.
-
Page 80: Advanced Copy Settings
5 Copy Advanced Copy Settings This section describes the advanced functions available for Copy feature. Setting Item Purpose Page: Copy Output Color To select the mode for color or black and P.81 white copying. Select Tray To select a tray. P.81 Reduce / Enlarge To reduce or enlarge the size of a copied... -
Page 81: Output Color
Advanced Copy Settings Select [Copy]. Select the desired setting item as needed. Output Color To select the mode for color or black and white copying. Select [Output Color] on the [Copy] tab. Select [Full Color] or [Black & White], and then select [OK]. -
Page 82: Reduce / Enlarge
5 Copy Select the desired setting, and then select [OK]. Note • Bold values are the factory default menu settings. Auto The paper is fed from an automatically selected tray. Tray5 (Bypass) The paper is fed from the Tray 5 (bypass). Tray 1 The paper is fed from Tray 1. - Page 83 Advanced Copy Settings A4, B4 A4, B5 B4, A4 115% A3, B5 122% B4, A5 141% A3, B5 200% inch series 100% Auto% 8.5 x 11" 5.5 x 8.5" A4, B4 8.5 x 14" 8.5 x 11" 11 x 17", A4 8.5 ×...
-
Page 84: Sided Copying
5 Copy 2 Sided Copying To make duplex copies with the specified binding position. Select [2 Sided Copying] on the [Copy] tab. Select the desired setting, and then select [OK]. Note • Bold values are the factory default menu settings. Select 1-sided or 2-sided and 1 Sided specify binding position for the 2-... -
Page 85: Original Type
Advanced Copy Settings Select the desired level on the [Lighten / Darken] bar, and then select [OK]. You can select a contrast level from seven levels between [Darken] and [Lighten]. Selecting a cell on the left side of the bar makes the document contrast darker, and selecting a cell on the right side of the bar makes the document contrast lighter. -
Page 86: Saturation
5 Copy Select the [Quality] tab, and then select [Sharpness]. Select the desired setting, and then select [OK]. Note • Bold values are the factory default menu settings. Sharpen Makes the copy image sharper than the original. Normal The color clarity of the image is the same as the original. Soften Makes the copy image softer than the original. -
Page 87: Auto Background Suppression
Advanced Copy Settings Auto Background Suppression To suppress the background of the original to enhance text on the copy. Select the [Quality] tab, and then select [Auto Background Suppression]. Select [On], and then select [OK]. Collation To sort the copy output. For example, if you make two copies of three page documents, one complete three page document will be printed followed by the second complete document. -
Page 88: Original Size
5 Copy When you are using the document glass and it is set to [Collated], the display prompts you for another page after pressing the <Start> button. 1) If you want to place a new document, replace the document with a new document, and then select [Continue] or press the <Start>... -
Page 89: Pages Per Side
Advanced Copy Settings Letter (8.5 x 11") Letter (8.5 x 11") inch series Auto Tabloid (11 x 17") Legal (8.5 x 14") Folio (8.5 x 13") Letter (8.5 x 11") Letter (8.5 x 11") A3 (297 x 420 mm) B4 (257 x 364 mm) A4 (297 x 210 mm) A4 (210 x 297 mm) B5 (257 x 182 mm) -
Page 90: Edge Erase
5 Copy Note • Bold values are the factory default menu settings. Does not perform Pages Per Side printing. 2-Up Automatically reduces the original pages to fit onto one sheet of paper. Edge Erase To specify the top and bottom margins of the copy. Note •... -
Page 91: Fax
6 Fax This chapter describes the Fax functions. Note • This feature is available when the Fax Kit is (optional) installed. Overview of Fax Operations ..................... 92 Operations during Faxing (Sending)..................97 Operations during Faxing (Receiving) .................. 98 Advanced Fax Settings ....................... 99 Sending a Fax Manually...................... -
Page 92: Overview Of Fax Operations
6 Fax Overview of Fax Operations This section describes the basic flow of fax operations including placing document in the machine, setting the recipient address, and making advanced settings. Important • You must set the [Region] and [Date & Time] items to use the Fax feature. For more information, refer to "Region"... - Page 93 Overview of Fax Operations Follow the steps below to place document in the document feeder. You can place a single or multiple pages of a document. Remove any paper clips or staples from document before placing it in the document feeder.
-
Page 94: Specifying The Recipient
6 Fax Follow the steps below to place a document on the document glass. You can place a single sheet document or bound document such as book on the document glass. Open the document glass cover. Important • When using the document glass, make sure to close the document glass cover after finishing your copy job. -
Page 95: Making Advanced Settings
Overview of Fax Operations 1) Use the numeric keypad to enter the fax recipient's number. Note • To delete the entered numbers, press the <C> (Clear) button. • You can enter fax numbers of up to 50 digits in length. Using the Speed Dial function To specify the fax recipient by entering a Speed Dial number (001 to 200) registered in the address book:... -
Page 96: Starting The Fax Job
6 Fax Make advanced settings as needed. Example: Settings in the [Options] tab For more information on advanced settings, refer to "Advanced Fax Settings" (P.99). Starting the Fax Job Press the <Start> button. <Start> button Important • If the document is placed in the document feeder, do not press down on the document Redial/Pause Power Saver... -
Page 97: Operations During Faxing (Sending)
Operations during Faxing (Sending) Operations during Faxing (Sending) You can cancel the fax currently being sent, and check or cancel pending jobs. Canceling the Fax Being Sent To cancel the fax currently being sent: Press the <Stop> button. <Stop> button Redial/Pause Power Saver Clear All... -
Page 98: Operations During Faxing (Receiving)
6 Fax Operations during Faxing (Receiving) You can cancel the fax currently being received. Canceling the Fax Being Received To cancel the fax currently being received. Press the <Stop> button. <Stop> button Redial/Pause Power Saver Clear All Stop Start Error Data Select the fax job that you want to cancel, and then select [Delete]. -
Page 99: Advanced Fax Settings
Advanced Fax Settings Advanced Fax Settings This section describes the advanced functions available for Fax feature. Setting Item Purpose Page: Lighten / Darken To adjust the contrast to make the copy P.100 lighter or darker than the original. Resolution To set the scan resolution. P.100 OnHook To send or receive faxes manually. -
Page 100: Lighten/Darken
6 Fax Lighten/Darken You can set the density from seven levels. Select [Lighten/Darken] on the [Fax] tab. Select the density level, and then click [OK]. Darken +1, +2, and +3 Creates copies with a dark density. Use this setting to scan document containing light objects. Normal Creates copies with the same density as document. -
Page 101: Onhook
Advanced Fax Settings Note • Faxes scanned in the Super Fine mode transmit at the highest resolution supported by the receiving device. Photo Suitable for documents containing photographic images. OnHook Use this function to send or receive faxes manually. For information on how to send a fax manually, refer to "Sending a Fax Manually" (P.105). For information on how to receive a fax manually, refer to "Receiving a Fax Manually in the TEL Mode"... -
Page 102: Delayed Send
6 Fax Select the [Options] tab, and then select [Original Size]. Select the document size, and then select [OK]. Auto If document is a standard size, the machine detects the document size automatically. The paper size used for sending the fax is determined by the detected document size. -
Page 103: Polling Receive
Advanced Fax Settings Select the [Options] tab, and then select [Delayed Send]. Select [On]. Note • Select [Off] to disable this function. Use the numeric keypad to enter the time, and then select [OK]. Polling Receive You can receive faxes from the remote fax machine when you want to receive it. Select the [Options] tab, and then select [Polling Receive]. - Page 104 6 Fax Select the [Options] tab, and then select [Cover Page]. Select [On], and then select [OK].
-
Page 105: Sending A Fax Manually
Sending a Fax Manually Sending a Fax Manually This section describes how to send a fax manually. Place document in the machine. Press the <Services Home> button. <Services Home> button Services Home Job Status Machine Status Select [Fax]. Adjust the document resolution to suit your fax needs. -
Page 106: Sending A Delayed Fax
6 Fax Sending a Delayed Fax The Delayed Start mode can be used to save scanned documents for transmission at a specified time to take advantage of lower long distance rates. Place document in the machine. Press the <Services Home> button. <Services Home>... - Page 107 Sending a Delayed Fax Enter the start time using the number pad, and then select [OK]. Select the [Fax] tab. Enter the fax number of the recipient using the number pad. You can also use speed or group dial numbers. Press the <Start>...
-
Page 108: Sending A Fax From The Driver (Direct Fax)
Driver CD Kit on the Mac OS X, and then open the [MacOSX] folder. Open either the [10.5-] folder depending on the version of Mac OS X you are running. Double-click [FX DocuCentre SC2020.dmg], and then follow the on-screen instructions to install the fax driver. - Page 109 Sending a Fax from the Driver (Direct Fax) For Mac OS X: For Windows, click [OK] to close the [Printing Preferences] dialog box, and then click [Print]. The [Recipient Setting] dialog box appears. For Mac OS X, click [Print]. The [Set / Check Fax Transmission] dialog box appears. For Windows: For Mac OS X:...
- Page 110 6 Fax Specify the destination for the recipient in one of the following ways. For more information on how to specify the destination, refer to the Help of the driver. 1) Enter the name and fax number directly. 2) Select a fax number from the address book. Look Up Address Book: Displays a list of fax numbers that are saved in the file specified for [My Address Book file].
-
Page 111: Receiving A Fax
Receiving a Fax Receiving a Fax This section describes the fax receiving modes and the other ways to receive a fax. About Receiving Modes Note • To use the TEL/FAX Mode or Ans/FAX Mode, connect an external telephone or answering machine to the TEL connector on the rear of the machine. -
Page 112: Receiving A Fax Manually Using An External Telephone
6 Fax Receiving a Fax Manually Using an External Telephone This feature works best when you are using an external telephone connected to the TEL connector on the rear of the machine. You can receive a fax from someone you are talking to on the external telephone without having to go to the machine. -
Page 113: Receiving Faxes In The Memory
Receiving a Fax Select [Fax Line Settings]. Select [ ] until [DRPD Pattern] appears, and then select [DRPD Pattern]. Select the desired pattern, and then select [OK]. Reboot the machine by turning the power switch off and then on again. Receiving Faxes in the Memory Since the machine is a multi-tasking device, it can receive faxes while you are making copies or printing. -
Page 114: Other Ways To Fax
6 Fax Other Ways to Fax This section describes how to use the secure receiving mode, an answering machine, and a computer modem. Using the Secure Receiving Mode You may need to prevent your received faxes from being accessed by unauthorized people. You can turn on the secure fax mode using the [Secure Receive] option to restrict printing out all of the received faxes when the machine is unattended. - Page 115 Other Ways to Fax Select [Secure Receive]. Select [Secure Receive Set]. Select [Enable], and then select [OK]. Enter a four-digit password using the number pad, and then select [OK]. To return to the top level of the System menu, press the <Clear All> button. When a fax is received in the secure receiving mode, the machine stores it into memory and the [Active Jobs] screen displays [Secure Receive] to...
-
Page 116: Using An Answering Machine
6 Fax Select [Secure Fax Receive]. Enter the passcode, and then select [OK]. The faxes stored in memory are printed. To turn the secure receiving mode off: Access the [Secure Receive Set] menu by following steps from 1 to 6 in "To turn the secure receiving mode on:"... -
Page 117: Using A Computer Modem
Other Ways to Fax If you answer the call and hear fax tones, the machine will answer the fax call if you Select [Manual Receive] in [OnHook] (you can hear voice or fax tones from the remote machine), and then press the <Start> button and hang up the receiver. Press the two-digit remote receive code and hang up the receiver. -
Page 118: Fax Activity Report
6 Fax Fax Activity Report Fax Activity Report lets you check whether fax send and receive operations ended normally. For each fax sent or received, the reports record the sender or recipient name and the transmission result/status. For information on how to print the Fax Activity Report, refer to "Printing Reports/Lists" (P.218). Item Description Sent... - Page 119 Fax Activity Report Item Description Received The serial number of each incoming fax. Job# A document number appended automatically when the fax job is received. Remote The sender's information, in the following priority order: Terminal 1. Remote ID 2. Communication mode Remote ID is the sender's phone number.
- Page 120 6 Fax...
-
Page 121: Scan
7 Scan This chapter describes the print function. Scanning Procedure ........................122 Scanning to a Computer ......................126 Using a Scanner on the Network..................130 Sending an E-Mail With the Scanned Image ..............139 Operations during Scanning....................142 Advanced Scanner Settings ....................143... -
Page 122: Scanning Procedure
7 Scan Scanning Procedure This section describes the basic flow of scan operations including placing document in the machine and making advanced settings. Placing the Document The following two methods are available to load documents: Document feeder Single sheet Multiple sheets Document glass Single sheet Bound documents, such as books... - Page 123 Scanning Procedure Important • To avoid paper jams, use the document glass for mixed size, folded, wrinkled, cut-and-pasted documents, curled paper, or carbon-backed paper. If you can flatten the curled document, you can use the document. Follow the steps below to place document on the document feeder. You can place a single or multiple pages of a document.
-
Page 124: Using The Scan Feature
7 Scan Selectable document sizes in the scan driver A3 (297 × 420 mm), A4 (210 × 297 mm), A5 (148 × 210 mm), B4 (257 × 364 mm), B5 (182 × 257 mm), 8.5 × 11", 8.5 × 14", 11 × 17", 7.25 × 10.5", and Custom. CAUTION Do not apply excessive force to hold thick document on the document glass. - Page 125 Scanning Procedure Note • The file name of the scanned data is displayed in the format [YYMMDDHHMMSS.extension]. Here, YY = Year (4 digits), MM = Month (2 digits), DD = Day (2 digits), HH = Hour (2 digits), MM = Minutes (2 digits), and SS = Seconds (2 digits).
-
Page 126: Scanning From Control Panel (Wsd Scan)
7 Scan Scanning to a Computer This section describes how to scan document to a computer. Scanning From the Control Panel - WSD Scan If the machine is connected to a computer via network using WSD (Web Services on Devices), you can use the WSD Scan function to send scanned images to a computer. The following procedure uses Windows 7 as an example. -
Page 127: Scanning Using The Twain Driver
Scanning to a Computer Scanning Using the TWAIN Driver The machine supports the TWAIN driver for scanning images. The following procedure uses Windows 7 as an example. The procedure differs depending on the OS and Microsoft Office version. Note • Ensure that the machine is connected to the computer via the USB cable. The following procedure to scan an image uses Clip Organizer as an example. - Page 128 Click [Paint] > [From scanner or camera] (Click [File] > [From Scanner or Camera] for Windows XP, Windows Server 2003, Windows Server 2008 and Windows Vista). The [Scan using FX DocuCentre SC2020 (WIA - USB)] window appears. Note • The illustration may vary for different operating systems.
- Page 129 Scanning to a Computer Click [Next] to start scanning. Follow the on-screen instructions to edit the picture after it is copied to your computer.
-
Page 130: Using A Scanner On The Network
7 Scan Using a Scanner on the Network This section describes how to use a scanner on the network. Note • This feature does not require a network scan driver. Overview The Scan to Server/Computer feature allows you to scan documents and send the scanned document to a network computer via the FTP or SMB protocol. -
Page 131: Setting A Login Name And A Password (Smb Only)
Using a Scanner on the Network • Windows Server 2003 FTP service of Microsoft Internet Information Services 6.0 • Windows Vista, Windows Server 2008 FTP service of Microsoft Internet Information Services 7.0 • Windows 7, Windows Server 2008 R2 FTP service of Microsoft Internet Information Services 7.5 •... - Page 132 7 Scan Create a folder in the desired directory on your computer (Example of folder name: MyShare). Right-click the folder, and then select [Properties]. Click the [Sharing] tab, and then click [Advanced Sharing]. For Windows Vista, when the [User Account Control] dialog box appears, click [Continue]. Select the [Share this folder] check box.
-
Page 133: Setting A Destination Using An Address Book
Using a Scanner on the Network Note • Do not use [Everyone] as the user login name. Click [OK]. Click [OK] to exit the [Advanced Sharing] dialog box. Click [Close]. Note • To add sub-folders, create new folders in the shared folder you have created. Example: Folder name: MyShare, Second-level folder name: MyPic, Third-level folder name: John You should now see MyShare\MyPic\John in your directory. - Page 134 7 Scan Note • The default user name is "11111", and the default password is "x-admin". Under [Network Scan (Comp./Serv.)], click [Computer/Server Address Book]. Select any unused number and click [Add]. The [Add Network Scan Address] page appears.
- Page 135 Using a Scanner on the Network To fill in the fields, enter the information as follows: Name (Displayed Enter a friendly name that you want it to appear on the [Computer/ on Printer) Server Address Book]. Server Type Select [Computer (SMB)] if you store the document in a shared folder of your computer.
- Page 136 7 Scan Click [Start] > [All Programs] > [Fuji Xerox] > [DocuCentre SC2020] > [Address Book Editor]. The [Select Device] window appears. Note • If the [Address Book Editor] window appears, go to step 4. Select your printer from the list.
-
Page 137: Sending The Scanned File On The Network
Using a Scanner on the Network Computer Settings Clicking this button opens the wizard screen which guides you wizard through several steps. When you complete the steps in the wizard, the settings for [Server Address] are automatically configured. Server Name / IP Enter a server name or IP address of your computer or the FTP server Address that you have shared out. - Page 138 7 Scan Select [Scan to]. Select [Network]. Select [ ] until the desired address appears and then select that address. Select [OK]. Specify scan options such as [Output Color], [Resolution], [2 Sided Scanning], and [File Format] on the [Scan to Network], [Quality] and [Options] tabs. For more information, refer to "File Format"...
-
Page 139: Sending An E-Mail With The Scanned Image
Sending an E-Mail With the Scanned Image Sending an E-Mail With the Scanned Image To send an e-mail attached with the scanned image from the machine, follow the steps below: Setup the E-mail address book through CentreWare Internet Services. For more information, refer to "Registering a New E-Mail Address"... -
Page 140: Sending An E-Mail With The Scanned File
7 Scan If user name and password are required, enter the correct user name and password. Note • The default user name is "11111", and the default password is "x-admin". Click [Email Address Book]. Select any unused number and click [Add]. The [Add Email Address] page appears. - Page 141 Sending an E-Mail With the Scanned Image Specify a recipient from the following, and then select [OK]: [New Recipient]: Enter an e-mail address directly. [Address Book]: Select from the following types of address books: [Device Address Book - Individuals]: Select an e-mail address registered in the address book.
-
Page 142: Operations During Scanning
7 Scan Operations during Scanning While the machine is scanning document, you can cancel the currently executing job, and check or cancel the pending jobs. Canceling the Current Scan Job To cancel the currently scanning job: On the machine Press the <Stop> button. <Stop>... -
Page 143: Advanced Scanner Settings
Advanced Scanner Settings Advanced Scanner Settings This section describes the advanced functions available for Scan feature. For more information on the setting values, refer to "Scan Defaults" (P.187). Scan to E-mail Setting Item Purpose Page: Quality Output Color To select the mode for color or black and "Output white scanning. - Page 144 7 Scan Scan To Network Setting Item Purpose Page: Scan To Output Color To select the mode for color or black and "Output Network white scanning. Color" (P.188) Resolution To adjust the resolution of the scanned "Resolutio image. n" (P.188) File Format To specify the file format.
-
Page 145: Print
8 Print This chapter describes how to print using the print driver. Major Print Driver Functions....................146 Printing............................147 Operations during Printing..................... 148... -
Page 146: Major Print Driver Functions
8 Print Major Print Driver Functions This section describes the major print driver functions used for printing. The print driver must be installed before use. For information on how to install the print driver, refer to "Installing the Print Driver/Scan Driver" (P.42). Note •... -
Page 147: Printing
The procedure used to print will vary according to the application you are using. See your application's manual for the specific procedure. The steps below are the operation used for the [FX DocuCentre SC2020] print driver screen. Select [Print] from the application's [File] menu. -
Page 148: Operations During Printing
8 Print Operations during Printing You can cancel the currently printing job. Stopping the Print Job To cancel the currently printing job: On the machine Press the <Stop> button, or select [Delete] on the <Stop> button touch screen. Redial/Pause Power Saver Clear All Stop Start... -
Page 149: Tools
9 Tools Each function is set to the factory default (initial) settings, but you can customize these settings to match your operating environment. You can change the settings in [Tools]. Note • Some settings cannot be displayed on some models. An optional component is required. For more information, contact our Customer Support Center. -
Page 150: Understanding The Machine Menus
9 Tools Understanding the Machine Menus When the machine is connected to a network and available to a number of users, the access to the [Admin Settings] can be limited. This prevents other users from using the control panel to inadvertently change a user default that has been set by the administrator. However, you can use your print driver to override user defaults and select settings for individual print jobs. -
Page 151: Billing Meters
Understanding the Machine Menus Fax Address Book Purpose: To print the list of all fax addresses stored as Fax Address Book information. Email Address Book Purpose: To print the list of all e-mail addresses stored as Email Address Book information. Server Address Purpose: To print the list of all server addresses stored as Server Address information. -
Page 152: Pcl Settings
9 Tools To create a group of fax destinations and register it under a two-digit dial code. Up to six group dial codes can be registered. PCL Settings Use the [PCL Settings] menu to change machine settings that only affect jobs using the PCL emulation printer language. - Page 153 Understanding the Machine Menus inch series Tabloid (11 x 17") Legal (8.5 x 14") Folio (8.5 x 13") Letter (8.5 x 11") A3 (297 x 420 mm) B4 (257 x 364 mm) A4 (210 x 297 mm) B5 (182 x 257 mm) A5 (148 x 210 mm) 8K (270 x 390 mm) 16K (195 x 270 mm)
- Page 154 9 Tools Values: CG Times LetterGothic CourierPS CG Times It LetterGothic It CourierPS Ob CG Times Bd LetterGothic Bd CourierPS Bd CG Times BdIt Albertus Md CourierPS BdOb Univers Md Albertus XBd SymbolPS Univers MdIt Clarendon Cd Palatino Roman Univers Bd Coronet Palatino It Univers BdIt...
- Page 155 Understanding the Machine Menus PC-850 PS MATH WINBALT PC-852 PI FONT SYMBOL PC-1004 LEGAL WINGDINGS PC-8 TK ISO-4 DNGBTSMS Font Size Purpose: To specify the font size for scalable typographic fonts, within the range of 4.00 to 50.00. The default is 12.00. Font size refers to the height of the characters in the font.
- Page 156 9 Tools Enables the Image Enhance feature. Hex Dump Purpose: To help isolate the source of a print job problem. With [Hex Dump] selected, all data sent to the machine is printed in hexadecimal and character representation. Control codes are not executed.
-
Page 157: Network Setup
Understanding the Machine Menus Enables the Ignore Form Feed feature. Network Setup Use the [Network Setup] menu to change the machine settings affecting jobs sent to the machine through the network. Note • Bold values are the factory default menu settings. Ethernet Purpose: To confirm or specify network settings. - Page 158 9 Tools Gateway Address When an IP address is being set manually, the gateway address is specified using the format "nnn.nnn.nnn.nnn". Each octet that makes up "nnn.nnn.nnn.nnn" is a value in the range of "0" to "254. 127" and any value in the range of "224"...
- Page 159 Understanding the Machine Menus WSD Scan Disable Disables WSD scan. Enable Enables WSD scan. SNMP UDP Disable Disables the Simple Network Management Protocol (SNMP) UDP port. Enable Enables the SNMP UDP port. StatusMessenger Disable Disables the Status Messenger feature. Enable Enables the Status Messenger feature.
- Page 160 9 Tools Purpose: To disable 802.1x authentication. The change becomes effective after the machine is turned off and then on again. Values: Disable Disables 802.1x. Reset Network Setup Purpose: To initialize network data stored in non-volatile memory (NVM). After executing this function and rebooting the machine, all network settings are reset to their default values.
- Page 161 Understanding the Machine Menus Thailand Vietnam Company Name Purpose: To set the sender name to be printed on the header on faxes. Line Type Purpose: To select the default line type. Values: PSTN Uses PSTN. Uses PBX. Line Monitor Purpose: To set the volume of the line monitor, which audibly monitors a transmission through the internal speaker until a connection is made.
- Page 162 9 Tools Values: Pattern1-7 DRPD is a service provided by some telephone companies. DRPD patterns are specified by your telephone company. The patterns provided with the machine are shown below: Pattern1 Pattern2 Pattern3 Pattern4 Pattern5 Pattern6 Pattern7 Ask your telephone company which pattern you need to select to use this service.
- Page 163 Understanding the Machine Menus Values: TEL Mode Automatic fax reception is turned off. You can receive a fax by picking up the handset of the external phone and then pressing the remote receive code, or by selecting [Manual Receive] in [OnHook] to [On] (you can hear voice or fax tones from the remote machine) and then pressing the <Start>...
-
Page 164: Junk Fax Filter
9 Tools Auto Answer Ans/FAX Sets the interval at which the machine goes into the fax receive mode after the external 0-255 answering machine receives an incoming call. The value is set in increments of 1 second. Junk Fax Filter Purpose: To reject unwanted faxes by accepting faxes only from the fax numbers registered in the Fax Address Book. - Page 165 Understanding the Machine Menus Print and E-mail Prints incoming faxes and also forward them to a specified e-mail address. Forward to Server Forwards incoming faxes to a specified server. Print and Forward to Server Prints incoming faxes and also forwards them to a specified server.
- Page 166 9 Tools Values: Prints excess images or text at the bottom of a fax page without discarding it. Discards any excess images or text. Auto Reduction Automatically reduces a fax page to fit it onto the appropriate paper size. Transmission Defaults Purpose: To configure settings for transmitting fax.
- Page 167 Understanding the Machine Menus Fax Cover Page Purpose: To set whether to attach a cover page to faxes. Values: Does not attach a cover page to faxes. Attaches a cover page to faxes. Send Header Purpose: To print the information of the sender on the header of the faxes. Values: Does not print the sender's information on the header of faxes.
-
Page 168: System Settings
9 Tools Fax Reports Purpose: To configure settings for fax reports. Fax Activity Purpose: To set whether to automatically print a Fax Activity Report after every 50 incoming and outgoing fax communications. Values: Auto Print Automatically prints a Fax Activity Report after every 50 incoming and outgoing fax communications. - Page 169 Understanding the Machine Menus Note • Bold values are the factory default menu settings. General Purpose: To configure general settings for the machine. Power Saver Purpose: To specify the time for transition to Power Saver mode. Values: Low Power Timer 1 min Specifies the time taken by the machine to enter Low Power mode after it finishes a job.
- Page 170 9 Tools Values: Millimeters (mm) Selects millimeter as the default measurement unit. Inches (") Selects inch as the default measurement unit. Original Size Detected Purpose: To specify the size of paper to be automatically detected when you use standard sizes of a document or the machine is set to detect sizes of a document.
- Page 171 Understanding the Machine Menus Panel Alert Tone Does not emit a tone when the control panel entry is incorrect. Soft Emits a tone when the control panel entry is incorrect. Normal Loud Machine Ready Tone Does not emit a tone when the machine is ready to process a job.
- Page 172 9 Tools All Tones Disables all the alert tones. Soft Sets the volume of all the alert tones at once. Normal Loud Low Toner Alert Message Purpose: To specify whether to show the alert message when the toner is low. Values: Does not show the alert message when the toner is low.
- Page 173 Understanding the Machine Menus Email Server Address Book Purpose: To specify whether to search the e-mail addresses from the Address Book for the LDAP server. Values: Does not search the e-mail addresses from the Address Book for the LDAP server. Searches the e-mail addresses from the Address Book for the LDAP server.
- Page 174 9 Tools Values: Disables the fault time-out. 60 sec Sets the amount of time the machine waits before canceling a job that stops abnormally. 3-300 sec Output Settings Purpose: To configure settings concerning output from the machine. Default Paper Size Purpose: To specify the default paper size.
- Page 175 Understanding the Machine Menus To specify the position of banner sheet, and also specify the tray in which the banner sheet is loaded. Values: Insert Position Does not print the banner sheet. Front Inserted before the first page of every copy. Back Inserted after the last page of every copy.
- Page 176 9 Tools Values: Does not limit functions by Auditron authentication. Limits functions by Auditron authentication. Print Auditron Purpose: To specify whether to limit the print functions that can be used per user by Auditron authentication. Values: Does not limit functions by Auditron authentication. Limits functions by Auditron authentication.
- Page 177 Understanding the Machine Menus Note • Bold values are the factory default menu settings. Adjust Paper Type Purpose: To specify paper density settings. Values: Plain Lightweight Heavyweight Labels Lightweight Heavyweight Adjust Transfer Belt Unit Purpose: To adjust the transfer bias when ghosting occur. (The ghost image may be the image of the previous page, or a part of the page currently printing.) Values: If faint ghosts appear, try to decrease the value.
- Page 178 9 Tools Postcard -5 to +10 Envelope -5 to +10 Adjust Alignment Purpose: To adjust the alignment of the printed image. Values: Adjust Lead/Side Regi Tray 5 Lead Regi (X) 0.0 mm (Bypass) -2.0 to 2.0 mm Side Regi (Y) 0.0 mm -2.0 to 2.0 mm Tray 1...
- Page 179 Purpose: To use toner cartridge of another manufacturer. Note • Using a non-Fuji Xerox toner cartridge may severely damage the machine. The warranty does not cover damages caused by using non-Fuji Xerox toner cartridges. Values: Does not use toner cartridge of another manufacturer.
-
Page 180: Secure Settings
9 Tools To calibrate the control panel. Secure Settings Use the [Secure Settings] menu to set a passcode to limit access to the menus. This prevents items from being changed accidentally. Note • Bold values are the factory default menu settings. Panel Lock Purpose: To set a limited access to [Admin Settings] with a passcode, and to set or change the... - Page 181 Understanding the Machine Menus To specify whether to enable editing of the transmission source when you use Scan to E- mail. Values: Disable Disables editing of the transmission source. Enable Enables editing of the transmission source. Confirm Recipients Note • If [Confirm Recipients] menu is set to [Confirm Recipient], recipients can only be selected from the address book.
-
Page 182: Default Settings
9 Tools Purpose: To specify the number of error entry attempts allowed when you log in as an administrator in the [Admin Settings] and [Report / List] menu. Values: Does not allow an administrator to log in after one error entry attempt. Sets the number of error entry attempts allowed when an administrator logs in. - Page 183 Understanding the Machine Menus Reduce / Enlarge Purpose: To set the default copy reduction/enlargement ratio. Values: mm series 100% Auto% 50% A3 70% A3 A4, B4 81% B4 A4, B5 86% A3 B4, A4 115% B4 A3, B5 122% A4 B4, A5 141% A4 A3, B5...
- Page 184 9 Tools B4 (257 x 364 mm) A4 (297 x 210 mm) A4 (210 x 297 mm) B5 (257 x 182 mm) B5 (182 x 257 mm) A5 (148 x 210 mm) 8K (270 x 390 mm) 16K (270 x 195 mm) 16K (195 x 270 mm) Tabloid (11 x 17") Legal (8.5 x 14")
- Page 185 Understanding the Machine Menus Values: Photo & Text Suitable for documents with both text and photos/gray tones. Text Suitable for documents with text. Photo Suitable for documents with photos. Lighten / Darken Purpose: To set the default copy density level. Values: Darken +3 Makes the copy darker than the original.
- Page 186 9 Tools To specify the default background suppression level. Values: Normal Sets the background suppression level to [Normal]. Higher Sets the background suppression level to [Higher]. Highest Sets the background suppression level to [Highest]. Color Balance Purpose: To specify the default color balance level within the range of -3 to +3. Values: Yellow Shadows...
-
Page 187: Scan Defaults
Understanding the Machine Menus 2 Sided Prints one sided originals on both sides of a sheet of paper. Binding of Long Edge Prints on both sides of a sheet of paper to be Output Binding bound by long edge. Short Edge Prints on both sides of a sheet of paper to be Binding bound by short edge. - Page 188 9 Tools Values: Multi-Page TIFF TIFF (1 File per page) JPEG (1 File per page) Output Color Purpose: To specify whether to scan in color, black and white, or gray scale. Values: Color Scans in color. Black & White Scans in black and white. GrayScale Scans in grayscale.
- Page 189 Understanding the Machine Menus 16K (270 x 195 mm) 16K (195 x 270 mm) Tabloid (11 x 17") Legal (8.5 x 14") Folio (8.5 x 13") Letter (8.5 x 11") Letter (8.5 x 11") inch series Auto Tabloid (11 x 17") Legal (8.5 x 14") Folio (8.5 x 13") Letter (8.5 x 11")
- Page 190 9 Tools To set the default scan density level. Values: Darken +3 Makes the scanned image darker than the original. Works well with light print or faint pencil markings. Darken +2 Darken +1 Normal Works well with standard typed or printed documents. Lighten +1 Makes the scanned image lighter than the original.
- Page 191 Understanding the Machine Menus Higher Sets the background suppression level to [Higher]. Highest Sets the background suppression level to [Highest]. Edge Erase Purpose: To specify the value of the top and bottom margins. Values: Top / Bottom 0.1 inch (2 mm) Sets the value in increments of 0.1 inch (1 mm).
-
Page 192: Fax Defaults
9 Tools Creates a folder when saving a scanned image. Fax Defaults Purpose: To modify the defaults for the [Fax] menu. Note • The FAX service cannot be used unless you set up a region code under [Region]. • Bold values are the factory default menu settings. Resolution Purpose: To specify the scan resolution to improve the output quality. - Page 193 Understanding the Machine Menus Original Size Purpose: To specify the default document size. Values: mm series Auto A3 (297 x 420 mm) B4 (257 x 364 mm) A4 (210 x 297 mm) B5 (182 x 257 mm) A5 (148 x 210 mm) 8K (270 x 390 mm) Tabloid (11 x 17") Legal (8.5 x 14")
-
Page 194: Tray Management
9 Tools Values: 21:00/9:00 PM Specify the fax transmission start time when sending a fax at a specified time. 0:00 - 23:59 / 1:00 - 12:59 AM/PM Note • A maximum of 19 delayed fax jobs can be stored in the machine. Tray Management Use the [Tray Management] menu to define the print media loaded in Tray 1 and Tray 2. - Page 195 Understanding the Machine Menus Size A3 (297 x 420 mm) (mm series) B4 (257 x 364 mm) A4 (297 x 210 mm) A4 (210 x 297 mm) B5 (257 x 182 mm) B5 (182 x 257 mm) A5 (148 x 210 mm) 8K (270 x 390 mm) 16K (270 x 195 mm) 16K (195 x 270 mm)
- Page 196 9 Tools Size Tabloid (11 x 17") (inch series) Legal (8.5 x 14") Folio (8.5 x 13") Letter (8.5 x 11") Letter (8.5 x 11") A3 (297 x 420 mm) B4 (257 x 364 mm) A4 (297 x 210 mm) A4 (210 x 297 mm) B5 (257 x 182 mm) B5 (182 x 257 mm)
- Page 197 Understanding the Machine Menus Type Plain (60-89 gsm) Plain Reload Bond (90-105 gsm) Bond Reload Recycled (60-105 gsm) Recycled Reload Punched (60-89 gsm) Letterhead (60-89 gsm) Heavyweight (HW) (106-169 gsm) HW Reload Extra Heavyweight (X-HW) (170-256 gsm) X-HW Reload Gloss (106-169 gsm) Gloss Reload Heavyweight Gloss (170-256 gsm) HW Gloss Reload...
-
Page 198: Tray Priority
9 Tools To specify the paper loaded in Tray 2. Values: Display Tray Enter a check to display a popup message that prompts to set Type and Size when Prompt paper is loaded in Tray 2. The factory default is on (check). Size Auto Detect Custom Size... -
Page 199: Language Settings
Understanding the Machine Menus Values: 1 First Tray5 (Bypass) Sets Tray 5 (bypass) as the first priority. Tray1 Sets Tray 1 as the first priority. Tray2 Sets Tray 2 as the first priority. 2 Second Tray5 (Bypass) Sets Tray 5 (bypass) as second priority. Tray1 Sets Tray 1 as the second priority. -
Page 200: Panel Lock Function
9 Tools Panel Lock Function This feature prevents unauthorized personnel from changing the settings made by the administrator. However, you can select settings for individual print jobs using the print driver. Note • Disabling the control panel menus does not prevent access to the [Secure Print], [Sample Print] and [Tray Settings] menus. - Page 201 Panel Lock Function Select [Panel Lock]. Select [Panel Lock Set]. Select [Enable], and then select [OK]. Enter the new passcode, and then select [OK]. Note • The factory-default panel passcode is 0000. • Be sure to remember the passcode. The procedure described below allows you to reset the passcode, but the settings for Address Book are cleared.
-
Page 202: Disabling The Panel Lock
9 Tools Disabling the Panel Lock Press the <Machine Status> button. <Machine Status> button Services Home Job Status Machine Status Select the [Tools] tab. Select [Admin Settings]. Enter the passcode, and then select [OK]. Note • The factory-default panel passcode is 0000. Select [Secure Settings]. - Page 203 Panel Lock Function Select [Panel Lock]. Select [Panel Lock Set]. Select [Disable], and then select [OK]. Enter the current passcode, and then select [OK].
-
Page 204: Limiting Access To Copy, Fax, And Scan
9 Tools Limiting Access to Copy, Fax, and Scan Enabling the Copy Lock, Fax Lock, and Scan Lock options limits access to copy, fax, and scan operations by requiring a passcode to be entered before copying, scanning, faxing, or printing. Taking Fax Lock as an example, the following procedure explains how to enable or disable the option. - Page 205 Limiting Access to Copy, Fax, and Scan Select [Panel Lock Set]. Select [Enable], and then select [OK]. Enter the new passcode using the number pad and then select [OK]. Re-enter the passcode and then select [OK]. Note • The default passcode is 0000. Select [ ] once.
- Page 206 9 Tools Select [FAX]. Enabled Password Locked Color Password Locked (available only for Copy Lock) Disabled...
-
Page 207: Setting The Power Saver Option
Setting the Power Saver Option Setting the Power Saver Option You can set the Power Saver for the machine. The machine switches to the Power Saver mode after the specified time. Note • If [Panel Lock Set] is set to [Enable], you need to enter the four digit passcode to enter the [Admin Settings] menu. - Page 208 9 Tools Select [Power Saver]. Select [Low Power Timer] or [Sleep Timer]. Select [ ] or [ ] or enter the desired value using the number pad, and then select [OK]. You can select from 1-150 minutes for [Low Power Timer] or 0-60 minutes for [Sleep Timer].
-
Page 209: About The Concurrent Jobs Feature
About the Concurrent Jobs Feature About the Concurrent Jobs Feature This feature enables you to start a concurrent job while a fax job is running. This is done by temporally displaying the Services Home screen and switching to a different function that can be run concurrently such as copy or scan. -
Page 210: Resetting To Factory Defaults
9 Tools Resetting to Factory Defaults After executing this function and rebooting the machine, the address book or all the menu parameters, except the parameters for the network, are reset to their default values. Press the <Machine Status> button. <Machine Status> button Services Home Job Status Machine Status... - Page 211 Resetting to Factory Defaults Select the desired setting. Select [Initialize]. The machine restarts automatically to apply the settings.
- Page 212 9 Tools...
-
Page 213: 10 Machine Status
10 Machine Status This chapter describes how to check the basic information and status of your machine. Note • Some settings are not displayed on some models. An optional component is required. For more information, contact our Customer Support Center. Checking Consumables...................... -
Page 214: Checking Consumables
10 Machine Status Checking Consumables The Machine Status screen displays the status of consumables such as the toner cartridge and the drum cartridge. Follow the steps below to check the status of consumables. Press the <Machine Status> button. <Machine Status> button Services Home Job Status Machine Status... -
Page 215: Selecting Language
Selecting Language Selecting Language You can select from five languages, English, Simplified Chinese, Korean, Vietnamese, and Thai, for the user interface language used in the control panel display. Note • The default language may vary depending on the region of purchase. Follow the steps below to select the language. -
Page 216: Checking The Machine's Ip Address
10 Machine Status Checking the Machine’s IP Address You can display the IPv6 or IPv4 address of your machine. Press the <Machine Status> button. <Machine Status> button Services Home Job Status Machine Status Select [About This MFP]. Select the [Network] tab. The IP address of your machine is displayed. -
Page 217: Checking The Meter
Checking the Meter Checking the Meter The Billing Meter screen shows the total number of printed pages (including the number of the pages of the copied documents and received fax documents). Item Description Meter1 Displays the total number of color prints. Meter2 Displays the total number of monochrome prints. -
Page 218: Printing Reports/Lists
10 Machine Status Printing Reports/Lists The machine can print the following reports/lists: The reports and lists with an asterisk can be printed only when the Fax Kit (optional) is installed. Report/List Purpose System Settings To print a list of the current user default values, the installed options, the amount of installed print memory, and the status of machine supplies. - Page 219 Printing Reports/Lists Select the report or list to print, and then select [Print]. Note • To cancel printing while a job is printing, press the <Stop> button.
- Page 220 10 Machine Status...
-
Page 221: 11 Job Status
11 Job Status This chapter describes how to check the status of current or pending jobs, and how to cancel jobs. Note • Some settings cannot be displayed when the Fax Kit (optional) is not installed. For more information, contact our Customer Support Center. Checking Current/Pending Jobs ................... -
Page 222: Checking Current/Pending Jobs
11 Job Status Checking Current/Pending Jobs You can check the status of the following current or pending jobs: Current print, scan or fax job Pending print jobs Pending fax jobs to send Note • Completed jobs are not displayed. Press the <Job Status> button. <Job Status>... -
Page 223: Canceling The Current Job
Checking Current/Pending Jobs Canceling the Current Job Press the <Job Status> button. <Job Status> button Services Home Job Status Machine Status Select the current job. Select [Delete]. Important • You may not be able to cancel a job depending on the status of the job processing. •... - Page 224 11 Job Status Important • You may not be able to cancel a job depending on the status of the job processing.
-
Page 225: 12 Maintenance
12 Maintenance This chapter describes how to replace consumables and clean the machine. Replacing Consumables ......................226 Cleaning the Machine......................234 Managing the Machine......................239... -
Page 226: Replacing Consumables
1unit/box Drum Cartridge CMYK CT351053 1unit/box Important • Our service representatives will replace the drum cartridge. Contact your local Fuji Xerox representative or sales representative. Note • We recommend that you always keep spare consumables/periodic replacement parts available. • Depending on your contract, the toner to order may vary. For more information, contact your local Fuji Xerox representative or sales representative. -
Page 227: Replacing The Toner Cartridge
Cartridge. *1 : This warning appears only when Fuji Xerox toner cartridge is used ([Non-Genuine Toner] is set to [Off]). *2 : The remaining page yield differs depending on printing conditions, contents of the documents, and frequency of turning on/ off the machine. - Page 228 Never throw a toner cartridge into an open flame. Remaining toner in the cartridge may catch fire and cause burn injuries or explosion. If you have a used toner cartridge no longer needed, contact your local Fuji Xerox representative for its disposal.
-
Page 229: Replacing The Waste Toner Container [R5]
Replacing Consumables Unpack a new toner cartridge, and shake it lightly up/down, and left/right 10 times. Important • Do not touch the shutter. Orient the toner cartridge with the arrow ( ) facing up, and insert it as far as it will go. Close the front cover. - Page 230 • The proper disposal of used waste toner containers is required. Return the old waste toner container to our Customer Support Center. • The use of waste toner containers not recommended by Fuji Xerox may degrade image quality and performance. Use only waste toner containers recommended by Fuji Xerox.
- Page 231 Replacing Consumables • After removing the waste toner container, do not touch the parts shown in the illustration. Toner can dirty or stain your hands. Important • Never lay the waste toner box on its side as this may cause its malfunction or toner spills. Prepare a new waste toner container.
- Page 232 12 Maintenance Insert the used waste toner container into the supplied plastic bag. Use both hands to carefully place the used waste toner container into the empty box. Important • Return the old waste toner container to our Customer Support Center.
-
Page 233: Replacing The Drum Cartridge
Replace the old drum cartridge with a new one. Important • The use of drum cartridges not recommended by Fuji Xerox may lower the machine's output quality or performance. Always use drum cartridges recommended by Fuji Xerox in the machine. -
Page 234: Cleaning The Machine
12 Maintenance Cleaning the Machine This section describes how to clean the machine such as the outer casing, the document glass cover, the document feeder, and the document glass. WARNING When cleaning this product, use the designated cleaning materials exclusive to it. Other cleaning materials may result in poor performance of the product. - Page 235 Cleaning the Machine Make sure that the machine is not operating, and open the front cover. Turn the lock lever counterclockwise. Unlock the waste toner container, and then pull it out making sure to hold it upright so that the waste toner does not spill out.
-
Page 236: Cleaning The Touch Screen
12 Maintenance Remove the cleaning bar from the back side of the front cover, and then clean each of the laser scanners once with the bar. Insert the cleaning bar into each slot until it stops, and then slowly slide the bar back out. Return the cleaning bar to the back side of the front cover. -
Page 237: Cleaning The Document Glass Cover And The Document Glass
Cleaning the Machine • Cleaning the touch screen with an excessive force may cause the screen to be damaged. Wipe the screen gently. Cleaning the Document Glass Cover and the Document Glass If the document glass cover and the document glass become soiled, smudges may appear on copies, faxes, or scanned documents and the machine may not detect the document sizes properly. -
Page 238: Cleaning Document Feeder Rollers
12 Maintenance Wipe the document presser with a soft cloth moistened with water to remove any dirt, and then wipe it with a soft, dry cloth. Important • Do not press the film with an excessive force as it can be easily damaged. •... -
Page 239: Managing The Machine
Managing the Machine Managing the Machine This section describes how to check the machine status using CentreWare Internet Services or the Status Messenger feature. Checking or Managing the Machine with CentreWare Internet Services When the machine is installed in a TCP/IP environment, you can use CentreWare Internet Services to check the machine status, the remaining volume of consumables, and the paper loaded in this machine. - Page 240 12 Maintenance Item to be Item Description configured Protocol Settings > Machine's E-mail Select appropriate settings for sending and E-mail Address, receiving e-mail. SMTP Server Address, SMTP Server Port Number, E-Mail Send Authentication, Login Name, Password, SMTP Server Connection Status, POP3 Server Address, POP3 Server Port Number,...
- Page 241 Managing the Machine When the same command is written two or more times in one e-mail, the second and subsequent commands are ignored. Command Parameter Description #Password Password Use this command at the top of the e-mail when a password for read only is set. You can omit this command when the password is not set.
- Page 242 12 Maintenance...
-
Page 243: 13 Problem Solving
13 Problem Solving This chapter provides possible solutions to various problems you may encounter with the machine. Troubleshooting ......................... 244 Machine Problems ........................245 Image Quality Problems ......................249 Copying Problems ........................255 Printer Problems ......................... 258 Fax Problems..........................260 Scan Problems .......................... -
Page 244: Troubleshooting
13 Problem Solving Troubleshooting This section describes troubles that may occur with the machine and their solutions. Follow the troubleshooting procedure below to solve the problems. There is a problem with the [Action] Refer to "Machine Problems" (P.245) . machine's operation. A message is displayed. -
Page 245: Machine Problems
Machine Problems Machine Problems Check the machine's status again if you suspect a malfunction. Symptom Possible Cause Remedy The machine is Is the power switched ON? Switch the power ON. not powered on. Refer to "Power Source" (P.50). Is the power cord plugged Switch the power OFF and make sure the into the power outlet? power plug is inserted securely. - Page 246 13 Problem Solving Symptom Possible Cause Remedy Unable to insert Did you open a cover or Do not forcibly insert or remove the tray. or remove a tray. switch the machine off during Switch off the power. In a few seconds, printing? switch on the power.
- Page 247 Machine Problems Symptom Possible Cause Remedy Paper is often Is paper loaded correctly in Load paper correctly. jammed or the tray? Refer to "Loading Paper in Trays 1 and 2" (P.64). wrinkled. Is the tray inserted correctly? Correctly insert the tray by firmly pushing it until it stops.
- Page 248 13 Problem Solving Symptom Possible Cause Remedy Documents often Are suitable types of Correctly load the documents suitable for the jam. documents being used? document feeder. Refer to "Placing Document" (P.72). Are you using the irregular shaped documents, business cards, transparencies, or thin documents? Are there any sticky tags, Remove any sticky tags, paper clips, or...
-
Page 249: Image Quality Problems
Image Quality Problems Image Quality Problems If the image quality of the printout is poor, use the table below to find our most likely cause, and take the required action. If the image quality remains poor after taking the required action, contact our Customer Support Center. - Page 250 13 Problem Solving Symptom Possible Cause Remedy Copies are out of Have you placed the Place the document correctly. position or document correctly? Refer to "Placing Document" (P.72). crooked. Is the paper loaded correctly Load the paper correctly. in the tray? Refer to "Loading Paper in Trays 1 and 2"...
- Page 251 Image Quality Problems Symptom Possible Cause Remedy Black spots The drum cartridge has Replace the drum cartridge with a new one. appear in copies. deteriorated or been Refer to "Replacing the Drum Cartridge" (P.233). damaged. Black or colored The drum cartridge has Replace the drum cartridge with a new one.
- Page 252 13 Problem Solving Symptom Possible Cause Remedy White spots The paper is unsuitable. Load the correct type of paper. appear in areas of The drum cartridge has Replace the drum cartridge with a new one. black fill. deteriorated or been Refer to "Replacing the Drum Cartridge"...
- Page 253 Image Quality Problems Symptom Possible Cause Remedy The printout The paper is damp. Replace the paper with new paper. contains white The paper is unsuitable. Load the correct type of paper. areas, or white or colored stripes. The printout is When using the Tray 5 Load paper of the correct type and size in the faint overall.
- Page 254 13 Problem Solving Symptom Possible Cause Remedy White or color The drum cartridge has Replace the drum cartridge with a new one. patches appear deteriorated or been Refer to "Replacing the Drum Cartridge" (P.233). vertically. damaged. The toner cartridge has run Replace the toner cartridge with a new one.
-
Page 255: Copying Problems
Copying Problems Copying Problems This section provides possible solutions to various problems you may encounter when using the Copy features. Unable to Copy The table below lists possible solutions when you are unable to copy. Symptom Possible Cause Remedy The document is The document size is too The minimum size of document that can be not fed properly... - Page 256 13 Problem Solving Symptom Possible Cause Remedy Copies are too The copy density adjustment Adjust the copy density. dark or too light. is not right. Refer to "Lighten / Darken" (P.84). The document is light. Adjust the copy density. Refer to "Lighten / Darken" (P.84). The image quality setting is If the copy output of black text is too light, not correct for the document.
- Page 257 Copying Problems Symptom Possible Cause Remedy The copy is not The document glass cover or Clean the document glass cover or document the desired size. document glass is dirty. glass. Refer to "Cleaning the Document Glass Cover and the Document Glass" (P.237). The document is a Place a sheet of white paper over the transparency or highly...
-
Page 258: Printer Problems
13 Problem Solving Printer Problems Unable to Print The table below lists possible solutions when you are unable to print. Symptom Possible Cause Remedy Data remains in The machine's power is not Switch the machine's power ON. the printer icon. Refer to "Power Source"... - Page 259 Printer Problems Symptom Possible Cause Remedy The computer is Confirm whether the print On the computer, select the print driver not using the print driver on the computer is the supplied with the machine. If the print driver driver supplied one supplied with the is not listed for selection, install the print with the machine...
-
Page 260: Fax Problems
13 Problem Solving Fax Problems The table below lists possible solutions to fax problems. Symptom Remedy The machine is not working, Unplug the power cord and plug it in again. there is no display and the Ensure that there is power to the electrical receptacle. buttons are not working. - Page 261 Fax Problems Symptom Remedy Documents are not stored in There may not be enough memory to store the document. If the the memory. display shows a [Memory Full] message, delete any documents you no longer need from the memory and then restore the document, or wait for the job in progress (e.g., a fax transmission or reception) to complete.
-
Page 262: Scan Problems
13 Problem Solving Scan Problems This section provides possible solutions to various problems you may encounter when using the Scan feature. The table below lists possible solutions when you are unable to scan. Symptom Remedy The scanner does not work. Ensure that you place the document to be scanned facing down from the document glass, or facing up in the document feeder. - Page 263 Scan Problems Symptom Remedy A smear appears at the same Clean the document glass. location on the output when Refer to "Cleaning the Machine" (P.234). scanned using the document glass. Images are skewed. Ensure that the document is loaded straight in the document feeder or on the document glass.
-
Page 264: Scan Driver/Printer Utility Problems
13 Problem Solving Scan Driver/Printer Utility Problems The table below lists possible solutions to scan driver/printer utility problems. Symptom Remedy Unable to retrieve the Address Check that the USB cable or Ethernet cable is connected Book data from the printer on properly. -
Page 265: Error Code
Error Code Error Code This section describes error codes. An error message and error code (xxx-xxx) are displayed if printing terminated abnormally because of an error, or a malfunction occurred in the machine. Refer to the error codes in the following table to resolve problems. Important •... - Page 266 13 Problem Solving Error Code Remedy 016-764 Select [Close], or wait for the time set in [Fault Timeout] for the machine to 016-765 recover. Contact the SMTP server administrator. 016-766 016-767 Select [Close], or wait for the time set in [Fault Timeout] for the machine to 016-768 recover.
- Page 267 Error Code Error Code Remedy 031-528 Select [Close], or wait for the time set in [Fault Timeout] for the machine to recover. Check if the machine can communicate via network with the forwarding destination SMB server. For example, check the following: Connection of the network cable TCP/IP settings Communication with Port 137 (UDP), 138 (UDP), and 139 (TCP)
- Page 268 13 Problem Solving Error Code Remedy 031-545 Select [Close], or wait for the time set in [Fault Timeout] for the machine to recover. Check the necessity of password change with your system administrator. 031-546 Select [Close], or wait for the time set in [Fault Timeout] for the machine to recover.
- Page 269 Error Code Error Code Remedy 031-588 Select [Close], or wait for the time set in [Fault Timeout] for the machine to recover. Check if the storage location has free space. 031-590 Select [Close], or wait for the time set in [Fault Timeout] for the machine to recover.
- Page 270 13 Problem Solving Error Code Remedy 033-762 Select [Close], or wait for the time set in [Fault Timeout] for the machine to recover. The machine rejected a fax from the blocked number. For more information, refer to "Junk Fax Filter" (P.164). 033-763 Select [Close], or wait for the time set in [Fault Timeout] for the machine to 033-764...
- Page 271 Error Code Error Code Remedy 035-702 Select [Close], or wait for the time set in [Fault Timeout] for the machine to 035-704 recover. 035-705 035-706 035-708 Select [Close], or wait for the time set in [Fault Timeout] for the machine to recover.
-
Page 272: Paper Jams
Carefully remove the jammed paper without tearing it. Do not leave any pieces of paper in the machine. WARNING If you need to pull out a tray to remove paper jam, contact your local Fuji Xerox representative. Do not pull out a tray, otherwise it may cause injuries. CAUTION Do not attempt to remove a paper deeply jammed inside the product, particularly a paper wrapped around the fusing unit or the heat roller. -
Page 273: Paper Jam In Left Side Cover [B]
Paper Jams 2) Remove the jammed paper. Note • Do not leave any torn pieces of paper inside the machine. 3) Return the handle [A1] back to its position. 4) Push on the center of the top left cover, close it slowly, and raise the Tray 5 (bypass). -
Page 274: Paper Jams In Trays 1 And 2
13 Problem Solving Pull the release lever, and slowly open the left side cover [B]. Remove the jammed paper. Note • The paper may be jammed in the upper part where it is difficult to see. Check thoroughly for jammed paper. •... -
Page 275: Paper Jams In Tray 5 (Bypass)
Paper Jams Remove the jammed paper. Note • If the paper tears, check to make sure there are no remaining shreds in the machine. Push the tray in gently until it stops. Paper Jams in Tray 5 (bypass) Follow the steps below to clear a paper jam in the Tray 5 (bypass). Inspect the inside (around the paper feed entrance) of the Tray 5 (bypass), and remove the jammed paper. -
Page 276: Document Jams
13 Problem Solving Document Jams Follow the steps below to remove the jammed document in the document feeder. Pull up the front handle of the document feeder top cover, and open the document feeder top cover completely. Note • The cover will remain fixed in position when fully opened. - Page 277 Document Jams Close the document feeder top cover until it clicks into place, and confirm that there is no space between the near or far side of the cover and the document feeder. If you cannot find the document, carefully lift up the document feeder. If you find the document, remove it, and then close the document feeder.
-
Page 278: Getting Help
13 Problem Solving Getting Help Fuji Xerox provides several automatic diagnostic tools to help you produce and maintain print quality. Control Panel Messages The control panel provides you with information and troubleshooting help. When an error or warning condition occurs, the control panel displays a message informing you of the problem. -
Page 279: Non-Genuine Mode
Non-Genuine Mode Non-Genuine Mode When toner within a toner cartridge is empty, the [Out of Toner] message appears. When you want to use the machine in Non-Genuine mode, program the mode and replace the toner cartridge. Important • If you use the machine in the Non-Genuine mode, the performance of the machine may not be at its optimum. - Page 280 13 Problem Solving...
-
Page 281: 14 Appendix
14 Appendix This chapter describes the machine specifications, optional components, and notes and restrictions. Specifications ..........................282 Printable Area..........................288 Optional Components......................289... -
Page 282: Specifications
Trays 1 and 2: 60 - 90 gsm Tray 5 (bypass): 60 - 256 gsm Important • Use paper recommended by Fuji Xerox. Copying may not be performed correctly depending on the conditions. First Copy Output Time <When the document glass is used>... - Page 283 (One Tray Module) Maximum Paper Capacity: 910 sheets (Standard + One Tray Module) Important • : When using 80 gsm paper • : When using Fuji Xerox standard paper Continuous Copy 999 sheets Output Tray Capacity 250 sheets (A4 ) Important •...
- Page 284 14 Appendix Print Functions Type Built-in Output Paper Size Same as the Basic Functions/Copy Functions Continuous Print Speed Same as the Basic Functions/Copy Functions Important • The speed may be reduced due to image quality adjustment. Print speed may also drop depending on the document. Print Resolution Output resolution: 1,200 x 2,400 dpi...
- Page 285 Specifications Scan to PC Driver TWAIN/WIA (TWAIN/ Operating ® ® Microsoft Windows : USB) System ® ® Microsoft Windows XP Professional x64 Edition ® ® Microsoft Windows Vista ® ® Microsoft Windows Vista ® ® Microsoft Windows Server 2008 x86 ®...
- Page 286 14 Appendix *1 : The scanning speed varies depending on documents. *2 : Please refer to our official website for the latest support operating systems. Fax Functions (Optional) Send Document Size Maximum: A3, 11 x 17" Recording Paper Size Maximum: A3, 11 x 17"...
- Page 287 A3, 11 x 17" Minimum: 38 - 128 gsm (2 Sided: 50 - 128 gsm) Capacity 110 sheets Important • When using Fuji Xerox standard paper Feeding Speed Monochrome: 18 sheets/minute (A4 , 1 Sided) Color: 20 sheets/minute (A4 , 1 Sided) Dimensions Width 540 mm ×...
-
Page 288: Printable Area
14 Appendix Printable Area The standard printable area is the area of the page within 4.0 mm from the top, and 2 mm from bottom, left and right edges of the paper. The actual printable area may vary depending on the printer (plotter) and control language. 4 mm Unprintable area Printable area/... -
Page 289: Optional Components
Optional Components Optional Components The following table shows the optional components available. To purchase these options, contact our Customer Support Center. Product Name Description Fax Kit Adds the Fax feature to the machine. One Tray Module A tray that can load 500 sheets of paper (when using 80 gsm paper). - Page 290 14 Appendix...
-
Page 291: Index
Index Index Numerics C Clear button................52 2 Sided Copying .............. 84, 186 Calibraion ..................176 2 Sided Print ..............153, 165 canceling a job ................ 142 2 Sided Scanning..........101, 189, 192 capacity..................287 802.1x ..................159 CentreWare Internet Services ........... 133 Changing numbers ..............55 changing paper size in Trays 1 to 4 ........67 Left side cover................46 checking consumables............ - Page 292 Direct Fax................... 108 Fax Defaults ................192 Disabling the Panel Lock ............. 202 fax kit ..................289 Discard Size................165 Fax Line Settings ..............160 Display Brightness..............170 FAX Mode .................. 111 Display Manual Fax Recipients......... 167 Fax Number ................160 Display Network Information ...........
- Page 293 Index installing the scan driver............42 Max E-mail Size ............... 173 interface cables ................32 maximum fill line............... 65, 66 IP Address (IPv4) ...............34 Measurements................. 169 IP Address (IPv6) ...............35 Memory ..................113 IP Filter..................159 memory ..................282 IP Mode ..................157 Modem Speed................167 IPP ....................39 IPsec.....................158 narrow glass strip...............49 Network Setup.................
- Page 294 paper types ..................60 Reduce / Enlarge..............82, 183 paper weight ................287 reduction/enlargement............282 PCL Fonts List..............150, 218 Region..................160 PCL Settings................152 Registering a new e-mail address........139 PDL ....................284 Remote Receive............... 165 Polling Receive................. 103 replacing a drum cartridge..........233 Port9100 ..................39 replacing a toner cartridge..........
- Page 295 Index Sharpness..............85, 185, 190 transmission speed ..............286 sleep mode...................51 transmission time..............286 SNMP....................39 Tray 1 ...................46, 197 SNTP ....................39 Tray 2 .....................46 Software Download...............181 Tray 5 (Bypass)................ 194 space requirement ..............283 Tray 5 (bypass)................46 standard paper................61 tray lock..................289 Start button .................52 Tray Management..............
- Page 296 DocuCentre SC2020 User Guide ME6739E2-1 (Edition 1) March 2013 Fuji Xerox Co., Ltd. Copyright © 2014 by Fuji Xerox Co., Ltd.
Need help?
Do you have a question about the DocuCentre SC2020 and is the answer not in the manual?
Questions and answers