Table of Contents
Advertisement
Advertisement
Chapters
Table of Contents
Troubleshooting

Subscribe to Our Youtube Channel
Related Manuals for Fuji Xerox DocuCentre SC2022


Summary of Contents for Fuji Xerox DocuCentre SC2022
- Page 1 DocuCentre SC2022 User Guide...
- Page 2 As the copying machine contains a feature designed to prevent forging of certain documents, there may be rare instances where copies do not achieve the desired results. Fuji Xerox is not responsible for any breakdown of machines due to infection of computer virus or computer hacking. Important This manual is copyrighted with all rights reserved.
-
Page 3: Preface
Preface Thank you for purchasing the DocuCentre SC2022 (mentioned as "the machine" hereafter). The procedures and precautions for operating the machine are written in this instruction guide. Please read this manual thoroughly to achieve the best performance from this machine. -
Page 4: Table Of Contents
Contents Preface......................................3 Before Beginning....................10 Types of Manuals................................11 1.1.1 Manuals Included With the Machine........................11 1.1.2 Manuals Included With Optional Accessories ...................... 11 About This Manual................................12 1.2.1 Organization..................................12 1.2.2 Conventions ..................................12 Features of the Machine ..............................14 Machine Overview ................................17 1.4.1 Front, Left Side, Right Side, Rear, and Internal View.................. - Page 5 Loading Print Media ................................67 3.5.1 Loading Print Media in Tray 1 and Tray 2....................... 67 3.5.2 Loading Print Media in Tray 5 (Bypass) ........................69 3.5.3 Loading Envelopes ................................72 Loading a Document...............................74 3.6.1 Loading a Document on the Duplex Automatic Document Feeder (DADF)..........74 3.6.2 Loading a Document on the Document Glass......................
- Page 6 8.2.2 Saving Scanned Data in a Cloud Storage Service (Scan to Cloud).............186 8.2.3 Sending Scanned Data to an E-mail Address (Scan to Me) ................192 ® Accessing the Cloud Service Hub From the Print & Scan Hub (Windows ) ........... 199 8.3.1 Displaying the Cloud Service Hub Screen ......................199 Printing and Scanning From Smartphones or Tablets ......200...
- Page 7 10.11.1 [Panel Lock] ..................................255 10.11.2 [Service Lock]..................................256 10.11.3 [User Authentication] ..............................257 10.11.4 [Secure Fax Receive] ..............................257 10.11.5 [Copy Accounting]................................258 10.11.6 [Print Accounting]................................258 10.11.7 [Edit Email From Field] ..............................259 10.11.8 [Confirm Recipients] ..............................259 10.11.9 [Domain Filtering] ................................259 10.11.10 [Software Download]..............................259 10.11.11 [Login Attempts]................................259 10.11.12 [Security Warning]................................259 10.12 [Maintenance].................................
- Page 8 11.4.2 Permitting Only Registered Users to Print......................291 11.4.3 Setting Printing Restrictions on Each Registered User..................295 11.4.4 Permitting Print Jobs Without Account Information ..................307 11.4.5 Checking Printing Usage..............................309 11.5 Using Copy Accounting ............................... 310 11.5.1 Overview.....................................310 11.5.2 Permitting Only Registered Users to Copy......................311 11.5.3 Setting Copying Restrictions on Each Registered User..................313 11.5.4...
- Page 9 Basic Specifications/Copy Function............................396 Print Function.......................................398 Scan Function ......................................399 Fax Function (Optional)...................................401 Direct Fax Function (Optional)..............................402 Duplex Function....................................402 Duplex Automatic Document Feeder............................402 Tray 2 (One Tray Module) (Optional)............................403 Optional Accessories ................................. 404 About Supplies..................................... 405 Life of Consumables..................................405 Collection and Recycling of Consumables..........................405 Attaching/Removing the Optional Wireless LAN Kit ....................
-
Page 10: Before Beginning
1 Before Beginning Types of Manuals .....................11 About This Manual ....................12 Features of the Machine..................14 Machine Overview....................17 Graphic Symbols on the Machine and Their Meanings ......21 User Guide... -
Page 11: Types Of Manuals
1.1 Types of Manuals 1.1.1 Manuals Included With the Machine Basic Operation Guide Describes step-by-step instructions on how to operate the machine, information you need to know before using the machine, and how to operate the machine safely. User Guide (this manual) ("Software/Product Manual" disc) Describes how to get ready to print, copy, fax, and scan as well as set various features. -
Page 12: About This Manual
1.2 About This Manual Describes how to operate the print, copy, scan, and fax functions. It also covers the operator panel menus, troubleshooting tips, and maintenance information. Note ® ® • In this manual, the procedures for the computer are explained using Microsoft Windows 7 and macOS 10.12 unless stated otherwise. - Page 13 – This manual uses the following symbols: Indicates important information you have to know or be reminded before Important operations. Indicates supplemental information useful for operations. Note Indicates reference sections or documents. Refer " " • A cross-reference included in this manual. •...
-
Page 14: Features Of The Machine
1.3 Features of the Machine This section describes the useful features available on the machine. Customizing the Home Screen Creating a New Tile P.52 You can create the tiles registered with the job settings that you often use, and then save it on the [Home] screen. - Page 15 Sending a Scanned Document via E-Mail ([Scan to Email]) P.134 You can send a scanned document as an e-mail attachment. Storing a Scanned Document to a USB Flash Drive ([Scan to USB Drive]) (Optional) P.144 You can save a scanned document to a USB flash drive. Faxing Faxing From the Machine P.162...
- Page 16 Receiving Faxes Without Printing ([Forward Settings]) P.240 You can forward incoming faxes to a specified e-mail address or server. Faxes are not printed so it saves resources and reduces the risk of an information leakage. Printing Printing a Confidential Document ([Secure Print]) P.83 Store the print data in the machine with your user ID and passcode specified.
-
Page 17: Machine Overview
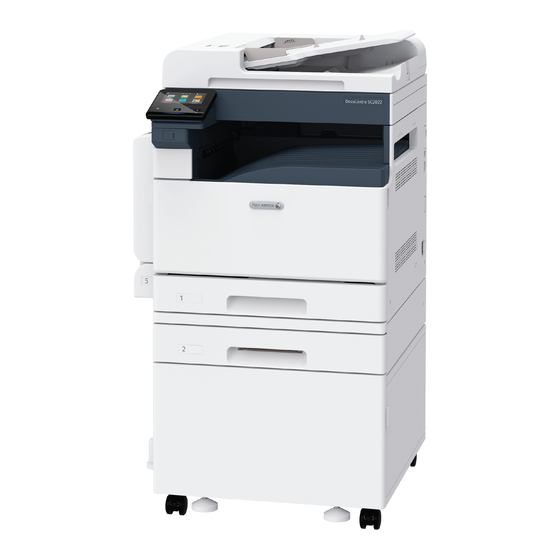
1.4 Machine Overview 1.4.1 Front, Left Side, Right Side, Rear, and Internal View Front and Left Side View Document Glass Cover Tray 2 (One Tray Module) (Optional) Document Glass Stand (Cabinet) (Optional) Operator Panel Left Side Cover [B] Output Tray 10 Tray 5 (Bypass) Front Cover 11 Front USB Port (Optional) - Page 18 Right Side and Rear View USB Port Wall Jack Connector Ethernet Port Power Cord Connector Phone Connector Wireless LAN Kit (Optional) Note • Phone connector and wall jack connector are available only on the model with the fax function. Internal View Toner Cartridges Waste Toner Container Drum Cartridges...
-
Page 19: Duplex Automatic Document Feeder (Dadf)
1.4.2 Duplex Automatic Document Feeder (DADF) Document Feeder Top Cover Document Stopper Inner Cover Document Output Tray Document Guides Document Presser Document Feeder Tray Narrow Glass Strip 1.4.3 Operator Panel Touch Panel Configures the settings by directly tapping the screen. Displays various settings, instructions, and error messages. - Page 20 Data LED • Blinks when faxes are being sent or received. • Lights up when data is stored in the memory. Status LED • Blinks in blue when the machine is turned on, a job is completed, the machine receives an identification signal from a mobile device, an authentication is completed successfully, or when an error is cleared.
-
Page 21: Graphic Symbols On The Machine And Their Meanings
1.5 Graphic Symbols on the Machine and Their Meanings Refer to the following table for the product symbol and their definitions. Symbol Definition Symbol Definition WARNING or CAUTION: Do not load punch paper in these orientations. Ignoring this warning could cause serious injury or even death. To avoid personal injury, use caution. -
Page 22: Setting Up The Machine
2 Setting Up the Machine Turning On/Off the Machine................23 Connecting Your Machine to a Computer ............24 User Guide... -
Page 23: Turning On/Off The Machine
2.1 Turning On/Off the Machine 2.1.1 Turning On the Machine Press the <Power> button. 2.1.2 Turning Off the Machine Important • The print data and stored data in the memory is cleared when the machine is turned off. Press the <Power>... -
Page 24: Connecting Your Machine To A Computer
2.2 Connecting Your Machine to a Computer 2.2.1 Overview The machine supports wired LAN, USB, and wireless LAN connection. The following procedures are recommended for the connections. Note • Wired LAN connection and wireless LAN connection cannot be used simultaneously. If you connect the machine to a wireless network, disconnect the Ethernet cable from the machine. -
Page 25: Connecting To A Wired (Ethernet) Network
Wireless LAN connection Preparation Install the optional Wireless LAN Kit, and then remove the Ethernet cable. "Attaching the Optional Wireless LAN Kit (P.406)" ® Windows Connect the machine to a wireless network, and then Connect the machine to a wireless network, and then install software. -
Page 26: Connecting To A Computer With Usb
2.2.3 Connecting to a Computer With USB With the machine turned off, connect the machine and your computer with the USB cable. Important • Do not connect the machine to a USB hub. Next, install software. Refer ® ® • For details about installing software on a Windows computer, see "Installing Software for Windows (P.33)", and for details about installing software on a Mac, see "Installing Software for Mac (P.35)."... - Page 27 These methods are available only when the access point or wireless router supports WPS. Refer • For details about the WPS operation on the access point or wireless router, see the manual supplied with the access point or wireless router. ...
- Page 28 Manually Connecting to a Wireless Network Connect to a wireless network by selecting your access point or wireless router from the list or by specifying the SSID. Note • You need the SSID and the WEP key or passphrase of the access point or wireless router. For details, see the manual supplied with the access point or wireless router.
- Page 29 Specify the encryption type. Tap [Next]. Enter the WEP key or passphrase as necessary, and then tap [Next]. ® Connecting Using [Quick Setup] (Windows You can easily connect the machine to a wireless network using [Quick Setup] in the "Software/Product Manual" disc.
-
Page 30: Setting The Ip Address
Click [Support Tools/Manuals]. Click [Wi-Fi Settings]. Follow the on-screen instructions to configure the settings. 2.2.5 Setting the IP Address Setting the IP Address This section describes how to set/change the IP address. Note • When you specify an IP address in IPv6 mode, use the Support Tools in the "Software/Product Manual" disc or CentreWare Internet Services. - Page 31 Tap [Device]. Tap [Network Settings]. When the machine is connected to a wired network, tap [Ethernet]. When the machine is connected to a wireless network, tap [Wi-Fi]. Tap [IP Mode]. Tap [Dual Stack], [IPv4], or [IPv6] according to your environment. Note •...
- Page 32 Click [IP Address Settings]. Follow the on-screen instructions to configure the settings. Checking the IP Address You can check the settings by using the operator panel, or by printing the System Settings report. Using the Operator Panel Press the <Home>...
-
Page 33: Installing Software For Windows
® 2.2.6 Installing Software for Windows Using the "Software/Product Manual" Disc With the "Software/Product Manual" disc, you can use the following features. 4 5 6 1 [Quick Setup] You can install the basic software you can use with the machine all at once. If you use this machine in a wireless network, you can connect the machine to the network and install software at the same time. - Page 34 4 [Support Tools] > [Create Driver Setup Disk] You can create a setup disk for the drivers. Using the setup disk reduces the amount of work required when installing drivers on multiple computers with the same settings. Note • The setup disk cannot be used on a computer that has a different operating system than the computer that the setup disk was created on.
-
Page 35: Installing Software For Mac
Follow the on-screen instructions to complete the setup. Installing With [Custom Installation] Note • Perform the following procedure in advance, and then start installing. - "Connecting to a Wired (Ethernet) Network (P.25)" - "Connecting to a Computer With USB (P.26)" - "Connecting to a Wireless Network (P.26)"... - Page 36 Double-click the pkg file in the folder. Follow the on-screen instructions to complete the setup. Registering the Machine in a Mac Adding the Machine Using USB Connection The following procedure uses macOS 10.12 as an example. Turn on the machine. Connect the USB cable to the machine and your computer.
- Page 37 From the [Name] list, select the name of your machine with [USB] displayed in the [Kind] column. From the [Use] drop-down list box, select a driver supported for the machine. Click [Add]. 2 Setting Up the Machine...
- Page 38 Specify the optional accessories installed on the machine, and then click [OK]. Make sure that the machine is displayed in the [Printers] list. Adding a Machine Using LPD Connection The following procedure uses macOS 10.12 as an example. Turn on the machine. Make sure that your computer and the machine are connected.
- Page 39 Click Click [IP]. From the [Protocol] drop-down list box, select [Line Printer Daemon - LPD]. 2 Setting Up the Machine...
- Page 40 Enter the IP address for the machine in the [Address] area. From the [Use] drop-down list box, select a driver supported for the machine. Click [Add]. User Guide...
- Page 41 Specify the optional accessories installed on the machine, and then click [OK]. Make sure that the machine is displayed in the [Printers] list. Adding the Machine Using Bonjour The following procedure uses macOS 10.12 as an example. Turn on the machine. Make sure that your computer and the machine are connected.
- Page 42 Click From the [Name] list, select the name of your machine with [Bonjour Multifunction] displayed in the [Kind] column. From the [Use] drop-down list box, select a driver supported for the machine. User Guide...
- Page 43 Click [Add]. Specify the optional accessories installed on the machine, and then click [OK]. Make sure that the machine is displayed in the [Printers] list. Enabling Optional Accessories On the driver, specify the optional accessories installed on the machine to enable the associated features. The following procedure uses macOS 10.12 as an example.
- Page 44 From the [Apple] menu, open [System Preferences], and then click [Printers & Scanners]. Select the machine in the [Printers] list, and then click [Options & Supplies]. Click [Options]. User Guide...
-
Page 45: Installing Print Drivers On Linux Computers (Cups)
Select the optional accessories installed on the printer, and then click [OK]. 2.2.8 Installing Print Drivers on Linux Computers (CUPS) The latest print drivers for Linux computers can be downloaded from our official web site. The communication fee shall be borne by users. 2 Setting Up the Machine... -
Page 46: Using Your Machine
3 Using Your Machine Using the Operator Panel..................47 Power Saver Mode....................59 Checking Jobs ......................61 Print Media Guidelines ...................63 Loading Print Media....................67 Loading a Document ....................74 User Guide... -
Page 47: Using The Operator Panel
3.1 Using the Operator Panel The operator panel consists of a touch panel, a <Home> button, a <Power> button, data LED, status LED, and <NFC>. Use the operator panel to browse the various menus, and enter texts and numbers. Touch Panel <Home>... - Page 48 [Fax] You can send and receive faxes, or configure the fax settings. Refer • "Sending/Receiving a Fax (P.162)" [Scan to Email] You can scan documents and send the scanned data by e-mail, or configure the scan settings. Refer • "Sending Scanned Data via E-Mail (Scan to Email) (P.134)" [ID Card Copy] You can make ID card copies, or configure the ID card copy settings.
-
Page 49: Basic Operations On The Touch Panel
[Scan to WSD] You can send scanned data to a computer with Web Services on Devices (WSD). Refer • "Storing to a Computer Connected to the Network (Scan to WSD) (P.129)" Sidebar When you tap the sidebar button on the upper left corner of the [Home] screen, the side bar screen appears. The sidebar screen displays the toner status, error messages, network information, and Wi-Fi Direct information. -
Page 50: Customizing The Home Screen
Scrolling the Screen Flick or swipe the screen upward or downward. 3.1.3 Customizing the Home Screen You can customize the [Home] screen to suit your preference or work style. For example, you can rearrange the tiles so that you can easily access the tiles you often use, or you can delete the tiles from the [Home] screen that you do not often use. - Page 51 The short orange bar appears in the place the tile is moved to. Confirm the place, and release the tile. Tap [Done]. Adding the Predefined Tiles You can add the predefined tiles to the [Home] screen. Tap [Home ] > [Customize]. Tap [Add].
- Page 52 Creating New Tiles You can create the tiles registered with the job settings that you often use, and save it on the [Home] screen. Creating a New Tile The following explanation is an example to create your custom tile for copying. To create custom tiles for other jobs such as faxing or scanning, follow the same procedures on the job settings screen of each job.
- Page 53 Tap [Done]. Note • When you save the job settings for [Fax] or [Scan to Email] as a custom tile, recipient information is saved together with the settings. To prevent sending faxes or e-mails to the wrong recipients, make sure that the fax numbers or e-mail addresses of the recipients displayed on the touch panel are correct.
-
Page 54: Entering Characters
Select the tile that you want to delete, and then tap on the upper left. Tap [Yes] > [Done]. 3.1.4 Entering Characters A keyboard is displayed on the touch panel when input of characters is required, for example when registering a destination. - Page 55 • [Maintenance] • [Advanced Settings] Enabling the Panel Lock Press the <Home> button. Tap [Device]. Tap [Security Settings] > [Panel Lock]. for [Panel Lock Settings] to display the check mark. Enter a four-digit passcode, and then tap [OK]. Re-enter the passcode, and then tap [OK]. Changing the Panel Lock Passcode Press the <Home>...
- Page 56 Tap [Device]. Tap [Security Settings]. Enter the current passcode, and then tap [OK]. Tap [Panel Lock] > [Change Passcode]. Enter the current passcode, and then tap [OK]. User Guide...
- Page 57 Enter the new passcode, and then tap [OK]. Re-enter the new passcode, and then tap [OK]. Disabling the Panel Lock Note • You need to disable [Secure Fax Receive], [User Authentication], and [Service Lock] before disabling the Panel Lock. For details, see "[Secure Fax Receive] (P.257),"...
-
Page 58: Restricting Usage Of Functions On Each User
of [Panel Lock Settings] to hide the check mark. Enter the current passcode, and then tap [OK]. 3.1.6 Restricting Usage of Functions on Each User When the User Authentication feature is enabled, you can give the registered users permission to use the features, or limit the features that unregistered users (guest users) can use. -
Page 59: Power Saver Mode
3.2 Power Saver Mode You can save the power consumption using the power saver mode. 3.2.1 Entering the Power Saver Mode The machine enters the power saver mode in the following cases: • When the machine is not used for a certain period of time. •... -
Page 60: Recovering From The Power Saver Mode
3.2.4 Recovering From the Power Saver Mode Press the <Power> button to recover from the power saver mode. User Guide... -
Page 61: Checking Jobs
3.3 Checking Jobs On the [Jobs] screen, you can check the status of the jobs or cancel the pending jobs. You can also print or delete the jobs stored in the machine. Note • You can also check the job status with the report or CentreWare Internet Services. For details, see "[Job History] (P.229)" or the CentreWare Internet Services Help. -
Page 62: Printing/Deleting Jobs Stored In The Machine
Tap [Jobs]. Select the job you want to cancel. Tap [Delete Job]. When the message "Do you want to cancel the job?" is displayed, tap [Yes]. 3.3.3 Printing/Deleting Jobs Stored in the Machine Printing/Deleting Stored Print Jobs You can print or delete the jobs that are stored for Secure Print and Sample Set. Refer •... -
Page 63: Print Media Guidelines
3.4 Print Media Guidelines 3.4.1 Print Media That We Recommend WARNING • Do not use conductive paper such as origami paper, carbonic paper or conductively-coated paper. When paper jam occurs, it may cause short-circuit and eventually a fire accident. Use the supported print media to print or copy clearly. The standard paper shown in the following table is recommended. - Page 64 Paper Type Paper Tray 1 Tray 2 (One Tray 5 Automatic Weight Tray Module) (Bypass) Duplex (gsm) (Optional) Recycled 60 - 89 Recycled Reload 60 - 89 Prepunched 60 - 89 Letterhead 60 - 89 Covers 106 - 169 Covers Reload 106 - 169 Covers Thick 170 - 256...
- Page 65 Paper Size Orientation Tray 1 Tray 2 (One Tray 5 Automatic Tray Module) (Bypass) Duplex (Optional) B5 (182 x 257 mm) LEF Orientation SEF Orientation A5 (148 x 210 mm) LEF Orientation SEF Orientation 8K (270 x 390 mm) LEF Orientation SEF Orientation 16K (195 x 270 mm) LEF Orientation...
-
Page 66: Storing And Handling Print Media
• Damp or rippled print media • Curled print media • Partly used label sheets • Printouts from other printers or copying machines • Transparency films • Backlight films • Water transfer paper • Inkjet paper • Thermal paper, heat transfer paper •... -
Page 67: Loading Print Media
3.5 Loading Print Media 3.5.1 Loading Print Media in Tray 1 and Tray 2 Important • Do not remove the tray while the machine is copying or printing. Pull out the paper tray until it stops. Important • Do not load different sizes or types of paper on top of any remaining paper in a tray. Doing so may cause paper jams or loading errors. - Page 68 Move the paper guides to the position to fit the paper size. Before loading print media, flex and fan the sheets. Straighten the edges of the stack on a level surface. Load print media with the side to copy or print on facing up, aligning the leading edge with the left side of the tray.
-
Page 69: Loading Print Media In Tray 5 (Bypass)
When the screen appears to specify the paper, make sure that the paper size loaded in the tray is displayed on the bottom left of the screen. Note • The machine is set at the factory to display the screen to specify the paper. If the screen does not appear, tap [Device] > [Trays], and select the [Display Tray Prompt] check box for each tray. - Page 70 Load print media stack neatly aligned, pushing the stack lightly until it stops with the side to be copied or printed facing down. Important • Do not load multiple types of paper at the same time. • Do not load print media above the fill line. Doing so may cause a jam or a malfunction. Note •...
- Page 71 Start printing. Note • You can select [Automatically Select] from [Select By Tray] on the print driver. In this case, clear the check mark for [Use Driver Setting] on the [Tray 5 (Bypass) Settings] screen, and specify the size and type of paper loaded in Tray 5 (bypass) correctly.
-
Page 72: Loading Envelopes
3.5.3 Loading Envelopes Important • You can load envelopes only in Tray 5 (bypass). Note • Use only freshly unpacked new envelopes. If the envelopes are not loaded right after they are unpacked, they may curl. To avoid jams, press the envelopes firmly to flatten them as shown in the illustration before loading the envelopes. - Page 73 Envelopes With a Flap on the Long Edge (Side-Opening Envelopes) Load envelopes with the flaps closed and with the side to be copied or printed facing down so that the top edge (side with a flap) is pulled in first to the machine. Envelopes With a Flap on the Short Edge (Top-Opening Envelopes) Load envelops with the side to be copied or printed facing down so that the bottom edge (side without a flap) is pulled in first to the machine.
-
Page 74: Loading A Document
3.6 Loading a Document You can use the Duplex Automatic Document Feeder (DADF) or the document glass to load a document. Documents that can be loaded on the Duplex Automatic Document Feeder (DADF): • One-sheet document • Multiple-sheet document Documents that can be loaded on the Document glass: •... - Page 75 Load a document facing up (front side facing up for a two-sided document) into the Duplex Automatic Document Feeder (DADF). Important • Remove sticky notes, paper clips, adhesive tapes or staples before loading documents. Otherwise they may cause a jam or a malfunction on the Duplex Automatic Document Feeder (DADF).
-
Page 76: Loading A Document On The Document Glass
3.6.2 Loading a Document on the Document Glass Automatically Detected Document Sizes The document size is detected automatically when [Original Size] is set to [Auto]. The following document sizes can be detected automatically: A3, B4, A4 , A4, B5 , B5, A5, 11 x 17", 8.5 x 11"... -
Page 77: Printing
4 Printing Printing From a Computer..................78 Canceling a Print Job ....................81 Printing Color Jobs in Black and White ............82 ® Using Stored Print (Windows ) ................83 Printing a File in a USB Flash Drive (USB Direct Print) (Optional) ..86 Printing on Envelopes .....................97 4 Printing... -
Page 78: Printing From A Computer
4.1 Printing From a Computer Note • Print settings made from a print driver have precedence over the menu settings made from the operator panel. For details about a print driver feature, see the print driver help. The following describes a typical printing procedure. ®... -
Page 79: For Mac
Configure the settings on [Preferences] as needed, and then click [OK]. Click [Print]. 4.1.2 For Mac Note • When you use the AirPrint feature with a USB connection, click [Connectivity] on the left pane in CentreWare Internet Services, select [AirPrint ] in [Mobile Printing], and select the [USB Connection] check box. - Page 80 Select the machine from [Printer], and then configure the print settings as needed. Click [Print]. User Guide...
-
Page 81: Canceling A Print Job
4.2 Canceling a Print Job 4.2.1 Canceling a Job From the Operator Panel Press the <Home> button. Tap [Jobs]. Tap [All Jobs] > [Print Jobs], and then select the print job that you want to cancel. Tap [Delete Job]. 4.2.2 Canceling a Job From a Computer Cancel a print job from the operating system or application you are using. -
Page 82: Printing Color Jobs In Black And White
4.3 Printing Color Jobs in Black and White Forcibly prints color jobs in black and white for all users. Note • With Print Accounting, you can set the restrictions for color printing on each user. For details, see "Using Print Accounting (P.290)."... -
Page 83: Using Stored Print (Windows ® )
® 4.4 Using Stored Print (Windows The print documents can be stored temporarily in the machine, and can be printed from the operator panel. This feature includes two types of jobs. One is Secure Print which can manage confidential documents by assigning passcode, and the other is Sample Set which is convenient when printing a large number of copies. -
Page 84: Sample Set
Tap [Jobs]. Tap [Stored Print Jobs] to select the desired folder. Enter the specified passcode. Select the document you want to print, and then specify the number of printouts. Note • To delete the document after printing, tap [Delete after Printing] to display the check mark. Tap [Print]. - Page 85 Printing Sample Set Jobs Press the <Home> button. Tap [Jobs]. Tap [Stored Print Jobs] to select the desired folder. Select the document you want to print, and then specify the number of printouts. Tap [Print]. Deleting Sample Set Jobs Press the <Home>...
-
Page 86: Printing A File In A Usb Flash Drive (Usb Direct Print) (Optional)
4.5 Printing a File in a USB Flash Drive (USB Direct Print) (Optional) You can print files stored in a USB flash drive without using a computer. Important • Do not remove the USB flash drive from the machine while printing is in progress. Note •... - Page 87 Tap [PDF/TIFF Print] or [Photo Print (JPEG)]. Select the file that you want to print, and then tap [OK]. Note • Up to 10 PDF or TIFF files can be selected, and up to 100 JPEG files can be selected. The files are printed in display order. •...
- Page 88 [Paper Trays] [Bypass] [Paper Size] [A3 (297 x 420 mm) ], [B4 (257 x 364 ], [A4 (297 x 210 mm) ], [A4 (210 x 297 mm) ], [B5 (257 x 182 ], [B5 (182 x 257 mm) ], [A5 (148 x 210 mm) ], [8K (270 x 390 ], [11 x 17"...
- Page 89 Tap [PDF/TIFF Print]. Select the file that you want to print, and then tap [OK]. Note • Tap to display the preview image of the selected file. Select the desired setting item. Select the file that you want to print. [Color] [Black] Specify whether to print in color or black and white.
- Page 90 [Quantity] Tap + (plus) or - (minus), or tap the numeric keys to specify the number of printouts. [Paper Trays] Select a paper feed tray. [Bypass] [Paper Size] Select the paper size. [Paper Type] Select the paper type. [Tray 1] [Tray 2] Available only when Tray 2 (One Tray Module) (Optional) is installed.
- Page 91 [PDF Password] Enter the password to open the secured PDF. [Image Type] Select the print image quality. [Auto] Prints PDF/TIFF files in the [Text] mode. [Photos (Standard Quality)] Prints the photographic images in standard quality. [Photos (High Quality)] Prints the photographic images in high quality. [Text] Prints the text document in standard quality.
- Page 92 Select the desired setting item. [Reset] Resets the [PDF/TIFF Print] settings of the machine. [Save as New Default] Saves as new default settings. Change the name for the tile as necessary, and then select the color and icon. Configuring the Settings for Photo Print (JPEG) Feature The setting items available on Photo Print (JPEG) feature are as follows.
- Page 93 You can configure the settings as follows. Press the <Home> button. Insert a USB flash drive into the front USB port of the machine. Tap [Photo Print (JPEG)]. Select the file that you want to print, and then tap [OK]. Note •...
- Page 94 Select the desired setting item. [Quantity] Tap + (plus) or - (minus), or tap the numeric keys to specify the number of printouts. [Layout] Specify the number of pages to be imposed on one side of print media. [Paper Trays] Select a paper feed tray.
- Page 95 [2-Sided Printing] Specify whether to print on both sides of a sheet of paper. For two-sided printing, specify whether the printouts are bound at the long edge or short edge. [Collation] Specify whether to print out the file page by page or set by set, when printing multiple sets of copies of the multiple page file.
- Page 96 Tap [Photo Print ]. Select the desired setting item. [Reset] Resets the [Photo Print (JPEG)] settings of the machine. [Save as New Default] Saves as new default settings. Change the name for the tile as necessary, and then select the color and icon. User Guide...
-
Page 97: Printing On Envelopes
4.6 Printing on Envelopes This section describes how to print using the PCL driver on envelopes loaded in Tray 5 (bypass). Load envelopes in Tray 5 (bypass). Important • You can load envelopes only in Tray 5 (bypass). Note • Use only freshly unpacked new envelopes. If the envelopes are not loaded right after they are unpacked, they may curl. - Page 98 • When loading envelopes with a flap on the long edge (side-opening envelopes): Load envelopes with the flaps closed and with the side to be printed facing down so that the top edge (side with a flap) is pulled into the machine first. •...
- Page 99 Click the icon on the left side of [Paper]. Note • In the [Advanced Paper Selection] dialog box, you can configure the relevant settings all at once. From the [Original Document Size] drop-down list box, select the document size. From the [Scale Options] drop-down list box, select [Automatically Scale]. From the [Output Paper Size] drop-down list box, select the envelope size.
-
Page 100: Copying
5 Copying Making a Copy......................101 Making ID Card Copies ..................110 User Guide... -
Page 101: Making A Copy
5.1 Making a Copy 5.1.1 Basic Copying Using the Duplex Automatic Document Feeder (DADF) Load a document. Refer • For details about loading a document, see "Loading a Document on the Duplex Automatic Document Feeder (DADF) (P.74)." Press the <Home> button. Tap [Copy]. - Page 102 Tap [Start]. Note • While scanning a document, tapping [Delete Job] will cancel the copy job. Making Copies From the Document Glass CAUTION • Do not apply excessive force to hold thick document on the document glass. It may break the glass and cause injuries.
-
Page 103: Various Copy Features
Tap the number on the numeric keys to specify the number of copies. Tap [Start]. Note • While scanning a document, tapping [Delete Job] will cancel the copy job. 5.1.2 Various Copy Features The machine enables you to configure the settings for various copy features as needed. You can configure the following setting items: are the factory default values. - Page 104 [Original Size] [Auto] , [A3 (297 x 420 mm) ], [B4 (257 x 364 mm) ], [A4 (297 x 210 mm) ], [A4 (210 x 297 mm) ], [B5 (257 x 182 mm) ], [B5 (182 x 257 mm) ], [A5 (148 x 210 ], [8K (270 x 390 mm) ], [16K (270 x 195 mm) ], [16K (195 x 270 mm)
- Page 105 Select the desired setting item. [Lighten/Darken] Specify the density to make the copy darker or lighter. [Reduce/Enlarge] Specify the zoom ratio to enlarge or reduce the copied image. When [Auto %] is selected, the optimal zoom ratio is automatically specified according to the document size and the paper size.
- Page 106 [Paper Trays] Select the paper tray. [Auto] The paper tray with the optimal size of paper loaded is automatically selected according to the document size and the zoom ratio. [Bypass] [Paper Size] Select the paper size. [Paper Type] Select the paper type. [Tray 1] [Tray 2] Available only when Tray 2 (One Tray Module) (Optional) is installed.
- Page 107 [Off] [Auto] Copies two pages of a document onto one side of a sheet of paper. The zoom ratio is specified automatically. [Sharpness] Specify the sharpness level to make the image sharper or softer. [Original Size] Select the document size to be copied. Note •...
- Page 108 [Auto] The printouts of the copies are collated when the document is set to the Duplex Automatic Document Feeder (DADF). [Collated] Prints out the copies set by set. [Uncollated] Prints out the copies page by page. [Saturation] Specify the vividness of color. [Background Suppression] to display the check mark to suppress the background density of the document to enhance the copied image.
- Page 109 Select the desired setting item. [Reset] Resets the [Copy] settings of the machine. [Save as New Default] Saves as new default settings. Change the name for the tile as necessary, and then select the color and icon. [Save as New App] Copies the existing settings, and saves as a new tile.
-
Page 110: Making Id Card Copies
5.2 Making ID Card Copies 5.2.1 Basic ID Card Copy You can copy both sides of an ID card on one side of a single sheet of paper in its original size. You can also copy up to two ID cards at the same time. ·... - Page 111 , and then configure the copy settings as needed. Note • To specify the number of copies, tap + (plus) or - (minus) beside [Quantity]. Or tap [Quantity] and enter using the numeric keys. • To specify the number of ID cards to be copied, tap [Number Of Cards]. Refer •...
-
Page 112: Various Id Card Copy Features
Place the ID card with the side to be copied face down, at least 5 mm away from the upper and left edges of the document glass. Note • If the ID card is placed too close to the upper and left edges of the document glass, the edges of the ID card may not be copied properly. - Page 113 [Paper Trays] [Bypass] [Paper Size] [A3 (297 x 420 mm) ], [B4 (257 x 364 ], [A4 (297 x 210 mm) ], [A4 (210 x 297 mm) ], [B5 (257 x 182 ], [B5 (182 x 257 mm) ], [A5 (148 x 210 mm) ], [8K (270 x 390 ], [16K (270 x 195 mm)
- Page 114 Select the desired setting item. [Quantity] Tap + (plus) or - (minus), or tap the numeric keys to specify the number of copies. [Output Color] Specify whether to copy in color or black and white. When [Auto Detect] is selected, the machine detects color documents and black and white documents to automatically determine whether to copy the document in color or black and white.
- Page 115 [Lighten/Darken] Specify the density to make the copy darker or lighter. [Paper Trays] Select the paper tray. [Bypass] [Paper Size] Select the paper size. [Paper Type] Select the paper type. [Tray 1] [Tray 2] Available only when Tray 2 (One Tray Module) (Optional) is installed. [Number Of Cards] Select the number of cards to be copied at the same time.
- Page 116 [Background Suppression] to display the check mark to suppress the background density of the document to enhance the copied image. [Saturation] Specify the vividness of color. Resetting or Saving the Settings Perform the following procedure to reset or save the configured settings. Tap [ID Card Copy ].
-
Page 117: Scanning
6 Scanning Overview........................118 Scanning Using the Operator Panel of the Machine ......119 Scanning From a Computer................152 6 Scanning... -
Page 118: Overview
6.1 Overview The machine provides several ways to scan your document. There are two scanning types. One is operated from the machine when scanning, and the other from a computer or a mobile device. The following illustration shows the overview for each scanning type. Operate From the Machine Computer/Mobile Device "Storing to a Computer Connected to the Network (Scan to WSD) (P.129)"... -
Page 119: Scanning Using The Operator Panel Of The Machine
6.2 Scanning Using the Operator Panel of the Machine 6.2.1 Storing Scanned Data to a Computer Storing to a Computer or Server With FTP/SMB (Scan to Network) The Scan to Network feature allows you to store scanned data to a FTP server or to a shared folder on a computer. - Page 120 Tap [Scan to Network]. Tap the desired destination. Tap the button under [File Format], and then select the file format of the scanned data to be saved. , and then configure the scan settings as needed. Refer • For details about the settings, see "Configuring the Detailed Settings (P.125)." Tap [Start].
- Page 121 Click the [Sharing] tab > [Advanced Sharing]. Select the [Share this folder] check box. Enter the shared name in [Share name]. Note • The shared name is required in the next setting procedure. Click [Permissions]. Click [Add]. Select the user login name by performing either of the following: •...
- Page 122 Click the selected user login name, and then select the [Allow] check box for [Full Control]. Click [OK]. When you are finished creating a shared folder, register destinations to the address book using the Address Book Editor. For details, see the Address Book Editor help. For Mac: The following procedure uses macOS 10.12 as an example.
- Page 123 Tap the button under [File Format], and then select the file format of the scanned data to be saved. , and then configure the scan settings as needed. Refer • For details about the settings, see "Configuring the Detailed Settings (P.125)." Tap [Start].
- Page 124 Preview Details Screen You can perform the following operations. Switches the page to be displayed. You can also switch the page by flicking or swiping the screen to the right or left. Enlarges/reduces the preview. Rotates the displayed page by 90 degrees clockwise each time you tap it. Pages are also rotated on the output data.
- Page 125 [File Name] [Auto] , [Add Prefix], [Add Suffix] [Edge Erase] [Top & Bottom] [Left & Right] [Middle] You can configure the settings as follows. Press the <Home> button. Tap [Scan to Network]. Tap the desired destination. Select the desired setting item. Select an FTP or SMB server address from the address book.
- Page 126 Select the desired setting item. [Preview] to display the check mark to display the preview of the scanned data before storing. [Output Color] Select the color mode when scanning a document. When [Black & White] is selected, documents are output as black and white images. When [Grayscale] is selected, documents are output as grayscale images.
- Page 127 [Lighten/Darken] Specify the density to make the scanned data darker or lighter. [Sharpness] Specify the sharpness level to make the image sharper or softer. [Contrast] Specify the difference between the light and the dark. The higher contrast makes the difference bigger, and the lower contrast smaller.
- Page 128 [File Name] Specify how to name the scanned data. File names can be specified up to 50 characters, in the following format. [Auto]: img-YYMMDDHHMMSS.extension [Add Prefix]: Specified characters_YYMMDDHHMMSS.extension [Add Suffix]: YYMMDDHHMMSS_specified characters.extension Note • "YYMMDDHHMMSS" stands for the last two digits of year, two digits of month and day, two digits of hour, minute, and second.
- Page 129 Select the desired setting item. [Reset] Resets the [Scan to Network] settings of the machine. [Save as New Default] Saves as new default settings. Change the name for the tile as necessary, and then select the color and icon. [Save as New App] Copies the existing settings, and saves as a new tile.
- Page 130 Make sure that the [WSD Scan] check mark is displayed. Setting the Computer ® ® The following procedure uses Windows 7 and Windows 10 as examples. ® For Windows Click [Start] > [Control Panel] > [Add a device]. Select the machine, and then click [Next]. User Guide...
- Page 131 Follow the on-screen instructions. The machine is connected to your computer using Web Services on Devices (WSD). Note • You can specify how your computer acts if the computer receives the scanned data. Open [Scan properties] of this machine on your computer, and specify the action in [Actions] under [Events] tab. For details, see the help of your computer.
- Page 132 Select the machine, and then click [Add device]. The machine is connected to your computer using Web Services on Devices (WSD). Note • You can specify how your computer acts if the computer receives the scanned data. Open [Scan properties] of this machine on your computer, and specify the action in [Actions] under [Events] tab.
- Page 133 Tap the button under [Destination]. Tap the name of the computer that you want to send the scanned data to. Tap the button under [Event], and then select the action after scanning. Tap [Start]. Note • If the message about the next document is displayed, follow the on-screen instructions to finish scanning. In the screen displayed on the computer that the scanned data is sent to, select the application to receive the scanned data, and scanning starts with the selected application.
-
Page 134: Sending Scanned Data Via E-Mail (Scan To Email)
6.2.2 Sending Scanned Data via E-Mail (Scan to Email) The Scan to Email feature allows you to send scanned data as an e-mail attachment. Preparing for Sending an E-mail From the Machine To send an e-mail from the machine, the following information is necessary: •... - Page 135 Perform either of the following: • When Acquiring the DNS Server Address Automatically: Select the [Use DHCP to Assign Address] check box for [IPv4 DNS Servers], or select the [Use DHCPv6-lite to Assign Address] check box for [IPv6 DNS Servers], depending on your network environment.
- Page 136 Click [POP3] in [Protocols]. Configure the server settings, and then click [OK]. Refer • For details about the settings, see the CentreWare Internet Services Help. Click [Restart Now]. When restarting the machine is complete, click [Refresh]. Click [SMTP] in [Protocols]. Configure the server settings, and then click [OK].
- Page 137 Tap [Scan to Email]. Enter the e-mail address for the recipient. Note • You can also use the address book or an LDAP server to specify the e-mail address. For details, see "Using the Address Book (P.279)." Tap the button next to , and then select the file format of the scanned data to be sent.
- Page 138 Rotates all the pages by 90 degrees clockwise each time you tap it. Pages are also rotated on the output data. Note • is not displayed depending on the file format. Closes the preview screen. [Send] Sends the scanned data. ...
- Page 139 [Lighten/Darken] [Lighten +3], [Lighten +2], [Lighten +1], [Normal] , [Darken +1], [Darken +2], [Darken +3] [Sharpness] [Higher], [Normal] , [Lower] [Contrast] [Higher], [Normal] , [Lower] [Background Suppression] , Off [Original Size] [Auto] , [A3 (297 x 420 mm) ], [B4 (257 x 364 mm) ], [A4 (297 x 210 ], [A4 (210 x 297 mm) ], [B5 (257 x 182 mm)
- Page 140 Select the file format of the scanned data to be sent. Configuring the Detailed Settings Select the desired setting item. [Preview] to display the check mark to display the preview of the scanned data before sending. [Output Color] Select the color mode when scanning a document. [Resolution] Select the scan resolution rate when scanning a document.
- Page 141 [2-Sided Scanning] Specify whether to scan both sides of documents. For two-sided documents, specify whether the document is bound at the long edge or the short edge. [Lighten/Darken] Specify the density to make the scanned data darker or lighter. [Sharpness] Specify the sharpness level to make the image sharper or softer.
- Page 142 [Original Size] Select the document size to be scanned. Note • When [Auto] is selected, the machine detects and specifies the document size automatically. [File Name] Specify how to name the scanned data. File names can be specified up to 50 characters, in the following format. [Auto]: img-YYMMDDHHMMSS.extension [Add Prefix]: Specified characters_YYMMDDHHMMSS.extension [Add Suffix]: YYMMDDHHMMSS_specified characters.extension...
- Page 143 [From] Specify the e-mail address for the sender. Resetting or Saving the Settings Perform the following procedure to reset or save the configured settings. Tap [Scan to Email ]. xxxxx Select the desired setting item. xxxxx [Reset] Resets the [Scan to Email] settings of the machine. [Save as New Default] Saves as new default settings.
-
Page 144: Storing Scanned Data To A Usb Flash Drive (Scan To Usb Drive) (Optional)
6.2.3 Storing Scanned Data to a USB Flash Drive (Scan to USB Drive) (Optional) The Scan to USB feature allows you to store scanned data directly to a USB flash drive attached to the machine. Refer • For details about the USB flash drives you can use with the machine, see "Supported USB Flash Drive (P.86)." Load a document. - Page 145 Checking the Scanned Data You can check the scanned data before storing. On the detailed setting screen, display the check mark for [Preview], and then tap [Preview] on the upper right corner. When a document is scanned, the Preview screen for the document is displayed.
- Page 146 Switches the page to be displayed. You can also switch the page by flicking or swiping the screen to the right or left. Enlarges/reduces the preview. Rotates the displayed page by 90 degrees clockwise each time you tap it. Pages are also rotated on the output data.
- Page 147 Insert a USB flash drive into the front USB port of the machine. Tap [Scan to USB Drive]. Select the desired setting item. Select a folder to store the scanned data. [File Format] Select the file format of the scanned data to be saved. Configuring the Detailed Settings 6 Scanning...
- Page 148 Select the desired setting item. [Preview] to display the check mark to display the preview of the scanned data before storing. [Output Color] Select the color mode when scanning a document. [Resolution] Select the scan resolution rate when scanning a document. [2-Sided Scanning] Specify whether to scan both sides of documents.
- Page 149 [Lighten/Darken] Specify the density to make the scanned data darker or lighter. [Sharpness] Specify the sharpness level to make the image sharper or softer. [Contrast] Specify the difference between the light and the dark. The higher contrast makes the difference bigger, and the lower contrast smaller.
- Page 150 [File Name] Specify how to name the scanned data. File names can be specified up to 50 characters, in the following format. [Auto]: img-YYMMDDHHMMSS.extension [Add Prefix]: Specified characters_YYMMDDHHMMSS.extension [Add Suffix]: YYMMDDHHMMSS_specified characters.extension Note • "YYMMDDHHMMSS" stands for the last two digits of year, two digits of month and day, two digits of hour, minute, and second.
- Page 151 Select the desired setting item. [Reset] Resets the [Scan to USB Drive] settings of the machine. [Save as New Default] Saves as new default settings. Change the name for the tile as necessary, and then select the color and icon. 6 Scanning...
-
Page 152: Scanning From A Computer
Load a document. Refer • For details about loading a document, see "Loading a Document (P.74)." On your computer, click [Start] > [All Programs] > [Fuji Xerox Print & Scan Hub] > [Print & Scan Hub]. ® For Windows 10, click [Start] > [Fuji Xerox Print & Scan Hub] > [Print & Scan Hub]. - Page 153 Configure the scan settings on [Scan Settings] as needed. [Output Color] Select the color mode when scanning a document. [Scanner Type] Specify whether to place a document on the document glass, or load a document in the Duplex Automatic Document Feeder (DADF). [Resolution] Select the scan resolution rate when scanning a document.
- Page 154 Scanning Using Web Services on Devices (WSD) If the machine is connected to a computer via network using Web Services on Devices (WSD), you can send scanned data to a computer. Note • This feature is supported on the following operating systems: ®...
- Page 155 Setting the Computer ® ® The following procedure uses Windows 7 and Windows 10 as examples. ® For Windows Click [Start] > [Control Panel] > [Add a device]. Select the machine, and then click [Next]. Follow the on-screen instructions. The machine is connected to your computer using Web Services on Devices (WSD). ®...
- Page 156 Click [Devices]. Click [Printers & scanners] > [Add a printer or scanner]. User Guide...
- Page 157 Select the machine, and then click [Add device]. The machine is connected to your computer using Web Services on Devices (WSD). Scanning From a Computer ® You can scan documents using the programs such as Print & Scan Hub or Windows Fax and Scan.
- Page 158 Configure the scan settings as needed, and then click [Scan]. Follow the on-screen instructions to store the scanned data. ® Scanning Using Windows Image Acquisition (WIA) Driver ® ® Windows Image Acquisition (WIA) is one of the standard components provided by Windows XP or later ®...
- Page 159 Click [New Scan]. On [Source], specify whether to scan a document placed on the document glass, or scan a document loaded in the Duplex Automatic Document Feeder (DADF). Note • If you select [Feeder (Scan one side)] or [Feeder (Scan both sides)], select the size for storing the scanned data in [Paper size].
-
Page 160: For Mac
6.3.2 For Mac You can scan documents using Image Capture, a standard program for Mac. Note • When scanning from Mac, click [Connectivity] on the left pane in CentreWare Internet Services, select [AirPrint ] in [Mobile Printing], and make sure that the [Enable] check box is selected. Also, when the machine is connected to Mac via USB, select the [USB Connection] check box for [AirPrint ]. -
Page 161: Faxing (Optional)
7 Faxing (Optional) Sending/Receiving a Fax..................162 Sending a Fax From a Computer (Direct Fax) ..........176 7 Faxing (Optional) -
Page 162: Sending/Receiving A Fax
7.1 Sending/Receiving a Fax 7.1.1 Sending a Fax Important • Check the destination before sending a fax. Note • Before using the fax function, make sure to specify a country code by tapping [Device] > [General] > [Fax Settings] > [Country/Region]. - Page 163 Enter the fax number for the recipient. Note • Pressing recalls the last dialed fax number. • You can also use the address book or an LDAP server to specify the fax number. For details, see "Using the Address Book (P.279)."...
- Page 164 Note • If [Original Size] is set to [Auto], is disabled and you cannot tap it. Specify the original size. Enter the fax number for the recipient. Tap [Send]. Note • To cancel the fax job, tap [Delete Job] while sending the fax. •...
- Page 165 > [Delay Send] > [Specific Time]. Specify the start time, and then tap [OK]. Configure the other fax settings as needed. Refer • For details about the settings, see "Configuring the Detailed Settings (P.173)." Enter the fax number for the recipient. Note •...
-
Page 166: Receiving A Fax
Opens the preview details screen. Closes the Preview screen. [Send] Sends the fax. Preview Details Screen You can perform the following operations. Switches the page to be displayed. You can also switch the page by flicking or swiping the screen to the right or left. - Page 167 Receiving a Fax Manually To receive a fax by using an external telephone or by operating the touch panel, set the fax receive mode to [TEL Mode]. Refer • For details about the fax receive mode, see "[Receive Mode] (P.239)." Note •...
- Page 168 Tap [Fax]. Note • If [Original Size] is set to [Auto], is disabled and you cannot tap it. Specify the original size. Tap [Receive]. Receiving Faxes Using the Distinctive Ring Pattern Detection (DRPD) The DRPD is a telephone company service which enables a user to use a single telephone line to answer several different telephone numbers.
- Page 169 Tap [Device]. Tap [Security Settings] > [Panel Lock]. for [Panel Lock Settings] to display the check mark. Enter a four-digit passcode, and then tap [OK]. Re-enter the passcode, and then tap [OK]. Tap [Secure Fax Receive]. to display the check mark. 7 Faxing (Optional)
- Page 170 Enter a four-digit passcode, and then tap [OK]. In the secure receiving mode, all incoming faxes are stored in memory. And is displayed at [Print Secure Fax] on the [Jobs] screen to let you know that there is a fax stored. ...
-
Page 171: Various Fax Features
Tap [Fax]. for [Polling Receive] to display the check mark. Enter the fax number for the recipient. Tap [Retrieve]. 7.1.3 Various Fax Features The machine enables you to configure the settings for various fax features as needed. You can configure the following setting items: are the factory default values. - Page 172 [Original Size] [Auto] , [A3 (297 x 420 mm) ], [B4 (257 x 364 mm) ], [A4 (210 x 297 , [B5 (182 x 257 mm) ], [A5 (148 x 210 mm) ], [8K (270 x 390 ], [11 x 17" ], [Legal (8.5 x 14") ], [8.5 x 13"...
- Page 173 Adds a pause symbol "-" to the fax number. If you tap and hold , a wait symbol "=" is added to the fax number. When the wait symbol "=" is added, the machine waits for a dial tone, and then starts dialing. Specify on-hook dialing to send or receive faxes manually.
- Page 174 Specify whether to scan both sides of documents. For two-sided documents, specify whether the document is bound at the long edge or the short edge. [Resolution] Select the image quality when scanning a document. [Standard] Suitable for documents with normal sized characters. [Fine] Suitable for documents containing small characters or thin lines.
- Page 175 Resetting or Saving the Settings Perform the following procedure to reset or save the configured settings. Tap [Fax ]. Select the desired setting item. [Reset] Resets the [Fax] settings of the machine. [Save as New Default] Saves as new default settings. Change the name for the tile as necessary, and then select the color and icon. Note •...
-
Page 176: Sending A Fax From A Computer (Direct Fax)
7.2 Sending a Fax From a Computer (Direct Fax) When you install the Printer Control Language (PCL) driver or fax driver, you can send a document created on a program by fax directly from your computer, in the same way as you print the document. This feature is called "Direct Fax."... - Page 177 • For Mac: Select [Fax Setting]. Specify the fax transmission settings. Refer • For details about the settings, see the help of the PCL or fax driver. ® • For Windows • For Mac: Perform either of the following: ® •...
- Page 178 Specify the destination. Refer • For details about how to specify the destination, see the help of the PCL or fax driver. ® • For Windows • For Mac: Click [Start Sending]. User Guide...
-
Page 179: Using The Cloud Service Hub
8 Using the Cloud Service Hub Connecting to the Cloud Service Hub ............180 Using the Cloud Service Hub ................182 Accessing the Cloud Service Hub From the Print & Scan Hub ® (Windows ) ......................199 8 Using the Cloud Service Hub... -
Page 180: Connecting To The Cloud Service Hub
8.1 Connecting to the Cloud Service Hub With the Cloud Service Hub, you can print files stored in a cloud storage service or save scanned data in a cloud storage service. You can also send scanned data to the e-mail address used to login. Note •... - Page 181 Tap [CloudServiceHub]. Enter an e-mail address, and then tap [OK]. Note • If login history is available, tap , and then select an e-mail address. • If the check mark for [Save User ID and Password] is displayed, the machine saves the user ID and password of the user who logs in last.
-
Page 182: Using The Cloud Service Hub
8.2 Using the Cloud Service Hub 8.2.1 Printing From the Cloud Service Hub (Print from Cloud) Using the Print from Cloud Feature You can print files stored in a cloud storage service from the machine. Login to the Cloud Service Hub. Refer •... - Page 183 [Quantity] - [99] [Output Color] [Color] , [Black & White] [Paper Trays] [Bypass] [Paper Size] [A3 (297 x 420 mm) ], [B4 (257 x 364 ], [A4 (297 x 210 mm) ], [A4 (210 x 297 mm) ], [B5 (257 x 182 ], [B5 (182 x 257 mm) ], [A5 (148 x 210 mm)
- Page 184 Configuring the Detailed Settings Select the desired setting item. [Quantity] Tap + (plus) or - (minus), or tap the numeric keys to specify the number of printouts. [Output Color] Specify whether to print in color or black and white. [Paper Trays] Select the paper tray.
- Page 185 Available only when Tray 2 (One Tray Module) (Optional) is installed. [2-Sided Printing] Specify whether to print on both sides of a sheet of paper. For two-sided printing, specify whether the printouts are bound at the long edge or short edge. [Layout] Specify the number of pages to be imposed on one side of print media.
-
Page 186: Saving Scanned Data In A Cloud Storage Service (Scan To Cloud)
[Collation] Specify whether to print out the file page by page or set by set, when printing multiple sets of copies of the multiple page file. [Collated] Prints out the file set by set. [Uncollated] Prints out the file page by page. Resetting or Saving the Settings To reset or save the settings, tap [Print from Cloud [Reset]... - Page 187 Tap [Scan to Cloud], and then select a cloud storage service you want to save the scanned data to. Note • You can search for the folder you want to save the scanned data to by tapping on the [Select Cloud] screen and entering a search word.
- Page 188 [Scan Another Page] Displayed when the document is placed on the document glass. Tap to scan the next document. Switches the page to be displayed. Opens the Preview details screen. Rotates all the pages by 90 degrees clockwise each time you tap it. Pages are also rotated on the output data. Note •...
- Page 189 [File Format] [PDF] , [JPEG], file formats available on the server [Preview] On, Off [Output Color] [Color] , [Black & White], [Grayscale] [Resolution] [200 dpi] , [300 dpi], [400 dpi], [600 dpi] [2-Sided Scanning] [1-Sided] , [2-Sided, Long Edge Bind], [2-Sided, Short Edge Bind] [Lighten/Darken] [Lighten +3], [Lighten +2], [Lighten +1], [Normal] , [Darken +1], [Darken +2], [Darken +3]...
- Page 190 Configuring the Detailed Settings Select the desired setting item. [Preview] to display the check mark to display the preview of the scanned data before storing. [Output Color] Select the color mode when scanning a document. [Resolution] Select the scan resolution rate when scanning a document. [2-Sided Scanning] Specify whether to scan both sides of documents.
- Page 191 [Lighten/Darken] Specify the density to make the scanned data darker or lighter. [Sharpness] Specify the sharpness level to make the image sharper or softer. [Contrast] Specify the difference between the light and the dark. The higher contrast makes the difference bigger, and the lower contrast smaller.
-
Page 192: Sending Scanned Data To An E-Mail Address (Scan To Me)
[File Name] Specify how to name the scanned data. File names can be specified up to 50 characters, in the following format. [Auto]: img-YYMMDDHHMMSS.extension [Add Prefix]: Specified characters_YYMMDDHHMMSS.extension [Add Suffix]: YYMMDDHHMMSS_specified characters.extension Note • "YYMMDDHHMMSS" stands for the last two digits of year, two digits of month and day, two digits of hour, minute, and second. - Page 193 Using the Scan to Me Feature Load a document. Refer • For details about loading a document, see "Loading a Document (P.74)." Login to the Cloud Service Hub. Refer • For details about how to login, see "Logging In to the Cloud Service Hub (P.180)." Tap [Scan to Me].
- Page 194 Preview Screen You can perform the following operations. [Scan Another Page] Displayed when the document is placed on the document glass. Tap to scan the next document. Switches the page to be displayed. Opens the Preview details screen. Rotates all the pages by 90 degrees clockwise each time you tap it. Pages are also rotated on the output data. Note •...
- Page 195 Rotates the displayed page by 90 degrees clockwise each time you tap it. Pages are also rotated on the output data. Note • is not displayed depending on the file format. Closes the Preview details screen. Configuring the Settings for the Scan to Me Feature The setting items available on Scan to Me feature are as follows.
- Page 196 [File Format] Select the file format of the scanned data to be sent. Configuring the Detailed Settings Select the desired setting item. [Preview] to display the check mark to display the preview of the scanned data before sending. [Output Color] Select the color mode when scanning a document.
- Page 197 Specify whether to scan both sides of documents. For two-sided documents, specify whether the document is bound at the long edge or the short edge. [Lighten/Darken] Specify the density to make the scanned data darker or lighter. [Sharpness] Specify the sharpness level to make the image sharper or softer. [Contrast] Specify the difference between the light and the dark.
- Page 198 [Edge Erase] Specify whether to remove the shadows on the top and bottom, the left and right, or the middle when scanning a thick document or a booklet. Resetting or Saving the Settings To reset or save the settings, tap [Scan to Me [Reset] Resets the [Scan to Me] settings of the machine.
-
Page 199: Accessing The Cloud Service Hub From The Print & Scan Hub (Windows ® )
The following procedure uses Windows 7 and Windows 10 as examples. Click [Start] > [All Programs] > [Fuji Xerox Print & Scan Hub] > [Print & Scan Hub]. ® For Windows 10, click [Start] > [Fuji Xerox Print & Scan Hub] > [Print & Scan Hub]. -
Page 200: Printing And Scanning From Smartphones Or Tablets
9 Printing and Scanning From Smartphones or Tablets Connecting the Machine to Smartphones/Tablets ........201 Printing and Scanning Using Print Utility ............ 206 Using Other Print Services.................. 207 User Guide... -
Page 201: Connecting The Machine To Smartphones/Tablets
9.1 Connecting the Machine to Smartphones/Tablets You can connect the machine directly to your mobile devices, such as smartphones or tablets, and then you can print or scan documents, photos, web pages, or e-mails quickly and easily. Connect the machine to mobile devices in either of the following methods: •... - Page 202 Setting Up Wi-Fi Direct To use Wi-Fi Direct, you need to first configure the Wi-Fi Direct settings from the operator panel of the machine. When you select the SSID of the machine on the display of the mobile device and then enter the specified passphrase, the mobile device will be connected to the machine via Wi-Fi Direct.
- Page 203 After the machine is restarted, tap [Device] > [Network Settings] > [Wi-Fi Direct] > [Group Role] > [Group Owner]. Tap [Paired Device]. Make sure that the number of mobile devices shown on the screen is two or less, and then tap Note •...
- Page 204 Tap [Network Settings] > [Wi-Fi Direct] > [Paired Device]. Note • [Paired Device] is displayed when a mobile device is connected to the machine via Wi-Fi Direct. Tap [Disconnect All]. Tap [Disconnect Now] or [Disconnect and Reset Passphrase]. When the confirmation message is displayed, tap [Yes]. Resetting the Passphrase Note •...
- Page 205 Tap [Reset Passphrase] > [Yes]. Mobile devices are disconnected, and the new passphrase is displayed. Resetting the PIN Code Press the <Home> button. Tap [Device]. Tap [Network Settings] > [Wi-Fi Direct] > [WPS Setup]. Tap [PIN Code] > [Reset PIN Code]. 9 Printing and Scanning From Smartphones or Tablets...
-
Page 206: Printing And Scanning Using Print Utility
9.2 Printing and Scanning Using Print Utility Print Utility is a free program for the smartphones and tablets. You can print from or scan a document to your iOS or Android mobile device. When your Android mobile device supports the NFC function, waving your device over the NFC reader of the machine starts printing or scanning. -
Page 207: Using Other Print Services
9.3 Using Other Print Services 9.3.1 AirPrint AirPrint is a printing service offered by Apple Inc. Without installing the print drivers or special programs, you can print the documents specified on iOS devices such as iPad or iPhone, or on Mac. Note •... -
Page 208: Google Cloud Print
Click [AirPrint ] in [Mobile Printing]. Select the [Enable] check box. Note • When you use the AirPrint feature with a USB connection, select the [USB Connection] check box in [AirPrint Click [OK]. Click [Restart Now]. When restarting the machine is complete, click [Refresh]. Printing With AirPrint The following procedure uses iOS 9 as an example. - Page 209 Preparing to Use the Machine With Google Cloud Print To use Google Cloud Print, you need to prepare the following in advance: • Acquire a Google account. • Enable Google Cloud Print on the operator panel. Press the <Home> button. Tap [Device].
- Page 210 Enter the [User Name] and [Password] for the administrator, and then click [Log In]. Refer • For details about the default user name and password, see "Logging In As the Administrator (P.273)." Click [Connectivity] on the left pane of the screen. Click [Google Cloud Print] in [Mobile Printing].
-
Page 211: Mopria ® Print Service
Make sure that the machine name appears in [My devices]. Note • It may take about 5 minutes or more until the machine name appears in [My devices]. Canceling the Registration to Google Cloud Print Enter the IP address for the machine in your web browser and start CentreWare Internet Services. Note •... - Page 212 In order to print, connect your mobile device to the same network as the machine or use the Wi-Fi Direct functionality to connect your mobile device to the machine. Note • When [Print Accounting] is enabled, you need to enable [Unauthenticated User Print] to use this feature. For details, see "[Unauthenticated User Print] (P.258)."...
- Page 213 Click [Mopria] in [Mobile Printing]. Click [On] > [OK]. Printing With Mopria Print Service Refer • Visit "http://mopria.org/" for details. 9 Printing and Scanning From Smartphones or Tablets...
-
Page 214: Changing The Machine Settings
10 Changing the Machine Settings 10.1 Understanding the Machine Setting Menus ..........215 10.2 [Language]....................... 227 10.3 [About]........................228 10.4 [Information Pages] ..................... 229 10.5 [Trays]......................... 231 10.6 [Supplies] ........................233 10.7 [Billing Meters] ....................... 234 10.8 [General] ........................235 10.9 [Network Settings] .................... -
Page 215: Understanding The Machine Setting Menus
10.1 Understanding the Machine Setting Menus This section describes the setting items that can be accessed by tapping [Device] on the [Home] screen. Press the <Home> button. Tap [Device]. Tap the desired setting item. [Language] You can select the language used on the machine. [About] You can check your machine information, including the model name, IP address, and serial number for the machine. - Page 216 You can configure the following setting items: are the factory default values. [Language] (P.227) [About] (P.228) [Information [System Settings], [Panel Settings], [PCL Fonts List], [PCL Macros List], [PDF Fonts List], [Job History], [Error Pages] (P.229) History], [Printer Meter], [Demo Page], [Protocol Monitor], [Address Book], [Server Address], [Fax Activity], [Fax Pending List], [Stored Documents List] [Trays] (P.231) [Bypass Tray]...
- Page 217 [Third] [Tray 5 (Bypass)], [Tray 1], [Tray 2] [Supplies] (P.233) [Billing Meters] [Meter 1] (P.234) [Meter 2] [Meter 3] [Meter 4] [General] (P.235) [Date & Time] [Time Zone] [Africa], [Americas], [Antarctica], [Asia], [Atlantic Ocean], [Australia], [Europe], [Indian Ocean], [Pacific Ocean] [Date] [Time] [Display...
- Page 218 [Original Size [Original Size [A/B Series (8K/16K)] , [Inch Series] Detected] Settings] [Switch Original [8.5 x 13"], [8.5 x 14"] Size 1] [Switch Original [B5] , [16K] Size 2] [Check Document [On] , [Off] Guide] [Default Paper [A4 (210 x 297 mm)] , [Letter (8.5 x 11")] Size] [Fax Settings]...
- Page 219 [2-Sided Printing] [Off] , [On] [Remote Receive] [Off] [On] [Remote Receive Tone] [Auto Reduction] [Off (Split Image)] , [Off (Crop to Fit)], [On] [Outgoing Fax [Auto Redial [Number of Settings] Setup] Redials] [Redial Interval] [Interval Timer] [Dial Type] [PB] , [DP (10pps)], [DP (20pps)] [Prefix Dial] [Off] , [On]...
- Page 220 [Wi-Fi Direct] [Wi-Fi Direct] , On [Group Role] [Auto], [Group Owner] [Device Name] [Paired Device] [Disconnect All] [Disconnect Now], [Disconnect and Reset Passphrase] [SSID] [Passphrase] [Reset Passphrase], [Print Passphrase] [WPS Setup] [Push Button Configuration] [PIN Code] [Reset PIN Code], [Print PIN Code] [Ethernet] [IP Mode] [Dual Stack]...
- Page 221 [App Defaults] [Copy Settings] [Output Color] [Auto], [Color], [Black & White] (P.249) [Paper Trays] [Auto] , [Bypass], [Tray 1], [Tray 2] [Collation] [Auto] , [Collated], [Uncollated] [Reduce/Enlarge] [Auto %] , [100%], [50% (A3→A5)], [70% (A3→A4, B4→B5)], [81% (B4→A4, B5→A5)], [86% (A3→B4, A4→B5)], [115% (B4→A3, B5→A4)], [122% (A4→B4, A5→B5)], [141% (A4→A3, B5→B4)], [200% (A5→A3)] Note...
- Page 222 [2→2 Sided] [Long Edge Binding], [Short Edge Binding] [2-Up] [Off] , [Auto] [Edge Erase] [Top & Bottom] [Left & Right] [Middle] [Number Of Cards] [1 Card] , [2 Cards] [Fax Settings] [Preview] On, Off [Resolution] [Standard] , [Fine], [Superfine], [Photo] [2-Sided [1-Sided] , [2-Sided, Long Edge Bind], [2-Sided, Short Edge...
- Page 223 [Middle] [File Name] [Auto] , [Add Prefix], [Add Suffix] [Add Folder] , Off [Direct Print [Output Color] [Color] , [Black & White] Settings] [Paper Trays] [Bypass], [Tray 1] , [Tray 2] [2-Sided Printing] [1-Sided] , [2-Sided, Long Edge Bind], [2-Sided, Short Edge Bind] [Layout] [1-Up]...
- Page 224 [Edit Email From [Enable] , [Disable] Field] [Confirm [Off] , [On] Recipients] [Domain Filtering] [On], [Off] [Software [Enable] , [Disable] Download] [Login Attempts] [Off] , [On] [Security Warning] [On] , [Off] [Maintenance] [Adjust Paper [Plain] [Lightweight] , [Heavyweight] (P.260) Type] [Labels] [Lightweight], [Heavyweight] [Adjust Transfer...
- Page 225 [Adjust Color [Auto Registration] Registration] [Quick Density Adjust] [Calibration] [Initialize NVM] [Fax Settings], [Scan Settings], [User Account Settings], [User App Settings], [System Settings], [Address Book] [Initialize Print Meter] [Clear Stored Jobs] [All Documents], [Secure Print], [Sample Set] [Non-Genuine [Disable] , [Enable] Toner] [Adjust Altitude] [0m]...
- Page 226 [Output Size] [A4] , [Auto] [Layout] [1-Up] , [Off (No Scaling)], [Booklet Creation], [2-Up], [4-Up] [PDF Default [Color (Auto)] , [Black & White] Color] [Detect Job [Off], [On] Separator] [USB Port Settings] [Port Status] [Disable], [Enable] [Fixed Port] [Off] , [On] [Job Timeout] [Off] [On]...
-
Page 227: Language]
10.2 [Language] You can select the display language. 10 Changing the Machine Settings... -
Page 228: About]
10.3 [About] You can check the information such as model name, IP address, and serial number of the machine. Fax number is also displayed on the model with the fax function. User Guide... -
Page 229: Information
10.4 [Information Pages] You can print the following reports and lists. for the name of the desired report or list. Note • Some of the menus are displayed only on the model with the fax function. [System Settings] Prints a list of information on machine settings and configuration, such as network settings and installed optional accessories. -
Page 230: Printing Information
[Address Book] Prints a list of all addresses registered in the address book. [Server Address] Prints a list of all server addresses registered in the address book. [Fax Activity] Prints the information on faxes you recently received and sent. [Fax Pending List] Prints a list of all pending faxes. -
Page 231: Trays]
10.5 [Trays] You can specify the size and type of paper loaded in Tray 1, Tray 5 (bypass), or Tray 2 (One Tray Module) (optional). [Bypass Tray] ....................................231 [Tray 1].......................................231 [Tray 2].......................................232 [Tray Priority] ....................................232 Refer • For details about supported paper sizes and types, see "Usable Print Media on Each Tray (P.63)." 10.5.1 [Bypass Tray] Specify the size or type of paper loaded in Tray 5 (bypass). -
Page 232: Tray 2]
[Paper Size] Displays the paper size. [Paper Type] Select the paper type. [Display Tray Prompt] Specify whether to display a screen for specifying the paper size and paper type when paper is loaded in in Tray 10.5.3 [Tray 2] Note •... -
Page 233: Supplies]
10.6 [Supplies] You can check the status of consumables. Note • For non-genuine toner cartridges, the remaining amount of toner is not displayed in percentage. When the toner cartridge is empty, [Replace] is displayed, and when the toner cartridge is not empty, [OK] is displayed regardless of the remaining amount of toner. -
Page 234: Billing Meters]
10.7 [Billing Meters] You can check the total number of printed pages. [Meter 1] Displays the total number of color printouts. [Meter 2] Displays the total number of monochrome printouts. [Meter 3] Displays the total number of large size color prints. [Meter 4] Displays the total number of color and monochrome prints (Meter 1 + Meter 2). -
Page 235: General]
10.8 [General] You can configure the general settings for the machine, such as date, time, or sound. Note • Some of the menus are displayed only on the model with the fax function. [Date & Time]....................................235 [Display Brightness]..................................235 [Sounds]......................................235 [NFC]........................................236 [Status LED (Blue)] ..................................237 [Power Saver] ....................................237 [Timers]......................................237... -
Page 236: Nfc]
[Invalid] Set the volume of the notification sound that is played when the operator panel input is not correct. [Copy \ Print] Set the volume of the notification sound that is played when a copy or print job is complete. [Fax Print] Set the volume of the notification sound that is played when a fax is printed. -
Page 237: Status Led (Blue)]
10.8.5 [Status LED (Blue)] Specify whether to enable the blue blinking feature of the Status LED on the operator panel. Refer • For details about the Status LED, see "Operator Panel (P.19)." 10.8.6 [Power Saver] Set the amount of time until the machine enters the power saver mode. Refer •... -
Page 238: Check Document Guide]
[Inch Series] Inch series documents are automatically detected. [Switch Original Size 1] [8.5 x 13"] Sets 8.5 x 13" as the document size that can be detected automatically. [8.5 x 14"] Sets 8.5 x 14" as the document size that can be detected automatically. [Switch Original Size 2] [B5] Sets B5 as the document size that can be detected automatically. - Page 239 Pattern1–7 Distinctive Ring Pattern Detection (DRPD) is a service provided by some telephone companies. DRPD Patterns are specified by your telephone company. The following shows the patterns provided with the machine. Pattern1 Pattern2 Pattern3 Pattern4 Pattern5 Pattern6 Pattern7 Ask your telephone company which pattern you need to select to use this service. For example, Pattern7 is the New Zealand FaxAbility distinctive ringing pattern: rings for 400 ms, stops for 800 ms, rings for 400 ms and stops for 1400 ms.
- Page 240 automatically receives the fax, and when the machine detects a phone call, the machine automatically makes the answering machine record the phone call. When the answering machine is turned off, the machine automatically changes the receive mode to [FAX Mode] after the ringtone sounds for a predefined time length.
- Page 241 Requires registering e-mail addresses of the destinations. For details, see the CentreWare Internet Services Help. Requires file server settings. For details, see the CentreWare Internet Services Help. [Receive Size] Specify the maximum size of paper for printing received faxes. [2-Sided Printing] Specify whether to print the received faxes on both sides of a sheet of paper.
-
Page 242: Email Settings]
[ECM] Specify whether to enable the ECM feature. To use the ECM feature, the remote machines must also support the ECM feature. ECM stands for "Error Correction Mode." With ECM, which is one of the G3 communication methods, the machine checks that the data is properly sent to the recipient, and if not, resends the data. [Modem Speed] Select the fax modem speed when a fax transmission or reception error occurs. -
Page 243: Network Settings]
10.9 [Network Settings] You can configure the network settings. [Wi-Fi] .........................................243 [Wi-Fi Direct]....................................245 [Ethernet]......................................246 [Protocol]......................................247 [Other]........................................247 10.9.1 [Wi-Fi] Note • This setting is available only when the Ethernet cable is disconnected from the machine, and the optional Wireless LAN Kit is connected to the machine. Configure the wireless network settings. - Page 244 [No Encryption] Specifies the wireless setting without specifying an encryption type. [WEP] Uses WEP for the encryption type. [Enter 10 or 26 Hex Characters] Enter the WEP key. Note • The [Ad hoc] setting is available only when [Wi-Fi Direct] is disabled. [WPS] Specify the wireless network settings using WPS.
-
Page 245: Wi-Fi Direct]
[Disable IPsec] Disables IPsec communication. Note • This setting is available only when [IPsec] is enabled on CentreWare Internet Services. For details, see the CentreWare Internet Services Help. [Reset Wi-Fi Settings] Initializes wireless network settings. After performing this setting and restarting the machine, all the wireless network settings are reset to their factory settings. -
Page 246: Ethernet]
[Reset Passphrase] Disconnects the Wi-Fi Direct connections and changes the passphrase. [Print Passphrase] Prints the passphrase. [WPS Setup] Configures the Wi-Fi Direct network with WPS. [Push Button Configuration] Configures the Wi-Fi Direct network with WPS (push button method). [PIN Code] Specify the Wi-Fi Direct network using the PIN code assigned to the machine. -
Page 247: Protocol]
[IP Address] Displays the IP address assigned to the machine. Enter the IP address when [IP Addressing] is set to [Manual Input]. [Subnet Mask] Displays the subnet mask assigned to the machine. Enter the subnet mask when [IP Addressing] is set to [Manual Input]. - Page 248 [IPv4 Filter] Specifies whether to limit devices that can communicate with the machine. Register the range of IPv4 addresses that you want to allow to communicate with the machine on CentreWare Internet Services. Note • This feature does not apply to communication via Wi-Fi Direct. [IPv6 Filter] Specifies whether to limit devices that can communicate with the machine.
-
Page 249: App Defaults]
10.10 [App Defaults] You can configure the default settings for the copy, fax, and scan functions, and the USB Direct Print feature. Note • Some of the menus are displayed only on the model with the fax function. [Copy Settings] ....................................249 [Fax Settings]....................................251 [Scan Settings]....................................251 [Direct Print Settings]...................................253... - Page 250 [Original Size] Select the default document size to be copied. When [Auto] is selected, the machine detects and specifies the document size automatically. [Original Type] Select the default document type. [Lighten/Darken] Specify the default copy density. [Sharpness] Specify the default sharpness level of the image. When [Sharpen] is selected, the image is sharper, and when [Soften] is selected, the image is softer.
-
Page 251: Fax Settings]
[Top & Bottom] Specify the top and bottom margins. [Left & Right] Specify the right and left margins. [Middle] Specify the center margin. [Number Of Cards] Select the number of cards to be copied at a time when making an ID card copy as the default setting. 10.10.2 [Fax Settings] Configure the default settings for the fax function. - Page 252 [Resolution] Select the default scan resolution rate when scanning a document. [Original Size] Select the default document size to be scanned. When [Auto] is selected, the machine detects and specifies the document size automatically. [2-Sided Scanning] Specify whether to scan both sides of documents as the default setting. For two-sided documents, specify whether the document is bound at the long edge or the short edge.
-
Page 253: Direct Print Settings]
[Add Suffix]: YYMMDDHHMMSS_specified characters.extension Note • "YYMMDDHHMMSS" stands for the last two digits of year, two digits of month and day, two digits of hour, minute, and second. • Prefix and suffix can be specified up to 32 characters. • When the scanned data is stored as one page per file, when the file name is the same with that of the existing file on the server, or when using the Scan to Email feature, "-"... - Page 254 [Uncollated] Prints out the file page by page. [PDF Password] Set the default password used to print PDF files protected by a password. User Guide...
-
Page 255: Security Settings]
10.11 [Security Settings] You can configure the security settings, such as limiting access to the setting menus or functions. Note • Some of the menus are displayed only on the model with the fax function. [Panel Lock] ......................................255 [Service Lock]....................................256 [User Authentication] ..................................257 [Secure Fax Receive] ..................................257 [Copy Accounting]..................................258... -
Page 256: Service Lock]
10.11.2 [Service Lock] Note • This setting is available only when [Panel Lock Settings] is enabled. For details about this setting, see "[Panel Lock] (P.255)." Specify whether to enable or disable each of the machine functions, or to use a passcode to restrict the use of a function. -
Page 257: User Authentication]
10.11.3 [User Authentication] Note • This setting is available only when [Panel Lock Settings] is enabled, and [Copy Accounting] is disabled. For details about the settings, see "[Panel Lock] (P.255)" and "[Copy Accounting] (P.258)." Specifies whether to restrict access to the features of the machine on each user. [Disable] Disables the User Authentication feature. -
Page 258: Copy Accounting]
Mopria Print Service Note • Even if a print driver or an application provided by Fuji Xerox is used, jobs generated with the print driver's or application's user authentication settings disabled are regarded as jobs without account information. [Auto Color To Mono Print] •... -
Page 259: Edit Email From Field]
10.11.7 [Edit Email From Field] Specify whether to enable editing the e-mail address for the sender when you send scanned data using the Scan to Email feature. Refer • For details about the e-mail address for the sender, see "[From] (P.143)." 10.11.8 [Confirm Recipients] Specify whether to display the recipient confirmation screen before sending an e-mail and a fax (only on the model with the fax function). -
Page 260: Maintenance]
10.12 [Maintenance] You can configure the maintenance settings, such as adjusting the transfer unit and initializing the non-volatile (NV) memory. Note • Some of the menus are displayed only on the model with the fax function. [Adjust Paper Type]..................................260 [Adjust Transfer Belt Unit]................................260 [Adjust 2nd BTR] ....................................260 [Image Position].....................................260 [Adjust Color Registration].................................261... -
Page 261: Adjust Color Registration]
[Lead/Side Registration] Adjusts the position of the printed image in the direction of the paper length (Lead Regi (L)) and paper width (Side Regi (S)) for each paper tray. [Perpendicularity] Adjusts the perpendicularity of the image. 10.12.5 [Adjust Color Registration] Adjusts the color registration. -
Page 262: Initialize Print Meter]
10.12.9 [Initialize Print Meter] Initializes the accounting meters. 10.12.10 [Clear Stored Jobs] Note • This setting is available only when [RAM Disk] is enabled. For details, see "[RAM Disk] (P.266)." Clears print jobs saved using the stored print feature. [All Documents] Deletes all print jobs saved using the stored print feature. -
Page 263: Advanced Settings]
10.13 [Advanced Settings] You can customize the settings in accordance with the setting environment, or your preferences. [PCL Settings] ....................................263 [PDF Settings] ....................................265 [USB Port Settings]..................................266 [Copy Settings] ....................................266 [Scan Settings]....................................266 [Output Settings] ...................................266 [Low Toner Alert Message].................................268 [End of Drum Life] ..................................268 [Job History].....................................268 [LDAP Address Book] ..................................268 [Optional Apps]....................................269... - Page 264 [Font Size] Specify the font size for scalable typographic fonts. [Font Pitch] Specify the font pitch for scalable mono spaced fonts. Font pitch refers to the number of characters printed in one horizontal inch. [Form Line] Specify the number of lines in a page. The amount of space between lines are specified based on the [Output Size] and [Original Orientation] settings.
-
Page 265: Pdf Settings]
10.13.2 [PDF Settings] Configure the machine settings that only affect PDF files. [Quantity] Specify the number of copies to print. [2-Sided] Specify whether to print on both sides of a sheet of paper. For two-sided printing, specify whether the printouts are bound at the long edge or short edge. -
Page 266: Usb Port Settings]
[Detect Job Separator] Specify whether to detect the end of the job in printing PDF files successively. 10.13.3 [USB Port Settings] Configure the machine settings related to a USB port. [Port Status] Specify whether to enable the USB port of the machine. [Fixed Port] Specify whether to use the same port as the one specified when the software has been installed. - Page 267 [Print ID] Specify whether to print the user ID, and select the location where the ID is printed. [Print Text] Specify whether to print Page Description Language (PDL) data as text when the data is not supported by the machine. [Substitute Tray] Specify whether to use paper of a different size when the paper that is loaded in the specified tray does not match the paper size settings for the current job.
-
Page 268: Low Toner Alert Message]
The messages for the drum cartridge [R1] are used as examples. • For details about replacing drum cartridges, contact your local Fuji Xerox representative. 10.13.9 [Job History] Specify whether to automatically print a job history report after every 20 jobs. -
Page 269: Optional Apps]
[On] Enables searching for e-mail addresses. You can search for both fax numbers and e-mail addresses on the model with the fax function. [On (Fax Only)] Enables searching for only fax numbers. [On (Email Only)] Enables searching for only e-mail addresses. This setting is displayed on the model with the fax function. -
Page 270: Making Better Use Of Your Machine
11 Making Better Use of Your Machine 11.1 Using CentreWare Internet Services.............. 271 11.2 Using Software Supplied With the Machine ..........274 11.3 Using the Address Book ..................279 11.4 Using Print Accounting..................290 11.5 Using Copy Accounting..................310 11.6 Using the User Authentication Feature............ -
Page 271: Using Centreware Internet Services
11.1 Using CentreWare Internet Services Use CentreWare Internet Services to monitor the status of your machine or to change the settings of the machine from a web browser. This feature is available on computers connected to the machine in a TCP/IP network environment. CentreWare Internet Services supports the following features. -
Page 272: Setting Up Your Web Browser
11.1.1 Setting Up Your Web Browser The following settings are needed on your web browser before using CentreWare Internet Services. The following procedure uses Internet Explorer 11 as an example. Specifying Temporary Internet Files Click [Tools] > [Internet Options]. The [Internet Options] dialog box is displayed. Click [Settings] of [Browsing history] in the [General] tab. -
Page 273: Starting Centreware Internet Services
11.1.2 Starting CentreWare Internet Services To start CentreWare Internet Services, enter the IP address of the machine in your web browser. If you do not know the IP address of the machine, verify the IP address by using the operator panel, or printing the System Settings report. -
Page 274: Using Software Supplied With The Machine
CentreWare Internet Services from the Print & Scan Hub, you can check the status of the toner cartridges/drum cartridges/waste toner container or the amount of paper remaining in the paper trays. Click [Start] > [All Programs] > [Fuji Xerox Print & Scan Hub] > [Print & Scan Hub]. ®... - Page 275 Select the machine from [Device List], and then click [Device Management]. Check the status of the machine and jobs. To check the status of consumables, click [Device Status]. CentreWare Internet Services starts, and you can check the status of consumables. 192.0.2.1 ...
- Page 276 When printing is completed or when an error occurs, a notification is displayed on the task bar of the computer screen. To use this feature, perform the following procedure to enable auto refresh. Click [Start] > [All Programs] > [Fuji Xerox Print & Scan Hub] > [Print & Scan Hub]. ® For Windows 10, click [Start] >...
- Page 277 To start Address Book Editor on Windows , click [Start] > [All Programs] > [Fuji Xerox DocuCentre SC2022] > [Address Book Editor]. To start Address Book Editor on a Mac, click [Finder] > [Applications] > [Fuji Xerox] > [Utilities] > [Address Book Editor]. ...
-
Page 278: Updating Software
Click [Save All]. The registered destination is saved in the machine. Refer • For details about how to use the Address Book Editor, see the Address Book Editor help. ® ContentsBridge Utility (Windows This software allows you to directly send the files saved on a computer to the machine and print them. You can print PDF files and TIFF files. -
Page 279: Using The Address Book
11.3 Using the Address Book The address book is a feature used for storing destinations. Fax numbers, e-mail addresses, and SMB or FTP server addresses can be registered as destinations. The procedures to register/edit/delete destinations vary depending on the destination type. •... - Page 280 > [Add Contact]. Tap [Name]. Enter a name, and then tap [OK]. Note • The name you specified in [Name] is also entered in the [Index Key] box automatically as the index name. Tap the box if you want to rename the index name. •...
-
Page 281: Specifying Destinations From The Address Book
11.3.2 Specifying Destinations From the Address Book This section describes how to specify fax and e-mail destinations using the address book. Note • For details about how to register destinations, see "Registering Destinations/Groups in the Address Book (P.279)." Press the <Home>... - Page 282 Tap [Address Book]. Tap the contact you want to edit or delete. Note • indicates a contact, and indicates a group. To edit the contact, tap [Edit]. To delete the contact, tap [Delete Contact] and proceed to step 6. Tap the desired item to edit. Note •...
- Page 283 Tap [Address Book]. Tap the group you want to edit or delete. Note • indicates a contact, and indicates a group. To edit the group, tap [Edit]. To delete the group, tap [Delete Group] and proceed to step 6. Tap the desired item to edit. Note •...
-
Page 284: Using The Address Book In An Ldap Server
11.3.4 Using the Address Book in an LDAP Server You can search and specify fax numbers or e-mail addresses registered in an external LDAP server. To access the server from the machine, you need to register the server settings in the machine using CentreWare Internet Services. - Page 285 Click [Security]. Click [Authentication System]. In the [Authentication Protocol], select [LDAP] as the authentication method, and then click [OK]. Note • When the server you are accessing uses the Kerberos authentication, select [Kerberos (Windows ADS)] as the authentication method. Also, enter the setting information on the Kerberos server in [Kerberos (Windows ADS)] in [Protocols].
- Page 286 Click [Log In] on the upper right corner. 192.0.2.1 Note • If [Local User] is displayed on the upper right corner, proceed to step 4. Enter the [User Name] and [Password] for the administrator, and then click [Log In]. Refer •...
- Page 287 When restarting the machine is complete, click [Refresh]. Setting the LDAP Attribute Names Enter the IP address of the machine in your web browser and start CentreWare Internet Services. Note • To check the IP address of the machine, press the <Home>...
- Page 288 Click [LDAP User Mappings]. Specify the attribute names used in the LDAP server. Note • If the attribute names are not customized in the LDAP server, leave the settings in this step as they are by default. Click [OK]. Click [Restart Now]. When restarting the machine is complete, click [Refresh].
- Page 289 For [Fax]: Tap [Send]. For [Scan to Email]: Tap [OK] > [Send]. 11 Making Better Use of Your Machine...
-
Page 290: Using Print Accounting
When the Print Accounting feature is enabled, only users registered in the machine (registered users) can print. This feature can also restrict each user's printing and count up printed pages. To print, the registered user needs to use a print driver or an application provided by Fuji Xerox on which the user account information is specified. -
Page 291: Permitting Only Registered Users To Print
Configuring Authentication Settings on the Print Driver/Application Specify account information (user name and password) that is required for authentication when printing from a print driver or an application provided by Fuji Xerox. ® ® The following procedure uses the PCL driver on Windows 7 and Windows 10 as examples. - Page 292 Click [Accounting]. From the [Accounting System] drop-down list box, select [Standard Accounting]. Specify [Account Mode]. Refer • For details about the settings, see the PCL driver help. Specify a user account (user name and password). • When displaying a dialog box to enter a user account every time a job is submitted: Select [Prompt User for Entry when Submitting Job].
- Page 293 Specify [User ID] and [Password]. Click [OK]. Click [OK]. Enabling Print Accounting on the Operator Panel Press the <Home> button. Tap [Device]. Tap [Security Settings] > [Print Accounting]. Tap [Print Accounting] > [On]. Turn off the machine, and then turn it on again. Registering Users on CentreWare Internet Services Register user account information (user name and password) that has been set on the print driver or an application in the machine.
- Page 294 Click [Log In] on the upper right corner. 192.0.2.1 Note • If [Local User] is displayed on the upper right corner, proceed to step 4. Enter the [User Name] and [Password] for the administrator, and then click [Log In]. Refer •...
-
Page 295: Setting Printing Restrictions On Each Registered User
Click [Add]. Set the [User Name], [Password], and [Retype Password], and then click [Add]. Note • The number of characters you can enter for the user names and passwords are as follows: User name: 1 - 32 alphanumeric characters and symbols Password: 4 - 12 alphanumeric characters and symbols •... - Page 296 Configuring Authentication Settings on the Print Driver/Application Specify account information (user name and password) that is required for authentication when printing from a print driver or an application provided by Fuji Xerox. ® ® The following procedure uses the PCL driver on Windows 7 and Windows 10 as examples.
- Page 297 From the [Accounting System] drop-down list box, select [Standard Accounting]. Specify [Account Mode]. Refer • For details about the settings, see the PCL driver help. Specify a user account (user name and password). • When displaying a dialog box to enter a user account every time a job is submitted: Select [Prompt User for Entry when Submitting Job].
- Page 298 Tap [Security Settings] > [Print Accounting]. Tap [Print Accounting] > [On]. Turn off the machine, and then turn it on again. Registering Users and Configuring Usage Restriction Settings on CentreWare Internet Services Register user account information (user name and password) that has been set on the print driver or an application in the machine, and set the printing restrictions.
- Page 299 Click [Accounting] on the left pane of the screen. Click [Add]. 11 Making Better Use of Your Machine...
- Page 300 Set the [User Name], [Password], and [Retype Password], and then click [Add]. Note • The number of characters you can enter for the user names and passwords are as follows: User name: 1 - 32 alphanumeric characters and symbols Password: 4 - 12 alphanumeric characters and symbols •...
- Page 301 Click [Edit]. next to [Color Prints] to clear the check mark. Click [OK]. Note • The color print jobs from a user with restrictions on performing color printing are canceled. To allow printing in black and white instead of canceling the jobs, follow the procedure below to enable [Auto Color To Mono Print]. Press the <Home>...
- Page 302 Configuring Authentication Settings on the Print Driver/Application Specify account information (a user name and a password) that is required for authentication when printing on our print driver or application. ® ® The following procedure uses the PCL driver on Windows 7 and Windows 10 as examples.
- Page 303 From the [Accounting System] drop-down list box, select [Standard Accounting]. Specify [Account Mode]. Refer • For details about the settings, see the PCL driver help. Specify a user account (user name and password). • When displaying a dialog box to enter a user account every time a job is submitted: Select [Prompt User for Entry when Submitting Job].
- Page 304 Tap [Security Settings] > [Print Accounting]. Tap [Print Accounting] > [On]. Turn off the machine, and then turn it on again. Registering Users and Configuring Usage Restriction Settings on CentreWare Internet Services Register user account information (user name and password) that has been set on the print driver or an application in the machine, and set the printing restrictions.
- Page 305 Click [Accounting] on the left pane of the screen. Click [Add]. 11 Making Better Use of Your Machine...
- Page 306 Set the [User Name], [Password], and [Retype Password], and then click [Add]. Note • The number of characters you can enter for the user names and passwords are as follows: User name: 1 - 32 alphanumeric characters and symbols Password: 4 - 12 alphanumeric characters and symbols •...
-
Page 307: Permitting Print Jobs Without Account Information
Click [Edit]. Enter the desired values in the [Limit] under [Color Prints]. Enter the desired values in the [Limit] under [Black & White Prints]. Click [OK]. 11.4.4 Permitting Print Jobs Without Account Information When [Print Accounting] is enabled, printing jobs without account information (user name and password) is not permitted. - Page 308 Mopria Print Service Note • Even if a print driver or an application provided by Fuji Xerox is used, jobs generated with the print driver's or application's user authentication settings disabled are regarded as jobs without account information. Permitting Printing in Color/Black and White Press the <Home>...
-
Page 309: Checking Printing Usage
11.4.5 Checking Printing Usage Print a Printer Meter report to check the current settings of printing restrictions and the total number of printed pages. Refer • For details about how to print the Printer Meter report, see "Checking by User or Paper Size (P.361)." 11 Making Better Use of Your Machine... -
Page 310: Using Copy Accounting
11.5 Using Copy Accounting 11.5.1 Overview When the Copy Accounting feature is enabled, only users registered in the machine (registered users) can copy. This feature can also restrict each registered user's copying and count up copied pages. To make a copy, registered users are required to login to their user account from the operator panel. -
Page 311: Permitting Only Registered Users To Copy
11.5.2 Permitting Only Registered Users to Copy To use this feature, settings need to be configured on the operator panel and CentreWare Internet Services. Note • You can also manage the use of the copy function with the User Authentication feature. For details, see "Using the User Authentication Feature (P.324)."... - Page 312 Click [Log In] on the upper right corner. 192.0.2.1 Note • If [Local User] is displayed on the upper right corner, proceed to step 4. Enter the [User Name] and [Password] for the administrator, and then click [Log In]. Refer •...
-
Page 313: Setting Copying Restrictions On Each Registered User
Click [Add]. Set the [User Name], [Password], and [Retype Password], and then click [Add]. Note • The number of characters you can enter for the user names and passwords are as follows: User name: 1 - 32 alphanumeric characters and symbols Password: 4 - 12 alphanumeric characters and symbols •... - Page 314 Permitting Copying Only in Black and White Enabling Copy Accounting on the Operator Panel Press the <Home> button. Tap [Device]. Tap [Security Settings] > [Copy Accounting]. Tap [On]. Turn off the machine, and then turn it on again. Registering Users and Configuring Usage Restriction Settings on CentreWare Internet Services Register user account information (user name and password) in the machine, and set the copying restrictions.
- Page 315 Click [Log In] on the upper right corner. 192.0.2.1 Note • If [Local User] is displayed on the upper right corner, proceed to step 4. Enter the [User Name] and [Password] for the administrator, and then click [Log In]. Refer •...
- Page 316 Click [Add]. Set the [User Name], [Password], and [Retype Password], and then click [Add]. Note • The number of characters you can enter for the user names and passwords are as follows: User name: 1 - 32 alphanumeric characters and symbols Password: 4 - 12 alphanumeric characters and symbols •...
- Page 317 A user account is added. Click the added user account. Click [Edit]. 11 Making Better Use of Your Machine...
- Page 318 next to [Color Copies] to clear the check mark. Click [OK]. Setting the Limit for Color/Black and White Copying Set the maximum number of pages that can be copied in color or in black and white. Enabling Copy Accounting on the Operator Panel Press the <Home>...
- Page 319 Registering Users and Configuring Usage Restriction Settings on CentreWare Internet Services Register user account information (user name and password) in the machine, and set the copying restrictions. To configure the settings, login to CentreWare Internet Services as the administrator. Enter the IP address of the machine in your web browser and start CentreWare Internet Services.
- Page 320 Click [Add]. Set the [User Name], [Password], and [Retype Password], and then click [Add]. Note • The number of characters you can enter for the user names and passwords are as follows: User name: 1 - 32 alphanumeric characters and symbols Password: 4 - 12 alphanumeric characters and symbols •...
- Page 321 A user account is added. Click the added user account. Click [Edit]. 11 Making Better Use of Your Machine...
-
Page 322: Using Copy Accounting
Enter the desired values in the [Limit] under [Color Copies]. Enter the desired values in the [Limit] under [Black & White Copies]. Click [OK]. 11.5.4 Using Copy Accounting When using the copy function with the Copy Accounting feature enabled, registered users need to login to their user account registered in the machine. -
Page 323: Checking Copying Usage
When you login, your user name is displayed on the upper right corner. Note • The machine automatically logs out in the following cases: - When the machine enters the sleep mode - When the time period specified on [Auto Clear] passes with no operation of the machine ... -
Page 324: Using The User Authentication Feature
11.6 Using the User Authentication Feature 11.6.1 Overview When the User Authentication feature is enabled, you can give the registered users permission to use the features, or limit the features that unregistered users (guest users) can use. Furthermore, you can limit the features that each registered user can use. -
Page 325: Configuring The User Authentication Feature Settings
The following illustration shows how the machine works with the User Authentication feature. Setting usage restrictions on each registered user Setting usage restrictions on guest users Registered user User A User B · Copying prohibited Usage User name · Scanning prohibited restrictions ·... - Page 326 Tap [Device]. Tap [Security Settings] > [Panel Lock]. for [Panel Lock Settings] to display the check mark. Enter a four-digit passcode, and then tap [OK]. Re-enter the passcode, and then tap [OK]. Tap [User Authentication] > [Local Authentication]. Tap [OK]. User Guide...
- Page 327 Registering Users and Configuring Restriction Settings on CentreWare Internet Services Register user account information (user name and password), and set the usage restrictions for each feature on guest users. Also, set the usage restrictions for each feature on the registered users as needed. To configure the settings, login to CentreWare Internet Services as the administrator.
- Page 328 Click [Permissions] on the left pane of the screen. Click [Add]. User Guide...
- Page 329 Set the [User Name], [Password], and [Retype Password], and then click [Add]. Note • The number of characters you can enter for the user names and passwords are as follows: User name: 1 - 32 alphanumeric characters and symbols Password: 4 - 128 alphanumeric characters and symbols A user account is added.
- Page 330 Set the usage restrictions for each feature. • To set the usage restrictions on a guest user: Click [Setup]. Click the desired setting item, and then change the setting. Refer • For details about the setting items, see the CentreWare Internet Services Help. Click [OK].
- Page 331 • To set the usage restrictions on a registered user: Click the added user account. Click [Edit]. 11 Making Better Use of Your Machine...
-
Page 332: Using The User Authentication Feature
Click the desired setting item, and then change the setting. Refer • For details about the setting items, see the CentreWare Internet Services Help. Click [OK]. 11.6.3 Using the User Authentication Feature When using the machine with the User Authentication feature enabled, registered users need to login to their user account registered in the machine. - Page 333 Tap the user account to login. Enter the password, and then tap [OK]. When you login, your user name is displayed on the upper right corner. Note • The machine automatically logs out in the following cases: - When the machine enters the sleep mode - When the time period specified on [Auto Clear] passes with no operation of the machine ...
-
Page 334: Using The Encryption Feature
11.7 Using the Encryption Feature The encryption feature encrypts the data to be transmitted, and prevents the interception or falsification of the data. To use the authentication feature on the machine, digital certificates are required. Note • The machine supports the following kinds of digital certificates: - Self-signed certificate made with CentreWare Internet Services - Certificate signed by the certificate authorities (CA) •... - Page 335 Click for [HTTP - SSL/TLS Communication] to display the check mark. Click [OK]. Click [Restart Now]. When restarting the machine is complete, click [Refresh]. Generating a Digital Certificate The method differs depending on whether you generate a self-signed certificate using CentreWare Internet Services, or you use a certificate signed by the certificate authorities (CA).
- Page 336 Click [Log In] on the upper right corner. 192.0.2.1 Note • If [Local User] is displayed on the upper right corner, proceed to step 4. Enter the [User Name] and [Password] for the administrator, and then click [Log In]. Note •...
- Page 337 Specify the validity period of the certificate in [Validity Period]. Click [Create]. Click [Close]. Using a Certificate Signed by the Certificate Authorities (CA) When using a certificate signed by the certificate authorities (CA), generate the certificate signing request (CSR), and receive the signed certificate from the certificate authorities (CA). Generating the Certificate Signing Request (CSR) Enter the IP address of the machine in your web browser and start CentreWare Internet Services.
- Page 338 Specify each item. Click [Create]. A CSR file is saved to your computer. Important • Once the CSR file is downloaded, do not download another CSR before you import the certificate. If you generate another CSR, the secret key stored in the machine does not match with the secret key included in the signed certificate, and you cannot import the certificate.
- Page 339 Click [Log In] on the upper right corner. 192.0.2.1 Note • If [Local User] is displayed on the upper right corner, proceed to step 4. Enter the [User Name] and [Password] for the administrator, and then click [Log In]. Note •...
- Page 340 Click [Log In] on the upper right corner. 192.0.2.1 Note • If [Local User] is displayed on the upper right corner, proceed to step 4. Enter the [User Name] and [Password] for the administrator, and then click [Log In]. Note •...
-
Page 341: Setting The Encryption Features
Click [Device Certificate - Server], and then select the certificate to be used. Click [OK]. Click [Restart Now]. When restarting the machine is complete, click [Refresh]. Refer • For details about deleting or exporting digital certificates, see the CentreWare Internet Services Help. 11.7.2 Setting the Encryption Features The following encryption features can be used: •... - Page 342 Click [Log In] on the upper right corner. 192.0.2.1 Note • If [Local User] is displayed on the upper right corner, proceed to step 4. Enter the [User Name] and [Password] for the administrator, and then click [Log In]. Note •...
- Page 343 Click [Log In] on the upper right corner. 192.0.2.1 Note • If [Local User] is displayed on the upper right corner, proceed to step 4. Enter the [User Name] and [Password] for the administrator, and then click [Log In]. Note •...
- Page 344 Click [Log In] on the upper right corner. 192.0.2.1 Note • If [Local User] is displayed on the upper right corner, proceed to step 4. Enter the [User Name] and [Password] for the administrator, and then click [Log In]. Note •...
- Page 345 Click [Log In] on the upper right corner. 192.0.2.1 Note • If [Local User] is displayed on the upper right corner, proceed to step 4. Enter the [User Name] and [Password] for the administrator, and then click [Log In]. Note •...
-
Page 346: Maintenance
12 Maintenance 12.1 Replacing Consumables..................347 12.2 Cleaning the Machine ..................354 12.3 Counting up the Number of Printed Pages ..........361 User Guide... -
Page 347: Replacing Consumables
It may catch fire by electric sparks inside a vacuum cleaner and cause explosion. Use a broom or a wet cloth to wipe off the spills. If you spill a large volume of toner, contact your local Fuji Xerox representative. - Page 348 • Do not shake or pound the used toner cartridges. The remaining toner may spill. • We recommend using the toner cartridges within one year after unpacking them. • The use of toner cartridges not recommended by Fuji Xerox may impair machine quality and performance. Use only toner cartridges recommended by Fuji Xerox.
-
Page 349: Replacing The Drum Cartridges
• Pull out the toner cartridge slowly. Otherwise, toner may spill from the cartridge. Note • If you have a used toner cartridge no longer needed, contact your local Fuji Xerox representative for its disposal. Unpack a new toner cartridge of the same color as the uninstalled toner cartridge. -
Page 350: Replacing The Waste Toner Container
• Proper disposal of used waste toner container is required. Return the old waste toner container to our Customer Support Center. • The use of waste toner container not recommended by Fuji Xerox may impair machine quality and performance. Use only waste toner container recommended by Fuji Xerox. - Page 351 Replacing the Waste Toner Container Make sure that the machine is not operating, and then open the front cover. Turn the lock lever counterclockwise. Unlock the waste toner container. To prevent the toner from spilling, gently pull the waste toner container upward with the side that was attached to the machine facing up.
- Page 352 Important • Take care not to drop the waste toner container while you are removing it. • After removing the waste toner container, do not touch the parts shown in the illustration. Your hands may get stained with toner. • Do not lay the waste toner container as shown in the illustration. This may cause the toner to spill out. Put the used waste toner container into the plastic bag that came with the new waste toner container and seal the bag.
- Page 353 Turn the lock lever clockwise. Close the front cover. 12 Maintenance...
-
Page 354: Cleaning The Machine
12.2 Cleaning the Machine WARNING • When cleaning this product, use the designated cleaning materials exclusive to it. Other cleaning materials may result in poor performance of the product. Never use aerosol cleaners to avoid catching fire and explosion. CAUTION •... -
Page 355: Cleaning The Touch Panel
12.2.2 Cleaning the Touch Panel Wipe the touch panel surface lightly with a soft cloth moistened with a neutral detergent or alcohol. Important • When you moisten a cloth with a neutral detergent or alcohol, make sure that no drips come of the cloth. When the cloth is heavily soaked with detergent or alcohol, squeeze the cloth lightly. - Page 356 Unlock the waste toner container. To prevent the toner from spilling, gently pull the waste toner container upward with the side that was attached to the machine facing up. Important • Take care not to drop the waste toner container while you are removing it. •...
- Page 357 Remove the cleaning rod on the back side of the front cover. Insert the cleaning rod into one of the four holes of the tabs on the drum cartridges until it stops, and then pull it out. Note • Insert the cleaning rod with the pad side up. •...
-
Page 358: Clean The Document Glass Cover, Document Glass, Document Presser, And Narrow Glass Strip
Push the waste toner container until it clicks. Turn the lock lever clockwise. Close the front cover. 12.2.4 Clean the Document Glass Cover, Document Glass, Document Presser, and Narrow Glass Strip If the document glass cover or the document glass get stained, smudges may appear on copy, fax, or scan results, and the machine may not detect the document sizes properly. -
Page 359: Cleaning The Feed Rollers Of The Duplex Automatic Document Feeder (Dadf)
Wipe the surface of the document presser, document glass cover, document glass, and narrow glass strip with a soft, moistened cloth. Wipe the moisture off with a dry soft cloth or paper towel until they are completely dry. Note • Be careful not to damage the document presser. 1 Document Presser 2 Document Glass Cover 3 Document Glass... - Page 360 While turning the rollers, wipe them with a soft cloth slightly moistened with water. Important • Use only water or neutral detergent, and never use other solutions. • Use a cloth firmly wrung to prevent water drops from falling into the machine. If water gets into the machine, it may cause the machine to malfunction.
-
Page 361: Counting Up The Number Of Printed
12.3 Counting up the Number of Printed Pages The total number of printed pages can be checked by meter, by user, or by paper size. One-sided print is counted as one job, and two-sided print is counted as two. Note •... - Page 362 Tap [Device]. Tap [Information Pages] > [Printer Meter]. User Guide...
-
Page 363: Troubleshooting
13 Troubleshooting 13.1 Clearing Jams......................364 13.2 Troubleshooting ..................... 370 13.3 Understanding Machine Messages..............389 13 Troubleshooting... -
Page 364: Clearing Jams
13.1 Clearing Jams WARNING • If you need to pull out a tray to remove paper jam, contact your local Fuji Xerox representative. Do not pull out a tray, otherwise it may cause injuries. CAUTION • Do not attempt to remove a paper deeply jammed inside the product, particularly a paper wrapped around the fusing unit or the heat roller. - Page 365 If the displayed message prompts you to turn the knob, turn it to convey the document to the top, and then remove the document. Important • If the document is fed into the feeder, do not pull it out directly. This may cause the document to tear. If the displayed message prompts you to open the inner cover of the Duplex Automatic Document Feeder (DADF), pull up the lever to open the inner cover.
-
Page 366: Clearing Paper Jams
If you could not find the document in step 9, lift the document feeder tray and remove the document. Gently return the document feeder tray to its original position. 13.1.2 Clearing Paper Jams Note • To resolve the error displayed on the touch panel, you must clear all print media from the print media path. Clearing Paper Jams From Inside the Left Side Cover [A] Important •... - Page 367 Clearing Paper Jams From Near the Fusing Unit Pull the handle [A1] downward. Remove the jammed paper. Note • Make sure that you do not leave any shreds inside the machine. Return the handle [A1] to its original position. Pushing the center part of the left side cover [A], close the cover gently, and then close Tray 5 (bypass).
- Page 368 Clearing Paper Jams From Inside the Left Side Cover [B] Pull the release lever and gently open the left side cover [B]. Remove the jammed paper. Note • The paper may be jammed in the upper part where it is difficult to see. Check thoroughly for jammed paper. •...
- Page 369 Remove the jammed paper. Note • If the paper tears, make sure that there are no shreds in the machine. Gently push the paper tray until it stops. Clearing Paper Jams From Tray 5 (Bypass) Check the inside of Tray 5 (bypass) (around the paper feed entrance), and then remove the jammed paper.
-
Page 370: Troubleshooting
13.2 Troubleshooting This section describes how to solve the problems with the machine. 13.2.1 Menu Setting Problems Problem Action Menu settings changed from the Settings in the software, the print driver, or the printer utilities have precedence operator panel have no effect. over the settings made on the operator panel. - Page 371 Problem Possible Cause Action Printing does not start in Is the Ethernet cable or USB cable Check the Ethernet cable or USB cable connection. When spite of the instruction. disconnected? Is the machine connecting to a wireless network, make sure that the Ethernet connected to the wireless cable is disconnected from the machine and the optional network?
- Page 372 Problem Possible Cause Action Paper is often jammed or Is the paper loaded in the paper Load the paper properly. wrinkled. tray properly? Refer • For details, see "Loading Print Media in Tray 1 and Tray 2 (P.67)." Is the paper tray mounted Mount the paper tray properly by inserting it securely all the properly? way into the machine.
-
Page 373: Print Quality Problems
(P.347)." Is a message displayed on the The drum cartridge needs to be replaced with a new one. For more information, contact your local Fuji Xerox representative. touch panel prompting you to replace a drum cartridge? The message to change... - Page 374 Problem Possible Cause Action Copies get stained. Is the document glass or Clean the document glass or document glass cover. document glass cover dirty? Refer • For details, see "Clean the Document Glass Cover, Document Glass, Document Presser, and Narrow Glass Strip (P.358)."...
- Page 375 Problem Possible Cause Action Copies are shifted Is the document loaded properly? Load the document properly. or skewed. Refer • For details, see "Loading a Document (P.74)." Is the paper loaded in the paper Load the paper properly. tray properly? Refer •...
- Page 376 The drum cartridge has The drum cartridge needs to be replaced with a new one. For deteriorated or been damaged. more information, contact your local Fuji Xerox representative. No toner is left in the toner Replace the toner cartridge with a new one.
- Page 377 The drum cartridge has The drum cartridge needs to be replaced with a new one. For deteriorated or been damaged. more information, contact your local Fuji Xerox representative. The printout comes off The paper is damp. Replace the paper with new paper.
- Page 378 The drum cartridge needs to be replaced with a new one. For appear vertically. deteriorated or been damaged. more information, contact your local Fuji Xerox representative. No toner is left in the toner Replace the toner cartridge with a new one.
-
Page 379: Copy Problems
Problem Possible Cause Action The printout is slanted. The paper guides of the paper Align the horizontal and vertical paper guides properly. tray are not aligned properly. Refer • For details, see "Loading Print Media in Tray 1 and Tray 2 (P.67)" or "Loading Print Media in Tray 5 (Bypass) (P.69)."... - Page 380 Problem Possible Cause Action Copies get stained. The document glass cover or Clean the document glass cover or document glass. document glass is dirty. Refer • For details, see "Clean the Document Glass Cover, Document Glass, Document Presser, and Narrow Glass Strip (P.358)."...
-
Page 381: Printing Problems
Problem Possible Cause Action Striped patterns appear The zoom ratio for the document When making enlarged copies, some zoom ratio can create in copies. is too large. striped patterns. Adjust the zoom ratio. Refer • For details, see "[Reduce/Enlarge] (P.105)." Copies are shifted The document is not loaded Load the document properly. - Page 382 Unable to print. The following list describes the possible solutions when you are unable to print. Problem Possible Cause Action Data remains in the The machine is turned off. Turn on the machine. printer icon. Refer • For details, see "Turning On/Off the Machine (P.23)." The Ethernet cable on the Connect the Ethernet cable to the computer.
-
Page 383: Fax Problems
Problem Possible Cause Action Unable to print in color. [Black and White] is selected for Select [Color] for [Output Color]. [Output Color] on the print option. The machine is specified to print Select [ Off] for [Auto Color To Mono Print]. color jobs in black and white Refer forcibly. - Page 384 Problem Action The machine does not send faxes. Check that the message indicating that the machine is sending a fax is displayed on the screen. Check the other fax machine you are sending to, to see if it can receive your fax. Check [PB], [DP (10pps)], and [DP (20pps)] of [Dial Type].
-
Page 385: Scanning Problems
Problem Action The machine receives faxes but does not Check the toner level. print them out. Make sure that the paper is loaded in the paper tray. Make sure that [Forward Settings] is set to [Off]. Make sure that [Junk Fax Filter] is set to [Off]. Make sure that [Secure Fax Receive] is set to [Off]. -
Page 386: Wireless Problems
Problem Action Vertical stripes appear on the scanned Clean the narrow glass strip. data when you scan using the Duplex Refer Automatic Document Feeder (DADF). • For details, see "Clean the Document Glass Cover, Document Glass, Document Presser, and Narrow Glass Strip (P.358)." Clean the machine using the cleaning rod. -
Page 387: Wi-Fi Direct Problems
Problem Action Unable to set up wireless connection Make sure that the security setting of the access point or wireless router is WPA or with WPS. WPA2. WEP is not supported on WPS. Make sure that the access from the MAC address of the machine is not restricted on your access point or wireless router. -
Page 388: Ipv6 Environment Problems
13.2.10 IPv6 Environment Problems Problem Action Unable to set an IP address for IPv6. Make sure that [Wi-Fi Direct] is disabled. Refer • For details about the settings, see "[Wi-Fi Direct] (P.245)." 13.2.11 Scanner Driver/Software Problems This section describes how to solve the problems with the scanner driver/software. Problem Action Unable to connect to the machine using... -
Page 389: Understanding Machine Messages
13.3 Understanding Machine Messages When the operation finishes abnormally due to an error or when problems occur on the machine, the operator panel displays error messages and the status codes (***-***). Solve the problems, referring to the status codes in the following list. - Page 390 Status-Code What you can do 016-541 A wireless certificate of the server or client cannot be correctly referenced while using Wireless LAN Mixed Mode Enterprise or WPA2-Enterprise. Ask your system administrator to connect the machine with a wired network, and then initialize the wireless settings. After that, import the wireless certificate, and then set Mixed Mode Enterprise or WPA2-Enterprise again.
- Page 391 Status-Code What you can do 016-790 Network connection error has occurred. If you use a wired LAN connection, make sure that the Ethernet cable is connected properly. If there is no problem with the cable, or if you use a wireless LAN connection, contact your server administrator.
- Page 392 Status-Code What you can do 031-530 Unable to find the SMB share folder on the specified SMB server. Check the following: • Is the storage location correct? • Is the file name you specified the same with the name of the file you created on the SMB server? •...
- Page 393 Status-Code What you can do 031-576 Unable to connect to the FTP server. Check if the machine communicates with forwarding destination FTP server. For example, check if the Ethernet cable is connected, or the IP address for the server is correct. 031-578 FTP server login error has occurred.
- Page 394 Status-Code What you can do 034-791 Check if the telephone cable is connected properly. If the line connection is correct, check the following: • Is the dialing type setting correct? Refer • For details, see "[Dial Type] (P.241)." If the dialing type setting is correct, check the following: •...
-
Page 395: Appendix
Appendix Specifications......................396 Optional Accessories .................... 404 About Supplies......................405 Attaching/Removing the Optional Wireless LAN Kit....... 406 "Software/Product Manual" Disc ..............408 Resetting Defaults....................409 New Zealand FAX modem statements ............411 Appendix... -
Page 396: Specifications
Tray 2 (One Tray Module): 60 - 256 gsm Tray 5 (Bypass): 60 - 216 gsm Important • The use of paper recommended by Fuji Xerox is suggested. Printing may not be performed correctly depending on the conditions. First Copy Output Time Black &... - Page 397 Continuous Copy 999 sheets Important • The machine may pause temporarily to perform image stabilization. Output Tray Capacity 250 sheets (A4 ), 200 sheets (A3) Important • When using 80 gsm paper Power Supply AC220-240 V +/- 10 %, 5 A, 50/60 Hz common AC110 V +/- 10 %, 10 A, 60 Hz Maximum Power 1.1 kW (AC220 V +/- 10 %), 1.2 kW (AC240 V +/- 10 %)
-
Page 398: Print Function
OS X 10.11 OS X 10.10 OS X 10.9 OS X 10.8 Optional: - Important • For information about the latest supported OS, visit the Fuji Xerox web site. Fonts Standard: 93 scalable fonts Optional: - Emulation Standard: PCL5e, PDF... -
Page 399: Scan Function
10.13 macOS 10.12 OS X 10.11 OS X 10.10 OS X 10.9 OS X 10.8 Important • For information about the latest supported OS, visit the Fuji Xerox web site. Scan to PC : File Format Depends on application Appendix... - Page 400 OS X 10.10 OS X 10.9 OS X 10.8 Important • For information about the latest supported OS, visit the Fuji Xerox web site. Scan to Network : File Monochrome binary: TIFF, DocuWorks documents, PDF Format Grayscale / Full colour: TIFF, JPEG, DocuWorks documents, PDF...
-
Page 401: Fax Function (Optional)
Windows Server 2008 (64 bit) Important • For information about the latest supported OS, visit the Fuji Xerox web site. Scan to WSD : File Format Monochrome binary: TIFF, DocuWorks documents, PDF Grayscale / Full colour: TIFF, JPEG, DocuWorks documents, PDF... -
Page 402: Direct Fax Function (Optional)
OS X 10.11 OS X 10.10 OS X 10.9 OS X 10.8 Important • For information about the latest supported OS, visit the Fuji Xerox web site. Duplex Function Paper Size Same as the Basic Specifications/Copy Function Paper Weight 60 - 169 gsm... -
Page 403: Tray 2 (One Tray Module) (Optional)
Black & White: 20 sheets/minute, Colour: 20 sheets/minute (A4 one sided) Scan Black & White: 27 sheets/minute, Colour: 27 sheets/minute (Fuji Xerox Standard Paper (A4 ), 200 dpi, using Scan to USB Drive feature) Important • The scanning speed varies depending on the documents. -
Page 404: Optional Accessories
Optional Accessories The following optional accessories can be attached to the machine. For details about how to purchase, contact our Customer Support Center. Product Name Description Wireless LAN Kit Adds the function for connecting the machine to a wireless LAN. Fax Kit Adds the fax function to the machine. -
Page 405: About Supplies
CT351053 Note • Depending on your contract, the toner to order may vary. For more information, contact your local Fuji Xerox representative or sales representative. • The remaining page yield for copy/print jobs is applicable when A4 paper LEF ( ) is used. -
Page 406: Attaching/Removing The Optional Wireless Lan Kit
Attaching/Removing the Optional Wireless LAN Kit Attaching the Optional Wireless LAN Kit Turn off the machine. Refer • For details about how to turn off the machine, see "Turning Off the Machine (P.23)." Push the lever to the left to remove the cover of the optional Wireless LAN Kit socket. Insert the connector of the optional Wireless LAN Kit into the optional Wireless LAN Kit socket. -
Page 407: Removing The Optional Wireless Lan Kit
Removing the Optional Wireless LAN Kit Turn off the machine. Refer • For details about how to turn off the machine, see "Turning Off the Machine (P.23)." Push the lever, and pull out the optional Wireless LAN Kit. Attach the cover of the optional Wireless LAN Kit socket. Appendix... -
Page 408: Software/Product Manual" Disc
"Software/Product Manual" Disc The "Software/Product Manual" disc includes the manuals and software such as the print drivers/scanner drivers/utilities. The "Software/Product Manual" disc includes the following software. Operating Driver/Software Overview/How to Install System Windows PCL Driver Refer • "Installing With [Quick Setup] (P.34)" •... -
Page 409: Resetting Defaults
Resetting Defaults The machine can be reset to the factory default setting by initialization. The following menu parameters are not reset: • Authentication setting of the machine administrator • [Login Attempts] setting • [Service Lock] setting • [Secure Fax Receive] setting •... - Page 410 To initialize the wireless network settings, tap [Wi-Fi] > [Reset Wi-Fi Settings]. To initialize the wired network settings, tap [Other] > [Reset Network Settings]. Tap [Start]. User Guide...
-
Page 411: New Zealand Fax Modem Statements
New Zealand FAX modem statements General The grant of a Telepermit for any item of terminal equipment indicates only that Telecom has accepted that the item complies with minimum conditions for connection to its network. It indicates no endorsement of the product by Telecom, nor does it provide any sort of warranty. - Page 412 DocuCentre SC2022 User Guide ME8229E2-3 (Edition 1) July 2018 Fuji Xerox Co., Ltd. Copyright© 2018 by Fuji Xerox Co., Ltd.
Need help?
Do you have a question about the DocuCentre SC2022 and is the answer not in the manual?
Questions and answers
How do you move the A2 lever on the Fujifilm Docucentre SC2022