Table of Contents
Advertisement
Advertisement
Table of Contents
Troubleshooting

Subscribe to Our Youtube Channel
Related Manuals for Network Critical SmartNA-X

Summary of Contents for Network Critical SmartNA-X
- Page 1 SmartNA™ 10G Network Access (SmartNA-X) User Guide 1.0...
-
Page 2: Table Of Contents
Placing TAPs on multiple locations ...................... 12 Chapter 3 – Setting up SmartNA-X ..................14 Check items included ......................14 Installing the SmartNA-X chassis and TAP modules ..............14 Powering up the system ......................15 Connecting to the Management/Network port ................. 16 Logging in to SmartNA-X ...................... - Page 3 Authenticating users..........................26 Enabling RADIUS and TACACS+ authentication servers ..............27 Enabling transaction logging ....................29 Saving and restoring SmartNA-X configurations ..............30 Restoring default settings and custom configurations ................31 Downloading and uploading a configuration ..................31 Rebooting the system ......................32 Updating system firmware ......................
- Page 4 CCESS MART ONTENTS Adding filters to maps ......................56 Chapter 9 – Using SNMP ....................58 About SNMP and SmartNA-X ....................58 About VACM ........................60 Configuring SNMP ....................... 61 SNMP default configuration......................... 61 Enabling SNMP ........................... 61 SNMP engine ID..........................62 Configuring SNMP notifications ......................
- Page 5 1 Gbit/s TAP module (RJ45 & SFP) ..................212 1 Gbit/s TAP module (LC & SFP) ..................213 Appendix D Troubleshooting ......................214 Troubleshooting connections to SmartNA-X ................214 Problems with slow data throughput on copper (RJ) ports..............214 Connecting with IPv6......................... 214 Troubleshooting the web UI ....................216...
-
Page 6: Preface
Power supply Removable power supplies are to be used in the SmartNA-X system only. For pluggable equipment the socket outlet shall be installed near the equipment and shall be easily accessible. -
Page 7: Command Line Notation
NA™ 10G N NA-X) MART ETWORK CCESS MART REFACE OMMAND LINE NOTATION Command line notation The following notation is used to describe command line syntax in this manual: Format Description Bold text Command keywords. Type exactly as shown. Modifier Command modifiers. Type exactly as shown. Italic text Placeholder for which you must supply a value. -
Page 8: Chapter 1 - Overview
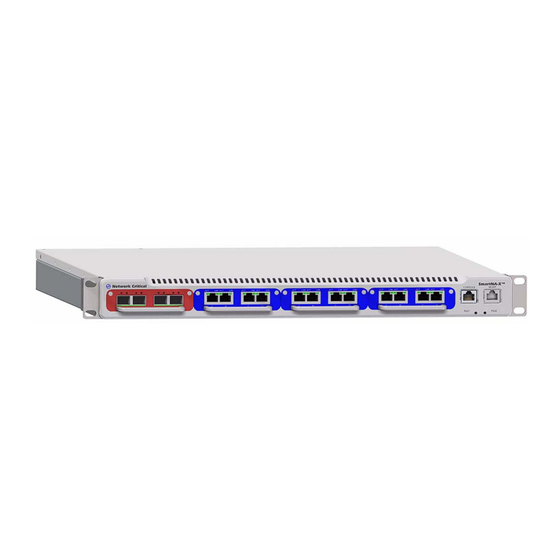
• Hardware overview, page 3 • Managing SmartNA-X, page 5 SmartNA-X features SmartNA-X 10G Network Access is a fully configurable filtering 10G TAP device that provides the following advanced TAP features: • Fail-safe ports • Traffic replication and aggregation capabilities •... - Page 9 Power LEDs – Indicate operational PSUs. Power supply units (PSUs) – Optional dual independent PSUs (AC 100V–240V or DC -48V). PSU-1 only present if a single PSU is installed in the chassis. Removable power supplies are to be used in the SmartNA-X system only...
-
Page 10: Managing Smartna-X
1-3), open a Java 1.5+ enabled web browser and enter the IP address for SmartNA-X. If this is the first time of logging on from a host, you’ll need to accept the SSL certificate before you can continue—this will not compromise your network security. Once you are at the login screen, enter your SmartNA-X username and password to access the web UI. - Page 11 VERVIEW ANAGING MART The web UI also provides access to all SmartNA-X configuration and management options. To access these options, click on the system part you wish to configure. For example, clicking on the chassis (shown in blue in Figure 1-4) shows options for network, SNMP, contact information, and other system-wide settings.
- Page 12 NA™ 10G N NA-X) MART ETWORK CCESS MART NA-X VERVIEW ANAGING MART To aggregate packets from multiple ports, create a map and then drag other sources to the line (Figure 1-6). You can also create an aggregation by selecting all the desired source ports (using the usual SHIFT/CTRL-CLICK) and then dragging from one of them to the desired destination port.
-
Page 13: Managing Smartna-X Through The Cli
The SmartNA-X CLI can be accessed through a Secure Shell (SSH) via the device’s network interface address: example.com ~# ssh admin@192.168.254.100 First time of connecting from a host, you will be asked to verify the authenticity of the SmartNA-X host. Entering ‘yes’ will allow you to continue: The authenticity of host '192.168.254.100 (192.168.254.100)' can't be established. - Page 14 • Select – selects a slot or the SmartNA-X system management options, making it the current home location. For example, select slot 1 selects the first slot, select controller selects SmartNA-X system management options.
-
Page 15: Chapter 2 - Introduction To Network Taps
• Suitable locations for placing TAPs, page 11 What is a network TAP? At Network Critical we define a network TAP as a “Test Access Point”, or a hardware device inserted at a specific point in the network where data can be accessed or “sniffed”. -
Page 16: Suitable Locations For Placing Taps
UITABLE LOCATIONS FOR PLACING Once traffic has entered the SmartNA-X system it can be directed, or mapped, to monitoring ports within the system. Tools can be attached to the monitoring ports and the traffic analyzed as required, as shown in... -
Page 17: Placing Taps On Multiple Servers
NA™ 10G N NA-X) MART ETWORK CCESS MART NTRODUCTION TO NETWORK UITABLE LOCATIONS FOR PLACING Placing TAPs on multiple servers If your environment consists of multiple servers and/or multiple server farms, the ideal TAP location would be either before or after the Load Balancer. This configuration is demonstrated in Figure 2-4 Figure 2-5. - Page 18 NA™ 10G N NA-X) MART ETWORK CCESS MART NTRODUCTION TO NETWORK UITABLE LOCATIONS FOR PLACING packet information. Other possibilities include instrumenting requester information into a custom field embedded in the application. Both methods are common when monitoring user traffic. Figure 2-5 TAP placed after load balancer DRAFT...
-
Page 19: Chapter 3 - Setting Up Smartna-X
• Serial Management Cable – DE-9 female to 8P8C (1.5 meters) • Chassis rack mounting kit (brackets and screws) • 2 x power leads Check all items are included and report any missing or damaged items immediately to Network Critical for replacement. See, Appendix I,“Contact & Support”... -
Page 20: Powering Up The System
Follow these steps to set up the chassis with your TAP modules and install it into a server rack. Unpack all supplied items and lay them on a workbench. Attach the mounting brackets to either side of the SmartNA-X chassis using the screws provided (Figure 3-1). -
Page 21: Connecting To The Management/Network Port
Logging in to SmartNA-X You can log in to the SmartNA-X management system with a web browser or a terminal client. Logging in via a web browser provides access to the web user interface, where you’ll be able to use mouse driven options to configure ports, maps, SNMP, filters, etc. - Page 22 216 for troubleshooting information. Start your Java-enabled web browser and enter https://<SmartNA-X_address>. Enter your SmartNA-X username and password and click Log in to login to the system. When you have finished working in the web UI, logout to allow access to other users of the system.
- Page 23 ~# Logging in to the CLI locally To log in to SmartNA-X as Administrator locally (without a network connection), you’ll need: • direct connection from a PC to the Console/Serial port using a DE-9 female to 8P8C (RJ45) serial management cable (supplied) •...
- Page 24 Built on Sep 25 2012 at 15:29:17 from svn revision 263M Running at Authorisation level 3 User admin logged in from serial-connection CONTROLLER> Use regular SmartNA-X CLI commands to configure settings. For example, to configure the following network settings: IP: 192.168.0.122 subnet mask: 255.255.255.0 gateway: 192.168.0.254...
- Page 25 10 minutes before attempting to change anything; this will normally be long enough for any previous operations to complete or time out, leaving the console CLI with sole control over the system. CONSOLE/SERIAL PORT Figure 3-6 SmartNA-X Console/Serial port DRAFT...
-
Page 26: Chapter 4 - Administering Smartna-X
• Monitoring system health, page 34 Logging in You can log in to SmartNA-X from a web browser or from a command line over a network link to the Management/Network port. Direct (local) access is also possible via the Console/Serial port when network access is not available. - Page 27 UI/CLI interface. MANAGEMENT/NETWORK PORT Figure 4-1 SmartNA-X Management/Network port Logging in to the web UI Enter the SmartNA-X network address in a web browser. For example: https://192.168.254.100 https://[2001:db8:1234::8a2e:370:fe56:dec4] (note the brackets). We recommend using DNS for resolving IPv6 host names.
-
Page 28: Configuring Smartna-X For The First Time
Logging in to the CLI locally If you need to configure SmartNA-X locally (without connecting to a wired LAN), you can connect a PC to the SmartNA-X Console/Serial port using a DE-9 female to 8P8C (RJ45) serial management cable (supplied). To... -
Page 29: Configuring Network Settings
“Configuring SNMP” section on page 61 Configuring network settings By default, the SmartNA-X interface is assigned a static network address. You can change the default IP address manually, or enable DHCP and let your DHCP server assign the IP, gateway and DNS addresses automatically. -
Page 30: Enabling Ntp
DMINISTERING MART NABLING Using the CLI to configure ports To enable DHCP for IPv4 (SmartNA-X does not support DHCP on IPv6), enter the following command and then skip to Step CONTROLLER>set ipv4 dhcp If setting up IPv4, enter the following commands to specify a static IP address, netmask, gateway address (optional), and DNS server address: CONTROLLER>set IPv4 static <ip-address>... -
Page 31: Managing User Accounts And Authentication
Access level: audit Table 4-2 SmartNA-X default user accounts Authenticating users Users must be authenticated before they can use the SmartNA-X management interfaces. Authentication can be performed locally or via a RADIUS/TACACS+ authentication server. To enable RADIUS/TACACS+ authentication, see the “Enabling RADIUS and TACACS+ authentication servers”... -
Page 32: Enabling Radius And Tacacs+ Authentication Servers
Enabling RADIUS and TACACS+ authentication servers The system can be configured to authenticate SmartNA-X accounts using RADIUS or TACACS+ servers to valid account authentication and privileges. This section explains how to set up RADIUS and TACACS+ authentication servers in SmartNA-X. - Page 33 NA™ 10G N NA-X) MART ETWORK CCESS MART NA-X | M DMINISTERING MART ANAGING USER ACCOUNTS AND AUTHENTICATION • Server port: Specifies the communication port, usually 1812 for authentication servers. • Shared secret: Specify the password/shared-secret required to access the authentication server. Passwords are case-sensitive.
-
Page 34: Enabling Transaction Logging
NABLING TRANSACTION LOGGING Enabling transaction logging For auditing purposes, all SmartNA-X transactions can be logged to a RADIUS or TACACS+ accounting server. Local logging is not supported by the system. This section explains how to enable accounting servers using the web UI and CLI. -
Page 35: Saving And Restoring Smartna-X Configurations
Saving and restoring SmartNA-X configurations SmartNA-X configurations can be saved to allow the system to be restored to a previous state. Configurations can also be downloaded and uploaded to another SmartNA-X device to allow the same configuration to be shared between multiple installations. -
Page 36: Restoring Default Settings And Custom Configurations
Downloading and uploading a configuration The current SmartNA-X configuration can be downloaded and saved to a text file for archiving or transferring to another SmartNA-X device. Downloading is available via the web UI only and is not available from the CLI. -
Page 37: Rebooting The System
Click Upload new configuration. Rebooting the system Rebooting the system may occasionally be required in order to refresh the SmartNA-X system and return all configuration settings to the last saved/applied settings. During the rebooting, users will not be able to access the system and any users logged in will be automatically logged out. -
Page 38: Uploading A User-Defined Ssl Certificate
Changing your password For security it’s important to keep your login password to the SmartNA-X system secure. If you suspect the password is no longer secure, you can change it after logging in to the web UI and accessing the Management tab. -
Page 39: Monitoring System Health
NA™ 10G N NA-X) MART ETWORK CCESS MART NA-X | M DMINISTERING MART ONITORING SYSTEM HEALTH Log in to the web UI. Click on the main chassis area to access system management settings. Select the Management tab. Click Change password. Enter your new password, and again to confirm, and click OK. -
Page 40: Chapter 5 - Using The Web User Interface
This chapter provides information on managing SmartNA-X via the integrated web user-interface (UI). The web UI supports a full set of administrative, user and audit options and is available to all SmartNA-X users, although some options may be disabled if you don’t have the required access privileges. It contains the following sections: •... -
Page 41: Selecting Options In The System Diagram
ELECTING OPTIONS IN THE SYSTEM DIAGRAM Enter the SmartNA-X IP address (for example 192.168.254.100) in a web browser. If this is the first time you have logged in, you will need to accept the security certificate (accepting the certificate does not compromise your network security). -
Page 42: Further Information
For further information on using the web UI, please refer to the following chapters: • For details about using the web UI to configure network settings and other Administrator options, see Chapter 4,“Administering SmartNA-X”. • For details about using the web UI to configure ports, see Chapter 6,“Configuring ports”. -
Page 43: Chapter 6 - Configuring Ports
3: 37.1.4.4 and allows for connection to legacy devices supporting half-duplex only. Thus, if the link partner is set as full-duplex (not auto) and the SmartNA-X port is set as full-duplex, the SmartNA-X port will revert to half- duplex, resulting in a duplex mismatch. A duplex mismatch will significantly slow down data throughput between the link partners. - Page 44 NA™ 10G N NA-X) MART ETWORK CCESS MART ONFIGURING PORTS ONFIGURING PORT COMMUNICATION SETTINGS Click on the port you want to configure and select the Port Configuration tab. Using the menus, select the port speed, duplex, MDI/MDI-X and mastery (clock master) as required. Auto is the recommended settings for all but the most critical situations.
-
Page 45: Configuring Port Failsafe And Lfp (Tap Mode)
NA™ 10G N NA-X) MART ETWORK CCESS MART LFP (TAP ONFIGURING PORTS ONFIGURING PORT FAILSAFE AND MODE Configuring port failsafe and LFP (TAP mode) Copper port pairs (AB and CD) support ‘TAP mode’ for integrated fail-to-safe and Link Failure Propagation (LFP). -
Page 46: Testing Failsafe
NA™ 10G N NA-X) MART ETWORK CCESS MART LFP (TAP ONFIGURING PORTS ONFIGURING PORT FAILSAFE AND MODE Select the TAP checkbox (if it is not already selected), as shown in Figure 6-2). TAP mode will automatically be selected in the pair (AB and CD). TAP OPTION Figure 6-2 Port configuration tab (TAP checkbox shown) Click Review/apply and review the changes you have made, and then click Apply to implement your changes. -
Page 47: Configuring Ports Roles
TAP configuration. Leave the setting as ‘Unknown’ if you don’t care about port role. Using the web UI to configure port roles Select the SmartNA-X chassis. Select the Port Configuration tab. From the Usage menu, select Tool if the port is an output/network tool port, select Network if the port is an input/TAP port. -
Page 48: Configuring Port Traffic Thresholds
NA™ 10G N NA-X) MART ETWORK CCESS MART ONFIGURING PORTS ONFIGURING PORT TRAFFIC THRESHOLDS The following example session enables TAP mode on ports on ports 2A and 2B: CONTROLLER>select slot 2 SLOT1>select slot 2 SLOT2>set port a tap on SLOT2>set port b tap on SLOT2>show port a speed : set auto... -
Page 49: Configuring Port Locking
NA™ 10G N NA-X) MART ETWORK CCESS MART ONFIGURING PORTS ONFIGURING PORT LOCKING Enter the upper and lower traffic thresholds as a percentage of total capacity. The ‘high’ value must be greater than the ‘low’ value. Setting the high to 100% or the low to 0% will inhibit the respective high/low traffic trap, preventing it from being sent. -
Page 50: Saving Port Settings
NA™ 10G N NA-X) MART ETWORK CCESS MART ONFIGURING PORTS AVING PORT SETTINGS The following example session enables autolock on ports 2A and 2B: CONTROLLER>select slot 2 SLOT2>set port a autolock on SLOT2>set port b autolock on SLOT2>show port a speed : set auto duplex... - Page 51 NA™ 10G N NA-X) MART ETWORK CCESS MART ONFIGURING PORTS AVING PORT SETTINGS configuration not only saves the port communication settings, but also any port maps and port filters that have been created, allowing you to configure different TAPs and quickly load them later as you need. Figure 6-3 The Saved configurations window DRAFT...
-
Page 52: Chapter 7 - Creating Port Maps
About port maps Port maps determine how tapped traffic within the SmartNA-X system flows from source port to destination port. Maps that originate from the same source port are independent of one another, thus, traffic flowing along a map is treated entirely separately from other maps originating from the same source. - Page 53 NA™ 10G N NA-X) MART ETWORK CCESS MART REATING BOUT PORT MAPS An essential map arrangement when setting a live TAP is to link A and B ports so traffic is allowed to pass upstream and downstream across the TAP. The map for this arrangement is shown in Figure 7-1 below.
-
Page 54: Creating Port Maps
NA™ 10G N NA-X) MART ETWORK CCESS MART REATING REATING PORT MAPS More complex port maps can also be created using several TAPs. For example, Figure 7-3 shows two TAP pairs on ports 1AB and 3AB aggregated to ports 1C and 1D. Figure 7-3 Multiple TAP aggregation map Creating port maps Port maps can be created in the web UI or CLI, depending on your working preference. -
Page 55: Creating Maps In The Web Ui
Figure 7-4 Creating a port map The modularity of the SmartNA-X system allows you to connect ports and maps with almost unlimited flexibility. For instance, you can map the upstream and downstream links to separate output ports for analysis by separate... - Page 56 NA™ 10G N NA-X) MART ETWORK CCESS MART REATING REATING PORT MAPS Direct input ports to one output port so filters can be used on one or both streams (Figure 7-7). Figure 7-7 Directing input ports to one output port and applying a filter Replicate a stream to different output ports (Figure 7-8).
-
Page 57: Creating Port Maps In The Cli
NA™ 10G N NA-X) MART ETWORK CCESS MART REATING YPICAL MAP CONFIGURATIONS Creating port maps in the CLI To create port maps using the CLI, use the set map command. For example, to create a mapping for the following ports: 1A ->... - Page 58 NA™ 10G N NA-X) MART ETWORK CCESS MART REATING YPICAL MAP CONFIGURATIONS Use regeneration TAPs when you want to monitor the same data set with multiple network tools DRAFT...
-
Page 59: Chapter 8 - Using Packet Filters
HAPTER SING ACKET ILTERS 8 – This chapter describes how to use packet filters to restrict the traffic that reaches the output ports in your TAP configuration. It covers the following major topics: • About packet filters, page 54 • Creating packet filters, page 55 •... -
Page 60: Creating Packet Filters
Creating packet filters You can create filters in the web UI or CLI. We suggest using the SmartNA-X web UI wherever possible as it provides plenty of assistance when making filter selections and will disable options which are not applicable for a particular packet type. -
Page 61: Adding Filters To Maps
NA™ 10G N NA-X) MART ETWORK CCESS MART SING ACKET ILTERS DDING FILTERS TO MAPS • Name: “subnet 198.168.10. tcp” • Packet type: IPv4 • Protocol: TCP • IP address source: 198.168.10.0/255.255.255.0 enter this command at the prompt: CONTROLLER>set filter "subnet 198.168.10. tcp" ipv4 address src 198.168.10.0/255.255.255.0 protocol tcp page 139 for information on the set filter IPv4 command, and... - Page 62 NA™ 10G N NA-X) MART ETWORK CCESS MART SING ACKET ILTERS DDING FILTERS TO MAPS enter this command at the prompt: CONTROLLER>set map 1A to 1B 1C require "filter1" exclude "filter2" page 136 for information on the set map command. DRAFT...
-
Page 63: Chapter 9 - Using Snmp
Both agent and management information base (MIB) reside on the device that is being managed, in this case SmartNA-X. An agent has local knowledge of management information and translates that information to or from an SNMP specific form. A manager can request a value from the agent or store a value into the agent. The agent can also respond to a manager’s requests to get or set data. - Page 64 NA™ 10G N NA-X) MART ETWORK CCESS MART SNMP | A SNMP NA-X SING BOUT MART processing SNMP retrieval or modification request messages from a manger, and also when a notification message must be sent to the manager. VACM elaborates on the community string concept by allowing a much stricter and more dynamic access control model that is easy to administer.
-
Page 65: About Vacm
When connecting with SNMPv3, there is an alternative mechanism for identification and access control: VACM. In this case, you provide a certain user’s credentials instead of a community string. On the SmartNA-X device, users belong to groups, available settings are collected into views, and the access control list determines which groups can access which views. -
Page 66: Configuring Snmp
None enabled Table 9-3 Default SNMP configuration Enabling SNMP For security, the SNMP agent in SmartNA-X is not enabled by default. It must first be enabled before you can use SNMP functions. Using the web UI to enable SNMP Select the SNMP tab. -
Page 67: Snmp Engine Id
The engine ID is automatically generated by the system and is a product of the enterprise number of Network Critical (by IANA) and the MAC address of the SmartNA-X ethernet interface, thus it is not user configurable. -
Page 68: Configuring Snmpv1/V2C Communities
SNMPv3 and VACM instead. Using the web UI to configure SNMP communities Log in to SmartNA-X as Administrator. Click on the chassis and select the SNMP tab. Under “Traditional access control”, click Configure communities. The “SNMP Communities” settings window appears. -
Page 69: Configuring Trap Managers (Notification Hosts)
NA™ 10G N NA-X) MART ETWORK CCESS MART SNMP | C SNMP SING ONFIGURING Select community settings from the following fields: • Community string – Enter a secret/password string for the community to authenticate clients. The community string is case-sensitive and must contain 1–32 alphanumeric characters (no spaces), and the first character must be a letter. -
Page 70: Configuring Snmpv3 Users With Vacm
SNMP, but the access control on the SmartNA-X device is configured using VACM. In this case, the community string is mapped onto a “security name” that is then added into groups, just like native SNMPv3 users. -
Page 71: Adding A Member Or Security Name To A Group
Using the web UI to add members or security names to a group Log in to SmartNA-X as Administrator. Click on the chassis and select the SNMP tab. -
Page 72: Configuring Views
NA™ 10G N NA-X) MART ETWORK CCESS MART SNMP | C SNMP SING ONFIGURING Using the CLI to add members or security names to a group In the CLI, use the snmp create sectogroup command to create SNMP groups. For example, the following command sets up group1 with USM security and maps user1: CONTROLLER>snmp create sectogroup group1 usm user1 CONTROLLER>snmp apply... -
Page 73: Configuring The Access Control List
Using the web UI to configure the access control list Log in to SmartNA-X as an Administrator. Click on the chassis and select the SNMP tab. Under “View-based access control”, click Configure access control list. The “SNMP Access Control List” window appears. -
Page 74: Appendix A Command Line Interface Reference
PPENDIX OMMAND NTERFACE EFERENCE A – This appendix describes the command line interface (CLI) commands that are available for SmartNA-X. It includes the following sections: • Basic commands, page 70 • Commands for managing contact and location details, page 79 •... -
Page 75: Basic Commands
NA™ 10G N NA-X) MART ETWORK CCESS MART OMMAND NTERFACE EFERENCE Basic commands The CLI supports the following basic commands: • , page 71 • , page 72 ELECT • , page 73 OMMIT • , page 74 REATE SETTINGS •... - Page 76 NA™ 10G N NA-X) MART ETWORK CCESS MART OMMAND NTERFACE EFERENCE Use the help command for information on command usage. Enter help (without any parameters) for general information on entering commands. Enter help auth for information on remote authorization and authentication commands, help net for information on networking commands, help filter for information on packet filtering commands, help map for information on port mapping commands, and help port for information setting port parameter commands.
- Page 77 NA™ 10G N NA-X) MART ETWORK CCESS MART OMMAND NTERFACE EFERENCE ELECT Use the select command to select the system Controller (motherboard) or a chassis slot. Selecting a slot will give you access to the TAP module that is installed in the slot and allow you to view and configure its ports. Command form select slot [0-4] select controller...
- Page 78 NA™ 10G N NA-X) MART ETWORK CCESS MART OMMAND NTERFACE EFERENCE OMMIT Use the commit command to program the system with the maps and filters defined with set map and set filter commands. Command form commit Example Commit maps and filters: CONTROLLER>commit Committing maps and filters DRAFT...
- Page 79 NA™ 10G N NA-X) MART ETWORK CCESS MART OMMAND NTERFACE EFERENCE REATE SETTINGS Use the create settings command to save current settings for ports, port mappings, packet filters and SNMP (not saved are network settings, firmware or counter states). Use the restore command to restore a profile. Command form create settings name-string name-string...
- Page 80 NA™ 10G N NA-X) MART ETWORK CCESS MART OMMAND NTERFACE EFERENCE ESTORE Use the restore command to restore the default configuration or a user-saved profile. Restoring a profile will overwrite port settings, filters, port maps and SNMP settings. To see a list of profiles that are available for restoring, use the restore command without the name-string parameter.
- Page 81 NA™ 10G N NA-X) MART ETWORK CCESS MART OMMAND NTERFACE EFERENCE ELETE SETTINGS Use the delete settings command to remove saved settings. Command form delete settings name-string name-string Specifies the settings name to remove. Example Delete settings config_tap1: CONTROLLER>delete settings config_tap1 deleted OK DRAFT...
- Page 82 NA™ 10G N NA-X) MART ETWORK CCESS MART OMMAND NTERFACE EFERENCE EBOOT Use the reboot command to restart the current TAP module or the system motherboard when Controller is selected. Rebooting the Controller/motherboard will log you out of the system and prevent connectivity for several minutes.
- Page 83 NA™ 10G N NA-X) MART ETWORK CCESS MART OMMAND NTERFACE EFERENCE Use the exit or quit command to exit from the CLI and log out the current user. If any network configuring changes are pending, they will be implemented after quitting from the CLI. Command form exit or quit Example...
-
Page 84: Commands For Managing Contact And Location Details
NA™ 10G N NA-X) MART ETWORK CCESS MART OMMAND NTERFACE EFERENCE Commands for managing contact and location details The CLI supports the following commands for setting the name, location and contact parameters used by SNMP: • , page 80 HOW NAME •... - Page 85 Default value: “Network Critical”. Examples • Set the system name string to SmartNA-X 10G Network Access: CONTROLLER>set name SmartNA-X 10G Network Access • Show system name string: CONTROLLER>show name...
- Page 86 If the string includes a comma and you are using a RADIUS server, the comma will replaced by an underscore when viewed in server logs. Default: “Network Critical”. Example Set the system location string to Service rack, Boston datacenter: CONTROLLER>set name Service rack, Boston datacenter...
- Page 87 OMMAND NTERFACE EFERENCE HOW CONTACT Use the set contact command to configure contact information for the SmartNA-X administrator or designated contact. Use the show contact command to display the current system contact string. Command form set contact contact_string show contact contact_string Specifies the contact name string.
-
Page 88: Commands For Managing Network Configuration
NA™ 10G N NA-X) MART ETWORK CCESS MART OMMAND NTERFACE EFERENCE Commands for managing network configuration The CLI supports the following commands for configuring network settings: • NTP, page 84 REATE • NTP, page 85 ELETE • 4, page 86 •... - Page 89 NA™ 10G N NA-X) MART ETWORK CCESS MART OMMAND NTERFACE EFERENCE REATE Use the create ntp command to add a time (NTP) server. Only one NTP server is allowed. Command form create ntp IP-addr IP-addr Specifies the network IP address of the NTP server. Example Add NTP server 192.168.10.100: CONTROLLER>create ntp 192.168.10.100...
- Page 90 NA™ 10G N NA-X) MART ETWORK CCESS MART OMMAND NTERFACE EFERENCE ELETE Use the delete ntp command to remove a time (NTP) server. Command form delete ntp Example Delete NTP server: CONTROLLER>delete ntp DRAFT...
- Page 91 NA-X) MART ETWORK CCESS MART OMMAND NTERFACE EFERENCE Use the show IPv4 command to display IPv4 settings for the SmartNA-X network interface: Command form show IPv4 Example Show network interface IPv4 settings: CONTROLLER>show ipv4 Addressing Mode : static Address: 192.168.0.122 Netmask: 255.255.255.0...
- Page 92 STATIC Use the set IPv4 static command to configure a static IPv4 network address, network mask, and optionally the gateway address for SmartNA-X. The new configuration is not implemented until you log out (exit) from the CLI. Command form set IPv4 static <static-addr> <mask> [gateway <IPv4-gateway>] static-addr Specifies the network interface IPv4 address, in dotted-decimal format (a.b.c.d).
- Page 93 NA™ 10G N NA-X) MART ETWORK CCESS MART OMMAND NTERFACE EFERENCE GATEWAY Use the set ipv4 gateway command to configure the IPv4 network gateway address. The new configuration is not implemented until you log out (exit) from the CLI. The CLI will not allow you to set gateway and IPv4 address to an invalid combination.
- Page 94 (DNS), a distributed database with which you can map host names to IP addresses. When you configure DNS for SmartNA-X, you can substitute the host name for the IP address with commands that take an address. There is no IPv6 equivalent of this command.
- Page 95 Use the set ipv4 dhcp command to enable DHCP and have your DHCP server automatically assign network settings, including IP address, gateway and DNS, to SmartNA-X. The new configuration is not implemented until you log out (exit) from the CLI when accessing through the current (static) IPv4 address. The requirement to exit the CLI does not apply if DHCP is enabled through the Console/Serial port or IPv6, and in these cases the configuration will be implemented instantly.
- Page 96 NA™ 10G N NA-X) MART ETWORK CCESS MART OMMAND NTERFACE EFERENCE Use the show IPv6 command to show all IPv6 settings. Command form show IPv6 Examples Show IPv6 settings: CONTROLLER>show ipv6 Set Global Address : 2001::5 Set Prefix Length : 16 Set Gateway : 2001::4 Link Local Address : fe80::21d:ffff:fe00:91ff Active Global Address : 2001::5...
- Page 97 Use the set IPv6 static command to configure a static IPv6 network address, prefix length, and optionally a gateway address. SmartNA-X has a link-local IPv6 address implicitly set, but you may specify one additional IPv6 address. The new configuration will not be implemented until you log out (exit) from the CLI.
- Page 98 NA™ 10G N NA-X) MART ETWORK CCESS MART OMMAND NTERFACE EFERENCE GATEWAY Use the set IPv6 gateway command to configure the IPv6 network gateway address. The new configuration is not implemented until you log out (exit) from the CLI. Command form set IPv6 gateway IPv6-addr IPv6-addr Specifies the network gateway IPv6 address.
-
Page 99: Commands For Managing Users
NA-X) MART ETWORK CCESS MART OMMAND NTERFACE EFERENCE Commands for managing users The CLI supports the following commands for setting up SmartNA-X users: • , page 95 HOW USERS • , page 96 REATE USER • , page 97 ET USER PASSWORD •... - Page 100 EFERENCE HOW USERS Use the show users command to display the current system users. Command form show users Example Show SmartNA-X users: CONTROLLER>show users user : security level 2 admin : security level 3 audit : security level 1 DRAFT...
- Page 101 NA™ 10G N NA-X) MART ETWORK CCESS MART OMMAND NTERFACE EFERENCE REATE USER Use the create user command to create user accounts locally. User accounts have the following attributes: • username • password • security level Note that you cannot use this command to create RADIUS or TACACS+ users. Command form create user username password { 2, 3...
- Page 102 NA™ 10G N NA-X) MART ETWORK CCESS MART OMMAND NTERFACE EFERENCE ET USER PASSWORD Use the set user password command to change the login password for the specified user when using local authentication. If your system has been set up to authenticate users via an external authentication server, you will need to manage user passwords on the external server instead.
- Page 103 SmartNA-X provides three security levels, each with varying access to system/TAP module options: • Level1 (Auditors): Allows read-only access to system and module settings. This level should be used by auditors and other users who require read-only access to the system.
- Page 104 NA™ 10G N NA-X) MART ETWORK CCESS MART OMMAND NTERFACE EFERENCE ELETE USER Use the delete user command to remove a locally authenticated account. Accounts must be deleted on your AAA server if external authentication is enabled. Command form delete user username username Specifies the name of the account to delete.
-
Page 105: Commands For Managing Authentication And Accounting
NA™ 10G N NA-X) MART ETWORK CCESS MART OMMAND NTERFACE EFERENCE Commands for managing authentication and accounting The CLI supports the following commands for setting up authentication and accounting: • , page 101 HOW RADIUS • , page 102 HOW TACACS •... -
Page 106: How Radius
NA™ 10G N NA-X) MART ETWORK CCESS MART OMMAND NTERFACE EFERENCE HOW RADIUS Use the show radius command to display the RADIUS server configuration information. Command form show radius Example Show RADIUS servers: CONTROLLER>show radius Authentication Server 192.168.10.22 port 1812 Accounting Server 192.168.10.23 port 1813 DRAFT... -
Page 107: How Tacacs
NA™ 10G N NA-X) MART ETWORK CCESS MART OMMAND NTERFACE EFERENCE HOW TACACS Use the show tacacs command to display the TACACS+ server configuration information. Command form show tacacs Example Show TACACS+ servers: CONTROLLER>show tacacs Authentication server 192.168.10.24 Accounting Server 192.168.10.25 DRAFT... -
Page 108: Et Authentication
NA™ 10G N NA-X) MART ETWORK CCESS MART OMMAND NTERFACE EFERENCE ET AUTHENTICATION Use the set authentication command to define the authentication method used to verify user login credentials. By default, user accounts are authenticated locally, but you can use an authentication server to authenticate users by choosing either RADIUS or TACACS+, as required by your authentication server. -
Page 109: Reate Radius Authserver
NA™ 10G N NA-X) MART ETWORK CCESS MART OMMAND NTERFACE EFERENCE REATE RADIUS AUTHSERVER Use the create radius authserver command to add a RADIUS authentication server. You must use also the set authentication radius command to enable RADIUS server authentication. If your network has more than one RADIUS authentication server running, you can add them as backup/failover servers and the system will attempt to contact the second server in order to validate a user (the system will not switch between RADIUS and TACACS+ servers though if both are defined). -
Page 110: Elete Radius Authserver
Use the delete RADIUS authserver command to remove access to a RADIUS authentication server. Note that users will not be able to access SmartNA-X unless local authentication is enabled (set authentication local) or another authentication server is added (create radius authserver). -
Page 111: Reate Tacacs Authserver
NA™ 10G N NA-X) MART ETWORK CCESS MART OMMAND NTERFACE EFERENCE REATE TACACS AUTHSERVER Use the create tacacs authserver command to add a TACACS+ authentication server. You must use also the set authentication tacacs command to enable TACACS+ server authentication. If your network has more than one TACACS+ authentication server running, you can add them as backup/failover servers and the system will attempt to contact the second server in order to validate a user if the account is not present or the secrets mismatch on the first server. -
Page 112: Elete Tacacs Authserver
Use the delete tacacs authserver command to remove access to a TACACS+ authentication server. Note that users will not be able to access SmartNA-X unless local authentication is enabled (set authentication local) or another authentication server is added (create tacacs authserver). -
Page 113: Reate Radius Accserver
REATE RADIUS ACCSERVER Use the create radius accserver command to add a RADIUS accounting server. Adding an accounting server implicitly enables SmartNA-X logging. Note that local logging is not available on SmartNA-X. Command form create radius accserver <IP-addr> <port> password IP-addr Specifies the network IP address of the RADIUS accounting server. -
Page 114: Elete Radius Accserver
NA™ 10G N NA-X) MART ETWORK CCESS MART OMMAND NTERFACE EFERENCE ELETE RADIUS ACCSERVER Use the delete radius accserver command to remove the specified RADIUS accounting server. Command form delete radius accserver IP-addr IP-addr Specifies the network IP address of the RADIUS accounting server. Example Delete RADIUS accounting server 192.168.10.23: CONTROLLER>delete radius accserver 192.168.10.23... -
Page 115: Reate Tacacs Accserver
EFERENCE REATE TACACS ACCSERVER Use the create tacacs accserver command to add a TACACS+ accounting server and implicitly enable SmartNA- X audit logging. Note that local audit logging is not available on SmartNA-X. Command form create tacacs accserver <IP-addr> password] IP-addr Specifies the network IP address of the TACACS+ accounting server. -
Page 116: Elete Tacacs Accserver
NA™ 10G N NA-X) MART ETWORK CCESS MART OMMAND NTERFACE EFERENCE ELETE TACACS ACCSERVER Use the delete tacacs accserver command to remove the specified TACACS+ accounting server. Command form delete tacacs accserver IP-addr IP-addr Specifies the network IP address of the TACACS+ accounting server. Example Delete TACACS+ accounting server 192.168.10.25: CONTROLLER>delete tacacs accserver 192.168.10.25... -
Page 117: Et Log
MART OMMAND NTERFACE EFERENCE ET LOG Use the set log command to add arbitrary log entries to SmartNA-X logs when using AAA accounting server(s). Command form set log text-string text Specifies the text to add to the log entry. Examples Add the following log entries: Ticket 243: Change IPV6 network settings <settings changed>:... -
Page 118: Commands For Managing Tap Modules
NA™ 10G N NA-X) MART ETWORK CCESS MART OMMAND NTERFACE EFERENCE Commands for managing TAP modules The CLI supports the following commands for managing TAP modules: • , page 115 HOW TEMPERATUREHIGH • , page 116 HOW STATUS • , page 117 HOW COUNTERS •... -
Page 119: Commands For Managing Tap Ports
NA™ 10G N NA-X) MART ETWORK CCESS MART OMMAND NTERFACE EFERENCE Commands for managing TAP ports The CLI supports the following commands for managing TAP ports: • , page 121 HOW PORT • , page 122 ET PORT SPEED • , page 123 ET PORT DUPLEX •... - Page 120 NA™ 10G N NA-X) MART ETWORK CCESS MART OMMAND NTERFACE EFERENCE HOW TEMPERATUREHIGH Use the set temperaturehigh command to set the TAP module temperature threshold for SNMP. An SNMP notification will be sent if SNMP health notification is enabled (with the snmp enable notify health command) and the temperature exceeds the value set here.
- Page 121 OMMAND NTERFACE EFERENCE HOW STATUS Use the show status command to display selected TAP module and system status information. This information may be requested when contacting your Network Critical Support Center. Command form show status Example Show Controller/system status: CONTROLLER>show status...
- Page 122 NA™ 10G N NA-X) MART ETWORK CCESS MART OMMAND NTERFACE EFERENCE HOW COUNTERS Use the show counters command to display bytes in/out (since the last reset) for each port in the selected slot. Command form show counters Example Show counter information for the TAP module in slot 1: SLOT1>show counters Port Bytes in...
- Page 123 NA™ 10G N NA-X) MART ETWORK CCESS MART OMMAND NTERFACE EFERENCE LEAR COUNTERS Use the clear counters command to reset all traffic counters to zero. Command form clear counters Example Show and reset counters for the TAP module in slot 1: SLOT1>clear counters Cleared Counters OK SLOT1>show counters...
- Page 124 NA™ 10G N NA-X) MART ETWORK CCESS MART OMMAND NTERFACE EFERENCE HOW RATES Use the show rates command to display traffic rates for the current slot. Input and output rates for each port are shown as bytes/sec and as percentage of the total capacity available. Press return to stop the command. Command form show rates Example...
- Page 125 NA™ 10G N NA-X) MART ETWORK CCESS MART OMMAND NTERFACE EFERENCE HOW ERRORS Use the show errors command to display packet error details for the selected TAP module. The following packet error details are returned: • Undersize • Fragments • Oversize •...
-
Page 126: How Port
NA™ 10G N NA-X) MART ETWORK CCESS MART OMMAND NTERFACE EFERENCE HOW PORT Use the show port command to display port information. Command form show port port-id Example Show settings for port 4A: CONTROLLER>select slot 4 SLOT4>show port A speed : set auto actual 1G duplex : set auto actual full... -
Page 127: Et Port Speed
NA™ 10G N NA-X) MART ETWORK CCESS MART OMMAND NTERFACE EFERENCE ET PORT SPEED Use the set port speed command to configure the speed of the specified copper port (A–D) of the selected TAP module. Setting anything other than Auto fixes the port at the specified setting, even if the link partner is unable to communicate at that setting or if network transmission conditions deteriorate. -
Page 128: Et Port Duplex
3: 37.1.4.4 and allows for connection to legacy devices supporting half-duplex only. Thus, if the link partner is set as full-duplex (not auto) and the SmartNA-X port is set as full-duplex, the SmartNA-X port will revert to half- duplex, resulting in a duplex mismatch. A duplex mismatch will significantly slow down data throughput between the link partners. - Page 129 NA™ 10G N NA-X) MART ETWORK CCESS MART OMMAND NTERFACE EFERENCE • Set port 4D to half-duplex: CONTROLLER>select slot 4 SLOT4>set port D duplex half SLOT4>show port D speed : set auto duplex : set half : set auto mastering : set preferslave : off autolock...
-
Page 130: Et Port
NA™ 10G N NA-X) MART ETWORK CCESS MART OMMAND NTERFACE EFERENCE ET PORT Use the set port mdi command to specify the crossover mode of the port, either MDI (normal) or MDI-X (crossover). To connect two ports of the same configuration (MDI to MDI or MDI-X to MDI-X), an Ethernet crossover cable is needed to cross over the transmit and receive signals in the cable, so that they are matched at the connector level. -
Page 131: Et Port Tap
NA™ 10G N NA-X) MART ETWORK CCESS MART OMMAND NTERFACE EFERENCE ET PORT TAP Use the set port tap command to configure the specified ports as TAP ports of the currently selected TAP module. TAP ports connect to the live network and as such must provide link-up status at all times. In the event of a power failure or a module being pulled, a relay switch is instantly closed to maintain the network connection when TAP is on. -
Page 132: Et Port Autolock
NA™ 10G N NA-X) MART ETWORK CCESS MART OMMAND NTERFACE EFERENCE ET PORT AUTOLOCK Use the set port autolock command to configure auto locking on the specified ports of the currently selected TAP module. To prevent unauthorized users from accessing ports, you can set autolock so the port becomes automatically locked if the cable is removed, preventing data transmission to/from the port. -
Page 133: Et Port Lock
NA™ 10G N NA-X) MART ETWORK CCESS MART OMMAND NTERFACE EFERENCE ET PORT LOCK Use the port set port lock command to configure port locking of the currently selected TAP module. Locking a port will prevent access to unauthorized users. This command is also used to unlock a port that has been auto- locked. -
Page 134: Et Port Mastering
NA™ 10G N NA-X) MART ETWORK CCESS MART OMMAND NTERFACE EFERENCE ET PORT MASTERING Use the port set port mastering command to configure port master/slave settings of the currently selected TAP module. The command sets the port’s master/slave relationship with the link partner on a 1G RJ/copper link when in TAP mode. - Page 135 NA™ 10G N NA-X) MART ETWORK CCESS MART OMMAND NTERFACE EFERENCE • Prefer slave for port 4D: SLOT4>set port C mastering preferslave SLOT4>show port C speed : set 1G duplex : set auto actual full : set mdi-x mastering : set preferslave : off autolock : on...
-
Page 136: Et Port Trafficlow
NA™ 10G N NA-X) MART ETWORK CCESS MART OMMAND NTERFACE EFERENCE ET PORT TRAFFICLOW Use the port set port trafficlow command to set the low traffic thresholds used by SNMP to trigger a health notification. Command form set port port-id trafficlow {0...100} port-id Specifies the port to set. -
Page 137: Et Port Traffichigh
NA™ 10G N NA-X) MART ETWORK CCESS MART OMMAND NTERFACE EFERENCE ET PORT TRAFFICHIGH Use the port set port traffichigh command to set the high traffic thresholds used by SNMP to trigger a health notification. Command form set port port-id traffichigh {0...100} port-id Specifies the port to set. -
Page 138: Commands For Managing Port Maps And Packet Filters
NA™ 10G N NA-X) MART ETWORK CCESS MART OMMAND NTERFACE EFERENCE Commands for managing port maps and packet filters The CLI supports the following commands for managing maps and filters: • , page 134 HOW MAPS • , page 135 LEAR MAPS •... - Page 139 NA™ 10G N NA-X) MART ETWORK CCESS MART OMMAND NTERFACE EFERENCE HOW MAPS Use the show maps command to review your mapping configurations before applying them with the commit command. Command form show maps Examples Show maps: CONTROLLER>show maps maps destinationPorts 1.
- Page 140 NA™ 10G N NA-X) MART ETWORK CCESS MART OMMAND NTERFACE EFERENCE LEAR MAPS Use the clear maps command to remove all defined maps and all filter that have been defined. Command form clear maps Example Clear maps: CONTROLLER>clear maps DRAFT...
- Page 141 NA™ 10G N NA-X) MART ETWORK CCESS MART OMMAND NTERFACE EFERENCE ET MAP Use the set map command to create port mappings. Packets received on a source port are sent to all of the destination ports mapped to it. Pre-defined filters can be applied to maps to pass or block packets that match the filtering conditions.
- Page 142 NA™ 10G N NA-X) MART ETWORK CCESS MART OMMAND NTERFACE EFERENCE 2C > 2D 2D > 2C 3A > 3B 3A > 3D include HTTP filter 3A > 4C exclude HTTP filter 3B > 3A 4A > 4B 2A > 2B, 2C, 2D, 3A, 3B, 4A, 4B, 1B include SMTP filter 4B >...
- Page 143 NA™ 10G N NA-X) MART ETWORK CCESS MART OMMAND NTERFACE EFERENCE HOW FILTERS Use the show filters command to display information for all filters, including any port maps they are bound to. To remove filters, use the clear maps command, which will also remove all defined maps. Command form show filters Examples...
- Page 144 • When a filter is set to permit VID 1, untagged packets will still be forwarded. • Tagged packets with a VID of 1 will be forwarded untagged. • Tagged packets with a VID of 0 will be dropped by SmartNA-X. mac-value] (Optional) Filters on the specified value matching the source mac src MAC address.
- Page 145 NA™ 10G N NA-X) MART ETWORK CCESS MART OMMAND NTERFACE EFERENCE dscp-value] (Optional) Filters on the specified value matching the DSCP dscp number. Use commas if specifying multiple DSCP values. prt-value] (Optional) Filters on the specified value matching the source port src UDP or TCP port number.
- Page 146 NA™ 10G N NA-X) MART ETWORK CCESS MART OMMAND NTERFACE EFERENCE • Set up IPv4 filter for TCP and UDP packets on port 25 (UDP port 25 is reserved for Simple Mail Transfer Protocol (SMTP) e-mail routing between mail servers): CONTROLLER>set filter smtp_traffic ipv4 protocol tcp_udp port src 25 CONTROLLER>show filters Use commit command to configure the switch with these.
- Page 147 NA™ 10G N NA-X) MART ETWORK CCESS MART OMMAND NTERFACE EFERENCE ET FILTER IPV Use the set filter ipv6 command to create a filter for IPv6 packets. If no other conditions are specified, the filter matches all packets of type IPv6. Additional IPv6 conditions can be specified to further refine the match conditions.
- Page 148 NA™ 10G N NA-X) MART ETWORK CCESS MART OMMAND NTERFACE EFERENCE prt-value] (Optional) Filters on the specified value matching the source port port src number. For prt-value, the following formats are recognized: • 10 – A single port • 10-20 – A range (inclusive) •...
- Page 149 NA™ 10G N NA-X) MART ETWORK CCESS MART OMMAND NTERFACE EFERENCE Examples • Set up IPv6 filter for TCP/UDP traffic from source address 2001:db8:85a3::8a2e:370:7334 to destinations 2000:abcd::77:88-99: CONTROLLER>set filter tcp6_traffic ipv6 protocol tcp_udp address src 2001:db8:85a3::8a2e:370:7334 address dest 2000:abcd::77:88-99 CONTROLLER>show filters Use commit command to configure the switch with these.
- Page 150 • When a filter is set to permit VID 1, untagged packets will still be forwarded. • Tagged packets with a VID of 1 will be forwarded untagged. • Tagged packets with a VID of 0 will be dropped by SmartNA-X. mac-value] (Optional) Filters on the specified value matching the source mac src MAC address.
- Page 151 NA™ 10G N NA-X) MART ETWORK CCESS MART OMMAND NTERFACE EFERENCE dscp-value] (Optional) Filters on the specified value matching the DSCP dscp number. Use commas if specifying multiple DSCP values. prt-value] (Optional) Filters on the specified value matching the source port port src number.
- Page 152 NA™ 10G N NA-X) MART ETWORK CCESS MART OMMAND NTERFACE EFERENCE ET FILTER ARP Use the set filter arp command to create a filter for ARP (Address Resolution Packets) packets. If no other conditions are specified, the filter matches all ARP packets. Additional conditions can be specified to further refine the match conditions.
- Page 153 NA™ 10G N NA-X) MART ETWORK CCESS MART OMMAND NTERFACE EFERENCE add-value] (Optional) Filters on the specified value matching the IP address src source address. For add-value, the following formats are recognized: • 192.168.0.1 – A single address • 192.168.0.4-10 – A range (inclusive) •...
- Page 154 NA™ 10G N NA-X) MART ETWORK CCESS MART OMMAND NTERFACE EFERENCE • Set up IPv4 filter for TCP and UDP packets on ports 80 (HTTP), 8080 (HTTP alternative), and 443 (HTTPS) from source addresses 10.10.0.* to destination addresses 192.168.0.*: CONTROLLER>set filter html_traffic ipv4 protocol tcp_udp port src 80,8080,443 address src 10.10.0.* address dest 192.168.0.* CONTROLLER>show filters html_traffic...
- Page 155 NA™ 10G N NA-X) MART ETWORK CCESS MART OMMAND NTERFACE EFERENCE ET FILTER MPLS LABEL Use the set filter mpls label command to create a filter for MPLS (Multiprotocol Label Switching) packets with an ethertype of 0x8847 or 0x8848 (the system does not process MPLS encapsulated in IP). The filter can be further refined by specifying an MPLS label.
- Page 156 • When a filter is set to permit VID 1, untagged packets will still be forwarded. • Tagged packets with a VID of 1 will be forwarded untagged. • Tagged packets with a VID of 0 will be dropped by SmartNA-X. mac-value] (Optional) Filters on the specified value matching the source mac src MAC address.
-
Page 157: Commands For Managing Snmp
Commands are entered in the SmartNA-X command-line interface and require Administrator access to run. For security, the SNMP agent is disabled on SmartNA-X by default. Although you can still configure SNMP notifications, users, views and groups, you’ll need to enable the agent to expose management data and send notifications. - Page 158 NA™ 10G N NA-X) MART ETWORK CCESS MART OMMAND NTERFACE EFERENCE SNMP basic commands • SNMP , page 154 SHOW ALL • SNMP SNMP / SMNP, page 155 AGENT SHOW • SNMP , page 156 APPLY • SNMP ID, page 157 SHOW ENGINE DRAFT...
- Page 159 NA™ 10G N NA-X) MART ETWORK CCESS MART OMMAND NTERFACE EFERENCE SNMP SHOW ALL Use the snmp show all command to output SNMP configuration information. SNMP SNMPv1, SNMPv2c, SNMPv3 Command form snmp show all Example Output all SNMP configuration information: CONTROLLER>snmp show all SNMP : Enabled SNMP...
- Page 160 NA™ 10G N NA-X) MART ETWORK CCESS MART OMMAND NTERFACE EFERENCE SNMP SNMP / SMNP AGENT SHOW Use the snmp agent command to enable and disable the SNMP agent, or to show the agent’s current status. The agent must be enabled to expose management data and send notifications. SNMP SNMPv1, SNMPv2c, SNMPv3 Command form...
- Page 161 NA™ 10G N NA-X) MART ETWORK CCESS MART OMMAND NTERFACE EFERENCE SNMP APPLY Use the snmp apply command to apply all pending SNMP changes. Note, the system does not allow you to partially implement pending SNMP changes. SNMP SNMPv1, SNMPv2c, SNMPv3 Command form snmp apply Example...
- Page 162 EFERENCE SNMP SHOW ENGINE Use the snmp show engineID command to display the SNMP engine identity. The engine identity is automatically generated from the enterprise number of Network Critical (by IANA) and MAC address of “eth0” interface. SNMP SNMPv3 Command form...
- Page 163 NA™ 10G N NA-X) MART ETWORK CCESS MART OMMAND NTERFACE EFERENCE SNMP notify commands • SNMP , page 159 NOTIFY • SNMP , page 160 SHOW HOST • SNMP , page 161 CREATE HOST • SNMP , page 163 DELETE HOST DRAFT...
- Page 164 NA™ 10G N NA-X) MART ETWORK CCESS MART OMMAND NTERFACE EFERENCE SNMP NOTIFY Use the snmp notify command to show the current status of notifications, and to enable and disable SNMP notifications. SNMP notifications can be sent as traps or informs. Traps are unreliable because the receiver does not send acknowledgments when it receives traps, so the sender cannot determine if the traps were received.
- Page 165 NA™ 10G N NA-X) MART ETWORK CCESS MART OMMAND NTERFACE EFERENCE SNMP SHOW HOST Use the snmp show host command to show recipients for SNMP notifications. SNMP SNMPv1, SNMPv2c, SNMPv3 Command form snmp show host Example Show SNMP notification recipients: CONTROLLER>snmp show host DRAFT...
- Page 166 NA™ 10G N NA-X) MART ETWORK CCESS MART OMMAND NTERFACE EFERENCE SNMP CREATE HOST Use the snmp create host command to configure the recipients of SNMP notifications, either traps or informs. Traps are asynchronous, unacknowledged messages sent from the agent to the SNMP managers listed in the host receiver table.
- Page 167 NA™ 10G N NA-X) MART ETWORK CCESS MART OMMAND NTERFACE EFERENCE • Set up SNMPv3 inform notifications for remoteUser on host 192.168.0.3 with engine id 0x80007b9d03001dffe67899: CONTROLLER>snmp create host 192.168.0.3 v3 remoteUser inform 0x80007b9d03001dffe67899 • Set up SNMPv2c trap notifications for community commsecret on host 192.168.0.4:162: CONTROLLER>snmp create host udp:192.168.0.4:162 v2c commsecret •...
- Page 168 NA™ 10G N NA-X) MART ETWORK CCESS MART OMMAND NTERFACE EFERENCE SNMP DELETE HOST Use the snmp delete host command to stop sending SNMP notifications to a manager/host. SNMP SNMPv1, SNMPv2c, SNMPv3 Command form snmp delete host HOST [ trap inform HOST Specifies details of the host to stop sending messages to.
- Page 169 NA™ 10G N NA-X) MART ETWORK CCESS MART OMMAND NTERFACE EFERENCE SNMPv1/v2c commands • SNMP , page 165 CREATE COMMUNITY • SNMP , page 167 DELETE COMMUNITY • SNMP , page 168 SHOW COMMUNITY DRAFT...
- Page 170 NA™ 10G N NA-X) MART ETWORK CCESS MART OMMAND NTERFACE EFERENCE SNMP CREATE COMMUNITY Use the snmp create community command to create the community secret used in SNMP v1/v2c get and set requests. A community secret authenticates messages between a management station and an SNMP v1/v2c engine. Optionally, you can specify one or more of these characteristics associated with the community secret: •...
- Page 171 NA™ 10G N NA-X) MART ETWORK CCESS MART OMMAND NTERFACE EFERENCE • Create the read-write community with access to only proprietary Network-Critical MIBS from 192.168 sub-net. CONTROLLER>snmp create community mysecret oid 1.3.6.1.4.1.31645 source 192.168.0.0/16 DRAFT...
- Page 172 NA™ 10G N NA-X) MART ETWORK CCESS MART OMMAND NTERFACE EFERENCE SNMP DELETE COMMUNITY Use the snmp delete community command to delete the specified community secret. SNMP SNMPv1, SNMPv2c Command form snmp delete community communitySecret communitySecret Specify the community secret to delete. Example Delete community mysecret.
- Page 173 NA™ 10G N NA-X) MART ETWORK CCESS MART OMMAND NTERFACE EFERENCE SNMP SHOW COMMUNITY Use the snmp show community command to display SNMP community information. SNMP SNMPv1, SNMPv2c Command form snmp show community Example Show community information: CONTROLLER>snmp show community Community number 0 IP protocol version : ipv6 comString : priSystem6...
- Page 174 NA™ 10G N NA-X) MART ETWORK CCESS MART OMMAND NTERFACE EFERENCE VACM examples Given a pre-existing user johnsmith (which can be set up using the snmp create user command), we could configure full read-write access to the whole OID tree using the following commands: CONTROLLER>snmp create sectogroup RWGroup usm johnsmith CONTROLLER>snmp create view All include .1 CONTROLLER>snmp create view None exclude .1...
- Page 175 NA™ 10G N NA-X) MART ETWORK CCESS MART OMMAND NTERFACE EFERENCE SNMP View-based Access Control Module (VACM) commands • SNMP , page 171 SHOW USER • SNMP , page 172 CREATE USER • SNMP , page 174 DELETE USER • SNMP , page 175 SHOW SECTOGROUP...
- Page 176 NA™ 10G N NA-X) MART ETWORK CCESS MART OMMAND NTERFACE EFERENCE SNMP SHOW USER Use the show snmp user command to display information on each SNMP username in the group username table. SNMP SNMPv3 Command form snmp show user Example Display SNMP users: CONTROLLER>snmp show user User number 0...
- Page 177 NA™ 10G N NA-X) MART ETWORK CCESS MART OMMAND NTERFACE EFERENCE SNMP CREATE USER Use the snmp create user command to create USM (user based security model) users with authentication and privacy options. A remote engine identity is required when an SNMPv3 inform is configured. The engine identity is used to compute the security digest for authenticating and encrypting packets sent to a user on the remote host.
- Page 178 NA™ 10G N NA-X) MART ETWORK CCESS MART OMMAND NTERFACE EFERENCE passphrase (Optional) Specifies the method of encryption for all SNMP messages/packets. priv none | DES passphrase} specifies that no SNMP message encryption is used. none specifies that SNMP packets are encrypted using the 56-bit CBC-DES privacy authentication algorithm.
- Page 179 NA™ 10G N NA-X) MART ETWORK CCESS MART OMMAND NTERFACE EFERENCE SNMP DELETE USER Use the snmp delete user command to delete a user. A remote engine identity is required when an SNMPv3 inform is configured. SNMP SNMPv3 Command form snmp delete user username [ engine-id] local...
- Page 180 NA™ 10G N NA-X) MART ETWORK CCESS MART OMMAND NTERFACE EFERENCE SNMP SHOW SECTOGROUP Use the show snmp sectogroup command to show groups, together with security model, view settings, and storage type details. A group defines the access rights afforded to all securityNames which belong to that group. SNMP SNMPv3 Command form...
- Page 181 NA™ 10G N NA-X) MART ETWORK CCESS MART OMMAND NTERFACE EFERENCE SNMP CREATE SECTOGROUP Use the snmp create sectogroup command to map security names into a named group. Several group directives can specify the same group name, allowing a single access setting to apply to several users and/or community strings.
- Page 182 NA™ 10G N NA-X) MART ETWORK CCESS MART OMMAND NTERFACE EFERENCE SNMP DELETE SECTOGROUP Use the snmp delete sectogroup command to delete (unmap) a security name from a group. You can use the snmp show sectogroup command to output a list of groups and users. SNMP SNMPv3 Command form...
- Page 183 NA™ 10G N NA-X) MART ETWORK CCESS MART OMMAND NTERFACE EFERENCE SNMP SHOW VIEW Use the snmp show view command to show defined named views (subsets of the OID tree). SNMP SNMPv3 Command form snmp show view Example Show SNMP views: CONTROLLER>snmp show view View number 0 view type : include...
- Page 184 NA™ 10G N NA-X) MART ETWORK CCESS MART OMMAND NTERFACE EFERENCE SNMP CREATE VIEW Use the snmp create view command to create a named subset view of the OID tree. A view is a mapping between SNMP objects and the access rights available for those objects. An object can have different access rights in each view.
- Page 185 Effectively, any user in this group will have no read, write or notify access to the MIB. CONTROLLER>snmp create view None exclude .1 • Create a view named NC with access to the OID subtree starting at .1.3.6.1.4.1.31645 (Network Critical proprietary MIBs).
- Page 186 NA™ 10G N NA-X) MART ETWORK CCESS MART OMMAND NTERFACE EFERENCE SNMP DELETE VIEW Use the snmp delete view command to delete a named view of the OID tree. A view is created by the snmp create view command and is a mapping between SNMP objects and the access rights available for those objects. SNMP SNMPv3 Command form...
- Page 187 NA™ 10G N NA-X) MART ETWORK CCESS MART OMMAND NTERFACE EFERENCE SNMP SHOW ACCESS Use the snmp show access command to show group of users/communities to one of three views, depending on the request being processed. SNMP SNMPv3 Command form snmp show access Examples Show snmp show access:...
- Page 188 NA™ 10G N NA-X) MART ETWORK CCESS MART OMMAND NTERFACE EFERENCE SNMP CREATE ACCESS Use the snmp create access command to map a group of users/communities to a read, write or notify view, depending on the request being processed. Get requests are mapped to the read view, set request are mapped to the write view, and notify requests are mapped to a notify view.
- Page 189 NA™ 10G N NA-X) MART ETWORK CCESS MART OMMAND NTERFACE EFERENCE write-viewname Specifies the view to which set requests are mapped. If no access is required, create a view called ‘None’ that excludes access to the OID root and specify it here. See the examples for the relevant command.
- Page 190 NA™ 10G N NA-X) MART ETWORK CCESS MART OMMAND NTERFACE EFERENCE SNMP DELETE ACCESS Use the snmp delete access command to delete the specified access group. SNMP SNMPv3 Command form snmp delete access group-name { } {read-viewname} noAuth auth priv {write-viewname} {notify-viewname} group-name Specifies the name of the group.
- Page 191 NA™ 10G N NA-X) MART ETWORK CCESS MART OMMAND NTERFACE EFERENCE SNMP SHOW COMTOSEC Use the snmp show comtosec command to show SNMPv1 or SNMPv2c community secret to security name mappings. SNMP SNMPv3 Command form snmp show comtosec Example Show current community secrets to security name mappings: CONTROLLER>snmp show comtosec DRAFT...
- Page 192 NA™ 10G N NA-X) MART ETWORK CCESS MART OMMAND NTERFACE EFERENCE SNMP CREATE COMTOSEC Use the snmp create comtosec command to map a security name to an SNMPv1/v2c style community string. Mapping can be from a particular range of source addresses or globally (“default”). The same community secret can be specified in several separate directives (with different source tokens), and the first source/community combination that matches the incoming request will be selected.
- Page 193 NA™ 10G N NA-X) MART ETWORK CCESS MART OMMAND NTERFACE EFERENCE SNMP DELETE COMTOSEC Use the snmp delete comtosec command to remove a community secret to a security name mapping. SNMP SNMPv3 Command form snmp delete comtosec securityName communitySecret [source SOURCE [ ipv4 ipv6 securityName...
-
Page 194: Appendix B Web User-Interface Reference
NTERFACE EFERENCE B – This appendix provides reference information for the system configuration options and data that is available through the SmartNA-X web UI. It contains the following sections: • System identity tab, page 190 • Mapping tab, page 191 •... -
Page 195: System Identity Tab
NA™ 10G N NA-X) MART ETWORK CCESS MART NTERFACE EFERENCE YSTEM IDENTITY TAB System identity tab The System identity tab (Figure B-1) is available after clicking on the chassis. It provides access to the system options shown in Table B-1, page 190. -
Page 196: Mapping Tab
Sets the device network interface IPv6 address. Default: None. The current active gateway address is shown in the adjacent Active IPv6 address field. System MAC address Shows the SmartNA-X MAC address. System link local Shows the IPv6 link local address. -
Page 197: Filters Tab
NA™ 10G N NA-X) MART ETWORK CCESS MART NTERFACE EFERENCE ILTERS TAB Filters tab The Filters tab (Figure B-3) is available after clicking on the chassis. It shows all available filters and allows you to edit, add and delete them. The table below shows the options that are available when setting up packet filters. Figure B-3 The Filters tab showing the Add filter window Table B-2 Filters tab options Option... - Page 198 • When a filter is set to permit VID 1, untagged packets will still be forwarded. • Tagged packets with a VID of 1 will be forwarded untagged. • Tagged packets with a VID of 0 will be dropped by SmartNA-X. MAC address Filter any non-MPLS packet type by MAC address.
- Page 199 NA™ 10G N NA-X) MART ETWORK CCESS MART NTERFACE EFERENCE ILTERS TAB Table B-2 Filters tab options (continued) Option Description IPv6 addressing Filter IPv6 packets by IP address. You may give either a single specification, to find packets where either the source or the destination address matches, or separate specifications for source and/or destination address.
-
Page 200: Snmp Tab
The SNMP engine ID identifies the agent in the device and is a security feature of SNMPv3. The engine ID is automatically generated by the system and is a product of the enterprise number of Network Critical (by IANA) and the MAC address of the ‘eth0’ interface, thus it is not user configurable. - Page 201 NA™ 10G N NA-X) MART ETWORK CCESS MART | SNMP NTERFACE EFERENCE Table B-3 SNMP tab options (continued) Option Description Configure views Options for configuring view-based views. See Table B-9, page 198. Configure access Options for configuring view-based access control. See Table B-10, page 198.
- Page 202 NA™ 10G N NA-X) MART ETWORK CCESS MART | SNMP NTERFACE EFERENCE Table B-6 Options for configuring SNMP Users Option Description User name Specify a name for the user. Names consist of 1–32 alphanumeric characters, and must begin with a letter. You may define local users (for most uses) and remote users (for use with sending SNMPv3 informs).
- Page 203 NA™ 10G N NA-X) MART ETWORK CCESS MART | SNMP NTERFACE EFERENCE Table B-8 Options for configuring view-based groups (SNMP v3) Option Description Member details Specifies details of the member you are adding to the group. This may be one of: An existing local SNMP user A security name assigned to an existing VACM-enabled SNMP community The membership will apply only when the specified security model is used for a request.
-
Page 204: Security Tab
NA™ 10G N NA-X) MART ETWORK CCESS MART NTERFACE EFERENCE ECURITY TAB Security tab The Security tab (Figure B-5) provides access to settings for adding network authentication and accounting servers. Figure B-5 The Security tab showing the Edit RADIUS server window DRAFT... -
Page 205: Health Tab
Health tab The Health tab (Figure B-6) is available after clicking on the chassis. It provides information for the overall health and state of the SmartNA-X system, and includes details of the hardware and firmware revisions, model and serial DRAFT... - Page 206 Shows the overall health of the system. Under normal circumstances, the system status will always be ‘OK’. If an internal error is detected, the system status will change to ‘Contact Network Critical’. If configured, an SNMP system health (SH) notification will also be sent should this condition occur. See “SNMP tab”...
-
Page 207: Management Tab
B-7) is available after clicking on the chassis. The Management tab provides options • loading and saving system configurations so you can quickly change configurations, downloading and uploading configurations so you can archive and share configurations between SmartNA-X devices (see Saving and restoring SmartNA-X configurations, page •... -
Page 208: Tap Module Health Tab
System firmware revision number Hardware revision Hardware revision number Model number System model number Serial number SmartNA-X devices serial number Temperature Current system temperature Temperature threshold Sets the upper temperature threshold (in Celsius) for the SNMP system to send over-temperature º... -
Page 209: Port Tab
NA™ 10G N NA-X) MART ETWORK CCESS MART NTERFACE EFERENCE ORT TAB Port tab The Port configuration tab (Figure B-9) is available after clicking on a port. It provides access to the port settings shown in Table B-14. Figure B-9 The Port configuration tab Table B-14 Port configuration tab options Option Description... - Page 210 NA™ 10G N NA-X) MART ETWORK CCESS MART NTERFACE EFERENCE ORT TAB Table B-14 Port configuration tab options (continued) Option Description Specifies the crossover mode of the port, either MDI (normal) or MDI-X (crossover). To connect two ports of the same configuration (MDI to MDI or MDI-X to MDI-X), an Ethernet crossover cable is needed to cross over the transmit and receive signals in the cable, so that they are matched at the connector level.
-
Page 211: Port Traffic Tab
NA™ 10G N NA-X) MART ETWORK CCESS MART NTERFACE EFERENCE RAFFIC TAB Port Traffic tab The port Traffic tab (Figure B-10) provides traffic statistics for the selected port, showing details for the total number of bytes and packets received and sent since rebooting, byte rate per second, and the overall utilization of the port. -
Page 212: Port Health Tab
NA™ 10G N NA-X) MART ETWORK CCESS MART NTERFACE EFERENCE ORT HEALTH TAB Figure B-11 The port Errors tab Port health tab The port Health tab (Figure B-12) is available after clicking on a port. It provides access to the settings shown in Table B-16. - Page 213 NA™ 10G N NA-X) MART ETWORK CCESS MART NTERFACE EFERENCE ORT HEALTH TAB Table B-16 Port Health tab options Option Description Traffic threshold Sets the high traffic threshold (entered as a percentage of the port’s total available carrying capacity) for the (high) (%) SNMP system to send traffic high/low Notifications to SNMP clients set up to receive this type of notification.
-
Page 214: Appendix C Specifications
PPENDIX PECIFICATIONS C – This appendix provides specification details for the SmartNA-X chassis and each of the TAP modules that are available for use with the SmartNA-X system. It contains the following sections: • SmartNA-X chassis, page 209 • 10 Gbit/s TAP module (SFP+ & SFP), page 210 •... -
Page 215: Gbit/S Tap Module (Sfp+ & Sfp)
NA™ 10G N NA-X) MART ETWORK CCESS MART | 10 G (SFP+ & SFP) PECIFICATIONS MODULE Physical Dimensions:450mm (w) x 44mm (h) x 450mm (d) Compliance Emissions: EN55022 class A Immunity: ESD: EN61000-4-2 Radiated: EN61000-4-3 EFT/Burst: EN61000-4-4 Surge: EN61000-4-5 Conducted: EN61000-4-6 Power frequency magnetic field: IEC 61000-4-8 Voltage dips &... -
Page 216: Gbit/S Tap Module (Rj45 & Rj45)
NA™ 10G N NA-X) MART ETWORK CCESS MART | 1 G (RJ45 & RJ45) PECIFICATIONS MODULE Standards and protocols Depends upon SFP / SFP+ modules fitted Power MTU (Maximum 10240 bytes (untagged and tagged traffic) Transmission Unit) 1 Gbit/s TAP module (RJ45 RJ45) &... -
Page 217: Gbit/S Tap Module (Lc & Rj45)
NA™ 10G N NA-X) MART ETWORK CCESS MART | 1 G (LC & RJ45) PECIFICATIONS MODULE 1 Gbit/s TAP module (LC RJ45) & Part number 552x Ports 2 LC fixed 1G Ports A & B 2 copper 10/100/1000M Ports C & D Standards and protocols Depends upon fiber modules fitted Ports A &... -
Page 218: Gbit/S Tap Module (Lc & Sfp)
NA™ 10G N NA-X) MART ETWORK CCESS MART | 1 G (LC & SFP) PECIFICATIONS MODULE MTU (Maximum 10240 bytes (untagged traffic) Transmission Unit) 10244 bytes (tagged traffic) 1 Gbit/s TAP module (LC SFP) & Part number 554x Ports 2 LC fixed 1G Ports A & B 2 SFP 1G Ports C&D Standards and protocols Depends upon fiber modules fitted Ports A &... -
Page 219: Appendix D Troubleshooting
Troubleshooting connections to SmartNA-X A simple ping test can be used to check the SmartNA-X IP address is reachable from the local machine. If DHCP is enabled, your DHCP server will automatically assign an IP address to SmartNA-X and you should check the DHCP server active client list for the correct IP to ping. - Page 220 Console. To find your SmartNA-X IPv6 address, ping the network IPv6 link-local address (ff02::1) to return the link-local address of all connected devices. The link local address of Network Critical devices always contain 1d:ffff:fe. If multiple Network Critical devices are connected to the network, pinging the target device connected then disconnected will easily reveal the correct device, as demonstrated below.
-
Page 221: Troubleshooting The Web Ui
Troubleshooting the web UI The SmartNA-X web UI has been written to comply with W3C recommendations and using standard Java 1.5 for the applet. In principle the system should run on any platform that supports web standards, including the latest versions of Internet Explorer Firefox, Chrome, Opera, and Safari. -
Page 222: Troubleshooting The Cli
ROUBLESHOOTING ROUBLESHOOTING THE Troubleshooting the CLI If you are unable to connect to the SmartNA-X CLI, we suggest running your SSH client in verbose mode in order to print debug messages: ssh -v admin@192.168.254.100 OpenSSH_5.8p1 Debian-7ubuntu1, OpenSSL 1.0.0e 6 Sep 2011... -
Page 223: Troubleshooting Snmp
(change the 8d according to the line number shown (highlighted) in the warning message): sed -i '8d' ~/.ssh/known_hosts After removing the key, try connecting to SmartNA-X again and accepting the RSA key. Troubleshooting SNMP Most SNMP issues can be resolved quickly by: •... -
Page 224: Appendix E Glossary
PPENDIX LOSSARY E – community string A text string used to authenticate messages between a management station and an SNMP v1/v2c engine. context Context name, or “context” in short, is a collection of management information accessible by an SNMP entity. An item of management information may exist in more than one context. - Page 225 NA™ 10G N NA-X) MART ETWORK CCESS MART LOSSARY maintaining and distributing switch-specific passwords to all users. For accounting, this can help you track network resource usage. security level A type of security algorithm performed on each SNMP packet. The three levels are: noauth, auth, and priv. noauth authenticates a packet by a string match of the user name.
- Page 226 NA™ 10G N NA-X) MART ETWORK CCESS MART LOSSARY TACACS+ TACACS+ (Terminal Access Controller Access-Control System) provides a centralized database against which to perform Authentication, Authorization, and Accounting (AAA). VACM VACM (View Based Access Control Module) is a mechanism that regulates access to MIB objects by providing a fine-grained access control mechanism associating users/community strings with MIB views.
-
Page 227: Appendix F Hardware Warranty
NETWORK CRITICAL SOLUTIONS, at its discretion, free of charge provided you: (1) return the product to a NETWORK CRITICAL SOLUTIONS designated repair facility with shipping charge prepaid, and (2) provide NETWORK CRITICAL SOLUTIONS with proof of the original date of purchase. -
Page 228: Appendix G Supported Mibs
PPENDIX UPPORTED G – Table G-1 lists the proprietary SNMP MIBs supported by Network Critical’s SmartNA-X network TAP device: Description NCPRODUCTIDS-MIB Unique IDs for Network Critical products. NCSYSTEM-MIB System information of Network Critical products NCTAP-MIB Information specific to TAPs and proprietary notifications (traps). The 64-bit packet in and out counters (psHCInPackets and psHCOutPackets respectively) in NCTAP-MIB are accessible through SNMPv2 and v3 only. -
Page 229: Obtaining Smartna Mib Files
Conformance definitions referenced in SNMPv2-MIB. SNMPv2-MIB System info and snmp notifications (coldStart, warmStart and authenticationFailure) Table G-2 Standard MIBs supported Obtaining SmartNA MIB Files SmartNA MIB files can be downloaded from the Network Critical, at the following web address: http://www.networkcritical.com/Support/SmartNA-Tools DRAFT... -
Page 230: Appendix H Ip Protocols
Table H-1 lists some of the IP protocols that you can filter on the SmartNA-X network tapping device. In each table, the ‘Protocol’ column lists the protocol name, the ‘Identifier’ column lists other names for the same protocol, and the ‘ISO Designator’ column lists the numeric designator for each protocol. For instructions on using IP protocols with filters, see Chapter 8,“Using Packet Filters”... - Page 231 NA™ 10G N NA-X) MART ETWORK CCESS MART IP P ROTOCOLS Protocol Identifier ISO Designator IL Transport Protocol IPv6 (encapsulation) IPv6 Routing Header for IPv6 IPv6-Route Fragment Header for IPv6 IPv6-Frag Resource Reservation Protocol RSVP Generic Routing Encapsulation Encapsulating Security Payload Authentication Header IP with Encryption (SwIPe) SWIPE...
- Page 232 NA™ 10G N NA-X) MART ETWORK CCESS MART IP P ROTOCOLS Protocol Identifier ISO Designator PGM Reliable Transport Protocol Layer Two Tunneling Protocol Version 3 L2TP IS-IS over IPv4 — Stream Control Transmission Protocol SCTP Fibre Channel UDP Lite — MPLS-in-IP —...
-
Page 233: Appendix I Contact & Support
& S ONTACT UPPORT I – For technical support, see our support pages on the web at http://www.networkcritical.com/support/. Your Network Critical regional Support Center can also provide help: • North and South America Tel: +1 (716) 558-7280 Email: support-us@networkcritical.com • Europe Tel: +44 (0)118 954 3210 Email: support@networkcritical.com...
Need help?
Do you have a question about the SmartNA-X and is the answer not in the manual?
Questions and answers