Integra Cusa Excel Service Manual
Ultrasonic surgical aspirator
Hide thumbs
Also See for Cusa Excel:
- Instructions for use manual (28 pages) ,
- Manual (43 pages) ,
- User manual (189 pages)
Table of Contents
Advertisement
Quick Links
Distributed By:
Integra LifeSciences Corporation
Plainsboro, NJ 08536 USA
Integra LifeSciences (Ireland) Limited
IDA Business and Technology Park
Sragh
Tullamore, County Offaly, Ireland
© 2009 Integra LifeSciences Corporation.
All Rights Reserved. Printed in Ireland
945103104ILS, Rev. A
Radionics ®
MAYFIELD®
Auragen
Ruggles
™
™
Stereotaxy
Stabilization
Brain Mapping
Instruments
Integra LifeSciences Corporation
Integra LifeSciences Corporation
311 Enterprise Drive • Plainsboro, NJ 08536
311 Enterprise Drive • Plainsboro, NJ 08536
Customer Service USA and Canada: 800.997.4868 • 609.936.5400 (Outside USA) • 888.980.7742 (Fax)
USA and Canada 800.997.4868 • (Outside USA) 609.936.5400 • (Fax) 888.980.7742
www.Integra-LS.com
www.Integra-LS.com
Camino, CUSA, DuraGen Plus, Integra NeuroSciences, OSV II, and Radionics are registered trademarks of Integra LifeSciences Corporation or its subsidiaries.
Camino, CUSA, CUSA Excel, DuraGen Plus, Integra NeuroSciences, OSV II, and Radionics are registered trademarks of Integra LifeSciences Corporation or its subsidiaries in the United States and/or other countries.
Auragen, Operate with Confidence, Ruggles, and the Integra wave logo are trademarks of Integra LifeSciences Corporation or its subsidiaries.
Auragen, Operate with Confidence, Ruggles, and the Integra wave logo are trademarks of Integra LifeSciences Corporation or its subsidiaries.
MAYFIELD is a registered trademark of SM USA Inc. and is used by Integra LifeSciences Corporation under license.
MAYFIELD is a registered trademark of SM USA Inc. and is used by Integra LifeSciences Corporation under license.
©2008 Integra LifeSciences Corporation. All rights reserved. Printed in the USA. NS2073-10/08
©2009 Integra LifeSciences Corporation. All Rights Reserved. Printed in the USA. NS408-06/09
OPERATE WITH CONFIDENCE
™
CUSA®
OSV II®
DuraGen Plus® Camino®
Tissue Ablation
CSF Management Duraplasty
NeuroCritical Care
Ultrasonic Surgical Aspirator Service Manual
®
Advertisement
Table of Contents
Troubleshooting

Related Manuals for Integra Cusa Excel


Summary of Contents for Integra Cusa Excel
- Page 1 Camino, CUSA, DuraGen Plus, Integra NeuroSciences, OSV II, and Radionics are registered trademarks of Integra LifeSciences Corporation or its subsidiaries. Camino, CUSA, CUSA Excel, DuraGen Plus, Integra NeuroSciences, OSV II, and Radionics are registered trademarks of Integra LifeSciences Corporation or its subsidiaries in the United States and/or other countries.
- Page 2 Service Manual CUSA EXcel Ultrasonic Surgical ® Aspirator System...
- Page 3 Preface This manual and the equipment it describes are for use only by qualified medical professionals trained in the particular technique and surgical procedure to be performed. It is intended as a guide for servicing the CUSA EXcel ® ultrasonic surgical aspirator only.
- Page 4 About This Manual The service manual describes the CUSA EXcel ultrasonic surgical aspirator. It presents the CUSA EXcel as a system that includes a console, handpieces, and accessories: • Descriptions of the system, its functions, specifications, and theory of operation •...
- Page 5 Indicates a hazardous situation which, if not avoided, may result in minor or moderate injury. Notice Indicates a hazard which may result in product damage. Important Indicates an operating tip or maintenance suggestion. CUSA EXcel Ultrasonic Surgical System Service Manual...
-
Page 6: Table Of Contents
Tip Motion Cooling Irrigation Aspiration (Suction) Handpieces Wide Variety of Tips Section 3. Unpacking and Installing the CUSA EXcel Surgical Aspirator System The Responsibility of the Manufacturer Unpacking the CUSA EXcel System Tools You Will Need Unpacking Procedure Preparing the CUSA EXcel Console for Use... - Page 7 Cooling Water Reservoir 4-11 Console Body Rear Panel 4-12 Speaker 4-13 Volume Control 4-13 Footswitch Connector Receptacle 4-13 AC Main Switch 4-13 Fuses 4-13 Footswitch 4-13 AC Power Cord 4-15 Equipotential Grounding Lug 4-15 CUSA EXcel Ultrasonic Surgical Aspirator System Service...
- Page 8 Pinch Point in the Suction Pinch Valve Fuse Replacement Footswitch Symbols Voluntary Standards Statutory and Regulatory Requirements EMC Compatibility Handpieces 5-12 Nominal Frequencies 5-12 Dimensions 5-12 Tip Specifications 5-12 23 kHz 5-13 36 kHz 5-14 CUSA EXcel Ultrasonic Surgical Aspirator System Service Manual...
- Page 9 AGC/Error Amplifier Circuit 7-10 Phase Compensator 7-11 Driver Stage 7-11 Feedback Signal 7-12 Bias Circuitry 7-12 Frequency Selection Circuitry 7-12 Ultrasonics Board–Other Circuits 7-13 Audible Alert and Operation Indicator 7-13 Valve Drivers 7-13 viii CUSA EXcel Ultrasonic Surgical Aspirator System Service...
- Page 10 Troubleshooting Safety 10-2 User Troubleshooting 10-2 Responding to Alerts 10-3 General Troubleshooting 10-6 Engineer Troubleshooting 10-15 Guidelines 10-15 Flowcharts 10-15 No Power 10-16 Handpiece Alarm 10-17 Footswitch Alarm 10-18 Cooling Water Alarm 10-19 CUSA EXcel Ultrasonic Surgical Aspirator System Service Manual...
- Page 11 Remove the Suction Pump 11-29 Install the Suction Pump 11-34 Ready for Suction Pump Controller Card Replacement 11-35 Remove the Suction Pump Controller Card 11-36 Install the Suction Pump Controller Card 11-37 Suction Pinch Valve 11-38 CUSA EXcel Ultrasonic Surgical Aspirator System Service...
- Page 12 Obtaining a Return Authorization Number 13-2 Returning the Console 13-2 Returning the Handpiece 13-9 Returning Circuit Boards 13-9 Ordering Replacement Parts 13-9 Integra Service Center 13-9 Section 14. Service Parts Lists Ordering Replacement Parts 14-1 CUSA EXcel Ultrasonic Surgical Aspirator System Service Manual...
- Page 13 Replacement Parts 14-2 Handpiece Cooling 14-2 Irrigation 14-2 Miscellaneous 14-3 Power 14-3 Suction 14-4 Electronic Parts 14-4 Miscellaneous Spare Parts 14-8 Appendix A. Warranty CUSA EXcel Ultrasonic Surgical Aspirator System Service...
- Page 14 List of Figures Figure 2-1. The pre-aspiration holes and threads on tips Figure 2-2. The three handpieces in the CUSA Excel system Figure 4-1. Console structural features Figure 4-2. Control panel features Figure 4-3. Control panel features (continued) Figure 4-4.
- Page 15 Figure 11-33. Replacing the handpiece flow sensor 11-47 Figure 11-34. Removing the end bell and tubing from the cooling water pump head 11-50 Figure 11-35. O-rings on cooling water reservoir connectors 11-51 CUSA EXcel Ultrasonic Surgical Aspirator System Service Manual...
- Page 16 14-5 Table 14-8. Ultrasonics board parts—diodes 14-5 Table 14-9. Ultrasonics board parts—FETs 14-6 Table 14-10. Ultrasonics board parts—integrated circuits 14-6 Table 14-11. Ultrasonics board parts—connectors 14-7 Table 14-12. Ultrasonics board parts—miscellaneous 14-8 CUSA EXcel Ultrasonic Surgical Aspirator System Service Manual...
- Page 17 Notes CUSA EXcel Ultrasonic Surgical Aspirator System Service Manual...
-
Page 18: Section 1. Service Personnel Safety
Warnings, Cautions, and Notices Before servicing the CUSA EXcel console or handpieces, it is important that you read, understand, and follow the instructions and the warnings, cautions, and notices supplied with it. It is also important that you read, understand, and follow the instructions for any other equipment used to install, test, adjust, or repair the CUSA EXcel system. -
Page 19: General
To avoid injury to surgical personnel, keep fingers away from the suction pinch valve. Technical Specifications Warning Explosion Hazard Do not use the CUSA EXcel system in the presence of flammable anesthetics or any potentially explosive or flammable atmosphere. Caution To avoid injury to surgical personnel, keep fingers away from the suction pinch valve while powering the unit on or off, activating vibration, or using fast flush. -
Page 20: Maintaining The Cusa Excel System
• Do not use ultrasonic or automatic washers. • Do not autoclave. • Do not use chlorinated substances such as bleach solution. • Do not clean with abrasives such as Ajax, Comet, or steel wool. CUSA EXcel Ultrasonic Surgical Aspirator System Service Manual... -
Page 21: Troubleshooting
CUSA EXcel system. High Current Hazard Do not touch the ultrasonics PCB heat sink while the CUSA EXcel system is energized. The heat sink is isolated from ground, and can deliver very high current, resulting in injury. CUSA EXcel Ultrasonic Surgical Aspirator System Service Manual... -
Page 22: Calibration
(R11). Calibration Warning High Current Hazard Do not touch the ultrasonics PCB heat sink while the CUSA EXcel system is energized. The heat sink is isolated from ground, and can deliver very high current, resulting in injury. Repair Policy Caution To prevent the ramp from falling and causing injury, be sure to hold the ramp in the up position while stapling the corrugated tab that secures it to the crate. - Page 23 Notes CUSA EXcel Ultrasonic Surgical Aspirator System Service Manual...
-
Page 24: Section 2. Introduction
• Wide variety of tips. For Your Information Caution Read all warnings, cautions, notices, and instructions provided with the CUSA EXcel system before servicing it. Read the instructions, warnings, cautions, and notices provided with the CUSA EXcel handpieces before servicing them. -
Page 25: Overview
Overview Overview The CUSA EXcel system is an ultrasonic surgical aspirator that allows a surgeon to remove tissue—selectively and with precise control—from the body. It performs three functions: • Fragmentation • Irrigation • Aspiration (suction). All three functions may occur at the same time. -
Page 26: Irrigation
• The pump can also accelerate to a Fast Flush speed, pumping at 25 to 30 cc/ min. The Fast Flush pedal on the CUSA EXcel system footswitch activates the Fast Flush feature. The pump pushes the fluid through the manifold irrigation tubing to a flue, a sleeve surrounding the vibrating tip. -
Page 27: Aspiration (Suction)
When the System Power Switch is off, the suction pump remains off and the suction pinch valve remains closed. A button on the front of the suction pinch valve allows you to open the valve manually. CUSA EXcel Ultrasonic Surgical Aspirator System Service Manual... -
Page 28: Handpieces
Angled Wide Variety of Tips You can use a wide variety of tips with the CUSA EXcel handpieces. Tips vary in inside diameter, length, and shape (straight or curved). For complete information on the tips that are available for each handpiece, refer to Appendix A, Tip Specifications, in the CUSA EXcel Ulstrasonic Surgical Aspirator System User’s... - Page 29 Notes CUSA EXcel Ultrasonic Surgical Aspirator System Service Manual...
-
Page 30: Section 3. Unpacking And Installing The Cusa Excel Surgical Aspirator System
The electrical installation of the relevant room complies with local codes and regulatory requirements. • You use the equipment in accordance with the Integra instructions for use. For warranty information, refer to the Preface section of this manual. CUSA EXcel Ultrasonic Surgical Aspirator System Service Manual... -
Page 31: Unpacking The Cusa Excel System
Unpacking the CUSA EXcel System Unpacking the CUSA EXcel System The CUSA EXcel system arrives in a corrugated cardboard crate strapped to a wood shipping pallet. The corrugated cardboard crate has several components: • A bottom, larger section contains the CUSA EXcel console and foam packing cushions. - Page 32 Squeeze the bars toward each other to release them from the locking retainer. Pull the bars toward you. They should swing outward. Pull the tab at the bottom of the clip to remove the clip from the carton. CUSA EXcel Ultrasonic Surgical Aspirator System Service Manual...
- Page 33 To prevent the ramp from falling and causing injury, be sure to hold the ramp in the up position while cutting the corrugated tab that secures it to the carton. Lower the ramp. CUSA EXcel Ultrasonic Surgical Aspirator System Service Manual...
- Page 34 Remove the four interlocking foam pieces from the foam cushion around the console (refer to the following figure). Remove the right and left foam cushions from the console. CUSA EXcel Ultrasonic Surgical Aspirator System Service Manual...
- Page 35 (refer to the following figure). Unlock the front casters by lifting the lock lever upward. Check the rear casters to be sure that, if locked, they will allow the console to roll toward the ramp. CUSA EXcel Ultrasonic Surgical Aspirator System Service Manual...
- Page 36 Save all shipping components. You will need them if you need to return the console to Integra. In fact, it is very important that you use the proper materials and the proper packing procedures to ship the console. If, in Integra’s...
-
Page 37: Preparing The Cusa Excel Console For Use
Preparing the CUSA EXcel Console for Use Preparing the CUSA EXcel Console for Use The CUSA EXcel console is shipped in one carton with the following items: • Footswitch • In-service kit • Contamination guards • User’s guide • Sterilizable instruction pad: Assembling or Changing Tips on the Sterile Field •... -
Page 38: Replacing The Power Connector
Preparing the CUSA EXcel Console for Use Replacing the Power Connector If your facility’s power receptacles are not compatible with the standard connector supplied on the CUSA EXcel system, install a different power connector according to your institution’s policy. Tools needed:... - Page 39 Notes 3-10 CUSA EXcel Ultrasonic Surgical Aspirator System Service Manual...
-
Page 40: Section 4. Console Components
• Other features. For Your Information This section presents the CUSA EXcel console. It begins with an overview of the console, then describes each major console subsystem and its components. The description includes an illustration and a brief sketch of the function each subsystem or component serves. -
Page 41: Console Overview And Structural Features
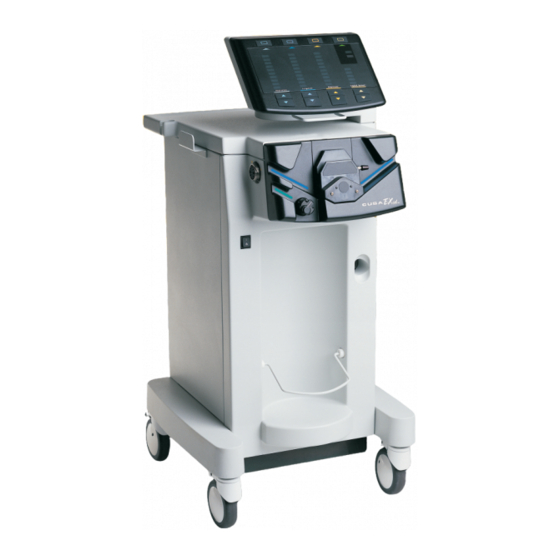
Console Overview and Structural Features Console Overview and Structural Features This drawing presents the front view of the CUSA EXcel console, with structural features called out. Figure 4-1. Console structural features Control panel I.V. pole Housing for irrigation pump head... -
Page 42: I.v. Pole
Unlocked, both front and rear casters roll easily and rotate freely. • Front casters have brake locks that stop the wheels from rolling. • Rear casters have direction locks; when locked, casters remain fixed in one direction. CUSA EXcel Ultrasonic Surgical Aspirator System Service Manual... -
Page 43: Control Panel
A slot in the rear of the control panel allows you to store the quick reference guide. Figure 4-2.Control panel features Lap Mode button Alerts (Red): Lap On indicator Vibration Footswitch Test button Handpiece Cooling Water Status button Prime button Displays (Green LED columns and values) CUSA EXcel Ultrasonic Surgical Aspirator System Service Manual... -
Page 44: Alerts
Not Activated: One LED illuminates to show the setpoint value • Activated: All LEDs up to and including the setpoint value light up. For TissueSelect, “Std” (standard) is the first setpoint value; “++++” is the highest setpoint value. CUSA EXcel Ultrasonic Surgical Aspirator System Service Manual... - Page 45 Control Panel Figure 4-3. Control panel features (continued) Status indicators: Run (Green) Standby (Amber) Wait/Cooling Water (Amber) Setpoint adjustment buttons (Up/Down Arrows): Aspiration (Green) Irrigation (Blue) Amplitude (Orange) TissueSelect (Yellow) CUSA EXcel Ultrasonic Surgical Aspirator System Service Manual...
-
Page 46: Status Indicators
Push a button once for a single change in setpoint value. Holding down the button changes a setpoint value by only one setting (you get no additional setpoint value changes by holding down the button). CUSA EXcel Ultrasonic Surgical Aspirator System Service Manual... -
Page 47: Console Body Front Panel
Retaining bail for suction canister Handpiece Connector Receptacle This receptacle allows you to connect the handpiece to the console. It is on the left side (as you face the front panel) of the console. CUSA EXcel Ultrasonic Surgical Aspirator System Service Manual... -
Page 48: Suction Pinch Valve
It is necessary to replace the contamination guard every six months or when it becomes blocked. Retaining Bail for Suction Canister The bail holds the suction canister in place on the shelf. CUSA EXcel Ultrasonic Surgical Aspirator System Service Manual... -
Page 49: Console Body Side Panel
Control panel Rotation lock handle I.V. pole release Housing (black) for button irrigation pump head and suction pinch valve Arm housing Arm release tab Cooling water reservoir release button Cooling water reservoir 4-10 CUSA EXcel Ultrasonic Surgical Aspirator System Service Manual... -
Page 50: Control Panel
The reservoir also includes fittings that snap into receptacles inside the Arm Housing on the console side panel. The fittings and receptacles automatically connect the reservoir to the cooling water system. CUSA EXcel Ultrasonic Surgical Aspirator System Service Manual 4-11... -
Page 51: Console Body Rear Panel
Console Body Rear Panel Figure 4-6. Console—rear view Speaker Volume control Footswitch connector receptacle AC main switch Fuses (2) Footswitch Integra LifeSciences (Ireland) Limited IDA Business and Technology Park Stragh, Tullamore, County Offaly, Ireland 4-12 CUSA EXcel Ultrasonic Surgical Aspirator System Service Manual... -
Page 52: Speaker
This receptacle allows you to connect the footswitch to the console. AC Main Switch This switch controls the flow of AC power to the CUSA EXcel system. It does not activate the system; instead, it allows power to flow from the wall receptacle to the System Power Switch. - Page 53 Storage compartment Cord wraps Integra LifeSciences (Ireland) Limited IDA Business and Technology Park Stragh, Tullamore, County Offaly, Ireland Equipotential Serial number, model number, and AC power cord grounding lug agency approval label 4-14 CUSA EXcel Ultrasonic Surgical Aspirator System Service Manual...
-
Page 54: Ac Power Cord
Equipotential Grounding Lug If you are using a CEM generator, the grounding lug allows you to connect ground from the CEM generator to the CUSA EXcel console. Label The label shows the console serial number, model number, and agency approvals. -
Page 55: Symbols On The Control Panel
Cooling water (red, left side of the control panel)—failure Alert (amber, right side of the control panel)—system is circulating cooling water Wait through the handpiece or draining the handpiece On/selected Laparoscopic mode 4-16 CUSA EXcel Ultrasonic Surgical Aspirator System Service Manual... -
Page 56: Other Features
It is possible to raise the arm that supports the control panel to allow a CEM unit to sit on top of the CUSA EXcel console or to see the control panel more easily over obstacles. A locking mechanism holds the arm at one of three positions: normal (lowest position), 7.6 cm (3 in.) above normal, and 15.2 cm (6 in.) above... -
Page 57: Rotating The Control Panel
Continue to rotate the control panel. At its next locking position, it will automatically lock into place. Adjusting the Tone Volume The CUSA EXcel system includes an audible tone that sounds in two circumstances: • When you press the Ultrasonics pedal on the footswitch to activate tip vibration •... -
Page 58: Adjusting The I.v. Pole
Gently lower the pole. As the pole clears its upper locking position, release the button. Continue to move the pole downward until it locks into position. After the pole has locked into its lower position, you can rotate it to position CUSA EXcel Ultrasonic Surgical Aspirator System Service Manual 4-19... - Page 59 Notes 4-20 CUSA EXcel Ultrasonic Surgical Aspirator System Service Manual...
-
Page 60: Section 5. Technical Specifications
SECTION Technical Specifications In this section: • Console dimensions • Console subsystems • Electrical requirements • Environment • Standards and IEC classifications • Handpieces • Tip specifications. CUSA EXcel Ultrasonic Surgical Aspirator System Service Manual... -
Page 61: Console Dimensions
23 kHz 35.75 kHz Maximum Tip Up to 355 microns for straight handpiece Amplitudes (23 kHz) Up to 183 microns for angled handpiece Maximum Tip Amplitude Up to 210 microns (36 kHz) CUSA EXcel Ultrasonic Surgical Aspirator System Service Manual... -
Page 62: Fluidic System
Connector Hospital grade, three-prong, 95–120 Vac connector If a facility intends to use the CUSA EXcel system in an operating room with another type of receptacle, the facility is responsible for replacing the connector on the power cord. The replacement connector must be properly grounded. -
Page 63: Low Frequency Leakage
Environment Warning Explosion Hazard Do not use the CUSA EXcel system in the presence of flammable anesthetics or any potentially explosive or flammable atmosphere. Low Frequency Leakage Enclosure leakage <300 µA current Patient leakage current <100 µA Duty Cycle Under maximum loading conditions, the CUSA EXcel console is suitable for ultrasonics activation times of 10 minutes on, 5 minutes off. -
Page 64: Standards And Iec Classifications
Type BF Applied Part Equipment (IEC 601-1) The CUSA EXcel console provides a high degree of protection against electric shock, particularly regarding allowable leakage currents. It is type BF isolated (floating) output. -
Page 65: Electromagnetic Interference
Standards and IEC Classifications Electromagnetic Interference The CUSA EXcel console minimizes electromagnetic interference to other equipment used in the operating room. The system complies with the requirements of IEC 801. Note that other devices in the operating room may generate electromagnetic interference. -
Page 66: Voluntary Standards
EMC Compatibility Notice The CUSA EXcel should not be used adjacent to or stacked with equipment other than specified in the CUSA EXcel User Guide and Service Manual. If adjacent or stacked use is necessary, the CUSA EXcel should be observed to verify normal operation in the configuration in which it will be used. - Page 67 Standards and IEC Classifications Guidance and manufacturer's declaration - electromagnetic emissions The CUSA EXcel is intended for use in the electromagnetic environment specified below. The customer or the user of the CUSA EXcel should assure that it is used in such an environment.
- Page 68 Standards and IEC Classifications Guidance and manufacturer's declaration - electromagnetic immunity The CUSA EXcel is intended for use in the electromagnetic environment specified below. The customer or the user of the CUSA EXcel should assure that it is used in such an environment.
- Page 69 Standards and IEC Classifications Guidance and manufacturer's declaration - electromagnetic immunity The CUSA EXcel is intended for use in the electromagnetic environment specified below. The customer or the user of the CUSA EXcel should assure that it is used in such an environment.
- Page 70 Recommended separation distances between portable and mobile RF communication equipment and the CUSA EXcel The CUSA EXcel is intended for use in an electromagnetic environment in which radiated RF disturbances are controlled. The Customer or the user of the CUSA EXcel can help prevent electromagnetic interferences by maintaining a minimum distance between portable and mobile RF communications equipment (transmitters) and the CUSA EXcel as recommended below, according to the maximum output power of the communications equipment.
-
Page 71: Handpieces
The table on page 5-9 shows specifications for tips that attach to the 23 kHz handpiece. The table on page 5-10 shows specifications for tips that attach to the 36 kHz handpiece. 5-12 CUSA EXcel Ultrasonic Surgical Aspirator System Service Manual... -
Page 72: 23 Khz
254 to 307 [0.0100 to 0.0121] Angled Handpiece: 102 to 142 [0.0040 to 0.0056] Laparoscopic Tip 30.14 [11.865] 1.98 [0.078] 2.54 [0.100] Straight Handpiece: 32.13 178 to 229 [0.007 to 0.009] Not compatible with angled handpiece CUSA EXcel Ultrasonic Surgical Aspirator System Service Manual 5-13... -
Page 73: 36 Khz
11.44 [4.504] 1.98 [0.078] 2.54 [0.100] 137 to 155 [0.0054 to 0.0061] 7.48 Standard Tip Curved Extended 11.44 [4.504] 1.98 [0.078] 2.54 [0.100] 137 to 155 [0.0054 to 0.0061] 7.48 Standard Tip 5-14 CUSA EXcel Ultrasonic Surgical Aspirator System Service Manual... -
Page 74: Section 6. Principles Of Operation
Electromechanical operation Fragmentation Cooling • How the TissueSelect feature works Inherent tissue selectivity Increasing tissue selectivity TissueSelect reduces reserve power to the tip Benefits of TissueSelect A common misunderstanding of the amplitude setting. CUSA EXcel Ultrasonic Surgical Aspirator System Service Manual... -
Page 75: How The Handpiece Works
Vibrating tip Flue Electromechanical Operation The CUSA EXcel console provides alternating current at 23 or 35.75 thousand cycles per second (kHz) to the handpiece (the frequency depends on which handpiece you connect to the console). In the handpiece, the current passes through a coil, which induces a magnetic field. -
Page 76: Fragmentation
Cooling The high frequency vibration generates heat. To reduce the heat, the CUSA EXcel system includes a closed, recirculating cooling water system. This system pulls water from a cooling water reservoir, through a tube in the handpiece cable, through the handpiece, and through a return tube in the handpiece cable to the cooling water reservoir. -
Page 77: How The Tissueselect Feature Works
Tip acceleration—produces the peak forces and pressures that fragment tissue. • Tip cross-sectional area at the tip-tissue contact site. These variables also affect tactile feedback—what the surgeon’s hand feels when using the handpiece. CUSA EXcel Ultrasonic Surgical Aspirator System Service Manual... -
Page 78: Inherent Tissue Selectivity
However, the surgeon may not always recognize the difference in tactile feedback quickly enough, or react quickly enough, to avoid damaging vital structures, particularly those with a tissue strength similar to the tissue being fragmented. The CUSA EXcel system can help the surgeon when dissecting near vital structures. Increasing Tissue Selectivity It is possible to increase the inherent selectivity resulting from variations in tissue strength while maintaining stroke amplitude, tip acceleration, and suction. -
Page 79: Tissueselect Reduces Reserve Power To The Tip
How the TissueSelect Feature Works The CUSA EXcel ultrasonic generator delivers electrical power (which is directly related to the acoustic power present at the tip, which results in fragmentation) to the handpiece. You can think of the power delivered to the handpiece in three terms: •... - Page 80 • The tip fragments “softer” tissue easily. • The tip fragments “stronger” tissue, but with more difficulty (slower, requires more surgeon pressure). CUSA EXcel Ultrasonic Surgical Aspirator System Service Manual...
-
Page 81: Benefits Of Tissueselect
• Maintains fragmentation ability. • Reduces (automatically) fragmentation rate. • Provides maximum tissue selectivity. • Gives surgeon superior tactile feedback. • Gives surgeon greater control and precision when dissecting near delicate structures. CUSA EXcel Ultrasonic Surgical Aspirator System Service Manual... -
Page 82: A Common Misunderstanding Of The Amplitude Setting
Therefore, decreasing the amplitude setting gives the following results: • Reduced fragmentation ability • Reduced fragmentation rate • Little increase in selectivity • Little reduction in reserve power. CUSA EXcel Ultrasonic Surgical Aspirator System Service Manual... - Page 83 Notes 6-10 CUSA EXcel Ultrasonic Surgical Aspirator System Service Manual...
-
Page 84: Section 7. Circuit Theory
• Ultrasonics board–ultrasonic generator • Ultrasonics board–other circuits • System 24 V Power Supply board. For Your Information When reading the descriptions in this section, refer to the Schematics Supplement to view schematics. CUSA EXcel Ultrasonic Surgical Aspiration System Service Manual... -
Page 85: Display Board
50-pin ribbon cable. Fundamentals of Operation The display board, the fundamental user interface for the system, both receives and displays information to the user. Figure 7-1 shows the display organization. CUSA EXcel Ultrasonic Surgical Aspiration System Service Manual... -
Page 86: Detailed Circuit Description
Each LED light bar (except for the numeric legends) has a unique map location; thus, each LED light bar is independently controlled. The numeric legends are controlled together, not independently. CUSA EXcel Ultrasonic Surgical Aspiration System Service Manual... -
Page 87: Machine Control Board
5v_x = 5.6v display desired voltage setpoint theoret v 0.28 0.32 0.45 0.47 0.61 0.63 0.78 0.79 0.93 0.95 1.11 1.27 1.45 1.43 1.59 1.75 1.75 ff max 4.98 Suction Pump CUSA EXcel Ultrasonic Surgical Aspiration System Service Manual... - Page 88 Table 7-2. Suction pump voltage steps suction step +5v_sp = 6.15v desired voltage setpoint theoret v 0.40 0.80 1.20 1.61 2.00 2.41 2.81 3.23 3.63 4.03 default 4.43 4.84 5.23 5.64 6.03 CUSA EXcel Ultrasonic Surgical Aspiration System Service Manual...
-
Page 89: Cooling Pump
15V from the supply. The following table shows the handpiece amplitude control steps: Table 7-4. Handpiece amplitude control amp step desired voltage D/A code theoret v voltages 1.00 2.01 2.208 3.01 4.04 5.04 CUSA EXcel Ultrasonic Surgical Aspiration System Service Manual... -
Page 90: Valve Controls
The crystal and inverter generate the PLD master clock at 32.768 kHz. The right angled 10-pin connector allows in-circuit programming of the PLD. An EE programmable read-only memory (prom) stores initial set points. CUSA EXcel Ultrasonic Surgical Aspiration System Service Manual... -
Page 91: Voltage Regulators
Ultrasonics Board–Ultrasonic Generator Fundamentals of Operation The CUSA EXcel ultrasonic generator is based on the principle of the Wien Bridge Oscillator. The system has a non-inverting feedback loop to establish the fundamental frequency of oscillation and an additional negative feedback loop, which controls the amplitude of oscillation. -
Page 92: The Main Frequency Loop
16 dB of midband loss due to the large feedback voltage swings of up to 90 Vp-p of the 23 kHz handpiece/tip. The gain set resistor R66, selected by the analog switch U10C when the 35.75 kHz CUSA EXcel Ultrasonic Surgical Aspiration System Service Manual... -
Page 93: Agc/Error Amplifier Circuit
The control function has an offset and a gain which limit the operating range capabilities (start-up and load) of the handpiece. At minimum level settings the control function must have a start-up gain of at least two times or greater the 7-10 CUSA EXcel Ultrasonic Surgical Aspiration System Service Manual... -
Page 94: Phase Compensator
R38 protects the output transistors from open-circuit loading (like a short-circuit for voltage based designs). The output transformer is center tapped with a ratio of 1:4.6 for each half coil. CUSA EXcel Ultrasonic Surgical Aspiration System Service Manual 7-11... -
Page 95: Feedback Signal
A signal, filtered and “wired OR” for the HP_PRES signal, goes to the Machine Control board when either handpiece is present. The 23_PRES and 23_PRES signals select analog switches. The default frequency selection is the 35.75 kHz circuit. 7-12 CUSA EXcel Ultrasonic Surgical Aspiration System Service Manual... -
Page 96: Ultrasonics Board-Other Circuits
System 24 V Power Supply Board The CUSA EXcel uses an OEM medical grade 600 watt power supply with an input voltage range of 88 to 264 VAC. The supply has two individually regulated 24 VDC outputs. - Page 97 Notes 7-14 CUSA EXcel Ultrasonic Surgical Aspiration System Service Manual...
-
Page 98: Section 8. Checkout Procedures
Inspect the cable for cuts, tears, or excessive compression. Clean the footswitch and cable with a damp cloth and mild detergent. Allow the footswitch to dry. Connect the footswitch to the console (rear panel). CUSA EXcel Ultrasonic Surgical Aspirator System Service Manual... -
Page 99: Power Cord
• Flue. For complete information on assembling the handpiece, refer to Section 9, Assembling the Handpiece in a Nonsterile Area, in the CUSA EXcel Ultrasonic Surgical Aspirator System User’s Guide. Notice To avoid product damage, NEVER hold the handpiece in your hand while using the torque wrench to tighten or loosen the tip. - Page 100 Fill the cooling water reservoir with 1000 cc distilled water. Slide the cooling water reservoir into the slot on the console side panel until it snaps into place. LifeSciences (Ireland) Limited Technology Park County Offaly, Ireland Integra Business Stragh, Tullamore, CUSA EXcel Ultrasonic Surgical Aspirator System Service Manual...
- Page 101 Turn on (|) the System Power Switch located on the front panel. System Power Switch CUSA EXcel Ultrasonic Surgical Aspirator System Service Manual...
- Page 102 Removing and re-attaching the tip, then pushing the Test button again. If the problem persists, attach a different handpiece. If the problem still persists, contact the Integra Service Center nearest you. If the test is successful, turn off the System Power Switch.
- Page 103 Notes CUSA EXcel Ultrasonic Surgical Aspirator System Service Manual...
-
Page 104: Section 9. Maintaining The Cusa Excel System
• Maintain the tip torquing set • Store the CUSA EXcel system and accessories. For Your Information Routinely performing a few simple maintenance tasks keeps your CUSA EXcel system operating at maximum safety and performance levels. Biomedical Engineering at your facility should perform these tasks. -
Page 105: Recommended Maintenance Schedule
Every 6 months or CUSA handpiece Replace the handpiece connector 100 procedures, o-rings. whichever comes first CUSA EXcel Ultrasonic Surgical System Service Manual... -
Page 106: Clean The Cusa Excel Console
Maintaining the handpiece involves cleaning the handpiece, lubricating the handpiece connector o-rings with a high viscosity lubricant such as silicone grease, or replacing the handpiece connector o-rings. If a problem develops, you may also need to have the handpiece recalibrated. CUSA EXcel Ultrasonic Surgical System Service Manual... -
Page 107: Clean The Handpiece
Cleaning the handpiece with a soft cloth Rinse the handpiece cable, handpiece housing, connecting body, and nosecone thoroughly with water. Using a soft cloth, dry the handpiece cable, handpiece housing, connecting body, and standard nosecone. CUSA EXcel Ultrasonic Surgical System Service Manual... -
Page 108: Lubricate The Handpiece Connector O-Rings
Insertion tool O-ring Recalibrate the Handpiece Handpieces for the CUSA EXcel system do not need recalibration unless a problem develops. If this happens, contact Integra to arrange returning the handpiece for service. (Refer to Return Equipment for Service in Section 13, Repair Policy.) -
Page 109: Maintain The Tip Torquing Set
Rinse the tip torquing set thoroughly with water. Using a soft cloth, dry the tip torquing set. Check the Torque on the Tip Torquing Wrench A biomedical engineer or an Integra service representative should check the torque on the tip torquing wrench. Tools Needed •... -
Page 110: Store The Cusa Excel System And Accessories
55 to 70 36 kHz (blue) 20 to 32 If the values are higher or lower, send the wrench to Integra for recalibration. Store the CUSA EXcel System and Accessories CUSA Console Drain all liquids. Store the CUSA system in a low traffic area that is free of dirt, blood, water, and other contaminants. - Page 111 Notes CUSA EXcel Ultrasonic Surgical System Service Manual...
-
Page 112: Section 10. Troubleshooting
• Engineer troubleshooting Guidelines Flow Charts. For Your Information Two types of troubleshooting procedure are available for the CUSA EXcel system: • User troubleshooting—these procedures involve conditions that may occur before or during the normal course of surgery. They are easy to diagnose and to fix. -
Page 113: Troubleshooting Safety
User Troubleshooting The CUSA EXcel system runs nearly trouble free. However, on occasion, a problem may arise. This section describes some conditions that may occur before or during the normal course of surgery. They are easy to diagnose and to fix. -
Page 114: Responding To Alerts
However, if the Cooling Water alert remains lit, refer to the condition immediately before this one: Cooling Water—continuously on. A pinch or kink in the handpiece cable Remove the pinch or kink in the cable. CUSA EXcel Ultrasonic Surgical Aspirator System Service Manual 10-3... - Page 115 Assembling or Changing Tips on the Sterile Field, in the CUSA EXcel Ultrasonic Surgical Aspirator System User’s Guide.) 2. Test the tip. Tip contacting another object Remove the contact with any other object. 10-4 CUSA EXcel Ultrasonic Surgical Aspirator System Service Manual...
- Page 116 (Refer to the Supplement, Assembling or Changing Tips on the Sterile Field, in the CUSA EXcel Ultrasonic Surgical Aspirator System User’s Guide.) 2. Test the tip. CUSA EXcel Ultrasonic Surgical Aspirator System Service Manual 10-5...
-
Page 117: General Troubleshooting
Prime button to make sure the irrigation system is ready to use. 5. Adjust the Aspiration, Irrigation, Amplitude, and TissueSelect settings. 6. Push the Status button to change to Run mode. 10-6 CUSA EXcel Ultrasonic Surgical Aspirator System Service Manual... - Page 118 Low or no suction due to suction tubing Verify that the manifold suction tube improperly connected to handpiece connects properly to the nosecone by disconnecting, then reconnecting, the tubing and its clip. CUSA EXcel Ultrasonic Surgical Aspirator System Service Manual 10-7...
- Page 119 2. Squeeze the blocked area to loosen it. 3. Immerse the handpiece tip in sterile irrigation fluid briefly. This may clear the blockage. Suction canister full Replace the suction canister. 10-8 CUSA EXcel Ultrasonic Surgical Aspirator System Service Manual...
- Page 120 If these conditions do not exist, call Integra for assistance. No green LEDs (other than setpoints) System in Standby mode Press the Status button to switch the illuminate when you activate vibration system to Run mode. CUSA EXcel Ultrasonic Surgical Aspirator System Service Manual 10-9...
- Page 121 5. Immerse the handpiece tip in sterile irrigation fluid briefly. This may clear the suction tubing. Incorrect flue installed Install the correct flue. 10-10 CUSA EXcel Ultrasonic Surgical Aspirator System Service Manual...
- Page 122 (Refer to the Supplement, Assembling or Changing Tips on the Sterile Field, in the CUSA EXcel Ultrasonic Surgical Aspirator System User’s Guide.) b. Test the tip. CUSA EXcel Ultrasonic Surgical Aspirator System Service Manual 10-11...
- Page 123 Suction tube won’t assemble correctly Nosecone not assembled to handpiece Align the dot on the nosecone with the dot to handpiece nosecone correctly on the handpiece. Transducer is twisted inside handpiece Replace the handpiece. housing 10-12 CUSA EXcel Ultrasonic Surgical Aspirator System Service Manual...
- Page 124 A pinch or kink in the suction tubing Straighten the tubing to remove a kink, or remove anything that might pinch the tube. CUSA EXcel Ultrasonic Surgical Aspirator System Service Manual 10-13...
- Page 125 The nosecone is loose Large o-ring not installed correctly, or Install the large o-ring in the proper missing position on the handpiece. Nosecone worn Replace the nosecone. 10-14 CUSA EXcel Ultrasonic Surgical Aspirator System Service Manual...
-
Page 126: Engineer Troubleshooting
If the solution is not obvious, check the power supply circuits first. Flowcharts The following flowcharts present troubleshooting procedures: • No power • Handpiece alarm • Footswitch alarm • Cooling water alarm • Low suction • Low irrigation • Vibration alarm. CUSA EXcel Ultrasonic Surgical Aspirator System Service Manual 10-15... -
Page 127: No Power
Engineer Troubleshooting No Power Integra Call Integra Service for Integra Service 10-16 CUSA EXcel Ultrasonic Surgical Aspirator System Service Manual... -
Page 128: Handpiece Alarm
Engineer Troubleshooting Handpiece Alarm Call Integra for Call Integra Service Call Integra for Call Integra Service Call Integra Service CUSA EXcel Ultrasonic Surgical Aspirator System Service Manual 10-17... -
Page 129: Footswitch Alarm
Engineer Troubleshooting Footswitch Alarm Call Integra Service Call Integra for Call Integra Service 10-18 CUSA EXcel Ultrasonic Surgical Aspirator System Service Manual... -
Page 130: Cooling Water Alarm
Engineer Troubleshooting Cooling Water Alarm Call Integra Service for Call Integra Service CUSA EXcel Ultrasonic Surgical Aspirator System Service Manual 10-19... -
Page 131: Low Suction
Engineer Troubleshooting Low Suction 10-20 CUSA EXcel Ultrasonic Surgical Aspirator System Service Manual... - Page 132 Engineer Troubleshooting Call Integra Service Call Integra Service Call Integra Service CUSA EXcel Ultrasonic Surgical Aspirator System Service Manual 10-21...
-
Page 133: Low Irrigation
Engineer Troubleshooting Low Irrigation Call Integra Service Call Integra Service 10-22 CUSA EXcel Ultrasonic Surgical Aspirator System Service Manual... -
Page 134: Vibration Alarm
Engineer Troubleshooting Vibration Alarm Call Integra for Call Integra for CUSA EXcel Ultrasonic Surgical Aspirator System Service Manual 10-23... - Page 135 Notes 10-24 CUSA EXcel Ultrasonic Surgical Aspirator System Service Manual...
-
Page 136: Section 11. Replacement Procedures
• Suction pump and controller card • Suction pinch valve • Irrigation pump head and gear motor • Handpiece flow sensor • Cooling water pump tubing • Cooling water reservoir o-rings • Fuses. CUSA EXcel Ultrasonic Surgical Aspirator System Service Manual 11-1... -
Page 137: For Your Information
CUSA EXcel system. High Current Hazard Do not touch the ultrasonics PCB heat sink while the CUSA EXcel system is energized. The heat sink is isolated from ground and can deliver very high current, resulting in injury. Notice If you plan to connect the handpiece for activation, ensure that an I.V. -
Page 138: Console Covers
Right and left sides of the console Right Side (includes the cooling water reservoir, arm, Left Side (includes and I.V. Pole) the system power switch and the handpiece connector receptacle) Tools Needed Phillips head screwdriver CUSA EXcel Ultrasonic Surgical Aspirator System Service Manual 11-3... -
Page 139: Open The Left Cover
Disconnect the footswitch connector from the receptacle on the rear panel. Remove two screws (M5 Phillips) from the bottom of the rear cover. Push the rear cover upwards to unhook it from the console, then remove the cover. 11-4 CUSA EXcel Ultrasonic Surgical Aspirator System Service Manual... -
Page 140: Re-Install The Left Cover
Allow it to slide downward and to hook into the console. Hold the top of the cover against the console and replace the two screws (M5 Phillips). Reconnect the footswitch connector to the receptacle on the rear panel. CUSA EXcel Ultrasonic Surgical Aspirator System Service Manual 11-5... -
Page 141: System 24 Volt Power Supply
Connect the wiring harness. Refer to Figure 11-2. Replace the left side cover. Plug the power cord connector into a wall receptacle. Turn on the AC Main Switch, located on the rear panel. 11-6 CUSA EXcel Ultrasonic Surgical Aspirator System Service Manual... - Page 142 System 24 Volt Power Supply Figure 11-2. The wiring harness on the system 24 volt power supply CUSA EXcel Ultrasonic Surgical Aspirator System Service Manual 11-7...
-
Page 143: Ultrasonics And Machine Control Printed Circuit Boards
2-pin connector red, black 4-pin connector red, black, orange, brown 4-pin connector red, black, yellow, gray (marked COOL) 4-pin connector red, black, orange, violet (marked IRR) 2-pin connector black, black (twisted) 11-8 CUSA EXcel Ultrasonic Surgical Aspirator System Service Manual... - Page 144 When you remove the ultrasonics PCB panel, you will find the heat sink and cooling fan cables attached to it. Figure 11-3. Cables on the ultrasonics PCB M5 Phillips screw assembly M5 Phillips screw M5 Phillips screw M5 Phillips screw CUSA EXcel Ultrasonic Surgical Aspirator System Service Manual 11-9...
- Page 145 Table 11-2. Ultrasonics PCB fan assembly Color connectors black Figure 11-4. The ultrasonics PCB fan assembly Red wires appear connections gray in this graphic Pin 5 (red wire) Pin 6 (black wire) 11-10 CUSA EXcel Ultrasonic Surgical Aspirator System Service Manual...
-
Page 146: Install The Ultrasonics Pcb
Ultrasonics and Machine Control Printed Circuit Boards Install the Ultrasonics PCB Place the new ultrasonics PCB assembly near the CUSA EXcel console. Insert the following ultrasonic PCB fan assembly lead wires into the 6-pin fan connector housing: Refer to Table 11-2 and Figure 11-4. - Page 147 20-pin ribbon cable 40-pin ribbon cable Replace the rear cover. Now you must replace the Machine Control PCB, which resides in the control panel assembly. 11-12 CUSA EXcel Ultrasonic Surgical Aspirator System Service Manual...
-
Page 148: Remove The Control Panel Assembly
20 pin ribbon cable (J5) 10 pin cable (J4) 6 pin cable (J2). Refer to Figure 11-6. Figure 11-6. Disconnecting control panel assembly cables Remove the control panel assembly from the control head. CUSA EXcel Ultrasonic Surgical Aspirator System Service Manual 11-13... -
Page 149: Remove The Machine Control Pcb
Position the new Machine Control PCB in the control panel assembly. Refer to Figure 11-7. Replace five screws (M4 Phillips) in the Machine Control PCB. Connect the 50-pin ribbon cable to the Machine Control PCB (J1). 11-14 CUSA EXcel Ultrasonic Surgical Aspirator System Service Manual... -
Page 150: Install The Control Panel Assembly
(attached to a chassis) constitute two layers in a control panel assembly within the control head (refer to Figure 11-8). Gaining access to any of these components involves removing previous layer(s). CUSA EXcel Ultrasonic Surgical Aspirator System Service Manual 11-15... - Page 151 D: Remove the display PCB and chassis, then separate the display PCB from its chassis The following procedures describe how to remove and install each individual component. Tools Needed Phillips head screwdriver 11-16 CUSA EXcel Ultrasonic Surgical Aspirator System Service Manual...
-
Page 152: Remove The Control Panel Assembly
40 pin ribbon cable (J3) head. 20 pin ribbon cable (J5) 10 pin cable (J4) 6 pin cable (J2). Remove the control panel assembly from the control head. Figure 11-9. Disconnecting control panel cables CUSA EXcel Ultrasonic Surgical Aspirator System Service Manual 11-17... -
Page 153: Remove The Machine Control Pcb
Remove the display PCB from the chassis (refer to Figure 11-11): Remove eight screws (M4 Phillips) from the display PCB. Lift the display PCB from the chassis. 11-18 CUSA EXcel Ultrasonic Surgical Aspirator System Service Manual... -
Page 154: Install The Display Pcb
Replace the eight screws (M4 Phillips) in the display PCB. Being careful to make sure the silicon buttons clear the bezel, position the display PCB and chassis in the control panel bezel. CUSA EXcel Ultrasonic Surgical Aspirator System Service Manual 11-19... -
Page 155: Install The Control Panel Overlay
Plug the power cord connector into the wall receptacle. control head. Turn on the AC Main Switch, located on the rear panel. 11-20 CUSA EXcel Ultrasonic Surgical Aspirator System Service Manual... -
Page 156: Suction Control Valve
Unplug the power cord connector from the wall receptacle. Remove the left, right, and rear covers. Disconnect the suction control valve from the ultrasonics PCB (J7). Lift the arm and control head to the highest position. CUSA EXcel Ultrasonic Surgical Aspirator System Service Manual 11-21... - Page 157 Slightly lean the enclosure toward the rear of the console so that, as you remove it, the enclosure will clear other components in the console. Carefully pull the suction pump enclosure out the left side of the console. 11-22 CUSA EXcel Ultrasonic Surgical Aspirator System Service Manual...
- Page 158 Left end of Removing the ends from the suction suction pump pump chamber chamber Right end of suction pump chamber Figure 11-13. Removing the suction pump enclosure from the console Suction pump enclosure CUSA EXcel Ultrasonic Surgical Aspirator System Service Manual 11-23...
- Page 159 Remove the cable tie and disconnect the 1⁄8 in. ID tube that connects to the left end of the control valve. Figure 11-15. Disconnecting the suction tube from the left end of the suction control valve 11-24 CUSA EXcel Ultrasonic Surgical Aspirator System Service Manual...
- Page 160 Remove two hex bolts (M5) and two lock washers that secure the manifold bracket to the frame. Carefully lift the manifold bracket (and suction control valve) out the left side of the console. Figure 11-17. Removing the manifold bracket from the console CUSA EXcel Ultrasonic Surgical Aspirator System Service Manual 11-25...
- Page 161 Note: The inlet screen for the suction control valve becomes unattached when you lift the suction control valve off the manifold bracket. Figure 11-18. Removing the suction control valve from the manifold bracket Suction control valve Inlet screen Manifold bracket 11-26 CUSA EXcel Ultrasonic Surgical Aspirator System Service Manual...
-
Page 162: Install The Suction Control Valve
Replace three screws (M4 socket head cap screws) in the suction control valve. Note: A lock washer secures the screw on each end of the assembly, but no lock washer secures the third screw. CUSA EXcel Ultrasonic Surgical Aspirator System Service Manual 11-27... - Page 163 Connect the suction control valve to the ultrasonics PCB (J7). Replace the left, right, and rear covers. Plug the power cord connector into the wall receptacle. Turn on the AC Main Switch, located on the rear panel. 11-28 CUSA EXcel Ultrasonic Surgical Aspirator System Service Manual...
-
Page 164: Suction Pump And Controller Card
Slightly lean the enclosure toward the rear of the console so that, as you remove it, the enclosure will clear other components in the console. Carefully pull the suction pump enclosure out the left side of the console. CUSA EXcel Ultrasonic Surgical Aspirator System Service Manual 11-29... - Page 165 Pull the split bushing restraint on the suction tube away from the manifold bracket (near the right end of the bracket). Figure 11-21. Pulling the split bushing away from the manifold bracket 11-30 CUSA EXcel Ultrasonic Surgical Aspirator System Service Manual...
- Page 166 -8 Service Manuals: Installing the Noise Reduction Kit (Document # 510I000IE) Perform the procedures in this addendum in place of the instructions described on pages 11-32 through 11-35 in this service manual. CUSA EXcel Ultrasonic Surgical Aspirator System Service Manual 11-31...
- Page 167 Remove four screws (M5 Phillips) and four lock washers (M5). You need a short Phillips screwdriver for this task. Carefully lift the suction pump and its bracket mount from the wire rope isolators. 11-32 CUSA EXcel Ultrasonic Surgical Aspirator System Service Manual...
- Page 168 Removing the suction pump from its from the suction pump bracket mount bracket mount: Remove four bolts (M6), four lock washers (M6), and four nuts (M6). Lift the pump off the bracket mount. CUSA EXcel Ultrasonic Surgical Aspirator System Service Manual 11-33...
-
Page 169: Install The Suction Pump
Note: The split bushing restraint should still be on the tube. Position the strain relief bushing on the suction pump wires 20 cm (8 in.) from where the wires exit the pump. Crimp the strain relief bushing in place with pliers. 11-34 CUSA EXcel Ultrasonic Surgical Aspirator System Service Manual... -
Page 170: Ready For Suction Pump Controller Card Replacement
The new suction pump is not yet connected to the controller card. The reason is simple: If you replace the suction pump, you must replace the controller card. Likewise, if you replace a controller card, you must replace the suction pump. CUSA EXcel Ultrasonic Surgical Aspirator System Service Manual 11-35... -
Page 171: Remove The Suction Pump Controller Card
(M4 Phillips), four lock washers (M4), and four flat avoid pulling other cables with it. washers (M4). Figure 11-26. Removing the cable clamps and screws from the suction pump controller card 11-36 CUSA EXcel Ultrasonic Surgical Aspirator System Service Manual... -
Page 172: Install The Suction Pump Controller Card
Return the arm and control head to normal position. Replace the left, right, and rear covers. Plug the power cord connector into the wall receptacle. Turn on the AC Main Switch, located on the rear panel. CUSA EXcel Ultrasonic Surgical Aspirator System Service Manual 11-37... -
Page 173: Suction Pinch Valve
Remove the pinch valve electrical leads from the cable restraints. Remove the pinch valve by pulling it forward. Refer to Figure 11-28. Note: Ensure that the electrical leads are free to move. 11-38 CUSA EXcel Ultrasonic Surgical Aspirator System Service Manual... - Page 174 Suction Pinch Valve Figure 11-27. Removing the irrigation pump bezel Irrigation pump bezel Figure 11-28. Removing the suction pinch valve Pinch valve collar Suction pinch valve CUSA EXcel Ultrasonic Surgical Aspirator System Service Manual 11-39...
-
Page 175: Install The Suction Pinch Valve
Close the irrigation pump latch by rotating the latch lever clockwise until it reaches the 3 o’clock position. Plug the power cord connector into the wall receptacle. Turn on the AC Main Switch, located on the rear panel. 11-40 CUSA EXcel Ultrasonic Surgical Aspirator System Service Manual... -
Page 176: Irrigation Pump Head And Gear Motor
Four ball-end retainers hold the irrigation pump bezel in place. Remove the pump bezel by pulling it straight forward. Refer to Figure 11-29. Figure 11-29. Removing the irrigation pump bezel Irrigation pump bezel Remove the Irrigation Pump Head CUSA EXcel Ultrasonic Surgical Aspirator System Service Manual 11-41... -
Page 177: Install The Irrigation Pump Head
Rotate the pump shaft by hand to ensure that the shaft tang has seated properly crack plastic parts in the pump in the gear motor coupling. head. 11-42 CUSA EXcel Ultrasonic Surgical Aspirator System Service Manual... -
Page 178: Remove The Irrigation Pump Gear Motor
Refer to Figure 11-31. Figure 11-31. IRRIGATION CONTROL CARD Disconnecting the irrigation pump gear motor from the control card HP COOLING CONTROL CARD PCOM IRRIGATION PUMP +24V PCOM +24V COOLING PUMP CUSA EXcel Ultrasonic Surgical Aspirator System Service Manual 11-43... - Page 179 Put the coupling on the new gear motor drive shaft, making sure that the coupling is in the same position on the new drive shaft as it was on the old drive shaft. 11-44 CUSA EXcel Ultrasonic Surgical Aspirator System Service Manual...
-
Page 180: Install The Irrigation Pump Gear Motor
Close the irrigation pump latch by rotating the latch lever clockwise until it reaches the 3 o’clock position. Plug the power cord connector into the wall receptacle. Turn on the AC Main Switch, located on the rear panel. CUSA EXcel Ultrasonic Surgical Aspirator System Service Manual 11-45... -
Page 181: Handpiece Flow Sensor
Remove the 3.175 mm (1⁄8 in.) ID tube from the 90° elbow fitting on the bottom end of the flow sensor. Remove the flow sensor. 11-46 CUSA EXcel Ultrasonic Surgical Aspirator System Service Manual... - Page 182 Handpiece Flow Sensor Figure 11-33. Replacing the handpiece flow sensor Plastic wire ties 1.587 mm (1/16 in.) ID Tubing Bottom end of sensor Plastic wire tie 3.175 mm (1/8 in.) ID Tubing CUSA EXcel Ultrasonic Surgical Aspirator System Service Manual 11-47...
-
Page 183: Install The Handpiece Flow Sensor
Replace the right side cover and the rear cover. Plug the power cord connector into the wall receptacle. Turn on the AC Main Switch, located on the rear panel. 11-48 CUSA EXcel Ultrasonic Surgical Aspirator System Service Manual... -
Page 184: Cooling Water Pump Tubing
Cooling Water Pump Tubing Cooling Water Pump Tubing Integra offers a cooling water preventive maintenance kit. This kit allows you to perform two tasks: • Replace the cooling water pump tubing. • Replace the o-rings on the cooling water reservoir connectors. -
Page 185: Install Tubing And Re-Assemble The Cooling Water Pump Head
Replace the left side cover. Plug the power cord connector into the wall receptacle. Turn on the AC Main Switch, located on the rear panel. Cooling Water Reservoir O-Rings 11-50 CUSA EXcel Ultrasonic Surgical Aspirator System Service Manual... -
Page 186: O-Rings On The Cooling Water Reservoir Connectors
Cooling Water Reservoir O-Rings Integra offers a cooling water preventive maintenance kit. This kit allows you to perform two tasks: • Replace the cooling water pump tubing. • Replace the o-rings on the cooling water reservoir connectors. Perform each task every 12 months. -
Page 187: Fuses
Remove the fuse holder from the rear panel. Replace the fuse: Table 11-9. Fuse values Volts Amps Type 95–120 V T10A Time Delay (Default) 220–240 V Time Delay 4. Insert the holder, and turn the cover clockwise. 11-52 CUSA EXcel Ultrasonic Surgical Aspirator System Service Manual... -
Page 188: Section 12. Calibration
Warning High Current Hazard Do not touch the ultrasonics PCB heat sink while the CUSA EXcel system is energized. The heat sink is isolated from ground, and can deliver very high current, resulting in injury. CUSA EXcel Ultrasonic Surgical Aspirator System Service Manual... -
Page 189: Tools/Equipment Needed For Calibrations
Adjust the potentiometer to 4.7 Vdc (-0 + 0.05). Turn off the System Power Switch (front panel) and the AC Main Switch (rear panel). Apply a suitable potentiometer locking compound to the adjustment screw of the potentiometer. 12-2 CUSA EXcel Ultrasonic Surgical Aspirator System Service Manual... -
Page 190: Suction Pump
Turn on the AC Main Switch (rear panel) and the System Power Switch (front panel). When you turn on the System Power Switch, the CUSA EXcel system begins to circulate cooling water through the handpiece. This takes about one minute to complete. - Page 191 Motor for the Cooling Water Pump Remove the left cover from the CUSA EXcel console. On the control panel, set the unit to Run mode. While the unit is in Run mode, apply the digital tachometer to the cooling water pump shaft.
-
Page 192: Section 13. Repair Policy
Repair Policy In this section: • Return equipment for service: Obtaining a return authorization number Returning the console Returning the handpiece Returning circuit boards Ordering replacement parts • Integra service centers. CUSA EXcel Ultrasonic Surgical Aspirator System Service Manual 13-1... -
Page 193: Return Equipment For Service
If, in Integra’s judgement, you fail to use the proper packing procedures or if you use improper packaging materials to return the console, you may void the warranty on this system. - Page 194 Put the power cord inside a polyethylene bag, then secure the cord and bag with a wire tie. Put the bagged power cord on the footswitch storage shelf in the console rear. CUSA EXcel Ultrasonic Surgical Aspirator System Service Manual 13-3...
- Page 195 Lower the arm, locking the control panel into the foam cushion. Lock the front (brake) casters and the rear (directional) casters by pushing each lock lever downward. Place the clear plastic bag over the console. 13-4 CUSA EXcel Ultrasonic Surgical Aspirator System Service Manual...
- Page 196 Attach the right (5) and left (6) foam cushions to the console. Attach the four interlocking foam pieces (1–4) from the foam cushion around the console (refer to the following figure). CUSA EXcel Ultrasonic Surgical Aspirator System Service Manual 13-5...
- Page 197 To prevent the ramp from falling and causing injury, be sure to hold the ramp in the up position while stapling the corrugated tab that secures it to the crate. Secure the ramp to the corrugated tab on the right front panel with two 1/2 in. staples. 13-6 CUSA EXcel Ultrasonic Surgical Aspirator System Service Manual...
- Page 198 Push the horizontal bars inside the clip toward the crate until the bars lock into place. CUSA EXcel Ultrasonic Surgical Aspirator System Service Manual 13-7...
- Page 199 Return Equipment for Service Pack the CUSA EXcel footswitch into its original packaging, and seal the packaging with tape. Place the sealed footswitch packaging into the corrugated tray. Note: If returning a handpiece, secure it into its original packaging, then...
-
Page 200: Returning The Handpiece
When ordering replacement parts for the handpiece, include the serial number (located on the handpiece connector). Integra Service Center Integra NeuroSciences 5965 Pacific Center Blvd. Suite 714 San Diego, CA 92121 Ph: 858-455-1115 Fax: 858-455-8298 E-mail: camts@integra-ls.com CUSA EXcel Ultrasonic Surgical Aspirator System Service Manual 13-9... - Page 201 Notes 13-10 CUSA EXcel Ultrasonic Surgical Aspirator System Service Manual...
-
Page 202: Section 14. Service Parts Lists
Replacement part ratings and tolerances must be equal to, or better than, original. Substituting lower grade parts can adversely affect system performance. If you have any questions about ordering parts, please call the Integra Service Center nearest you. CUSA EXcel Ultrasonic Surgical Aspirator System Service Manual... -
Page 203: Replacement Parts
Integra Designator Description Part Number 1004270 Irrigation Pump Gear motor, 25:1 Ratio 1004268 Irrigation or Cooling Motor Control Card Irrigation Pump Head 243500267 Coupling, Pump / Motor 223400735 IV Pole 223400733 14-2 CUSA EXcel Ultrasonic Surgical Aspirator System Service Manual... -
Page 204: Miscellaneous
Power Cable 15ft/4.57m Domestic 207002065 Power Cable 16.5ft/5m (Europe/Continental) 207002066 Power Cable 15ft/4.57m (UK) 207002073 Power Cable 15ft/4.57m (Swiss) 207002074 CUSA EXcel+: Power Supply, 800W x 2 x 24 V 207000278 CUSA EXcel Ultrasonic Surgical Aspirator System Service Manual 14-3... -
Page 205: Suction
Assembly Cable Power Supply - GND 207500678 Assembly Cable AC/SW - Fuse 207500635 Assembly Cable Fuse - Line Filter 207500636 Assembly Cable Line Filter - MC Power 207500753 Assembly Cable Filters - Power Supply 207500684 14-4 CUSA EXcel Ultrasonic Surgical Aspirator System Service Manual... - Page 206 223301205 Bottom Left Channel 223301254 Bottom Right Channel 223301255 CUSA EXcel+: Bezel, IRR Pump 1103001 IE CUSA EXcel+: Cover Top CUSA EXcel+ 1103000 IE CUSA EXcel+: Cover, Left, EXcel+ 1102000 IE CUSA EXcel Ultrasonic Surgical Aspirator System Service Manual 14-5...
- Page 207 Part Number IC, Timer LM555CN 210006001 U19, 3, 6 UDN2596A 210100053 IC, 74HC00 210230007 DG201A 210250102 IC, Flip-Flop MC1417B 210250103 LM78L05 210300109 LF353 210400037 IC, LM 393 AN 210410004 AD570JD 210740014 14-6 CUSA EXcel Ultrasonic Surgical Aspirator System Service Manual...
- Page 208 Header, 2 PIN, 0.100 in. centers, Lock 208200389 J16, 17, 19 Header, 4 PIN, 0.100 in. centers, Lock 208200390 J8, 13 Header, 2 PIN, 0.295 in. centers, Lock 208200391 Connector CIR Receptacle, 7 CKT 208300818 CUSA EXcel Ultrasonic Surgical Aspirator System Service Manual 14-7...
-
Page 209: Miscellaneous Spare Parts
TRANSF, 24 V dc to 15 V dc Converter 251200086 All DFs Filter, EMI, 1MHz FC, 3 Pins 251400011 Miscellaneous Spare Parts Reference Integra Designator Description Part Number CUSA EXcel Service Transportation Case 4103002IE 14-8 CUSA EXcel Ultrasonic Surgical Aspirator System Service Manual... -
Page 210: Appendix A. Warranty
(1) year (except as otherwise expressly provided as to accessory items) from the date of invoice by Integra (or its authorized distributor) to the original purchaser, but in no event beyond the expiration date stated on any product labeling (hereinafter the Warranty Period). - Page 211 Integra. 2.2. Equipment Replacement. The defective Equipment or part thereof that is replaced in accordance with the Warranty shall be the property of Integra. Integra reserves the right to fill spare parts requests using refurbished sub-assemblies provided that such sub-assemblies are functionally equivalent to new sub-assemblies and carry the same warranty as the replaced sub-assemblies.
- Page 212 INTEGRA product that has been repaired by anyone other than an authorized INTEGRA service representative or altered in any way so as to affect its stability or reliability, or which has been subject to misuse, negligence or accident, or which has been used otherwise than in accordance with the instructions furnished by INTEGRA.
- Page 213 Integra, Integra authorized distributors, or Customer, then and in that event Integra, Integra authorized distributors, or Customer, as the case may be, shall promptly notify the other party hereto of the difficulties resulting therefrom, and any of the foregoing events shall excuse any performance required under the Warranty.
Need help?
Do you have a question about the Cusa Excel and is the answer not in the manual?
Questions and answers