Table of Contents
Advertisement
Quick Links
Advertisement
Table of Contents

Summary of Contents for Amano Time Guardian Series
- Page 1 Time Guardian Series Installation and User Guide...
-
Page 2: Thank You
We recommend that this document be read in its entirety before any attempt is made to operate the equipment. For more information about Amano’s complete line of products, visit our web site at: www.amano.com/time Licenses and Trademarks Amano and Time Guardian are registered trademarks of Amano Cincinnati, Inc. -
Page 5: Table Of Contents
Table of Contents Table of Contents ........................i Chapter 1: Introduction ......................1-1 Welcome to Amano Time & Attendance Software Suite ............1-1 Amano Customer Support ....................1-4 Chapter 2: Installation ......................2-1 Time & Attendance Software Installation ................2-2 Chapter 3: Setup Wizard ......................3-1 Using Time &... -
Page 6: Table Of Contents
Chapter 18: Zone Differential Module ................. 18-1 Zone Differential (Premium Rules) Module Introduction ............. 18-1 Using the Zone Differential (Premium Rules) Module ............18-1 Chapter 19: Payroll Interface Module ................. 19-1 Payroll Interface Module Introduction ................. 19-1 – Table of Contents Time Guardian Series... -
Page 7: Table Of Contents
Chapter 23: Nexus Lite Module ................... 23-1 Nexus Lite Management (NLM) Software Installation ............23-2 NLM Setup Wizard ......................23-7 Using Nexus Lite Management (NLM) Software ..............23-7 Upgrading to Time and Attendance ................... 23-7 Glossary ..........................G-1 – Table of Contents Time Guardian Series... - Page 8 Table of Contents This page intentionally left blank. – Table of Contents Time Guardian Series...
-
Page 9: Chapter 1: Introduction
Guardian, Time Guardian Plus, or Time Guardian Pro welcome you to the Amano Cincinnati family of Time Solution and Access Control products. The following table lists the standard and optional features for all Amano Time & Attendance software. Feature/Module Time Guardian... - Page 10 6 labor levels to reports and show billable rates on reports). • Optional Access Control integration with Amano Nexus 220 and AmanoNet systems. See Access Control Module section for additional information. Employee and department synchronization with auto sync on login.
- Page 11 Access System Integration • Company Profile • Payroll Interface STEP 2: Department Setup [Optional Wizard Step] STEP 3: Pay Code Setup [Optional Wizard Step] • Pay Code Types • Overtime and Absence Rules • Wages Rules – Introduction Time Guardian Series...
-
Page 12: Amano Customer Support
Can be accessed through the main menu in the software or most windows by clicking on the button. E-Mail Support Support is provided via e-mail at TGSupport@amano.com. A zip file with your settings should be sent to Amano support for diagnostic troubleshooting. – Introduction... - Page 13 Amano One-on-One Technical Support Options Toll Free support number is: 1(800) 253-9836. • The first 30 days of support is provided free of charge, however this only applies to installation and set up questions, and requires the user to complete the warranty registration card.
- Page 14 This page intentionally left blank. – Introduction Time Guardian Series...
-
Page 15: Chapter 2: Installation
Chapter 2: Installation There are five documents available to assist you in the setup and use of your Amano Time & Attendance software: This Installation & User Guide, the FPT-40 Terminal/Time Guardian Quick-Start Guide, the MTX-15 Terminal/Time Guardian Quick-Start Guide, the MTX-15 Installation &... -
Page 16: Time & Attendance Software Installation
The following discussion utilizes Time Guardian for screen illustrations. The installation of the Amano Time & Attendance software is as follows: 1. Insert the Amano CD into your CD-ROM drive. The software program should automatically launch the Time Guardian Series CD Menu (see figure). - Page 17 If you would like to install the Time & Attendance Software in another folder, click on the Choose button. To reset this field, click on the Restore Default Folder button. After you have made your selection, click on the Next button. – Installation Time Guardian Series...
- Page 18 Note: Amano recommends not installing the Time & Attendance software inside the “Program Files” folder. 8. The Choose Database Option screen will appear. Select either Firebird SQL or Microsoft SQL and click on the Next button. If you chose Microsoft SQL, the Firebird Database Service does not have to be installed.
- Page 19 Please review the displayed information on the screen and click on the Next button to proceed. 12. The Installing screen will appear. The status bar on the bottom of the screen will display the installation status. – Installation Time Guardian Series...
- Page 20 15. If QuickBooks Integration was selected the QuickBooks drivers will be installed to exchange data between Time Guardian and QuickBooks . Next QuickBooks utility will execute and the QuickBooks InstallShield Wizard for QBFC will appear. – Installation Time Guardian Series...
- Page 21 17. Click on the Finish button to complete installing the QuickBooks InstallShield Wizard for QBFC. 18. Next, click on the Install button to begin installing the QuickBooks Remote Data Sharing Client or Cancel if you are not using QuickBooks payroll software. – Installation Time Guardian Series...
- Page 22 “Please wait Time Guardian is being configured for your system….” 21. The Amano Software Activation (ASA) screen will appear after the initial software installation (see Figure). Enter the Activation Code/Serial Number (9-digit number) supplied on the Amano software CD and click on the Activate button.
- Page 23 Note – If the Activation error dialog appears, e.g., the Activation Code/Serial Number is incorrect, or the same Activation Code/Serial Number was previously installed. At this point contact Amano customer support at 1-800-896-7035. 22. Upon successful activation the registration screen will appear (see figure). Perform on-line...
- Page 24 Click on the Next button to begin the Setup Wizard to configure the Time & Attendance Software and the Setup Wizard Steps Summary screen will appear (see Using the Setup Wizard). 2-10 – Installation Time Guardian Series...
-
Page 25: Chapter 3: Setup Wizard
Poll all terminals of the Run payroll file. selected locations. Set the time for all terminals Add employee certification. at the selected locations. Show schedule timeline. Filter employee records. – Setup Wizard Time Guardian Series... - Page 26 Open timecard with exception Labor references. list filter. Find terminals. Edit labor names. Send map templates for FPT- Clear map templates for FPT-40 40 terminal only terminal only. Receive map templates for FPT-40 terminal only. – Setup Wizard Time Guardian Series...
-
Page 27: Using The Setup Wizard
Red: Indicates an error or data not entered for a required field. Icon Toolbar The following icons are used in most Amano Time & Attendance modules, and if they are present they will have the same universal function, which is: •... - Page 28 Amano recommends that you have the appropriate information before you begin the Setup Wizard. Should you need to exit the Setup Wizard before completion, your settings will be saved. Once the Setup Wizard is finished, the Wizard Complete button will become active. At this point, all settings will be applied, including the time synchronization between the Time &...
- Page 29 7. The function to Close Pay Period is on automatically active when activated. 8. Select Default Pay Code to use from the drop down list. 9. IM Settings Escalation Frequency only enabled when Events Notification module is activated. Select the desired escalation frequency in minutes. – Setup Wizard Time Guardian Series...
- Page 30 Do you want to integrate access control? [Module – requires activation to use] From Step 1: General Setup press the Access Control button to define the company's access control profile and the Access Control screen will appear (see figure). – Setup Wizard Time Guardian Series...
- Page 31 ADP PC Payroll for Windows • CBS Payroll • Ceridian Power Pay • EasyPay • Excel • Gevity HR • PayDay • ® PayChex Paylink • ® PayChex Preview • PayWeb • ® PeachTree • ® QuickBooks Pro – Setup Wizard Time Guardian Series...
- Page 32 Note: You can close at any time to end the Setup Wizard, but you must complete the Setup Wizard before you can Log into the Amano Time & Attendance system. The Wizard will automatically open up to the Welcome screen until it is completed.
- Page 33 Press the Pay Code button to configure the Pay Codes that your company will be using (see figure). At least one Pay Code must be selected for the Time and Attendance software to calculate hours. – Setup Wizard Time Guardian Series...
- Page 34 Pay Code to another. Not allowed for BONUS Pay Code. 9. Check On Call Pay if you want to this type of pay to be added to hours. Only allowed for BONUS Pay Code. 3-10 – Setup Wizard Time Guardian Series...
- Page 35 Counts Towards Attendance, and Counts Towards Overtime parameters are selectable that’s indicates that this action can be turned On or Off. A checkmark ( ) in this column indicates the default setting. – Setup Wizard 3-11 Time Guardian Series...
- Page 36 Pay Codes will not be sent to the MTX-15 and/or FPT-40 terminal(s) to be used for labor transfer. A maximum of 4 Pay Codes based on position number can be downloaded to the terminal(s). 3-12 – Setup Wizard Time Guardian Series...
- Page 37 5. Enter in the number of hours that will be awarded for the holiday [yellow required field]. 6. Click on the Setting tab. The Setting tab is used to enter the date and condition definition for the holiday. – Setup Wizard 3-13 Time Guardian Series...
- Page 38 7. After completing the Pay Code and Holiday entry/selection of information for Step 3: Pay Code Setup, click on the Next button to advance to Step 4: Schedule Setup. Step 4: Schedule Setup Wizard [Optional Wizard Setup Step] 3-14 – Setup Wizard Time Guardian Series...
- Page 39 5. After completing the entry/selection of information for Step 4: Schedules Setup, click on the Next button to advance to Step 5: Pay Class Setup. Step 5: Pay Class Setup Wizard [Required Wizard Setup Step] – Setup Wizard 3-15 Time Guardian Series...
- Page 40 Step 5: Pay Class Setup only performs basic Pay Class setup. If you are configuring Amano Time & Attendance software with the Advanced Pay Class module activated, i.e., Time Guardian Pro you must continue configuring Pay Class rules from the Pay...
- Page 41 4:00 AM. • The day change time is set to 2:00 AM. • The Day Change is configured to Before Midnight, with a maximum shift length of 12 hours and 59 minutes. – Setup Wizard 3-17 Time Guardian Series...
- Page 42 Execution order, Daily Overtime template, Consecutive and non-consecutive template, etc.]. You can cancel all authorized overtime by clicking No to the question; Do you want to authorize your employee's hours? 2. Select Yes if overtime applies to this Pay Class. 3-18 – Setup Wizard Time Guardian Series...
- Page 43 Schedule hours, with potential for counting towards OT? 4. Select the Daily overtime after and enter the hours to award overtime after the assigned number of hours have been worked in a day. – Setup Wizard 3-19 Time Guardian Series...
- Page 44 Pay Period to auto reset every pay on start date. 7. Select if Worked on Holiday is considered as overtime, else any holiday dates will not be counted towards overtime based on the other overtime rules. 3-20 – Setup Wizard Time Guardian Series...
- Page 45 Pay Code of OT or DT. If DT is selected for Overtime Level 1, OT Level 2 will be disabled. 12. From the Pay Class Advanced Overtime Rules, click on the Weekend Overtime tab to define the Weekend Overtime (see figure). – Setup Wizard 3-21 Time Guardian Series...
- Page 46 Consecutive Day Weekend Overtime (see figure). Consecutive Day Overtime awards overtime based on the qualifying number of consecutive days worked. If an employee fails to work the number of consecutive days needed to qualify, no overtime is awarded. 3-22 – Setup Wizard Time Guardian Series...
- Page 47 This allows all of the hours to be better managed for payroll purposes because rounding moves an employee’s punches [IN/OUT] or daily [hours] to an even amount to make it easier for calculations. – Setup Wizard 3-23 Time Guardian Series...
- Page 48 00:10 00:11 00:11 00:11 00:11 00:12 (Next Unit Start) 00:12 (Next Unit Start 00:12 00:12 00:13 00:13 00:13 00:13 00:14 00:14 00:14 00:14 00:15 (Next Unit Start) 00:15 00:15 (Next Unit Start) 00:15 3-24 – Setup Wizard Time Guardian Series...
- Page 49 Start by selecting Yes to the question "Do you want time deducted for a meal?" Next enter the Minimum hours that an employee must work before the Meal rule will be applied, followed by the length of the Meal deduction. – Setup Wizard 3-25 Time Guardian Series...
- Page 50 Bill Jackson is displayed in the following table using the same rounding formula of Unit = 15 and Point = 7 with various scenarios for meal rules. For this example a normal meal time = 45 minutes. 3-26 – Setup Wizard Time Guardian Series...
- Page 51 Out and In for lunch of 11:15 to 13:15. This will prevent meal punches from being deducted twice because he was within the meal window/. With Meal Grace No Meal Grace For the following example the employee has a regular schedule of working from 08:15 to 17:00. – Setup Wizard 3-27 Time Guardian Series...
- Page 52 Pay Class. The Year view (see figure) is used to see the current, previous, or following year’s scheduled holidays. Click on the icon too print the displayed Holiday calendar, and to close the calendar, click on the button. 3-28 – Setup Wizard Time Guardian Series...
- Page 53 Add button. To select all the listed Exceptions, click on the Add All button. To remove an Exception from an employee’s record, highlight the desired Exception in the Selected list and click on the Remove button. To remove all the listed Exceptions, click on the Remove All button. – Setup Wizard 3-29 Time Guardian Series...
- Page 54 2. After completing the entry/selection of information for Step 6: Exception Setup, click on the Next button to advance to Step 7: Employee Setup. Step 7: Employee Setup Wizard [Required Wizard Setup Step] 3-30 – Setup Wizard Time Guardian Series...
- Page 55 Once complete, field’s specific to Time Guardian such as Schedule, Department, Wages and Employee Type will have to be updated for the newly imported employees from Access Control. These items can also be globally assigned. – Setup Wizard 3-31 Time Guardian Series...
- Page 56 If these parameters are not set to properly match the import file, the import process might fail. The file contents window on the Import Field Map Settings tab screen will help to indicate the file format. Pay attention when you select the following for an example: 3-32 – Setup Wizard Time Guardian Series...
- Page 57 Employee Number: Select how the Employee Number will be defined. The choices are: As it is, Same as Badge, or Manual Increment From. If Manual Increment From is selected, you must enter the starting number in the field provided. – Setup Wizard 3-33 Time Guardian Series...
- Page 58 To assign a field, select a data element in the Available list and click on the Add button. To select all the fields, click 3-34 – Setup Wizard Time Guardian Series...
- Page 59 Employees screen to filter employees with using Pay Class, department, and/or employee criteria. The following is an example of the screen that will appear when you click on the Employee tab from the Employee Filter screen: – Setup Wizard 3-35 Time Guardian Series...
- Page 60 Create a new Employee and you will be required to enter a Name, etc. Click on the necessary tabs to complete the entry of employee information. See the following paragraphs for description. Also, see the Employee Administration chapter. 3-36 – Setup Wizard Time Guardian Series...
- Page 61 Note: Use the inactive field to remove an employee from being calculated, but still leave the employee information in the system for historical records, and/or in case you want to reactive the employee at a later date, i.e., may be a seasonal employee? – Setup Wizard 3-37 Time Guardian Series...
- Page 62 Education Level; None specified, Elementary, High School, Some College, No Degree, Bachelor, Masters, Doctorate. • IM Password; This field active only if Events Notification module is activated. • Confirm IM Password; This field active only if Events Notification module is activated. 3-38 – Setup Wizard Time Guardian Series...
- Page 63 Validation: Assigns employee(s) to terminal(s). Can be used to filter employees. Apply on Call Pay for Weighted Average overtime: Adds On Call Pay [Bonus Pay Code] to weighted average overtime pay. Can be used to filter employees. – Setup Wizard 3-39 Time Guardian Series...
- Page 64 Note: See Advanced Labor/Rate Module, Example of Multiple Labor Levels for details about Labor Level Association links (Parent/Child relationship). Note: This function can also be done with Global Assign from the main employee list. 3-40 – Setup Wizard Time Guardian Series...
- Page 65 To edit a Certification, highlight the desired item in the list. The selected Certification will appear in the Name and Description fields. After making your changes, click on the button when finished. – Setup Wizard 3-41 Time Guardian Series...
- Page 66 From the Employees screen, click on the Benefit tab and the following type of screen will appear: Select a Pay code from the dropdown list. The choices are all non-work hours type pay codes; SCK, VAC, PER, HOL, JURY, and BRV. 3-42 – Setup Wizard Time Guardian Series...
- Page 67 Allows the employee to change his or her password. Schedule Posting Allows the employee to schedule posting his or her timecard. Report Note: This function can also be done with Global Assign from the main employee list (see Global A). – Setup Wizard 3-43 Time Guardian Series...
- Page 68 This is part of an optional Access Control Module which requires activation to utilize. Use to setup access control integration with PIN numbers and/or tags for each employee. See the Access Control Integration section for additional configuration information. 3-44 – Setup Wizard Time Guardian Series...
- Page 69 The company has an access system, but wants to use a different device(s) for Time Attendance. Do you have Terminal(s) other than Access Control Terminal(s)? If Yes, the Time & Attendance software will automatically poll and upload punches from connected terminals each time the software is opened. – Setup Wizard 3-45 Time Guardian Series...
- Page 70 Employees filter. For example, if employee numbers 1 - 20 where assigned to the “Engineering” Department, and the Engineering Department was deselected, the Employees tab would not list employees 1 – 20. 3-46 – Setup Wizard Time Guardian Series...
- Page 71 Select the desired sort criteria from the dropdown list (the choices are; Labor Number and Name). Both the Available and Selected lists for terminal validations can be sorted by typing in the “Criteria” fields above each list. 5. Click on the Employees tab to filter employees. – Setup Wizard 3-47 Time Guardian Series...
- Page 72 Selected list and click on the Remove button. To remove all, click on the Remove All button. Do you want to configure Bell Schedules? If Yes is selected for Bell Schedules, click the Bell Schedule button and the Bell Schedules screen will appear (see figure). 3-48 – Setup Wizard Time Guardian Series...
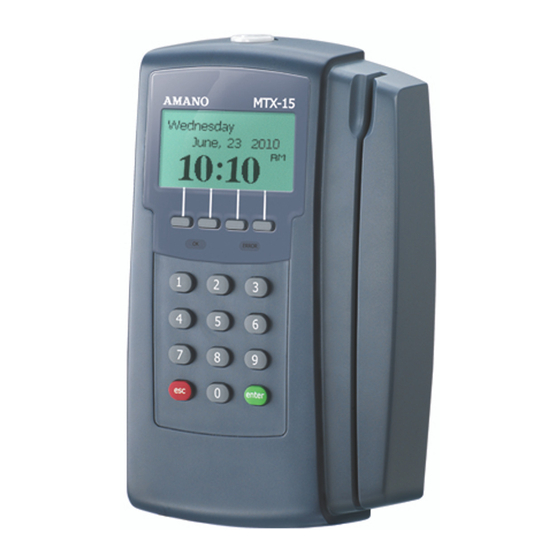
- Page 73 Locations screen will appear (see figure). Answer Yes to this question if you are using terminals such as a Hand Punch, FPT-40 (Fingerprint), and/or MTX-15 terminal via a serial, Ethernet, or modem connection. – Setup Wizard 3-49 Time Guardian Series...
- Page 74 Start Date: The date that the DLS period will begin. • Start Time: The time of the day of the Start Date that the DLS period will begin. • End Date: The date that the DLS period will end. 3-50 – Setup Wizard Time Guardian Series...
- Page 75 Com Port and Baud Rate. 10. Click on the Terminals tab to add, edit, delete, or find terminals. 11. To find terminals, click on the Find Terminals button to search for terminals (see figure). – Setup Wizard 3-51 Time Guardian Series...
- Page 76 15. In the Serial No. field, a unique number will appear for a found MTX-15 terminal. 16. If you wish to assign a Bell Schedule to the terminal, select one from the dropdown list in the Bells field. 3-52 – Setup Wizard Time Guardian Series...
- Page 77 22. If you set the Term Type to Hand Punch 1000, 2000, 3000, or 4000 in the General tab, the HP Options tab will also be enabled. This allows you to reassign configuration parameters for Hand Punch terminals. Click on the HP Options tab and the following screen will appear: – Setup Wizard 3-53 Time Guardian Series...
- Page 78 23. To update the terminal settings, click on the Update button. This will download the current settings in this window to the terminal. 24. After completing the entry/selection of information for Step 8: Terminal Setup, click on the Next button to advance to Step 9: Login Setup. 3-54 – Setup Wizard Time Guardian Series...
- Page 79 1. In the General tab, enter the name of the individual or account you are adding in the Name field. 2. Select the type of group you want the user to belong to from the dropdown choices of; Administrator – will have full access to all functions (all modules). – Setup Wizard 3-55 Time Guardian Series...
- Page 80 Expires after: This allows you to set a specific date for the password to expire. After this date the user will be prompted to enter a new password. • Cannot change password: The users will not be able to change their password. 3-56 – Setup Wizard Time Guardian Series...
- Page 81 Remove button. To remove all, click on the Remove All button. Note: By unselecting Pay Classes/Departments/ Labor Levels/Employees, it will reduce the Employees that the user has access to. Note: The Administrator cannot be deleted. – Setup Wizard 3-57 Time Guardian Series...
- Page 82 Time Guardian will poll for any connected terminals. Note: Employees can be entered during the initial setup process, or any time later. Employees can also be imported. 3-58 – Setup Wizard Time Guardian Series...
-
Page 83: Chapter 4: Daily Use
When the installation, software activation/registration, and Setup Wizard are complete, the Login screen will appear. The following figures may use Time Guardian, Time Guardian Plus, and Time Guardian Pro from the Time Guardian Series as examples. Enter the Username and Password you defined in... -
Page 84: Layout Appearance
Title Bar Located across the top of the screen, the Title Bar contains the software name, username, and the Windows screen buttons that will allow you to minimize, resize or close the software. – How To Use Time Guardian Series... -
Page 85: Menu Bar
Log Off: Log off current user. • Synchronize Access Control: Provides the ability to synchronize both the Amano Time & Attendance software database with the AmanoNet 7.6 or Nexus 220 databases. This submenu item will only appear after Access Control integration has been selected by selecting Yes in the Setup Wizard Step 1: General Setup, pressing the Access Control button, and configuring Access Control. -
Page 86: Help Menu
• Help Topics: Provides access to the on-line Help. • Time Guardian Licensing: Provides access to License Information and a connection for software registration. Select License Information to see employee and concurrent user – How To Use Time Guardian Series... -
Page 87: Tree View
Access Control. Use these arrows to expand or collapse the tree view panel. See the next section for a more detailed description of Tree View activity. – How To Use Time Guardian Series... - Page 88 The following figure shows the colors displayed in the timecard to indicate various actions performed. These timecard actions may differ depending on the modules activated. – How To Use Time Guardian Series...
-
Page 89: Holiday Formulas
Date Definition and Condition tables to generate the holiday. Note: If the Advanced Pay Class Module is activated see this module for additional information on the Holiday Group and formulas. – How To Use Time Guardian Series... - Page 90 This page intentionally left blank. – How To Use Time Guardian Series...
-
Page 91: Chapter 5: Employee Administration
Employees list will appear in the Table View (see the following figure). Note: Employees can be added to the Amano Time & Attendance database by selecting to; Sync Employees with QuickBooks and import from QuickBooks database from Setup Wizard Employee (Step 7 of initial Wizard), or using the Import module to import employee data. - Page 92 Inactive: When checked, the employee will be considered inactive and will no longer be displayed on reports or count toward your employee total. Inactive Date: The date that the employee was put on Inactive status. – Employee Administration Time Guardian Series...
- Page 93 Valid image formats are; JPEG, JPG, GIF, TIFF, TIF, and PNG. The employee image will be saved into the Time Guardian database and displayed on the General tab. Note: Cannot be retained when converting from Firebird to MS SQL and vice versa. – Employee Administration Time Guardian Series...
- Page 94 Confirm IM Password: Only available if Events Notification module is activated. Contact Tab From the Employees screen, click on the Contact tab and the following type of screen will appear to enter employee contact information (see figure). – Employee Administration Time Guardian Series...
- Page 95 Classes and Departments/Labor Levels they are assigned to in each of the available Pay Class and Department/Labor Level tabs. Employees that are assigned to the selected Pay Classes and/or Departments/Labor Levels will appear in the Available list. – Employee Administration Time Guardian Series...
- Page 96 This tab is used to assign a Schedule to an employee. Schedules can be created in the Setup Wizard from the Schedule tab. Select a Schedule by clicking on the dropdown list of Schedules. – Employee Administration Time Guardian Series...
- Page 97 From the Employees screen, click on the Wages tab and the following type of screen will appear: For example, as illustrated in the following table and figures, the Cost Rate for employee # 1002, Bill Jackson is: – Employee Administration Time Guardian Series...
- Page 98 Access Control module must be activated for this feature. Use to setup access control integration with PIN numbers and/or tags for each employee. See Access Control Integration Module for details on the setup/configuration and use of the AmanoNet system with the Amano Time & Attendance software.
- Page 99 General – Global Apply If selected, the General window for the Global Apply Wizard (see the following figure) will be the to appear. This corresponds to the General tab found on the Employees screen (see General Tab). – Employee Administration Time Guardian Series...
- Page 100 In the example (figure above), the user choose to apply all the selections to the employee(s). When the Global Apply Wizard is completed, all these settings will be applied to all the employees selected on the list. 5-10 – Employee Administration Time Guardian Series...
- Page 101 If selected, the Labor Level window for the Global Apply Wizard (see the following figure) will be the 4 to appear. This corresponds to the Labor Level tab found on the Employees screen (see Labor Level Tab). – Employee Administration 5-11 Time Guardian Series...
- Page 102 If selected, the Cost Rate window for the Global Apply Wizard (see the following figure) will be the 6 to appear. This corresponds to the Wages tab found on the Employees screen (see Wages Tab). 5-12 – Employee Administration Time Guardian Series...
- Page 103 If selected, the Billable Rate window for the Global Apply Wizard (see the following figure) will be the 8 to appear. This corresponds to the Wages tab found on the Employees screen (see Wages Tab). – Employee Administration 5-13 Time Guardian Series...
- Page 104 If selected, the Web Access window for the Global Apply Wizard (see the following figure) will be the 9 to appear. This corresponds to the Web Access tab found on the Employees screen. 5-14 – Employee Administration Time Guardian Series...
- Page 105 OK button perform the operation. Deleting Employees To delete an employee, highlight the desired employee record from the employee list in the Table View and click on the button. You will be prompted to confirm your deletion. – Employee Administration 5-15 Time Guardian Series...
- Page 106 Employee tree view list. Use the Apply button to save and exit to the Employee tree view list. These functions are present on all of the Employees tab screens. 5-16 – Employee Administration Time Guardian Series...
-
Page 107: Chapter 6: Timecard Administration
To view employees’ punches in the Timecard grid, click on the Timecard button, or double-click on the desired employee record. To filter those employees with certain Exceptions click on the Exceptions list filter preferences button, and the following window will appear: – Timecard Administration Time Guardian Series... - Page 108 To view those employees’ punches with the selected Exceptions in the Date Range selected, click on the button to open the employee’s timecard with the current exceptions list filter. – Timecard Administration Time Guardian Series...
- Page 109 From the Timecard module double-click on an employee or highlight an employee on the list and click on the Timecard icon to view the Timecard grid screen with the Punches tab as shown: The Punches Tab in the Timecard grid consists of the following displayed columns: – Timecard Administration Time Guardian Series...
- Page 110 10 hours of REG for a post calculation after override of REG = 10 and OT = 2. Hours Daily Overtime Overrides After Worked After 8 Hours Override Hours 10 Hours REG = 8 Change Reg = 8 REG = 10 OT = 2 to Reg = 10 OT = 2 – Timecard Administration Time Guardian Series...
- Page 111 3. Click in the hour’s column to enter the value for Hours, or click in the Dollars column to enter value for dollars [Bonus Pay Code only]. This action must be done before you can enter comments. – Timecard Administration Time Guardian Series...
- Page 112 Adjustment Hours 10 Hours REG = 8 Add 2 hours regular REG = 8 OT = 2 OT = 4 Illustration of Bill Jackson timecard before adjustment Illustration of Bill Jackson timecard after adjustment – Timecard Administration Time Guardian Series...
- Page 113 The Daily and Pay period Totals for the employee are shown in the Timecard grid at the bottom of the screen to provide a quick view for the employee’s Daily and Pay period totals (see figure). – Timecard Administration Time Guardian Series...
- Page 114 User Module will add Preferences icon on the timecard toolbar. Benefit Time Module will add Benefit icon on the timecard toolbar. Advanced Schedule Module will add Create Individual Schedule icon on the timecard toolbar. – Timecard Administration Time Guardian Series...
- Page 115 Grid Navigation Timecard grid navigation can be accomplished through the following keys and mouse clicks: Note: Holding down any of the above keys will cause the cursor to move rapidly in the designated direction. – Timecard Administration Time Guardian Series...
-
Page 116: Hot Keys
Hot Keys The table below lists hot keys for commands for the Timecard grid. Some may also used throughout the Amano Time & Attendance software family. Adding, Editing and Deleting Employee Punches Adding Punches Punches are added by clicking on the desired IN or OUT punch field and or by clicking the Add Punch button in the toolbar and entering the time in the field. -
Page 117: Adding, Editing And Deleting Employee Tips
Hours worked on an unassigned schedule = U-Sch Auth you must place a check in the corresponding overtime column (B-Sch, A-Sch, or U-Sch) on the timecard on the Punches tab for the employee to be awarded overtime hours (see figure). – Timecard Administration 6-11 Time Guardian Series... -
Page 118: Authorizing Payroll Export
• Click on the Global Edit button, and the General Global Edit window will open. • Select Edit Type from the choices of; Add Punch, Add Hours, or Add Dollars. 6-12 – Timecard Administration Time Guardian Series... - Page 119 Note: Advanced Meal module must be activated for this feature to be available. • If desired, enter text in the Comments/reason field. • When Add Hours is selected, the following is an example of the General Global Edit window: – Timecard Administration 6-13 Time Guardian Series...
- Page 120 Check “Home Labor” box to bypass departments, or select desired departments. • If desired, enter text in the Comments/reason field. • Click on the Next button, and the following is an example of the Global Edit Exceptions window that will appear: 6-14 – Timecard Administration Time Guardian Series...
- Page 121 Until and enter the date using the calendar dialog screen, or select Forward or Backward. If using Forward or Backward, pick an amount of time and type a fixed time from the dropdown lists. The choices for time segments are; Day(s), Week(s), Month(s), or Year(s). – Timecard Administration 6-15 Time Guardian Series...
- Page 122 Use the Criteria field above the Available and Selected lists to filter/sort departments in the respective list. The choices are; Number, Badge, Payroll, Last Name, First Name, or Comment. • Click on the Next button for each Labor Level and complete same as Department. 6-16 – Timecard Administration Time Guardian Series...
- Page 123 Click on the Apply button, and the following Global Edit dialog box will appear: • Click on the Yes button to configure another global edit, or No to exit global editing of timecards. – Timecard Administration 6-17 Time Guardian Series...
- Page 124 This page intentionally left blank. 6-18 – Timecard Administration Time Guardian Series...
-
Page 125: Chapter 7: Communications
DLS settings, and previous punches. This will be finished by setting the time. • FPT-40 Terminal - send the employee names, employee hours, time display format, and DLS settings. This will be finished by setting the time. – Communications Time Guardian Series... - Page 126 Select terminals in the Terminals list by placing a check in the Select box of each terminal. When you have finished making your selections, use one the commands to communicate with the terminals. Click on the Close button to close this dialog. – Communications Time Guardian Series...
-
Page 127: Chapter 8: Recalculate
To recalculate the hours of employees that belong to a particular Department/Labor Level, highlight the desired Department/Labor Level in the Available list and click on the Add button. To select all Departments/Labor Levels listed, click on the Add All button. – Recalculate Time Guardian Series... - Page 128 Remove button. To remove all selected employees, click on the Remove All button. 7. Click on the button to recalculate the selected employees hours and exit. Verify the selected employee hours using the Timecard or Reports module. – Recalculate Time Guardian Series...
-
Page 129: Chapter 9: Output Group
Lists daily employee punches, hours, exceptions, breaks, Time Card Detail Report adjustments, absent days, and schedules in a landscape style format. Tips Report A report by employee showing all paid tips for a period of time. – Output Time Guardian Series... - Page 130 Creating a Report Profile 1. Click on the Reports module of the Output group in the Tree View (see figure). 2. Click on the button, and the following type of a Reports window General tab will appear: – Output Time Guardian Series...
- Page 131 Check Actual Punches or Rounded Punches Advanced Modules can add the following; • Cost Rate • Billable Rate • Show Zone Number 8. For Labor Analysis Report: Only Check the output formats for the report. – Output Time Guardian Series...
- Page 132 Previous Pay period. Note: When Current Pay period and Previous Pay period are selected, the first Pay Class in the Selected List on the Pay Class tab will be used as the date range for the report. – Output Time Guardian Series...
- Page 133 4. Also, sort in the Available column by Date, Department, Department No. and/or Pay Code. Note: Sorting options may vary depending upon the report selected. 5. Placing a check in the Page Break column will place a page break after each of the sorting criteria selected. – Output Time Guardian Series...
- Page 134 Requirement field and enter a time in HH:MM format. 24. Click on the Pay Code tab. The Pay Code TT for triple time will appear if advanced module is activated. See the following illustration for an example: – Output Time Guardian Series...
- Page 135 11. Click on the Move Up or Move Down buttons to move an item up or down in the sort Selected column to change the priority. 26. Click on the Department and/or labor Level tabs. See the following illustration for an example: – Output Time Guardian Series...
- Page 136 Employee tab from the Employee Filter screen: Note: Clicking in the box “Show Active Employees Only” does not apply for new employees added after the filter profile was set. – Output Time Guardian Series...
- Page 137 Events will be listed in chronological order, starting with the first edit and continuing through to the last, with a line separating activities for each date. This report will record all punch transaction records and warnings of undefined data. – Output Time Guardian Series...
- Page 138 Schedule Posting Report As seen in the following example, the Schedule Posting Report provides a list of employees, including the information showing when they are scheduled to work. Requires Advanced Schedule module activation to be available. 9-10 – Output Time Guardian Series...
- Page 139 If no exceptions were selected during the Setup Wizard, then this report will be blank. By default, all Exception codes are selected during the Setup Wizard and are included in the report. – Output 9-11 Time Guardian Series...
- Page 140 This report provides a one line total for each employee, displaying pay codes, wages, and total hours. This can also provide totals by department, when the selected employee is sorted by department. Note: When Zone Differential module is activated the report will include Zone information. 9-12 – Output Time Guardian Series...
- Page 141 As seen in the following example, the Labor Analysis Report provides a complete and detailed account of employees’ labor for a specified period of time. Information will vary based on your company’s Setup Wizard selections. – Output 9-13 Time Guardian Series...
- Page 142 Wages will only be displayed if enabled to be displayed on reports on the Pay Code tab within the Setup Wizard. When the Zone Differentials module is activated, the Zone information will be shown on these reports. 9-14 – Output Time Guardian Series...
- Page 143 Requires Benefit Time module activation to be available. DeAccrual History Report As seen in the following example, the DeAccrual History Report provides a list of employees, showing history of benefit use. Requires Benefit Time module activation to be available. – Output 9-15 Time Guardian Series...
-
Page 144: Payrolls Module
Adobe Acrobat PDF Output format was selected. If Excel Output was selected, the report will be generated and an Excel worksheet created and saved in the Amano Time & Attendance software directory [i.e., Time Guardian] in the "Reports" folder [C:\Program Files\Time Guardian\reports]. - Page 145 Configure the General and Pay Codes settings tabs as per the desired payroll requirements and click on the button. QuickBooks Compatibility Note: The Amano Time & Attendance software is compatible with the following versions of QuickBooks Pro for manual export: • The current QuickBooks 2011 and two years back –...
- Page 146 See the following matrix tables for additional information on Specific Payroll Settings: QuickBooks Pro Examples of export iif file fields for QuickBooks Pro are shown in the following matrix table: 9-18 – Output Time Guardian Series...
- Page 147 ADP For DOS Examples of export file fields for ADP for DOS are shown in the following matrix table: – Output 9-19 Time Guardian Series...
- Page 148 ADP PC Payroll For Windows Examples of export file fields for ADP PC Payroll for Windows are shown in the following matrix table: 9-20 – Output Time Guardian Series...
- Page 149 CBS Payroll Examples of export file fields for CBS Payroll are shown in the following matrix table: – Output 9-21 Time Guardian Series...
- Page 150 Ceridian Power Pay Examples of export file fields for Ceridian Power Pay are shown in the following matrix table: 9-22 – Output Time Guardian Series...
- Page 151 EasyPay Examples of export file fields for EasyPay are shown in the following matrix table: – Output 9-23 Time Guardian Series...
- Page 152 Excel Examples of export file fields for Excel are shown in the following matrix table: 9-24 – Output Time Guardian Series...
- Page 153 Gevity HR Examples of export file fields for Gevity HR are shown in the following matrix table: – Output 9-25 Time Guardian Series...
- Page 154 Paychex Paylink Examples of export file fields for Paychex Paylink are shown in the following matrix table: 9-26 – Output Time Guardian Series...
- Page 155 Paychex Preview Examples of export file fields for Paychex Preview are shown in the following matrix table: – Output 9-27 Time Guardian Series...
- Page 156 PayDay Examples of export file fields for PayDay are shown in the following matrix table: 9-28 – Output Time Guardian Series...
- Page 157 PayWeb Examples of export file fields for PayWeb are shown in the following matrix table: – Output 9-29 Time Guardian Series...
- Page 158 Peachtree Win Examples of export file fields for Peachtree Win are shown in the following matrix table: 9-30 – Output Time Guardian Series...
- Page 159 From Date using the Forward and Backward options. 12. Click on the Breaks tab. The Breaks tab determines which departments in the Amano Time & Attendance software that will be passed to the Payroll Export file. The number of departments to be passed on is dependent upon the payroll company you are using.
-
Page 160: Generating The Payroll File
To generate a payroll file from the Payroll Profile, select the desired Payroll Profile from the list in the Table View, and click on the Run Payroll button and the following message will appear: 9-32 – Output Time Guardian Series... -
Page 161: Quickbooks Manual Integration
The setup process to create a QuickBooks export iif file manually is as follows: Part A - Configuration Step 1. During installation of the Amano Time & Attendance software the Setup Wizard in Step 1: General Setup will ask; Do you want to send employee hours to your payroll software? Select Yes. - Page 162 Step 2. Select Utilities Export Timer Lists and the following screen will appear: Step 3. Enter the name for the payroll file in the File name field (see figure). It is recommended to use an .iif file extension. 9-34 – Output Time Guardian Series...
- Page 163 After the file has been saved, open the file using Notepad (see figure). Information from this file will be used to create the export file from the Amano Time & Attendance software. Part C – Payroll Export Step 1. From the tree view in the Time & Attendance software select the Payrolls module and double-click on the created QuickBooks Pro payroll profile to define the Name, Description, Payroll, and/or Payroll ID fields or just use the default QuickBooks entries.
- Page 164 A complete list of payroll Ids can be found in QuickBooks payroll items. The “Item Name” in QuickBooks = Pay Code in the Time & Attendance software. Example of Amano Time & Attendance Pay Codes vs. QuickBooks Payroll Field IDs: 9-36 – Output...
- Page 165 Add button. To select all the listed employees, click on the Add All button. To remove an employee from the Payroll, highlight the desired employee in the Selected list and click on the Remove button. To remove all the listed employees, click on the Remove All button. – Output 9-37 Time Guardian Series...
- Page 166 Time & Attendance software. Step 12. Once the export file has been created from the Amano Time & Attendance software it can now be imported by QuickBooks. From QuickBooks select File from the main menu (see figure).
-
Page 167: Quickbooks Auto Integration
The following procedure describes how to setup the Amano Time & Attendance software for QuickBooks Pro auto integration/synchronization. Part A - Configuration Step 1. During installation of the Amano Time & Attendance software the Setup Wizard in Step 1: General Setup will ask; Do you want to send employee hours to your payroll software? Select Yes. - Page 168 From the tree view select the Payrolls module and double-click on the created QuickBooks Pro payroll template to define the Name, Description, Payroll, and/or Payroll ID fields or just use the default entries. 9-40 – Output Time Guardian Series...
- Page 169 Step 5. When the NO CERTIFICATE message appears; select “Yes, always allow access even if QuickBooks is not running” and “Allow this application to access personal data such as Social Security Numbers and customer credit card information” click Continue. – Output 9-41 Time Guardian Series...
- Page 170 Company Preferences tab to verify access to QuickBooks; click OK. Step 9. The “Synchronizing Payrolls” message will appear followed by the message QuickBooks” click OK to finish. “Successfully synchronized employees with 9-42 – Output Time Guardian Series...
- Page 171 The “Item Name” in QuickBooks = Pay Code in the Time & Attendance software. Step 3. From the Time & Attendance software Payrolls screen, click on the Employee tab, and select the employee (see figure). – Output 9-43 Time Guardian Series...
- Page 172 “Please make sure that QuickBooks is running synchronize” message will appear click OK to proceed. The before proceeding to “Synchronizing Payrolls” message will appear followed by the message QuickBooks” click OK to finish. “Successfully synchronized employees with 9-44 – Output Time Guardian Series...
-
Page 173: Import Module
1. Click on the Import module within the Output group in the Tree View (see the following figure). 2. Click on the button to create a new import profile and the following Import window will appear: – Output 9-45 Time Guardian Series... - Page 174 The choices are: Tab, Comma, Pipe, Semicolon, Backslash, Forward slash, or User Defined. If User Defined is selected, you must enter the character in the field provided. 9-46 – Output Time Guardian Series...
- Page 175 Note: The defaults will be used if the import file does not contain data for these fields. 9. Click on the Import Field Map Settings tab. This tab allows you to manually define the elements of the import file you are using (see figure for example). – Output 9-47 Time Guardian Series...
-
Page 176: Export Module
10. To Import a file, select the import profile for the file from the import profile list and click on the Run Import button. Export Module The Export module provides a way to create a profile for the export of employee and schedule data from the Amano Time & Attendance software. 9-48 – Output Time Guardian Series... - Page 177 7. To Export the file, select the export profile from the list and click on the Run Export icon. 8. An export dialog box will appear as the Amano Time & Attendance database records are exported and the export file is created (see figure). Click Ok to complete.
-
Page 178: Auto Process Module
Amano Nexus 220/AmanoNet access control systems from the Amano Time & Attendance software. The Auto Process will run as a service in the background based upon the selections and the “Recurrence” settings that you have defined. - Page 179 E-mail parameters defined in the Company Module under E-Mail Settings screen. 8. When Communications is selected for the Process Type, you must select the operation to be performed and the Location for the Operation. See the following figure for an example. – Output 9-51 Time Guardian Series...
- Page 180 11. Click on the Recurrence tab. The following is an example of the Recurrence tab window that will appear: Daily: The service for the auto process can be run every day or every number of days, or every number of hours. 9-52 – Output Time Guardian Series...
- Page 181 Start Time: Enter the time of day (HH:MM) that you want the process to run. Monthly: The service for the auto process can be set to run on a specific day of each month, for a set number of months. See the following example: – Output 9-53 Time Guardian Series...
- Page 182 Every: Select the desired Month from the dropdown list and enter in the day of the month in the field provided. b. Start Time: Enter the time of day (HH:MM) that you want the process to run 9-54 – Output Time Guardian Series...
-
Page 183: Chapter 10: Advanced Pay Class Module
Main Application Tree View Company Setup Wizard, Main Application Tree view Pay Period Setup Wizard, Main Application Tree view Holiday Group Main Application Tree view Pay Code Template Main Application Tree view – Advanced Pay Class Module 10-1 Time Guardian Series... -
Page 184: Using The Advanced Pay Class Module
3. Enter a name for the Holiday in the Name field [required field]. 4. Enter a description of the Holiday in the Description field. 5. Using the dropdown list, select the Holiday Group that this holiday belongs to. 10-2 – Advanced Pay Class Module Time Guardian Series... - Page 185 Holiday Group window. 1. Click on the Holiday Group node within the Pay Class module in the Tree View. 2. Click on the button, and the Holiday Group window will appear: – Advanced Pay Class Module 10-3 Time Guardian Series...
- Page 186 6. If the eligibility requirement chosen requires a date, enter the number of days in the Days field and select the desired “From Date” (Hire Date or Selected). For Selected, use the Calendar icon to select the “From Date”. 10-4 – Advanced Pay Class Module Time Guardian Series...
- Page 187 Must work next scheduled day: To be awarded holiday hours, the employee must work a required minimum amount of hours in the designated Pay Code(s) on the next scheduled day after the holiday. – Advanced Pay Class Module 10-5 Time Guardian Series...
- Page 188 13. If the employee works on an unscheduled day after the holiday, you have the option of using that day for the next day requirement. To do so, place a check in the checkbox. 14. Click on the Holiday Selection tab. By default, all Holidays will be selected. 10-6 – Advanced Pay Class Module Time Guardian Series...
- Page 189 Creating a Pay Class 1. Click on Pay Class module within the Setup group in the Tree View (see the following figure). 2. Click on the button, and the Pay Class window will appear: – Advanced Pay Class Module 10-7 Time Guardian Series...
- Page 190 5. Select the Pay period type choice of Custom and Select the start date for the Pay period with the number of days. 6. Click on the icon to display the Rounding Demo view to help understand rounding rules. 7. Click on the Day Change tab. 10-8 – Advanced Pay Class Module Time Guardian Series...
- Page 191 Max Shift Length = Shown below. If Shift Requirement is: AND: Punches P1 through P6 qualify. OR: Punches P1 through P4 qualify. Max Number of Punches = 6 Max Shift Length = Shown below. – Advanced Pay Class Module 10-9 Time Guardian Series...
- Page 192 Order (Priority) of Benefits: The execution order (Priority) of benefits can be set by selecting the benefit category and clicking on the up down arrows to move the benefit up or down the list. 10-10 – Advanced Pay Class Module Time Guardian Series...
- Page 193 The Pay codes module will be visible in the tree view when the optional Advanced Pay Class Module is activated. To create a Pay code: 1. Click on the Pay codes module within the Setup group in the Tree View (see the figure). – Advanced Pay Class Module 10-11 Time Guardian Series...
- Page 194 16. Check “Download to clock” if you want the Pay Code to be sent to the terminal (clock). 17. Check “On Call Pay” if you want the Pay Code to count for On Call Pay [only for Bonus] to be used in Weighted Average OT calculation. 10-12 – Advanced Pay Class Module Time Guardian Series...
-
Page 195: Chapter 11: Advanced Overtime Module
Period overtime can be created and assigned to a Daily Rule template Note: If the advanced overtime module is not active, daily overtime and period overtime will be grayed theses nodes will not be accessible from the tree view. – Advanced Overtime Module 11-1 Time Guardian Series... -
Page 196: Using The Advanced Overtime Module
Using the Advanced Overtime Module The activation of the Advanced Overtime Module affects the Pay Class, Shifts, and Daily Rules Modules. Overtime Definition in Pay Class Module 1. Click on Overtime Definition tab. 11-2 – Advanced Overtime Module Time Guardian Series... - Page 197 The overtime hours Pay time and half checked: Pay Code Hours Overtime Monday Tuesday Wednesday Thursday Friday The overtime hours Pay time and half unchecked: Pay Code Hours Overtime Monday Tuesday Wednesday Thursday Friday 10.0 – Advanced Overtime Module 11-3 Time Guardian Series...
- Page 198 Order (Priority) of Overtime: The execution order (Priority) of overtime can be set by selecting the desired overtime type and clicking on the up down arrows to move the overtime up or down the list. 11-4 – Advanced Overtime Module Time Guardian Series...
- Page 199 Shift Overtime: Defines the overtime rules for the schedule. • Outside Shift Overtime: Defines a finite set of overtime rules for employees that work before or after their scheduled Shift or Schedule. – Advanced Overtime Module 11-5 Time Guardian Series...
- Page 200 To create a Shift Overtime template: 1. Click on the Shift Overtime node in the Shifts module in the Tree View (see the figure). 2. Click on the button, and the Shift Overtime window will appear. 11-6 – Advanced Overtime Module Time Guardian Series...
- Page 201 DT (double-time rate), and from the 12 hour till the end of the day, the employee will be paid at a TT (triple time rate). 7. Click on the Count tab. – Advanced Overtime Module 11-7 Time Guardian Series...
- Page 202 To create an Outside Shift Overtime template: 1. Click on the Outside Shift Overtime node in the Shifts module in the Tree View (see figure). 2. Click on the button, and the Outside Shift Overtime window will appear. 11-8 – Advanced Overtime Module Time Guardian Series...
- Page 203 6. Click on the Before Shift tab. 7. In the Level table, enter the threshold limits and assign a Pay Code to each level of overtime. 8. Click on the Count tab. – Advanced Overtime Module 11-9 Time Guardian Series...
- Page 204 10. Click on the After Shift tab. 11. In the Level table, enter the threshold limits and assign a Pay Code to each level of overtime. 12. Click on the Count tab. 11-10 – Advanced Overtime Module Time Guardian Series...
-
Page 205: Daily Rules
Pay Code Base 00:00 08:00 Level 1 08:00 10:00 Level 2 10:00 12:00 Level 3 12:00 Level 4 Additionally, you can set the Pay Codes that will count toward daily overtime level. – Advanced Overtime Module 11-11 Time Guardian Series... - Page 206 3. Enter a name for the Daily Overtime template in the name field [required field]. 4. Enter a description of the Daily Overtime template in the Description field. 5. Click on the Settings tab and the following window will appear: 11-12 – Advanced Overtime Module Time Guardian Series...
- Page 207 Up to (4) levels of Period Overtime can be used. Each level can be assigned its own threshold limit that move the hours from one Pay Code to another. For example, (2) 24-hour periods: – Advanced Overtime Module 11-13 Time Guardian Series...
- Page 208 1. Click on the Period Overtime node within the Shifts Module in the Tree View, and the following type of screen will appear. 2. Click on the button, and the Period Overtime window will appear (see figure). 11-14 – Advanced Overtime Module Time Guardian Series...
- Page 209 For example, if you checked REG and HOL in the Level1 column, then the hours for REG and HOL Pay Codes will be combined to reach Level1’s threshold value. – Advanced Overtime Module 11-15 Time Guardian Series...
-
Page 210: Pay Class
Creating a Weekly Overtime Template 1. Click on the Weekly Overtime node within the Pay Class module in the Tree View. 2. Click on the button, and the Weekly Overtime window will appear. 11-16 – Advanced Overtime Module Time Guardian Series... - Page 211 You can also deselect any checked Pay Codes in a column by clicking on the column heading. To select all Pay Codes in the grid, click on the button. This button will also deselect all the Pay Codes in the grid, if all were selected. – Advanced Overtime Module 11-17 Time Guardian Series...
- Page 212 1. Click on the Consecutive Overtime node within the Pay Class module in the tree view (see the following figure). 2. Click on the button, and the Consecutive Overtime window will appear: 11-18 – Advanced Overtime Module Time Guardian Series...
- Page 213 5. Enter the threshold limits and assign a Pay Code to each level. 6. Repeat Steps 5 and 6 for Consecutive 2 thru 4 (If applicable). 7. Click on the Count tab. – Advanced Overtime Module 11-19 Time Guardian Series...
- Page 214 1. Click on the Range Overtime node within the Pay Class module in the tree view (see the following figure). 2. Click on the button, and the Range Overtime window will appear: 11-20 – Advanced Overtime Module Time Guardian Series...
- Page 215 The Select Date dialog box will appear: Using the dropdown lists, select the Month and Year. Click on the desired day in the calendar. When you have finished, click on the button on the Select Date screen to – Advanced Overtime Module 11-21 Time Guardian Series...
- Page 216 Range Overtime template, open it, enter in a new name and click on the Save As button. The new Range Overtime template will appear in the Main View. 11-22 – Advanced Overtime Module Time Guardian Series...
- Page 217 For example, if you checked REG and HOL in the Level 1 column, then the hours for REG and HOL Pay Codes will be combined to reach Level 1’s threshold value. – Advanced Overtime Module 11-23 Time Guardian Series...
- Page 218 Note: The (4) buttons at the top right of the Level tab allow you to Select (or De-select) all, copy, cut, and paste the (Overtime) Pay Codes into different days or holidays. The buttons are as follows: 11-24 – Advanced Overtime Module Time Guardian Series...
-
Page 219: Chapter 12: Advanced Schedule Module
Main Application Tree View Advanced Pay Class Main Application Tree View Shift Rules Main Application Tree View Reports Main Application Tree View Import Main Application Tree View Web Schedules Applicable if web Module is enabled – Advanced Schedule Module 12-1 Time Guardian Series... -
Page 220: Using The Advanced Schedule Module
IN punch must occur in to be assigned to a schedule. 2. In the After scheduled start field, enter the amount of time after schedule that an employee’s IN punch must occur in to be assigned to a schedule. 12-2 – Advanced Schedule Module Time Guardian Series... - Page 221 To create Template Schedules: 1. Click on the Template Schedules node within the Schedule module in the Tree View (see the following figure). – Advanced Schedule Module 12-3 Time Guardian Series...
- Page 222 The following is an example of the Auto Schedules screen. To create Auto Schedules: 1. Click on the Auto Schedules node within the Schedule module in the Tree View (see the following figure). 12-4 – Advanced Schedule Module Time Guardian Series...
- Page 223 Together these schedules form the weekly work pattern that can be applied to an employee. The screen below shows an example of the template schedule and auto schedule assignments into a schedule. – Advanced Schedule Module 12-5 Time Guardian Series...
- Page 224 To remove a Template or Auto Schedule from the Schedule list, highlight the desired schedule and click on the remove button. Note: Time Guardian Pro checks for a schedule in the following order: 1. Schedule Override 2. Template Schedule 3. Auto Schedule 12-6 – Advanced Schedule Module Time Guardian Series...
- Page 225 Schedules to employees in the Employee Module. To create a Schedule Coverage Report: 1. Click on the Schedule Coverage node within the Schedule module in the Tree View (see the following figure). – Advanced Schedule Module 12-7 Time Guardian Series...
- Page 226 Description field. 4. Select the Maximum # of employee(s) to be included in the report. 5. Select the Employee Interval (y-axis of the report, see the following example). 12-8 – Advanced Schedule Module Time Guardian Series...
- Page 227 Selected list and click on the Remove button. To remove all selected schedules, click on the Remove All button. 10. Click on any of the Labor Level tabs. – Advanced Schedule Module 12-9 Time Guardian Series...
- Page 228 Sort field. Also, enter filter characters in the Criteria field above the Selected list to show employees filtered based upon that information. Do the same thing above the Selected list to filter those employees. 12-10 – Advanced Schedule Module Time Guardian Series...
- Page 229 Page Setup window will appear: The Coverage Report will print to your system’s default printer. To change the printer, click on the Printer button. A print dialog similar to the following will appear: – Advanced Schedule Module 12-11 Time Guardian Series...
- Page 230 To add employees to an Individual Schedule profile: 1. In the Tree View, select the Individual Schedule node within the Daily Activities module (see the following figure). 2. Click on the button, and the Individual Schedule window will appear. 12-12 – Advanced Schedule Module Time Guardian Series...
- Page 231 The Select Date dialog box will appear as shown in the following: When you have finished, click on the click on the Save button to enter the date. – Advanced Schedule Module 12-13 Time Guardian Series...
- Page 232 7. Click on any of the Labor Level tabs. These tabs allow you to select those employees that belong to particular category of a Labor Level. By default, all categories are selected. 12-14 – Advanced Schedule Module Time Guardian Series...
- Page 233 To select an employee, highlight the desired employee in the Available list and click on button. • To select all employees, click on the button. • To remove an employee from the Selected list, highlight the employee in the Selected list and click on the button. – Advanced Schedule Module 12-15 Time Guardian Series...
- Page 234 Date Range of the Individual Schedule Grid. Custom schedules based on Template Schedules can be created by clicking on the Template Schedules button and the following screen will appear: 12-16 – Advanced Schedule Module Time Guardian Series...
- Page 235 Schedule. You can select the labor categories from the dropdown list or click on the button from the Individual Scheduler screen to create a custom labor reference. The following window will appear: – Advanced Schedule Module 12-17 Time Guardian Series...
- Page 236 2. Select the desired template schedule using the dropdown list or create a custom template schedule using the button. 3. Select the desired labor category, click on the button, and the schedule will appear in the cell. 12-18 – Advanced Schedule Module Time Guardian Series...
- Page 237 Advanced Schedule to an individual, click on the desired cell in the grid and right click once. A menu will appear. Scroll down the menu to Advanced Schedule. A submenu will appear. Select either New or Edit User Defined. – Advanced Schedule Module 12-19 Time Guardian Series...
- Page 238 Note: The Hours for the Pay in Advance will be put into the Payroll Export file on the Pay in Advance date. The hours on the Timecard will indicate the date they occur. 12-20 – Advanced Schedule Module Time Guardian Series...
- Page 239 Advanced Schedule pop-up menu. The Labor Level, Pay Code, and Zone fields can be modified by double clicking on them and using the dropdown lists to make a selection. – Advanced Schedule Module 12-21 Time Guardian Series...
- Page 240 To create a Rotating Schedule Template: 1. Click on the Schedule Rotation node within the Schedule module in the Tree View (see the following figure). 2. Click on the button, and the Schedule Rotation window will appear: 12-22 – Advanced Schedule Module Time Guardian Series...
- Page 241 6. In the Length In Days field, select the number of days that this template will span. A blank schedule grid will appear in the Pattern box. The days included in the template are indicated by white cells. – Advanced Schedule Module 12-23 Time Guardian Series...
- Page 242 Schedule Rotation window. Click on the button. The displayed schedule in the Schedule list and labor category in the Labor Reference list will be applied to the cell. 12-24 – Advanced Schedule Module Time Guardian Series...
- Page 243 To add a labor category, select a subcategory from each of the dropdown lists and click on the Add button. The selected labor category will appear in the Selected window. To – Advanced Schedule Module 12-25 Time Guardian Series...
- Page 244 Schedule. The selection of Benefit will be possible if the Benefit Module is Activated. Creating a Import Profile 1. Click on the Import node within the Output module in the Tree View. 2. Click on the button, and the following Import window will appear: 12-26 – Advanced Schedule Module Time Guardian Series...
- Page 245 The choices are: Tab, Comma, Pipe, Semicolon, Backslash, Forward slash, or User Defined. If User Defined is selected, you must enter the character in the field provided. – Advanced Schedule Module 12-27 Time Guardian Series...
- Page 246 Note: The defaults will be used if the import file does not contain data for these fields. 14. Click on the Import Field Map Settings tab. This tab allows you to manually define the elements of the import file you are using. 12-28 – Advanced Schedule Module Time Guardian Series...
- Page 247 A landscape format analysis report of scheduled time with Schedule vs. Actual wages versus actual hours with variance. – Advanced Schedule Module 12-29 Time Guardian Series...
- Page 248 In this instance penalty hours are generated in the Pay Code plus the MPNT exception code will be generated). • Meal Templates: Defines employee breaks and meal breaks. • Shift Overtime: Defines the overtime rules for the schedule. 12-30 – Advanced Schedule Module Time Guardian Series...
- Page 249 1. Click on the Exception module within the Shifts module in the Tree View, and the list of defined exceptions will appear: 2. Click on the button, and the Exception window will appear. – Advanced Schedule Module 12-31 Time Guardian Series...
- Page 250 Exception will be reported once the Minute Requirement has been reached. For example, Time Guardian Pro can be configured to not generate a LI (Late In Exception) if the employee is late by less than 5 minutes. 12-32 – Advanced Schedule Module Time Guardian Series...
-
Page 251: Chapter 13: Advanced Meal Module
• Global Edit − Punch Type − Meal Type User Interface: From shift link in tree view only exception templates and meal templates can be created and assigned to a shift template – Advanced Meal Module 13-1 Time Guardian Series... -
Page 252: Using The Advanced Meal Module
A fixed meal or break has to be taken at a set time of the day. To create a fixed Meal Template: 1. Click on the Meal Templates node within the Shifts module in the Tree View, and the list of meal templates will appear: 13-2 – Advanced Meal Module Time Guardian Series... - Page 253 A row will appear in the Fixed Breaks box. Must double-click on From, To, and/or Length fields to enter data. 10. Enter From and To times for the break (in 24-hour format) and Break Length (in HH:MM format). – Advanced Meal Module 13-3 Time Guardian Series...
- Page 254 18. Enter From and To times for the interval (in 24-hour format) and Meal Length (in HH:MM format). 19. Click on the button to add more meals, or click on the button to remove a meal. 13-4 – Advanced Meal Module Time Guardian Series...
- Page 255 Enter in the required number of hours to work before the deduction is applied and select the (Punch) Position [amount of time to deduct start or end] of the shift to deduct from. 8. Click on the Breaks tab. – Advanced Meal Module 13-5 Time Guardian Series...
- Page 256 For breaks based on Shift break size, the following selection will appear: For breaks based on Shift break size, click on the button, and the following Define Breaks window will appear: 13-6 – Advanced Meal Module Time Guardian Series...
- Page 257 Regular break or Coffee break. 11. In the Deduction for Long Break box, set how the break will be deducted if the employee uses a longer period of time than allocated for the break. – Advanced Meal Module 13-7 Time Guardian Series...
- Page 258 Enter the From and To (interval) times for each break. The employee punch times will be assigned to one of the Meal Template types (Break, Meal, or Coffee Break) based on the time between the OUT and IN punches. 13-8 – Advanced Meal Module Time Guardian Series...
- Page 259 9. Select the Break size based on Default Size or Shift Break Size. For breaks based on default size, enter the number of breaks and the default break size in the fields provided. – Advanced Meal Module 13-9 Time Guardian Series...
- Page 260 Enter in the amount of time (HH:MM) that the action is to be taken. 13-10 – Advanced Meal Module Time Guardian Series...
- Page 261 12. Click on the Coffee Breaks tab. Repeat steps 10 through 12 for the Coffee Breaks. 13. Click on the Meals tab. Repeat steps 10 through 12 for the Meals. 14. Click on the Assignments tab. – Advanced Meal Module 13-11 Time Guardian Series...
- Page 262 OUT punch and working backwards. 7. Click on the Breaks tab. 8. Select the Break size based on Default Size or Shift Break Size. 13-12 – Advanced Meal Module Time Guardian Series...
- Page 263 Enter in the amount of Threshold time (HH:MM) before the action is to be taken. – Advanced Meal Module 13-13 Time Guardian Series...
- Page 264 From field setting before the break window begins. • Length: Length of window in which the employee must punch to be awarded the break. • From: Select the Schedule Start or 1st IN Punch. 13-14 – Advanced Meal Module Time Guardian Series...
- Page 265 1. Click on the Meal Templates node within the Shifts module in the Tree View. 2. Click on the button, and the Meal Templates window will appear. Click on the Break Credit tab. – Advanced Meal Module 13-15 Time Guardian Series...
- Page 266 The choices are; None, Meals, Breaks, Coffee Breaks, All Breaks, Breaks and Meals, Coffee Breaks and Meals, or All Breaks and Meals. 8. In the Maximum Amount field, enter the maximum amount of time (HH:MM) that will be credited. 13-16 – Advanced Meal Module Time Guardian Series...
-
Page 267: Chapter 14: Advanced Rounding Module
Meal/Break Rounding (Hours Rounding or Punch Rounding) • Daily Rules − Rounding Template − Daily Rounding − Meal/Break Rounding (Hours Rounding or Punch Rounding) − Specific Day of Week / Holiday Rounding • Shift Rules (Exception Template) – Advanced Rounding Module 14-1 Time Guardian Series... -
Page 268: Using The Advanced Rounding Module
• Unit: The numeric value used to adjust an employee punch time to a consistent measurement of time. Common Units are 1, 3, 6, 15, and 30. A Point divides each Unit. 14-2 – Advanced Rounding Module Time Guardian Series... - Page 269 To create a Rounding Template: 1. Click on the Rounding Template node within the Shifts module in the Tree View. 2. Click on the button, and the following Rounding Templates window will appear: – Advanced Rounding Module 14-3 Time Guardian Series...
- Page 270 Clicking in the dropdown boxes for Hour and Minute will set the actual time clock display, while clicking in the dropdown boxes in Unit and Point will enter the rounding rules. This presents a real time visual display of actual time versus rounded time. 14-4 – Advanced Rounding Module Time Guardian Series...
- Page 271 OUT punch for the day occurs between these two times it will be rounded to the schedule start time of 4:00 PM. First IN/Last OUT This rounding occurs outside of the grace rounding windows and when an employee has a schedule with start and end times. – Advanced Rounding Module 14-5 Time Guardian Series...
- Page 272 9:00 AM. It then shows that if a punch occurs between 7 and 15 minutes, it will be rounded to 15, so that 9:07 AM will be rounded to 9:15 AM. 14-6 – Advanced Rounding Module Time Guardian Series...
- Page 273 There are four types of rounding performed for the open schedule. A Unit and Point must be entered for each type. They are: • First IN punch of the day • All OUT punches • All IN punches • Last OUT punch of the day – Advanced Rounding Module 14-7 Time Guardian Series...
- Page 274 Schedule as the Rounding Type. Punch Pair rounds the amount of time worked between two punches after the automatic break/meal deductions are taken out. Schedule rounds the total amount of time worked for a schedule after the automatic break/meal deductions are taken out. 14-8 – Advanced Rounding Module Time Guardian Series...
- Page 275 Note: The minus 5 minutes will be taken away from the last interval hours in Schedule 2. This would give the employee a daily total of 6 hours and 30 minutes. – Advanced Rounding Module 14-9 Time Guardian Series...
- Page 276 If Hour Rounding is selected, you must set the Unit and Point for the entire Break and Lunch (Meal). If Punch Rounding is selected you must set the Unit and Point for the Break OUT, Break IN, Lunch (Meal) OUT, and Lunch (Meal) IN punches. 14-10 – Advanced Rounding Module Time Guardian Series...
- Page 277 Meal OUT Meal IN The 11:02 AM and 12:08 PM punches are assigned by the system to a break. The 03:09 PM and 04:10 PM are not assigned to any break or meal. – Advanced Rounding Module 14-11 Time Guardian Series...
- Page 278 This page intentionally left blank. 14-12 – Advanced Rounding Module Time Guardian Series...
-
Page 279: Chapter 15: Advanced Labor/Rate Module
When the Advanced Labor/Rate Module is activated, up to (6) main Labor Level categories can be created with an unlimited number of entries per category. These multiple levels can be used simultaneously for where an employee worked and what an employee worked on. – Advanced Labor/Rate Module 15-1 Time Guardian Series... - Page 280 Level 1 is always active. Once entered, the main Labor Level name will appear in the desired field number. To add levels within each Labor Level, click on the Edit Names button in the desired row. 15-2 – Advanced Labor/Rate Module Time Guardian Series...
- Page 281 “Active” To create Labor Levels Associations, click on the Labor Associations tab. Click on each Labor Level dropdown to select the Level you want to link to. – Advanced Labor/Rate Module 15-3 Time Guardian Series...
- Page 282 To assign a Cost or Billable Rate for wages, click on the button or check the Use Rate Template for Cost or Billable rate. Note: You must be an Administrator to have access to Wages, or this tab will not appear. 15-4 – Advanced Labor/Rate Module Time Guardian Series...
- Page 283 Rate Setup. Rates can be increased using the Operation field or clicking on the Percent Increase button. The following window will appear for percent increase: – Advanced Labor/Rate Module 15-5 Time Guardian Series...
- Page 284 Select a row and click on the button to edit a Rate Setup. 3. In the General tab, select the number of decimal places (0 thru 5) that will be used for the rates. 15-6 – Advanced Labor/Rate Module Time Guardian Series...
- Page 285 To select all the listed items, click on the Add All button. To remove an item, highlight the desired item in the Selected list and click on the Remove button. To remove all the listed items, click on the Remove All button. 7. Click on the Combined tab. – Advanced Labor/Rate Module 15-7 Time Guardian Series...
- Page 286 The items assigned to the Cost Rate Order in the General tab of the Rate Setup window will appear in the Combined Cost Rates window. 15-8 – Advanced Labor/Rate Module Time Guardian Series...
- Page 287 Date field to enter the effective date for the rate will be in effect. When you have finished, click on the button to save your settings and return to the Rate Template window. – Advanced Labor/Rate Module 15-9 Time Guardian Series...
- Page 288 7. Repeat Steps #3 thru #6 to add additional Rates to this template. 8. To delete a rate select the desired row and click on the Delete button. 9. To automatically increase the rate by a %, click on the Percent Increase button. 15-10 – Advanced Labor/Rate Module Time Guardian Series...
- Page 289 The items assigned to the Billable Rate Order in the Combined tab of the Rate Setup window will appear in the Combined Cost Rates window. 2. Click on the button, and the following is an example of the Combined Billable Rates window that will appear: – Advanced Labor/Rate Module 15-11 Time Guardian Series...
- Page 290 Rate Template from the dropdown list in the Rate field. If you do not wish to use a Rate Template, click on the Add button, and a row will appear in the Rates box (see the following figure). 15-12 – Advanced Labor/Rate Module Time Guardian Series...
- Page 291 To create a Rate Template: 1. Select the Rate Template module within the Company module in the Setup group in the Tree View. 2. Click on the button, and the Rate Template window will appear: – Advanced Labor/Rate Module 15-13 Time Guardian Series...
- Page 292 Date field to enter the effective date for the rate. When you have finished, click on the Apply button to save your settings and return to the Rate Template window. 15-14 – Advanced Labor/Rate Module Time Guardian Series...
- Page 293 Note: The sequence of overtime is first check employee and if Yes then apply rules. Second check Pay Class and if Yes apply all selected and if No apply nothing. Third apply On Call for Weighted Average if selected. – Advanced Labor/Rate Module 15-15 Time Guardian Series...
- Page 294 Example Showing: 15-16 – Advanced Labor/Rate Module Time Guardian Series...
- Page 295 Example Showing: – Advanced Labor/Rate Module 15-17 Time Guardian Series...
- Page 296 Example Showing: 15-18 – Advanced Labor/Rate Module Time Guardian Series...
- Page 297 Example Showing: – Advanced Labor/Rate Module 15-19 Time Guardian Series...
- Page 298 Example Showing: 15-20 – Advanced Labor/Rate Module Time Guardian Series...
-
Page 299: Chapter 16: Access Control Module
Chapter 16: Access Control Module Access Control Module Introduction When the Amano Nexus 220 or AmanoNet 7.6 software is installed on your system coupled with the Amano Time & Attendance Software with the optional Access Control Module active; you can load employees from the Access Control system into the Time & Attendance System using the Synchronize Access Control command (see Auto Process –... -
Page 300: Using Access Control Module
Note: For Tag 1 the Badge number (Tag Code) is disabled as it is Read only, but it is enabled in the other tags. It will be Read only and the same as the Badge number. 16-2 – Access Control Module Time Guardian Series... - Page 301 If you wish to assign another tag for the employee, click on the Tag 2, thru Tag 4 (Tag 8) buttons and follow a similar procedure performed for Tag 1. – Access Control Module 16-3 Time Guardian Series...
- Page 302 Time & Attendance software File menu. Use this menu selection to synchronize Time & Attendance software with the Nexus 220 system. The procedure for this synchronization is as follows: 16-4 – Access Control Module Time Guardian Series...
- Page 303 = 0, then all valid transactions will be processed. Otherwise, only transactions with the set Reason Code value will be processed. • The Nexus 220 Tag holder that has a transaction must have an Id No defined. – Access Control Module 16-5 Time Guardian Series...
- Page 304 Systems during Employee Setup with the Setup Wizard if the Access Control Module has been activated (see Step 7: Employee Setup Wizard for additional Wizard information). Employees Setup for AmanoNet Use to setup access control integration with PIN numbers and/or tags for each employee. 16-6 – Access Control Module Time Guardian Series...
- Page 305 3. Select employee type from the dropdown list choices of; Employee or Visitor. 4. Click on Tag 1 through Tag 4 and the following type of screen will appear: – Access Control Module 16-7 Time Guardian Series...
- Page 306 2. From the General Tab of the Setup Wizard, select Yes to integrate Access Control, then click on the Access Control button and the Access Control screen will appear. 3. From the General tab on the Access Control screen; 16-8 – Access Control Module Time Guardian Series...
- Page 307 AmanoNet’s Tag holder Id. • The Time & Attendance employee must be an Active employee. • The Time & Attendance employee’s Management Type must be Access Control or Access Control and Time Attendance. – Access Control Module 16-9 Time Guardian Series...
- Page 308 AmanoNet database to prevent re-processing the same transaction again. Note: These processes only bring in NEW Departments, Employees/Tag holders, and AmanoNet Transactions. It does NOT update any existing Departments, Employees/Tag holders, and AmanoNet Transactions. 16-10 – Access Control Module Time Guardian Series...
- Page 309 Requirements / Relationship Matrix for Amano Time & Attendance software and AmanoNet 7.6: – Access Control Module 16-11 Time Guardian Series...
- Page 310 This page intentionally left blank. 16-12 – Access Control Module Time Guardian Series...
-
Page 311: Chapter 17: Web Interface Module
To configure and/or start the Apache Tomcat 6 service; Step 1. Open “Computer Management” and select “Services and Applications”. Step 2. Click on “Services” and the following type of “Service” screen which lists currently installed services will appear: – Web Interface Module 17-1 Time Guardian Series... - Page 312 The activation of the Web Interface Module provides a punch web view that allows the employee to punch IN or OUT. This operates with same functionality as the Amano MTX-15 and/or FPT-40 clock provides. The employee may be capable of doing labor transfers from the punch submission screen.
-
Page 313: Using The Web Interface Module
Time & Attendance software server. The standard port for SSL is 8443. [May need to obtain the IP address from the network administrator]. Note: All SSL certificates are the responsibility of the customer network. – Web Interface Module 17-3 Time Guardian Series... - Page 314 The supervisor allowed menu items provide this user group with access to the following features: Schedule (Web) An employee’s schedule is made up of template schedules and auto schedules. Together these schedules form the weekly work pattern that can be applied to an employee. 17-4 – Web Interface Module Time Guardian Series...
- Page 315 To create a Template Schedule: 1. Click on the Template Schedules menu selection from the Setup menu (see figure). 2. Click on the button, and the following Template Schedule window will appear. – Web Interface Module 17-5 Time Guardian Series...
- Page 316 To create an Auto Schedule: 1. Click on the Auto Schedules menu selection from the Setup menu (see figure). 2. Click on the button, and the Auto Schedule window will appear (see figure). 17-6 – Web Interface Module Time Guardian Series...
- Page 317 The screen below shows an example of the template schedule and auto schedule assignments into a schedule. To create a Schedule: 1. Click on the Schedules menu selection from the Setup menu (see figure). – Web Interface Module 17-7 Time Guardian Series...
- Page 318 2. Template Schedule 3. Auto Schedule Note: If a schedule does not meet the schedule assignment rules set in the Pay Class of the employee, the employee will be unscheduled for this shift. 17-8 – Web Interface Module Time Guardian Series...
- Page 319 5. In the Relative Start Date field, enter in the start date of the pattern in DDMMYYYY format or click on the button, and the following Select Date dialog box will appear: – Web Interface Module 17-9 Time Guardian Series...
- Page 320 Existing Template Schedule and Labor Reference: To add a template or auto schedule and labor category to a particular day: a. Select the desired day in the Pattern box with the check box b. Select desired Template Schedule from the Template Schedules dropdown list. 17-10 – Web Interface Module Time Guardian Series...
- Page 321 Note: Any schedule conflicts will be flagged with error message and marked with a red cell at this time (see figure). 10. When you have finished, click on the button to finish and return to the Schedule Rotation main window, which lists all defined schedule rotations. – Web Interface Module 17-11 Time Guardian Series...
- Page 322 Activities menu (see the following figure). 2. Click on the button alongside the selected employee to view/edit the employee's Timecard grid. The appropriate Timecard window will appear showing punches, overrides, and adjustments (see the following figure). 17-12 – Web Interface Module Time Guardian Series...
- Page 323 Paid As Punch for OUT Punch DLS (OUT Punch) Daylight Saving Time used for OUT time Previous Shift (OUT Punch) Previous OUT Punch Shift Override (OUT Punch) OUT Punch for Shift Override – Web Interface Module 17-13 Time Guardian Series...
- Page 324 To modify an Individual Schedule for an employee, select a date from the Timecard Grid on the Punches tab, and click on the Individual Schedule button (only active on this screen). The Individual Schedule will allow you to create and/or modify the schedule for that date (see figure). 17-14 – Web Interface Module Time Guardian Series...
- Page 325 Pay Code; i.e. hours defined as overtime. When you have finished performing a Timecard adjustment, click on the Save button to save your changes. When you have finished, click on the Save button to save your changes. – Web Interface Module 17-15 Time Guardian Series...
- Page 326 Overrides Tab (Web) This function allows overrides for only the existing employee hours and associated Pay Code. For all other Timecard modifications see Punches and Adjustments tabs. To perform an 17-16 – Web Interface Module Time Guardian Series...
- Page 327 Labor Level 5 (user defined) LEVEL6 Labor Level 6 (user defined) Comments/Reason Comments/Reason Note: See Advanced Labor/Rate Module, Example of Multiple Labor Levels for details about Labor Level Association links (Parent/Child relationship). – Web Interface Module 17-17 Time Guardian Series...
- Page 328 The timecard total rows can be expanded to show more detail about the hours for the Pay period or a given day by clicking on the left-hand side on the + node (see illustration below – notice the hand pointer and + and - signs). 17-18 – Web Interface Module Time Guardian Series...
- Page 329 Cancel any Timecard adjustments and Cancel return to the Employees screen. Deletes the selected row(s) in the grid. Delete Row Inserts a row below the selected row in Insert Row the grid. – Web Interface Module 17-19 Time Guardian Series...
- Page 330 Pick A Color palette from a palette of 3 choices. The choices are; Windows Safe Palette, Web Safe Palette, or Grey Scale Palette. 17-20 – Web Interface Module Time Guardian Series...
- Page 331 To save/apply new settings for the Adjustment & Overrides Columns, click on the button. The following is an example of the Overrides Columns, which is set the same way as the Adjustment Columns. – Web Interface Module 17-21 Time Guardian Series...
- Page 332 To save new settings for the Exception Colors, click on the button. The desktop side of Time Guardian Pro has one set of colors, while the Web side has a different set of colors. 17-22 – Web Interface Module Time Guardian Series...
- Page 333 Timecard grid. Select the Miscellaneous Colors and the following User Preferences – Miscellaneous Colors window will appear: To define colors for miscellaneous columns, click on the button on the desired color column and select a color from the Pick A Color palette. – Web Interface Module 17-23 Time Guardian Series...
- Page 334 Delete. Also, you can click to toggle row selection and press the Delete button (see figure). When you have finished, click on the Save button in the toolbar to save your changes. 17-24 – Web Interface Module Time Guardian Series...
- Page 335 Note: If this schedule does not meet the schedule assignment rules set in the Pay Class of the employee, the employee will be unscheduled for this shift. Note: You can also select to "Clear Individual Schedule" to switch the employee to unscheduled status. – Web Interface Module 17-25 Time Guardian Series...
- Page 336 Sch) for the employee to be awarded overtime hours (see the figure). Authorizing Payroll Export To authorize hours for an employee to be included in the payroll export file, place a check in the corresponding Hours Auth column (see the figure). 17-26 – Web Interface Module Time Guardian Series...
-
Page 337: Chapter 18: Zone Differential Module
Zone Award definition Main Application Tree view Note: Due to the complexity of the Zone Differential rules Amano recommends using Support to assist in defining your Zone Differentials. See also the Zone Windows examples document. Using the Zone Differential (Premium Rules) Module... - Page 338 4. Enter a name for the Zone Code in the name field [required field]. 5. Enter a description of the Zone Code in the Description field. 6. Assign a Number to the Zone Code in the Number field [required field]. Duplicate numbers are not allowed. 18-2 – Zone Differential Module Time Guardian Series...
- Page 339 Zone Award. Each single schedule has to pass the rule to get this. • Zone: Looks at the time in the window. – Zone Differential Module 18-3 Time Guardian Series...
- Page 340 • < (Less than) • <= (Less than or equal to) • = (Equal to) • > (Greater than) • >= (Greater than or equal to) • <> (Not equal to) 18-4 – Zone Differential Module Time Guardian Series...
- Page 341 1. Click on the Zone Differential node within the Daily Rules module in the Tree View. 2. Expand the view of the Zone Differential node and click on Zone Award. 3. Click on the button, and the Zone Award window will appear. – Zone Differential Module 18-5 Time Guardian Series...
- Page 342 • Change Billable Rate: Change only billable rate. • Change Cost Rate: Change only cost rate. • Set Zone Number: Used to select zones. • Guaranteed Hours: System gives you guaranteed amount across all schedules or single schedule. 18-6 – Zone Differential Module Time Guardian Series...
- Page 343 Labor Level that will be included in the Zone Award. Zone Codes: Select the zone code to set the awarded hours to. The following table displays the options for the Zone Award based on the Source selected: – Zone Differential Module 18-7 Time Guardian Series...
- Page 344 Zone Differential will be in effect. The choices are: Default, Sun, Mon, Tue, Wed, Thu, Fri, Sat, or Standard. 7. To add a Zone Differential Rule, click on the Add button and enter the following: • Type: Select Fixed Times, Schedule Start, or First IN Punch. 18-8 – Zone Differential Module Time Guardian Series...
- Page 345 Not Qualified Zone Code: Select the Zone Code from the list that will be applied to the qualification. • Zone Award: Click on the Zone Award button, and the following window will appear: – Zone Differential Module 18-9 Time Guardian Series...
- Page 346 Remove button. 10. In the Set Zone code for all Windows field, choose one of the following; None, Highest Zone Code, Majority Hours, First In Punch, and Last Out Punch 18-10 – Zone Differential Module Time Guardian Series...
-
Page 347: Chapter 19: Payroll Interface Module
Chapter 19: Payroll Interface Module Payroll Interface Module Introduction The Amano Time & Attendance Software comes standard with a default 13 common payroll interfaces. The activation of the Payroll Interface Module can supply up to 46 additional payroll interfaces. Default Payroll Interfaces Optional Payroll Interfaces 1. - Page 348 45. MAS 90 v4.1.0 46. Paragon Note: Due to the complexity of the Payroll Interface Profile creation, Amano recommends using Support to assist in defining your Payroll Interface parameters. Payroll Interface Module provides a way of transferring data in the system to payroll software.
-
Page 349: Chapter 20: Events Notification Module
Time Guardian and Time Guardian Plus. Time Guardian Pro automatically has this service configured to start. Also, the Time Guardian Series software can now provide even notification via e-mail if set on the IM Profile module. - Page 350 “Start” to immediately start the service. Step 6. Close “Computer Management” screen as you are finished configuring and starting the required “Apache Tomcat 6” service. From now on the service will start automatically. 20-2 – Events Notification Module Time Guardian Series...
-
Page 351: Using Events Notification Module
The Time Guardian Series software sections affected and/or features added from the activation of this module include: • Instant Messaging Profile (IM/E-mail [event] notification) − Notification base on Pay Code Threshold − Notification Exception selection − Absence notification by Threshold •... - Page 352 Note: Due to the complexity of the configuration of the Events Notification Module, Amano recommends using Support to assist in setting up your Instant Messenger (IM) service. Creating an IM Profile 1. Click on the IM Profile node within the Output/Notification modules in the Tree View (see the following figure).
- Page 353 10. Click on the Employee tab. This tab enables you to select employee for IM/E-mail (event) notification. 11. To filter/add employees for IM Profile, click on the Employee tab, select the employee, and click on the button. The Employee Filter window will appear: – Events Notification Module 20-5 Time Guardian Series...
- Page 354 To remove an employee from the Selected list, highlight the employee in the Selected list and click on the Remove button. • To remove all selected employees, click on the Remove All button. 20-6 – Events Notification Module Time Guardian Series...
- Page 355 Contacts from Outlook (e-mail addresses from Microsoft Outlook address book). Configuring the IM Server 1. Right click on the in the system tray in the lower right hand corner and click Launch Admin. – Events Notification Module 20-7 Time Guardian Series...
- Page 356 2. Select English, then click continue. 3. Change the Domain to the server's IP Address (as seen below), then click Continue. 4. In the Data source Settings screen, select Embedded Database and click Continue. 20-8 – Events Notification Module Time Guardian Series...
- Page 357 6. The Jive Messenger Setup Complete screen will appear. The IM Server must be restarted. To do so, right click on the in the system tray on the lower right hand corner and click Launch Admin. – Events Notification Module 20-9 Time Guardian Series...
- Page 358 3. In the Server field, enter the IP Address of the IM Server. 4. Click Save. 5. Restart the IM Client and login. Editing an IM Profile 1. Select IM Client from the Start Menu or your Desktop. 20-10 – Events Notification Module Time Guardian Series...
- Page 359 3. The Profile Editor screen will appear. 4. Enter the changes to the Profile and click Save. 5. Restart the IM Client and login. 6. Change the Domain to the server's IP Address, then click Continue. – Events Notification Module 20-11 Time Guardian Series...
- Page 360 7. In the Data source Settings screen, select Embedded Database and click Continue. 20-12 – Events Notification Module Time Guardian Series...
-
Page 361: Chapter 21: Benefit Time Module
This tab will only be visible if the Tracking Type on the Company module is select as “DeAccrual” or “Import Balances”. If None was selected in this field, the Benefit tab will be grayed out on the Employees screen. – Benefit Time Module 21-1 Time Guardian Series... - Page 362 The benefit balance for an employee will appear under the Benefit Balance column if the Tracking Type has been previously set to DeAccruals or Import Balance. Note: This function can also be done with Global Assign from the main employee list. 21-2 – Benefit Time Module Time Guardian Series...
-
Page 363: Chapter 22: User/Group Module
Group Main Application Tree View − User creation View − Group creation view Note: This module will be included with any optional module. It is not be available in the basic software package. – User/Group Module 22-1 Time Guardian Series... -
Page 364: Using The User/Group Module
Users module in the Tree View. Groups must be created before Users can be assigned. Groups Access privileges are defined in the Groups selection from the optional User/Group Module the Tree View. This module is only visible after it has been activated. 22-2 – User/Group Module Time Guardian Series... - Page 365 3. In the General Tab, enter a name and a description for the Group in the fields provided. 4. Click on the Modules tab, and the following type of window will appear: – User/Group Module 22-3 Time Guardian Series...
- Page 366 Users module selected in the tree view, and the User’s window will appear. The User’s window can consist of up to (9) tabs: General, Password, Employee, and Department/Labor Levels (5). 22-4 – User/Group Module Time Guardian Series...
- Page 367 6. Enter in a password for the user. The password must then be confirmed. Note: The minimum required password length is (6) characters, and can be any combination of letters and numbers and is case-sensitive. 7. Set the password expiration options. The choices are: – User/Group Module 22-5 Time Guardian Series...
- Page 368 To add an employee to the Users Group, highlight the desired employee in the Available list and click on the Add button. To select all the listed employees, click on the Add All button. 22-6 – User/Group Module Time Guardian Series...
- Page 369 Remove All button. Departments can be simultaneously filtered in both the “Available” and Selected” lists in ascending order by using the Sort field dropdown list. The choices in this list are; labor number, or name. – User/Group Module 22-7 Time Guardian Series...
- Page 370 “Available” list filters only that list, while the Criteria field above the “Selected” list filters that list. Each list is filtered independently in ascending order. Note: By unselecting Departments, it can reduce the Employees that the user can have access 22-8 – User/Group Module Time Guardian Series...
-
Page 371: Chapter 23: Nexus Lite Module
Chapter 23: Nexus Lite Module There are five documents available to assist you in the setup and use of your Amano Nexus Lite Management (NLM) software: This Chapter of the Installation & User Guide, the Nexus Lite Management Quick-Start Guide, the Nexus Lite Touch Screen Quick-Start Guide, the Nexus Lite Web Interface Quick-Start Guide, and the Nexus Lite Controller Installation Manual. -
Page 372: Nexus Lite Management (Nlm) Software Installation
The following discussion utilizes the Nexus Lite Management screens for illustrations. The installation of the Amano Nexus Lite Management (NLM) software is as follows: 1. Insert the Amano CD into your CD-ROM drive. The software program should automatically launch the Nexus Lite Management CD Menu (see figure) 2. - Page 373 If you would like to install the Nexus Lite Management (NLM) Software in another folder, click on the Choose button. To reset this field, click on the Restore Default Folder button. After you have made your selection, click on the Next button. – Nexus Lite Module 23-3 Time Guardian Series...
- Page 374 Note: Amano recommends not installing the NLM software inside the “Program Files” folder. 8. The Choose Database Option screen will appear. Select either Firebird SQL or Microsoft SQL and click on the Next button. If you chose Microsoft SQL, the Firebird Database Service does not have to be installed.
- Page 375 14. Click on the Done button to finish the initial Nexus Lite Management (NLM) software installation. The system will briefly prompt; “Please wait Nexus Lite Management is being configured for your system….” – Nexus Lite Module 23-5 Time Guardian Series...
- Page 376 16. The Amano Software Activation (ASA) screen will appear after the initial software installation (see Figure). Enter the 9-digit Serial Number supplied on the Amano software CD and click on the Activate button. Upon successful activation the dialog "Your Software...
-
Page 377: Nlm Setup Wizard
1. The Wizard Help will guide you through the Wizard Steps. The Setup Wizard has 4 Steps (see figure), however, as a minimum only Steps 2 are required with at least 1 employee, and 1 user login defined. These steps will have Red X’s alongside them. – Nexus Lite Module 23-7 Time Guardian Series... - Page 378 Amano recommends that you have the appropriate information before you begin the Setup Wizard. Should you need to exit the Setup Wizard before completion, your settings will be saved. Once the Setup Wizard is finished, the Wizard Complete button will become active. At this point, all settings will be applied, including the time synchronization between the NLM software PC and the connected terminals.
- Page 379 Note: You can close at any time to end the Setup Wizard, but you must complete the Setup Wizard before you can Log into the Amano Nexus Lite Management (NLM) software. The Wizard will automatically open up to the Welcome screen until it is completed.
- Page 380 Employee Import file you will be required to enter a Name for the Import profile. 2. Enter a brief description of the Import profile in the Description field. 23-10 – Nexus Lite Module Time Guardian Series...
- Page 381 Start and Stop time, select the desired days for the Schedule. Finish the Schedule by clicking on the “Doors” button. Note: You can create a maximum of eight (8) schedules per Access Group. – Nexus Lite Module 23-11 Time Guardian Series...
- Page 382 Employees can be added to the system at any time by accessing the Setup Wizard from the Edit menu or clicking on the Employees module from the Tree View (see Figure for example). 23-12 – Nexus Lite Module Time Guardian Series...
- Page 383 Education Level; None specified, Elementary, High School, Some College, No Degree, Bachelor, Masters, Doctorate. • IM Password; This field is grayed out and not used. • Confirm IM Password; This field is grayed out and not used. – Nexus Lite Module 23-13 Time Guardian Series...
- Page 384 Daily Rule: Grayed out and not used. Supervised by: Grayed out and not used Validation: Grayed out and not used. Apply on Call Pay for Weighted Average overtime: Grayed out and not used. 23-14 – Nexus Lite Module Time Guardian Series...
- Page 385 End Date: Displays the date when the tag will expire (YYYYMMDD). (If left blank, the tag will never expire). • Suspend: Enables the tag holder to override the APB constraint condition on the doors to which they have access by suspending it. – Nexus Lite Module 23-15 Time Guardian Series...
- Page 386 Validations are downloaded to the selected terminals by location in the Communications module. To create validation, perform the following: 23-16 – Nexus Lite Module Time Guardian Series...
- Page 387 3. The Department tab is not used and grayed out. 4. Click on the Employees tab to filter employees. 5. To filter/add employees for the Terminal Validation setting, click on the button and the Employee Filter window will appear: – Nexus Lite Module 23-17 Time Guardian Series...
- Page 388 2. In the Description field, enter in a brief description of the Location. 3. The Term Type field is fixed as Nexus Lite for the type of terminal. 23-18 – Nexus Lite Module Time Guardian Series...
- Page 389 NLM client. The UDP Service must be running for this communication. The “Receiving Port Number” on the Nexus Lite must be set to the same as the NLM client which has a default = 4445. (See Network Module). – Nexus Lite Module 23-19 Time Guardian Series...
- Page 390 18. If you wish to assign a Terminal Validation setting to the terminal, select one from the dropdown list in the Validation field. 19. Click the “Active” box to enable the terminal in this location. 23-20 – Nexus Lite Module Time Guardian Series...
- Page 391 Nexus Lite Management (NLM). Press the Login button and the following Users screen will appear to enter general info for account settings. The User’s window consists of (3) tabs: General, Password, and Employee (see figure). – Nexus Lite Module 23-21 Time Guardian Series...
- Page 392 Note: The minimum required password length is (6) characters with a maximum of 20 characters. The password can be any combination of letters and numbers and is case- sensitive. However, no spaces and/or symbols are allowed. 23-22 – Nexus Lite Module Time Guardian Series...
- Page 393 Number, Badge, Payroll, Last Name, First Name, and Comment, and then apply the criteria. To add an employee to the Users, highlight the desired employee in the Available list and click on the Add button. To select all, click on the Add All button. – Nexus Lite Module 23-23 Time Guardian Series...
- Page 394 From the “Network” screen click in the IP Address field to change the IP Address (only if not communicating with the desired Nexus Lite. The “Port” field can also be changed if necessary, but the default = 4,445. 23-24 – Nexus Lite Module Time Guardian Series...
- Page 395 Name, Description, Term Type, TZ Offset, Connection, IP, Port, COM Port, Baud Rate, Modem, and Phone. Once the location is selected use the following commands found at the bottom of the screen to communicate with the terminal(s) at that location: – Nexus Lite Module 23-25 Time Guardian Series...
- Page 396 Click on the Close button to close this dialog. Reports Module (NLM) From the NLM Tree View, click on “Reports” module within the Output group and the following type of screen will appear: 23-26 – Nexus Lite Module Time Guardian Series...
- Page 397 Creating a Access Transaction Report (NLM) Profile 1. Click on the Reports module of the Output group in the Tree View. 2. Click on the button, and the Reports window General tab will appear: – Nexus Lite Module 23-27 Time Guardian Series...
- Page 398 Date using the Calendar icon. You also have the option of going forward or backward as many days, weeks, months, or years from the From Date using the Forward and Backward options. 10. Click on the Title/Page Footer tab. See the following illustration for an example: 23-28 – Nexus Lite Module Time Guardian Series...
- Page 399 16. Placing a check in the Page Break column will place a page break after each of the sorting criteria selected. 17. Placing a check in the Totals column will total each of the sorting criteria selected. – Nexus Lite Module 23-29 Time Guardian Series...
- Page 400 Note: Report profile settings are associated with the user that was logged into the Nexus Lite Management (NLM) software when the report profiles where created. Creating a Employee Report (NLM) Profile Note: Please see “Creating a Report Profile” and “Report Functions & Examples”. 23-30 – Nexus Lite Module Time Guardian Series...
- Page 401 (see Figure below). If Excel Output was selected, the report will be generated and an Excel worksheet created and saved in the Amano Nexus Lite Management software directory [i.e., Nexus Lite Management] in the "Reports" folder [C:\Program Files\Nexus Lite Management\reports].
- Page 402 Click on the apply button and the dialog will close with a new user being created. Go to: File->Log off. Login as the new user you have just created. If you see Timecard under Daily Activities on the Tree View the procedure has succeeded. 23-32 – Nexus Lite Module Time Guardian Series...
- Page 403 A report that displays all changes made in the Time and Attendance software, which is listed by user, date, time, and the change made. Auto Update Automatically locates the terminal and sets the time. Badge Number The number of the card assigned to each employee. – Glossary Time Guardian Series...
- Page 404 Indicates the “Current” day. Custom Toolbar Allows the user to add, edit or delete buttons from the toolbar located on the Main screen. Daily Overtime The time at which hours worked are applied to the Overtime Pay Code. – Glossary Time Guardian Series...
- Page 405 The unique number assigned to each employee. Employee Report Provides a list of all employees in the system. Employee Setup An option located on the Main menu that allows the administration of employees in the system. – Glossary Time Guardian Series...
- Page 406 One of two types of employee designations used by the Time and Attendance software when calculating time. Hours Display Determines how hours are displayed throughout the system. There are two options: Minutes and 100 of hours. – Glossary Time Guardian Series...
- Page 407 Determines the period of time that all punches occurring after Day Change Time will be associated with the last IN Punch before the Day Change Time. Meal Grace A "Free" period of time that is allocated to an employee who returns late from a meal. – Glossary Time Guardian Series...
- Page 408 Used in the Help menu, on-line indicates that the information is contained within the software. Overtime Hours worked that extend beyond an assigned schedule. Overtime Authorization Requires manager approval before overtime hours are awarded. Overtime Reset Day The day or date on which overtime calculations are reset. – Glossary Time Guardian Series...
- Page 409 A term used to describe the retrieving of information from the terminal by the software. Presence Report A report that displays employees currently punched IN at the terminal. Previous Indicates that the punch originates from the “Previous” day. – Glossary Time Guardian Series...
- Page 410 If a salaried employee works on a holiday, they will only receive holiday pay. Save Used to store updates made to the system. Schedules Work patterns with fixed start and end times that can then be assigned to employees to track IN and OUT punches. – Glossary Time Guardian Series...
- Page 411 Used to record tip earnings. Also, one of two pay codes used to assign dollar amounts. Tools Located under the Help section of the Main menu, Tools are internal utilities used to assist in the understanding of the Time and Attendance software calculations. – Glossary Time Guardian Series...
- Page 412 An assigned number of hours that, when exceeded, will cause an employee’s hours to be calculated as overtime. Wizard The installation program created specifically for the Time and Attendance software, which can also be accessed from the Setup menu. G-10 – Glossary Time Guardian Series...
- Page 414 AMX-406700 Rev6 Copyright © 2011 Amano Cincinnati, Inc. 6/11...
Need help?
Do you have a question about the Time Guardian Series and is the answer not in the manual?
Questions and answers