Table of Contents
Advertisement
Quick Links
Advertisement
Table of Contents

Related Manuals for HYRobotics NEXIA-SY Series


Summary of Contents for HYRobotics NEXIA-SY Series
- Page 1 NEXIA-SY Take-out Robot User Manual NEXIA-V-100SY NEXIA-V-200SY ■ NEXIA-V-400SY NEXIA-V-600SY ■ NEXIA-V-800SY NEXIA-V-1300SY ■ NEXIA-V-2000SY NEXIA-V-2500SY ■ NEXIA-V-3000SY Read this manual completely prior to installing, operating or performing maintenance on this equipment...
- Page 3 Selling, Installing and Using the Product not in Manufacturing Country When the products and any parts of the products is to be taken foreign country after delivery to the original purchaser, the purchaser should obtain legal permission to export the products according the laws in both exporting and importing country.
- Page 4 Attention Marks Danger, Warning, Caution, Notice This document use following attention mark for the safety of operation If the actions indicated in a “ DANGER” are not compiled with, death or serious damage of major equipment could results. If the actions indicated in a “ WARNING” are not compiled with, serious injury or major equipment damage could results.
- Page 5 OPERATIONAL WARNINGS DANGER The robot must be installed in as safe and secure manner by professionals familiar with The robot must be installed in a safe and secure method by professionals familiar with the structural engineering principles related to the installation of large industrial equipment. The information on the following pages can be used as a guide to help you install your robot.
- Page 6 WANRING Do not enter robot motion area or inside the safety guard during robot operation. Do not touch or do not allow other objects interfere with the safety fence. Do not remove or open safety guard during robot operation. Do not operate robot inside of the safety guard .
- Page 7 WANRING If any of the following cases should occur, stop the operation with E-Stop button immediately and turn off the power. If you continue the operation of machine under such conditions, a fire may result in the worst case. When fume rises from the robot body or control box, or the outside surface of the robot emits abnormal heat.
- Page 8 CAUTION If the following items are contained to the air, do not use it. Use only clean air. Acid Organic solvents Chlorine gas Sulfur dioxide Compressor oil Do not drop or give any strong shock the the handy controller. It may be cause of Handle with care with Teach palm handy controller malfunction.
- Page 9 CAUTION When setting up the robot arm in the mold area by manual operation, take really care that the robot arm does not contact with the mold or tie bar. Make sure to operate the robot outside the safety guard. Do not use an operation fluid other than clean compressed air Regulate the air pressure as specified.
- Page 10 MAINTENANCE WARNINGS WARNING Before cleaning, inspecting, repairing, adjusting, or performing maintenance on the take- out, be sure to turn OFF the control power and pull out the plug and follow Lock out / Tagout Procedure. If you attempt to perform the cleaning without turning OFF the control power, electric shock.
- Page 11 POWER RELATED WARNINGS WARNING Handle with care with power cable, do not pull and bend. Do not place heavy object on the cable (No folk lift passing on the power cable). Use cable tie to organize power cable for safety. (Damaged cable could be the cause of fire or electric shock. Using unspecified Extension cable cause abnormal symptoms including heat and fire.
- Page 12 WARNING Power off when connect or disconnect any connector of robot Lockout / Tagout before opening the control box Connect the earth terminal of the plug to a class D grounding terminal...
- Page 13 Safety Signs There are safety signs on the robot like below figures. Respect and follow the messages on these signs when operating or performing maintenance on the robot. Do not peel off these labels or signs...
-
Page 15: Table Of Contents
CONTENTS Introduction ................................1 1.1 Robot Assembly........................3 1.2 Robot Body ..........................4 1.3 Remote Controller and Stand ....................5 1.4 Each Axis..........................6 Before Operation ..............................7 2.1 Before Operation ........................9 2.1.1 Air regulator ........................9 2.1.2 Vacuum Verification Sensor Adjustment ..............10 2.2 Before Starting (Preventative Maintenance Schedule) ............11 START UP / STOP............................... - Page 16 4.6.4 EOAT Change ......................53 4.6.5 Mode Select........................ 55 4.7 Step Setup..........................57 4.7.1 Add Position on Basic 4 Steps ................... 61 4.7.2 Add Motion ......................... 66 4.7.3 Modify Step ........................ 68 4.7.4 Delete Step ......................... 90 4.7.5 Grip Position ....................... 92 4.7.6 I/O View........................
- Page 17 Appendix ..................................145 A. Specification ......................... 147 B. External Dimension ......................148 B.1 NEXIA-V Series......................148 B.2 NEXIA Series ......................149 C. Safe guarded space ......................150 C.1 NEXIA-V Series......................150 C.2 NEXIA Series ......................151 D. Air Chart ..........................152 E.
-
Page 19: Introduction
1. Introduction... -
Page 21: Robot Assembly
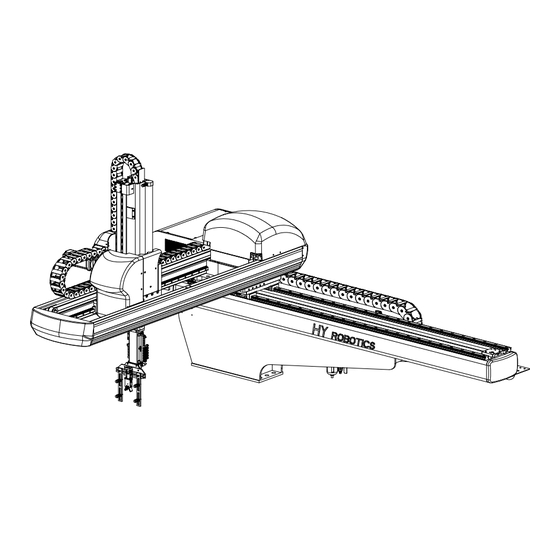
1. Introduction 1.1 Robot Assembly This Robot is consisted of Robot Body Interlock and Control Box Handy Controller Control Box Robot Body Remote controller and Stand NEXIA-SY Series User Manual 3... -
Page 22: Robot Body
Solenoid Valve and Signal I.O and Vacuum Sensor are Kick installed. Main and Sub Arm Traverse For traverse movement Jig Unit Regulator Control Box Regulator and air Servo Controller etc. filter are installed. are installed. 4 NEXIA-SY Series User Manual... -
Page 23: Remote Controller And Stand
Main Arm Kick- (Main Arm Kick Return) Main Arm Kick+ (Main ArmKick) FWD/BWD Main Arm Up/down+ (Main Arm Down) ASNT/DSNT Main Arm Up/down- (Main Arm Up) Rotation+ (Rotation) ROTATION Rotation- (Rotation Return) SWIVEL Runner FWD/BWD ASNT/DSNT NEXIA-SY Series User Manual 5... -
Page 24: Each Axis
1. Introduction 1.4 Each Axis Main Arm Up/Down Traverse Chuck Rotation Vacuum, Chuck Main Arm Kick/Return 6 NEXIA-SY Series User Manual... -
Page 25: Before Operation
2. Before Operation... -
Page 27: Before Operation
Cock 3. Pull Up the adjusting knob and adjust the pressure to [5.9 × 10 Pa(Gauge) or kg/cm ] and Push down to set * Remove water from air regulator regularly if required. Filter Plug NEXIA-SY Series User Manual 9... -
Page 28: Vacuum Verification Sensor Adjustment
P a Press more than 3 seconds. “PL” will blink twice and Sensor will lock. k P a Press more than 3 seconds “PA” will blink twice and sensor will unlock. 10 NEXIA-SY Series User Manual... -
Page 29: Before Starting (Preventative Maintenance Schedule)
Inspecting electrical terminal : Check all electrical terminals for tightness, adjust as required. Inspect each axis cylinder, make sure operation and the cushion is working properly Inspect body for any damage during mold set up or other operation NEXIA-SY Series User Manual 11... - Page 30 2. Before Operation 12 NEXIA-SY Series User Manual...
-
Page 31: Start Up / Stop
3. START UP / STOP... -
Page 33: Step For Start-Up
3. Start up/ Stop 3.1STEP FOR START-UP Follow step for Auto Operation Power ON Search Origin Main New mold Mold File Mold under operation Step Setting Auto Mode NEXIA-SY Series User Manual 15... -
Page 34: Start Up
3. Start up/ Stop 3.1 Start Up STEP 1 Turn On Power.. STEP 2 TP(3X) :Ver 5.xx It will display System Version. And move to origin NAND(3X):Ver 5.xx SC(3X) : Ver 5.xx screen. STEP 3 TRAVERSE SrchOrg Mold: W1 Product Press for origin point of robot motion. - Page 35 NO S T E P Press and start Auto Operation Current : 1 0 0 0 0 Home 1 CYCLE: 1 5 .0 WaitPos TkTime : 5 .0 1DayCount:5 7 6 0 TkPos AscPos RelStatus 1 Layer RelPos NEXIA-SY Series User Manual 17...
-
Page 36: Stop Operation
3. Start up/ Stop 3.2 Stop Operation STEP 1 Auto Mold: REZZO1 In order to stop Automatic operation before completing Target : 1 0 0 0 0 NO S T E P Current : 1 0 0 0 0 WaitPos 1 CYCLE: 1 5 .0 object quantity, press... - Page 37 3. Start up/ Stop STEP 4 Turn Off Power. STEP 5 Disconnect Air Pressure. NEXIA-SY Series User Manual 19...
-
Page 38: Emergency Stop ( Emo Stop )
3. Start up/ Stop 3.4 Emergency Stop ( EMO Stop ) Press EMO button in any dangerous situation ( Protect People, Robot, Mold Etc ) STEP 1 In case emergency power interception button is pressed, power of robot is turned off to stop. [Emergency power interception button] case emergency... -
Page 39: Restoring Emergency Stop
FWD/BWD Search origin by pressing start. ASNT/DSNT pressing ROTATION SWIVEL Runner FWD/BWD ASNT/DSNT [Emergency system stop button] STEP 1 Eliminate Emergency Stop Situation. Rotate ROBOT EMO button to Clock Wise NEXIA-SY Series User Manual 21... - Page 40 3. Start up/ Stop STEP 2 TRAVERSE After moving robot to safe place using SrchOrg Mold: W1 Product FWD/BWD manual button, return to origin point by Search origin by pressing start. ASNT/DSNT pressing ROTATION SWIVEL Runner FWD/BWD ASNT/DSNT 22 NEXIA-SY User Manual...
-
Page 41: Operation
4. OPERATION... -
Page 43: Screen Structure
Ascent Position Modify Step Step Forward Release Position Delete Step Detail Grip Position Display I/O Input Waiting User Output Detail Automatic Operation Error List Counter Modify Position Detail Start/Pause (Auto) 1Cycle Reject Sampling Alarm ON/OFF NEXIA-SY Series User Manual 25... -
Page 44: Description Of Remote Controller Screen
Speed value is percentage for rated speed, which is composed of 1%, 2%, 3%, 5%, 10%, 20% and 30%. Unit is %. Distance value is 1% of speed value, which is a distance moved whenever manual button is pressed once. This is composed of 10mm, 1mm, 0.1mm and 0.05mm. Unit is mm. 26 NEXIA-SY Series User Manual... - Page 45 K L M N O P Q R S T to previous screen U V W X Y Z □ ← Cancel button Alphabet and Numeric keypad This moves to the previous screen without storing setting. NEXIA-SY Series User Manual 27...
- Page 46 □ : Blank letter ← : Back space Arrow key and Enter key : Alphabet is selected by moving focus of alphabet and figure key pad up, down, left and right. : Selected alphabet is inputted. 28 NEXIA-SY Series User Manual...
-
Page 47: Initial Screen
4. Operation 4.2Initial Screen Power on displays Logo and Robot Name/type , Robot Initiation and Move Origin Point :Ver 5.430 NAND(3X) :Ver 5.12 SC(3X) :Ver 5.43 NEXIA-SY Series User Manual 29... -
Page 48: Search Origin
SrchOrg Mold: W1 Product FWD/BWD Search origin by pressing start. ASNT/DSNT ROTATION SWIVEL Runner FWD/BWD ASNT/DSNT (2) Button Function Button Description Manual Operate each axis manually. Button Each Robot axis search homing point and stop. 30 NEXIA-SY Series User Manual... -
Page 49: Main
Moves each axis to origin point. Checks I/O and moves to Manual screen which manually operates each axis and output. Moves to Mold File screen. Moves to Auto Mode screen in case there is the past operation file. NEXIA-SY Series User Manual 31... -
Page 50: Reject Position
(2) Button Function Button Description Maunal Operate each axis manually. button Setting None. Save current Position Cancel Move to Main screen (3) Example STEP 1 Main Mold: Default Maintenance Press move to Reject Postion screen. 32 NEXIA-SY Series User Manual... - Page 51 PFwBw 100.0 ROTATION PAscDsc SWIVEL RFwBw RAscDsc Runner FWD/BWD ASNT/DSNT STEP 3 RjctPos Mold: W1 Press store the positon. Current Memory Trvs 900.0 900.0 Press move to Main screen. PFwBw 100.0 100.0 PAscDsc RFwBw RAscDsc NEXIA-SY Series User Manual 33...
-
Page 52: Eoat Position
Save current Position Cancel saving Move to Main screen Need to set up outside of robot descent prevention area . (3) Example STEP 1 Main Mold: Default Maintenance Press , move to setting for EOAT change 34 NEXIA-SY Series User Manual... - Page 53 100.0 ROTATION PAscDsc SWIVEL RFwBw RAscDsc Runner FWD/BWD ASNT/DSNT STEP 3 EOAT Pos Mold: W1 Press store the positon. Current Memory Trvs 1300.0 1300.0 Press move to Main screen. PFwBw 100.0 100.0 PAscDsc RFwBw RAscDsc NEXIA-SY Series User Manual 35...
-
Page 54: System Time
This cursor will move cursor to Year, Month, Date, and Time. This cursor will set date, time. Input number, Save Move main screen (3) Date / Time Setting STEP 1 Main Mold: Default Maintenance Press , move to setting screen. 36 NEXIA-SY Series User Manual... - Page 55 Date: 07/09/29 Time: 13:15:23 STEP 3 SysTime Mold: W1 Move cursor Date: 07/09/29 Set data Time: 13:15:23 save data in system. STEP 4 SysTime Mold: W1 Press move to Main screen. Date: 07/09/29 Time: 13:15:23 NEXIA-SY Series User Manual 37...
- Page 56 Time: 13:15:23 Date: 07/10/05 Time: 13:15:23 STEP 3 SysTime Mold: W1 move cursor Date: 07/10/05 , set data Time: 13:15:23 save. STEP 4 SysTime Mold: W1 , move to main screen. Date: 07/10/05 Time: 10:00:00 38 NEXIA-SY Series User Manual...
- Page 57 When time window is activated with date window activated, date window is deactivated and its content is stored. when date window is activated with time window activated, time window is deactivated and its content is stored. NEXIA-SY Series User Manual 39...
-
Page 58: Technical Service
STEP 2 Mold: W1 This screen will show you version of each control ( TP, SC, NAND ) , let service department to know this version, press to close. : 6.03 : 6.01 NAND: 6.03 40 NEXIA-SY Series User Manual... -
Page 59: Error History
Error history is stored up to 100 sets. When numbers of errors exceed 100 sets, the oldest error will be deleted and new error is added. (3) Example STEP 1 Main Mold: Default Maintenance Press , move to Error List NEXIA-SY Series User Manual 41... - Page 60 4. Operation STEP 2 ErHist Mold: W1 Date Time ErrorCode Press , to go back to main screen. 02/08/14 11:16:24 42 NEXIA-SY Series User Manual...
-
Page 61: Manual
Turns on/off release 1 valve. Turns on/off release 2 valve. Turns on/off release 3 valve. Turns on/off suction valve.[Suction On/Suction Off] Turns on/off chuck valve.[Chuck On/Chuck Off] Turns on/off product grip valve.[Product Grip On/Product Grip Off] NEXIA-SY Series User Manual 43... - Page 62 Turns on/off User Output 4. Turns on/off User Output 5. Turns on/off User Output 6. Turns on/off User Output 7. Turns on/off User Output 8. Show Next page Show Previous Page Move to Main screen. 44 NEXIA-SY Series User Manual...
- Page 63 Press I/O display button in order to see description on X301 Y301 interlock. Interlock signal description window appears. X302 Y302 X303 Y303 X304 Y304 X305 Y305 X306 Signal Description Window <Input signal description window> <Interlock signal description window> <Output signal description window> NEXIA-SY Series User Manual 45...
-
Page 64: Mold File
[no] does not cancel it. In case [YES] or [NO] is pressed, message window disappears. Moves to EOAT Change screen which changes jig. Moves to Main screen. Moves to Step Setup screen. Move to Mold Select screen 46 NEXIA-SY Series User Manual... -
Page 65: New Mold
Other than figure cannot be inputted on mold number input window; inputting existing mold number displays a message “mold number already exists” and pressing makes window disappear. Two Same Mold file can be created in one robots control. NEXIA-SY Series User Manual 47... - Page 66 K L M N O P Q R S T U V W X Y Z □ ← STEP 3 SrchOrg Mold: W1 Press , robot arm move to origing point of Search Org, Press “Start” Button. new mold. Go back to main screen. 48 NEXIA-SY Series User Manual...
-
Page 67: Copy Mold
Show copy method. ( All Copy and Pattern only Copy ) Cancel Copy Copy all information and move to next screen. Copy of Robot motion pattern except position data. And move to mold maintenance screen. NEXIA-SY Series User Manual 49... - Page 68 A B C D E F G H I K L M N O P Q R S T Press will move to servo origin point. U V W X Y Z . □ ← 50 NEXIA-SY Series User Manual...
-
Page 69: Change Name
K L M N O P Q R S T U V W X Y Z . □ ← (2) Button Function Button Description Arrow Move cursor button Input text in the cursor Delete text Save name and move to mold maintenance screen Cancel. NEXIA-SY Series User Manual 51... - Page 70 2 3 4 5 6 7 8 9 0 Press to move maintenance screen. A B C D E F G H I K L M N O P Q R S T U V W X Y Z . □ ← 52 NEXIA-SY Series User Manual...
-
Page 71: Eoat Change
ASNT/DSNT (2) Button Function Button Description This will move robot arm to EOAT change position if that is set up. Cancel. When robot arm move to EOAT change position, this button will stop the robots. NEXIA-SY Series User Manual 53... - Page 72 E O A T p o s i t i o n STEP 3 EOATChg Mold: REZZO1 Press , robot arm will move to EOAT Moved to jig change position . change position. After finishing work , pressing start button Moves to origin . 54 NEXIA-SY Series User Manual...
-
Page 73: Mode Select
( When robot arm down in the mold, allow IMM eject ) Robot is not control eject ( No Interlock for eject ) After chuck or suction parts, robot arm will move back EjectBwSig after confirm ejector backward complete signal. NEXIA-SY Series User Manual 55... - Page 74 STEP 2 Traver s e with Rot Select or Change each mode with pressing Ejector rectangular box. EjectBwSig Press , move to mold maintenance screen. EjtC nt Op Time I ns er t After Take-Out 56 NEXIA-SY Series User Manual...
-
Page 75: Step Setup
4 steps. And they you can add any position motion in addition of this steps. New mold does not include information such as delay time, speed, position value and take-out method in these 4 steps, so each information shall be inputted by correcting step. NEXIA-SY Series User Manual 57... - Page 76 Moves to Grip Position screen, which sets up Grip Position. Moves to Display I/O screen which checks I/O. Receives signal input, and then moves to Input Waiting screen which performs next step. 58 NEXIA-SY Series User Manual...
- Page 77 (3) Example [Step Setup] Add each step and position. STEP 1 StepSet Mold: W1 Pressing displays a message “Non-setting of S T E P Home WaitPos position information”, Close message window by TkPos AscPos RelPos pressing NEXIA-SY Series User Manual 59...
- Page 78 All step will run with low speed to make sure the setting is right, press stop or E-Stop button if something is not right during operation. STEP 1 StepSet Mold: W1 Pressing starts step operation, and S T E P WaitPos TkPos AscPos converted into RelPos 60 NEXIA-SY Series User Manual...
-
Page 79: Add Position On Basic 4 Steps
WaitPos TkPos then stop. AscPos RelPos 4.7.1 Add Position on Basic 4 Steps (1) Description This adds user position. In case position name is not inputted, it is impossible to move to Add Position screen. NEXIA-SY Series User Manual 61... - Page 80 Operate robot with this button to get position. button Save current position Close and move back to step screen. (3) Example When moving from position P0 to position P1 at 70% speed after 0.3 second delay time 62 NEXIA-SY Series User Manual...
- Page 81 , to cancel go back to mold setting A B C D E F G H I K L M N O P Q R S T screen. U V W X Y Z . □ ← NEXIA-SY Series User Manual 63...
- Page 82 RAscDsc AddPos Mold: W1 Make input by pressing in regular Pos: P1 DlyTime Speed 0 .3 Sec order, store speed by pressing , and then Current Memory Trvs PFwBw 100.0 close window. PAscDsc RFwBw RAscDsc 64 NEXIA-SY Series User Manual...
- Page 83 SWIVEL RFwBw RAscDsc Runner FWD/BWD ASNT/DSNT Do not add position with many axis movement for 1 position, Robot might move to the position without your intention. Manually move robot arm for 1 axis and save. NEXIA-SY Series User Manual 65...
-
Page 84: Add Motion
Turn on/off spare out 4. Addition, chuck, product grip, nipper, spare 1, spare 2, spare 3 and spare 4 of action addition indicate status of robot. Setting and canceling by pressing each relevant button operate robot according to it. 66 NEXIA-SY Series User Manual... - Page 85 DlyTime:0 .0 Sec Press to set 0.3 Sec for delay time. Product 0 . 3 STEP 4 AddMot Mold: W1 DlyTime:0 .3 Sec Press for suction on. Product Press to save and move to step screen. NEXIA-SY Series User Manual 67...
-
Page 86: Modify Step
DlyTime 00 .0 Sec [Input with numeric keypad] This is a speed necessary for moving to Waiting Position. Speed [Input with numeric keypad] Save current position and data Close screen move back to step screen. 68 NEXIA-SY Series User Manual... - Page 87 RFwBw RAscDsc WaitPos Mold: W1 Make input by pressing DlyTime Speed 0.0 Sec regular order, store delay time by pressing 0 . 3 Current Memory Trvs PFwBw 200.0 and then close window. PAscDsc RFwBw RAscDsc NEXIA-SY Series User Manual 69...
- Page 88 , and then Current Memory Trvs PFwBw 200.0 close window. PAscDsc RFwBw RAscDsc Position Each axes Traverse 0 mm 0 mm Main Arm Kick/Return 200 mm 250 mm Main Arm Up/down 0 mm 0 mm Rotation 70 NEXIA-SY Series User Manual...
- Page 89 Speed 0.3 Sec ASNT/DSNT manual button. Current Memory Trvs ROTATION PFwBw 250.0 250.0 PAscDsc SWIVEL Store current value by pressing , and then RFwBw RAscDsc Runner FWD/BWD move to Step Setup screen by pressing ASNT/DSNT NEXIA-SY Series User Manual 71...
- Page 90 Take-out Position. Take-out delay is indicated and 00.0 Sec set up. [Input with numeric keypad] Stores position. Take-out method window to select Take-out Method appears. Save current position Close screen and move to step 72 NEXIA-SY Series User Manual...
- Page 91 Take-out Position so as to operate regardless of set take-out delay. 1) Initial Setting. Robot will perform setting and save current setting. 2) After Step setting. After step set, before change setting, take method will be same as current setting. NEXIA-SY Series User Manual 73...
- Page 92 Make input by pressing DlyTime Speed TkTime 0 .0 Sec 0.0 Sec regular order, store delay time by pressing 0 . 2 Current Memory Trvs PFwBw 400.0 and then close window. PAscDsc 1250.0 S지 RFwBw RAscDsc 74 NEXIA-SY Series User Manual...
- Page 93 Mold: W1 Make input by pressing , store DlyTime Speed TkTime 0 .2 Sec 0.0 Sec take-out time by , and then close window. Current Memory 0 . 2 Trvs PFwBw 250.0 PAscDsc S지 RFwBw RAscDsc NEXIA-SY Series User Manual 75...
- Page 94 Take-out Method window, Current Memory Trvs PFwBw 400.0 400.0 PAscDsc 1250.0 1250.0 and pressing sets up suction. OFF OFF S지 OFF OFF RFwBw RAscDsc Pressing closes Take-out Method window. Move to Step Setup screen by pressing 76 NEXIA-SY Series User Manual...
- Page 95 1250.0 1250.0 Each axes Take-out Arc End OFF OFF S지 OFF OFF Position Position RFwBw RAscDsc Traverse 0 mm 0 mm Main Arm Kick/Return 400 mm 300 mm Main Arm Up/down 1250 mm 1250 mm Rotation NEXIA-SY Series User Manual 77...
- Page 96 SWIVEL RFwBw RAscDsc Runner FWD/BWD ASNT/DSNT STEP 3 ArcEnd Mold: W1 Store current value by pressing Current Memory Move to Take-out Position screen by pressing Trvs PFwBw 300.0 300.0 PAscDsc 1250.0 1250.0 S지 RFwBw RAscDsc 78 NEXIA-SY Series User Manual...
- Page 97 DlyTime 00.0 Sec [Input with numeric keypad] Speed necessary for moving to Ascent Position Speed 000 % [input with numeric keypad] Move to Arc Start Position screen. Store current value. Move to Step Setup screen. NEXIA-SY Series User Manual 79...
- Page 98 PFwBw 300.0 PAscDsc 1250.0 S지 RFwBw RAscDsc AscPos Mold: W1 Press , Press to save and DlyTime Speed close windows 0.3 Sec Current Memory 1 0 0 Trvs PFwBw 300.0 PAscDsc 1250.0 S지 RFwBw RAscDsc 80 NEXIA-SY Series User Manual...
- Page 99 ROTATION PFwBw 200.0 200.0 PAscDsc Press manual so that current number of position SWIVEL S지 RFwBw becomes PFWBW 0.00, PASCDSC 0.00, Runner RAscDsc FWD/BWD Press to save ASNT/DSNT Press to move to step setting screen. NEXIA-SY Series User Manual 81...
- Page 100 Each axes Ascent Arc Start PFwBw 300.0 300.0 PAscDsc 1250.0 1250.0 Position Position S지 Traverse 0 mm 0 mm RFwBw RAscDsc Main Arm 200 mm 250 mm Kick/Return Main Arm Up/down 1250 mm 1250 mm Rotation 82 NEXIA-SY Series User Manual...
- Page 101 Press manual to move robot arm to PFWBW to ArcStart Mold: W1 Product FWD/BWD 250.0. ASNT/DSNT Current Memory Press to save Trvs PFwBw 200.0 200.0 ROTATION PAscDsc 1250.0 1250.0 S지 SWIVEL Press to move to previous screen.. RFwBw RAscDsc Runner FWD/BWD ASNT/DSNT NEXIA-SY Series User Manual 83...
- Page 102 This is delay time before opening product after moving to Release RelDly 00.0 Sec Position. [input with numeric keypad] Opens the take-out product. Moves to Detail Setup screen. Store current value. Move to Step Setup screen. 84 NEXIA-SY Series User Manual...
- Page 103 Mold: W1 Make input by pressing DlyTime RelDly Speed 0.0 Sec 0.0 Sec regular order, store delay time by pressing Current Memory 0 . 4 Trvs PFwBw 200.0 and then close window. PAscDsc S지 RFwBw RAscDsc NEXIA-SY Series User Manual 85...
- Page 104 Mold: W1 Make input by pressing DlyTime RelDly Speed 0.4 Sec 0.0 Sec regular order, store delay time by pressing Current Memory 0 . 5 Trvs PFwBw 200.0 and then close window. PAscDsc S지 RFwBw RAscDsc 86 NEXIA-SY Series User Manual...
- Page 105 Step Setup screen by pressing Cancel the product by pressing Move to Step Setup screen by pressing Traverse is possible only by completing ascent of take-out arm in C region. Refer to [1.3.3 operation range] NEXIA-SY Series User Manual 87...
- Page 106 Distance of Kick for each cycle Up Pitch Distance of Up for each cycle Numeric Keypad Traverse Layer Setting layer for Traverse Kick Layer Setting layer for Kick Up Layer Setting layer for Up CLEAR Clear 88 NEXIA-SY Series User Manual...
- Page 107 ④ Input 2 in Times of FwBw. Pos1 Pos2 Pos3 Pos4 CLEAR STEP 3 Detail Mold: W1 MainPos Trvs FwBw AscDsc Press to close and save. Pitch 300.0 200.0 Times SubPos DlyTime Speed TrvsDis FwBwDis AscHeight Pos1 Pos2 Pos3 Pos4 CLEAR NEXIA-SY Series User Manual 89...
-
Page 108: Delete Step
) Close and move back to step screen. (3) Example STEP 1 StepSet Mold: W1 Press to go to step delete screen. S T E P WaitPos TkPos AscPos RelPos 90 NEXIA-SY Series User Manual... - Page 109 Press to close Please be careful to delete step, fully read instruction manual / contact factory or training person. Robot arm will move unexpectedly step deleted without careful motion movement consideration. NEXIA-SY Series User Manual 91...
-
Page 110: Grip Position
DlyTime Delay time to move to insert grip position. 00.0 Sec Speed Speed to move to insert grip position. GripDly Delay time is insert grip delay time 00.0 Sec Stacked insert gripping Save. Cancel. Close. 92 NEXIA-SY Series User Manual... - Page 111 RFwBw RAscDsc STEP 3 GripPos Mold: W1 [Set speed at 80%] DlyTime Speed GripDly Speed 0 .3 Sec 0 .0 Sec Press for setting speed. Current Memory Trvs 1700.0 PFwBw 300.0 PAscDsc 1000.0 RFwBw RAscDsc NEXIA-SY Series User Manual 93...
- Page 112 Traverse 1700mm, PFwBw 400mm, PAscDsc ROTATION PFwBw 300.0 400.0 PAscDsc 1000.0 1000.0 1000mm, Rotation ON SWIVEL RFwBw RAscDsc Runner Press to save current information. FWD/BWD ASNT/DSNT Close to move back to step setting. 94 NEXIA-SY Series User Manual...
- Page 113 Gripping insert from Traverse 35mm, Kick 35mm, 10 row, 14 column ( on pallet ) STEP 1 GripPos Mold: W1 Press to move detail insert grip position. DlyTime Speed GripDly 0 .3 Sec 0 .3 Sec Current Memory Trvs 1700.0 1700.0 PFwBw 300.0 400.0 PAscDsc 1000.0 1000.0 RFwBw RAscDsc NEXIA-SY Series User Manual 95...
- Page 114 Sub Position of insert grip has Pos1, Pos2, Pos3, Pos4. ( Need to input order of 1,2,3,4 ) (5) Button Function of Sub Position Button Description Move to Pos1 Pos1 Pos2 Move to Pos2 Pos3 Move to Pos3 Move to Pos4 Pos4 96 NEXIA-SY Series User Manual...
- Page 115 Button Description Move robot arm with manual button and Save current position. Cancel save. Close screen. Move to add motion screen. Delete step on Sub Grip Position. Move cursor to below. Move cursor to up. NEXIA-SY Series User Manual 97...
- Page 116 This is distance from Basic Gripping position. Input with numeric keypad. Save current positon. Cancel Close and move to previous screen. Move to Add motion screen. Delete step on cursor Move cursor to below. Move Cursor to up. 98 NEXIA-SY Series User Manual...
- Page 117 0 .3 Sec Current Memory Trvs 1700.0 1700.0 PFwBw 300.0 400.0 PAscDsc 1000.0 1000.0 RFwBw RAscDsc STEP 2 Detail Mold: W1 MainPos Press Pos1 to move Pos1. Trvs FwBw Pitch Times SubPos CLEAR Pos1 Pos2 Pos3 Pos4 NEXIA-SY Series User Manual 99...
- Page 118 Press to save and move back to previous screen. STEP 6 Pos1 Mold: W1 1 Op Press to finish Pos1 setting. Current Memory Trvs 1700.0 1700 .0 PFwBw 300.0 300 .0 PAscDsc 1000.0 1000 .0 100 NEXIA-SY Series User Manual...
- Page 119 - Sec Current Memory Trvs 10.0 10.0 PFwBw 300.0 300.0 PAscDsc STEP 10 AddOp Mold: W1 DlyTime:0 .0 Sec Press to use Spare output 3 Press to move back to Pos2 Screen. NEXIA-SY Series User Manual 101...
- Page 120 0.8 Sec Current Memory Trvs 10.0 10.0 PFwBw 300.0 300.0 PAscDsc STEP 12 Detail Mold: W1 MainPos Press , move back to previous screen. Trvs FwBw Pitch Times SubPos CLEAR Pos1 Pos2 Pos3 Pos4 102 NEXIA-SY Series User Manual...
-
Page 121: I/O View
X002 X014 X100 WaitPos X004 X015 X101 TkPos screen. X005 X016 X102 AscPos X006 X017 X103 RelPos X007 X018 X104 X008 X019 X105 X009 X020 X106 X010 X021 X107 X011 X022 X200 X012 X023 X201 NEXIA-SY Series User Manual 103... -
Page 122: Input
Save and move back to previous screen. (3) Example When Robot wait for User input 1 and User input 2 and go to next step. STEP 1 StepSet Mold: W1 Press InputDly icon. S T E P WaitPos TkPos AscPos RelPos 104 NEXIA-SY Series User Manual... - Page 123 4. Operation STEP 2 입력대기 Mold: W1 Input Mold: W1 Press Input Select Press to save and go back to previous screen. Robot will wait all selected signal confirmed to proceed next steps NEXIA-SY Series User Manual 105...
-
Page 124: Output
(2) Button Function Button Description Select User Output Pulse Signal On Set signal until Robot command off within program. To turn off signal which is On Set within program Cancel Save and move to previous screen. 106 NEXIA-SY Series User Manual... - Page 125 PulseTime: 0 .3 sec PulseTime: 0 .3 sec Press to call Output Select input time with numeric keypad to pulse time Press to keep On until turn off. Press to off which is on. Press to save. NEXIA-SY Series User Manual 107...
-
Page 126: Auto Mode
Stop Operation after finished step. Move to Input / Output Screen Alarm on/off selection. Error History. 1 Cycle operation with Actual speed of Automatic Move to step setting screen. End and go to Mold Manager screen. 108 NEXIA-SY Series User Manual... - Page 127 Number : Layer of Release Stack Array display Row and Column of products Array stacked. Grip Insert Grip: Display Insert gripped Position Array ( Insert ) : Display Row and Column of Insert Gripped by Robots. NEXIA-SY Series User Manual 109...
-
Page 128: Counter Set
Ex) Set 8000 for Target STEP 1 Auto Mold: REZZO1 Target NO S T E P Target : Current : WaitPos Current : 1 CYCLE: 1 CYCLE: Press TkPos TkTime : 1DayCount: 0 TkTime : AscPos 1DayCount: 0 RelPos 110 NEXIA-SY Series User Manual... - Page 129 Target: Reject : Samling: Cavity : PNTimes: STEP 3 Counter Mold: W1 Press , move to Auto. CountSet TotalCount Product: Target: 8 0 0 0 Reject : Samling: Cavity : PNTimes: 2 0 0 0 NEXIA-SY Series User Manual 111...
-
Page 130: Step ( Position, Speed, Delay Time ) Modification In Auto
70 % Step Screen Position RFwBw RAscDsc TkDly RelDly Detail (2) button Function Button Function Move cursor to desired position Set Delay Time Set Speed Set Position Modification Close screen and move back to Screen 112 NEXIA-SY Series User Manual... - Page 131 DlyTime Speed Press move to Auto Screen. WaitPos 대기위치 WaitPos 70 % 70 % 70 % Trvs TkPos 70 % PFwBw 20.0 AscPos 70 % PAscDsc 50.0 RelPos 70 % RFwBw RAscDsc TkDly RelDly Detail NEXIA-SY Series User Manual 113...
- Page 132 70 % Need to input absolute number and maximum is 100 mm. RFwBw RAscDsc ( For examples Current Trvs is 1500, would like to TkDly RelDly Detail change 1550, input 1550 with numeric key pad ) 114 NEXIA-SY Series User Manual...
- Page 133 Change detail information and Press Trvs FwBw AscDsc Pitch 300.0 200.0 to close. Times SubPos DlyTime Speed TrvsDis FwBwDis AscHeight Warning Pos1 Pos2 Pos3 Pos4 CLEAR * Changing detail information is not recommended during automation NEXIA-SY Series User Manual 115...
-
Page 135: Follow-Up
5. Follow-up... -
Page 137: Setup Motion
5. Follow Up 5.1 Setup Motion ⑫ ⑦ ⑪ ① ⑥ ② ③ ⑩ ⑤ ⑧ ④ ⑨ ①. Waiting Position ②. Take-out Position ③. Ascent Position ④. Release Position NEXIA-SY Series User Manual 119... -
Page 138: Start Up
TP(3X) :Ver 5.xx Log screen appears, and loading state bar indicates NAND(3X):Ver 5.xx SC(3X) : Ver 5.xx data loading level. In case loading state bar is all full, move to origin searching screen. Loading state bar NEXIA-SY Series User Manual... -
Page 139: Searching Origin
Mold: W1 Confirm Robot is not interfere with any obstacle and Search Org, Press “Start” Button. Press to homing position After finished homing, robot will back to main SrchOrg Mold: W1 screen. Searching Org ... NEXIA-SY Series User Manual 121... -
Page 140: Creat New Mold
2 3 4 5 6 7 8 9 0 Press to move back to mold manager A B C D E F G H I K L M N O P Q R S T screen. U V W X Y Z □ ← NEXIA-SY Series User Manual... -
Page 141: Step Setting
RelPos STEP 9 StepSet Mold: W1 Cursor moved to WaitPos.. S T E P WaitPos Press to input WaitPos ( Waiting Position ) TkPos AscPos RelPos Wait Position is only can be changed Step Modification. NEXIA-SY Series User Manual 123... -
Page 142: Setting Waiting Position
( This is for delay time from last step to current PFwBw 200.0 PAscDsc step ) RFwBw RAscDsc WaitPos Mold: W1 Press , Press to save DlyTime Speed and close. 0.0 Sec 0 . 3 Current Memory Trvs PFwBw 200.0 PAscDsc RFwBw RAscDsc NEXIA-SY Series User Manual... - Page 143 ASNT/DSNT Move robot arm with manual button until you get Current Memory Trvs current position as desired number and press ROTATION PFwBw 250.0 250.0 PAscDsc SWIVEL to save and close. RFwBw RAscDsc Runner FWD/BWD ASNT/DSNT NEXIA-SY Series User Manual 125...
-
Page 144: Take Out Position Setting
STEP 14 StepSet Mold: W1 Step Cursor moved to TkPos S T E P WaitPos TkPos AscPos Press and move to set up Take out position RelPos Take out position can be set up in Step Modification. NEXIA-SY Series User Manual... - Page 145 RFwBw RAscDsc TkPos Mold: W1 Press to set speed 100%, Press DlyTime Speed TkTime 0 .2 Sec 0.0 Sec to save and close. Current Memory 1 0 0 Trvs PFwBw 250.0 PAscDsc S지 RFwBw RAscDsc NEXIA-SY Series User Manual 127...
- Page 146 Current Memory 0 . 2 Trvs PFwBw 250.0 PAscDsc S지 RFwBw RAscDsc Position Waiting Take out Each Axis Position Position Traverse 0 mm 0 mm Kick 250 mm 400 mm Up/Down 0 mm 1250 mm Rotation NEXIA-SY Series User Manual...
- Page 147 Take out cycle time delay time is from take out position and receive ejector forward complete signal to chuck operation. Reference Suction operation will be start after moving to take out position and chucking operation will be start after Take out cycle delay time complete NEXIA-SY Series User Manual 129...
-
Page 148: Ascent Position Setting ( Imm Operate Next Cycle )
RelPos STEP 21 StepSet Mold: W1 Cursor located on AscPos.. S T E P WaitPos TkPos AscPos Press to setting Ascend Position.. RelPos AscPos can be set up only in StepMod ( Step Modification ) NEXIA-SY Series User Manual... - Page 149 Trvs PFwBw 300.0 PAscDsc 1250.0 S지 RFwBw RAscDsc AscPos Mold: W1 Press and press to save DlyTime Speed and close. 0.3 Sec Current Memory 1 0 0 Trvs PFwBw 300.0 PAscDsc 1250.0 S지 RFwBw RAscDsc NEXIA-SY Series User Manual 131...
- Page 150 0.3 Sec ASNT/DSNT Current Memory Trvs Press manual button to Traverse 0mm, Kick 0mm, ROTATION PFwBw 200.0 200.0 PAscDsc Up/Down 0mm, Rotation OFF. SWIVEL S지 RFwBw Runner RAscDsc Press to save position FWD/BWD ASNT/DSNT Press to close. NEXIA-SY Series User Manual...
-
Page 151: Release Position
Step cursor is located on RelPos ( Release S T E P Position ). WaitPos TkPos AscPos RelPos Press to move to setting screen. RelPoss can be set up only in StepMod ( Step Modification ) NEXIA-SY Series User Manual 133... - Page 152 0.0 Sec Speed Press Current Memory Trvs PFwBw 200.0 PAscDsc S지 RFwBw RAscDsc RelPos Mold: W1 Press and Press to save. DlyTime RelDly Speed 0.4 Sec 0.0 Sec Current Memory Trvs PFwBw 200.0 PAscDsc S지 RFwBw RAscDsc NEXIA-SY Series User Manual...
- Page 153 Current Memory 0 . 5 Trvs PFwBw 200.0 PAscDsc S지 RFwBw RAscDsc Position Ascent Release Each Axis Position position Traverse 0 mm 1700 mm Kick 200 mm 500 mm Up/Down 0 mm 1100 mm Rotation NEXIA-SY Series User Manual 135...
- Page 154 SWIVEL RFwBw RAscDsc And then move robot arm Down 1100mm Runner FWD/BWD ASNT/DSNT Press to save. Press to release all position Press IN SAFETY ZONE, ROBOT ARM NEED TO UP COMPLETE TO MOVE WARNING TRAVERSE AXIS NEXIA-SY Series User Manual...
-
Page 155: Step Operation
TkPos AscPos Press will stop operation RelPos will be changed to Press to run in Fully Automatic Mode will not activate until finish the 1 step operation ( after change mold, or reboot system ) NEXIA-SY Series User Manual 137... -
Page 156: Auto Runs
: 8000 NO S T E P Current : Press , robot stops, will be changed WaitPos 1 CYCLE: TkPos TkTime : 1DayCount: 0 AscPos Grip RelPos Press to finish Job, move to Mold Manger screen NEXIA-SY Series User Manual... -
Page 157: Error
6 Error... -
Page 159: Error Screen
M-Arm Kick Servo Drive Alarm 3. Bad Encorder Connector barrier or operate mistake crash. Restart robot 4. Motor Power after completely shutdown robot for more than M-Arm Down Servo Drive Alarm 5. Crash 20 seconds. NEXIA-SY Series User Manual 141... -
Page 160: Pneumatic Related
1. Open Safety Door and Fix Problem in Manual Mode 3. Bad Sensor 2. Adjust location of Sensor 1. Gripper Motion Failure 3. Replace Sensor M-Arm Gripper Failure 2. Wrong Sensor Location 3. Bad Sensor 142 NEXIA-SY Series User Manual... -
Page 161: Machine Abnormality
(Check Mold Open Complete Sensor) Complete Safety Door Stop In Auto mode, when safety door Close Safety Door. opened, robot will stop operation 6.2.7 Description Cause Recovery Method Speed Information Error Wrong Speed Input Contact Factory NEXIA-SY Series User Manual 143... - Page 162 No Servo Origin Setup Origin looking without home sensor detection setting. Encoder Z Non Setup Origin looking without Encorder Z Phase Dip Switch Fail Dip switch Setting is wrong Watch Dog Timer Reset Noise or Electricity Unknown error 144 NEXIA-SY Series User Manual...
-
Page 163: Appendix
Appendix... -
Page 165: Specification
Up to 1300 ton 3000 3500 1590 1800 AC220V S:16A(Max.) NEXIA-V-2000S Up to 2000 ton 3500 4000 1750 2100 3 phase AC220V NEXIA-V-2500S 1750 2500 S:26A(Max.) Up to 3000 ton 4000 4500 NEXIA-V-3000S 2100 3000 NEXIA-SY Series User Manual 147... -
Page 166: External Dimension
NEXIA-V-2000S 3070 1680 (6010) (4000) 1055 1750 1197 2980 2250 6010 NEXIA-V-2500S 3250 2080 (6510) 4000 (4500) 5960 NEXIA-V-3000S 3875 1100 2100 2515 1397 3355 2592 (6460) ( ): L Type [ ]: LL Type 148 NEXIA-SY Series User Manual... -
Page 167: Nexia Series
1450 420 1380 NEXIA-1300D 3500 4988 NEXIA-2000S 2820 1710 1725 1092 2530 267 1977 (5488) (4000 ) 4000 5990 NEXIA-3000S 3490 1055 2070 2580 1197 3300 500 2570 (6490) (4500 ) ( ): L TYPE NEXIA-SY Series User Manual 149... -
Page 168: Safe Guarded Space
NEXIA-V -800S 1212 2500 1210 1412 (3000) NEXIA-V-800D 1363 3000 NEXIA-V-1300S 1590 1425 1857 (3500) 3500 NEXIA-V-2000S 1680 (4000) 1750 2250 NEXIA-V-2500S 2080 4000 (4500) NEXIA-V-3000S 2515 2100 2592 ): L TYPE, [ ]: LL TYPE 150 NEXIA-SY Series User Manual... -
Page 169: Nexia Series
1085 2000 1046 1155 (2500) NEXIA-600D 1082 NEXIA-800S 1218 2500 1290 1363 (3000) NEXIA-800D 1292 1572 NEXIA-1300S 3000 1410 1772 (3500) 1723 NEXIA-1300D 3500 NEXIA-2000S 1725 1710 1977 (4000) 4000 NEXIA-3000S 2070 2580 2570 (4500) NEXIA-SY Series User Manual 151... -
Page 170: Air Chart
Appendix D. Air Chart 152 NEXIA-SY Series User Manual... -
Page 171: Interlock
Appendix E. Interlock NEXIA-SY Series User Manual 153... - Page 172 Auto Injection -Coil (+) 16-2 White Mold Open -Coil (+) 16-9 White+red Safety Door Open -Coil (+) 14-2 White+black Full Automatic -Coil (+) 16-10 Black+yellow Ejector Backward Complete -Coil (+) 14-4 White+gray Ejector Forkward Complete -Coil (+) 154 NEXIA-SY Series User Manual...
-
Page 173: Input/Output
User Output 2 X10⁷ UserIn4 User Input4 Y106 UserOut3 User Output 3 X200 JudgeSensor1 Judgment Sensor1 Y107 UserOut4 User Output 4 X201 JudgeSensor2 Judgment Sensor2 Y200 JudgeLamp1 Judegment Lamp 1 JudgeLamp2 Judgement Lamp 2 Y201 NEXIA-SY Series User Manual 155... - Page 174 Y302 MoldOpen Mold Open X303 FullAuto Full Automatic Y303 MoldClose Mold Close X304 EjtBwdOk Ejector backward Complete Y304 EjectorSig Ejector Signal X305 EjtFwdOk Ejector Forward Complete Y305 Robot Emg Robot Emergency X306 ImmEmg IMM Emergency 156 NEXIA-SY Series User Manual...
-
Page 175: G Main Wiring
R4-1 R4-2 (* SERVO AMP MAIN ARM UP/DOWN BRAKE CN1A CONNECTOR*) SAFE CYLIDER SOL TRAVERSE SERVO 1.5KW L11 L21 MAIN ARM KICK SERVO 750W MAIN ARM UP/DOWN SERVO MAIN WIRING NEXIA-V-2500SY CHOI JONG KEUN '07.10,11 NEXIA-SY Series User Manual 157... -
Page 176: System Control (Sc) Board
Appendix H. SYSTEM CONTROL (SC) BOARD I/O POWER FAN connector Middle Board Connector TP Select Dip Switch Counter TP Connector Aux Connector Control Power Model Select Dip User I/O Swtich (SW2) Connector 158 NEXIA-SY Series User Manual... -
Page 177: Model Selection Dip Switch (Sw2)
H.3 TP Connector ( Touch Panel Connecter ) ■ Connector No. Direction Pin No Name P24V EMERGENCY H.4 Separate Electric Connection Separated 24V Control Power and I/O power Control Power I/O Power Power Pin No Connector J19 Connetor J10 NEXIA-SY Series User Manual 159... -
Page 178: Middle Board Connector
Y004 Y014 Y024 X005 X015 미사용 Y005 Y015 Y025 X006 X016 Y006 Y016 Y026 X007 X017 Y007 Y017 Y027 X008 X018 P24V Y008 Y018 Y028 X009 X019 P24V Y009 Y019 Y029 ■ Connector Pin No. 160 NEXIA-SY Series User Manual... -
Page 179: Aux. Connection And Fan Connector
LAMP Buzzer Brake Brake (J15, Molex 2P) ■ Signal of Connector and Pin BRAKE Signal PinNo. Connector J15 +24V BRAKE ■ Connector Pin Number ■ Relay required for BRAKE Control - Brake + Relay Coil NEXIA-SY Series User Manual 161... - Page 180 ■ Direct Connection with Alarm Light -24V DC Type Alarm BUZZER Installation (J13, Molex 2P) BUZZER Signal Connector J13 +24V BUZZER ■ Connector Pin No. ■ Direct connection BUZZER (DC 24V) -24V DC Type + Buzzer 162 NEXIA-SY Series User Manual...
- Page 181 FAN Name Pin No Connector J20 +24V ■ Connector Pin No. ■ If FAN is for DC Voltage, connect directly , if FAN IS FOR AC Voltage connect through external relay. - FAN +Relay Coil NEXIA-SY Series User Manual 163...
-
Page 182: Motor Control Board : Mbd-4X
No.1 MBD-4X No.2 MBD-4X Board 1XAxis 1YAxis 1ZAxis 1Taxis 2XAxis 2YAxis 2ZAxis 2Taxis Model Name NEXIA-3X (Single) No.2 MBD is not in use Travers Kick Main Down NEXIA-5X (Single) Rotation Swivel Travers Kick Main Down 164 NEXIA-SY Series User Manual... - Page 183 /CLR 06 PULSE_CLR+ OUT /S_ON /S-ON /P_CON /P-CON 09 /ALM_RESET /ALM-RST P24V_OUT +24VIN 11 /INPOS_COM COIN- /INPOS COIN+ 13 /S_RDY_COM OUT /S-RDY- /S_RDY /S-RDY+ CW_STOP P-OT CCW_STOP N-OT /ALM_COM /ALM- /ALM /ALM+ Frame Main Frame NEXIA-SY Series User Manual 165...
-
Page 184: Setting For Motor Board
1X 1Y 1Z 1T 2X 2Y 2Z 2T Model NEXIA-3X ◉ ◉ ◉ All is ON All is Off No User No.2 Board NEXIA-5X ◉ ◉ ◉ All is ON All is Off All is OFF All is ON ◉ ◉ 166 NEXIA-SY Series User Manual... -
Page 185: Middle Connection Board : If
X014 X024 Y004 Y014 Y024 X005 X015 Not in Use Y005 Y015 Y025 X006 X016 Y006 Y016 Y026 X007 X017 Y007 Y017 Y027 X008 X018 P24V Y008 Y018 Y028 X009 X019 P24V Y009 Y019 Y029 NEXIA-SY Series User Manual 167... -
Page 186: Interlock Board : Il
IMM E-Stop. SW1Setting Use - No1 is OFF (IMM E-Stop connection required ) If no connection, alarm will trigger Not in Use - No 1 is ON (IMM E-Stop connection is not required ) 168 NEXIA-SY Series User Manual... - Page 188 LS cable Noise Filter1 WYF-S06A2 6A WOONYOUNG Co., LTD Noise Filter2 FTN-E20H-CM-20A FINE SUNTRONIX CO., LTD. SMPS HNPS756-24-N 3.1A HYROBOTICS CO., LTD. Relay SZR-LY2-N1 24VDC Honeywell Relay Socket KLY2 Korea Automatic Control Co., Inc Motor Drive SGDH-□□A YASKAWA ELECTRIC CORPORATION...
- Page 203 HYROBOTICS Co., Ltd. 173-228 GAJWA-DONG SEO-GU INCHON KOREA TEL:+82-32-582-5040 FAX:+82-32-584-7040 HYROBOTICS Corp. 5988 Mid Rivers Mall Dr. St.Louis MO 63303 TEL:+1-636-578-6059 FAX:+1-866-232-5594...
Need help?
Do you have a question about the NEXIA-SY Series and is the answer not in the manual?
Questions and answers