Table of Contents
Advertisement
Quick Links
Advertisement
Table of Contents

Related Manuals for Siare Morpheus ND


Summary of Contents for Siare Morpheus ND
- Page 1 Anaesthesia Unit User's Manual...
-
Page 3: General Information
The contents of this manual do not in any way limit the right of SIARE ENGINEERING INTERNATIONAL GROUP s.r.l. to revise, change or modify without prior notice the equipment (including the relative software) described herein. -
Page 4: Observations
Observations SIARE Engineering International Group s.r.l. wishes to thank you for purchasing one of its products. Any comment on the accuracy and usefulness of this User’s Manual would be very helpful in allowing us to guarantee current and future users of the high quality level of our manuals. -
Page 5: Warnings, Cautions And Notes
• For any repairs to anaesthesia unit (due to malfunctioning, defects or failures), the user must contact SIARE or the authorised local Technical Service Centre; it is advisable to specify the data on the identification label (model, serial number, ……) when requesting intervention. - Page 6 Do not connect external devices NOT manufactured or NOT authorized by SIARE to the anaesthesia unit (example: scavenging systems, patient simulators, etc…..), and not described in the present user’s manual: in case of need contact SIARE. • The correct functioning of the anaesthesia unit can be impaired if original SIARE spare parts and accessories are not used;...
- Page 7 • SIARE assumes all foreseen legal liability if the anaesthesia unit is used and periodically maintained according to the instructions contained in this manual: the Technical Assistance Report, drawn up and signed by the authorised SIARE technician, is proof of the completion of the scheduled maintenance.
- Page 8 WARNING !! Before connecting the anaesthesia unit to other electrical equipment not described in this manual, a request for authorisation should be sent to Siare. WARNING !! An auxiliary ventilation system is suggested for the patients for which the anaesthesia unit represents a life support.
-
Page 9: Year Of Manufacture
• If personnel not officially authorised by SIARE have performed maintenance. • If non-original SIARE spare parts or components not checked by SIARE have been used. • If the anaesthesia unit has been connected to equipment not complying with the safety norms for the intended use. -
Page 10: Electromagnetic Compatibility
Electromagnetic Compatibility The MORPHEUS anaesthesia unit is designed to operate in the specified electromagnetic environment (see warning below). The customer or the user of MORPHEUS anaesthesia unit should ensure that it is used in such an electromagnetic environment. The MORPHEUS anaesthesia unit complies with the EN 60601-1-2 regulations on Electromagnetic Compatibility of electro-medical equipment. -
Page 11: Table Of Contents
Table of contents GENERAL INFORMATION ......................III Observations ............................IV Definitions ............................... IV Warnings, cautions and notes ......................... V Year of manufacture ..........................IX Shelf life of medical device ........................IX Manufacturer ............................IX Electromagnetic Compatibility ......................... X Table of contents ............................ XI PRESENTATION ........................ - Page 12 Breathing system use ....................... 2-12 2.7.1 soda lime absorber canister ................2-12 2.7.2 Assembling and disassembling of absorber canister (e.g. disposable model) ... 2-12 2.7.3 Dismount of the valves group ..................2-13 Breathing system accessories ....................2-14 2.8.1 sensor ........................2-14 2.8.2 Patient circuit .......................
- Page 13 PREPARATION TO USE....................4-1 General warnings ........................4-1 Before the use ..........................4-3 4.2.1 cell assembling ......................4-3 4.2.2 Assembling of absorber canister ................... 4-3 4.2.3 Battery charger ......................4-5 Preparation to use ........................4-6 4.3.1 Medical gas connection ....................4-6 4.3.2 Connection of medical gas supply to cylinders ( optional ) ...........
- Page 14 MORPHEUS_ND USE ......................5-1 Flowmeter ........................... 5-2 5.1.1 Dosing and administration of fresh gas ................. 5-2 5.1.2 Administration of fresh gas in the "TO and FRO" system ..........5-4 5.1.3 Flowmeter pre-setting ....................5-5 Anaesthesia Unit switching ON - Self Test phase ..............5-7 PATIENT DATA / SETUP parameters ..................
- Page 15 5.12 Calibration programs ........................ 5-58 5.12.1 Calibration Programs displaying ................. 5-59 5.12.2 Turbine Characterization ..................... 5-60 5.12.3 Respiratory Flow Sensors Calibration ................. 5-61 5.12.4 VTEc ( On - Off ) ......................5-65 5.12.5 ScreenShot Enable ( Off - On ) ................... 5-66 5.12.6 Self Test ........................
- Page 16 Periodic maintenance ......................... 7-9 7.4.1 Maintenance operations table ..................7-9 7.4.2 Cleaning, disinfection and sterilization before use with another patient ..... 7-12 7.4.3 Turbine ........................7-12 Repairs and spare parts ......................7-13 7.5.1 Annual kit for Morpheus_ND anaesthesia unit ............7-13 Miscellaneous...........................
-
Page 17: Presentation
SIARE ENGINEERING INTERNATIONAL GROUP s.r.l. is glad to introduce this new product, as the result of 40 years of experience and investment in technological innovation that we are implementing in recent years. Siare has heavily focused on the innovation of materials, ergonomics and ease of use. -
Page 18: Main Innovations
Main innovations The Morpheus_ND HYBRID anaesthesia unit represents a true new revolution, engineered with the help of anaesthetists of proven experience aiming to realize a safe device both for the doctor and for the patient. The anaesthesia unit is equipped by a Turbine (hence the name “Morpheus HYBRID”) and provides a double functionality: the traditional gas supply system (Air and Oxygen) and the turbine functioning (in this case it is not necessary a pneumatic Air supply for the movement of the breathing system bellows). -
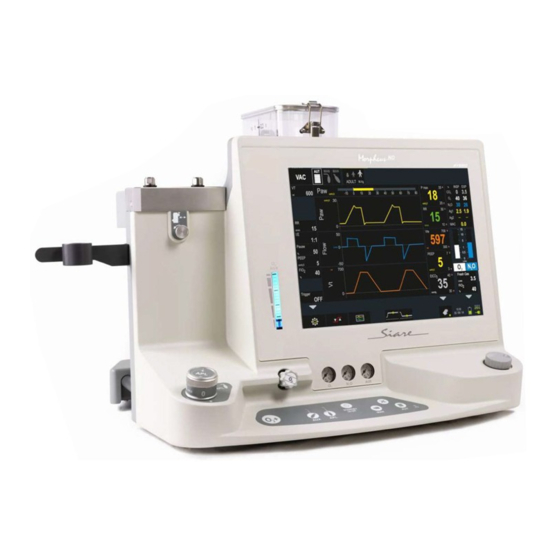
Page 19: Main Characteristics: Anaethesia Unit Structure
• Standard auxiliary fresh gas outlet • The fresh gas dosing system guarantees maximum safety thanks to the redundant system with double valve and double control. In this way, the supply of oxygen or overdoses of nitrous oxide in the event of a failure will never be interrupted. •... -
Page 20: Lung Ventilation Module
1.3.2 Lung ventilation module For those who have a basic knowledge on how medical devices for resuscitation work, the use of this equipment is intuitive and a brief training course on regard would be enough. • The lung ventilation module equipped with a 15” colour Touch Screen display, delivers controlled or spontaneous ventilations with a re-adjustable level of end expiration positive pressure (PEEP), of the trigger sensitivity and oxygen concentration. -
Page 21: Trolley (Optional)
1.3.4 Trolley (optional) The mechanical structure of the trolley is made with light aluminum alloy uprights and a steel base structure. The base of the base is made of shock-proof ABS with a polyester coating; this guarantees an excellent impact resistance thanks to the flexibility and excellent resistance to abrasion. The dimensions and weight are very limited and allow installation even in small rooms or with restricted work areas. - Page 22 (see on chapter 7). For further information, contact SIARE Engineering International Group s.r.l.. SIARE Engineering International Group s.r.l. recommends careful reading of this manual and the relative labels before operating the anaesthesia unit or carrying out any maintenance.
-
Page 23: Norms And Standards Regulations
Norms and standards regulations The MORPHEUS_ND anaesthesia unit is made in accordance with the following norms and it is manufactured according to UNI EN ISO 13485:2004 standards. EN 60601-1 :2006/A1 Medical electrical equipment - Part 1: General requirements for :2011/A1 :2013 safety. -
Page 24: Morpheus_Nd - Description
With regard to the assembly, the interface and the servicing operations, please refer to the relative chapter or contact Siare technical support service. Front view •... -
Page 25: Keyboard For Manual Ventilation
2.1.1 Keyboard for manual ventilation Electronic type O BY-PASS control. Pressing the button puts oxygen in the anaesthesia circuit with a flow of about 35 l/min Fresh gas selection control: enabling output connector (back of the anesthesia unit) at fresh gas exit (AUX) Fresh gas exit selection control: enabling output connector BAG on valves group. -
Page 26: Other Commands
2.1.2 Other commands Back-lit The flowmeter and the knob are to be used mainly in an emergency. In fact, in flowmeter the event of an emergency, with the anesthesia unit switched off (malfunctioning), the User can deliver a flow of fresh gas (oxygen) adjustable Fresch gas through the AUX outlet (located on the back of the DM) for manual ventilation of control knob... -
Page 27: Side View - Power Supply Connections
Side view – power supply connections • Scavenging connector (see on chapter 2.x and 4) • Vaporizer support – parking only (see on chapter 2) • Gas supply connection (see on chapter 2 and 4.3) • Electric power supply (see on chapter 2.x and 4.5) On the front side of the anaesthesia unit there is a horizontal mono-bloc for rapid fixing of one vaporizer. -
Page 28: Gas Supply Connection
2.2.1 Gas supply connection • Connections for O exit • Connections for O entry • Connections for Air entry • Connections for N O entry WARNING !! Risk of equipment failure • In order that the anaesthesia unit operates as specified, the inlet pressures of medical gases must be between 280 kPa and 600 kPa (2.8 - 6 bar): before use ensure that this requirement is met. -
Page 29: Back View
Back view • Support for manual ventilation circuit ( see on chapter 5.8 ) • Valves group - Breathing system ( see on chapter 2.x ) • Turbine Air Filters ( see on chapter 7 or on Service Manual ) •... -
Page 30: Electric Power Supply Area
2x10 AT), socket for connection of main supply power cable. • FUSE 10 AT : safety fuse for battery power circuit (1 x 10 AT) WARNING !! Risk of equipment failure Use and connect electric devices authorized by Siare, only. Morpheus_ND... -
Page 31: Side View
Side view • Vaporizer support ( see on chapter 2 ) • APL valve for manual ventilation ( see on chapter 5.8 ) • Electrical connector : future uses ( optional ) • Valves group - Breathing system ( see on chapter 2.6 ) •... -
Page 32: Product Identification Label
Product identification label The product identification label mentions the following information. • Manufacturer • Model name • Main power supply • Battery’s features • Fuses features • Regulation (CE mark) • Serial number • Symbols (see description) The mark identifies the protection level against electric shock ( category of protection type B ). -
Page 33: Valves Group - Breathing System
Valves group - Breathing system The valves group (or also the breathing system) is the device that conveys the fresh gases (coming from anaesthesia module) to the patient; collects the exhaust gases and conveys them to the CO absorber canister, and then toward the bellow of valves group to be delivered to the patient When the CO absorber canister is inserted, the system is automatically configured in rebreathing modality. -
Page 34: Patient Circuit View
2.6.1 Patient circuit view absorber canister with lock lever 10.1 Connector for manual ventilation circuit 10.2 Connector for gas scavenging circuit 10.3 Connector for inspiratory line 10.4 Connector for expiratory line flow sensor 10.6 Valves group cover 10.7 Bellows with weight 10.8 Bellows jar Automatic gas connections to anaesthesia 10.9... -
Page 35: Breathing System Use
Breathing system use CAUTION • When the CO absorber canister is inserted, the system is automatically configured in rebreathing modality. • When the CO absorber canister is removed, the system is automatically configured in non-rebreathing modality. 2.7.1 soda lime absorber canister The CO absorber canister is positioned in the upper side of valves group;... -
Page 36: Dismount Of The Valves Group
All the interventions of maintenance on valves group, must be affected exclusively by personnel highly qualified and specifically trained and formally authorized by SIARE. Pay much ATTENTION during this operation. • Lift and remove completely the valves group and position it on a flat surface. -
Page 37: Breathing System Accessories
Breathing system accessories 2.8.1 O2 sensor WARNING !! Risk of injury for the user To avoid risks of electric shocks and/or break of components, during interventions, verify that the anaesthesia unit has been disconnected from power supply. • Unpack carefully the O cell. -
Page 38: Patient Circuit
2.8.2 Patient circuit • Connect the patient circuit to the apposite INS. and EXP. connectors on the valves group. • Position the patient circuit on the patient circuit supporting arm. For more details about anaesthesia unit installation, please see on chapter 4. Tidal Volume Set of hoses CAUTION... -
Page 39: Mapleson C Adult Patient Circuit
2.8.4 MAPLESON C Adult patient circuit • Connect the patient circuit to the “AUX” connector on the valves group (anaesthesia unit back side). • Position the patient circuit on the patient circuit supporting arm. For more details about manual ventilation, please see on chapter 5.8.9. CAUTION With the “APL”... -
Page 40: User Interface Module
At the end, the 15” touch screen graphical interface, will be easy to understand for those having a sufficiend acquired experience on lung ventilation and on SIARE’s devices. The User will find in this chapter all the information needed for using the anaesthesia unit the proper way. -
Page 41: Keyboard With Soft Key And Encoder Knob
Keyboard with soft key and encoder knob Well shaped from an ergonomic point of view, on the front of the anaesthesia unit, we have the keybor and a multifunctioning knob encoder They keyboard includes either the controls for the working in auto mode, ot the controls for the patient’s manual ventilation. - Page 42 - Soft key for enabling the automatic ventilation. • By pressing AUT soft key it is possible to start ventilation in the selected ventilatory mode and with parameters set by User. ALARM RESET - Soft key to silence an active alarm. •...
- Page 43 CAUTION With the manual ventilation, the APL regulator, located aside the control keybord, shall be used to determine the max value of the airways pressure in the patient. Using this manualventilation mode (APL enabled), the system displays the monitoring of the patient’s parameters. - Soft key for attivazione raccordo uscita gas freschi ( AUX ).
-
Page 44: Anaesthesia Unit Switching On
Anaesthesia unit switching ON Before switching on the Morpheus_ND anesthesia unit, all the devices and accessories necessary for the operation of the anesthesia unit must be present and correctly connected: electric power and gas supplies connected, patient circuit, lung simulator, etcc... •... -
Page 45: Self Test Phase
3.2.1 Self Test phase During Self Test phase, the software carries out the self-diagnostic tests and checks a series of devices necessary for safe operation of the Unit /patient ( for further details ABOUT self test,please see on chapter see on 4.7.1 ). •... - Page 46 Cancel Supplementary Tests Press : the system will display the page. Through of this page it is possible to Supplementary Test perform the for further details see on chapter 4.x ). PATIENT DATA Press : the system will display the page.
-
Page 47: Anaesthesia Unit Switching Off
3.2.2 Anaesthesia unit switching OFF Anaesthesia unit in Stand-by operative mode. • Hold the STANDBY / ON-OFF soft key for few seconds to switch-OFF the anaesthesia unit. • The system requires to user if Turn-Off the Anaesthesia unit. The Anaesthesia unit will be switched OFF. The “... -
Page 48: 15" Touch Screen Monitor
15” touch screen monitor On the front of the anaesthesia unit, a 15” touch screen monitor, displays all the information needed for patient’s ventilation. Operatin mode selection, setting and displaying of respiratory parameters, graphics, alarms signals and electronic flowmeter (see on cfr. 4.3) are the main available and active functions. -
Page 49: Touch Screen
3.3.1 Touch screen In electronics a “ touch screen “ is a particular device resulting from the merge of a display/screen and a digital display, allowing user interaction with a graphic interface by fingers or particular objects. Therefore, a touch screen is a inlet and outlet device at the same time. - Page 50 CAUTION An operative mode can be selected in two different operating conditions. • Stand-by Anaesthesia unit in mode. • normal operation During the of the anaesthesia unit. Anaesthesia unit in Stand-by mode. Select the area indicating Operative Mode (icon: VC/VAC) All the operative modes foreseen are displayed Select a new operative mode Anaesthesia unit: Stand-by mode.
- Page 51 Anaesthesia unit in normal operation: operative mode VC/VAC. • Select the area indicating Operative Mode (icon: VC/VAC) All the operative modes foreseen can be displayed. • Select a new operative mode. • A second column with the PRP parameters referred to the APCV operative mode can be displayed.
- Page 52 : The Anaesthesia unit directly switches to the new selected operative mode APCV. : Possible PRP parameters of the APCV Operative Mode modified, are stored by the system: the system is fitted for a future APCV ventilation mode. The anaesthesia unit continues to ventilate in VC/VAC operative mode.
- Page 53 Operative modes list Assisted pressure-controlled ventilation, synchronised with patient's breathing with leak compensation. (Volume Targeted) Assisted pressure-controlled ventilation, synchronised with patient's breathing and with assured current volume. Assisted pressure support ventilation with assured respiratory rate set by the User (Apnea Back Up) with leak compensation. (Volume Targeted) Pressure support ventilation with assured current volume and assured safety respiratory rate set by the User (Apnea Back Up).
-
Page 54: Operative Commands
Pressure-targeted synchronised intermittent mandatory ventilation. After selecting the most suitable operative mode for patient ventilation, the system will automatically display the physiological respiratory parameters for the new setup. Alongside the operative command icon, the patient type set is specified (Adult, Child, New Born). - Page 55 Operative command : AUT / MAN / STAND-BY Three control keys useful for anaesthesia unit operation are foreseen next to operative modes selection. The three control keys here below are similar to those present on the keyboard with soft key. By touch AUT it is possible to start ventilation in the selected ventilatory mode and with parameters set by User.
-
Page 56: Patient Data
3.3.4 PATIENT DATA Alongside the operative command PATIENT TYPE icons, the set is specified (Adult, Child, New Born). In this way the default respiratory parameters are set automatically (breathing parameters and alarms limits). CAUTION - Anaesthesia unit switched ON. At the end of Self-Test phase, the system does not switch directly to Stand-by operative mode, but it previously displays a page which allows the adjustment of the following type of PATIENT informations and anaesthesia unit SETUP. - Page 57 CAUTION During the normal operation of the anaesthesia unit, the User can modify the PATIENT DATA selecting the icon: • SETTING MENU / PATIENT DATA • or by touching the relative icon (PATIENT DATA) • The choice of the patient typology, set automatically the default functioning parameters of the anaesthesia unit (breathing...
- Page 58 • Select : the PATIENT DATA settings will NOT be saved. • Select : the PATIENT DATA setting will be saved. The system will display the PATIENT DATA screen. 3-19 Morpheus_ND...
-
Page 59: Setup
3.3.5 SETUP Alongside the operative command icon, PATIENT TYPE set is specified (Adult, Child, New Born). CAUTION - Anaesthesia unit switched ON. At the end of Self-Test phase, the system does not switch directly to Stand-by operative mode, but it previously displays a page which allows the adjustment of the following type of PATIENT informations and anaesthesia unit SETUP parameters. - Page 60 CAUTION During the normal operation of the anaesthesia unit, the User can modify the SETUP parameters selecting the icon MENU A series of pages (displaying) are available to determine the operation SETUP of anaesthesia unit. Display • BRIGHTNESS • ENERGY SAVING •...
- Page 61 Units • Weight (referred to the patient) • Height (referred to the patient) • (unit of measurement) • Pressure (unit of measurement) Default • Erase Trends data • Erase Events data • Erase Patient data • Setting & Ventilation Default Other •...
- Page 62 • Save Cancel At the end, what SETUP is set in pages. • Select : to quit SETUP page without saving. : it remains in SETUP page. • Select : the set values will be saved. : it remains in SETUP page. Stand-by The system will display the screen.
-
Page 63: Physiological Respiratory Parameters
Physiological respiratory parameters In this paragraph the User will find a description of available physiological respiratory parameters (referred to from now on as PRP) selectable on user interface module. 3.4.1 Respiratory parameters display Just for our examples we refer to the Operative Modes available with ADULT Patient Data ( VC/VAC ). -
Page 64: Respiratory Parameter Modification ( Respiratory Rate )
Other respiratory parameters To return to previous related to VC/VAC operative displaying, re-select mode are displayed 3.4.2 Respiratory parameter modification ( Respiratory Rate ) Select the area indicating the respiratory parameters to be modified. The modification bar is displayed. decrease the parameter value increase the parameter value... -
Page 65: List Of Available Respiratory Parameter
The value of Respiratory Rate has been modified. Confirm Select to close modification bar 3.4.3 List of available respiratory parameter WARNING !! Risk for Patient injury Depending on the chosen ventilation mode, the same PRP can be a dependent variable (that varies depending on other parameters modification) or an independent variable (a value that if modified, affects the values of other parameters). - Page 66 PEEP (cmH2O) Positive airway pressure value during expiratory phase. Pinsp (cmH2O) Maximum airway pressure limit value. The parameter is used in pressure controlled modes to fix an operating limit for the airway pressure that shall not be exceeded. PMax (cmH2O) Maximum airway pressure limit.
-
Page 67: Monitoring Of Respiratory Parameter
Tr. E (%) Percentage of the inhaled flow with regard to the maximum peak where the inspiratory phase ends and the expiratory phase begins. Tr. I (L/min) (cmH2O) Flow level (pressure) for detecting the patient spontaneous breathing. Vte (ml) Expired tidal volume guaranteed for the patient. Vti (ml) Inspired tidal volume guaranteed for each breath. - Page 68 Meaning of the values reported in the cell : respiratory parameter : unit of measurement : value set by the User 1000 - 100 : alarm limits The value displayed is the maximum measured pressure inside the airways (cmH The displayed value shows the real respiratory rate (number of breaths per time unit) taking into consideration for the calculation any spontaneous activity.
- Page 69 The displayed value shows the volume value expired by the patient per minute : the unit of measurement is L/min. You can also calculate this value using the formula: current volume (Vte) x respiratory frequency (RF). FiCO2 The displayed value shows the value of CO maximum concentration in the CO2 inspiratory phase (insp-fraction CO The value is detected by the gas sensor analyzer installed on the patient...
- Page 70 Inspiratory time It shows the duration of the patient's inspiratory phase: the unit of measurement is the second. This value represents the total inspiratory time, and also includes the inspiratory pause period. This value depends on the respiratory rate and I:E ratio parameters. For example: if RATE = 15 and I:E=1:1 you will have an inspiratory phase of 2 seconds.
- Page 71 Dynamic compliance It is one of the parameters of the lung mechanics: measured in ml/cmH2O, represents the lung compliance either during the inspiration or during the expiration. You can use it to asses the lung elasticity: the higher the compliance, the more elastic the “lung”;...
-
Page 72: Monitoring Of " Gas Analysis Parameters
3.4.5 Monitoring of “ gas analysis parameters “ The values monitored are measured through a Sidestream or Mainstream GAS analyzer connected to the Anaesthesia unit. The measuring ranges of the considered gas are available on the technical data sheet relevant to the type of sensor used. -
Page 73: Alarms Areas
Alarms areas The anaesthesia unit features automatic means for detecting and identifying any conditions that might put the patient at risk (based on the level of urgency and seriousness), using acoustic or visual alarm signals. The role of the alarm signal is to draw the attention of the User to the event as well as to inform him on the requested response speed. - Page 74 Setting up the Alarms limits ( Respiratory Parameter ) Anaesthesia unit in Stand-by mode. Just for our examples we refer to the Operative Modes available with ADULT Patient Data ( VC/VAC ). Select the icon for see the Alarms parameters. ALARM Limits page is displayed.
- Page 75 Alarms limits visualization It’s possible to display the ALARM Limits page ( Respiratory Parameter ) even selecting any respiratory parameter monitored. ALARM Limits page ( GAS Sensor ). Select the alogenated gas area. The Alarm Limits screen ( gas sensor ) appears. •...
-
Page 76: Measures, Charts And Loops
Measures, charts and loops The anaesthesia unit is equipped with a GRAPHICs feature called that allows the user to combine on display the Loops, the Charts and the Measured patient respiratory parameters in different ways. Moreover, it allows to display the Trends and Events. - Page 77 1st combination 3 charts 2nd combination 2 charts 2 loops or 1 loop and 1 lung status icon 3rd combination 1 chart 3 loops or 2 loops and 1 lung status icon 1 measured respiratory parameter 3-38 User manual, DU33ND101...
- Page 78 4th combination 2 loops or 1 loop and 1 lung status icon 4 measured respiratory parameters or different combinations 5th combination Trends 6th combination Events 3-39 Morpheus_ND...
-
Page 79: How To Edit A New Charts
3.6.2 How to edit a new Charts To change the combination of Charts detections, the anaesthesia unit must be started-up. The selection of the box of one of the Charts displayed, enable the visualization of a drop-down menu with the list of the options available. Keep selected FLOW the area of the... - Page 80 Tidal Volume chart is selected. Tidal Volume chart is displayed and it replaces the Flow graphic. Gas charts is selected. The drop-down menu with the list of the available Gas type appears. Select the Gas to be monitored through a graphic. Available Gas charts , CO O, Ag1, Ag2 .
-
Page 81: How To Edit A New Loop
3.6.3 How to edit a new Loop To change the combination of Loops detections, the anaesthesia unit must be started-up. The selection of the box of one of the Loops displayed, enable the visualization of a drop-down menu with the list of the options available. Keep selected the area of the loop PAW / Volume... -
Page 82: How To Edit A New Measures
Available Loops: Tidal Volume / Flow , PAW / Tidal Volume , PAW / Flow , Lung status icon The PAW / Flow loop is selected. • P / F loop is displayed and it replaces the previous loop. The procedure described is applicable to all the loops areas and in the different visualizations available. - Page 83 Select a Measure . The drop-down menu with the list of the available measured parameters appears. Available Measures: PAW , PEEP , Vte , Vm , O , I:E , RR , FiCO EtCO , ……… The Vte is selected. measures is displayed and it replaces the previous measured parameter.
-
Page 84: Meaning Of Lung Status Icon
3.6.5 Meaning of lung status icon The lung status icon simulates the patient's lungs, graphically displaying the respiratory cycle by alternatively switching the lungs color. In fact in case of patient's spontaneous activity ( Trigger ), the lung status icon turns to yellow and if the “... -
Page 85: Trends
3.6.6 TRENDs Selecting TRENDs function, to visualize the most significant respiratory parameters on medium - long term. GRAPHICs Select the icon. TRENDs Select the icon Monitored respiratory parameters: o Rate o PAW o PEEP o Vm o Vte The storage capacity for each parameter is 72 hours with sampling at every 4 minutes. - Page 86 On the left side of the TRENDs graphic the following data are reported: the monitored respiratory parameter, the date and the hour (it varies depending on the position of the vertical dashed bar) in which the parameter value has been measured. CAUTION To erase the values of the TRENDs stored, select MENU / DEFAULT / Erase Trends data...
- Page 87 • Erase TRENDs data Select: • select Cancel the choice: • select Confirm the choice: All the former values TRENDs have been deleted; the system is ready for a new data storage. 3-48 User manual, DU33ND101...
-
Page 88: Events
3.6.7 EVENTs Selecting EVENTs function, to visualize the most significant information on the anaesthesia unit operation over time. • GRAPHICs Select the icon. • EVENTs Select the icon The monitored EVENT refer mainly to the alarms (active alarms) and the various operating conditions of the anaesthesia unit (POWER ON, POWER OFF, STAND-BY,... - Page 89 The table of the Events provides the following indications: • Alarm icon • Event date and time indication • Event description: green (anaesthesia unit operating conditions), red (information on event's alarms) CAUTION To erase the EVENTs data stores, select MENU / DEFAULT / Erase Events data. Erase EVENTs data •...
- Page 90 • Erase EVENTs data Select: • select Cancel the choice: • select Confirm the choice: All the former EVENTs data have been erased; the system is ready for a new data storage. 3-51 Morpheus_ND...
-
Page 91: Flowmeter
Flowmeter A great innovation is the flowmeter integrated on the front of the anaesthesia unit or better to say, included in the user’s interface. In this condition, the User will have a unique touch screen and the possibility to modify from a graphical point of view the fresh gases values delivered, the possibility to set and display from a graphical point of view the flows... - Page 92 Gas flow adjustment CAUTION The procedure described is applicable to all the gases foreseen (Air, Oxygen, Nitrous Oxide and Xenon). In case we want to increase the AIR flow in the fresh gases circuit: • Verify the gases set on the e AIR flowmeter ( •...
- Page 93 The AIR flow in the FRESH GAS circuits has been increased from l/min to 8 l/min Gas type selection In case we want to modify the gas used in the fresh gases circuit: • Select The system requires a confirmation for the modification and in this case, it requires the User to confirm he wants to use the Xenon:...
- Page 94 CAUTION The procedure to go back to the use of (so from Xe or N2O to ) is the same; the system requires to confirm the modification. It’s anyway necessary to point out that the User can decide to choose both the Nitrous Oxide and the Xenon instead of •...
-
Page 95: Menu, Operative Functions And General Informations
MENU, Operative functions and general informations In the lower side of user interface module there are a series of controls and functions that are fundamental for use of anaesthesia unit. Some of these functions (icons) have already been described in the previous paragraphs. - Page 96 drop-down MENU allows to enter the following options: • Anaesthesia unit's SETUP / PATIENT DATA ( see on cfr 3.2.4 and 3.2.5 ). Setting of the gas IRMA/ISA sensor ( see on cfr 4.x ). • Supplementary Tests ( see on cfr 4.x ). •...
- Page 97 INSP HOLD Select the INSP HOLD mode: the system will extend the inspiration time to seconds . The function activation is displayed by the monitor and signalled by the yellow LED inside the box, that turns on. EXP HOLD to 20 Select the EXP HOLD mode: the system will extend the expiration time seconds .
- Page 98 BY-PASS O2 Control Selecting the icon, pure oxygen is introduced in the anaesthesia circuit with a flow of approx 35 l/min MANUAL MANUAL fucntion enabling • Select the icon to activate the manual ventilation to the patient: by selecting the MAN mode the system provides the patient with a breath.
-
Page 99: List Of Default Parameters
General information • Battery level (if the symbol is steadily lit and green, the battery is full). • Presence of mains power supply, (the “green plug” symbol means that the device is powered from mains). For more details about this icon, see on chapter 6 ( Alarms ) List of default parameters Parameters Adult... -
Page 100: Preparation To Use
PREPARATION TO USE • In the first part of this chapter it is illustrated how to install the Morpheus_ND anaesthesia unit. • In the second part it is illustrated how to perform the preliminary tests before using the Morpheus_ND anaesthesia unit ( hereinafter called anaesthesia unit ). General warnings CAUTION - UNPACK THE EQUIPMENT •... - Page 101 • The assembly and connection of all the accessories must be carried out by highly qualified technical personnel, trained and formally authorised by SIARE. • This type of anaesthesia unit is not suitable for and therefore cannot be used in a hyperbaric chamber.
-
Page 102: Before The Use
On the anaesthesia unit it is possible to use a multipurpose rechargeable absorber canister or a disposable pre-loaded absorber canister. It is recommended to use only original SIARE spare parts or spare parts checked and approved by SIARE. The absorber canister is positioned in the upper side of valves group. - Page 103 • Press the specific lock “PUSH” lever (unlock). • Press down and release the specific lock lever (unlock). • Ensure the correct assembly When the CO absorber canister is inserted, the system is automatically configured in rebreathing modality. When the canister is removed, the system is automatically configured in non rebreathing modality (real open circuit).
-
Page 104: Battery Charger
4.2.3 Battery charger The anaesthesia unit is equipped with an internal battery that guarantees (if perfectly efficient) at least 120 minutes operation (90 minutes, according to ventilatory parameters), in case of power failure. The switching to battery operation is made automatically: on the unit screen appears the relevant message “... -
Page 105: Preparation To Use
Preparation to use 4.3.1 Medical gas connection • With the unit operating by TURBINE, it is anyhow necessary the presence of an oxygen supply, useful for the operating of the internal pneumatic system. • The equipment can also work with oxygen supply only, but in this case the FiO will be adjustable at 99% only. -
Page 106: Connection Of Medical Gas Supply To Cylinders ( Optional )
WARNING !! Risk of power failure • If all the gas supply hoses are not correctly connected, the anaesthesia unit will not be available in case of gas supply failure. • Ensure that all supply hoses are connected according with the indication engraved on the gas inlet bloc and the relative illustrations. -
Page 107: Medical Gas Connection Checks
4.3.3 Medical gas connection checks WARNING !! Risk of gas power failure This check is strictly necessary and has to be performed whenever a hose from hospital gas distribution system (or cylinder supply) is mounted on the unit (first connection or first replacement of hoses or connectors for maintenance reasons). CAUTION Only highly qualified personnel can fit the anaesthesia unit with connectors compatible with the hospital medical gas distribution system and perform all... -
Page 108: Connection Of Anaesthetic Gases Scavenging System
4.3.4 Connection of anaesthetic gases scavenging system For more details about scavenging system manufactured by SIARE, please refer to relative User and Service manual. • SCAVENGINGS : gas scavenging connector. • O2 : gas supply connection for active gas scavenger. -
Page 109: Patient Circuit Connections
4.3.6 Patient circuit connections Insert the patient circuit supporting arm in the specific bracket, fixed to the full-height steel rod used for accessories mounting. Tidal Volume Set of hoses CAUTION < 50 mL Neonatal Use a suitable patient circuit for the from 50 to 200 mL Paediatrics patient ventilation. -
Page 110: Gas Analyzer Connection
4.3.7 Gas analyzer connection For further information on operating logic and on gas sensor malfunctioning, make reference to the gas analyzer manual supplied with the device. • Extract the gas analyzer and the cable + interface module, from package. • Switch OFF the anaethesia unit power supply - OFF •... -
Page 111: Data Connection (Trend And Events Downloading )
CAUTION GAS ANALYZER - Zeroing • Mainstream IRMA sensor after around one minute from the device is turned on, it is necessary to perform the manual procedure of Zero Calibration. • With sidestream ISA sensor the zeroing of gas sensor measurement is activated in automatic mode;... -
Page 112: Man Ventilation
MAN ventilation 4.4.1 Fresh gases exit - TO and FRO patient circuit WARNING !! Risk for Patient injury Do not connect the patient directly to the fresh gases exit without an adequate ventilation circuit with pressure relief system. If the patient is connected to the fresh gases exit without an adequate ventilation circuit with pressure relief system, there will be an high pressure dangerous for the patient. -
Page 113: Connection Of Circuit For Manual Ventilation
4.4.2 Connection of circuit for manual ventilation • Apply to the manual ventilation patient circuit to the anaesthesia unit ( BAG connector ) as shown in the picture. Select MAN operative mode. To activate the manual ventilation patient circuit act on the fresh gases exit selection control: enabling of valves group BAG connector ( APL ). -
Page 114: Connection To Power Supply
100 - 240Vac / 50 - 60Hz / 120 VA. WARNING !! Patient / User injury hazard SIARE specialized personnel or qualified technical personnel formerly authorized by SIARE, shall always verify the following during the installation. •... -
Page 115: Low Voltage Power Supply
WARNING !! Risk of personal-physical injuries In order to avoid any electric shock hazard, make sure that the supply cable is connected to an electrical socket with the grounding cable connected. CAUTION • The Morpheus_ND complies with the requirements for electro-medical devices detailed on chapter 1.3 ( Norms and standards regulations ). -
Page 116: Battery Power Supply
4.5.3 Battery power supply • The operation time of the anaesthesia unit guaranteed by the battery can vary in the following cases: old battery or not fully efficient, unusual ventilatory parameters, presence of electronic flowmeter box. • Replace the battery each two years ( please refer to chapter 7 Maintenance ). WARNING !! Risk of personal-physical injuries •... -
Page 117: Protection Fuses
WARNING !! Risk for Patient / User injury The operations described here below must be carried out by highly qualified technical personnel, trained and formally authorised by SIARE only. In case of break of protection fuse, please proceed as follows. -
Page 118: Connection To Other Equipments
Connection to other equipments Connection to Siare equipment If the equipment to be connected is a SIARE unit, all the instructions necessary for the connection to anaesthesia unit can be found in the documentation supplied with the unit. WARNING !! Risk for Patient / User injury Do not connect external devices NOT manufactured or NOT authorized by SIARE to the anaesthesia unit (e.g., scavenging systems, patient simulators), and not... -
Page 119: Use - Preliminary Tests
• it is used a patient simulator fixed to the terminal of supplied patient circuit. SIARE code LS.AB.001 The patient simulator suggested for tests and checks is which is equipped with variable compliance and resistance. - Page 120 Do not use the anaesthesia unit if you detect any suspect oxygen leaks from the anaesthesia unit or any other unit next to it. Close all oxygen supply sources and contact the nearest Siare Support Centre or any other support centres authorised by Siare.
-
Page 121: Power-On / Self Test Phase
Power-ON / Self Test phase • Set the main switch (placed on the back side of the anaesthesia unit) to “ “. • Make sure that the green led (that indicates the presence of mains power supply) is ON on the unit keyboard (commands area) •... - Page 122 Self Test phase in progress. “ If the acoustic alarm is audible, please push the RESET key ” • Acoustic Alarm test. Acoustic Alarm test If you do not hear any acoustic signal and/or you did not press the Alarm Reset key, the red message “...
- Page 123 Cancel Supplementary Tests Press : the system will display the page. Supplementary Tests Through this page it is possible to perform the Supplementary Test ( for further details see chapter 4.8 ). • Leak test • Sensor calibration Before connecting the anaesthesia, unit and ventilate a patient it is always necessary to perform a series of preliminary checks to verify the correct operation.
- Page 124 Stand-by mode In this phase press indifferently one of the two keys ( Cancel or OK ) to access Stand-by visualization. In case of variations of PATIENT DATA values, press OK to confirm the updating. Stand-by mode After carrying out the Self Test or before turning the anaesthesia unit OFF, it automatically switches to this operative mode.
-
Page 125: Self Test Phase : Fail
Turn OFF the Anasthesia Unit and repeat the Self Test. • If the problem persists, contact the nearest Siare Technical Centre or any other Technical Centre authorised by Siare. For further information on ventilation module, and in particular on how to set the language used on graphic interface (see chapter 4.7.2). -
Page 126: Self Test : List Of Self-Diagnostic Tests
For a more correct and detailed analysis of the issues arising during Self Test phase, please consult the Service Manual. If the “ Self Test “ phase is not overcome consult the chapters 8 ( Alarms and Troubleshooting ) or contact the nearest Siare Technical Centre or a Technical Centre authorized by Siare. 4-27... -
Page 127: Preliminary Checks
Preliminary checks 4.9.1 Introductions The preliminary checks are divided in 4 sections SUPPLEMENTARY TEST • O Sensor Calibration • Leak Test FLOWMETER VENTILATION MODULE • Physiological respiratory parameters • Parameters monitoring • Anaesthesia unit alarms OPTIONAL WARNING !! Risk of unit failure and/or injuries for the patient Running or cancelling the preliminary checks might result in a malfunction during ventilatory operation: pay utmost attention. -
Page 128: Supplementary Test
4.9.2 Supplementary Test Before connecting anaesthesia unit to the patient it is always necessary to perform a Preliminary Test to verify the correct operation of Morpheus_ND. • MENU Select • Supplementary Tests Select Supplementary Tests screen appears. 4.9.3 Leak Test WARNING !! Risk of unit failure and/or injuries for the patient Leak Test verifies that there are no leaks higher than 100 ml in the... - Page 129 CAUTION Leak Test Before performing the , ensure that: • the gas fresh regulators on ventilation module are closed ( 0.00 ) • the CO absorber canister is not mounted on valves group • the supplied manual ventilation kit is not fixed to the valves group connector •...
-
Page 130: Leak Test
Leak Test procedure is in progress. Leak Test procedure has been successfully completed: the measured value is 9 ml/min. Leak Test If the procedure of been correctly performed the Test Completed message “ “ is displayed. In case the test has not passed, one of the following messages is displayed. -
Page 131: Leak Test Not Overcome
(check the breathing system). Repeat the Leak test. Leak Test ERROR Please see chapter 6 : Alarms and Troubleshooting. If the problem persists, contact the Siare Technical Centre or a Technical Centre authorized by Siare. 4-32 User manual, DU33ND101... -
Page 132: O2 Sensor Calibration
4.9.5 O Sensor calibration WARNING !! Risk of unit failure and/or injuries for the patient sensor calibration should be carried out to check the proper operation of the oxygen sensor. sensor calibration monthly. Perform the CAUTION O2 sensor calibration Before performing the , ensure that: •... - Page 133 The software reads the electrical value (mV) generated by the oxygen sensor when immersed in a pure oxygen flow provided during the calibration by the anaesthesia unit in order to check if the O sensor works properly. sensor calibration is in progress.
-
Page 134: O2 Sensor Calibration Not Overcome
4.9.6 O Sensor calibration not overcome WARNING !! Risk of DM failure The oxygen sensor calibration is not overcome when the detected voltage value is not included between 43 mV and 67 mV. oxygen sensor calibration procedure has not been successfully completed. -
Page 135: Exit From Supplementary Tests
4.9.7 Exit from SUPPLEMENTARY TESTS • Select Stand-by to go to Stand-by mode. The system leaves the Supplementary Tests and displays the Stand-by page. CAUTION - Supplementary Tests In previous paragraphs the Tests to be performed before start up the Morpheus_ND anaesthesia unit have been illustrated. -
Page 136: Flowmeter Module
4.10 Flowmeter module For more informations on use, controls meaning and parameters of flowmeter, consult the chapter 3.7: Flowmeter. Manometers Verify that the pressures of medical gases displayed in the manometers are from 280 kPa to 600 kPa (2,8 - 6 bar). MIX-LIFE: device used to avoid the administration of hypoxic mixtures •... - Page 137 MIX-LIFE: device used to avoid the administration of hypoxic mixtures The modification bar is displayed • Use the cursor or encoder knob to change the FiO value from 100% to 25% • Select Confirm • FiO : 25 % • Select Fresh Gas 0.2 l/min icon •...
- Page 138 CUT-OFF: alarm activated in case of leak of O pressure or low O pressure • Select Fresh Gas icon • The modification bar is displayed • Use the cursor or encoder knob to change the value to approximately 2 l / min. •...
- Page 139 • The relative visual and acoustic alarms are activated. • At the end of the test, restore the supply from distribution system. Against the simultaneous delivery of Air and N To avoid simultaneous delivery of Air and N2O, a single icon is provided in the area of the flow meter Air Supply Check •...
- Page 140 Against the simultaneous delivery of Air and N O Supply Check • KIT for the manual ventilation connected. • Select MAN operative mode. • Press APL soft key (green led light on). • Check of the pneumatic circuit: the manual KIT bag inflates; the pressure increases in the patient simulator.
- Page 141 • the patient circuit is connected to valves group; INSP. and EXP. connectors • the patient circuit is connected the patient simulator ( SIARE type) • the circuit for manual ventilation is connected to the “ BAG “ connector 4-42...
- Page 142 VC/VAC ventilation • Select Fresh Gas icon The modification bar is displayed • Set the value at approx 2 l/min. Stand-by Anaesthesia unit in operative mode. • Select / Press AUT : the anaesthesia unit begins its ventilation cycle. • The anaesthesia unit starts the inspiratory (expiratory) phase by determining a variation of the...
- Page 143 concentration • Select FiO icon • The modification bar is displayed • Set the value to 50% (the values of the flows on the flow meter symbols vary). • Check that the value of O2 (see parameter monitoring area), is adjusted to the set value of FiO2 of the flowmeter: approximately 50%.
-
Page 144: Ventilation Module
4.11 Ventilation module Preliminary checks to be carried out on the ventilation module. • Physiological respiratory parameters ( PRP ) • Parameters monitoring • Anaesthesia unit alarms For information on use, controls meaning and breathing parameters of ventilation module, consult chapter 3 : User Interface Module. Physiological respiratory parameters ( PRP ) Set standard physiological respiratory parameters (PRP). - Page 145 Parameters monitoring Based on the PRP set by the User and on the patient's [patient simulator] characteristics, the User Interface Module is able to monitor and measure a series of values necessary for the patient's clinical evaluation. Before checking the value of the set parameters, leave the User Interface Module on for at least 15 minutes.
- Page 146 • Check the correspondence between the monitored parameters and the displayed curves. • Select the key to display all the parameters. CAUTION - Unit operation check • Make sure that the airways pressure increases during the inspiratory phase. • Make sure that the airways limit pressure intervenes (pressometric operating mode).
- Page 147 Alarm limits check Select the icon to access the anaesthesia unit's ALARMS. The Alarm Limits screen appears. Check the Alarms Limits and if necessary change the values set, based on the test you want to carry out. For additional information on Alarms Limits and on relevant settings, see chapter 6 (Alarms).
- Page 148 Set the high pressure alarm limit to a value higher than the PAW ventilation pressure by 5 cmH High Block the patient simulator (using your hands) during ventilation. Pressure The system activates the airways HIGH PRESSURE alarm: silence the alarm. Unlock the patient simulator.
- Page 149 Set the high expired Vm alarm limit to 8 l. During ventilation, set Vti to 800 ml / 15 bpm. High The system activates the high expired Vm alarm: silence the alarm. Restore the default alarm value. Set the low expired Vm alarm limit to 5 l. During ventilation, set Vti to 175 ml / 20 bpm.
- Page 150 During ventilation, set the main power supply switch to OFF ( 0 ). Power supply fault The system activates the main power failure alarm: silence the alarm. Restore the main switch and set it to ON ( I ). Close the medical gas supply during anaesthesia unit operation. Low O gas supply The system activates the gas supply failure alarm: silence the alarm.
-
Page 151: Conclusions
Morpheus_ND Anaesthesia Unit. Preliminary checks phase failed. Please see Alarms chapter and/or Troubleshooting chapter. Please contact the nearest Siare Support Centre or any other support centres authorised by Siare. WARNING !! Risk for Patient injury. -
Page 152: Morpheus_Nd Use
MORPHEUS_ND USE This chapter shows you how to use the Morpheus_ND anaesthesia unit. Thoroughly read this chapter and the entire manual to make sure respiratory parameters and alarm limits are set correctly and choose the most suitable ventilation mode. The User must choose the Operative modes and the alarm limits that best match patient's physiological state and pathologies. -
Page 153: Flowmeter
Flowmeter 5.1.1 Dosing and administration of fresh gas The term “ fresh gas ” means the gas mixture that is dosed in the anaesthesia module and in the anaesthetic vaporizer. The fresh gas is continuously delivered to the valves group to be administered to the patient. The excess of gas that may be present in the patient circuit is automatically eliminated through the scavenger connection. - Page 154 High flows open circuit ( NON REBREATHING ) To perform this type of ventilation it is necessary to take off the soda lime canister from valves group. • The breathing gas concentration is similar to the fresh gas ones. • There is a high consumption of fresh gas.
-
Page 155: Administration Of Fresh Gas In The "To And Fro" System
5.1.2 Administration of fresh gas in the "TO and FRO" system In order to deliver the fresh gas flow to the TO and FRO system it is necessary to perform the following operations: • Anaesthesia unit in Stand-by mode. • TO and FRO patient circuit connected to the AUX connector ( if the connector is positioned on the back side of the anaesthesia unit). -
Page 156: Flowmeter Pre-Setting
5.1.3 Flowmeter pre-setting After calculation of Minute Volume needed by the patient basing physiologic and pathologic conditions (obtained from the product of Tidal Volume x Respiratory Rate (Vti x RR)) ; determinate the total flow of fresh gas to be introduced in the patient circuit basing on chosen dosage. For more informations about Flowmeter use, see on chapter 3.7 . - Page 157 Select the type of desired breathing circuit on the keyboard, • • : enabling of : enabling of fresh gas outlet valves group. connector. The anaesthesia unit is ready to start the phase of patient ventilation according with the modalities described in the following paragraphs. CAUTION - Electric control The activation of this key, allows to enrich the mixture of gas delivered to the patient, conveying pure oxygen (flow...
-
Page 158: Anaesthesia Unit Switching On - Self Test Phase
Anaesthesia Unit switching ON - Self Test phase • Set the main switch (placed on the back side of the anaesthesia unit) to “ I “. • Make sure that on the unit keyboard (commands area) the green led (indicating the presence of mains power supply) is ON. - Page 159 • Acoustic Alarm test : “ If the acoustic alarm is audible, please press the RESET key ”. The Self Test phase has been successfully completed. • Press OK to start • Press Cancel for other tests Press Cancel : the system will display the Supplementary Tests page. Supplementary Tests Through of this page it is possible to perform the Supplementary Test ( for...
- Page 160 The software does not switch directly to Stand-by operative mode, but it previously displays a page which allows the adjustment of the anaesthesia unit setup. The PATIENT DATA displaying allows to set the patient data and characteristics. • PATIENT DATA ( see 5.3.1 ) •...
- Page 161 Stand-by mode • In this phase select indifferently Cancel or OK to access Stand-by displaying. • In case of variations on PATIENT DATA values press OK to confirm updatings. CAUTION : Stand-by After carrying out the Self Test or before turning the anaesthesia unit OFF, it automatically switches to this operative mode.
-
Page 162: Patient Data / Setup Parameters
PATIENT DATA / SETUP parameters Actually the anaesthesia unit software does not switch directly from Self Test phase to Stand-by operative mode, but it previously displays a page which allows the adjustment of the following types of information and machine setup. •... - Page 163 • The choice of the patient type, automatically sets the default function parameters of the unit (breathing parameters and alarms levels). • A designated keyboard appears on the display when the space to fill-in is selected. 5-12 User manual, DU33ND101...
- Page 164 Once completed the entering of PATIENT DATA, save or cancel what is indicated in the page. • Select PATIENT DATA setting will NOT be saved. • Select PATIENT DATA setting will be saved. • The system will display the Stand- by screen.
-
Page 165: Setup Parameters
5.3.2 SETUP parameters CAUTION During the normal operation of the unit, the User can modify the parameters SETUP selecting the function: SETTING MENU. The SETUP displaying allows to determine the operation settings of anaesthesia unit. Display • BRIGHTNESS • ENERGY SAVING •... - Page 166 Units • Weight (referred to the patient) • Height (referred to the patient) • (Unit of measurement) • Pressure (Unit of measurement) Default • Trends data Default • Events data Default • Patient data Default • Setting & Ventilation rends data Default Other •...
- Page 167 At the end, save or cancel what is set in SETUP pages. • Select : to quit SETUP page without saving. : it remains in SETUP page. • Select : the set values will be saved. : it remains in SETUP page. •...
-
Page 168: Setting Up The Ugi Language
Setting up the UGI language Two ways are available to set/modify the UGI (User Graphic Interface) language. • Mode 1 : at unit start-up at the end of Self Test phase. • Mode 2 : during normal operation of unit. 5.4.1 Mode 1 At the end of Self Test phase the system displays the page, PATIENT... - Page 169 A series of languages are available and identified by a flag icon ( in the picture: Italian ). • Select the flag which identifies the desired language to be set ( e.g. English ). • Confirm the choice. • Press : the setting will be saved.
- Page 170 5.4.2 Mode 2 Unit in Stand-by operative mode. • Select: SETTING MENU • Select: Language The SETUP / Language page is displayed. 5-19 Morpheus_ND...
- Page 171 A series of languages are available and identified by a flag icon ( in the picture: Italian ). • Select the flag which identifies the desired language to be set ( e.g. English ). • Confirm the choice • Press : the setting will be saved.
-
Page 172: Patient Data Setting
PATIENT DATA Setting Two ways are available to set/modify PATIENT DATA. • Mode 1 : at unit start-up at the end of Self Test phase ( see on chapter 5.3.1 ). • Mode 2 : during normal operation of unit. 5.5.1 Mode 2 Unit in Stand-by operative mode. - Page 173 • Select: PATIENT DATA The displaying of PATIENT DATA allows to set / modify the following data. • Patient type • Male / Female • Name / Surname • Physical date • Birthday • Note To set/modify the PATIENT DATA , see on chapter 5.3.1. 5-22 User manual, DU33ND101...
-
Page 174: Erasing Patient Data
5.5.2 Erasing the PATIENT DATA Unit in Stand-by operative mode. • Select: SETTING MENU • Select: Default • Select: Erase Patient data • Confirm the choice : select • Cancel the choice : select 5-23 Morpheus_ND... - Page 175 • Press : to RUN the selected DEFAULT. • Press : to cancel the command. • Select: SETTING MENU • Select: Display • Select: PATIENT DATA The PATIENT DATA page, shows an example of Default configuration . To set/modify the PATIENT DATA , see chapter 5.3.1. 5-24 User manual, DU33ND101...
-
Page 176: Setting Up The Alarms
Setting up the ALARMS Alarm Limits Two ways are available to set/modify values • Mode 1 : with unit in Stand-by operative mode. • Mode 2 : during normal operation of Unit ( see on chapter 6.2.1 ). 5.6.1 Mode 2 Unit in Stand-by operative mode. -
Page 177: Operative Modes
Operative modes In the following chapter you will find a description of available Operative Modes selectable on Morpheus Unit. WARNING !! Patient injury hazard The User must choose the Operative modes that match the patient's physiological features and pathologies best. 5.7.1 Operative Modes setting procedure CAUTION •... - Page 178 • All the operative modes foreseen are displayed. • Select a new operative mode. • APCV. Operative mode selected: CAUTION If the anaethesia unit is in Stand-by mode, the system does not require any confirmation or enabling for setting a new operative mode. •...
- Page 179 2. Anaesthesia Unit in normal operation • Operative mode: VC/VAC. • All the operative modes foreseen can be displayed. • Select a new operative mode. • APCV operative mode selected. • A second column with the PRP parameters referred to the APCV operative mode can be displayed.
- Page 180 • : The unit directly switches to the new selected operative mode APCV • : to exit • : The PRP parameters of the APCV operative mode modified, are stored by the system; the system is fitted for a future APCV ventilation mode.
-
Page 181: Operative Modes List
Operative modes list 5.8.1 APCV ( NIV APCV ) Assisted pressure controlled ventilation, synchronised with patient's breathing with leak compensation. • The system displays all PRP relative to the set operative mode. APCV is a pressure controlled ventilation, synchronised with the patient's breathing with leak compensation. - Page 182 During the inspiratory phase, the Unit generates a settable flow (Slope). When the airway pressure reaches the control value (Pinsp), this pressure level is kept constant by the Unit until the end of the inspiration that you can set using (RR). Use the settable parameters to define an inspiratory trigger (Tr.
-
Page 183: Apcv-Tv
5.8.2 APCV-TV (Volume Targeted ) Pressure controlled ventilation, synchronised with patient's breathing and with guaranteed current volume. • The system displays all PRP relative to the operative mode set. APCV-TV is a pressure controlled ventilation, synchronised with the patient's breathing (automatic Pinsp) with guaranteed current volume (Vte). - Page 184 The higher is the value, the bigger is the patient's effort to breath. 5-33 Morpheus_ND...
-
Page 185: Psv ( Niv Psv )
5.8.3 PSV ( NIV PSV ) Assisted pressure support ventilation with guaranteed safety respiratory rate, set by the User (Apnea Back Up) with leak compensation. • The system displays all PRP relative to the set operative mode. is an assisted type of ventilation with pre-set pressure support (PS) with guaranteed safety respiratory rate set by the User in case of patient apnea (RR bk) and with leak compensation. - Page 186 When the set support pressure is reached, the expiration takes the place of the inspiration (according to Tr. E - percentage of the inspiratory flow peak beyond which the expiration can begin). This technique saves the patient from the work of breathing, as he only has to reach the small quota necessary to enable the Unit trigger (Tr.
-
Page 187: Psv-Tv
5.8.4 PSV-TV (Volume Targeted) Pressure support ventilation with guaranteed current volume and guaranteed safety respiratory rate set by the User (Apnea Back Up). • The system displays all PRP related to the operative mode set. PSV-TV is an assisted pressure support ventilation with guaranteed current volume and guaranteed safety respiratory rate set by the User in case of patient apnea (RR bk). - Page 188 When the Vte pre-set value is reached, the expiration takes the place of the inspiration (according to Tr. E - percentage of the inspiratory flow peak beyond which the expiration can begin). This technique saves the patient from the work of breathing, as he only has to reach the small quota necessary to enable the Unit trigger (Tr.
-
Page 189: Vc-Vac
5.8.5 VC-VAC Volume targeted controlled ventilation synchronised with the patient if the inspiratory trigger is active. • The system displays all PRP related to the operative mode set. VC/VAC is a volume-targeted controlled ventilation (Vti), synchronised with the patient's breaths if the inspiratory trigger (Tr. - Page 190 If during the expiratory phase, the patient generates a spontaneous breath that enables the trigger, the Unit will synchronise its activity to the patient's spontaneous breath, recalculating the I:E cycle times starting from that event and displaying them on the unit screen. This way the unit provides a minimum number of breaths as indicated on the RATE display of the integrated screen.
-
Page 191: Vc-Vac Baby
5.8.6 VC-VAC BABY Volume targeted controlled ventilation synchronised with the patient if the inspiratory trigger for paediatric and neonatal patients is enabled. • The system displays all PRP related to the operative mode set. VC/VAC BABY is a volume-targeted controlled ventilation (Vte), synchronised with the patient's breaths if the inspiratory trigger (Tr. - Page 192 The volume (Vte) is pre-set and generated in a pre-set time (RR and I:E) and determines the characteristics and the pressure range necessary to reach the pre-set amount of gas mixture that must be provided. The patient's breathing attempt is detected by the system (Tr. I) and it automatically sends inside the airway a gas flow at a pre-set volume (Vte).
-
Page 193: V-Simv
5.8.7 V-SIMV Volume-targeted synchronised intermittent mandatory ventilation. • The system displays all PRP related to the operative mode set. V-SIMV is a synchronised intermittent mandatory ventilation, during which the unit generates a certain number of breaths per minute (RRsimv) at a pre-set volume (Vti). The Operative Mode V-SIMV is active only with patients: ADULT and PAEDIATRIC. - Page 194 The graphic shows how the SIMV operative mode works. The spontaneous activity between one synchronised breath and the other is 70% managed in pressometric mode (PS) while the remaining 30% represents the window for the activation of the forced synchronised breathing. 5-43 Morpheus_ND...
-
Page 195: P-Simv
5.8.8 P-SIMV Pressure-targeted synchronised intermittent mandatory ventilation. • The system displays all PRP related to the operative mode set. P-SIMV is a synchronised intermittent mandatory ventilation, during which the Unit generates a certain number of breaths per minute (RRsimv) at a pre-set inspiratory pressure (Pinsp) providing pressure support (PS) during the spontaneous phase. - Page 196 The graphic shows how the SIMV operative mode works. The spontaneous activity between one synchronised breath and the other is 70% managed in pressometric mode (PS) while the remaining 30% represents the window for the activation of the forced synchronised breathing. 5-45 Morpheus_ND...
-
Page 197: Man Operative Mode
5.8.9 MAN operative mode Tha Manual ventilation can be performed in two different modes. • Through the supplied manual circuit acting on bag connected to “BAG” connector placed on valves group. • Otherwise, with an auxiliary ventilation system, Mapleson C (To and Fro) type, connected to “AUX”... - Page 198 1. MAN operative mode : manual circuit • The manual ventilation can be effected by the bag connected to the “BAG” connector positioned on the breathing system through the supplied manual circuit ( see picture on the right ). • MAN.
- Page 199 2. MAN operative mode : Mapleson C ( To and Fro ) manual circuit • A manual ventilation can be performed also with an auxiliary ventilation system, Mapleson C type (To and Fro), connected to the “AUX” connector placed on the valves group ( see picture on the right ).
- Page 200 5.8.10 APNEA BACK-UP • Apnea BACK-UP is a safety function available in two operative modes : PSV and PSV-TV. • Apnea BACK-UP function enables if the patient, ventilated in one of the above mentioned modes (PSV and PSV-TV), stops breathing. •...
-
Page 201: Physiological Respiratory Parameters ( Prp )
Physiological Respiratory Parameters ( PRP ) In the chapter 3.3 the User will find a description of available Physiological Respiratory Parameters selectable on anaesthesia unit. • Chapter 3.3.1 Respiratory parameters display • Chapter 3.3.2 Respiratory parameter modification ( Respiratory Rate ) •... -
Page 202: Ventilation Phase
5.10 Ventilation phase • Based on the ventilation parameters set by the User and on the patient's characteristics, the anaesthesia unit is able to monitor and measure a series of values necessary for the patient's clinical evaluation. • On the top of the screen, there is a led indicator that displays the pressure inside the airways in real time. -
Page 203: Ventilation Interruption
5.10.1 Ventilation interruption • Select STBY, to return in Stand-by mode. • The system will ask you if you want to stop the ventilation (switch to Stand-by mode). : stop ventilation. cancel the command. Anaesthesia unit in Stand-by mode. • Press ON/OFF, to Turn-Off the anaesthesia unit. -
Page 204: Setup Menu
5.10.2 SETUP MENU During the patient ventilation, the User can intervene using the graphical user interface, by selecting the “Operative functions” at the bottom of the screen. • Select the icon to access the anaesthesia unit's SETTING MENU. • To go back to the Stand-by display, select Cancel. The SETTING MENU functions are shown in chapter 3.7. -
Page 205: Alarm Limits
5.10.3 Alarm limits • Select the icon to access the anaesthesia unit's ALARM LIMITS. • To go back to the Stand-by display, select Cancel or OK (follow the instructions displayed). • For ALARM LIMITS, please see chapter 6 (Alarms). 5-53 Morpheus_ND... -
Page 206: Graphics Visualization
5.10.4 GRAPHICs visualization The anaesthesia unit is equipped with a feature called GRAPHICs that allows the user to combine on display the Loops, the Charts and the Measured patient respiratory parameters in different ways. Moreover, it allows to display the Trends and Events. The User selecting the icon (GRAPHICs) can choose “which “and “how”... -
Page 207: Functions List
5.11 Functions list Operative mode See chapter 3.2.2 and 5.8 Operative commands See chapter 3.11 Patient data See chapter 3.2.4 Alarms faults See chapter 6 Password See chapter 6.1.1 Physiological respiratory See chapter 3.3.1 parameters Monitoring of respiratory See chapter 3.3.4 and 3.3.5 parameter Calibration programs See chapter 5.12... - Page 208 See chapter 3.7 SETUP parameters • Brightness • Energy saving Display • Sound volume • Touch audio • Date Date & Time • Time • Italian, English, German, Turkey, Language Polish, French, Russian, Spanish • Weight (referred to the patient) •...
- Page 209 Alarms Limits See chapter 6 GRAPHICs visualization See chapter 3.5 INSP Hold See chapter 3.7 EXP Hold See chapter 3.7 MAN function See chapter 3.7 Time / Data See chapter 3.2.5 and 3.7 Battery / Power supply See chapter 6 5-57 Morpheus_ND...
-
Page 210: Calibration Programs
WARNING !! Risk for Patient / User injury The informations herein are exclusively intended to be used by SIARE specialised staff or qualified technical staff, formally authorised by SIARE for the use of the Morpheus anaesthesia unit. The procedures described are critical operations and must be carried out only by authorised staff as they might affect the equipment's safety and proper operation. -
Page 211: Calibration Programs Displaying
5.12.1 Calibration Programs displaying • Set the main switch (placed on the side back of anaesthesia unit) in position “ I ” (ON). • Make sure that on the keyboard (user commands area) the green led (indicating the presence of mains power supply) is ON. -
Page 212: Turbine Characterization
• Select Turbine Characterization In order to start the Turbine Characterization is necessary the intervention of qualified SIARE personnel or qualified technical personnel authorized by SIARE. For further information on the procedure please refer to the SERVICE manual. • The page to perform Turbine Characterization is displayed. -
Page 213: Respiratory Flow Sensors Calibration
Calibration. In order to start the Flow Sensors Calibration is necessary the intervention of qualified SIARE personnel or qualified technical personnel authorized by SIARE. For more information on the procedure please refer to the SERVICE manual. The page to perform Expiratory Flow Sensors Calibration is displayed. - Page 214 • Compensation percentage factor for fine-tuning the inspired flow sensor reading. • This is a default parameter, set during MND testing phase. WARNING !! Risk of DM failure and/or injuries for the patient This value is properly adjusted during the factory test after having assembled the unit and it can be modified only by authorized personnel.
- Page 215 • Successfully completed Expiratory Flow Sensors Calibration. • Test Calibration phase: Completed. • Not successfully completed Expiratory Flow Sensors Calibration. • Test Aborted. Calibration phase: • Test Failed. Calibration phase: • Select • The Flow Sensors verification program is performed and proceeding correctly.
- Page 216 For further information please refer to the SERVICE manual. WARNING !! Risk of DM failure and/or injuries for the patient If Expiratory Flow Sensors Calibration and/or relevant verification are not positive, consult the SERVICE manual or contact Siare or a Technical Centre authorized by Siare. 5-64...
-
Page 217: Vtec ( On - Off )
5.12.4 VTEc ( On - Off ) • VTEc - Off • Selecting the line the VTEc is enabled (On) and vice versa. • VTEc - On The activation of VTEc ( VTEc On ) function is necessary to optimize the displaying of calculation of the Vte parameter displayed during ventilation operation. -
Page 218: Screenshot Enable ( Off - On )
5.12.5 ScreenShot Enable ( Off - On ) • ScreenShoot Enable – Off • Selecting the VTEc, the line is enabled (On) and vice versa. • ScreenShoot Enable – On Allows the User’s to store on an USB key an instant image (image saved in bmp format) during the operation of the anaesthesia unit (for further details, please see on chapter 2). -
Page 219: Self Test
5.12.6 Self Test • Self Test Select to switch to the normal operation of the anaesthesia unit • Self Test The automatic phase begins. • Please close the patient circuit. Self Test During the Self Test phase, the software carries out the self-diagnostic tests and checks a series of devices necessary for safe operation of the anaesthesia unit /patient ( for further details, please see on 5.2 ). -
Page 220: Power Off
5.12.7 Power Off • Select Power Off to switch off the anaesthesia unit. 5-68 User manual, DU33ND101... -
Page 221: Default Parameters Set
5.13 Other functions 5.13.1 Default parameters set CAUTION By “Default Parameters” we refer to settings : MENU, SETUP, ALARMS limits, ecc…). Default parameters setup allows the User to restore the Morpheus anaesthesia unit factory settings. Unit in Stand-by operative mode. •... -
Page 222: Touch Screen Set
In case of Touch Screen system malfunctioning, it is possible to perform calibration of the same system (see on Service Manual). WARNING !! Risk of DM failure and/or injuries for the patient • Refer directly to SERVICE Manual. • Contact SIARE or a Centre authorized by SIARE. 5-70 User manual, DU33ND101... -
Page 223: Reset To Zero The " Partial Operating Hours
5.13.3 Reset to ZERO the “ Partial operating hours “ The zeroing of the partial operating hours can be performed both in the page of Turbine Characterization, and in the Respiratory Flow Sensors Calibration page. As an example, the Turbine Characterization displaying is used. •... - Page 224 • Select the white area (a key board appear). • Digit the following code: 1397. • Press OK (the partial operating hours are reset). Partial operating hours = 0h 0m 0s • Select to quit Turbine Characterization program. • Select to perform the Turbine Characterization program.
- Page 225 The system software permits the download of the data stored in the Morpheus_ND anaesthesia unit. Ask Siare for the dedicated program to transform the stored and downloaded data (see procedure below) into a file that can be read and interpreted by the User.
- Page 226 • The Trend and Events data are saved on the USB stick in TXT format. • Ask Siare for the dedicated program to transform the TXT file into a readable and interpretable file of the User. 5-74 User manual, DU33ND101...
-
Page 227: Alarms
ALARMS The first section of the paragraph illustrates the part of the system relevant to the alarms operation of the Morpheus_ND anaesthesia unit; also, the operating logic and issues for alarms action are taken into consideration. The second section of the chapter is an indicative but not exhaustive User’s guide useful also for the engineer to detect in a short delay the causes or the reasons of a malfunctioning or an alarm signal. - Page 228 Displaying and symbols used Alarms display area A1 - ALARM signalization area ( see on 6.2.1 ) A2 - ALARMS Limits configurable by User : respiratory parameters ( see on 6.2.2 ) A3 - ALARMS Limits configurable by User : gas sensor ( see on 6.2.3 ) A3 - General information signal area : battery charge level and main power presence ( see on 6.2.4 ) A4 - Soft key for acoustic alarm silencing : alarm reset ( see on 6.2.5 )
-
Page 229: A1 - List Of Active Alarms Messages
6.1.1 A1 - List of active alarms messages This area of the monitor provides the following indications. • A text string related to the type of active alarm. • An “ alarm bell symbol ” indicating the priority and the alarm status. •... - Page 230 MAINTENANCE 1000 hours ( * a symbol replace the alarm bell image; see following note ). WARNING !! ( * ) MAINTENANCE 1000 HOURS Once the anaesthesia unit reached 1000 hours operation this symbol appears. Contact Siare Technical Centre or a Technical Centre authorized by Siare for preventive maintenance. Gas Sensor alarms •...
- Page 231 Gas Sensor alarms • Gas Sensor: Error (……) • Gas Sensor: No Breaths • Gas Sensor: Replace O Sensor • Gas Sensor: O Calibration Required • Gas Sensor: Low FiO • Gas Sensor: Low EtO • Gas Sensor: Low EtCO •...
- Page 232 Lock icon Lock icon (open) green color : touch screen enabled. Lock icon (closed) red color : touch screen disabled. • Select the lock icon (open) green color. • The red icon is displayed (closed) • .The touch screen monitor is disabled.
-
Page 233: A2 - Alarms Limits : Respiratory Parameters
6.1.2 A2 - ALARMS Limits : respiratory parameters Touching this icon, a window showing the Alarm limits is displayed: the User can possibly set the Min and Max values of each single alarm. • Select: ALARMS icon Nota. The alarm limits can be modified also while the equipment works. -
Page 234: A3 - Alarms Limits : Gas Sensor
6.1.3 A3 - ALARMS limits : gas sensor Touching this icon, a window showing the available Alarm limits appears and the User can possibly set the Min and Max values of each single alarm • Select: gas sensor area The Alarm Limits screen appears. •... -
Page 235: A4 - General Information Area
6.1.4 A4 - General information area This area shows the battery charge level and the power supply status (present/absent). Green “BATTERY” symbol: battery completely charge: • with fix symbol the battery is complete charge; • with flashing symbol the battery is in charging phase. Green “PLUG”... -
Page 236: A5 - Acoustic Alarm Silencing
6.1.5 A5 - Acoustic alarm silencing During the normal operating phase of anaesthesia unit, it is possible to silence the active acoustic alarm. • By pressing the Alarm Reset soft key. • By selecting the bell evidencing the active state of the alarm. WARNING !! Risk for Patient / User injury The User should never stop checking the patient conditions during the alarm silencing. -
Page 237: Alarms Setting
Alarms setting 6.2.1 Setting of ALARMS limits values The User can modify and display the Alarm Limits values in two different ways; through the ALARMS selection icon or selecting a Respiratory Parameter icon. WARNING !! Risk for Patient injury Using in the same area more than one medical device having different alarm limits setting, the User could have a potential false misinterpretation. - Page 238 • Select the Alarm Limits to be modified ( e.g. PAW ). • The parameter bar is highlighted and the monitoring parameter box on display is activated ( e.g. PAW : 40 cmH O ). The values set by the scrolling cursor are displayed in the parameter monitoring box ( e.g.
- Page 239 • Select the Alarm Limits to be modified. • Increase (decrease) the value to be modified ( e.g. PAW : 50 O ). The selection of both the bar and the cursor of the alarm can be done using the encoder knob or the touch screen.
-
Page 240: Setting Of Alarms Volume
6.2.2 Setting of ALARMS volume The SOUND VOLUME parameter allows the adjustment of the volume of acoustic alarms signals at any priority level. Acoustic intensity value at 1 mt distance • Minimum level Acoustic Volume setting at 1 = 54dBA •... - Page 241 WARNING !! Risk for Patient injury Using in the same area more than one medical device having different alarm limits setting, the User could have a potential false misinterpretation. • Select the SOUND VOLUME scrolling cursor • Set the SOUND VOLUME •...
-
Page 242: Setting Of Default Parameters
6.2.3 Setting of DEFAULT parameters The DEFAULT page allows setting the standard factory parameters. • Select the icon to access the anaesthesia unit's SETTING MENU. • Select Default • To go back to Stand-by page, select Cancel The Default page allows to set: •... - Page 243 • Select Setting & Ventilation Default • Select RUN • The system requires to confirm the application of default parameters • Select YES: to quit Default page; the Default Parameters will be saved. NO: it remains in Default page. Possible User’s options. •...
-
Page 244: Alarms Default Parameters Values
6.2.4 Alarms DEFAULT parameters values Alarm Settings Adult Paediatric Neonatal PAW : Pressure (cmH 5 - 40 5 - 35 5 - 35 PEEP (cmH 0 - 15 Vte : Tidal Volume (ml) 100 - 1000 50 - 300 10 - 50 Vm : Minute Volume (L) 2 - 12 1 - 8... -
Page 245: Tables Of Alarm Characteristics
Tables of alarm characteristics 6.3.1 Alarms configurable by User Alarm type Priority Activation Suspendable Suspension Inhibition delay (sec.) delay (sec.) LOW PRESSURE HIGH OF AIRWAYS HIGH PRESSURE HIGH OF AIRWAYS patient HIGH RESPIRATORY breaths RATE HIGH patient HIGH RESPIRATORY breaths RATE HIGH LOW EXP. -
Page 246: System Alarms
6.3.2 System alarms Alarm type Priority Activation Suspendable Suspension Inhibition delay (sec.) delay (sec.) HIGH LOW O SUPPLY =21% LOW AIR SUPPLY LOW BATTERY 50% HIGH REM. LOW BATTERY 25% HIGH REM. LOW BATTERY 10 HIGH MIN. REM. BATTERY HIGH DISCONNECTED BATTERY HIGH... -
Page 247: Gas Sensor Alarms
6.3.3 Gas Sensor alarms Alarm type Priority Activation Suspendable Suspension Inhibition delay (sec.) delay (sec.) Sampling Line HIGH Clogged No Sampling Line HIGH Replace Adapter HIGH No Adapter HIGH Port Failure Sensor Error Unspecified HIGH Accuracy (……) Error (……) HIGH No Breaths HIGH Replace O... - Page 248 This page has been left blank intentionally to make front / back copying easier. 6-22 User manual, DU33TS101...
- Page 249 If the problem persists, carry out a complete check of the anaesthesia unit to identify any irregularities. • If the problem cannot be resolved, contact the Siare Service Centre or a Centre authorized by Siare. 6.4.1 Troubleshooting list Switch ON failure The anaesthesia unit does not switch on.
- Page 250 The initialization phase is not completed. Initialization phase - SELF TEST Verify and intervene in function on the error messages and indications evidenced during the “SELF TEST” phase. • Turbine : if this step is not passed means that the turbine is not running so check if the turbine cable is properly connected and if the turbine is properly powered.
- Page 251 Turn Off and On the anaesthesia unit and repeat “SELF TEST” phase. • If the problem persists, contact the Siare Service Centre or a Centre authorized by Siare. Soft keys and This condition occurs when the control keyboard or the Encoder are not working.
- Page 252 (or replace the cylinders) if the pressure is insufficient. • Contact the Siare Service Centre or a Centre authorised by Siare. Low Air gas This alarm is activated when the pressure is insufficient (< 2.7 bar) for the anaesthesia unit to operate correctly.
- Page 253 • Check the battery connection. • If the problem persists, contact the Siare Service Centre or a Centre authorised by Siare. Battery This alarm condition is present when the battery pack internal temperature pass the 75°C. overtemperature •...
- Page 254 Calibrate the oxygen cell: if the problem occurs again after a short time, replace the oxygen cell. • Contact the Siare Service Centre or a Centre authorised by Siare. This alarm is activated when the measured concentration of oxygen is below the set % low limit.
- Page 255 Check that the patient circuit is connected correctly to the anaesthesia unit and to the patient. • Check that the low-pressure level is higher than the PEEP level set. If not, increase it above the PEEP level. • If the problem persists, contact the Siare Service Centre or a Centre authorised by Siare. 6-25 Morpheus_ND...
- Page 256 Check that the sensitivity of the Trigger is appropriate to the patient's physiological conditions. • If the problem persists, contact the Siare Service Centre or a Centre authorised by Siare. This alarm is activated when the respiratory rate value is lower than the set value.
- Page 257 The anaesthesia unit automatically stop the ventilation to avoid dangers to the patient safety. • Check if the turbine air filter is clean or clogged. • If the problem persists, contact the Siare Service Centre or a Centre authorised by Siare. Turbine failure The turbine doesn’t work properly (failure). •...
- Page 258 Check the errors shown in the GAS SENSOR area. • If the problem persists, contact the Siare Service Centre or a Centre authorised by Siare. For further information on operating logic and on gas sensor malfunctioning, make reference to the GAS ANALYZER manual supplied with the device.
-
Page 259: Maintenance
All maintenance and/or repair operations require perfect knowledge of the equipment and therefore must be carried out only by highly qualified personnel, specifically trained and formally authorised by SIARE. Inappropriate intervention or unauthorised modifications can compromise safety and cause danger to the patient. -
Page 260: Cleaning, Disinfection And Sterilisation
• Siare is aware that working procedures can differ considerably from one health structure to another: it is therefore impossible to indicate specific procedures that are suitable for all requirements. -
Page 261: General Instructions
Rinse the parts well with clean hot water (tap water can be used) and leave to dry. Siare recommends that the components should be checked every time they are cleaned and any damaged parts should be replaced. ... -
Page 262: Disinfection By Immersion (Chemical)
• Do not disinfect, sterilize or re-use disposable products. • Disinfect and sterilize every time an infected patient is ventilated. • In normal conditions, disinfect and sterilize according to how often the anaesthesia unit is used and in any case at least once a month. That the components should be checked every time they are sterilized and any damaged parts should be replaced. -
Page 263: Cleaning, Disinfection And Sterilisation Table
Cleaning, disinfection and sterilisation table Component Procedure Notes Outer casing Use a moistened disposable cloth with neutral Make sure that no sprays or liquids detergent or a chemical substance or the like. penetrate inside the equipment and Use water to remove any remaining traces of the connectors. - Page 264 WARNING !! Risk of injury for the patient It is necessary to have at least one spare patient circuit in stock for routine use and /or accidental breaks. CAUTION • Do not clean or re-use disposable circuit tubes. Components that cannot be destroyed should be sterilized and disinfected according to local standards.
-
Page 265: Sterilization Of " Exp Flow Sensor
If reusable: clean, then sterilize in autoclave or Check the presence of fissures and Water trap filter chemically disinfect. replace in case of damages. Refer to the accompanying Other accessories Carefully follow the manufacturer’s instructions. documentation. Perform daily checking’s of cable condition;... -
Page 266: Disposable Bacterial Filter
The following are generic agents recommended for cold sterilization of EXP flow sensor. • Cidex Plus • Cidex OPA • Denatured Ethyl Alcohol • 70% Iso-Propyl Alcohol • 5.25% - 6.15% Sodium Hypochlorite solution • Sporox II (Hydrogen Peroxide) • Protex wipes (Octyl decyl dimethyl ammonium chloride, Dioctyl dim ethyl ammonium chloride, Didecyl dimethyl ammonium chloride, Alkyl dimethyl benzyl ammonium chloride) -
Page 267: Periodic Maintenance
When you require service, please indicate the serial number of the unit and the problem to SIARE or to your authorised technicians. • SIARE assumes responsibility for all provisions foreseen by the law, if the equipment is used and maintained as per the instructions in this manual and the technical manual. •... - Page 268 Frequency Component Procedure / Action Several times a day Patient circuit Check for any water collection, drain and clean the tubes Condensation trap when necessary. Every day / when filter necessary Disposable bacteria Replace filter According to local Oxygen sensor Calibrate according to the procedures described in this practice and manual.
- Page 269 Frequency Component Procedure / Action Every 6 months or Oxygen sensor Replace. 1000 working hours The working life of the cell depends on the working environment. If the temperature or the O % is high, the working life of the sensor will be lower. Gas filters and Turbine air filter Replace.
-
Page 270: Cleaning, Disinfection And Sterilization Before Use With Another Patient
All maintenance and/or repair operations require perfect knowledge of the anaesthesia unit and must therefore only be carried out by highly qualified personnel, specifically trained and formally authorised by SIARE. Inappropriate intervention or unauthorised modifications can compromise safety and cause danger to the patient. -
Page 271: Repairs And Spare Parts
See the technical sheet in the Appendix. 7.6.2 Repackaging and shipment If it is necessary to return the equipment to SIARE for any reason, we suggest using the original packaging to prevent damage to the equipment during shipment. -
Page 272: Disposal
7.6.3 Disposal Batteries, accumulators, O cells and electronic parts in general: do not put them in the fire, explosion risk do not open them, corrosion danger do not recharge batteries do not throw them away with normal waste. The batteries and the accumulators are special waste materials and they must be disposed of in appropriate containers in accordance with local regulations for the disposal of such waste materials. -
Page 273: Appendix
The Morpheus ND HYBRID is suitable for administration of Oxygen - Air - Nitrous Oxide / Xenon - Halothane - Enflurane - Isoflurane - Sevoflurane - Desflurane mixtures. - Page 274 STRUCTURE Lung ventilator Light aluminium alloy and plastic moulds Dimensions 55 x 51 x 42,5 (W x D x H) cm Weight 25 kg (without accessories) - Support for 2 vaporizers On horizontal guide: SIARETEX rapid connection device, Selectatec compatible for 2 vaporizers (1 vaporizer in use and one park positioned) •...
- Page 275 25% of oxygen with all mixtures set different from air / oxygen (MIX-LIFE device • PROTOLOCK system. The exclusive SIARE safety device that analyzes the coherence of the gases connected to the machine when the machine is switched on, warning the operator in case of incorrect connections, thus avoiding possible fatal accidents to the patient •...
- Page 276 Medical gas supply OXYGEN • Pressure included between 280 kPa and 600 kPa (2,8 – 6 bar) • Max. required flow 14 L/min. (with electric operation) • Max. required flow 68 L/min. (with HYBRID oxygen emergency operation) NITROUS OXIDE • Pressure included between 280 kPa and 600 kPa (2,8 –...
- Page 277 • Other Socket for recycle of exhaust monitor gas • Connection for anaesthetic gas scavenging (optional device: active type, or passive type) Patient connections Male conic connectors 22 mm / Female of 15 mm (according to EN ISO 5356- 1:2015 norm) BREATHING SYSTEM •...
- Page 278 • SELF TEST Primary test: at anaesthesia unit’s start-up, a control test of low pressure compressor operation, medical gas supply presence, INSP. and EXP. flow sensors operation, patient circuit leakage check, pressure sensor back-up battery state, oxygen cell state, correct medical gases connections (Protolock), integrity of audible alarm is automatically performed.
- Page 279 Flow trigger ( I ) Flow adjustable from OFF; 0.3 to 15 L/min • from 0.3 to 1 L/min (step of 0.1 L/min) • from 1 L/min to 2 L/min (step of 0.5 L/min) • from 2 L/min to 15 L/min (step of 1 L/min) Trigger E From 5 to 90 % of the inspiratory flow peak Exp.
- Page 280 • Displaying and settings Operative Mode setting • AUT, MAN e Stand-by mode Setting • Display of signals and alarm messages, screen lock • Setting and monitoring of physiological breathing parameters • MENU function for setting operation parameters • Graph function for display of curves, LOOPS, respiratory parameters, gas parameters •...
- Page 281 • Range of measured Respiratory rate (range: 0 ÷ 200 bpm) parameters • I:E ratio (range 1:99 ÷ 99:1) • % of FiO2 - EiCO2 (range: 0% ÷ 100%) • Tidal Volume: Vte, Vti (range: 0 ÷ 3000 ml) • Minute Volume (range: 0 ÷...
- Page 282 ALARMS • Alarm types By MENU: with limits set by the operator • By DEFAULT: the operator cannot set them up Alarm default setting Present (Neonatal, Paediatric, Adult) Alarm priority High Alarms with limits set up by the operator Airways pressure High –...
- Page 283 • Flowmeter alarms Lack or low O pressure with consequent cut-off of N O delivery • Lack or low N O pressure • Lack or low Xe pressure • Lack or low AIR pressure • Fresh gas occlusion • Wrong fresh gases connection (PROTOLOCK) Gas Analyzer Sampling line obstruction Sampling line absent...
- Page 284 Battery Checking on battery power Oxygen sensor Cell condition Protolock O2 Verification and Oxygen presence Protolock Air Verification and Air presence Acoustic alarm Verification by the user of acoustic signal emission, the confirmation of the test is made by silencing of that alarm Gas analysis ( optional ) Gas analysis Integrated software for analysis of CO2, O2, N2O, AG automatic identification,...
-
Page 285: Glossary
Glossary Ampere (current intensity measurement unit) Alarm message A message which appears together with an alarm indication; this consists of a basic message indicating the type of alarm. Alarm silencing or Key that stops the acoustic alarm signal for a software value preset by the last suspension key pressing of the key. - Page 286 EXP. PAUSE Expiratory pause, a manoeuvre started by the User which closes the inspiratory and expiratory valves during the expiratory phase of a breath. Parameter set by the User and monitored. The % setting of FiO determines the percentage of oxygen in the gas delivered to the patient. The monitored data of the % of FiO indicate the percentage of oxygen delivered to the patient, measured on the inspiratory line.
- Page 287 Metre (unit of length). Maintenance All the operations necessary to maintain the equipment in working order or to carry out cleaning, maintenance, repairs, modifications, revisions and performance checks. If the MANUAL key is pressed in PSV mode, the system delivers pressure controlled ventilation to the patient.
- Page 288 Second (unit of time). SIMV+PS Synchronized Intermitted Mandatory Volumetric ventilation with spontaneous ventilation by pressure support. SPONT In SPONT mode, the patient activates all ventilations delivered by ventilator without any controlled respiratory rate set. The patient makes spontaneous breaths by pressure support. STANDBY Ventilation system in pause status: no ventilation is enabled when the ventilator is in this status.
-
Page 289: Electromagnetic Compatibility Tables
Electromagnetic compatibility tables 8.3.1 Annex A: Table 1 Guidance and manufacturer’s declaration – electromagnetic emissions The Morpheus is intended for use in the electromagnetic environment specified below. The customer or the user of the Morpheus should assure that it is used in such an environment. Electromagnetic environment –... -
Page 290: Annex B: Table 2
8.3.2 ANNEX B: Table 2 Guidance and manufacturer’s declaration – electromagnetic immunity The Morpheus is intended for use in the electromagnetic environment specified below. The customer or the user of the Morpheus should assure that it is used in such an environment. Electromagnetic IMMUNITY test IEC 60601 test level... -
Page 291: Annex C: Table 3
8.3.3 ANNEX C: Table 3 Guidance and manufacturer’s declaration – electromagnetic immunity The Morpheus is intended for use in the electromagnetic environment specified below. The customer or the user of the Morpheus should assure that it is used in such an environment. Electromagnetic environment –... -
Page 292: Annex E: Table 5
8.3.4 ANNEX E: Table 5 Recommended separation distances between portable and mobile RF communications equipment and the Morpheus. The Morpheus is intended for use in an electromagnetic environment in which radiated RF disturbances are controlled. The customer or the user of the Morpheus can help prevent electromagnetic interference by maintaining a minimum distance between portable and mobile RF communications equipment (transmitters) and the Morpheus as recommended below, according to the maximum output power of the communications equipment. -
Page 293: Preliminary Tests
Preliminary tests In the following table: List of preliminary tests - Morpheus ANAESTHESIA UNIT 8-21 Morpheus_ND... -
Page 294: List Of Preliminary Tests - Morpheus Anaesthesia Unit
8.4.1 List of preliminary tests - Morpheus anaesthesia unit Make a copy of this checklist and fill-it in while following the preliminary test described in chapter 5. The unit may be used only if all the tests have been passed with positive answers. Hospital................ - Page 295 The leak test has been overcome? SCHEDULED MAINTENANCE To be performed by the User. Has the periodic maintenance (that should be performed by the User) performed? SCHEDULED MAINTENANCE To be performed by SIARE’s Service Department Has the scheduled maintenance been performed? Date......Signature..........8-23...
- Page 296 This page has been left blank intentionally to make front / back copying easier. 8-24 User manual, DU33ND101...
- Page 298 Anaesthesia Unit User's Manual User’s Manual, DU33ND101 Revision 1 - 13.05.2019 SIARE ENGINEERING INTERNATIONAL GROUP s.r.l. Via Giulio Pastore, 18 Località Crespellano, 40053 Valsamoggia (BO), ITALY Tel.: +39 051 969802 - Fax: +39 051 969366 E-mail: mail@siare.it Web: www.siare.it...
Need help?
Do you have a question about the Morpheus ND and is the answer not in the manual?
Questions and answers