Table of Contents
Advertisement
Quick Links
Advertisement
Table of Contents

Related Manuals for Freecom SUPERLOADER3 LTO2-HH


Summary of Contents for Freecom SUPERLOADER3 LTO2-HH
- Page 2 Quantum SuperLoader 3 User’s Guide, 81-81317-02 A01, September 2005. Quantum Corporation provides this publication “as is” without warranty of any kind, either express or implied, including but not limited to the implied warranties of merchantability or fitness for a particular purpose.
-
Page 3: Table Of Contents
Contents Preface Chapter 1 Introduction Overview......................1 SuperLoader 3 LTO-2 ................. 2 SuperLoader 3 LTO-3 ................. 2 SuperLoader 3 VS160 ................. 3 SuperLoader 3 SDLT600 ................3 Chapter 2 Installation and Configuration Installing the Autoloader.................. 5 Installation Overview................. 6 Installation Preparation ................7 SCSI Bus Requirements................ - Page 4 Contents UL Requirements....................10 Elevated Operating Ambient Temperature...........10 Reduced Air Flow ..................10 Mechanical Loading..................10 Overloading the Circuit ................10 Reliable Earthing (Grounding)..............10 Understanding Autoloader Features.............11 General Features..................11 Bar Code Reader ....................11 Product Overview ..................12 Unpacking the Autoloader ................14 Identifying Product Components ..............15 Accessories ....................15 Mounting the Rail Kit ..................16 Connecting the SCSI and Power Cables............16...
- Page 5 Contents Running an Inventory ..................38 Data Compression.................... 39 Chapter 4 On-board Remote Management On-board Remote Management Overview..........41 Opening On-board Remote Management..........42 Viewing Status Information ..............43 Default Username and Password............43 Time Display ..................... 43 Feedback on Pages..................44 Configuration Page..................
- Page 6 Contents Setting the Change Mode ................68 Sequential Mode Operations ..............69 Setting Security..................70 Setting Magazines ..................70 Setting Passwords ..................71 Getting Lost Passwords................72 Chapter 6 Diagnostics POST........................74 Perform a POST ..................75 Interpret the POST Results ..............75 Diagnostic Tests from the Front Panel ............75 Setting the Security ...................76 Stopping a Diagnostic Test ..............76 Front Panel Diagnostic Tests ..............77...
- Page 7 Contents Chapter 8 Troubleshooting Before Contacting Customer Support............107 Returning the Autoloader for Service............112 Preparing the Autoloader for Shipment..........112 Removing the Autoloader from a Rack..........113 Packing the Autoloader ................. 114 Checking for Errors..................114 Hard Error Log Display ................. 123 Error Code Field Description ..............
- Page 8 Contents Tape Drive Specifications................153 LTO-2 Drive Specifications ..............153 Media Capacity..................154 Media Specifications ................154 LTO-3 Drive Specifications ..............155 Media Capacity..................155 Media Specifications ................155 VS160 Drive Specifications ..............156 Media Capacity..................157 Media Specifications ................157 SDLT600 Drive Specifications ...............158 Media Capacity..................158 Media Specifications ................159 Appendix B Drive Error Logs Tape Drive Error Logs ...................161...
- Page 9 Contents Index SuperLoader 3 Autoloader User’s Guide...
- Page 10 Contents SuperLoader 3 Autoloader User’s Guide...
- Page 11 Figures Figure 1 Front Panel Controls ..............12 Figure 2 Back Panel Overview ..............13 Figure 3 Accessories .................. 15 Figure 4 Attaching SCSI and Power Cables ........... 17 Figure 5 Front Panel .................. 24 Figure 6 Left and Right Sides of a Magazine ......... 30 Figure 7 System Menu Tree..............
- Page 12 Figures Figure 18 Left Rail Assembly..............96 Figure 19 Right Rail Assembly ..............96 Figure 20 Front Mount Features..............97 Figure 21 Rear Mount Features ..............97 Figure 22 Front Cover Plate and 10-32 Nut Plates ........98 Figure 23 .375 Square Hole Rack Installation...........99 Figure 24 .280 Diameter Thru Hole Rack Installation......100 Figure 25...
- Page 13 Tables Table 1 Location Criteria ................9 Table 2 Autoloader Status............... 35 Table 3 Firmware Version Fields ............35 Table 4 Drive Status Fields ..............37 Table 5 Drive Version Fields ..............37 Table 6 Ethernet Information Fields............38 Table 7 POST Descriptions ..............
- Page 14 Tables Table 18 ASC/ASCQ Field Descriptions ..........165 Table 19 Bugcheck Log Field Descriptions ...........166 Table 20 Error Event Logs Field Descriptions........168 Table 21 Hard Read /Hard Write Error Field Descriptions....169 Table 22 Hard Read Error/Hard Write Error Field Descriptions ..171 Table 23 Loader Communication Error Field Description ....173 Table 24...
- Page 15 Preface Documents related to the Quantum SuperLoader 3 are shown below: Related Documentation Related Quantum Documentation Document No. Document Title Document Description 81-81313 This guide contains a Quantum SuperLoader 3 Quick sequence of steps Start Guide recommended for unpacking, installing, and setting up your autoloader.
- Page 16 Preface Document No. Document Title Document Description 81-81316 This guide contains a Quantum SuperLoader 3 Rail sequence of steps Installation Quick recommended for unpacking Start Guide and installing a rail kit. 81-81237 This guide provides How to Ship the Quantum information on the proper SuperLoader packing for returning the...
- Page 17 Preface Contact Information Quantum Corporate Headquarters To order documentation for the Quantum SuperLoader 3 or other products contact: Quantum Corporation 141 Innovation Irvine, CA 92617-3040 (949) 856-7800 (800) 284-5101 Technical Publications To comment on existing documentation, send e-mail to: doc-comments@quantum.com Visit the Quantum home page at: http://www.quantum.com Quantum Frequently Asked Questions (FAQs)
- Page 18 Preface Customer Support The Quantum Customer Support Department provides a 24-hour help desk that can be reached at: North/South America (949) 725-2100 or (800) 284-5101 Asia/Pacific Rim (International Code) +61 7 3839 0988 Europe/Middle East/Africa: (International Code) +44 (0) 1256 848748 Send faxes for the Customer Support Department to: North/South America (949) 725-2176...
-
Page 19: Chapter 1 Introduction
Chapter 1 Introduction Overview Data backup is essential to protect irreplaceable information. Backing up data to magnetic tape is an easy, cost-efficient method used by many small and medium businesses. However, most enterprises have so much data that a single backup tape is not enough; the information has to be spread across numerous tapes. -
Page 20: Superloader 3 Lto-2
Chapter 1 Introduction Overview The Quantum SuperLoader 3 contains a Quantum LTO-2 half-height tape drive, a Quantum LTO-3 tape drive, a Quantum VS160 tape drive, or a Quantum SDLT600 tape drive, and one or two magazines containing up to eight cartridges each. A single cartridge can be inserted directly via a password-protected mailslot. -
Page 21: Superloader 3 Vs160
Chapter 1 Introduction Overview The autoloader is compatible with the most popular operating systems and environments supporting a Ultra 160 SCSI-3 LVD interface but requires direct support from the operating system or a compatible backup application to take full advantage of its many features. SuperLoader 3 The autoloader is SCSI-3 compatible and operates as a single SCSI ID/ VS160... - Page 22 Chapter 1 Introduction Overview SuperLoader 3 Autoloader User’s Guide...
-
Page 23: Chapter 2 Installation And Configuration
Chapter 2 Installation and Configuration Installing the Autoloader • Installation Overview • Installation Preparation • SCSI Bus Requirements • Accessories • Choosing a Location on page 9 • UL Requirements on page 10 • Understanding Autoloader Features on page 11 •... -
Page 24: Installation Overview
Chapter 2 Installation and Configuration Installing the Autoloader • Connecting the SCSI and Power Cables on page 16 • Preparing the Host and Verifying the Connection on page 18 • Installing the Device Drivers on page 19 Installation Installing the autoloader consists of the following steps, which are Overview explained in more detail later in this section: 1 Prepare to install your new Quantum SuperLoader 3 autoloader (see... -
Page 25: Installation Preparation
Chapter 2 Installation and Configuration Installing the Autoloader Installation Before you install your new Quantum SuperLoader 3 autoloader, unpack Preparation it carefully and inspect it for any damage that might have occurred during shipping. The included in Quantum SuperLoader 3 Quick Start Guide the packaging describes all the necessary information to unpack and inspect your autoloader correctly. -
Page 26: Accessories
Chapter 2 Installation and Configuration Accessories General Information Your SCSI host adaptor card must also support the SCSI bus type used to connect the autoloader. If you use a LVD SCSI bus, use a host adapter card with a connection for a VHDCI cable. Note: If you use a single-ended (SE) SCSI bus, the tape drive’s performance is limited to the maximum data transfer speed of... -
Page 27: Choosing A Location
Chapter 2 Installation and Configuration Choosing a Location ® • Documentation CD containing all of the documentation in Adobe Portable Document Format (PDF) • Bar code labels Choosing a Location Choose a location that meets the following criteria (see table 1). -
Page 28: Ul Requirements
Chapter 2 Installation and Configuration UL Requirements Criteria Description Humidity 20–80% RH (non-condensing) Clearance Back: Minimum of 43.2 cm (17 in.) Front: Minimum of 68.6 cm (27 in.) Sides: Minimum of 5.08 cm (2 in.) UL Requirements Elevated When installed in a closed multi-unit rack assembly, the operating ambient temperature of the rack environment may be greater than the Operating Ambient room ambient. -
Page 29: Understanding Autoloader Features
Chapter 2 Installation and Configuration Understanding Autoloader Features Understanding Autoloader Features General Features The autoloader is compatible with most operating systems and environments that support the SCSI interface, but requires either direct support from the operating system or a compatible backup application to take full advantage of its many features. -
Page 30: Product Overview
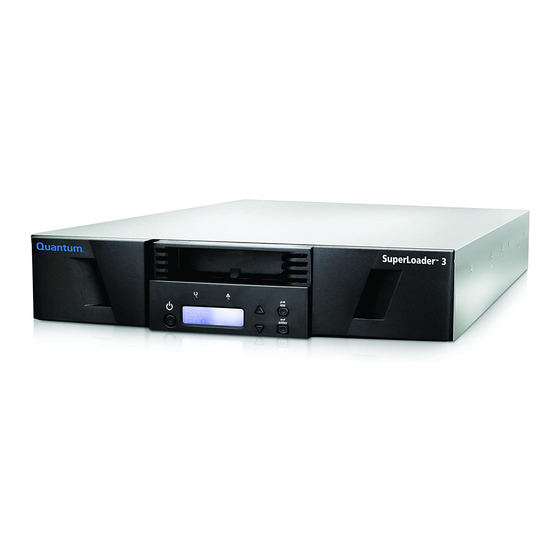
Chapter 2 Installation and Configuration Bar Code Reader Product Overview Figure 1 Front Panel Controls Power switch Mailslot Front panel LEDs Front panel LCD screen Function keys Left magazine (or blank) Right magazine (or blank) SuperLoader 3 Autoloader User’s Guide... -
Page 31: Figure 2 Back Panel Overview
Chapter 2 Installation and Configuration Bar Code Reader Figure 2 Back Panel Overview VHDCI SCSI connectors Fan vent Power connector Ethernet connector Power switch Note: If the cover must be taken off, there are 26 screws that need to be removed. SuperLoader 3 Autoloader User’s Guide... -
Page 32: Unpacking The Autoloader
Chapter 2 Installation and Configuration Unpacking the Autoloader Unpacking the Autoloader Before you begin, clear a desk or table so that you can unpack the autoloader. You also need to select an open 2U computer rack location near the server that will host the autoloader. If the room in which you are working differs from the Caution: temperature in which the autoloader was shipped or... -
Page 33: Identifying Product Components
Chapter 2 Installation and Configuration Identifying Product Components Identifying Product Components Accessories Figure 3 Accessories SCSI cable SCSI terminator Power cable Quick Start Guide CD (drivers and documentation) Magazine blank Bar code labels TORX T8 and T10 L-key drivers SuperLoader 3 Autoloader User’s Guide... -
Page 34: Mounting The Rail Kit
Chapter 2 Installation and Configuration Mounting the Rail Kit Mounting the Rail Kit For instruction on mounting the autoloader in a standard 19-inch rack, Installing and Removing the Optional V-Rail Kit on page 95. Connecting the SCSI and Power Cables To connect the SCSI and power cables to the autoloader, follow these steps: 1 Shut down and turn off the selected server. -
Page 35: Attaching Scsi And Power Cables
Chapter 2 Installation and Configuration Connecting the SCSI and Power Cables Attaching SCSI and Power Cables Figure 4 Attaching SCSI and Power Cables Ethernet cable SCSI cable SCSI terminator If the supplied SCSI cable does not fit the connector on your SCSI host adapter, you either have an incompatible SCSI host adapter or you need to purchase a cable adapter. -
Page 36: Preparing The Host And Verifying The Connection
Chapter 2 Installation and Configuration Preparing the Host and Verifying the Connection 5 Turn on the autoloader by setting the power switch on the front panel to the position. Turn on any other devices you turned off earlier. Check the LCD screen to make sure the autoloader is receiving power. -
Page 37: Installing The Device Drivers
Chapter 2 Installation and Configuration Installing the Device Drivers Only the devices physically at the beginning and end of the SCSI bus should be terminated. If the host is located at the beginning of the SCSI bus, the host should already have a terminator installed. •... -
Page 38: Autoloader Device Driver
Chapter 2 Installation and Configuration Installing the Device Drivers 3 Open the device manager (please refer to your specific OS documentation for instructions). For example, right-click the icon on the Windows desktop, click , and then click Computer Manage Device Manager •... - Page 39 Chapter 2 Installation and Configuration Installing the Device Drivers 3 Right-click the icon on the Windows desktop, click My Computer , and then click Manage Device Manager The autoloader should be listed under Medium Changers Unknown Medium Changer Device 4 Right-click the listing, click Unknown Medium Changer Device , and then click...
- Page 40 Chapter 2 Installation and Configuration Installing the Device Drivers SuperLoader 3 Autoloader User’s Guide...
-
Page 41: Chapter 3 Operating The Autoloader
Chapter 3 Operating the Autoloader • Operator's Panel Functionality • Using Cartridges on page 26 • Using Magazines and Magazine Blanks on page 30 • Viewing Status Information on page 34 • Running an Inventory on page 38 • Data Compression on page 39 SuperLoader 3 Autoloader User’s Guide... -
Page 42: Operator's Panel Functionality
Chapter 3 Operating the Autoloader Operator's Panel Functionality Operator's Panel Functionality If security is enabled and you try to execute a command Note: without entering a password, the autoloader displays the screen until you enter a password. Once you Enter Password enter a password, the autoloader takes you back to the command screen that you were at prior to entering the password. -
Page 43: Enter Passwords
Chapter 3 Operating the Autoloader Operator's Panel Functionality Scroll down button Escape Enter All the functionality accessed from the scrolling menu is password- protected. Two levels of security are built into the menu. The lower-level security is the operator level and the higher-level security is the administrator level. -
Page 44: Using Cartridges
Chapter 3 Operating the Autoloader Using Cartridges Using Cartridges Typically, when you first install the autoloader, you load your cartridges into the magazines and then load the magazines into the autoloader. However, you can insert and eject cartridges individually using the mailslot, or you can eject a magazine, manually load and unload cartridges, then load the magazine back into the autoloader. -
Page 45: Insert A Single Cartridge
Chapter 3 Operating the Autoloader Using Cartridges Insert a Single When you want to load a single cartridge into the autoloader, you can use Cartridge the mailslot. However, if the option is turned on, you have to Security enter a valid password to unlock the mailslot before you can load a cartridge. -
Page 46: Moving A Single Cartridge
Chapter 3 Operating the Autoloader Using Cartridges After appears on the LCD, you have 20 seconds to load Load cartridge a cartridge through the mailslot before it relocks. The autoloader automatically loads the cartridge into the selected slot. Note: If the load cartridge function fails, the cartridge ejects and you will have to perform steps again. - Page 47 Chapter 3 Operating the Autoloader Using Cartridges 4 Scroll to By Barcode A bar code label appears. 5 Scroll to the label that corresponds to the cartridge you want to eject. Press Enter To eject a cartridge by location: 1 From the main menu, scroll to , and then press Commands Enter...
-
Page 48: Using Magazines And Magazine Blanks
Chapter 3 Operating the Autoloader Using Magazines and Magazine Blanks Using Magazines and Magazine Blanks Figure 6 Left and Right Sides of a Magazine SuperLoader 3 Autoloader User’s Guide... -
Page 49: Ejecting A Magazine
Chapter 3 Operating the Autoloader Using Magazines and Magazine Blanks The autoloader will not run unless both magazine openings are properly closed. One way that you can close the openings is to use two magazines. If you use only one magazine, then you must fill the other magazine opening with a magazine blank for the unit to become operational. -
Page 50: Magazine Load/Unload Command
Chapter 3 Operating the Autoloader Using Magazines and Magazine Blanks Magazine Load/ When issuing a Load/Unload command to the autoloader, the system Unload Command automatically ejects the right-hand magazine. To remove the left-hand magazine using the Load/Unload command, you must: 1 Remove the right magazine. -
Page 51: Manually Operating The Magazine
Chapter 3 Operating the Autoloader Using Magazines and Magazine Blanks Manually The following section describes how to operate a magazine. Operating the There are two knobs located on each end of the magazine. You can move Magazine the slots within the magazine by turning these two knobs and aligning a slot with one of the two openings. -
Page 52: Viewing Status Information
Chapter 3 Operating the Autoloader Viewing Status Information To identify a slot: Each slot has an identification number that is exposed when the slots are in the upper section of the magazine. With the magazine removed from the autoloader, you can see the identification mark on the top side of the magazine through one of two windows on the upper surface of the magazine. -
Page 53: Viewing Firmware Version
Chapter 3 Operating the Autoloader Viewing Status Information Table 2 Autoloader Status Status Message Description Magazines The left magazine is present. The right magazine is present. SCSI ID A digit 0 through 7 The assigned SCSI ID for the autoloader. (default 5) Mode Random... -
Page 54: Viewing Element Status
Chapter 3 Operating the Autoloader Viewing Status Information Field Description HW Rev The number indicates the hardware version. ME Rev The number indicates the mechanical version. Viewing Element The element status reports the status of the magazine slots. The status Status indicates whether a slot contains a cartridge or not, and which slot is allocated as the cleaning cartridge's slot. -
Page 55: Viewing Tape Drive Status
Chapter 3 Operating the Autoloader Viewing Status Information Viewing Tape Drive To view the tape drive status, use the following procedure. Status 1 From the main menu, scroll to , and then press Status Enter 2 From the submenu, scroll to , and then press Status Drive... -
Page 56: Viewing Ethernet Information
Chapter 3 Operating the Autoloader Running an Inventory Viewing Ethernet To view the Ethernet information, use the following procedure. Information 1 From the main menu, scroll to , and then press Status Enter 2 From the submenu, scroll to , and then press Status Ethernet Enter... -
Page 57: Data Compression
Chapter 3 Operating the Autoloader Data Compression Data Compression Compressing the data means that the autoloader can write more data to the same amount of tape. Compression also increases the performance of the data transfers from or to the SCSI bus. The data compression is drive dependent and cannot be set from the front panel or On-board Remote Management. - Page 58 Chapter 3 Operating the Autoloader Data Compression SuperLoader 3 Autoloader User’s Guide...
-
Page 59: Chapter 4 On-Board Remote Management
Chapter 4 On-board Remote Management • On-board Remote Management Overview • Configuration Page • Updates Page on page 53 • Diagnostics Page on page 54 • Commands Page on page 56 On-board Remote Management Overview Your Quantum SuperLoader 3 autoloader firmware includes an Ethernet interface to allow remote administration of the autoloader. -
Page 60: Opening On-Board Remote Management
Chapter 4 On-board Remote Management On-board Remote Management Overview options, networking options, security options, running diagnostic tests, and performing system updates. Note: Only use the command when the autoloader is Diagnostic known to be idle and unavailable to host backup/restore applications. -
Page 61: Viewing Status Information
Chapter 4 On-board Remote Management On-board Remote Management Overview page appears in your browser window. Home Note: When using the On-board Remote Management page with Microsoft Internet Explorer, be sure to enable the Allow option. META REFRESH On Internet Explorer version 6.0, this feature is controlled through the menu selection under Tools>Internet Options... -
Page 62: Feedback
Chapter 4 On-board Remote Management Configuration Page Feedback on If there is feedback from the system when you submit a request, the Pages feedback appears beneath the button. In some cases, you may submit have to scroll to see the feedback information. Configuration Page page includes a submenu on the left-hand side of the Configuration... - Page 63 Chapter 4 On-board Remote Management Configuration Page mode, you (or the backup software) can specify which Random cartridge you want to use and where you want it to go. You will probably use this mode the most. mode supports certain backup applications that do not Sequential manage media.
- Page 64 Chapter 4 On-board Remote Management Configuration Page Compression For the Quantum SuperLoader 3 autoloader, data compression is drive- dependent. The front panel and On-board Remote Management will display whether or not compression is enabled. Compressing the data means that the drive can write more data to the same amount of tape.
- Page 65 Chapter 4 On-board Remote Management Configuration Page 2 Scroll to Cleaning Tape If a check mark appears in the box next to , the option is Auto Clean enabled. To disable , click the box to remove the check Auto Clean mark.
- Page 66 Chapter 4 On-board Remote Management Configuration Page • To change the configuration, scroll to the setting you Magazines want for the autoloader, selecting the appropriate check box, and then click . These settings include , and submit Both Right Left The message This will require a power cycle and ISV configuration is displayed.
- Page 67 Chapter 4 On-board Remote Management Configuration Page 6 In the text box, type the current minute. Minute 7 Click to save the information. submit Setting Network Options When you originally installed the autoloader, you set the Ethernet configurations through the front LCD panel. However, you can modify them through On-board Remote Management.
- Page 68 Chapter 4 On-board Remote Management Configuration Page 2 Click submit Setting Security Options When you enable the security option, users must enter a password to access the autoloader's front panel functionality. A password allows either administrator-level access or operator-level access (see Setting Security on page 70).
- Page 69 Chapter 4 On-board Remote Management Configuration Page 7 Click submit Note: To view the list of currently defined users, click submit with Select User Type To set the Client Authorization Control 1 From any page, click the heading. The Configuration Configuration screen displays.
- Page 70 Chapter 4 On-board Remote Management Configuration Page • allows multiple clients to have unrestricted access to No Locking control the system as long as they are on the authorized client list. • permits only one authorized client to issue control Full Locking requests at a time.
-
Page 71: Updates Page
Chapter 4 On-board Remote Management Updates Page Note: By entering an improper range of IP addresses, a user could possibly lock out all IP clients from administering the autoloader. If this occurs, you can restore the default values by running from the front panel Restore Default Configuration... -
Page 72: Diagnostics Page
Chapter 4 On-board Remote Management Diagnostics Page Diagnostics Page From the page, you can run various tests on the autoloader. Diagnostics You can also view error and history logs, test progress, identify the physical unit in a rack, or reset the system. The diagnostic tests available on the autoloader include: Running Diagnostic Tests... -
Page 73: Diagnostics
Chapter 4 On-board Remote Management Diagnostics Page Diagnostics To view the various diagnostic options: 1 From any page, click the heading. The screen Diagnostics Diagnostics displays. 2 In the section, select the diagnostic test that you want to Diagnostics run from the drop-down menu. -
Page 74: Commands Page
Chapter 4 On-board Remote Management Commands Page Commands Page You can move tapes, run a system inventory, reset the picker to its home position, or perform sequential operations from the page. Commands When you click , the page displays. Commands From a remote location, you can request that a tape be moved from one position to another. -
Page 75: Sequential Operations
Chapter 4 On-board Remote Management Commands Page 1 From any page, click the heading. The screen Commands Commands displays. 2 From the page, click . This executes a reset Commands Set to Home command to the autoloader. mode supports certain backup applications Sequential Sequential Operations that do not manage media. - Page 76 Chapter 4 On-board Remote Management Commands Page SuperLoader 3 Autoloader User’s Guide...
-
Page 77: Chapter 5 Administration
Chapter 5 Administration Administration of the Autoloader • Configuring the Autoloader • Setting the SCSI ID on page 62 • Setting Ethernet on page 62 • Setting the Time on page 66 • Setting the Change Mode on page 68 •... -
Page 78: Configuring The Autoloader
Chapter 5 Administration Configuring the Autoloader When you first power on the Quantum SuperLoader 3 autoloader, it automatically runs a Power-On Self-Test (POST). During the POST, the left (green) LED flashes. After the POST, the left (green) and right (amber) LED flash alternately back and forth. -
Page 79: Figure 7 System Menu Tree
Chapter 5 Administration Configuring the Autoloader When you first power on the autoloader, the default is set with no password protection. However, after you set the security option, all the configuration functionality is password-protected. You need an administrator-level password to configure the autoloader. The front panel menu has the following options: Figure 7 System Menu Tree... -
Page 80: Setting The Scsi Id
Chapter 5 Administration Configuring the Autoloader To configure the Quantum SuperLoader 3 autoloader, you must verify the setup of the following: • SCSI ID(s). For the autoloader, there is a single SCSI ID. • Magazine(s). • Ethernet IP address (if you are not using DHCP). •... -
Page 81: Setting The Ip Address
Chapter 5 Administration Configuring the Autoloader • A Simple Network Management Protocol (SNMP) server (optional) • A time server, or set the time and time zone manually (optional) An IP address is the address of any device attached to a network. Each Setting the IP device must have a unique IP address. -
Page 82: Setting The Subnet Mask
Chapter 5 Administration Configuring the Autoloader When you have advanced through all of the digits of the IP address, the autoloader displays Enter to save Note: If you make a mistake, press to backspace to the Escape digit you want to change. 6 Press . -
Page 83: Setting The Snmp Server
Chapter 5 Administration Configuring the Autoloader 3 From the submenu, scroll to , and then press Ethernet Set Gateway . The cursor automatically appears at the first digit. Enter 4 At each position of the gateway address, use the up and down arrows to change the value of each digit. -
Page 84: Setting The Time
Chapter 5 Administration Setting the Time 6 Press to return to the Ethernet submenu. Escape Enter Setting the Time The system time is displayed by On-board Remote Management and it is used internally when logging events and errors. The system time is either regular time or power-on time. - Page 85 Chapter 5 Administration Setting the Time When you have advanced through all of the digits of the time server address, the autoloader displays Enter to save. Note: If you make a mistake, press to backspace to the Escape digit you want to change. 5 Press appears on the LCD.
-
Page 86: Setting The Change Mode
Chapter 5 Administration Setting the Change Mode 7 The next two digits represent the current hour. At each position of the hour, use the up and down arrows to change the value of each digit. Press Enter 8 The last two digits represent the current minute. At each position of the minute, use the up and down arrows to change the value of each digit. -
Page 87: Sequential Mode Operations
Chapter 5 Administration Setting the Change Mode To set the Change Mode 1 From the main menu, scroll to , and then press Configuration Enter 2 From the menu, scroll to , and then press Configuration Change Mode . the mode options appear. A check mark appears next to the Enter currently enabled mode. -
Page 88: Setting Security
Chapter 5 Administration Setting the Change Mode 3 From the menu, scroll to , and then press Sequential Ops Stop Enter appears on the LCD. Ejecting tape from drive To resume mode operation: Sequential 1 From the main menu, scroll to , and then press Commands Enter... -
Page 89: Setting Passwords
Chapter 5 Administration Setting the Change Mode To set the number of magazines: 1 From the main menu, scroll to , and then press Configuration Enter 2 From the menu, scroll to , and then press Configuration Magazines Enter 3 From the menu, select either , or to indicate... -
Page 90: Getting Lost Passwords
Chapter 5 Administration Setting the Change Mode 8 Press to submit the password. Enter Password Successfully changed appears on the LCD. 9 Press . The Operator and Administrator options reappear. You Enter can either enter another password, or press Escape Enter necessary to return to the main menu. -
Page 91: Chapter 6 Diagnostics
Chapter 6 Diagnostics • POST • Diagnostic Tests from the Front Panel on page 75 • On-board Remote Management Diagnostic Tests on page 78 The Power On Self Test (POST) and diagnostic tests are helpful tools for testing the autoloader’s functionality and for troubleshooting errors. With the results from the POST and diagnostic tests, you can determine how well the autoloader is working and locate any problems. -
Page 92: Post
Chapter 6 Diagnostics POST POST Every time you turn on the autoloader, the POST checks all of the autoloader’s basic components. If you experience problems with the autoloader, the POST is a good method to determine if any major parts are malfunctioning. -
Page 93: Perform A Post
Chapter 6 Diagnostics Diagnostic Tests from the Front Panel Perform a POST If you experience errors while operating your autoloader, you may need to reboot the autoloader to perform a POST. To reboot the SuperLoader 3 Autoloader: 1 Hold down the power button until System Shutdown Please Wait... -
Page 94: Setting The Security
Chapter 6 Diagnostics Diagnostic Tests from the Front Panel Setting the When you enable the security function, the diagnostic tests are password Security protected to ensure data integrity. To access any of the diagnostic tests, you must first enter an Administrator password. If you do not enter the password, you will be prompted to enter the password when you attempt to perform a diagnostic test. -
Page 95: Front Panel Diagnostic Tests
Chapter 6 Diagnostics Diagnostic Tests from the Front Panel 2 On the submenu, scroll to , and then press Halt Test Enter. User Abort appears. 3 Press to return to the submenu. Refer to On-board Enter Diagnostics Remote Management for any test results. To perform a from On-board Remote Management: Halt Test... -
Page 96: On-Board Remote Management Diagnostic Tests
Chapter 6 Diagnostics On-board Remote Management Diagnostic Tests 3 If you are not logged in, you will be asked to enter the Administrator password. Do the following: From the front panel, enter the administrator password by using scroll arrows to select each digit, and then press Down to move to the next digit. -
Page 97: Diagnostics Using On-Board Remote Management
Chapter 6 Diagnostics On-board Remote Management Diagnostic Tests • Loader—Magazine Test • Loader—Inventory Test On-board Remote Management allows you to request all Note: diagnostic tests, but any tests that require a cartridge to be inserted will time-out unless someone manually inserts the cartridge at the appropriate time. - Page 98 Chapter 6 Diagnostics On-board Remote Management Diagnostic Tests SuperLoader 3 Autoloader User’s Guide...
-
Page 99: Chapter 7 Customer Replaceable Units (Crus)
Chapter 7 Customer Replaceable Units (CRUs) The SuperLoader 3 is not intended for customer servicing. If you do service the unit yourself, the power cable must be removed from the unit and the electrical outlet before removing the cover. Failure to do so may cause severe bodily injury or damage to the equipment. -
Page 100: Replacing A Magazine Or Magazine Blank
Chapter 7 Customer Replaceable Units (CRUs) Replacing a Magazine or Magazine Blank Replacing a Magazine or Magazine Blank To replace a cartridge magazine or magazine blank, you need to remove the current magazine or blank, and then install the new magazine or blank. -
Page 101: Removing A Magazine Blank
Chapter 7 Customer Replaceable Units (CRUs) Replacing a Magazine or Magazine Blank Removing a Your autoloader comes equipped with either two magazines, or one Magazine Blank magazine and one magazine blank. The autoloader will not function without both magazine bays equipped with either a magazine or a magazine blank. -
Page 102: Changing The Orientation
Chapter 7 Customer Replaceable Units (CRUs) Replacing a Magazine or Magazine Blank Changing the A magazine or magazine blank can be configured to fit in the right or left Orientation magazine bay. The handle must be removed and the appropriate handle attached to match the orientation of the magazine or blank. -
Page 103: Figure 9 Removing The Screws From The Handle
Chapter 7 Customer Replaceable Units (CRUs) Replacing a Magazine or Magazine Blank Changing the orientation of a magazine 1 Remove the two screws that attach the handle to the front of the magazine. Figure 9 Removing the Screws from the Handle Screws 2 Unsnap the handle carefully, being careful not to break the hinge. -
Page 104: Rack Mounting The Autoloader
Chapter 7 Customer Replaceable Units (CRUs) Rack Mounting the Autoloader 3 Rotate the magazine blank 180 degrees so that what was the front of the magazine is now the back. 4 Add the appropriate right or left handle to the front of the rotated magazine blank. -
Page 105: Figure 10 Clearance Requirements For Rack Mounting
Chapter 7 Customer Replaceable Units (CRUs) Rack Mounting the Autoloader Figure 10 Clearance Requirements for Rack Mounting Minimum clearance to load or unload a magazine from the system 27.0” [686 mm] Minimum clearance to load a tape via the mailslot Clearance to door inside a rack 6.0”... -
Page 106: General Preparation For Rack Mount Installation
Chapter 7 Customer Replaceable Units (CRUs) Rack Mounting the Autoloader General Take the following general safety steps before beginning either rack Preparation for mount installation. Rack Mount 1 Lower the cabinet feet. Installation 2 Extend the cabinet anti-tip device, if available. 3 Ensure that the cabinet and all rack mounted equipment have a reliable ground connection. -
Page 107: Figure 11 Required Parts For Installation
Chapter 7 Customer Replaceable Units (CRUs) Rack Mounting the Autoloader • The following parts shipped with the rack: • Eight clip nuts • Eight screws Figure 11 Required Parts for Installation Support brackets (74-60605-01) Short autoloader brackets (74-60604-03) Long autoloader brackets (74-60604-01) Support bracket screws 2 Install two clip nuts, 1.75 in. -
Page 108: Figure 12 Installing Two Clip Nuts
Chapter 7 Customer Replaceable Units (CRUs) Rack Mounting the Autoloader Figure 12 Installing Two Clip Nuts Rail Rail Clip nut Outer covers 1.75 in of the rack (44.45 mm) Rail Clip nut 3 Select the long or short autoloader brackets (depending on the depth of the rack), and then attach them to the rear of the autoloader (see figure 13). -
Page 109: Figure 13 Attaching Autoloader Brackets
Chapter 7 Customer Replaceable Units (CRUs) Rack Mounting the Autoloader Figure 13 Attaching Autoloader Brackets Autoloader Screws (10-32 x 1/4 only) Autoloader bracket SuperLoader 3 Autoloader User’s Guide... -
Page 110: Figure 14 Attaching Support Brackets
Chapter 7 Customer Replaceable Units (CRUs) Rack Mounting the Autoloader 4 Using rack screws, attach a support bracket to the clip nuts on each rear rail (see figure 14.) Note: Be sure to attach the support brackets correctly; the side of the bracket with only two holes should be secured to the rail. -
Page 111: Figure 15 Sliding Autoloader Into Rack
Chapter 7 Customer Replaceable Units (CRUs) Rack Mounting the Autoloader 5 With the help of a second installer, insert the autoloader into the rack so that the autoloader brackets slide into corresponding support brackets on the rear rails and the tabs at the front of the autoloader align flush with the clip nuts on the front rails (see figure 15). -
Page 112: Figure 16 Front Alignment
Chapter 7 Customer Replaceable Units (CRUs) Rack Mounting the Autoloader 6 While the other installer holds the front end of the autoloader, secure the autoloader in the rack by doing the following: Secure the front end of the autoloader to the rack using four rack screws (two per tab) as shown in figure 16. -
Page 113: Installing And Removing The Optional V-Rail Kit
Chapter 7 Customer Replaceable Units (CRUs) Installing and Removing the Optional V-Rail Kit 8 When the autoloader is level, tighten all screws securing the autoloader to the rack. This includes the following: • Four screws securing the autoloader tabs to the front rails. •... -
Page 114: Figure 18 Left Rail Assembly
Chapter 7 Customer Replaceable Units (CRUs) Installing and Removing the Optional V-Rail Kit Figure 18 Left Rail Assembly Figure 19 Right Rail Assembly SuperLoader 3 Autoloader User’s Guide... -
Page 115: Accessory Pieces
Chapter 7 Customer Replaceable Units (CRUs) Installing and Removing the Optional V-Rail Kit Figure 20 Front Mount Features Figure 21 Rear Mount Features Besides the rail parts themselves, there are two plates included with the Accessory Pieces rail kit. These plates are used for various rack mountings. The front cover plate is used on all rack rails. -
Page 116: Installation In A .375 Square Hole Rack
Chapter 7 Customer Replaceable Units (CRUs) Installing and Removing the Optional V-Rail Kit Figure 22 Front Cover Plate and 10-32 Nut Plates Front cover plate used 10-32 inside nut plate used on on all rack rails .375 square hole rail and .280 and M6 rails Installation in a To install the rail in a .375 square hole rack:... -
Page 117: Installation In A .280 Diameter Thru Hole Rack
Chapter 7 Customer Replaceable Units (CRUs) Installing and Removing the Optional V-Rail Kit Figure 23 .375 Square Hole Rack Installation 2 Mount the front cover plate to the vertical rail in the identified holes by using 10-32 x .625 bolts in the center two holes of the plate. 3 Mount the tab of the autoloader to the upper and lower holes in the front cover plate using 10-32 x .625 bolts. -
Page 118: Installation In A 10-32 Threaded Hole Rack
Chapter 7 Customer Replaceable Units (CRUs) Installing and Removing the Optional V-Rail Kit Figure 24 .280 Diameter Thru Hole Rack Installation 2 Mount the front cover plate to the vertical rail in the identified holes by using M6 (.200”) threaded bolts in the center two holes of the plate. -
Page 119: Chassis-Mounted Rails
Chapter 7 Customer Replaceable Units (CRUs) Installing and Removing the Optional V-Rail Kit Figure 25 10-32 Threaded Hole Rack Installation 2 Mount the front cover plate to the vertical rail in the identified holes by using 10-32 x .625 bolts in the center two holes of the plate. 3 Mount the tab of the autoloader to the upper and lower holes in the front cover plate using 10-32 x .625 bolts. -
Page 120: Figure 26 Chassis Rail Parts
Chapter 7 Customer Replaceable Units (CRUs) Installing and Removing the Optional V-Rail Kit Figure 26 Chassis Rail Parts Figure 27 Rail Installed on Chassis SuperLoader 3 Autoloader User’s Guide... -
Page 121: Figure 28 Close Up Of Chassis Rail
Chapter 7 Customer Replaceable Units (CRUs) Installing and Removing the Optional V-Rail Kit Figure 28 Close up of Chassis Rail SuperLoader 3 Autoloader User’s Guide... -
Page 122: Figure 29 Chassis Mounted In Rack
Chapter 7 Customer Replaceable Units (CRUs) Installing and Removing the Optional V-Rail Kit Figure 29 Chassis Mounted in Rack Figure 30 Back View of Mounted Chassis SuperLoader 3 Autoloader User’s Guide... -
Page 123: Figure 31 Close Up Of Back View Chassis
Chapter 7 Customer Replaceable Units (CRUs) Installing and Removing the Optional V-Rail Kit Figure 31 Close Up of Back View Chassis Figure 32 Back View of the Rail After Installation SuperLoader 3 Autoloader User’s Guide... - Page 124 Chapter 7 Customer Replaceable Units (CRUs) Installing and Removing the Optional V-Rail Kit SuperLoader 3 Autoloader User’s Guide...
-
Page 125: Chapter 8 Troubleshooting
Chapter 8 Troubleshooting • Before Contacting Customer Support • Returning the Autoloader for Service on page 112 • Checking for Errors on page 114 Before Contacting Customer Support Errors that you may experience with your autoloader can range from severe hardware damage to simple connection problems. Before you return your autoloader, you may be able to fix the problem yourself by following some basic troubleshooting procedures. -
Page 126: Table 8 Probable Cause And Possible Solutions
Chapter 8 Troubleshooting Before Contacting Customer Support Table 8 describes the probable cause and suggested action for problems that you may encounter. Caution: The SuperLoader 3 is not intended for customer servicing. If you do service the unit yourself, the power cable must be removed from the unit and the electrical outlet before removing the cover. - Page 127 Chapter 8 Troubleshooting Before Contacting Customer Support The autoloader does not The power cable or • Check all outlets and power cables for turn on. source is proper connection. malfunctioning. The • Contact customer support. autoloader is incorrectly configured. The front panel and light •...
- Page 128 Chapter 8 Troubleshooting Before Contacting Customer Support The autoloader does not • Verify that the SCSI cables are communicate with the connected to the rear of the autoloader host system via the SCSI and that the correct LVD host bus. controller card is installed.
- Page 129 Chapter 8 Troubleshooting Before Contacting Customer Support The autoloader does not • Verify that the Ethernet cable is communicate with the connected to the correct hub. host system via the • Verify the Ethernet configuration Ethernet. settings via the front panel LCD. If the DHCP server is available, Ethernet status should indicate DHCP, otherwise, you must set a unique IP...
-
Page 130: Returning The Autoloader For Service
Chapter 8 Troubleshooting Returning the Autoloader for Service The application software • Try a different piece of media. reports an error while • Issue a either by using System Reset reading or writing a piece On-board Remote Management of media. page , or Diagnostics... -
Page 131: Removing The Autoloader From A Rack
Chapter 8 Troubleshooting Returning the Autoloader for Service 3 Remove the power, Ethernet, and SCSI cables, and any terminators from the autoloader. Note: Do not ship these items if you are returning the autoloader to the factory. Removing the To remove the autoloader from a rack: Autoloader from a 1 Loosen the four screws that connect the two support brackets to the Rack... -
Page 132: Packing The Autoloader
Chapter 8 Troubleshooting Checking for Errors Packing the Use the original packing material to pack the autoloader: the shipping Autoloader container, two foam insert packing pieces, the accessory kit box (or the filler tube if your autoloader did not come with an accessory kit box), and the antistatic bag. - Page 133 Chapter 8 Troubleshooting Checking for Errors When either of these things occur, the system generates a log of the error. You can use these error logs to determine the type of error, when it occurred, and what parts of the autoloader it affects. The error logs also describe what you must do to fix the error, or which parts of the autoloader need to be repaired or replaced.
-
Page 134: Figure 33 Error Log Diagram
Chapter 8 Troubleshooting Checking for Errors Figure 33 Error Log Diagram Is there an error? No corrective action required Check Application logs Is the problem related to the operation Is the problem related to the motion of cartridges within the autoloader? of the tape drive? Check Tape Drive Check autoloader... -
Page 135: Table 9 Error Codes
Chapter 8 Troubleshooting Checking for Errors The autoloader generates four types of logs. For troubleshooting errors, you will only use one type, Hard Error logs. The screen displays the error message and the Hard Error logs record all hard error events. Note: To troubleshoot hard errors, you may need to power cycle, repair, or replace the unit. - Page 136 Chapter 8 Troubleshooting Checking for Errors Screen Display Error Code TX No Memory TX Start error TX Delete error TX Resume error TX Caller error TX Suspend error TX Timer error TX Tick error TX Activate error TX Thresh error TX Suspend Lifted SYS Cmd started SYS Failure...
- Page 137 Chapter 8 Troubleshooting Checking for Errors Screen Display Error Code SYS Element tbl bad SYS Global corrupt SYS Stack corrupt SYS Stack low SYS Stack ovflw SYS POST fail SYS Watchdog fail SYS PWR on/restart SYS PWR down SYS Overload SYS Performance SYS Asyc stop SYS Cleaning error...
- Page 138 Chapter 8 Troubleshooting Checking for Errors Screen Display Error Code Media UnThrd Err Media MAM/ID Err Invalid Media Type Expired Media Unknown Media Drv/Media err Command in Progress Unsupported Command Command failed Device Not Ready Invalid Element Address Invalid Page Code Invalid Test # Exchange Command/Not Supported Invalid Command Parameter...
- Page 139 Chapter 8 Troubleshooting Checking for Errors Screen Display Error Code No Volume Tab\Information Available CUP In Progress Drive Command Failed Overtemp Rejected Command Communication Error Elev Unknown err Elev Unknown err Elev Flag bad Elev Sensor bad Elev Unknown err Elev Unknown err Elev Unknown err Elev cal lost...
- Page 140 Chapter 8 Troubleshooting Checking for Errors Screen Display Error Code SRVO Failure SRVO HW/MTR timeout SRVO SW error SRVO Not Calibrated SRVO No src element SRVO No mag SRVO Mail Slot full SRVO Dest full SRVO Pkr full SRVO PKR crt sns err SRVO DRV pth sns err SRVO MSdoor sns err SRVO MSdoor dol err...
-
Page 141: Hard Error Log Display
Chapter 8 Troubleshooting Checking for Errors Screen Display Error Code PKR Rot cal lost PKR Trans cal lost PKR Rot lost PKR Trans lost PKR Rot pos error PKR Trans pos error PKR Dropped cartridge PKR Missed cartridge PKR Jammed cartridge MTR Unknown err MTR SW error MTR HW error... - Page 142 Chapter 8 Troubleshooting Checking for Errors from the front panel and SCSI. The front panel and SCSI display only the most important information for each log. Whenever the autoloader generates a Hard Error log, the On-board Remote Management automatically displays the log information. For the other retrieval methods, you must request the information.
-
Page 143: Error Code Field Description
Chapter 8 Troubleshooting Checking for Errors Table 10 Hard Error Field Description Log Field Descriptions Time Stamp The time the event occurred. This field helps correlate the event with a possible application interruption. If the unit is unable to acquire the correct time/date from the SNTP time server, or the front panel, the time stamp contains values indicating the... -
Page 144: Figure 34 Error Code Bit Descriptions
Chapter 8 Troubleshooting Checking for Errors Figure 34 Error Code Bit Descriptions Description 0–3 Error Location 4–7 Error Location 8–11 Error Location 12–15 Error Location 16–19 Error Type 20–23 Error Type 24–27 Task ID 28–29 Task ID 30–31 Recovery Action Figure 35 Error Code Field Descriptions Field... - Page 145 Chapter 8 Troubleshooting Checking for Errors Field Description Servo Picker Magazine Left Magazine Right Magazine Up left Magazine Up right Loader Bar Code Reader Front Panel Diagnostic Error Code Update PSP Timer Volume Servo Manager HTTP SNTP Idle Watch Dog Un-handle Interrupt SuperLoader 3 Autoloader User’s Guide...
-
Page 146: Figure 36 Error Code Listing And Suggested Actions
Chapter 8 Troubleshooting Checking for Errors Field Description Defines the type of error or event that did occur. Follow the suggested actions to Error: troubleshoot each type of error. Defines a location in the firmware internal to the task being performed. Software Location ID: This ID is used by firmware engineering to identify what part of the actual firmware task detected the event. - Page 147 Chapter 8 Troubleshooting Checking for Errors Error Description Suggested Actions Message parameter Bad • Check the host device driver. • Check the host application. • Check the SCSI bus cables and terminators. • Check the host adapter. • Power cycle the autoloader. Repeat checks after power cycle.
- Page 148 Chapter 8 Troubleshooting Checking for Errors Error Description Suggested Actions 31–38 System Monitoring type • Check for a Hard Error log. If an error events appears in the Hard Error log, power cycle the autoloader and run the Loader—Health test. Check •...
- Page 149 Chapter 8 Troubleshooting Checking for Errors Error Description Suggested Actions Load Error • Verify that the cartridge does not have labels or other matter anywhere on the cartridge except where labels are expected to be placed. • Try to load a different piece of media. •...
- Page 150 Chapter 8 Troubleshooting Checking for Errors Error Description Suggested Actions Source Element Empty • Verify that the expected source really does have a cartridge. • Run the test. Loader–Health Check • If the source is a magazine, replace the cartridge in that slow with a different cartridge and try again.
- Page 151 Chapter 8 Troubleshooting Checking for Errors Error Description Suggested Actions Destination Element Full • Verify the expected destination really does not have a cartridge. • Run the test. Loader—Health Check • If destination is a magazine, install and remove a cartridge from the selected slot and try again.
- Page 152 Chapter 8 Troubleshooting Checking for Errors Error Description Suggested Actions Mail Slot Door Sensor Error • Insert a cartridge into the autoloader via the mailslot. • Power cycle the autoloader. • If all previous steps fail, contact customer support. Mail Slot Solenoid Error •...
- Page 153 Chapter 8 Troubleshooting Checking for Errors Error Description Suggested Actions Magazine Solenoid Bad • Check the Task ID in the Hard Error log to determine if the problem is the right or the left magazine. • Remove and reinsert the magazine. Verify that the magazine slides freely, and clicks and locks into place.
- Page 154 Chapter 8 Troubleshooting Checking for Errors Error Description Suggested Actions D5–DE Cartridge flags located on the • Check the Task ID in the Hard Error log to magazine may be bad or the determine if the problem is the right or the sensor to detect the flags may left magazine.
-
Page 155: Chapter 9 Basic Logs
Chapter 9 Basic Logs • Basic Information Logs • Log Descriptions • Error Codes • Tape Drive Logs on page 145 • POST Failure Logs on page 146 Basic Information Logs Whenever any system or application actions occur, the autoloader or tape drive generates logs recording the action. -
Page 156: Log Descriptions
Chapter 9 Basic Logs Log Descriptions Log Descriptions The autoloader and tape drive generate different types of logs. Autoloader logs provide information if the error relates to data cartridge movement. Tape drive logs provide information on the tape drive's read/ write performance. -
Page 157: Error Codes
Chapter 9 Basic Logs Error Codes Log Type http Front Panel SCSI Hard The logs contain three main fields. Table 12 Log Fields Field Description Time Stamp The time the event occurred. This field helps correlate the event with a possible application interruption. If the unit is unable to acquire the correct time/date from the Simple Network Time Protocol (SNTP) server, or the front panel, the time stamp contains values indicating the power cycle number... -
Page 158: Table 13 Error Code Fields
Chapter 9 Basic Logs Error Codes Table 13 Error Code Fields Field Description Recovery Action Defines what the autoloader will do based on the event that occurred. If the value is 0, the autoloader will continue operations because this is typically a soft, recoverable event, or an event that is just recording an action for when the development team may be working on enhancements. - Page 159 Chapter 9 Basic Logs Error Codes Field Description Error Code Update PSP Timer HTTP SNTP Idle Watch Dog Un-handle Interrupt Defines the type of error or event that occurred. Error Type: Code Descriptions 00–25 General Software flags Message Send ID error Message Bad Message parameter Bad Invalid Element...
- Page 160 Chapter 9 Basic Logs Error Codes Field Description Open Front Over Temp Drive Error Load Error Unload Error 60–69 Internal communication events A0–A4 Picker Servo Errors Source Element Empty Source Magazine Missing Destination Magazine Missing Destination Element Full Picker Full Picker Cartridge Sensor Error Drive Path Sensor Error Mail Slot Door Sensor Error...
-
Page 161: Soft Logs
Chapter 9 Basic Logs Error Codes Field Description D2–D4 Position Sensor Bad D5–DE Cartridge flags located on the magazine may be bad or the sensor to detect the flags may have a problem Jammed Cartridge Software Location ID: Defines a location in the firmware internal to the task being performed. This ID is used by firmware engineering to identify what part of the actual firmware task detected the event. -
Page 162: Boot Logs
Chapter 9 Basic Logs Error Codes Figure 37 Shadow Log Sample Boot Logs Boot logs keep track of the boot status in terms of number of hours the unit has been powered on, the number of times the autoloader has been rebooted, and the reason for the reboot. -
Page 163: Tape Drive Logs
Chapter 9 Basic Logs Tape Drive Logs Tape Drive Logs The tape drive generates six types of logs (see Tape Drive Error Logs page 161). The four generated with this drive include: • SCSI Check Condition Error Logs on page 162 •... -
Page 164: Post Failure Logs
Chapter 9 Basic Logs POST Failure Logs POST Failure Logs These events indicate that the autoloader or tape drive detected a failure when power was applied. POST may have failed during a reset and retry. This event type only indicates each time the test ran and Note: experienced the error condition. -
Page 165: Appendix A Specifications
Appendix A Specifications This appendix describes the specifications relating to the SuperLoader 3 autoloader. The autoloader is equipped with one of the following drive types: • Quantum LTO-2 half-height • Quantum (Certance) LTO-3 full-height • Quantum VS160 • Quantum SDLT600 SuperLoader 3 Autoloader User’s Guide... -
Page 166: Physical Specifications
Appendix A Specifications Physical Specifications Physical Specifications Rack Mount Height 8.9 cm (3.5 in.) Width 45 cm (17.7 in.) Length 75.46 cm (29.71 in.) Package Weight 22.7 kg (50 lb.) (without media) Footprint 0.32 square meters (3.4 square feet) SuperLoader 3 Autoloader User’s Guide... -
Page 167: Autoloader Performance Specifications
Appendix A Specifications Autoloader Performance Specifications Autoloader Performance Specifications Maximum data transfer rate LTO-2 Drive Native: 93.6 GB/hr. Compressed: 187.2 GB/hr. (assuming 2:1 compression ratio) LTO-3 Drive Native: 245 GB/hr. Compressed: 490 GB/hr. (assuming 2:1 compression ratio) VS160 Drive Native: 28.8 GB/hr. Compressed: 57.6 GB/hr. - Page 168 Appendix A Specifications Autoloader Performance Specifications Average load time (after placing LTO Ultrium 2 cartridge in drive) 12 seconds (to BOT for previously written tape) 40 seconds (to BOT with new tape) LTO Ultrium 3 58 seconds (to BOT for previously written tape) <...
-
Page 169: Environmental Specifications
Appendix A Specifications Environmental Specifications Environmental Specifications Temperature Range (Dry Bulb) Operating +10º to +35ºC Nonoperating - 40ºC to +65ºC Temperature Variation Operating 10ºC per hour Nonoperating 20ºC per hour Humidity Operating 20% to 80% noncondensing Nonoperating 10% to 90% noncondensing Gradient 10% per hour without condensation Wet Bulb... -
Page 170: Autoloader Power Specifications
Appendix A Specifications Autoloader Power Specifications Autoloader Power Specifications Line voltage All Drive Types : 90–265 VAC; 60 Hz system : 90–265 VAC 50 Hz system Line frequency All Drive Types 47–63 Hz AC Input current All Drive Types : 4.0 A (RMS) for 115 VAC 60 Hz system : 4.0 A (RMS) for 230 VAC 50 Hz system... -
Page 171: Autoloader Shock Specifications
Appendix A Specifications Autoloader Shock Specifications Autoloader Shock Specifications Operating 3 G, 5 ms half-sine, 3 pulses (+/-) per axis, X, Y, Z Non-Operating 20 G, 8 ms half-sine, 3 shocks (+/-) per axis, X, Y, Z Tape Drive Specifications LTO-2 Drive Specifications Description... -
Page 172: Media Capacity
Appendix A Specifications Tape Drive Specifications Media Capacity Media Type Capacity LTO Ultrium 2 storage capacity 6400 GB (compressed) with 16 cartridges Media Specifications Characteristic LTO Ultrium 2 LTO Ultrium 2 formatted capacity 200 GB (noncompressed) 400 GB (2:1 typical compression) Basic description Advanced metal particle Tape length... -
Page 173: Drive Specifications
Appendix A Specifications Tape Drive Specifications LTO-3 Drive Specifications Description Quantum LTO-3 Read/write transfer rate: maximum Noncompressed mode: 68 MB/s sustained (LTO Ultrium 3 media) Compressed (2:1 typical): 136 MB/s Burst transfer rate 160 MB/s (maximum, native) Average access time 58 seconds (from BOT) Loading time to BOT (for previously written 75 seconds (maximum) -
Page 174: Vs160 Drive Specifications
Appendix A Specifications Tape Drive Specifications Characteristic LTO Ultrium 3 Tape length 680 m (2230.9 ft.) Cartridge dimensions 10.2 x 10.54 x 2.15 cm (4 x 4.15 x .85 in) Read compatibility LTO Ultrium 1, LTO Ultrium 2, LTO Ultrium 3 Write compatibility LTO Ultrium 2, LTO Ultrium 3 Shelf life... -
Page 175: Media Capacity
Appendix A Specifications Tape Drive Specifications Media Capacity Media Type Capacity VS1 storage capacity 1280 GB (compressed) with 16 cartridges Media Specifications Characteristic Quantum DLT VS1 VS1 formatted capacity 80 GB (noncompressed) 160 GB (2:1 typical compression) Basic description 0.498 inch (advanced metal particle) Tape length 557.2 m (1847 ft.) Cartridge dimensions... -
Page 176: Sdlt600 Drive Specifications
Appendix A Specifications Tape Drive Specifications SDLT600 Drive Specifications Description Quantum SDLT600 Read/write transfer rate: maximum Noncompressed mode: 129.6 GB/hr sustained (SDLT II media) Compressed (2:1 typical): 259.2 GB/hr Burst transfer rate 160 MB/s Average access time 79 seconds (from BOT) Loading time to BOT (for previously written 40 seconds (maximum) tape) -
Page 177: Media Specifications
Appendix A Specifications Tape Drive Specifications Media Specifications Characteristic SDLT II SDLT II formatted capacity 300 GB (noncompressed) 600 GB (2:1 typical compression) Basic description Advanced metal particle Tape length 630 m (2,066 ft.) Cartridge dimensions 105.6 x 105.3 x 25.4 mm (4.16 x 4.15 x 1.0 in) Read compatibility SDLT I, SDLT II... - Page 178 Appendix A Specifications Tape Drive Specifications SuperLoader 3 Autoloader User’s Guide...
-
Page 179: Appendix B Drive Error Logs
Appendix B Drive Error Logs • Tape Drive Error Logs • SCSI Check Condition Error Logs • Bugcheck Error Logs (SDLT600 only) • Event Error Logs (SDLT600 only) on page 168 Tape Drive Error Logs The tape drive generates six types of logs. For troubleshooting errors, you will only use SCSI Check Condition Error logs, Bugcheck Error logs, and Event Error logs. -
Page 180: Scsi Check Condition Error Logs
Tape Drive Error Logs Table 15 Error Log Display Field Descriptions Field Description Event Log Number A sequence number that indicates the order in which the event was logged. Event Number or Name This field appears in every event log, but varies depending on the event type. -
Page 181: Table 16 Scsi Check Condition Error Log Field Descriptions
Tape Drive Error Logs Table 16 SCSI Check Condition Error Log Field Descriptions Field Description Media ID (MID) A Media ID which is an internal identification number, written to the media the first time the media is used, to aid in tracking the media to the different events. - Page 182 Tape Drive Error Logs Sense Key Definition The drive was not able to read or write successfully to the tape. Medium Error. Look at the Event Logs and correlate the events with media and system logs to determine if this is due to media or the drive. This sense key is recorded in the drive logs.
-
Page 183: Table 18 Asc/Ascq Field Descriptions
Tape Drive Error Logs Table 18 ASC/ASCQ Field Descriptions ASC/ASCQ Description Suggested Action 0C/00 . Drive was not able to • Problem may be the tape cartridge or the Write Error successfully write the customer drive. Check logs to correlate A401/A501 data to the tape. -
Page 184: Bugcheck Error Logs (Sdlt600 Only)
Bugcheck Error Logs (SDLT600 only) Bugcheck Error Logs (SDLT600 only) Bugcheck Error logs typically indicate that the firmware has reached a point in the decision process that requires a drive reset. There are 11 bugchecks, indicated by the Bugcheck Error field found in the event log's first line. - Page 185 Bugcheck Error Logs (SDLT600 only) Field Description EE03 Spurious Level 5 Interrupt—Drive problem. If the problem continues multiple times after you reset the drive, contact customer support. EE04 Spurious Drive Comm Interrupt—Drive or Loader problem. If the problem continues multiple times after you reset the drive, contact customer support.
-
Page 186: Event Error Logs (Sdlt600 Only)
Event Error Logs (SDLT600 only) Event Error Logs (SDLT600 only) These logs record basic drive events including drive errors, calibration, and history-related actions. There are 14 event error logs, indicated by the Event number filed, and the Event number is located on the first line. All Event Error logs contain the same specialized fields. -
Page 187: A500: Hard Read Error
Event Error Logs (SDLT600 only) Hard Read Error is a recorded event indication the tape drive detected a A500: Hard Read Error condition in which the drive was not successfully able to read the data from a particular location on the media. Figure 40 Hard Read Error/Hard Write Error Block Descriptor... - Page 188 Event Error Logs (SDLT600 only) Field Description Track Number Track number where error occurred Retry Count Retry count used when reading Logical Block Number A block of data on media that includes all physical block associated (LBN) with all heads for that single point of media. For example, in the forward direction if there are four heads and 10 tracks, five forward and five backwards, there would be two logical blocks going backwards.
-
Page 189: A501: Sdlt Hard Write Error
Event Error Logs (SDLT600 only) Write Error is an event is which the tape drive detected a condition that A501: SDLT Hard Write Error the drive was not successfully able to write data to the media. Figure 41 Hard Read Error/Hard Write Error Block Descriptor Long Word... - Page 190 Event Error Logs (SDLT600 only) Field Description Track Number Track number where error occurred Retry Count Retry count used when reading Logical Block Number A block of data on media that includes all physical block associated (LBN) with all heads for that single point of media. For example, in the forward direction if there are 4 heads and 10 tracks 5 forward and 5 backwards, there would be two logical blocks going backwards.
-
Page 191: A502: Sdlt Loader Communication Error
Event Error Logs (SDLT600 only) A502: SDLT Loader Communication Error Figure 42 Loader Long Byte 03 Byte 02 Byte 01 Byte 00 Communication Error Word Block Description Loader Communication Status Table 23 Loader Description Value Communication Error Field Description Loader Communication Status: Status of communication problem Overrun Error 0x10 Parity Error... -
Page 192: Figure 43 Drive Servo Error Block Descriptor
Event Error Logs (SDLT600 only) Figure 43 Drive Servo Error Block Descriptor Long Word Byte 03 Byte 02 Byte 01 Byte 00 Log Type Drive Error Code Drive Status (MSW) Drive Status (LSW) Track Number Physical Block Number (PBN) 7-11 Power on Hours (LSW) Power on Hours (MSW) Head Wear Hours... - Page 193 Event Error Logs (SDLT600 only) Field Description Controller to 0x0A Drive Interface Drive Command 0x21 Time Out Drive Event 0x20 Drive Error Code: Error code from Servo processor Major Error Code Description Possible Action 0000h-001Fh Power on Self Test Check Power Error Check Post Flags 0020h-003Fh...
- Page 194 Event Error Logs (SDLT600 only) Field Description 00C0h-00DFh Internal Software Possible drive, try multiple Errors media 00E0h-00EFh Interrupt Trap Possible Drive Errors 00F0h-00FFh Miscellaneous Possible Drive Errors Drive Status (on Error) MSW Bits Description 15 undefined Drive did not buckle the tape when loading Drive is unloading a tape Drive is loading a tape LSW Bits...
- Page 195 Event Error Logs (SDLT600 only) Field Description Drive is Stopped on Tape Drive is at EOT Drive is at BOT Drive is in process of loading the tape step 2 Drive is in process of loading the tape step 1 A cartridge has been inserted No cartridge has been inserted Drive is in the Process of Initializing (typical after...
- Page 196 Event Error Logs (SDLT600 only) Field Description Unused Unused EEROM Bad LSW Bits Description Unused BOT LED bad Unused A to D test failed Unused Unused EEROM check sum failed 12 volts bad Unused Unused PLL clock test failed EEROM check sum failed Code check sum failed...
-
Page 197: A507/A508: Directory Read Failure/Directory Write Failure
Event Error Logs (SDLT600 only) Cause This error could be due to grave failure to track the optical servo or electrical servo. Suggested Actions Run a Tape Drive Write/Read test with two pieces of media. If test fails, contact customer support. A507/A508: These events indicate a possible problem in reading or writing to the tape directly. -
Page 198: Table 25 Directory Read/Write Failure Field Descriptions
Event Error Logs (SDLT600 only) EOT Status 10-12 Table 25 Directory Read/Write Failure Field Descriptions Field Description Called Mode Directory mode called from Mode Value READ on LOAD WRITE on UNLOAD WRITE from BOT READ BOTH REVERSE READ BOTH FORWARD Save Format Tape format before reading directory Format... - Page 199 Event Error Logs (SDLT600 only) Field Description Flags Directory flags Bits Description 14-31 Filler Calibration On Load success Lram directory stale Tape direction rev Directory stale Retry needed Directory clobbered Non-zero first track Unknown format Event log Format mismatch Directory Write failed LBN 0 found Inhibit directory write Read On Load complete...
- Page 200 Event Error Logs (SDLT600 only) Field Description Read Fail Status Status for Directory Read failures Description Value Unknown Retry failed No Blocks Goofy Blocks No Block 0 Bad ECC Directory Cell Recovery Directory Cell stale Directory Cell fail Serpentine Verify fail BOT fail BOT No Blocks BOT Bad ECC...
- Page 201 Event Error Logs (SDLT600 only) Field Description Status Media directory status Description Value Directory unknown No directory Partial directory Directory complete Directory stale EEPROM Status EEPROM directory status Description Value Directory recovered Initial 0x0001 No LBN 0 Media ID mismatch On Tape directory not empty Sync Lock mismatch...
- Page 202 Event Error Logs (SDLT600 only) Field Description EOT Status Directory status four Description Value Directory recovered Directory attempt Bad directory cell structure Bad directory cell entry Invalid track Sync Lock mismatch Track zero Directory No Pair Directory Zeroed Directory Bad Revision Directory Bad Media Directory RSTO...
- Page 203 Event Error Logs (SDLT600 only) Suggested Actions Following is a list of suggested actions: • Check for other Write Errors. • If the problem continues, contact customer support. SuperLoader 3 Autoloader User’s Guide...
- Page 204 Event Error Logs (SDLT600 only) SuperLoader 3 Autoloader User’s Guide...
- Page 205 Appendix C Regulatory Statements FCC Statement This equipment has been tested and found to comply with the limits for a Class A digital device, pursuant to Part 15 of the FCC rules. These limits are designed to provide reasonable protection against harmful interference in a residential installation.
-
Page 206: Appendix C Regulatory Statements Taiwan Statement
Appendix C Regulatory Statements Taiwan Statement • Connect the equipment into an outlet on a circuit different from that to which the receiver is connected • Consult the dealer or an experienced radio/TV technician for help. Note: Additional information on the need to interconnect the device with shielded (data) cables or the need for special devices, such as ferrite beads on cables, is required if such means of interference suppression was used in the... -
Page 207: Japan Notice
Appendix C Regulatory Statements Japan Notice Japan Notice Canadian Notice (Avis Canadien) This Class A digital apparatus complies with Canadian ICES-003. Cet appareil numérique de la classe A est conforme à la norme Canadian Notice (Avis Canadien) This Class A digital apparatus meets all requirements of the Canadian Interference-Causing Equipment Regulations. -
Page 208: Product Safety Electrostatic Discharge
Appendix C Regulatory Statements Product Safety Electrostatic Discharge Compliance with these directives implies conformity to the following European Norms (in brackets are the equivalent international standards): • EN55022 (CISPR 22) - Electromagnetic Interference • EN50082-1 (IEC801-2, IEC801-3, IEC801-4) - Electromagnetic Immunity •... -
Page 209: Grounding Methods
Appendix C Regulatory Statements Grounding Methods Grounding Methods There are several methods for grounding. Use one or more of the following methods when handling or installing electrostatic-sensitive parts: Use a wrist strap connected by a ground cable to a grounded workstation or computer chassis. -
Page 210: Disposal Of Electrical And Electronic Equipment
Appendix C Regulatory Statements Disposal of Electrical and Electronic Equipment Disposal of Electrical and Electronic Equipment This symbol on the product or on its packaging indicates that this product should not be disposed of with your other waste. Instead, it should be handed over to a designated collection point for the recycling of waste electrical and electronic equipment. -
Page 211: Glossary
Glossary Read, write, or update information on a storage medium, such as access tape. The interval between the time a request for data is made by access time the system and the time the data is available from the drive. The process of assigning particular areas of the media to allocation particular data or instructions. - Page 212 Glossary An aluminum die casting that acts as the support platform for base plate the other modules and for the drive enclosure. The base plate is standard 5.25 inch (133.35 mm) full-high form factor and includes the precision mounting holds used to install Super DLTtape drives into a server or tape library.
- Page 213 Glossary According to SCSI specification, up to eight SCSI devices can be device connected to a single SCSI bus. Each SCSI device contains a SCSI ID number that can be set to 0 through 7. A low-level (usually kernel-mode) operating system device driver component that enables a PC to communicate with peripheral devices such as fixed disk drives, CD-ROMs, and tape drives.
- Page 214 Glossary A message that occurs when there is a loss of ability to interpret error recorded data. Usually due to magnetic issues or defects in or on the media. See ECC. Error Correction Code See EDC. Error Detection Code a local-area network (LAN) protocol using high-speed Ethernet communications at 10 megabits per second.
- Page 215 Glossary Dimensions of a drive that meet standard height full height requirements, usually 3.25 inches (82.55 mm) for a tape or disk drive product. Gigabyte. A unit of measurement equal to 1 million kilobytes. Gigahertz. A measurement of frequency that equals one thousand million Hz, or one thousand MHz.
- Page 216 Glossary between the drive and computer. The most common interfaces for small computer systems are AT (IDE) and SCSI. A drive mounted inside one of a computer’s drive bays. internal drive A worldwide network of computer servers originally developed Internet by the federal government as a communication system in the event of nuclear war or other wide-scale disaster.
- Page 217 Glossary Recording technology in which data is written in tracks linear recording that run the length of the tape media. Contrast with helical scan technology which records data diagonally across the tape. Megabyte. A unit of measurement equal to 1 million bytes. Mean Cycles Between Failures.
- Page 218 Glossary One thousandth of a second (.001 sec.). millisecond (ms) A somewhat out-of-date term used to describe a class of minicomputer multi-user computer that was one notch below a mainframe system. Minicomputer popularity fell with the rise in popularity of the networked PC.
- Page 219 Glossary A measure of the speed of the drive during normal performance operation. Factors affecting performance are seek times, transfer rate, and command overhead. A device added to a system as a complement to the basic peripheral central processing unit (CPU), such as a disk drive, tape drive, or printer. Power-on Hours.
- Page 220 Glossary Small Computer System Interface. An American National SCSI Standards Institute (ANSI) interface between the computer and peripheral controllers. Apple MacIntosh systems and many UNIX operating system workstations use the SCSI interface. Refers to the capability provided by the DLT tape drive scalability family to read tapes from previous generations of drives.
- Page 221 Glossary A faulty data reading that does not recur if the same data is soft error reread from the disk or corrected by ECC. Usually caused by power fluctuations or noise spikes. A tape automation system that sequentially loads and unloads stacker tape cartridges.
- Page 222 Glossary Transmission Control Protocol/Internet Protocol. A TCP/IP communications protocol which ensures that the total amount of bytes sent is received correctly, and also provides the routing information. A type of coating allowing very thin layers of magnetic material thin film used on tape drive read/write heads.
- Page 223 Index returning for service 112 shock specifications 153 status, front panel 35 A500 Hard Read Error 169 unpacking 14 A501 SDLT Hard Write Error 171 vibration specifications 152 A502 SDLT Loader Communication autoloader logs 138 Error 173 A503 SDLT Drive Servo Error 173 A507/A508 Directory Read Failure/ Directory Write Failure 179 accessories 15...
- Page 224 Index cartridges tests 75 ejecting single 28 inserting single 27 moving single 28 using 26 Change mode ejecting setting, front panel 68 magazines 31 choosing a location 9 single cartridge 28 cleaning tape electrostatic discharge (ESD) 190 On-board Remote Management 46 Error Log Client Authorization Control 51 process diagram 116...
- Page 225 Index controls 12 default passwords 60 diagnostic tests 77 Hard Error log diagnostics 75 error codes 117 element status 36 On-board Remote Management entering passwords 25 Ethernet 62 Ethernet information 38 IP address 63 IP gateway 64 logout 25 ID logs 144 magazines 70 identification passwords 71...
- Page 226 Index location single cartridge 28 choosing 9 criteria 9 logout front panel 25 logs network options autoloader 138 On-board Remote Management 49 Basic Information 137 Boot logs 144 Bugcheck Error logs 166 error or history, viewing 54 ID logs 144 OEM logs 144 OEM logs 144 On-board Remote Management...
- Page 227 Index Updates Page 53 operators panel entering passwords 25 rackmounting 86 function keys 24 Random mode functionality 24 On-board Remote Management 45 overview setting, front panel 68 installation 6 regulatory On-board Remote Management 41 Canadian Notice (Avis Canadien) SuperLoader 3 LTO-2 2 SuperLoader 3 LTO-3 2 European Union Notice 189 SuperLoader 3 SDLT600 3...
- Page 228 Index Seq Cycle mode SuperLoader setting, front panel 68 rackmounting 86 Sequential Cycle mode System Operations On-board Remote Management 45 options 44 Sequential mode system reset On-board Remote Management 45 On-board Remote Management 55 setting, front panel 68 system time Sequential mode operations On-board Remote Management 48 front panel 69...
- Page 229 Index viewing element status, front panel 36 Ethernet information, front panel firmware version 35 tape drive status, front panel 37 tape drive version, front panel 37 SuperLoader 3 Autoloader User’s Guide...
- Page 230 Index SuperLoader 3 Autoloader User’s Guide...