Thermo Scientific Applied Biosystems SeqStudio Genetic Analyzer User Manual
Hide thumbs
Also See for Applied Biosystems SeqStudio Genetic Analyzer:
- Getting started manual (64 pages)
Table of Contents
Advertisement
Quick Links
™
SeqStudio
Software
USER GUIDE
for use with:
SeqStudio
Data Collection Software v1.2
™
SeqStudio
Plate Manager
™
SeqStudio
Remote Monitoring App
™
SAE Administrator Console v2.0
SeqStudio
Genetic Analyzer Cartridge (Cat. No. A33671)
™
SeqStudio
Genetic Analyzer Cartridge v2 (Cat. No. A41331)
™
Publication Number MAN0018646
Revision A.0
For Research Use Only. Not for use in diagnostic procedures.
Genetic Analyzer Instrument and
Advertisement
Table of Contents
Troubleshooting

Subscribe to Our Youtube Channel
Related Manuals for Thermo Scientific Applied Biosystems SeqStudio Genetic Analyzer


Summary of Contents for Thermo Scientific Applied Biosystems SeqStudio Genetic Analyzer
- Page 1 ™ SeqStudio Genetic Analyzer Instrument and Software USER GUIDE for use with: SeqStudio Data Collection Software v1.2 ™ SeqStudio Plate Manager ™ SeqStudio Remote Monitoring App ™ SAE Administrator Console v2.0 SeqStudio Genetic Analyzer Cartridge (Cat. No. A33671) ™ SeqStudio Genetic Analyzer Cartridge v2 (Cat.
- Page 2 Manufacturer: Products: Life Technologies Holdings Pte Ltd | ™ SeqStudio Genetic Analyzer Block 33 | ™ SeqStudio Data Collection Software Marsiling Industrial Estate Road 3 | ™ SeqStudio Plate Manager (desktop) #07-06, Singapore 739256 ™ SeqStudio Genetic Analyzer Cartridge ™ SeqStudio Genetic Analyzer Cartridge v2 Security, Auditing, and E‑signature (SAE) v2.0 module...
-
Page 3: Table Of Contents
Contents ■ CHAPTER 1 Product information ........12 Instrument overview . - Page 4 Contents Prepare the samples ............37 Sample preparation guidelines .
- Page 5 Contents Sign a dye calibration or an install run ..........64 View E-signature records for a dye calibration or an install run .
- Page 6 Contents ■ CHAPTER 7 Start and monitor a run ........92 Load the plate or the tube assembly .
- Page 7 Contents Delete plate setups ............124 Manage email notifications in the Connect cloud-based platform .
- Page 8 Contents Create your own local instrument profile ........153 Change your own local instrument profile PIN .
- Page 9 Contents Software troubleshooting ............181 Service tools .
- Page 10 Contents ■ APPENDIX E Run modules ......... . . 218 Run modules, read lengths, size ranges, and run times .
- Page 11 Contents ■ Documentation and support ......... . . 236 Related documentation .
-
Page 12: Chapter 1 Product Information
Product information ■ Instrument overview ..........13 ■... -
Page 13: Instrument Overview
Chapter 1 Product information Instrument overview Instrument overview The Applied Biosystems ™ SeqStudio ™ Genetic Analyzer with SeqStudio ™ Data Collection Software is a fluorescent dye-labeled genetic analysis system using capillary electrophoresis technology. It enables both sequencing and fragment analysis applications without the need to switch polymer type or capillary array length. -
Page 14: Parts Of The Instrument
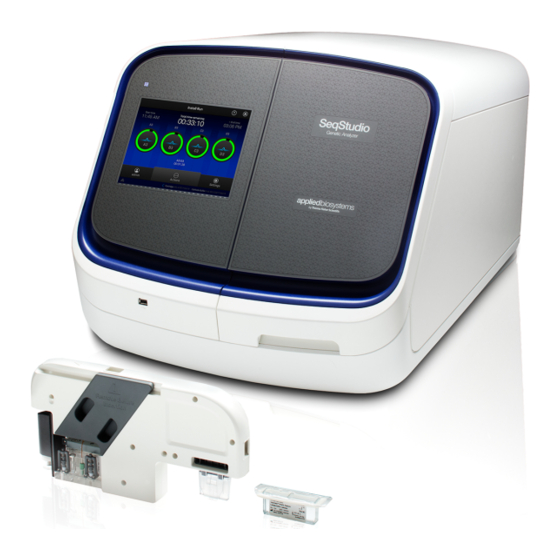
Chapter 1 Product information Parts of the instrument Parts of the instrument Figure 1 Front of the instrument Front panel indicator—Shows the status of the instrument Touchscreen—User interface Door—Provides access to the cartridge, the cathode buffer, and sample plate or tubes USB port Figure 2 Interior of the instrument Cartridge rails... -
Page 15: Instrument Status Indicator
Chapter 1 Product information SeqStudio Genetic Analyzer consumables ™ Figure 3 Rear of the instrument RJ45 ethernet port USB port Power receptacle On/Off switch Instrument status indicator Indicator Instrument status All lights off Powered off or in Cartridge storage mode. Blue light (blinking) Starting up. -
Page 16: Cartridge
Chapter 1 Product information SeqStudio Genetic Analyzer consumables ™ Cartridge The SeqStudio ™ Genetic Analyzer uses a 4-capillary, self-contained, replaceable cartridge. The following cartridges are available: Cartridge No. of injections No. of samples Storage ™ SeqStudio Genetic Analyzer 125 injections 500 samples See Table 1 on Cartridge (Cat. - Page 17 Chapter 1 Product information SeqStudio Genetic Analyzer consumables ™ Figure 5 Parts of the polymer delivery system Universal polymer Polymer valve Syringe Capillary fitting (anode end) Buffer valve Anode buffer reservoir Figure 6 Cartridge with optical cover and Integrated Capillary Protector Optical cover Optical cover hand hold (for removing the optical cover) Integrated Capillary Protector...
- Page 18 Chapter 1 Product information SeqStudio Genetic Analyzer consumables ™ Cartridge storage Table 1 Storage information for the SeqStudio Genetic Analyzer Cartridge (Cat. No. A33671) ™ Condition Description Shipping Shipped at 2–8°C. Store upright at 2–8°C upon receipt. Save the white storage box and optical cover for off-instrument cartridge storage. On-instrument storage For routine use, can be used and stored on the instrument for up to 4 months.
- Page 19 Chapter 1 Product information SeqStudio Genetic Analyzer consumables ™ Table 2 Storage information for the SeqStudio ™ Genetic Analyzer Cartridge v2 (Cat. No. A41331) Condition Description Shipping Shipped at 2–8°C. Store upright at 2–8°C upon receipt. Save the white storage box and optical cover for off-instrument cartridge storage. On-instrument storage For routine use, can be used and stored on the instrument for up to 6 months.
-
Page 20: Seqstudio Genetic Analyzer Cathode Buffer Container
Chapter 1 Product information SeqStudio Genetic Analyzer consumables ™ SeqStudio ™ The SeqStudio ™ Genetic Analyzer Cathode Buffer Container (CBC) contains running buffer for capillary electrophoresis. The container has two compartments. The rear Genetic Analyzer compartment provides the cathode buffer for electrophoresis. The front compartment Cathode Buffer is for capillary wash and waste. -
Page 21: Important Notice Regarding Use Of Consumables That Exceed Supported Limits
Chapter 1 Product information SeqStudio Genetic Analyzer consumables ™ Table 3 RFID tag read/write events and consumables status updates Component RFID read RFID write Consumables status update • The Expiration time is reset SeqStudio ™ When a cartridge Every 8 hours and/or before from the manufacturer expiry Genetic Analyzer inserted. -
Page 22: Software Features
Chapter 1 Product information Software features use of expired consumables is at customer's own risk and without recourse to Life Technologies. For example, product warranties do not apply to defects resulting from or repairs required due to misuse, neglect, or accident including, without limitation, operation outside of the environmental or use specifications or not in conformance with Life Technologies instructions for the instrument system, software, or accessories. - Page 23 Chapter 1 Product information Software features SeqStudio ™ Data SeqStudio ™ Plate SeqStudio ™ Plate Feature Collection Manager (Connect Remote Monitoring App Manager (desktop) Software platform) Manage run — ✓ ✓ ✓ modules (including edit a run module) Advanced options for plate properties Adjust —...
-
Page 24: Seqstudio ™ Plate Manager Overview
Chapter 1 Product information SeqStudio Plate Manager overview ™ SeqStudio ™ Data SeqStudio ™ Plate SeqStudio ™ Plate Feature Collection Manager (Connect Remote Monitoring App Manager (desktop) Software platform) View Contiguous — — ✓ ✓ Read Length (sequence analysis only) View and export results View real-time —... -
Page 25: Computer And Operating System Options
Chapter 1 Product information SeqStudio Plate Manager overview ™ Figure 9 Plate Manager on the Connect cloud-based platform or desktop ™ Computer and • PC with Windows operating system ™ • PC with Windows options ™ • Macintosh with OS X Recommended The following browsers are recommended to use the Plate Manager app on the Connect cloud-based platform or a desktop computer:... -
Page 26: Seqstudio ™ Remote Monitoring App Overview
Chapter 1 Product information SeqStudio Remote Monitoring App overview ™ ™ SeqStudio Remote Monitoring App overview The Remote Monitoring App allows you to monitor the status of instrument runs from a remote location. The Remote Monitoring App is available: • As an app on the Connect cloud-based platform, with direct access from the Plate Manager or the InstrumentConnect. -
Page 27: Network Connection Options
Chapter 1 Product information Network connection options Network connection options The SeqStudio ™ Genetic Analyzer can be connected to a network or computer in the following configurations: Local area network (LAN) Connect platform Direct connection connection connection Wired Wired or wireless Wired or wireless Network and password security requirements Network... -
Page 28: Experiment Types
Chapter 1 Product information Experiment types Experiment types Sequencing Sequencing is the determination of the base-pair sequence of a DNA fragment by the formation of extension products of various lengths amplified through PCR. For more information, see DNA Sequencing by Capillary Electrophoresis Chemistry Guide Second Edition (Pub. -
Page 29: Data Output
Chapter 1 Product information Data output Data output SeqStudio ™ Data Collection Software generates an electropherogram (intensity plot) for each dye that is based on the migration of DNA fragments through the capillaries during a run. The format of the sample data files is determined by the type of experiment that is specified at the time of plate setup. - Page 30 Chapter 1 Product information Secondary analysis software Analysis Description Fragment analysis Sizing Analysis Module Peak Performs peak sizing. Scanner ™ Software Microsatellite Analysis Analyzes a mixture of DNA fragments, separated by size, on Software supported capillary electrophoresis systems. Desktop secondary analysis software IMPORTANT! Older versions of the desktop secondary analysis software cannot ™...
-
Page 31: Workflow: Connect Cloud-Based Platform Or Desktop
Chapter 1 Product information Workflow: Connect cloud-based platform or desktop Workflow: Connect cloud-based platform or desktop Get started Prepare the instrument (page 39) Prepare the samples (page 37) Create a plate setup on the Connect cloud-based platform or desktop Access the Plate Manager on the Connect cloud-based platform (page 69) Access the Plate Manager on the desktop (page 69) -
Page 32: Workflow: Instrument
Chapter 1 Product information Workflow: instrument Workflow: instrument Get started Prepare the instrument (page 39) Prepare the samples (page 37) Create a plate setup on the instrument Create or import a plate setup (page 81) Enter plate properties (page 82) Assign wells: run module, size standard, dye set, and kit (page 84) Assign wells: sample name, sample type, and custom fields... -
Page 33: Precautions For Use
Prepare the samples and the instrument ■ Precautions for use ........... 33 ■... -
Page 34: Chapter 2 Prepare The Samples And The Instrument
Chapter 2 Prepare the samples and the instrument Power on the instrument Power on the instrument IMPORTANT! Do not power on the instrument until it has been installed and set up by a Thermo Fisher Scientific representative. Press the On/Off switch on the rear panel. The instrument does not maintain the correct temperature conditions for IMPORTANT! the cartridge when it is powered off. -
Page 35: Sign In With The Guest Instrument Profile
Chapter 2 Prepare the samples and the instrument Sign in with the Guest instrument profile Sign in with the Guest instrument profile 1. In the Sign In screen, touch the down arrow. 2. In the bottom left of the screen, touch the Guest button. No PIN is required. Sign out In the home screen: 1. -
Page 36: Parts Of The Home Screen
Chapter 2 Prepare the samples and the instrument Parts of the home screen Parts of the home screen Eject icon Help Instrument name Status dial—Touch to create a plate setup. Settings—Touch to view previous results (Run History) or configure the instrument. Status of consumables—See “Check the consumables status“... -
Page 37: Prepare The Samples
Chapter 2 Prepare the samples and the instrument Prepare the samples Prepare the samples Sample preparation guidelines Item Guidelines • Use MicroAmp ™ Optical 96-Well Reaction Plate or MicroAmp ™ Reaction Tubes with Plates and tubes a tray and retainer set. IMPORTANT! Fast plates are not compatible with the SeqStudio ™... -
Page 38: Plate Layout And Loading Guidelines
Chapter 2 Prepare the samples and the instrument Prepare the samples Plate layout and • Samples are stable for 16–24 hours on the instrument. loading guidelines • Load a maximum of 48 samples per plate if you use a long run module (Long Seq, Long Seq BDX, and Long Frag Analysis). -
Page 39: Prepare The Tubes
Chapter 2 Prepare the samples and the instrument Prepare the instrument Prepare the tubes On a clean and level surface: 1. Place the tubes in the MicroAmp ™ 96-well tray, then place the tray retainer over the tubes. 2. Prepare the sample according to your application protocol, then pipet the sample into the tubes. - Page 40 Chapter 2 Prepare the samples and the instrument Prepare the instrument and Arrows Display Cartridge Cathode buffer arrow to use in this SVG. Not installed on the instrument. Not installed on the instrument. advanced callouts or arrows White OK for use. OK for use.
-
Page 41: Load The Cbc, The Sample Plate, And The Cartridge
Chapter 2 Prepare the samples and the instrument Prepare the instrument Load the CBC, the The Eject plate command is disabled for a few minutes after you insert a cartridge. If you are loading the CBC, sample plate, and cartridge at the same time, you can save sample plate, and time by loading the CBC and sample plate before you insert the cartridge. - Page 42 Chapter 2 Prepare the samples and the instrument Prepare the instrument 5. Close the autosampler lid: Press down on the center of the lid or press down on both sides of the lid with equal pressure until the lid clicks shut. 6.
-
Page 43: Based Platform
Use the instrument with the Connect cloud-based platform ■ Understanding instrument and Connect cloud-based platform interaction . . . 43 ■ Connect cloud-based platform administrators for an instrument ... . 48 ■... -
Page 44: Local Versus Connect Cloud-Based Platform Instrument Profiles
Chapter 3 Use the instrument with the Connect cloud-based platform Understanding instrument and Connect cloud-based platform interaction Local versus • Local instrument profile—All plates and results are stored on the instrument under a local instrument profile. Connect cloud- based platform •... -
Page 45: If You Link When You Are Not Signed In To The Instrument
Chapter 3 Use the instrument with the Connect cloud-based platform Understanding instrument and Connect cloud-based platform interaction Phase Steps that occur User G. ) and • Your Connect platform instrument profile ( is displayed in the After you link: home screen of the instrument. •... - Page 46 Chapter 3 Use the instrument with the Connect cloud-based platform Understanding instrument and Connect cloud-based platform interaction Phase Steps that occur • You use an option described in “Link the instrument to your Connect cloud-based When you link: platform account“ on page 136 to link. •...
-
Page 47: Connect Cloud-Based Platform Instrument Profile Roles And Functions
Chapter 3 Use the instrument with the Connect cloud-based platform Understanding instrument and Connect cloud-based platform interaction Connect cloud-based platform instrument profile roles and functions Instrument profile Location Functions allowed • Create, save, open, import, and run plate setups Standard Connect platform •... -
Page 48: Connect Cloud-Based Platform Administrators For An Instrument
Chapter 3 Use the instrument with the Connect cloud-based platform Connect cloud-based platform administrators for an instrument Connect cloud-based platform administrators for an instrument Connect cloud- The first user who links the instrument to the Connect cloud-based platform is automatically assigned the Connect platform administrator role for the instrument based platform (even if the user has a standard local profile). -
Page 49: Manage The Users And Administrators Of Your Instrument
Chapter 3 Use the instrument with the Connect cloud-based platform Connect cloud-based platform administrators for an instrument Manage the users Any user with a Connect cloud-based platform administrator profile can manage users for an instrument or disconnect an instrument from InstrumentConnect. administrators of If a Connect cloud-based The software... -
Page 50: Disconnect Individual Users From An Instrument
Chapter 3 Use the instrument with the Connect cloud-based platform Register and obtain a Connect cloud-based platform account Disconnect You cannot disconnect individual users from an instrument. individual users To disconnect a user, or to unlink the instrument from a Connect cloud-based platform from an account, you must disconnect the instrument from InstrumentConnect. -
Page 51: Link The Instrument To Your Connect Cloud-Based Platform Account
Chapter 3 Use the instrument with the Connect cloud-based platform Link the instrument to your Connect cloud-based platform account Link the instrument to your Connect cloud-based platform account Note: For detailed information on linking the instrument to your Connect cloud- based platform account, see Appendix B, “Link the instrument to your Connect cloud- based platform account—detailed instructions“. -
Page 52: Change Your Own Connect Cloud-Based Platform Instrument Profile Pin
Chapter 3 Use the instrument with the Connect cloud-based platform Change your own Connect cloud-based platform instrument profile PIN Option Action Mobile Note: Before selecting this option, install and sign in to the devices InstrumentConnect app on your mobile device. In the Connect to the Cloud screen: 1. -
Page 53: Set Up Email Notifications From The Instrument
Chapter 3 Use the instrument with the Connect cloud-based platform Set up email notifications from the instrument Set up email notifications from the instrument When an instrument is linked to your Connect cloud-based platform account, email notifications are automatically sent to your Connect platform account email address. Perform this procedure to disable any of the default notifications. - Page 54 Chapter 3 Use the instrument with the Connect cloud-based platform Set up email notifications from the instrument 3. In the Email notifications screen, select or deselect the options for which you want to receive email notifications, then touch Done. SeqStudio Genetic Analyzer Instrument and Software User Guide ™...
-
Page 55: And E-Signature (Sae) V2.0 Module
Use the instrument with the Security, Auditing, and E‑signature (SAE) v2.0 module ■ Overview of the Security, Auditing, and E-signature (SAE) v2.0 module components ..........56 ■... -
Page 56: Chapter 4 Use The Instrument With The Security, Auditing
Chapter 4 Use the instrument with the Security, Auditing, and E‑signature (SAE) v2.0 module Overview of the Security, Auditing, and E‑signature (SAE) v2.0 module components Overview of the Security, Auditing, and E‑signature (SAE) v2.0 module components The Security, Auditing, and E-signature (SAE) v2.0 module includes three components: •... -
Page 57: Configuring The Sae Module
Chapter 4 Use the instrument with the Security, Auditing, and E‑signature (SAE) v2.0 module Configuring the SAE module Dialog box Description An action is set up for auditing and requires you to specify a reason for the action. An action is set up for electronic signature and allows you to enter your password to allow the action. -
Page 58: Instrument Functionality When Sae Is Enabled Or Disabled
Chapter 4 Use the instrument with the Security, Auditing, and E‑signature (SAE) v2.0 module Instrument functionality when SAE is enabled or disabled Instrument functionality when SAE is enabled or disabled Sign in to the instrument with Affect on instrument profile type •... -
Page 59: Enable Sae On The Instrument And Specify The Sae Server (Administrator Only)
Chapter 4 Use the instrument with the Security, Auditing, and E‑signature (SAE) v2.0 module Enable SAE on the instrument and specify the SAE server (administrator only) Enable SAE on the instrument and specify the SAE server (administrator only) This procedure requires a local administrator profile on the instrument and an SAE administrator account in the SAE Administrator Console. -
Page 60: Sign In With Sae Enabled
Chapter 4 Use the instrument with the Security, Auditing, and E‑signature (SAE) v2.0 module Sign in with SAE enabled b. In the Sign In screen under Local sign in, touch Sign in. c. Enter your local administrator profile name and PIN. d. -
Page 61: Specify Audit Reasons
Chapter 4 Use the instrument with the Security, Auditing, and E‑signature (SAE) v2.0 module Specify audit reasons Specify audit reasons Depending on the way that your SAE administrator configures audit settings, the Enter Audit Reason screen may be displayed when you make changes to a plate setup or a run module. - Page 62 Chapter 4 Use the instrument with the Security, Auditing, and E‑signature (SAE) v2.0 module E-signature requirements when you start a run The Object Name column lists the items that require signatures: If the Object Name The object is For information, see lists A dye set name The most recent dye calibration...
-
Page 63: Sign A Plate Setup
Chapter 4 Use the instrument with the Security, Auditing, and E‑signature (SAE) v2.0 module Sign a plate setup Sign a plate setup 1. Create or open a plate setup, make changes as needed, then save the plate setup. 2. In the Plate Properties tab, touch More Options, then touch the Sign Plate button at the bottom left of the screen. -
Page 64: Sign A Dye Calibration Or An Install Run
Chapter 4 Use the instrument with the Security, Auditing, and E‑signature (SAE) v2.0 module Sign a dye calibration or an install run Sign a dye calibration or an install run 1. Touch Settings4Maintenance and Service. 2. Touch Calibration4Calibration history or Install run4Install run history. 3. -
Page 65: Use The Instrument When The Sae Server Is Offline
Chapter 4 Use the instrument with the Security, Auditing, and E‑signature (SAE) v2.0 module Use the instrument when the SAE server is offline Use the instrument when the SAE server is offline If your SAE administrator has configured your instrument to allow use when the SAE server is offline (Client offline login System setting in the SAE module), you can use the instrument for the period of time specified by the SAE administrator for Client offline login. -
Page 66: Sae Error Messages And Actions
Chapter 4 Use the instrument with the Security, Auditing, and E‑signature (SAE) v2.0 module SAE error messages and actions SAE error messages and actions Message Possible cause Action Not authorized to... Your SAE account does not specify Contact your SAE administrator. permission to perform the function. -
Page 67: Plate Manager
Create or modify a plate setup from the Plate Manager ■ Overview of plate setup settings ........67 ■... - Page 68 Chapter 5 Create or modify a plate setup from the Plate Manager Overview of plate setup settings Category Setting Notes (Fragment/HID analysis only) Size • Injection group User‑created size standards and dye sets are standard accessible to all users. (a set of 4 wells) •...
-
Page 69: Set Up A Plate Using Default Settings (Plate Manager)
Chapter 5 Create or modify a plate setup from the Plate Manager Set up a plate using default settings (Plate Manager) Set up a plate using default settings (Plate Manager) Access the Plate 1. Sign in to thermofisher.com/connect. Manager on the 2. -
Page 70: Enter Plate Properties
Chapter 5 Create or modify a plate setup from the Plate Manager Set up a plate using default settings (Plate Manager) Enter plate In the Properties tab: properties 1. (Optional) Edit the Plate name, Barcode, or Owner. 2. Select an option in the Plate setup security field. •... -
Page 71: Assign Wells: Sample And Run Information
Chapter 5 Create or modify a plate setup from the Plate Manager Set up a plate using default settings (Plate Manager) This feature is useful in secondary analysis software applications that organize files based on amplicon and specimen information (Connect cloud-based platform applications: Variant Analysis (VA) module, Next-generation Confirmation (NGC) module;... -
Page 72: Keyboard Shortcuts For The Sample Table
Chapter 5 Create or modify a plate setup from the Plate Manager Set up a plate using default settings (Plate Manager) Sample name to "Test" for well E1, the Sample name for well A1 is also changed to "Test". 4. (Fragment/HID analysis only) Select the Sample type for each well: Allelic ladder, Negative control, Positive control, or Sample. -
Page 73: Save A Plate Setup In The Plate Manager
Chapter 5 Create or modify a plate setup from the Plate Manager Set up a plate using default settings (Plate Manager) Keys Action Ctrl+ Shift+End Select all cells in the column to the bottom cell including the current cell. Editor Enter Open and close the cell editor. -
Page 74: Additional Plate Settings (Plate Manager)
Chapter 5 Create or modify a plate setup from the Plate Manager Additional plate settings (Plate Manager) 2. Click Save. Note: The Monitor my run button is available only in the Connect cloud-based platform app. If you are running the Plate The plate setup is saved as a... -
Page 75: Edit Analysis Settings
Chapter 5 Create or modify a plate setup from the Plate Manager Additional plate settings (Plate Manager) Edit analysis Factory-installed items cannot be edited or deleted. To create a new item from a factory-installed item, copy, edit, then save the new item. settings 1. -
Page 76: Hide Or Share A Plate (Plate Setup Security)
Chapter 5 Create or modify a plate setup from the Plate Manager Additional plate settings (Plate Manager) For information on creating custom fields to include in file name conventions, see “Define custom fields“ on page 89. 3. (Optional) Click-drag to move an attribute to another position. 4. -
Page 77: Chapter 6 Create Or Modify A Plate Setup From The Instrument
Create or modify a plate setup from the instrument ■ PSM and CSV plate setup files for import into the instrument ....78 ■ Shared (public), hidden (my plates), and guest plate setup files ... . . 79 ■... -
Page 78: Psm And Csv Plate Setup Files For Import Into The Instrument
Chapter 6 Create or modify a plate setup from the instrument PSM and CSV plate setup files for import into the instrument PSM and CSV plate setup files for import into the instrument Format Contains... When to use... names and •... -
Page 79: Shared (Public), Hidden (My Plates), And Guest Plate Setup Files
Chapter 6 Create or modify a plate setup from the instrument Shared (public), hidden (my plates), and guest plate setup files Shared (public), hidden (my plates), and guest plate setup files Create by setting Plate Accessible to Stored in folder on File name convention Analysis settings used... -
Page 80: (Optional) Set Up For Auto Export Of Sample Data Files (Ab1 And Fsa)
Chapter 6 Create or modify a plate setup from the instrument (Optional) Set up for auto export of sample data files (AB1 and FSA) Category Setting Notes (Fragment/HID analysis only) Size • Injection group User‑created size standards and dye sets are standard accessible to all users. -
Page 81: Set Up A Plate Using Default Settings (Instrument)
Chapter 6 Create or modify a plate setup from the instrument Set up a plate using default settings (instrument) Set up a plate using default settings (instrument) Create or import a In the home screen: plate setup 1. Touch Set up run. 2. -
Page 82: Enter Plate Properties
Chapter 6 Create or modify a plate setup from the instrument Set up a plate using default settings (instrument) Enter plate 1. At the top-right of the Plate properties screen, touch the Properties tab. properties 2. Touch the Plate name field, then enter the plate name. 3. - Page 83 Chapter 6 Create or modify a plate setup from the instrument Set up a plate using default settings (instrument) Original location to which the plate was saved, but is no longer accessible by the instrument. 8. (Optional for Sequencing or Mixed plate) Touch the I am analyzing my data with Sanger variant analysis software checkbox.
-
Page 84: Assign Wells: Run Module, Size Standard, Dye Set, And Kit
Chapter 6 Create or modify a plate setup from the instrument Set up a plate using default settings (instrument) Assign wells: run Note: You can assign these settings to one or more injection groups at the same time. module, size 1. - Page 85 Chapter 6 Create or modify a plate setup from the instrument Set up a plate using default settings (instrument) Note: All settings in the remaining steps will be assigned to all selected injection groups. If different injection groups require different settings, repeat these steps for each injection group.
-
Page 86: Assign Wells: Sample Name, Sample Type, And Custom Fields
Chapter 6 Create or modify a plate setup from the instrument Set up a plate using default settings (instrument) Assign wells: Note: You can assign these settings to only one well at a time. sample name, 1. In the Edit plate screen, touch Sample name to display the well attributes fields. sample type, and custom fields 2. -
Page 87: Set Optional Plate Settings (Instrument)
Chapter 6 Create or modify a plate setup from the instrument Set optional plate settings (instrument) 3. Touch Done to close the screen then Done to close the Edit Plate screen. Application type—Sequencing, Fragment or HID; designated by S, F, or H Save the plate or start the run 4. -
Page 88: Modify The Default File Name Convention
Chapter 6 Create or modify a plate setup from the instrument Set optional plate settings (instrument) Note: The last setting selected is used as the default for new plates. 3. Touch Done. Modify the default The default file name convention determines how the data files (AB1 or FSA) associated with a plate are named. -
Page 89: Hide Or Share A Plate (Plate Setup Security)
Chapter 6 Create or modify a plate setup from the instrument Set optional plate settings (instrument) 5. Touch and drag attributes up or down in the list. 6. Touch Done. Hide or share a For more information, see “Shared (public), hidden (my plates), and guest plate setup files“... - Page 90 Chapter 6 Create or modify a plate setup from the instrument Set optional plate settings (instrument) 2. Touch Sample name to display the injection group and well attributes fields. Touch the sample name field 3. Touch a custom field, then enter the definition for the selected wells. 4.
-
Page 91: (Optional) View The Injection List, Change Injection Settings Or Order, Or Specify Replicates And Re-Injections
Chapter 6 Create or modify a plate setup from the instrument Set optional plate settings (instrument) (Optional) View In the Plate properties screen: the injection list, 1. Touch Injection options. change injection settings or order, 2. Touch an injection group, then configure the injection list: or specify •... -
Page 92: Load The Plate Or The Tube Assembly
Start and monitor a run ■ Load the plate or the tube assembly ........92 ■... -
Page 93: Chapter 7 Start And Monitor A Run
Chapter 7 Start and monitor a run Select a plate setup and start a run 5. Close the autosampler lid: Press down on the center of the lid or press down on both sides of the lid with equal pressure until the lid clicks shut. 6. -
Page 94: Automatic File Cleanup
Chapter 7 Start and monitor a run Select a plate setup and start a run 4. Touch Start run. • If a new cartridge was inserted before the run, the instrument performs an optical alignment before starting the run. • During the run, the instrument performs an automatic spectral calibration adjustment (auto calibration) for each sample to correct for spectral overlap. -
Page 95: Lock The Touchscreen
Chapter 7 Start and monitor a run Lock the touchscreen Lock the touchscreen During a run, you can lock the touchscreen to prevent other users from using the instrument. This feature is not available to Guest users. Only the user who locked the touchscreen or an administrator can sign in to the instrument if the touchscreen is locked. - Page 96 Chapter 7 Start and monitor a run Monitor a run from the Connect cloud-based platform Figure 11 Remote Monitoring App SeqStudio Genetic Analyzer Instrument and Software User Guide ™...
-
Page 97: Open The Remote Monitoring App From The Plate Manager
Chapter 7 Start and monitor a run Monitor a run from the Connect cloud-based platform Open the Remote A run is accessible from the Plate Manager for 24 hours after the run is complete, or until another run is started. Monitoring App from the Plate You can open the Remote Monitoring App immediately after you save a plate setup or... - Page 98 Chapter 7 Start and monitor a run Monitor a run from the Connect cloud-based platform • To open the Remote Monitoring App at a later time, click , then select an instrument or click to access InstrumentConnect. Select an instrument or click to access InstrumentConnect. Figure 12 Remote Monitoring App SeqStudio Genetic Analyzer Instrument and Software User Guide...
-
Page 99: Platform Account
Chapter 7 Start and monitor a run Monitor a run from the Connect cloud-based platform View notifications 1. In any screen in the Connect cloud-based platform, click from the instrument on your Connect cloud-based platform account 2. Click a notification, then click Dismiss or Dismiss all to dismiss the notification. 1. - Page 100 Chapter 7 Start and monitor a run Monitor a run from the Connect cloud-based platform Edit injection group run settings In the Results screen: 1. Select Actions4Edit injection group. 2. Edit settings as needed, then click OK. Re-inject or delete an injection group In the Results screen: Select Actions4Re-inject group or Actions4Delete injection group.
- Page 101 Chapter 7 Start and monitor a run Monitor a run from the Connect cloud-based platform Figure 14 Sequence analysis raw trace Zoom in/out. Raw trace. Lock/unlock trace zooming for all traces in the injection group. View Options—Select the basecalls to display; set vertical scaling. Remote Monitoring App EPT trace The EPT view (ElectroPhoresis Telemetry) shows instrument data conditions (currents, temperatures, electrophoresis voltage) as a function of time.
- Page 102 Chapter 7 Start and monitor a run Monitor a run from the Connect cloud-based platform Remote Monitoring App analyzed trace Figure 15 Fragment analysis analyzed trace Lock/unlock trace zooming for all traces in the injection group. Zoom in/out. Analyzed trace. Thumbnail trace—Click-drag to view another region of the trace.
-
Page 103: Monitor A Run From A Mobile Device
Chapter 7 Start and monitor a run Monitor a run from a mobile device Monitor a run from a mobile device Before you begin, see “Link the instrument from a mobile device“ on page 185. 1. On your mobile device, launch InstrumentConnect. 2. - Page 104 Chapter 7 Start and monitor a run Monitor a run from a mobile device 4. Touch the status dial to view the injection list. 5. Touch an injection group to display quality alerts, then touch View raw plot to view the data. •...
-
Page 105: Monitor A Run From The Instrument
Chapter 7 Start and monitor a run Monitor a run from the instrument Monitor a run from the instrument (Optional) View In the Plate properties screen: the injection list, 1. Touch Injection options. change injection settings or order, 2. Touch an injection group, then configure the injection list: or specify •... -
Page 106: View Real-Time Results
Chapter 7 Start and monitor a run Monitor a run from the instrument View real-time During a run, touch one of the injection dials to display the trace for the selected capillary. results See “Fragment/HID analysis trace“ on page 113 or “Sequence analysis trace“ on page 115 for information. -
Page 107: View Results When The Run Is Completed
Chapter 7 Start and monitor a run Monitor a run from the instrument 2. Manage the plate or injections: Touch View results View the list of injections and status. Edit plate For injections that have not yet been run, edit Sample Name, Run Module, Dye Set, Size Standard, Sample Type, and custom fields. - Page 108 Chapter 7 Start and monitor a run Monitor a run from the instrument 3. Touch an injection group. 4. View the results in the Run Result Details screen, or touch for well details. See “Fragment/HID analysis results“ on page 113 or “Sequence analysis results“...
-
Page 109: Unload The Plate Or The Tube Assembly
Chapter 7 Start and monitor a run Unload the plate or the tube assembly Unload the plate or the tube assembly When the run is complete: 1. Touch , touch Eject plate, then open the instrument door when prompted. 2. Press the release button on the autosampler to open the lid. 3. -
Page 110: Chapter 8 View And Analyze Results
View and analyze results ■ View results in the Remote Monitoring App on the Connect cloud- based platform ............110 ■... -
Page 111: View Results On The Instrument
Chapter 8 View and analyze results View results on the instrument View results on the instrument View results when View results for the plate when the run is completed (all injections are finished). the run is 1. Touch Results to view the run results. completed Arrows o use in this SVG. - Page 112 Chapter 8 View and analyze results View results on the instrument 7. (Optional) Adjust the graphical view (see “Adjust the trace display“ on page 108). 8. Touch to scroll to the raw data or EPT Plot (ElectroPhoresis Telemetry). See “EPT plot“ on page 117. Adjust the trace display See “View results when the run is completed“...
-
Page 113: Fragment/Hid Analysis Results
Chapter 8 View and analyze results View results on the instrument Fragment/HID Fragment/HID analysis trace analysis results Trace color hide/show—Touch to open, then touch a color to hide or show. Analyzed trace Size standard curve (red line) Thumbnail trace—Drag the center of the pane in the thumbnail trace to display another trace area in the top pane. - Page 114 Chapter 8 View and analyze results View results on the instrument Setting Description Size Quality • If SQ is ≤0.75, it passes the QC test and does not trigger a quality alert ( • If SQ is 0.25–0.74, it triggers a warning quality alert ( •...
-
Page 115: Sequence Analysis Results
Chapter 8 View and analyze results View results on the instrument Sequence analysis Sequence analysis trace results Quality Value bars and values: • Pure base with QV ³20 • Pure base with QV 15–19 • Pure base with QV <15 •... - Page 116 Chapter 8 View and analyze results View results on the instrument Result Description CRL (Contiguous Read The longest uninterrupted segment of bases with an average Quality Value (QV) ³20. Length) In addition to evaluating the QV of a base call, the software considers the QV of adjacent bases within a ±21-bp moving average to determine a contiguous read length based on quality values.
-
Page 117: Ept Plot
Chapter 8 View and analyze results View results on the instrument Pure base versus mixed base QVs Pure bases and mixed bases have the same probability of error for the associated –q/10 basecall (10 ). Note the following: • High-quality pure bases typically have QVs of 20 or higher. •... -
Page 118: View Results For A Previously Run Plate (Run History)
Chapter 8 View and analyze results View results on the instrument View results for a In the home screen: previously run 1. Touch Settings4Run history. plate (run history) 2. Touch a plate name, then touch View. If you select more than one plate name, the View button is dimmed. The Run History screen is displayed. -
Page 119: Data Quality Alerts
Chapter 8 View and analyze results View results on the instrument 5. Touch a sample file name, then touch View. If you select more than one sample file name, the View button is dimmed. If the data triggered any quality alerts, a QC alerts screen is displayed. For information on quality alerts, see: Click View data to display the trace for the sample. -
Page 120: Edit Injection Parameters And Re-Inject Samples
Chapter 8 View and analyze results View results on the instrument Quality alert Description Action • Analyze the data in a The analysis range is too small. Correct the Various causes. secondary analysis analysis range in analysis settings and re- software with a corrected analyze in secondary analysis software or re- analysis range. -
Page 121: Export Results From The Instrument (Sample Data Files And Qc Reports)
Chapter 8 View and analyze results Export results from the instrument (sample data files and QC reports) Export results from the instrument (sample data files and QC reports) In the home screen: 1. Touch Settings4Run history. 2. Select one or more plates from the Run History table. 3. -
Page 122: Chapter 9 Manage The Software (Plate Manager)
Manage the software (Plate Manager) ■ Add a custom dye calibration to the Plate Manager ..... . 122 ■ Download a plate setup template as a CSV file ......122 ■... -
Page 123: Save A Plate Setup As A Pdf
Chapter 9 Manage the software (Plate Manager) Save a plate setup as a PDF Save a plate setup as a PDF In the Plate tab: Select Actions4Print plate view. The plate view and table view are exported. Save a plate setup as a CSV file In the Plate tab: 1. -
Page 124: Delete Plate Setups
Chapter 9 Manage the software (Plate Manager) Delete plate setups Delete plate setups To delete plate setups from the Plate Manager: On the... Use... Desktop Windows ™ Explorer to delete PSM or CSV files. Note: The location shown in the figure is an example. Users can save PSM files in any location. -
Page 125: Manage Run Modules
Chapter 9 Manage the software (Plate Manager) Manage run modules 2. Click Settings. 3. Select or deselect your email address. Manage run modules This function manages the list of run modules that you can select from when you create a plate setup. To assign a run module to a plate, see “Assign wells: Sample and run information“... -
Page 126: Manage Analysis Settings
Chapter 9 Manage the software (Plate Manager) Manage analysis settings b. Enter a name and select a dye color, then edit the fragment sizes (basepairs). c. Click Save. 3. As needed, select a size standard of interest, then click Edit or Delete (user-created size standards only). - Page 127 Chapter 9 Manage the software (Plate Manager) Manage analysis settings Setting Description (default) To analyze the entire scan region as collected by the genetic • Full Range— Analysis range analysis instrument, including the primer peak. • Partial Range—To analyze only data points within a specified range. Enter Start Point in data points after the primer peak and before the first required size standard peak.
- Page 128 Chapter 9 Manage the software (Plate Manager) Manage analysis settings Setting Description Baseline Window Specify a window to adjust the baseline signals of all detected dye colors to the same level for an improved comparison of relative signal intensity. Note the following: •...
-
Page 129: Sequencing Settings (Base Calling)
Chapter 9 Manage the software (Plate Manager) Manage analysis settings Sequencing The default settings are optimized for sequencing of PCR amplicons from diploid genes, which are expected to have Mixed bases and which should end At PCR Stop. settings (base calling) For sequencing from plasmid templates, which are of pure sequence (no Mixed bases) and have longer sequence read times than PCR products, create new analysis settings... -
Page 130: Chapter 10 Manage The Software (Instrument)
Manage the software (instrument) ■ Connect the instrument to a network drive ......130 ■... -
Page 131: Create Folders And Enable Network Folder Sharing
Chapter 10 Manage the software (instrument) Connect the instrument to a network drive 4. Note the IP address listed. Note: The location and number of digits in your IP address may differ from the IPv4 Address example shown below. ™ Create folders and In the Windows desktop:... -
Page 132: Connect To A Network Drive
Chapter 10 Manage the software (instrument) Connect the instrument to a network drive Connect to a See your laboratory administrator for the information you need to connect to a network drive. network drive From any screen that displays Network drive or Save location as an option, you can connect to the drive for the first time. -
Page 133: (Auto Export)
Chapter 10 Manage the software (instrument) Connect the instrument to a network drive Set up a default 1. In the home screen of the instrument, touch Setup run, then touch Create new plate setup. Connect cloud- based platform 2. Touch Save location. location for saving results (auto 3. -
Page 134: Set Up A Default Network Location For Saving Results (Auto Export)
Chapter 10 Manage the software (instrument) Connect the instrument to a network drive The Setup Run screen is displayed. Figure 17 Setup Run screen example Example IP address and folder locations List of plates (will be blank if you have not saved plates to this location) Set up a default 1. - Page 135 Chapter 10 Manage the software (instrument) Connect the instrument to a network drive 5. In the Select Directory screen: Touch New folder Create a subfolder. Set up export Change the Network Destination you specified in the previous step. Select this folder Select the directory shown at the top of the screen. Figure 18 Select Directory screen example Example IP address and folder locations List of folders...
-
Page 136: Link The Instrument To Your Connect Cloud-Based Platform Account
Chapter 10 Manage the software (instrument) Link the instrument to your Connect cloud-based platform account Link the instrument to your Connect cloud-based platform account Note: For detailed information on linking the instrument to your Connect cloud- based platform account, see Appendix B, “Link the instrument to your Connect cloud- based platform account—detailed instructions“. -
Page 137: Lock The Touchscreen
Chapter 10 Manage the software (instrument) Lock the touchscreen Option Action Mobile Note: Before selecting this option, install and sign in to the devices InstrumentConnect app on your mobile device. In the Connect to the Cloud screen: 1. Touch Mobile devices. 2. -
Page 138: Manage Plate Setups
Chapter 10 Manage the software (instrument) Manage plate setups Manage plate setups Export or delete a 1. Touch Set up run, then touch My instrument. plate setup 2. Touch Manage at the bottom left of the screen. (PSM file) 3. Touch a plate, then touch Export or Delete. 4. -
Page 139: Import A Plate Setup From A Csv Or Psm File
Chapter 10 Manage the software (instrument) Manage run settings (instrument) Import a plate Note: You can create a plate setup in CSV or PSM file in the Plate Manager (desktop or Connect cloud-based platform). setup from a CSV or PSM file Before importing a CSV file, see “PSM and CSV plate setup files for import into the instrument“... - Page 140 Chapter 10 Manage the software (instrument) Manage run settings (instrument) 2. To create a new run module: a. Touch a default run module or a user-created run module to use as a starting point, then touch Copy. b. Enter values, then touch Next. c.
- Page 141 Chapter 10 Manage the software (instrument) Manage run settings (instrument) Contiguous read Approximate run Run module QV threshold length (CRL) time LongSeq QV20 ~ 2 hours ≥800 LongSeq_BDX CRL was determined using the Long Read Sequencing standard. A minimum of 90% of analyzed sequences with an average QV ≥QV threshold were observed.
-
Page 142: Manage Size Standard Definitions
Chapter 10 Manage the software (instrument) Manage run settings (instrument) Manage size This function manages the list of size standard definitions that you can select from during plate set up. standard definitions To assign a size standard definition to a plate, see “Assign wells: run module, size standard, dye set, and kit“... - Page 143 Chapter 10 Manage the software (instrument) Manage run settings (instrument) b. Enter a name and edit settings as needed (see “Fragment/HID analysis settings (size calling)“ on page 126). c. As needed, touch View or Delete (user-created settings only). 3. Touch Done. Edit sequencing settings Factory-installed items cannot be edited or deleted.
- Page 144 Chapter 10 Manage the software (instrument) Manage run settings (instrument) Setting Description (default) To analyze the entire scan region as collected by the genetic • Full Range— Analysis range analysis instrument, including the primer peak. • Partial Range—To analyze only data points within a specified range. Enter Start Point in data points after the primer peak and before the first required size standard peak.
- Page 145 Chapter 10 Manage the software (instrument) Manage run settings (instrument) Setting Description Baseline Window Specify a window to adjust the baseline signals of all detected dye colors to the same level for an improved comparison of relative signal intensity. Note the following: •...
-
Page 146: Modify The Default File Name Convention
Chapter 10 Manage the software (instrument) Manage run settings (instrument) Sequencing settings (base calling) The default settings are optimized for sequencing of PCR amplicons from diploid genes, which are expected to have Mixed bases and which should end At PCR Stop. For sequencing from plasmid templates, which are of pure sequence (no Mixed bases) and have longer sequence read times than PCR products, create new analysis settings and disable (uncheck) At PCR Stop and Mixed base threshold checkboxes. -
Page 147: Manage Instrument Settings
Chapter 10 Manage the software (instrument) Manage instrument settings 1. Access the File name convention screen: From Action Plate properties screen Select the Properties tab, then touch More options4File name convention. Home screen Touch Settings4Run settings 4File name convention. 2. Touch Attributes. 3. -
Page 148: Change The Instrument Name
Chapter 10 Manage the software (instrument) Manage instrument settings • Instrument software release • Instrument serial number 2. (Optional) Touch EULA to display the end-user licence agreement or touch Details to display additional instrument information. Change the If the instrument is linked to the Connect cloud-based platform, only a Connect platform administrator for the instrument can change the instrument name. -
Page 149: Manage The Network Configuration
Chapter 10 Manage the software (instrument) Manage instrument settings Manage the Note: For a direct connection between the instrument and a computer, set up a wired connection. network configuration In the home screen: 1. Touch Settings4Insrument settings4Network Configuration. 2. Touch Edit, or touch one of the network settings fields. 3. -
Page 150: Check For Software Updates (Administrator Only)
Chapter 10 Manage the software (instrument) Manage instrument settings Check for In the home screen: software updates 1. Touch Settings4Instrument settings4About. (administrator only) 2. Touch Check for updates. If the software update is located on a USB, it may take 10–15 seconds for the instrument to recognize the USB. -
Page 151: Manage Instrument Profiles On The Instrument
Chapter 10 Manage the software (instrument) Manage instrument profiles on the instrument Manage instrument profiles on the instrument Local instrument profile roles and functions Instrument profile Location Functions allowed • Create, save, open, import, and run plate setups Standard Local •... -
Page 152: Change The Role Of A Local Instrument Profile (Administrator Only)
Chapter 10 Manage the software (instrument) Manage instrument profiles on the instrument 5. Touch PIN (4 digits required), enter a four-digit numerical PIN, then touch Enter. 6. Touch Confirm PIN, reenter the PIN, then touch Enter. 7. Touch Create profile. 8. -
Page 153: Create Your Own Local Instrument Profile
Chapter 10 Manage the software (instrument) Manage storage space 4. Touch Delete PIN. The user will be prompted for a new pin upon the next sign in. 5. Touch Yes to confirm. 6. Touch Done. Create your own If you are not signed in to the instrument when you link the instrument to your Connect cloud-based platform account, the software creates a local instrument profile local instrument with the Standard role using the FirstName LastInitial of your Connect platform... -
Page 154: Export Or Delete A Plate Setup (Psm File)
Chapter 10 Manage the software (instrument) Manage storage space Export or delete a 1. Touch Set up run, then touch My instrument. plate setup 2. Touch Manage at the bottom left of the screen. (PSM file) 3. Touch a plate, then touch Export or Delete. 4. -
Page 155: Delete A Run History
Chapter 10 Manage the software (instrument) Manage storage space Delete a run In the home screen: history 1. Touch Settings4Run history. 2. Select one or more plates from the Run History table. 3. Touch Delete, then touch OK to confirm. Note: Run histories for the oldest exported plates are automatically deleted if sufficient storage space is not available when you start a run. -
Page 156: Chapter 11 Maintain The Instrument
Maintain the instrument ■ Regular maintenance tasks ......... . . 156 ■... -
Page 157: Clean The Instrument Exterior And Touchscreen
Chapter 11 Maintain the instrument Regular maintenance tasks 4. Reinstall the CBC. 5. Close the autosampler lid: Press down on the center of the lid or press down on both sides of the lid New CBC buffer level with equal pressure until the lid clicks shut. -
Page 158: Manage The Cartridge
Chapter 11 Maintain the instrument Manage the cartridge Manage the cartridge Cartridge storage Table 10 Storage information for the SeqStudio ™ Genetic Analyzer Cartridge (Cat. No. A33671) Condition Description Shipping Shipped at 2–8°C. Store upright at 2–8°C upon receipt. Save the white storage box and optical cover for off-instrument cartridge storage. On-instrument storage For routine use, can be used and stored on the instrument for up to 4 months. -
Page 159: Set Cartridge Storage Mode (Administrator Only)
Chapter 11 Maintain the instrument Manage the cartridge Table 11 Storage information for the SeqStudio ™ Genetic Analyzer Cartridge v2 (Cat. No. A41331) Condition Description Shipping Shipped at 2–8°C. Store upright at 2–8°C upon receipt. Save the white storage box and optical cover for off-instrument cartridge storage. On-instrument storage For routine use, can be used and stored on the instrument for up to 6 months. -
Page 160: Check Or Export The Instrument-Cartridge History
Chapter 11 Maintain the instrument Manage the cartridge 1. Touch Settings4Cartridge 4Cartridge Storage Mode. 2. Select the duration of instrument inactivity before the instrument enters Cartridge Storage Mode. 3. Touch OK. Check or export This function lists the cartridges that have been installed on this instrument. the Instrument- 1. -
Page 161: Fill The Capillary Array And Refresh The Polymer Delivery System
Chapter 11 Maintain the instrument Manage the cartridge Fill the capillary The functions accessed from Cartridge maintenance are performed automatically during a run. Do not use these commands to manually perform these functions unless array and refresh instructed to do so in troubleshooting or by Support. the polymer delivery system In the home screen:... - Page 162 Chapter 11 Maintain the instrument Manage the cartridge 2. Prepare the cartridge. a. Remove the cartridge from the box. Note: Save the box for off-instrument cartridge storage. b. Remove the optical cover from the cartridge by grasping the finger holds, then pulling toward you. Note: Save the optical cover for off-instrument cartridge storage.
-
Page 163: Store The Cartridge
Chapter 11 Maintain the instrument Manage the cartridge 3. Grasp the cartridge above the capillaries. 4. Position the cartridge: a. Orient the cartridge with the embossed arrow pointing toward the rear of the instrument. b. Align the guides at the top of the cartridge with the insertion rails in the instrument. -
Page 164: Seqstudio Integrated Capillary Protector
Chapter 11 Maintain the instrument Manage the cartridge 5. Place a new SeqStudio ™ Integrated Capillary Protector on the cartridge: pinch the clamp on the ICP, then push up on to the capillaries. 6. Place the cartridge in the white storage box. -
Page 165: Long-Term On-Instrument Cartridge Storage
Chapter 11 Maintain the instrument Manage the cartridge SeqStudio ™ Integrated Capillary Protector storage Condition Description Shipping Is shipped at 2–8°C. Before opening, can be stored until expiry date on label at 2–8°C. Discard the shipping ICP when you insert a new cartridge in the instrument. Reuse Do not reuse. -
Page 166: Install Cathode Buffer
Chapter 11 Maintain the instrument Install cathode buffer Install cathode buffer SeqStudio Genetic Analyzer Cathode Buffer Container storage ™ Condition Description Shipping Is shipped at ambient temperature. Store at 2–8°C upon receipt. On-instrument storage After installation, can be stored for up to 2 weeks when the instrument is powered on and in Cartridge storage mode. -
Page 167: Insert The Cathode Buffer Container
Chapter 11 Maintain the instrument Install cathode buffer 4. Place the reservoir septa on the CBC, then press firmly to seat the septa. Note: The CBC is filled significantly above Fill Line to account for evaporation. Replace the CBC when the fluid level is at or below the fill line. Insert the Cathode Perform these steps if the Cathode Buffer Container has not been installed, if the CBC on the instrument has expired, or if the buffer level is at or below the fill line. - Page 168 Chapter 11 Maintain the instrument Install cathode buffer 4. Press the autosampler lid until it clicks shut. 5. Touch Retract plate, then close the instrument door. SeqStudio Genetic Analyzer Instrument and Software User Guide ™...
-
Page 169: Troubleshooting Resources
Troubleshooting ■ Troubleshooting resources ..........169 ■... -
Page 170: Appendix A Troubleshooting
Appendix A Troubleshooting Troubleshooting workflow Troubleshooting workflow Follow this general workflow when you are troubleshooting: Review the analyzed data. ▼ Review the raw data, then review the EPT plot. ▼ (Fragment/HID analysis) Check size standard quality (“Check size standard quality“ on page 172). ▼... -
Page 171: View The Raw Data And The Ept Plot
Appendix A Troubleshooting View the raw data and the EPT plot View the raw data and the EPT plot The EPT view (ElectroPhoresis Telemetry) shows instrument data conditions (currents, temperatures, electrophoresis voltage) as a function of time. When a run is complete, in the home screen: 1. -
Page 172: Check Size Standard Quality
Appendix A Troubleshooting Check size standard quality Quality alert Description Action The number of size standard peaks detected is Size standard definition Use or create a size standard less than what is defined in the size standard. includes peaks that are not definition with the appropriate present in the sample. -
Page 173: Instrument Troubleshooting
Appendix A Troubleshooting Instrument troubleshooting 5. Touch on the left border of the trace, then deselect all dyes except the size standard dye (red or orange). 6. As needed, touch on the right border of the trace to zoom on the trace. Instrument troubleshooting Observation Possible cause... -
Page 174: Cartridge Troubleshooting
Appendix A Troubleshooting Cartridge troubleshooting Observation Possible cause Recommended action The electrophoresis failed or The Cathode Buffer Container Replace the Cathode Buffer Container. Current check failed is has been installed on the displayed instrument for more than two (continued) weeks or used for more than 125 injections. -
Page 175: Sample And Data Troubleshooting
Appendix A Troubleshooting Sample and data troubleshooting Sample and data troubleshooting See also “Data quality alerts“ on page 119, “Sizecalling and basecalling quality alerts“ on page 119, and Troubleshooting Sanger sequencing data User Bulletin (Pub. No. MAN0014435). Observation Possible cause Recommended action Offscale signal is detected is The sample concentration is... - Page 176 Appendix A Troubleshooting Sample and data troubleshooting Observation Possible cause Recommended action There is no signal or a low The sample had a high Dilute or desalt the samples. signal concentration of salt. There was an excess of Dilute or desalt the samples. Note: Samples are stable on unlabeled template competing the instrument for 16–24 hours.
- Page 177 Appendix A Troubleshooting Sample and data troubleshooting Observation Possible cause Recommended action Poor resolution in some Poor-quality samples were See “Sample preparation guidelines“ on capillaries used. page 37. Use a control sample to determine if the poor resolution is due to the samples are another factor.
- Page 178 Appendix A Troubleshooting Sample and data troubleshooting Observation Possible cause Recommended action Dye blobs are seen in the Impurities remained in the Improve the sample purification method. See sequencing data sample after the sample “Sample preparation guidelines“ on page 37 purification.
- Page 179 Appendix A Troubleshooting Sample and data troubleshooting Observation Possible cause Recommended action Extra peaks are present in the Primer‑dimer has occurred. You can often diagnose primer-dimer by sequencing traces looking at the raw trace data for questionable (continued) sequences. When primer-dimer exists, the 5′ sequence signal may be significantly higher for a region of bases spanning the length of the forward and reverse gene-specific primers.
-
Page 180: Ept Data
Appendix A Troubleshooting EPT data Observation Possible cause Recommended action There are pull-up or pull-down The incorrect dye set was Correct the dye set and repeat the injection. peaks in the data selected in the Plate setup. (continued) Note: This is applicable to both sequence analysis and fragment analysis. -
Page 181: Software Troubleshooting
Appendix A Troubleshooting Software troubleshooting Software troubleshooting Observation Possible cause Recommended action Strikethrough text is displayed in Save location in The original location to which No action. Plate properties screen the plate was saved is no longer accessible by the instrument. - Page 182 Appendix A Troubleshooting Software troubleshooting Observation Possible cause Recommended action Analysis settings or run module is not available for Analysis settings and run Change the plate setup selection by some users modules are saved per user. security from Hidden to Shared (see “Hide or share a If the analysis settings or run plate (Plate setup security)
-
Page 183: Service Tools
Appendix A Troubleshooting Service tools Observation Possible cause Recommended action Unexpected error is displayed There was a software error. Follow the instructions in the error message. Export the log files to determine the potential source of the unexpected error. See “Export log files for plates, install runs, injections, and instrument“... -
Page 184: Appendix B Link The Instrument To Your Connect Cloud- Based Platform Account-Detailed Instructions
Link the instrument to your Connect cloud-based platform account— detailed instructions ■ Workflow: Set up the instrument for Connect cloud-based platform access . . 184 ■ Network requirements ..........184 ■... -
Page 185: Link The Instrument From A Mobile Device
Appendix B Link the instrument to your Connect cloud-based platform account—detailed instructions Link the instrument from a mobile device Link the instrument from a mobile device Create a Connect 1. Sign in to thermofisher.com/connect. cloud-based 2. Click to access InstrumentConnect. platform PIN and generate the QR 3. -
Page 186: The Instrument
Appendix B Link the instrument to your Connect cloud-based platform account—detailed instructions Link the instrument using a link code 1. On your mobile device, download the InstrumentConnect from the Apple Store Register the ™ or from Google Play. instrument with the Instrument 2. - Page 187 Appendix B Link the instrument to your Connect cloud-based platform account—detailed instructions Link the instrument using a link code 2. Touch PC. A unique link code is displayed. 3. Sign into your Connect cloud-based platform account on a separate computer. Go to thermofisher.com/connect.
- Page 188 Appendix B Link the instrument to your Connect cloud-based platform account—detailed instructions Link the instrument using a link code 4. Click , then click Add an Instrument. 5. Select SeqStudio ™ , then click Next. SeqStudio Genetic Analyzer Instrument and Software User Guide ™...
- Page 189 Appendix B Link the instrument to your Connect cloud-based platform account—detailed instructions Link the instrument using a link code 6. Enter the link code from the instrument touchscreen (from step 2), then click Send. 7. If you have not previously set up a PIN, enter a PIN to use when you sign in to an instrument, then click Send.
-
Page 190: Set Up Email Notifications From The Instrument
Appendix B Link the instrument to your Connect cloud-based platform account—detailed instructions Set up email notifications from the instrument Set up email notifications from the instrument When an instrument is linked to your Connect cloud-based platform account, email notifications are automatically sent to your Connect platform account email address. Perform this procedure to disable any of the default notifications. - Page 191 Appendix B Link the instrument to your Connect cloud-based platform account—detailed instructions Set up email notifications from the instrument 3. In the Email notifications screen, select or deselect the options for which you want to receive email notifications, then touch Done. SeqStudio Genetic Analyzer Instrument and Software User Guide ™...
-
Page 192: Appendix C Dye Calibration And Install Standard Checks
Dye calibration and install standard checks ■ Calibrate dyes ............192 ■... -
Page 193: Factory, Auto, And Manual Calibration
Appendix C Dye calibration and install standard checks Calibrate dyes Factory, auto, and Three types of calibration can occur on the instrument: manual • Factory calibration—Default calibration provided with the instrument. It is not calibration optimized for a specific instrument. •... - Page 194 Appendix C Dye calibration and install standard checks Calibrate dyes 1. Touch Settings4Maintenance and Service4Calibration4Calibration history. 2. Examine the entry for the dye set of interest. If the dye set does not list a date and a cartridge serial number for a manual calibration or a date for auto calibration, the dye set requires manual calibration.
-
Page 195: Perform A System Dye Calibration
Appendix C Dye calibration and install standard checks Calibrate dyes Perform a system A system dye calibration requires ~30 minutes to complete. dye calibration Prepare the dye set calibration standards and plate as described in the product information sheet for the dye set. In the home screen: 1. - Page 196 Appendix C Dye calibration and install standard checks Calibrate dyes 3. Touch Sequence Standard or Matrix Standard, then select a system dye calibration standard provided with the instrument. 4. Touch Calibrate. The calibration run starts. IMPORTANT! If the dye calibration fails: ·...
-
Page 197: Perform A Custom Dye Calibration
Appendix C Dye calibration and install standard checks Calibrate dyes Condition number A Condition Number indicates the amount of overlap between the dye peaks in the fluorescence emission spectra of the dyes in the dye set. If there is no overlap in a dye set, the Condition Number is 1.0 (ideal conditions), the lowest possible value. - Page 198 Appendix C Dye calibration and install standard checks Calibrate dyes 4. Touch the system dye to use as a starting point for the custom dye settings. 5. Modify the settings as needed then touch Next. 6. Enter a Dye set name, then touch Done. Add a custom dye set to the software using the Any Dye template 1.
- Page 199 Appendix C Dye calibration and install standard checks Calibrate dyes 5. Touch a dye color, then manage the dye set arrangement: • Touch Dye selection to deselect the dye. • Touch Move up or Move down to organize the dyes in the order in which they occur as peaks in the electropherogram of the custom dye set standard.
- Page 200 Appendix C Dye calibration and install standard checks Calibrate dyes 1. Touch Settings4Maintenance and Service4 Calibration4Dye calibration. 2. Touch the injection group for the dye set in the plate, then touch Dye set. 3. Touch a custom dye set. 4. Touch Calibrate. 5.
-
Page 201: View The Dye Calibration History
Appendix C Dye calibration and install standard checks Calibrate dyes d. Touch a custom dye, then touch Export. e. Select a location, then touch Export. f. Import the custom dye on another instrument ( Settings4Maintenance and Service4 Calibration4Dye calibration4Custom dye4Manage4Import). View the dye In the home screen: calibration history... -
Page 202: Import Or Export A Custom Dye Set
Appendix C Dye calibration and install standard checks Calibrate dyes b. (Optional) Touch Deselect All to clear the dye set selections. c. Touch Done. 6. Touch OK. Import or export a In the home screen: custom dye set • Touch Settings4Maintenance and Service4 Calibration4Dye calibration4Custom dye4Manage. -
Page 203: Perform An Install Run
Appendix C Dye calibration and install standard checks Perform an install run Perform an install run Overview of install Install checks are performed by a Field Service Engineer at the time of installation. checks An install check can be run at any time with the following reagents to ensure instrument performance: Install check type Reagent... -
Page 204: Perform An Install Run
Appendix C Dye calibration and install standard checks Perform an install run Perform an install An install run requires ~45 minutes to complete each injection group. Prepare the installation standard and plate as described in the product information sheet for the installation standard. In the home screen: 1. -
Page 205: View Install Run Results
Appendix C Dye calibration and install standard checks Perform an install run View install run 1. Open the install run results summary: results • To view results immediately after the install run completes, touch Results. • To view results for a previous install run, touch Settings4Maintenance and Service4Install run4Install run history. - Page 206 Appendix C Dye calibration and install standard checks Perform an install run 2. Touch an install run to display the results, including the pass/fail results. Each injection group displays a QC color for each capillary: • —All QC tests passed. •...
- Page 207 Appendix C Dye calibration and install standard checks Perform an install run 3. Touch Detail to see allele-specific details for fragment/HID analysis and basecall accuracy for sequencing. 4. Touch Export report (see “Export the install run report“ on page 208). Fragment analysis install run pass/fail criteria Result Acceptance criteria...
-
Page 208: Export The Install Run Report
Appendix C Dye calibration and install standard checks Perform an install run HID analysis install run pass/fail criteria Result Acceptance criteria # Allele peaks 343 for all four capillaries # Size standard peaks 26 for all four capillaries Minimum peak height >400 RFU Standard deviation of the observed allele fragment sizes <0.15 base pairs (bp) - Page 209 Appendix C Dye calibration and install standard checks Perform an install run Example fragment analysis run report SeqStudio Genetic Analyzer Instrument and Software User Guide ™...
-
Page 210: View The Install Run History
Appendix C Dye calibration and install standard checks Perform an install run Example sequencing run report View the install In the home screen: run history 1. Touch Settings4Maintenance and Service4Install run history. SeqStudio Genetic Analyzer Instrument and Software User Guide ™... - Page 211 Appendix C Dye calibration and install standard checks Perform an install run 2. (Optional) Touch Filter, select the install run type, then touch Done. Note: If the screen is blank when you click Done, no install runs are present for the chemistry you selected.
-
Page 212: Appendix D Create And Run An Hid Plate
Create and run an HID plate ■ HID analysis requirements ......... . . 212 ■... -
Page 213: Pull-Up Reduction Feature
Appendix D Create and run an HID plate Pull-up reduction feature Pull-up reduction feature The software includes two pull-up reduction features: • Automatic pull-up reduction feature that is applied with all dye sets. ™ • (HID analysis only for Applied Biosystems dyes) Marker-to-marker pull-up reduction that is optimized for the markers in each kit. -
Page 214: Resolution Algorithm
Appendix D Create and run an HID plate Resolution algorithm Resolution algorithm A resolution algorithm, unique when running an HID application, is incorporated into SeqStudio ™ Data Collection Software v1.2. The purpose of the algorithm is to align the resolution power traditionally generated with a 3500/3500xL Genetic ™... -
Page 215: Workflow: Hid Analysis
Appendix D Create and run an HID plate Workflow: HID analysis Workflow: HID analysis Get started Prepare the instrument (page 39) Prepare the samples (page 37) Create a plate setup on the instrument Create or import a plate setup (page 81) Enter plate properties (page 82) Assign wells: run module, size standard, dye set, and kit... -
Page 216: Hid Run Module, Dye Sets, Size Standard Definitions, And Kits
Appendix D Create and run an HID plate HID run module, dye sets, size standard definitions, and kits Item Description • Size standard—0.4 µL Volumes of install check components per reaction ™ • Hi‑Di Formamide—9.6 µL • Allelic ladder—1 µL •... -
Page 217: Manage Kits (Hid Applications Only)
Appendix D Create and run an HID plate Manage kits (HID applications only) Manage kits (HID applications only) The kit files for the kits that have been validated for the instrument are preloaded in the software. If a new or updated kit file is provided, import the kit file as described below. -
Page 218: Appendix E Run Modules
Run modules Run modules, read lengths, size ranges, and run times Table 15 Sequencing run modules for standard sequencing Contiguous read Approximate run Run module QV threshold length (CRL) time ShortSeq QV30 30 minutes ≥350 ShortSeq_BDX MediumSeq QV30 45 minutes ≥500 MediumSeq_BDX LongSeq... - Page 219 Appendix E Run modules Run modules, read lengths, size ranges, and run times Table 17 HID run modules Resolution Approximate Run module Sizing precision Compatible size standards range run time • GeneScan ™ 500 LIZ ™ Size HIDAnalysis 60–470 bp 39 minutes 60–470: <0.15 Standard...
-
Page 220: Appendix F Parts And Materials
Parts and materials Required materials not supplied Unless otherwise indicated, all materials are available through thermofisher.com. MLS: Fisher Scientific (fisherscientific.com) or other major laboratory supplier. Item Source Software (Optional) SeqStudio ™ Remote Monitoring App Available on the Connect cloud-based platform (Optional) InstrumentConnect Available on the Connect (Optional) SeqStudio... - Page 221 Appendix F Parts and materials Required materials not supplied Item Source ™ BigDye XTerminator Purification Kit 4376486 Sequencing kits BigDye ™ Terminator v1.1 Cycle Sequencing Kit 4337449 BigDye ™ Terminator v3.1 Cycle Sequencing Kit 4337454 BigDye ™ Direct Cycle Sequencing Kit 4458689 Fragment analysis size standards and installation standard GeneScan...
-
Page 222: Appendix G Instrument Specifications And Layout
Instrument specifications and layout ■ Instrument dimensions ..........222 ■... -
Page 223: Environmental Requirements
Appendix G Instrument specifications and layout Environmental requirements Environmental requirements Ensure that the installation room is maintained under correct environmental conditions. Condition Acceptable range Installation site Indoor use only Electromagnetic Do not use this device in close proximity to sources of strong electromagnetic radiation (for interference example, unshielded intentional RF sources). -
Page 224: Electrical Requirements
Appendix G Instrument specifications and layout Electrical requirements Electrical requirements CAUTION! Do not unpack or plug in any components until the Field Service Engineers (FSEs) have configured the system for the proper operating voltage. WARNING! For safety, the power outlet used for powering the instrument must be accessible at all times. -
Page 225: Network Requirements
Appendix G Instrument specifications and layout Network requirements Device Description Uninterruptible We recommend the use of a 1.5-kVA uninterruptible power supply (UPS), especially in areas power supply prone to power failure. Power failures and other events that abruptly terminate the function of (UPS) the instrument and computer can corrupt data and possibly damage the system. -
Page 226: Required Safety Equipment
Appendix G Instrument specifications and layout Safety requirements Required safety Your laboratory has specific safety practices and policies designed to protect laboratory personnel from potential hazards that are present. Follow all applicable equipment safety-related procedures at all times. The following safety equipment and protection from hazards must be available at the installation site: •... -
Page 227: Appendix H Safety
Safety WARNING! GENERAL SAFETY. Using this product in a manner not specified in the user documentation may result in personal injury or damage to the instrument or device. Ensure that anyone using this product has received instructions in general safety practices for laboratories and the safety information provided in this document. -
Page 228: Conformity Symbols
Appendix H Safety Symbols on this instrument Symbol English Français Caution, hot surface Attention, surface chaude Potential biohazard Danger biologique potentiel On (marche) Off (arrêt) On/Off On/Off (marche/arrêt) Protective conductor terminal (main Borne de conducteur de protection ground) (mise à la terre principale) Terminal that can receive or supply Borne pouvant recevoir ou envoyer alternating current or voltage... -
Page 229: Safety Alerts On This Instrument
Appendix H Safety Safety alerts on this instrument Conformity mark Description Indicates conformity with European Union requirements. Indicates conformity with Australian standards for electromagnetic compatibility. Safety alerts on this instrument Additional text may be used with one of the symbols described above when more specific information is needed to avoid exposure to a hazard. -
Page 230: Safety Information For Instruments Not Manufactured By Thermo Fisher Scientific
Appendix H Safety Safety information for instruments not manufactured by Thermo Fisher Scientific Safety information for instruments not manufactured by Thermo Fisher Scientific Some of the accessories provided as part of the instrument system are not designed or built by Thermo Fisher Scientific. Consult the manufacturer's documentation for the information needed for the safe use of these products. -
Page 231: Cleaning And Decontamination
Appendix H Safety Instrument safety Cleaning and CAUTION! Cleaning and Decontamination. Use only the cleaning and decontamination decontamination methods specified in the manufacturer's user documentation. It is the responsibility of the operator (or other responsible person) to ensure the following requirements are met: ·... -
Page 232: Safety And Electromagnetic Compatibility (Emc) Standards
Appendix H Safety Safety and electromagnetic compatibility (EMC) standards Safety and electromagnetic compatibility (EMC) standards The instrument design and manufacture complies with the following standards and requirements for safety and electromagnetic compatibility. Safety compliance Reference Description EU Directive 2014/35/EU European Union “Low Voltage directive” EN 61010-1 Safety requirements for electrical equipment for measurement, control, and laboratory use –... -
Page 233: Environmental Design
Appendix H Safety Safety and electromagnetic compatibility (EMC) standards Reference Description RFID FCC Notice (for U.S. Customers): This device complies with Part 15 of the FCC Rules: Operation is subject to the following conditions: 1. This device many not cause harmful interference, and 2. -
Page 234: Chemical Safety
Appendix H Safety Chemical safety Chemical safety WARNING! GENERAL CHEMICAL HANDLING. To minimize hazards, ensure laboratory personnel read and practice the general safety guidelines for chemical usage, storage, and waste provided below. Consult the relevant SDS for specific precautions and instructions: ·... -
Page 235: Biological Hazard Safety
Appendix H Safety Biological hazard safety Biological hazard safety WARNING! BIOHAZARD. Biological samples such as tissues, body fluids, infectious agents, and blood of humans and other animals have the potential to transmit infectious diseases. Conduct all work in properly equipped facilities with the appropriate safety equipment (for example, physical containment devices). -
Page 236: Documentation And Support
Documentation and support Related documentation Document Pub. No. SeqStudio Genetic Analyzer Instrument and Software User Guide ™ MAN0018646 SeqStudio Genetic Analyzer Instrument and Software Getting Started Guide ™ MAN0018654 SeqStudio ™ Genetic Analyzer for HID Instrument and Software v1.2 User Bulletin— 100086084 New Features and Developmental Validation SeqStudio... -
Page 237: Limited Product Warranty
Documentation and support Limited product warranty Limited product warranty Life Technologies Corporation and/or its affiliate(s) warrant their products as set forth in the Life Technologies' General Terms and Conditions of Sale at www.thermofisher.com/us/en/home/global/terms-and-conditions.html. If you have any questions, please contact Life Technologies at www.thermofisher.com/support. SeqStudio Genetic Analyzer Instrument and Software User Guide ™... -
Page 238: Index
Index CBC. See cathode buffer 3200 data, SeqStudio Genetic Analyzer 29, 121 Cloud. See Connect cloud-based platform condition number 196 Connect cloud-based platform analysis software 29 AB1 file auto export default location 133 export automatically 80 browser requirements 25 export manually 121, 154 disconnect instrument 49 amber light blinking 15 open plate setup default location 132... - Page 239 Index instrument profile delete 152 E-signature records E-signature records PIN, change 52, 153 dye calibration 64 Instrument-cartridge history, view or export 160 install run 64 IP address 130, 147 EPT plot, remote monitor 101 export, plate 138, 154 kit (HID analysis only), marker-to-marker pull-up re- duction 67, 79 file name convention 75, 88, 146 kit, HID, import 217...
- Page 240 Index loading guidelines 38 pause 106 raw data 171 Plate Manager raw trace, remote monitor 100 add custom dye calibration 122 re-inject, remote monitor 100 operating system requirements 25 re-injection 91, 105, 120 plate setup related documentation 169, 236 create on instrument 81 remote monitor CSV file, import 81 analyzed trace 102...
- Page 241 Index plasmid templates 129, 146 system dye 192 serial number 147 set in injection group 67, 79 sign dye calibration 64 template, plate setup 122, 123 terms and conditions 237 install run 64 sign in 34 Thermo Fisher Cloud. See Connect cloud-based plat- sign out 35 form troubleshooting, log file, export 170...
- Page 242 thermofisher.com/support | thermofisher.com/askaquestion thermofisher.com 4 November 2019...
Need help?
Do you have a question about the Applied Biosystems SeqStudio Genetic Analyzer and is the answer not in the manual?
Questions and answers