
Related Manuals for Kontron KBox C-102 Series


Summary of Contents for Kontron KBox C-102 Series
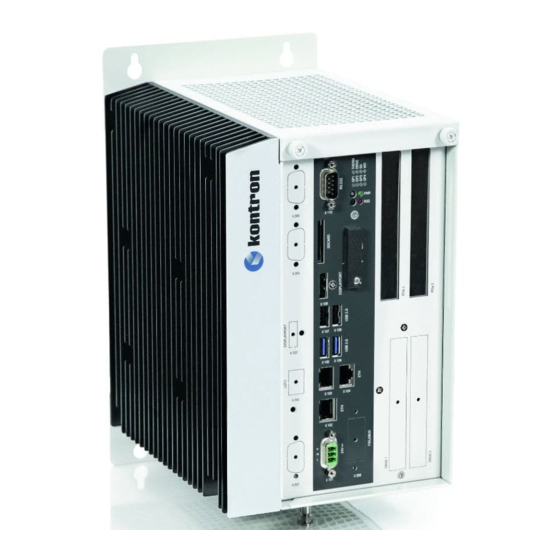
- Page 1 USER GUIDE KBox C-102-0 KBox C-102-1 KBox C-102-2 KBox C-102-4 KBox C-102 Doc. User Guide, Rev. 1.0 Doc. ID: 1062-4961 www.kontron.com // 1...
- Page 2 KBox C-102 - User Guide, Rev. 1.0 This page has been intentionally left blank www.kontron.com // 2...
- Page 3 In cases of doubt, please contact Kontron. This user guide is protected by copyright. All rights are reserved by Kontron. No part of this document may be reproduced, transmitted, transcribed, stored in a retrieval system, or translated into any language or computer language, in any form or by any means (electronic, mechanical, photocopying, recording, or otherwise), without the express written permission of Kontron.
- Page 4 ENVIRONMENTAL DAMAGE (COLLECTIVELY, "HIGH RISK APPLICATIONS"). You understand and agree that your use of Kontron devices as a component in High Risk Applications is entirely at your risk. To minimize the risks associated with your products and applications, you should provide adequate design and operating safeguards.
- Page 5 If you have any difficulties using this user guide, discover an error, or just want to provide some feedback, contact Kontron support. Detail any errors you find. We will correct the errors or problems as soon as possible and post the revised user guide on our website.
-
Page 6: Symbols
Eye protection per manufacturer notice shall review before servicing. This symbol indicates general information about the product and the user guide. This symbol also indicates detail information about the specific product configuration. This symbol precedes helpful hints and tips for daily use. www.kontron.com // 6... -
Page 7: For Your Safety
Therefore, in the interest of your own safety and of the correct operation of your new Kontron product, you are requested to conform with the following guidelines. -
Page 8: Lithium Battery Precautions
General Instructions on Usage In order to maintain Kontron’s product warranty, this product must not be altered or modified in any way. Changes or modifications to the product, that are not explicitly approved by Kontron and described in this user guide or received from Kontron Support as a special handling instruction, will void your warranty. -
Page 9: Table Of Contents
4.4.3. X105/X106 - USB 3.0 ................................... 29 4.4.4. X107/X108 - USB 2.0 ................................... 29 4.4.5. X109 - DisplayPort ....................................29 4.4.6. SDCARD Slot ......................................30 4.4.7. X110 - RS232 Port ....................................30 4.4.8. POWER Button and PWR LED ................................31 www.kontron.com // 9... - Page 10 9.2. Power OFF/ON Procedure ..................................62 9.3. Operating System and Hardware Component Drivers ....................... 62 10/ Maintenance and Cleaning .................................. 63 10.1. Replacing the Lithium Battery................................63 10.2. Preventive Maintenance for SSD Drives ............................64 10.3. Replacing the Fan Tray ..................................64 www.kontron.com // 10...
- Page 11 15.1. uEFI Shell Introduction, Basic Operation ............................107 15.1.1. Entering the uEFI Shell ..................................107 15.1.2. Exiting the uEFI Shell ..................................107 15.1.3. Kontron-Specific uEFI Shell Commands ............................ 108 15.2. uEFI Shell Scripting ....................................108 15.2.1. Startup Scripting....................................108 15.2.2. Create a Startup Script ................................... 108 15.2.3.
-
Page 12: List Of Tables
Table 7: Boot Setup Menu Functions ..............................104 Table 13: Save and Exit Setup Menu Functions ........................... 106 Table 14: Kontron-Specific uEFI Shell Commands ..........................108 Table 9: Technical Specifications ................................112 Table 10: Mechanical Specifications of the KBox C-102-4........................ 116 Table 11: Mechanical Specifications of the KBox C-102-2 ......................... -
Page 13: List Of Figures
Figure 29: KBox C-102-4 shown with optional interfaces and without removable drive bays ..........38 Figure 30: X205 or X206 – Locations for the optional FIELDBUS interface ................. 40 Figure 31: KBox C-102-1 equipped with the optional fan tray ......................41 www.kontron.com // 13... - Page 14 Figure 84: Dimensions: top side (KBox C-102-2) ..........................117 Figure 85: Dimensions: right side (KBox C-102-2 with fan tray option) ..................118 Figure 86: Dimensions: front side with key holes (KBox C-102-2 with fan tray option) ............118 www.kontron.com // 14...
- Page 15 Figure 96: Dimensions: top side (KBox C-102-1 with fan tray option) ..................121 Figure 97: Dimensions: right side (KBox C-102-0) ..........................123 Figure 98: Dimensions: front side with key holes (KBox C-102-0) ....................123 Figure 99: Dimensions: detail key hole (KBox C-102-0) ........................123 Figure 100: Dimensions: top side (KBox C-102-0) ..........................123 www.kontron.com // 15...
-
Page 16: 1/ General Safety Instructions For It Equipment
Kontron is exempt from accident liability, this also applies during the warranty period. The product has been built and tested according to the basic safety requirements for low voltage (LVD) applications and has left the manufacturer in safety-related, flawless condition. - Page 17 – as stipulated by EN60950-1 or VDE0100 or EN60204 or UL508 regulations. The devices do not generally fulfill the requirements for "centralized DC power systems“ (UL 60950-1, Annex NAB; D2) and therefore may not be connected to such devices! www.kontron.com // 17...
-
Page 18: Electrostatic Discharge (Esd)
Do not dispose of lithium batteries in general trash collection. Dispose of the battery according to the local regulations dealing with the disposal of these special materials, (e.g. to the collecting points for dispose of batteries). www.kontron.com // 18... -
Page 19: 2/ Electromagnetic Compatibility (Class B Device)
Consult the dealer or an experienced radio/TV technician for help. Kontron Europe GmbH is not responsible for any radio television interference caused by unauthorized modifications of this equipment or the substitution or attachment of connecting cables and equipment other than those specified by Kontron Europe GmbH. -
Page 20: 3/ Shipment And Unpacking
Please keep the associated paperwork. It contains important information for handling the unit. Check the contents for visible shipping damage. If you notice any shipping damage or inconsistencies between the contents and your order, please contact Kontron for help and information. 3.2. Scope of Delivery ... -
Page 21: Type Label And Product Identification
DRIVEs and/or PCIe expansion slots KBox C-102-1: corresponds for system configurations with one slot row for optional removable DRIVE and/or PCIe expansion slot KBox C-102-0: corresponds for system configuration without any slot row for optional removable DRIVE and PCIe expansion slot www.kontron.com // 21... -
Page 22: 4/ System Overview
The KBox C-102 Family is a highly scalable and flexible industrial computer platform that offers high-end performance for industrial automation application such as control or process monitoring. The performance scalability is achieved by deploying various Kontron COMExpress ® CPU modules (from factor basic and type 6 pinout) inside the system. - Page 23 KBox C-102. Do not place any objects on the device. When installing the system, please observe the clearance recommendation (keep out area) in the subsection 8.1 “Control Cabinet Mounting”; refer to the marked areas in Figure 43 to Figure 49. www.kontron.com // 23...
-
Page 24: Rtc (Goldcap)
During startup, the uEFI performs a comparison of chipset clock and “external RTC” module and sets the chipset clock accordingly, if the RTC time is valid. Further it is possible to set the time manually by accessing the RTC over the I Bus. www.kontron.com // 24... -
Page 25: Optional Rtc Lithium Battery (Externally-Accessible)
Protective cover for the lithium battery 2 Philips countersunk head screw that secure the protective cover at the front side of the chassis 3 Externally-accessible battery shown with removed protective cover www.kontron.com // 25... -
Page 26: System Expansion Capabilities
Please observe the different configuration options, regarding the installation of 2.5" SATA HDD/SSD devices, for each system of the KBox C-102 family (refer to the area marked “D” in the section 4.4). Refer to chapter 16/ “Technical Specifications” and the descriptions in this manual. www.kontron.com // 26... -
Page 27: Figure 6: Bottom Side View
Figure 8: Front side view Figure 9: Front side view config. with removable config. without Figure 7: Right side view drives removable drives Figure 10: Left side view Figure 11: Top side view Figure 12: Rear side view www.kontron.com // 27... -
Page 28: Front Side Configuration And Options - Kbox C-102
Internally/externally accessible 2.5" SATA HDD/SSD (Options) Either Internal 2.5" SATA HDD/SSD Removable Drive Bay for 2.5" SATA HDD/SSD Externally accessible CMOS Battery (Option) CR 2025, 3V Fan Tray (Option) Fan Tray Figure 13: KBox C-102-4 with fan tray www.kontron.com // 28... -
Page 29: X101 - Power Input Connector
The KBox C-102 provides a DisplayPort compliant interface realised using a standard DisplayPort connector. An external (digital) display can be connected to the DisplayPort connector (X109, Figure 59, Figure 61 and Figure 64). For pin assignment refer to subsection 18.1.5. www.kontron.com // 29... -
Page 30: Sdcard Slot
4.4.7. X110 - RS232 Port The RS232 interface (X110, Figure 59, Figure 61 and Figure 64) is provided as a 9-pin D-SUB connector. It allows you to connect a serial device to the system. For pin assignment refer to subsection 18.1.6. www.kontron.com // 30... -
Page 31: Power Button And Pwr Led
To do this, press the RSQ button for more than five seconds, whether or not the system is running it will now start-up using the backup flash for booting. To revert to using the standard boot flash, the system must be cold started, or remove power completely from the system and then reapply. www.kontron.com // 31... -
Page 32: Status And General Purpose Leds
Watchdog timeout Watchdog Red blinking occurred General Purpose 1 User general purpose 1 Red/Green/Orange General Purpose 2 User general purpose 2 Red/Green/Orange General Purpose 3 User general purpose 3 Red/Green/Orange General Purpose 4 User general purpose 4 Red/Green/Orange www.kontron.com // 32... -
Page 33: Pci/Pcie Expansion Slots
For system configuration refer to Figure 61, Figure 62 and for expansion card installation the subsection 13.1.1 “PCIe Expansion Slot 1”. KBox C-102-0: can’t be equipped with PCI/PCIe expansion cards. Refer to Figure 64 and Figure 65. Refer also to the area marked “C” in the section 4.4. www.kontron.com // 33... -
Page 34: Internal Or Removable 2.5" Sata Hdds/Ssds
The KBox C-102-0 can be equipped with only one internal 2.5" SATA HDD/SSD. Refer to the chapter 14/ “KBox C-102-0 Variant” and the subsection 14.1.1 “Internal 2.5" SATA Drive”. Refer also to the area marked “D” in the section 4.4. www.kontron.com // 34... - Page 35 Pull out the lever (Figure 21, pos. 3) of the drive cover (Figure 20, pos. 2) and release it. (If required, unlock the lever with the corresponding key before.) The drive bay cover will spring open and the removable drive will automatically slide out a bit. Insert/remove the drive into/out from the bay receptacle. Close the cover. www.kontron.com // 35...
-
Page 36: Left And Right Side View
When powering on the KBox C-102, make sure that the air intake and exhaust openings are not obstructed. To provide sufficient heat dissipation for the cooling of the KBox C-102 system, never cover the cooling fins of the chassis. Do not place any objects onto the device. www.kontron.com // 36... -
Page 37: Rear Side View
There is an M4 functional earth terminal on the lower mounting bracket of the KBox C-102 (Figure 27, pos. 6). This terminal may be connected as required. The KBox C-102 with the stud marked with a “Functional Earth” symbol (Figure 27) has to be grounded to an appropriate “common earth” connection point. www.kontron.com // 37... -
Page 38: 5/ System Extensions
2 CAN port 3 DisplayPort (DP 2) (depending on the ordered option) 4 OR: LDT3 port (depending on the ordered option) 5 Fieldbus (ProfiBus/ProfiNet etc.), as D-Sub (X206) or dual RJ45 (X205) (depending on the ordered option) www.kontron.com // 38... -
Page 39: X204) - Serial Port Rs232/Rs422
The HDBaseT standard can be used to extend the distance between a computer and a monitor of up to 150 meters, depending on the resolution and the cable quality. HDBaseT is also known as IEEE1911. For pin assignment refer to subsection 18.2.1. www.kontron.com // 39... -
Page 40: X205 Or X206) Fieldbus
D-Sub (X206) or as dual RJ45 (X205) connector. To add a FIELDBUS interface to the system, the second mPCIe socket (on the bottom of the baseboard), will be used. This connection can be implemented at factory only. www.kontron.com // 40... -
Page 41: Optional Versions With Fan Tray - Kbox C-102-4/-2/-1
In order to ensure a clean air circulation through the system, the fan tray slot provides an installed air filter (Figure 31, pos. 3). The air filter, which protects your system against dust and dirt, is washable and may be replaced during operation; refer to subsection 10.4 “Cleaning the Air Filter”. www.kontron.com // 41... -
Page 42: Fan Tray (Only For Kbox C-102-1, Kbox C-102-2 And Kbox C-102-4)
(see subsection 10.3 “Replacing the Fan Tray”). Figure 32: Fan tray components of the KBox C-102-1/-2/-4 (cable connections between fan and fan connector are included in this assembly) Fan tray with knurled screws Fan (temperature controlled) Connector for fan power and control www.kontron.com // 42... -
Page 43: 6/ Accessing Internal Components
Please follow the safety instructions for components that are sensitive to electrostatic discharge (ESD). Failure to observe this warning notice may result in damage to the device or/and internal components. Please pay attention to the manufacturer’s instructions before installing/removing an expansion card. www.kontron.com // 43... -
Page 44: Top Cover
Figure 33: Inside of the top cover with centering and fixing brackets Inside of the top cover 3 Centering bracket (on the rear side) 2 Rear part of the top cover 4 Air exhaust openings 5 Fixing bracket with knurled screws on the front side www.kontron.com // 44... -
Page 45: Opening And Closing The Kbox C-102
Lift the top cover up (on the front edge) and remove it (Figure 35). Now you have access to the internal sockets (PCI/PCIe/Mini PCIe and mSATA) or to the corresponding cards/devices, in order to install or remove internal hardware components. Figure 35: Removing the cover (detail of the KBox C-102-2) www.kontron.com // 45... -
Page 46: Figure 36: Kbox C-102-2 - Removing The Right Side Cover
6 SATA cable connections (power and data) 3 Screws to fix the PCIe slot bracket or the I/O 2x mSATA sockets bracket of the PCIe card 8 Fixing clips to secure the 2x mSATA SSDs 4 Riser card with 2x PCIe x4 sockets www.kontron.com // 46... -
Page 47: Internal View
The KBox C-102 provides two internal Mini PCIe sockets. You can see one of them in Figure 38, pos. 4. The second Mini PCIe socket is on the bottom side of the baseboard and can be only at factory equipped with an expansion card. www.kontron.com // 47... -
Page 48: Integrated Come Module
COMe-bSL6 module. The user manual of the installed COMe Module can be downloaded from our web page www.kontron.com . Search for the name of the installed module. 6.3.2. mSATA Socket Depending on the system configuration ordered your KBox C-102 can be extended with up to two mSATA SSDs. -
Page 49: Expansion Socket For Pcie Mini Cards
For system configuration refer to Figure 61, Figure 62 and for expansion card installation refer to the subsection 13.1.1 “PCIe Expansion Slot 1”. KBox C-102-0: can’t be equipped with PCI/PCIe expansion cards. Refer also to the area marked “C” in the section 4.4. www.kontron.com // 49... -
Page 50: Installing/Removing Pci/Pcie Expansion Cards (For Kbox C-102-4/-2/-1 Only)
Figure 41: Detail of the KBox C-102-2 with PCI-PCIe riser card with 1x PCI (32 bit) and 1x PCIe x4 sockets Figure 42: Detail of the KBox C-102-4 with PCIe riser card with 4x PCIe x4 sockets www.kontron.com // 50... -
Page 51: Installing/Removing The Pcie Mini Card
Slide outwards the fixing clips in order to release the PCIe Mini card. It will spring up at an angle of approx. 45° on the fixing clips side. Gently pull the PCIe Mini card out. In order to close the KBox C-102, proceed in reverse order (step 6 to 1 of the section 6.2). www.kontron.com // 51... -
Page 52: Installing/Removing An Msata Ssd
In order to close the KBox C-102, proceed in reverse order (step 6 to 1 of the section 6.2). Preventive Maintenance for SSD drive: Because of the limited predetermined lifespan of SSDs, we recommend to check the condition of your installed SSD drives via S.M.A.R.T. regularly. Pay attention to the manufacturer specifications for lifespan. www.kontron.com // 52... -
Page 53: 7/ Thermal Considerations
Max. ambient Approx. System Max. ambient Approx. System Consumption Temperature [°C] internal Temp. Rise [°C] Temperature [°C] internal Temp. Rise [°C] The maximum system ambient temperature depends mostly on the power consumption of the processor and the chipset. www.kontron.com // 53... -
Page 54: Third Party Components
125°C. This event will be indicated by the red blinking "Thermal" LED on the front panel. This behavior cannot be altered. Once activated, the event remains latched until power is cycled. www.kontron.com // 54... -
Page 55: 8/ Installation Instructions
Do not operate the KBox C-102 with foreign objects inside the chassis. Further do not insert any retrieval device into the device while it is connected to power. Kontron rejects all liability for any and all damages resulting from operation of the unit with foreign objects inside the chassis. -
Page 56: Control Cabinet Mounting
KBox C-102”, and the subsections 16.1.1 / 16.1.4 / 16.1.5 / 16.1.6 and 16.1.7, or refer to the drawings for KBox C-102 on our web site. The drawings can be downloaded from our web site www.kontron.com by selecting the product. -
Page 57: Figure 45: Keep Out Area For Mounting Around Kbox C-102-2 (Front Side View Without Fan Tray)
KBox C-102 - User Guide, Rev. 1.0 Figure 45: Keep out area for mounting around Figure 46: Keep out area for mounting around KBox C-102-2 (front side view without fan tray) KBox C-102-2 (front side view with optional fan tray) www.kontron.com // 57... -
Page 58: Figure 47: Keep Out Area For Mounting Around Kbox C-102-1 (Front Side View Without Fan Tray)
KBox C-102 - User Guide, Rev. 1.0 Figure 47: Keep out area for mounting around Figure 48: Keep out area for mounting around KBox C-102-1 (front side view without fan tray) KBox C-102-1 (front side view with optional fan tray) www.kontron.com // 58... -
Page 59: Figure 49: Keep Out Area For Mounting Around Kbox C-102-0
KBox C-102 - User Guide, Rev. 1.0 Figure 49: Keep out area for mounting around KBox C-102-0 www.kontron.com // 59... -
Page 60: Dc Power Plug Terminal
[refer to Figure 50, Figure 14 or subsection 18.1.1, “(X101) Power Input Connector “]. Fasten the screws to secure the wires into the clamps of the plug terminal. Close the cover (Figure 50, pos. 2). www.kontron.com // 60... -
Page 61: 9/ Starting Up
Connect the other ends of the DC power wires to the connections of the DC main power supply. Pay attention to the polarity of the connections. Switch on the disconnecting device (circuit breaker) in order to apply voltage to the terminals of the power wires. www.kontron.com // 61... -
Page 62: Power Off/On Procedure
(optional hardware components) yourself. You can download the relevant drivers for the installed hardware from our web site at www.kontron.com by selecting the product. Pay attention to the manufacturer specifications of the operating system and the integrated hardware components. -
Page 63: 10/ Maintenance And Cleaning
KBox C-102 - User Guide, Rev. 1.0 10/ Maintenance and Cleaning Equipment from Kontron requires only minimum servicing and maintenance for proper operation. For light soiling, clean the KBox C-102 with a dry cloth. Carefully remove dust from the surface of the cooling fins of the chassis using a clean, soft brush. -
Page 64: Preventive Maintenance For Ssd Drives
The operation of the KBox C-102 versions with fan tray extension is permitted only with a functional fan tray! Defective components may only be replaced by Kontron original spare parts: Part number of the fan tray: 9-5000-1096 for KBox C-102-4 ... -
Page 65: Cleaning The Air Filter
11. Secure the air filter holder by tightening the knurled screw to the tapped hole (Figure 53, pos. 4) of the fan tray slot (Figure 52, pos. 5 or Figure 53, pos. 3). Defective components may only be replaced by Kontron original spare parts. Air filter: part number: 9-5000-1099 (for KBox C-102-4) ... -
Page 66: Figure 53: Kbox C-102-2 With Removed Fan Tray And Removed Air Filter
4 Air intake openings at the bottom side of the fan 10 Socket for fan power and control (on internal rear side tray slot of the fan tray slot) 5 Tapped hole to secure the knurled screw of the air filter holder www.kontron.com // 66... -
Page 67: 11/ Kbox C-102-4 Variant
X 103/X 104 (ETH) Drive Bay 2 X 10² (SATA (ETH) Drive Bay 1 (SATA X 101 (24V DC) X 205/X 206 FIELDBUS Exp. Side of KBox C-102-4 with cooling fins Top side cover with knurled screws www.kontron.com // 67... -
Page 68: Figure 58: Block Diagram - Kbox C-102-4
Power Monitor 24 VDC Fan Tray FAN_TACHIN FAN_CTRL Tacho X 101 /PWMOUT 10 ms Hold-Up (Option) Baseboard COMe Onboard External Optional ext. interfaces and Onboard Complex Legend Baseboard Module connectors interfaces onboard components controller function www.kontron.com // 68... -
Page 69: 12/ Kbox C-102-2 Variant
X 103/X 104 (ETH) X 102 (ETH) X 101 (24V DC) Drive Bay 2 (SATA X 205/X 206 FIELDBUS Exp. Drive Bay 1 (SATA Side of KBox C-102-2 with cooling fins Top side cover with knurled screws www.kontron.com // 69... -
Page 70: Figure 60: Block Diagram - Kbox C-102-2
Power Monitor 24 VDC Fan Tray FAN_TACHIN FAN_CTRL Tacho X 101 /PWMOUT 10 ms Hold-Up (Option) Baseboard COMe Onboard External Optional ext. interfaces and Onboard Complex Legend Baseboard Module connectors interfaces onboard components controller function www.kontron.com // 70... -
Page 71: 13/ Kbox C-102-1 Variant
(USB 2.0) X105/X106 (USB 3.0) X 103/X 104 (ETH) X 102 (ETH) X 101 (24V DC) X 205/X 206 Drive Bay 1 FIELDBUS Exp. (SATA Side of KBox C-102-1 with cooling fins Top side cover with knurled screws www.kontron.com // 71... -
Page 72: Figure 62: Block Diagram - Kbox C-102-1
Power Monitor 24 VDC Fan Tray FAN_TACHIN FAN_CTRL Tacho X 101 /PWMOUT 10 ms Hold-Up (Option) Baseboard COMe Onboard External Optional ext. interfaces and Onboard Complex Legend Baseboard Module connectors interfaces onboard components controller function www.kontron.com // 72... -
Page 73: Kbox C-102-1 - System Expansion Capabilities
”Installing/Removing PCI/PCIe Expansion Cards”, with observation that only one PCIe slot is available (“PCIe 1”). Please observe that for KBox C-102-1 only one PCIex4/PCIe x1 expansion card can be installed into the available PCIe x4 socket of the riser card (Figure 63, pos. 11 and pos. 12). www.kontron.com // 73... -
Page 74: Internal Or Removable 2.5" Sata Hdd/Ssd
“DRIVE 1” for removable 2.5" SATA SATA HDD/SSD is not available on the front side of the system; refer to Figure 9, under consideration of the system design (Figure 61, Figure 62) and mechanical differences (see 16.1.5 and 16.1.6). Refer also to the area marked “D” in the section 4.4. www.kontron.com // 74... -
Page 75: 14/ Kbox C-102-0 Variant
X 107/X 108 (USB 2.0) X 105/X 106 (USB 3.0) X 103/X 104 (ETH) X 102 (ETH) X 101 (24V DC) X 205/X 206 FIELDBUS Exp. Side of KBox C-102-0 with cooling fins Top side cover with knurled screws www.kontron.com // 75... -
Page 76: Figure 65: Block Diagram - Kbox C-102-0
Power Monitor 24 VDC Fan Tray FAN_TACHIN FAN_CTRL Tacho X 101 /PWMOUT 10 ms Hold-Up (Option) Baseboard COMe Onboard External Optional ext. interfaces and Onboard Complex Legend Baseboard Module connectors interfaces onboard components controller function www.kontron.com // 76... -
Page 77: Kbox C-102-0 - System Expansion Capabilities
The KBox C-102 provides two internal Mini PCIe sockets. You can see one of them in Figure 38, pos. 4. The second Mini PCIe socket is on the bottom side of the baseboard and can be only at factory equipped with an expansion card. www.kontron.com // 77... -
Page 78: 15/ Uefi Bios
1.1. Starting the uEFI BIOS The KBox C-102 is provided with a Kontron-customized, pre-installed and configured version of Aptio® V uEFI BIOS based on the Unified Extensible Firmware Interface (uEFI) specification and the Intel® Platform Innovation Framework for EFI. This uEFI BIOS provides a variety of new and enhanced functions specifically tailored to the hardware features of the KBox C-102. -
Page 79: Setup Menus
Each Setup menu provides two main frames. The left frame displays all available functions. Configurable functions are displayed in blue. Functions displayed in grey provide information about the status or the operational configuration. The right frame displays an Item Specific Help window providing an explanation of the respective function. www.kontron.com // 79... -
Page 80: Main Setup Menu
Sub-Screen Description BIOS Read only field Information> Displays information about the BIOS system Vendor, Core version, Compliancy, Kontron BIOS Version, and Access level Board Read only field Information> Displays Board Information: Board ID, Fab ID, and LAN PHY revision Processor Read only field Information>... - Page 81 KBox C-102 - User Guide, Rev. 1.0 Sub-Screen Description System Date> Sets the system date [Week Day mm/dd/yyyy] System Time> Sets the system time [hh:mm:ss] www.kontron.com // 81...
-
Page 82: Advanced Setup Menu
Advanced Setup Menu The Advanced Setup menu provides sub-screens and second level sub-screens with functions, for advanced configuration and Kontron specific configurations. Setting items on this screen to incorrect values may cause system malfunctions. Figure 67: Advanced Setup Menu Initial Screen The following table shows the Advanced menu sub-screens and functions and described the content. - Page 83 Enables or disables core BIOS done message sent to ME Message> [Enabled, Disabled] Firmware ME FW Image Enables or disables ME FW Image RE-Flash function Update Re-Flash> [Enabled, Disabled] Configuration> Local FW Enables or disables local FW update function Update> [Enabled, Disabled] www.kontron.com // 83...
- Page 84 Specifies the ICC registers to write to, after end of post. Default - Dynamic EOP> registers for runtime clock adjustements are left writeable. All locked - No clock register adjustements allowed after EOP. All Unlocked - All ICc registers can be written after EOP. [Default, All Locked, All Unlocked] www.kontron.com // 84...
- Page 85 Enables or disables systems ability to hibernate (OS/S4 Sleep State) Hibernation> This option may not be effective with some operating systems. [Enabled, Disabled] ACPI Sleep Selects highest ACPI sleep state that the system enters when SUSPEND State> button is pressed [Suspend Disabled, S3 (Suspend to Ram)] www.kontron.com // 85...
- Page 86 SMART Smart Self Test> Run Smart Self Test on all HDDs during POST Settings> [Enabled, Disabled] H/W Monitor> Read only field Temperature> Displays CPU temperature in °C Module Read only field Temperate> Displays module temperature in °C www.kontron.com // 86...
- Page 87 Console redirection via COM3, available with an optional Winbond SuperIO on the baseboard. (Default is disabled) Console Redirection> If redirection is enabled, then the port settings such as Terminal type, Bits per second, Data bits, Parity etc. can be adjusted here.’ [Enabled, Disabled] www.kontron.com // 87...
- Page 88 Allows the user to change the device’s resource settings: settings. New settings are reflected on the Setup page after system restart. Possible> [Use Automatic Settings, IO=2F8h; IRQ=3, IO=3F8h; IRQ=3,4,5,7,9,10,11,1, IO=2F8h; IRQ=3,4,5,7,9,10,11,12, IO=3E8h; IRQ=3,4,5,7,9,10,11,12, IO=2E8h; IRQ=3,4,5,7,9,10,11,12] Additional Information SIO: www.kontron.com // 88...
- Page 89 If enabled, the CSM details can be changed. Below ‘Option ROM Execution’ are ‘Network, ‘Storage’, ’Video’ and ‘Other PCI devices’. Note: ‘Network’ must be changed to’ Legacy’ for legacy boot. (Default setting is ‘Do not launch’). CSM Support> [Enabled, Disabled] (continued) www.kontron.com // 89...
- Page 90 [NO NVME Device Found] Switchable SG Mode Select> Read only field Graphics> Switchable graphics selection [Muxless] Read only fields Configuration> USB Configuration, USB Module Version, USB Controllers, and USB devices Legacy USB Enable- Supports legacy USB www.kontron.com // 90...
- Page 91 Mass storgage device emulation type. ‘Auto’ enumerates devices Devices> according to their media format. Optical drives are emulated as ‘CDROM’, drives with no media will be emulated according to a drive type. Generic Ultra HS-SD/MMC [Auto, Floppy, Forced FDD, hard Disk, CD-ROM] www.kontron.com // 91...
-
Page 92: Chipset Setup Menu
Displays supported Graphics turbo IMON current values range: (14-31) Configuration> IMON Current> [31] Skip Scanned for If enabled, no scan is made for external Gfx cards on PEG or PCH PCIE External GfX Card> ports. Default setting is disabled. [Enabled, Disabled] www.kontron.com // 92... - Page 93 LVDS via a bridge. Note: Depends on LFP Panel Type> hardware option of the module. [LVDS, eDP ] Backlight Control> Backlight control settings options [None external, PWM, PWM Inverted, I2C] PWM Frequency> Set LCD backlight PWM frequency www.kontron.com // 93...
- Page 94 Selects scale used for the slot power limit value Limit Scale> [1.0x, 0.1x, 0.01x, 0.001X] PEG0 Physical Slot Sets the port’s slot number. This number must be Number> globally unique within the chassis (0 - 8191). PEG1 Hotplug> PCI Express Hotplug Enable/Disable [Disabled, Enabled] www.kontron.com // 94...
- Page 95 MMIO length of the installed graphic controller. [Dynamic, 1 GB, 1.25 GB, 1.5 GB, 1.75 GB, 2 GB, 2.25 GB, 2.5 GB, 2.75 GB, 3 GB, 3.25 GB, 3.5 GB] VT-d> VT-d capability [Enabled/Disabled] www.kontron.com // 95...
-
Page 96: Table 5: Chipset Set > Pch-Io Configuration Sub-Screens And Functions
Assigned toLAN> This port is always 5. Port8xh Decode> PCI express port 8xh decode [Enabled, Disabled] Peer Memory Enables/disables peer memory write Write Enable> [Enabled, Disabled] Compliance Test Enable when using compliance load board Mode> [Enabled, Disabled] www.kontron.com // 96... - Page 97 Root PCI Express System Error on non-Fatal Error [Enabled, Disabled] SECE> Root PCI Express System Error on correctable error [Enabled, Disabled] PME SCI> PCI Express PME SCI [Enabled, Disabled] Hot Plug> PCI Express hot plug [Enabled, Disabled] www.kontron.com // 97...
- Page 98 Detect Non- Detects non-compliance PCI express device. If Compliance Device> enabled, It takes more time at post time. [Enabled, Disabled] Prefetchable Prefetchable memory range for this root bridge Memory> [10] Reserved Memory Reserved memory alignments Range:(0-31)bits Alignment> www.kontron.com // 98...
- Page 99 [Hard Disk Drive, Solid State Drive] SATA0 - Drive1 SATA Port# DevSlp [Enabled, Disabled] SATA1 – Drive 2 DevSlp> DITO Configuration> DITO configuration [Enabled, Disabled] DITO Value> Read only field [625] DM Value> Read only field [15] www.kontron.com // 99...
- Page 100 USB devices plugged into the connector will not be MiniPCIe J17> detected by BIOS or OS. MiniPCIe J18> [Disabled, Enabled] Security BIOS Lock> Enables or disables PCH BIOS lock enable feature. Required to be Configuration> enabled to ensure SMM protection of flash. [Enabled, Disabled] www.kontron.com // 100...
- Page 101 [Enabled, Disabled] ETH (X104)> Enable/Disable ETH (X104) [Enabled, Disabled] SD Card Enable/Disable this USB physical connector (physical port). controller> Once disabled, any USB devices plugged into the connector will not be detected by BIOS or [Enabled, Disabled] www.kontron.com // 101...
- Page 102 BIOS or OS. [Enabled, Disabled] Serial IRQ Mode> Configure serial IRQ mode [Quiet, Continuous] State After G3> Specifies state to go to when power is re-applied after power failure (G3 State). [S0 State, S5 State] www.kontron.com // 102...
-
Page 103: Security Setup Menu
If the system cannot be booted because the User Password or the Supervisor Password are not known, see chapter 15.3 “Updating the uEFI BIOS” for information about clearing the uEFI BIOS settings, or contact Kontron Support for further assistance. -
Page 104: Boot Setup Menu
[UEFI Hard Disk, UEFI Hard Disk1, UEFI Hard Disk2, UEFI Hard Disk3, UEFI Hard Disk4, UEFI Hard Disk5, UEFI AP: UEFI: Built-in EFI Shell, Boot Option #14> UEFI CD/DVD, UEFI USB Hard Disk, UEFI USB CD/DVD, UEFI USB Key, UEFI USB Floppy, UEFI USB Lan, UEFI Network, Disabled] www.kontron.com // 104... - Page 105 Boot Option #11> [UEFI USB Key] Boot Option #12> [UEFI USB Floppy] Boot Option #13> [UEFI USB Lan] Boot Option #14> [UEFI Network] UEFI Application Boot Priorities> Boot Option #1> Sets the system boot order [UEFI: Built-in EFI shell, Disabled] www.kontron.com // 105...
-
Page 106: Save And Exit Setup Menu
Restores/loads standard default values for all setup options Save as User Defaults> Saves changes made so far as user defaults Restore User Defaults> Restores user defaults to all setup options UEFI Built-in EFI shell> Attempts to launch the built in EFI Shell www.kontron.com // 106... -
Page 107: Uefi Shell Introduction, Basic Operation
The Kontron uEFI BIOS features a built-in and enhanced version of the uEFI Shell. For a detailed description of the available standard shell scripting refer to the EFI Shell User’s Guide. For a detailed description of the available standard shell commands, refer to the EFI Shell Command Manual. -
Page 108: Kontron-Specific Uefi Shell Commands
KBox C-102 - User Guide, Rev. 1.0 15.1.3. Kontron-Specific uEFI Shell Commands The Kontron uEFI implementation provides the following additional commands related to the specific HW features of the Kontron system. Table 14: Kontron-Specific uEFI Shell Commands COMMAND DESCRIPTION kBoot Boots a selected device. -
Page 109: Examples Of Startup Scripts
%wdt_enable% == “on” then kwatchdog -t 15 echo “Watchdog enabled” endif To create uEFI Shell environment variable, use the set uEFI Shell command as shown below: Shell> set wdt_enable on Shell> set wdt_enable : on Shell> reset www.kontron.com // 109... -
Page 110: Updating The Uefi Bios
Boot into Setup and enable ME Update (Advanced> PCH-FW Configuration> Firmware Update Configuration> Me FW Image Re-Flash [Enabled]) Save and Exit and directly boot to EFI Shell Go to USB Stick (use "map" to list all devices): e.g.: fs0: Start update update.nsh <FileName>.bin www.kontron.com // 110... -
Page 111: Uefi Bios Recovery
SPI boot flash may result in operation with different uEFI BIOS code and settings. 15.3.2. Determining the Active Flash Sometimes it may be necessary to check which flash is active. The information is available using the kboardinfo uEFI Shell command. www.kontron.com // 111... -
Page 112: 16/ Technical Specifications
Up to 2x mSATA • DRIVE 2: SATA 6 • DRIVE 2: SATA 6 1x SD Card Gb/s. Gb/s. Up to 2x mSATA Up to 2x mSATA Up to 2x mSATA 1x SD Card 1x SD Card 1x SD Card www.kontron.com // 112... - Page 113 1x PCIe x4 4x PCI x4 (via corresponding 1x PCI (32 bit) and 1x riser card) PCIe x4 (power consumption (via corresponding less than 15W is riser card) allowed) (power consumption less than 15W is allowed) Fan Tray (Option) www.kontron.com // 113...
-
Page 114: Mechanical Specifications Of The Kbox C-102
16.1.1. Mechanical Specifications of the KBox C-102-4 Figure 73: Dimensions: right side (KBox C-102-4) Figure 74: Dimensions: front side with key holes (KBox C-102-4) Figure 75: Dimensions: detail key hole (KBox C-102-4) Figure 76: Dimensions: top side (KBox C-102-4) www.kontron.com // 114... -
Page 115: Mechanical Specifications Of The Kbox C-102-4 With Fan Tray Option
Figure 78: Dimensions: front side with key holes (KBox C-102-4 with fan tray option) (KBox C-102-4 with fan tray option) Figure 79: Dimensions: detail key hole Figure 80: Dimensions: top side (KBox C-102-4 with fan tray option) (KBox C-102-4 with fan trayoption) www.kontron.com // 115... -
Page 116: Table 10: Mechanical Specifications Of The Kbox C-102-4
Weight Approx. 4.2 kg (9.25 lbs.) Approx. 6.00 kg (13.22 lbs.) (without packaging, without expansions) Chassis Cooling fins, black Chassis: steel sheet, light grey (RAL 7035) Side with External Interfaces : trim strips, traffic grey (RAL 7043) www.kontron.com // 116... -
Page 117: Mechanical Specifications Of The Kbox C-102-2
16.1.3. Mechanical Specifications of the KBox C-102-2 Figure 81: Dimensions: right side (KBox C-102-2) Figure 82: Dimensions: front side with key holes (KBox C-102-2) Figure 83: Dimensions: detail key hole (KBox C-102-2) Figure 84: Dimensions: top side (KBox C-102-2) www.kontron.com // 117... -
Page 118: Mechanical Specifications Of The Kbox C-102-2 With Fan Tray Option
Figure 86: Dimensions: front side with key holes (KBox C-102-2 with fan tray option) (KBox C-102-2 with fan tray option) Figure 87: Dimensions: detail key hole Figure 88: Dimensions: top side (KBox C-102-2 with fan tray option) (KBox C-102-2 with fan trayoption) www.kontron.com // 118... -
Page 119: Table 11: Mechanical Specifications Of The Kbox C-102-2
Weight Approx. 4.75 kg (10.47 lbs.) Approx. 6.00 kg (13.22 lbs.) (without packaging, without expansions) Chassis Cooling fins, black Chassis: steel sheet, light grey (RAL 7035) Side with External Interfaces : trim strips, traffic grey (RAL 7043) www.kontron.com // 119... -
Page 120: Mechanical Specifications Of The Kbox C-102-1
16.1.5. Mechanical Specifications of the KBox C-102-1 Figure 89: Dimensions: right side (KBox C-102-1) Figure 90: Dimensions: front side with key holes (KBox C-102-1) Figure 91: Dimensions: detail key hole (KBox C-102-1) Figure 92: Dimensions: top side (KBox C-102-1) www.kontron.com // 120... -
Page 121: Mechanical Specifications Of The Kbox C-102-1 With Fan Tray Option
Figure 94: Dimensions: front side with key holes (KBox C-102-1 with fan tray option) (KBox C-102-1 with fan tray option) Figure 95: Dimensions: detail key hole Figure 96: Dimensions: top side (KBox C-102-1 with fan tray option) (KBox C-102-1 with fan tray option) www.kontron.com // 121... -
Page 122: Table 12: Mechanical Specifications Of The Kbox C-102-1
Weight Approx. 4.6 kg (10.14 lbs.) Approx. 5.6 kg (12.34 lbs.) (without packaging, without expansions) Chassis Cooling fins, black Chassis: steel sheet, light grey (RAL 7035) Side with External Interfaces : trim strips, traffic grey (RAL 7043) www.kontron.com // 122... -
Page 123: Mechanical Specifications Of The Kbox C-102-0
16.1.7. Mechanical Specifications of the KBox C-102-0 Figure 97: Dimensions: right side (KBox C-102-0) Figure 98: Dimensions: front side with key holes (KBox C-102-0) Figure 99: Dimensions: detail key hole (KBox C-102-0) Figure 100: Dimensions: top side (KBox C-102-0) www.kontron.com // 123... -
Page 124: Table 13: Mechanical Specifications Of The Kbox C-102-1
210 mm (8.26 ") Weight Approx. 3.8 kg (8.37 lbs.) (without packaging, without expansions) Chassis Cooling fins, black Chassis: steel sheet, light grey (RAL 7035) Side with External Interfaces : trim strips, traffic grey (RAL 7043) www.kontron.com // 124... -
Page 125: Environmental Specifications
30 G, 11 ms, half sine, acc. to IEC 60068-2-27 Operating Shock 15 G, 11 ms, half sine, acc. to IEC 60068-2-27 Non-Operating Vibration 10Hz - 150 Hz, 2 G, acc. to IEC 60068-2-6 Operating Vibration 10Hz - 150 Hz, 1 G, acc. to IEC 60068-2-6 www.kontron.com // 125... -
Page 126: Ce-Directives, Standards And Approvals
EN 55011, Class B (conducted Emission) EN 55032, Class B EN 61000-6-4 Generic standards - Immunity for industrial environments (Immunity): EN 55024, EN 61000-6-2, EN 61000-4-3 EN61131-2 (Standard for programmable controllers, part 2 equipment requirements and tests) www.kontron.com // 126... -
Page 127: 17/ Kbox C-102 Cpld Specific Registers
Board ID Register Low Byte Reserved Reserved LCFG LED Configuration Register LCTRL LED Control Register Reserved Reserved Reserved Reserved Reserved Reserved TMPSR Temperature Status Register Reserved Reserved Reserved Reserved Reserved Reserved Scratchpad Register : Register uses Reserved address space www.kontron.com // 127... -
Page 128: Register Descriptions
BFUS: Boot Flash Update Selection - The active SPI boot flash will be toggled each time if bit BFUS is written with 0 to 1 or 1 to 0. The active SPI boot flash can be read back via the Status Register 0, bit field BFSS. The effective selection of rescue BIOS flash is indicated by red blinking rescue LED. www.kontron.com // 128... -
Page 129: Reset Status Register Rstat
1 = Shutdown executed (intentional or because of power failure) WDRS: Watchdog Reset Status – This bit if set reports reset was caused by CPLD watchdog implementation. 0 = System reset not generated by CPLD watchdog timeout. 1 = System reset generated by CPLD watchdog timeout. www.kontron.com // 129... -
Page 130: Board Interrupt Configuration Bicfg
WICF[1:0]: - The WICF bit field is used to select an interrupt line association for the board watchdog as decoded as follows: Table 32: Watchdog Interrupt Configuration WICF[1] WICF[0] Interrupt request line Disabled (Default) IRQ5 (Recommended) IRQ10 IRQ11 www.kontron.com // 130... -
Page 131: Board Id Register High Byte Bidh
Board ID Register High Byte BIDH BIDH[7:0] Name Access Reset P 17.2.6. Board and PLD Revision Register Table 34: Board and PLD Revision Register 0x109 Board and PLD Revision Register BREV Name BREV[3:0] PREV[3:0] Access Reset P www.kontron.com // 131... -
Page 132: Watchdog Timer Register Wtim
0110 = 8 sec 0111 = 16 sec 1000 = 32 sec 1001 = 64 sec 1010 = 128 sec 1011 = 256 sec 1100 = 512 sec 1101 = 1024 sec 1110 = 2048 sec 1111 = 4096 sec www.kontron.com // 132... -
Page 133: Board Id Register Low Byte Bidl
0001 = Reserved 0010 = Mode B (default after Boot) remaining = Reserved In POST mode all eight LED’s will display POST code during the pre-boot phase. Mode B is used for display of general purpose informations. www.kontron.com // 133... -
Page 134: Led Control Register Lctrl
LCOL[3:0]: LED color – This bit field is used to define the color of the LED specified together with .the SET command. 0000 = Off 0001 = Green 0010 = Red 0011 = Red + Green 01xx = Reserved www.kontron.com // 134... -
Page 135: Temperature Status Register Tmpsr
This register can be read and written to any time and is not associated with internal logic. It may be used for example for test purposes. Table 40: Scratchpad Register SCR 0x11F Scratchpad Register SCR Name SCR[7:0] Access Reset PS This register is set to $00 after power on and reset. www.kontron.com // 135... -
Page 136: 18/ Standard Interfaces - Pin Assignments
Table 42: (X102, X103) Ethernet Connectors Signal Name X2, X3, X10LAN1, LAN2,LAN3 (RJ45) MDI0+ MDI0- MDI1+ MDI2+ MDI2- MDI1- MDI3+ MDI3- LINK/ACT Speed (Mbps) LINK ACTIVE orange on (blinking) green orange on (blinking) 1000 orange orange on (blinking) www.kontron.com // 136... -
Page 137: X105, X106) Usb 3.0 Port
Lane 2 (n) Lane 3 (p) GND (ML Lane 3) Lane 3 (n) AUX SEL# Pull-down to GND AUX CH (p) GND (AUX CH) AUX CH (n) Hot Plug 3.3V (DDC EEPROM GND (GND_DDC) power 500 mA fused www.kontron.com // 137... -
Page 138: X110) Serial Interface Com 1 (Rs232)
Table 46: (X110) Serial Interface COM 1 (RS232) Signal Name 9-pin D-SUB Connector (male) (Data Carrier Detect) (Receive Data) (Transmit Data) (Data Terminal Ready) (Signal Ground) (Data Set Ready) (Request to Send) (Clear to Send) (Ring Indicator) www.kontron.com // 138... -
Page 139: Optional Interfaces Via Adapter Modules
Pin # Signal Name LDT3 (RJ45 female) TRD1+ TRD1- TRD2+ TRD3+ TRD3- TRD2- TRD4+ TRD4- Green LED Yellow LED Link LED HDMI Activity LED 18.2.2. (X 202) DP 2 - DisplayPort For Pin assignment refer to 18.1.5. www.kontron.com // 139... -
Page 140: 204) Serial Port Rs232/Rs422
(Clear to Send) (Ring Indicator) 18.2.3.2. Serial Port RS232/RS422 configured as RS422 Table 49: Serial Port RS232/RS422 configured as RS422 Signal Name 9-pin D-SUB Connector (male) RxD- (Receive Data-) TxD- (Transmit Data-) (Signal Ground) TxD+ (Transmit Data+) (Receive Data+) www.kontron.com // 140... -
Page 141: 203) Can Bus Port
Signal Name 9-pin D-SUB Connector (male) TERM L 120Ω CAN_L CAN_L bus line (dominant low) CAN_GND (CAN Ground) Reference potential (not connected) (not connected) (not connected) CAN_H CAN_H bus line (dominant high) TERM H 120Ω (not connected) www.kontron.com // 141... -
Page 142: Appendix A: List Of Acronyms
PCI Industrial Computer Manufacturers Group Real Time Clock System Event Log ShMC Shelf Management Controller SMBus System Management Bus SMWI System Monitor Web Interface Serial Over LAN Secure Shell Trusted Platform Module UEFI Unified Extensible Firmware Interface Very Low Profile www.kontron.com // 142... - Page 143 KBox C-102 - User Guide, Rev. 1.0 www.kontron.com // 143...
-
Page 144: About Kontron
Kontron is a listed company. Its shares are traded in the Prime Standard segment of the Frankfurt Stock Exchange and on other exchanges under the symbol "KBC". For more information, please visit: www.kontron.com...
Need help?
Do you have a question about the KBox C-102 Series and is the answer not in the manual?
Questions and answers