
Subscribe to Our Youtube Channel
Related Manuals for Parker P Series


Summary of Contents for Parker P Series
- Page 1 Parker Hannifin P series – New Servo System P Series User Guide 1. Effective day: September 2014 Rev.1.0 1 P series User Guide...
- Page 2 Failure to do so can result in damage to equipment and/or serious injury to personnel. P Series products and the information in this user guide are the proprietary property of Parker Hannifin Corporation or its licensers, and may not be copied, disclosed, or used for any purpose not expressly authorized by the owner thereof.
-
Page 3: Table Of Contents
Important User Information ................14 Change Summary ....................1. Introduction ....................15 1.1 P Series Products Overview ....................16 1.1.1 P series Features........................16 1.1.2 PD Drive Names ........................16 1.1.3 Input Power ..........................16 1.1.4 Front panel description of representative drives ..............17 1.1.5 PM Motor Names........................18... - Page 4 Party Motor Parameters .....................76 4.3.10 CiA402 Parameters .......................77 4.3.11 Index Related Parameters .....................79 4.3.12 Index00~63 Internal Variable Communication Address ............80 4.4 I/O ............................. 81 4.4.1 Digital I/O ..........................81 4.4.2 Analog I/O ..........................83 4.4.3 Pulse Heat Input ........................84 2 P series User Guide...
- Page 5 6.3 Function Setting of PCLEAR ..................118 6.4 Homing ........................... 118 6.4.1 Homing Methods ........................119 6.4.2 Related Objects ........................120 6.5 Electronic Gear Setting ....................131 6.5.1 Electronic Gear ........................131 6.5.2 Example of Electronic Gear Setting ..................133 3 P series User Guide...
- Page 6 8.4 Functions of Index Output Signal ................... 179 8.5 Analog Speed Override ....................180 9. Object ......................181 9.1 Object Dictionary ......................182 9.1.1 Data Type..........................182 9.1.2 General Objects ........................182 9.1.3 Manufacturer Specific Objects ..................186 4 P series User Guide...
- Page 7 11.1 Troubleshooting Guidelines ..................275 11.2 Servo Alarm and Check List ..................275 11.3 Servo Warning and Check List ..................277 Appendix A Firmware Update ................279 Using USB OTG ........................280 Using Drive Support Tool ..................... 281 5 P series User Guide...
-
Page 8: Table Of Figures
Figure 28. Allocating Digital Output Signals ..................90 Figure 29. Commanded Position ......................98 Figure 30. Position Response Types ....................100 Figure 31. Control Loop Block Diagram ..................101 Figure 32. Vibration Control ......................103 6 P series User Guide... - Page 9 Figure 55. FAL Series N-T Curves ....................262 Figure 56. FBL Series N-T Curves ....................263 Figure 57. FCL Series N-T Curves ....................265 Figure 58. FE Series N-T Curves ..................... 271 Figure 59. FF Series N-T Curves ..................... 273 7 P series User Guide...
- Page 10 Table 28. Read Input Signal ....................... 68 Table 29. Example of Reading Drive Status ..................68 Table 30. Write Single Register ......................69 Table 31. Example of Write Single Register ..................69 Table 32.Write Multi Register ......................69 8 P series User Guide...
- Page 11 Table 62. Bit Mask Descriptions ......................96 Table 63. Auto Tuning Related Objects .................... 101 Table 64. Notch Filter Related Objects .................... 104 Table 65. Adaptive Filter Related Objects ..................105 Table 66. Analog Monitor Related Objects ..................106 9 P series User Guide...
- Page 12 Table 95. Analog Speed Override Related Objects ................180 Table 96. Object Dictionary Data Type .................... 182 Table 97. Hardware Version ......................183 Table 98. Software Version ....................... 183 Table 99. Store Parameters ....................... 184 Table 100. Restore Parameters ......................185 10 P series User Guide...
- Page 13 Table 117. PM-FExxMMxx Series Features ..................259 Table 118. PM-FFxxAM/MMxx Series Features ................260 Table 119. PM-FFxxDM/GMxx Series Features ................260 Table 120. Servo Alarm Check List ....................277 Table 121. Servo Warning Check List ....................278 11 P series User Guide...
- Page 14 Parker Hannifin Warning — Risk of damage and/or personal injury The P series described in this guide contain no user-serviceable parts. Attempting to open the case of any unit, or to replace any internal component, may result in damage to the unit and/or personal injury. This may also void the warranty.
-
Page 15: Important User Information
Since Parker Hannifin constantly strives to improve all of its products, we reserve the right to modify equipment and user guides without prior notice. No part of this user guide may be reproduced in any form without the prior consent of Parker Hannifin. -
Page 16: Change Summary
Parker Hannifin Change Summary 14 P series User Guide... -
Page 17: Introduction
Parker Hannifin 1. Introduction IN THIS CHAPTER 1.1 P Series Products Overview 1.1.1 P series Features 1.1.2 PD Drive Names 1.1.3 Input Power 1.1.4 Front panel description of representative drives 1.1.5 PM Motor Names 1.1.6 Options 1.2 Compatible Parker Product 1.3 Assumptions of Technical Experience... -
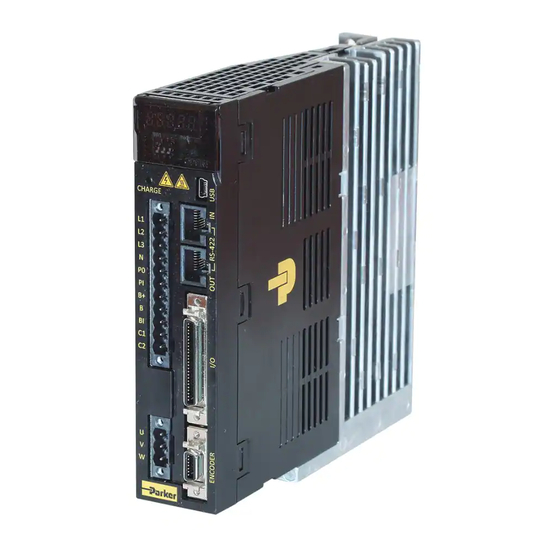
Page 18: P Series Products Overview
Parker Hannifin 1.1 P Series Products Overview The PD drives are a family of super compact, super economic digital servo drives. Their maximum continuous shaft power ranges from 100 Watts to 3500 Watts (3.5kW). Ready for direct panel mounting, you can select the precise power level needed for your application. -
Page 19: Front Panel Description Of Representative Drives
Bus Voltage 340Vdc Drive Input Voltage 230 VAC, 3Ø , 50/60Hz Drive Control Voltage 230 VAC, 1Ø , 50/60Hz Table 1. Output Power Level 1.1.4 Front panel description of representative drives Figure 2. 400W Drive Front Description P series User Guide... -
Page 20: Pm Motor Names
Parker Hannifin Figure 3. 1000W Drive Front Description Figure 4. 3500W Drive Front Description 1.1.5 PM Motor Names The following diagram explains the PM motor part numbers : P series User Guide... -
Page 21: Options
For the latest additions, see our website at http://solutions.parker.com/AUG_EM 1.2 Compatible Parker Product Stepper Controller (S&D mode)....ACR series or other Parker controller Software ..........Drive Support Tool (Easy configuration) For information about cables, motors, etc., see ―Chapter 2 Mechanical Installation‖. -
Page 22: Assumptions Of Technical Experience
Parker Hannifin 1.4 Illustrations in this Installation Guide Typically, the illustrations in this guide show the P series PD-04xx, PD-10xx and the PD-35xx. These three models represent other models with similar features. PD-04xx represents models PD-01xx and PD02xx. Model PD-10xx represents the PD-08 and Model PD-35xx represents the PD-20. -
Page 23: Mechanical Installation
2.2.4 PM Motor Dimensions (FCL Series) 2.2.5 PM Motor Dimensions (FE Series) 2.2.6 PM Motor Dimensions (FF Series) 2.3 Weight 2.4 Mounting Guidelines 2.4.1 Cable Routing 2.4.2 Panel Mounting 2.4.3 Preventing Excessive Impact 2.4.4 Combining with Load Device 2.4.5 Pulley Combining P series User Guide... -
Page 24: Environment
Excessive vibration may shorten the life cycle of the Acceleration Vibration bearings 4.9[㎨] or below No exposure to direct sunlight Environmental No corrosive/flammable gas Requirements No oil or dust In case of a closed space, adequate ventilation Table 2. Drive Installation Environment P series User Guide... -
Page 25: Dimensions
( Unit : mm ) PD-01 ~ 04 PD-08 / 10 PD-20 / 35 Height Overall Height Overall Width Width 1 Width 2 Width 3 Width 4 Depth 107.7 127.7 112.5 Overall Depth Table 3. PD Drive Dimensions P series User Guide... -
Page 26: Pm Motor Dimensions (Fal Series)
32.5 PM-FALR5AM2 139.6 114.6 PM-FAL01AM2 156.6 131.6 PM-FAL015AM2 176.6 151.6 Table 4. PM-FAL series Motor Dimension NOTE : PM-FAL series are no key type, Detail drawings are available at http://solutions.parker.com/AUG_EM Specification subject to change without notice. P series User Guide... -
Page 27: Pm Motor Dimensions (Fbl Series)
62 80 50 49.5 14 22.5 80 PM-FBL01AMK2 147.2 117.2 PM-FBL02AMK2 158.2 128.2 PM-FBL04AMK 178.2 148.2 Table 5. PM-FBL series Motor Dimension NOTE : Detail drawings are available at http://solutions.parker.com/AUG_EM Specification subject to change without notice. P series User Guide... -
Page 28: Pm Motor Dimensions (Fcl Series)
174.7 134.7 PM-FCL08AMK PM-FCL07DMK 192.7 152.7 PM-FCL10AMK 63.6 PM-FCL03AMK2 PM-FCL04AMK2 PM-FCL05DMK2 PM-FCL06AMK2 PM-FCL06DMK2 PM-FCL08AMK2 PM-FCL07DMK2 PM-FCL10AMK2 Table 6. PM-FCL series Motor Dimension NOTE : Detail drawings are available at http://solutions.parker.com/AUG_EM Specification subject to change without notice. P series User Guide... -
Page 29: Pm Motor Dimensions (Fe Series)
255.3 197.3 PM-FE11DMK2 PM-FE15AMK2 PM-FE09MMK2 PM-FE13GMK2 275.3 217.3 PM-FE16DMK2 PM-FE22AMK2 PM-FE12MMK2 PM-FE17GMK2 293.3 235.3 PM-FE22DMK2 PM-FE30AMK2 Table 7. PM-FE series Motor Dimension NOTE : Detail drawings are available at http://solutions.parker.com/AUG_EM Specification subject to change without notice. P series User Guide... -
Page 30: Pm Motor Dimensions (Ff Series)
60 230 PM-FF12MMK2 PM-FF20GMK2 308.9 229.9 PM-FF22DMK2 PM-FF30AMK2 PM-FF20MMK2 PM-FF30GMK2 338.9 259.9 PM-FF35DMK2 PM-FF30MMK2 382.9 303.9 Table 8. PM-FF series Motor Dimension NOTE : Detail drawings are available at http://solutions.parker.com/AUG_EM Specification subject to change without notice. P series User Guide... -
Page 31: Weight
Included heat-sink Table 9. PD Drive Weight 2.4 Mounting Guidelines The P series drive is a vented product. To prevent material spilling into the drive, mount it under an overhang or in a suitable enclosure. 2.4.1 Cable Routing Route high power cables (motor and mains) at right angles to low power cables (communications and inputs/outputs). -
Page 32: Figure 12. Pd-04P Mounting Information
Parker Hannifin Figure 12. PD-04P Mounting Information Figure 13. PD-10P Mounting Information P series User Guide... -
Page 33: Preventing Excessive Impact
Combining with Coupling: install coupling by matching the motor shaft with the load shaft within the permissible window as below. 0.03[mm] or below (peak to peak) Load Shaft Motor Shaft 0.03[mm] or below (peak to peak) P series User Guide... -
Page 34: Pulley Combining
Parker Hannifin 2.4.5 Pulley Combining Radial Load Shaft Load Flange Note Nr: 30[㎜] or below Radial Load 1548 1850 Axis Load Table 10. Pulley Combining Information P series User Guide... -
Page 35: Electrical Installation
3.7.1 PD Drive Alarm Code List 3.7.2 PD Drive Warning Code List 3.8 Connector Descriptions 3.9 Installation Test 3.9.1 Testing the PD Drive 3.10 Drive Blocks 3.11 Wiring 3.11.1 Power 3.11.2 Feedback Signal 3.11.3 I/O Signal Wiring 3.11.4 Pulse Heat Signal P series User Guide... -
Page 36: Installation Safety Requirements
Label, clearly, the switch or breaker as the disconnecting device. 3.1.2 Auto-Configuration for Encoders The PD drives recognize ―smart encoders‖ attached to Parker motors. You can apply power to the drive, and the drive reads all necessary motor parameters from the motor. -
Page 37: Power Supply
(4.0 SQ) UA-F1510, SEOIL UA-F2010, SEOIL UA-F4010, SEOIL Pressure Terminal (10mm Strip & Twist) (10mm Strip & Twist) (10mm Strip & Twist) Recovery 50[W] 100[W] 150[W] Resistance 100Ω 40Ω 13Ω (default) Table 11. Power Circuit Electronics Specification P series User Guide... -
Page 38: Multiple Drive Installations
OFF OFF OFF OFF OFF OFF OFF OFF OFF OFF OFF setting Node address Rotary switch setting Toggle switch OFF OFF OFF OFF OFF OFF ON setting Node address Rotary switch setting Toggle switch setting Node address Table 12. Drive Node Address Setting P series User Guide... -
Page 39: Terminating Resistance Setting
Circuits related with dynamic brake are installed inside the drive. This drive shorts either 2 phases or 3 phases, depending on the model. You can set various stop modes shown below by configuring the dynamic brake control mode. (0x2012) P series User Guide... -
Page 40: Signal Output Function Setting
Index Format Allocation 0x2012 Dynamic Brake Control Mode UINT 0x2013 Emergency Stop Configuration UINT Table 13. Dynamic Brake Related Objects 3.5.2 Signal Output Function Setting Please refer to ― 6.8.2 Brake Output Signal Function Setting ‖. P series User Guide... -
Page 41: Regeneration Protection
Ω 0x200B UINT Value Regeneration brake Resistor 0x200C UINT Watt Power Peak Power of Regeneration 0x200D UINT Watt brake Resistor Duration Time @ Peak Power of 0x200E UINT Regeneration brake Resistor Table 14. Regeneration Related Objects P series User Guide... -
Page 42: Table 15. Internal Resistor Setting
To use the regeneration broke built in the drive, you should set the brake in the following order. A. Regeneration brake wiring - Check for B, BI terminal short (default short at the time of release from the factory, 1kW or less) P series User Guide... - Page 43 - Check regeneration brake power (0x200C) - 1KW or less : Attach to the backside of the heat protection panel(See the figure below) - 3.5KW ~ 15KW : install inside the drive - 15KW or above: no internal regeneration brake P series User Guide...
-
Page 44: External Resistor Setting
- Set the resistance value of the regeneration brake regeneration brake to [Ω]Unit - The value should be set if the regeneration brake setting (0x2009) is 1. - Default value: 0 D. Regeneration brake power setting (0x200C) P series User Guide... -
Page 45: Other Consideration
When derating (set the vale to 100 or below), the regeneration overload alarm (AL-23) sets off faster if the set value is smaller. If you want to set the derating factor to 100% or above, you should fully consider the heat protection condition of the installed drive. P series User Guide... -
Page 46: Drive Status Indicators
Display of servo warning is given priority over other statuses. Digit 3~Digit 1 Display Status Description Servo off Positive limit sensor input Negative limit sensor input Servo on Servo warning: W10 (code:10) Digit4 displays the current operation status and the servo‘s READY status. P series User Guide... -
Page 47: Pd Drive Alarm Code List
In case of servo alarm, DIGIT 5~1 blinks and displays the following message, where DIGIT2 and 1 display the alarm code. Display of servo warning is given priority over other statuses 3.7.1 PD Drive Alarm Code List Table 17. PD Drive Alarm Code List P series User Guide... -
Page 48: Pd Drive Warning Code List
Table 18. PD Drive Warning Code List 3.8 Connector Descriptions Power Input Connector Specification : BLT 5.08HC 11 180F SN BK BX (weidmuller, PD-01~04, 300V/10A) BLZP 5.08 11 180F SN BK BX (weidmuller, PD-08~10, 300V/15A) Feedback Connector Specifications: 10114-3000VE (3M) P series User Guide... - Page 49 Analog Monitoring Connector Specification : DF-11-4DS-2C (HIROSE) I/O connector Specification : 10120-3000PE (3M) Motor U/V/W Connector Specification : BLT 5.08HC 03 180F SN BK BX (weidmuller, PD-01~04, 300V/10A) BLZP 5.08 03 180F SN BK BX (weidmuller, PD-08~10, 300V/15A) P series User Guide...
-
Page 50: Installation Test
If the PD drive has been installed correctly, the motor will spin at one revolution per second. If the motor does not spin, a wiring or configuration error possibly exists. Please refer to ― P Series Software Reference Manual ― . P series User Guide... -
Page 51: Drive Blocks
Figure 17. PD Drive Block Diagram Note 1) When using DC reactor, please connect with PO, PI. Note 2) When using external recovery resistance, remove the shorting pins B, BI and then connect with the B+, B pins. P series User Guide... -
Page 52: Wiring
Please check the voltage of the input power so that it does not exceed the permissible window. Connecting commercial power with the drive‘s U, V, W terminals may cause damage. Please connect the power to the L1, L2, L3 terminals. P series User Guide... - Page 53 Warning Connecting excessive voltage will damage the drive. Caution Start re-wiring after making sure that the charge lamp is off after shutting off the main power, to avoid being electrocuted. P series User Guide...
-
Page 54: Feedback Signal
Parker Hannifin 3.11.2 Feedback Signal APCS-ExxxAS Cable (Quadrature type) APCS-ExxxBS Cable (Quadrature type) P series User Guide... - Page 55 Parker Hannifin APCS-ExxxCS Cable (Serial Single-turn type) APCS-ExxxDS Cable (Serial Single-turn type) P series User Guide...
- Page 56 Parker Hannifin APCS-ExxxES Cable (Serial Single-turn type) APCS-ExxxDS1 Cable (Serial Multi-turn type) P series User Guide...
- Page 57 Parker Hannifin APCS-ExxxES1 Cable (Serial Multi-turn type) Tamagawa Feedback (17bit incremental) P series User Guide...
-
Page 58: I/O Signal Wiring
Each input contact point can be allotted to 28 functions. Please see “ 4.5 I/O Signals Setting “ for signal allotment and contact point change of input contact points. The service rating is DC12V~ DC 24V. P series User Guide... -
Page 59: Figure 19. Example Of Digital Input Signal Wiring
Please see “ 4.5 I/O Signals Setting “ for signal allotment and contact point change of input contact points. As transistor switches are used, over voltages/current may cause damage. Please exercise caution. The service rating is DC 24V ±10%, 120[㎃]. Inner Circuit P series User Guide... -
Page 60: Figure 20. Example Of Digital Output Signal Wiring
Please see ― 5.8 Analog Monitor ― for setting and scale adjustment of monitoring signals. The window of analog output signal is -10V ~ 10V. The resolution of analog output signals is 12bit. The permissible maximum load current is 2.5[mA] or below. The stabilization time is 15[us]. P series User Guide... -
Page 61: Pulse Heat Signal
Parker Hannifin Figure 22. Example of Analog Output Signal Wiring 3.11.4 Pulse Heat Signal Line Drive (5[V]) Pulse Input Figure 23. Example of Pulse Heat Signal Wiring P series User Guide... -
Page 62: Figure 24. Example Of Open Collector Pulse Input Signal Wiring
12[V] or 5[V] NPN Open Collector Pulse Command Figure 25. Example of NPN Open Collector Pulse Command Wiring Note 1) When using 5[V] power: resistance R=100~150[Ω], 1/2[W] When using12[V] power: resistance R=560~680[Ω], 1/2[W] When using24[V] power: resistance R=1.5[kΩ], 1/2[W] P series User Guide... -
Page 63: Communications And I/O
4.3.12 Index00~63 Internal Variable Communication Address 4.4 I/O 4.4.1 Digital I/O 4.4.2 Analog I/O 4.4.3 Pulse Heat Input 4.4.4 Encoder Output 4.5 I/O Signal Setting 4.5.1 Allocating Digital Input Signals 4.5.2 Allocating Digital Output Signals 4.5.3 Using User I/O P series User Guide... -
Page 64: Overview
In addition, up to 31 multiple PD drives can be connected using multi-drop method, to allow for operation and control through communication. Servo Servo Servo Drive Drive Drive USB Port USB to RS-422 Communication converter Figure 26. RS-422 Multi-Drop Connection Example P series User Guide... -
Page 65: Terminal Configuration
4.2.2 Establishing Communication The terminating resistance used for RS-422 communication is configured within this drive. The terminating resistance inside the drive is 120Ω. To use the terminating resistance, turn on the switch as shown in the figure below. P series User Guide... -
Page 66: Packet Structure
3.5 char at least 3.5 char 4.5 char Transmission Packet Structure Additional Functio Data Error Check Address n Code Byte description Node ID Function Data CRC(MSB) CRC(LSB) Table 21. RS-422 Transmission Packet Structure P series User Guide... -
Page 67: Table 22. Rs-422 Reception Packet Structure
In the case of Write Single Register command, the same values as the transmitted values are received. In the case of Write Multi Register, the starting address intended to write the data in with the same values as the transmitted values and the number of registers are received. P series User Guide... -
Page 68: Protocol Command Code Description
Table 25. Read Holding Register Example1) reading a single parameter (current speed (Address: 0x2600)) Request Starting Starting Node Functio Quantity of Quantity of Address Address Register Hi. Register Lo 0x01 0x03 0x26 0x00 0x00 0x01 0x8F 0x42 P series User Guide... -
Page 69: Table 26. Example Of Reading Single Parameter
CRC Hi CRC Lo 0x01 0x83 0x01 ~ 0x06 Table 27. Example of Reading Multiple Parameters B. Read Input Register (0x04) Read binary values of single register (16bit data) and continuous register (16bit data unit). Request P series User Guide... -
Page 70: Table 28. Read Input Signal
0x0000 to 0xFFFF Quantity of Registers 2Bytes 0x0000 to 0xFFFF Request OK Function code 1Byte 0x06 Starting Address 2Bytes 0x0000 to 0xFFFF Quantity of Registers 2Bytes 0x0000 to 0xFFFF Response not OK Error code 1Byte 0x86 P series User Guide... -
Page 71: Table 30. Write Single Register
Table 32.Write Multi Register Example 1) Writing multiple parameter values (Jog Speed(Address: 0x2300), Jog Acceleration Time(Address: 0x2301), Jog Deceleration Speed(Address: 0x2302)) Request Starting Starting Node Quantity of Quantity of Byte Function Address Address Register Hi. Register Lo Count P series User Guide... -
Page 72: Communication Address Table
Fail Check 0x2006 UINT Mode Main Power 8200 0x2008 Fail Check 0x2007 UINT 5000 Time 7SEG 8201 0x2009 Display 0x2008 UINT Selection Regeneration brake 8202 0x200A 0x2009 UINT Resistor Configuration Regeneration 8203 0x200B 0x200A UINT brake P series User Guide... -
Page 73: Control Parameters
0x201D UINT 65535 Sinusoidal Encoder Homing 8223 0x201F Done 0x201E UINT Behavior Table 34. System Configuration Parameters 4.3.2 Control Parameters communication address paramete Variable Default Accessi parameter name Unit r No. Format Value bility deci hexadeci P series User Guide... -
Page 74: I/O Parameters
UINT 0x000F 0xFFFF Selection Digital Input Signal 2 8705 0x2201 0x2201 UINT 0x0001 0xFFFF Selection Digital Input Signal 3 8706 0x2202 0x2202 UINT 0x0002 0xFFFF Selection 8707 0x2203 Digital Input Signal 4 0x2203 UINT 0x000C 0xFFFF P series User Guide... -
Page 75: Speed Operation Parameters
UDINT Scale Analog Monitor Channel 2 0x40000 8525 0x2226 0x2226 UDINT Scale Table 36. I/O Parameters 4.3.4 Speed Operation Parameters communication address paramet Variable Default Accessibil parameter name Unit er No. Format Value hexadec decimal imal P series User Guide... -
Page 76: Miscellaneous Parameters
0x240A UINT 1000 Homing Using Stopper 9227 0x240B Modulo Mode 0x240B UINT 0x3FF 9228 0x240C Modulo Factor 0x240C DINT 3600 FFFFF 9230 0x240E User Drive Name 0x240D STRING Drive Individual Parameter 9283 0x2416 0x240E DINT Store P series User Guide... -
Page 77: Advanced Control Parameters
0x2519 Suppression Filter 2 0x2519 UINT Damping Table 39. Advanced Control Parameters 4.3.7 Monitoring Parameters communication address paramet Variable Default Accessibil parameter name Unit decim hexade er No. Format Value cimal 9728 0x2600 Feedback Speed 0x2600 P series User Guide... -
Page 78: Procedures And Alarm History
FP32 0.321 Inertia [Third Party Motor] Kg.m2. 10250 0x280A 0x2807 FP32 0.46 Torque Constant 10-4 0x280 [Third Party Motor] 10252 0x2808 FP32 0.82 Phase Resistance [Third Party Motor] 10254 0x280E 0x2809 FP32 3.66 1000 Phase Inductance P series User Guide... -
Page 79: Cia402 Parameters
21474 83648 5368709 24610 0x6022 Home Offset 0x607C DINT 53687 0912 Software Position 1073741 24614 0x6026 0x607D:01 DINT 2000000 10737 Limit (Min) 0000 41824 Software Position 2000000 1073741 24616 0x6028 0x607D:02 DINT Limit (Max) 0000 10737 P series User Guide... -
Page 80: Table 43. Cia402 Parameters
0x60FE DINT (Physical) FFFF Digital Outputs (Bit 0xFFFF 24678 0x6066 0x60FE DINT mask) FFFF 2147483 24680 0x6068 Target Speed 0x60FF DINT 21474 UU/s 83648 Supported Drive 0x00000 24682 0x606A 0x6502 UDINT Modes Table 43. CiA402 Parameters P series User Guide... -
Page 81: Index Related Parameters
13192 0x3388 Index36 0x3124 13210 0x339A Index37 0x3125 13228 0x33AC Index38 0x3126 13246 0x33BE Index39 0x3127 13264 0x33D0 Index40 0x3128 13282 0x33E2 Index41 0x3129 13300 0x33F4 Index42 0x312A 13318 0x3406 Index43 0x312B 13336 0x3418 Index44 0x312C P series User Guide... -
Page 82: Index00~63 Internal Variable Communication Address
2147483647 12556 0x310C RegSpeed INT32 2147483647 UU/s2 12558 0x310E Repeat Count UINT16 65535 12559 0x310F Dwell Time UINT16 65535 12560 0x3110 Next Index UINT16 12561 0x3111 Action UINT16 Table 46. Example of Internal Variable of Index00 P series User Guide... -
Page 83: I/O
Gain 1 Transfer to Gain 2. When the PCL signal is on, positive Limit positive torque is limited. [0x2110] You can ** PCL torque preset the action, and the torque limit is determined by [0x2111]. P series User Guide... -
Page 84: Table 47. Digital Input Signal Description
DO2- RDY- operational. This signal is for controlling brakes DO3+ BRAKE+ installed inside or outside the motor. It Brake is displayed when the SVON contact DO3- BRAKE- is off. P series User Guide... -
Page 85: Analog I/O
Name Description Function Details -10~+10Vis connected between A- TLMT(AI1) and AGND to limit the motor‘s A-TLMT Analog Torque Limit output torque. The relationship between input voltage and torque limit varies depending on the set [0x221C] value. P series User Guide... -
Page 86: Pulse Heat Input
[0x3004]. When using the line drive method, the maximum input frequency is 1Mpps. When using the open collector method, the maximum input frequency is 200kpps. Table 51. Pulse Train Input Signal Description P series User Guide... -
Page 87: Encoder Output
Encoder Signal A Outputs divided encoder signals Encoder (Phase A, B, Z) using the line drive Signal B method. The output division can be set at [0x3006]. Encoder Signal Z Table 52. Encoder Output Signal Description P series User Guide... -
Page 88: I/O Signal Setting
You can set the functions of digital input signal of I/O connector and input signal level. Among the 28 input functions listed below, you can allocate the functions that you want to use to digital input signals 1 through 16 at your discretion. P series User Guide... -
Page 89: Figure 27. Allocating Digital Input Signals
UINT 0x220B Digital Input Signal 12 Selection UINT 0x220C Digital Input Signal 13 Selection UINT 0x220D Digital Input Signal 14 Selection UINT 0x220E Digital Input Signal 15 Selection UINT 0x220F Digital Input Signal 16 Selection UINT P series User Guide... -
Page 90: Table 55. Allocating Digital Input Related Objects
START Example) When the set value is 0x0006. CONTACT A GAIN2Allocation Contact A: Base status is 0(Low). Activates when 1(High) is input.(Active High) Contact B: Base status is 1(High). Activates when 0(Low) is input (Active Low) P series User Guide... -
Page 91: Allocating Digital Output Signals
You can set the functions of digital output signal of I/O connector and output signal level. Among the 19 output functions listed below, you can allocate the functions that you want to use to digital input signals 1 through 8 at your discretion. P series User Guide... -
Page 92: Figure 28. Allocating Digital Output Signals
Selection Digital Output Signal 2 0x2211 UINT Selection Digital Output Signal 3 0x2212 UINT Selection Digital Output Signal 4 0x2213 UINT Selection Digital Output Signal 4 0x2214 UINT Selection Digital Output Signal 4 0x2215 UINT Selection P series User Guide... -
Page 93: Table 57. Allocating Digital Output Related Objects
Allocated output signal 0x01 BRAKE 0x02 ALARM 0x03 0x04 ZSPD 0x05 INPOS1 0x06 TLMT 0x07 VLMT 0x08 INSPD 0x09 WARN 0x0A TGON 0x0B INPOS2 0x10 0x11 0x12 IOUT0 0x13 IOUT1 0x14 IOUT2 0x15 IOUT3 0x16 IOUT4 0x17 IOUT5 P series User Guide... -
Page 94: Using User I/O
If the number of User I/O required is small, you can use the drive‘s I/O connector instead of using additional I/O modules, resulting in cost reduction. This drive provides up to 16 input signals and 8 output signals as user I/O. P series User Guide... - Page 95 (Set Value 0)‖. (See Allocating Input Signal) B. The values of relevant bits (0x60FD.16~31) are read from digital input, to use as user input. Related Objects Variable Index Name Format Accessibility Allocation Unit Index 0x60FD (Digital Inputs UDINT P series User Guide...
-
Page 96: Table 59. User Input Related Objects
DI #C(I/O pin 25), 0:Open, 1:Close DI #D(I/O pin 26), 0:Open, 1:Close DI #E(I/O pin 27), 0:Open, 1:Close DI #F(I/O pin 28), 0:Open, 1:Close DI #10(I/O pin 29), 0:Open, 1:Close Table 59. User Input Related Objects P series User Guide... - Page 97 C. Using physical outputs(0x60FE:01), set the value corresponding to user output to 0 or 1, at the relevant port (bit 16~23) Related Objects Variable Index Name Format Accessibility Allocation Unit Index Digital Outputs Number of entries USINT 0x60FE Physical outputs UDINT P series User Guide...
-
Page 98: Table 60. User Output Related Objects
DO#1(I/O pin 43, 44)output status setting (0:Disable, 1:Enable) DO#2(I/O pin 45, 46)output status setting (0:Disable, 1:Enable) DO #3(I/O pin 47, 48)output status setting (0:Disable, 1:Enable) DO #4(I/O pin 49, 50)output status setting (0:Disable, 1:Enable) 24 to 31 Reserved Table 62. Bit Mask Descriptions P series User Guide... -
Page 99: Tuning
5.7.3 Related Objects 5.8 Analog Monitor 5.8.1 Related Objects 5.8.2 Analog monitor output mode(0x2220) setting 5.8.3 Analog monitor channel 1 setting (0x2221) 5.8.4 Setting Example 5.9 Gain Conversion 5.9.1 Gain Group Conversion 5.9.2 P/PI Control Conversion P series User Guide... -
Page 100: Servo Tuning Overview
Therefore, the commanded position is the intended position at any given point of time. To view the commanded position, use the drive support tool. (drive setup software) Figure 29. Commanded Position P series User Guide... -
Page 101: Actual Position
One common misperception is that whenever there is oscillation, the system is unstable. It is important to recognize that a system is considered stable if the oscillation finally diminishes (damps out), even if it takes a long time. 5.3.2 Position Response Types P series User Guide... -
Page 102: Performance Measurements
Please set the appropriate value depending on the rigidity of the load being operated. As shown in the figure below, commands in the sinusoidal form are generated either in the forward or reverse direction depending on the set value of the offline gain tuning direction. P series User Guide... -
Page 103: Related Objects
5.4.1 Related Objects Variable Index Name Accessibility Unit Index Format Allocation 0x250E System Rigidity for Gain Tuning UINT 0x2510 Off-line Gain Tuning Direction UINT 0x2511 Off-line Gain Tuning Distance UINT Table 63. Auto Tuning Related Objects P series User Guide... -
Page 104: Manual Gain Tuning
- Feed forward value can be set from 0 to 100%. The value is the ratio of the position command value currently being input against the difference C. Position command filter setting - It provides smoother position command P series User Guide... -
Page 105: Vibration Control
This drive provides a total of 4 layers of notch filters, and the frequency, width, depth can be set separately for each filter. One or two notch filters can be used as adaptive filters with automatic frequency and width setting, through real-time frequency analysis (FTT). P series User Guide... -
Page 106: Related Objects
One or two notch filters can be automatically set by detecting the vibration frequency through frequency analysis. The frequency and width are automatically set, and the set value is used for depth. P series User Guide... -
Page 107: Related Objects
(0x2507, 0x2508) and notch filter 4 (0x250A, 0x250B) setting. Reserved Table 65. Adaptive Filter Related Objects 5.8 Analog Monitor The drive provides 2-channel analog monitor output, for drive gain tuning or internal status parameter monitoring. P series User Guide... -
Page 108: Related Objects
UINT Select Analog Monitor Channel 1 0x2223 DINT Offset Analog Monitor Channel 2 0x2224 DINT Offset Analog Monitor Channel 1 0x2225 UDINT Scale Analog Monitor Channel 2 0x2226 UDINT Scale Table 66. Analog Monitor Related Objects P series User Guide... -
Page 109: Analog Monitor Output Mode(0X2220) Setting
Inertia ratio Full-Closed position error (Reserved) drive temperature 1 °C drive temperature2 °C encoder temperature (Reserved) °C Hall sensor signal phase U current phase V current phase W current P series User Guide... -
Page 110: Setting Example
Output offset : 0 rpm Output offset : 1000 rpm Output scale : 500rpm/V Output scale : 500rpm/V Monitors signals by amplifying them 5 times Output offset : 1000 rpm Output scale : 100rpm/V Figure 37. Setting Example P series User Guide... -
Page 111: Gain Conversion
The waiting time and conversion time during gain conversion are as follows. Gain group 1 Gain conversion time Gain group2 1(0x211A) Position loop gain1(0x2101) Position loop gain2(0x2105) Speed loop gain1(0x2102) Gain conversion waiting Speed loop gain2(0x2106) P series User Guide... -
Page 112: P/Pi Control Conversion
P control refers to control using only proportion gain. Proportion gain determines the response of the overall controller, and the integral gain is used to remove the error of the steady state. Excessive integral gain leads to overshoot during acceleration/deceleration. P series User Guide... -
Page 113: Figure 38. P/Pi Control Conversion
Convert to P control when the command speed is over the P control switch speed(0x2116) Convert to P control when the acceleration command is over the P control switch speed(0x2117) Convert to P control when the following error is over the P control switch following error(0x2117) P series User Guide... -
Page 114: Figure 39. Example Of P/Pi Conversion
By using appropriate P/PI conversion mode, you can reduce the determination time. The figure below shows an example of conversion mode by torque command. Figure 39. Example of P/PI Conversion P series User Guide... -
Page 115: Command Reference
6.7.1 Position Command Filter 6.7.2 Signals Related with Position Control 6.8 Limit Setting 6.8.1 Forward/Reverse Limit Setting 6.8.2 Brake Output Signal Function Setting 6.8.3 Torque Limit Setting 6.9 Absolute Encoder Data Transmission 6.10 Touch Probe Function P series User Guide... -
Page 116: Pulse Input Position Operation
Position Position Statusword (0x6041.10) WindowTime Reached Window Following Error in (0x6068) Comparator Following Following Statusword (0x6041.13) Error TimeOut Error Window Position Actual (0x6066) Comparator Value (0x6064) Following Error Position Reached Figure 40. Pulse Input Position Operation P series User Guide... -
Page 117: Function Setting Of Pulse Input Logic
0x60FC DINT pulse Value Position Actual Internal 0x6063 DINT pulse Value 0x6064 Position Actual Value DINT 0x60B1 Speed Offset DINT UU/s 0x60B2 Torque Offset 0.1% 0x606C Speed Actual Value DINT UU/s 0x6077 Torque Actual Value 0.1% P series User Guide... -
Page 118: Table 71. Pulse Input Logic Related Objects
UINT 0x3006 Encoder Output Pulse UDINT Pulse 0x3007 Encoder Output Mode UINT 0x3008 Start Index Number(0~63) UINT 0x221C Analog Torque Limit Scale UINT 0.1%/V 0x221D Analog Torque Limit Offset Table 71. Pulse Input Logic Related Objects P series User Guide... -
Page 119: Block Diagram
0x2110 Calulation Ext. Positive 0x2111 Current Control Ext. Negative 0x2112 Positon Encoder Motor Gain 0x2514 Positive 0x60E0 Calulation Negative 0x60E1 0x6074 Torque Demand Max. 0x6072 Value [0.1%] Figure 41.Inner Block Diagram under the Pulse Input Position P series User Guide... -
Page 120: Function Setting Of Pulse Input Filter
PCLEAR Mode Select UINT 6.4 Homing This drive provides built-in homing function (return to origin). The figure below shows the relationship of input/out parameters to the homing mode. You can select speed, acceleration, offset and homing methods. P series User Guide... -
Page 121: Homing Methods
(Z) pulse. While returning to origin, when negative limit switch (NOT) is input, the direction changes. During forward operation, the motor is returned to origin by homing switch (POT). While returning to origin, when positive limit switch (POT) is input, the direction changes. P series User Guide... -
Page 122: Related Objects
DINT 0x6098 Homing Method SINT Homing speed Number of entries USINT 0x6099 Speed during search for UDINT UU/s switch Speed during search for zero UDINT UU/s 0x609A Homing Acceleration UDINT UU/s Table 75. Homing Related Objects P series User Guide... - Page 123 B. When the negative limit switch (NOT) is on, the direction changes to forward (CCW). The motor decelerates to Zero search speed. C. While operating at Zero search speed, the first index pulse is detected, and the motor rotates to the index position (Home). P series User Guide...
- Page 124 B. When the positive limit switch (POT) is on, the motor decelerates to Zero search speed, and the direction changes to reverse (CW). C. While operating at Zero search speed, the first index pulse is detected, and the motor rotates to the index position (Home). P series User Guide...
- Page 125 C. When the Positive Home Switch is off, the motor decelerates to Zero search speed. D. While operating at Zero search speed, the first index pulse is detected, and the motor rotates to the index position (Home). P series User Guide...
- Page 126 Please see the explanations below. The sequence varies in each of the three cases below, depending on the load position at the time of homing and the relationship of home switches. Please see the explanations below. Please see the explanations below for further details. P series User Guide...
- Page 127 B. When the Home Switch is off, the motor decelerates to Zero search speed. C. While operating at Zero search speed, the first index pulse is detected, and the motor rotates to the index position (Home). P series User Guide...
- Page 128 Method 14 explained above, except for differences in initial direction and actions pertaining to Home switch positivity/negativity. Method 24 The initial direction is forward (CCW), and the position where the Positive Home Switch is on becomes the home position home position. P series User Guide...
- Page 129 The initial direction is reverse (CW), and the position where the Positive Home Switch is on becomes the home position home position Methods 33, 34 The initial position is reverse (CW) for Method 33 and forward (CCW) for Method 44. The index pulse is detected at Zero search speed. P series User Guide...
- Page 130 You can use these methods when not using a separate home switch. Methods -1, -2 Homing Methods -1, -2 uses Stopper and Index(Z) pulse to return to origin. The speed profile of each sequence is as follows. Please see the explanations below for further details. P series User Guide...
- Page 131 A. The initial direction is forward (CCW). The motor operates at the switch search speed. B. When the motor hits the Positive Stopper, the motor stands by based on the torque limit for homing using stopper (0x2409) and set value of homing time (0x240A), and changes direction.. P series User Guide...
- Page 132 Homing Methods -1, -2 uses only Stopper to return to origin. The speed profile of each sequence is as follows. Please see the explanations below for further details. A. The initial direction is reverse (CW). The motor operates at the switch search speed. P series User Guide...
-
Page 133: Electronic Gear Setting
Using the drive‘s electronic gear function prohibits maximizing the use of the encoder‘s resolution. Therefore, if the host device has an electronic gear function, we recommend using the host device. Please set the gear ratio between 1000~1/1000. P series User Guide... - Page 134 Motor Revolutions =5000 Motor Revolutions =524288 Electronic gear setting Shaft Revolutions = 10000 Shaft Revolutions = 10000 With electronic You can give the same command to move 12000(12mm= gear 12000*1um) regardless of the encoder (motor) type. P series User Guide...
-
Page 135: Example Of Electronic Gear Setting
Electronic Gear setting Shaft Revolutions : 10000 Turntable Load Unit Specifications Deceleration ratio:100/1 User Unit 0.001° Encoder Specifications 19bit(524288 PPR) Load Movement / 1 360/100/0.001=3600 revolution Motor Revolutions : 524288 Electronic Gear setting Shaft Revolutions : 3600 P series User Guide... -
Page 136: Speed Control Setting
The speed command acceleration/deceleration time (0x2301, 0x2302) is the time it takes to accelerate to the rated speed or decelerate from the rated speed to full stop. (See the figure below) Speed command Speed command Figure 43. Speed Control The actual acceleration/deceleration time can be calculated as follows. P series User Guide... -
Page 137: Servo Lock Function
As shown in the figure below, when the value of the speed feedback goes under the ZSPD output range (0x2404), the ZSPD (0 speed) signal is displayed. If the value goes over the TGON output range (0x2405), the TGON (motor revolution) signal is displayed. P series User Guide... -
Page 138: Position Control Setting
(0x2109) and the position command average filter time constant using movement average (0x210A). Position command filter can be used in the following cases. (1) Cases where the electronic gear ratio is 10 times or higher (2) Cases where the host device cannot create acceleration/deceleration profile. P series User Guide... -
Page 139: Figure 45. Position Command Filter
Position command filter using position command average filter time constant (0x210A). Related Objects Variable Index Name Format Accessibility Allocation Unit Index Position Command Filter 0x2109 UINT 0.1ms Time Constant Position Command 0x210A Average Filter Time UINT 0.1ms Constant Table 79. Position Command Filter Related Objects P series User Guide... -
Page 140: Signals Related With Position Control
(In case of output time = Related Objects Variable Index Name Accessibility Unit Index Format Allocation 0x2401 INPOS1 Output Range UINT 0x2402 INPOS1 Output Time UINT 0x2403 INPOS2 Output Range UINT Table 80. Position Control Related Objects P series User Guide... -
Page 141: Limit Setting
Decelerate and stop using the emergency stop torque (0x2113) Related Objects Variable Index Name Format Accessibility Allocation Unit Index Dynamic Brake Control 0x2012 UINT Mode Emergency Stop 0x2013 UINT Configuration 0x2113 (Emergency Stop Torque UINT Table 81. Limit Setting Related Objects P series User Guide... -
Page 142: Brake Output Signal Function Setting
When using a motor with the brake equipped at the vertical shaft, you can prevent slipping in the vertical direction by first outputting the brake signal and turning off PWM after the set time. P series User Guide... - Page 143 Cases where the PWM is turned off before the brake signal is output. When the PWM output is turned off before the brake signal output, the load falls in the vertical direction, pulled down by the gravity. P series User Guide...
-
Page 144: Torque Limit Setting
- Forward: 0x60E0, B Torque is limited using the forward/negative torque limit value depending on the direction of rotation. ackward: 0x60E1 Internal Torque Limit 2 (Set Value 1) The torque is limited only by the maximum torque (0x6072) regardless of the direction P series User Guide... - Page 145 Torque is limited using the internal and external positive/negative torque limit value depending on the direction of rotation and torque limit signal. - Forward: 0x60E0(PCL without signal input), 0x2111(with PCL signal input) - Reverse: 0x60E1(NCL without signal input), 0x2112(with NCL signal input) P series User Guide...
- Page 146 - Regardless of the positivity/negativity of analog input voltage, when inputting +/-10[V], the torque is limited in the forward/reverse direction (Set Value 4) with 300[%]torque - The relationship between analog input voltage and torque limit is as follows. P series User Guide...
-
Page 147: Figure 47. Torque Limit
UINT 0.1% Value External Negative Torque Limit 0x2112 UINT 0.1% Value 0x6072 Maximum Torque UINT 0.1% 0x60E0 Positive Torque Limit Value UINT 0.1% 0x60E1 Negative Torque Limit Value UINT 0.1% Table 82. Torque Limit Related Objects P series User Guide... -
Page 148: Absolute Encoder Data Transmission
(division ratio). 200[ms] after the single-turn data transmission begins, the drive goes back to the normal encoder output signal. Figure 48. Absolute Encoder Data Sequence P series User Guide... -
Page 149: Touch Probe Function
In case of simultaneous input through 2 channels, the values can be separately latched at each of the positive/negative edges. Trigger by touch probe 1(I/O, PROBE1) Trigger by touch probe 2(I/O, PROBE2) P series User Guide... -
Page 150: Table 83. Touch Probe Function Related Objects
Position 3 Latched (0x60BC) Probe input Continuous Trigger Mode (0x60B8.1=1, 0x60B8.9=1): At continuous trigger mode, Bits 6, 7, 14, 15 of touch probe status (0x60B9) toggles between 0 and 1 every time the relevant input/edge is input. P series User Guide... -
Page 151: Figure 50. Touch Probe Function Timing Diagram
Continuous Trigger mode 0x60B8.1 (0x60B8.9) 0x60B8.2 (0x60B8.10) Position 1 Position 5 Position 6 Position 7 Position 8 Position 9 0x60BA Latched Latched Latched Latched Latched Latched (0x60BC) 0x60B9.6 (0x60B9.14) Index(Z) Pulse Figure 50. Touch Probe Function Timing Diagram P series User Guide... -
Page 152: Procedure
7.1.1 Manual Jog Operation 7.1.2 Program Jog Operation 7.1.3 Alarm Record Detection 7.1.4 Automatic Gain Tuning 7.1.5 Index Pulse Probing 7.1.6 Absolute Encoder Reset 7.1.7 Instantaneous Maximum Torque Reset 7.1.8 Phase Current Offset Tuning 7.1.9 Software Reset 7.1.10 Commutation P series User Guide... -
Page 153: Procedure Function
Operation speed is set considering the condition of the machine Related Objects Variable Index Name Accessibility Unit Index Format Allocation 0x2300 Jog Operation Speed Speed Command 0x2301 UINT Acceleration Time Speed Command 0x2302 UINT Deceleration Time P series User Guide... -
Page 154: Program Jog Operation
Please check the following before operation The main power is ON No alarm Servo is OFF Speed and time are set considering the condition of the machine Figure 51. Program Jog Operation P series User Guide... -
Page 155: Alarm Record Detection
This function deletes all alarm code history Stored in the drive. The alarm history of the newest alarm and up to 16 previous alarms is Stored in the drive. The alarm history can be viewed at0x2702:01~16, as shown below. The newest recent alarm is displayed at 0x2702:01. P series User Guide... -
Page 156: Automatic Gain Tuning
As it uses the speed operation mode to find the position, it is used in finding an estimation of the position. The exact index pulse position can be found with homing operation. The speed for index pulse search is set at 0x230C[rpm]. P series User Guide... -
Page 157: Absolute Encoder Reset
Changing the home offset (0x607C) during operation will not change the position actual value (0x6064). Related Objects Variable Index Name Format Accessibility Allocation Unit Index 0x2005 Absolute Encoder Configuration UINT 0x2607 Single Turn Data UDINT pulse P series User Guide... -
Page 158: Instantaneous Maximum Torque Reset
The product is released with the offset tuned by default. The measured Phase U/V/W offset are stored at 0x2015, 0x2016, 0x2017, respectively. AL-15 occurs when the offset is abnormally large. P series User Guide... -
Page 159: Software Reset
Related Objects Variable Index Name Format Accessibility Allocation Unit Index 0x2019 Linear Scale Resolution UINT 0x201A Commutation Method UINT 0x201B Commutation Current UINT 0.1% 0x201C Commutation Time UINT Table 92. Commutation Related Objects P series User Guide... -
Page 160: Indexer
Blending Absolute and Relative Move 8.2.5 Rotary Absolute and Relative Move 8.2.6 Rotary Shortest Move 8.2.7 Rotary Positive and Negative Move 8.3 Functions of Index Input Signal 8.4 Functions of Index Output Signal 8.5 Analog Speed Override P series User Guide... -
Page 161: Indexer Overview
Following Error Window (0x6065) Position Position Statusword (0x6041.10) WindowTime Reached Window Following Error in (0x6068) Comparator Following Following Statusword (0x6041.13) Error TimeOut Error Window Position Actual (0x6066) Comparator Value (0x6064) Following Error Position Reached Figure 52. Indexing Position Operation P series User Guide... -
Page 162: Table 93. Indexing Position Operation Related Objects
UINT Action UINT 0x313F Index 63 0x221C Analog Torque Limit Scale UINT 0.1%/V 0x221D Analog Torque Limit Offset 0x221E Analog Speed Override Mode UINT 0x221F Analog Speed Override Offset Table 93. Indexing Position Operation Related Objects P series User Guide... - Page 163 0x2119 Window TimeOut 0x6066 Time1 0x211A 0x6064 Position Actual Pulse Output Time2 0x211B Value [UU] A phase B phase Encoder Output Pulse Waiting 0x211C Z phase Time1 Regeneration Waiting 0x3006 0x211D OutPulse Time2 Output 0x3007 Mode P series User Guide...
-
Page 164: Coordinate Setting
Linear coordinate expresses the position value within the range from–2147483648 to +2147483647. If the value exceeds +2147483647 when rotating forward, the lowest value (–2147483648) is displayed. If the value exceeds–2147483648 when rotating reverses, the highest value (+2147483647) is displayed. P series User Guide... - Page 165 Rotary Coordinate Method The rotary coordinate expresses position values only in positive values. The expressed range depends on the set value of the modulo factor, within the range of 0 ~ (Modulo Factor-1). P series User Guide...
-
Page 166: Index Structure
The motor is operated always in the - direction. Depending on the distance value, the motor rotates within one cycle (the value set at the Modulo Factor. The distance value is handled as absolute value. 8.1.3 Index Structure The index structure is composed as follows. P series User Guide... -
Page 167: Table 94. Index Structure
1 ~ 2147483647(Unit: UU/s) Repeat Count 1 ~ 65535 Dwell Time 0 ~ 65535(Unit: ms) Next Index 0 ~ 63 0 : Stop Action 1 : Wait for Start 2 : Next Index Table 94. Index Structure P series User Guide... -
Page 168: Indexing Position Operation
When the moving distance is not sufficient compared with the set value of speed and acceleration/deceleration, a triangular pattern may be generated, which means the speed failed to reach the target speed. P series User Guide... - Page 169 The meaning of registration distance and registration speed is as follows. A. Registration Distance Means the distance (Unit: UU) after the REGT signal input. B. Registration Speed Means the target speed (Unit: UU/s) for movement after the REGT signal input. P series User Guide...
- Page 170 The set value of dwell time does not apply to repeated index operation. Dwell Time It sets the dwell time for index operation (Unit: ms). The set dwell time value is applied after the operation pattern of the index is generated. P series User Guide...
- Page 171 If the action of the index is set to Stop (set value 0), the overall sequence is completed after the relevant index is complete. When the start signal is input from outside, the indexing position operation begins from the index (0~63) set as the start index (0x3008). P series User Guide...
- Page 172 If the action of the index is set to Next Index(set value 2), the index set as the next index automatically begins after the end of the relevant index. The preset index automatically begins without input of the digital input signal (START, ISEL0 ~ 5). D. Example of Action Setting P series User Guide...
-
Page 173: Absolute And Relative Move
Example) Absolute move when current position = 500 and Distance = 1000 time Relative Move The final distance is the input value of the distance. Example) Relative move when current position = 500 and Distance = 1000 P series User Guide... -
Page 174: Registration Absolute And Relative Move
Registration Relative Move Performs relative move to the set value of the. The motor is rotated to the set registration position at the set registration speed. The distance after REGT signal input is the set registration distance P series User Guide... -
Page 175: Blending Absolute And Relative Move
)In this case, the final position is determined considering the Modulo Factor. Inputting a negative value is a useful way to make the motor rotate reverse past the 0 position. Depending on the command value, the motor may rotate more than 1 cycle. P series User Guide... -
Page 176: Rotary Shortest Move
The motor rotates within one cycle (value set for Modulo Factor: 0x240C). The set distance value is processed as absolute value. The figure below shows reverse rotation (the direction with the shorter distance) from to 310 ,and forward rotation from 30 to 180 P series User Guide... -
Page 177: Rotary Positive And Negative Move
The motor rotates within one cycle (value set for Modulo Factor: 0x240C). The set distance value is processed as absolute value. The figure below shows reverse rotation from 60 to 340 and from 340 to 180 P series User Guide... -
Page 178: Functions Of Index Input Signal
When the stop signal (Rising Edge) is input, the motor stops at the set deceleration (0x6085), ending the index operation sequence. When the start signal is input again, the operation resumes from the index set as the start index (0x3008). P series User Guide... - Page 179 After returning to the original position, the ORG (origin) signal is displayed. At the start of the return to the origin, the ORG signal is rest to 0. JSTART / JDIR P series User Guide...
- Page 180 JOG operation is performed using the speed control mode. Related Objects Description JOG operation speed (0x2300) Speed command acceleration time (0x2301) See “ 6.6 Speed Control Setting “. Speed command deceleration time(0x2302) Speed command S-curve time (0x2303) Servo motor rotation direction. P series User Guide...
-
Page 181: Functions Of Index Output Signal
8.4 Functions of Index Output Signal EOS(End of Index Sequence) When the index action is Stop or Wait for Start, the EOS(End of Sequence) signal is displayed. IOUT0~5(Index Output 0~5) The number of index currently performed is displayed (IOUT0~5). P series User Guide... -
Page 182: Analog Speed Override
Related Objects Variable Index Name Access Unit Index Format Allocation Analog speed override mode 0x221E UINT (Analog Speed Override Mode) Analog speed override offset 0x221F (Analog Speed Override Offset) Table 95. Analog Speed Override Related Objects P series User Guide... -
Page 183: Object
Parker Hannifin 9. Object IN THIS CHAPTER 9.1 Object Dictionary 9.1.1 Data Type 9.1.2 General Objects 9.1.3 Manufacturer Specific Objects 9.1.4 Index Objects P series User Guide... -
Page 184: Object Dictionary
Device Type Variable Default Accessi Change Set Range Unit Store Format value bility Allocation Property UDINT 0x00020192 Displays the device type and functions M SB 16 15 Additional information Device profile number 0x0002 : 0x0192 : DS402 P series User Guide... -
Page 185: Table 97. Hardware Version
Variable Default Accessib Change Setting Range Unit Store Format Value ility Allocation Property UDINT 0 to 0xFFFFFFFF Sub Index 2 Store communication parameters Variable Default Accessib Change Setting Range Unit Store Format Value ility Allocation Property P series User Guide... -
Page 186: Table 99. Store Parameters
Setting Range Unit Store Format Value ility Allocation Property UDINT 0 to 0xFFFFFFFF SubIndex 4 Restore drive specific parameters Variable Default Accessib Change Setting Range Unit Store Format Value ility Allocation Property UDINT 0 to 0xFFFFFFFF P series User Guide... -
Page 187: Table 100. Restore Parameters
Setting Range Unit Store Format Value ility Allocation Property UDINT SubIndex 4 Serial number Variable Default Accessib Change Setting Range Unit Store Format Value ility Allocation Property UDINT Table 101. Identity Object Shows information on the device P series User Guide... -
Page 188: Manufacturer Specific Objects
BiSS Serial Absolute(multi-turn 16bit) coming soon BiSS Serial Absolute(multi-turn 20bit) coming soon BiSS Serial Absolute(multi-turn 24bit) coming soon Sinusoidal(1Vpp) Analog Hall Sinusoidal to BiSS coming soon Reserved Tamagawa Serial(single turn only) Tamagawa Serial Absolute(multi-turn 16 bit) EnDat 2.2 P series User Guide... -
Page 189: Table 103. Encoder Pulse Per Revolution
Set Value Descriptions Positive command turns the motor counter clockwise. In this case, the position feedback value increases Positive command turns the motor clockwise. In this case, the position feedback value decreases. P series User Guide... - Page 190 Single phase power supply Main power supply 3phase power supply setting DC power supply Sets off alarm (AL-24) in case of main power fail Countermeasure against main power frosting Sets off warning(W-01)in case of main power fail P series User Guide...
- Page 191 Internal temperature of the encoder Node ID 0x2009 Regeneration brake Resistor Configuration Variabl Default Acces Change Stor Setting Range Unit Allocati Value sibility Property Format UINT 0 to 1 Servo Off Settings related to regeneration brake. P series User Guide...
- Page 192 When using the built-in regeneration brake (0x2009= 0), the set value does not apply. 0x200D Peak Power of Regeneration brake Resistor Variabl Default Acces Change Stor Setting Range Unit Allocati Value sibility Property Format UINT 1 to 50000 watt Servo Off P series User Guide...
- Page 193 PWM after the set time, to prevent vertical slipping. 0x2012 Dynamic Brake Control Mode Variabl Default Acces Change Stor Setting Range Unit Allocati Value sibility Property Format UINT 0 to 3 Servo Off P series User Guide...
- Page 194 Value Stop the motor using the method set at the dynamic brake mode (0x2012) Stop the motor using the dynamic brake and maintain the torque command at 0 Decelerate and stop using the emergency stop torque(0x2113) P series User Guide...
- Page 195 (0x2700 See descriptions) will allow for checking the auto- tuned values. 0x2017 W Phase Current Offset Variable Default Acces Change Stor Setting Range Unit Allocati Format Value sibility Property -1000 to 1000 0.1% Servo Off P series User Guide...
- Page 196 Commutation performed when the servo is turned on Reserved 0x201B Commutation Current Variabl Default Acces Change Stor Setting Range Unit Allocati Value sibility Property Format UINT 0 to 1000 0.1% Servo Off Set commutation current to get information for first angle of motor P series User Guide...
- Page 197 Motor will not move and home offset [0x607C] value will be zero position after homing by homing method [0x6098] Motor will be rotate as much as home offset and zero offset will be 0, after homing by homing method [0x6098] P series User Guide...
- Page 198 UINT 1 to 1000 times Set the integral time constant of the speed controller. Higher value decreases the error under the steady state (stop or operation at regular speed). However, excessive state (acceleration/deceleration) may cause vibration. P series User Guide...
- Page 199 Property Format At all UINT 0 to 1000 0.1ms times Sets the torque command filter time constant used as gain group 2 for gain conversion. Please see descriptions on torque command filter time constant 1(0x2104). P series User Guide...
- Page 200 When tuning the gain, please increase the set value gradually. 0x210D Speed Feed-forward Filter Time Constant Variabl Default Acces Change Stor Setting Range Unit Allocati Value sibility Property Format At all UINT 0 to 1000 0.1ms times P series User Guide...
- Page 201 - Reverse: 0x60E1(NCL without signal input), 0x2112(with NCL signal input) The torque is limited using the torque limit value depending on the analog input voltage. - See analog torque limit scale (0x221C) and offset(0x221D) P series User Guide...
- Page 202 Convert to P control when the command speed is over the P control switch speed(0x2116) Convert to P control when the acceleration command is over the P control switch speed(0x2117) Convert to P control when the following error is over the P control switch following error(0x2117) P series User Guide...
- Page 203 0 to 7 times Converting between two gain groups improves the overall system performance. Depending on the conversion mode, you can either manually convert through external input signal or automatically convert based on the output signal. P series User Guide...
- Page 204 0x211B Gain Conversion Time 2 Variabl Default Acces Change Stor Setting Range Unit Allocati Value sibility Property Format At all UINT 0 to 1000 times Set the time for conversion from gain group2 to gain group1. P series User Guide...
- Page 205 OR calculation of the signal input through the I/O connector and the bit value under this setting. Please see the table below for input descriptions Setting Details HOME STOP PCON GAIN2 P_CL N_CL Reserved P series User Guide...
- Page 206 Allocati Value sibility Property Format UINT 0 to 0xFFFF Other than outputting the drive‘s output signal status by allocating it to the I/O connector output signal, you can check the bit corresponding to the output value. P series User Guide...
- Page 207 Other than outputting the drive‘s output signal status by allocating it to the I/O connector output signal, you can check the bit corresponding to the output value. Setting Details IOUT0 IOUT1 IOUT2 IOUT3 IOUT4 IOUT5 15~8 Reserved P series User Guide...
- Page 208 0x1A ABSRQ 0x1B JSTART 0x1C JDIR 0x1D PCLR 0x1E AOVR 0x2201 Digital Input Signal 2 Selection Variabl Default Acces Change Stor Setting Range Unit Allocati Value sibility Property Format Power UINT 0 to 0xFFFF 0x0001 Resupply P series User Guide...
- Page 209 Unit Allocati Value sibility Property Format Power UINT 0 to 0xFFFF 0x0012 Resupply Set the function of I/O connector‘s digital input signal 7 and input signal level. Please see the descriptions 0x2200 for more detailed explanation. P series User Guide...
- Page 210 Unit Allocati Value sibility Property Format Power UINT 0 to 0xFFFF 0x0015 Resupply Set the function of I/O connector‘s digital input signal 12 and input signal level. Please see the descriptions 0x2200 for more detailed explanation P series User Guide...
- Page 211 Unit Allocati Value sibility Property Format Power UINT 0 to 0xFFFF 0x8002 Resupply Allocates the function of I/O connector‘s digital output signal 1, and sets the output signal level. Example) when the set value is 0x8001. P series User Guide...
- Page 212 Value sibility Property Format Power UINT 0 to 0xFFFF 0x8001 Resupply Allocates the function of I/O connector‘s digital output signal 3, and sets the output signal level. See the descriptions on 0x2210 for more detailed explanation. P series User Guide...
- Page 213 Value sibility Property Format Power UINT 0 to 0xFFFF 0x0006 Resupply Allocates the function of I/O connector‘s digital output signal 8, and sets the output signal level. See the descriptions on 0x2210 for more detailed explanation. P series User Guide...
- Page 214 Value sibility Property Format At all UINT 0 to 1 times The output range of analog monitor is -10~+10V. With set value of 1, only the absolute value (positive value) of the output value is displayed. P series User Guide...
- Page 215 Analog Monitor Channel 2 Select Variabl Default Acces Change Stor Setting Range Unit Allocati Value sibility Property Format At all UINT 0 to 65535 times Sets the monitoring variable to output through the monitor output channel 2. P series User Guide...
- Page 216 Set the scaling of variables to output per 1V when outputting the monitoring variables set for analog monitor output channel 2. The unit is the unit/1V of the variable set at analog monitor channel 2 setting (0x2222). P series User Guide...
- Page 217 Default Acces Change Stor Setting Range Unit Allocati Value sibility Property Format At all -6000 to 6000 times For program jog operation, you can set operation speed 1~4 and operation time 1~4 for each operation speed. P series User Guide...
- Page 218 Please see descriptions on speed 1(0x2304). 0x230A Program Jog Operation Time 3 Variabl Default Acces Change Stor Setting Range Unit Allocati Value sibility Property Format At all UINT 0 to 10000 times Please see descriptions on speed 1(0x2304). P series User Guide...
- Page 219 UINT 0 to 10000 6000 times Sets the detection level for the excessive speed alarm (AL-50).When the set value is higher than the motor‘s maximum speed, the detection level is determined by the motor‘s maximum speed P series User Guide...
- Page 220 Do not use either positive or negative software position limit Use only positive software position limit. Negative position is not limited Use only negative software position limit. Positive position is not limited Use both positive and negative software position limit P series User Guide...
- Page 221 TGON signal is output when the current speed is smaller than the set value. 0x2406 INSPD Output Range Variabl Default Acces Change Stor Setting Range Unit Allocati Value sibility Property Format At all UINT 0 to 6000 times P series User Guide...
- Page 222 Variable Default Access Change Stor Setting Range Unit Allocatio Format Value ibility Property UINT 0 to 3 Servo Off Selects whether to use Modulo function (PD drive is determined depending on coordinate shaft and Index type). P series User Guide...
- Page 223 Individually store parameters. Parameters are automatically stored. Enhanced Control(0x2500~ ) 0x2500 Adaptive Filter Function Select Variabl Default Acces Change Stor Setting Range Unit Allocati Value sibility Property Format UINT 0 to 5 Servo Off Set the function of adaptive filter. P series User Guide...
- Page 224 Unit Allocati Value sibility Property Format UINT 1 to 100 Servo Off 0x2506 Notch Filter 2 Depth Variabl Default Acces Change Stor Setting Range Unit Allocati Value sibility Property Format UINT 1 to 5 Servo Off P series User Guide...
- Page 225 Format UINT 1 to 5 Servo Off 0x250D On-line Gain Tuning Mode Variabl Default Acces Change Stor Setting Range Unit Allocati Value sibility Property Format UINT 0 to 1 Servo Off Set on-line gain tuning mode. P series User Guide...
- Page 226 1 to 10 Servo Off Set the distance for offline gain tuning. Higher set value means longer movement distance. Please use the appropriate setting that fits the mechanical unit. Secure sufficient distance before tuning (1 rotation or longer). P series User Guide...
- Page 227 Property Format UINT 0 to 5 Servo Off Reserved 0x2518 Vibration Suppression Filter 2 Frequency Variabl Default Acces Change Stor Setting Range Unit Allocati Value sibility Property Format UINT 1 to 2000 0.1Hz Servo Off P series User Guide...
- Page 228 Default Acces Change Stor Setting Range Unit Allocati Value sibility Property Format 0.1% how the instantaneous maximum of operation overload ratio from the drive. This value can be reset by resetting the instantaneous maximum operation overload. P series User Guide...
- Page 229 Stor Setting Range Unit Allocati Value sibility Property Format DINT rev. Show the multi-turn data of multi-turn encoder. 0x260B Drive Temperature 1 Variabl Default Acces Change Stor Setting Range Unit Allocati Value sibility Property Format ℃ P series User Guide...
- Page 230 Default Acces Change Stor Setting Range Unit Allocati Value sibility Property Format UINT 0.1A Shows the drive‘s rated current. 0x2611 FPGA Version Variabl Default Acces Change Stor Setting Range Unit Allocati Value sibility Property Format STRIN P series User Guide...
- Page 231 Shows the analog torque input voltage by mV. 0x2616 Analog Input Channel 2 Value Variabl Default Acces Change Stor Setting Range Unit Allocati Value sibility Property Format Shows the analog speed override input voltage by mV. P series User Guide...
- Page 232 Adjust phase current offset Phase current offset (U/V/W phase offset are stored in device. 0x2015~0x2017, respectively. AL-15 sets (0x0008) off when the offset is abnormally large) Software Reset Software reset (0x0009) Commutation Perform commutation (0x000A) P series User Guide...
- Page 233 Property Format STRIN SubIndex 6 Alarm Code 6 Variabl Default Acces Change Stor Setting Range Unit Allocati Value sibility Property Format STRIN SubIndex 7 Alarm Code 7 Variabl Setting Range Default Unit Acces Change Stor P series User Guide...
- Page 234 Change Stor Setting Range Unit Allocati Value sibility Property Format STRIN SubIndex 15 Alarm Code 15 Variabl Default Acces Change Stor Setting Range Unit Allocati Value sibility Property Format STRIN SubIndex 16 Alarm Code 16(the oldest) P series User Guide...
- Page 235 Change Stor Setting Range Unit Allocati Value sibility Property Format FP32 2.89 Arms Sets the motor‘s rated current. 0x2803 [Third Party Motor]Maximum Current Variabl Default Acces Change Stor Setting Range Unit Allocati Value sibility Property Format P series User Guide...
- Page 236 Set the motor‘s torque constant. The force constant is set for linear motors. The unit is N/A. 0x2808 [Third Party Motor] Phase Resistance Variabl Default Acces Change Stor Setting Range Unit Allocati Value sibility Property Format FP32 0.82 Set the motor‘s phase resistance (=linear resistance÷2) P series User Guide...
- Page 237 Stor Setting Range Unit Allocati Value sibility Property Format FP32 100.0 Set the motor‘s speed/torque curve data. The torque which can be output at the maximum speed is input in percentage based on the maximum torque. P series User Guide...
- Page 238 Setting Range Unit nication Value sibility Property Format address UINT 0 to 1 Servo Off Sets the coordinate to use for the drive‘s indexing position control Set Value Setting Details Use Linear Coordinate Use Rotary Coordinate P series User Guide...
- Page 239 Set the frequency bandwidth of digital filter that is set at the pulse input unit. The frequency band-width are selected according to width of the input pulses filter. Set Value Setting Details Do not use filter 500Khz (Min) 750Khz 1Mhz (Default) 1.25Mhz P series User Guide...
- Page 240 0x3008 Start Index Number(0~63) Variabl Default Acces Change Stor Setting Range Unit Allocati Value sibility Property Format 0 to 003F At all UINT 0 to 63 times Set the number to operate when starting indexing position. P series User Guide...
- Page 241 Allocation Property DINT 1 to 2147483647 1000000 UU/s At all times SubIndex 8 Repeat Count Variable Default Accessib Change Setting Range Unit Store Format Value ility Allocation Property UINT 1 to 65535 At all times P series User Guide...
- Page 242 Shutdown Option Code Variabl Default Acces Change Stor Setting Range Unit Allocati Value sibility Property Format At all 0 to 1 times Sets the actions for servo drive shut down. (Operation Enable state ->Ready to Switch On state) P series User Guide...
- Page 243 Unit Allocati Value sibility Property Format At all times Set the action method for fault action to protect the drive‘s system. Set Value Descriptions Do not use servo drive functions. Keep the motor at free run. P series User Guide...
- Page 244 Show the position demanded by the user as position Unit (UU). 0x6063 Position Actual Internal Value Variabl Default Acces Change Stor Setting Range Unit Allocati Value sibility Property Format DINT pulse Show the actual internal position of the encoder, by pulse. P series User Guide...
- Page 245 Bit10(0x6041.10) to 1. 0x6068 Position Window Time Variabl Default Acces Change Stor Setting Range Unit Allocati Value sibility Property Format At all UINT 0 to 65535 times P series User Guide...
- Page 246 Set the speed window time. If the error between the target speed and the actual speed holds within the speed window (0x606D) for the duration of the speed window time(0x606E), set the status word‘s Bit10(0x6041.10) to 1. P series User Guide...
- Page 247 • Incremental Encoder If the home position was found or the current position is the home position, the 0 point is the position moved from the home position to the target position as much as the home offset.. P series User Guide...
- Page 248 USINT SubIndex 1 Motor revolutions Variable Default Accessib Change Setting Range Unit Store Format Value ility Allocation Property Power UDINT 0 to 0x40000000 Resupply SubIndex 2 Shaft revolutions Variable Setting Range Default Unit Accessib Change Store P series User Guide...
- Page 249 Speed during search for zero Variable Default Accessib Change Setting Range Unit Store Format Value ility Allocation Property DINT 0 to 0x40000000 100000 UU/s At all times Set the operation speed for homing. 0x609A Homing Acceleration P series User Guide...
- Page 250 Capture positive edge position value of touch probe 1 Do not capture negative edge position value of touch probe 1 Capture negative edge position value of touch probe 1 6 to 7 – Reserved Do not use touch probe 2 P series User Guide...
-
Page 251: Table 104. Touch Probe Functions
11 to 13 Reserved Toggled when positive edge position value of touch probe 2 is 0, 1 updated Toggled when negative edge position value of touch probe 2 is 0, 1 updated Table 105. Touch Probe Status P series User Guide... - Page 252 DINT Shows negative edge value of touch probe 2. 0x60E0 Positive Torque Limit Value Variabl Default Acces Change Stor Setting Range Unit Allocati Value sibility Property Format At all UINT 0 to 5000 3000 0.1% times P series User Guide...
- Page 253 HOME(origin sensor input) 3 to 15 Reserved DI #1(I/O pin 12), 0:Open, 1:Close DI #2(I/O pin 13), 0:Open, 1:Close DI #3(I/O pin 14), 0:Open, 1:Close DI #4(I/O pin 15), 0:Open, 1:Close DI #5(I/O pin 16), 0:Open, 1:Close P series User Guide...
-
Page 254: Table 106. Digital Input Status
Provided that the relevant bit mask (0x60FE:02.19) is set to Forced output of DO#1(I/O pin 43, 44) (0:OFF, 1:ON) Provided that the relevant bit mask (0x60FE:02.20) is set to Forced output of DO#1(I/O pin 45, 46) (0:OFF, 1:ON) P series User Guide... -
Page 255: Table 107. Physical Output Descriptions
Table 108. Bit Mask Descriptions 0x60FF Target Speed Variabl Default Acces Change Stor Setting Range Unit Allocati Value sibility Property Format –2147483648 to At all DINT UU/s 2147483647 times Set the target speed at PV mode and CSV mode. P series User Guide... -
Page 256: Table 109. Supported Modes
1: Supported IP (Interpolated Position) 0: Not Supported CSP (Cyclic Synchronous Position) 0: Not supported CSV (Cyclic Synchronous Speed) 0: Not supported CST (Cyclic Synchronous Torque) 0: Not supported 10 to 31 Reserved Table 109. Supported Modes P series User Guide... - Page 257 Parker Hannifin 10. PM Motors IN THIS CHAPTER 10.1 Specification 10.2 FAL Series N-T Curves 10.3 FBL Series N-T Curves 10.4 FCL Series N-T Curves 10.5 FE Series N-T Curves 10.6 FF Series N-T Curves P series User Guide...
-
Page 258: Table 110. Pm-Fal Series Features
Available Moment of Load Inertia Motor Inertia x 20 BiSS Interface – 19bit Position Feedback Weight 0.7kg 0.9kg 1.3kg Standards 0 - 40 ˚ C Temperature Humidity 20-80% non-condensing Shock / Vibration 5G (49m/s Table 111. PM-FBL Series Features P series User Guide... -
Page 259: Table 112. Pm-Fclxxamxx Series Features
Available Moment of Load Inertia Motor Inertia x 15 BiSS Interface – 19bit Position Feedback Weight 1.6kg 2.2kg 2.7kg 3.8kg Standards 0 - 40 ˚ C Temperature Humidity 20-80% non-condensing Shock / Vibration 5G (49m/s Table 113. PM-FCLxxDMxx Series Features P series User Guide... -
Page 260: Table 114. Pm-Fexxamxx Series Features
Available Moment of Load Inertia Motor Inertia x 10 BiSS Interface – 19bit Position Feedback Weight 5.0kg 6.7kg 8.5kg 10.1kg Standards 0 - 40 ˚ C Temperature Humidity 20-80% non-condensing Shock / Vibration 5G (49m/s Table 115. PM-FExxDMxx Series Features P series User Guide... -
Page 261: Table 116. Pm-Fexxgmxx Series Features
Available Moment of Load Inertia Motor Inertia x 10 BiSS Interface – 19bit Position Feedback Weight 5.0kg 6.7kg 8.5kg 10.1kg Standards 0 - 40 ˚ C Temperature Humidity 20-80% non-condensing Shock / Vibration 5G (49m/s Table 117. PM-FExxMMxx Series Features P series User Guide... -
Page 262: Table 118. Pm-Ffxxam/Mmxx Series Features
Available Moment of Load Inertia Motor Inertia x 5 BiSS Interface – 19bit Position Feedback Weight 12.5kg 17.4kg 12.5kg 17.4kg Standards 0 - 40 ˚ C Temperature Humidity 20-80% non-condensing Shock / Vibration 5G (49m/s Table 119. PM-FFxxDM/GMxx Series Features P series User Guide... - Page 263 Parker Hannifin 10.2 FAL Series N-T Curves P series User Guide...
-
Page 264: Figure 55. Fal Series N-T Curves
Parker Hannifin Figure 55. FAL Series N-T Curves 10.3 FBL Series N-T Curves P series User Guide... -
Page 265: Figure 56. Fbl Series N-T Curves
Parker Hannifin Figure 56. FBL Series N-T Curves 10.4 FCL Series N-T Curves P series User Guide... - Page 266 Parker Hannifin P series User Guide...
-
Page 267: Figure 57. Fcl Series N-T Curves
Parker Hannifin Figure 57. FCL Series N-T Curves P series User Guide... - Page 268 Parker Hannifin 10.5 FE Series N-T Curves P series User Guide...
- Page 269 Parker Hannifin P series User Guide...
- Page 270 Parker Hannifin P series User Guide...
- Page 271 Parker Hannifin P series User Guide...
- Page 272 Parker Hannifin P series User Guide...
-
Page 273: Figure 58. Fe Series N-T Curves
Parker Hannifin Figure 58. FE Series N-T Curves 10.6 FF Series N-T Curves P series User Guide... - Page 274 Parker Hannifin P series User Guide...
-
Page 275: Figure 59. Ff Series N-T Curves
Parker Hannifin Figure 59. FF Series N-T Curves P series User Guide... - Page 276 Parker Hannifin 11. Troubleshooting IN THIS CHAPTER 11.1 Troubleshooting Guidelines 11.2 Servo Alarm and Check List 11.3 Servo Warning and Check List P series User Guide...
- Page 277 Motor cable open Check motor wiring Motor cable open Check drive temperature2(0x260C), Drive temperature 2 Install cooling fan, check load status Drive temperature 2 Check encoder status(0x260D), Encoder overheating Install cooling fan, check load status Encoder temperature P series User Guide...
- Page 278 Encoder2 POS differnce Check USB communication cable and USB communication error connection USB communication Reserved reserved Reserved reserved Parameter fail Restore default parameters (0x1011) Parameter checksum Parameter rage fail Restore default parameters (0x1011) Parameter range P series User Guide...
-
Page 279: Table 120. Servo Alarm Check List
Excessive DB current DB current exceeding the fault level was output OV_DB_CUR Operation overload Accumulated operation overload ratio reached the warning level (0x2010). Check for equipment clash or arrest OV_LOAD Check load status, brake action, drive P series User Guide... -
Page 280: Table 121. Servo Warning Check List
190V when the action in case of main power fail is set to warning in the main UD_VTG power input mode setting (0x2006). Emergency signal input Check emergency stop contact signal, external 24V power Table 121. Servo Warning Check List P series User Guide... - Page 281 Parker Hannifin Appendix A Appendix A Firmware Update IN THIS CHAPTER Using USB OTG Using Drive Support Tool P series User Guide...
- Page 282 USB cable and the USB. L/A 0 L/A 1 (7-Segment display for firmware update using OTG cable) Turn on the power again, and then check if the firmware update is applied. P series User Guide...
- Page 283 Do not turn off the PC or drive during transmission. Do not unplug the USB cable or close the firmware program during transmission. Do not run other PC applications during transmission. OS Download Action A. Click the ‗Open Firmware Downloader‘ button. P series User Guide...
- Page 284 Parker Hannifin B. Click the ‗Load‘ button to load the OS. C. Click the ‗BIN‘ file of the OS to transmit, and then click ‗Open.‘ D. The ‗Total Length‘, ‗Total Packet‘ of the loaded OS are displayed. P series User Guide...
- Page 285 PC‘s performance, from tens of seconds to a few minutes.) G. ‗Transmission completed‘ window pops up when the transmission is properly competed (after transmission, turn off and on the drive to reboot it.) When an error occurs during transmission P series User Guide...
- Page 286 Parker Hannifin Turn off and on the drive, and then repeat through (2) to (7). P series User Guide...
Need help?
Do you have a question about the P Series and is the answer not in the manual?
Questions and answers