Tieline ViA User Manual
Codec
Hide thumbs
Also See for ViA:
- User manual (393 pages) ,
- Quick start user manual (39 pages) ,
- User manual (15 pages)
Table of Contents
Advertisement
Quick Links
Download this manual
See also:
User Manual
Advertisement
Table of Contents

Related Manuals for Tieline ViA


Summary of Contents for Tieline ViA
- Page 1 Codec User Manual Software Version: 2.16.108 Manual Version: 2.0 September, 2017...
-
Page 2: Table Of Contents
Table of Contents Part 1 Warnings & Safety Information Part 2 How to Use the Documentation Part 3 Glossary of Terms Part 4 Items Shipped with ViA Part 5 Introduction Part 6 Battery Use and Power Management Part 7 Inserting and Removing Modules... - Page 3 ViA User Manual v2.0 Part 19 Using the Matrix Editor Part 20 Analog and Digital Outputs Part 21 Cue and Talkback Operation Part 22 General Audio Settings Part 23 Configuring AES3 and AES42 Input Audio Part 24 Backup and Redundancy...
- Page 4 7 Configuring POTS ........................... 234 8 Configuring Input/Output Settings ........................... 240 9 Configure Mono or Stereo Peer-to-Peer Programs in ViA ........................... 246 10 Configure Mono or Stereo + IFB Dialing Programs ........................... 256 11 Configure 2 Mono Peer-to-Peer Dialing Connections ...........................
- Page 5 5 Testing ISDN Connections ........................... 335 6 Using Answer Routes for Sessionless ISDN Calls ........................... 335 7 POTS Connection Tips & Precautions ........................... 338 8 ViA Compliances and Certifications ........................... 340 9 ViA Declaration of Conformity ........................... 341 10 Software Licences ........................... 342 11 Trademarks and Credit Notices ...........................
-
Page 6: Part 1 Warnings & Safety Information
PERMANENT DAMAGE MAY OCCUR! If you are unfamiliar with any facility, check that the line you are using is NOT a digital line. If the Tieline codec becomes faulty due to the use of a digital phone system, the WARRANTY WILL BE VOID. - Page 7 RADIO FREQUENCY SAFETY INFORMATION: IMPORTANT: To satisfy radio frequency exposure compliance requirements, the antenna and transmitter in the ViA codec must be at least 20 cm from all persons and must not be used in conjunction with any other antenna or transmitter.
- Page 8 ViA User Manual v2.0 guidelines on maximum exposure limits. As a rule of thumb, avoid extended periods listening to sound pressure levels (SPLs) of 85dBA or higher. CHINESE SAFETY WARNINGS: This device must only be used in not-tropical climate regions.
- Page 9 This Warranty does not apply if the product has been damaged by accident or misuse or as the result of service or modification performed by anyone other than Tieline. With the exception of the warranties set forth above, Tieline makes no other warranties, expressed or implied or statutory, including but not limited to warranties of merchantability and fitness for a particular purpose, which are hereby expressly disclaimed.
-
Page 10: Part 2 How To Use The Documentation
ViA User Manual v2.0 How to Use the Documentation Manual Conventions Warnings: Instructions that, if ignored, could result in death or serious personal injury caused by dangerous voltages or incorrect operation of the equipment. These must be observed for safe operation. -
Page 11: Part 3 Glossary Of Terms
IP networks Failover Method of switching to an alternative backup audio stream if the primary connection is lost. Fuse-IP Tieline bonding of IP interfaces to aggregate data GPIO General-purpose Input/Output Graphical User Interface HTML5 A markup language used for structuring and presenting content on the internet. - Page 12 Service Level Agreements (SLAs) a contractual agreement between an ISP and a customer defining expected performance levels over a network SmartStream Tieline implementation of dual redundant IP streaming. PLUS SNMP Simple Network Management Protocol: Simple Network Management Protocol: a protocol used mostly in network management systems to monitor devices for conditions that warrant administrative attention.
-
Page 13: Part 4 Items Shipped With Via
Your new ViA codec is shipped with the following items: 1. ViA codec. 2. 12VDC power supply. 3. Rechargeable Li-ion battery pack RRC2057. 4. Protective case. Immediately contact Tieline or your dealer if any of these items are missing or damaged. © Tieline Pty. Ltd. 2017... -
Page 14: Part 5 Introduction
* Supported in later releases. Compatibility ViA connects over IP to any compatible codec brand that supports the EBU N/ACIP tech 3326 standard using SIP and SDP protocols. The codec also connects to competitor ISDN codecs in 'sessionless' mode. ViA is also POTS-compatible with Comrex® Vector, Matrix® or BlueBox®... -
Page 15: Part 6 Battery Use And Power Management
ViA User Manual v2.0 Battery Use and Power Management ViA has an internal battery slot on the rear panel designed for high performance RRC2057 Lithium- ion batteries. Only use this battery in the codec. Caution: 1. Please read the important safety and user information in the manufacturer user manuals for both the battery and any external charger purchased separately before use. - Page 16 The battery is fully charged and the external power supply is in use. Unknown battery error while the external power supply is attached. The battery should immediately be removed from the codec. Please contact Tieline if this situation persists. Unknown battery error. The battery should immediately be removed from the codec.
- Page 17 ViA User Manual v2.0 Touch Screen Power Management By default the TOUCH SCREEN has Screen Sleep mode enabled to preserve battery power. The default Screen Timeout setting is 1 minute. The TOUCH SCREEN will "reawaken" from sleep mode when a button or rotary encoder is adjusted, or the TOUCH SCREEN is tapped or swiped. It is also possible to: ·...
- Page 18 ViA User Manual v2.0 4. Tap Screen Timeout to adjust the number of minutes, then tap Done in the top right-hand corner of the TOUCH SCREEN. 5. Tap Screen Brightness and then use the left and right NAVIGATION buttons to adjust brightness.
- Page 19 ViA User Manual v2.0 Advanced Power Management Other ways to conserve battery power when operating without a power supply include the following: Power Management Mode Explanation Audio Power Setting Power consumption can be reduced by lowering the audio output threshold from +22dBU to +16dBU. Tap...
- Page 20 ViA User Manual v2.0 3. Tap to adjust each option. © Tieline Pty. Ltd. 2017...
-
Page 21: Part 7 Inserting And Removing Modules
A single module slot is available on the codec rear panel for inserting an optional ISDN or POTS module into the codec. ViA codec with an ISDN module installed Inserting or Removing a Module Ensure the codec is [OFF] when inserting or removing modules. Where possible use anti- static precautions to help minimize the chance of static charges damaging the highly sensitive circuitry. -
Page 22: Part 8 External Connections
AES3 signals. Alternatively, input 1 also supports AES42 Mode 1 and Mode 2 mics. AES input modes can be selected via codec menus. VOLTAGE WARNING: DO NOT attach non-digital microphones or an AES3 source to input 1 when AES42 mode is selected, or equipment may be damaged by high voltages. - Page 23 Nine pin female RS232 serial data connection for local and remote control of equipment at either end of the link. 3 S/PDIF In/Out (Auxiliary S/PDIF IN/OUT auxiliary input and output via RCA connectors. input) 4 LAN1 and LAN2 Ports The codec features two Gigabit (10/100/1000) RJ-45 Ethernet ports for IP connections.
- Page 24 Right Side Panel Connections Connection Details 1 Stereo Line In STEREO LINE IN is an auxiliary line input option via a 3.5mm (1/8") TRS connector. 2 Outputs 1 and 2 OUTPUT 1 and 2 are balanced analog XLR line outputs.
-
Page 25: Rear Panel Connections
SD card slot for firmware upgrades, codec backup and restore functions, and installation of SSL certificates. 3 Module slot Module slot for inserting an optional ViA POTS or ViA ISDN module. 4 XLR Power Socket 4-pin male XLR on the rear panel to attach an external 12VDC 3A power supply. -
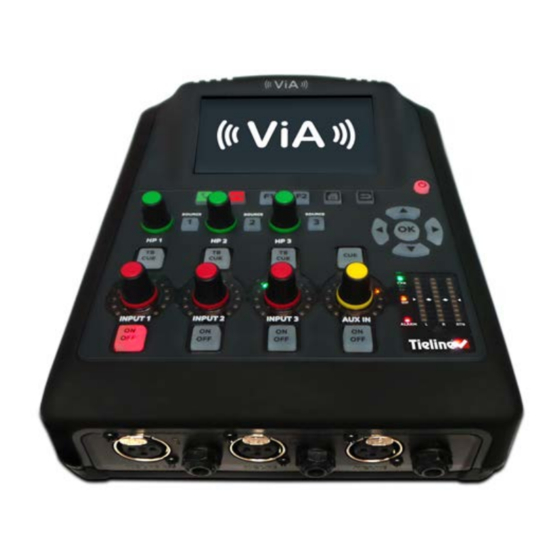
Page 26: Part 9 Codec Controls
ViA User Manual v2.0 Codec Controls The top of the codec features input and headphone controls, as well as navigation buttons, a color LCD TOUCH SCREEN display and PPM meters. Navigation Buttons The codec has four arrow shaped NAVIGATION buttons and the OK button buttons for navigating codec menus and adjusting levels and settings. - Page 27 ViA User Manual v2.0 Operation Button Descriptions Features Operation Button Descriptions Connect Button Press to dial/connect Disconnect Button Press to disconnect a connection Function Button 1 Press to activate codec user functions Function Button 2 Press to activate codec user functions.
-
Page 28: Part 10 Wireless Ip Connection Options
The codec has multiple IP interface connection options, including: 1. LAN1 Ethernet port (default Primary Via interface in the Dialer 2. LAN2 Ethernet port (default Secondary Via interface in the Dialer ) 3. Internal Wi-Fi (default Tertiary Via interface in the Dialer ) 4. - Page 29 ViA User Manual v2.0 4. Tap to select the Wi-Fi access point to which you are connecting, in this example AndroidAP. 5. Tap to select the preferred Authentication Mode and then tap Password to enter the network password. 6. Enter the password, then tap Done in the top right-hand corner of the TOUCH SCREEN.
- Page 30 ViA User Manual v2.0 Important Note: ViA supports IEEE 802.11 a/b/g/n Wi-Fi with dual band connectivity (2.4 and 5 GHz). For increased security Tieline has implemented the WPA2-PSK authentication protocol because standard WEP encryption is less secure. Wi-Fi Indications The following Wi-Fi indications are displayed in the Status Bar on the codec screen.
- Page 31 Helpful Hint: Use fingers on the TOUCH SCREEN to pinch zoom in to web-browser content, or zoom out. Connecting over Cellular Wireless via USB Modems 1. Attach a supported USB Modem to either USB PORT 1 or USB PORT 2 on the codec. When the modem is detected by the codec, the network symbol and signal strength is displayed in the Status Bar on the TOUCH SCREEN.
- Page 32 ViA User Manual v2.0 USB Cellular Modem Indications Symbol Description of Status · 1 No symbol A cellular modem is not attached to the codec. · A modem is attached but not ready yet; it can take up to a minute for the modem to be detected.
-
Page 33: Part 11 Menu Navigation
ViA User Manual v2.0 Menu Navigation Home Screen Navigation All main codec menus can be launched from the Home screen. Features Home Screen Elements 1 Dialer Tap to create simple 'ad hoc' dialing connections and save a program 2 Programs... - Page 34 ViA User Manual v2.0 Navigation Shortcuts 1. For IP and POTS connections negotiate higher bit rates by pressing the F2 button and then the NAVIGATE UP button while viewing the Statistics screen; for lower bit rates press the F2 button and then the NAVIGATE DOWN button.
-
Page 35: Part 12 Codec Menus
ViA User Manual v2.0 Codec Menus Following is an overview of the menu structure in the codec. © Tieline Pty. Ltd. 2017... -
Page 36: Part 13 Connection Guide
ViA User Manual v2.0 Connection Guide This quick start guide will get you connected with ViA in mono or stereo in just a few minutes. The codec is configured to connect in mono over IP by default when shipped, or when factory default settings are restored. -
Page 37: Connecting Over Ip
1. Press the HOME button to return to the Home screen, then tap Dialer 2. Tap Transport and select IP > Tieline if ISDN or POTS is the currently configured transport. Note: Select SIP instead of Tieline session when dialing non-Tieline codecs and Dialing SIP Peer-to-Peer to configure SIP connections. - Page 38 8. Tap Via to select a specific dialing interface in the Select Via screen, or use the default Any setting. Tap Save in the top right-hand corner of the screen to dial using the default Any setting.
- Page 39 ViA User Manual v2.0 · Tertiary = Wi-Fi. You can also select a specific interface, e.g. Primary Secondary LAN1 LAN2, as displayed in the preceding image. Interfaces are not displayed if they are unavailable, e.g. if Wi- Fi is turned off or there is no cellular modem attached to USB PORT 1 USB PORT 2.
- Page 40 ViA User Manual v2.0 12. Tap FEC to configure local and remote forward error correction settings. See Configuring Forward Error Correction for more details. 13. Tap Direction if you want to save data and configure the codec to either Encode Only or Decode Only.
- Page 41 ViA User Manual v2.0 17. Swipe left once to view Jitter and Send/Return values. 18. Tap the Statistics button to view connection and packet statistics. Note: Incrementally renegotiate higher connection bit rates by pressing the F2 button and then the NAVIGATE button while viewing the Statistics screen;...
-
Page 42: Monitoring Ip Connections
ViA User Manual v2.0 Monitoring IP Connections 13.2 To view and monitor any active connections: 1. Press the HOME button to return to the Home screen, then tap Connections. 2. To view Connection Details: a. Tap the On Air indication on the Connections screen, or b. - Page 43 ViA User Manual v2.0 Feature Description 1 Lost Packets Packets sent that failed to arrive 2 Empty (Jitter Indicates how often the jitter buffer ‘reservoir’ empties causing loss of Buffer) audio 3 Late Packets The number of packets that arrive late, i.e. after audio play out...
-
Page 44: Connecting Over Sip
3. It is not possible to renegotiate the connection bit rate over a SIP connection. 4. When connecting to a Tieline G3 codec using SIP you need to manually select the G3 audio reference level. From the Home screen navigate to Audio >... - Page 45 ViA User Manual v2.0 4. Tap Algorithm to select the preferred algorithm, sample rate and bit-rate. G.711 is configured by default. 5. Tap Destination to configure how to connect. 6. To dial peer-to-peer tap Destination. 7. Use the on-screen keypad to enter the IP address, or alphanumeric characters in the SIP URI of the codec you want to dial, then tap Done in the top right-hand corner of the TOUCH SCREEN to confirm all settings.
- Page 46 ViA User Manual v2.0 8. Tap Via to adjust the interface used to dial the connection. 9. Tap to select None as the SIP account when dialing peer-to-peer, or select a registered SIP account if you are using a SIP server to establish a connection.
- Page 47 LAN2 with the Wi-Fi interface if you select Secondary in SIP mode. If you want to use a different IP interface such as Wi-Fi to dial over SIP, configure this as the Via setting in either the SIP1 or SIP2 interface. See Configuring SIP Interfaces for more information on configuring the two available SIP interfaces.
- Page 48 ViA User Manual v2.0 13. Swipe left once to view Jitter and Return values. 14. Tap the Statistics button to view connection packet statistics. 15. Tap Disconnect or press the DISCONNECT button to hang up the connection. Important Notes: ·...
-
Page 49: Connecting With Fuse-Ip
How does Fuse-IP work? Fuse-IP is another Via interface you can use to dial, similar to selecting a LAN port or Wi-Fi. Fuse-IP requires one codec to be a server and the other codec is the client. Normally the remote codec is configured as the client and the studio codec is the server, because it's easier to dial static IP addresses configured at the studio than cellular or Wi-Fi interfaces at the remote site. - Page 50 ViA User Manual v2.0 2. Tap Transport Interfaces to expand the menu if it is not displayed, then tap Fuse-IP configure module settings. 3. Configure the Fuse-IP Mode as Client. 4. Tap Server Address to enter a public static IP address associated with the bonded interfaces at the studio, then tap Done in the top-right hand corner of the TOUCH SCREEN.
- Page 51 ViA User Manual v2.0 6. Tap Bonded Interfaces and then tap the On/Off button for the interfaces you want to bond. Next, tap Save in the top-right hand corner of the TOUCH SCREEN. 7. Leave the default Fuse-IP Port as 8999 in most situations unless this port is already in use, e.g.
- Page 52 ViA User Manual v2.0 10. Select Fuse-IP as the Via interface with which to dial when creating a program in the HTML5 Toolbox Web-GUI Program Manager panel or the Dialer Important Notes: · Data is sent by the codec over the newly created 'tunnel' as soon as Fuse-IP is enabled, even if a connection has not been configured and dialed.
-
Page 53: Connecting With Isdn
2. Tap Transport to adjust this setting if the current selection is IP. 3. Tap to select ISDN as the preferred connection type. 4. When dialing a Tieline codec tap to select the default Tieline Codecs Session Data setting, or tap Sessionless if dialing a non-Tieline codec. - Page 54 ViA User Manual v2.0 Important Note: By default, when Tieline codecs dial they send configuration settings to the remote codec using Tieline Session Data. This configures the codec receiving the call with matching algorithm, sample rate and bit rate settings. Non-Tieline devices don't support this feature and Sessionless must be selected to provide compatibility.
- Page 55 ViA User Manual v2.0 9. Tap Destination to configure ISDN dialing. 10. Tap Via to select a B-channel interface to use when dialing. Tap an individual B-channel, or use the default Any setting and allow the codec to use the first available interface.
- Page 56 ViA User Manual v2.0 13. Tap Done in the in the top right-hand corner of the TOUCH SCREEN to return to the Direct Dial screen.. 14. Tap the Auto reconnect On/Off button to toggle between enabling and disabling this feature. Note: See Configuring Auto Reconnect for more details.
- Page 57 ViA User Manual v2.0 16. Tap Connect or press the CONNECT button to dial the destination codec. Swipe left once to view connection details. Note: When dialing: · The Status Bar turns green. · OFF AIR is displayed and this changes to ON AIR when connected.
-
Page 58: Connecting Pots
Important Notes: · Configure the correct country setting for connections over POTS to adjust the ViA POTS G5 module for varying ring tones and line impedances in different countries. · POTS Connection Tips and Precautions for valuable information about setting up and maintaining reliable POTS connections. - Page 59 ViA User Manual v2.0 4. Tap to select Tieline Codecs session data when connecting to another Tieline codec, or tap Sessionless when dialing non-Tieline POTS codecs. Important Notes: Tieline Music Mono is the algorithm automatically configured for Tieline Codecs. The Other algorithm is automatically configured when Sessionless is selected to support dialing a Comrex®...
- Page 60 ViA User Manual v2.0 · When the call goes into the POTS/PSTN network from the PBX. The PSTN takes time to prepare the line for an outgoing call, i.e. disabling the incoming call circuitry. A pause is inserted by typing a comma "," in the dial string. The length of the pause may need to be adjusted when dialing through older PBX systems that have latency in connecting to the PSTN.
-
Page 61: Part 14 Redialing A Connection
ViA User Manual v2.0 POTS Dialing and Negotiating POTS Connected 10. Swipe left once to view connection details and Local and Remote line quality. The Local and Remote line quality displayed for POTS Codec connections is related to the actual POTS line quality at either end of the link. -
Page 62: Part 15 Load, Connect And Manage Programs
What is a Program? Tieline ViA, Genie, Merlin and Bridge-IT codecs also use 'programs' to connect to each other. A program configures a Tieline codec to send or receive one or more Audio Streams based upon the particular application the codec is being used for at any given time. - Page 63 3. Tap Load Program & Unload Previous to load a saved program and unload the current program. Note: Saved programs could have been configured using the HTML5 Toolbox Web- GUI, or locally via the TOUCH SCREEN. 4. The Connections screen is displayed when you load a new program. Tap Connect to dial the program.
- Page 64 ViA User Manual v2.0 Add Programs to Favorites Add programs as Favorites to view and connect them easily by swiping left from the Home screen. This makes it simple for non-technical users to connect and go live with preconfigured dialing configurations.
- Page 65 ViA User Manual v2.0 4. In this example, the program LA Studio 2 appears in the Programs list with a Star symbol next to the radio button, indicating it has been added to the list of Favorites. Remove Programs from Favorites 1.
- Page 66 ViA User Manual v2.0 Delete a Program 1. Press the HOME button to return to the Home screen, then tap Programs 2. Tap to select the program you want to delete. 3. Tap More Options and then tap Delete. 4. Tap Delete in the confirmation dialog.
-
Page 67: Part 16 Via Headphone Controls
ViA User Manual v2.0 ViA Headphone Controls WARNING: LISTENING AUDIO EXCESSIVE VOLUMES CAN CAUSE PERMANENT HEARING DAMAGE. REDUCE VOLUME AS LOW AS POSSIBLE. A headphone volume limiter can be employed to protect hearing when monitoring loud sources and/or when using low impedance headphones. To configure this: 1. - Page 68 Important Note: When the audio menu is enabled in administrator mode it is possible to configure the headphone mix via the Headphone menu. Select Home screen > Audio > Headphones . Then tap Headphone Settings for each headphone output and select the preferred headphone mix.
- Page 69 ViA User Manual v2.0 3. The custom mix will be saved and loaded and is displayed in the Headphone screen. Important Note: The mix displayed for Headphone 1-3 also reflects the loaded mix in the Matrix Editor. If you create custom headphone mixes, save them, and then save the overall mix in the Matrix Editor.
-
Page 70: Part 17 Input Levels And Input Settings
2. Do not attach an unbalanced input source (e.g. smartphone) to an analog XLR input if phantom power is enabled, or it may damage the connected device. Tieline recommends using an unbalanced to balanced converter to avoid damaging connected equipment. - Page 71 ViA User Manual v2.0 2. Tap Inputs 3. Tap to select the input you want to configure. 4. Tap to select Analog as the Input Type and tap to select Gain Type. 5. Tap to select the correct gain setting, or tap Save to keep the existing setting. There are 5 mic level settings as well as Unbalanced and Line level menu options.
- Page 72 ViA User Manual v2.0 IGC (Intelligent Gain Control) When the broadcast action really starts to heat up, the codec's inbuilt DSP limiter automatically takes care of any instantaneous audio peaks that occur in demanding broadcast situations. IGC (Intelligent Gain Control) is enabled by default and is automatically activated at +20 dBu (G5 audio scale) and +14dBu (G3 audio scale) to prevent audio clipping.
- Page 73 ViA User Manual v2.0 Enabling Phantom Power 1. Press the HOME button to return to the Home screen, then tap Audio > Inputs > [tap to select an input] > Phantom Power. 2. Tap Enabled to activate phantom power on the selected input.
- Page 74 ViA User Manual v2.0 2. Tap the On/Off button to toggle between enabling and disabling Polarity Inversion (default setting Off). On/Off as Cough Button Each INPUT ON/OFF button can be configured as a cough button. When On/Off as Cough Button is enabled on an input, press the INPUT ON/OFF button to mute the input for the duration of the button press.
- Page 75 ViA User Manual v2.0 Compressor Each input has an adjustable dynamic range compressor. To adjust input compression: 1. Press the HOME button to return to the Home screen, then tap Audio > Inputs > [tap to select an input] > Dynamic Range Compressor.
- Page 76 There are 3 stereo auxiliary input and 2 stereo auxiliary output options available in the codec: · An analog stereo line input via 1/8" (3.5mm) TRS jack. · A stereo S/PDIF input and output via RCA connectors, supporting 32kHz, 44.1kHz and 48kHz sample rates. · USB audio input and output via a micro USB connector.
- Page 77 Then right-click USB Composite Device and select Update Driver Software. · On Mac OS X El Capitan v10.11 or macOS Sierra v10.12: Open "System Preferences", then select "Sound", then select "Output." Select "Tieline G5 ViA Digital Audio" as the output source. Other Auxiliary Input Options Other input options available include: 1.
-
Page 78: Part 18 Ppm Meters And Analog Audio Outputs
A Tieline codec with proprietary Tieline session data enabled will automatically adjust the reference level to suit G5 and G3 codecs, or Report-IT. When connecting to a non-Tieline codec, or a Tieline codec without session data enabled, the codec will use the Tieline G5 reference scale setting. For... -
Page 79: Tieline Pty. Ltd
ViA User Manual v2.0 PPMs on the Codec PPMs on the Connections screen PPM Meters for Mono Peer-to-Peer Programs When a mono program is connected the codec displays a mix of all inputs on the LEFT PPM and mono return audio on the RETURN PPM. By default, all inputs are mixed in the outgoing mono program audio stream. - Page 80 ViA User Manual v2.0 The Connections screen PPM meters display outgoing stereo program audio on the left and right SND PPMs. Return audio is displayed on the left and right RTN PPMs. By default, stereo return audio is routed to analog OUTPUT 1 (decoder 1) and OUTPUT 2 (decoder PPM Meters for 2 x Mono Peer-to-Peer Programs The codec is capable of creating two independent mono peer-to-peer connections simultaneously.
- Page 81 ViA User Manual v2.0 By default, return audio from the first audio stream is routed to analog OUTPUT 1 (decoder 1). Return audio from the second audio stream is routed to OUTPUT 2 (decoder 2). PPM Meters for Mono + IFB Programs The codec is capable of broadcasting a bidirectional mono peer-to-peer audio stream and a separate bidirectional IFB (talkback/communications) audio stream.
- Page 82 ViA User Manual v2.0 PPM Meters for Stereo + IFB Programs The codec is capable of broadcasting a bidirectional stereo peer-to-peer audio stream and a separate bidirectional IFB (talkback/communications) audio stream. Inputs 1-3 are routed to both encoders 1 and 2. To provide stereo on the auxiliary input, the left channel is routed to encoder 1 and the right channel is routed to encoder 2.
-
Page 83: Part 19 Using The Matrix Editor
ViA User Manual v2.0 Using the Matrix Editor The matrix editor in the codec allows any input to be routed to any output. Default routing settings are configured for each program type and these default matrices can be edited and saved as custom matrices. - Page 84 Any edits take effect immediately in: 1. The Headphone mix accessed by pressing the SOURCE button. 2. The XLR Outputs and Digital Outputs accessed via HOME > Audio > XLR Outputs / Digital Outputs...
- Page 85 2. Enter a new Mix Name and tap Done in the top right-hand corner of the TOUCH SCREEN. 3. The new custom mix stays loaded in the codec until a new mix is loaded, an incompatible program is loaded, or program defaults are restored via Menu > Reset Defaults.
-
Page 86: Part 20 Analog And Digital Outputs
ViA User Manual v2.0 4. Tap to load, rename or delete a Custom Mix. Analog and Digital Outputs The codec has two XLR outputs and also supports S/PDIF or micro USB digital outputs. The XLR Output Settings and the Digital Output Settings screens support: ·... -
Page 87: Digital Outputs
ViA User Manual v2.0 Feature Description Output level PPM meter in dBFS. Gang button Tap to select/deselect ganging of the output sliders and the Input Mute buttons. Output mute button Mute button is available for each output; this function can be ganged using the Gang button. -
Page 88: Part 21 Cue And Talkback Operation
Stereo Peer-to-Peer + IFB program. It is also possible to broadcast mono program and use a separate communications channel, with either the Tieline Music or Music PLUS algorithm, over a stereo program using the G3 Mono Peer- to-Peer + IFB program template. - Page 89 ViA User Manual v2.0 Editing Cue and Talkback Routing To edit the routing of cue and talkback audio, either: 1. Tap a crosspoint on the TOUCH SCREEN to select or deselect an audio crosspoint, or 2. Use the NAVIGATION buttons to focus on a crosspoint and press the OK button to select or deselect an audio crosspoint.
- Page 90 The codec supports offline cueing of external analog and digital sources attached to the stereo auxiliary input. By default, offline cue monitoring of the auxiliary input is only available via headphone output 1 (HP1). This routing can be adjusted as required.
- Page 91 Using G3 Mono Peer-to-Peer + IFB Mode with a Stereo Connection in ViA It is also possible to connect a stereo program and use one channel for talkback communications. This is preconfigured in ViA if you create a program using the G3 Mono Peer- to-Peer + IFB program template.
- Page 92 ViA User Manual v2.0 © Tieline Pty. Ltd. 2017...
-
Page 93: Part 22 General Audio Settings
Tieline G5 reference scale setting. The default Tieline G5 audio reference scale displayed on the PPMs when you connect to a Tieline G5 codec is -38dBFS to 0dBFS (e.g. Merlin, Genie, Bridge-IT and ViA codec families). Using this reference scale audio peaks can safely reach 0dBFS without clipping, providing 18dB of headroom from the nominal 0vu point. - Page 94 ViA User Manual v2.0 1. Press the HOME button to return to the Home screen, then tap Audio > General > Reference Level. 2. Tap to select the appropriate reference scale to suit the codec to which you are connecting.
- Page 95 ViA User Manual v2.0 2. Tap to select the preferred voltage setting. Helpful Hint: As a shortcut you can tap the Hamburger menu in the Input Audio screen to adjust this setting. Disable +48V Phantom Power on Boot By default, 48V phantom power is disabled when the codec is rebooted. This protects users from attaching a non-phantom device to a phantom-enabled codec input and damaging equipment.
- Page 96 ViA User Manual v2.0 Show +48V High Voltage Warning Dialog By default, a 48V phantom power warning dialog is displayed when phantom power is enabled in the codec. This feature can be disabled if required: 1. Press the HOME button to return to the Home screen, then tap Audio >...
- Page 97 ViA User Manual v2.0 2. Tap the On/Off button to enable and disable this feature. Show AES42 Mic Input Warning Dialog By default, an AES42 warning dialog is displayed when AES42 is selected as the Input Type on input 1. This feature can be disabled if required: 1.
- Page 98 ViA User Manual v2.0 Loopback Audio Test Loopback Audio Test mode is used by the codec to perform an input/output loopback test of audio. E.g. Input 1 is routed to analog Output 1, Input 2 is routed to Output 2. The test remains active until it is disabled, or a connection is dialed or answered, or a new program is loaded.
-
Page 99: Input Audio
ViA User Manual v2.0 Configuring AES3 and AES42 Input Audio INPUT 1 (MIC/LINE/AES) on the codec supports: · A mic or line level analog source, or · AES3 (AES/EBU) format digital audio, or · An AES42 digital microphone. VOLTAGE WARNING: DO NOT attach non-digital microphones or an AES3 source to input 1 when AES42 input mode is selected, or equipment may be damaged by high voltages. - Page 100 ViA User Manual v2.0 6. AES3 settings are confirmed in the Input Type field on the screen. Important Note: There is a maximum of 6dB of additional gain available when adjusting an AES input source. AES42 Digital Microphone Input VOLTAGE WARNING: DO NOT attach non-digital microphones or an AES3 source to input 1 when AES42 input mode is selected, or equipment may be damaged by high voltages.
- Page 101 ViA User Manual v2.0 4. Tap Input Type. Tap AES42 AES42 settings are confirmed in the Input Type field on the screen and an AES42 Settings menu appears. 7. Tap AE42 Settings to adjust mic parameters as required. © Tieline Pty. Ltd. 2017...
-
Page 102: Part 24 Backup And Redundancy Options
Imagine the peace of mind knowing you can bond 2 USB modem data links from different Telcos and let Tieline’s Fuse-IP technology automatically manage the data capability of each link! Flexibility is paramount for remotes, so you can even bond a USB modem with a Wi-Fi connection, or bond two Ethernet connections. - Page 103 ISDN connection, or a backup POTS connection in the same program. Note: ViA has a single module slot and can connect over POTS or ISDN if a ViA POTS or ViA ISDN module is installed. For details on configuring backup connections using failover see...
-
Page 104: Monitoring Smartstream Plus
ViA User Manual v2.0 Auto Reconnect Auto Reconnect is the simplest form of connection backup whereby the codec will redial a lost connection continuously until it is either: · Re-established, or · Dialing is manually stopped. Auto reconnect can be enabled when configuring a codec program designed to dial another codec or codecs. -
Page 105: Managing Failover
ViA User Manual v2.0 Managing Failover 24.2 If a primary and backup connection are configured in a program, the codec supports automatically failing over to a backup connection according to Backup data loss parameters. It can also automatically fail back to the original connection according to Auto Resume parameters. It is also possible to manually fail over to a backup connection, and fail back to the original connection, using the Connection Details screen. -
Page 106: Part 25 Administrator And Basic Operation Modes
ViA User Manual v2.0 Administrator and Basic Operation Modes The codec can be operated in either Admin Mode or Basic Mode. When shipped the codec is configured in Admin Mode with access to all features and menus. An administrator can also configure the codec to present a subset of menus for non-technical users in Basic Mode to simplify operation. - Page 107 ViA User Manual v2.0 Admin Mode Active Basic Mode Active Admin Mode Login There are two ways to log in as an administrator when the codec is in Basic Mode: 1. Tap Menu on the Home screen and then tap Switch to Admin Mode to log in as an administrator.
- Page 108 An administrator can adjust the subset of settings visible to a user when the codec is in Basic Mode. To adjust these settings and the login Password: 1. Log in as an administrator and tap Manage via the Menu button, or navigate to Home screen >...
- Page 109 ViA User Manual v2.0 2. Enter the current admin password, then tap Done in the top right-hand corner of the TOUCH SCREEN. 3. Tap New Admin Password to enter the new password, then tap the Right Arrow in the top right-hand corner of the TOUCH SCREEN.
- Page 110 ViA User Manual v2.0 Configure Basic Mode Settings Tap Basic Mode Settings to configure which menus and screens are visible in the codec in Basic Mode. Basic Mode Settings screen Basic Mode Setting Explanation Start-up Screen (default setting Tap to select the default screen displayed on start-up. The Favorites) default setting displays the Favorites screen.
- Page 111 Wi-Fi access point information. Configure ViA Power-up Mode The codec can be configured to always boot in either Admin Mode or Basic Mode. 1. Tap ViA Power-up Mode. 2. Tap to select the preferred option. © Tieline Pty. Ltd. 2017...
-
Page 112: Part 26 About Isdn Modules
The NT-1 is a relatively simple device that converts a 2-wire U interface into the 4-wire S/T interface. If you have an NT-1 device connected to the U interface line then you will require a Tieline ViA (ST) ISDN module (S/T interface - model: TLISDNEUROVIA). If you don’t have an NT-1 device installed then the Tieline ViA (U) USA ISDN module (U interface - model: TLISDNUSAVIA) will be required. -
Page 113: Isdn Module Settings
ViA User Manual v2.0 How to Configure ISDN G5 Modules To configure the codec to dial using ISDN for the first time: 1. Ensure that the correct country setting is configured in your codec via Home screen > Settings > System > Country 2. - Page 114 ViA User Manual v2.0 2. Tap Transport Interfaces to expand the menu if it is not displayed, then tap ISDN Module to configure module settings. 3. Tap Accept to adjust the type of calls the codec will accept. Important Note: ISDN Sync should be displayed when an ISDN line is connected to the codec.
- Page 115 ViA User Manual v2.0 5. Tap Network to view Network Type options. 6. Tap to select the correct Network Type for the region in which you are using the codec. Networks Region EU-ETSI If Switch Type is ETSI (UK, Europe, Australia and most other countries)
- Page 116 DN or MSN numbers as required. Note: SPID1 and SPID2 are only visible when a ViA (U) USA ISDN module is installed in the codec. 10. Use the on-screen keyboard to enter each number, then tap Done in the top right-hand corner of the TOUCH SCREEN to add each number.
-
Page 117: Isdn Answering Configuration
ViA User Manual v2.0 DN/MSN numbers. This is the best way to answer calls from codecs in a predictable manner. SPID Numbers in North America ISDN relies on an initialization procedure for associating Service Profiles with specific terminating equipment (e.g. your audio codec) rather than lines. In the US Telcos assign a Service Profile ID (SPID) number which assists in identifying different ISDN services across the network. - Page 118 Non-Tieline Encoding and answer route settings are used to answer sessionless calls. 5. Tap Non-Tieline Encoding and then tap to select the default algorithm used when receiving a call from a non-Tieline codec.
- Page 119 ViA User Manual v2.0 6. Tap G3 and Non-Tieline Answering Route to configure an answer route when receiving a call from a non-Tieline or Tieline G3 codec, then tap to select a Route. Important Note: Routing configuration is unsupported on Tieline G3 and non-Tieline codecs.
-
Page 120: Part 27 About Pots Modules
About POTS Modules The ViA POTS G5 module is essentially the same as other G5 POTS modules in Genie and Merlin codecs. It can be used in the codec to stream high quality audio over a POTS (PSTN) phone line. - Page 121 Making Analog Phone (Voice) Calls The ViA POTS G5 module is capable of making analog voice calls. This may be useful to dial a telephone hybrid, or to use for communications, or when there is no Tieline codec at the other end of the link.
-
Page 122: Pots Module Settings
Answering menu via Settings > Answering > POTS Answering if you are connecting to non-Tieline codecs. The codec displays POTS line status in the Status Bar at the top of the TOUCH SCREEN. Symbol Description of Status No POTS No POTS module is installed in the codec. - Page 123 ViA POTS G5 modules initially attempt to establish a link at the lowest Max Bit rate setting configured in the two modules being connected. If the POTS line doesn't support this bit rate, the modems will attempt to connect at the highest possible bit rate to suit the prevailing line quality at each end of the link.
- Page 124 Monitor Modem Tone (Affects Dialing and Answering) Tap the On/Off button to Enable (default) or Disable this feature. If enabled the module will allow audio monitoring of modem tones via the phone input during POTS Codec mode connections. © Tieline Pty. Ltd. 2017...
-
Page 125: Pots Answering Configuration
By default, Tieline codecs communicate information via session data transferred when a connection is established. If you answer a call from a non-Tieline codec (or a sessionless call from a Tieline codec), POTS Answering settings determine the algorithm used when connecting. An Answering Route can also be configured, which routes a call to a specific audio stream on the answering codec. - Page 126 Tieline session calls or sessionless Session Type calls only. 4. Tap to select Tieline Codecs and Sessionless or Sessionless Only if connecting to non- Tieline codecs only. Important Note: By default, calls from Tieline codecs contain session data information, which includes algorithm, bit-rate, route and other settings.
-
Page 127: Part 28 About Sip
SIP peer-to-peer connection involves two codecs connecting to each other directly using an IP address, as you would for a standard Tieline IP call. The difference is that a Tieline IP call uses proprietary Tieline session data to negotiate call parameters (e.g. algorithm and bit rate) when a call is established, whereas a peer-to-peer SIP connection uses Session Description Protocol (SDP) for this purpose. - Page 128 SIP is G.711. SIP Server Connections The benefit of using a SIP server to connect is that any device can be ‘discovered’ via its SIP server registration. This is particularly useful if a codec is being used in multiple locations with IP addresses that are DHCP assigned.
- Page 129 Failover and SmartStream PLUS redundant streaming are not available with SIP connections. · When connecting to a Tieline G3 codec using SIP you need to manually select the G3 audio reference level in the codec. To do this select Audio > General >...
-
Page 130: Configuring Sip Interfaces
2. Tap SIP to expand the menu and then tap Interfaces. 3. Tap SIP1 to configure the first available SIP interface. 4. Tap to select and edit any setting, then tap to select the Via, i.e. the interface used to dial over SIP1 or SIP2. - Page 131 ViA User Manual v2.0 5. Tap Public IP Address if you want to dial over SIP from behind a firewall. Enter the public IP address here and then configure port forwarding to route traffic to the codec's local IP address behind your firewall.
-
Page 132: Configuring Sip Accounts
ViA User Manual v2.0 Configuring SIP Accounts 28.2 Getting Started Up to 6 SIP accounts can be configured in the codec and registering codecs for SIP connectivity is simple. First, select the SIP server to which you will register your codec. On a LAN this may be your own server, or it could be one of the many internet servers available. - Page 133 ViA User Manual v2.0 4. Tap each field in turn to enter SIP account credentials. Tap Done to confirm the details for each entry. 5. Select Answer Route to route incoming calls to this SIP account to a specific audio stream.
- Page 134 ViA User Manual v2.0 8. Once enabled, the SIP account can be selected when creating a new SIP connection via the Home screen > Dialer > Destination Confirming Account Registration There are three symbols displayed in the codec next to an account which indicate SIP account registration status.
-
Page 135: Adding Sip White And Black Lists
ViA User Manual v2.0 Adding SIP White and Black Lists 28.3 The SIP Filters menu allows filtering of SIP URIs and User Agents to provide greater security for your codec connections. For example, add trusted network codecs to the URI Whitelist in this panel and only codecs using these SIP URIs will be able to connect. - Page 136 ViA User Manual v2.0 Important Note: Regular expressions should not use ^ and $ anchors because searches implicitly try to match anywhere in the line. © Tieline Pty. Ltd. 2017...
-
Page 137: Part 29 Other Touch Screen Configuration Tasks
ViA User Manual v2.0 Other Touch Screen Configuration Tasks The following sections explain how to configure a wide range of codec settings using TOUCH SCREEN. 29.1 Configuring LAN/VLAN Settings Verifying IP Address Details in the Codec 1. Press the HOME button to return to the Home screen, then tap Settings 2. - Page 138 ViA User Manual v2.0 Ethernet and VLAN Configuration Options The codec features two physical Ethernet port interfaces (LAN1 and LAN2) and up to four additional VLAN interfaces. VLAN interfaces have features similar to physical Ethernet interfaces. However, your network administrator will need to configure VLAN support throughout your network for VLANs to be supported in your codec.
- Page 139 ViA User Manual v2.0 5. Tap to select DHCP. 6. Tap Save in the top right-hand corner to reconfigure the codec for DHCP IP address configuration. Configure a Static IPv4 Address Static IP addresses are fixed addresses which are normally recommended for studio installations.
- Page 140 ViA User Manual v2.0 5. Tap to select Static. 6. Use the on-screen keyboard to enter the static IP address into the codec, and then tap the Right Arrow in the top-right hand corner of the TOUCH SCREEN. 7. Enter the IPv4 Subnet mask into the codec, and then tap the Right Arrow.
- Page 141 ViA User Manual v2.0 7. Tap Save in the top right-hand corner to reconfigure the codec for static IP address configuration. IPv6 Address Assignment There are three IPv6 settings available for each LAN port on the codec and any VLANs which are configured.
-
Page 142: Adding Access Points And A Sim Pin
ViA User Manual v2.0 1. Press the HOME button to return to the Home screen, then tap Settings 2. Tap to select Transport Interfaces and then LAN1 , LAN2 or a VLAN interface. 3. Tap Network Settings. 4. Tap DNS Configuration. - Page 143 ViA User Manual v2.0 5. Enter the SIM PIN and tap Done. 4. Tap Save in the top right-hand corner of the TOUCH SCREEN to apply new settings. Add a Custom APN Profile 1. Press the HOME button to return to the Home screen, then tap Settings 2.
- Page 144 ViA User Manual v2.0 Select a Custom USB Modem Profile (APN) 1. After adding the custom profile and APN, tap to select the interface you want to configure. (Navigate to Home screen > Settings > Cellular > Select a modem or module).
-
Page 145: Selecting An Algorithm
Music and MusicPLUS algorithms. Overview of Tieline Algorithms 1. The Tieline Music algorithm is optimized for audio bit rates as low as 19.2kbps with only a 20 millisecond encode delay. It offers 15 kHz mono from 24kbps to 48kbps. 2. Tieline MusicPLUS delivers up to 20 kHz mono from 48kbps upwards. It can also deliver up to 20 kHz stereo from 96kbps upwards, offering huge savings on your IP data bills and outstanding audio quality. - Page 146 ViA User Manual v2.0 A sample rate of 32kHz is used in the codec's default profiles to achieve ultra-low bit-rate connections, but this is adjustable to 44.1kHz or 48kHz if required. AAC-LD AAC-LD (Low Delay AAC), AAC-ELD (Enhanced Low Delay AAC) and AAC-ELD v 2 are optimized for low latency real-time communication.
- Page 147 ViA User Manual v2.0 3. Tap to select an algorithm. Note: In most situations Tieline Music is the best algorithm to select and this is configured by default. How do I choose the right algorithm? The algorithm you select will not only affect the quality of the broadcast but it will also contribute to the amount of latency or delay introduced.
- Page 148 ViA User Manual v2.0 Algor- Audio Algor- rate over- Audio Quality and Recom m ended Band- ithm ic per channel head Features applications for on-air ithm Delay connectio w idth · · Linear/PCM 16/24 bit sample rate x 80kbps Full bandw idth,...
- Page 149 ViA User Manual v2.0 · · High delay Use w hen bidirectional communication betw een announcers is not required · · LC-AAC Up to 64ms 64kbps 15kbps High quality voice Voice or music 15kHz and music at remotes as w ell as low est bit rate;...
- Page 150 ViA User Manual v2.0 · Highly cascade low delay is highly resilient desirable. · Resilient w ith multiple encodes/decodes w hen required · · Opus 4Hz- 20ms 9.6-256kbps 16kbps Very high quality "Opus Voice" is ideal 20kHz voice and music for high quality, and ·...
- Page 151 ViA User Manual v2.0 IP Connection Bit rates Supported © Tieline Pty. Ltd. 2017...
-
Page 152: Configuring The Jitter Buffer
· Manage forward error correction (FEC). With Tieline codecs you can configure either a fixed or automatic jitter buffer and the settings you use depend on the IP network over which you are connecting. Over LANs, WANs and wireless networks the automatic jitter buffer generally works well. It adapts automatically to prevailing IP network conditions to provide continuity of audio streaming and minimize delay. - Page 153 A fixed jitter buffer is preferable over satellite or high latency connections to ensure continuity of signals. CAUTION: If a Tieline codec connects to a device that is using non-compliant RTP streams then the last fixed setting configured in the codec will be enabled (default is 500ms). Non- compliant devices include some other brands of codec, web streams and other devices.
- Page 154 ViA User Manual v2.0 Algorithm Non-SIP Connections SIP Connections PCM Linear (Uncompressed) Tieline Music Tieline MusicPLUS G.711 G.722 MPEG Layer 2 MPEG Layer 3 LC-AAC HE-AAC v.1 HE-AAC v.2 AAC-LD AAC-ELD Opus aptX Enhanced Configuring Automatic Jitter Buffering (Default Setting) 1.
- Page 155 ViA User Manual v2.0 5. Use the on-screen keyboard to set the minimum jitter buffer depth. Note: The Depth setting allows you to select predetermined minimum and maximum jitter settings within the auto jitter buffer's minimum and maximum jitter limitations. The default setting of 60 to 1000ms is a good starting point for most networks.
- Page 156 5. Fixed (F): This state is displayed if the jitter buffer is fixed. Configure the Jitter Buffer on the Answering Codec Session data is exchanged when a Tieline codec dials another Tieline codec and this configures the answering codec algorithm, bit-rate and jitter buffer etc. Depending on the capability of your network infrastructure, you may want to independently configure the jitter buffer settings on the answering codec.
- Page 157 Satellite IP 500 - 5000 milliseconds Important Note: The preceding table assumes Tieline Music is the algorithm in use. Do not use PCM (linear uncompressed) audio over highly contended DSL/ADSL connections without enough bandwidth to support the high connection bit rates required.
-
Page 158: Configuring Forward Error Correction
100ms to the fixed jitter buffer on a codec receiving FEC at a setting of 20% and 20ms at a setting of 100%. Tieline’s auto jitter buffer detects the amount of FEC that is being used and automatically compensates to increase the codec jitter buffer when this feature is enabled. - Page 159 ViA User Manual v2.0 The four FEC settings are outlined in the following table with their bit rate ratios. FEC Setting Bit rate Ratios Connection Use 100% simultaneous dual-redundant Recommended to be used over stream (1:1 ratio) is sent from the...
-
Page 160: Configuring Auto Reconnect
FEC according to the available uplink bandwidth at each end for best performance. As an example, if you want 15 kHz mono (using the Tieline Music Algorithm) you will need at least a 24kbps connection for audio. Adding 100% FEC will add another 24kbps making your bit rate 48kbps plus some overhead of around 10kbps is required. -
Page 161: Configuring Encode/Decode Direction
ViA User Manual v2.0 Auto reconnect enabled for IP Auto reconnect enabled for ISDN 29.7 Configuring Encode/Decode Direction By default the codec by is configured to both encode and decode data. However, it is possible to configure the codec to either encode or decode audio data only. This is useful for: ·... -
Page 162: Headphone Settings
ViA User Manual v2.0 Headphone Settings 29.8 The Headphone Settings menu includes configuration settings for the three 1/4 inch (6.35mm) headphone jack outputs. To access this menu press the HOME button to return to the Home screen, then tap Audio >... - Page 163 By default, alarm tones are enabled in the headphone outputs to deliver low battery level alerts. To disable alarm tones and adjust the level of the alarm tone in the headphones. Acknowledging active alarm tones via the TOUCH SCREEN will turn alarm tones off: 1. Press the HOME button to return to the Home screen, then tap Audio >...
-
Page 164: Enabling Relays & Rs232 Data
Select Enable Auxiliary Data when creating a program in the Programs panel to enable RS232 data and activate rules employing relay reflection over a connection. This will allow the codec to connect to external devices and send RS232-compatible data via the serial port on the rear panel. Alternatively, enable auxiliary data as follows: 1. - Page 165 Important Note: A non-WheatNet-IP Tieline codec can be configured to trigger a logic IO in a Tieline WheatNet-IP codec. Up to 64 logic IOs are available in Genie Distribution and Merlin PLUS WheatNet-IP codecs, as well as 4 physical CONTROL PORT GPIOs.
- Page 166 Tap Save in the top right-hand corner of the TOUCH SCREEN to confirm the new setting. Note: Flow control is Disabled by default. Important Notes: · When connecting to G3 codecs over IP, ISDN or POTS only in-band data is available via the Music and MusicPLUS algorithms. See RS232 Data Configuration for more details.
-
Page 167: Configuring Tcp/Udp Ports
Codec at the Studio. This section also contains useful information for configuring port forwarding and troubleshooting IP connections. The following sections describe how to adjust port settings for Tieline session data and audio ports. To configure SIP ports see Configuring SIP Interfaces... - Page 168 Tieline G5 codecs (Bridge-IT, Genie, Merlin and ViA codec families) and Tieline Commander and i- Mix codecs dialing over IP1 use session port 9002 by default. Tieline G3 codecs dialing over IP2 use session port 9012 and the codec can answer calls from these codecs automatically using the Alternate Answering Session Port.
- Page 169 ViA User Manual v2.0 3. Tap Answering Session Port to change the port. 4. Enter the port number, then tap Done in the top right-hand corner of the TOUCH SCREEN. 5. Tap Alternate Answering Session Port to change the port, then tap Done in the top right- hand corner of the TOUCH SCREEN.
-
Page 170: Configuring Qos For Ip Packets
ViA User Manual v2.0 29.11 Configuring QoS for IP Packets It is possible for IP networks to prioritize and differentiate between data packets transmitted through routers across networks. This is useful because in data networks many different IP services like email, voice, web pages, streaming video and music coexist within the same network infrastructure. -
Page 171: Tieline Pty. Ltd
ViA User Manual v2.0 Important Note: To ensure the continuous and regular flow of tagged data packets along the path from point-to-point, all routers and switching equipment must allow the QoS DSCP setting. Any bandwidth partitioning schemes should partition over a small interval to ensure the codec jitter buffer does not empty and audio remains continuous. -
Page 172: Reset Defaults And Backup/Restore Settings
6 Codec Logs Tap to clear codec event and log history. Note: This should only be performed if instructed to by Tieline support staff. Important Note: After restoring factory defaults the codec will automatically reboot. 1. Press the HOME button to return to the Home screen, then tap Settings 2. - Page 173 ViA User Manual v2.0 Backup Settings 1. Insert an SD card into the SD card slot on the rear panel of the codec. Note: A single partition FAT32 formatted SD card must be used. 2. Press the HOME button > Settings >...
- Page 174 ViA User Manual v2.0 4. Tap Proceed Anyway in the confirmation dialog to continue. 5. Tap to select the config file to restore on the codec and commence the system restore process. 6. Press the HOME button, then tap Settings >...
-
Page 175: Configuring Via Interfaces
3. Internal Wi-Fi (default Tertiary Via interface) Important Note: · If an interface is not available it is not listed in the Via interface selection screen. E.g. Wi-Fi is not enabled or a USB modem is not attached. · VLAN interfaces have features similar to physical Ethernet interfaces. However, your network administrator will need to configure VLAN support throughout your network for them to be supported in your codec. -
Page 176: Configuring Snmp Settings
ViA User Manual v2.0 3. Tap to select an interface to configure. Note: A LAN interface displayed in yellow text is enabled, but a network cable is not attached. An interface in red text is disabled, e.g. Wi-Fi in the following image. - Page 177 ViA User Manual v2.0 schemes, though convention is to use the device's fully-qualified domain name. Codec Location A user-specified alphanumeric string which may be used by third- party SNMP software to identify a device. Device location corresponds ".iso.org.dod.internet.mgmt.mib- 2.system.sysLocation" SNMP attribute.
-
Page 178: Configuring Country Of Use
ViA User Manual v2.0 29.15 Configuring Country of Use The Country setting in the codec configures country-specific settings like: · POTS line ring tones. · POTS line impedance. · Use of G.711 µ -law for North America and Japan, and G.711 a-law in most other regions of the world (e.g. - Page 179 ViA User Manual v2.0 Touch Screen Typing With your finger swipe left and right on the space bar to select a different language. Tap and hold a key to access multiple accent options, then tap to select the preferred option.
-
Page 180: Configuring Web-Gui Settings
ViA User Manual v2.0 Shift Key Functions Tap the Shift key once in the onscreen keyboard to capitalize a single letter. Tap the Shift key twice, or press and hold the Shift key to turn the cap lock on. Tap the Shift key once to unlock the cap lock. -
Page 181: Lock Or Unlock A Program In The Codec
Generally programs will be up or down-mixed by the answering codec to match the loaded program type. In some situations incompatible program types will be rejected. A compatible program type can still connect and specify different connection parameters such as the algorithm and bit rate via session data. -
Page 182: Adjusting Time Settings
ViA User Manual v2.0 Important Note: It is only possible to lock custom programs in a codec. If Lock Loaded User Program is enabled and you load a new custom program in the codec, the feature remains enabled and locks the most recently loaded custom program. -
Page 183: Upgrading Firmware Via Sd Card
ViA User Manual v2.0 29.20 Upgrading Firmware via SD Card To download the latest codec firmware visit http://www.tieline.com/Support/Latest-Firmware. Copy the firmware file onto a USB stick and then use the following procedure to perform a firmware upgrade. Note: A single partition FAT32 formatted SD card must be used. To safely remove an SD... -
Page 184: Safely Remove Usb Sticks And Sd Cards
2. Swipe up and tap to expand the System menu, then tap Safe Eject 29.22 Install and Manage Security Certificates Tieline codecs support the installation of TLS/SSL (hereafter referred to as SSL) security certificates to deliver an additional layer of security when connecting to IP networks. The digital SSL security certificate authenticates the codec and provides more secure encrypted HTTPS browser connections. - Page 185 ViA User Manual v2.0 5. Select Private Key and navigate to the correct directory and .key (Private Key) file to install from the SD card. Tap to select it. 6. Select Certificate and navigate to the SSL Certificate (.crt) file on the SD card. Tap to select it.
- Page 186 9. Tap Install SSL in the confirmation dialog to complete installation. Installed should now be visible in the SSL Certificates menu. 10. To access a codec via the HTML5 Toolbox Web-GUI in a browser after installing SSL security certificates ensure you type "https://" before the codec IP address. For example, https://172.16.0.100.
-
Page 187: Shut Down And Screen Lock Options
ViA User Manual v2.0 Troubleshooting Certificate Installation If you type "https://" before the codec IP address and can't open the Toolbox web-GUI, first uninstall the certificates and then reinstall them. Also double-check you are installing the correct certificates. If you continue to have issues, contact your certificate vendor to ensure the certificate is valid. -
Page 188: About Unit Details
ViA User Manual v2.0 29.24 About Unit Details The Unit Details menu lists details like the codec firmware version, IP addresses and the serial number. 1. Press the HOME button to return to the Home screen, then tap Settings 2. Tap to expand the About & Firmware menu and then tap Unit Details 29.25 Alarm Notifications... -
Page 189: Part 30 Connecting To The Toolbox Web-Gui
The HTML5 Toolbox Quick Connect Web-GUI has a reduced feature-set and allows non-technical users to load existing programs and dial via the Quick Connect panel. Users can dial a simple peer-to-peer connection over POTS, ISDN or IP. By default, the HTML5 Quick Connect panel is enabled in each codec. - Page 190 1. Click to launch the HTML5 Toolbox Web-GUI. 2. When you launch Toolbox for the first time an authentication dialog prompts you to enter the user name "admin" and password "password" to login, then click the OK button. Tieline highly recommends you change the password (see Changing the Default Password).
-
Page 191: Security And Changing The Default Password
ViA User Manual v2.0 Using the Web-GUI over the Internet If your codec is connected over the internet via a public static IP address it is possible to connect and configure it from any PC also connected to the internet. - Page 192 Tieline default ports can also ensure the codec is more difficult to discover by external parties. 3. Ports 80 and 8080 are commonly used to access the Tieline codec web server. You can add an additional layer of security by translating these ports on the WAN side of your network into non-standard port numbers.
- Page 193 ViA User Manual v2.0 Creating a New Password The authentication login password can be changed at any time using the TOUCH SCREEN. Note that passwords are case sensitive: 1. Press the HOME button to return to the Home screen, then tap Settings 2.
-
Page 194: Part 31 Using The Html5 Toolbox Web-Gui
ViA User Manual v2.0 Using the HTML5 Toolbox Web-GUI The following sections provide an overview of the different configuration panels available within the codec's HTML5 Toolbox Web-GUI. Navigate with the mouse pointer to the Menu bar at the top of the Web-GUI screen and click to select and open each panel in turn. - Page 195 ViA User Manual v2.0 Some panels can be resized. Click the bottom right-hand corner of a panel supporting this feature and drag and resize as required. © Tieline Pty. Ltd. 2017...
- Page 196 ViA User Manual v2.0 Connect Panels: Load & Connect Programs & Manage Audio Streams Connections Panel Feature Description 1 Program Connect Click to connect/disconnect all audio streams in a program. Disconnect button 2 Audio Stream Connect / Click to connect/disconnect all connections in an audio stream.
- Page 197 ViA User Manual v2.0 Feature Description Program list The list of saved programs in the codec. Create New Program Click to create a new program using the program wizard. button Delete Selected Click to delete all selected programs Program button Create New Program Click to create a new program using the program wizard.
- Page 198 ViA User Manual v2.0 Scheduler Panel Feature Description Date selection Select the days you wish to view in the scheduler. Add event button Click to create a new scheduled event. View type Click to select the timeframe or timeline view of scheduled events.
- Page 199 ViA User Manual v2.0 Scheduler History Feature Description 1 Grouping Drag and drop a column header to group event history by that column, e.g. Codec Time. 2 Event History List View the codec's history of scheduled events. 3 Purge Scheduler Click to clear all event history displayed.
- Page 200 ViA User Manual v2.0 Audio Menu Panels Headphones Panel Feature Description Default Configurations Displays the default headphone mix being viewed and/or edited. Custom Configurations Lists custom headphone mixes available. Load, Rename, Delete Buttons used to load, rename delete custom buttons...
- Page 201 ViA User Manual v2.0 Inputs Panel Important Note: Tieline codecs have different input configurations, therefore the image shown may not reflect the number of inputs displayed in your codec Web-GUI. Feature Description Settings button Click to adjust input Name, Type, Polarity Inverted and IGC settings.
- Page 202 ViA User Manual v2.0 Matrix Editor Panel Feature Description Default Configurations Displays the default matrix mix. Custom Configurations Lists custom matrices available. Load, Rename, Delete Buttons used to load, rename and delete custom matrices buttons Options menu Menu options available to undo any changes, reset the mix to the current matrix loaded in the Matrix Editor, or save a new matrix.
- Page 203 ViA User Manual v2.0 PPMs Panel Note: Click and drag the bottom right-hand corner to expand the panel. Feature Description PPM Mode Select a preferred PPM meter mode. Options include Program Default, Input, Decoder, HP Monitor and Input / Output...
- Page 204 ViA User Manual v2.0 Control Menu Rules Panel Rule Description Connect disconnect Click to configure connection and disconnection by program when input toggling an input. toggled Connect when input Click to configure connection and disconnection after switched ON; Disconnect when different relay inputs are switched ON.
- Page 205 ViA User Manual v2.0 Transport Panels There are several Transport panels which can be opened in the Web-GUI. Each panel provides specific transport-related configuration settings and options. Click to select and open each panel. As an example, the Network panel is displayed with network interface configuration options. A brief description of the other panels is also provided.
- Page 206 URI Blacklist and add user agents to the User Agent Blacklist to deny them access to the codec. 16 SIP Interfaces Click to open the panel and configure port, proxy and Via settings for the SIP1 and SIP2 interfaces. The codec supports dialing over these SIP interfaces simultaneously.
- Page 207 Description 1 Close button Click to close the panel. 2 Tieline Session Edit the Tieline session and alternative session port used by the codec. 3 RS232 Click Baud rate to adjust the baud rate used by the RS-232 serial port on the codec. Select the check-box to Enable Flow Control.
-
Page 208: Language Selection
5 Event Logs Click to download user-viewable event logs 6 Support Logs Click to download diagnostic information that can be sent to Tieline support About Panel Details of the codec Toolbox and firmware version, as well as the codec serial number. Note: the codec name displayed will vary by product type. -
Page 209: Using The Html5 Toolbox Quick Connect Web-Gui
The HTML5 Quick Connect Web-GUI is designed for simple peer-to-peer connections and non- technical users. It has a reduced feature-set and allows users to: 1. Load existing programs in a codec via the Program Loader panel and then dial via the Quick Connect panel. - Page 210 ViA User Manual v2.0 Important Note: To change the password using the codec TOUCH SCREEN navigate to Settings > System > Web GUI > Password. Use the TOUCH SCREEN keypad to enter a new password and tap Done in the top right-hand corner to save the new setting.
- Page 211 ViA User Manual v2.0 To unload a program click the Unload button. Dial a Loaded Program 1. Click the Connect button in the Quick Connect panel to dial a loaded program. Note: After connecting, the Connect button changes to a Disconnect button.
- Page 212 ViA User Manual v2.0 2. Click Yes in the confirmation dialog to disconnect the connection. Dial Peer-to-Peer over IP with Quick Connect Important Notes: · Click the Unload button in the Program Loader panel if a program is currently loaded.
- Page 213 ViA User Manual v2.0 4. Click in the Destination text box and enter the IP address of the destination codec. 5. Click the Connect button to dial. Dial Peer-to-Peer over ISDN with Quick Connect Important Notes: Click the Unload button in the Program Loader panel if a program is currently loaded.
- Page 214 Tieline G5 reference scale setting. The default Tieline G5 audio reference scale displayed on the PPMs is -38dBFS to 0dBFS (e.g. Merlin, Genie, Bridge-IT and ViA codec families). Using this reference scale audio peaks can safely reach 0dBFS without clipping, providing 18dB of headroom from the nominal 0vu point.
- Page 215 ViA User Manual v2.0 Mono and Stereo PPM Metering When connected with a mono program the codec will display a mix of inputs 1 and 2 on PPM1. PPM 3 displays the level of return audio. When connecting with a stereo program, the codec displays audio on PPM1 and 2 for inputs 1 and 2 and PPM 3 and 4 for the return audio.
-
Page 216: Configuring Ip Settings
An IP address is a unique address to identify a device on a TCP/IP network. Your codec uses dual IP protocol stacks to allow your codec to work on both IPv4 and IPv6 networks. Tieline codecs support both DHCP (default) IP addressing and static IP addresses for dialing IPv4 connection endpoints. - Page 217 Click to select the TCP/IP tab in the Network panel to configure settings. The codec is capable of automatic DHCP address assignment, or manually configured static IPv4 address configuration via the drop-down Configure IPv4 drop-down menu. If you want to ignore IPv4 settings select Off.
- Page 218 ViA User Manual v2.0 Static IP addresses are fixed addresses that are recommended for studio installations, so that IP address dialing remains the same over time for incoming codec connections. Click Save to store all configuration settings. Note: The Subnet Mask is used by the TCP/IP protocol to determine whether a host is on the local subnet or on a remote network.
- Page 219 When dialing over IP you can select the preferred interface to use when establishing a connection. By default Any is selected, which means the first available interface will be used to dial a connection. The default Via interfaces in order of use when available are: 1. LAN1 Ethernet port (default Primary Via interface) 2.
- Page 220 USB cellular interface. This allows you to configure site- specific settings to suit the available network interfaces at different remote locations. 1. Open the HTML5 Toolbox Web-GUI and click Settings and then click IP Via Mapping to open this panel.
-
Page 221: Configure Cellular Modems And Module
MMS APN information and you need to enter the internet APN details in the codec. See Adding Cellular Access Points for more details on configuration via the codec TOUCH SCREEN. Cellular Configuration Open the HTML5 Toolbox Web-GUI and click Settings and then Cellular to view and configure a cellular modem attached to the codec. - Page 222 ViA User Manual v2.0 Adding a Custom APN 1. Click to select the Profiles tab to add a custom APN profile. 2. Enter the APN details and click the Save button. Important Note: Up to 10 custom access point profiles can be added to the codec.
-
Page 223: Configure Fuse-Ip Bonding
Configure Fuse-IP Bonding 31.4 Tieline’s proprietary Fuse-IP data aggregation technology uses a point-to-point tunnel between two codecs to bond multiple IP interfaces (peers). Fuse-IP automatically distributes data over any two bonded interfaces. IP interfaces from which you can choose to bond include: ·... - Page 224 ViA User Manual v2.0 5. Click the On/Off button for Fuse-IP to create a Fuse-IP tunnel between the server and client codecs. Note: Connected should be displayed after a few seconds. 6. The status indicator is orange when Fuse-IP is enabled but no tunnel is created. It turns green when a tunnel is active.
-
Page 225: Line Hunt Call Answering
Line Hunt as the routing type. Then select Group 1 for the first three audio streams, to route outgoing and incoming calls via inputs and outputs 1 to 3 of a codec at the studio. These physical inputs and outputs on the codec can be routed to a particular studio or station. - Page 226 ViA User Manual v2.0 For the next three audio streams, select Group 2 to route outgoing and incoming calls via inputs and outputs 4 to 6. These physical inputs and outputs on the codec can be routed to a different studio or station.
-
Page 227: Configuring Isdn
ViA User Manual v2.0 Configuring ISDN 31.6 A ViA ISDN module can be inserted into the codec's rear panel module slot and a dial and/or answer program can be configured using the HTML5 Toolbox Web-GUI. See About ISDN Modules for additional information on ISDN. It may also be necessary to: Configure ISDN module settings. - Page 228 ViA User Manual v2.0 5. Click the drop-down Line Type arrow and select your preferred option. Ask your Telco whether your ISDN line is Point-to-Point or Point-to-Multipoint. By default select Point-to- Multipoint, unless your switch type is an AT&T 5ESS custom point-to-point.
- Page 229 ISDN Answer Config, which tells the answering codec how a sessionless call will try and connect. After installing a ViA ISDN module it is possible to save up to two different ISDN Answer Configs, which allow each ISDN B channel to be individually configured for unique answering behaviors. ISDN answering can be configured to suit: ·...
- Page 230 Bonding Setting Behavior Unbonded When an unbonded single B Channel is selected Bonded Unbonded (May Calls using the same algorithm from the same Tieline codec, Bond) or sessionless calls, will attempt to bond when received. Calls © Tieline Pty. Ltd. 2017...
- Page 231 Config 1-2 in ISDN Answer. You can also select the default algorithm. For example, if a call from a non-Tieline codec is received via B Channel 1 on Module 1 (i.e. no Dial Route has been specified in the dialing codec):...
- Page 232 If it fails to receive Tieline session data within 5 seconds (i.e. a non- Tieline codec is calling, or a Tieline codec with session data disabled), it will use the settings in the ISDN Answering Config instead.
- Page 233 Allow Answering of Sessionless ISDN Calls Only Select Sessionless Only when answering ISDN calls from non-Tieline codecs only. When Sessionless Only is selected, the codec will not wait to receive the Tieline session data. This reduces the time taken to answer an inbound sessionless call.
-
Page 234: Configuring Pots
Audio route: None 31.7 Configuring POTS A ViA POTS module can be inserted into the codec's rear panel module slot and a dial and/or answer program can be configured using the HTML5 Toolbox Web-GUI. See About POTS Modules for additional information on POTS. It may also be necessary to: Configure POTS module settings. - Page 235 Calls are answered based on the POTS Answer settings in Config 1 & 2. Adjustments to these Config settings are not normally necessary when connecting between Tieline codecs. They are usually adjusted when connecting to non-Tieline codecs over POTS (see...
- Page 236 Blind Dialing: Allows the module to dial when no dial tone is present. 8. Click the drop-down arrow for Monitor Modem Tone to select either Enabled or Disabled. Note: When enabled, the module will allow audio monitoring of modem tones via the phone input while connecting in POTS Codec mode.
- Page 237 3. Select the Sessionless Only check-box when only non-Tieline codecs are dialing a Tieline codec over POTS. This allows you to choose the default encoding setting and Route the incoming call to a nominated audio stream via a corresponding Answer Route in the answering codec program if required.
- Page 238 Config 1 or 2 in POTS Answer. You can also select the default algorithm. For example, if a call from a non-Tieline codec is received via POTS Module 1 (i.e. no Dial Route has been specified in the dialing codec): 1.
- Page 239 ViA User Manual v2.0 4. Click Save Settings to store the new Config settings. 5. This will associate the incoming call with a corresponding Answer Route configured in the answering codec program, e.g. Answer Route 1 as displayed in the following example.
-
Page 240: Configuring Input/Output Settings
ViA User Manual v2.0 Configuring Input/Output Settings 31.8 Open the HTML5 Toolbox Web-GUI and click Inputs to display the Inputs panel. Adjusting Audio Levels To adjust input audio levels, click on the input slider and drag it to the desired input gain level. - Page 241 For more information on reference scales see General Audio Settings. For more information on input levels and input settings see ViA Input Levels and Input Settings. For more info on PPM meters see PPM Meters and Analog Audio Outputs. Configuring Input Settings...
- Page 242 ViA User Manual v2.0 3. Click Save to confirm changes. Select Input Gain The default analog input gain setting for inputs 1-3 is Medium Microphone Gain. The stereo auxiliary input is a line level input when operating in analog mode. To adjust input gain settings: 1.
- Page 243 (default setting disabled). Phantom power of 10V or 48V is supplied to all inputs when enabled. The default setting is 10V and the currently configured voltage is displayed in brackets in the Phantom power menu via Home screen, then tap Audio > Inputs >...
- Page 244 ViA User Manual v2.0 2. Click to select the On/Off as Cough button check-box and enable cough button mode on the selected input. 3. Click Save to confirm the change. Note: The label on the input changes from ON to COUGH when enabled.
- Page 245 ViA User Manual v2.0 3. Click Save to confirm the change. © Tieline Pty. Ltd. 2017...
-
Page 246: Configure Mono Or Stereo Peer-To-Peer Programs In Via
ViA User Manual v2.0 Configure Mono or Stereo Peer-to-Peer Programs in ViA 31.9 The Programs panel incorporates a wizard to configure a new program and all audio stream settings. Before you configure a new codec program consider if: · You want your codec to be capable of dialing and answering, dialing only or answering only. - Page 247 ViA User Manual v2.0 Important Note: When you decide to use an existing program as a template, the new program inherits all the settings of the template program and you can adjust these settings as required by continuing through the program wizard.
- Page 248 1. Auto: The codec will dial the G3 codec and connect in mono or stereo. Note: This is overridden in a ViA codec when a G3 Main + IFB use-case is configured. 2. Dual Program: This allows the codec to dial a G3 codec with a Dual Program profile loaded and support two simultaneous mono connections.
- Page 249 The Local Audio Port is used by the local codec to receive audio from the remote codec. When Tieline Codecs is the Session Protocol selected (using Tieline session data), the default port value for the Local Audio Port is Automatic.
- Page 250 By default, primary IP streaming is via LAN1. To achieve the maximum level of redundancy select Secondary to configure redundant streaming from the secondary IP port LAN2. The redundant stream uses Remote Audio Port 9001 by default and the Local Audio Port allocated is Automatic.
- Page 251 ViA User Manual v2.0 Important Note: Dual SmartStream PLUS redundant streaming over two IP interfaces mitigates lost packets on either link and will provide IP network backup if an IP link is lost. To learn more about SmartStream PLUS redundant IP streaming see http://www.tieline.com/Transports/SmartStream-IP...
- Page 252 The time frame against which lost data is measured Keep Alive The keep connection alive time before failing over to a backup connection; Tieline RTP pings every second to confirm connectivity Failback Parameters Select the check-box to fail back to a higher priority...
- Page 253 Configuring ViA to Answer Connections The codec is capable of being configured to accept calls via different transports (e.g. IP, ISDN and POTS), or to accept calls using different audio ports. To answer one or more incoming audio stream connections: 1.
- Page 254 ViA User Manual v2.0 Click Next to specify individual algorithm, jitter buffer and FEC settings, or create another answering connection. Click to configure: · Auto Jitter Adapt and the preferred auto jitter setting using the drop-down arrow for Buffer priority. It is also possible to configure the Minimum depth and Maximum depth of jitter over the connection.
- Page 255 ViA User Manual v2.0 · A non-WheatNet-IP Tieline codec can be configured to trigger a logic IO (LIO) in a Tieline WheatNet-IP codec. Up to 64 logic IOs are available in Genie Distribution and Merlin PLUS WheatNet-IP codecs, as well as 4 physical CONTROL PORT GPIOs.
-
Page 256: Configure Mono Or Stereo + Ifb Dialing Programs
ViA User Manual v2.0 31.10 Configure Mono or Stereo + IFB Dialing Programs This program is designed to allow ViA to dial a Merlin or Merlin PLUS codec at the studio and transmit: 1. A bidirectional mono or stereo audio stream connection. - Page 257 ViA User Manual v2.0 · Failover and SmartStream PLUS redundant streaming are not available with SIP or sessionless IP connections. · POTS is not supported for stereo audio stream connections. · To learn more about programs see the section titled Load, Connect and Manage Programs.
- Page 258 ViA User Manual v2.0 Routing Type Options: Default No Dial Route or Answer Route is configured. An incoming call will be routed to an audio stream on a first-come, first-served basis in a multi- stream program. Note: By default IP streams are routed using audio ports.
- Page 259 (when creating 2 x Mono or Stereo Peer-to-Peer + IFB connections), use Remote Audio Port 9020 to configure the second mono/stereo dialing connection at the studio. Mono or stereo program audio over this audio stream connection will be routed via audio inputs/outputs 3 and 4 on the studio Merlin PLUS codec.
- Page 260 By default, primary IP streaming is via LAN1. To achieve the maximum level of redundancy select Secondary to configure redundant streaming from the secondary IP port LAN2. The redundant stream uses Remote Audio Port 9001 by default and the Local Audio Port allocated is Automatic.
- Page 261 ViA User Manual v2.0 Important Note: Dual SmartStream PLUS redundant streaming over two IP interfaces mitigates lost packets on either link and will provide IP network backup if an IP link is lost. To learn more about SmartStream PLUS redundant IP streaming see http://www.tieline.com/Transports/SmartStream-IP...
- Page 262 ViA User Manual v2.0 Next, enter the phone number of the codec or device you want to dial. Next, click Save Program to save the program with default settings, or click Next to specify algorithm settings and configure a backup connection if required (recommended).
- Page 263 The time frame against which lost data is measured Keep Alive The keep connection alive time before failing over to a backup connection; Tieline RTP pings every second to confirm connectivity Failback Parameters Select the check-box to fail back to a higher priority...
- Page 264 · A non-WheatNet-IP Tieline codec can be configured to trigger a logic IO in a Tieline WheatNet-IP codec. Up to 64 logic IOs are available in Genie Distribution and Merlin PLUS WheatNet-IP codecs, as well as 4 physical CONTROL PORT GPIOs.
- Page 265 2 x Mono or Stereo Peer-to-Peer + IFB connections), use Remote Audio Port 9030 to configure the second IFB connection at the studio. IFB audio over this audio stream connection will be routed via audio input/output 6 on the studio Merlin PLUS codec.
- Page 266 Reconnect or a failover connection, whereby the alternative connection is dialed if the primary connection fails. By default, primary IP streaming is via LAN1. To achieve the maximum level of redundancy select Secondary to configure redundant streaming from the secondary IP...
- Page 267 ViA User Manual v2.0 port LAN2. The redundant stream uses Remote Audio Port 9011 by default, and provides automatic IP streaming backup in case one IP connection fails. Important Note: Dual SmartStream PLUS redundant streaming over both Ethernet ports mitigates lost packets on either link and will provide IP network backup if an IP link is lost.
-
Page 268: Configure 2 Mono Peer-To-Peer Dialing Connections
ViA is capable of sending a mono program mix to two separate codecs over different connections. ViA 2 x Mono Peer-to-Peer Dialing Configuration This requires the creation of a dialing program in ViA with two separate mono audio streams and associated dialing connections. - Page 269 ViA User Manual v2.0 Important Note: When you decide to use an existing program as a template, the new program inherits all the settings of the template program and you can adjust these settings as required by continuing through the program wizard.
- Page 270 The Local Audio Port is used by the local codec to receive audio from the remote codec. When Tieline Codecs is the Session Protocol selected (using Tieline session data), the default port value for the Local Audio Port is Automatic.
- Page 271 ViA User Manual v2.0 from which the call originates, this will also need to be adjusted in the answering codec using a custom program. Click Next Stream to configure the first audio stream with default algorithm, jitter and FEC settings which are physically entered in the codec. Alternatively, click Next to specify individual algorithm, jitter buffer and FEC settings and configure a failover connection or SmartStream PLUS for this audio stream (recommended).
- Page 272 By default, primary IP streaming is via LAN1. To achieve the maximum level of redundancy select Secondary to configure redundant streaming from the secondary IP port LAN2. The redundant stream uses Remote Audio Port 9001 by default and the Local Audio Port allocated is Automatic.
- Page 273 Next, enter the phone number of the codec or device you want to dial. When multiple POTS modules are installed, click the Via drop-down menu and select Module 1 or Module 2 to specify which POTS module will dial. Next, click Save Program to save the program with default settings, or click Next to specify algorithm settings and configure a backup connection if required (recommended).
- Page 274 The time frame against which lost data is measured Keep Alive The keep connection alive time before failing over to a backup connection; Tieline RTP pings every second to confirm connectivity Failback Parameters Select the check-box to fail back to a higher priority...
- Page 275 · A non-WheatNet-IP Tieline codec can be configured to trigger a logic IO in a Tieline WheatNet-IP codec. Up to 64 logic IOs are available in Genie Distribution and Merlin PLUS WheatNet-IP codecs, as well as 4 physical CONTROL PORT GPIOs.
- Page 276 ViA User Manual v2.0 3. Continue through the steps in the wizard to complete configuration in the same way as the first peer-to-peer connection was configured. Click Save Program to save all program settings, then click Finish to exit the wizard.
-
Page 277: Configuring Sip
For detailed information about connecting with other brands of codec using SIP click http://www.tieline.com/interoperability. · When connecting to a Tieline G3 codec using SIP you need to manually select the G3 audio reference level. To do this select Home screen > Audio > General >... - Page 278 Important Notes: 1. SIP interfaces are disabled by default. 2. SIP1 is configured to use LAN1 by default, which is mapped to the Primary Via interface by default. 3. SIP2 is configure to use Wi-Fi by default, which is mapped to the Tertiary Via interface by default.
- Page 279 ViA User Manual v2.0 31.12.2 Configuring SIP Accounts Up to 6 SIP accounts can be configured in the codec and registering codecs for SIP connectivity is simple. First, choose the SIP server to which you will register your codec. On a LAN this may be your own server, or it could be one of the many internet servers available.
- Page 280 (which shouldn't need to be adjusted from the default setting). Also ensure a SIP Interface is selected (e.g. SIP1 or SIP2.) The SIP interface contains settings related to ports and the selected Via interface, e.g. LAN1 or LAN2. See Configuring SIP Interfaces for more details.
- Page 281 If a SIP account is not being registered please check the following: 1. Confirm all account registration information has been entered correctly. 2. Confirm the SIP interface (SIP1 or SIP2) configured as the Via in the account is enabled. © Tieline Pty. Ltd. 2017...
- Page 282 ViA User Manual v2.0 3. Verify that the Via selection in the SIP1 or SIP2 interface settings corresponds with the network interface being used by the codec to register the account. E.g. LAN1, LAN2. 31.12.3 Configure SIP White and Blacklists The SIP Filter Lists panel allows filtering of SIP URIs and User Agents to provide greater security for your codec connections.
-
Page 283: Configure Peer-To-Peer Sip Programs
ViA User Manual v2.0 Important Note: Regular expressions should not use ^ and $ anchors because searches implicitly try to match anywhere in the line. 31.13 Configure Peer-to-Peer SIP Programs SIP programs are like a normal IP program to configure, with two small differences; entering a SIP address and selecting SIP as the Session Protocol. - Page 284 In this configuration the specified account's interface will be used rather than the specified Via, e.g. if the account is using SIP2 and SIP2 is using LAN 2 then the call will proceed using LAN 2. If you do not wish to use an account for the dial...
- Page 285 The default UDP audio port when using SIP for a peer-to-peer connection is 5004 in Tieline codecs. To contact a codec that is behind a firewall or NAT-enabled router, it is essential that this and all other relevant ports are open and forwarded to the other device.
- Page 286 ViA User Manual v2.0 9. Click Next to select the check-box if you want to Enable Auto Reconnect. 10. Click Next to name the answering connection for when calls are received by the codec. 11. Click Next to configure the Session Protocol as SIP for the answering connection to receive a SIP call.
-
Page 287: Configure Multiple Stream Sip Programs
· A non-WheatNet-IP Tieline codec can be configured to trigger a logic IO in a Tieline WheatNet-IP codec. Up to 64 logic IOs are available in Genie Distribution and Merlin PLUS WheatNet-IP codecs, as well as 4 physical CONTROL PORT GPIOs. - Page 288 Programs. Please note that caller ID, dial routes and G3 profile information can not be used for SIP connections because Tieline session data is replaced by SDP for SIP connections. 4. This audio stream connection in the wizard will allow the codec to dial. Enter the name of the connection in the text box, then click Next.
- Page 289 · Tieline codecs automatically add "sip:" to the address you enter in the Address field when dialing, so it's not necessary to add this. 7. Click the drop-down arrows on the right-hand side of each active drop-down menu to adjust the Encoding, Sample rate or Bit rate parameters.
- Page 290 ViA User Manual v2.0 8. Click to configure: · Auto Jitter Adapt and the preferred auto jitter setting using the drop-down arrow for Buffer priority. It is also possible to configure the Minimum depth and Maximum depth of jitter over the connection. See Configuring the Jitter Buffer for more details.
- Page 291 Answering Multiple SIP Peer-to-Peer Programs. Please note that caller ID, dial routes and G3 profile information can not be used for SIP connections because Tieline session data is replaced by SDP for SIP connections. © Tieline Pty. Ltd. 2017...
-
Page 292: Answering Multiple Sip Peer-To-Peer Calls
SIP account you have registered to the codec. In this way, when a call is received via a particular account, it is routed to the audio stream with the matching audio answer route. This process also reliably predetermines which inputs and outputs are used on the answering codec (e.g. - Page 293 2. SIP Interfaces: When answering multiple incoming peer-to-peer SIP calls, configure an answer Route for incoming peer-to-peer calls via the SIP Interface panel and route them to specific audio streams. Configure answer routes in Interface SIP1 and Interface SIP2 to match answer routes configured in an answering program's audio streams.
-
Page 294: Load, Unload And Dial A Program
ViA User Manual v2.0 31.16 Load, Unload and Dial a Program To load and dial a program it is necessary to open the Program Loader panel and Connections panel. Use the Program Loader panel to load a program and then manage connecting and disconnecting using the Connections panel. - Page 295 ViA User Manual v2.0 1. Click the program Connect/Disconnect symbol and then click Connect; this connects all active audio streams and connections associated with the program. 2. Click the audio stream Connect/Disconnect symbol and then click Connect; this connects all connections associated with this audio stream.
- Page 296 ViA User Manual v2.0 Disconnect a Program To disconnect audio streams and connections within an existing program there are three options: 1. Click the program Connect/Disconnect symbol and then click Disconnect to disconnect a program; this includes all audio streams and connections associated with the program.
-
Page 297: Delete A Program
ViA User Manual v2.0 Unloading a Program 1. Click to select the loaded program in the Program Loader panel and then click Unload to unload the program in the codec. 31.17 Delete a Program click 1. Open the HTML5 Toolbox Web-GUI and Connect in the Menu Bar, then click Program Manager to open the Program Manager panel. -
Page 298: Matrix, Cue And Talkback Editing
ViA User Manual v2.0 Important Notes: Any program that is currently loaded or listed in the Sheduler Events panel cannot be deleted. 31.18 Matrix, Cue and Talkback Editing The matrix editor in the codec allows any input to be routed to any output. Default routing settings are configured for each program type and these default matrices can be edited, saved and recalled as required. - Page 299 Routing can be adjusted very simply in the matrix editor. To edit default matrix settings click a crosspoint to select or deselect it. Routing edits are also reflected automatically in: 1. The Headphone mix visible in the Headphones panel. 2. The XLR Outputs and Digital Outputs accessed via HOME > Audio > XLR Outputs / Digital Outputs on the codec TOUCH SCREEN.
- Page 300 2. Enter a new Name and Description (if required) and click Save. 3. The new custom mix stays loaded in the codec until a new mix is loaded, an incompatible program is loaded, or program defaults are restored via Reset Defaults. Important Notes: ·...
- Page 301 ViA User Manual v2.0 · If you make runtime matrix edits to a loaded mono program, then load a stereo program, and subsequently reload the original mono program, the runtime matrix edits are recalled. Editing Cue and Talkback Matrices Typically, local cue intercom is configured for commentators to talk to each other offline. In cue mode, offline communications audio from inputs 1-3 is routed to the right side of all local headphone outputs (HP 1-3) when the TB CUE button is pressed.
- Page 302 ViA User Manual v2.0 2. To rename a custom mix, click to select a saved mix and then click Rename. 3. To delete a custom mix, click to select a custom mix and then click Delete. Note: A mix cannot be deleted if it is currently loaded.
-
Page 303: Headphone Matrix Editing
ViA User Manual v2.0 31.19 Headphone Matrix Editing The Headphones panel in the HTML5 Toolbox allows the customization of audio source monitoring for each headphone output. The send/return balance between incoming and outgoing audio sources can also be adjusted. The mix displayed for Headphone 1-3 in the panel reflects the loaded mix in the Matrix Editor. If... -
Page 304: Adjusting The Connection Bit Rate
ViA User Manual v2.0 Routing changes not yet saved as a custom mix are displayed in orange. Runtime changes are audible in real-time and persist if the unit is powered down and rebooted. Load, Rename and Delete Custom Mixes Select Headphone 1, 2 or 3, then click to select a mix listed under Custom Configurations, next click the Load, Rename or Delete buttons to perform these functions. -
Page 305: Tieline Pty. Ltd
ViA User Manual v2.0 Important Notes: It is not possible to renegotiate the connection bit rate of a SIP connection. © Tieline Pty. Ltd. 2017... -
Page 306: Reset Factory Default Settings
ViA User Manual v2.0 31.21 Reset Factory Default Settings There are several options which allow you to backup, restore or reset specific factory default settings within the codec. See Reset and Restore Factory Defaults for more details on each option. - Page 307 ViA User Manual v2.0 Creating Backup Files 1. Open the HTML5 Toolbox Web-GUI and click Settings at the top of the screen, then click Reset/Backup to display the Reset panel. 2. Click Backup. 3. Click to select the check-boxes to confirm your backup requirements, then click Backup.
-
Page 308: Lock Or Unlock Programs
ViA User Manual v2.0 31.23 Lock or Unlock Programs It is possible to lock a loaded custom program in a codec to ensure the currently loaded program type, e.g. mono, cannot be unloaded by a codec dialing in with a different program type, e.g. stereo. -
Page 309: Configure Country Setting
ViA User Manual v2.0 31.24 Configure Country Setting The Country setting in the codec configures country-specific settings like: · POTS line ring tones. · POTS line impedance. · Use of G.711 µ -law for North America and Japan, and G.711 a-law in most other regions of the world (e.g. -
Page 310: Configuring Snmp In The Codec
ViA User Manual v2.0 31.25 Configuring SNMP in the Codec The codec supports Simple Network Management Protocol (SNMP ) for managing devices on IP networks. To use SNMP you need to configure SNMP Device settings in your codec. Description of SNMP Settings in the Codec... - Page 311 Management Information Base (MIB) files are required for SNMP applications to interact with your Tieline codec and interpret SNMP data. The codec supports SNMPv1 and SNMPv2 MIB protocols. The required MIB files can be downloaded from the codec using the following link in a PC web browser connected to the same network as your codec: ·...
-
Page 312: Download Logs
1. Open the HTML5 Toolbox Web-GUI and click Help in the Menu Bar, then click Resources. 2. Click Download Logs. 3. Save the file to your computer and then send it as a .zip file to Tieline support via support@tieline.com Download Event Logs Event logs can be downloaded from the codec and viewed in your browser. -
Page 313: Rs232 Data Configuration
RS232 data and activate rules employing relay reflection over a connection. This will allow the codec to connect to external devices and send RS232-compatible data via the serial port on the rear panel. Alternatively, select Home screen > Dialer > Auxiliary Data > On to enable auxiliary data using the codec's TOUCH SCREEN. - Page 314 Data). Important Notes: · When connecting to G3 codecs over IP, ISDN or POTS only in-band data is available via the Music and MusicPLUS algorithms. · Use firmware higher than 2.8.xx in the Bridge-IT, Genie and Merlin families of codecs to enable auxiliary data over multicast connections.
-
Page 315: Creating Rules
Important Notes: · A non-WheatNet-IP Tieline codec can be configured to trigger a logic IO in a Tieline WheatNet-IP codec. Up to 64 logic IOs are available in Genie Distribution and Merlin PLUS WheatNet-IP codecs, as well as 4 physical CONTROL PORT GPIOs. - Page 316 ViA User Manual v2.0 Note: When rules have been configured previously they are displayed when the Rules panel is opened. Rule 1: Toggle a Control Port Input to Connect and Disconnect a Program This rule is used to connect and disconnect a selected program when a control port input is toggled.
- Page 317 ViA User Manual v2.0 2. Click the drop-down arrows to select the control port input used to connect and the alternative input for disconnecting. 3. Click the drop-down Program arrow to select an individual program, which will be connected and disconnected by the change in the control port input states.
- Page 318 ViA User Manual v2.0 3. Check the Rule summary and click Create Rule to save the settings. Rule 5: Toggle a Relay Output with each Change in Connection Status This rule is used to toggle a codec's control port relay output each time a program connects and disconnects.
-
Page 319: Adjusting Codec Time And Date
ViA User Manual v2.0 4. Click Yes in the confirmation dialog. 31.29 Adjusting Codec Time and Date Network Time Protocol (NTP) is a networking protocol for clock synchronization between computer systems over packet-switched, variable-latency data networks. By default Use NTP time is enabled in the codec and it will synchronize with ntp.tieserver.com. -
Page 320: Upgrading Codec Firmware
ViA User Manual v2.0 31.30 Upgrading Codec Firmware To download the latest codec firmware visit http://www.tieline.com/Support/Latest-Firmware. See Upgrading Firmware via USB to upgrade codec firmware using a USB stick with new firmware copied onto it. New Firmware Notifications By default the HTML5 Web-GUI integrates with TieServer to automatically update users when a firmware upgrade is available. - Page 321 ViA User Manual v2.0 5. We recommend clearing your browser cache after the upgrade is complete. The short cuts for this are: · Google Chrome: shift+Ctrl+delete · Mozilla Firefox: Ctrl+shift+delete · Internet Explorer: Ctrl+shift+delete · Safari: Ctrl+alt+e © Tieline Pty. Ltd. 2017...
-
Page 322: Part 32 Reference
The following instructions are intended to help you configure your internet connection and Tieline codecs at the studio to enable incoming calls over the internet from a remote Tieline codec. It is assumed that you have a basic understanding of your IP network and how to configure IP devices. If... - Page 323 The following table lists the firewall ports you need to open for each model of Tieline codec if they are dialing your router at the studio. If the remote codec is also connected to a LAN with a firewall you may also need to open the ports at the remote end of the link to connect successfully.
- Page 324 ViA User Manual v2.0 Firewall Ports Commander G3 / Bridge-IT / Bridge-IT Merlin and Genie ViA Codec i-Mix G3 XTRA Codec Families IP1 Session IP1 Audio Session Audio Session Audio Port Session Audio Port Port: 9002 Port: Port (Proto): Port:...
- Page 325 (Bridge-IT, Genie and Merlin codecs only) IP Address IPv6 Prefix Size IPv6 Gateway Configuring a Static IP Address ViA 1. Press the HOME button to return to the Home screen, then tap Settings 2. Tap to select Transport Interfaces and then LAN1...
- Page 326 IP address and you know this address. If you dial the studio using a cell-phone data network at the remote site you will not normally experience any firewall or port blocking issues at the remote end of the link using default Tieline ports.
- Page 327 ViA User Manual v2.0 If you attach your Tieline codec at the remote site to a LAN with access to the internet you can often dial and connect to the studio without any problem. It is less likely that a firewall will block outgoing TCP and UDP ports.
- Page 328 ViA User Manual v2.0 Learning More About IP Networks For more IP network information please see the section titled Understanding IP Networks which discusses: · Private versus public IP addresses. · Static versus DHCP assigned IP addresses. · Network Address Translation (NAT), port forwarding and firewalls.
-
Page 329: Understanding Ip Networks
(DHCP) and static. Most ISPs assign a dynamic public IP address by default, which can often change without you knowing. This is suitable for a quick demo of your Tieline codec, but for a permanent installation you will need to request a permanent static public IP address. - Page 330 Port Forwarding: Tieline TCP and UDP Port Settings For your Tieline Codec to communicate over the public internet an IP Address alone is not sufficient. In TCP/IP and UDP networks the codec port is the endpoint of your connection. Ports are doorways for IP devices to communicate with each other.
-
Page 331: Tips For Creating Reliable Ip Connections
256 kbps for a studio codec and 64 kbps for a field unit connection. 5. Use good quality equipment to connect your codecs to the internet. (Tieline successfully uses Cisco® switching and routing equipment.): ·... - Page 332 ViA User Manual v2.0 9. When using UDP ensure the total bit rate (audio bit rate plus header bit rate) is no more than 80% of the ISP connection rate. IP headers require around 20 kbps in addition to the audio bit rate.
-
Page 333: Testing Ip Network Connections
ViA User Manual v2.0 Testing IP Network Connections 32.4 There are a few very simple tools that you can use to test whether a codec can be reached over an IP network. · Visit http://www.speedtest.net/ to test the upload and download speed of your IP connections and identify your public IP address. - Page 334 ViA User Manual v2.0 vi. The round trip time of the packets is displayed, as well as any packet loss for the period of time that the test occurred. Trace the Route of IP Packets Another utility available on your PC is traceroute. This tool can be used to determine the route and number of hops that data packets are taking to their destination (codec).
-
Page 335: Testing Isdn Connections
Tieline Genie Distribution, Merlin, Merlin PLUS and ViA audio codecs support multiple connections using a variety of connection transports such as IP, ISDN and POTS. Tieline codecs support using Tieline session data, which assists with configuration and routing of multiple incoming calls to these codecs. - Page 336 “extension number” is used to route a phone call. Step 2: Configure the ISDN Module to accept two sessionless ISDN calls. This can be configured via Settings > Modules or use the Toolbox Web-GUI via Transport > ISDN Answer Modules.
- Page 337 Number/MSN2. (This has been allocated Route 2 previously.) Next, click Save. If codec 1 always uses the first directory number to call then it will always be routed via Route 1 to the Answering Audio Stream Connection using Answer Route 1 (configured in step 1). Codec 2 should always use the second directory number and then it will always be routed via Route 2 to the Answering Audio Stream Connection configured with Answer Route 2.
-
Page 338: Pots Connection Tips & Precautions
POTS Operation Precautions POTS performance is greatly affected by the quality of the line being used. Precautions must be taken to ensure the Tieline codec is not sharing the line with other devices. Please remove these possible sources of interference: ·... - Page 339 Simply place the ADSL/DSL filter between the POTS line and your codec to remove the interference. 3. Tieline USA has a POTS test codec you can dial on +1-317-913 6911 to facilitate line tests at each end of your connection to diagnose line problems.
-
Page 340: Via Compliances And Certifications
ViA Compliances and Certifications 32.8 FCC Compliance This ViA codec displays all FCC compliance information on the LCD TOUCH SCREEN. To view FCC compliance information power up the codec and press the HOME button to return to the Home screen and then tap Settings >... -
Page 341: Via Declaration Of Conformity
ViA User Manual v2.0 ViA Declaration of Conformity 32.9 © Tieline Pty. Ltd. 2017... -
Page 342: Software Licences
(e.g. GNU General Public License v2/v3, GNU Lesser GPL v2.1/v3, BSD 3/2/4 Clause, MIT, ISC, etc.). The licenses are listed on the product via the Settings menu, About, Legal. You may request a copy of the source code of the open source software used in this product on DVD, by contacting our support team on +61 (0)8 9249 6688. -
Page 343: Trademarks And Credit Notices
14. Wi-Fi® and Wi-Fi Protected Access® (WPA) are registered trademarks of Wi-Fi Alliance. 15. AAC audio coding technology licensed from Via Licensing Corporation. 16. Other product names mentioned within this document may be trademarks or registered trademarks, or a trade name of their respective owner. -
Page 344: Part 33 Via Specifications
Advanced Networking VLAN tagging (IEEE 802.1Q,802.1p) Serial RS232 up to 115kbps with or without CTS/RTS flow control via female DB9 connector, can be used as a proprietary data channel Protocols supported Tieline, DHCP, SNMP, DNS, HTTP, IGMP, ICMP, VLAN, IPv4/v6,... - Page 345 ViA User Manual v2.0 Display 4.3 inch TFT Color LCD touch screen Navigation Touch screen or 5 button navigation keypad General Dimensions 7 11/64" x 3 5/16" x 8 15/32" 182mm (W) x 84mm (H) x 215mm (D) includes protruding front connectors, rear battery compartment...
-
Page 346: Part 34 Appendix A: Rs232 And Control Port Wiring
330 ohm pull-up resistor to +5 volts. Operation is as simple as joining the input pin to the ground terminal. This can be via a remote relay contact or the open circuit collector of a transistor or FET. DO NOT feed voltages into the inputs. - Page 347 · When connecting to G3 codecs over IP, ISDN or POTS, only in-band data is available via the Music and MusicPLUS algorithms. · It is important to enable serial port flow control as it regulates the flow of data through the serial port.
-
Page 348: Index
ViA User Manual v2.0 add USB APN profile Index select APN profile aptX Enhanced audio coding Auto Reconnect configuration - A - operation Auxiliary data enable/disable Auxiliary input Access point Compression add custom APN Comressor add USB APN profile configuration... -
Page 349: Tieline Pty. Ltd
Index Configuration files - D - backup via HTML5 Toolbox restore via HTML5 Toolbox Connect/Hangup IP DB15 pin-outs Connect/Hangup ISDN Connect/Hangup POTS pin-outs Connect/Hangup SIP Default password Connection new Toolbox password IP link quality IP statistics Deleting programs Connections DHCP IP address... - Page 350 ViA User Manual v2.0 Factory defaults Headphone out restore via touch screen Headphone routing Fail over, how it works Headphone settings Failover Headphone volume limiter Features Headphones edit current headphone mix configuration headphone mix how it works level adjustment save new headphone mix...
- Page 351 Multiple Subscriber Number phase reverse non-Tieline codecs rename input SPID renaming ISDN connections setting levels ISDN: HTML5 Toolbox configuration Interfaces defaults Items shipped primary reconfiguration secondary © Tieline Pty. Ltd. 2017...
- Page 352 ViA User Manual v2.0 recall matrix - J - rename matrix save matrix Matrix Editor - HTML5 Toolbox Jitter buffer Matrix, Cue and Talkback editing about algorithms Menus codec menus automatic fixed Modules minimum and maximum inserting/removing relationship to FEC...
- Page 353 DSCP 170, 216 POTS - HTML5 Toolbox Quick start answer config IP connections configuration ISDN connections deterministic dialing POTS connections dial and answer routes SIP connections module config module settings POTS connections © Tieline Pty. Ltd. 2017...
- Page 354 ViA User Manual v2.0 account registration - R - adding accounts configure interfaces SIP1 and SIP2 interfaces Rear panel connections troubleshooting registration Reboot URI blacklists options URI whitelists Redialing user agent blacklist Reference SIP - HTML5 Toolbox Renegotiate bit rate...
- Page 355 IP config alarm dissemination panel verify IP addresses alarm history panel view IP address cellular panel VLAN config change theme Trademarks configure alarms panel Transcriptor Rx connections panel Transcriptor Tx current alarms panel Troubleshooting firmware panel © Tieline Pty. Ltd. 2017...
- Page 356 ViA User Manual v2.0 Web-GUI - HTML5 Fuse-IP panel help panels inputs panel IP Via Mapping panel ISDN answer panel licensing panel master panels modules panel network panel opening panels options panel POTS answer panel PPMs panel program loader panel...
Need help?
Do you have a question about the ViA and is the answer not in the manual?
Questions and answers