Axis 7000 User Manual
Network document server
Hide thumbs
Also See for 7000:
- User manual (170 pages) ,
- Application integration (11 pages) ,
- Installation information (1 page)
Table of Contents
Advertisement
Quick Links
Advertisement
Table of Contents

Subscribe to Our Youtube Channel
Related Manuals for Axis 7000


Summary of Contents for Axis 7000
- Page 1 AXIS 7000/FX Network Document Server User’s Manual...
-
Page 2: Copyright Information
Notices Safety Notices Take some time to read through the safety notices before installing the AXIS 7000/FX. Please observe all safety markings and instructions when using this product. Caution! - must be observed to avoid loss of data or damage to your equipment. - Page 3 PrefacePreface Preface Thank you for purchasing the AXIS 7000/FX Network Document Server. This product allows digital copiers and scanners to be connected anywhere in Ethernet and Fast Ethernet networks. Based on AXIS ThinServer™ Technology, the optimized product hardware and Web-based management software simplifies the distribution and archiving of paper-based information across workgroups, organizations and the Internet.
-
Page 4: Support Services
Internet/intranet, you will reduce your faxing/mailing costs, as well as save time, thus improving your organization’s efficiency. Support Services Should you require any technical assistance, please contact your Axis dealer. If your questions cannot be answered immediately, your Axis dealer will forward your queries through the appropriate channels to ensure you a rapid response. -
Page 5: Table Of Contents
Section 4: Configuring the AXIS 7000/FX ........ - Page 6 Index ..............131 AXIS 7000/FX User’s Manual...
-
Page 7: Section 1: Introduction
The AXIS 7000/FX Network Document Server distributes paper-based information to any e-mail address, file server, PC or printer. Simply connect the AXIS 7000/FX to a digital copier or scanner and plug it into your Ethernet network to effortlessly send documents, photographs, reports and other paper-based information to corporate distribution lists or around the world. -
Page 8: Features And Benefits
AXIS 7000/FX User’s Manual Features and Benefits File Server The AXIS 7000/FX is connected as a node in Ethernet or Fast Ethernet Independence networks, enabling digital copiers and scanners to be accessed via standard Internet protocols. Communicating directly with the network client, the AXIS 7000/FX can be used independently of file servers, which means reduced network licensing fees. - Page 9 AXIS 7000/FX User’s Manual Ease of Use The AXIS 7000/FX is designed for quick and easy installation on both your network and your digital copier or scanner. It has a number of interesting features that will help you to simplify the distribution of your paper-based information, including: •...
- Page 10 Introduction AXIS 7000/FX User’s Manual...
-
Page 11: Section 2: Physical Description
10 Mbps to 100 Mbps according to the local network segment. Keyboard Connector A Mini-DIN connector for connection of a standard PC compatible keyboard. Power Supply The AXIS 7000/FX can use either the AXIS PS-C or AXIS PS-E power supply. - Page 12 Status Indicator The Status indicator flashes during startup and remains lit when the AXIS 7000/FX is ready for use. If the status indicator turns off, this may indicate an error. Busy Indicator The Busy indicator turns on when the AXIS 7000/FX is allocated for use and remains on during the scanning process.
-
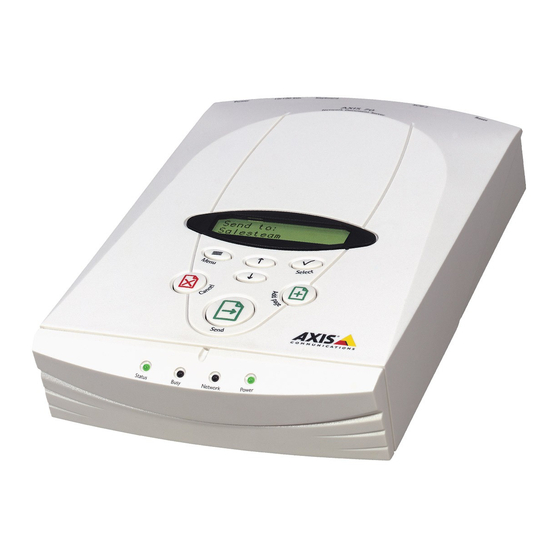
Page 13: Control Panel
AXIS 7000/FX User’s Manual Control Panel The AXIS 7000/FX Control panel has user keys (described below) and a message display that describes the selected menu options and current status of the unit. The message display consists of 2 lines of 16 characters indicating status and menu options. - Page 14 Physical Description Send The Send key destination(s) and releases the AXIS 7000/FX for other users. For a single page/stack of sheets, use this key to scan the material and send the image in one step. Up/Down The Up User Key Combinations...
-
Page 15: External Keyboard
The F2 key sends the scanned material to the selected destination and releases the AXIS 7000/FX for other users. For a single page or stack of sheets, use this key to scan the material and send the image in one step. - Page 16 Press Page Down to go to the previous entry with a different first character in the “Send to:” or “Sent by:” list. Home Press Home to go to the first entry in a list. Press End to go to the last entry in a list. AXIS 7000/FX User’s Manual...
-
Page 17: Section 3: Basic Installation
A detailed hardware inventory Instructions for installing the AXIS 7000/FX onto your networking environment Instructions for setting the IP address using the AXIS 7000/FX control panel, DHCP, RARP, BOOTP and AXIS IP Installer Instructions for setting a host name Instructions on how to verify your installation... - Page 18 The AXIS Online CD provides an easy-to-use electronic catalog, that includes the AXIS utilities software, user documents, technical notes and references etc. It can be used within all of the supported Axis computing environments. AXIS 7000/FX does not require any additional software installation from the AXIS Online CD.
-
Page 19: Connecting Digital Copiers And Scanners
• Make sure the scanning device is switched off and the AXIS 7000/FX power supply is discon- nected. The SCSI bus may become damaged if you connect or disconnect units when power is Connecting the AXIS 7000/FX to your scanner or digital copier: 1. -
Page 20: Connecting The Axis 7000/Fx To The Network
1. Turn off the AXIS 7000/FX by unplugging the power supply. 2. Connect your AXIS 7000/FX to the network. Note: The AXIS 7000/FX is designed for 10 Mbps Ethernet and 100 Mbps Fast Ethernet networks and connects to the network via a twisted pair category 5 cable (10baseT and 100baseTX). -
Page 21: Assigning An Ip Address
Note: you should not use AXIS IP Installer to set the IP address of the AXIS 7000/FX, if you have an active DHCP server on your network. Operates on the entire network and allows for automatic but tempo- rary assignment of IP addresses from a central pool. - Page 22 Similar to RARP, but operates on the entire network. It requires a BOOTP daemon on your system. Follow the instructions below to set the IP address from the control panel: 1. Power up the AXIS 7000/FX. Press Menu appears: AXIS 7000/FX Version: 1.00E 2.
- Page 23 13. Press Menu 14. Press Menu 15. Press Select 16. Write the name or IP address of the AXIS 7000/FX on the supplied Note: If you make a mistake while editing the parameters, press the Cancel key on the control panel to cancel the operation.
- Page 24 Verifying the Network Settings Using a PC keyboard Access the Advanced menu from the AXIS 7000/FX control panel to verify that the chosen network settings are correct, as described below: 1. Press and hold down the Menu key pressing the Select key 2.
- Page 25 AXIS 7000/FX User’s Manual 4. Use the following keys to enter the IP address: The instructions above also apply for editing the router address and subnet mask setting. • Use the numeric keys to enter the digits. • Press Left or Right arrow to edit the previous or next digit.
- Page 26 Follow the appropriate instructions for the preferred method below. Before you begin: • Power Make sure the AXIS 7000/FX is powered on and attached to the net- work. • System Privileges You will need administrator privileges on the Windows NT server or root privileges on the UNIX system.
- Page 27 Important! Windows 95 only: If the ARP table is empty, you must first ping an existing unit on your network before setting the IP address of your AXIS 7000/FX. Type ARP table. From the DOS prompt, type the following: 7000/FX with each pair of digits separated by a hyphen.
- Page 28 IP address, the change the address. The reason for this is to avoid accidental or unau- thorized changes of the IP address. Restart the AXIS 7000/FX to make it accept the setting of the IP address. You can perform a restart remotely via the AXIS 7000/FX web interface.
- Page 29 The reason is to avoid accidental or unauthorized change of the IP address. Restart the AXIS 7000/FX to make it accept the setting. You can perform a restart remotely via the AXIS 7000/FX web interface. See “Specifying the System Settings ”on page 36.
- Page 30 3. Start the BOOTP daemon, if it is not already running. This is typically performed using the command 4. Restart the AXIS 7000/FX to download the IP address, default router address and subnet mask. Notes: BOOTP is enabled by default but can be disabled by an Administrator using the System Settings page.
-
Page 31: Mapping A Host Name To The Ip Address
If the digital copier/scanner is not supported, an error message will be displayed. If no destinations have been specified yet, the AXIS 7000/FX will display: If one or more destinations have already been specified, the AXIS 7000/FX will display: where “... - Page 32 Basic Installation 3. Enter the name or IP address of your AXIS 7000/FX in the location/address field. Example: http://172.16.253.80 4. The AXIS 7000/FX Home Page, the Scan Document page is displayed. Place an image in the digital copier/scanner and click Scan.
-
Page 33: Section 4: Configuring The Axis 7000/Fx
Important! To access the AXIS 7000/FX configuration file, you must first set the IP address as described in “Assigning an IP Address ”on page 21. You configure the AXIS 7000/FX from a standard Web browser such as Netscape Navigator or Internet Explorer. - Page 34 You can access the AXIS 7000/FX Home Page using a standard Web browser such as Netscape Navigator or Internet Explorer. 1. Start the Web browser. 2. Enter the name or IP address of the AXIS 7000/FX on the location/address line: Example: http://172.16.253.80...
- Page 35 AXIS 7000/FX User’s Manual 4. Click admin. Note: It is recommended that you change the password of your AXIS 7000/FX as soon as possible, since all Axis products are shipped with the same password as default. 5. The This AXIS 7000/FX page is displayed: The Administrator can modify the system settings directly from this page.
-
Page 36: Specifying The System Settings
Specifying the System Settings Important! When installing the AXIS 7000/FX for the first time, it is recommended that the Administrator retains the default system settings, profiles and paper sizes. Optionally, customize these when you are familiar with the unit operation and functionality. - Page 37 AXIS 7000/FX User’s Manual The Edit Button Click the Edit button to display the This AXIS 7000/FX - Edit Page. Clicking the appropriate tag displays the General, Date & Time, User Options, International, and Authentication settings for your AXIS 7000/FX as described below:...
- Page 38 Note: All user-defined profiles and modifications to predefined profiles will be lost when you click Restore Predefined Profiles. Authentication makes it possible to allow access to the AXIS 7000/FX to authenticated users only. For more information, please refer to “Specifying Authentication Settings”...
-
Page 39: Specifying Network Settings
External Address Book - defines an external e-mail address book on an LDAP server or a destination list on an FTP server which is automatically retrieved and downloaded to the AXIS 7000/FX.. Configuring the AXIS 7000/FX... - Page 40 Displays the Protocols page that allows all of the sup- ported protocols to be set up within a single dialog. Restart Server Restarts the AXIS 7000/FX. LED indicators flash during startup and self test. When they have stopped and the Network indicator starts flashing to indicate network ac- tivity, the unit is ready for use.
- Page 41 AXIS 7000/FX User’s Manual Using the Wizard The Wizard provides a convenient way to set up the AXIS 7000/FX in your networking environment. Follow the instructions below to configure the supported networking protocols: Important! • The Network settings for the TCP/IP and E-mail (SMTP) protocols must be specified by the Administrator before the AXIS 7000/FX can be used for distributing reproduced documents on the network.
- Page 42 Important! • The Network settings for the TCP/IP and E-mail (SMTP) protocols must be specified by the Administrator before the AXIS 7000/FX can be used for distributing reproduced documents on the network. You can optionally configure the External Address Book for automatic retrieval and loading of e-mail addresses and/or other destination types.
- Page 43 However, it is recommend that you verify the settings when the AXIS 7000/FX has been restarted and then enter any missing parameters manually.
- Page 44 • If the IP address is changed, you must re-establish the HTTP commu- nication using the new address. • You can also set the IP address from the AXIS 7000/FX control panel. Refer to “Assigning an IP Address” on page 21.
- Page 45 AXIS 7000/FX User’s Manual Web (HTTP) Select Web(HTTP) to add a customized link to the AXIS 7000/FX Home Page: • • Note: Note that the width of the image can not exceed 117 pixels. Leave blank to use a standard button.
- Page 46 4. In the SMTP Port field, specify the number of the TCP/IP port. 5. Define the Connection Timout period, i.e. how long the AXIS 7000/FX is to wait before timing out when connecting to the e-mail (SMTP) server. This must be greater than 5 but no more than 65535 seconds.
- Page 47 • The user can specify another sender at the moment of scanning. This, • Make sure that your AXIS 7000/FX has a valid SMTP reply address to • To be able to receive mail from the AXIS 7000/FX you may need to however, does not apply if the administrator has enabled Authentica- tion or if the Specify the sender of scanned documents option is not selected (see the admin|Edit|User Options tab).
- Page 48 Configuring the AXIS 7000/FX External Address Book A Destination Address Book can be retrieved from an LDAP (Lightweight Directory Access Protocol) server or from a specified file on an FTP server. Alternatively, you can choose not to retrieve an address book.
- Page 49 LDAP (Lightweight Directory Access Protocol) server. For more information on LDAP, see “LDAP” on page 105. Check the AXIS 7000/FX Support Web for more information on the settings for your specific LDAP server.
- Page 50 Configuring the AXIS 7000/FX External Address Book from a File (e-mail, printer and file • destinations) - Select this option to read an external address book from a file on an FTP server. FTP Server - Specify the name or IP Address of the FTP server.
- Page 51 • The external e-mail addresses will appear in alphabetical order • The event log will show how many e-mail addresses that have been together with existing destinations in the destination list on the AXIS 7000/FX message display. loaded with LDAP or FTP.
-
Page 52: Specifying Authentication Settings
Specifying Authentication Settings Authentication makes it possible for the administrator to allow access to the AXIS 7000/FX for authenticated users only. Click the Edit button on the This AXIS 7000/FX page and then click the Authentication tag to modify the authentication parameters. - Page 53 Specify the number of seconds that the AXIS 7000/FX waits for user input before it automatically logs out the authenticated user. AXIS 7000/FX page. If you want to return to the This AXIS 7000/FX page without saving your changes click Cancel. Configuring the AXIS 7000/FX...
-
Page 54: Specifying Destinations
Configuring the AXIS 7000/FX Specifying Destinations A destination is used when sending scanned images from the AXIS 7000/FX control panel and is defined as one of the following: • an e-mail address • a file on an FTP server referenced by a URL hyperlinks •... - Page 55 AXIS 7000/FX User’s Manual Services Overview The table below provides an overview of the information and services provided by each button on this page. Button E-mail Destination New >> File Destination New >> Printer Destination New >> URL for E-mail >>...
- Page 56 7. From the drop-down Profile list, select the profile to be used as the default for this destination. Note: The user can specify another profile from the AXIS 7000/FX control panel at the moment of scanning. <Default-xx> is the default value specified on the Destination Defaults page.
- Page 57 Description Default value specified on the Destination Defaults page Information about the AXIS 7000/FX, the connected digital copier/scanner, the parameter settings used when scanning etc. Includes the image-related profile settings. Does not include any information.
- Page 58 Configuring the AXIS 7000/FX Adding Permanent Destinations Creating and Editing File Destinations The Administrator can permit users to add temporary e-mail destinations using the New Destination button on the User|Destination page. If this privilege is enabled, the five most recently added temporary destinations will appear at the top of the table on the Destinations page.
- Page 59 AXIS 7000/FX User’s Manual Note: The user can specify another profile from the AXIS 7000/FX control panel at the moment of scanning. <Default-xx> is the default value specified on the Destination Defaults page. 6. With reference to the table below, select the amount of information Option <Default-xx>...
- Page 60 For a directory with many files, performance increases if you store the sequence number on the FTP server. However, to do that, the AXIS 7000/FX must be permitted to overwrite/delete files in the specified directory. The table below summarizes the available sequence numbers and...
- Page 61 AXIS 7000/FX User’s Manual Option Store sequence number on FTP server: Append file extension to file name: Creating and Editing Printer destinations New Printer PCL printer on the network, using either the Raw TCP or LPD printing Destinations method. Raw TCP Printing...
- Page 62 8. From the drop-down Profile list, select the profile to be used as the default for this destination. Notes: • The user can specify another profile from the AXIS 7000/FX control panel at the moment of scanning. <Default-xx> is the default value specified on the Destination Defaults page.
- Page 63 9. From the drop-down Profile list, select the profile to be used as the Note: The user can specify another profile from the AXIS 7000/FX control panel at the moment of scanning. <Default-xx> is the default value specified on the Destination Defaults page.
-
Page 64: Specifying Profiles
Note: Although a profile is normally associated with a destination, the user can override that setting by choosing another profile from the AXIS 7000/FX control panel at the moment of scanning. Click Profiles for: •... - Page 65 Notes: • When you have selected a new language you must go to the Profiles • The AXIS 7000/FX will display an error message if the selected set- 1. Click Profiles. 2. The previously added profiles are listed in the table. The Profile Name 3.
- Page 66 Configuring the AXIS 7000/FX 4. In accordance with the information provided in the Profiles Parameters table (below), define all of the parameters featured in the New Scanning Profile/Edit Scanning Profile page. 5. To complete this task do one of the following: •...
- Page 67 AXIS 7000/FX User’s Manual Profiles Parameters Parameter Name Options Profile Name Paper Size Duplex Scanning Paper Orientation Multipage Documents Resolution Configuring the AXIS 7000/FX Instructions This is the name that will appear in the profile list. Specify a descrip- tive name for the profile.
- Page 68 Configuring the AXIS 7000/FX Parameter Name Options Intensity 0 - 100 (%) Contrast 0 - 100 (%) Data Type • Black and White • Grayscale • Color Format - • TIFF - No compression Comp. • TIFF - CCITT G.3 - one dim •...
- Page 69 AXIS 7000/FX User’s Manual Parameter Name Options Dithering Method (b/w only) JPEG Quality Level Configuring the AXIS 7000/FX Instructions • None Select the dithering method for (recommended for text) black/white images from the drop- • Dithered down dialog. (recommended for photos)
- Page 70 Configuring the AXIS 7000/FX Predefined Profiles Temporary Profiles Guidelines for Format and Compression The AXIS 7000/FX is pre-installed with 10 standard profiles to cover most needs. This table lists the predefined profiles: Name Resolution Color high Color low Color PDF...
- Page 71 AXIS 7000/FX User’s Manual Notes: • Although the generated TIFF files do not contain searchable text, you • The generated PDF image files do not contain searchable text. You can use an Optical Character Recognition (OCR) application to con- vert the bitmap to text that can be edited, indexed, searched or cop- ied to other files.
-
Page 72: Specifying Paper Sizes
Note: A user can override the Paper Size setting used by a profile by choosing another paper size from the AXIS 7000/FX control panel at the moment of scanning. The AXIS 7000/FX includes 14 predefined standard paper sizes to cover most needs. -
Page 73: Configuring Using A Text Editor And Ftp
Predefined Paper Sizes. Note that all your current paper sizes will be lost. To access the AXIS 7000/FX configuration file, you must first set the IP address as described in “Assigning an IP Address ”on page 21. command before modifying your AXIS 7000/FX where <Internet address>... - Page 74 • All parameter settings apart from the IP address, Gateway and Subnet mask can be changed using FTP. Please refer to “The Parameter List” on page 111. AXIS 7000/FX User’s Manual to download the file to the AXIS 7000/FX , or quit exit...
-
Page 75: Section 5: Using The Axis 7000/Fx
“Section 4 - Configuring the AXIS 7000/FX” is targeted specifically to users responsible for the administration of the AXIS 7000/FX. Please refer to this section if you wish to access the AXIS 7000/FX as an Administrator. Using the AXIS 7000/FX... -
Page 76: Sending Methods
Using the AXIS 7000/FX Sending Methods The AXIS 7000/FX supports five basic methods for distributing scanned and copied documents over the network: • Send-to e-mail destinations • Send-to-file destinations • Send-to-printer destinations • Send-to-URL • Send-to-Web browser Digital Copier AXIS 7000/FX... - Page 77 AXIS 7000/FX User’s Manual Destinations Documents are typically distributed using the AXIS 7000/FX control panel or an attached PC compatible keyboard (if connected by your administrator), to selected e-mail, file or printer destinations. Users can add temporary e-mail destinations using the Web interface or keyboard if the destination you wish to send your document to does not exist in the destination list.
- Page 78 Send-to-Printer This allows document images to be distributed to any printer defined in the AXIS 7000/FX destination list using either Raw TCP or LPD as printing method. Raw TCP printing support means that you can distribute your document images across network segments to any TCP/IP printer connected on a local or remote network.
-
Page 79: Authentication
Authentication If the administrator has enabled authentication the user must enter a user name and password to gain access to the AXIS 7000/FX. If the authentication process is not enabled, proceed to the next section“Sending to Destinations” on page 80. -
Page 80: Sending To Destinations
“Specifying Destinations” on page 54. Perform these instructions from the AXIS 7000/FX control panel: 1. The AXIS 7000/FX display shows “Send to: xxxxxx” when it is ready for use. For example: Send to: Accounting Dept 2. - Page 81 • By scanning multiple pages, you can accumulate several pages into • If no operations are performed within five minutes of allocation, the • The AXIS 7000/FX keeps all temporary settings in memory for 60 sec- feeder of the attached digital copier/scanner.
-
Page 82: Adding Temporary Destinations
The PDF rotation option can be used to enable the same feeder orientation as when copying i.e long-edge first. The e-mail list resident within the AXIS 7000/FX is initially created by your administrator. If you want to send a scanned document to an e-... - Page 83 AXIS 7000/FX User’s Manual Using a standard PC Connecting a standard keyboard to your AXIS 7000/FX will allow you Keyboard to quickly search any destination within the resident list. You can do this by simply typing in the first couple of characters of the destination you wish to search for.
- Page 84 To send the scanned material to the selected destination and release the AXIS 7000/FX for other users. For a sin- gle page/stack of sheets, use this key to scan the mate- rial and send the image in one step...
- Page 85 1. Start the Web browser. 2. Enter the name or IP address of your AXIS 7000/FX on the 3. Click Destinations. The table lists the available destinations. 4. Click New Destination and specify the settings for the new 5.
-
Page 86: Adding Temporary Profiles
Web browser interface. 1. Start the Web browser. Note: The Administrator might not allow the user to add temporary profiles. 2. Enter the name or IP address of your AXIS 7000/FX on the location/address line. Example: http://172.16.253.80 3. This brings you to the AXIS 7000/FX Home Page. Click Profiles. -
Page 87: Scanning Parameters
Text/Photo, Gray or Color profiles. Scanning color images to JPEG/JFIF can be time consuming due to the amount of computation performed by the AXIS 7000/FX. You should therefore avoid using a higher resolution than is really needed. “Color low” (75 dpi) is normally sufficient for web publishing of color images. - Page 88 Using the AXIS 7000/FX Predefined Profiles Note: • Should you select a profile that is not supported by the digital copier/scanner, the output file will automatically default to PDF. For example, if you select color JPEG on a black and white digital copier/scanner, the output is generated as PDF.
-
Page 89: Sending To Your Web Browser
Follow these steps to scan to your Web browser: 1. Place the material in your scanner or digital copier. 2. Start the Web browser. 3. Enter the name or IP address of the AXIS 7000/FX on the Name Description Color PDF Creates a 150 dpi PDF document;... - Page 90 Using the AXIS 7000/FX 4. This brings you to the AXIS 7000/FX Home Page, the Scan Document page. We recommend that you add the address as a bookmark, or as a link on the Department or Workgroup Web page. 5. Optionally change the default profile.
-
Page 91: Viewing Image Files
During the scanning this message appears on the display: Scanning #1 please wait image is completed, the AXIS 7000/FX is released for other users to access. • By scanning multiple pages, you can accumulate several pages into one image file. See “Multipage Image Files” on page 82. - Page 92 The PDF format requires the Adobe Acrobat Reader. Acrobat Readers for Windows (3.1, 95/98, NT), Macintosh and UNIX can be downloaded free of charge from Adobe Systems Web site http://www.adobe.com. Adobe Acrobat Reader is also supplied on the AXIS Online CD. AXIS 7000/FX User’s Manual...
- Page 93 Web browsers. tools. However, if you find a tool that is not supported by the AXIS 7000/FX, we would like to know about it. For information on how to contact us see “Preface”...
- Page 94 Using the AXIS 7000/FX AXIS 7000/FX User’s Manual...
-
Page 95: Axis 7000/Fx User's Manual
You will need to re-assign the IP address as described in “Assigning an IP Address ”on page 21. Restore factory default settings to the AXIS 7000/FX Interpret the AXIS 7000/FX front panel indicators Interpret the AXIS 7000/FX error messages... - Page 96 Follow these steps to restore the default settings using the Push button: 1. Turn off the AXIS 7000/FX by disconnecting the power supply. 2. Press and hold the Push button while you connect the AXIS 7000/FX. Keep the Push button pressed until the Status indicator flashes at regular two second intervals.
- Page 97 Web Browser Follow these steps to reset to the defaults settings from a Web browser: 1. Start the Web browser. 2. Enter the name or the IP address of the AXIS 7000/FX in the 3. Click admin. 4. Click Factory Defaults.
-
Page 98: Front Panel Indicator Conditions
Normal Conditions Error Conditions The Power LED is hardware controlled and should always remain on when power is connected to the AXIS 7000/FX. The remaining LEDs are all software controlled. This table shows the front panel indicators during normal conditions:... -
Page 99: Error And Warning Messages
AXIS 7000/FX User’s Manual Status Indicator Off The Status indicator remains off if a problem with the scanning device communication has occurred. The AXIS 7000/FX message display may additionally provide error status information. Network Indicator Off The Network indicator flashes when there is network traffic. If it remains off and you know there is network activity, check the network connection. - Page 100 Description SCSI command sequence The scanning device cannot receive the SCSI com- illegal mands in the order they were sent. Contact your AXIS 7000/FX dealer. Invalid field in SCSI The SCSI parameter block includes one or several in- parameter list valid fields.
- Page 101 AXIS 7000/FX User’s Manual Message Paper jam No paper in scanning device Scanner warming up, please retry Scanner not ready, please check scanner and retry The ADF cover is open, please check and retry Could not connect to LDAP server...
-
Page 102: Displaying The Log File
Follow these steps to display the log file from a Web browser: 1. Start the Web browser. 2. Enter the name or IP address of the AXIS 7000/FX in the location/address field: AXIS 7000/FX User’s Manual... - Page 103 AXIS 7000/FX User’s Manual 3. The AXIS 7000/FX Home Page is displayed. Click admin. 4. Click Event Log. Example http://172.16.253.80 The event log is displayed. Troubleshooting...
- Page 104 Troubleshooting AXIS 7000/FX User’s Manual...
-
Page 105: Appendix B: Ldap
AXIS 7000/FX User’s Manual Appendix B LDAP This section gives you an introduction to LDAP and how to use it. Introduction LDAP (Lightweight Directory Access Protocol) is used to program directory-enabled applications. It is a directory service that allows people to locate other users, resources, services and information. LDAP allows resources and services to be selected with ease and accessed with location-independence. -
Page 106: Usual Attribute Types
Attribute Type objectClass street title AXIS 7000/FX User’s Manual Matches Describes the kind of object which the entry represents. Contains the name of an object. If the object is a person, it is typically the person’s full name. - Page 107 AXIS 7000/FX User’s Manual The attribute types are used to create search filters. There are six types of basic search filters and the syntax of the filters is in the <attribute><operator><value> format. Complex search filters can easily be constructed by combining these basic search filters and other complex filters using the Boolean operations AND, OR and NOT.
- Page 108 Apart from being familiar with the administrator and/or the inner workings of the server itself, only trial and error can tell you whether your filter is working efficiently or not. AXIS 7000/FX User’s Manual Example Matches Entries with an (&(sn=smith)
-
Page 109: Example Searches
All persons in Sweden. All entries at Axis independent of coun- try, except the ones called Smith. All persons at Axis Marketing in Sweden. (&(objectclass=person)(c=S All persons with a common name con- taining “bert” at Axis Marketing or Sales. LDAP Filter to use (&(objectclass=person)(c=S... - Page 110 LDAP AXIS 7000/FX User’s Manual...
-
Page 111: Appendix C: The Parameter List
AXIS 7000/FX User’s Manual Appendix C The Parameter List This table below displays the AXIS 7000/FX parameter list. The middle column shows applicable default values, and the right-hand column a brief description of the parameter. Important! The parameters are case dependent and must be entered exactly as in the table below. - Page 112 = company.se Specifies the name of the domain to which the AXIS 7000/FX belongs. Domain refers to a set of computers on a network that have been assigned a group name. A domain might contain two or more workgroups.
- Page 113 Menu button Specifies the URL to a customized link, e.g. to your company’s web site. The link will be available from the AXIS 7000/FX Web browser interface. Specifies the URL to the image that will indicate the customized external link.
- Page 114 Specifies the e-mail address of the person responsible for the administration of the AXIS 7000/FX. Note: Be sure to configure the AXIS 7000 with a valid SMTP reply address. = A scanned image Specifies the text that will appear on the Subject line of the e-mail containing the scanned image.
- Page 115 [SMTP] The Parameter List Description Specifies the language used on the AXIS 7000/FX message display. Valid values are U.S. English, German, French, Italian, Swedish and Spanish. Specifies the measurement units used, e.g. for paper sizes. Valid values are inches or cm.
- Page 116 =mail Specifies the name or IP address of the SMTP mail server that provides the e-mail facilities for the AXIS 7000/FX. If you are using DNS, specify the name. Otherwise, specify the IP address. E.g. mail or mail.domain.com or 192.36.253.80.
- Page 117 Description Specifies the name of the file destination. This is the name that will appear in the destination list on the AXIS 7000/FX message display. Specifies how the scanned image should be sent; that is by which protocol. Defines the E-mail address of the e-mail recipient (SMTP).
- Page 118 Note that the parameters in this list apply to all profiles parameters. =Text Specifies the name of the profile. This is the name that will appear on the AXIS 7000/FX message display. = 300 Specifies the resolution to be used for scanning in dots per inch (dpi).
- Page 119 Note that the parameters in this list apply to all paper sizes parameters. Specifies the name of the paper size. This is the name that will appear on the AXIS 7000/FX message display. Specifies the width of the paper. Specifies the length of the paper.
- Page 120 The Parameter List AXIS 7000/FX User’s Manual...
-
Page 121: Appendix D Updating The Software
Appendix D Updating the Software The system software for your AXIS 7000/FX is stored in a resident flash memory chip that, like ordinary ROM memory, keeps its contents even when the power is turned off. Flash memory is unique because its contents can be erased and re-written. -
Page 122: Updating The Flash Memory
Updating the Software Updating the Flash Memory Caution Be careful not to interrupt the file transfer. If the transfer is interrupted, the AXIS 7000/FX may have to be re-initialized by your dealer. Before you begin: To upgrade over the network you will need the following: •... -
Page 123: Appendix E Technical Specifications
HTTP, IP, FTP, SMTP, TCP, LPD, Raw TCP, ARP, RARP, BOOTP, DHCP, ICMP, SNMP, LDAP, UDP, NTP. Supported Devices If supported, the AXIS 7000/FX automatically senses the brand and model of the attached scanner or digital copier, without any user intervention. Digital copiers/scanners with built-in compression provide optimum performance. - Page 124 User Storage Area. LDAP destinations are limited only by available RAM memory. Software Updates Flash memory allows central and remote updating of the AXIS 7000/FX software over the network using FTP. Hardware CPU: 32 bit RISC Controller (AXIS ETRAX100)
- Page 125 SCSI cable: 50 pin high-density shielded (micro-D) Bracket: Use for mounting AXIS 7000/FX Power supply 12V DC (36VA), via external power unit (AXIS PS-C) or 12V DC (13,2VA), via external power unit (AXIS PS-E) Dimensions Height: 1.7 in (4.3 cm) Width: 5.9 in (14.9 cm)
- Page 126 Technical Specifications AXIS 7000/FX User’s Manual...
-
Page 127: Appendix F Glossary
AXIS 7000/FX User’s Manual Appendix F Glossary Automatic Document Feeder Advanced Interactive eXecutive. A version of the UNIX operating system from IBM that runs on various IBM computers including Mainframe systems Address Resolution Protocol. A protocol within TCP/IP networks that... - Page 128 Line Printer Daemon. A protocol for network printing Light Emitting Diode An underlying definition or description Management Information Base. A database of network configuration information used by SNMP and CMIP to monitor or change network settings AXIS 7000/FX User’s Manual...
- Page 129 AXIS 7000/FX User’s Manual Mini-DIN Connector used on a PC to connect a keyboard. If your keyboard has a PS/2 DIN connector, a DIN to Mini-Din adapter can be used MIME Multipurpose Internet Mail Extension. Enables transmission of e-mail containing non-English characters as well as attachments such as image files Network Information Services.
- Page 130 Glossary AXIS 7000/FX User’s Manual UNIX A 32-bit multitasking, multiuser operating system originally developed by AT&T Uniform Resource Locator. A way of specifying the location of publicly available information on the Internet Universal Time Coordinated WINS Windows Internet Name Service Extensible Markup Language.
-
Page 131: Index
AXIS 7000 User’s Manual Index ADF 101, 127 Administration tools Advanced menu AIX systems Archiving 92 ARP 22 OS/2 28 UNIX 28 Windows Assigning an IP address Associating image formats Attachments in e-mails Authentication 9, 34, 37, 52, 79, 81... - Page 132 Measurement units Message display multipage image files net mask 23 Network settings NTP Server OCR 92 AXIS 7000 User’s Manual Paper orientation 82 Paper sizes 72, 89 Parameter list 111 PC 7 PDF 92 Photo 70, 72 Picture editing 92...
- Page 133 AXIS 7000 User’s Manual setting IP address ARP 27, 28 BOOTP 30 control panel 22 DHCP 26 RARP 29 Setting up destinations 56, 58, 61, 62 Setting up paper sizes Setting up profiles 64, 72 SMTP 77 Specifying scanning parameters...
- Page 134 Index AXIS 7000 User’s Manual...
Need help?
Do you have a question about the 7000 and is the answer not in the manual?
Questions and answers