Table of Contents
Advertisement
Quick Links
Download this manual
See also:
User Manual
Advertisement
Table of Contents

Subscribe to Our Youtube Channel
Related Manuals for Axis 7100


Summary of Contents for Axis 7100
- Page 1 AXIS 7100 User’s Guide AXIS 7100 for WORKiO Network Document Server User’s Guide...
-
Page 2: About This Document
1.00 and subsequent releases until otherwise notified. The document provides introductory information as well as instructions on how to set up and manage the AXIS 7100. It is intended for anyone involved in installing and using the AXIS 7100. -
Page 3: Table Of Contents
Connecting the AXIS 7100 to the Network ......11 Assigning an IP Address to the AXIS 7100 .......12 Verifying the Network Settings . -
Page 4: Introduction
Important! Online help is available on every page within the AXIS 7100 web interface. This is of particular relevance when configuring the unit and should be used as a first point of reference for any administration queries. The help system is stored internally in the AXIS 7100. -
Page 5: Product Overview
Connecting to 10 Mbps Ethernet and 100 Mbps Fast Ethernet networks, the AXIS 7100 allows documents to be easily distributed to any e-mail address, file server, RightFax server or printer. For convenient electronic distribution of scanned documents e.g. to e-mail... -
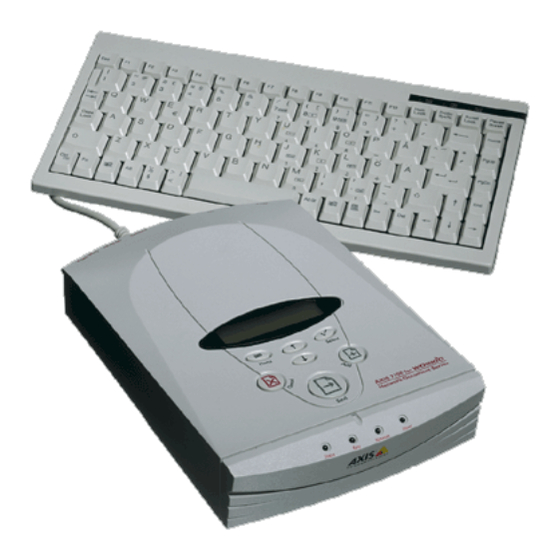
Page 6: Physical Description
• You can connect a standard PC-AT Keyboard to the AXIS 7100. This allows you to enter e-mail addresses at the WORKiO copier, to easily search long e-mail listings and to save any non-listed addresses as a temporary or permanent addition to the resident address list. -
Page 7: Indicators
Indicators Status Indicator The Status indicator flashes during startup and remains lit when the AXIS 7100 is ready for use. If the Status indicator turns off, this may indicate an error. Busy Indicator The Busy indicator lights up when the AXIS 7100 is allocated for use and remains lit during the scanning and sending process. -
Page 8: Connectors
Keyboard Connector A mini-DIN connector for connection of a standard PC-Keyboard. Refer to the AXIS 7100 User’s Manual or the AXIS 7100 product page on the Axis web site for further details. Network Connector The AXIS 7100 is designed for 10 Mbps Ethernet and 100 Mbps Fast Ethernet networks and connects to the network via a twisted pair category 5 cable (10baseT and 100baseTX). -
Page 9: Basic Installation
AXIS 7100 User’s Guide Basic Installation Installation Summary The AXIS 7100 is installed in the following steps: • Checking the Hardware Inventory • Connecting the AXIS 7100 to the WORKiO copier • Connecting the AXIS 7100 to the network • Assigning an IP address to the AXIS 7100 •... -
Page 10: Checking The Hardware Inventory
Checking the Hardware Inventory Unpack and check all the items using the following list. Contact your dealer if anything is missing or damaged. All packing materials are recyclable. Hardware AXIS 7100 for WORKiO Network Document Server Power Supply AXIS PS-E Media... -
Page 11: Connecting The Workio Copier
Connecting the WORKiO Copier Caution! • Check that the power supply included with your AXIS 7100 is marked with the correct voltage. • Make sure that the external power supply to the AXIS 7100 is disconnected before connecting and disconnecting to other units. -
Page 12: Assigning An Ip Address To The Axis 7100
A valid and unused IP address must be acquired from your Network Administrator. • Connecting a PC-AT keyboard directly to the mini-DIN connector on your AXIS 7100 provides a convenient method for managing the unit, and setting the IP address during system start up. - Page 13 15.Press Select startup sequence. 16.Write the name or IP address of the AXIS 7100 on the supplied instructions label and attach it to the top cover. The unit is ready for use when the Status indicator stops flashing and remains lit.
-
Page 14: Verifying The Network Settings
Basic Installation Verifying the network settings Access the Advanced menu from the AXIS 7100 control panel to verify that your chosen network settings are correct, as described below: 1. To access the Advanced menu, press and hold down Menu simultaneously. -
Page 15: Verifying The Installation
Netscape Navigator or Microsoft Internet Explorer, as described below: 1. Place a document in the WORKiO copier. 2. Start your web browser. 3. Enter the name or IP address of your AXIS 7100 in the location/address field of your web browser. Example: http://172.16.253.80... -
Page 16: Configuring The Axis 7100
• It is possible to enable user authentication to restrict use of the AXIS 7100 to validated users only. For more information, please refer to the AXIS 7100 User’s Manual at the Axis web site http://www.axis.com or on the AXIS Product CD. -
Page 17: Accessing The Administration Tools
Netscape Navigator or Microsoft Internet Explorer. 1. Start your web browser. 2. Enter the name or IP address of your AXIS 7100 in the location/address field. Example: http://172.16.253.80 The AXIS 7100 home page, the Scan Document is displayed. -
Page 18: Specifying The Network Settings
Web (HTTP) External Address Book Printing Note: The AXIS 7100 Parameter Checklist on page 31 is provided to help you in the configuration process. Purpose and function Defines the IP address, default router and subnet mask, automatic download method (BOOTP, RARP or DHCP), domain name and DNS server. -
Page 19: Specifying Destinations
However, only manually-loaded e-mail destinations are shown in the AXIS 7100 Destinations page. • For more information, please refer to the AXIS 7100 User’s Manual at the Axis web site http://www.axis.com or on the AXIS Product CD. Specifying a Destination Manually 1. -
Page 20: Adding New Destinations
From the admin - Destinations web page, follow these instructions to add new e-mail or file destinations. For instructions on how to add Rightfax and printer destinations, please refer to the AXIS 7100 User’s Manual on the AXIS Product CD or the Axis web site at www.axis.com :... -
Page 21: Specifying System Settings
Note: If you lose the Server password, you will need to restore the factory default settings. Refer to the AXIS 7100 User’s Manual on how to do that. Note that all your current settings will be lost. Description General: enter Server Password and confirm, Date &... -
Page 22: Using The Axis 7100
If the following message is displayed, your administrator has enabled authentication and you must enter your user name and password. For further information, please refer the AXIS 7100 User’s Manual at the Axis web site http://www.axis.com or on the AXIS Product CD. - Page 23 AXIS 7100 User’s Guide 3. If you want to send the image to more than one destination, press Select to choose each destination: Notes: • When sending to a printer, note that the image can only be sent to one printer at a time •...
- Page 24 AXIS 7100 is released for other users. Note: The AXIS 7100 keeps all temporary settings in its memory for one minute after the last scanning job or until user has logged out, it then returns to its default settings.
-
Page 25: Paper Orientation On Digital Copiers
WORKiO copier. The PDF rotation option can be used to enable the same feeder orientation as when copying i.e long-edge first. For more information on PDF rotation please refer to the AXIS 7100 User’s Manual which is available from the Axis web site at www.axis.com or from the AXIS Product... -
Page 26: Adding A New E-Mail Address To The List Using A Keyboard
Follow the instructions below to add temporary e-mail addresses to the address list: 1. Start the web browser. 2. Enter the name or IP address of your AXIS 7100 in the location/address field. This brings you to the AXIS 7100 Home Page. Example: http://172.16.253.80... -
Page 27: Adding Temporary Profiles
1. Start the web browser. 2. Enter the name or IP address of your AXIS 7100 in the location/address field. Example: http://172.16.253.80 3. This brings you to the AXIS 7100 Home Page. Click Profiles. -
Page 28: Viewing The Scanned Images
Using the AXIS 7100 Viewing the Scanned Images The AXIS 7100 creates images in standard TIFF, PCL and PDF formats. Note that these files are merely images that do not include searchable text. Please contact your system administrator if you are unsure about which format to use. -
Page 29: Associating Image Formats With Applications
AXIS 7100 User’s Guide Associating Image Formats with Applications Applications are typically associated with a file format automatically during the installation procedure. If not, it is recommended that you manually associate your image applications with the supported image file formats, so that double-clicking on an image icon launches the appropriate application. -
Page 30: Specifying A Sender
Specifying a Sender If the Administrator has enabled the parameter *specify the sender of scanned documents, you can identify yourself, your department or organization as the sender of distributed information directly from the AXIS 7100 Control Panel, as follows: 1. Press Menu repeatedly until the Sent by: prompt is shown on the message display. -
Page 31: Axis 7100 Parameter Checklist
This table is a summary of the AXIS 7100 network settings. For future reference, you can enter the unique configuration values of your document server in the “My AXIS 7100” column. This will also be of help in the configuration process.
Need help?
Do you have a question about the 7100 and is the answer not in the manual?
Questions and answers