
Subscribe to Our Youtube Channel
Related Manuals for Vanderbilt SPC42 Series


Summary of Contents for Vanderbilt SPC42 Series
- Page 1 SPC42xx/43xx/52xx/53xx/63xx Installation & Configuration Manual Vanderbilt A6V10276959 01.05.2016...
- Page 2 Copyright Copyright Technical specifications and availability subject to change without notice. © Copyright Vanderbilt We reserve all rights in this document and in the subject thereof. By acceptance of the document the recipient acknowledges these rights and undertakes not to...
-
Page 3: Table Of Contents
6.2.2 Battery installation for EN50131 compliance ........47 Mounting a G5 housing ..................48 6.3.1 Tamper protection ................50 6.3.2 Mounting the housing with tamper protection ........50 6.3.2.1 Tamper operation ................51 Vanderbilt Installation & Configuration Manual A6V10276959 01.05.2016... - Page 4 Powering from battery only ................. 89 Keypad user interface ..................90 12.1 SPCK420/421 ..................... 90 12.1.1 Introduction ..................90 12.1.2 Using the LCD keypad interface ............92 12.1.3 Data entry on the LCD keypad ............94 Vanderbilt Installation & Configuration Manual A6V10276959 01.05.2016...
- Page 5 16.7.1 Add Sensors ..................130 16.7.2 Edit Sensors (Zone Assignment) ............131 16.7.3 Add WPA................... 131 16.7.4 Edit WPA ................... 132 16.8 Zones ........................ 132 16.9 Doors ........................ 133 16.9.1 Doors ....................133 Vanderbilt Installation & Configuration Manual A6V10276959 01.05.2016...
- Page 6 16.20.3 Delete ....................154 16.21 SMS ........................155 16.21.1 Add ....................155 16.21.2 Edit ....................156 16.21.3 Delete ....................156 16.22 X-10 ........................156 16.23 Set Date/Time ....................157 16.24 Installer Text ..................... 157 Vanderbilt Installation & Configuration Manual A6V10276959 01.05.2016...
- Page 7 17.9.1.1 Editing an input ................. 196 17.9.1.2 Editing an output ................197 17.9.1.3 Configuring system latch and auto set outputs ......... 202 17.9.1.4 X10 Config - Settings ................ 203 17.9.2 X-BUS ....................204 17.9.2.1 Expanders ..................204 Vanderbilt Installation & Configuration Manual A6V10276959 01.05.2016...
- Page 8 17.10.2.4 Configuring an SPC Connect ATS ............ 285 17.10.2.5 Exporting and Importing an ATS ............285 17.10.2.6 Configuring Event Profiles ..............286 17.10.2.7 Configuring Command Profiles ............290 17.10.3 Reporting ................... 292 17.10.3.1 Alarm Reporting Centres (ARCs) ............292 Vanderbilt Installation & Configuration Manual A6V10276959 01.05.2016...
- Page 9 Domestic, Commercial and Financial mode default settings ......336 23.6 Wiring of the X10 interface ................337 23.7 SIA Codes ......................337 23.8 CID Codes ......................342 23.9 Overview of keypad types ................343 Vanderbilt Installation & Configuration Manual A6V10276959 01.05.2016...
- Page 10 23.21.1.1 Addressing Transponders for SAP 8, SAP 14, and SAP 20 ..... 358 23.21.1.2 Addressing Transponders for PSU SAP 25 ........358 23.22 FlexC Glossary ....................359 23.23 FlexC Commands ..................... 360 23.24 ATS Category Timings ..................362 23.25 ATP Category Timings ..................363 Vanderbilt Installation & Configuration Manual A6V10276959 01.05.2016...
-
Page 11: Meaning Of Symbols
Only available for SPC controller with IP interface (SPC43xx/SPC53xx/SPC63xx). Not available for installation type Domestic. Only available in unrestricted mode. Find further information about Security Grade, Region or Mode in text. See Appendix for further information. Vanderbilt Installation & Configuration Manual A6V10276959 01.05.2016... -
Page 12: Security
Use only spare parts and accessories that have been approved by the manufacturer. 2.2.2 Transport Unit damage during transport Keep the packaging material for future transportation. Do not expose the device to mechanical vibrations or shocks. Vanderbilt Installation & Configuration Manual A6V10276959 01.05.2016... -
Page 13: Setup
Always disconnect the power cable and other cables from the main power supply before performing maintenance. Danger of electrical shock while cleaning the device Do not use liquid cleaners or sprays that contain alcohol, spirit or ammonia. Vanderbilt Installation & Configuration Manual A6V10276959 01.05.2016... -
Page 14: Meaning Of Written Warning Notices
Possible danger of death or severe bodily harm. CAUTION Danger of minor bodily injury or property damage IMPORTANT Danger of malfunctions Meaning of hazard symbols WARNING Warning of hazard area WARNING Warning of dangerous electrical voltage Vanderbilt Installation & Configuration Manual A6V10276959 01.05.2016... -
Page 15: Directives And Standards
SPC6330.320 SPC5350.320 SPC5330.320 SPCP355.300 SPCP333.300 SPCE652.100 SPCK420.100 SPCK421.100 SPCE452.100 SPCE110.100 SPCE120.100 SPCA210.100 SPCK620.100 SPCK623.100 SPCN110.000 SPCN310.000 Vanderbilt Installation & Configuration Manual A6V10276959 01.05.2016... - Page 16 Technical data SPC4000 [➙ 31] output Technical data SPC5000 [➙ 32] Technical data SPC6000 [➙ 35] Programmable functions provided Engineer programming via the keypad [➙ 110] Engineer programming via the browser [➙ 159] Vanderbilt Installation & Configuration Manual A6V10276959 01.05.2016...
- Page 17 Comfort keypad configuration [➙ 122] Outputs [➙ 198] Zone types [➙ 347] Notification of output signals or messages Outputs [➙ 198] provided (see 8.6); Areas – setting/unsetting [➙ 243] User rights [➙ 187] Vanderbilt Installation & Configuration Manual A6V10276959 01.05.2016...
- Page 18 SPC5350.320 SPC5330.320 SPCP355.300 SPCP333.300 SPCP355.300 SPCE652.100 SPCK420.100 SPCK421.100 SPCE452.100 SPCE110.100 SPCE120.100 SPCA210.100 SPCK620.100 SPCK623.100 SPCN110.000 SPCN310.000 Vanderbilt Installation & Configuration Manual A6V10276959 01.05.2016...
-
Page 19: Compliance With En50131 Approvals
The Wireless settings Prevent Setting Time and Device Lost Time must be set to a value other than 0. Select Synchronization Time with Mains under Clock settings to use mains as clock master. Vanderbilt Installation & Configuration Manual A6V10276959 01.05.2016... - Page 20 Directives and standards EU directives DO NOT select the attribute Setting State in the Keypad configuration settings for Visual indications. Vanderbilt Installation & Configuration Manual A6V10276959 01.05.2016...
-
Page 21: Compliance With En 50136-1:2012 And En 50136-2:2014
SPC products listed have been tested according to EN 50136-1:2012 and EN 50136-2:2014. 3.1.4 Compliance with INCERT Approvals Software Requirements Selecting Belgium (*) under Region implements local or national requirements which supercede EN50131 requirements. Vanderbilt Installation & Configuration Manual A6V10276959 01.05.2016... - Page 22 SPC42xx/SPC52xx is: COMMS NONE PSTN PSTN+GSM Standby time 12 h 568 mA 543 mA 438 mA 413 mA 214 mA 189 mA 84 mA 59 mA 30 h 143 mA 118 mA 13 mA Vanderbilt Installation & Configuration Manual A6V10276959 01.05.2016...
-
Page 23: Pd 6662:2010 Conformance Guidelines
Completion/Termination of the full setting procedure is achieved by any of the following methods: a) Shunt lock fitted to the final exit door A shunt lock must be installed by the installer as follows: Vanderbilt Installation & Configuration Manual A6V10276959 01.05.2016... - Page 24 This method of setting is supported by using SPC COM XT or other third party ARC software using EDP commands. Methods of completion of unsetting (BS 8243:2010 - Clause 6.4) 3.1.5.3.2 Unsetting methods are complied with as follows: Vanderbilt Installation & Configuration Manual A6V10276959 01.05.2016...
- Page 25 This method of unsetting the intruder alarm system might be unacceptable to your insurers. 6.4.6 Unsetting in conjunction with an alarm receiving centre (ARC) Vanderbilt Installation & Configuration Manual A6V10276959 01.05.2016...
-
Page 26: Configuration Requirements For Pd 6662:2010 Conformance
SPC system is configurable in such a way that the setting is completed by 'Final Exit'. It is possible to configure the SPC so that a WD (Warning Device) is activated momentarily on setting. Vanderbilt Installation & Configuration Manual A6V10276959 01.05.2016... -
Page 27: Additional Commissioning Requirements For Pd 6662:2010 Conformance
Methods of completion of setting and unsetting methods should be clearly described to the end user as detailed in this document. Ensure written arrangements are supplied to the end user in the event of a lock failure. Vanderbilt Installation & Configuration Manual A6V10276959 01.05.2016... -
Page 28: Additional Information
3.1.6 Compliance with VdS approvals This installation document encompasses the required product installation information for VdS approvals. Vanderbilt SPC42xx/43xx/53xx/63xx : VdS Approval Nr. G 112104, G112124, and G112128. VdS EN Certificates EN-ST000142, EN-ST000143, EN-ST000055, EN-ST000056, EN-ST000057, EN-ST000058, EN-ST000061, EN-ST000062. Siemens SPC42xx/43xx/53xx/: VdS Approval Nr. -
Page 29: Compliance With Nf And A2P Approvals
93571 Saint Denis La Plaine Cedex CD 64 - CS 22265 www.marque-nf.com F-27950 SAINT MARCEL www.cnpp.com To comply with NF & A2P installation regulations, this enclosure must be sealed by affixing the accompanying Tamper Label after installation. Vanderbilt Installation & Configuration Manual A6V10276959 01.05.2016... - Page 30 (Cert. 1232200003) SPC5320.320 36h, unmonitored NF Grade 2, (Cert. 1222200003) Class 1 SPC4320.320 36h, unmonitored (Cert. 1222200003) SPCN110.000 NF Grade 2 and 3, SPCN310.000 Class 1 SPCK420.100 SPCK620.100 SPCK623.100 SPCE652.100 SPCE452.100 SPCE110.100 SPCE120.100 Vanderbilt Installation & Configuration Manual A6V10276959 01.05.2016...
-
Page 31: Technical Data
Power consumption SPC42xx: Max. 160 mA at 230 VAC SPC43xx: Max. 200 mA at 230 VAC Operating current SPC42xx Controller: Max. 160 mA at 12 VDC SPC43xx Controller: Max. 200 mA at 12 VDC Vanderbilt Installation & Configuration Manual A6V10276959 01.05.2016... -
Page 32: Spc5000
2) More I/O expanders can be addressed instead of a keypad or door expander, but number of programmable inputs / outputs cannot exceed specified system limits. SPC5000 Programmable areas Max. number of user PINs Remote controls Up to 100 Wireless Panic Alarm Up to 128 Vanderbilt Installation & Configuration Manual A6V10276959 01.05.2016... - Page 33 Tamper contact SPC5320/5330: Front spring tamper, 2 auxiliary tamper contact inputs SPC5350: Front/back tamper switch Power supply Type A (per EN50131-1) Mains voltage 230 VAC, + 10%/ -15%, 50 Hz Vanderbilt Installation & Configuration Manual A6V10276959 01.05.2016...
- Page 34 outputs Operating temperature -10 ~ +50 °C Relative humidity Max. 90 % (non condensing) Colour RAL 9003 (signal white) Weight SPC5320: 4.500 kg SPC5330: 6.400 kg SPC5350: 18.600 kg Vanderbilt Installation & Configuration Manual A6V10276959 01.05.2016...
-
Page 35: Spc6000
EOL resistor Dual 4k7 (default), other resistor combinations configurable Relay Outputs SPC6320\6330 — 1 strobe (30 VDC/1A resistive switching current) SPC6350 — 4 (single-pole changeover, 30VDC/ maximum 1A resistive switching current) Vanderbilt Installation & Configuration Manual A6V10276959 01.05.2016... - Page 36 SPC6350: Max. 210 mA at 12 V DC Quiescent current SPC63xx Controller: Max. 170 mA at 12 V DC (195 mA with PSTN, 300 mA with GSM, 325 mA with PSTN & GSM) Vanderbilt Installation & Configuration Manual A6V10276959 01.05.2016...
- Page 37 SPC6330: 4 additional expanders (size 150 mm x 82 SPC6350: 6 additional expanders (150 x 82 mm) or 1 additional controller + 4 expanders IP / IK Rating 30 / 06 Event Profiles Event Exceptions Vanderbilt Installation & Configuration Manual A6V10276959 01.05.2016...
-
Page 38: Spcp355.300
Metal housing (1.5 mm mild steel) Colour RAL 9003 (signal white) Dimensions 498 x 664 x 157mm Weight (without batteries) 18.400 kg (housing incl. cover), 11.300 kg (housing without cover) IP / IK Rating 30 / 06 Vanderbilt Installation & Configuration Manual A6V10276959 01.05.2016... -
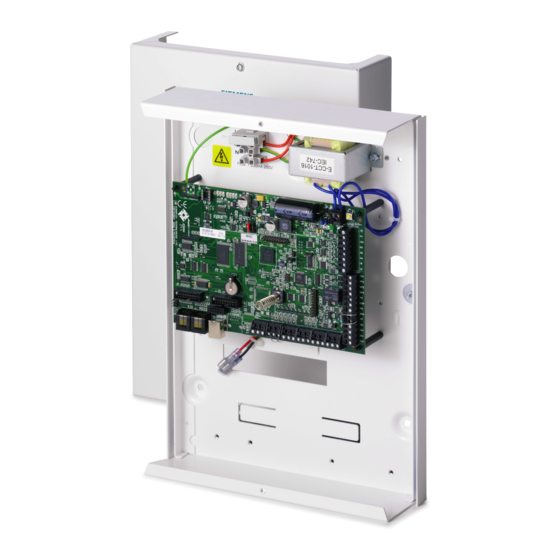
Page 39: Introduction
6 Battery 12 V Broadband router 7 RF Network 8 Wired outputs (6) Central 9 Wired inputs (8) LAN/WLAN 10 Keypads Service desk 11 IO expander Remote user 12 Output Expander Mobile interfaces Vanderbilt Installation & Configuration Manual A6V10276959 01.05.2016... -
Page 40: Mounting System Equipment
Screws with a 4-5 mm shank, a minimum head diameter of 8 mm and a minimum length of 40 mm are recommended for mounting the housing. Additional expansion plugs or fixings may be required depending on the construction of the wall. Vanderbilt Installation & Configuration Manual A6V10276959... -
Page 41: Mounting A G3 Housing
The G3 housing contains the controller PCB (Printed Circuit Board) mounted on a hinged mounting bracket. Expanders and PSUs can be mounted on the underside of the hinged mounting bracket and also on the back wall of the housing underneath the mounting bracket. Vanderbilt Installation & Configuration Manual A6V10276959 01.05.2016... - Page 42 Screws with a 4-5 mm shank, a minimum head diameter of 8 mm and a minimum length of 40 mm are recommended for mounting the housing. Additional expansion plugs or fixings may be required depending on the construction of the wall. Vanderbilt Installation & Configuration Manual A6V10276959...
-
Page 43: Mounting A Back Tamper Kit
Leads for connecting the back tamper switch to the controller Wall fixing plate Mounting the Wall Fixing Plate 1. Mount the SPC in the appropriate position on the wall using all three fixings (see item 1 below). Vanderbilt Installation & Configuration Manual A6V10276959 01.05.2016... - Page 44 7. Fit the wall plate to the wall. Fitting the Back Tamper Switch 1. Insert the tamper switch (See item 2 below) into the back of the enclosure so that the plunger faces outwards (See item 1 below). Vanderbilt Installation & Configuration Manual A6V10276959 01.05.2016...
- Page 45 2. Fit the enclosure back onto the wall using the three fixings previously removed (See item 2 below). Visually check to ensure there is a flush finish between the wall plate and the enclosure metalwork. Vanderbilt Installation & Configuration Manual A6V10276959...
- Page 46 All control panels have spare inputs configured as tamper inputs that are designed for wiring the tamper switch and do not require any programming. This tamper switch will be referred to as ‘Aux Tamper 1’ by the system. Vanderbilt Installation & Configuration Manual A6V10276959...
-
Page 47: Battery Installation For En50131 Compliance
If a 17 Ah battery is used then the battery is biased to the right of the cabinet and middle flap is bent to meet the battery. Vanderbilt Installation & Configuration Manual A6V10276959... -
Page 48: Mounting A G5 Housing
Expander is mounted on top of the PSU. Four extra pillars are included to give you the option to mount the 8 In/2 Output Expander below the PSU board in the G5 cabinet. Additional expanders can be installed in the housing as shown. Vanderbilt Installation & Configuration Manual A6V10276959... - Page 49 If an antenna is fitted to the unit, it must be enabled in the firmware. The SPC G5 housing provides 4 screw holes for wall mounting the unit. Vanderbilt Installation & Configuration Manual A6V10276959...
-
Page 50: Tamper Protection
3. The G5 housing is pre-configured for front tamper only. To configure the housing for both front and back tamper, remove the front tamper securing screw (item 1). The tamper bracket swings to the far right of the orientation slot (item 6). Vanderbilt Installation & Configuration Manual A6V10276959 01.05.2016... -
Page 51: Tamper Operation
If the housing is removed from the wall or displaced, the back tamper contact needs to be tested again for proper functionality and re-adjusted if required. 6.3.2.1 Tamper operation Tamper switch - normal Vanderbilt Installation & Configuration Manual A6V10276959 01.05.2016... - Page 52 This in turn causes the tamper switch to swivel away from the lid and opens the switch contact. WARNING If the tamper bracket screw is not secure against the wall, then tamper protection is compromised. Vanderbilt Installation & Configuration Manual A6V10276959 01.05.2016...
-
Page 53: Installing The Batteries
4. Fasten the two ends of the strap firmly using the Velcro strip. Ensure that the strap is tight around the battery. Vanderbilt Installation & Configuration Manual A6V10276959... -
Page 54: Mounting A Keypad
6. Connect the loose ends of the attached temperature monitoring leads to the battery temperature monitoring inputs on the PSU. Mounting a keypad Please refer to corresponding installation instruction. Mounting an expander Please refer to corresponding installation instruction. Vanderbilt Installation & Configuration Manual A6V10276959 01.05.2016... -
Page 55: Smart Psu
LIMIT — Current limit LED STATUS — Status LED A2 — 14.5V power output. Not backed up by battery Protected by PTC resettable fuse, rated at 300mA (Item 23 in image above) Vanderbilt Installation & Configuration Manual A6V10276959 01.05.2016... - Page 56 (item 12 in image above), power and data connector, with a straight-through cable. Front tamper switch — Not used. The Front/Back tamper connected to T1 and T2 of the SPCP355.300 Smart PSU is the only tamper required by this installation. Vanderbilt Installation & Configuration Manual A6V10276959 01.05.2016...
-
Page 57: Supervised Outputs
Output tamper detection is enabled by connecting a 4K7 EoL resistor in parallel with the load device, such as an external bell. A power diode (1N4001 for example, or similar) is also required, if not already present in the external device. Vanderbilt Installation & Configuration Manual A6V10276959 01.05.2016... -
Page 58: Batteries
OP 6 – OP 8 Number Description Standard 12V Power output Configurable, supervised, 12V DC logical switched output. 7.1.2 Batteries 7.1.2.1 Installing Batteries This section describes the battery installation for the SPCP355.300 Smart PSU and G5 Enclosure. Vanderbilt Installation & Configuration Manual A6V10276959 01.05.2016... - Page 59 Battery temperature leads PSU\Expander Mounting positions for additional expanders. It is recommended that two batteries are used. These batteries must be of the same type and capacity. 1. Install the batteries in the battery compartment. Vanderbilt Installation & Configuration Manual A6V10276959 01.05.2016...
-
Page 60: Testing Battery Voltage
X-BUS can be wired in a number of different configurations, depending on the installation requirements. The following table lists the cable types and distances recommended: Maximum cable length = (number of expanders and keypads in the system) x (maximum cable distance for each cable type) Vanderbilt Installation & Configuration Manual A6V10276959 01.05.2016... -
Page 61: Wiring The Inputs
The expander has 8 on-board zone inputs which can be configured as one of the following: No End of Line Single End of Line Dual End of Line Anti-Masking PIR Default Configuration The following diagram shows the default configuration, Double EOL 4K7: Vanderbilt Installation & Configuration Manual A6V10276959 01.05.2016... -
Page 62: Wiring The Outputs
When the relay is activated, the Common terminal connection (COM) is switched from the Normally Closed (NC) to the Normally open (NO) terminal. The following diagram shows the wiring of an active, high output: Vanderbilt Installation & Configuration Manual A6V10276959... -
Page 63: Compliance With Nf And A2P Approvals
AFNOR Certification Pôle Européen de Sécurité - Vernon 11 rue François de Pressensé Route de la Chapelle Réanville 93571 Saint Denis La Plaine Cedex CD 64 - CS 22265 www.marque-nf.com F-27950 SAINT MARCEL www.cnpp.com Vanderbilt Installation & Configuration Manual A6V10276959 01.05.2016... -
Page 64: Psu Led Status
Mains Fail, Battery OK Mains OK, battery faulty or not present Mains OK, battery faulty, not present, or in deep All LEDs Off. discharge protection mode Fuse Fail Total Load Current exceeded PSU switcher failure Flash Vanderbilt Installation & Configuration Manual A6V10276959 01.05.2016... -
Page 65: System Recovery
3. Hold the PSU Kickstart button until the LEDs stop flashing. 4. Release the PSU Kickstart button. PTC Fuse Reset In the event of one of the PTC fuses resetting, you must manually disconnect then reconnect the mains and battery connections. Vanderbilt Installation & Configuration Manual A6V10276959 01.05.2016... -
Page 66: Controller Hardware
The controller PCB can be factory fitted with a wireless module for use module with wireless (868 MHz) sensors. 2 SPC status LEDs These 7 LEDs display the status of various system parameters as Vanderbilt Installation & Configuration Manual A6V10276959 01.05.2016... - Page 67 LED indicates data activity on the Ethernet port; the right LED Ethernet connectivity indicates the Ethernet link is active. LEDs The Ethernet interface provides for the connection of a PC to the controller for the purposes of programming the system. Ethernet interface Vanderbilt Installation & Configuration Manual A6V10276959 01.05.2016...
- Page 68 (Not applicable for SPC5350 and SPC5360 panels) 22 Auxiliary power input 12 v input from battery or PSU**. * Default setup for SPC5350 and SPC5360 panels ** PSU only applies to SPC5350 and SPC6350 panels. Vanderbilt Installation & Configuration Manual A6V10276959 01.05.2016...
-
Page 69: Controller Hardware Spc5350 And 6350
6 X-BUS interface This is the SPC communications bus used to network expanders together on the system. See page [➙ 72]. Terminals 1B and 1A must be connected to SPCP355.300 I/O Expander Vanderbilt Installation & Configuration Manual A6V10276959 01.05.2016... - Page 70 22 Real-time clock Battery for real-time clock (RTC). battery 23 Auxiliary power input 12 v input from A1 on SPCP355.300 Smart PSU. See also Powering expanders from the auxiliary power terminals [➙ 333] Vanderbilt Installation & Configuration Manual A6V10276959 01.05.2016...
-
Page 71: Door Expander
1 is connected to the X-Bus (which is using the zone numbers 9- 16).The assigned zone from the two door controller will be moved to the next free zone number. Configuration will be adapted accordingly. Vanderbilt Installation & Configuration Manual A6V10276959... -
Page 72: 10 Wiring The System
Each device has 4 terminals (1A, 1B, 2A, 2B) for connection to expanders via the X-BUS cable. The controller initiates a detection procedure on power up to determine the number of expanders connected on the system and the topology in which they are connected. Vanderbilt Installation & Configuration Manual A6V10276959 01.05.2016... -
Page 73: Loop Configuration
The loop (or ring) cabling method offers the highest security by providing fault tolerant communications on the X-BUS. All keypads and expanders are supervised and in case of a X-BUS fault or break, the system continues to operate and all Vanderbilt Installation & Configuration Manual A6V10276959... -
Page 74: Spur Configuration
E.g. if 6 expanders are connected in an open loop configuration, then the nearest expander on the X-BUS connection is expander 1, the second nearest expander is 2, etc. ending with the expander wired farthest from the controller, which is expander 6. Vanderbilt Installation & Configuration Manual A6V10276959 01.05.2016... -
Page 75: Star And Multi-Drop Configuration
The performance in star or multi-drop configuration wiring is limited due to non- optimal conditions of the RS-485 bus specification (reduced signal quality due to multiple receivers/transmitters in parallel with unbalanced terminating resistors). Vanderbilt Installation & Configuration Manual A6V10276959 01.05.2016... - Page 76 In the case of a X-BUS break the single will be disconnected, all other expanders and detectors continue to be supervised. A short in the cable renders all expanders disabled. Star configuration Vanderbilt Installation & Configuration Manual A6V10276959 01.05.2016...
- Page 77 See multi-drop configuration in the second figure. In the case of a X-BUS break, all expanders and detectors up to the fault continues to be supervised. A short in the cable renders all expanders disabled. Multi-drop configuration Vanderbilt Installation & Configuration Manual A6V10276959 01.05.2016...
-
Page 78: Examples Of Correct Wiring
Wiring the system Wiring the X-BUS interface Multi-drop configuration 2 1 SPC controller 2-4 Expanders 10.1.3.1 Examples of correct wiring Star wiring Vanderbilt Installation & Configuration Manual A6V10276959 01.05.2016... -
Page 79: Examples Of Incorrect Wiring
A mix of star and multi-drop configuration is only allowed if the star point is at the controller X-BUS port. In this case, all expanders/keypads must be wired in multi- drop configuration without any other star points in the wiring. Vanderbilt Installation & Configuration Manual A6V10276959... -
Page 80: Shielding
(higher capacitance) in star and multi-drop wiring configuration. However, if shielding is required (i.e. sites with high electric field interference) a new wiring in proper spur or loop configuration with appropriate installation cable configuration has to be done. Vanderbilt Installation & Configuration Manual A6V10276959 01.05.2016... -
Page 81: Cable Map
The following modules have branch expander wiring capability (additional terminals 3A/B and 4A/B): 8 Input / 2 Output Expander 8 Output Expander PSU Expander Wireless Expander 2-door Expander Vanderbilt Installation & Configuration Manual A6V10276959 01.05.2016... -
Page 82: Wiring The System Ground
SPC system outputs. This relay output can switch a rated voltage of 30 V DC (non-inductive load). When the relay is activated the common terminal connection (COM) is switched from the Normally Closed terminal (NC) to the Normally Open terminal (NO). Vanderbilt Installation & Configuration Manual A6V10276959 01.05.2016... -
Page 83: Wiring The Zone Inputs
The installer can choose from any of the following configurations when wiring the inputs: No End of Line (NEOL) Single End of Line (SEOL) Dual End of Line (DEOL) Anti-masking PIR Vanderbilt Installation & Configuration Manual A6V10276959 01.05.2016... - Page 84 6 EOL 4K7 The following table shows the resistance ranges associated with each configuration. Single EOLs EOL Type Quiescent Alarm NONE 0Ω 150Ω 300Ω 300Ω Infinite (-100%) (+100%) (+100%) SINGLE_1K 700Ω 1kΩ 1.3kΩ 23kΩ Infinite Vanderbilt Installation & Configuration Manual A6V10276959 01.05.2016...
- Page 85 (+32%) (-23%) (+28%) DUAL_2k2_4k7 4.7kΩ 6.9kΩ 4.1kΩ 5.4kΩ 6kΩ 7.9kΩ (-13%) (+15%) (-14%) (+15%) DUAL_2K7_8K2 7.2 kΩ 8.2kΩ 9.2kΩ 9.9kΩ 10.9kΩ 11.9kΩ (-13%) (+13%) (-10%) (+10%) DUAL_3K0_3K0 3.0kΩ 6kΩ 2.1kΩ 3.9kΩ 4.5kΩ 7.5kΩ Vanderbilt Installation & Configuration Manual A6V10276959 01.05.2016...
-
Page 86: Wiring An External Sab Bell
TR terminal on the external bell interface. External bell wiring A Strobe + B Strobe – C Hold off D Tamper return E Bell - F Bell + Vanderbilt Installation & Configuration Manual A6V10276959 01.05.2016... -
Page 87: Wiring An Internal Sounder
If both modem slots are available, always install the plug-in module in the primary slot; the system always attempts to make PSTN or GSM calls on a modem installed on the primary slot before attempting to use the back-up slot. Vanderbilt Installation & Configuration Manual A6V10276959... - Page 88 Engineer again. Configure and save the configuration. Failure to follow this process results in a CRC error. Plug-in modules 1 Wireless receiver slot 2 Primary modem slot 3 Back-up modem slot For installation please refer to the corresponding Installation Instruction. Vanderbilt Installation & Configuration Manual A6V10276959 01.05.2016...
-
Page 89: 11 Powering Up The Spc Controller
The battery will continue to power the system until deep discharge level (10.5 V to 10.8 V) has been detected. The time duration that the system will hold up on battery will depend on the external loading and Ah rating of the battery. Vanderbilt Installation & Configuration Manual A6V10276959... -
Page 90: 12 Keypad User Interface
3 LEDs on the keypad provide an indication of AC power, system alerts, and communications status. The LCD keypad may be factory fitted with a Portable ACE (PACE) proximity device reader (see page [➙ 343]). Vanderbilt Installation & Configuration Manual A6V10276959 01.05.2016... - Page 91 [➙ 343]), users should present the Portable ACE Fob to within 1 cm of this area to SET/UNSET the system. Multi-functional The multi-functional navigation key in combination with the keypad display navigation Key provides an interface for programming the system. Status Vanderbilt Installation & Configuration Manual A6V10276959 01.05.2016...
-
Page 92: Using The Lcd Keypad Interface
Continually press this key to scroll through all programming options available on the current menu level. In alphanumeric mode, press this key over an upper case character to change the character to lower case. Vanderbilt Installation & Configuration Manual A6V10276959 01.05.2016... - Page 93 – Bell tamper – Cabinet tamper – Aux tamper 1 – Aux tamper 2 – Wireless jamming – Modem 1 fault – Modem 1 line – Modem 2 fault – Modem 2 line Vanderbilt Installation & Configuration Manual A6V10276959 01.05.2016...
-
Page 94: Data Entry On The Lcd Keypad
The use of the interface for each type of operation is detailed below. Entering numeric values In Numeric Entry mode, only the numeric digits (0 - 9) can be entered. Vanderbilt Installation & Configuration Manual A6V10276959 01.05.2016... -
Page 95: Spck620/623
The SPCK623 is equipped with a proximity card reader (125 kHz EM 4102) for easy user access, soft keys, large graphical LCD and voice annunciation support. The functionality can be enhanced with key switch expander SPCE110 or indication expander SPCE120. Vanderbilt Installation & Configuration Manual A6V10276959 01.05.2016... - Page 96 (#) key. To enter a numeric digit, hold down the appropriate key for 2 seconds. Multi-functional navigation key Navigation through menus and to scroll through alert messages. (See Display Message Vanderbilt Installation & Configuration Manual A6V10276959 01.05.2016...
- Page 97 XBUS antenna fault – XBUS wireless jamming – XBUS panic – XBUS fire – XBUS medical – XBUS Power supply link – XBUS output tamper – XBUS Low voltage – Engineer restore Required Vanderbilt Installation & Configuration Manual A6V10276959 01.05.2016...
-
Page 98: Led Description
Assigned area is unset. Flashing Assigned area is Partset A / B Assigned area is fullset Alarm Alarm Flashing No alarm Alert Amber Flashing Trouble No trouble Mains Green System ok Flashing Mains fault Vanderbilt Installation & Configuration Manual A6V10276959 01.05.2016... -
Page 99: Viewing Mode Description
12.2.4 Function keys in idle state Emergency Keys Depending on configuration, emergency keys are displayed. A simultaneous pressing of the keys activates an emergency call. Panic Alarm Fire alarm Vanderbilt Installation & Configuration Manual A6V10276959 01.05.2016... - Page 100 The activated process depends on the system configuration. Please ask the installer for details. Direct Settings Depending on configuration, the direct set option is displayed. A forced set / part set without PIN is possible of the area the keypad is assigned to. Vanderbilt Installation & Configuration Manual A6V10276959 01.05.2016...
-
Page 101: 13 Software Support Tools
Enables the remote creation, control and modification of access based functionality within the SPC system. SPC Safe Provides automated remote site administration of an SPC system. SPC Remote Maintenance Provides automated remote monitoring and servicing of an SPC system. Vanderbilt Installation & Configuration Manual A6V10276959 01.05.2016... -
Page 102: 14 Starting The System
PIN at the panel. If you do not change your PIN, you will get an information message forcing you to change your default PIN before logging out of full engineer mode. Vanderbilt Installation & Configuration Manual A6V10276959... -
Page 103: Programming Tools
COMMERCIAL: provides additional zone types and commercial zone default descriptions for the first 8 zones. FINANCIAL: is specific for banks and other financial institutions and includes features such as auto-setting, time locks, interlock groups and a seismic zone type. Vanderbilt Installation & Configuration Manual A6V10276959 01.05.2016... - Page 104 13. Choose the installation topology: LOOP (Ring) or SPUR (Chain). The system scans for the quantity of keypads, expanders, door controllers and available zone inputs. 14. Press NEXT to scan all X-BUS devices. Vanderbilt Installation & Configuration Manual A6V10276959 01.05.2016...
-
Page 105: Creating System Users
1 cm of the receiver area on the keypad. Vanderbilt Installation & Configuration Manual A6V10276959... -
Page 106: Configuring Wireless Fob Devices
The keypad indicates UPDATED. 14.6 Configuring wireless fob devices If an 868 MHz wireless receiver module is installed on the keypad or controller, a wireless fob device can be programmed via the keypad. Vanderbilt Installation & Configuration Manual A6V10276959 01.05.2016... -
Page 107: Clearing Alerts Using The Fob
To enable this functionality, the KEYFOB RESTORE option must be enabled in System Options: 1. Login to the keypad with an Engineer PIN. 2. Scroll to FULL ENGINEER > OPTIONS. 3. Press SELECT. 4. Scroll to KEYFOB RESTORE and press SELECT. Vanderbilt Installation & Configuration Manual A6V10276959 01.05.2016... - Page 108 Starting the system Configuring wireless fob devices 5. Toggle the setting to ENABLED and press SAVE. Vanderbilt Installation & Configuration Manual A6V10276959 01.05.2016...
-
Page 109: 15 Soft Engineer Programming Via The Keypad
See also TEST [➙ 145] DOOR CONTROL [➙ 157] Engineer programming via the keypad [➙ 110] INSTALLER TEXT [➙ 157] SET DATE/TIME [➙ 157] SMS [➙ 155] Vanderbilt Installation & Configuration Manual A6V10276959 01.05.2016... -
Page 110: 16 Engineer Programming Via The Keypad
The first fault will display on the keypad when you attempt to leave engineer mode. You can view and isolate all faults within the System Status menu under Alerts and Open Zones. Vanderbilt Installation & Configuration Manual A6V10276959 01.05.2016... -
Page 111: Options
FRANCE APPLICATION Determines whether SPC is being installed for use in a commercial business or a private Domestic residence. Choose between COMMERCIAL (see page [➙ 321]), DOMESTIC (see page [➙ 320]) or FINANCIAL. Vanderbilt Installation & Configuration Manual A6V10276959 01.05.2016... - Page 112 6 DIGITS 7 DIGITS 8 DIGITS CODED RESTORE ENABLED/DISABLED WEB ACCESS ENABLED/DISABLED Allows/restricts access to the web browser. OPEN ZONES ENABLED/DISABLED ALLOW ENGINEER ENABLED/DISABLED ALLOW MANUFACT. * ENABLED/DISABLED SHOW STATE ENABLED/DISABLED EOL RESISTANCE NONE Vanderbilt Installation & Configuration Manual A6V10276959 01.05.2016...
- Page 113 CLOCK SETTINGS AUTOMATIC DST MAINS TIME SYNC SUSPICION AUDIBLE ENABLED/DISABLED SHOW CAMERAS ENABLED/DISABLED SEIS TEST ON SET ENABLED/DISABLED ALERT FORBID SET ENABLED/DISABLED ANTIMASK SET DISABLED TAMPER FAULT ALARM ANTIMASK UNSET DISABLED TAMPER FAULT ALARM Vanderbilt Installation & Configuration Manual A6V10276959 01.05.2016...
-
Page 114: Timers
10 and 250 seconds. SETTING AUTH Final Exit The Final Exit time is the number of seconds that arming is 7 sec. delayed after a zone programmed with the final exit attribute Vanderbilt Installation & Configuration Manual A6V10276959 01.05.2016... - Page 115 Number of changes within a valid period ( 1 - 50 ) PIN CHANGES LIMIT PIN Warning Time before PIN expiry after which a warning will be 5 days displayed PIN WARN ( 1 - 14 ) Vanderbilt Installation & Configuration Manual A6V10276959 01.05.2016...
-
Page 116: Areas
ENTRY TIMER – EXIT TIMER – NO EXIT TIMER – FOB ENTRY ACTIVE PARTSET A/B – ENABLED/DISABLED – TIMED – ACCESS TO E/EXIT – E/EXIT TO ALARM – LOCAL – NO BELLS Vanderbilt Installation & Configuration Manual A6V10276959 01.05.2016... -
Page 117: Area Groups
ENABLED or DISABLED as required to add it or remove it from the group. An asterisk (*) indicates if an area is part of the group. DELETE Select the area to be deleted. Vanderbilt Installation & Configuration Manual A6V10276959 01.05.2016... -
Page 118: X-Bus
Automatically addressed expanders are not supported by SPC41xx. 16.6.2 XBUS Refresh The X-Bus Refresh utility performs a discovery of the current status of the X-Bus and displays the current X-Bus configuration. Vanderbilt Installation & Configuration Manual A6V10276959 01.05.2016... -
Page 119: Reconfigure
The number of online keypads is displayed. 3. Press NEXT. The number of online expanders is displayed. 4. Press NEXT The number of online zones is displayed. 5. Press BACK to exit. Vanderbilt Installation & Configuration Manual A6V10276959 01.05.2016... -
Page 120: Keypads/Expanders/Door Controllers
Firmware version POWER Power parameters: real-time voltage and current readings ADDRESS INFO The addressing mode and the address of the keypad\expander\door controller. AUX FUSE The status of the auxiliary fuse on the expander\door controller Vanderbilt Installation & Configuration Manual A6V10276959 01.05.2016... -
Page 121: Edit Keypads
Tick this box to disable the keys on the keypad during the entry time when a PACE is configured on the keypad. Areas Location Select the secured area where the keypad is located. Areas Select which areas can be controlled through keypad. Options Vanderbilt Installation & Configuration Manual A6V10276959 01.05.2016... - Page 122 LCD display. Audible indications Alarms Select speaker volume for alarm indications or disable sound. Entry/Exit Range is 0 – 7 (Max volume) Chime Select speaker volume for entry & exit indications or disable sound. Vanderbilt Installation & Configuration Manual A6V10276959 01.05.2016...
-
Page 123: Edit Expanders
For naming and identifying, expanders are allocated zones (in groupings of 8) with subsequent identities of 1 to 512. (The greatest number in zone identification is 512.) Therefore, any expander named or identified by a number greater than 63 has no allocated zones. Vanderbilt Installation & Configuration Manual A6V10276959 01.05.2016... - Page 124 Select a location for the expander from the list of available areas. FUNCTION KEYS Enables you to assign behaviour to specific keys for specific areas. Select an area and assign one of the following options to that area: None Vanderbilt Installation & Configuration Manual A6V10276959 01.05.2016...
- Page 125 Card Reader – enable or disable deactivation using a keypad. MODE Select Linked or Flexible. Linked mode reduces the number of options available in the Expander Edit menu. INPUT Select the zone Vanderbilt Installation & Configuration Manual A6V10276959 01.05.2016...
- Page 126 None Unset Partset A Partset B Fullset Toggle Unset/Fullset Toggle Unset/Partset A Toggle Unset/Partset B All Okay Setting Authorisation Vanderbilt Installation & Configuration Manual A6V10276959 01.05.2016...
-
Page 127: Edit Door Controllers
1 is connected to the X-Bus (which is using the zone numbers 9-16) the assigned zone from the two door controller will be moved to the next free zone number. The configuration will be adapted accordingly. To edit a READER PROFILE: Vanderbilt Installation & Configuration Manual A6V10276959 01.05.2016... -
Page 128: Addressing Mode
Select any of the following profiles for the reader: For readers with a green and a red LED. For VANDERBILT readers with a yellow LED (AR618X). Profile 3 is used with HID readers that send a PIN to the panel as a card reading... -
Page 129: Xbus Type
To designate the length of time before a communication fault is recorded: 1. Scroll to COMMS TIMER. 2. Press SELECT. 3. Enter the preferred time setting. 4. Press ENTER to update the setting. Vanderbilt Installation & Configuration Manual A6V10276959 01.05.2016... -
Page 130: Wireless
The top line of the display flashes the text ACTIVATE DEVICE. 3. Activate the wireless device between 3 and 5 times in succession to allow the keypad receiver to detect the wireless transmission of the device. Vanderbilt Installation & Configuration Manual A6V10276959... -
Page 131: Edit Sensors (Zone Assignment)
WPA option. One of the WPAs buttons must be pressed when the ACTIVATE WPA message is displayed, in order for the panel to identify the WPA. The panel will not accept a WPA if it’s ID is a duplicate of a currently configured WPA. Vanderbilt Installation & Configuration Manual A6V10276959 01.05.2016... -
Page 132: Edit Wpa
Determines the attributes of the zone. See page [➙ 350]. TO AREA Determines which zone is mapped to which area. This menu option is only displayed if multiple areas are defined on the system. Selecting this feature allows Vanderbilt Installation & Configuration Manual A6V10276959 01.05.2016... -
Page 133: Doors
(If the card reader is used for setting & unsetting, this (Web and SPC Pro only) area will be set / unset). Door Position (Web) The resistor used with the door position sensor. Choose Vanderbilt Installation & Configuration Manual A6V10276959 01.05.2016... - Page 134 PIN is required. No card will be accepted. PIN Code or Card PIN or card are required to gain entry PIN to Exit PIN is required on exit reader. Door with entry and exit reader is required. Vanderbilt Installation & Configuration Manual A6V10276959 01.05.2016...
- Page 135 The custodian must be the first to enter the room. The non-custodians are only allowed to enter if the custodian is in the room. The custodian will not be allowed to exit until all non-custodians have left the room. Vanderbilt Installation & Configuration Manual A6V10276959 01.05.2016...
-
Page 136: Outputs
OUTPUT Determines the style of the output: continuous, momentary or pulsed. MODE POLARITY Determines whether the output is activated on a positive or negative polarity. Determines if system log is enabled or disabled. Vanderbilt Installation & Configuration Manual A6V10276959 01.05.2016... -
Page 137: Outputs Types And Output Ports
This output turns on following activation of panic alarm zone types from any area. A panic alarm output is also generated if a user duress event is generated or if the panic option for the keypad is enabled. Vanderbilt Installation & Configuration Manual A6V10276959... - Page 138 This output turns on if there is a failure to communicate to the central station Man Down Test This output turns on a ‘Man Down’ wireless device which is activated during a ‘Man Down’ test. Vanderbilt Installation & Configuration Manual A6V10276959 01.05.2016...
- Page 139 Activates if there is a code tamper in the area. Clears when state is reset. Trouble Activates if any zone is in trouble state. Ethernet Link Activates if there is a fault on the Ethernet link. Network Fault Activates if there is an EDP communications fault. Vanderbilt Installation & Configuration Manual A6V10276959 01.05.2016...
-
Page 140: Communication
Determines if the data is under hardware (RTS, CTS) or software control (None). CONTROL Please note that the flow control must be set the same for both items of equipment. 16.11.2 Ethernet Ports To program the Ethernet port: 1. Scroll to ETHERNET PORT. Vanderbilt Installation & Configuration Manual A6V10276959 01.05.2016... -
Page 141: Modems
If the SPC Alarm System does not receive a polling ACK within the timeout (depends on ATP category), the SPC Alarm System updates its status to DOWN. SPC supports the following transmission interfaces: Ethernet GSM with GPRS enabled PSTN modem. Vanderbilt Installation & Configuration Manual A6V10276959 01.05.2016... -
Page 142: Configuring Modems
(PSTN modem only) Enter a prefix number to include before the SMS number, if required. LINE MONITORING For PSTN: Enable this feature to monitor the voltage of the line connected to the modem. Vanderbilt Installation & Configuration Manual A6V10276959 01.05.2016... -
Page 143: Central Station
The modem (primary or back-up) to be used to communicate with the ARC 16.11.4.2 Edit To edit the central station settings: 1. Scroll to CENTRAL STATION >EDIT. 2. Press SELECT. 3. Select the desired programming option shown in the table below. Vanderbilt Installation & Configuration Manual A6V10276959 01.05.2016... -
Page 144: Delete
IP connections from the Remote Maintenance server. If not enabled, only modem connections are possible. Enter the IN TCP/IP PORT on which the panel listens to incoming IP connections from the Remote Maintenance server. Vanderbilt Installation & Configuration Manual A6V10276959 01.05.2016... -
Page 145: Test
All zones can be included in an Engineer walk test. 16.12.3 Zone Monitor The Zone Monitor option displays status information on each of the zones on the system. To view zone status information: 1. Scroll to TEST > ZONE MONITOR. Vanderbilt Installation & Configuration Manual A6V10276959 01.05.2016... -
Page 146: Output Test
SH or DI indicates that the zone is shorted or disconnected. 16.12.4 Output Test To perform an output test: 1. Scroll to OUTPUT TEST. 2. Press SELECT. 3. Toggle between CONTROLLER and EXPANDER for preferred option. Vanderbilt Installation & Configuration Manual A6V10276959 01.05.2016... -
Page 147: Soak Test
On the LCD keypad, two rows of continuously changing characters are displayed. On the Comfort keypad, all the LED indicators are lit and all screen pixels are displayed. 1. Press BACK to disable the test. Vanderbilt Installation & Configuration Manual A6V10276959 01.05.2016... -
Page 148: Wpa Test
To back-up a configuration. RESTORE CONFIG To restore a configuration. FAST PROGRAMMER DATA FROM PANEL: Transfer data from the controller to the Fast Programmer. You are prompted to confirm if the new Vanderbilt Installation & Configuration Manual A6V10276959 01.05.2016... -
Page 149: Isolate
Recent events on the system are displayed in the EVENT LOG option. Events flash in one second intervals. 1. Scroll to EVENT LOG and press SELECT. 2. To view an event from a particular date, enter the date with the numeric keys. Vanderbilt Installation & Configuration Manual A6V10276959 01.05.2016... -
Page 150: Access Log
If the display times out during the process, the old PIN remains valid. 16.19 Users Only users with the appropriate user right enabled in their profile have the ability to add, edit, or delete users: Vanderbilt Installation & Configuration Manual A6V10276959 01.05.2016... -
Page 151: Add
One access card can be assigned to each of the users on the control panel. To configure the access control for a user: 1. Scroll to USERS > EDIT. 2. Press SELECT. 3. Select the user which should be configured and press SELECT. Vanderbilt Installation & Configuration Manual A6V10276959 01.05.2016... - Page 152 2. Press SELECT. 3. Edit the desired user setting shown in the table below. 4. Press BACK to exit. Access Control Attribute Description Card Number Enter card number. Enter 0 to unassign this card. Vanderbilt Installation & Configuration Manual A6V10276959 01.05.2016...
-
Page 153: Delete
2. Press SELECT. 16.19.3 Delete To delete users on the system: 1. Scroll to USERS > DELETE. 2. Press SELECT. A prompt displays, confirming command to delete. 3. Press YES to delete the user. Vanderbilt Installation & Configuration Manual A6V10276959 01.05.2016... -
Page 154: User Profiles
To delete user profiles on the system: 1. Scroll to USER PROFILES > DELETE. 2. Scroll through the user profiles to the required profile. 3. Press SELECT You are prompted to confirm deletion. Vanderbilt Installation & Configuration Manual A6V10276959 01.05.2016... -
Page 155: Sms
2. Select a user to add for SMS operation. 3. Enter an SMS NUMBER for this user and press ENTER. 4. Enter an SMS PIN for this user and press ENTER. Keypad indicates that SMS details are updated. Vanderbilt Installation & Configuration Manual A6V10276959 01.05.2016... -
Page 156: Edit
X10 devices. The SPC controller provides a dedicated serial port (serial port 1) for interfacing directly with standard X10 equipment. 1. Scroll to X-10 and press SELECT. Vanderbilt Installation & Configuration Manual A6V10276959 01.05.2016... -
Page 157: Set Date/Time
The installer contact details programmed in these menu options should also be entered on the keypad pull-down label on completion of the installation. 16.25 Door Control This option allows you to control all the doors of the system. Vanderbilt Installation & Configuration Manual A6V10276959 01.05.2016... -
Page 158: Spc Connect
SPC Connect website, https://www.spcconnect.com, for remote access to their panel. COMPANY ID For future use. DELETE To remove an SPC Connect ATS from a panel, select DELETE. Vanderbilt Installation & Configuration Manual A6V10276959 01.05.2016... -
Page 159: 17 Engineer Programming Via The Browser
Click Refresh to view the current programming values on a web page. 17.1 System Information Click the ? icon to view the Help menu which provides up-to-date information about the panel and the functionality that is currently licensed on the system. 17.2 Ethernet interface Vanderbilt Installation & Configuration Manual A6V10276959 01.05.2016... - Page 160 1. Entering the Engineer mode (See Engineering PINs [➙ 102]). 2. Using the up/down arrow keys, scroll down COMMUNICATION option and press SELECT. 3. Scroll to ETHERNET PORT and press SELECT. 4. Scroll to IP ADDRESS and press SELECT. Vanderbilt Installation & Configuration Manual A6V10276959 01.05.2016...
-
Page 161: Connecting To The Panel Via Usb
Vanderbilt Intrunet SPC USB Local Connection 7. Click Next. A dialog box regarding Windows certification appears. Vanderbilt deems this acceptable to continue. For further queries, please contact network administrator or a Vanderbilt technician. - Page 162 11. In the General tab, click Change Settings to allow editing of the properties. 12. Select the Modem tab. 13. Change the value in the Maximum Port Speed to 115200 and click OK. Vanderbilt Installation & Configuration Manual A6V10276959 01.05.2016...
-
Page 163: Logging Into The Browser
2. Enter the IP address in the address bar of the browser using the hyper text transfer protocol secure. (e.g. https:// 192.168.1.100) See table below. A window with a security message is displayed. 3. Click Continue to this website. The login screen is displayed. Vanderbilt Installation & Configuration Manual A6V10276959 01.05.2016... -
Page 164: Spc Home
You can set or unset an area and the area status displays here. Inhibits and Isolates: Lists all the isolated zones and allows you to deisolate or bypass before setting. Vanderbilt Installation & Configuration Manual A6V10276959 01.05.2016... -
Page 165: Alarms Overview
Click the Restore button to clear. The Alarm log shows up to 20 events. 17.5.3 Viewing Video The Video tab displays images from up to 4 IP cameras. In Full Engineer, Soft Engineer and User mode, select SPC Home > Video. Vanderbilt Installation & Configuration Manual A6V10276959 01.05.2016... - Page 166 Client error The camera returned a client error. Check your camera configuration. Authorization error User name and/or password are incorrect Unknown An unknown error was returned. The camera may be an unsupported model. Vanderbilt Installation & Configuration Manual A6V10276959 01.05.2016...
-
Page 167: Panel Status
The following window with the status of the different X-Bus devices is displayed. All detected expanders are listed as default. 2. Select one of the following tabs. Expanders (for programming expanders see page [➙ 204]). Vanderbilt Installation & Configuration Manual A6V10276959 01.05.2016... -
Page 168: Expander Status
Click the button to update the status of the X-BUS. To view more status information: Click on any of the expander’s identifying parameters (ID, description, type, serial number) to display further status details. Vanderbilt Installation & Configuration Manual A6V10276959 01.05.2016... - Page 169 It is recommended that you exercise caution when isolating zones as those zones will not be active every time the system is SET. Vanderbilt Installation & Configuration Manual A6V10276959 01.05.2016...
-
Page 170: Psu Status
Battery Status Displays the condition of the battery connection. Possible values are Fault or OK. Battery Voltage Displays the voltage reading of the battery. Battery Current Displays the current taken from the battery. Vanderbilt Installation & Configuration Manual A6V10276959 01.05.2016... - Page 171 Primary Circuit Displays the condition of the primary circuit which supplies power when the mains is connected. Charge Circuit Displays the condition of the charge circuit which charges the batteries when the mains Vanderbilt Installation & Configuration Manual A6V10276959 01.05.2016...
-
Page 172: Keypad Status
Click on the refresh button to update the list of detected keypads and their status. To view more status information: Click on a keypad’s identifying parameters (ID, description, type, serial number) to display further status details. Vanderbilt Installation & Configuration Manual A6V10276959 01.05.2016... -
Page 173: Door Controller Status
1. Select Status > Hardware > X-Bus Status. 2. Select the Door Controllers tab. A list of detected door controllers is displayed. Expander ID This ID number is a unique identifier for the door controller. Vanderbilt Installation & Configuration Manual A6V10276959 01.05.2016... - Page 174 It is recommended that you exercise caution when isolating zones as those zones will not be active every time the system is SET. Vanderbilt Installation & Configuration Manual A6V10276959 01.05.2016...
-
Page 175: Wireless
Click to view the wireless sensor Log. See page [➙ 176]. Enrol Click to open the list of unenrolled wireless devices. 1. Select Status > Hardware > Wireless > WPA. 2. The identity of each enrolled WPA and its status displays. Vanderbilt Installation & Configuration Manual A6V10276959 01.05.2016... -
Page 176: Log - Wireless Sensor X
1. To view all zones, select Status > Inputs > All Zones. To view X-Bus only zones, select the X-Bus Zones tab or to view wireless zones only, select the Wireless Zones tab. 2. See tables below for further information. Vanderbilt Installation & Configuration Manual A6V10276959 01.05.2016... - Page 177 PIR Masked, Normal, Actuated, Tamper , Post Alarm. A zone is in the post alarm status if an alarm occurred and the confirmed alarm timed out. This reinstates the zone, however it also flags that an alarm did occur. Vanderbilt Installation & Configuration Manual A6V10276959...
-
Page 178: Doors
Displays a log of events for the selected door. Lock Locks the selected door. Unlock Unlocks the selected door. Normal Returns the door to normal system control. Momentary Unlocks the door for one timed interval. Vanderbilt Installation & Configuration Manual A6V10276959 01.05.2016... -
Page 179: Flexc Status
Event Description Additional Event Info Result Reported ATP Start Timestamp ACK/Fail Timestamp Report Duration Network Log Network log for the ATS showing the configured polling interval. Vanderbilt Installation & Configuration Manual A6V10276959 01.05.2016... -
Page 180: System Alerts
Click this button to isolate the zone. Isolating a zone will de-activate that zone until such time as the zone is explicitly de-isolated again. It is recommended that you exercise caution when isolating zones as those zones will not be active every time the system is SET. Vanderbilt Installation & Configuration Manual A6V10276959 01.05.2016... -
Page 181: Logs
17.7.2 Access Log The log provides all the access events of the SPC system. Select Log > Access log. The following window will be displayed: Vanderbilt Installation & Configuration Manual A6V10276959 01.05.2016... -
Page 182: Wpa Log
The following types are displayed in this log: Zones – Alarm – Panic System Events – Confirmed Alarm – User Duress – XBus Panic – User Panic – RPA Panic Vanderbilt Installation & Configuration Manual A6V10276959 01.05.2016... -
Page 183: Users
1. Select Users > Users > Add User. A list of configured users is displayed. 2. Click on the Add button or click on the Edit button of the required user. The following screen is displayed. Vanderbilt Installation & Configuration Manual A6V10276959 01.05.2016... - Page 184 Priority cards are stored locally in the door controllers and will grant access in case of a technical fault where the door controller cannot communicate with the control panel. The maximum number of priority users is: Vanderbilt Installation & Configuration Manual A6V10276959 01.05.2016...
-
Page 185: Unknown Devices
1. Change the card number to zero (0). 2. Click Save. The card is unassigned from the user and deleted from the system. 3. To add the card again, you must rescan it. Vanderbilt Installation & Configuration Manual A6V10276959 01.05.2016... -
Page 186: Adding / Editing User Profiles
2. Provide a User Profile Name (maximum 16 characters and case sensitive). 3. Select all Areas that will be controlled by this user profile. 4. Select a Calendar to set the time limitations of this profile on the system. Vanderbilt Installation & Configuration Manual A6V10276959... - Page 187 Standard Inhibiting a zone deactivates that zone for one alarm Manager set period. This is the preferred method of deactivating a faulty or open zone as the fault or open condition is displayed Vanderbilt Installation & Configuration Manual A6V10276959 01.05.2016...
- Page 188 User can activate/deactivate configured X-10 devices. Manager Note: X-10 is in maintenance. The functionality remains Access Control in the system for backward compatibility. Door Control Standard* User can lock/unlock doors. Manager Access Control Vanderbilt Installation & Configuration Manual A6V10276959 01.05.2016...
- Page 189 A list of users assigned to this profile is displayed. Click on a user to view or edit the user’s details. You can create a new user profile based on an existing profile by clicking Replicate. A new User Profile page is displayed. Vanderbilt Installation & Configuration Manual A6V10276959 01.05.2016...
-
Page 190: Configuring Sms
Enter the number to which the SMS will be sent (requires three-digit country code prefix). Note: Engineer SMS number can deleted by resetting it 0. User SMS numbers cannot be deleted. User Select a new user for this SMS ID if required. Vanderbilt Installation & Configuration Manual A6V10276959 01.05.2016... -
Page 191: Sms Commands
Retrieves the status of Status of system and applicable areas. areas ****.SSTA STATUS For a single area system, ****. STATUS system and mode are returned, where mode is the set status of the system Vanderbilt Installation & Configuration Manual A6V10276959 01.05.2016... - Page 192 (Example: O5 for mapping gate 5) For SMS recognition, X-10 device uses the format: XYNN, where X stands for X- 10; Y stands for the alphabetic identity and NN are the available numeric placeholders. (Example: XA1) Vanderbilt Installation & Configuration Manual A6V10276959 01.05.2016...
-
Page 193: Deleting Web Passwords
Note: To comply with INCERT approvals, the user’s PIN code must contain more than 4 digits. 4. Select the Language that will be used by the engineer. (Only displayed if multiple languages available – see Upgrading Languages [➙ 308]) Vanderbilt Installation & Configuration Manual A6V10276959 01.05.2016... -
Page 194: Changing Engineer Pin And Web Password
17.8.6.1 Changing Engineer PIN and web password This screen enables you to change the PIN for accessing the keypad and also the password for accessing the Web browser for Engineer level only. Vanderbilt Installation & Configuration Manual A6V10276959 01.05.2016... - Page 195 Click on the Change Password button to activate the new password. This password is case sensitive – ensure that you enter the correct upper or lower case alphabetic characters in your new password. Vanderbilt Installation & Configuration Manual A6V10276959 01.05.2016...
-
Page 196: Configuration
Only if (multiple) Areas is activated in menu Panel Settings > System Settings > Options. Select the areas to which this zone has been assigned. Attributes An icon in this field indicates that attributes have been programmed for this zone (see page [➙ 197]). Vanderbilt Installation & Configuration Manual A6V10276959 01.05.2016... -
Page 197: Editing An Output
The attributes presented on this page will depend on the type of zone selected. For a list of assignable attributes see page [➙ 352]. 17.9.1.2 Editing an output 1. Select Configuration > Hardware > Controller. 2. Configure the fields as described in the table below. Vanderbilt Installation & Configuration Manual A6V10276959 01.05.2016... - Page 198 Output types that are not assigned to physical outputs act as indicators of events on the system and may be logged and/or reported to remote central stations if required. Vanderbilt Installation & Configuration Manual A6V10276959...
- Page 199 This output turns on when a medic zone is activated Fault This output turns on when a technical fault is detected Technical This output follows tech zone activity Mains Fault* This output activates when Mains power is removed Vanderbilt Installation & Configuration Manual A6V10276959 01.05.2016...
- Page 200 If that doesn’t happen, the test fails. The panel then waits a further 2 seconds before reporting the test result. The result of the test, either manual or automatic, is stored in the system event log Local Alarm This output activates on a local intrusion alarm. Vanderbilt Installation & Configuration Manual A6V10276959 01.05.2016...
- Page 201 Full Engineer Activates if an engineer is on site and the system is in full engineer mode. This output type can only indicate system wide events (no area specific events). Vanderbilt Installation & Configuration Manual A6V10276959 01.05.2016...
-
Page 202: Configuring System Latch And Auto Set Outputs
Output turns on when valid user PIN entered on keypad and fire zone is active Select the behavior of the output. Output will remain on if auto set is active. Keypad Output will follow keypad operation. Vanderbilt Installation & Configuration Manual A6V10276959 01.05.2016... -
Page 203: X10 Config - Settings
This is the number (1-16) that is assigned to the device. Active This field indicates if the device is active or not. Description This field displays a description that is used to help identify the device – e.g. downstairs light (16 characters max). Vanderbilt Installation & Configuration Manual A6V10276959 01.05.2016... -
Page 204: X-Bus
512). Therefore, any expander named or identified by a number greater than 63 has no allocated zones. 2. Click on one of the expander identifying parameters to display the Expander Configuration screen. Vanderbilt Installation & Configuration Manual A6V10276959 01.05.2016... - Page 205 Tick this box if there is no secondary battery connected to the PSU only When expanders are added or removed: Click Reconfigure to implement changes. See also Wiring the system [➙ 72] Vanderbilt Installation & Configuration Manual A6V10276959 01.05.2016...
- Page 206 3. Select the areas that are to be controlled by the 4 functions keys. 4. Configure the input. Flexible Mode 1. Click the Flexible Mode button. 2. Configure the fields described in the tables below. 3. Configure the input. Vanderbilt Installation & Configuration Manual A6V10276959 01.05.2016...
- Page 207 Select if indicator module should not be activated until a valid card/fob is presented to the built-in card reader. 17.9.2.1.2 Configuring a Keyswitch Expander 1. Select Settings > X-Bus > Expanders. 2. Click one of the keyswitch identifying parameters. The following dialog is displayed. Vanderbilt Installation & Configuration Manual A6V10276959 01.05.2016...
- Page 208 Mapping gate Select if the keyswitch module should be limited by a mapping gate. Output Output Configure and text the outputs for the keyswitch. See Outputs [➙ 198] for more details Keyswitch Functions Vanderbilt Installation & Configuration Manual A6V10276959 01.05.2016...
-
Page 209: Keypads
17.9.2.2.1 Editing a Standard Keypad 1. Select Configuration > Hardware > X-Bus > Keypads. 2. Click one of the standard keypad identifying parameters. 3. Configure the fields as described in the table below. Vanderbilt Installation & Configuration Manual A6V10276959 01.05.2016... - Page 210 Enable or disable the buzzer on the keypad. Partset Buzzer Enable or disable buzzer during exit time on Partset. Keypress Select if the speaker volume for the key presses should be activated. Deactivation Vanderbilt Installation & Configuration Manual A6V10276959 01.05.2016...
- Page 211 17.9.2.2.2 Editing a Comfort Keypad 1. Select Configuration > Hardware > X-Bus > Keypads. 2. Click one of the comfort keypad identifying parameters. 3. Configure the fields as described in the table below. Vanderbilt Installation & Configuration Manual A6V10276959 01.05.2016...
- Page 212 Engineer programming via the browser Configuration Vanderbilt Installation & Configuration Manual A6V10276959 01.05.2016...
- Page 213 Tick this box to disable the keys on the keypad during the entry time when a PACE is configured on the keypad. Areas Location Select the secured area where the keypad is located. Areas Select which areas can be controlled through keypad. Vanderbilt Installation & Configuration Manual A6V10276959 01.05.2016...
-
Page 214: Door Controllers
(in groupings of 8) in subsequent identities of 1 to 512 (the greatest number in zone identification is 512). Therefore, any expander named or identified by a number greater than 63 has no allocated zones. Vanderbilt Installation & Configuration Manual A6V10276959... -
Page 215: Cable Map
Profile 1 For readers with a green and a red LED. Profile 2 For VANDERBILT readers with a yellow LED (AR618X). Profile 3 Profile 3 is used with HID readers that send a PIN to the panel as a card reading... -
Page 216: Settings
The number of times the system attempts to re-transmit data on the X-BUS interface before a communications fault is generated. (1 – 99: default is 25) Comms Timer The length of time before a communication fault is recorded. Vanderbilt Installation & Configuration Manual A6V10276959 01.05.2016... -
Page 217: Wireless
Click to view the wireless sensor Log. See page [➙ 218]. Enrol Click to open the list of unenrolled wireless devices. 1. Select Status > Hardware > Wireless > WPA. 2. The identity of each enrolled WPA and its status displays. Vanderbilt Installation & Configuration Manual A6V10276959 01.05.2016... -
Page 218: Log - Wireless Sensor X
WPAs may be permanently attached to a surface such as under a desk or behind a till. A maximum of 128 WPAs is allowed per panel. Vanderbilt Installation & Configuration Manual A6V10276959... - Page 219 Adding a WPA To add a WPA to the system: Click the Add button in the main WPA Configuration and Status page. The Configure WPA page is displayed for the new WPA. Vanderbilt Installation & Configuration Manual A6V10276959 01.05.2016...
- Page 220 Panic, Panic silent, Holdup, Suspicion, RF User Output and Medical. More than one combination can be selected for the same function. The screen above shows the defaults for the panel for a Financial installation: Yellow - Suspicion Vanderbilt Installation & Configuration Manual A6V10276959 01.05.2016...
-
Page 221: Changing Wireless Settings
Tick to filter low strength RF signals. Detect RF Jam Tick to activate an alert if RF interference is detected. RF FOB SOS Select how the SOS buttons on the RF Fob should operate.: Vanderbilt Installation & Configuration Manual A6V10276959 01.05.2016... -
Page 222: Changing System Settings
Offline Tamper Enable this for offline expander zones to generate a zone tamper. Keyfob Restore If enabled, key fob is enabled to restore alerts by pressing the Unset key. Vanderbilt Installation & Configuration Manual A6V10276959 01.05.2016... - Page 223 Bell on Fail to Set Enable to activate the internal bell if the system fails to (FTS) set. Strobe on Fail to Enable to activate the strobe if the system fails to set. Vanderbilt Installation & Configuration Manual A6V10276959 01.05.2016...
- Page 224 ‘Unrestricted’ mode. In Grade 2 or 3 mode, the type of event reported is in accordance with the standards for the selected region: Ireland - Disabled All other regions - Tamper Vanderbilt Installation & Configuration Manual A6V10276959 01.05.2016...
- Page 225 (Financial mode only). Auto Restore Enable this feature to automatically restore alerts on the system i.e. when the open zone that triggered an alarm is Vanderbilt Installation & Configuration Manual A6V10276959 01.05.2016...
- Page 226 This requirement stipulates that an alarm will only be deemed to be a confirmed alarm if it meets the following conditions: - 3 zone activations in 30 minutes (default), whereby Vanderbilt Installation & Configuration Manual A6V10276959 01.05.2016...
- Page 227 Note: This option cannot be changed if an SPC Manager PIN digit mode is set. Refer to page [➙ 303] Note: To comply with INCERT approvals, the user’s PIN code must contain more than 4 digits. Vanderbilt Installation & Configuration Manual A6V10276959 01.05.2016...
- Page 228 This option works together with the function "Confirmation". Engineer Exit If enabled, the engineer is allowed to leave Full Engineer mode with alerts active. Vanderbilt Installation & Configuration Manual A6V10276959 01.05.2016...
- Page 229 Set and Unset modes. Web Only System General Select options to manage remote control of the system Policy and alarm and bell settings from the following: - No confirmed alarms if internally set Vanderbilt Installation & Configuration Manual A6V10276959 01.05.2016...
-
Page 230: Timers
(1 – 15 minutes: 0 = never)) INT BELL TIME External Bells 15 min. Duration that external sounders will sound when alarm is activated. (1 – 15 minutes; 0 = never) EXT BELL TIME Vanderbilt Installation & Configuration Manual A6V10276959 01.05.2016... - Page 231 0 mins LOCKOUT POST ALARM External Bell Strobe 15 min. Duration that the strobe output will be active when an alarm is activated. (1 – 15 minutes; 0 = indefinitely) STROBE TIME Alerts Vanderbilt Installation & Configuration Manual A6V10276959 01.05.2016...
- Page 232 Time when duress will remain silent and not restorable from 0 Minutes keypad (0 - 999). Holdup/panic silent Number of minutes that a holdup/panic will remain silent and 0 Minutes cannot be restored from the keypad (0 - 999). Vanderbilt Installation & Configuration Manual A6V10276959 01.05.2016...
-
Page 233: Identification
Engineer Lock Tick this box to require use of the engineer lock PIN to factory default the panel. Engineer Lock PIN Enter value for lock PIN (4 digits). Vanderbilt Installation & Configuration Manual A6V10276959 01.05.2016... -
Page 234: Standards
Select the Security Grade that applies to the installation. Irish and European Regions: – EN50131 Grade 2 – EN50131 Grade 3 – Unrestricted UK Region: – PD6662 (EN50131 Grade 2 based) – PD6662 (EN50131 Grade 3 based) Vanderbilt Installation & Configuration Manual A6V10276959 01.05.2016... -
Page 235: Clock
Real-Time Clock (RTC) that is battery backed to preserve the time and date information in the event of power failure. 1. Select Configuration > System > Clock. The following window will be displayed. Vanderbilt Installation & Configuration Manual A6V10276959 01.05.2016... -
Page 236: Language
This option determines the system language in which the texts and menus on the keypads, the web interface and the event log will be displayed. For the Idle Language option, select either ‘Use System Language’ or ‘Last Used’. Vanderbilt Installation & Configuration Manual A6V10276959 01.05.2016... -
Page 237: Configuring Zones, Doors And Areas
2. Configure the fields as described in the table below. Zone The number is presented for reference and can not be programmed. Description Enter a text (max. 16 characters) that serves to uniquely identify the zone. Vanderbilt Installation & Configuration Manual A6V10276959 01.05.2016... -
Page 238: Adding / Editing An Area
Note that the area type for the new area is automatically set to Standard. If the Installation Type is Financial , the following window is displayed and the area must be added manually. Vanderbilt Installation & Configuration Manual A6V10276959 01.05.2016... - Page 239 For the set and unset options, the user will be unable to change the state of the area at any stage from the keypad. A timer for setting authorisation can be configured. See Timers [➙ 230]. 17.9.5.2.2 Partset Options Vanderbilt Installation & Configuration Manual A6V10276959 01.05.2016...
- Page 240 Calendar Select a calendar to control scheduling. Unset Select if area should automatically Unset as per the time specified in the selected calendar. Fullset Select this option to Fullset the area as per Vanderbilt Installation & Configuration Manual A6V10276959 01.05.2016...
- Page 241 Enabling Reporting of Unusual Setting/Unsetting for an ARC To configure event reporting for an ARC configured to communicate over SIA or CID, select Communications>Reporting>Analog ARC> Edit>Filter to display the Event Filter page for an ARC. Vanderbilt Installation & Configuration Manual A6V10276959 01.05.2016...
- Page 242 Enable Reporting of Unusual Setting/Unsetting for SMS SMS Events can be configured using both Engineer and User configuration pages. For Engineer configuration, select Users > Users SMS > Engineer SMS > Edit: Vanderbilt Installation & Configuration Manual A6V10276959 01.05.2016...
- Page 243 Interlocking only allows one area within the group to be Unset at any time. Typically used in ATM areas. Unset Duration If area is Unset for longer than this it will Set Vanderbilt Installation & Configuration Manual A6V10276959 01.05.2016...
- Page 244 All Okay All Okay Required If selected, user must confirm ‘All okay’ input or silent alarm is generated. See Editing a Zone [➙ 237] for details on configuring an ‘All Okay’ zone input. Vanderbilt Installation & Configuration Manual A6V10276959 01.05.2016...
- Page 245 Configure the trigger for the area using the following parameters: Trigger Select a trigger from the drop down list. Edge The trigger can activate from either the positive or negative Vanderbilt Installation & Configuration Manual A6V10276959 01.05.2016...
-
Page 246: Editing A Door
(not all zones types are available). (Web and SPC Pro only) Zone attributes The attributes for the zone the door position sensor is assigned to can be modified. (Web and SPC Pro only) Vanderbilt Installation & Configuration Manual A6V10276959 01.05.2016... - Page 247 PIN is required to set and unset the linked area. The card has to be presented before the PIN is entered. Unset outside (Browser) Panel/area will unset, when card is presented at entry reader. Unset on Entry Reader (SPCPro) Vanderbilt Installation & Configuration Manual A6V10276959 01.05.2016...
- Page 248 The custodian will not be allowed to exit until all non-custodians have left the room. Door Sounder Door controller PCB mounted sounder sounds on door alarms. Ignore Forced Door forced open is not processed. Vanderbilt Installation & Configuration Manual A6V10276959 01.05.2016...
- Page 249 If the assigned trigger is activated, the door will get back to normal operation. This is to undo locking / unlocking of the door. A card / will be is needed to open the door. Vanderbilt Installation & Configuration Manual A6V10276959 01.05.2016...
- Page 250 2. In the Expander Configuration page, click on the Change Type button for the required output. 3. Select Door as the output type. 4. Select the required door and Interlocked as the output type. Vanderbilt Installation & Configuration Manual A6V10276959 01.05.2016...
-
Page 251: Adding An Area Group
52 or 53 weeks in one year. The SPC calendar implementation conforms to the ISO8601international standard. Configuring calendars Select Configuration > Calendars. A list of configured calendars is displayed: Vanderbilt Installation & Configuration Manual A6V10276959 01.05.2016... -
Page 252: Adding / Editing A Calendar
The following window will be displayed: Provide a Description for the calendar (max. 16 characters) Copying a Calendar To make a copy of this calendar structure, click on the Replicate button. Vanderbilt Installation & Configuration Manual A6V10276959 01.05.2016... - Page 253 Configuring Exception Days 1. Select Configuration > Calendars > Exceptions > Add. The following window will be displayed. 2. Configure the fields as described in the table below. Vanderbilt Installation & Configuration Manual A6V10276959 01.05.2016...
-
Page 254: Automatic Setting/Unsetting Of Areas
24 hour clock (hh:mm). If the hour is 24, then minutes must be 00, such as midnight is 24:00. Each configuration consists of a pairing of settings for On/Off, True/False, Active/Inactive states. Any one setting without a respective corresponding setting is disregarded. Vanderbilt Installation & Configuration Manual A6V10276959 01.05.2016... -
Page 255: Change Own Pin
System - the trigger is on if the system output is in the configured state, which can be on or off. Possible system outputs are “External Bell”, “Alarm”, etc. Area - the trigger is ON if the area output is in an ON or OFF state. Possible Vanderbilt Installation & Configuration Manual A6V10276959... -
Page 256: Mapping Gates
The following window will be displayed. 2. Enter a Description for the gate. This is important as no mapping gate number, only the description, is displayed on the Outputs user page for turning on and off gates. Vanderbilt Installation & Configuration Manual A6V10276959 01.05.2016... -
Page 257: Audio/Video Verification
17.9.8.3.1 Configuring Video Overview Cameras are used for video verification. The SPC panel supports a maximum of four cameras. Only IP cameras are supported and the panel must have an Ethernet port. Vanderbilt Installation & Configuration Manual A6V10276959 01.05.2016... - Page 258 The following cameras are supported in addition to other generic cameras: Vanderbilt CCIC1410 (1/4” VGA IP Colour Camera) Vanderbilt CFMC1315 (1/3” 1.3 MP Indoor Dome Colour Camera) A command string is available as a default to access configuration details for the above cameras directly.
- Page 259 SPC Pro can configure this automatically if connected to a Vanderbilt CCIC1410 or CFMC1315 camera over a LAN. The default command string for a Vanderbilt CCIC1410 or CFMC1315 camera with no password is "/cgi-bin/stilljpeg". Pre-event images Enter the number of pre-event images to record (0 - 16).
- Page 260 The View Video right can also be set on the keypad and in SPC Pro (‘Video in Browser’ setting). To view images, go to SPC Home > Video. See Viewing Video [➙ 165]. See also Adding / Editing a User [➙ 183] Configuring Video [➙ 257] Vanderbilt Installation & Configuration Manual A6V10276959 01.05.2016...
-
Page 261: Updating Spc Licenses
Communications Settings 17.10.1.1 Configuring the networking services of the panel 1. Select Communications > Communications > Services. The following window will be displayed. 2. Configure the fields as described in the table below. Vanderbilt Installation & Configuration Manual A6V10276959 01.05.2016... -
Page 262: Ethernet
The Ethernet port on the controller can be configured from both the browser and keypad interfaces. An Ethernet connection with the SPC controller can be established using a direct connection or a LAN connection. Vanderbilt Installation & Configuration Manual A6V10276959... -
Page 263: Modems
No other modem configuration is allowed at this stage. To program the modem(s): Note: A modem must be installed and identified. (See section Installing plug-in modules [➙ 87]) 1. Select Communications > Communications > Modems. 2. Click Enable and Configure. Vanderbilt Installation & Configuration Manual A6V10276959 01.05.2016... - Page 264 Engineer SMS Control. See page. User SMS Control. See page. Depending on configurations, features include these SMS abilities: Event notification. See page. Remote Commands (users may be assigned select remote commands. See page. Vanderbilt Installation & Configuration Manual A6V10276959 01.05.2016...
- Page 265 USET Unset Alarm System Unset ****.USET **** SSTA (STATUS) SSTA Status displayed Status of system and applicable areas ****.SSTA **** XA1.ON Where X10 device is Status of “A1” identified as “A1”, it is Vanderbilt Installation & Configuration Manual A6V10276959 01.05.2016...
- Page 266 10; Y stands for the alphabetic identity and NN are the available numeric placeholders. Example: XA1. 17.10.1.3.5 PSTN modem 1. Select Communications > Communications > Modems > Configure. 2. Configure the fields as described in the table below. Vanderbilt Installation & Configuration Manual A6V10276959 01.05.2016...
- Page 267 In order for EN50131-9 Confirmation to operate correctly, line monitoring must be enabled. (refer to System Options [➙ 222]) Monitor Timer Select the period (in seconds) for which the line voltage must be seen Vanderbilt Installation & Configuration Manual A6V10276959 01.05.2016...
- Page 268 SMS service provider with a unique phone number. This feature is not released in all countries. Please contact your local supplier for more information (support of feature, recommended service provider). Vanderbilt Installation & Configuration Manual A6V10276959 01.05.2016...
- Page 269 Check with the local SMS service provider for details on these requirements. 17.10.1.3.6 GSM modem A GSM modem must be properly installed and functioning correctly. 1. Select Communications > Communications > Modems > Configure. The following window will be displayed: Vanderbilt Installation & Configuration Manual A6V10276959 01.05.2016...
- Page 270 Select to enable GSM roaming. Note: Changing this setting resets the modem. Note: Supported on GSM modems v3.08 or higher. Incoming Calls The modem can be programmed to answer calls based on the following Vanderbilt Installation & Configuration Manual A6V10276959 01.05.2016...
- Page 271 The SMS test is provided only for the purpose of ensuring the SMS feature is operating correctly. A short text message using alphabetic characters (A-Z) should be used to test this feature. Vanderbilt Installation & Configuration Manual A6V10276959 01.05.2016...
-
Page 272: Serial Ports
1 PC with serial port running hyperterminal 2 SPC controller 4000 4 RS232 To configure the serial ports: Select Communications > Communications > Serial Ports. The following window will be displayed: Vanderbilt Installation & Configuration Manual A6V10276959 01.05.2016... -
Page 273: Flexc
Communication monitoring of a complete ATS and individual ATPs. SPC intrusion panels support FlexC over IP with any of the following interfaces: Ethernet GSM modem with GPRS enabled PSTN modem Vanderbilt Installation & Configuration Manual A6V10276959 01.05.2016... -
Page 274: Operation Mode
SPC Com XT Client and Sur-Gard interfaces. 17.10.2.2 Quick Start ATP Configuration for EN50136 ATS FlexC provides the following out of the box features that enable you to get FlexC up and running quickly: Vanderbilt Installation & Configuration Manual A6V10276959 01.05.2016... - Page 275 FlexC Command User Name and FlexC Command Password), and Auto Encryption with no password. To change the settings, see Configuring an EN50136-1 ATS or Custom ATS [➙ 276]. 4. Click Back. The ATS displays in the Configured ATS table. Panel Identification Vanderbilt Installation & Configuration Manual A6V10276959 01.05.2016...
-
Page 276: Configuring An En50136-1 Ats Or Custom Ats
An ATS comprises an alarm panel, network paths and an RCT (e.g. SPC Com XT). It combines one or multiple paths between an SPC panel and an RCT. You can add up to 10 ATPs to an ATS. Vanderbilt Installation & Configuration Manual A6V10276959... - Page 277 5. Complete the ATS Faults fields as shown in the table below. 6. Click the Edit Installation Details button to complete the settings to identify the panel to the RCT operator. See Edit Installation Details [➙ 284]. Vanderbilt Installation & Configuration Manual A6V10276959...
- Page 278 Add ATP to FlexC RCT allows you to configure an ATP between the SPC panel and the RCT (e.g. SPC Com XT). You can configure up to 10 ATPs for each ATS. 1. Click the button Add ATP to FlexC RCT. Vanderbilt Installation & Configuration Manual A6V10276959...
- Page 279 SPC Com XT Installation & Configuration Manual ATP Interface Communications Interface From the dropdown list, select the interface this ATP uses for communication. Ethernet GPRS: Modem 1 GPRS: Modem 2 Vanderbilt Installation & Configuration Manual A6V10276959 01.05.2016...
- Page 280 Permanent: Stay Connected Temporary: Hangup 1second Temporary: Hangup 20 second Temporary: Hangup 80 second Temporary: Hangup 3 minutes Temporary: Hangup 10 minutes Temporary: Hangup 30 minutes Vanderbilt Installation & Configuration Manual A6V10276959 01.05.2016...
- Page 281 ATP Profiles Event Profile Select the Event Profile which defines how and which events are transmitted on this ATS. Use ATS Setting Default Event Profile All events Vanderbilt Installation & Configuration Manual A6V10276959 01.05.2016...
- Page 282 1. To configure an ATP between an SPC panel and an Analog ARC, click the button Add ATP to Analog ARC. 2. Complete the ATP fields described in the table below. 3. Click Save. Panel Identification Vanderbilt Installation & Configuration Manual A6V10276959 01.05.2016...
- Page 283 Use ATS Setting Default Event Profile Default Portal Event Profile All events Custom Event Profile ATP Faults ATP Monitoring Fault Select to generate an ATP fault if the ATP Vanderbilt Installation & Configuration Manual A6V10276959 01.05.2016...
- Page 284 The name of the installer of the ATS. Installer Phone Number 1 The phone number of the installer of the ATS. Installer Phone Number 2 The phone number of the installer of the ATS. Vanderbilt Installation & Configuration Manual A6V10276959 01.05.2016...
-
Page 285: Configuring An Spc Connect Ats
1. To export an ATS, go to Communications - FlexC - FlexC ATS. 2. In the Configured ATS table, locate the ATS to export and click the Export ATS button (green arrow). Vanderbilt Installation & Configuration Manual A6V10276959 01.05.2016... -
Page 286: Configuring Event Profiles
To see a list of all events, go to Communications - FlexC - Event Profiles. Click Edit (blue pencil) for an event profile. Scroll to the end of the screen and click Show Complete Event Table. Vanderbilt Installation & Configuration Manual A6V10276959... - Page 287 4. Click Add to view the Event Exception Definition screen. See Event Exception Definition [➙ 288]. 5. To apply an event profile to an area, select the area under Area Filter. 6. Click Save and Back. The new profile displays in the Event Profiles table. Vanderbilt Installation & Configuration Manual A6V10276959 01.05.2016...
- Page 288 Remap the Zone ID 1 - 9 to Zone ID 101 - 109 1. To configure an Event Exception Definition, complete the fields described in the table below. 2. Click Save. Vanderbilt Installation & Configuration Manual A6V10276959 01.05.2016...
- Page 289 . When enabled, the fields below display. Zone ID if (0 ≤ ≤ 9999) Enter the range of addresses to remap for an Zone ID event, for example, if you want to remap Vanderbilt Installation & Configuration Manual A6V10276959 01.05.2016...
-
Page 290: Configuring Command Profiles
(blue pencil), Scroll to the bottom of the screen and click Replicate. You can now make the changes you require. To add a command profile step by step, go to Communications - FlexC - Command Profiles. Click Add. Vanderbilt Installation & Configuration Manual A6V10276959 01.05.2016... - Page 291 8. Click Save. 9. Click Back to view the command profile in the Command Profiles table. 10. To change a command profile, click the Edit button (pencil icon) next to a command profile. Vanderbilt Installation & Configuration Manual A6V10276959 01.05.2016...
-
Page 292: Reporting
4. To add or edit an ARC, click Add. – OR - Click Edit. The following window will be displayed. 5. Configure the fields as described in the table below. Vanderbilt Installation & Configuration Manual A6V10276959 01.05.2016... - Page 293 A list of the configured ARC accounts will be displayed on the browser screen along with the account information, description, protocol, dial-up status and time and date of the last call to the ARC. Vanderbilt Installation & Configuration Manual A6V10276959...
- Page 294 System is Set and Unset. Early/Late Unscheduled setting and unsetting of the system. Inhibits Inhibit and isolate operations are performed on the system. Door Events Door events are activated. Only works with SIA protocol. Vanderbilt Installation & Configuration Manual A6V10276959 01.05.2016...
-
Page 295: Edp Setup
EDP Setup The system has the facility to communicate information to the SPC Com server remotely using Vanderbilt ’s own protocol, the EDP (Enhanced Datagram Protocol). By correctly configuring an EDP receiver on the system, it can be programmed to automatically make data calls to the SPC Com server in a remote location whenever events such as alarm activations, tampers, or arming/disarming occur. - Page 296 Editing EDP Receiver Settings [➙ 296] 17.10.3.2.2 Editing EDP Receiver Settings 1. Select Communications > Reporting > EDP > Edit. The following window will be displayed. 2. Configure the fields as described in the table below. Vanderbilt Installation & Configuration Manual A6V10276959 01.05.2016...
- Page 297 TCP retries will fail before 10s (9s approx) EDP event retries are set to 1 independent of the global “Retry Count” setting in “EDP Settings” FTC will be generated within 20s of network failure. Security Vanderbilt Installation & Configuration Manual A6V10276959 01.05.2016...
- Page 298 Dial-up on Net Fault Check this box to report network faults on a dial-up test call. Dial-up Interval 1* Enter the number of minutes between dial-up test calls when network link is up. Vanderbilt Installation & Configuration Manual A6V10276959 01.05.2016...
- Page 299 17.10.3.2.3 Editing Event Filter Settings 1. Select Communications > Reporting > EDP > Edit > Filter The following window will be displayed. 2. Configure the fields as described in the table below. Vanderbilt Installation & Configuration Manual A6V10276959 01.05.2016...
- Page 300 Door events are activated. Only works with SIA protocol. Other All other types of events are detected on the system. Other (Non standard) Non supported SIA codes used with SPC COM XT including Camera Online/Offline events. Vanderbilt Installation & Configuration Manual A6V10276959 01.05.2016...
- Page 301 Enter the maximum number of failed dial attempts accepted by the system before the modem is locked out (prevented from making further attempts to dial). The lockout period is defined in the option Dial Lockout. Vanderbilt Installation & Configuration Manual A6V10276959...
-
Page 302: Pc Tools
For further information about configuration of the SPC Safe please refer to the SPCS410 Installation & Configuration Manual. 1. Click the Enable SPC Safe button. 2. Configure the fields as described in the table below. Vanderbilt Installation & Configuration Manual A6V10276959 01.05.2016... -
Page 303: Spc Manager
PINs on a global system controlled by SPC Manager. Mode41: 4-digit PIN enables 1,000 global users Mode51: 5-digit PIN enables 10,000 global users Mode61: 6-digit PIN enables 100,000 global users Vanderbilt Installation & Configuration Manual A6V10276959 01.05.2016... -
Page 304: Remote Maintenance
2. Select the Get Service Report from Panel menu option. For further details on Remote Maintenance, refer to the SPC Remote Maintenance manual. 17.11 File Operations To perform operations on the panel files and configuration: Vanderbilt Installation & Configuration Manual A6V10276959 01.05.2016... -
Page 305: File Upgrade Operations
Manufacturer Access is required for firmware upgrade operations and when enabled, is available for the completion of both controller and peripheral firmware upgrades. See System Options [➙ 222]. Firmware for SPC is contained in two separate files: Vanderbilt Installation & Configuration Manual A6V10276959 01.05.2016... - Page 306 If you downgrade the controller firmware (i.e. install an older version of firmware), the system defaults all current configuration settings. Also, when downgrading firmware, it is important to downgrade the corresponding peripheral firmware otherwise zones may appear disconnected, opened or closed. Vanderbilt Installation & Configuration Manual A6V10276959 01.05.2016...
- Page 307 The peripheral firmware can also be upgraded with SPC Pro or using the Fast Programmer [➙ 311]. Upgrading the SPCP355.300 Smart PSU Firmware To upgrade the SPCP355.300 Smart PSU you must ensure the following: Vanderbilt Installation & Configuration Manual A6V10276959 01.05.2016...
-
Page 308: Upgrading Languages
2. Select the language file to upgrade by clicking the Browse button for the Language File Upgrade option, selecting the required language file and then clicking on the appropriate Upgrade button. A list of available languages in this file is displayed. Vanderbilt Installation & Configuration Manual A6V10276959 01.05.2016... - Page 309 3. Click on the Upgrade Selected button. The Confirm Language Upgrade screen is displayed. When deleting a language, the panel deletes all languages and reinstalls only the languages required. In the example below, Flemish is being deleted. Vanderbilt Installation & Configuration Manual A6V10276959 01.05.2016...
-
Page 310: File Manager Operations
See also Language [➙ 236] 17.11.2 File Manager Operations Select File -> File Manager. A screen displays showing details of the system configuration, language and trace files. Vanderbilt Installation & Configuration Manual A6V10276959 01.05.2016... -
Page 311: Using The Fast Programmer
This USB interface is located at the bottom of the Fast Programmer and connects directly to the USB interface on a PC. Configuration and other files can be only be copied between the PC and the Fast Programmer using the SPC Pro programming tool. Vanderbilt Installation & Configuration Manual A6V10276959 01.05.2016... -
Page 312: Connecting The Fast Programmer To The Controller
For Windows XP SPCPro must be installed on the Windows XP PC. 1. Connect the Fast Programmer to a USB interface on the PC. The Found New Hardware wizard is displayed. Vanderbilt Installation & Configuration Manual A6V10276959 01.05.2016... -
Page 313: Fast Programmer File Operations
Accessing the Fast Programmer using the Browser 1. Enter Full Engineer in browser programming and select the File programming page. 2. Click Fast Programmer. The options to upload and download files are displayed. Vanderbilt Installation & Configuration Manual A6V10276959 01.05.2016... - Page 314 Manufacturer Access is required for firmware operations. A list of the firmware files stored on the Fast Programmer is displayed. To upgrade firmware, click on the Upgrade button beside the required firmware file. Vanderbilt Installation & Configuration Manual A6V10276959 01.05.2016...
-
Page 315: 18 Accessing Web Server Remotely
(primary or backup) to answer an incoming call. 4. On the keypad, scroll to Full Engineer Mode > Comms > Modems 5. Select the following settings: Enable Modem: Set to enabled Type: Displays the type of modem (PSTN) Vanderbilt Installation & Configuration Manual A6V10276959 01.05.2016... - Page 316 The Completing the New Connection Wizard window is displayed. 9. Click Finish to save the Dial-up connection to the PC. Default code should be changed and noted accordingly as Vanderbilt is unable to retrieve this new code. Forgotten codes are be remedied only by a factory default of the system, rendering loss of programming.
-
Page 317: Gsm Connection
For some Windows operating systems, a dialog box regarding Windows certification appears. Vanderbilt deems this acceptable to continue. For further queries, please contact network administrator or a Vanderbilt technician. To obtain this IP address: 1. Right click the dial-up icon. - Page 318 The Completing the New Connection Wizard window is displayed. 9. Click Finish to save the Dial-up connection to the PC. Default code should be changed and noted accordingly as Vanderbilt is unable to retrieve this new code. Forgotten codes are be remedied only by a factory default of the system, rendering loss of programming.
- Page 319 For some Windows operating systems, a dialog box regarding Windows certification appears. Vanderbilt deems this acceptable to continue. For further queries, please contact network administrator or a Vanderbilt technician. To obtain this IP address: 1. Right click the dial-up icon.
-
Page 320: 19 Intruder Alarm Functionality
An exit timer can be applied to this mode by enabling the Partset B Timed variable. FULL SET Area is fully armed; opening of entry/exit zones starts the entry timer. If the alarm is not unset before entry timer expires, the alarm is activated. Vanderbilt Installation & Configuration Manual A6V10276959 01.05.2016... -
Page 321: Domestic Mode Operation
A Silent Alarm activation does not activate outputs 1 – 3 (no visual or audible indications of the alarm). The alarm event is reported to the ARC. Silent alarms are only generated when alarm zones with the Silent attribute have been opened when the system is set. Vanderbilt Installation & Configuration Manual A6V10276959 01.05.2016... -
Page 322: 20 System Examples And Scenarios
NOTE: The accounts worker cannot UNSET the Sales area. COMMON: unsets ONLY the Common Area (Reception). This provides the option to unarm the reception area only while leaving the Accounts and Sales offices set. Vanderbilt Installation & Configuration Manual A6V10276959 01.05.2016... - Page 323 As a rule it is advisable to use common areas in installations that have only one keypad located at the common access point, i.e. front door access to the entire building. Vanderbilt Installation & Configuration Manual A6V10276959 01.05.2016...
-
Page 324: 21 Seismic Sensors
7. Configure an output for testing a seismic zone. (See Output Types and Output Ports [➙ 198]) The output can be assigned to either the system or an area, if the panel is Vanderbilt Installation & Configuration Manual A6V10276959 01.05.2016... -
Page 325: Seismic Sensor Testing
The seismic output is normally high, and goes low during tests (i.e. when it is active). If this signal is not suitable for a particular sensor then the physical output can be configured to be inverted. Vanderbilt Installation & Configuration Manual A6V10276959... -
Page 326: Automatically Testing Sensors
SPC Com, with SPC Pro or the browser. However, there is an automatic seismic test when a virtual keypad is used with SPC Com or SPC Pro. No event is reported if seismic testing on set fails. Vanderbilt Installation & Configuration Manual A6V10276959 01.05.2016... -
Page 327: Manually Testing Sensors
Entries are recorded in the event log with the following details: user who initiated the test result (OK or FAIL) area and zone number and name. No events are reported for manual tests. Vanderbilt Installation & Configuration Manual A6V10276959 01.05.2016... -
Page 328: 22 Blocking Lock Operation
Blocking Lock Setting Start No open zone, Output pending alarm or Ready to Set pending fault Output Blockschloss 1/2 Blocking Device Locked Input Keyarm Area Set 3 secs Output Setting Ack Output Fullset Done Vanderbilt Installation & Configuration Manual A6V10276959 01.05.2016... -
Page 329: Authorized Setting Of The Blocking Lock
Input Setting Code No open zone, Authorisation Entered pending alarm or pending fault 20 secs Output Blockschloss 1/2 Blocking Device Locked Input Keyarm Area Set 3 secs Output Setting Ack Output Fullset Done Vanderbilt Installation & Configuration Manual A6V10276959 01.05.2016... -
Page 330: Locking Element
If the Lock Element input (if configured) is not in the closed state when the exit timer expires, then the system will not set and a Fail to Set signal will be raised. The Lock Element – Unlock output will be activated. Vanderbilt Installation & Configuration Manual A6V10276959... - Page 331 Fail to Set Lock Element - Unlock The configuration requirements for the lock element are as follows: Outputs: – Lock Element – Lock – Lock Element – Unlock Inputs – Lock Element Vanderbilt Installation & Configuration Manual A6V10276959 01.05.2016...
-
Page 332: 23 Appendix
FLASHING: wireless data is being received by the wireless module OFF: no wireless data is being received LED 2 Battery Status ON: battery voltage has dropped below the deep discharge level (10.9 V) OFF: battery status OK Vanderbilt Installation & Configuration Manual A6V10276959 01.05.2016... -
Page 333: Powering Expanders From The Auxiliary Power Terminals
(0 V 12 V). If the total maximum current draw from the expanders exceeds the auxiliary power, a PSU expander should be used to provide additional power. Vanderbilt Installation & Configuration Manual A6V10276959 01.05.2016... -
Page 334: Calculating The Battery Power Requirements
85 % of its maximum capacity. 0.85 x battery size (Ah) (Icont + Ibell) Imax Time (hours) Battery size = Capacity, in Ah, depending upon SPC enclosure chosen Time = backup time, in hours, depending upon Security grade Vanderbilt Installation & Configuration Manual A6V10276959 01.05.2016... - Page 335 12 h 30 h Amount of current from Aux output using a 24 Ah battery (SPC535x/635x) COMMS NONE PSTN PSTN+GSM Standby time 12 h 1650 1625 1610 1585 24 h 30 h 60 h Vanderbilt Installation & Configuration Manual A6V10276959 01.05.2016...
-
Page 336: Domestic, Commercial And Financial Mode Default Settings
This table gives the default zone name and types on the controller for each mode of operation. All zones on connected expanders are be categorized as unused until explicitly configured by the installation engineer. Feature Domestic mode Commercial mode Financial mode Zone Names Vanderbilt Installation & Configuration Manual A6V10276959 01.05.2016... -
Page 337: Wiring Of The X10 Interface
Controller - Zone 8 PANIC PANIC ALARM 23.6 Wiring of the X10 interface X10 wiring to the controller RJ45 RJ11 23.7 SIA Codes DESCRIPTION CODE AC RESTORAL AC TROUBLE BURGLARY ALARM BURGLARY BYPASS BURGLARY CANCEL Vanderbilt Installation & Configuration Manual A6V10276959 01.05.2016... - Page 338 REQUEST TO EXIT EXIT ALARM EXPANSION TAMPER RESTORE EXPANSION MISSING EXPANSION MISSING RESTORE EXPANSION RESTORAL EXPANSION DEVICE TAMPER EXPANSION TROUBLE FIRE ALARM FIRE BYPASS FIRE CANCEL FIRE TROUBLE RESTORE FIRE RESTORAL FIRE TROUBLE FIRE UNBYPASS Vanderbilt Installation & Configuration Manual A6V10276959 01.05.2016...
- Page 339 EARLY OPEN OPENING REPORT OPENING KEYSWITCH LATE TO CLOSE REMOTE OPENING DISARM FROM ALARM PANIC ALARM PANIC BYPASS PANIC TROUBLE RESTORE PANIC RESTORAL PANIC TROUBLE PANIC UNBYPASS RELAY CLOSE REMOTE RESET RELAY OPEN Vanderbilt Installation & Configuration Manual A6V10276959 01.05.2016...
- Page 340 BELL RESTORED COMMUNICATION RESTORAL BATTERY MISSING PSU TROUBLE PSU RESTORAL BATTERY RESTORAL COMMUNICATION TROUBLE BATTERY TROUBLE WATCHDOG RESET SERVICE REQUIRED SERVICE COMPLETED SPECIAL SIA EVENTS USER DURESS USER DURESS RESTORE ENET PANIC ALARM Vanderbilt Installation & Configuration Manual A6V10276959 01.05.2016...
- Page 341 ZONE LOW BATTERY RESTORAL OTHER NON-STANDARD SIA CODES CAMERA ONLINE CAMERA OFFLINE ALERT CLOSE ALERT REOPEN XBUS ALERT CLOSE XBUS ALERT REOPEN UNKNOWN CARD USER ACCESSING USER ACCESSING END LOW VOLTAGE LOW VOLTAGE RESTORAL Vanderbilt Installation & Configuration Manual A6V10276959 01.05.2016...
-
Page 342: Cid Codes
RF jam fault and restore. TELCO 1 Primary modem fault and restore. TELCO 2 Secondary modem fault and restore. HOLDUP TROUBLE SENSOR TROUBLE OPENCLOSE Unset, post alarm and fullset. ALARM ABORT Cancel alarm. EARLY OPENCLOSE Vanderbilt Installation & Configuration Manual A6V10276959 01.05.2016... -
Page 343: Overview Of Keypad Types
Overview of keypad types Keypad type Model no. Audio Basic Proximity Functionality Detection Standard Keypad SPCK420 ✓ Keypad with PACE SPCK421 ✓ ✓ Comfort Keypad SPCK620 ✓ Comfort Keypad with Audio/CR SPCK623 ✓ ✓ ✓ Vanderbilt Installation & Configuration Manual A6V10276959 01.05.2016... -
Page 344: User Pin Combinations
No of digits Note: To comply with INCERT approvals, the user’s PIN code must contain more than 4 digits. The default Engineer PIN is 1111. See Engineer PINs [➙ 102] for more details. Vanderbilt Installation & Configuration Manual A6V10276959 01.05.2016... -
Page 345: Duress Pins
‘Engineer Access’ in Timers [➙ 230]). 23.12.4 Keypad User Logoff If no keys are pressed on a keypad for a specific duration (see ‘Keypad Timeout’ in Timers [➙ 230]), the user is automatically logged off. Vanderbilt Installation & Configuration Manual A6V10276959 01.05.2016... -
Page 346: Wiring Of Mains Cable To The Controller
It is also recommended that any firmware update release notes be checked for any additional updates that may improve the security of the system. Vanderbilt Installation & Configuration Manual A6V10276959 01.05.2016... -
Page 347: Maintenance Smart Psu
The entry timer controls this delay. When the system is being full set, this zone type provides an exit delay allowing time to vacate an area. The Vanderbilt Installation & Configuration Manual A6V10276959... - Page 348 SET/UNSET all the areas in the common area. If the ‘Open only’ attribute is set then the armed status of the System / Area / Common Areas will toggle on each opening of the key lock. ( Vanderbilt Installation & Configuration Manual A6V10276959 01.05.2016...
- Page 349 This zone type will report the SIA messages, YA (Bell Fault) and YH (Bell Restore) and for CID, a sensor trouble event (380) is produced. Note: On a grade 2 system, a cable fault will cause a fault and not an Vanderbilt Installation & Configuration Manual A6V10276959...
-
Page 350: Zone Attributes
FULLSET or PARTSET A Mode (Bells - Internal & External, Strobe). 24 Hour If a Zone is assigned the ‘24 Hour’ attribute, then it is active at all times and Vanderbilt Installation & Configuration Manual A6V10276959 01.05.2016... - Page 351 This attribute only applies to the FIRE zone type. If this attribute is set, then activation of the fire zone will only report the activation to the central station. No alarms will be generated on site. Vanderbilt Installation & Configuration Manual A6V10276959...
-
Page 352: Applicable Attributes To Zone Types
Force Set If enabled, the keyarm device can set the system, automatically inhibiting all open zones. 23.18 Applicable attributes to zone types The following table shows which attributes are applicable to each zone type: Vanderbilt Installation & Configuration Manual A6V10276959 01.05.2016... - Page 353 Appendix Applicable attributes to zone types Only available in Commercial Mode. * Only in conjunction with Remote Maintenance. ** Only available in Financial Mode Vanderbilt Installation & Configuration Manual A6V10276959 01.05.2016...
-
Page 354: Ats Levels And Attenuation Specifications
The following card readers and formats are supported on the SPC system: Reader Card Format HD500-EM IB41-EM PR500-EM IB42-EM SP500-EM IB44-EM PM500-EM IB45-EM ABR5100-BL ABR5100-TG ABR5100-PR AR6181-RX IB41-EM AR6182-RX IB42-EM IB44-EM IB45-EM ABR5100-BL ABR5100-TG Vanderbilt Installation & Configuration Manual A6V10276959 01.05.2016... - Page 355 Wiegand 26 bit Max site code. 255 Max card no. 65535 Wiegand 36 bit Max site code.. 32767 Max card no. 524287 HID Corporate 1000 Max site code.. 4095 Max card no.. 1048575 Vanderbilt Installation & Configuration Manual A6V10276959 01.05.2016...
-
Page 356: Spc Support For E-Bus Devices
BUS sections. X-Bus devices require unique addresses. To support this conflict, E- BUS peripheral readdressing may be required. For more information, see ADDRESSING MODE [➙ 128]. NOTICE Vanderbilt recommends you read the Sintony System Migration document before configuring E-Bus devices. 23.21.1 Configuring and Addressing E-Bus Devices... - Page 357 Hold the addressing input transponders button for 5 seconds and release to hear a continuous beep. Output IDs to assign to Sintony E-BUS ID (X-BUS ID) Hold the addressing output transponders button for 5 seconds Vanderbilt Installation & Configuration Manual A6V10276959 01.05.2016...
-
Page 358: Addressing Transponders For Sap 8, Sap 14, And Sap 20
In the PSU dropdown list, a hash (#) symbol prefixes an SAP 25 ID to indicate that the automatic addressing of transponders will conflict with existing input transponders. To resolve this conflict, you must readdress one of the conflicting devices. Vanderbilt Installation & Configuration Manual A6V10276959 01.05.2016... -
Page 359: Flexc Glossary
Integrated onto SPC Panel using Transceiver Ethernet, GPRS, PPP over PSTN. ATE at the supervised premises including the interface to the AS and the interface to one or more transmission networks and being Vanderbilt Installation & Configuration Manual A6V10276959 01.05.2016... -
Page 360: Flexc Commands
Get a User Profile Configuration Add a User Profile Edit a User Profile Delete a User Profile Change a User's own PIN Calendar Commands Read Calendar Configuration Add a Calendar Edit a Calendar Edit a Calendar Week Vanderbilt Installation & Configuration Manual A6V10276959 01.05.2016... - Page 361 Saves the Panel Configuration Reset the Panel Legacy Commands Get Panel Info Get Panel Status Get Headers of Configuration Files Get Language Configuration Get Intruder Configuration Get Status of X-BUS Devices Get the Area Configuration Vanderbilt Installation & Configuration Manual A6V10276959 01.05.2016...
-
Page 362: Ats Category Timings
3 min 24 hr 30 3 min [Ethern Cat 4 [Modem Cat 5 30 s 90 s 5 hr 90 s 30 s 90 s 4 hr 10 90 s [Ethern Cat 5 [Modem Vanderbilt Installation & Configuration Manual A6V10276959 01.05.2016... -
Page 363: Atp Category Timings
24 hr 2 min 24 hr 30 24 hr 90 s [Modem] 10min Cat 1 2 min 24 hr 10 min 25 hr 10 min 30 days 90 s [Modem] days 1 hr days Vanderbilt Installation & Configuration Manual A6V10276959 01.05.2016... - Page 364 Appendix ATP Category Timings Vanderbilt Installation & Configuration Manual A6V10276959 01.05.2016...
- Page 365 Appendix ATP Category Timings Vanderbilt Installation & Configuration Manual A6V10276959 01.05.2016...
- Page 366 Appendix ATP Category Timings Vanderbilt Installation & Configuration Manual A6V10276959 01.05.2016...
- Page 367 Appendix ATP Category Timings Vanderbilt Installation & Configuration Manual A6V10276959 01.05.2016...
- Page 368 Issued by © Vanderbilt, 2015 Vanderbilt Technical specifications and availability subject to change without notice. Clonshaugh Business and Technology Park Clonshaugh Dublin D17 KV84 www.service.vanderbiltindustries.com Document ID A6V10276959 Edition 01.05.2016...
Need help?
Do you have a question about the SPC42 Series and is the answer not in the manual?
Questions and answers