Table of Contents
Advertisement
Advertisement
Table of Contents

Subscribe to Our Youtube Channel
Related Manuals for NetComm NB702


Summary of Contents for NetComm NB702
-
Page 2: Table Of Contents
Package Contents .................. 5 III. Features ....................6 Safety Guidelines ..................7 Appearance ..................... 8 Hardware Installation for the NB702/NB704 ........10 VII. Management ..................11 VIII. Default Values ..................12 Software Upgrade ................. 13 Chapter 2 - Web Management Interface ..............14 Overview .................... - Page 3 605 to RJ-11 adapter ..................94 USB cable ...................... 94 9 Pin (RS-232 ) Serial Cable ................. 94 Appendix D – Registering your NetComm Product ............ 95 Contact Information ..................95 Trademarks and Notices ................95 Legal & Regulatory Information Copyright Information ......... 96 Warranty Registration Form ................
-
Page 4: Chapter 1 - Getting Started
Product naming conventions This manual covers both the NB702 - 2 Wire SHDSL Modem Router and the NB704 - 4 Wire SHDSL Modem Router. Where features and functions are common to both models the product will be refered to as the NB702/NB704. Features and functions dedicated to the either model are shown separately. -
Page 5: Package Contents
Package Contents This package consists of the following items: ■ NetComm 2 wire SHDSL Router (NB702) ■ NetComm 4 wire SHDSL Router (NB704) ■ RJ-45 Cable ■ RJ-11 Cable ■ AC Adapter ■ This User Guide and a Package Contents Note contained on the CD Rev. -
Page 6: Features
Configuration and management by local Telnet, SNMP, and web-browser through the Ethernet interface, and remotely through SHDSL interface. ■ Firmware upgradeable through TFTP. ■ High performance, simple operation, and low power consumption www.netcomm.com.au Rev. 1 - YML689 Page 6 NB702/NB704 User Guide... -
Page 7: Safety Guidelines
■ Do not place any heavy objects on top of this unit. ■ Do not use liquid cleaners or aerosol cleaners. Use a soft dry cloth for cleaning. Rev. 1 - YML689 www.netcomm.com.au NB702/NB704 User Guide Page 7... -
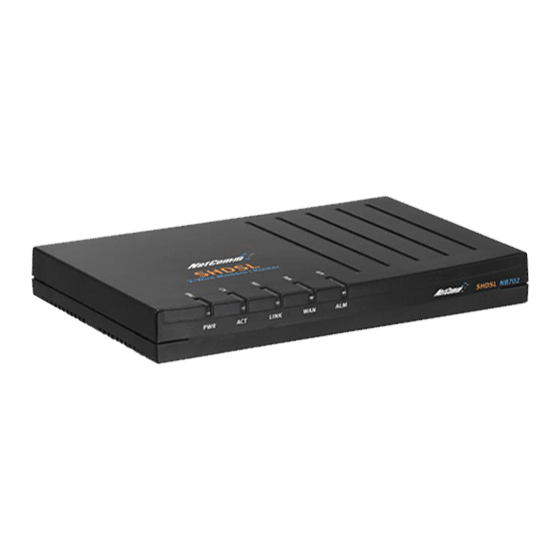
Page 8: Appearance
Appearance Front Panel for NB702 and NB704 Label Status Color Description Green Power supply is connected. Blinking Green Transmitting or receiving packets over an Ethernet port. Green An Ethernet port is connected to a LAN or PC. Blinking Green Training with DSLAM. -
Page 9: Rear Panel
Rear Panel NB702 Rear View NB704 Rear View Label Description DC-inlet for AC Adapter. CONSOLE Serial port; connect to an ASCII data terminal. 1X ~ 4X Four RJ-45 ports; connect to a PC or LAN. LINK LINK LED indicates a specific port is connected. -
Page 10: Hardware Installation For The Nb702/Nb704
1. Connect one end of the RJ-11 cable into the WAN port of the NB702/NB704, and the other end into the SHDSL wall outlet. 2. Connect one end of the RJ-45 cable into one of the RJ-45 ports of the NB702/ NB704, and the other end into your PC or LAN. -
Page 11: Management
Note: As operating an SHDSL device requires technical know-how and experience. It is recommended that only qualified technical staff manage the NB702/NB704. Therefore, password authentication is required when you enter the command line and web interface. See the Default Values section to obtain the password. -
Page 12: Default Values
VIII. Default Values The NB702/NB704 is pre-configured with the following parameters; you may also re- load the default parameters by typing Restore in the command line interface. (For further details, See Chapter 3: Command Line Interface) Default mode: Bridge User Name:... -
Page 13: Software Upgrade
Extract the ZIP file for updated firmware ■ Connect the NB702/NB704 via the local Ethernet port or remote ADSL link, make sure that the NB702/NB704 Ethernet IP address and your terminal are properly configured so that you can successfully “ping” the NB704. The default local IP address is 192.168.1.1. -
Page 14: Ii. Preparation
23 (Telnet). This will allow you to log-in from the WAN side of the NB702/4. If you do not want to allow Telnet service via the WAN port (Internet) you should delete the table entry for port 23. -
Page 15: Login
By default, the NB702/NB704 is configured in bridge mode. This section describes the steps involved in setting up the NB702/NB704 as a bridge. The links on the navigation bar are: Manage, Bridge, xDSL, Status, Save, and Restart. Each one is described in the next few sections. -
Page 16: Manage
IP Setup Click on the IP link on the top of the page. You will then see the Device IP Setup table. On this page you can change the IP address and subnet mask of the NB702/ NB704. Ethernet IP Address: Enter the IP address of this device. -
Page 17: Password Setup
Enter the old password of the device. New Password: Enter the new password. New Password Again: Re-type the new password Click on the Submit button to complete the configuration. You will then see a confirmation message. Rev. 1 - YML689 www.netcomm.com.au NB702/NB704 User Guide Page 17... - Page 18 Select a port number. From the drop down list select: Auto-nego, 100/Full, 100/Half, 10/Full, or 10/Half. Click on the Submit button to complete the configuration. You will then see a confirmation screen. www.netcomm.com.au Rev. 1 - YML689 Page 18 NB702/NB704 User Guide...
-
Page 19: Bridge
Bridge Setup table. On this page you can create up to 8 VPI/VCI channels and configure its QoS, encapsulation, packet filter, and spanning tree. Enable: Place a check in this box if you would like to enable the settings in that row. Rev. 1 - YML689 www.netcomm.com.au NB702/NB704 User Guide Page 19... - Page 20 If you would like the connection to use spanning tree, place a check in this box. Click on the Submit button to complete the configuration. You will then see a confirmation screen. www.netcomm.com.au Rev. 1 - YML689 Page 20 NB702/NB704 User Guide...
-
Page 21: Xdsl
Click on the DSL Setup link on the top of the page. You will then see the SHDSL Setup table. On this page you can modify the line rate, annex standard, and terminal type of the NB702/NB704. Adapt: If you would like to use adaptive line rate, then select MaxRate and MinRate from the drop down list. - Page 22 Select A or B from the drop down list. Terminal: Select a terminal type from the drop down list, CPE or COE. Click on the Submit button to complete the configuration. You will then see a confirmation screen. www.netcomm.com.au Rev. 1 - YML689 Page 22 NB702/NB704 User Guide...
-
Page 23: Status
Version Click on the Version link on the top of the page. You will then see the Version table that displays the software version, firmware version, MAC address, and release date of the NB702/NB704. Rev. 1 - YML689 www.netcomm.com.au NB702/NB704 User Guide... - Page 24 Bridge Click on the Bridge link on the top of the page. You will then see the RFC 1483 Bridge table that displays the VPI/VCI values, QoS, encapsulation method, and packet filter of the NB702/NB704. www.netcomm.com.au Rev. 1 - YML689...
- Page 25 Click on the SHDSL link on the top of the page. You will then see the SHDSL Information table that displays the terminal mode, SHDSL standard, rate mode, and line rate range of the NB702/NB704. Rev. 1 - YML689 www.netcomm.com.au...
- Page 26 Save In order to save the changes to the NB702/NB704, you must click on the Save link on the navigation bar. You will then see the following message appear. Click on the OK button to save the changes. www.netcomm.com.au Rev. 1 - YML689...
- Page 27 Restart In order to restart the NB702/NB704, you must click on the Restart link on the navigation bar. You will then see the following message appear. Click on the OK button to restart the NB702/NB704. Rev. 1 - YML689 www.netcomm.com.au...
-
Page 28: Router Mode Configuration
Router Mode Configuration By default, the NB702/NB704 is configured in bridge mode. In order to switch to Router mode, click on the to Router link at the bottom of the navigation bar. You will then see the following screen. This section describes the steps involved in setting up the NB702/NB704 as a router. -
Page 29: Manage
IP Setup Click on the IP link on the top of the page. You will then see the Device IP Setup table. On this page you can change the IP address and subnet mask of the NB702/ NB704. Ethernet IP Address: Enter the IP address of this device. - Page 30 Enter the old password of the device. New Password: Enter the new password. New Password Again: Re-type the new password Click on the Submit button to complete the configuration. You will then see a confirmation message. www.netcomm.com.au Rev. 1 - YML689 Page 30 NB702/NB704 User Guide...
- Page 31 Select a port number. From the drop down list select: Auto-nego, 100/Full, 100/half, 10/Full, or 10/Half. Click on the Submit button to complete the configuration. You will then see a confirmation screen. Rev. 1 - YML689 www.netcomm.com.au NB702/NB704 User Guide Page 31...
-
Page 32: Router
You will then see four options: RFC1483, PPPoA, IPoA, and PPPoE. You may configure each connection by first clicking on the link above. Each configuration is described in the next few sections. www.netcomm.com.au Rev. 1 - YML689 Page 32 NB702/NB704 User Guide... - Page 33 Enter the IP address of the WAN interface. Mask: Enter the subnet mask for the WAN IP. Click on the Submit button to complete the configuration. You will then see a confirmation screen. Rev. 1 - YML689 www.netcomm.com.au NB702/NB704 User Guide Page 33...
- Page 34 Enter the username provided by your ISP. Password: Enter the password provided by your ISP. Confirm: Re-type the password provided by your ISP. WebEchoInterval: Leave this value set to 0, unless your ISP tells you otherwise. www.netcomm.com.au Rev. 1 - YML689 Page 34 NB702/NB704 User Guide...
- Page 35 VCI: Enter the VCI value that you received from your ISP. QoS: Select a Quality of Service from the drop down list, options available are: UBR, CBR, VBR-nrt, VBR –rt. Rev. 1 - YML689 www.netcomm.com.au NB702/NB704 User Guide Page 35...
- Page 36 Select an RIP version from the drop down list, options available are: none, V1, V2, or V1&V2. Click on the Submit button to complete the configuration. You will then see a confirmation screen. www.netcomm.com.au Rev. 1 - YML689 Page 36 NB702/NB704 User Guide...
- Page 37 Re-type the password provided by your ISP. WebEchoInterval: Leave this value set to 0, unless your ISP tells you otherwise. Click on the Submit button to complete the configuration. You will then see a confirmation screen. Rev. 1 - YML689 www.netcomm.com.au NB702/NB704 User Guide Page 37...
-
Page 38: Xdsl
Click on the DSL Setup link on the top of the page. You will then see the SHDSL Setup table. On this page you can modify the line rate, annex standard, and terminal type of NB702/NB704. Adapt: If you would like to use adaptive line rate, then select MaxRate and MinRate from the drop down list. - Page 39 Select A or B from the drop down list. Terminal: Select a terminal type from the drop down list, CPE or COE. Click on the Submit button to complete the configuration. You will then see a confirmation screen. Rev. 1 - YML689 www.netcomm.com.au NB702/NB704 User Guide Page 39...
-
Page 40: Advance
Click on the DHCP link on the top of the page. You will then see the DHCP Server Setup table. On this page you can modify the DHCP Server settings of NB704. www.netcomm.com.au Rev. 1 - YML689 Page 40 NB702/NB704 User Guide... - Page 41 Range 1 Start IP Address: Enter the IP address from which the NB702/NB704 can start assigning IP address. Range 1 End IP Address: Enter the IP address that is the last one that the NB702/ NB704 will assign. Range 2 Start IP Address: Enter a second range if required.
- Page 42 23 (Telnet). This will allow you to log-in from the WAN side of the NB702/4. If you do not want to allow Telnet service via the WAN port (Internet) you should delete the table entry for port 23.
- Page 43 Enter the IP address of the server that will receive the packets. Click on the Submit button to complete the configuration. You will then notice that your configuration has been added to the list. Rev. 1 - YML689 www.netcomm.com.au NB702/NB704 User Guide Page 43...
-
Page 44: Routing Table
Select a gateway IP from the drop down list. Click on the Submit button to complete the configuration. You will then notice that your configuration has been added to the list. www.netcomm.com.au Rev. 1 - YML689 Page 44 NB702/NB704 User Guide... -
Page 45: Dns Relay
Enter the IP address of the DNS Server. Retry Time: Enter the number of times that you would like the NB702/NB704 to try to connect to the DNS Server if the connection fails. Click on the Submit button to complete the configuration. You will then see a confirmation screen. - Page 46 Version Click on the Version link on the top of the page. You will then see the Version table that displays the software version, firmware version, MAC address, and release date of the NB702/NB704. www.netcomm.com.au Rev. 1 - YML689 Page 46...
- Page 47 Click on the Advance link on the top of the page. You will then see the Advanced Status Options. Click on the appropriate option to view its status, or click on the Advance link in the navigation bar for configuration. Rev. 1 - YML689 www.netcomm.com.au NB702/NB704 User Guide Page 47...
- Page 48 Click on the SHDSL link on the top of the page. You will then see the SHDSL Information table that displays the terminal mode, SHDSL standard, rate mode, and line rate range of the NB702/NB704. www.netcomm.com.au Rev. 1 - YML689...
- Page 49 In order to save the changes to the NB704, you must click on the Save link on the navigation bar. You will then see the following message appear. Click on the OK button to save the changes. Rev. 1 - YML689 www.netcomm.com.au NB702/NB704 User Guide Page 49...
- Page 50 Restart In order to restart the NB702/NB704, you must click on the Restart link on the navigation bar. You will then see the following message appear. Click on the OK button to restart the NB702/NB704. www.netcomm.com.au Rev. 1 - YML689...
-
Page 51: Chapter 3 - Command Line Interface
23 (Telnet). This will allow you to log-in from the WAN side of the NB702/4. If you do not want to allow Telnet service via the WAN port (Internet) you should delete the table entry for port 23. -
Page 52: Console Setup
Function, arrow, and ctrl keys act as: Windows keys Emulation: Auto-detect Back-scroll buffer lines: ASCII Setup: Echo typed characters locally Line delay: 0 milliseconds Character line feeds incoming line ends: enable www.netcomm.com.au Rev. 1 - YML689 Page 52 NB702/NB704 User Guide... -
Page 53: Main Menu Commands
>> shdsl Entry to SHDSL menu (See SHDSL Menu Commands for more details) >> ver displays software version Note: Commands not currently supported in the NB702 are: ipoa, pppoa, pppoe, rtable Rev. 1 - YML689 www.netcomm.com.au NB702/NB704 User Guide Page 53... - Page 54 The default mode is: bridge >> mode Please select bridge or router:(b/r,b) b Current mode is bridge > > >> mode Please select bridge or router:(b/r,b) r Current mode is router www.netcomm.com.au Rev. 1 - YML689 Page 54 NB702/NB704 User Guide...
- Page 55 Saves the current configuration and reboots the modem. Syntax: save >> save Saving configuration... Configuration saved. Updating flash filing system ... done NBfs0ZSDRAM size = 0x800000 Booting... System start... password: Rev. 1 - YML689 www.netcomm.com.au NB702/NB704 User Guide Page 55...
- Page 56 DHCP current/ineffective setting, and routing table setting. >> show Ethernet ip: 192.168.0.3 Subnet mask: 255.255.255.0 DHCP current setting : disable. DHCP ineffective setting : disable. effective routing table: Routing table is empty www.netcomm.com.au Rev. 1 - YML689 Page 56 NB702/NB704 User Guide...
-
Page 57: Dns Relay Menu Commands
Primary DNS Server: 192.168.10.5 Note: Strictly maintain stable power to the NB702/NB704while upgrading its software. If the power fails during the upgrading process, contents in the memory could be destroyed, and the system may hang. In such as case, you must call the dealer or system integrator for repairs. -
Page 58: Lan Menu Commands
Set an option for DHCP: server or disable. Syntax: setdhcp <server>|<disable> Example: setdhcp server SETIP Set the LAN IP address and subnet mask. Syntax: setip <etherip[/<masknum>] [subnet mask]>|<dhcp> Example: setip 192.168.0.1 255.255.255.0 www.netcomm.com.au Rev. 1 - YML689 Page 58 NB702/NB704 User Guide... - Page 59 SWITCHLIST Displays the speed/duplex setting of each port on the switch. Syntax: switchlist > lan> switchlist SwitchHub configuration Port 1: Auto Port 2: 100F Port 3: Auto Port 4: Auto Rev. 1 - YML689 www.netcomm.com.au NB702/NB704 User Guide Page 59...
-
Page 60: Manage Menu Commands
The password will then be changed and the configuration will be saved. > manage> setpass Old Password:**** New Password(press ENTER to disable):**** Confirm password again:**** Password has been changed Saving configuration... Configuration saved. www.netcomm.com.au Rev. 1 - YML689 Page 60 NB702/NB704 User Guide... -
Page 61: Shdsl Menu Commands
(this will set annex to ab, to verify the annex value, use the “status” command) DEFAULT Sets the SHDSL configurations back to the factory settings. Syntax: default ENABLE Activates the last updated SHDSL parameters. Syntax: enable Rev. 1 - YML689 www.netcomm.com.au NB702/NB704 User Guide Page 61... - Page 62 Sets the terminal type as: COE (Central Office Equipment) or CPE (Customer Premises Equipment). Syntax: terminal <coe>|<cpe> Example: annex cpe (this will set the terminal to CPE mode, to verify the terminal setting, use the “status” command) www.netcomm.com.au Rev. 1 - YML689 Page 62 NB702/NB704 User Guide...
-
Page 63: Bridge Mode Configuration
This section lists and describes all the commands that are used for configuring the NB702/NB704 as a bridge. By default, the NB702/NB704 is configured as a bridge. To switch between Bridge and Router mode, use the “mode” command under the main menu. -
Page 64: Quick Command (Rfc 1483 Bridge)
You will then see a summary of your configuration. Preserve the configuration: type “y” to preserve this configuration, or “n” to ignore it. Please remember to save and restart the NB702/NB704 in order for the settings to take affect. >> quick 1 PVC existed, 7 PVCs available. -
Page 65: Pat Menu Commands
PAT configuration/table use the “show” command. SHOW Displays the PAT interface table. Syntax: show PAT enabled interface: Interface IP address No setting PAT incoming table: No. i/f name|WanIP Port/Protocal Server IP No setting Rev. 1 - YML689 www.netcomm.com.au NB702/NB704 User Guide Page 65... -
Page 66: R1483 Menu Commands
Example 2: delpvc 8/35 (delete record of VPI/VCI 8/35) PFILTER Sets the packet filter type. Syntax: pfilter [<vpi>/]<vci> <any|ip|pppoe|igmp|none> Select between: Any, IP, PPPoE, IGMP, or None Example: pfilter 8/35 IP www.netcomm.com.au Rev. 1 - YML689 Page 66 NB702/NB704 User Guide... - Page 67 Displays the R1483 Bridge configuration. Included is the function name, VPI/VCI settings, QoS, LLC/VC MUX, Spanning Tree and Packet Filtering. Syntax: show > r1483> show FUNCTION VPI/VCI CLASS LLC/VCMUX Spanning Pkt Filter Rfc1483 8/35 Disable Rev. 1 - YML689 www.netcomm.com.au NB702/NB704 User Guide Page 67...
-
Page 68: Router Mode Configuration
Router Mode Configuration This section lists and describes all the commands that are used for configuring NB702/ NB704 as a router. By default, NB702/NB704 is configured as a bridge. To switch between Bridge and Router mode, use the “mode” command under the main menu. -
Page 69: 3.1.1 R 1483 (Routing) Quick Setup
Preserve the configuration: type “y” to preserve this configuration, or “n” to ignore it. Continue Quick? Enter “y” if you would like to run another quick session, or type “n” to continue and save the changes. Rev. 1 - YML689 www.netcomm.com.au NB702/NB704 User Guide Page 69... - Page 70 Please remember to save and restart the NB702/NB704 in order for the settings to take affect. >> quick R1483(r)/ IPoA(i)/ PPPoA(p)/ PPPoE(pe): r 0 PVC existed, 6 PVCs available. Ethernet IP (192.168.0.3) : 192.168.1.1 Subnet mask (255.255.255.0) : 255.255.255.0 VPI(0-4095): 8 VCI(1-65535): 36 WAN IP : 210.62.8.1...
-
Page 71: 3.1.2 Ipoa Quick Setup
Enter “y” if you would like to run another quick session, or type “n” to continue and save the changes. Please remember to save and restart the NB702/NB704 in order for the settings to take affect. Rev. 1 - YML689 www.netcomm.com.au... -
Page 72: 3.1.3 Pppoa Quick Setup
Preserve the configuration: type “y” to preserve this configuration, or “n” to ignore it. Continue Quick? Enter “y” if you would like to run another quick session, or type “n” to continue and save the changes. www.netcomm.com.au Rev. 1 - YML689 Page 72 NB702/NB704 User Guide... - Page 73 Please remember to save and restart the NB702/NB704 in order for the settings to take affect. >> quick R1483(r)/ IPoA(i)/ PPPoA(p)/ PPPoE(pe): p 0 PVC existed, 1 PVC available. Ethernet IP (192.168.1.1) : 192.168.1.1 Subnet mask (255.255.255.0) : 255.255.255.0 VPI(0-4095): 8...
-
Page 74: 3.1.4 Pppoe Quick Setup
Preserve the configuration: type “y” to preserve this configuration, or “n” to ignore it. Continue Quick? Enter “y” if you would like to run another quick session, or type “n” to continue and save the changes. www.netcomm.com.au Rev. 1 - YML689 Page 74 NB702/NB704 User Guide... - Page 75 Please remember to save and restart the NB702/NB704 in order for the settings to take affect. >> quick R1483(r)/ IPoA(i)/ PPPoA(p)/ PPPoE(pe): p 0 PVC existed, 1 PVC available. Ethernet IP (192.168.1.1) : 192.168.1.1 Subnet mask (255.255.255.0) : 255.255.255.0 VPI(0-4095): 8...
-
Page 76: Ipoa Menu Commands
Syntax: setrip [<vpi>/]<vci> <1|2|1&2|0> Example: setrip 8/35 2 SETWANIP Set the WAN IP address for IPOA Syntax: setwanip [<vpi>/]<vci> [ unnumber | <wanip[/ <masknum>]> <gateway> Example: setwanip 8/45 unnumber 192.168.2.5 www.netcomm.com.au Rev. 1 - YML689 Page 76 NB702/NB704 User Guide... - Page 77 Displays the IPoA settings: this includes: function, VPI/VCI, class of service, WAN IP address, gateway IP address, and RIP IP address. Syntax: show > ipoa> show IPoA setting: FUNCTION VPI/VCI CLASS Wan IP/MaskNum GatewayIP IPoA 0/35 192.168.10.2/24 192.168.10.3 Rev. 1 - YML689 www.netcomm.com.au NB702/NB704 User Guide Page 77...
-
Page 78: Pat Menu Commands
PAT configuration/table use the “show” command. SETPAT Enable or Disable the PAT function. Syntax: setpat <wanip><(e)nable><(d)isable> Example: setpat 192.168.2.5 e This will enable the PAT function on IP address 192.168.2.5 www.netcomm.com.au Rev. 1 - YML689 Page 78 NB702/NB704 User Guide... - Page 79 Interface number, port, protocol, and server IP address. Syntax: show > pat> show PAT enabled interface: Interface IP address PPPoE 8.218.23.0 PAT incoming table: No. i/f name|WanIP Port/Protocal Server IP pppoe 80/tcp 192.168.2.3 Rev. 1 - YML689 www.netcomm.com.au NB702/NB704 User Guide Page 79...
-
Page 80: Pppoa Menu Commands
You will be prompted to enter the old password. Then enter the new password, and type it again to re- confirm it. CONNECT Enable the PPPoA connection. Syntax: connect www.netcomm.com.au Rev. 1 - YML689 Page 80 NB702/NB704 User Guide... - Page 81 Configure the Routing Information Protocol setting. Syntax: setrip <1|2|1&2|0> Choose between RIP 1, RIP2, RIP 1&2, or 0 (none) Example: setrip 1 This will set the Routing Information Protocol to RIP1 Rev. 1 - YML689 www.netcomm.com.au NB702/NB704 User Guide Page 81...
- Page 82 QoS class, RIP level, User Id, authentication, LLC enabled or disabled, interval time, and idle time. Syntax: show > pppoa> show PPPoA setting: Function VPI/VCI CLASS RIP UserID/Authentication PPPoA 8/45 john/PAP LLC=Enabled Echo interval time: 5 s IdleTime 0/200 Type:numbered www.netcomm.com.au Rev. 1 - YML689 Page 82 NB702/NB704 User Guide...
-
Page 83: R1483 Menu Commands
Configure the Routing Information Protocol setting. Syntax: setrip <1|2|1&2|0> Choose between RIP 1, RIP2, RIP 1&2, or 0 (none) Example: setrip 1 This will set the Routing Information Protocol to RIP1 Rev. 1 - YML689 www.netcomm.com.au NB702/NB704 User Guide Page 83... - Page 84 Displays the R1483 configuration. Included is the function name, VPI/VCI settings, QoS, LLC/VC MUX, WAN IP, and RIP stetting. Syntax: show > r1483> show RFC1483 setting: FUNCTION VPI/VCI CLASS LLC/VCMUX Wan IP/MaskNum Rfc1483 8/35 192.168.2.10/24 www.netcomm.com.au Rev. 1 - YML689 Page 84 NB702/NB704 User Guide...
-
Page 85: Rtable Menu Commands
Displays Routing table. Included are the entry number, destination IP address, subnet mask, and gateway IP address. Syntax: show > rtable> show Routing Table: No. Destination IP SubMask Gateway IP 0.0.0.0 0.0.0.0 192.168.10.3 192.168.0.0 255.255.255.0 192.168.0.32 effective routing table: Rev. 1 - YML689 www.netcomm.com.au NB702/NB704 User Guide Page 85... -
Page 86: Snmp (Example)
Type "snmp help all" or "snmp help <command>" for more details Use "home" to return to "NB702" prompt. NB702 snmp> access access read public access write xdsl00 NB702 snmp> help access (show the help for the command... -
Page 87: Appendix A - Nb704 Specifications
Operation Temperature: 0?C ~ 45?C Operation Humidity: 5% ~ 95% Storage Temperature: -20 ~ +85?C Storage Humidity: 5%~95% Physical Dimensions (W x D x H) 220mm x 169mm x 40mm Rev. 1 - YML689 www.netcomm.com.au NB702/NB704 User Guide Page 87... - Page 88 Input 110 or 230 or 240 VAC, 50/60Hz; Output 12VDC 1A Power Consumption: Less than 10 Watts Certificates EMC: CE EN300386 & FCC Part 15 class B Safety: EN60950 & CB www.netcomm.com.au Rev. 1 - YML689 Page 88 NB702/NB704 User Guide...
-
Page 89: A2. Software Specifications
Configuration and Network Management DHCP server for IP management Local console configuration and management through RS-232 port Telnet for local or remote management TFTP for firmware upgrade and configuration Web configuration Rev. 1 - YML689 www.netcomm.com.au NB702/NB704 User Guide Page 89... -
Page 90: Appendix B - Nb702 Specifications
Appendix B – NB702 Specifications A1. Hardware Specifications Local Interface Four 10/100BaseTX Ethernet switch, IEEE 802.3u, RJ-45 connectors. 10 Half, 10Full, 100Half, 100Full, Auto Negotiation configurable for each port. Supports port based VLAN. WAN SHDSL Line Interface Data Rate: 72 Kbps up to 2.3Mbps rate adaptive... -
Page 91: A2. Software Specifications
DNS Relay. Configuration and Network Management DHCP server for IP management. Local console configuration and management through RS-232 port. Telnet for local or remote management. TFTP for firmware upgrade. Web configuration. Rev. 1 - YML689 www.netcomm.com.au NB702/NB704 User Guide Page 91... -
Page 92: Appendix C - Cable Connections
RJ-45 Network ports All of the ethernet ports on the NB702/NB704 are 10/100 Mbps capable auto-sensing Ethernet ports. Each port supports only unshielded twisted pair (UTP) cable using an 8-pin RJ-45 plug. The Auto-uplink feature senses the connection of uplink (MDI-II) -
Page 93: Straight And Crossover Cable Configuration
RJ-11 Connector Pin Assignment Normal Assignment Signal Ground +5 Volts In Signal Ground Figure 5 Rev. 1 - YML689 www.netcomm.com.au NB702/NB704 User Guide Page 93... -
Page 94: 605 To Rj-11 Adapter
USB devices can be connected and disconnected at any time. 9 Pin (RS-232 ) Serial Cable A 9 Pin (RS-232) Serial Cable may be used to connect the NB702/NB704 to a serial console terminal or a PC running a terminal emulation program, such as Hyper Terminal. -
Page 95: Appendix D - Registering Your Netcomm Product
Alternatively, you can complete the following copy of the Warranty Registration Form and mail it to NetComm Limited, PO Box 1200, Lane Cove NSW 2066. Contact Information If you have any technical difficulties with your product, please do not hesitate to contact NetComm’s Customer Support Department. -
Page 96: Legal & Regulatory Information Copyright Information
Do not use this power supply with any other product or do not use any other power supply that is not approved for use with this product by NetComm. Failure to do so may cause damage to this product, fire or result in personal injury. -
Page 97: Warranty Registration Form
Warranty Registration Form Date of Purchase …..…………...………......... Name …..…………...………......... Company …..…………...………......... Address …..…………...………......... ……………………..……... Post Code ..………..………. Tel No ( ) ....……….…. Fax No ( ..………...………. E-mail …..…………...………......... The following information is vital for your warranty Please make sure it’s correct and complete. Serial No …..…………...………......... -
Page 99: Product Warranty
The warranty is automatically voided if: You, or someone else, use the product, or attempts to use it, other than as specified by NetComm; The fault or defect in your product is the result of a voltage surge subjected to the product either by the way of power supply or communication line, whether caused by thunderstorm activity or any other cause(s);...
Need help?
Do you have a question about the NB702 and is the answer not in the manual?
Questions and answers