Table of Contents
Advertisement
Quick Links
Download this manual
See also:
Setup Manual
Advertisement
Table of Contents

Related Manuals for NetComm NB604


Summary of Contents for NetComm NB604
-
Page 1: User Guide
NB604 ADSL2+ Modem Router USER GUIDE... - Page 2 Copyright Copyright©2012 NetComm Limited. All rights reserved. The information contained herein is proprietary to NetComm Limited. No part of this document may be translated, transcribed, reproduced, in any form, or by any means without prior written consent of NetComm Limited.
-
Page 3: Table Of Contents
Advanced Setup ......................................17 Diagnostics ......................................... 42 Management ....................................... 43 Technical Data ..................................... 47 Electrical Specifications ....................................47 Environmental Specifications / Tolerances ..............................47 FAQ ......................................48 Legal & Regulatory Information..............................49 Contact......................................51 YML604X NetComm NB604 – ADSL2+ Modem Router www.netcommwireless.com... -
Page 4: Overview
Target Users The individual reading this manual is presumed to have a basic understanding of telecommunications terminology and concepts. Prerequisites Before continuing with the installation of your NB604, please confirm that you comply with the minimum system requirements below. ... -
Page 5: Product Introduction
The NB604 also comes with a built-in 4 port Ethernet switch, allowing for other devices to access the Internet over a wired connection. -
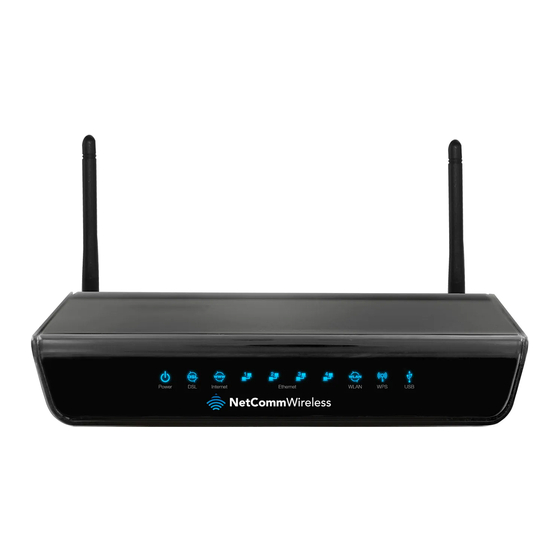
Page 6: Physical Dimensions And Indicators
LED Indicators The NB604 has been designed to be placed on a desktop. All of the cables exit from the rear for better organization. The display is visible on the front of the NB604 to provide you with information about network activity and the device status. See below for an explanation of each of the indicator lights. -
Page 7: Physical Dimensions
Physical Dimensions The following page lists the physical dimensions of the NB604. NB604 Length 196 mm Height 133 mm Width 34 mm Weight 315 grams NB604 Default Settings The following tables list the default settings for the NB604. LAN (MANAGEMENT) Static IP Address: 192.168.1.1... -
Page 8: Integrated Interfaces
FUNCTION Attach a telephone line with an active xDSL service here RESET Hold this button down for 10 seconds or more to reset the NB604 to factory defaults LAN1-LAN4 Attach Ethernet based devices Attach an external USB storage device to share content with connected devices Power (12V) Jack Power connector, connects to a DC 12V 1.5A Power Adapter... -
Page 9: Safety And Product Care
Disconnect the power line from the device before servicing. Transport and Handling When transporting the NB604, it is recommended to return the product in the original packaging. This ensures the product will not be damaged. In the event the product needs to be returned, ensure it is securely packaged with appropriate padding to prevent damage during courier transport. -
Page 10: Hardware Installation
Wait approximately 60 seconds for the NB604 to power up. Connecting via a cable Connect the yellow Ethernet cable provided to one of the ports marked ‘LAN’ at the back of the NB604. Connect the other end of the yellow Ethernet cable to your computer. -
Page 11: Management Console Login Procedure
Management Console Login Procedure To log in to the management console and view the status or make changes to your NB604 configuration, please follow the steps below: Open your web browser (e.g. Internet Explorer/Firefox/Safari) and navigate to http://192.168.1.1 Enter the default username and password of “admin” (without the quotes) and click “OK”. -
Page 12: Device Info
Summary The summary page provides an overview of the current operating parameters used by your NB604. You can use this check your firmware version or network connection information, such as your current Internet IP address or Internet connection speed as shown below. - Page 13 The WAN page displays a summary of the WAN connection settings and your WAN IP address (if applicable). Statistics Statistical information is provided and displayed broken down by network connection and type of connection. Please see the following pages for an explanation of each these items. YML604X NetComm NB604 – ADSL2+ Modem Router www.netcommwireless.com...
- Page 14 The LAN page displays information about computers or devices connected to the NB604 either by an Ethernet cable. WAN Service The WAN page displays information about the WAN connection in use by the NB604. An entry will be shown for each configured connection.
- Page 15 The Asynchronous Transfer Mode (ATM) page shows information about the currently configured ATM interface. xDSL The xDSL page shows information about the currently configured xDSL connection and connection conditions. YML604X NetComm NB604 – ADSL2+ Modem Router www.netcommwireless.com...
- Page 16 The Route page lists the current routing table entries. The Address Resolution Protocol (ARP)page shows the current ARP table entries. DHCP The DHCP page lists the current DHCP leases in use on the NB604. YML604X NetComm NB604 – ADSL2+ Modem Router...
-
Page 17: Basic Setup
Enter the username provided by your Internet Service Provider (ISP) in the PPP Username field. Enter the password provided by your ISP in the PPP Password field. Click Apply/Save. Click “Next” and view your connection information. The NB604 will then automatically attempt to connect using the details you entered. Advanced Setup The Advanced Setup page provides configuration options for other network and connection based functions of the NB604. -
Page 18: Layer 2 Interface
Encapsulation Mode Select the type of encapsulation utilised by your service QoS Settings Select the appropriate Quality of Service settings to apply to this connection Click Apply/Save to save the new Interface. YML604X NetComm NB604 – ADSL2+ Modem Router www.netcommwireless.com... - Page 19 Select the Ethernet port to apply the configuration to. Select the connection mode. Connection Mode (VLAN MUX is typically used to access services such as IPTV) Click Apply/Save to save the new Interface. YML604X NetComm NB604 – ADSL2+ Modem Router www.netcommwireless.com...
-
Page 20: Wan Service
WAN Service This screen provides a summary of the current WAN interfaces you have configured. If you have connected the NB604 to an ADSL connection through the ADSL Quick Setup interface, details of the connection will be summarized here. You can also add or remove WAN Services. - Page 21 Select to enable PPP IP Extension on the connection Static IPv4 Address Enter a static IP Address to utilise with the connection Select to enable IPv6 support for the connection. This enables the NB604 to Request Prefix Delegation and Enable IPv6 request an IPv6 Address.
- Page 22 (e) Review the configured functions of the connection and click Save/Apply to save the new WAN Service connection. In the case of a bridged connection, click Save/Apply to save the new WAN Service connection. YML604X NetComm NB604 – ADSL2+ Modem Router www.netcommwireless.com...
- Page 23 To set a DHCP reservation, enter the MAC Address of the chosen host and IP to use and then click Apply/Save. The NB604 enables you to set the DHCP options which are provided to hosts attempting to connect to the DHCP server.
- Page 24 IPv6 Autoconfig The NB604 offers a stateless IPv6 Autoconfig function for IPv6 enabled devices connected via the LAN. The following auto configuration options are available: PARAMETER DEFINITION Interface Address Set the IPv6 Address of the NB604 Enable DHCPv6 Server Select to enable the stateless DHCPv6 Server...
- Page 25 Enter the IP Address to forward the incoming connections to. Enter the External Port range for the incoming connections Select the appropriate protocol Enter the Internal Port Range Click Save/Apply to save the new Virtual Server configuration settings. YML604X NetComm NB604 – ADSL2+ Modem Router www.netcommwireless.com...
- Page 26 DMZ Host, just clear the DMZ Host IP Address field, and then click Save/Apply. Please note: The DMZ exposes your computer to the Internet. Ensure appropriate steps are taken to protect it. YML604X NetComm NB604 – ADSL2+ Modem Router www.netcommwireless.com...
- Page 27 An Application Layer Gateway (ALG) allows two or more simultaneous NAT connections to be made by clients through this router. Select the specific ALG NAT functions to enable and click Save/Apply. Multi NAT Multi NAT enables the NB604 to support a number of different NAT types such as: One to One ...
- Page 28 Enter the destination port number used by the application to block Click Save/Apply to take effect the settings. The new rule will then be displayed in the Outgoing IP Filtering table list. YML604X NetComm NB604 – ADSL2+ Modem Router www.netcommwireless.com...
- Page 29 MAC Filtering The NB604 offers the ability to utilise MAC Address filtering on ATM PVCs. You can elect to block or allow connections based on MAC Address criteria. The default policy is to allow connections which match the criteria. Click Add to enter a new MAC Address filter.
-
Page 30: Parental Control
Click Apply/Save to save the new Access Time Restriction rule. URL Filter The NB604 offers the ability to block or allow specific URLs based on filter rules. To delete a filter, click the Remove checkbox next to the selected filter and click Remove. -
Page 31: Quality Of Service
Enable Select to enable or disable the entered QoS queue configuration Interface Select the interface to apply the QoS queue configuration to. Click Apply/Save to save the new QoS Queue configuration settings. YML604X NetComm NB604 – ADSL2+ Modem Router www.netcommwireless.com... - Page 32 Select the priority the entered QoS classification will have applied to it Tag VLAN ID Enter the VLAN tag ID to apply the entered QoS classification to Click Apply/Save to save the new QoS Classification configuration settings. YML604X NetComm NB604 – ADSL2+ Modem Router www.netcommwireless.com...
- Page 33 If you wish to use a specific gateway to reach the destination network, enter the IP address of the gateway. Metric Enter the metric (traffic priority/weighting) to be applied to the static route. Click Save/Apply to save the new static route entry. YML604X NetComm NB604 – ADSL2+ Modem Router www.netcommwireless.com...
- Page 34 WAN connections which do not utilise NAT. Select the RIP version and Operation mode to use with the specified WAN service interface. Click Apply/Save to save the new RIP configuration settings. YML604X NetComm NB604 – ADSL2+ Modem Router www.netcommwireless.com...
- Page 35 To use your preferred DNS servers instead, enable the ‘Use the following Static DNS IP Address’ option and enter in the IP address of your Primary DNS server. Adding a Secondary DNS server is optional. Click Apply/Save to save the new DNS Server Configuration settings. YML604X NetComm NB604 – ADSL2+ Modem Router www.netcommwireless.com...
- Page 36 Select the interface information to update the DynDNS service with. DynDNS Settings Enter the account details of your selected dynsmic DNS service. Click Apply/Save to save the new dynamic DNS service configuration settings. YML604X NetComm NB604 – ADSL2+ Modem Router www.netcommwireless.com...
- Page 37 Click Apply/Save to save the new DSL test mode configuration settings. As part of configuring the DSL test mode, you can also manually select which tone frequencies the NB604 will use when establishing a connection to a DSL service. Click ‘Tone Selection’ and enable or disable the applicable frequencies. By default, all frequencies are enabled.
-
Page 38: Dns Proxy
UPnP The NB604 supports UPnP on WAN Services with NAT enabled. Select to enable or disable UPnP support and click Apply/Save to save the new UPnP configuration settings. DNS Proxy The DNS Proxy function enables the NB604 to perform as a forwarding DNS server which an associated DNS Host entry and Domain name entry. -
Page 39: Interface Grouping
Port Mapping allows you to create groups composed of the various interfaces available in your router. These groups then act as separate networks. To delete an Interface group entry, click the Remove checkbox next to the selected group entry and click Remove. Click Add to create an Interface group. YML604X NetComm NB604 – ADSL2+ Modem Router www.netcommwireless.com... - Page 40 Click Apply/Save to save the Interface grouping configuration settings. IPSec The NB604 offers IPSec VPN tunnel functionality. To delete an IPSec entry, click the Remove checkbox next to the selected IPSec tunnel entry and click Remove. Click Add to create a new IPSec tunnel connection.
-
Page 41: Power Management
Power Management The power management page enables you to control the green aspects of the NB604. You can enable or disable the power management features by selecting or unselecting the different power management functions as necessary and then click Apply to save these settings. -
Page 42: Diagnostics
Testing the connection to your Internet service provider. Click ‘Next Connection’ to run diagnostics on the next configured WAN Service connection or click ‘Test with OAM F4’ to retest the current WAN Service connection. YML604X NetComm NB604 – ADSL2+ Modem Router www.netcommwireless.com... -
Page 43: Management
Restore Default To restore your router to its factory default settings, click Restore Default Settings. When prompted, click OK. Upon clicking OK, you will be prompted to follow the instruction as shown below. YML604X NetComm NB604 – ADSL2+ Modem Router www.netcommwireless.com... -
Page 44: System Log
As a TR-069 capable router, the Internet service provider can remotely update the settings of the device. These settings should not be changed unless directed to do so by your Internet Service Provider. Click Apply/Save to save the new TR-069 configuration settings. YML604X NetComm NB604 – ADSL2+ Modem Router www.netcommwireless.com... -
Page 45: Internet Time
Select which Services to allow, which ports the services are available on and whether to allow this access from the LAN or the WAN side connection. Click Apply/Save to save the new Services control configuration settings. YML604X NetComm NB604 – ADSL2+ Modem Router www.netcommwireless.com... -
Page 46: Update Software
Click Browse to locate the software file and then click Update Software. Reboot This feature allows the router to enable new network configuration to take effect or to clear problems with the modem router’s network connection. YML604X NetComm NB604 – ADSL2+ Modem Router www.netcommwireless.com... -
Page 47: Technical Data
Regulatory Compliancy A-Tick Electrical Specifications It is recommended that the NB604 be powered by the supplied 12VDC/1.5A power supply. A replacement power supply is available from the NetComm Online shop. Environmental Specifications / Tolerances The NB604 housing enables it to operate over a wide variety of temperatures from 0˚C ~ 40˚C. -
Page 48: Faq
Verify your PC or device is on the same subnet as the Router and that DHCP is enabled. I cannot access any attached USB Storage Verify that you have created an appropriate user account and granted the required access permissions for the volume YML604X NetComm NB604 – ADSL2+ Modem Router www.netcommwireless.com... -
Page 49: Legal & Regulatory Information
NetComm’s (or its licensors’) intellectual property rights to you. You are permitted to use this Manual for the sole purpose of using the NetComm product to which it relates. Otherwise no part of this Manual may be reproduced, stored in a retrieval system or transmitted in any form, by any means, be it electronic, mechanical, recording or otherwise, without the prior written permission of NetComm. -
Page 50: Product Warranty
Consumer Protection Laws which cannot be excluded, NetComm’s liability for any breach of that guarantee, condition or warranty is limited to: (i) in the case of a supply of goods, NetComm doing any one or more of the following: replacing the goods or supplying equivalent goods;... -
Page 51: Contact
Contact Address: NETCOMM WIRELESS LIMITED Head Office PO Box 1200, Lane Cove NSW 2066 Australia P: +61(0)2 9424 2070 F: +61(0)2 9424 2010 sales@netcommwireless.com www.netcommwireless.com YML604X NetComm NB604 – ADSL2+ Modem Router www.netcommwireless.com...
Need help?
Do you have a question about the NB604 and is the answer not in the manual?
Questions and answers