Table of Contents
Advertisement
Quick Links
Advertisement
Table of Contents

Related Manuals for Extron electronics NAVigator


Summary of Contents for Extron electronics NAVigator
- Page 1 NAVigator System Manager User Guide NAV Pro AV Over IP 68-2740-01, Rev. D 03 24...
- Page 2 Safety Instructions Safety Instructions • English Instructions de sécurité • Français AVERTISSEMENT : Ce pictogramme, , lorsqu’il est utilisé sur le WARNING: This symbol, , when used on the product, is intended to produit, signale à l’utilisateur la présence à l’intérieur du boîtier du produit alert the user of the presence of uninsulated dangerous voltage within the d’une tension électrique dangereuse susceptible de provoquer un choc product’s enclosure that may present a risk of electric shock.
- Page 3 安全说明 • 简体中文 警告: 产品上的这个标志意在警告用户, 该产品机壳内有暴露的危险 电压, 有触电危险。 注意: 产品上的这个标志意在提示用户, 设备随附的用户手册中有重 要的操作和维护(维修)说明。 关于我们产品的安全指南、遵循的规范、EMI/EMF 的兼容性、无障碍使 用的特性等相关内容, www.extron.com 敬请访问 Extron 网站 , ,参见 Extron 安全规范指南,产品编 www.extron.com 号 68-290-01 。 安全記事 • 繁體中文 안전 지침 • 한국어 경고: 이 기호 가 제품에 사용될 경우, 제품의 인클로저 내에 있는 警告: 若產品上使用此符號,...
- Page 4 FCC Class A Notice This equipment has been tested and found to comply with the limits for a Class A digital device, pursuant to part 15 of the FCC rules. The Class A limits provide reasonable protection against harmful interference when the equipment is operated in a commercial environment.
- Page 5 Software Commands Commands are written in the fonts shown here: ^AR Merge Scene,,0p1 scene 1,1 ^B 51 ^W^C.0 [01] R 0004 00300 00400 00800 00600 [02] 35 [17] [03] E X! *X1&* X2)* X2#* X2! NOTE: For commands and examples of computer or device responses used in this guide, the character “0”...
-
Page 7: Table Of Contents
Commissioning Report page ..........................24 Monitoring Page ................................26 Settings Page ................................27 Creating a NAV System ..............................28 Network Connection Settings ............................29 Discover and Assign Encoders and Decoders ......................31 Configure Selected Endpoint Communication Settings ....................33 Create NAV Ties ................................35 NAVigator System Manager • Contents... - Page 8 IGMP Querier pane ............................. 112 Control Systems pane ............................112 Alarms pane................................ 113 Download Logs link............................. 114 Settings Pages ................................ 115 General page ..............................115 Networking page ..............................122 Advanced page ..............................124 About Page .................................127 NAVigator System Manager • Contents viii...
- Page 9 Using the Command and Response Tables .......................133 Common symbol definitions ............................133 SIS Command and Response Tables .........................134 Command and Response Table for NAVigator Commands ..................134 Command and Response Table for IP-Specific SIS Commands ................138 NAVigator to Endpoints Communication (Encapsulation) ..................139 ..............................140...
- Page 10 NAVigator System Manager • Contents...
-
Page 11: Introduction
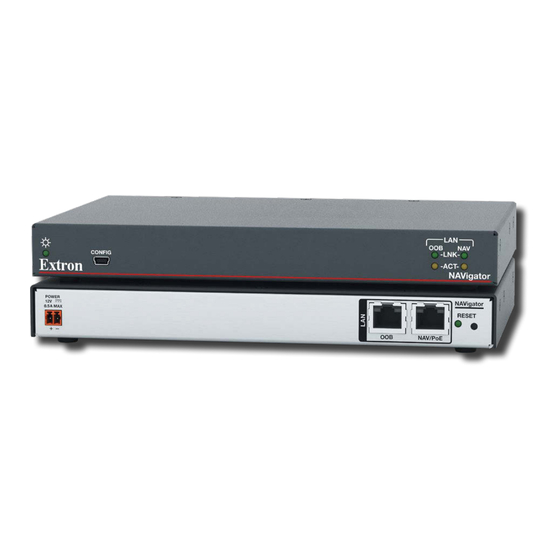
The NAVigator is housed in a 1-inch high, half-rack width metal enclosure that can be mounted in any standard 19-inch rack or under furniture with optional mounting kits. The NAVigator can be powered via Power over Ethernet (PoE) or by an included external 100 VAC to 240 VAC, 50-60 Hz power supply that provides worldwide power compatibility. -
Page 12: About The System
WindoWall presets provide a quick and easy way to manipulate the videowall canvas between different image arrangements. • Confidence preview — Allow you to view the video output on the built-in HTML page of the NAVigator, encoder, and decoder. This feature helps to remotely validate video output during configuration or debugging. •... - Page 13 • Enables parallel firmware update of multiple NAV devices at once — Upgrades firmware on all endpoints directly from the NAVigator web interface for quick and reliable firmware management that enables efficient system enhancements. •...
-
Page 14: Installation And Operation
Injector or a PoE capable network switch. NAV/PoE port — Connect this port to your A/V LAN network for control of the NAVigator, control of the A/V streaming network (NAV encoders and decoders), or both. Optionally, you can also power the NAVigator by inserting PoE through this port. -
Page 15: Connector And Cable Details
Figure 4 shows how to wire the connector. Use the supplied tie-wrap to strap the power cord to the extended tail of the connector. Smooth Ridges SECTION A–A Power Supply Tie Wrap Output Cord Figure 4. Power Connector Wiring Captive Screw Connector NAVigator System Manager • Installation and Basic Operation... - Page 16 5) permettent de repérer le pôle négatif du cordon d’alimentation. To verify the polarity before connection, plug in the power supply with no load and check the output with a voltmeter. NAVigator System Manager • Installation and Basic Operation...
-
Page 17: Front Panel Connection And Indicators
• The modes listed close all open IP connections and close all sockets. • For Reset IP Setting and Factory Reset, nothing happens if the momentary press does not occur within 1 second. NAVigator System Manager • Installation and Basic Operation... -
Page 18: Performing Factory And Ip Resets
9 seconds RESET Figure 6. Resets 2. Release the RESET button and then immediately press and release the RESET button again. Nothing happens if you do not momentarily press RESET within 1 second. NAVigator System Manager • Installation and Basic Operation... -
Page 19: Html Operation
Configuration port uses IP over USB technology. The factory-embedded pages are always available and cannot be erased or overwritten. NOTE: If connection to the NAVigator using either the NAV/PoE port or OOB port is unstable, try turning off the proxy server in your web browser. - Page 20 • The factory configured passwords for all accounts on this device have been set to the device serial number. In the event of a complete system reset, the passwords revert to the default. The default username is admin and the default password is extron. • Passwords are case sensitive. NAVigator System Manager • HTML Operation...
-
Page 21: Html Pages Overview
KVM WORKSTATIONS link — Opens a page that provides tools for creating and configuring KVM KVM WORKSTATIONS Page workstations (see on page 18). TOOLS link — Opens pages that provide NAVigator tools and tools for entire system, including the endpoints (see Tools Pages on page 21). -
Page 22: Endpoints Page
NOTE: The log in to the HTML pages automatically times out after 30 minutes of user inactivity. Endpoints Page The Endpoints page allows you to discover endpoints and assign one or more to the NAVigator. To access the Endpoints page, if necessary, click the Menu icon (see figure 10,... -
Page 23: Ties Page
Ties page, if necessary, click the Menu icon (see figure 12, ). Click TIES ( ). The Ties page opens, displaying a grid of endpoints assigned to this NAVigator and indicates existing ties. See Creating a NAV System on page 28 for a detailed description of assigning and tying endpoints as part of creating a system. -
Page 24: Edid Page
1 1 1 1 1 1 1 1 1 1 1 1 2 2 2 2 2 2 2 2 2 2 2 2 2 2 2 2 2 2 Figure 13. EDID Page NAVigator System Manager • HTML Operation... -
Page 25: Windowalls Page
WINDOWALLS Page The NAVigator can support up to eight NAV WindoWalls with mixed sources. The NAVigator can support up to eight workspaces called canvases, each of which can support up to eight rows by eight columns. The WINDOWALLS page provides tools to configure NAV WindoWall canvases, assign encoders (sources) to the canvases, and to save the canvas as a NAV WindoWall preset. -
Page 26: Canavas Configuration Page
Each canvas has a Canvas ID ( ) that identifies that canvas. If you need to reference a canvas from a control system, the canvas ID does not change, even if you have renamed the canvas. NAVigator System Manager • HTML Operation... -
Page 27: Canvas Presets Pane
Canvas view — A grid diagram in which each cell represents a display in the NAV WindoWall. Input and preset controls — Assign encoders, manage presets, and switch inputs. NOTE: Incomplete ( ) indicates a canvas is not finished being configured and is not ready for use as a WindoWall. NAVigator System Manager • HTML Operation... -
Page 28: Kvm Workstations Page
KVM WORKSTATIONS Page The NAVigator can support up to eight KVM workstations, each of which allows the NAV system to function as a KVM-Over-IP Matrix KVM workstation. Users can control a selection of computers that are remotely located from a single workspace. -
Page 29: Kvm Configuration Page
Input Assignment and Output Assignment buttons (see figure 18 on page 18) — Click to select input (encoder) and output (decoder) variables to configure. Display Settings (off-screen on figure 18, see figure on page 82) — Adjust the display settings of all outputs (decoders) in that workstation. NAVigator System Manager • HTML Operation... -
Page 30: Workstation Presets Page
Workstation display layout — A virtual representation of how the displays are setup at the workstation desk. Each cell represents a display in the KVM workstation. Input and preset controls — Show available encoders and manage saved presets. NAVigator System Manager • HTML Operation... -
Page 31: Tools Pages
Tools Pages The Tools pages provide a variety of NAVigator, system, and network tools. 1 1 1 1 1 1 1 1 1 1 1 1 1 1 1 1 1 1 To access the Tools pages, if necessary, click the Menu icon (see figure 18,... -
Page 32: System Tools Page
96 for a detailed description of these system tools. 1 1 1 1 1 1 1 1 1 1 1 1 1 1 1 1 1 1 Figure 21. System Tools Page NAVigator System Manager • HTML Operation... -
Page 33: Diagnostic Tools Page
• Trace — Use this tool to trace the network route taken by a packet from source to destination. Figure 27 shows the typical results of a Trace diagnostic. Figure 23. Trace Results Shown 4. Click CLEAR ( ) to reset the Address field if you want to run another diagnostic. NAVigator System Manager • HTML Operation... -
Page 34: Commissioning Report Page
), Integrator name ( ), and Consultant name ( 3. Click CREATE REPORT. The NAVigator prepares a displays a report (see figure 25 on page 25) detailing the composition of the AV system including items such as (among other things): NAVigator: •... - Page 35 Name NAV1-E-101-17-84-05 NAV - AV LAN including the NAVigator and all its assigned Endpoints. The settings shown in this commissioning COMMISSIONING REPORT report were the current settings of the connected and powered devices at the time the report was Location...
-
Page 36: Monitoring Page
Monitoring Page on page 109 for a detailed description of the monitored functions. 1 1 1 1 1 1 1 1 1 1 1 1 1 1 1 1 1 1 Figure 27. Monitoring Page NAVigator System Manager • HTML Operation... -
Page 37: Settings Page
Settings Page The Settings pages provide access to many NAVigator settings grouped as General, 1 1 1 1 1 1 1 1 1 1 1 1 1 1 1 1 1 1 Networking, and Advanced. To access the Settings pages, if necessary, click the Menu... -
Page 38: Creating A Nav System
Creating a NAV System Connection to the NAVigator can be done via the embedded HTML pages. Creating a NAV system using the NAVigator and its embedded HTML pages is a seven-part process: 1. Connect to the NAVigator via the embedded HTML pages (see Opening the Embedded HTML Pages page 9). -
Page 39: Network Connection Settings
5. Examine the network connection settings, comparing them against the values provided by the local system Discover and Assign Encoders and Decoders administrator. If all values are correct, proceed to page 31. NAVigator System Manager • HTML Operation... - Page 40 10. Repeat step 9 as necessary for other values. 11. Click SAVE ( NOTE: If you change the settings of either port, you will lose communications momentarily while the NAVigator and endpoints self-reconfigure. This is normal. NAVigator System Manager • HTML Operation...
-
Page 41: Discover And Assign Encoders And Decoders
1 1 1 1 1 1 1 1 1 1 1 1 Figure 32. Appearance of Endpoints Page when Adding to Existing Endpoints Continue the discovery and assignment process as described in steps 4 and 5 on page 32. NAVigator System Manager • HTML Operation... - Page 42 See LinkLicense Page on page 121 to install the license. • When you assign an endpoint to the NAVigator, the endpoint automatically assumes the password of the NAVigator. TIPS: • Use the ID function to help identify an endpoint as follows: •...
-
Page 43: Configure Selected Endpoint Communication Settings
(see Backing up the system on page 96) is the file from which the endpoint is configured. • Click Unassign ( ) to unassign an endpoint from the NAVigator. 5. Click the GENERAL link (see figure figure ) or the NETWORK link (see ) as necessary to make the desired changes to the settings shown on the figures. - Page 44 2 2 2 2 2 2 2 2 2 2 2 2 2 2 2 2 2 2 Figure 36. Configure Endpoints > Network 7. Click SAVE ( ) or SAVE ALL ( ) on either figure. NAVigator System Manager • HTML Operation...
-
Page 45: Create Nav Ties
Figure 37. Crea TIP: Use the browser zoom feature to see more devices in the ties grid. 3. Click to select the Set Tie Mode (Audio + Video, Audio Only, or Video Only ( NAVigator System Manager • HTML Operation... - Page 46 Audio + Video from input NAV-E-101-12-F2-41 is tied to figure 37 NAV-SD-101-17-84-CO (all outputs). 5. If the Create Ties page asks you to confirm the change, click CONTINUE. Ties are displayed as follows: Video and audio Video only Audio only NAVigator System Manager • HTML Operation...
-
Page 47: Detailed Descriptions And Operations
Besides the startup tasks of discovering and assigning endpoints to the NAVigator, the Endpoints pane has tools for “bulk” configuring one or multiple endpoints from the NAVigator. These tools are a more efficient way to manage your system than making changes to individual endpoints, either through their HTML pages directly (see... - Page 48 Configure the streaming settings Configure the USB settings USB (applicable endpoints only) USB port settings on page 55 On-screen display Configure the OSD on page 56 Screen saver Configure the screen saver on page 57 NAVigator System Manager • HTML Operation...
-
Page 49: General Tab
Figure 39. Endpoints Page, Configure Tools — General Tab NOTE: The procedures that follow assume that you already have the GENERAL tab displayed on the Configure Endpoints tools (see the procedure on page 37). NAVigator System Manager • HTML Operation... - Page 50 Device Details page on page 116). 3. Click anywhere outside the edited field. 4. To create a tag for an individual assigned endpoint, click Add ). An editable field opens (see figure 41 on page 41. NAVigator System Manager • HTML Operation...
- Page 51 • Spaces are allowed any other position. after the first • Cannot begin with a character. space. • Multiple tags are • Spaces are allowed allowed, making after the first character. filtering and sorting searching easier. NAVigator System Manager • HTML Operation...
- Page 52 If you enter a value in either the Edit All Inputs or Edit All Outputs field ( ), the first endpoint listed below the edited field is changed to that number ( ). Subsequent input or output numbers ( ) increment as the endpoints are listed from top to bottom. NAVigator System Manager • HTML Operation...
- Page 53 Enable or disable Confidence Preview Confidence Preview is a feature that allows you to view the video output of encoders and decoders in a Device Details pane on the HTML page of the NAVigator (see Device Details pane, confidence preview, and proxy connections on page 59).
-
Page 54: Network Tab
4 4 4 4 4 4 4 4 4 4 4 4 B B B B B B B B B B B B B B B B B B Figure 44. Endpoints Page, Configure Tools — NETWORK Tab NAVigator System Manager • HTML Operation... - Page 55 ) or SAVE ALL ( ) to save the changes or CANCEL ( ) to abandon them. 7. Click X ( ) to close the Configuration Endpoints page or select a different tab to change other settings. ¢ NAVigator System Manager • HTML Operation...
-
Page 56: Input Tab
TIP: After you make any change in steps 2 through 5, an asterisk ( ) appears in the tab to indicate that there are unsaved changes. NAVigator System Manager • HTML Operation... -
Page 57: Output Tab
NOTE: The Output procedures that follow assume that you already have the GENERAL tab displayed on the Configure Endpoints tools (see the procedure on page 37). Figure 46. Endpoints Page, Configure Tools — OUTPUT Tab NAVigator System Manager • HTML Operation... - Page 58 (see Configure the screen saver page 57). TIP: After you make any change in steps 2 and 3, an asterisk ( ) appears in the tab to indicate that there are unsaved changes. NAVigator System Manager • HTML Operation...
- Page 59 ) or SAVE ALL ( ) to save the changes or CANCEL ( ) to abandon them. 8. Click X ( ) to close the Configuration Endpoints page or select a different tab to change other settings. NAVigator System Manager • HTML Operation...
- Page 60 ) or SAVE ALL ( ) to save the changes or CANCEL ( ) to abandon them. 6. Click X ( ) to close the Configuration Endpoints page or select a different tab to change other settings. ¢ NAVigator System Manager • HTML Operation...
- Page 61 ) or SAVE ALL ( ) to save the changes or CANCEL ( ) to abandon them. 5. Click X ( ) to close the Configuration Endpoints page or select a different tab to change other settings. NAVigator System Manager • HTML Operation...
-
Page 62: Scaling Decoder Tab
) to save the changes or CANCEL ( ) to abandon them. ¢ £ ¤ 7. Click X ( ) to close the Configuration Endpoints page or select a different tab to change other settings. ¥ NAVigator System Manager • HTML Operation... -
Page 63: Stream Tab
), it affects both 1G and 10G products. 3. Click the NAV AUDIO checkbox or all endpoints ( ) or for one or more individual endpoints ( ) to toggle NAV AUDIO on and off. NAVigator System Manager • HTML Operation... - Page 64 ) to save the changes or CANCEL ( ) to abandon them. ¢ £ 7. Click X ( ) to close the Configuration Endpoints page or select a different tab to change other settings. ¤ NAVigator System Manager • HTML Operation...
- Page 65 • DEVICE CLASS FILTERING restricts the USB device types, typically for security purposes. Different functionality applies in the two modes. TIP: After you make any changes in step 2 through 4, an asterisk ( ) appears in the tab to indicate that there are unsaved changes. NAVigator System Manager • HTML Operation...
-
Page 66: Osd Tab
) to save the changes or CANCEL ( ) to abandon them. 4. Click X ( ) to close the Configuration Endpoints page, select a different tab to change other settings, or continue to Configure the screen saver o page 57. NAVigator System Manager • HTML Operation... - Page 67 NOTE: To be available for selection, the custom image must be manually uploaded into the endpoint (see the applicable User Guide at www.extron.com). 4. Click SAVE OSD ( ) or SAVE ALL ( ) to save the changes or CANCEL ( ) to abandon them. NAVigator System Manager • HTML Operation...
- Page 68 2 2 2 2 2 2 2 2 replace the custom image. 3. Click X (see figure on page 57 to close the page or select a different tab to change other settings. ¢ NAVigator System Manager • HTML Operation...
-
Page 69: Device Details Pane, Confidence Preview, And Proxy Connections
• Confidence preview ( • Tags, if created, are displayed on this pane ( • Click BREAK ( ), if present (if this endpoint is part of a tie), to break the active tie. NAVigator System Manager • HTML Operation... - Page 70 The HTML page for the endpoint behaves as described in the user guides for the endpoint (see the applicable encoder and decoder guides available at www.extron.com). NAVigator System Manager • HTML Operation...
-
Page 71: Ties Page
Search Outputs field — Click in the field and enter a few characters to search for an output by name. NOTE: See Add and edit names, tags, and locations on page 40 to assign and edit , and values. NAVigator System Manager • HTML Operation... - Page 72 1 1 1 1 1 1 1 1 1 1 1 1 2. Click the IP Address ( , at right). The HTML page opens a new tab in the browser that is connected to the endpoint. NAVigator System Manager • HTML Operation...
-
Page 73: Edid Page
NOTES: • Available EDIDs — All EDIDs on the NAVigator including custom or uploaded EDIDs. • Favorite EDIDs — EDIDs that you have tagged as favorite ( • Connected Outputs — Display devices connected on either the Encoder HDMI Loop through or the Decoder HDMI output. -
Page 74: Assign An Edid To An Input
(encoders). 3. Select the desired EDID (click the figure 64, ). The selected EDID displays in the EDID field (see page 65). Available input sources are also displayed ( NAVigator System Manager • HTML Operation... - Page 75 • Click Remove All ) to remove all input selections. The page appears as in figure 65. 4. Click ASSIGN EDID (see figure 65, ). The NAVigator assigns the EDIDs and reports success on the EDID page. NAVigator System Manager • HTML Operation...
-
Page 76: Download An Edid
Colorspace and sampling • • • Color bit depth High Dynamic Range (HDR) • • • 3. Click Download EDID ( ). Figure 67 shows the results of downloading an EDID in the Chrome browser ( NAVigator System Manager • HTML Operation... -
Page 77: Presets Page
Figure 67. EDID Page — Add a Custom EDID 2. If necessary, click EDID ( 3. Click ADD CUSTOM EDID TO LIBRARY ( figure 68 ). An Open dialog box opens (see on page 68) NAVigator System Manager • HTML Operation... - Page 78 4. Navigate to the folder where the EDID file is saved (see figure 68, ). Select the file. 5. Click Open ( ). The NAVigator reports that it is Uploading and then Adding the EDID to the library. NOTE: This action happens quickly; you may not see it.
-
Page 79: Delete A Custom Edid
Custom EDIDs are displayed with a lighter border color. 4. Click REMOVE EDID ( ).The HTML page asks you to confirm the deletion. 5. Click REMOVE. The NAVigator deletes the EDID and reports success on the endpoints page. NAVigator System Manager • HTML Operation... -
Page 80: Find Edid Common Timings
). The page shows a list of connected outputs and timings that are common to them (see figure 73 on page 71). The page also recommends the highest resolution and refresh rate compatible with all selected displays ( NAVigator System Manager • HTML Operation... - Page 81 ) or another available common timing ( 7. Click SHOW EDIDs ( ). Only the available EDIDs that match the resolution and refresh rate of the Common Timing selection appear (see figure 74 on page 72). NAVigator System Manager • HTML Operation...
- Page 82 8. Assign the desired EDID to one of more encoders (see Assign an EDID to an input, beginning at step 3 page 64). TIP: Click CLEAR COMMON TIMINGS (see figure 74, ) to clear the list. NAVigator System Manager • HTML Operation...
-
Page 83: Windowalls Page
An incomplete canvas ( , to complete a canvas) • An existing and complete canvas ( , to make changes to a canvas) The Canvas CONFIGURATION pane opens (see figure 76 on page 74). NAVigator System Manager • HTML Operation... - Page 84 ID LED and the on-screen display Status screen for an individual decoder or all decoders on and off. 6. If desired, highlight the Canvas Name field ( ) and enter a custom name for the canvas. NAVigator System Manager • HTML Operation...
-
Page 85: Configuring Canvas Decoders
) to select among the resolutions presented to scale all outputs in the canvas to the desired output resolution. b. Click the Refresh Rate drop-down list ( ) to select among the available rates for all outputs in the canvas. NAVigator System Manager • HTML Operation... -
Page 86: Configuring The Mullions
11). 2. If necessary, click WINDOWALLS (see figure on page 73). 3. If necessary, click the existing canvas to configure ( ). The Canvas CONFIGURATION pane opens (see figure 78 on page 77). NAVigator System Manager • HTML Operation... - Page 87 When checked the two fields are to each other; a change in one changes the other to the same value. 6. Click SAVE ( ) to save all changes or CANCEL ( ) to abandon them. NAVigator System Manager • HTML Operation...
-
Page 88: Creating Windowall Windows And Presets
), you switch all outputs in the canvas to the layout you have prepared without creating a preset. You cannot recall an applied WindoWall. 8. Click SAVE AS PRESET ( ). The Save Preset pane opens (see figure 80 on page 79). NAVigator System Manager • HTML Operation... -
Page 89: Recalling Windowall Presets
B B B B 2 2 2 2 2 2 2 2 2 2 2 2 2 2 2 2 2 2 Figure 81. Recalling a WindoWall Preset 2. Click the desired Preset ( NAVigator System Manager • HTML Operation... -
Page 90: Renaming A Windowall Preset
• You can use a control system to recall a preset, and then you can switch inputs via the control system as well. • The switch happens immediately as you drop the dragged input (release the mouse button). NAVigator System Manager • HTML Operation... -
Page 91: Kvm Workstations Page
) and enter a custom name for KVM workstation being configured in the Workstation Configuration pane. NOTE: After any change, an asterisk ( ) appears in the CONFIGURATION tab to indicate the unsaved changes. NAVigator System Manager • HTML Operation... - Page 92 (decoders) in the KVM workstation. Auto (if selected) follows the input format. NOTE: The decoders change their color space, chroma sampling and quantization parameters for compatibility with HDMI and DVI display devices. NAVigator System Manager • HTML Operation...
- Page 93 HID only. • The K/M column displays if the decoder is not in the NAV 5nn series. step 12 • You cannot Save the configuration (see on page 84) unless one K/M decoder is selected. NAVigator System Manager • HTML Operation...
- Page 94 Normal workstation operation and taking control page 89). NOTE: A KVM workstation can have up to 50 encoders associated with it. 12. Click SAVE ( ) to save all changes or CANCEL ( ) to abandon them. NAVigator System Manager • HTML Operation...
-
Page 95: Creating Kvm Presets
) to specify which encoder you want keyboard and mouse (USB) control of when you recall the preset. 8. Click Save as Preset ( figure 87 ). The Save Preset pane opens (see on page 86). NAVigator System Manager • HTML Operation... - Page 96 10. Enter a preset name ( 11. Click SAVE ( ) to save the preset or CANCEL ( ) to abandon the preset. 12. Click X ( ) to close the Save Preset pane. NAVigator System Manager • HTML Operation...
- Page 97 2. Click to confirm or to abandon the deletion. 2 2 2 2 2 2 2 2 2 2 2 2 2 2 2 2 2 2 NAVigator System Manager • HTML Operation...
-
Page 98: Smartglide Kvm And Smartglide Kvm Focus
NOTE: The KVM workstation must have two or more configured displays for Smart KVM switching to be available for selection. 2. If desired, click SmartGlide KVM Focus ( 3. Click SAVE ( ) to save the Smart KVM changes or CANCEL ( ) to abandon them. NAVigator System Manager • HTML Operation... -
Page 99: Normal Workstation Operation And Taking Control
• The mouse cursor is constrained to within the on-screen display boundaries when the display is open. • The on-screen display close after 30 seconds of mouse inactivity. TIP: Press the computer <Esc> key to manually close the display. NAVigator System Manager • HTML Operation... -
Page 100: Tools Pages
The two pages provide the following functions: • Backup — You can make backup files for just the NAVigator itself (see “Backing up the NAVigator,” below) or for the entire NAV system (including one or more or selected endpoints) (see Backing up the system page 96). - Page 101 NOTE: Unless otherwise directed, the NAVigator backup file goes to the Downloads folder of the connected PC. 5. Click Keep to save the file to the Downloads folder or Discard as desired.
- Page 102 Restore Communication Settings and Restore Configuration Settings must both be checked. 8. Click RESTORE (see figure on page 92). The NAVigator reports that it is uploading the backup file and then that is restoring the settings. When the operation completes, the NAVigator reboots. NAVigator System Manager • HTML Operation...
- Page 103 Opening the Embedded HTML Pages on page 9). Upgrading the NAVigator firmware Upgrade the NAVigator firmware, the built-in software that controls NAVigator operation, as follows: NOTES: • See Download a firmware or software package on page 145 to obtain the firmware package.
- Page 104 2 2 2 2 Figure 97. Device Page with Firmware File Identified 7. Click UPDATE ( The NAVigator page displays a sequence that reports the progress as it uploads the file (see figure 98, updates the firmware ( ), and then reboots ( NOTE: Do not unplug the NAVigator while the firmware is been upgraded.
- Page 105 8). 5. Click APPLY ( The NAVigator reports that it is Resetting and displays a status bar that shows the progress of the reset operation. When the operation completes, the NAVigator reboots.
-
Page 106: System Tools Page
) to select one or more endpoints to backup. 5. Click BACKUP ( The NAVigator creates a file of current system settings. The NAVigator reports that the backup was file was successfuly created. NOTE: Unless otherwise directed, the NAVigator backup file goes to the Downloads folder of the connected PC. - Page 107 Restoring the system configuration Restore the system settings, including the NAVigator and endpoints, as follows: NOTE: Backup files are not compatible between firmware versions, due to the possible addition of new NAV system features. See the firmware Release Notes available at www.extron.com.
- Page 108 1 1 1 1 Figure 103. System Tools — Restore Function 8. Click NEXT (see figure 103, For Restore Configuration settings or Restore communication settings, a Select page opens (see figure 104 on page 100. NAVigator System Manager • HTML Operation...
- Page 109 NAVigator reboots. Transferring system settings to a replacement NAVigator NOTES: • This procedure is a restore option to recover your system if a NAVigator fails. It allows a replacement NAVigator to assume NAV system management if necessary. Backing up the •...
- Page 110 4. Open the system restore page — Perform steps 1 through 3 of Restoring the system configuration page 97. 5. Select (click) Transfer Endpoints to current NAVigator (requires reboot) (see figure 105, 2 2 2 2 2 2 2 2 2 2 2 2 2 2...
- Page 111 2 2 2 2 Figure 107. System Tools — Restore Function During Transfer 9. Enter the Password (see figure 107, ) used by the original NAVigator when the system backup file was created. 10. Click NEXT ( NAVigator System Manager • HTML Operation...
- Page 112 Login dialog box (see figure 8 on page 10). 11. After the reboot, reconnect to the replacement NAVigator via the embedded HTML pages (see Opening the Embedded HTML Pages on page 9). The replacement NAVigator has now taken over management of the NAV system.
- Page 113 Click Unassign (see figure 110 or figure 111, 3. Connect new endpoint to the system (see “Installation and Operation” in the User Guide for the applicable endpoint, available at www.extron.com, and Rear Panel Connections and Features on page 4). NAVigator System Manager • HTML Operation...
- Page 114 NOTE: This procedure is performed directly on the endpoint, not through the bulk settings capabilities of the NAVigator. See the User Guide for the applicable endpoint, available at www.extron.com. 1. Connect directly to the newly-installed endpoint via its USB or NAV port.
- Page 115 Download a firmware or software package on page 145 to obtain the firmware package. • Upgrading the system firmware results in the NAVigator rebooting. • Create a system backup before upgrading the system firmware to make it possible fo you to rollback system formware if desired.
- Page 116 Figure 114. Device Pane with Firmware File Identified 8. Click NEXT ( The NAVigator page displays a page where you can select endpoints to upgrade (see figure 115). 1 1 1 1 1 1 1 1 1 1 1 1 1 1...
- Page 117 NOTES: • The upgrade to the NAVigator itself, if selected, is always performed last so that the NAVigator can manage the upgrades of the endpoints. • Some firmware updates may not apply to some endpoints, such as updates for 1G endpoints only and updates for 10G endpoints only. If desired, select Filter >...
- Page 118 ( ). Once its firmware is updated, the NAVigator reboots. On reboot, the connection to the NAVigator is lost and the browser displays the home page Login 5 5 5 5 5 5 5 5 5 5 5 5 5 5...
-
Page 119: Monitoring Page
Control Systems pane — See Control Systems pane on page 112. Alarms pane — See Alarms pane on page 113. Alarm Settings link — See Alarms pane. Download Logs link — See Download Logs link on page 114. NAVigator System Manager • HTML Operation... -
Page 120: Offline Endpoints Pane
To remove an undesired endpoint from the system, perform the following: 1. Click the All checkbox ( ) or individual endpoint checkboxes ( ) to select one or more endpoints to unassign. 2. Click UNASSIGN ( NAVigator System Manager • HTML Operation... -
Page 121: Conflicted Endpoints Pane
Figure 119. Identifying and Resolving an Endpoint Conflict NOTE: A conflict exists when either of the following conditions is present: • An endpoint indicates it is assigned to a NAVigator, but that NAVigator doesn’t include this endpoint in its list of assigned endpoints. -
Page 122: Igmp Querier Pane
117, ) shows the status of control systems that are paired and connected to the NAVigator. The leftmost shown number at right indicates the number paired. The rightmost number indicates the number connected. Figure 121 shows the indication if no control system is paired (on the left) and if one is connected (on the right). -
Page 123: Alarms Pane
109) shows any alarms that have been triggered in the NAV system managed by this NAVigator. Figure 123 shows the pane when alarms are present. Some alarms self-clear when specific conditions are met, others remain as long as the conditions that cause them remain. As an example, a temperature alarm remains until the NAVigator cools down. -
Page 124: Download Logs Link
The decoder monitors the active alarm states of all devices in the NAV system. All alarm state changes are logged even if status reporting is disabled from the decoder. NAVigator System Manager • HTML Operation... -
Page 125: Settings Pages
Username/Password page on page 120, or LinkLicense page on page 121). 1 1 1 1 1 1 1 1 1 1 1 1 1 1 1 1 1 1 Figure 125. General Settings Page NAVigator System Manager • HTML Operation... - Page 126 125 on page 115) opens a read-only pane that shows general information unique to the NAVigator (see figure 126). The Device Name and Location can be edited by clicking the EDIT button ( ). An editable version of the selection opens (see figure 127).
- Page 127 4 4 4 4 Figure 129. Set Time Manually Set from PC — Click this link to sync the NAVigator date and time to the computer with which you are connected. Date & Time — Click in this field and type in the date and time.
- Page 128 Figure 131. Sync Time with Server SYNC NOW — Click to force the NAVigator to sync its internal clock to an NTP server. NTP server — Click in these fields and type in the IP address or DNS name of an NTP server.
- Page 129 NOTE: The entry must be in the valid IP address or domain name format. 4. Click anywhere outside the edited field. 5. Click SYNC NOW ( ) to synchronize the time with the configured time server. 6. Click SAVE ( NAVigator System Manager • HTML Operation...
- Page 130 125 on page 115) opens a read- only pane that shows the credentials of the NAVigator (see figure 133). The Password can be edited by clicking the EDIT button ( ). An editable version of the selection opens (see figure 134).
- Page 131 ). The LinkLicense page returns to the top (see figure 137). 1 1 1 1 1 1 1 1 1 1 1 1 1 1 1 1 1 1 Figure 137. Link License— Restore Function NAVigator System Manager • HTML Operation...
-
Page 132: Networking Page
4. Click UPDATE (see figure 137, on page 121). The NAVigator reports that it is Uploading and then Installing the license. NOTE: To continue to operate the NAVigator, you must reconnect Opening the Embedded HTML Pages (see on page 9). - Page 133 138 on page 122) opens a read-only pane that shows the port usage parameters of the NAVigator (see figure 139). The HTTP and SSH/SIS ports can be edited by clicking the EDIT button ( ). This feature gives the flexibility to use specific ports of your choosing, if the default ports are in use.
-
Page 134: Advanced Page
Advanced Networking page The Advanced Networking selection on the Advanced page (see figure 141) opens a read-only pane that shows the port usage parameters of the NAVigator (see figure 142). The parameters can be edited by clicking the EDIT button ( ). - Page 135 RESET TO DEFAULT — Click to restore the advanced networking settings of the encoder to their default values. Multicast IP addresses — Click in these fields and type in valid IP addresses for your NAVigator. NOTES: • Multicast Discovery IP is the multicast IP address (Default: 239.255.255.254) that is used for discovery and communication purposes across the NAV system.
- Page 136 (OOB or NAV - AV LAN). Click to close the pane. NOTE: Figure 144 shows the OOB Extended Data pane. The AV-LAN Extended Data pane is similar in appearance. NAVigator System Manager • HTML Operation...
-
Page 137: About Page
1 1 1 1 1 1 1 1 Figure 145. About Page The About page provides the following useful information: Firmware version number Installed licenses, which can be sorted by click the desired filtering letter NAVigator System Manager • HTML Operation... -
Page 138: Control System
Global Scripter • ControlScript Deployment Utility The NAVigator can be remotely controlled from a host device such as a computer or Extron control system. The controlling device communicates over the network via the NAV/PoE+ port (see figure 2, on page 4) or OOB... -
Page 139: Secure Sockets Layer (Ssl) Certificates
Third party control is available as a LinkLicense addition. Contact an Extron support representative on the Extron S3 Sales and Technical Support Hotline (see www.extron.com for the phone number in your region of the world). NAVigator System Manager • Control Systems... -
Page 140: Global Configurator Plus And Professional
Access to the features of Global Configurator Professional is available to users who successfully complete Extron Control Professional Certification. For detailed descriptions and procedures to setup a control system with an IPCP Pro device and Global Configurator, see the applicable Global Configurator Help File. NAVigator System Manager • Control Systems... -
Page 141: Global Scripter
• It is strongly recommended that all devices are updated to the latest firmware, to use all the features of this release of the ControlScript Deployment Utility. See the ControlScript Deployment Utility release notes NAVigator System Manager • Control Systems... -
Page 142: Sis Operation
SSH 3rd Party Control SSH via a Third-Party Control LinkLicense (see on page 129 This section provides guidance on operation of the NAVigator via a string of commands and lists the SIS commands, including: • Connecting the NAVigator to the Host •... -
Page 143: Navigator-Initiated Power-Up Message
An assigned endpoint has changed its online status. HkdmP*<endpoint> ] or HkdmK*<endpoint> ] The NAVigator has detected a valid hot key combination: < Ctrl > < Ctrl >+<letter> or < Ctrl > < Shift >+<letter>. NAVigator Error Responses When the NAVigator receives a valid SIS command, it executes the command and sends a response to the host device. -
Page 144: Sis Command And Response Tables
(Host to Unit) (Unit to Host) NOTES • The NAVigator supports 1- through 4-digit numeric entries (such as ). Leading zeroes are not required. 0002*0002 • Commands can be entered back-to-back in a string, with no spaces. For example: 1*1!02*02&03*03%4*8!. - Page 145 NOTE: If tagged responses are enabled, all read and view commands return the constant string and the value as the set command does (for X2)] returns Ipn • example, the read matrix name command, NAVigator System Manager • SIS Operations...
- Page 146 3 pairs of the • • NAVigator-” MAC address. Verbose mode NOTE Verbose mode affects all responses from the NAV system, not just those from the NAVigator. Set verbose mode EX2! X2!] Read verbose mode X2!] Report AV ties...
- Page 147 NOTE: If tagged responses are enabled, all read and view commands return the constant string and the value as the set command does (for returns Ipn • X2)] example, the read matrix name command, NAVigator System Manager • SIS Operations...
-
Page 148: Command And Response Table For Ip-Specific Sis Commands
View IP address, subnet address, *CISG Subnet Gateway and gateway DNS address EX3! Set DNS address Sets DNS servers for the NAVigator. DNSS You can list up to 3 DNS servers ( Dnss X3$] EX3! Clear all DNS addresses •... -
Page 149: Navigator To Endpoints Communication (Encapsulation)
SIS commands). They do not need to be valid commands for the NAVigator. • Just as in SIS commands to the NAVigator, | (pipe) and W can be used interchangeably with the E characters in encapsulated commands. -
Page 150: Troubleshooting
NAVigator. The NAVigator failed to assign a Confirm that the NAVigator has not reached its Assignment Failure discovered endpoint. endpoint assignment limit. If a device has been decomissioned from the NAV system, unassign the endpoint from the "Offline endpoints"... - Page 151 The NAVigator failed to receive three Debug network connectivity between the IGMP Failure consecutive IGMP queries from an NAVigator and the IGMP querier (which can be IGMP querier. either a router or a managed switch). Link Speed The negotiated communication speed...
- Page 152 If ambient temperature is 140 °F, (60 °C) or • less, check the mounting location for nearby equipment emitting excessive heat. Ensure there is an air gap around NAVigator to allow adequate airflow. The NAVigator failed to establish a tie Debug the network connectivity between the Tie Failure between the specified endpoints.
-
Page 153: Reference Information
• Installation and service must be performed by authorized personnel only. • L’installation et l’entretien doivent être effectués par le personnel autorisé uniquement. The 1-inch high, quarter rack width NAVigator can be placed on a table, mounted in a rack, or mounted under a desk or table. -
Page 154: Ul Rack-Mounting Guidelines
Consultez à cet égard les indications de la plaque d’identification de l’équipement. • Mise à la terre — Assurez-vous que l’équipement est correctement mis à la terre. Accordez une attention particulière aux connexions électriques autres. NAVigator System Manager • Reference Information... -
Page 155: Download A Firmware Or Software Package
4. Click Download for the firmware package to download ( ). If you have not logged in previously with your Extron Insider account, the Log in dialog box appears (see figure 148 on page 146). NAVigator System Manager • Reference Information... - Page 156 • Figure 149 may look different or may not appear at all, depending on your web browser choice and its security settings. • File names and version numbers on this page are sample values only. NAVigator System Manager • Reference Information...
- Page 157 NOTE: Click the Subscribe link ( ) to receive an automatic e-mail notification if the packge is updated. 8. Return to either Upgrading the NAVigator firmware on page 93 or Upgrading the system firmware page 105. NAVigator System Manager • Reference Information...
-
Page 158: Operation With Aes67 Audio
See the user guide for the applicable device to configure that device and also the Dante documentation. ® Once you have configured the AES67 device, the device is displayed on the NAVigator Configuration Configure Input settings, steps 2 through 4 Endpoints Input page. -
Page 159: Extron Warranty
Extron Electronics makes no further warranties either expressed or implied with respect to the product and its quality, performance, merchantability, or fitness for any particular use. In no event will Extron Electronics be liable for direct, indirect, or consequential damages resulting from any defect in this product even if Extron Electronics has been advised of such damage.
Need help?
Do you have a question about the NAVigator and is the answer not in the manual?
Questions and answers