
Related Manuals for Extron electronics TouchLink


Summary of Contents for Extron electronics TouchLink
- Page 1 User Guide Room Scheduling Room Scheduling System Room Agent™ Room Booking Software and TouchLink Scheduling Panels ® 68-3051-01 Rev. K 05 20...
- Page 2 Safety Instructions Safety Instructions • English Istruzioni di sicurezza • Italiano AVVERTENZA: Il simbolo, , se usato sul prodotto, serve ad This symbol, , when used on the product, is intended to WARNING avvertire l’utente della presenza di tensione non isolata pericolosa alert the user of the presence of uninsulated dangerous voltage within the all’interno del contenitore del prodotto che può...
- Page 3 Global Scripter, GlobalViewer, Hideaway, HyperLane, IP Intercom, IP Link, Key Minder, LinkLicense, LockIt, MediaLink, MediaPort, NAV, NetPA, PlenumVault, PoleVault, PowerCage, PURE3, Quantum, ShareLink, Show Me, SoundField, SpeedMount, SpeedSwitch, StudioStation, System I , TeamWork, TouchLink, V-Lock, VideoLounge, VN-Matrix, VoiceLift, WallVault, WindoWall, XPA, XTP, XTP Systems, and NTEGRATOR ZipClip...
- Page 4 Conventions Used in this Guide Notifications The following notifications are used: ATTENTION: • Risk of property damage. • Risque de dommages matériels. NOTE: A note draws attention to important information. A tip provides a suggestion to make working with the application easier. TIP: Software Commands Commands are written in the fonts shown here:...
-
Page 5: Table Of Contents
Contents Introduction EMS Setup ............1 ............46 About this Guide ..........1 Prerequisites ............. 46 About the Room Scheduling System ....1 Creating a Web Administrator for EMS ..... 46 System Benefits ..........3 Calendar Setup ..........48 Security Overview ........... 3 Panel Setup ............ - Page 6 Setting up a Proxy Server ......... 82 Before Starting ..........82 Setting Up the Proxy Server ......82 Troubleshooting: ..........84 Can the TouchLink Screen Communicate with the Proxy Server? ......... 84 Are your Proxy Credentials Correct? ..... 85 Reference Information ........86 System Communications Overview ....
-
Page 7: Introduction
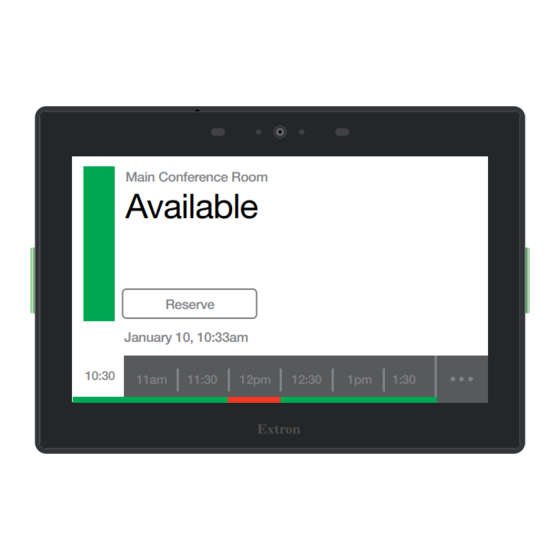
Microsoft Office 365™, and Rendezvous by NFS (NFS) to work with Room Agent software. About the Room Scheduling System Room Agent software uses Extron TouchLink Scheduling Panels and compatible TouchLink Pro touchpanel as full-feature room booking appliances that conveniently display meeting information and availability for rooms (see figure 1). Extron... - Page 8 Room Agent software, installed on a computer with network access, allows system administrators to set up the Extron TouchLink Scheduling panels as room scheduling appliances by filling in the required fields that correspond with areas of the user interface.
-
Page 9: System Benefits
connects to Ad Astra, 25Live, EMS , Google Calendar, Microsoft Exchange, Office 365, and NFS. Customization options allow fields to be shown or hidden, depending on user preference. System Benefits The Room Scheduling System can be integrated into any network and requires minimal network bandwidth for communication between each panel and the room calendar server. -
Page 10: Network Traffic
Network Traffic The traffic generated on the network consists of requests for data and responses from the room calendar server. Communications occur at regular intervals, such as when requesting meetings, sending meeting invitations, or when administrators retrieve an activity file for a room from the panel. -
Page 11: Features
Room Agent software provides easy integration with multiple calendar applications. No annual subscription or maintenance fees. • • Each TouchLink panel model communicates directly with the calendar server. • All communication between the panel and the calendar server is encrypted and secure. •... - Page 12 Power over Ethernet - PoE allows the room scheduling panel to receive power and • communication over a single Ethernet cable, eliminating the need for a local power supply. • Multi-language support – Extron Room Scheduling supports a number of different languages.
-
Page 13: Panel Overview
Panel Overview This section summarizes how to operate the scheduling system from the distributed scheduling panels. It is presumed that you have installed and configured the Extron Room Agent software and the desired calendar server. See the following sections if necessary: •... - Page 14 Data fields (see on the previous page) — Five fields, of various type sizes, figure 3 each of which can display a variety of informational messages, defined using the Room Agent software (see Layout tab on page 26). Four fields are above and one is below the position of the button ( , the Room Available display shown in figure 3)
- Page 15 Full day ( . . . ) button (see on page 7) — Touch this button to display a figure 3 timeline of the full day availability for approximately 5 seconds (see figure 4). You can set the starting and end time of the timeline. 1 1 1 1 1 1 1 1 1 1 1 1 1 1 1 1 1 1...
- Page 16 Release button (see on page 7) — This button appears on the room figure 3 unavailable display when two conditions are met: The room is unavailable in the selected 30-minute block on the timeline (see • on page 8). Timeline The button is programmed to appear using the Room Agent software (see Layout •...
-
Page 17: Room Agent Installation And Configuration
Room Agent Installation and Configuration NOTES: This manual assumes that one or more panels are already installed, cabled, and ready to serve as room booking appliances. • Installation • Configuration • Show Available Network Adapters • Update Firmware Installation The Room Agent software is available at no charge at www.extron.com. Minimum System Requirements •... -
Page 18: Install The Software
Install the Software The Room Agent software, version 1.8 or newer, is available on the Extron website. Download and install the program as follows: NOTES: • Steps 1 through 6 are also used to download a firmware update package. • This procedure was written using Microsoft ®... - Page 19 Click Download for Room Agent to download (see on the previous page). figure 7 The Log in dialog box appears (see figure 8). 1 1 1 1 1 1 1 1 3 3 3 3 3 3 3 3 5 5 5 5 5 5 5 5 4 4 4 4 4 4 4 4...
-
Page 20: Configuration
It places the entries shown below into correct group folders and on the PC desktop: • Folder — C:\Program Files\Extron\Extron Room Agent NOTE: C:\Program Files(x86)\... for 64-bit Windows OS. Group folder — Extron Electronics\Extron Room Agent • Room Agent Help • Room Agent Quick Help •... - Page 21 Verify or change settings (panel appearance, time, and audio clicks) on the General Settings tab (see General Settings window on page 20). Select the Calendar type and connect to the Calendar server. The exact procedure depends on the calendar that you select: Ad Astra Setup on page 41 •...
-
Page 22: Start The Program
86. Start the Extron Room Agent software by double-clicking the desktop icon or as follows: Click Start > All Programs > Extron Electronics > Extron Room Agent > Extron Room Agent. The Room Agent software opens in the Panel Management view (the Panel Management tab selected) (see figure 10). -
Page 23: Automatically Discover Panels
Automatically Discover Panels Automatically discover panels that are on the same subnet as the computer running the Room Agent software as follows: NOTE: Any panels not on the same subnet as the computer running Room Agent must be added using the Manually Add Panels pane (see “Manually Add Panels”). If Panel Management view is not currently displayed, click the Panel Management tab. - Page 24 If the panel is password protected, enter the password in the Password: field NOTES: • The factory configured passwords for all accounts on this device have been set to the device serial number. Passwords are case sensitive. • If the device is reset to default settings, the password is the default password configuration.
-
Page 25: Panel Management Tab
Panel Management Tab Connect to the panel Each panel requires setup as follows: Click the Setup button for the panel to be set up. NOTE: The button deletes a panel from the list. The Panel Connection dialog box opens (see figure 14). 1 1 1 1 1 1 1 1 1 1 1 1 1 1 1 1... - Page 26 Communication Settings window The Communication Settings tab on the Device Management window (see figure 15) provides a set of tools for managing the following internet settings of the connected panel: ¤ ¤ ¤ ¤ ¤ ¤ ¤ ¤ ¤ ¤ ¤ ¤ ¤ ¤ ¤...
- Page 27 General Settings window The General Settings tab on the Device Management window (see figure 16) provides a set of tools for managing display, time, and audio settings of the connected panel. 8 8 8 8 8 8 8 8 8 8 8 8 8 8 8 8 6 6 6 6 6 6 6 6 6 6 6 6...
-
Page 28: Panel Configuration Tab
Panel Configuration Tab The Panel Configuration window (see figure 17) provides a set of tools for selecting among the supported calendar servers and managing the settings of the selected server. NOTE: Until you designate the calendar server for your system, only the Select a Calendar Type drop-down list ( ) is available for selection. - Page 29 Common Panel Configuration tab functions Some functions are common to all calendar types. These include the Configuration and Activity buttons (see figure 17 , on page 22). Send and retrieve the configuration The send and receive configuration functions push and pull configurable settings between the Room Agent software and one or more panels.
- Page 30 Click OK to exit the clear operation. Enter a name for the retrieved activity file ( 1 1 1 1 1 1 1 1 1 1 1 1 1 1 1 1 2 2 2 2 2 2 2 2 2 2 2 2 2 2 2 2 Figure 18.
-
Page 31: Panel Design Tab
Panel Design Tab The Panel Design window (see figure 20) provides tools for customizing the appearance and function of the connected panels. The window consists of the design pane ( , see , on the next page), the preview pane ( , see on page 34), Design pane... - Page 32 Design pane Layout tab If necessary, click the Layout tab (see figure 21, ) to make changes to the following: • The arrangement of the fields on the display • Whether or not you can locally (on the panel): Reserve the room •...
- Page 33 Reserve: drop-down list (see on the previous page)— figure 21 Use this drop-down list to select whether the Reserve button appears on the panel and how it functions. The Reserve button allows user to book the room locally, on the panel itself. Anytime allows you to reserve any half-hour segment displayed on the panel.
- Page 34 When there’s no action drop-down list (see , on page 26)— figure 21 Select among the options to choose how the Check in button and room reservation behave when no action is taken. Release room — The scheduling software releases the room •...
- Page 35 Background image: (see on the previous page) — figure 23 Change Image... button — Click to open a dialog box to assign a background • image (see figure 53 and the following procedure). Remove button — Click to clear any assigned background image. •...
- Page 36 Date & Time tab If necessary, click the Date & Time tab (see figure 25, ) to make changes to the date and time format. 1 1 1 1 1 1 1 1 1 1 1 1 1 1 1 1 2 2 2 2 2 2 2 2 2 2 2 2 2 2 2 2...
- Page 37 Panel Message tab If necessary, click the Panel Message tab (see figure 26, ) to make changes to the message displayed when the panel has no connection to the calendar server. 1 1 1 1 1 1 1 1 1 1 1 1 1 1 1 1 2 2 2 2 2 2 2 2...
- Page 38 Room Occupancy tab NOTES: • This screen is always selectable and behaves as described, but only TLS 520M, TLS 725M, and TLS 1025M scheduling panels, and TLP Pro 520M touchpanels have the digital I/O connectors necessary to connect the OCS 100 Occupancy Sensors.
- Page 39 Sensor Output Type radio button (see on the previous page) — Select one figure 27 of these radio buttons to denote how the occupancy sensor is wired to the TLS 520M, TLS 725M, or TLS 1025M scheduling panel or TLP Pro 520M touchpanel: Control •...
- Page 40 Preview pane The preview pane (see figure 28, ) shows the effects of changes that you make using the controls within the panel design pane. NOTE: The preview pane contains hardcoded, sample, entries. The layout and appearance of this pane change to reflect your changes in the design pane, but, other than the date and time, the content, such as “Main ”, do not Conference Room...
- Page 41 Templates pane Templates, such as the default DefaultTLPTemplate, which is the default that is installed as part of the Room Agent installation, allow you to create a number of customized panel appearances. Each panel in a system can have its own template, assigned on the Panel Configuration window.
-
Page 42: Show Available Network Adapters
Show Available Network Adapters Room Agent can show you all of the network interfaces available on the computer for you to use in communications and allow you to select the active one. Type <Ctrl>+<Shift>+<F2> to open a dialog box displaying the available controllers (see figure 30). 1 1 1 1 1 1 1 1 1 1 1 1 1 1 1 1... -
Page 43: Update Firmware
Update Firmware To use version 1.10 of the Room Agent software, ensure that the touchpanels have the following version of the firmware: • Extron recommends that all TLS panels use firmware version 1.12.0001-b001 or later. • TLP Pro panels require version 2.11.0002-b001 or later. NOTE: The latest firmware for all compatible panels is automatically downloaded onto your PC when you install the Room Agent software. - Page 44 Click OK. The Device Management window closes and the Panel Configuration window is displayed (see figure 32). 2 2 2 2 2 2 2 2 2 2 2 2 3 3 3 3 3 3 3 3 3 3 3 3 3 3 3 3 3 3 3 3 3 3 3 3...
- Page 45 1 1 1 1 1 1 1 1 1 1 1 1 1 1 1 1 2 2 2 2 2 2 2 2 2 2 2 2 2 2 2 2 Figure 33. Firmware File Selection Select the file (see figure 33, ).
- Page 46 Select one or more checkboxes for the panels that you want to update (see figure 34 on the previous page). Ensure that you have the correct firmware file selected for the panels you select. Once firmware files and panels are selected, the Update Firmware button becomes ).Click this button.
-
Page 47: Ad Astra Setup
Room Agent Column Headings with Ad Astra • Status — Use this check box to select individual panels for configuration. IP Address — This cell contains the IP address of the touchlink panel. • • Hostname — The host name is a fully qualified domain name that uniquely identifies the computer. - Page 48 Password — This is the password that is used to log into the Ad Astra web interface. • • Customer Name — This is listed on the Ad Astra web page. In the Main menu bar, select Settings > People. From the People List (see figure 38, ), select the required name.
- Page 49 Event Type — This is listed on the Ad Astra web page. In the Main menu bar, select • Events > Event Types. From the Master List (see figure 40, ), select the required name. This is the Event Type and should be copied and pasted to ensure it is an exact match. Figure 40.
-
Page 50: Collegenet 25Live Setup
Status — Use this check box to select individual panels for configuration. • IP Address — This cell contains the IP address of the touchlink panel. Hostname — The host name is a fully qualified domain name that uniquely identifies •... - Page 51 Space Name —enter the name that is displayed as the meeting information on the • touchpanel. This field must match exactly the Formal Name set up on the 25Live server. 1 1 1 Figure 43. CollegeNET 25Live Space Name Check the name by searching for the Formal Name ( ) in the Locations section of 25Live.
-
Page 52: Ems Setup
EMS Setup Prerequisites NOTE: Extron recommends the Google Chrome browser for all EMS Web operations. • The EMS Version must be version 44 or higher. The EMS version can be confirmed by accessing the EMS platform (typically http://<your_server_name>/EmsPlatform) • The EMS Platform Services API must be installed. •... - Page 53 The Everyday User Security Templates dialog box opens (see figure 46). 1 1 1 1 1 1 1 1 1 1 1 1 1 1 1 1 Figure 46. Everyday User Security Templates Dialog Box Click New ( A new security template dialog box opens (see figure 47). 2 2 2 2 2 2 2 2 2 2 2 2 2 2 2 2...
-
Page 54: Calendar Setup
The new security role dialog box opens (see figure 48). 2 2 2 2 2 2 2 2 2 2 2 2 2 2 2 2 3 3 3 3 3 3 3 3 3 3 3 3 3 3 3 3 1 1 1 1 1 1 1 1 1 1 1 1 1 1 1 1... -
Page 55: Panel Setup
Status — Use this check box to select individual panels for configuration. • IP Address — This cell contains the IP address of the touchlink panel. • Hostname — The host name is a fully qualified domain name that uniquely identifies the computer. - Page 56 Event Type Name — This is the event type to be used for ad hoc meetings booked • on behalf of the scheduling panel. The EMS server requires a template name or Event Type, when a new meeting is booked. This information can be obtained from the EMS Desktop Client.
- Page 57 1 1 1 1 1 1 1 1 1 1 1 1 1 1 1 1 2 2 2 2 2 2 2 2 2 2 2 2 2 2 2 2 3 3 3 3 3 3 3 3 3 3 3 3 3 3 3 3 4 4 4 4 4 4 4 4 4 4 4 4...
- Page 58 Client ID — This is a unique ID generated by EMS to use the API. It grants a secure • point for the panels to communicate with the server. Before third-party clients can access the EMS API, a valid Client ID must be generated. NOTES: •...
- Page 59 The Clients/New page opens: Figure 56. EMS Clients/New Page Configure the new client as recommended by your EMS representative. How the client is configured depends on your requirements and is beyond the scope of this guide. However, to allow touchpanels to make ad hoc bookings, you must select Allow this client to book without Everyday User Templates and ignore Booking Rules (see figure 49, Click Save Client (...
- Page 60 Client Secret — This is a number generated by the EMS web site, which is required for • secure communication between the touchpanels and the EMS calendar server. Click Reset Secret (see figure 57 , on the previous page). A pop-up opens, warning This action is permanent. Would you like to continue? Click OK.
-
Page 61: Google Calendar Setup
Google Calendar Setup Calendar Setup NOTES: • When you select Google Calendar, you can have multiple devices using the same calendar or multiple calendars. • When you use Google, Microsoft Exchange, or Office 365 calendars, you can create private meetings. For these meetings, the subject title defaults to Private Meeting and the meeting organizer is hidden. -
Page 62: Downloading A Json File
Downloading a JSON File NOTES: • As of June 2016 this information is correct. However, this site is not controlled by Extron and may change. • These instructions assume that you have a Google account and the necessary permissions. To authenticate a Room Agent touchpanel to Google, a Google account and a credential JSON file are required. - Page 63 The Create an OAuth 2.0 client ID screen opens. Figure 61. Create an OAuth 2.0 client ID Enter a name (see figue 61, ) and click Create client ID ( The Set up the OAuth 2.0 consent screen opens. 1 1 1 1 1 1 1 1 1 1 1 1 1 1 1 1 1 1 2 2 2 2 2 2...
-
Page 64: Authenticate A Device To Google
Authenticate a Device to Google NOTE: These instructions assume that you have already discovered or manually added touchpanels to the Room Agent in the Panel Management screen. Open the Panel Configuration tab (see figure 64). Figure 64. Selecting the Google Calendar Select Google Calendar™... - Page 65 If there are no errors, the Authenticate a Device to Google dialog box shows complete. 1 1 1 1 1 1 1 1 1 1 1 1 1 1 1 1 Figure 67. Authentication Complete The new account is added to the list of available accounts and can be viewed by either of the following methods: By clicking View all available accounts at the top of the Panel •...
-
Page 66: Panel Setup
Status — Use this check box to select individual panels for configuration. • • IP Address — This cell contains the IP address of the touchlink panel. Host Name — The host name is a fully qualified domain name that uniquely identifies •... -
Page 67: Microsoft Exchange Setup
Microsoft Exchange Setup The Extron Room Scheduling System works with the following Microsoft Exchange versions: Exchange 2007, Service Pack 1 • • Exchange 2010 • Exchange 2013 • Exchange 2016 In Exchange servers, the Room Scheduling System uses the Exchange Web Services (EWS) protocol to tie in to the server room mailboxes;... - Page 68 Figure 69. Selecting the Microsoft Exchange Calendar Select Microsoft Exchange™ from the Select a Calendar Type drop-down list (see figure 69, Select a protocol ( ). The options are http:// or https://. When you select https://, the Proxy Server must be setup as “TLS Pass Through”. This is required for the TLS to validate the calendar server’s SSL certificate (see Setting up a Proxy Server...
-
Page 69: Adding A Service Account
If required, select the Enable Service Accounts check box (see figure 69, When this check box is selected, a Service Account Manager button appears: Figure 71. Service Account Manager NOTE: The Enable Service Account checkbox allows one or more service accounts to be used to configure the panels. - Page 70 The Service Account Manager dialog box opens, with the Assign Service Account tab (see figure 72, ) selected. 1 1 1 1 1 1 1 1 1 1 1 1 1 1 1 1 2 2 2 2 2 2 2 2 2 2 2 2 2 2 2 2 6 6 6 6 6 6 6 6 6 6 6 6...
-
Page 71: Assigning A Service Account
Assigning a Service Account If necessary, click the Assign Service Account tab ( 1 1 1 1 1 1 1 1 1 1 1 1 1 4 4 4 4 4 4 4 4 4 4 4 4 4 3 3 3 3 3 3 3 3 3 3 3 3 3 6 6 6 6 6... -
Page 72: Editing A Service Account
Editing a Service Account Click Service Account Manager (see on page 63) to open the Service figure 71 Account Manager dialog box. Click the Edit Service Account tab ( 1 1 1 1 1 1 1 1 1 1 1 1 1 1 1 1 5 5 5 5 5 5 5 5 5 5 5 5... -
Page 73: Panel Setup
Status — Use this check box to select individual panels for configuration. • • IP Address — This cell contains the IP address of the touchlink panel. • Host Name — The host name is a fully qualified domain name that uniquely identifies the computer. -
Page 74: Verify The Exchange User Id Is The Upn
Verify the Exchange User ID is the UPN Verify the UPN as follows: Access the Exchange server Active Directory Users and Computers window. 1 1 1 1 1 1 1 1 1 1 1 1 1 1 1 1 1 1 Figure 76. - Page 75 The Properties dialog box opens (see figure 78). 1 1 1 1 1 1 1 1 1 1 1 1 1 1 1 1 1 1 2 2 2 2 2 2 2 2 2 2 2 2 2 2 2 2 2 2 3 3 3 3 3 3 3 3 3 3 3 3 3 3...
-
Page 76: Microsoft Office 365 Setup
Microsoft Office 365 Setup NOTES: • When you use Google, Microsoft Exchange, or Office 365 calendars, you can create private meetings. For these meetings, the subject title defaults to Private Meeting and the meeting organizer is hidden. • Room Agent provides an additional feature when you use the Microsoft Exchange or Microsoft Office 365 calendar. -
Page 77: Oauth For Microsoft Office 365
OAuth for Microsoft Office 365 NOTE: Microsoft is planning to end single-factor authorization in Oct 2020 and will be moving to two-factor authorization (OAuth). To obtain Oauth credentials by two-factor authorization, follow the steps below. There are three steps to this process: •... - Page 78 The App registrations page opens: Figure 82. App registrations Page Click New registration (see figure 82, The Register an application page opens: Figure 83. Register an application Page Provide a Name for the App (see figure 83, ). This can be edited later. Check the radio button to select from the Supported account type ( ).
- Page 79 The page for your new app opens: Figure 84. New App Page Make a note of the Application (client) ID (see figure 84, ) and the Directory (tenant) ID ( ). You will need these to access the calendar from Room Agent. The values have been blurred out in figure 84.
- Page 80 The Request API permissions page opens: Figure 86. Request API permissions Page Scroll to the Supported legacy APIs at the bottom of the page. Figure 87. Supported legacy APIs Click Exchange (see figure 87, The Request API permissions page opens: Figure 88. Request API permissions page Click Delegated Permissions (see figure 88, Room Scheduling System •...
-
Page 81: Assigning Oauth Credentials To Room Agent
A list of permission categories opens: Figure 89. Calendar Permissions Click Calendars (see figure 89, The menu expands to show several Calendar options. Select the Calendars.ReadWrite.All check box ( Click Add Permissions ( Assigning Oauth Credentials to Room Agent Open Room Agent and select the Panel Configuration tab. Figure 90. - Page 82 The Authenticate a device to Office 365 dialog box opens: Figure 91. Authenticate a device to Office 365 Dialog Box Provide a Name for the Credentials (see figure 91, Enter the Client ID ( ) and Tenant ID ( ), which were obtained in of the step 9 previous section (see page 73).
- Page 83 The Microsoft website opens: Figure 93. Microsoft Website — Enter code Enter the code obtained in on page 76. step 6 Click Next. Select an account that will provide authorization for Room Agent to read its calendar. The Microsoft website confirms that the Oauth process is complete. Figure 94.
-
Page 84: Assigning Oauth Credentials To Touchpanels
With Microsoft Office 365, you get the following column headings: • Status — Use this check box to select individual panels for configuration. IP Address — This cell contains the IP address of the touchlink panel. • • Hostname — The hostname is a fully qualified domain name that uniquely identifies the computer. -
Page 85: Rendezvous By Nfs Setup
• Status — Use this check box to select individual panels for configuration. IP Address — This cell contains the IP address of the touchlink panel. • • Hostname — The host name is a fully qualified domain name that uniquely identifies the computer. - Page 86 NOTE: The password and User ID are both provided by an NFS administrator. These are API credentials. They may be the same as the web page login credentials but this is not required. • Password — this is the password for the account with access to the NFS server. •...
- Page 87 To add a new resource: Log on to the NFS server. Click Administration. Select the Resource Management tab. Select Resource. Click Add New Resource. Provide the required information. Language — Select an option from the Language drop-down list (see • Supported on page 87).
-
Page 88: Setting Up A Proxy Server
Setting up a Proxy Server If you use the https:// protocol to connect to the calendar server, the Proxy Server must be setup as “TLS Pass Through”. This is required for the TLS to validate the calendar server’s SSL certificate. Before Starting Your proxy server administrator must provide you with the following information: Proxy Server IP Address/Hostname –... - Page 89 The Proxy Settings dialog box opens: Figure 100. Proxy Settings Dialog Box Enter the information collected from the proxy server administrator (see Before Starting on page 82). Click Save. Room Scheduling System • Setting up a Proxy Server...
-
Page 90: Troubleshooting
Troubleshooting: If your TouchLink screen cannot communicate to the calendar server through the proxy server, check the following: • Can the TouchLink Screen Communicate with the Proxy Server? • Are your Proxy Credentials Correct? Can the TouchLink Screen Communicate with the Proxy Server? -
Page 91: Are Your Proxy Credentials Correct
Are your Proxy Credentials Correct? Open the Windows Start menu but do not click any of the icons. Type Proxy. The Start menu provides a Manual proxy setup dialog. Figure 102. Manual Proxy Setup NOTE: If you are not an administrator on your PC, or if your PC is managed by an IT group, the proxy setting may be locked out. -
Page 92: Reference Information
Reference Information This section provides a central location for additional Room Scheduling System information, including: • System Communications Overview • Supported Languages • Occupancy Sensor Configuration • Panel Installation Overview System Communications Overview The following table is a summary of ports and protocols used by the Extron Room Scheduling System. -
Page 93: Supported Languages
NTP Server 4503 Multicast DNS (mDNS) 5353 Internal System Messaging Room Agent software is only used during setup and con guration of TouchLink Scheduling Panels Legend Figure 103. Room Scheduling Communication Flow Diagram Supported Languages As of Room Agent software release 1.7.1, the software supports scheduling panel displays... -
Page 94: Occupancy Sensor Configuration
Occupancy Sensor Configuration TLS 520M, TLS 525M, TLP Pro 520M, TLS 725M, and TLS 1025M panels have digital I/O connectors necessary to connect room occupancy sensors. Figure 91 shows how to wire the sensors to the panels and configure the panels. NOTES: •... -
Page 95: Panel Installation Overview
Panel Installation Overview The Extron panel models have the following mounting capabilities: • TLS 520M and TLP Pro 520M Panels — Mountable in a wall • Mountable on a non-porous surface, such as a conference room window with the • optional Extron SMB 1 Low Profile Surface Mount Box and GMK 1 Glass Mount Kit TLS 525M Scheduling Panel —... -
Page 96: Wall Mounting
Wall Mounting Mount the panel directly into drywall as follows: ATTENTION: • Do not install the panel in a fire resistant rated wall or partition assembly. • Veuillez ne pas installer les écrans tactiles dans un mur protégé par un dispositif coupe-feu ou dans une cloison. -
Page 97: Vesa Mounting (Tls 1022T, Tlp Pro 720T)
• The Toolbelt Help file provides detailed step-by-step information on using the software to set up 802.1X for TouchLink Pro control systems and on troubleshooting. The 802.1X Primer white paper, also available from www.extron.com, provides a •... -
Page 98: Certificate File Requirements
DER encoded certificates must be converted to PEM encoding using a third-party tool. Contact your IT administrator for more information on required tools. To create the 802.1X security certificate for uploading to Extron TouchLink Pro control systems, ensure that the certificate file meets the following requirements: •... - Page 99 Extron Electronics makes no further warranties either expressed or implied with respect to the product and its quality, performance, merchantability, or fitness for any particular use. In no event will Extron Electronics be liable for direct, indirect, or consequential damages resulting from any defect in this product even if Extron Electronics has been advised of such damage.
Need help?
Do you have a question about the TouchLink and is the answer not in the manual?
Questions and answers