Simplex 4100ES Installation Manual
Fire alarm system
Hide thumbs
Also See for 4100ES:
- Installation manual (262 pages) ,
- Installation & maintenance (165 pages) ,
- Operator's manual (93 pages)
Table of Contents
Advertisement
Advertisement
Table of Contents

Related Manuals for Simplex 4100ES


Summary of Contents for Simplex 4100ES
- Page 1 4100ES Fire Alarm System Installation Guide 574-848 Rev. BQ *0574848BQ*...
- Page 2 This page is intentionally blank...
- Page 3 Cautions, Warnings, and Regulatory Information...................11 Emissions Compliance, Radio Frequency Immunity, Safety and Agency Approvals......12 Listings, Approvals, Codes, and Standards....................13 Codes and Standards..................................13 Environmental Operating Range..............................13 Introduction to the 4100ES Fire Alarm System..................14 System configurations..................................14 Standalone configuration.................................. 14 4.2.1 System design........................................14 MINIPLEX configuration..................................
- Page 4 4100ES CPU Bay Placement Guidelines..............................48 5.10 Step 6. Installing Modules into Expansion Bays........................... 49 5.10.1 4100ES Placement Guidelines................................... 49 5.10.2 Motherboard Placement Guidelines for a 4100ES bay........................50 5.10.3 Mixed 4100 Motherboard/4100ES 4”x5” Card Placement Guidelines.....................51 5.10.4 Installing 4 X 5 Cards.....................................52 5.10.5 Installing Motherboards into a 4100ES Expansion Bay........................
- Page 5 4100ES Fire Alarm System Installation Guide 5.14.2 System Power Down Procedure................................62 5.14.3 The Terminal Block Utility Module................................62 5.14.4 Mounting to the Electronics Bay................................63 Installing 4100ES MINIPLEX Components....................64 Introduction to MINIPLEX Transponders............................64 6.1.1 Transponder Cabinets....................................64 6.1.2 Transponder Interface Cards (TICs) and Audio Riser Modules......................64...
- Page 6 Ethernet Service Port and Serial Service Port..........................106 10.2.1 Ethernet Service Port Overview (0566-719 only)..........................106 10.2.2 Serial Service Port Overview..................................107 MNS/ECS Application..........................108 11.1 Application of 4100ES as a UL2572 Mass Notification System....................108 11.1.1 General Information....................................108 11.1.2 Hierarchy of Operator Interfaces................................108 11.1.3 Priority of Signals......................................108 11.1.4...
- Page 7 14.1 Using the Volt/ Ohm Meter................................123 14.2 Checking System Wiring................................123 14.2.1 Meter Readings......................................123 Appendix D: References to 4100ES Module Installation Instructions..........125 Appendix E: Labels..........................132 Appendix F: Earth Fault Diagnostics..................... 134 17.1 General Guidelines..................................134 17.2 Earth Fault Searching from the Front Panel..........................136 17.2.1...
- Page 8 Appendix H: IDNAC Compatible Appliances and Devices..............144 19.1 IDNAC Compatible Devices................................144 19.2 IDNAC Compatible Appliances..............................144 Appendix I: Cooper Wheelock Appliances Compatible With 4100ES Wheelock Protocol For Special Applications..............................147 20.1 Synchronizing Horn Strobes................................. 147 20.2 Synchronizing strobes................................... 147 20.3...
- Page 9 4100ES Fire Alarm System Installation Guide 22.4.4 Troubleshooting......................................171 22.4.4.1 IDNet Power Monitor Trouble................................171 22.4.4.2 Extra Device......................................171 22.4.4.3 Class A Trouble...................................... 171 22.4.4.4 Earth Fault Search....................................171 22.4.4.5 Short Circuit......................................171 22.4.4.6 Channel Fail......................................171 22.4.4.7 No Answer/Bad Answer..................................171 22.4.4.8 Output Abnormal....................................171 22.5...
- Page 10 Wiring Overview....................................201 22.7.6.2 Wiring Parameters....................................201 22.7.6.3 Class A Wiring......................................201 22.7.6.4 Class B Wiring......................................203 Appendix K: Installing 4100 FACU Components (Non-4100ES/4100U)..........205 23.1 Introduction to FACUs................................... 205 23.1.1 Master Controller Bay....................................205 23.1.2 Master Motherboards and Controllers..............................205 23.1.3 Universal Power Supply (UPS)..................................208...
- Page 11 4100ES Fire Alarm System Installation Guide 23.6.2 Installing Motherboards.................................... 219 23.6.3 Connecting the 733-525 Harness................................219 page ix 574-848 Rev. BQ...
- Page 12 This page is intentionally blank...
-
Page 13: Cautions, Warnings, And Regulatory Information
Product operation and reliability depend upon proper installation. DO NOT INSTALL ANY SIMPLEX™ PRODUCT THAT APPEARS DAMAGED Upon unpacking your Simplex product, inspect the contents of the carton for shipping damage. If damage is apparent, immediately file a claim with the carrier and notify an authorized Simplex product supplier. - Page 14 4100-9165, 4100-9168, 4100-9169, 4100-9170, 4100-9248, 4100-9249, 4100-9250, 4100-9251, 4100-9252, 4100-9253, 4100-9357, 4100-9358, 4100-9359, 4100-9545, 4100-9725, 4100-9735, 4100-9755, 4100-9765. Manufacturer’s Name: Simplex Time Recorder Co., D/B/A Simplex-US Manufacturer’s Address: 50 Technology Drive, Westiminster MA 01441-0001, United States of America. page 12 574-848 Rev.
-
Page 15: Codes And Standards
ULC S524 Standard for Installation of Fire Alarm Systems (Canadian Systems) UL 1076 Standard for Safety for Proprietary Burglar Alarm Units and Systems Environmental Operating Range The 4100ES and all modules are rated to operate at ambient temperatures from 32 F - 120 F (0... -
Page 16: System Configurations
4 Introduction to the 4100ES Fire Alarm System The 4100ES is an expandable fire alarm system that can be used as a standalone system with one host panel, or as a wide-ranging system with several remote back boxes, with or without multiple host panels. This chapter is an overview of standalone, MINIPLEX®, and network 4100ES system concepts. -
Page 17: Miniplex Configuration
MINIPLEX configuration The MINIPLEX version of the 4100ES Fire Alarm System, which is designed for moderately larger applications than the standalone configuration, allows up to 3000 monitor and/or control points and 3000 annunciator points to be controlled by a single FACU. -
Page 18: Rui Communication
Data to and from the CPU may have to be routed over long distances in a MINIPLEX system. An RUI line, routed from either the CPU motherboard in the 4100ES or the RUI card in some legacy systems, allows the data to travel longer distances. Once the RUI line terminates at a remote box, the TIC (4100ES) or RIC (Legacy 4100) at that box distributes the CPU’s data to the remote modules. - Page 19 4100ES Fire Alarm System Installation Guide Figure 2: MINIPLEX 4100ES system page 17 574-848 Rev. BQ...
-
Page 20: Network Configuration
The 4100ES can be expanded to a network system by using network interface cards (NICs). When a NIC is installed into a 4100ES host panel, it is used to connect to up to 98 other network nodes. Nodes may consist of other host 4100ES panels, or they may be completely different: 4010 FACUs, TrueSite®... -
Page 21: Network Communication
4100ES Fire Alarm System Installation Guide Figure 4: Interconnected loop configuration 4.4.3 System design To be used as a network node, a 4100ES panel must contain the following: • CPU • System Power Supply • ES Power Supply • 4100 Network Interface Card •... - Page 22 2975-9813 Semi-Flush Trim Band – Platinum (743-949) 4100ES PIDs This section lists the PIDs (model numbers) that are supported by the 4100ES Fire Alarm System. There are two basic types of PIDs listed here: • PIDs denoting standard installations, such as host panels containing multiple, already functioning modules •...
-
Page 23: Remote Annunciator
4100ES Fire Alarm System Installation Guide 4.6.1 Basic Control Panels Basic Control Panels (United States) Control panels available in the U.S. that use the ES-PS: 4100-9701 Master Controller – English, 2x40 Display, CPU Card, ES Power Supply (120-240V 50/60Hz, 250 Addressable/analog points, 24V Aux. -
Page 24: Power Distribution Modules
• 4100-7152 Master Controller Upgrade with 2X40 Display, operator interface and power supply (old 4100 to Rev 10 or higher) (742-922) • 4100-7153 InfoAlarm Display Upgrade (4100ES with 2x40 display to InfoAlarm display) (743-240) • 4100-7154 Master Controller Upgrade with InfoAlarm Display (old 4100 to Rev 10 or higher) (743-241) •... -
Page 25: Communication Modules
• 4081-9308 External 220-240 V Battery Cabinet with Charger for 110 Ah Batteries; Red (637-030) 4.6.12 Communication Modules The following communication modules can be added on to 4100ES systems. • 4100-3102 MAPNET II Interface Module (742-696) • 4100-3103 MAPNET Isolator Module (742-725) •... -
Page 26: Power Supplies
• 4100-6310 ES Net Network Interface Card - Flat 4.6.13 Power Supplies The power supplies listed below can be used with 4100ES systems. • 4100-5115 Expansion NAC Module (XNAC) (742-386) • 4100-5120 TrueAlert Power Supply (TPS) (120 VAC) (742-659) • 4100-5152 12 V, 2 A Power Option (742-718) •... - Page 27 4.6.16 Transponders and Transponder Components The following is a list of transponder cabinets and components for the 4100ES. • 4100-9600 Basic Transponder (Expansion Bay with PDI and Basic TIC) (742-866) • 4100-9601 Local Mode Transponder (Expansion Bay with PDI and Local Mode TIC) (742-867) •...
- Page 28 4100ES Fire Alarm System Installation Guide • 4100-1272 Telephone Expansion Card (742-600) • 4100-1273 Class A Telephone Adapter Module (742-599) • 4100-1274 Microphone Mux Module (743-808) 4.6.21 Common Audio Options • 4100-1245 Flex 50 Expansion NAC Board with 3 Class B NACs (742-540) •...
- Page 29 • 2975-9236 IP Gateway External Box, beige (743-2022) 4100 PIDs (non-4100ES/4100U) This section lists the 4100, non-4100ES/4100U, PIDs that are supported by the 4100ES Fire Alarm System (in retrofit applications). There are two basic types of PIDs listed here: • PIDs denoting standard installations, such as host panels containing multiple, already functioning modules •...
-
Page 30: Optional Modules
4100ES Fire Alarm System Installation Guide 4.7.3 NAC Modules Notification appliance circuit (NAC) modules are listed below. • 4100-4001 2-Circuit (Class B) • 4100-4011 2-Circuit (Class A) • 4100-4321 6-Circuit (Class B) • 4100-4331 6-Circuit (Class A) 4.7.4 IDC Modules Initiating device circuit (IDC) modules are listed below. -
Page 31: Audio Options
4100ES Fire Alarm System Installation Guide 4.7.7 Audio Controllers and Amplifiers The following modules can be used in 4100ES Upgrade/Retrofit applications, but cannot be used with 4100ES audio modules. • 4100-0210 Single-Channel Audio Controller Board • 4100-0211 Dual-Channel Audio Controller Board •... -
Page 32: System Accessories
4100ES Fire Alarm System Installation Guide 4.7.12 System Accessories • 2080-9047 DACT Communication Cable (14 feet [4 meters]) (733-913) • 2081-9031 Potted Module for PVCS (740-688) • 2081-9272 Batteries (6.2 Ah) (112-112)* • 2081-9274 Batteries (10 Ah) (112-113)* • 2081-9275 Batteries (18.8 Ah) (112-046)* •... - Page 33 4100ES Fire Alarm System Installation Guide 5 Installing FACU Components This chapter describes installation procedures that apply directly to the Fire Alarm Control Panel (FACU) as well as each step of the host panel installation for the ES-PS configuration. Before beginning the installation, review the next few pages to get a sense of the types of bays and modules that make up the FACU.
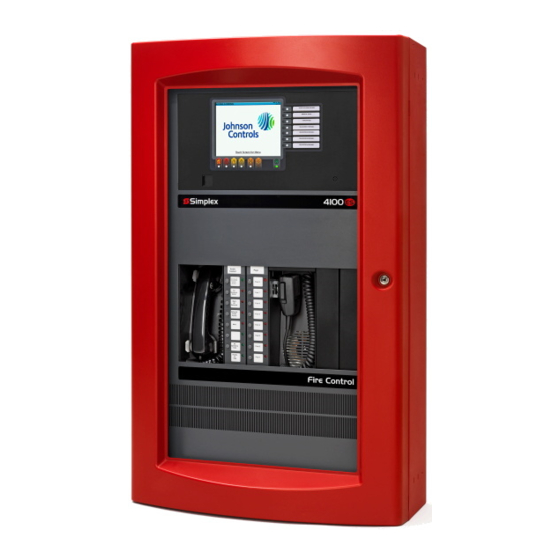
- Page 34 Operator Interface The following images show the operator interfaces which are available with the 4100ES. The Operator Interface is used to obtain alarm, supervisory, trouble and other status via the Liquid Crystal Display and LEDs. Control functions are accessed using dedicated and user- programmable keys.
- Page 35 4100ES Fire Alarm System Installation Guide Figure 8: ES Touch Screen Display Table 2: Electrical Specification for the ES Touch Screen Display Specification Details Voltage 24VDC Current Draw 160 mA normal standby (LCD dimmed) 225 mA alarm page 33 574-848...
-
Page 36: Expansion Bays
4100ES Fire Alarm System Installation Guide FACU Expansion Bays 5.3.1 Additional CPU Bay Modules 4100-6030 Service Modem Card. CPU mezzanine card. Provides a connection to remote PCs for diagnostics and programming purposes. 4100-6031 City Card with Disconnect. FACU power supply mezzanine card. Provides two UL-listed city connections to the municipal fire department or other remote supervising station. - Page 37 4100ES Fire Alarm System Installation Guide Figure 9: Expansion Bays page 35 574-848 Rev. BQ...
-
Page 38: Power Requirements
In expansion bays, the PDM may connect to the following: ES Series Power Supply or a 100 W Amplifier. Note: *The 4100-5111, 4100-5112, 4100-5113 SPS is available for expansion bays only. Figure 10: System Power Important: AC power must be provided to the 4100ES from a dedicated branch circuit. 5.4.2 Power Requirements... -
Page 39: Specifications
4100ES Fire Alarm System Installation Guide Step 1. Mounting Back Boxes Three different sizes of system back boxes are available, accommodating one, two, or three electronics bays. These back boxes are shipped in large containers separate from the system electronics. If system electronics containers are shipped with the back box containers, store the system electronics containers in a safe, clean, and dry location until the back box installation is completed, and you are ready to install the system electronic bays. - Page 40 4100ES Fire Alarm System Installation Guide Figure 11: Back Box Installation Diagram Figure 11 notes: Dimensions shown are typical for all surface and semi-flush installations. Use suitable punch when conduit is required. Knockouts are not provided. Locate and create on-site as required during installation.
- Page 41 4100ES Fire Alarm System Installation Guide 5.5.3 Back Box side views Figure 12: Height off the wall for Back Box and doors (plastic and metal) page 39 574-848 Rev. BQ...
-
Page 42: Mounting Guidelines
4100ES Fire Alarm System Installation Guide Step 2. Mounting the System Electronics This section describes the process for removing the CPU and equipment bays that come with the system modules from their shipping container and installing them into the mounted back boxes. - Page 43 4100ES Fire Alarm System Installation Guide Note: Install the mounting screws to within 1/8" from the seated position. Mount the system electronics bay assemblies in the back box by carefully placing the assembly onto the four extended screws in the back box, allowing the electronics bay assembly to hang from the screws.
- Page 44 4100ES Fire Alarm System Installation Guide Step 3. Trim Kit Application (optional) Trim Kits are used to cosmetically cover wall openings when boxes are mounted semi-flush into the wall. The kit includes: • Two top trim bands (shorter) • Two side trim bands (longer) •...
- Page 45 4100ES Fire Alarm System Installation Guide Figure 17: Applying the Trim page 43 574-848 Rev. BQ...
-
Page 46: Step 4. Mounting The Door
4100ES Fire Alarm System Installation Guide Step 4. Mounting the Door This section describes how to hang and attach glass and solid doors to the back box. Additionally, this section describes how to reverse doors so that their hinges are on the right and locks are on the left. -
Page 47: Attaching Doors
4100ES Fire Alarm System Installation Guide 5.8.1 Attaching Doors Read the following instructions to attach glass or solid doors to the back box. Note that the hinges and lock catch should already be attached. Note: A 5/16 hex nut driver is required to complete the following steps. -
Page 48: Reversing The Door
4100ES Fire Alarm System Installation Guide Figure 21: Securing the Dress Panel Figure 22: Hinge Pin Alignment Attach the two ground wires to the back box with the # 6 hex flange nuts in the shipping group (the grounding straps should already be attached to the door). - Page 49 4100ES Fire Alarm System Installation Guide 10. Re-attach the ground-wire and flange nut to the back box and door. 11. Remove the B-key that is attached to the door, and keep it in a safe place. page 47 574-848 Rev. BQ...
- Page 50 4100ES Fire Alarm System Installation Guide Step 5. Installing Motherboards into the CPU Bay This section contains placement guidelines and physical installation instructions on installing traditional aftermarket motherboards into the 4100ES CPU bay. Note: • If you do not need to install individual motherboards into the CPU bay, but need to install aftermarket modules into expansion bays, skip to Step 7.
-
Page 51: Step 6. Installing Modules Into Expansion Bays
4100ES Fire Alarm System Installation Guide 5.10 Step 6. Installing Modules into Expansion Bays This section contains placement guidelines and physical installation instructions on installing 4” X 5” cards and traditional motherboards into 4100ES electronics bays. Important: This section applies to aftermarket modules for expansion bays only. If you do not need to install any aftermarket modules at all, and if you have followed Steps 1 through 6, you have completed the panel installation and can apply AC power. - Page 52 4100ES Fire Alarm System Installation Guide 5.10.2 Motherboard Placement Guidelines for a 4100ES bay • Motherboards can be installed on top of the PDI in expansion bays. The data and power that would normally be bussed via the PDI is instead routed across the boards by a connector from one board to the next.
- Page 53 4100ES Fire Alarm System Installation Guide 5.10.3 Mixed 4100 Motherboard/4100ES 4”x5” Card Placement Guidelines • As shown in Figure 26, motherboards can be installed alongside 4” X 5” cards, if necessary. Figure 26: Mixed Module Placement page 51 574-848 Rev. BQ...
-
Page 54: Installing 4 X 5 Cards
Figure 27: 4"x5" Option Card/PDI Connection 5.10.5 Installing Motherboards into a 4100ES Expansion Bay Use the following procedure when installing motherboards in an expansion bay. Start with the second slot from the left and fill to the right. Orient the motherboard with the connector labeled J1 on the right and the header labeled P1 on the left. - Page 55 4100ES Fire Alarm System Installation Guide Figure 28: Installing the Motherboard in a 4100ES Expansion Bay page 53 574-848 Rev. BQ...
-
Page 56: Step 7. Interconnecting Modules And Bays
4100ES Fire Alarm System Installation Guide 5.11 Step 7. Interconnecting Modules and Bays Each card has to be interconnected with every other card in its bay. At the same time, bays in the FACU also have to be connected together. Read this section to ensure that cards and bays are interconnected. - Page 57 4100ES Fire Alarm System Installation Guide 5.11.3 Connecting to 4100 Motherboards Panels with motherboards on the left side of the expansion bays require some non-PDI connections. If you need to connect a harness to a motherboard, refer to Figure 30 and follow these steps. Make sure to route the power and communication wiring on the left side of the bay.
- Page 58 4100ES Fire Alarm System Installation Guide Figure 30: Power and Communication Wiring for Motherboards page 56 574-848 Rev. BQ...
-
Page 59: Step 8. Configuring Cards
4100ES Fire Alarm System Installation Guide 5.12 Step 8. Configuring Cards The all cards and modules in the CPU FACU back box must be configured to operate correctly in the system via their DIP switch and jumper ports. This section describes the hardware configuration for the CPU components. -
Page 60: Appendix A: The Device Configuration Dip
4100ES Fire Alarm System Installation Guide 5.12.3 ES-PS Configuration Setting the card address The DIP switch SW1 is used to set the ES-PS and ES-XPS addresses as identified in the Panel Programmer job (see ES Panel Programmer's Manual, 574-849 for more information). From left to right, these switches are designated as SW1-1 through SW1-8. The function of these switches is as follows: •... - Page 61 4100ES Fire Alarm System Installation Guide Figure 31: One Bay Battery Installation page 59 574-848 Rev. BQ...
- Page 62 4100ES Fire Alarm System Installation Guide 5.13.2 Installing and Removing Batteries in a Multi-Bay Cabinet To install the batteries: Remove the batteries from the packaging and inspect them for any damage. Place the batteries at the bottom of the cabinet, center them and gently push them against the back wall.
- Page 63 4100ES Fire Alarm System Installation Guide Figure 32: Multi-Bay Battery Installation page 61 574-848 Rev. BQ...
-
Page 64: System Power Down Procedure
System Power Up Procedure Important: • Never connect or disconnect power on a 4100ES by removing the connector from the PDM. This could cause an improper order of power disconnection which may shorten the product life. • If this procedure is not followed, you may cause damage to the system and/or create a shock hazard. -
Page 65: Mounting To The Electronics Bay
4100ES Fire Alarm System Installation Guide 5.14.4 Mounting to the Electronics Bay Follow the directions below to mount the terminal block utility module to the electronics bay. Align the terminal block utility module to any two compatible screw holes on the electronics bay. Position the higher terminal block towards the middle of the bay. -
Page 66: Transponder Cabinets
TIC modules are optionally available with local mode operation that provides basic (degraded mode) system functions in the event of a communication loss with the master panel. TICs receive communications from the 4100ES host panel using Remote Interface (RUI) communications with either Class B or Class X wiring. -
Page 67: Tic Illustrations
4100ES Fire Alarm System Installation Guide 6.1.5 TIC Audio Risers Audio risers are used when digital or analog audio is being transmitted to the transponder cabinet. They are always mounted directly beneath the TIC, on the leftmost side of the transponder bay. - Page 68 4100ES Fire Alarm System Installation Guide • 4100-3110 IDNet 2+2 Card • 4100-5101 , 4100-5103 Expansion Power Supply NACs (including TrueAlert Non-Addressable SmartSync appliances) • 4100-5111 , 4100-5113 System Power Supply NACs (including TrueAlert Non-Addressable SmartSync appliances) • 4100-5125 , 4100-5127 Remote Power Supply NACs (including TrueAlert Non-Addressable SmartSync appliances) •...
-
Page 69: Card Specifications
• The Class A RUI card supports MINIPLEX transponders and 4602/4603 serial annunciators on the same signaling line circuit. • Up to 4 RUI cards in the 4100ES Control Panel can be used for distributing transponder wiring in different directions or for supporting different wiring requirements (such as using a Class X RUI for serial annunciators). -
Page 70: Tic Configuration
4100ES Fire Alarm System Installation Guide Table 9: Replacement boards Name Legacy Card New Card Basic Transponder Interface Card 0566-093 0566-1166 Local Transponder Interface Card 0566-094 0566-1167 Configuring Cards The TIC and all other cards to be mounted in the transponder cabinet and attached expansion bays must be configured to operate correctly in the system via their DIP switch and jumper ports. - Page 71 4100ES Fire Alarm System Installation Guide Figure 35: TIC Mounting page 69 574-848 Rev. BQ...
- Page 72 4100ES Fire Alarm System Installation Guide TIC/Motherboard Interconnections 6.5.1 Interconnections Use Figure 36 to connect the TIC to a motherboard in another bay. Figure 36: Transponder Cabinet Interconnections page 70 574-848 Rev. BQ...
-
Page 73: Rui Wiring
4100ES Fire Alarm System Installation Guide RUI Wiring The TIC connects to the CPU via the RUI interface. Wire from the RUI interface to each TIC. The wiring may be Class A or Class B. 6.6.1 RUI/RUI+ Specifications • Output: 24V @ 130mA (RUI), 500 mA (RUI+); 32V maximum (RUI); 25.2V max (RUI+). - Page 74 4100ES Fire Alarm System Installation Guide 6.7.1 Analog Interconnections Figure 38 is an illustration of Class A and Class B wiring from the analog audio controller to analog audio risers that are in turn connected to TICs or the Network Audio Riser Controller Module.
- Page 75 4100ES Fire Alarm System Installation Guide 6.7.2 Digital Interconnections (4100-1311 Digital Audio Controller, 4100-1411 ES Net Digital Audio Controller) Figure 39 is an illustration of Class X and Class B digital wiring from the 4100-1311 Digital Audio Controller to risers connected to TICs or the Network Audio Riser Controller Module.
- Page 76 4100ES Fire Alarm System Installation Guide of four overvoltage protectors are allowed. Each 2081-9044 adds 6 Ohms and 0.006 µF. Wiring must be free of all grounds. Maximum number of digital interface cards per digital audio riser: 31. All riser wiring is supervised and power-limited.
- Page 77 • The Fiber-Optic Media Card can be used for electrically noisy environments or for connecting externally to other buildings. • Non-4100ES/4100U only: the Modem Media Card is typically used when a large transmission distance is required. • The Wired Media Card is used in all other types of applications.
-
Page 78: Network Module Illustrations
4100ES Fire Alarm System Installation Guide 7.1.1 Network Module Illustrations Figure 40 depicts the 4100-6078 Network Interface Card. Figure 40: 4100-6078 Network Interface Card 7.1.2 NIC Card LED Indications The 4100-6078 NIC has the following LEDs: LED1 (yellow). Illuminates when •... - Page 79 4100ES Fire Alarm System Installation Guide LED5 (green). Illuminates when a data ‘0’ is transmitted at the left port. 7.1.3 4100 Motherboard Options The figures below are illustrations of two motherboards apart from the default CPU motherboard that can be used with the 4100 NIC.
- Page 80 4100ES Fire Alarm System Installation Guide Fiber-optic data assembly Fiber 565-261 and 566-376: Fiber Optic Data: for 746-109: Transmit (U1), Receive (U2) Transmit/Receive (U1) Transmit, Receive 40-pin 566-1197, 566-1198, network interface 566-1199, or 566-1200 card connector (J1) Figure 43: 4100-6301/4100-6302/4100-6303/4100-6304 4120 Duplex Fiber...
-
Page 81: Requirements And Limitations
4100ES Fire Alarm System Installation Guide Figure 45: The 4100-6055 Modem Media Card (565-279 or 566-338) 7.1.5 Requirements and Limitations Refer to Table 10 for electrical environmental requirements for the 4100 NIC and media cards. Table 10: Electrical and Environmental Specifications... -
Page 82: Nic Card Address Setting
7.2.5 Modem Media Card Jumper Settings Non-4100ES/4100U only. P4 and P5 on the modem media card tell the system how the card is being used. (NIC Card Modules): P4: Sets the card up as a network media card or a standalone modem. -
Page 83: Step 2. Mounting Media Cards To The Nic
4100ES Fire Alarm System Installation Guide 7.2.7 Duplex Fiber Media Configuration (0566-1197, 0566-1198, 0566-1199, 0566-1200 only) SW1 displays the diagnostics on the diagnostic LEDs. Press to display the type and thresholds reached. • Hold for three seconds to toggle between the Normal and Advanced diagnostics mode. - Page 84 4100ES Fire Alarm System Installation Guide Figure 47: Media Card Mounting Note: 4100-6301 and 4100-6303 Duplex Fiber Media cards are Left cards and must be inserted in the corresponding Network card Left port (P5). 4100-6302 and 4100-6304 Duplex Fiber Media cards are Right cards and must be inserted in the corresponding Network card Right port (P6).
-
Page 85: Step 4. Wiring Network Cards
4100ES Fire Alarm System Installation Guide Figure 48: Installing the Daughter Card Step 4. Wiring Network Cards The nodes in the network now have to be wired together, so that the NIC in one host panel connects to the NIC in the next panel. This section contains guidelines and instructions for NIC wiring. -
Page 86: Wiring Distances
4100ES Fire Alarm System Installation Guide Figure 49: The Transient Suppressor 7.5.2 Wiring Distances Maximum wiring distances are shown in Table 11. Table 11: Wiring Distances Media Type Size Data Rate Max Distance Wired 24 AWG 57.6 kbps 7,000 ft (2,134 m) 9.6 kbps... - Page 87 4100ES Fire Alarm System Installation Guide • Fiber backbone components must meet or exceed standard EIA/TIA 568-B (Electronic Industries Alliance/Telecommunications Industry Association) for maximum power losses; single-mode fiber is preferred; attenuation should be measured at 1310 nm. Figure 50 shows how two network nodes are connected via fiber-optic cable.
- Page 88 Duplex Fiber Optic wiring (0566-1197, 0566-1198, 0566-1199, or 0566-1200 only) Use the transceiver U1 on the duplex fiber-optic media card to connect 4100ES NICs across parts of a 4120 network. Figure 21 shows how two network nodes are connected via fiber-optic cable.
- Page 89 4100ES Fire Alarm System Installation Guide Table 14: Fiber media card service kits 650-2013 Fiber Media Card Service Kit MM 650-2014 Fiber Media Card Service Kit MM 62.5um 50um Part # Description Part # Description 156-087 Wire Clamp 156-087 Wire Clamp...
-
Page 90: Wiring With The Wired Media Card
TB3-4 Earth ground TB3-4 Earth ground TB3-5 TB3-5 Figure 53, shows how two CPU motherboards with wired media network cards connect to each other in the 4100ES. Figure 53: Wired Media Interconnections Between 4100ES Motherboards page 88 574-848 Rev. BQ... -
Page 91: Modem Wiring
Modem Guidelines Review the following guidelines before wiring a network with modem media boards. • Modem media wiring for NICs applies to non-4100ES/4100U systems only. • Phone Line Classification consists of the following: - Private leased line for analog data communications... - Page 92 4100ES Fire Alarm System Installation Guide 7.5.13 Wired Media Class X Wiring Figure 55: Wired Media, Class X Wiring Note: Refer to general wiring precautions in this chapter, as well as Field Wiring Specifications: document 900-082 for 4100; 900-408 for 4100ES.
- Page 93 Refer to general wiring precautions in this chapter, as well as Field Wiring Specifications: document 900-082 for 4100; 900-408 for 4100ES. For specific information about fiber optic wiring, refer to the 900-143 Fiber Tutorial. 2. The maximum distance between nodes when using the fiber communication path is dependent upon the fiber’s multimode graded index: 10,000 feet (3,048 m) for 50/125 fiber;...
- Page 94 Refer to general wiring precautions in this chapter, as well as Field Wiring Specifications: document 900-082 for 4100; 900-408 for 4100ES. For specific information about fiber optic wiring, refer to the 900-143 Fiber Tutorial. The maximum distance between nodes when using the fiber communication path is dependent upon the fiber’s multimode graded index: 10,000 feet (3,048 m) for 50/125 fiber;...
- Page 95 4100ES Fire Alarm System Installation Guide When wiring leaves the building, 2081-9044 Overvoltage Protectors are required. One overvoltage protector is installed where wiring leaves the building; another is installed where wiring enters the next building. 7.5.16 Duplex fiber optic Class X wiring (0566-1197, 0566-1198, 0566-1199, 0566-1200 only)
- Page 96 4100ES Fire Alarm System Installation Guide SEE NOTE 6 SEE NOTES 5 AND 6 LEFT “WIRED” MEDIA PORT OPTION ASSY 565-413 EARTH NETWORK EARTH INTERFACE 8 7 6 5 4 3 2 1 XCVR ASSY 565-518 “ “ WIRED WIRED” ” MEDIA...
- Page 97 4100ES Fire Alarm System Installation Guide The 4100-0623 Network Audio Riser Controller Module supports audio interconnections when connected to 4100-0621 Analog Audio Risers or 4100-0622 Digital Audio Risers. It is a version of the Basic TIC that doesn’t have an RUI input. It communicates via internal communications and is used to control audio riser interface modules in network nodes that are stand-alone fire alarm control panels.
- Page 98 4100ES Fire Alarm System Installation Guide 7.6.4 Analog Interconnections Figure 61 is an illustration of Class A and Class B wiring from the analog audio controller to risers connected to the Network Audio Riser Controller Module. Note: Old legacy 0566-218 Analog Audio Controller was replaced due to component obsolescence. The replacement board is the 0566-1011 Analog Audio Controller.
- Page 99 4100ES Fire Alarm System Installation Guide 11. All riser wiring is supervised and power-limited. 7.6.5 Digital Interconnections for the 4100-1311 Digital Audio Controller Figure 62 is an illustration of Class X and Class B digital wiring from the digital audio controller to risers connected to the Network Audio Riser Controller Module.
- Page 100 4100ES Fire Alarm System Installation Guide All wiring that leaves the building requires the 2081-9044 Overvoltage Protector at each entry or exit to the building. A maximum of four overvoltage protectors are allowed. Each 2081-9044 adds 6 Ohms and 0.006 uF.
- Page 101 4100ES Fire Alarm System Installation Guide Figure 63: Distributed Microphone Interconnections 7.6.7 Reference for MCC DARIC Installation For information of the installation of Multiple Digital Command Centre (MCC) Digital Audio Riser Input Option Cards (DARICs) refer to the latest revision of document 574-844.
- Page 102 4100ES Fire Alarm System Installation Guide Figure 64: Installing a Digital Audio PDI Termination Plug page 100 574-848 Rev. BQ...
- Page 103 8 ES Net Networking Use the ES Net Network Interface Cards (NICs) to expand a 4100ES to an ES Net network system. Install a NIC in a 4100ES host panel to connect to up to 98 other network nodes. Examples of other nodes include other host 4100ES panels, 4010ES FACUs, 4007ES FACUs, or TrueSite Workstations (TSWs).
- Page 104 The ES Net Network Interface Card (NIC) is an option card that is used to add a 4100ES FACU or a TSW node to an ES Net network. You can mount the ES Net NIC in a bay in the FACU, and configure the card as an ES Net NIC or an ES Net TSW NIC. The NIC communicates between each panel using Ethernet, DSL, or fiber connections in a Class X or Class B wiring configuration.
- Page 105 4100ES Fire Alarm System Installation Guide For more information about installing the 4100-6310 flat type ES Net NIC, see Flat Type ES Net NIC Installation Instructions (579-1257). For more information about installing the 4100-6104 slot type ES Net NIC, see Slot Type ES Net NIC Installation Instructions (579-1256).
- Page 106 9 The ES Power Supply The 4100-5401 ES-PS and 4100-5402 ES-XPS are modular power supply providers for the 4100ES Fire Alarm Control Unit (FACU). The ES- XPS functionally replaces the current expansion power supplies (XPS). The ES-PS functionally replaces the following existing power supplies for the 4100ES system: •...
-
Page 107: Pc Software Connections
4100ES Fire Alarm System Installation Guide 10 PC Software Connections The service port on the CPU daughter card allows the 4100ES panel to connect to a PC’s running important utilities, such as diagnostics, programming, CPU firmware downloading, and channel monitoring. -
Page 108: Ethernet Service Port And Serial Service Port
4100ES Fire Alarm System Installation Guide Master Bootloader Interface Mode: This interface should be used when the Master executable is not functioning. It downloads the Master CPU Exec firmware and the CFG.TXT file to the CPU using the serial port. -
Page 109: Serial Service Port Overview
4100ES Fire Alarm System Installation Guide Figure 73: Front Panel Ethernet Service Port 10.2.2 Serial Service Port Overview The Serial Service Port P5 on the CPU card (0566, 149, 0566-692 and 0566-719) can also be used to connect the Panel to a local PC. See Figure 72 for the port location. -
Page 110: General Information
All other signals In the 4100ES system, signal priority can be selected by assignment of point type and further by custom control. Refer to the ES Panel Programmer’s Manual (574-849) for detailed information about programming input point priority and writing custom control. - Page 111 Overriding Fire Alarm Signals An MNS/ECS system must have the capability to override any other notification signals. When the 4100ES is used as a combination fire alarm/MNS, the system programming determines which signal has priority. Just as an Evacuation Message has higher priority than an Alert Message, system programming gives priority to MNS functions over other alarm functions.
-
Page 112: Programming And Configuration
4100ES Fire Alarm System Installation Guide A variety of devices can be connected to a Simplex 4100ES via an individual addressable module (IAM). The IAM should be programmed as a priority 2 device, or other non-fire alarm point. The IAM may be used to monitor any contact type initiating device. Use a contact-type initiating device listed to ANSI/UL 2017. -
Page 113: Configuration Limitations
11.2.4 Voice Control Centers The primary solution for controlling and activating voice messages on a Simplex fire alarm network is utilizing the standard 4100ES LED and Switch user interface along with a microphone for live voice announcements. In the example below the operator first selects the destination for a message on the left and then selects the audio source or pre-recorded message to play on the right. - Page 114 MNS Wiring The 4100ES field wiring is “power-limited”, with the exception of AC input, battery and the City Circuit option module wiring. For MNS, the term “power limited” has been replaced by the NEC term “class 2”. Wherever this document uses the UL864 term “power limited”, it can be taken to mean class 2.
- Page 115 • SWx-1. This switch sets the baud rate for the internal 4100 communications line running between the card and the CPU. Set this switch to ON. • SWx-2 through SWx-8. These switches set the card’s address within the 4100ES FACU. Refer to Figure 77 for a complete list of the switch settings for all of the possible card addresses.
- Page 116 4100ES Fire Alarm System Installation Guide Figure 77: Card Addresses page 114 574-848 Rev. BQ...
-
Page 117: Appendix B: Installing 4100 Miniplex Components (Non-4100Es/4100U)
13 Appendix B: Installing 4100 MINIPLEX Components (Non-4100ES/4100U) MINIPLEX remote interface cards (RICs) allow for data and power interconnections between the 4100 host panel and remote locations. This chapter describes the transponder installation procedure for all MINIPLEX systems in non-4100ES/4100U systems. 13.1 Introduction to MINIPLEX Systems The 4100 MINIPLEX Fire Alarm System uses transponder cabinets containing remote interface cards (RICs) to extend power and communication across large areas. -
Page 118: The Rui Card
4100ES Fire Alarm System Installation Guide Figure 78: MINIPLEX System Design 13.2 MINIPLEX System Components The 4100 MINIPLEX system is comprised of a host panel containing everything required in a standalone cabinet (see Chapter Installing 4100ES MINIPLEX Components), plus: • An RUI module in the master controller bay •... -
Page 119: The Remote Interface Card (Ric)
4100ES Fire Alarm System Installation Guide Figure 79: The Remote Unit Interface Card The RUI card mounts onto a 562-799 or 562-856 Motherboard. 13.2.2 Transponder Cabinets Communication wiring from the RUI module in the host panel extends to the RIC II card in a remote transponder cabinet. The transponder cabinet is simply a 2975-91xx Back Box with a RIC II module in it, and can have one, two, or three bays. -
Page 120: Installing The Rui Motherboard
4100ES Fire Alarm System Installation Guide • Up to 4 RUI cards in the 4100 Control Panel can be used for distributing transponder wiring in different directions or for supporting different wiring requirements (such as using a Class X RUI for serial annunciators). -
Page 121: Installing The Ric Ii Motherboard
4100ES Fire Alarm System Installation Guide 13.4.3 Installing the RIC II Motherboard The RIC II motherboard is installed into a remote transponder cabinet (back box PID series 2975-91xx). Review the following guidelines before mounting RIC II motherboard. • If a power supply is installed in the bay, it must be installed on the far right of the bay and any relay modules must be installed in the slots immediately to its left. -
Page 122: Miniplex Wiring
4100ES Fire Alarm System Installation Guide wiring on the left side of the bay. Insert the harness connector with the blue wire into the P2 connector. Note that the P2 connector has eight pins. Insert the harness connector on either the top four pins or the bottom four pins, not in the middle. -
Page 123: Class A Wiring
4100ES Fire Alarm System Installation Guide 13.5.1 Wiring Configurations RUI cabling can be accomplished either through Class A or Class B wiring. Class A wiring allows transponder cabinets to communicate with the FACU even in the event of an open circuit somewhere in the loop. -
Page 124: Wiring Illustration
4100ES Fire Alarm System Installation Guide 13.5.4 Wiring Illustration Figure 84 illustrates Class A and Class B wiring. Figure 84: MINIPLEX Wiring Note: Power wiring is not shown. Connect the RIC II card to the UPS or expansion power supply in the transponder cabinet. -
Page 125: Appendix C: Checking System Wiring
4100ES Fire Alarm System Installation Guide 14 Appendix C: Checking System Wiring This appendix contains instructions on how to use a volt/ohm meter to check system wiring. 14.1 Using the Volt/ Ohm Meter When using the volt/ohm meter to check each circuit, make sure to adhere to the notes and instructions below. - Page 126 4100ES Fire Alarm System Installation Guide Table 19: Acceptable Zone and Signal Circuit Meter Readings Circuit Type Meter Reading From zone - OUT to - IN Less than 50 Ohms Resistance across circuit: Infinity In one direction Less than 200 Ohms...
-
Page 127: Appendix D: References To 4100Es Module Installation Instructions
4100ES Fire Alarm System Installation Guide 15 Appendix D: References to 4100ES Module Installation Instructions ES-PS Master Controller Description Installation Instructions 4100-0156 8V DC CONVERTER 574-123 4100-0620 TRANSPONDER IF MODULE 574-848 4100-0621 ANALOG AUDIO RISER MODULE 574-848 4100-0622 DIGITAL AUDIO RISER MODULE... -
Page 128: Installation Instructions
4100-1296 8 SW, 16 GREEN/ YELLOW LED MOD. 574-843 4100-1297 TFX PHONE CARD 579-862 4100-1298 4100U/4100ES MASTER FIREFIGHTER PHONE ASSEMBLY w/TFX Phone Card 579-862 4100-1311 AUDIO CONTROL BOARD - DIGITAL 579-159 4100-1312 50W AMP W/3 CLASS B NACS 25V 579-173... - Page 129 4100ES Fire Alarm System Installation Guide Description Installation Instructions 4100-1364 DIGITALFLEX 35W AMP, 3NACS-70V 579-173 4100-1411 ES Net Digital Audio Controller 579-1408 4100-3101 IDNET MODULE, UP TO 250 POINTS- Each IDNet Device (Add to IDNet current) 4100-3101 with full 574-800...
- Page 130 4100U/4100ES PRECONFIG. CAN/ENG 120V; 0 Devices 574-848 4100-9113 PRECONF, CANADIAN FRENCH 120V; 0 Devices 574-848 4100-9114 4100U/4100ES PRECONFIG. W/ InfoAlarm DOMESTIC 120V; 0 Devices 574-848 4100-9115 4100U/4100ES PRECONFIG. W/ InfoAlarm CAN/ENG 120V; 0 Devices 574-848 4100-9116 PRECONF W/ InfoAlarm, CANADIAN FRENCH 120V; 0 Devices...
- Page 131 PRECONF, CANADIAN FRENCH 120V; 0 Devices, EPS with IDNet 2 Card 574-848 4100-9314 4100U/4100ES PRECONFIG. W/ InfoAlarm DOMESTIC 120V; 0 Devices, EPS with IDNet 2 Card 574-848 4100-9315 4100U/4100ES PRECONFIG. W/ InfoAlarm CAN/ENG 120V; 0 Devices, EPS with IDNet 2 Card...
- Page 132 4100ES Fire Alarm System Installation Guide Description Installation Instructions 4100-9332 MSTR CANADIAN ENG. NO DISPLAY, EPS with IDNet 2 Card 574-848 4100-9342 NDU W/VOICE, DOMESTIC, EPS with IDNet 2 Card 579-269 4100-9352 NDU W/VOICE and InfoAlarm, DOMESTIC, EPS with IDNet 2 Card...
- Page 133 4100ES Fire Alarm System Installation Guide Description Installation Instructions 4100-0647 240V ES-PS PDM Harness 579-1288 4100-9616 Remote Annunciator with Touch Screen Display (BTIC) 579-271 4100-9617 Basic Remote Annunciator with Touch Screen Display (RTIC) 579-271 4100-9706 ES-PS Master Controller with ES Touch Screen Display...
-
Page 134: Appendix E: Labels
4100ES Fire Alarm System Installation Guide 16 Appendix E: Labels page 132 574-848 Rev. BQ... - Page 135 4100ES Fire Alarm System Installation Guide page 133 574-848 Rev. BQ...
-
Page 136: Appendix F: Earth Fault Diagnostics
4100ES Fire Alarm System Installation Guide 17 Appendix F: Earth Fault Diagnostics This appendix contains instructions on how to use the Earth Fault Search feature of the 4100ES diagnostics menus. The minimum Earth Fault detection level for the 4100ES is 10k ohms for all circuits. - Page 137 4100ES Fire Alarm System Installation Guide Important: The FACU cannot provide fire protection during an Earth Fault Search. page 135 574-848 Rev. BQ...
-
Page 138: Earth Fault Searching From The Front Panel
4100ES Fire Alarm System Installation Guide 17.2 Earth Fault Searching from the Front Panel This section describes how to conduct an Earth Fault Search, from selecting the appropriate access code to correcting the fault. 17.2.1 Access Level Selection The panel must be at the appropriate access level (1, 2, 3, or 4) in order to run diagnostics. To get to the correct access level, Press the Menu button. -
Page 139: Search Option B: Select Channel
4100ES Fire Alarm System Installation Guide displays, the search is ready to start. A sample is shown below. CARD 1, SYSTEM POWER SUPPLY Press <ENTER> to start search Note: The FACU suspends normal operation for the duration of the search. -
Page 140: Non-Point Faults
4100ES Fire Alarm System Installation Guide 17.3.1 Non-Point Faults A non-point fault indicates a ground that cannot be traced to an addressable point (for example, a shield or an audio riser). The earth fault in this example is not occurring at the audio controller but somewhere in the riser:... -
Page 141: Result Not Available
4100ES Fire Alarm System Installation Guide • The fault is on an auxiliary output that was excluded from the search. The problem may have to be found manually and then corrected in some of the above scenarios. 17.3.4 No Fault If the message in the lower right corner of the LCD reads NO FAULT, it means the IDNet channel search could not locate any earth faults on that channel. - Page 142 4100ES Fire Alarm System Installation Guide Select the RPS located in Transponder 1 (this selects Transponder 1 as the location for the search). When prompted, select exclusion of AUXPWR circuits. Start the search. (The panel turns on the earth fault search trouble pseudo-point and the keypad inactivity utility pseudo-point to disable timeout during the search).
-
Page 143: Appendix G: Special Application Nac-Compatible Notification Appliances And Accessories
4100ES Fire Alarm System Installation Guide 18 Appendix G: Special Application NAC-Compatible Notification Appliances and Accessories Table 20: Special Application NAC-Compatible Notification Appliances and Accessories DESCRIPTION 4904-9168 V/O 15CD RED FREE-RUN TNA 4904-9171 V/O 15CD WHITE FREE-RUN TNA 4904-9176 V/O 24VDC 15CD RED VER F/S... - Page 144 4100ES Fire Alarm System Installation Guide Table 20: Special Application NAC-Compatible Notification Appliances and Accessories DESCRIPTION 4901-9822 HORN 24VDC RED 4009-9201 NAC EXTENDER 120VAC, IDNET 4009-9301 NAC EXTENDER, 240VAC, IDNET 4009-9401 4009 T/A ADDR CONTROLLER 4903-9252 A/V 24VDC 15CD RED HOR F/S...
- Page 145 4100ES Fire Alarm System Installation Guide Table 20: Special Application NAC-Compatible Notification Appliances and Accessories DESCRIPTION 4905-9815 SMARTSYNC ADAPTER, TNA 4905-9938 SMARTSYNC CTL MODULE 4090-9005 4090-9006 SRP w/ENCLOSURE 4098-9772 SENSOR BASE WITH 520 Hz SOUNDER 4098-9773 CO SENSOR BASE WITH 520 Hz SOUNDER...
-
Page 146: Appendix H: Idnac Compatible Appliances And Devices
4100ES Fire Alarm System Installation Guide 19 Appendix H: IDNAC Compatible Appliances and Devices 19.1 IDNAC Compatible Devices The following devices are compatible with the EPS. Addressable Appliance Description Model Numbers 4009 IDNAC Repeater 4009-9601 (platinum) 4009-9602 (red) Dual Class A Isolator (DCAI) - Page 147 4100ES Fire Alarm System Installation Guide Table 21: Compatible Appliances Addressable Appliance Description TrueAlert ES Appliances TrueAlert Appliances Model Numbers Model Numbers Visible Only notification appliances 49VO-WRF 49VOH-APPLCB-BA 4906-9201 49VO-WWF 49VO-WRS-BA 4906-9202 49VO-WRA-A 49VO-WWA-BA 4906-9203 49VO-WWA-A 49VO-WWF-BA 4906-9204 49VO-WRA-BA 49VO-WWS-BA 49VO-WRF-BA...
- Page 148 4100ES Fire Alarm System Installation Guide Table 21: Compatible Appliances Addressable Appliance Description TrueAlert ES Appliances TrueAlert Appliances Model Numbers Model Numbers LED Audible/Visible Wall-Mount High 59AV-APPLWRH-O Candela Weatherproof 59AV-APPLWWH-O Audible-Only Wall-Mount 59AO-WRS 59AO-WWS-BA 59AO-WRS-BA 59AO-APPLWR 59AO-WWS 59AO-APPLWW Audible-Only Wall-Mount Weatherproof...
-
Page 149: Appendix I: Cooper Wheelock Appliances Compatible With 4100Es Wheelock Protocol For Special Applications
4100ES Fire Alarm System Installation Guide 20 Appendix I: Cooper Wheelock Appliances Compatible With 4100ES Wheelock Protocol For Special Applications The tables in this appendix list Cooper Wheelock appliances compatible with 4100ES Wheelock protocol for special applications. 20.1 Synchronizing Horn Strobes... -
Page 150: Appliances With Synchronizing Strobes
4100ES Fire Alarm System Installation Guide Table 23: Synchronizing strobes Appliance Description RSSA-24MCCH, RSSB-24MCCH, RSS Series Strobe. 24VDC, Multi-High-Cd, Ceiling Mount. Amber/Blue/Green/Red. RSSG-24MCCH, RSSR-24MCCH RSSPA-24MCC RSSP Series Strobe. 24VDC, Multi-Cd, Ceiling Mount. Amber RSSWPA-2475W RSS Series WP Strobe. 24VDC, Wall Mount. Amber RSSWPA-24MCCH,RSSWPB-24MCCH, RSS Series WP Strobe. -
Page 151: Synchronizing Horns
4100ES Fire Alarm System Installation Guide Table 24: Appliances with synchronizing strobes Appliance Description E60-24MCWH E60 Series Speaker Strobe. 24VDC, Multi-High-Cd, Wall Mount E60-24MCC E60 Series Speaker Strobe. 24VDC, Multi-Cd, Ceiling Mount E60-24MCCH E60 Series Speaker Strobe. 24VDC, Multi-High-Cd, Ceiling Mount E70-241575W E70 Series Speaker Strobe. -
Page 152: Non-Synchronizing Appliances
4100ES Fire Alarm System Installation Guide 20.6 Non-synchronizing appliances Table 27: Non-synchronizing appliances Appliance Description MB-G6-24, MB-G10-24 MB Series Bell. 24V, Wall Mount page 150 574-848 Rev. BQ... -
Page 153: Appendix J: Audio Equipment Compatible With 520 Hz Low Frequency Alarm
The following audio system components have been tested by UL to meet the requirements in UL464 Section 24.3 "Determination of low frequency signal format". These components have only been tested with Simplex speaker Notification Appliances and accessories. The analog digital controller assembly, reproduces the low frequency audio 520Hz, which is playback from memory to produce the low frequency. - Page 154 4100ES Fire Alarm System Installation Guide Notification Appliance Description Model Numbers Wall Mount Speaker Only 4902-9716 4902-9717 Ceiling Mount Speaker Only 4902-9721 Wall Mount Speaker Visible 4906-9151 4606-9153 Wall Mount ADDR Speaker Visible 4906-9254 4906-9255 4906-9256 Ceiling Mount ADDR Speaker Visible...
- Page 155 4100ES Fire Alarm System Installation Guide Notification Appliance Description Model Numbers 49XX Series Wall-Mount Speaker and Speaker/Visible 49SV-APPLW 49SV-APPLW-BA 49SO-APPLW 49SO-APPLW-BA 49HFV-APPLW 49HFV-APPLW-BA 49HF-APPLW 49HF-APPLW-BA page 153 574-848 Rev. BQ...
- Page 156 4100ES Fire Alarm System Installation Guide Notification Appliance Description Model Numbers 49XX Series Dress Cover Accessories 49SOC-CK 49SOC-CR 49SOC-CW 49SOC-WRBA 49SOC-WRBC 49SOC-WRBF 49SOC-WRFEU 49SOC-WRFIRE 49SOC-WRS 49SOC-WWBA 49SOC-WWBC 49SOC-WWBF 49SOC-WWFEU 49SOC-WWFIRE 49SOC-WWS 49SVC-CK 49SVC-CRALT 49SVC-CRBA 49SVC-CRBC 49SVC-CRBF 49SVC-CRFEU 49SVC-CRFIRE 49SVC-CRS 49SVC-CWALT...
- Page 157 4100ES Fire Alarm System Installation Guide Notification Appliance Description Model Numbers Auxiliary Audio Input Board 4100-1240 Audio Operator Interface Modules 4100-1252 4100-1253 4100-1254 4100-1255 Expansion Bay 4100-2300 Audio Expansion Bay Harness Kit 4100-2320 Constant Supervision Modules 4100-1259 4100-1260 Message Expansion Board...
-
Page 158: Appendix L: Legacy Power Supplies
4100ES Fire Alarm System Installation Guide 22 Appendix L: Legacy Power Supplies This appendix describes the installation of legacy 4100ES power supplies, including the SPS and EPS. 22.1 SPS CPU Bay Overview 22.1.1 RUI+ Master Motherboard The 4100 Master motherboard has two slots, one is dedicated for the system CPU and the other slot is typically used for 4120 Network, ES Net network or RS232 cards. - Page 159 4100ES Fire Alarm System Installation Guide Figure 87: RUI+ CPU Master Motherboard (566-938) Note: If the RUI+ Master Motherboard is used to connect to a 4602-9101 (SCU), 4602-9102 (RCU) or 4602-9150, 4602-7101 (SCU/RCU Graphic Command Center) move the P5 and P6 jumpers to the RUI NON ISO position.
-
Page 160: Master Controller Daughter Card
4100ES Fire Alarm System Installation Guide 22.1.2 Master Controller Daughter Card (566-719) The master controller daughter card mounts onto the master motherboard. The master controller daughter card contains a service port, a direct drive user interface connection, and a port for a service modem. -
Page 161: Master Controller Daughter Card Leds
4100ES Fire Alarm System Installation Guide 22.1.3 Master Controller Daughter Card LEDs The master controller daughter card LEDs indicate the card's status. These LEDs are used for troubleshooting. 22.1.4 Master Controller Switches Table 28: Master Controller Switches Switch Description Reset (Warm Start) Short press (<... -
Page 162: System Power Supply (Sps)
4100ES Fire Alarm System Installation Guide 22.1.5 System Power Supply (SPS) The SPS is the power source for the CPU. The SPS provides 24 VDC card power to the CPU motherboard, which is distributed to other bays up to 2A capacity. - Page 163 4100ES Fire Alarm System Installation Guide 22.2 EPS CPU Bay Overview 22.2.1 The Power Distribution Interface In the CPU bay and the expansion bays, power and data are distributed via the PDI. The PDI is a wiring board with eight card slots, each of which can accommodate a 4 x 5 card.
- Page 164 4100ES Fire Alarm System Installation Guide 22.2.4 Master Controller Daughter Card (566-719) The master controller daughter card mounts onto the master motherboard. The master controller daughter card contains a service port, a direct drive user interface connection, and a port for a service modem.
- Page 165 4100ES Fire Alarm System Installation Guide 22.2.5 Master Controller Daughter Card LEDs The master controller daughter card LEDs indicate the card's status. These LEDs are used for troubleshooting. 22.2.6 Master Controller Daughter Card Switches Table 29: Master Controller Switches Switch...
- Page 166 4100ES Fire Alarm System Installation Guide Figure 93: EPS with IDNet 2 (566-872) The 4100-3109 IDNet 2 is a 4"x5" card that provides the Fire Alarm Control Panel (FACU) with an isolated IDNet channel which contains two isolated loops. This card is compatible with IDNet communicating initiating devices and allows the system CPU to communicate with up to 250 peripheral devices, such as smoke detectors and pull stations.
- Page 167 4100ES Fire Alarm System Installation Guide Figure 94: IDNet 2 Card 22.3 Interconnecting Bays and Modules 22.3.1 SPS CPU Card Interconnections in the CPU Bay Use the following directions to connect the CPU to the SPS and other motherboards (refer to Figure 95).
- Page 168 4100ES Fire Alarm System Installation Guide 22.3.2 SPS CPU Card Interconnections in Expansion Bays Expansion bays comprise all bays other than the CPU bay. If you are installing a two- or three-bay FACU, you will be using expansion bays (refer to Figure 30).
- Page 169 Jumpers P4 and P5 are set to positions 1 and 2 (left) to provide card power to the bay from P1 on the PDI. Note: Interconnections can become more involved if regular motherboards are used. Refer to “Installing Modules into Expansion Bays” if this is the case. Figure 96 shows the basic CPU interconnections in a 4100ES EPS FACU. page 167 574-848...
- Page 170 4100ES Fire Alarm System Installation Guide Figure 96: Basic CPU Interconnections For information on remote expansion bays, refer to Appendix K: Installing 4100 FACU Components (Non-4100ES/4100U). 22.4 The System Power Supply (SPS) This chapter describes how the system power supply (SPS) is installed and configured by the factory. Check the information in this chapter to make sure the SPS is installed correctly.
- Page 171 12.7 Ah batteries. For UL Listed systems, up to 110 Ah batteries may be used. For ULC Listed systems, up to 50 Ah batteries may be used. Simplex Manufacture has already tested Amp Hour capability due to requirements of UL 864 which is tested to the value that has been de-rated by 20%.
- Page 172 Appendix H: IDNAC Compatible Appliances and Devices will be consistently out of visual sync with appliances in Appendix I: Cooper Wheelock Appliances Compatible With 4100ES Wheelock Protocol For Special Applications by about 30 milliseconds. Appliances listed Appendix H: IDNAC Compatible Appliances and Devices...
-
Page 173: Troubleshooting
This message does not appear if there are no configured devices on the IDNet channel. 22.4.4.7 No Answer/Bad Answer Occurs when the 4100ES is put into a diagnostic mode and finds a device not responding, or responding unreliably. Refer to the ES Panel Programmer’s Manual (574-849) for information on how to perform this diagnostic. -
Page 174: General Field Wiring Guidelines
4100ES Fire Alarm System Installation Guide 22.5.1 General Field Wiring Guidelines 22.5.1.1 General Guidelines Make sure these guidelines are accounted for before wiring: • All wires must be 18 AWG, or as the local code dictates. • Conductors must test free of all grounds. -
Page 175: Power-Limited Guidelines
4100ES Fire Alarm System Installation Guide 22.5.1.2 Power-Limited Guidelines Make sure these guidelines are accounted for before wiring for power-limited systems: • Non-power limited field wiring (AC power, batteries, City connection) must be installed and routed in the shaded areas shown in Table •... -
Page 176: Power Supply Wiring Distances
4100ES Fire Alarm System Installation Guide Figure 98: The EOL Relay Note: The 2098-9739 Relay is used as an example. Other UL Listed 24VDC EOL relays can be used, depending on the application. 22.5.2 Power Supply Wiring Distances Before wiring from any type of power supply to notification appliances, check Table 32 and Table 33 for wiring distances. - Page 177 4100ES Fire Alarm System Installation Guide Table 33: Class B Wiring Distances Alarm Current @ 24 Max Distance with Max Distance with Max Distancewith 14 Max Distance with 12 DC Resistance 18 AWG 16 AWG 1.50 A 140 ft. (43 m) 222 ft.
-
Page 178: Class A Nac Wiring
4100ES Fire Alarm System Installation Guide 22.5.4 SPS NAC Wiring 22.5.4.1 Class A NAC Wiring To connect the SPS to reverse-polarity, non-addressable notification appliances using Class A wiring, read the following instructions and refer to Figure 99. Route wire (between 12 and 18 AWG) from the “B+”, “B-”, and SHIELD outputs on TB2 of the SPS to the appropriate inputs on a peripheral notification appliance. - Page 179 4100ES Fire Alarm System Installation Guide Repeat steps 1 through 3 for each NAC output you want to use. Leave the factory installed EOL Resistor (10 K Ohm, ½ W; brown/black/orange) on each unused circuit. The circuit must connect “B+” to “B-” terminals.
-
Page 180: Class A Wiring
4100ES Fire Alarm System Installation Guide Figure 101: Loop Wiring as Shown 22.5.6 SPS IDNet Wiring 22.5.6.1 Class A Wiring Route wire (between 12 and 18 AWG) from the B+, B-, and SHIELD outputs on TB1 of the SPS to the appropriate inputs on a peripheral IDNet appliance. - Page 181 4100ES Fire Alarm System Installation Guide Figure 103 shows Class B wiring. Figure 103: Class B Wiring 22.5.7 SPS Auxiliary Power Wiring 22.5.7.1 Guidelines • All wiring is 18 AWG and 12 AWG. • All wiring is power-limited. • When a NAC is configured as an auxiliary power circuit, no end-of-line resistor is used.
- Page 182 4100ES Fire Alarm System Installation Guide - 4190-9050/9051 4-20 mA ZAMs - 4603-9101 LCD Annunciator • The total auxiliary current available is 5 A. The total current available for the entire SPS is 9A (special application) or 4A regulated 24VDC, including NAC, auxiliary, and card power.
- Page 183 4100ES Fire Alarm System Installation Guide • When power through auxiliary contacts is not provided by the SPS, use an in-line fuse (208-165). If the power source is not power- limited to the requirements of UL864, wiring is to be segregated to the non-power-limited spaces of the cabinet.
- Page 184 4100ES Fire Alarm System Installation Guide 22.6.1 EPS Specifications 22.6.1.1 Card Specifications Figure 106: EPS Card Layout Operating 32°F - 120°F (0°C-49°C) Conditions Up to 93% relative humidity at 90°F (32°C), non-condensing. Electrical AC Input Specifications: 120 V, 50/60 Hz, 4.6 A Specifications 220/230/240 V, 50/60 Hz, 2.3 A...
-
Page 185: Eps Configuration
Detection Battery Standby Battery standby requirements are dependent on system configuration. The 4100ES can support up to 115 Ah batteries (UL) and 50 Ah batteries (ULC). With 115 Ah batteries, a system could be configured to draw 3.8A for (sealed lead-acid 24 hours, followed by 15 minutes at 9.375A. - Page 186 4100ES Fire Alarm System Installation Guide Figure 108: EPS Card Addresses page 184 574-848 Rev. BQ...
- Page 187 4100ES Fire Alarm System Installation Guide 22.6.2.2 Earth Connect Jumper The EPS Earth Fault Enable/Disable jumper allows you to enable or disable Earth Fault detection. • To enable the function: Place the jumper block on pins 1 and 2 • To disable the function: Place the jumper block on pins 2 and 3 Figure 109: Earth Connect Jumper Positions Earth Fault detection is set to active on one EPS per battery location.
-
Page 188: Setting The Address
4100ES Fire Alarm System Installation Guide 22.6.3 EPS IDNet 2 Configuration 22.6.3.1 Setting the Address The DIP Switch SW1 is used to set the IDNet 2 address as identified in the Panel Programmer job (see the section on Programming for more information). - Page 189 4100ES Fire Alarm System Installation Guide Figure 112: 4100-3109 Card Addresses page 187 574-848 Rev. BQ...
- Page 190 4100ES Fire Alarm System Installation Guide 22.6.4 Connections 22.6.4.1 Connection to the Power Distribution Module The EPS is powered by the Power Distribution Module (PDM). The PDM takes power directly from a dedicated AC line and the two backup batteries, and distributes power to each bay in the cabinet.
-
Page 191: System Trouble Led Codes
4100ES Fire Alarm System Installation Guide Figure 114: XPS/PDM Connection 22.6.5 Troubleshooting 22.6.5.1 LED Trouble Indicator Overview The code produced by the lit indicator LEDs corresponds to a trouble that is either occurring on the System or on the SLC Channels. See Table 34 for the LED definitions. -
Page 192: Slc Channel Trouble Led Codes
4100ES Fire Alarm System Installation Guide Table 35: System Trouble LED Codes Description: No Trouble: There are no troubles detected on the system. AC Fail: The AC power is disconnected but the battery is working. Low Battery: The battery charge is under 22 V. -
Page 193: Trouble Messages
4100ES Fire Alarm System Installation Guide Table 36: SLC Channel Trouble LED Codes Description: IDNAC Channel Fail: The channel is not responding. IDNAC Short Circuit: There is a short circuit on the channel. IDNAC Duplicate Device: There are 2 devices on the channel that have the same address. - Page 194 4100ES Fire Alarm System Installation Guide Table 37: EPS Trouble Messages Message Definition Short Circuit Appears when a short is detected on the IDNAC channel. This status clears automatically when the short circuit is removed. Channel Fail Appears when each device on the IDNet channel has been configured, and when none of the devices are communicating on the channel.
-
Page 195: Wiring Overview
4100ES Fire Alarm System Installation Guide Figure 116: Power-Limited Wiring Guidelines 22.7.2 EPS Class B IDNAC Wiring 22.7.2.1 Wiring Overview The EPS has three SLCs for power and communication wiring. Each ES-PS IDNAC card SLC powers and communicates with up to 127 IDNAC devices. The ES-PS IDNAC is wired to compatible devices and appliances, such as the TrueAlert ES and TrueAlert Addressable lines (both multi and fixed candela), using Class B circuitry. -
Page 196: Ferrite Beads
Do not mix TrueAlert ES speakers with conventional speakers on an audio NAC. IDNAC wire length limitations dictate the maximum audio NAC wire run length between a TrueAlert ES speaker and the connected 4100ES amplifier. The maximum IDNAC wire run length from the EPS to a device, with a Repeater extension is 8,000 feet. Because the maximum distance between the amplifier and the EPS is 2500 feet over RUI/RUI+, the total allowable distance between the amplifier and the TrueAlert ES device speaker is 10,500 feet. - Page 197 4100ES Fire Alarm System Installation Guide Table 38: UTP Wiring Limit Based on Alarm Current Alarm Current Distance to the Last Appliance 20 AWG 18 AWG 16 AWG 14 AWG 12 AWG 0.400 661 ft 1051 ft 1671 ft 2657 ft 4000 ft 0.450...
- Page 198 4100ES Fire Alarm System Installation Guide Note: Although the required wire for IDNAC circuits is twisted pair (controlled impedance) wiring, some applications will wish to take advantage of existing wiring that is not twisted pair. This is only allowed if both conductors of the IDNAC circuit reside in the same metal conduit, and only under certain conditions.
- Page 199 4100ES Fire Alarm System Installation Guide Figure 118: Class B Wiring 22.7.4.2 4009 IDNAC Repeater Using a 4009 IDNAC Repeater extends the possible wiring distance and increases the current capacity of an IDNAC channel. Each IDNAC repeater has a capacity of 3A, and regenerates the IDNAC signal. Models 4009-9601 (platinum enclosure) and 4009-9602 (red enclosure) are compatible with the EPS.
- Page 200 4100ES Fire Alarm System Installation Guide • Add the alarm loads of all the devices on an SLC wire branch and apply to Equation 1. • Add the unit loads for all devices on an SLC wire branch and the number of isolators and apply to Table 39.
- Page 201 4. If circuit is terminated with a 10k EOLR, at the terminals, remove this resistor before wiring. 5. If wiring is routed outside the building, use of a listed secondary protector is required. Use Simplex 2081- 9028 or 2081-9044. A protector must be installed at each building exit/entrance.
- Page 202 4100ES Fire Alarm System Installation Guide Note: Output of AUX or NAC is 24V nominal. Minimum voltage is 19.5 @ full load and minimum battery; maximum is 31.5V at light load, high AC line. Aux Loads include 4601-9101 Annunciator, 4100-96xx series Annunciators, 4090 series of IDNet ZAMs and IAMs and any Listed device operating within the output limits of the AUX.
-
Page 203: Wiring Parameters
Table 44 identifies the IDNet 2 card wiring parameters that must be considered when installing this card. For additional wiring information see the applicable installation documentation, or contact your authorized Simplex Product Supplier. Table 44: IDNet 2 Card Wiring Parameters... - Page 204 4100ES Fire Alarm System Installation Guide - Loop D= Jumper P1 on the second IDNet Loop card Figure 122: Class A Jumper Setting Shielded wire is not recommended. If shielded wires are present, cut and tape off the shield to prevent it from coming in contact with other components.
- Page 205 4100ES Fire Alarm System Installation Guide 22.7.6.4 Class B Wiring When wiring the loop for Class B circuits, both the B+, B- and A+, A- terminals are available for parallel connections. Within the IDNet 2 circuitry, A+ is connected to B+, and A- is connected to B- so circuits can stem from either one. Additionally, two wires can be connected to each screw terminal.
- Page 206 4100ES Fire Alarm System Installation Guide address than the isolator it preceeds. For Class B wiring only, the “A” output and “B” output per loop are connected together in parallel for wiring convenience. Isolation functionality is not affected by the order of isolator addresses.
-
Page 207: Appendix K: Installing 4100 Facu Components (Non-4100Es/4100U)
4100 back boxes are available in one, two, and three-bay sizes. Each can be equipped with a solid or glass door. This chapter describes how to mount all types of non-4100ES/4100U back boxes to a wall, and how to mount system electronics bays into the boxes. - Page 208 4100ES Fire Alarm System Installation Guide Figure 127: UT Motherboard (565-161) Figure 128: UT Motherboard with City Connection (565-213) The figures below are illustrations of the two UT master controllers. Note: See Step 3. Configuring Modules, for information on configuring switches and jumpers.
- Page 209 4100ES Fire Alarm System Installation Guide Figure 130: UT Master Controller (565-333) Figure 131: UT Master Controller (565-148) page 207 574-848 Rev. BQ...
-
Page 210: Universal Power Supply (Ups)
4100ES Fire Alarm System Installation Guide 23.1.3 Universal Power Supply (UPS) The power supply controller card contains the switches and jumpers for configuring the power supply, as shown in Figure 132. Note: See Step 3. Configuring Modules, for information on configuring switches and jumpers. -
Page 211: Operator Interface
4100ES Fire Alarm System Installation Guide 23.1.4 Operator Interface Shown below is the operator interface which is available for the 4100. The Operator Interface is used to obtain alarm, supervisory, trouble and other status via the Liquid Crystal Display and LEDs. Control functions are accessed using dedicated keys. -
Page 212: System Power
4100ES Fire Alarm System Installation Guide 23.1.7 System Power The FACU is powered primarily by the universal power supply (UPS), which in turn takes power directly from the AC mains and the two backup batteries. Figure 135: Power and Comm Lines 23.2... - Page 213 4100ES Fire Alarm System Installation Guide 23.2.1 Specifications Table 45 lists the specifications for the back boxes. Table 45: Back Box Specifications PID Number Description Height Width Rough Opening Size Weight Trim Door Height Width 4100-2001/2011 1 Bay 55 lb.
- Page 214 4100ES Fire Alarm System Installation Guide 23.2.2 Installing the Back Box(es) Install the back box as shown in Figure 136. Use the holes in the back box to secure it to the wall. • For mounting to a wooden wall structure, the back box must be attached with four 1-½-inch-long (38 mm) lag bolts and four ½-inch- diameter (13 mm) washers.
- Page 215 4100ES Fire Alarm System Installation Guide 23.3.1 Installing the System Electronics Bays The system electronics bays for each back box are mounted on two rails. These rails are secured inside a cardboard shipping container when shipped from the factory. Perform the following procedure to install the system electronics bays.
- Page 216 4100ES Fire Alarm System Installation Guide Figure 138: Inserting the Mounting Screws Tighten the two mounting screws, but leave a 1/8-inch (3-mm) gap from the seated position of each screw. Using the vertical rails as handles, carefully lift the system electronics bay assembly and the terminal block from the shipping container.
- Page 217 4100ES Fire Alarm System Installation Guide Insert the remaining mounting screws through the screw holes in the rails. Securely tighten all mounting screws. Refer to Table 47 for the recommended torque. Table 47: Recommended Torque for Mounting Hardware Screw / Nut Size Recommended Torque No.6...
-
Page 218: Step 3. Configuring Modules
4100ES Fire Alarm System Installation Guide 23.4 Step 3. Configuring Modules The master controller, UPS, and all other modules to be mounted in the FACU back boxes must be configured to operate correctly in the system via their DIP switch and jumper ports. This section describes the hardware configuration for the master controller and UPS, since they will always be used in the master controller bay. - Page 219 • Position 0: 50 Ah battery charging. • Position 1: 110 Ah battery charging. DIP Switch SW2. Device address DIP switch. See Appendix K: Installing 4100 FACU Components (Non-4100ES/4100U) for details. Use the following jumper settings to continue configuring the UPS.
-
Page 220: Interconnecting Cards
4100ES Fire Alarm System Installation Guide 23.5 Step 4. Interconnecting Master Controller Bay Cards Each card has to be interconnected with every other card in the master controller bay. Read this section to ensure that cards are interconnected. 23.5.1 Interconnecting Cards Use the following instructions and Figure 140 to interconnect master controller bay cards. -
Page 221: Installing Motherboards
4100ES Fire Alarm System Installation Guide 23.6.2 Installing Motherboards Use the following directions and Figure 141 to install a motherboard into an expansion bay. Orient the motherboard with the connector labeled J1 on the right and the header labeled P1 on the left. - Page 222 © 2022 Johnson Controls. All rights reserved. All specifications and other information shown were current as of document revision and are subject to change without notice. Additional listings may be applicable, contact your local Simplex® product supplier for the latest status. Listings and approvals under Simplex Time Recorder Co.
Need help?
Do you have a question about the 4100ES and is the answer not in the manual?
Questions and answers