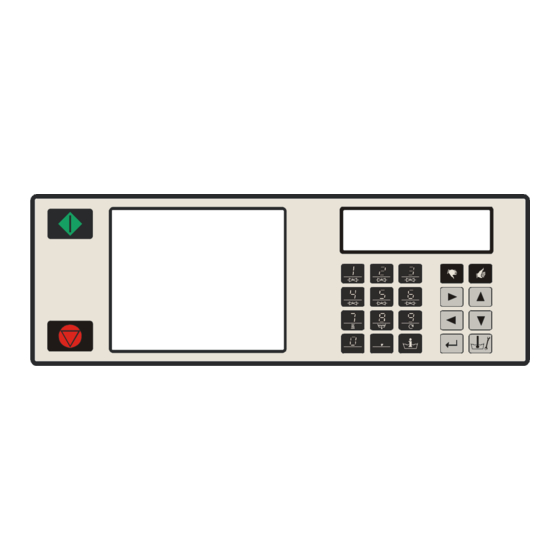
Primus RF6 Programming Manual

Primus RF6 Programming Manual

Industrial washer extractors
Table of Contents

Advertisement

INDUSTRIAL WASHER EXTRACTORS
RIGID MOUNTED WASHER EXTRACTORS:
HIGH SPIN HYGIENIC BARRIER WASHER EXTRACTORS:
PROGRAMMING MANUAL
HIGH SPIN WASHER EXTRACTORS:
6 kg
7 kg
10 kg
16 kg
22 kg
6 kg
7 kg
10 kg
13 kg
16 kg
16 kg
26 kg
33 kg
44 kg
FULL CONTROL
33 kg
40 kg
55 kg
120 kg
18 kg
22 kg
27 kg
35 kg
43 kg
66 kg
90 kg
140 kg
180 kg
S E L E C T P R O G R A M
A B C D E F G H K L M N O P Q R
1 005 21
Publication date: 24 Jun 2008
100962 G

Advertisement

Table of Contents
loading

Summary of Contents for Primus RF6

  • Page 1 INDUSTRIAL WASHER EXTRACTORS HIGH SPIN WASHER EXTRACTORS: 6 kg 33 kg 7 kg 40 kg 10 kg 55 kg 16 kg 120 kg 22 kg RIGID MOUNTED WASHER EXTRACTORS: 6 kg 18 kg 7 kg 22 kg 10 kg 27 kg 13 kg 35 kg 16 kg...
  • Page 3: Table Of Contents

    1. TABLE OF CONTENTS Publication date: 24 Jun 2008 Page: 1. TABLE OF CONTENTS ....................1 2. WARNINGS AND SYMBOLS ..................3 2.1. WARNINGS ............................3 2.2. SYMBOLS USED..........................4 3. BASIC DESCRIPTION OF CONTROLS ................. 6 3.1. GENERAL............................6 3.2. SPECIFIC ............................7 3.3.
  • Page 4 7.1. LEGEND ............................82 7.2. WASH PROGRAMS........................83 Wash program 1: HOT WASH – 90°C..................... 83 Wash program 2: WARM WASH – 60°C ..................83 Wash program 3: COLORED WASH – 40°C ................... 84 Wash program 4: BRIGHT COLORED WASH – 30°C ..............84 Wash program 5: WOOLENS –...
  • Page 5: Warnings And Symbols

    2. WARNINGS AND SYMBOLS 2.1. WARNINGS BEFORE OPERATING A MACHINE CONTROLLED BY AN ELECTRONIC PROGRAMMER, READ THIS MANUAL. INCORRECT USE CAN RESULT IN SERIOUS INJURIES OR DAMAGE TO THE MACHINE CONTROLS. IGNORING INSTRUCTIONS CAN CAUSE AN INCORRECT MACHINE FUNCTION, WHICH MAY RESULT IN INJURIES OR MACHINE AND/OR LINEN DAMAGES.
  • Page 6: Symbols Used

    2.2. SYMBOLS USED BUTTONS OPERATION BUTTONS PROGRAM BUTTONS 1 2 3 4 5 6 7 8 9 0 ARROW UP - Program number selection buttons - Selecting the previous menu item 100955 START ARROW DOWN - Starting up a program - Selecting the next menu item 100956 100947...
  • Page 7 100962 G PUBLICATION DATE 24 JUN 2008.DOC PROGRAMMING MANUAL...
  • Page 8: Basic Description Of Controls

    3. BASIC DESCRIPTION OF CONTROLS 3.1. GENERAL THE CONTROL OFFERS : 99 programmable programs (including 15 pre-programmed ones) Control of signal voltages for external pumps or liquid supply dispensers Redistribution of the garments to avoid imbalance Automatic temperature balance at the water fill process Setting the machine options and configuration Multiple languages can be selected ( one at a time) IN OPERATION THE FOLLOWING DATA IS DISPLAYED :...
  • Page 9: Specific

    3.2. SPECIFIC The PROGRAM Menu is designated for : the creation of a specific name for a wash program. the creation and implementation of a new wash program step by step. editing a wash program step by step. inserting and deleting steps in the wash program. copying a wash program.
  • Page 10 99 Wash Programs – 99 Steps Program 1 Program 2 Program 3 . . . Program 99 Name Prog Name Prog Name Prog Name Prog Step 1 Step 1 Step 1 . . . Step 1 Wash Wash Wash Wash Sequence Sequence Sequence...
  • Page 11: The Creation Of A Wash Program

    3.3. THE CREATION OF A WASH PROGRAM a Wash Program is built up step by step. each step always consists of a Wash sequence and a Drain/Extraction sequence. Top soap hopper and Front soap hopper washing machines : The Full Control Wash Computer is designated for 2 Main groups of washing machines: - The washing machines with Top Soap Hopper - The washing machines with Front Soap Hopper Depending upon the machine type, more or less machine functions are available.
  • Page 12 Programming the Drain sequence : After programming the Wash sequence, next program the Drain/Extraction sequence. Washing Machines Washing Machines with 1 motor with 2 motors DRAIN DRAIN EXTRACTION LOW EXTRACTION No DRAIN HIGH EXTRACTION Static DRAIN No DRAIN Static DRAIN Then program all the related functions of the Drain/Extraction sequence.
  • Page 13: Programming The Functions

    3.4. PROGRAMMING THE FUNCTIONS Limits To ensure the correct functionality of the washing machine you have to program values within certain limits. If you program a value that falls below the minimal or above the maximal programmable limit then the new value will not be accepted and the previous value stays valid. Programming the Water Temperature Limits - Minimum value : 1 °C...
  • Page 14 ATTENTION !!! FOR MACHINES WITH LIQUID SUPPLY PUMPS, DIRECT WATER INLET VALVES 3 OR 6 MUST BE PROGRAMMED BECAUSE THE LIQUID IS ADDED AT THE DIRECT WATER INLET CHANNEL. DEPENDING THE WASHING MACHINE EXECUTION, WATER INLET VALVE 1 WILL FUNCTION WITH COLD WATER.
  • Page 15 Programmable water level units related to the amount of water in the tub Machine RF10 RF13 RF16 RF18 RF22 RF27 RF35 type units 12 l 13 l 14 l 19 l 13 l 14 l 16 l 21 l 14 l 15 l 19 l 23 l...
  • Page 16 Programmable water level units related to the amount of water in the tub Machine FF10 FF16 FF22 type units 11 l 12 l 13 l 12 l 13 l 14 l 13 l 14 l 15 l 19 l 14 l 15 l 17 l 22 l...
  • Page 17 Programmable water level units related to the amount of water in the tub Machine FF33 FF40 FF55 XF22 XF35 XF43 MB16 MB26 MB33 MB44 MB66 type units 31 l 48 l 48 l 34 l 52 l 52 l 37 l 56 l 56 l 30 l...
  • Page 18 Programmable water level units related to the amount of water in the tub Machine type FF120 MB90 MB140 MB180 units litres litres litres litres 143 l 154 l 165 l 176 l 185 l 141 l 196 l 287 l 294 l 150 l 207 l...
  • Page 19 Programmable water level units related to the amount of water in the tub Machine type FF120 MB90 MB140 MB180 units litres litres litres litres 715 l 1145 l 1210 l 729 l 1163 l 1230 l 742 l 1181 l 1250 l 756 l 1199 l...
  • Page 20 Minimum Normal Low Normal High Maximum Machine type programmable Level Level programmable level level Default value Default value RF 6 RF 7 RF 10 RF 13 RF 16 RF 18 RF 22 RF 27 RF 35 FF 6 FF 7 FF 10 FF 16 FF 22...
  • Page 21 Low spin Wash Speed Spin Speed Speed Machine default default Blocked default type frequency RF10 RF13 RF16 RF18 RF22 RF27 RF35 351-449 351-449 FF10 351-449 FF16 351-449 FF22/3 351-449 FF22/5 351-449 FF33 351-449 FF40 351-449 FF55 351-449 FF120 150-250 XF22 351-449 XF35 351-449...
  • Page 22 Programming the Wash Speed Standard reversing wash speed is between ≅ 40 and 50 RPM. (≅ Verify exact value at table 3.4.B.) For some special applications the drum should only turn very slowly. - Speed Limits The minimum programmable wash speed is 10 RPM. The maximum programmable wash speed is 50 RPM.
  • Page 23 Programming the Motor On and Off times for Reversing The standard Reversing Motor On and Off times at Wash speed are 12 Seconds On and 3 Seconds Off. For Delicates and Woolens it’s recommended to program a gentle wash action with a Reversing On time of 3 Seconds and an Off time of 12 Seconds.
  • Page 24: Initializing The Machine

    4. INITIALIZING THE MACHINE Initializing the machine goes in four steps: 1. Install the machine mechanically. (See Installation Manual) Full Control Wash Computer only : 2. Select the machine specific settings in the Configuration Menu. 3. Select the operator specific settings in the Initialisation Menu. 4.
  • Page 25 I:Language • Select the preferred Language from the list by pressing the English ARROW LEFT or RIGHT button. • English is the default setting. • Press the ENTER button to confirm. English | French | Spanish | German | Dutch | Czech | Polish | Finnish | Danish | Slovenian | Italian | …...
  • Page 26 avoid the shrinking of the garments. (Takes more time) See Chapter 5. • Yes is the default value. • Yes : Automatic Cool-down enabled. No : Automatic Cool-down disabled. • Press the ENTER button to confirm. I:Wait for • With the Wait for Temperature function, The Full Control Temp : Yes Wash Computer will put the process time on Hold as long as the programmed temperature hasn‘t been reached.
  • Page 27 No : Temperature balance disabled. • Press the ENTER button to confirm. I:Motor On • For programming the ON-OFF reversing time at wash Time : _ _ Sec speed, the default values are 12 Sec ON and 3 Sec OFF. This corresponds with a normal wash action.
  • Page 28 and a stable water temperature is obtained. If the programmed water temperature is not reached within 30 seconds, the heating will be started again. • The default value is 0%. (The function is switched Off) • A value between 0% and 30% can be programmed. •...
  • Page 29 Attention ! It’s strongly recommended that the heating power of the steam installation has enough power to heat the bath quickly. Otherwise the tub will be filled with extra water and an error message will occur that the machine takes more then 10 units extra water.
  • Page 30 I:Strict Temp. Extra Info : Control : No • Only for Hygienic washing machine applications. • If Strict Temperature Control is selected, the machine will wash with the programmed temperature as minimum hysteresis value. This will result in a water temperature as close as possible to the programmed temperature value.
  • Page 31: Configuration Menu

    4.2 CONFIGURATION MENU This electronic managing system has been specially constructed for a wide range of washing machines. For that reason it must be individually set up with important parameters for various machine types. Basic machine adjusting is made in the factory. WARNING ! ONLY A QUALIFIED TECHNICIAN SHOULD CHANGE THE CONFIGURATION SET UP.
  • Page 32 ATTENTION !!! BE SURE THAT YOU HAVE SELECTED THE CORRECT MACHINE TYPE, OTHERWISE THE MACHINE WILL NOT FUNCTION PROPERLY. ATTENTION !!! BY CHANGING THE MACHINE TYPE THE WASH PROGRAM’S KEPT IN THE EEPROM MEMORY ARE NOT CHANGED. AFTER CHANGING THE WASH MACHINE TYPE IT’S RECOMMENDED TO ERASE THE PROGRAM MEMORY AND LOAD THE STANDARD WASH PROGRAM’S AGAIN.
  • Page 33 ATTENTION !!! The Selection TTL is only for Mitsubishi inverters Type : FR-A024-S0.4K - S2.2K-EC and FR-A044-0.4K - 3.7K-EC For these inverters you don’t have to select the Supply Voltage of the washing machine. You have to select the list element TTL. From October 2000, these inverters have been replaced by inverters from the E500 Series (Current ) that do NOT function with TTL communication anymore.
  • Page 34 C:Drain • Some machines function with water recovery and are Valve 2: No equipped with a second drain valve. • If this second drain valve is a Normal Closed drain valve then, drain valve 2 must be Selected Yes. • Confirm by pressing the ENTER button. C:Water Recycle Machines with Front Soap Hopper Only.
  • Page 35 • Some washing machines function with external Liquid soap C:Liquid Supply supplies and others do not. Signals: No • If external liquid soap supplies are connected to the washing machine, the selection must be Yes. • If No is selected, then No external liquid soap supplies can be programmed at the Program menu.
  • Page 36 • Confirm by pressing the ENTER button. C:Full • Full Heating 0-100 (%) Heating : 67 % This function allows to reduce the energy consumption at Long hot washes. • When the heating has reached the programmed target temperature, heating will be restarted when the bath temperature goes below the temperature hysteresis.
  • Page 37 C:Auto Position • Only for MB90 – 140 – 180. Drum : Yes • At the end of the wash cycle, the Inner Door of the Drum is positioned automatically at the hole Outer Door Tub. • If the Auto Position system should get broken, you can switch off the Auto Position System.
  • Page 38 • After Loading the first 15 standard programs, it’s also C:Load Program possible to load 37 dedicated programs. 16– 52 ? No • By pressing the Yes and ENTER button, the 37 dedicated program’s will be loaded at the Program numbers 16 to 52. •...
  • Page 39 100962 G PUBLICATION DATE 24 JUN 2008.DOC PROGRAMMING MANUAL...
  • Page 40: Programming

    5. PROGRAMMING 5.1 GENERAL Specific functions have been implemented in the Full Control wash computer to allow a detailed programming. Functions for the complete program. - Program Number : Selecting the wash Program - Name : Insert or Modify the Name for the Program - View : Inspecting the Program settings without making changes - Edit :...
  • Page 41: Step : Program Functions

    5.3. STEP : PROGRAM FUNCTIONS SELECT THE PROGRAM NUMBER P:Give Program • Insert the desired program number. Number : _ _ • Program 1 to 99 can be selected. • Press the ENTER button as a confirmation. ENTER THE PROGRAM NAME P:Name Prog XX: •...
  • Page 42 EDIT A PROGRAM P: Program N°XX • Editing a program is changing the program by selecting a Edit new element from a list or by changing values in an existing program. You can also add, insert or delete steps in an existing program.
  • Page 43 P: Copy from • Insert the desired program number from which you want to Program N° _ _ _ copy the program. • Press the ENTER button as a confirmation. Goto Attention ! The standard programs can be selected at the program numbers 101-115.
  • Page 44: Step : Program Step Function

    5.4. STEP : PROGRAM STEP FUNCTION ADDING A STEP AT THE END OF THE PROGRAM P:Add • If you create a new program, new steps will be added at the Step end of the program. • Press the ARROW DOWN button if you don‘t want to Add a new step.
  • Page 45 • Insert the Step number. If the number is not accepted, this means that the step is not available. • Press the ENTER button to confirm your selection. Goto DELETE A STEP P:Delete • If you delete a step, an existing step in the program will Step : _ _ disappear.
  • Page 46: Step : Programming The Wash Part

    5.5. STEP : PROGRAMMING THE WASH PART This paragraph gives a detailed explanation about programming the Wash Sequences. Each program step contains a wash part and a drain part. First the wash part must be selected, item by item can be programmed. Next the drain part must be selected, item by item can be programmed.
  • Page 47 THE PREWASH SEQUENCE Prewash | Wash | Cooldown | Rinse | Final Rinse | Soak | Flush | Spray | No wash Only for washing machines with a Top Soap Hopper. P:Pr XX Step XX °C : degrees Celsius Temp : 40 °C °F : degrees Fahrenheit •...
  • Page 48 P:Pr XX Step XX • If you don‘t want to get in the supply sub-menu, press the Supply ? ARROW DOWN button. • Press the ENTER button to get into the supply sub-menu. • Default: all the supplies are switched off. (time = 0) •...
  • Page 49 • Insert the desired Prewash time. Press the ENTER button for confirmation. P:Pr XX Step XX • When a signal is programmed, a pause will be introduced at Signal : No the end of the Wash Step. This allows the operator to add soap for the next step.
  • Page 50 THE WASH SEQUENCE Wash Prewash | Cooldown | Rinse | Last Rinse | Soak | Flush | Spray | No wash P:Pr XX Step XX °C : degrees Celsius Temp : 60 °C °F : degrees Fahrenheit • The temperature can be programmed between 1°C and 92°C. •...
  • Page 51 • Insert the desired speed value. Press the ENTER button for confirmation. P:Pr XX Step XX • If you don‘t want to get into the supply sub-menu, press the Supply ? ARROW DOWN button. • Press the ENTER button to get into the supply sub-menu. •...
  • Page 52 P:Pr XX Step XX • A Wash Sequence can be programmed between 0 and Time : 7.0 Min 99.5 minutes in steps of 0.5 minutes. • The default time is 7.0 Minutes. • Programming a time of 0 minutes : the Wash Sequence will not be functional (cfr No Wash) •...
  • Page 53 THE COOLDOWN SEQUENCE Cooldown Prewash | Wash | | Rinse | Final Rinse | Soak | Flush | Spray | No wash • After a Hot wash you can program a Cool-down Sequence to avoid the temperature shock and shrinking of the garments. •...
  • Page 54 P:Pr XX Step XX • The wash motor ON time can be programmed between 0 and On Time : _ _ Sec 99 seconds. • The wash motor OFF time can be programmed between 3 and 99 seconds. • The suggested default values can be adapted in the P:Pr XX Step XX Initialisation menu.
  • Page 55 THE RINSE SEQUENCE Rinse Prewash | Wash | Cooldown | | Final Rinse | Soak | Flush | Spray | No wash • No temperature can be programmed as a Rinse is only dedicated for cold water. P:Pr XX Step XX Top Soap-Hopper washing machines Inlet : _ _ _ •...
  • Page 56 • Liquid soap supplies can only be programmed if the selection in the configuration menu is enabled. • The supplies can be programmed for an interval time between 0 and 99 seconds. • The supply will not be activated if 0 Seconds is programmed. •...
  • Page 57 • Programming a time of 0 minutes : the Rinse will not be functional (cfr No Wash) • Insert the desired Rinse time. Press the ENTER button for confirmation. P:Pr XX Step XX • When a signal is programmed, a pause will be introduced at Signal : No the end of the Wash Step.
  • Page 58 THE FINAL RINSE SEQUENCE Final Rinse Prewash | Wash | Cooldown | Rinse | | Soak | Flush | Spray | No wash Only for Top Soap Hopper washing machines. • No temperature can be programmed as a Last Rinse is only dedicated for cold (hard) water. P:Pr XX Step XX Top Soap Hopper washing machines Inlet : _ _ _ _...
  • Page 59 P:Pr XX Step XX • If you don‘t want to get into the supply sub-menu, press the Supply ? ARROW DOWN button. • Press the ENTER button to get into the supply sub-menu. • Default: all the supplies are switched off. (time = 0) •...
  • Page 60 • The Final Rinse Sequence can be programmed between 0 P:Pr XX Step XX and 99 minutes in steps of 0.5 minutes. Time : 2.0 Min • The default time is 2.0 Minutes. • Programming a time of 0 minutes : the Final Rinse will not be functional (cfr No Wash) •...
  • Page 61 THE SOAK SEQUENCE Soak Prewash | Wash | Cooldown | Rinse | Final Rinse Flush | Spray | No wash P:Pr XX Step XX °C : degrees Celsius Temp : 40 °C °F : degrees Fahrenheit • The temperature can be programmed between 1°C and 45°C.
  • Page 62 P:Pr XX Step XX • The suggested drum speed value depends on the machine RPM : _ _ type. • Check the corresponding table paragraph 3.4. • The drum speed value can only be programmed within certain limits. • Insert the desired speed value. Press the ENTER button for confirmation.
  • Page 63 • Standard wash motor ON time of 12 seconds and a wash P:Pr XX Step XX motor OFF time of 10 minutes is recommended. Off Time: _ _ Min • Insert the desired ON – OFF times. Press the ENTER button for confirmation.
  • Page 64 THE FLUSH SEQUENCE Flush Prewash | Wash | Cooldown | Rinse | Final Rinse | Soak | | Spray | No wash Only for Top Soap Hopper washing machines. No water level can be programmed as the water will raise and escape by the overflow hole. No inlets can be programmed as only cold water from inlet 6 is used.
  • Page 65 P:Pr XX Step XX • When a signal is programmed, a pause will be introduced at Signal : No the end of the Wash Step. This allows the operator to add soap for the next step. To alert the operator that the program has been interrupted, a buzzer signal will be activated.
  • Page 66 THE SPRAY SEQUENCE Spray Prewash | Wash | Cooldown | Rinse | Final Rinse | Soak | Flush | No wash • Water or Liquid is injected at Distribution or Low Spin Speed • No standard water inlets can be programmed in this function. •...
  • Page 67 configuration menu is enabled. Extra supplies, correspond P:Pr XX Step XX with soap pump signals. • The Spray Sequence will only function with 1 Supply. Supply A : 0 Sec If you have programmed more then 1 supply an error message will be generated.
  • Page 68 minutes in steps of 0.5 minutes. • The default time is 1,0 Minutes. • Programming a time of 0 minutes : the Spray will not be functional (cfr No Wash) • Enter the desired spray time. Press the ENTER button for confirmation.
  • Page 69: Step : Programming The Drain Step

    5.6. STEP : PROGRAMMING THE DRAIN STEP This paragraph gives a detailed explanation about programming the Drain/Extraction Sequences. After programming the wash step, the drain step still has to be programmed. ATTENTION ! YOU DON’T HAVE TO PROGRAM A DRAIN SEQUENCE BEFORE AN EXTRACTION SEQUENCE AS THE WATER WILL AUTOMATICALLY BE DRAINED AT THE EXTRACTION SEQUENCE SELECTING THE DRAIN/EXTRACTION STEP Depending the machine type, you have more or less functions.
  • Page 70 P: Program • You can always return to a previous menu item by pressing Step XX Exit the ARROW UP button. ↵ • By pressing the ENTER button you will leave the current Step. Goto ATTENTION ! R - MACHINES ONLY. THE REVERSING ON – OFF TIMES FOR THE DRAIN SEQUENCE ARE THE SUGESTED DEFAULT VALUES.
  • Page 71 THE LOW EXTRACT SEQUENCE Low Extract Drain | Extract | High Extract | No Drain | Static Drain Only for washing machines with 2 motors. P:Pr XX Step XX • Only available on washing machines with both : a normal Drain valve : 1 Open and a normal Closed Drain valve.
  • Page 72 THE HIGH EXTRACT SEQUENCE High Extract Drain | Extract | Low Extract | No Drain | Static Drain Only for washing machines with 2 motors. P:Pr XX Step XX • Only available on washing machines with both : a normal Drain valve : 1 Open and a normal Closed Drain valve.
  • Page 73 THE STATIC DRAIN SEQUENCE Static Drain Drain | Extract | Low Extract High Extract | No Drain | The drum is at standstill while the water is drained. P:Pr XX Step XX • Only available on washing machines with both : a normal Drain valve : 1 Open and a normal Closed Drain valve.
  • Page 74: Operation Menu

    6. OPERATION MENU 6.1. STARTING UP ATTENTION !!! BEFORE STARTING UP THE FIRST TIME, BE SURE THAT THE MACHINE IS WELL INSTALLED. SEE INSTALLATION MANUAL. MAKE SURE THAT THE CONFIGURATION AND INITIALISATION MENU HAVE THE RIGHT SETTINGS. SEE CHAPTER 4. ATTENTION !!! WASH CYCLES CAN ONLY BE STARTED WHEN THE KEY SWITCH IS IN RUN MODE.
  • Page 75: Programming A Delay Time

    MB-machines only. After pressing the „START“ button a message appears with the request to verify if you have locked the Inner Door. Did you lock the Inner Door ? Press the „START“ button if you are sure that you have locked the Inner Doors mechanically. If you are not sure press the “STOP”...
  • Page 76: Advancing A Wash Program

    PrXX StYY ZZ.Z Min Wash PrXX : The selected program number. StYY : The selected program Step. ZZ.Zmin or ZZ.Z H : The remaining program time in 1/10 of Minutes or 1/10 of Hours. : A row of bars appears as a function of the remaining sequence time. Wash : The executed Sequence.
  • Page 77 Only for X80 and X100 machines : The door can be opened by pressing the DOOR UNLOCK button and by pressing the Door Handle when the message UNLOAD is displayed. MB washing machines only When the message Unload is displayed, the indication lights TURN DRUM and UNLOCK DOOR will be illuminated.
  • Page 78: Water Fill Process

    By pressing the TURN DRUM push button the drum will turn automatically to the next drum compartment. When the drum has stopped and the indication light UNLOCK DOOR is eluminated, press the UNLOCK DOOR button. Now you can unload / load the drum at the next compartment. On the small MB washing machines after closing and locking the Outer Door at the Hygienic Side automatically the wash computer switches the door and turn drum control to the Dirty Side.
  • Page 79: Flush Function

    6.15. FLUSH FUNCTION Only for machines with a Top Soap Hopper. At the Fill process of the Flush sequence, No water level is programmed and the water will escape by the overflow hole. The larger soil particles will get separated from the garments due to the water that is draining through the overflow hole.
  • Page 80: Open Soap Box

    6.20. OPEN SOAP BOX ONLY FOR WASHING MACHINES WITH FRONT SOAP BOX By opening the soap box, the Program is interrupted at once. First the machine will go over to a safe state. Then the message CLOSE SOAP DOOR is displayed. Once the soap box is closed again, the message CONTINUE ? will be displayed.
  • Page 81: How To Handle Power Interuptions

    ATTENTION !!! IT’S UP TO THE OPERATOR TO TAKE THE NECESSARY PRECAUTIONS IF THE DRAIN VALVE IS NOT FUNCTIONAL AND THERE IS STILL HOT WATER IN THE TUB AT THE END OF THE WASH CYCLE. ON THE DISPLAY THE ACTUAL WATER TEMPERATURE AND LEVEL WILL BE DISPLAYED. WAIT UNTIL THE WATER IS DRAINED AND UNTIL THE WATER HAS COOLED BEFORE ALL INTERVENTIONS AS HOT WATER CAN CAUSE BURNS.
  • Page 82 - the actual wash machine states at the running wash cycle By turning the key switch to Program, the Service-State menu will not disappear after 1 minute. By pressing the ARROW DOWN button you will see all the menu items. You can leave the Service - State menu by pressing the SERVICE-STATE button again.
  • Page 83: Water Recycling

    6.25. WATER RECYCLING If the washing machine is connected with a water recycling system, a signal from the water recycling tank can be connected to the Full Control washing machine computer. If the tank is empty, then the message NO RECUP will be generated on the display of the Full Control Wash Computer.
  • Page 84: Pre-Programmed Programs

    7. PRE-PROGRAMMED PROGRAMS The Full Control Wash Computer contains 15 pre-programmed Standard Wash Programs. (Standard Programs : 1 to 15. Programs 16 to 52 are dedicated.) ATTENTION !!! THE PRE-PROGRAMMED PROCESSES ARE GIVEN AS AN EXAMPLE ONLY. FOR THE CREATION OF YOUR OWN WASH PROGRAM’S, CONTACT YOUR SOAP SUPPLIER. 7.1.
  • Page 85: Wash Programs

    7.2. WASH PROGRAMS WASH PROGRAM 1: HOT WASH – 90°C Sequence Supply Inlet Temp. Level Wash action Time R.P.M. Front Front Front Prewash Wash A=30“ 35°C A=12“ R=3“ 6 min Step 1 Spin Spin 1 min Wash Wash B=30“ 3-4-5 90°C A=12“...
  • Page 86: Wash Program 3: Colored Wash - 40°C

    WASH PROGRAM 3: COLORED WASH – 40°C Sequence Supply Inlet Temp. Level Wash action Time R.P.M. Front Front Front Prewash Wash A=30“ 35°C A=12“ R=3“ 4 min Step 1 Spin Spin 1 min Wash Wash B=30“ 40°C A=12“ R=3“ 7 min Step 2 Drain Drain...
  • Page 87: Wash Program 5: Woolens - 15°C

    WASH PROGRAM 5: WOOLENS – 15°C Sequence Supply Inlet Temp. Level Wash action Time R.P.M. Front Front Front Wash Wash B=30“ 15°C A=3“ R=12“ 5 min Step 1 Drain Drain 30 sec Rinse 1 Rinse 1 2-5-6 A=3“ R=12“ 1,5 min Step 2 Drain Drain...
  • Page 88: No Prewash

    WASH PROGRAM 7: LIGHTLY SOILED - WARM WASH - 60°C NO PREWASH Sequence Supply Inlet Temp. Level Wash action Time R.P.M. Front Front Front Wash Wash B=30“ 3-4-5 60°C NL -3 A=10“ R=5“ 10 min Step 1 Drain Drain 30 sec Rinse 1 Rinse 1 2-5-6...
  • Page 89: Wash Program 9: Badly Soiled - Cooldown - Colored - 90°C

    WASH PROGRAM 9: BADLY SOILED – COOLDOWN - COLORED - 90°C Sequence Supply Inlet Temp. Level Wash action Time R.P.M. Front Front Front Wash 1 Wash 1 A=30“ 3-4-5 90°C A=12“ R=3“ 10 min Step 1 Spin Spin 1 min Wash 2 Wash 2 B=30“...
  • Page 90: Wash Program 11: Badly Soiled - Cooldown - 60°C

    WASH PROGRAM 11: BADLY SOILED – COOLDOWN - 60°C Sequence Supply Inlet Temp. Level Wash action Time R.P.M. Front Front Front Prewash Wash A=30“ 35°C A=12“ R=3“ 7 min Step 1 Spin Spin 1 min Wash Wash B=30“ 3-4-5 60°C A=12“...
  • Page 91: Wash Program 13: White Oxygen Bleach - 90°C (Peroxy Bleach)

    WASH PROGRAM 13: WHITE OXYGEN BLEACH – 90°C (PEROXY BLEACH) Sequence Supply Inlet Temp. Level Wash action Time R.P.M. Front Front Front Prewash 1 Wash A=30“ 35°C A=12“ R=3“ 5 min Step 1 No Drain No Drain Prewash 2 Wash 55°C NL +3 A=12“...
  • Page 92: Wash Programs For X-Machines

    7.3. WASH PROGRAMS FOR X-MACHINES X & XS - type washing machines have a Spray Inlet in the Door glass. A Spray Sequence replaces the Second Rinse for the Standard Wash program 1, 2, 3, 4 and 6, 7 and 8. After the Spray Sequence, the Drain or Spin step is replaced by a No Drain step as the water has already been drained in the Spray Sequence.
  • Page 93: Troubleshooting

    8. TROUBLESHOOTING 8.1. DISPLAY MESSAGES Various messages may appear on the display at the start, during or at the end of a washing cycle. In some specific cases, an acoustic signal will alert the operator. When an error occurs the machine will automatically go over to a safe state. With the diagnostic program you can determine the problem.
  • Page 94: How To Handle Fault Messages

    8.3. HOW TO HANDLE FAULT MESSAGES ATTENTION !!! CHECK IN THE MANUAL FOR WHAT PROBLEM THE ERROR MESSAGE CORRESPONDS TO. ASK THE ASSISTANCE OF AN EXPERIENCED TECHNICIEN TO SOLVE THE PROBLEM. ALL THE SAFETY PRECAUTIONS MUST BE FOLLOWED BEFORE EACH INTERVENTION. You can overrule and erase fault messages by: pressing the STOP or ENTER button (key switch in program mode) switching the power off/on...
  • Page 95 DEPENDING THE FAILURE TYPE THE FULL CONTROL COMPUTER WILL START A SPECIFIC PROCEDURE : WHEN SAFETY IS INVOLVED Full stop + tumble : the program is stopped but will run the tumble sequence Full stop + safety time : the program is stopped and a safety time is started Don’t start : the program will not be started as long as the safety conditions are not fulfilled...
  • Page 96: Overview

    8.4. OVERVIEW N° Failure message Failure Action Fault occurrence Drain failure Full Stop + tumble Draining sequence Cooldown No Drain Co Cooldown Drain failure Full Stop + tumble Draining sequence No Drain Full stop + tumble Start spin Tilt Fault Out of balance : Before spin Skip + continue...
  • Page 97 Termic Tumbl Fatal error : Full stop At tumble sequence Defective motor contactor No Drain Sp Full stop + tumble Spray Sequence Drain failure at the Spray Sequence No Recycle Warning at the End. Wash step The Tank with recycle water is empty Front Hopper Mach.
  • Page 98 Door Locked Don’t Start At locking sequence Door Lock Switch stays closed when the outer (MB90-140-180 only) door is open. Time Out Input16 Full stop + tumble. Whole cycle On Hold Signal Failure Soap Dispensing System No Reheat Heating Failure Full stop + tumble.
  • Page 99: Service Menu

    8.5. SERVICE MENU In the Service menu you have some extra utilities: The Software Version Number. An overview of the 8 last failure messages. Statistics for 9 general error messages Pulley ratio An overview of the input states Switching On the Inverter for a technical intervention Reset Cycle Counter and Statistics Error Messages HOW TO GET INTO THE SERVICE MENU The SERVICE menu can only be accessed when the machine is in standby (the power is switched...
  • Page 100 • Press the ARROW DOWN button to see message by message and to leave the Error message menu. • If no messages are displayed, this means that no Errors have occurred. S:Erase Fault • If you don‘t want to erase the Fault messages, Messages? No press the ARROW DOWN button.
  • Page 101 ATTENTION !!! SPECIAL CARE HAS BEEN TAKEN AT THE INITIALISATION OF THE PARAMETERS OF THE MITSUBISHI FREQUENCY INVERTER. THE MANUFACTURER IS NOT RESPONSIBLE FOR THE WRONG BEHAVIOR OF THE WASHING MACHINE IF THE OWNER HAS INSTALLED NEW PARAMETER SETTINGS IN THE INVERTER THAT DO NOT CORRESPOND WITH THE ORIGINAL SETTINGS AT THE FACTORY.
  • Page 102 S:Reset Magn. • ONLY FOR MB WASHING MACHINES. Sensor Err: No • Error messages 53, 55, 56 can only be reset by selecting Yes in this menu item. • If you don‘t want to reset the Magnetic Sensor Error Message, press the ARROW DOWN button. •...
  • Page 103: Diagnostic Program

    8.6. DIAGNOSTIC PROGRAM The purpose of the diagnostic program is to test the wash machine functions one by one. HOW TO GET INTO THE DIAGNOSTIC MENU The Diagnostic menu can only be accessed when the machine is in standby (the power is switched on, but no program is started).
  • Page 104 TEST SEQUENCE Display test and door lock test Sensor test Motor test Water fill, heating and drain test BASIC Diagnostic Wash program Diagnostic Test Sequence for Machines with Top Soap Hopper. Test (R) : For Rigid Mounted washing machines. Test (F) : For Free Standing washing machines. Test Test Info...
  • Page 105 Diagnostic Test Sequence for Machines with Front Soap Hopper. Test (2) : For washing machines with 2 Main Water Supplies. Test (3) : For washing machines with 3 Main Water Supplies. Test Test Info Explanation Black display followed Door lock test (locks and unlocks 5 x the door) by a Text display.
  • Page 106 BASIC Diagnostic Wash program Sequence Supply Inlet Temp. Level Wash action Time R.P.M. Front Front Front Wash Wash 3-4-5 40°C A=12“ R=3“ 6 min Step 1 Drain Drain 30 sec Rinse 1 Rinse 1 2-5-6 A=12“ R=3“ 1.5 min Step 2 Spin Spin 1 min...
  • Page 107: Problem Check List

    8.7. PROBLEM CHECK LIST Problem Cause Solving the problem • no external power • Switch on the external power supply When the power is switched on : the display is not illuminated • verify the external power to the machine •...
  • Page 108: Explanation Error Messages

    8.8. EXPLANATION ERROR MESSAGES FAILURE 1 : DRAIN FAILURE COOLDOWN SEQUENCE Failure 1 occurs when the electronic timer detects that the water is not drained after 3 minutes in a Cooldown Sequence. The failure message is displayed at the end of the cycle. DIAGNOSE: 1.
  • Page 109 FAILURE 5 : OUT OF BALANCE HIGH SPIN Failure 5 occurs when the out of balance sensor is activated at high spin. This failure indicates that there will be probably a mechanical defect. DIAGNOSE: 1. Check the position of the out of balance If the out of balance switch is not correctly mounted, install the out of balance switch properly switch...
  • Page 110 DIAGNOSE: 1. Check if the input connector A is connected If the input connector A is not connected : connect connector A 2. Check the functioning of the If the door switch is broken or functions not 100% : “DOOR SOLENOID SWITCH” replace the door lock system 3.
  • Page 111 FAILURE 11: FILL FAILURE Failure 11 occurs when the water level has not reached its target level in x minutes. x = Max fill time, a value that can be programmed at the Initialisation Menu. ATTENTION !!! : The rubber hose must be fixed with a fastener on the electronic water level Sensor. DIAGNOSE: 1.
  • Page 112 DIAGNOSE: 1. Check if the heating contactor is activated If the heating contactor is not activated: repair the wiring or replace the contactor 2. Check if the heating elements are heating If the heating elements are not heating: Repair the wiring or replace the defective heater elements 3.
  • Page 113 wash sequence value then the temperature of the wash bath will be too high. 3. Check the water temperature If the temperature of the supplied hot water is too high: decrease the temperature of the hot water 4. Check if the temperature sensor is If the temperature sensor is defective: replace the temperature sensor functioning...
  • Page 114 FAILURE 20: M2 DISTRIBUTION + HIGH SPIN MOTOR SECURITY When the motor overcurrent security has tripped the motors are switched off. The contact will be closed again automatically after some time (the thermal contact is only checked when an output relay for a motor is on).
  • Page 115 FAILURE 24: DEFECTIVE LEVEL SENSOR If the level sensor is broken then fault 24 will be displayed. The fault is only generated when the machine is in standby mode and no program is active. The fault can only be erased by switching off and on the power. DIAGNOSE: 1.
  • Page 116 4. Check if the fuses are still functional If the fuses are blown up : replace the fuses 5. Check if the safety contactor is activated If the safety contactor is broken : replace the contactor 6. Check if the connectors on both sides of the Connect the connectors on the electronic board and the inverter.
  • Page 117 IT IS NOT RECOMMENDED TO USE THE WASHING MACHINE AS THE INVERTER WILL FUNCTION WITH THE WRONG PARAMETERS SETTINGS. Parameters Inverter Type FR-A024-S0.4K – S2.2K-EC : P35 = 1 (external communication) P77 = 1(disabling parameter writing) P53 = 12 (communication interval) If these 3 parameters do have another value, it is NOT possible to load the parameters by the „Full Control“...
  • Page 118 ATTENTION !!! ALL THE CUSTOM SETTINGS WILL BE ERASED IN THE FULL CONTROL WASH COMPUTER BY LOADING THE FACTORY SETTINGS. After reinitialisation of the Full Control Wash Computer, fault 35 can only be erased by switching the power Off/On. FAILURE 36: DEFECTIVE MOTOR CONTACTOR Fault 36 can only occur when the overcurrent thermal protection off both motor thermal protections are opened during the tumble sequence.
  • Page 119 FAILURE 39: EMPTY SOAP SUPPLY BOX Failure 39 occurs when the electronic timer detects that the Soap Reservoir is empty. To avoid that No Liquid Soap is added at the wash process, the operator gets a warning when a Liquid Soap Supply Reservoir is almost empty.
  • Page 120 FAILURE 41: SERVICE DUE WARNING Failure 41 occurs when the cycle counter of the Electronic timer has reached the Programmed Value for Service due. The fault message will be erased by opening the door. If the cycle counter has not been reset the message will appear again at the end of the next wash cycle.
  • Page 121 points on the drum pulley. distance. 2. Check the wiring. If the wiring is damaged: repair the wiring. 3. Check the well functioning of the speed sensor. If the speed sensor is broken or not well functioning, replace the speed sensor. (The actual speed value is available at the Service –...
  • Page 122 commands the brake air pressure valve. 4. Check the output relay that powers the control If the relay receives a command signal but is not closed, replace the electronic board signal for the brake air pressure valve. 5. Check the output relay that powers the control If the relay does not receives a command signal, replace the electronic board signal for the brake air pressure valve.
  • Page 123 (Data out of range reading data from EEPROM) Wash computer to be reset at manufacturer by Factory Test validation procedure. FAILURE 54: LOCK ACTIVE Failure 54 occurs when at standby the door lock is locked nevertheless the door is open. Before further usage of washing machine, door lock must be unlocked first by technical intervention.
  • Page 124 FAILURE 57: DOOR LOCKED MB90-140-180 machines only. Failure 57 occurs when the “Door Lock Switch” stays locked when the outer door has been unlocked pneumatically and opened by hand. Purpose is to find out at the unload sequence if “Door Lock Switch” is broken. (Normal Open Contact that stays closed) DIAGNOSE: 1.
  • Page 125 FAILURE 82: No Refill MB machine only. Failure 82 occurs when the water filling is not restarted (at the wash sequence) when the water level of the bath is below it's normal programmed value. When the water level drops below the predefined water level limit of a hygienic wash cycle, the wash cycle can not be validated for hygienic reasons as the wash process has not followed the standards of the wash program in execution.
  • Page 126 FAILURE 300-353: MITSUBISHI INVERTER ALARM MESSAGE If a Mitsubishi Inverter Alarm occurs, check the trouble shooting in the Mitsubishi inverter manual. 300 Err OC1 308 Err FAN 316 Err RET 324 Err OP2 332 Err MB5 340 Err E.3 348 USB 301 Err OC2 309 Err OLT 317 Err CPU 325 Err OP3 333 Err MB6 341 Err ILF 349 OS...
  • Page 127 2. Check if the correct machine type is If the wrong machine type is selected, enter the right machine type. selected in the S-Menu. 3. Check if the correct parameters have been If the correct parameters are not loaded in the inverter, load the correct parameters.
  • Page 128: Service Information

    9. SERVICE INFORMATION ATTENTION !!! PROFESSIONAL REPAIRS IN ELECTRO INSTALLATION CAN BE CARRIED OUT ONLY BY SERVICE ORGANIZATION WITH PERMISSION GIVEN BY PRODUCER / SUPPLIER. IN CASE OF ANY MAINTENANCE OR REPAIR DISCONNECT THE MACHINE FROM SOURCE OF ENERGY AND WAIT UNTIL THE MACHINE COOLS DOWN OR DRAINS WATER. PLEASE FOLLOW ALL INSTRUCTIONS IN THE MANUALS AND THE LABELS AND AS WELL AS VALID BASIC SECURITY LAWS IN ORDER TO PREVENT BURNS AND SCALDS AND INJURIES CAUSED BY ELECTRICITY.
  • Page 129: Programmer Circuit Board

    9.3. PROGRAMMER ELECTRONIC BOARD WARNING ! CONNECTION TO THE WRONG VOLTAGE SUPPLY MAY CAUSE SERIOUS BODILY INJURY AS WELL AS DAMAGE TO THE ELECTRONIC PARTS AND TO THE WASHING MACHINE ITSELF. - Voltage 200-240 Vac, 50/60 Hz - Power max 16 VA - Memory EPROM (contains the software) EEPROM (contains the customised programs)
  • Page 130: Instructions For Installing New Software

    9.5. INSTRUCTIONS FOR INSTALLING NEW SOFTWARE Switch off the main power. Open the cover plate of the washing machine. Take the combination keyboard-electronic timer out of the machine. See also paragraph 9.4. The EPROM with the implemented software is the only IC on the electronic board that can be removed.
  • Page 131: Specification Of Your Machine

    10. SPECIFICATION OF YOUR MACHINE MACHINE DATA type :……………………. phases ……………………. serial number :……………………. frequency ……………………. voltage :……………………. output ……………………. water supply cold soft cold hard hot soft heating electric…… kW hot water steam ELECTRONIC DATA Programmer type : serial number ……………………………...
  • Page 132: Index

    11. INDEX ADD STEP..........42 ECONOMIC..........73 INSTRUCTIONS FOR REPLACING THE ADDING A STEP AT THE END OF THE EDIT A PROGRAM........40 ELECTRONIC BOARD AND KEYPAD.125 PROGRAM..........42 EDIT A STEP..........42 ADVANCING A WASH PROGRAM..74 ELECTRONIC DATA,......27 ALARM FREQUENCY INVERTER..114 EMERGENCY STOP SWITCH....4 ALLOW ADVANCE YES......23 EMPTY SOAP SUPPLY BOX....
  • Page 133 OV3 TIME OUT........114 SERVICE MENU........97 OVERFILL FAILURE......109 SERVICE MENU EXIT......100 OVERFLOW FAILURE......112 SIGNAL ..9,21,47,50,52,55,58,61,63,66,105 UNBALANCE ........... 77 OVERVIEW ..........94 SOAP BOXES ..........81 UNDEFINED FREQUENCY INVERTER SOAP SUPPLY MENU EXIT....53 ERROR CODE........113 SOAP SUPPLY MENU EXIT..46,60,64 SOFTWARE ERRORS......123 SPD DISTRIBUTE........64 PAUSE............
  • Page 136: Serial Number

    IMPORTANT ! MACHINE TYPE: PROGRAMMER: FULL CONTROL TIMER MCB FC INSTALLATION DATE: INSTALLATION CARRIED OUT BY: SERIAL NUMBER: ELECTRICAL DETAILS: .....VOLT....PHASE....HZ NOTE: ANY CONTACTS WITH YOUR DEALER REGARDING MACHINE SAFETY, OR SPARE PARTS, MUST INCLUDE THE ABOVE IDENTIFICATION. MAKE CERTAIN TO KEEP THIS MANUAL IN A SECURE PLACE FOR FUTURE REFERENCE.

Table of Contents