Table of Contents
Advertisement
Advertisement
Table of Contents

Subscribe to Our Youtube Channel
Related Manuals for Omron LD


Summary of Contents for Omron LD
- Page 1 LD Cart Transporter Mobile Robot User’s Guide I612-E-02...
- Page 2 The information contained herein is the property of Omron Adept Technologies, Inc., and shall not be reproduced in whole or in part without prior written approval of Omron Adept Tech- nologies, Inc. The information herein is subject to change without notice and should not be con- strued as a commitment by Omron Adept Technologies, Inc.
-
Page 3: Table Of Contents
Payload Movement and Transfer Configurable Warning Buzzer Multi-Vehicle Avoidance Traffic Control Passing Lanes 2.4 Environment General Environmental Conditions Public Access Clearance Obstacles 2.5 Intended Use Non-Intended Use Robot Modifications LD Cart Transporter User's Guide, 14766-000 Rev B Page 3 of 190... - Page 4 LD Cart Transporter Repacking for Relocation 3.4 Setting Up an LD Cart Transporter Mounting the Side Lasers Rolling the LD Cart Transporter off of the Crate Base Installing the Battery Installing the Docking Station 3.5 Installing the Cart Brake Release...
- Page 5 7.2 Operator Panel E-Stop Button ON Button OFF Button Brake-release (BRAKE) Button Keyswitch LATCH Button UNLATCH Button 7.3 Other Controls and Indicators Light Discs and Beacon Robot Core Indicators LD Cart Transporter User's Guide, 14766-000 Rev B Page 5 of 190...
- Page 6 10.1 Safety Aspects While Performing Maintenance Electrical Hazards Pinch Hazard Magnetic Field Hazards 10.2 Lifting the Platform Safely Front Lifting Points Rear Lifting Area 10.3 Safety Inspection Warning Devices Warning Labels LD Cart Transporter User's Guide, 14766-000 Rev B Page 6 of 190...
- Page 7 10.5 Accessing the Payload Bay Removing Latching Mechanism Cover Removing Top Plate Installing Top Plate Installing Latching Mechanism Cover 10.6 Removing and Installing LD Cart Transporter Covers Removing Covers Installing Covers 10.7 Replacing Periodic Parts 10.8 Replacing Non-Periodic Parts Docking Station Roller and Bearing...
-
Page 9: Chapter 1: Introduction
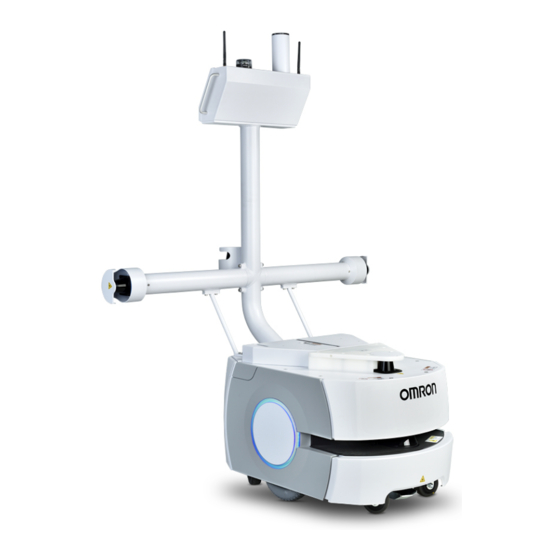
The LD Cart Transporter is available in two models, designed to transport carts with a total weight up to 105 kg (231 lb) for the LD-105CT and 130 kg (287 lb) for the LD-130CT platform. Where appropriate, differences between the models are called out. Otherwise, this manual applies to both LD Cart Transporters. - Page 10 Chapter 1: Introduction Figure 1-1. Cart and LD Cart Transporter, Separate Figure 1-2. Cart and LD Cart Transporter, Coupled LD Cart Transporter User's Guide, 14766-000 Rev B Page 10 of 190...
-
Page 11: Ld Cart Transporter
This would apply to areas where objects, such as pallets or carts, are moved so frequently that they can’t be mapped, or where they block the laser’s view of fea- tures that are mapped. This is covered in the LD Platform Peripherals Guide. Body and Drive The transporter is relatively small, lightweight, and highly maneuverable. - Page 12 The platform includes a safety scanning laser, a low front laser, two side lasers, a rear- facing laser, and two rear-facing sonar pairs. Each pair is one transmitter and one receiver. LD Cart Transporter User's Guide, 14766-000 Rev B Page 12 of 190...
-
Page 13: Cart
Cart The Cart is a frame mounted on four casters, designed so that it can couple with an LD Cart Transporter. Once coupled, the cart moves with the transporter. When the transporter arrives at the intended goal, it uncouples from the cart and leaves, while the cart remains at the goal. -
Page 14: Coupling
These allow a robot to be requested from a remote location, or allow the robot system to control an automated door, so the robot can pass through it. LD Cart Transporter User's Guide, 14766-000 Rev B Page 14 of 190... -
Page 15: User-Supplied Components / System Requirements
In order to have your robot perform autonomous mobile activities, you need to make a map of its operating space, and configure its operating parameters. The MobilePlanner software is used to make this map and perform this configuration. LD Cart Transporter User's Guide, 14766-000 Rev B Page 15 of 190... -
Page 16: Setnetgo
It can be accessed when connected via the maintenance and management Ethernet ports, or via wireless Ethernet if enabled. LD Cart Transporter User's Guide, 14766-000 Rev B Page 16 of 190... -
Page 17: How Can I Get Help
Related Manuals This manual covers the installation, setup, operation, and maintenance of a Mobile Robot - LD Platform. There are additional manuals that cover these actions for the platform. See the fol- lowing table. Table 1-1. Related Manuals... - Page 18 SetNetGo. Otherwise, open a web browser and enter the URL: https://1.2.3.4: You will be requested to confirm security certificates. Regardless of how you accessed SetNetGo, you should now have a window similar to the fol- lowing: LD Cart Transporter User's Guide, 14766-000 Rev B Page 18 of 190...
- Page 19 Status > Debug Info This will display the “Download debug info” button. 2. Click Download debug info. 3. Save the downloaded file, and attach it to your support request. LD Cart Transporter User's Guide, 14766-000 Rev B Page 19 of 190...
-
Page 21: Chapter 2: Safety
However, only qualified personnel who have read and understood this manual and the Mobile Robot LD Safety Guide should manually move the platform. The brakes on the drive wheels can be released with the brake release button. This requires battery power, and an E-Stop must be pressed on the robot. -
Page 22: Releasing An E-Stop
Door Box option. Refer to the LD Platform Peripherals Guide for details on the Door Box. Do not get the robot wet. Do not expose the robot to rain or moisture. -
Page 23: Falling Hazards
Immediately disconnect the battery after opening the battery compartment door. Avoid shorting the battery terminals. Do not use any charger not supplied by Omron Adept Technologies, Inc. If any liquid is spilled on the robot, power off the robot, clean up all possible liquid, and allow the robot to air dry thoroughly before restoring power. -
Page 24: Pinch Hazards
Chapter 2: Safety Pinch Hazards Latching System Latch CAUTION: Pinch hazard. The latch of the LD Cart Transporter can pinch you if you are not careful. Keep your hands clear of the transporter when it is in action. Latching System Belt/Pulley CAUTION: Pinch hazard. -
Page 25: Qualification Of Personnel
It is the end-user’s responsibility to ensure that all personnel who will work with or around mobile robots have attended an appropriate Omron training course and have a working know- ledge of the system. The user must provide any necessary additional training for all personnel who will be working with the system. -
Page 26: Payload Movement And Transfer
Providing an interlock between the robot and facility equipment is the user’s responsibility. Configurable Warning Buzzer The LD Cart Transporters have a configurable warning buzzer. It is the user’s responsibility to configure this buzzer as appropriate for the facility in which the robot will be operating.The buzzer will sound whenever the robot is moving backwards or is turning. -
Page 27: Traffic Control
Passing Lanes Since the LD Cart Transporter technology does not use fixed tracks to guide the robots, the con- cepts of passing lanes and human safety areas are not relevant. -
Page 28: Obstacles
(with no forward motion). Obstacles If the LD Cart Transporter will be entering high-traffic areas, the user must take appropriate precautions to alert people in those areas that a robot might enter. If the traffic consists of other machines, the user must adjust the robot‘s and/or the other machine’s parameters to reduce... -
Page 29: Robot Modifications
Robot Modifications If the user or integrator makes any changes to the LD platform or cart, it is their responsibility to ensure that there are no sharp edges, corners, or protrusions. -
Page 31: Chapter 3: Setup
Configure the robot for your environment, so it can perform useful tasks. This includes generating the map that the LD Cart Transporter will use for its nav- igation. This procedure and parameter configuration is covered in the Mobile Robot Soft- ware Suite User's Guide. -
Page 32: Transport And Storage
LD Cart Transporter The LD Cart Transporter system, which includes a cart, is shipped in one crate, along with the docking station, joystick, and all components except for the battery. The system must be shipped and stored in a temperature-controlled environment, from 5° to 60°... -
Page 33: Before Unpacking
If the items received do not match the packing slip, or are damaged, do not sign the receipt. If the items received do not match your order, please contact Omron Adept Tech- nologies, Inc. immediately. Retain the containers and packing materials. These items may be necessary to settle claims or, at a later date, to relocate the equipment. - Page 34 The battery box measures 311 x 540 x 457 mm (12.25 x 21.25 x 18 in.). NOTE: The battery weighs 19 kg (42 lbs). There are recesses at the front and the back of the battery, to aid in lifting it. LD Cart Transporter User's Guide, 14766-000 Rev B Page 34 of 190...
-
Page 35: Ld Cart Transporter
Chapter 3: Setup LD Cart Transporter Figure 3-2. Cart and LD Cart Transporter in Crate The cart crate measures 1156 x 794 x 1759 mm (45.5 x 31.25 x 69.25 in.). NOTE: The preceding figure includes accessory boxes for Call/Door Boxes. - Page 36 3. Remove the straps from the cart, and then the cart itself. CAUTION: Due to the weight and height of the cart, two people should work together to lift it down. 4. Remove the shelf from the crate. LD Cart Transporter User's Guide, 14766-000 Rev B Page 36 of 190...
- Page 37 2. Remove two Klimp fasteners at each side holding the upper body of the crate to the base. Figure 3-5. Removing a Klimp Fastener 3. Slide the upper body of the crate off of the base. LD Cart Transporter User's Guide, 14766-000 Rev B Page 37 of 190...
-
Page 38: Repacking For Relocation
As shipped, the horizontal tubes with side lasers will not be attached to the HMI post. A wooden board that spans the width of the transporter supports them during shipping. See the following figure. LD Cart Transporter User's Guide, 14766-000 Rev B Page 38 of 190... - Page 39 Brace Front Brace Figure 3-6. LD Cart Transporter on Crate Base Mounting the Side Laser Support Tubes This procedure involves minor routing of wiring for the rear-facing laser. This wiring must be in place before the support tubes are fully-installed.
- Page 40 See the following figure. the cable for the rear-facing laser goes through the notch in the HMI post, where it attaches to the support tube flange LD Cart Transporter User's Guide, 14766-000 Rev B Page 40 of 190...
- Page 41 M6 SHCS SS Screw (x4) Tube Laser Guard Screw, BHCS, M4 SS (x8) Support Braces Washer, Lock Washer, M5 SHCS SS Screw (x8) Figure 3-9. Side Laser Support Tubes LD Cart Transporter User's Guide, 14766-000 Rev B Page 41 of 190...
-
Page 42: Rolling The Ld Cart Transporter Off Of The Crate Base
This will expose the platform battery cover, which you will need to remove to install the battery. Rolling the LD Cart Transporter off of the Crate Base 1. Install the crate front onto the crate base, to serve as a ramp. - Page 43 Chapter 3: Setup Figure 3-11. LD Cart Transporter on Crate Base, with Ramp 3. Remove the two wheel pins that held the wheels up during transit. The wheels are pinned up to protect the motors and drives. When you receive your transporter, the drive wheels will not touch the ground until you remove the wheel pins.
- Page 44 Remove the pin by pulling the ring that is attached. These pin can be used for later service of either the wheel/tire assemblies or the entire drive assemblies. LD Cart Transporter User's Guide, 14766-000 Rev B Page 44 of 190...
-
Page 45: Installing The Battery
Your platform battery comes with less than 30% charge, to comply with air-shipping reg- ulations. It should be charged as soon as possible, to a full charge. NOTE: Air shipping regulations require that the LD Cart Transporter be shipped without the battery installed. - Page 46 Chapter 3: Setup Figure 3-14. Pulling the Bottom of the Rear Cover Out Figure 3-15. Lowering the Rear Cover LD Cart Transporter User's Guide, 14766-000 Rev B Page 46 of 190...
- Page 47 Chapter 3: Setup Refer to Removing and Installing LD Cart Transporter Covers in the Maintenance section for cover removal and installation. 1. Remove the inner rear platform cover. a. Pull the bottom of the cover away from the platform chassis.
- Page 48 3. Lift and slide the new battery into the platform body. The battery weighs 19 kg (42 lbs). There are recesses at the front and the back of the battery, to aid in lifting it. LD Cart Transporter User's Guide, 14766-000 Rev B Page 48 of 190...
- Page 49 The battery compartment is designed to hold the battery tightly, so that it will not move within the compartment, once the door is closed. 6. Reinstall the inner rear platform cover. LD Cart Transporter User's Guide, 14766-000 Rev B Page 49 of 190...
-
Page 50: Installing The Docking Station
98 ± 20 mm (3.9 ± 0.8 in.) above the floor, using user-supplied anchors and screws. There is leeway, so you can adjust the height a little bit. Refer to the following figure: LD Cart Transporter User's Guide, 14766-000 Rev B Page 50 of 190... - Page 51 2. Screw the two shoulder bolts, each with a washer, into the rear of the docking station. The shoulder bolts are M5 x 4, stainless steel. Their locations are shown in the fol- lowing figure. Tighten to 9 N-m (80 in-lb). LD Cart Transporter User's Guide, 14766-000 Rev B Page 51 of 190...
- Page 52 This mounting method uses the floor plate. The floor plate is not shipped attached to the dock- ing station, so you must attach it for this type of mount. It will be in the crate with the docking LD Cart Transporter User's Guide, 14766-000 Rev B Page 52 of 190...
- Page 53 Figure 3-21. Underside of Docking Station Foot, Showing Screw Locations NOTE: These are the three locations for the M4 x 12 flat-head screws. Two are already in place, and need to be removed before attaching the plate. LD Cart Transporter User's Guide, 14766-000 Rev B Page 53 of 190...
- Page 54 Chapter 3: Setup Figure 3-22. Docking Station, Mounted on Floor Plate 406 [16.0] 495 [19.5] Units are mm [in.] Figure 3-23. Docking Station Floor Plate Dimensions LD Cart Transporter User's Guide, 14766-000 Rev B Page 54 of 190...
-
Page 55: Installing The Cart Brake Release
The two rear casters of the cart have brakes, which push a blunt pin against the caster rolling surface to prevent the cart from rolling when it is parked on a floor that is not perfectly level. LD Cart Transporter User's Guide, 14766-000 Rev B Page 55 of 190... -
Page 56: Installation
The brake-release lever comes with a 1524 mm (60 in.) cable. The lever has a clamp the fits a 22 mm (7/8 in.) tube. LD Cart Transporter User's Guide, 14766-000 Rev B Page 56 of 190... - Page 57 There is a 6.4 mm (0.25 in.) horizontal hole through the rear horizontal tube of the cart. See the following two figures. Ø 0.25 Pass-through hole for brake cable, through rear frame tube Figure 3-27. Thru-hole for Brake-release Cable LD Cart Transporter User's Guide, 14766-000 Rev B Page 57 of 190...
- Page 58 After the brake-release lever has been mounted on the cart payload: 1. Push the free end of the lever cable through the hole in the cart’s upper-rear horizontal tube. LD Cart Transporter User's Guide, 14766-000 Rev B Page 58 of 190...
-
Page 59: Adjustment
The brake lever cable should be adjusted at the lever cable clamp, shown in the prededing fig- ure. There should be just enough slack so the actuator bar touches its hard stop. LD Cart Transporter User's Guide, 14766-000 Rev B Page 59 of 190... - Page 60 After the caster cables are adjusted correctly, ensure that the actuator bar just touches its hard stop. This will keep the actuator bar in position if you have to adjust the lever cable. LD Cart Transporter User's Guide, 14766-000 Rev B Page 60 of 190...
-
Page 61: Chapter 4: Configuration
The LD Cart Transporter comes with firmware and on-board software installed. Configuration of an LD Cart Transporter is done using the MobilePlanner software. Con- figuration includes generation of the map that the robot will use for navigation. The cart park- ing goals need to be added to that map. -
Page 62: Setting Up Wireless Ethernet
NOTE: Although an LD Cart Transporter is capable of working without wireless Ethernet if there are no other LD Cart Transporters that it needs to know about (and to avoid), that is the exception. In most cases, wireless Ethernet will be needed. - Page 63 Ensure that, in such cases, you have adequate wireless coverage. Because of the variation pos- sible in different environments, we don't specify what components or techniques should be used to obtain this coverage. LD Cart Transporter User's Guide, 14766-000 Rev B Page 63 of 190...
-
Page 64: Mapping
In order to have your LD Cart Transporter perform autonomous mobile activities, you need to make a map of its operating space. Configuration includes generation of the map that the LD Cart Transporter will use for navigation. The cart parking goals need to be added to that map. -
Page 65: Setting Up Cart-Parking Goals
If the only change is to enable DHCP, then the platform does not have to be power-cycled. In the MobilePlanner software, select: MobilePlanner > SetNetGo Network > User LAN Ethernet LD Cart Transporter User's Guide, 14766-000 Rev B Page 65 of 190... -
Page 66: Operating Modes
Select either Choose Dropoff or Patrol Route with the Pages > MainPage parameter, which has a dropdown selection box. Choose Dropoff Mode The following parameters only apply to the Choose Dropoff mode. Dropoff Priority This is accessed under Pages > ChooseDropoffPage. LD Cart Transporter User's Guide, 14766-000 Rev B Page 66 of 190... - Page 67 MobilePlanner software. You also need to specify if the robot will start its patrol automatically, or if it requires an Operator to press Go. LD Cart Transporter User's Guide, 14766-000 Rev B Page 67 of 190...
-
Page 68: Localization Goals
Config > Robot Interface > Touchscreen From there, use ChooseLocalizationPage to set LocalizationButtonCount to the number of loc- alization goals you want, and then specify the GoalName and ButtonLabel for each. LD Cart Transporter User's Guide, 14766-000 Rev B Page 68 of 190... -
Page 69: Screen Logo
Config > Robot Interface > Touchscreen From there, use Style/Appearance. A logo is displayed in the upper-left corner of the touchscreen. The default logo is Omron, as shown in the following figure. LD Cart Transporter User's Guide, 14766-000 Rev B... -
Page 70: Screensaver
Click Open. 4. Click Save, to save the configuration. NOTE: If the SmallLogo field is left blank, the default Omron logo will be dis- played. NOTE: If a different version of the same file name is uploaded to the robot, you will need to power cycle the robot to see the change. -
Page 71: Display Language
This parameter is not touchscreen-specific, so it may affect other displays that involve written language. As of this writing, only the touchscreen is affected. This parameter does not affect synthesized speech. LD Cart Transporter User's Guide, 14766-000 Rev B Page 71 of 190... -
Page 72: Contact Information
Service can work with your system designer to input your needs into our models. Contact Omron Adept Technologies, Inc. for details. See Support on page 17. If your payload’s center of gravity is not within the guidelines given in the Payloads chapter, you will need to adjust the Absolute Movement Maximums parameters in the MobilePlanner software. -
Page 73: Supplemental Information
Laser_2 Settings are for the low front laser (TiM). Laser_3 Tilted and Laser_4 Tilted are for the side lasers (TiM). Laser_5 Settings are for the coupling laser (TiM). Laser_6 Settings are the rear-facing laser (TiM). LD Cart Transporter User's Guide, 14766-000 Rev B Page 73 of 190... -
Page 75: Chapter 5: Payloads
Pinch Hazard There is a potential, with an improperly-designed cart payload, to create a pinch hazard between the payload and the HMI post. LD Cart Transporter User's Guide, 14766-000 Rev B Page 75 of 190... -
Page 76: Weight
WARNING: These figures show centers of gravity for the listed parameter set- tings only. They do not apply to any other parameter settings. Even small changes in these parameters can change the safe CG area drastically. LD Cart Transporter User's Guide, 14766-000 Rev B Page 76 of 190... - Page 77 Chapter 5: Payloads 105 kg Figure 5-1. Isometric View, 105 kg Figure 5-2. Longitudinal View, 105 kg LD Cart Transporter User's Guide, 14766-000 Rev B Page 77 of 190...
- Page 78 Chapter 5: Payloads Figure 5-3. Transverse View, 105 kg Figure 5-4. Top View, 105 kg LD Cart Transporter User's Guide, 14766-000 Rev B Page 78 of 190...
- Page 79 Chapter 5: Payloads 130 kg Figure 5-5. Isometric View, 130 kg Figure 5-6. Longitudinal View, 130 kg LD Cart Transporter User's Guide, 14766-000 Rev B Page 79 of 190...
- Page 80 Chapter 5: Payloads Figure 5-7. Transverse View, 130 kg Figure 5-8. Top View, 130 kg LD Cart Transporter User's Guide, 14766-000 Rev B Page 80 of 190...
-
Page 81: Payload-Related Tradeoffs
In general, lowering the maximum accel, decel, and rotation speeds will be required. Refer to Acceleration, Deceleration, and Rotation Limits on page 72. LD Cart Transporter User's Guide, 14766-000 Rev B Page 81 of 190... -
Page 83: Chapter 6: Connectivity
NOTE: If a connection is covered in this subsection, it means that the description in the subsection Standard Platform Connections on page 89 does not apply to the transporter, because that connection is being used for a cart-specific use. LD Cart Transporter User's Guide, 14766-000 Rev B Page 83 of 190... -
Page 84: Core
Aux Sensors is used for both side lasers and the low front laser. Light Pole goes through the PCA to the Operator panel. User LAN goes to the Ethernet switch in the payload bay. Two ports are spares. LD Cart Transporter User's Guide, 14766-000 Rev B Page 84 of 190... -
Page 85: Cart-Specific Pca
ESTOP 2A Dry contact ESTOP 2B Dry contact BRAKE Use switch to connect to BATTERY (pin 5) for external brake release ESTOP CTRLD POWER (BAT) 1 A limit LD Cart Transporter User's Guide, 14766-000 Rev B Page 85 of 190... - Page 86 User I/O Outputs, J19 - J26. Micro MATE-N-LOK, mates with TE 2C 794617-2. The return is common for each bank of four outputs, with the indicated jumper. Connector Designation Notes OUT1 JP13, LED DS14 OUT2 JP11, LED DS15 OUT3 JP10, LED DS16 LD Cart Transporter User's Guide, 14766-000 Rev B Page 86 of 190...
- Page 87 User I/O Inputs, J40, J45 - J51. Micro MATE-N-LOK, mates with TE 4C 794617-4. The return is common for each bank of four inputs, with the indicated jumper. Connector Designation Notes LED DS26 LED DS27 LD Cart Transporter User's Guide, 14766-000 Rev B Page 87 of 190...
- Page 88 Selects SINK LO or SOURCE HI for J48 - J51 Pin No. Designation Notes BATTERY 22-29 VDC, 0.4 A TOTAL HI (BAT) or LO (GND) SENSOR SHIELD GND LD Cart Transporter User's Guide, 14766-000 Rev B Page 88 of 190...
-
Page 89: Standard Platform Connections
If there is no conflicting connection in the Connectivity on page 83, these connections are avail- able for use with standard- and user-supplied accessories. The antennas and joystick come with the platform. LD Cart Transporter User's Guide, 14766-000 Rev B Page 89 of 190... -
Page 90: Robot Core Front, Upper
HDB44F 16 digital inputs, in 4 banks of 4. Each bank can be wired as active high or active low depending on the connection of the BANK# terminal. LD Cart Transporter User's Guide, 14766-000 Rev B Page 90 of 190... - Page 91 = ~3.9 kΩ BANK1 Common for INPUT_1.X INPUT_2.1 Input_2.1 0 – 30 V Range, R = ~3.9 kΩ INPUT_2.2 Input_2.2 0 – 30 V Range, R = ~3.9 kΩ LD Cart Transporter User's Guide, 14766-000 Rev B Page 91 of 190...
- Page 92 OUTPUT_8 Output_8 OUTPUT_9 Output_9 OUTPUT_10 Output_10 OUTPUT_11 Output_11 OUTPUT_12 Output_12 OUTPUT_13 Output_13 OUTPUT_14 Output_14 OUTPUT_15 Output_15 OUTPUT_16 Output_16 VBAT_IO_OUT4 VBAT @ 0.5 A Max (shared with light pole) LD Cart Transporter User's Guide, 14766-000 Rev B Page 92 of 190...
- Page 93 3.9 kΩ minimum Current at V = +24 VDC I ≤ 6 mA NOTE: The input current specifications are provided for reference. Voltage sources are typically used to drive the inputs. LD Cart Transporter User's Guide, 14766-000 Rev B Page 93 of 190...
- Page 94 ON state resistance (I = 0.5 A) ≤ 0.14 Ω @ 85° C Output leakage current ≤ 5 μA DC short circuit current limit 0.7 A ≤ I ≤ 1.7 A LD Cart Transporter User's Guide, 14766-000 Rev B Page 94 of 190...
-
Page 95: Standard Equipment
The 0-10 V analog inputs have an input impedance of about 35 kΩ. The 0-30 V analog inputs have an input impedance of about 110 kΩ. The analog outputs have an output impedance of about 200 Ω. LD Cart Transporter User's Guide, 14766-000 Rev B Page 95 of 190... - Page 96 Port 1 and 2, General Use Pin No. Designation Notes 1, 4, 6, 9 No Connection RS232_USR#_RXD #=1 or 2 RS232_USR#_TXD #=1 or 2 RS232_USR#_RTS #=1 or 2 RS232_USR#_CTS #=1 or 2 LD Cart Transporter User's Guide, 14766-000 Rev B Page 96 of 190...
-
Page 97: Robot Core Rear, Upper
Directly connected to the externally-mounted Joystick port HMI Panel HDB15F Operator screen, E-Stop, Brake_Rel, ON, OFF Sonar 2 DB9M This connection is not used with a cart transporter. LD Cart Transporter User's Guide, 14766-000 Rev B Page 97 of 190... - Page 98 3 x 2 Light tower (user-supplied) Pin No. Designation Notes Cable shield LIGHT_P1 LIGHT_P2 Yellow or orange VBAT_IO_OUT4 VBAT @ 0.5A Max (shared with DIO) LIGHT_P3 Green LIGHT_P4 Buzzer LD Cart Transporter User's Guide, 14766-000 Rev B Page 98 of 190...
- Page 99 ESTOP_USR_2H Short 5 & 12 to close ESTOP_USR_2 ESTOP_OUT_1H Pins 6 & 13 short when ESTOP_CH1 is closed ESTOP_OUT_2H Pins 7 & 14 short when ESTOP_CH2 is closed LD Cart Transporter User's Guide, 14766-000 Rev B Page 99 of 190...
- Page 100 CAUTION: If you are using a user-supplied E-Stop, you must run the Safety Commissioning to verify the E-Stop’s functionality before putting the robot into service. NOTE: See the following figure. Figure 6-10. E-Stop Jumper on Platform Core LD Cart Transporter User's Guide, 14766-000 Rev B Page 100 of 190...
- Page 101 Chapter 6: Connectivity Figure 6-11. E-Stop Chain Diagram LD Cart Transporter User's Guide, 14766-000 Rev B Page 101 of 190...
- Page 102 *9,10 and 11,12 share the 10 A of current. Joystick Connector type DB9F Joystick Pin No. Designation Notes JOY_XAXIS Analog X input JOY_YAXIS Analog Y input JOY_SPEED Analog SPEED input LD Cart Transporter User's Guide, 14766-000 Rev B Page 102 of 190...
- Page 103 Operator screen, E-Stop, Brake_Rel, ON, OFF NOTE: The HMI panel that this connects to is not the touchscreen used for the LD Cart Transporter. The HMI panel is not used with the LD Cart Transporter, so this connector is not used. Designation Pin No.
-
Page 104: Internal Robot Core Connections
DB9M Connection to Sonar Module RS-422 (Rear sonar sensors) Charge Contacts Mini-Fit Sr., 2-pin HDB15F Reserved USB x 3 USB Type A Reserved LIDAR HDB26M Safety Scanning Laser LD Cart Transporter User's Guide, 14766-000 Rev B Page 104 of 190... -
Page 105: Core Internal Data Pinouts
CAN Communication differential pair 8, 9 SW_12V_WHEEL WheelLight_Power 12 V @ 1 A Max (switched in SW) NOTE: Sonar 1 is covered at the end of Core, Upper Rear. LD Cart Transporter User's Guide, 14766-000 Rev B Page 105 of 190... - Page 106 No Connection Connections to 10, 18 SW_20V_LIDAR Main_Laser_Power Factory-Supplied LIDAR 11 thru 17 GND RS422_LIDAR_TX+ RS422_LIDAR_TX- IN_A1 IN_A2 IN_B1 IN_B2 IN_C1 IN_C2 Pin 10 + 18: Current < 600 mA LD Cart Transporter User's Guide, 14766-000 Rev B Page 106 of 190...
-
Page 107: Robot Core Internal Power Pinouts
BUMPER_L2H Left, Channel 2, High BUMPER_L1H Left, Channel 1, High Speakers ® Connector type Mini-Fit 2 x 2 Speakers Pin No. Designation Notes RIGHT+ Right Speaker RIGHT- LEFT+ Left Speaker LEFT- LD Cart Transporter User's Guide, 14766-000 Rev B Page 107 of 190... - Page 108 Chapter 6: Connectivity Batt Comm. ® Connector type Mini-Fit 3 x 2 Battery control Pin No. Designation Notes RS232_BATT_RXD RS232_BATT_TXD Connections to the Factory-Supplied Battery FBAT_ALWAYS START_BUTTON OFF_BUTTON LD Cart Transporter User's Guide, 14766-000 Rev B Page 108 of 190...
-
Page 109: Chapter 7: Operator Interface
1. Initializing robot core connection... NOTE: This may take a minute or two to initialize. 2. Initializing touchscreen software... 3. Connecting to the robot core... 4. Downloading data from the robot core... LD Cart Transporter User's Guide, 14766-000 Rev B Page 109 of 190... -
Page 110: Touchscreen Configuration
See Screen Logo on page 69. Below the screen logo, the robot status is displayed, first graphically, and below that, in text. LD Cart Transporter User's Guide, 14766-000 Rev B Page 110 of 190... - Page 111 The bottom of the left side of the touchscreen provides a Stay button, to delay the departure of the robot, and a count-down timer, indicating when the robot will depart. LD Cart Transporter User's Guide, 14766-000 Rev B Page 111 of 190...
-
Page 112: Right Screen Pane
Figure 7-5. Payload Alert, Displayed from the Home Tab The preceding screen will not be displayed unless the configuration has been set up in the MobilePlanner software: Config > Robot Physical > Payload > NumSlots LD Cart Transporter User's Guide, 14766-000 Rev B Page 112 of 190... - Page 113 (which accesses screen-cleaning mode). The number of alert messages that are available for viewing is indicated by a number in a red circle on the Status button. See the preceding figure. LD Cart Transporter User's Guide, 14766-000 Rev B Page 113 of 190...
- Page 114 Help shows information on the installed software and contact information. NOTE: No contact information will be displayed unless it is set up in the MobilePlanner software. See Contact Information on page 72. LD Cart Transporter User's Guide, 14766-000 Rev B Page 114 of 190...
- Page 115 Start. When you are done recording, touch Stop. The Duration and Replay File fields are filled in by the recorder. After the recording is completed, use the MobilePlanner software to download the file generated. Figure 7-9. Replay Recorder Start Page LD Cart Transporter User's Guide, 14766-000 Rev B Page 115 of 190...
-
Page 116: Center Pane
Choose Dropoff Mode In this mode, the touchscreen communicates with the queuing manager, which then com- municates with the robot. LD Cart Transporter User's Guide, 14766-000 Rev B Page 116 of 190... - Page 117 AIV is on its way to the but- ton's goal, and when the job is completed (and robot dismissed). LD Cart Transporter User's Guide, 14766-000 Rev B Page 117 of 190...
- Page 118 NOTE: Changing a high-priority dropoff button or job to normal priority will move that button or job to the end of the queue, so it will be serviced last. Figure 7-11. Touchscreen Dropoff Goals Page, with Cancel and Hi-Priority Pop-ups LD Cart Transporter User's Guide, 14766-000 Rev B Page 118 of 190...
-
Page 119: Patrol Route Mode
Stay button to pause the robot, and give the Operator more time to load or unload the payload. Patrol Route Mode The robot does not communicate with the queuing manager in this mode. LD Cart Transporter User's Guide, 14766-000 Rev B Page 119 of 190... -
Page 120: Operator Panel
The motors must be explicitly enabled, either with the dialog box that will pop up (MobilePlan- ner software with Map > Show Robot on), with the ON button, or with an ARCL command. See the following figure: Figure 7-14. Motor Enable Pop-up Dialog LD Cart Transporter User's Guide, 14766-000 Rev B Page 120 of 190... -
Page 121: On Button
A beacon is used to indicate movement and to signal an Operator that the robot is waiting for assistance. Their states are described here, and summarized in the following tables. LD Cart Transporter User's Guide, 14766-000 Rev B Page 121 of 190... - Page 122 Driving with Warning (doesn't prevent driving, such as low battery) The Light Discs will be orange instead of blue for Stopped, Driving, and Turn Signals. Beacon alternates green then yellow. LD Cart Transporter User's Guide, 14766-000 Rev B Page 122 of 190...
- Page 123 Slow pulse: Obstacle Detected The Light Discs will blink yellow if the robot is stopped for an object in its safety zone. Beacon blinks yellow. LD Cart Transporter User's Guide, 14766-000 Rev B Page 123 of 190...
- Page 124 When booting, the Light Discs will display two blue arcs, traveling from the 6 o'clock to the 12 o'clock position and back, in opposite directions. Beacon alternates green, yellow, then red. LD Cart Transporter User's Guide, 14766-000 Rev B Page 124 of 190...
- Page 125 Driving slowly, <300 Orange Circle/ mm/sec Blinking signal Orange Pulse Green/Green/Green Stopped with warning /Yellow Yellow Blink Yellow Blink Object detected in safety zone Orange Left+Right Yellow Blink Lost Half-circles LD Cart Transporter User's Guide, 14766-000 Rev B Page 125 of 190...
-
Page 126: Robot Core Indicators
5 V power is available VBAT Raw battery power is available Right Column LAN MAINT The Maintenance Ethernet connector is showing activity LAN USER The USER LAN connector is showing activity LD Cart Transporter User's Guide, 14766-000 Rev B Page 126 of 190... -
Page 127: Battery And Docking Station
The hard drive is showing activity Battery and Docking Station For the battery, see Battery Indicators and Controls on page 132. For the docking station, see Docking Station on page 133. LD Cart Transporter User's Guide, 14766-000 Rev B Page 127 of 190... -
Page 129: Chapter 8: Operation
Clearance The LD Cart Transporter is designed to operate in an environment that is level and has no doors or other restricted areas too narrow for the cart or transporter. It is the user’s responsibility to ensure that adequate clearance is maintained on each side of the robot, so that a person cannot get trapped between the robot and a wall or other fixed object. -
Page 130: Environment And Floor
The LD Cart Transporter is not intended for use in hazardous environments (explosive gas, water, dust, oil mist). It has an IP rating of IP40. The LD Cart Transporter is not intended for use in the presence of ionizing or non-ionizing radiation. -
Page 131: Typical Operation
ID and password access, to prevent unauthorized operation of an AIV. As configured either by the factory or through your own parameter changes. LD Cart Transporter User's Guide, 14766-000 Rev B Page 131 of 190... -
Page 132: Power And Charging
The battery has one push-button and four LEDs. From left to right, they indicate: LED Color Meaning Error condition Green 25% state of charge Green 50% state of charge Green 75% state of charge Green 100% state of charge LD Cart Transporter User's Guide, 14766-000 Rev B Page 132 of 190... -
Page 133: Docking Station
If the platform is powered off, it will turn on automatically when it is pushed onto the docking station. A platform cannot be turned off while on the docking station. LD Cart Transporter User's Guide, 14766-000 Rev B Page 133 of 190... - Page 134 (0) and then back to on (1). The power plug for AC supply is next to the power switch. Power requirements are 100 - 240 VAC, 50 - 60 Hz, and 8 A. LD Cart Transporter User's Guide, 14766-000 Rev B Page 134 of 190...
-
Page 135: Manually Charging The Battery
NOTE: The docking station cannot charge a platform and a separate battery at the same time. If a platform is on the station, the power to the manual charge connector is cut off. LD Cart Transporter User's Guide, 14766-000 Rev B Page 135 of 190... -
Page 136: Balancing The Battery
We recommend that you do a battery swap weekly, at a minimum. If you see a reduc- tion in run-time, you should do a swap more often than that. LD Cart Transporter User's Guide, 14766-000 Rev B Page 136 of 190... -
Page 137: Startup
CAUTION: The joystick should be locked up when not in use, to prevent unauthorized operation of an AIV. Drive Button Trigger Speed Button Goal Button Figure 8-4. Joystick LD Cart Transporter User's Guide, 14766-000 Rev B Page 137 of 190... -
Page 138: Working With Carts
CAUTION: Pinch hazard. The coupling action of transporter and cart can pinch you if you are not careful. Keep your hands clear of the space between the HMI post and cart when the platform and cart are coupling. LD Cart Transporter User's Guide, 14766-000 Rev B Page 138 of 190... -
Page 139: Cart Brakes
Operator should always release the brakes with the brake release handle. In the unlikely event that the cart becomes unlatched from the LD platform while in motion, the brakes are designed to stop the cart within six feet. -
Page 141: Chapter 9: Options
Extra carts can be ordered, because a cart installation can use more carts than transporter. The part number is 75020-000. The following options are documented in the LD Platform Peripherals Guide. Call Buttons/Door Boxes Call buttons are used to issue a request for an AIV to go to the goal associated with the button. -
Page 142: Acuity Localization
This allows an AIV to achieve accurate alignment at a specific location, typically at a fixed con- veyor, using a sensor to detect magnetic tape at that location. LD Cart Transporter User's Guide, 14766-000 Rev B Page 142 of 190... -
Page 143: Chapter 10: Maintenance
Light Pole (Beacon) Position E-Stop, LATCH, UNLATCH Sensor Antenna x2 Latching Mechanism Cover HMI Post Figure 10-2. Top View of an LD Cart Transporter, Side Laser Support Tubes Removed LD Cart Transporter User's Guide, 14766-000 Rev B Page 143 of 190... -
Page 144: Safety Aspects While Performing Maintenance
DANGER: Only skilled or instructed persons, as defined in the Mobile Robot LD Safety Guide, should perform the procedures and replacement of parts covered in this section. DANGER: During maintenance and repair of the transporter, turn off the transporter and disconnect the battery as soon as possible. -
Page 145: Pinch Hazard
On each side of the laser, under the upper side of the laser slot. Do not lift at the center - there is no frame supporting it there. Do not lift anywhere else! Refer to the following illustration: LD Cart Transporter User's Guide, 14766-000 Rev B Page 145 of 190... -
Page 146: Rear Lifting Area
The center underside of the platform, where the cover has a raised section. Do not lift any- where else! Refer to the following illustration: Figure 10-5. Bottom of Inner Rear cover. Lift from the frame, not the cover. LD Cart Transporter User's Guide, 14766-000 Rev B Page 146 of 190... -
Page 147: Safety Inspection
See Figure 10-6. and Figure 10-7. All warning labels on the LD Cart Transporter system should be checked on a weekly basis for being present and legible. If any of the labels are missing or illegible, they should be replaced. - Page 148 Yellow circle surrounding the E-Stop, 11229-167 This is labeled EMERGENCY STOP. It is located on the Operator Panel, at the top of the HMI post. No Riding Label, 18178-000 LD Cart Transporter User's Guide, 14766-000 Rev B Page 148 of 190...
-
Page 149: Informative Labels
The labels, with part numbers, are: HMI post button label, 14463-000 This includes the BRAKE, ON, OFF, and Keyswitch labels. HMI post LATCH, UNLATCH button labels, 14628-000 LD Cart Transporter User's Guide, 14766-000 Rev B Page 149 of 190... -
Page 150: Cleaning
Laser Magnetic Labels Field Labels (Underside of Platform) Figure 10-6. Locations of Labels on LD Cart Transporter Magnetic Field and No-ride Labels Ø 0.25 Pass-through hole for brake cable, through rear frame tube Figure 10-7. Magnetic Field/Pacemaker, No Riding Labels on Cart 10.4 Cleaning... -
Page 151: Ld Cart Transporter And Cart
Pay particular attention to areas around goals and frequently- traveled paths. LD Cart Transporter and Cart Some parts of the transporter require periodic cleaning. The following table gives a summary of cleaning procedures for the LD Cart Transporter system. Table 10-1. Cleaning Item Period... -
Page 152: Lasers
Care must be taken, when accessing the payload bay, that the wires and connections between the platform and the HMI post and coupling plate are not damaged. See Top View of an LD Cart Transporter, Side Laser Support Tubes Removed on page 143. -
Page 153: Removing Top Plate
2. Reinstall the four M3 screws holding the Latching Mechanism cover to the top plate. Use the screws previously removed from the Latching Mechanism cover. These go into four 45 mm standoffs in the top plate. LD Cart Transporter User's Guide, 14766-000 Rev B Page 153 of 190... -
Page 154: Removing And Installing Ld Cart Transporter Covers
Chapter 10: Maintenance 10.6 Removing and Installing LD Cart Transporter Covers Many of the maintenance procedures require removing some of the platform's covers. Most covers are held in place with just magnets. The rear outer cover has an additional brace at the bottom for support, the bumper cover uses screws and magnets, and the access panel uses just a push-push (toggle) latch. - Page 155 1. Pull the top of the cover away from the chassis a few inches. The cover will pivot on the metal brace at its bottom edge. 2. Pull the four sonar wires, with their connectors, out of the chassis holes. LD Cart Transporter User's Guide, 14766-000 Rev B Page 155 of 190...
- Page 156 Figure 10-9. Sonar Connectors, with Connectors Exposed 4. Tilt the cover down to about 45°, and slide the brace on the bottom of the cover out of its clip. LD Cart Transporter User's Guide, 14766-000 Rev B Page 156 of 190...
-
Page 157: Installing Covers
5. Tuck the connectors into the four holes in the chassis, until just an inch of sonar lead is sticking out. 6. Tilt the top of the cover up to meet the chassis. LD Cart Transporter User's Guide, 14766-000 Rev B Page 157 of 190... - Page 158 Access Panel 1. Slide the panel to the right, so its tab goes under the left side cover. The panel is attached with a lanyard, to prevent getting lost. LD Cart Transporter User's Guide, 14766-000 Rev B Page 158 of 190...
-
Page 159: Replacing Periodic Parts
19/7 is 4 years. (19 hours/day is full-time, with time-out to recharge.) NOTE: There are no serviceable parts inside the battery case. Do not open it. WARNING: Replace the battery only with an Omron Adept Technologies, Inc. battery. Dispose of the battery according to all local and national environmental regulations regarding electronic components. -
Page 160: Replacing Non-Periodic Parts
WARNING: There are no user-serviceable parts inside the docking station. Do not remove the covers of the docking station. There is high voltage inside, and the covers are not interlocked. LD Cart Transporter User's Guide, 14766-000 Rev B Page 160 of 190... - Page 161 2. Remove the roller and bearing from the docking station. 3. Install the new roller and bearing, using the retained shoulder bolt. Switch Roller Figure 10-12. Docking Station Roller Location LD Cart Transporter User's Guide, 14766-000 Rev B Page 161 of 190...
-
Page 162: Safety Scanning Laser
CAUTION: The programming for the laser is contained in the cap. If you replace the cap, this programming will be lost, and must be restored by factory personnel. Figure 10-13. Safety Scanning Laser LD Cart Transporter User's Guide, 14766-000 Rev B Page 162 of 190... -
Page 163: Obstacle Detection And Coupling Lasers
1. Remove the four M5 screws holding the laser guard to the mounting plate along with their lock washers and flat washers. This will free the guard from the plate. Retain the M5 screws, lock washers, and flat washers for reassembly. LD Cart Transporter User's Guide, 14766-000 Rev B Page 163 of 190... - Page 164 1. Loosen the two M4 screws holding the laser guard to the mounting flange. The screws go through two slots in the guard, so the guard can slide off after the screws are loosened. LD Cart Transporter User's Guide, 14766-000 Rev B Page 164 of 190...
- Page 165 CAUTION: Take care not to scratch the laser lens when removing the laser guard. 5. Remove the two M4 screws, lock washers, and flat washers holding the laser to the LD Cart Transporter User's Guide, 14766-000 Rev B Page 165 of 190...
-
Page 166: Rear Sonar Units
The platform's four rear sonar units can be replaced individually. All four sonar units are identical, although two are used as emitters and two as receivers, in pairs. LD Cart Transporter User's Guide, 14766-000 Rev B Page 166 of 190... -
Page 167: Sonar Controller
Chapter 10: Maintenance 1. Remove the inner and outer rear covers from the platform. Refer to Removing and Installing LD Cart Transporter Covers on page 154. 2. Unscrew the connection between the sonar cable and the sonar unit's lead. Ensure that both the connectors and leads are labeled, and match. If not, label them. -
Page 168: Cart Latching Mechanism
Chapter 10: Maintenance Cart Latching Mechanism CAUTION: The latch mechanism belt adjustment is for Omron Adept Tech- nologies, Inc. Field Service only. Changing the belt tension can lead to pre- mature failure. The Delrin end of the Latching Mechanism is subject to wear, and may need replacement. -
Page 169: Light Discs
1. Remove the side cover, on the side that needs the light disc assembly replaced. Refer to Removing and Installing LD Cart Transporter Covers on page 154. 2. Unscrew the four screws holding the light disc PCA to the side cover. -
Page 170: Wheels And Tires
Removal 1. Remove the side cover a small distance from the platform on the side where you want to replace the wheel and tire. Refer to Removing and Installing LD Cart Transporter Covers on page 154. The light disc PCA cable will still be attached. - Page 171 4. Remove the pin or screw you used to hold the wheel in the up position. 5. Put the side cover next to the platform, and attach the light disc cable to the light disc PCA. 6. Reinstall the side cover. LD Cart Transporter User's Guide, 14766-000 Rev B Page 171 of 190...
-
Page 172: Drive Assemblies
3. Disconnect battery power by unplugging the two cables at the rear of the battery. 4. Remove the side cover a small distance from the platform on the side where you want to replace the drive assembly. Refer to Removing and Installing LD Cart Transporter Covers on page 154. -
Page 173: Platform Casters
8. Reinstall the rear cover. Platform Casters The platform casters should be checked every 3 months. If they show signs of cracking, excess- ive wear, or any damage they should be replaced. LD Cart Transporter User's Guide, 14766-000 Rev B Page 173 of 190... - Page 174 Bolt Hole Fitting M10 x 30 mm Screw, Flat Head Socket Completed Assembly Figure 10-22. LD Cart Transporter Caster Replacement 2. Remove the caster from the platform. LD Cart Transporter User's Guide, 14766-000 Rev B Page 174 of 190...
-
Page 175: Cart Casters
Figure 10-23. Front Cart Caster Screw Assembly 1. Remove the M10 screw and washer holding the caster to the cart. Threadlocker was used on this screw during assembly. LD Cart Transporter User's Guide, 14766-000 Rev B Page 175 of 190... - Page 176 5. Push the inner wire into the brake cable housing until the brake pin, which presses against the caster wheel surface, slides out of the caster mounting screw. LD Cart Transporter User's Guide, 14766-000 Rev B Page 176 of 190...
- Page 177 NOTE: Do not use threadlocker on the rear caster mounting screws. Torque to 73.2 N-m (54 ft-lbf). 4. Push the brake cable inner wire back into the cable housing, so the ball end slides out of LD Cart Transporter User's Guide, 14766-000 Rev B Page 177 of 190...
-
Page 178: Cart Brake Release
Adjust. Hard Stop Pulley Lever Left Actuator Cable Brake Adjust. Lever Cable Anchor Figure 10-25. Internal Brake-Release Mechanism Replacing Brake Lever Cable To replace the cart brake-release cable: LD Cart Transporter User's Guide, 14766-000 Rev B Page 178 of 190... -
Page 179: Robot Core
This is two pieces, held in place with four screws down into the chassis, with four more going sideways into the robot core itself. Retain all of these screws for installing the new robot core. See the following figure: LD Cart Transporter User's Guide, 14766-000 Rev B Page 179 of 190... - Page 180 16. Reconnect the battery power and data cables to the battery. 17. Close and latch the battery compartment door. 18. Reinstall the inner rear cover. 19. Reinstall the platform top plate and Latching Mechanism cover. LD Cart Transporter User's Guide, 14766-000 Rev B Page 180 of 190...
-
Page 181: E-Stop And Safety Laser Commissioning
1. From the MobilePlanner software, select: Main Menu > Robot > Safety Commissioning 2. Follow the on-screen instructions to complete the test. You can print a certificate after successful completion of the commissioning. LD Cart Transporter User's Guide, 14766-000 Rev B Page 181 of 190... -
Page 183: Chapter 11: Technical Specifications
Figure 11-1. Overall LD Cart Transporter Dimensions 10x Ø 6.6 (0.26) THRU (17.83) (16.89) 299.5 (11.79) 153.4 (6.04) 24.1 (0.95) Units are mm (in.) Figure 11-2. Coupling Plate Dimensions, Arms Removed LD Cart Transporter User's Guide, 14766-000 Rev B Page 183 of 190... -
Page 184: Specifications
Overall Height (with HMI post) 1372 mm (54.8 in.) Weight (with battery) 79 kg (175 lb) Frame clearance 27 mm (1.1 in.) Suspension Drive wheels 2 grey non-marking foam-filled rubber LD Cart Transporter User's Guide, 14766-000 Rev B Page 184 of 190... -
Page 185: Ld Cart Transporter Performance
F 25 is a fairly lenient specification. Battery Duty cycle Weight 19 kg (42 lb) Voltage 22 - 30 VDC 72 Ah Capacity Energy 1.84 kWh nominal LD Cart Transporter User's Guide, 14766-000 Rev B Page 185 of 190... -
Page 186: Battery Output
22 - 30 VDC battery 10 A Switched 22 - 30 VDC battery 10 A Safe, Switched * 10 A Switched and 10 A Safe, Switched share the 10 A of current. LD Cart Transporter User's Guide, 14766-000 Rev B Page 186 of 190... -
Page 187: Cart
Mounting Directly to floor, wall bracket (included), or on floor (free-standing) with included floor plate Indicators Power on - blue Charging - yellow Connector For out-of-platform battery charging LD Cart Transporter User's Guide, 14766-000 Rev B Page 187 of 190... - Page 190 OMRON ELETRÔNICA DO BRASIL LTDA • HEAD OFFICE São Paulo, SP, Brasil • 55.11.2101.6300 • www.omron.com.br OMRON EUROPE B.V. • Wegalaan 67-69, NL-2132 JD, Hoofddorp, The Netherlands. • +31 (0) 23 568 13 00 • www.industrial.omron.eu Authorized Distributor: Controllers & I/O •...
Need help?
Do you have a question about the LD and is the answer not in the manual?
Questions and answers