Dexcom G5 MOBILE User Manual
Continuous glucose
monitoring system
Hide thumbs
Also See for G5 MOBILE:
- User manual (411 pages) ,
- Quick start manual (72 pages) ,
- Getting started manual (68 pages)
Table of Contents
Advertisement
Quick Links
Download this manual
See also:
User Manual
Advertisement
Table of Contents
Troubleshooting

Subscribe to Our Youtube Channel
Related Manuals for Dexcom G5 MOBILE


Summary of Contents for Dexcom G5 MOBILE
- Page 1 CONTINUOUS GLUCOSE MONITORING SYSTEM User Guide...
- Page 2 (high blood glucose) occurrence and/or making a treatment decision that may result in injury. If your glucose alerts and readings from your Dexcom G5 Mobile CGM System do not match your symptoms or expectations, use a fingerstick blood glucose value from your blood glucose meter to make diabetes treatment decisions.
-
Page 3: Table Of Contents
7.6 Preparing for Calibration ......113 Part 2: Let's G5! The Basics 7.7 Ready? Set? Calibrate! ......114 Chapter 4 - What Is the Dexcom G5? ..35 7.8 Calibration Errors ........121 4.1 System Description ........35 Chapter 8 - Ending Your Sensor Session and 4.2 Safety Statement ........ - Page 4 9.4 Rate of Change Arrows ......173 9.5 Error Messages ........174 Dexcom G5......273 15.1 Introduction ......... 273 Chapter 10 - Daily Events Affect Your Glucose 15.2 Basic Maintenance .......274...
-
Page 5: Part 1: Getting Started
GETTING STARTED • Glossary • Getting Started • Indications for Use and Safety Statement • Risks and Benefits... - Page 6 Page intentionally left blank...
-
Page 7: Glossary
The G5 Mobile app was developed as a display for continuous glucose monitoring. It may also be referred to as the Dexcom CGM app, or the app. - Page 8 It’s important to treat hyperglycemia. If left untreated, hyperglycemia can lead to serious complications. The default high alert in the Dexcom G5 is set to 200 mg/dL. Consult your healthcare professional to determine the appropriate hyperglycemia setting for you.
- Page 9 The removal poses a security risk, and data may become vulnerable. Do not use, install, or run the G5 Mobile app on a jailbroken smart device. The app may not work correctly on a jailbroken smart device.
- Page 10 Warning A safety statement letting you know the following feature has important hazard information. Describes serious and life-threatening circumstances of using the Dexcom G5, their consequences, and how to avoid the hazard. Dexcom G5 Mobile System User Guide Glossary...
-
Page 11: System Journey
(CGM) device, the Dexcom G5 Mobile CGM System (Dexcom ® G5) allows you to break free from constant fingersticks. But how do you use the Dexcom G5? What are its features? Do you need to avoid anything? Where do you even begin? This chapter is the first step to answering these and many other questions. -
Page 12: Self-Paced Resources
Online Tutorials First Steps With Your CGM Designed for those who have never used a Dexcom CGM, this tutorial covers what to expect in your first week and includes links to step-by-step videos on how to insert your sensor, calibrations, ending a sensor session, etc. - Page 13 One of the great things about the GSG is you can use it with the videos, taking notes as you Accessing the GSG: • Booklet in the receiver package Both the tutorial and the GSG give you the basics in getting started with your Dexcom G5. But what if you want more detailed information? User Guide...
- Page 14 • Travel Tips • Customer Service Contacts • Technical Information • Troubleshooting • Package Symbols At the end of your Dexcom G5 user guide is the user guide for Dexcom Share , a remote ® monitoring system. Part 5: Sharing Is Caring •...
-
Page 15: Your Dexcom Account
You’ll need a username and password to set up the G5 Mobile app and for reordering supplies. If you haven’t already done so, go to dexcom.com and set up your own account. Or, if you prefer, the G5 Mobile app walks you through creating your log-in credentials as part of your initial app setup. Summary Now You Can: •... - Page 16 Page intentionally left blank...
-
Page 17: Chapter 2 - Indications For Use And Safety Statement
Indications for Use and Safety Statement 2.1 Introduction We want the Dexcom G5 to be a valuable tool in your diabetes management. Like any system, there are steps to take to get the most out of it. As excited as you are about getting started,... -
Page 18: Safety Statements
Indications let you know who should use the Dexcom G5 System and when. Contraindications Contraindications let you know when not to use the Dexcom G5. If used during these situations, you may hurt yourself or the system; the risk of use clearly outweighs the benefit. - Page 19 Why you need to follow the steps: Calibrating less often than every 12 hours might cause inaccurate sensor glucose readings. And finally what happens, or the Consequences, if you don’t: Missing a severe low (hypoglycemia) or high (hyperglycemia) glucose event. Dexcom G5 Mobile System User Guide Indications for Use and Safety Statement...
-
Page 20: Overview Of Safety Statements
The Dexcom G5 is intended for single patient use and requires a prescription. Important User Information Failure to use the Dexcom G5 and its components according to the instructions for use and all indications, contraindications, warnings, precautions, and cautions may result in you missing a severe hypoglycemia (low blood glucose) or hyperglycemia (high blood glucose) occurrence and/or making a treatment decision that may result in injury. - Page 21 1.858.200.0200. Do Not Use Damaged Goods If the Dexcom G5 receiver or Dexcom G5 transmitter is damaged or cracked, do not use it. This could create an electrical safety hazard causing possible electrical shocks resulting in injury. In addition, a damaged or cracked Dexcom G5 receiver or Dexcom G5 transmitter may cause the Dexcom G5 System not to function properly.
- Page 22 Diabetes Treatment Decisions If your Dexcom G5 does not display a sensor glucose reading and an arrow or if you are getting inaccurate or inconsistent readings, use a fingerstick blood glucose value from your blood glucose meter to make diabetes treatment decisions.
- Page 23 Placement Do not insert the sensor component of the Dexcom G5 in a site other than the belly/ abdomen (ages 2 years and older) or the upper buttocks (ages 2 to 17 years). The placement and insertion of the sensor component of the Dexcom G5 is not approved for other sites.
- Page 24 The Dexcom G5 Alarm/Alert vibrations are not any different from other vibrating apps on your smart device. Medical device apps, like the G5 Mobile app, do not have any special priorities over your smart device’s features. You cannot determine if a vibration is a notification from your G5 Mobile app or another app.
- Page 25 Do not enter Dexcom G5 sensor glucose readings for calibration. Entering incorrect blood glucose values, blood glucose values obtained more than 5 minutes before entry, or sensor glucose readings might affect sensor performance.
- Page 26 Setting Alarm/Alert Notifications When using both a receiver and a smart device with your Dexcom G5, you must set your settings separately in each. If you set up one device and then use another, you might not get an Alarm or Alert.
- Page 27 If the receiver or smart device is turned off (Shut Down), it will not display sensor data, information, Alarm or Alerts generated by the Dexcom G5. Make sure the display devices are turned on; otherwise you won’t get sensor glucose readings or Alarm or Alerts.
- Page 28 The transmitter is tied to the sensor glucose readings. If the transmitter is used by more than one person, the glucose readings, alerts, and reports may be wrong. Caution U.S. law restricts the sale of the Dexcom G5 to sale by or on order of a physician. Summary Now You Can: •...
-
Page 29: Chapter 3 - Risks And Benefits
Getting Started: Risks and Benefits When using any medical device, there are risks and benefits. In this chapter, you’ll learn what they are, helping you decide if Dexcom G5 is right for you. First, let’s review some possible risks. 3.1 Risks There are some risks with using real-time CGM. - Page 30 BG meter. If you are a caregiver of someone using the Dexcom G5, watch how they act. If their symptoms don’t match the CGM, take a fingerstick BG measurement.
-
Page 31: Benefits
CGM information: your trend arrow and sensor glucose reading. If you are using the G5 Mobile to make treatment decisions, make sure your Alerts are on. Talk to your healthcare professional to determine your best Alert levels. - Page 32 Real-time CGM can help improve your A1C as well as improve the quality of your glucose control. If your A1C is at or below 7%, using a CGM such as the Dexcom G5 helps reduce hypoglycemia (Juvenile Diabetes Research Foundation Continuous Glucose Monitoring Study Group, 2008).
- Page 33 Japanese Patients with Non-insulin-dependent Diabetes Mellitus: A Randomized Prospective 6-year Study. Diabetes Research and Clinical Practice, 28(2), 103-117. What’s Next? You’ve read the Safety Statements, reviewed the risks and benefits; now let’s take a look at the Dexcom G5! Dexcom G5 Mobile System User Guide Risks and Benefits...
- Page 34 Page intentionally left blank...
-
Page 35: Part 2: Let's G5! The Basics
LET'S G5! THE BASICS • Introduction to the Dexcom G5 • Initial Setup • Starting a Sensor Session: Inserting the Sensor & Attaching the Transmitter • Calibration • Ending a Sensor Session & Transmitter Session... - Page 36 Page intentionally left blank...
-
Page 37: Chapter 4 - What Is The Dexcom G5
Let’s G5! The Basics: What Is the Dexcom G5? 4.1 System Description Now it’s time to get an overview of the Dexcom G5 System. After this chapter, you’ll be able • Explain what Dexcom G5 does • Describe options to view trends •... -
Page 38: The Dexcom G5 System
• Pregnant women • Persons on dialysis Do not use the Dexcom G5 Mobile CGM System in critically ill patients. It is not known how different conditions or medications common to the critically ill population may affect performance of the system. Sensor glucose readings may be inaccurate in critically ill patients. - Page 39 For a list of current compatible smart devices and operating systems go to: dexcom.com/compatibility Chapter 5 covers how to set up your smart device with the G5 Mobile app. The primary difference between the receiver and app is not the information they give you, but how that information is presented.
-
Page 40: What's New To The Dexcom G5
In Chapter 11, you can learn more about the Alarm and Alerts feature. Viewing Your Glucose Values The Dexcom G5 allows you to see the last 1-3-6-12-24 hours of your sensor glucose readings. On the receiver, from the home screen, press up/down arrows to view. On a smart device, hold upright in portrait mode to see the most recent three hours;... - Page 41 Check your CGM information on your smart device without needing to open the app, even when the device is locked. Swipe down from the top of your screen to access the G5 Mobile widget in the Apple Today view. This is where you might check the weather or stocks if using the default settings.
-
Page 42: System Information
Share by tapping on the Share icon in the G5 Mobile app, follow a few simple steps, and then invite up to five people to connect with you. After downloading the Dexcom Follow™ app, each of the five people becomes your Follower. - Page 43 Megjegyzés: Ha a használati útmutató egy másik példányára lenne szüksége, kunt u dit downloaden op www.dexcom.com of kunt u contact opnemen met de lokale distributeur. azt letöltheti a www.dexcom.com weboldalról, vagy vegye fel a kapcsolatot a helyi forgalmazóval.
- Page 44 (Continued from previous page) Transmitter Reusable transmitter Receiver package Receiver Receiver’s USB charging and download cable AC power adapter (Continued on next page) Dexcom G5 Mobile System User Guide What Is the Dexcom G5?
- Page 45 This section is meant as a quick overview of each part; specifics for each are found in following chapters. For detailed product specifications and technical information, please go to Chapter 18. The Dexcom G5 is comprised of four key parts: 1. Single use sensor 2. Reusable transmitter 3.
-
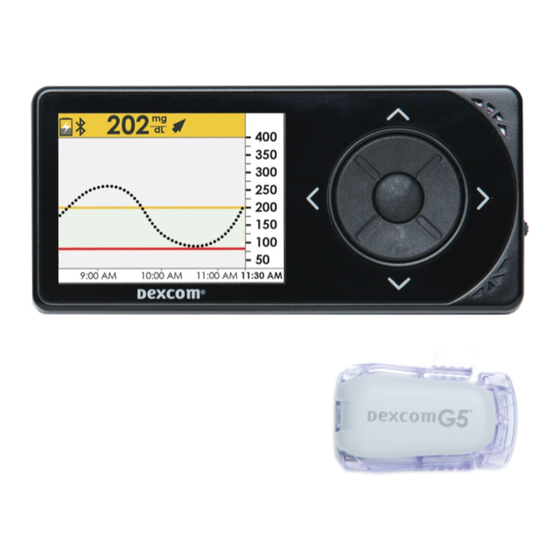
Page 46: Sensor Overview
Chapter 6. Plunger Safety Lock Applicator Barrel (contains small introducer needle Collar and sensor) Transmitter Latch Sensor Pod Release Tab Adhesive Patch Figure 1. Dexcom G5 Sensor Applicator and Pod Dexcom G5 Mobile System User Guide What Is the Dexcom G5? - Page 47 Transmitter Cradle Holds transmitter in place during sensor session. Wire measures glucose levels in fluid in between your cells. Sensor Wire Attached to sensor pod. Discarded with pod after session. Dexcom G5 Mobile System User Guide What Is the Dexcom G5?
-
Page 48: Transmitter Overview
Receiver or smart devices prompts you when battery is running low. • Serial number is on the back More transmitter features and insertion information is in Chapter 6. Now that you are familiar with the sensor and transmitter, let’s review the Dexcom G5 receiver. Dexcom G5 Mobile System User Guide... - Page 49 What it does Provides data about your glucose Receiver trends via screen display, sounds, and vibration. Plug USB cable into port for Micro USB Port recharging. (Continued on next page) Dexcom G5 Mobile System User Guide What Is the Dexcom G5?
- Page 50 Please Note: Your adapter/charger may look different. Shows sensor glucose readings, trend graphs and arrows, Display Screen Alarm/Alerts, sensor session status. Change settings on Menu screen. (Continued on next page) Dexcom G5 Mobile System User Guide What Is the Dexcom G5?
- Page 51 Press to scroll up or down to select menu items or set values. Up/Down Arrows Press to scroll back and forth beyond from the 3-hour trend graph to the 1-6-12-24 views. Dexcom G5 Mobile System User Guide What Is the Dexcom G5?
-
Page 52: Smart Device Overview
4.7 Smart Device Overview The G5 Mobile app was created to work with your smart device, giving you even more options in monitoring your glucose trends and patterns. The app is similar to all other apps. This user guide is not meant to show you how to use your smart device. Please contact your smart device support or read your smart device’s user guide for assistance. -
Page 53: Chapter 5 - Set Up Your Display Devices
Set Up Your Display Devices 5.1 Introduction In the previous chapter, you received a high level overview of the Dexcom G5 and learned you can monitor your glucose levels with different display devices. Now it’s time to set up your G5 Mobile app and your receiver. -
Page 54: Why Different Monitoring Methods
The next section walks you through the initial setup for the app. To set up the receiver, go to Section 5.5. If you want to use both the G5 Mobile app and the receiver, you need to set up each individually. - Page 55 See your smart device instructions to learn how to change its settings. Use the following with your CGM system: • Bluetooth: Your transmitter talks to your G5 Mobile app with Bluetooth wireless technology. Bluetooth is designed for wireless communication between devices (unlike Wi-Fi, which wirelessly connects devices to the Internet).
- Page 56 Once you have verified your smart device’s settings are right, the next step is installing the G5 Mobile app • The G5 Mobile app needs to be open and running in the background. This may drain your smart device’s battery quicker than you expect. Make sure you check the battery is charged Don’t change your smart device’s time because it can make the time on the trend screen...
- Page 57 Installing the app is easy! Simply download the G5 Mobile app from your smart device’s store. Do not use, install, or run the G5 Mobile app on a jailbroken smart device. The app may not work correctly or remain secure on a jailbroken smart device.
- Page 58 Step What you see What you do Introductory Screens Tap G5 Mobile app icon to open app. Swipe through introductory screens or tap Log In. (Continued on next page) Dexcom G5 Mobile System User Guide Set up Your Display Devices...
- Page 59 What you do Introductory Screens Enter existing username and password Need a Dexcom username and password? Tap Sign Up. Complete username/password fields. Tap Login once. (Continued on next page) Dexcom G5 Mobile System User Guide Set up Your Display Devices...
- Page 60 (Continued from previous page) Step What you see What you do Introductory Screens Tap Log In. (Continued on next page) Dexcom G5 Mobile System User Guide Set up Your Display Devices...
- Page 61 Once each screen is read, tap appropriate answer to move forward. Tap Full Safety Statement or, when applicable, I don’t understand to get more information. (Continued on next page) Dexcom G5 Mobile System User Guide Set up Your Display Devices...
- Page 62 Scroll to select another amount. Tap Save to move forward. Once your High Glucose Alert is set, you’ll receive an Alert if your glucose rises above your set amount. (Continued on next page) Dexcom G5 Mobile System User Guide Set up Your Display Devices...
- Page 63 Make sure you get your Alarm/Alert notifications. Tap the appropriate response to move forward and set your notifications. Tap OK or Don’t Allow to receive Alarm/Alert notifications. (Continued on next page) Dexcom G5 Mobile System User Guide Set up Your Display Devices...
- Page 64 The next screens provide suggestions for device volume, Do Not Disturb, and other basic settings. Tap appropriate answer to move forward. Connecting/Pairing Transmitter With App Tap Next. (Continued on next page) Dexcom G5 Mobile System User Guide Set up Your Display Devices...
- Page 65 What you do Connecting/Pairing Transmitter With App Verify Bluetooth is on. The app will check Bluetooth is turned “On.” Get your transmitter box. Tap Take Photo. (Continued on next page) Dexcom G5 Mobile System User Guide Set up Your Display Devices...
- Page 66 Chapter 8. Please Note: Picture is representational only; the back of your transmitter box may not look the same. Check mark confirms successful transmitter SN scan. (Continued on next page) Dexcom G5 Mobile System User Guide Set up Your Display Devices...
- Page 67 Connecting/Pairing Transmitter With App If unable to use app’s scanning device: Tap Enter transmitter SN by hand. Use keyboard to enter transmitter SN. Confirm correct SN. Tap Save. (Continued on next page) Dexcom G5 Mobile System User Guide Set up Your Display Devices...
- Page 68 Insert sensor and attach transmitter following video’s instructions. See Chapter 6 for more information. Wait up to 30 minutes for smart device and transmitter to connect. (Continued on next page) Dexcom G5 Mobile System User Guide Set up Your Display Devices...
- Page 69 Tap Sensor warmup circle to start your two-hour sensor warmup. Congratulations! When you see the sensor warmup timer, your initial setup is complete. Dexcom G5 Mobile System User Guide Set up Your Display Devices...
-
Page 70: Dexcom G5 Receiver
If you have any issues setting up the G5 Mobile app, always contact Technical Support (available 24/7): • TechSupport@dexcom.com Toll free: 1.888.738.3646 • Toll call: 1.858.200.0200 • If you are having problems with your smart device, contact your smart device’s support line. -
Page 71: Dexcom G5 Mobile System User Guide
• Right Arrow – Go forward to next item or screen Initial Setup of the Dexcom G5 Receiver Press the select button to turn receiver on. The first screen is the startup screen with progressing green bars. Once complete, a setup wizard guides you through the initial setup steps. -
Page 72: Dexcom G5 Mobile System User Guide
Press right arrow to move forward. Press up/down arrows to change month. Press right arrow. Press up/down arrows to change day. Press right arrow to move to time. (Continued on next page) Dexcom G5 Mobile System User Guide Set up Your Display Devices... -
Page 73: Dexcom G5 Mobile System User Guide
Chapter 8. Please Note: Image is representational only; your box label may look different. If transmitter box isn’t available: SN is on transmitter’s back (Continued on next page) Dexcom G5 Mobile System User Guide Set up Your Display Devices... -
Page 74: Dexcom G5 Mobile System User Guide
Press select button to save and close. Setting High Alert System default is set at 200 mg/dL. Press select button to save at present levels and close. (Continued on next page) Dexcom G5 Mobile System User Guide Set up Your Display Devices... -
Page 75: Dexcom G5 Mobile System User Guide
• Download the G5 Mobile app • Set up app with the recommended settings • Successfully set up your Dexcom G5 receiver What’s Next? Now that you have completed setting up your app and/or the receiver, your next step is starting a sensor session. - Page 76 Page intentionally left blank...
-
Page 77: Chapter 6 - Starting A Sensor Session: Inserting Sensor, Attaching Transmitter, And Starting Your Session
Now that your display devices are set up, you’re ready to begin a sensor session. If this is your first time inserting a sensor, you may want to watch the Dexcom G5 sensor insertion video to get a better understanding of the steps. -
Page 78: Safety Statements
Following are some important warnings and precautions to review; we want to make sure you and the system are safe before starting a sensor session. Dexcom G5 Mobile System User Guide Starting a Sensor Session: Inserting Sensor, Transmitter, and Starting Your Session... - Page 79 Dexcom G5 Mobile System User Guide Starting a Sensor Session: Inserting Sensor, Transmitter, and Starting Your Session...
- Page 80 Warning Do: Use BG values from your BG meter for treatment decisions (for example, how much insulin to take) if your Dexcom G5 does not display a sensor glucose reading or if you are getting inconsistent readings. Why: Inconsistent readings may indicate that your sensor glucose readings are inaccurate.
-
Page 81: Prepping For Sensor Insertion
6.3 Prepping for Sensor Insertion Before inserting a sensor, make sure you have everything you need. Some items are included in the Dexcom G5 packages, others are not. Items Included in Your Dexcom G5 Packages For sensor insertion, you need the sensor and transmitter. - Page 82 8. Transmitter Latch 7. Sensor Pod 9. Release Tab 2. Adhesive Patch Figure 3. Dexcom G5 Sensor Applicator and Pod The following table reviews the sensor applicator components in order of use. Applicator Components Order of use Name What it does Sterilized for your protection.
- Page 83 You won’t be able to start a sensor session if your transmitter isn’t paired with your receiver and/or smart device. Not included in packages: • Alcohol wipes Dexcom G5 Mobile System User Guide Starting a Sensor Session: Inserting Sensor, Transmitter, and Starting Your Session...
-
Page 84: Choosing Your Insertion Site
“pinchable,” and free from where rubbing can occur (along the waistband, seat belt strap or where you lie when sleeping). For more help on ideal sensor insertion sites, contact your healthcare professional. Dexcom G5 Mobile System User Guide Starting a Sensor Session: Inserting Sensor, Transmitter, and Starting Your Session... - Page 85 • Use sites where bones are close to the surface of your skin (for example; ribs or hip bones) • Use sites where sensor can be rubbed against Dexcom G5 Mobile System User Guide Starting a Sensor Session: Inserting Sensor, Transmitter, and Starting Your Session...
-
Page 86: Inserting Your Sensor
Once dry, your skin may feel slightly sticky. NOTE: Contact your healthcare professional for specific questions regarding the use of medical tape, barrier wipes and/or other adhesives as it relates to your use of Dexcom CGM. 6.5 Inserting Your Sensor You’ve collected all of the needed items to begin a sensor session, viewed the tutorials,... - Page 87 Closely inspect sensor, check it has not been damaged. If yes, do not use. Keep sensor packaging until sensor session is complete. (Continued on next page) Dexcom G5 Mobile System User Guide Starting a Sensor Session: Inserting Sensor, Transmitter, and Starting Your Session...
- Page 88 Move fingers around top of adhesive patch several times to secure tape. Inserting Sensor Wire Hold applicator barrel. Pull out safety lock. (Continued on next page) Dexcom G5 Mobile System User Guide Starting a Sensor Session: Inserting Sensor, Transmitter, and Starting Your Session...
- Page 89 Pull back collar all the way towards your thumb. You should hear 2 clicks. NOTE: Finger placement is important for correct removal. (Continued on next page) Dexcom G5 Mobile System User Guide Starting a Sensor Session: Inserting Sensor, Transmitter, and Starting Your Session...
- Page 90 You have successfully inserted the sensor! At this point, you should have two items attached to your belly or upper buttocks: 1. Sensor pod 2. Transmitter latch Dexcom G5 Mobile System User Guide Starting a Sensor Session: Inserting Sensor, Transmitter, and Starting Your Session...
-
Page 91: Attaching Your Transmitter
Keep box. Save safety lock from sensor applicator (helps remove transmitter once sensor session is over). Get alcohol wipe. (Continued on next page) Dexcom G5 Mobile System User Guide Starting a Sensor Session: Inserting Sensor, Transmitter, and Starting Your Session... - Page 92 If transmitter is not completely snapped in, you may have a bad connection and it won’t be watertight. (Continued on next page) Dexcom G5 Mobile System User Guide Starting a Sensor Session: Inserting Sensor, Transmitter, and Starting Your Session...
- Page 93 The remaining steps vary from app to receiver: • Letting your device know you need to start the sensor warmup. • Following your warmup countdown Dexcom G5 Mobile System User Guide Starting a Sensor Session: Inserting Sensor, Transmitter, and Starting Your Session...
-
Page 94: Loose Sensor Pod
BG values into either the smart device or the receiver. We’ll first review starting the sensor session for the app. Dexcom G5 Mobile System User Guide Starting a Sensor Session: Inserting Sensor, Transmitter, and Starting Your Session... - Page 95 Keep smart device within 20 feet of transmitter during the sensor warmup period. (Continued on next page) Dexcom G5 Mobile System User Guide Starting a Sensor Session: Inserting Sensor, Transmitter, and Starting Your Session...
- Page 96 Chapter 7 covers calibrating. Initial calibration prompt tells you when warmup is complete. Sensor warmup is complete. You’re ready to calibrate! Dexcom G5 Mobile System User Guide Starting a Sensor Session: Inserting Sensor, Transmitter, and Starting Your Session...
- Page 97 Start Sensor progress bar confirms two-hour sensor warmup. Keep your receiver within 20 feet during the warmup period. (Continued on next page) Dexcom G5 Mobile System User Guide Starting a Sensor Session: Inserting Sensor, Transmitter, and Starting Your Session...
-
Page 98: Receiver Bluetooth Tips
Unlike with other Alerts, if your smart device is on Silent or Do Not Disturb, you won’t get a vibration or hear any Dexcom G5 Mobile System User Guide Starting a Sensor Session: Inserting Sensor, Transmitter, and Starting Your Session... - Page 99 Press down arrow to highlight Settings. Press select button. Press down arrow to highlight Transmitter. Press select button. Press select button again. (Continued on next page) Dexcom G5 Mobile System User Guide Starting a Sensor Session: Inserting Sensor, Transmitter, and Starting Your Session...
- Page 100 If sensor session has started, to correct transmitter SN, you must stop the sensor session. Press down arrow to highlight Stop Sensor. Press select button. (Continued on next page) Dexcom G5 Mobile System User Guide Starting a Sensor Session: Inserting Sensor, Transmitter, and Starting Your Session...
- Page 101 Press down arrow to highlight Settings. Press select button. Press down arrow to highlight Transmitter. Press select button. Highlight Transmitter SN. Press select button. (Continued on next page) Dexcom G5 Mobile System User Guide Starting a Sensor Session: Inserting Sensor, Transmitter, and Starting Your Session...
-
Page 102: Sensor Session Warmup
Chapter 12, steps you through how to personalize your Dexcom G5 display devices. Remember, during your warmup period, you will not get any Alarm/Alerts or sensor readings. During this time, use your BG meter. - Page 103 • Properly attach transmitter to sensor • Outline sensor warmup • Identify countdown icon What’s Next? The next chapter guides you through the calibration steps. Dexcom G5 Mobile System User Guide Starting a Sensor Session: Inserting Sensor, Transmitter, and Starting Your Session...
- Page 104 Page intentionally left blank...
-
Page 105: Chapter 7 - Calibration
Recognize when you shouldn’t enter a fingerstick measurement for calibration – Determine if you need to calibrate outside of the normal calibration requirements • Initiate startup calibration • Perform update calibrations • Correctly enter your fingerstick measurement Dexcom G5 Mobile System User Guide Calibration... -
Page 106: Safety Statements
Warning Do: Do take a BG measurement with your BG meter and use the BG value for treatment decisions (such as how much insulin to take) if your Dexcom G5 does not display both a number and a trend arrow. - Page 107 Why: Calibrating during significant rise/fall of BG may affect accuracy of sensor glucose readings. Consequences: Missing a severe low or high blood glucose event or making a treatment decision that results in injury. Dexcom G5 Mobile System User Guide Calibration...
-
Page 108: Calibration Overview
BG meter. Your BG meter “teaches” the sensor your glucose values through calibration. Just like a clock can need adjusting, calibrations allow your CGM to adjust to your body. Dexcom G5 Mobile System User Guide Calibration... - Page 109 Why Is Calibrating Important? Calibrations are a must. They align your Dexcom G5 Mobile readings with your BG meter, improving its accuracy and helping it perform at its best. By calibrating when the system notifies you that a calibration is due, the Dexcom G5 uses your meter’s BG value to make sure the sensor glucose readings remain accurate throughout...
-
Page 110: When To Calibrate
1. Enter one fingerstick measurement at least every 12 hours. 2. Display devices provide calibration prompts. 3. Your next calibration is due 12 hours from the LAST calibration but you may be prompted to calibrate sooner. Dexcom G5 Mobile System User Guide Calibration... -
Page 111: Calibration Prompts
BG values, your glucose readings begin. If you don’t enter your BG values right away, the system reminds you every 15 minutes. Remember, only use your BG meter for calibrations, and never enter values from your CGM. Dexcom G5 Mobile System User Guide Calibration... - Page 112 Sensor warmup is Smart Device: Section 7.6 and 7.7. complete. In App Immediately prepare Ready for first for next calibration. of two initial Calibrate only from calibrations. your BG meter. Receiver (Continued on next page) Dexcom G5 Mobile System User Guide Calibration...
- Page 113 Your sensor glucose readings begin in approximately five minutes once the device(s) accepts your calibrations. Look for the dots on your trend screen. Each dot represents a single reading taken every five minutes. Dexcom G5 Mobile System User Guide Calibration...
- Page 114 In case you can’t look at your screen, both the smart device and receiver provide, with the exception of your regular 12-hour update calibration, sound/vibration prompts notifications to let you know it’s time to calibrate or if there was a system calibration error. Dexcom G5 Mobile System User Guide Calibration...
-
Page 115: Preparing For Calibration
6. Use fingerstick (fingertip) BG values only. a. Other sites are not as accurate. b. Must enter within five minutes of taking BG meter value. c. Enter exact BG value from your meter for each calibration. Dexcom G5 Mobile System User Guide Calibration... -
Page 116: Ready? Set? Calibrate
Next are steps to enter your calibrations using the app, followed by the steps for entering your calibrations into the receiver. Dexcom G5 Mobile System User Guide Calibration... - Page 117 Calibrate With Your G5 Mobile App Step What you see What you do Additional info Screenshot is for initial calibration only. Initial calibration: Enter two back-to-back meter BG values. Tap circle. Update calibration: Enter single meter BG value. Having clean and dry...
- Page 118 BG meter. Double-check your Enter meter’s BG value numbers. using number pad. Entering wrong values Tap Save. can affect the sensor’s accuracy. (Continued on next page) Dexcom G5 Mobile System User Guide Calibration...
- Page 119 Verify value is correct. Tap Save. If not correct: Tap Cancel. Reenter correct value. Tap circle to enter your second BG value. Follow steps 2-3 and enter second reading. (Continued on next page) Dexcom G5 Mobile System User Guide Calibration...
- Page 120 What you see What you do Additional info BG meter icon has no Your calibration was red calibration badge. successful. Calibration accepted. Default home screen. Wait for next calibration prompt in 12 hours. Calibration accepted. Dexcom G5 Mobile System User Guide Calibration...
- Page 121 Don’t use cleaning gels, water. they may affect your meter values. Only use your fingertip, Take a fingerstick BG never use alternative measurement using your sites for measuring your BG meter. (Continued on next page) Dexcom G5 Mobile System User Guide Calibration...
- Page 122 Verify BG value is correct. Cancel and reenter BG value. If incorrect: Fingerstick Press right arrow to measurement must highlight Cancel. be within five-minute Press select button. window. Reenter BG value. (Continued on next page) Dexcom G5 Mobile System User Guide Calibration...
-
Page 123: Calibration Errors
12 hours. Calibration(s) accepted. 7.8 Calibration Errors Before or during your calibration process, your display device may show error notifications. If the notifications don’t go away after 15 minutes, refer to Chapter 19, Troubleshooting. Dexcom G5 Mobile System User Guide Calibration... - Page 124 Fingerstick measurements entered into one device will be available in the other approximately ten minutes after entering data. Dexcom G5 Mobile System User Guide Calibration...
- Page 125 In the next chapter, you’ll learn how to end a typical seven day sensor session, and what to do if you need to end your sensor session early, along with removing the transmitter and determining if you need to replace it. Dexcom G5 Mobile System User Guide Calibration...
- Page 126 Page intentionally left blank...
-
Page 127: Chapter 8 - Ending Your Sensor Session And Transmitter Session
Session 8.1 Introduction Dexcom G5 sensor sessions last seven days. This chapter reviews what you should expect when your session is about to expire and removing the sensor and transmitter. It also covers how to determine if you need to end your session early. -
Page 128: Safety Statements
Ending Your Seven Day Sensor Session Just like with other prompts, you need to confirm your sensor session ending prompts: • App Tap screen – Dexcom G5 Mobile System User Guide Ending Your Sensor Session and Transmitter Session... - Page 129 Smart Device: Clock will count down until session has In App ended. Continue to get sensor glucose readings. Receiver (Continued on next page) Dexcom G5 Mobile System User Guide Ending Your Sensor Session and Transmitter Session...
- Page 130 Smart Device: Lock Screen Two hours remain on your current sensor session. Smart Device: In App Continue to get sensor glucose readings. Receiver (Continued on next page) Dexcom G5 Mobile System User Guide Ending Your Sensor Session and Transmitter Session...
- Page 131 What it means At Thirty Minutes Smart Device: Lock Screen Thirty minutes remain. Smart Device: Continue to get sensor glucose readings. In App Receiver (Continued on next page) Dexcom G5 Mobile System User Guide Ending Your Sensor Session and Transmitter Session...
- Page 132 Smart Device: App: In App Tap “?” for steps to: • Remove sensor • Insert new sensor Receiver: Press select button to confirm. Receiver (Continued on next page) Dexcom G5 Mobile System User Guide Ending Your Sensor Session and Transmitter Session...
- Page 133 Getting Started Guide, view the online tutorials, or go to Chapter 6 in the user guide. Dexcom G5 Mobile System User Guide Ending Your Sensor Session and Transmitter Session...
- Page 134 • Toll free: 1.888.738.3646 • Toll call: 1.858.200.0200 When your display device has system errors, you may not receive any sensor glucose readings and you should not calibrate. Dexcom G5 Mobile System User Guide Ending Your Sensor Session and Transmitter Session...
- Page 135 Lock Screen Sensor issues detected. Session ends automatically. Smart Device: In App • Sensor glucose readings • Alarm/Alerts Tap OK. Replace sensor. Receiver (Continued on next page) Dexcom G5 Mobile System User Guide Ending Your Sensor Session and Transmitter Session...
- Page 136 Make sure you haven’t taken In App acetaminophen. If not corrected after 3 hours: Contact Technical Support (available 24/7): • TechSupport@dexcom.com Receiver • Toll free: 1.888.738.3646 • Toll call: 1.858.200.0200 Dexcom G5 Mobile System User Guide Ending Your Sensor Session and Transmitter Session...
- Page 137 The Dexcom G5 knows when a typical seven-day sensor session is over, automatically ending the session in each display device. However, if you need to end the session early, you need to let the system know by manually stopping the sensor session.
- Page 138 Blue “?” icons provide additional information. Remove sensor. Confirms sensor session has ended. Insert new sensor. Ready for new session. Tap green circle when ready for new session. Dexcom G5 Mobile System User Guide Ending Your Sensor Session and Transmitter Session...
- Page 139 Ready to start a new session. Insert new sensor. Start Sensor option Press Start Sensor appears when not in an when ready for new active session. session. Dexcom G5 Mobile System User Guide Ending Your Sensor Session and Transmitter Session...
- Page 140 Press select button. shut down receiver. Press the select button to turn the receiver back on. It may take up to 20 seconds for the receiver to turn on. Dexcom G5 Mobile System User Guide Ending Your Sensor Session and Transmitter Session...
-
Page 141: Remove Sensor Pod And Transmitter
Remember your transmitter is reusable. With a battery life of 90 days, use the same transmitter over a number of sensor sessions. You’ll receive prompts as you near the end of its battery life. Dexcom G5 Mobile System User Guide Ending Your Sensor Session and Transmitter Session... - Page 142 Put sensor pod on flat surface. Place safety lock’s jagged edge: • Over transmitters wide edge • In between open slots on sensor pod’s sides Lift up safety lock. Dexcom G5 Mobile System User Guide Ending Your Sensor Session and Transmitter Session...
- Page 143 Put sensor pod on flat surface. Grasp sensor pod’s wide end with two hands and place fingers in sides’ open slots. Pull tabs away from transmitter. Dexcom G5 Mobile System User Guide Ending Your Sensor Session and Transmitter Session...
-
Page 144: End Of Transmitter Battery
What it means Smart Device: Lock Screen Smart Device: Transmitter battery will expire in three In App weeks. Order a new transmitter. Receiver (Continued on next page) Dexcom G5 Mobile System User Guide Ending Your Sensor Session and Transmitter Session... - Page 145 What it means Smart Device: Lock Screen Smart Device: Transmitter battery will expire in two In App weeks. Order a new transmitter. Receiver (Continued on next page) Dexcom G5 Mobile System User Guide Ending Your Sensor Session and Transmitter Session...
- Page 146 But how do you pair a new transmitter once your display device is already set up? After inserting the sensor and putting the transmitter into the transmitter holder, pair the transmitter before starting a new sensor session. Dexcom G5 Mobile System User Guide Ending Your Sensor Session and Transmitter Session...
- Page 147 Pairing New Transmitter With App Step What you see What you do Tap Menu icon. Tap Settings. Tap Transmitter. Tap Pair New. (Continued on next page) Dexcom G5 Mobile System User Guide Ending Your Sensor Session and Transmitter Session...
- Page 148 Please Note: Picture is representational only; the back of your transmitter box may not look the same. Center longest barcode within green brackets. Tap Take Photo. (Continued on next page) Dexcom G5 Mobile System User Guide Ending Your Sensor Session and Transmitter Session...
- Page 149 What you do Check mark confirms successful transmitter SN scan. If unable to use app’s scanning device: Tap Enter transmitter SN by hand. (Continued on next page) Dexcom G5 Mobile System User Guide Ending Your Sensor Session and Transmitter Session...
- Page 150 Use keyboard to enter transmitter SN. Confirm correct SN . Tap Save. Wait up to 30 minutes for smart device and transmitter to connect. (Continued on next page) Dexcom G5 Mobile System User Guide Ending Your Sensor Session and Transmitter Session...
- Page 151 After inserting sensor and attaching transmitter into the sensor pod: Press left arrow twice to go to Main Menu. Press down arrow to highlight Settings. Press select button. (Continued on next page) Dexcom G5 Mobile System User Guide Ending Your Sensor Session and Transmitter Session...
- Page 152 Make sure receiver and transmitter are connected/ paired before starting a sensor session. Check receiver 10 minutes after starting for Bluetooth icon. • Solid: Connected/Paired • Blinking: Searching/Not Paired Dexcom G5 Mobile System User Guide Ending Your Sensor Session and Transmitter Session...
- Page 153 But the Dexcom G5 can do much more. In the next part, Part 3: Next Steps, you will learn how to get the most out of your Dexcom Dexcom G5 Mobile System User Guide...
- Page 154 Page intentionally left blank...
-
Page 155: Part 3: Next Steps - Getting The Most
NEXT STEPS - GETTING THE MOST OUT OF YOUR DEXCOM G5 • Reading Trend Graph Screens and Recognizing Trends • Events • Alarm and Alerts • Sounds for Alarm, Alerts and System Messages • Using Dexcom G5 for Treatment Decisions... - Page 156 Page intentionally left blank...
-
Page 157: Arrows, And Errors
Chapter 9 Next Steps - Getting the Most out of Your Dexcom G5 Home Screen, Rate of Change Arrows, and Errors 9.1 Introduction to Home Screens In the previous chapter, you learned about calibrations: why they are important and how to do them. -
Page 158: Safety Statements
Warning Do: Take a BG measurement with your BG meter and use the BG value for treatment decisions (such as how much insulin to take) if your Dexcom G5 does not display both a number and a trend arrow. Why: Not having both a number and the arrow means you may be getting inconsistent or inaccurate sensor glucose readings. -
Page 159: Overview Of Home Screen
This section first familiarizes you with the app’s home screen, then the Today view and Apple Watch, and last the receiver’s home screen. In other chapters, you’ll see how to use the icons to enter data or make system changes. Dexcom G5 Mobile System User Guide Home Screen, Rate of Change Arrows, and Errors... - Page 160 1. Task bar: Change settings, enter data, calibrate, and use Share. 2. Glucose information: Reflects glucose readings and trends. Task Bar Glucose Information Figure 6. App Home Screen on Smart Device Dexcom G5 Mobile System User Guide Home Screen, Rate of Change Arrows, and Errors...
- Page 161 (see Chapter 21). Gray icon: Share is not active. Do nothing. Once activated, Dexcom Share Dexcom Share icon Tap icon to access is colored. Dexcom Share. Dexcom G5 Mobile System User Guide Home Screen, Rate of Change Arrows, and Errors...
- Page 162 Shown in milligrams per deciliter (mg/dL). • Yellow: At or above target • Gray: Within target range • Red: At or below target (Continued on next page) Dexcom G5 Mobile System User Guide Home Screen, Rate of Change Arrows, and Errors...
- Page 163 Rate of Change Arrow Direction and number of arrows show sensor glucose change rate. (Continued on next page) Dexcom G5 Mobile System User Guide Home Screen, Rate of Change Arrows, and Errors...
- Page 164 Range and Alert Levels • Yellow bar: High Alert level • Gray background: Within target range • Red bar: Low Alert level (Continued on next page) Dexcom G5 Mobile System User Guide Home Screen, Rate of Change Arrows, and Errors...
- Page 165 Your sensor glucose readings are below 40 mg/dL. You will not receive sensor readings until you are at or above 40 mg/dL. (Continued on next page) Dexcom G5 Mobile System User Guide Home Screen, Rate of Change Arrows, and Errors...
- Page 166 Apple Watch and Today View The G5 Mobile app offers other ways to check your glucose information, aside from opening the app. If you choose, you can use either of the following methods: •...
- Page 167 Reading • Gray: Within target range • Red: At or below target Shows direction and speed your Trend Arrow glucose is changing. (Continued on next page) Dexcom G5 Mobile System User Guide Home Screen, Rate of Change Arrows, and Errors...
- Page 168 Displays your glucose information: • Current glucose number G5 on Apple • Direction your glucose is Watch heading • Graph of glucose trend (Continued on next page) Dexcom G5 Mobile System User Guide Home Screen, Rate of Change Arrows, and Errors...
- Page 169 • Yellow: High Alert setting Trend Graph • Gray: Target range • Red: Low Alert setting or, if that’s disabled, 55 mg/dL (Urgent Low Glucose Alarm) Dexcom G5 Mobile System User Guide Home Screen, Rate of Change Arrows, and Errors...
-
Page 170: Status Bar
When you wake your Apple Watch, it gets your current CGM data from your smart device. There may be a brief delay before the watch shows current information. For compatibility information, see dexcom.com/compatibility. Now that you’ve learned about the app’s home screen, let’s move our focus to the Dexcom G5 receiver. Receiver Home Screen Unlike your smart device screens, the receiver’s screen is not interactive;... - Page 171 Plug USB into the adapter and then into electrical outlet. Do nothing. Shows Bluetooth Receiver’s Bluetooth connection is Bluetooth is always working. (Continued on next page) Dexcom G5 Mobile System User Guide Home Screen, Rate of Change Arrows, and Errors...
- Page 172 Shows direction and speed Review and take Trend Arrow your glucose is appropriate action. changing. Far right. Take appropriate Error icons Status Area action. and calibration prompts. Dexcom G5 Mobile System User Guide Home Screen, Rate of Change Arrows, and Errors...
- Page 173 Press up/down arrows to access 1-, 3-, 6-, 12-, or 24-hour trend views. Rate of Change Arrow Direction and speed of your glucose changes. (Continued on next page) Dexcom G5 Mobile System User Guide Home Screen, Rate of Change Arrows, and Errors...
- Page 174 Now that you’re familiar with the basic layout of the trend graph screen and can locate readings, identify color-coding, and view time frames, let’s take a closer look at the rate of change arrows. Dexcom G5 Mobile System User Guide Home Screen, Rate of Change Arrows, and Errors...
-
Page 175: Rate Of Change Arrows
Arrows and the trend graph help you know when to take action before you are too high or too low. You need a rate of change arrow when using your Dexcom G5 to make treatment decisions. However, before doing anything, think about your most recent insulin dosing, food intake, overall trend graph, and current sensor glucose reading. -
Page 176: Error Messages
Each device notifies you when there is an issue; however, the notifications look different. Before the system can move forward, you need to address the error. Dexcom G5 Mobile System User Guide Home Screen, Rate of Change Arrows, and Errors... - Page 177 1. Restart smart device. If error remains: 1. Open your device Bluetooth settings. 2. Delete all Dexcom from My Receiver Devices. Pair your transmitter. (Continued on next page) Dexcom G5 Mobile System User Guide Home Screen, Rate of Change Arrows, and Errors...
- Page 178 1. Press Home button. 2. Tap Settings. Smart Device: 3. Tap Bluetooth. In App 4. Turn Bluetooth on. N/A; Bluetooth is always Receiver (Continued on next page) Dexcom G5 Mobile System User Guide Home Screen, Rate of Change Arrows, and Errors...
- Page 179 System may correct problem on its own In App and display sensor glucose readings again. If notification stays for three hours: Contact Technical Support (see Section 17.1). Receiver (Continued on next page) Dexcom G5 Mobile System User Guide Home Screen, Rate of Change Arrows, and Errors...
- Page 180 If not corrected: • Contact Technical Support (see Section 17.1) • Remove sensor Receiver • Insert new sensor (Continued on next page) Dexcom G5 Mobile System User Guide Home Screen, Rate of Change Arrows, and Errors...
- Page 181 What you do Calibration Required Smart Device: Lock Screen Smart Device: In App Error in calibrating. Enter another BG meter value. Receiver (Continued on next page) Dexcom G5 Mobile System User Guide Home Screen, Rate of Change Arrows, and Errors...
- Page 182 What you do Calibration Error Smart Device: Lock Screen Smart Device: In App Wait 15 minutes. Enter a BG meter value. Receiver (Continued on next page) Dexcom G5 Mobile System User Guide Home Screen, Rate of Change Arrows, and Errors...
- Page 183 • Describe when you receive a high or low sensor glucose reading • Change trend graph views • Cite differences between rate of change arrows • Recognize error messages Dexcom G5 Mobile System User Guide Home Screen, Rate of Change Arrows, and Errors...
- Page 184 In the next chapter, you will learn how to enter Events in the Dexcom G5. Dexcom G5 Mobile System User Guide...
-
Page 185: Chapter 10 - Daily Events Affect Your Glucose Trends And Patterns
These are all Events that can raise or lower your blood sugars. An Event is an action or situation affecting your glucose levels. With the Dexcom G5, you have the ability to enter your daily Events, helping you track their effect on your glucose... - Page 186 Once entered into the smart device or receiver, Events can be viewed in Dexcom reports. The reports help you review how each Event influenced your glucose trends. You can use the reports with your healthcare professional to create a game plan in managing your diabetes.
- Page 187 Enter Carb grams per snack or meal, Receiver’s screen up to 250 grams. reflects last number entered. Receiver (Continued on next page) Dexcom G5 Mobile System User Guide Daily Events Affect Your Glucose Trends and Patterns...
- Page 188 Enter insulin units for each dose, up to Receiver’s screen 250 units. reflects last number entered. Can't enter type of insulin, only dosage. Receiver (Continued on next page) Dexcom G5 Mobile System User Guide Daily Events Affect Your Glucose Trends and Patterns...
- Page 189 In App exercise’s intensity level and duration. Default duration is Enter intensity and 30 minutes. duration. Type of exercise isn't an option. Receiver (Continued on next page) Dexcom G5 Mobile System User Guide Daily Events Affect Your Glucose Trends and Patterns...
- Page 190 What it means What you do Health Smart Device: In App Enter different health Events (see General well-being. following Health Events Menu table). Receiver (Continued on next page) Dexcom G5 Mobile System User Guide Daily Events Affect Your Glucose Trends and Patterns...
- Page 191 BG symptoms, etc. You select the Event: no amounts are entered, just date and time. Dexcom G5 Mobile System User Guide Daily Events Affect Your Glucose Trends and Patterns...
- Page 192 Device What you see What it means Health Main Menu Smart Device: In App Use Health Main Menu to access selections. Receiver (Continued on next page) Dexcom G5 Mobile System User Guide Daily Events Affect Your Glucose Trends and Patterns...
- Page 193 Feel high BG symptoms? Low Symptoms Feel low BG symptoms? Cycle Have you started your menstrual cycle? Alcohol Had a glass of wine, beer, or cocktail? Receiver Dexcom G5 Mobile System User Guide Daily Events Affect Your Glucose Trends and Patterns...
-
Page 194: Entering Events
Entering Events: Smart Device In the G5 Mobile app, Events are just a tap away! The Event icon, a running man, is on the app’s home screen task bar in portrait mode (remember, you don’t have the task bar in landscape). - Page 195 Entering Events: G5 Mobile App Step What you see What you do Enter Carbs Event Tap Running Man. Tap Carbs. (Continued on next page) Dexcom G5 Mobile System User Guide Daily Events Affect Your Glucose Trends and Patterns...
- Page 196 What you do Enter Carb Event Add up all carb grams from lunch. Enter “85” using keypad. Tap Done. Tap Event Time. (Continued on next page) Dexcom G5 Mobile System User Guide Daily Events Affect Your Glucose Trends and Patterns...
- Page 197 What you do Enter Carb Event Scroll and select date and time. Tap Done. Tap Save or Cancel. Enter Stress Event Tap Running Man. (Continued on next page) Dexcom G5 Mobile System User Guide Daily Events Affect Your Glucose Trends and Patterns...
- Page 198 (Continued from previous page) Step What you see What you do Enter Stress Event Tap Health. Tap Stress. Tap Done. (Continued on next page) Dexcom G5 Mobile System User Guide Daily Events Affect Your Glucose Trends and Patterns...
- Page 199 (Continued from previous page) Step What you see What you do Enter Stress Event Tap Event Time. Scroll and select date and time. Tap Done. (Continued on next page) Dexcom G5 Mobile System User Guide Daily Events Affect Your Glucose Trends and Patterns...
- Page 200 Trend screen. The app has Event markers on its screen, the receiver doesn’t. There may be times when you want or need to enter Events on the Dexcom G5 receiver. Dexcom G5 Mobile System User Guide Daily Events Affect Your Glucose Trends and Patterns...
- Page 201 Press select button to go to Main Menu. Press down arrow to highlight Events. Press select button. Highlight Carbs. Press select button. (Continued on next page) Dexcom G5 Mobile System User Guide Daily Events Affect Your Glucose Trends and Patterns...
- Page 202 Press left/right arrows to change time and date. • Left: Backward • Right: Forward Press select button. Confirmation screen. Press select button. (Continued on next page) Dexcom G5 Mobile System User Guide Daily Events Affect Your Glucose Trends and Patterns...
- Page 203 • Right: Forward Press select button. Verify information is correct. Press left/right arrows to highlight field. Press up/down arrows to change numbers. Press select button to save. Dexcom G5 Mobile System User Guide Daily Events Affect Your Glucose Trends and Patterns...
-
Page 204: Viewing Events
10.4 Viewing Events Events entered into your receiver can only be viewed on a Dexcom report; there are no Event markers on your receiver’s screen. On your smart device, turn to landscape mode to view your Event markers. A single small square marks all Events. - Page 205 In the next chapter, you will learn about how your trend’s Alarm and Alerts help you monitor you glucose levels. You’ll also learn how you know when your system loses its signal and stops communicating. Dexcom G5 Mobile System User Guide Daily Events Affect Your Glucose Trends and Patterns...
- Page 206 Page intentionally left blank...
-
Page 207: Alerts
The Dexcom G5 understands there are times when you can’t look at your receiver or smart device; however, you still need to know of actionable glucose trends or if you’re not getting your sensor glucose readings. -
Page 208: Safety Statements
Do: Verify your smart device settings let you get Alarm and Alerts. To receive Alarm/Alerts you must: • Make sure G5 Mobile app notifications are turned on in Settings menu • Verify app hasn’t been shut down. • Adjust volume so you can hear sounds. - Page 209 Don’t: Never assume the Dexcom G5 Mobile app’s Alarm/Alerts vibrations are different from other vibrating apps. Do: Look at your smart device and check if vibration is a Dexcom G5 Alarm or Alert. Why: Medical device apps don’t have special priority over your smart device’s features.
-
Page 210: Alarm And Alerts
What Are Alerts? An Alert is a message telling you your glucose level or CGM system needs attention. Dexcom G5 Mobile System User Guide Sensor Glucose Alarm and Alerts... - Page 211 Default Alerts Low/High Alerts When making treatment decisions using your Dexcom G5 Mobile CGM System, it’s best to keep your Alerts turned on. Your Low/High Alerts have the same color-coding as your trend graph screen: • Red: Glucose levels are below your low threshold.
-
Page 212: Alarm And Alerts Screens
– If you are concerned about missing your Signal Loss Alert, don’t turn on Silent or Do Not Disturb. Now you have the basics for Dexcom G5 Alarm/Alerts feature. Next, you will learn about each Alarm/Alert in more detail. 11.4 Alarm and Alerts Screens When you fall within an Alarm or Alert target range, your display device tells you. - Page 213 What it means Smart Device: Lock Screen Smart Device: Sensor glucose reading at or below 55 In App mg/dL. Shows last glucose value. Arrows reflect rate of change. Receiver Dexcom G5 Mobile System User Guide Sensor Glucose Alarm and Alerts...
- Page 214 Shows most current sensor glucose In App reading. Arrows reflect rate of change. Can be set to repeat between 15 minutes to 4 hours Receiver (Continued on next page) Dexcom G5 Mobile System User Guide Sensor Glucose Alarm and Alerts...
- Page 215 High Glucose Alert level. Smart Device: Shows most current sensor glucose In App reading. Arrows reflect rate of change. Can be set to repeat between 15 minutes to 4 hours. Receiver Dexcom G5 Mobile System User Guide Sensor Glucose Alarm and Alerts...
- Page 216 What it means Smart Device: Lock Screen Sensor glucose readings Smart Device: rising quickly. In App Number of arrows shows how fast (2 mg/dL/min; 3+ mg/dL/min). Receiver (Continued on next page) Dexcom G5 Mobile System User Guide Sensor Glucose Alarm and Alerts...
- Page 217 What you see What it means Smart Device: Lock Screen Sensor glucose readings Smart Device: falling quickly. In App Number of arrows shows how fast (2 mg/dL/min; 3+ mg/dL/min). Receiver Dexcom G5 Mobile System User Guide Sensor Glucose Alarm and Alerts...
-
Page 218: App: Suggested Settings
Receiver 11.5 App: Suggested Settings Review Chapter 5 to learn how to configure your smart device for use with the Dexcom G5. Use the suggested settings to help ensure you get Alarm and Alerts. 11.6 Receiver: Default Beeps and Vibrations The Dexcom G5 receiver’s Alarm/Alerts are vibrations and a beep, or a series of beeps,... - Page 219 After 5 Minutes: Vibrates/beeps 3 times every 5 minutes until confirmed. Trend screen will continue to reflect Alert until sensor glucose readings go above Low Alert level. (Continued on next page) Dexcom G5 Mobile System User Guide Sensor Glucose Alarm and Alerts...
- Page 220 After Setting Change: Vibrates 2 times, 2 sounds. After 5 Minutes: Vibrates/beeps 3 times every 5 minutes until confirmed or sensor glucose reading rises below Alert level. (Continued on next page) Dexcom G5 Mobile System User Guide Sensor Glucose Alarm and Alerts...
- Page 221 Vibrates 3 times. After 5 Minutes: Vibrates/beeps 3 times every 5 minutes until confirmed. Will re-alert if sensor glucose readings drop to 55 mg/dL or below. (Continued on next page) Dexcom G5 Mobile System User Guide Sensor Glucose Alarm and Alerts...
-
Page 222: Confirming Alarm/Alerts
Due to its medical importance, the Alarm is more persistent. Even after confirming an Alarm, if your sensor’s glucose readings remain at or below 55 mg/dL, an Alarm will sound every 30 minutes until readings are above 55 mg/dL. Dexcom G5 Mobile System User Guide Sensor Glucose Alarm and Alerts... - Page 223 Once confirmed, you won’t receive the same Alert unless you hit the Alert’s target range again. Your Alarm will repeat even after confirming if your glucose levels do not return to your target range. Dexcom G5 Mobile System User Guide Sensor Glucose Alarm and Alerts...
- Page 224 High Alert glucose level threshold, or you want to continue getting a Low Alert notification if your glucose levels don’t improve, even though you’ve confirmed the notification? How do you make your Alarm/Alerts fit your needs? Dexcom G5 Mobile System User Guide Sensor Glucose Alarm and Alerts...
-
Page 225: Chapter 12 - On The Go With G5: Customizing Your Alarm And Alerts
Chapter 12 Next Steps - Getting the Most out of Your Dexcom G5 On the Go With G5: Customizing Your Alarm and Alerts 12.1 Introduction The receiver and app come with default glucose level Alert settings, but perhaps they don’t reflect the glucose level that works best for you. -
Page 226: Safety Statement
Do: If using both receiver and app to get an Alarm or Alerts, change settings in each display device. Why: Any changes to the G5 Mobile app will not carry over to the receiver. Consequences: Missing a severe low or high blood glucose event or making a treatment decision that results in injury. - Page 227 What you see What it means What you do Access Main Menu. Tap Main Menu icon. Access Alerts Main Tap Alerts. Menu. (Continued on next page) Dexcom G5 Mobile System User Guide On the Go With G5: Customizing Your Alarm and Alerts...
- Page 228 • "Notify me" options • Sound options “?” explains: • Each Alarm/Alert • Message options Tap “?” for Alarm/Alert information. • Recommended settings (Continued on next page) Dexcom G5 Mobile System User Guide On the Go With G5: Customizing Your Alarm and Alerts...
- Page 229 Tap switch to turn Alert on/off. 3. Tap Notify me. a. Change the Alert glucose level (mg/dL). Scroll selection wheel to find your desired Alert level. Tap to highlight. Dexcom G5 Mobile System User Guide On the Go With G5: Customizing Your Alarm and Alerts...
- Page 230 In this following example, we’ll change the High Alert level from 200 mg/dL to 190 mg/dL, repeating every hour if you continue to stay high, with a Door Bell sound. Dexcom G5 Mobile System User Guide On the Go With G5: Customizing Your Alarm and Alerts...
- Page 231 What it means What you do Access Alerts Main Menu Tap Main Menu icon. Opens Main Menu. Opens Alerts Menu. Tap Alerts. (Continued on next page) Dexcom G5 Mobile System User Guide On the Go With G5: Customizing Your Alarm and Alerts...
- Page 232 Check High Alerts is on. Shows High Alert options and current • On - Orange settings • Off - Gray (Continued on next page) Dexcom G5 Mobile System User Guide On the Go With G5: Customizing Your Alarm and Alerts...
- Page 233 Won’t get Alert if off. • On - Orange • Off - Gray Changes High Alert (mg/ Tap Notify Me Above. dL). (Continued on next page) Dexcom G5 Mobile System User Guide On the Go With G5: Customizing Your Alarm and Alerts...
- Page 234 Saves new High Alert glucose level (mg/dL). Returns to High Glucose Tap Save. Alert screen options. Notify Me Above set at 190 mg/dL. (Continued on next page) Dexcom G5 Mobile System User Guide On the Go With G5: Customizing Your Alarm and Alerts...
- Page 235 Changes the current repeat setting. Scroll selection wheel. Can select in five Stop at 1 hour. minute steps (range 15 minutes-4 hours). (Continued on next page) Dexcom G5 Mobile System User Guide On the Go With G5: Customizing Your Alarm and Alerts...
- Page 236 Returns to High Glucose Tap Save. Alert screen options. Repeat shows how often you’ll get notified. Tap Sound. Customizes Alert sound. (Continued on next page) Dexcom G5 Mobile System User Guide On the Go With G5: Customizing Your Alarm and Alerts...
- Page 237 Tap Sound again to hear setting. sound sample. Saves your new Alert sound. Tap Back Arrow. Returns to High Glucose Alert Menu. (Continued on next page) Dexcom G5 Mobile System User Guide On the Go With G5: Customizing Your Alarm and Alerts...
- Page 238 What it means What you do Return to Trend Screen Tap“X”. Returns to Main Menu. Tap Menu icon Returns to trend screen. Swipe right. Dexcom G5 Mobile System User Guide On the Go With G5: Customizing Your Alarm and Alerts...
-
Page 239: Changing Receiver Alarm And Alerts
The next table lists the different sound Profiles, starting with the quietest, working its way up to the loudest. Dexcom G5 Mobile System User Guide On the Go With G5: Customizing Your Alarm and Alerts... - Page 240 In a meeting? Select Vibrate. Going to a ball game after work? Select Attentive. The next table shows how to change a sound Profile, then sample how it sounds. Dexcom G5 Mobile System User Guide On the Go With G5: Customizing Your Alarm and Alerts...
- Page 241 Stop at Profiles. of Alarm/Alerts. Press select button. Press up/down arrows. Stop at desired Profile. Choose sound Profile. Press select button. (Continued on next page) Dexcom G5 Mobile System User Guide On the Go With G5: Customizing Your Alarm and Alerts...
- Page 242 The Low/High Alert option lets you adjust your Low/High glucose Alert level (mg/dL). If you are using your Dexcom G5 for treatment decisions, keep your Alerts on. The Advanced option lets you turn on Low/High Repeat, Rise/Fall Rate Alerts, and Signal Loss Alert.
- Page 243 200 mg/dL to 190 mg/dL, repeating every 60 minutes. Follow the same steps for turning on the Rise/Fall Rate Alerts, and adjusting your Low Alert. Dexcom G5 Mobile System User Guide On the Go With G5: Customizing Your Alarm and Alerts...
- Page 244 Press select button. option. Press up/down arrows. Alerts’ option menu. Stop at High Alert. Lists different Alerts. Press select button. (Continued on next page) Dexcom G5 Mobile System User Guide On the Go With G5: Customizing Your Alarm and Alerts...
- Page 245 Press left arrow. Turn on Repeat Alerts Menu. Press down arrow. Choose Advanced to get Stop at Advanced. to Repeat Alert. (Continued on next page) Dexcom G5 Mobile System User Guide On the Go With G5: Customizing Your Alarm and Alerts...
- Page 246 Change time frame in 5 minute increments. Changed Repeat time for Press select button. High Alert. Changed completed. To exit: Press left arrow. Return to Alerts Menu. Dexcom G5 Mobile System User Guide On the Go With G5: Customizing Your Alarm and Alerts...
- Page 247 Signal Loss What’s Next? Believe it or not, you are becoming a pro at using your Dexcom G5! You’ve set up the app and receiver, started a session, calibrated, followed your glucose trends, paid attention to your Alarm/Alerts prompts, and ended a session!
- Page 248 Page intentionally left blank...
-
Page 249: Chapter 13 - Using The Dexcom G5 Mobile Cgm System For Treatment Decisions
Glucose Alert. What would you do? What would you look at? Could you use your Dexcom G5 sensor glucose readings to make a treatment decision? Prior to the Dexcom G5, you had to take a fingerstick with your BG meter before making any treatment decisions. -
Page 250: Safety Statement
Before you start making treatment decisions with your Dexcom G5, work with your HCP and learn the basics: When do you need to use a BG meter instead of relying on your Dexcom G5? How can you avoid insulin stacking? Once you and your HCP are comfortable that you know the basics, you’re ready! - Page 251 Along with helping you figure out your target glucose range, your HCP can show you how to stay within your target range using the Dexcom G5. Let your HCP guide you through the system’s features: adjusting your Alert settings accordingly, working with sensor readings and trend errors for treatment decisions, along with managing your diabetes with the system.
- Page 252 How can you improve? What Not to Do While talking to your HCP about using your Dexcom G5 for treatment decisions, ask, “When shouldn’t I use my Dexcom G5 and use my BG meter instead?” Use Your BG Meter When…...
- Page 253 You shouldn’t use your smart watch readings for treatment decisions. If you‘re using a smart watch to get your Dexcom G5 information, look at your receiver or smart device before making a treatment decision. Your smart watch reflects information sent from your smart device and may not show your most recent sensor readings.
-
Page 254: Treatment Decisions: Beyond The Basics
Ready for more? Your Dexcom G5 offers information you can use to adjust your treatment decisions. The next table is an overview of the information your Dexcom G5 offers, followed by how you can use its Alarm/Alerts, readings, and trend arrows, in your treatment decisions. - Page 255 What it means Smart Device: In App, Portrait Alarm/Alerts Highlighted sections show your Alarm and Alerts triggers. Your Alarm/Alerts are your call to action. Receiver Dexcom G5 Mobile System User Guide Using the Dexcom G5 Mobile CGM System for Treatment Decisions...
- Page 256 Most recent sensor glucose reading. Trend Arrows Current sensor glucose speed and rate of change arrows. No readings or arrows? Use your BG meter. Receiver Dexcom G5 Mobile System User Guide Using the Dexcom G5 Mobile CGM System for Treatment Decisions...
- Page 257 Alarm/Alerts With the Dexcom G5, you have everything you need to make a treatment decision: an Alarm or Alert, sensor glucose readings, and trend arrows. Just got an Alarm or Alert? Chances are you need to make a treatment decision quickly.
- Page 258 Before dosing, watch and wait! The table below gives you a general overview of how you use your Dexcom G5 trend arrows to fine-tune your treatment decisions. Your HCP can help you determine what is your appropriate low or high glucose value, and the best plan of action based on the direction of the trend arrow.
- Page 259 Don’t stack insulin. target range. (Continued on next page) Dexcom G5 Mobile System User Guide Using the Dexcom G5 Mobile CGM System for Treatment Decisions...
- Page 260 Was last insulin dose wait to reach target carbohydrate. too high or activity range. too strenuous? Dexcom G5 Mobile System User Guide Using the Dexcom G5 Mobile CGM System for Treatment Decisions...
-
Page 261: You Decide
At this point, you should know when you can and when you cannot make a treatment decision based on your Dexcom G5 sensor glucose readings. Now let us go back to the questions at the beginning of the chapter and see what you would do! 13.5 You Decide! - Page 262 BG reading is 150 mg/dL with a single arrow pointing up, so you know it is rising. After taking your normal insulin dose, you eat lunch. About 90 minutes later, you get a High Glucose Alert. Dexcom G5 Mobile System User Guide Using the Dexcom G5 Mobile CGM System for Treatment Decisions...
- Page 263 C. Eat fast-acting carbohydrates to treat your sensor glucose value and don’t take any more insulin. Dexcom G5 Mobile System User Guide Using the Dexcom G5 Mobile CGM System for Treatment Decisions...
-
Page 264: General Guidelines
• Did you drink any alcohol? • Did you accurately count carbohydrates? • Did you take too much insulin in too close a time period? Dexcom G5 Mobile System User Guide Using the Dexcom G5 Mobile CGM System for Treatment Decisions... - Page 265 • Identify when you can use your Dexcom G5 in treatment decisions • Describe the importance of Alarm/Alerts in treatment decisions • Tell when you shouldn’t make a treatment decision using the Dexcom G5 • Recognize when you should watch and wait before treating What’s Next?
- Page 266 Page intentionally left blank...
-
Page 267: Part 4: Everything Else G5
EVERYTHING ELSE G5 • Warranty • Maintenance • Travel Tips • Customer Service Contacts • Technical Information • Troubleshooting • Package Symbols... - Page 268 Page intentionally left blank...
-
Page 269: Chapter 14 - Warranty: The Fine Print
Dexcom, Inc. (“Dexcom”) provides a limited warranty to the original purchaser (“you” or “Purchaser”) that the Dexcom G5 Receiver (the “Receiver”) is free from defects in material and workmanship under normal use (“Limited Warranty”) for the period starting from the shipment date and continuing for a year following the shipment date (“Warranty Period”):... - Page 270 6. Installation, maintenance, and service of products or services other than the CGM system (which may be subject to a separate limited warranty), whether provided by Dexcom or any other party; this includes your cell phone or smart device and your connection to the Internet.
- Page 271 Dexcom shall not be liable for any special, incidental, consequential, or indirect damages, however caused, and on any theory of liability, arising in any way out of the sale, use, misuse, or inability to use, any Dexcom G5 or any feature or service provided by Dexcom for use with the Dexcom G5.
-
Page 272: Transmitter Warranty Information
This Limited Warranty is based on the Purchaser properly using the CGM system in a timely manner and in accordance with the documentation provided by Dexcom. You are not permitted to use the CGM system otherwise. You understand that misusing the CGM system, improperly accessing it or the information it processes and transmits, “jailbreaking”... -
Page 273: Dexcom's Obligations Under The Limited Warranty
6. Installation, maintenance, and service of products or services other than the CGM system (which may be subject to a separate limited warranty), whether provided by Dexcom or any other party; this includes your cell phone or smart device and your connection to the Internet. -
Page 274: Dexcom G5 Mobile System User Guide
Dexcom shall not be liable for any special, incidental, consequential, or indirect damages, however caused, and on any theory of liability, arising in any way out of the sale, use, misuse, or inability to use, any Dexcom G5 or any feature or service provided by Dexcom for use with the Dexcom G5. -
Page 275: Dexcom G5
How to Take Care of Your Dexcom G5 15.1 Introduction There are not a lot of moving parts in the Dexcom G5, so maintenance is relatively simple: keep it clean, keep display device (s) dry and protected, use accessory parts, like the USB cable, etc., given to you with the system and store according to each piece’s labeling... -
Page 276: Basic Maintenance
2. Keep receiver dry—it is only splash resistant. a. Don’t submerge in liquid. b. Don’t spill fluids on receiver. 3. Keep battery charged. a. Use only Dexcom USB charging/download cable. Dexcom G5 Mobile System User Guide How to Take Care of Your Dexcom G5... - Page 277 What you do Low Battery Charge your battery. Open USB port door . Micro USB Port Plug USB cable into port for recharging. (Continued on next page) Dexcom G5 Mobile System User Guide How to Take Care of Your Dexcom G5...
- Page 278 Plug USB cable into adapter/wall charger. Plug wall charger into an electrical outlet Wall Charger to charge receiver’s battery. Don’t block access to the charger. (Continued on next page) Dexcom G5 Mobile System User Guide How to Take Care of Your Dexcom G5...
- Page 279 3. Look at cables for signs of wear and tear. Do not use if worn or damaged. There is no repair service available for any Dexcom G5 parts. If you experience problems, call Dexcom Technical Support, available 24 hours, 7 days a week, toll free at 1.888.738.3646 or toll at 1.858.200.0200 to report the issue.
-
Page 280: Storage
15.3 Storage Storing your Dexcom G5 correctly helps prevents system failures. Sensor 1. Keep the sensor in its sterile packaging until you are ready to use it. 2. Store at temperatures between 36° F-77° F. a. Storing outside of this range may cause inaccurate sensor glucose readings. -
Page 281: Checking App And Receiver Information
Available Information • Insertion Time • Last Calibration • Transmitter Battery • Transmitter SN • Serial Number • Part Number • Part Revision • Software Number Dexcom G5 Mobile System User Guide How to Take Care of Your Dexcom G5... -
Page 282: System Disposal
Transmitter Receiver What’s Next? Taking care of your Dexcom G5 is pretty easy. In the next chapter, “On the Go With Dexcom G5: Getting Through Security,” you’ll learn how simple it is to travel the world with your Dexcom G5! -
Page 283: Chapter 16 - On The Go With Dexcom G5: Getting Through Security
Security 16.1 Introduction Dexcom G5 can be a great travel companion; you can go through metal detectors, be hand- wanded, and even keep your receiver on during your flight. This chapter covers only the Dexcom G5. It doesn’t cover steps you need to take when traveling with your smart device. -
Page 284: Technical Information
Don’t put your Dexcom G5 components through x-ray machines. Before your screening process begins, ask the TSA Officer to perform a visual inspection of the receiver and your extra sensors. Place all Dexcom G5 components in a separate bag before handing over to the Security Officer. - Page 285 (EMI). Still Have Questions? Visit the TSA’s website if you have any questions or concerns at tsa.gov. • Email: TSA-ContactCenter@tsa.dhs.gov • Phone: 1.866.289.9673 Dexcom G5 Mobile System User Guide On the Go with Dexcom G5: Getting Through Security...
- Page 286 Page intentionally left blank...
-
Page 287: Chapter 17 - Need Help? You're Not Alone
Everything Else G5: Need Help? You’re Not Alone! 17.1 Dexcom Technical Support Team The Dexcom Technical Support Team helps you with all CGM system-related issues as well as software-related issues. They provide replacement units, resolve technical issues, and take product complaints. -
Page 288: Dexcom Patient Care Team
• Toll free: 1.888.738.3646 • Toll call: 1.858.200.0200 What Can They Help Me With? The Dexcom Technical Support Team helps you with all CGM system related issues as well as software related issues. Dexcom Technical Support does not offer medical advice. -
Page 289: Sales Support Team
• Reason for inquiry or education needed For additional Dexcom CGM education, check the Dexcom website: dexcom.com/web-based- education. By Phone Available Monday-Friday 5:30 AM-8:00 PM PST (subject to change) Toll Free: 1.888.738.3646 Toll Call: 1.858.200.0200 17.3 Sales Support Team Inside Sales Support Team By Internet Dexcom online store: dexcom.com/order... - Page 290 Page intentionally left blank...
-
Page 291: Chapter 18 - Technical Information
NOTE: We recommend that you review the information in this chapter with your healthcare provider to understand how well the Dexcom G5 performs. The Dexcom G5 (the System) uses a glucose sensor to continuously measure and monitor your glucose levels. The sensor is “calibrated” using a commercially available blood glucose meter. Once calibrated, the System reports glucose readings up to every 5 minutes. - Page 292 6-years old. All subjects had Type 1 or Type 2 diabetes mellitus and required insulin or oral medication Original Pediatric to manage their diabetes. In the Study, about 99% of subjects had Type 1 diabetes Dexcom G5 Mobile System User Guide Technical Information...
- Page 293 System readings agreed with laboratory standard blood glucose results. The remainder of the study took place at home, and the System performance was also paired with the comparative meter results, referred to as the “SMBG.” Dexcom G5 Mobile System User Guide Technical Information...
- Page 294 Original 301-350 Software 505 Original 351-400 Software 505 CGM readings are within 40-400 mg/dL, inclusive. Original Software 505 Both sets of study data are presented and are labeled as (SW10050) or (SW10505). Dexcom G5 Mobile System User Guide Technical Information...
- Page 295 80 mg/dL the absolute difference in mg/dL between the two glucose results was calculated. For values greater than 80 mg/dL the absolute percent difference (%) from Dexcom G5 Mobile System User Guide Technical Information...
- Page 296 2263. Of these, 93% of the System readings fall within ± 20 mg/dL of the YSI blood glucose values ≤ 80 mg/dL and within ± 20% of YSI blood glucose values > 80 mg/dL. Dexcom G5 Mobile System User Guide Technical Information...
- Page 297 > 240 ≤ 240 Readings Pairs Original Cumulative Percent “HIGH” Software Cumulative 100% 100% Percent Original Software 505 Both sets of study data are presented and are labeled as (SW10050) or (SW10505). Dexcom G5 Mobile System User Guide Technical Information...
- Page 298 The System reports glucose readings between 40 and 400 mg/dL. When the System determines the glucose reading is below 40 mg/dL, it displays “LOW” in the Receiver Status Box. When the Dexcom G5 determines that the glucose level is above 400 mg/dL, it displays “HIGH” in the Receiver Status Box.
- Page 299 YSI values were less than 70 mg/dL. When the System displayed “HIGH” (45 occasions), 100% (45 out of 45) of the YSI values were greater than 240 mg/dL, and 100% (45 out of 45) of the YSI values were greater than 280 mg/dL. Dexcom G5 Mobile System User Guide Technical Information...
- Page 300 201- 251- 301- 351- > < 40 of Paired CGM-YSI < 40 40-60 61-80 81-120 1706 121-160 1492 161-200 1240 201- 250 1181 251- 300 1018 301- 350 351- 400 > 400 Dexcom G5 Mobile System User Guide Technical Information...
- Page 301 Row Percentage of Matched Pairs in Each CGM Glucose Range Number (mg/dL) 121- 161- 201- 251- 301- 351- > < 40 of Paired CGM-YSI < 40 40-60 61-80 81-120 121-160 161-200 201- 250 251- 300 301- 350 351- 400 > 400 Dexcom G5 Mobile System User Guide Technical Information...
- Page 302 Row Percentage of Matched Pairs in Each CGM Glucose Range Number (mg/dL) 121- 161- 201- 251- 301- 351- > < 40 of Paired CGM-YSI < 40 40-60 61-80 81-120 121-160 161-200 201- 250 251- 300 301- 350 351- 400 > 400 Dexcom G5 Mobile System User Guide Technical Information...
- Page 303 Software 505 Adult, when CGM readings are within 81 to 120 mg/dL, you can example, based on the expect your blood glucose levels are within 81 to 120 mg/dL 72% of time. Dexcom G5 Mobile System User Guide Technical Information...
- Page 304 Both sets of study data are presented and are labeled as (SW10050) or (SW10505). * For CGM ≤ 80 mg/dL, the difference and absolute difference in mg/dL are included instead of percent differences (%). Dexcom G5 Mobile System User Guide Technical Information...
- Page 305 90 mg/dL, a 10% difference between the System and the YSI is reported. The System and YSI values were compared by pairing the System reading that fell immediately after the YSI value was collected. Dexcom G5 Mobile System User Guide Technical Information...
- Page 306 System reads 2.4% or less than the YSI blood glucose values and the Median Absolute Percent Difference shows that half of the time the System reads about 7.0% or less than the YSI blood glucose values. Dexcom G5 Mobile System User Guide Technical Information...
- Page 307 Original Software 505 Original Software 505 Original Software 505 Original Software 505 Original Software 505 Original Software 505 Both sets of study data are presented and are labeled as (SW10050) or (SW10505). Dexcom G5 Mobile System User Guide Technical Information...
- Page 308 Original Software 505 Original Software 505 Original Software 505 Original Software 505 Original Software 505 Original Software 505 Both sets of study data are presented and are labeled as (SW10050) or (SW10505). Dexcom G5 Mobile System User Guide Technical Information...
- Page 309 Table 5-B represents the alert evaluation within 15 minutes of the YSI value for a subset of the pediatric population—subjects age 6 to 17 years who had YSI measurements every 15 minutes. Dexcom G5 Mobile System User Guide Technical Information...
- Page 310 70 mg/dL, you can expect your alarm to sound 91% of the time and not to sound approximately 9% of time within the 15 minute period before or after your blood sugar goes below 70 mg/dL. Dexcom G5 Mobile System User Guide Technical Information...
- Page 311 Original Software 505 Original Software 505 Original Software 505 Original Software 505 Original Software 505 Both sets of study data are presented and are labeled as Original (SW10050) or Software 505 (SW10505). Dexcom G5 Mobile System User Guide Technical Information...
- Page 312 Original Software 505 Original Software 505 Original Software 505 Original Software 505 Original Software 505 Both sets of study data are presented and are labeled as Original (SW10050) or Software 505 (SW10505). Dexcom G5 Mobile System User Guide Technical Information...
-
Page 313: The High Glucose Alert
6 to 17 years who had YSI measurements every 15 minutes. Table 6-C represents the alert evaluation within 30 minutes of an SMBG reading for 2- to 5-year old subjects in the pediatric studies. Dexcom G5 Mobile System User Guide Technical Information... - Page 314 200 mg/dL, you can expect your alarm to sound 98% of the time and not to sound approximately 2% of time within the 15 minute period before or after your blood sugar goes above 200 mg/dL. Dexcom G5 Mobile System User Guide Technical Information...
- Page 315 Software 505 Original 12-14 hours Software 505 CGM readings are within 40 to 400 mg/dL, inclusive. Original Software 505 Both sets of study data are presented and are labeled as (SW10050) or (SW10505). Dexcom G5 Mobile System User Guide Technical Information...
- Page 316 System readings within 15 mg/dL or 15%, 20 mg/dL or 20%, 30 mg/dL or 30%, 40 mg/dL or 40% and greater than 40 mg/dL or 40% of the YSI values in Tables 7-A and 7-B. Dexcom G5 Mobile System User Guide Technical Information...
- Page 317 3021 11.9% 8.9% Software 8.5% 7.2% CGM readings are within 40 to 400 mg/dL, inclusive. Original Software 505 Both sets of study data are presented and are labeled as (SW10050) or (SW10505). Dexcom G5 Mobile System User Guide Technical Information...
- Page 318 1096 15.1% 11.3% Software 10.4% 8.4% CGM readings are within 40 to 400 mg/dL, inclusive. Original Software 505 Both sets of study data are presented and are labeled as (SW10050) or (SW10505). Dexcom G5 Mobile System User Guide Technical Information...
- Page 319 40 mg/dL or 40% of the YSI values at the beginning (Day 1), middle (Day 4) and end (Day 7) of the System lifecycle. The average and median of the absolute percent differences are Dexcom G5 Mobile System User Guide Technical Information...
- Page 320 Study, 351 sensors were evaluated. Eighty-five percent (85%) of the sensors lasted until Day 7 (145-168 hours). Software 505 Pediatric In the Study, 77 sensors were evaluated. Ninety-four percent (94%) of the sensors lasted until Day 7 (145-168 hours). Dexcom G5 Mobile System User Guide Technical Information...
- Page 321 Software 505 856-856 Original 1267-1267 51-75% Software 505 1253-1253 Original 1811-1992 76-100% Software 505 1497-1992 Original Software 505 Both sets of study data are presented and are labeled as (SW10050) or (SW10505). Dexcom G5 Mobile System User Guide Technical Information...
- Page 322 Software 505 877-891 Original 1006-1484 51-75% Software 505 1131-1342 Original 1518-1992 76-100% Software 505 1623-1990 Original Software 505 Both sets of study data are presented and are labeled as (SW10050) or (SW10505). Dexcom G5 Mobile System User Guide Technical Information...
- Page 323 Both sets of study data are presented and are labeled as (SW10050) or (SW10505). Original A total of 108 sensors were included with the Study and 51 sensors were included with the Software 505 Study. Dexcom G5 Mobile System User Guide Technical Information...
- Page 324 (or more than 75% of the expected number of readings) as seen in Table 9-A. Adjusted within each system wear-day, the System in the Software 505 Adult Study provided an average of 98% of all expected glucose readings (288) as seen in Table 10-A. Dexcom G5 Mobile System User Guide Technical Information...
- Page 325 Software 505 Original 351-400 Software 505 CGM readings are within 40 to 400 mg/dL, inclusive. Original Software 505 Both sets of study data are presented and are labeled as (SW10050) or (SW10505). Dexcom G5 Mobile System User Guide Technical Information...
- Page 326 Software 505 Original 351-400 Software 505 CGM readings are within 40 to 400 mg/dL, inclusive. Original Software 505 Both sets of study data are presented and are labeled as (SW10050) or (SW10505). Dexcom G5 Mobile System User Guide Technical Information...
- Page 327 Software 505 Both sets of study data are presented and are labeled as (SW10050) or (SW10505). * For CGM ≤ 80 mg/dL, the differences in mg/dL are included instead of percent differences (%). Dexcom G5 Mobile System User Guide Technical Information...
- Page 328 System in their daily diabetes management when comparing the System readings to their home blood glucose meter results. For readings less than or equal to 80 mg/dL, the absolute difference in mg/dL between the two glucose Dexcom G5 Mobile System User Guide Technical Information...
-
Page 329: Product Specifications
Do not touch the metal connectors on the bottom of the transmitter and other open connectors on the receiver, charging cable and charger. Dexcom G5 Mobile System User Guide Technical Information... - Page 330 Limited Warranty 3 months IP28: Protection against insertion of large objects and immersion in water Moisture Protection for up to 8 feet for 24 hours Protection Against Type BF applied part Electrical Shock Dexcom G5 Mobile System User Guide Technical Information...
- Page 331 Data Communication Range 20 feet The Dexcom G5 is safe for use on U.S. commercial airlines. The Dexcom G5 is an M-PED with emission levels that meet RTCA/DO160, Section 21, Category M. Per FAA Advisory, Circular #91-21, 1B, dated 8/25/06, any M-PED that meets this standard in all modes may be used onboard the aircraft without any further testing by the operator.
- Page 332 There are no risks to connecting any part of the system to an MSO (Multiple Socket Outlet) Temperature: 32° F - 104° F Storage/Operating Conditions Humidity: 15% - 95% RH, (Storage 10% - 95% RH) Operating Altitude -1300 feet to 13800 feet (Continued on next page) Dexcom G5 Mobile System User Guide Technical Information...
- Page 333 1 year. The service life for the accessories is noted to be up to one year. If you have difficulty reading your receiver in bright sunlight, you may need to seek a shady location. Do not connect the receiver to any equipment not specified in instructions for use (IFU). Dexcom G5 Mobile System User Guide Technical Information...
- Page 334 30 A/m 30 A/m characteristic of a typical location Field in a typical commercial or hospital IEC 61000-4-8 environment. NOTE: U is the a.c. mains voltage prior to application of the test level. Dexcom G5 Mobile System User Guide Technical Information...
- Page 335 Immunity The Dexcom G5 is intended for use in the electromagnetic environment specified in the next table. The customer or the user of the Dexcom G5 should ensure that it is used in such an environment. System Electromagnetic Immunity Specifications...
-
Page 336: Electromagnetic Emissions
Electromagnetic Emissions The Dexcom G5 is intended for use in the electromagnetic environment specified in the next table. The customer or the user of the Dexcom G5 should ensure that it is used in such an environment. Electromagnetic Emissions Specifications... - Page 337 NOTE 1: At 80 MHz and 800 MHz, the separation distance for the higher frequency range applies. NOTE 2: These guidelines may not apply in all situations. Electromagnetic propagation is affected by absorption and reflection from structures, objects and people. Dexcom G5 Mobile System User Guide Technical Information...
-
Page 338: Fcc Requirements
Operation is subject to the following two conditions: 1. This device may not cause harmful interference, and 2. This device must accept any interference received, including interference that may cause undesired operation. Warning (Part 15.21) Dexcom G5 Mobile System User Guide Technical Information... - Page 339 • Connect the equipment into an outlet on a circuit different from that to which the receiver is connected. • Consult the dealer or an experienced radio/TV technician for help. This portable transmitter with its antenna complies with FCC/IC RF exposure limits for general population/uncontrolled exposure. Dexcom G5 Mobile System User Guide Technical Information...
- Page 340 Page intentionally left blank...
-
Page 341: Chapter 19 - Troubleshooting
If your problem is not found here, follow the steps listed on your app screen, or call Technical Support. Please call the Dexcom Technical Support Team, 24/7, toll free at 1.888.738.3646 or toll at 1.858.200.0200 if any of these errors continue and the instructions don’t resolve the issue. - Page 342 Water (for example, while swimming, surfing, bathing, etc.) can severely limit communication range. Consequences: Missing a severe low or high blood glucose event or making a treatment decision that results in injury. Dexcom G5 Mobile System User Guide Troubleshooting...
-
Page 343: Troubleshooting
Silent Not receiving or Do Not Disturb (if Alarm/Alerts. applicable). Check your app is running in the background. Use your BG meter for treatment decisions during this time. Receiver Dexcom G5 Mobile System User Guide Troubleshooting... -
Page 344: Sensor Glucose Readings
Receiver Example: a 202 mg/dL sensor reading and a 188 mg/dL glucose meter value = a 7% difference (this is still considered accurate). Outside of 20/20 rule: Calibrate again. (Continued on next page) Dexcom G5 Mobile System User Guide Troubleshooting... - Page 345 System will often Not getting resolve itself. sensor glucose If this continues for readings. an extended period of time, contact Technical Receiver Support to report error (see Section 17.1). (Continued on next page) Dexcom G5 Mobile System User Guide Troubleshooting...
- Page 346 Smart device: transmitter not communicating. 1. Restart smart device. Receiver If error remains: 1. Open your device’s Bluetooth settings. 2. Delete all Dexcom entries. 3. Pair your transmitter. (Continued on next page) Dexcom G5 Mobile System User Guide Troubleshooting...
- Page 347 In App Wait up to 2 hours. System is counting No sensor down to when you do glucose your initial calibration. readings. Use your BG meter for treatment decisions Receiver during this time. Dexcom G5 Mobile System User Guide Troubleshooting...
- Page 348 Twist transmitter latch with other hand to break transmitter latch off. See Chapter 6. Put medical tape over sensor pod’s white Sensor pod won’t stick. adhesive patch (for example, Blenderm). Don’t place tape over the transmitter. Dexcom G5 Mobile System User Guide Troubleshooting...
- Page 349 Won’t turn on. Push down on paper clip. Receiver will vibrate. Processing screen appears. Charge receiver . See Chapter 4. Receiver low Receiver battery. Charge receiver . (Continued on next page) Dexcom G5 Mobile System User Guide Troubleshooting...
- Page 350 Press select button to confirm Alert. See Chapter 5. Go to smart device’s Settings . Smart Device: No Bluetooth. Make sure Bluetooth is On. In App If problem persists, please contact device’s manufacturer. Dexcom G5 Mobile System User Guide Troubleshooting...
- Page 351 No sensor Receiver to report error (see Section glucose readings 17.1). will be displayed until error is App: resolved. Follow same instructions. Tap question mark to get more information. (Continued on next page) Dexcom G5 Mobile System User Guide Troubleshooting...
- Page 352 System didn’t value. accept recent calibration. Wait 15 minutes. If no sensor glucose readings appear on the display, the sensor needs to be replaced. Contact Technical Support (see Section 17.1) to report error. Receiver Dexcom G5 Mobile System User Guide Troubleshooting...
- Page 353 Sensor session Tap OK to confirm Alert. automatically stopped. Receiver: No sensor Press select button to glucose readings Receiver confirm Alert. displayed. Will not re-alert once confirmed. Order new transmitter. (Continued on next page) Dexcom G5 Mobile System User Guide Troubleshooting...
- Page 354 Pairing failed. Menu > Trans SN > Enter correct SN Receiver Receiver: Settings > Trans SN > Enter correct SN If SN correct: Contact Technical Support (see Chapter 17). (Continued on next page) Dexcom G5 Mobile System User Guide Troubleshooting...
- Page 355 (Continued on next page) Device What you see Problem What you do Smart See Chapter 17. Device: In App Contact Technical Support: • TechSupport@dexcom. Transmitter low battery. • Toll free: 1.888.738.3646 • Toll free: 1.858.200.0200 Receiver Dexcom G5 Mobile System User Guide Troubleshooting...
- Page 356 Page intentionally left blank...
-
Page 357: Chapter 20 - Symbols On Package Labels
The following symbols may be found on the sensor, transmitter, and receiver packaging. These symbols tell you about the proper and safe use of the Dexcom G5. Some of these symbols may not have meaning in your region, and are listed for informational purposes only. - Page 358 European Union WEEE Do Not Use If Package Is Directive 2012/19/EU Damaged Electrical Equipment Designed Ship By Date Primarily for Indoor Use Input Prescription Required Keep Dry MR Unsafe Refer to Instruction Bluetooth Manual/Booklet Dexcom G5 Mobile System User Guide Label Symbols...
-
Page 359: Part 5: Dexcom Share
SHARING IS CARING • Dexcom Share... - Page 360 Page intentionally left blank...
-
Page 361: Chapter 21 - Dexcom Share
Secondary notification using the following parts: • Dexcom G5 • Bluetooth wireless technology • Sharer’s smart device • G5 Mobile app • Internet • Follower’s smart device • Dexcom Follow app (Continued on next page) Dexcom G5 Mobile System User Guide Dexcom Share... - Page 362 On the Dexcom Follow app, the Follow Dashboard shows the Dashboard™ glucose information of up to five (5) Sharers. Follower A person that gets the Sharer’s shared information in the Dexcom Follow app. Follower’s Smart Runs the Dexcom Follow app.
- Page 363 Data the Sharer receives on the G5 Mobile app. Although your Dexcom Follow app might be similar to what you see on your G5 Mobile app, it cannot be considered real-time because there are layers of communication between the G5 Mobile app and the Dexcom Follow app.
-
Page 364: Dexcom Share Overview
21.2 Dexcom Share Overview Dexcom Share is a feature within the G5 Mobile app. It allows for remote monitoring of Dexcom G5 data from one person, the Sharer, to another person, the Follower. Dexcom Share includes: •... - Page 365 The Sharer must be within 20 feet of his/her smart device in order to send data to the Follower or it will not work. Figure 8. Sharing Dexcom Share Parts Sharer’s smart device* Follower’s smart device* G5 Mobile app Dexcom Follow app (Continued on next page) Dexcom G5 Mobile System User Guide Dexcom Share...
-
Page 366: Risks And Benefits
Dexcom recommends charging the smart device when sharing. 21.3 Risks and Benefits Risks Dexcom Share is a feature of the G5 Mobile app. The main risks involved with using the Dexcom Share feature are based on misunderstanding its purpose. Dexcom G5 Mobile System User Guide... - Page 367 With the secondary display, there might be delays in getting your sensor readings. When Dexcom Share is enabled in the G5 Mobile app, you will be able to share your glucose information and notifications with up to five (5) other people. Shared sensor glucose readings and information can add another level of awareness.
-
Page 368: Safety Statement
21.4 Safety Statement Intended Use The purpose of Dexcom Share secondary displays is to notify another person, the Follower, of the patient’s Dexcom G5 sensor glucose information. The secondary display is intended for providing secondary notification of a continuous glucose monitoring system and does not replace real-time continuous glucose monitoring (Dexcom G5) or standard home BG meter. - Page 369 PRECAUTIONS Do not use secondary displays as the main source of CGM glucose trend information. Use the Dexcom G5 receiver and/or the G5 Mobile app as the main device to track sensor glucose information, notifications, and alarms. At times, the patient will be unable to share data using the Dexcom Share feature, and the Follower might miss helping the patient in the event of low or high BG values.
- Page 370 The smart device settings override the Dexcom Follow app, and all notifications will be silent even if the Follower has selected a Dexcom Follow app notification sound. If the smart device has a vibrate feature and vibrate is On, the Dexcom Follow app notifications will only vibrate.
-
Page 371: Setting Up Dexcom Share
Tips • Read the rest of the Dexcom G5 user guide before using Dexcom Share • Check the status screen after turning Dexcom Share “On” on the smart device to make sure it is working • If you stop sharing with a Follower, the Follower will no longer receive data or... - Page 372 Chapter 5 for steps to set up your smart device). Once your app has been set up, activate Dexcom Share. A series of screens walk you through the features of Dexcom Share, highlighting important information. Dexcom G5 Mobile System User Guide...
- Page 373 If Dexcom Share icon is Activates Dexcom Share. gray, your Share feature has not been turned on. Read screen. Dexcom Share Welcome Screen. Tap Next when done. (Continued on next page) Dexcom G5 Mobile System User Guide Dexcom Share...
- Page 374 (Continued from previous page) Step What you see What it means What you do Message about Internet Tap Next. access. How to know you are Tap Next. sharing your data. (Continued on next page) Dexcom G5 Mobile System User Guide Dexcom Share...
- Page 375 Step What you see What it means What you do Tap Let’s Get Started to How to know your Follower is not getting move on and invite your your sensor data. Followers. Dexcom G5 Mobile System User Guide Dexcom Share...
- Page 376 Enter the Follower’s nickname and email address. Confirm Follower’s email address. The Follower will get a Follow Invitation email. Make sure the Follower can access this email account from his/her smart device. Tap Next. (Continued on next page) Dexcom G5 Mobile System User Guide Dexcom Share...
- Page 377 200 mg/dL for more than 2 hours, you can set this up in the Follower’s Settings menu). Tap Save for each Follower’s Setting “Save.” Tap Next when done. (Continued on next page) Dexcom G5 Mobile System User Guide Dexcom Share...
- Page 378 Tap Send Invitation. After sending invitation, you cannot adjust the Follower’s settings. To add more Followers: Tap Followers tab on the Sharing Status screen. Invite up to a total of five (5) Followers. Dexcom G5 Mobile System User Guide Dexcom Share...
-
Page 379: Using Dexcom Share
21.6 Using Dexcom Share Dexcom Share Status You can look at the Dexcom Share icon on your home screen to see if Dexcom Share is working. After turning on Dexcom Share, check its status. Share icon Figure 9. G5 Mobile App Home Screen... - Page 380 Follower. Troubleshooting Sharing Status Issues The Dexcom Sharing status bar is a useful tool. It can help identify if there is a problem and Dexcom Share is not working. The following table provides troubleshooting tips for the Sharing status bar.
- Page 381 If the Sharer continues to see this, the Sharer should turn off Share and then turn it back on. (Continued on next page) Dexcom G5 Mobile System User Guide Dexcom Share...
- Page 382 The Follower list allows the Sharer to manage his/her Followers. In the Follower list you can: • Invite a new Follower • See the status of Followers you have invited • Glance at what options your current Followers have Dexcom G5 Mobile System User Guide Dexcom Share...
- Page 383 Follower. Remove a Follower by tapping “Remove Follower.” Once removed, the Follower won’t get glucose information or Alarm/Alerts. NOTE: The Sharer cannot change any Follower settings after the Follow Invitation email is sent. Dexcom G5 Mobile System User Guide Dexcom Share...
-
Page 384: Dexcom Follow App
21.7 Dexcom Follow App Dexcom Follow App Description The Dexcom Follow app is a separate app from the G5 Mobile app. Your Followers only need to download and install the Dexcom Follow app. What the Dexcom Follow app does: •... - Page 385 • No More Data - Notification sent when active glucose sharing is stopped for any reason, other than the Sharer turning Share “Off”. The Follower should contact the Sharer for more information about the data interruption The Follower Dashboard Figure 11. Follower Dashboard Dexcom G5 Mobile System User Guide Dexcom Share...
- Page 386 Home icon Sharer’s Trend arrow glucose Time reading duration setting of 3, 6, 12 or 24 hours Glucose range (between high Trend graph and low alerts) Figure 13. Follower Information With Trend Graph Dexcom G5 Mobile System User Guide Dexcom Share...
-
Page 387: Troubleshooting
“LOW” (less than 40 mg/dL) or “HIGH” (greater than 400 mg/dL). Figure 14. Follower Information 21.8 Troubleshooting Dexcom Share Troubleshooting Troubleshooting Sharing Status - See the Troubleshooting Sharing Status Issues portion of Section 21.6. Figure 15. Sharing Status Troubleshooting Dexcom G5 Mobile System User Guide Dexcom Share... - Page 388 - To see a list of supported smart devices and operating systems, go to: dexcom.com/compatibility • G5 Mobile app is open or running in the background • Smart device has an active Internet connection (Wi-Fi, 3G, 4G, LTE) - Check to see if the Internet connection is working by trying to open a web...
-
Page 389: Index
When to Calibrate, 108 Contraindications, 19 Why is Calibrating important, 107 Indications, 18 CGM System Precautions, 22, Basic Maintenance, 274 Warnings, 19 Different Monitoring Methods, 52 Sensor Insertion Disposal, 280 Choosing site, 82 Dexcom G5 Mobile System User Guide Index... - Page 390 Connecting/Pairing Transmitter with App, 62 ________________________________ Connecting/Pairing with Receiver, 69 ________________________________ End of Transmitter Battery, 142 Overview, 75 ________________________________ Remove from Sensor Pod, 139 Safety Statements, 76 ________________________________ Troubleshooting, 339 ________________________________ ________________________________ Warranty, 271 ________________________________ Dexcom G5 Mobile System User Guide Index...
- Page 391 © 2017 Dexcom, Inc. All rights reserved. Covered by patents www.dexcom.com/patents. Dexcom, Dexcom Follow, Dexcom G4, Dexcom G4 PLATINUM, Dexcom G5, Dexcom G5 Mobile, Dexcom Share, Follow Dashboard, G5, are either registered trademarks or trademarks of Dexcom, Inc. in the United States and/or other countries. All other product or company names that may be mentioned in this publication are trade names, trademarks, or registered trademarks of their respective owners.
- Page 392 Dexcom, Inc. 6340 Sequence Drive San Diego, CA 92121 USA Phone: 1.858.200.0200 Tech Support: 1.888.738.3646 Web: dexcom.com LBL013445 Rev 005 MT23435...
Need help?
Do you have a question about the G5 MOBILE and is the answer not in the manual?
Questions and answers